| Author |
Message |
 |
|
|
|
|
Advert
|
Forum adverts like this one are shown to any user who is not logged in. Join us by filling out a tiny 3 field form and you will get your own, free, dakka user account which gives a good range of benefits to you:
- No adverts like this in the forums anymore.
- Times and dates in your local timezone.
- Full tracking of what you have read so you can skip to your first unread post, easily see what has changed since you last logged in, and easily see what is new at a glance.
- Email notifications for threads you want to watch closely.
- Being a part of the oldest wargaming community on the net.
If you are already a member then feel free to login now. |
|
 |
2012/10/18 07:16:02
Subject: How to paint digital camo
|
|

Hellion Hitting and Running
|
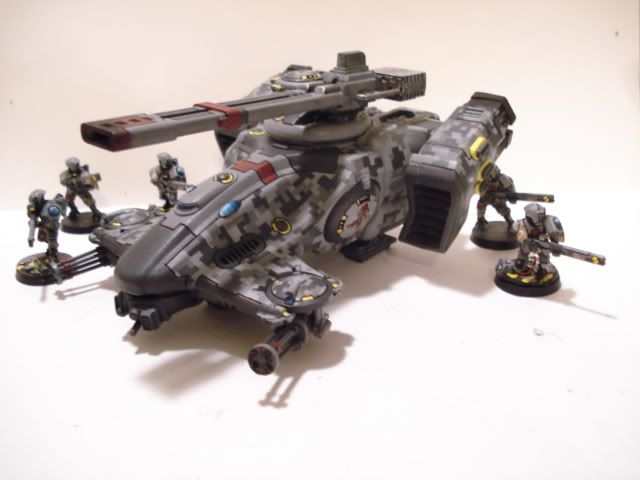
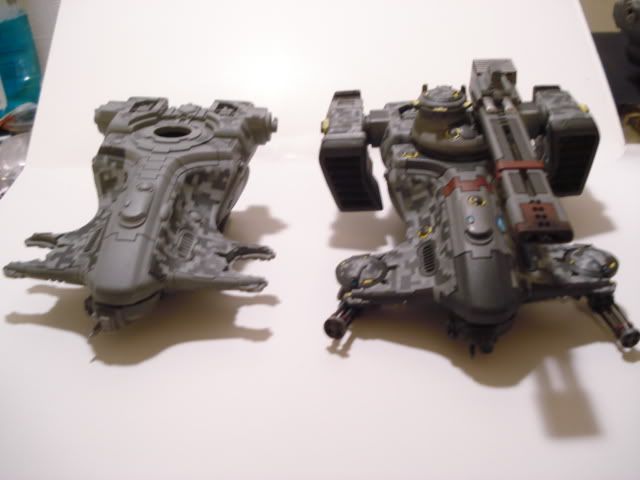
So a lot of people have been requesting a how-to on my tau digital camo, here it goes and I hope it helps you.
Step 1) choose a color scheme. You will want three or more colors. Shades of the same color look great but you could easily do something like forest green, khaki and brown for a more traditional camo scheme. Because I was tau I had to decide between oranges and browns or greys for a urban effect.
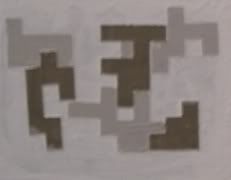 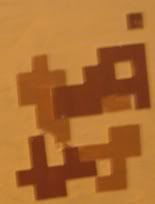
In the end I went with the urban greys.
Step 2) obtaining your mask. there are several ways to do the masking for this. You can lay down strips of masking tape and then cut out the camo, you can print the camo on sticker paper and cut it out or you can use a premade mask. I used a premade mask which is a lot faster.
Step 3) Base coat with your darkest color.

Step 4) Apply first layer of mask. For this you will want to try to keep it as straight as possible. The hull of the tau hammerhead is curved so it can be difficult at times and you may need to fudge it a little. You will also want to space the mask out so the distances between them can fit other mask without leaving too noticeable of gaps. This can take a while to get right. After applying the mask go over all of the mask with a sponge or Q-tip to insure the mask is pressed down tight. If your mask is not tightly stuck to the hull of the ship you will get leakage under the mask which will look bad and takes a long time to clean up.

Step 5) Coat with the second darkest color

Step 6) Wait for the paint to dry and then apply the second layer of mask. This layer is a lot easier to apply. You can use your first layer as a guide and fill in the gaps you made. You can also allow your mask to overlap. But be sure to keep it straight with your first layer.

Step 7) Coat with your lightest color.

Step 8) After the paint has dried you can start removing the mask. I used a hobby knife to remove the mask. Be very careful not to scratch the paint. Also you can save some of the mask for other projects. I do not use the same mask twice for vehicles but I will use left over mask on things like gun drones. Only keep the ones that lay are still sticky and can lay flat again.
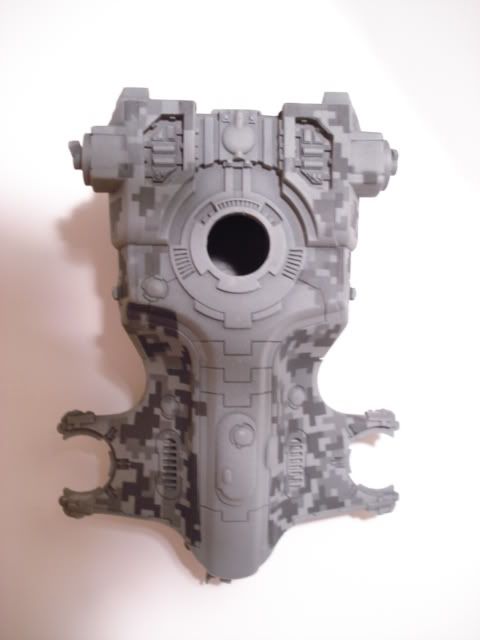 
Step 9) Add the details you want to the rest of the vehicle. I used solid areas for the middle paneling and rail gun because too much digital camo is a little off putting. I then used yellow highlights to give a pop of color. Pigment was added to the railgun tip and the engine exhaust. Finally I made custom decals.
|
|
|
 |
|
2012/10/18 07:28:53
Subject: How to paint digital camo
|
|

Revving Ravenwing Biker
|
Ahhhhh!!! That's a lot easier than I thought... thanks for the tute.
But, I don't understand the pre-made mask bit?
|
|
|
|
|
2012/10/18 11:00:15
Subject: How to paint digital camo
|
|

Dakka Veteran
|
That's really simple but effective!
Also much faster then i anticipated.
will be giving that a try.
|
|
|
|
|
2012/10/18 11:30:42
Subject: How to paint digital camo
|
|

Trustworthy Shas'vre
|
 Makaleth wrote: Makaleth wrote:Ahhhhh!!! That's a lot easier than I thought... thanks for the tute.
But, I don't understand the pre-made mask bit?
Stuff like this. http://www.hlj.com/product/HQPDCMTS
|
Tau and Space Wolves since 5th Edition. |
|
|
|
|
2012/10/18 14:06:04
Subject: How to paint digital camo
|
|
Raging-on-the-Inside Blood Angel Sergeant
Alexandria, VA
|
Awesome tutorial, I'm definitely saving this one. Thanks!
|
|
|
|
|
2012/10/18 17:52:34
Subject: How to paint digital camo
|
|
Paramount Plague Censer Bearer
|
Good job. I may just use this.
|
Meet Arkova.
or discover the game you always wanted to:
RoTC. |
|
|
|
|
2012/10/19 04:01:09
Subject: How to paint digital camo
|
|
Boosting Space Marine Biker
|
This is really awesome. If I did Tau, I would have to steal this idea.
Are there other sources for the pre-cut masking tape? From the link you listed, it is backordered.
|
|
|
|
|
|
2012/10/19 04:19:15
Subject: How to paint digital camo
|
|
Revving Ravenwing Biker
|
You sir are fantastic.

|
|
|
|
|
2012/10/19 06:53:29
Subject: How to paint digital camo
|
|
Owns Whole Set of Skullz Techpriests
Versteckt in den Schatten deines Geistes.
|
Ok, so that answers my "how do I do three colours on a Guard tank" question. For the life of me I couldn't figure out what order to do it in.
Thank you!
|
|
|
|
|
|
2012/10/20 06:30:36
Subject: How to paint digital camo
|
|
Regular Dakkanaut
|
Soooo awesome. Just to be clear, is this an airbrush technique, or is this just as doable with a brush?
|
Winning is good, explosions are better! |
|
|
|
|
2012/10/20 07:29:14
Subject: How to paint digital camo
|
|
Hellion Hitting and Running
|
 firepower wrote: firepower wrote:Soooo awesome. Just to be clear, is this an airbrush technique, or is this just as doable with a brush?
The two color samples were done with a regular brush. I used an airbrush for the model. There may be some more cleanup from using a brush because paint can leak under the edges but it is doable.
|
|
|
|
|
2012/10/22 22:50:50
Subject: How to paint digital camo
|
|
Lead-Footed Trukkboy Driver
Oklahoma
|
Good work. nice to see someone actually sells camo masks. I've been using my printer to make traditional camo patterns, and like you I start with the darkest and work my way up.
|
|
|
|
|
2012/11/01 09:29:53
Subject: Re:How to paint digital camo
|
|

Imperial Recruit in Training
The Netherlands
|
Nice tutorial! And the end result is really awesome!
|
|
|
|
|
2012/11/01 15:03:01
Subject: How to paint digital camo
|
|
Fresh-Faced New User
|
 lambsandlions wrote: lambsandlions wrote:The two color samples were done with a regular brush. I used an airbrush for the model. There may be some more cleanup from using a brush because paint can leak under the edges but it is doable.
It's more work, but if you either give your model a light overspray with clearcoat, or run thinned clearcoat along the edges of the newly-applied mask pieces with a brush, that will help seal the edges of the masks against bleeding.
|
|
|
|
|
2012/11/02 00:16:30
Subject: How to paint digital camo
|
|
Beast of Nurgle
|
awesome tutorial, very handy and at lot more efficient then i thought.
|
|
|
|
|
2012/11/24 05:42:14
Subject: How to paint digital camo
|
|
Quick-fingered Warlord Moderatus
|
I can't tell from your gallery pictures, but did you apply that digi-cam to your Fire Warriors too?
|
Click here for my Swap Shop post - I'm buying stuff!
DR:90-S++G++M+B++I+Pw40kPbfg99#+D++A++/eWDR++T(T)DM+
 Black Legion/Iron Warriors/Night Lords Black Legion/Iron Warriors/Night Lords  Inquisitorial Friends & Co. (Inq, GK, Elysians, Assassins) Inquisitorial Friends & Co. (Inq, GK, Elysians, Assassins)  Elysian Droptroops, soon-to-add Armored Battlegroup Elysian Droptroops, soon-to-add Armored Battlegroup  Adeptus Mechanicus Forge World Lucius Adeptus Mechanicus Forge World Lucius
 |
|
|
|
|
2012/11/27 15:26:07
Subject: Re:How to paint digital camo
|
|

Squishy Squig
|
Wow... That looks really good!
I'd love to see a blue variant Too bad this wouldn't make sense on an Ork Deff Dread 
|
|
|
|
|
2012/12/18 12:08:52
Subject: How to paint digital camo
|
|
Tough-as-Nails Ork Boy
|
Actually, it would work great on a Blood Axe Deff Dread.
|
|
|
|
|
2012/12/23 16:41:14
Subject: How to paint digital camo
|
|
Nimble Mounted Yeoman
|
I am really temted to try this on a pair of dark eldar Jetfighter's i have to paint, as the "inner lines" on the jetfighter could really compliment the digital camo.
|
May your chest inspire the hopes and dreams of millions.
May your arm girth frighten the elderly, slow moving adults and very small children.
May your gains be plentiful.
Go forth and LIFT.
|
|
|
|
|
2012/12/23 20:23:05
Subject: How to paint digital camo
|
|
Infiltrating Hawwa'
Through the looking glass
|
Awesome tut! I've been wanting to do this to things outside of the wargaming hobby, and now I've got a solid set of directions.
Thanks!
|
“Sometimes I can hear my bones straining under the weight of all the lives I'm not living.”
― Jonathan Safran Foer |
|
|
|
|
2013/01/04 17:51:02
Subject: How to paint digital camo
|
|
Chalice-Wielding Sanguinary High Priest
Arlington TX, but want to be back in Seattle WA
|
awesome tutorial and effect!~
|
 4250 points of Blood Angels goodness, sweet and silky W12-L6-D4 4250 points of Blood Angels goodness, sweet and silky W12-L6-D4
 1000 points of Teil-Shan (my own scheme) Eldar Craftworld in progress 1000 points of Teil-Shan (my own scheme) Eldar Craftworld in progress
800 points of unassembled Urban themed Imperial Guard
 650 points of my do-it-yourself Tempest Guard 650 points of my do-it-yourself Tempest Guard
 675 points of Commoraghs finest! 675 points of Commoraghs finest!
The Dude - "Jackie Treehorn treats objects like women, man."
Lord Helmet - "I bet she gives great helmet."
|
|
|
|
|
2013/01/08 21:28:26
Subject: How to paint digital camo
|
|
Reverent Tech-Adept
New York, Technocratic People's Republic of Vinnland
|
Nice effect, looks like it would take a nice chunk of time to cut out the stencils but the effect is very much worth it!
|
|
|
|
|
|
2013/01/09 16:25:24
Subject: Re:How to paint digital camo
|
|
Veteran Wolf Guard Squad Leader
|
I'll give it a try but it looks like it will require a couple test runs first to get down
|
|
|
|
|
|
2013/02/05 15:10:18
Subject: How to paint digital camo
|
|
Lesser Daemon of Chaos
|
I think I'm going to have to try this out with blue camo and see how that looks for an Alpha Legion based Traitor Guard detachment.
Awesome tutorial, thanks.
|
|
|
|
|
2013/02/06 05:18:45
Subject: How to paint digital camo
|
|
Rough Rider with Boomstick
Gunblaze West
|
I made the total mistake of trying to duplicate this effect in my guardsmen with spray paint and bits of masking tape.... it will not happen again
|
 Kilkrazy wrote: Kilkrazy wrote:We moderators often make unwise decisions on Friday afternoons.
 kestril wrote: kestril wrote: Page 1: New guard topic
Page 2: FW debate
Page 3: Ailaros and Peregrine fight. TO THE DEATH
I swear I think those two have a hate-crush on each other sometimes.
|
|
|
|
|
|
|


