| Author |
Message |
 |
|
|
|
|
Advert
|
Forum adverts like this one are shown to any user who is not logged in. Join us by filling out a tiny 3 field form and you will get your own, free, dakka user account which gives a good range of benefits to you:
- No adverts like this in the forums anymore.
- Times and dates in your local timezone.
- Full tracking of what you have read so you can skip to your first unread post, easily see what has changed since you last logged in, and easily see what is new at a glance.
- Email notifications for threads you want to watch closely.
- Being a part of the oldest wargaming community on the net.
If you are already a member then feel free to login now. |
|
 |
2012/12/05 22:20:19
Subject: Nowlan's IG force (Now with 100% more Chicken-walker!)
|
|

Pyromaniac Hellhound Pilot
|
Looking good, I've been slightly put off sentinals in 6th as they are easier to take out and can give away 1st blood .... It's a pity as I really like them, Armoured sentinels will mitigate this a bit however.
|
My combined Macragge PDF Imperial Guard and Ultramarine 3rd Co. Blog Clicky
My WAB Hundred Years War English Clicky
AlexHolker wrote:At this stage, I'm starting to think GW's CEO was just getting ready for the Rapture
|
|
|
 |
|
2012/12/05 23:00:45
Subject: Nowlan's IG force (Now with 100% more Chicken-walker!)
|
|

Hurr! Ogryn Bone 'Ead!
|
Was reading something last night that said they're good in a squad outfitted with autocannons, flank them in and harass the enemy's rear by getting side/rear shots on his armor.
Armored sentinels can apparently also make half decent tar-pits to occupy MEQs (that cost much more than they do) in melee.
|
 - Assembling first army. - Assembling first army.
 Nowlan's IG Army in progress Nowlan's IG Army in progress
 Thin your paints, drill your gun barrels, remove all mold lines. The Emperor wills it. Thin your paints, drill your gun barrels, remove all mold lines. The Emperor wills it. |
|
|
|
|
2012/12/06 09:40:39
Subject: Nowlan's IG force (Now with 100% more Chicken-walker!)
|
|
Pyromaniac Hellhound Pilot
|
Yes that is a fun tactic, I outfitted my Sentinels with HKs to increase this even more but because of the BS3 more often than not you'll flank in and not do anything and find yourself very exposed..this can be bad in KP (less of a problem now) and before FB has been claimed..
Armoured ones can do that but don't forget krak grenade buffs now...
|
|
This message was edited 1 time. Last update was at 2012/12/06 10:09:14
My combined Macragge PDF Imperial Guard and Ultramarine 3rd Co. Blog Clicky
My WAB Hundred Years War English Clicky
AlexHolker wrote:At this stage, I'm starting to think GW's CEO was just getting ready for the Rapture
|
|
|
|
|
2012/12/06 19:46:49
Subject: Nowlan's IG force (Now with 100% more Chicken-walker!)
|
|
Hurr! Ogryn Bone 'Ead!
|
I'll keep that in mind.
How satisified were you with your purchase from Ramshackle Games?
I'm considering getting some of their dirtbikes in order to make some RR's that would fit with the mechanized theme of my force.
Figure 9 dirtbikes with 1 quad (for the sgt) would work well.
|
- Assembling first army.
Nowlan's IG Army in progress
Thin your paints, drill your gun barrels, remove all mold lines. The Emperor wills it. |
|
|
|
|
2012/12/06 20:26:07
Subject: Nowlan's IG force (Now with 100% more Chicken-walker!)
|
|
Pyromaniac Hellhound Pilot
|
I was reasonably pleased, some of the casts were a bit shonky but nothing that put me off too much, I would buy from them again.
|
My combined Macragge PDF Imperial Guard and Ultramarine 3rd Co. Blog Clicky
My WAB Hundred Years War English Clicky
AlexHolker wrote:At this stage, I'm starting to think GW's CEO was just getting ready for the Rapture
|
|
|
|
|
2012/12/21 01:23:09
Subject: Re:Nowlan's IG force (Now with 100% more Chicken-walker!)
|
|
Hurr! Ogryn Bone 'Ead!
|
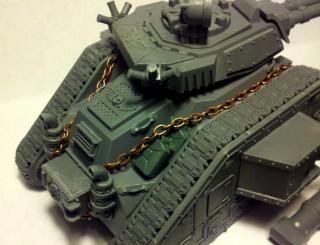
The cavalry has arrived.
Got a little bored of painting, so I figured I'd build something.
Took me some thinking (don't worry, didn't hurt myself), but I figured out how to magnetize the main weapons. The kit is a little different than the LR Demolisher when it comes to how the main weapons attach, so I had to come up with a different method. I cut off the pins for where the weapons mount inside the turret and replaced them with recessed magnets so they were flush with the sides of the weapon so that they would fit through the opening. Then I inserted magnets into the channels where the pegs would go had it been assembled per instructions.
Next a small magnet was drilled into the top of each weapon where the mantlet attaches. I attached a small peice of metal (actually just a couple staples cut down) to the underside of the mantlet cover so that it would make contact with the magnet on the top of the weapons.
So yeah, all turret weapons are interchangable as well as the mantlet cover being usable for all three. Took more effort, and considerably more magnets than the demolisher kit, but it should be worth it to be able to swap between battle cannon and auto cannon... and nova cannon (not that I'll ever use that one)
Sponsons were done the same way as the demolisher, no difference in that method.
If anyone wants, I can take more pictures of the weapons later and wright a slightly more detailed how-to.
Enough chat, on with the show.
Business end.
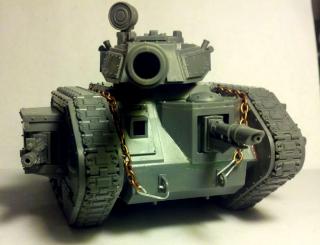
Look Ma, tow chains!
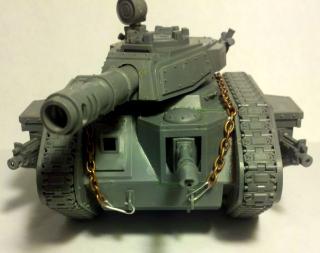
Options.
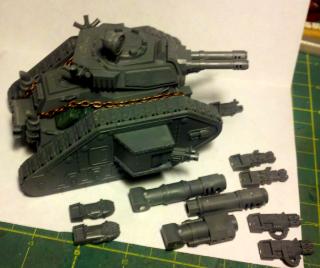
Fuel/Water cans.
|
- Assembling first army.
Nowlan's IG Army in progress
Thin your paints, drill your gun barrels, remove all mold lines. The Emperor wills it. |
|
|
|
|
2012/12/21 01:34:32
Subject: Nowlan's IG force (the cavalry has arrived.)
|
|
Nimble Pistolier
|
Not quite the cavalry I thought you meant! But hey ho silver!
Looks good, I think it may look better though if you cut the chain in two and hang them off the handles at the side of the engine.
Keep up the good work.
Regards,
Howie.
|
|
|
|
|
|
2012/12/23 09:47:41
Subject: Re:Nowlan's IG force (the cavalry has arrived.)
|
|
Hurr! Ogryn Bone 'Ead!
|
Late breaking news:
Taking a quick break from the IG force in an attempt to build a model aircraft as a gift for my father for xmas.
The aircraft in question is the Lockheed Hudson Bomber, the aircraft my grandfather flew in as an aircraft electrician during WWII.
Will post pictures when (if) I get it completed.
For now, here's a preview. This photo is of the actual aircraft he flew in.

|
- Assembling first army.
Nowlan's IG Army in progress
Thin your paints, drill your gun barrels, remove all mold lines. The Emperor wills it. |
|
|
|
|
2013/02/04 20:22:57
Subject: Nowlan's IG force (Status uptade)
|
|
Hurr! Ogryn Bone 'Ead!
|
Status update and explanation for lack of progress.
Recently my mother in law has been experiencing a lot of medical issues and as a result of the costs involved they've been tight financially.
To help them out my wife and I have moved in to help them out and fix up the house (its in need of a fair bit of work).
As such, I'm currently without a workstation for my hobbies until we get to the point in the renovations where we can tear out the late-70's style bar in the living room and build a suitable desk in its place.
On the bright side, this means that once I'm up and running again, I'll be working on a customized desk built from the ground up for scale model construction. The only stipulation is that since its in the living room, my wife wants it to have a cover (to hide the mess), so it'll be an old school secretary's desk with a fold down cover.
There's only 2 projects ahead of this in the list; fixing the master bathroom's shower, and redoing the landscaping in the back yard to make it suitable for our 3 dogs. Should be up and running in a month or so.
|
- Assembling first army.
Nowlan's IG Army in progress
Thin your paints, drill your gun barrels, remove all mold lines. The Emperor wills it. |
|
|
|
|
2013/04/05 05:47:49
Subject: Re:Nowlan's IG force (I made an art!)
|
|
Hurr! Ogryn Bone 'Ead!
|
Little update to prove I'm still alive.
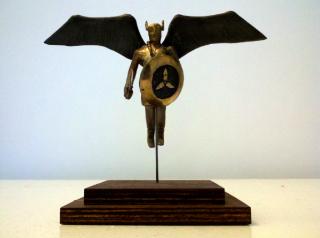
After moving at the end of January I'm still without a suitable workspace for hobby stuff. However, to make 12 credit hours this semester I ended up taking a sculpture class. I thought it was going to be mostly clay stuff that would easily translate to warhammer stuff, but we're mostly sculpting in wax (which we then use to make a mold to cast in bronze), wood, and steel (currently learning to weld).
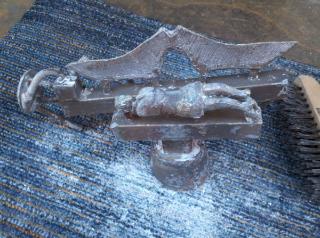
Since I've always been a fan of Norse mythology and I've been listening to a lot of Blind Guardian lately, my first project ended up being a valkyrie. Here's the pictures from the process.
Apologies for blurry phone pictures.
Click for full size.
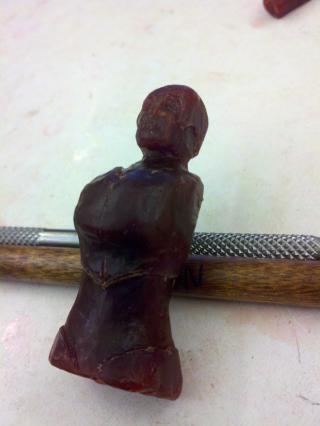
General shape blocked out.
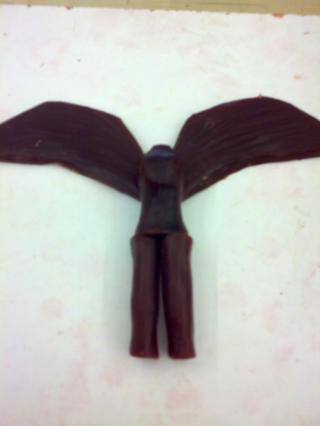
She has a head! (Sort of)
Ok, now she really has a head.
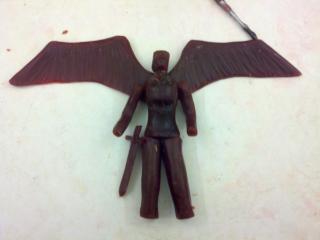
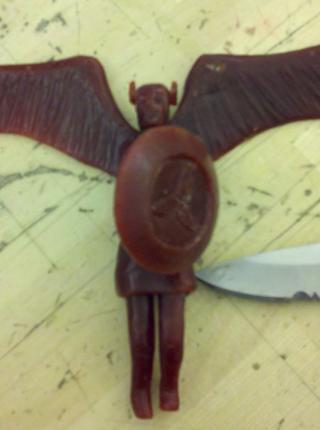
Head attached and shield done.
Final shot before making the mold
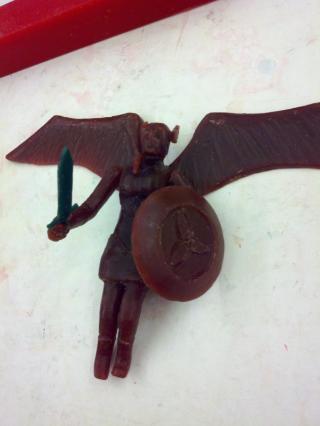
The pour. You can see the glow from the molten bronze.
Mold removed.
Sandblasted.
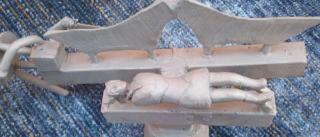
Assembled.
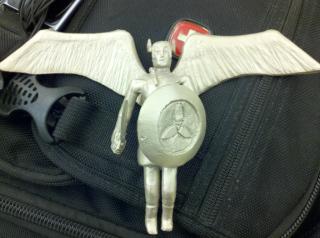
First attempt at patina. Wasn't satisfied.
Second patina. Finished product.
All in all I'm happy with how she turned out. I may have been a weeee bit over ambitious with my choice of subject, it being my first real attempt at sculpting anything, but I think I did well.
My wood project was nothing to write home about.
Steel project I'm about to start will be a CL4P-TP.
Here's a preview of my final project (another wax).
Not sure if I'll cast it in bronze or aluminum. My plan is to display it next to an oversized dice (showing a 1), and "Feeling lucky, punk?" next to it.
|
- Assembling first army.
Nowlan's IG Army in progress
Thin your paints, drill your gun barrels, remove all mold lines. The Emperor wills it. |
|
|
|
|
2013/04/05 10:53:00
Subject: Nowlan's IG force (Status uptade)
|
|
Pyromaniac Hellhound Pilot
|
Oh that kind of Valkyrie!
That's turned out really well, especially for your first go! Good luck with the pistol.
I'd change your title from 'Status upTaDe' to 'Awesome Bronze Casting'!
Look forward to more.
|
My combined Macragge PDF Imperial Guard and Ultramarine 3rd Co. Blog Clicky
My WAB Hundred Years War English Clicky
AlexHolker wrote:At this stage, I'm starting to think GW's CEO was just getting ready for the Rapture
|
|
|
|
|
2013/04/15 22:09:17
Subject: Re:Nowlan's IG force- I made an art! (Bronze sculpture)
|
|
Hurr! Ogryn Bone 'Ead!
|
Small update.
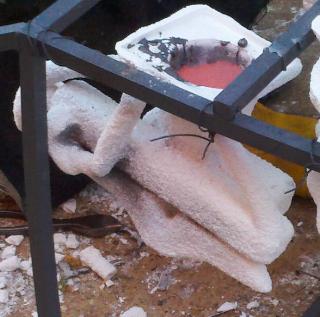
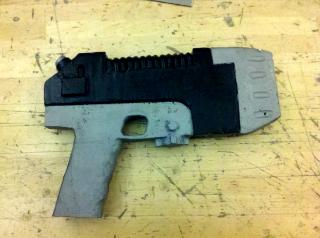
Since I spent most of yesterday breaking apart iron sinks and other scrap to be smelted down, I've earned the right to cast my final project in iron. The pour is next weekend.
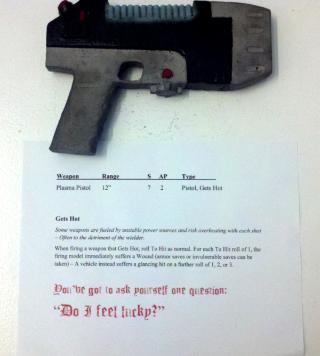
That being said, the plasma pistol, and the 6" D6 I created to go with it, will be quite heavy.
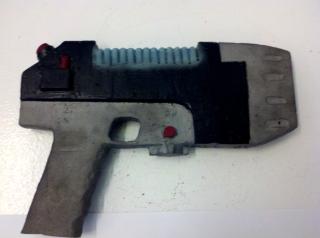
Anyway. Here's a picture of the pistol right before it went on the sprue and started the dipping process to create the mold.
The D6 will probably weigh 10lbs or more since it's being cast solid. I think I might call it "The Table Crusher" or something along those lines.
|
|
This message was edited 1 time. Last update was at 2013/04/15 22:11:19
- Assembling first army.
Nowlan's IG Army in progress
Thin your paints, drill your gun barrels, remove all mold lines. The Emperor wills it. |
|
|
|
|
2013/04/15 22:18:07
Subject: Nowlan's IG force- I made an art! (Plasma Pistol Update)
|
|
Regular Dakkanaut
|
That Valkyrie looks awesome especially for your first attempt at it. I want to know If you'll make me one for my daughter who just happens to be named "Valkyrie?" Pm me the details if you can make it happen.
|
|
|
|
|
2013/04/17 04:36:05
Subject: Nowlan's IG force- I made an art! (Plasma Pistol Update)
|
|
Hurr! Ogryn Bone 'Ead!
|
Unfortunately the ceramic shell molds are a one-shot as you break it to get the bronze out, and the wax original is melted out when the mold is baked.
I'll see if I can figure out a way to safely cut her arms back off and do a silicone mold to recast her in wax for another go at it.
|
- Assembling first army.
Nowlan's IG Army in progress
Thin your paints, drill your gun barrels, remove all mold lines. The Emperor wills it. |
|
|
|
|
2013/04/18 16:32:17
Subject: Nowlan's IG force- I made an art! (Plasma Pistol Update)
|
|
Regular Dakkanaut
|
 Nowlan wrote: Nowlan wrote:Unfortunately the ceramic shell molds are a one-shot as you break it to get the bronze out, and the wax original is melted out when the mold is baked.
I'll see if I can figure out a way to safely cut her arms back off and do a silicone mold to recast her in wax for another go at it.
That would be awesome. Let me know what you come up with.
|
|
|
|
|
2013/04/25 03:55:41
Subject: Re:Nowlan's IG force- I made an art! (Plasma Pistol Update)
|
|
Hurr! Ogryn Bone 'Ead!
|
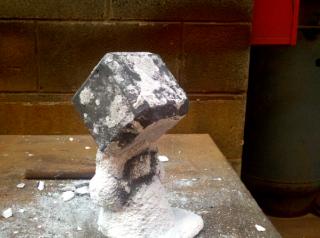
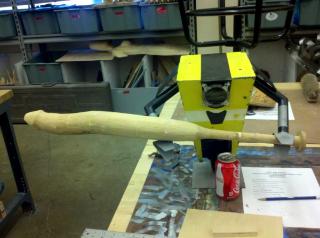
This past saturday was "Iron Day" for the sculpture labs. We made an afternoon event out of it, since it took weeks to prepare, what with the breaking of the iron for smelting and the construction of the cupola.
It was a fun afternoon, all went well, even though I got drafted into some last minute iron-breaking because we came up 50lbs short at the end. At the end of the event, to thank the metal gods for a good pour, we sacrificed two old coffee makers into the cupola. I have a video of one that I'll throw on youtube.
Picture of the shell mold for the pistol the day before
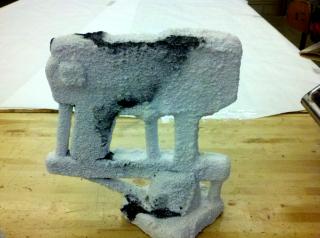
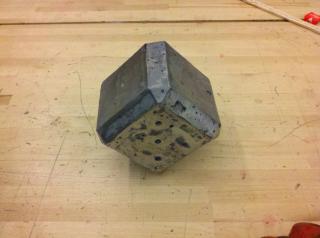
Pistol the day after with some of the shell removed. I had a strange dream sunday night where the grip and muzzle cast, but the entire body didn't, so I went after class monday to break some of the shell off to dismiss my fears.
Everything came out fine.
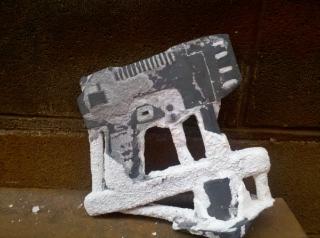
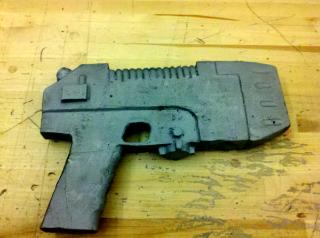
Pistol following sprue removal and sand blasting on Tuesday.
All in, she ways 6.6lbs. IMO that should be worth an extra melee attack.
For the same project I also cast a giant D6 to go along with the pistol.
The purpose of the D6 is to be displayed with the pistol, cocked on edge, with the gets hot rule posted next do it, with "Feeling lucky, punk?" scribbled on it.
Dice with shell cracked off.
 D6
D6 after sprue removal, sand blasting, and a little grinding to get the edges flat.
The dice needs a little more grinding and the pips need to be cleaned up and painted. The pistol just needs paint to be finished.
Stay tuned for next update (in like 10min) featuring everyone's favorite robot butler.
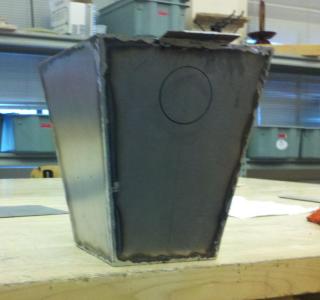
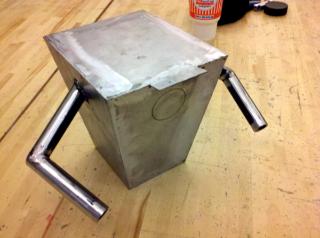
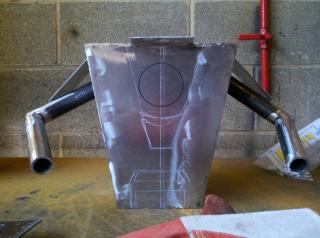
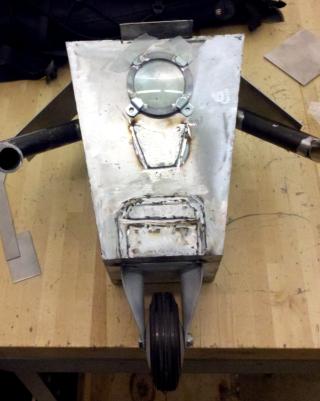
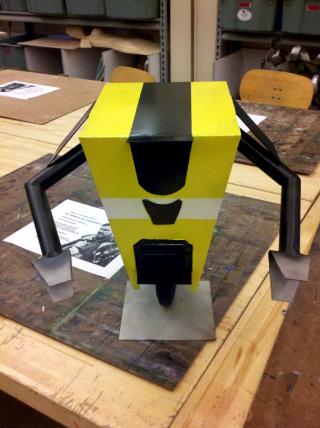
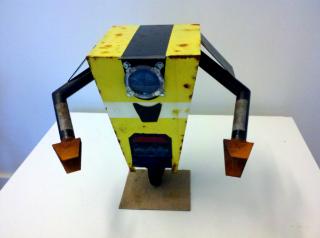
Automatically Appended Next Post: So, the other assignment I've got right now is to create something out of sheet metal. After our practice excercise (which was a 6"cube to let us practice welding) turned out to be so easy, I decided to do something a little more ambitious than the rest of my classmates... and I'd just finished playing Borderlands 2, so I figured I'd build my own Claptrap unit.
So, without further delay, Claptrap!
"Oh god, I can't feel my arms! Minion, what have you done to me!?"
"Much better! Now I can beat... err... motivate you to finish me faster!"
"I'm gonna be soooo handsome! If only I could move! *hint* *hint*"
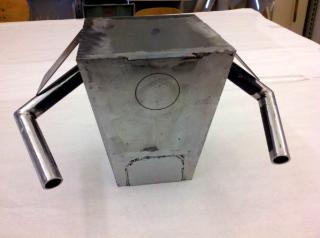
"A mouth doesn't help me move, minion. Oh well, now I can berate you further! Get back to work!"
"Horray, locomotion! What do you mean you're just holding it there? Attach it, minion!"
"Well done minion! But did you have to weld my ass?!"
"My eye! You got it back from that bullymong! You didn't? What do you mean it used to be a magnifiying glass? You're building me from SCRAP?! Oh well, it worked for Tony Stark!"
Thats all for now.
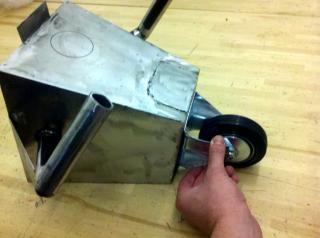
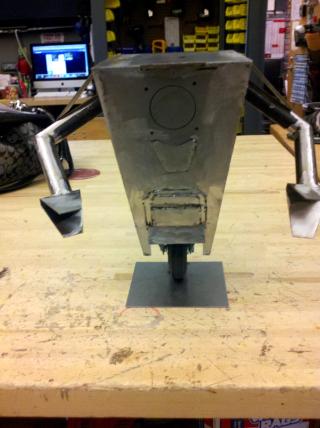
Still have to build up the bottom of him around the wheel and devise a way to make him stand on his own.
Also planning to use one of those voice-recordable greeting cards to make him talk. Still have to figure out the logistics on that one. Oh, and hands, he may want those.
Then its on to painting.
|
|
This message was edited 1 time. Last update was at 2013/04/25 04:29:22
- Assembling first army.
Nowlan's IG Army in progress
Thin your paints, drill your gun barrels, remove all mold lines. The Emperor wills it. |
|
|
|
|
2013/04/27 22:39:10
Subject: Re:Nowlan's IG force- I made an art! (Updated 4/24, Pistol & dice cast, and everyone's favorite robot)
|
|
Hurr! Ogryn Bone 'Ead!
|
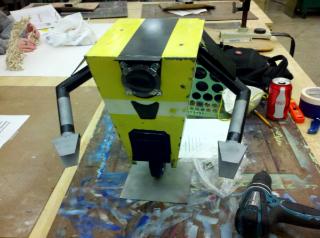
Small update.
Masked and sprayed the black section of the pistol.
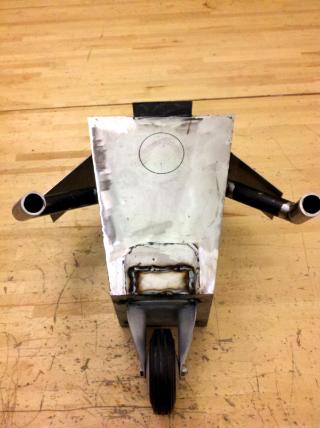
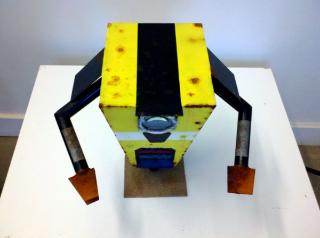
Claptrap found his balance.
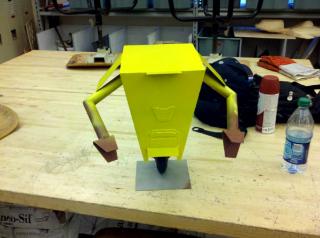
And I primed and applied the first coat of yellow. Not satisfied with the color though. It needs to be a flatter & more pale yellow. Going to sandblast him back to bare metal.
Not sure what to do to get the color I want. I may re-prime in black and try something like behr paints since they have a pretty extensive color range. Not sure. Input would be appreciated.
|
- Assembling first army.
Nowlan's IG Army in progress
Thin your paints, drill your gun barrels, remove all mold lines. The Emperor wills it. |
|
|
|
|
2013/05/04 19:13:18
Subject: Re:Nowlan's IG force- I made an art! (Updated 4/27)
|
|
Hurr! Ogryn Bone 'Ead!
|
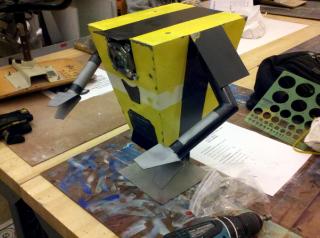
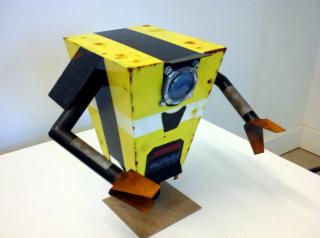
More updates for Claptrap.
He's almost done painting, I just need to do behind the eyes and his "mouth" which has to be done by airbrush.
He also needs to be dirtied up, including some rusting where I've chipped the paint away.
Pre weathering.
Post weathering.
Wearing a welding hat & gloves
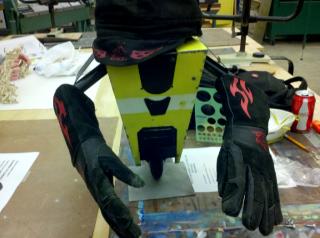
And last but not least, weilding a penis-bat. Don't ask, it's my friend's project.
He does look like he means business though.
|
- Assembling first army.
Nowlan's IG Army in progress
Thin your paints, drill your gun barrels, remove all mold lines. The Emperor wills it. |
|
|
|
|
2013/05/16 00:35:09
Subject: Re:Nowlan's IG force- I made an art! (Updated 5/4, More Claptrap!)
|
|
Hurr! Ogryn Bone 'Ead!
|
Class ended the other day.
Few new pictures to share, everything's complete.
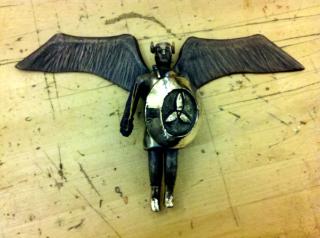
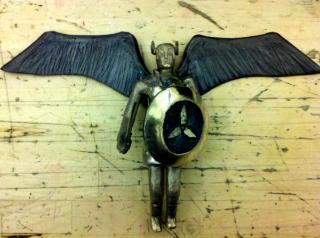
First off, I made a base for the valkyrie and mounted her on it. Now she actually looks like she's in flight.
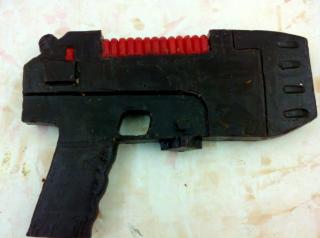
Plasma Pistol with Gets Hot.
Pistol alone.
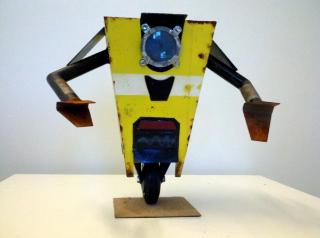
Claptrap got smacked around a fair bit and rusted.
Thats it.
I'm taking the second half of the class over the summer, but probably wont bother with photo updates since most of them got little to no response.
|
- Assembling first army.
Nowlan's IG Army in progress
Thin your paints, drill your gun barrels, remove all mold lines. The Emperor wills it. |
|
|
|
|
2013/05/16 23:40:57
Subject: Nowlan's IG force- I made an art! (Updated 5/15, Finished Projects)
|
|
Pyromaniac Hellhound Pilot
|
One guy offered to buy one that's not too bad of a response 
They are looking great BTW, I'd like to see more.
|
|
This message was edited 1 time. Last update was at 2013/05/17 08:47:51
My combined Macragge PDF Imperial Guard and Ultramarine 3rd Co. Blog Clicky
My WAB Hundred Years War English Clicky
AlexHolker wrote:At this stage, I'm starting to think GW's CEO was just getting ready for the Rapture
|
|
|
|
|
2013/10/16 12:15:40
Subject: Re:Nowlan's IG force- I made an art! (Updated 5/15, Finished Projects)
|
|
Jinking Ravenwing Land Speeder Pilot
|
Very clean brother, great looking paint job!
|
|
|
|
|
|
|
|