| Author |
Message |
 |
|
|
|
|
Advert
|
Forum adverts like this one are shown to any user who is not logged in. Join us by filling out a tiny 3 field form and you will get your own, free, dakka user account which gives a good range of benefits to you:
- No adverts like this in the forums anymore.
- Times and dates in your local timezone.
- Full tracking of what you have read so you can skip to your first unread post, easily see what has changed since you last logged in, and easily see what is new at a glance.
- Email notifications for threads you want to watch closely.
- Being a part of the oldest wargaming community on the net.
If you are already a member then feel free to login now. |
|
 |
2012/12/31 15:19:19
Subject: The FINAL Unforgiven!!
|
|

Perfect Shot Dark Angels Predator Pilot
|
When I started a couple of months back, my first set of minis looked like THIS:- My 'Alpha' Squad: http://www.dakkadakka.com/dakkaforum/posts/list/488678.page Then after some harsh but fair and necessary advice on painting technique, I tried again with earnest:- My 'Beta' Squad:- http://www.dakkadakka.com/dakkaforum/posts/list/490433.page After lots more reflection and practice, I now find myself at this stage... How can I now further improve my technique??
|
|
This message was edited 1 time. Last update was at 2012/12/31 21:38:20
Mixed-Wing army has positive results thus far!
"Belial SMASH!"
 3,500+ point fully painted army of Unforgiven goodness 3,500+ point fully painted army of Unforgiven goodness
Wins 17 Draws 4 Losses 36 Abandoned 1 Hopeless 1
"Never Forgive! Never Forget!"
So I dub thee Unforgiven |
|
|
 |
|
2012/12/31 19:34:09
Subject: The FINAL Unforgiven!!
|
|

Drop Trooper with Demo Charge
|
That looks really nice. it's good to hear that you've spend some time on your models, and it shows 
|
|
|
|
|
|
2012/12/31 20:03:16
Subject: The FINAL Unforgiven!!
|
|

Thunderhawk Pilot Dropping From Orbit
|
Hey man. I can really see that you've taken the criticisms well, and used it to progress in leaps and bounds. Your bases are far better now, and don't draw the eye from the model. My only real criticism (and I suspect it's due to a camera flash) is that it looks really shiny. Have you got gloss varnish on there?
Your edge highlighting is improving. Keep up the good work. Just a case of practice making perfect.
|
|
|
|
|
|
2012/12/31 20:33:31
Subject: The FINAL Unforgiven!!
|
|

Lone Wolf Sentinel Pilot
|
That, sir, is a huge improvement. Your bases look much more complete and your colors are much smoother.
The shine is a bit much..you may want to consider hitting the model with a thin coat or 2 of Testers Dull Coat. It knocks the shine down and provides a protective layer over your models.
Keep practicing. Every time you do a new unit, try a new technique with it. Base coat, layer coat, wash, highlites, etc.
For your purity seals I use a small sharpie pen. You can make little squiggle lines and dots that look like very small fancy script. Basecoat. Let dry. Add squiggles. Then apply a wash.
|
|
This message was edited 1 time. Last update was at 2012/12/31 20:35:12
Life isn't fair. But wouldn't it be worse if Life were fair, and all of the really terrible things that happen to us were because we deserved them?
M. Cole.
    |
|
|
|
|
2013/01/01 05:29:28
Subject: The FINAL Unforgiven!!
|
|
Perfect Shot Dark Angels Predator Pilot
|
 Eggs wrote: Eggs wrote:Hey man. I can really see that you've taken the criticisms well, and used it to progress in leaps and bounds. Your bases are far better now, and don't draw the eye from the model. My only real criticism (and I suspect it's due to a camera flash) is that it looks really shiny. Have you got gloss varnish on there?
Your edge highlighting is improving. Keep up the good work. Just a case of practice making perfect.
Thanks for the kind words mate!
I actually use this great matte varnish, but my photography is so crap, you can't tell. On a different note, the pic I uploaded ended up looking overly exposed, not sure why. I'll try to sort out the shot later and re-post pictures! Automatically Appended Next Post: dkellyj wrote:That, sir, is a huge improvement. Your bases look much more complete and your colors are much smoother.
The shine is a bit much..you may want to consider hitting the model with a thin coat or 2 of Testers Dull Coat. It knocks the shine down and provides a protective layer over your models.
Keep practicing. Every time you do a new unit, try a new technique with it. Base coat, layer coat, wash, highlites, etc.
For your purity seals I use a small sharpie pen. You can make little squiggle lines and dots that look like very small fancy script. Basecoat. Let dry. Add squiggles. Then apply a wash.
Sharpie it is! I'll go out and buy one NOW!
Thanks for the advice!
|
|
This message was edited 1 time. Last update was at 2013/01/01 05:30:20
Mixed-Wing army has positive results thus far!
"Belial SMASH!"
3,500+ point fully painted army of Unforgiven goodness
Wins 17 Draws 4 Losses 36 Abandoned 1 Hopeless 1
"Never Forgive! Never Forget!"
So I dub thee Unforgiven |
|
|
|
|
2013/01/01 07:46:25
Subject: Re:The FINAL Unforgiven!!
|
|
Morphing Obliterator
|
that's really great progress for just a few months. here are a few thoughts on how you can take it up another notch:
- do a cleanup pass with your base color after you edge highlight. it gives you a chance to clean up the highlights and make them sharper and thinner.
- instead of painting pure white, use a very light gray. this lets you use pure white as a highlight color so you still get some definition.
- instead of using pure black, use a dark gray. you can still use a black wash for shading over the dark gray, so you don't lose depth.
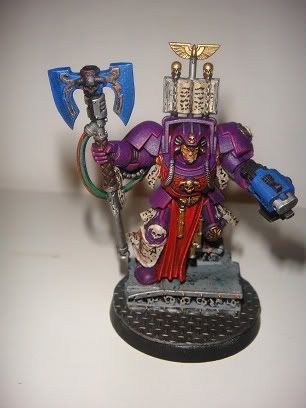
- consider using different highlight colors; the orange-yellow highlight over the red on the bolter is a bit jarring for me. a pink color might actually work better there. you might also try adding some white to the green base color you're using for the armor highlights.
- highlight your metals (you might be doing this already, but it's hard to tell from the photo)
- consider adding some layers to the eye lenses so they have a bit more life. lots of ways to do this, but a couple of suggestions can be found here
you've got the basics down, so now it's all about the details Automatically Appended Next Post: btw, for the squiggles on purity seals I use a sakura pigma micron 005 pen. not sure if sharpie makes anything that small, but if not the microns are pretty easy to find at art stores.
|
|
This message was edited 1 time. Last update was at 2013/01/01 07:48:41
|
|
|
|
|
2013/01/01 12:33:20
Subject: The FINAL Unforgiven!!
|
|
Slippery Scout Biker
|
wow, the improvement is impressive indeed!
I think varl has it mostly on the nose, but i'd say working on the eyes will help tidy up the model alot.
I'd suggest a heavy wash to get a thin black line all around, then a little blazing orange (or equivalent) on the bottom at the front of each eye and a little white dot right back in the far corners. Every other part of the model has been done so neatly, but the eyes seem to detract from that.
Also the bases are looking far far better  well done indeed
Have you tried painting the rim of the base back to black black?
i find sometimes it can make the model look a lot more professional, but it can also leave it feeling a little unfinished sometimes
nehoo, carry on painting! looking forward to seeing more!
|
|
|
|
|
2013/01/01 13:05:56
Subject: The FINAL Unforgiven!!
|
|

Rebel_Princess
|
Pretty nice compared to the previous ones. That one is more than tabletop level. I bet it looks very nice from 1m away.
How to improve: Smooths could me blender. Or blends could be smoother. You could try to blend the edges to the rest of the armor. Also highlighting white.
The photo is crap though. It seems to be over exposed. Do you use flash? It's better not to use and just get better lightning sources. A bit fixed version

|
Forever a pone. |
|
|
|
|
2013/01/01 15:09:06
Subject: The FINAL Unforgiven!!
|
|
Thunderhawk Pilot Dropping From Orbit
|
I'm crap at eye lenses and jewels etc, so I've developed a 'cheaty' way of doing them - paint them black, then pick out the centre in pure white - the part you want to look coloured, leaving plenty of black all around. Once the white is dry, hold the model upside down, and put a generous amount of ink on there - the ink should pool in the top (bottom when upside down). You can use a dry brush to pull off ink on reject part you want to be lighter. Then just add a small white highlight on the darkest part.
Hope that makes sense? Works for me anyway.
|
|
|
|
|
|
|
|
 Night Lords P&M Blog:
  Salamanders P&M Blog: