| Author |
Message |
 |
|
|
|
|
Advert
|
Forum adverts like this one are shown to any user who is not logged in. Join us by filling out a tiny 3 field form and you will get your own, free, dakka user account which gives a good range of benefits to you:
- No adverts like this in the forums anymore.
- Times and dates in your local timezone.
- Full tracking of what you have read so you can skip to your first unread post, easily see what has changed since you last logged in, and easily see what is new at a glance.
- Email notifications for threads you want to watch closely.
- Being a part of the oldest wargaming community on the net.
If you are already a member then feel free to login now. |
|
 |
2013/04/03 22:34:46
Subject: Tonio's journey into Brushfire, and excursion into Endless
|
|

[DCM]
Dankhold Troggoth
|
Do you have any issues getting paint to stick to balsa (with all the pores / etc) or do you just leave it bare? I've always wondered as I've thought of using wood in conversions before but wasn't sure if it would paint up correctly.
|
|
|
 |
|
2013/04/03 23:26:23
Subject: Re:Tonio's journey into Brushfire, and excursion into Endless
|
|

Scribe of Dhunia
|
I haven't had problem painting balsa; the pores help more than they hinder.
You have two options with it. First is tinting it using washes. This looks good, but if you want to use that method, you must be really careful during assembly, as any glue that leaked from a joint will seal the balsa and leave it untinted.
You can also simply paint it like any other material. It soaks up a bit more paint, especially in the first couple of layers, but otherwise takes paint well.
|
|
|
|
|
|
2013/04/03 23:38:26
Subject: Re:Tonio's journey into Brushfire, and excursion into Endless
|
|
Old Sourpuss
|
 Tonio wrote: Tonio wrote:I haven't had problem painting balsa; the pores help more than they hinder.
You have two options with it. First is tinting it using washes. This looks good, but if you want to use that method, you must be really careful during assembly, as any glue that leaked from a joint will seal the balsa and leave it untinted.
You can also simply paint it like any other material. It soaks up a bit more paint, especially in the first couple of layers, but otherwise takes paint well.
I just either dip mine in Quickshade, or I throw a bit of Agrax Earthsade on it, comes out great! I'm sure the Quickshade works well because it's basically a polyurethane floor coating! 
|
DR:80+S++G+M+B+I+Pwmhd11#++D++A++++/sWD-R++++T(S)DM+
 
Ask me about Brushfire or Endless: Fantasy Tactics |
|
|
|
|
2013/04/05 14:10:56
Subject: Re:Tonio's journey into Brushfire, and excursion into Endless
|
|
Scribe of Dhunia
|
I put some paint on the Capitan Wednesday, but in the end only finished the green on his pants. Not worth a picture...
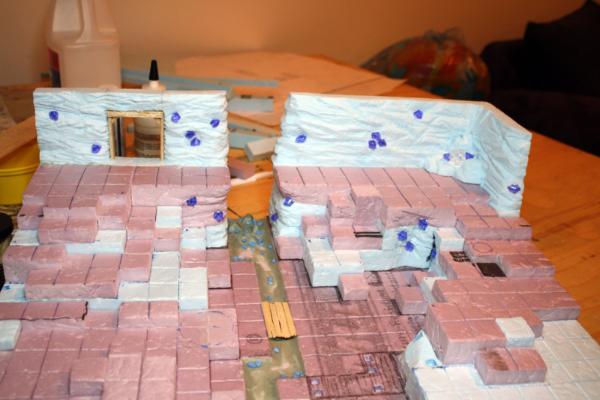
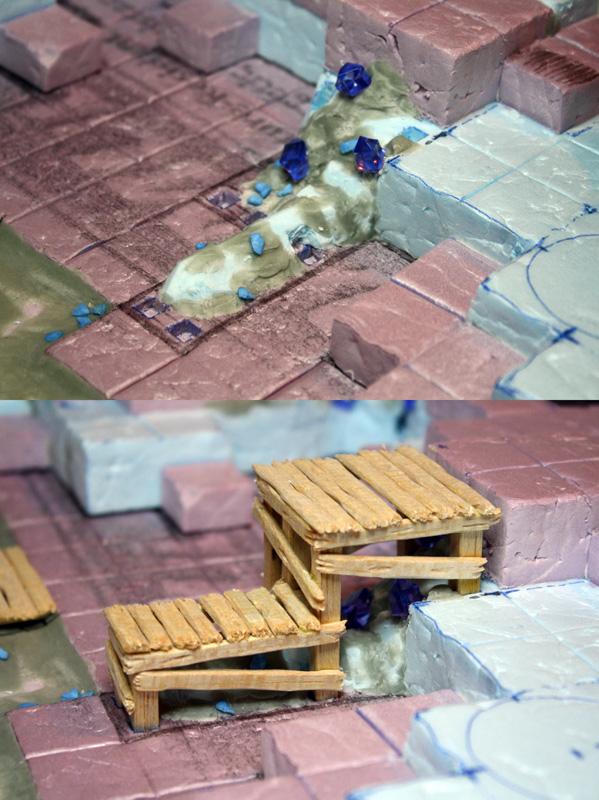
Some small progress on the board. I was able to finish both bridges and the first platform, and I also began the second platform. None of these element are glued to the foam, to help with painting.
Wip18 - Platform 1 done
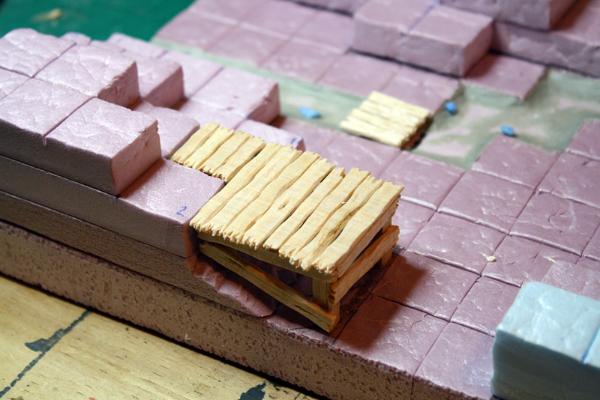
Wip19 - Bridge 2 done, and beginning of platform 2
|
|
This message was edited 1 time. Last update was at 2013/04/05 14:13:20
|
|
|
|
|
2013/04/05 14:31:44
Subject: Tonio's journey into Brushfire, and excursion into Endless
|
|

Dakka Veteran
|
Looks really nice!
|
|
|
|
|
2013/04/05 15:43:22
Subject: Re:Tonio's journey into Brushfire, and excursion into Endless
|
|
Decrepit Dakkanaut
|
Tonio wrote:
You can also simply paint it like any other material. It soaks up a bit more paint, especially in the first couple of layers, but otherwise takes paint well.
Balsa also takes primer just fine. I use it all the time for trench bases and just paint it like normal.
|
|
|
|
|
|
2013/04/06 14:14:21
Subject: Tonio's journey into Brushfire, and excursion into Endless
|
|
[DCM]
Dankhold Troggoth
|
Tinting the balsa with washes is a cool idea! Nice to know it's a viable material to use (and that you can prime it, too) I've always shied away from it.
|
|
|
|
|
2013/04/07 05:21:57
Subject: Re:Tonio's journey into Brushfire, and excursion into Endless
|
|
Scribe of Dhunia
|
Hobby night yesterday with Fragjuice, and some time today to, so stuff advanced quite a bit.
On the Brushfire side first, I was able to finish the cloth sections (pants and sleeve) of the capitan, but then mishandled the model, and it plummeted to the floor. Results: a broken ankle and some paint chips. I need to get my pinvise out...

Most of my time was put in the Endless board though. I was able to finish the second platform, did a first texture pass on the long wall, and I started installing crystals. Next steps are going to be more texture work on the long wall, more crystals everywhere, then finishing the slopes under the platforms, and finding what to do to break the monotony of the long wall. I already got some ideas, but I need to check if I have the space to do them without being in the way of the models too much. We will see. 
Wip20 - Platform 2 still in progress
Wip21 - Platform 2 done
Wip22 - Crystallization begin
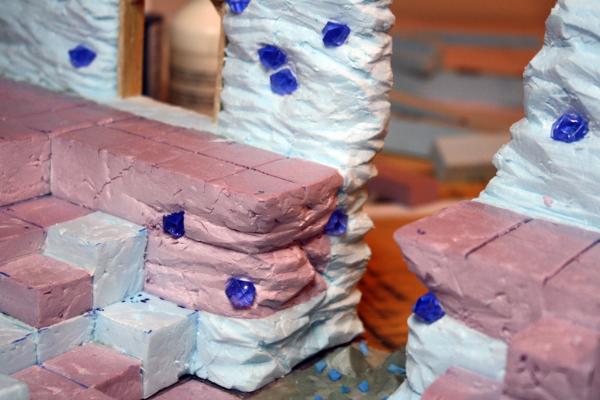
Wip23 - Second wall textured and more crystals
|
|
|
|
|
|
2013/04/07 12:41:41
Subject: Tonio's journey into Brushfire, and excursion into Endless
|
|

Fixture of Dakka
|
Love it! Both of the 'its' that is.
The board is coming together wonderfully and the Capitan is looking kick ass. If the foot reattachment gives you hassle it might be a good idea to give him a peg leg.
|
|
|
|
|
|
2013/04/08 00:06:56
Subject: Re:Tonio's journey into Brushfire, and excursion into Endless
|
|
Dakar
|
I must say Tonio, that board is looking amazing!  I'm trying not to let it discourage me from my more humble EFT board projects. I haven't speant any serious time modeling/painting in a few years and my attempts were never up to the level of what you have here. 
|
|
|
|
|
2013/04/08 16:49:20
Subject: Tonio's journey into Brushfire, and excursion into Endless
|
|
Scribe of Dhunia
|
Thanks guys. I'm really happy with how both projects are coming along. Some more progress pictures of the board incoming tonight, and of the captain tomorrow, after my club's weekly painting night.
 Casey's Law wrote: Casey's Law wrote:If the foot reattachment gives you hassle it might be a good idea to give him a peg leg.
lol I thought about that, but I like his small ballerina's iron slippers. We'll see how the reattachment turns out before going for the peg leg.
|
|
This message was edited 1 time. Last update was at 2013/04/08 18:23:27
|
|
|
|
|
2013/04/08 20:01:16
Subject: Tonio's journey into Brushfire, and excursion into Endless
|
|
Fixture of Dakka
|
Haha, cool.
|
|
|
|
|
|
2013/04/11 04:47:58
Subject: Re:Tonio's journey into Brushfire, and excursion into Endless
|
|
Scribe of Dhunia
|
Hobby time has been light in the past few days, but I still got to do some stuff. I'll begin with the Endless board. I was able to finish the crystal pile that go in one of the back corner of the board, and I textured the under of the two platforms. I started gluing some of the elevations to the base board, starting at the front. I'll glue them all by the end of the week, except one in the back, to be able to work on the cliff and platform going there.
Basic work is pretty much done. I still have to do the pillars, but they could easily be done in a second wave, especially if I keep them separate for ease of move and re-playability. I'll think about that. Another thing I have to do is glue the fine texture on the board. That's gonna be a mix of sand of different grit. It will ge wherever there is already some rough spot (walls, piles, platform, a bit in the river), but I'll also put some scaterred on the tiles, to spice it up a bit during painting.
And then, I have a huge decision to make. My sketches include a mining cart rail track, going from the back entrance to one of the side, with a part of it broken off. It would look kick-ass, but the board could do without it. However, I have not yet been able to figure how to do it without making it difficult to place model on/around. My initial plan was a classic bed of wooden beams and plasticard h-beams running on top. But no matter how I look at it, it wouldn't work with game play. Another possibility would be to keep the wooden beams, but replace the h-beams with simple flat plates to represent them. That would be flatter and easier for model placement, but I fear the beams and the plates would still be too much in the way, especially in curves. If anybody got an idea about how to model that without interfering with game play too much, share!
Wip23 - Crystal pile
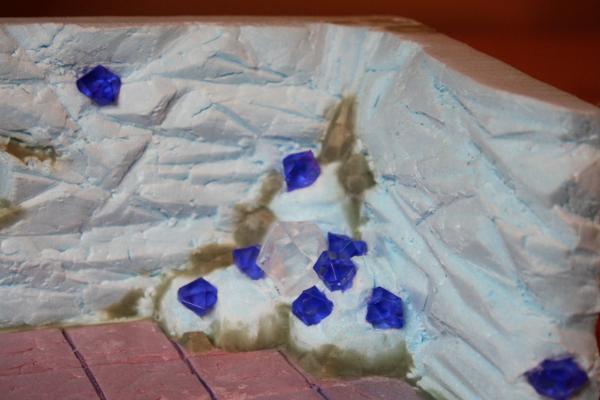
Wip24 - Under platform
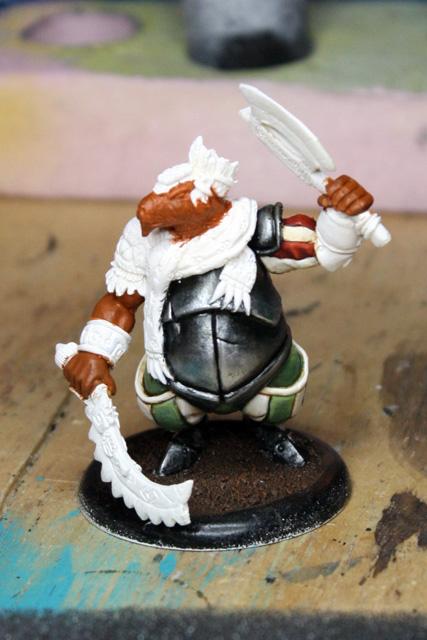
Onto Brushfire next. Operation Ballerina has been a success. The break was clean, with no part missing, and I was able to pin it back in place without it being apparent at all. On top of that, the armour is now done. That makes pants, sleeve, plate and slippers done. Here a wip picture. I took the opportunity of it being off the base to paint it. 
|
|
|
|
|
|
2013/04/11 07:49:22
Subject: Tonio's journey into Brushfire, and excursion into Endless
|
|
Fixture of Dakka
|
Great work. I'm not sure how I'd go about the tracks on the board, it's hard to say without having it in person. It's all looking good though, I'm sure it'll work with or without it.
Actually, you could have the tracks coming in and then being broken, after that just throw in the odd section and some rubble. That might help you keep movement space free. You could also try having it enter from a height so the models can possibly move underneath.
The Capitan looks good, I really like the armour. How did you go about painting that?
|
|
|
|
|
|
2013/04/12 05:55:45
Subject: Tonio's journey into Brushfire, and excursion into Endless
|
|
Scribe of Dhunia
|
That is pretty simple, just long to do. Base mix of a dark metal and black. Then a black, brown and blue wash. After that, it's lots of layering and blending, with less and less black, more and more shiny metal. I ended with pure Vallejo Air Chrome. Like I said, simple, but the blending is time intensive.
Progress
The Endless board saw some glue today, but that's all. Not worth a picture.
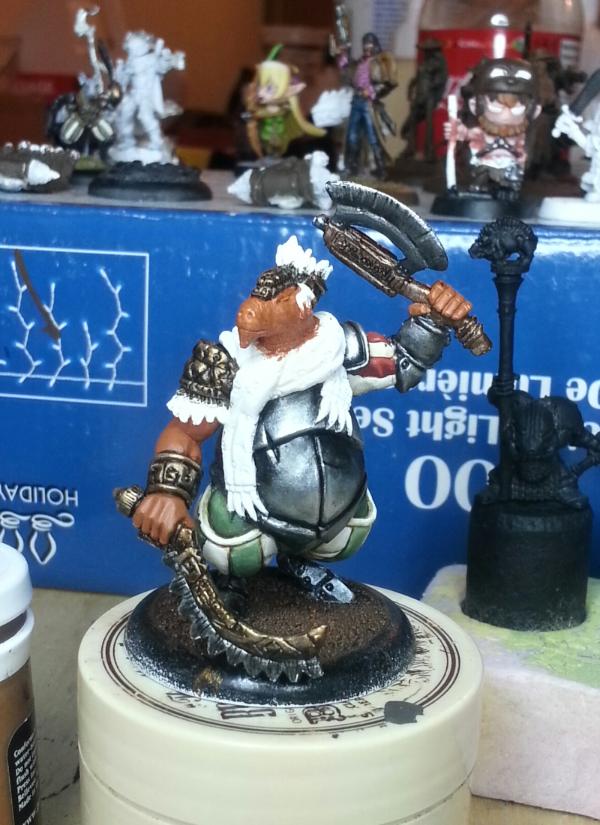
Brushfire wise, I did work on the Capitan. All metal is done, both gold and iron. I might do some more green and brown wash on the gold when I see it with rested eyes tomorrow, but that's all. Not too good cellphone picture:
|
|
This message was edited 1 time. Last update was at 2013/04/12 13:17:18
|
|
|
|
|
2013/04/12 16:03:28
Subject: Re:Tonio's journey into Brushfire, and excursion into Endless
|
|
Dakar
|
That metal paint job does look beautiful. He should really make a good centerpiece for your force. I also approve of the Chronopia dwarf next to him I have been thinking about pulling out some of my darktusks to get back in the swing of painting in preparation for my Bones and EFT kickstarter minis arrival.
|
|
|
|
|
2013/04/12 16:14:22
Subject: Re:Tonio's journey into Brushfire, and excursion into Endless
|
|
Scribe of Dhunia
|
 Galen wrote: Galen wrote:I also approve of the Chronopia dwarf next to him I have been thinking about pulling out some of my darktusks to get back in the swing of painting in preparation for my Bones and EFT kickstarter minis arrival.
It's my piece for our group monthly painting challenge. This month theme is "old minis"; I think he fill the role perfectly. My only gripes with Chronopia is that I didn't get enough dwarves when it was put on sale everywhere. I should have hoarded them!
|
|
|
|
|
|
2013/04/13 13:15:27
Subject: Tonio's journey into Brushfire, and excursion into Endless
|
|
Fixture of Dakka
|
Nice progress and thanks for the run down on the armour. It's a great effect and worth the effort.
What about the fade out towards the bottom of the main armour plate? I'm not certain what it's representing, wear and tear I guess, but I think it would work really well as distressed leather if the technique were applied somewhere else. How did you do that bit?
|
|
|
|
|
|
2013/04/15 03:15:40
Subject: Tonio's journey into Brushfire, and excursion into Endless
|
|
Scribe of Dhunia
|
Casey's Law wrote:What about the fade out towards the bottom of the main armour plate? I'm not certain what it's representing, wear and tear I guess, but I think it would work really well as distressed leather if the technique were applied somewhere else. How did you do that bit?
That's only a painted shadow. But the lightning during the picture might have accentuated it a bit too much. I do try to paint everything like that, but I always go all out on metal, which I find easier to paint. However, it doesn't take to picture too well. Most of the time, the rest look a bit dull. I am on my way to build a light box, to help with that. With indirect lighting, I hope that pieces with a lot of metallic will come out better overall. Automatically Appended Next Post: No painting during the weekend (one most play some times ), but some work on the board.
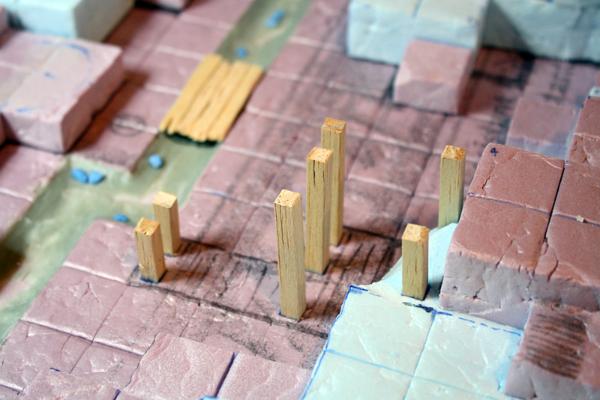
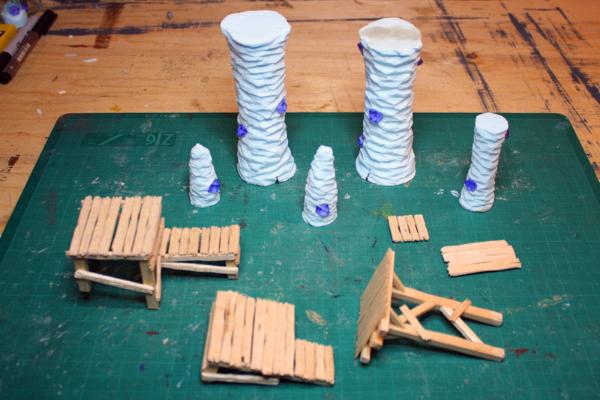
After looking at the board a lot, at my various height of balsa, my tiling test piece, my sketches, I finally came to the conclusion that the rail system wouldn't work. In my initial plan, I had it going 2 inch large, which is far too large now that I have have the board in front of me. I could make it only 1 inch large, but the design of the board doesn't fit well with that. Instead, to fill up the space, I chose to do more columns. Which bring me to what I did this weekend: columns. The three that goes up to the ceiling have specific spots with magnets, but the smaller stalagmites don't have specific spots and can be moved around from game to game.
Wip25 - Magnetizing a column
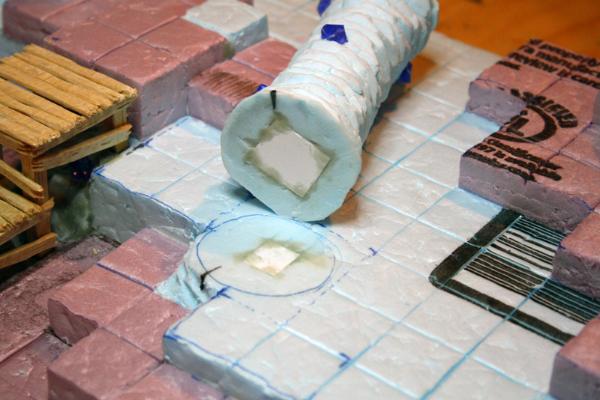
Wip26 - Column in place
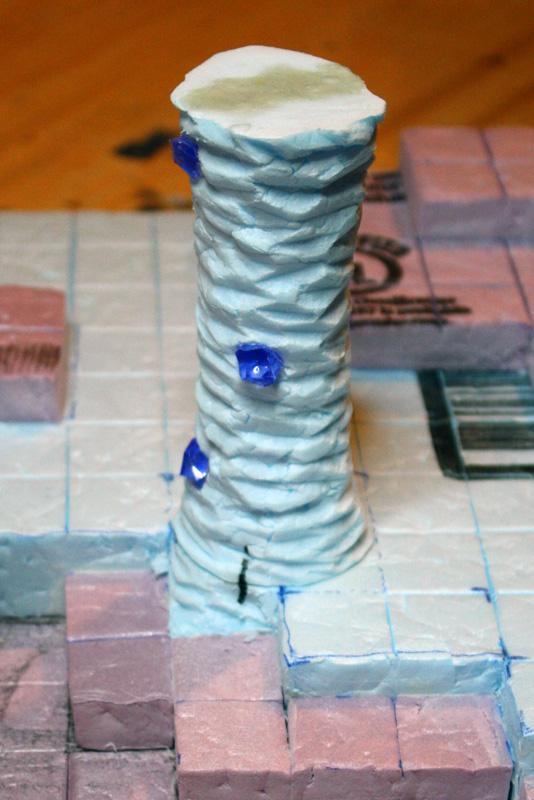
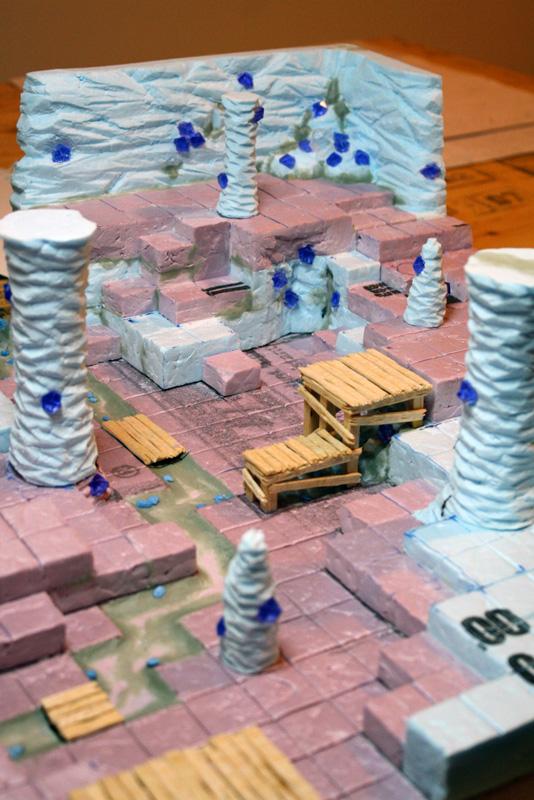
Wip27 - Overall view
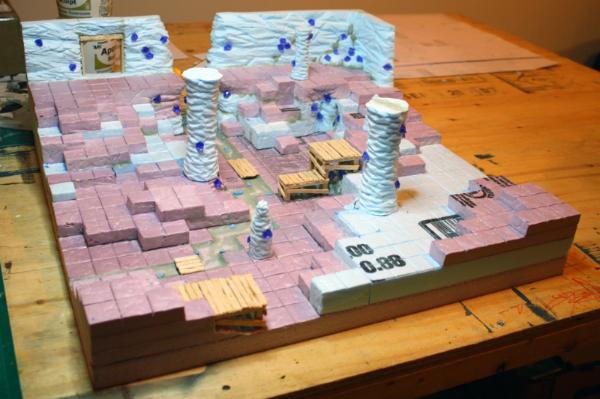
Wip28 - Zoomed in view
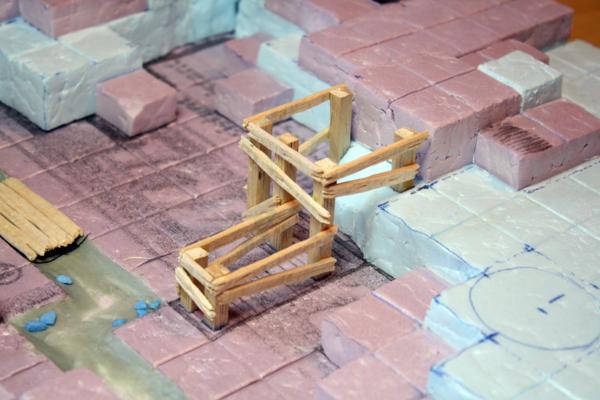
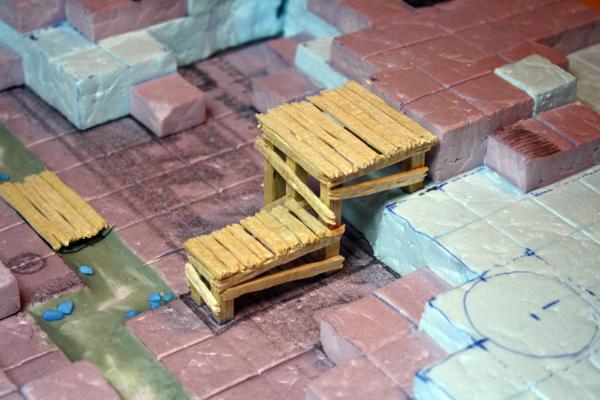
Next step will be to build the brige in the back of the board, between the two cliff sides. The rail was supposed to pass there, but even without it, it's going to look good and tie in the board. Once that is done, all I will have left to work on is some accessory squares with mining tools (wheelbarrow, pick axe, shovel, buckets, etc.) on them, to add some blocked out squares during the game. As with thestalagmites, those will be movable.
After that, it's painting time!
|
|
This message was edited 1 time. Last update was at 2013/04/15 03:31:00
|
|
|
|
|
2013/04/15 09:24:49
Subject: Tonio's journey into Brushfire, and excursion into Endless
|
|
Fixture of Dakka
|
Excellent stuff. Sorry, I see shadow on the metal now.  As you say it's just not translating well in photography, I'm sure it's obvious in person.
The board is coming together brilliantly, that'll keep you coming back to play!
|
|
|
|
|
|
2013/04/16 05:19:17
Subject: Re:Tonio's journey into Brushfire, and excursion into Endless
|
|
Scribe of Dhunia
|
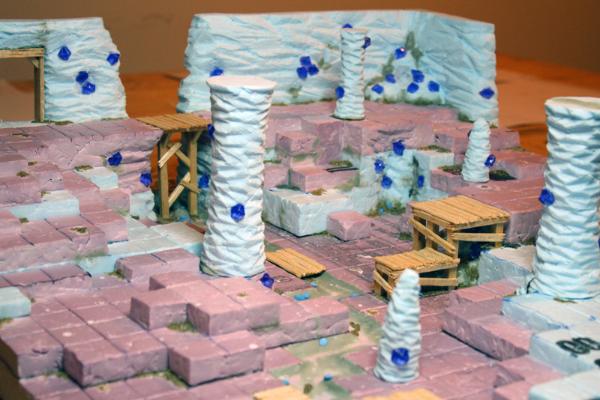
Board construction is done! I'm really happy with how it all came along. Can't wait to start painting.
Last steps were construction of the back bridge, applying sand for some more texture, and final putty work here and there.
Wip29 - Accessories
Wip30 - Sand texture close up

Wip31 - Board fully textured
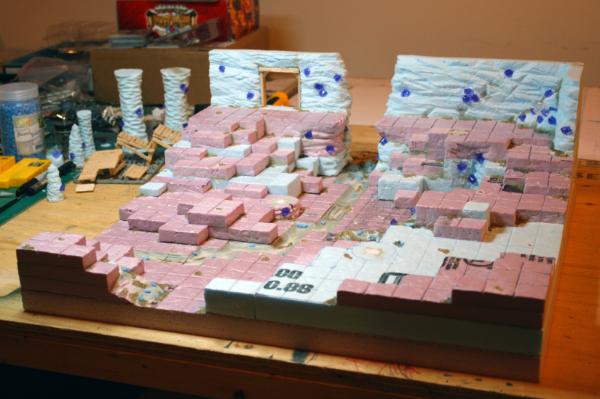
Wip32 - Final shot : board done!
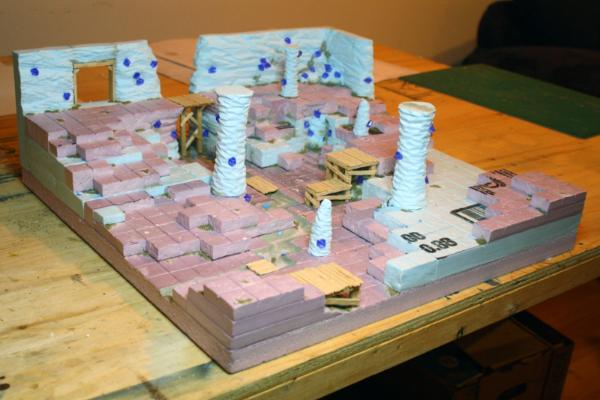
Wip33 - Final board close up
I made the last two votable, if anybody want to give them a coolness rating.
Tomorrow is our club's hobby night, but it's probably going to be a play night, instead of painting. I just got the latest SDE extension, so I need to destroy heroes with my new undead minions. Painting of the board will start later this week, and I hope to have the Capitan done by next week.
|
|
|
|
|
|
2013/04/16 08:24:47
Subject: Tonio's journey into Brushfire, and excursion into Endless
|
|
Fixture of Dakka
|
Brilliant job! I'm sure you'll do it justice when painting too! Off to vote now.
|
|
|
|
|
|
2013/04/18 16:38:06
Subject: Re:Tonio's journey into Brushfire, and excursion into Endless
|
|
Scribe of Dhunia
|
I have published two articles about the making of the board on our Club's blog. Nothing you haven't seen here, but if you read French or just want to look at all the pictures in a single shot, you can do it there.
Part 1:
http://www.clubchaos.net/2013/03/plateau-de-jeu-maison-pour-endless.html
Part 2:
http://www.clubchaos.net/2013/04/plateau-de-jeu-maison-pour-endless.html
By the way, the Civitas Capitan is coming along nicely. I will probably have final (or almost final) pictures of him this weekend. After that, it's gaming time!
|
|
This message was edited 1 time. Last update was at 2013/04/18 16:43:16
|
|
|
|
|
2013/04/19 13:59:09
Subject: Re:Tonio's journey into Brushfire, and excursion into Endless
|
|
Scribe of Dhunia
|
Last night saw some work on both fronts.
The Endless board go a coat of Gesso, to work as a primer. It was my first time with that material, and it worked great. The feel is a bit coarser than sprayed primer, but for terrain, it's perfect. It also sticked to foam well, which is not always the case with brushed on products.
On the Brushfire side, I put some more coats on the Capitan. Skin, weapons and jaguar pelt are done. Leaving feathers, eyes, bases and some small details for next sitting. I'm positive it will be done by the end of the weekend now.
|
|
This message was edited 1 time. Last update was at 2013/04/24 13:39:11
|
|
|
|
|
2013/04/19 23:06:46
Subject: Tonio's journey into Brushfire, and excursion into Endless
|
|
Fixture of Dakka
|
That's great, Tonio. I've probably said it before but it's impressive how much realism you get into quite cartoony miniatures. You are a very skilled painter, sir.
|
|
|
|
|
|
2013/04/21 01:02:33
Subject: Tonio's journey into Brushfire, and excursion into Endless
|
|
[DCM]
Dankhold Troggoth
|
Your work is inspiring, Tonio! Can't wait to see that Endless board painted
|
|
|
|
|
2013/04/22 05:41:37
Subject: Re:Tonio's journey into Brushfire, and excursion into Endless
|
|
Scribe of Dhunia
|
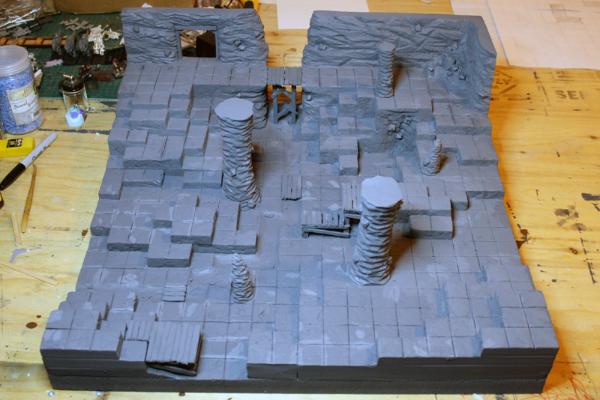
Thanks a lot guys. Reading your comments is always encouraging.
---
For the sake of it, here is a picture of the board primed with gesso. The color is not flat, as I did the priming in batches and some touch ups, and my color mixes were not the same each time. It shouldn't matter once I start the real painting.
Wip34 - Primed
---
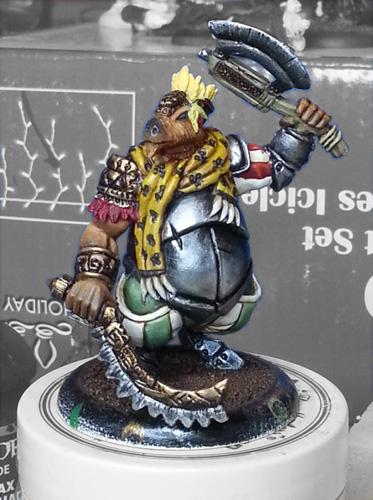
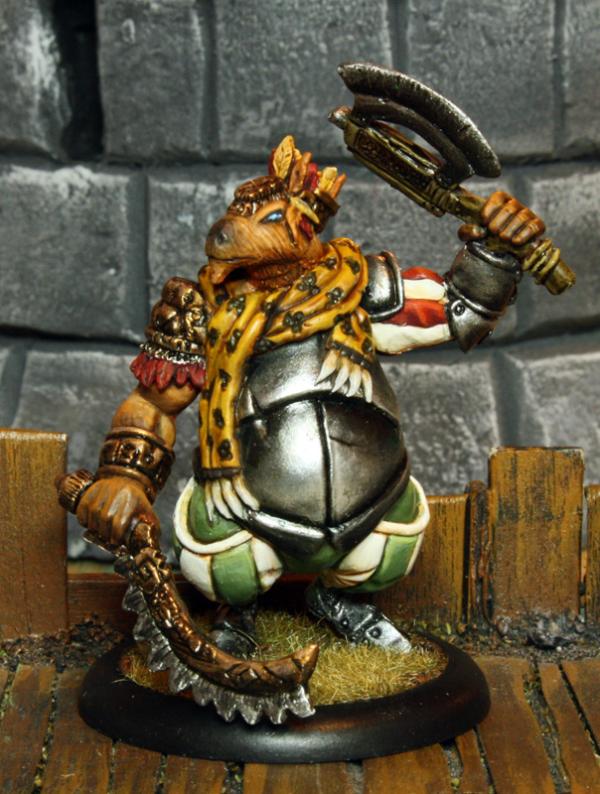
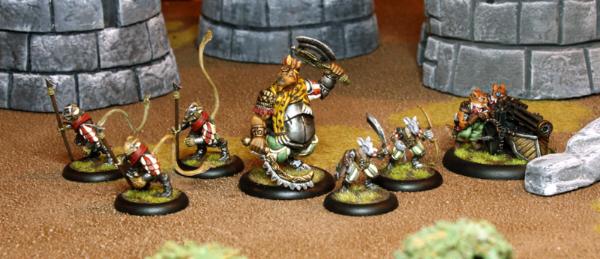
Onward to the more interesting part of the weekend's work: the Capitan is done, as promised! I made a single pic and a group shot. I'm not really happy with both pictures. With all the metalics, it's really more apparent that I need to change the lighting of my hobby zone, or get a light tent asap. A brighter room, but with indirect lignting, would probably make for better metalics' pictures. The other solution would be to pass to NMM, which is camera friendly. But I'm not sure I'm there yet for whole forces... However, I'm really happy with the model itself. It's different enough to all the smaller rodents with the yellows, but still tie in smoothly. Not sold on the jaguar "dots", but that's more of a comment on the sculpt than the paint job.
Only thing left to do is a coat of matte varnish once it gets a bit hotter outside, before hitting the table with them! (If Fragjuice ever finishes his termies and get to painting his Vandalands. Who knows, I might get, and paint, my Ribenguo starter before that happens... )
|
|
|
|
|
|
2013/04/22 17:30:48
Subject: Tonio's journey into Brushfire, and excursion into Endless
|
|
Longtime Dakkanaut
|
Gesso is great stuff. It's one of my go to products for painting foam atleast in the beginning. Wood glue works great in a pinch as well, but I find paint sticks to gesso better then dried glue.
It's going to be interesting to see what direction you take with the painting. I wasn't expecting you to paint the plastic gems but looking back it would be more of a pain not to.
|
|
|
|
|
|
2013/04/22 18:43:05
Subject: Tonio's journey into Brushfire, and excursion into Endless
|
|
Fixture of Dakka
|
Nice work, Tonio. The Capitan has come through excellently!
|
|
|
|
|
|
2013/04/22 18:55:42
Subject: Tonio's journey into Brushfire, and excursion into Endless
|
|

Fixture of Dakka
|
So much beautiful work...
Very inspiring. You and Alf are going to make me paint something Brushfire sooner than I should.
|
The secret to painting a really big army is to keep at it. You can't reach your destination if you never take any steps.
I build IG...lots and lots of IG. |
|
|
|
|
|
|


