| Author |
Message |
 |
|
|
|
|
Advert
|
Forum adverts like this one are shown to any user who is not logged in. Join us by filling out a tiny 3 field form and you will get your own, free, dakka user account which gives a good range of benefits to you:
- No adverts like this in the forums anymore.
- Times and dates in your local timezone.
- Full tracking of what you have read so you can skip to your first unread post, easily see what has changed since you last logged in, and easily see what is new at a glance.
- Email notifications for threads you want to watch closely.
- Being a part of the oldest wargaming community on the net.
If you are already a member then feel free to login now. |
|
 |
2014/02/06 11:59:46
Subject: Problem while Painting lights colors
|
|

Fresh-Faced New User
|
Hi Everyone,
First sorry for my Bad English but I'm from Uruguay a small country in South America and here we speak spanish so my english might have some errors 
I'm very new to the world of Warhammer and I must say I am in love with this hobby, at least for now
I started to paint some models, my first models ever!! (I will attach a picture of my progress if someone wanna see it) and I am very happy with the results, i put a lot of effort in learning, I have read tons of forums and watched tons of videos about painting but I am having a problema right now when painting light colors like white or skulls colors, some clothes too.
The problem right now is because I am painting some Deathwings Terminators from the Dark Vengance pack.
I just can't get it right :( It doesn't cover too well and too cover it I put tons of paint that hide the details and it looks kinda dirty, the paint looks grainy, i don't know how to explain it.
I have read that painting white or lights colors can be very hard :(
Can someone give me some tips?
Thanks in advance
Pablo
|
|
This message was edited 1 time. Last update was at 2014/02/06 12:31:59
|
|
|
 |
|
2014/02/06 12:04:59
Subject: Problem while Painting lights colors
|
|

Sneaky Lictor
|
Painting white is, indeed, quite difficult.
Are you painting your Dark Angels colours over a black undercoat? That would increase the difficulty.
If your paint is grainy, it is possible that your paint is over-diluted. Paint is a mix of pigment and binder, and too much water will cause that it to split.
Perhaps if you post a picture, more experienced painters on this forum can pinpoint areas of improvement?
|
|
|
|
|
|
2014/02/06 12:53:00
Subject: Problem while Painting lights colors
|
|

Grey Knight Purgator firing around corners
|
gohkm wrote:Painting white is, indeed, quite difficult.
Are you painting your Dark Angels colours over a black undercoat? That would increase the difficulty.
Indeed, you could get better results with white or grey priming.
Then (I assume gw colours), I suggest this (borrowing hints from youtube Durgin88's tutorials):
Basecoat 1:1 water:Zamesi Desert
Shade with Seraphim Sepia
Retouch with basecoat mix
Highlight 2:1 water:Ushabti Bone
Extreme Highlight 2:1 water: Ushabti Bone + White Scar (just add a bit of white scar to the previous water/bone mix)
Do not overlad the brush, do not "underload" it, paint light colours toward the ligjht source and dark colours away from it.
Doing it right (I made several attepts before starting to get it good) gives you a nice tabletop finish.
gohkm wrote:If your paint is grainy, it is possible that your paint is over-diluted. Paint is a mix of pigment and binder, and too much water will cause that it to split.
There is no such thing as over-thinning or over-dilution.
|
 2270 (1725 painted) 2270 (1725 painted)
 1978 (180 painted) 1978 (180 painted)
 329 (280ish) 329 (280ish)
 705 (0) 705 (0)
 193 (0) 193 (0)
 165 (0) 165 (0)
:assassins: 855 (540) |
|
|
|
|
2014/02/06 12:56:54
Subject: Problem while Painting lights colors
|
|

Mysterious Techpriest
|
It might be too thick to cause that grainy effect. Also shake your paintpot well before using it.
On that tutorial: 2 parts water, 1 part colour is for OSL/glazing I presume? As a starter, i'd say edge highlights are easier to do. For this, just thin your paints down a little, so that they flow easily of the brush, but not so thin that they run into crevices.
|
Data author for Battlescribe
Found a bug? Join, ask, report:
https://discord.gg/pMXqCqWJRE |
|
|
|
|
2014/02/06 19:54:04
Subject: Problem while Painting lights colors
|
|
Sneaky Lictor
|
There certainly is if you're painting white. Too watery a mix is a particular problem with white.
Perhaps with today's foundation paints, it is less of an issue, or even eliminated completely, but it is hard to layer or wetblend white. I just cheat now - white gets the airbrush treatment.
|
|
|
|
|
|
2014/02/07 00:29:48
Subject: Problem while Painting lights colors
|
|
Fresh-Faced New User
|
Thanks for the tips! I will try to take some pictures of my problems this weekend. My problem is not only with white, I have it with a lot of the lights colors, like ushabi bone for example when painting deadwings armor, I simple cant get it right and I don't like how the models are looking, can I strip the paint and re paint it?
One of my problems is that the undercoat was black :(
|
|
|
|
|
2014/02/07 06:39:04
Subject: Problem while Painting lights colors
|
|

Longtime Dakkanaut
St. George, UT
|
Painting is all about layers. If your undercoat is black and you want to eventually paint white, you have to work yourself up to white.
Find a dark grey, then a light grey, then start mixing in the white until you can paint it straight white. You just continue adding layers until you get the color you want.
The trick will be getting just the right amount of coverage vs thinning of the paints so you don't loose detail. Unfortunately there is no tutorial on this because your paints will react differently than my paints even if they are the same brand. Only practice and actually putting paint to figure will help you learn where this break point is.
|
|
This message was edited 1 time. Last update was at 2014/02/07 06:40:17
See pics of my Orks, Tau, Emperor's Children, Necrons, Space Wolves, and Dark Eldar here:

|
|
|
|
|
2014/02/07 08:16:52
Subject: Problem while Painting lights colors
|
|
Grey Knight Purgator firing around corners
|
 Thairne wrote: Thairne wrote:On that tutorial: 2 parts water, 1 part colour is for OSL/glazing I presume?
That (and I find his tutorials good, but then again, they are in italian, so language is not an issue to me) tutorial - and he says so, somewhere - explains how to highlight and shade by glazing, on the basis that more thinned layers are better, and help building transitions, than one single, thicker layer.
|
2270 (1725 painted)
1978 (180 painted)
329 (280ish)
705 (0)
193 (0)
165 (0)
:assassins: 855 (540) |
|
|
|
|
2014/02/07 08:24:23
Subject: Problem while Painting lights colors
|
|
Nigel Stillman
|
I would try using a white primer if you want to paint lighter colors.
|
|
|
|
|
|
2014/02/07 11:25:39
Subject: Problem while Painting lights colors
|
|
Using Inks and Washes
St. George, Utah
|
Keep it thin, and do multiple coats. Lighter colors require that kind of touch, regardless of what the undercoat is. The biggest mistake you can do with lighter colors is to let it glob up so it looks like it's getting coverage, rather than have patience to go over a miniature twice with the same color to make sure your coverage is smooth.
|
|
|
|
|
2014/02/07 13:02:39
Subject: Problem while Painting lights colors
|
|
Grey Knight Purgator firing around corners
|
 SRSFACE wrote: SRSFACE wrote:Keep it thin, and do multiple coats. Lighter colors require that kind of touch, regardless of what the undercoat is. The biggest mistake you can do with lighter colors is to let it glob up so it looks like it's getting coverage, rather than have patience to go over a miniature twice with the same color to make sure your coverage is smooth.
Qft.
With many light layers, you will eventually obtain the desired coverage, while preserving details. Plus, layer after layer, you may build also a gradient.
As a bonus, more diluted colour tend to look matte, whereas thicker colour from the same pot could dry a bit more gloss.
Edit: edited for grammar
|
|
This message was edited 1 time. Last update was at 2014/02/07 13:03:16
2270 (1725 painted)
1978 (180 painted)
329 (280ish)
705 (0)
193 (0)
165 (0)
:assassins: 855 (540) |
|
|
|
|
2014/02/07 13:34:00
Subject: Re:Problem while Painting lights colors
|
|
Fresh-Faced New User
|
So basically the best is to add very thin layers? the problem for me is that right now i don't know what's a thin layer  I guess i will know it with practice.
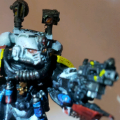
Attached are my first ever painted miniatures I know there's a lot of room to improve but I am quite happy because i never painted before this.
I will attach some pictures of the Deadthwings terminators :(
|
|
|
|
|
2014/02/07 15:47:22
Subject: Problem while Painting lights colors
|
|
Shas'la with Pulse Carbine
|
Generally a good rule of thumb for a thin layer is the consistency of milk or a bit thinner. This gives you good control over how much paint is on the brush and therefor the model. Now with that it will take around 3-4 coats to get what I would call good coverage to build up the color.
Especially with light colors it is best to slower build up the color. Starting with a white or grey primer is best. For deathwing specifically. I would follow the paint patter given in the 3rd post as a good starting point from there you can adjust it to get the look you want.
|
|
|
|
|
|
2014/02/07 18:14:44
Subject: Problem while Painting lights colors
|
|
Trustworthy Shas'vre
|
Welcome Pablo!!!
Some good advice here already, I do not have too much more to add - but can agree that when I am painting models which will have a final color that is lighter, I use a white primer.
It is easier to add a darker layer on top.
Best of luck in you painting, and I hope it works out well!
|
DavePak
"Remember, in life, the only thing you absolutely control is your own attitude - do not squander that power."
Fully Painted armies:
TAU: 10k Nids: 9600 Marines: 4000 Crons: 7600
Actor, Gamer, Comic, Corporate Nerd
|
|
|
|
|
2014/02/07 18:36:59
Subject: Re:Problem while Painting lights colors
|
|
Grey Knight Purgator firing around corners
|
lito88 wrote:So basically the best is to add very thin layers? the problem for me is that right now i don't know what's a thin layer I guess i will know it with practice.
"Milk consistency" is, as said, the keywords.
To roughly recognise it? When, while mixing it leaves just a semitransparent veil, you should be there..
Also this: you basecoat (or layer) smoothly, but you see the previous colour, almost identical or a tiny weeny smidgy bit tinted: in this case you are glazing and probably see the new hue after two or three coats... Which will preserve the details.
Aside that, generally a water:paint ratio of 2:1 or 3:1 is good for shading/highlighting, where a 1:1 is usable for basecoats - but, obviously, it also depends on the starting consistency of the paint. When in doubt, I found (the hard way) that is better to err in favor of dilution.
|
2270 (1725 painted)
1978 (180 painted)
329 (280ish)
705 (0)
193 (0)
165 (0)
:assassins: 855 (540) |
|
|
|
|
2014/02/07 18:39:07
Subject: Problem while Painting lights colors
|
|

Secretive Dark Angels Veteran
UK - Warwickshire
|
I find the best way is to put a drop of water onto the pallette, and seperatly put a drop of paint. Then using a brush move water bit by bit into the paint untill it feels right.
Experience will tell what is right.
Also if your going very thin, be careful about how much is on the brush, perhaps dabbing excess off onto paper towel.
|
'Ain't nothing crazy about me but my brain. Right brain? Riight! No not you right brain! Right left brain? Right!... Okay then lets do this!! |
|
|
|
|
2014/02/08 15:30:58
Subject: Problem while Painting lights colors
|
|
Fresh-Faced New User
|
This are great advices
Right now I Leave the terminators for a moment because I will try to improve my painting first. I painted Librarian following this advices and I must say I am very happy with the results, i will upload a picture of the clothes (light colors) that I painted following some advices from this topic, the result is quite good for a begginer like me.
You guys rocks.
|
|
|
|
|
|
|

 Warrior based hive fleet