| Author |
Message |
 |
|
|
|
|
Advert
|
Forum adverts like this one are shown to any user who is not logged in. Join us by filling out a tiny 3 field form and you will get your own, free, dakka user account which gives a good range of benefits to you:
- No adverts like this in the forums anymore.
- Times and dates in your local timezone.
- Full tracking of what you have read so you can skip to your first unread post, easily see what has changed since you last logged in, and easily see what is new at a glance.
- Email notifications for threads you want to watch closely.
- Being a part of the oldest wargaming community on the net.
If you are already a member then feel free to login now. |
|
 |
2014/03/26 11:07:37
Subject: Basic painting tips in one's notebook?
|
|

Regular Dakkanaut
|
Yo Dakkas,
So I was thinking lately on the moment when I first started painting... 'damn, I wish I've known that or that' (lots of swearing may have been included)
and figured it might be great idea to write all the tips and ideas and general thoughts on painting tricks and pro advices how to paint, and if anyone like myself wants, write it down on his notebook? 
But this would not include recipes ofc, that we google on our own  (and write it down if wanted)
These tips should help painters who are either forgetful, take big gaping breaks in painting and forget few things when painting again and newcomers?
So to start off with what I have written in notebookie last night, just few tips cause nothing else crossed my mind (hence this thread)
Basic small tips -this list will be updated more and more as people share tips.
------------------------------------------------------------------------------------------------------------------------------------------------------------------------------------------------------------
1. Cleaning the mold lines from model should be done with edge of a blade/knife around 30-45 degrees angle without cutting into the model, and carefully not to loose to much details. And ofc face the blade away from you, always!
2. Wash the model first with soap after cleaning to remove residue from mold lines or other junk, then prime it so that the paint doesn't scrape off and applies paints onto the model easier.
3. Dilute the paint! Either to milky consistency (you can check how the milk behaves in a cup) or 1:1 depending on what you're painting, in order not to lose details! 
4. Basic triade = base coat, shade and rehighlight.
5. You can add little white to the original base paint instead of buying new paint to add highlights/layers to build on as you go.
6. Highlights should hit the spots where light would naturally fall on the model, edges help too. 
7. Try to highlight with edge of brush, around certain point of angle.
8. If possible, mount the model on a stick or pen with flat surface that can be glued on to ( ofc position them so the glue will stick to the one foot of a model). I use this method for small minis that are hard to paint between leg spots, detach them after you're done and glue them to a base.
9. Sometimes its best to paint the model with parts detached such as weapon or backpack so you can get all the parts covered and with little problems.
10. Detached parts can be either glued or even jammed with flattened toothpicks (some work with blade/knife required), depending if they have a gap/hole on parts to jam the toothpick, so you can paint the parts with no problems, and leave it to dry on plastic material by sticking the sharp edge of a toothpick onto the plastic thingies :p (toothpick sticking ftw)
11. You can make your own wash with any paint by mixing either water, but I think products like flowaid helps the paint.. err... flow?
12. Glazes are also excellent for doing transitions. I've found it's much easier to paint crude bold highlights and blend them out with glaze, than it is to try and wet blend, or paint light over dark.
13. After cleaning and removing all the obvious flash on a mini, give it a thin wash of whatever colour wash you have sitting about (darker is better). It will show up any mold lines/flash you may have missed on your first pass.
14. You can buy spray primers in paint/hobby shops and even online to help you prime big batch of armies quickly. You can even find specific color for spray primer, just remember to read instructions, shake it 'waaaagh' style and spray the army in a box or hanged from a wire somewhere. Keep in mind spray primer won't cover all of the model. Follow the instructions if there are any, and don't get the spray primer to close to the model or over-spray them to lose the details!
16. Be sure to wait for the glue of the model to dry! Painting while glue is still bonding can ruin your model and brush, not to mention make a mess.
17. You can prime your models with an airbrush, as long as you're using an actual primer. :p
18. To strip a model of his paints get a simple green. Concentrated formlua, not the prediluted one. Let the models soak for 24 hours, scrub them with old scrubber/toothbrush under some running water.
19. You can use 'heavy' brush to 'dust' off the model when cleaning them from mold lines or making battle damage with knife.
20. You can use small diamond files to clean mold lines off a mini, just be careful how you handle them not to ruin the mini.
21. Be sure to buy quality paint brushes, Kolinsky Sable brushes are considered the best but there are other quality brushes out there. Number 0 is probably the most versatile brush.
22. If all you have is white primer and want a bright model with darker recesses (not black) spray the model in white, water down a darker version of the base coat coat to a wash consistency and wash into the low shadow areas, may need a few coats. When base coating avoid the cracks and crevices and then you get a darker shade while maintaining a bright upper coat.
23. You can use spare brush and water nearby to remove wrongly painted part quickly by dabbing the spare brush into the water and brushing the paint of a model.
24. If you want to highlight something that's a bright red, mix the red with an orange. Sounds strange, but it works. (And it's waaay manlier than the pink highlights you get when mixing red and white!)
25. Shake paints before use (ensure that the lid is firmly held down while shaking) -shake it for about 30 seconds, paint behaves lot better this way.
26. Work paint into the brush on a palette before applying to a model to prevent buildup and mess.
27. When using green stuff, wet your tools and fingers slightly. This allows you to mould and shape the putty without it sticking to your tools and hands or pulling out of your delicate shapes. It also makes smoothing it much easier. A stanley blade is ideal for molding GW's Liquid green stuff.
28. Wash your brushes out regularly and thoroughly after use in clean running water. Acrylic sets quickly and holds firm and just washing them in your paint water in between colors is not clean enough to be left, this will increase your brushes usable lifetime.
29. Adding white to highlight does work tend to work with red or brown, this will normally give you a pinker or cream tint instead.
------------------------------------------------------------------------------------------------------------------------------------------------------------------------------------------------------------
Suggestions
------------------------------------------------------------------------------------------------------------------------------------------------------------------------------------------------------------
 Smacks wrote: Smacks wrote:I recommend instead of buying paint pots individually, you get Vellejo Premium in 60ml bottles, and pick some 5ml paint pots up off ebay. With just red, yellow, blue and white you can mix just about every colour you'd ever need (except metallics) and all the triads for every colour you mix. I have some colours that I mixed last year, maybe only 2-3mm deep of paint, and they're still wet inside the pots. You can just get a regular small pot of black because it only takes a speck to darken things, so you need far less. Throw in some glaze and fluid mediums and you can make all the washes and and glazes you'll ever need too. You can pick up all this stuff so cheaply (probably less than £30) and it's every bit as good as having the master paint set. (Only you don't have to cry when your expensive paints dry out before you've used them).
Wet pallet is amazing if you can get it working. It's fantastic to be able to mix 8 shades of a colour to highlight smooth gradients, and then be able to paint a whole squad with it before it dries out.
Bobug wrote:To create a wet palette, get an icecream tub lid or similar shallow flat object with a slight rim to it, and pour a very small amount of water onto it, then cut a sheet of baking paper that fits up to the corners of the lid. Place the paper down into the lid so that the water spreads out underneath, drain off any excess water that is still pooling or running but ensure that some is left behind. You now have a rudimentary wet pallette
------------------------------------------------------------------------------------------------------------------------------------------------------------------------------------------------------------
|
|
This message was edited 15 times. Last update was at 2014/03/27 20:15:26
|
|
|
 |
|
2014/03/26 11:50:25
Subject: Re:Basic painting tips in one's notebook?
|
|

Longtime Dakkanaut
|
I recommend instead of buying paint pots individually, you get Vellejo Premium in 60ml bottles, and pick some 5ml paint pots up off ebay. With just red, yellow, blue and white you can mix just about every colour you'd ever need (except metallics) and all the triads for every colour you mix. I have some colours that I mixed last year, maybe only 2-3mm deep of paint, and they're still wet inside the pots. You can just get a regular small pot of black because it only takes a speck to darken things, so you need far less. Throw in some glaze and fluid mediums and you can make all the washes and and glazes you'll ever need too. You can pick up all this stuff so cheaply (probably less than £30) and it's every bit as good as having the master paint set. (Only you don't have to cry when your expensive paints dry out before you've used them).
Wet pallet is amazing if you can get it working. It's fantastic to be able to mix 8 shades of a colour to highlight smooth gradients, and then be able to paint a whole squad with it before it dries out.
Glazes are also excellent for doing transitions. I've found it's much easier to paint crude bold highlights and blend them out with glaze, than it is to try and wet blend, or paint light over dark.
|
|
|
|
|
2014/03/26 12:41:03
Subject: Basic painting tips in one's notebook?
|
|
Krazed Killa Kan
|
Mine is:
After cleaning and removing all the obvious flash on a mini, give it a thin wash of whatever colour wash you have sitting about (darker is better).
It will show up any mold lines/flash you may have missed on your first pass.
|
DR:80S---G+MB---I+Pw40k08#+D+A+/fWD???R+T(M)DM+
My P&M Log: http://www.dakkadakka.com/dakkaforum/posts/list/433120.page
 Atma01 wrote: Atma01 wrote:
And that is why you hear people yelling FOR THE EMPEROR rather than FOR LOGICAL AND QUANTIFIABLE BASED DECISIONS FOR THE BETTERMENT OF THE MAJORITY!
Phototoxin wrote:Kids go in , they waste tonnes of money on marnus calgar and his landraider, the slaneshi-like GW revel at this lust and short term profit margin pleasure. Meanwhile father time and cunning lord tzeentch whisper 'our games are better AND cheaper' and then players leave for mantic and warmahordes.
daveNYC wrote:The Craftworld guys, who are such stick-in-the-muds that they manage to make the Ultramarines look like an Ibiza nightclub that spiked its Red Bull with LSD.
|
|
|
|
|
2014/03/26 13:30:49
Subject: Basic painting tips in one's notebook?
|
|
Regular Dakkanaut
|
Updated, thx for the tips guys. Keep em coming
 Leigen_Zero wrote: Leigen_Zero wrote:Mine is:
After cleaning and removing all the obvious flash on a mini, give it a thin wash of whatever colour wash you have sitting about (darker is better).
It will show up any mold lines/flash you may have missed on your first pass.
 And here I was using light lamp to see the mold/flashes on mini... that's a good trick there, but does it affect priming in any way after you wash it?
|
|
|
|
|
2014/03/26 13:34:05
Subject: Re:Basic painting tips in one's notebook?
|
|

Sword-Wielding Bloodletter of Khorne
|
When painting a Riptide, be careful not to accidentally paint an actual block of cheese instead, it's a common mistake.
Alright, I got nothing.
|
“Idleness is the enemy of the soul; and therefore the brethren ought to be employed in manual labor at certain times, at others, in devout reading.”
― St. Benedict of Nursia, The Rule of Saint Benedict
 The Mendicants Polaris, Chaos Warband, Deviant Sect of Word Bearers The Mendicants Polaris, Chaos Warband, Deviant Sect of Word Bearers  |
|
|
|
|
2014/03/26 13:48:39
Subject: Basic painting tips in one's notebook?
|
|
Krazed Killa Kan
|
Tyris1013 wrote:Updated, thx for the tips guys. Keep em coming
Leigen_Zero wrote:Mine is:
After cleaning and removing all the obvious flash on a mini, give it a thin wash of whatever colour wash you have sitting about (darker is better).
It will show up any mold lines/flash you may have missed on your first pass.
And here I was using light lamp to see the mold/flashes on mini... that's a good trick there, but does it affect priming in any way after you wash it?
Nope, as long as it's just a thin coat it doesn't really affect things, but if you slather it on really thickly then probably it will
|
DR:80S---G+MB---I+Pw40k08#+D+A+/fWD???R+T(M)DM+
My P&M Log: http://www.dakkadakka.com/dakkaforum/posts/list/433120.page
Atma01 wrote:
And that is why you hear people yelling FOR THE EMPEROR rather than FOR LOGICAL AND QUANTIFIABLE BASED DECISIONS FOR THE BETTERMENT OF THE MAJORITY!
Phototoxin wrote:Kids go in , they waste tonnes of money on marnus calgar and his landraider, the slaneshi-like GW revel at this lust and short term profit margin pleasure. Meanwhile father time and cunning lord tzeentch whisper 'our games are better AND cheaper' and then players leave for mantic and warmahordes.
daveNYC wrote:The Craftworld guys, who are such stick-in-the-muds that they manage to make the Ultramarines look like an Ibiza nightclub that spiked its Red Bull with LSD.
|
|
|
|
|
2014/03/26 17:51:36
Subject: Basic painting tips in one's notebook?
|
|
Stern Iron Priest with Thrall Bodyguard
|
hahahahaha...
i pretty much do the exact opposite to everything you have said, except for:
#9: paint in parts
#16: wait for glue to dry (i always give it 24 hours)...
funny how techniques vary...
people have asked me many times for tutorials, but my advice would always be, "do the exact opposite of what i do"...
for instance, i work from black, through darkest up to lightest tones, and i barely dilute my paint (mostly painting straight from the pot)...
good list, though...
seems to follow the accepted norms...
cheers
jah
|
Paint like ya got a pair!
Available for commissions.
|
|
|
|
|
2014/03/26 18:03:42
Subject: Basic painting tips in one's notebook?
|
|
Regular Dakkanaut
|
 jah-joshua wrote: jah-joshua wrote:hahahahaha...
i pretty much do the exact opposite to everything you have said, except for:
#9: paint in parts
#16: wait for glue to dry (i always give it 24 hours)...
funny how techniques vary...
people have asked me many times for tutorials, but my advice would always be, "do the exact opposite of what i do"...
for instance, i work from black, through darkest up to lightest tones, and i barely dilute my paint (mostly painting straight from the pot)...
good list, though...
seems to follow the accepted norms...
cheers
jah
Wait, what? 
I checked your gallery and your minis look amazing, and here you're telling me you're not cleaning them from mold lines or washing them after that and so on... You see my confusion
But surely you got some stories to tell  -which brand of paint are you using straight from pot? Doesn't it get all blotchy and mess up the cracks/details, and leaving brush marks?
How do you work with white color and so on?
If you feel like sharing, I'd love to hear how you work
Also, we need more dakka! 
|
|
This message was edited 1 time. Last update was at 2014/03/26 18:10:50
|
|
|
|
|
2014/03/26 18:31:45
Subject: Basic painting tips in one's notebook?
|
|
Stern Iron Priest with Thrall Bodyguard
|
sorry, i clean mold lines mostly with a file, but i meant opposite in that my knife is usually at 90 degrees, and the blade is always toward me...
just works better for me that way...
i've never really washed my minis before prep...
i do use a GW tank brush for dusting a lot while i clean off the moldlines...
i guess between the handling, and the dusting, the minis get clean...
i've never had a problem with mold release agents mucking up my priming...
i use P3 paints...
i do have a little puddle of water on my tile that i dip the tip of my brush into, after i dip the tip in the paint, then i mix it on the back of my thumb...
it's a technique that works for me...
for white, i start from Thamar Black, and then work up through Ironhull Grey, a mix of Ironhull and Trollblood Highlight, pure Trollblodd Highlight, and then a mix of Trollblood and Morrow White, finished with a last highlight of pure Morrow White...
like i said, i tell everyone not to follow my rules, because they go against the accepted way to work...
cheers
jah
|
|
This message was edited 2 times. Last update was at 2014/03/26 18:42:12
Paint like ya got a pair!
Available for commissions.
|
|
|
|
|
2014/03/26 20:32:33
Subject: Basic painting tips in one's notebook?
|
|
Regular Dakkanaut
|
jah-joshua wrote:sorry, i clean mold lines mostly with a file, but i meant opposite in that my knife is usually at 90 degrees, and the blade is always toward me...
just works better for me that way...
i've never really washed my minis before prep...
i do use a GW tank brush for dusting a lot while i clean off the moldlines...
i guess between the handling, and the dusting, the minis get clean...
i've never had a problem with mold release agents mucking up my priming...
i use P3 paints...
i do have a little puddle of water on my tile that i dip the tip of my brush into, after i dip the tip in the paint, then i mix it on the back of my thumb...
it's a technique that works for me...
for white, i start from Thamar Black, and then work up through Ironhull Grey, a mix of Ironhull and Trollblood Highlight, pure Trollblodd Highlight, and then a mix of Trollblood and Morrow White, finished with a last highlight of pure Morrow White...
like i said, i tell everyone not to follow my rules, because they go against the accepted way to work...
cheers
jah
Its np, thanks m8 -this thread is pretty much just to spread ideas to write down to help you develop your owns or use existing ones (not to mention it would help new painters), and I was curious about your ideas too.
Can you tell me how you use the files to remove the molds? Cause I feel pretty uncomfortable when using them, always feel like I'm doing too much damage to the model opposite to the knife.
|
|
|
|
|
2014/03/26 21:49:15
Subject: Basic painting tips in one's notebook?
|
|
Stern Iron Priest with Thrall Bodyguard
|
i have a big set of files from Gale Force 9...
they are cheap, but good...
i use a rough file, followed by a smooth file, and buff with my thumbnail...
works on metal, resin, and plastic...
all the big moldlines get a first pass with the knife, though, for sure...
i just have a bad habit of using the blade toward my thumb...
i have a light touch with the files, and the knife...
i have stayed away from restic and Finecast, so i don't know how they act under the file..
cheers
jah
|
Paint like ya got a pair!
Available for commissions.
|
|
|
|
|
2014/03/27 04:02:59
Subject: Basic painting tips in one's notebook?
|
|

Monstrous Master Moulder
Space Cowboy Cruising Around Olympus Mons
|
Here are my tips that haven't already been said:
1- Be sure to buy quality paint brushes, Kolinsky Sable brushes are considered the best but there are other quality brushes out there. Number 0 is probably the most versatile brush
2- If all you have is white primer and want a bright model with darker recesses (not black) spray the model in white, water down a darker version of the base coat coat to a wash consistency and wash into the low shadow areas, may need a few coats. when basecoasting avoid the cracks and crevices and then you get a darker shade while maintaining a bright upper coat.
|
|
|
|
|
2014/03/27 10:49:10
Subject: Basic painting tips in one's notebook?
|
|
Regular Dakkanaut
|
 chiefbigredman wrote: chiefbigredman wrote:Here are my tips that haven't already been said:
1- Be sure to buy quality paint brushes, Kolinsky Sable brushes are considered the best but there are other quality brushes out there. Number 0 is probably the most versatile brush
2- If all you have is white primer and want a bright model with darker recesses (not black) spray the model in white, water down a darker version of the base coat coat to a wash consistency and wash into the low shadow areas, may need a few coats. when basecoasting avoid the cracks and crevices and then you get a darker shade while maintaining a bright upper coat.
Thanks for tips, totally forgot about brush qualities tips.
I'm curious tho would your white tip work with a brush too? Say you prime the model with valleyo white primer with a brush and add base coat of skull white, on this step I washed diluted space wolves grey into the recesses of a model, but never though of taking even more darker color than that. Stick with space wolves grey or add few drops of black into SWG to make it more visible?
Keep 'em coming, dakkas!  surely we missed something.
|
|
This message was edited 1 time. Last update was at 2014/03/27 10:52:07
|
|
|
|
|
2014/03/27 12:22:03
Subject: Basic painting tips in one's notebook?
|
|
Monstrous Master Moulder
Space Cowboy Cruising Around Olympus Mons
|
Tyris1013 wrote: chiefbigredman wrote:Here are my tips that haven't already been said:
1- Be sure to buy quality paint brushes, Kolinsky Sable brushes are considered the best but there are other quality brushes out there. Number 0 is probably the most versatile brush
2- If all you have is white primer and want a bright model with darker recesses (not black) spray the model in white, water down a darker version of the base coat coat to a wash consistency and wash into the low shadow areas, may need a few coats. when basecoasting avoid the cracks and crevices and then you get a darker shade while maintaining a bright upper coat.
Thanks for tips, totally forgot about brush qualities tips.
I'm curious tho would your white tip work with a brush too? Say you prime the model with valleyo white primer with a brush and add base coat of skull white, on this step I washed diluted space wolves grey into the recesses of a model, but never though of taking even more darker color than that. Stick with space wolves grey or add few drops of black into SWG to make it more visible?
Keep 'em coming, dakkas! surely we missed something.
Well I have never tried it when brushing on primer (if that is what you are asking). I am sure it would work though. As for adding black to Space Wolves Grey/Fenrisian Grey I probably wouldn't add a black since it is sort of a blueing grey but you might want to add some The Fang to it to darken it a bit.
Works well when doing skin tones as well (usually do mournfang brown wash first for shadows on medium skin tones) then layer up using multiple colours.
|
|
|
|
|
2014/03/27 18:48:36
Subject: Re:Basic painting tips in one's notebook?
|
|
Neophyte undergoing Ritual of Detestation
|
If you want to highlight something that's a bright red, mix the red with an orange. Sounds strange, but it works. (And it's waaay manlier than the pink highlights you get when mixing red and white!)
|
 : 3350 : 3350
 : 200 : 200
Bonereapers: 1700 |
|
|
|
|
2014/03/27 19:10:48
Subject: Re:Basic painting tips in one's notebook?
|
|
Purposeful Hammerhead Pilot
|
I would disagree on the OP's paint thin solution, 1:1 is way way too watered down, its more like 4 parts paint to 1 part water imo
Anyways:
Shake paints before use (ensure that the lid is firmly held down while shaking)
Work paint into the brush on a palette before applying to a model to prevent buildup and mess
To create a wet palette, get an icecream tub lid or similar shallow flat object with a slight rim to it, and pour a very small amount of water onto it, then cut a sheet of baking paper that fits up to the corners of the lid. Place the paper down into the lid so that the water spreads out underneath, drain off any excess water that is still pooling or running but ensure that some is left behind. You now have a rudimentary wet pallette
When using green stuff, wet your tools and fingers slightly. This allows you to mould and shape the putty without it sticking to your tools and hands or pulling out of your delicate shapes. It also makes smoothing it much easier
A stanley blade is ideal for moulding GW's Liquid green stuff
Wash your brushes out regularly and thoroughly after use in clean running water. Acrylic sets quickly and holds firm and just washing them in your paint water in between colours is not clean enough to be left, this will increase your brushes useable lifetime.
Adding white to highlight does work tend to work with red or brown, this will normally give you a pinkier or cream tint instead.
|
|
This message was edited 1 time. Last update was at 2014/03/27 19:14:15
|
|
|
|
|
2014/03/27 20:13:53
Subject: Re:Basic painting tips in one's notebook?
|
|
Regular Dakkanaut
|
Bobug wrote:I would disagree on the OP's paint thin solution, 1:1 is way way too watered down, its more like 4 parts paint to 1 part water imo
Hmmm, I'm not so sure about this. I think it may have variations between paint brands, cause citadel paints that I'm using are way to thick, and ruin small details by building too much if I would go 4 paint to 1 water.
I strictly remember folks saying I should not be able to get even layer with only one coat, so diluting always not to lose details and takes 2-3 coats
Other than that, nice tips
|
|
|
|
|
2014/04/05 10:27:25
Subject: Basic painting tips in one's notebook?
|
|
Incorporating Wet-Blending
Wales: Where the Men are Men and the sheep are Scared.
|
A model painted poorly is better than a model never painted. Each model you paint makes you better at painting. You can always strip a model later if you feel you can do a better job but just go for it and don't fret about ruining it.
|
|
|
|
|
|
2014/04/05 14:05:04
Subject: Re:Basic painting tips in one's notebook?
|
|

Lady of the Lake
|
Be sure to purchase super glue solvent and keep it handy if an accident does occur.
Always cut away from yourself, with a sharp blade as a blunt is more likely to slip.
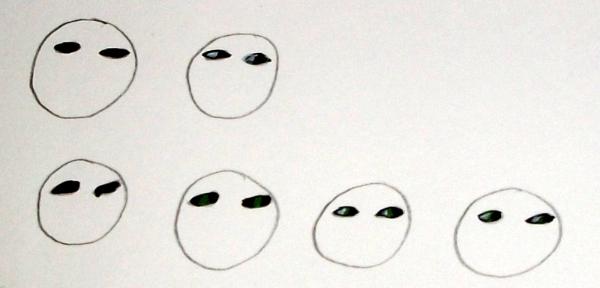
When painting eyes a simple way to avoid the surprised/stunned look while practicing brush control is to add dots of white to black instead of black pupils to white.
When trying to improve shading and highlighting try to visualise a light source near the model, if you can keep this in mind you'll find it much simpler to know what parts to make brighter.
When edge highlighting you do not need to actually hit every edge should an edge be in shadow and not hit by light.
Sometimes less is better than more, and over complicated scheme can look busy and actually detract from what could have been a good job. Learn to know when to stop.
Never be afraid to try a new technique, to limit yourself to only what you're comfortable is to stagnate yourself. A new technique you may be uncomfortable with will, with practice, eventually become a handy skill.
When painting OSL the glow can be easier to achive if you paint it at the same time as the light. Paint the glow around the light the same time as the light keeping in mind which spots it would hit and which spots it wouldn't. Then brighten up the glow and the source inwards until eventually you just brighten the source itself. This will let you keep track of the glow and allow it to fade evenly as it moves away from the source. The most important thing to remember is the source must be brighter than the glow, the only area that should be as bright as the light is any edges directly touching the source.
Reference pictures. Research new techniques by looking at how they work in real life to make it easier to visualise and transfer onto your models.
|
|
|
|
|
|
2014/04/05 18:19:51
Subject: Basic painting tips in one's notebook?
|
|
Regular Dakkanaut
|
Often, rather than diluting paint directly, I just keep the brush wet and it gives excellent final paint consistency even working with thick paint directly from the pot. Having a good brush with adequate belly to hold some water makes this much easier.
Spending more for good brushes up front and then properly caring for them will save you money in the long term. Even the best synthetic brushes cared for as well as possible wear out relatively quickly while a natural hair brush with proper care will last for years. You only need a few sizes and they're small so relatively cheap. Buy good brushes once and save yourself the aggravation and long term expense of dealing with inferior brushes. I personally think that you can get better results with craft store paint and a good brush than the other way around.
Cheap brushes have their place. Stippling and dry brushing will kill a good brush so a fairly cheap synthetic is the right tool for the job there.
Either keep two water pots on the desk (one clean and one for washing the brush) or change your water every time you change colors. Dirty water in the brush will muddy up bright/light colors.
A dropper is very useful for transferring water from the clean water pot to your palette.
Keep some toothpicks handy for stirring those stubborn paints that don't want to mix by shaking.
Here in the desert, I typically add a drop of extender to new pots of paint to keep them from dying a rapid death. I also store pots upside down if I'm not going to be painting for awhile. It seems to work as I have some GW paints that I still use that are nearly 15 years old.
Extender, flow aid and acrylic mediums are your friend. Sometime you can't get the effect you want thinning with water alone.
If you have access to RO or distilled water, use it for painting. Here, at least, there is so much mineral, chlorine and dissolved solids content in the water that it will muck with the paint and is bad for the brushes as well. It's ok for brush cleaning when using a brush soap.
Use brush soap. I typically wash my brush (a Dick Blick Master series Size 0 has been my workhorse for the last 7 years or so) at the end of every painting session. The brush still looks and acts like a brand new brush. Good I guess since you can't get new ones right now.
I scrape, not cut, mold lines with the blade 90 deg to the surface. Not likely to cut myself and not likely to cut into the model either. I also have lots and lots of precision files and sanding sticks for cleaning up details.
I have a pair of diagonal cutters available but I use a pair of flush cutters for trimming parts from the sprue simply because they allow you to cut right up to the part if needed and leave no tag that requires a lot of clean-up. They can also fit into much smaller spaces. You don't need hobby sprue cutters for this though. Radio Shack sells a pair for around $8 that is essentially the exact same thing. Lowe's and Home Depot probably do as well.
Use the right cutter for the job! I keep several types of cutters handy, small flush cutters for plastic and a second pair for small metal bits (brass and pewter), diagonals for larger pieces and hardened wire like coat hanger wire or paper clips and a razor saw with miter box for wood and plastic flat and round stock. Using your small cutters to try to cut hardened wire will ruin them in very short order. Likewise regularly using your plastic cutter to cut anything else will dull them and keep them from making clean cuts.
For small, delicate or detailed parts I trim the sprue with a little tag remaining on the part and clean that up with a sharp hobby knife.
Buy blades in bulk and don't be stingy about changing them out. You're more likely to cut yourself with a dull knife since you have to use a lot of force to get it to cut. Too much force means that you give up control. Blades that aren't suitable for fine trimming work anymore still work fine for scraping mold lines for quite a bit longer, though, so I usually have at least two handles on the desk: one with a new blade for fine work and one with a slightly older blade for scraping mold lines. When the fine work blade starts to get dull, the older blade gets replaced with a brand new one and the previous fine work blade is graduated to scraping.
Rather than deal with hardened wire like coat hanger or paper clip which is difficult to cut precisely for pinning minis that require it I picked up several different sizes or floral wire at a craft store. It's easy to work with like brass since it won't ruin a pair of precision cutters but is less than 25% of the cost of brass wire. A single package of the wire is a couple of buck and will probably last you the rest of your modeling career. It's cheap enough that you can also use it in sections several inches long for pinning minis to a cork or stick or into a pin vise for painting without worrying about wasting it.
|
|
|
|
|
|
|
