Switch Theme:

Painting/sculpting scales onto armor  [RSS] Share on facebook Share on Twitter Submit to Reddit
»
Author Message
Advert


Forum adverts like this one are shown to any user who is not logged in. Join us by filling out a tiny 3 field form and you will get your own, free, dakka user account which gives a good range of benefits to you:
  • No adverts like this in the forums anymore.
  • Times and dates in your local timezone.
  • Full tracking of what you have read so you can skip to your first unread post, easily see what has changed since you last logged in, and easily see what is new at a glance.
  • Email notifications for threads you want to watch closely.
  • Being a part of the oldest wargaming community on the net.
If you are already a member then feel free to login now.


Made in us
Regular Dakkanaut


VA USA

First let me say I've tried searching this, I'm sure it's out there but everything I found was more "dinosaur" scales as opposed to the Alpha Legion Dragon Scales that I'm going for. (Also the search forum function doesn't work for me, just get an error)

I want to sculpt scales onto the leg armor of my CSM squads, more pointed and shingled as seen here

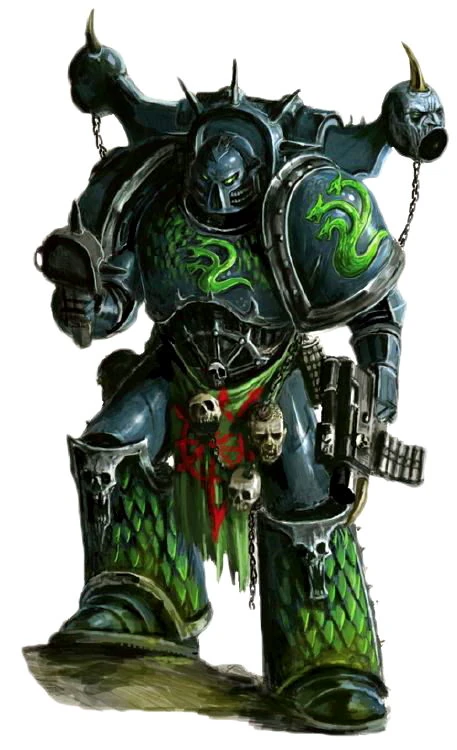
Anyone have any advice
   
Made in us
Longtime Dakkanaut


Your Google must be broken - "scale armor" pops up Steamforge's blog which has a good tutorial on several types of scale armor - the variety you are looking for being the first one he addresses:

http://www.steamforged.com/sculpting-101-scaly-skin-and-leather/
   
Made in us
Regular Dakkanaut


VA USA

Ty Sean, I probably could have put "armor" in the search as well
   
Made in us
Longtime Dakkanaut


BTW - for the tools he lists at the top of the page...

I use brass stock that I shape as needed for those sorts of things. He actually uses bits of leftover sprue. I find it helps to make my triangular (what he calls the "Angler" tool roughly the size and shape of my scaled that way I can just stab up into the GS to refine the shape.

I've probably got a half dozen of them now - and I keep a few pieces of brass on hand in case I need to make a new shape. You can also cut more custom shapes for scales that are not diamond shaped but in the same general design (I have one that I use for making "coin/fish scale" armor for example).

For doing "inset" work like that - I will occasionally work on the flat instead of on the model itself. Keep your sculpting as thin as possible while still being structurally sound. After it has been sculpted and cured - bend it around the object (greaves in the case of the picture). Trim to fit and then sculpt edging as needed. I find that this works faster than having to hand sculpt all the half scales that are around the edges of the armor. To do that though - the putty has to cure flexible. GS works, but many other putties are too rigid to bend without snapping.

Compound curves like the shoulder pads generally still need to be dealt with on the curve - but instead of trying to sculpt the partials - use a sharp knife to trim the access putty to the final shapes. Again - a bit of a change from his tutorial as he recommends sculpting those areas after the bulk has cured...where I tend to be impatient and would rather get it done in one go.
   
Made in us
Regular Dakkanaut


VA USA

Ive been trying to make some tools haha, mainly a V shape to imprint scales, it's really hard to make one that small


Automatically Appended Next Post:
 Sean_OBrien wrote:
BTW - for the tools he lists at the top of the page...

I use brass stock that I shape as needed for those sorts of things. He actually uses bits of leftover sprue. I find it helps to make my triangular (what he calls the "Angler" tool roughly the size and shape of my scaled that way I can just stab up into the GS to refine the shape.

I've probably got a half dozen of them now - and I keep a few pieces of brass on hand in case I need to make a new shape. You can also cut more custom shapes for scales that are not diamond shaped but in the same general design (I have one that I use for making "coin/fish scale" armor for example).

For doing "inset" work like that - I will occasionally work on the flat instead of on the model itself. Keep your sculpting as thin as possible while still being structurally sound. After it has been sculpted and cured - bend it around the object (greaves in the case of the picture). Trim to fit and then sculpt edging as needed. I find that this works faster than having to hand sculpt all the half scales that are around the edges of the armor. To do that though - the putty has to cure flexible. GS works, but many other putties are too rigid to bend without snapping.

Compound curves like the shoulder pads generally still need to be dealt with on the curve - but instead of trying to sculpt the partials - use a sharp knife to trim the access putty to the final shapes. Again - a bit of a change from his tutorial as he recommends sculpting those areas after the bulk has cured...where I tend to be impatient and would rather get it done in one go.


OK i can't do this! Can i see a pic of your's sean

This message was edited 1 time. Last update was at 2014/04/29 16:07:06


Made in us
Longtime Dakkanaut


I'm not at the house right now - but the tools don't have to be all that small in order to do detail work:

http://www.steamforged.com/sculpting-101-wigs-braids-beards/

Take a look at that page - it shows pictures of his "tools" a bit down the page.

For my own work - I keep a small belt sander (also works wonders for sharpening knives...):

http://www.amazon.com/Grizzly-H6070-5-Inch-Sander-30-Inch/dp/B0007D2YAO/ref=sr_1_1?s=power-hand-tools&ie=UTF8&qid=1398797839&sr=1-1

You can do the work with self adhesive sandpaper applied to a sheet of glass (or other flat material). Just hold the tool at the angle you want and sand back and forth with light pressure.

Shaping plastic and even brass only takes a few minutes in that manner.
   
 
Forum Index » Painting & Modeling
Go to: