| Author |
Message |
 |
|
|
|
|
Advert
|
Forum adverts like this one are shown to any user who is not logged in. Join us by filling out a tiny 3 field form and you will get your own, free, dakka user account which gives a good range of benefits to you:
- No adverts like this in the forums anymore.
- Times and dates in your local timezone.
- Full tracking of what you have read so you can skip to your first unread post, easily see what has changed since you last logged in, and easily see what is new at a glance.
- Email notifications for threads you want to watch closely.
- Being a part of the oldest wargaming community on the net.
If you are already a member then feel free to login now. |
|
 |
2014/06/27 12:51:49
Subject: Would like some criticism on my Brazen Claws Terminator
|
|

Regular Dakkanaut
|
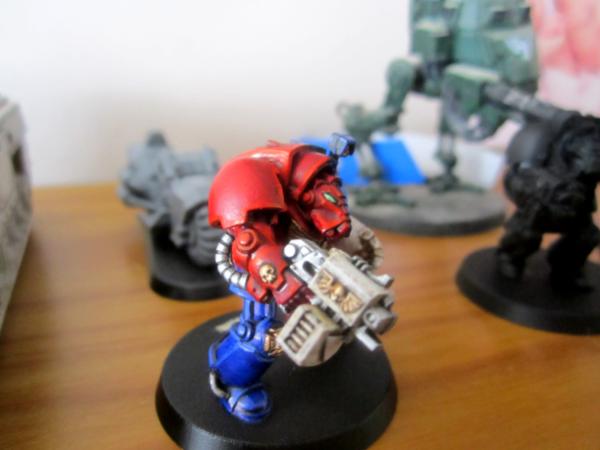
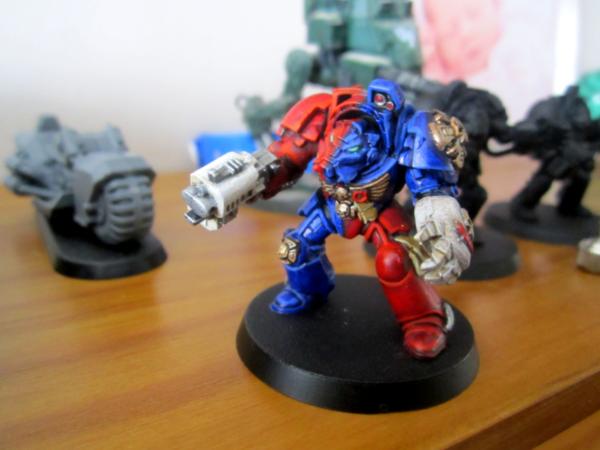
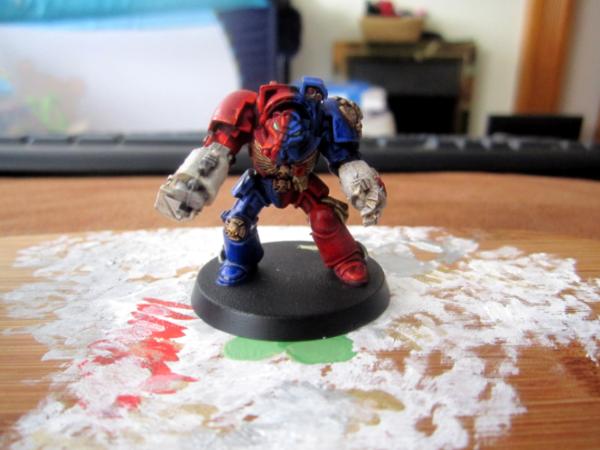
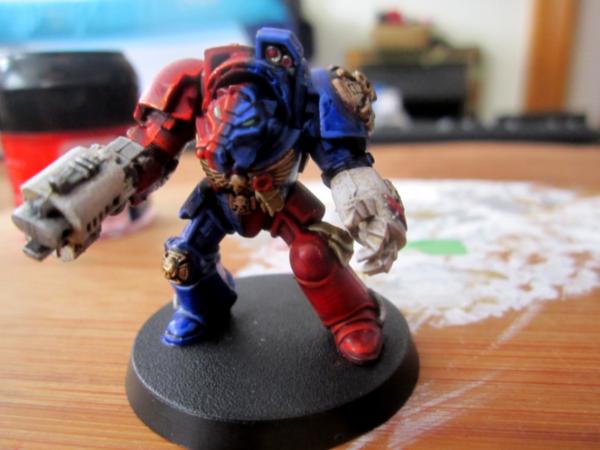
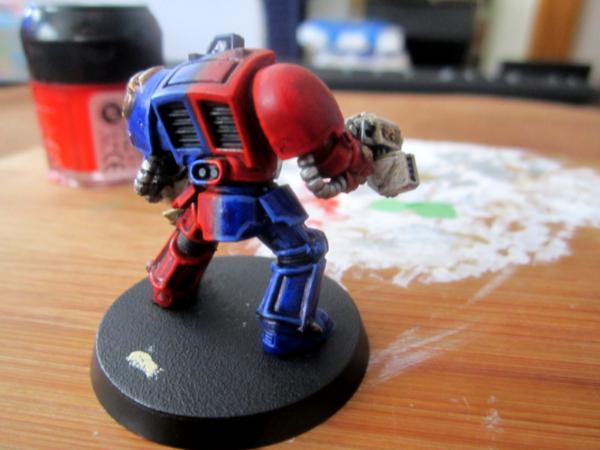
So putting the Imperial guard army aside for a while (painting guardsmen is pretty boring) I decided to have a go at some of the models I had lurking around from my youth. I had some terminators and a few other bits from when i stopped collecting a while ago.
The first 2 termies were write offs as I played around with schemes and painting techniques and the third one is this guy who Im pleased with enough to put on the interwebs. (actually I'm really pleased with it  )
Things I struggled with were trying to get even coverage with the reds (they were old paints I had to resurrect and they are quite thin)
Still working on the patchy ivory of the fist and I still need some details in the vents at the back and the targeting thingy above his head but overall I'm quite pleased with the brazen claws scheme.
I tried to avoid pics of the terminator crux as the gold came out really flat
I have no idea what the camera has done to the purity seal! I may have to re do it.
All the references and pics I could find were of quite a bright blue and I wanted to have a darker hue. I also decided against black weaponry as It made the model look really bland so went for an ivory look
I really want to fork out for some centurions as I think they would look awesome in the brazen claws scheme.
2 Questions:
I was thinking of maybe putting some white scripture on his blue shin? I used to do this on ultramarines and it looked pretty cool.
Im expecting an airbrush and bits any day now, would this make the red coverage easier to apply?
Anyone know a site that can make custom water transfers? Theres no way i can freehand that!
Thanks for looking!
|
|
This message was edited 1 time. Last update was at 2014/06/27 13:00:02
|
|
|
 |
|
2014/06/27 13:30:16
Subject: Would like some criticism on my Brazen Claws Terminator
|
|
Is 'Eavy Metal Calling?
|
Nice work, and good stuff pulling off the split scheme, it's something I wouldn't dare attempt. The highlighting is very good and neat too.
If you're looking to take this up a level, my suggestion would be to employ some freehand on the larger flat areas (the lower leg, shoulder pads, the hip-plates) as well as the shins you mentioned. Termies can run the risk of looking bland if they're not detailed, but freehand on those surfaces helps alleviate that and gives you some space to show off!
|
|
This message was edited 1 time. Last update was at 2014/06/27 13:30:48
|
|
|
|
|
2014/06/27 13:48:41
Subject: Re:Would like some criticism on my Brazen Claws Terminator
|
|

[MOD]
Anti-piracy Officer
Somewhere in south-central England.
|
The split scheme looks really good. It doesn't pop out in the first pic but the later ones look great.
Obviously the model wants some kind of contrasting detail such as insignia or warning labels, on the shoulder pad, shins and top of the "hump".
You might be able to freehand those better than you think, if you stick to a simple design.
Otherwise there are military transfers already available such as Ancient shield designs or WW2 vehicle unit signs. Worth a look for inspiration, I think...
.jpg)
Another option is to get transfer paper and print your own.
|
|
|
|
|
|
2014/06/27 14:22:44
Subject: Would like some criticism on my Brazen Claws Terminator
|
|
Long-Range Ultramarine Land Speeder Pilot
|
Again, impressive.
Perhaps drybrush the solid colours with a lighter red/blue?
|
|
|
|
|
|
2014/06/27 15:01:23
Subject: Re:Would like some criticism on my Brazen Claws Terminator
|
|
Regular Dakkanaut
|
Thanks Guys.
When I get home from work I might freehand onto his shoulder the brazen claws emblem. After having another look its simple enough that I might be able to pull it off. Plus if I screw it up, the shoulder is nice and easy to re paint. But what colour? Im thinking it should be blue but think that might be a bit bland. Might try a gold? White scripture on the blue shin and a white iron cross thingy on the red gak? or maybe black.
Is there such a thing as too many purity seals? I could dot a couple of those somewhere, maybe the gun...Now that I've said it, I feel the gun needs a purity seal.
I really wish he wasnt already glued to the base otherwise I would make a nice base but will stick to some gravel and dirt, maybe a skull.
|
|
This message was edited 2 times. Last update was at 2014/06/27 15:04:38
|
|
|
|
|
2014/06/27 15:12:54
Subject: Would like some criticism on my Brazen Claws Terminator
|
|
Been Around the Block
|
Its looking good and an ambitious colour scheme!! You are going to love your airbrush, it makes red much faster with better results. The airbrush will give you a solid, thin and even base coat which for a weak pigment like red is time consuming by brush. Here is an example of something i air brushed red, and just added a few highlights. You can see the top section is just base coated nice and evenly.

|
|
|
|
|
2014/06/27 16:56:37
Subject: Re:Would like some criticism on my Brazen Claws Terminator
|
|

Utilizing Careful Highlighting
|
Paintjob looks good. My only problem with it is the highlight on the back of the model (butt area!) there's an extreme highlight where the color schemes meet. That's a bit weird. Also the edge highlights (especially on the blues) could be thinner, but this is me being nitpicky.
On the modelling side if you really want to get it to the next level: clean the mold lines and drill your barrels. I've committed the same mistake with my models from the past (you can even see some of them in my gallery!), and after I diligently cleaned mold lines and dril barrels, they look so much better. It's just a small change that takes minimal effort, but that's one of the things that would destroy an otherwise great piece.
|
|
|
|
|
|
2014/06/27 17:53:30
Subject: Re:Would like some criticism on my Brazen Claws Terminator
|
|
Regular Dakkanaut
|
 heartserenade wrote: heartserenade wrote:Paintjob looks good. My only problem with it is the highlight on the back of the model (butt area!) there's an extreme highlight where the color schemes meet. That's a bit weird. Also the edge highlights (especially on the blues) could be thinner, but this is me being nitpicky.
On the modelling side if you really want to get it to the next level: clean the mold lines and drill your barrels. I've committed the same mistake with my models from the past (you can even see some of them in my gallery!), and after I diligently cleaned mold lines and dril barrels, they look so much better. It's just a small change that takes minimal effort, but that's one of the things that would destroy an otherwise great piece.
The big highlight on his butt flap is actually light from my window The blue side is really glossy ( blue ink). I kinda know what you mean about the blue highlights though. I think the problem is the highlights being the wrong colour ( ultramarines blue) . I think on the next model I will use a darker highlight and the do the extreme edges with the ultramarines blue.
The thing was on the red side, after the washes, it's base colour was the perfect shade to highlight with. I assumed the blue would be the same but
awas to bright
These models were assembled years ago before I knew that mould lines existed ( thick paints hide them well). Gun barrels eh, I wonder if the cordless hammer drill will work...
|
|
|
|
|
2014/06/28 08:20:07
Subject: Re:Would like some criticism on my Brazen Claws Terminator
|
|

Douglas Bader
|
heartserenade wrote:On the modelling side if you really want to get it to the next level: clean the mold lines and drill your barrels. I've committed the same mistake with my models from the past (you can even see some of them in my gallery!), and after I diligently cleaned mold lines and dril barrels, they look so much better. It's just a small change that takes minimal effort, but that's one of the things that would destroy an otherwise great piece.
This. Fix your mold lines, drill your barrels. A model isn't finished until these things are done. Automatically Appended Next Post:
Don't use a power drill, you'll just tear the gun apart as soon as you touch it. In fact, don't use a drill at all. Just hold the bit in your hand and turn it a few times. You're drilling shallow holes into very soft material, precision is way more important than power.
|
|
This message was edited 1 time. Last update was at 2014/06/28 08:21:25
There is no such thing as a hobby without politics. "Leave politics at the door" is itself a political statement, an endorsement of the status quo and an attempt to silence dissenting voices. |
|
|
|
|
2014/06/29 11:39:59
Subject: Re:Would like some criticism on my Brazen Claws Terminator
|
|
Courageous Space Marine Captain
|
 Peregrine wrote: Peregrine wrote: heartserenade wrote:On the modelling side if you really want to get it to the next level: clean the mold lines and drill your barrels. I've committed the same mistake with my models from the past (you can even see some of them in my gallery!), and after I diligently cleaned mold lines and dril barrels, they look so much better. It's just a small change that takes minimal effort, but that's one of the things that would destroy an otherwise great piece.
This. Fix your mold lines, drill your barrels. A model isn't finished until these things are done.
A model is done when the owner says its done. If the owner wants to paint it white, dip it in wash and call it a day with moldlines and undrilled barrels, its done. If he wants to give it 2 highlights and shade and scrape moldlines, its done. If he wants to Wet blend, NMM, OSL, Zenitial highlight, airbrush, use premium paints and brushes at £40 a touch, freehand every millimetre of the model and make it Golden Demon (or higher) standard then its done.
|
I'm celebrating 8 years on Dakka Dakka!
I started an Instagram! Follow me at Deadshot Miniatures!
DR:90+S++G+++M+B+IPw40k08#-D+++A+++/cwd363R+++T(Ot)DM+
Check out my Deathwatch story, Aftermath in the fiction section!

Credit to Castiel for banner. Thanks Cas!
|
|
|
|
|
2014/06/29 11:57:30
Subject: Would like some criticism on my Brazen Claws Terminator
|
|

Incorporating Wet-Blending
|
To be fair, op expressly asked for criticism.
Power drills are fine, you just need a variable speed so you can go slowly. I bought a cheap and nasty little 12v drill, makes pinning and bolters easy.
Other than that, yeah, your awesome paintwork is let down by the modeling, but that is the easiest to fix. If you did this well with a brush, you will kill with an airbrush.
|
|
|
|
|
2014/06/29 12:04:37
Subject: Re:Would like some criticism on my Brazen Claws Terminator
|
|
Utilizing Careful Highlighting
|
What.
The OP is asking for critique. We gave critique. Yes, the owner will say if the model is done. That's not the point: the point is if it was done well.
|
|
|
|
|
|
2014/06/29 15:02:43
Subject: Would like some criticism on my Brazen Claws Terminator
|
|
Courageous Space Marine Captain
|
Of course, its not "perfected" until these are done. But saying such things as "its not finished until..." irritates me. If someone told me my models were incomplete because I hadn't done 3 consecutive edge highlights (I don't like highlights), it wouldn't aid any potential friendship.
|
I'm celebrating 8 years on Dakka Dakka!
I started an Instagram! Follow me at Deadshot Miniatures!
DR:90+S++G+++M+B+IPw40k08#-D+++A+++/cwd363R+++T(Ot)DM+
Check out my Deathwatch story, Aftermath in the fiction section!
Credit to Castiel for banner. Thanks Cas!
|
|
|
|
|
2014/06/29 15:13:40
Subject: Re:Would like some criticism on my Brazen Claws Terminator
|
|
Navigator
|
You can get your own decal paper and make your own. I ended up doing that for my Chaos Marine warband (fluffwise, more of a damned mercenary company), and a bit for my SW army.
http://craftyprinter.com/laser-decal-paper.html
http://craftyprinter.com/inkjet-decal-paper.html
|
SIUC Strategic Games Society, a Roleplaying/Tabletop/Card student organization/club at Southern Illinois University - Carbondale
 Vermis wrote: Vermis wrote: Bronzefists42 wrote: Bronzefists42 wrote:I noticed that the plastic glue label recommends wearing something akin to a hazmat suit when handling the glue. I have been using it for years and never used gloves or anything nor do I know anyone who does. ShouldI be worried for my health?
Well, there's a slight risk of gluing something together with it. Only slight, mind.
|
|
|
|
|
2014/06/29 20:54:17
Subject: Would like some criticism on my Brazen Claws Terminator
|
|
Incorporating Wet-Blending
|
 Deadshot wrote: Deadshot wrote:Of course, its not "perfected" until these are done. But saying such things as "its not finished until..." irritates me. If someone told me my models were incomplete because I hadn't done 3 consecutive edge highlights (I don't like highlights), it wouldn't aid any potential friendship.
So read it as "it isn't finished TO ME until..." And cheer up a bit
|
|
|
|
|
2014/06/29 21:10:55
Subject: Would like some criticism on my Brazen Claws Terminator
|
|
Stabbin' Skarboy
|
Excellent tone to your blue, its great to see a split colour scheme they look so good when you pull them off (which you have).
Red can be a difficult colour to paint and if you want to go that route an airbrush will help, dont go over board or be over reliant in it tho, to much airbrushing can lack richness and seem powdery, far to many 'studio quality' painters rock this crutch.
Transfer paper is something I always meant to buy, but im glad I push on with free hand its a good skill to master, and in certain places even custom made decals would be to difficult to scale and apply.
My main critique of your model would actually be the pose and not the paintwork, he is strangely positioned in between movements not engaged or unengaged, both his arms and head don't seem to have a common purpose and his body weight seems to be shifting awkwardly.
|
|
This message was edited 1 time. Last update was at 2014/06/29 21:11:29
 3500pts 3500pts 1500pts 1500pts 2500pts 2500pts 4500pts 4500pts 3500pts 3500pts 2000pts 2000pts  2000pts plus several small AOS armies 2000pts plus several small AOS armies |
|
|
|
|
2014/06/30 21:02:16
Subject: Re:Would like some criticism on my Brazen Claws Terminator
|
|
Regular Dakkanaut
|
Thanks for all the suggestions and tips guys! (please dont worry about saying my model is garbage until [insert problem here] This is the sort of thing I need and if I feel it will work for me then I will take it on board. If not then I will just let it slide ) I don't remove mould lines from all my models. My guard army still has mould lines as it takes a lot of time to get rid on them and file down the points from cutting off the sprue and personally my eyes are not drawn to them that much but for rank and file guys that will be seeing a lot of table top use (and all the drops, bumps and scrapes that entails) I don't see the need for the extra time
However I have bought a set of centurions as some centre piece models (rank and file guardsmen painted to a lesser standard are all well and good but having some really well painted stuff above the fireplace is very satisfying. Its taken me a good few hours to assemble just 1 centurion (and magnetize all his weapons) but once he's painted up it should be worth it. I just love the centurion models and think they are gonna look great as brazen claws!
I have been able to play with the airbrush over the last couple of days and for reds (and whites) its really good but its just not for me. It just lacks the precision that I like and I have been getting better and better results over the past month just using a brush. I might keep it and use it to do some tanks but for infantry its not for me.
Genius!!! This helped massively in magnetizing my centurion
Thanks!!! I thought something like this might exist. My current attempts at freehand haven't gone so well (still working on it though)
 Zognob Gorgoff wrote: Zognob Gorgoff wrote:
My main critique of your model would actually be the pose and not the paintwork, he is strangely positioned in between movements not engaged or unengaged, both his arms and head don't seem to have a common purpose and his body weight seems to be shifting awkwardly.
I know what you mean but this was probably put together 10 years ago (maybe less) and probably didnt put much thought into this. Mostly this was a painting exercise but reading this made me want to put extra effort into some half decent poses for the centurion (rank and file soldiers probably wont get much thought though)
I will post an update of the centurion when more of him is painted. Im still experimenting and have been putting more effort into my layering and lighting effects which came out really well until I applied a red ink which has hidden most of the layering i did :( It still looks good but its alot more subtle now. THis is because on the terminators I used the red ink to blend my 2 really harsh layers together but it didnt need it on the centurion. It was really fun layering and was my first attempt at actually mixing paints. At first I didnt really see much difference but once you get to the 5th layer to tie it all together (using that zenitial technique thing) really looks smart! Althouygh it still looked flat before washing and after a quick inking has made it somehow vibrant but still a dark shade of red. I will do a before and after on the second centurion because both look good in their own way.
This is also the first model i have painted before full assembly and its been a breeze with no arms to get in the way.
Only downside to magnetizing all his weapons is the lack of cables to link the weapons to his back but this is a sacrifice for gameplays sake.
I love your highlights. Did you use white to do the extreme bits or was it a mix of red and white. I want to do similar highlight sbut not sure if mixing red and white into a pink will look right.
|
|
This message was edited 3 times. Last update was at 2014/06/30 21:10:26
|
|
|
|
|
|
|