| Author |
Message |
 |
|
|
|
|
Advert
|
Forum adverts like this one are shown to any user who is not logged in. Join us by filling out a tiny 3 field form and you will get your own, free, dakka user account which gives a good range of benefits to you:
- No adverts like this in the forums anymore.
- Times and dates in your local timezone.
- Full tracking of what you have read so you can skip to your first unread post, easily see what has changed since you last logged in, and easily see what is new at a glance.
- Email notifications for threads you want to watch closely.
- Being a part of the oldest wargaming community on the net.
If you are already a member then feel free to login now. |
|
 |
2015/02/08 21:59:26
Subject: What medium for a clean color gradation ?
|
|

Space Marine Scout with Sniper Rifle
|
Hi,
I've tried to highlight my figurine by doing a color shading but the result isn't what i expected.
When i thin my paint with water, the flow of the pain isn't good and the paint will will dry a little bit on the edge and do a mark.
If i use lahmian medium to thin the pain, i like the flow to make the shade, but in the end it gave a shinny looks.
So do you have any advice how make the shading and what do use to thing my paint ?
|
|
|
 |
|
2015/02/08 22:27:45
Subject: Re:What medium for a clean color gradation ?
|
|

Regular Dakkanaut
|
I would tend to paint a Base colour and highlights and then do the shading with 50/50 black and lahmahan medium or glaze medium, watered down. This works for my chaos stuff. I'd try something different for "good guys" keep going mate, you'll get the hang of it 
|
1500pt undefeated Nurgle and Khorne army.
Starting on Eldar.
|
|
|
|
|
2015/02/09 01:06:59
Subject: What medium for a clean color gradation ?
|
|

Fixture of Dakka
|
Lahmian medium should actually dull the paint. As a test, paint 2 inches of a sprue red or blue. Shake up your Lahmian medium really well, and 'Ardcoat. Paint half with Ardcoat and half with Lahmian; you should see the Lahmian side look relatively dull (regular, GW satin), and the Ardcoat side quite shiny.
Make sure to shake the lahmian medium, perhaps?
If you don't want drying rings, lahmian medium and liquitex flo-aid are your champs. Drying rings happen when you thin excessively with water.
|
|
|
|
|
2015/02/09 08:33:04
Subject: What medium for a clean color gradation ?
|
|
Space Marine Scout with Sniper Rifle
|
It was shaken but after a time the pigments "fell down", i should stir it regularly i suppose.
Talys wrote:If you don't want drying rings, lahmian medium and liquitex flo-aid are your champs. Drying rings happen when you thin excessively with water.
I tend to thin my pain too much, and I still haven't found the right dosage for my liking. I didn't know about the drying rings.
I will try with the flow-aid (I've found another of your post post on Dakka and this guide http://www.dakkadakka.com/wiki/en/A_basic_course_in_Acrylic_Mediums to help me understand)
So i'll keep trying (It is only my second squad so I still low level and need more xp :p)
Lucas Radford wrote:I'd try something different for "good guys" keep going mate, you'll get the hang of it
I don't paint an specific army, I paint for fun, so I'll have plenty of occasion to try different style on good and bad guys
Thanks for the encouragements
|
|
|
|
|
2015/02/09 09:36:03
Subject: What medium for a clean color gradation ?
|
|

Grizzled Space Wolves Great Wolf
|
What's your current technique? Are you painting thinned (almost wash-like) paint directly in to the crevices? If you're doing that, you'll always get a bit of an edge that you need to blend in if you want to be able to view the model up close (I don't bother when painting large regimental blocks that I intend to be viewed as a whole). The way I tackle shades is to paint them in to the crevice, then wash my brush off and where that ugly harsh transition line normally forms I sweep with my clean brush across it to blend it in. The trick is to clean your brush (doesn't need to be perfectly clean, I usually just swish it in the water for 2-3 seconds) then wipe the excess water off on a tissue (so your brush is damp but not so wet that it leaves puddles on the model) then use the tip of your brush to sweep away the line. If you find there's too much paint on the model for you to remove in one swipe, just wipe the brush off on a tissue again and go back to the model. The other trick is timing, how long to wait between applying the line and blending the line, I find it useful to mix my shade with drying retarder to open up the windows where I can easily manipulate the paint and also do my shades over the top of a varnish to protect the underlying paint from my meddling. The tank pictured below I mixed 2 drops of Burnt Umber, 1 drop of black and 2 drops of Vallejo drying retarder and then thinned it to wash-like consistency. With that mix, if I paint a line then come back to clean it within 1-3 minutes (approximately) I can just use water for cleaning my brush, but swapping to vodka I open that window up to about 10-15 minutes, use Vallejo Airbrush Thinner and I open that window up to about half an hour, maybe more (note: This is what I use on the brush to clean up the paint, not what I thin the original paint with!). So if I paint maybe a third the lines on my model and then wash the brush off and come back to clean them up with Vallejo Airbrush Thinner, that works pretty well. If I'm only using water I can only paint 1 or 2 lines then I have to clean the brush and fix those lines before the paint dries too much. Needless to say, I have water, vodka and Vallejo airbrush thinner on my desk at all times  If I do happen to make a mistake and don't notice it, I can usually clean off the paint with Vallejo Airbrush thinner for over an hour, it's just harder to make the blend look smooth. It's a lot more effort than just painting a line though, it's worth it for models you want to look top notch. 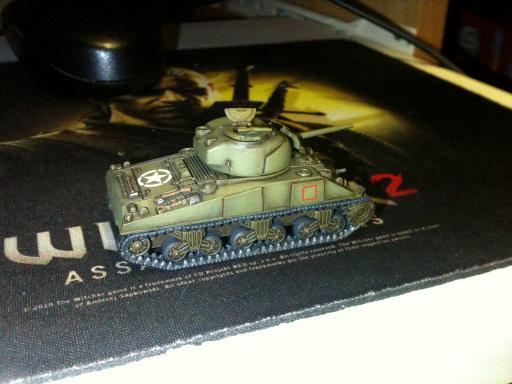 Instead of blending it smoothly you can also intentionally wipe it across the surface in a streaking motion to create subtle filtering and weathering like I attempted to do with this firefly... http://www.dakkadakka.com/gallery/685395-firefly3.html?m=2
|
|
This message was edited 2 times. Last update was at 2015/02/09 09:38:50
|
|
|
|
|
2015/02/09 10:03:56
Subject: Re:What medium for a clean color gradation ?
|
|

Cultist of Nurgle with Open Sores
|
A simple hack: use not-quite-thinned oils instead of acrylics. The advantage is that much longer drying times result in much easier blending. Disadvantage - much longer drying times, you still need acrylic undercoat (as oils are not very opaque in thin layers),need of varnish if you want to apply something on top of them, an odor of silvents that not all people can tolerate (though there are some odorless mineral spirits, but they are slightly more expensive), and, much longer drying times.
|
|
This message was edited 1 time. Last update was at 2015/02/09 10:06:33
 "Never try to teach a pig to sing. It is a waste of your time, and it annoys the pig." "Never try to teach a pig to sing. It is a waste of your time, and it annoys the pig." |
|
|
|
|
2015/02/09 10:18:25
Subject: Re:What medium for a clean color gradation ?
|
|
Grizzled Space Wolves Great Wolf
|
 TseGuevara wrote: TseGuevara wrote:A simple hack: use not-quite-thinned oils instead of acrylics. The advantage is that much longer drying times result in much easier blending. Disadvantage - much longer drying times, need of varnish if you want to apply something on top of them, an odor of silvents that not all people can tolerate (though there are some odorless mineral spirits, but they are slightly more expensive), and, much longer drying times.
Recently I've been playing with oil washes and enamels and acrylics. Out of the pot, I like enamels the best. But with drying retarder added in and using airbrush thinner as a cleaning agent, I'm starting to like acrylics the most. The drying time can be extended to the point where I'm happy while not having huge lengths of time for things to dry.
I started moving back to acrylics after watching the video Vallejo produced on weathering with acrylics.
https://www.youtube.com/watch?v=gGPH1BM4e_Q
Though I found you can do a lot more and manipulate blends more if you use drying retarder more, as it not only extends drying time, it means you can use the airbrush thinner (or even vodka or water) rather than the significantly harsher airbrush cleaner to do blending.
|
|
|
|
|
2015/02/09 14:00:31
Subject: What medium for a clean color gradation ?
|
|
Space Marine Scout with Sniper Rifle
|
AllSeeingSkink wrote:What's your current technique? Are you painting thinned (almost wash-like) paint directly in to the crevices?
Yes I paint thinned (as you said almost wash like) but I paint a lighter color than my base paint (mistake I won't make again) to add depth to the mini.
AllSeeingSkink wrote:
The trick is to clean your brush (doesn't need to be perfectly clean, I usually just swish it in the water for 2-3 seconds) then wipe the excess water off on a tissue (so your brush is damp but not so wet that it leaves puddles on the model) then use the tip of your brush to sweep away the line. If you find there's too much paint on the model for you to remove in one swipe, just wipe the brush off on a tissue again and go back to the model.
I've been trying to do that when I mess things up. I try to apply the paint in one go, I direct the pigments where I want them to stack with my brush.
AllSeeingSkink wrote:
The other trick is timing, how long to wait between applying the line and blending the line, I find it useful to mix my shade with drying retarder to open up the windows where I can easily manipulate the paint and also do my shades over the top of a varnish to protect the underlying paint from my meddling. The tank pictured below I mixed 2 drops of Burnt Umber, 1 drop of black and 2 drops of Vallejo drying retarder and then thinned it to wash-like consistency. With that mix, if I paint a line then come back to clean it within 1-3 minutes (approximately) I can just use water for cleaning my brush, but swapping to vodka I open that window up to about 10-15 minutes, use Vallejo Airbrush Thinner and I open that window up to about half an hour, maybe more (note: This is what I use on the brush to clean up the paint, not what I thin the original paint with!). So if I paint maybe a third the lines on my model and then wash the brush off and come back to clean them up with Vallejo Airbrush Thinner, that works pretty well. If I'm only using water I can only paint 1 or 2 lines then I have to clean the brush and fix those lines before the paint dries too much.
Sorry I didn't understand that part.
Do you let the paint dry or is it still wet ? I guess it is the later but I don't get the thing with the vodka (obviously not drinking ^^) and Vallejo Airbrush Thinner ? Are those used to "erase" the paint ?
AllSeeingSkink wrote:It's a lot more effort than just painting a line though, it's worth it for models you want to look top notch.
That's my goal, I paint to fun (I am not building an army) and so I want them to be really well painted.
TseGuevara wrote:A simple hack: use not-quite-thinned oils instead of acrylics. The advantage is that much longer drying times result in much easier blending. Disadvantage - much longer drying times, need of varnish if you want to apply something on top of them, an odor of silvents that not all people can tolerate (though there are some odorless mineral spirits, but they are slightly more expensive), and, much longer drying times.
I have a baby at home so white spirit and such are prohibited for now, but one day, I think i'll try 
I'll watch it this evening at home
I will also post pics tonight to show what I've done so you can c&c (A picture will describe my results way better than my words)
Again thanks for your answers
|
|
|
|
|
2015/02/09 16:12:19
Subject: What medium for a clean color gradation ?
|
|
Grizzled Space Wolves Great Wolf
|
 Flo wrote: Flo wrote:AllSeeingSkink wrote: The other trick is timing, how long to wait between applying the line and blending the line, I find it useful to mix my shade with drying retarder to open up the windows where I can easily manipulate the paint and also do my shades over the top of a varnish to protect the underlying paint from my meddling. The tank pictured below I mixed 2 drops of Burnt Umber, 1 drop of black and 2 drops of Vallejo drying retarder and then thinned it to wash-like consistency. With that mix, if I paint a line then come back to clean it within 1-3 minutes (approximately) I can just use water for cleaning my brush, but swapping to vodka I open that window up to about 10-15 minutes, use Vallejo Airbrush Thinner and I open that window up to about half an hour, maybe more (note: This is what I use on the brush to clean up the paint, not what I thin the original paint with!). So if I paint maybe a third the lines on my model and then wash the brush off and come back to clean them up with Vallejo Airbrush Thinner, that works pretty well. If I'm only using water I can only paint 1 or 2 lines then I have to clean the brush and fix those lines before the paint dries too much.
Sorry I didn't understand that part. Do you let the paint dry or is it still wet ? I guess it is the later but I don't get the thing with the vodka (obviously not drinking ^^) and Vallejo Airbrush Thinner ? Are those used to "erase" the paint ?
Sorry it's kind of hard to describe and I probably didn't do a good job of it, lol. Like any blending technique it does take some practice, it took me a few models before I even figured out what I should be doing. You can do it while it's still "wet" but it's a bit harder to manipulate I find, so I usually do it once it's partially dried. When you apply acrylic paint, it'll look dry after (for example, obviously depends how thick it is and how much retarder you've added) a minute, but it actually takes a couple of days to fully harden. In the first couple of minutes you can probably re-wet it with water and manipulate it. Beyond that, you need to start using stronger solvents. Vodka is a stronger solvent than water (being ~40% ethanol), so even though a few minutes after applying paint you can't do much to it with water, you can still wet it with vodka and manipulate it (using the mix I described above, probably for about 15 minutes). Vallejo's airbrush thinner is an even stronger solvent, so once the paint has hardened to the point where vodka won't easily remove it, you can still wet it with airbrush thinner and manipulate it. Things that are even stronger solvents are things like white spirit and isopropyl alcohol (the latter you have to be VERY careful if you're going to use it because it'll easily strip even fully cured paint). So what I do, I spend maybe 3-5 minutes (I never actually time it, lol) painting the lines then clean off my brush and start cleaning up the lines I've already painted, by which time they'll be partially dry. Automatically Appended Next Post: The first 14:30 is just airbrushing and applying decals, after that is the acrylic weathering techniques. What I'm describing is basically what he's doing from 16:50, but where he uses just a straight wash and cleans up with airbrush cleaner, I mix my own wash using a healthy dose of drying retarder and clean up with vallejo airbrush thinner or vodka instead (which is a far less harsh solvent than the airbrush cleaner).
|
|
This message was edited 2 times. Last update was at 2015/02/09 16:23:36
|
|
|
|
|
2015/02/09 20:46:13
Subject: Re:What medium for a clean color gradation ?
|
|
Space Marine Scout with Sniper Rifle
|
With the video it is clearer. It is a technique I didn't think of and I'll will try it So on my to do list : - Try "cleaning" washes - Try flow aid. About the pictures : This is with Lahmian medium, on the jump pack, it is shiny. I was working for more than an hour with my mix, so maybe it needed a little bit of stiring 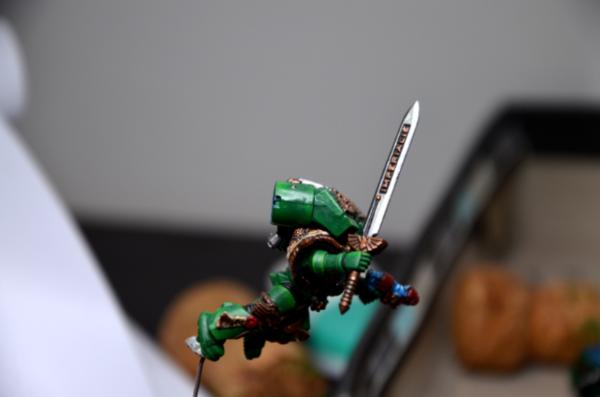 And another done with water 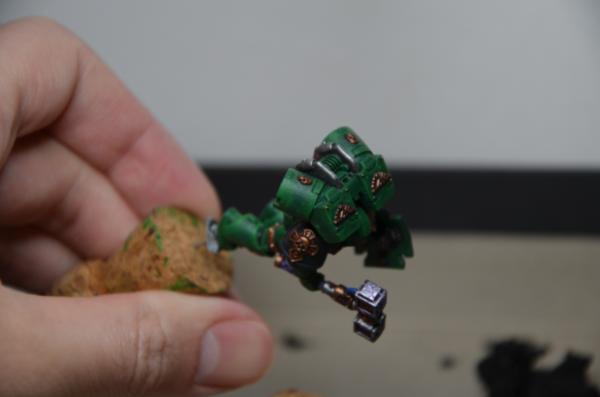 For the work on the mini, I need to clean the dust off them before painting (that's why the surface is not even I guess) and some parts, my paint was too thick. PS : This video is a gold mine, thank you so much !
|
|
This message was edited 1 time. Last update was at 2015/02/09 21:06:45
|
|
|
|
|
|
|
|