| Author |
Message |
 |
|
|
|
|
Advert
|
Forum adverts like this one are shown to any user who is not logged in. Join us by filling out a tiny 3 field form and you will get your own, free, dakka user account which gives a good range of benefits to you:
- No adverts like this in the forums anymore.
- Times and dates in your local timezone.
- Full tracking of what you have read so you can skip to your first unread post, easily see what has changed since you last logged in, and easily see what is new at a glance.
- Email notifications for threads you want to watch closely.
- Being a part of the oldest wargaming community on the net.
If you are already a member then feel free to login now. |
|
 |
2016/08/30 02:43:37
Subject: Oldraven's Little Projects Thread.
|
|

Gargantuan Great Squiggoth
|
Methinks that for all their banging on about IP rights etc. GW are completely not above stealing ideas from everyone. Though difficult sometimes to say which came first.
Warthog is a perfect proxy. Even better for being good enough without needing much work. Did a buggy conversion myself some time ago. A £2 toy. But was a fair bit of work. I was really happy with the end result though. Actually got a couple metal Tauros somewhere.
Good ideas as always here. Will be something to see your army once done.
|
|
|
|
 |
|
2016/08/30 03:47:07
Subject: Oldraven's Little Projects Thread.
|
|

Rogue Inquisitor with Xenos Bodyguards
|
 Camkierhi wrote: Camkierhi wrote:Methinks that for all their banging on about IP rights etc. GW are completely not above stealing ideas from everyone. Though difficult sometimes to say which came first.
Warthog is a perfect proxy. Even better for being good enough without needing much work. Did a buggy conversion myself some time ago. A £2 toy. But was a fair bit of work. I was really happy with the end result though. Actually got a couple metal Tauros somewhere.
Good ideas as always here. Will be something to see your army once done.
Yeppers, they just make the pattern similar, then go all "gothic" on it.
Latest Deathwatch ship reminds me of something from Chronicles of Riddick" merc ship.
|
"Your mumblings are awakening the sleeping Dragon, be wary when meddling the affairs of Dragons, for thou art tasty and go good with either ketchup or chocolate. "
Dragons fear nothing, if it acts up, we breath magic fire that turns them into marshmallow peeps. We leaguers only cry rivets!


|
|
|
|
|
2016/08/30 05:59:32
Subject: Oldraven's Little Projects Thread.
|
|
Pious Palatine
|
From the pics you've posted I think it should work. Difficult to say for certain without seeing some GW crew types incorporated into it. Before you invest in more you should 40k it up first, to see how it works out.
EDC
|
|
|
|
|
2016/08/31 09:59:49
Subject: Oldraven's Little Projects Thread.
|
|
Longtime Dakkanaut
|
shasolenzabi wrote:Warthogs make for some nice IG fast attack cars, forgeworld makes similar cars, and a slightly bigger version.
Elysian Tauros

Elysian Tauros Venator

So the Warthog fits the Tauros well.
Automatically Appended Next Post:
In fact, methionks GW also liked the Warthog and made the Tauros like the SM Talon- GS resembles the Orca from Command and Conquer
Yep. At some point, I might pick up one of each. Unfortunately, one of them is listed as being "temporarily out of stock". And with Forge World, that means there is no telling when it's going to be restocked. Just look how long the Destroyer, and one of the Centaurs, have been "temporarily" out of stock.
Camkierhi wrote:Methinks that for all their banging on about IP rights etc. GW are completely not above stealing ideas from everyone. Though difficult sometimes to say which came first.
Warthog is a perfect proxy. Even better for being good enough without needing much work. Did a buggy conversion myself some time ago. A £2 toy. But was a fair bit of work. I was really happy with the end result though. Actually got a couple metal Tauros somewhere.
Good ideas as always here. Will be something to see your army once done.
Much thanks for the positive feedback. If it's in your gallery, I'll check it out (if I haven't seen it already, there is far too much good stuff on Dakka to be able to remember it all).
evildrcheese wrote:From the pics you've posted I think it should work. Difficult to say for certain without seeing some GW crew types incorporated into it. Before you invest in more you should 40k it up first, to see how it works out.
EDC
Yeah, you're right. It might pay to crew it with Citadel minis before I buy a slew of them. But that's going to be a while yet, unless I get a wild hair up my ass and decide to jump right into it sooner rather than later. I've already set the Phantom aside for a couple of days (I'm getting frustrated with the Tamiya flat white), and started painting on the Zeta Plus Gundam's main cannon on a whim.
And speaking of frustrations and disasters, I went ahead an applied the transfers to the Galleon (aka the "Sandpaper on Treads"-Coutesy of the Rust-O-Leum Corporation). I put some Citadel 'Ardcoat on the spots where they would be applied, and afterwards "sealed" them in with the same. Personally, I consider MicroSol and MicroSet to be a waste of money for anything but a narrow range of circumstances. I was afraid that I would need both because of the paint's rough texture. But I took a chance and it worked. Now, the only thing left is weathering, maybe some mud, and dry brushing in an attempt to salvage a bit more from this mess (I already went over it with some Vallejo Black Wash some time back). Then I'll seal it with Krylon matte varnish and say to hell with it. As rare as these kits are nowadays, and the scalper's prices for most of them on Ebay when they do pop up, it's probably going to be a long time before I find anymore at this price point (forty bucks). So, I'm pretty  pissed off at the botched base coating. In hindsight, I should have soaked the can in some hot water before using it.
The main transfers are from Forge World. These particular Imperial Guard transfers are no longer available. But because they are not cut to shape (the whole damned sheet is like one big transfer), and the minor annoyance involved with them as a result, I wouldn't consider it a great loss if it wasn't for the fact that Imperial Guard transfers are hard to come by, unless you buy complete damned kits from GW. It's even worse for those who want to build an Elysian army, since that sheet was discontinued too (it's my understanding that Forge World kits don't come with decals).
The small red stenciling are from that Testors-Italeri Russian "Ferret-E" concept stealth fighter kit, the same one I used for the Wolverine's stencils.
Anyway, here are some pics.
Anyway, that's it for now. More to come.....
|
|
This message was edited 1 time. Last update was at 2016/08/31 10:02:24
Proud Purveyor Of The Unconventional In 40k |
|
|
|
|
2016/09/10 07:32:52
Subject: Re:Oldraven's Little Projects Thread.
|
|
Longtime Dakkanaut
|
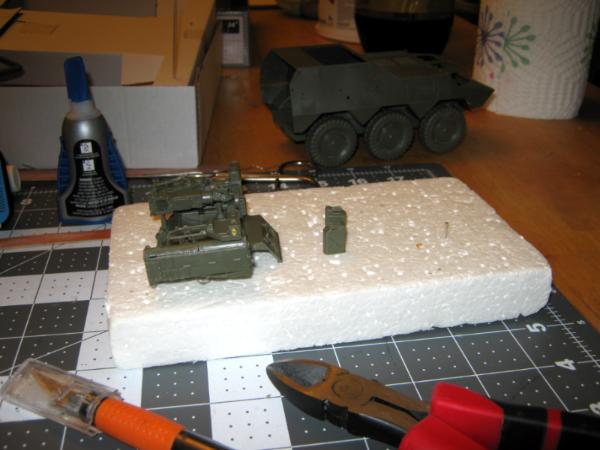
Sorry for the late update. Let's get to business, shall we?
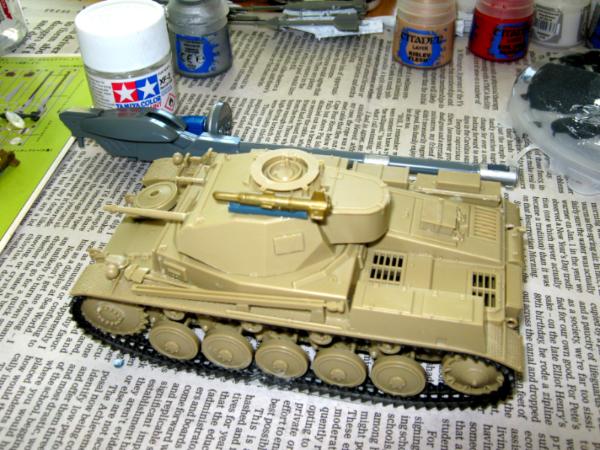
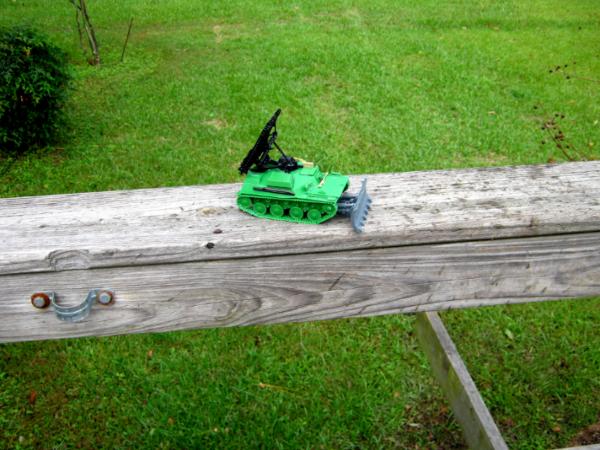
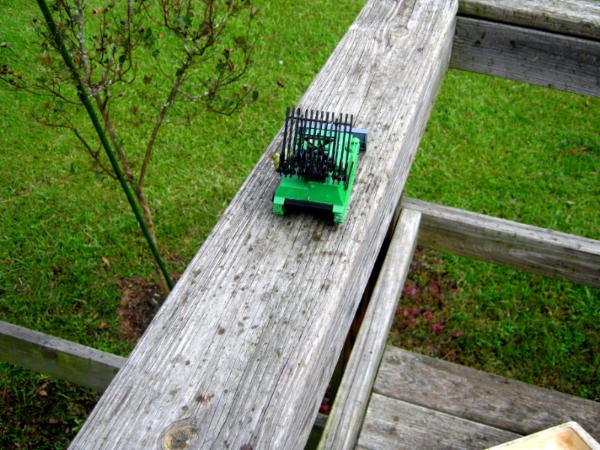
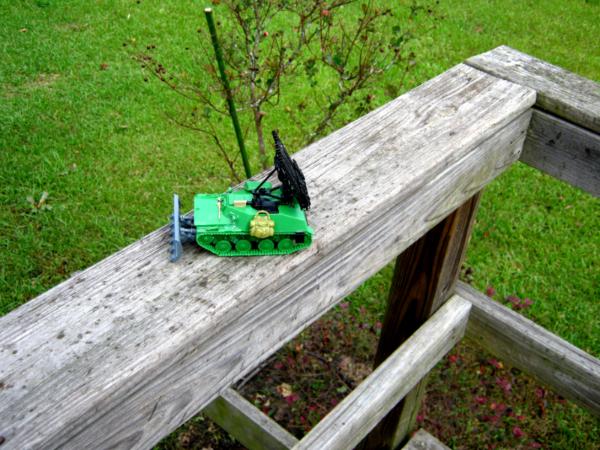
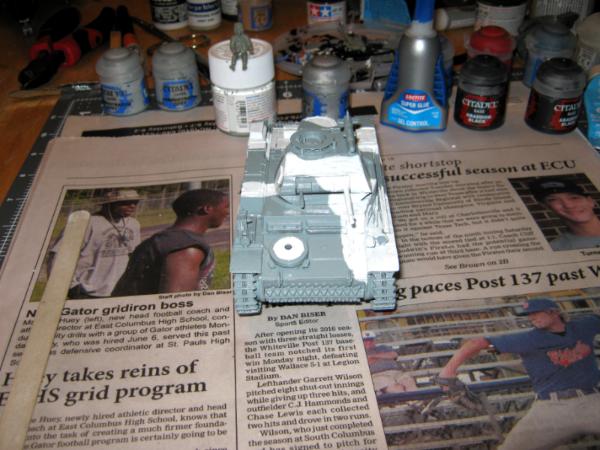
First up is the Panzer II.
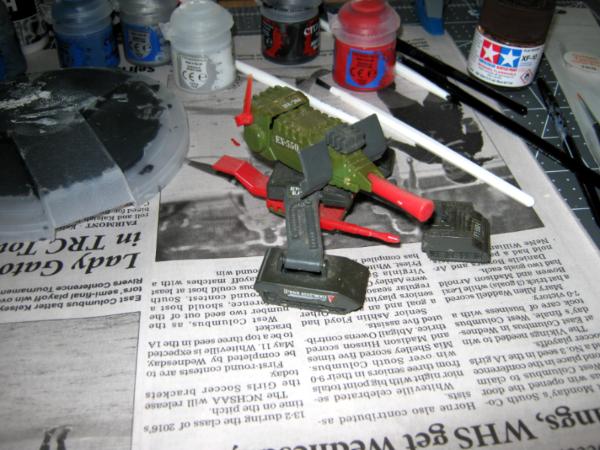
Using a bit of sprue from the Galleon kit, I fashioned a launch rail for the Panzer's turret. The "Hunter-Killer Missile" is a rocket from a G.I. Joe action figure set. Also in this shot is the Gundam Sentinel's beam cannon. I mentioned some time that I started painting on it. As you can see, my lazy ass hasn't made much progress on that one. 
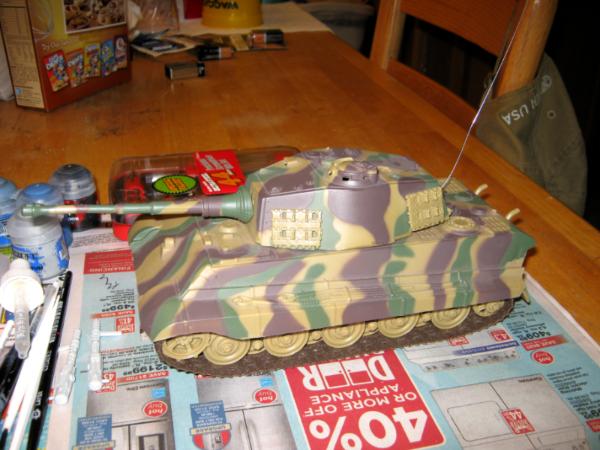
On a side note, here is another addition to my now-long list of future projects: A New Ray 1/32 radio controlled King Tiger. I'll wipe it down, detail it, and do some weathering/environmental effects. For a cheap Chinese RC toy, they did a pretty good job on reproducing late-war German camo. I'll also add some stuff to it. Just haven't decided what route I will take in that area yet.
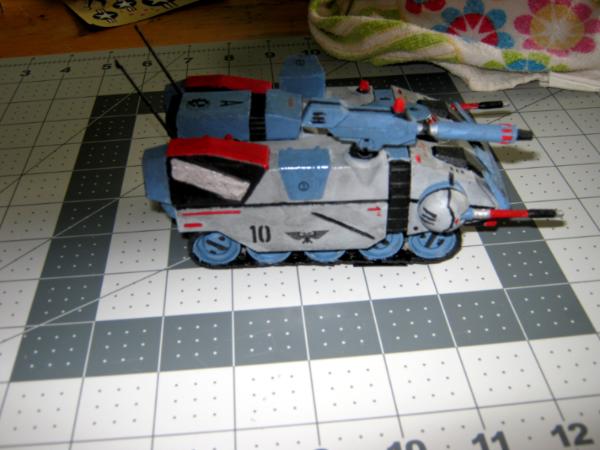
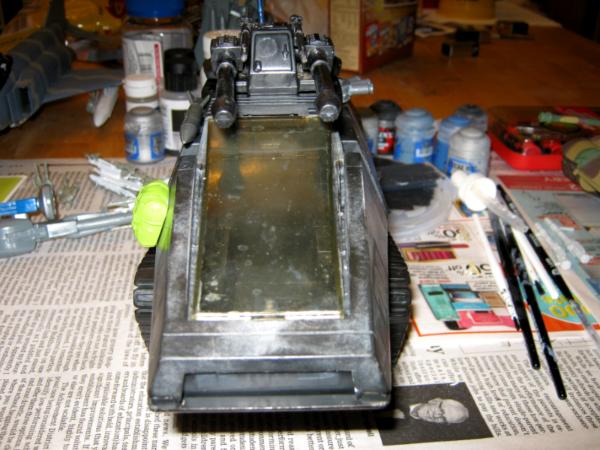
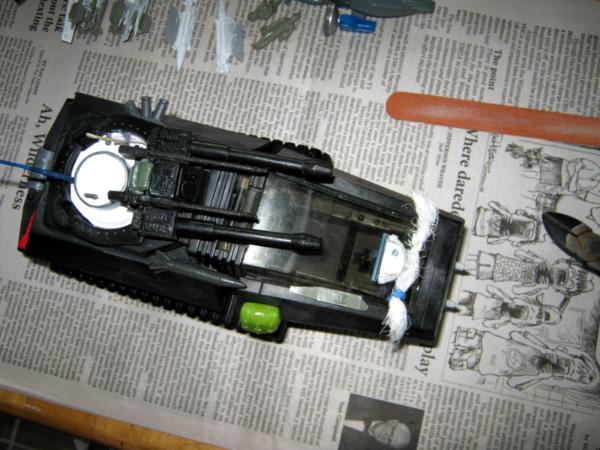
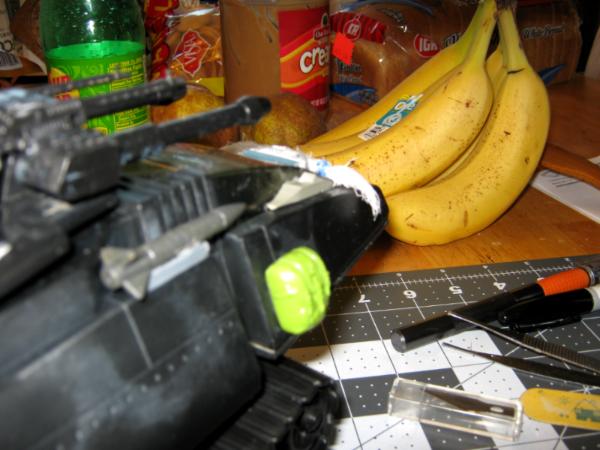
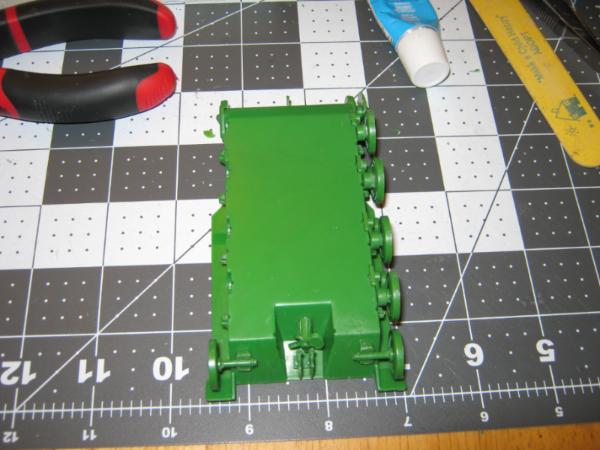
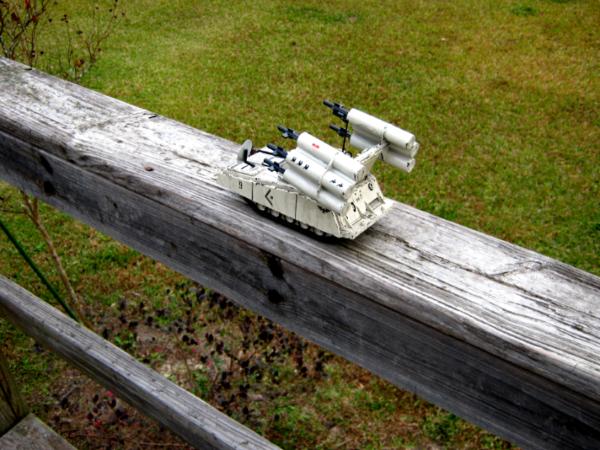
Now for a special surprise. A spur of the moment deal. The H.I.S.S. tank. 
I cleaned it up and used Goo Gone to remove the old sticker adhesive from the tank. I then started on the turret. I cut pieces from the "No Trespassing" sign to use as turret "flooring".
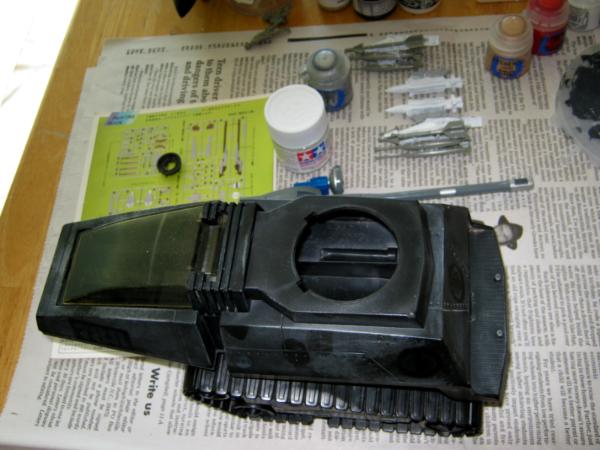

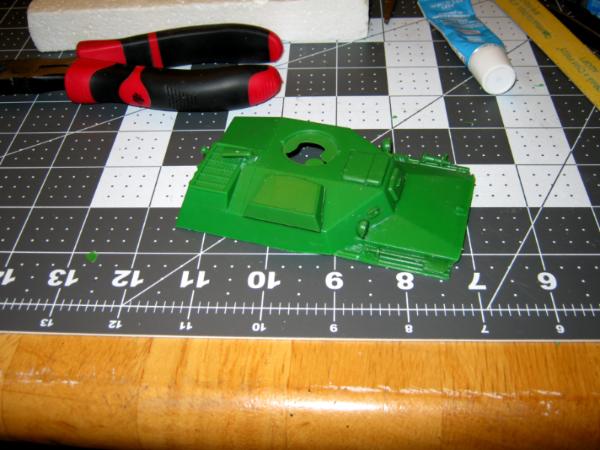
After a couple of days of work, here is what I have so far. I only used what I had on hand or could scrounge. It's still a work in progress.
I used Loc-Tite super glue due to the weight of the parts and composition of the various components. I only used Testors plastic cement on the rifle and bipod stowed in the turret.
I super-glued the drive unit/tracks back onto the bottom of the main hull (it broke apart a long time ago). I also glued down the canopy. I had to glue the guns to a fixed position, since the piece that stabilized them also broke years ago.
On this side, I used a piece of sprue from my Citadel spare parts set, and a missile from an old G.I. Joe Cobra Trubble Bubble flying pod, to make a Hunter-Killer missile assembly (I filled in the attachment slot on the missile with Testors putty). The large stowage pack is an old G.I. Joe action figure backpack, that I cut and filed down the piece that you attached the pack to the figure with.
Front shot of the tank:
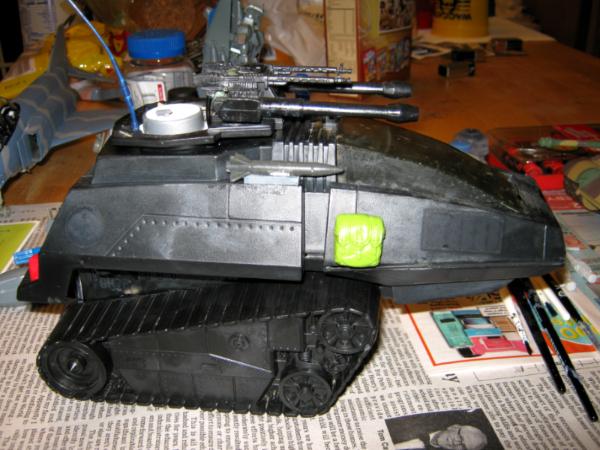
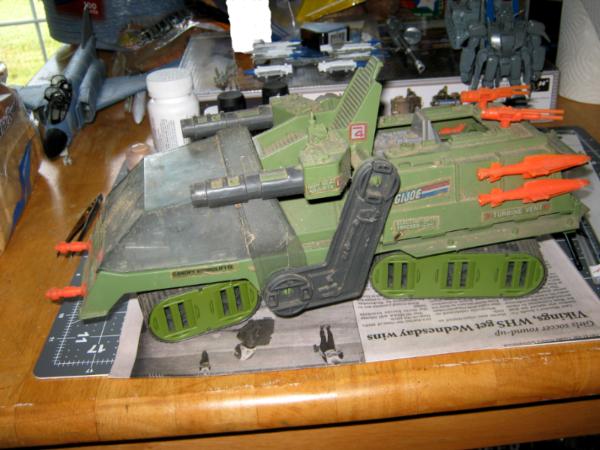
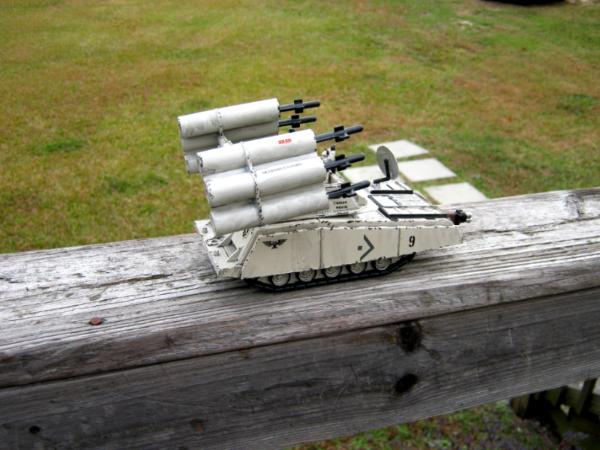
Here I used the old smoke launchers from the Equalizer. I think I will add the photo-etched chains from the Type 61's smoke launchers that I didn't use before. They're kinda small in comparison. But it will add a bit of detail, I think.
Here is the rear shot of the WIP: The red tool box is from an old AMT 1957 Chevy Bel-Air kit, the stowage kit on the turret is a G.I. Joe action figure backpack, the auxiliary fuel tank is from the Citadel spare parts set, and the vox aerial is from a G.I. Joe Dreadnok Thunder Machine. If you look closely, you can see that I glued down a couple of square pieces from leftover sprue just under the gun assembly as bases. Then, I shaved down the handles for the machine guns, and attached some "power cables", made from tubing from a G.I. Joe action figure set, from the guns to the two little bases ("power cable attachment points").
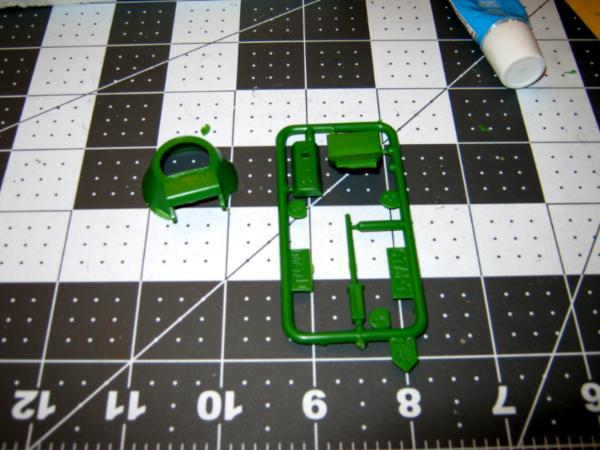
Top shot. The silver round doohickey....I don't know where it came from. All I know is that it made for a decent coupla. After making the hatch from the "No Tresspassing" sign, I used a small bit of sprue to make a handle for said hatch. The stand-ins for turret mounted autocannons are heavy machine guns from action figures (G.I. Joe knock-offs that you could buy at the time). I used more sprue to make a rifle rack. In the rack is a Kar 98k from the Tamiya Panzer II kit, with a M299 bipod from the Type 61 Bandai kit attached. I didn't have anything small enough to make a scope. But it still works as a DMR to shoot Tau from the turret with. 
Well, that's it for now. More updates to come. 
|
Proud Purveyor Of The Unconventional In 40k |
|
|
|
|
2016/09/10 14:31:53
Subject: Oldraven's Little Projects Thread.
|
|
Pious Palatine
|
Funky conversions. I'm digging it.
EDC
|
|
|
|
|
2016/09/10 20:52:26
Subject: Oldraven's Little Projects Thread.
|
|
Rogue Inquisitor with Xenos Bodyguards
|
Stuff is looking good there! Sad about the Tauros kits, But the Warthog stands in for the Tauros very well. Tauros Venator is more a truck with the triple axles.
|
"Your mumblings are awakening the sleeping Dragon, be wary when meddling the affairs of Dragons, for thou art tasty and go good with either ketchup or chocolate. "
Dragons fear nothing, if it acts up, we breath magic fire that turns them into marshmallow peeps. We leaguers only cry rivets!
|
|
|
|
|
2016/09/12 19:07:56
Subject: Re:Oldraven's Little Projects Thread.
|
|
Longtime Dakkanaut
|
Thanks for the positive feedback. It is very much appreciated.
SUPPLY DROP!
Got some Archer transfers in. WWII Heer divisional markings.
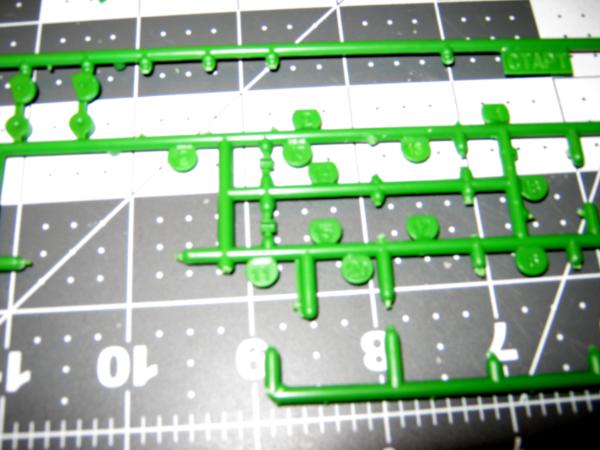
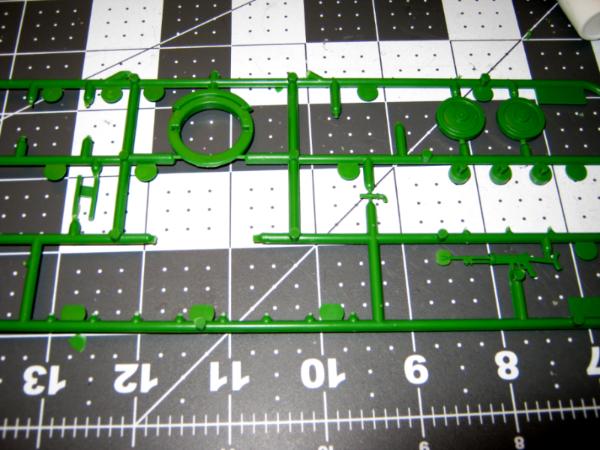
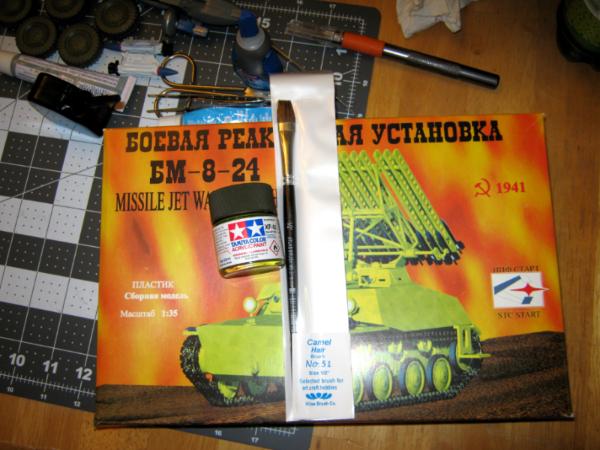
Also, found this cool little kit at Hobbylinc. It only cost me $8.64 plus shipping. It's what I assume to be a Russian kit. STC Start 1/35 scale BM-8-24 "Katyusha" Rocket Launcher on a Soviet T40 light tank chassis.
Instruction sheet. The text is mostly, if not all, in Russian.
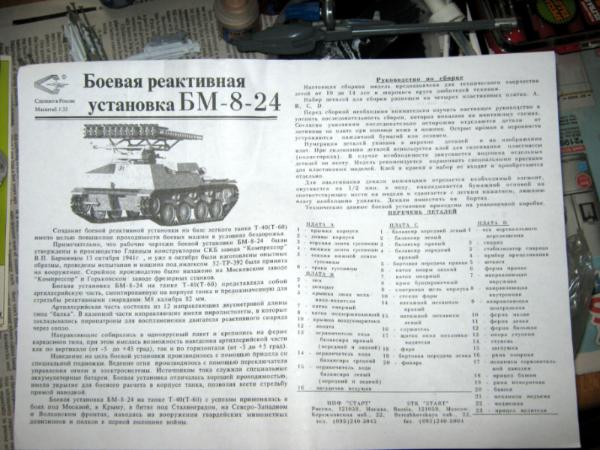
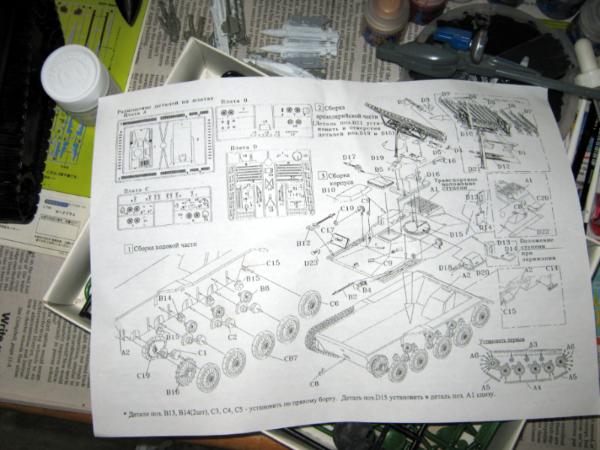
Other side of the sheet. It has a correct sprue map and everything looks to be numbered correctly. The pictorial instructions are not overly cluttered. Which is good, because I can't read Russian.
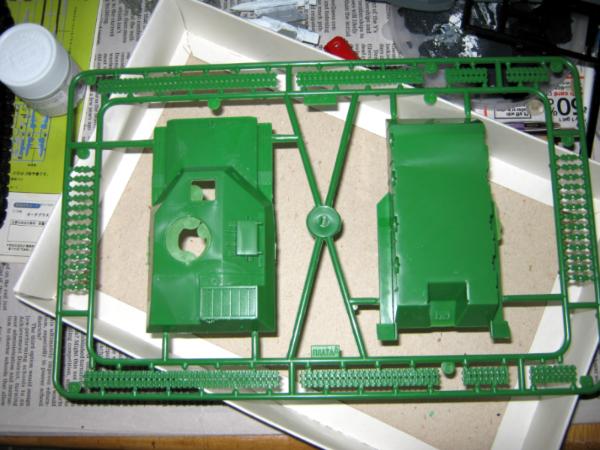
The hull and tracks. Some flash, but far less than what I expected from such an inexpensive kit.
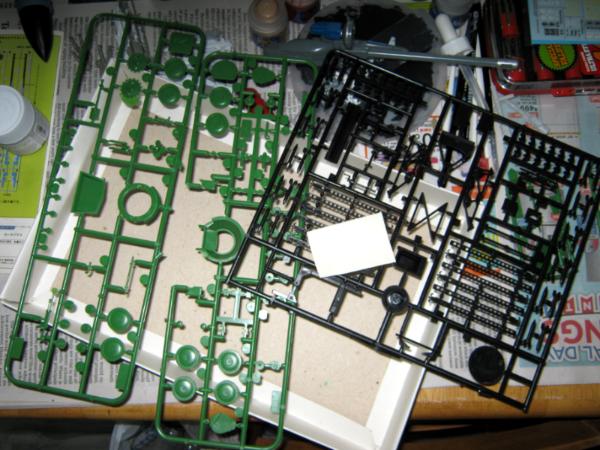
Small parts and transfers. The parts look okay and all there. The transfers look a little iffy, though.
If this kit isn't too much of a pain in the ass, I'll try to get a couple of more for a battery. It will make for a nice PDF vehicle.
Anyway, that's all for now. More to come.
|
Proud Purveyor Of The Unconventional In 40k |
|
|
|
|
2016/09/12 19:43:03
Subject: Oldraven's Little Projects Thread.
|
|
Rogue Inquisitor with Xenos Bodyguards
|
Light tank /missile launcher looks promising, good luck with it.
|
"Your mumblings are awakening the sleeping Dragon, be wary when meddling the affairs of Dragons, for thou art tasty and go good with either ketchup or chocolate. "
Dragons fear nothing, if it acts up, we breath magic fire that turns them into marshmallow peeps. We leaguers only cry rivets!
|
|
|
|
|
2016/09/16 03:05:16
Subject: Oldraven's Little Projects Thread.
|
|
Longtime Dakkanaut
|
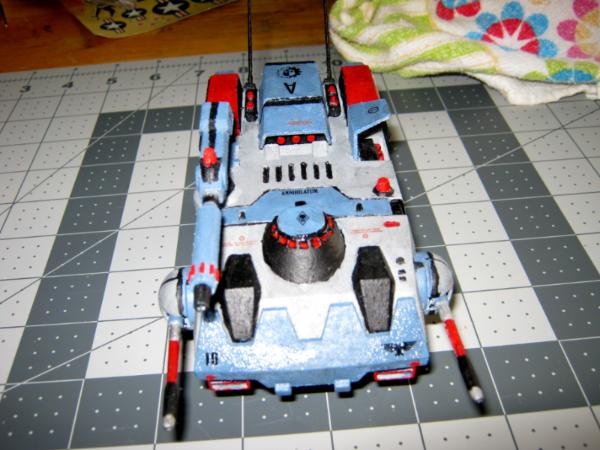
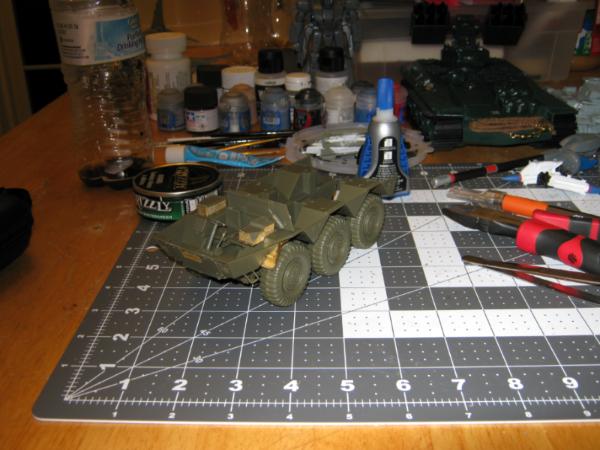
Thanks. Since I finished the H.I.S.S. tank. I started on it, since it appears to be a fairly simple kit.
Now for tonight's update.......
First off, supply drop. I got some Elmer's white glue for weathering projects, and I was running low on Loc-Tite for the H.I.S.S.

I then went back to work. First off was the "heavy stubbers" and some extra lights for the tank. I cut the actions and grips from a couple of G.I. Joe action figure machine guns. Using a 383 Chevy head cover from an old AMT Bel-Air kit, and some spare headlamps from a G.I. Joe AWE Striker, I made a fog light unit for the lower hull.
I then mounted them to the tank. The "heavy stubbers" were attached in a couple of convenient recesses in the hull, below the pilot's compartment:
Another shot:

I then used some photo etched chains (for the smoke launchers) from the Type 61 kit. I added them to the smoke discharger units scavenged from the Equalizer. As you all may recall, I went with the Citadel smoke canisters on the Equalizer, because I was missing one of the Hasbro sets. As for the work here, it was a pain in the ass and I made something of a gom of it. I hate small PE parts. This is what I have to look forward to with the JGSDF Chemical Recon Vehicle when I start on it soon. Ugh.
Sorry for the craptastic pics. I'm not a very good photographer. 

The ladders were less of a hassle. I used sprue from various kits (mostly from the Galleon and Patlabor kits) to make them. As for the ladder mounted on the side of the rear platform, I originally wanted a two-section slide-down ladder, similar to the one on the back of the Bandai Type 61 MBT. But I settled on an easier single piece ladder.
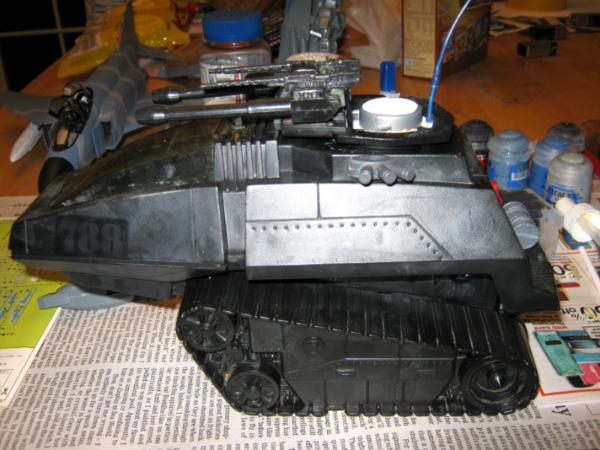
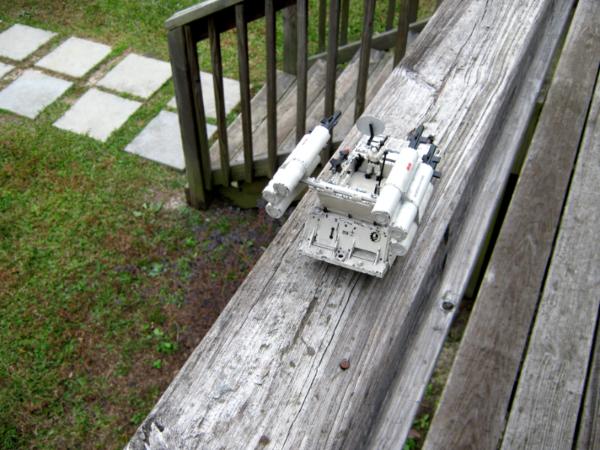
I used some sprue to make a coupla for the front of the upper hull, and made a hatch and some inner coupla armor from the "No Trespassing" sign (that I still have plenty of). Also, using medical gauze and bread ties, I made a roll of camo netting. Rounding it off is the photo-recon camera unit from the Phantom kit, that I used as a sensor pod and laser rangefinder/targeting unit (the grey piece glued to the side of the clear canopy).
I wasn't happy with how the large handle stood out on the front hatch. I also didn't like how the front coupla looked like a shot trap. So, I cut the handle down on the front hatch, and cut some transparent (and easily bent) plastic from the Warthog's packaging, to make a couple of armored plates at the front of the coupla.
I then used some old pieces from an ATM card to make the headlights, and the grill between said headlights. I wanted to stick as close to the original design as possible, since I like the early 1980's "automotive" look. The pieces are not cut perfectly to size, but it works for me.
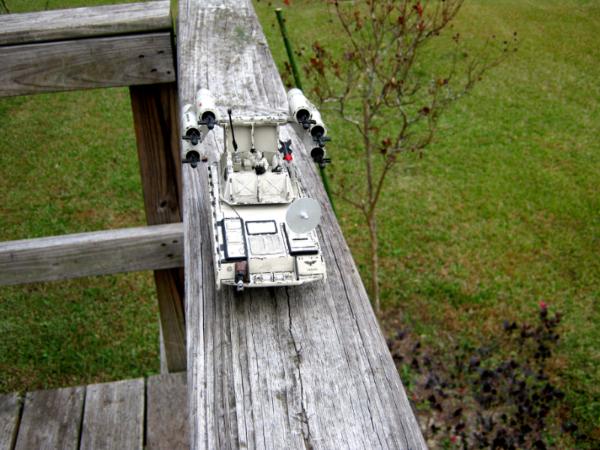
In this shot, you can see the transparent "armored plates" for the coupla a little better. I've since trimmed the tops of the plates down a bit, so they don't stand out so much:
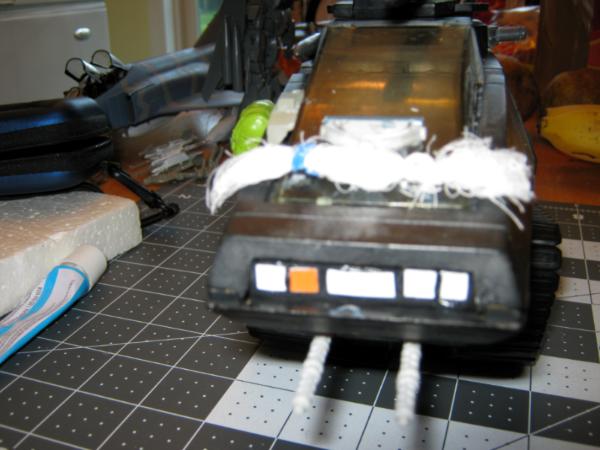
And the H.I.S.S. is complete, except for the painting, weathering, decals, etc. It looks clumsy and a little like crap. But once painted, it will look a lot better in my opinion (going for the same winter scheme as the Equalizer ADV).
Except for the need to pick up some more Loc-Tite super glue, everything with this project was what I had on hand. Not too shabby.
On another note, future project news......
I dug out and cleaned up my old G.I. Joe Triple-T tank. I'm lucky that all of the parts are still there, and the only thing broken is the little joystick in the pilot's cockpit. You can see the spot where it's broken in the photograph. But it's no big deal, considering what I have in mind for it.
Right now I'm working on the STC Start BM-8-24/T40 kit, since it's a fairly simple kit. I'll post some updates on that one soon, in addition to more on the Phantom's and Gundam Sentinel's paint work.
Anyway, that's it for now. More to come...........
|
|
This message was edited 1 time. Last update was at 2016/09/16 03:13:17
Proud Purveyor Of The Unconventional In 40k |
|
|
|
|
2016/09/16 05:10:23
Subject: Oldraven's Little Projects Thread.
|
|
Rogue Inquisitor with Xenos Bodyguards
|
HISS Tank wants banana?
|
"Your mumblings are awakening the sleeping Dragon, be wary when meddling the affairs of Dragons, for thou art tasty and go good with either ketchup or chocolate. "
Dragons fear nothing, if it acts up, we breath magic fire that turns them into marshmallow peeps. We leaguers only cry rivets!
|
|
|
|
|
2016/09/16 05:20:56
Subject: Oldraven's Little Projects Thread.
|
|
Pious Palatine
|
Oo I think there's a lot of potential in the triple t tank.
EDC
|
|
|
|
|
2016/10/03 16:03:15
Subject: Re:Oldraven's Little Projects Thread.
|
|
Longtime Dakkanaut
|
Yeah, I have a bad habit of leaving fruit on the table. I also have a bad habit of continuing my hobby work on the same table, instead of creating a dedicated workspace for painting and modeling,
As for the Triple-T, I'm trying to figure out the best way to construct a cockpit for it that fits well with the lines of the vehicle. Still thinking on that one.
I know I promised a more extensive update, but unfortunately real life has a bad tendency to cut into hobby time. However, I'll share a few things in a brief update.
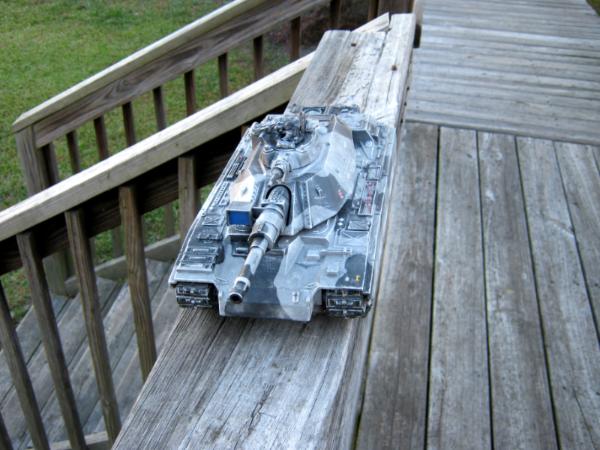
First off, I started thinking about that can of Rust-o-Leum that I used with that semi-disaster of the Galleon project. I recalled something I read on Dakka about issues with rattle can paint, and how you can set a can of paint in a pan of warm/hot water for an hour to cure any issues with gritty finishes or splatter issues. So, I decided to give it a shot and try it on the Panzer II as a test, since I was going for a gray base color on that model anyway. Here is the results:
Much, MUCH better than the results I got with the Galleon. I learn something everyday.
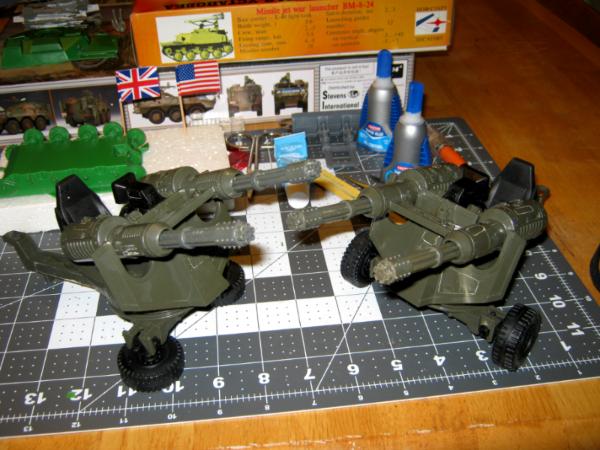
Next up is the BM-8-24 rocket artillery. I've been doing a little work on this kit. Other than having to deal with the flash (it's a cheap beginner's kit), and some issues with glue control (which prompted me to order some Testor's non-toxic in a controlled applicator), it's been going well. I've gotten more done since I took these pics, but I have no photos on that work yet.
The lower hull, as of the time these pics were taken:
As you can see, part of the amphibious assembly wasn't included with the kit (probably because the T40s used by the Soviets for these conversions lacked that feature). But I used them anyway, since it fit's into the 40k backstory I created for this model kit.
The upper hull:
One thing I discovered is that this kit has extra parts to allow you to build a light tank instead of a mobile rocket battery. Unfortunately for anybody looking for a historical accurate production T40 in this kit, the main gun and assembly is for the T30 prototypes as opposed to the production models. As for me, it's no big deal, since accuracy isn't a must for my needs.
The turret assembly:
The pistol port covers:
The turret ring and machine gun:
And now, for another parade of future project subjects!
A couple of G.I. Joe "Whirlwind Twin Battle Guns".
A G.I. Joe "Desert Fox 6 W.D.". I need to repair that one missile hardpoint on the right side.
A G.I. Joe "V.A.M.P."

A Cobra "Rattler Ground Attack Jet". The gatling cannon needs to be repaired.
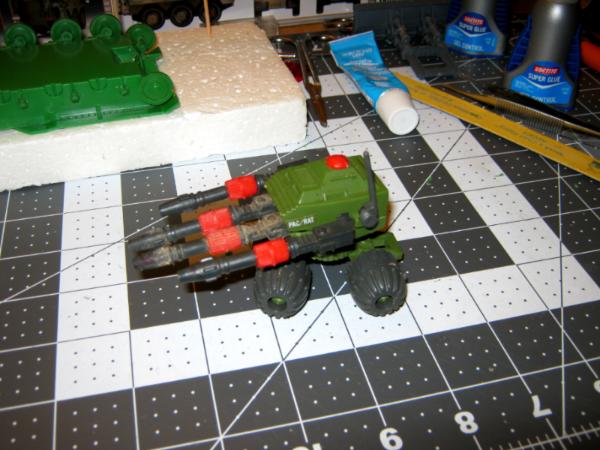
A G.I. Joe "PAC/ RAT Mobile Gun". Still have to take it apart and clean it up.
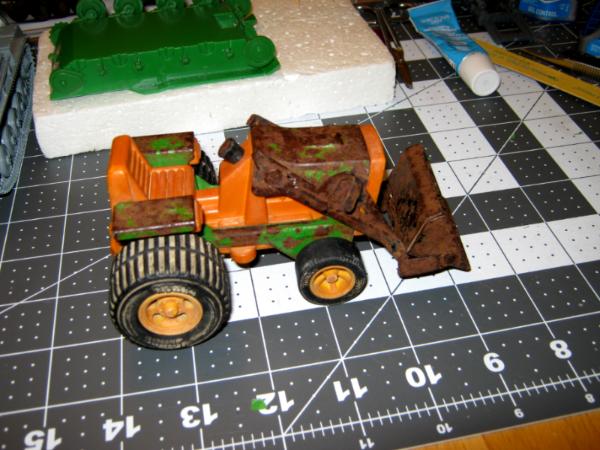
An old Tonka front-end loader for a future Imperial Navy diorama. Still needs a bit more cleaning and a good sanding down.
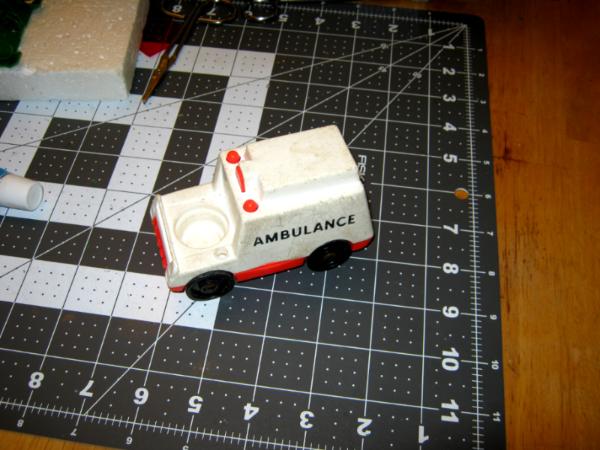
An old Fisher-Price toy ambulance that will become a military ambulance at some point:
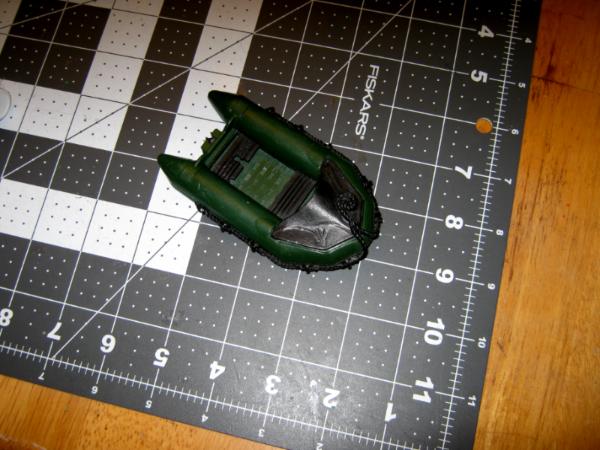
I see a lot of potential with this inflatable Zodiac-style boat. Especially if I can find a replacement outboard for it:
Anyway, that's it for now. More to come folks!
|
Proud Purveyor Of The Unconventional In 40k |
|
|
|
|
2016/10/15 03:50:02
Subject: Re:Oldraven's Little Projects Thread.
|
|
Longtime Dakkanaut
|
Long overdue update. We just got power back day before yesterday, and the cable/internet was down most of the day yesterday. The hurricane really threw things for a loop around here. One good thing to come out of it was that I had some peace and quiet to work on my models some (during the daylight hours during the five day long power outage).
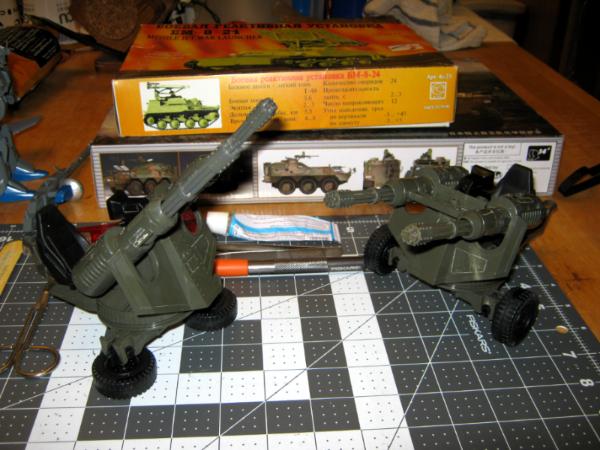
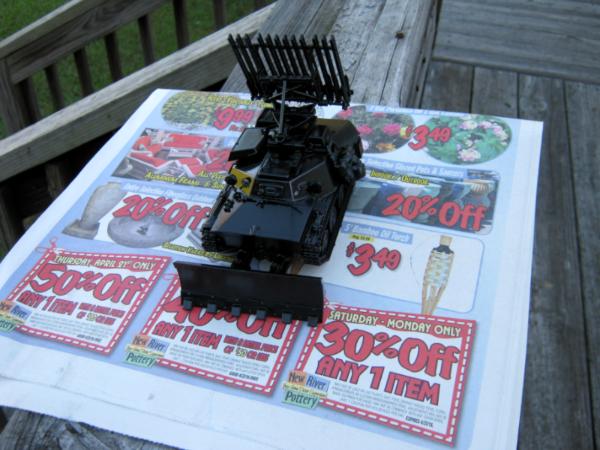
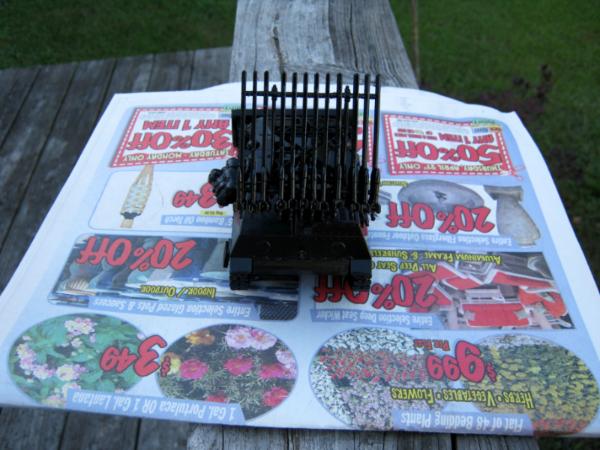
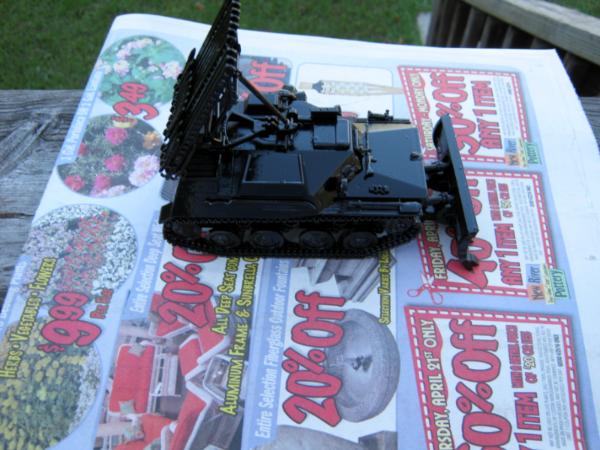
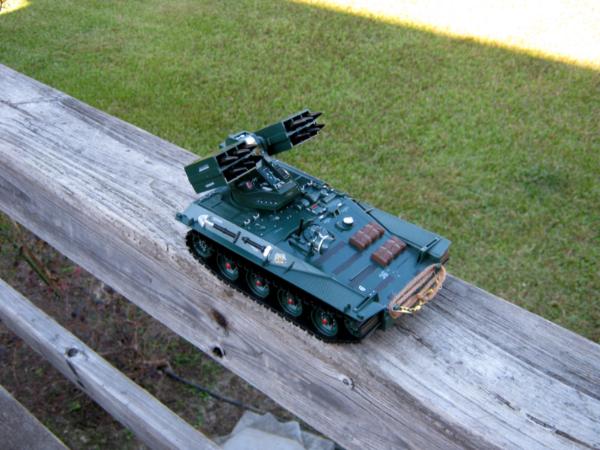
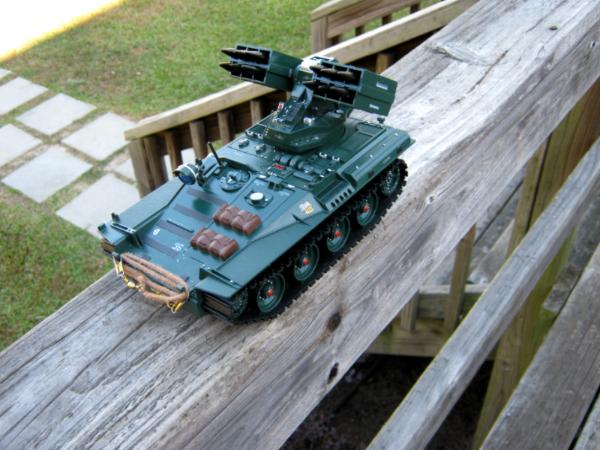
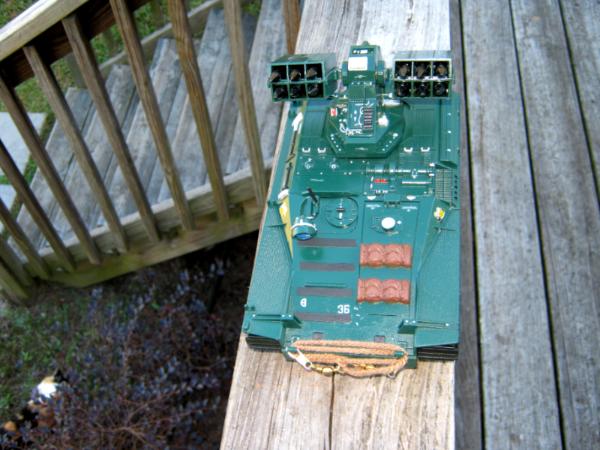
First off the STC Start 1/35 scale BM-8-24 "Katyusha" on the T-40 Chassis........
Here I finished up the frame for the launcher's rails.....
Then I worked toward finishing up installing the track links. They were a pain in the ass.
The last few links. Because of a slight screw-up in the spacing (barely noticeable after base coating with black Krylon), I had one link left over. I ended up gluing it to the hull as a spare.
The completed tracks. I then glued the upper and lower hull pieces together:
Next up was the Citadel dozer blade:
Then came the assembly of the 82mm rockets. It was fairly easy and quick:
The rear blast shield (I guess that's what it is):
Some shots of the completed vehicle before spraying on the base coat/prime, with some extras. Namely, an old G.I. Joe action figure ruck (in hindsight, I should have used a slightly smaller one), a Tamiya MG34 stowed, a Tamiya ammo box (for the MG34), and a machete from a G.I. Joe action figure (standing in as a stowed power sword).
Yesterday, I managed to luck out on the humidity in my area, and was able to base/prime the vehicle with Krylon Fusion Gloss Black:
The base coat came up fairly good. It wasn't overly blemished by the "glazing" effect the Loc-Tite superglue had on the plastic used to mold this kit (visible as white smudges in some of the previous photos).
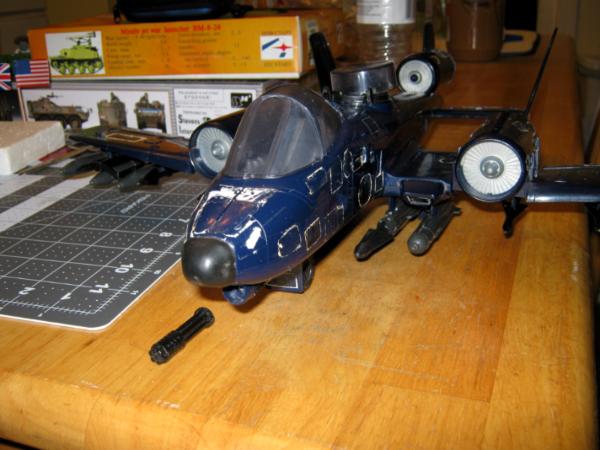
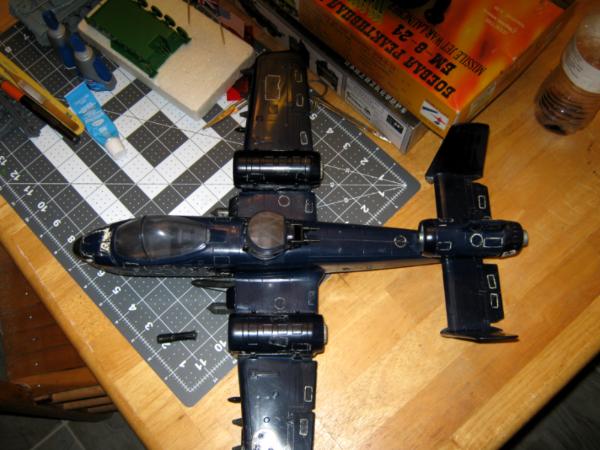
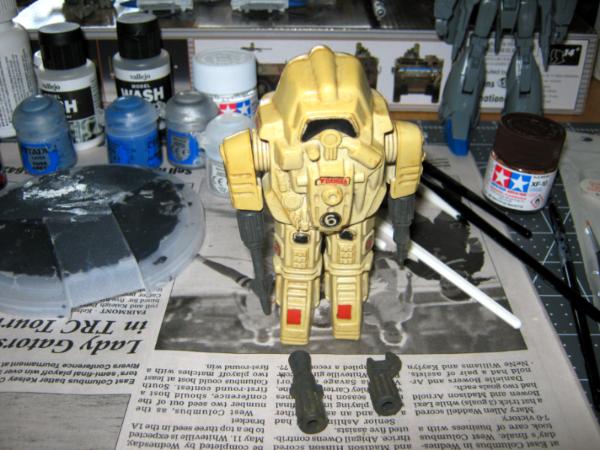
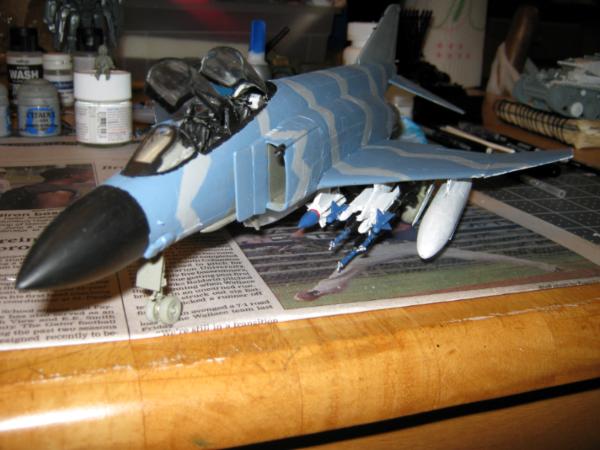
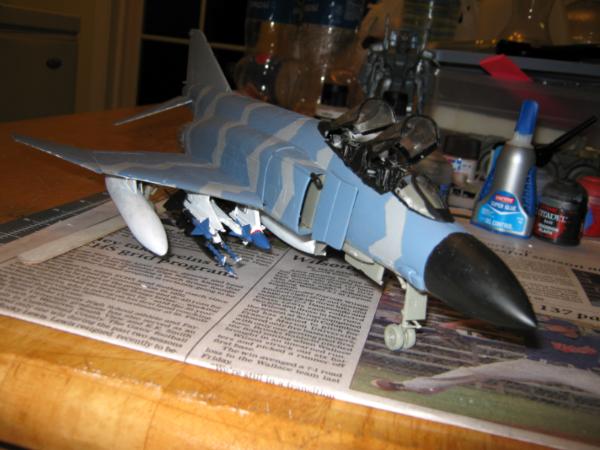
Next up, I went back to painting. Here is the work so far on the Gundam Sentinel's main gun, and some extra paint layers on the Phantom's warload. The Tamiya Flat White (XF-2) isn't working out as well as I hoped:
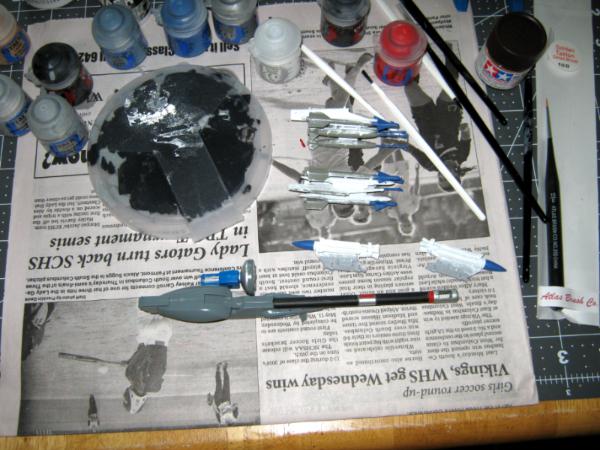
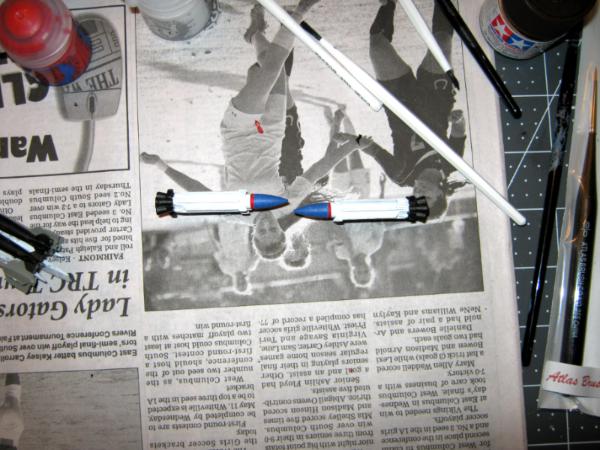
Here is a shot of the (nearly) completed Hellstrike missiles from Forge World. I need to apply another coat on the warheads. Also, on the bottom corner of the shot is a peek at my initial progress on the Mk 82 bombs (in black):
Now to wrap this post up with some extras......
Supply drop:
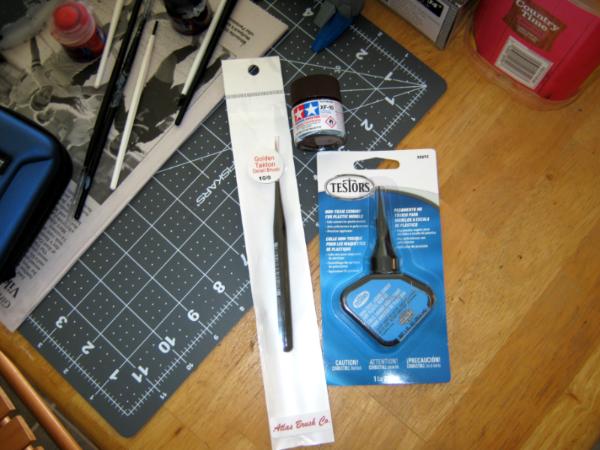
I went with this type of container for the Testors because I need better glue control than the standard tube offers.
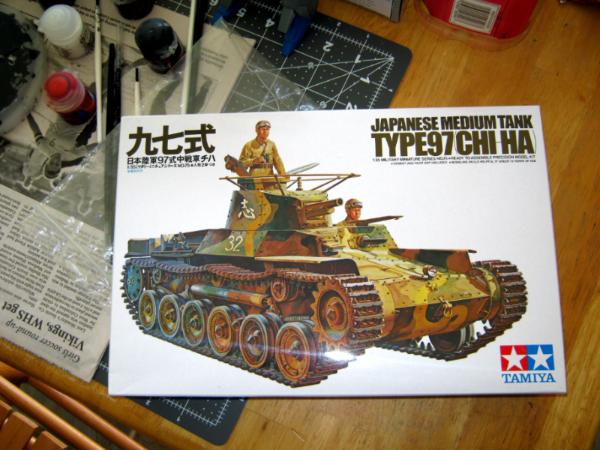
And a new model to assemble later:
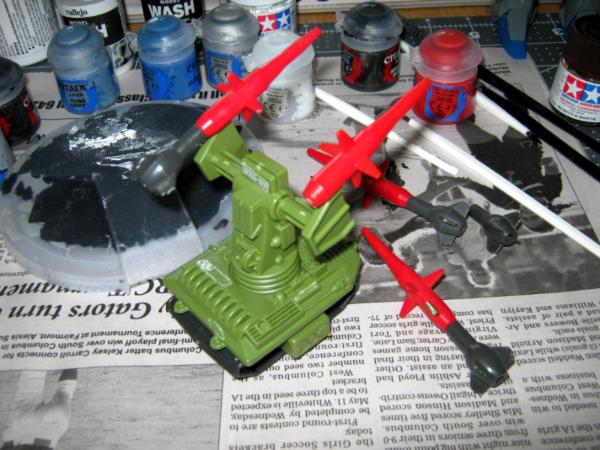
And some more G.I. Joe stuff to showcase. I managed to salvage enough parts from two units to make a complete PAC/ RAT Missile Launcher:
The PAC/ RAT Flamethrower (from the same 1983 line as the PAC/ RAT Missile Launcher, and PAC/ RAT Machine Gun unit, respectively). I still need to clean this one up a bit:
This one is a Cobra Command S.N.A.K.E. from the 1983 G.I. Joe toy line. I plan on using it as part of my Phantom diorama, with the gun (as a laser wielder) and claw:
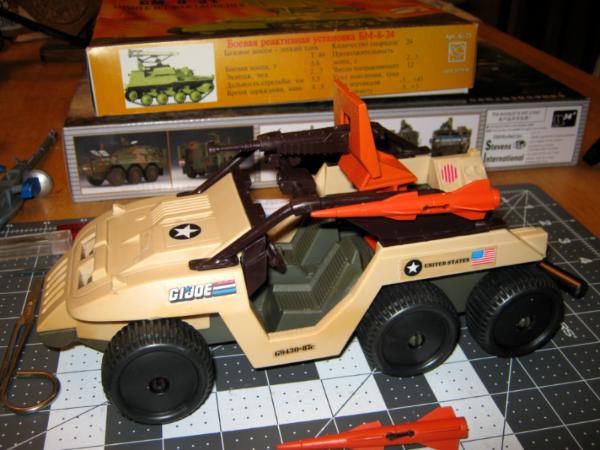
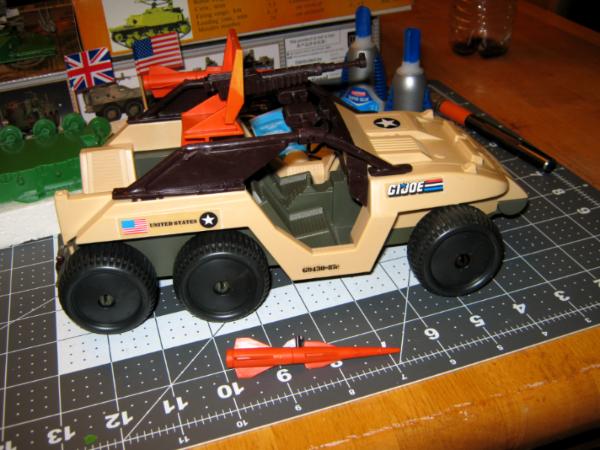
Here is another big vehicle from Hasbro's 1986 G.I. Joe line-The H.A.V.O.C.. Of course, it needs cleaning up after years in storage before I work on bringing it into the Emperor's service.
Can you you say "Big-ass mobile H.Q. command center"?
One of the missiles on the other side is missing. If I can't find it, I'll have to find a replacement on Ebay.
Well, folks, that's all for now. More to come later on.......
|
Proud Purveyor Of The Unconventional In 40k |
|
|
|
|
2016/11/01 13:36:34
Subject: Re:Oldraven's Little Projects Thread.
|
|
Longtime Dakkanaut
|
A quick, but overdue update. But nowadays, I take it one day at a time.
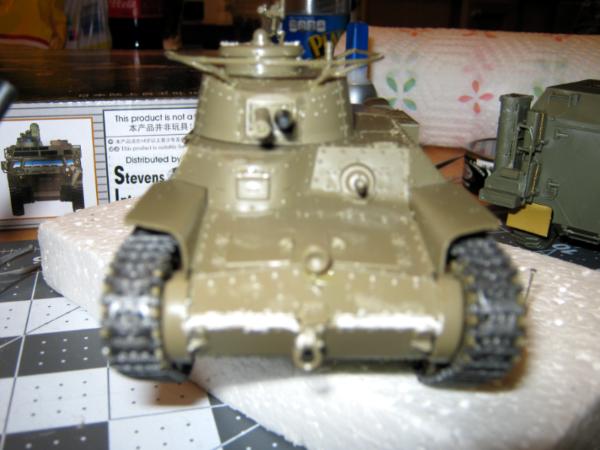
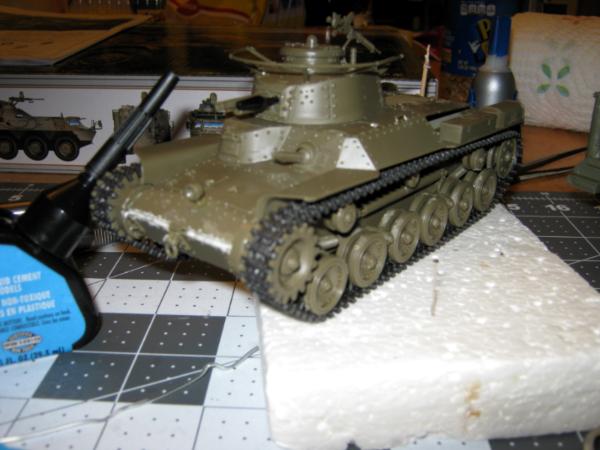
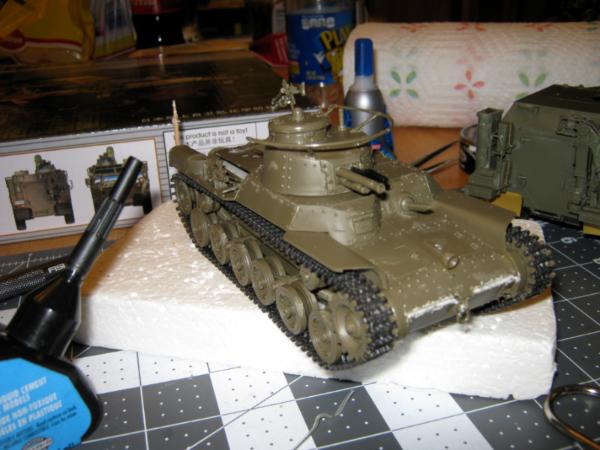
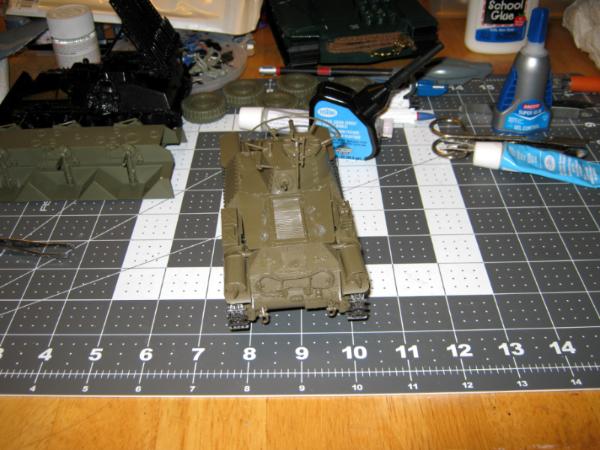
I managed to get the Type 97 Chi Ha assembled. It went off without much trouble (as expected from a Tamiya kit). I'll still have to add some putty to a gap on the front of the vehicle, where the top and bottom hull meets. Here is the bone stock build:
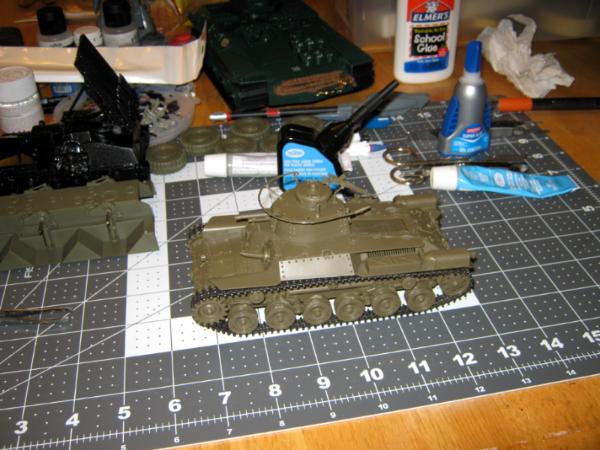
You can see the gap that needs filling here:


I have some stuff on order. One of the items is a Citadel lascannon assembly I found on E-bay for cheap. It's going to be mounted co-ax to the "battle cannon" in the turret. I also want to add some stowage, and maybe make another camo net roll for the vehicle. And of course, gotta have the hunter-killer missile. I haven't decided if I want to use a Citadel missile, or just throw one together from my old G.I. Joe/aircraft model bits. Throwing one together would be the cheaper option.
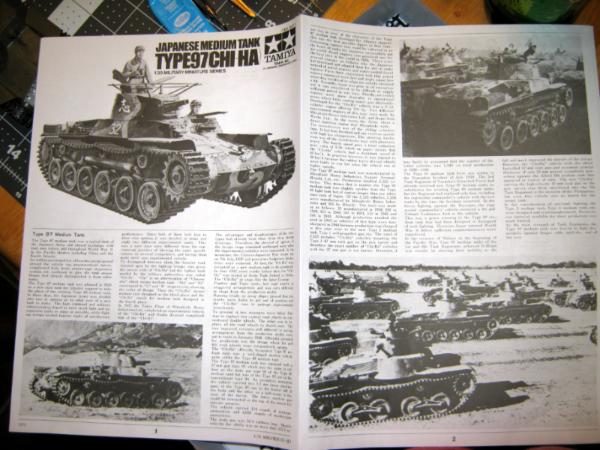
One thing I like about these old Tamiya kits is that they include some history, technical stuff, and organizational info concerning the model in question. I know it doesn't pertain to what I'm building it for. But it's still a nice touch.
I finally got around to starting the Trumpeter JGSDF Chemical Reconnaissance Vehicle. It has a lot of detail for a twenty dollar kit, including photo-etching. At 248 pieces, it's going to be a slower than normal build.
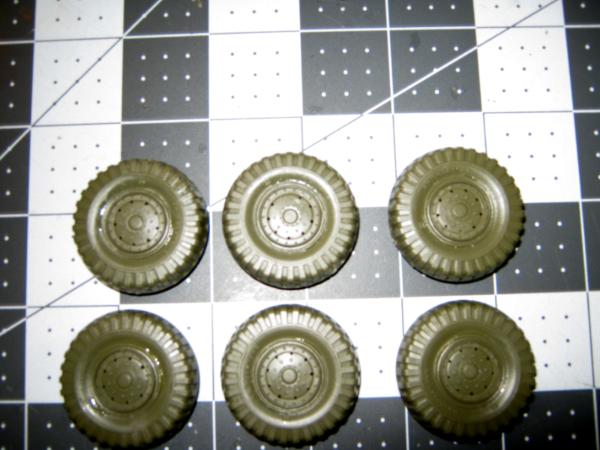
Here is a couple of shots of the wheels assembled. They are replicas of Bridgestone tires (using the name brand is a nice bit of detail). I don't plan on sanding the lettering off of them for the sake of 40k. For, in the grim darkness of the far future, the Imperium chooses Bridgestone. 
Preliminary work on the lower hull and suspension:

And the lower hull completed. I still hate photo-etching, even though the PE on this kit isn't as aggravating as the Bandai Type 61's PE parts:
Supply drop. I also ordered another STC Start BM-8-24/T40 kit, because it has the parts to build a "T30" light tank, the prototype of the T40, which is the chassis that this mobile launcher is based on. I also needed some brown paint and a dry brush.
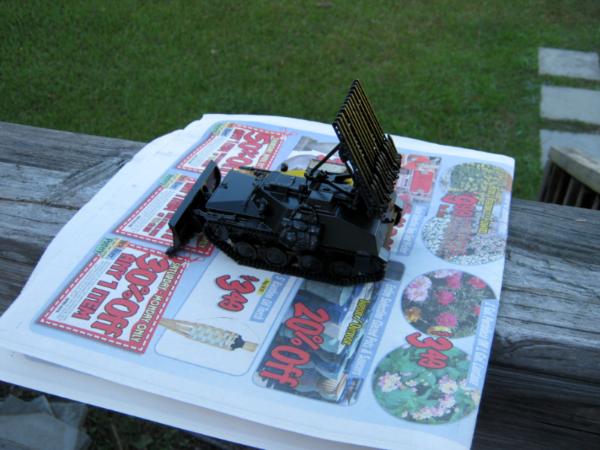
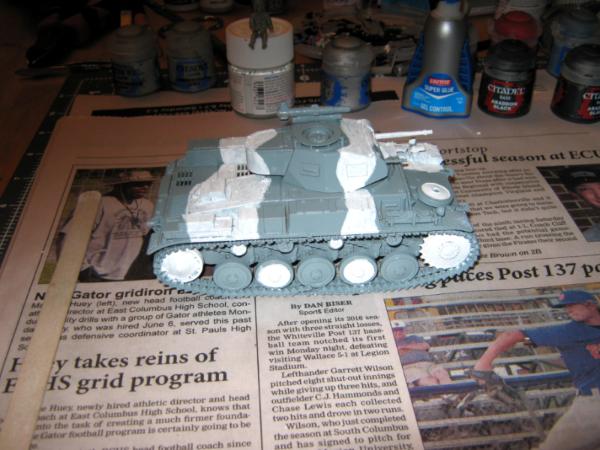
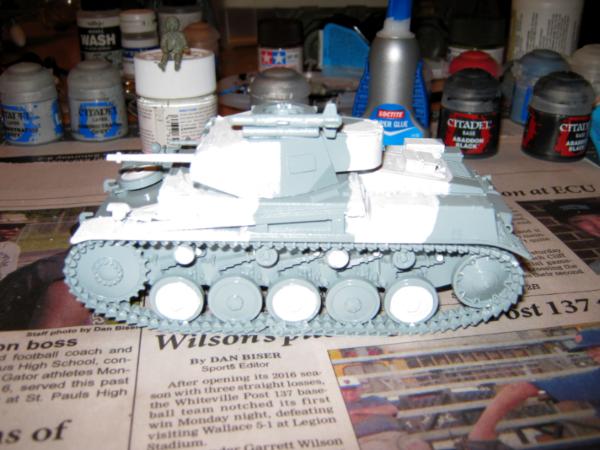
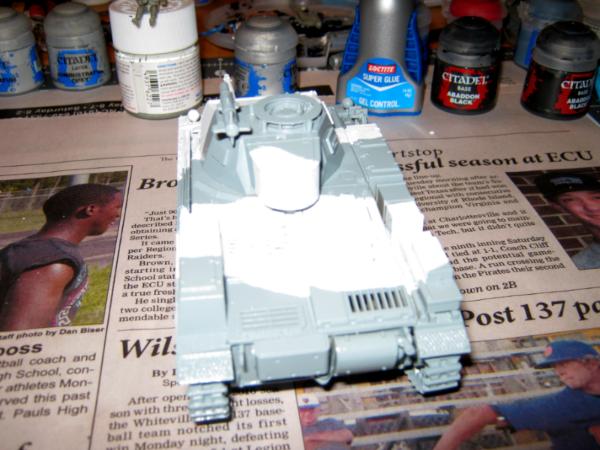
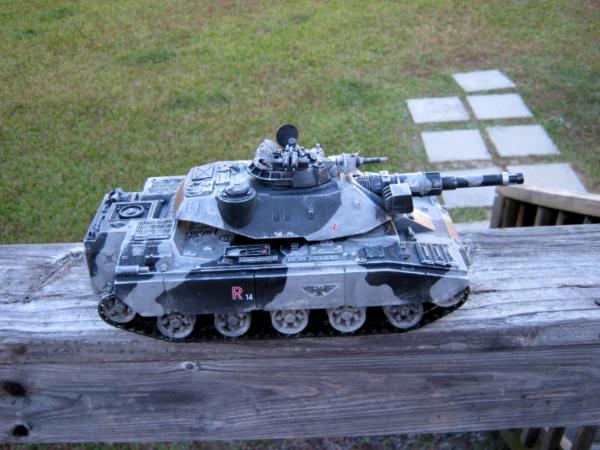
Moving on, I started the winter camo on the Panzer II. It's still a work in progress. With this Tamiya flat white, it'll take several coats to get it close to how I want it.
Pics:
I also managed to get the Phantom's weapons finished, painting wise. Next, I will concentrate on finishing the base coat on the bottom of the fuselage. I'm over half-done with that step:
And finally, I did the detailing on the Wolverine. I still need to find some white Aquila transfers and weather/wash the vehicle. I may also add some mud to the tracks (something I'm strongly leaning toward).

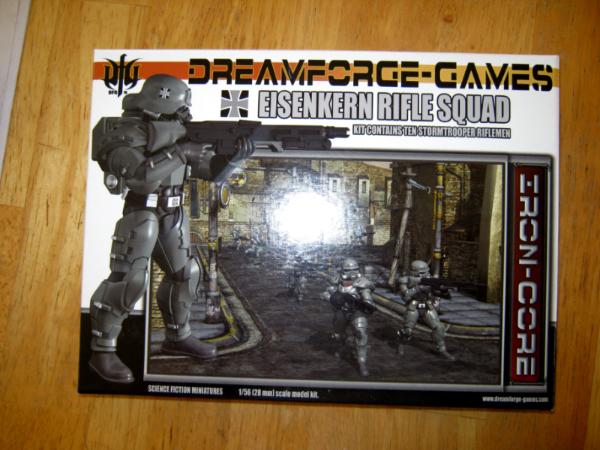
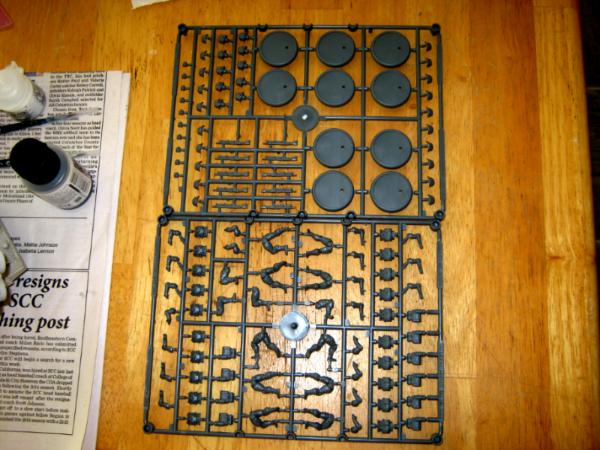
In addition to the lascannon parts for the Type 97, I also have some Necron Compound on the way to finish the "Nightblade" (MOBAT). Also, I have some Eisenkern Stormtroopers on order from Dreamforge's webstore, so I can start some work on the infantry.
Anyway, folks, that's all I have for now. More to come.......
|
Proud Purveyor Of The Unconventional In 40k |
|
|
|
|
2016/11/01 23:53:13
Subject: Oldraven's Little Projects Thread.
|
|
Rogue Inquisitor with Xenos Bodyguards
|
Someone's been a very busy boy!
|
"Your mumblings are awakening the sleeping Dragon, be wary when meddling the affairs of Dragons, for thou art tasty and go good with either ketchup or chocolate. "
Dragons fear nothing, if it acts up, we breath magic fire that turns them into marshmallow peeps. We leaguers only cry rivets!
|
|
|
|
|
2016/11/05 21:19:54
Subject: Oldraven's Little Projects Thread.
|
|
Longtime Dakkanaut
|
Not busy enough, it seems. But some progress has been made. And any is better than none at all, I guess.
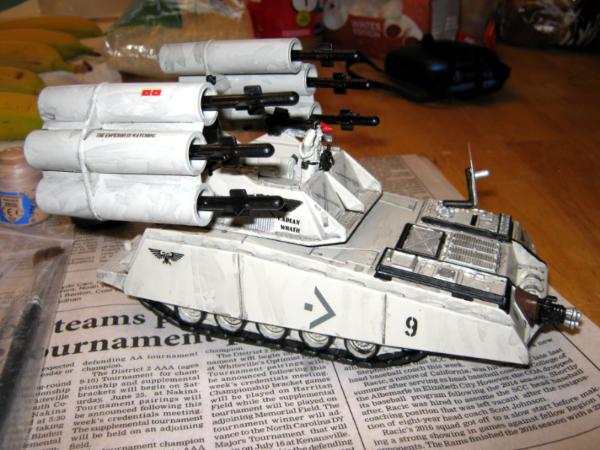
I did get my Necron Compound in. And I went to work drybrushing the MOBAT. I might have gotten a little too crazy with it. But it had the side effect of adding some wear on a few flat areas.

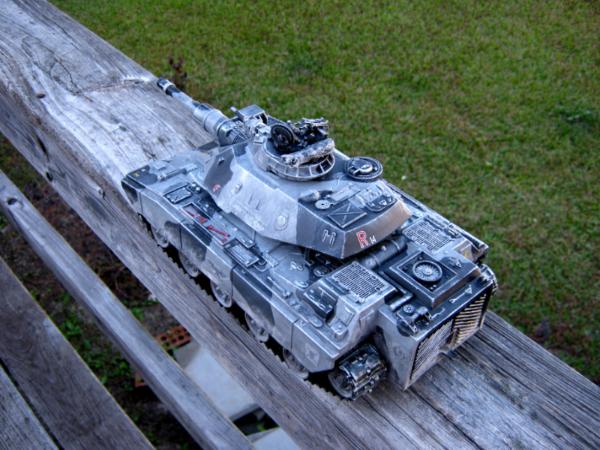
And far as I'm concerned, the "Nightblade" is finished. I might get another MOBAT off Ebay at some point in the future if the price is right.
The lascannon assembly I found on Ebay for cheap. Too bad it's too big for what I had in mind. So, I'll put it aside to use for something else, and go back to the drawing board. I'll figure out something else I can use as a turret co-ax weapon on the Type 97.
I did start painting a bit on the mobile "Katyusha". Still have a ways to go, though.

I'm still waiting on my Eisenkern Stormtroopers. I'm expecting them in this coming Monday or Tuesday.
Well, that's it for now. More to come.
|
Proud Purveyor Of The Unconventional In 40k |
|
|
|
|
2016/11/05 23:10:02
Subject: Oldraven's Little Projects Thread.
|
|
Rogue Inquisitor with Xenos Bodyguards
|
Well, as you will see, the Eisenkern are great miniatures! they come like Tamiya style soldiers, just smaller and you will love the crisp details and options.
Necron compound made that MOBAT look good, so yeah, Nightblade looks great
Katyusha looking to be a real heart stealer of a little tank! 
Oh yeah GW oversized weapons can only ever be main weapons of a 1/35 scale kit, never coaxials, sadly. :(
But all looking good so far, just got paint drop early today, and some miniatures as well, have to snap pics and upload myself.
|
|
This message was edited 1 time. Last update was at 2016/11/05 23:10:29
"Your mumblings are awakening the sleeping Dragon, be wary when meddling the affairs of Dragons, for thou art tasty and go good with either ketchup or chocolate. "
Dragons fear nothing, if it acts up, we breath magic fire that turns them into marshmallow peeps. We leaguers only cry rivets!
|
|
|
|
|
2016/11/11 02:13:16
Subject: Oldraven's Little Projects Thread.
|
|
Longtime Dakkanaut
|
 shasolenzabi wrote: shasolenzabi wrote:Well, as you will see, the Eisenkern are great miniatures! they come like Tamiya style soldiers, just smaller and you will love the crisp details and options.
Necron compound made that MOBAT look good, so yeah, Nightblade looks great
Katyusha looking to be a real heart stealer of a little tank!
Oh yeah GW oversized weapons can only ever be main weapons of a 1/35 scale kit, never coaxials, sadly. :(
But all looking good so far, just got paint drop early today, and some miniatures as well, have to snap pics and upload myself.
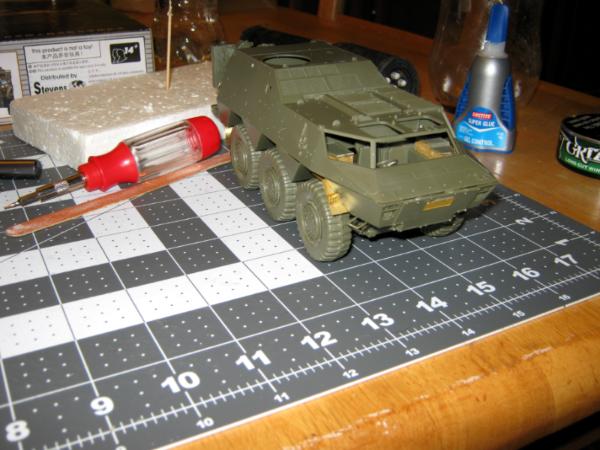
I finally got them in today. The quality is every bit as good as you said. The molding is outstanding.
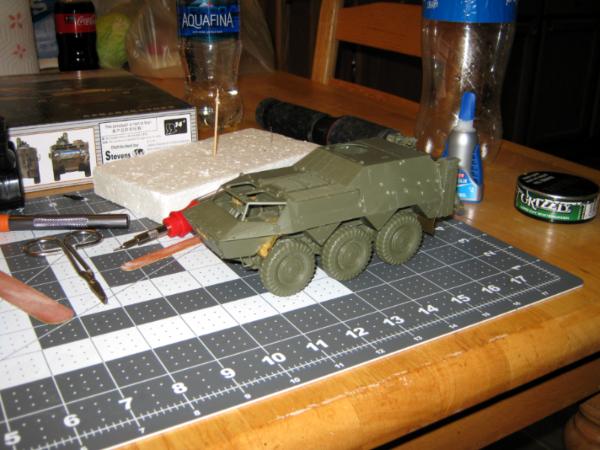
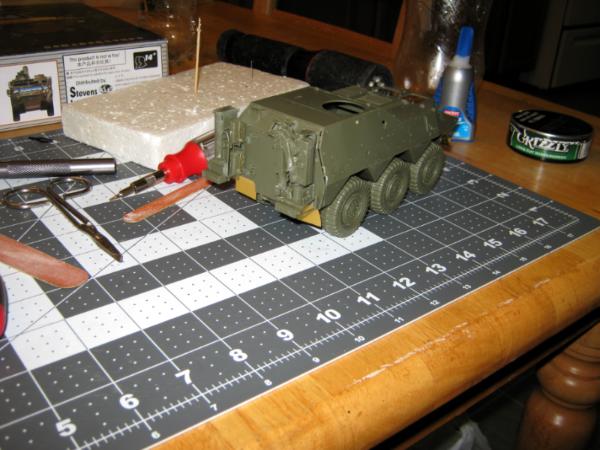
On another note, the Armadillo got a bit more attention after a long period of neglect. It's still very much a work in progress.
More to come.......
|
Proud Purveyor Of The Unconventional In 40k |
|
|
|
|
2016/11/11 02:43:06
Subject: Oldraven's Little Projects Thread.
|
|
Rogue Inquisitor with Xenos Bodyguards
|
Armadillo looks good, and glad you like the stormtroopers, I liked them so much I have three of the heavy weapon sets, the command squad, and the panzerjeagers and loads of regular stormers, and the 3 squads of heavy armored knight troopers, the one leviathan, 3 Hanomags, 1 with rockets, the other turned into the mobile cannon. I could not help myself.
Nice thing about the eisenkern plastics is they work with the Testors' lemong scented glue (non-toxic btw).
|
|
This message was edited 1 time. Last update was at 2016/11/11 02:46:51
"Your mumblings are awakening the sleeping Dragon, be wary when meddling the affairs of Dragons, for thou art tasty and go good with either ketchup or chocolate. "
Dragons fear nothing, if it acts up, we breath magic fire that turns them into marshmallow peeps. We leaguers only cry rivets!
|
|
|
|
|
2016/11/11 11:37:14
Subject: Oldraven's Little Projects Thread.
|
|
Pious Palatine
|
Nice work on the Armadillo.
EDC
|
|
|
|
|
2016/11/11 13:17:31
Subject: Re:Oldraven's Little Projects Thread.
|
|
Lesser Daemon of Chaos
|
Very cool tanks.
|
|
|
|
|
|
2016/11/12 16:59:28
Subject: Oldraven's Little Projects Thread.
|
|
Gargantuan Great Squiggoth
|
Looking brilliant bud, really nice effect on the paint.
|
|
|
|
|
|
2016/11/13 15:55:26
Subject: Re:Oldraven's Little Projects Thread.
|
|
Longtime Dakkanaut
|
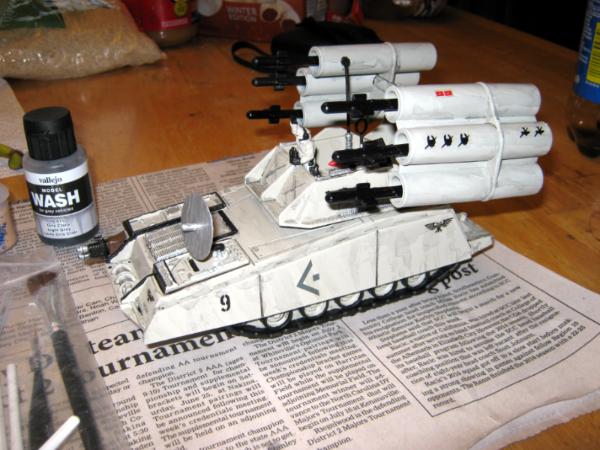
Thank you all for the kind words and feedback. It's always very much appreciated.
On the subject of the Armadillo.......
I was watching a video on Youtube from Andy's Hobby Headquarters channel (I'm a subscriber). It was a vid where Andy assembled and painted up a Tamiya Matilda infantry tank from the North Africa Campaign. In the video, he demonstrated an easy method of applying chipping effects on a desert paint scheme. I decided to try it myself.
I mixed up some Citadel Abbadon Black and Tamiya XF-10 Flat Brown, and applied it to the edges of the vehicle. I also applied to areas where there would be metal friction and minor bump damage (like Sentinel power lifters bumping up against the launch tubes while reloading).
Here is the end results. Feedback and advice is always welcome.

Sorry for the poor lighting. It's overcast here this morning.
That's it for now. More to come.
|
Proud Purveyor Of The Unconventional In 40k |
|
|
|
|
2016/11/13 21:16:55
Subject: Oldraven's Little Projects Thread.
|
|
Rogue Inquisitor with Xenos Bodyguards
|
Looking decent! I would lightly smudge the front of the launcher tubes to show the burn from the rockets leaving. Automatically Appended Next Post: Looking decent! I would lightly smudge the front of the launcher tubes to show the burn from the rockets leaving.
|
|
This message was edited 1 time. Last update was at 2016/11/13 21:17:35
"Your mumblings are awakening the sleeping Dragon, be wary when meddling the affairs of Dragons, for thou art tasty and go good with either ketchup or chocolate. "
Dragons fear nothing, if it acts up, we breath magic fire that turns them into marshmallow peeps. We leaguers only cry rivets!
|
|
|
|
|
2016/11/19 05:18:52
Subject: Oldraven's Little Projects Thread.
|
|
Longtime Dakkanaut
|
shasolenzabi wrote:Looking decent! I would lightly smudge the front of the launcher tubes to show the burn from the rockets leaving.
Automatically Appended Next Post:
Looking decent! I would lightly smudge the front of the launcher tubes to show the burn from the rockets leaving.
In all likelyhood, I'll go that route. But I want to use soot/jet exhaust pigments to simulate that, in order to avoid completely obscuring the chipping work I did on the launch tubes. I hate wasting paint.
I painting up some stuff in the commander's area. But looking at the pic closely, I'll need to do some touch-ups on the vehicle commander:

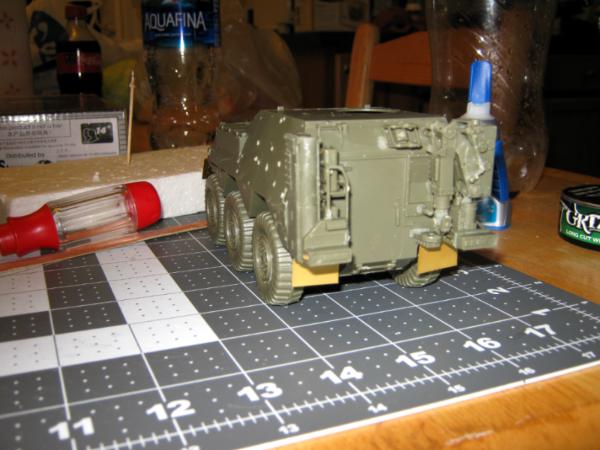
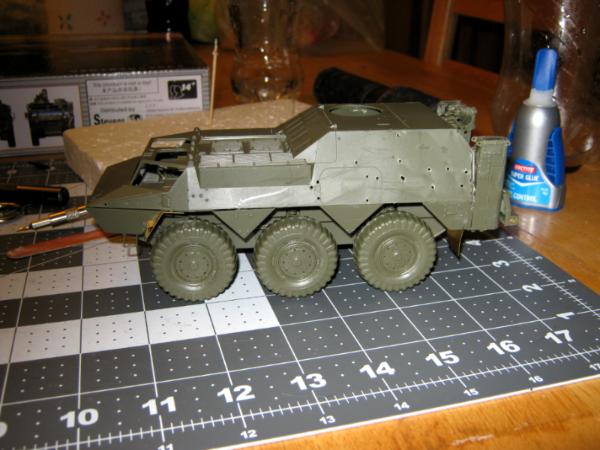
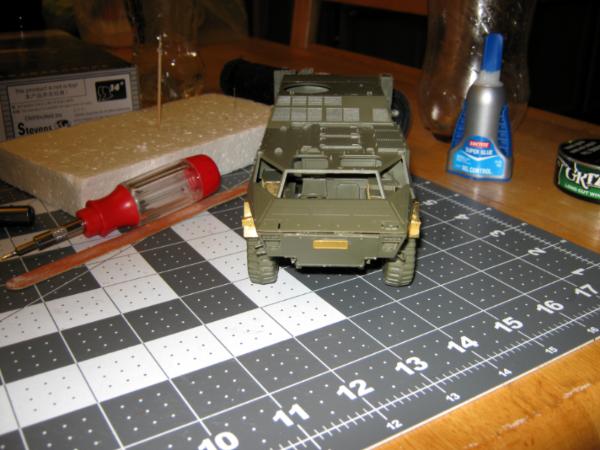
On another note, I've been working a bit more on assembling the JGSDF CRV:
Anyway, that's it for now. More to come later.
|
Proud Purveyor Of The Unconventional In 40k |
|
|
|
|
2016/11/19 21:48:18
Subject: Oldraven's Little Projects Thread.
|
|
Rogue Inquisitor with Xenos Bodyguards
|
Your motor pool is nicely varied!
I hear ya on the soot concept, As long as you are happy with the work, that is what matters.
|
"Your mumblings are awakening the sleeping Dragon, be wary when meddling the affairs of Dragons, for thou art tasty and go good with either ketchup or chocolate. "
Dragons fear nothing, if it acts up, we breath magic fire that turns them into marshmallow peeps. We leaguers only cry rivets!
|
|
|
|
|
2016/11/23 03:51:30
Subject: Oldraven's Little Projects Thread.
|
|
Longtime Dakkanaut
|
|
Proud Purveyor Of The Unconventional In 40k |
|
|
|
|
2016/11/23 03:56:36
Subject: Oldraven's Little Projects Thread.
|
|
Rogue Inquisitor with Xenos Bodyguards
|
So, what will that new weapon on the Chi-Ha be?
|
"Your mumblings are awakening the sleeping Dragon, be wary when meddling the affairs of Dragons, for thou art tasty and go good with either ketchup or chocolate. "
Dragons fear nothing, if it acts up, we breath magic fire that turns them into marshmallow peeps. We leaguers only cry rivets!
|
|
|
|
|
2016/11/23 04:11:25
Subject: Oldraven's Little Projects Thread.
|
|
Longtime Dakkanaut
|
Co-ax lascannon riding sidecar to the "light battle cannon". A little something to supplement the main gun in the light-to-medium anti-armor role. The three heavy stubbers are the supplemental anti-personnel weapons to the battle cannon.
This is going to be primarily a PDF "infantry tank" designed to support the boots on the ground, as opposed to a full-on battle tank like the Leman Russ. In that vein, I may add a Hunter-Killer Missile rail somewhere on the vehicle.
|
Proud Purveyor Of The Unconventional In 40k |
|
|
|
|
|
|