Forum adverts like this one are shown to any user who is not logged in. Join us by filling out a tiny 3 field form and you will get your own, free, dakka user account which gives a good range of benefits to you:
No adverts like this in the forums anymore.
Times and dates in your local timezone.
Full tracking of what you have read so you can skip to your first unread post, easily see what has changed since you last logged in, and easily see what is new at a glance.
Email notifications for threads you want to watch closely.
Being a part of the oldest wargaming community on the net.
If you are already a member then feel free to login now.
Ok, I have some ideas for something involving sewer pipes and sludge pits for Necromunda. Anyone have any advice on how to model pouring liquid effectively?
i guess you should have a kind of "skeleton" for the pouring effect...i used some clear nylon string...any other clear stuff...even a strap of a plastic folder would do...and then onto the water effect...i posted a link on page one here where some guidance is given...
I finally figured out what I am doing, now that there is only a few weeks left.
Ill be making plasma generator out of the stuff you see in the photo..
CD base, bottles, sprews, tp roll. also have papertowel rolls and a few other bits and bobs im going to try and see what i can come up with. If nothing else can make objective markers too.
2016/08/07 06:28:32
Subject: The -=]_=- Terrain Competition Thread -=]_=- LoER Terrain Contest #19 "Let it Flow!"
@ ssisal Never too late, quick effort and you can be looking at something special, that's what these things are all about. I like you choice of materials as well.
Well the race is on I guess, and at the moment we are a one horse race people, Tek has it in the bag at this moment in time, so lets see some action guys.
On this note, I do not want people dropping out. If it is a bit more time needed, due to everyone having a bit of a summer, we may look at giving you a bit more. So speak up guys.
2016/08/07 09:38:45
Subject: The -=]_=- Terrain Competition Thread -=]_=- LoER Terrain Contest #19 "Let it Flow!"
Took your time this round, Tek. Good job again. Can't say more until judging.
Good starting pile there, ssisal.
Mastodon: @DrH@dice.camp
The army- ~2295 points (built).
* -=]_,=-eague Spruemeister General. * A (sprue) Hut tutorial * Dsteingass - Dr. H..You are a role model for Internet Morality! // inmygravenimage - Dr H is a model to us all Theophony - Sprue for the spruemeister, plastic for his plastic throne! // Shasolenzabi - Toilets, more complex than folks take time to think about!
2016/08/09 01:10:57
Subject: The -=]_=- Terrain Competition Thread -=]_=- LoER Terrain Contest #19 "Let it Flow!"
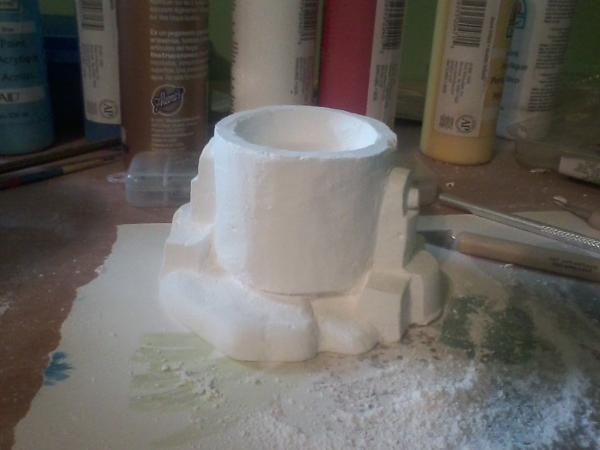
Gonna go with the suggestion of using my crucible's crack to show the flow.
My biggest issue is that the only phone I have regular access to is a potato-quality flipphone camera. 'cause of that, I'm generally loathe to take pictures of stuff.
Would you all mind if I just did my final submission as a video instead? I got more stuff for that. Though I suppose I could see if the webcam has a photo option, or borrow a family member's camera stuff.
GENERATION 8: The first time you see this, copy and paste it into your sig and add 1 to the number after generation. Consider it a social experiment.
If yer an Ork, why dont ya WAAAGH!!
M.A.V.- if you liked ChromeHounds, drop by the site and give it a go. Or check out my M.A.V. Oneshots videos on YouTube!
2016/08/09 09:01:38
Subject: The -=]_=- Terrain Competition Thread -=]_=- LoER Terrain Contest #19 "Let it Flow!"
Anvildude, So long as it's good quality that'll be fine. Remember, if we can't see it, we can't judge it.
Don't leave us guessing if it's a bigfoot or a UFO in the video.
Mastodon: @DrH@dice.camp
The army- ~2295 points (built).
* -=]_,=-eague Spruemeister General. * A (sprue) Hut tutorial * Dsteingass - Dr. H..You are a role model for Internet Morality! // inmygravenimage - Dr H is a model to us all Theophony - Sprue for the spruemeister, plastic for his plastic throne! // Shasolenzabi - Toilets, more complex than folks take time to think about!
2016/08/09 13:53:41
Subject: The -=]_=- Terrain Competition Thread -=]_=- LoER Terrain Contest #19 "Let it Flow!"
made some progress, got the cd's glued to the padding for the base. got the bottle cap glued to the top cd, just heading out the prime the "tanks" then head to bed. if its still light when i get up, ill take a couple WIP shots, if not ill do tomarrow morning before i go to bed. am a night owl.
Thats amazing news about being able to submit a video. I can do those soo much better then photos.
I can take two photos of the same minatures, both look good to me. But to someone else the non-croped whole bunch of extra stuff in background, out in the super bright sunlight about 20' away; looks better then a shot of just the mini in my hand. Id much much rather take a video if thats cool too.
Automatically Appended Next Post: Also trimed a bunch of the sprews to work for beams.. and managed to put together 10 thunderwolf mounts and get them primed and washed, along with assembling the riders and figuring out their weapons, and totally forgetting about arms..
This message was edited 1 time. Last update was at 2016/08/09 13:56:04
2016/08/09 14:54:23
Subject: The -=]_=- Terrain Competition Thread -=]_=- LoER Terrain Contest #19 "Let it Flow!"
Also, remember that you don't have to do just one; you can submit both photos and video. They both have their pros and cons.
A shaky hand can still cause issues for both.
I do prefer photos, as I like to zoom right in and take my time to study everything that is shown.
So if you are thinking of making a video, make sure to not rush it, keep it steady, keep it slow. Make sure we get to see every angle; see the rules in the OP about photos showing all angles.
And we are still waiting for Camkierhi to share his thoughts. It's his round and he has final say.
Mastodon: @DrH@dice.camp
The army- ~2295 points (built).
* -=]_,=-eague Spruemeister General. * A (sprue) Hut tutorial * Dsteingass - Dr. H..You are a role model for Internet Morality! // inmygravenimage - Dr H is a model to us all Theophony - Sprue for the spruemeister, plastic for his plastic throne! // Shasolenzabi - Toilets, more complex than folks take time to think about!
Well, I do not mind video, I think Tek got it about right, couple pics and a nice demo video. As said, we need to see the details as you will get marked down otherwise. But a good quality video can be as good as a string of pics.
I do not want it to become a "thing" that videos are used for the competitions.
Love the entries I am seeing so far, however, it is awful quiet round here. Need to see some WIP shots, even if they are not very good. The main attraction for me about these competitions is that even if you do not finish you have shared in something, gained from seeing others ideas. One persons fail is another persons inspiration. So lets see some action peeps.
I dont plan things out, i get high and let the creative juices flow. I have no plan drawn up. but this is how i think it will go down, after painting the components.
The CD with the bottle cap will be the base.
Then the big water jug will screw into it upside down.
Then i will stack the other 5 cd's and their black padding (2cd's not included in the pictures but they look just the like the other four with the same foam padding they are secured to.
Then I will attach the Platform and Secondary Tank Housing to it.
Then I will attach the four Secondary tanks to the Housing Unit.
Then I will create a framework strong enough to support the weight of 10-20 metal scouts using the Support Beams 1 and Support Beams 2.
Then I will add some Dark Angel Iconography.
Then I will add some Battle Damage
Automatically Appended Next Post:
I want you to interpret this in any way you see fit, but I will be impressed by any interesting, unusual and original interpretation thereof. The main idea is liquid, I want to see flowing liquid. In the last round I experimented with this a little, and I think it is something everyone should try. Bonus goes to unusual material use, but you can use water effect products if you want to. It does not have to be water, any "liquid" will do.
It does not look like much but a bunch of junk at the moment.
I am basing my entire piece on this quote below.
"
Vaporization is an example of what's knows as a first-order phase transition. This means that there's a discontinuous jump in the properties of the material once a certain amount of heat has been put into it; when a liquid boils or evaporates, the density abruptly changes despite the temperature and pressure remaining nearly constant.
Ionization can be classified as a second-order phase transition. There's no sudden change in the properties of the material; instead, it becomes gradually more strongly ionized as the temperature increases.
In order to jump straight from a liquid to a plasma, you need to supply sufficient energy to remove the electrons from the atoms over a large enough volume that the material can be classified as a plasma (see my answer to this question for more details on what constitutes a plasma). The easiest way of doing this is with an extremely powerful, intense laser pulse. Some of the world's most powerful short-pulse lasers are capable of producing power densities of a billion trillion (1021) watts per square centimetre. The electric fields generated by these lasers are strong enough to rip electrons from the atoms in any material, be it solid, liquid or gas, in much less than a trillionth of a second. The material doesn't even get a chance to go through the normal solid-liquid-gas phase transitions; it's completely vaporized and ionized almost as soon as the laser pulse hits it.
So in answer to your question about converting a liquid straight to a plasma, it's possible as long as you have a big enough laser!
"
I will also be using every single spare las gun or cannon i have in my armour(bitboxes) to aim at the central core, to get the "water" inside hot enough to fill the top four tanks with plasma. I intend to fill them with different colors of plasma, (all four blacklight/bluelight colors i have atm blue, green, yellow, pink) so even if ya all dont like it, I still have something cool that i think is cool to put out one the table here for games, and leave in my garage that is lit all night either in blue or black lights so it will look amazing as a shelf piece while im out there.
It is far far larger then just a CD. Sorta. I will try my best to use the support beams in such a way that it stands upright and does not extend at the base, more then the cd size.
Due to weight and stability (my neighbor is a train yard) issues casued by excessive vibrations the location of the tanks may have to be swapped around or I have to extend the base off the CD size. I spent all night trying to just dryfit the tanks together.
I have every single brush i own coated in a thick layer of that masters brush cleaner as well.. They are all really beat up and ive only got 2 that are new/not damage due to me never learning proper brush control.
The amount of idiots guides to painting/tutorials out there on youtube is crazy. I didnt think about looking for anyting until recently someone pointed out i needed to thin the paints.. and take better care of the brushes.. while i was tinkering i watched hours of videos on how to's. very educational.
2016/08/11 23:27:34
Subject: The -=]_=- Terrain Competition Thread -=]_=- LoER Terrain Contest #19 "Let it Flow!"
Well there you go, Ssisal, you've already improved your modelling.
Mastodon: @DrH@dice.camp
The army- ~2295 points (built).
* -=]_,=-eague Spruemeister General. * A (sprue) Hut tutorial * Dsteingass - Dr. H..You are a role model for Internet Morality! // inmygravenimage - Dr H is a model to us all Theophony - Sprue for the spruemeister, plastic for his plastic throne! // Shasolenzabi - Toilets, more complex than folks take time to think about!
I have learned a thing! My phone is now bluetooth'd to my computer, meaning I'll have a much easier time transferring photos- means more potatoe-quality wip pics for you!
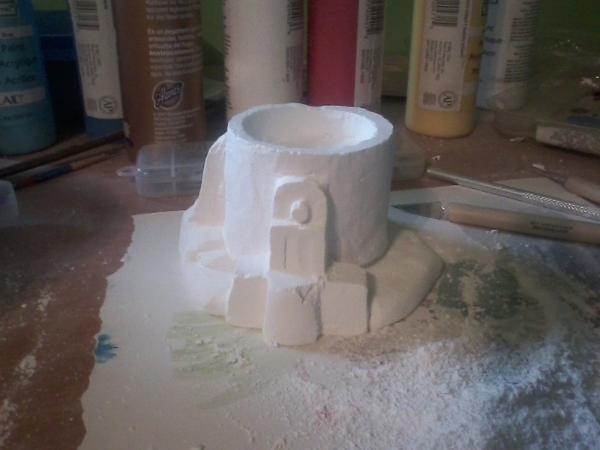
Carving is coming along. I'm really super digging this material and process, and I think I'll be using it for future projects as well.
This is the front of the cracked crucible- that blob of uncarved plaster on the front will be the rivulet of leaking metal. It's gonna be a delicate bit, so I'm trying to leave it as bulky as possible until I get to it.
Frontside
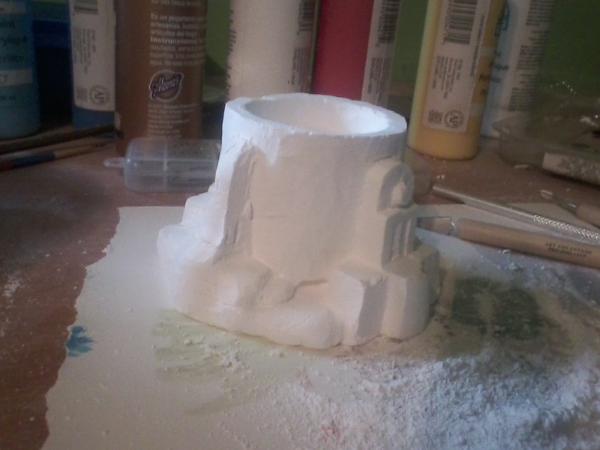
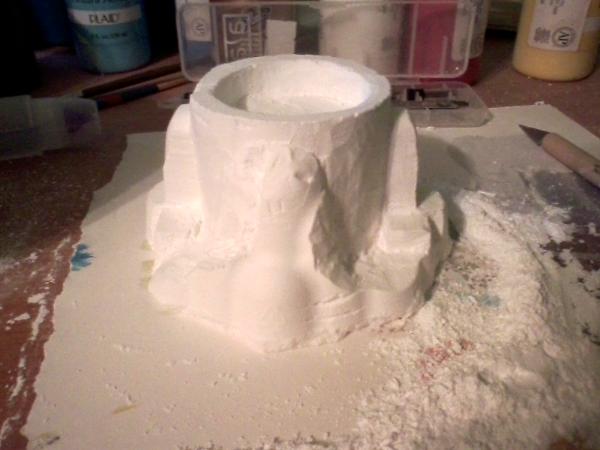
The back is rather smoother right now, and I'm starting to do a little undercut on it.
I got a question for you all, though. How do you think I ought to seal this? Will I need to? It's basic carving plaster, so I'm thinking a coat of PVA might work, but I'm wondering if just painting it would be alright as well.
GENERATION 8: The first time you see this, copy and paste it into your sig and add 1 to the number after generation. Consider it a social experiment.
If yer an Ork, why dont ya WAAAGH!!
M.A.V.- if you liked ChromeHounds, drop by the site and give it a go. Or check out my M.A.V. Oneshots videos on YouTube!
2016/08/17 00:17:05
Subject: The -=]_=- Terrain Competition Thread -=]_=- LoER Terrain Contest #19 "Let it Flow!"
Sealing: Probably a good thing, as plaster tends to soak up quite a bit of paint, which would mean a lot of paint is required for a good "first" coat.
PVA would therefore be a cheap first coat.
Mastodon: @DrH@dice.camp
The army- ~2295 points (built).
* -=]_,=-eague Spruemeister General. * A (sprue) Hut tutorial * Dsteingass - Dr. H..You are a role model for Internet Morality! // inmygravenimage - Dr H is a model to us all Theophony - Sprue for the spruemeister, plastic for his plastic throne! // Shasolenzabi - Toilets, more complex than folks take time to think about!
2016/08/17 20:48:52
Subject: The -=]_=- Terrain Competition Thread -=]_=- LoER Terrain Contest #19 "Let it Flow!"
As I've been playing about with "water" on my latest model I thought I'd share my findings here before it's too late to help anyone; I do have a full tutorial in the works, but by the time that's done (the model is still in progress at the moment) it really will be too late.
I tried out a few things I had to hand to see what produced a good water effect. These are my thoughts:
Nail polish - I have some nice deep blue stuff, and even though it produces a nice gloss finish, it's just too BLUE for water, and (even more importantly) is opaque; which just doesn't look like water. Could be sculpted as it dries though, allowing for the creation of waves etc.
Thick paint - The few pots of acrylic paint I have (those that know me, know I typically use Enamel paint), have become very thick. These are Revell Aqua color paints.
So I tried out the blue one, and it was thick enough to sculpt waves and ripples, but suffered the same problems as the nail polish; being opaque and too blue.
Paint and varnish mixture - To try and make a transparent "water" I mixed various quantities of paint (both enamel and acrylic, but not at the same time) and clear varnishes. While these did produce transparent coatings they were no longer thick enough to hold their shape. Paint being paint it'll shrink to a thin coating and would therefore take far too many layers to fill in where I wanted the water to fill.
Glaze medium - This is where a thick artist's medium comes in. I picked up some when I was experimenting with paint effects for my Wave Serpent (see my army blog for this).
The one I have is a Daler-Rowney Glaze medium (acrylic). This comes in both matt and gloss finishes, and while gloss would be preferable for water, I only had the matt flavour and thought I'd see if it'd work.
I mixed in tiny amounts of green (lower layer) and blue (all subsequent layers) and then spread this mixture over a blue basecoat.
I'm working on a very small scale so a deep blue is the look I'm after, for the larger scales you'll likely be working on, a lighter basecoat would probably be better (possibly even as far as white, letting the blue tint of the medium mixture add all the colour you need).
I added the medium mixture in thin(ish) coats and allowed to cure fully before adding the next coat. I found in one of my tests that if I added the next layer before the previous had fully cleared, that layer never cleared, leaving it cloudy at a depth.
Even so, it would take several hours, to overnight, to clear fully. Thinner coats are quicker, but you need more coats...
At this stage, after basecoat, green layer, 3 blue layers, and one gloss varnish coat (as I'm using a matt medium), it looks like this:
Notice that it's still cloudy at the bottom right of this photo.
This will then need some white details adding for breaking water of waves and ripples, and a final gloss coat.
Keep at it people.
Mastodon: @DrH@dice.camp
The army- ~2295 points (built).
* -=]_,=-eague Spruemeister General. * A (sprue) Hut tutorial * Dsteingass - Dr. H..You are a role model for Internet Morality! // inmygravenimage - Dr H is a model to us all Theophony - Sprue for the spruemeister, plastic for his plastic throne! // Shasolenzabi - Toilets, more complex than folks take time to think about!
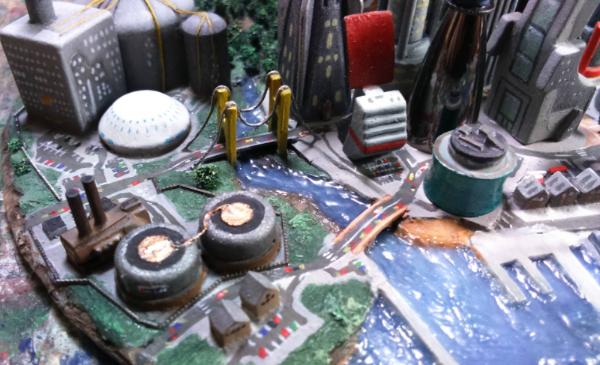
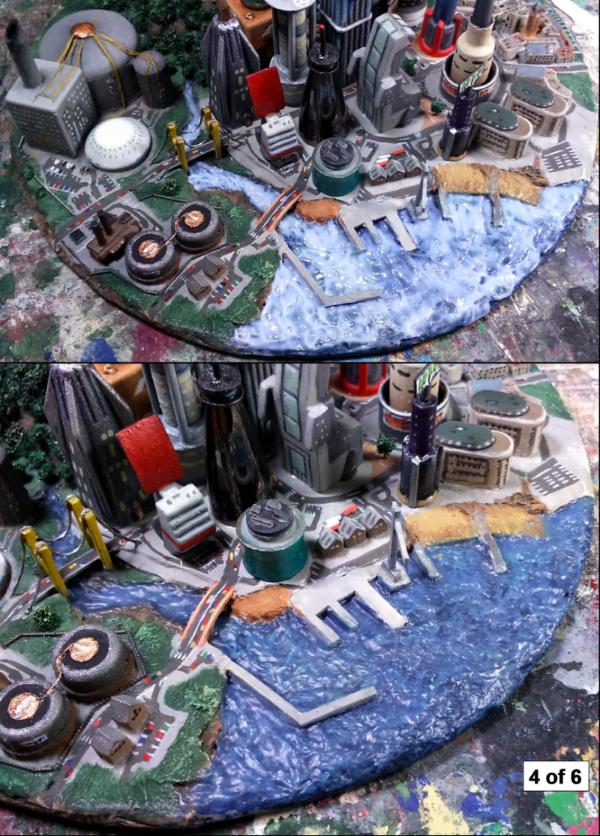
And so, minus the boats and a painted harbour, this is how it was done:
This is for small scale water, really small, you may think that your miniature gaming pieces are small, but that's just peanuts to this...
The scale you are working at is important for the colour of the water.
At very small scales, such as this*, the water will appear quite blue.
At smaller and smaller scales (that is 1:a smaller number, e.g. 1:56, 1:48, 1:12...), the water will be more and more colourless.
*I've not yet worked out the scale of this model, but when a car is only just over a millimetre you know it's small.
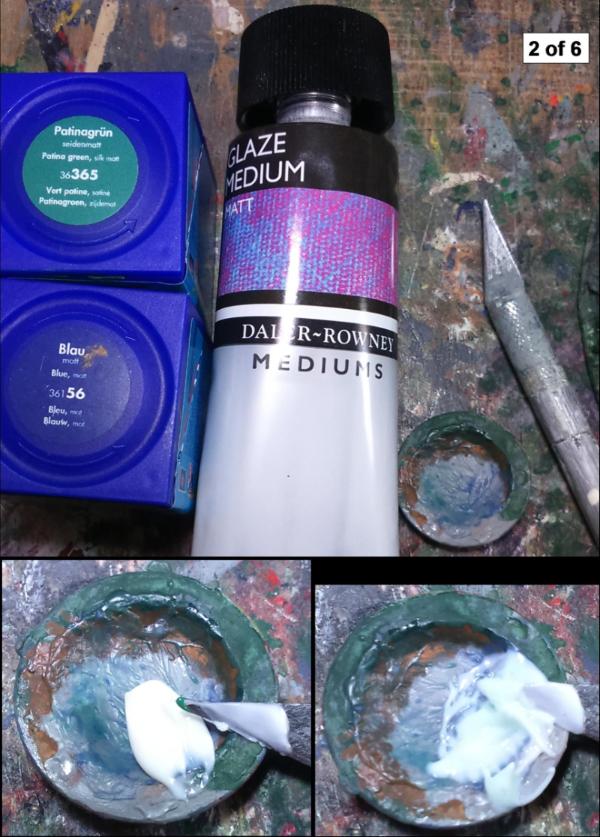
1. The base area, modelled with tissue/PVA, was painted with a dark blue then highlighted with a light blue.
This is just a base coat which lends it's colour to the finished water (as it will be transparent), and the highlighting is just to give a little variation in tone.
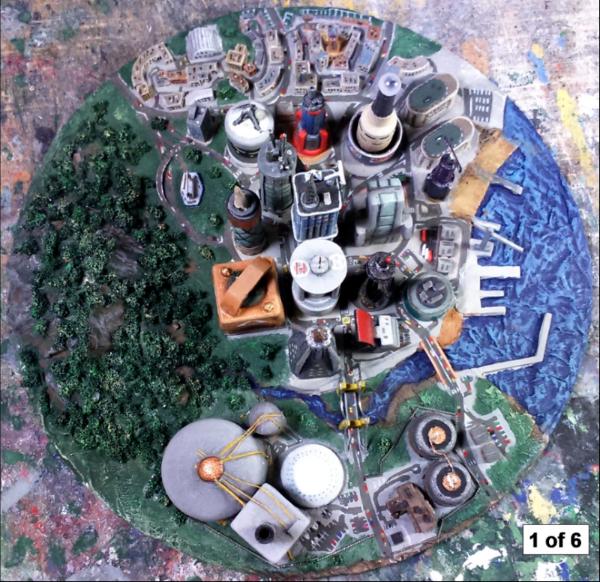
2. This is all that I used to create the water:
A glaze medium, this is the bulk of what will become the water. A gloss finish would be ideal, but I only had a matt variety to hand. Therefore the finished water needed a gloss varnish.
You want something that will cure with very little shrinkage (unlike paint) and will be transparent. Look for mediums rather than varnishes.
Acrylic paint, as the medium was acrylic these needed to match so that they could be mixed. Both green and blue (see later).
Something to mix in, and my universal poking device (a blunt scalpel).
These last photos show the relative quantities of medium to paint (see the tiny dot on the tip of the blade), and the final colour of the mixture; a very slight tint to an otherwise white medium.
3. The mixture was spread over the water area.
The first pass was with a green mixture to give the final water a slight greenness; adding to the variety in tone.
You will also notice that it’s applied unevenly, this helps to give swirls in the finished water.
Once dry you have a slightly green, transparent coat over the blue base.
It’s important to make each layer reasonably thin as they will dry quicker.
And it’s important to let each layer fully cure before adding the next, or you may end up with a cloudy lower layer.
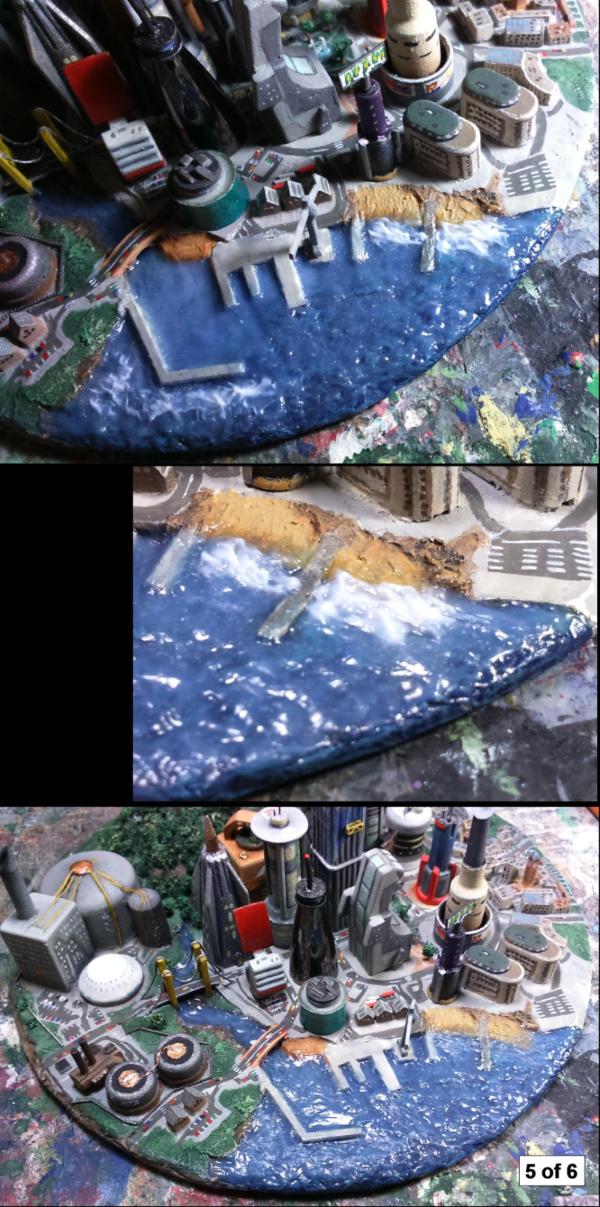
4. Three progressively smoother coats of blue-tinted medium were then spread over the water area.
Each time I made sure to keep the edges where the “water” met the land, neat.
Removing excess “water” after it has cured leads to unsightly differences in the surface of the water.
I continued to tidy the edges as the medium cured, as it was often too “wet” at first.
A wet brush did help initially to smooth out the parts that didn't behave when poked with my poking device.
Areas that were further out to “sea” were modelled with waves, while inside the harbour it was kept relatively smooth.
5. The final touches was to add patches of larger waves outside the harbour and at the beach.
The ripples and waves stand out much more once coated with a gloss varnish (as seen here).
6. The last thing to do was add some white highlights, via dry-brushing, to the peaks of the largest waves, and one last gloss varnish.
Getting the translucency to show up in photos is tricky, and I've not found a particularly good way to do this yet.
Hope that proves interesting and/or useful to someone.
Mastodon: @DrH@dice.camp
The army- ~2295 points (built).
* -=]_,=-eague Spruemeister General. * A (sprue) Hut tutorial * Dsteingass - Dr. H..You are a role model for Internet Morality! // inmygravenimage - Dr H is a model to us all Theophony - Sprue for the spruemeister, plastic for his plastic throne! // Shasolenzabi - Toilets, more complex than folks take time to think about!
Tek Thornison wrote: Strange situlation. What happen with all others, who join competition?
Just finished up today, I'd have done more WIP photos but I have literally just sat down today for a marathon session finshing it off after no work for a month lol. I haven't linked the gallery because the OP says 'FINAL pictures should not be shown here.'
This message was edited 1 time. Last update was at 2016/08/23 19:04:31
Totally forgot about this contest :/ Did a speed build in a couple of hours just now and am waiting on the PVA to dry. should be able to paint tomorrow night after work.
Ended up doing an entirely different build than my original idea, so the liquid I'll be modelling is BLOOOOOD. anyone tinted WS water effects before? that's all I have on hand at the moment. I'll try some test blobs tonight using acrylics and inks and such to see what works out. if anyone has tinted before let me know!
Oh, or resin maybe? I have some, but it's not clear resin, so don't know how that'd work...
If the water effects and paints/inks are water-based then they should mix fine.
Obviously a test is always worth it.
You will also need less paint than you will expect, although blood is (thicker) more opaque than water anyway, so more paint will be needed for that.
Resin would likely need compatible colouration stuff. Certain paints may affect the curing of the resin.
Probably not worth it for non-clear resin, that little bit of transparency makes all the difference to liquids in model form.
Good luck
Mastodon: @DrH@dice.camp
The army- ~2295 points (built).
* -=]_,=-eague Spruemeister General. * A (sprue) Hut tutorial * Dsteingass - Dr. H..You are a role model for Internet Morality! // inmygravenimage - Dr H is a model to us all Theophony - Sprue for the spruemeister, plastic for his plastic throne! // Shasolenzabi - Toilets, more complex than folks take time to think about!
Welp my original concept just isn't coming together. Sadly. I really want to do justice to Pratchett's world, as he is my favorite author. Anyway putting it on the backburner maybe my sculpting skills will be up to it someday =/
Meanwhile, I needed a piece of terrain for Malifaux anyways so I started throwing this together yesterday. Good little western theme water barrel/rain catcher.
Anyway:
^^ making use of Dr H's excellent making wood planks idea (again)
put some coffee stirrers around a couple of lids to make the barrel. Added plasticard to make the copper band holding them together.
slightly blurry pic of whole thing, with the ladder (sprue and toothpicks)


 Frontside
 Backside