| Poll |
 |
|
|
|
| Author |
Message |
|
|
|
|
|
Advert
|
Forum adverts like this one are shown to any user who is not logged in. Join us by filling out a tiny 3 field form and you will get your own, free, dakka user account which gives a good range of benefits to you:
- No adverts like this in the forums anymore.
- Times and dates in your local timezone.
- Full tracking of what you have read so you can skip to your first unread post, easily see what has changed since you last logged in, and easily see what is new at a glance.
- Email notifications for threads you want to watch closely.
- Being a part of the oldest wargaming community on the net.
If you are already a member then feel free to login now. |
|
 |
2018/02/26 18:04:30
Subject: Guardsman eyes and boots
|
|

Stalwart Ultramarine Tactical Marine
|
Hello,
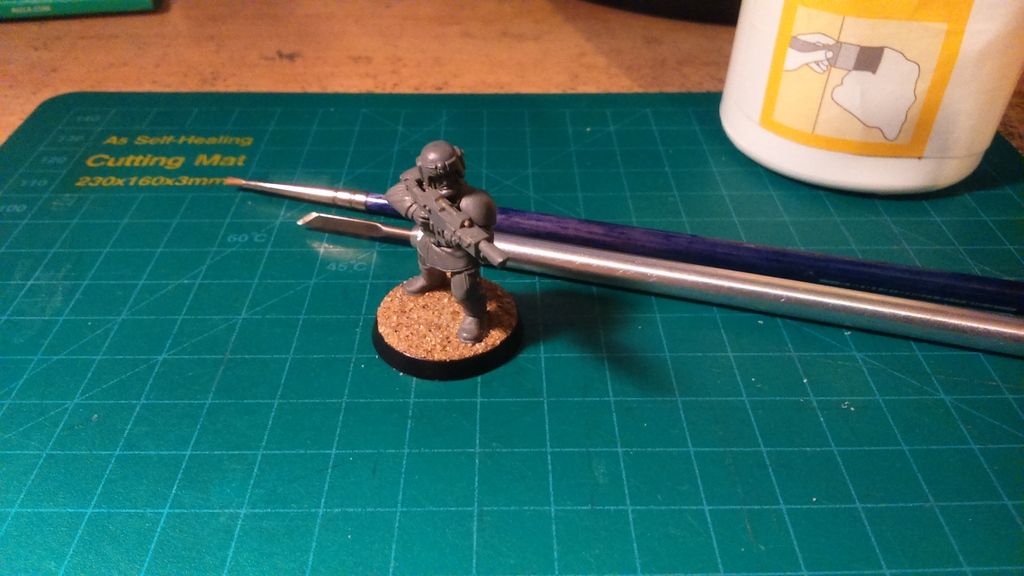
I like to paint and started with w40k last year, but I can't figure out a reliable way to paint the eyes. Needle maybe? How are the "pro painters" actually doing it? I've seen 10000 tutorials, but I can't get the results. Also, any other comments you have please let me know! I've painted 2 troops and the 3rd tallarn one is incoming.
The other question is how to make sure boots don't get too much sand and glue, if you look closely you see the sand from the base is covering up boots, not sure I like it.
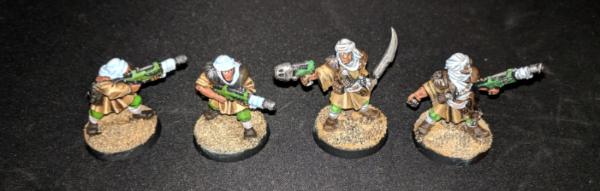
Thanks!
|
|
This message was edited 1 time. Last update was at 2018/02/26 18:09:11
|
|
|
 |
|
2018/02/26 18:08:26
Subject: Guardsman eyes and boots
|
|

Powerful Phoenix Lord
|
I don't. You almost never see them, and I'd say easily 90% of the people who paint them paint them poorly and they massively detract from the miniature rather than adding anything. I use dip, so a small amount settls around the eyes, but that's it.
I'd argue it's a waste for most people.
|
|
|
|
|
2018/02/26 18:16:37
Subject: Guardsman eyes and boots
|
|
Stalwart Ultramarine Tactical Marine
|
 Elbows wrote: Elbows wrote:I don't. You almost never see them, and I'd say easily 90% of the people who paint them paint them poorly and they massively detract from the miniature rather than adding anything. I use dip, so a small amount settls around the eyes, but that's it.
I'd argue it's a waste for most people.
I see, it's definitely a waste for me, all my soldiers have aim problems.
|
|
|
|
|
|
2018/02/26 18:45:20
Subject: Guardsman eyes and boots
|
|

Dakka Veteran
|
I paint lenses on Marines and stuff, but eyes on bare-chested figures seem like too much effort for too little result. I did paint some lipstick on one of my Witch Elf into Aeldari conversions though.
|
|
|
|
|
|
2018/02/26 18:50:16
Subject: Guardsman eyes and boots
|
|
Blood-Drenched Death Company Marine
|
Eyes are tricky and I'd agree than on horde troops in something like a guard army, it can be unecessary given how rarely it'll be noticed.
If you're not planning on slopping wash all over the face/head, then I've found it's quite effective to paint the eyes first, do them blackand then add white to the edges. Trying to zero in to put the dot in the right place can be risky, especially on a fully painted face where the margin for error without re-painting is very slim.
As for how the pros do it... I've seen incredibly fine eye detail on 28mm figs that people swear they've done with a no.2 brush! Generally they're using a combination of the right tools (magnifier, well cared for brush that holds an immaculate point), natural talent and years of honing their skills.
|
|
|
|
|
|
2018/02/26 21:39:14
Subject: Guardsman eyes and boots
|
|

Longtime Dakkanaut
|
for the eyes, dont bother with it on the troops. save that for hq or elites. just paint the skin tone and give a flesh wash over the whole face and when that has dryed, a 2nd one on just the eyes and mouth.
the way i paint eyes is, after the skin tone is painted, i do the whole eye black. then i add white but i dont fill out the whole black section. that way i have the outline for the eye.
next i paint 1 very, very thin black line from the top of the eye to the bottom of the eye to represent the pupil. that leave just enugh white left so that the whole thing looks like a normal eye.
should i get any black paint from the pupil line on the face then it is so thin that i can easly paint over it whit my skin tones. (and i use the smallest brush GW sells for this)
as for the basing material on your feet, no way to avoid that exepct gluing the model on top of the basing material with super glue or pva glue.
|
|
This message was edited 2 times. Last update was at 2018/02/26 21:40:20
darkswordminiatures.com
gamersgrass.com
Collects: Wild West Exodus, SW Armada/Legion. Adeptus Titanicus, Dust1947. |
|
|
|
|
2018/02/26 21:41:17
Subject: Guardsman eyes and boots
|
|
Stalwart Ultramarine Tactical Marine
|
craggy wrote:I paint lenses on Marines and stuff, but eyes on bare-chested figures seem like too much effort for too little result. I did paint some lipstick on one of my Witch Elf into Aeldari conversions though.
Allright from the next batch I'll leave one with no explicitly painted eyes and compare him with other to see which is best. Sounds reasonable not to over do, although I'd really like to try and nail it sometime.
sockwithaticket wrote:Eyes are tricky and I'd agree than on horde troops in something like a guard army, it can be unecessary given how rarely it'll be noticed.
If you're not planning on slopping wash all over the face/head, then I've found it's quite effective to paint the eyes first, do them blackand then add white to the edges. Trying to zero in to put the dot in the right place can be risky, especially on a fully painted face where the margin for error without re-painting is very slim.
As for how the pros do it... I've seen incredibly fine eye detail on 28mm figs that people swear they've done with a no.2 brush! Generally they're using a combination of the right tools (magnifier, well cared for brush that holds an immaculate point), natural talent and years of honing their skills.
Magnifier and black with white contour, next batch will also have one done this way! Thanks for the suggestions!! Trial and error is painful but tends to work in the long run, hopefully also for me.
|
|
|
|
|
|
2018/02/26 21:53:24
Subject: Guardsman eyes and boots
|
|
Ship's Officer
|
paint the skin tones first, the black for the eyes with small detail brush, then white over the black leaving a thin edge of black, then black dot in the middle, touch upon around the eyes with skin tone, then the hair/facial hair/brow, lastly a flesh wash to blend it in.
|
|
|
|
|
2018/02/26 22:50:47
Subject: Guardsman eyes and boots
|
|
Stalwart Ultramarine Tactical Marine
|
 Big Mac wrote: Big Mac wrote:paint the skin tones first, the black for the eyes with small detail brush, then white over the black leaving a thin edge of black, then black dot in the middle, touch upon around the eyes with skin tone, then the hair/facial hair/brow, lastly a flesh wash to blend it in.
Thanks for the details!!! I definitely had wrong the white over the black initial setup, let's see if I can get this right..
|
|
|
|
|
|
2018/02/26 23:50:21
Subject: Guardsman eyes and boots
|
|
Xeno-Hating Inquisitorial Excruciator
London
|
Good luck! Please post your results.
I tried painting eyes on some IG once ... damn, those were some creepy arsed minis .... Had to cover them up with skintone and wash ... felt like they were staring at me ...
|
|
|
|
|
2018/02/27 00:06:07
Subject: Re:Guardsman eyes and boots
|
|
Kid_Kyoto
|
I don't paint all the eyes, but I'll usually do it on a sarge or a character or someone otherwise special.
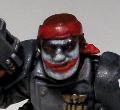
I have a Army Painter Precise Detail brush that I keep myself for using on a regular case basis even when I should. It's pristine and reserved SPECIFICALLY for eyes and small writing (like the writing on a GK shoulder pad). I still have the little plastic tube thing that goes on it, and it gets stored tip-up in one of the spots in my paint organizer made specifically for that.
All of that detail is important, because you need what's basically a brand new brush to do eyes well. I'll use fraying brushes with curling tips for things I probably shouldn't, but there's just something (uncanny valley) about eyes that, if you screw them up, are probably better off just not being painted at all.
I'll go with a horizontal line of white across the "ball" of the eye, and then I take a vertical line down in the middle of the eye (or slightly offset if I'm trying to get him to look in direction), and then i clean up above/below the eye with a flesh tone as needed.
An example of how it turned out:
That's not the best picture of the eye, but hopefully it's representative.
|
|
|
|
|
|
2018/02/27 01:33:37
Subject: Re:Guardsman eyes and boots
|
|
Drop Trooper with Demo Charge
|
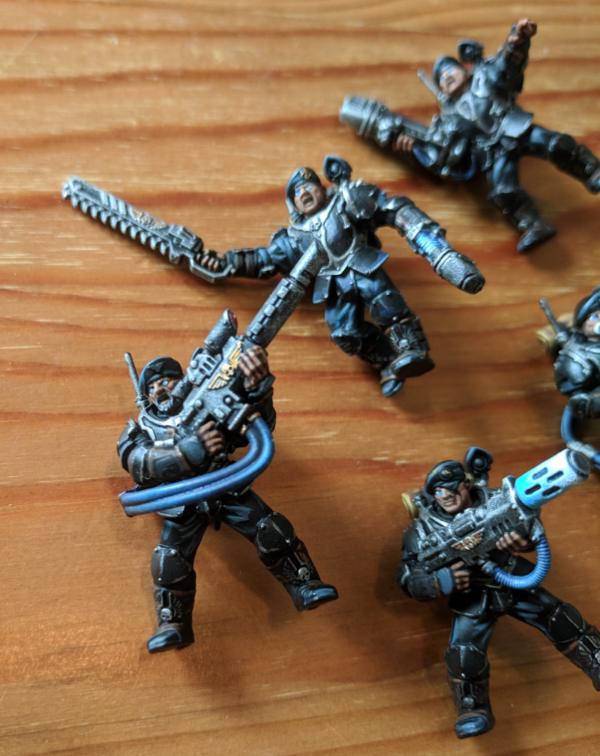
The best way I've found to keep the feet fairly clean is a bit time consuming but I think its worth it in the end. First a pic of the tools I use and a guardsman I based recently so you can judge if its worth reading the rest of this.
The brush is an old fine detail brush trimmed down to stiffen the bristles, The blade I think is a marking scalpel blade and the glue is Diall decorators PVA.The only things not in the pic are the basing material which is just sand from GW. And a cheap size 3 boldmere long handled round bristle brush(for applying glue).
First you'll want to thin your pva with some water. This servers a few purposes, first it means that any small bits of glue on the boots and stuff will be so thin they won't show once it dries and since its thinner it will be easier to spread it in and around the feet without getting glue on the model in the first place and thirdly you'll be sealing the entire surface with the thinned pva at the end and you don't want it so thick that it obscures the detail of the sand. If you do get any larger pools of glue on the model just take a clean brush and soak it up then a damp brush to clean any residue off the area.
You'll want your pva to be about the same consistancy as double cream but this will probably make the pva pull together and not spread properly when you apply it as the surface tension can be too high with thinner consistancies. Just mix a drop of washing up liquid with your glue and it will spread properly. (I use a decorators pva which is thinnner than normal pva so I just add a drop of washing up liquid.)
Once you've glued the sand to the base you want to go around the feet and any other areas touching the base with a small stiff brush and remove any sand clinging to the model but you don't want to touch the area where the feet meet the base as may suck up the glue and ruin the bond the sand has with the base or you may get clumps of sand sticking to the bristles and pulling off the base or clumping on the base. Instead take a small piece of metal like the marking scalpel blade you see in the picture above and gently press down any rogue pieces of sand that are sitting high or any clumps around the feet. This all sounds like it'll take an age but its actually a pretty quick process.
Once your happy let it sit for at least an hour and then you can seal the base. What you're looking to do her is to essentially flood the sand with the thinned pva, I usually start in the middle of the base with a good couple of brush fulls of pva and start working it out to the edges as I add more glue. You'll want to use a light touch as you can easily dislodge some of the sand if you're too heavy handed luckily the sand will help you here as it will pull the glue from your brush and into the surrounding areas. Just make sure that you don't go back over your own work too much as the new layer of glue will soften the original layer. If done right what you should see at the end of this stage is just the very tips of the sand poking out of the glue.
You can repeat this final step a couple of times to ensure all the sand stays in place but so far I've found once is enough and i can scrape my nail across the finished piece without removing any of the sand.
|
|
|
|
|
2018/02/27 10:18:09
Subject: Guardsman eyes and boots
|
|

Regular Dakkanaut
|
An easy way to paint eyes is to fill the eye with white, paint a black stripe down the middle and clean up the skin around the eye afterwards. Many people try to do this the hard way by putting a dot in the middle of the eye which often leads the miniature to stare weirdly or look cross-eyed.
|
|
|
|
|
2018/02/27 11:00:00
Subject: Guardsman eyes and boots
|
|
Stalwart Ultramarine Tactical Marine
|
War Drone wrote:Good luck! Please post your results.
I tried painting eyes on some IG once ... damn, those were some creepy arsed minis .... Had to cover them up with skintone and wash ... felt like they were staring at me ...
At least yours were staring, mine have just a belated stare of surprise or something, in two or more different directions of course, no wonder they hit on a 4+.
daedalus wrote:I don't paint all the eyes, but I'll usually do it on a sarge or a character or someone otherwise special.
I have a Army Painter Precise Detail brush that I keep myself for using on a regular case basis even when I should. It's pristine and reserved SPECIFICALLY for eyes and small writing (like the writing on a GK shoulder pad). I still have the little plastic tube thing that goes on it, and it gets stored tip-up in one of the spots in my paint organizer made specifically for that.
All of that detail is important, because you need what's basically a brand new brush to do eyes well. I'll use fraying brushes with curling tips for things I probably shouldn't, but there's just something (uncanny valley) about eyes that, if you screw them up, are probably better off just not being painted at all.
I'll go with a horizontal line of white across the "ball" of the eye, and then I take a vertical line down in the middle of the eye (or slightly offset if I'm trying to get him to look in direction), and then i clean up above/below the eye with a flesh tone as needed.
An example of how it turned out:
That's not the best picture of the eye, but hopefully it's representative.
That's a great example and also great tip on the tools, I try to take decent care of my tools but they are not mint conditions: need a new one.
Sasquatch wrote:The best way I've found to keep the feet fairly clean is a bit time consuming but I think its worth it in the end. First a pic of the tools I use and a guardsman I based recently so you can judge if its worth reading the rest of this.
The brush is an old fine detail brush trimmed down to stiffen the bristles, The blade I think is a marking scalpel blade and the glue is Diall decorators PVA.The only things not in the pic are the basing material which is just sand from GW. And a cheap size 3 boldmere long handled round bristle brush(for applying glue).
First you'll want to thin your pva with some water. This servers a few purposes, first it means that any small bits of glue on the boots and stuff will be so thin they won't show once it dries and since its thinner it will be easier to spread it in and around the feet without getting glue on the model in the first place and thirdly you'll be sealing the entire surface with the thinned pva at the end and you don't want it so thick that it obscures the detail of the sand. If you do get any larger pools of glue on the model just take a clean brush and soak it up then a damp brush to clean any residue off the area.
You'll want your pva to be about the same consistancy as double cream but this will probably make the pva pull together and not spread properly when you apply it as the surface tension can be too high with thinner consistancies. Just mix a drop of washing up liquid with your glue and it will spread properly. (I use a decorators pva which is thinnner than normal pva so I just add a drop of washing up liquid.)
Once you've glued the sand to the base you want to go around the feet and any other areas touching the base with a small stiff brush and remove any sand clinging to the model but you don't want to touch the area where the feet meet the base as may suck up the glue and ruin the bond the sand has with the base or you may get clumps of sand sticking to the bristles and pulling off the base or clumping on the base. Instead take a small piece of metal like the marking scalpel blade you see in the picture above and gently press down any rogue pieces of sand that are sitting high or any clumps around the feet. This all sounds like it'll take an age but its actually a pretty quick process.
Once your happy let it sit for at least an hour and then you can seal the base. What you're looking to do her is to essentially flood the sand with the thinned pva, I usually start in the middle of the base with a good couple of brush fulls of pva and start working it out to the edges as I add more glue. You'll want to use a light touch as you can easily dislodge some of the sand if you're too heavy handed luckily the sand will help you here as it will pull the glue from your brush and into the surrounding areas. Just make sure that you don't go back over your own work too much as the new layer of glue will soften the original layer. If done right what you should see at the end of this stage is just the very tips of the sand poking out of the glue.
You can repeat this final step a couple of times to ensure all the sand stays in place but so far I've found once is enough and i can scrape my nail across the finished piece without removing any of the sand.
Yes!!! Thanks for the guide, thinning the glue looks promising as in fact I had clogs and I didn't brush the sand away because the glue was quite strong and I felt I could push away also the paint.
|
|
|
|
|
|
2018/02/27 11:44:06
Subject: Guardsman eyes and boots
|
|

Locked in the Tower of Amareo
|
 Findarfin wrote: Findarfin wrote:
The other question is how to make sure boots don't get too much sand and glue, if you look closely you see the sand from the base is covering up boots, not sure I like it.
I solved this by being lazy. I do bases first and then simply glue model top of it. Works well enough for me. One reason I went this way is I use airbrush to paint the bases quickly. So if I have them together I either paint first base or have to tape like hell. And if I use airbrush for the model(like my 30k blood angel armour) I MUST tape like hell as otherwise either grey ground gets red or red armour gets grey.
Haven't found any bad side with this except for slight headache gluing the model which, depending on pose, can require bit creative support until glue does it's job
|
2024 painted/bought: 109/109 |
|
|
|
|
2018/02/27 11:51:07
Subject: Guardsman eyes and boots
|
|
Hurr! Ogryn Bone 'Ead!
|
I never paint eyes. Most of the time my miniatures squint too much, and the wash I apply to the skin is sufficient to emphasize the eyes.
|
|
|
|
|
2018/02/27 12:06:14
Subject: Guardsman eyes and boots
|
|
Drop Trooper with Demo Charge
|
I solved this by being lazy. I do bases first and then simply glue model top of it. Works well enough for me. One reason I went this way is I use airbrush to paint the bases quickly. So if I have them together I either paint first base or have to tape like hell. And if I use airbrush for the model(like my 30k blood angel armour) I MUST tape like hell as otherwise either grey ground gets red or red armour gets grey.
Haven't found any bad side with this except for slight headache gluing the model which, depending on pose, can require bit creative support until glue does it's job
Yeah glueing stuff to finished bases can be a pain and sometimes takes quite a lot of glue since a lot soaks into the surface (this can lead to frosting around the feet if you use superglue). One method I heard of recently on here was to put small amounts of green stuff on the feet which you then press to the base. when you lift the model off the green stuff should stay behind and leave a better gluing surface once dried.
|
|
|
|
|
2018/02/28 19:53:30
Subject: Re:Guardsman eyes and boots
|
|
Stalwart Veteran Guard Sergeant
|
For eyes, here are the tips that work for me.
Use a good, well cared for brush. Mine is a Windson-Newton Kolinsky, 00 point. Make sure to never use it for washes or drybrushing, and don't get paint anywhere near the ferrule (metal bit). Wash it with some brush soap after use. It may sound like a bit of an investment, but once you get used to treating your brushes right you'd be amazed what you can do.
Keep the whites small. Eyes always look the weirdest when there's too much white in them; they make the model look bug-eyed. Use an off-white shade (I use Pallid Wych Flesh), and don't be afraid to pare down the eyes to a sliver with your base flesh shade after they're applied.
Sight lines. The other problem with bad eye jobs is when they're cross-eyed, wall-eyed, or just not looking in a natural direction. Decide ahead of time where you want your model to be looking- aiming down sights, glancing to the side, whatever. Make sure it jives with their stance. Then, after you've applied the pupils, don't be afraid to go back in and adjust where their line of sight.
Don't be afraid of the cleanup. No matter how steady your hand, you're gonna miss your target when dealing with such tiny details. Just futz with it until you get it looking good.
For boots, I base the models ahead of time, expecting some sand to end up on the boots. I then use a scribing tool (for scoring panel lines) to scratch off anything that ended up on the model before putting down a second layer of thinned PVA to seal the rest of the grit in. Then I paint the base before the model.
|
|
This message was edited 1 time. Last update was at 2018/02/28 19:54:04
|
|
|
|
|
2018/05/07 10:04:40
Subject: Re:Guardsman eyes and boots
|
|
Stalwart Ultramarine Tactical Marine
|
After months of tinkering the technique with your advice I think I've made a step forward!
The eyes here are blu because I'd like to make a desert army inspired by Dune, where "fremen" are a tribe with dark clothing had blu eyes due to spice intoxication.
The biggest improvements so far were:
-use a bigger but newer brush, which shapes into a perfect point (I was using a smaller brush but it had a strange shape)
-encircle the eyes with the paint color to make them smaller
There is more to improve:
-pupils, I can't make them symmetric, any advice?
-smaller brush.. I pass in front of an hobby shop every day and every day I forget.. 
-around the eyes I could use a darker paint to make them pop out even more, if I try to put a wash after it's really difficult and doesn't create a proper contour
|
|
|
|
|
|
2018/05/07 12:07:53
Subject: Re:Guardsman eyes and boots
|
|
Douglas Bader
|
One thing that doesn't get mentioned enough with eyes is never use pure black or pure white. It stands out way too much, making the eyes much more prominent than they would be in reality. If you're going to do the eyes at all make sure you use an off-white, just a little lighter than a light skin tone, and a medium to dark brown for the dark parts. You should be creating a subtle suggestion of an eye, not a bright high-contrast "LOOK AT THIS EYE" sign.
Looking at your example picture I can tell you that you're violating this rule. Your eyes are bright white and look like they're an attempt at OSL. Tone it down massively from there.
|
|
This message was edited 1 time. Last update was at 2018/05/07 12:08:44
There is no such thing as a hobby without politics. "Leave politics at the door" is itself a political statement, an endorsement of the status quo and an attempt to silence dissenting voices. |
|
|
|
|
2018/05/07 16:37:20
Subject: Re:Guardsman eyes and boots
|
|
Stalwart Ultramarine Tactical Marine
|
 Peregrine wrote: Peregrine wrote:One thing that doesn't get mentioned enough with eyes is never use pure black or pure white. It stands out way too much, making the eyes much more prominent than they would be in reality. If you're going to do the eyes at all make sure you use an off-white, just a little lighter than a light skin tone, and a medium to dark brown for the dark parts. You should be creating a subtle suggestion of an eye, not a bright high-contrast "LOOK AT THIS EYE" sign.
Looking at your example picture I can tell you that you're violating this rule. Your eyes are bright white and look like they're an attempt at OSL. Tone it down massively from there.
Yes, definitely true, that white it's really too much, I will try a watered down brown shade. Thanks for the advice!
|
|
|
|
|
|
2018/05/09 17:51:17
Subject: Guardsman eyes and boots
|
|

Fixture of Dakka
|
Big Mac wrote:paint the skin tones first, the black for the eyes with small detail brush, then white over the black leaving a thin edge of black, then black dot in the middle, touch upon around the eyes with skin tone, then the hair/facial hair/brow, lastly a flesh wash to blend it in.
I do the same, and it actually pretty easy once you have done it a few times.
My two cents,
CB
|
|
|
|
|
|
2018/10/21 22:02:22
Subject: Re:Guardsman eyes and boots
|
|
Stalwart Ultramarine Tactical Marine
|
Hello,
after months of silence, I'm at some scout ultramarines and I've used all your suggestions, so I'm posting it to see how it's faring so far:
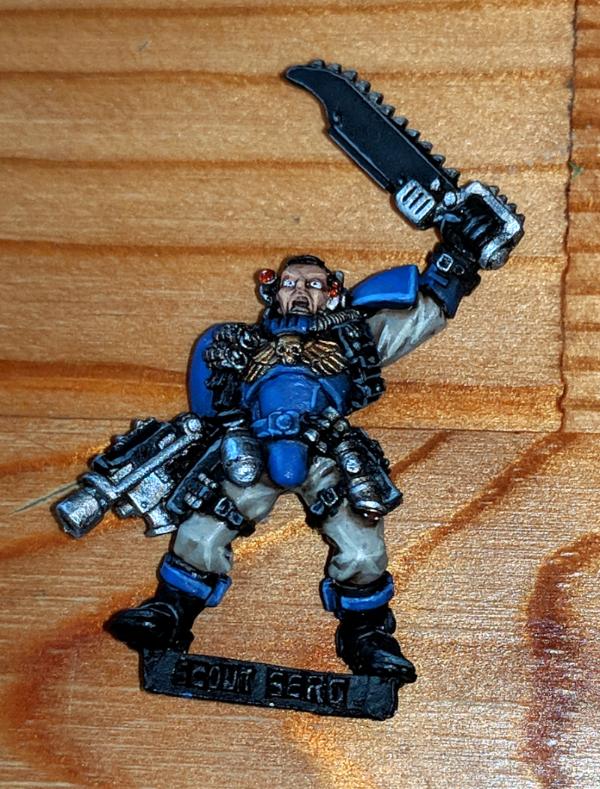
I think it's getting there, probably the eyes should be a little smaller and with darker contour..
The technique I used:
buy brush for eyes only
skin tone, wash,
white (but not pure white, I used pallid witch flesh) eye with dark dot/stripe closer to the center
contour with skin tone
add some more wash with eye brush to mark contour
thanks for all the tips!
|
|
This message was edited 4 times. Last update was at 2018/10/21 22:10:55
|
|
|
|
|
2018/10/22 08:45:20
Subject: Guardsman eyes and boots
|
|
Longtime Dakkanaut
|
You need to add a dark fleshtone line above the pupil to stop the wild stare from going on.
|
|
|
|
|
|
2018/10/22 09:08:47
Subject: Guardsman eyes and boots
|
|
Stalwart Ultramarine Tactical Marine
|
winterdyne wrote:You need to add a dark fleshtone line above the pupil to stop the wild stare from going on.
thanks I'll try, you mean just above the pupil so that the top part of the white eye will go away?
That wild stare though...but yea, he looks a bit foolish or under ketamine or something
|
|
|
|
|
|
2018/10/22 09:49:27
Subject: Guardsman eyes and boots
|
|
Longtime Dakkanaut
|
Yeah, just to lid the eye a little.
My process for eyes (and faces) is this:
Basecoat face.
Wash.
Paint eyes in ivory / very light bone.
Dot pupil (fairly large, aim to occupy about 1/4 to 1/3 the eye area) in a dark brown or grey. Generally avoid centred eyes and have the pupil off centre one way or another in both eyes to give direction to the look.
Dot white (not always, but usually looks good) off centre from the pupil. VERY fine point brush needed, thin paint, low load and practice.
Retouch eyelids (upper and lower) in a slightly darkened flesh tone to tidy up any bleed of the white or overpainting with the pupil.
Highlight face (usually 3 passes, progressively lighter with each).
Glaze colour variance (bluish darkened flesh under eyes and in sallow cheeks, very thin red glazes on nose and upper cheeks).
Re-highlight if needed (usually if the glazes were too thick).
Done.
|
|
|
|
|
|
2018/10/22 11:15:32
Subject: Guardsman eyes and boots
|
|
Whiteshield Conscript Trooper
|
XuQishi wrote:An easy way to paint eyes is to fill the eye with white, paint a black stripe down the middle and clean up the skin around the eye afterwards. Many people try to do this the hard way by putting a dot in the middle of the eye which often leads the miniature to stare weirdly or look cross-eyed.
This is the technique I prefer. There is no one "correct" technique for this it's what works well for you,
I'm going to play devils advocate here and say go for it and paint the eyes on all your miniatures. As others have said on a horde army no one is going to notice, which also means they probably won't notice if you mess it up a whole bunch of times. The advantage is you'll have a lot more practice, which ultimately is what it takes to master any technique, so when the time comes and you're doing that centrepiece model you'll be well versed in your technique.
Thanks.
|
|
|
|
|
2018/10/22 12:05:16
Subject: Guardsman eyes and boots
|
|
Thane of Dol Guldur
|
the problem with peoples eyes on miniatures is that they often paint the lower eyelid, which is sculpted slightly more prominently than normal to give realism to the face when painted, as the eyeball itself. This is what youve done on your scout and that's why he looks like hes been on the methamphetamine. to remedy this you need to highlight the lower eyelid in fleshtone, and get your eye details into the tiny slit which forms above it. now this is possible. I use a 4/0 and a miniscule amount of paint, and pray the gods bless me with a degree of luck. but all in all my advice would be to avoid painting eyes unless you really want to go for a high competition standard. eyes take a lot of effort and a steady hand, and really arent worth it for tabletop in my opinion.
|
|
This message was edited 1 time. Last update was at 2018/10/22 13:49:47
  Heresy World Eaters/Emperors Children Heresy World Eaters/Emperors Children 
Instagram: nagrakali_love_songs |
|
|
|
|
2018/10/22 12:19:54
Subject: Re:Guardsman eyes and boots
|
|
Thane of Dol Guldur
|
Just to show you I'm not full of turd. You can see on zhufor how small the eye detail needs to be. Same on canoness veridyan. The eyes on abaddon were even harder due to the higher detail on the forge world resin sculpt.
Automatically Appended Next Post:
Also, you can see that even in zoomed in photos it should be hard to see the eye detail. It needs to be that subtle.
For your boots issue, I use a liquid super glue, allow it to flow around the boots then apply your sand. Use a precision scalpel blade to flick off any wayward sand granules that may stick to the top of the boots.
|
|
This message was edited 3 times. Last update was at 2018/10/22 12:59:08
Heresy World Eaters/Emperors Children
Instagram: nagrakali_love_songs |
|
|
|
|
2018/10/22 15:12:30
Subject: Re:Guardsman eyes and boots
|
|
Stalwart Ultramarine Tactical Marine
|
 queen_annes_revenge wrote: queen_annes_revenge wrote:Just to show you I'm not full of turd. You can see on zhufor how small the eye detail needs to be. Same on canoness veridyan. The eyes on abaddon were even harder due to the higher detail on the forge world resin sculpt.
Automatically Appended Next Post:
Also, you can see that even in zoomed in photos it should be hard to see the eye detail. It needs to be that subtle.
For your boots issue, I use a liquid super glue, allow it to flow around the boots then apply your sand. Use a precision scalpel blade to flick off any wayward sand granules that may stick to the top of the boots.
Thanks for the tips and the examples! Stunning stuff!
I actually like the painting aspect of warhammrr quite a lot, I'll give it a shot, worse case scenario it's practice for the heroes, best case scenario they advance +1 and have +1 attacks due to stimulants (-1 BS because they can't aim straight though)
|
|
|
|
|
|
|
|
 500,
500,  800 -
800 - 

 Finished Tau Sept Cadre
  Finished Ork Waaagh |
  Alaitoc Eldar Warhost
  Finished Order of Our Martyred Lady - Sisters of Battle
  Finished Necromundian Imperial Guard Regiment


