Forum adverts like this one are shown to any user who is not logged in. Join us by filling out a tiny 3 field form and you will get your own, free, dakka user account which gives a good range of benefits to you:
No adverts like this in the forums anymore.
Times and dates in your local timezone.
Full tracking of what you have read so you can skip to your first unread post, easily see what has changed since you last logged in, and easily see what is new at a glance.
Email notifications for threads you want to watch closely.
Being a part of the oldest wargaming community on the net.
If you are already a member then feel free to login now.
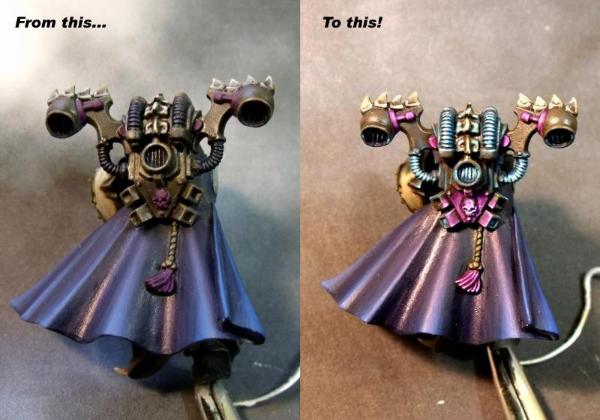
Hello everyone, I've been tasked with writing a tutorial about my Object Source Lighting (referred to as OSL in this tutorial) technique by Gitsplitta, who was also sympathetic enough to lend a hand when needed.
+++++++ Aim of the tutorial +++++++
The aim of this tutorial is to give you the tools & techniques I use to get :
+++++++ Tools & Paints +++++++
I used two different types of brush for this tutorial :
- a GW Detail Brush ;
- a GW Standard Brush ;
- tap water for thinning down the paint ;
- a sheet of paper to act as a palette (so no wet palette, as I don't know how to use it).
The two colours I will be focusing on are purple (Liche Purple) and blue (Hawk Turquoise), but I have used it succesfully with green (Scorpion Green) and another blue (Enchanted Blue), with minor adjustments based mainly on errors & trials. I am using GW paints.
For the blue : - Necron Abyss ;
- Hawk Turquoise ;
- Skull White ;
- Devlan Mud Wash.
For the purple : - Liche Purple ;
- Warlock Purple ;
- Skull White ;
- Devlan Mud Wash.
Spoiler:
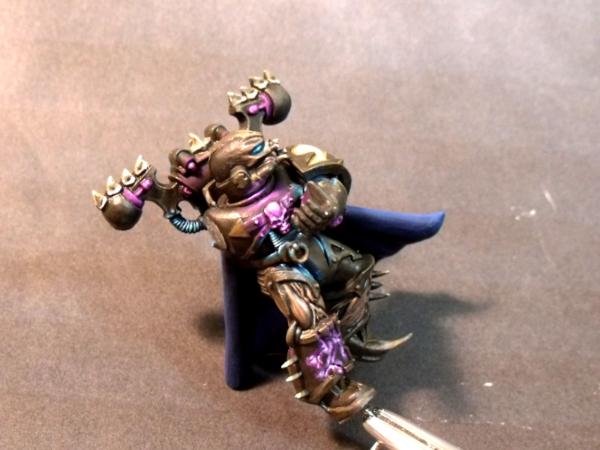
For the record, the armour colour is Charadon Granite, darkened with Devlan Mud and highlighted with Graveyard Earth.
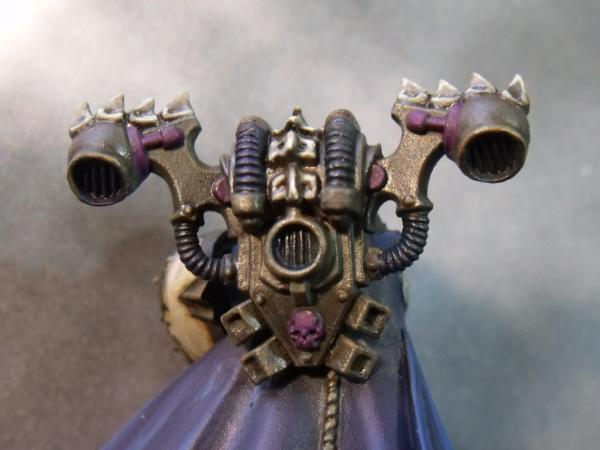
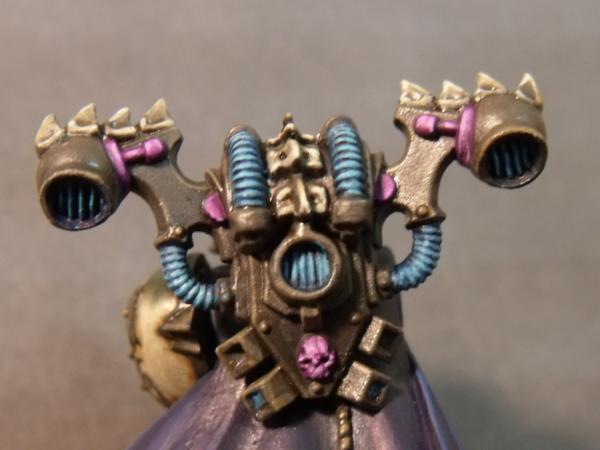
This step is the basic basecoat. White undercoat, Charadon Granite basecoat (this is optional, as this colour is the base colour for the armour parts on my Tzeentch warband).
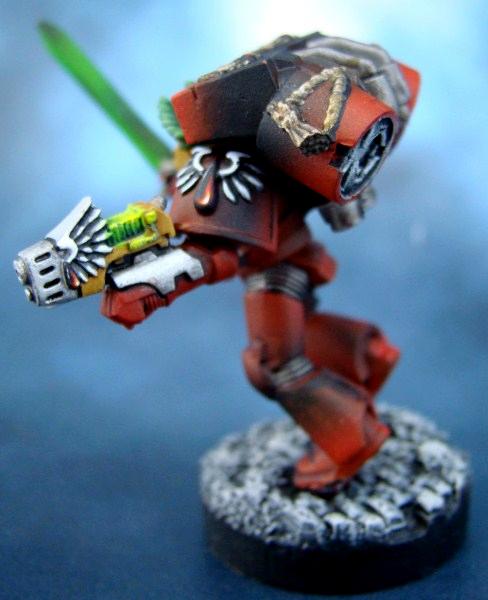
Note : the areas I'll be focusing on are the cables & vents for the blue, and the skull for the purple. I'll highlight the other purple details along, but will not go to the OSL effect on them.
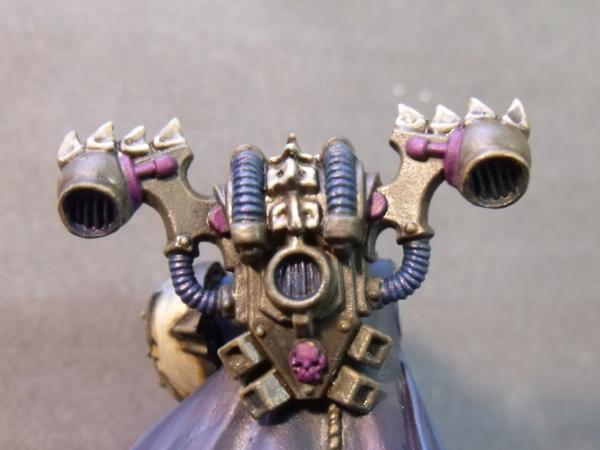
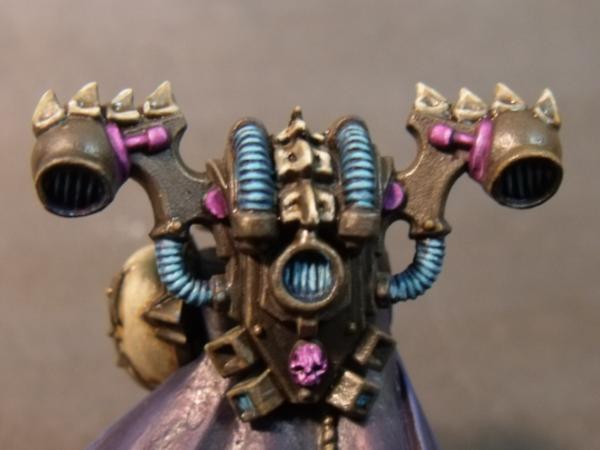
Blue : Necron Abyss basecoat, Devlan Mud wash, Necron Abyss second basecoat (except in the deeper recesses).
Purple : Liche Purple basecoat, Devlan Mud wash, Liche Purple second basecoat (except in the deeper recesses).
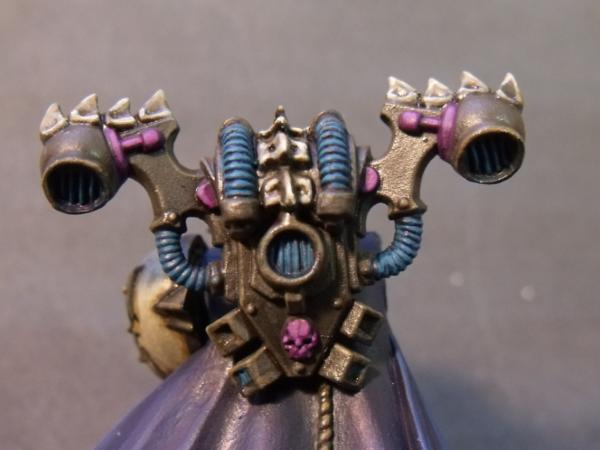
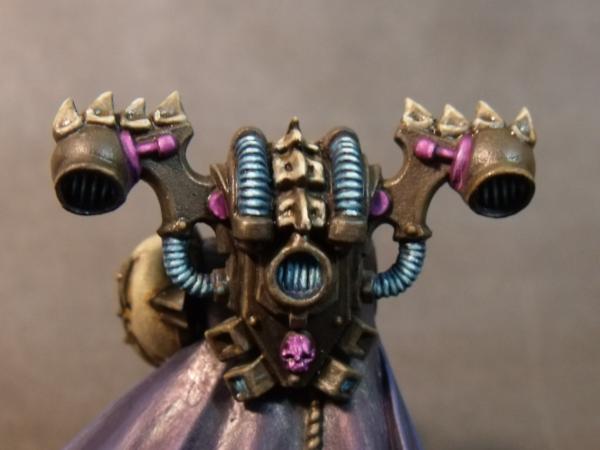
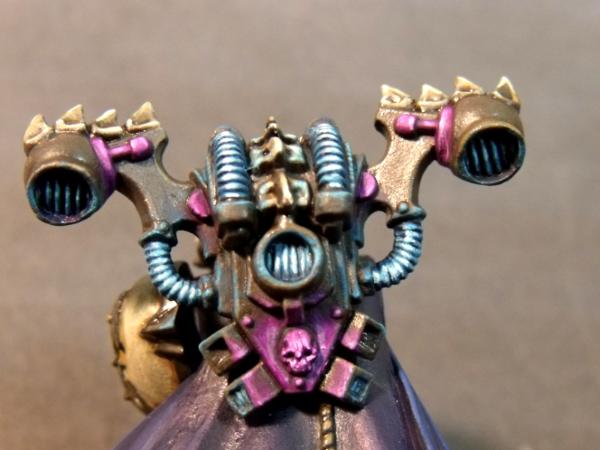
Blue : Hawk Turquoise highlight.
Purple : 50/50 Liche Purple/Skull White + a touch of Warlock Purple mix; the Warlock Purple is here to prevent the colour to become dull (desaturated?).
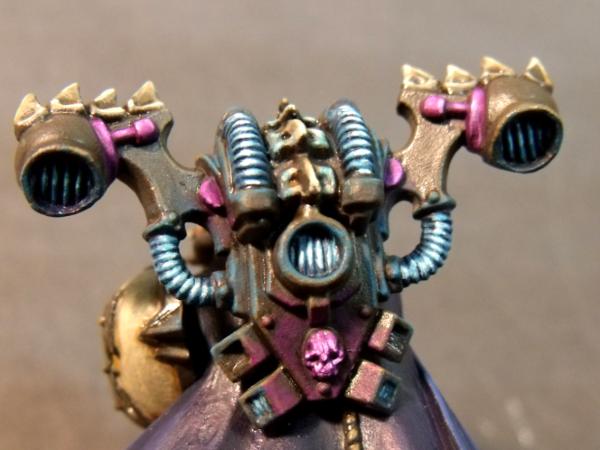
Blue : 75/25 Skull White/Hawk Turquoise mix.
Purple : 95/05 Skull White/Liche Purple extreme edge highlight, then a Liche Purple glaze on the skull / Warlock Purple glaze on other parts.
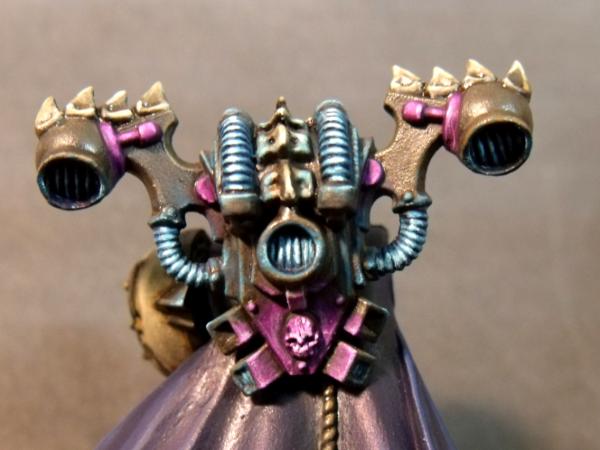
Blue : Hawk Turquoise wash, then Hawk Turquoise medium edge highlighting.
Purple : Liche Purple wash, then Liche Purple medium edge highlighting.
This step might be tricky.
Spoiler:
Ideally, for the wash (e.g. around the skull), you want to thin the paint heavily with water, and apply between two to four layers of almost translucent liquid that will let the base colour (Charadon Granite in this case) show through. You might also notice, I tend to leave a thin gap just around the shining object without wash, that acts as a shadow and will reinforce the "shining" effect. This technique is mostly used on large, flat parts.
The edge highlighting is applied on highly-textured areas where the light will only show on the outer surface (e.g. around the blue cables and small vents on the bottom of the backpack). It can be either done with gentle drybrushing, 'wet' brushing, or regular edge highlight. In order to prevent the paint from flowing freely into the recesses and to allow it to show on the edges, it will not be as watered down as for the wash. In addition, be sure to paint it on a quite larger area than the strict edge (as seen on the purple edge highlighting on the bottom vents) so that subsequent highlight will show. Rivets / spikes / protruding appendages are also of great help to the OSL, if you manage to paint only one side of them. As you can see on the pic, it can be tricky for small rivets such as the ones surrounding the purple skull.On weirdly-textured or -coloured areas, such as the bones on top of the backpack, you should try a mix of the two techniques : the paint has to be mixed with enough water to be translucent and let the light bone colour show through, while being thick enough to cling to the edges & avoid dripping in the recesses, which would ruin the effect.
Blue : 50/50 Hawk Turquoise/Skull White edge highlighting.
Purple : 50/50 Liche Purple/Skull White wash, then edge highlighting.
At this point I screwed the purple wash part.
Spoiler:
The paint wasn't watered down enough, so wasn't translucent at all and left a large, white-ish line on the left of the skull. Under the frustration, I forgot to take pics as I tried to correct my mistake. How I did it was with a heavy glaze of Liche Purple, followed (when the glaze was dry) by a gentle, subtle stippling of a watered down 50/50 Liche Purple/Skull White mix all around the skull.
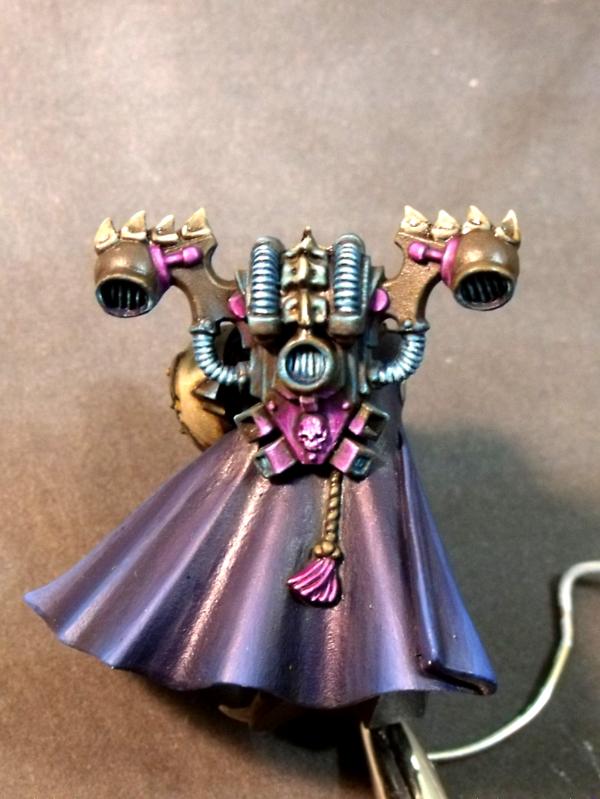
Blue : 25/75 Hawk Turquoise/Skull White edge highlighting.
Purple : 25/75 Liche Purple/Skull White edge highlighting, a few, very thin Liche Purple glazes if necessary to smoothe the transitions.
+++++++ Step 9 : final highlight, OSL complete +++++++
Blue : 10/90 Hawk Turquoise/Skull White extreme edge highlighting, on the tip of edges, to give the final glow of the surfaces.
Purple : 05/95 Liche Purple/Skull White extreme edge highlighting on the skull, that I deemed not bright enough for it to really glow that strong.
Of course, you can adapt this technique with little effort to nearly any surface / texture / engraving, as long as you keep close to that line.
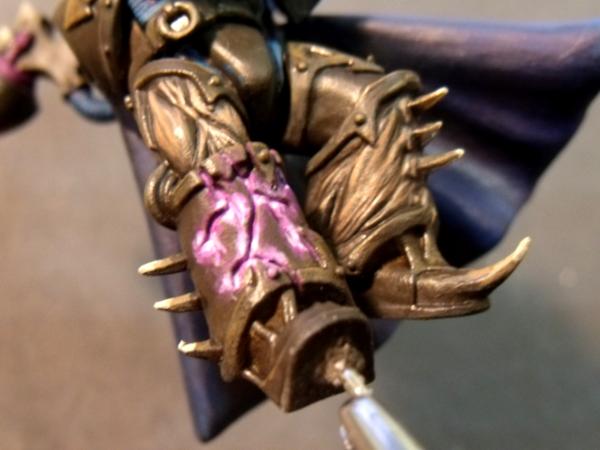
For the leg, the things worth mentioning are :
- heavy Liche Purple washes around the cracks ;
- irregular strength of highlights along the lines ;
- almost pure white for the brightest points.
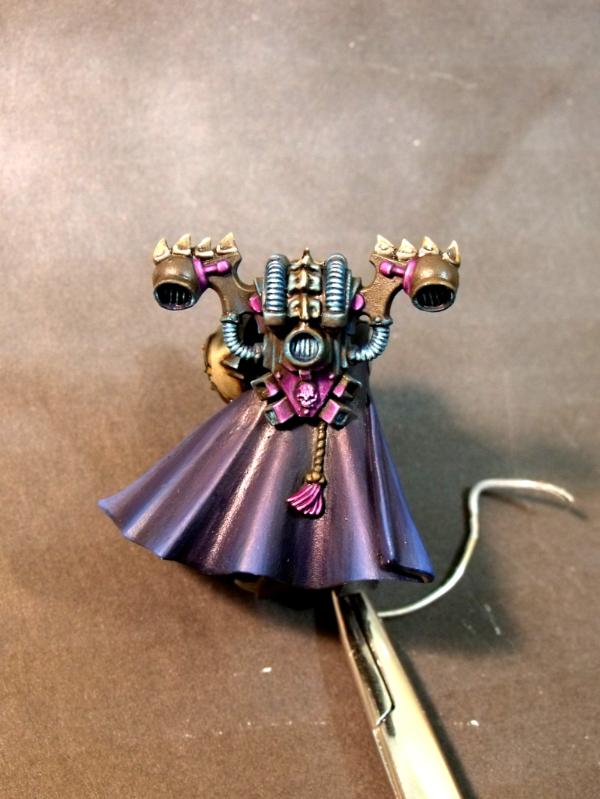
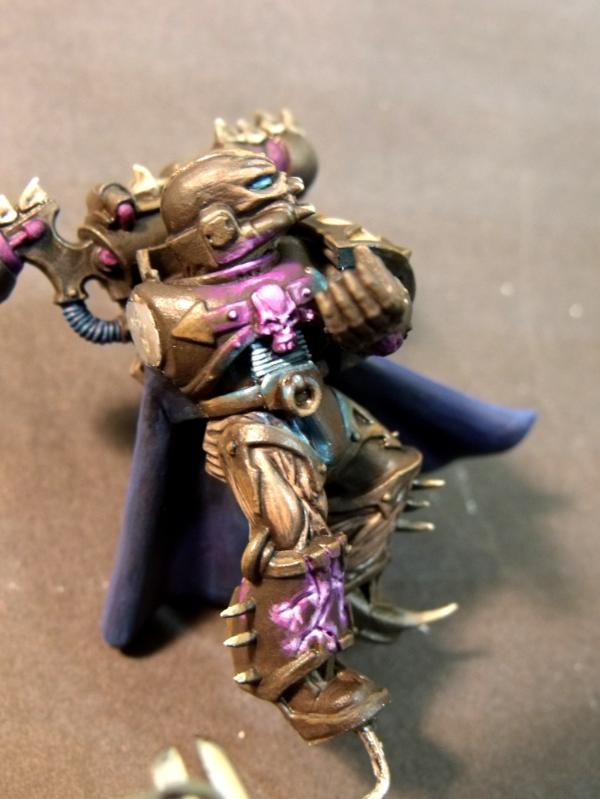
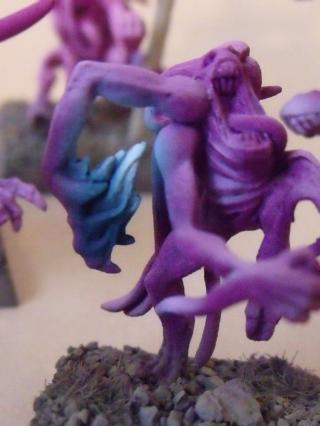
For the chest, it's nearly the same as the backpack skull, the only thing is the extra care you have to put into checking all the surrounding parts where light can reflect : bottom of jaw, inner part of the left forearm, etc...
As you may notice, the blue glow right below the chest skull was almost solely made through edge highlighting, with a light wash in the abdomen recesses.
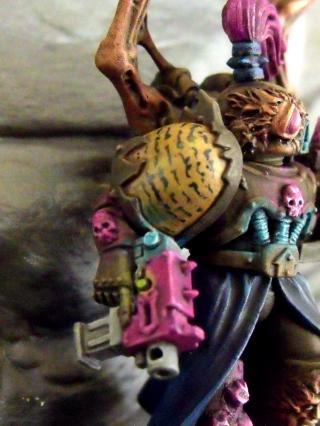
As you can see, this one has both colours described in this tutorial, as well as a green flashing light on the bolt pistol.
The technique for the green is quite the same as for the blue, but with Camo Green / Scorpion Green replacing Necron Abyss / Hawk Turquoise.
+++++++ Additional advice / thoughts +++++++
Spoiler:
- The final highlight on the exposed surface shall always be just one (1) step darker than the light source, no more, no less.
- As a corollary & additional explanation, the light source last highlight will always be one step brighter than the reflected glow in itself.
- If you screw something, you have two options : your paint was full of water and you can just wipe it off with a dry brush stroke, or it has already dried on the model and you have to do it all over again : basecoat, DM wash, basecoat, highlight; light source colour wash, highlights. It might be frustrating, but it works, and quicker than you can imagine.
- You should finish all the highlights on the rest of the model before proceeding to step 6 (first halo effect). During one of my first OSL attempts, I forgot / overlooked doing it, and I was later hindered by the fact a lot of areas I should have highlighted were already covered with light. Also, it helps in emphasizing the OSL effect by showing through the translucent paint, so it's a win/win.
- For first attempts, don't be dauntless. You might want to skip the last highlight and last halo highlight. I kind of over-did it here for teaching purpose, and I think I didn't screw it up too much, but for first attempts, you should try and keep the halo effect quite limited, with a less intense light source.
- The reason why the steps are different depending on the colour is because Liche Purple tends to lose its "red" colour when you mix it with white, to a quite dull colour. I don't know the colour theory thing behind this, but some might do. To counterbalance this, I have two techniques : add in a small amount of Warlock Purple to the mix, or glaze / wash with the base colour. You will never be wrong if you wash with the base colour, as long as it doesn't drip in the recesses. Repeat after me : "You will never be wrong if you wash with the base colour, as long as it doesn't drip in the recesses". And, yeah, for those who wonder, I didn't copy-paste the second sentence, but re-wrote it entirely (some say I can be quite a psycho).
- No Asurmen Blue or Leviathan Purple wash were harmed during the making of this tutorial.
- I guess that's about all.
I just hope this proved to be helpful, feel free to post comments / add your own technique / give feedback / ask for more details / ask for less details / just say hello.
In no case is this tutorial supposed to show the "perfect" technique. It's just the one I came up with, and felt right to me. I am sure you can find some more detailed, more realistic, or more efficient ones around.
+++++++ Credits +++++++
Thanks for those who supported me in writing this humble guide and helped making it understandable :
"Squat Hulk- in space no one knows you no longer exist." - Gitzbitah
"Now you're just being silly, everyone knows red paint tastes fasta." - monkeytroll
"Both servers are on different continents so space meteors or thermonuclear war will not be enough take out dakka hopefully." - legoburner
Please remember to tick the "Disable Voting" box, if the pics you are uploading do not deserve votes (ie. early WIP, blurry pics, batreps, ...) Thanks in advance.
Thanks for the article. I am just starting to get into more advanced painting techniques and this helped fill in alot of the blanks I had about mixing and highlighting. I hope I can get to your level before I grow too old.
You're pretty awesome. I've gotten good effects progressively mixing in white, but haven't tried applying it in slightly toned down "halo" areas around the source, it's a good idea. I want to try this on my warjacks eyes and fire weapons. Do you think this technique could be pulled off for a glowing machine eye, like the button you did on the pistol? The eye is red. This model is my first candidate I'll try.
Spoiler:
*Spoilered because I hate adding pics that aren't my work in a thread that's not even mine.
@ Diarmid : Practice makes perfect, as they say... But trying out new things is also a good way to improve!!!
@ Bizmo : Of course you can try on eyes as well!
Red will be a quite hard colour though, I'd suggest using a bright yellow (GW : Sunburst) to lighten the red, rather than white, unless you want it to turn into a bad-looking pink...
And, remember, a red glaze will help your highlighted areas to get their original colour back!
Good luck, and feel free to post some pics & lessons of your work in here, we could all benefit from it!
"Squat Hulk- in space no one knows you no longer exist." - Gitzbitah
"Now you're just being silly, everyone knows red paint tastes fasta." - monkeytroll
"Both servers are on different continents so space meteors or thermonuclear war will not be enough take out dakka hopefully." - legoburner
Please remember to tick the "Disable Voting" box, if the pics you are uploading do not deserve votes (ie. early WIP, blurry pics, batreps, ...) Thanks in advance.
Bobbing along on the briny North Sea, and Montrose, Scotland when home
Merci Yggdrasil.
This will work briiliantly with my Spacewolves and all their glowing runes
Kanluwen wrote: What's that quote from Mauleed? "When you can make complete strangers on the Internet hate you, you know you're doing something magical."?
Hatemonger wrote: If that is true, then GW must be run by Gandalf and Nagash and Harry Potter and Tinker Bell, because this site alone is crapping rainbows worth of magical internet nerdrage.
- H8
Nice tut! Would this technique also work for underfoot lighting? For example if a model was supposed to be standing over a bright light.
I'm working on a diorama/terrain piece/doomsday machine which will center around a psyker being held in a clear glass container. i was going to go for water effect in the tank but can't afford it. So i think i will go for a sickly green light underneath him instead.
MODS: Sorry about the thread necromancy, but this was the most recent OSL tut i could find.
This message was edited 1 time. Last update was at 2011/06/02 08:38:47
One of the better OSL tutorials I've ever seen. I'll have to remember it when the question inevitably pops up in P&M a few days from now. And a few days after that. And...
Now I can link them to a single, solid tutorial instead of giving them the proper term and sending them to Dakka search/Google. It's a pain, but yakface is right - this would make a great article.
The Dreadnote wrote:But the Emperor already has a shrine, in the form of your local Games Workshop. You honour him by sacrificing your money to the plastic effigies of his warriors. In time, your devotion will be rewarded with the gift of having even more effigies to worship.
Praxiss wrote:Nice tut! Would this technique also work for underfoot lighting? For example if a model was supposed to be standing over a bright light.
I'm working on a diorama/terrain piece/doomsday machine which will center around a psyker being held in a clear glass container. i was going to go for water effect in the tank but can't afford it. So i think i will go for a sickly green light underneath him instead.
MODS: Sorry about the thread necromancy, but this was the most recent OSL tut i could find.
Honestly I'm not sure it'd work well on large surfaces, but if you want to give a little glow from behind, I'm pretty sure that'd do it!!!
Also, Mods, correct me if I'm wrong, but the tutorial sections is the one I consider "thread-revival-free", as they are usually one-shots, and people asking questions or debating about the techniques...
dantay_xv wrote:Merci Yggdrasil.
This will work briiliantly with my Spacewolves and all their glowing runes
As I said, just remember to post some pics in here too!!!
JB wrote:Very nice Ygg!
Foo wrote:Nice tutorial. I'll have to try this once I find some extra patience.
It sure is a bit time-consuming, but it looks great in the end, so never regretted the time invested!
oadie wrote:One of the better OSL tutorials I've ever seen. I'll have to remember it when the question inevitably pops up in P&M a few days from now. And a few days after that. And...
Now I can link them to a single, solid tutorial instead of giving them the proper term and sending them to Dakka search/Google. It's a pain, but yakface is right - this would make a great article.
Thanks for the comment... I really need to get to the "articl-ing" part...
"Squat Hulk- in space no one knows you no longer exist." - Gitzbitah
"Now you're just being silly, everyone knows red paint tastes fasta." - monkeytroll
"Both servers are on different continents so space meteors or thermonuclear war will not be enough take out dakka hopefully." - legoburner
Please remember to tick the "Disable Voting" box, if the pics you are uploading do not deserve votes (ie. early WIP, blurry pics, batreps, ...) Thanks in advance.
Please don't pretend you need help from someone vent... Your models are already masterpieces !!
(thanks for the kind words though... And nice job on that one : you manage to do what I'm still struggling to achieve : keep it simple & not overwhelming ! )
"Squat Hulk- in space no one knows you no longer exist." - Gitzbitah
"Now you're just being silly, everyone knows red paint tastes fasta." - monkeytroll
"Both servers are on different continents so space meteors or thermonuclear war will not be enough take out dakka hopefully." - legoburner
Please remember to tick the "Disable Voting" box, if the pics you are uploading do not deserve votes (ie. early WIP, blurry pics, batreps, ...) Thanks in advance.


 -affiliated Traitors -


 18000+ points
 3000+ points

 (Iron Warriors)


 )
)