| Author |
Message |
 |
|
|
|
|
Advert
|
Forum adverts like this one are shown to any user who is not logged in. Join us by filling out a tiny 3 field form and you will get your own, free, dakka user account which gives a good range of benefits to you:
- No adverts like this in the forums anymore.
- Times and dates in your local timezone.
- Full tracking of what you have read so you can skip to your first unread post, easily see what has changed since you last logged in, and easily see what is new at a glance.
- Email notifications for threads you want to watch closely.
- Being a part of the oldest wargaming community on the net.
If you are already a member then feel free to login now. |
|
 |
2011/08/05 19:30:37
Subject: Dipped Skaven army (update 3/11: Ratogres)
|
|

Monstrous Master Moulder
|
Hey folks...
Here's a couple of shots of my newly started skaven army. I decided I wasn't going to be doing this army using the more "traditional methods"... not if I wanted to keep my sanity after 200+ models. So I decided to try the armypainter quickshade for this army to see what the fuss was all about... And I'm actually rather happy with the results!
The pics you are about to see, are taken when then army reached the 1 month "checkpoint" after purchase. In that one month period, I was able to get the following stuff from sprue to finished:
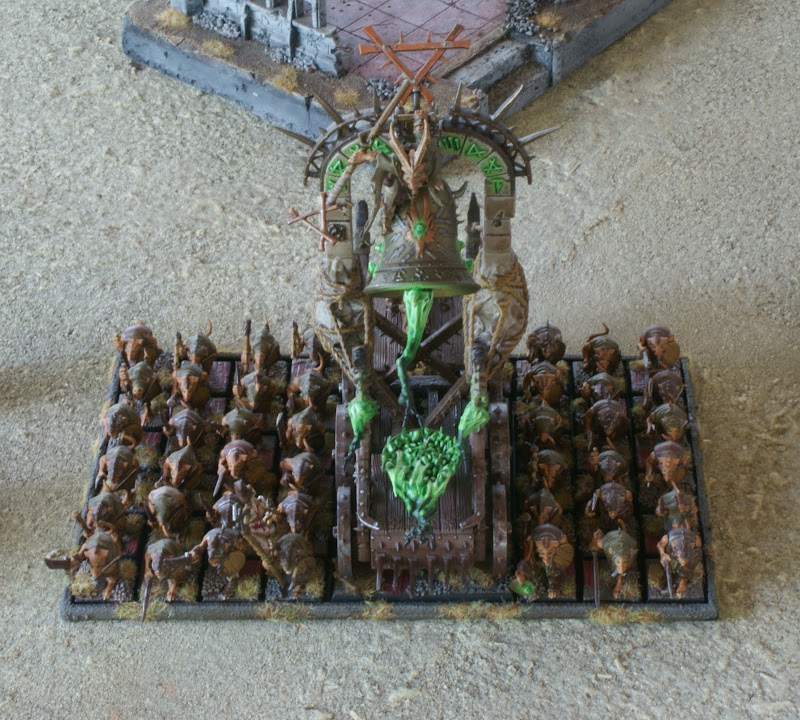
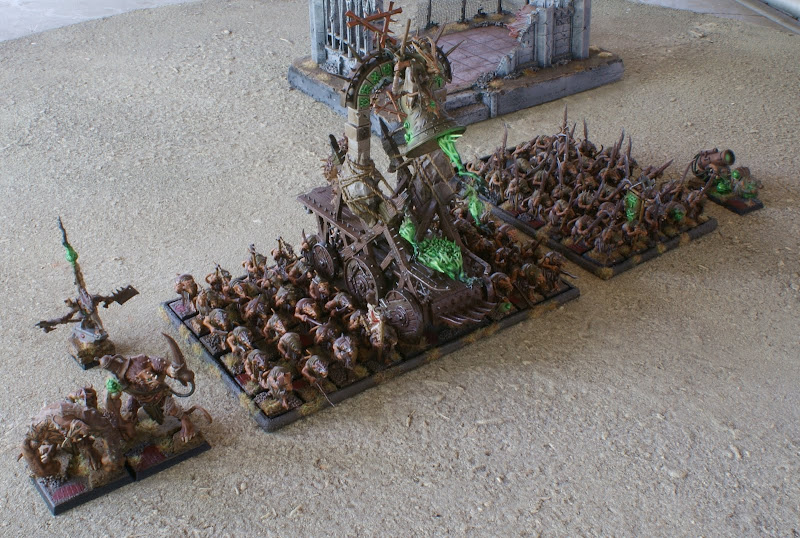
- 80 IoB clanrats (one 35 strong unit to house my BSB and one 45 unit to push the screaming bell).
- my grey seer on screaming bell
- The IoB warlord
- 2 ratogres + packmaster
- a poison wind mortar.
I didn't just use the quickshade... I also used my airbrush to try a technique that is entirely new to me: OSL. A lot of the warpstone stuff was given a glow effect. Given the frame of the "boring" browns, greys and greens, I think the bright warpstone green creates some nice distractions from an otherwise rather simple and plain paintjob.
But: judge for yourself


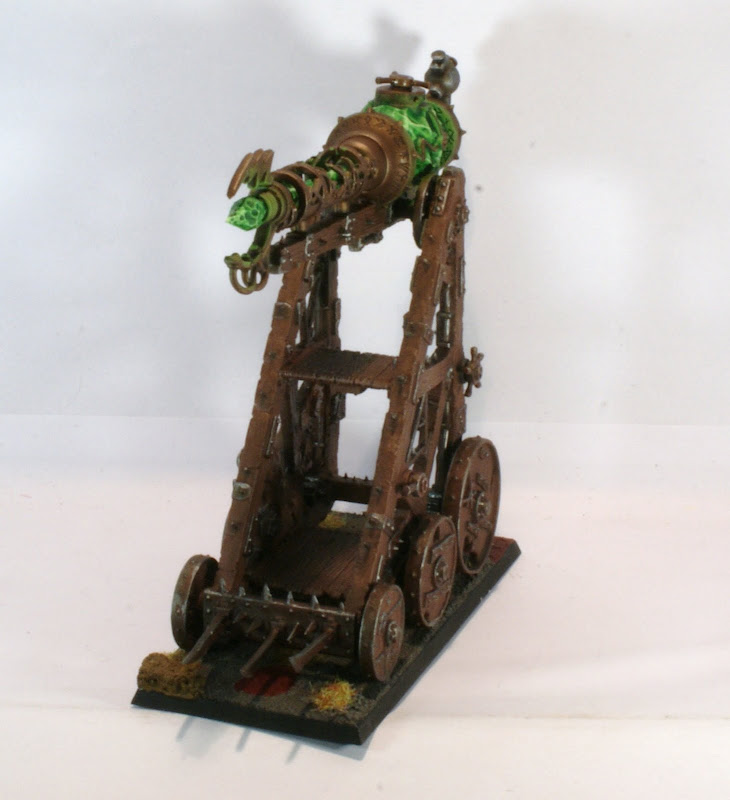
And finally, a little WIP, showing the soon to be finished additions: WLCs (2 of them for extra cheese!)


Enjoy.
|
|
This message was edited 3 times. Last update was at 2011/11/03 16:13:06
The boy, I say, the boy is as sharp as a sack of wet mice... |
|
|
 |
|
2011/08/05 19:47:28
Subject: Dipped Skaven army
|
|

Crazed Gorger
|
Really love the greens and OSL
|
'The One Who Doesn't Fall, Doesn't Stand Up'
-Fedor Emelianenko 31-3-1 The Greatest Heavyweight ever
|
|
|
|
|
2011/08/05 19:52:05
Subject: Dipped Skaven army
|
|

Purposeful Hammerhead Pilot
|
Those are dipped?! That's really good! I've never tried dipping, I thought it was less effective than washes. Nice to be proven wrong once in awhile!
|
|
|
|
|
|
2011/08/05 19:55:47
Subject: Dipped Skaven army
|
|
Monstrous Master Moulder
|
deffskulla wrote:Those are dipped?! That's really good! I've never tried dipping, I thought it was less effective than washes. Nice to be proven wrong once in awhile!
They are, although the dip is applied by brush instead of just dunking the miniature in the good and then getting it out and shaking of the excess. So in a way, you get rather similar results as with a wash, although this is a fair bit quicker. The pooling qualities and the way you can still manipulate it for quite a long time when it's applied do make it more interesting to use then a regular wash.
|
The boy, I say, the boy is as sharp as a sack of wet mice... |
|
|
|
|
2011/08/05 20:05:47
Subject: Dipped Skaven army
|
|

Longtime Dakkanaut
|
That army looks great!
I really like the scheme you went with, very muted with that bright bright green.
Was that AP medium tone you used?
|
|
|
|
|
|
2011/08/05 20:42:43
Subject: Re:Dipped Skaven army
|
|

Dakka Veteran
|
Those look great. I've only used Army Painter dip a little, but my experiece is mixed - it works great for some models (such as Skaven evidently) but for others like Marines or High Elves (anything with clean surfaces) I think it's best left in the toolbox. I find it can be very versatile, you can highlight before or after the dip, I've even tried drybrsusing after the dip had dried and the result was okay.
I agree with Elmir - when I use it I always brush mine on, I tried 'literal' dipping, but there was too much left on for my liking. By using a brush you get far more control and have little to no cleaning up to do - or you could just spray everything with Devlan Mud - the results are pretty similar.
Fantastic job Elmir and a sensible sanity-saving choice. Details like the OSL, green eyes and attention to the bases/weapons really help make them stand-out. Skaven are a perfect choice for the dip method, as they're pretty dirty rats after all. Just goes to show, if used well, the AP method can produce pleasing results. @ELmir - Did you do any extra work after the dip was dry, before or after you varnished? I only ask as the weapons look like they've had an edge highlight.
Thanks for sharing 
|
|
|
|
|
|
2011/08/05 23:51:21
Subject: Dipped Skaven army
|
|
Mighty Gouge-Horn
|
Nicely done sir
|
D.O.O.M.F.A.R.T's 30th man!
Red_Zeke wrote:Now if your theme, is Hans, the arch-lector, who likes taking out the war altar to go watch his steam tank race around, while shooting off 3 cannons and 3 mortars for a fireworks display, it gets a little iffy.
http://www.dakkadakka.com/dakkaforum/posts/list/390844.page
CowPows ying to his WoC Yang |
|
|
|
|
2011/08/06 04:04:59
Subject: Dipped Skaven army
|
|
Veteran Inquisitorial Tyranid Xenokiller
|
The plasma green stuff looks incredible. It isn't too bright or over powering. The glow effect was well done as well. All of these models look great, and I can't wait to see more of your work. Nice job. 
|
|
|
|
|
|
2011/08/06 04:09:48
Subject: Dipped Skaven army
|
|
Chaos Space Marine dedicated to Slaanesh
|
Savage job!
|
 Emperors Children Emperors Children
 ''Kneel,or you shall be knelt'' ''Kneel,or you shall be knelt'' 
|
|
|
|
|
2011/08/06 04:10:03
Subject: Dipped Skaven army
|
|
Savage Khorne Berserker Biker
|
The OSL just makes this look professionally done. I'd love to play against this if I had a Fantasy army (I'd play Warriors of Chaos).
|
|
|
|
|
|
2011/08/06 05:49:59
Subject: Dipped Skaven army
|
|
Ambitious Space Wolves Initiate
|
Bravo best skaven army iv ever seen thats for sure.
|
 SUFFER NOT THE UNCLEAN TO LIVE SUFFER NOT THE UNCLEAN TO LIVE
Lead us from death to victory,
from falsehood to truth.
Lead us from despair to hope,
from faith to slaughter.
Lead us to his strength
and an eternity of war.
Let His wrath fill our hearts.
Death, war and blood;
in vengeance serve the Emperor
in the name of Dorn! |
|
|
|
|
2011/08/06 12:36:29
Subject: Re:Dipped Skaven army
|
|
Monstrous Master Moulder
|
warspawned wrote:
Fantastic job Elmir and a sensible sanity-saving choice. Details like the OSL, green eyes and attention to the bases/weapons really help make them stand-out. Skaven are a perfect choice for the dip method, as they're pretty dirty rats after all. Just goes to show, if used well, the AP method can produce pleasing results. @ELmir - Did you do any extra work after the dip was dry, before or after you varnished? I only ask as the weapons look like they've had an edge highlight.
Thanks for sharing
The procedure with these is rather simple actually. It's mostly basecolor work, wich takes the longest. If you can get a good basecoat wich is thin enough to not destroy the detail, but thick enough to get decent coverage, you can get good results. Quickshade can give "patchy" results on smooth surfaces, but if you brush it on, it's not too bad. And if you have a patchy, uneven basecoat, you'll always have an uneven finish after you aply the quickshade.
So the method is as follows:
- Aply a white primer (I use the vallejo airbrush primer for this)
- Aply the skintone with my airbrush (vallejo sand brown).
- Aply color to the robes (vallejo's sky grey and Russian WWI uniform) by regular brush.
- Boltgun metal on all the metal areas
- Mix some vallejo oxidation brown pigment with water and use that to wash the metallics
- Pick out some detail (belts, pouches, icons, straps) in flat brown
- Paint the base codex grey, bricks in gory red, stone in green-brown.
- Apply the dip by hand (this will also "fixate" the rust pigments). This includes the base.
- Pick out the eyes with skorpion green
- Aply some green wash/ink around the eyes
- Edge highlight the weapons with chainmail to make them pop a bit more
- Go over the base-edges with black
- Aply model master's dullcote (a european brushed on variant of the old famous testor's dullcote).
- Glue some static grass to the base.
This gives me a reasonable time/effort/result ratio imo. I read the "is dipping fair" thread on these boards, and it made me chuckle. Dipping is rather fast, but it still needs a bit of technique to really make it work. If you put in some thought and have a good "game plan" to paint your army, I don't see how anybody could have anything against that. *shrug*
Automatically Appended Next Post: More Dakka wrote:That army looks great!
I really like the scheme you went with, very muted with that bright bright green.
Was that AP medium tone you used?
This was done using the the medium tone (the dark brown one).
|
|
This message was edited 1 time. Last update was at 2011/08/06 12:45:57
The boy, I say, the boy is as sharp as a sack of wet mice... |
|
|
|
|
2011/08/06 14:27:03
Subject: Dipped Skaven army
|
|
Veteran Wolf Guard Squad Leader
|
Great stuff! All you jerks with airbrushes are going to make me spend money i dont have...
|
|
|
|
|
|
2011/08/06 14:52:13
Subject: Dipped Skaven army
|
|
Lord of the Fleet
|
When it comes to large armies like skaven, you cant help but take a few "short cuts". But with what you did, it still looks beautiful
|
|
|
|
|
|
2011/08/06 15:43:53
Subject: Re:Dipped Skaven army
|
|
Monstrous Master Moulder
|
I posted a few more shots of this army on my gallery page btw. They seem to be of much higher quality then these and you should be able to zoom in a lot for a more detailled look at the models.
|
The boy, I say, the boy is as sharp as a sack of wet mice... |
|
|
|
|
2011/08/06 16:01:59
Subject: Dipped Skaven army
|
|
Avatar of the Bloody-Handed God
Inside your mind, corrupting the pathways
|
Might have been tempted to paint a few shades of wood on the vehicles (maybe some peeling paint or something), but otherwise your army looks pretty damn good - the runes in particular look great 
|
|
|
|
|
|
2011/08/06 16:07:46
Subject: Dipped Skaven army
|
|

Ultramarine Scout with Sniper Rifle
|
You painted the 'light' very well!
|
|
|
|
|
|
2011/08/07 14:00:19
Subject: Dipped Skaven army
|
|

Whiteshield Conscript Trooper
|
Like the green alot... painting light is something i have to try after seeing this. Great stuff!
|
|
|
|
|
2011/08/07 14:03:09
Subject: Dipped Skaven army
|
|
Fixture of Dakka
|
Very effective painting sir  I tip my hat to you
|
|
|
|
|
|
2011/08/07 21:25:02
Subject: Dipped Skaven army
|
|
Armored Iron Breaker
|
The more I see dipping, the more I like it. Very nicely done.
|
|
|
|
|
|
2011/08/07 23:51:22
Subject: Re:Dipped Skaven army
|
|
Araqiel
|
This may seem like a really stupid question lol but how did you do the glow effect??
|
|
|
|
|
2011/08/08 01:55:07
Subject: Re:Dipped Skaven army
|
|
Shas'o Commanding the Hunter Kadre
|
Great looking rats! Now if I can only paint mine...
AtomicEngineer wrote:This may seem like a really stupid question lol but how did you do the glow effect??
You mean the warpstone coloration? It's just applying brighter greens over darker greens.
|
|
|
|
|
|
2011/08/08 02:09:49
Subject: Re:Dipped Skaven army
|
|
Flashy Flashgitz
|
Great job. The army is really tied together by the paint scheme.
You have really captured an eeriness with the warpstone OSL. Looking at the pics you can almost hear them skittering around the sewers of Altdorf.
Keep up the great work.
|
|
|
|
|
|
2011/08/08 11:18:17
Subject: Dipped Skaven army
|
|

Long-Range Ultramarine Land Speeder Pilot
|
Uber job!
|
"Each path must be chosen with care,
Lest disaster swallow us whole."
Varo Tigurius
Ultramarines Chief Librarian

Wh40k: Ultramarines, Blood Angels, Dark Angels, Space Wolves, Black Templars, Grey Knights, Imperial Guard, Inquisition, Eldar, Dark Eldar, Harlequins, Tyranids, Orks, Chaos Space Marines, Daemons of Chaos.
Wh: Dark Elves, Vampire Counts, Empire, Dwarfs, High Elves, Warriors of Chaos, Bretonnia. |
|
|
|
|
2011/08/08 13:47:59
Subject: Re:Dipped Skaven army
|
|

Ork Boy Hangin' off a Trukk
Newcastle, Australia
|
As much as I hate the new skaven plastics, well done with the paintjob. The green accenting/source lighting is striking
|
|
|
|
|
|
2011/08/08 14:53:49
Subject: Re:Dipped Skaven army
|
|
Monstrous Master Moulder
|
AtomicEngineer wrote:This may seem like a really stupid question lol but how did you do the glow effect??
I just used my airbrush the paint the warpstone chunks and the runes AFTER the whole thing was painted in the greys/browns/muted greens and dipped. I used skorpian green in my airbrush to paint the large chunks and then the sides will automatically catch some of the spray that's not really on target.
However, due to the nature of an airbrush, that'll be a very translucent, thin layer that still shows some of the colors underneath. The warpstone itself will have a good, solid basecoat though, because I mainly focus on that with the airbrush. The areas around the stones, will be a diffused light green that fades out the further you get away from the warpstone itself... and that creates an OSL effect.
Because it's a spray, you'll even have decent shading in the areas that wouldn't get any light/radiation... It's dead easy really, it just requires basic control of a dual action airbrush and a fine needle (I used a 0.2 mm for this work). And you have to toy around a bit to have paint that's thick enough to get coverage, but thin enough not to gunk up the airbrush itself. Mixing some glaze medium, some windex, some flowaid and some slowdry into your paint helps immensely for this.
After the airbrushing, the warpstone is given a green wash and then highlighted up again by progressively mixing white into the skorpian green.
|
The boy, I say, the boy is as sharp as a sack of wet mice... |
|
|
|
|
2011/08/22 21:08:50
Subject: Re:Dipped Skaven army
|
|
Monstrous Master Moulder
|
Hey folks.
Sadly, I haven't really been able to get a lot of painting done on my rats lately... mainly because I have been a bit preoccupied by moving house.
BUT! I did find a lovely new place in wich a single room will be dedicated to my hobby. Today, I set out to get a bit of a "mini studio" setup going and I bought myself a brand new camera to play around with it and test it. Sadly, the lens I was planning to use for miniature photography wasn't in stock (prime lenses are getting out of fashion it seems), but that didn't stop me from using my kitlens.
Anyway, I bought 2 500Watt lightbulbs and a 90x90x90 cm lightbox popup tent. Here's a few shots of the setup:


The idea is to get a nice, even soft light within the box, allowing me to take snapshots at 100 ISO, with f-stops of 8 (or higher) and still have decent exposure time. So far, the results are pretty good. I forgot to buy a whitebalance card though... so the gimp had to assist me a bit to correct WB afterwards, but nothing too major.
Anyway, the shots it yielded are:


And the now finished WLC:

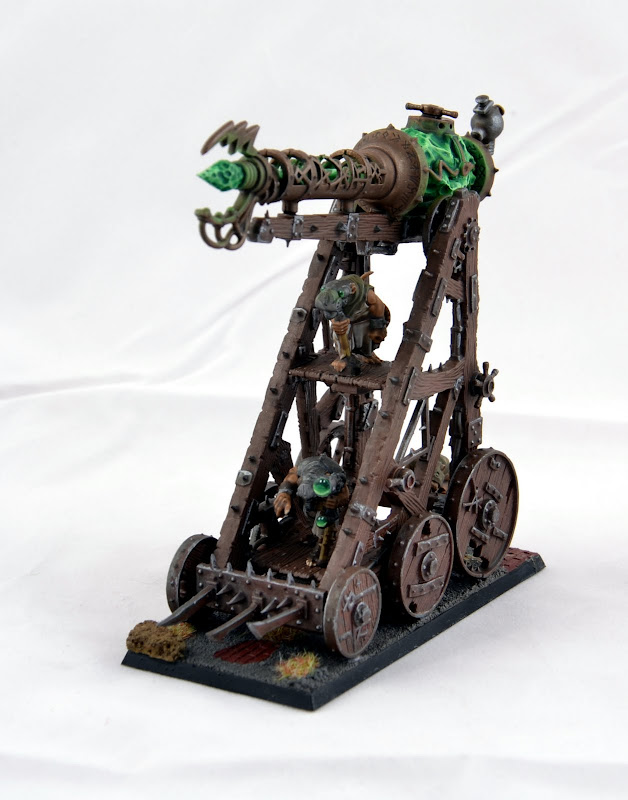
I'm going to check if I can get these into the gallery for higher picture quality then image tags. I'm quite happy with these first results... It'll probably require more experimenting to get the pictures just right.
Oh and yes! I did not iron the white background cloth yet. Sadly, I couldn't iron it at my new place yet.
Enjoy!
|
The boy, I say, the boy is as sharp as a sack of wet mice... |
|
|
|
|
2011/08/27 23:01:24
Subject: Dipped Skaven army
|
|
Death-Dealing Devastator
|
Those are very good. Skaven are cool.
|
|
|
|
|
|
2011/08/27 23:14:14
Subject: Re:Dipped Skaven army
|
|
Boosting Space Marine Biker
|
Great army man. That photo set up is amazing.
|
Peace is an individual conquest; it has never been a deed of the masses. |
|
|
|
|
2011/08/27 23:17:15
Subject: Dipped Skaven army
|
|
Fixture of Dakka
|
I like the tall frame for the WLC. Works quite well.
|
|
|
|
|
|
|
|


 Desert Hunters of Vior'la
  The Purge
  Iron Hands
  Adepts of Pestilence
  Tallaran Desert Raiders
  Grey Knight Teleport Assault Force


