| Author |
Message |
 |
|
|
|
|
Advert
|
Forum adverts like this one are shown to any user who is not logged in. Join us by filling out a tiny 3 field form and you will get your own, free, dakka user account which gives a good range of benefits to you:
- No adverts like this in the forums anymore.
- Times and dates in your local timezone.
- Full tracking of what you have read so you can skip to your first unread post, easily see what has changed since you last logged in, and easily see what is new at a glance.
- Email notifications for threads you want to watch closely.
- Being a part of the oldest wargaming community on the net.
If you are already a member then feel free to login now. |
|
 |
2013/04/03 23:46:58
Subject: The Librarian in Terminator Armor
|
|

Focused Dark Angels Land Raider Pilot
|
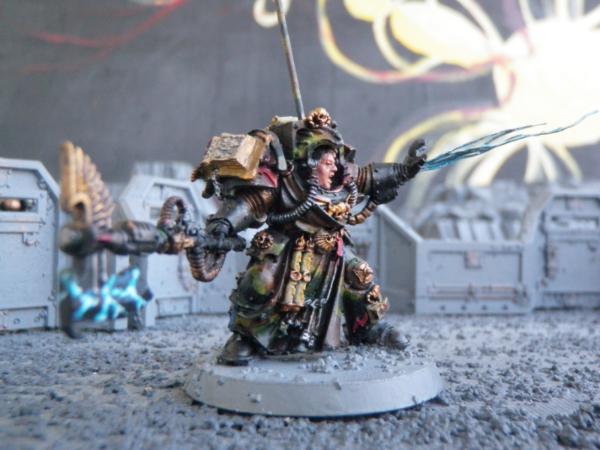
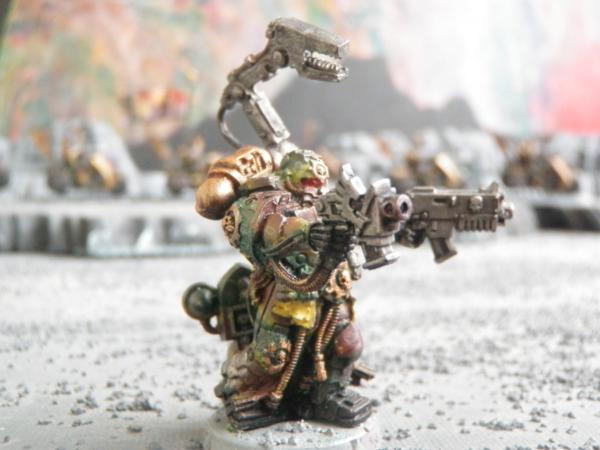
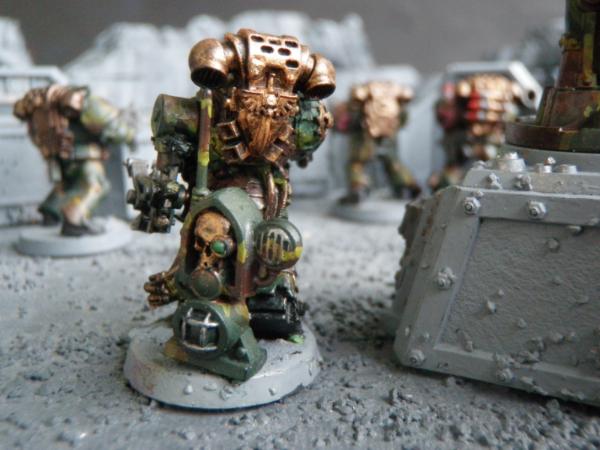
Since Psykers have become more important in the 6th Edition, I decided to add a librarian in terminator armor. I have considered using him near the quad-gun with Sergeant Telion since he can survive a Heldrake attack better than Sergeant Telion and he may be able to take over the Quad-Gun if I lose Sergeant Telion.
 The Librarian in Terminator Armor
I used a standard Games Workshop terminator librarian with a few modifications. First, I cut off both ends of his psychic force stave and replaced one end with the head of a force axe. I think this looks better and I think a force axe would serve a librarian in terminator armor better than the stave. Second, I left off the top piece that would be placed above his head which had a book. I thought it cluttered the model and made him appear top heavy. He already had a book on his shoulder and the second book seemed to be too much. The longer I have been making my models, the less I add decorative bits such as purity seals, scrolls, and books. I think they often clutter the model making them appear too busy and awkward rather than improve the model’s appearance. Besides, in combat it would be difficult to keep such items looking good and most soldiers would jettison such doodads for additional weapons, ammo, and survival gear. Of course, even without the top book, this librarian model still has a number of such bits, which is in keeping with a psychic model.
The third modification was adding the psychic streamers coming out of the librarian’s hand. I made the psychic streamers out of the flowering wire that I had purchased from Michaels. I drilled a hole in the hand and placed the wire in the hole. Unfortunately, this model is Finecast so it is somewhat brittle and the thumb and the fingers broke off while I was working on it. Fortunately, I had a plastic hand bit from the Blood Angels Sanctuary Guard bits which I was able to use.
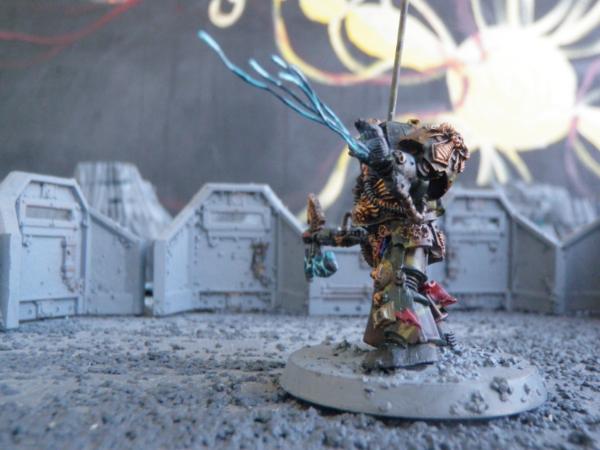 Side View of the Librarian in Terminator Armor
I had made a bike librarian earlier but the model was damaged, so I plan to rebuild the bike librarian. I am not sure whether a biker librarian or a librarian in terminator armor would work better with my army. I will probably remake the biker librarian and experiment with both librarians in my army to see which one serves me best.
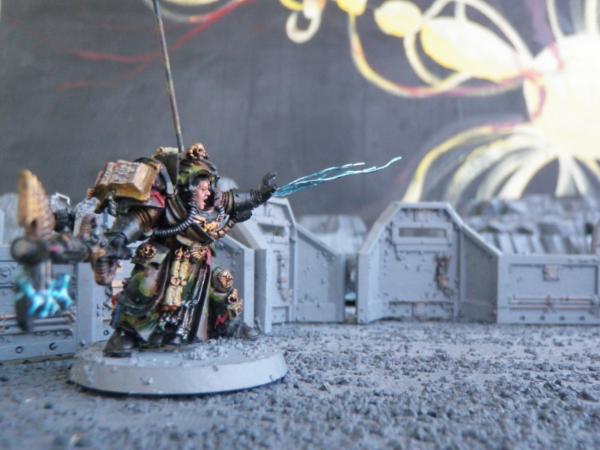 Another View of the Librarian in Terminator Armor
|
|
This message was edited 2 times. Last update was at 2013/05/09 13:27:16
|
|
|
 |
|
2013/04/06 01:17:28
Subject: Sammael on the Corvex and the Dark Angels Ravenwing, Part 1
|
|
Focused Dark Angels Land Raider Pilot
|
Because I already have so many biker models, I have been upgrading my army to run as a Dark Angels Ravenwing. In many ways this is an easy conversion since my camouflaged bikers look more like Dark Angels then vanilla marines with the color of the camouflage being almost the same as Dark Angel green. Although my models do not have the robes and doodads associated with Dark Angels, I would not have used the robes and doodads anyway since I tend to like my models uncluttered except by weapons, ammo, and other combat gear. Most of my models could be played as Dark Angels with no conversion and I can easy assemble a Dark Angels Ravenwing out of my existing models.
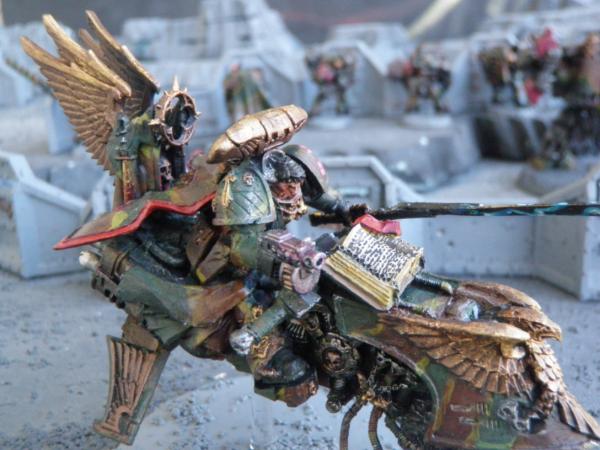
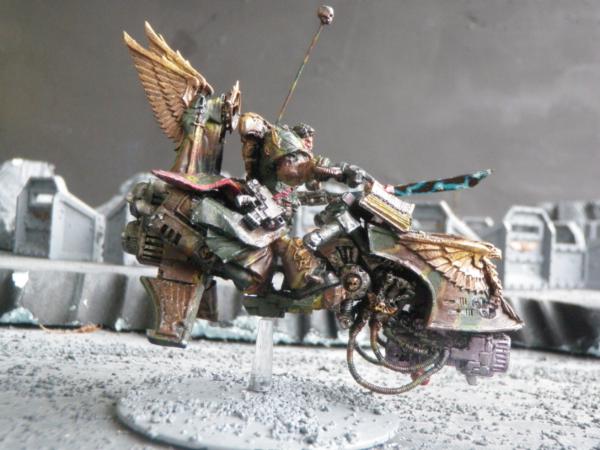
The one model I needed, however, was Sammael to make my bikers into scoring units. After studying the codex and discussions on the internet, I decided to mount Sammael on the Corvex, his jetbike, rather than on the Sableclaw, his land speeder. I purchased the new Sammael model from Games Workshop.
I must admit, I am disappointed with the model. I wasn’t overly impressed with the picture of the model on the Games Workshop site. Sammael looks overweight, disheveled, and drunk. He is posed barely hanging onto the Corvex, off balance with his sword trailing him like he just took a bump and is ready to fall off. He has a long trailing cape that threatens, like Isadora Duncan flowing scarf, to get entangled in the machinery of the Corvex and break his neck. Still, I ordered the model because I have found that some that models that appeared awkward in the pictures, such as the Stormtalon, actually look pretty good when they are finally assembled, especially with a little modification.
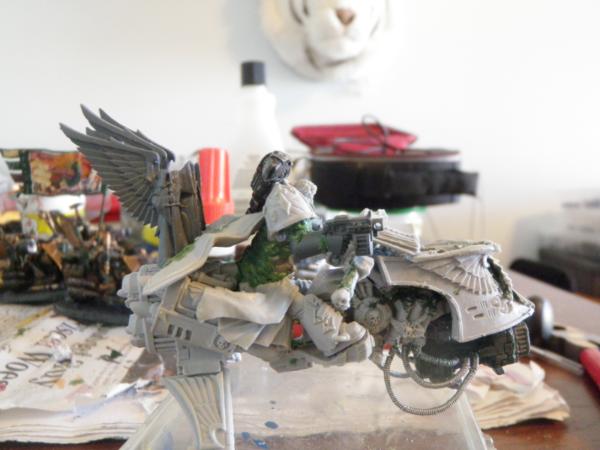
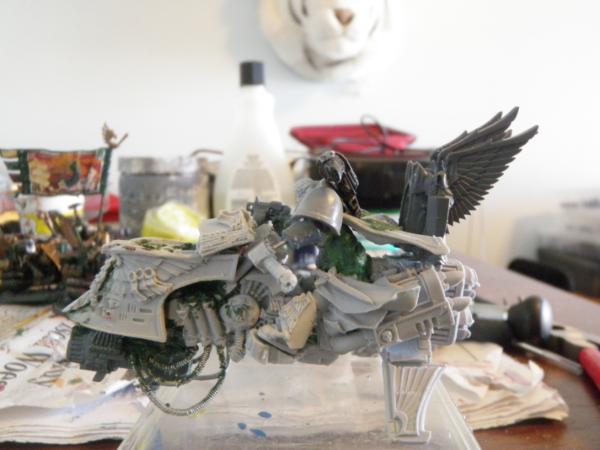
The model was finecast which didn’t concern me since I had just finished my librarian and loved how the finecast model painted up. I knew that it would be brittle and somewhat difficult to modify but I have been able to deal with that problem before. Unfortunately, finecast models often are warped, which usually is not a problems for a model such as the librarian which is somewhat free flowing, but the Sammael model was so warped that the Corvex was not straight so that the back of the jetbike did not really line up with the front. I solved this in part, by cutting the model in half and reattaching the two parts together with a heavy brass wire. I left a small gap between the front and back which can be seen in the picture below.
 Unpainted Sammael Model Showing Gap between Front and Back of the Corvex
If you look carefully, you can see the piece of the heavy brass wire just below Sammael’s thigh and knee. This allowed me to twist the model so that the front and back were more properly aligned. I also made a number of other alterations including cutting out the plasma cannon in front and replacing it with a plastic plasma cannon from a devastator pack, adding the hoses from the plasma gun to the Corvex, and replacing the upright wing of the Corvex, which was badly warped with the paired Dark Angels from the Company Champion of the Ravenwing Command Squad set. I also cut off Sammael’s right hand which was on the right handle of the Corvex. Actually, I cut off both the hand and the handle and the skull at the end of the handle, and then replaced the cut off handle with a short piece of heavy brass wire and reattached the skull on at the end of the handle. To recreate the ridges on the handle, I wrapped flower wire around the handle.
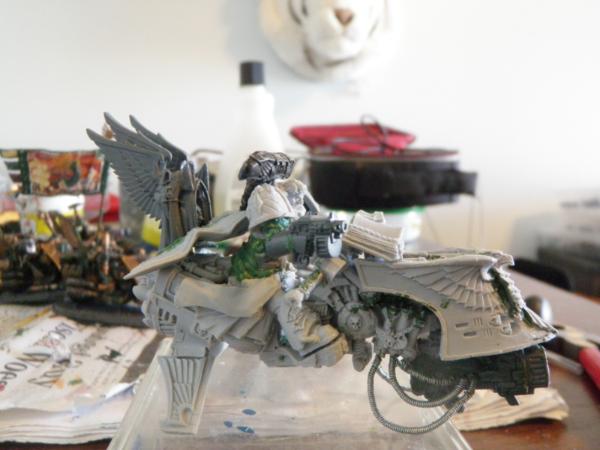
 Left View of Unpainted and Unfinished Sammael on Corvex
I brutally cut up Sammael’s upper torso so that I could twist him back into a forward more aggressive position. I used a lot of green stuff to fill in the parts that I cut out. I am not a master of green stuff and use it primarily to bulk up a portion of the model. I almost always cover up the green stuff anyway and although I have not yet put them on for these pictures, I later covered the green stuff with a lot of packs and ammo bits. I put a space marine captains two headed eagle backpack on his back and also carved out the cape so it was much shorter and flowed around both sides of the twin Dark Angels.
 Right View of Unpainted and Unfinished Sammael on Corvex
The hoses are made from flower wire with heavier copper colored wires extending from the plasma cannon the Corvex and with thinner silver colored wire tightly wrapped around the copper colored wire to give the hose effect. I replaced Sammael’s left arm with bits including a Ravenwing bolter pistol with extended round magazine and although it is not shown any of the above pictures, with a new sword. Sammael is armed with the Raven Sword, which may be the best power melee power weapon available to any character in 40K. Regardless, the actual model’s sword looked no different than a sword given to the greenest of sergeant’s. I had a sword that I had made from a piece of brass wire which I had used for one of my earlier captains. In the picture, I hadn’t put it on yet because it was already painted and I wanted to spray paint Sammael and the Corvex first.
|
|
|
|
|
2013/04/07 23:32:20
Subject: Sammael on the Corvex and the Dark Angels Ravenwing, Part 2
|
|
Focused Dark Angels Land Raider Pilot
|
In my last post I discussed how I modified the Games Workshop finecast model of Sammael on the Corvex. This post shows the finished model.
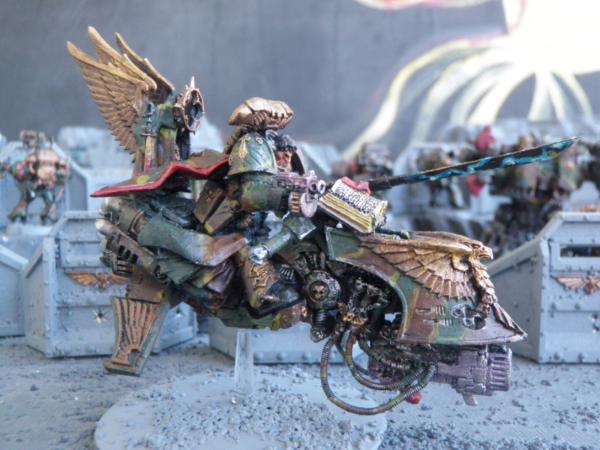 Sammael on the Corvex – Right View
Notice that I covered up much of the green stuff with his pistol holder and some belt packs.
I would like to say that with all the conversions and work that this model turned out great. Unfortunately, I would be lying if I did. There are parts that I like but this is not one of my favorite models. Sammael is too hunched over on the bike. The heavy bolter in his right hand is not great. I am not sure that the Raven Sword is great. The worst, however, is the Adamantine Mantle that capes behind him.
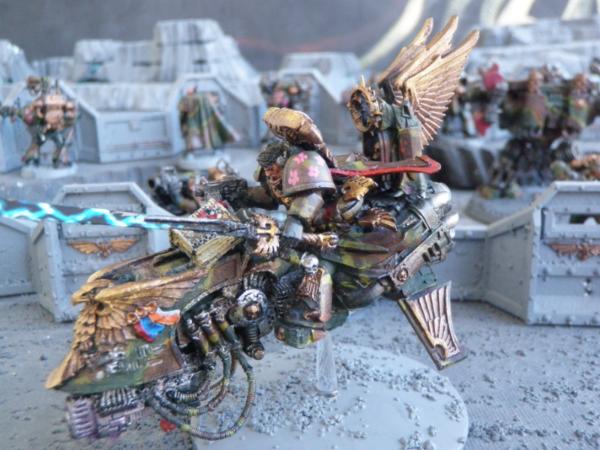 Sammael on the Corvex – Left View
Note the helmet hanging from his belt. It is the Ravenwing champion helmet which I really like. Again, there are some details I like. I like the twin dark angels in back. I like the eagle in front. I like the Plasma cannon and the most of the bike.
 Sammael on the Corvex – Close Up
Overall, however, this is not one of my favorite models. Recently I searched the Dakka dakka gallery for Sammael and looked through the models displayed there. Generally, I like the scratch built models better than the new finecast model. If I were doing it over again, I would not purchase this Sammael model from Games Workshop. I would build this model from my left over bits and perhaps ordered a neat looking jet-bike from a third party supplier if I couldn’t have figured out have to make it myself.
 Sammael on the Corvex – Front View
I may re-work this model, replacing the Adamantine Mantle and perhaps replacing Sammael’s head with either a helmet or another bead. I am also considering putting the bolt pistol in its holster and replacing the right arm. This may be a job for the pointing finger which is the best bit 40k bit that always gives strength and swagger to my models. For now, however, this model is adequate for actual games and Sammael and the Corvex will be able to clean up some of the heretic scum such as the Chaos space marines that has been infesting our game tables lately.
|
|
|
|
|
2013/05/07 23:52:02
Subject: Ravenwing Command Squad – Three Black Knights - Light
|
|
Focused Dark Angels Land Raider Pilot
|
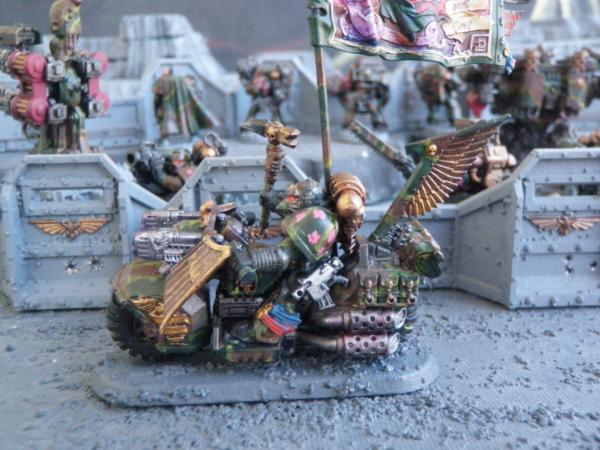
I built a Ravenwing Command Squad with just three Black Knights. I had been worried about this squad since I have played enough with my bikers to know how easy they are to kill. Only three bikers seemed to be too vulnerable for a command squad carrying a large important banner. Such an inviting target may not last long. Now that an FAQ allows five Black Knights in the Ravenwing command squad, I will have to build two more to make the squad a little more survivable.
 Ravenwing Command Squad with Sammael in Background
Banners are hard to paint. For my Space Marine bike army, I painted a red, white, and blue banner for the banner bearer and although it was fun, the painting appeared thick and splotchy. I have since learned that the best way to paint models is with a series of thin layers and I did this on this banner.
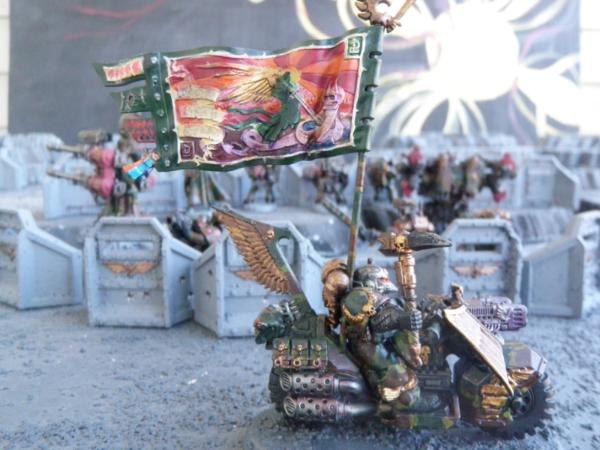
 Ravenwing Wing Black Knight with Ravenwing Banner
I made at least two modifications to the banner bearer. The first is that I replaced the banner’s plastic pole with a brass wire. I have learned that plastic is too breakable for banner poles and antennas. I also set up the bike so that the banner pole is held on the bike rather than held in the Black Knight’s hand. Instead, I put a Corvus hammer in the banner bearer’s free hand.
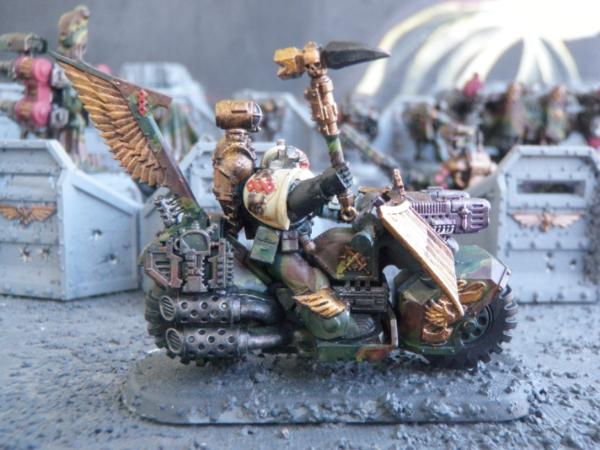
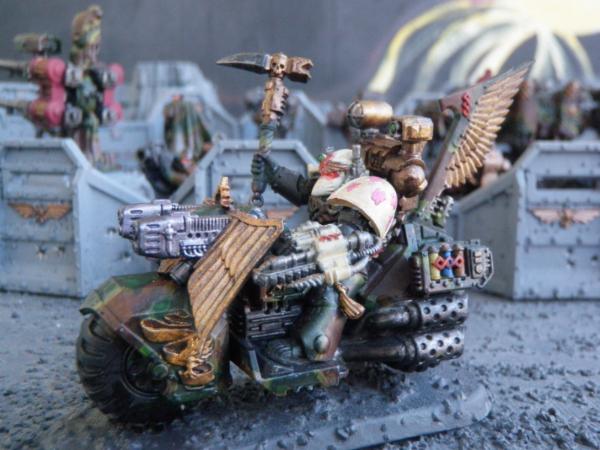
 Ravenwing Wing Black Knight with Ravenwing Banner – Close Up of the Black Knight
 Black Knight with Ravenwing Banner
I made an Apothecary upgrade for one of the Black Knights. I set it up so that his narthecium is holding one of the handlebars which I like better than just having the narthecium hanging loose. I had considered changing him to a regular Black Knight because I didn’t want to invest the points for a Apothecary but with five Black Knights to support, he seems like a better investment.
 Ravenwing Apothecary - Right View
 Ravenwing Apothecary – Left View
I am pleased with the medicines in the bottles that he is carrying. I have discovered that the best way to paint anything, including these medicines, is again to build up the paint in layers. I started with dull colors and highlighted with bright colors but to the eye the colors of the medicine look like a single color. I noticed this with the brass. If I painted using straight Dwarf bronze (the old GW color), the results looked flat and blotchy. If however, I first painted a bronze part with tin bitz (another old GW color) and then highlighted with a lighter bronze, the color looked the same brightness and intensity for the bronze but the without the blotchiness.
 Ravenwing Knight Grenadier – Left View
The GW kit for the Ravenwing Knights has a hand already on each handle. I wanted at least one of the knights with both hands off the handle, with one hand holding a bolt pistol and the other hand holding the Corvus hammer. I substituted the Ravenwing bike handle with a handle off of a regular bike. It took a little drilling and cutting but wasn’t too difficult. I used the Ravenwing handle with my biker techmarine which I will display in another entry. For the pistol, I used a Ravenwing bolt pistol with the round magazine.
 Ravenwing Knight Grenadier – Right View
Note that he has both hands off the handlebars. Also note that he is a grenadier and he has a grenade launcher rather than the twin-linked plasma guns.
|
|
|
|
|
2013/05/18 18:18:14
Subject: Sammael on the Corvex and the Dark Angels Ravenwing, Part 3
|
|
Focused Dark Angels Land Raider Pilot
|
In part 2 on Sammael on the Corvex, I admitted that I was disappointed with how Sammael turned out and wanted to re-work this model. I actually did rework the model, almost immediately after I had posted part 2. I pulled Sammael’s torso off the legs, pulled out his arms, and removed the robe. I made extensive cutting into the model to removed excess green stuff from the torso and his buttocks. I decided to replace the sword holding hand. Although I kept the metal blade of the sword, I had a servo arm bit that I had ordered from Bitspudlo.com. I cut off and replaced the plastic blade in the servo arm bit with the old metal blade. I thus made Sammael’s left arm a robotic arm which I thought looked good. There is nothing in the fluff of the Dark Angels Codex that suggests that he has a robotic arm but my Sammael does which in part justifies why the Raven Sword is so powerful.
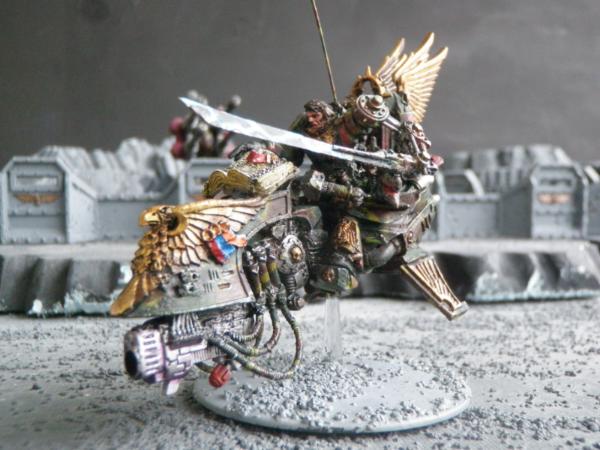 Sammael with Servo-Arm
I straightened up Sammael torso so that he stood up straighter on the Corvex. This was a major improvement as it gave a better angle on his face and front. As I mentioned before, I had trimmed the torso and buttocks which now made Sammael’s body long and lanky.
 Sammael – Right Side
I wanted to replace his right arm with the pointing finger bit but discovered that the pointing finger bit was for the left arm rather than the right. Since I had already used the servo arm for the left hand and arm, I decided to build my own right handed pointing finger. I took the arm and hand that was designed to hold the flag in the Ravenwing command squad set. I had the hand since I mounted the flag directly to the bike. I drilled out the pole part of the left the hand, which left just the hand and the fingers. Then I cut off the curled index finger and using a piece of paper clip I made a pointing finger. I had learned this trick when I had built my terminator librarian. A piece of paper clip wire makes a good replacement for a missing finger. I then covered the paper clip wire with a little green stuff and with a little filing and trimming; I had a right arm with a right hand pointing finger.
[ 
Sammael and the Pointing Finger
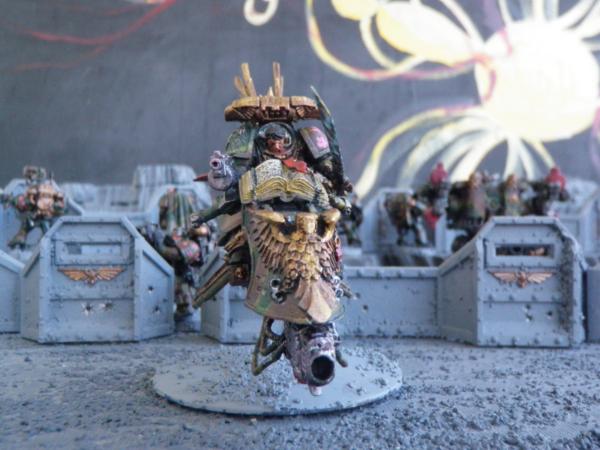
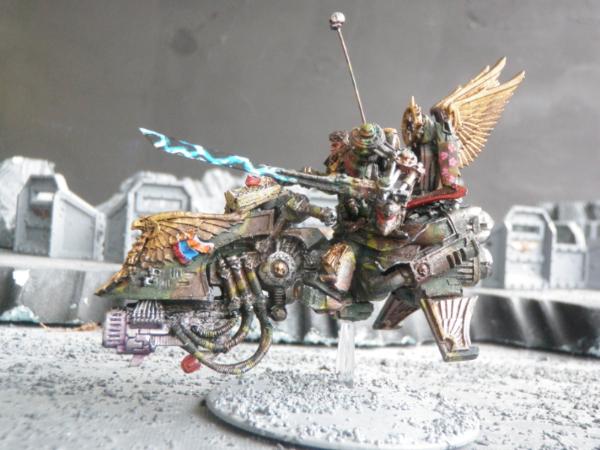
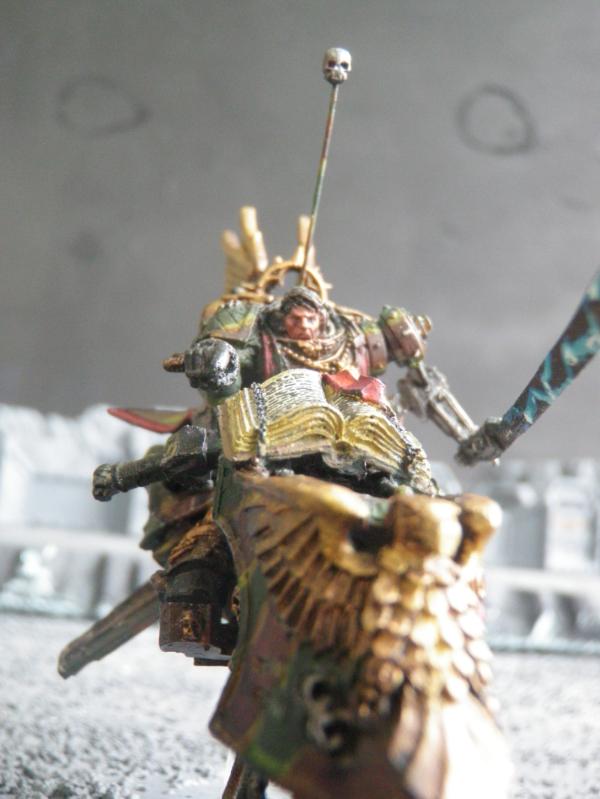
I further trimmed cut down his Adamantine Mantle so that it fit more directly on the seat of the Corvex to expose the back tail of the Corvex. I repositioned his helmet at his side so it was more upright and added grenades and a plain bolt pistol to his waist. I wanted a fancier pistol but this was all I was able to find. Actually, I think the plain pistol fits the character I created, a lanky thin and unpretentious leader who wears the rank and badge of honor not for self glory, but to make himself visible in the fog of combat and help him be effective as a combat leader.
 Sammael – Right Side
I am delighted at the results. In Jewish tradition Sammael is name of the Angel of Death and this model seems to embody such in his countenance. I love the new pointing finger and his long lanky body. Now this Sammael has become a Puritan warrior judge ready to impart eternal justice to the damned, not with anger or viciousness, but with firmness of purpose in administering the fiery retribution of right to those enemies of righteousness and traitors to human race. He is a futuristic intergalactic General William Tecumseh Sherman who will make the unrepentant rebels howl with pain and despair as a result of their own rebellious and violent acts, for they have chosen destruction over creation, chaos over order, war over peace, death over life.
 Sammael – A Traitor’s Last View
With a few tweaks and adjustments, this model has gone from barely adequate to one of my favorite, if not my most favorite, Warhammer model. In many ways a great Warhammer 40K model is like a Wingtip or other dress shoe that isn’t really great until after it has been broken in and had its soles replaced. Many of my favorite models didn’t really sparkle until I had rebuilt them once or twice. I am eager to put Sammael and the Ravenwing on the tabletop to clean out the unholy alliance of Orks, Daemons, and traitors, the Helldrakes and Monsters, who have been infesting our game tables lately. We are almost ready to face the Helldrake.
|
|
This message was edited 1 time. Last update was at 2013/05/19 19:30:42
|
|
|
|
|
2013/05/22 13:33:52
Subject: Review of Modeling Tools (Updated)
|
|
Focused Dark Angels Land Raider Pilot
|
A few months ago, I wrote about the tools I used when modeling. I felt that I needed to update this since I am using some of the tools that I had dismissed as unnecessary. The updates are in bold italics.
Today I am going to review the Modeling Tools that you need to build a Games Workshop army. Although I am building a Space Marine Bike Army, this article will apply to all plastic miniature armies.
For each tool, I will address two issues: First, is the tool itself useful? Second, should you buy the tool from Games Workshop or can you easily pick up the same tool for a cheaper price elsewhere?
Glue: Glue is necessary. The real issue is which glue to use. Games Workshop recommends plastic glue for the plastic models and super glue for everything else. I disagree and use only super glue on my models, whether plastic or not. Plastic Glue melts the plastic so that it bonds plastic pieces together forming a bond stronger than the plastic itself. It also melts the plastic pieces that you don’t want to melt leaving finger prints and destroying details. Super glue is more forgiving and the bond can be broken, which is great for remodeling. Although Games Workshop sells super glue, it is cheaper and more convenient to pick up super glue at a hardware store or even at most grocery stores.
Hobby Knife: The Hobby Knife is my most important and used tool. I use it to carve out parts, to remove seams, and to cut apart joints. I use my knife for both building and for rebuilding models. It is certainly necessary for any modification of a plastic model. The Games Workshop Hobby Knife is merely a standard X-Acto Knife readily available from any hardware store or from most major chain stores. Even if you buy the Hobby Knife from Games Workshop, you will need to buy replacement blades elsewhere.
Plastic Cutters: Plaster Cutters are useful for removing parts from the plastic trees. Although they may be available elsewhere, it is convenient to purchase them from Games Workshop. One set will last for years. They do wear out, especially if you use them like I do to cut piano wire. I just bought a new set from my local Games Workshop.
Hobby Drill: If you do any pinning or drilling out of weapons barrels, you will need the hobby drill, a small hand driven drill. Get it from Games Workshop. The clerk at a local hobby shop insisted that he had better and cheaper hobby drills but they were never in stock. You will eventually need replacement bits which you will need to order over the internet. They are 1 mm drill bits. I also use 0.7 mm bits although not as often.
Brushes: Unless you use an airbrush, you need paint brushes. I purchase mine from an art store and use a 0, 00, 000 (or 2/0 or 3/0) stable hair brushes. You will need to replace the brushes periodically. Games Workshop brushes are okay if you don’t have ready access to an art store.
Spray Paints: I use Chaos Black Spray Paint to undercoat my models. If colors are critically important to me, for example, on a banner or other such decorative device, I will undercoat the critical part with white spray paint instead of black and glue it to the rest of the model later. I always use Games Workshop spray paint because it seems to go on smoother and covers less details than other primer spray paints.
Paints: Of course you need paint to paint models. The real issue is whether you should purchase your paints from Games Workshop or not. I do. Although I am aware that Blood Red and Barbie Lipstick Red are probably the same color, Games Workshop has devoted a great deal of energy in assembling their paint palette and in publishing and disseminating techniques for using the colors they market. Thus, if I want to use their expertise and match what I am seeing in White Dwarf, How to Paint Citadel Miniatures, the Codex’s and the internet, it is easier to use Citadel paints. Although a complete set of paint can be a large investment of money, I find that the paints last for a long time and I usually only need to replace at the most one or two jars of paint every few months.
Green Stuff: I love green stuff and use it regularly to fill in joints and for minor modeling. Some modelers actually can make parts out of green stuff but I don’t use it for such sophisticate modeling. Games Workshop is a convenient source of Green Stuff although I ordered a roll of green stuff over the internet from another supplier and this roll has lasted me for years.
Paint Station: The Citadel paint stations are very expensive, ranging from $40 - $70. Why bother? I just put newspaper on a table when I am working on a model. If I to do cutting, I may put a piece of wood down or just have enough paper so that I don’t cut through it. My son had a paint station but we eventually threw it away since it just got messy and took up space.
Files: I just purchased a set of hobby files from a bits supplier and find that I am using them all the time, especially if I want to rebuild or modify a model. I suspect that the Warhammer files are also good quality and would work just as well.
Hobby Vice: I don’t need a hobby vice. I have a bench mounted vice which I use on my models when I need to hold them into place.
Citadel Clean-Up Kit: I purchased this kit from Games Workshop but it was really a waste of money. An old used tool-brush will work as well as the brush and the hobby knife does a better job removing seams than the mold-line scraping tool.
Razor Saw: I like having a razor saw although I use it only on occasion when I have to cut a model in half. I already have an old razor saw so I don’t need the Games Workshop saw.
Sculpting Tool: I bought the Warhammer sculpting tool. Warhammer now sells liquid green stuff in a paint bottle. It is good for filing in small gaps. I find that the sculpturing tool works great with the liquid green stuff. On normal green stuff, however, I find that a wet toothpick works better.
Water Pot: You got to be kidding. The one thing our modern civilization produces is little plastic containers for soft margarine, yogurt, or such. Save one from the trash bin and use it to hold water.
Palettes: These are useful for both mixing paints and diluting the paint to the right consistency. Again, however, we live in a civilization that produces plastic bits of garbage. Man Boy Genius at Spikey Bits suggests using the plastic tops of Pringle Chips containers. http://blog.spikeybits.com/2012/12/secret-tech-hobby-better-with-pringles.html
|
|
This message was edited 1 time. Last update was at 2013/05/23 00:34:01
|
|
|
|
|
2013/05/23 23:47:10
Subject: Librarian on Bike with Power Field Generator
|
|
Focused Dark Angels Land Raider Pilot
|
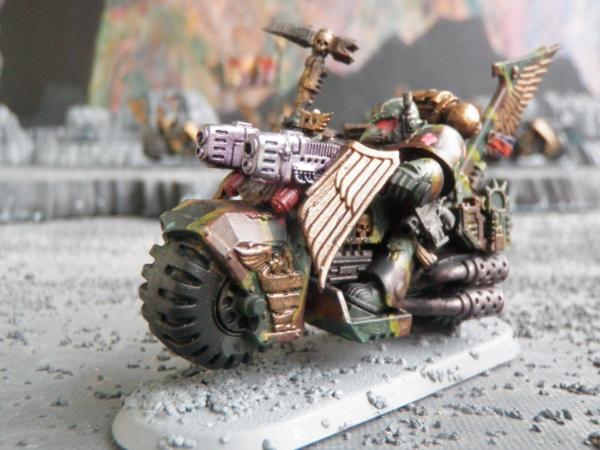
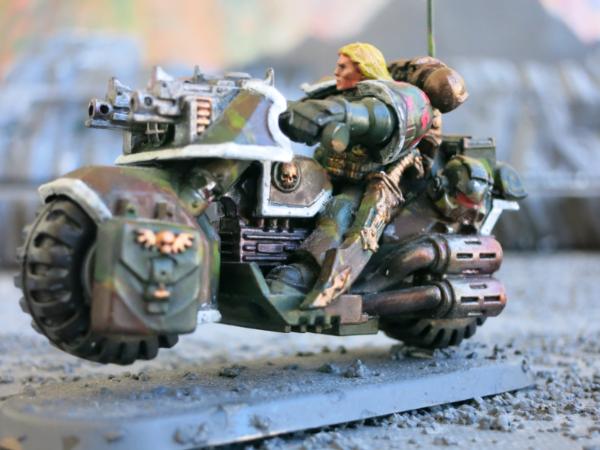
 Librarian on Bike with Power Field Generator
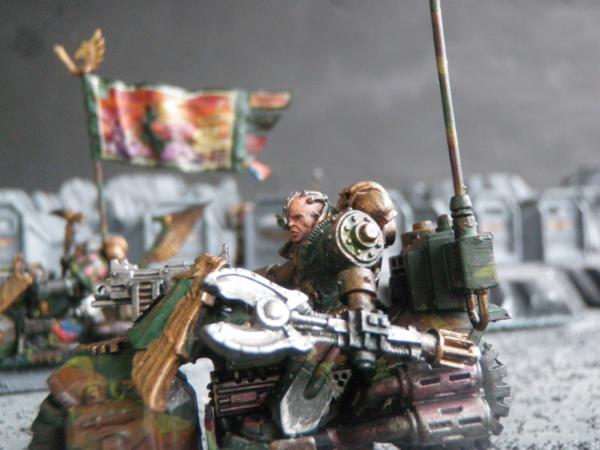
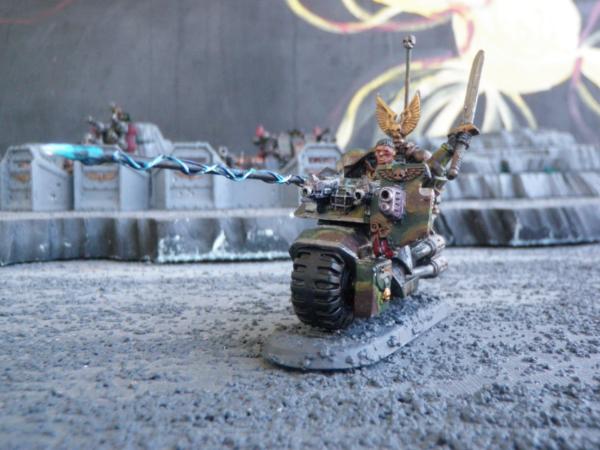
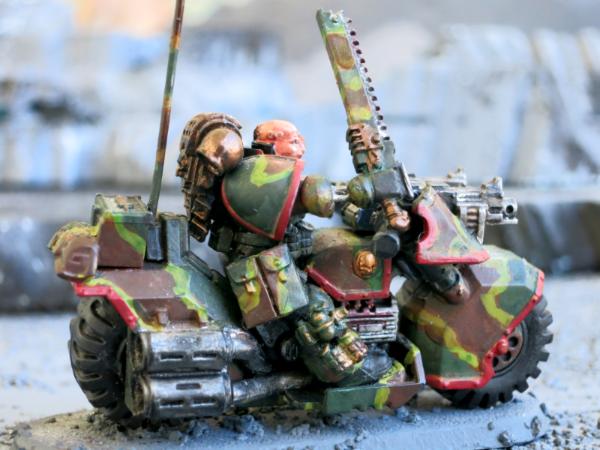
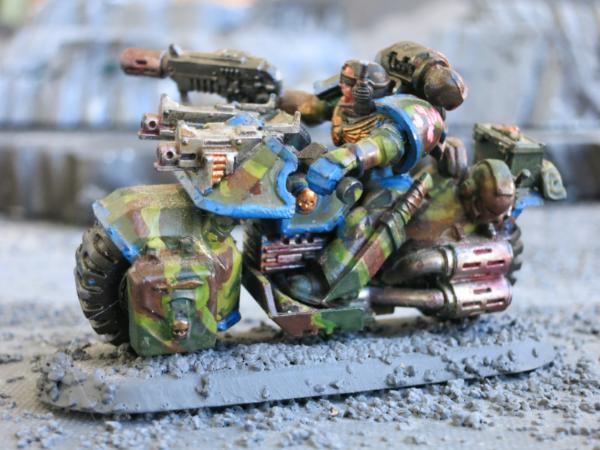
I love bikes but bikers are expensive and easy to kill. One threat to bikers, as well as all MEQs, is the Chaos Marine Helldrake. I expect many of my opponents to have Helldrakes. After all, if I were a traitor to mankind, if I turned my back on all the is right and good, if I turned myself over to my most base and disgusting impulses, I would play Chaos Marines and would field at least two and possibly three Helldrakes with flamers. I think the models are neat looking and are an excellent tool against MEQs. So if I would play Helldrakes, I must assume that those who sold their souls to the false gods of Chaos will use Helldrakes.
So in building my bike army, I have to deal with Helldrakes and other fliers. I have a number of solutions including taking allies. The best allies may be Imperial Guard with Vendettas. but at this time I am not interested in starting to acquire, build, and master an IG army.
For Dark Angels I have several solutions even without IG. One is to ally in my space marines with a Stormtalon and a Stormraven. I already have two Stormtalons and have purchased a Stormraven. But if I want to maintain a pure Dark Angels army, I am limited in what flier I can bring. Although Dark Angels have fliers, these fliers have a reputation as being poor anti-aircraft fighters so I will forgo them for now.
Other Dark Angel options are to field a quad gun, which I have done; Black Knights which although they only hit flyers on sixes, are twin-linked and especially if in the right position, may be able to take down a flyer; and adding the Forge World Mortis Dreadnaught. I can also use evasive tactics such as assaulting weak units with my very mobile bikes when Helldrakes are near, using my bikes mobility to move to positions where a Helldrake may not be able to maneuver fast enough, and finally, liberal use of a power field generator. I suspect that the best tactic is a combination of all the above combined with use of the strong Alpha strike of the quad gun and a rifleman dreadnaught, and a strong Beta strike of the bikers to eliminate as much of the scoring troops, troop transportation, and as many other obstacles as possible before the Helldrakes come out of reserve.
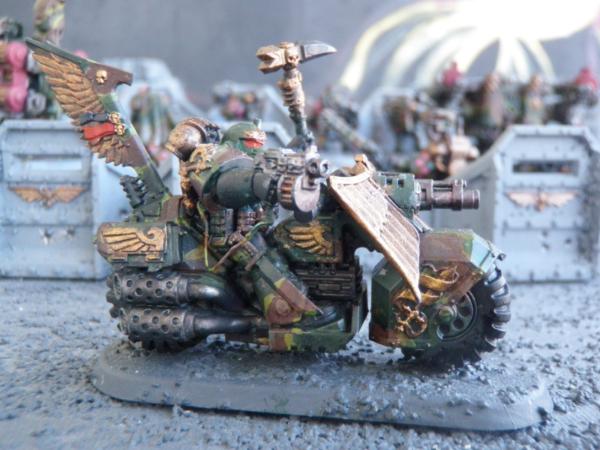
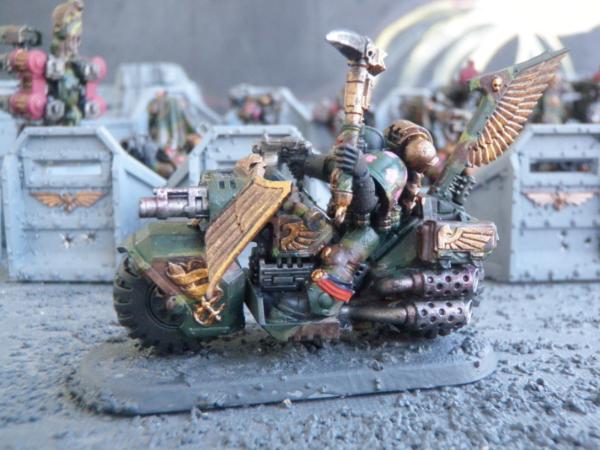
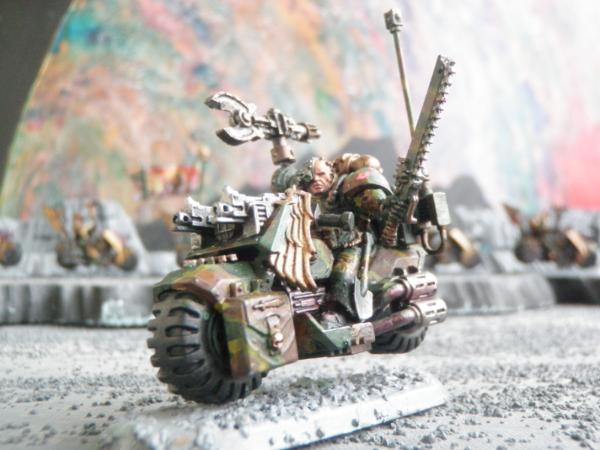
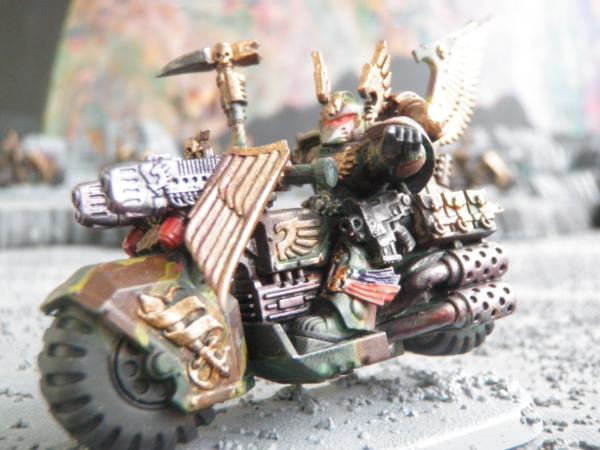
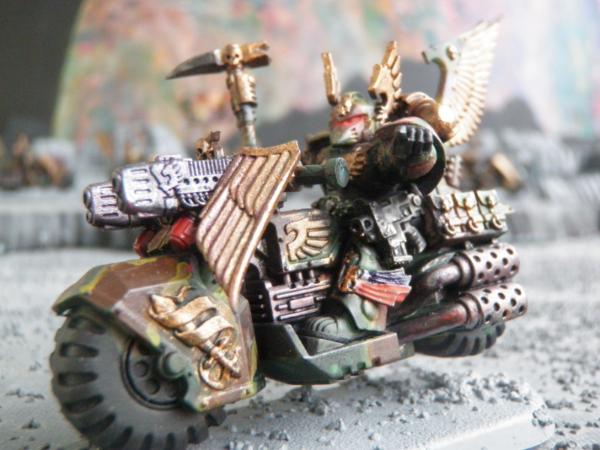
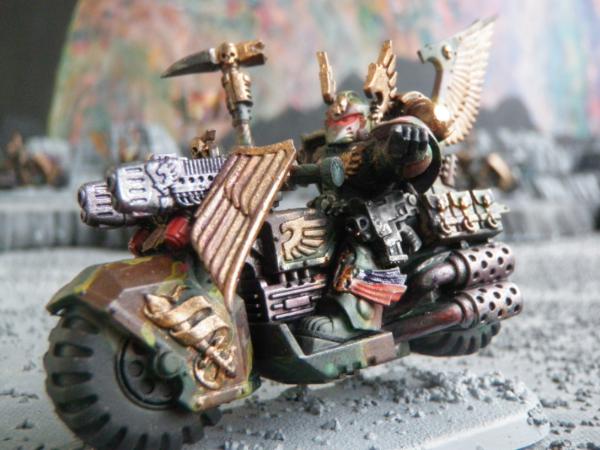
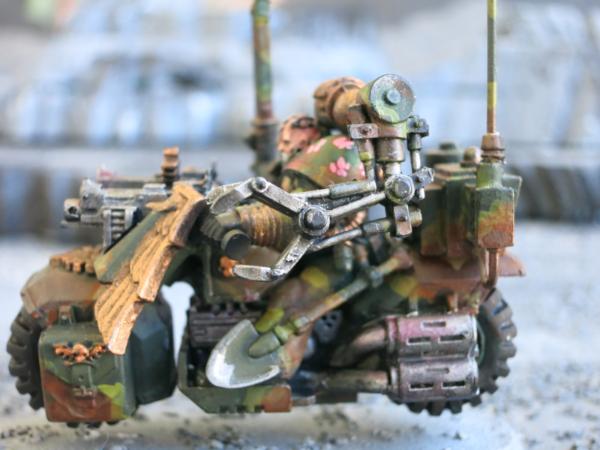
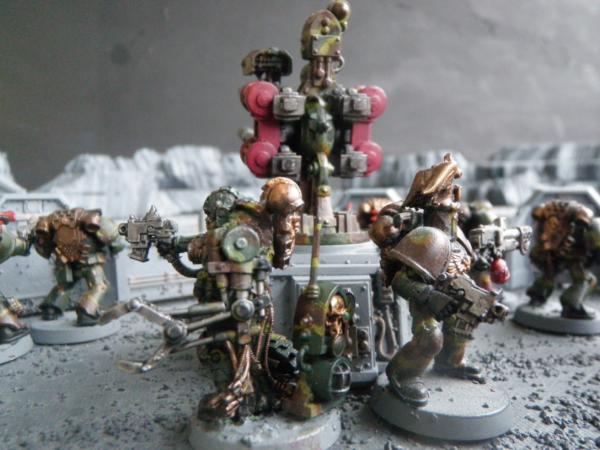
With this long winded introduction out of the way, I would like to introduce the first of three headquarters characters, each carrying a power field generator to give my bikers and my other troops 4+ invulnerability saves. These models include 1) a librarian on a bike, 2) a techmarine on a bike, and 3) a techmarine on foot. The first of these models is the librarian on a bike as a second headquarters in addition to Sammael.
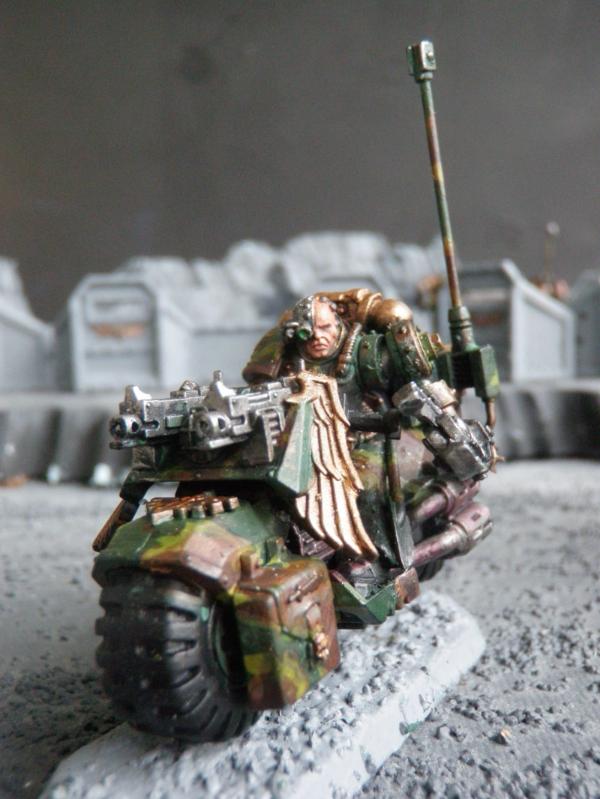
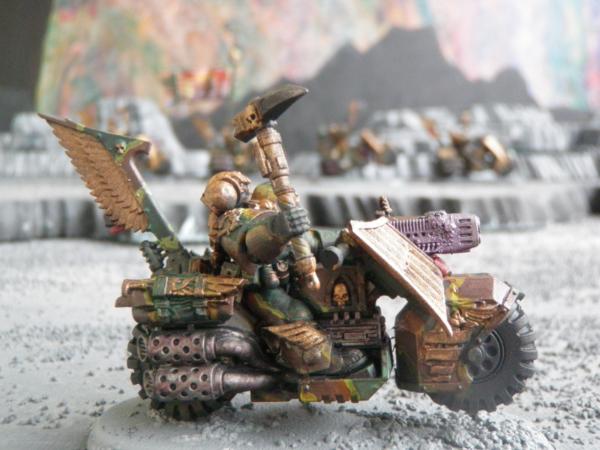
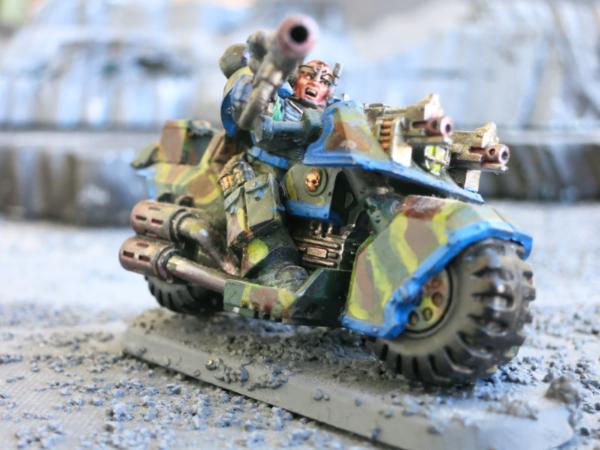
 Dark Angel Librarian on Bike
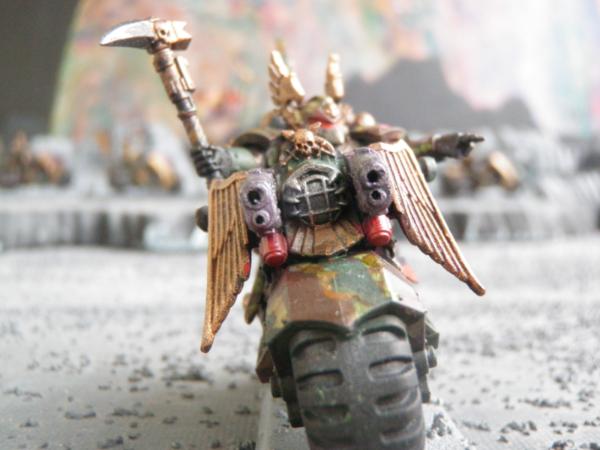
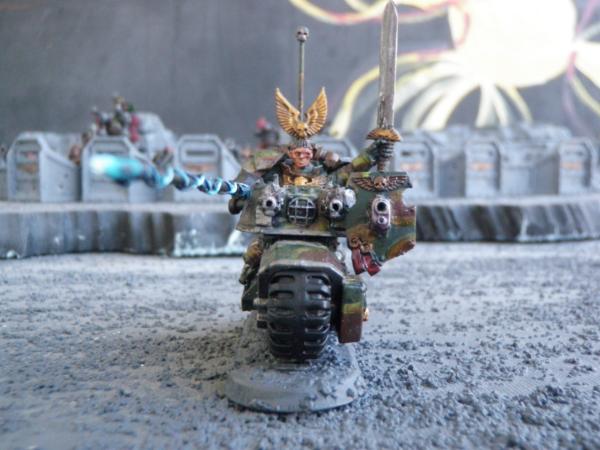
Like many pieces of equipment in a Warhammer 40K, the power field generator is not illustrated in the Dark Angels codex or elsewhere so I am guessing what it looks like. Since I had two left over commo relays with the Aegis defense line, I decided to use them as the power field generators and put one of them on the back of the librarian’s bike.
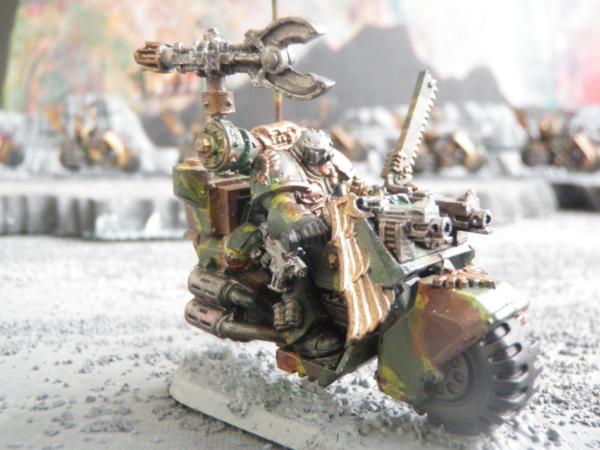
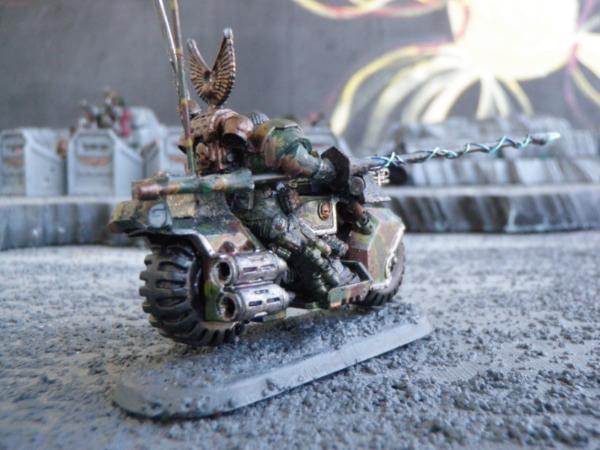
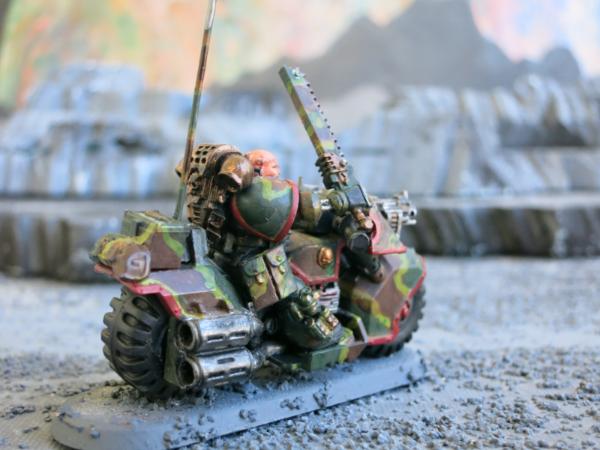
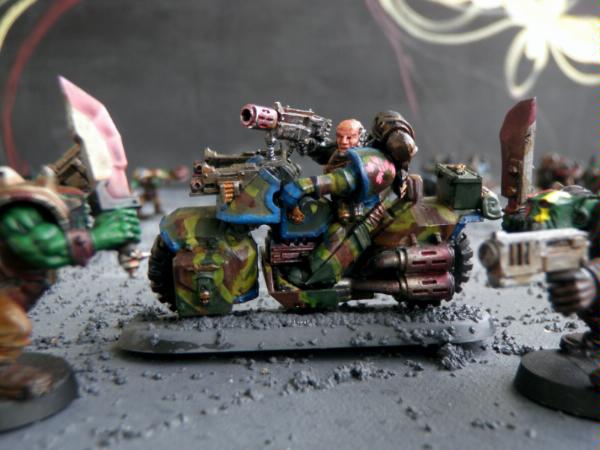
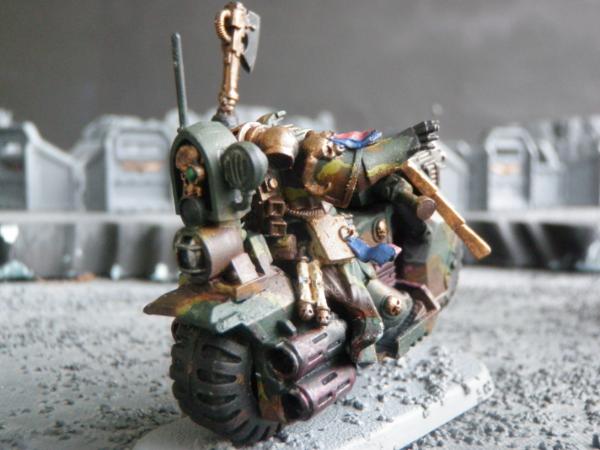 Power Field Generator on Librarian’s Bike
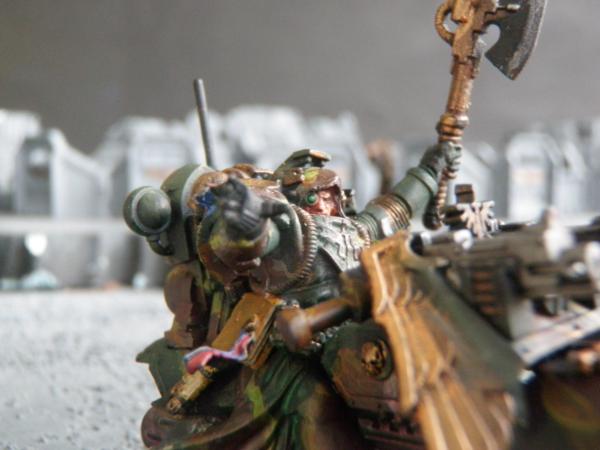
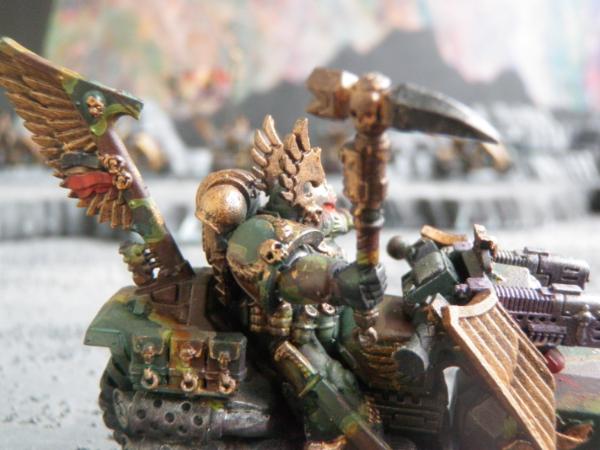
I mounted the librarian himself on a standard space marine bike. As for the body of the librarian, I was able to purchase Librarian Turmiel from the Warhammer 40,000: Dark Vengeance starter set. I think Librarian Turmiel is Warhmammer's best looking power armor librarian and he is already a Dark Angel. I sawed him in half at the waist and with a little green stuff and some pinning, mounted his torso on the robed legs of a biker. From my bits, I found an axe for his Force Weapon and with a few modifications, he was ready to go. I plan to field him with my command squad to provide them a 4+ save and psychic powers.
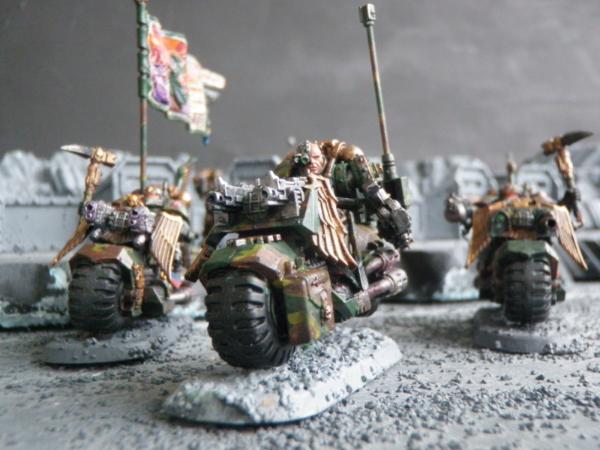
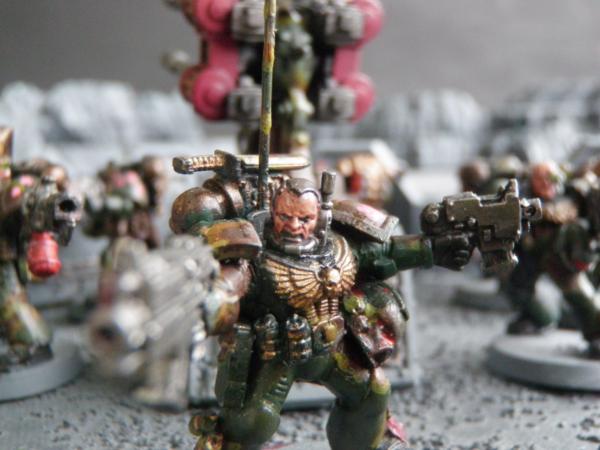
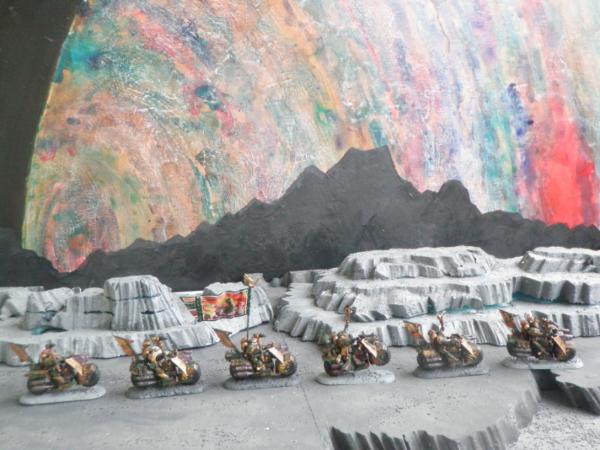
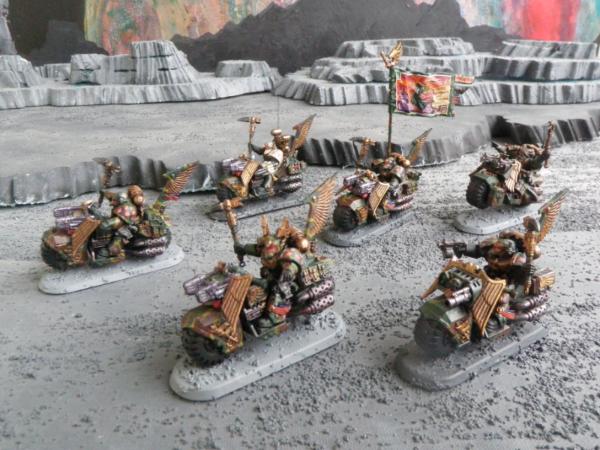
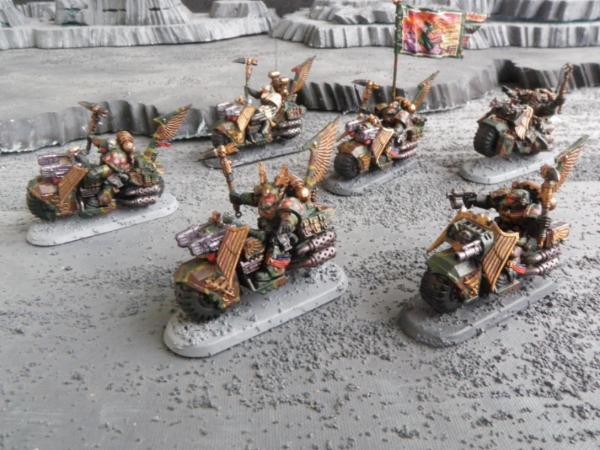
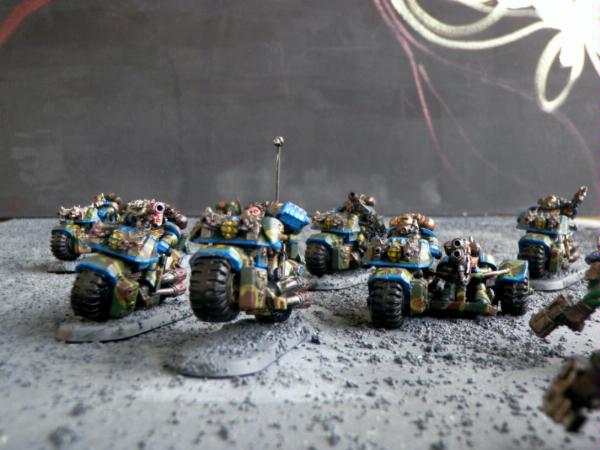
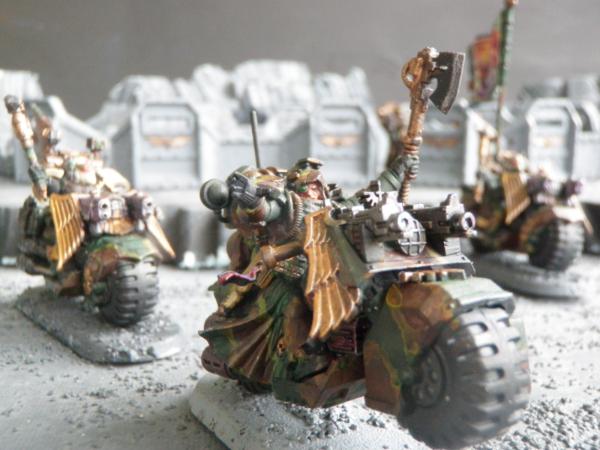 Biker Librarian with Command Squad
|
|
|
|
|
2013/05/25 02:37:13
Subject: The Dismounted Techmarine
|
|
Focused Dark Angels Land Raider Pilot
|
|
|
|
|
|
2013/05/26 03:18:00
Subject: The Mounted Techmarine with Power Field Generator
|
|
Focused Dark Angels Land Raider Pilot
|
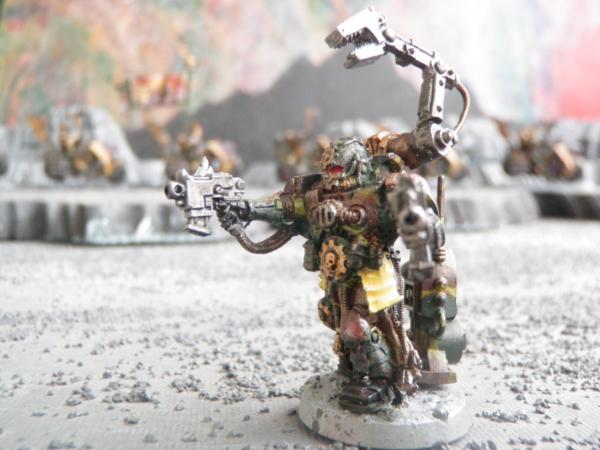
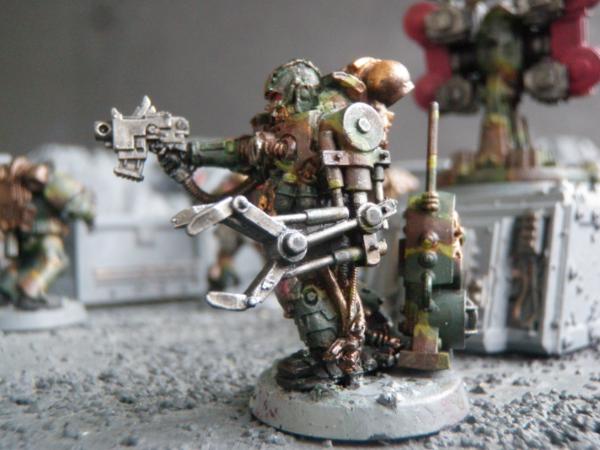
I built a mounted techmarine. I cut one of the servitors in half and pinned and green stuffed him on some biker legs.
 The Mounted Techmarine
 The Mounted Techmarine with Ravenwing Command Squad Black Knights
For the power field generator, I used a part I had which I think belonged to a land raider or other vehicle. I actually like it better as a power field generator than the commo relay bits. Unfortunately, I only had this single bit. The shovel is an Imperial Guard bit that I bought from an on-line bits supplier.
 The Mounted Techmarine with Power Field Generator on his Back Fender
This turned out to be one of my favorite models and he is one of the few models that I have given a name, Brett Socket. Actually, several of my models have names but most do not.
 Another View of the Mounted Techmarine
Isn't he handsome? He looks like one of my favorite son-in-laws.
|
|
|
|
|
2013/05/29 02:06:26
Subject: Painting Eyes
|
|
Focused Dark Angels Land Raider Pilot
|
One of the most difficult things to paint are human faces. I have done some figure drawing and painting and faces are always a challenge, especially the eyes. Actually, if you examine great art, you will discover that many great artists hint at the eyes rather than actually draw the eyes and our mind automatically fills in the detail. In fact, this often works better than drawing the detail of the eye because if they are slightly wrong, we pick it up immediately. Our minds seem to be geared to pick up the most minute details and movement of another person's eye, including flaws even when the eye is shadowed and partly hidden. The eyes are very small in relation to the body and even the face, but it is the first thing we seem to notice about a person.
Eyes are difficult even on our three dimensional Games Workshop models. I find that some of the Warhammer models have faces and eyes that are easier to paint than other. Sometimes the model’s eyes are mere slits which look good as unpainted plastic but are difficult to paint. Below are close up views of four faces that I have just finished painting. All were a struggle.
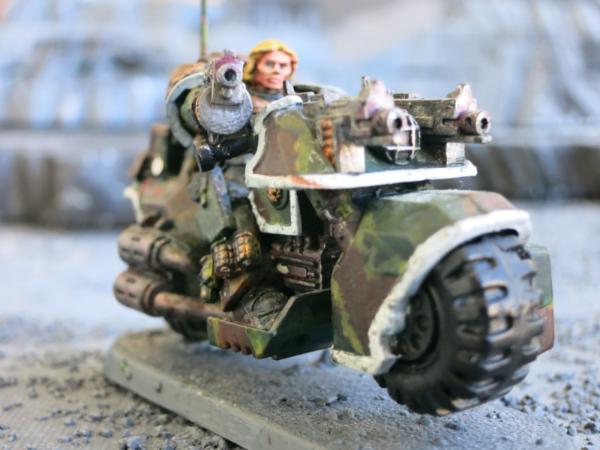
 The Mounted Techmarine
Notice that I just hint at the pupil in the eye. I might retouch this one up as I have been rebuilding his arm to conform to the Dark Angel’s FAQ for techmarines giving each of them a bolt gun as well as a bolt pistol.
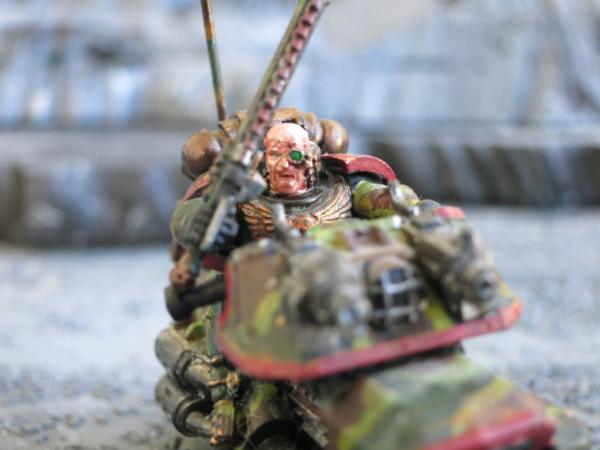
 The Mounted Librarian
He only shows a single eye which is easier to paint. Still, it was difficult to get to the eye and I still only hint at the pupil.
 Tactical Sergeant
I needed a simple tactical sergeant with no power sword or other upgrade. He has a Dark Angel’s Ravenwing bare head which I like.
 Sammael
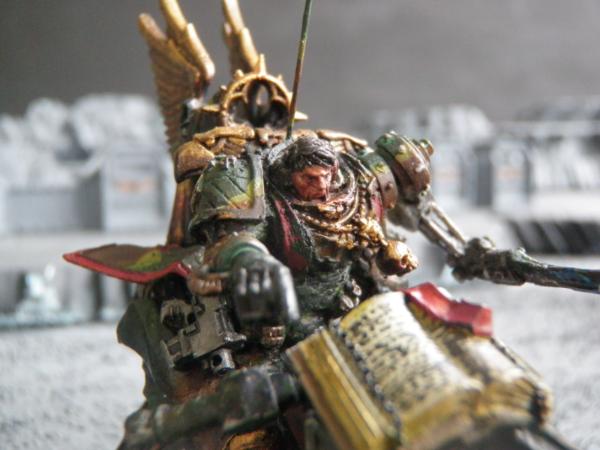
I really like this model now that I have redone him. The face was difficult but I think it will do. Notice the gold skull hanging around his neck. Sammael come already with the necklace and the pendant but I pinned in a skull I cut off from a bike antenna. Also notice the writing on the book. I put that in with a scroll ink pen. I now realize that I could use the same pen to put in the pupils for the eyes. I may try that.
|
|
|
|
|
2013/05/31 20:57:38
Subject: Plasma Cannon Gunner in the Tactical Squad
|
|
Focused Dark Angels Land Raider Pilot
|
I have a full Tactical Squad of dismounted space marines with several space marines who carry special and heavy weapons. Although I use magnets on some of my models, I find it easier and more fun just to make a dismounted space marine for each heavy or special weapon. I have plenty of spare parts to make a dismounted space marines and it is easier to mix and match models to the various squads than it is to attach tiny magnets to the arms and weapons. It is also easier to keep track of models than it is to keep track of bits or pieces of arms and weapons. Because of this, I have a full seven man squad plus the sergeant who are armed with bolters and in addition, I have a flamer, a melta-gunner, a multi-melta gunner, and four missile launcher gunners which can be part of the Tactical Squad.
I have now built another dismounted space marine, a plasma cannon gunner.
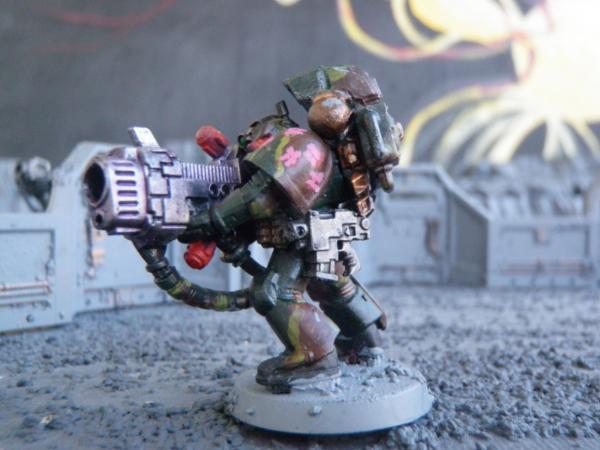 Plasma Cannon Gunner – Left View
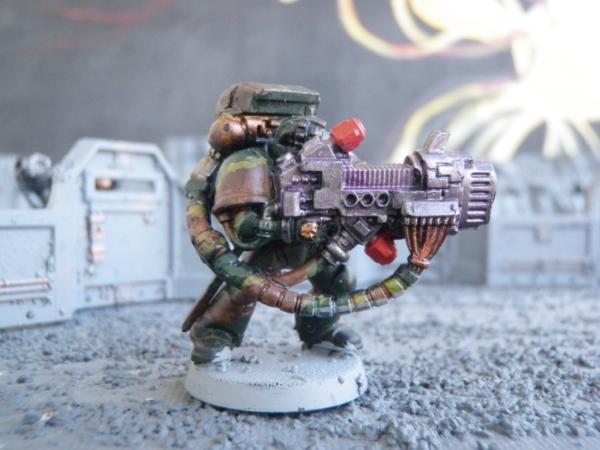 Plasma Cannon Gunner – Right View
|
|
|
|
|
2013/06/02 03:43:38
Subject: Just a Tactical Sergeant
|
|
Focused Dark Angels Land Raider Pilot
|
I am thinking of using a tactical squad to defend my Quad Gun. Although I had tried to figure the best configuration for a tactical sergeant, I am inclined to keep him cheap with no upgrades. So I rebuilt my tactical sergeant with just a bolter and a bolt pistol. Although this is just a Tactical Sergeant, I still like to give him a personality.
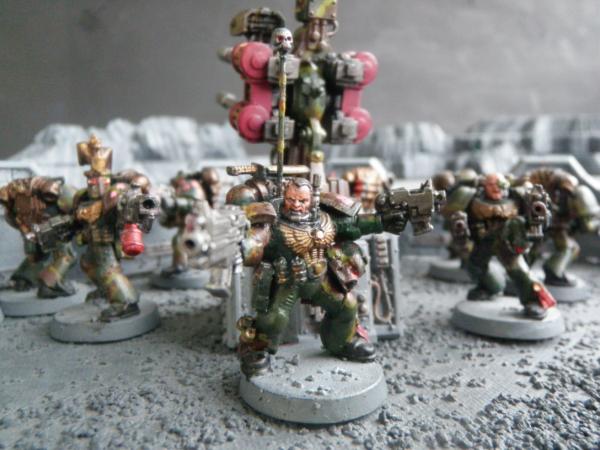 The Sergeant with a Tactical Squad Defending Quad Gun
 Close Up of the Tactical Sergeant
|
|
|
|
|
2013/06/10 23:21:26
Subject: The Mounted Techmarine with PFG Revisited
|
|
Focused Dark Angels Land Raider Pilot
|
 Mounted Techmarine with Chainsword
After I made my two techmarines, I discovered the Dark Angels Techmarines have been FAQed to have a bolter in addition to their bolt pistol and other equipment. Since a Techmarine can replace any of his weapons for a chainsword for free, I can choose two weapons out of the three. For the tech marine on the bike, the choice is easy. A bolter is worthless on a bike since anytime that I would want to fire the bolter, I would rather fire the twin-linked bolter. With a pistol and a chainsword, however, I have an extra attack. I am not sure how valuable this is. With the power field generator giving a 4+ invulnerability save to all models with three inches, the techmarine wants to avoid close combat. Also, although I have played with the servo-arm providing an extra attack in addition to the techmarines normal attacks, I see nothing in the rules that would show that this is the way that the techmarine should be played, so if I have to choose between the servo arm attack and the chainsword/pistol attack, I may often choose the servo arm. Still, when the choice is between no value and a small value, I will pick the small value, especially since swinging chainswords always look neat on a biker.
 Mounted Techmarine with Servo-Arm on Backpack
I ripped off the servo arm and put it on the pack. I replaced the missing arm with an extra chainsword that I had. I like this chainsword since it has a robot arm with two struts. The struts are plastic but in doing Sammael’s servo-arm I broke the thin brittle struts so I had to replace them with paperclip wire. It turned out looking good so I decided to replace the two plastic struts in this arm with paperclip wire. Unfortunately, I didn’t get a good picture of it.
 The Chainsword on Techmarine
|
|
|
|
|
2013/06/12 14:04:55
Subject: A New Background – Gas Giant
|
|
Focused Dark Angels Land Raider Pilot
|
I like having a good background for my models. I use some simple terrain that I made up for the foreground but I use a painting for the background. I have an abstract that shows up in a lots of my pictures and I have a simple black canvas that that I use. This week I decided to do another background using acrylics. I am just starting to use acrylics in my painting so I used this background as an excuse to experiment with the paints.
I have always thought it would be neat to paint a gas giant and have that as the background so it looked like my models were on some moon around a gas giant in some distant solar system. To paint the gas giant, I used a first coat of fluid acrylics on a white gesso and then I added layers by painting the stripes around the gas giant with water and then brushing in already dilute fluid acrylics and allowing them to flow through the water stripes to create very cloud like free flowing colors. This technique give the painting its cloud like feel and was fun and easy to do. The only problem was that I had to let the water drying between applications so painting the gas giant took several weeks. I painted a dark carbon black fluid acrylic over black gesso to produce the mat like finish for the dark starry night. I was going to use regular paint acrylics for the stars on the black mat but I hadn’t finished this yet.
I painted a Mountain range using dark heavy acrylics so that it had a thicker appearance. I am not too happy with my mountain range but will still be working on that. Although I still have some work with this new background, I decided to make my last photos using it. Enclosed are some examples.
 Ravenwing Command Squad in Front of Gas Giant Background
Because the Gas Giant model is much brighter than my other backgrounds, when I looked through my viewer, it appeared that my models were too dark. I compensated by increasing the brightness which was a mistake when I compared three brightness levels of the same shot. Note that the shots get progressively darker and the darkest is the best.
 Dark Knight – Brightest Exposure
 Black Knight – Less Bright Exposure
 Black Knight – Normal Exposure
I like the last picture the best.
|
|
|
|
|
2013/06/14 15:29:46
Subject: Ravenwing Command Squad – Heavy
|
|
Focused Dark Angels Land Raider Pilot
|
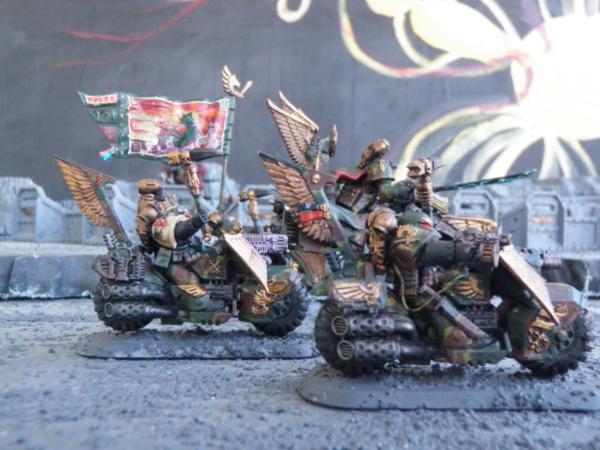
With the new FAQ, the Ravenwing Command Squad can now include two additional bikers. This makes the command squad much more viable. I made two more bikes and now have a five bike command squad, six if you include the librarian on a bike.
 Black Knight with Ravenwing Company Champion Helmet
Since I had it and liked it, I used the Ravenwing Company Champion’s helmet. Still, I did not make this biker a company champion because for five additional points, the Company Champion can exchange his Corvus Hammer for a Blade of Caliban which is just like a power axe only worse. Although the power axe has both its limitations and strengths, the blade of Caliban kept all the limitations and weakened one of its two strengths, so I just couldn’t bring myself to spend the five lousy points. I did give the model the pointing finger which is one of my favorite bits.
 Black Knight with Pointing Finger
The second new bikers is a standard black knight but a standard black knight is still good looking.
 Second Black Knight – Left View
 Second Black Knight – Right View
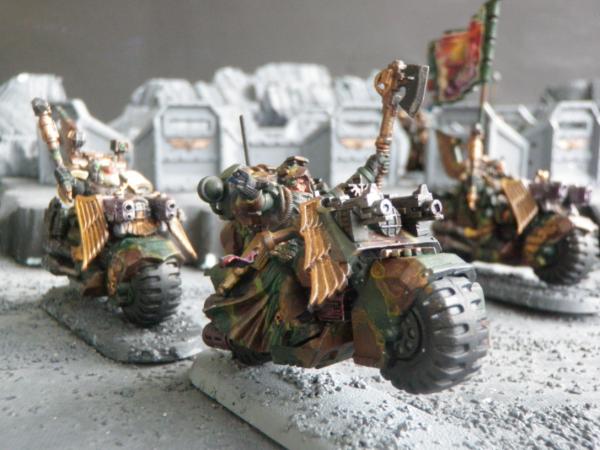
 The Full Command Squad with Biker Librarian
 A Second View of the Full Command Squad with Biker Librarian
|
|
|
|
|
2013/06/16 18:38:11
Subject: Space Marine Company Champion with Lance
|
|
Focused Dark Angels Land Raider Pilot
|
Space Marine Company Champion with Lance
I experimented with a Lance for my Space Marine Company Champion. I don’t think I will use this configuration but it was fun. Actually, it didn’t look as neat as I thought it would but that is okay because I don’t think that this is really a viable option right now.
 Company Champion with Lance
The Lance would be fun on the Black Knights of my Ravenwing Command Squad or even on the Ravenwing biker sergeants since they have hit and run but at least not now, it isn’t an option.
 Company Champion with Lance - Front View
 Company Champion with Lance – Rear View
The second weapon, the Power-Sword, is attached with a magnet and can be removed and replaced with a chainsword. The latter is a cheaper option on an already too many point model.
|
|
|
|
|
2013/06/17 20:03:17
Subject: The Dismounted Techmarine with Power Field Generator
|
|
Focused Dark Angels Land Raider Pilot
|
A few days ago I discussed the FAQ change on the Dark Angels Techmarine giving him a bolter in addition to the bolt pistol. I noted that the bolter could be exchanged for a chainsword and did so for the mounted Techmarine. For the dismounted Techmarine, I removed the servo-arm and replaced it with a bolter and then added the bolt gun to his hand and a servo-arm to his pack. I used a different servo-arm than the one I used earlier but that was because the old one wasn’t as attractive upside down on the pack.
 FAQ Techmarine with Bolter and Servo-arm on Pack
I have not finished painting him. I need to add some wording to his scroll.
 Second View of FAQ Techmarine with Bolter
On the dismounted Techmarine, I decided that the advantage of the bolter outweighed the advantage of a chainsword. The dismounted Techmarine will remain near with his 2+ artificer armor near the Quad-Gun behind the Aegis Defense Line. I have discovered that this is a hot area and I need as much bolter fire as I can get, especially if things get so hot that I need to move the command squad with the Standard of Devastation nearby. In that case, I double my bolter fire. I would rather have the extra bolter firepower than the one extra close combat attack.
|
|
|
|
|
2013/06/19 17:49:25
Subject: The Land Raider Crusader
|
|
Focused Dark Angels Land Raider Pilot
|
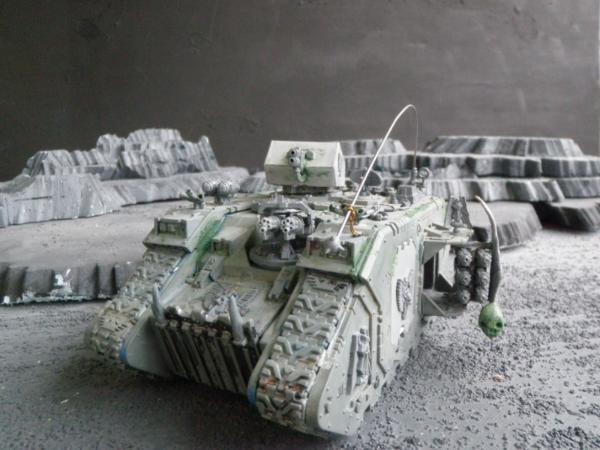
Several years ago, I stripped the paint off an old land raider. It was pretty beat up, with the hurricane bolters missing and several parts broken including the front ramp and a side door. I put it aside and almost forgot about it until the Dark Angels came up with the Standard of Devastation.
 The Old Stripped Down Land Raider
Since one configuration for the Standard of Devastation is to carry it in a Land Raider Crusader and use it to support twin-linked relentless bolter on bike and the hurricane bolters on the Land Raider Crusader itself to create max bolter goodness, I decided to remake the old Land Raider. I had to remake some of the parts using plastic sheet and green stuff. I have included these unpainted pictures to show what parts I had to remake.
 Rebuilt Land Raider Crusader – Left View
This view shows the remade door. I cut it out of plastic and it was somewhat difficult to match it to the door frame but I finally was able to match it.
I used an old set of wings for some flying creature to cover the Hurricane Bolters. I made the skull out of green stuff.
 Rebuilt Land Raider Crusader – Right View
This view shows the turret for the combi-melta which I made out of plastic sheet. This was rather difficult and it took me several tries to get it right. The next view shows the combi-melta gunner in the turret.
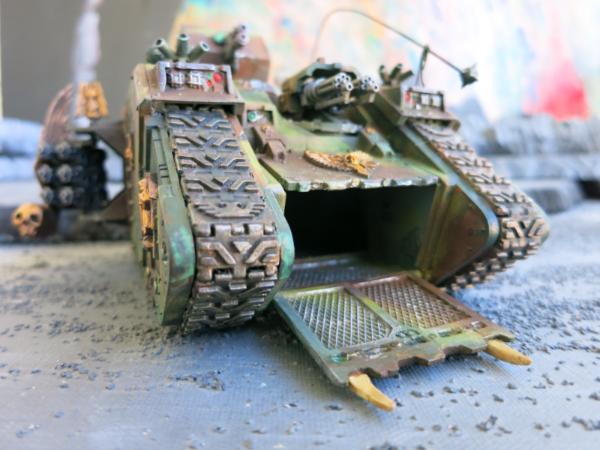
 Land Raider Crusader – Rear View
I made the antenna out of piano wire and mounted it in a regular antenna base. The teeth on the ramp on the front view was carved out of old plastic spruce.
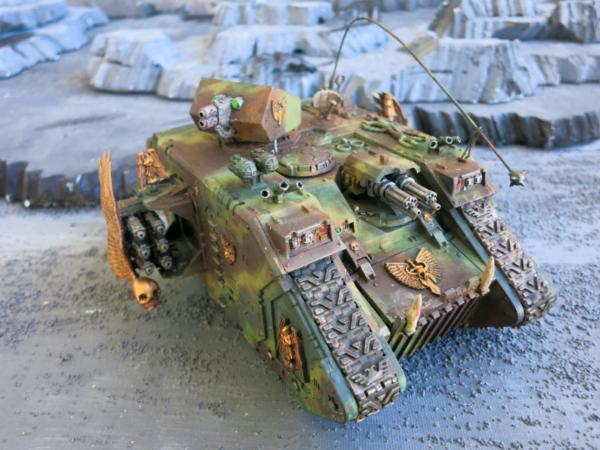
 Land Raider Crusader – Front View
Now I need to paint the Land Crusader which I dread since my least favorite things to paint are large armor vehicles since it takes so long to paint the camouflage pattern. I actually have painted several of my bikes and several dismounted infantry since I rebuilt this model but have avoided the hard tedious job of painting the land raider. Maybe in a couple of weeks I will post the painted up Land Raider Crusader.
|
|
|
|
|
2013/06/24 20:20:33
Subject: Mortis Contemptor Dreadnought
|
|
Focused Dark Angels Land Raider Pilot
|
|
|
|
|
|
2013/07/10 20:41:41
Subject: 6th Biker Troop - “Schrödinger's Apocalyptic Raiders”
|
|
Hard-Wired Sentinel Pilot
|
The conversion work you do is just stunning.
|
|
|
|
|
|
2013/07/22 15:43:12
Subject: Sammael on the Corvex and the Dark Angels Ravenwing, Part 4
|
|
Focused Dark Angels Land Raider Pilot
|
I read a kind remark from Apostle Pat which was really encouraging. I appreciate the remark. Thank you.
Due to family vacations and work, I have not posted to or reviewed this blog for almost a month. Although I have been slowly building a second Ravenwing Command Squad to carry the Standard of Devastation, I have not finished and painted up any of these models. In reviewing my posts, I discovered that I had not shared a few of my favorite pictures of my reworked Sammael with the first Ravenwing Command Squad.
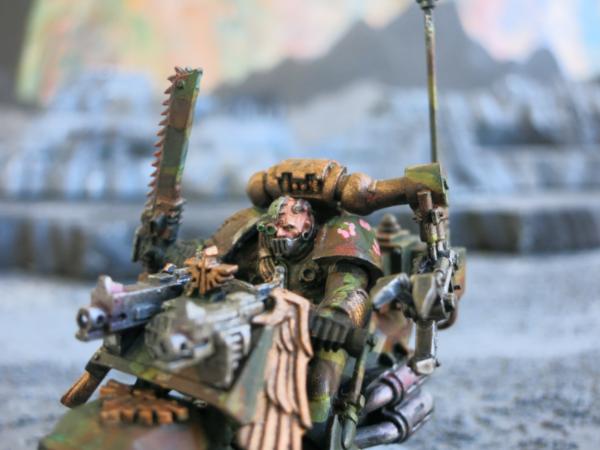
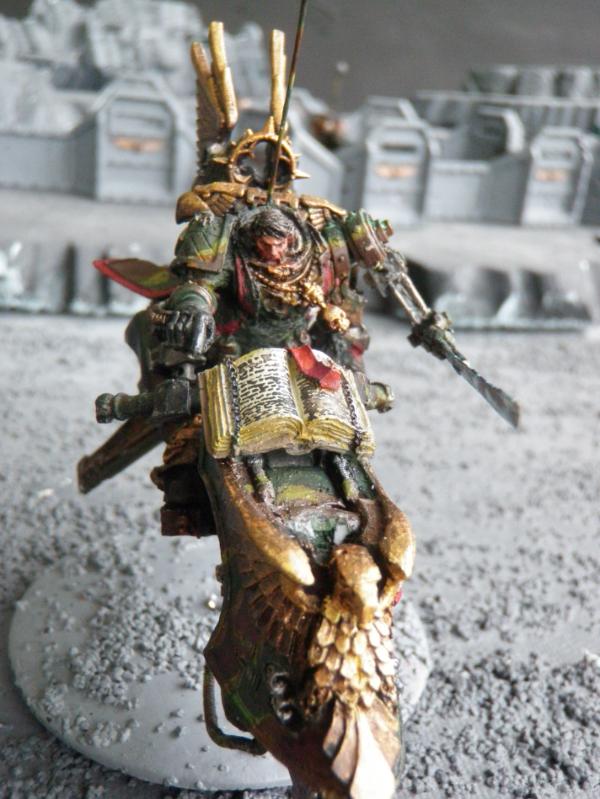 Sammael from the Top
This is not one of my favorite pictures because it shows too many of the flaws. In building the model, the plastic struts on the servo arm broke and I replaced them with paper clip wire which worked better.
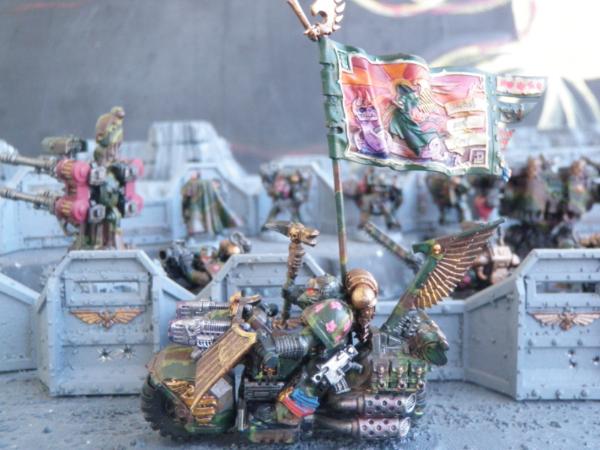
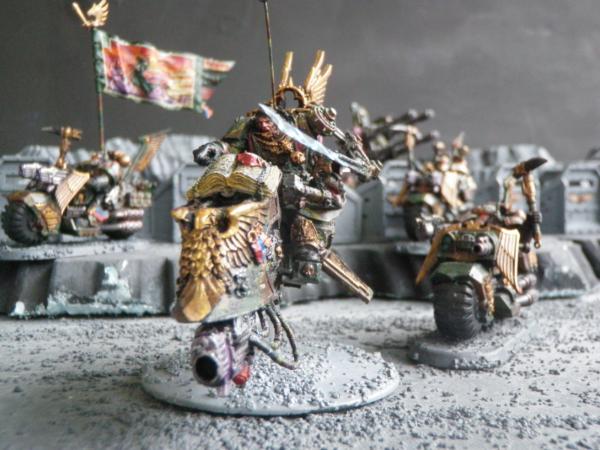
 Sammael and the Ravenwing Banner
This is a better angle of Sammael than the first picture, hiding the model’s flaws.
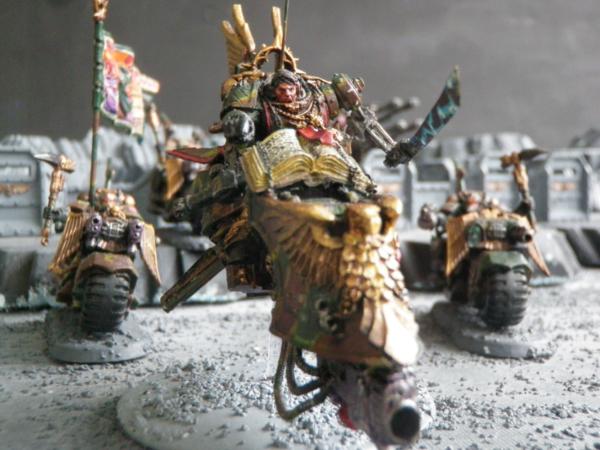
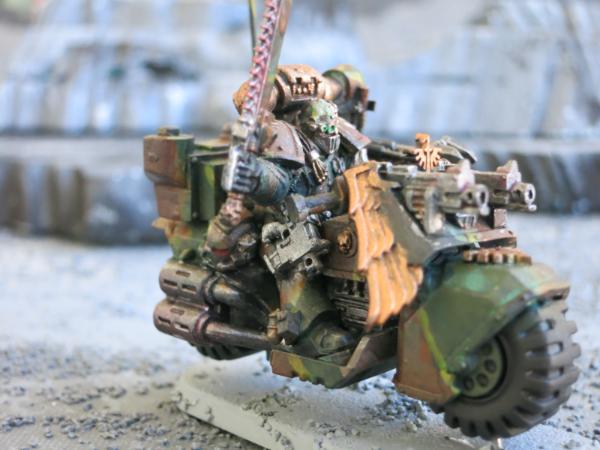
 Sammael Leading a Charge
This last picture is my favorite pictures of Sammael and one of my favorite pictures I have taken since I have started photographing my models. I like the way the Sammael appears to be moving, straightway charging and running down another traitor to mankind.
|
|
This message was edited 1 time. Last update was at 2013/07/23 18:21:32
|
|
|
|
|
2013/07/25 11:50:52
Subject: 6th Biker Troop - “Schrödinger's Apocalyptic Raiders”
|
|
Hard-Wired Sentinel Pilot
|
You're welcome bud!
Totally dig your Sammael, was he finecast??
I also never thought of extending the banner, I think I prefer the way you have it over the standard kit.
|
|
|
|
|
|
2013/09/17 01:33:37
Subject: Mortis Pattern Dreadnought with Two Twin-Linked lascannons
|
|
Focused Dark Angels Land Raider Pilot
|
I have not posted since July. This because I ruined my camera and have just replaced it.
In a late response to the question from Apostle Pat about my Sammael model, the bulk of the model is Games Workshop finecast with plastic bits from other GW kits. The only metal is the sword which I pounded out of a brass wire, the hoses on the plasma cannon which are made of floral wire, and bits of paper clips which I used for the arm and for the pointing index finger. The servo arm for the sword was from a section of bits I ordered from Bits Pudlo. It was brittle and I had to replace several of the struts with paper clip wire.
Although I have not posted for several months, I have been somewhat busy with Warhammer since I spent some time at NOVA Open playing the narrative game at night since I had to work during the day. I brought an all bike Ravenwing with only two models that were not bikes. One was the Whirlwind and the other was a Mortis Pattern Dreadnought with two twin-linked lascannons.
Playing an all bike army was a mistake as an all bike army lacks resiliency, especially since I have very little experience playing the game. I love making the models but often lack the time to play long Warhammer 40K games. Thus, I lack the experience to fully utilize a bike army, especially since at my level I tend to get into slugfests with the opposing Army. I plan to keep the bike army theme but decrease the actual number of bikes and reinforce my army with more support in the way of long ranged fire and flyers. I am excited about the new Space Marine Codex. I plan to spend the next few month reworking some of the models I already have as well as adding a few new models to increase my firepower and resiliency.
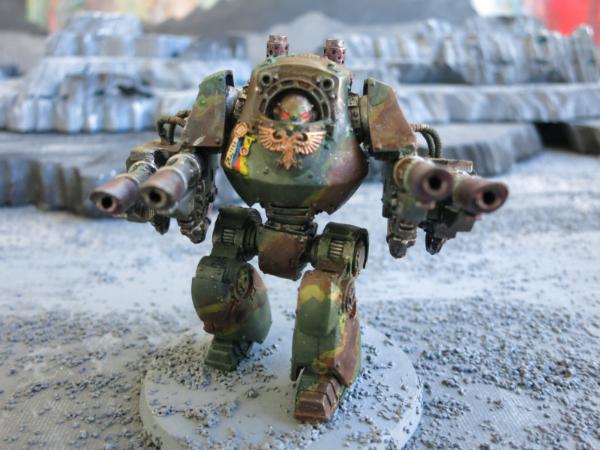
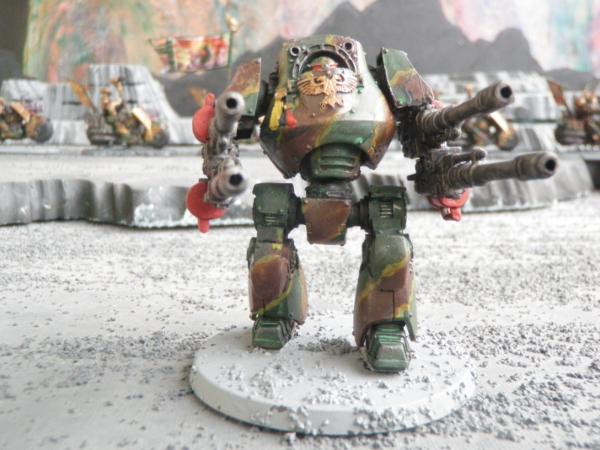
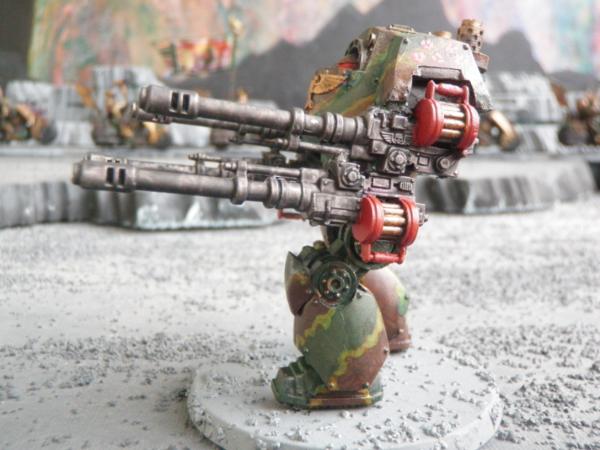
Enclosed is a view of the Mortis Pattern Dreadnought with two twin-linked lascannons. It is a Forge World model with skyfire and interceptor if the model has not moved during a turn. It is a great model but unfortunately cannot be used in a game if Forge World is not allowed.
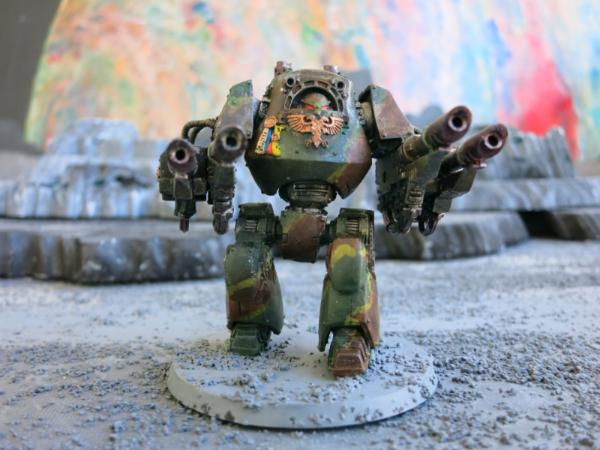 Mortis Pattern Dreadnought with two twin-linked lascannons – Front View
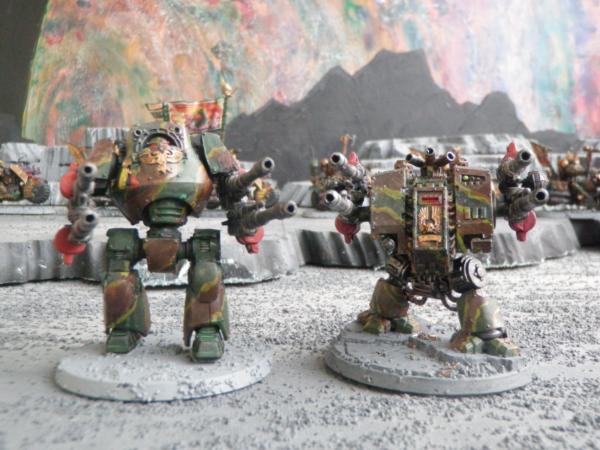
This model was fairly effective but he needed more support including his brother with the twin-linked autocannons.
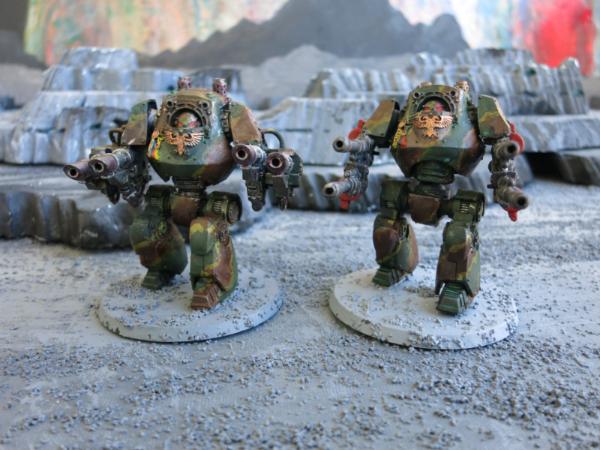 Two Mortis Pattern Dreadnoughts
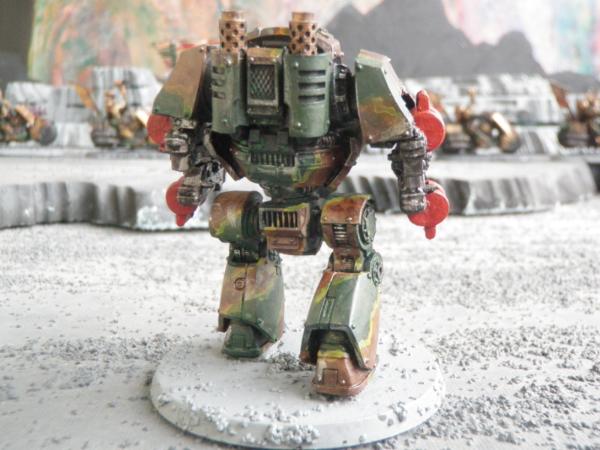
This model looks almost as good from the back as from the front.
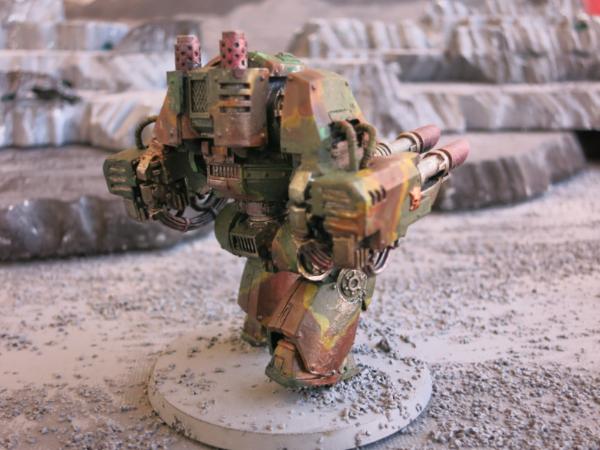 Mortis Pattern Dreadnoughts - Rear View
Notice the hoses on top of the lascannons. I plan to add some pictures and a narrative showing how to make such hoses in a few weeks.
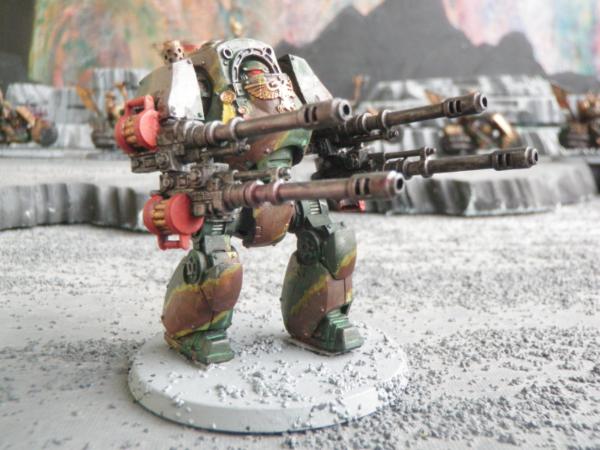
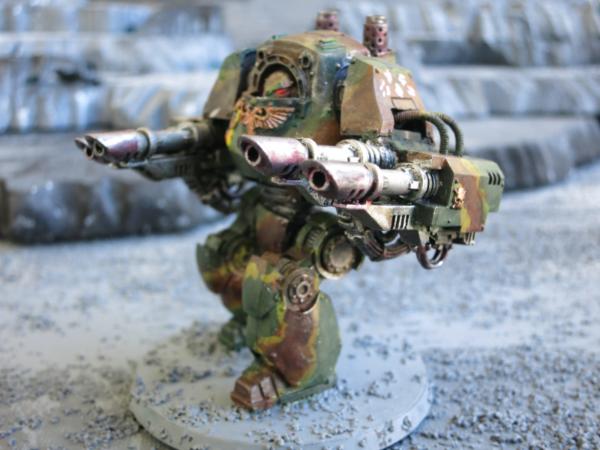 Mortis Pattern Dreadnoughts - Side View
 Mortis Pattern Dreadnoughts – Front-top View
|
|
|
|
|
2013/09/17 23:09:43
Subject: The Pit-Bull – A rebuilt Land Raider Crusader
|
|
Focused Dark Angels Land Raider Pilot
|
It has been at least a three year project to rebuild my Land Raider. Of course, I didn’t work on my Land Raider the whole time but kept putting it aside. About three years ago, in June, 2010, I took an old Land Raider and stripped off its paint.
 The Old Land Raider Crusader
Notice that the bottom of the front door is missing. I soaked the Land Raider in a product called Purple Power for a day and scrubbed it down.
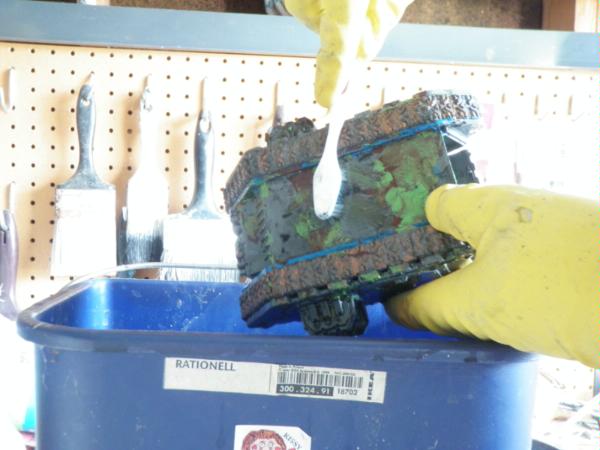
Scrubbing the Land Raider
Several years ago I actually posted a detailed discussion about cleaning up the Land Raider. Last May, I actually rebuilt the Land Raider using bits that I had around, cutting some plastic to fit missing pieces, and repairing and customizing some missing pieces.
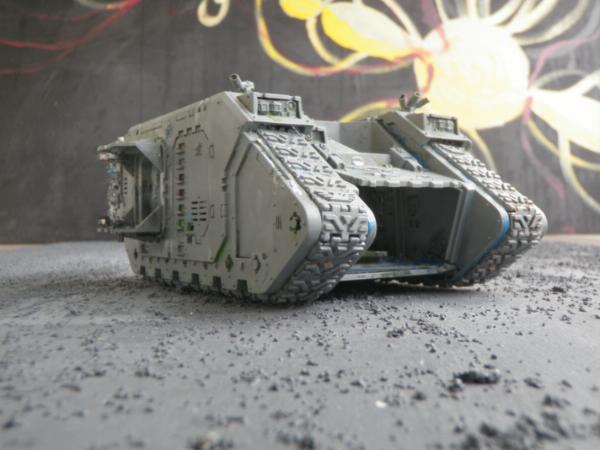
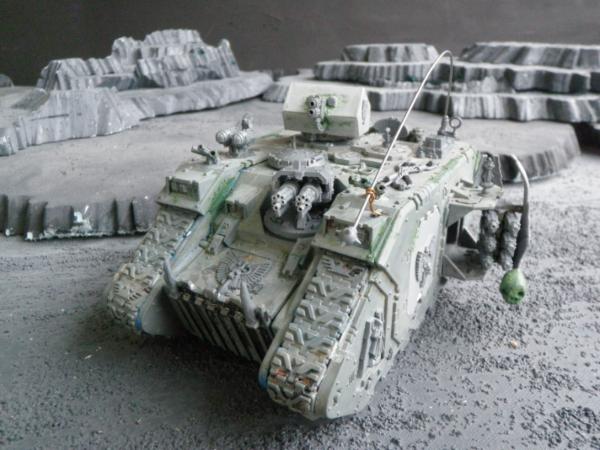 The Unpainted Rebuilt Land Raider
Still, I could not get motivated to spend the long hours painting it. At the NOVA Open, I bought myself my first airbrush and air compressor set so I needed a project to test out my new airbrush. The Land Raider was perfect since it has lots of big spaces that are tedious to paint by hand.
I actually enjoyed painting the model. I first listened to a instruction video on the airbrush and found out that an airbrush is prone to gumming up so I have to really focus on keeping my paints clean and properly diluted. I learned to use distilled water rather than tap water to thin my paints. I bought an inexpensive water bottle with a dropper. So this has been a time when I have learned about my paints and how to keep them as well as painted my first model with the airbrush. The Land Raider isn’t perfect and I had to finish up the detail with my detail brushes.
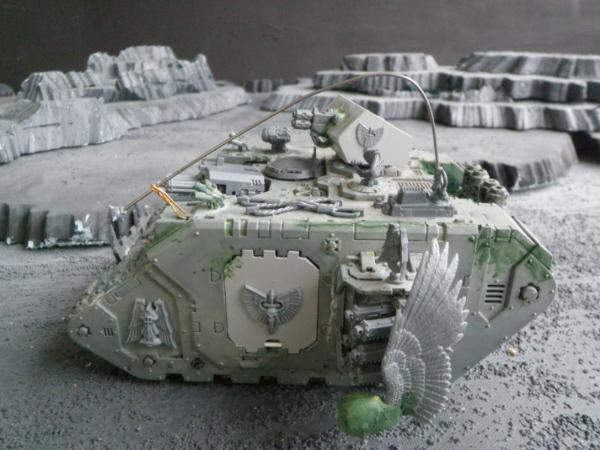
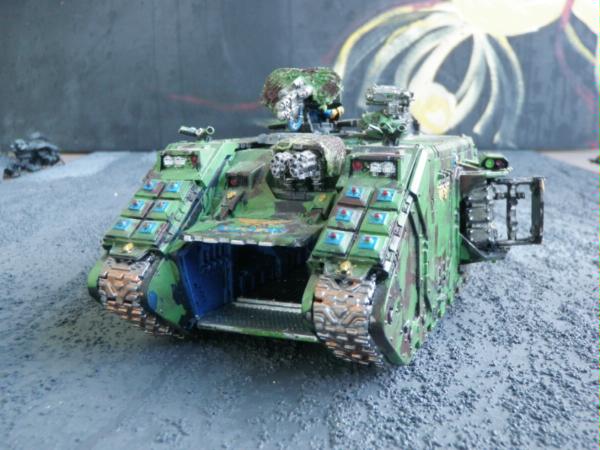
 The Pit-Bull – Front View
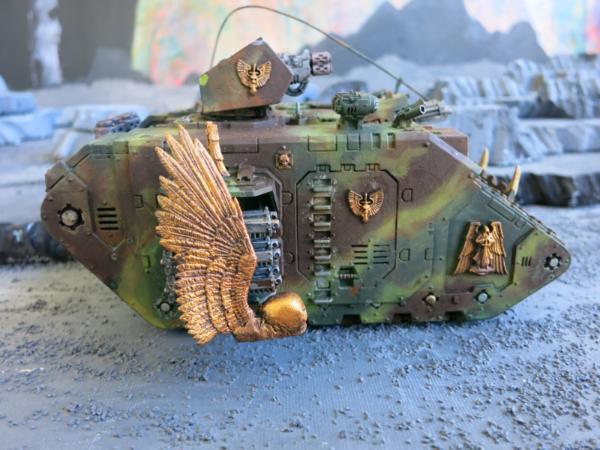 The Pit-Bull – Side View
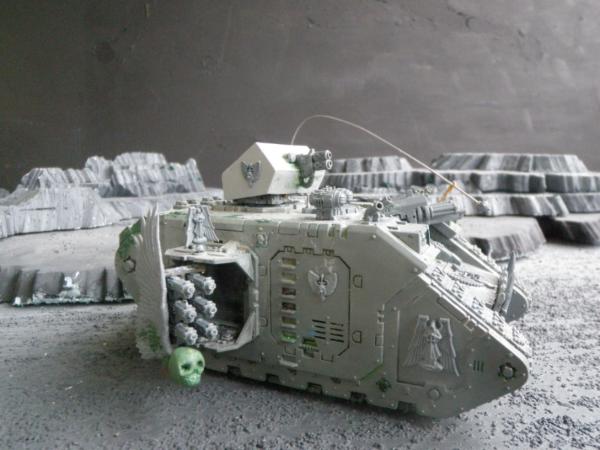
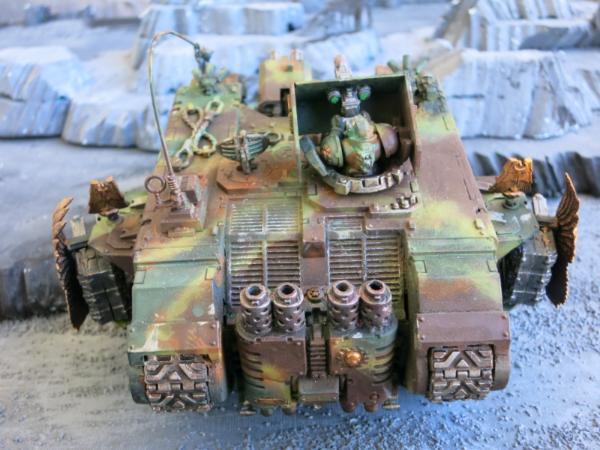 The Pit-Bull – Rear View
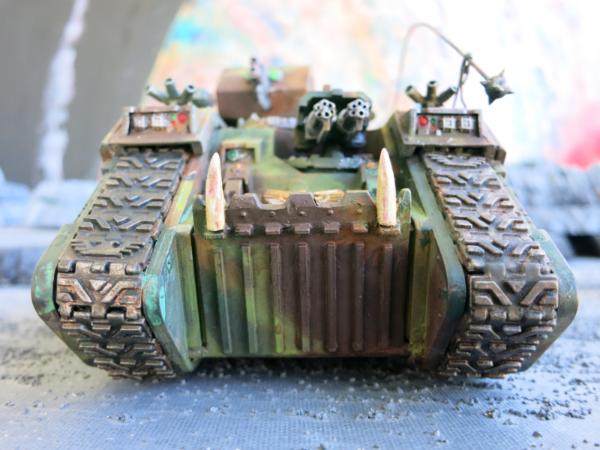 The Pit-Bull – An Ork’s Last View
|
|
|
|
|
2013/09/20 00:11:47
Subject: Second Techmarine with Power Field Generator
|
|
Focused Dark Angels Land Raider Pilot
|
The one tool that helps Dark Angels bikers survive is the Dark Angel’s Power Field Generator (PFG) which gives invulnerability saves to nearby models. A PFG can be put on a bike mounted techmarine who can move the PFG quickly to where it is needed. I actually used three at NOVA, two on two techmarines and one on a librarian. I have already displayed the librarian and the first techmarine but I haven’t shown the second techmarine.
 The Second Techmarine with Power Field Generator
For the PFG, I ordered some 40K Apocalypse Command Imperial Guard Bits which is some type of radio. It must be some standard bit because I already had one bit like it and I don’t know where it came from but I haven’t bought any Imperial Guard bits. The bit is the piece on the rear fender of the motorcycle and it is as good of PFG as I could find.
 Side View of the Second Techmarine on Bike
I also ordered a bunch of imperial guard shovels at the same time. The servo-arm is from bitspudio.com which sell great looking but somewhat fragile bits. I like this arm better than a normal servo arm from Games Workshop.
 Close-Up of the Second Techmarine
The techmarine himself is made from a servitor from the Games Workshop kit labeled Space Marine Techmarine with Servitors. This kit is a great source of bits. I cut the servitor in half and mounted him on biker legs. I love making my space marines out of the servitors as the faces are almost beautiful. With regular marine shoulder pads, these servitors look just like regular space marines. I like the servitors better than techmarine models and I plan to use them to enhancement my techmarines.
 Right Side of the Second Techmarine
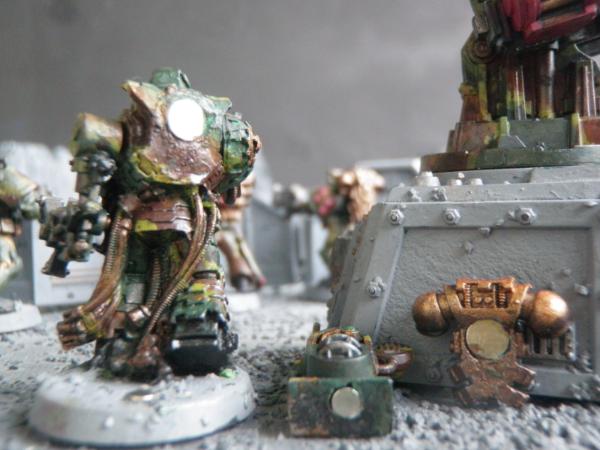
Of course a techmarine, especially with a PFG, pairs nicely with a Land Raider Crusader. The techmarine hides behind Land Raider and is nearby when the Land Raider needs to restore a hull point or needs to have a invulnerability save.
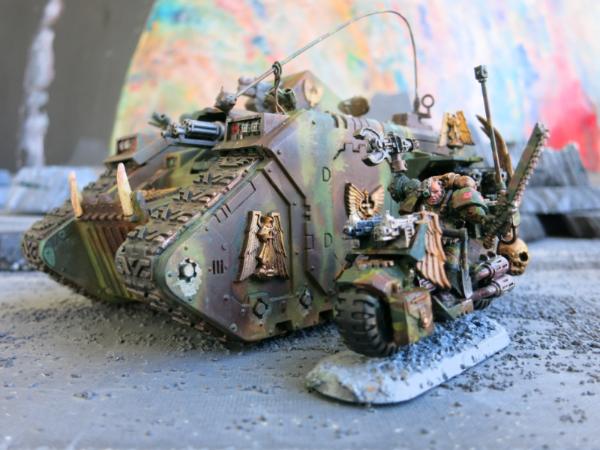 First Techmarine with the Pit-Bull
|
|
|
|
|
2013/09/22 00:28:17
Subject: Bits and Pieces - Ravenwing Biker Sergeant with Chainsword
|
|
Focused Dark Angels Land Raider Pilot
|
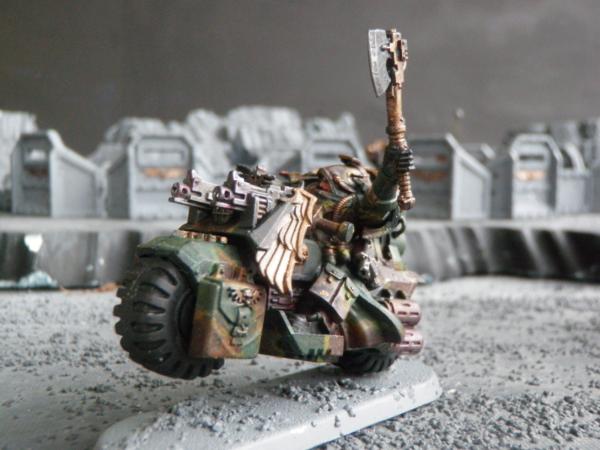
I made a few minor changes on some of my models. Mostly, I replaced weapons for other weapons, sometimes to make them legal for my list, sometimes just because I saw a bit I liked better. I needed a bike sergeant so I changed one of my models and made him sergeant by adding an antenna and saying he was a sergeant. In the new Ravenwing Codex, a biker sergeant can exchange a pistol for a chainsword. Since a bike is relentless, it always is better to shoot the twin-linked bolter rather than a pistol on a bike so in practice a chainsword operates just like a pistol, only it look cooler. So I added a chainsword to one of my bikers and now call him a sergeant.
 Ravenwing Biker Sergeant with Chainsword
I wanted to give him a little pizazz so I made his chainsword arm into a cyborg arm. I simply cut out a section of his arm and replaced it with two short pieces of paperclip wire. I liked the effect so much that I repeated it with several other models.
 Ravenwing Biker Sergeant with Cyborg Arm
I touched up his face and think he now looks a little like John Wayne -- an old beat up John Wayne.
 Front View of Ravenwing Biker Sergeant with Cyborg Arm
|
|
|
|
|
2013/09/23 00:14:25
Subject: Bits and Pieces - Pretty Boy Sergeant with Machine Pistol
|
|
Focused Dark Angels Land Raider Pilot
|
Another model that I modified was one of my pretty boy sergeants. I gave him the new Ravenwing machine pistol and made his arm a cyborg arm.
 Pretty Boy Sergeant with Machine Pistol
I can tell that the model is one of my earlier models. I trimmed it in white and laid the paint down too heavy. Now I would not trim in white and if I did I would put on thinner layers starting with yellow rather than the grey that I started with. This would give a smoother appearance to the paint and with a yellow undercoat, the white is more subdued.
 Pretty Boy Sergeant with Machine Pistol – Front View
Although the paint is a little thick, the model is still fun and I will use it for my games. I give almost every model a knife and allow each model to choose his style of knife. This sergeant used a Chaos Space Marine Khorne Berzerker Sheathed Knife which under the unit SOP, he had to take from an enemy solider and preferably one he had killed in combat.
 Pretty Boy Sergeant with a Chaos Space Marine Khorne Berzerker Sheathed Knife
|
|
|
|
|
2013/09/24 02:05:53
Subject: Bits and Pieces - Ravenwing Melta-Gunner
|
|
Focused Dark Angels Land Raider Pilot
|
I have been updating some of my older models adding parts to make them compliant with the new codex and with my army lists and giving them a little more personality. One model that I was unhappy with was blue squad right wing melta-gunner. I felt that his melta arm was positioned somewhat awkwardly.
 Old Blue Squad Right Wing Melta-Gunner
Notice how his melta arm is positioned. It is dynamic but it is somewhat awkward when he is with the squad because his melta gun is pointing in the same direction as the left wing melta gunner so the squad doesn’t appear to have coverage on both sides.
O ld Blue Squad Right Wing Melta-Gunner with the Blue Squad
I also decided to replace his head with one of the new Ravenwing bare heads that looked kind of neat.
[b]Rebuilt Blue Squad Right Wing Melta-Gunner
I am not sure that I got the eyes right as he looks both a little crossed eyed and he is not looking at the target he is aiming his melta-gun at. Still, I like him better than the old model although I may try to touch up the eyes.
 Rebuilt Melta-Gunner
He is still carrying the Choppa that he picked up from a somewhat incorporative Ork. Still, a couple of twin-linked bolter shots to the gut and a melta-gun blast can be very persuasive, even to an Ork.
 Rebuilt Melta-Gunner with Choppa
|
|
This message was edited 1 time. Last update was at 2013/12/12 02:50:14
|
|
|
|
|
2013/09/25 22:30:12
Subject: Magnets – Land Raider, Pretty Boy Sergeant, and a Techmarine
|
|
Focused Dark Angels Land Raider Pilot
|
I have been using magnets for my models. Originally, I thought that it would be a good way to replace weapons. Thus, I could build a biker sergeant with a magnetized power sword arm and a power lance arm that I could interchange weapons depending on my opponent. I have found this to be ineffective for at least three reasons. The first is that I have to put in little magnets in the arms and they have limited holding power. As a result, the models with magnetized arms often look awkward as the arms tend to become displaced. Moreover, it is easy for a magnetized arm to fall off and get lost. Second, it is usually a lot of trouble having a magnetized spare arm which I have to keep track of. Thus, while the magnetized power sword arm is awkwardly mounted on the model, the alternative combi-melta arm is easily lost or misplaced in the jumble of models. The third reason is that, since I use super glue rather than plastic glue on my models, I can easily remove the current arm and weapon fairly fast and replace it with a different weapon if I want to reconfigure the model. Thus, I have tended to replace my magnetized arms with regular glued-on arm.
I still use magnets. One place I have found magnets useful is on my vehicles. I often use magnets to hold on turrets that I want to be able to rotate without having the turret fall off. I am also using magnets, or more precisely, rows of magnets to hold doors shut on the vehicles. Look at this Land Raider I just rebuilt. Notice that there is a row of little magnets on the front bottom ramp and corresponding magnets on the top hatch to hold the ramps together. The magnetics may be hard to see but are the little silver round things between the teeth on the top swinging hatch and between the holes for the teeth on the bottom swinging hatch. This is has been nice for gaming since the doors only open when I want them opened.
 Magnetics on the Ramp of the Land Raider Crusader
When the ramp is up, the magnets hold the ramp shut.
 Land Raider Crusader with Ramp Shut
I also have a large pair of magnets holding the assault cannon in position. I love these magnets on turreted weapons because it allows them to swivel without becoming detached and since it allows the turreted weapon to be removed during a game if a weapon is destroyed.
The other place I have put magnets is on the backpacks of techmarines so that I can interchange between the servo-harness and a standard backpack. Below is a prior posted model of a techmarine with a magnetized backpack. I have just finished a servo-harness for this model which I will be using in upcoming games and it is held on by a magnet. These magnets are big and powerful enough to hold the backpack firmly in to place, unlike the arm magnets.
 Techmarine with Magnetized Backpack and Servo-Arm
I will take and include a picture of the refinished Techmarine with servo-harness in a later post.
My final picture is a picture that I just posted last week of a space marine sergeant on a bike. Notice the magnet just above the rear bumper on his ammo case. This is for a melta bomb. At the time the picture was taken, I had lost the melt bomb although I have since found it. Still, it illustrates that the little magnets have limited holding power and may lead to misplaced parts.
 Space Marine Biker with Magnet for Melta-bomb
|
|
|
|
|
2013/09/27 00:30:11
Subject: The Wall of Shame
|
|
Focused Dark Angels Land Raider Pilot
|
A few weeks ago, I put up a shelf in my hobby arm room for my Warhammer models. I was shocked at how many I had. I call it my Wall of Shame because it reminds me who much money and time I have given to building these models, trading my financial future for little pieces of plastic. I will be painting up the bottom of the shelf later although I put on a mixture of gesso and terrain grit on the top to match the bases of my models.
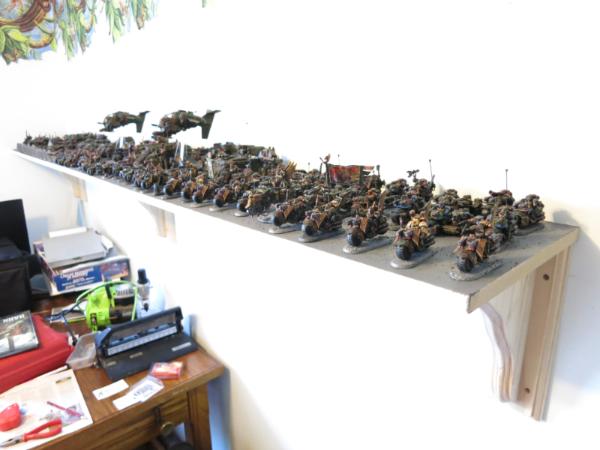 The Wall of Shame
It wouldn’t be so bad but I have models not showing that either damaged or waiting to be built. I suspect that I will be getting models in the future so it must be an addiction.
|
|
|
|
|
|
|


 Knights of Titan 500 points Primary
  Warp Angels 750 points Primary
  The Eternal Crusade XXXX points Primary