This was the final game at this year's Eastern Europe
GT, and I had the pleasure of playing Richard Simms. I had heard about his nids from friends of mine who had met him at the
UKGT and was really looking forward to meet him and pick his brains on tricks and tactics. When I found out I was going to play him, I was delighted. Richard posted his own report for the whole tournament here:
http://www.dakkadakka.com/dakkaforum/posts/list/238951.page
My list was:
HIVE FLEET EUDAEMON
HQ: Hive Tyrant (3#, 221 Pts)
1 Hive Tyrant @ 221 Pts
Enhanced Senses +1
BS; Toxin Sacs +1
St; Twin-linked Devourer (x2); Psychic Scream; Synapse Creature; The Horror
2 Tyrant Guard @ [90] Pts
Rending Claws; Scything Talons
HQ: Hive Tyrant (3#, 221 Pts)
1 Hive Tyrant @ 221 Pts
Enhanced Senses +1
BS; Toxin Sacs +1
St; Twin-linked Devourer (x2); Psychic Scream; Synapse Creature; The Horror
2 Tyrant Guard @ [90] Pts
Rending Claws; Scything Talons
Heavy Support: Carnifex (2#, 296 Pts)
1 Carnifex @ 148 Pts
Enhanced Senses +1
BS; Barbed Strangler; Venom Cannon
1 Carnifex @ 148 Pts
Enhanced Senses +1
BS; Barbed Strangler; Venom Cannon
Elite Fexes (2#, 226 Pts)
1 Carnifex @ 113 Pts
Scything Talons (x1); Barbed Strangler
1 Carnifex @ 113 Pts
Enhanced Senses +1
BS; Twin-linked Devourer (x2)
Elite: Warriors (6#, 200 Pts)
0 Warriors @ 200 Pts
Toxin Sacs +1
St; Twin-linked Deathspitter; Synapse Creature
1 Warriors @ [36] Pts
Toxin Sacs +1
St; Scything Talons (x1); Barbed Strangler; Synapse Creature
1 Warriors @ [31] Pts
Toxin Sacs +1
St; Deathspitter; Spinefists; Synapse Creature
1 Warriors @ [33] Pts
Toxin Sacs +1
St; Rending Claws (x1); Deathspitter; Synapse Creature
1 Warriors @ [32] Pts
Toxin Sacs +1
St; Lash Whips (x1); Deathspitter; Synapse Creature
1 Warriors @ [37] Pts
Toxin Sacs +1
St; Twin-linked Deathspitter; Synapse Creature
1 Warriors @ [31] Pts
Toxin Sacs +1
St; Scything Talons (x1); Deathspitter; Synapse Creature
Troops: Genestealers (14#, 280 Pts)
7 Genestealers @ 140 Pts
Feeder Tendrils; Scuttlers; Rending Claws
7 Genestealers @ 140 Pts
Feeder Tendrils; Scuttlers; Rending Claws
Troops: Genestealers (6#, 120 Pts)
6 Genestealers @ 120 Pts
Flesh Hooks; Scuttlers; Rending Claws
Troops: Gaunt Brood (38#, 240 Pts)
18 Gaunt Brood @ 108 Pts
Fleshborer
12 Gaunt Brood @ 60 Pts
Spinefists
8 Gaunt Brood @ 72 Pts
Fleshborer; Without Number
Heavy Support: Zoanthrope (3#, 195 Pts)
1 Zoanthrope @ 195 Pts
Toxic Miasma; Psychic Scream; Warp Blast; Warp Field
1 Zoanthrope @ [65] Pts
Toxic Miasma; Psychic Scream; Warp Blast; Warp Field
1 Zoanthrope @ [65] Pts
Toxic Miasma; Psychic Scream; Warp Blast; Warp Field
Total Roster Cost: 1999
His list was:
ADEPTUS MECHANICUS
HQ: Hive Tyrant (1#, 225 Pts)
1 Hive Tyrant @ 225 Pts
Acid Maw; Adrenal Glands +1 In; Adrenal Glands +1
WS; Implant Attack; Toxic Miasma; Toxin Sacs +1
St; Winged; Scything Talons (x2); Synapse Creature; The Horror; Warp Field
HQ: Hive Tyrant (3#, 268 Pts)
1 Hive Tyrant @ 268 Pts
Adrenal Glands +1
WS; Enhanced Senses +1
BS; Extended Carapace +1 Save; Implant Attack; Toxic Miasma; Toxin Sacs +1
St; Twin-linked Devourer (x2); Psychic Scream; Synapse Creature; The Horror
2 Tyrant Guard @ [90] Pts
Lash Whips; Rending Claws
Elite Fexes (3#, 339 Pts)
1 Carnifex @ 113 Pts
Enhanced Senses +1
BS; Twin-linked Devourer (x2)
1 Carnifex @ 113 Pts
Scything Talons (x1); Barbed Strangler
1 Carnifex @ 113 Pts
Scything Talons (x1); Barbed Strangler
Troops: Gaunt Brood (38#, 304 Pts)
15 Gaunt Brood @ 120 Pts
Spinefists; Without Number
15 Gaunt Brood @ 120 Pts
Spinefists; Without Number
8 Gaunt Brood @ 64 Pts
Spinefists; Without Number
Fast Attack: Warriors (6#, 303 Pts)
3 Warriors @ 303 Pts
Adrenal Glands +1
WS; Enhanced Senses +1
BS; Toxin Sacs +1
St; Winged; Lash Whips (x1); Deathspitter; Synapse Creature
1 Warriors @ [55] Pts
Adrenal Glands +1
WS; Enhanced Senses +1
BS; Toxin Sacs +1
St; Winged; Lash Whips (x1); Barbed Strangler; Synapse Creature
1 Warriors @ [49] Pts
Adrenal Glands +1
WS; Enhanced Senses +1
BS; Toxin Sacs +1
St; Winged; Scything Talons (x1); Deathspitter; Synapse Creature
1 Warriors @ [49] Pts
Adrenal Glands +1
WS; Enhanced Senses +1
BS; Toxin Sacs +1
St; Winged; Scything Talons (x1); Deathspitter; Synapse Creature
Heavy Support: Carnifex (2#, 376 Pts)
1 Carnifex @ 188 Pts
Enhanced Senses +1
BS; Extended Carapace +1 Save; Reinforced Chitin; Barbed Strangler; Venom Cannon
1 Carnifex @ 188 Pts
Enhanced Senses +1
BS; Extended Carapace +1 Save; Reinforced Chitin; Barbed Strangler; Venom Cannon
Heavy Support: Zoanthrope (3#, 185 Pts)
2 Zoanthrope @ 185 Pts
Toxic Miasma; Psychic Scream; Warp Blast; Warp Field
1 Zoanthrope @ [55] Pts
Toxic Miasma; Psychic Scream; Synapse Creature; Warp Field
Total Roster Cost: 2000
Mission is 5 Objectives and Spearhead deployment. Richard wins the roll but lets me go first and choose sides. Normally this is a good idea in objective based games but 1 table quarter is stacked with 3 objectives, and allows me to castle and forces him to come to me.
Implant attacks on his tyrants are scary, and give him an advantage in that regard. But I have genestealers, which can hold objectives without synapse and are strong in
CC.
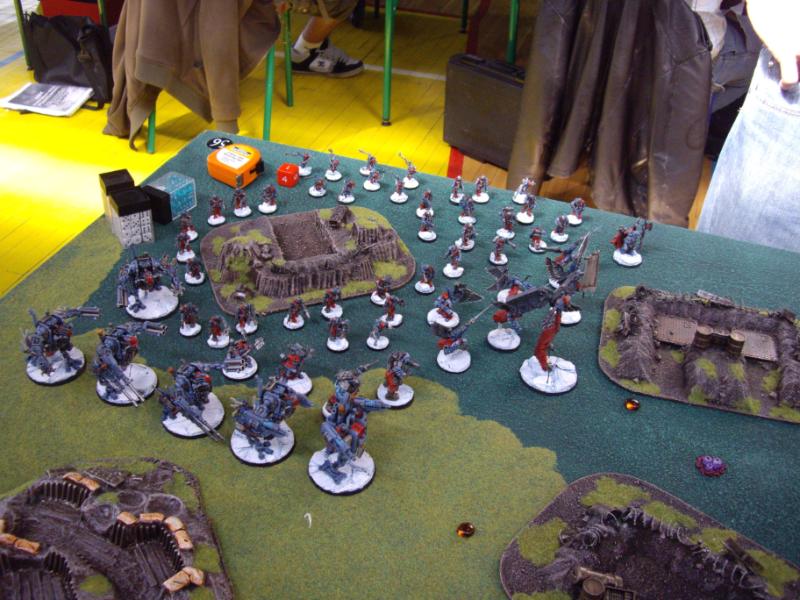
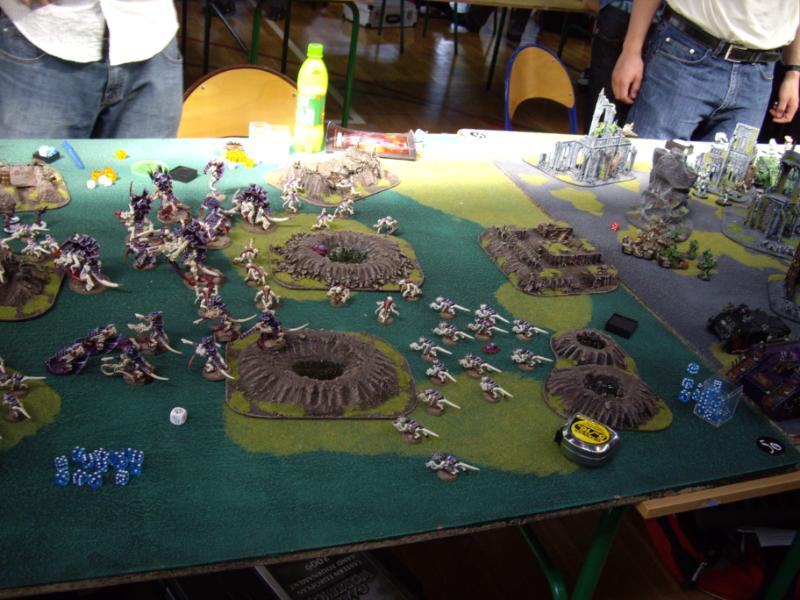
This is Richard's deployment. His army was so beautiful that I took many pictures of it. His flying tyrant is backed by the flying warriors, and on the other flank, the walking tyrant is followed by 5 Carnifexes.

This is the game deployed. You can see the objectives are red and purple spires from the genestealer sprue. There are 3 you cant really see: 1 is just in front of my Dakkafex, 1 is in the crater with all the genestealers and 1 is on the far right in the middle of my spinegaunts.
Our armies are very similar, but I have genestealers and he only has gaunts to hold objectives. I decide not to outflank my genestealers, and use the flesh hook ones as bait to the fexxes and dakka fex, and use a squad of 7 to try to deal with the flying tyrant should my shooting fail to bring it down.
The Plan: focus on his synapse, and once he has no synapse his gaunts will have a hard time holding objectives. Try to distract him with genestealers and dakkafex.
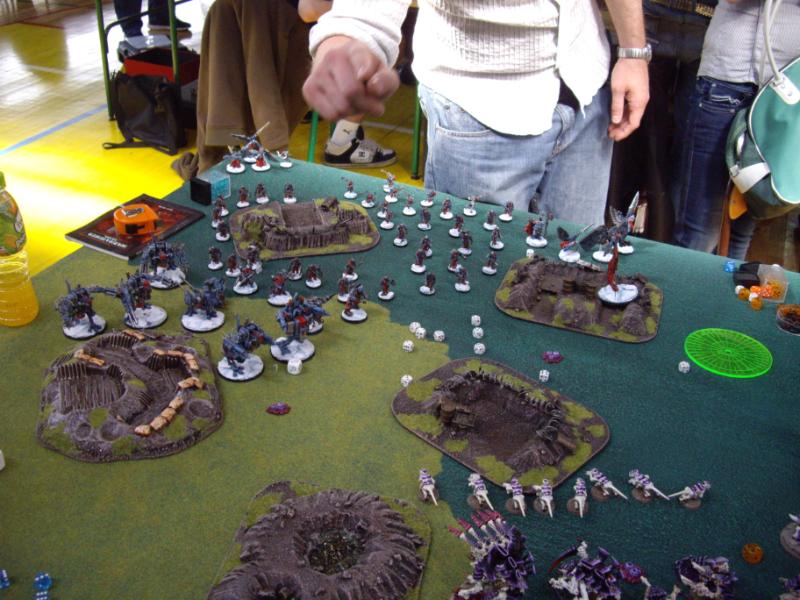
Bottom of turn 1. I advance a little and shoot. I bring down 3 warriors, (I was lucky with the Barbed Strangler scatters) and a spinegaunt. You can see Richard's casualties in the top left corner of the board. The 8 gaunts in the middle are without number ones. He advances his flying hive tyrant and gets ready to charge next turn.
And these are my casualties. He kills the dakkafex, and a few genestealers and a gaunt.
In turn 2 I get a good break and down the flying hive tyrant. I shot the without number gaunts with fleshborers, 2 dakka tyrants at it, and it goes down. I had also moved forward the feeder tendril stealers to engage it, should my shooting prove to be inadequate. This turn actually got me thinking about some interesting maths. What are then chances of a 2+ tyrant (toughness 6) to die to 8 Bs3
str 4 shots (reroll to wound) and 24 BS4 (twinlinked)
Str 5 (reroll to wound). On average it shouldnt die. But the average just tells you the midpoint of the distribution, not the chance that he will die, and with so many shots and so many rerolls, I would guess that there is a pretty good chance that he could die. Can somebody help me with the maths please?
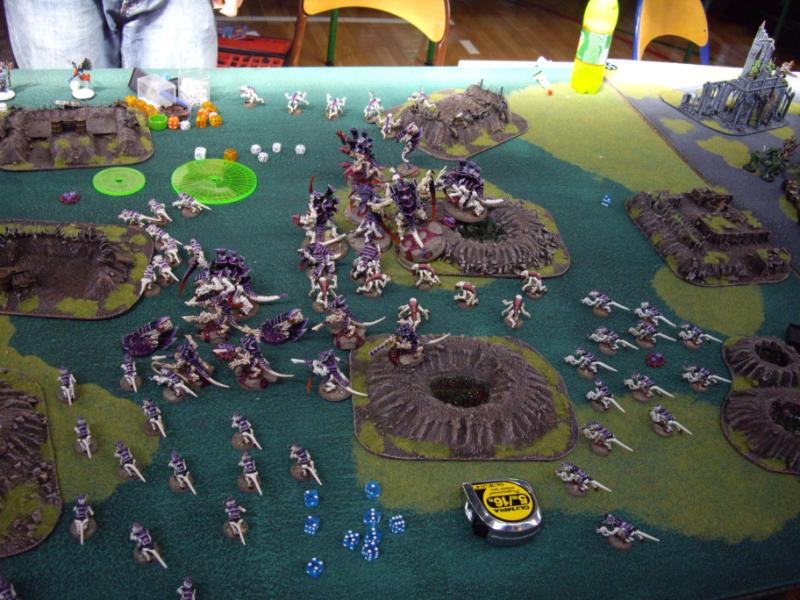
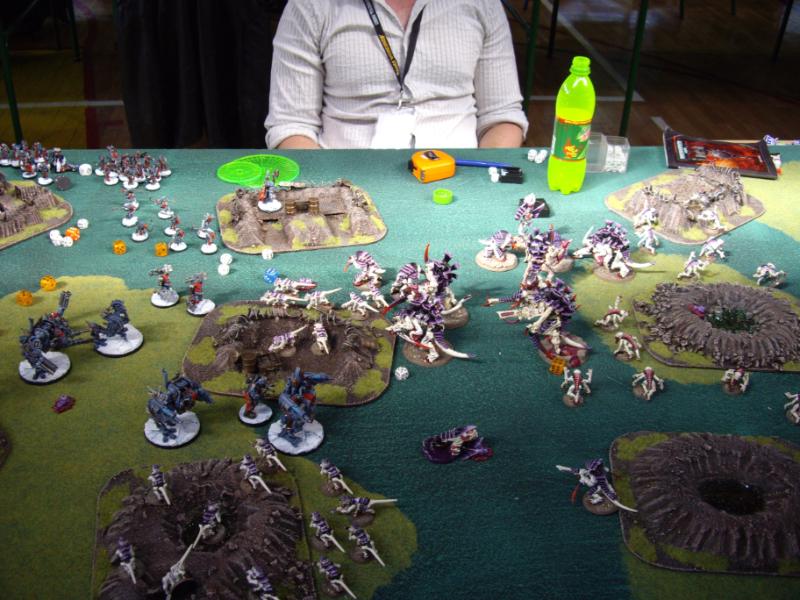
This is turn 3 and you can see the objectives a bit better, especially the one in the crater and the one near the spinegaunts. I continue to try to kill his synapse, and kill the rest of his warriors. He retaliates against my warriors, but since all are different and are in cover, they prove to be hard to kill.

The flyrant and other units in the top left of the board are his casualties, they are not on the board. Richard moves his monstrous creaturres towards my lines and also moves forward a unit of spinegaunts won, which he will use to tie up my hive tyrant. Unfortunately they take were already damaged, and take too many casualties and evaporate due to no retreat. But in the next turn they will be back to full strength and tie him up for 1 turn of shooting.
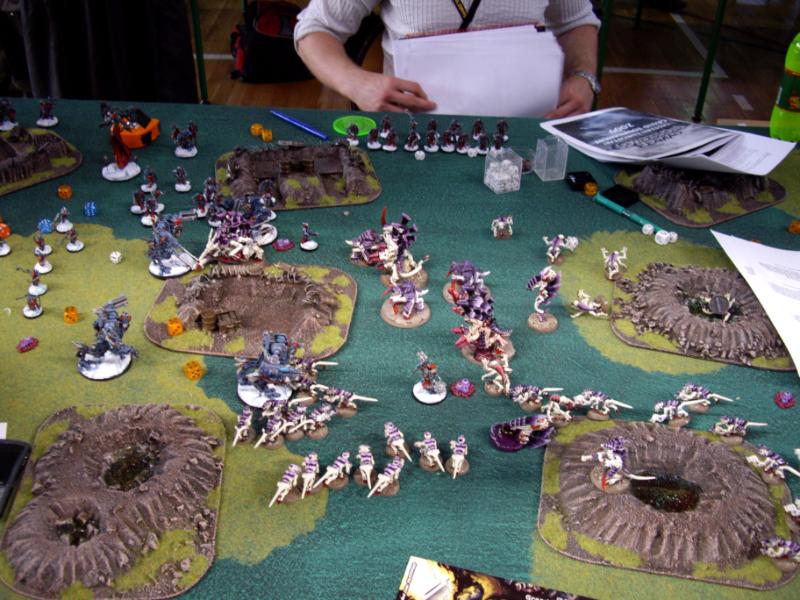
This is the beginning of turn 4, right before my move. A lot is happening now, and he only has 2 synapse creatures left. He moved the hive tyrant very aggressively forward - perhaps to use his implant attack on some fexes. What happens now is:
1. 16 of my termagaunts + 7 of my won termagaunts + zoanthropes wtih focussed blast and 1 hive tyrant bring down his walking tyrant.
2. the other hive tyrant moves to the edge of the terrain where the zoanthrope is. His zoanthrope is in the terrain near the 2 circular blast templates. If I manage to kill him, the game is virtually won. But the Zoanthrope passes all the saves. Now if the hive tyrant can roll at least a 5 on 3 dice for the assault, I have a good chance of killing him in assault, but I fail the roll. In his section of turn 4 he brings the gaunts back on and ties up the tyrant for both bottom of turn 4 and top of turn 5, so that I cannot shoot the zoanthrope in turn 5. To free the tyrant from the gaunts, I make a conga line with feeder tendrils stealers to give my tyrant preferred enemy and allow himself to win the combat in the subsequent round. This would prove to be a great risk that could have cost me the game!
3. My stranglerfex advances to contest the objective near his zoanthrope, but gets charged by 2 of his fexes and dies.
4. I move both of my heavy support fexes toward the central objective to make sure they contest it.
This is the end of the game. In Turn 5
1. I exacted revenge on one of his fexes that killed my stranglerfex, by charging him with both my fexes and killing him. Both of my fexes are near the objective, but in his turn 5 they eat a counter charge by his fexes, and 1 dies and 1 survives. My fex surviving meant I could win the game because he was contesting that objective.
2. My gaunts charge the dakkafex to tie him up preventing him from contesting the objective in the bottom of the picture. But in his turn he moves a zoanthrope on it, and there is nothing I can do - that objective is contested too.
3. He moves his gaunts to claim the objective closest to his quarter
4. He brings back his WON gaunts and tries to charge the stealers that did the conga line to help the tyrant out. If he gets a 4 on the fleet, I have to countercharge, and will move off the objective in the crater. He rolls a 1!
And that is the end of the game, with 2 objectives for me, 1 for him and 2 contested. I end up winning the tournament, but Richard wins best army and comes 3rd. A very tense game for me, and one of the most tactical games I played. Richard was a pleasure to play against, although he was not at his best tactically after a big night out the previous day, and a large hangover.
A rematch is due!


 4500 pts

