DakkaDakka - Warhammer 40000, Flames of War, Warmachine and Warhammer Forums
ForumGalleryArticlesArmy ProfilesStore FinderJoin Us!Login - Services - Switch Theme
Switch Theme:
 
Welcome to dakkadakka.com! Check out our Warhammer 40K Forums, Space Marine Images in our gallery, and interesting Warhammer Painting Articles in our wiki.
Search - Recent Threads - Member List
Whatwhat's greenstuff tips and tricks  [RSS]  
Forum Index » Painting and Modeling Tutorials
Author Message
Advert


Forum adverts like this one are shown to any user who is not logged in. Join us by filling out a tiny 3 field form and you will get your own, free, dakka user account which gives a good range of benefits to you:
  • No adverts like this in the forums anymore.
  • Times and dates in your local timezone.
  • Full tracking of what you have read so you can skip to your first unread post, easily see what has changed since you last logged in, and easily see what is new at a glance.
  • Email notifications for threads you want to watch closely.
  • Being a part of the oldest wargaming community on the net.
If you are already a member then feel free to login now.
Made in gb
Journeyman Inquisitor with Visions of the Warp


90 Gallery Images
2 Article Edits
Gallery Votes: 203
Posts: 2320

Joined: 2008/10/11 16:00:32
Location: Cumbria - England
Offline

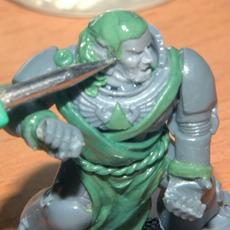
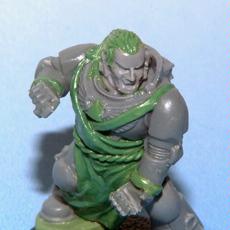
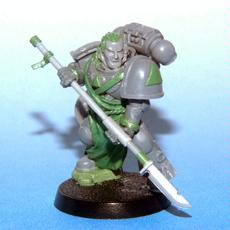
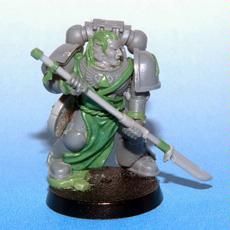
Ok, so in this tutorial I am going to show you some tips and tricks with green stuff to help you convert different models. In this example I am going to be building my company champion for a space marine chapter I am building.


Tools
Ok So to start off with you’re going to need some tools. Firstly you need your sculpting tools, in my opinion you don’t need fancy specialist ones I just use and old compass and something from a women’s nail care kit I got hold of. Basically, something pointy and something to smooth. Together with that you will need some green stuff, some milliput (or other solid drying putty) a knife of some sort and some lubricant. I use some old massage oil but Vaseline or other oil would do.
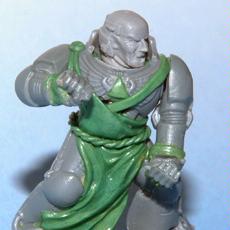


Robes

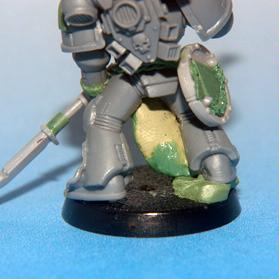
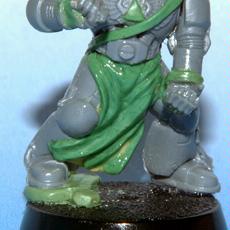
Ok so firstly I am going to be making the robes for my model. What I have done firstly is create a base for me to sculpt on with miliput. This dries rock hard after a few days so I will be able to push and press as hard as I like with the greenstuff without having to control it from the back. When you’re doing this be carful not to cover any detail you want showing and to leave enough room for the green stuff to go on top.


So after that is dry mix some green stuff and rol out a shape rougly the size you want one of the folds or creases on your model to be.


Now place that on your model in the position you want.


Start to build them up with a rough idea of how you want the fold to run.


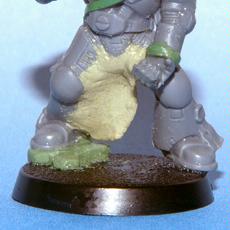
Ok now you have the base work done you need to start smoothing your folds to make them look more acceptable, for this we use our smoothing tool.


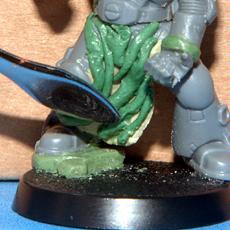
Remember not to push too hard or press against the putty and just to gently work it into place by multiple, gentle strokes against it.


Hopefully it should start to come along a little something like this. You can always take some greenstuff away if you feel there is too much or add some if too little.


Take a look at how folds normally work on your clothes and on pictures to better get an idea of the realism. And keep a good thought on how easy it will be to paint also.


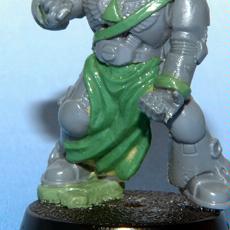
Once the mainstay of the smoothing work is over you can use your other tool to start sculpting smaller detail. In this case I have better defined one of the creases at the top.


Rope
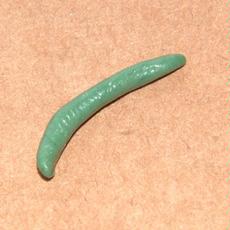
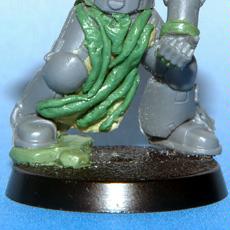
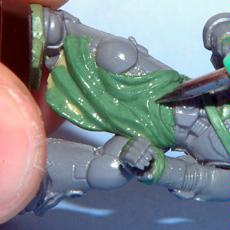
Ok now I’m going to add some rope as a belt, this is fairly easy.

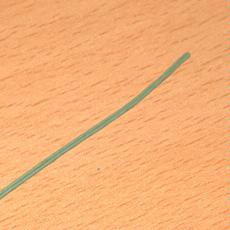
First of all roll out a length of greenstuff half the thickness you want your rope to be.


Now wait until that is slightly dry (the importance of which comes later one) and fold it against itself.


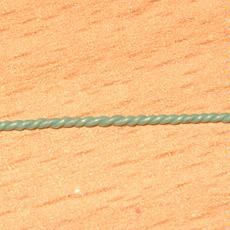
Now you want to twist it to make a rope like texture. Be carefull not to stretch it (this is why we let it dry a bit as it is harder to stretch), stretching it will make it uneven and look off. Twist it in different areas to get it looking even.


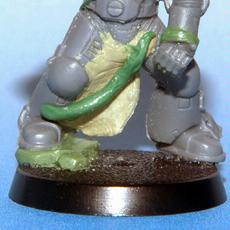
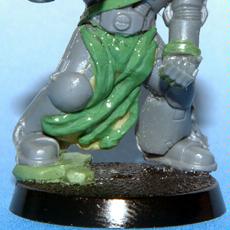
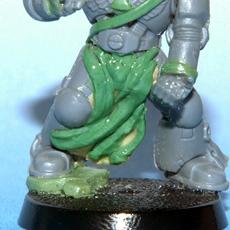
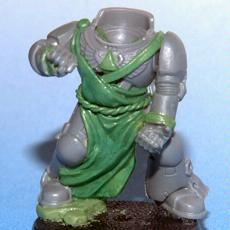
All you have to do now is put it in place like I have done here. Notice I have also extended the robes and added the bit to the torso, this has been done using the same method as before.
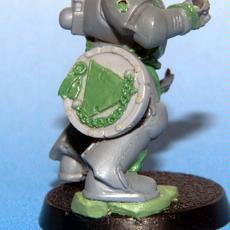
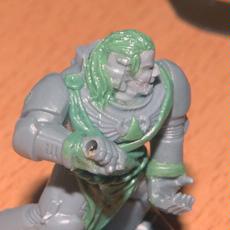
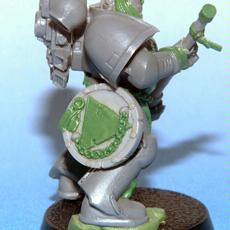


Chains
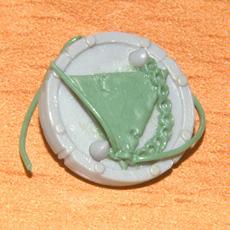
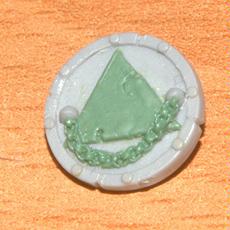
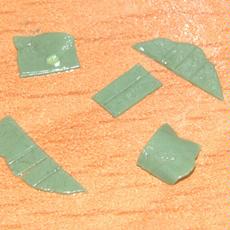
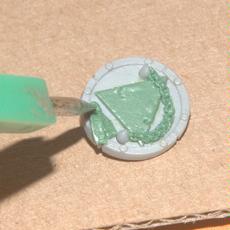
Ok so now I need to decorate my champion’s shield so I am making a small chain, my example is going to be very small but you can make your chain as big as you like with the same method.

Firstly rollout a bit of greenstuff to the thickness you want the chain to be and cut it to size.


Next, put it in place where you want it on the model.


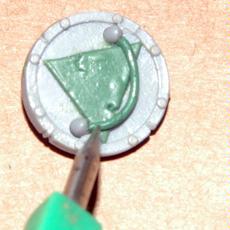
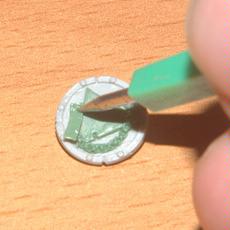
Now you want to got your sculpting tool and poke holes along the length of the chain…


Again once that is done, use your tool to poke and pull at the sides and inside the holes to give them more of a rounded shape.


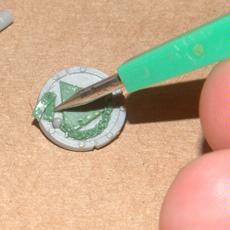
Once you have that you want let it set hard for the next step.

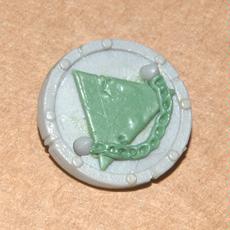
After it is dry roll out another length of green stuff slightly smaller in thick ness. Now carefully press that into the holes on your chain so far.


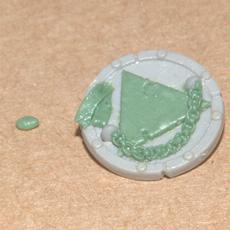
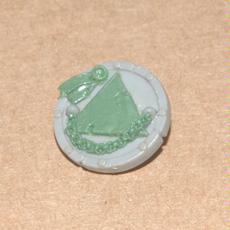
Once you have run along the length of your chain you can cut off the ends and you should end up with something like this…


Purity Seals
I also want to add a purity seal to the shield. To do that firstly I flatten out a bit of greenstuff then let it dry slightly, this mean you can be more brutal with it later on, which is handy when your making it off model. Make sure your surface has a bit of lubricant on it so you can pull it off cleanly.


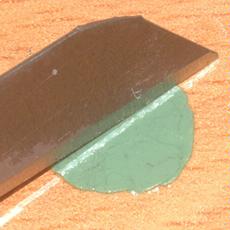
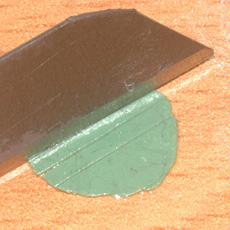
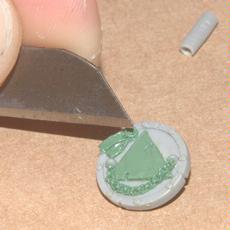
Next, take a knife and slice into the greenstuff. Cutting two rectangular shapes which will be the parchment part of your seal. Once you have done that pull the unwanted greenstuff away.


Push that into place on wherever you want it to go, remember you don’t need to wrry about messing up the end as the seal will cover this part. So if you want to spike it in order to pick it up do so. Once that is done get your other piece and place it on top.


I leave that to dry completely then so I can play a bit more with the seal without messing it up. So get a small ball of greenstuff which you can press down as your seal.


Use something of suitable size to make a hole in it, as you can see I’m just using my same tool as this is the size I need.


If you want to create the small cuts and roughness on the seal like you see with GW’s versions I use a knife and cut gently around the seal.


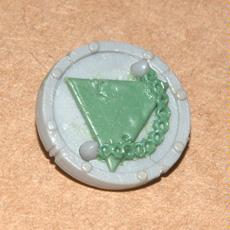
Purity seals are great for all sorts of things, you can use them to add more decoration, cover up things you don’t want people to see or just to add more to a blank space, like my example I made bellow.


Ok that’s my shield done…


Hair

Hair is a fairly difficult thing to get right and is also an important part of the model, most people will look to the facial first as it is a natural mechanism being human.

So to start with I have added a head, in this case it happens to be bald but you can shave another head with exiting hair down if you need to.


Ok so firstly apply rough amounts of greenstuff to the area where you want the hair.


Now use your smoother to smooth it more towards the end result, then take or add any bits you may need. The second picture shows me pulling away some unwanted greenstuff.


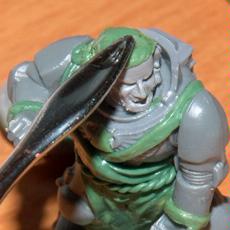
Now, with some lubricant to aid, you want to stroke your geenstuff to get the wanted texture. Here, I’m going for a half slicked back look with hair falling other the back of the implants.


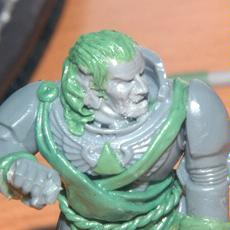
Keep working the greenstuff using whichever tools give you your wanted effect. For example here I wanted the hair falling over the back to look smoother and less messier than the hair on top so I have used a different tool.

The main thing to worry about is the amount of greenstuff you have on your model. Keep looking at it form different angles to make sure yur not over compensating on one side.


The same technique can be used for facial hair. Here I have stroked the greenstuff into different curves and to create the ends of the hair I have pulled away greenstuff to leave points.


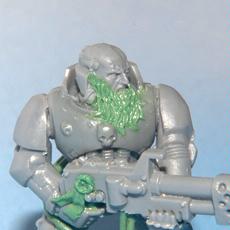
I’ts always worth going back to your model when it’s half dry as you will be able to apply more pressure when the putty has hardened and do things you weren’t able to before. Sometimes you might find it advantageous to do one part of the hair after the first part is done and set.


Pole Detail

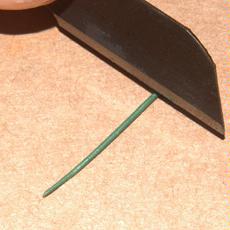
One fairly simple trick I am using here is one I thought up to better aid the creation of pole based weapons like halberds and such.

To start off with bet your pole then a bit of greenstuff.
Roll that greenstuff out so it covers the pole evenly. Now wait for that to set.


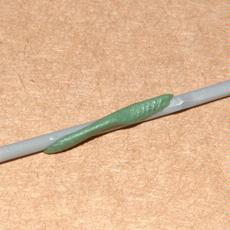
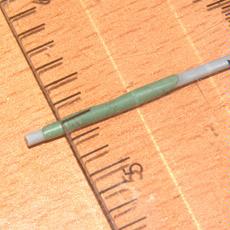
Once it has set, slide it off. Now you can cut whatever length of it you want and place it back on the pole to whatever effect you want. You can vary the thickness by rolling more greenstuff over it in the first stage.


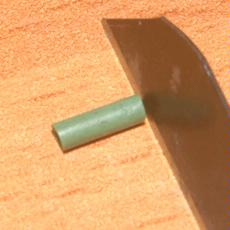
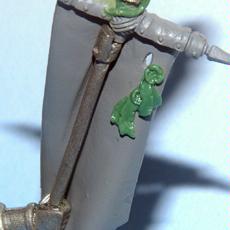
Here I have used this technique to add detail to my champion’s halberd.
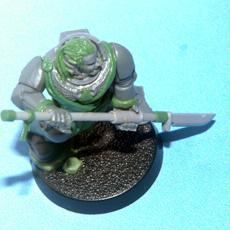


End Result


So I have now finished and am fairly happy with the results. I hope at least some of that may be useful to you. Thank you for reading.


This message was edited 1 time. Last update was at 2009/05/31 18:33:43


Made in gb
Lone Wolf Sentinel Pilot


38 Gallery Images
Gallery Votes: 191
Posts: 1351

Joined: 2008/04/06 17:01:49
Location: London, England
Offline

Mate that's incredible!

Awesome tut.

sA

My Loyalist P&M Log, Irkutsk 24th

"And what is wrong with their life? What on earth is less reprehensible than the life of the Levovs?"
- American Pastoral, Philip Roth

Oh, Death was never enemy of ours!
We laughed at him, we leagued with him, old chum.
No soldier's paid to kick against His powers.
We laughed - knowing that better men would come,
And greater wars: when each proud fighter brags
He wars on Death, for lives; not men, for flags. 
Made in us
Master Sergeant


Gallery Votes: 10
Posts: 420

Joined: 2009/05/05 00:04:06
Location: At the computer when I should be doing homework...
Offline

Goodness gracious... That's impressive, and doable for someone with the greenstuff skills of a polio patient (like me!).

Thank you very much, I will use your tips for my DA guys.

Rico.

Bunker wrote:Jesus H Christ in a sidecar.


"Well, looks can be deceiving."
"Not as deceiving as a low down, dirty... Deceiver."

Burn my flag and I will shoot you. But I will do it with love, like a good American. - Johnny Cash 
Made in us
Lurking Gaunt


Gallery Votes: 39
Posts: 59

Joined: 2009/03/11 04:55:56
Location: United States (Delaware)
Offline

Pro stuff! well done

 
Made in gb
Journeyman Inquisitor with Visions of the Warp


90 Gallery Images
2 Article Edits
Gallery Votes: 203
Posts: 2320

Joined: 2008/10/11 16:00:32
Location: Cumbria - England
Offline

Cheers guys

Made in us
Nurgle Veteran Marine with the Flu


7 Gallery Images
Gallery Votes: 92
Posts: 979

Joined: 2008/11/05 00:39:17
Location: Escondido, CA USA
Offline

Greatness! Finally an easy way to do robes! Love that it's multiple tips all on the same mini. Thank you for sharing.

 
Made in gb
Bounding Assault Marine


724 Gallery Images
198 Article Edits
Gallery Votes: 44
Posts: 275

Joined: 2008/11/28 11:06:09
Location: Thorne, South Yorkshire, UK
Offline

I love this tutorial...fantastic work.

My Armies:
IRON FALCONS


Made in us
Growlin' Guntrukk Driver with Killacannon


204 Gallery Images
Gallery Votes: 2048
Posts: 1317

Joined: 2008/01/07 16:29:24
Location: Atlanta
Offline

Excellent work, whatwhat! Thanks for sharing your skills!

"...if I haven't drawn blood on a conversion, then I haven't tried hard enough." -Death By Monkeys

If Gork had wanted you to live, he would not have created me.
Saving Orks from crappy converters since 1996 
Made in gb
Journeyman Inquisitor with Visions of the Warp


90 Gallery Images
2 Article Edits
Gallery Votes: 203
Posts: 2320

Joined: 2008/10/11 16:00:32
Location: Cumbria - England
Offline

Glad you like it.

LBursley wrote:Greatness! Finally an easy way to do robes! Love that it's multiple tips all on the same mini. Thank you for sharing.


Thank you, and thank you also for setting the whole contest thing up. Been a good month of tutorials learnt quite a bit, heres hoping it continues. I for one shall be making more, got a few things in mind I wasn't able to cover here.

This message was edited 1 time. Last update was at 2009/06/01 08:49:28


Made in au
Pop and Drop Kreoss


2 Gallery Images
11 Article Edits
Gallery Votes: 2
Posts: 7545

Joined: 2008/04/24 05:49:53
Location: The deepest depths of the internet
Offline

Nice tutorial! My GS skills are awful and following this should help me improve a lot. Hope to see more soon.

 
Made in gb
Morbid Black Knight


95 Gallery Images
Gallery Votes: 34
Posts: 2041

Joined: 2008/07/06 00:01:30
Location: Swindon, UK
Offline

Bookmarked

A proud player of 40k and Guildwars (soon to also be a player of Guildwars 2), in other words im a geek

Zorks

92% of teens put made up statistics in their signatures, if you one of the 8% that uses real statistics then dont put this in your sig.

The Effects of Citadel Washes on Metallics

=====Begin Dakka Geek Code=====
DA:90SGMB++IPw40k06----D+A+/cWD-R++T(M)DM+
======End Dakka Geek Code======
 
Made in gb
Scuttling Genestealer


13 Gallery Images
Gallery Votes: 14
Posts: 106

Joined: 2009/02/18 17:34:59
Offline

Yayses! Something for us sculpting virgins

I know. I'm evil.
I saw weird stuff in that place last night. Weird, strange, sick, twisted, eerie, godless, evil stuff. And I want in.


Made in gb
Journeyman Inquisitor with Visions of the Warp


90 Gallery Images
2 Article Edits
Gallery Votes: 203
Posts: 2320

Joined: 2008/10/11 16:00:32
Location: Cumbria - England
Offline

K thinking of making a gs banner tutorial next as I am needing to make one anyway, watch this space.

This message was edited 1 time. Last update was at 2009/06/02 09:17:03


Made in gb
Lesser Daemon of Chaos


120 Gallery Images
Gallery Votes: 101
Posts: 438

Joined: 2008/08/04 11:43:58
Location: West sussex
Offline

So good, i voted!

RIP 40k radio
2008-2010

Hello im back


DS:90-S+G+++M++++B++I+Pw40k03#++D++++A++/sWD199R++T(M)DM++ 
Made in gb
[DCM]
DAKKA'S JUNKYARD DOG


1 Gallery Image
Gallery Votes: 195
Posts: 5969

Joined: 2008/09/07 11:19:33
Location: Bristol - City of Villains
Offline

/approved

"At the age of four with paper hats and wooden swords we're all Generals. Only some of us never grow out of it." - Peter Ustinov

"Oh people, know that you have commited great sins. If you ask me what proof I have for these words, I say it is because I am the punishment of God. If you had not commited great sins, God would not have sent a punishment like me upon you." - Temujin

"In the rich man's house, there is no place to spit but his face." - Diogenes of Sinope 
Made in se
Hardened Veteran Guardsman


1 Article Edit
Gallery Votes: 24
Posts: 199

Joined: 2009/02/04 18:14:59
Offline

Most Excellent


Starting my first army!

Any Cadian who can't field-strip his own lasgun by age ten was born on the wrong planet! Anon

DA:90SG-M+B+I+Pw40K(4)06----D-A+/hWD-R++T()MDM+
 
Made in us
Fluttering Firewyrm of Tzeentch

Gallery Votes: 0
Posts: 17

Joined: 2009/06/05 19:13:48
Location: Monroe, LA
Offline

For the past few days I've been looking for sculpting tips and tutorials all over the net. I got more of what I've been looking for out of this than everything else combined.
Made in ca
Stealthy Dark Angels Scout with Shotgun


14 Gallery Images
Gallery Votes: 24
Posts: 85

Joined: 2009/01/15 22:48:17
Location: Zerg Spawning Pool
Offline

How long did it take you to figure out how to do the green stuff cloak?

"Turn the tables and sometimes your pieces are the only ones that fall off the board."

Wah! I like dis beef too much!
__________________________________________

And nothing else...  
Made in gb
Fresh-Faced New User

Gallery Votes: 1
Posts: 3

Joined: 2009/06/01 11:41:38
Offline

Awesome!!
That will really help me with sculpting.

Thank you for this tut
Made in us
Glorious Grot Banna Wava


26 Gallery Images
Gallery Votes: 7
Posts: 6862

Joined: 2008/10/28 05:06:10
Location: Minnesota
Offline

Excellent tutorial.

The Emperor doesn't seem to do much for you but you sure are expected to be mutilated, suffer, and die to make him happy. And is he dead or what? If he's entombed that would mean he's dead as a doornail, right? So, how can he be happy about anything you do, or even give orders to anyone? Are you worshipping the dead now? Is that something you'd really want to do? Because it sounds freaking creepy to me.
 
Made in gb
Veteran Wolf Guard Squad Leader


44 Gallery Images
Gallery Votes: 3
Posts: 1001

Joined: 2008/08/11 16:38:39
Offline

Bloody awesome mate ! just what I needed, i never thought of doing robes etc in that way !

 
Made in us
Fresh-Faced New User

Gallery Votes: 0
Posts: 13

Joined: 2009/05/07 03:31:56
Offline

great detail work, thanks for the posting.
Made in gb
Morbid Black Knight


95 Gallery Images
Gallery Votes: 34
Posts: 2041

Joined: 2008/07/06 00:01:30
Location: Swindon, UK
Offline

Its no surprise this tutorial is topping the polls, creative and innovative techniques combined with clear and simple instructions makes a rather amazing walkthrough.

A proud player of 40k and Guildwars (soon to also be a player of Guildwars 2), in other words im a geek

Zorks

92% of teens put made up statistics in their signatures, if you one of the 8% that uses real statistics then dont put this in your sig.

The Effects of Citadel Washes on Metallics

=====Begin Dakka Geek Code=====
DA:90SGMB++IPw40k06----D+A+/cWD-R++T(M)DM+
======End Dakka Geek Code======
 
Made in au
Spawn of Chaos


66 Gallery Images
Gallery Votes: 141
Posts: 96

Joined: 2009/05/12 00:58:22
Offline

the rope idea was excellent and very easy to do. Top notch tutorial

Sing Us a Sea shanti so great that we will laugh our gizzards out, ya scurvy dog

from the land down under! 
Made in us
Despised Traitorous Cultist


25 Gallery Images
Gallery Votes: 75
Posts: 43

Joined: 2009/06/05 00:46:27
Location: pennsylvania
Offline

what a great tutorial you've done here. Cant wait to get home and try some of this stuff out.

Check out my personal album
avatar comes from this wonderful artist: http://mellanius.deviantart.com/ cclicense
member of 3 yahoo groups: collecting citadel miniatures, 40k-chaos, and Megabattles  
Made in us
Fresh-Faced New User

Gallery Votes: 0
Posts: 10

Joined: 2007/06/14 14:54:48
Offline

I know everyone is thanking you for an awesome tutorial.....but it's been a week or so and I need more awesome scultping tutorials!!!! More please
Made in gb
Journeyman Inquisitor with Visions of the Warp


90 Gallery Images
2 Article Edits
Gallery Votes: 203
Posts: 2320

Joined: 2008/10/11 16:00:32
Location: Cumbria - England
Offline

Thank you everyone for your kind words, the reception has been quite flatering.

@ V0ldem0r7
Took me about 5 to ten minutes for this example.

@ Vex
Working on it.

This message was edited 1 time. Last update was at 2009/06/09 08:53:11


Made in us
Steady Dwarf Warrior


Gallery Votes: 0
Posts: 33

Joined: 2007/10/18 14:59:40
Location: NE Pennsylvania
Offline

Beautiful finished product, and it definately gives someone whos never done any sculpting before a ton of confidence to get in and give it a try.

My only question is; What does the model look like from the back with the clay you put down for the base of the loin cloth? Its hard to get perspective with the shots provided. Is it something that has to be treated or prepared for Prime/painting differently? Or is the shield there to screen the foundation?

If ya misses it, it's obviously one o' ours. If ya hits it, den it must be one o' theirs - Boss Uzgob 
Made in gb
Journeyman Inquisitor with Visions of the Warp


90 Gallery Images
2 Article Edits
Gallery Votes: 203
Posts: 2320

Joined: 2008/10/11 16:00:32
Location: Cumbria - England
Offline

Hey,

No the back doesn't suffer because of the clay, I know its hard to get an idea of what it looks like from the back but it's fairly thin. This is one of the main reasons I was using miliput, as it dries very solid after a few days meaning I could use a very thin layer and it would still do what I needed it to.

Milliput you can paint and prime same as greenstuff/plastic/metal. Other putties/clay I guess you would have to look into.

The shield is on the side of his leg and isn't meant to hide anything. If I'm honest, I didn't show the back as I haven't finished it yet. But don't tell anyone that.

edit: actually I shall try and get a pic for you tomorow if you want.

edit2: Screw tomorrow, just took this...


As you can see I haven't done the green stuff yet. But I hope you can se that the way I have laid the milliput it's not hindered the look from the back, and I can still sculpt my creases over that. ...when I get round to it.

This message was edited 3 times. Last update was at 2009/06/11 21:20:21


Made in us
Death-Dealing Dark Angels Devastator


445 Gallery Images
3 Article Edits
Gallery Votes: 955
Posts: 199

Joined: 2009/03/23 21:48:46
Location: U.S.
Offline

Hey congrats on the dakka win! We were neck in neck for the first part of it but you finally pulled ahead in the end.
Now you just need to show how you would sculpt muscles. (so I can steal it to reposition my 3x be'lakors.)
This is by far one of the more helpful and informitive guides I've seen.

Littleboyblues

This message was edited 1 time. Last update was at 2009/06/12 13:04:38


Forum Index » Painting and Modeling Tutorials
Go to:   

Dakka 5.30 - Privacy Policy - Legal Stuff - Forum Rules