| Author |
Message |
 |
|
|
|
|
Advert
|
Forum adverts like this one are shown to any user who is not logged in. Join us by filling out a tiny 3 field form and you will get your own, free, dakka user account which gives a good range of benefits to you:
- No adverts like this in the forums anymore.
- Times and dates in your local timezone.
- Full tracking of what you have read so you can skip to your first unread post, easily see what has changed since you last logged in, and easily see what is new at a glance.
- Email notifications for threads you want to watch closely.
- Being a part of the oldest wargaming community on the net.
If you are already a member then feel free to login now. |
|
 |
2009/06/21 11:50:27
Subject: Super sized Wraithlord with fries.
|
|

Moustache-twirling Princeps
About to eat your Avatar...
|
I have decided to definitely make a super sized Wraithlord. For now I am planning on having the final piece to be around 3-4 feet (1 meter) in height. Total replica, down to the finest detail, I WILL NOT BE SELLING THIS, so do not even ask. For now I have no room for such a piece in my apartment so it will find a resting place in my FLGS, if they will receive it of course.
The Wraithlord is my favorite model in the whole game, from a purely aesthetic stand-point. There are a few things that I would change, and I would do this for two reasons; A.) MY WRAITHLORD MUWAHAAAHAAAHAAAAAaaa and B.) Just in case GW tries to be weird in some obscure way about the project.
I would love to make this bugger poseable but I just do not have the time nor the tools to effectively do so. For a frame I will be starting with PVC, to provide the cheapest and most resilient structure I can think of. Fleshing out everything will be a bit tough, but I am sure there are a million and a half ways to figure that part out.
I would sincerely appreciate any C&C DakkaDakka has to offer on this subject.
|
|
|
|
 |
|
2009/06/21 12:07:17
Subject: Re:Super sized Wraithlord with fries.
|
|

Lady of the Lake
|
Sounds like it will be good. Also look at things like Gundam models to get an idea about posability. It's probably easier to do than you think. I can think of some ways to make it effectivly posable, but if you want to add posability it will probably increase the price. If you go for posability, you might want to look at some hydrolic things I used in woodwork. Unfortunately I don't remember the exact right name for that type of thing but it basically adds some resistance to allow it to stay in a pose without the weight of the arms and such moving it out of the pose. Of course that all depends on how much each piece weighs, the benefit is that these things are usually adjustable so there shouldn't be much of a problem for them.
Although you were probably already going to do this, I'd say build an entire skeleton for it then add the armour and details onto the outside of that skeleton. Reducing the weight and the strain on each joint.
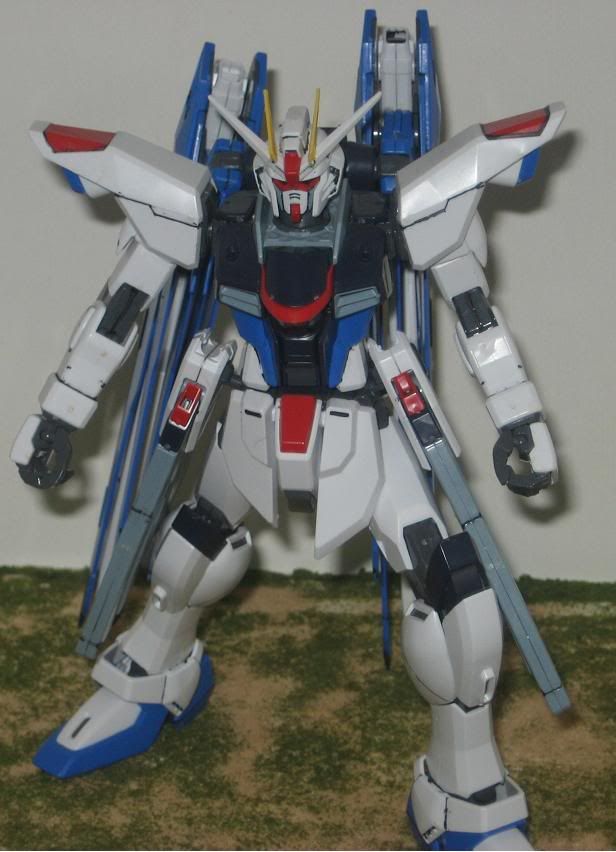
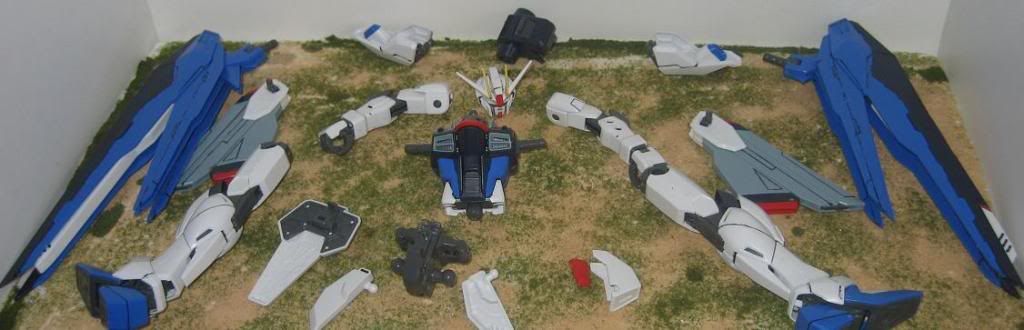
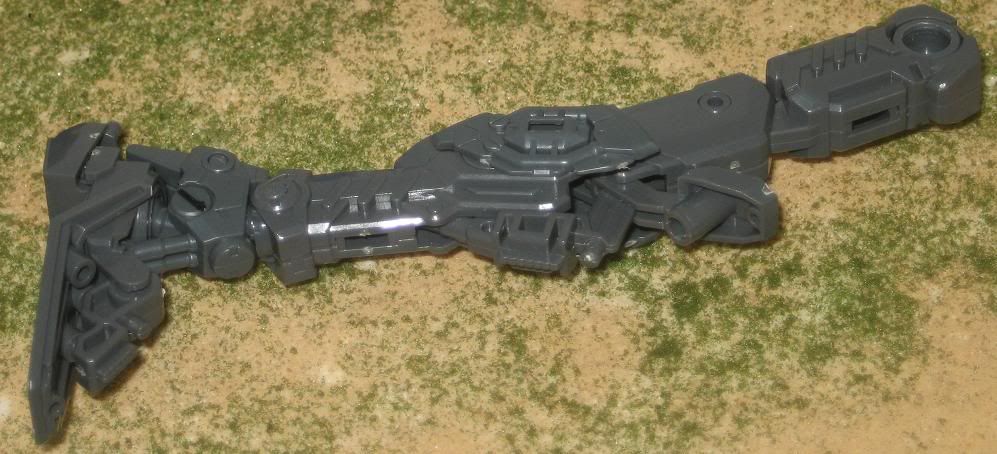
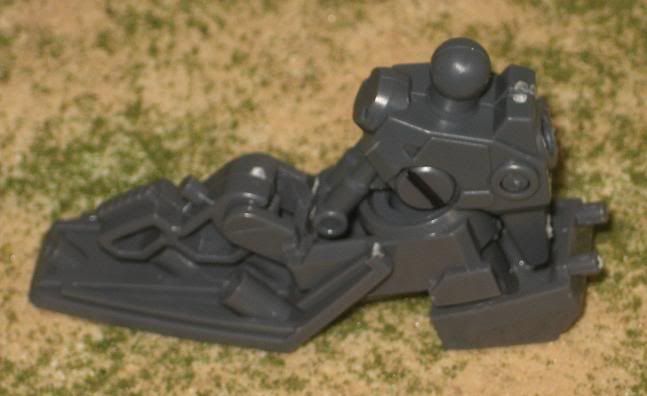
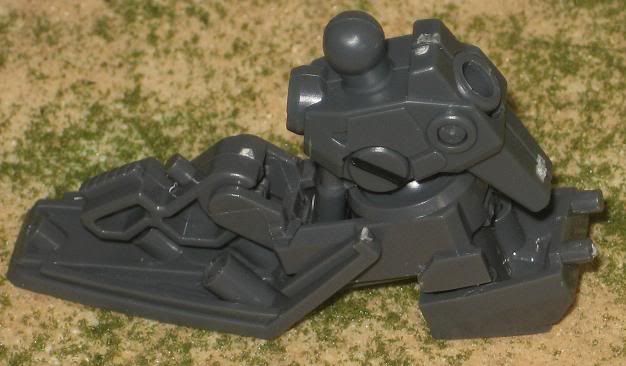
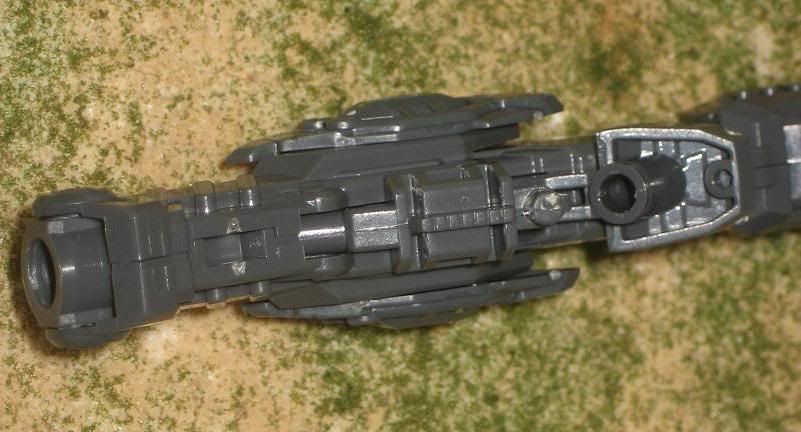
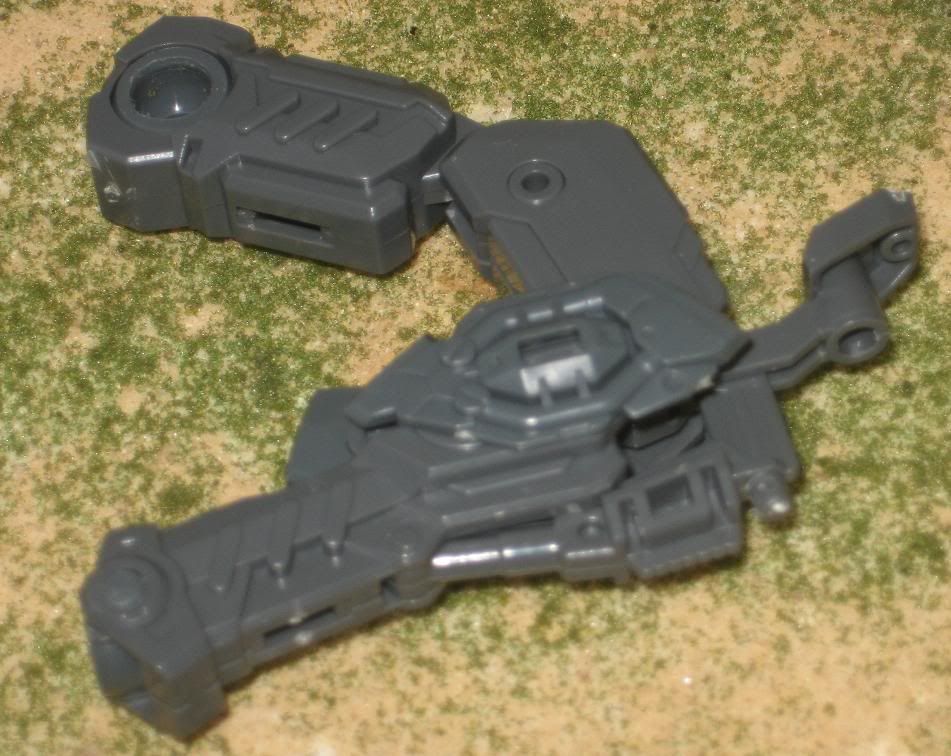
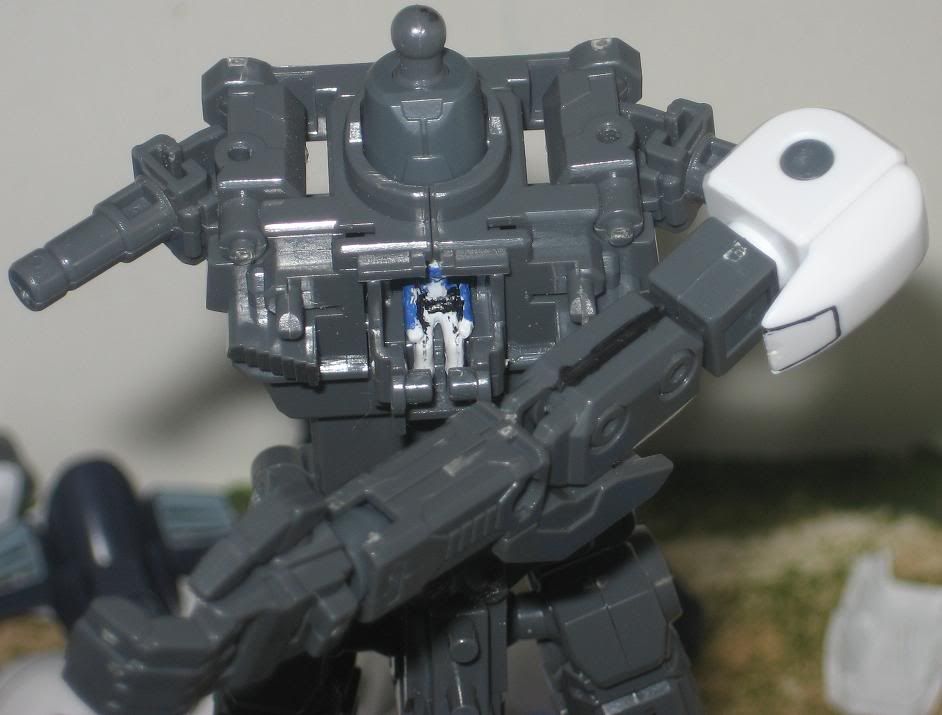
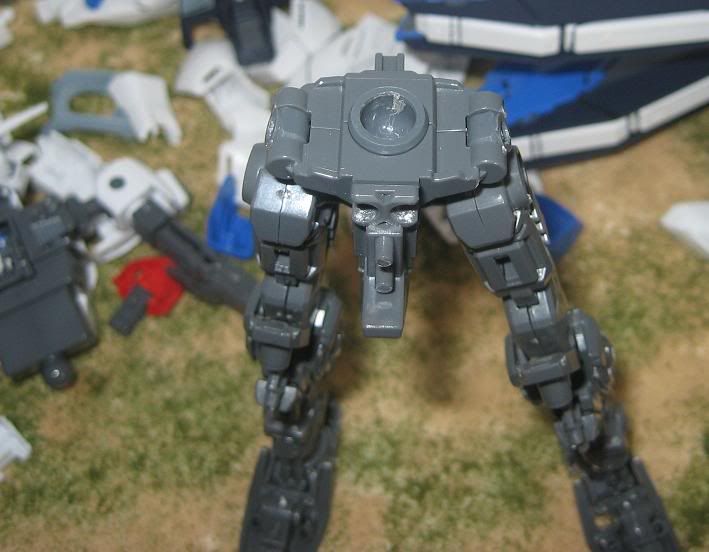
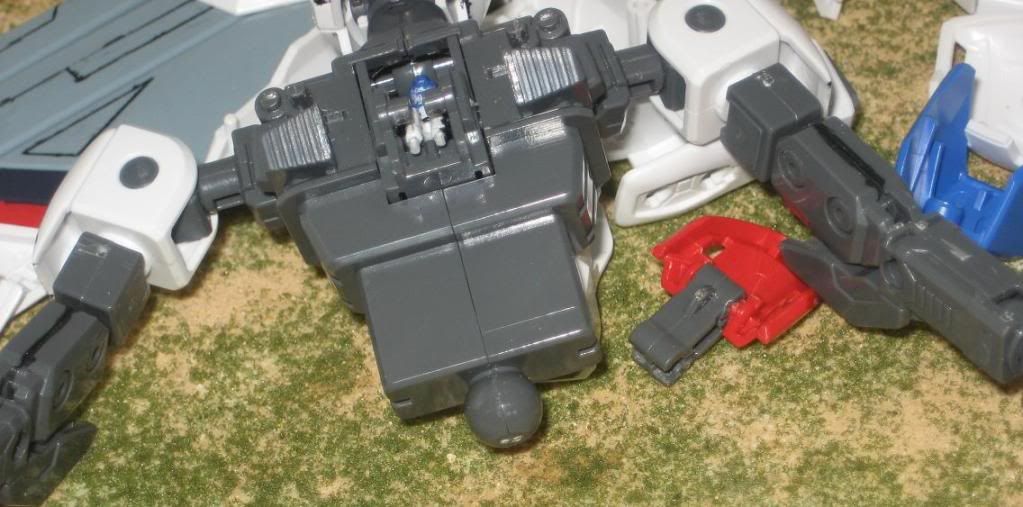
Can't wait to see pics of this  Automatically Appended Next Post: Automatically Appended Next Post: just to add to that when I said Gundam models I meant the more recent MG ones. You build the skeleton for them first then add the armour over the top. These skeletons are very detailed and should help you with the joints. If you need them I could take a few pictures of the ones I have without the armour on them. However if you do make it posable, do not copy the design of the Freedom's feet, they don't really work that well and make it hard for it to balance at times. It works just fine without the wings though, they're just a weaker design then normal.
|
|
This message was edited 1 time. Last update was at 2009/06/21 12:10:38
|
|
|
|
|
2009/06/21 12:18:00
Subject: Super sized Wraithlord with fries.
|
|

Junior Officer with Laspistol
|
If this is going to be a metre-high display piece, surely posability is somewhat redundant?
|
|
|
|
|
|
2009/06/21 12:21:02
Subject: Re:Super sized Wraithlord with fries.
|
|
Long-Range Ultramarine Land Speeder Pilot
Probably somewhere I shouldn't be
|
Ambitious, nice 
Getting symmetry on all those curves will pose an interesting problem, I assume you'll be using putty over a framework? My local art supply has very fine aluminium mesh (less than 2mm grid iirc) which would,, with a little support, be strong enough to take putty.
or will you be using plaster bandage or something as a base for the curves?
|
40k:    WHFB: WHFB:  (I want a WE Icon, dammit!) (I want a WE Icon, dammit!)
DR:80S+G+M(GD)B++I++Pw40k96+D+A+++/areWD206R+++T(M)DM+
Please stop by and check out my current P&M Blog: Space Wolves Wolf Lord |
|
|
|
|
2009/06/21 12:27:29
Subject: Super sized Wraithlord with fries.
|
|
Moustache-twirling Princeps
About to eat your Avatar...
|
I would like to see those pics Not_U. That would be great.
At some point next week I will pick up some PVC pipe to I can frame out the main skeleton. I would like to talk a bit more about the actual construction so it can work with whatever I make the "flesh" and armor out of.
I would like to keep it under 20 pounds, and I think this is a quite reasonable estimate. The PVC won't weigh more than 5 pounds, along with less than a pound of bolts and the like to connect structural pieces like the shoulders, hips, and head (which I will make as a seperate piece).
It would be super-awesome if I could actually make it poseable. Either way I will have extra arms, guns, and the like that can represent a few poses if necessary.
I am trying to make this for the least amount of money possible, just a scaled replica with a few minor changes, nothing fancy. I will most likely drop a crisp Biel-tan or Ulthwe paintjob on the Wraithlord to make sure the model really yells ELDAR!!! ELDAR GODAMMIT!!!
unistoo wrote:Ambitious, nice
Getting symmetry on all those curves will pose an interesting problem, I assume you'll be using putty over a framework? My local art supply has very fine aluminium mesh (less than 2mm grid iirc) which would,, with a little support, be strong enough to take putty.
or will you be using plaster bandage or something as a base for the curves?
I was actually considering using some variation on paper mache. Not sure exactly what I had in mind... most likely card-stock reinforced by a piece of PVC along with assorted nuts, bolts, and wire; then I would make the general shape out of wire and fill the wire with a mix of wood-glue and ground paper ( I have too much of this stuff... what do you do with it besides throw it in the compost?). I could use newspaper to add a bit more fiber to the mix. When this dried I would have to use... Hmmm...
 OK... here we go, I would coat it in saran wrap, heat it so it sticks to the paper, then use a heated knife to smooth the surface. Could work, possibly.
Man, this could end up being some real armor 
|
|
This message was edited 3 times. Last update was at 2009/06/21 12:37:05
|
|
|
|
|
2009/06/21 12:52:01
Subject: Super sized Wraithlord with fries.
|
|

Dakka Veteran
|
Now that I think about it, the best option would be (I'm assuming you can sculpt) to get some Roma Plastlina. http://www.dickblick.com/products/sculpture-house-roma-plastilina-modeling-clay/ This is what a lot of professor sculptors use when taking on projects like this. It will essentially never dry. Even if you let it sit for years and years, if you worked it enough it would become pliable again.
Anyway take that stuff, make your sculpt. After that make a plaster mold. You'll need to coat the clay model with vaseline or something similar to ensure it won't stick to the plaster. You'll also need to also make sure there are no negative concave angles, as plaster will get stuck in them. That shouldn't be a problem with a wraith lord. Lastly you'll use some kind of insert and stick it all the way around the die of the model to separate the halves of plaster. Alternatively, you could just mold one side at a time.
Once you finish the mold and pull it off and it dries (you should let it sit a day or two ideally) you can put fiberglass cloth and resin inside of it. Once that is hard and removed, autobody filler will take care of details you lost in the process or necessary patch ups. You'll need to sand the fiberglass to get it smooth naturally.
I've used this exact method to cast costume masks and it's great if you have time for the project. Not to mention you will end up with a mold if you do it carefully that you could reuse! Good luck!
|
|
This message was edited 1 time. Last update was at 2009/06/21 12:59:04
 5000 points (Blue rods are better than green!) 5000 points (Blue rods are better than green!)
 5000 points (Black Legion & Pre-heresy Sons of Horus) 5000 points (Black Legion & Pre-heresy Sons of Horus) |
|
|
|
|
2009/06/21 13:01:13
Subject: Super sized Wraithlord with fries.
|
|
Long-Range Ultramarine Land Speeder Pilot
Probably somewhere I shouldn't be
|
Wrexasaur wrote:
OK... here we go, I would coat it in saran wrap, heat it so it sticks to the paper, then use a heated knife to smooth the surface. Could work, possibly.
Could you get it smooth enough? maybe a fine slurry of plaster filler built up over a lot of applications and sanded?
|
40k: WHFB: (I want a WE Icon, dammit!)
DR:80S+G+M(GD)B++I++Pw40k96+D+A+++/areWD206R+++T(M)DM+
Please stop by and check out my current P&M Blog: Space Wolves Wolf Lord |
|
|
|
|
2009/06/21 13:01:47
Subject: Super sized Wraithlord with fries.
|
|
Moustache-twirling Princeps
About to eat your Avatar...
|
Fiberglass sounds perfect.
Is that something that I could do without a workshop? I can work in the backyard, but I would have to clean up every day. I usually work on a bench in my room, and I have area to store around two large-scale projects at one time (2000 point armies, model-planes, etc...).
Fiberglass resin would be something I would have to look into. I am pretty sure the cloth is self-explanatory.
I want to get all of the major detail with something like auto-body filler, which I can reinforce with shellac, then finish the detail with Brown stuff kneadatite so I can sand and file to perfection. Stuff like the gems and the "joints" would be a good example.
morgendonner wrote:Now that I think about it, the best option would be (I'm assuming you can sculpt) to get some Roma Plastlina. http://www.dickblick.com/products/sculpture-house-roma-plastilina-modeling-clay/ This is what a lot of professor sculptors use when taking on projects like this. It will essentially never dry. Even if you let it sit for years and years, if you worked it enough it would become pliable again.
Anyway take that stuff, make your sculpt. After that make a plaster mold. You'll need to coat the clay model with vaseline or something similar to ensure it won't stick to the plaster. You'll also need to also make sure there are no negative concave angles, as plaster will get stuck in them. That shouldn't be a problem with a wraith lord. Lastly you'll use some kind of insert and stick it all the way around the die of the model to separate the halves of plaster. Alternatively, you could just mold one side at a time.
Once you finish the mold and pull it off and it dries (you should let it sit a day or two ideally) you can put fiberglass cloth and resin inside of it. Once that is hard and removed, autobody filler will take care of details you lost in the process or necessary patch ups. You'll need to sand the fiberglass to get it smooth naturally.
I've used this exact method to cast costume masks and it's great if you have time for the project. Not to mention you will end up with a mold if you do it carefully that you could reuse! Good luck!
Interesting. I think this may be my best bet. I could easily pull off the molds, although I may not keep them after casting.
Oh lord... I have to sand the fiberglass?!? Hmmm... I have installed insulation in an entire house, and I can honestly say it was the closest I will ever get to being in hell. The itching was INSANE. I would have to think about this one.
unistoo wrote:Could you get it smooth enough? maybe a fine slurry of plaster filler built up over a lot of applications and sanded?
I do like the idea of creating my own medium out of something along the lines of plaster mixed with ground paper and wood glue. It would be a lot of fun to make!!! If I could get the consistency right I could create a surface that would respond well to nearly any other medium, as well as being able to carve AND sand it once it dries. Getting a substance that will dry evenly is the man problem, along with it's reaction to whatever "armature" is.
|
|
This message was edited 2 times. Last update was at 2009/06/21 13:10:58
|
|
|
|
|
2009/06/21 13:28:08
Subject: Re:Super sized Wraithlord with fries.
|
|
Lady of the Lake
|
Maybe Plasticard for the outside armour. As for the skeleton, you want the PVC pipe to be only as wide as normal. For this to work properly the skeleton is going to make up most of the weight. As for the posability of the models they are very advanced (knees have the main joint and a sliding one on the thigh to allow them to kneel down completely).
If it doesn't bother you I might be able to draw up some of the joints and that as well. But I would suggest trying to build it out of paper/cardboard first, that way you can find any flaws in the design and fix them. It would probably also be a good idea to do that before you get the PVC pipe as it would help confirm the width of the pipes needed.
Also I might have found out the name of the hinges I mentioned before that could be used to add stability to the poses. I think it was called Pneumatics or something like that, basically the hinge closes with some resistance to stop slamming but can be adjusted to determine the resistance needed. So with these you will be able to have it so it will be posable, but remain in the pose unless moved.
This gives me an idea to build my own skeleton, but the point for it is that the finished skeleton can also be used for other things as well. Such as if someone wants to make a Firewarrior that size, maybe a crisis suit.
For the hindges a quick search brought me to this. It turns out I was calling them hinges when in fact they are called pneumatic stays.
http://hardware.hardwarestore.com/73-441-screen-door-closers/aluminum-adjustable-pneumatic-door-closer-611666.aspx
This one is a bit more expensive than the ones I used, which hold up a top panel that weighs around 5-6Kg. So cheaper ones are an option, this one was just to show you what I was talking about.
As for how they would work for the joints, use a bolt on the joint with some washers and add the pneumatic stay onto the joint as well. These aren't hinges but are designed to work with hinges so don't rely on these to be the backbone of any joint, these will be the support. This will work for the elbows, knees and maybe the thighs (I doubt this though). These seem to be for 90 degree joints, for the shoulders you're going to have to figure out something else, maybe look at some toys to cut up and take their joints.
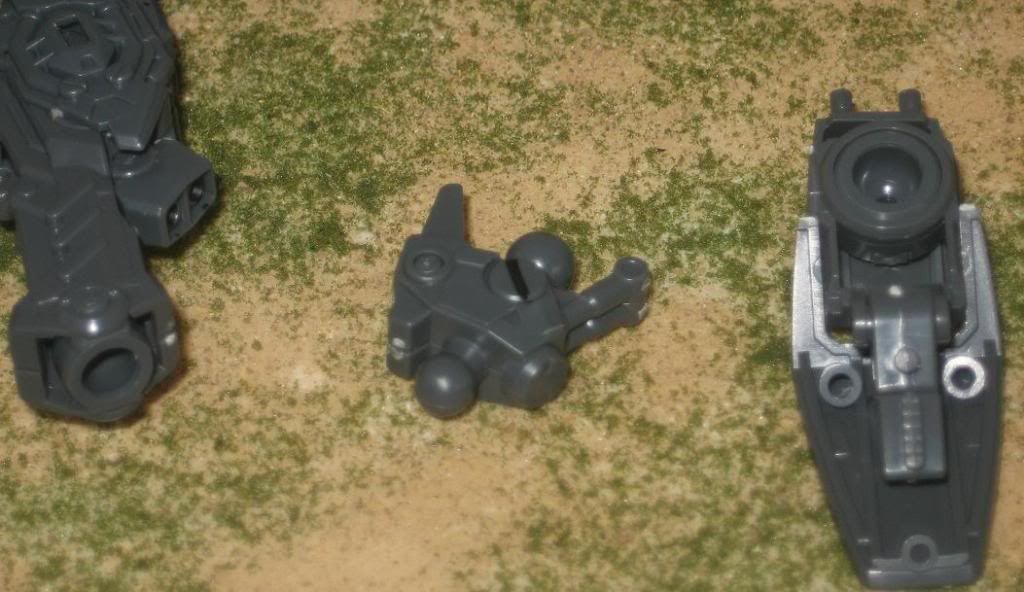
I should put the pictures up tomorrow, I'll include them (I've got Freedom, Zaku II and Impulse like this) with the armour, without the armour and detailed pictures of each joint. If I can find my scanner I'll include the instructions for the joints as well. The Zaku II is an older MG one, but I like the design of it (some of it seems better than some of the newer MG). If you want the fingers posable as well you'll want to look at the PG 1/60, which I have none of. But, it is possible as they are a little bit smaller than what you expect your one to be. As far as I can see the biggest problem is going to be the head, but if you figure that one out you can copy those joints to the shoulders, thighs and ankels.
Either way this project will take a long time. But, as I think it is a good idea I'll help.
Also, maybe you could use it in Apocolypse as an Eldar titan
Make the Orks jealous.
|
|
|
|
|
|
2009/06/21 13:45:17
Subject: Super sized Wraithlord with fries.
|
|
Moustache-twirling Princeps
About to eat your Avatar...
|
Thank you Not_U for all the help, I would like to see the drawings if you could do that.
I saw a titan project on here, where the guy had actually made his own joints, using a spring and some rubber washers. The spring pulled the pieces together so the washers were spread out and filled the PVC housing. That was the jist of it at least, from what I understood. I'll put a link up in a minute.
http://www.dakkadakka.com/dakkaforum/posts/list/238420.page
It actually looks really good, and I could put that together no problem.
|
|
This message was edited 2 times. Last update was at 2009/06/21 13:49:02
|
|
|
|
|
2009/06/21 13:59:25
Subject: Super sized Wraithlord with fries.
|
|
Dakka Veteran
|
Fiberglass resin is simply using the products you would use with the cloth, but not using cloth. When using the cloth you mix two chemicals (one is the resin, the other is a small tube of liquid hardener) and apply it to an area, add in cloth, and then brush in some more of the mixture on top. If you use the chemical mixture without the cloth, it will make a rigid layer similar to plastic.
In terms of needing a workshop, you shouldn't. I've done this in my garage and while my garage is decked out quite substantially for craftsman work, you don't really need anything of that nature for this.
Just make sure to wear long sleeves, gloves, and DEFINITELY a dust mask (rebreather if you have one just to be extra safe) and goggles when sanding fiberglass. If it is just the resin you are sanding though, there is no worry about getting strands of the cloth in your skin.
There's definitely many ways you could go with this, but I think sculpting with clay gives you the most freedom and doesn't impose a time restriction before it hardens. Naturally you could make a PVC or similar skeleton (maybe you could even find some kind of toy with similar dimensions to use as a skeleton) and apply the clay on top of that to save a lot of time and clay.
|
|
This message was edited 1 time. Last update was at 2009/06/21 14:05:07
5000 points (Blue rods are better than green!)
5000 points (Black Legion & Pre-heresy Sons of Horus) |
|
|
|
|
2009/06/21 14:06:38
Subject: Re:Super sized Wraithlord with fries.
|
|
Moustache-twirling Princeps
About to eat your Avatar...
|
IT HAS FEET!!!
|
|
This message was edited 1 time. Last update was at 2009/06/21 14:09:03
|
|
|
|
|
2009/06/21 14:12:13
Subject: Re:Super sized Wraithlord with fries.
|
|
Lady of the Lake
|
That titan is amazing, I think a slightly modified version of the ball and socket joint he used of the feet would be good for the ankels, head and waist. As for the shoulders they might need something different. The knee joints look interesting, and cheaper to make. The one I'm thinking of would be more stable, but you might as well test that one first because that might work for it. The width of the Wraithlord's legs makes it difficult for the ankel joints though which will be annoying later. But as that was an Imperial design, not all the joints will work, but you should probably use the ones that do work.
Automatically Appended Next Post:
Good start, building from the feet up is probably a good idea. But I think the best thing to do would be to make the head as light as possible almost having no inner frame.
|
|
This message was edited 1 time. Last update was at 2009/06/21 14:13:46
|
|
|
|
|
2009/06/21 14:26:05
Subject: Super sized Wraithlord with fries.
|
|
Moustache-twirling Princeps
About to eat your Avatar...
|
I was thinking the same thing about the knees. They look pretty vulnerable when the rest of the model is so very solid.
The ankle is something I will have to test out, but it is so cheap I will have no problem with it. Hmm... I need to get my irrigation tools organized at some point.
The head will be pretty easy to make out of just a wire mesh frame, and some type of skin. I will keep it open underneath besides a bit of aesthetic covering near its connection point.
|
|
This message was edited 1 time. Last update was at 2009/06/21 14:27:46
|
|
|
|
|
2009/06/21 15:34:59
Subject: Re:Super sized Wraithlord with fries.
|
|
Bounding Dark Angels Assault Marine
|
Someone showed this to me after I had already built my titan joints but if you are early on you might want to consider it:
http://www.igus.com/igubal.asp
I don't think they are too expensive, not to mention you can get free samples. I got a few and they are pretty nice. Unfortunately they don't have really large sizes like you may need. I stayed with the joints I had made but I think there is a clever way to use some of these ball joints with some supporting structure to make a larger stable joint. It is worth getting some samples anyway.
Something else I have found is as I add weight my titan is starting to get less stable. Since eldar poses are a little more dramatic than imperial poses you may want to give some thought to a supporting structure while you work (I have dropped a few pieces, and while everything was repairable it is painful). You will also likely need stiffer joints if you are planning to support a dramatic pose.
Just a few things to think about. Looks like a cool project, i am looking forward to seeing updates.
|
|
|
|
|
2009/06/21 15:40:40
Subject: Re:Super sized Wraithlord with fries.
|
|
Decrepit Dakkanaut
|
Im really going to like this project of yours. I too really like the Wraithlord mini. Its always been a cool ass mini to see on a table. Good luck!
|
|
|
|
|
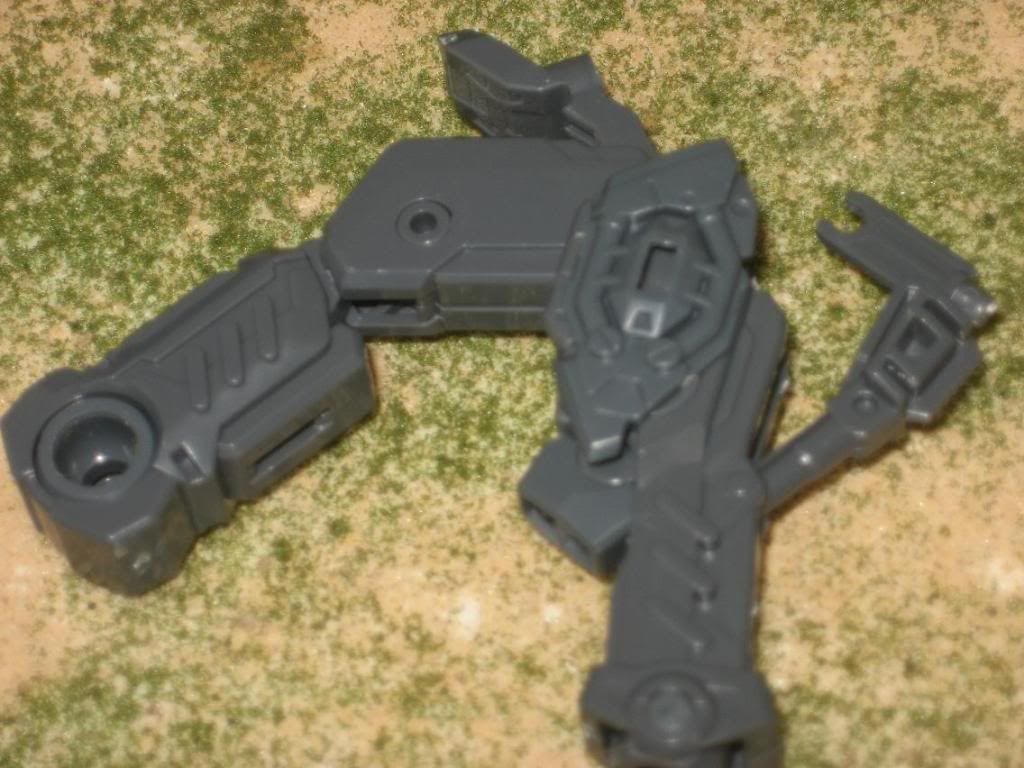
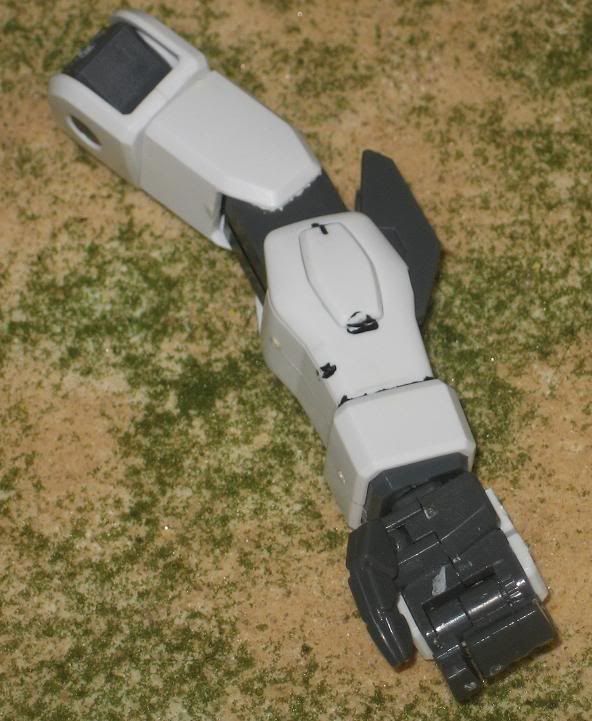
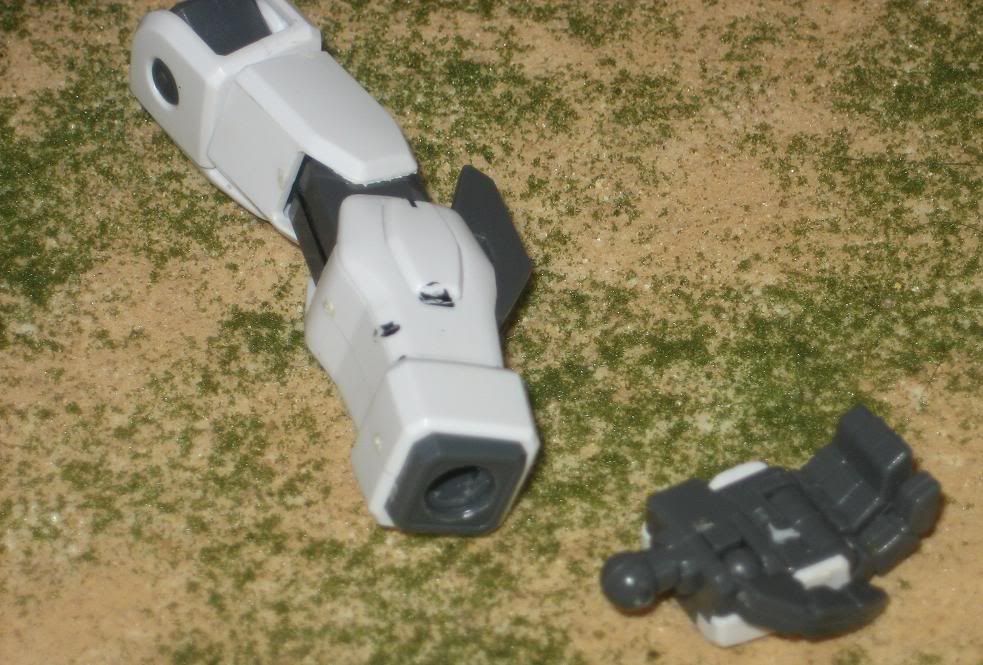
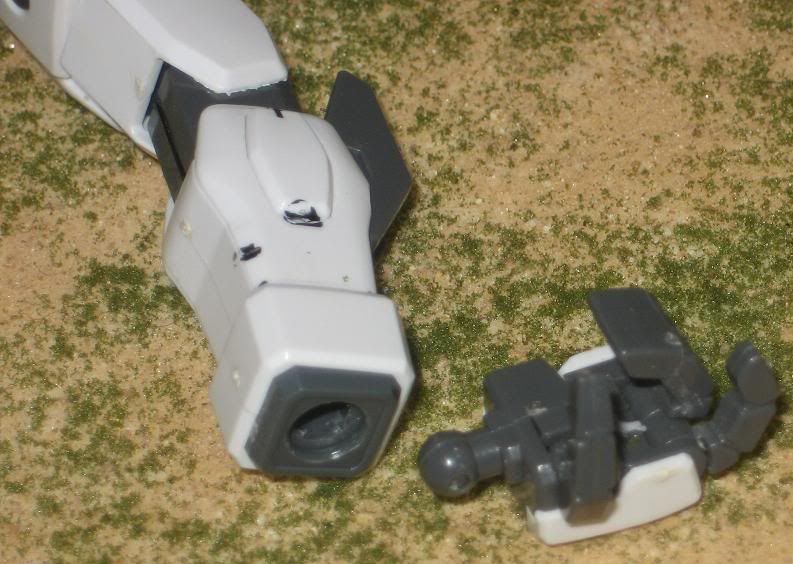
2009/06/22 02:48:36
Subject: Re:Super sized Wraithlord with fries.
|
|
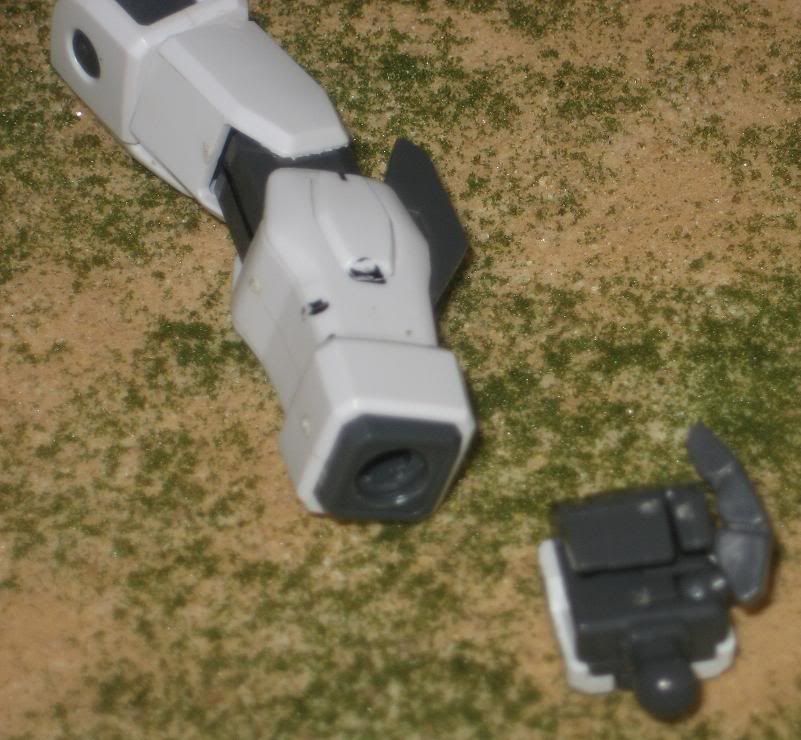
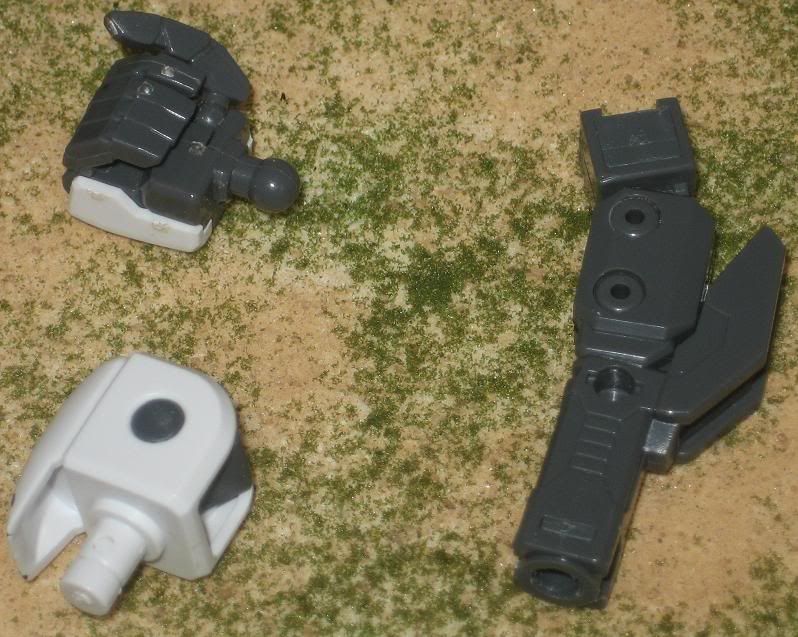
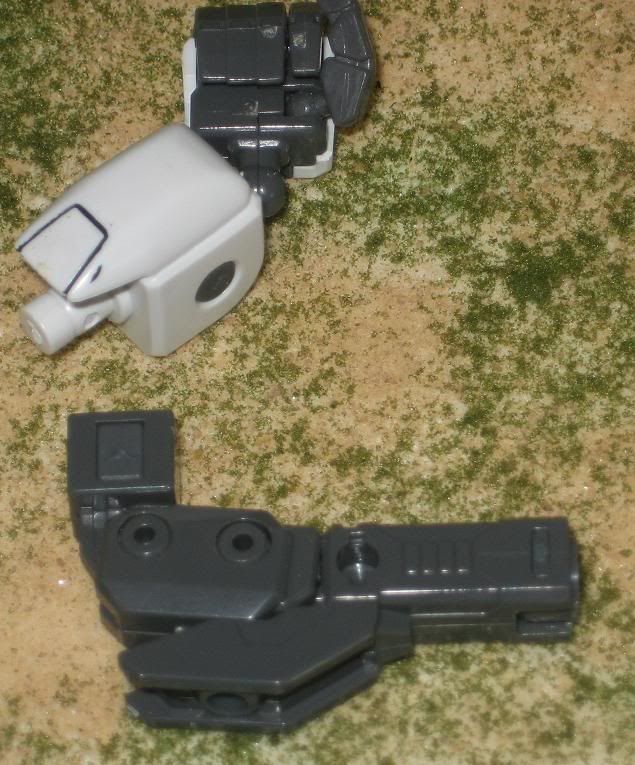
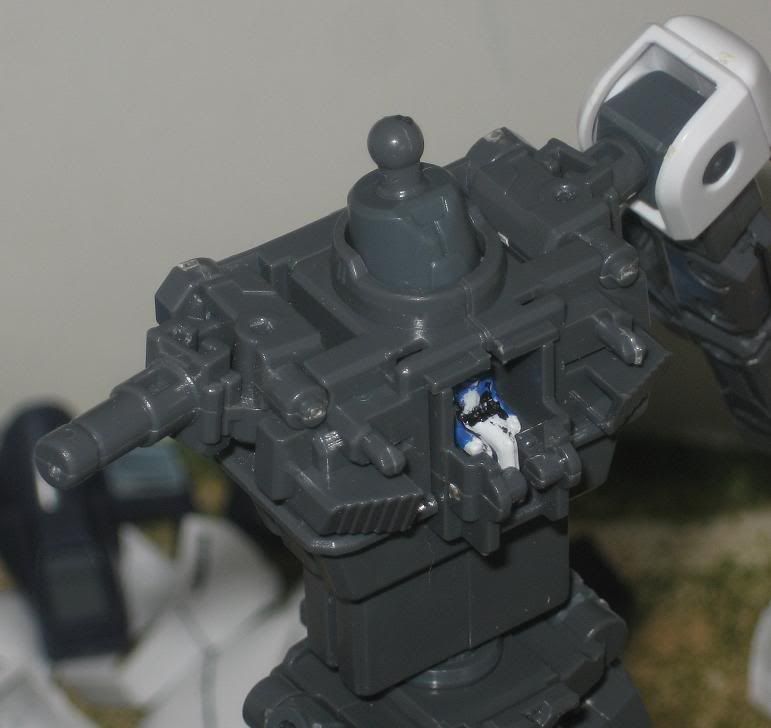
Lady of the Lake
|
|
|
|
|
|
|
2009/06/22 17:01:08
Subject: Super sized Wraithlord with fries.
|
|
Moustache-twirling Princeps
About to eat your Avatar...
|
Interesting.
I may be able to make simple joints like that with a bit of research and some trial and error. I would think that a large socket lined with rubber could provide enough resistance to hold a 2-5 pound arm in position; if it gets bumped or falls it will adjust instead of snap.
Thank you Not_U
|
|
|
|
|
|
2009/06/23 11:57:13
Subject: Re:Super sized Wraithlord with fries.
|
|
Lady of the Lake
|
No problem. But, just remember that the Freedom's ankels are a little weak so you might want to keep that in mind when you make the ankels.
|
|
|
|
|
|
|
|