| Author |
Message |
 |
|
|
|
|
Advert
|
Forum adverts like this one are shown to any user who is not logged in. Join us by filling out a tiny 3 field form and you will get your own, free, dakka user account which gives a good range of benefits to you:
- No adverts like this in the forums anymore.
- Times and dates in your local timezone.
- Full tracking of what you have read so you can skip to your first unread post, easily see what has changed since you last logged in, and easily see what is new at a glance.
- Email notifications for threads you want to watch closely.
- Being a part of the oldest wargaming community on the net.
If you are already a member then feel free to login now. |
|
 |
2010/11/29 19:27:43
Subject: WIP Scratch Built Chaos Warhound Titan
|
|

Hellacious Havoc
|
So I've been chipping away at this guy for a little over a month or so and am getting to some of the finer details now. This being my first scratch build I have had to learn along the way and am looking for a few tips, specifically with some of the detail work. I notice quite a few people manage to add the little bolts/rivet type dot onto their builds and was wondering what some of the common techniques are to do this. My best guess was tiny dots of glue that just dry on the surface, maybe dabbing with the tip of a toothpick or something. Also I've hit a bit of a show stopper with the turbo lasers, specifically the ends of the barrels where they have that four-pronged collar that stages down to a slightly smaller barrel, the best idea I've had so far is to but thin PVC reducer and cut the prongs into it myself because I couldn't find anything like it in the specialty fasteners sections of Lowes or Home Depot.
That's it for the questions, here are the progressive WIP pictures I've taken along the way and the Foreworld turbo laser for comparison.
|
|
|
|
 |
|
2010/11/29 19:32:02
Subject: Re:WIP Scratch Built Chaos Warhound Titan
|
|
Mutated Chosen Chaos Marine
|
Ahem, subscribed.
|
|
|
|
|
|
2010/11/29 19:33:17
Subject: Re:WIP Scratch Built Chaos Warhound Titan
|
|

Mechanized Halqa
|
Nice work!
|
GENERATION 10: The first time you see this, copy and paste it into your sig and add 1 to the number after generation. Consider it a social experiment.
|
|
|
|
|
2010/11/29 19:35:27
Subject: WIP Scratch Built Chaos Warhound Titan
|
|
Gargantuan Grotesque With Gnarskin
|
Badass. That's great so far for scratch build.
|
The Imperium using advanced technology is like drinking Pepsi out of a Coke bottle.
|
|
|
|
|
2010/11/30 00:01:04
Subject: Re:WIP Scratch Built Chaos Warhound Titan
|
|
Chalice-Wielding Sanguinary High Priest
Arlington TX, but want to be back in Seattle WA
|
nice work so far. I think you should really consider going with the paper post-it chaos face you originally had on the model though  . I love the accurate dimensions of the model and the nice symmetry. I will await more updates...also love the detail work on the legs with the pneumatics!
|
 4250 points of Blood Angels goodness, sweet and silky W12-L6-D4 4250 points of Blood Angels goodness, sweet and silky W12-L6-D4
 1000 points of Teil-Shan (my own scheme) Eldar Craftworld in progress 1000 points of Teil-Shan (my own scheme) Eldar Craftworld in progress
 800 points of unassembled Urban themed Imperial Guard 800 points of unassembled Urban themed Imperial Guard
 650 points of my do-it-yourself Tempest Guard 650 points of my do-it-yourself Tempest Guard
 675 points of Commoraghs finest! 675 points of Commoraghs finest!
The Dude - "Jackie Treehorn treats objects like women, man."
Lord Helmet - "I bet she gives great helmet."
|
|
|
|
|
2010/11/30 00:04:52
Subject: WIP Scratch Built Chaos Warhound Titan
|
|
Crafty Bray Shaman
|
The attention to detail with the legs is great. By looking at it you can tell how it operates..
|
|
|
|
|
|
2010/11/30 00:30:33
Subject: WIP Scratch Built Chaos Warhound Titan
|
|
Gargantuan Grotesque With Gnarskin
|
Before it's done you'll need to buy a chaos vehicle conversion kit.
|
The Imperium using advanced technology is like drinking Pepsi out of a Coke bottle.
|
|
|
|
|
2011/10/24 18:47:03
Subject: Re:WIP Scratch Built Chaos Warhound Titan
|
|
Hellacious Havoc
|
So I know it has been quite some time since I have done an update but here it is. Unfortunately the time span is not commiserate with the amount of work done, sadly the hassle of real life has slowed the progress of my inner Chaos. However the future looks bright for this little guy and I'm aiming for Christmas as the completion date. Without further delay here are the updates.


I made a negative mold for this shin guard detail using GS and a skull from an infantry bit and glued it to a stick of spru and stamped it all over the place, then stuffed some GS into the negative and the next morning had this. Skulls for the skull throne.

This was one of my first attempts at actually 'sculpting' with GS. Just made little sausages and slowly pushed them around into the Chaos arrows. I took more the style from the 4th Edition Daemon Prince, I liked the ones that were curved and took on their own proportions (not to mention it made it easier for someone with spotty sculpting skills).

Here I added some nuts to make the knee joints look like they would rotate. The largest portion of the leg detailing has been filling in gaps between plates, trim, pipes, etc... I still need to add rivets but can't come up with a good-looking, consistent way to do it. Tips would be appreciated. 

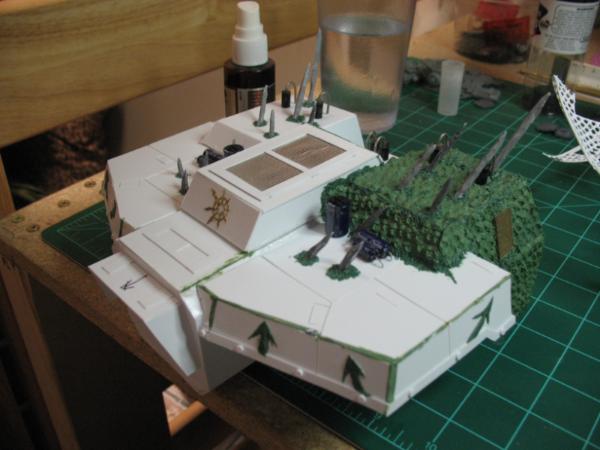
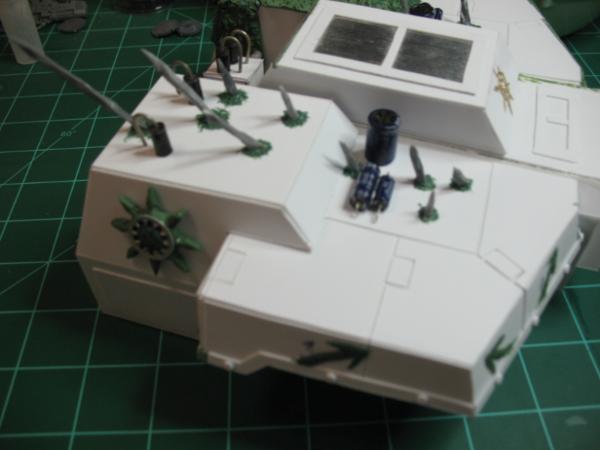
Here I stole the detail from the FW Mars pattern Chaos Warhound, an Eye of Horus detail that ends in some arrows.

I used a couple of the shin molds to fill the majority of the back left shoulder, I was running out of ideas for details and I felt like this would give it some diagonal symetry. This still need to be gap filled then "smoothed" out to look like a Daemonic possession.

And the general overshot. If I can keep up the motivation I feel like it will roll along. However I still need to come up with some ideas for the top detailing. Again I have thought about using the FW as a base and making a full 8-point Chaos star that spreads the entire top of it, or making more arrows from the shoulder trim that point up to the flat top, or a smaller star on one side and something else. Again input and ideas would be appreciated.
|
|
|
|
|
|
2011/10/24 18:53:45
Subject: Re:WIP Scratch Built Chaos Warhound Titan
|
|
Stabbin' Skarboy
|
Scratch built Titans don't always turn out so well, but your looks amazing. The GS work with all the skulls/faces is superb.
|
ChrisWWII wrote:
My reaction to this thread is still 'Why, Flying Spaghetti Monster, why?"
asimo77 wrote
Then we're all going down in a blaze of glory and ork milk
Sir Pseudonymous wrote
A pasty, barrel shaped, acid-drooling, balding mutant wearing the jumpsuit version of an Abrams.
|
|
|
|
|
2011/10/24 19:31:07
Subject: WIP Scratch Built Chaos Warhound Titan
|
|
Elusive Dryad
|
That skull-shin is very impressive. This is gonna look great.
|
|
|
|
|
2012/01/03 03:10:58
Subject: Re:WIP Scratch Built Chaos Warhound Titan
|
|
Paladin of the Wall
|
Just out of curiosity, What did you build the titan out of?
PS (I'm building one now)
|
 Badork Magthugs 2000Pts WAAAGH Wins: 23 Loses: 4 Draws: 4 Badork Magthugs 2000Pts WAAAGH Wins: 23 Loses: 4 Draws: 4
Ork Tournament Wins: 2
 Purge the Unclean 5000Pts Wins: 33 Loses: 7 Draws: 5 Purge the Unclean 5000Pts Wins: 33 Loses: 7 Draws: 5
Castellan Crowe used to be good, then he took a Lascannon to the face. |
|
|
|
|
2012/01/13 03:27:22
Subject: Re:WIP Scratch Built Chaos Warhound Titan
|
|
Hellacious Havoc
|
Surfboard66 wrote:Just out of curiosity, What did you build the titan out of?
PS (I'm building one now)
Sorry it took me a bit to reply.
I made mine from .030"/0.8mm Plastruct (sheet styrene) and .020"/0.5mm Plastruct for alot of the smaller overlay detail as it was a little thinner and easier to work with. No frame or skeleton used, the styrene is strong and light enough to support itself. Most of the pistons/pipes/barrels are from assorted thickness brass and aluminum tubing.

|
|
|
|
|
|
2012/01/15 04:03:33
Subject: Re:WIP Scratch Built Chaos Warhound Titan
|
|
Hellacious Havoc
|

Gap filled the carapace, added some power cells, spikes and will sculpt some more arrows on the trim soon.

Added some chaos tangles, gap filled trim and will shave it down once it dries, added what will be brass strips and banding with rivets. I'll need to find a stage down tip for the turbo lasers too.


Plugged some holes on the snout and will trim it, added eye lenses and flat GS to cut into trim with rivets for the eyes. Automatically Appended Next Post: 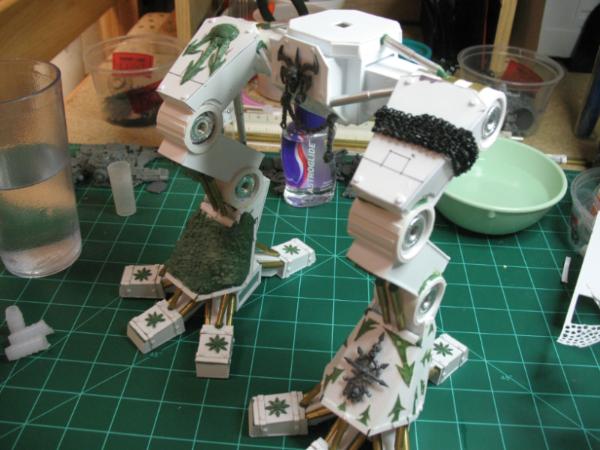
Added chain and rivets to the legs.
Sculpted arrows and "growth wounds" at the bases of the spikes.
Also made a World Eaters icon for the other shoulder and stuck rivets on all the trim.
Now onto the face!  More to come tomorrow.
|
|
This message was edited 1 time. Last update was at 2012/01/15 05:52:45
|
|
|
|
|
2012/01/16 00:30:30
Subject: Re:WIP Scratch Built Chaos Warhound Titan
|
|
Hellacious Havoc
|
I moved the finished build to an army blog here. I figured it was more appropriate.
|
|
|
|
|
|
|
|


 10,000+ Points Chaos Undivided & Daemons
