| Author |
Message |
 |
|
|
|
|
Advert
|
Forum adverts like this one are shown to any user who is not logged in. Join us by filling out a tiny 3 field form and you will get your own, free, dakka user account which gives a good range of benefits to you:
- No adverts like this in the forums anymore.
- Times and dates in your local timezone.
- Full tracking of what you have read so you can skip to your first unread post, easily see what has changed since you last logged in, and easily see what is new at a glance.
- Email notifications for threads you want to watch closely.
- Being a part of the oldest wargaming community on the net.
If you are already a member then feel free to login now. |
|
 |
2011/04/21 05:36:49
Subject: Easy Crater making Tutorial.
|
|

Scarred Ultramarine Tyrannic War Veteran
|
Do you know how hard Toilet paper sets when it gets wet? An Idea came to me that I could use this to make terrain. At the time I had seen tutorials on the internet where to make a crater they just painted pie tins a certain colour and that was basically it. So I decided to put two and two together and make a crater with wet toilet paper using a pie tin as a mould. You will need -Toilet paper -Aluminium Pie tin any size (obviously the bigger the tin the bigger the crater). -Water in a cup/bowl -PVA/White Glue -Basing sand or other equivalents -Paints and brushes spray paint. Step 1. Mould the pie tin into a crater shape. You now have your “crater mould” 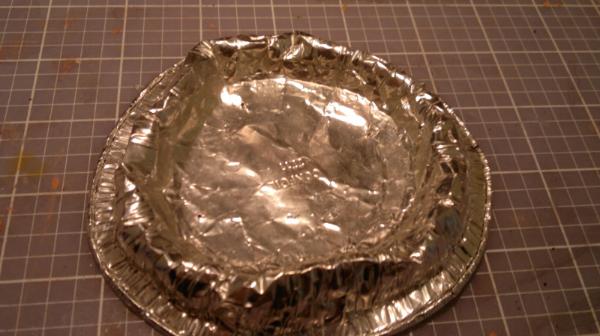 Step 2 Step 2 Completely drench a few sheets of toilet paper with water ONLY and place them in the base of your crater mould. 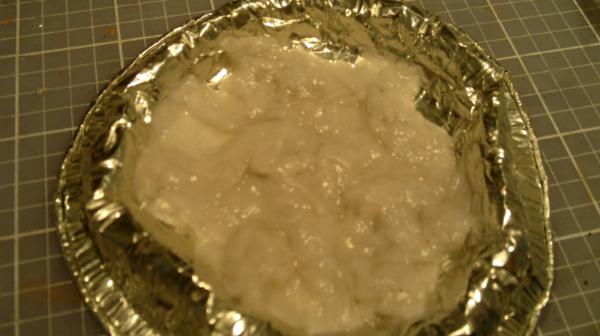 Step 3 Step 3 Start folding some dry sheets over the sides of your crater mould. The water from the wet sheets will seep up and wet these dry sheets making it easier to shape it around the mould. These sheets of toilet paper should be very damp not soggy. If they are not wet enough wet your hands slightly and wet it manually. 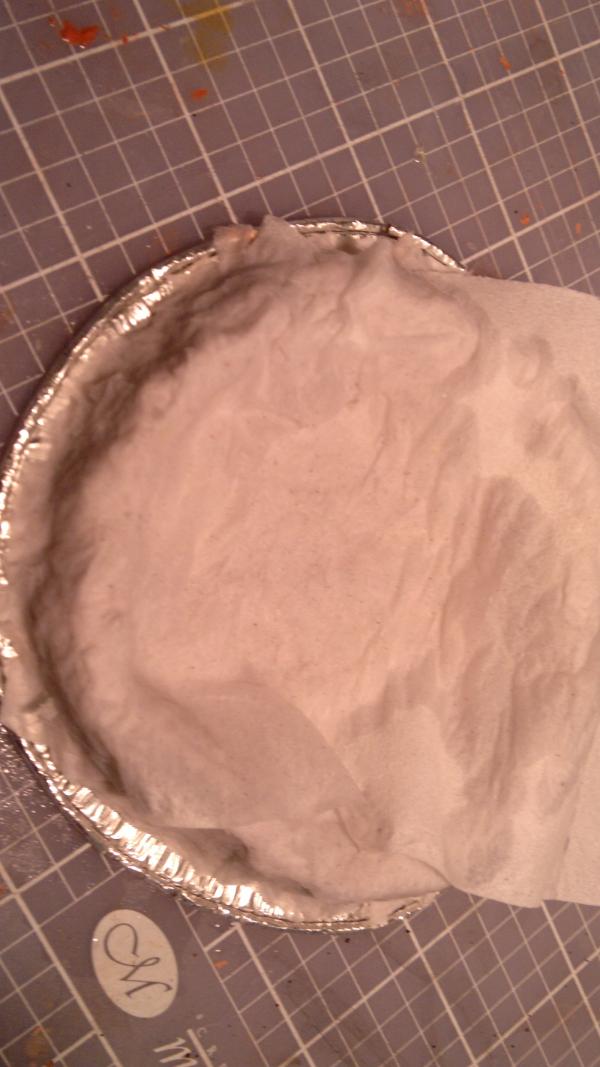 Step 4 Step 4 At the end of step three your crater should look like this. After this you should leave it for around 2-4 Days to dry. I have put it under a heat lamp which speeds things up a little. If you leave it outside in the sun it will also dry faster. 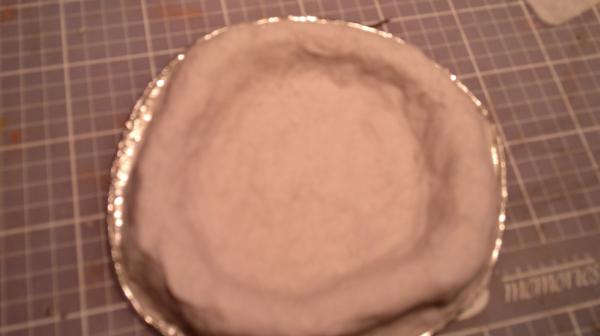 Step 5 Step 5 I don’t have to wait that long because here is one I prepared earlier.  When it is dry it will be rock hard. You can pull it out of the mould and now you have a crater. 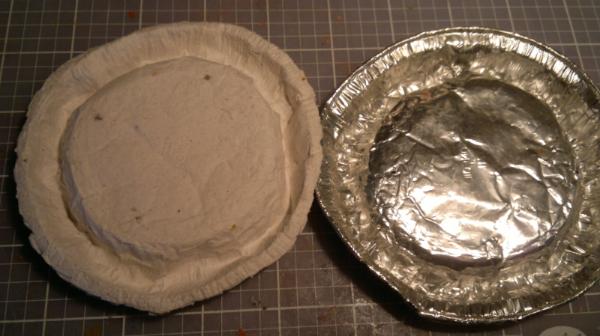 Step6 Step6 Texture it with PVA glue and basing sand, when it is dry I like to give it a couple coats of watered down PVA to seal the sand and stop it falling off. 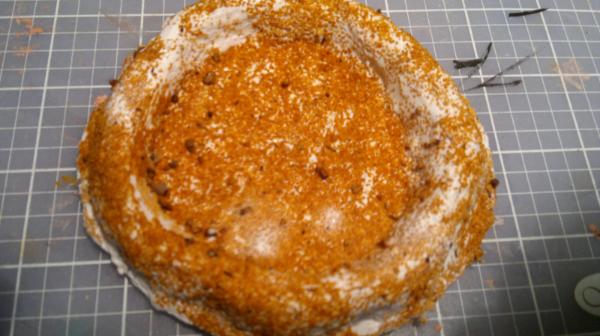 Step 7 Painting Step 7 Painting I first undercoated it with black spray paint, then dry brushed it scorched brown then I applied a second dry brush of graveyard earth. When that was dry I gave it a watered down wash with gryphonne sepia. However you can paint it the way you want. 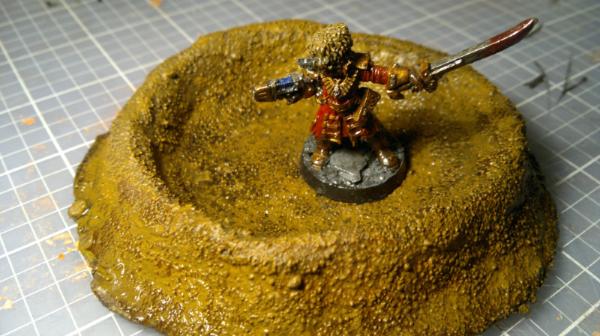 I hope someone finds this helpful. FP 
|
|
This message was edited 3 times. Last update was at 2011/12/01 23:46:23
  "Whilst we stand, we fight. Whilst we fight, we prevail. Nothing shall stay our wrath" "Whilst we stand, we fight. Whilst we fight, we prevail. Nothing shall stay our wrath"
 Guilliman and the Ultramarines are like Manchester United, everyone hates them because they are so awesome! Guilliman and the Ultramarines are like Manchester United, everyone hates them because they are so awesome!
|
|
|
 |
|
2011/04/21 08:05:03
Subject: Re:Easy Crater making Tutorial.
|
|

Mimetic Lasiq
|
That was good. Easy to do and with a pretty good looking result.
|
|
|
|
|
|
2011/04/21 15:40:36
Subject: Easy Crater making Tutorial.
|
|

Wicked Wych With a Whip
|
Heh. Cheap and easy papier-mâché! Nice!
|
|
This message was edited 1 time. Last update was at 2011/04/21 15:40:44
|
|
|
|
|
2011/04/22 12:49:03
Subject: Re:Easy Crater making Tutorial.
|
|
Scarred Ultramarine Tyrannic War Veteran
|
I just made another crater with a CD base; this makes the craters more durable. To stick the crater to the CD you can use some toilet paper soaked with a 1:3 mix of PVA/White glue and water, this will set extremely hard.
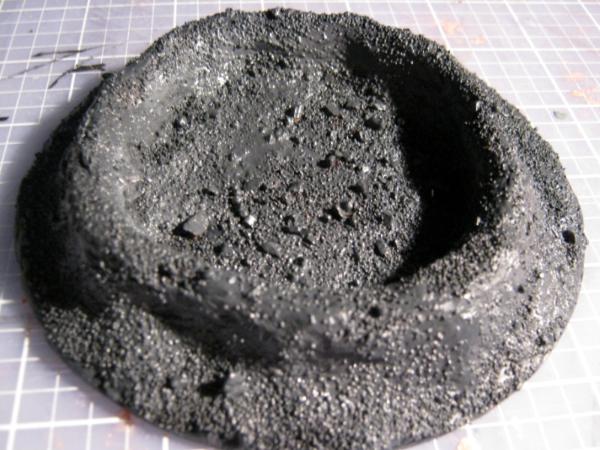
Here it is. I painted this with a darker moon base theme.
|
"Whilst we stand, we fight. Whilst we fight, we prevail. Nothing shall stay our wrath"
Guilliman and the Ultramarines are like Manchester United, everyone hates them because they are so awesome!
|
|
|
|
|
2011/12/01 12:30:50
Subject: Easy Crater making Tutorial.
|
|

Shroomin Brain Boy
|
other than the actual form i think this is a great tut.... for some reason i would like the rim of the crater to be more angled, but the process is really helpful. papermache became just recently quite a big problemsolver to me!
thanks for sharing!
|
|
|
|
|
|
2011/12/01 12:56:05
Subject: Easy Crater making Tutorial.
|
|

Twisted Trueborn with Blaster
|
Yep, the shape could be worked on a bit, but thats pretty good!
Good and cheap way to make them. It does say in the book that you need to replace exploded vehicles with craters, and nearly nobody does it because normally they dont have any craters so this is a good solution!
P.s. I dont think you mentioned anything about pva glue in your methods, just in the list of things youl need, but I take it when you mention drenching and soaking you mean that youve mixed the water with glue already?
|
Full on, Full on! |
|
|
|
|
2011/12/01 23:42:37
Subject: Easy Crater making Tutorial.
|
|
Scarred Ultramarine Tyrannic War Veteran
|
No, don't use glue mixed with the water when soaking the toilet paper. Otherwise you can't pull out the pie tin after it has dried. It sets as hard as rock using water alone!
|
|
This message was edited 1 time. Last update was at 2011/12/01 23:45:27
"Whilst we stand, we fight. Whilst we fight, we prevail. Nothing shall stay our wrath"
Guilliman and the Ultramarines are like Manchester United, everyone hates them because they are so awesome!
|
|
|
|
|
2011/12/01 23:54:07
Subject: Easy Crater making Tutorial.
|
|
Shroomin Brain Boy
|
i recently tried that too... water does alone with tissue create a sturdy mass... if you use enough papertissue you can leave the glue at home^^
|
|
|
|
|
|
2011/12/02 21:04:48
Subject: Easy Crater making Tutorial.
|
|

Utilizing Careful Highlighting
Finland... the country next to Sweden? No! That's Norway! Finland is to the east! No! That's Russia!
|
You know... an easy crater making tutorial by someone named ''flying pooo'' can be a bit misleading... 
The tutorial was great! I'll be using your idea. Automatically Appended Next Post: You know... an easy crater making tutorial by someone named ''flying pooo'' can be a bit misleading...
The tutorial was great! I'll be using your idea.
|
|
This message was edited 1 time. Last update was at 2011/12/02 21:12:33
Sweet Jesus, Nurgle and Slaanesh in the same box!?
No, just Nurgle and Slaanesh, Jesus will be sold seperately in a blister.
|
|
|
|
|
2011/12/03 06:26:56
Subject: Easy Crater making Tutorial.
|
|

World-Weary Pathfinder
|
Thanks for the great tut!!! I've been meaning to make one of these and this is an easy way to do it.
|
[/CENTER] |
|
|
|
|
2011/12/03 08:49:00
Subject: Easy Crater making Tutorial.
|
|

Thunderhawk Pilot Dropping From Orbit
|
WHY DID I NOT THINK OF THIS!!! i have been using the GW guide to crater making which is MUCH longer and more expensive. And this way I get a Chicken pie added Bonus!
Nice Idea, great effect = Awesome Tutorial 
|
|
|
|
|
|
2011/12/04 10:35:33
Subject: Easy Crater making Tutorial.
|
|
Bounding Dark Angels Assault Marine
|
great tutorial: Always good to see things that you can bodge together with household materials!
|
|
|
|
|
|
|
|


