Ok, my first battle report... Can someone please tell me how to make the pictures a bit larger. I don't want them full size, because that's too large, but for them to be as wide as the page at least, would be ideal.. Thanks!
Optional Details: I recently moved from Washington to California. This game is between a friend of mine (
aquaticrna) in Seattle vs myself in Santa Clara. He is also just getting into the hobby, and still deciding on a permanent first army to start playing. So this was a good way for us to try and give him a feel for Daemons as a possible army, and a good way for me to try out some different tactics. We're both still learning the game and rules, so any reminders or clarifications on the rules or tactics would be more than welcome! We're planning another larger 1000pt game this weekend (
1000 pt Orks VS Dark Eldar). We used GoogleDocs for this game.
Back Story: We setup the map and ended up with a "Capture and Control"/"Spearhead" setup. So we each setup our objectives...
So, I know Orks grow from fungus, but my Warboss likes the female form... so this 500point raiding party of orks just came across a Damsel in Distress (Ork's starting objective), and were claiming her for their Warboss when they came across a view of a Daemon relic (Daemon's starting objective) in the distance! They decided they wanted that too, as it would likely lead to them getting to krump some powerful daemonz. Luckily, as fate would have it, some daemons started warping in right at that moment. Intent on taking both the damsel back from the orks, and using the relic to summon even more daemons in the future.
Ork Army: I had never used big gunz before, and they ended up being pretty good - might use them again in the future, but their range was a bit lacking, I had used a weirdboy once before, but in that game he had never got to use a single power aas he failed all his psychic tests... he did better this game!
- (
HQ) Weirdboy with warphead upgrade. (He seemed like a fun unit - he was - not really that good though.)
- (Troop) 22 Ork Boyz Including nob with
PK
- (Troop) 20 Ork Boyz Including nob with
PK
- (
HS) 2 Big Gunz (Kannonz) with 2 ammo runtz and 1 extra krew.
- (
HS) 1 Big Gun (Zzap Gun) with 2 ammo runtz and 2 extra krew. (I forgot to use both of these ammo runtz, and so that was a wasted 6 points that I propaply didn't need anyway..)
Daemon Army:
- (
HQ) Herald of Tzeentch with Disk of Tzeentch, We Are Legion, Master of Sorcery, Daemonic Gaze and Bolt of Tzeentch
- (Troop) 7 Plaguebearers with Instrument of Chaos and Chaos Icon
- (Troop) 7 Plaguebearers with Instrument of Chaos and Chaos Icon
- (Troop) 5 Bloodletters with Instrument of Chaos
Setup:
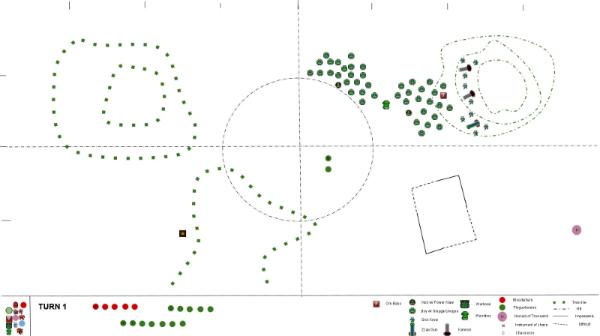
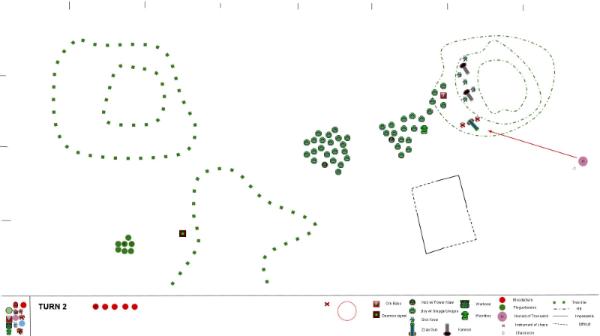
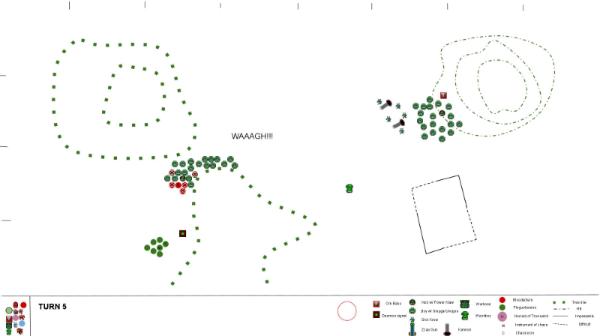
So as you'll see in this first image, the view is always from a top view. The marks along the top and left side show the scale. THe distance between each mark is a foot. So we played on a 4x8 map. On the bottom right of the image, you can see our table for what the symbols mean. The forest was difficult terrain. The top right hill is really the most complicated. It has elevation, so the inner shape is one layer above the middle layer. The edge of the hill is the outside layer. In between one layer to another layer is where the hill rises to another level. If you are behind the top segment of the hill at the ground level of your unit, then it would provide cover... Just ask for more clarification if you need it.

So I won the roll off, and chose to go first, but then the daemons stole the initiative.. (this first turn has a lot of action!)
Turn 1.0 (Top-Daemons) You can see I was well setup on the hill, but with no targets anywhere on the map... :(
Turn 1.1 (Top-Daemons) without starting lines - The Daemons just deep struck in and the heralds in good position to

over my kannonz... :(
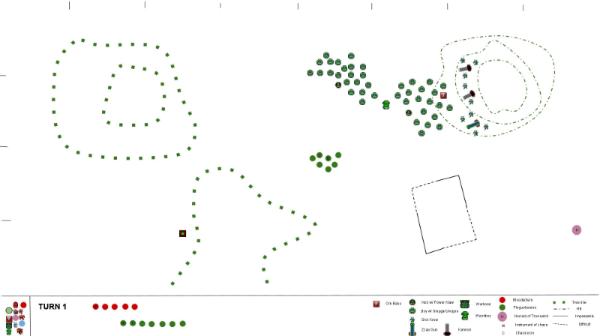
Turn 1.2 (Bottom-Orks) - But luckily his shooting only killed two of my zzap gunz krew. Whew!

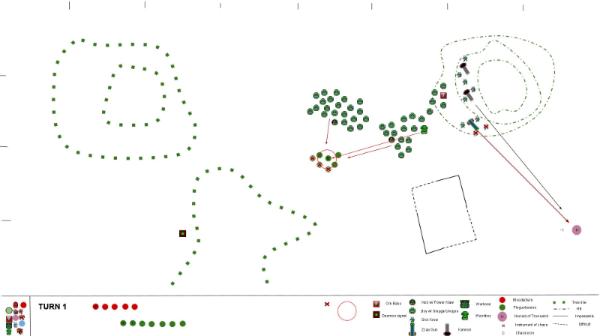
Turn 1.3 (Bottom-Orks Shooting) - My kannons turn to return fire at the daemonic herald, but only manage to take one of his wounds. My boyz fare better as they move up to launch their assault vs the plaguebearers, taking out 3 of them with their Sluggas after some great rolls on my part. The Weirdboy's blast of energy from his Frazzle attack does nothing.
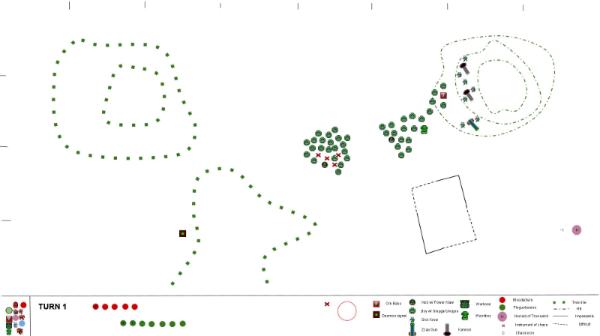
Turn 1.4 (END) - My boyz charged in and although the plaguebearers attacked at the same initiative, no boyz were lost! The remaining plaguebearers were not as fortunate though..
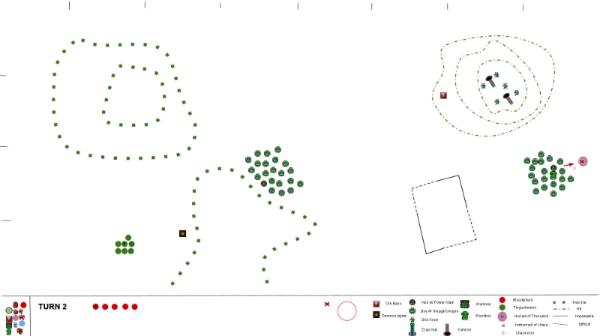
Turn 2.1 (Top-Daemons) - The herald moved farther over so that neither of my kannons had
LOS to him, and then shot and finished off my zzap kannon.. the 2nd squad of plaguebearers was able to deep strike in.
Turn 2.2 (END) - My Kannons moved to the top of the hill (which was a mistake as it was a wasted turn, as they needed to move the other direction next turn - oops!) My Weirdboy rolled and got the psychic power "Ere We Go!" which forces him and the squad he's in to any other spot on the map as he teleports them through the warp to a new spot. I chose to get closer to his herald, and scattered even closer to him. The boyz then shot at him and managed to kill him. My other boyz moved closer to the daemonic relic.
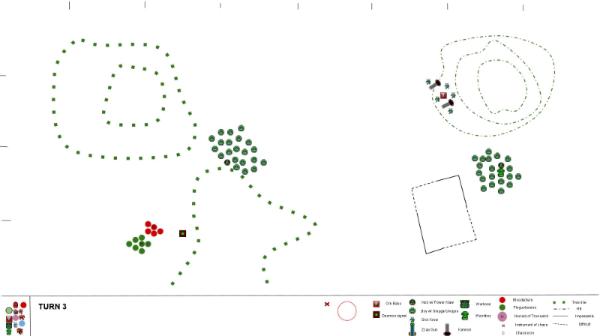
Turn 3.1 (END) - units moved forward... Bloodletters finally arrived on the battlefield.
Turn 4.1 (END) - I was a bit of a wheenie on this turn, and instead of charging forward with my forward squad of boyz, i went back and hid behind some trees...

I was really afraid of those Bloodletters.

Turn 5.1 (Bottom - Orks just Shot) - I called a WAAAGHHH! (though I didn't use it at all... I just wanted to use it in the game, since it's fun to say... though I'm usually very bad at making an effective waaagh.. advice please?) My Boyz, and Weirdboy both shot at the bloodletters, but no wounds this time. The kannons got lucky and one of the shells punched through a bloodletter's thick head. The Other orkmoy squad moved to my objective to secure it.
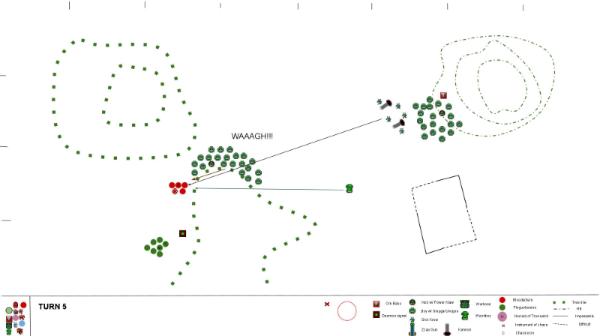
Turn 5.2 (End) - My Boyz charged in this turn, and managed to kill 3 bloodletters and only lost 2 of their own. Both units are still fearless though, so no one runs.. (After this game, we finally found the rules for "No Retreat!" which deals with fearless units that lose squads taking wounds... so neither of us had to make this kind of wound in this game, but now we know!

) The turn doesn't end...
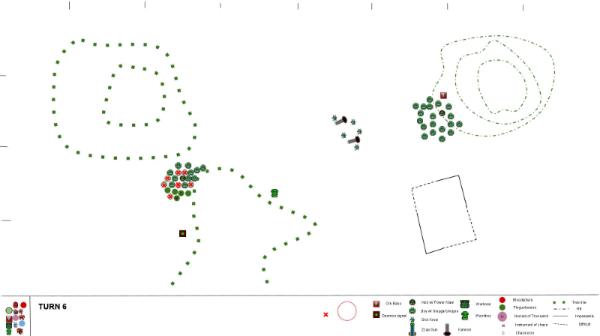
Turn 6.1 (End) - The plaguebearers join the fray and my boyz start getting slaughtered... The last bloodletter finally falls, along with one plagubearer, but they take 5 boyz with them. Luckily the boyz are still fearless! My kannons and weirdboy move up to try and get in to help in time... running 6 inches. (Kannons can run, right? Or was this a mistake?)
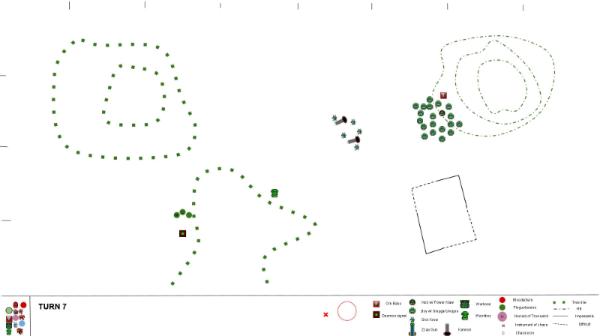
Turn 7.1 (End of Game) - I forgot to take some images of this turn, but more of my boyz died, and killed a few more plague bearers. On my turn, my boys killed all but 3 of his plaguebearers, but lost combat and since there were only 9 left they had to take a leadership test which they promptly failed. My boyz broke and started to run... but then lost the initiative roll off (we both rolled a 1
, and both had initiative 2, so ties go to the winner of the combat.) Then the plaguebearers consolodated to their objective and the game was over.
So it's a tie game right? I feel like I remember someone telling me once that a troop unit of less than half strength couldn't hold an objective, and could only contest it... but I couldn't find it anywhere in the book... Am I imagining this?
Either way, hope you enjoyed the game! I sure did!
Stay tuned for the larger rematch!


 ) but when i was making the army my thought was to attach him to a squad... completely forgetting that my herald of tzeenetch can't join any of my other units. Hopefully the next fight goes better...


 Thanks for the comment!
 S.O.U. (Straight Outta Ultramar)


 Rid-Ex Nids
