Can someone please tell me how to make the pictures a bit larger. I don't want them full size, because that's too large, but for them to be as wide as the page at least, would be ideal.. Thanks!
Optional Details: I recently moved from Washington to California. This game is between a friend of mine (
aquaticrna) in Seattle vs myself in Santa Clara. He is also just getting into the hobby, and still deciding on a permanent first army to start playing. So this was a good way for us to try and give him a feel for Dark Eldar as a possible army, and a good way for me to try out some different tactics. We're both still learning the game and rules, so any reminders or clarifications on the rules or tactics would be more than welcome! We played two games prior to this one. Originally was a
500pt Daemon vs Ork Battle. Then a larger
1000pt Daemon vs Ork Mek Battle. I tweaked the mek army from the 1000pt army I used vs the daemons.. We used GoogleDocs for this game.
Back Story: We setup the map and ended up with a "Annihilation"/"Pitched Battle" setup. After the battles with the Daemons, and still hungry for battle, my orks were happy to come across some puny dark elves. They were hovering about on their dinky hover rafts, and looked in need of some krumpin'!
Ork Army: I had never used a gretchin screen before, and they were quite fun! I also tried out buggies for the first time, but had bad results with them, as I missed all their shots..

- (
HQ) Big Mek w/
KFF, 1 Grot Oiler - 90pts
- (
HQ) Big Mek w/
KFF 1 Grot Oiler - 90pts
- (Troop) Deff Dread w/ 2 more Dread
CC Weapons - 105pts
- (Troop) Deff Dread w/ 2 more Dread
CC Weapons - 105pts (Next time I run these guys I want to try them with some Skorchas!

)
- (Troop) 14 Gretchin, 1 Runtherd - 52pts
- (Troop) 14 Gretchin, 1 Runtherd - 52pts
- (Heavy) 3 Killa Kans w/ Rokkit Launchas - 150pts
- (Heavy) 3 Killa Kans w/ Rokkit Launchas - 150pts
- (Heavy) 3 Killa Kans w/ Grotzookas - 135pts (These were a top of fun -- but not very good range at all.... I'm not sure on what I think of them yet for that reason..)
- (Fast Attack) 2 Warbuggies w/
TL Rokkits - 70pts (I threw these on to the end of the list, as I had the extra points and wanted to try them out. I want to try them again in a full squad of two of 3 buggies each. They seemed great. I just missed every single shot with them, and then they got shaken every round after that..

)
Total: 999pts
Dark Eldar Army:
- (
HQ) Archon w/ Blaster, Venom Blade - 80pts
- (Troop) 5 Warriors w/ Splinter Cannon in Venom with Splinter Cannon - 120pts
- (Troop) 5 Warriors w/ Splinter Cannon in Venom with Splinter Cannon - 120pts
- (Elite) 5 True Born w/ 2 Dark Lance, 3 Blaster, Raider with Flickerfield - 225pts
- (Elite) 5 True Born w/ 2 Dark Lance, 3 Blaster, Raider with Flickerfield - 225pts
- (Heavy) Ravager w/ Flickerfield - 115pts
- (Heavy) Ravager w/ Flickerfield - 115pts
Total: 1000pts
Setup:
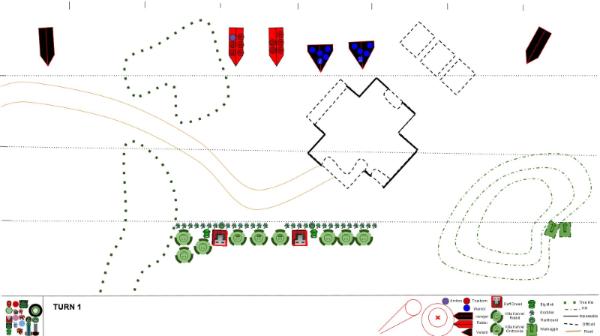
So as you'll see in this first image, the view is always from a top view. The marks along the top and left side show the scale. The distance between each mark is a foot. So we played on a 4x8 map. On the bottom right of the image, you can see our Key for what the symbols mean. The forest was difficult terrain with 4+ cover. The bottom right hill is really the most complicated. It has elevation, so the inner shape is one layer above the middle layer. The edge of the hill is the outside layer. In between one layer to another layer is where the hill rises to another level. If you are behind the top segment of the hill at the ground level of your unit, then it would provide cover/ block
LOS... Just ask for more clarification if you need it. The 3 rectangles on the top right are flimsy storage sheds that provide cover but don't block
LOS. The center building is a damaged bunker/barracks yet is still very strong in some places. The solid lines are impassable. The dashed lines designate difficult terrain.
Game:
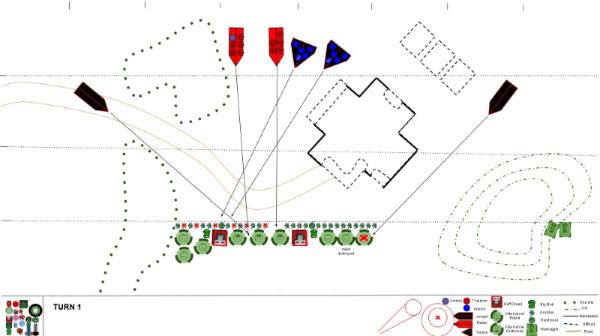
TURN 1
So the Dark Eldar rolled high and chose to go first.. here's the map on the first turn right before the

hits the fan. (I suggest you zoom into at least a few3 of these images to get a better idea of what's going on..)
At the end of the
DE's shooting phase - despite all the
KFF cover - there are a lot of dead grots.. and a wrecked Kan.
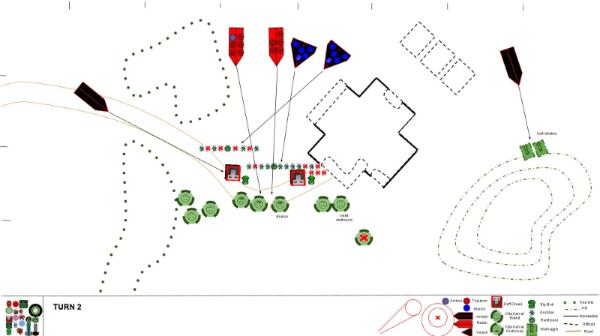
But that don't matter! The orks get a turn to shoot now! The Kans lumber forward blasting their rokkits. The Buggies zip over the hill and launch their
TL Rokkits...unfortunately they all miss / do anything with their shots...
 TURN 2
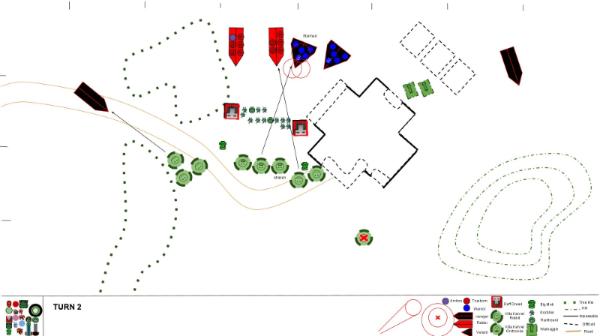
The ravager turns and scores hits on both my buggies, Shaking both their crew... more grots get slaughtered... one of the kanz is shaken...
...luckily the orks are even closer now and can shoot even better this turn to make up for all their misses last turn! My Big Mek moves back and repairs a rokkit on a Kan, and then the Kans unleash Hell!!! And the grotzookas, after landing all their shots, only manage to stun one of the Venoms... but that was better than the rest of the army, that all missed... The buggies also run away so that they can opefully live and shoot next turn.
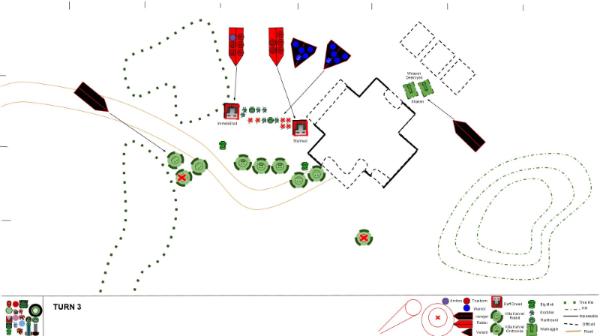
 TURN 3
As my orks get ever closer to combat the
DE unload their weapons into the ork's faces. Stunning and Immobilizing both the Deff Dreads, Weapon Destroyed/Shaking the Buggies, Killing a Kan, and Mowing down yet more Gretchen... The only real time my terribly low rolls were coming in handy were on the Gretchen leadership tests. I consistently was rolling 3's for their leadership..

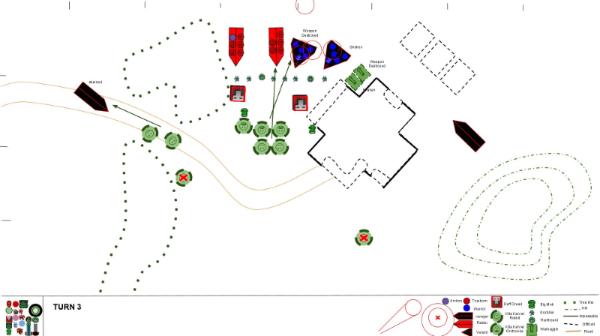
Gutsy Grots!!
The grots move right in close to be a super obnoxious screen/cover in the
DE's face... The Deff dreads both get back on their feet and run forward in the shooting phase.. All the other shots, other than the grotzookas fail yet again. The Grotzookas however, with 4 direct hits do Amazingly this turn (and score my first Destroyed Weapon of the game!!! Wooooo!
) Despite all the failed shooting the entire game, I'm looking forward to the next turn, where I'll get to finally charge into the
DE with my Dreads...

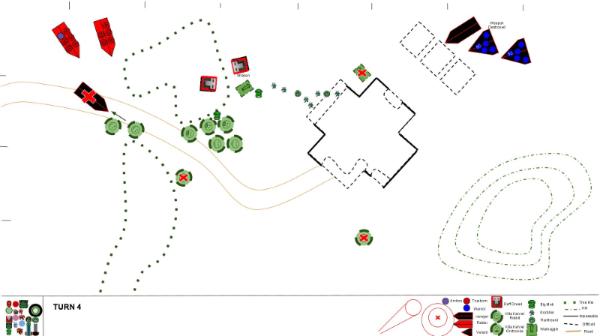
 TURN 4
....except that all my hopes of a charge are destroyed like a toy ship being ripped asunder against the rocks by a large hateful wave!
The
DE retreat away, jumping over the trees like they aren't even there... They also destroy a buggy.
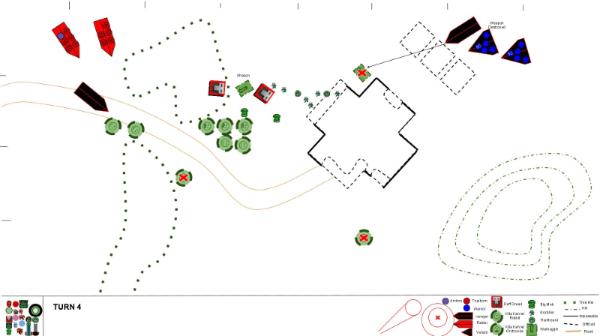
But since he split his forces, I decide there still might be a chance for me to win if I just go after a single half.. My Kans get my FIRST kill and wreck a Ravager!!! My grots make a run for the building, so that they hopefully don't give away any kill points... THe rest of my forces run into the woods after the to transports.
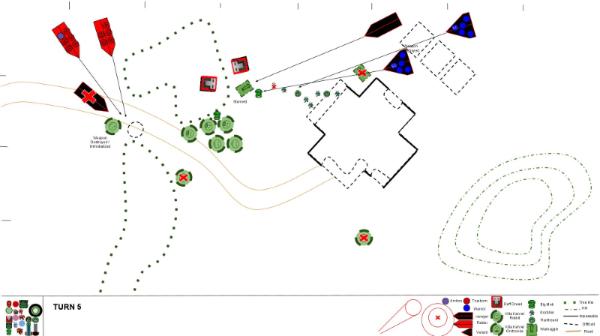
 TURN 5
The two Raiders let loose and blow up and immobilize both my lone kans. The last buggy is Stunned (as he has been every single turn since the 2nd..) Only 1 grot is killed this turn.
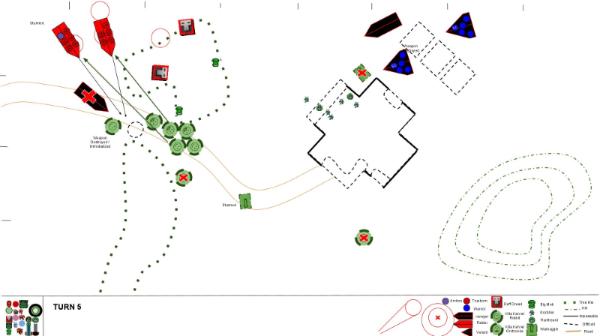
The grots run farther into the building... the last buggy makes a run for it, hoping not to die... The rest of the army rushes at the two Raiders. Yet again, none of the rokkits hit, but a grotzooka shot gets lucky and stunnes one of the skimmers...
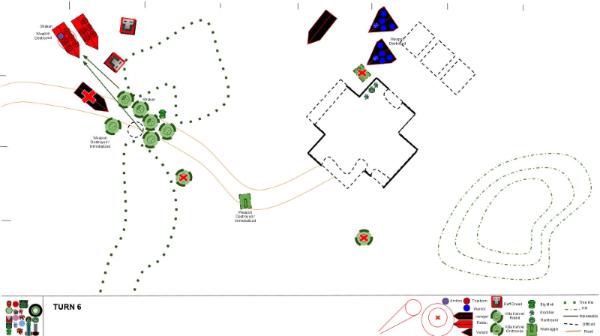
 TURN 6 - Last Turn
The Venoms move up and kill off one of the grot units and one of the Big Meks... The last ravager Finally chases down the last buggy and immobilizes it... The Raider lands two good hits on the Grotzookas and destroys one weapon, and shakes the other.. The raider also moves farther away so that my deff dreads realize just how useless they were the entire game..

For my last turn, hoping maybe I can make back some of the points I've lost, I shoot one last volly... and as expected, don't hit enough to do anything but destroy my 2nd weapon of the game..
 FINAL SCORE: Dark Eldar 4 - Orks 1
So yeah, clearly I rolled pretty terribly, but my force was also clearly lacking in some elements. I could have used a bit more fast attack, I think my Dreads could have actually been useful with Skorchas (though not that much more...) Any suggestions would be super appreciated! I really like the style of this army, but it was way outclassed/out maneuvered by this
DE army.. I just couldn't move fast enough.. Either way, thanks for reading! Check out the other battle reports (
1000pt Daemon vs Ork Mek Battle and
500pt Ork vs Daemon), and check out my
Blog to be updated when I post more.


 Thanks, your input's most appreciated!