| Author |
Message |
 |
|
|
|
|
Advert
|
Forum adverts like this one are shown to any user who is not logged in. Join us by filling out a tiny 3 field form and you will get your own, free, dakka user account which gives a good range of benefits to you:
- No adverts like this in the forums anymore.
- Times and dates in your local timezone.
- Full tracking of what you have read so you can skip to your first unread post, easily see what has changed since you last logged in, and easily see what is new at a glance.
- Email notifications for threads you want to watch closely.
- Being a part of the oldest wargaming community on the net.
If you are already a member then feel free to login now. |
|
 |
2011/09/07 20:27:29
Subject: How To Multi-Assault: A Comprehensive Guide for Beginners -//- Part 3 up - Stuck in the middle!
|
|

Mounted Kroot Tracker
|
Part 1: Side by Side
If you've played fifth edition Warhammer 40k, or even read the rulebook, you'll notice that the rules governing close combat appear very restrictive and and complicated. With greater examination, however, you'll find that they are fairly easy to follow, providing you keep in mind a few simple steps.
Multi-assaults are advantageous in many ways, but inexperienced players may have difficulty beginning them. The rules can be confusing to implement at first, and you might be wondering if you're even doing it properly!
Let's review the criteria for moving models in the assault phase:
1. Each model must end its move in coherency with a previously moved model.
2. Each model must move into base contact with an unengaged enemy model if possible.
3. If there are no reachable unengaged enemy models, each model must attempt to move into base contact with an engaged enemy model.
4. If there are no reachable enemy models at all, each model must attempt to move into coherency with a model that is already engaging the enemy.
5. If none of the above are possible, the model must stay in coherency.
Scenario: 12 Kroot Carnivores have advanced upon a squad of 4 Space Marine Scouts and 1 Drop Pod. (While the Kroot cannot actually harm the drop pod in any way, it was the only stand in I had readily available.) The Kroot declare an assault on the Scouts, hoping to tie the Drop Pod in as well.
The first step in any assault is to check the range and move the closest assaulting model into base-to-base contact with the closest defending model.
Having completed this action, the rest of the models can be moved in any order. Remember, the order you move your models will determine how many units you are able to assault. The rulebook states that each model must end its assault move in coherency with another model in its own unit that has already moved. Secondly, each model must move into base contact with an unengaged enemy model if possible. So, we move another model:
It is important to note that you don't want too many models assaulting your primary target. If you choose your order carelessly, all of your models will have to fight against the first squad, and you will not be able to engage the second target at all. Therefore, a large portion of making your assault moves is focused on getting in your own way. No model may move through the base of another model, so you can make good use of placement to deny Assault Criteria 2 and 3. If the model can't make it to the enemy, then it is free to move towards another one!
So, our next move will block up the path of the rest of the models, so that they don't have to move into the scouts:
There is now insufficient room to move towards the scouts by that path, so now let's block up the left side. As you can see, model D cannot reach the Scouts. He is moved so that he blocks as much movement to the leftmost scout as possible.
(Here I messed up a little with my tagging, but that isn't too important.) As you can see, model E cannot move sufficiently to get into base contact with any of the scouts, because model D blocks the path. The gaps between the bases are too small to fit through, so we can use model E to begin to block up the 2" path to the models already in base contact.
We moved E to the maximum distance from the engaged models - we don't want anyone to fit behind him!
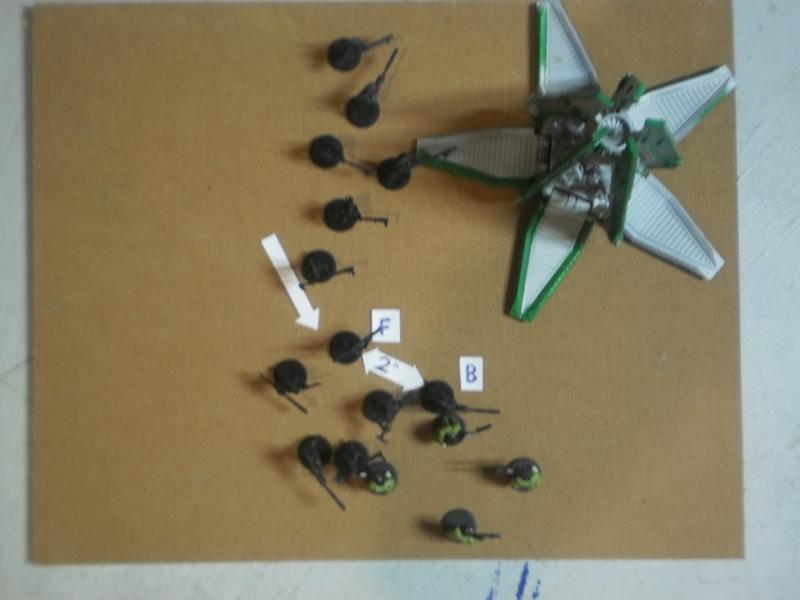
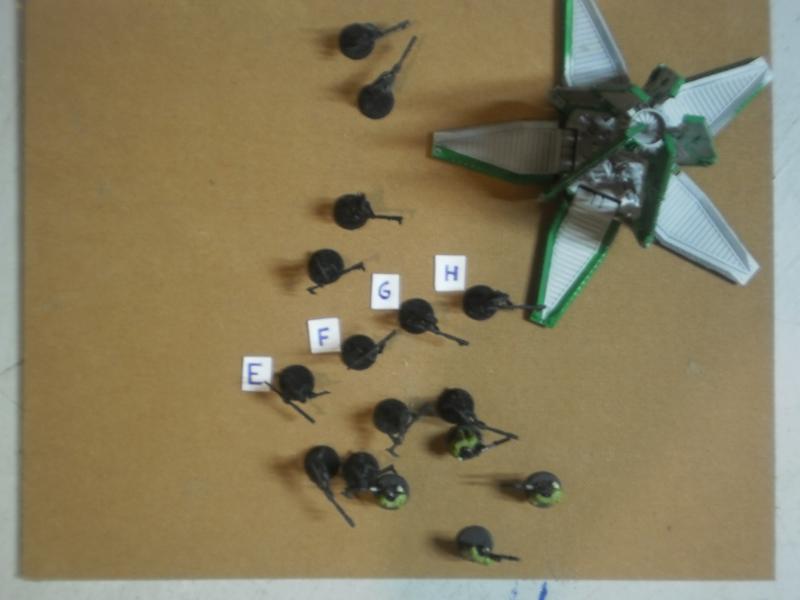
Take a good look at model F now. F isn't within 6 inches of the scouts, but he can make it into coherency with a model that is.
So, we'll put him into coherency with B, but make the sure that the gap between him and E isn't enough room for a model to squeeze through, lengthening our wall.
Here's model G. It's the same story as F, and we're taking him from the back so he can prevent the closer models from reaching the scouts. He'll add nicely to our wall, and stay in coherency with B.
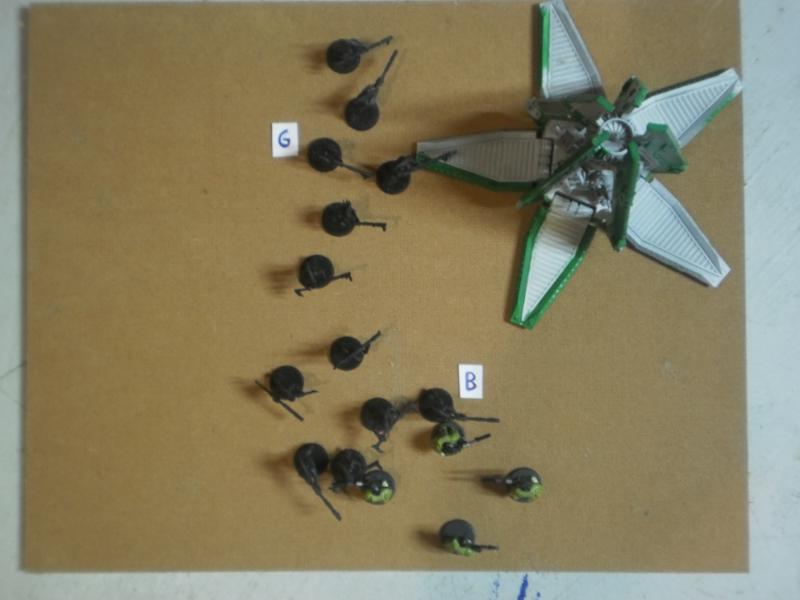
Note how there isn't enough room between F and G to get through.
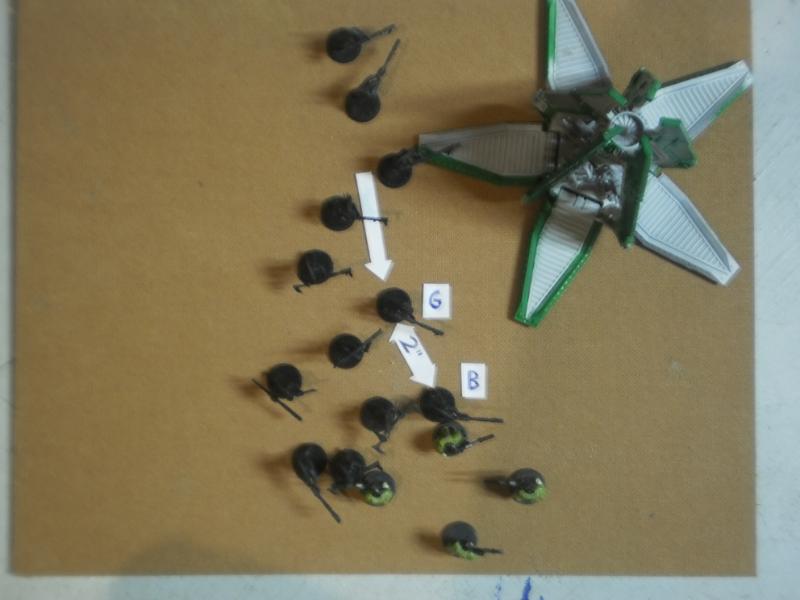
Model H is also just short of making it to the scouts. He'll be the last piece of our wall.
And here he is, moved into position, within 2" of B, but close enough to G to prevent passing.
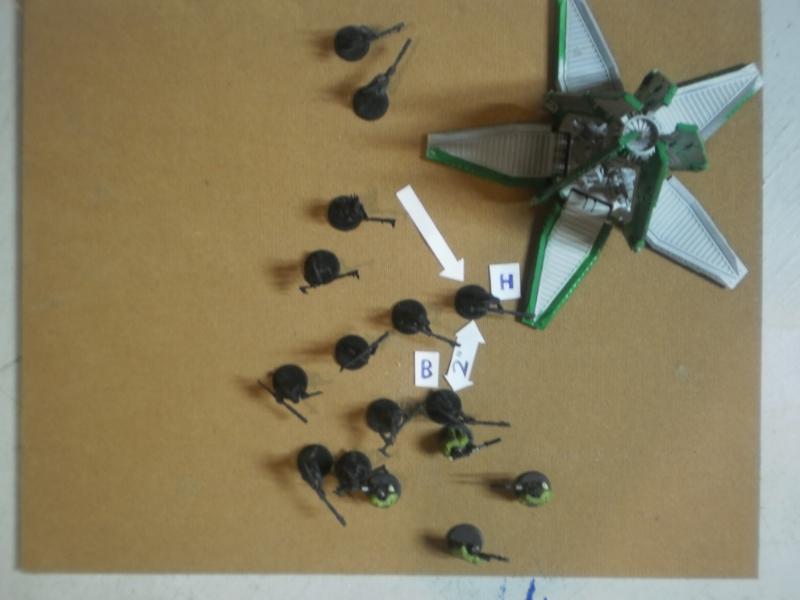
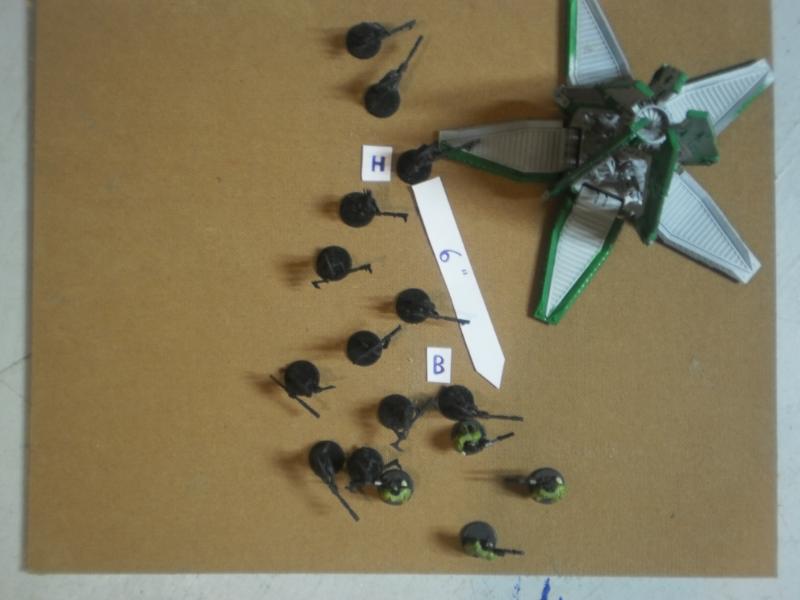
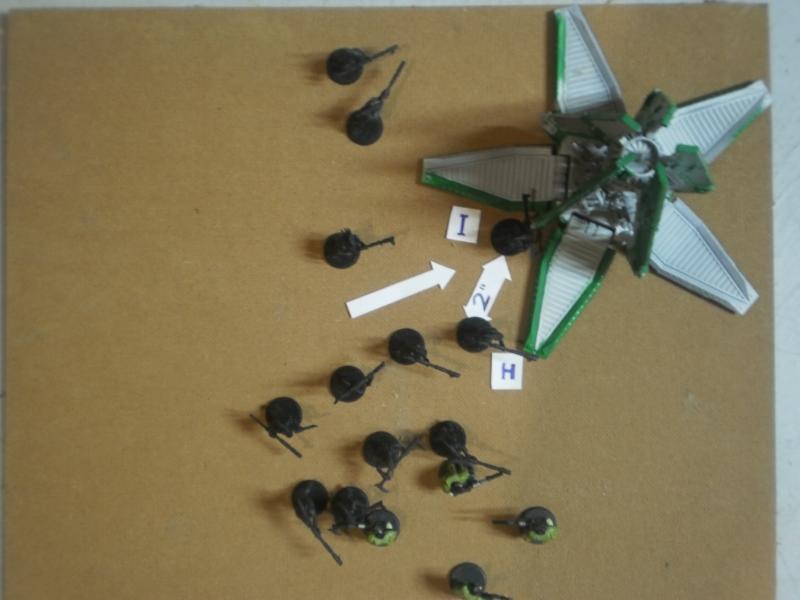
The rest of the models simply can't get close enough to join the fray - they'd have to wrap around much more than 6 inches to get into base contact with the scouts, or even within coherency of A or B - which means that they're free to assault the drop pod, provided they stay within 2 inches of A-H.
Let's finish this off, now. Model I will attempt to reach the drop pod, but stay in coherency with H...
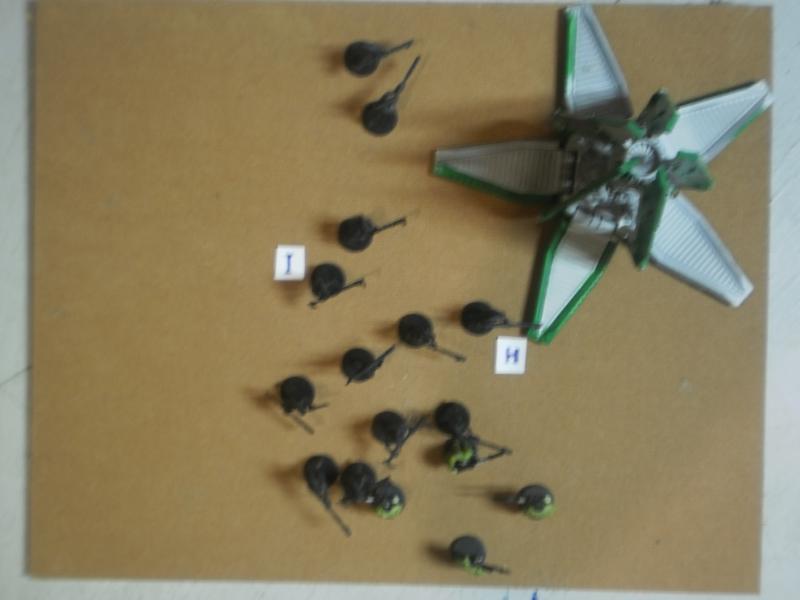
And he makes it.
And the rest follow.
You've done it. Your squad is now successfully engaged to two other units. There are much quicker, shorter methods to get into base contact with two squads than I've shown here, and it can be done after only moving the third model or so. However, this does demonstrate how to do it and follow the rules, which was its purpose.
Edits: Fixing up a few things I overlooked. (number of criteria, etc)
|
|
This message was edited 5 times. Last update was at 2011/09/09 19:21:40
Night Watch SM
Kroot Mercenaries  W 2 - D 3 - L 1 W 2 - D 3 - L 1
Manchu wrote: This is simply a self-fulfilling prophecy. Everyone says, "it won't change so why should I bother to try?" and then it doesn't change so people feel validated in their bad behavior.
Nightwatch's Kroot Blog
DQ:90-S++G++M-B++I+Pw40k08#+D+A--/cWD-R+T(S)DM+
|
|
|
 |
|
2011/09/07 21:32:52
Subject: Re:How To Multi-Assault: A Comprehensive Guide for Beginners
|
|

Sword-Bearing Inquisitorial Crusader
|
You're really stretching the rules for multiple assault. The rules specifically state that models must move as far as possible behind other models when charging in and that if they can't make it, they need to be within 2 inches. It doesn't allow you to make a perfect 2 inches around your models in B2B so that you can charge something 5 miles away.
So, for beginners, just letting you know, if you try and pull this on someone, chances are you're going to get called out. Taking advantage of the rules doesn't make for a fun game.
|
|
This message was edited 3 times. Last update was at 2011/09/07 21:35:38
|
|
|
|
|
2011/09/07 21:39:36
Subject: How To Multi-Assault: A Comprehensive Guide for Beginners
|
|
[DCM]
Tilter at Windmills
|
Nice article; excellent start. Really appreciate the work invested here to use a bunch of photos and spell this out for folks.
That being said, you've missed a requirement. If a model can't make it into base contact itself, it has to try to get into 2" of a model which is in base contact, so it can attack. If it can't do that, it just has to get into coherency with a model which has already moved. So models A-H aren't actually interchangeable for assault move purposes. If subsequent models can get into 2" of A-C, they've got to attempt to do so in preference to D-H.
This requirement tends to restrict how wide a gap between enemy units you can actually bridge.
|
Adepticon 2015: Team Tourney Best Imperial Team- Team Ironguts, Adepticon 2014: Team Tourney 6th/120, Best Imperial Team- Cold Steel Mercs 2, 40k Championship Qualifier ~25/226
More 2010-2014 GT/Major RTT Record (W/L/D) -- CSM: 78-20-9 // SW: 8-1-2 (Golden Ticket with SW), BA: 29-9-4 6th Ed GT & RTT Record (W/L/D) -- CSM: 36-12-2 // BA: 11-4-1 // SW: 1-1-1
DT:70S++++G(FAQ)M++B++I+Pw40k99#+D+++A+++/sWD105R+++T(T)DM+++++
A better way to score Sportsmanship in tournaments
The 40K Rulebook & Codex FAQs. You should have these bookmarked if you play this game.
The Dakka Dakka Forum Rules You agreed to abide by these when you signed up.
Maelstrom's Edge! |
|
|
|
|
2011/09/08 02:04:11
Subject: Re:How To Multi-Assault: A Comprehensive Guide for Beginners
|
|
Mounted Kroot Tracker
|
Mannahnin wrote:Nice article; excellent start. Really appreciate the work invested here to use a bunch of photos and spell this out for folks.
That being said, you've missed a requirement. If a model can't make it into base contact itself, it has to try to get into 2" of a model which is in base contact, so it can attack. If it can't do that, it just has to get into coherency with a model which has already moved. So models A-H aren't actually interchangeable for assault move purposes. If subsequent models can get into 2" of A-C, they've got to attempt to do so in preference to D-H.
This requirement tends to restrict how wide a gap between enemy units you can actually bridge.
My apologies, I forgot to add that as one of the requirements; however, the pictures and steps that I listed do follow it. You'll notice that models D through H could not reach the scouts, and instead stayed within 2 inches of A and B. Following that, model I and the remainder could not even make into two inches of A or B, and could therefore just remain within two inches of any already moved model (H, in this instance).
Kreedos wrote:You're really stretching the rules for multiple assault. The rules specifically state that models must move as far as possible behind other models when charging in and that if they can't make it, they need to be within 2 inches. It doesn't allow you to make a perfect 2 inches around your models in B2B so that you can charge something 5 miles away.
So, for beginners, just letting you know, if you try and pull this on someone, chances are you're going to get called out. Taking advantage of the rules doesn't make for a fun game.
There are no rules stretched; nowhere does it say that the full 6 inches of movement (for infantry, of course) must be used. The main requirement is that if possible they must engage
a)unengaged enemy models (while staying within coherency of previously moved models)
b)engaged enemy models (while staying within coherency of previously moved models)
c) make it to within 2" of an engaged friendly model
d) make it to within 2" of any friendly model.
By choosing to move the models that are farthest away first, you can fulfill the requirements, but block a path to the enemy to open up new enemies for assaulting.
|
Night Watch SM
Kroot Mercenaries W 2 - D 3 - L 1
Manchu wrote: This is simply a self-fulfilling prophecy. Everyone says, "it won't change so why should I bother to try?" and then it doesn't change so people feel validated in their bad behavior.
Nightwatch's Kroot Blog
DQ:90-S++G++M-B++I+Pw40k08#+D+A--/cWD-R+T(S)DM+
|
|
|
|
|
2011/09/08 02:39:31
Subject: Re:How To Multi-Assault: A Comprehensive Guide for Beginners
|
|
Regular Dakkanaut
|
This is a great guide, but I don't think multi-assaulting is as hard to pull off as described.
After the first model moves, you're free to start multi-assaulting as long as you can maintain coherency. Even if there are unengaged or reachable enemy models from the first unit, you can move up to the models in a second unit... as long as you are within 2" of a model that already moved. So "cutting off" avenues isn't usually necessary unless you have a unit that's already 1" away from an enemy before assaulting. To be specific, you're allowed to move back row models early on, and have more leeway in positioning them since they can't reach unengaged enemy models, but can reach within 2" of your lead assaulter.
By moving carefully, you can probably make your second move with models that are more than 6" from an enemy, and send them within 2" of your initial engaged models. Using that, you can quickly span a 4"-6" gap between enemy units and multi-assault. Once you have models from multiple units engaged, it's easy to pick which of your models will assault which of theirs.
|
|
|
|
|
2011/09/08 02:50:30
Subject: How To Multi-Assault: A Comprehensive Guide for Beginners
|
|
Imperial Agent Provocateur
Bethlehem, PA
|
Any way we could get an example of hose this may work with the scouts in front of a transport with a gap that allows the enemy to assault through a squad and get the transport also? I had it explained to me but I am still not seeing how it works.
|
|
|
|
|
|
2011/09/08 03:39:02
Subject: How To Multi-Assault: A Comprehensive Guide for Beginners
|
|
Mounted Kroot Tracker
|
wizardofgore wrote:Any way we could get an example of hose this may work with the scouts in front of a transport with a gap that allows the enemy to assault through a squad and get the transport also? I had it explained to me but I am still not seeing how it works.
That's not very difficult at all; it's fairly straight-forward. The only thing you have to do is watch out for coherency, but that normally isn't an issue.
Part 2: Getting at the Shiny Stuff
Scenario 2.
Step 1. Closest model to closest model.
Now, we simply push any model forward, into another unengaged scout.
And again.

Now that we have model C close enough, our final move should bring us into the tank, while staying within coherency of an already-moved model.
And it's an easy 2 inches to C, so no problem!
Now, someone needs to tie up that final scout, but the rest of the models can try to engage any of the enemy's models, whether it's the mighty Land Raider or a Scout. That's all!
Automatically Appended Next Post:
Emperor awfulness wrote:This is a great guide, but I don't think multi-assaulting is as hard to pull off as described.
After the first model moves, you're free to start multi-assaulting as long as you can maintain coherency. Even if there are unengaged or reachable enemy models from the first unit, you can move up to the models in a second unit... as long as you are within 2" of a model that already moved. So "cutting off" avenues isn't usually necessary unless you have a unit that's already 1" away from an enemy before assaulting. To be specific, you're allowed to move back row models early on, and have more leeway in positioning them since they can't reach unengaged enemy models, but can reach within 2" of your lead assaulter.
By moving carefully, you can probably make your second move with models that are more than 6" from an enemy, and send them within 2" of your initial engaged models. Using that, you can quickly span a 4"-6" gap between enemy units and multi-assault. Once you have models from multiple units engaged, it's easy to pick which of your models will assault which of theirs.
Well, I did put "for Beginners" in the title - most experienced gamers can handle it fairly easily, but for people new to the gaming aspect of the hobby it can be a little confusing at first.
|
|
This message was edited 4 times. Last update was at 2011/09/09 19:20:15
Night Watch SM
Kroot Mercenaries W 2 - D 3 - L 1
Manchu wrote: This is simply a self-fulfilling prophecy. Everyone says, "it won't change so why should I bother to try?" and then it doesn't change so people feel validated in their bad behavior.
Nightwatch's Kroot Blog
DQ:90-S++G++M-B++I+Pw40k08#+D+A--/cWD-R+T(S)DM+
|
|
|
|
|
2011/09/08 04:39:39
Subject: How To Multi-Assault: A Comprehensive Guide for Beginners
|
|

Lone Wolf Sentinel Pilot
|
I...honestly didn't think it was as complex as this. I was always under the assumption that as long as you end your move within 2" coherency, and that all unengaged models within the 6" assault move have been tagged, then you can charge whatever additional unit you like.
L. Wrex
|
|
|
|
|
|
2011/09/08 15:31:35
Subject: How To Multi-Assault: A Comprehensive Guide for Beginners
|
|
Mounted Kroot Tracker
|
Lycaeus Wrex wrote:I...honestly didn't think it was as complex as this. I was always under the assumption that as long as you end your move within 2" coherency, and that all unengaged models within the 6" assault move have been tagged, then you can charge whatever additional unit you like.
L. Wrex
You're correct. The real difficulty occurs when the two units you wish to assault are far enough apart that you can't stay in coherency with your models assaulting the first squad while moving into the second squad. This means you have to move into already engaged models in the first squad, rather than unengaged models in the second - this is why learning how to build a bridge is important, which I'll be demonstrating in my next post.
|
Night Watch SM
Kroot Mercenaries W 2 - D 3 - L 1
Manchu wrote: This is simply a self-fulfilling prophecy. Everyone says, "it won't change so why should I bother to try?" and then it doesn't change so people feel validated in their bad behavior.
Nightwatch's Kroot Blog
DQ:90-S++G++M-B++I+Pw40k08#+D+A--/cWD-R+T(S)DM+
|
|
|
|
|
2011/09/08 18:50:14
Subject: Re:How To Multi-Assault: A Comprehensive Guide for Beginners
|
|
Yellin' Yoof
|
Excellent guide. I am a big fan of the multi-assault, and even simple ones people tend to miss. I do like the "wall-in" technique to reach things that would normally put you out of coherency.
One of the better contributions to the Tactics section I've seen in a while. Thanks.
|
|
|
|
|
2011/09/09 19:18:07
Subject: Re:How To Multi-Assault: A Comprehensive Guide for Beginners
|
|
Mounted Kroot Tracker
|
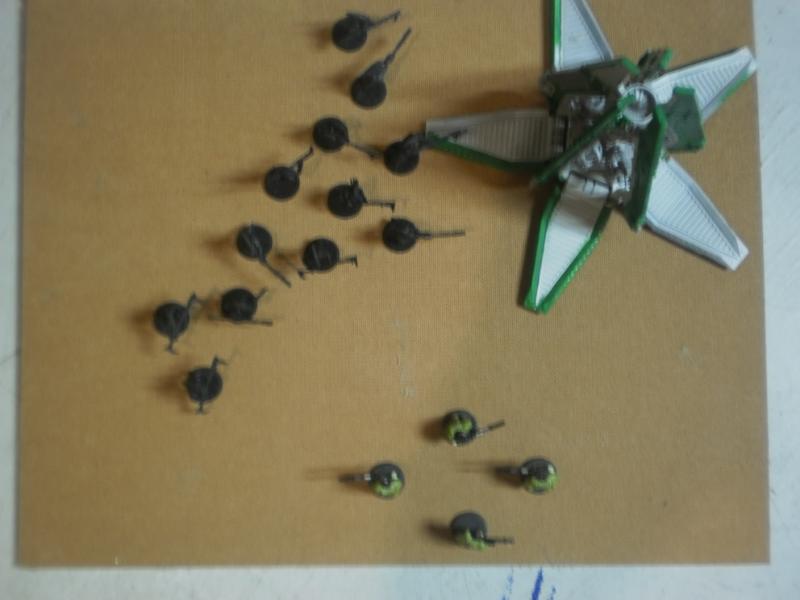
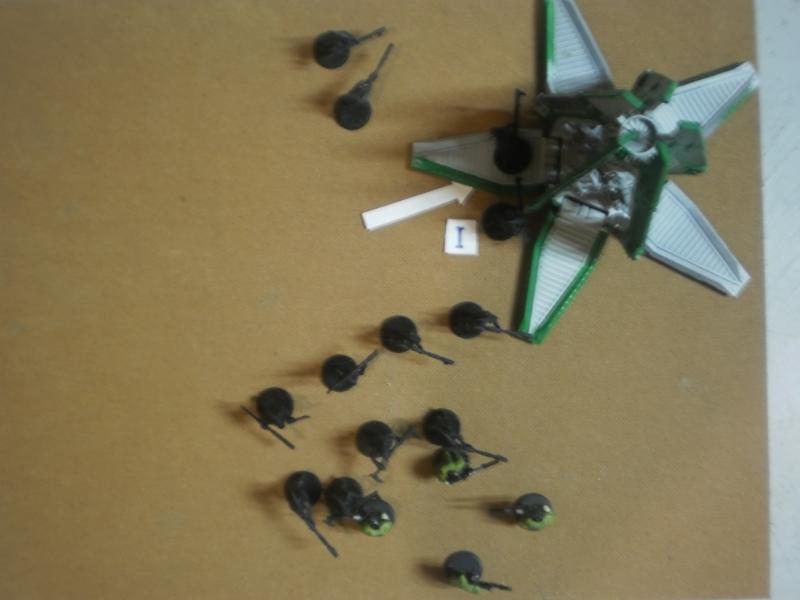
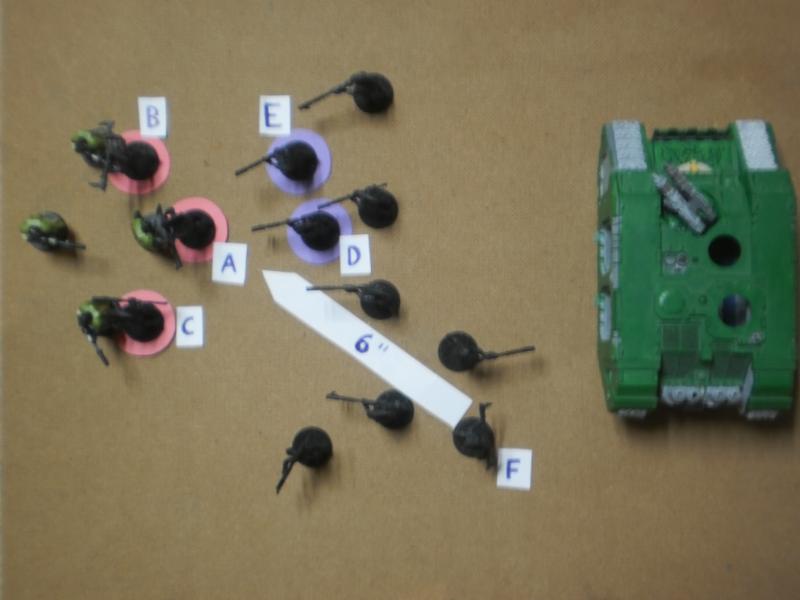
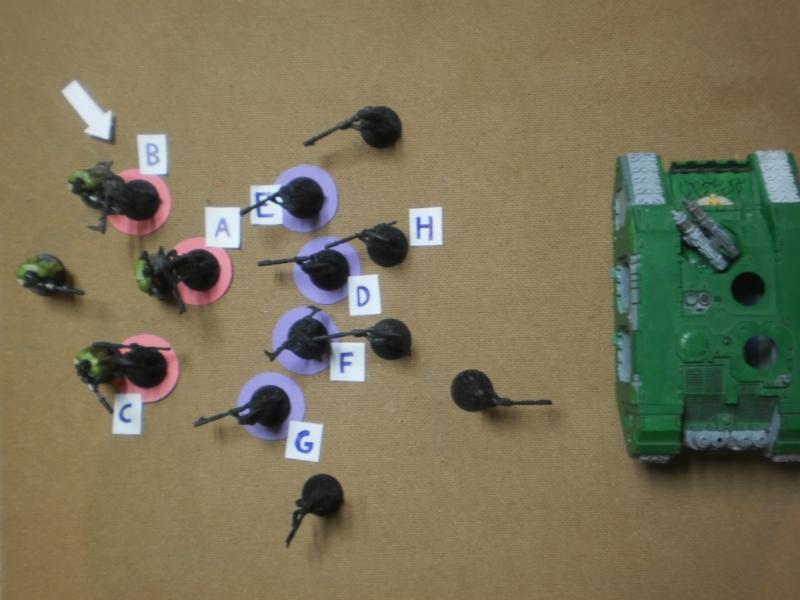
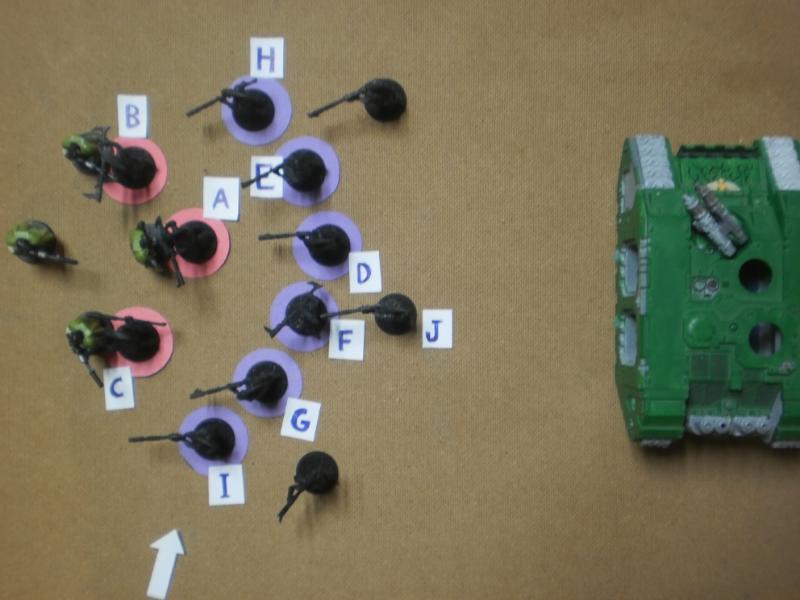
Part 3: Stuck Between Two Targets
The Scenario:
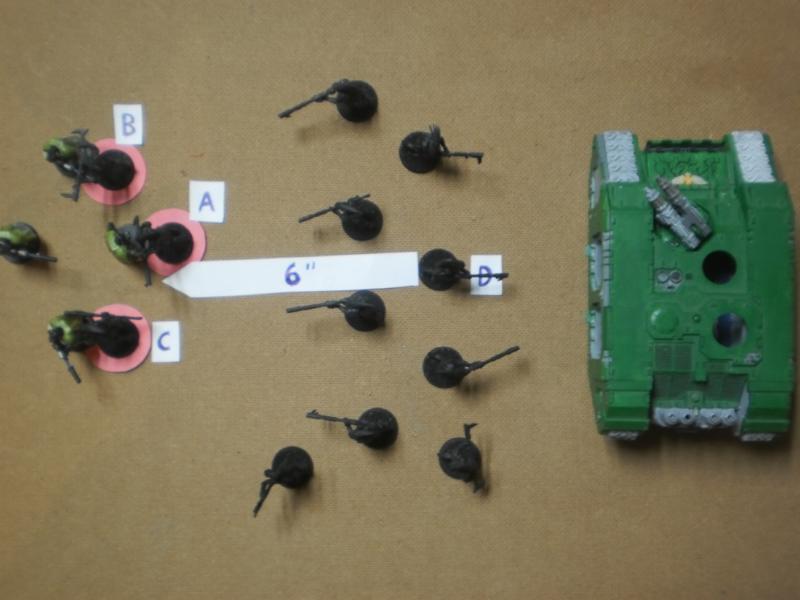
The Kroot have outflanked, or somehow managed to get between the squad of scouts and a Land Raider. Let's ignore that they can't harm the Land Raider in any way - we've all rolled 10s before on a D6, have we not? 
At any rate, a lot of trouble could be spared by simply clumping the Kroot a little closer together in the movement phase, but for the sake of argument I have them nicely spaced out here - not quite 2 inches apart but far enough to let a base through.
http://images.dakkadakka.com/gallery/2011/9/8/268417_md-.JPG
We'll choose the Scouts as the main target we want to focus on here, because the Land Raider's hull is so large that we might have to all pile into it before we could try bridging to the Scouts.
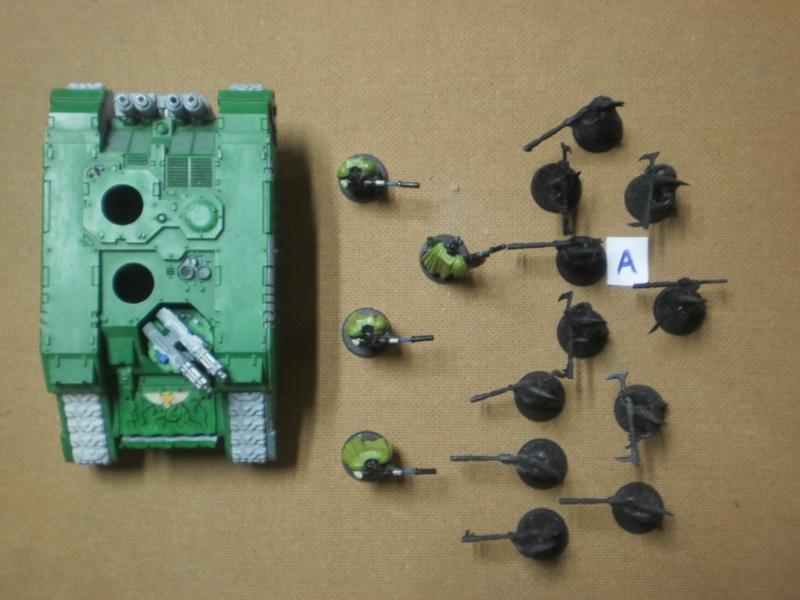
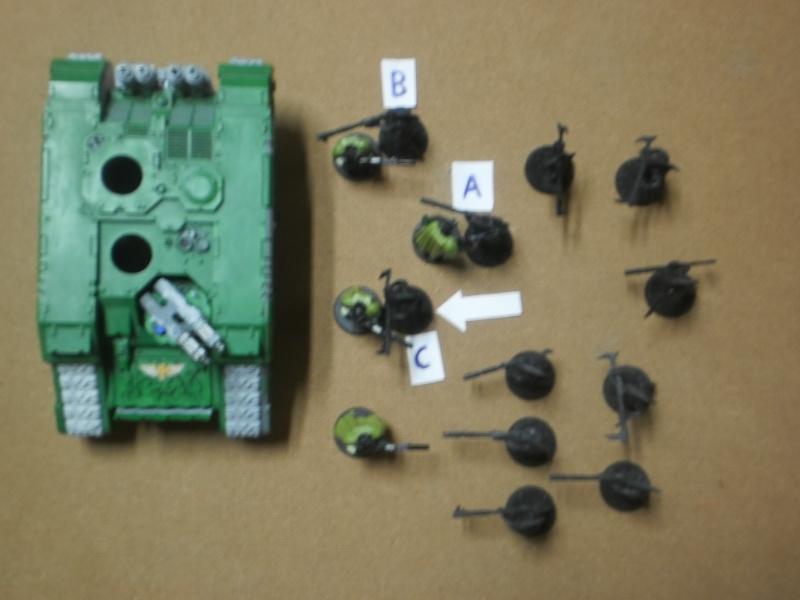
So, let's get the closest model stuck in.
As seen here, it's model A. I did a better job of keeping the darned letters attached to their appropriate counterparts this time around.
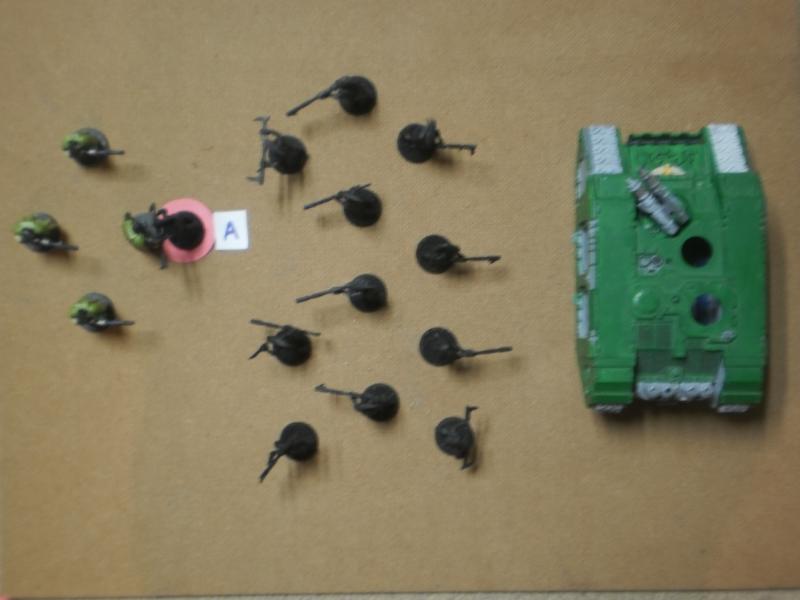
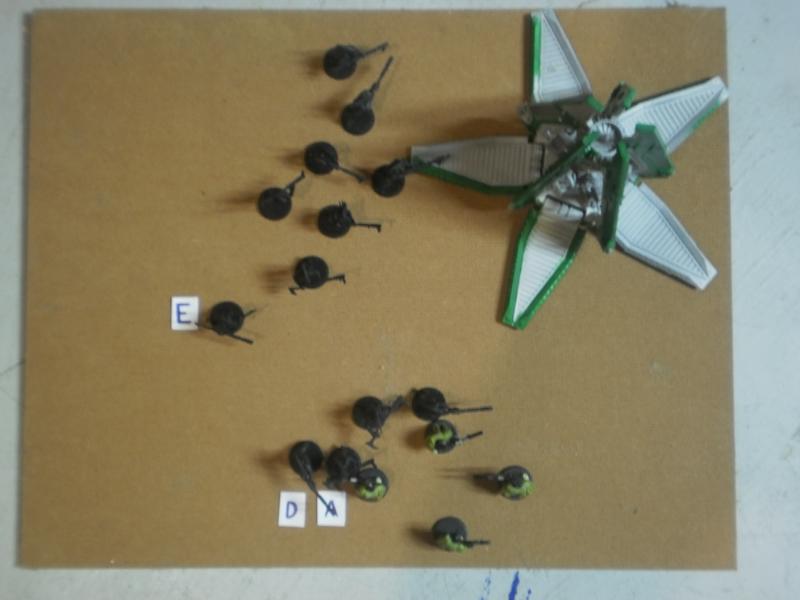
Something new and exciting in this new edition: coloured rings around the bases! (That's colored for you American folks). The red circle will represent a model in base to base contact with an enemy. A violet/blue circle will represent a model within 2 inches of a friendly engaged model. Finally, a green circle will indicate a model that is not within coherency of a fighting model - these models will not be able to fight in the combat, but they help to bridge the gap from one enemy unit to the next.
We're going to have to engage the front three scouts before even thinking about bridging towards the Land Raider - there aren't enough Kroot far enough away from the Scouts to bridge immediately.
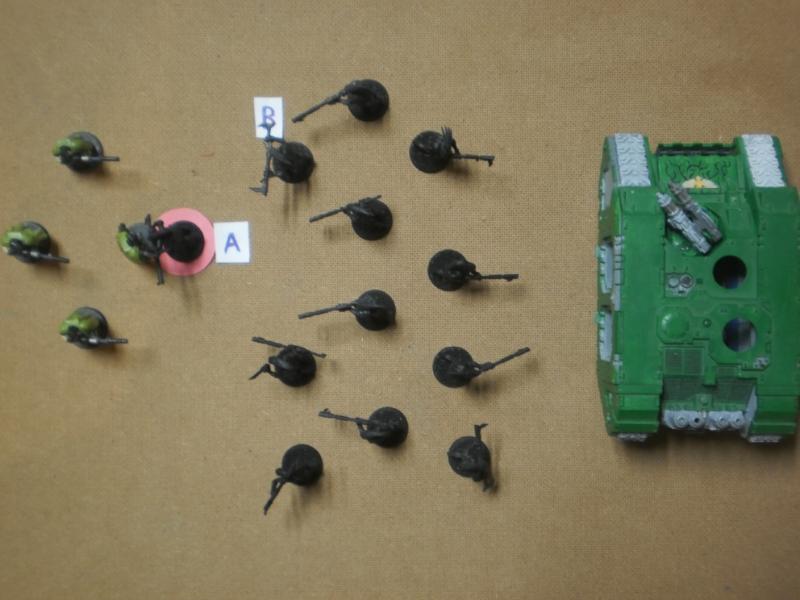
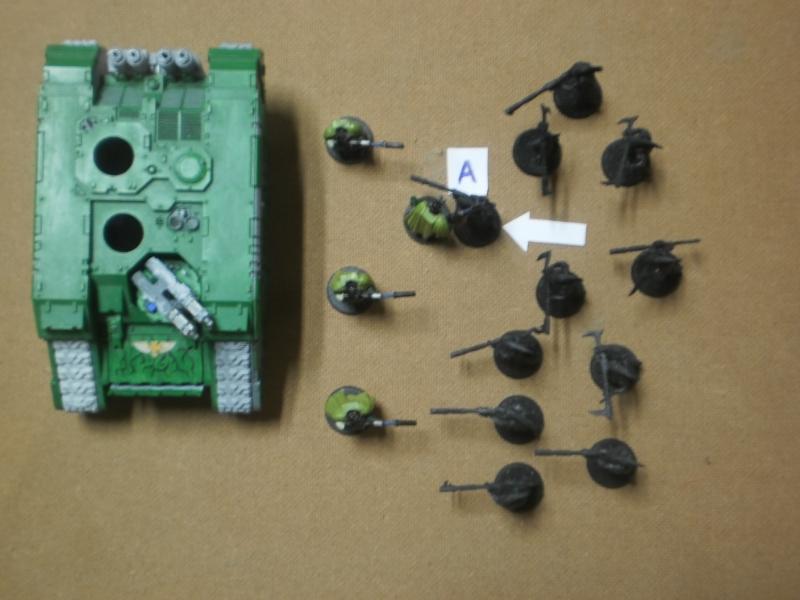
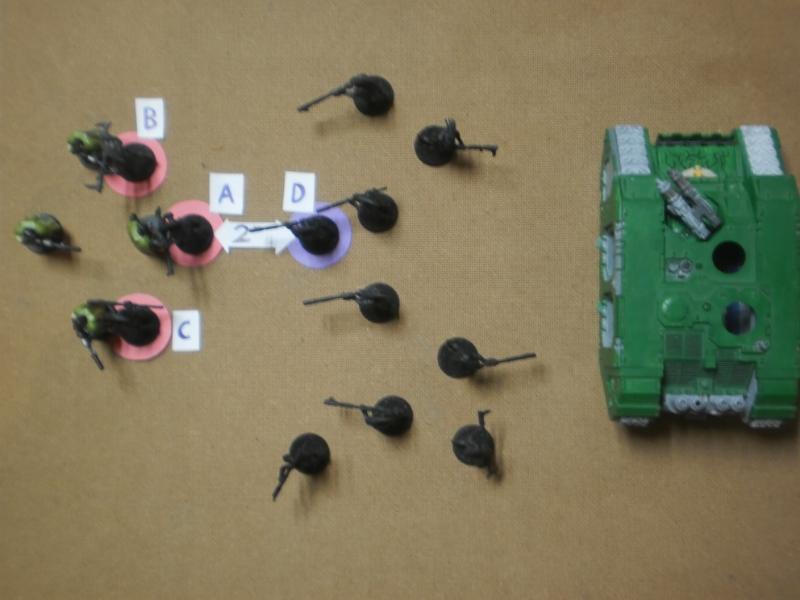
Model B maintains coherency with model A, and ties up another Scout.

And now, the third Scout gets stuck in:
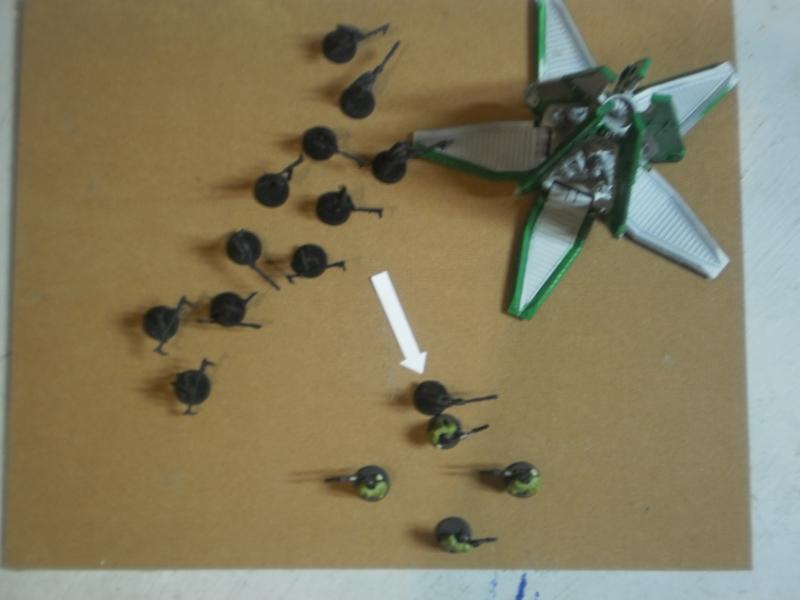
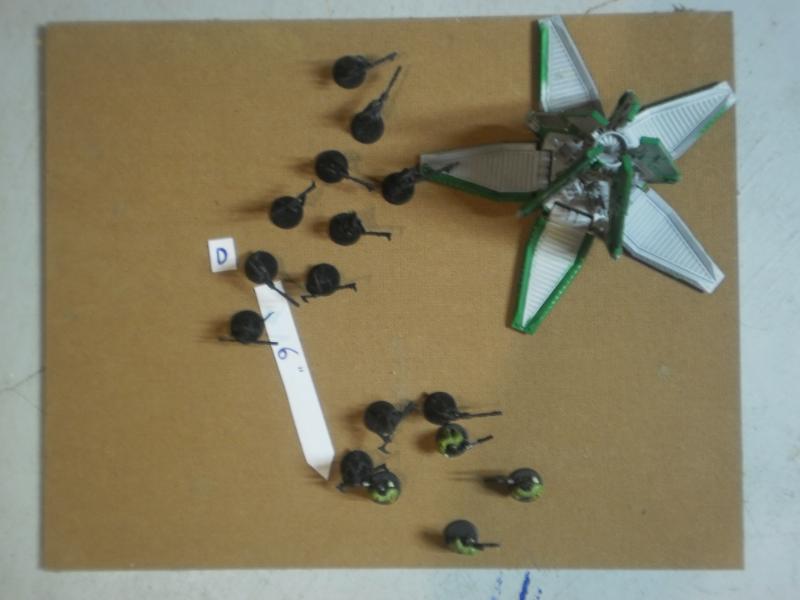
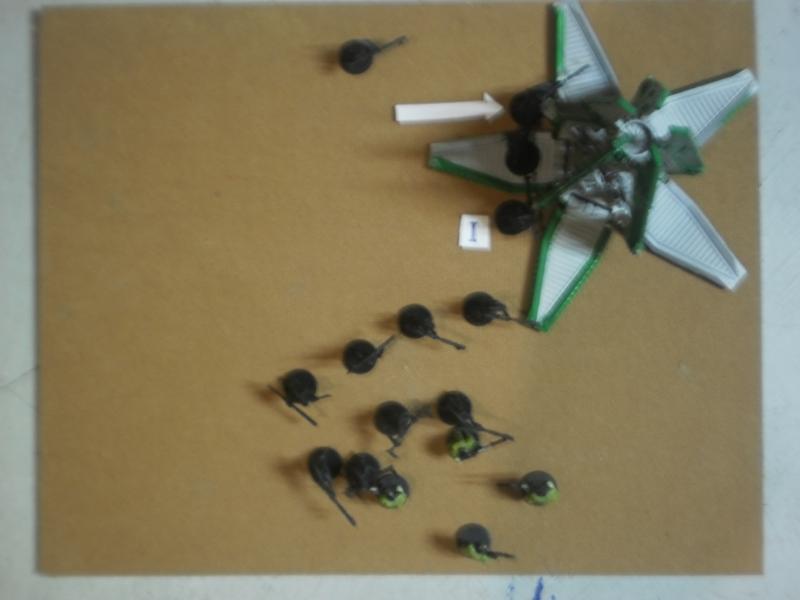
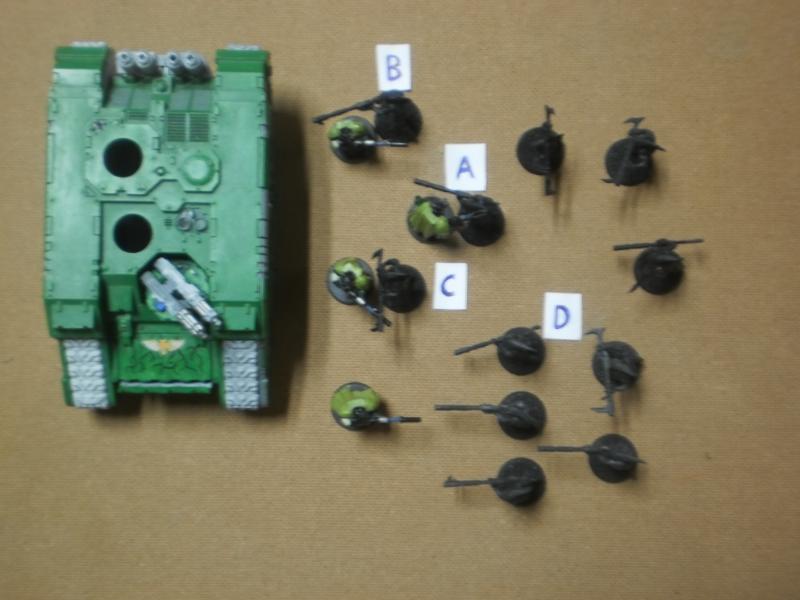
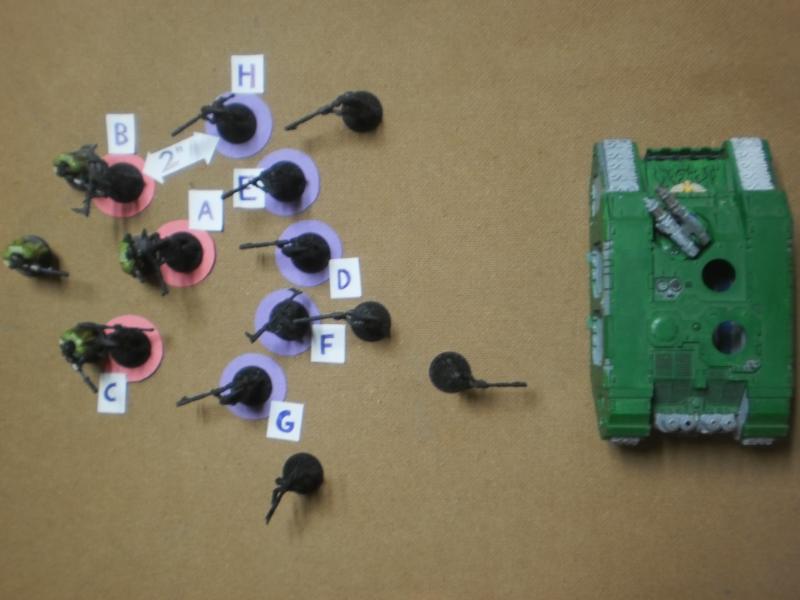
Here's where we have to get picky about who we choose to move next. Model D, pictured below, is at the perfect distance from the Scouts - he's far enough away not to reach any, and so he can be used to begin a wall, staying within coherency of the engaged models, and blocking off the models behind him.
And this is after we've finished moving D. We're keeping him stretched at the maximum 2 inches, because the Land Raider is pretty far away and we're going to need as much length as we can get. Look at the pretty purple circle - that's what you get when you can't reach the enemy!
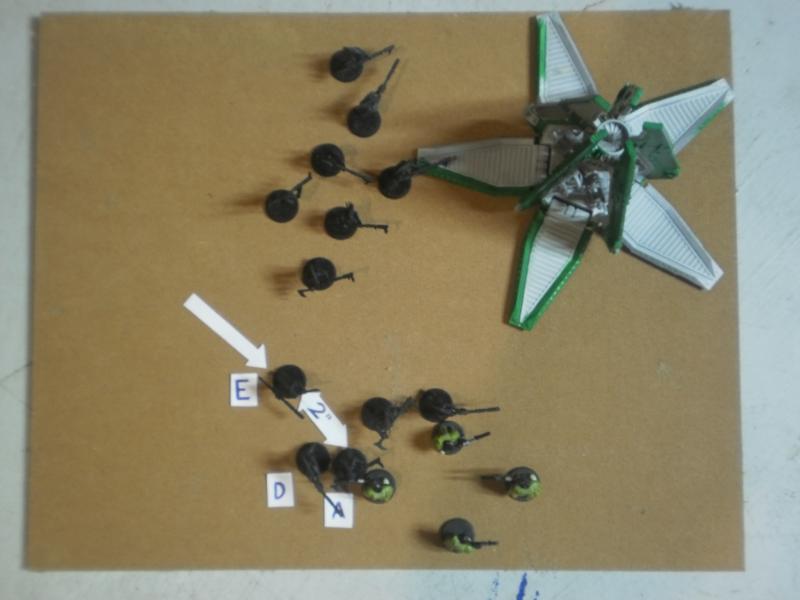
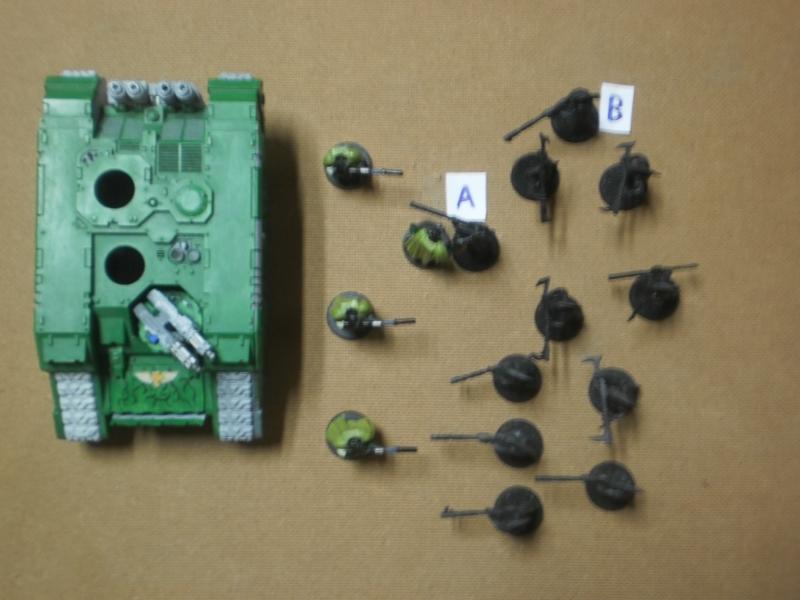
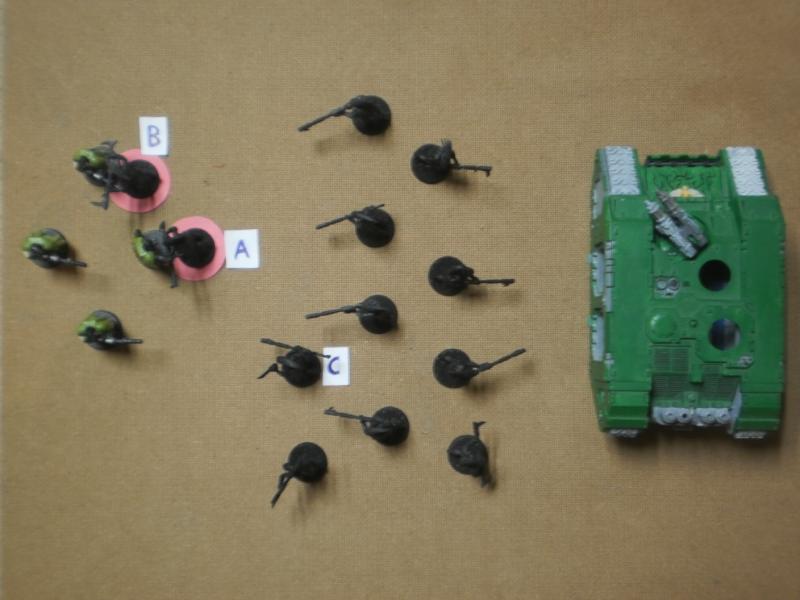
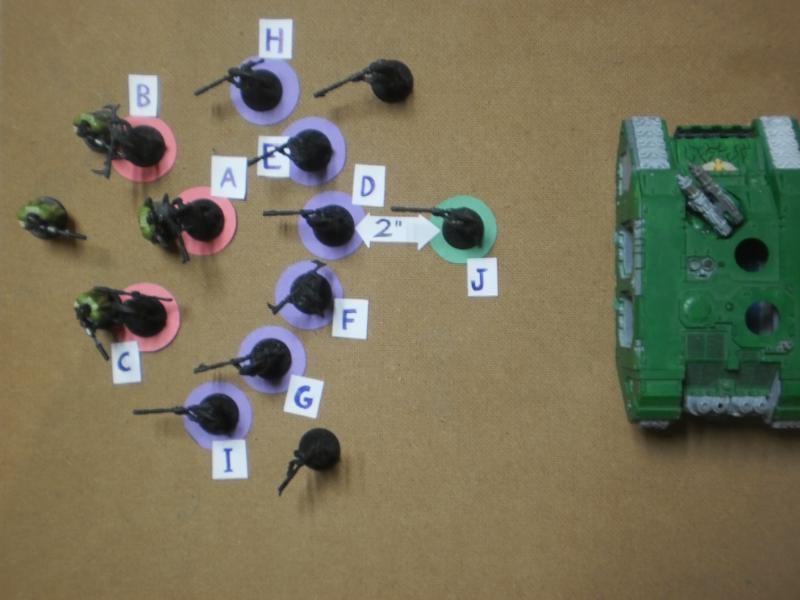
Model E is also perfectly placed - his movement would bring him only millimetres away from the Scout, but even that's enough to deny him base to base contact, so we'll use him as part of the wall.
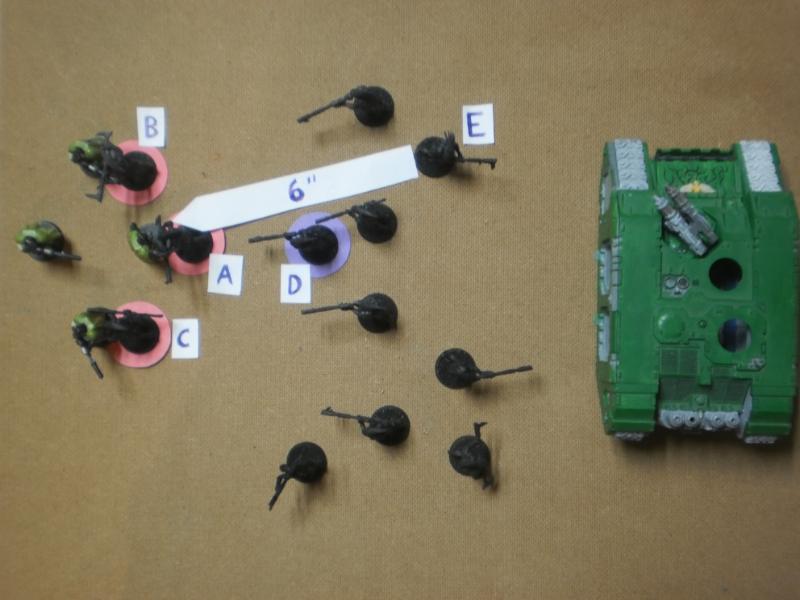
Now, we want to make sure that he's within 2 inches of A, but close enough to D to deny movement between the two.
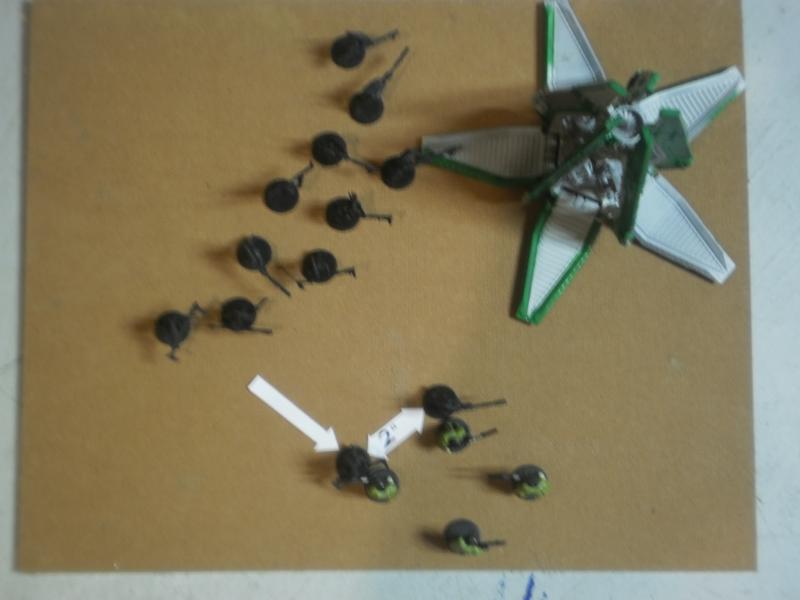
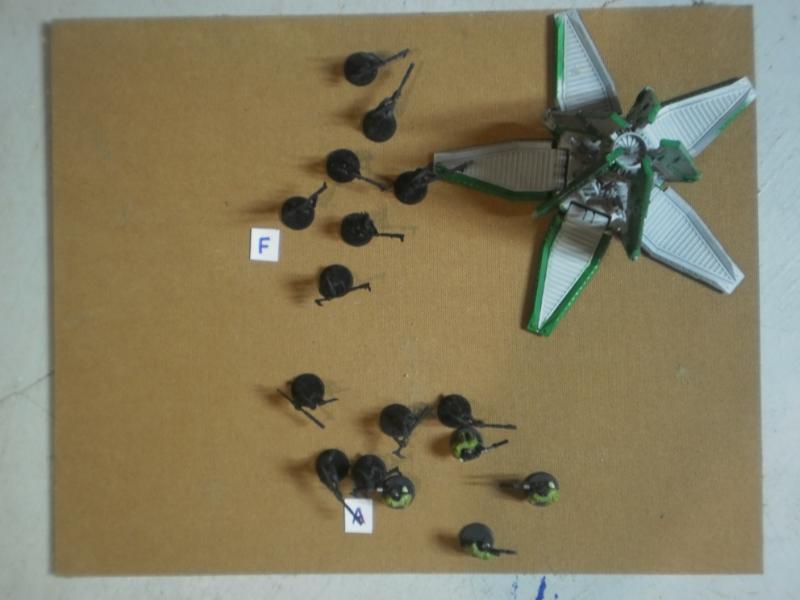
Let's grab another model from the rear to join in our movement-blocking wall:
Model F joins the wall, close enough to D to deny movement between them, but still in coherency with an engaged model.
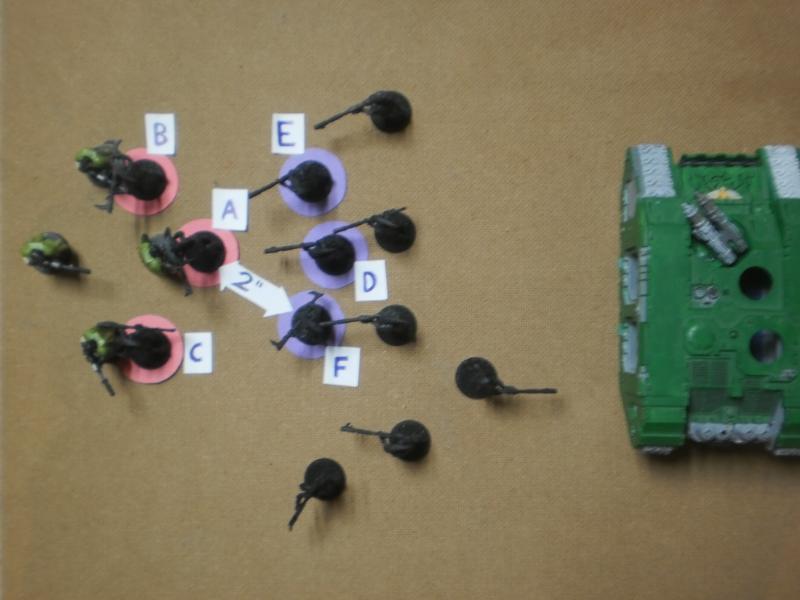
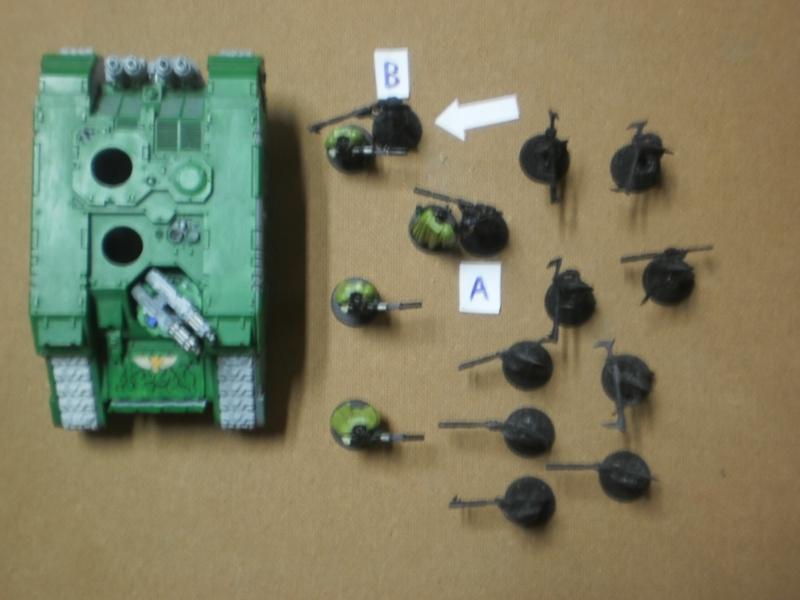
Let's throw another in for good measure:
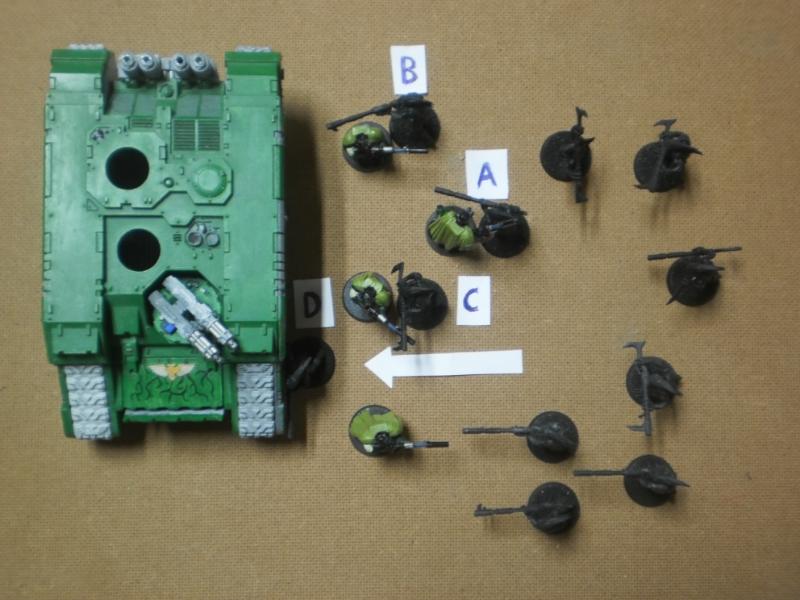
Once again, G is too far away to make it to the scout, and we'll place him in a good position to block movement:
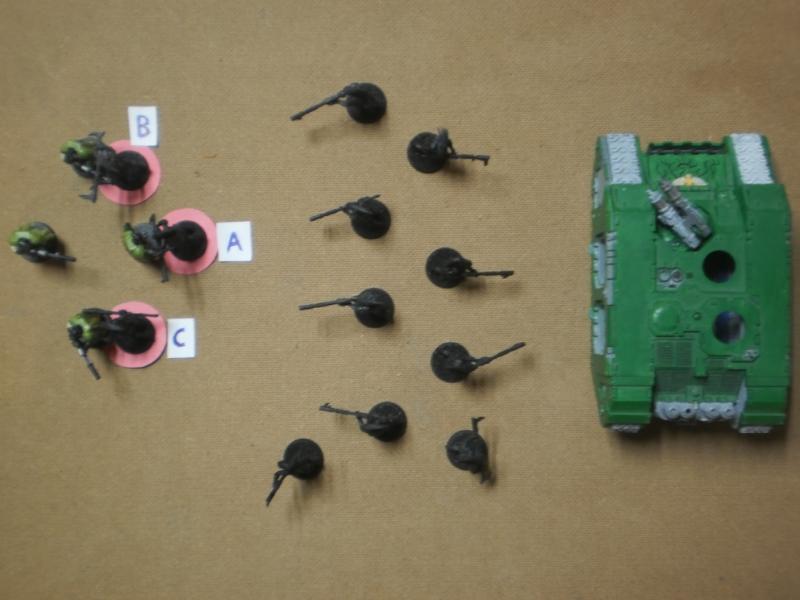
We're almost there, but the models can still reach around the top, so we'll block that off now. The arrow indicates model H's maximum move distance - I didn't have a curved marker to show it, so I measured and dropped the little arrow instead. This one was especially close - he was almost within assault range, which might have ended our chances for a multi-assault.
But it's the same story as with the previous ones: we'll throw him into place in coherency, but close enough to deny movement between the bases.
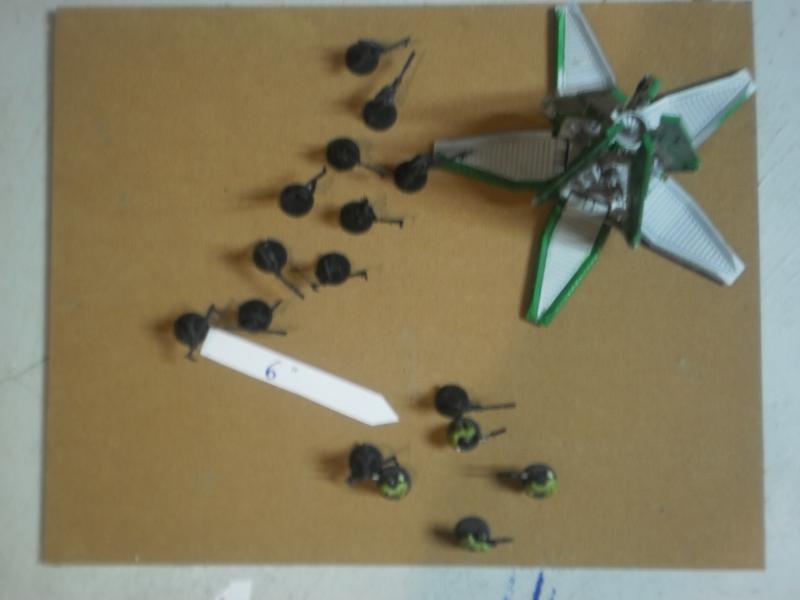
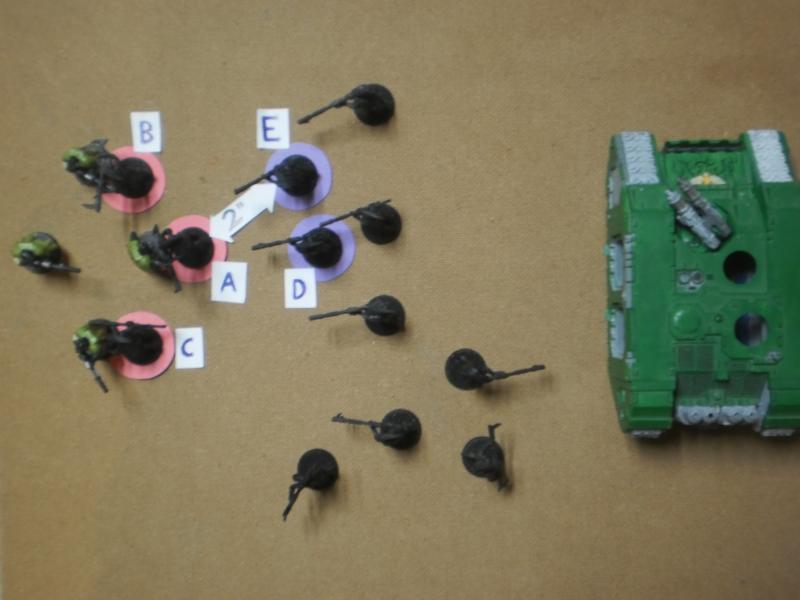
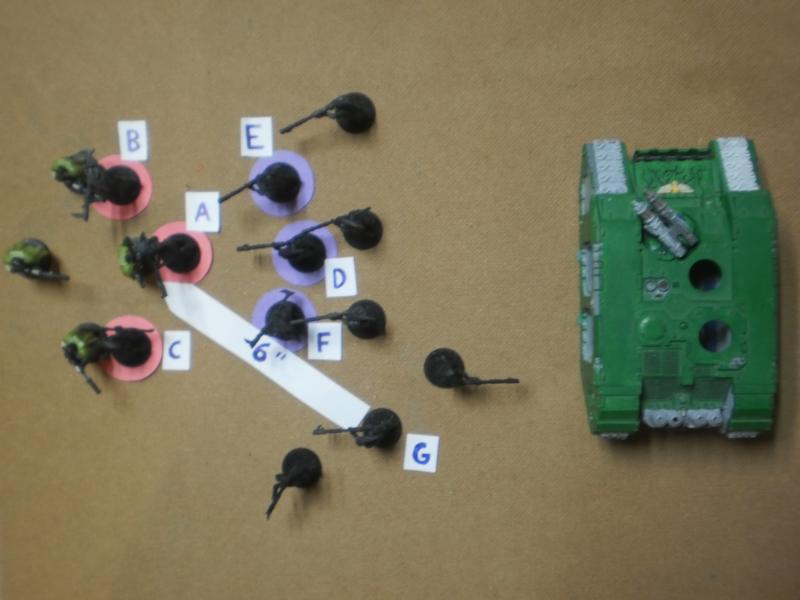
The model behind D and F is our target bridge model: if we can just block off the bottom passage a little more, then we can move him into place to form the bridge. So, we'll move model I to form the last piece of the wall. Sorry, still no bendy movement marker, the little arrow will have to do again.
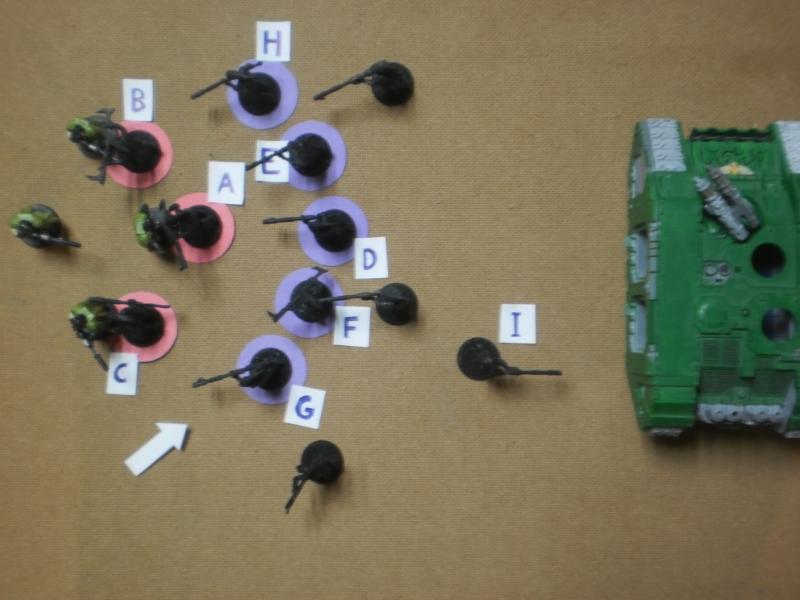
And with him in the wall:
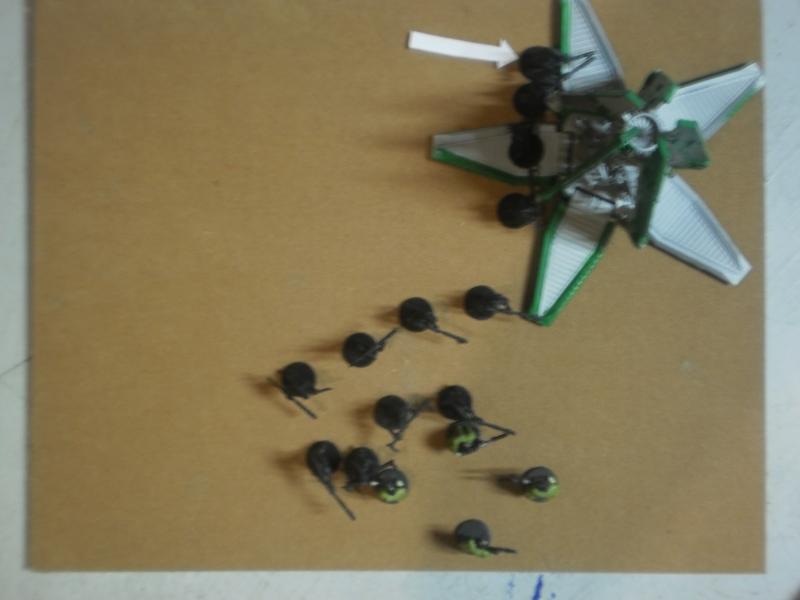
Now, let's take a look at model J, the bridge model. He's too far away from either side to even get in coherency - perfect! The arrow shows how far he can move on the bottom, and he was suitably far away from the top as well.
Let's stretch him out to the maximum distance...I'm not quite sure if we'll even reach the Land Raider. We have 2 inches plus the width of the base (about 1 inch) to span the gap, will it be enough? And a green circle - he isn't within 2 inches of any engaged model...yet.
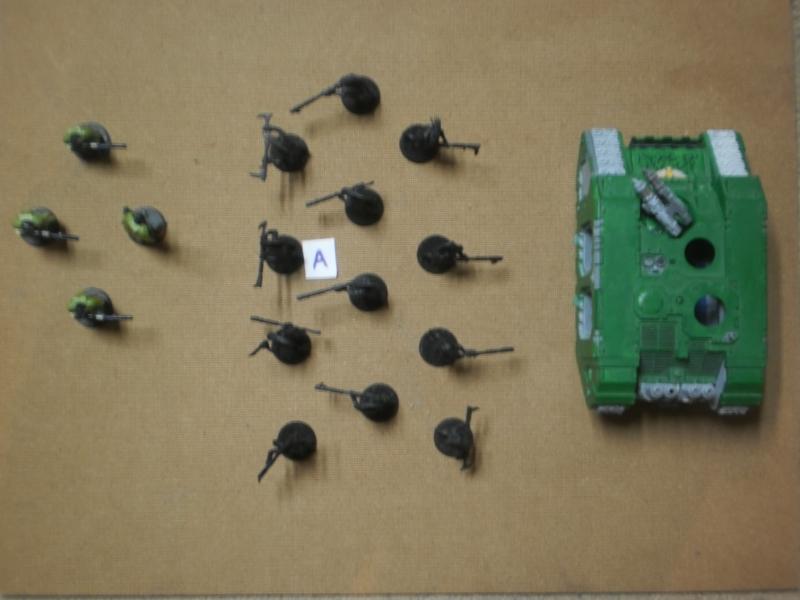
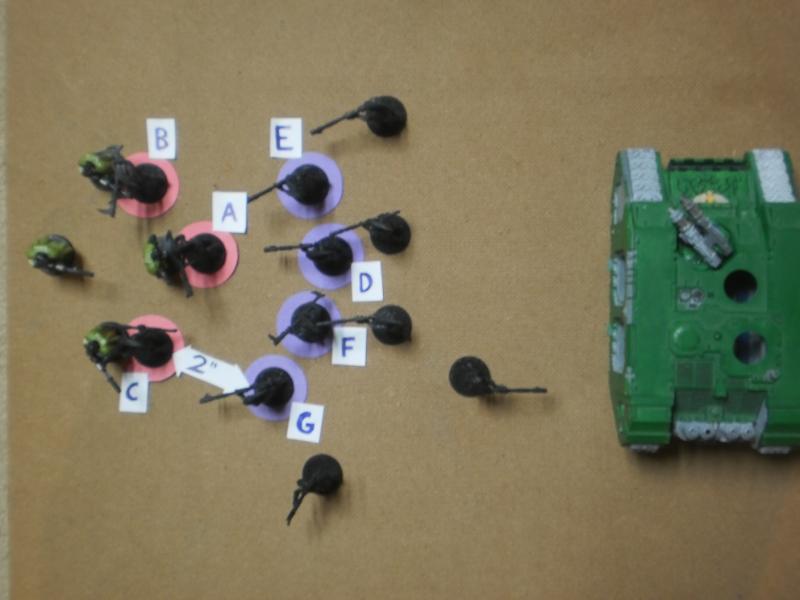
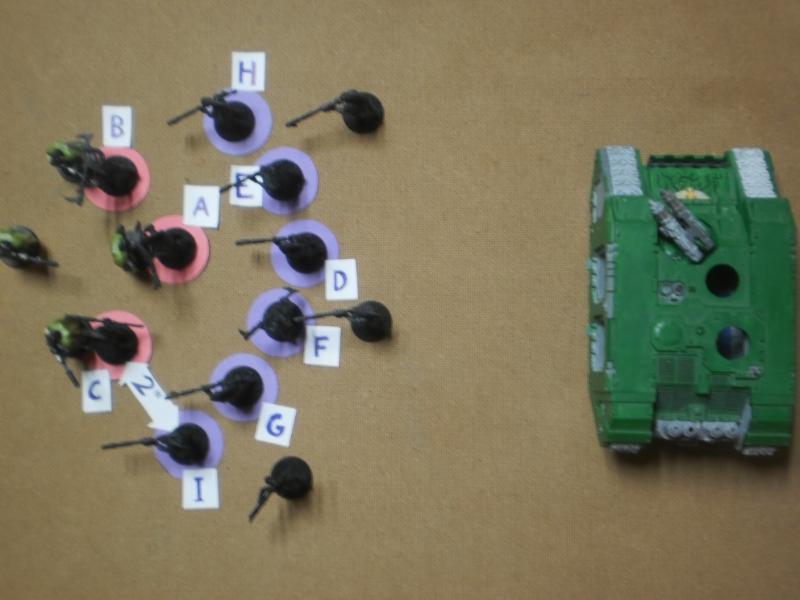
And it looks like Model K is going to make it, with a little room to spare!
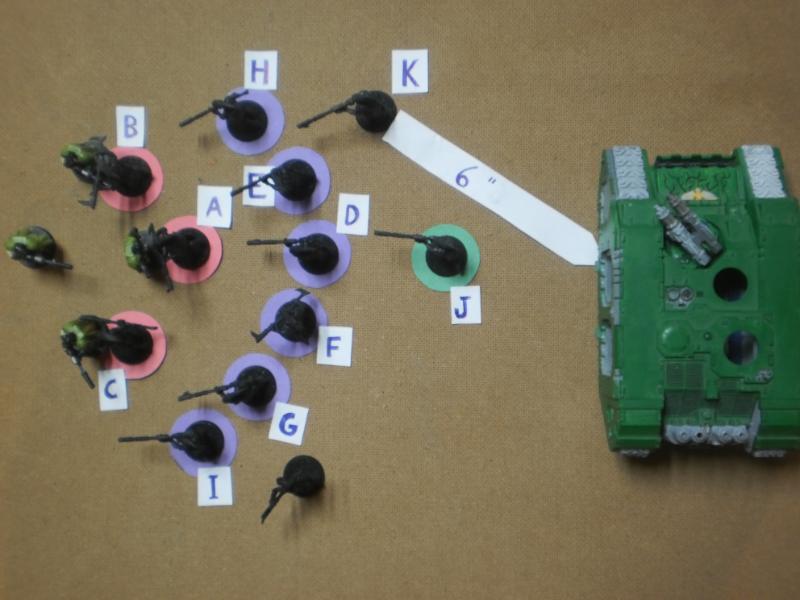
Of course, now model J will be able to fight in the combat as well, being in coherency with K(though he won't do much against a Land Raider).
And a check for our last model:
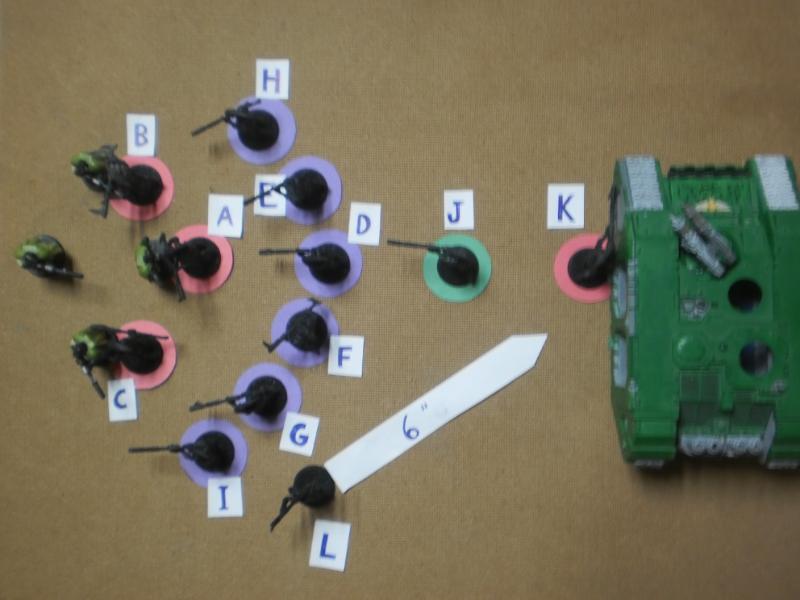
Well, he can't make it to the tank, but that's okay, he's within 2 inches of K.
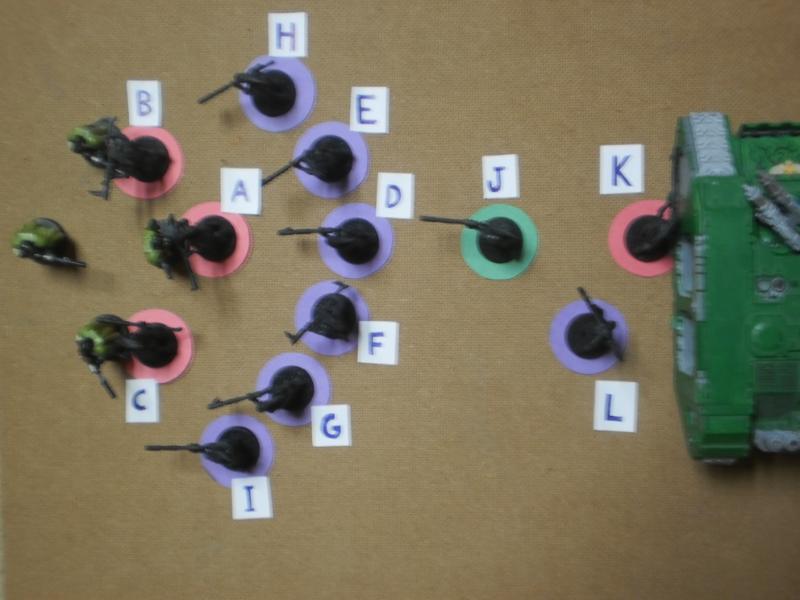
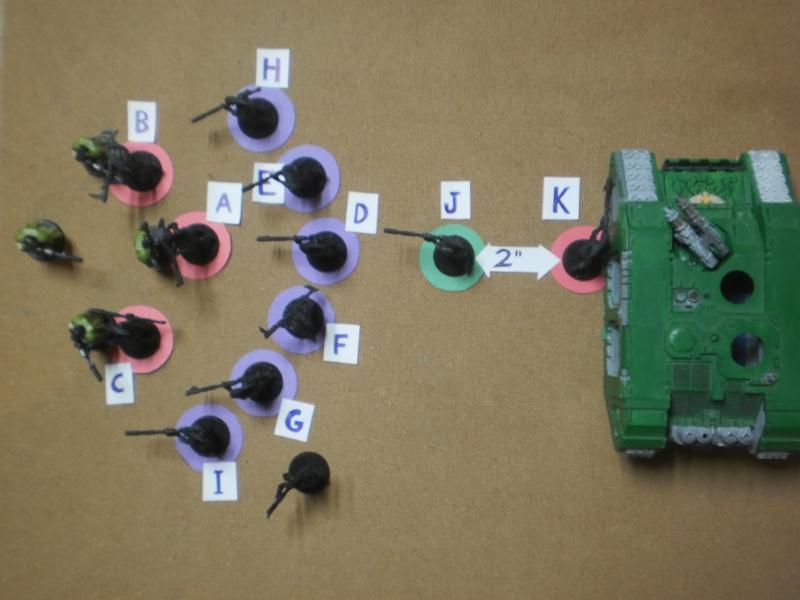
And that's everything!
If you're already an experienced player, this is probably all old news to you, but I hope this little tutorial was helpful to somebody!
|
Night Watch SM
Kroot Mercenaries W 2 - D 3 - L 1
Manchu wrote: This is simply a self-fulfilling prophecy. Everyone says, "it won't change so why should I bother to try?" and then it doesn't change so people feel validated in their bad behavior.
Nightwatch's Kroot Blog
DQ:90-S++G++M-B++I+Pw40k08#+D+A--/cWD-R+T(S)DM+
|
|
|
|
|
2011/09/09 19:43:32
Subject: Re:How To Multi-Assault: A Comprehensive Guide for Beginners -//- Part 3 up - Stuck in the middle!
|
|
Fixture of Dakka
|
Very useful for me to show the people I play with how I've been doing what I do and why what they want to do isn't legal.
|
"'players must agree how they are going to select their armies, and if any restrictions apply to the number and type of models they can use."
This is an actual rule in the actual rulebook. Quit whining about how you can imagine someone's army touching you in a bad place and play by the actual rules.
Freelance Ontologist
When people ask, "What's the point in understanding everything?" they've just disqualified themselves from using questions and should disappear in a puff of paradox. But they don't understand and just continue existing, which are also their only two strategies for life. |
|
|
|
|
2011/09/09 20:05:28
Subject: Re:How To Multi-Assault: A Comprehensive Guide for Beginners -//- Part 3 up - Stuck in the middle!
|
|
Mounted Kroot Tracker
|
DarknessEternal wrote:Very useful for me to show the people I play with how I've been doing what I do and why what they want to do isn't legal.
I find that most of the time, if you show people the bullets on page 34 that takes care of it. I suppose a visual example is an asset, however.
|
Night Watch SM
Kroot Mercenaries W 2 - D 3 - L 1
Manchu wrote: This is simply a self-fulfilling prophecy. Everyone says, "it won't change so why should I bother to try?" and then it doesn't change so people feel validated in their bad behavior.
Nightwatch's Kroot Blog
DQ:90-S++G++M-B++I+Pw40k08#+D+A--/cWD-R+T(S)DM+
|
|
|
|
|
2011/09/09 20:07:38
Subject: How To Multi-Assault: A Comprehensive Guide for Beginners -//- Part 3 up - Stuck in the middle!
|
|
Thinking of Joining a Davinite Loge
|
Very clear guide and I appreciate the effort that you've gone to in order to produce this. Can I ask, though - in your last example only 1 kroot gets into b2b with the land raider. Does this mean that he's the only one that could attack it since none of the other kroot are in b2b with him?
|
|
|
|
|
|
2011/09/09 20:12:22
Subject: How To Multi-Assault: A Comprehensive Guide for Beginners -//- Part 3 up - Stuck in the middle!
|
|
Mounted Kroot Tracker
|
ColdSadHungry wrote:Very clear guide and I appreciate the effort that you've gone to in order to produce this. Can I ask, though - in your last example only 1 kroot gets into b2b with the land raider. Does this mean that he's the only one that could attack it since none of the other kroot are in b2b with him?
Nope, models J, K, and L can all attack the Land Raider. K is in base contact, and J and L are both within 2 inches of K, allowing them to attack the model he is engaged with (the land raider). In this scenario, all of the models will get to attack, because they are all
A) In base contact with an enemy
or
B) Within 2 inches of a model that is in base contact with an enemy.
|
Night Watch SM
Kroot Mercenaries W 2 - D 3 - L 1
Manchu wrote: This is simply a self-fulfilling prophecy. Everyone says, "it won't change so why should I bother to try?" and then it doesn't change so people feel validated in their bad behavior.
Nightwatch's Kroot Blog
DQ:90-S++G++M-B++I+Pw40k08#+D+A--/cWD-R+T(S)DM+
|
|
|
|
|
2011/09/09 20:34:13
Subject: How To Multi-Assault: A Comprehensive Guide for Beginners -//- Part 3 up - Stuck in the middle!
|
|
Thinking of Joining a Davinite Loge
|
Nightwatch wrote:ColdSadHungry wrote:Very clear guide and I appreciate the effort that you've gone to in order to produce this. Can I ask, though - in your last example only 1 kroot gets into b2b with the land raider. Does this mean that he's the only one that could attack it since none of the other kroot are in b2b with him?
Nope, models J, K, and L can all attack the Land Raider. K is in base contact, and J and L are both within 2 inches of K, allowing them to attack the model he is engaged with (the land raider). In this scenario, all of the models will get to attack, because they are all
A) In base contact with an enemy
or
B) Within 2 inches of a model that is in base contact with an enemy.
Thanks! Multi assaulting is one of those things that I've always kind of got but not fully and this has been really helpful. Looking forward to your next guide - Wound Allocation!  (Still haven't got that down 100%)
|
|
|
|
|
|
2011/09/09 22:05:52
Subject: How To Multi-Assault: A Comprehensive Guide for Beginners -//- Part 3 up - Stuck in the middle!
|
|
Mounted Kroot Tracker
|
ColdSadHungry wrote:
Thanks! Multi assaulting is one of those things that I've always kind of got but not fully and this has been really helpful. Looking forward to your next guide - Wound Allocation! (Still haven't got that down 100%)
What is it about wound allocation that you don't fully understand? Just how to allocate wounds in close combat, or shooting, ...?
|
Night Watch SM
Kroot Mercenaries W 2 - D 3 - L 1
Manchu wrote: This is simply a self-fulfilling prophecy. Everyone says, "it won't change so why should I bother to try?" and then it doesn't change so people feel validated in their bad behavior.
Nightwatch's Kroot Blog
DQ:90-S++G++M-B++I+Pw40k08#+D+A--/cWD-R+T(S)DM+
|
|
|
|
|
2011/09/09 23:33:35
Subject: How To Multi-Assault: A Comprehensive Guide for Beginners -//- Part 3 up - Stuck in the middle!
|
|
Rampaging Furioso Blood Angel Dreadnought
Potters Bar, UK
|
Great work Nightwatch, truly awesome Tactica work!
|
inmygravenimage wrote:Have courage, faith and beer, my friend - it will be done!
MeanGreenStompa wrote:Anonymity breeds aggression.
Chowderhead wrote:Just hit the "Triangle of Friendship", as I call it.
|
|
|
|
|
2011/09/10 02:42:45
Subject: How To Multi-Assault: A Comprehensive Guide for Beginners -//- Part 3 up - Stuck in the middle!
|
|
Imperial Agent Provocateur
Bethlehem, PA
|
Thank you for additional examples. Makes much more sense.
|
|
|
|
|
|
2011/09/10 03:27:16
Subject: How To Multi-Assault: A Comprehensive Guide for Beginners -//- Part 3 up - Stuck in the middle!
|
|
Regular Dakkanaut
|
It works better if you assault the first unit with model "A" and assault the second unit with model "B" and so forth. Then you don't have to worry about any of the other concerns as all models move to get into combat or maintain coherency. It's much easier and accomplishes the same thing. Try to do the tutorial that way and you will see what I mean. This is overly complicated for no reason.
-Myst
|
|
|
|
|
2011/09/10 03:48:05
Subject: How To Multi-Assault: A Comprehensive Guide for Beginners -//- Part 3 up - Stuck in the middle!
|
|
Mounted Kroot Tracker
|
Mysticaria wrote:It works better if you assault the first unit with model "A" and assault the second unit with model "B" and so forth. Then you don't have to worry about any of the other concerns as all models move to get into combat or maintain coherency. It's much easier and accomplishes the same thing. Try to do the tutorial that way and you will see what I mean. This is overly complicated for no reason.
-Myst
If you can arrange your movement phase so that is possible, then it does make things considerably less complicated. However, you don't get to choose which model moves first - it's whichever is the closest to the enemy. Obviously, moving strategically will be of great assistance here. From then on, however, all your next moves have to end within 2 inches of a model you moved previously - which is why it gets exceedingly difficult if the two targets are far apart.
*//Edited for spelling//*
|
|
This message was edited 1 time. Last update was at 2011/09/10 03:48:50
Night Watch SM
Kroot Mercenaries W 2 - D 3 - L 1
Manchu wrote: This is simply a self-fulfilling prophecy. Everyone says, "it won't change so why should I bother to try?" and then it doesn't change so people feel validated in their bad behavior.
Nightwatch's Kroot Blog
DQ:90-S++G++M-B++I+Pw40k08#+D+A--/cWD-R+T(S)DM+
|
|
|
|
|
2011/09/11 03:58:30
Subject: How To Multi-Assault: A Comprehensive Guide for Beginners -//- Part 3 up - Stuck in the middle!
|
|
Mounted Kroot Tracker
|
Just started another thread with another tactic I like to use from time to time.
|
Night Watch SM
Kroot Mercenaries W 2 - D 3 - L 1
Manchu wrote: This is simply a self-fulfilling prophecy. Everyone says, "it won't change so why should I bother to try?" and then it doesn't change so people feel validated in their bad behavior.
Nightwatch's Kroot Blog
DQ:90-S++G++M-B++I+Pw40k08#+D+A--/cWD-R+T(S)DM+
|
|
|
|
|
|
|
 3800 pts
 3750 pts
 1500 pts
 700 pts
 700 pts