| Author |
Message |
 |
|
|
|
|
Advert
|
Forum adverts like this one are shown to any user who is not logged in. Join us by filling out a tiny 3 field form and you will get your own, free, dakka user account which gives a good range of benefits to you:
- No adverts like this in the forums anymore.
- Times and dates in your local timezone.
- Full tracking of what you have read so you can skip to your first unread post, easily see what has changed since you last logged in, and easily see what is new at a glance.
- Email notifications for threads you want to watch closely.
- Being a part of the oldest wargaming community on the net.
If you are already a member then feel free to login now. |
|
 |
2013/05/04 07:41:11
Subject: Storm Raven conversion, Starting from a CH kit and going farther.
|
|

Raging Ravener
|
I've been painting up a Blood Angels counts as army for a little bit, and though I loved what the Storm Raven does in game, I couldn't abide by the model itself. I originally just planned on buying a storm eagle, but after reading horror stories and other blogs about building it decided I likely didn't have the skill to do it justice.
So instead I bought the Chapter House kit. It's not bad, but didn't do away with most of my dislikes. Once I received both my SR kit and the CH kit and started working on them, i realised it wasn't going to do. So i bought a ton of plasticard (I found a bulk supplier and ended up with almost 3 square meters of the stuff in various thicknesses) and decided to take a saw to the kit.
I used these conversions as inspirations:
http://www.dakkadakka.com/dakkaforum/posts/list/0/346080.page
http://musingsofametalmind.blogspot.co.nz/2012/04/stormraven-conversion-finished.html
http://www.bolterandchainsword.com/topic/244683-my-stormraven-conversion-project/
as well as the excellent looking Forgeworld Storm Eagle. Incidentally, James Wappel has put up great reference photos for anyone looking to understand how that kit looks IRL:
http://wappellious.blogspot.co.nz/2013/05/look-it-flies.html
http://wappellious.blogspot.co.nz/2013/04/the-view-from-above_29.html
http://wappellious.blogspot.co.nz/2012/07/taking-flight-more-images-of-finished.html
http://wappellious.blogspot.co.nz/2013/04/taking-flight-once-again.html
so good in fact that you can get guestimated measurements for some pieces.
Im still very much learning how to use plasticard, so some of my techniques are probably quite rough. I've been building an ADL from plans as practice as well, they may appear on the photos in the background.
One thing i discovered very quickly is I suck at cutting straight. This tool has been a godsend so far.
Right so to work:
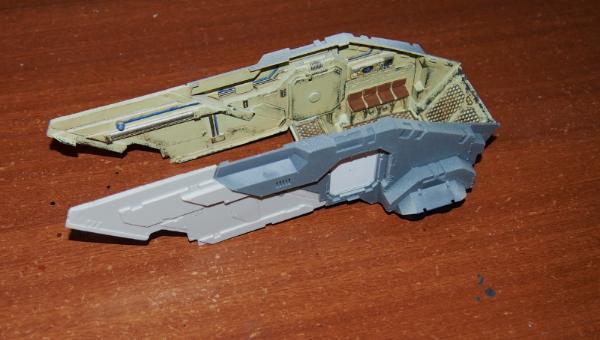
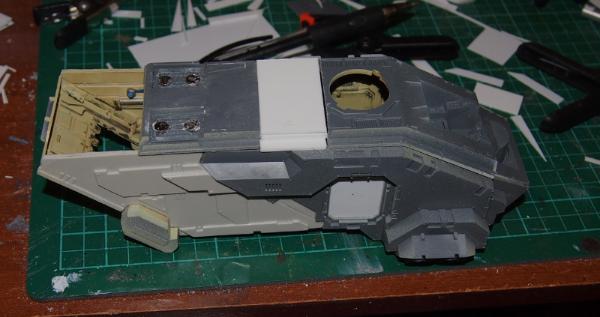
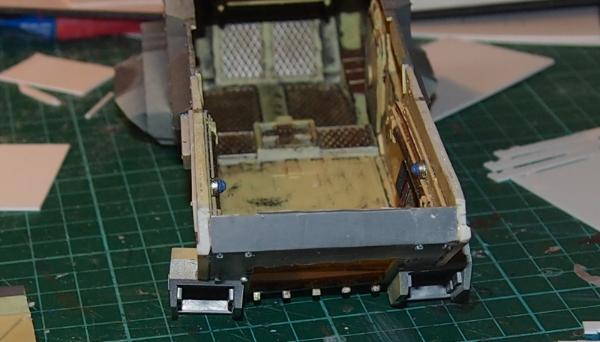
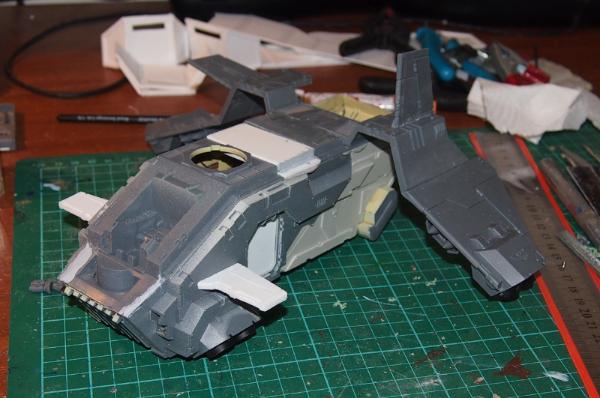
the stock chapterhouse kit, with the interior starting to get painted. Its not a bad kit for a 3rd party, but just doesn't do enough to change the look. The casting was average, the pieces to their credit were very straight which makes the rest of the build easier. There's a lot of spots where it's obvious they rushed it / didn't bother filling gaps that turn up in the final model, but generally the outside is much better modeled than the interior.
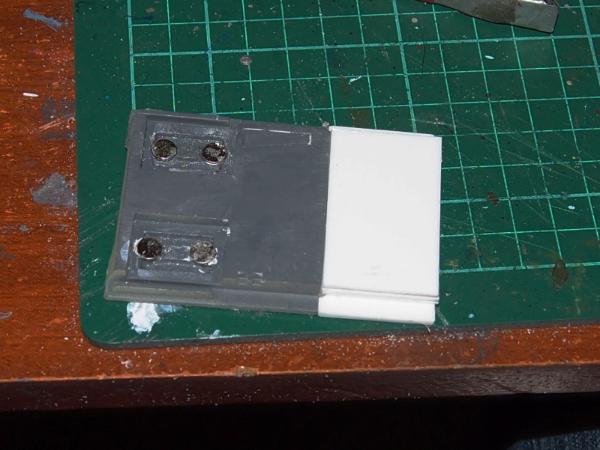
While I was working underneath the model, I decided to fill the stock location for the stand:
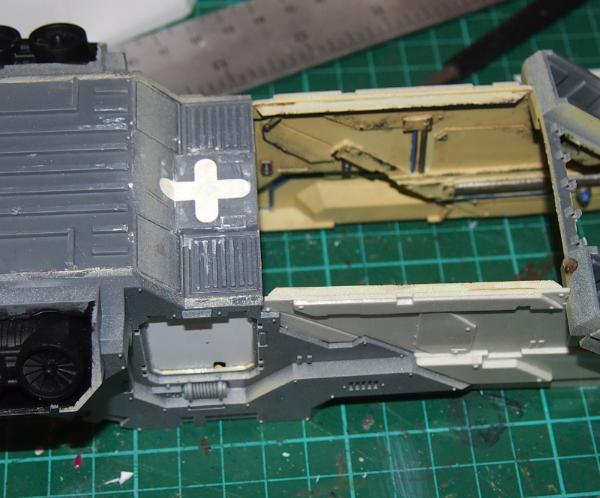
I had a few issues as well. The SR kit I got had a badly warped back section. This is a photo AFTER i'd put it in boiling water, hair dryered, tried everything I could imagine to straighten it.

The chapterhouse floor is pretty straight in this photo, the plastic is not. The CH stand holder looks a bit tacked on, but at least they tried to make it look like it might be something intentional.
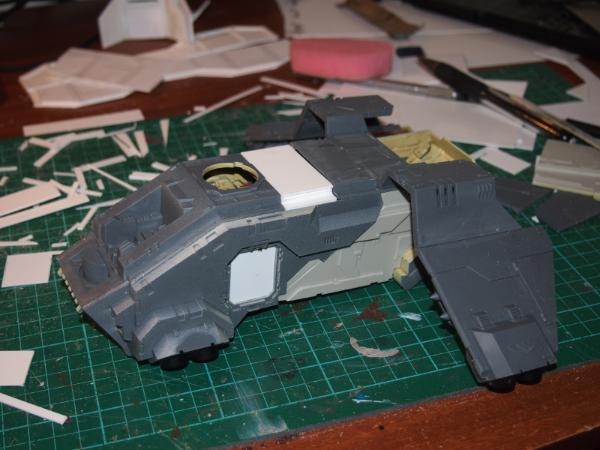
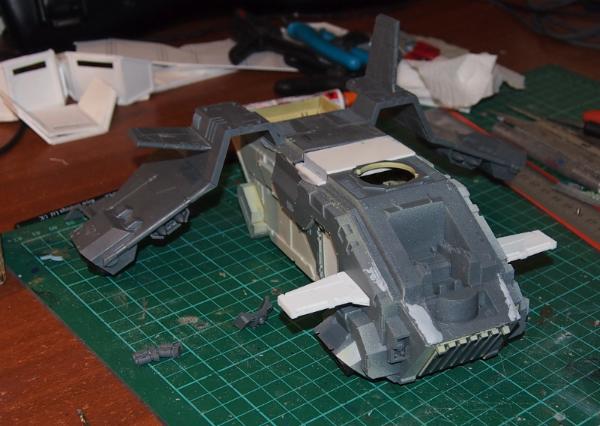
Looking at this progress so far and playing around with the wings, i decided I was going to omit the tail entirely. As such, the wings would have to move back. I didn't see any way to do that other than to move the actual mounting plate back itself. I want the back edge of the wings to be flush with the back of the fuselage, so here we go!
it's always nerve racking cutting a brand new kit. This piece has a great guide though, two tabs on the underside where it slots into the fuselage. So i cut there. worked out great.
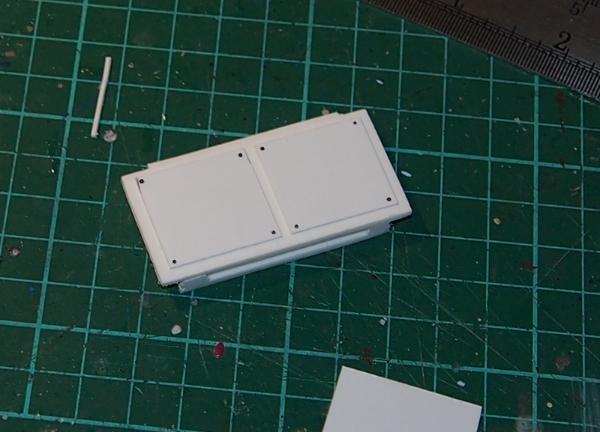
Figured out where the mounting plate should go then started building a piece to fit the gap:
figured out based on my available plasticard what i'd need to match the shape and size of the raises on the model by layering pieces. It'll be greenstuffed smooth once it's attached to the rest of the roof.
not a bad fit. you can see the start to my magnetising the wings there. It's not pretty, and in fact will have to be redone because they don't sit flush.
on the model it looks pretty close. They aren't glued on at all yet, just sat on top of the thing.
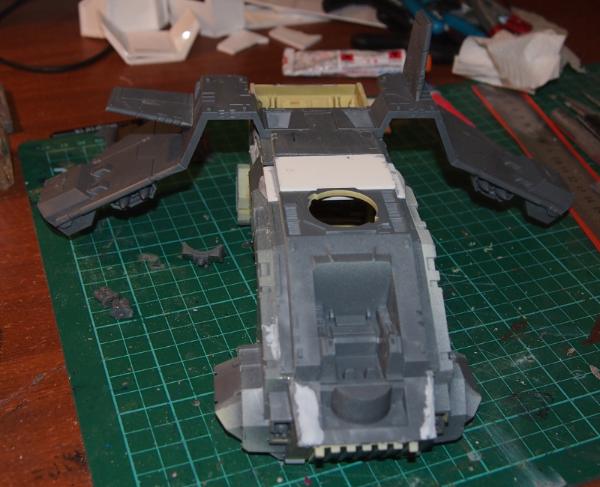
Since I wasn't going to use the stock tail, I figured I could get away with using the elevators as rudders (vertical) or elevons (at an angle)
I also decided to scratch build some canards for the front. Basing my work on the photos I gleaned from Wappelious, I ended up with these:
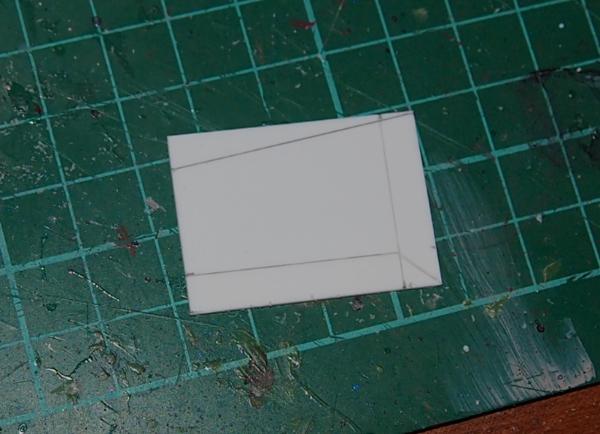
pencil design based on the Storm Eagle
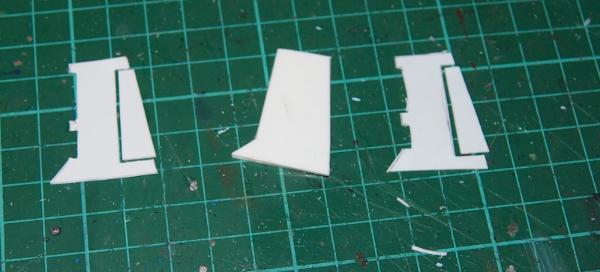
cut out some detail
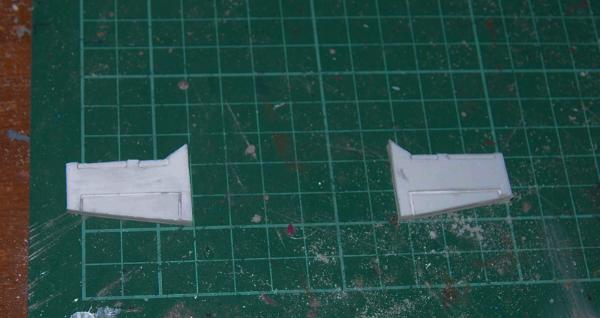
complete. Other than the flaps not being quite the same size i'm pretty happy with them. I'll have to see how they look when primed, I find it exceedingly difficult to judge based on white plasticard (and it does my camera in as well)
So that's where I'm at.
Tonight's plans are to re-magnetise the wings and start working on filling that gap on the tail. I'll grind off the last of the back tail "holder" section as well.
Not sure if i want to go with vertical rudders or some sort of angled elevon system. My thought is that if it's got canards, they should be rudders, but coolness outweighs aerodynamics when you're building a flying schoolbus.
|
|
|
|
 |
|
2013/05/04 11:16:38
Subject: Storm Raven conversion, Starting from a CH kit and going farther.
|
|
Daring Dark Eldar Raider Rider
|
Looking good so far, big guy.
Impressed at how fast you got the "canards" to look good. (side note: do we know why the front "wings" on an aircraft are called ducks? of all the flying animals, why ducks?)
I take it that the styrene and the plastic glue are interacting nicely?
looking fwd to seeing more.
Automatically Appended Next Post:
Looking good so far, big guy.
Impressed at how fast you got the "canards" to look good. (side note: do we know why the front "wings" on an aircraft are called ducks? of all the flying animals, why ducks?)
I take it that the styrene and the plastic glue are interacting nicely?
looking fwd to seeing more.
|
|
This message was edited 1 time. Last update was at 2013/05/04 11:16:49
|
|
|
|
|
2013/05/05 01:49:53
Subject: Re:Storm Raven conversion, Starting from a CH kit and going farther.
|
|
Raging Ravener
|
Small amounts of progress today. Remagnetising the wings properly turned into a complete b***h of a job, took 4 attempts to get the right balance of glue, right sized magnets and what not. So that ate most of the evening.
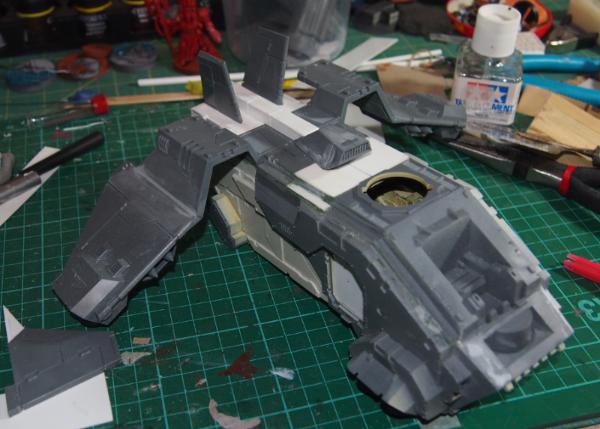
However, i did get a chance to grind down the back end and do some trial fitting:
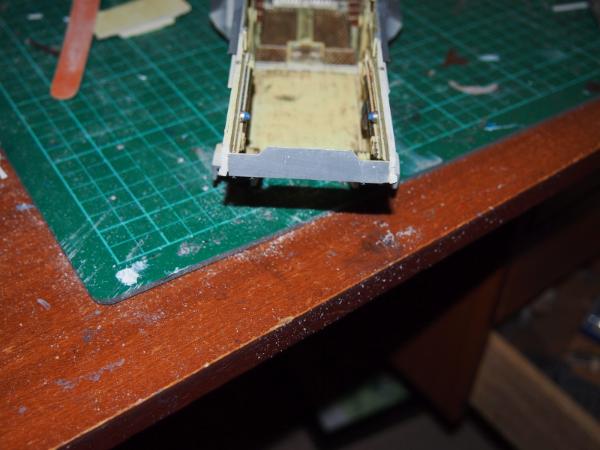
And the trial fit of the first three pieces of the top (front one is actually glued in, the other two are still free floating)
interestingly, the wings interfere slightly with the back piece so i'll have to give some thought to how i want to handle them. My current plan is to get everything smooth and then add plating / detail, though i'd like to replicate the "cut in" notching on the back pieces somewhat so i'll have to take that into consideration.
Also, this model will not have a manned turret, it'll be much smaller and flatter. Still not sure what to do about the middle, probably clone something similar to the storm eagle there.
|
|
|
|
|
|
2013/05/06 10:14:31
Subject: Re:Storm Raven conversion, Starting from a CH kit and going farther.
|
|
Raging Ravener
|
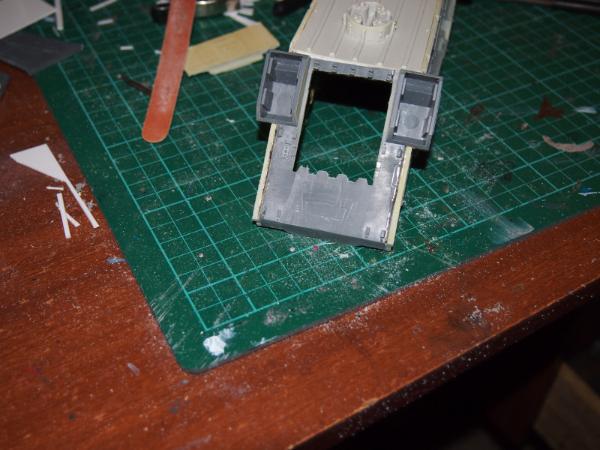
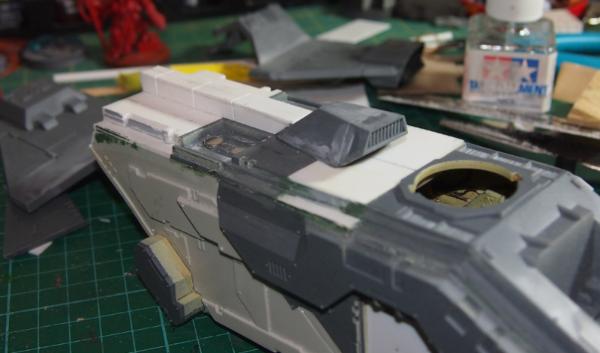
Damn tail piece was interfering with the next piece I had to make, so off it went as well.
I've also decided I'm not giving up on the painted interior I'd started, so the pieces I scratchbuild will need some details. Not going crazy here, but some basic panels with rivets go a long way to making it look better. I also closed up the gap on the first piece:
And finally, work on the back most piece. I decided I liked the look of the cut in pieces on the edges of the storm raven kit, so thought i'd try my hand replicating it. I've got a 3mm cut out and a 21mm cutout here, and once laminated together should give me the basis for the thing. Then the top piece will be cut 3 to 5 mm deep (as opposed to the 1mm recesses you see in the below photo) and the effect will hopefully be complete.
|
|
|
|
|
|
2013/05/07 05:43:28
Subject: Storm Raven conversion, Starting from a CH kit and going farther.
|
|
Daring Dark Eldar Raider Rider
|
That semi-assembled shot looks pretty good.
how are you going to be mounting the unmanned turret? are there some turret bits remaining to provide a round hole to insert into? i probably have a few ork bit that you could just cut apart for the ring if need be.
thoughts on how you're going to make the unmanned turret?
|
|
|
|
|
2013/05/07 09:17:29
Subject: Storm Raven conversion, Starting from a CH kit and going farther.
|
|
Raging Ravener
|
i'm likely to clone the turret from the dakka thread in the top page. Take the guns and put them on their side.
The chapterhouse kit comes with a convenient cover for that big gaping hole that I'll use. I'll make a way to pivot the guns up and down as well (probably just magnets)
I'll mock it up as well.
in fact, here's an excellent post about it:
http://www.dakkadakka.com/dakkaforum/posts/list/346080.page#2471464
|
|
|
|
|
|
2013/05/10 10:22:23
Subject: Re:Storm Raven conversion, Starting from a CH kit and going farther.
|
|
Raging Ravener
|
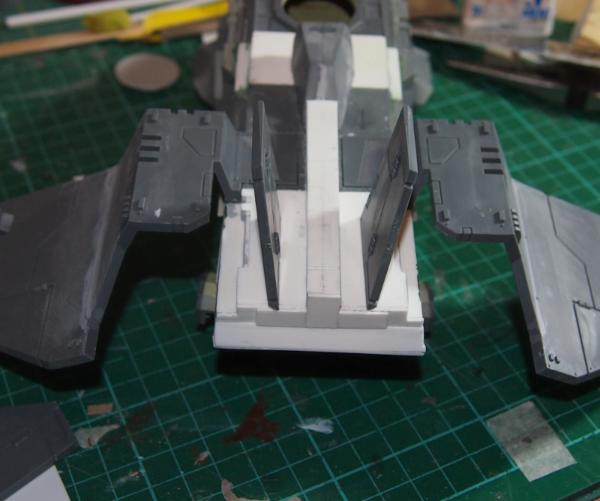
Lots of work going on, none of it is particularly photogenic though. Mostly to do with filling gaps, magnetising the weapons on the front.
I've hit a bit of a stumbling block. I've decided I want the thing to have canards, so i'm trying to figure out what to do with the elevators I chopped up earlier. I was originally going to mount them on the side of the engine nasselles but aerodynamically it makes no sense for a plane to have 2 sets of elevators / elevons and no rudder at all. So i tried the rudder look.
note in the following photos everything is temporarily tacked on.
The alternative I didn't picture was the rudders on the main body instead of on the wings, but I'll have to finish building the roof before I can mock that up.
Thoughts?
|
|
|
|
|
|
2013/05/10 10:40:51
Subject: Storm Raven conversion, Starting from a CH kit and going farther.
|
|

Omnious Orc Shaman
A long time ago in a galaxy far, far, away...
|
Great work dude, this kit was always crying out for conversion...
If you haven't seen it already, check out MajorTom11's blog - I referred to this for inspiration on my version of the raven, might give you some more ideas  http://www.dakkadakka.com/dakkaforum/posts/list/342328.page
|
|
|
|
|
|
2013/05/12 02:24:04
Subject: Storm Raven conversion, Starting from a CH kit and going farther.
|
|
Daring Dark Eldar Raider Rider
|
I think the upright elevators are better. your have a real X-wing feel going on otherwise, and while that's not a bad thing necessarily, the stubbyness of the elevators compares unfavourably with the bulk of the wings.
have you considered slight outward angle on the elevators, like:
_\____/_
i think it looks a bit "cooler" than:
_|____|_
but that's just me.
|
|
|
|
|
2013/05/12 08:59:49
Subject: Storm Raven conversion, Starting from a CH kit and going farther.
|
|
Raging Ravener
|
Damn good idea. Ill slap some pins in it and do some experiments. Going to glue together the roof tonight and then start looking t the rudders.
|
|
|
|
|
|
2013/05/25 08:26:27
Subject: Storm Raven conversion, Starting from a CH kit and going farther.
|
|
Raging Ravener
|
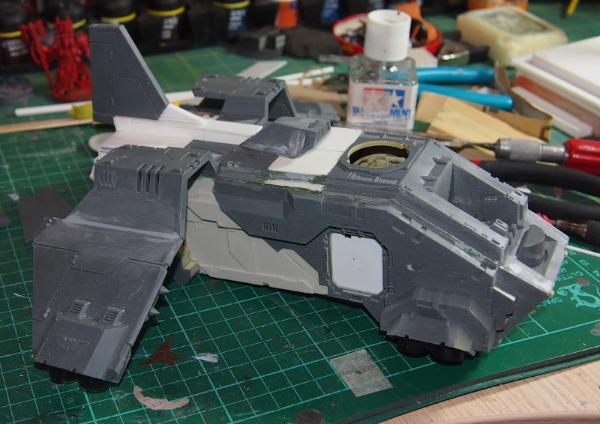
13 days since last update. Anyway
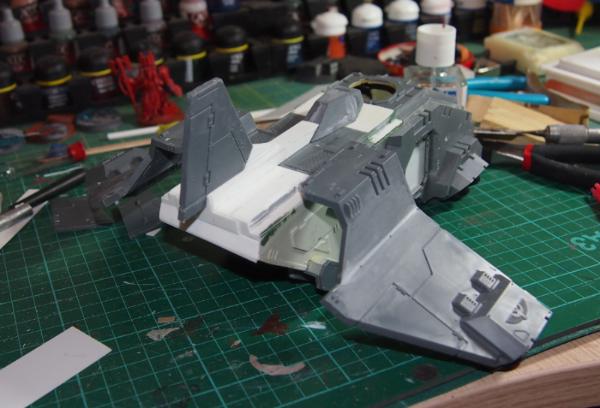
I had some issues with poor fit and bending on the back of the raven so I decided to repanel a bunch of it:

which hides most of the sins.
Like the Storm Eagle, I wanted a spine across the back to break up the big space. Also used inspiration from another custom build to shop up and recycle the air scoop:
I'm still struggling with the rudder ideas in the back though.
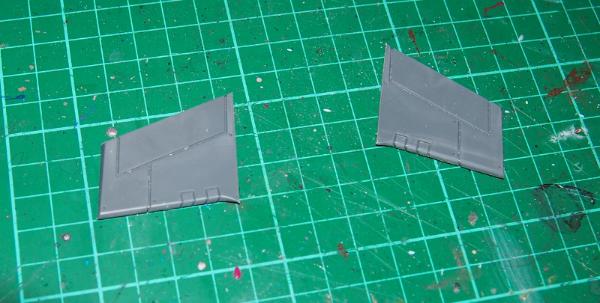
Here's 2 rudders made out of the old elevators:
and though I like the idea, I can't figure out how to make them look anything but tacked on.
I made an alternative, cutting the original rudder and extending it instead. I think it matches the shape better but I'm afraid it's too big...
the extension at the bottom extends the panel line as well.
I gave up on building a crane / extender arm for the dreadnought carrying capacity as it was getting too complicated.
I think I'm very close to throwing a coat of grey primer to find all the spots that need filling / sanding / repriming, I can feel it 
|
|
|
|
|
|
2013/05/25 11:09:33
Subject: Re:Storm Raven conversion, Starting from a CH kit and going farther.
|
|

Is 'Eavy Metal Calling?
|
This build is coming along great, can't wait to see it completed. I don't like the idea of the revered dreadnought dangling from the back of the plane, so glad your not doing that. I guess I feel about it the same way as my wife feels about the novelty ball sacks that some people hang from their trucks.
|
LOL, Theo your mind is an amazing place, never change.-camkierhi 9/19/13
I cant believe theo is right.. damn. -comradepanda 9/26/13
None of the strange ideas we had about you involved your sexual orientation..........-Monkeytroll 12/10/13
I'd put you on ignore for that comment, if I could...Alpharius 2/11/14 |
|
|
|
|
2013/05/25 22:07:59
Subject: Storm Raven conversion, Starting from a CH kit and going farther.
|
|
Raging Ravener
|
THIS STORMRAVEN NEEDS TRUCKBALLS!
Back to normalcy now, thanks for the comments! There was no way I could get it to not look tacked on, then there was the whole "realism" around a giant metal robot throwing the center of gravity completely to hell.
|
|
|
|
|
|
2013/05/26 01:12:20
Subject: Storm Raven conversion, Starting from a CH kit and going farther.
|
|
Daring Dark Eldar Raider Rider
|
Trucknuts would be pretty funny, and hell my father-in-law really enjoyed them as a birthday gift, but maybe hard to model in the correct size... ;-)
i like it with the large single rudder. it's not surprising that a big plane would have a big rudder.
my concern is that in the photos, the air scoop looks crooked. is that just me?
|
|
|
|
|
2013/05/26 04:09:57
Subject: Storm Raven conversion, Starting from a CH kit and going farther.
|
|
Raging Ravener
|
think it's off by about a mill and tbh i'm not that worried about it. The whole model is a little warped so getting things to look "just right" is actually quite hard. The rudder was way more out of alignment, and that's going to be addressed.
Think I'll go with single rudder on this one, cutting it down slightly (I'll chop the top bit before the actual rudder bit and clean it up)
|
|
|
|
|
|
2013/05/27 10:05:11
Subject: Storm Raven conversion, Starting from a CH kit and going farther.
|
|
Raging Ravener
|
tonight's progress.
Glued on: rudder and canards.
mocked up: turret.
Pretty happy with how everything looks. Didn't chop the rudder in the end.
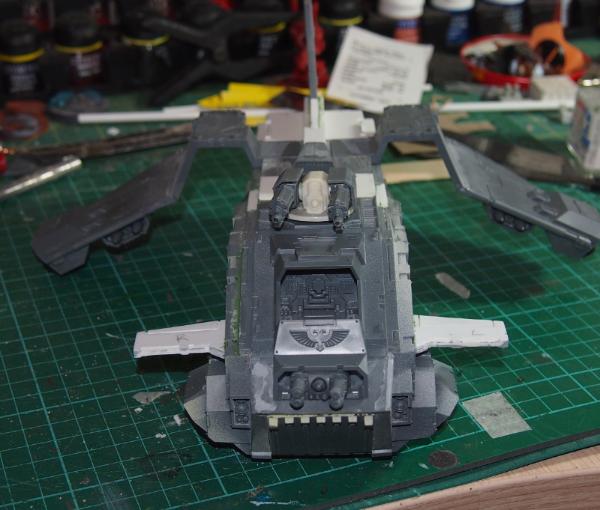

Also been filling some of the worse gaps. I hate gaps (i've de-gapped all my rhinos, which was a right pain but worth it in my opinion)
|
|
|
|
|
|
2013/05/27 11:17:42
Subject: Storm Raven conversion, Starting from a CH kit and going farther.
|
|
Daring Dark Eldar Raider Rider
|
I think it's coming along nicely.
turret looks good. reminds me of the other "unmanned" turrets i've seen, so i suppose that's a good thing.
I remember the plastic War Walkers you built and how you refused to have even a seem at the front where the 2 bits of of the "cockpit" come together. actual gap filling seems sane in comparison.
Do you have chapter specific doors and/or door sized icons?
|
|
|
|
|
2013/05/27 19:59:49
Subject: Storm Raven conversion, Starting from a CH kit and going farther.
|
|
Raging Ravener
|
yup got some "forgeworld"  doors and a few icons left. Not sure where I'll stick the icons, I was thinking on the front and back hatches.
Trying to figure out what I'll do for distinctive markings. I'd love to do a big white scorpion on the top by that might be a wee bit ambitious. Also, unlike the Valkries, there's not a huge flat surface area to pull something like that off on.
Maybe just some wing stripes.
|
|
|
|
|
|
2013/06/05 05:49:32
Subject: Storm Raven conversion, Starting from a CH kit and going farther.
|
|
Daring Dark Eldar Raider Rider
|
You told me you primed it, so where is it already?I'd like to see how it looks without all the green/grey/white visible.
|
|
|
|
|
2013/06/05 09:47:09
Subject: Storm Raven conversion, Starting from a CH kit and going farther.
|
|
Raging Ravener
|
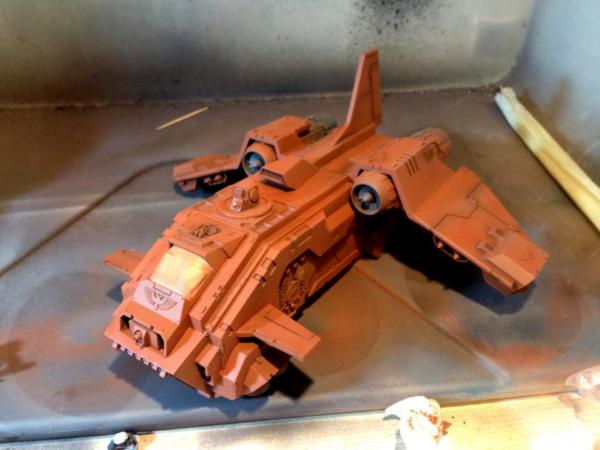
I have been publicly shamed..
Right so part of the reason for no updates is that I was doing the really boring part. Surface prep.
Fill:
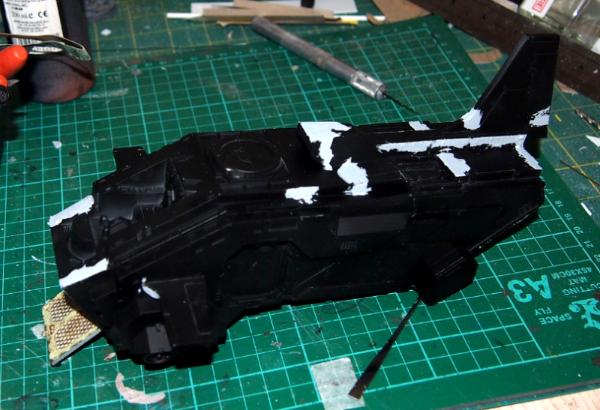
Sand:
Repeat. Then repeat some more.
The black primer was just to get everything looking even, so I could spot all the spots I needed to fill. As you can see, there were several. It's also the basis for the darkest of the preshading (everything under the model, wings, underside, under the canards etc. stays black)
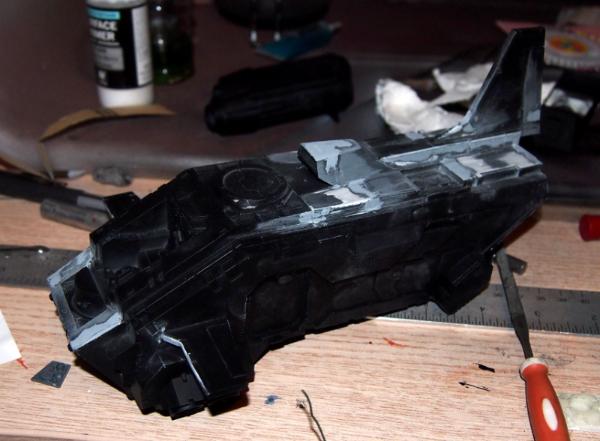
Anyway then I primed it dark grey, then light grey on the tops and anywhere light would hit it. Then I went back and preshaded around all the panel lines where crap would naturally accumulate. This was my first time and it was quite a bit harder than I expected
The idea being that as I use an airbrush, I put thin light coats on, leaving a little bit of the preshading to show through to darken the spots that are black. We'll see if it works, this is my first time trying it.
Anyway, so here's the model, primed at this point. Camera was having a lot of trouble finding the right exposure so some of them are a little odd.
Also, the front piece isn't glued in yet, i'm going to have to paint the cockpit and pilot before I do that.
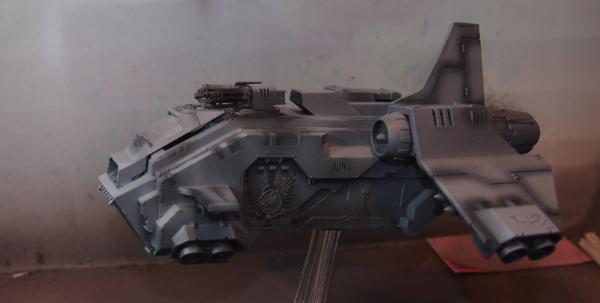
Incidentally this is just before it fell off its base as I'd only bluetacked the acrylic rod to the base. Not a good idea.

You can see the spine and the rudder detail pretty well. Think for the next one i'll do something different on the rudder, I'm not 100% happy with it or the back.
|
|
This message was edited 1 time. Last update was at 2013/06/05 09:48:07
|
|
|
|
|
2013/06/05 10:50:19
Subject: Storm Raven conversion, Starting from a CH kit and going farther.
|
|
Daring Dark Eldar Raider Rider
|
I like it.
The doors look real nice.
The tail looks MUCH better than the stock version, as does the beefed up body. looking fwd to seeing it all orange
|
|
|
|
|
2013/06/14 00:09:06
Subject: Re:Storm Raven conversion, Starting from a CH kit and going farther.
|
|
Raging Ravener
|
Yay! Crappy cellphone picture time!
Mostly it's because after priming and painting the cockpit I couldn't be arsed going upstairs to get the good camera.
These are all very WIP

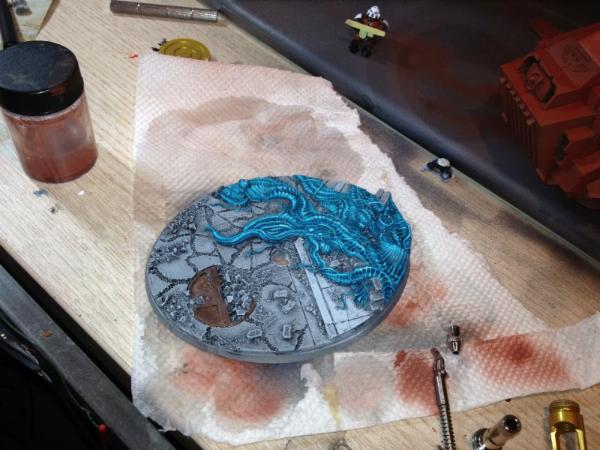
and of course it needs a base, here the excellent Secret Weapon Miniatures Alien Invasion base
Better photos coming up after the next couple of layers of orange.
|
|
|
|
|
|
2013/06/14 09:26:39
Subject: Storm Raven conversion, Starting from a CH kit and going farther.
|
|
Daring Dark Eldar Raider Rider
|
I may just start calling this the SS Pumpkin
Do think a tail stripe or maybe a wing strip would help, along with white doors.
|
|
|
|
|
2013/06/19 23:24:31
Subject: Storm Raven conversion, Starting from a CH kit and going farther.
|
|
Fresh-Faced Inquisitorial Acolyte
|
love the elongated look. It may be based on the stormraven, but it looks a lot better than the stock model (and I aint even that mad at the stock model). Very cool design with a great sense of balance. If anything the stormraven looks too front heavy with the bulbous troop carriage and the storm eagle looks too back heavy with all the weapons on the rear wings. This though, this looks just right!
insert Goldilocks reference here
|
Spitty Dakka Klan 2000 
30k Alpha Legion 
Imperial Guard 2500 
Ostland of the Empire 2500 
|
|
|
|
|
2013/06/20 22:03:52
Subject: Re:Storm Raven conversion, Starting from a CH kit and going farther.
|
|
Raging Ravener
|
Thanks DJ i'm pretty happy with it overall. I've been trying hard to keep the "space marines" look going and had a long hard look at the thunder hawk and the storm eagle before settling on this design. The next one will be more storm eagle'esque as I'll move the wings down so that the engines are level with the top of the fuselage and make the nice triangular wing addons that it has.
Right so where were we? Right painting. Lots of experimentation with various techniques and lots of failures. It's kinda the point of experimenting. I tried doing a salt mask to simulate chipping and it went... poorly. Salt water and acrylic aren't best of friends it turns out. In the end i salvaged most of it though:

I really need to get some better photos together.
Still think it needs more white to break up the orange. I'll start working on blocking out all the other colours first and see where that gets me.
|
|
|
|
|
|
2013/06/21 00:50:40
Subject: Storm Raven conversion, Starting from a CH kit and going farther.
|
|
Daring Dark Eldar Raider Rider
|
Logo on the tail fin? Stripes on the canards?
And to be fair, when you told me you put stripes on the wings i had pictured them on an angle for some reason. Nothing wrong with straight, but is all that symmetry necessary, even for marines?
I suppose the question is really: Do you want to re-do those having already re-done them once?
|
|
|
|
|
2013/06/21 01:48:29
Subject: Storm Raven conversion, Starting from a CH kit and going farther.
|
|
Raging Ravener
|
Nah i'm definitely happy with the stripes on the wings. they were a mission but they are more less what i wanted. I think the big thing will be the weathering will tone down the contrast quite a bit.
Was thinking 1 stripe on each canard. The tail fin will have something white on it, either commissioned freehand or something else..
think the doors will add a bit to it as well, can't really see them in the picture.
|
|
|
|
|
|
2013/11/17 21:38:55
Subject: Re:Storm Raven conversion, Starting from a CH kit and going farther.
|
|
Raging Ravener
|
self necro. great.
All of july / august was spent traveling the world with my family. Things I wouldn't recommend unless you have to: doing an around the world trip with an 18 month old. It was fun, but definitely a LOT of work. Then work got crazy, but I kept plugging away on this model.
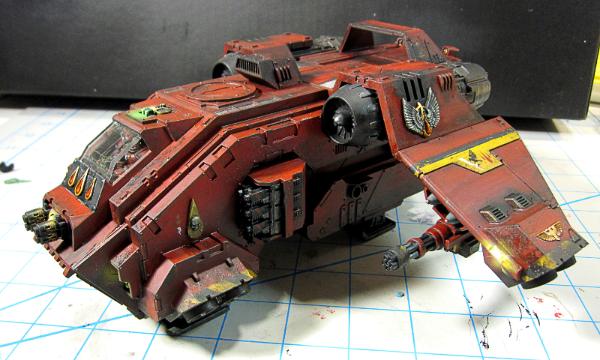
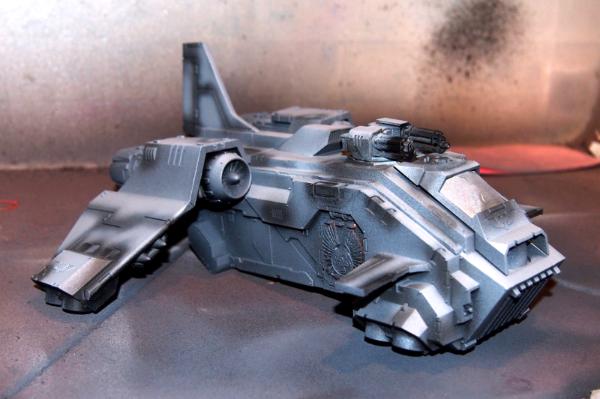
It's now at a point where I think I can show it as "complete"
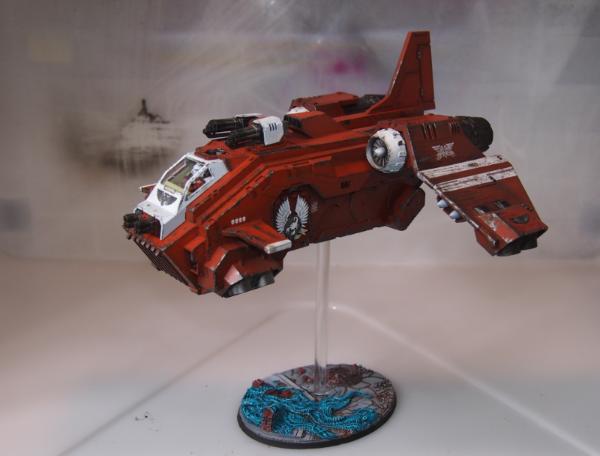
On it's base.
closeup:
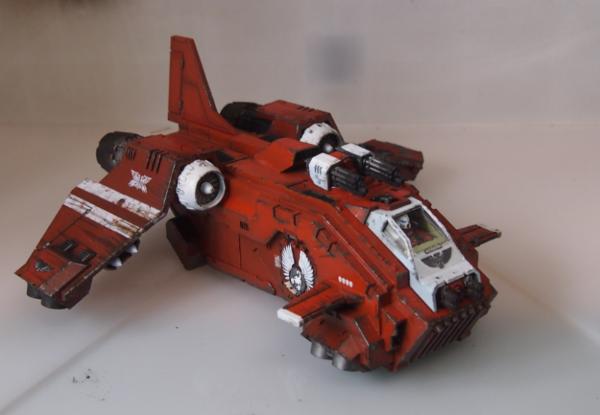
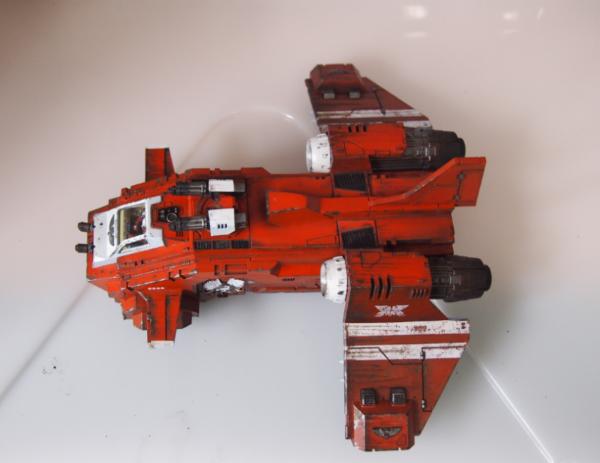
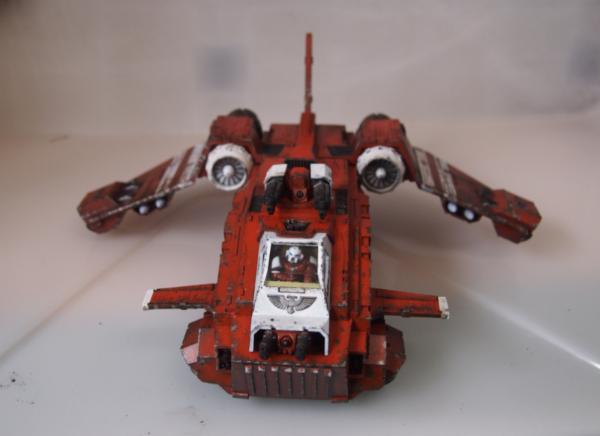
Magnetised for transport.
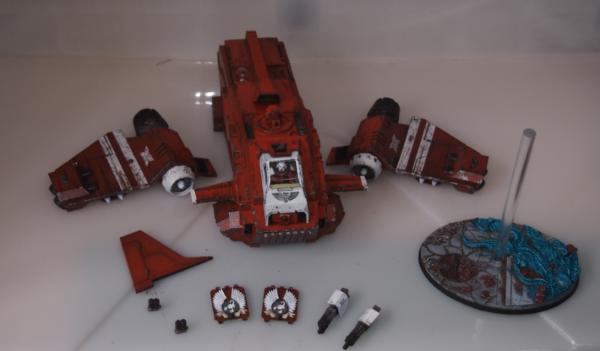
The tail magnetisation was a late addition. I brought it to a tournament where the tail snapped off in transit, so I had to get a little creative with how to fix it. Figured magnets were as good a solution as any.
As always, it's not 100% done. I'm going to be printing some custom decals for the tail at some point, but for now i'm pretty pleased with it.
|
|
|
|
|
|
2013/11/18 01:35:29
Subject: Storm Raven conversion, Starting from a CH kit and going farther.
|
|
Bounding Assault Marine
terra
|
That's an impressive bird brother!
|
For the ruination of the Emperor's foes, I commit your body and soul to battle. Strike down upon those that defy His divine will, go forth and lay the blood of our enemies at the Emperor's feet."
-- Litany of Demolition  |
|
|
|
|
2013/11/18 06:25:13
Subject: Storm Raven conversion, Starting from a CH kit and going farther.
|
|
Raging Ravener
|
Cheers for that
|
|
|
|
|
|
|
|


