| Author |
Message |
 |
|
|
|
|
Advert
|
Forum adverts like this one are shown to any user who is not logged in. Join us by filling out a tiny 3 field form and you will get your own, free, dakka user account which gives a good range of benefits to you:
- No adverts like this in the forums anymore.
- Times and dates in your local timezone.
- Full tracking of what you have read so you can skip to your first unread post, easily see what has changed since you last logged in, and easily see what is new at a glance.
- Email notifications for threads you want to watch closely.
- Being a part of the oldest wargaming community on the net.
If you are already a member then feel free to login now. |
|
 |
2013/05/05 18:21:12
Subject: A short time ago in a FLGS not really so far, far away... [X-Wing]
|
|

The New Miss Macross!
|
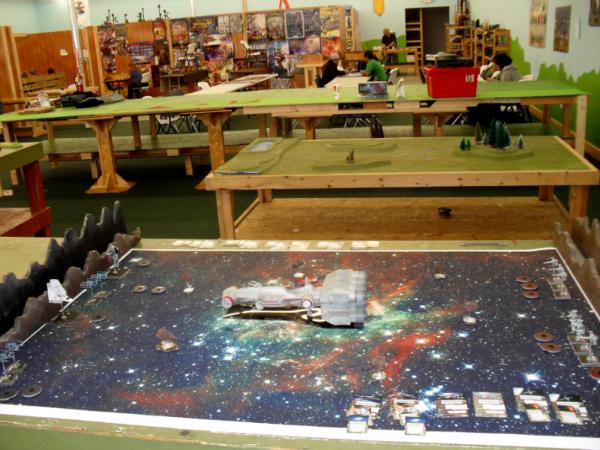
We had our second monthly X-Wing league night yesterday in honor of the "Fourth be with you!" theme day and it was quite fun. The store owner managed to get the previous league kit with the plastic range ruler and Luke/Vader megasized cards and we did a short intro pair of tourny games at 100pts to distribute the loot. First and second prize got the rulers and everyone got a megasized card for participated. After that, I had been planning a themed game to go along with a toy that I bought for that purpose and all but one player were up for another bigger game. The themed game was based on the excellent material posted over on BGG and modified to my own preferences based on feedback I've seen there and also on the FFG forums.
http://boardgamegeek.com/thread/860628/custom-mission-the-redeemer
I changed the stats on the corvette to a more durable version with increased armor, hull, and shields but less offensive firepower as it seemed from reports that the rebels really had a hard time winning the scenario. I was afraid of swinging the balance too far so I erred on the side of caution and bumped up the survivability but not the offensive firepower of the capital ship (as well as decreased the reinforcements of the imperials). I ignored the 8 smaller laser batteries that aren't modelled well on the corvette model I'm using (Lights and Sounds Collector Fleet Blockade Runner) and changed the turbolaser turrets to heavy laser cannon stats from the Slave 1 upgrade card. In addition, I made a quickie custom base for the model that divided the ship footprint up into separate sections; each section was effectively a different "base" that you could fire upon but sharing the same hull/shields. If you wanted to fire for instance at the turbolaser batteries, you measured to that hull section on the base and the batteries fired by measuring from there as well. If a ship was in base contact with the corvette for two turns in a row, it rolled a collision die per the asteroid rules to hopefully encourage players to strafe but not play bumper cars with the corvette. Finally, the shields were ignored within range 1 of each section and the armor on the corvette was ignored with critical results instead of the face up card text (so a crit plus two regular hit did one damage total).

The mission goals were three-fold for each side. The primary mission goal for the Imperials was to disable the engines of the cruiser whereas the rebels wanted to reach the hyperspace point at the other end of the table (9 turns with the corvettes 3-forward move each turn if undamaged); winning this gives you a minor victory if nothing else is accomplished. The secondary goal was to get off a distress call with the sensor/communications system to call for rebel reinforcements (and for the imperials to destroy the two sensor dishes to prevent this). The final goal for each side was to decimate the other side's fighter strength. The rebels were to decapitate the leadership of the imperial fighter squadrons (destroy all unique character craft not counting the firespray) whereas the imperials were to destroy every rebel fighter. Imperial players with destroyed unique pilots could bring in one ship per player at the most basic generic version of the same craft as reinforcements launched from an oncoming star destroyer from their long table edge on odd numbered turns.
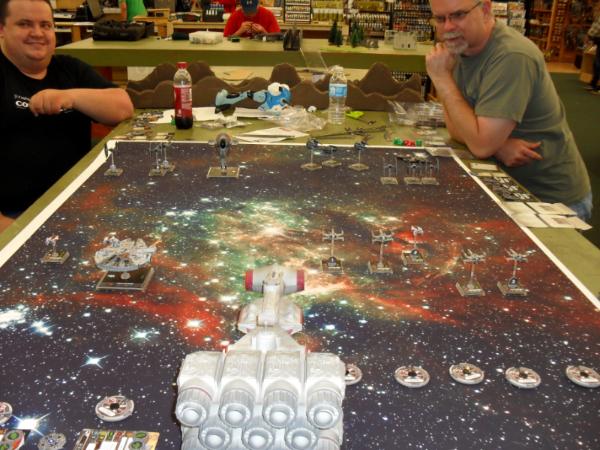
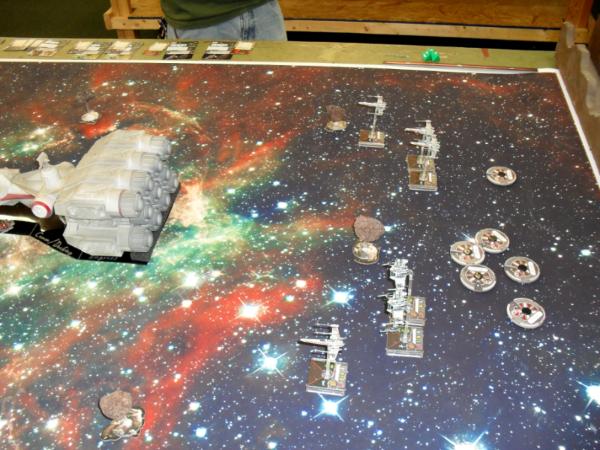
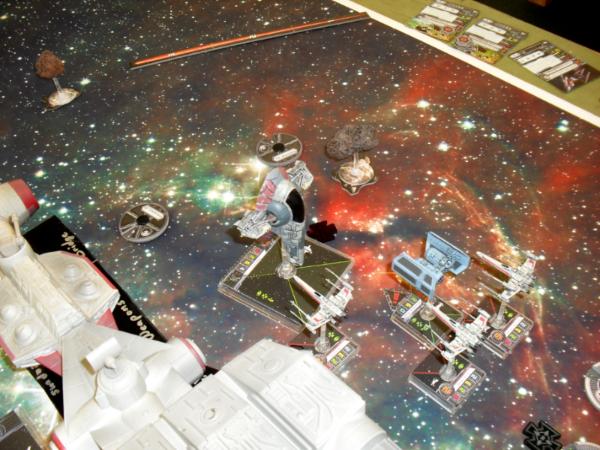
So here we have the initial setup. The imperials were largely composed of unique characters (to get the scenario custom reinforcement rule assisted by a Kath firespray for some torpedo bombardment). The rebels were led by Han Solo in the Falcon with Arven and two green squadron A-wings plus a pair of rookie X-wings and drag-strip qualtiy Red Squadron X-wings with push the limit and engine mods.
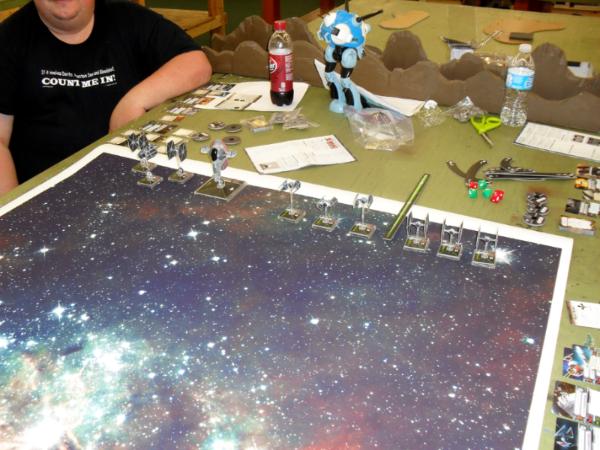

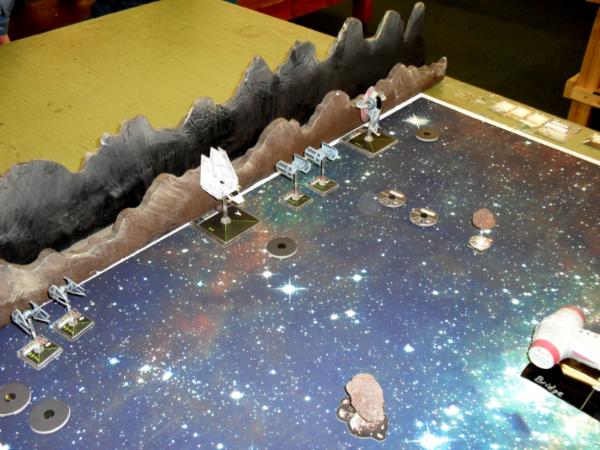
The first turn was relatively uneventful with the sides moving for the most part at full speed towards each other... most of the TIEs screaming towards their targets (except for one taking some early zig zag evasive patterns) whereas the rebel fighters rushed forward to strafe the incoming Imperials, not knowing if they'd stop to dogfight or proceed towards their objective. No one was in range so no shots were fired.
More to come in a bit as I upload and edit the pics. Feel free to comment in the meantime.
|
|
This message was edited 6 times. Last update was at 2013/05/06 03:39:44
|
|
|
 |
|
2013/05/05 20:38:03
Subject: A short time ago in a FLGS not really so far, far away... [X-Wing]
|
|
Hangin' with Gork & Mork
|
I eagerly await the Zentradi battlepod entering the battle.
|
Amidst the mists and coldest frosts he thrusts his fists against the posts and still insists he sees the ghosts.
|
|
|
|
|
2013/05/05 20:48:09
Subject: A short time ago in a FLGS not really so far, far away... [X-Wing]
|
|
The New Miss Macross!
|
LOL, that won't happen till around December when the Robotech Kickstarter stuff supposedly arrives (and I did actually come up with veritech stats in the x-wing game already!). I actually brought him to the game along with a print out of some of the first post in the Robotech KS thread to see if anyone was getting in on the kickstarter. I figured if someone actually recognized what it was, they might be interested in the kickstarter. I've had a problem with getting into Heavy Gear and having no one to actually play against despite my best demo and PR efforts so I figured I'd get ahead of the curve this time around. I found two people really interested in getting in on it who didn't know about it as well as a third who already was (but for the battletech unseen aspect).
|
|
|
|
|
2013/05/05 20:54:06
Subject: A short time ago in a FLGS not really so far, far away... [X-Wing]
|
|
Tail Gunner
|
That is an awesome corvette.
I love the whole scenario as well.
|
|
|
|
|
2013/05/05 21:16:45
Subject: Re:A short time ago in a FLGS not really so far, far away... [X-Wing]
|
|
The New Miss Macross!
|
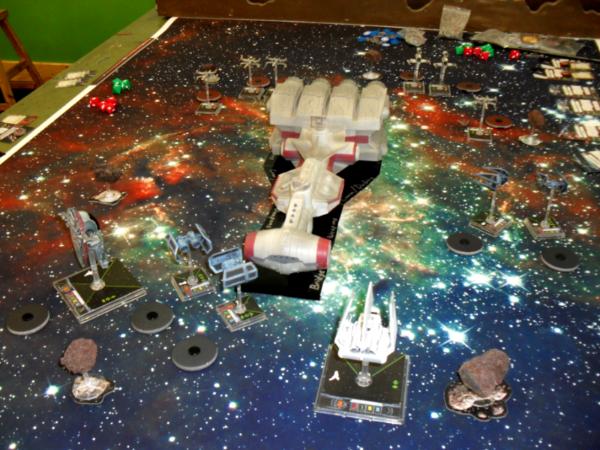
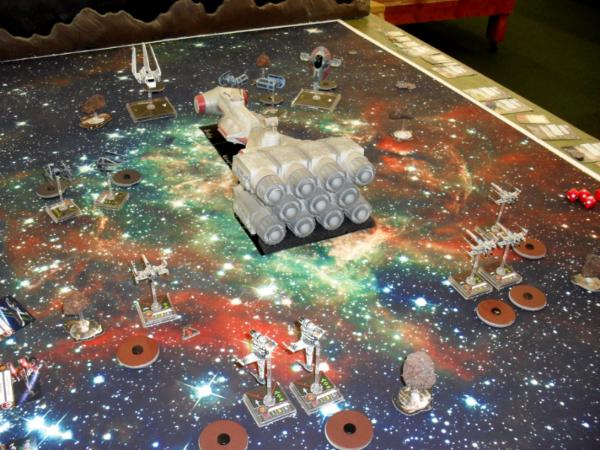
@Chugosh: Thanks! I can't take credit for the basic scenario idea and graphics as well as using that particular model as they're from BGG but I did try to modify them to fit my own needs. The corvette is exactly as I got it straight out of the box which was actually one reason I got it as it was effectively "pre-painted". The only things I may eventually change are the turrets as they do look a bit more toy-ish than I had initially hoped. Turn 2 The rebels again rushed forward to get in some free shots hopefully versus the oncoming Imperial TIE wall... all except Han who played it a bit more carefully and hung back as he nervously noticed a firespray heading towards him. The Imperials again largely continued forward as well with the right flank alternating zigzagging TIE squadrons. All but one of the rebel ships opened fire but apparently the Imperial defector on the corvette wasn't the only spy active in the system as the rebel ships managed to score only two damage with the entire fusillade.  Turn 3 The rebels took a more cautious approach and slammed on the retrothrusters to get off a second (and hopefully more deadly) pointblank salvo on the right but were largely thwarted by decidedly good imperial maneuvering as the imperials rushed forward and then barrel rolled into contact with the ships that were locked onto them, largely negating most of the effectiveness of the attacks. (We weren't sure if it was legal to do that but it sounded novel and cool so went with it). One TIE still managed to be destroyed and another marginally damaged whereas the Imperial response was largely focused on long range shots onto the corvette in an attempt to whittle down the shields. On the left, Kath's Firespray went straight for the corvette in a strafing run while Vader and two TIEs tangled with the Millenium Falcon. The pair of a-wings rushed forward and flipped in order to support the larger ship but to no avail due to the stressful maneuver and range.  Turn 4 The rebel hoped for distraction of a furball on both flanks largely dissipated as the imperials rushed past the rebel line and focused again on the shields of the frigate, leaving the X-wings and A-wings scrambling to maneuver back around into position and costing them valuable time. On the left, the Vader ordered the TIEs to disengage from the Falcon and concentrate as well on the corvette, hoping to not disappoint the Emperor yet again. The firespray finished its strafing run and continued past the corvette, getting off some more shots with its rear mounted cannons at close range. The shields of the frigate failed early in the battle and some minimal damage was done to one turbolaser turret with only a single Imperial casualty to show for the response.  Turn 5 All but one of the rebel fighters on the right managed to get back into the fight but unfortunately the tactical mess made them almost all out of range from the ships that their targeting computers had locked onto. Strangely, though, they did still manage to destroy the two TIE interceptors but only after they had both did damage to the engines of the corvette the A-wing on the left and the Turbolaser turrets focused on and killed Lord Vader as he zooming in for his own engine strafing run. The two regular TIEs and the Steele's Advanced on the right and the Imperials on the left flank focused almost exclusively on the engines as well, bringing the engine's hull point down to only two left and decreasing the corvette's speed to a 2 forward move. The imperial reinforcement zoomed forward as fast as they could and took some long range shots at the straggler X-wings and managed to drop the shields of one of them. 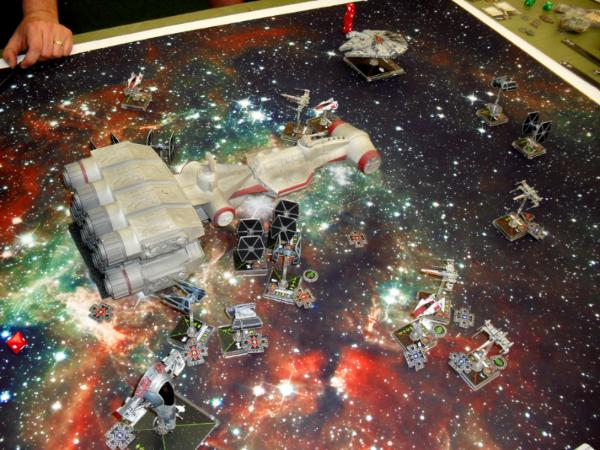 Turn 6 The corvette plodded forward at a reduced speed of two as the engines struggles to move it towards the hypserspace point. The Firespray turned sharply and focused its attention (as well as firepower) on an unfortunately close rookie X-wing, dropping its shields and damaging its hull. The two rookies in turn fired back and dropped the shields of the Firespray while the rest of the rebel fighters focused on the TIEs, destroying one fighter and dropping the shields of Steele's Advanced. The Imperial TIE fighters failed to account for the slower speed of the corvette and bumped up against it but luckily took no damage. Despite not being able to take an action (in base contact with the corvette's base), the point blank shots were hard to miss and both the damaged turret and the remaining engines were destroyed, leaving the corvette floating slowly through space and accomplishing the first Imperial goal. The previous turn's imperial reinforcements continued to fire and damage the rebel fighter tail while Han stayed back and focused on the new arrivals himself.  Turn 7 The second wave of imperial reinforcements arrived and zoomed forward while most of the earlier waves focuses on the secondary goal of the comm/sensor array when possible. Kath tired of toying with the rookie X-wings and dropped a goodbye seismic charge present shortly before turning and firing on the top sensor dish. The TIES in base contact continued to bump into the corvette, taking a single point of damage but destroying one of the two dishes despite their ineptitude. Both red squadron x-wings focused on the TIEs and destroyed one but only after he got in his final shot. Marek Steele turned to face his persuers and managed to survive the incoming fire of three target locked (but inexperienced) rebel fighters. Truly his is indeed one of the Empire's greatest fighter aces!  At this point, it was getting late and the store was likely to close before we finished another full turn so we decided to call the game with a minor Imperial victory. The imperials had disabled the corvette and destroyed one of it's sensor dishes and had a good chance of destroying the other in the remaining two turns I initially had planned as their reinforcements would have been in range. The rebels had mostly destroyed the named fighters with only three remaining out of the initial nine. If played to the end, it likely would have continued to be a minor Imperial victory with the loss of the elite squadron leaders counteracting the expected destruction of the second comm dish. I'll post some thoughts probably tomorrow about how the scenario turned out and what I'll tweak for the version 2.0 I want to try in a few months when the next wave with TIE bombers hits the store shelves. Hope you guys and gals enjoyed the battle report and I'll leave you with one final picture of the engines ablaze as the corvette rushes towards the hyperspace point during turn 1!  VROOOOOM!! VROOOOOM!!
|
|
This message was edited 5 times. Last update was at 2013/05/05 22:15:26
|
|
|
|
|
2013/05/06 23:57:29
Subject: A short time ago in a FLGS not really so far, far away... [X-Wing]
|
|
Cocky Macross Mayor
Georgia
|
Nice battle, will have to look up the rules on BGG, where did you get the Corvette?
|
|
|
|
|
|
2013/05/07 00:07:05
Subject: Re:A short time ago in a FLGS not really so far, far away... [X-Wing]
|
|
The New Miss Macross!
|
Thanks! I just used the pdf packet they provide in the BGG link I posted above and modified it in MS Paint to fit my needs. The corvette is just an ebay purchase I did last month especially for x-wing games.
Thoughts/musings on the mission...
Overall I'm happy with how the game turned out as it seemed like everyone was having fun (which would be the priority). I was surprised though that my changes to the scenario that buffed the ship up defensively didn't have much of an effect. Part of that would likely be due to the 3 imperial players strictly playing for the primary mission objectives instead of getting distracted by the tertiary goal of killing the fighters. Kudos for the imps for playing smart! The engines though did drop a lot faster than I expected and I may buff them up a bit more than I did as they basically dropped in 2 turns of concentrated fire. My initial thought was to have 1 hull per engine port but I was afraid that it would be too difficult with armor 2 for the imperials to accomplish. In addition, I initially wanted regenerating shields for the cruiser (2 shields per turn) but decided that would be too powerful. I think for the next game I would give it the regenerating shields plus get rid of the rule that the shields don't apply within range 1. So, to recap, the engines would switch to hull 11 (with a drop of speed to 2 forward with 4 damage and 1 forward with 8 damage). The main hull of the ship (which frankly was never targeted) would be increased to 15 and the shields to 12 with 2 shield regen per turn as long as the engines worked). The offensive power of two heavy laser cannons with possible target locks was where I wanted it to be so no change there.
My initial hope of treating the ship as an asteroid field for collisions if bumped for two turns in a row was a failure as 4 ships at one time were playing bumper cars and only 1 damage was dealt due to collisions during the entire game. One solution would be to use the flat paper print out of the ship instead of the model and just ignore collisions completely but that frankly doesn't suit me as I find the ship on the table a lot more visually impressive and memorable. The only other thing would be to simply make the collisions much deadlier as people didn't really seem to care about bumping into it and would rather risk it to get the range 1 shot at the engines at the cost of a single possible damage roll and lost action. Instead, I'd rather treat it as damage dice rolled equal to your original hull with any damage inflicted ignoring the fighter's shields if you end in contact or in the ship (with a pushback to just contact). I think that would really encourage a lot more strafing rather than bumping into the ship. I'm a little bit afraid that this (combined with the engine hull increase) will make the ship too tough but I would apply the same damage dealt to the main hull of the corvette as well (minus the 2 armor of course) and I do run the risk of players trying kamikaze suicide runs at the cruiser's engines with this though... If I can wrangle a friend to try a 1 on 1 game, I'd probably try the increased crash damage rules without the added hull boosts in a smaller game (150pts per side instead of the 250+ we did) and leave the full hull boost plus crash damage for the first big league game that occurs after the tie-bomber figure release.
|
|
|
|
|
2013/05/07 00:40:22
Subject: A short time ago in a FLGS not really so far, far away... [X-Wing]
|
|
Decrepit Dakkanaut
|
It's the Star Wars Collector's Fleet Blockade Runner.
|
|
|
|
|
|
2013/05/07 02:40:22
Subject: A short time ago in a FLGS not really so far, far away... [X-Wing]
|
|
Cocky Macross Mayor
Georgia
|
thanks
|
|
|
|
|
|
2013/05/09 21:05:14
Subject: Re:A short time ago in a FLGS not really so far, far away... [X-Wing]
|
|
Flashy Flashgitz
|
I could have sworn it was this thread, but apparently not... You might be able to help me anyway. Somebody on dakka posted a link that had all of the relative ship sizes according to x-wing's scale. Do you know what that link is by any chance [or anybody else that sees this]?
|
|
|
|
|
|
2013/05/09 21:28:57
Subject: A short time ago in a FLGS not really so far, far away... [X-Wing]
|
|
The New Miss Macross!
|
I do remember seeing a list of previous minis from other companies and their derived scales but I don't have a link and couldn't find it with a quick google search. IIRC, it was on boardgamegeek so I'd try searching there. As for dakka, there is one other general misc x-wing thread along with Panic's painting/modeling/battlereport thread and the news and rumors x-wing thread that you could search through for the link.
|
|
|
|
|
2013/05/11 01:32:28
Subject: Re:A short time ago in a FLGS not really so far, far away... [X-Wing]
|
|
Flashy Flashgitz
|
Ahah! You were right! After you said it, I remembered the link was actually on panic's thread and it was to board game geeks. Thanks dude!
|
|
|
|
|
|
2013/06/13 16:02:37
Subject: Re:A short time ago in a FLGS not really so far, far away... [X-Wing]
|
|
The New Miss Macross!
|
So I reran the scenario this past weekend with a few of the changes presented above and was happy overall with the results. I'll post a few low quality pictures up later tonight but it was a slightly smaller game (125pts instead of 150). My single opponent this game took the "bait" so to speak and attacked my fighters about half the time and didn't manage (also due to no crit rolls ever) to put much of a dent in the ships engines (as opposed to the almost singe-minded focus against the corvette during the last game). I upped the engine hull points to 11 (1 per actual engine on the model) as well as most importantly changed the ramming rules.
Ramming was done as damage dice equal to the hull of the fighter that is colliding with the corvette with any results affecting both. Ironically, due to some bad maneuver choices on my part, I actually did the first damage to the engines as an x-wing accidently collided with them in an attempt to avoid two chasing TIEs. I think the collision rules may be a bit too harsh at this point so I think the best will be to roll a number of dice equal to the hull of the fighter but then allow it the option to try and avoid the collision by rolling its agility dice as well to counter the "hit". After playing both extremes (no damage on average and too much), I suspect that will be the sweet spot middle ground. I'll probably give this scenario a rest for now until the release of the bombers in the next wave and just play a normal set of games during the next league night.
|
|
|
|
|
2013/06/13 16:46:54
Subject: A short time ago in a FLGS not really so far, far away... [X-Wing]
|
|

Blood Angel Chapter Master with Wings
|
ooo la la! Don't have time to read through the specifics right this minute but that looks sexy!
|
|
|
|
|
|
2013/06/14 22:26:48
Subject: A short time ago in a FLGS not really so far, far away... [X-Wing]
|
|
The New Miss Macross!
|
Thanks! I've been a bit busy but I'll get around to emailing my pics and then uploading them. I've never tried uploading to dakka's gallery with an android phone so haven't done so yet. I'd highly recommend anyone who likes the corvette model to snap one up on ebay.
|
|
|
|
|
2013/12/17 17:24:54
Subject: Re:A short time ago in a FLGS not really so far, far away... [X-Wing]
|
|
The New Miss Macross!
|
I finally had the opportunity to do the follow up game to the scenario presented above. Since it was a one on one game instead of the group game that the first scenario was, we went with a smaller point total. I'll be updating the thread with turns throughout the week as I write them but I'll start with the ongoing scenario.
In the first game, the corvette's engines were disabled as well as the hyperspace comms but only after the urgent mayday was sent out. All the Imperial aces were killed during the initial encounter so the Star Destroyer outside of the asteroid field had to send in the second string "generic" pilots to escort the Lambda shuttle carrying the Stormtroopers for the boarding action. The Imperials primary objective was to dock with the corvette (0 speed maneuver for the Lambda within range 1 of the docking port section of the corvette) for a turn to capture rebel prisoners and to escort them off board. While docked, the Lambda cannot be attacked by either side. The secondary Imperial objective was to then later destroy the corvette within 10 turns as the hyperdrive system would be repaired then. The rebels on the other hand needed to prevent the boarding and allow the corvette to escape in 10 turns. The special rules we used were that the Imperials had one reinforcement per generic ship destroyed (coming in from the board edgeas an upgrade-free version of the stock ship) where as Rebels had the use of the two turbolaser turrets on the ship (but no target locks as the comm/sensor arrays were destroyed).
The Imperials had two TIE Interceptors and Bombers (with Proton Torpedoes) as well as a Lambda shuttle and Boba Fett. If they successfully docked with the corvette, the lambda would get the rebel prisoner crew card for free for the return trip to the Star Destroyer.

The Rebels had two rookie X-wings and two veteran X-wings in the form of Rogue Squadron's Wedge and Luke piloting upgraded fighters. In addition, two B-wings were dispatched with ion weaponry to hopefully disable the shuttle and prevent the Imperials from gaining such valuable intel on the alliance.

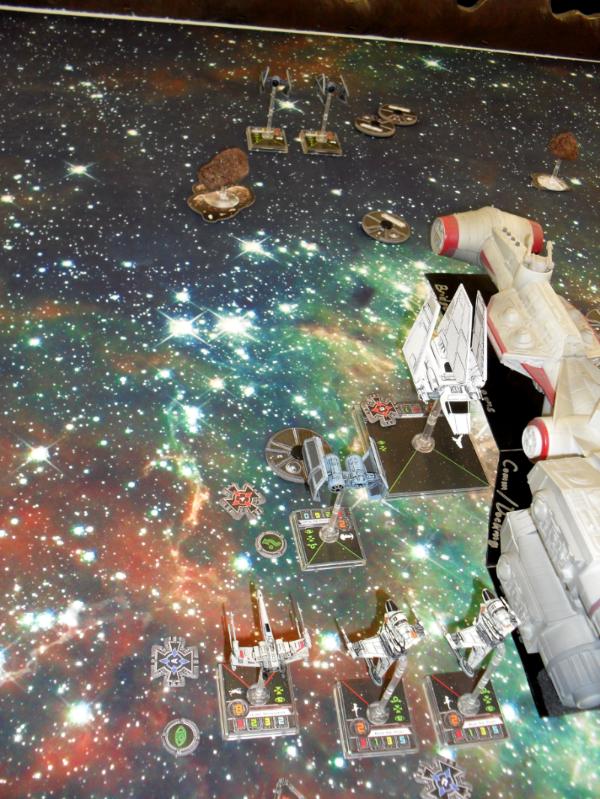
Since both sides were arriving fresh at the scene, they deployed on the long edges and zoomed towards the Corvette
Imperial Deployment
Rebel Deployment
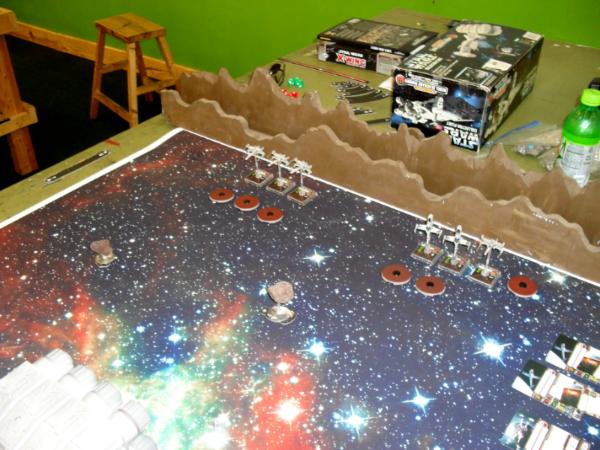
The first turn not surprisingly had lots of movement but little action. The Imperials moved up with haste but still in an orderly fashion with the TIE Bombers being just in range to target and destroy a turbolaser turret with their Proton Torpedoes with only a single hull point of damage in return from the remaining turret.
The rebels moved up at varying speed with Wedge pulling ahead of the rookie X-wings and Luke doing the same with the B-wings, both due to the engine modifications installed in their elite fighters. Unfortunately, despite the speed of the oncoming Interceptors as well as the souped up X-wings, no target was in range on that side.
|
|
|
|
|
2014/01/10 19:54:35
Subject: Re:A short time ago in a FLGS not really so far, far away... [X-Wing]
|
|
The New Miss Macross!
|
Turn 2
The Interceptors sped forward as fast as they could to engage the approaching Rebel Ace, doing a single point of damage to the hero of the first Death Star attack. The TIE bombers executed a compllicated and unfortunately unnecessary scissor flight pattern which left one out of any targets. The other TIE bomber as well as the calmly approaching mercenary Boba Fett continued to attack the second turbolaser battery.
The rebels surged forward as well but only Luke Skywalker had a valid target and did a single damage point to the Interceptor barreling down on his X-wing.
 Turn 3
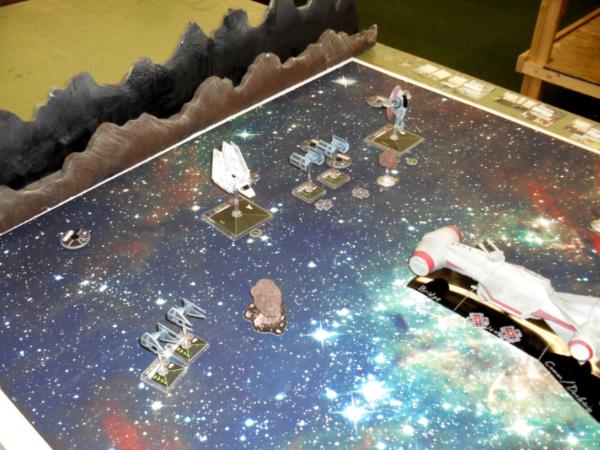
The Shuttle continued its approach to the Corvette's docking port and took a few shots on the corvette for good measure, doing a point of damage. The TIE bomber that had no target last turn escorted Boba Fett towards the approaching X-wings whereas the other bomber flew across the bow of the corvette to come up behind the advancing Interceptors. The rebels throttled down to a measured approach and locked onto Boba and the Interceptors. Where as the mercenary fire largely found its mark, the rebel return fire was largely ineffective and only did a point of damage on that side. Luckily for the rebellion, Skywalker and his B-wing escort faired better, destroying the two Interceptors.
 Turn 4
With the looming thread of the Interceptors gone (but reinforcements immediately appearing on extreme sensor range), the B-wings focused their fire onto the shuttle to prevent it from docking and succeeded in temporarily disabling it with Ion cannons. Luke focused instead on the TIE Bomber but the force was with him yet again as he destroyed it with a target lock and focus (via PTL). The Shuttle took some shots back at the B-wing after mistakenly maneuvering too close (the player forgot to initiate boarding via the scenario rules and chose a 1 forward instead of full stop maneuver) and braced for the inevitable impact next turn.
Lady Luck was much more generous over on the other side of the battle for the Imperials as Boba Fett and the TIE bomber blew Wedge Antilles away in a turn from full strength with only some minimal return fire. With the two sides face to face at point blank range, the next turn would hopefully be interesting.
|
|
This message was edited 1 time. Last update was at 2014/01/11 20:02:47
|
|
|
|
|
2014/01/11 20:00:04
Subject: Re:A short time ago in a FLGS not really so far, far away... [X-Wing]
|
|
The New Miss Macross!
|
Turn 5 Disabled by last turns ion blasts, the shuttle bounced relatively harmlessly (1 damage) off of the corvettes hull, exchanging 1 damage fire with the B-wings who stunned it yet again. The interceptors pilots realized the rebel strategy and focused on and destroyed a B-wing with Luke strafing them in turn as them came in hot.  On the other side, with Wedge Antilles destroyed in the opening salvo, the two rookie pilots largely flailed around with only one managing to get off a shot at Boba Fett. Boba, in turn, fired with his rear mounted guns severely damaging the X-wing who unfortunately was at range 1. Both Boba and the TIE bomber adjusted their path to circle around behind the corvette and reinforce the boarding shuttle on the other side. 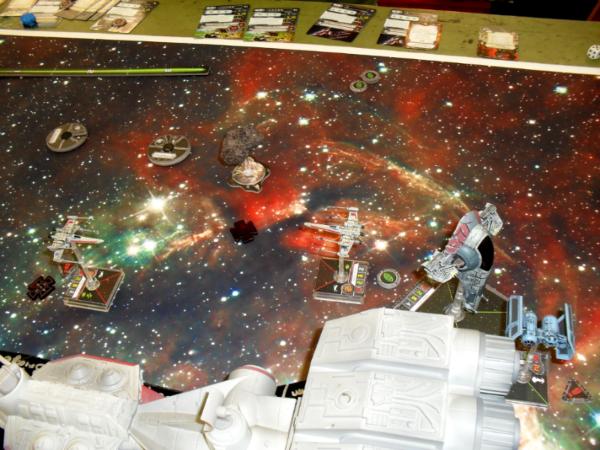 Turn 6 Turn 6 The rookie X-wings chased after Boba Fett but their lack of experience was obvious with one having to adjust course not to slam into the corvette and the other having to do a K-Turn after the last failed pass. The flanking Imperials were unable to fire and only one interceptor was got off a shot. The shuttle's luck ran out as this turn it rammed the ship and causing several crits on both itself and the corvette. Luke and the remaining B-wing focused again on the stunned and damaged shuttle and succeeded in destroying it. Unfortunately for Boba, a lucky shot from the remaining heavy laser turret on the corvette finally had a target outside of range 1 and destroyed him with four lucky hits including a double damage crit that he was unable to shrug off in his damaged state even with the added cover of the ship engines. 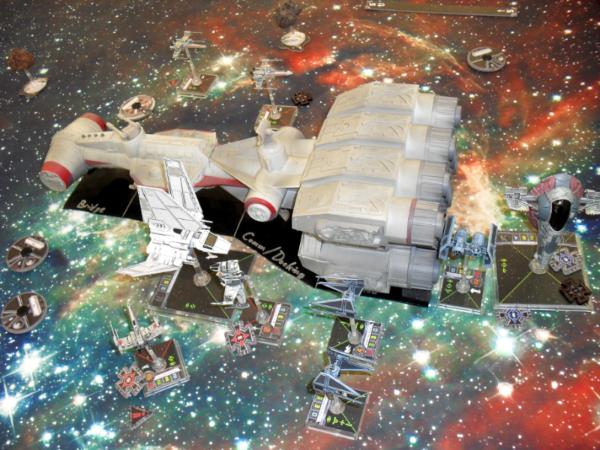 Turn 7 Turn 7 The rookie X-wings continued to jockey for a better position while the remaining original TIE Bomber rounded the back of the corvette. The reinforcement TIE Bomber zoomed into the fray as well. Many shots were fired but no kills were made on either side. 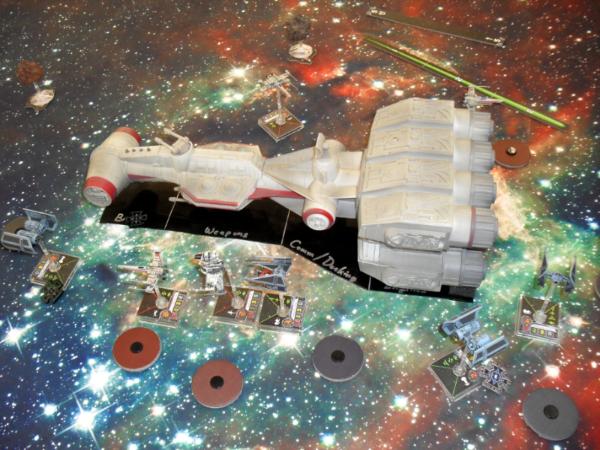 Turn 8 Turn 8 With the primary mission of boarding the corvette and taking prisoners lost, the Imperials largely focused on their secondary objective of destroying the corvette before it's hyperdrive came online. A single gung-ho Interceptor continued around the back of the corvette to engage the rookie X-wings whereas all the rebels now focused on destroying the Imperials immediately.  Turn 9 Turn 9 The flanking Interceptor continued to spar with a second X-wing rookie as the first barreled past him towards the enemies attacking the other side of the corvette. 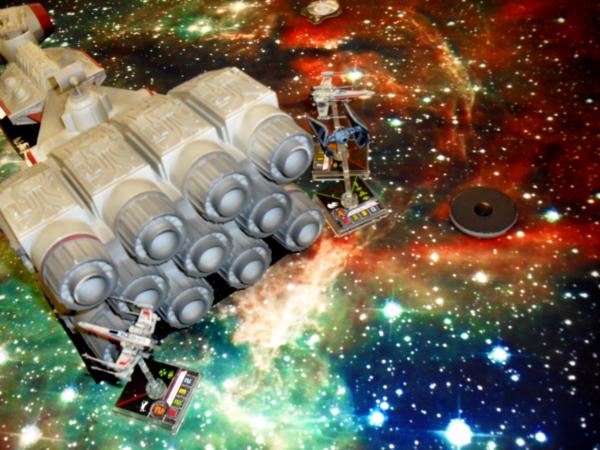 The fight there turned into a massive furball with pilots executing K-Turns and other sharp maneuvers in order to keep their targets within their fire arcs. The Imperials focused on destroying the corvette regardless of the danger to themselves. The TIE Bomber survived the fire however the Interceptor pilot was destroyed but only after he had finished his strafing run on the corvette. 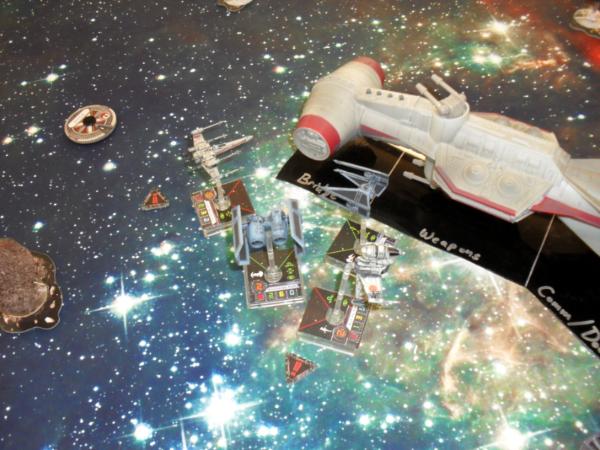 Turn 10 Turn 10 With only one turn left and sensors indicating that the corvette hyperdrives were coming online, the Imperials redoubled their efforts and apparently the fear of death was superceded by the fear of failing the Emperor as they inflicted multiple crits on the corvette exploding it. Unfortunately for them, they paid the ultimate price as the remaining rebels wiped them out completely. The remaining B-wing destroyed the last TIE Bomber whereas Luke managed to safely fly over the corvette before it exploded and finished off the TIE Interceptor that the rookie X-wing had been unable to destroy. 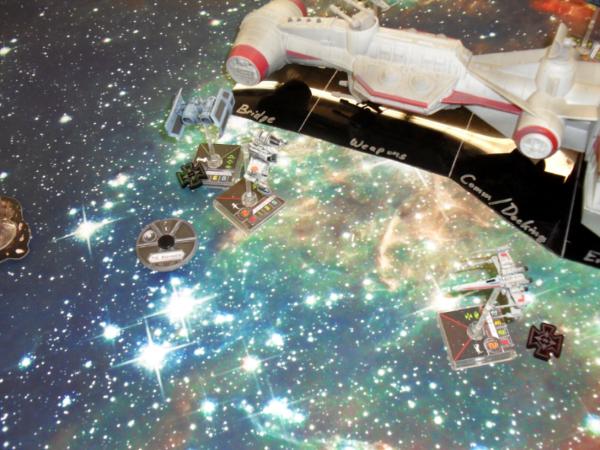 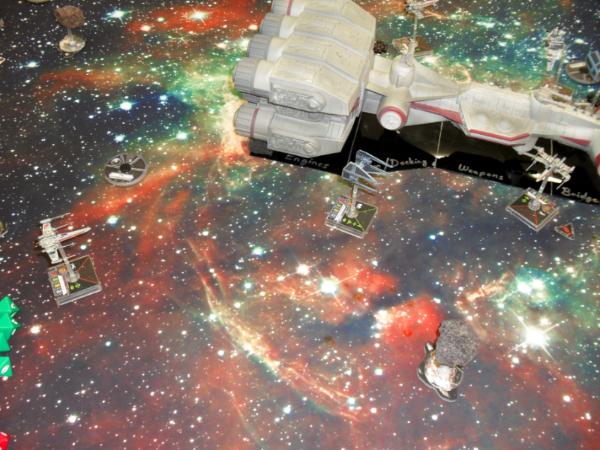 With nothing left to protect or keep them in the system, the Rebels activated their hyperdrives and zoomed away before the next wave of Imperial fighters closed in on them. The Rebels accomplished their primary goal of keeping the information out of Imperial hands by preventing the boarding but lost their secondary objective of saving the valuable ship for the resource starved Rebel fleet. The Imperials did the opposite and accomplished their secondary goal of destroying the ship but failed their primary mission of capturing information and spies which means that the Rebel Alliance pulled off a minor pyrrhic victory.
|
|
This message was edited 3 times. Last update was at 2014/01/11 20:29:42
|
|
|
|
|
2014/01/12 10:28:25
Subject: A short time ago in a FLGS not really so far, far away... [X-Wing]
|
|
PanOceaniac Hacking Specialist Sergeant
Indiana, U.S.A.
|
Shouldn't make it look so fun.
|
|
|
|
|
|
2014/01/12 17:56:52
Subject: A short time ago in a FLGS not really so far, far away... [X-Wing]
|
|
The New Miss Macross!
|
It is a fun little game. I'm just glad you found a post where I'm not just complaining about Heavy Gear. 
|
|
|
|
|
2014/01/13 00:59:45
Subject: A short time ago in a FLGS not really so far, far away... [X-Wing]
|
|
PanOceaniac Hacking Specialist Sergeant
Indiana, U.S.A.
|
-shrug- Is what it is. Complaints are worth it. Guess I needed to get some crap off my chest anyway.
But this just makes me want to spend money to get a game started. And that's not good. I have a lady to think about getting to, remember?
|
|
|
|
|
|
2014/01/13 01:24:28
Subject: A short time ago in a FLGS not really so far, far away... [X-Wing]
|
|
The New Miss Macross!
|
I can almost guarantee you that playing X-wing won't help you find that special someone. That said... it does make some weekend days go by alot quicker when you play. It's also not that expensive overall when you consider what it is you get. You get a mini with all the rules and chits you'll ever need for that mini and you get a nicely painted mini for $15 each MSRP. It's overall the same as HG's blister prices ($10-20 per mini) but you don't need to paint anything. I do actually enjoy painting but I also realize that I don't paint very frequently and stuff sits unpainted and unplayed (I try to only use painted stuff or at least WIP whenever possible) for months to years.
$100 plus tax will get you a starter and 4 blisters at full MSRP. For the rebels (you seem like a rebellion player to me!), you can't even use 5 ships in a standard 100pt game unless you go with only low level generic pilots. For imperials, those 4 blisters (plus 2 TIEs in the starter) give you decent numbers and you still have enough points to splurge on some better ships if you throw noobs in the basic TIEs.
The rules are easy enough to pick up in 15 minutes for the basics (no upgrades, generic pilots) and you can largely pick up the more advanced stuff in a second game the same night. Fortunately for the game, there is also enough added depth (not complexity but tactical depth) that there are deeper levels to explore and learn. Just google TIE swarm tactics and you'll see blog articles about how to move fighter swarms with such precision that an olympic synchronized swim team would be envious of. The "net lists" go the full gammut from basic TIE swarms with one key special character ship to all elite builds like death star runs with Han, Luke, and Wedge loaded up to the gills with upgrades.
All that for the price of one flashy night out with a lady friend...
|
|
|
|
|
2014/01/13 02:00:19
Subject: A short time ago in a FLGS not really so far, far away... [X-Wing]
|
|
PanOceaniac Hacking Specialist Sergeant
Indiana, U.S.A.
|
I'm sure the lady in question wouldn't be too crazy about all that. I still need a car, brother.
But it's tempting. Seeing what the TIE swarm tactics are at their most basic... evil.
And yes, I'm a Rebellion kinda guy, how did you know? What can I say, browncoats and rebels just hit me in the feels. But when it comes to the US of A, I'm a bluebelly from Indiana. 
|
|
|
|
|
|
|
|


 Me ladz: