| Author |
Message |
 |
|
|
|
|
Advert
|
Forum adverts like this one are shown to any user who is not logged in. Join us by filling out a tiny 3 field form and you will get your own, free, dakka user account which gives a good range of benefits to you:
- No adverts like this in the forums anymore.
- Times and dates in your local timezone.
- Full tracking of what you have read so you can skip to your first unread post, easily see what has changed since you last logged in, and easily see what is new at a glance.
- Email notifications for threads you want to watch closely.
- Being a part of the oldest wargaming community on the net.
If you are already a member then feel free to login now. |
|
 |
2014/07/08 04:45:36
Subject: Mechanica Australis - Resuming normal programming
|
|

Combat Jumping Ragik
|
Hmm, so how did you celebrate international towel day anyway?
That is a piece of gauze, no?
|
|
|
|
 |
|
2014/07/08 12:15:03
Subject: Re:Mechanica Australis - Resuming normal programming
|
|

Lone Wolf Sentinel Pilot
|
@Red: Not much of that around here, trying to do so would surely wind up in a 24 hour long explanation marathon instead!
As for the towel itself, it is (I figure, please bear with my web-search and translation here) a piece of barkcloth, (aka paper cloth?), a cheap, non-woven fabric, usually used for costumes or disposable outfits.
Sturdier than a paper towel, it was just soaked in a PVA-paint mix before - literally - being hung there to dry.
And,
Of course not, these are just for cannon fodder troopers; 2-ply is only for the Emperor's Finest  .
No true update yet, got drafted (again) for yard duty yesterday, hope to get something done during the rest of the week...
Cheers.
|
|
|
|
|
|
2014/07/08 20:14:23
Subject: Mechanica Australis - Resuming normal programming
|
|
Combat Jumping Ragik
|
You do have a soccer game to watch too 
Crepe paper (papel de crepe, or crespón, not sure which term you Southern South American guys use.) might also work. Can't say I've ever seen bark cloth, but it is apparently out there.
|
|
|
|
|
|
2014/07/09 15:37:11
Subject: Re:Mechanica Australis - Resuming normal programming
|
|
Lone Wolf Sentinel Pilot
|
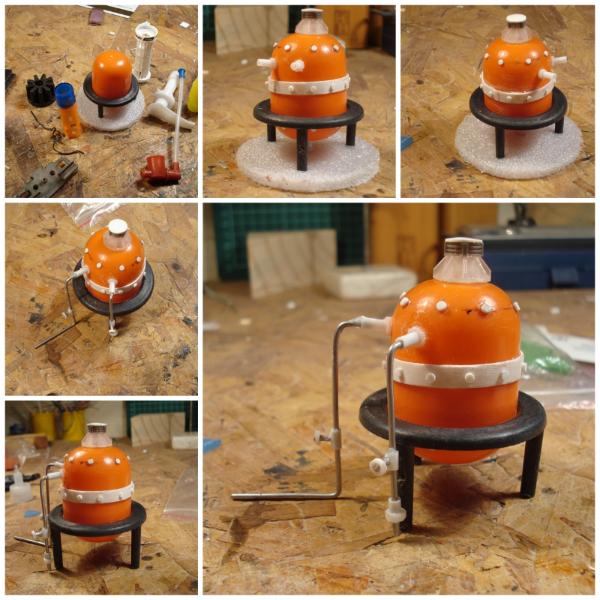
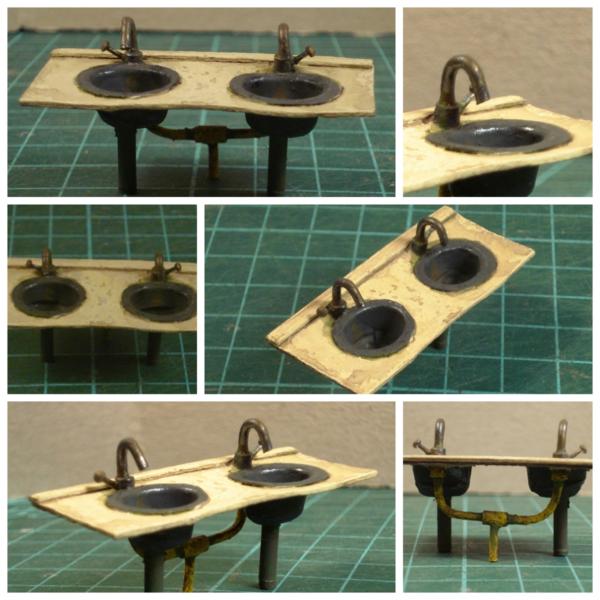
Quick update, water heater in progress:
Prequel WIP shots are available if of interest, painting to come after the primer dries...
As always, open and willing to hear comments and critiques.
Cheers.
|
|
|
|
|
|
2014/07/09 18:14:09
Subject: Mechanica Australis - Resuming normal programming
|
|

Gargantuan Great Squiggoth
|
Looks brilliant. Is that a kinder egg?
|
|
|
|
|
|
2014/07/10 02:17:34
Subject: Re:Mechanica Australis - Resuming normal programming
|
|
Lone Wolf Sentinel Pilot
|
@Red H. Crepe paper (Papel crepé) would be the OK wording around here. Yes, it certainly would, though I'd forgotten about it (More old school than synthetic barkcloth and EVA rubber, I guess. I haven't seen any around lately, and I usually rummage through the little cubs kindergarten materials' boxes for supplies like those!)
@Camkierhi: It is (was) 
A better? view:
And this it how it came about to what it is supposed to be now:
(I really needed to find a place to add some rivets to, so thus!)
Thanks for stopping by.
|
|
|
|
|
|
2014/07/12 21:31:22
Subject: Re:Mechanica Australis - Not so sanitary facilities...
|
|
Lone Wolf Sentinel Pilot
|
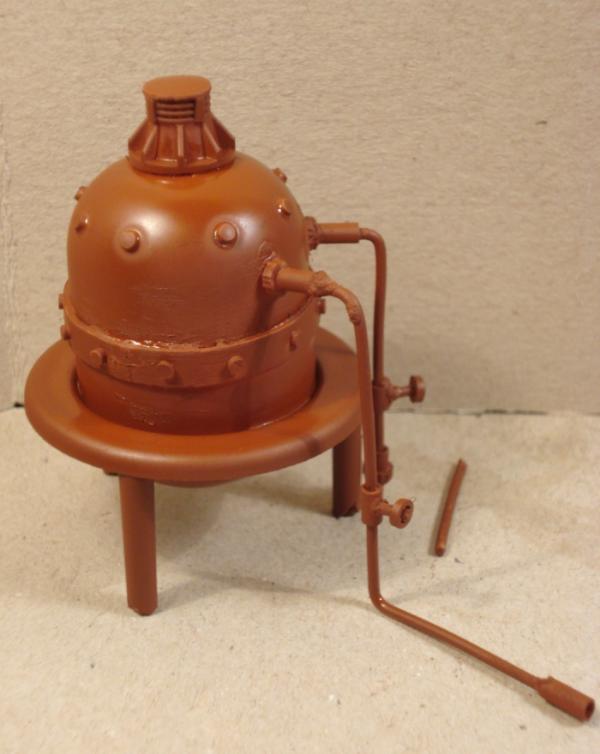
Got some colour on the water heater:
Weathering is half-done, the tank support/legs and the floor need more work.
I also started on the base, though nothing picture worthy there yet.
C&C are always welcome.
Cheers.
|
|
|
|
|
|
2014/07/12 23:36:41
Subject: Mechanica Australis - Not so sanitary facilities...
|
|
Mastering Non-Metallic Metal
|
Good use of a kinder egg. Nice progress. 
|
     Mastodon: @DrH@warhammer.social Mastodon: @DrH@warhammer.social
The army-                   ~2295 points (built). ~2295 points (built).
 
* -=]_,=-eague Spruemeister General. * A (sprue) Hut tutorial *
Dsteingass - Dr. H..You are a role model for Internet Morality! // inmygravenimage - Dr H is a model to us all 
Theophony - Sprue for the spruemeister, plastic for his plastic throne! // Shasolenzabi - Toilets, more complex than folks take time to think about! |
|
|
|
|
2014/07/13 00:01:45
Subject: Re:Mechanica Australis - Not so sanitary facilities...
|
|
Lone Wolf Sentinel Pilot
|
Thanks, Dr.
And laid out on the base:
That is about it for today.
Comments and critiques are always welcome.
Thank you for stopping by.
|
|
|
|
|
|
2014/07/14 14:35:38
Subject: Re:Mechanica Australis - Not so sanitary facilities...
|
|
Lone Wolf Sentinel Pilot
|
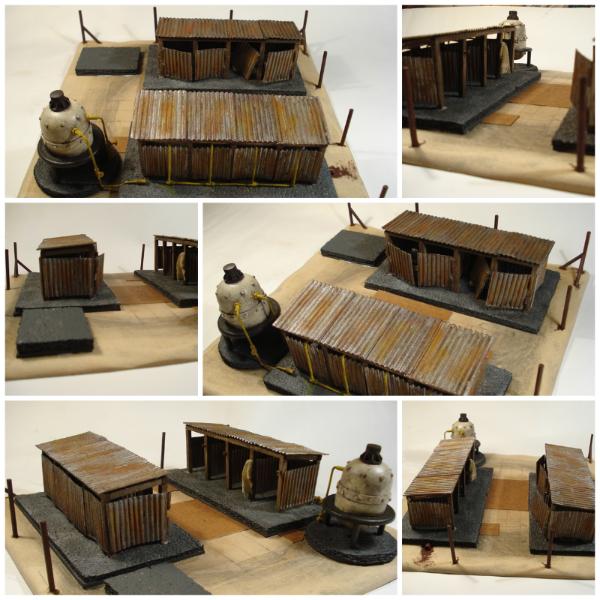
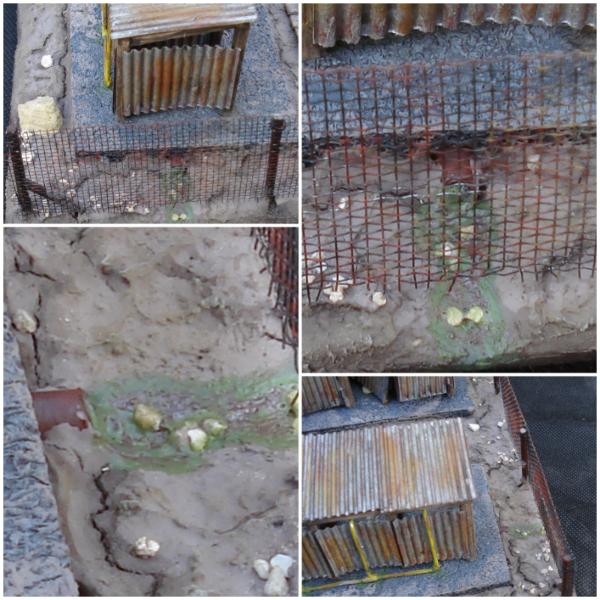
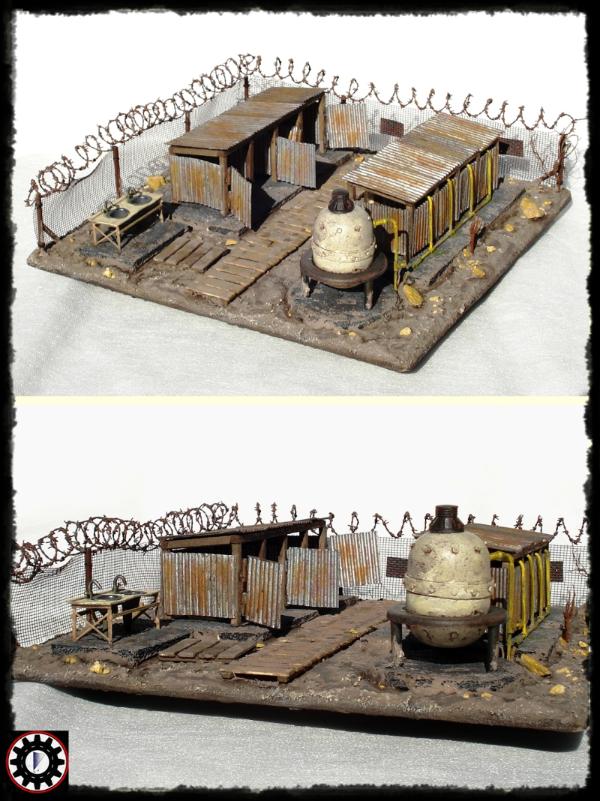
Moving on(to) the base:
I "sacrificed" some originality on the base and the surrounding wire fence so as to keep it in line with the barrack's build, in case - rarest of cases - they ever get to be used together in a gaming table.
Thoughts and comments are appreciated.
Cheers.
|
|
|
|
|
|
2014/07/15 20:26:31
Subject: Re:Mechanica Australis - Not so sanitary facilities...
|
|
Lone Wolf Sentinel Pilot
|
Even muddier:

Other pics to come soon.
C&C are welcome as always.
Cheers.
|
|
|
|
|
|
2014/07/15 22:45:12
Subject: Mechanica Australis - Not so sanitary facilities...
|
|
Combat Jumping Ragik
|
Venganza. Half bury a German soccer jersey in that mud Or is that too much?
|
|
|
|
|
|
2014/07/16 02:28:01
Subject: Re:Mechanica Australis - Not so sanitary facilities...
|
|
Lone Wolf Sentinel Pilot
|
@Red H: Cathartic as it might be, I doubt it would match the message I've been trying to teach the cubs about the goodness of friendly competition and fair play...
Maybe I could throw in a Brazuca 1 on the side instead, if I get around to freehand it. Would that do it?
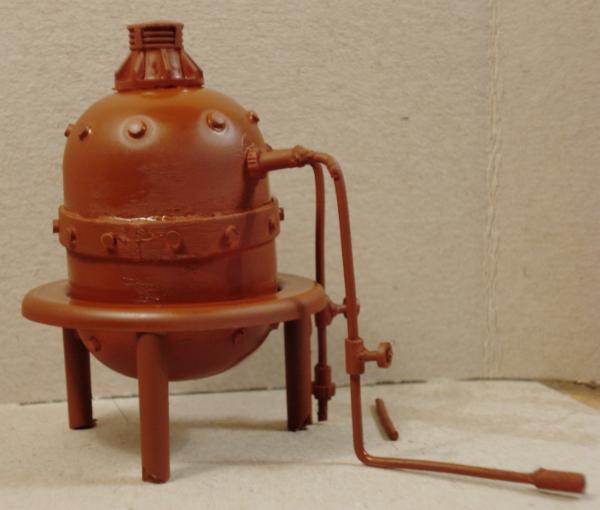
Some more, albeit not necessarily better, pics:
Closer:
Water heater:
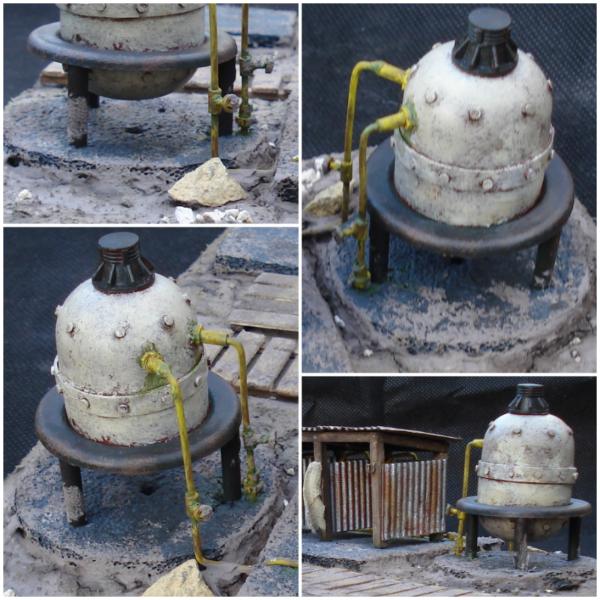
And sewage treatment plant:
Thoughts welcome.
Thanks for stopping by.
1 Brazuca: Official Brazil 2014 World Cup soccer ball. 2
2 Yes, I was paying attention, and taking notes. Thanks for the tip
|
|
|
|
|
|
2014/07/16 17:54:08
Subject: Mechanica Australis - Not so sanitary facilities...
|
|
Gargantuan Great Squiggoth
|
Looking fantastic, look brilliant next to your hut.
|
|
|
|
|
|
2014/07/16 22:57:08
Subject: Mechanica Australis - Not so sanitary facilities...
|
|
Combat Jumping Ragik
|
We compromise. Half bury a vuvuzela 1 But do paint the brazuca, and other grafitti. A slightly favela look would be quite fitting.
\
It does look like it will set nicely next to your previous winning entry. I like that very much.
I gotta ask, why 'cubs'?
Took me a moment to figure out the second footnote, but I got there.
1 You remember those, eh?
|
|
|
|
|
|
2014/07/17 12:18:17
Subject: Re:Mechanica Australis - Not so sanitary facilities...
|
|
Lone Wolf Sentinel Pilot
|
@Camkierhi: Thanks!
@Red H: Painted grafitti might be hard, as it is already fixed in place and fenced (Hard to reach the walls for fine paint work now. Not to mention my very probable inability to pull it off!)
The vuvuzela and/or brazuca, OTHO, might still happen...
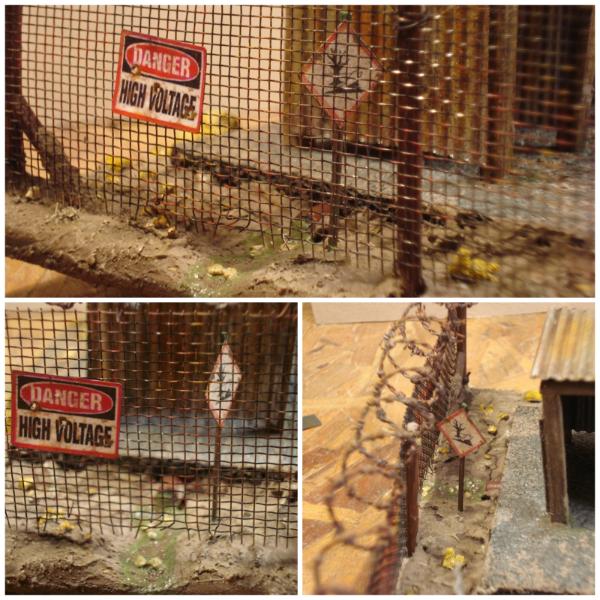
And some signage, to make up for the missing graffiti?
Cubs is just literal for cachorros, in-house byname for the kids (Though looking at how much they eat, it should probably be upgraded to pack soon enough)
* Quite handy, actually, and I would hardly had figured it out on my own!
No proper update yet, but it will be done on time.
I ran out of barbed wire to top the fence, so I'm twisting some more. The subject has been breached more than once, and I hardly came up with anything new; does anybody reckon some step-by-step pics to be worth it?
Cheers.
|
|
|
|
|
|
2014/07/17 22:44:07
Subject: Mechanica Australis - Not so sanitary facilities...
|
|
Combat Jumping Ragik
|
Step by steps are always useful, if for no other reason than to see alternative ways people might do things... their ways may be better
Cachorros, okay then. Also means puppies, at least here in the North. I thought it might something general to Argentina, like the way we call children kids (young goats) around here.
Signage works too. Might need one to warn people about that green effluvia from the treatment plant pipe.
|
|
|
|
|
|
2014/07/18 15:51:03
Subject: Re:Mechanica Australis - Interlude: Barbed Wire Step-by-Step
|
|
Lone Wolf Sentinel Pilot
|
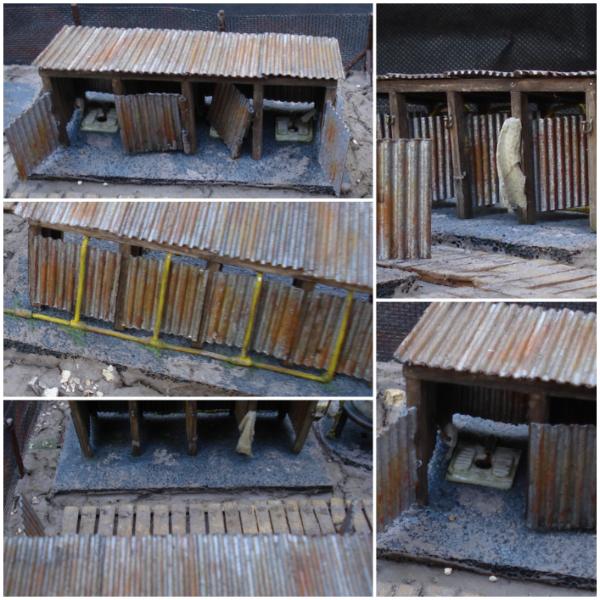
Brief walk-through to scratch-made barbed wire:
0 th Copper wire: 24 AWG (0,51mm Ø) strands, recovered from communications or UTP cable (Telephone cable would be better, as it has a lower twist ratio, and thus making it easier to separate the individual strands from each pair), with insulation stripped off.
A lesser gauge might be even better scale wise (AWG 28 / 0,32mm Ø) and still workable, it could be obtained from a multi-strand standard electrical wire, though harder to strip in long stretches.
1 st Put two strands together (about 2 meters long in this case, I went full wholesale this time), attach one end of the pair to a fixed point (bench vise in my case) and fasten the other end to a power drill/screwdriver. Twist to taste, without overdoing it (Too tight would cause the wire to roll onto itself first once loose). Aprox 5 turns/centimetre here.
2 nd Add the barbs usind a third strand: Starting from one end, twist 2/3 times tightly around the main wire, leave an open loop about half a centimetre wide, go back to the core double-strand and repeat. And again and again: To end up with a 2 meter length of barbed wire, this should be done approximately four hundred times. Doing it in a couple sessions might be advisable, as getting a good movie to watch while you are at it, this step does not require too much attention.
It took around 4 times as much wire for the loops as the total length of the main strand. I did no use one single piece to do it, but rather long stretches are advisable (if the twists around the main wire are turned in alternating directions after each loop, the loose end does not get entangled with the bearing strand, and starting with a new length is far more time consuming than looping.
3 rd & 4 th Close up and general view of the - expected - current state of affairs at this stage.
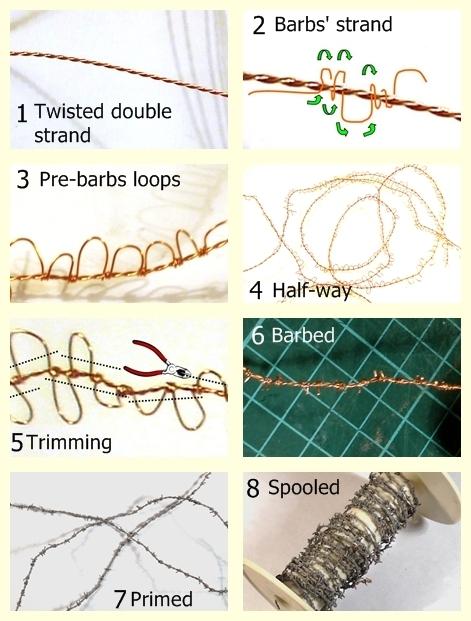
5 th Trimming the loops: Cut off the loops, leaving just a short end of each leg protruding from the main strand.
Beware: The cut-offs tend to fly away. Two pieces of advice: wear eye protection, and work over a smooth, easy to wipe, surface, or and opened newspaper page, to just fold over and throw away.
6 th This it how it should sort of be looking by now.
7 th Primed in grey. Spraying is horribly inefficient (most of the paint is actually squandered this way), brush-on is advisable.
8 th Finished and properly stored for future use.
Additional comments:
If the turns around the main wire are pulled tight enough, the barbs should stay in place along the core strand. If loose, fix them with a drop of superglue before painting.
The barbs are actually that, and quite sharp at it. The wire will easily entangle with anything it gets close to, and prick skin too (tough not long enough to be actually harmful, they can get pretty annoying), handle and store with some care.
Picts are NOT matchingly resized (And not overly in-focus either, BTW). The pliers in the 5 th frame are NOT in scale either
Hope it is of use!
Any C&C and improvement suggestions are welcome.
Cheers, and will get back to proper WIP anytime soon!
PS: sups FTW
|
|
|
|
|
|
2014/07/21 18:24:13
Subject: Mechanica Australis - Interlude: Barbed Wire Step-by-Step
|
|
Decrepit Dakkanaut
|
Brilliant tutorial LT. Thank you for making it!
|
|
|
|
|
|
2014/07/21 19:30:18
Subject: Mechanica Australis - Interlude: Barbed Wire Step-by-Step
|
|
Combat Jumping Ragik
|
Gracias. A very good tutorial. And not at all how I made barbed wire back in the day. Your way is much more elaborate. I'll try it sometime.
Another way to prevent flying bits is to use an inverted storage container- the clear plastic kind--as a hood. Even with goggles, those bits can still do harm.
|
|
This message was edited 1 time. Last update was at 2014/07/21 19:30:53
|
|
|
|
|
2014/07/21 21:37:28
Subject: Mechanica Australis - Interlude: Barbed Wire Step-by-Step
|
|
Mastering Non-Metallic Metal
|
Always interesting to see how others go about doing things. Good tutorial.
|
Mastodon: @DrH@warhammer.social
The army- ~2295 points (built).
* -=]_,=-eague Spruemeister General. * A (sprue) Hut tutorial *
Dsteingass - Dr. H..You are a role model for Internet Morality! // inmygravenimage - Dr H is a model to us all
Theophony - Sprue for the spruemeister, plastic for his plastic throne! // Shasolenzabi - Toilets, more complex than folks take time to think about! |
|
|
|
|
2014/07/21 22:26:02
Subject: Re:Mechanica Australis - Back to work: Facilities WIP
|
|
Lone Wolf Sentinel Pilot
|
 Red Harvest wrote: Red Harvest wrote:Signage works too. Might need one to warn people about that green effluvia from the treatment plant pipe.
Sorry for the involuntary misdirection: the pipe does not come from the treatment plant, it IS the sewage treatment plant
But I did put up a sign!
@Gitsplitta: Thank you  , and glad to see you back around. Only I might have to learn to paint minis now...
@Dr H: Thanks!
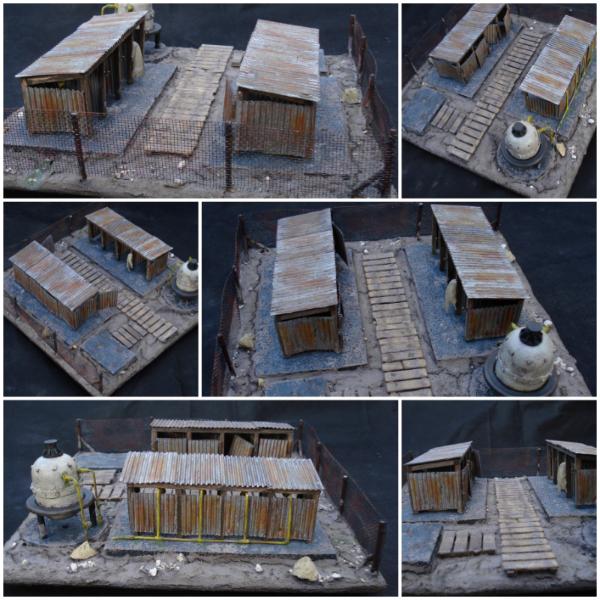
And last WIP piece:

Reposted disclaimer:
 Littletower wrote: Littletower wrote:Any resemblance with other people's work, past or current, is purely and merely coincidental, and should not be considered a shameless rip-off in any way
C&C are always welcome.
Thanks for stopping by.
|
|
|
|
|
|
2014/07/21 23:11:43
Subject: Mechanica Australis - Back to work: Facilities WIP
|
|
Combat Jumping Ragik
|
Littletower wrote:[
Sorry for the involuntary misdirection: the pipe does not come from the treatment plant, it IS the sewage treatment plant
Ah, I see you've been studying civil engineering in Bolivia then.
Shameless rip-off? No sir, we borrow ideas. (pedir prestado. You guys may have a single word verb for it.)
Speaking of which, how are you making those signs? ie printing at what DPI, on what sort of paper, etc...
|
|
|
|
|
|
2014/07/22 17:40:23
Subject: Re:Mechanica Australis - Back to work: Facilities WIP
|
|
Lone Wolf Sentinel Pilot
|
Muchas gracias por esos prestamos, entonces! (Thanks a lot for those loans, then!)
As for the signs, nothing too fancy, I'm afraid.
Those are printed in a home inkjet printer (Printer specs mention up to 1200 dpi, but the print options window allows only for a max of 600 dpi), on standard 80 grams (20lb) paper. I did set the printer for gloss paper, which rends a slower feed speed, preventing ink bleeding/blurring.
Sprayed on both sides with two coats of Rust-Oleum Matte Clear. The back was then painted steel grey, and the sign weathered all around with a tan wash, some chipping and rust.
As mentioned before, the spray does add a slightly grainy texture, which was fine with the intended look here, but might go against a brand new appearance.
|
|
|
|
|
|
2014/07/23 09:51:22
Subject: Mechanica Australis - Back to work: Facilities WIP
|
|
Combat Jumping Ragik
|
Te agradezco
I usually print from GIMP, which allows for some crazy DPI settings. At least with Linux. With Windows, no idea. Now printing with the gloss setting... new idea. I will try this. I've been troubled with the ink bleeding.
For a smooth surface, make sure to have a thick coat of sealer on it then use 800 grit wet/dry sandpaper. lightly dampen the surface and lightly sand. wipe off the residue, brush on a gloss finish if you want gloss, otherwise leave it. Mentioned in case you didn't already know.
|
|
|
|
|
|
2014/07/23 19:46:49
Subject: Re:Mechanica Australis - Back to work: Facilities WIP
|
|
Lone Wolf Sentinel Pilot
|
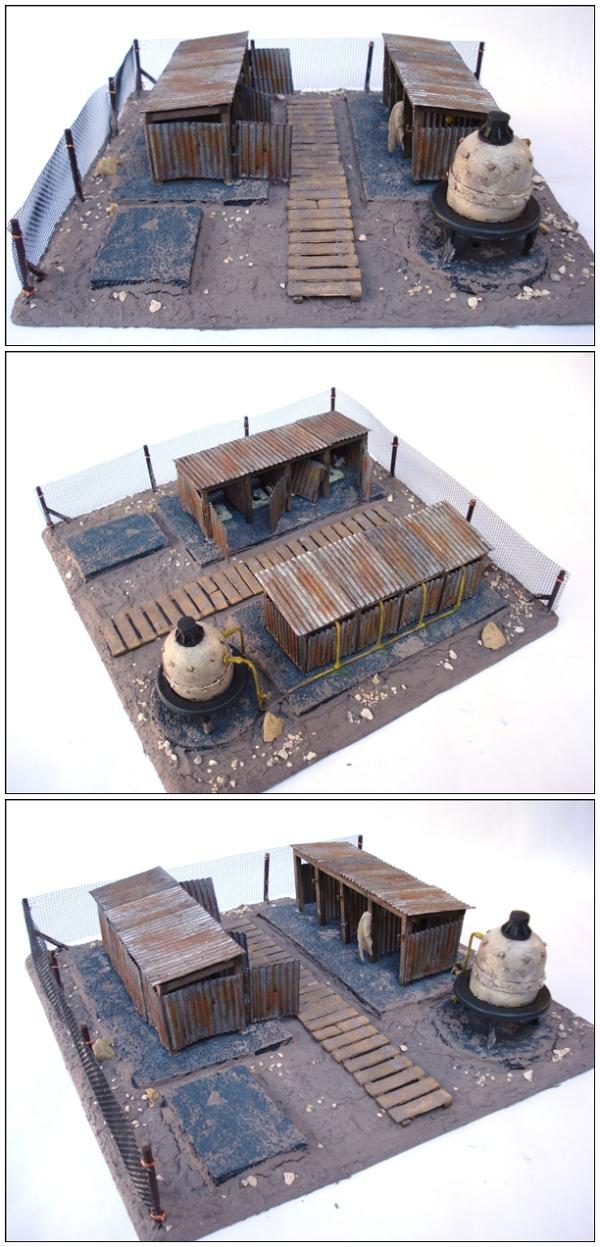
Minimal update, just to keep things going:
Close to calling it done by now!
Cheers.
|
|
|
|
|
|
2014/07/24 21:14:41
Subject: Re:Mechanica Australis - Aimed for the throne, ended up with a latrine
|
|
Lone Wolf Sentinel Pilot
|
Today's state of affairs:
Mostly picture taking left now before submitting.
Comments, critiques and suggestions are always welcome.
Thanks for stopping by.
|
|
|
|
|
|
2014/07/25 00:07:46
Subject: Mechanica Australis - Aimed for the throne, ended up with a latrine
|
|
Combat Jumping Ragik
|
Some sort of pavilion over the wash area. That would seal the deal, IMHO.
|
|
|
|
|
|
2014/07/25 09:06:36
Subject: Mechanica Australis - Aimed for the throne, ended up with a latrine
|
|

Shroomin Brain Boy
|
over all this brilliant scratch building and the artful painting I have a question... tho I understand the need for s spot colour I still don´t see why the pipes had to be yellow... I mean... it is a tad brighter then I would have expected compared to all the other weathered down appearance...but....BUT... this is an amazing piece nevertheless and is in the top rank of all entries....(in fact I know mine is not as I am unsure weather I will be able to finish at all... we´re tomorrow for one week away on vacation... and I still need to paint the minis for mine....  ...)
|
|
|
|
|
|
2014/07/25 12:57:08
Subject: Mechanica Australis - Aimed for the throne, ended up with a latrine
|
|
Lone Wolf Sentinel Pilot
|
Red Harvest wrote:Some sort of pavilion over the wash area. That would seal the deal, IMHO.
 , I was about to call it! There is still time left, though... Might give it a try...
(I do like the idea, mind you, just have to get over the thought of it already being done that had already started to settle down...)
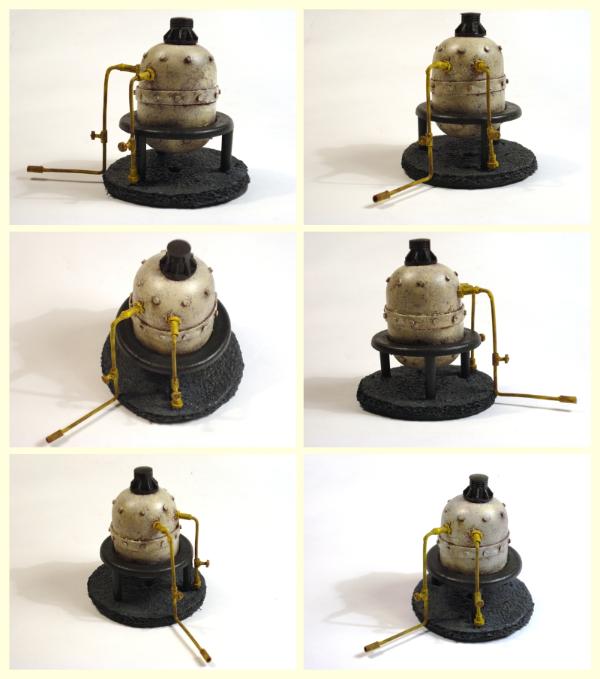
Viktor von Domm wrote:over all this brilliant scratch building and the artful painting I have a question... tho I understand the need for s spot colour I still don´t see why the pipes had to be yellow... I mean... it is a tad brighter then I would have expected compared to all the other weathered down appearance...
Hot water (and other possible hazard-bearing lines such as steam, power, or dangerous materials) pipelines tend to be painted in bright (aka caution warning) colours, so it seemed a fitting way to add a - very needed - touch of a brighter spot colour. Green shrubbery would have been another way to do it, but I did not think it'd go along with the trampled earth & mud look of the ground.
I did try to texture, rust and weather the pipes, did it come short at that?
On another topic, I put together a quick build to try some masonry/concrete effects and painting:
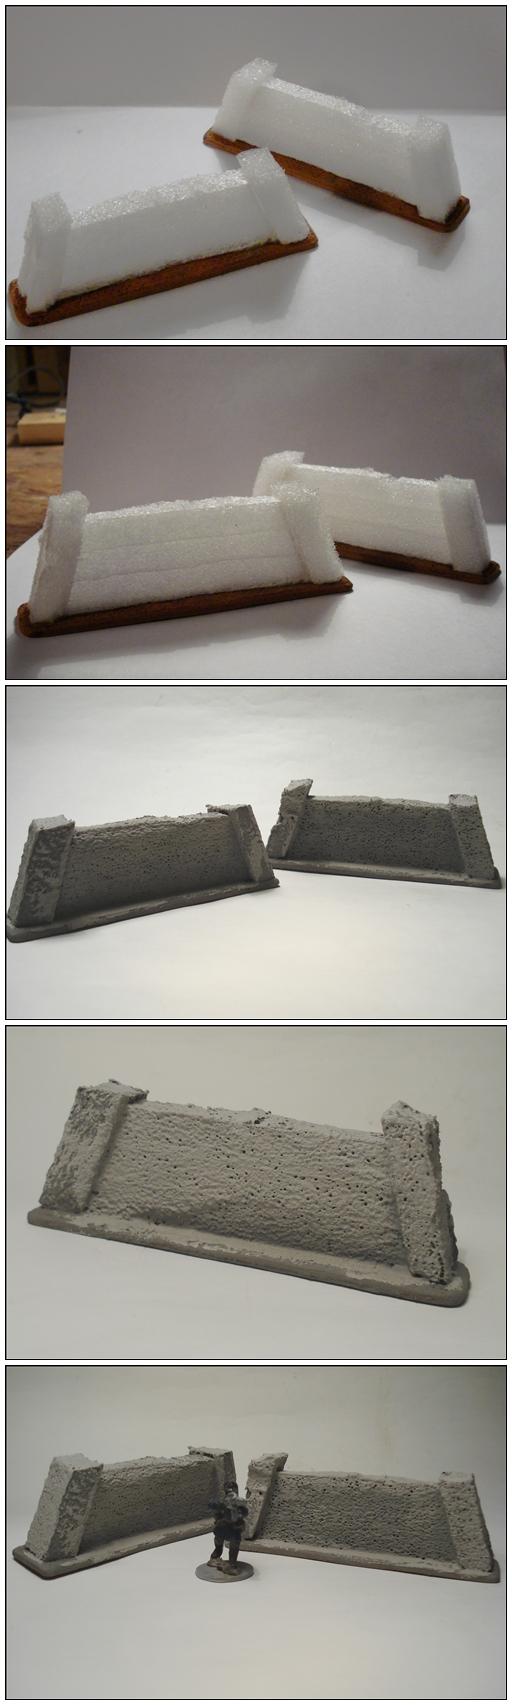
Simple LoS blockers, tinted dry-wall filler over packaging foam, maybe too much of the foam texture visible yet...
Thoughts and suggestions are always welcome.
Thanks for stopping by.
|
|
|
|
|
|
|
|


