| Author |
Message |
 |
|
|
|
|
Advert
|
Forum adverts like this one are shown to any user who is not logged in. Join us by filling out a tiny 3 field form and you will get your own, free, dakka user account which gives a good range of benefits to you:
- No adverts like this in the forums anymore.
- Times and dates in your local timezone.
- Full tracking of what you have read so you can skip to your first unread post, easily see what has changed since you last logged in, and easily see what is new at a glance.
- Email notifications for threads you want to watch closely.
- Being a part of the oldest wargaming community on the net.
If you are already a member then feel free to login now. |
|
 |
2009/08/21 04:15:01
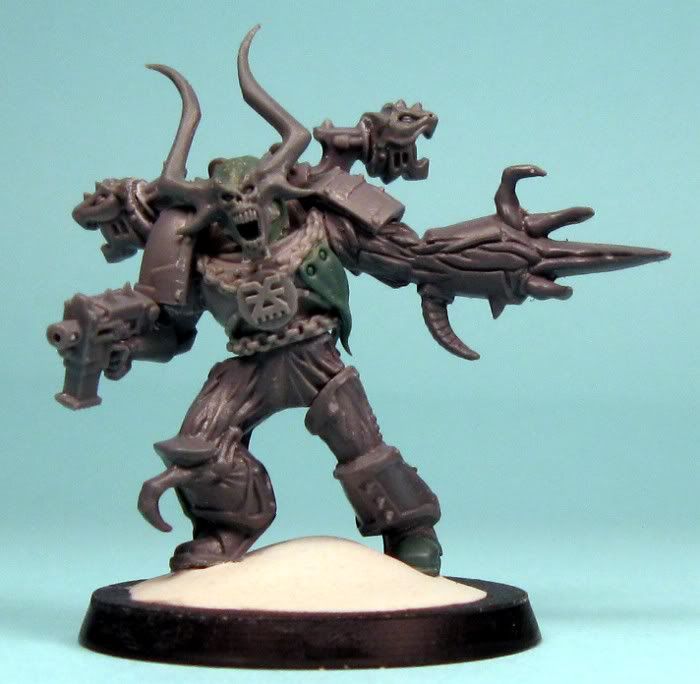
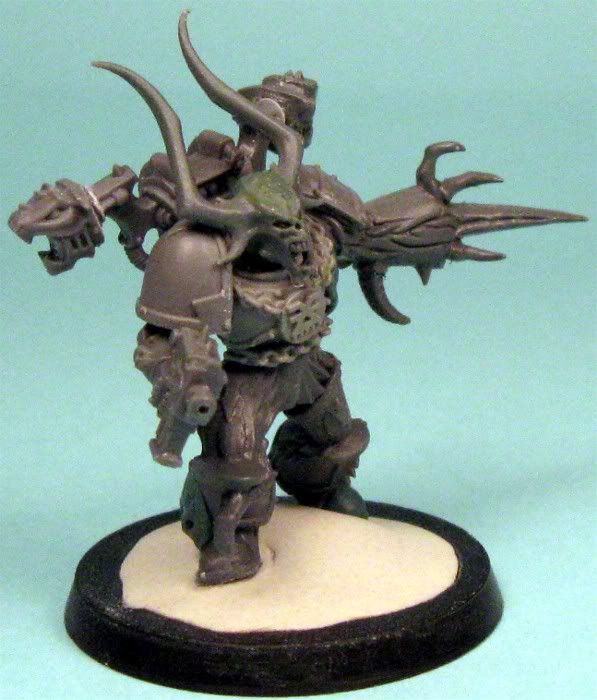
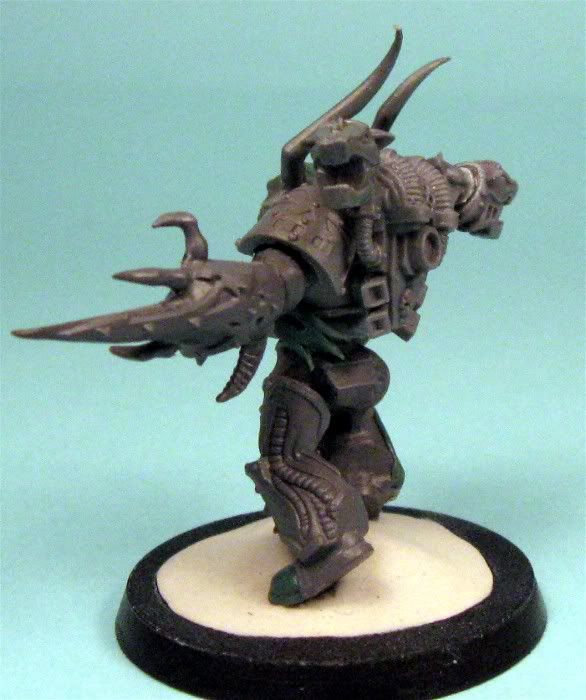
Subject: Re:Messing with Chaos...Balrog to Blood Thirster conversion Done, Beginning Armor Plating Tutorial
|
|

Regular Dakkanaut
The Crosse, Wisc.
|
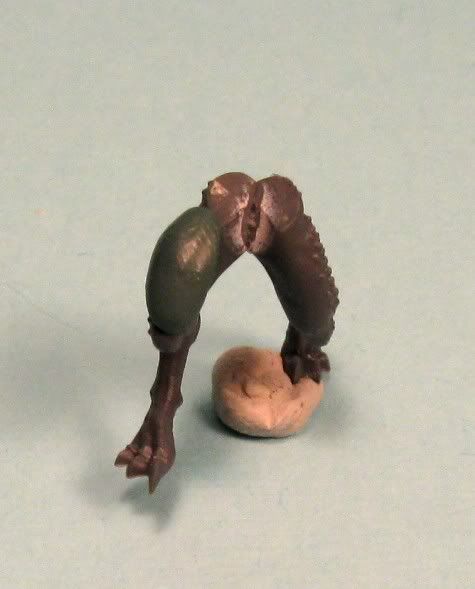
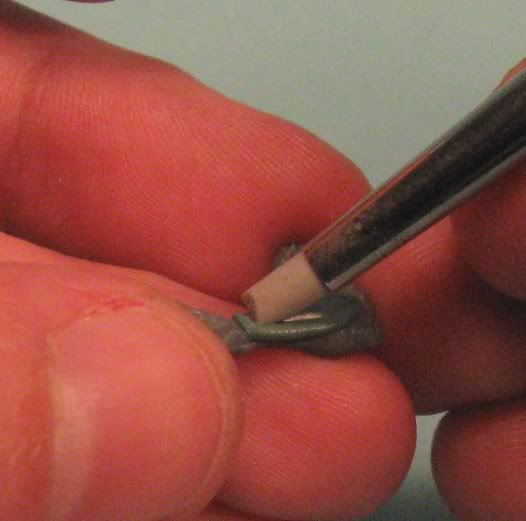
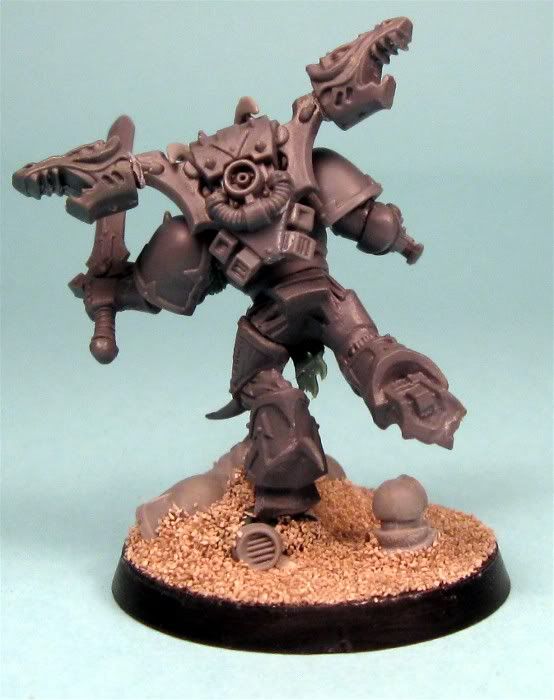
Armor Plating
Tools Used: Xacto knife, various metal sculpting tools, tooth picks, needles, colour shapers (primarily Royal Sovereign Size 0, for beginners I recommend the Firm), Ball Burnisher/Stylus, Mechanical Pencil, Thin Wall Metal Tubing
The picture below shows the various tools I use:
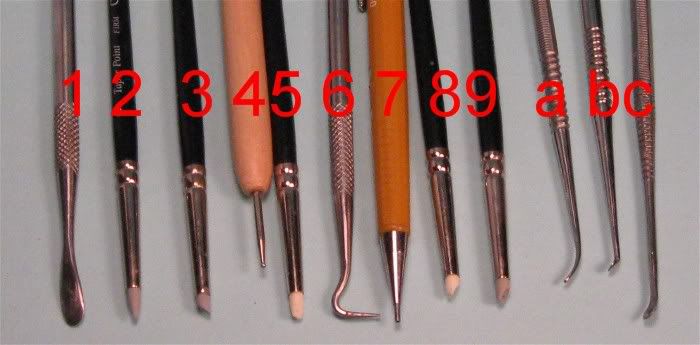 1 – Large Spoon Spatula
: I use this for smoothing larger plate areas. Turned on
its edge works great for smoothing out the edges of your plates.
2 – Firm Round taper point. I use this for getting into all of those really tight areas and for smooth curved concave surfaces.
3 – Cup Round. I use this one for general smoothing. Flat for smoothing plates and convex surfaces. Round for concave surfaces and for round raised edges.
4 – Ball Burnisher / Stylus. I use this primarily for chainmail, but also for make holes in putty plates. Has too ball sizes. I also use this for denting and making the ball-peened hammer type look on the plates.
5 – Flat Chisel. General Smoothing. Square raised edges. Smoothing out plate edges.
6 – Metal Tooth Pick Hook. The point is like the Stylus. The bend kind of works like the Round Taper and Cup Round, but much finer than both and moves the putty much better.
7 – Mechanical Pencil. Used for recessed rivets and normal rivets when coupled with an xacto.
8 – Cup Chisel, Soft. When you really need a soft touch. These are the work horses for the way I make the raised edges on the armor.
9 – Cup Chisel, Firm. When you can use a slightly firmer touch. These are the work horses for the way I make the raised edges on the armor.
a – Knife on one end and long narrow spoon of uniform width.
b - Normal style knife, spoon spatula Sculpting tool. When you need to really move the putty. These are the work horses for the way I make the raised edges on the armor. The knife end used for smoothing the edges of the plates.
c - Normal style knife, spoon spatula Sculpting tool, but larger than b.
Materials Used: Brownstuff ( BS), or Greenstuff ( GS), Water.
General Notes, The More Common Putties
Greenstuff (also known as Kneadatite Blue-Yellow)
It is the most common putty you see used. It will cure solid, but will retain some flexibility. Very similar to a hard rubber. It strength is that it is excellent for making organic shapes. Its weakness is that it does not hold well for sharp edges. If you want really sharp edges, use your Xacto Knife and cut those edges after the GS has cured. GS can easily be cut once cured. GS does not take well to sanding or filing, but that does not mean you cannot smooth it out after it has cured. To smooth it after it is cured, use a sharp razor blade and gently shave the GS with the edge of the blade. Holds detail very well. Semi-sticky like gum in the early stages of curing, after being mixed.
Brownstuff (also known as Kneadatite Brown-Aluminum)
BS is a hard putty that combines a bit of flexibility with the ability to be sanded and filed into sharp edges. It cures harder than GS, and is more brittle. BS is often used for making mechanical looking parts or other metal parts like sword blades. I have also found that BS is much easier to get smooth before its cured than GS. Does not work as well as GS when sculpting more organic looking stuff, better suited for mechanical things.
Apoxie-Sculp
Apoxie-sculp is a self-hardening synthetic clay that combines the features and benefits of clay with those of epoxy. Apoxie sculp will be very soft when mixed, and has a much longer working time than BS or GS and takes a couple hours to really start stiffening. Once cured it becomes rock like. It can take sanding and filing. Its very strong and rigid. However, it does not take detail very well in my opinion.
Milliput
Milliput is an epoxy putty that cures hard. Once fully cured Milliput can be machined, drilled, tapped, turned, filed, sawn, sanded, but can be brittle.
Putty Mixing / Curing
After mixing the GS or BS putty, it will be soft and pliable. You will have about 20-30 minutes where it is very soft. This is a good time for basic shapes. After the first 20 minutes the putty will start showing more rubbery characteristics and begin to harden. Most epoxy putties, also depends on the amount of the hardener you use, will have about 1-1.5 hours of working time before it is too hard to work anymore. Epoxy putty will typically cure fully in about 24 hours.
General Tips for Armor Plates
- Recommend using BS, but GS works fine. BS is more forgiving in getting smooth plates, especially if you are new to using putty.
- Sharp edges are very critical to make it look right.
- To make raised edges very gently use your spatula/spoon tool, ball burnisher, or my personal favorites the chisel pointed colour shapers.
- For recessed rivets use a mechanical pencil without the lead in them and simply jab the putty as it's curing with the metal tubing.
- Plastic Rod Rivet method. Use your Xacto to shave off a thin layer of plastic rod. Place a tiny drop of glue on the model where you want the rivet and put the thin layer of the plastic rod over the glue.
- For raised rivets, allow the putty armor to cure (it helps if you put a little tiny divot in the putty where the rivet is going), flatten a small ball of putty over the armor, then use the tubing and press it into the flattened piece of putt. Remove the excess putty and allow it to cure. This is a very delicate rivet, not durable at all unless it is sealed in place somehow. I recommend the recessed rivet for use with your armies and things that get played with, its much more durable and gets the idea across easily.
Next time we begin the correcting of the posture of some Bloodletters on our way to making the armor plating.
|
|
|
|
 |
|
2009/08/31 04:23:08
Subject: Re:Messing with Chaos...Armor Plating Tutorial Update - 8/30
|
|
Regular Dakkanaut
The Crosse, Wisc.
|
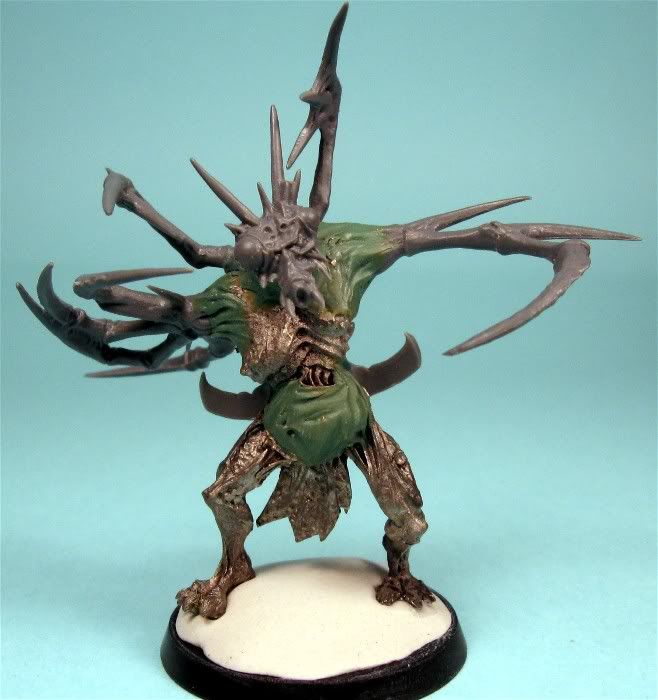
Posture and Armor Plating Part 2
In this post we'll correct the posture of the bloodletter and see some general gap filling and smoothing tips on GS work.
Stage 1
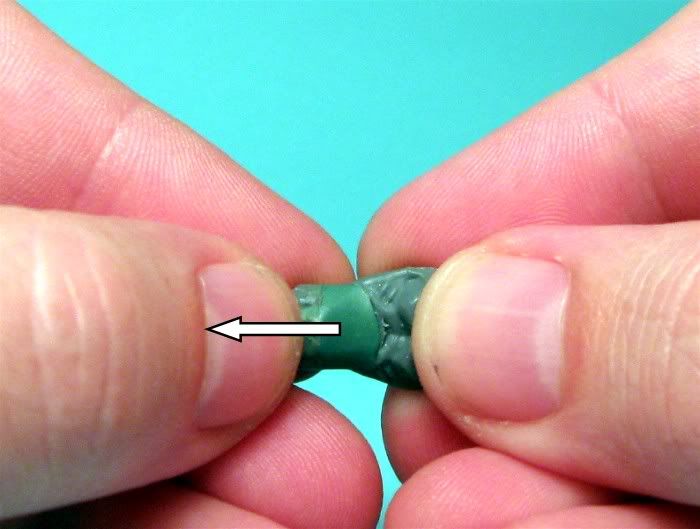
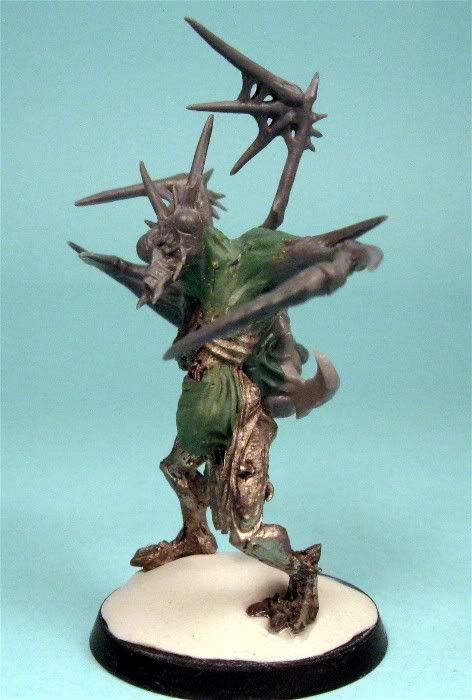
We’ll cut the torso at the waist, straighten it out matching the back groove where the spine piece goes. Pin the two pieces back together with using some pin material and a pin vise.

Fill the gap with GS and smooth it out a little, one of the quickest ways to smooth it out is by simply dragging your finger gently across the GS. Put a little water or lotion on prior to doing that. The goal is not just too smooth it out, but also to blend it in to get a smooth transition from plastic to GS.
 Stage 2
Allow stage 1 to cure for awhile. In this stage we want to make the area we created in stage one to look like it has abdominal muscles. Roll out a small sausage of GS, and place it approximately where shown on the pic below.
Blend the edges of the sausage into to the torso with fingers and/or sculpting tools. If I use tools I’m generally using the round cup chisel or the tapered round to do the blending. Once the edges of the sausage is blended into the torso I'll use the round cup chisel to do some general correcting of the sausage to rid it of any possible ridges.
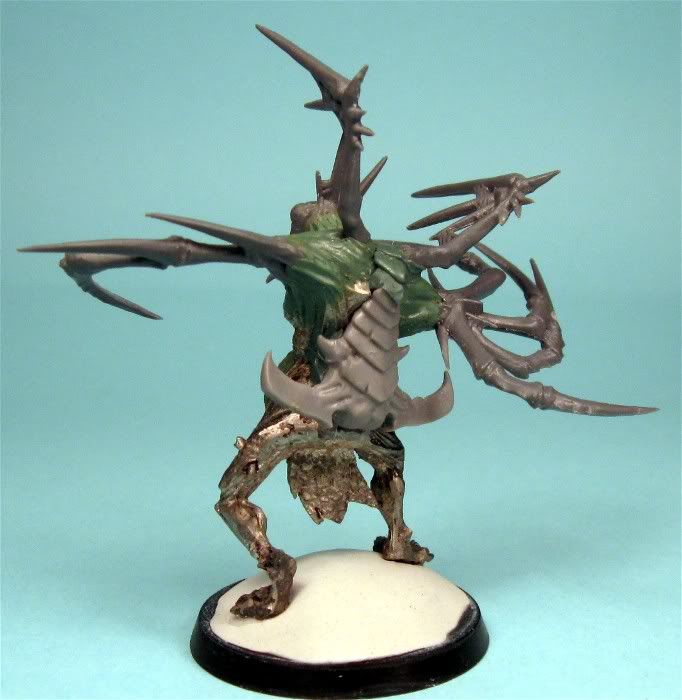
Below you see me blending in the GS with the tapered round.
The result of the blending:
Now we need to define the abdominal muscle, again I'll use the tapered round and gently add an indentation down the center.
 Automatically Appended Next Post:
 And the final product, shown below. Allow this to cure a little and do the next set of abdominal muscles.
Next post, we're ready for the actual armor plating of the miniatures, but the thing to take out of this how to smooth out the GS, which is critical to making armor plates.
---PPC
|
|
This message was edited 1 time. Last update was at 2009/08/31 04:24:35
|
|
|
|
|
2009/09/08 00:26:48
Subject: Re:Messing with Chaos...Armor Plating Tutorial Continued - 8/30
|
|
Regular Dakkanaut
The Crosse, Wisc.
|
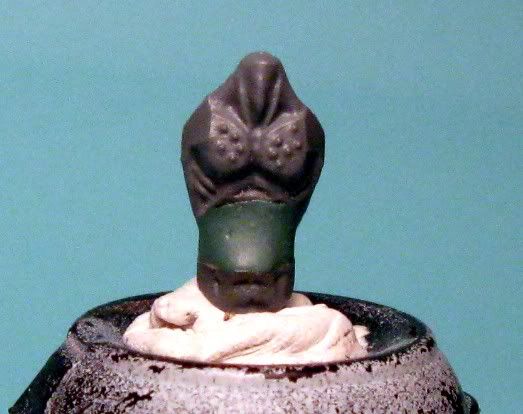
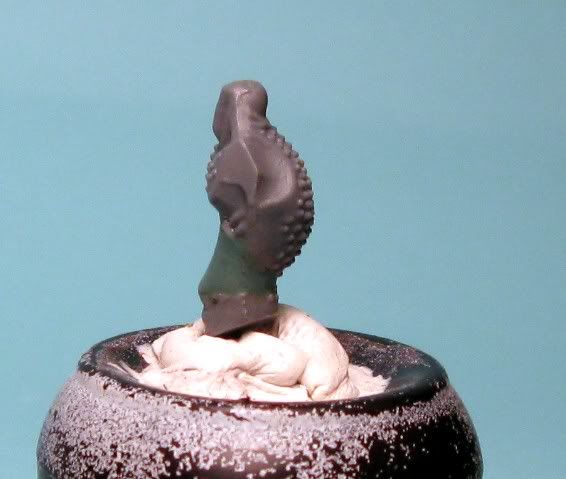
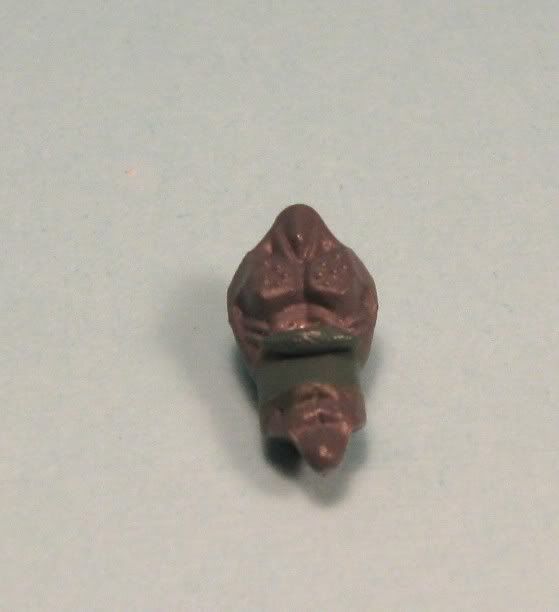
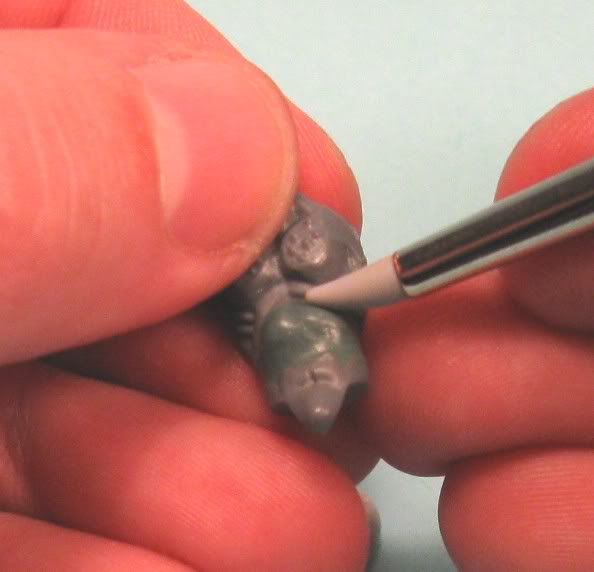
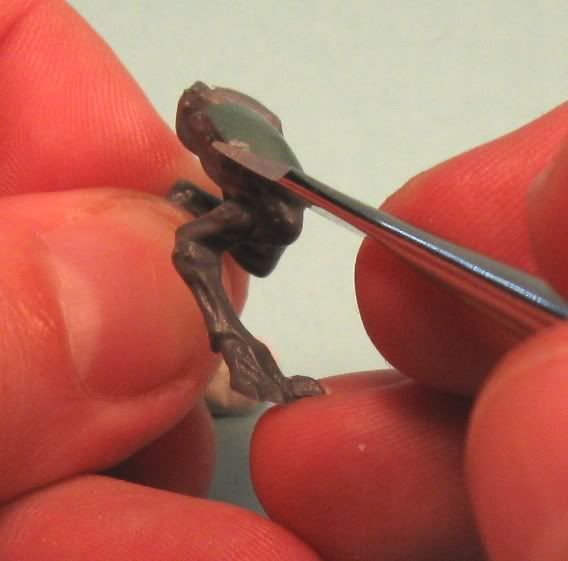
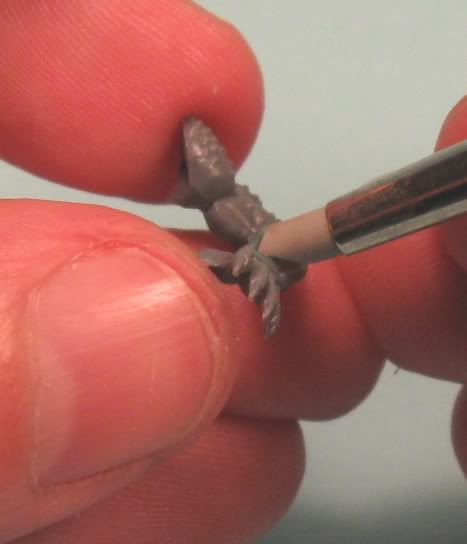
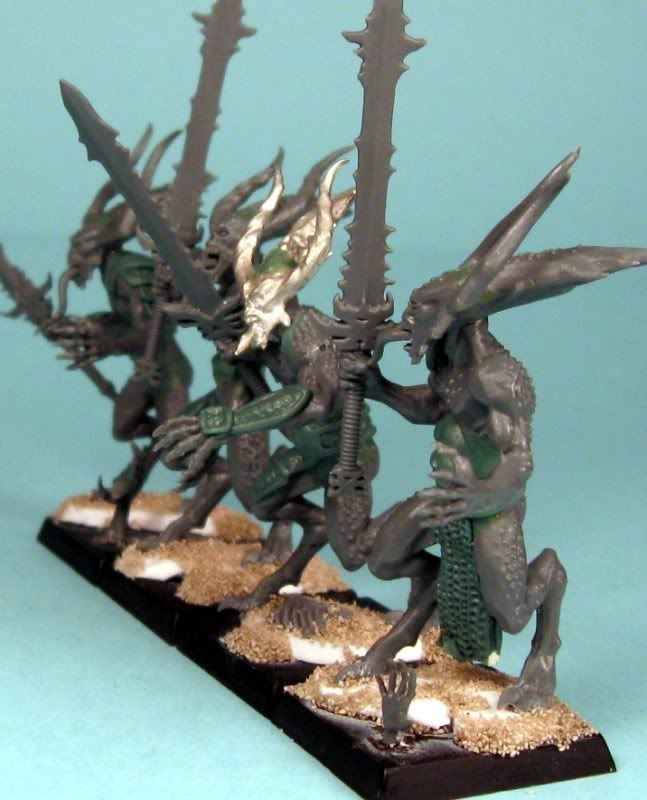
Stage 3
Alright, let’s do some armor plates. Here we have a set of bloodletter legs, I’ve added a sheet of GS to the legs in the general shape that I want on the leg, and smoothed it out with my fingers. Again use water and/or lotion on your fingers to smooth out the GS.
Next shape up the armor plate edges with the knife end of your sculpting tool. Done right this will give you a fairly sharp edge.
Smooth out the plate. In this picture you see me using the round cup smoothing out the GS. This is a cool picture, as you can actually see the water between the cup and the GS, as I was lifting the tool to back up and smooth an area out.
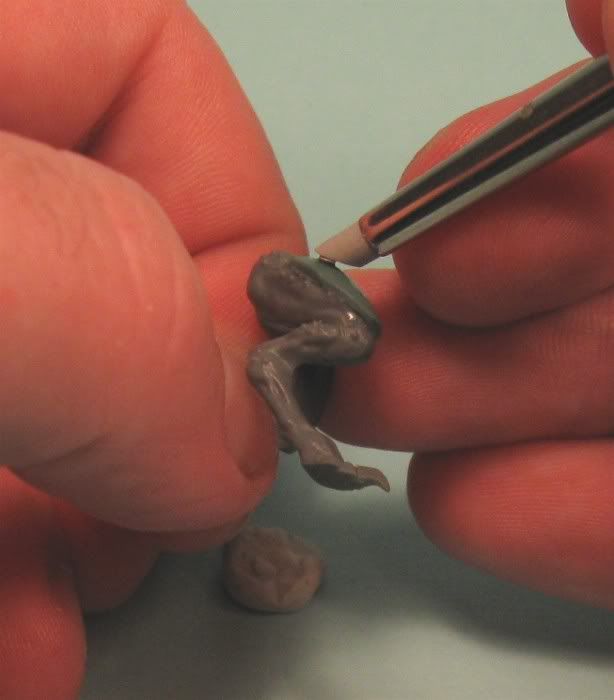
You could also use the spoon/spatula shaped end of your sculpting tool to do this, like what I am doing on this arm.

At this point I want to make the plate on the leg into several plates, so I’m using the firm flat chisel point to make raised edges for what will be overlapping plates.
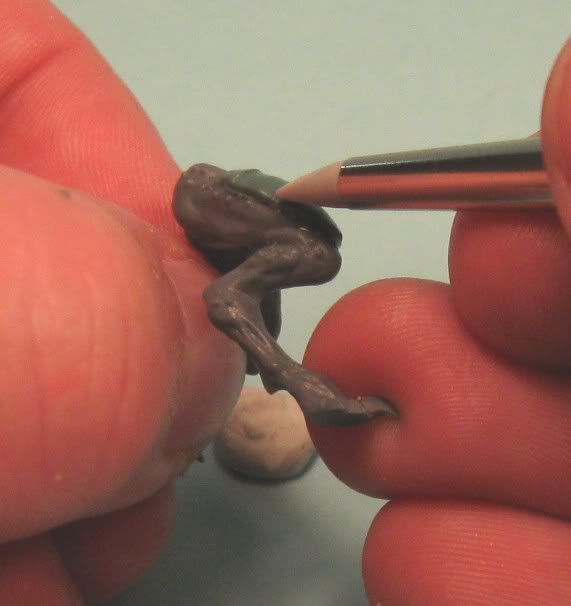
Now back to the arm. I’m not making a number of plates, but I am using the same technique to make raised edges around the perimeter of the plate. In this picture I am gently denting the plate with the cup chisel. I do this by pushing edge in and then gently drag it back to smooth the central area. Again we are doing this after we got the plate completely smooth and the edge defined.
Some more coming up very soon.
---PPC
Automatically Appended Next Post:
Some additional pics of the arm:
|
|
This message was edited 2 times. Last update was at 2009/09/08 00:40:43
|
|
|
|
|
2009/09/08 15:37:22
Subject: Messing with Chaos...Armor Plating Tutorial Continued - Updated 9/7/09
|
|

Fresh-Faced New User
|
awesome quick tut! That looks so much simpler than I was thinking it was gonna be!!
|
|
|
|
|
2009/09/08 16:26:41
Subject: Re:Messing with Chaos...Armor Plating Tutorial Continued - Updated 9/7/09
|
|
Excellent Exalted Champion of Chaos
Grim Forgotten Nihilist Forest.
|
I like these... I wana try and order some chaos knight head's now
|
I've sold so many armies. :(
Aeldari 3kpts  
Slaves to Darkness.3k  
Word Bearers 2500k  
Daemons of Chaos  
|
|
|
|
|
2009/09/08 16:30:47
Subject: Messing with Chaos...Armor Plating Tutorial Continued - Updated 9/7/09
|
|
Ork-Hunting Inquisitorial Xenokiller
|
Great stuff... makes me feel like i could possibly pull it off 
|
2009's 1500 IG - 11/5/5 (W/L/D) |
|
|
|
|
2009/09/09 03:59:29
Subject: Re:Messing with Chaos...Armor Plating Tutorial Continued - Updated 9/7/09
|
|
Regular Dakkanaut
The Crosse, Wisc.
|
It is a pretty straight forward technique. I've shown this technique to numerous people in about 10 minutes, and have them sculpting the basics in no time. You can make it as difficult as you want, or as simple as you want. My advice is that if you are having trouble with metal tools, it probably means you need a softer touch, and try the colour shapers, they are more forgiving while you are learning to get that right touch. If you have trouble getting green stuff smooth, get more patience and if that doesn't work try brownstuff for awhile, again its more forgiving, and sandable.
|
|
|
|
|
|
2009/09/11 03:37:29
Subject: Re:Messing with Chaos...Armor Plating Tutorial Continued - Updated 9/7/09
|
|
Regular Dakkanaut
The Crosse, Wisc.
|
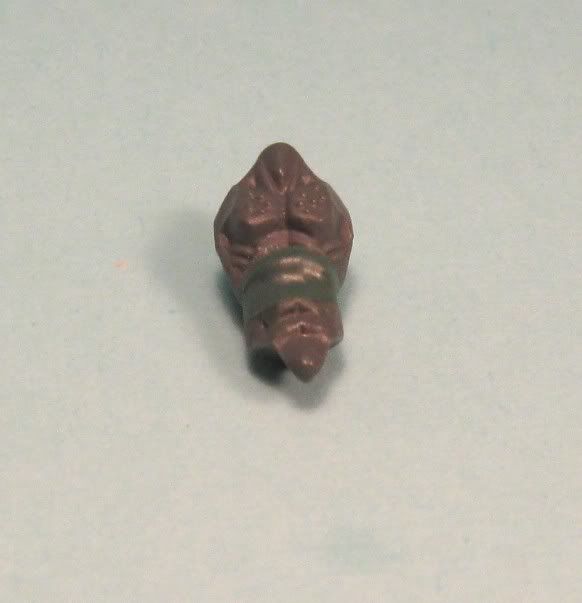
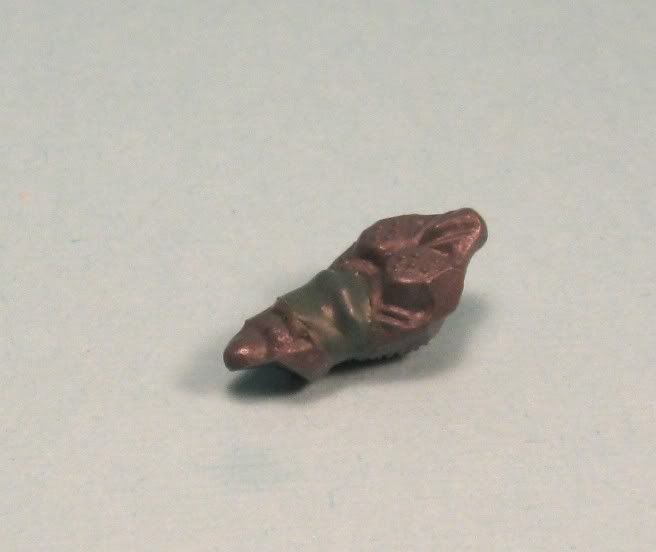
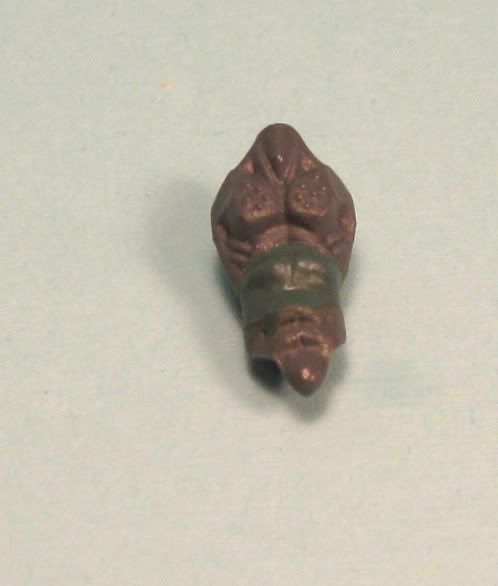
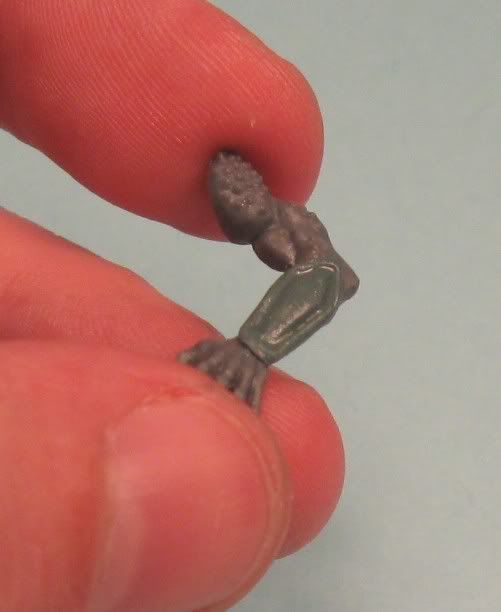
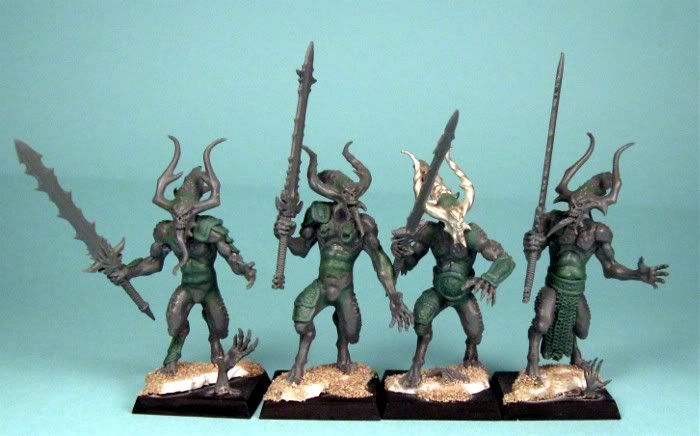
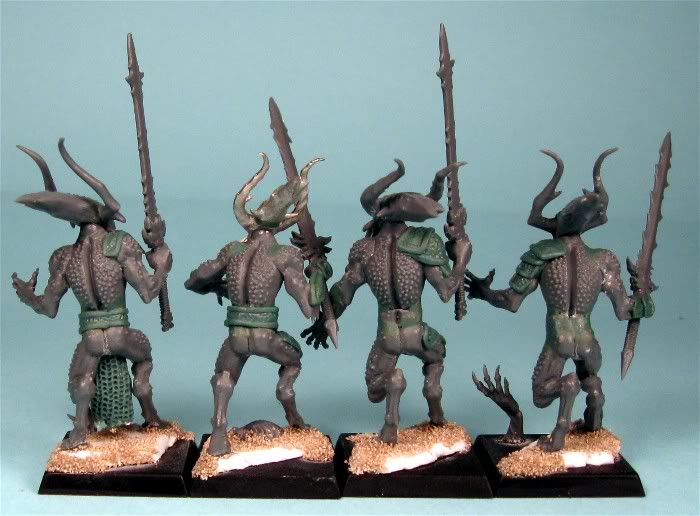
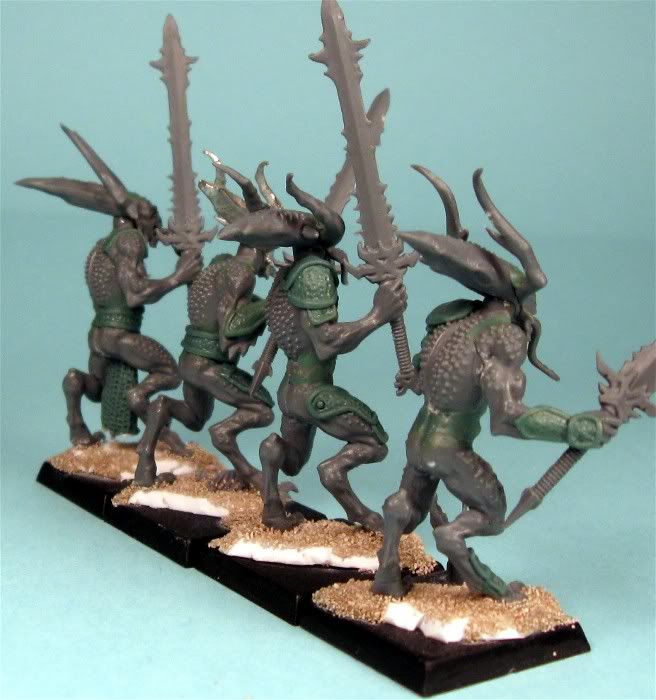
Got around to shooting pics of the pieces from tutorial. A fun bit of work, getting ready to prime, and very soon expand the number of bloodletters I have at my disposal.
And here is the final work minus the bl spine pieces:
|
|
|
|
|
|
2009/09/11 04:54:21
Subject: Messing with Chaos...Armored Plastic Bloodletters - Updated 9/10/09
|
|
Pyromaniac Hellhound Pilot
|
Whoa. Very nice work. Keep at this!!
|
It's better to simply be an idiot, as no one can call you on it here. -H.B.M.C.
Cap'n Gordino's instant grammar guide:
"This is TOO expensive." "I'm going TO the store, TO get some stuff."
"That is THEIR stuff." "THEY'RE crappy converters."
"I put it over THERE." "I'll go to the store THEN."
"He knows better THAN that." "This is NEW." "Most players KNEW that." |
|
|
|
|
2009/09/11 09:53:08
Subject: Messing with Chaos...Armored Plastic Bloodletters - Updated 9/10/09
|
|

Calculating Commissar
|
Those armour plates look really nice; I like the dimpled effect on them. Must give this a go on some of the carapace armour I'll be doing for my guard, thank you 
|
|
|
|
|
|
2009/09/12 14:38:35
Subject: Re:Messing with Chaos...Armored Plastic Bloodletters - Updated 9/10/09
|
|
Regular Dakkanaut
The Crosse, Wisc.
|
|
|
|
|
|
|
2009/09/12 16:17:51
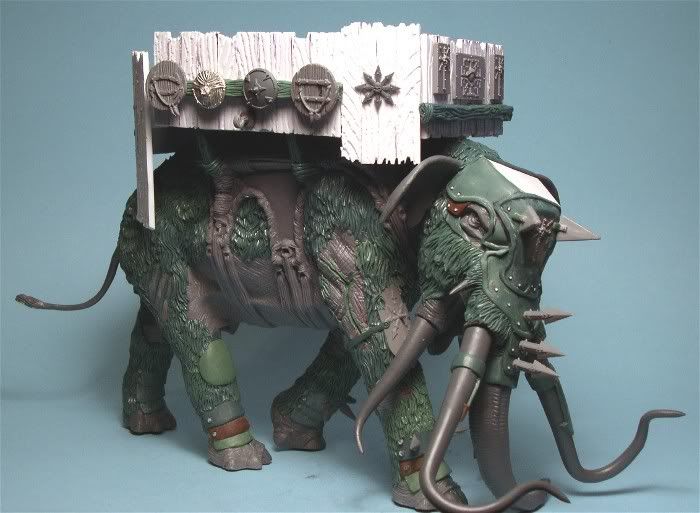
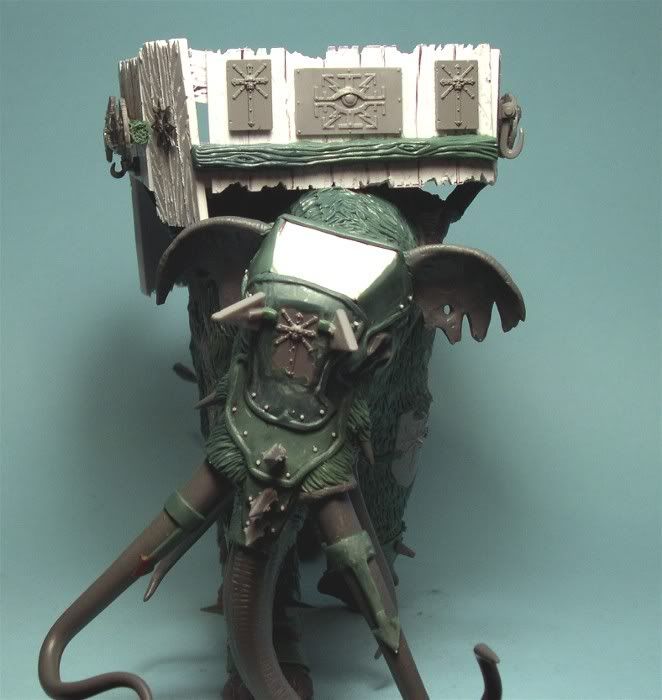
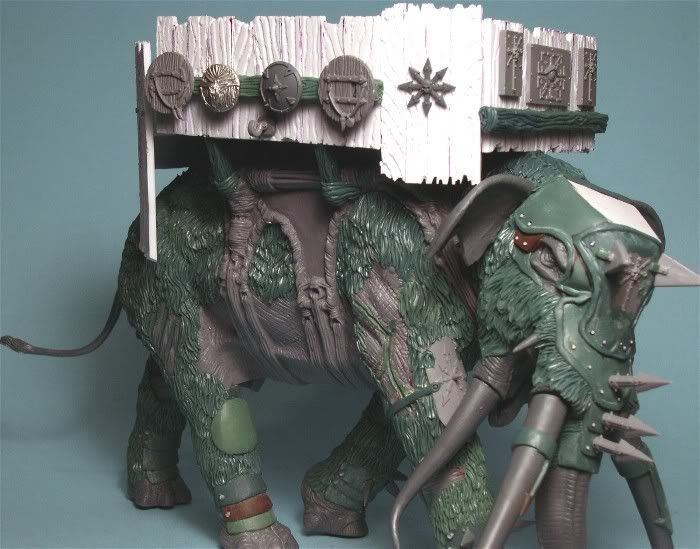
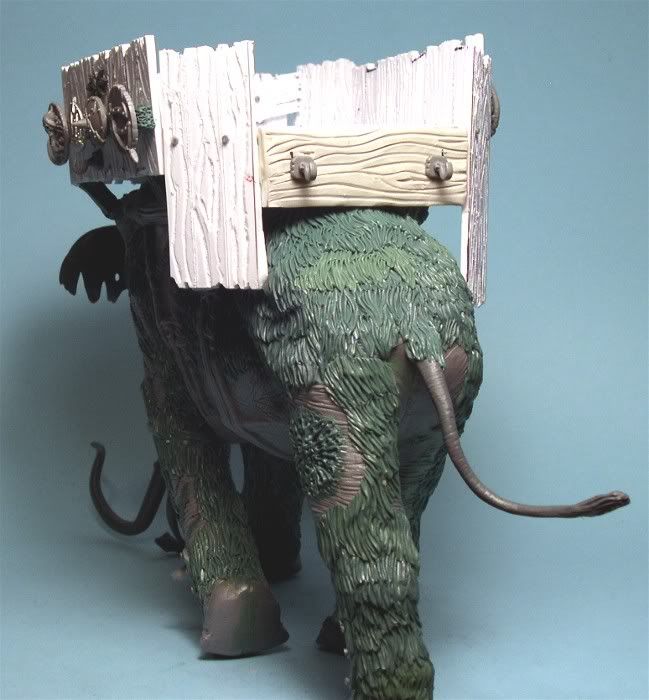
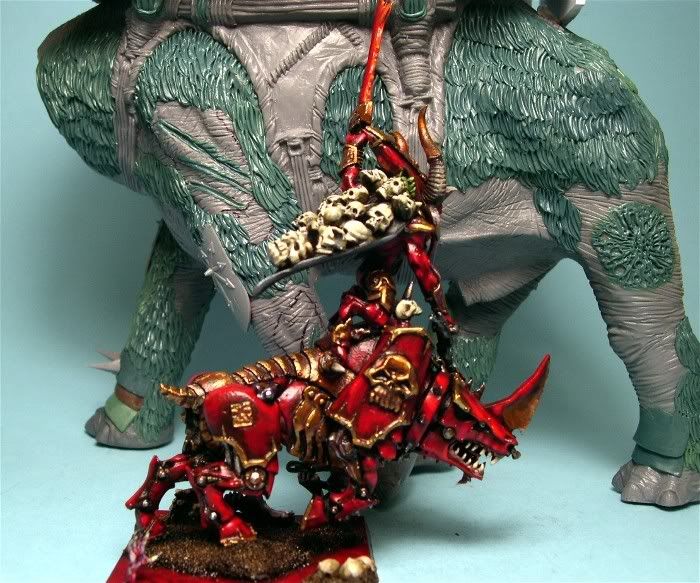
Subject: Re:Messing with Chaos...War Mammoth Conversion - Updated 9/12/09
|
|
Hungry Little Ripper
USA we are around the states
|
Mind me asking how much that job cost?
|
Let us paint your army for you for cheap     

|
|
|
|
|
2009/09/12 16:26:15
Subject: Messing with Chaos...War Mammoth Conversion - Updated 9/12/09
|
|

Junior Officer with Laspistol
|
Ah so your the guy who did that cool Daemon army, saw it in a GW GT army feature(or atleast I think those daemons look the same as the ones in the GT feature).
Cool chaos mammoth, nice conversion work on him keep up the good work.
|
|
This message was edited 1 time. Last update was at 2010/04/11 18:38:27
"I refuse to join any club that would have me as a member."-Groucho Marx
|
|
|
|
|
2009/09/12 23:07:13
Subject: Messing with Chaos...War Mammoth Conversion - Updated 9/12/09
|
|
Regular Dakkanaut
The Crosse, Wisc.
|
Deff Dread red Edition wrote:Ah so your the guy who did that cool Daemon army,saw it in a GW GT army feature(or atleast I think those daemons look the same as the ones in the GT feature).
Yea, GW's Chicago GT '08 web coverage, the Khorne Demon army is mine. Mike Butcher and I generally team up and go to those things when held in Chicago. His awesome Nurgle army is also featured there. And another of the Wisconsin guys has a piece up in the models.
|
|
|
|
|
|
2009/09/12 23:39:45
Subject: Messing with Chaos...War Mammoth Conversion - Updated 9/12/09
|
|
Maddening Mutant Boss of Chaos
|
That's an amazing war mammoth. I like it alot. I'm also really inspired by your kit-bashing of the whfb and csm, it's something I've been wanting to try since I started the hobby. Kudos!
|
Veteran Sergeant wrote:Oh wait. His fluff, at this point, has him coming to blows with Lionel, Angryon, Magnus, and The Emprah. One can only assume he went into the Eye of Terror because he still hadn't had a chance to punch enough Primarchs yet.
Albatross wrote:I guess we'll never know. That is, until Frazzled releases his long-awaited solo album 'Touch My Weiner'. Then we'll know.
warboss wrote:I marvel at their ability to shoot the entire foot off with a shotgun instead of pistol shooting individual toes off like most businesses would.
Mr Nobody wrote:Going to war naked always seems like a good idea until someone trips on gravel.
Ghidorah wrote: You need to quit hating and trying to control other haters hating on other people's hobbies that they are trying to control.
ShumaGorath wrote:Posting in a thread where fat nerds who play with toys make fun of fat nerds who wear costumes outdoors.
Marshal2Crusaders wrote:Good thing it wasn't attacked by the EC, or it would be the assault on Magnir's Crack.
|
|
|
|
|
2009/09/13 01:20:28
Subject: Messing with Chaos...War Mammoth Conversion - Updated 9/12/09
|
|
Pyromaniac Hellhound Pilot
|
#1 of the Awesomeness Mafia just ceased stroking his Persian cat in shock.
|
It's better to simply be an idiot, as no one can call you on it here. -H.B.M.C.
Cap'n Gordino's instant grammar guide:
"This is TOO expensive." "I'm going TO the store, TO get some stuff."
"That is THEIR stuff." "THEY'RE crappy converters."
"I put it over THERE." "I'll go to the store THEN."
"He knows better THAN that." "This is NEW." "Most players KNEW that." |
|
|
|
|
2009/09/13 13:37:23
Subject: Messing with Chaos...War Mammoth Conversion - Updated 9/12/09
|
|
Junior Officer with Laspistol
|
Yeah Mark Butcher's Nurgle army is also really cool.Well any way,nice sculpt/conversion/greenstuffing on the war mammoth.
OT again:Hope you don't mind me stealing your idea for putting armour on the blood letters,although I guess if you didn't want us to use it,you wouldn't have put the tutorial up.
|
|
This message was edited 3 times. Last update was at 2009/09/13 13:53:01
"I refuse to join any club that would have me as a member."-Groucho Marx
|
|
|
|
|
2009/09/13 14:14:28
Subject: Messing with Chaos...War Mammoth Conversion - Updated 9/12/09
|
|
Regular Dakkanaut
The Crosse, Wisc.
|
Deff Dread red Edition wrote:Yeah Mark Butcher's Nurgle army is also really cool.Well any way,nice sculpt/conversion/greenstuffing on the war mammoth.
OT again:Hope you don't mind me stealing your idea for putting armour on the blood letters,although I guess if you didn't want us to use it,you wouldn't have put the tutorial up.
Yea I get to see Mike's nurgle and other stuff quite often, since we don't live very far apart. If anyone is unfamilliar with his work they should check out http:/www.chaosbutcher.com, he's only been featured in Whitedwarf a few times.
And I have no problems with people armoring up their BLs. I armor up everything it seems from beastmen to orcs and beyond.
|
|
|
|
|
|
2009/09/13 14:23:01
Subject: Messing with Chaos...War Mammoth Conversion - Updated 9/12/09
|
|
Rampaging Reaver Titan Princeps
|
That War Mammoth is utterly stupendous. I also really am enjoying your beastmen conversions. The idea of using them as/in Chaos Warrior Regiments has suddenly made my Nurgle Beastmen army seem much more playable and practical cheers!
|
"But me no buts! Our comrades get hurt. Our friends die. Falkenburg is a knight who swore an oath to serve the church and to defend the weak. He'd be the first to tell you to stop puling and start planning. Because what we are doing-at risk to ourselves-is what we have sworn to do. The West relies on us. It is a risk we take with pride. It is an oath we honour. Even when some soft southern burgher mutters about us, we know the reason he sleeps soft and comfortable, why his wife is able to complain about the price of cabbages as her most serious problem and why his children dare to throw dung and yell "Knot" when we pass. It's because we are what we are. For all our faults we stand for law and light.
Von Gherens This Rough Magic Lackey, Flint & Freer
Mekagorkalicious -Monkeytroll
2017 Model Count-71
|
|
|
|
|
2009/09/14 02:22:54
Subject: Messing with Chaos...War Mammoth Conversion - Updated 9/12/09
|
|
Automated Rubric Marine of Tzeentch
|
I just spent about 30 minutes looking for this thread so I could figure out how to do the armour on the Balrog (I'm using a different model but the principle is the same  ). Nice work! Thanks for the inspiration! EDIT: I also stole the idea for the Chaos Knight heads. My Berzerkers are going to be scary!
|
|
This message was edited 1 time. Last update was at 2009/09/14 02:24:47
|
|
|
|
|
2009/09/20 23:27:35
Subject: Re:Messing with Chaos...War Mammoth Conversion - Updated 9/12/09
|
|
Regular Dakkanaut
The Crosse, Wisc.
|
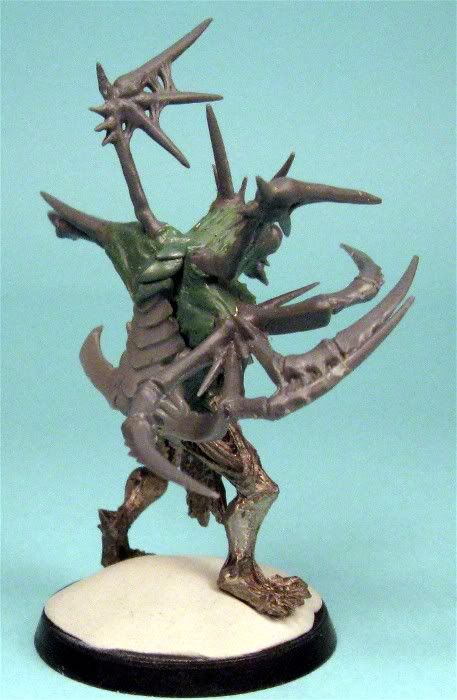
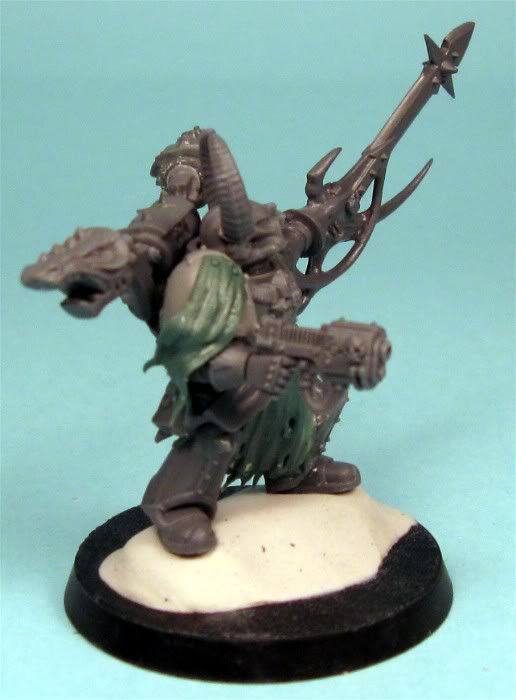
Sometime simple and subtle conversions can make things very different, this one of those cases where you just put a little GS in the neck socket to accommodate a fantasy beastman head, rotate the sword arm and do a little ripped cloth, mixed with some other subtle parts and conversions and you get a figure that looks like we have below, something very quick, but yet different:

---PPC
|
|
|
|
|
|
2009/09/21 00:02:07
Subject: Re:Messing with Chaos...Back to 40k for a bit - Updated 9/20/09
|
|

2nd Lieutenant
|
Those shoulder guards remind me of the ones from halo. Great work so far, keep the pics coming!
|
*Ex Username: Gutteridge*

|
|
|
|
|
2009/09/22 01:41:59
Subject: Re:Messing with Chaos...Back to 40k for a bit - Updated 9/20/09
|
|
Regular Dakkanaut
The Crosse, Wisc.
|
|
|
|
|
|
|
2009/09/22 11:14:28
Subject: Re:Messing with Chaos...Back to 40k for a bit - Updated 9/21/09
|
|
Sinewy Scourge
|
Where are you getting the heads for the backpacks?
|
|
|
|
|
|
2009/09/26 13:59:40
Subject: Re:Messing with Chaos...Back to 40k for a bit - Updated 9/21/09
|
|
Regular Dakkanaut
The Crosse, Wisc.
|
Where are you getting the heads for the backpacks?
Chaos Vehicle sprues
------------------------------------------------------
A long time ago I built some chaos trolls for my beastmen army. I absolutely hated the models after I finished them, and they were quickly thrown out of the army.
When the spawn kit came out I built a couple and had all kinds of pieces left over and decided to strip the trolls down and see what I could do with them. The first turned out pretty cool.
This is the second one, chaos troll converted into chaos spawn. Now there was a bit of dremel work done grinding down a bunch a things, and a bit of GS work done to blend all of the parts to make a nasty looking bug. Now I really like the chaos trolls as chaos spawns, much better.
And another chaos spacemarine like the first couple of word bearer styled ones, no chaos warriors helmet on this one.
|
|
|
|
|
|
2009/09/26 19:21:27
Subject: Messing with Chaos...A CSM & 40k Spawn from a Troll - Updated 9/26/09
|
|
Lethal Lhamean
|
Im digging the chaos marines with the head swaps and the latest guy.. but somehow the latest guy looks a little short eh?
|
|
|
|
|
2009/10/02 02:22:53
Subject: Messing with Chaos...A CSM & 40k Spawn from a Troll - Updated 9/26/09
|
|
Regular Dakkanaut
The Crosse, Wisc.
|
He is normal sized, no squat. I do understand what you mean, sometimes when you add all kinds of stuff it changes how a model appears in reality. Photos don't really help sometimes either. Next up a converted Khorne Doombull, as I try to liven up that old model a little.
|
|
|
|
|
|
2009/10/02 02:49:42
Subject: Messing with Chaos...A CSM & 40k Spawn from a Troll - Updated 9/26/09
|
|
Enigmatic Sorcerer of Chaos
|
I think its the crazy head things on the back that make it look small... totally love everything youve done tho!
|
|
|
|
|
2009/10/04 23:55:04
Subject: Re:Messing with Chaos...A Khorne Doombull Conversion - Updated 9/26/09
|
|
Regular Dakkanaut
The Crosse, Wisc.
|
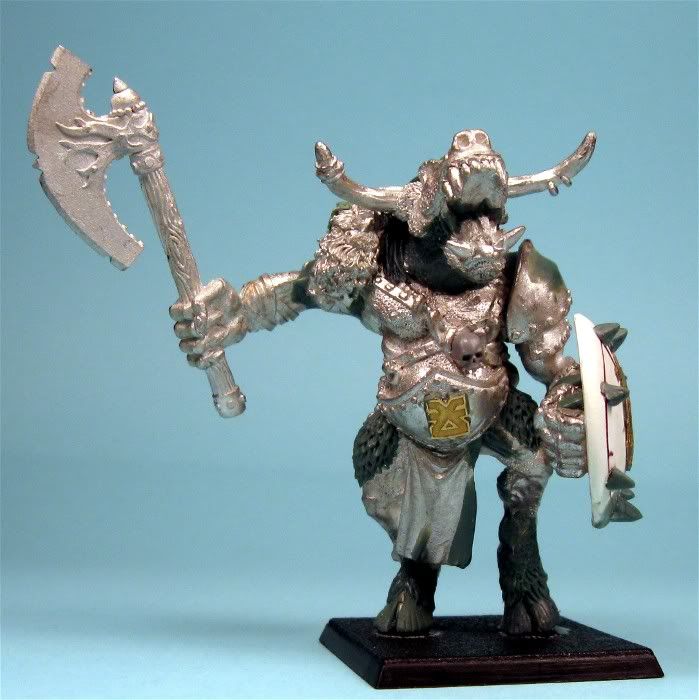
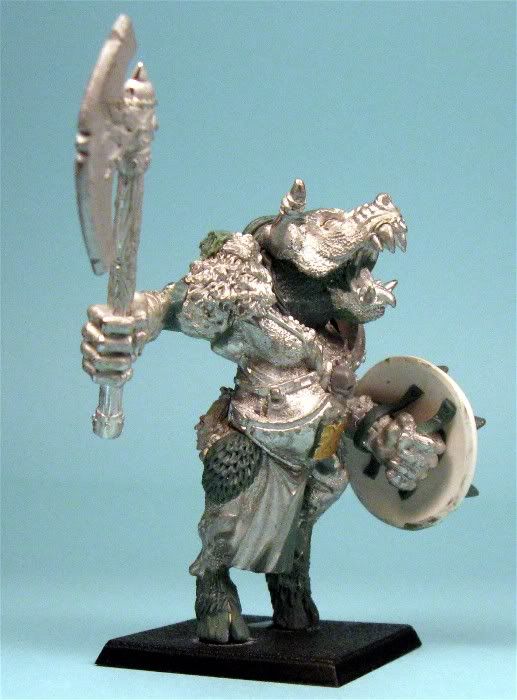
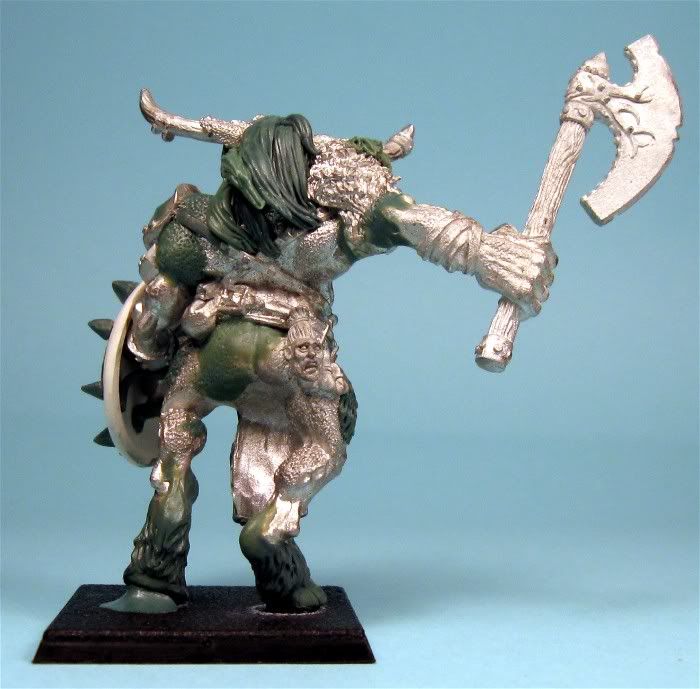
When I started playing beastmen, I knew right away that did not like the looks of the old minotaur and doombull models, but I never really got around to finishing a Doombull that I was happy with while getting the army ready to play some tournaments. I started this a new Doombull conversion for my Khorne beastmen about 2 years ago, and never finished the modeling until now. It matches up pretty much all of my minotaurs and first Doombull, being Khorne themed and have long flowing hair.
I decided to arm him with a shield, give him neck, and get rid of those hideous feet. Originally I planned to give him a sword, but never got around to making one. Here's the final look of the model:
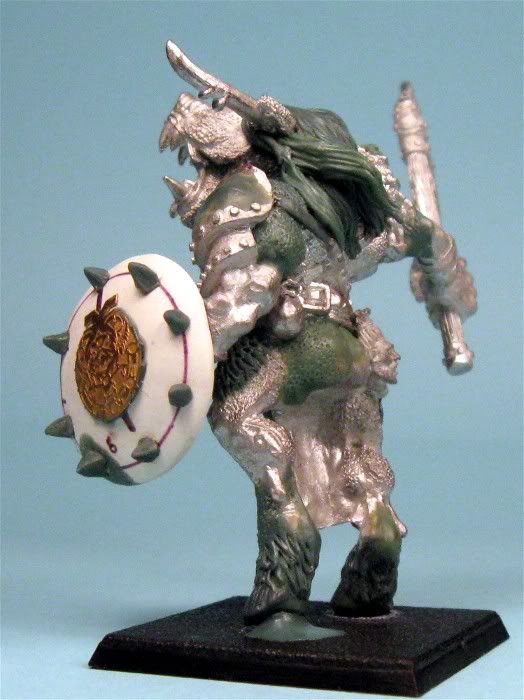
---PPC
|
|
|
|
|
|
2009/10/05 02:09:30
Subject: Messing with Chaos...Khorne Doombull Conversion - Updated 10/4/09
|
|
Frightening Flamer of Tzeentch
|
Theres nothing on these three pages that i dont like alot. Especially the kit bashing and Balrog. Both the mamoth and doombull are awsome too
|
When you call an intimate moment with your partner "the Assault Phase"
Is that followed by a pile-in move?
That brings a whole new meaning to the term "Hit and Run"
Can that be following a deep strike, or do you have to wait until the next round? |
|
|
|
|
|
|