| Author |
Message |
 |
|
|
|
|
Advert
|
Forum adverts like this one are shown to any user who is not logged in. Join us by filling out a tiny 3 field form and you will get your own, free, dakka user account which gives a good range of benefits to you:
- No adverts like this in the forums anymore.
- Times and dates in your local timezone.
- Full tracking of what you have read so you can skip to your first unread post, easily see what has changed since you last logged in, and easily see what is new at a glance.
- Email notifications for threads you want to watch closely.
- Being a part of the oldest wargaming community on the net.
If you are already a member then feel free to login now. |
|
 |
2015/12/01 22:21:59
Subject: Bailey03's work in progress blog
|
|

Fresh-Faced New User
|
Hello to everyone here at Dakka Dakka. I've posted a few projects here in the past but not that much. I thought perhaps I'd start up a continuing work in progress thread where I could post whatever I am currently working on. First a little about me... I paint primarily for display and competition, rather than gaming. So it's not uncommon for me to work on a single figure for a month or longer. I also tend to work on slightly larger figures. I do a lot of 54mm as well as 75mm and 90mm figures. I'll do the occasional 28mm, but I like having more room to work. I like a lot of genres. You'll see me paint a lot of historical figures (ancients, knights, Napoleonics, etc) but also fantasy and sci-fi. In addition to my projects, I will try to share tips and tricks I've learned, color mixes, and other tutorials. Hopefully you all will find at least something in here helpful!
Okay, on to the figures...
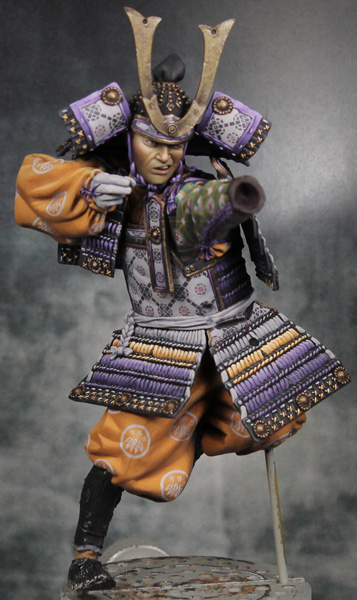
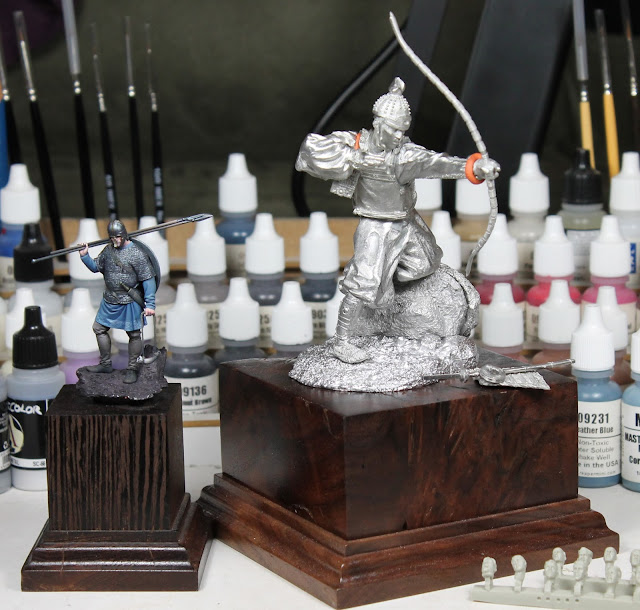
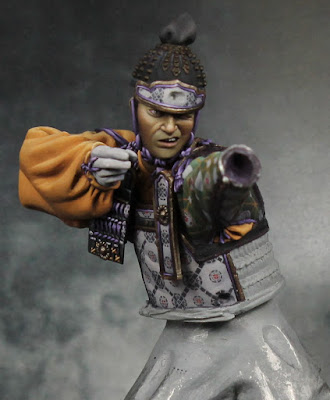
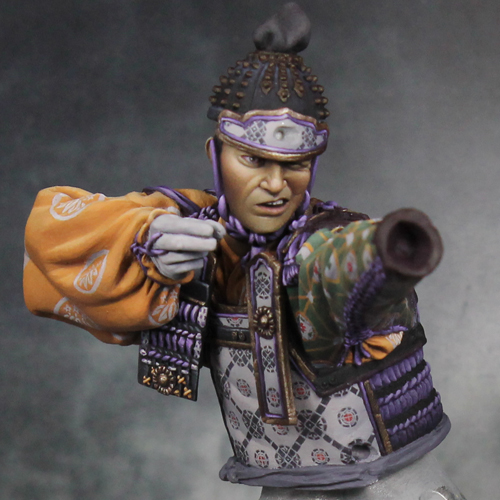
My current project is a bit on the large side for me. This is a 90mm samurai from Pegaso Models. To give you a sense of scale, here he is before I started. On the left is a 54mm and you've got the paint bottles so that should give you an idea of the size of this one.
He's got a lot of overlapping parts, so I'm painting this guy in sections and assembling as I go. I initially left most of the armor plates off as well as his right arm. As usual, I began with his face

For the face I used Reaper's Volcano Brown, Bronzed Skin Shadow, Bronzed Skin, Bronzed Skin Highlight, and Linen White. I also applied glazes of red, blue, and purple made from Scale75 inks to tint the face and add more life to it. Red was used on the cheeks and nose, blue on the lower face to hint at stubble, and purple to deepen some shadows. These were very thin, the idea was to hint at color and not make him look like a clown!
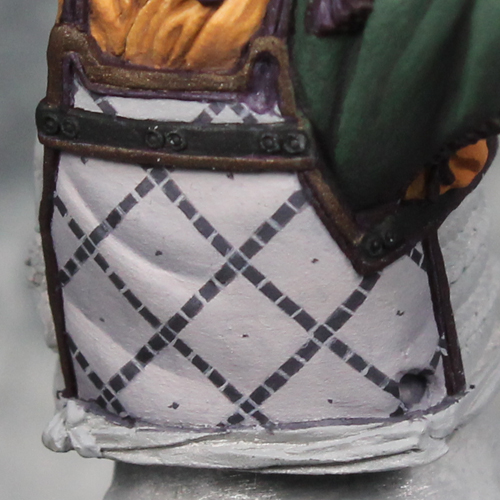
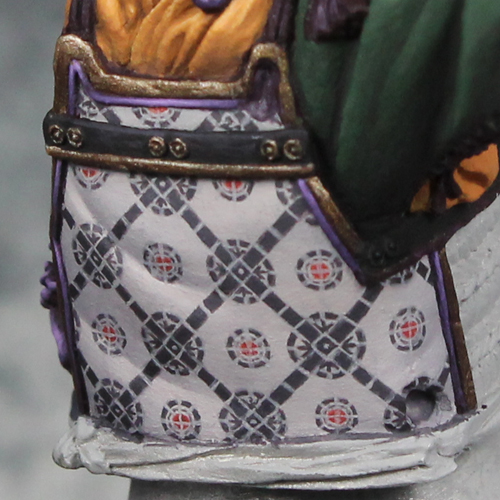
From there I got to work on his armor. Since he is a samurai, I felt he needed a lot of design work on his clothing and armor. I do all of this work freehand, starting with simple shapes and building up to a more complex design. I began by measuring out distances and making small dots to use as guides for later. I then drew in diagonal lines connecting some of the dots. These lines were originally solid. I then went in with the background color and painted perpendicular lines to break them up
I then drew in dark circles where the lines met and broke those up using the background color. I also added red dots in the middle of the open areas (over the remaining guide dots)
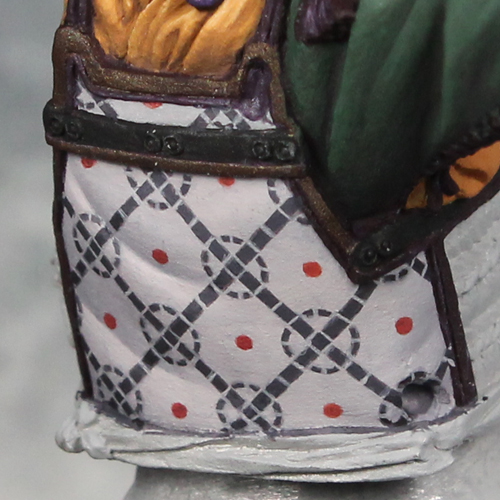
More lines are added around the red circles

With the background color I subdivided the red circles and the surrounding black lines. I also added a few more details where the main black lines cross. In the end you've got this rather intimidating pattern, but by breaking it down, each piece isn't so bad. This is the same process I use for banners, shields, etc on any scale, even 28mm ones.
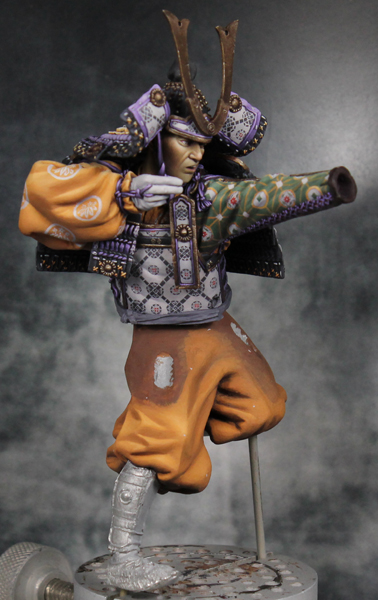
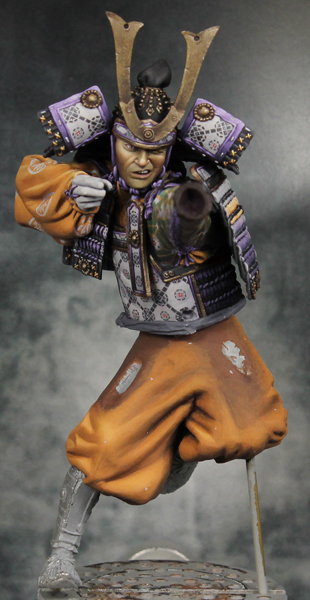
I've continued to work on the figure, adding a design to the left sleeve. With the chest finished, I was able to add some more of the armor and the right arm. There is still a very long way to go with this figure, but here he is at the current state.
I will continue to post updates as I get further along with this piece. I've got some other projects in the works, so I will share those here as well. Hope you enjoy! Automatically Appended Next Post: Here are two other pieces I've been working on recently. The first is a 54mm Northumbrian warrior from Latorre. You got a glimpse of him in the first post next to the samurai. Here he is a little closer
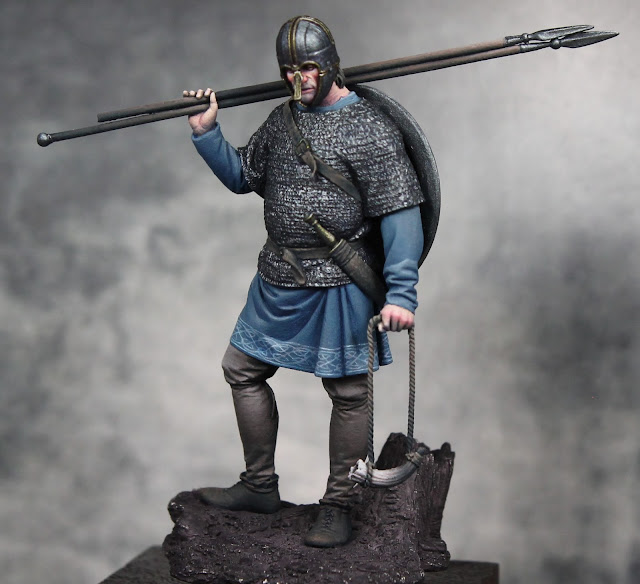 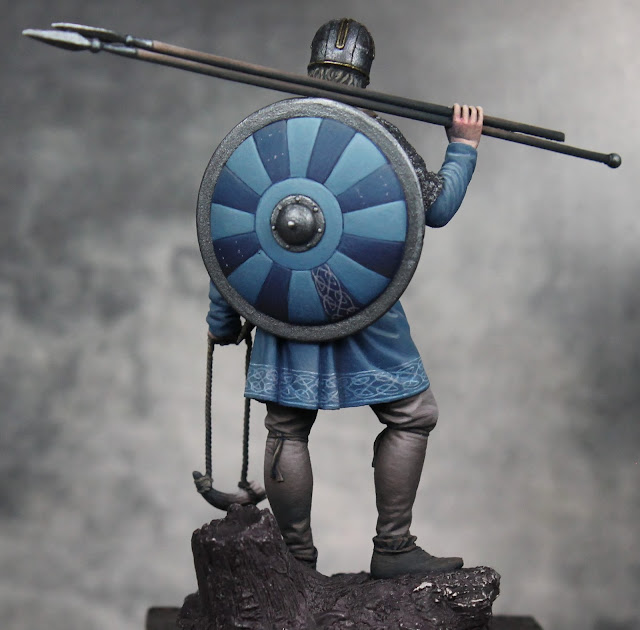
The design work on the bottom of his tunic was done similarly to how I did the design on the samurai. I began by measuring out and placing guide dots, then filling in the design piece by piece. I'm starting to do the design on the shield as well. You can see the faint dots that I'll be using as a guide. The figure is almost finished, I just need to wrap up the shield, do some weathering, and finish off the base.
Another project that I've nearly finished is Sorondil, a 54mm figure from Andrea.
|
|
This message was edited 1 time. Last update was at 2015/12/01 23:29:09
|
|
|
 |
|
2015/12/02 02:26:52
Subject: Bailey03's work in progress blog
|
|
Blood Angel Captain Wracked with Visions
|
Absolutely stunning work
|
|
|
|
|
|
2015/12/02 02:32:46
Subject: Bailey03's work in progress blog
|
|
Anti-Armour Yaogat
Cookeville, TN; USA
|
|
  
There are 10 types of people in this world; those that know binary and those that dont.
----->MANTIS MAKER COMPETITION <---- |
|
|
|
|
2015/12/03 17:44:28
Subject: Re:Bailey03's work in progress blog
|
|
Nasty Nob
|
Beautiful work, wow! 
|
|
|
|
|
|
2015/12/03 18:53:44
Subject: Re:Bailey03's work in progress blog
|
|
Fresh-Faced New User
|
Thank you!
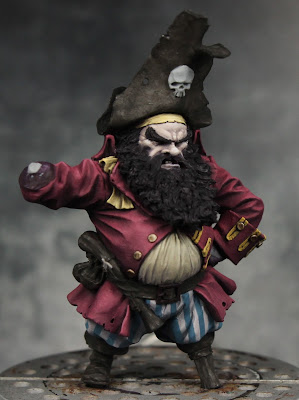
I needed a break from the samurai. It's a big project and my progress has been slowing down with all the pattern work. So I thought I'd work on something a little easier for a bit. I recently picked up this dwarf pirate from M Proyec. He's 1/35 scale... but as a dwarf is 46mm to the eyes. So still a bit bigger than your typical gaming figure, but not by too much. The work on his still very very early. I base coated most of the figure to get an idea of how the colors look together. I've done the basic shading and highlighting on the face, however I still plan to go back with various ink glazes to give it more color variation and bring out the shadows. His red coat is partially done. I've painted in the shadows but haven't gotten to the highlights yet (and not even the shadows on the bit under his belt). I like the dark red I've got, but the highlights will give it a bit more pop. On the pants I've sketched in some stripes. When I get around to the shading and highlighting there I will clean them up.
 
|
|
|
|
|
2015/12/03 19:14:46
Subject: Bailey03's work in progress blog
|
|
Giggling Nurgling
|
Wow your work is amazing! I can really appreciate the freehand on that samuri armor.. I like how you broke it down and showed us how you did it with a simple explanation.
When you describe it like you did it isn't nearly as intimidating.. maybe ill have to try it someday 
|
|
|
|
|
|
2015/12/07 16:15:12
Subject: Re:Bailey03's work in progress blog
|
|
Fresh-Faced New User
|
|
|
|
|
|
2015/12/08 01:31:18
Subject: Bailey03's work in progress blog
|
|

Lone Wolf Sentinel Pilot
|
Masterful work!
And excellent and clear breakdowns to boot, hopefully I'll manage to pick something up as I tag along.
|
|
|
|
|
|
2015/12/11 16:06:05
Subject: Re:Bailey03's work in progress blog
|
|
Fresh-Faced New User
|
|
|
|
|
|
2015/12/14 16:17:31
Subject: Re:Bailey03's work in progress blog
|
|
Fresh-Faced New User
|
|
|
This message was edited 1 time. Last update was at 2015/12/14 16:17:44
|
|
|
|
|
2015/12/21 16:15:09
Subject: Re:Bailey03's work in progress blog
|
|
Fresh-Faced New User
|
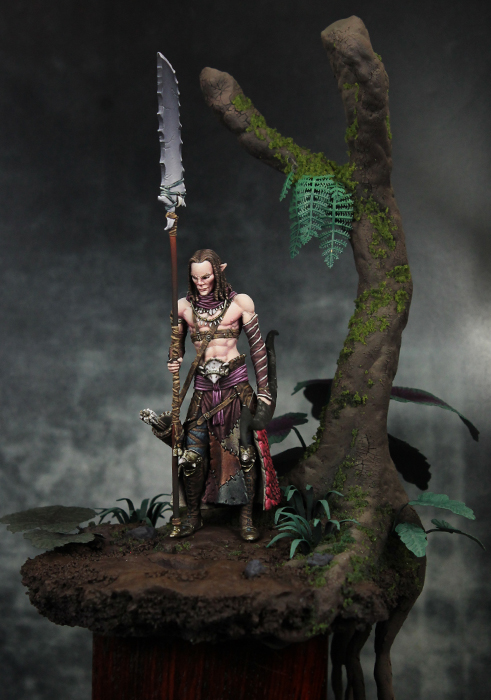
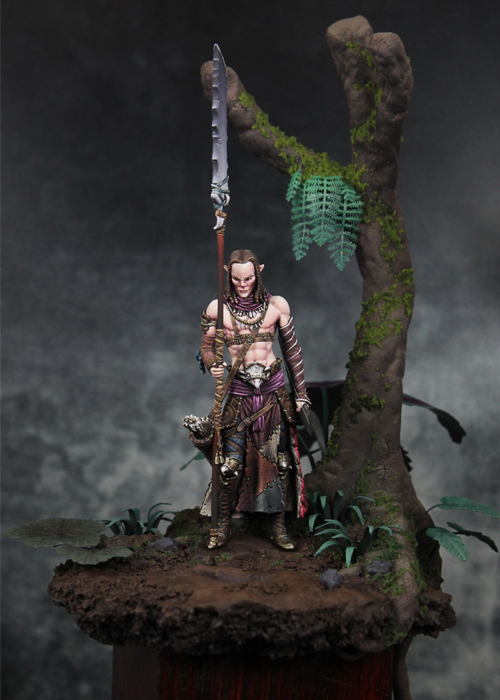
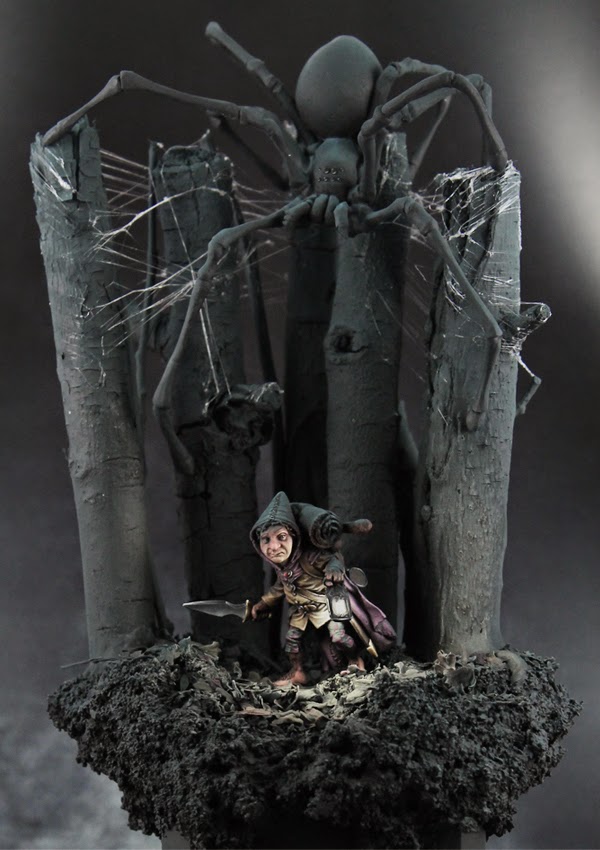
It's a little bit quiet here, so I thought I'd post a piece I did a while ago that's still one of my favorites. The figure is a 1/35 scale hobbit from Andrea miniatures. The sculpt has two options for his left hand, one of which is holding a lantern. I really wanted to play around with OSL (object source lighting), basically painting the figure as if some object in the scene (ie not the sun) is the light source. The rest of the scene grew from there. In the end, what I created is heavily influenced by the Hobbit and Lord of the Rings, although it's not meant to be a specific scene. So don't complain if the details don't exactly match the books! =)
Here's how the figure started. I kept the lamp off initially, so I could look at the piece from the point of view of the lamp. That made it easier to see what surfaces the light would hit.
 
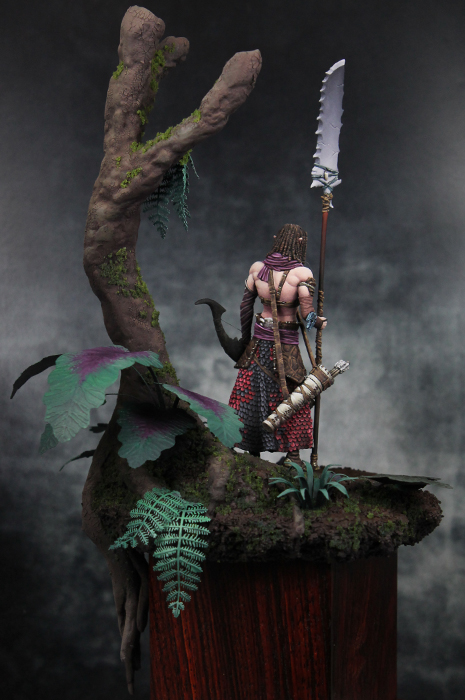
From there I continued to add the rest of the pieces. The metals were painted using the NMM technique. This way I could force them to look like the light source was the lamp, true metallic paints would reach too much to the actual light in the room and ruin the illusion. The unlit portions I painted using a blue-black mix to represent moonlight.
 
With the figure finished, I turned to the base. I used a little bit of airbrushing here to lay down the dark colors and then the lights.
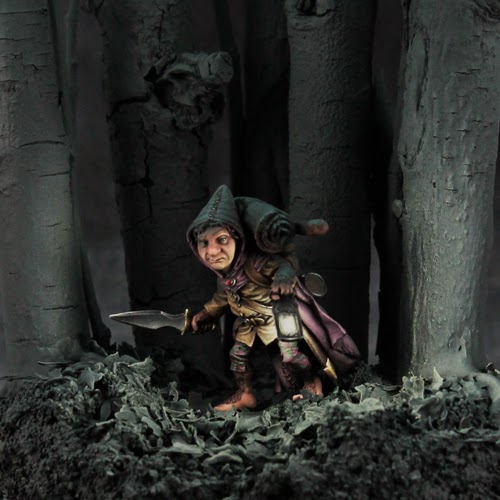
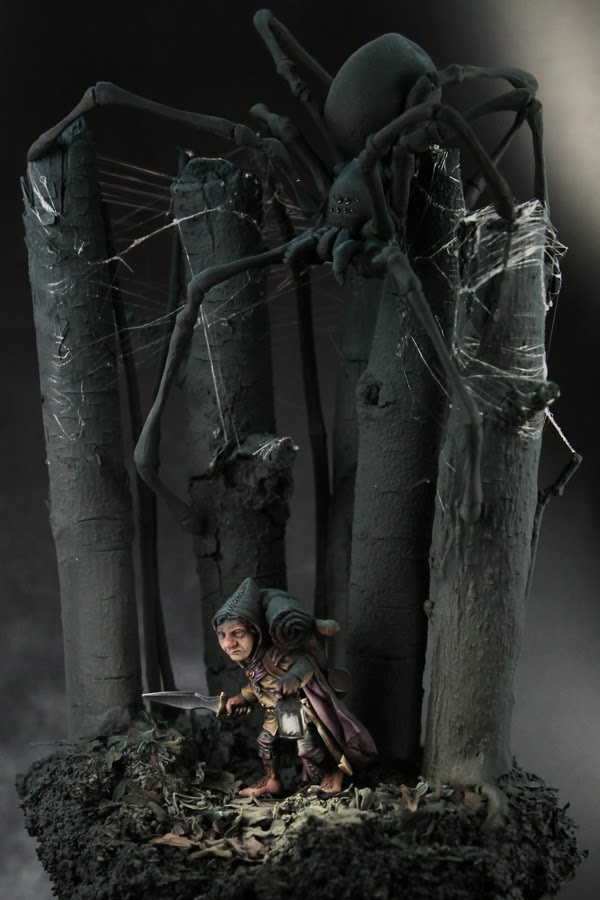
And finally here is the completed scene. I thought it needed a little something more to add to the story and create a sense of drama, so I added one more figure. I hope you like how it turned out!
|
|
|
|
|
2015/12/21 16:41:54
Subject: Bailey03's work in progress blog
|
|
Fixture of Dakka
|
Wow, that looks fantastic! Really impressed with how that turned out!
The elf and northumbrian are also great! Can't wait to see more.
|
|
|
|
|
|
2015/12/21 16:43:23
Subject: Bailey03's work in progress blog
|
|

Crushing Black Templar Crusader Pilot
|
This is fantastic! I love the way that the OSL has actually been thought of and has been carefully applied. Love the NMM and the whole piece is very dramatic. I can only say that I am amazed that there have not been many comments on your pieces
|
  
Relapse wrote:
Baron, don't forget to talk about the SEALs and Marines you habitually beat up on 2 and 3 at a time, as you PM'd me about.
|
|
|
|
|
2015/12/22 13:29:27
Subject: Re:Bailey03's work in progress blog
|
|

Longtime Dakkanaut
|
In all honesty, that Hobbit should be used in a class to teach what OSL is really about. What a stunning piece!
|
"Fear is freedom! Subjugation is liberation! Contradiction is truth! These are the truths of this world! Surrender to these truths, you pigs in human clothing!" - Satsuki Kiryuin, Kill la Kill |
|
|
|
|
2015/12/28 18:09:18
Subject: Re:Bailey03's work in progress blog
|
|
Fresh-Faced New User
|
Thanks, Wehrkind, IGtR, and TheDraconicLord!
I've made some more progress on the dwarf pirate I posted a little while ago. One thing that bugged me about this figure was the sword. It's got barnacles sculpted onto it (which, as a fantasy figure, is fine), but the rest of the surface is pretty normal. Seems to me, if it's got barnacles growing on it, there would be a lot more corrosion going on. I'd prefer either a smooth sword or one really crusty. So, I decided to give it a little more texture. I used a technique Sproket (David Soper) has used on Nurgle figures. Baking soda is mixed with the base color and matte varnish to form a paste, then applied to the figure. The base color is just there to speed up the painting, but the matte varnish is important to hold on the baking soda. It gives a pretty secure bond when dry.
With the texture added to the sword, I went in with some stippling to further exaggerate the effect. I left some exposed portions as still metal.
  
Since the figure is almost complete, I went back to work on the base. The main structure was previously built using balsa wood. To match the sword, I decided to add some texture to the side. I used pro-create (grey stuff) to create some barnacles there as well. Then I used the same baking soda + matte varnish technique to fill in the spaces around the barnacles. I also added some rope and a portion of the rigging. This was done using string. I used superglue to coat the strings and lock them in the desired shape. A bit of regular superglue can be helpful in attaching specific spots, but mostly I used thin super glue. This quickly soaks into the string and is really useful for fixing large sections. You've just got to be careful since it can get all over the place and you don't want to touch the strings as they'll be coated in glue. Needless to say, I got a lot on my hands and there were numerous times I almost glued the myself to the base!
  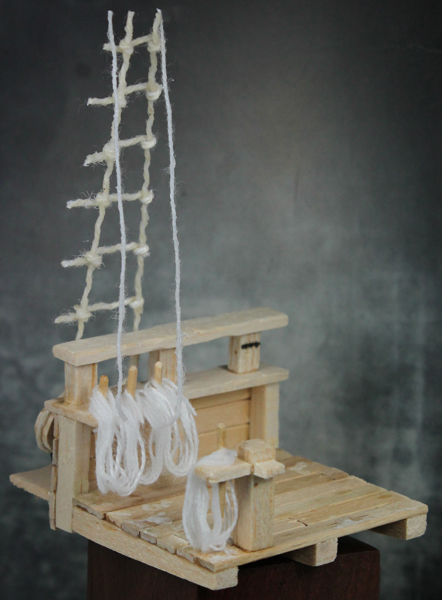
To create the long straight portions, I just taped the string to my work table and let it hang down. I taped a piece of balsa wood to the end for added weight to help keep them straight. Then I soaked the strings with thin superglue to lock in the shape. It's a good idea to put some paper down beneath the strings to catch any drips. Once dry, I simply clipped off the ends and cut it to the desired size. You could use brass rod if you needed the strength but, as you can see, they do a pretty good job of supporting themselves.
|
|
|
|
|
2015/12/31 17:08:22
Subject: Re:Bailey03's work in progress blog
|
|
Fresh-Faced New User
|
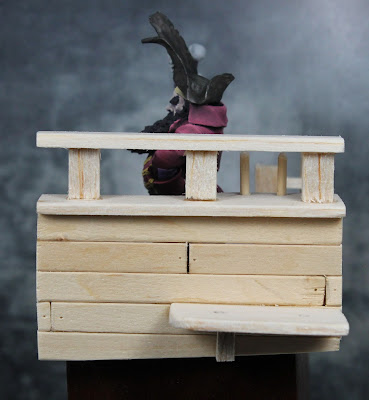
I've started painting the ship. I went with a grey-brown instead of a more vivid brown. I thought it worked for a pirate ship and went well with the colors of the figure (helps it stand out against the base). So far I've focused on the outside of the ship. The inner part of the deck is just base coated
|
|
This message was edited 1 time. Last update was at 2015/12/31 17:09:08
|
|
|
|
|
2015/12/31 17:20:48
Subject: Bailey03's work in progress blog
|
|
Fixture of Dakka
|
Wow, that barnacle paste is slick! What did you use to apply it, a sponge of some sort? It looks amazing, and may well be profitably immitateable 
I also want to note that I am deeply jealous of your purples. I am never happy with how my own attempts at that color come out, but yours just really fit better than mine ever do.
|
|
|
|
|
|
2015/12/31 19:03:52
Subject: Bailey03's work in progress blog
|
|
Fresh-Faced New User
|
Thanks, Wehrkind. A lot of the purples I've been using recently were created by mixing red with grey. It gives you a paler more desaturated purple. Sometimes it's 50/50 red and grey, other times it's 2 parts red to 1 part grey. The coat on the pirate is more red than grey, while the color around the barnacles is pretty much 50/50. Just remember to keep the light/dark consistent. So for a medium red, go with a medium grey. For a light red, pick a light grey.
For application of the paste, as long as it wasn't too thick you could probably apply it with a sponge. You can always add more matte varnish to thin it down or more baking soda to thicken it. In this instance, I just used an old brush. It gave me a bit more control on where I placed it so I didn't end up covering up the sculpted on barnacles.
While the barnacles on the sword were part of the kit, I had to create my own for the side of the ship. This ended up being pretty simple though. I just make small spheres of grey stuff (green stuff would work too) and put them in various spots on the outside of the hull. With a clay shaper I smoothed out the sides, blending them into the hull. It's okay to have some lines or arms going out (doesn't need to be perfectly smooth). This left a circular bump in the middle. I used a pointed tool to create the hole here. That's all. Once the putty hardened, I went in with the baking soda and matte varnish mix to add the rest of the texture.
|
|
|
|
|
2015/12/31 23:17:02
Subject: Bailey03's work in progress blog
|
|
Stern Iron Priest with Thrall Bodyguard
|
nice to see you make the move over here from CMON, homie...
love your work ...
if you are going to be out and about in L.A. anytime over the next three months, let me know...
i would love to see some of your minis in real life before i head back to Mexico to chase big waves during the hurricane season...
that archer is coming along nicely...
you should post your goalie, too, to show off how well you handle white ...
cheers
jah
|
Paint like ya got a pair!
Available for commissions.
|
|
|
|
|
2016/01/01 05:14:25
Subject: Bailey03's work in progress blog
|
|
Fixture of Dakka
|
bailey03 wrote:Thanks, Wehrkind. A lot of the purples I've been using recently were created by mixing red with grey. It gives you a paler more desaturated purple. Sometimes it's 50/50 red and grey, other times it's 2 parts red to 1 part grey. The coat on the pirate is more red than grey, while the color around the barnacles is pretty much 50/50. Just remember to keep the light/dark consistent. So for a medium red, go with a medium grey. For a light red, pick a light grey.
For application of the paste, as long as it wasn't too thick you could probably apply it with a sponge. You can always add more matte varnish to thin it down or more baking soda to thicken it. In this instance, I just used an old brush. It gave me a bit more control on where I placed it so I didn't end up covering up the sculpted on barnacles.
While the barnacles on the sword were part of the kit, I had to create my own for the side of the ship. This ended up being pretty simple though. I just make small spheres of grey stuff (green stuff would work too) and put them in various spots on the outside of the hull. With a clay shaper I smoothed out the sides, blending them into the hull. It's okay to have some lines or arms going out (doesn't need to be perfectly smooth). This left a circular bump in the middle. I used a pointed tool to create the hole here. That's all. Once the putty hardened, I went in with the baking soda and matte varnish mix to add the rest of the texture.
Thanks for the tip! I will have to give that a go. I am still trying to find my happy place with desaturated colors and not making things too dark and receding. Gotta find something to paint purple now
|
|
|
|
|
|
2016/01/04 16:43:52
Subject: Re:Bailey03's work in progress blog
|
|
Fresh-Faced New User
|
Thanks, Jah. I should be at the LAMS (LA Miniaturists) meeting next month. It's Saturday, Feb 6 from roughly 9:30 to 12:30 up in Burbank. You can find out more info on the meeting here:
http://laminiaturists.com/
In case you're not familiar with the group, it's a mix of figure and vehicle modelers. Pretty much any type of scale model is welcome. If you've got anything with you, bring it for the show and tell table. The meetings consist of show and tell, socializing, a raffle, and a short demo. If you're able to, come check it out. I'm sure I'll be bringing along the samurai and the dwarf pirate. If you're able to make it and there's anything else from my collection you want to see in person, let me know and I'll bring it along too.
Since you mentioned it, here is the goalie I painted a couple years ago. The figure is 75mm scale and I did this as a gift for my wife (she's a big Sharks fan). Everything on this guy is hand painted. No decals or stencils.
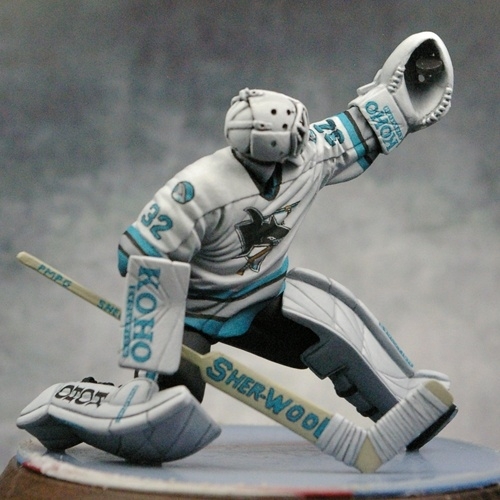 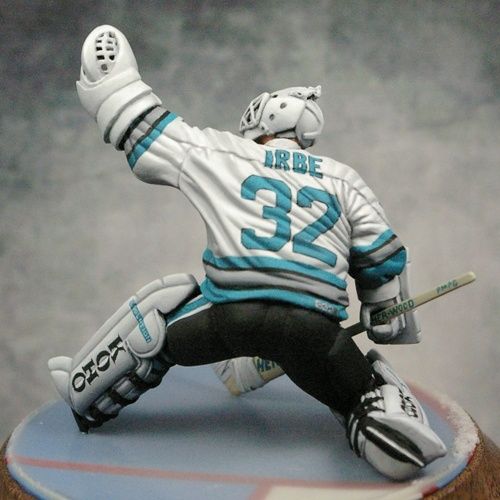 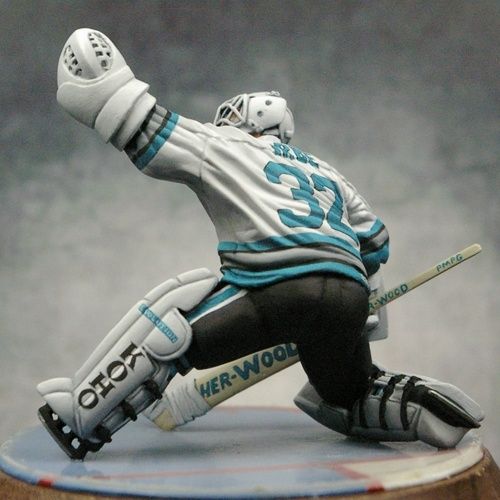 
If anyone is interested, I wrote up a tutorial on how I like to paint white. It can be a tricky color, but you can get some nice results using off whites and don't limit yourself to just shading with grey.
http://powellminipainting.blogspot.com/p/painting-white.html
In other news, I returned to the samurai archer this weekend. I finished up the design work on the sleeves (I'd be stalling on that) and then began painting his back. I really want to get this piece done in time for Adepticon and Crystal Brush. I think it's doable, but with all that's involved in this project, there's not much time left to waste!
|
|
|
|
|
2016/01/25 18:15:19
Subject: Re:Bailey03's work in progress blog
|
|
Fresh-Faced New User
|
|
|
|
|
|
2016/01/25 23:38:22
Subject: Bailey03's work in progress blog
|
|
Stern Iron Priest with Thrall Bodyguard
|
thanks for the info, bailey...
i will definitely try to make it...
you are talking 9:30 am, right???
i could probably be there around 11:30, and spend an hour...
i haven't been to Burbank in years, but always enjoyed a trip to the Last Grenadier...
i was sad to see they closed their doors for good in 2013, as i got my first box of Imperial Dwarfs there, back in the day...
always a pleasure to see the goalie again...
you did such a great job on that guy...
tell your wife i said Go Kings!!! 
at least she's not a Ducks fan...heeheehee
the archer is looking really good...
orange and purple go so nicely together...
the freehand over the white is just gorgeous...
gonna be amazing when he's done...
always a pleasure to see your work...
cheers
jah
|
Paint like ya got a pair!
Available for commissions.
|
|
|
|
|
2016/01/26 00:44:25
Subject: Bailey03's work in progress blog
|
|
Fresh-Faced New User
|
Yup, doors open around 9:30 am. I might be there a little late too, so if you come around 11:30 you should be fine. People usually stick around until 12:30
|
|
|
|
|
2016/01/29 17:25:22
Subject: Re:Bailey03's work in progress blog
|
|
Fresh-Faced New User
|
I'm still working on the samurai. In the meantime, I thought I'd share a figure I painted about a year ago. This is a 54mm scale Knight of the Holy Sepulchre. The kit is from Pegaso and one of my favorite sculpts of theirs. This historical color scheme called for a lot of white, so I decided to break it up with some additional details like the border along the cape and the subtle background design on the banner. And, as a contrast to all the white, I decided to paint the horse in a blue-black color. After I'd finished painting, I used dry pigments to weather it and create the dusty look. This piece ended up winning gold in one of the historical categories at Crystal Brush and was 7th overall. Hope you enjoy!
|
|
|
|
|
2016/02/01 21:03:47
Subject: Re:Bailey03's work in progress blog
|
|
Fresh-Faced New User
|
|
|
|
|
|
|
|