| Author |
Message |
 |
|
|
|
|
Advert
|
Forum adverts like this one are shown to any user who is not logged in. Join us by filling out a tiny 3 field form and you will get your own, free, dakka user account which gives a good range of benefits to you:
- No adverts like this in the forums anymore.
- Times and dates in your local timezone.
- Full tracking of what you have read so you can skip to your first unread post, easily see what has changed since you last logged in, and easily see what is new at a glance.
- Email notifications for threads you want to watch closely.
- Being a part of the oldest wargaming community on the net.
If you are already a member then feel free to login now. |
|
 |
2014/06/18 02:54:31
Subject: GamesEtc P&M Blog: I am back! Terrain Contest: Wooden Well(DONE) & Mantis Warrior(DONE)
|
|

Anti-Armour Yaogat
Cookeville, TN; USA
|
|
|
This message was edited 12 times. Last update was at 2015/11/30 23:32:31
  
There are 10 types of people in this world; those that know binary and those that dont.
----->MANTIS MAKER COMPETITION <---- |
|
|
 |
|
2014/06/19 06:24:46
Subject: Re:GamesEtc P&M Blog: League Throne Contest
|
|
Anti-Armour Yaogat
Cookeville, TN; USA
|
|
|
This message was edited 2 times. Last update was at 2015/11/13 05:17:01
There are 10 types of people in this world; those that know binary and those that dont.
----->MANTIS MAKER COMPETITION <---- |
|
|
|
|
2014/06/20 07:10:57
Subject: Re:GamesEtc P&M Blog: League Throne Contest
|
|
Anti-Armour Yaogat
Cookeville, TN; USA
|
HILARIOUS: Tonight at work was very interesting. Had a guest inform me that they smelled weed in the hallway. I go to check and confirm it, trying to track down which room it was coming from. I found the door where it was the strongest and return to the desk to ask my manager how he wanted me to proceed. Unless I know for sure where it is coming from and can confirm it, I can't call the police. Well I relayed this to the guest that reported it to me and he agreed that it is from the same room but would confirm it.
He camped by his door waiting for the guy to open his door again which he did and we had confirmation. So while I am on the phone to the police the smoker comes to the counter to buy a few food items and hears my conversation. Mind you I did not know what the guy looked like at this time but watching the security cameras I see him enter the room. He comes out a minute later spraying the hallway and carpets with deodorizer. While he is spraying the carpets the police come into the lobby and he hears them as there is a balcony overlooking the lobby from where the guy is. So the guy makes a run for one of the stairways and I tell the cop he is running for it and point the direction to the stairs. Well, the cop was able to head him off and next I see the guy being escorted to his room.
The guest that told me about the smell then comes to the counter and says the guy has a few of his buddies in a car outside and we watch them. They eventually walk inside, walk to the elevator and then decide to walk down the hallway to the other stairway. They slowly meander to the room and are outside the door listening in. The guy goes upstairs to his room, comes out and walks over to the two guys who begin to walk away.
He tells them to wait a moment and he knocks on the smokers room and when the cops ask who is there, he tells them there are 2 kids outside trying to listen in.
The cops open the door and say "Come on in Gentlemen, we would love to talk to you too." and next I see on camera the two new guys getting patted down. After reporting what happened to my Manager, they get charged for the night, get evicted from their room and possibly have even more charges added to their room.
LESSON: If you are gonna smoke dope, open a window!
ANYWAYS......here is a scratch built titan I made a while back. I finally got her primed and deciding how I am going to paint it. It was constructed mostly from 99c No Trespassing signs from Walmart.
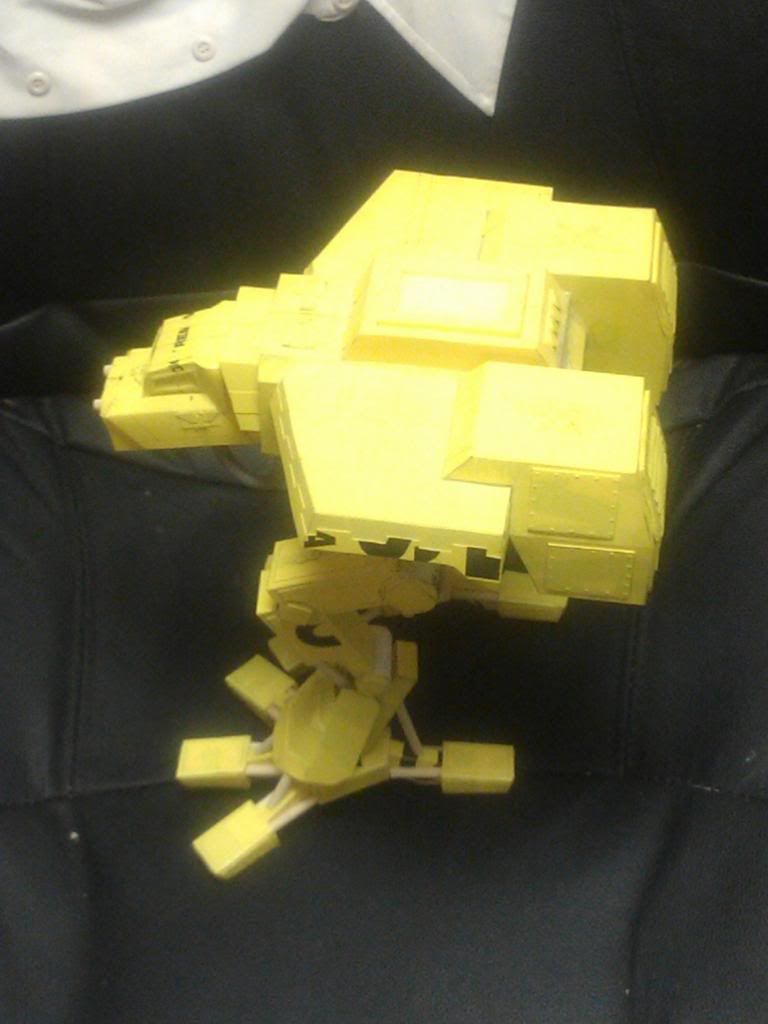
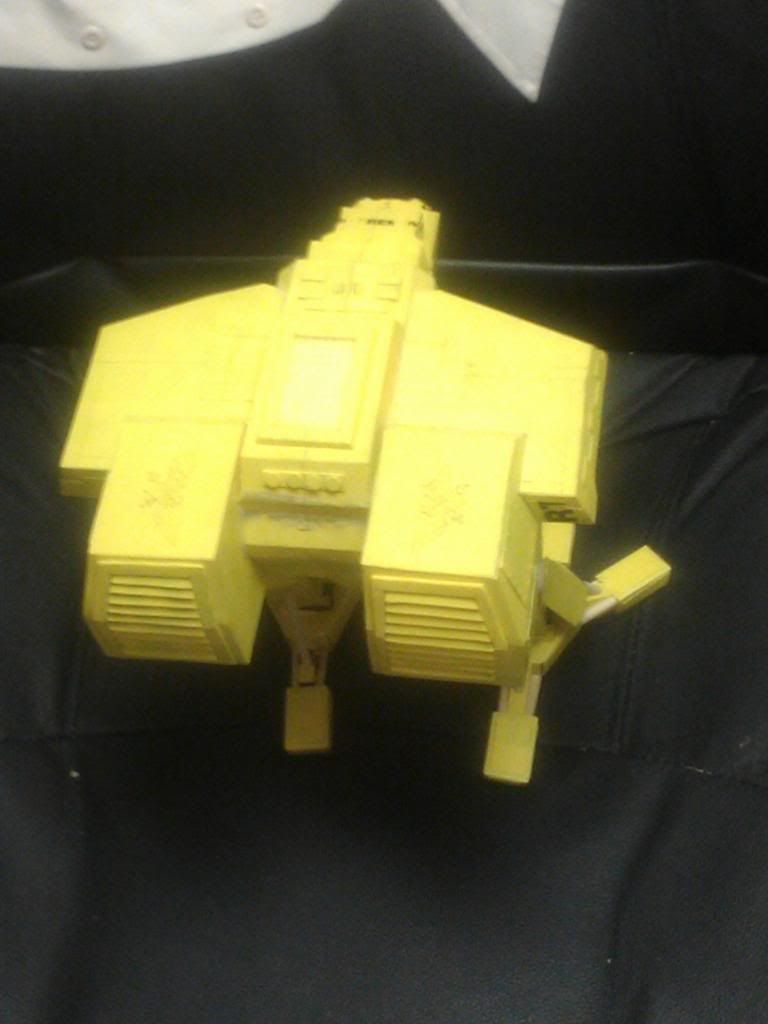
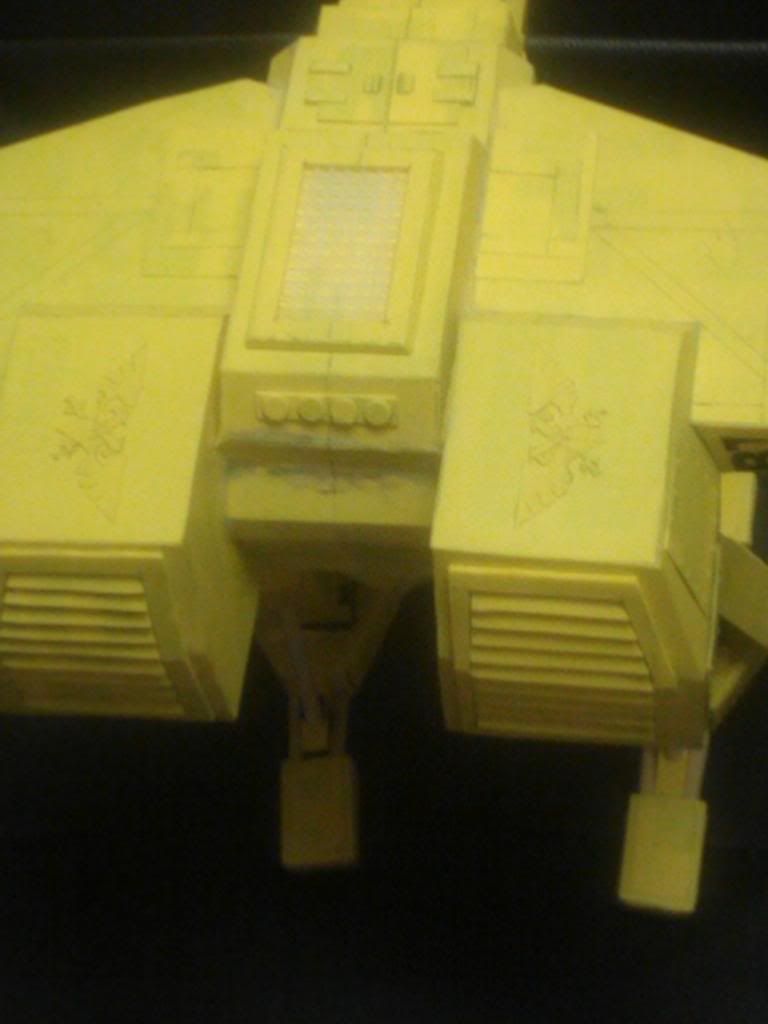
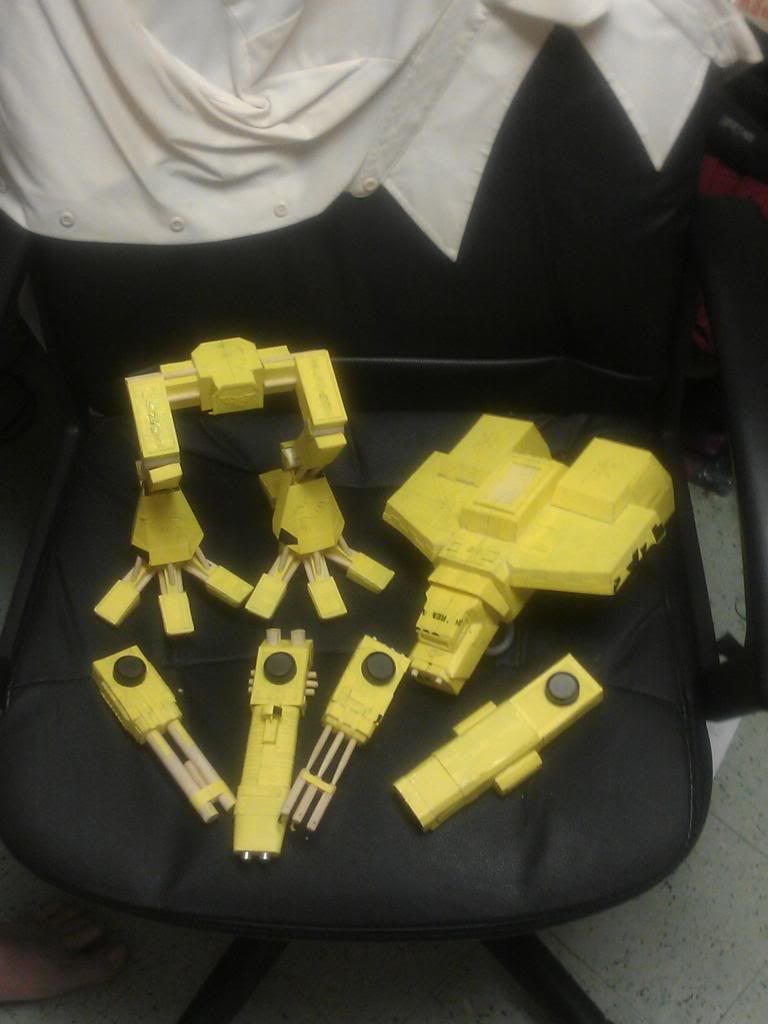
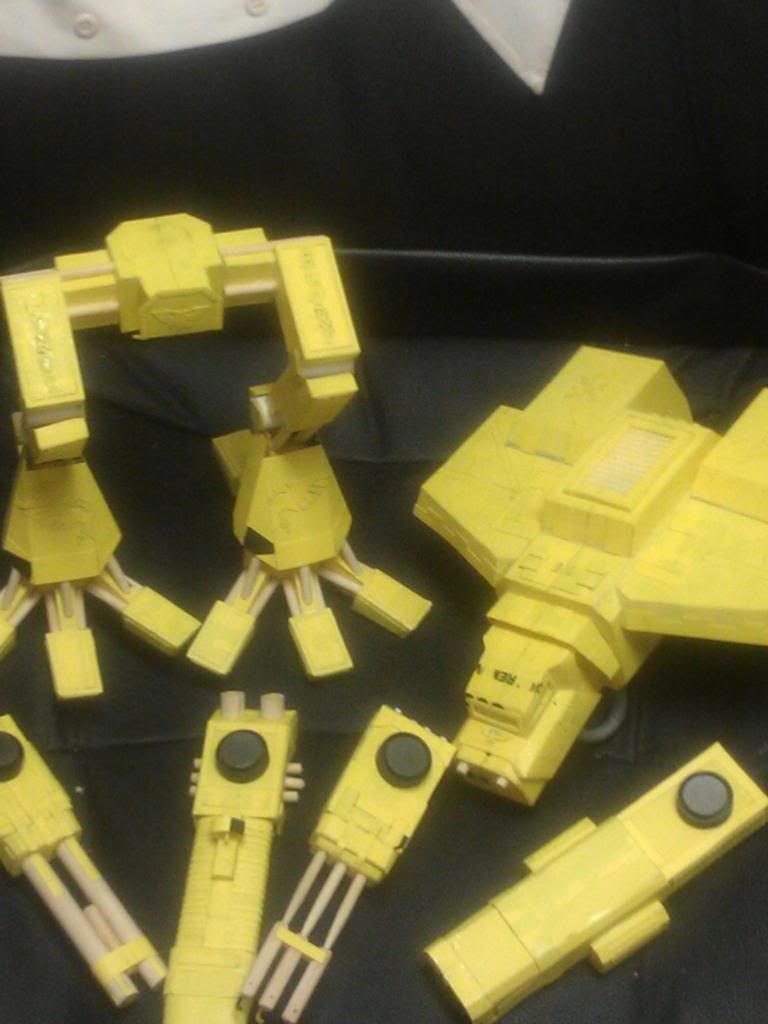
I know with the pics the details are hard to see but there are quite a few of them. Rivets, Acquilia, Panels, and lots of little things. Hopefully when I get it painted those details will be more visible.
|
There are 10 types of people in this world; those that know binary and those that dont.
----->MANTIS MAKER COMPETITION <---- |
|
|
|
|
2014/06/21 22:02:24
Subject: GamesEtc P&M Blog: League Throne Contest and More
|
|

Omnious Orc Shaman
A long time ago in a galaxy far, far, away...
|
Cool little blog you got going... 'The Throne' is a great concept, eager to see more... Love the truck and your Warhound looks awesome 
|
|
|
|
|
|
2014/06/21 22:54:53
Subject: GamesEtc P&M Blog: League Throne Contest and More
|
|
Mastering Non-Metallic Metal
|
Good work on the various terrain pieces. Like the pond and bridge.
Good effort on the titan. Look forward to seeing it painted.
and good luck with the shoulder pad creating. I would recommend getting hold of some Oyumaru / instant mold, it will help with testing out the casting and creating masters for mass moulding/casting. 
|
     Mastodon: @DrH@dice.camp Mastodon: @DrH@dice.camp
The army-                   ~2295 points (built). ~2295 points (built).
 
* -=]_,=-eague Spruemeister General. * A (sprue) Hut tutorial *
Dsteingass - Dr. H..You are a role model for Internet Morality!  // inmygravenimage - Dr H is a model to us all // inmygravenimage - Dr H is a model to us all 
Theophony - Sprue for the spruemeister, plastic for his plastic throne! // Shasolenzabi - Toilets, more complex than folks take time to think about! |
|
|
|
|
2014/07/10 05:57:27
Subject: Re:GamesEtc P&M Blog: League Throne Contest and More
|
|
Anti-Armour Yaogat
Cookeville, TN; USA
|
|
There are 10 types of people in this world; those that know binary and those that dont.
----->MANTIS MAKER COMPETITION <---- |
|
|
|
|
2014/07/24 05:09:06
Subject: Re:GamesEtc P&M Blog: League Throne Contest and More
|
|
Anti-Armour Yaogat
Cookeville, TN; USA
|
I know its been a while but life keeps kicking me down. Today the exhaust pipe fell off my truck and wrapped itself around my rear axle. Fun times.
Anyways, on with the pics in progress:
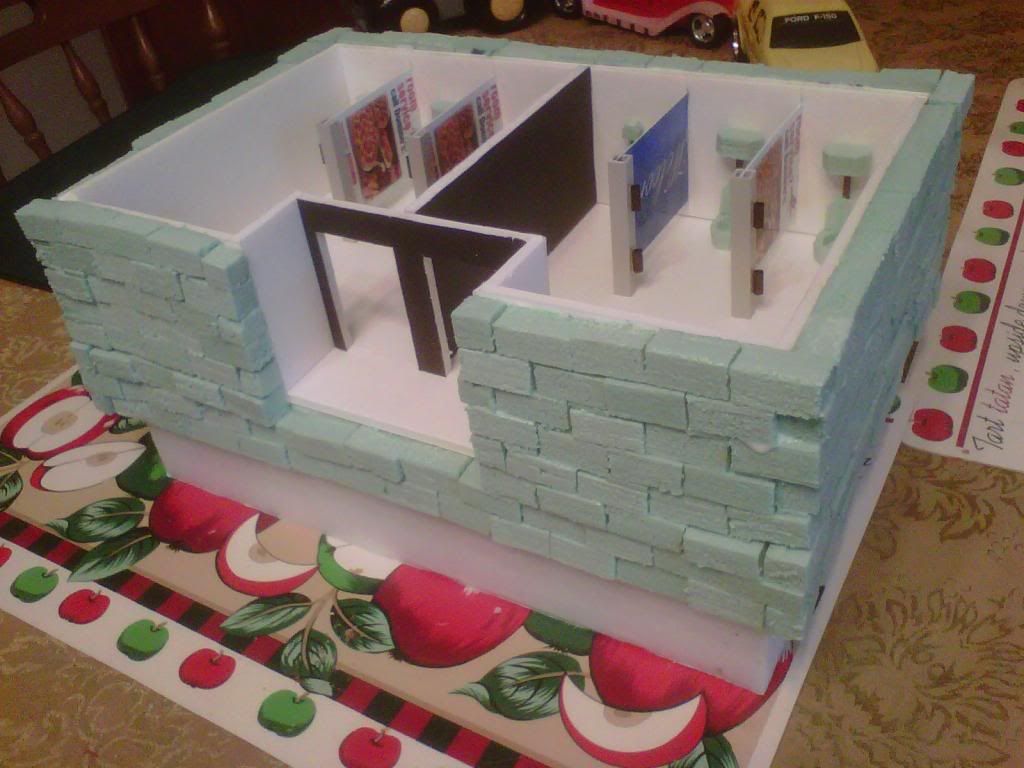
So here I got the hill shaped and base coated.
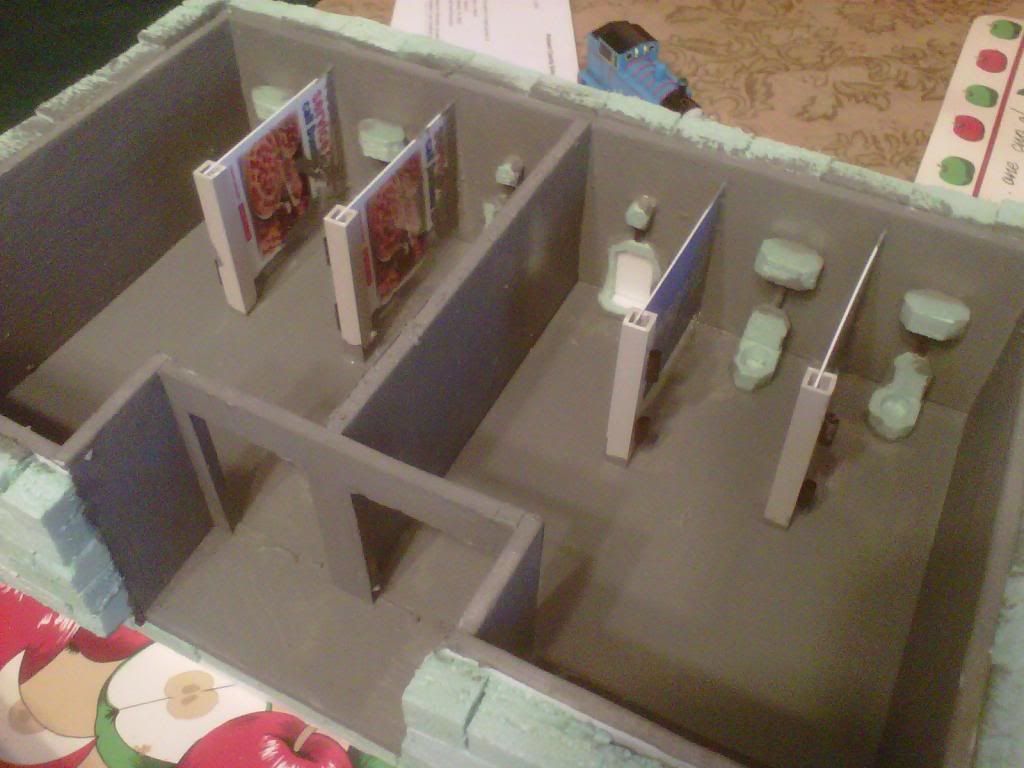
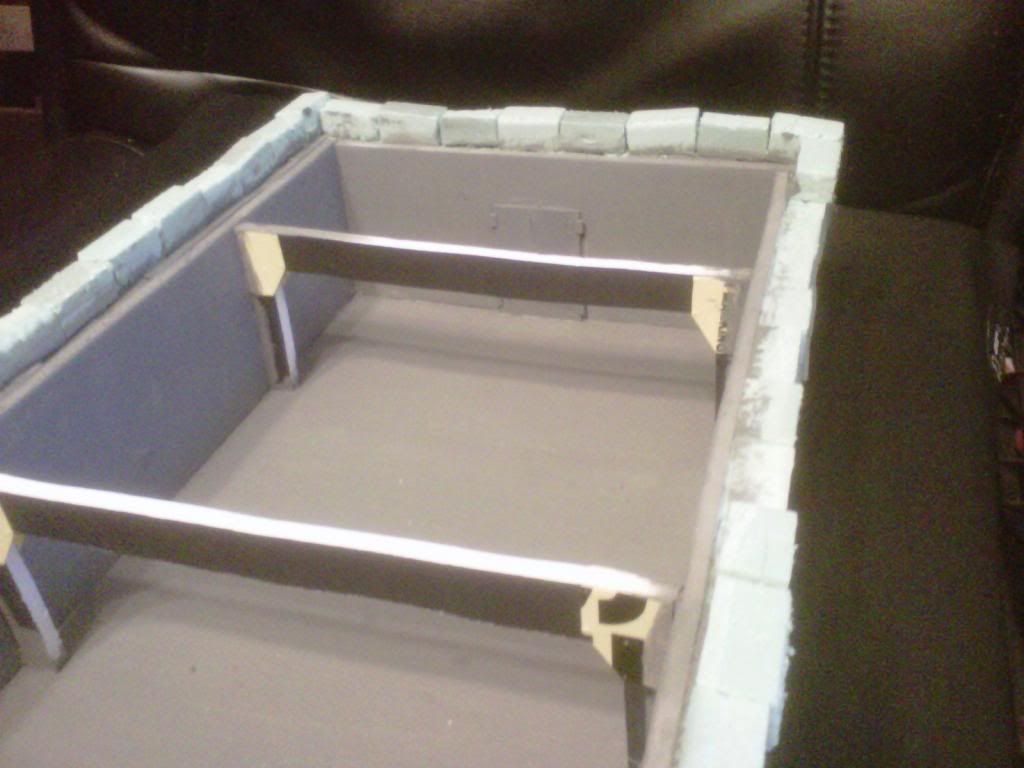
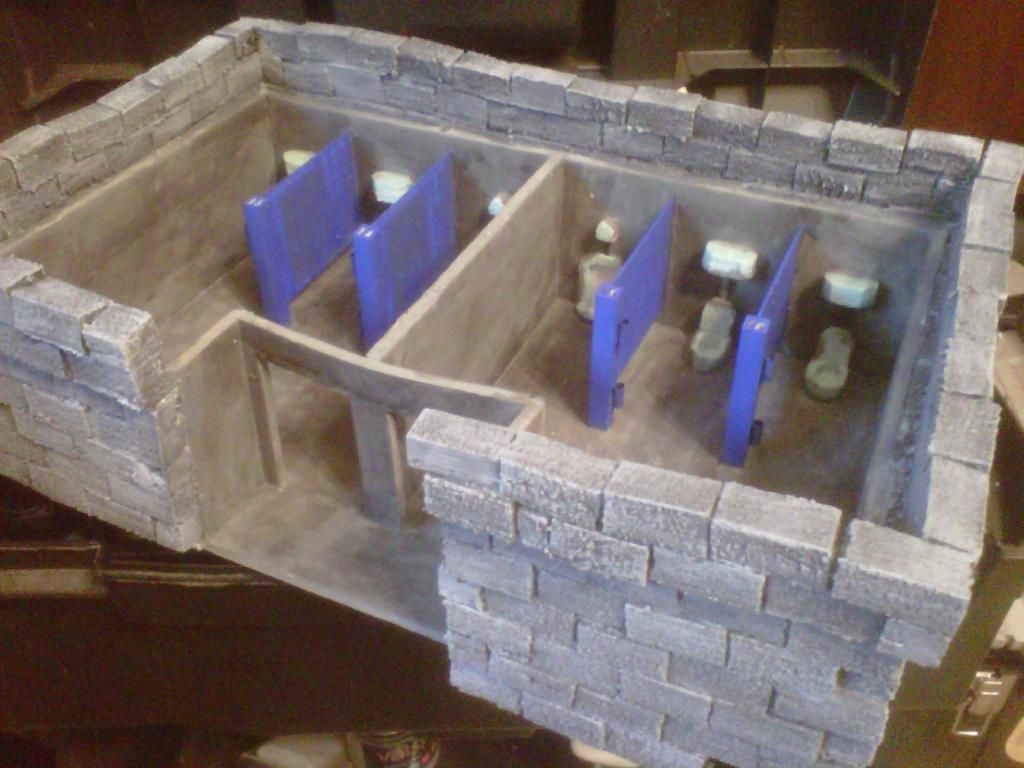
Got the Urinals and Toilets completed. Also for the doors to open and shut on the stalls, just not hanging there yet.
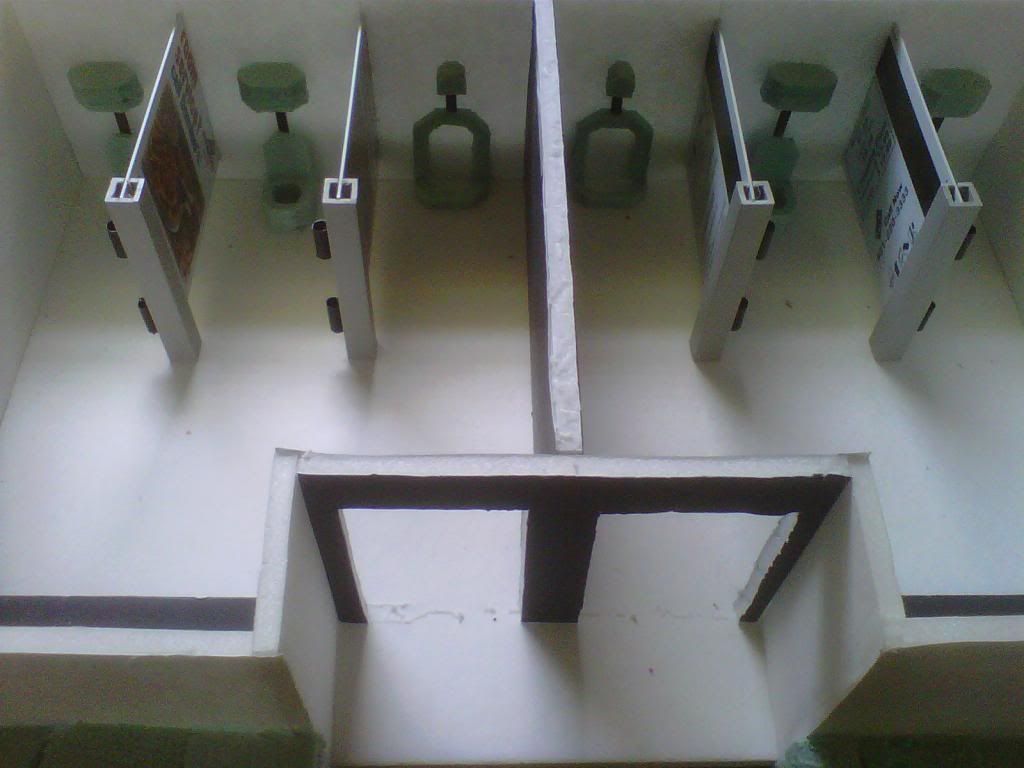
Got most of the external blocks completed. Just have 2 more rounds to go so that the roof can be used and get cover from the walls.
Doors hanging
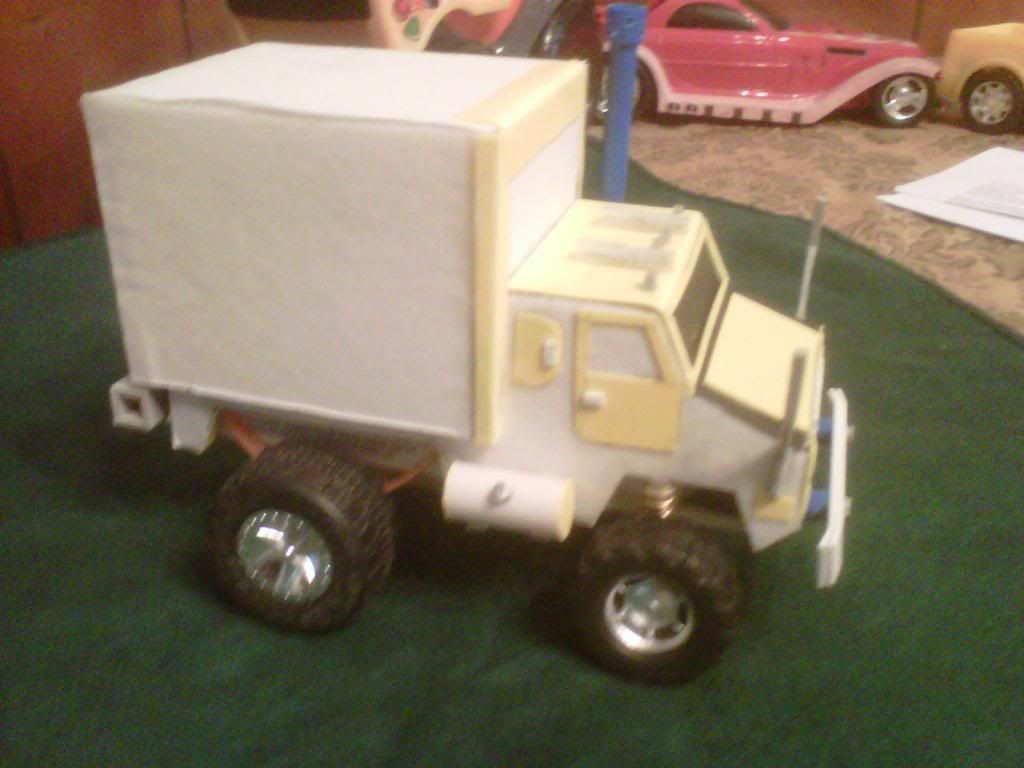
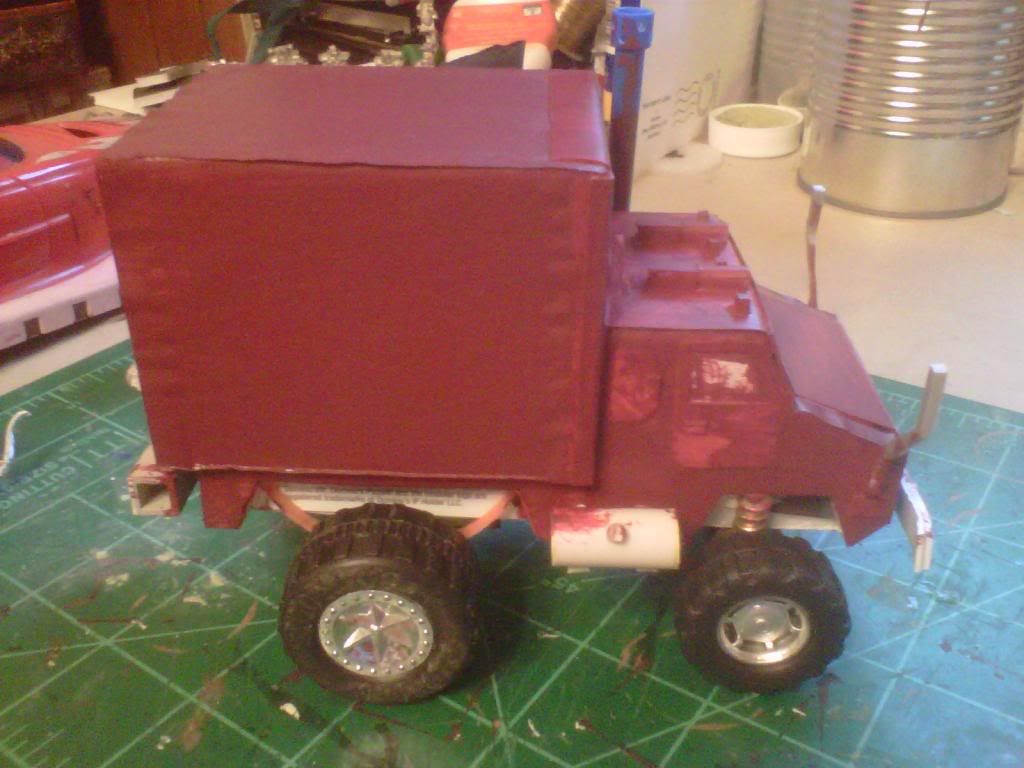
Truck Completed. Also got the labels for the sides, front and back of the truck printed as well as several other bits of printed material for this project. And the wheels do spin. I regret I couldnt find different wheels but the toy bin at Goodwill has been rather lacking and Dollar Tree hasn't had much better. I dont think its too bad since the rear wheels are bigger than the front.
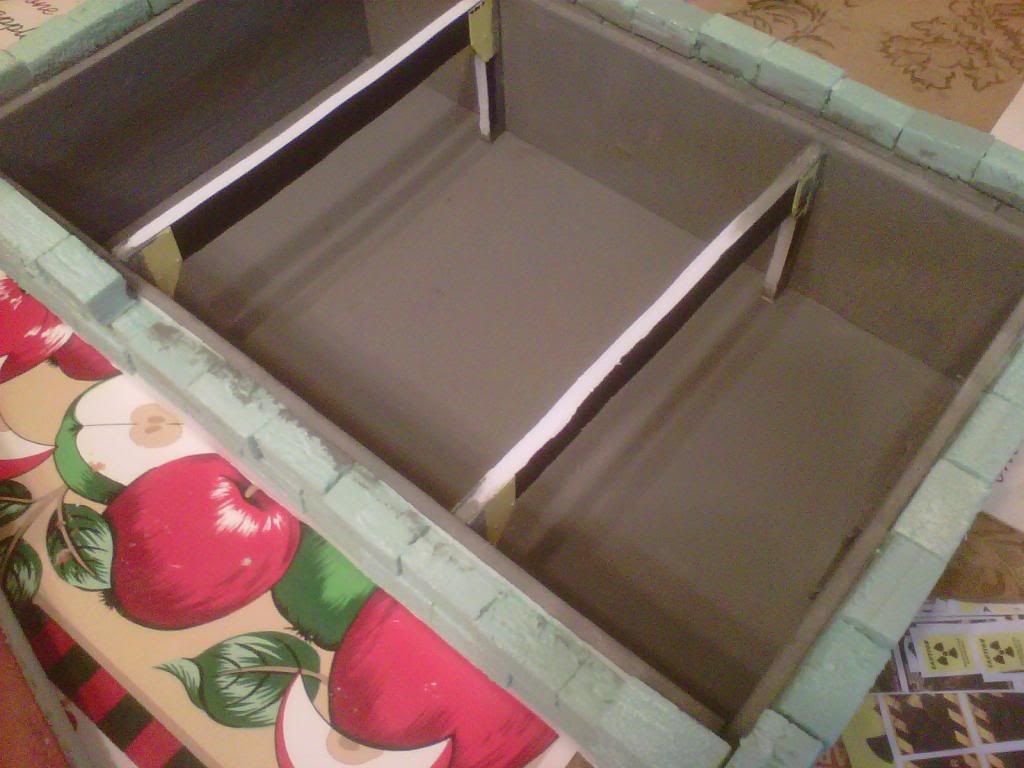
Starting to flesh out the basement a bit.
Started pouring the concrete.
Started painting the truck. Just glad my labels for the truck are going to cover up some of the warping done to the foam core.
Almost for got the doors to the basement
I have also been busy stripping the paint off about 100 Sisters of Battle I just traded for and thats pretty slow going, especially when some have like 3-4 layers of primer/paint.
More to come, and if I stick to schedule, I should be done by the 3rd. Almost out of my base grey paint and dont get paid again until the first!
|
There are 10 types of people in this world; those that know binary and those that dont.
----->MANTIS MAKER COMPETITION <---- |
|
|
|
|
2014/08/03 06:00:20
Subject: GamesEtc P&M Blog: League Throne Contest and More
|
|
Anti-Armour Yaogat
Cookeville, TN; USA
|
|
There are 10 types of people in this world; those that know binary and those that dont.
----->MANTIS MAKER COMPETITION <---- |
|
|
|
|
2014/08/04 00:47:58
Subject: GamesEtc P&M Blog: League Throne Contest (DONE) and FW Thunderhawk
|
|
Anti-Armour Yaogat
Cookeville, TN; USA
|
Here is the last of my WiP pics as I am putting the finishing touches on now. I should be completed within the next 3 hours, so before midnight Eastern time....sorry for the couple hour delay.
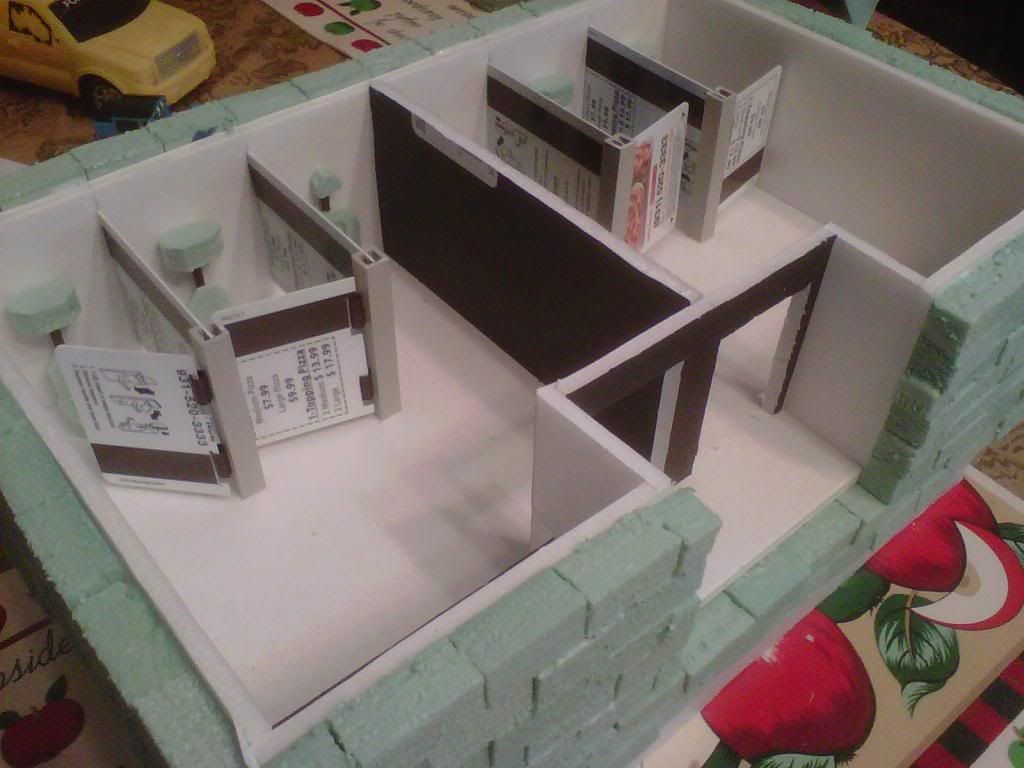
I should've primed the plastics in the building. It is taking a lot of coats and drying time to build up the layers to cover the key cards.
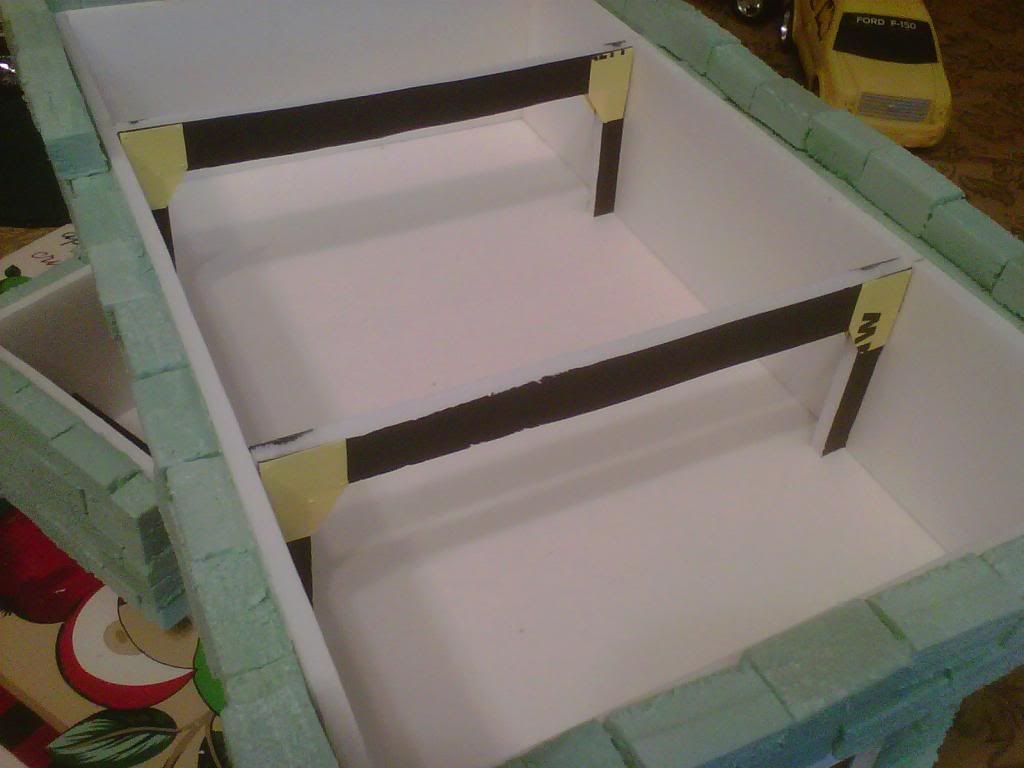
Outside of upper floor base coated:
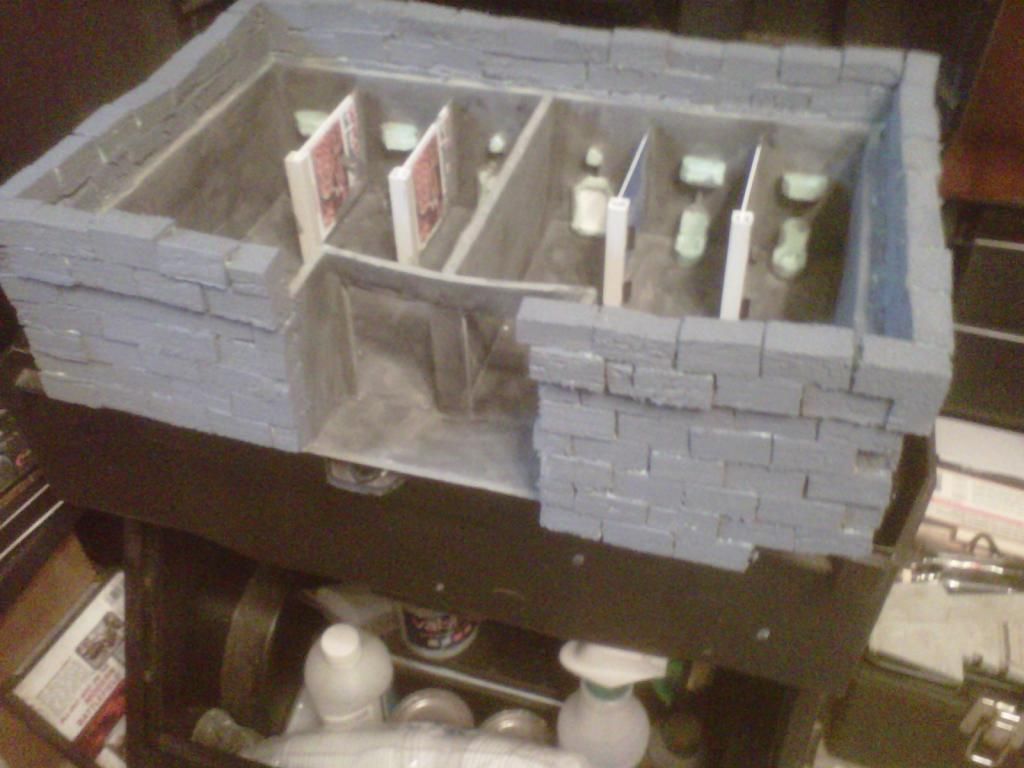
Started on the stalls:
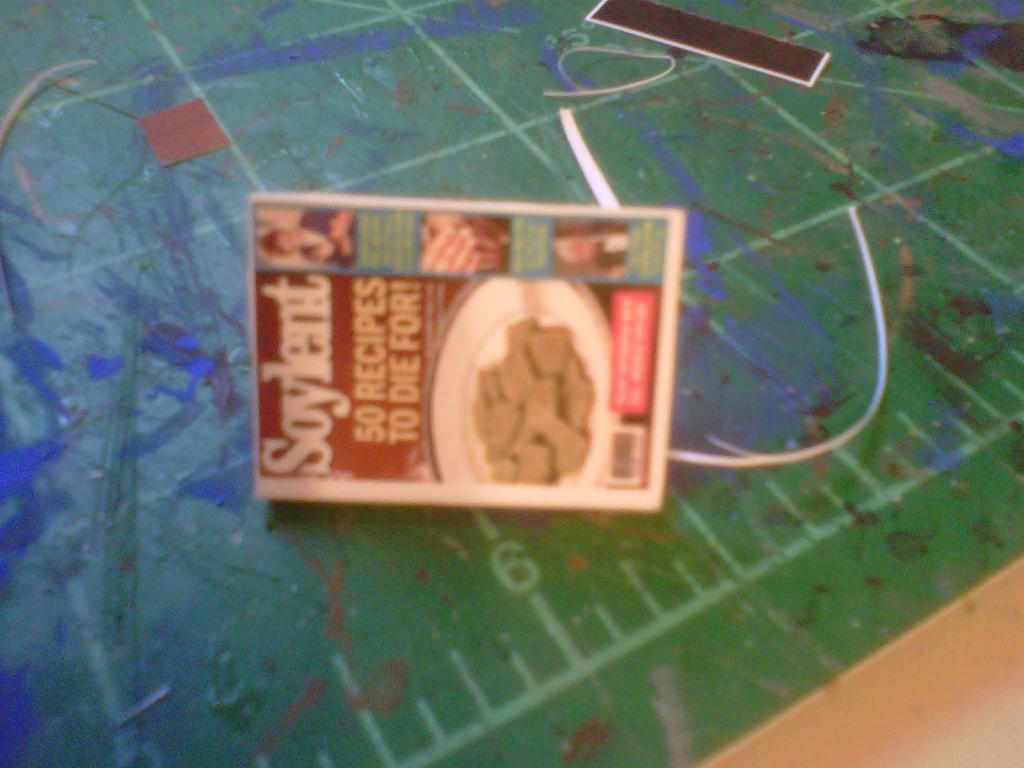
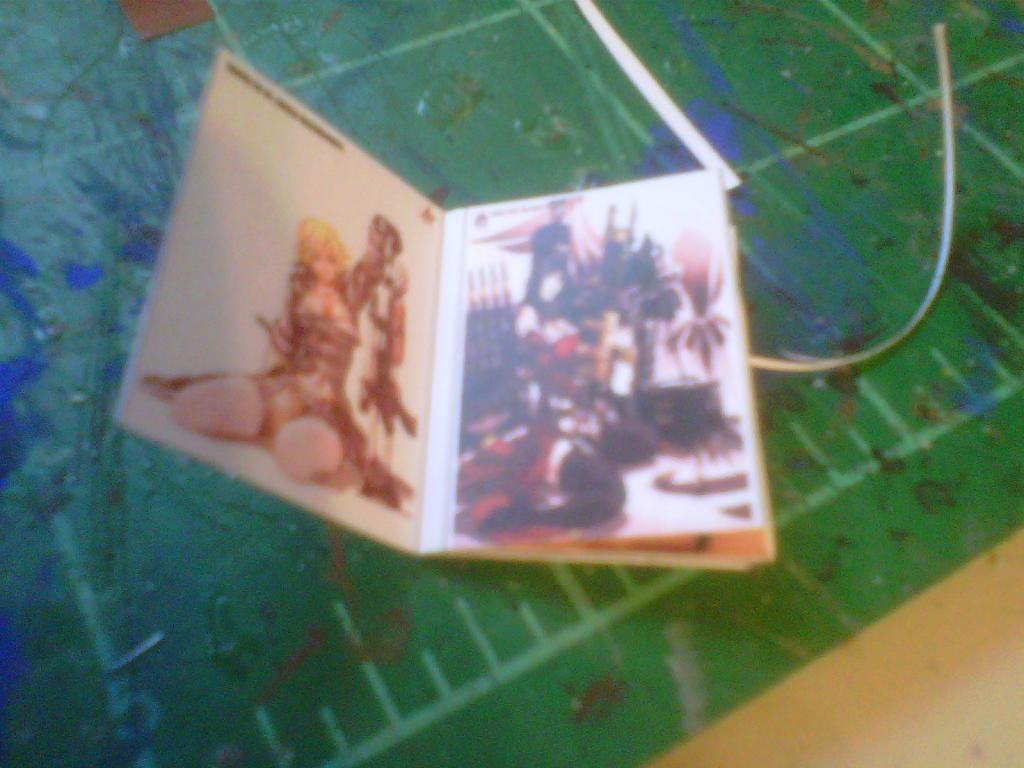
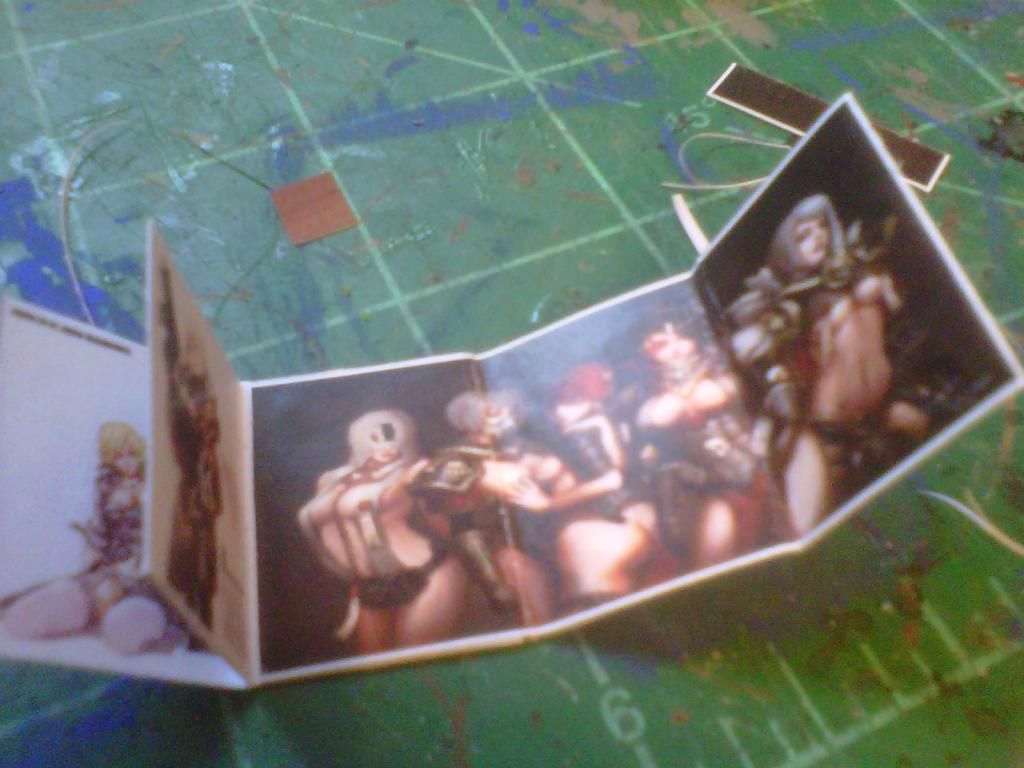
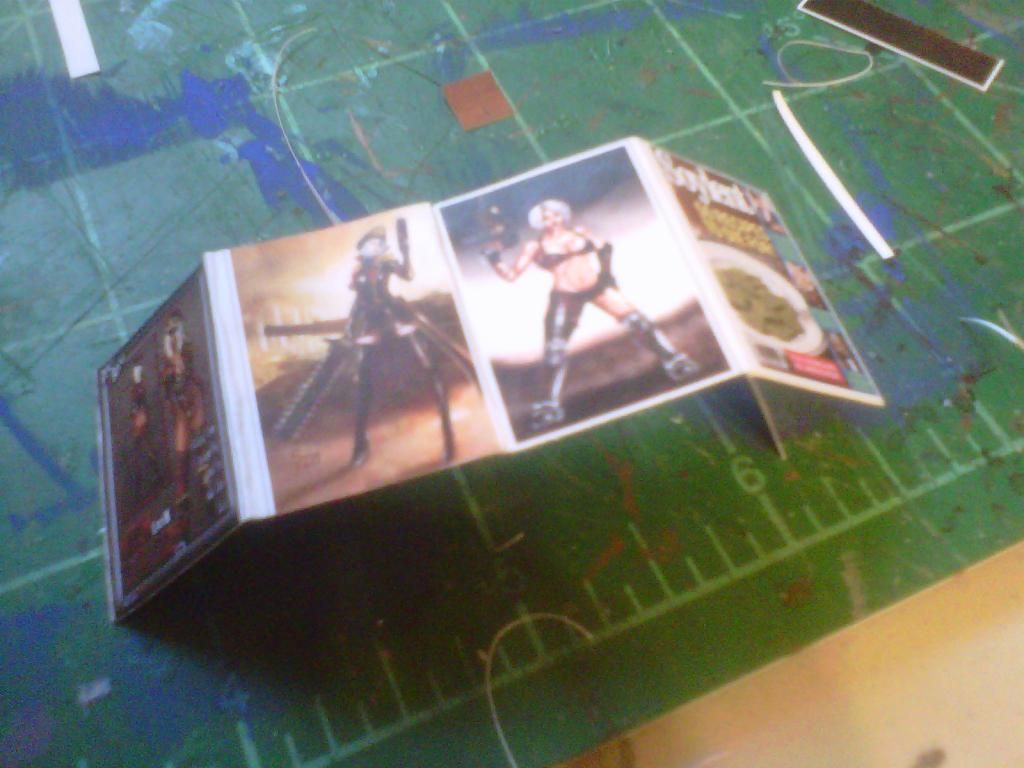
Every bathroom needs reading material, right?
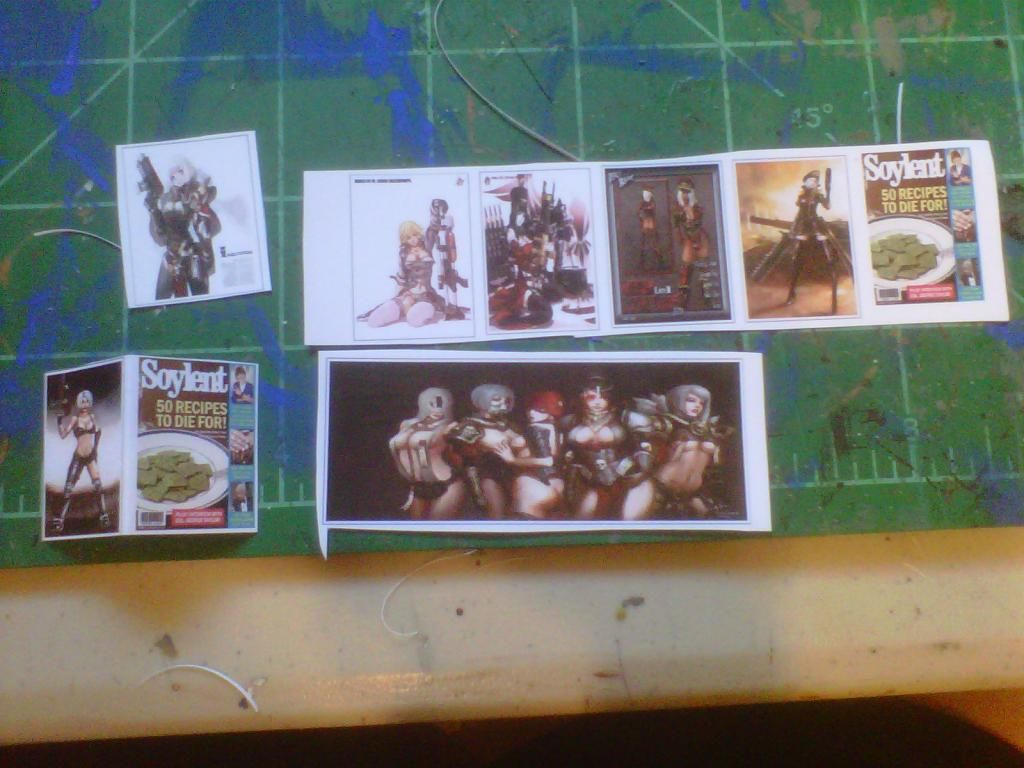
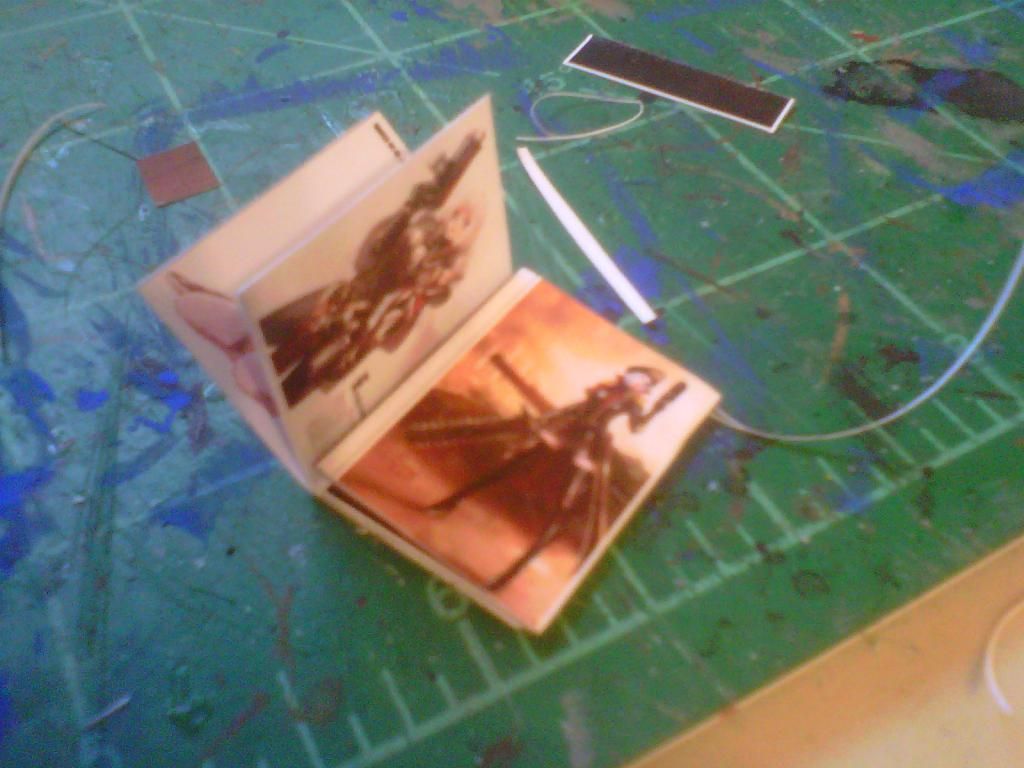
Posters for one side:
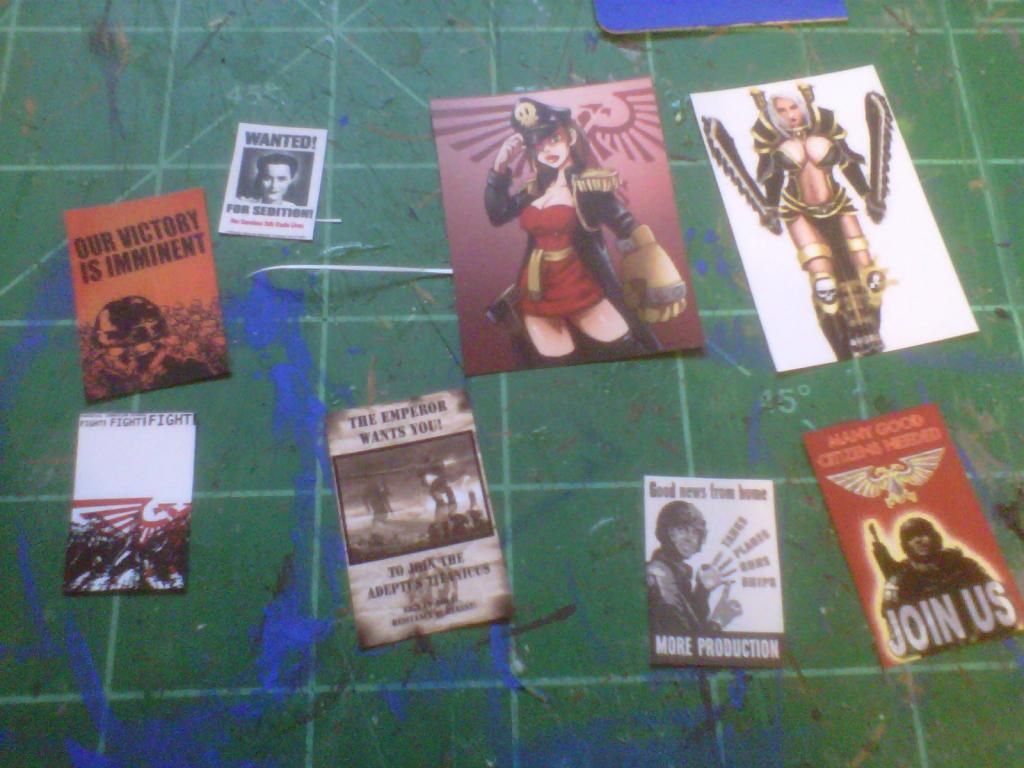
Posters for the other side:
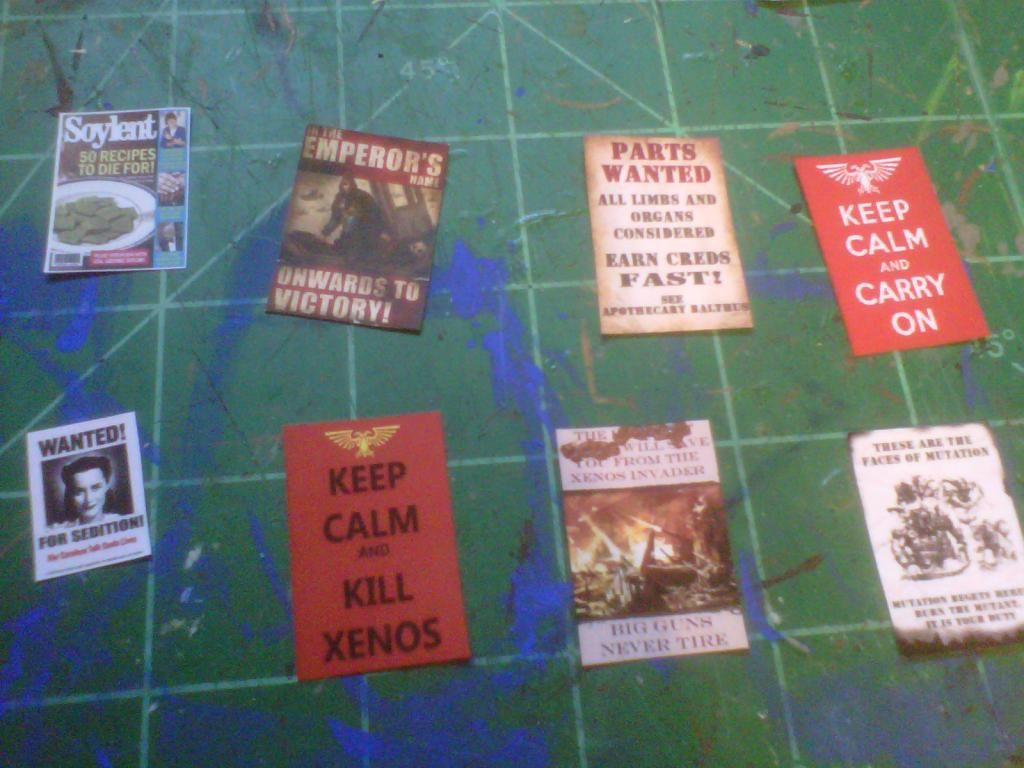
And not to give away the purpose of the basement:

This building was inspired by the movie Soylent Green and hence why it is called the Charlton Heston Memorial Rest Area. =P
Automatically Appended Next Post:
Well, PM'd my entry pics. I will post the completed pics here after the end of the contest.
On to my next project. Modify and Complete my Forgeworld Thunderhawk. =D

|
|
This message was edited 3 times. Last update was at 2014/08/04 04:13:18
There are 10 types of people in this world; those that know binary and those that dont.
----->MANTIS MAKER COMPETITION <---- |
|
|
|
|
2014/08/04 17:36:45
Subject: GamesEtc P&M Blog: League Throne Contest (DONE) and FW Thunderhawk
|
|
Ragin' Ork Dreadnought
Deep in the Outer Boroughs of NYC
|
Is that what passes for "imperial porn" these days? The "Soylent" magazine is a great idea. And the boxes of "cereal" are really cool, too. Nice job overall.
|
|
|
|
|
|
2014/08/04 17:50:44
Subject: Re:GamesEtc P&M Blog: League Throne Contest (DONE) and FW Thunderhawk
|
|
Anti-Armour Yaogat
Cookeville, TN; USA
|
I reckon. I wanted to make some sort of bathroom "reading material" but also wanted to keep the pics Safe For Work as best as I could. There were a lot more *cough* pics out there, but I felt these were sufficient to get the idea across.
Attached are the PDFs that contain the printable posters and such that were used in the project, but also contain a ton of other stuff that was not used on this project but future ones as well. The second file contains multiple and various sizes of the different posters used in the project and as I said, a TON of others that were not used yet.
I will get all the final pics of the project posted here shorty after the entry pics are all compiled.
| Filename |
signals_n_panels.pdf |
![[Disk]](/dakkaforum/templates/default/images/icon_disk.gif) Download
Download
|
| Description |
PDF of signs found on the net |
| File size |
1540 Kbytes
|
| Filename |
signals_n_panels 2.pdf |
Download
|
| Description |
PDF compilation of mine. |
| File size |
4634 Kbytes
|
|
|
This message was edited 1 time. Last update was at 2014/08/04 17:51:21
There are 10 types of people in this world; those that know binary and those that dont.
----->MANTIS MAKER COMPETITION <---- |
|
|
|
|
2014/08/04 23:20:13
Subject: Re:GamesEtc P&M Blog: League Throne Contest (DONE) and FW Thunderhawk
|
|
Anti-Armour Yaogat
Cookeville, TN; USA
|
|
There are 10 types of people in this world; those that know binary and those that dont.
----->MANTIS MAKER COMPETITION <---- |
|
|
|
|
2014/08/08 05:09:06
Subject: Re:GamesEtc P&M Blog: FW Thunderhawk & LoER Comp. (Planning)
|
|
Anti-Armour Yaogat
Cookeville, TN; USA
|
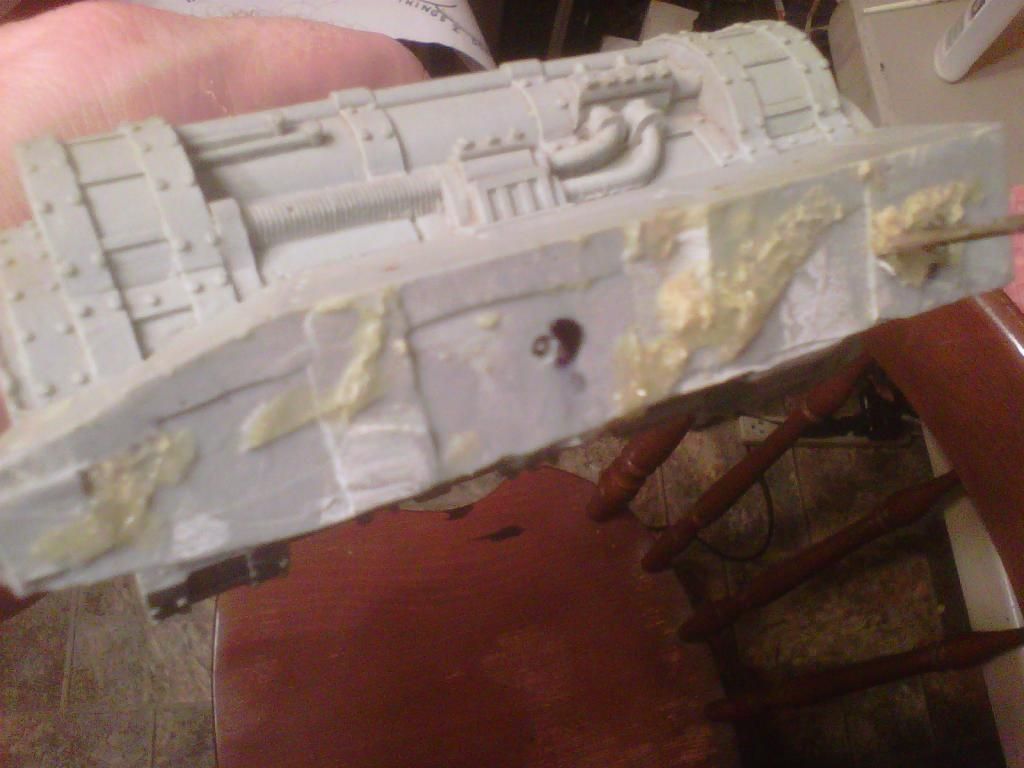
Well, started cleaning up the mess the previous owner of my Thunderhawk had made with it. Anyone know an easy way to remove clumps of Gorilla glue (the kind that puffs up as it dries)?
I also started cleaning up all the flash and mold lines as well as drilling a few holes for magnets. There are a lot of details inside this thing that I would truly hate to hide by covering it up with other pieces. Now the very back compartment is empty and void of any details. I am wondering what "would" be in there that I could add with a little bit of scratch building. If anyone has some ideas, please let me know.
The nose has a damaged piece where the casting was thin and the previous owner punched through it somehow. Any ideas other than using green stuff/Milliput?
And I have again entered the LoER Terrain Comp, Round 11. I just cant work on one project at a time as I do get bored quickly that way. I also intend to finish stripping my new SoB figs and getting them painted.....all 100+ of them. LOL Now those I may be able to bring to work and get a little done each night as I got 4-5 hours a night which I do nothing but read forums. :(
Here is a general picture of the idea I have in mind, but wont be exactly like this:
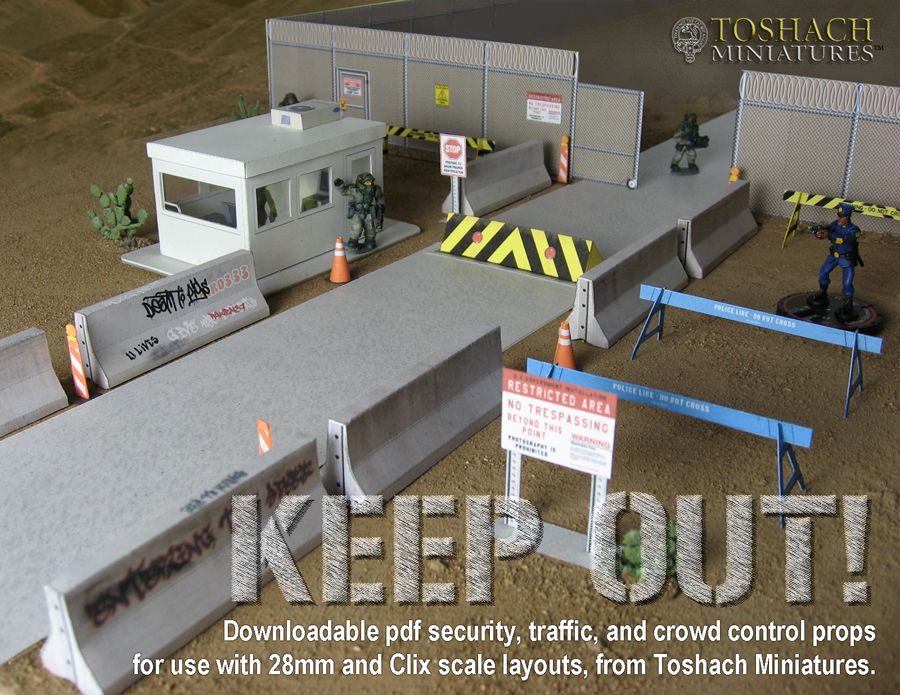
Now I plan on adding additional elements to this piece, which "should" include, but not limited to the following:

Gonna try to make these barricades well detailed, including chips missing, reflectors and the like.
I got a few ideas how to pull this off, but not sure how well they will work out.
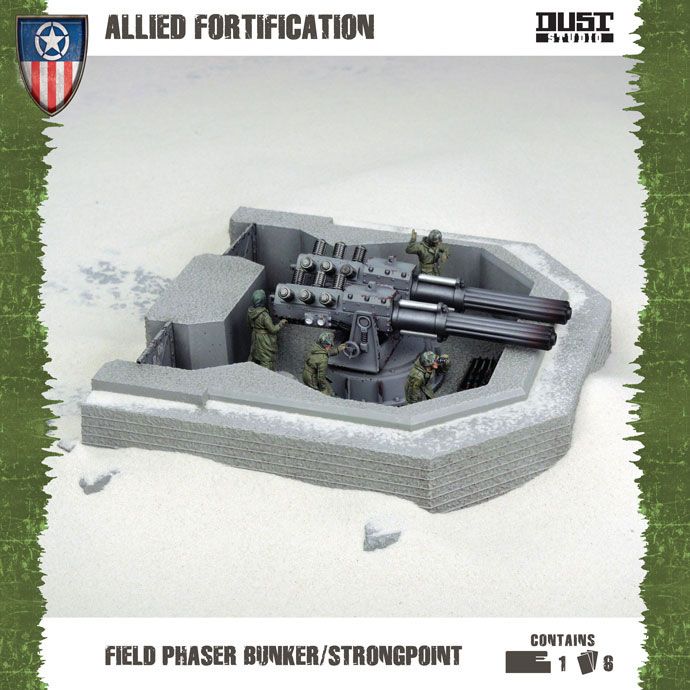
Debating if I want to put an AA gun emplacement or not. Like Dr. H said about my last project, the truck did slow me down. So if I take this on, it may be as an extra after the core of the project is done to satisfaction.
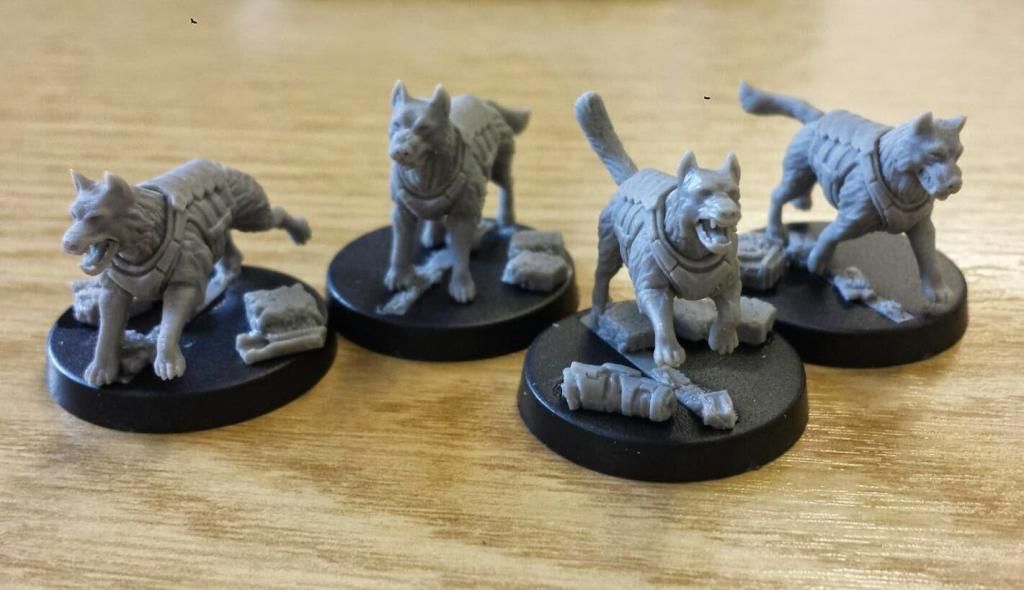
Been trying to find a German Shepherd fig but the only one I found on the web (and is not Evil-Bay) is from the Ukraine and getting anything from there now will be a nightmare. Suggestions?
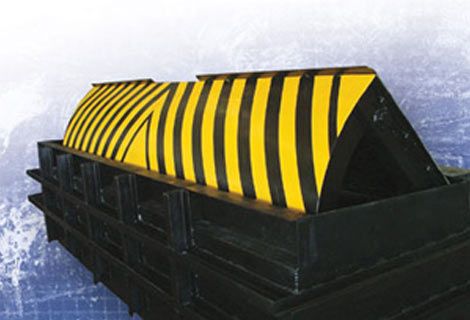
Would like to make this an interactive piece of terrain and not static. Might also put in some of the Pole versions.
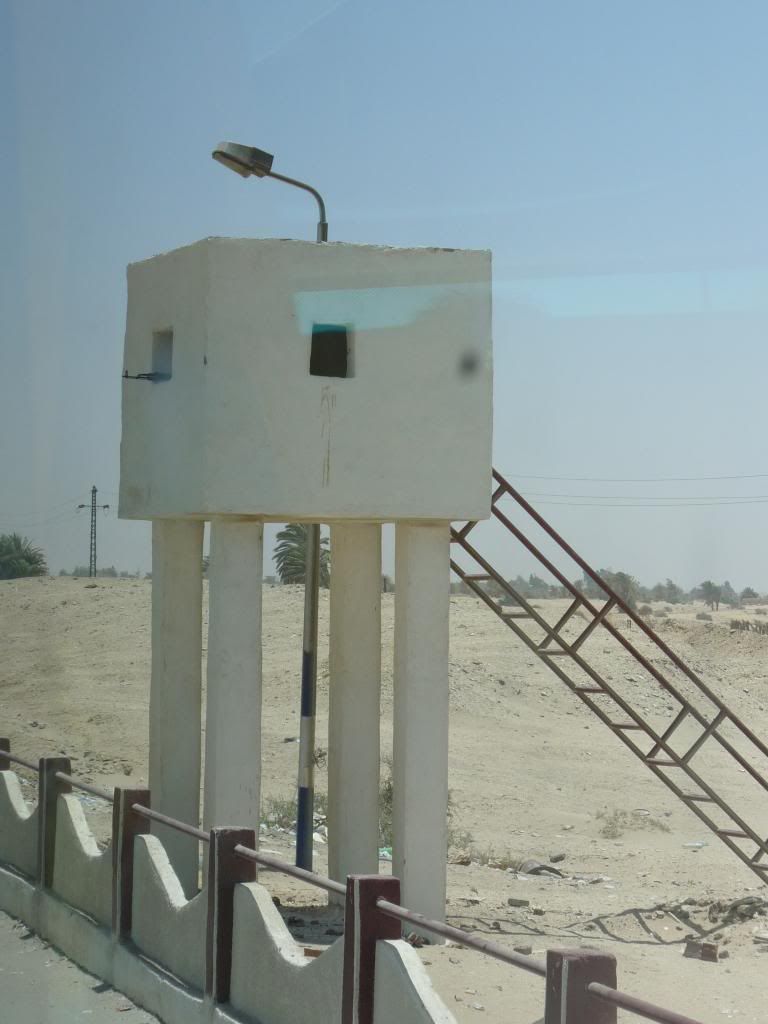
Debating having this guard tower actually a part of the guard shack.
OTHER:
Planning to make the wall in the back a combination of stone and metal, topped with razor wire if I can pull off making some of that. Will also try to add street lights as well as flood lights on the walls and buildings. Will also be making several security cameras to place in various areas. Will try to add some security personnel to go along with the dog. One of them I plan to have holding a pole with a mirror on the end. The road to the workable gate will be two lane with the barricades forcing a driver to zig-zag to get to the gate with possibly one road leading out.
The biggest roadblock I have will not be time this time as I am getting in at the beginning. Its going to be a matter of materials as I am tapped out until September. So if anyone can recommend any cheap building materials I don't already use, I would appreciate it. So far I plan on working with:
Foam Core
No Trespassing Signs
Hotel Key Cards
Random Bits
Random Broken Toys
Cork Board
Wooden Dowls
Polystyrene
So what does everyone think? Will try to get a sketch of the idea up tomorrow.
|
There are 10 types of people in this world; those that know binary and those that dont.
----->MANTIS MAKER COMPETITION <---- |
|
|
|
|
2014/08/08 14:15:50
Subject: GamesEtc P&M Blog: League Throne Contest (DONE) and FW Thunderhawk
|
|

Shroomin Brain Boy
|
hey games!
I finally had a look at your thread...
you didn´t show up on my radar yet the way that I thought it was needed to take a look... man was I wrong... you are a serious player indeed!... built your own titan... 
the Asian themed terrain set looks very good...and it is nice to see the last entry to the comp in one go here...the whole soylent brown joke now is way better to understand  ...very good mate... the only thing that brings me to think it is a scratchbuild about your truck by the way are the rearview mirrors...as these are a tad too thick to be convincing... other than that I think it looks totally the part as if just pulled out of a blister...
consider me subbed as I wanna see close how this new entry of yours will develop...
seeing you resurrect that thunderhawk will be a nice show too
cheers, vik
|
|
|
|
|
|
2014/08/08 20:18:15
Subject: GamesEtc P&M Blog: League Throne Contest (DONE) and FW Thunderhawk
|
|
Combat Jumping Ragik
|
Interesting stuff.
The Gorilla glue. Slice the foam off with a razor or other blade. The lumps... grind them off or file them off somehow. Trying to cut those will be an exercise in frustration unless you use a dremel with a cut-off wheel. So if you can do that without damaging the model, that is where I would start. then file/sand down the remaining stuff.
|
|
|
|
|
|
2014/08/09 04:56:39
Subject: GamesEtc P&M Blog: League Throne Contest (DONE) and FW Thunderhawk
|
|
Anti-Armour Yaogat
Cookeville, TN; USA
|
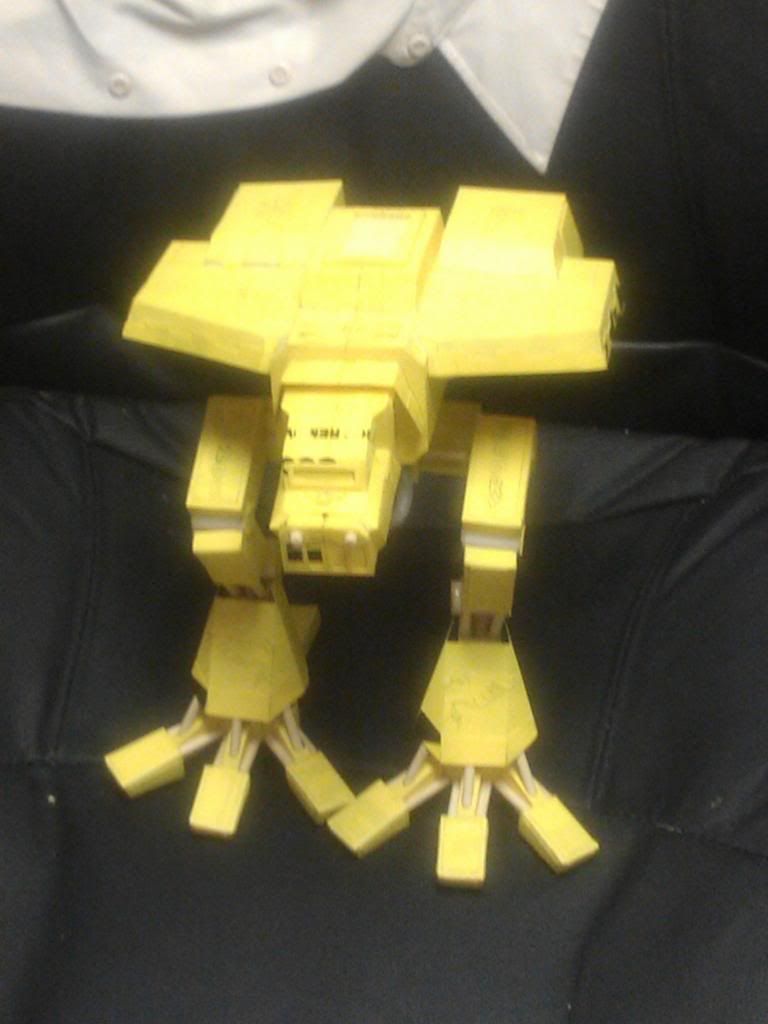
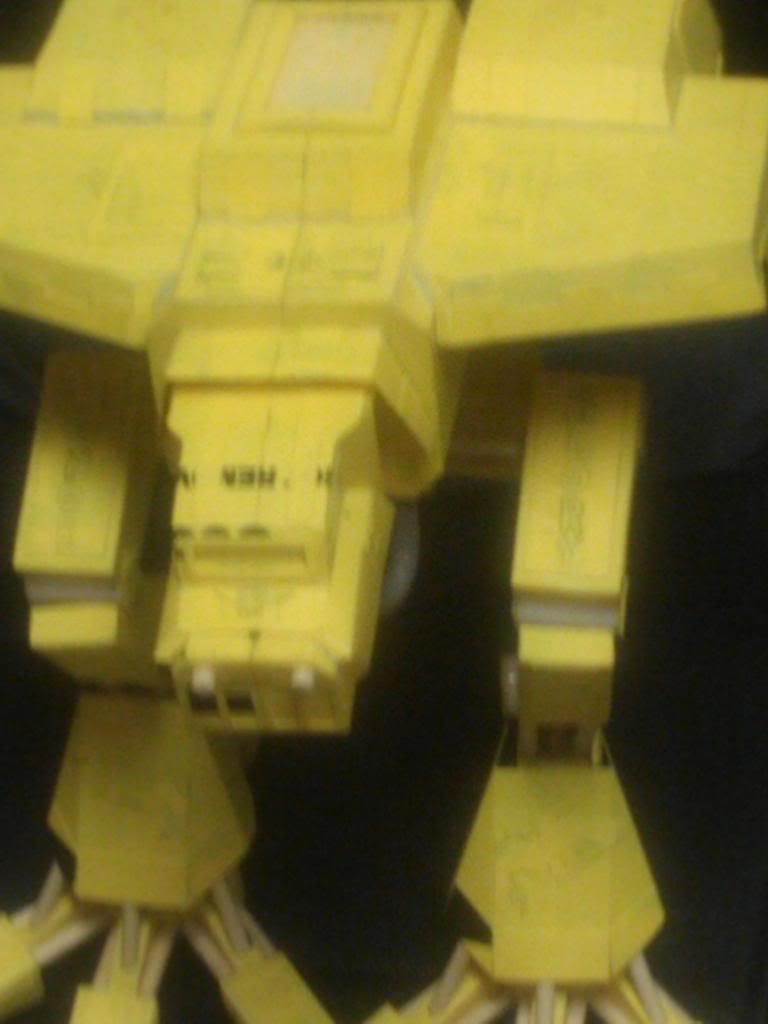
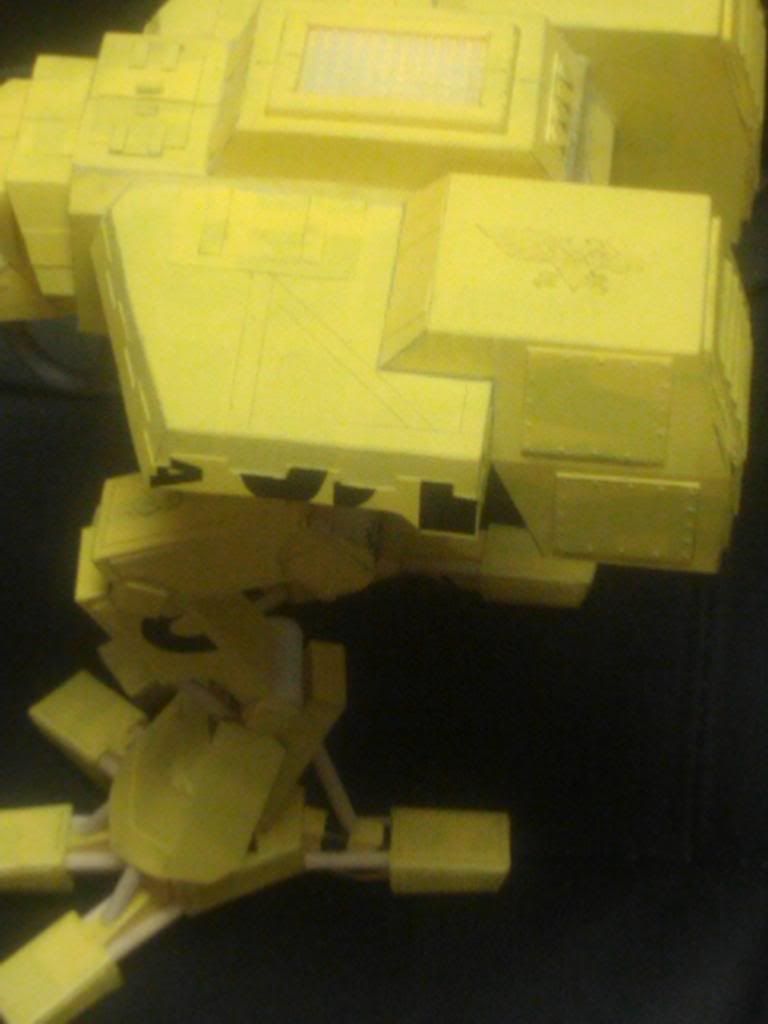
@ Vik - Thank man. The Titan has a lot of details that you really cant make out. I have gotten as far as to prime it, but even that doesnt show the detail as much either. I hope to get it painted before the new year as I started already on the weapons. I am sure once it is painted the details will begin to show more. There was an incredible amount of rivets made on that, so much my wife thought I needed to be committed. Then there are all the eagles and other such things all over the place on it.
As for the mirrors on the truck, I know what you mean, but it was all I had to work with. Funds are tight during the summer as the wife has to travel halfway across the country to pick up her older kids from her ex-husband, then the increase in food and utilities, the the return trip. However, I did manage to spend like $2USD to get about 2400 rivets from Amazon. =D
And yes, I am looking forward to working on the Thunderhawk. I have had it a while now and never got around to doing anything with it and after seeing Blackadders scratch built one, it has motivated me to pimp mine out with extra detail work. Just need to know what could be in that back compartment.
@ Red - I got most of the foam parts off with the x-acto blade and now there are those hard yellow splotches. I tried using a file, but the spacing where the glue is makes it very difficult. I got a variable speed battery dremmel, but all I have are drill bits lol. But maybe on payday I can swing a grinding stone attachment? think that might work? then all I would have to do is file down near the creases?
And right now, for Round 11, I am just making sketches of my project so I know exactly what I want to get done and can plan how to go about it. I brought my crackberry to work with me so if I can get all the drawings done tonight, I can get them uploaded. =D
Automatically Appended Next Post: Okay, here is the overall plan. Sorry my perspective drawing is a bit rusty and the ruler here at work is little better than using a doughnut for making straight lines.
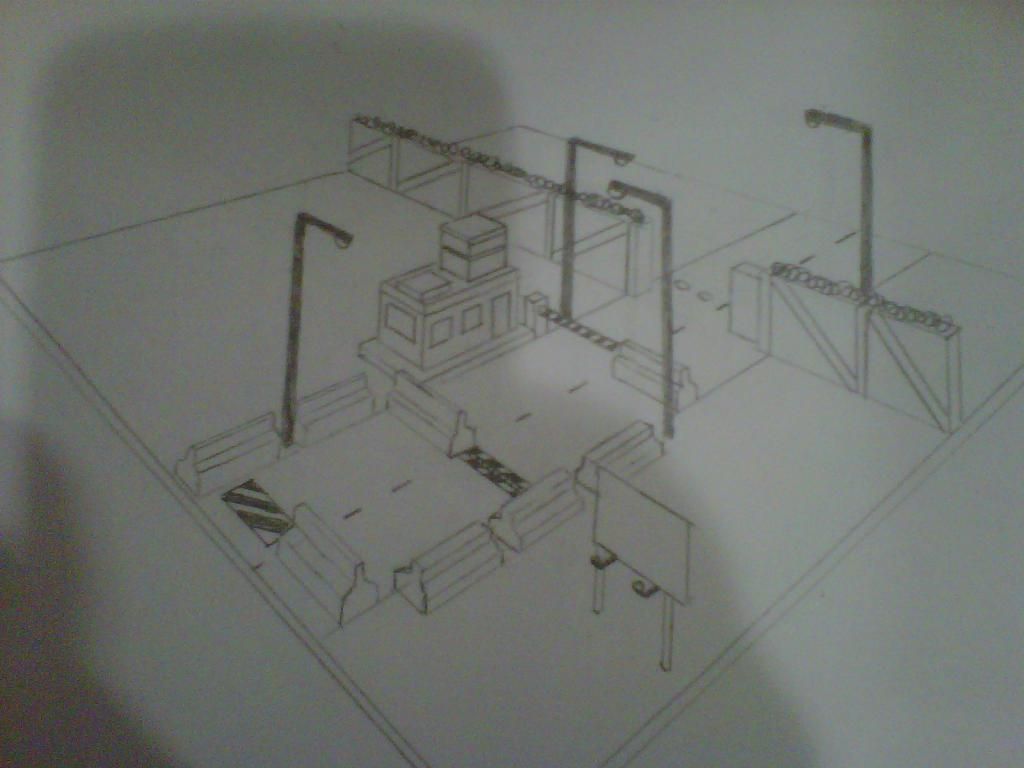
These are the minimal elements I plan to build with this piece, with only one part I am still debating and would like some feed back on.
Guard tower on the roof of the shack.......Do it or scrap the idea. Let me show you how it will look first without and then with:
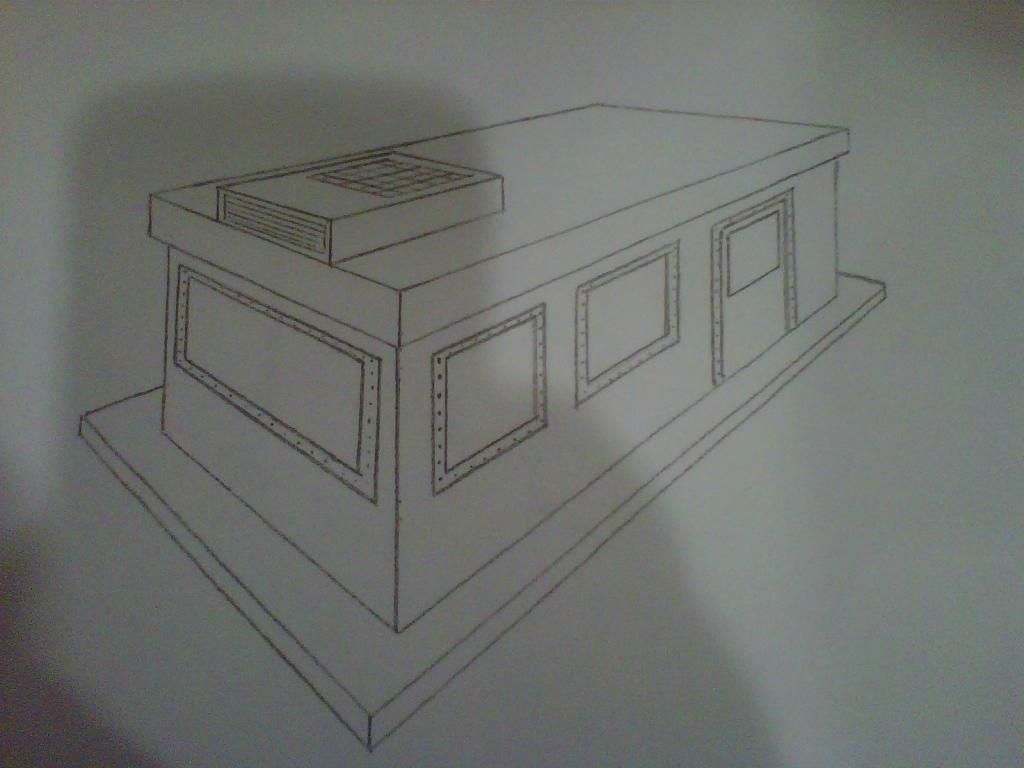
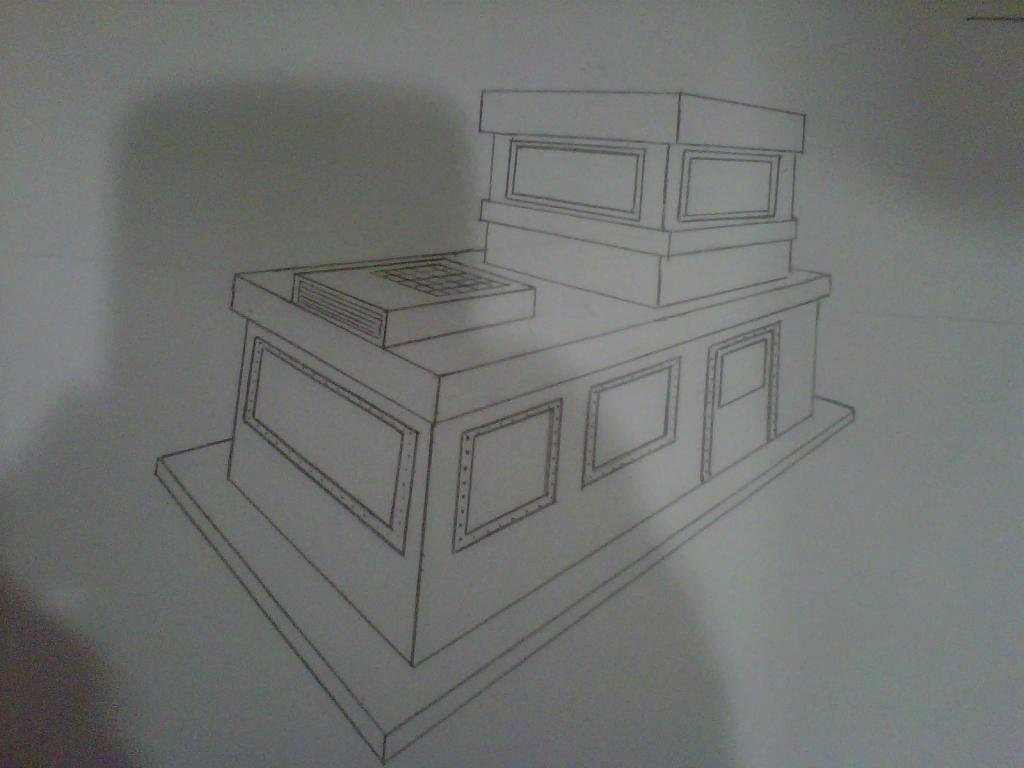
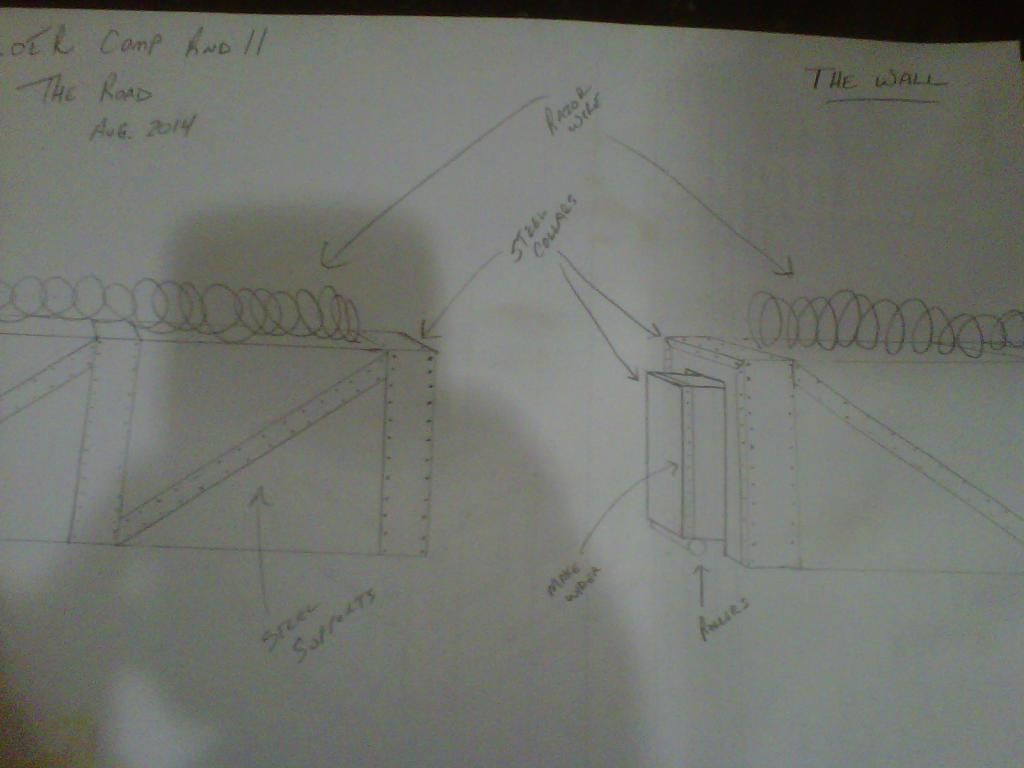
And here is the preliminary idea for making the wall. I got another sketch that I am also fooling around with trying to see if I can improve upon it.
What do you think?
|
|
This message was edited 1 time. Last update was at 2014/08/09 10:16:38
There are 10 types of people in this world; those that know binary and those that dont.
----->MANTIS MAKER COMPETITION <---- |
|
|
|
|
2014/08/10 04:46:51
Subject: Re:GamesEtc P&M Blog: League Road Contest (Planning) and FW Thunderhawk
|
|
Anti-Armour Yaogat
Cookeville, TN; USA
|
Tried doing a little bit of clean up on the Thunderhawk and this is how far I got tonite with the gorilla glue.
Glue on the fuselage
Glue on the wing
Now this stuff is HARD. Its almost like filing rocks. I picked off all I could with the x-acto knife and tried filing but seems like I am not getting anywhere. Any Ideas?
Here is the other side of the fuselage, which has what appears to be dried super glue which should be a lot easier to clean off. I am thinking of scrubbing it down with some acetone? Anyone know if acetone will interfere with forgeworlds resin? The other wing is about in the same condition.
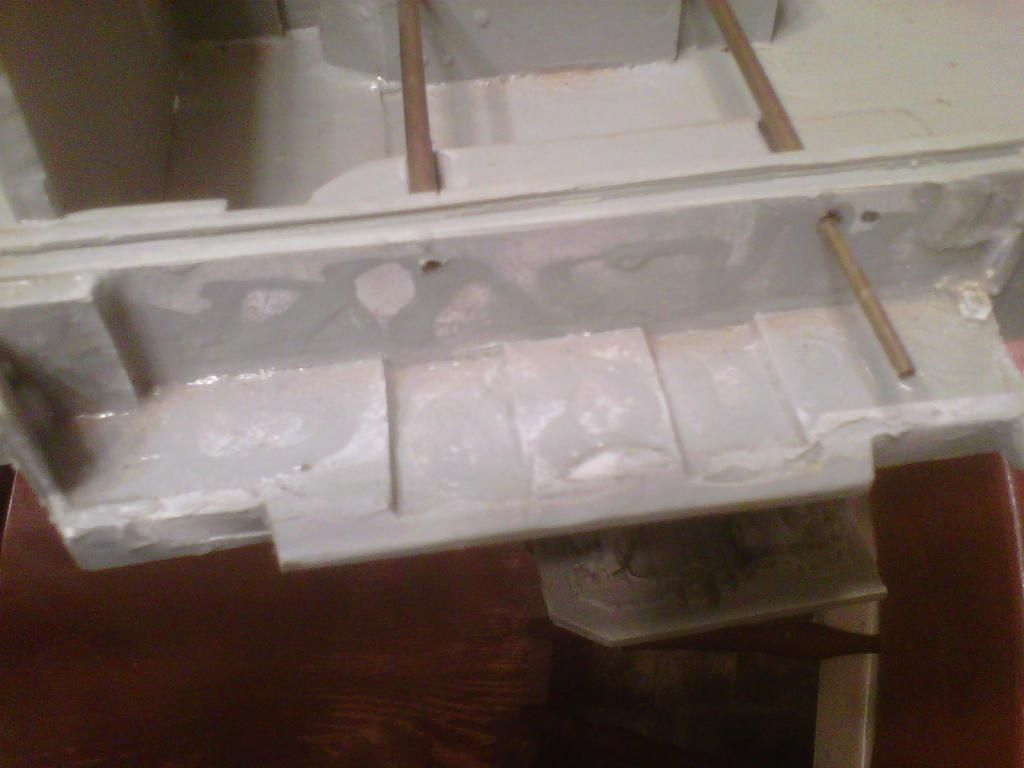
And here is the damage to the nose I mentioned before. I am debating if it might just be easiest to put an armored plate on both side to cover up the hole, and then make a similar plate for the other side. Thoughts?
|
There are 10 types of people in this world; those that know binary and those that dont.
----->MANTIS MAKER COMPETITION <---- |
|
|
|
|
2014/08/18 01:49:58
Subject: Re:GamesEtc P&M Blog: League Road Contest (Planning) and FW Thunderhawk
|
|
Anti-Armour Yaogat
Cookeville, TN; USA
|
Well, got some supplies yesterday but not all, but enough time delaying the work.
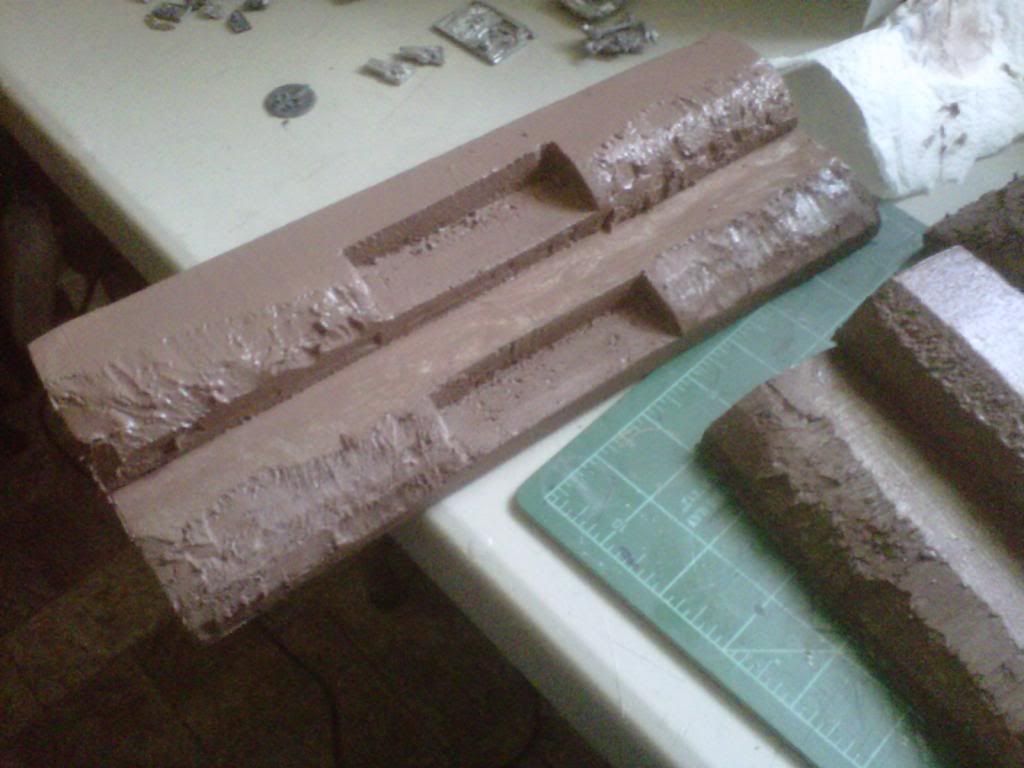
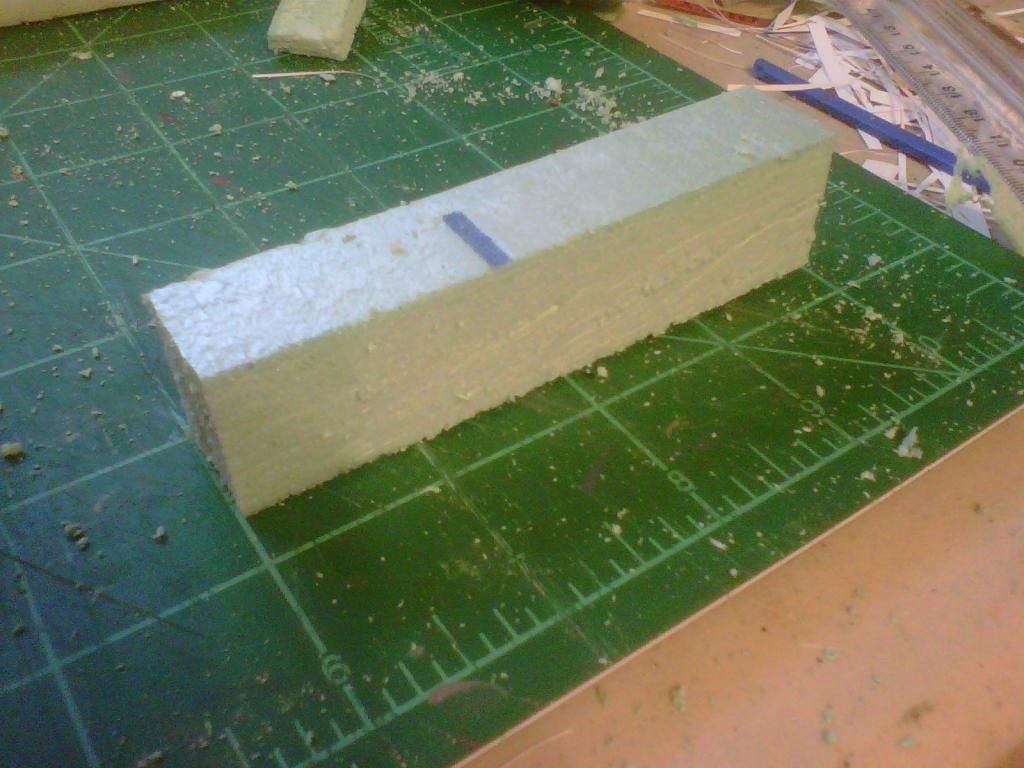
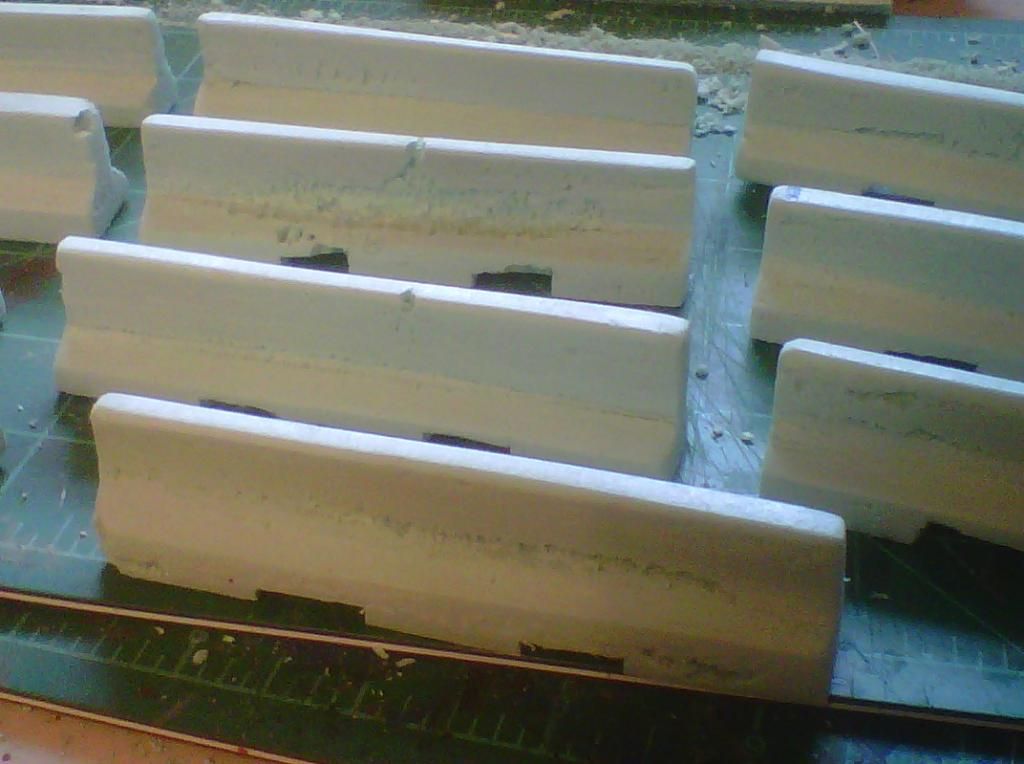
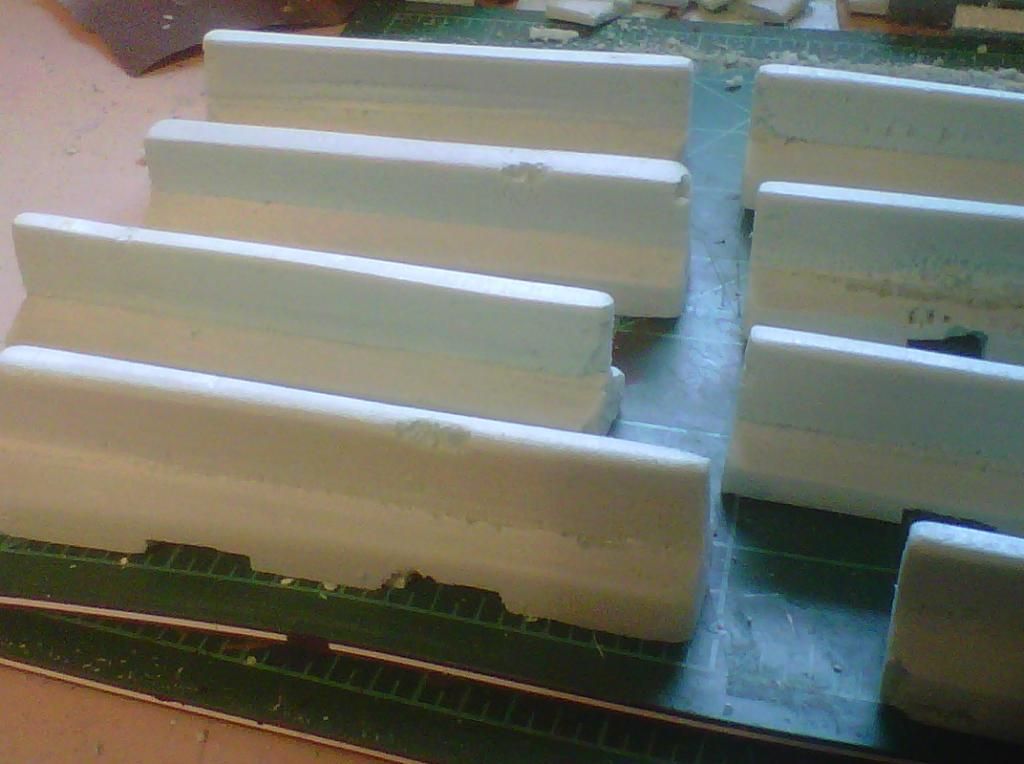
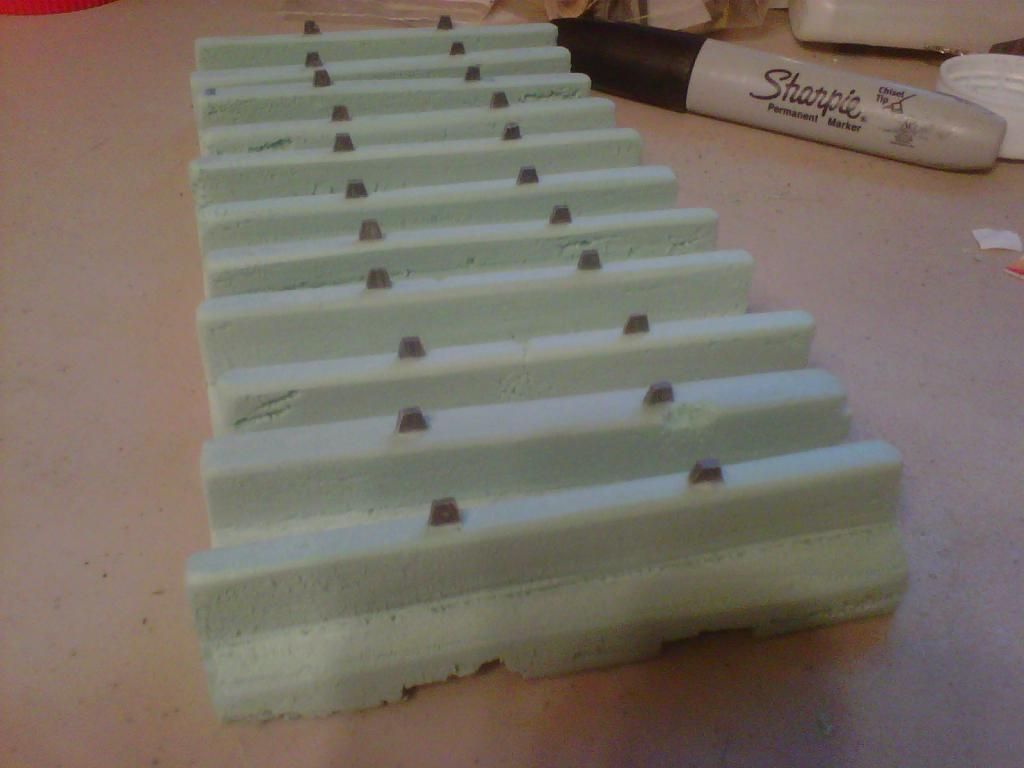
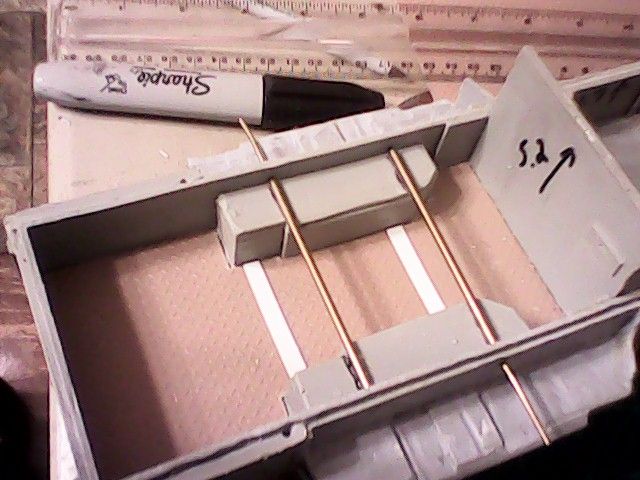
Began the cement barricades today. According to my sketch I need 9 I think, but cut enough for 11, so made all of them.
The starting block
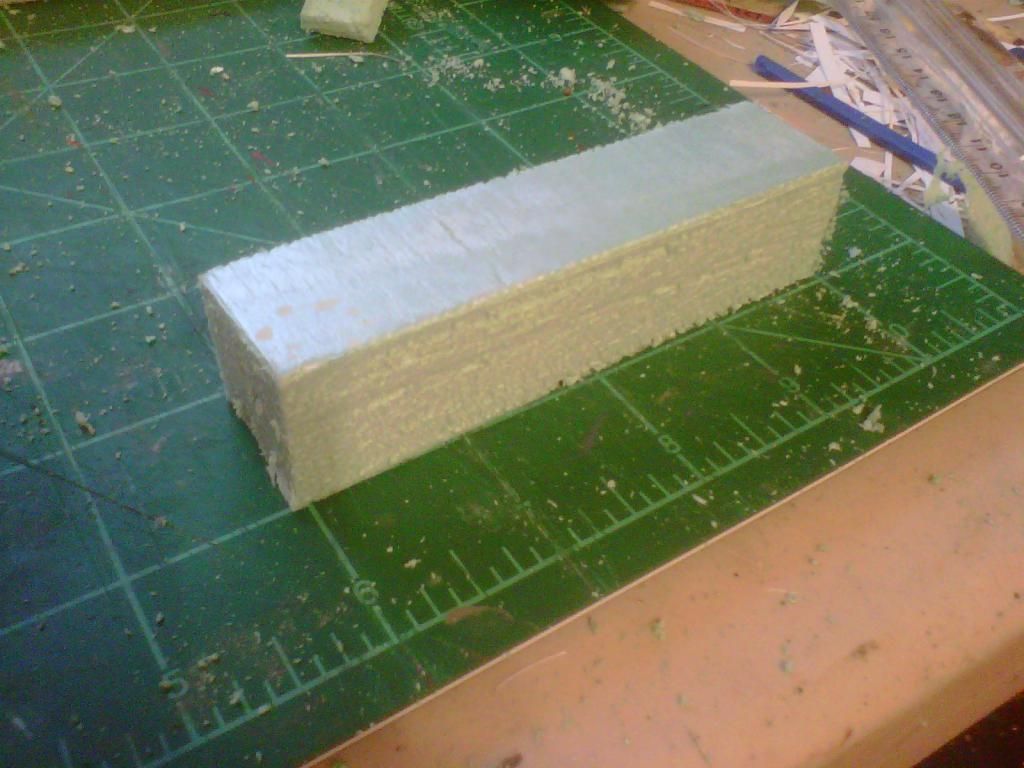
Reducing the block to appropriate size
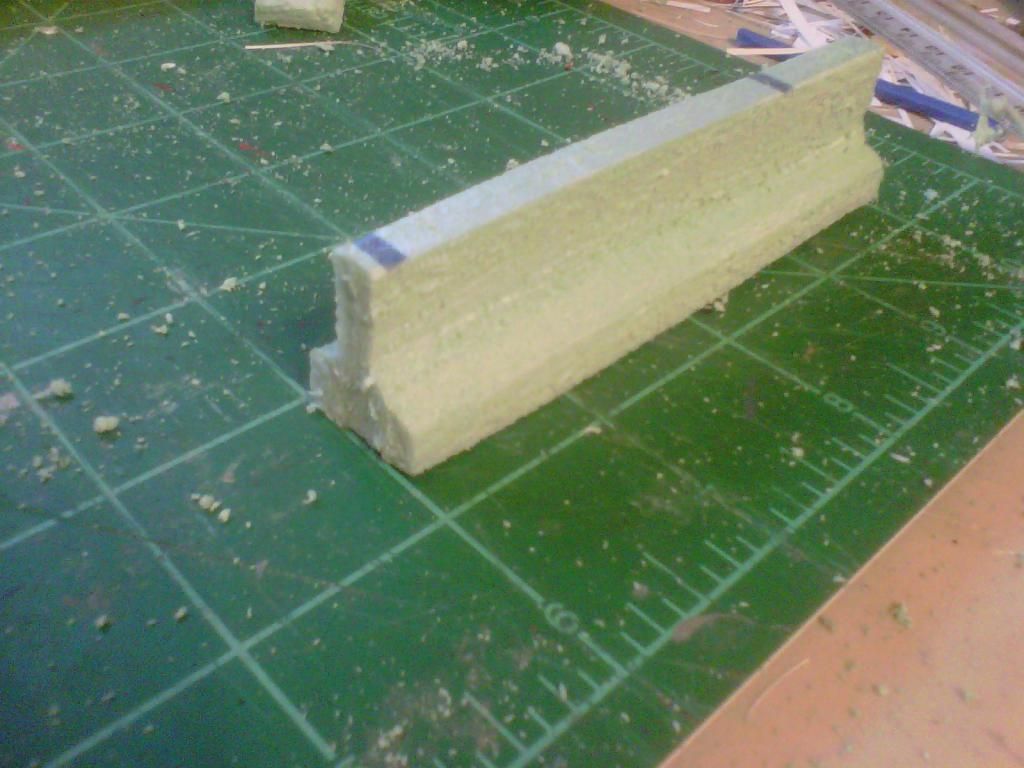
Shaping the block
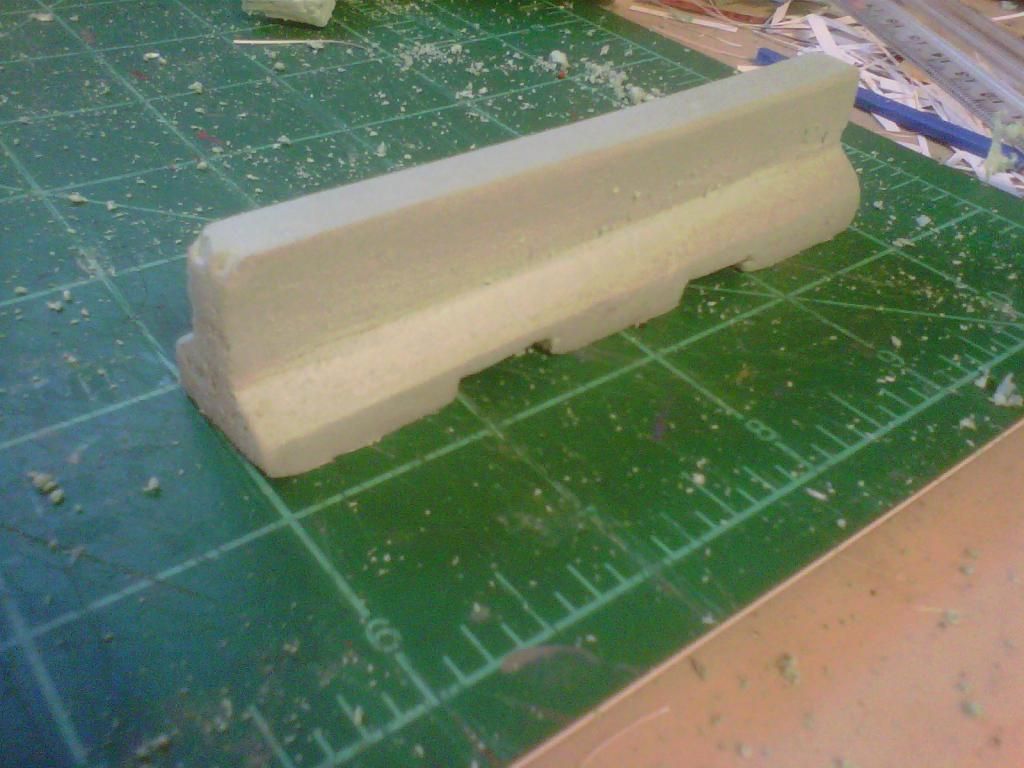
Sanding down the roughness

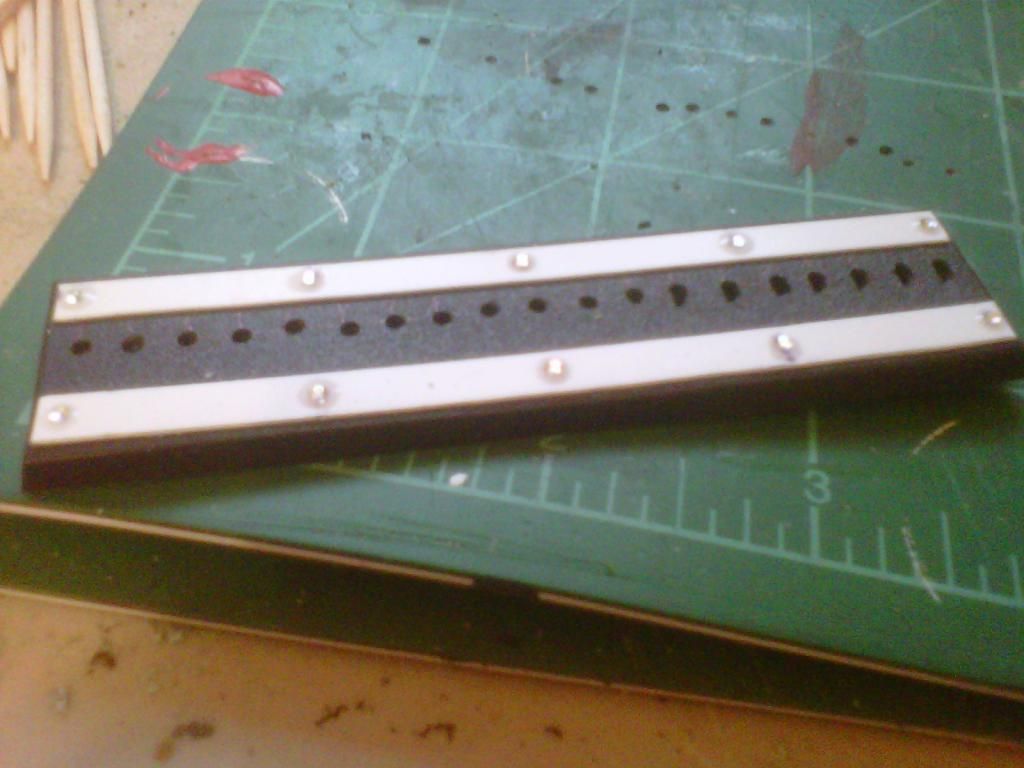
Cutting out the fork lift grooves
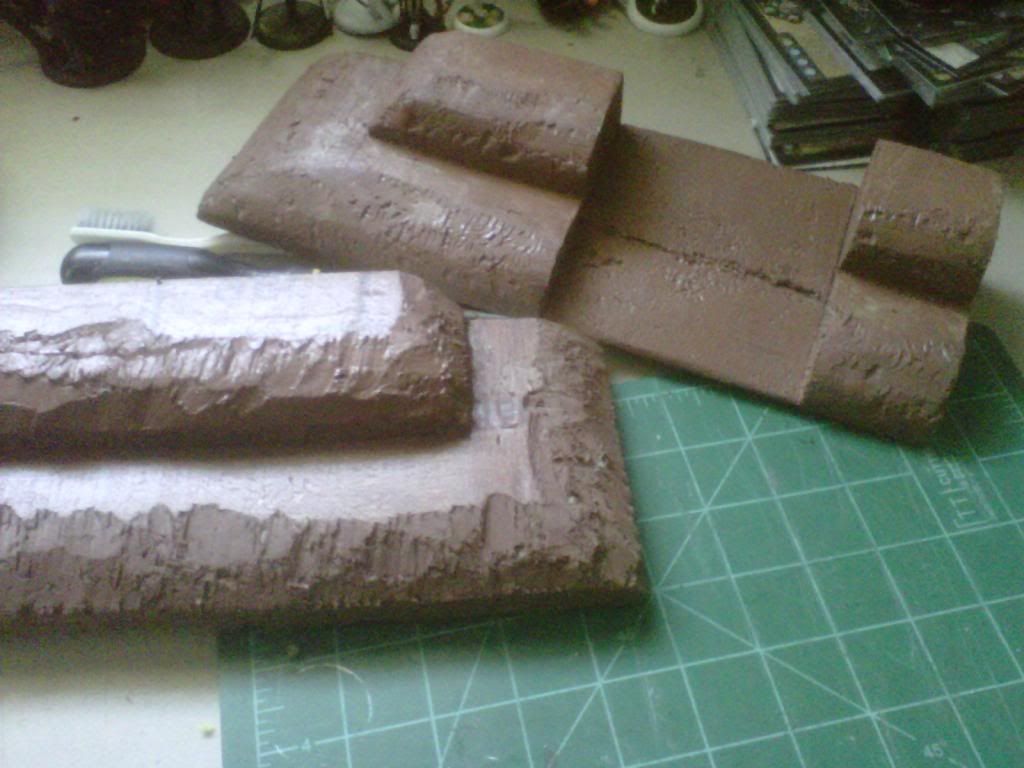
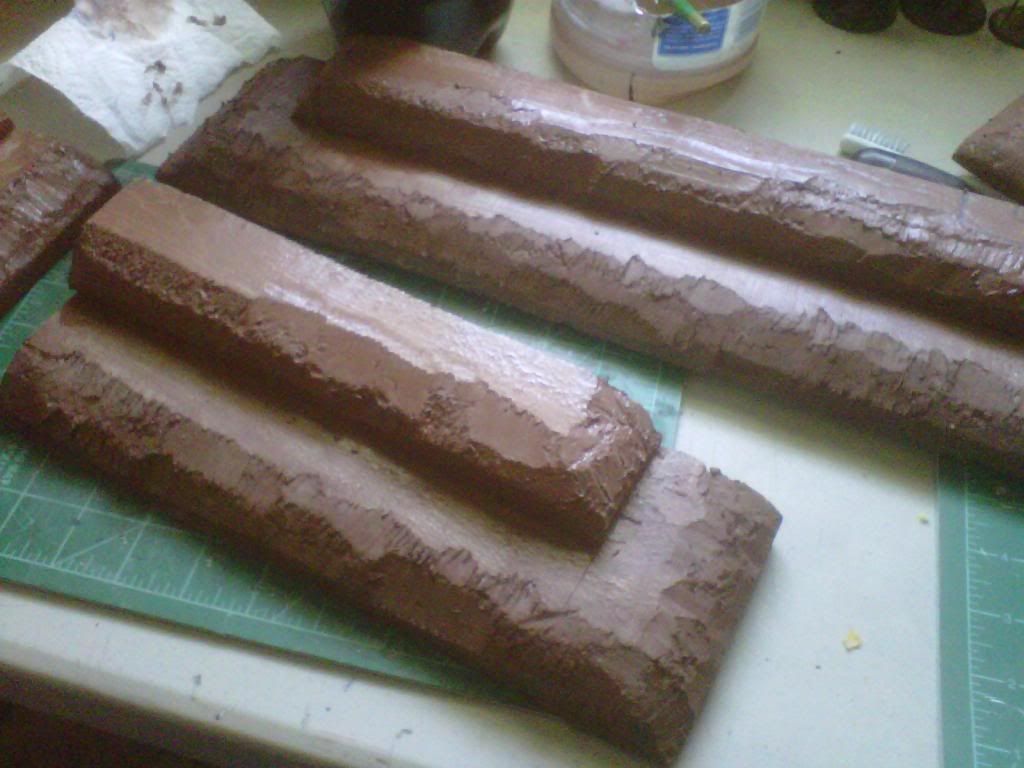
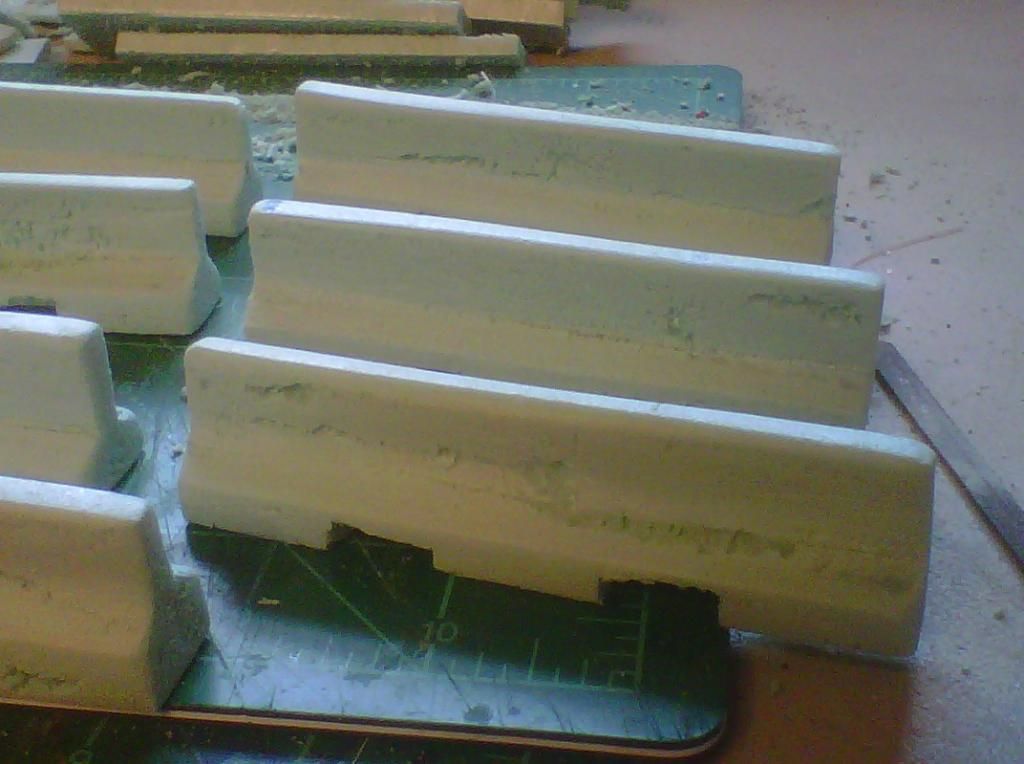
Next I am going to cut what little sprue I got left to make the reflectors on each of the barricades.
Then I am going to examine each barricade and determine how best to apply damage to them based on the cutting imperfections.
PART TWO
Added varying degrees of damage to the concrete barricades. All they require now is the reflectors and painting.
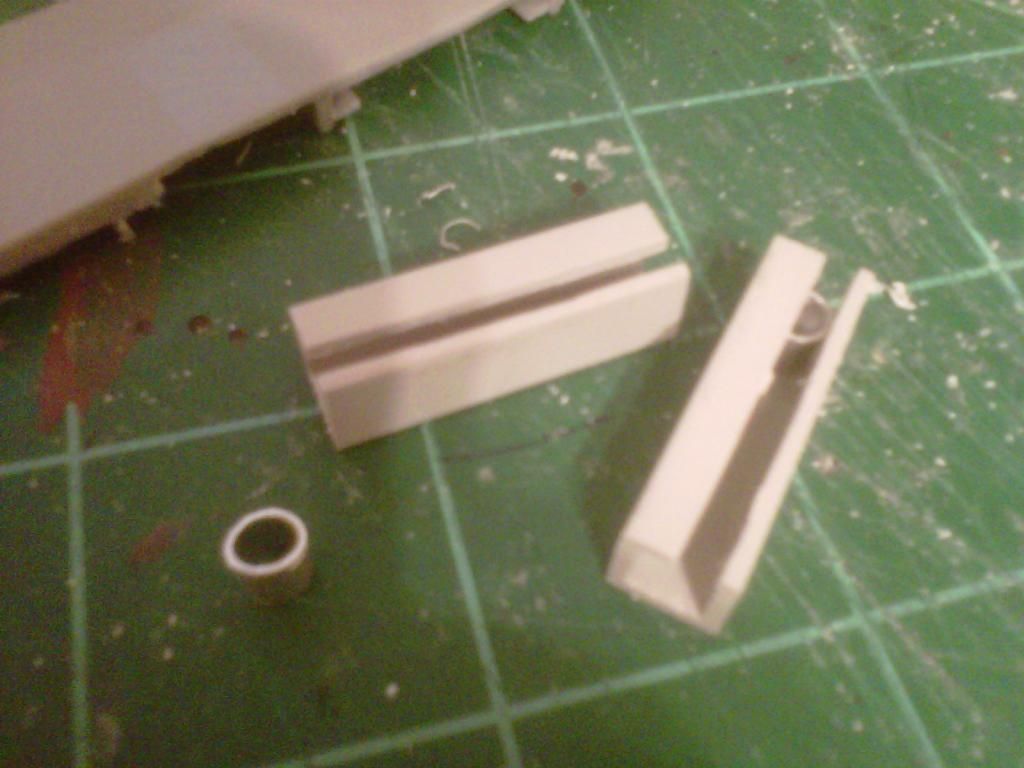
Then I started on the mechanical arm today.
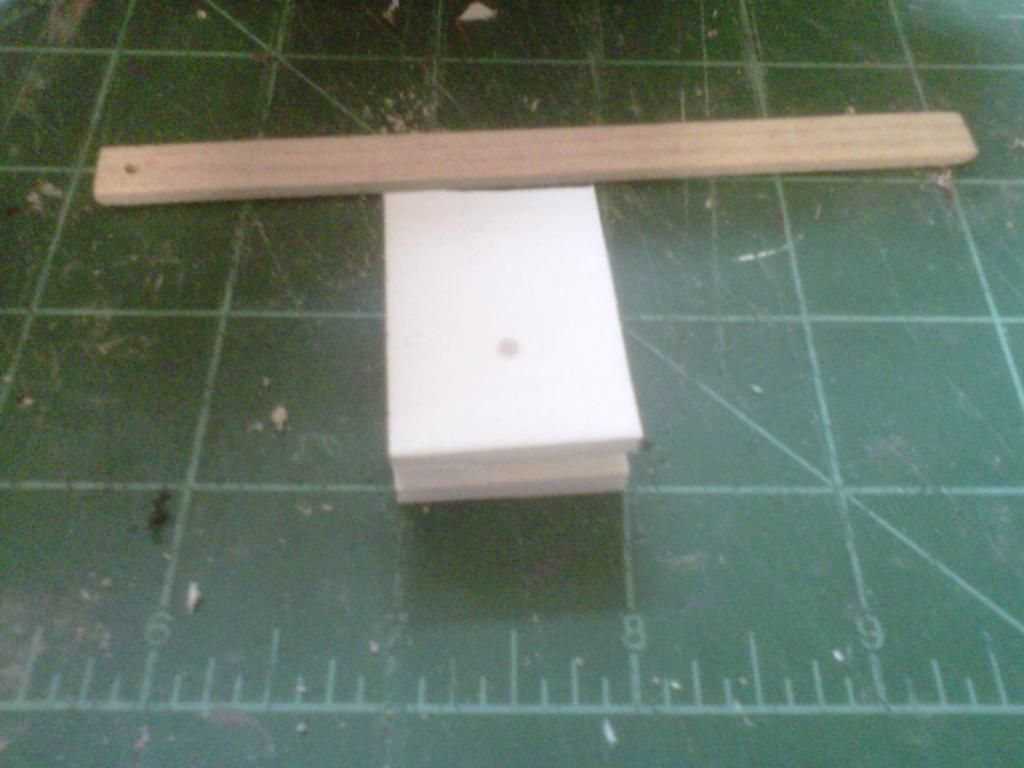
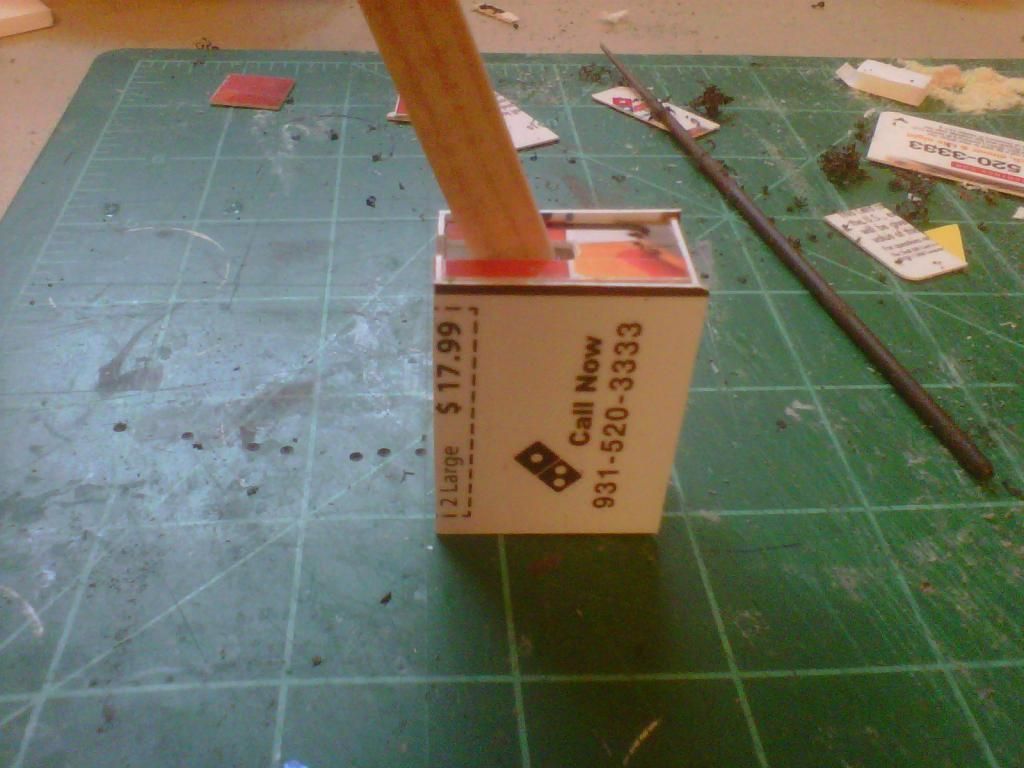
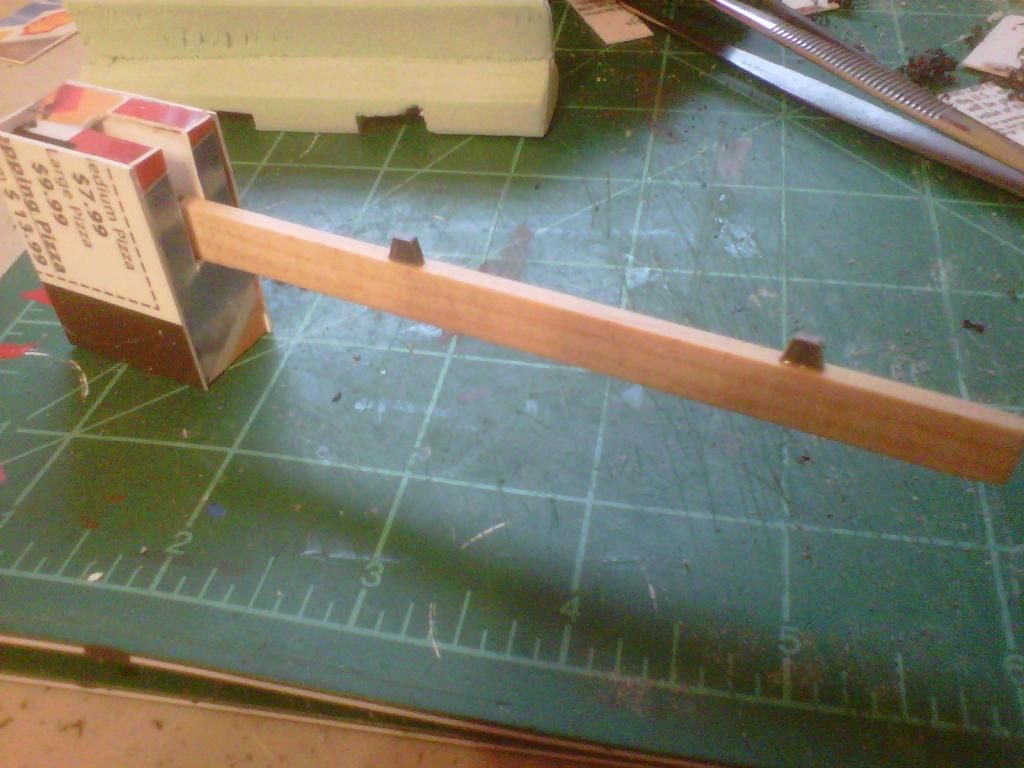
Prepped the box with a magnet and the arm with a small sliver of tin so that when open it will stay open
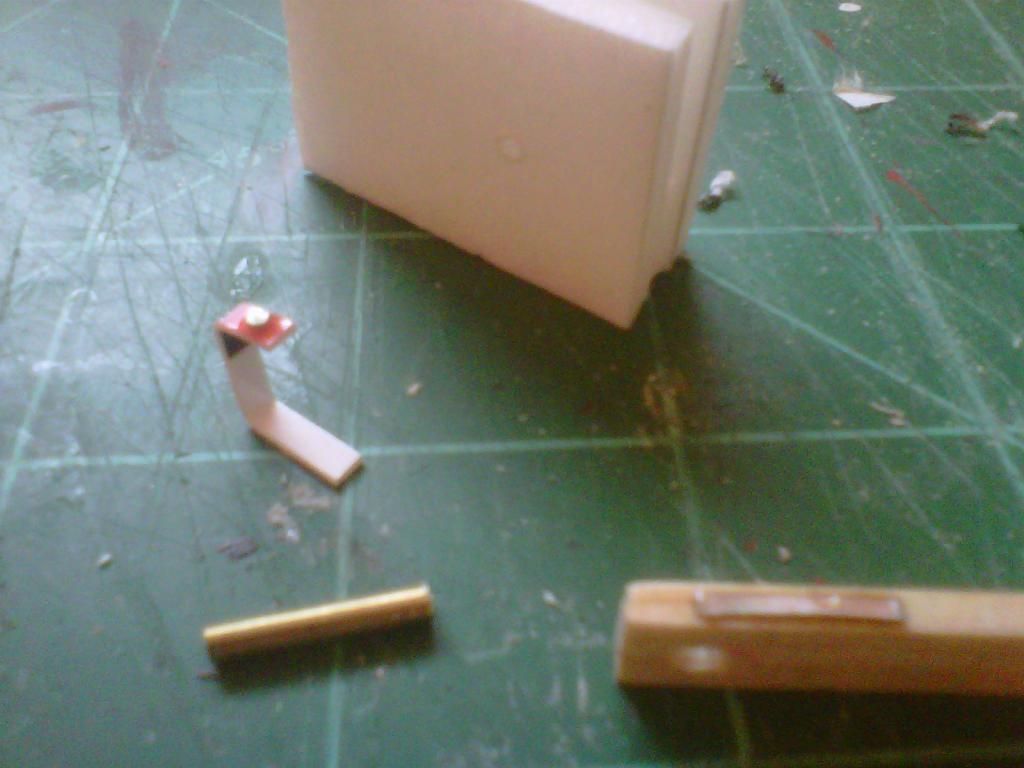
Closed
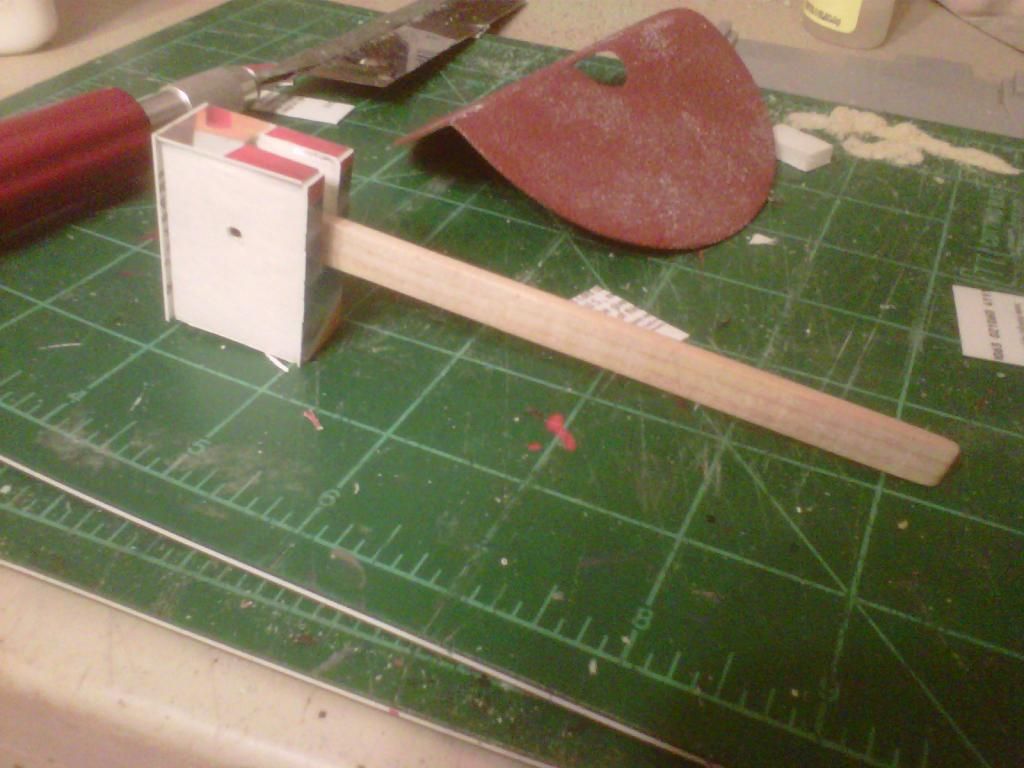
Open

Just need to add the sides to the box and then add detail work to the outside of the box.
ALSO.....
Since I was not able to get a grinding stone attachment for my dremel this week and I am getting tired of looking at this Thunderhawk not getting anything done, I Found an old drill bit and attempted to grind down all the dried glue off the wings. It bit into the wings a little bit, but I got 98% of the dried glue off.


Next, to grind the dried glue off the fuselage.
|
There are 10 types of people in this world; those that know binary and those that dont.
----->MANTIS MAKER COMPETITION <---- |
|
|
|
|
2014/08/18 09:50:04
Subject: GamesEtc P&M Blog: League Road Contest (Planning) and FW Thunderhawk
|
|
Combat Jumping Ragik
|
That poor thunderhawk. Well, it seems to have found a good home now.
Those are Anima Tactics minis in the photo?
Good progress on the barriers.
|
|
|
|
|
|
2014/08/18 20:01:06
Subject: GamesEtc P&M Blog: League Road Contest (Planning) and FW Thunderhawk
|
|
Anti-Armour Yaogat
Cookeville, TN; USA
|
Yeah. I pretty much have all of Saga 1 for A:T as well as most of Saga 2 and about half of Saga 3. I think I have 120 A:T figs and all.
I am also a former Free Agent for Cipher Studios and now a part of Ninja Division so that I can do official demos for A:T Automatically Appended Next Post: Ok, I got a little more work done today and probably wont get back to it until Wednesday.
Got the side panels on the mechanical arm and began to even everything out.
Then added some reflectors to the top of the arm.
Made sure to cut enough reflectors for the entire project, most likely will have some left over.
Then started ti put them on the barricades. Was going to put them on the side, but I didnt like how much they stuck out so I decided to mount them on the tops.

And they are all ready for painting
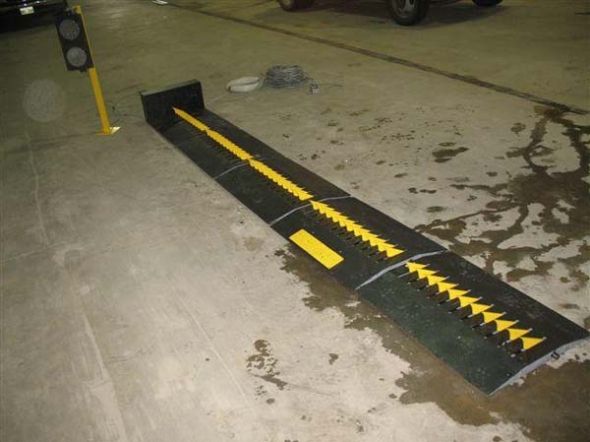
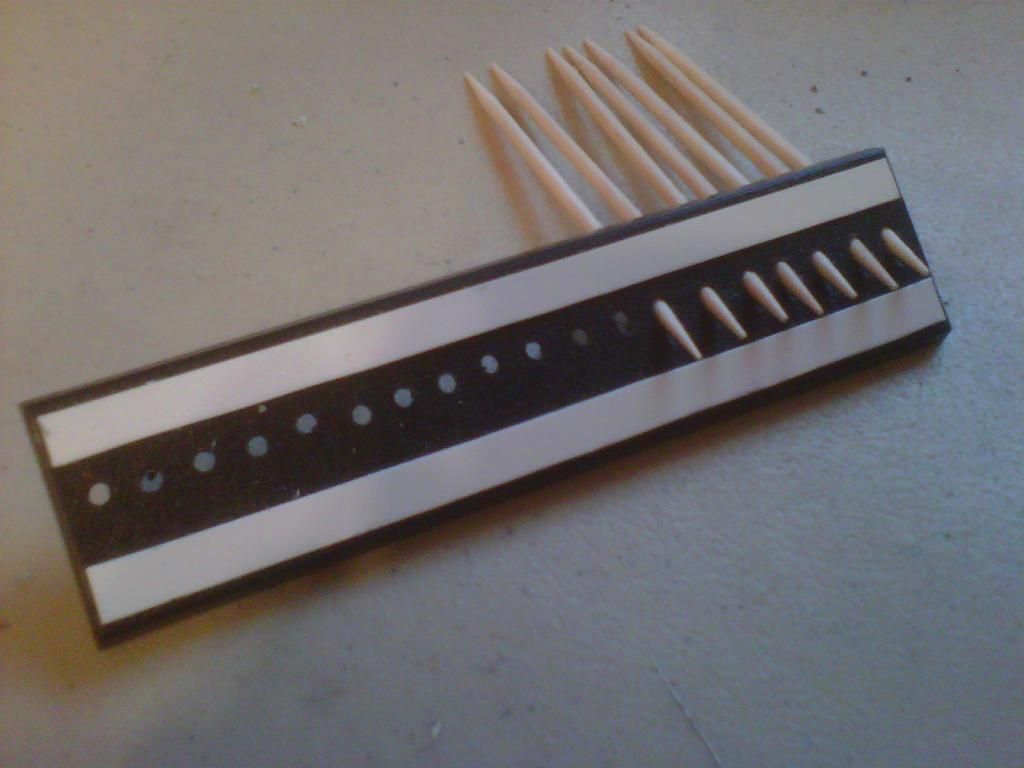
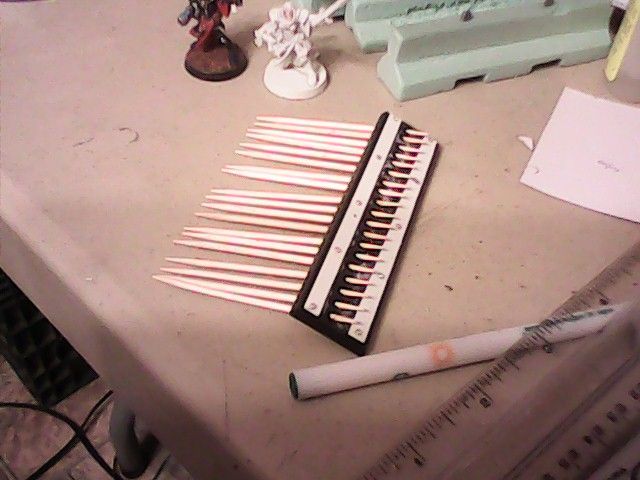
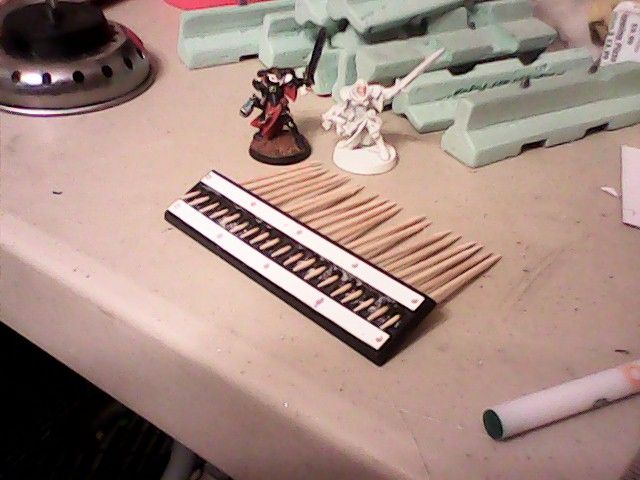
Started on the tire spikes
Testing out spikes
Then I started on the rising barricade. Here is the pic of the beginning mechanics of this piece. Here you can see the grooves and rollers. More to come on this one.
|
|
This message was edited 1 time. Last update was at 2014/08/19 01:08:23
There are 10 types of people in this world; those that know binary and those that dont.
----->MANTIS MAKER COMPETITION <---- |
|
|
|
|
2014/08/20 00:21:14
Subject: GamesEtc P&M Blog: League Road Contest (Planning) and FW Thunderhawk
|
|
Anti-Armour Yaogat
Cookeville, TN; USA
|
Just ordered some goodies.
http://www.amazon.com/gp/product/B005BF1M10/ref=oh_aui_detailpage_o02_s00?ie=UTF8&psc=1
Well, because easy rivets would be a godsend!
http://www.amazon.com/gp/product/B0092BWWG8/ref=oh_aui_detailpage_o00_s00?ie=UTF8&psc=1
Wanting to pimp out my Thunderhawk as well as other projects.
Just hope the two above items get here quick enough from China so that I can use them in the current LoER competition. I have this odd feeling they wont though which will really suck as I had some great ideas for the optic strands.
BTW, anyone familiar with this product and what colors are in it? Tempted to get it with my rewards from work.
http://www.amazon.com/Vallejo-Model-Color-Combo-17ml/dp/B00BATAE7O/ref=pd_sbs_t_3?ie=UTF8&refRID=0KFYSVK8G59E91D9KNPD
GrimDork gave me this link but it has more colors than what is in the set. Was wondering if anyone knows more details.
Thanks for any feedback!
|
There are 10 types of people in this world; those that know binary and those that dont.
----->MANTIS MAKER COMPETITION <---- |
|
|
|
|
2014/08/20 02:40:54
Subject: Re:GamesEtc P&M Blog: League Road Contest (Planning) and FW Thunderhawk
|
|
Is 'Eavy Metal Calling?
|
Dsteingass is the resident paint guru, I'd hit him up in his thread. He's always good for advice. Let me know how those rivets turn out.
|
LOL, Theo your mind is an amazing place, never change.-camkierhi 9/19/13
I cant believe theo is right.. damn. -comradepanda 9/26/13
None of the strange ideas we had about you involved your sexual orientation..........-Monkeytroll 12/10/13
I'd put you on ignore for that comment, if I could...Alpharius 2/11/14 |
|
|
|
|
2014/08/22 07:09:38
Subject: Re:GamesEtc P&M Blog: League Road Contest (Planning) and FW Thunderhawk
|
|
Anti-Armour Yaogat
Cookeville, TN; USA
|
FROM Blackadder's scratchbuilt Thunderhawk thread:
 The_Blackadder wrote: The_Blackadder wrote:My two cents:
Seeing that the Shadow Sword (Does FW still offer the interior I wonder?) the volcano cannon machinery takes up a good percentage of the hull I would say that besides the top half of the engine the plasma generators for the cannon would just about fill the remaining space.
BTW thanks for the detailed interior shot; it will be helpful when I finish up the interior. Is there really a set of stairs leading to the upper level..............
Ok, from your suggestion about the plasma generators and Jabbakahut's mention of the machine spirit, I think I could manage up something to fill the insides.
As for the stairs, I think so but cannot recall 100%. I am at work right now, but as soon as I can, I can get a bunch of interior pics for you if that will help. I should be getting my new tablet either friday or monday so I will get the pics taken then and posted that night.
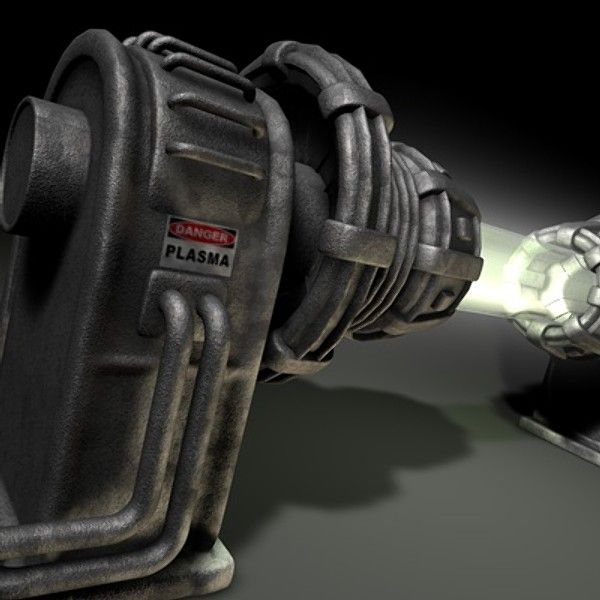
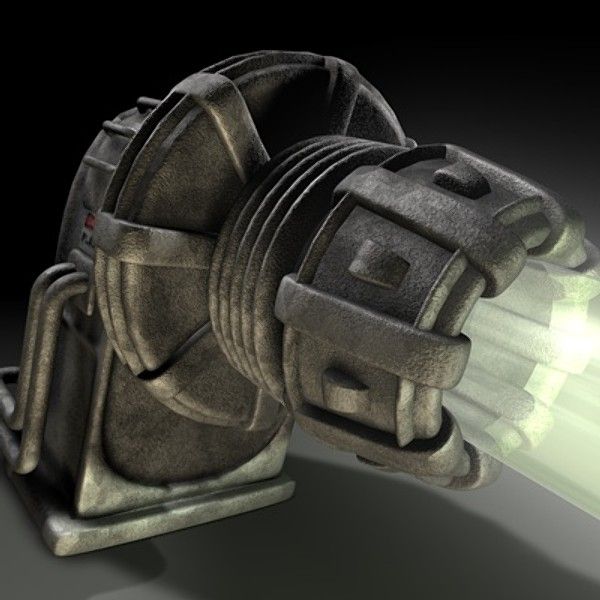
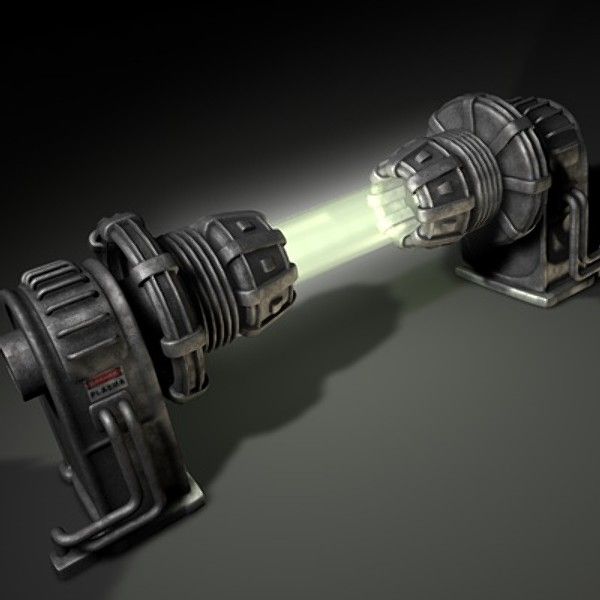
And as soon as my fiber optic strands get here from China, I will start working more on this project. I have plans to run "conduit" throughout the interior to light up various things inside and possibly some spots on the outside. Might be able to hide most of the electronics and LEDs inside the plasma generators?
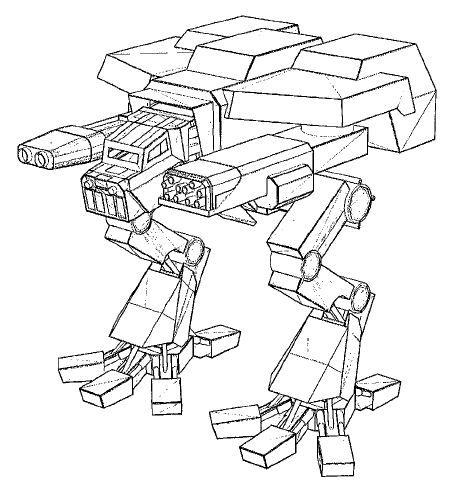
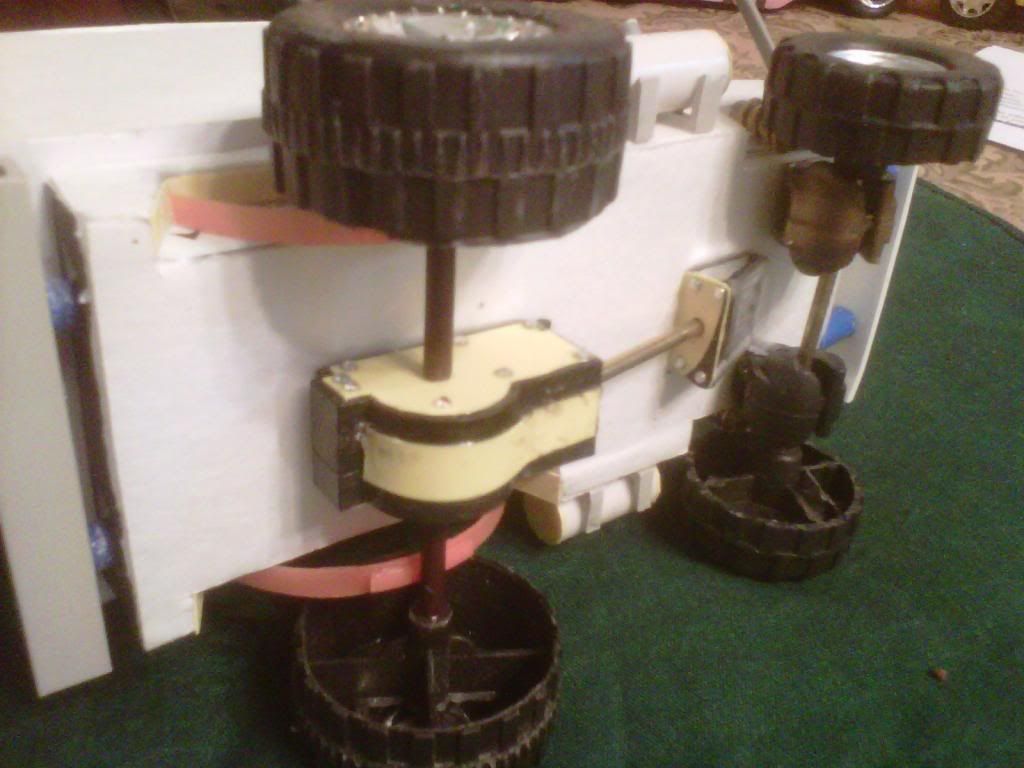
How about something like this for the plasma generators?
Combine elements from this:
With elements from this:
|
|
This message was edited 1 time. Last update was at 2014/08/22 07:14:46
There are 10 types of people in this world; those that know binary and those that dont.
----->MANTIS MAKER COMPETITION <---- |
|
|
|
|
2014/08/28 04:43:43
Subject: GamesEtc P&M Blog: League Road Contest (Building) and FW Thunderhawk
|
|
Anti-Armour Yaogat
Cookeville, TN; USA
|
Got some work done the other morning after work when I was all hyped up on coffee.
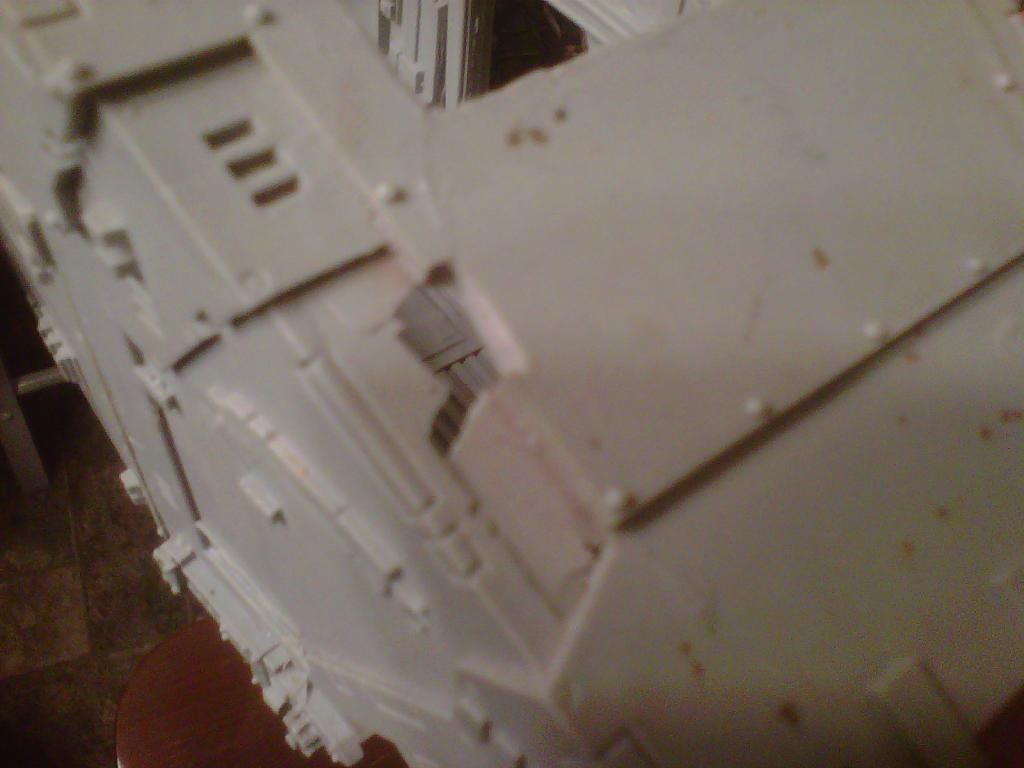
Got the glue off the fuselage of the thunderhawk as best as I could with the dremmel. In some areas it bit a little to deep but nothing that should affect the mounting of the wings later.

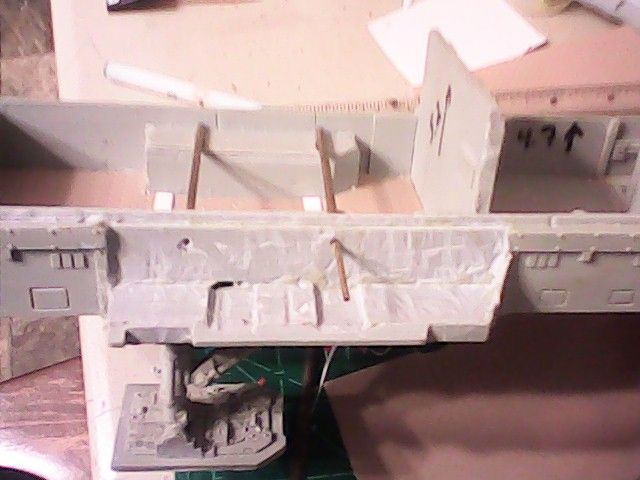
On the above pic, the dremmel bit in too deep and made a hole in the landing gear well. Shouldnt be too difficult to fix up.
Then I started putting in some diamond plating in the rear compartment. Did it in three pieces to ensure that everything fit flush. I had to grind down the inside at some areas as even the insides didnt have perfect right angles where the floor met with the wall. I then covered the seams with some more platicard and will be adding some 1mm rivets to those two white pieces so as to remain uniform with the rivets in the rest of the bird.
Then just made some measurements on how tall I can make the new wall sections throughout the ship.
Then on to the LoER Road contest. Didnt get a whole lot done. I finished the tire spikes, all that is left is to clip the excess in toothpicks.
Wish I had more time, but putting in extra hours at work this month is paying off. I will be starting management training here in the next month or so =D
|
|
This message was edited 1 time. Last update was at 2014/08/28 04:53:44
There are 10 types of people in this world; those that know binary and those that dont.
----->MANTIS MAKER COMPETITION <---- |
|
|
|
|
2014/08/28 12:40:56
Subject: GamesEtc P&M Blog: League Road Contest (Building) and FW Thunderhawk
|
|

Lone Wolf Sentinel Pilot
|
Work on the bird seems to be comin along, and those spikes look nasty, would not like to be the one wrong-driving over them!
|
|
|
|
|
|
2014/08/28 14:26:44
Subject: GamesEtc P&M Blog: League Road Contest (Building) and FW Thunderhawk
|
|
Thunderhawk Pilot Dropping From Orbit
|
That's a very clever idea for the road spikes.
|
|
|
|
|
|
2014/08/28 20:09:35
Subject: GamesEtc P&M Blog: League Road Contest (Building) and FW Thunderhawk
|
|
Mastering Non-Metallic Metal
|
If you are going to be building the interior to that area of the model, are there hatches, so that you can actually see into there?
Just curious,
I can't talk about building the inside of something that won't be seen again, with the way I build details into my models that get mostly hidden in the end...
|
Mastodon: @DrH@dice.camp
The army- ~2295 points (built).
* -=]_,=-eague Spruemeister General. * A (sprue) Hut tutorial *
Dsteingass - Dr. H..You are a role model for Internet Morality! // inmygravenimage - Dr H is a model to us all
Theophony - Sprue for the spruemeister, plastic for his plastic throne! // Shasolenzabi - Toilets, more complex than folks take time to think about! |
|
|
|
|
2014/08/29 00:15:35
Subject: GamesEtc P&M Blog: League Road Contest (Building) and FW Thunderhawk
|
|
Anti-Armour Yaogat
Cookeville, TN; USA
|
Thanks guys.
@ Dr H - The entire top section, as well as the cockpit areas will be closed using magnets so the interiors can be seen. The rest of the ship has so much detail that I feel it is a waste to not magnetize the top sections of the ship.
|
There are 10 types of people in this world; those that know binary and those that dont.
----->MANTIS MAKER COMPETITION <---- |
|
|
|
|
2014/08/29 17:29:11
Subject: GamesEtc P&M Blog: League Road Contest (Building) and FW Thunderhawk
|
|
Mastering Non-Metallic Metal
|
Ahh, fair enough then. You'll have to make all the details go right into all the corners then. Nowhere to hide.
Look forward to it.
|
Mastodon: @DrH@dice.camp
The army- ~2295 points (built).
* -=]_,=-eague Spruemeister General. * A (sprue) Hut tutorial *
Dsteingass - Dr. H..You are a role model for Internet Morality! // inmygravenimage - Dr H is a model to us all
Theophony - Sprue for the spruemeister, plastic for his plastic throne! // Shasolenzabi - Toilets, more complex than folks take time to think about! |
|
|
|
|
2014/08/29 17:38:55
Subject: GamesEtc P&M Blog: League Road Contest (Building) and FW Thunderhawk
|
|
Ragin' Ork Dreadnought
Deep in the Outer Boroughs of NYC
|
Those barricades look awesome! I may have to loot that idea.
|
|
|
|
|
|
|
|


