| Author |
Message |
 |
|
|
|
|
Advert
|
Forum adverts like this one are shown to any user who is not logged in. Join us by filling out a tiny 3 field form and you will get your own, free, dakka user account which gives a good range of benefits to you:
- No adverts like this in the forums anymore.
- Times and dates in your local timezone.
- Full tracking of what you have read so you can skip to your first unread post, easily see what has changed since you last logged in, and easily see what is new at a glance.
- Email notifications for threads you want to watch closely.
- Being a part of the oldest wargaming community on the net.
If you are already a member then feel free to login now. |
|
 |
2016/02/07 23:24:38
Subject: looted drop pod and udder stuff
|
|

Sneaky Striking Scorpion
|
it's been a long time since i was on here, but i finally have something worth sharing with my friends on here once again. still no internet at my house so i have to use a friends on the weekends, but ii promise any questions or ideas posted by people will be answered, just bear in mind it might take a bit. not sure if i can get on here and do things as needed from my android phone, but i'm willing to give it a shot.
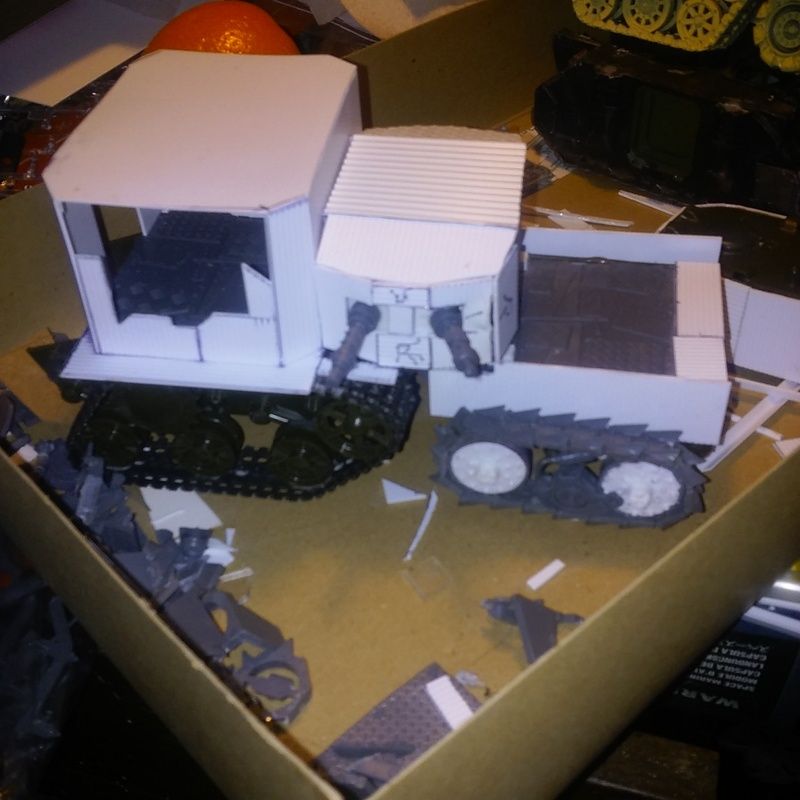
so today we share with you the work in progress pics of a 'rigt an propah orky looted drop pod'. i think the best thing is to share the WIP in bits and pieces. enjoy.
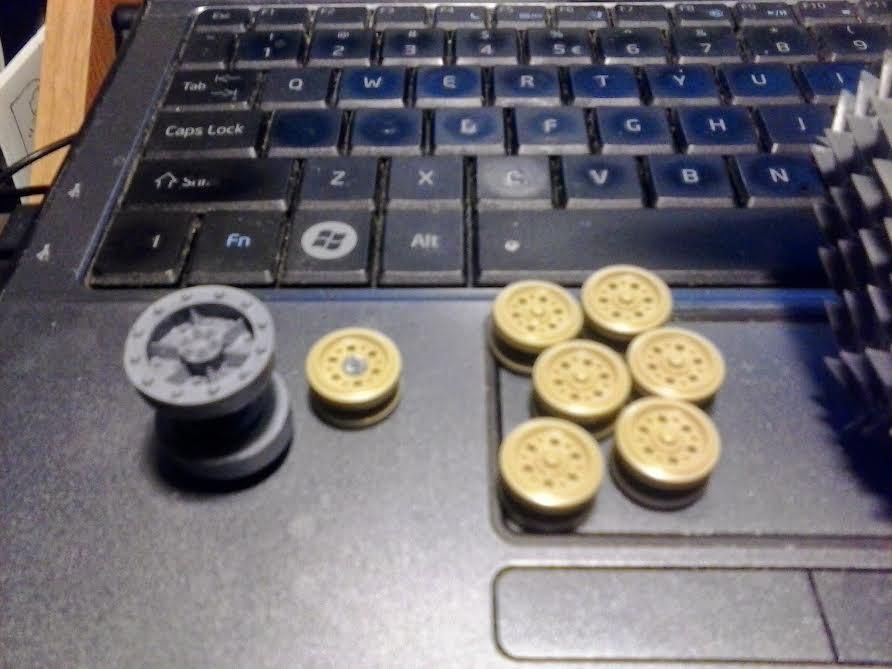
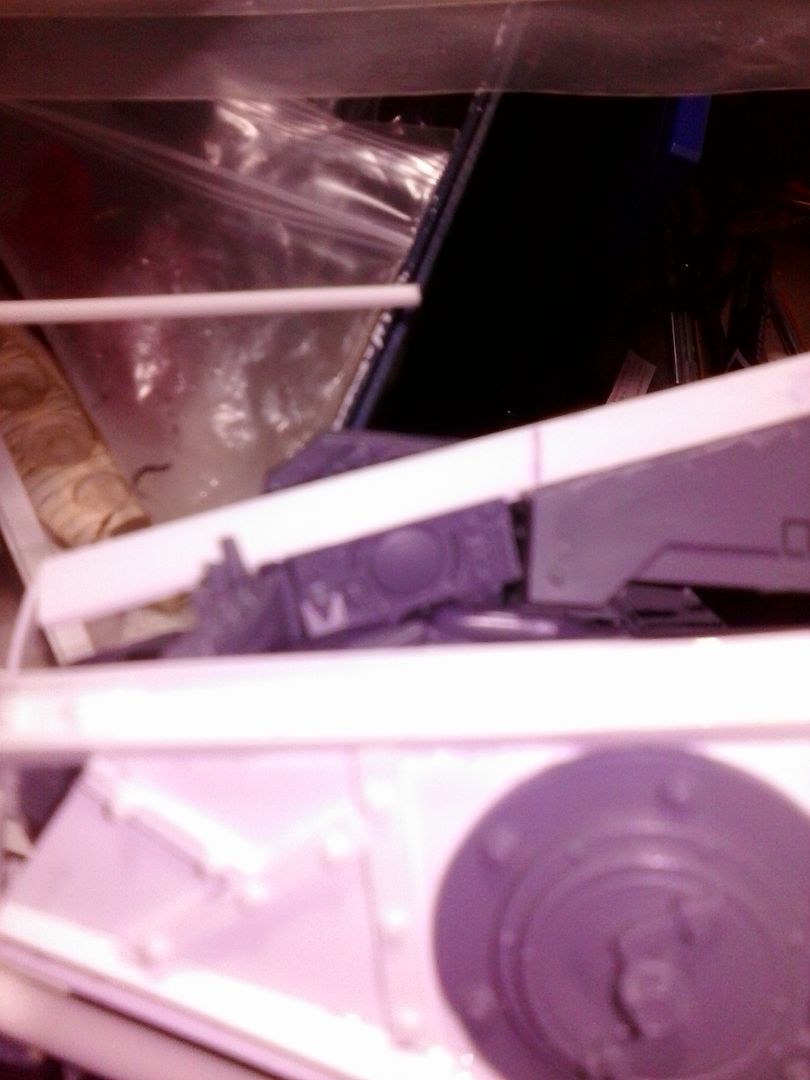
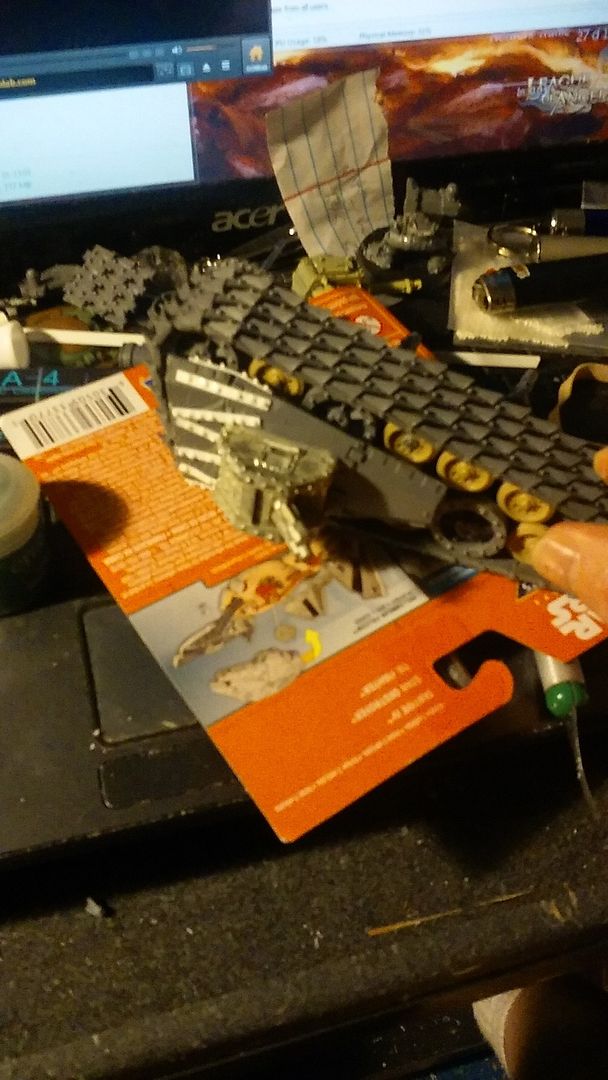
start with a box of parts.
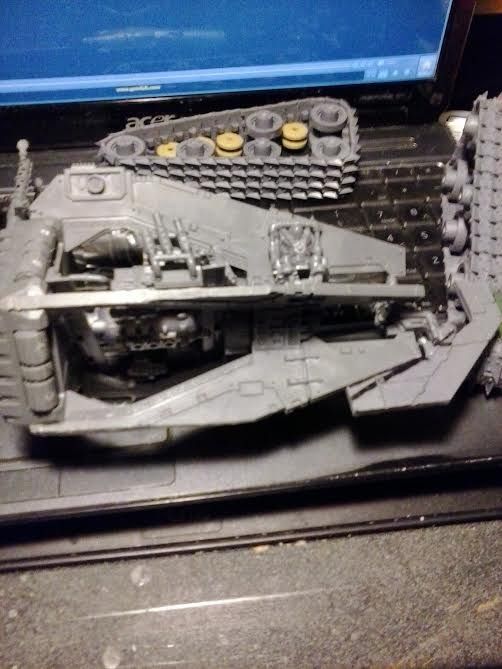
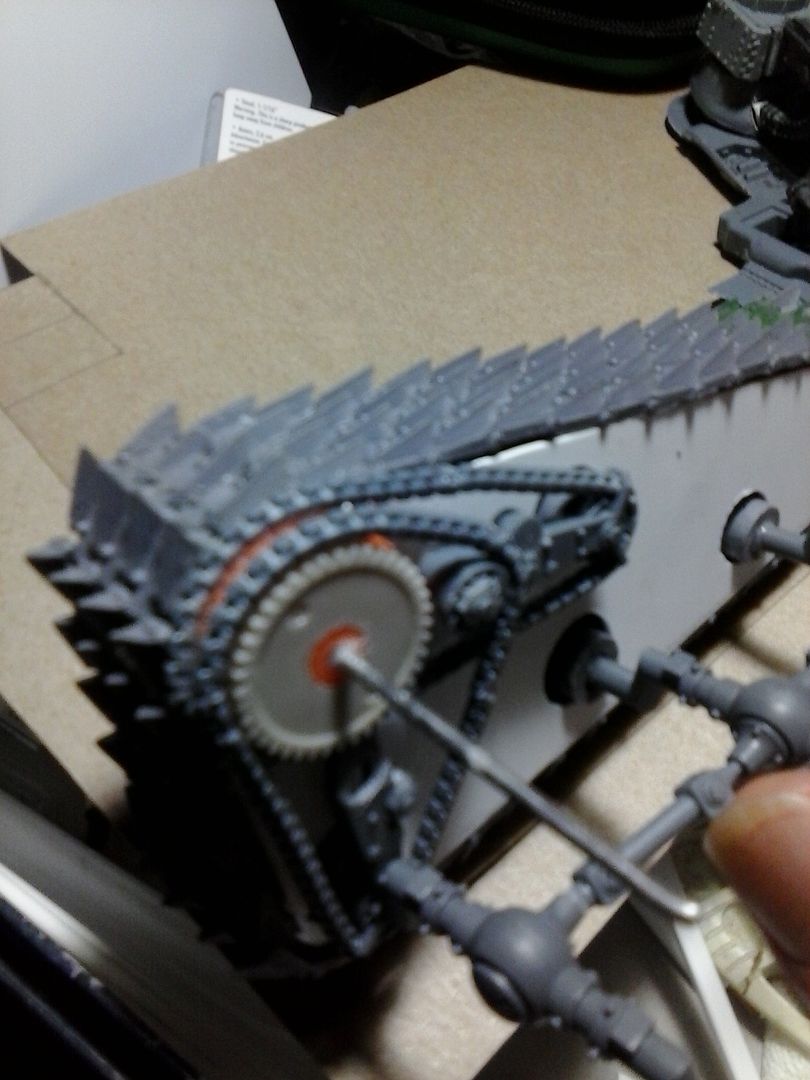
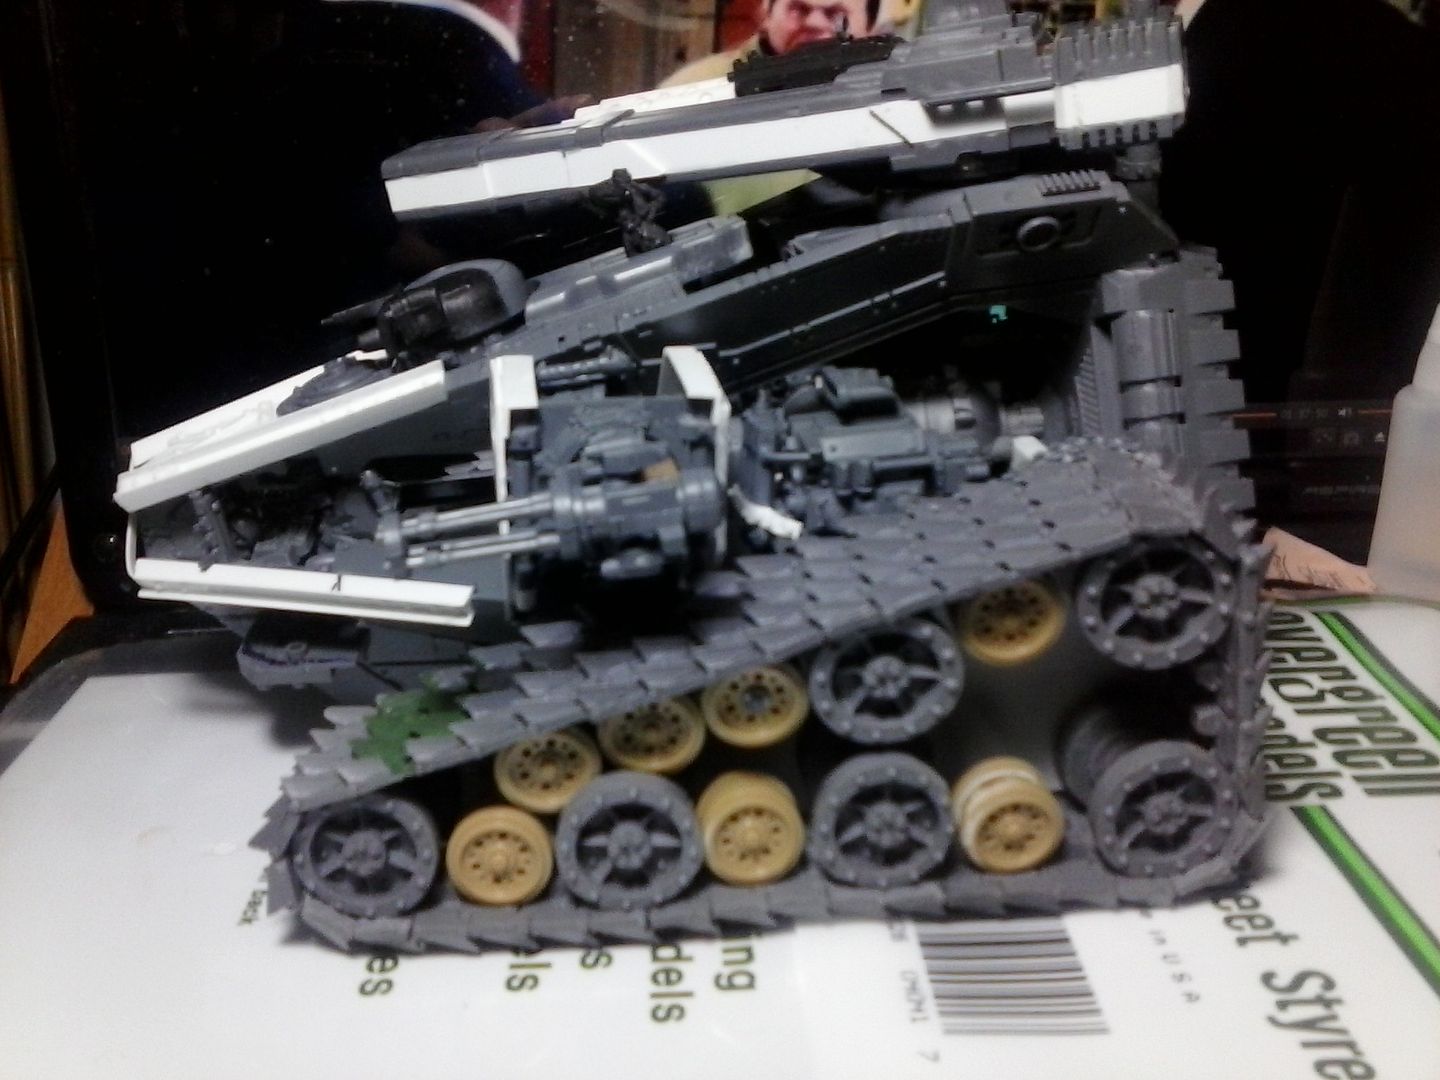
order tank treads from the ebay member Blood and Skull industries. then tear into an old german tank model for more tank wheels.
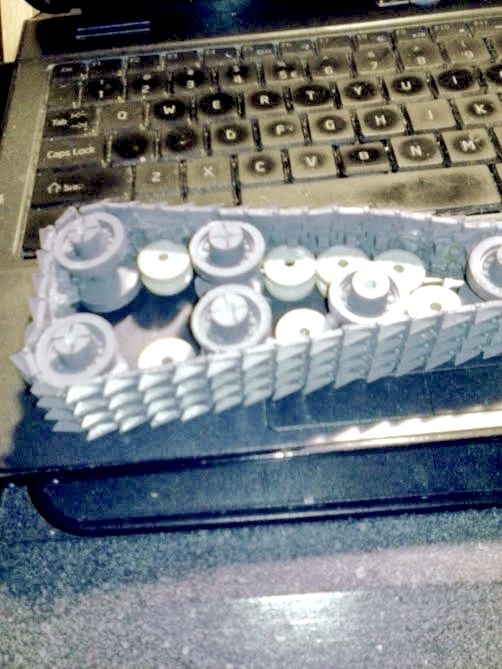
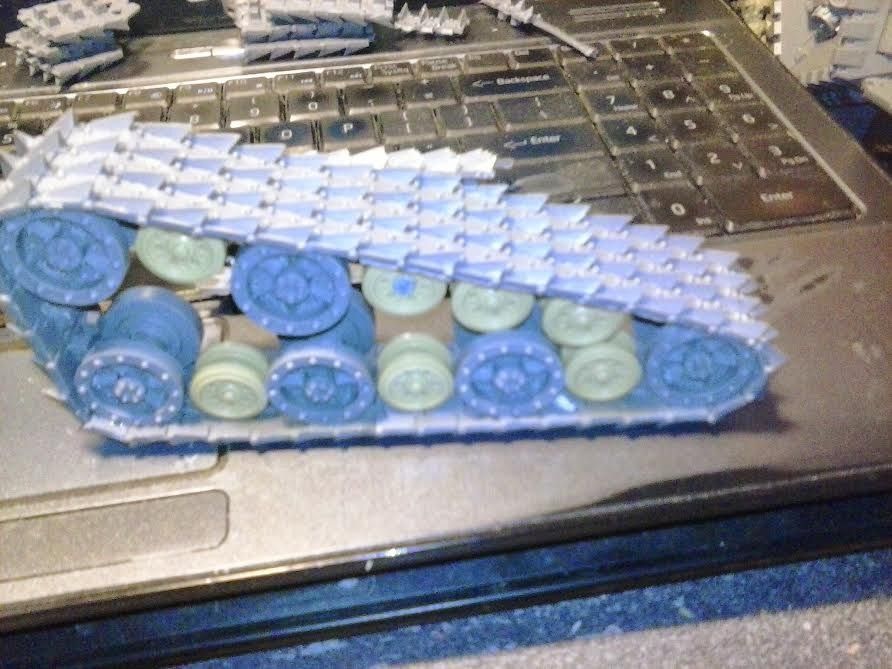
put it all together to get this tread setup.
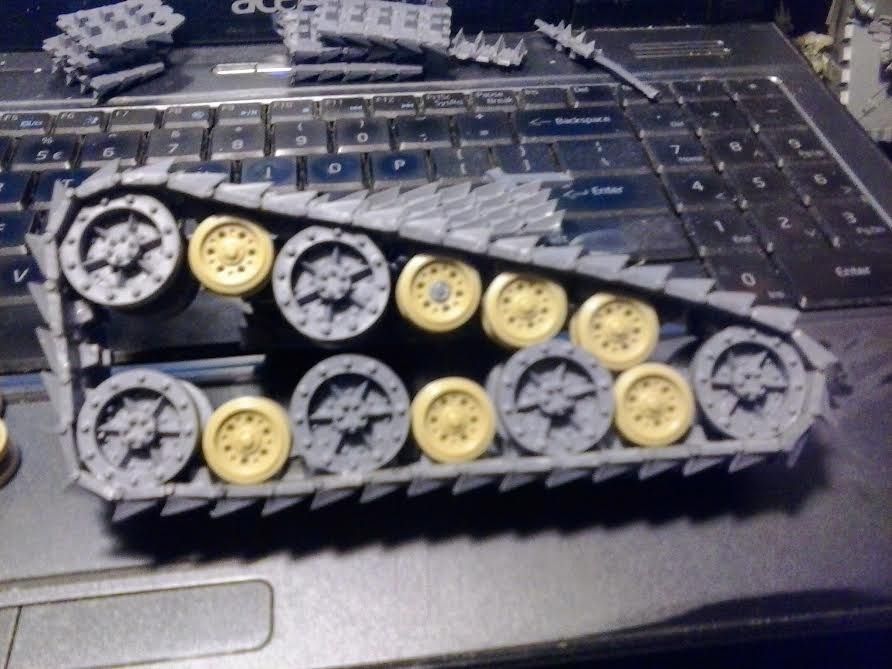
WARNING: make sure when assembling your treads, that you take into account that while they may look the same, they are not and that you need one set for the left AND the right. i had to tear a set down when i made the mistake of assembling them the exact same and ended up with two sets of treads for the right side. thank goodness for 'uncure' a super glue dissolver i got specifically for reasons like this. another WARNING: uncure will also soften and dissolve resin and plastic if left on long enough. however, for short term IE: long enough to get apart the pieces you need to remove from each other it's fine.
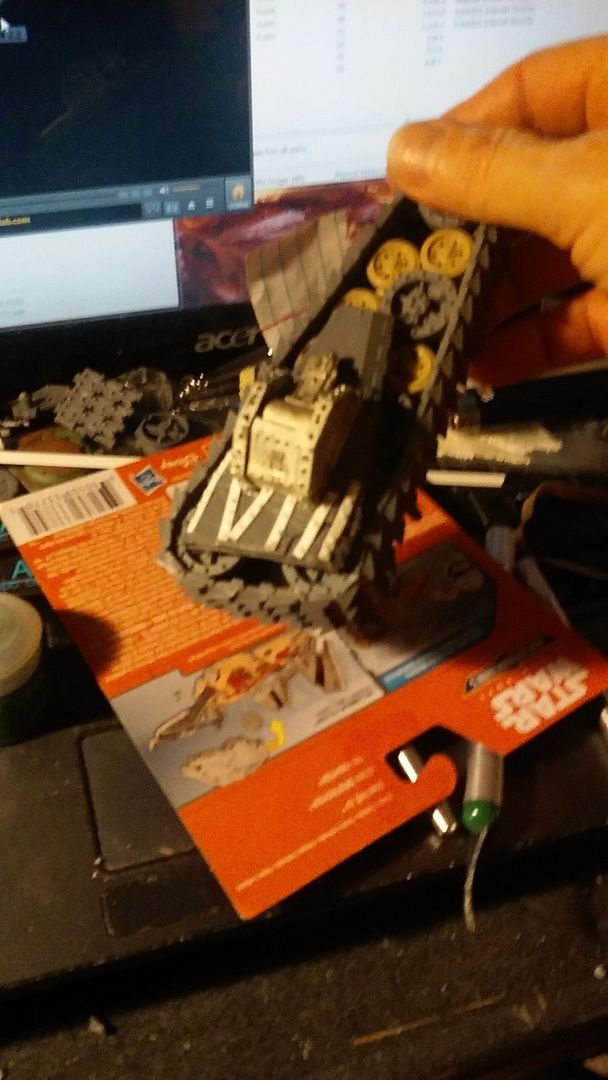
assemble the pod. for me it has become a thing to have more than one engine in some of my models. that all started with the double engine in the battlewagon bus, and is now a mainstay. so in order to do this i knew i needed two engines, and to make use of the thrusters in the bottom of the pod, that meant a third. all of this comes down to more shopping on ebay for bitz parts. eventually though you get this.
left side

left side closeup
rear end
bottom showing the rokkit fuel mix chamber
right side closeup of engine
and right side in whole
i'll just end this here for now as there are three pages of pics in my photobucket account of the process of building this thing. right now as it stands i have one small section left to finish riveting, and then it's off to be painted. so if i do a few pics each week, with commentary and questions answered, then by the time we reach the end i should actually be able to post the finished and painted product in whole (fingers crossed).
Automatically Appended Next Post:
btw, these photos were taken with the crappy camera on my phone. its the only camera i have so i'm kinda stuck with it, but i apologize in advance for some of them.
|
|
This message was edited 2 times. Last update was at 2016/03/20 02:53:00
fav movie quotes: "Well let's put her in charge man! - - "Step up to red alert." "Are you sure sir? It does mean changing the bulb." - - "The escape pods not an option, it escaped last Thursday."
Kirasu - Q: What comes out of an Eldar cocoon? A: Corsair butterflies!
|
|
|
 |
|
2016/02/08 05:20:08
Subject: looted drop pod
|
|

Dakka Veteran
|
Lookz very promising! Cant wAit to see more.
|
|
|
|
|
2016/02/09 19:54:20
Subject: Re:looted drop pod
|
|
Utilizing Careful Highlighting
|
This is going to look extremely cool I think!
|
|
|
|
|
|
2016/02/10 02:07:22
Subject: Re:looted drop pod
|
|

Sneaky Kommando
|
those tracks look great, I'll have to pick some up! I'm interested to see where this goes, it looks exciting!
|
 "Sir, the enemy has us encircled!" "Sir, the enemy has us encircled!"
"Most excellent. They can't escape us now!"
   |
|
|
|
|
2016/02/13 23:37:01
Subject: Re:looted drop pod
|
|
Sneaky Striking Scorpion
|
hey folks, back again with another update to this orky build from the mekaniaks garage. first though i would like to respond to those who bothered to actually say something.
@Kingpin54
@Guildenstern
thank you very much for the interest, and your excitement over this, it's appreciated. and yes, this thing is cool looking. i quote one of my local players, "that thing is stupid(read: awesome), I can't wait to blow it up."
@General_K - thanks also for your excitement on this as well. here's the link to blood and skulls for you - http://stores.ebay.com/Blood-and-Skulls-Industry
the resin he uses is more of a plastic type, so while it is still brittle as all resins are, it does have some durability to it and can actually bend to some degree as well. relatively clean stuff as well, what flash there was on the treads and wheels was very easy to get off, as it was really thin, i'd goes so far as to describe it as flakes of flash. very little in the way of deformities either, but since this is an ork build, the deformities just tie into it being, looted so i wasn't very concerned about that and used them anyways. be careful though, once this stuff is glued together, your not getting back apart very easily, hence the reason i used 'uncure' here's a link for the place i bought my uncure at - http://www.votawtool.com/un-cure-super-glue-debonder.html
now on to the build and more pics.
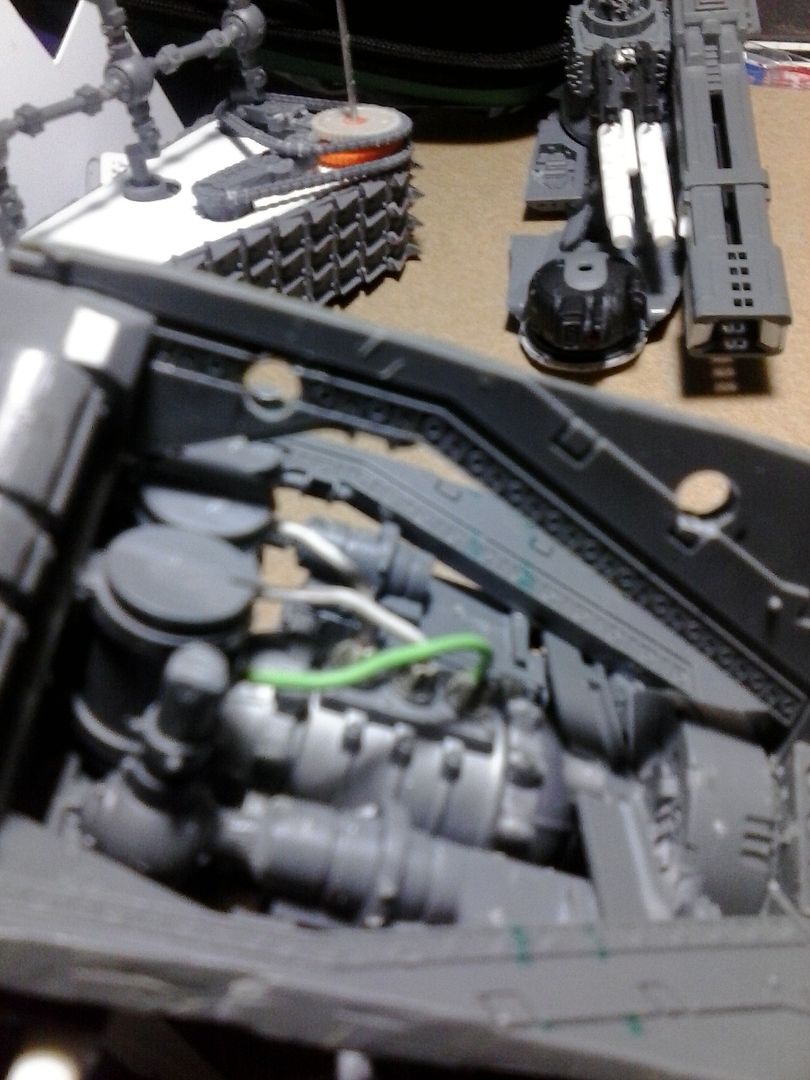
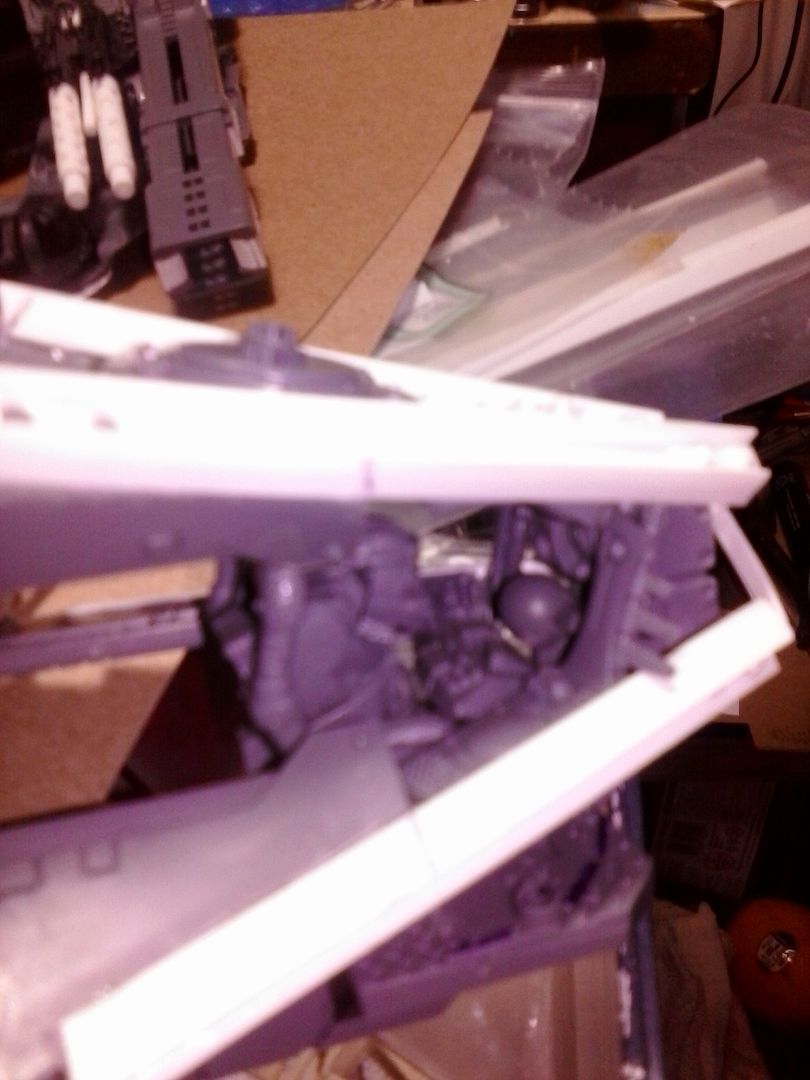
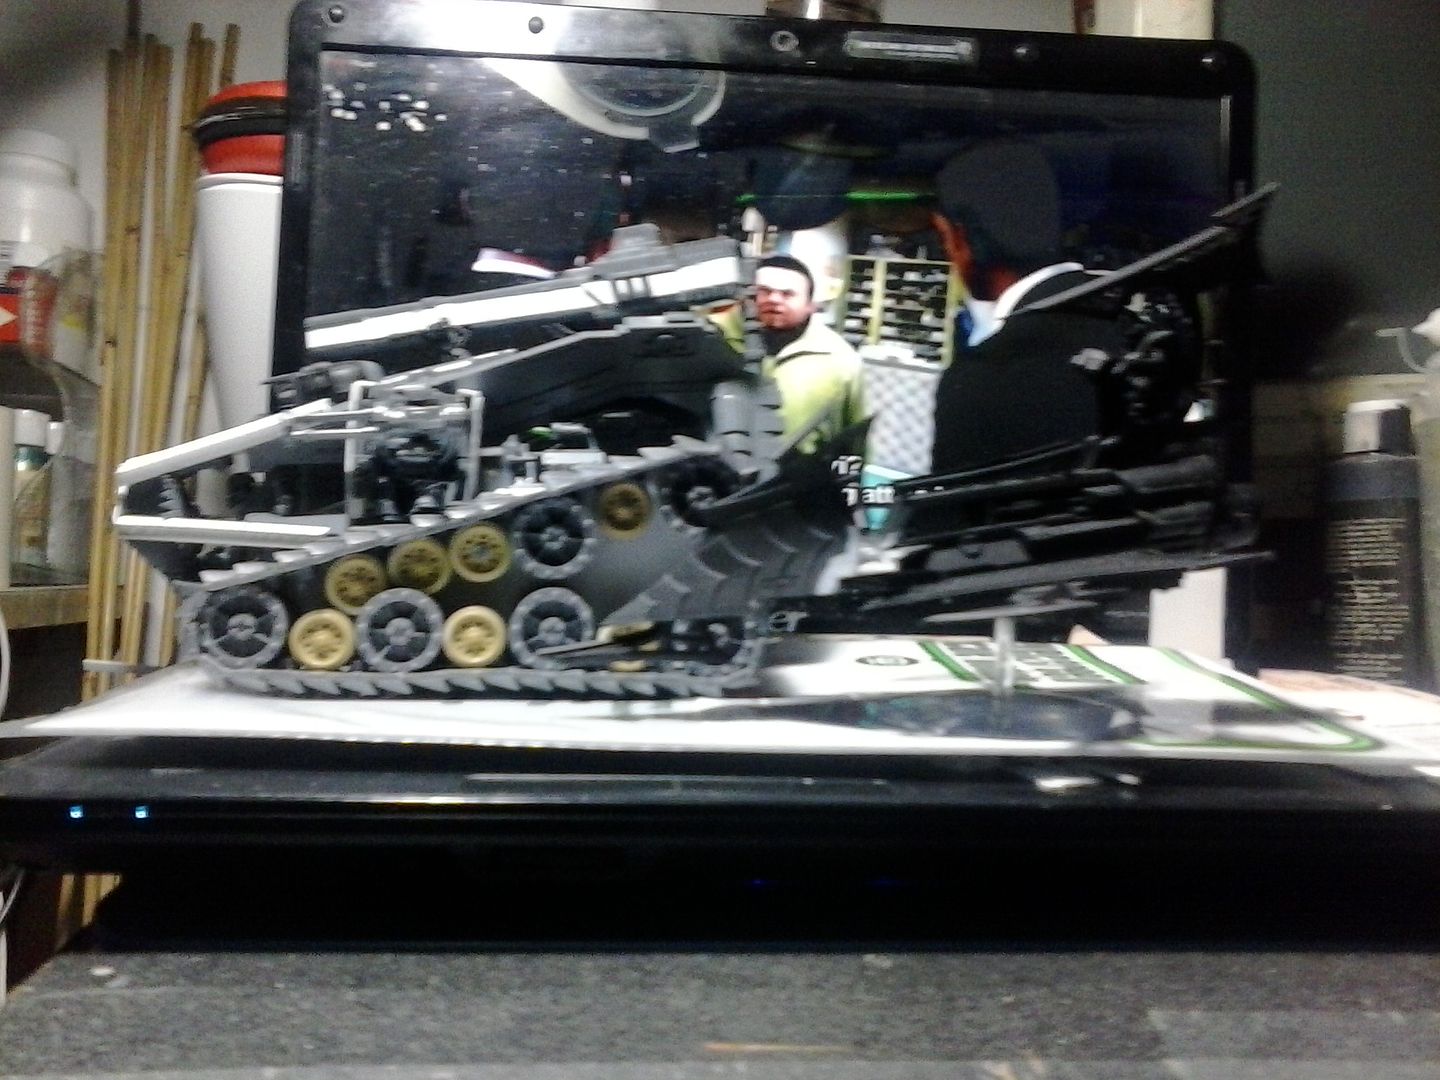
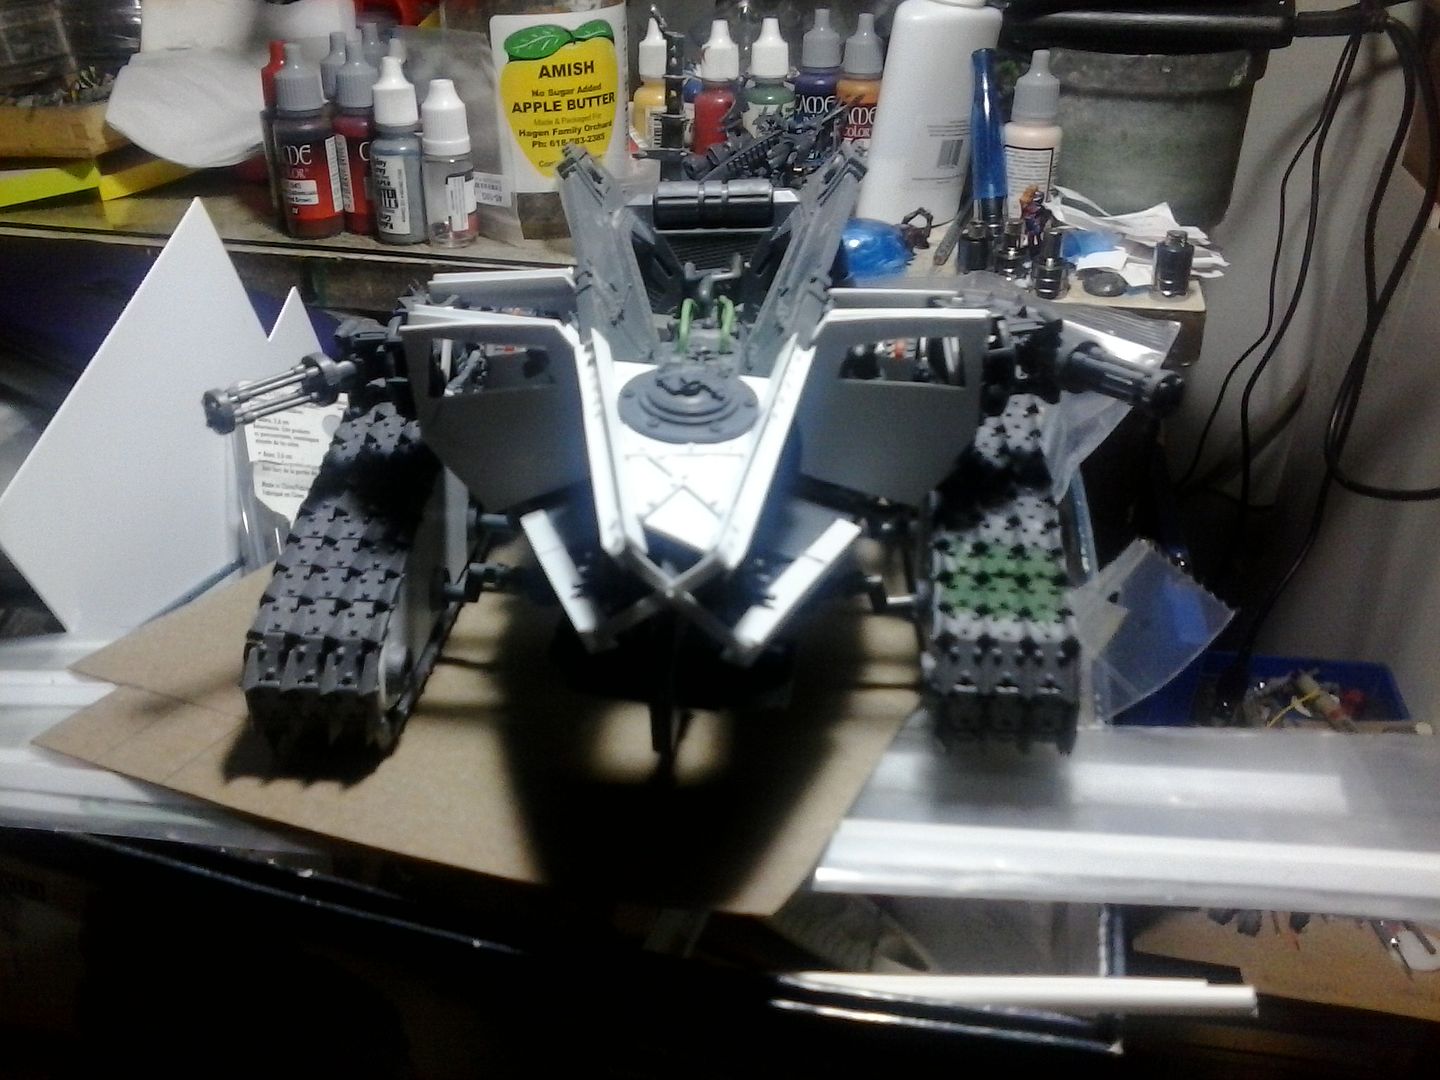
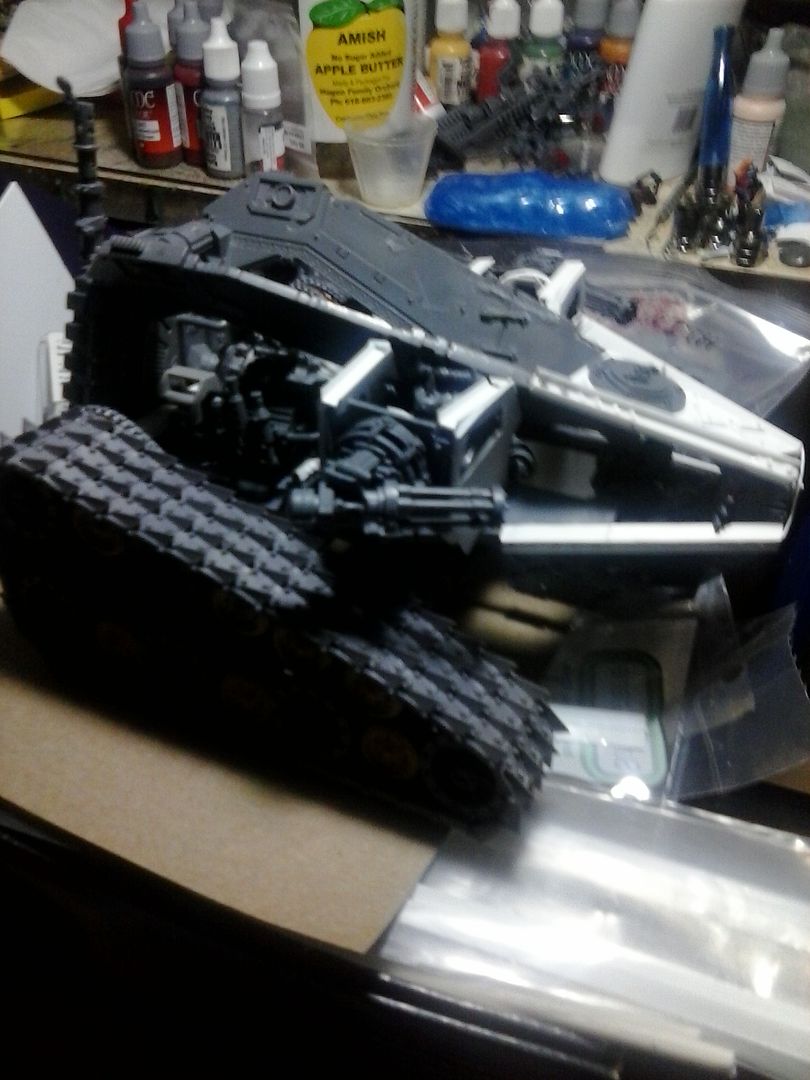
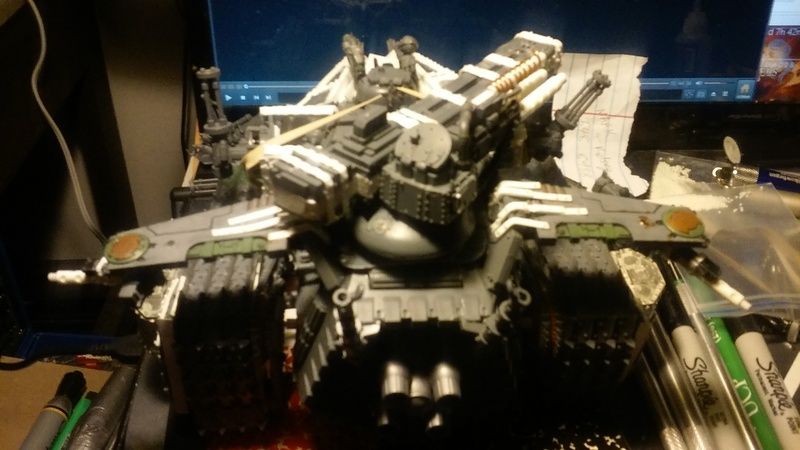
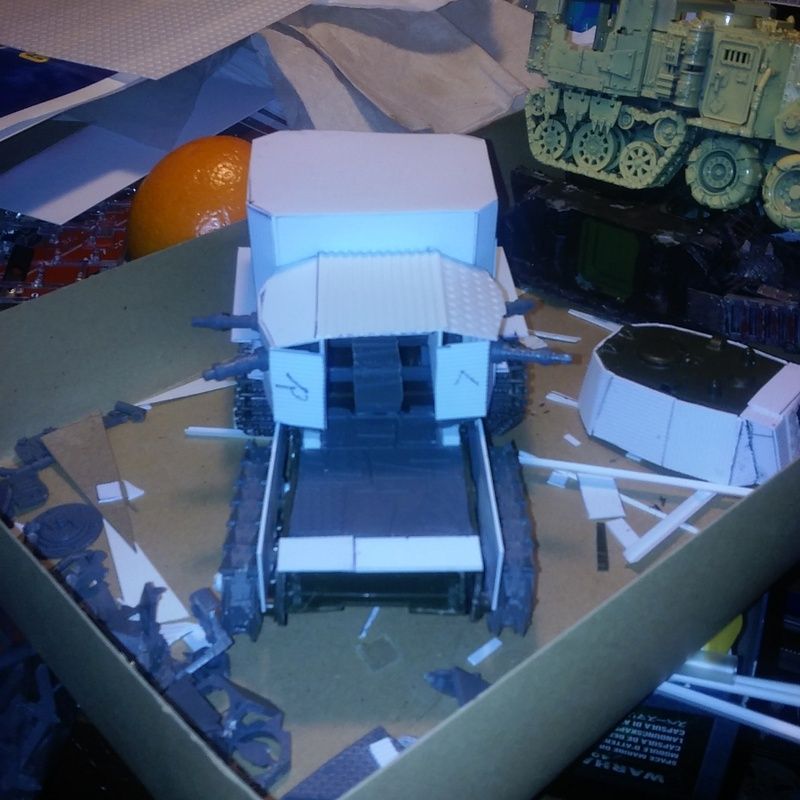
lets start with the pics we already have. i knew from the beginning that i wanted this thing to be a tank, i have no walkers in my army. their all Bad Moonz speed freakz, so everything is tracked, wheeled, flys, etc, etc,. i also knew i wanted to follow the lines of the pod with it laying on edge, and that's why i built the treads the way i did. the two orks you see sitting in front of the engines compartment are actually gunners. in the last pic above, you'll also notice a piece of stormraven added the the front, that piece is the beginning of the drivers cockpit, and if you look closely you can already see the driver is mounted in place. btw, just to give you guys an idea on the time frame for this thing, i started ordering parts on ebay on August 24th, of 2014, and i will finally be finshed and ready to send out for painting tomorrow, so almost a year and a half of build time, and i must say it's about time this thing was finished. i actually had anxiety issues over how to connect the treads to the body, thank god i finally got that figured out. after that it just went together like a snap tite model.
so lets continue now with what we have already established in previous pics and continue with the body and treads. i knew i needed to put fuel cans into this thing just to make it look more "stupid" :-) so here's what i did for that.
and from another angle:
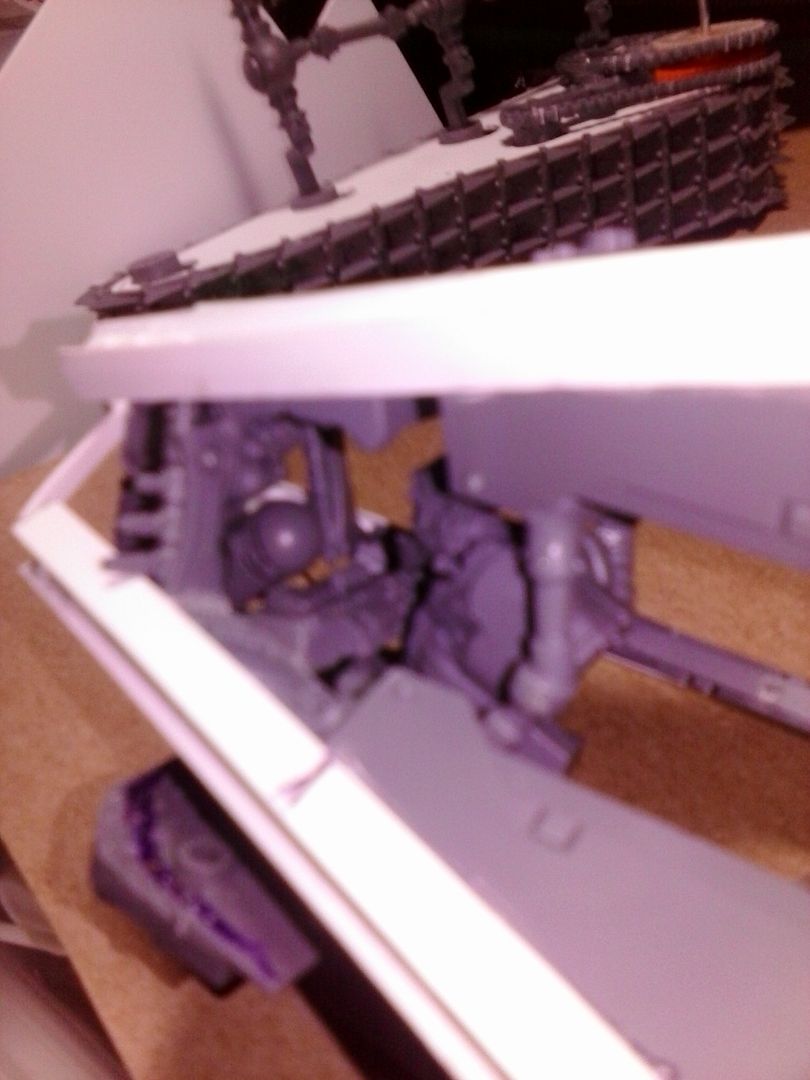
i just realized if you look closely at those two pics, they contain spoilers for the treads and guns. at any rate, a threw some grey stuff together blobbed into onto the rocket fuel chamber, then used a number 2 pencil end to indent the stuff on the sides and in the middle. drilled the tanks, slipped in the fuel lines (actually just random copper wire i got from somewhere) and taa daa! the bars that the engines are sitting on i have no idea what they are from, they were given to me by a friend and they just came in handy for this project. however, the more i kept looking at the engines, the more it began to dawn on me that people would remark that there's nothing holding them down the radiators, and so a bit of plasticard and rivets resulted in this fix:

and the other side:

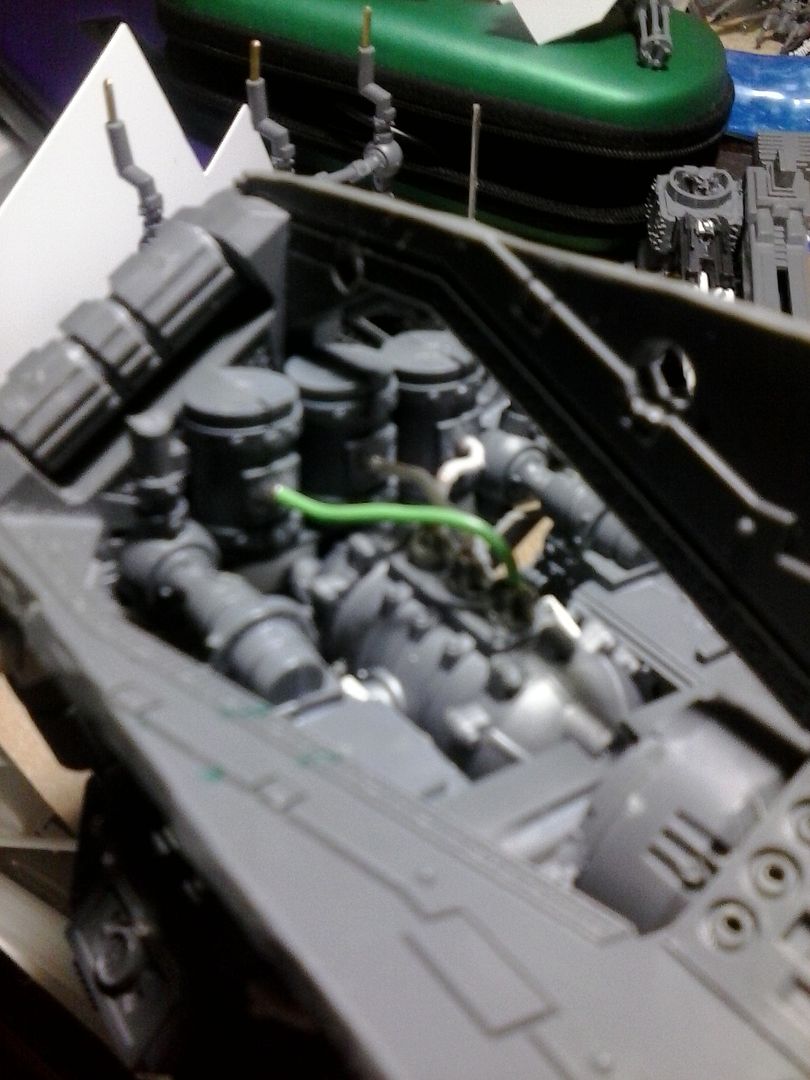
now we move on to the drivers cockpit, again i knew i wanted to have consoles surrounding the driver, especially since he can't really see around that huge peice of metal fin in the front, so that also meant monitors. once again back to ebay for more shopping. the people i use for my bits are rather extensive but the main ones are blackdagger games, window box, bits-world, and hoard a bits. any search for bitz will bring up listings from these stores. they are all highly rated sellers and are very good at what they do. sadly, if you don't have much money, like me, it's going to take a while to get what you want, at the price you want.
anyways, here's the cockpit:
the plasticard bars were added to give surface area to glue consoles and monitors onto. here's pics of the finished driver's cockpit:
he has as you can barely see from the crappy phone pics, a console in front of him, and as well as monitors in front and overhead. there's also a necron globe that will become the vehicles radar screen, the other two necron parts were added in just because they looked cool there, and i'm planning on having them painted up as neon lights/power systems. then he has two more consoles on both the left and right side.
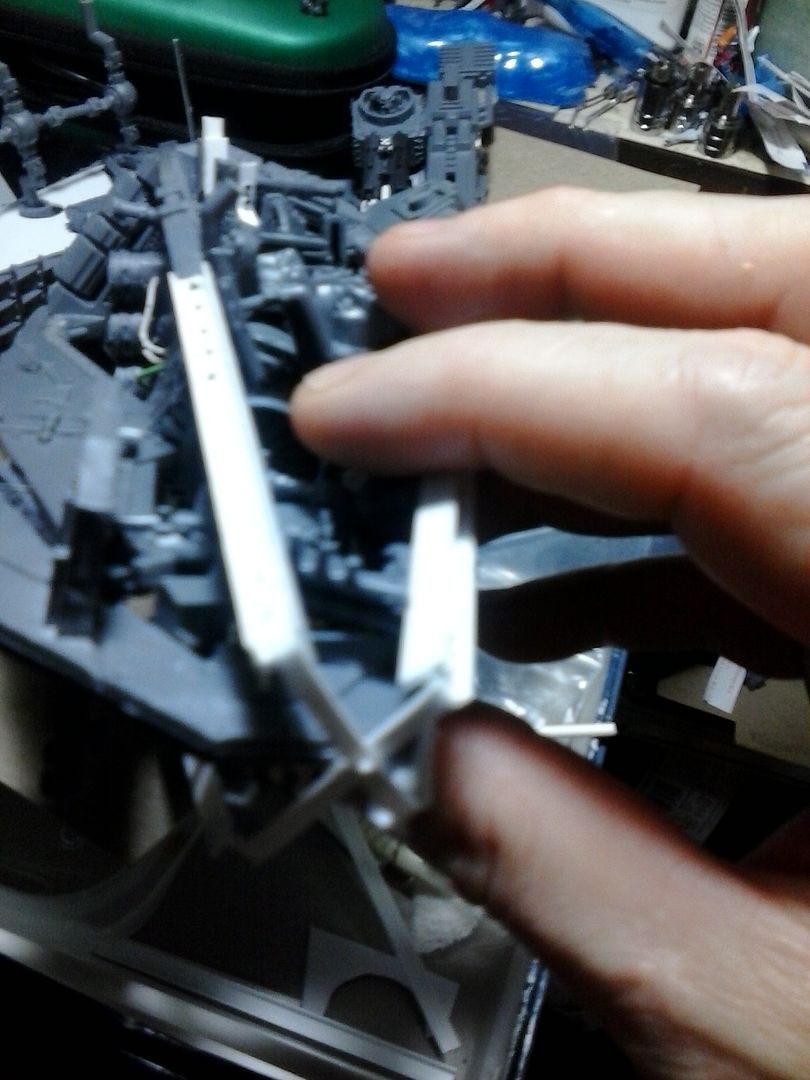
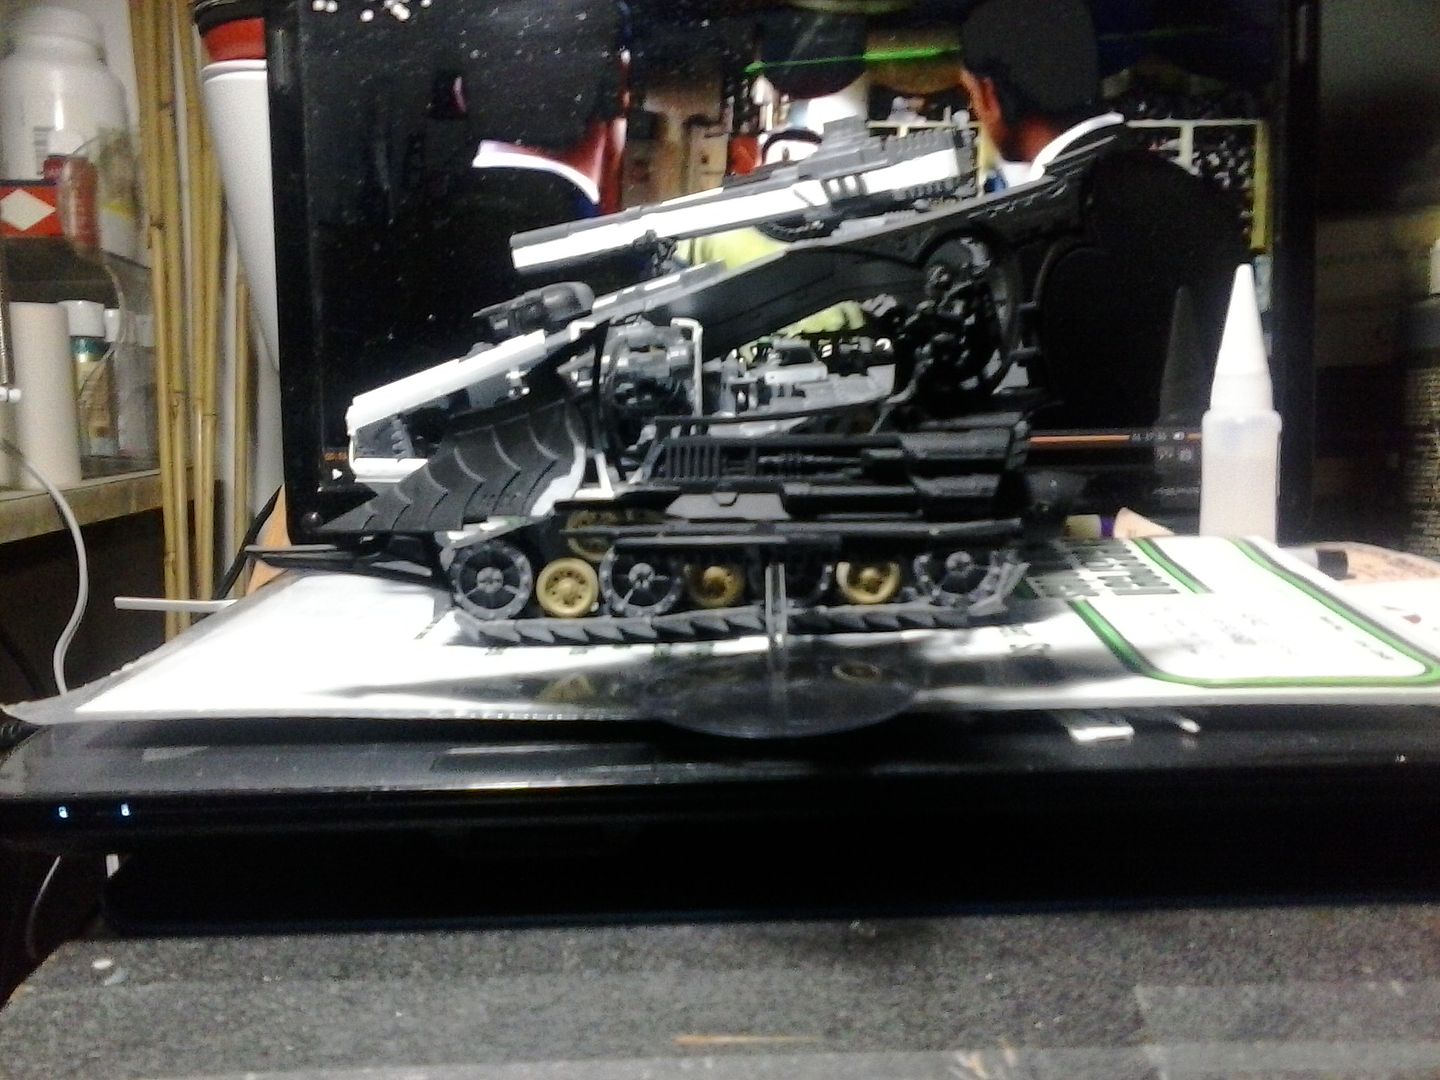
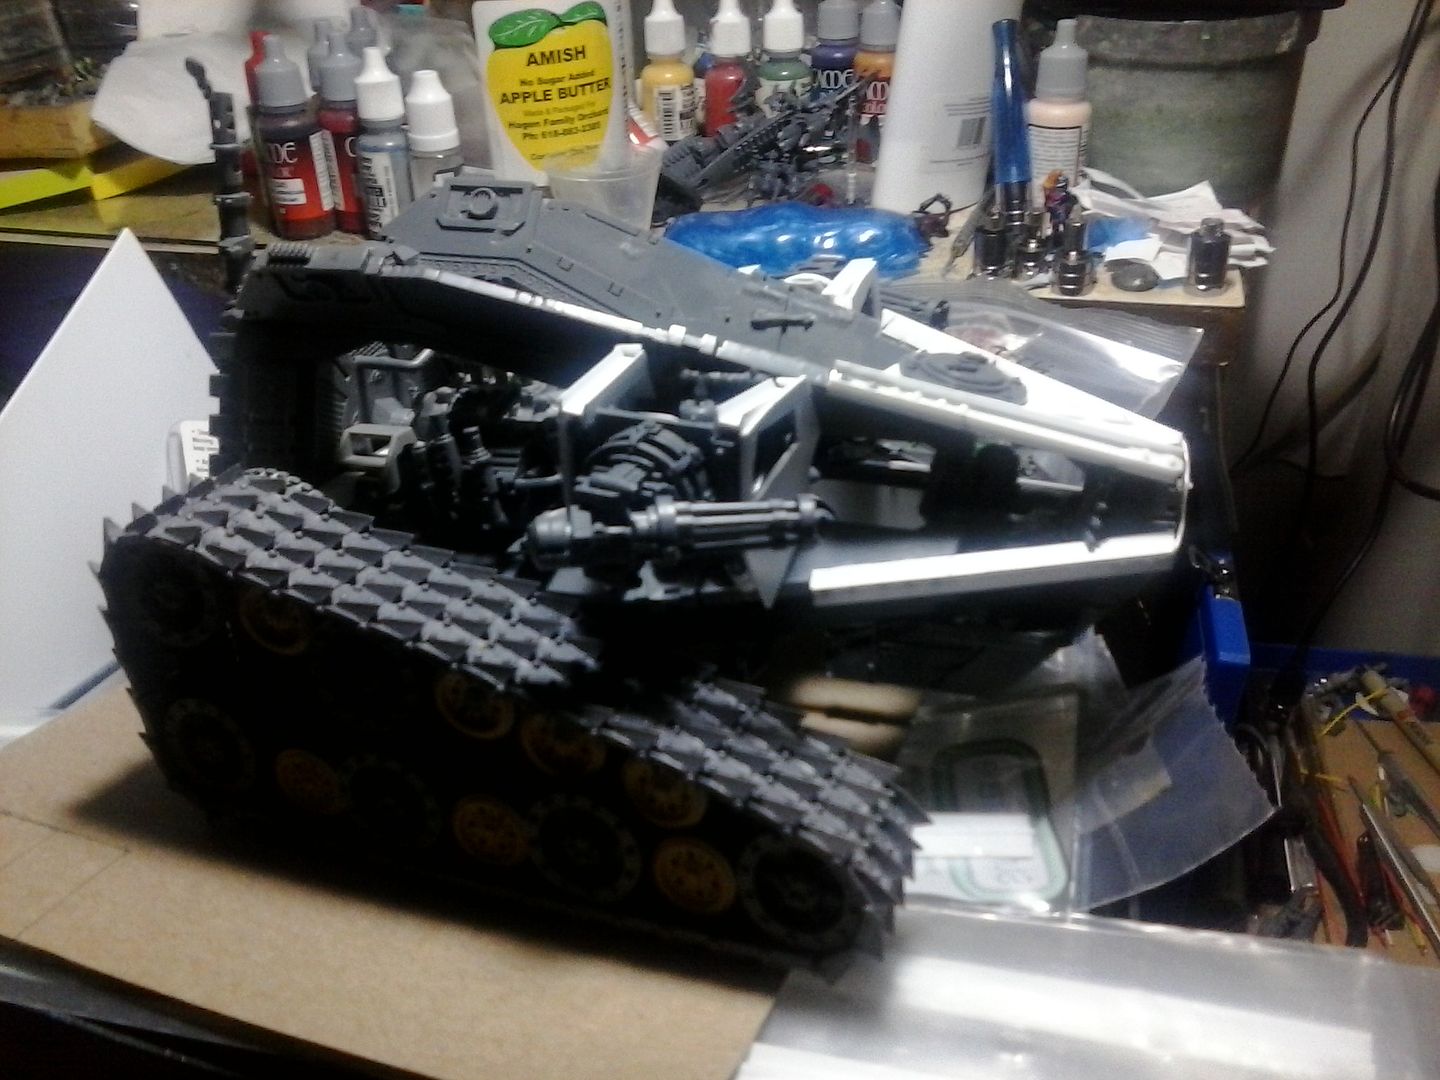
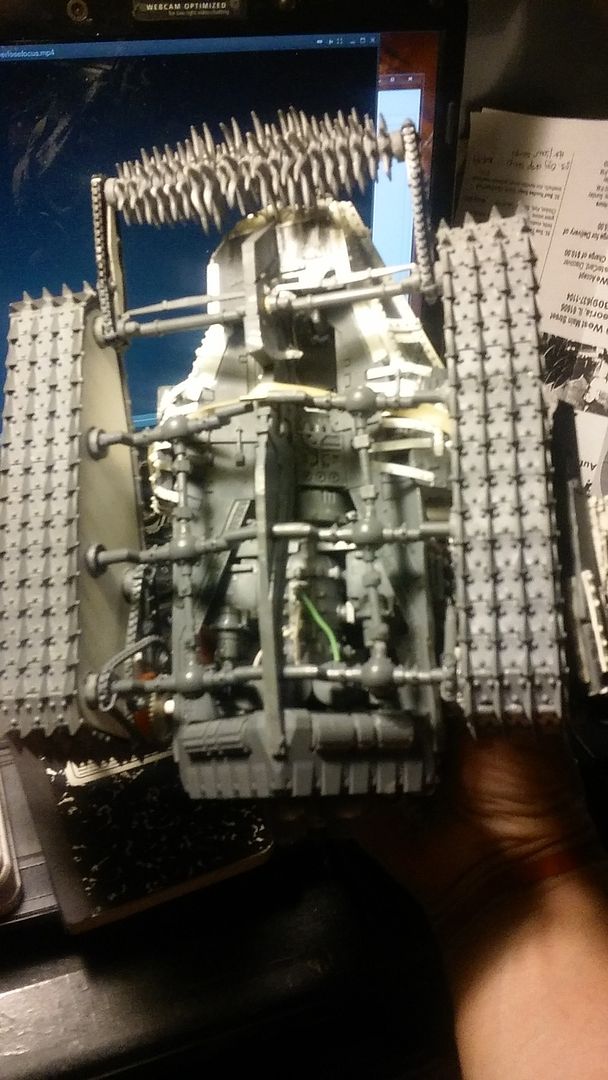
since the previous pics contained spoilers on the treads, and since we were already headed that way for this WIP blog, let's go there now. as i stated i had fits trying to figure out how to attach these things, and finally i came up with an idea, which of course didn't pan out, so i broke down and went back to ebay and participated in a few bid wars for trukk chassies, just to get the axles.
this is what that process ended up as:
pretty much the same thing for both left and right, but i didn't like the open back and the way you could see right through the treads, so i made a back plate for them, which turned out to be just the thing, as it also hides the fact that the little wheels are not the same depth as the big ones. now in talking to a friend of mine i learned that various companies usually make their triangular treads with the powered wheel at the bottom back corner, the top back corner and the front act as tensioners to keep the treads tight against the wheels for the most part. so with that in mind, i had more fits trying to figure out how to make the top rear wheel do what we wanted. i finally hit on the idea in the following pics. warning: this process is not for the faint of heart unless you have a heat gun. all i had was a will to succeed, glue, and a couple of wide rubber bands.

now in putting all of this together, the more i looked at it, the more the top rear axle post bothered me, i also needed to pull the treads further away from the body than i originally planned, this was the solution.
it hides the metal post, and keeps the chain drives away from the body just enough to make it not look stupid, as we see here in a dry fit.
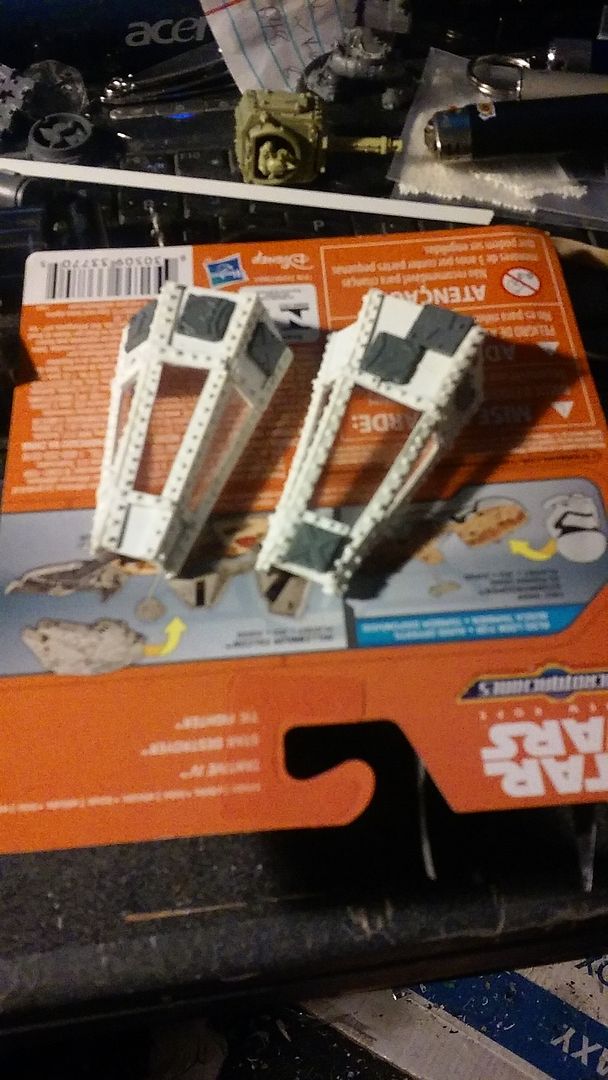
but wait there's more. i still did not like the wide open gap on the front side of the treads and i was originally planning on using the doors of the drop pod as an armored area over the top of the treads. with the dry fit in place, i experimented more with this idea, only to finally scrap it due to other issues cropped up, as you'll see in the future. however, they did not go to waste, as i eventually realized that with a little bit of cutting they would perfectly to cover the front gap. while taking these pics, i decided to show that the gun sponsons do actually move. this was another idea that i got after using the doors as i wanted more dakka (one can never have to much dakka), and these were given to me by another friend who never planned on using them. they look great to me, i hope the rest of you agree.
and here's the dry fit from the top, hold onto your hats folks. in fact i'm going to spoiler this pic for those who want to wait till the end.
that's all for now folks, see you again next week, for the next installment of this mad meks garage special. i hope you enjoyed this bit, next week i'll cover the weapons. again thoughts, comments, and constructive criticism is appreciated.
|
fav movie quotes: "Well let's put her in charge man! - - "Step up to red alert." "Are you sure sir? It does mean changing the bulb." - - "The escape pods not an option, it escaped last Thursday."
Kirasu - Q: What comes out of an Eldar cocoon? A: Corsair butterflies!
|
|
|
|
|
2016/02/14 02:45:23
Subject: looted drop pod
|
|
Krazed Killa Kan
|
Uhhh. Wow.
This looks super rad.
Bummer that those gears arent more exposed though.
|
|
|
|
|
2016/02/14 23:19:30
Subject: looted drop pod
|
|
Tail-spinning Tomb Blade Pilot
|
I'd recommend cutting chunks out of those panels hiding the tread gears, show off all that awesome work!
|
DZC - Scourge
  |
|
|
|
|
2016/02/20 20:28:17
Subject: Re:looted drop pod
|
|
Sneaky Striking Scorpion
|
back again for another session on this looted drop pod, done roight proppa an orky. first up though...
@doktor_g
@thokt
---thanks for the compliments, i really do like the idea of the chain gears and it is a shame that they can't be exposed more. however, cutting chunks out of the back tread wall panels would not open them up to view the gears. the tread wheels themselves are in the way, as is the sponsoned drop pod door. it's just one of those things where you know its there, you know its great, and you just hope that the person viewing the model will notice the detail and look closer.
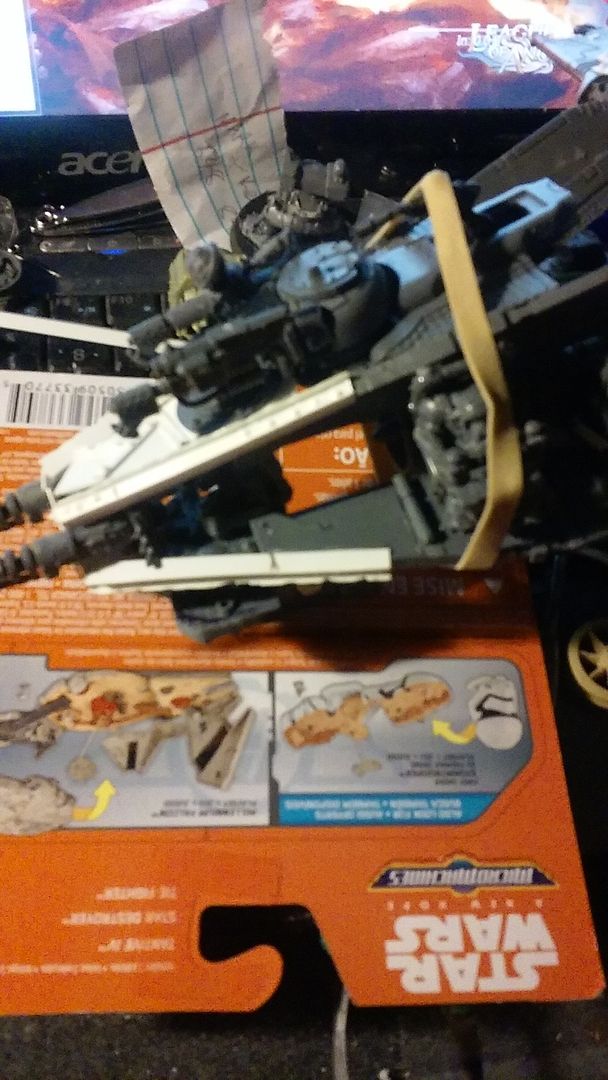
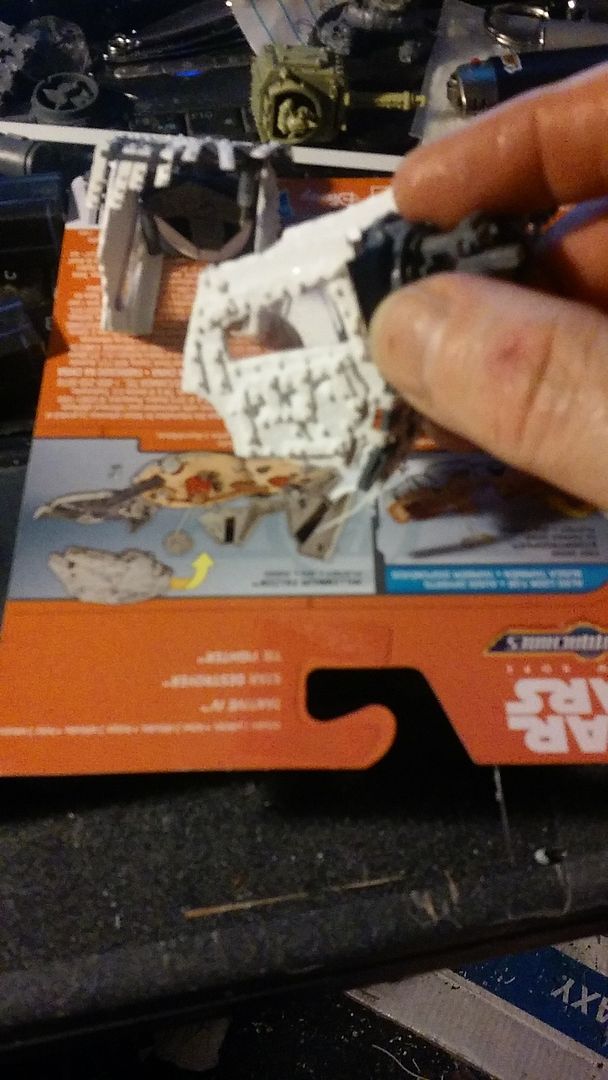
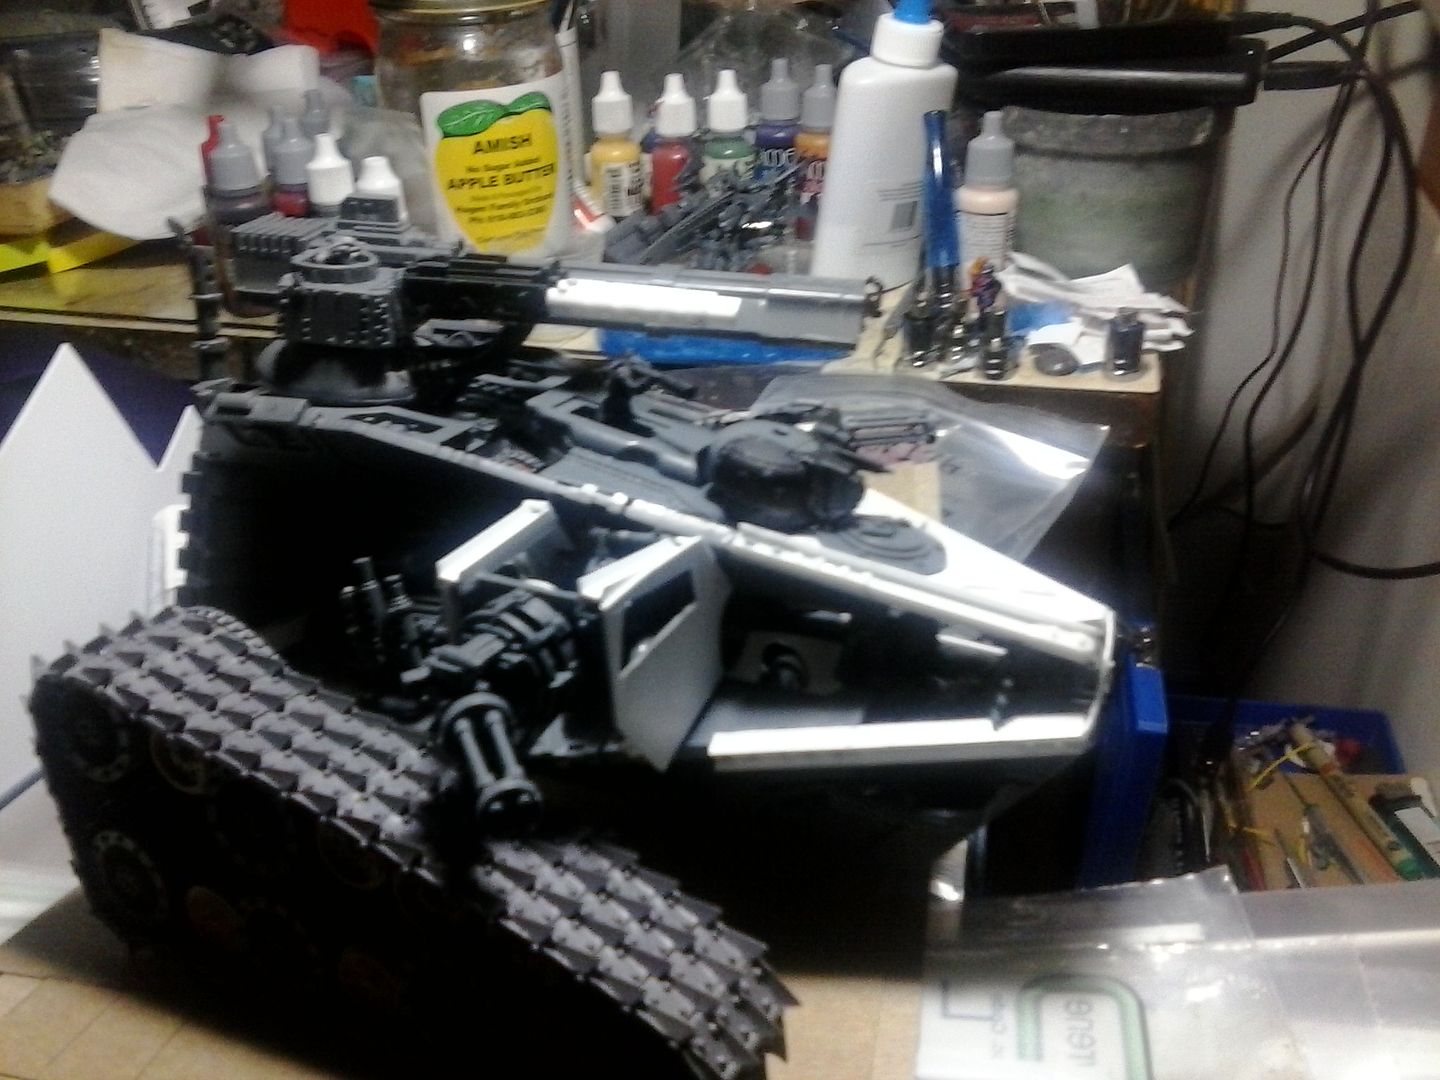
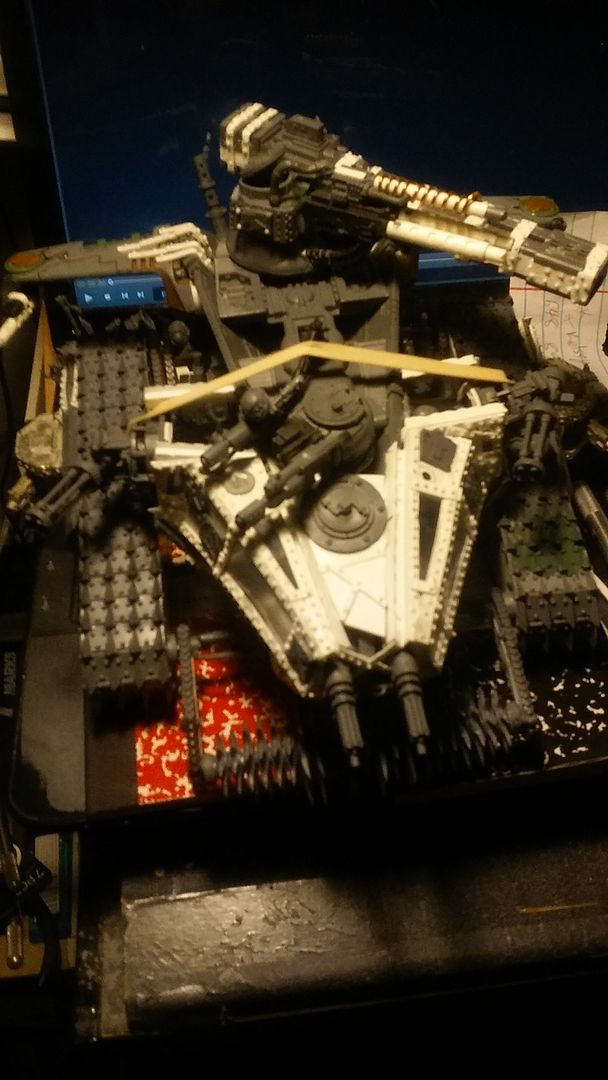
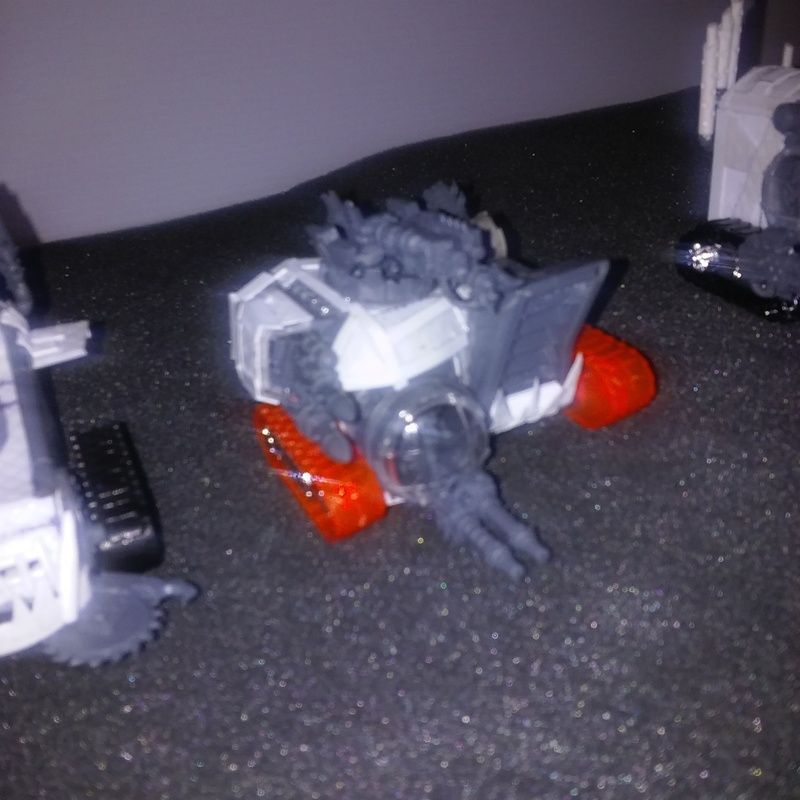
and now onto the next installment, this week is going to be a relatively short update as basically all we're covering is the weapons on this thing. i can state this, the pod was finished this past weekend, the engine on the left side missing it's exhaust pipes has since been repaired and the pipes are once again in place, the front cockpit has been armored in on the bottom and riveted. the main exhaust pipes on the rear end were removed because the main gun would hit them and be unable to fully articulate have been repositioned and placed back on the pod.
onto the weapons loadout, i knew i wanted guns mounted on the sides where the two orks have been sitting for the longest with nothing to do, i also knew that with a clear field of fire i wanted them to AA mount in the rules. while i could use just about any weapon for this i chose Tau, as seen below.
again i apologize for the crappy phone pics.
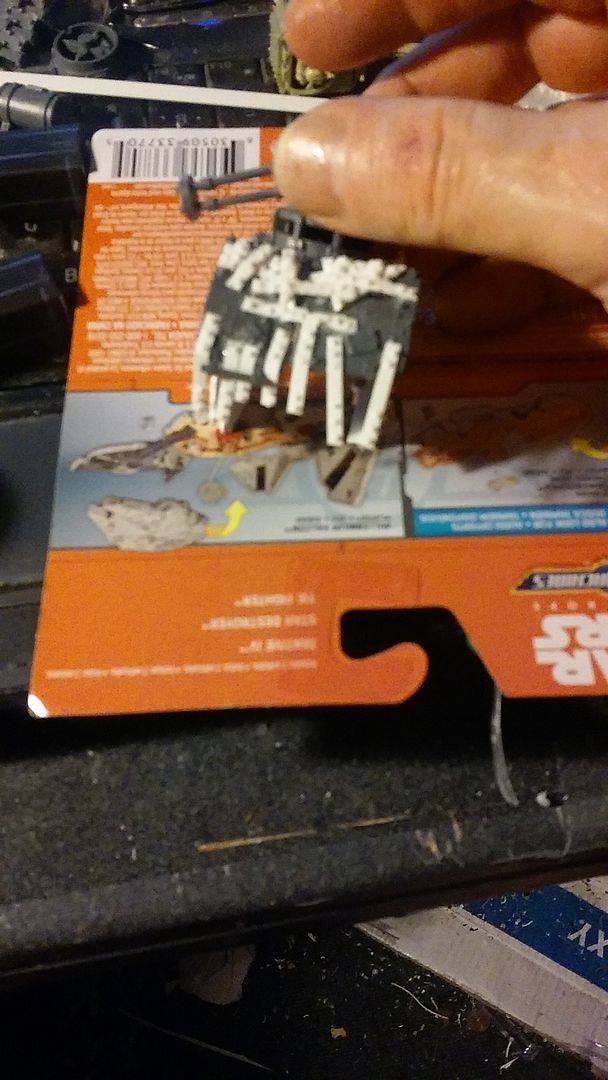
i mounted this on the ork trukk gunner ring which gives it the 360 degree field of fir that i wanted. from there i then built up a cage that goes around the ork and holds the weapon in place. problem was even with the cage it didn't look right just hanging there and so we boxed the whole thing in, this also allowed me to add a weapon console to the inside of the weapon box.
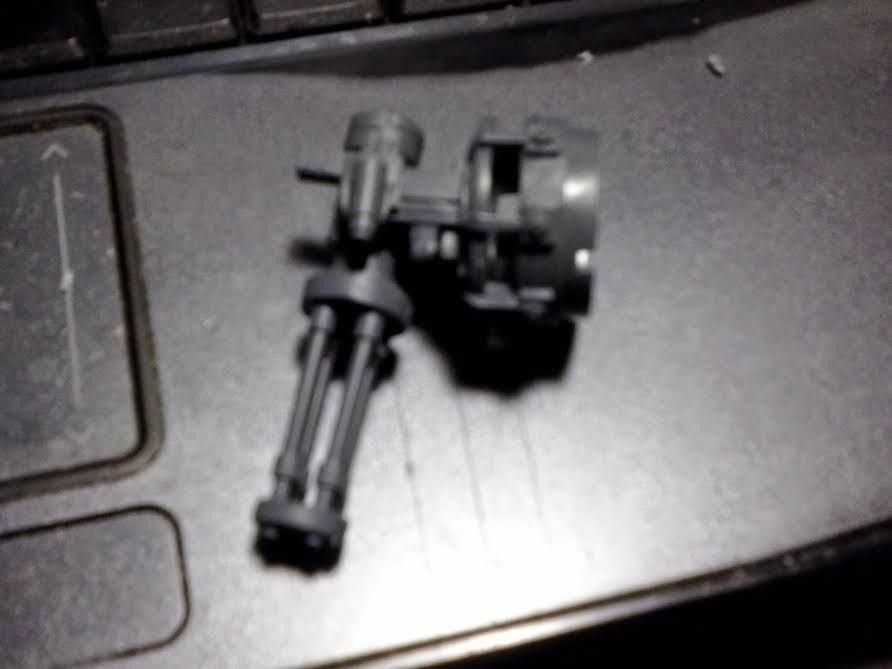
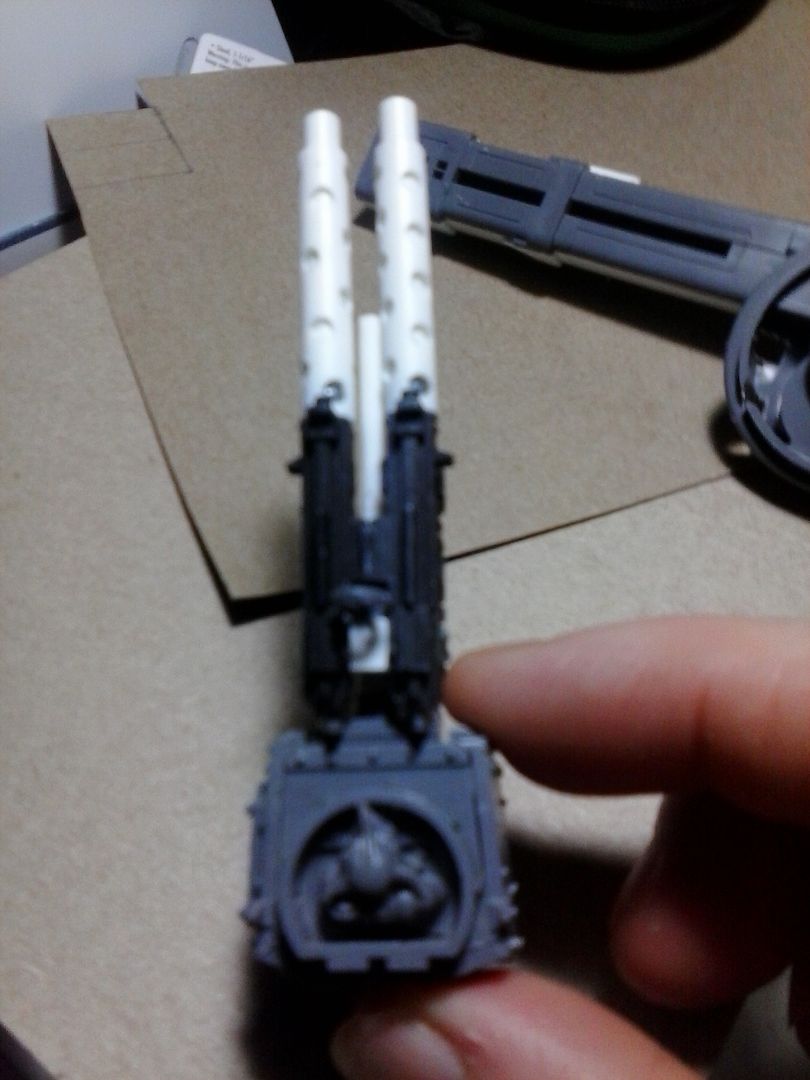
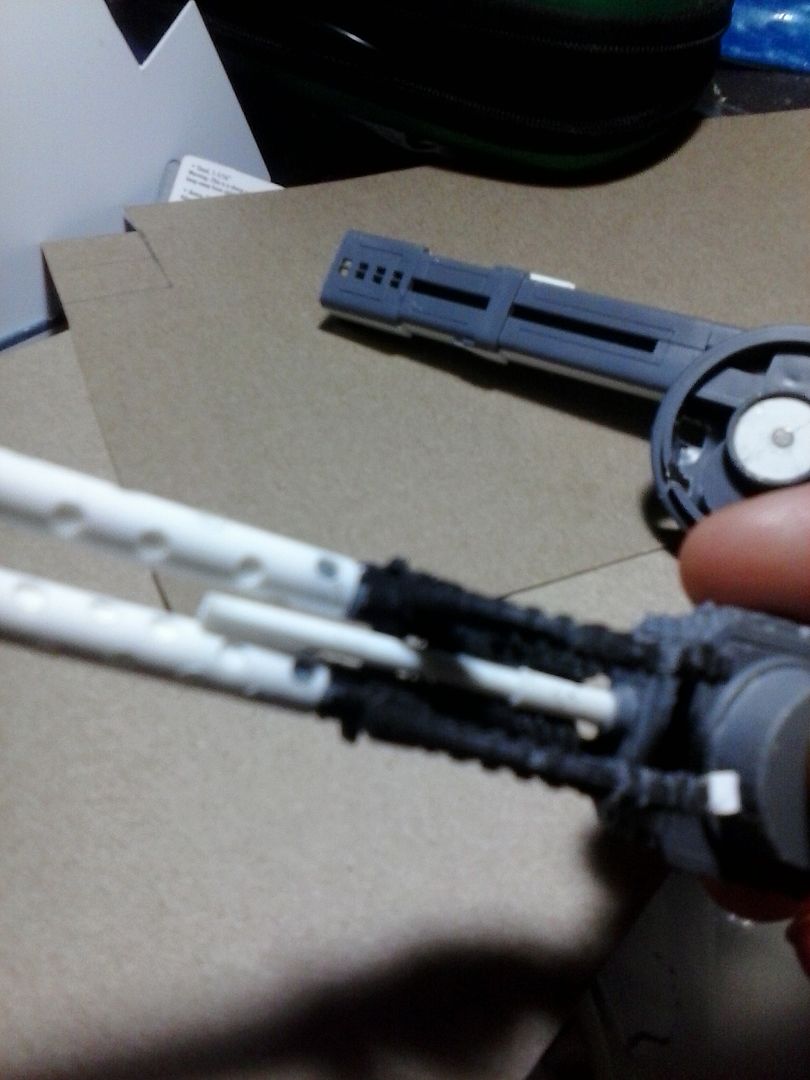
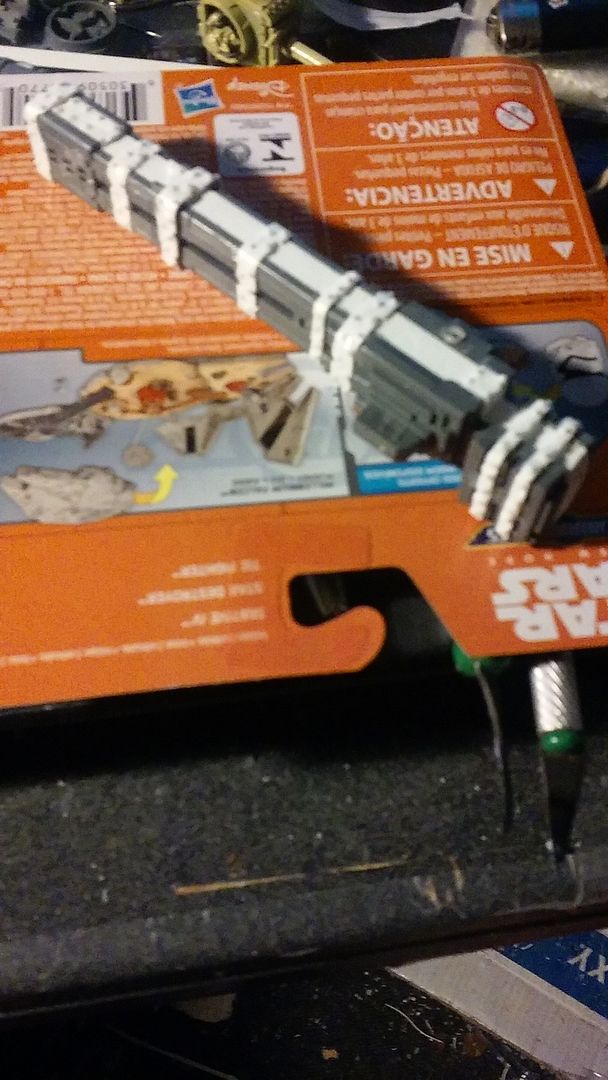
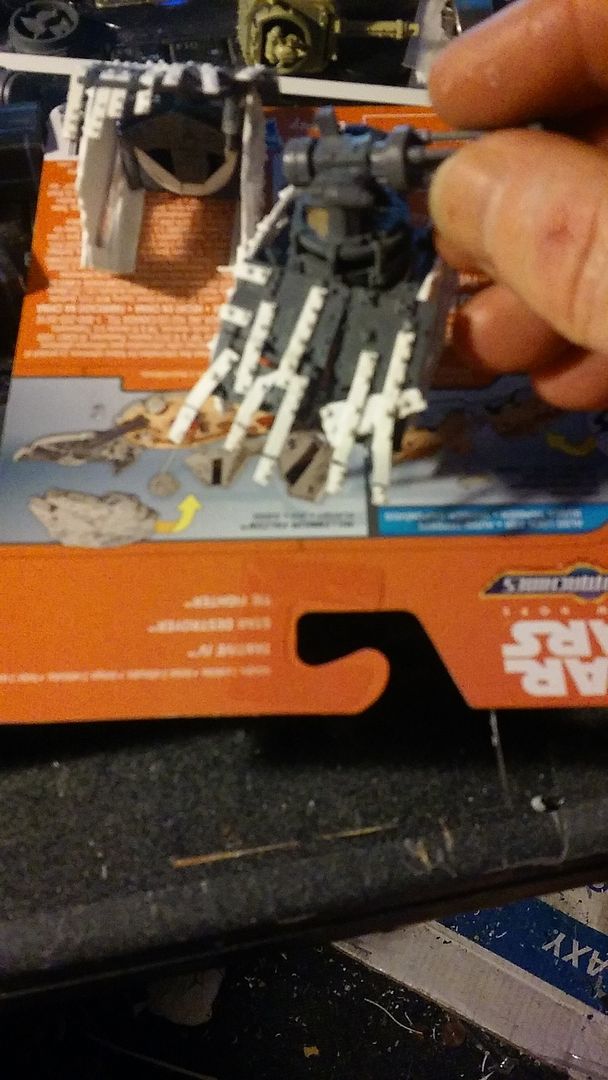
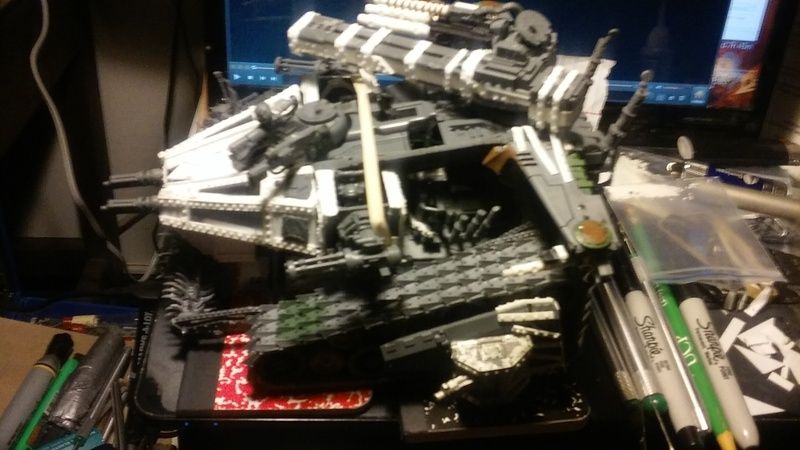
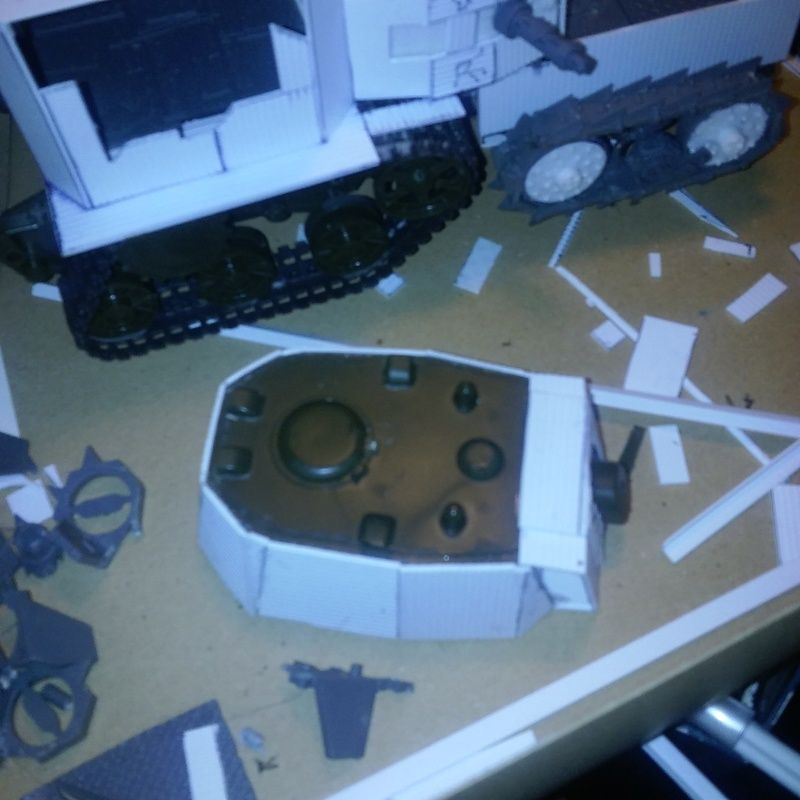
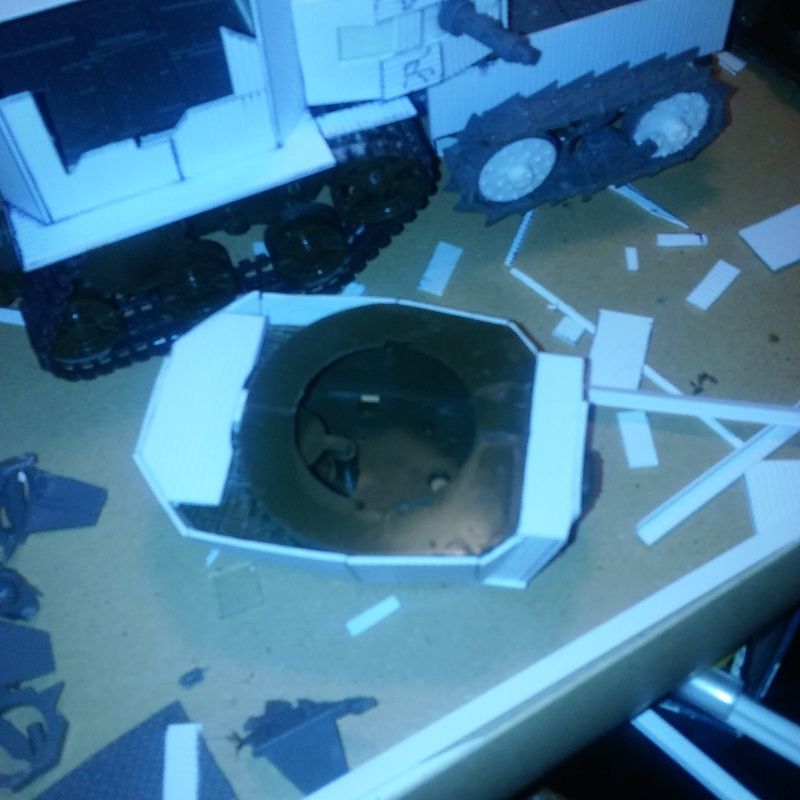
ok so with that done, the next thing was to start on the main gun. again from the beginning i knew i wanted ONE weapon in particular for this thing, as i'd long dreamed of orking one out, and that was the Tau hammerhead rail gun.
one i got the rail gun together it just seemed a bit weedy to me for this tank, and so we popped it back apart and reconfigured it into this, which is much more in line with orky know wots.


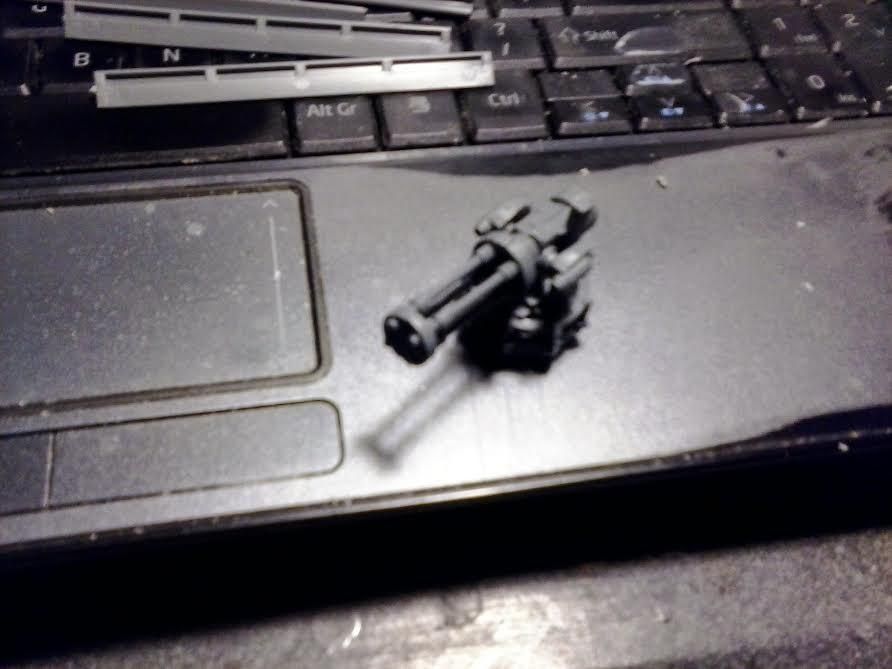
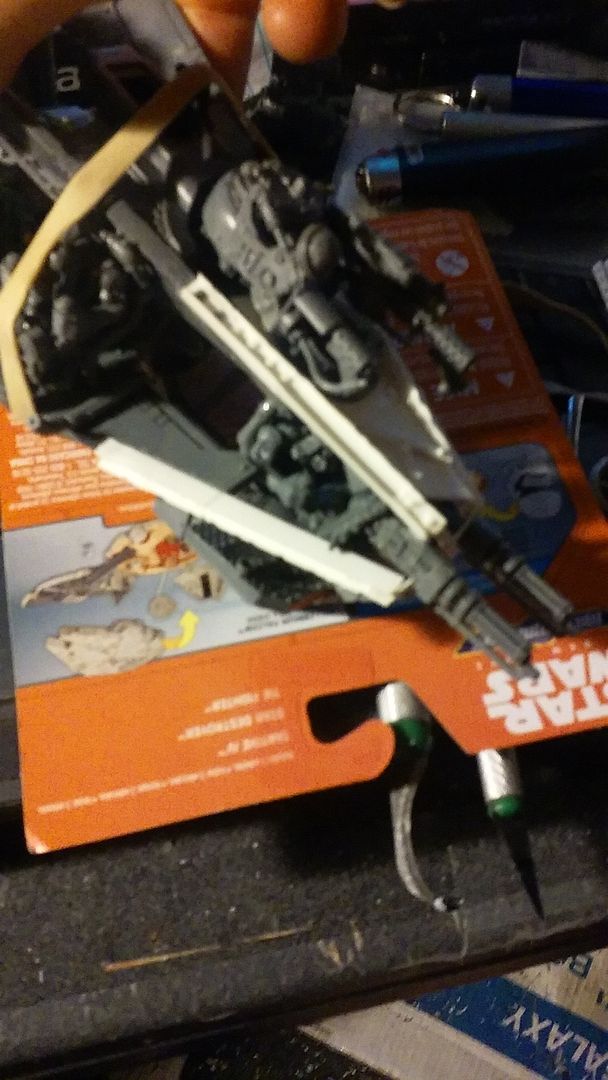
now as you see in the pic above i needed another weapon to go into the turret ring/hatch, and so i went with the idea on the ork flakk trukk of AA guns, for this i dug into my bits and pulled out two space marine weapons, storm bolters or heavy bolters, not sure which since i don't play space marines at all. same thing though they just weren't orky enough, so the addition of plasticard to lengthen the barrels was just the thing.
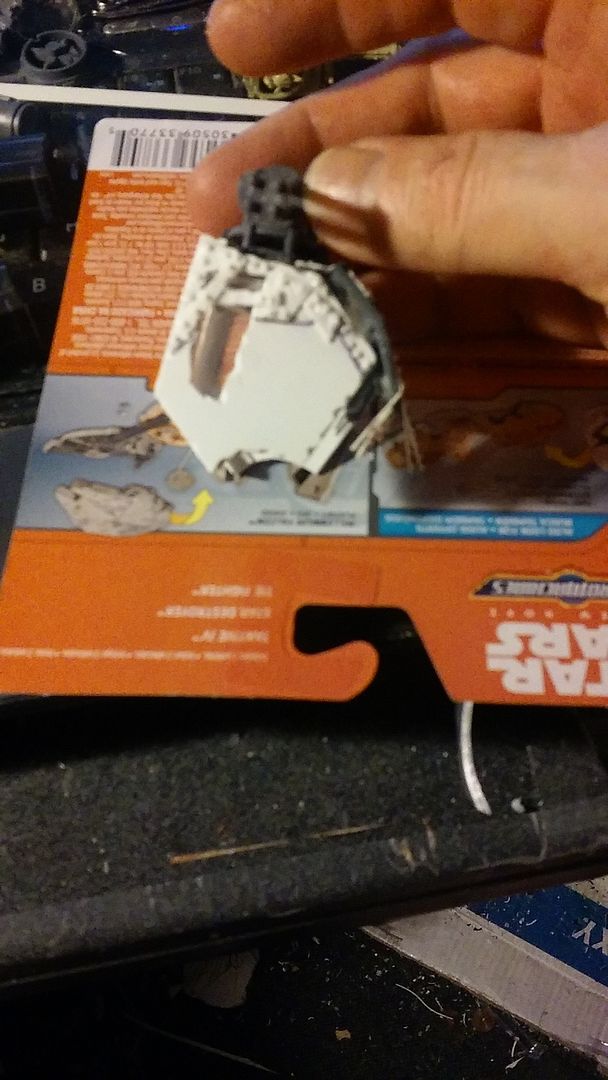
it seems i've been remiss in my duties for taking photo's of this thing as i just realized that there was an addition made that i have failed to photograph, the guns in the above pic bothered me for a while as they just didn't seem complete, and so i went in and added a grot glowy gun onto the top of them, this resulted in the grot gunner not being able to see over the top of the weapons, and so i added a monitor in front of him to act as a targeting screen for him. i also added a bundle of wires from the dreadnaught laser arm to power the glowy gun. since the only pics i have of this are of the whole tank in its finished state, you'll have to wait for them.
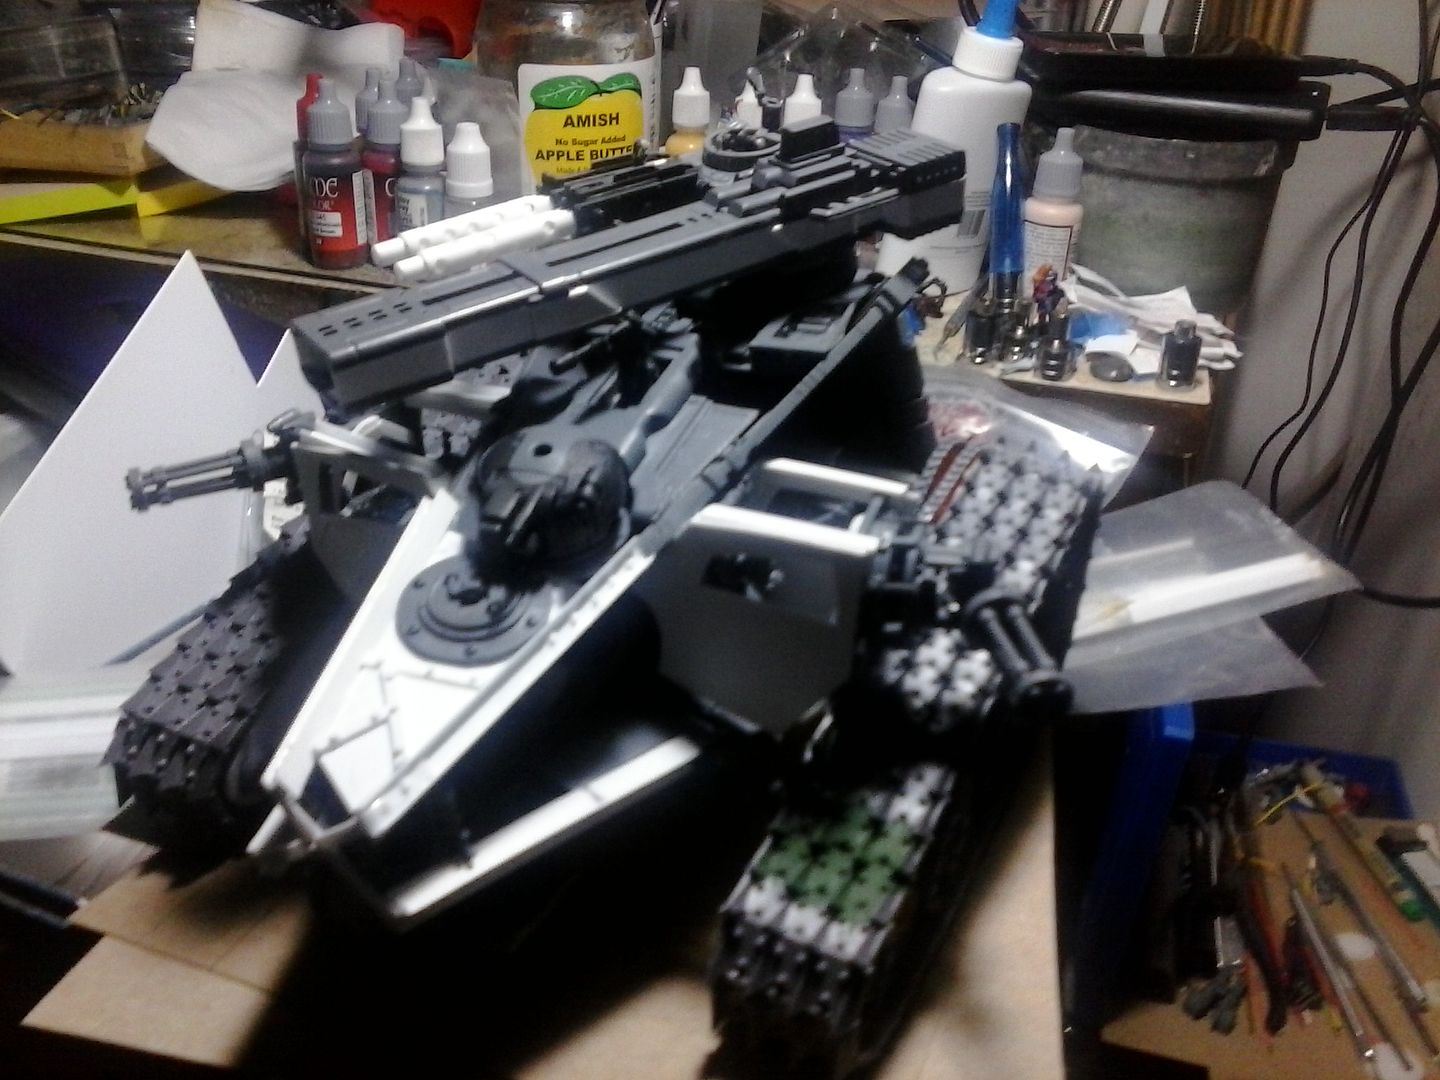
now i needed to work on mounting the rail gun assembly to the tank, so we cut the plate from a busted up tau tank i got from a friend, and did this.
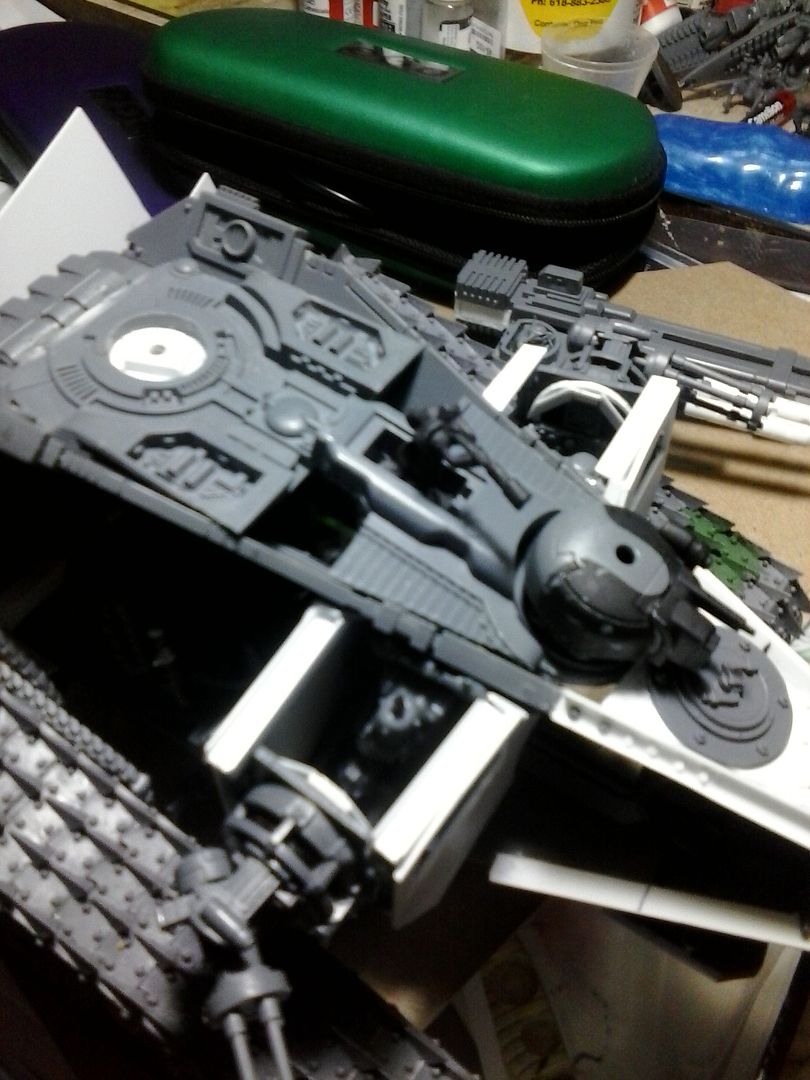
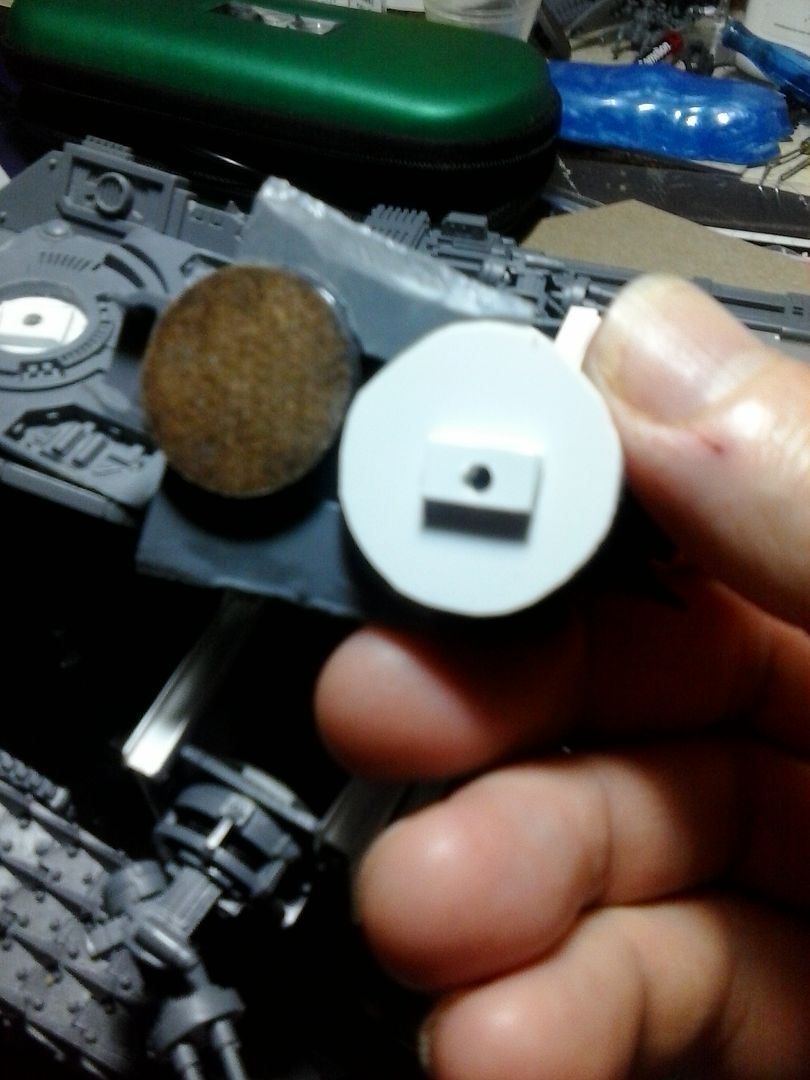
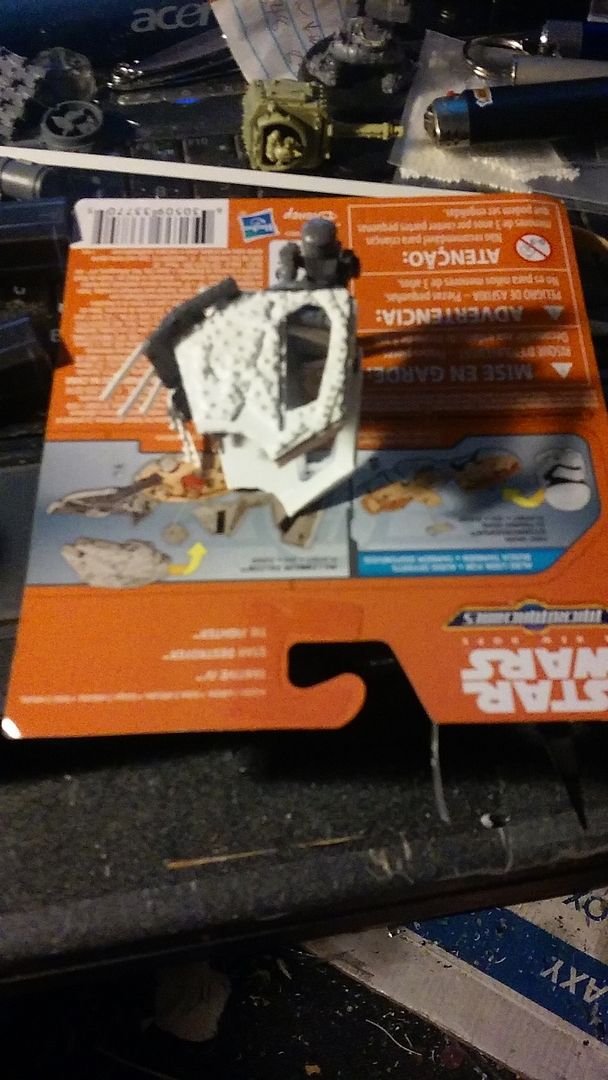
in that pic you can also see the gun box for the side guns mounted in place. at any rate we still had this huge bullet catching gap on the top that leads into the most vulnerable area of the tank, the engines. i knew i need to cover that are up as i did not want this thing to be considered open topped, and so as you can see i added another piece from the Tau vehicle, specifically the bottom of it, and then scratch built armor plates to cover the drivers cockpit. that left that opening where the Tau landing gear should be, but it's perfect for a grot hatch. so we based the grot and magnetized the sensor array, as follows.
from there i went in and added dakka to the sensor array, as once again yhou can't have too much dakka. cut into the sensor array and place a hatch on the top and it looks like another grot weapon system, this time as you can see though it's using heavy flamers, for anti infantry.

also in the two pics above you can the addition of two more guns sticking out from the of the drivers cockpit, after all he has to get into the fun of shooting things as well. here's another pic of those guns.
then of course there was also these weapons as we've seen already.
but wait there's more, i also kept looking at the back end of this thing and the large amount of open space there, and i had wanted to add supa rokkits/ grot bombs on this tank, and i finally figured it out. so we have 3 supa rokkits, in the form of 6 tau seeker missiles.
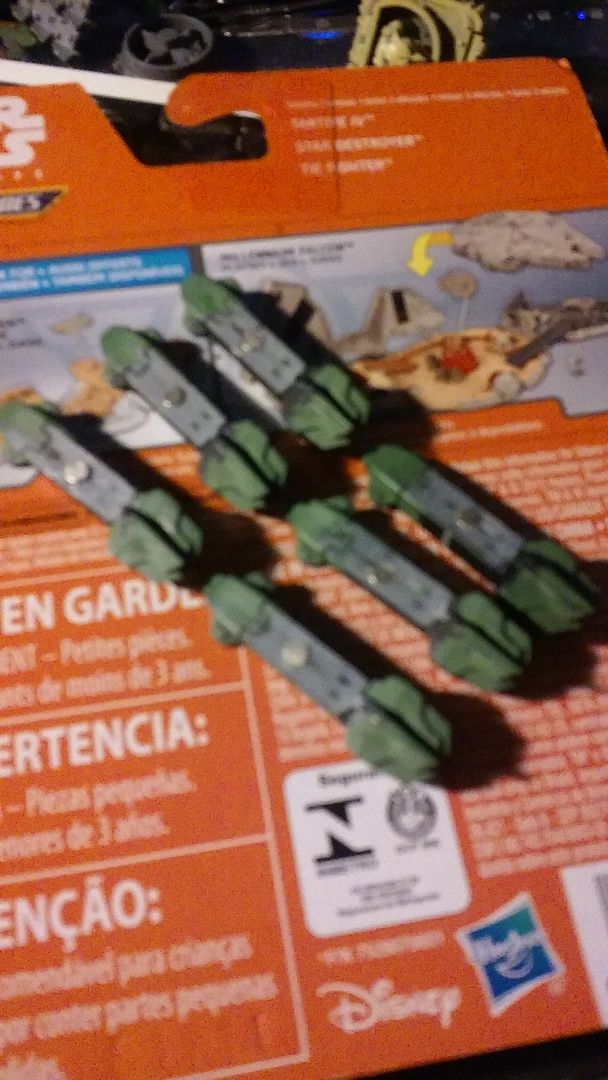
this is where they mount to
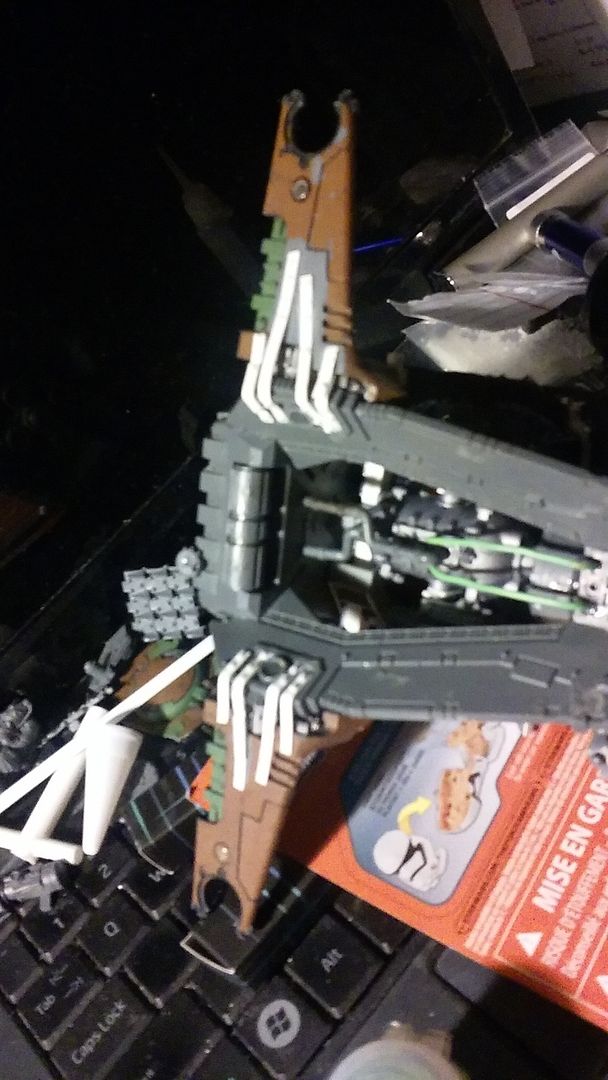
now i had thought from the beginning that the little drones on the wingtips in the pic were guns, and then i was corrected by a tau player who told me they are marker light systems. well hell, that ain't gonna do, we don't need purdy lights, we need......you guessed it, MORE DAKKA. so we took a couple of ork sluggas, reconditioned them into big shootas and taa daa.
BUT WAIT there's still more, we have one major weapon system missing from this thing, allthough with the new ork codex it's no longer a staple weapon choice like it was once was but it's still not too bad, and that is the deff rolla. now, there were and are plenty of options for the rolla, ioncluding making one from scratch, but i've always liked the looks of puppet wars rolling slaughter. something like that would look right at home on this thing, next to the those rippy treads, problem is the rolling slaughter isn't made big enough for the tank, so we went back to ebay, shopped for bits and made this. the chain gears on this item were easier to put together than they were on the treads, trust me on that.
puppet wars rolling slaughter.

my version of the rolling slaughter.
so there you have it, two sponson mount big shootas, two AA side mount twin linked big shootas, two front mount big shootas, two topside turret mounted heavy flamers, topside AA mount twin linked big shootas w/ grot glowey gun, top mount kill kannon/supa kannon, two wing mount big shootas w/ marker light for an extra +1 to ballistic skill = BS 3, supa rokkits x3(using 2 missiles each), and a deff slaughterer.
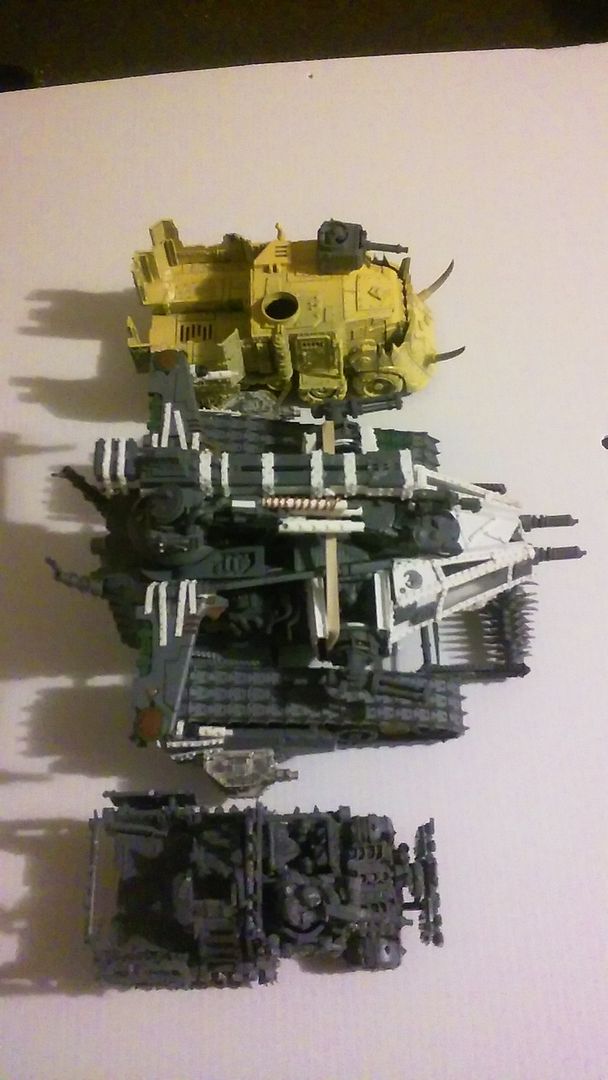
you can't get more dakka on this thing without building a second level of super structure to it. btw in case you haven't figured it out, this thing isn't just a tank, it's a super heavy, and here's a size comparison to prove it. that's an old dark eldar skimmer on it's flight base and this tank is still taller and longer than the skimmer. i also have pics of this thing in it's finished state sitting next to a trukk, a battlewagon, a biker, an ork, a nob and a boss. again though those are finished pics, so they will have to wait until next week.
that's all for this installment of the mad meks garage special, tune in next week for pics and discussion of the finished pieces which means rivets out the ying yang, and lots of detailing. sadly it's going to be a while before i can get painted pics up as the painter is already working on a commission piece and needs to finnish that first before he can start on this thing. that doesn't mean this thread will sit empty and gather dust though, as i have been working on grot tanks for a while and the last amount of bits to finish them arrived today, so they will be finished and ready to post up this week. on top of that there's the conversions i've done on some of my trukks, as well making my own nob warbikes. i also plan to start working on building killa kans and deff dreads on treads in the near future, as well as converting/kitbashing some more trukks based off the new mad max movie, fury road. see ya'll next week.
|
fav movie quotes: "Well let's put her in charge man! - - "Step up to red alert." "Are you sure sir? It does mean changing the bulb." - - "The escape pods not an option, it escaped last Thursday."
Kirasu - Q: What comes out of an Eldar cocoon? A: Corsair butterflies!
|
|
|
|
|
2016/02/28 23:02:47
Subject: Re:looted drop pod
|
|
Sneaky Striking Scorpion
|
back again for the second to last installment for the looted drop pod, today i'll basically be posting pics pf detail and rivet work. however, for some reason the pics i take look absolutely fine on my phone, their nice and crisp images, with no to very little blurring. it does seem that the further away from the item the better the pic on the phone, however, it seems that anywhere else those same images are viewed, they are gak, blurred detail, fuzzy images, etc, etc. this just affirms my belief that i really, really need to get a camera.
at any rate, since there's nothing i can currently do about that, onto the pics.
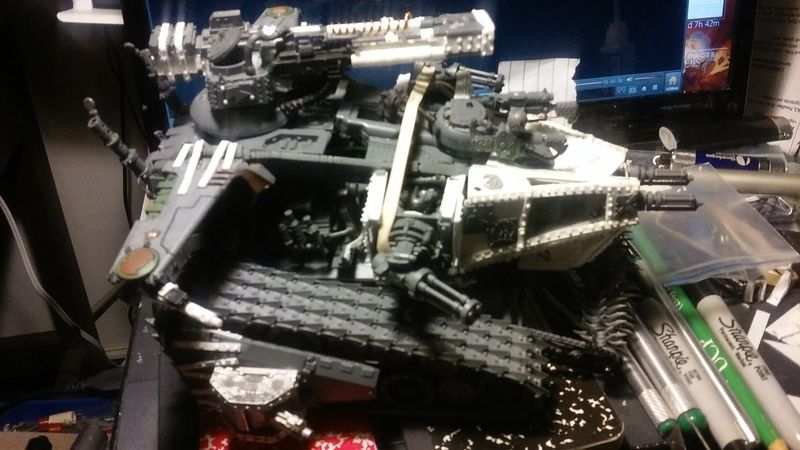
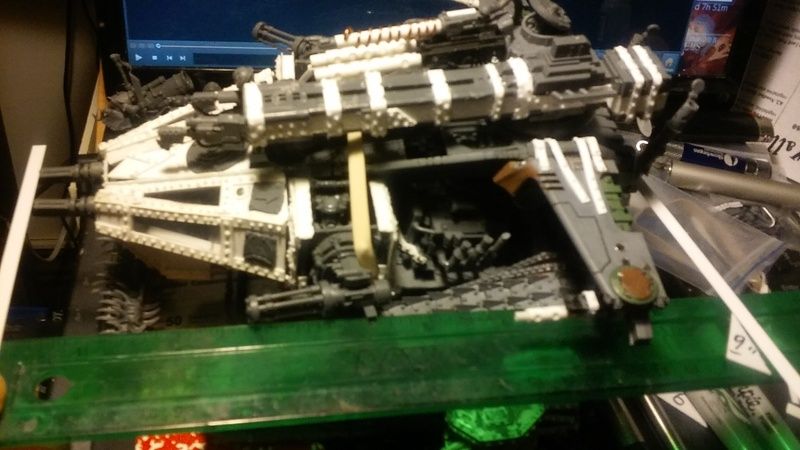
so i got to looking at the main gun again, and while i liked it, it didn't look orky enough, add a few strips of plasticard, and some rivets, and perfecto.

same thing here with these guns, i imagined someone looking at them and asking how are they attached, so once again plasticard and rivets
so we added detail to the gun pods in the way of notching up the armor edges and adding rivets, sadly as stated above, the phone camera will not pick up that notching detail, it does show the rivet work though. both left and right pods in the following pics.
now at the bottom of the gun pod i needed to attach strips that will, once the model is done being painted, be permantly glued to the hull. so these strips simulate the gun pods being attached along the bottom edges for obvious reasons.
small amount of work here vs the large amount on the opposite side, theres a reason for this that will be covered further down.
now as you can see in this pic, when the gun pods are placed into position, they break the lines of the pod and make it look blocky, rather than the sleek racer that i've been aiming for this whole time. some of you may feel that this makes it perfectly orky, and i agree, but for me, it just kept setting off the OCD part of my personality.
this was the solution to that problem. cockpit armor plates designed to fit into the plasticard railings on the front of the pod, they close off the cockpit, and help break the blocky look of the gun pods, by bringing back and mimicking the sleek lines of the original pod.
i also went in and added the rokkit thrusters to the ass end of the model as well. i was originally planning on having them similar to the kind seen on the space shuttle, buti wasn't sure how to go about doing that. meanwhile i did still have plenty of parts left over from pegasus hobbies chemical plant model. digging through those parts gave me this idea, no fuss, no muss.

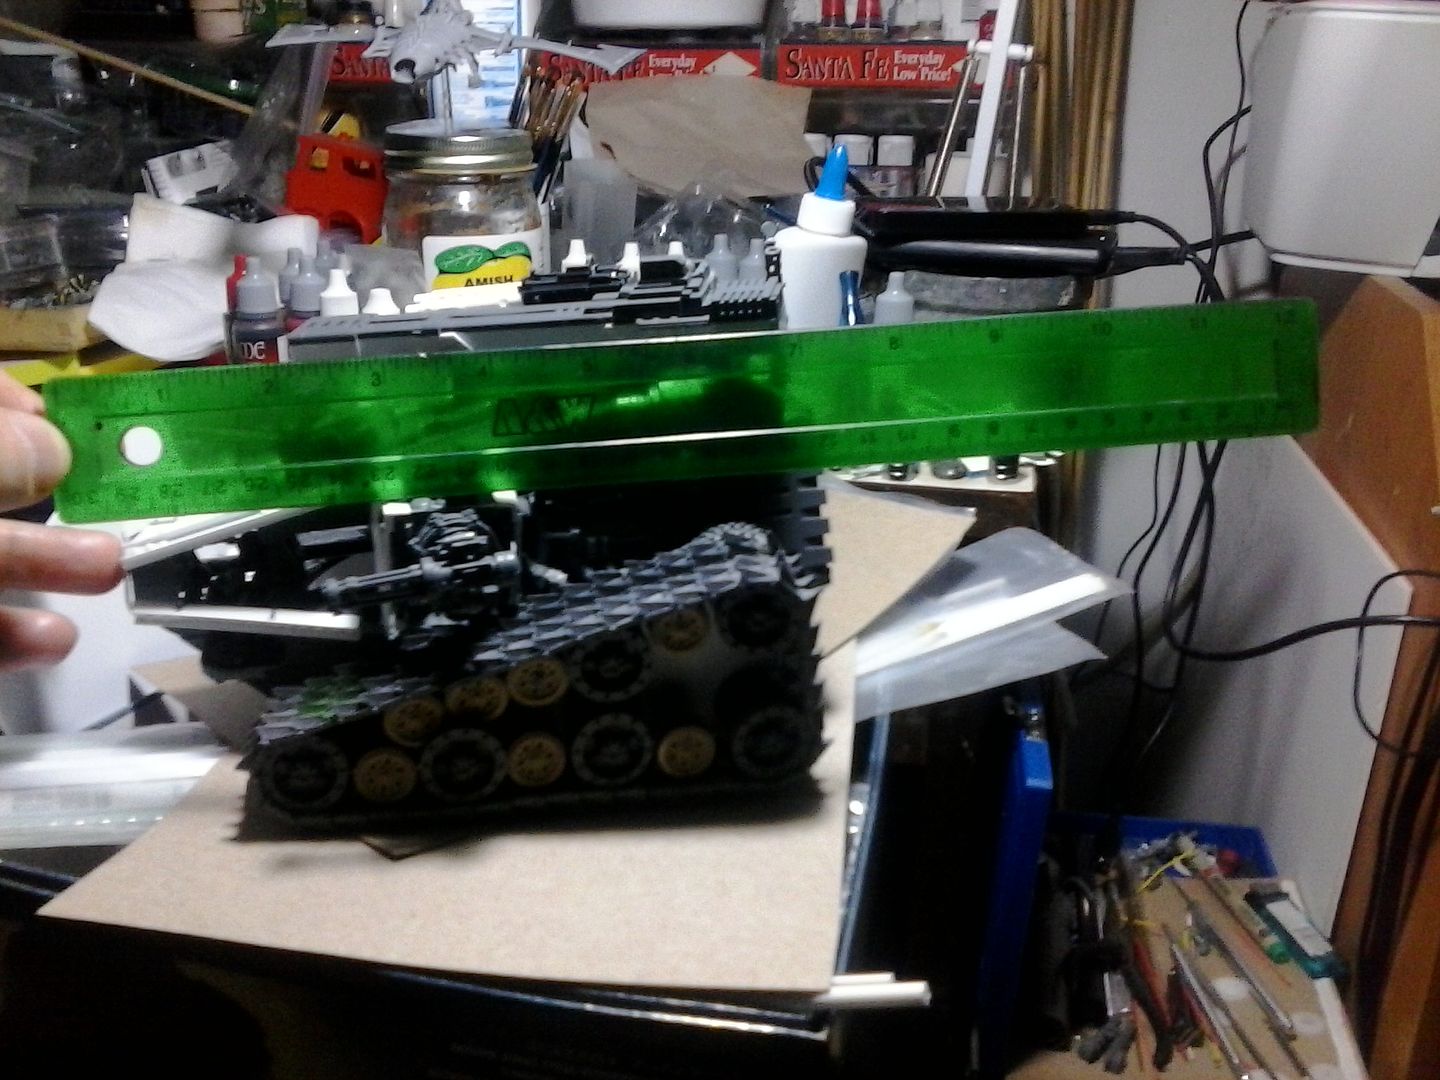
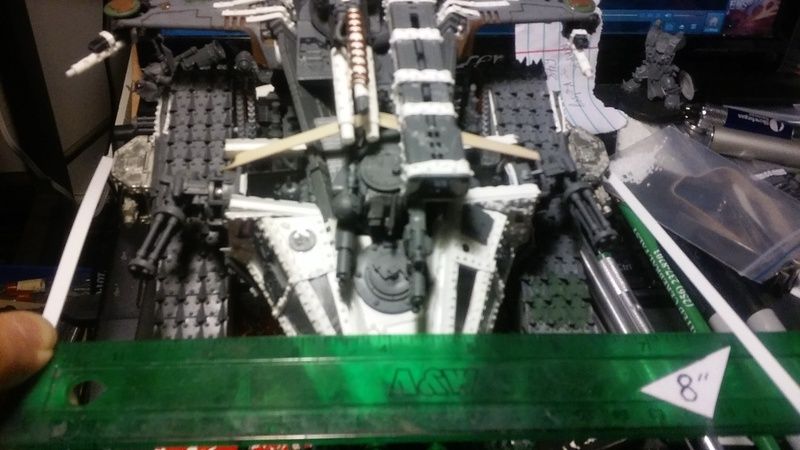
and now the rest of the pics showing original dry fits, final dry fits, and then lastly scale photos.
 that is a standard 12 inch ruler
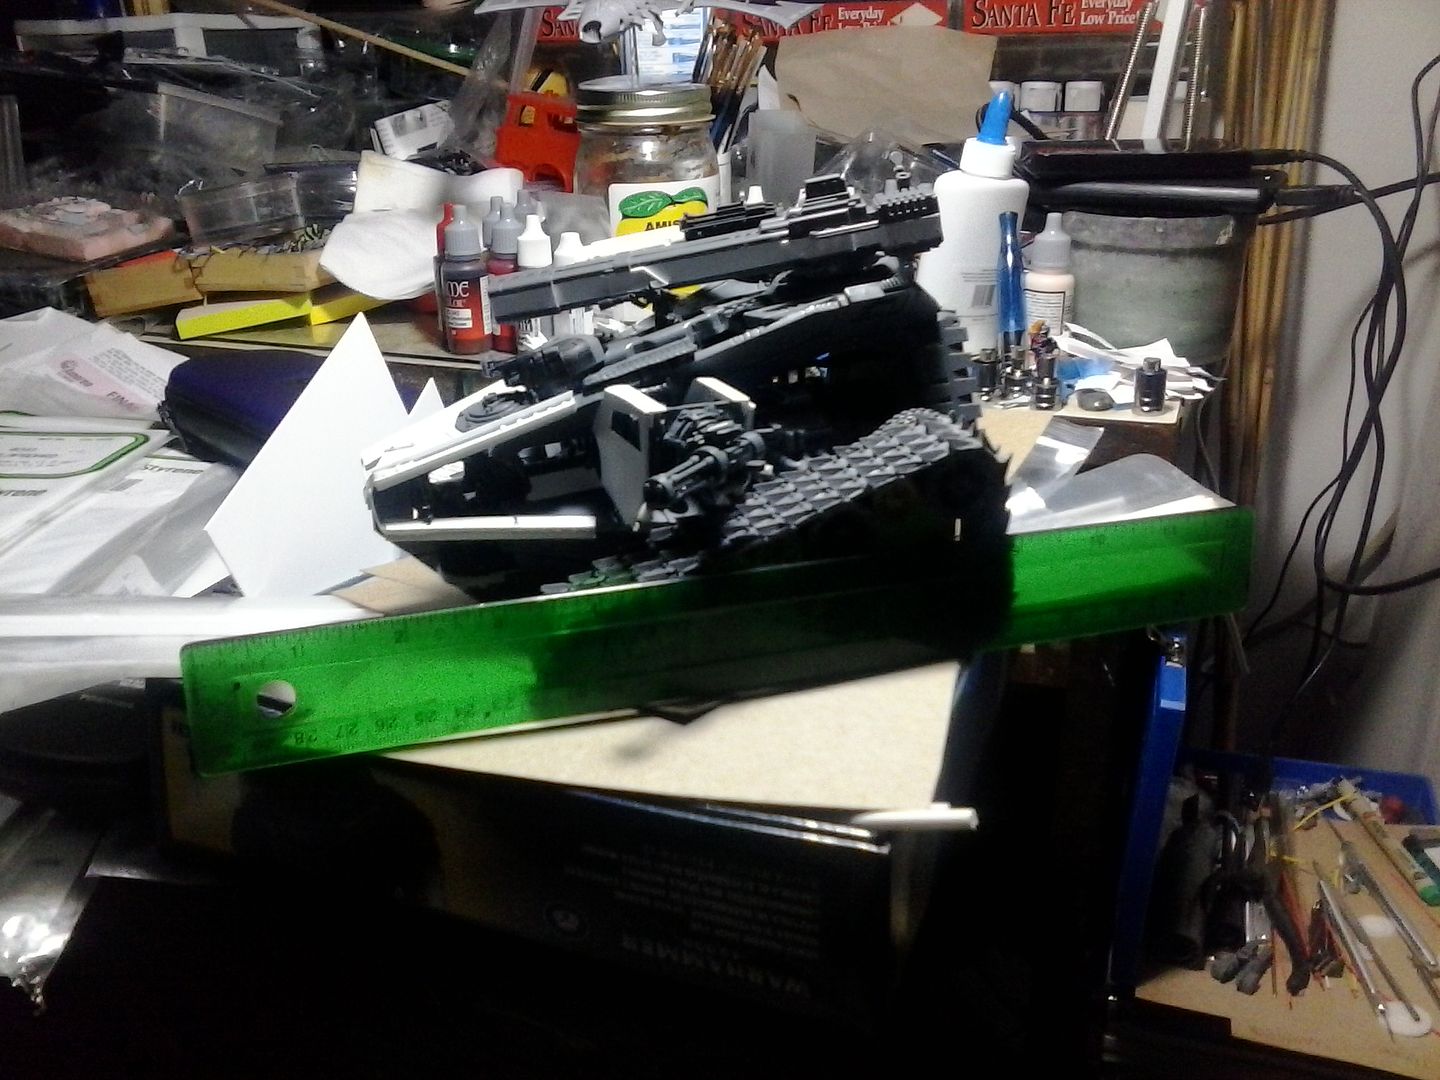
 and this is an old dark eldar raider on flight stand
final dry fits

 again, a standard 12 inch ruler same as before
 the following pics also show the cockpit armor in place. the clear plastic windows in this thing were a pain in the butt, it took at least two tries on each window before i got them right as i kept getting glue on them, and would have to rip them out and replace them.
and last but not least, the scale of this thing compared to an ork boy, a nob, a boss, a biker, a truck, and a battlewagon.
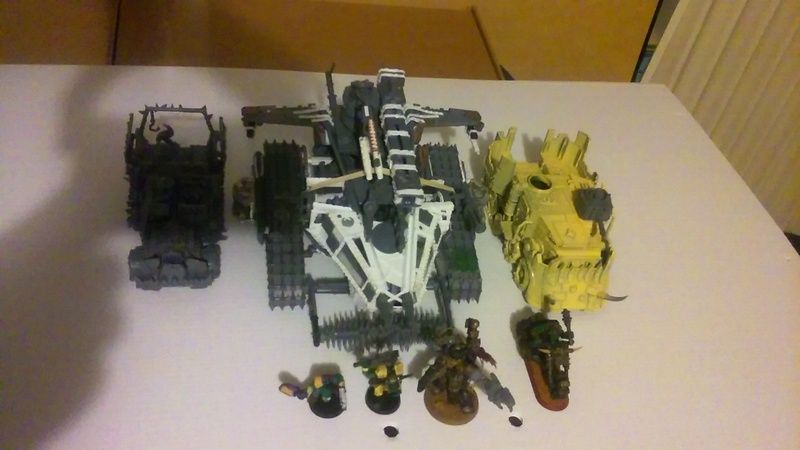

now we just need to have this thing painted, sadly the painter still isn't ready to paint it yet, but he says soon. as stated before, i will have stuff for grot tanks, converted trukks, nob warbikes, and so on that i can use to fill this space until the painted pod comes back. fyi according to the rules for a kustom battlefortress this thing comes it at over 600 pts, i've reduced that cost to 525 because it has no transport capacity, and does not have the mandatory 3 big guns that a GW says a battlefortress has.
again, comments, ideas, and constructive criticism is always welcomed.
BTW, this thing needs a name, i've currently been calling it 'Da Thresha', but i think it needs something cooler sounding, post your suggestions, the winner will get his name orky'd up and painted on this thing somewhere.
|
|
This message was edited 1 time. Last update was at 2016/02/28 23:15:29
fav movie quotes: "Well let's put her in charge man! - - "Step up to red alert." "Are you sure sir? It does mean changing the bulb." - - "The escape pods not an option, it escaped last Thursday."
Kirasu - Q: What comes out of an Eldar cocoon? A: Corsair butterflies!
|
|
|
|
|
2016/02/28 23:15:03
Subject: looted drop pod
|
|

Longtime Dakkanaut
|
Seeing a drop pod evolve to a crazy scrap heap challenge tank lawnmower is a fun journey.
|
Inactive, user. New profile might pop up in a while |
|
|
|
|
2016/02/28 23:21:19
Subject: Re:looted drop pod
|
|
Sneaky Striking Scorpion
|
thanks Zoggy, the compliment is appreciated. and it was challenging to do this, but i found out when i started playing gorkamorka that i like orks, and the fact that i can kitbash and scratchbuild to my hearts content really hits the spot for me, this thing just proves that. sitting at home i also have a valkyrie, a devilfish, a couple of monster trucks, and a space shuttle model that will eventually be converted into ork vehicles as well. the space shuttle will become an orc mega bomma one day, and it is a full 18 inches or so in length, so that one is going to be a challenge as well.
|
fav movie quotes: "Well let's put her in charge man! - - "Step up to red alert." "Are you sure sir? It does mean changing the bulb." - - "The escape pods not an option, it escaped last Thursday."
Kirasu - Q: What comes out of an Eldar cocoon? A: Corsair butterflies!
|
|
|
|
|
2016/03/20 02:52:09
Subject: Re:looted drop pod an uvver stuff
|
|
Sneaky Striking Scorpion
|
Ok, so i'm back again after a couple weeks hiatus. my apologies but since i'm using a friends comp, i can't control when i get to use it, and if i can't get it over the weekend it means waiting till the next weekend. as some of you may have noticed, I've changed the title of this thread to now reflect the fact that it will contain things other than the looted drop pod.
and there's some good news on that front, it will finally go out to the painter next weekend, as he's free now to start working on it. so stay tuned for upcoming pics of the painted version of the pod.
so i've not been idle, while i was posting the WIP about the pod, i was working on a set of Grot Tanks, sadly it didn't occur to me to take pics of their being built until after i already had them finished. here's the end results of that project
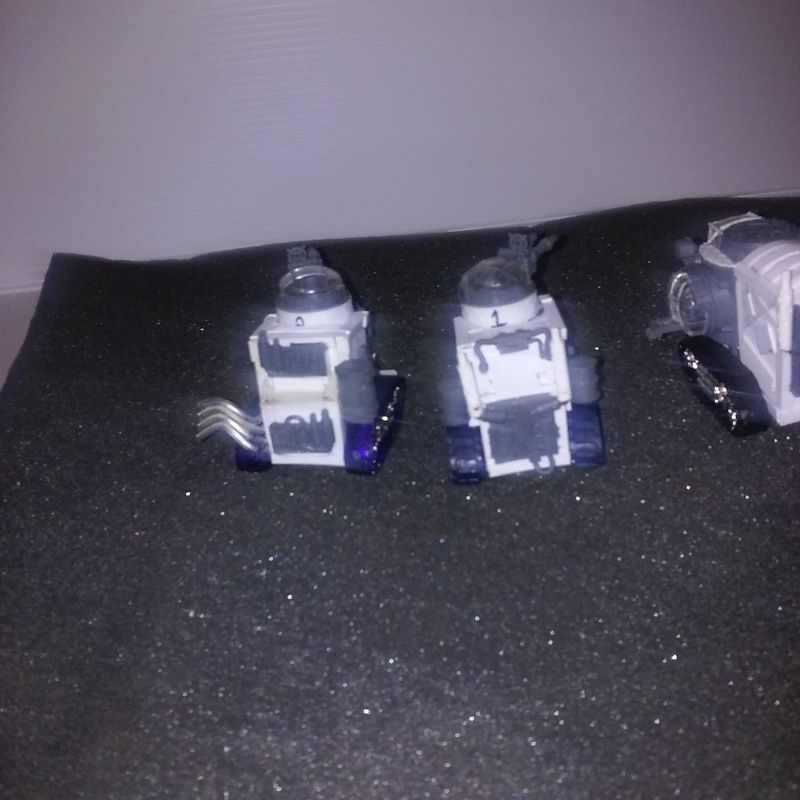
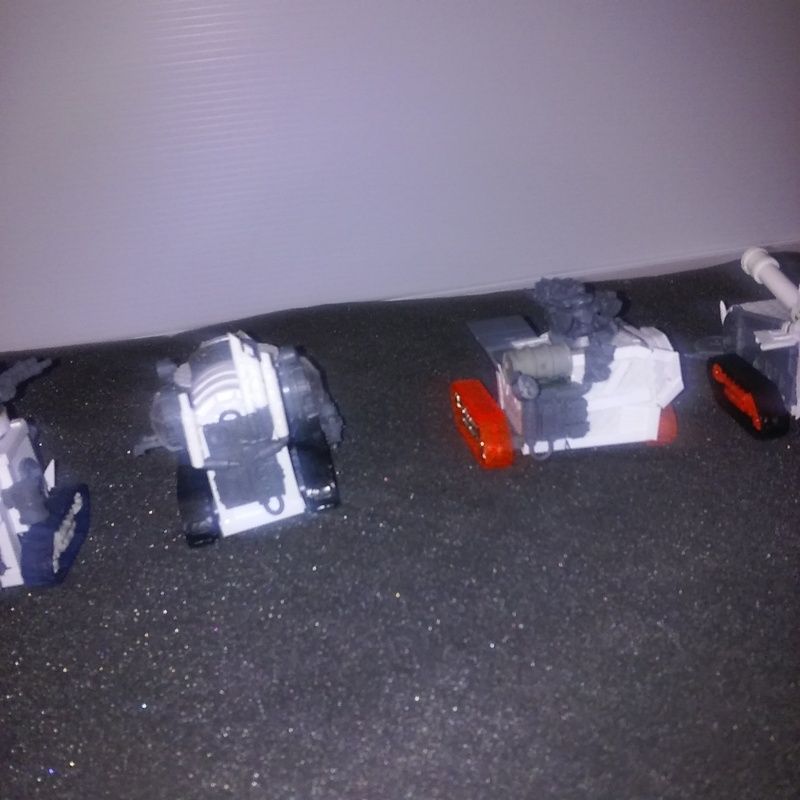
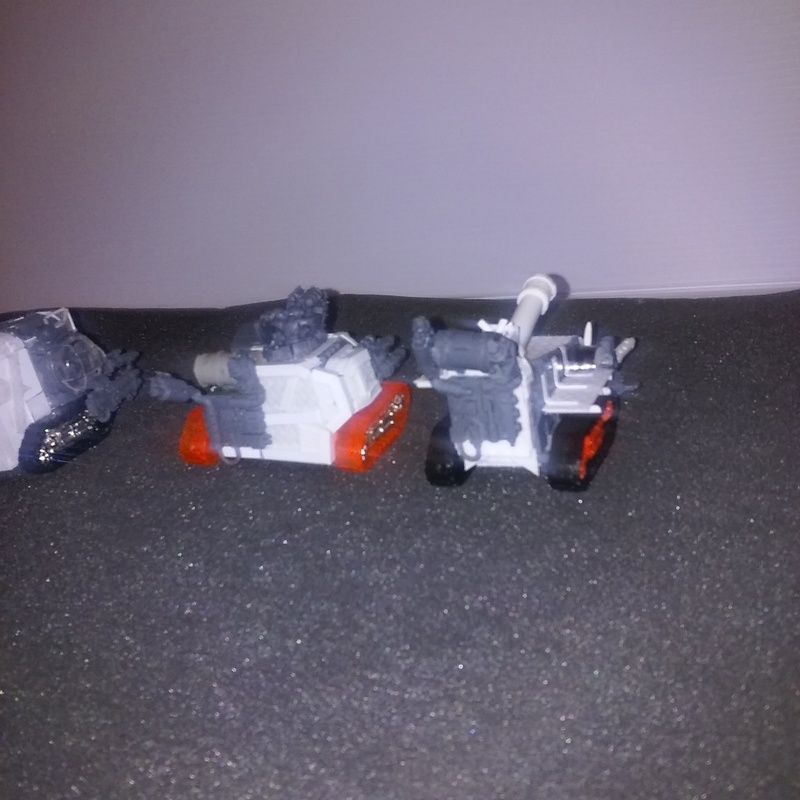
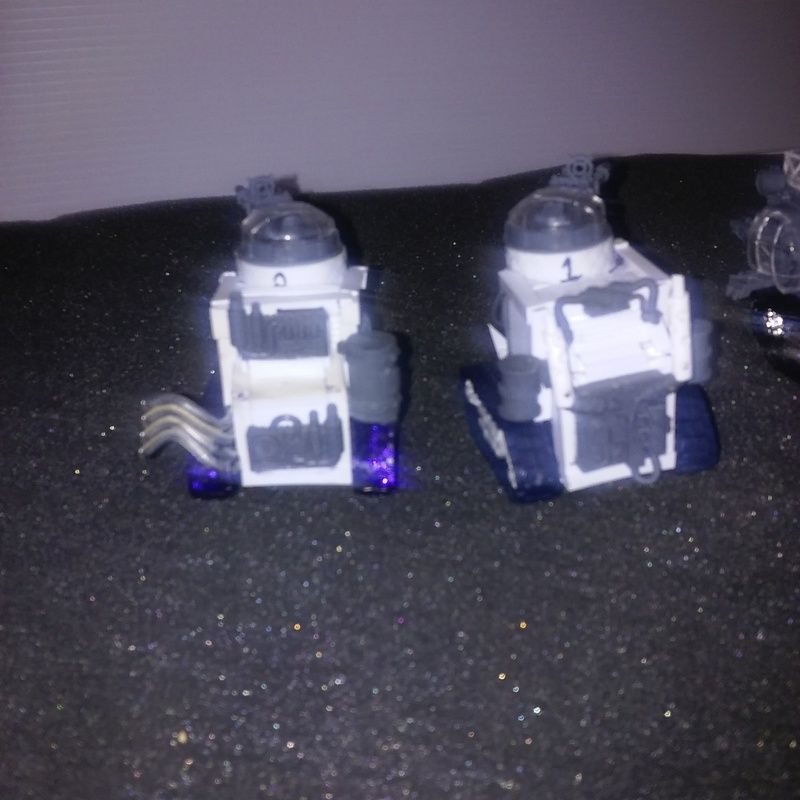
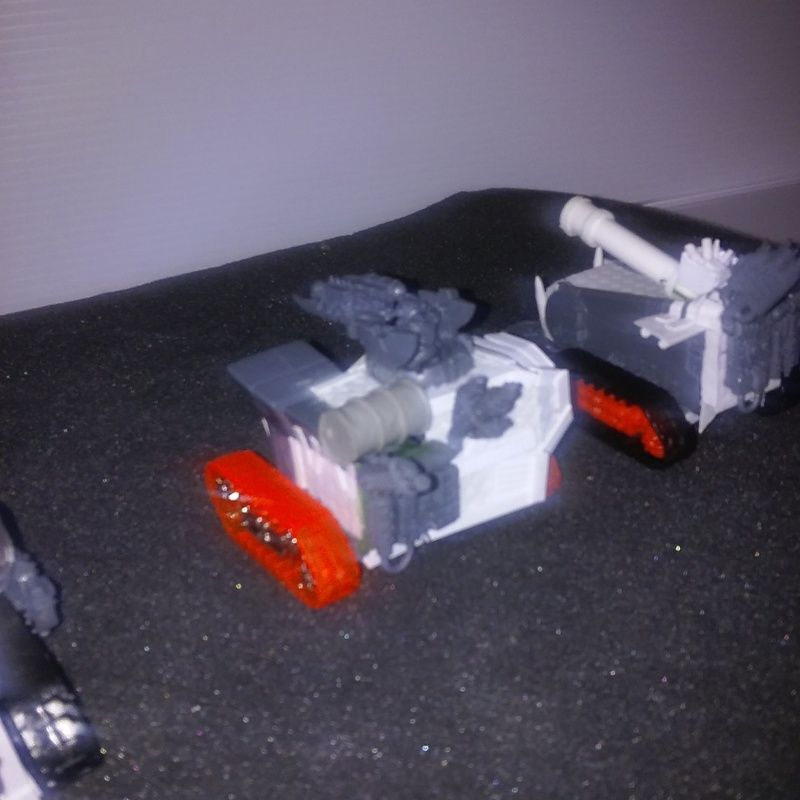
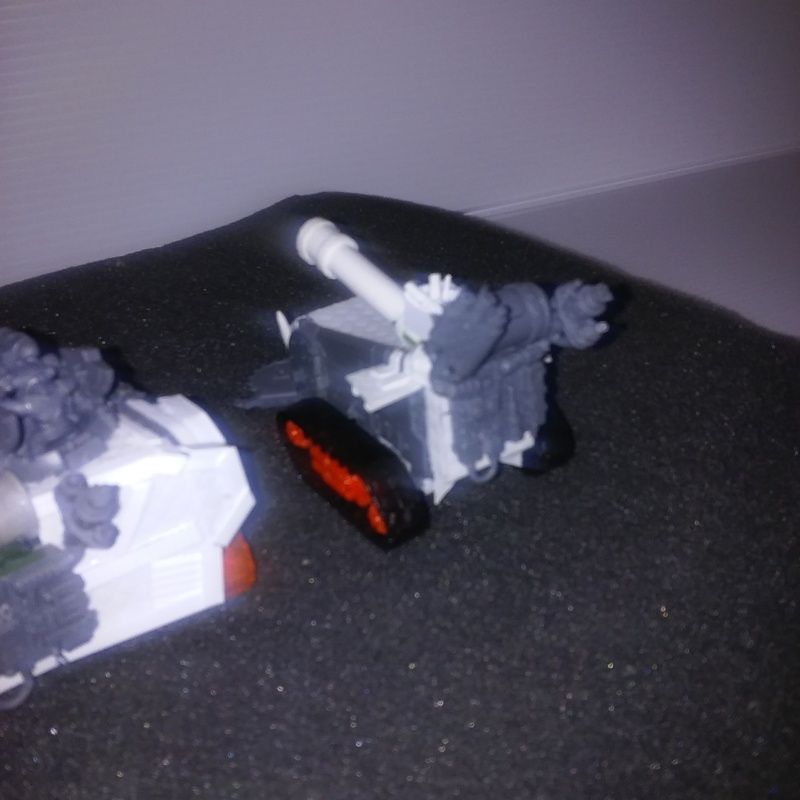
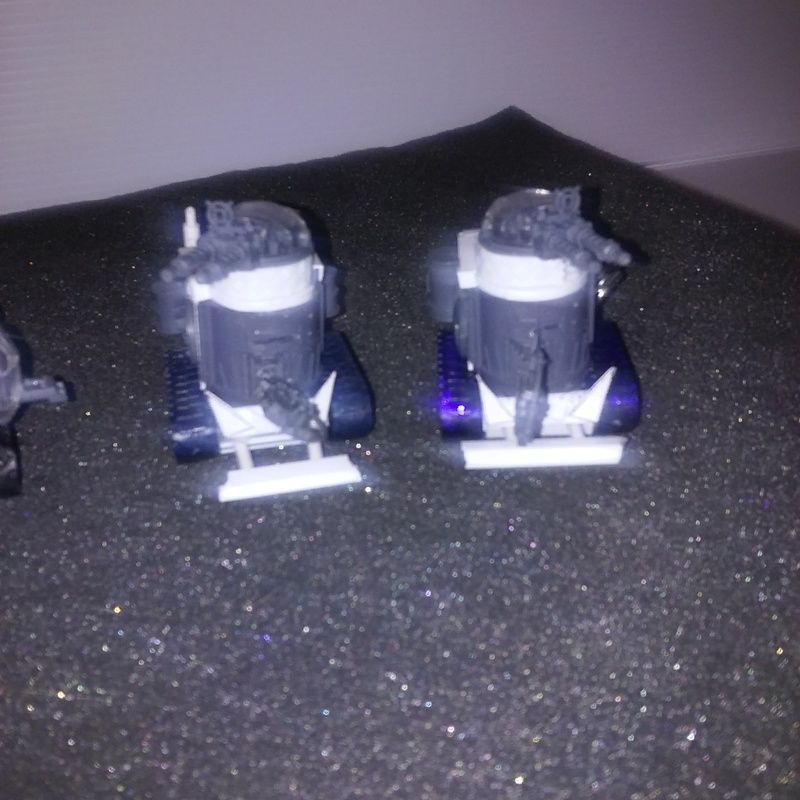
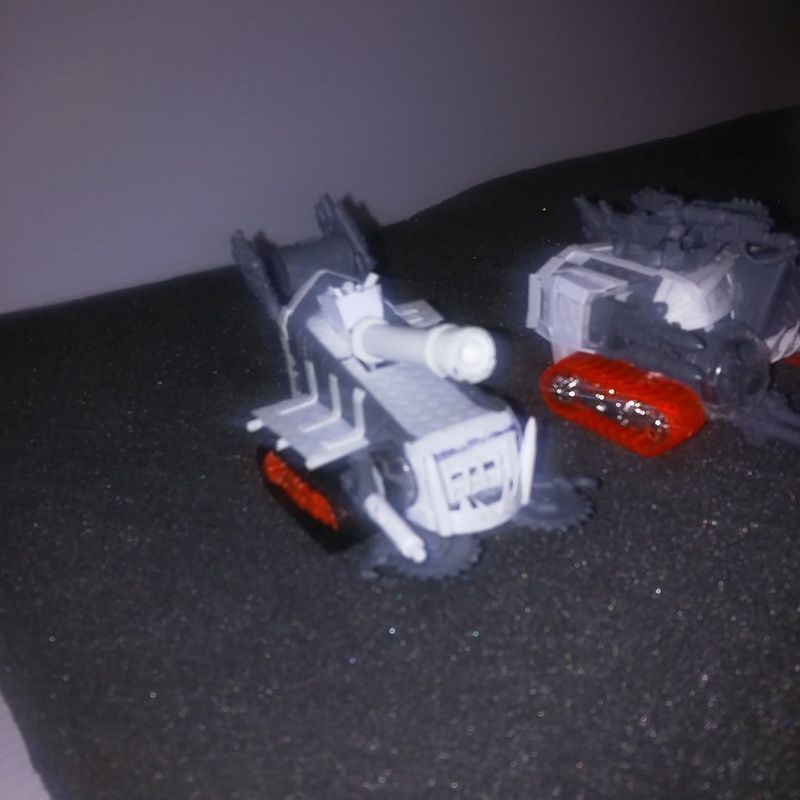
all of these guys have been given pintle mounted shootas, a couple of them actually have more weapons than they are supposed to have simply because it makes the model look better. the two that have the bubble turret on the top of the rounded fronts have been magnetized for scorcha/rokkit launcha/mega blasta.
the one with the Tau engine on the side has also been magnetized but his weapon mount is in the side pod where the rokkit launcha is at in the above pic.
the one with the bubble turrets on the side is using an airplane canopy for his front bubble, and the idea i had was to make it look like a mini sub, instead it came out looking like something from Mad Max beyond Thunderdome. his weapons are also magnetized, with his weapons mount on the left hand side. unlike the others this will also have a magnetic grotzooka, which just came in from Ebay this week.
the various parts i used besides plasticard are the water tower can from the Stompa model, the rear wings from a Tau Skyray/ sans missiles, and a lot of Dakkajet/bomma turrets, as well as the two engine pods from a Tau skimmer, killa kan engine parts, and killa can close combat weapons. I also used droid factory tank treads acquired off Ebay a long time ago expressly for this purpose, and i must say, they work like a charm. when you cut the truck chassis just right utilizing the banded springs where the trukk axles go. they don't quite slot into the droid factory treads but with a little work they will kinda of pop into a workable position. if you try this yourself, just play with it in dry fitting, and you'll see what i mean. i also realized as i was posting this that one of my grot tanks is not in the pics as he was out getting green stuff work done on exhaust pipes, i'll have to correct this and get pics of him for you guys as he is my favorite out of all of these.
next week i'll bring you pics of a new project i've started. i will say this much, the idea was to build a Grot Mega Tank. well i screwed the pooch on that one, but the results are working quite well for a different model. Later all, and i hope you like what i brought ya.
i leave you with this last bit of advice, until next time. "Hold on ta da pin, trow da udder part."
|
fav movie quotes: "Well let's put her in charge man! - - "Step up to red alert." "Are you sure sir? It does mean changing the bulb." - - "The escape pods not an option, it escaped last Thursday."
Kirasu - Q: What comes out of an Eldar cocoon? A: Corsair butterflies!
|
|
|
|
|
2016/03/20 08:09:46
Subject: Re:looted drop pod and udder stuff
|
|

Newbie Black Templar Neophyte
England
|
This whole project is incredible. Being a marine player (and a Templar one at that) seeing a sacrid astartes weapon of war abused so sets off the need to declare war. However it is undeniably awesome! The attention to detail and thought process make this. And seeing what people come up with like this is insane. I really like this and the sleek look is smart. It's all very orky too.
|
  "Trust in the Emperor at the hour of battle. "Trust in the Emperor at the hour of battle.
Trust to him to intercede, and protect his warriors true as they deal death on alien soil.
Turn their seas to red with the blood of their slain.
Crush their hopes, their dreams
And turn their songs into cries of lamentation."
 - "Uphold the honour of the Emperor", - "Uphold the honour of the Emperor", |
|
|
|
|
2016/03/20 10:08:00
Subject: looted drop pod and udder stuff
|
|
Irked Necron Immortal
|
I have to admire the amount of work you've put in to make this, it does look truly amazing!
I can't wait to see it painted. I think it's going to be spectacular.
As for the images, maybe try downloading the Photobucket Mobile app and linking through that? Seems like your pics here are being compressed heavily.
other than that, top notch work!
|
|
|
|
|
|
2016/03/20 10:42:20
Subject: looted drop pod and udder stuff
|
|
Decrepit Dakkanaut
|
Very cool indeed! This kind of project is why my heart is always secretly with the Orks.
|
|
|
|
|
|
2016/03/20 10:57:08
Subject: looted drop pod and udder stuff
|
|
Growlin' Guntrukk Driver with Killacannon
|
Nice work! Would like to see photos through a better camera.
|
|
|
|
|
|
2016/03/28 03:50:35
Subject: Re:looted drop pod and udder stuff
|
|
Sneaky Striking Scorpion
|
@ HighMarshall - thanks for the compliment. that fact that this thing sets off your desires to see it blown up, means i did my job correctly.
@D4V1D0 and Stonned_Astartes - thanks for compliment as well. i agree, there's something going on between my uploading to a comp, then to photobucket, and then here. and the only thing i can figure is that it has to be the crappy phone camera.
@Buttery Commissar - yep, the exact same reason i started doing more Orks. as i stated before, either here or elsewhere a long time ago, i started with 1 box of boys and a scratch built trukk, purely for the purposes of playing GorkaMorka. from there it has evolved into a proppa Waaauuuggh of over 10K pts, 6K in vehicles alone.
@ Big Mek Rekkcrasha, i'm not kidding when i say in the above post that, that gearing bit is not for the faint of heart. it will cause you fits trying to get the GW chain to stay on the gear the way you want. now if you make a gear from plasticard it might be a different story, but i've noticed that a lot of after market stuff doesn't take well to either superglue or plastic glue. now, that said, loot away, i've already seen a couple things i'm going to loot from you, namely your coil spring shocks. and yeah, i seriously need to find me a better camera.
@ Big Mekboy Chumba, thanks for the compliment.
--------------------------------------------------------------------------
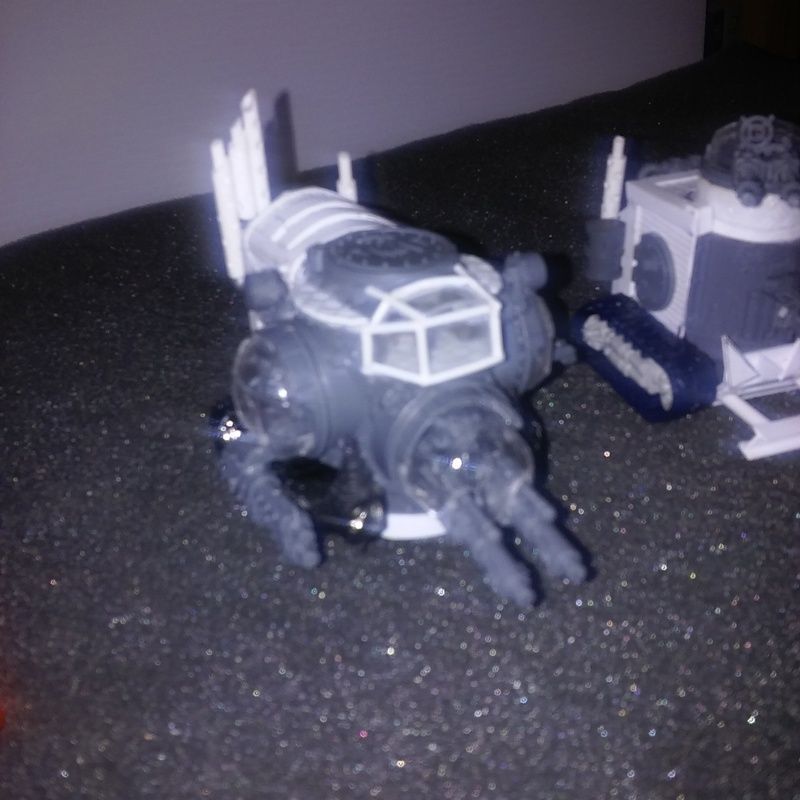
ok, so i wanted to build a grot mega tank to go with the grot tanks above. so i started with this.
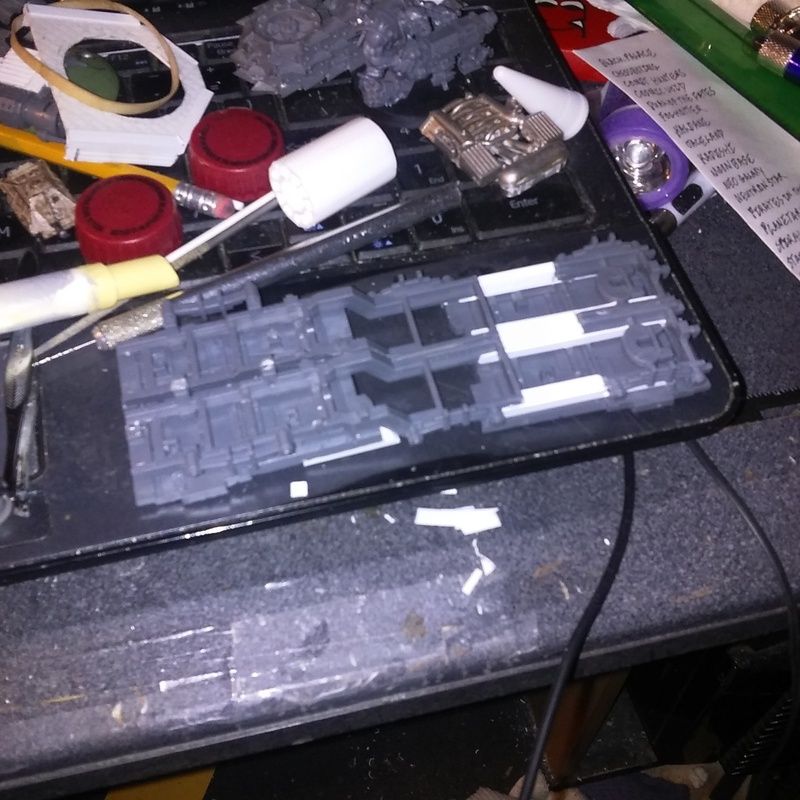
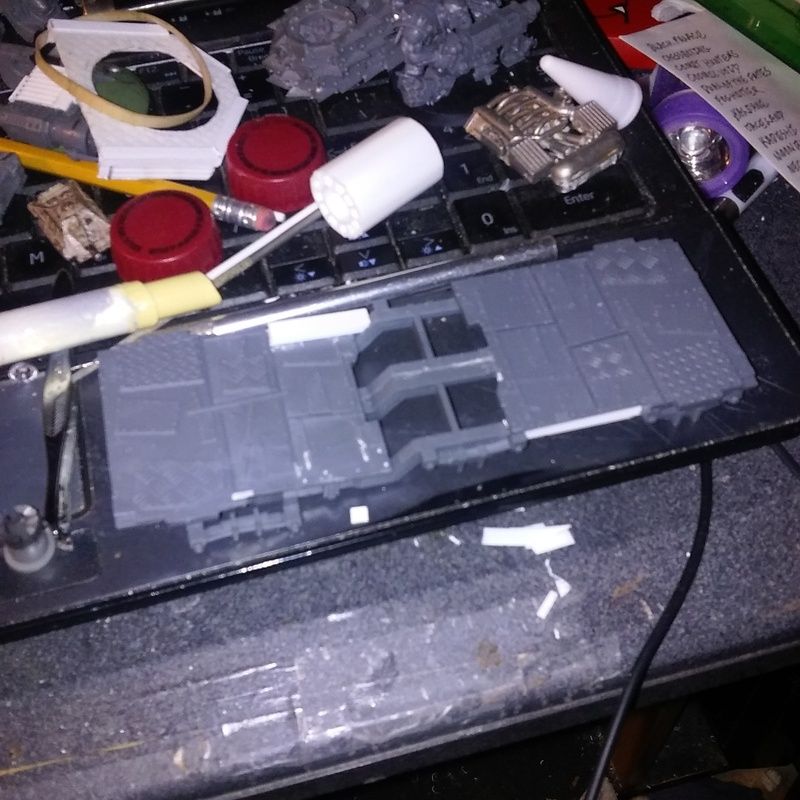
all right we got the bottom chassis done, next thing was i knew i wanted to do something similar to what Forgeworld did on theirs with the side turrets, so i came up with this, once again using excess trukk parts
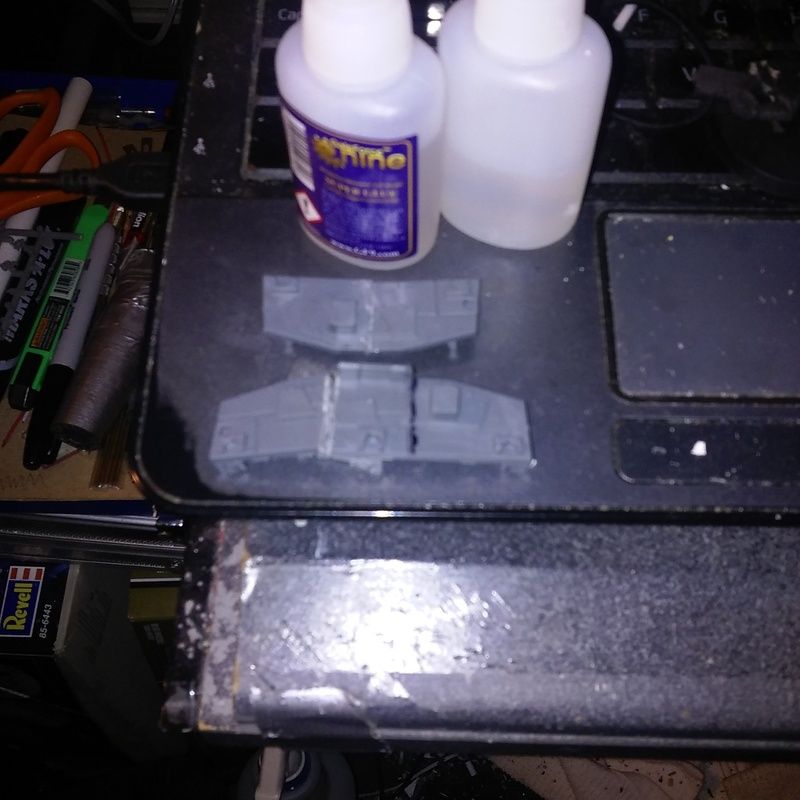
these will be the bottom of the enclosed side turret, giving me a base to build onto and off of. next thing i did was to take the treads that i used for a failed grot kommand tank and razor sawed them in half, this way i could still use them but wouldn't have to use up more of my limited supply of treads from Blood and skulls industry. they were too long for what and where i wanted them, and not long enough to use on the back, so i cut a couple of the treads out, bled freely for my conversion (again, seems i can't build a single model without slicing, poking, drilling, or gouging my fingers), and came ended with this.
so, now i have the front i needed the back, and since i had already used stuff from one old Tamiya model, i dug through what was left, came up blank, so busted out another tamiya model, the German Kv-1. using parts from it, i came up with this read end for my grot mega tank. one of the rubber treads went missing, not sure where, so i had to cut the remaining tread in half and work it into place. fortunately, it goes almost all the way around, and what little area it doesn't i can cover up with armor plate and make it unnoticeable.
now before i did this i had already noticed i was going to have a problem attaching the treads, both front and back to the chassis. so since i was already using parts from the Kv-1 i figured i might as well continue and did this for front and back.
this is what it all looks like assembled. anybody figured out what's wrong yet? if you haven't, just keep reading.
now it's about this time that i began to realize something was amiss, so based on the scale that someone posted elsewhere, not sure where now, the mega tank is the same length as a battlewagon, but not as wide as one. i went in and pulled out my GW battlewagon sat it beside this thing, and started using language not appropriate for most forums.
ok, so i have a chassis that is too large for a Grot Mega Tank, but is just about half and inch longer than a battlewagon, but is almost exactly the same size in width. well, i need another battlewagon anyways, while the battlewagon bus is really cool, it's not really feasible for regular games of 40K, and i have since decided to relegate it to apoc status. here's a scale of the bus.
it's 13 inches without the deff rolla on it, so i have to either deploy it sideways/angled/or hang the back end off the table edge. at any rate, i started using the GW model for reference and came out with the following.

did some more work on the turret area and ended up with this.
from here it was back to the rear to build the top large turret.
i decided that i wanted to use the Kv-1's turret, but i needed to armor it up so it would look less like an after market model, but i wanted to keep the top where the hatch actually opens and closes.
i left the bottom the way it is on the model so i could make use of the turret ring cutout.
this is what it looks like on top of the main body.
i also decided that the one thing i didn't have, was a good representation of a killkannon. so i built it with one instead of magnetizing the turret. added armor plates to cover up the missing treads, finished off the front drivers compartment, and added exhaust pipes to represent the engine, of course i failed to photograph this part of the build. but all told i think it looks spiffy, however, i'm not perfect yet, so please let me know if you guys think something could have been done better.

side by side to the GW model
 still need a name for the looted drop pod folks, remember the best name submitted by someone gets their name painted on the thing.
|
fav movie quotes: "Well let's put her in charge man! - - "Step up to red alert." "Are you sure sir? It does mean changing the bulb." - - "The escape pods not an option, it escaped last Thursday."
Kirasu - Q: What comes out of an Eldar cocoon? A: Corsair butterflies!
|
|
|
|
|
2016/03/28 21:16:39
Subject: Re:looted drop pod and udder stuff
|
|
Nasty Nob
|
Love the looted drop pod, and the battlewagons, and all your stuff really.
My name suggestions: Tiny, Khurt, Hugenormous, Bruce, Tanky McTankface, Grond, Da' Mulcha'.
|
|
|
|
|
|
2016/03/29 10:03:57
Subject: looted drop pod and udder stuff
|
|
Jovial Plaguebearer of Nurgle
|
Grond is the winner in my mind
|
Facts are chains that bind perception and fetter truth. For a man can remake the world if he has a dream and no facts to cloud his mind. |
|
|
|
|
2016/03/29 11:01:59
Subject: looted drop pod and udder stuff
|
|
Growlin' Guntrukk Driver with Killacannon
|
Love the bus! Pity it's to long, maybe keep it as reserve? Seems a shame not to use it. The battle wagon looks an improvement on the gw model!
|
|
|
|
|
|
2016/04/10 05:11:29
Subject: Re:looted drop pod and udder stuff
|
|
Sneaky Striking Scorpion
|
@ Cleatus - thanks for the compliments. since the start of GW's Tank Shock event this weekend, i've started another battlewagon, this time with a lifta droppa for the event. interesting thing when going in and rolling for the events vehicle upgrade, i rolled for adaptive shielding, and the one that raises the vehicles ballistic skill to 5. so the lifta wagon will be unaffected by lance or melta rules, and shoots FAR better than any other vehicle in my army. gonna have to cover the thing in Tau Marker Lights to represent this.
@ Cleatus and Ubl1k - Grond? is there something i'm missing here, i don't get the reference of this name to the looted pod. please enlighten me.
@ Stonned_Astartes - i really like my busses as well, but they won't just go unused. as i stated previously, they will be relegated to Apoc, as Kustom Battlefortresses, this means a slight reworking of them to meet the Battlefortress rules, and they will still be useable. since Apoc usually allows for a larger deployment area this will mean i won't have to hang them off the edge of the table, or place them at a side cant.
---------------------------------------------------------------------------------
so not much to report. this past week or so has seen me put together a 5 man unit of metal kommandos, including the nob w/ PK kommando, two 3 man units of Kromlech gretchin artillery krew, and a 10 man unit of Kromlech iron riech greatcoat tankbusters. Kromlech didn't send me all the arms needed to finish this unit so i'll need to contact them and see if they'll send me two left arms. for the two greatcoats missing all of their arms, i've decided to modify those so that they are weilding tank hammers. thus i don't need Kromlech to send me everything they left out.
I've also been working on repairing and rebasing some bugs that i bought as an army lot. i need to pick up some small flight stands to finish the gargoyles, find another genestealer broodlord, and finish magnetizing the harpy/crone, as well as the carnifex brood. after that i just need to pick up a few more models and i'll pretty much have all the bugs i want.
in spite of working on all of this various infantry, Mek Boss Lojakk found some time to be lazy, and didn't keep as close of an eye on watching his grot workers. when the grots realized that Lojakk was more interested for the time being in watching the old humie vids, Stargate Atlantis, they proceeded to ransack his garage and his scrap yard for stuff they could steal. now they have a unit of Grot Tanks, A Grot Trukk (pics coming soon), and have now openly established themselves as a part of the Grot Revolushun with the inclusion of this little gem. I introduce you to....
the Grot Fightta Bomma
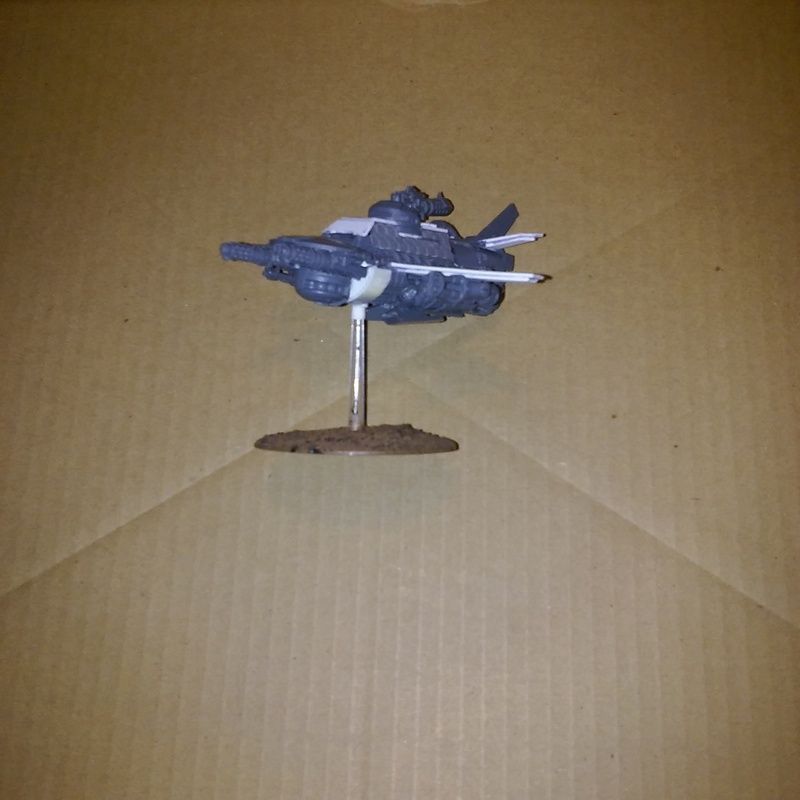
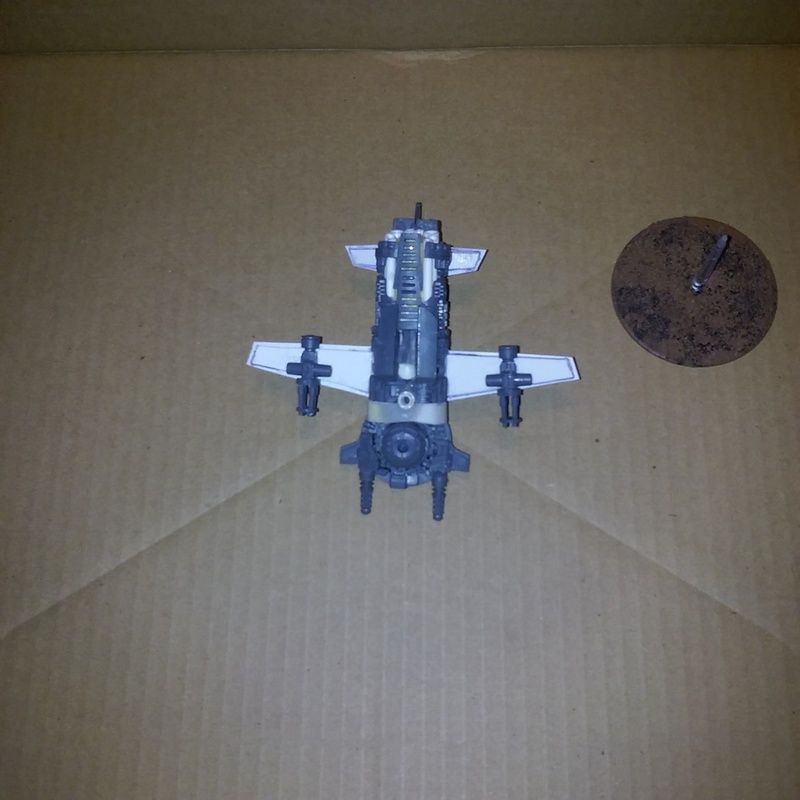
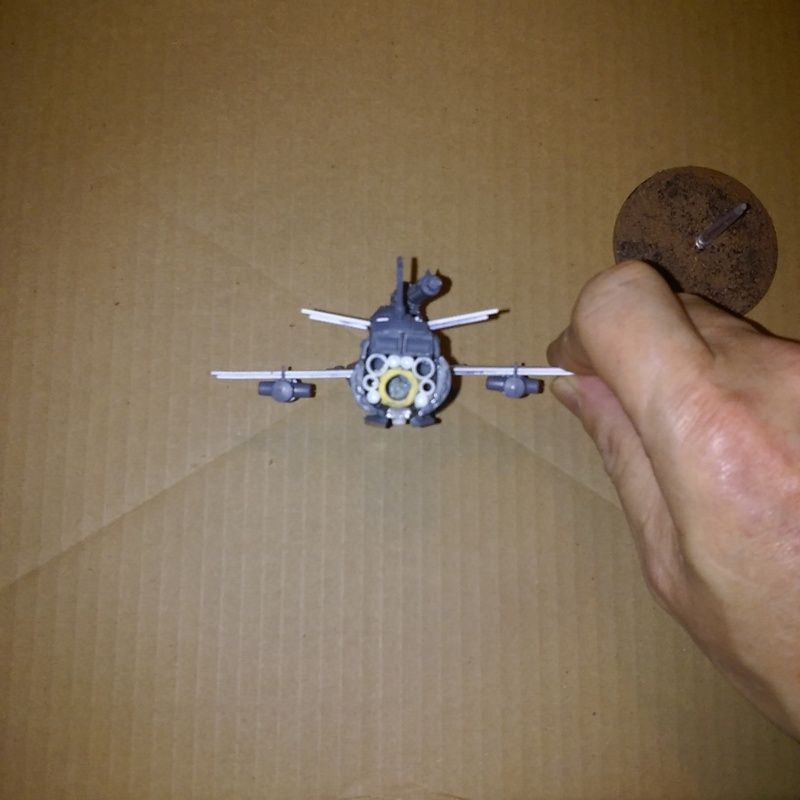
i still need to build and magnetize some bomms for it as the ork bomms from GW are either A) too small, or B) too large to sit right. i want the holes, in the side of the hull (the ones that look like portholes) to hold one set of magnets, and for the bomms to fit over those holes. i also need to finish the bomm targeter's cockpit (the recon drones underside) with a targeting reticule that hangs down slightly off the drones lower hull. plus a new addition i plan to add to this is the inclusion of some itty bitty windows i found that were originally for an SR-71 Blackbird, they will go up top on the pilot's cockpit. i have 4 more recon drones at the house that will be made into Grot Attakk Fighttas. the whole unit, fightta bomma and attakk fighttas, will be run as a squadron, and partially under Grot Tank rules, using -ramshackle-, and -grot riggers-, as well as -deep strike-, -skimmer-, -flyer-, and some made up rules.
RULES -
Armor - F:10, S:10, R:8, HP: 2 each
Flyer - nuff said
Ramshackle - 5+ invulnerable save
Grot Riggers - It Will Not Die
Deep Strike - the squadron may deep strike, but will always scatter the full distance on the die roll. in the case of a hit, the controlling player may choose the direction s/he wishes for the unit to scatter to.
Skimmer - at the beginning of the movement phase the controlling player may choose to use the squadron as skimmers rather than flyers, when choosing to do this, roll on the blitza-bomma table and apply the results, if a crash and burn result applies, roll vs ramshackle, if successful one random model in the squadron is destroyed rather than the whole squad. the squadron may reroll missed hits this turn. at any time the controlling player may declare the squad is returning to flyers. this will take effect at the beginning of thier next turn, and when returning from skimmer to flyer mode the unit may not fire any weapons except for bomms. this represents the squad zooming down to, but hopefully not into, the ground, and angling back up into the sky in an attempt to gain altitude once again.
Movement - movement is 18 inches + 2d6 inches and scatter die. the squadron will move the minimum 18 inches, then roll a scatter die and 2d6. the 2d6 represents the sometimes inefficient rokkit engines, or bad fuel, busted parts, wrong parts, what have you, that are used in the building, and therefore are unreliable when it comes to propulsion. the scatter die is the final facing position of the squad, this represents the fact that flying is new to the Grots, and so they sometimes turn the flight stick the wrong way. Grot Flyers leaving the table go into ongoing reserves but may return to the table either from an edge or via deep strike automatically, and thus do not need to make a reserve die roll.
these rules are by no means finalized, if someone has something to add to these or changes to one or more of the rules, i'm more than willing to listen to what they have to say. in my mind the more random and comedic the outcome for rules for these flyers, the better. that said, i don't want them to be OP, nor do i want them to be worthless, i also need a points cost for the whole squad as well. maybe 50 or 60 pts, that makes them more costly than deffkoptas, but you are getting 5 not just one, and they do have advantages deffkoptas don't have. i also need a slot to put them in, either fast attack, elite, or heavy support, not sure which is more appropriate.
until next time, fight on!
|
fav movie quotes: "Well let's put her in charge man! - - "Step up to red alert." "Are you sure sir? It does mean changing the bulb." - - "The escape pods not an option, it escaped last Thursday."
Kirasu - Q: What comes out of an Eldar cocoon? A: Corsair butterflies!
|
|
|
|
|
2016/06/08 15:23:28
Subject: looted drop pod and udder stuff
|
|
Sneaky Striking Scorpion
|
Not much to report on this except the looted pod 'finally' made it out to the person painting it for me.
I did add to my waaurgh squadren though with the purchase of the wazbom blastajet. Anyone else a little dissapointed that the blastajet weapon uses the same port as the dakkajet supa shootah? I figure its going to take no less than 8 magnets to magnetize the whole weapon kit, or maybe I'll just break down and by the bits , so i can make both weapons, then magnetize thise..
I saw a build recently on facebook 40k group page where a guy went in and in less than a week slapped together a krimson barrun based off the german dr1 fokker. This makes two different versions of thus I've seen, and been impressed by both. I've started ordering the parts to make my own version. Once completed he'll be my flyboss fighter ace.
Ill get pics of bith versions on here in the next day or so.
|
fav movie quotes: "Well let's put her in charge man! - - "Step up to red alert." "Are you sure sir? It does mean changing the bulb." - - "The escape pods not an option, it escaped last Thursday."
Kirasu - Q: What comes out of an Eldar cocoon? A: Corsair butterflies!
|
|
|
|
|
2016/06/08 15:42:45
Subject: looted drop pod and udder stuff
|
|
Regular Dakkanaut
|
some great scratchbuilding there,, love them
|
|
|
|
|
2016/06/08 15:48:10
Subject: looted drop pod and udder stuff
|
|
Sneaky Striking Scorpion
|
@bobbuilder - thanks definately took some effort to do that stuff, and i am getting a lot better at working with styrene. Now i just need to improve my greenstuff skills to the same level.
Painting things....uugh, i hate painting. I'd rather just build it, I'm perfectly happy leaving things in grey, white and whatever color, cause then it makes it easier fir people to see how stuff went together. However, i definately do not dispute the effect that painting has on a model.
So i decided that instead of going to sleep like i should cause i work nights and it's almost noon right now, that I'd instead find those ork tri planes and post them.
Well there's the original one i saw, the other is on facebook, and i guesd I'll have to image host it first before i can post it here.
Anybody have any good ideas on looting an advanced tie fighter? Really want to build the looted x-wing i found on Google as well, and can't have a looted x-wing without having a looted tie fighter.
|
|
This message was edited 1 time. Last update was at 2016/06/08 17:05:06
fav movie quotes: "Well let's put her in charge man! - - "Step up to red alert." "Are you sure sir? It does mean changing the bulb." - - "The escape pods not an option, it escaped last Thursday."
Kirasu - Q: What comes out of an Eldar cocoon? A: Corsair butterflies!
|
|
|
|
|
2016/06/08 18:33:22
Subject: looted drop pod and udder stuff
|
|
Rogue Inquisitor with Xenos Bodyguards
|
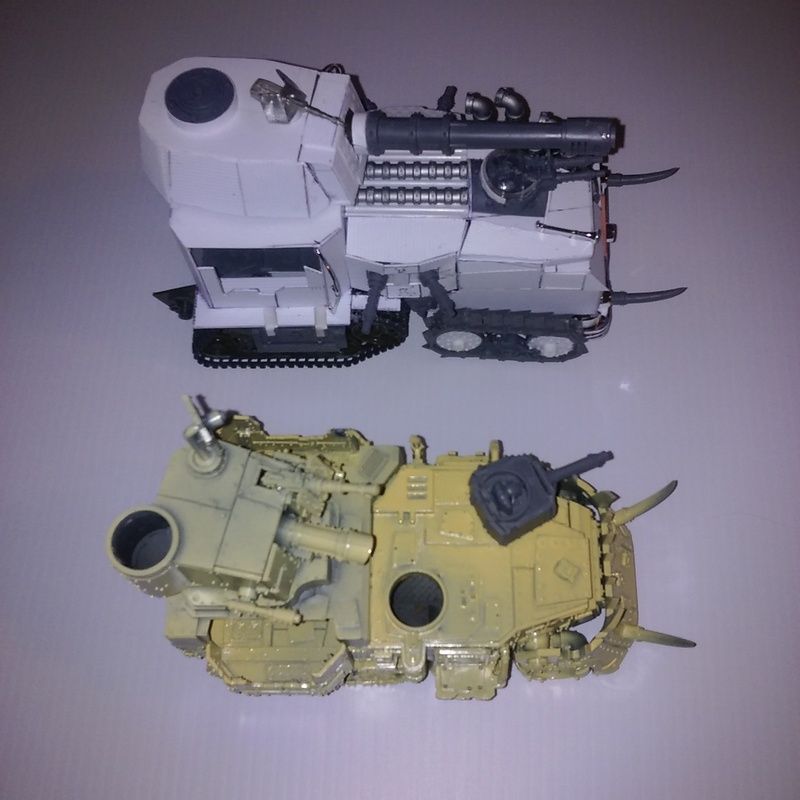
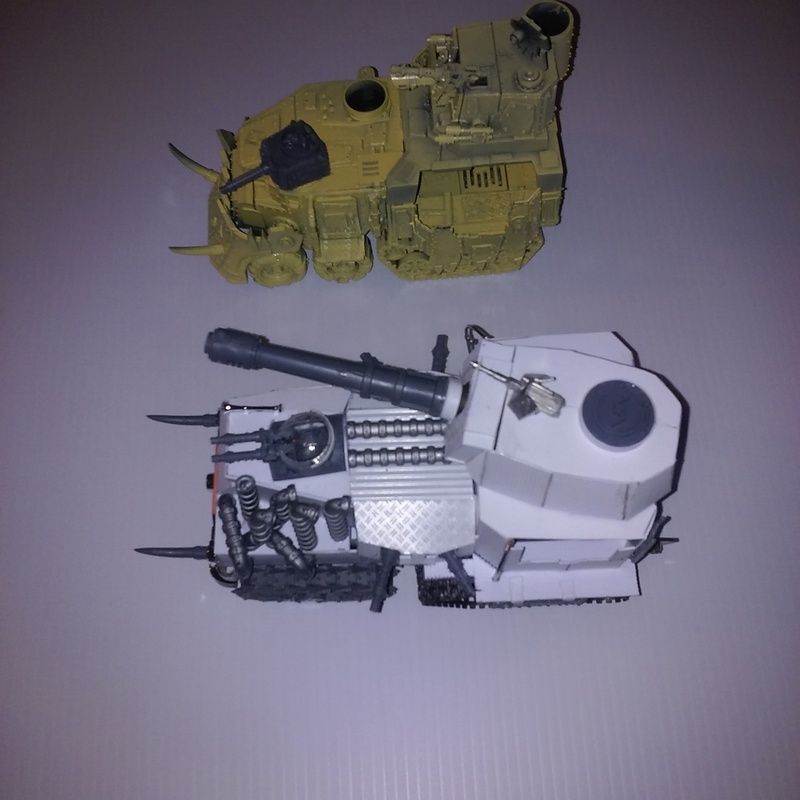
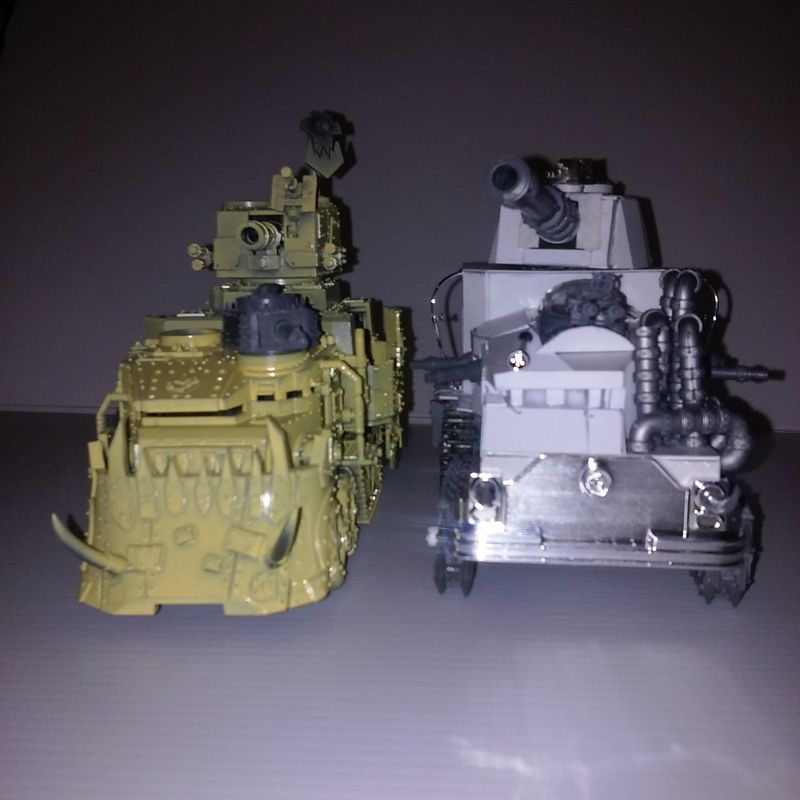
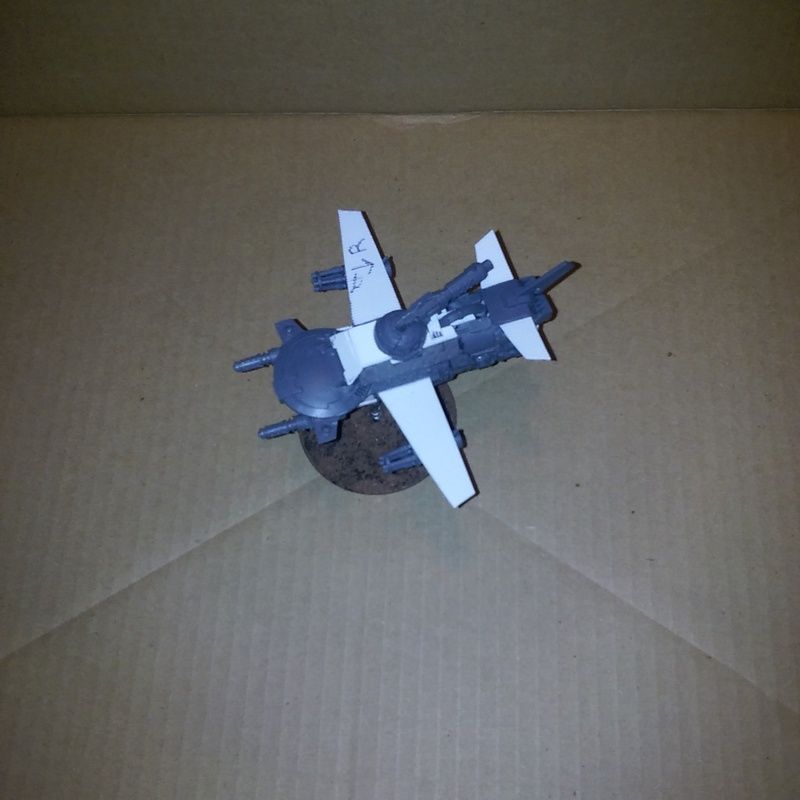
Drop-pod tank turned out "Supa-'Eavy" 
Dri-decker and minitanks all look good!
|
"Your mumblings are awakening the sleeping Dragon, be wary when meddling the affairs of Dragons, for thou art tasty and go good with either ketchup or chocolate. "
Dragons fear nothing, if it acts up, we breath magic fire that turns them into marshmallow peeps. We leaguers only cry rivets!


|
|
|
|
|
2016/06/09 16:26:40
Subject: Re:looted drop pod and udder stuff
|
|
Sneaky Striking Scorpion
|
@shasolenzabi - thanks for the compliment, glad you like the looted pod, and the grot tanks. Coming from you as the supreme tank commander around here, that's high praise indeed.
Sadly, the tri-decker plane isn't mine, but i will have my o own soon enough. Then, of course, I'm going to have to build one that's a double wing. Still looking for a good model or scratch build prop engine i can steal, so i can build my own, and add them to my fightta bomma, and eventually the mega bommer, and supa landa.
But before i get into doing the giant planes, i need to refurbish some of my trukks, and build several more. I currently have about 50 boyz, with no rides for them, and i need to correct that.
|
fav movie quotes: "Well let's put her in charge man! - - "Step up to red alert." "Are you sure sir? It does mean changing the bulb." - - "The escape pods not an option, it escaped last Thursday."
Kirasu - Q: What comes out of an Eldar cocoon? A: Corsair butterflies!
|
|
|
|
|
2016/06/09 16:44:14
Subject: Re:looted drop pod and udder stuff
|
|
Nasty Nob
|
 SebastionSynn wrote: SebastionSynn wrote:
@ Cleatus and Ubl1k - Grond? is there something i'm missing here, i don't get the reference of this name to the looted pod. please enlighten me.
D'oh, I apologize for not replying before. Grond was the name of the battering ram that the forces of Mordor used to break down the gates at Minas Tirith. Seemed like an appropriate comparison.  (ref: http://lotr.wikia.com/wiki/Grond)
I like the Grot Fightta Bomma, and I love the Ork tri-plane!
Mmm, more Trukks. I approve.
|
|
|
|
|
|
2016/06/09 20:59:58
Subject: Re:looted drop pod and udder stuff
|
|
Rogue Inquisitor with Xenos Bodyguards
|
SebastionSynn wrote:@shasolenzabi - thanks for the compliment, glad you like the looted pod, and the grot tanks. Coming from you as the supreme tank commander around here, that's high praise indeed.
Sadly, the tri-decker plane isn't mine, but i will have my o own soon enough. Then, of course, I'm going to have to build one that's a double wing. Still looking for a good model or scratch build prop engine i can steal, so i can build my own, and add them to my fightta bomma, and eventually the mega bommer, and supa landa.
But before i get into doing the giant planes, i need to refurbish some of my trukks, and build several more. I currently have about 50 boyz, with no rides for them, and i need to correct that.
Hmmm, loot some 1/48scale WW-I or even WW-II planes for a good engine Radial engines would fit best!  Automatically Appended Next Post: Automatically Appended Next Post: Me? Supreme tank commander? I a flattered! 
|
|
This message was edited 1 time. Last update was at 2016/06/09 21:39:50
"Your mumblings are awakening the sleeping Dragon, be wary when meddling the affairs of Dragons, for thou art tasty and go good with either ketchup or chocolate. "
Dragons fear nothing, if it acts up, we breath magic fire that turns them into marshmallow peeps. We leaguers only cry rivets!
|
|
|
|
|
2016/06/10 14:09:31
Subject: Re:looted drop pod and udder stuff
|
|
Sneaky Striking Scorpion
|
@Cleatus - ok, now i get the reference, so Grond it is.
I'll have the painter stick a "Cleatus waz 'ere" bit on one of the tank plates with dakkadakka under it for reference.
@shasolenzabi - good idea, two birds, one stone. Use a world war double wing plane as planned, and totally scratch copy the engine for the others.
0_0!!! Really excited here, been watching the tracking number for 5 sets of tamiya tank tracks/wheels that i ordered. They listed the delivery date from hong kong as the 19th to june 1st. The tracks are already in Chicago going through processing, so i should have them by middle or the beginning of next week. This means i can start in on my killa kans and finish them off. Going to do one up in a pixar movie scene, but not going to say what movie yet, that's a surpreese. If this works like i think it will, then I'll also have my first counts as deff dredd in the form of Kromlechs Clanking Destroyer.
|
fav movie quotes: "Well let's put her in charge man! - - "Step up to red alert." "Are you sure sir? It does mean changing the bulb." - - "The escape pods not an option, it escaped last Thursday."
Kirasu - Q: What comes out of an Eldar cocoon? A: Corsair butterflies!
|
|
|
|
|
2016/06/11 01:19:10
Subject: looted drop pod and udder stuff
|
|
Rogue Inquisitor with Xenos Bodyguards
|
Cool beans. I always track my stuff and get ready for delivery day
|
"Your mumblings are awakening the sleeping Dragon, be wary when meddling the affairs of Dragons, for thou art tasty and go good with either ketchup or chocolate. "
Dragons fear nothing, if it acts up, we breath magic fire that turns them into marshmallow peeps. We leaguers only cry rivets!
|
|
|
|
|
|
|
|