Forum adverts like this one are shown to any user who is not logged in. Join us by filling out a tiny 3 field form and you will get your own, free, dakka user account which gives a good range of benefits to you:
No adverts like this in the forums anymore.
Times and dates in your local timezone.
Full tracking of what you have read so you can skip to your first unread post, easily see what has changed since you last logged in, and easily see what is new at a glance.
Email notifications for threads you want to watch closely.
Being a part of the oldest wargaming community on the net.
If you are already a member then feel free to login now.
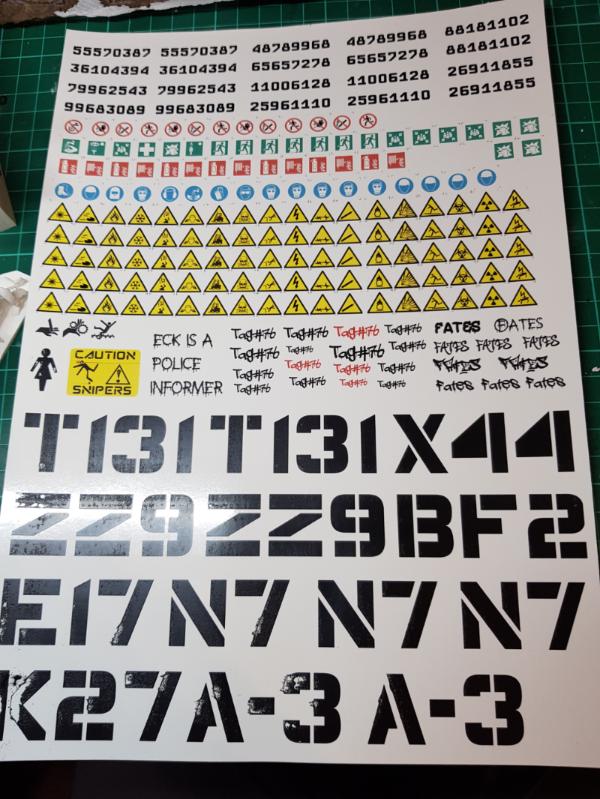
I don't think I used that product but I have used laser printer decal paper for doing graffiti for my necromunda scenery. My main learning point was that the toner isn't terribly robust on the paper and can be scratched away quite easily, especially with big blocks of toner/ colour like the top picture. If you're gentle with it until you can get a sealer coat over the top.it is fine though.
This message was edited 1 time. Last update was at 2019/05/11 10:27:29
Please excuse any spelling errors. I use a tablet frequently and software keyboards are a pain!
Flinty wrote: I don't think I used that product but I have used laser printer decal paper for doing graffiti for my necromunda scenery. My main learning point was that the toner isn't terribly robust on the paper and can be scratched away quite easily, especially with big blocks of toner/ colour like the top picture. If you're gentle with it until you can get a sealer coat over the top.it is fine though.
Spoiler:
Those look great. Do you have any photos of colored decals or white decals?
This message was edited 1 time. Last update was at 2019/05/11 15:42:57
I've printed my own decals for my Salamanders and Deathwatch. They're a bit more awkward and fiddly than the professional decals, but if you take your time and apply them carefully the end result is pretty close.
You need to be careful to make sure you get the right paper for your needs:
Inkjet/Laserjet: There are different papers for these two different printer types. The main difference is that injket paper will need to be sealed with a coat of varnish after printing. If you don't, the ink will start to run once you dip them in water to apply them. Laserjet paper doesn't need to be sealed with varnish before application, but it may help the durability. Whichever type you get, you just put it in your printer like normal paper (though careful to get it the correct way up). Make sure your printer is well aligned/calibrated, because even a small misalignment that you might not notice in printing a document will make a big difference on your decals. Print, and if you used inkjet printer & paper, seal with varnish.
White/Clear: This depends on what colour you're doing the decals and what colour you're planning to apply them on top of. To put it simply, your standard consumer printer assumes that it is printing on white paper and it uses its ink accordingly. If you're printing light cyan*, for example, it will print some fairly widely spaced dots of cyan, which when combined with the white paper looks like a solid area of light cyan. So that's how it will print your decals. The problem then, is if you used clear decal paper and apply your light cyan decal onto, say, a black tank. Because rather than a white background filling in the gap between the ink dots, you now get black background and the area looks like a much darker cyan than you intended. It's even worse if you want your decal to be pure white - the printer doesn't print anything at all because it assumes the paper is already white, and couldn't print pure white even if it wanted to. If that's on clear decal paper, the area that's supposed to be white actually ends up as whatever the underlying colour is (e.g. if you try to print a white Novamarines chapter symbol, the printer won't actually print anything).
*cyan chosen as an example purely because it's one of the standard CMYK ink colours
So, clear decal paper is only really useful if your decal is going to be dark (i.e. heavy ink saturation which doesn't let much of the underlying colour show through), and preferably if it's going to be put onto a light coloured model (e.g. Black Templars chapter symbols in black to go onto white pauldrons). If you want to do the aforementioned Novamarines symbol (white, to go on a blue background), you need to use white paper so that your white shows up. Because your decal paper is white, you need to print the blue area around the symbol, matching your paint colour as close as you can. Then cut into the decal through the blue, apply it, and blend the blue in with more paint.
I've used both paper types. Clear is obviously easier because you don't need to print the surrounding colour and don't need to blend it, but you've got to be careful to only use it at the appropriate times. So, for example, I used clear paper for my 5th company Salamanders decals (black symbol to go onto a yellow/orange background), and white paper for my 3rd company Salamanders decals (orange symbol to go on a black background) - with a blob of black printed around the orange so that I can blend it with my paint.
I'm impressed. I would have believed you if you told me that sheet was store bought. Thanks for sharing Flinty!
And thanks for the brief writeup Bellerophon. This thread has really helped give me a better picture of what to expect while attempting my own transfers.
A couple things I found out while printing and using some transfers on both clear and white:
1 - You absolutely must seal the sheet after printing - whether using ink jet or laser. Also, be sure to get the right paper, as there is a difference in inkjet and laser decal paper.
2 - You can use a very light clear coat to seal the decals once printed, but you must put it on very lightly. If it is any way thick, the decal will not soften well and conform to any curves.
3 - I found the best top sealer for the decals the Testor's decal seal - it comes in a small can and does not yellow and keeps the decal sheet properties well so the decal set can still soften the decal.
4 - I brush a bit of clear semi-gloss acrylic in the area I will put down the decal and then once set, brush clear matte acrylic over it all - it sets the decal and it really makes it disappear on the model.
edit: The decals I printed and used to customize some spots on a helicopter I did for my son actually performed better that the decals that came with the kit!!
This message was edited 1 time. Last update was at 2019/05/13 14:02:59
I did my own transfers for a variety of projects, and the advice about all sounds about right - you can use clear if the transfers are color, or you can use white transfers with a border of the base color of your model.
I did a sheet of Fleshtearer transfers, and put a black border around the saw, using an inkjet, sealed the transfer paper, and then used the micro sol/micro set followed by a dullcoat to blend it in. They came out great.
I used the transfer paper from Micromark. They sell a starter set with the setting solutions, paper, and spray fixative all together.
Here is a Rhino with transfer. It even bent and conformed to the split in the door.
This message was edited 2 times. Last update was at 2019/05/13 16:18:14
"There is rational thought here. It's just swimming through a sea of stupid and is often concealed from view by the waves of irrational conclusions." - Railguns
I used to do custom decals on water-slide decal printer paper like the custom named character bases and they work just fine. Laser printers are best, but those nameplates were done on an inkjet printer with no issues, just make sure you buy the correct paper for your type of printer and wait for the ink to fully completely dry if you use inkjet. Seal the decals with a spray of gloss varnish before you try to apply them.
Nowadays I have a laser printer and my absolute favorite way to do decals for flat areas is to print a reversed image onto label backing paper, the shiny backing paper that the labels and stickers come on that you'd normally throw away as trash after you peel the label off it. Set your printer settings for glossy photo paper and max resolution. Print out whatever (reversed) image you want onto the backing paper, the toner sticks to the backing paper but not very well because it's so glossy. Spread a layer of varnish on the model where you want to "decal", and rub the backing paper into the wet varnish and leave it to dry. The backing paper peels away easily and leaves the toner embedded in the varnish layer, so it's super durable and you can do as large of a "decal" as a full 8x11 sheet on pretty much any surface. A friend originally showed me this technique for how he transferred his own digital art to wood blocks and I immediately wanted to try it to make my own "pre-printed" terrain. Full credit to "The Crafsman" youtube channel, he uses it for a lot of his projects and has a few videos on how to do it:
I had my decals printed. Got an empty decal sheet, got them printed by a color laser printer and done.
Problem is the printer can't print white color, so all have to be placed on a white background. After that, I sealed it in place by PVA glue and then with varnish I use on my models.
I even tried freehand painting on the decal paper and it works too.


 Cadre Coronal Afterglow w1;d0;l0


 Legio Suturvora 2000 points (painted)
 Daemonhunters 1000 points (painted)
 Flesh Tearers 2000+ points (painted) - Balt GT '02 52nd; Balt GT '05 16th
 Kabal of the Tortured Soul 2000+ points (painted) - Balt GT '08 85th; Mechanicon '09 12th


 Neutran Panzergrenadiers,
  Ostrakan Skitarii Legions,
  Order of the Silver Hand