| Author |
Message |
 |
|
|
|
|
Advert
|
Forum adverts like this one are shown to any user who is not logged in. Join us by filling out a tiny 3 field form and you will get your own, free, dakka user account which gives a good range of benefits to you:
- No adverts like this in the forums anymore.
- Times and dates in your local timezone.
- Full tracking of what you have read so you can skip to your first unread post, easily see what has changed since you last logged in, and easily see what is new at a glance.
- Email notifications for threads you want to watch closely.
- Being a part of the oldest wargaming community on the net.
If you are already a member then feel free to login now. |
|
 |
2014/08/31 03:05:36
Subject: Orion Paintworks Commissions: A little bit of everything!
|
|

Colonel
This Is Where the Fish Lives
|
In my lull between commissions, I got some much needed time to work on some personal projects! I've been collecting these phenomenal Fine Molds Star Wars kits over the last year or so and I started putting them together. They have been a nice break from the mountain of 40K models I've been doing for the last couple years. The engineering of these kits is second to none; very few seams/injection pin marks to worry about and they practically build themselves. The TIE/Ln fighter I built earlier this month was done start to finish in less than 4 days. Darth Vader's TIE/x1 Advanced was done in about a week with a majority of the paint work being completed in the span of a day.
I have a couple of more TIEs to work on but I had enough Imperial vehicles for now so I moved on to one of the three 1/72 X-wing I own. This particular one will be painted as Luke Skywalker's Red Five from the Battle of Yavin. Like every Find Molds model, they go together very well with very few seams or gaps to worry about. The only area that I am concerned about is where the butt plate meets the fuselage behind the S-foils; that area will most likely need some filler. After a couple of hours at the desk with some classic Mystery Science Theater 3000 episodes playing on my computer I managed to get the S-foils (where a majority of the kit parts end up) complete, the cockpit tub built, and the laser cannons done.
The next day I moved on to priming the S-foils, landing gear, and cockpit tub and let everything sit over night. One of the cool features of this kit is that the landing gear is removable, held in place by a rubber polycap buried under the exposed engine piece. The kit supplies the closed gear bay as well so you can display the ship if flight. I haven't decided whether to display it in flight or landed so I am going to paint both sets of gear.
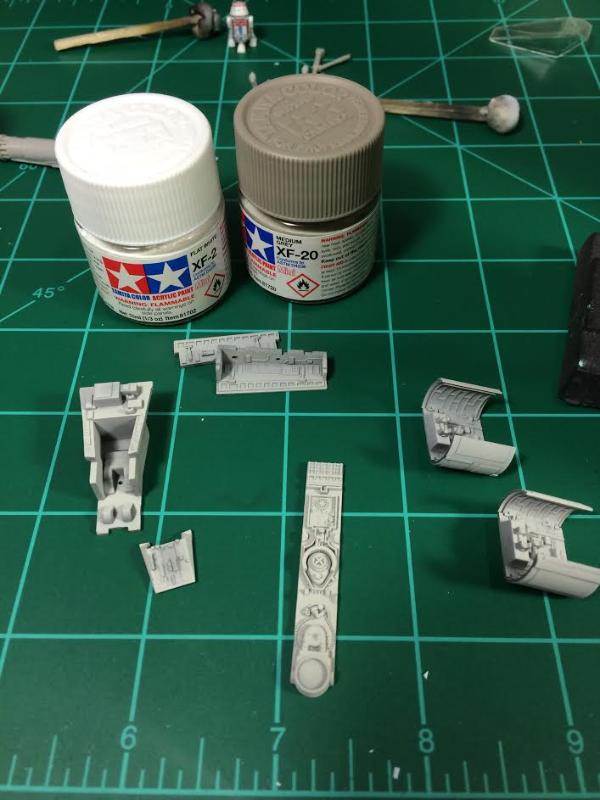
After the primer was dry, I basecoated the droid strip, the cockpit tub, and the landing gear bays. I decided to go with the color the kit calls out, which is a mix of Tamiya Flat White (XF-2) and Medium Gray (XF-20). I was more or less pleased with the color as it is a slightly warm light grey that turned out quite nice over the black basecoat. I might play around with this color by adding a tiny amount of Tamiya Buff (XF-57) to mix to warm it even more.
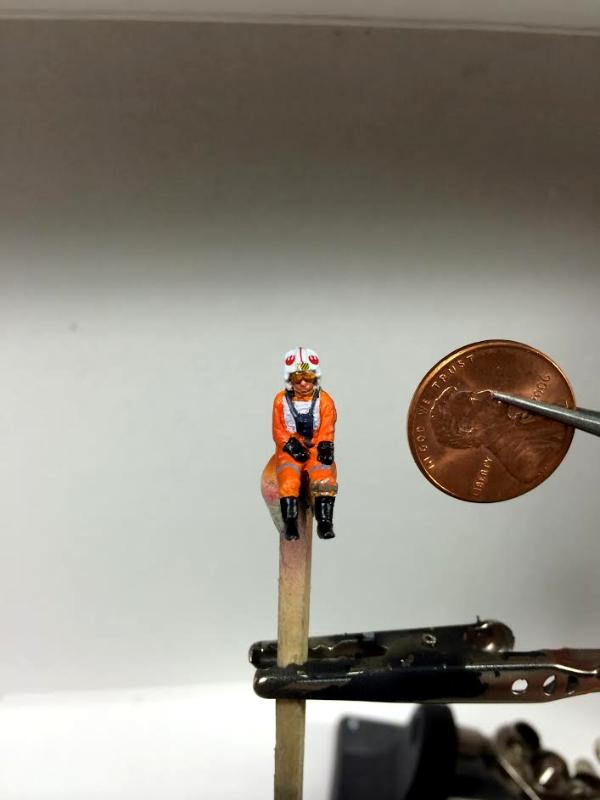
I also managed to get Luke painted up as well. I preshaded the model with VMA Tank Brown before masking off the helmet and painting the flight suit with VMA Orange. The boots and gloves are VMA Black and the vest and helmet are VGC Ghost Grey with a VMC Grey wash. The chest device is VMA Intermediate Blue with a VMA Black square painted on it. The harness is GW Codex Grey while the leg strap is RMS Olive Drab with VMA Steel used to pick out the cylinders. His skin is GW Dwarf Flesh with a wash of GW Orygen Flesh. The visor is undercoated with VMA Steel and then painted with Tamiya Clear Orange (X-26). He has three decals on his helmet: two starbirds and the caution stripes/red stripe on the crest. Of course, he will be buried in the cockpit with most of this not even visible, but I wouldn't be happy with myself unless he was fully painted.
The kit gives you decals and parts to build four different X-wings present at the Battle of Yavin: Red Leader (Garven Dreis), Red Two (Wedge Antilles), Red Three (Biggs Darklighter, and Red Five (Luke Skywalker). Since the pilots had different astromech droids in their starfighters, the kit gives you two R2 domes, one R5 dome, one droid body, and various decal options for them. Like I stated before, I'm building Red Five which had R2-D2 sitting in the astromech socket, so to keep myself busy while everything was drying, I built up one of my favorite droids: R5- D4!
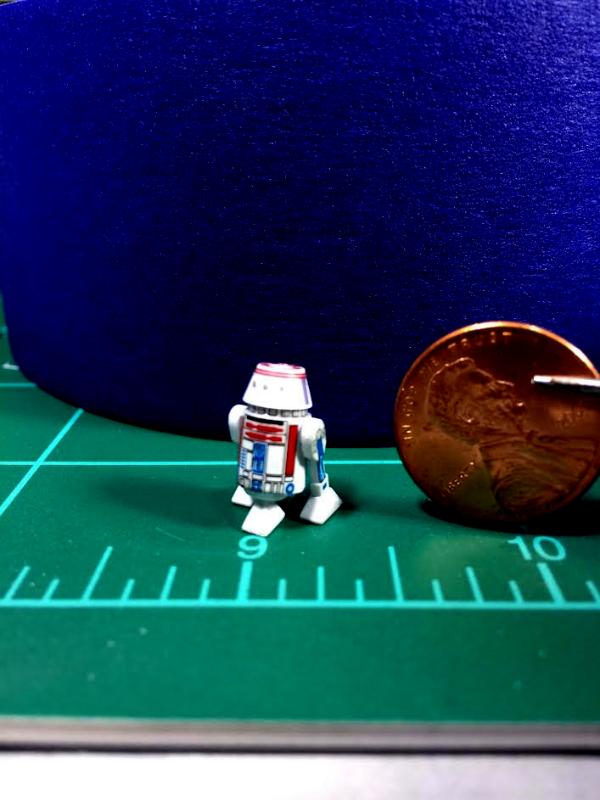
This little fella has eight (!) separate decals on him and they went one okay except for the ring underneath his head. It took a lot of coaxing to get that decal in there all the way and I eventually gave up after I got it looking okay from the front. I need to seal the decals in with another coat of Future and I might give him a little bit of weathering (like everything else in the Star Wars Galaxy).
The sight of this little guy always makes me laugh, mainly because of this Robot Chicken clip:
I'm at work for the last night in my shift so when I get home tomorrow morning (8/31), I'll start working on the next part of the build: finishing the cockpit and completing the fuselage. Stay tuned!
|
|
This message was edited 11 times. Last update was at 2015/09/03 03:50:00
 d-usa wrote: d-usa wrote:"When the Internet sends its people, they're not sending their best. They're not sending you. They're not sending you. They're sending posters that have lots of problems, and they're bringing those problems with us. They're bringing strawmen. They're bringing spam. They're trolls. And some, I assume, are good people."
|
|
|
 |
|
2014/08/31 15:42:03
Subject: Re:WIP: Fine Molds 1/72 X-wing (Update: 8/31)
|
|
Colonel
This Is Where the Fish Lives
|
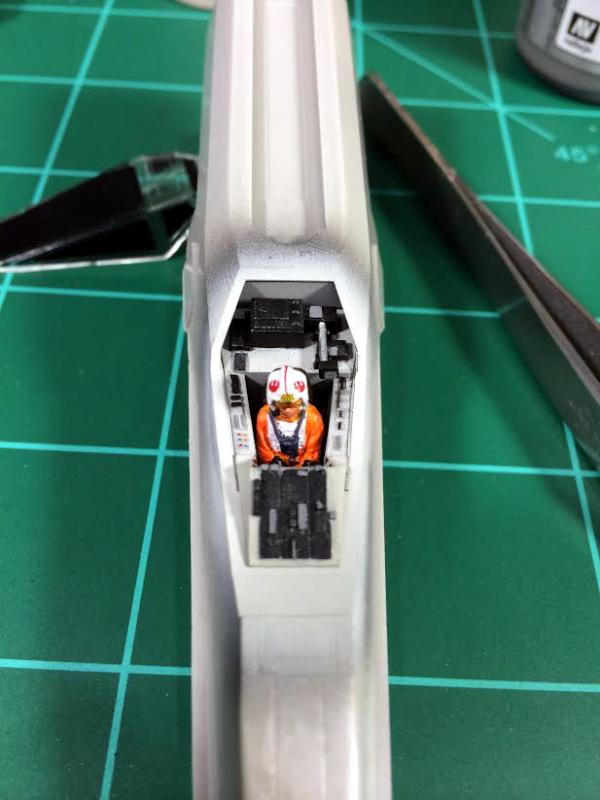
Working without sleep, I managed to finish the cockpit tub and instal it in to the fuselage. I decided against adding the tubes from the rear bulk head; I just didn't have it in me this morning. I highlighted the black areas with a Tamiya gunmetal weathering pastel and picked out some other details with GW Codex Grey. Afterwards, I gave the entire tub a wash with Vallejo Model Wash Grey. All and all, I think it turned out pretty good.
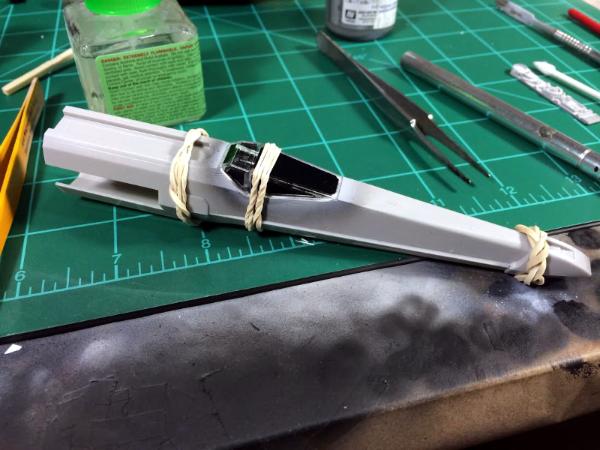
I glued the two halves of the fuselage together and secured everything with rubber bands. To secure the canopy, I used MicroScale Industries Micro Kristal Clear. It's sort of like PVA glue and is totally transparent when it dries. Now I just have to wait for the glue to dry and I can fill and sand the nose cone and the rear sides.
After I take a short nap, I'll do some more work to this little guy.
|
|
This message was edited 1 time. Last update was at 2014/09/02 12:49:57
d-usa wrote:"When the Internet sends its people, they're not sending their best. They're not sending you. They're not sending you. They're sending posters that have lots of problems, and they're bringing those problems with us. They're bringing strawmen. They're bringing spam. They're trolls. And some, I assume, are good people."
|
|
|
|
|
2014/09/02 13:22:13
Subject: Re:Orion Paintworks Commissions (plus some personal goodies!): Fine Molds 1/72 X-wing
|
|
Colonel
This Is Where the Fish Lives
|
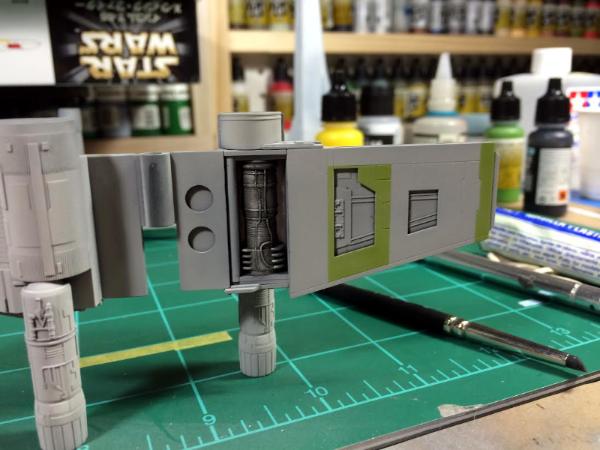
While I waited for the primer to dry on the fuselage, I moved on to painting the S-foils. After giving them a basecoat of my X-wing color (Medium Gray + Flat White), I started painting various panels. The kit comes with a fairly extensive decal kit but I decided to hand paint them where ever I could. I started with the green panels (2:1 mix of VMA Pale Green and VMA Yellow) on the lower starboard wing. Here is where I hit the first setback of the project. I decided to use Micro Mask masking fluid to mask off the interior of the wing. After painting it, I tried to remove the mask and it pulled up the basecoat and some of the primer! Frustrated, I removed as much as I could and repainted the insert. The second time around, I used the decal sheet to cut a mask out of 18mm Tamiya Tape and used that instead. I painted the exposed engines with a mix of VMA Steel and VMA Black, gave them a wash of GW Badab Black and highlighted them with some Tamiya steel pigments.
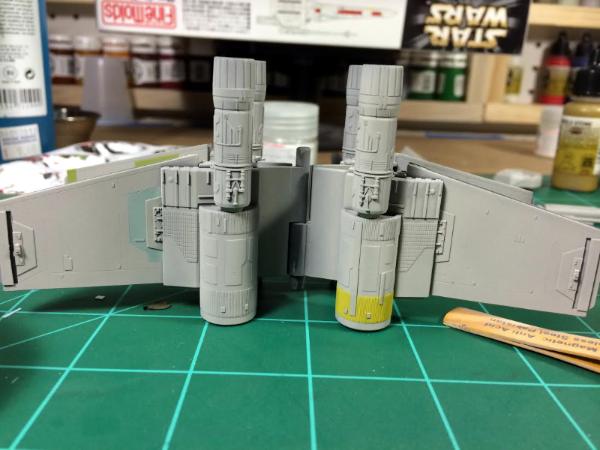
I moved on to the top starboard wing and painted a light blue panel with Tamiya Light Blue (XF-23). This panel was not in the decal sheet but it is plainly visible in the photographs of the studio model. I also painted painted the top port intake cover Tamiya Flat Yellow (XF-2), another marking not called out on the decal/color sheet. I protected everything with a light coat of Future after these panels were done.
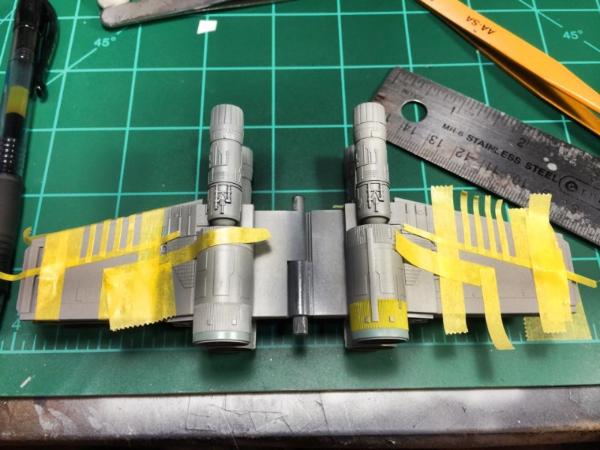
Now it was time to seriously test my patience. Like the panels, I decided against using the kit decals for the Red Squadron markings. Using a combination of the decal sheet, excellent photos of the studio model, and the decal sheet, I managed to get all of the masking down for the red markings... and let's just say to took a lot of effort (and lots of ripping tape off in frustration). In the end, I was pleased with how it looked and after carefully studying it (and getting a second opinion from my wife), I decided it was pretty symmetrical.
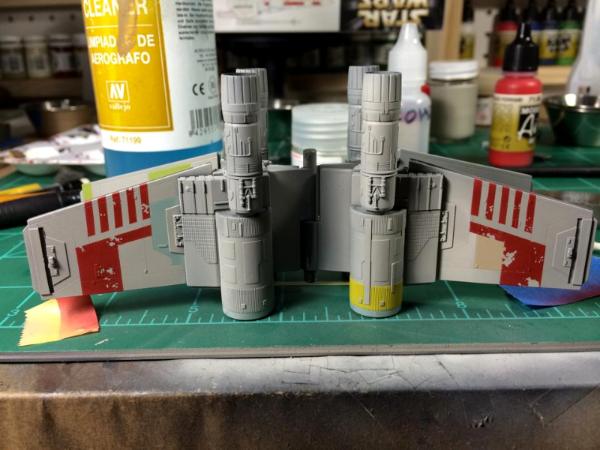
After the masking fluid dried, it was time to spray the red markings on. I had first decided to use Tamiay Flat Red (XF-7) as the red color. I thought it was a little too bright, but nothing I couldn't darken after a couple of filters, washes, and weathering. When I first started spraying the red, I quickly discovered that I had thinned it too much, and combined with the coat of Future, it started running everywhere. I tried to wipe most of it up with it was still wet but ended up with a fingerprint in the red area. Since red is a translucent color, I decided to try and remove it with a little bit of alcohol. This turned out to be a mistake as the alcohol attacked the Future in the soon-to-be red area and ate away some of the base color. I repaired the exposed area with the base color and sprayed the red paint, this time using a mixture of VMA Italian Red and VMA Hull Red mixed 2:1. After the pain dried I used a piece of poster tack to remove the liquid mask. Upon removing the mask, I discovered that the alcohol had bleed underneath and damaged the paint, so I fixed that area which ended up making that part brighter than the rest of the wing. That should be okay because filters, washes, and weathering will darken it. Plus, the X-wing has a little bit of a mottled look due to the wear and tear on them. I added the brownish panel on the port wing using Tamiya Buff (XF-57), yet another detail missed in the kit instructions but clearly visible on the studio model.
That's it for now! The next step will be painting the fuselage and adding the wings.
|
d-usa wrote:"When the Internet sends its people, they're not sending their best. They're not sending you. They're not sending you. They're sending posters that have lots of problems, and they're bringing those problems with us. They're bringing strawmen. They're bringing spam. They're trolls. And some, I assume, are good people."
|
|
|
|
|
2014/09/03 19:25:55
Subject: Re:Orion Paintworks Commissions (plus some personal goodies!): Fine Molds 1/72 X-wing
|
|
Colonel
This Is Where the Fish Lives
|
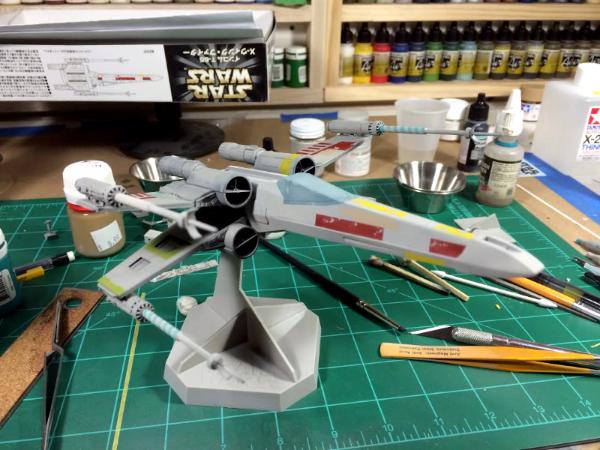
I managed to get a little more work done on the X-wing before my next couple of commission models (a Knight-Titan and a Stormraven) come in the mail this week. I repainted the "barber stripes" on the two cannons; the first time I painted I used Tamiya Light Blue (XF-23) which wound up being too dark. I repainted them with the base color and mixed P3 Arcane Blue and VMA White at 1:1, which was a remarkably close color to decal of the stripes. The red, yellow, and buff were the same as I used on the S-foils. The blue canopy was painted with Tamiya Light Blue (XF-23), then I dabbed on masking fluid and painted it with a coat of Tamiya Light Blue (XF-23) and Medium Blue (XF-18) mixed 2:1.
Now time to add the filters and weathering... this will probably take longer than it did to get to this stage, but it will be worth it when I'm done.
|
d-usa wrote:"When the Internet sends its people, they're not sending their best. They're not sending you. They're not sending you. They're sending posters that have lots of problems, and they're bringing those problems with us. They're bringing strawmen. They're bringing spam. They're trolls. And some, I assume, are good people."
|
|
|
|
|
2014/09/03 20:37:31
Subject: Orion Paintworks Commissions (plus some personal goodies!): Fine Molds 1/72 X-wing
|
|

Is 'Eavy Metal Calling?
|
Coming along nicely!
|
|
|
|
|
|
2014/09/03 21:00:53
Subject: Orion Paintworks Commissions (plus some personal goodies!): Fine Molds 1/72 X-wing
|
|
Colonel
This Is Where the Fish Lives
|
Thanks mate!
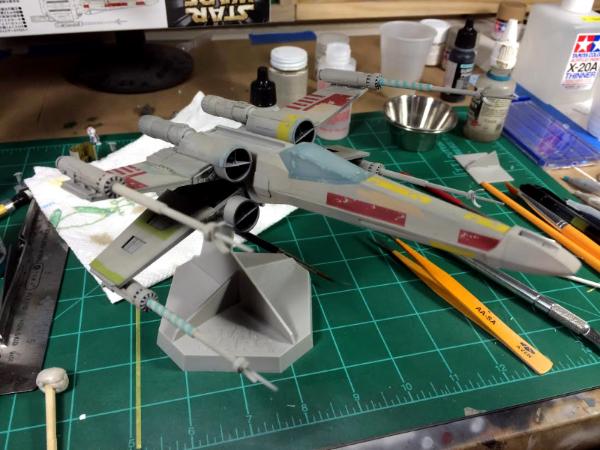
I've now added two passes of Mig Productions Brown Filter to warm the base color and use it as a starting point for weathering. After the filter dries, I will need to give it a coat of Future to add decals and a wash before more weathering.
Before:
After:
|
d-usa wrote:"When the Internet sends its people, they're not sending their best. They're not sending you. They're not sending you. They're sending posters that have lots of problems, and they're bringing those problems with us. They're bringing strawmen. They're bringing spam. They're trolls. And some, I assume, are good people."
|
|
|
|
|
2014/09/05 00:45:50
Subject: Re:Orion Paintworks Commissions (plus some personal goodies!): Fine Molds 1/72 X-wing
|
|
Colonel
This Is Where the Fish Lives
|
I had to work today so I wasn't able to make any progress on the X-wing, but I did attend my first Northern Virginia IPMS meeting last night. This was a big step for me for a couple of reasons: first, I'm a somewhat shy introvert (those two things are different!) that is uncomfortable in social situations with strangers, and two, it is only the second time I had publicly displayed my work (the first time was at the Huzzah Hobbies Painting Competition in 2012). Needless to say, everyone I talked to was very friendly and made me feel welcome! Another plus was there was five new members besides myself in attendance last night so I wasn't the only new guy. The club holds a friendly model contest every month and I brought a small selection of models to display: the TIE/Ln fighter, Darth Vader's TIE/x1 Advanced, my Deathwing Venerable Dreadnough, and a Grey Knights terminator. This was the result:


That's right, my TIE fighters won First Place in the Sci-Fi category and my space marine models won Best of Show! I was beyond excited to recieve the Best of Show reward, especially considering there was some stiff competition that night! Unfortunately, I will not be able to attend next month's meeting because of work, but I am looking forward to bringing even more models the following month.
On the commission front, I am awaiting an Imperial Knight-Titan and Stormraven to arrive in the mail this week. They will be painted in the same manner as the two Stormtalons I completed last month. I have also been contacted by a repeat customer to paint his soon-to-be-arriving Infinity PanOceanian force. This should be interesting as I have never painted Infinity miniature before but I know they are pretty small and packed with details. Another client contacted me earlier this week to let me know that he ordered the kit for his submarine model, the USS Michigan (SSBN-727). The kit is coming from Asia and he isn't sure when it will arrive, but when it does I am looking forward to starting on it.
|
|
This message was edited 1 time. Last update was at 2014/09/05 09:32:39
d-usa wrote:"When the Internet sends its people, they're not sending their best. They're not sending you. They're not sending you. They're sending posters that have lots of problems, and they're bringing those problems with us. They're bringing strawmen. They're bringing spam. They're trolls. And some, I assume, are good people."
|
|
|
|
|
2015/11/06 14:21:18
Subject: Orion Paintworks Commissions (and other exciting things on my workbench!): Fine Molds 1/72 X-wing
|
|
Is 'Eavy Metal Calling?
|
Congratulations, that win looks well deserved!
|
|
|
|
|
|
2014/09/06 14:44:17
Subject: Orion Paintworks Commissions (and other exciting things on my workbench!): Fine Molds 1/72 X-wing
|
|
Imperial Agent Provocateur
The Ocean
|
Beautiful work.
|
|
This message was edited 1 time. Last update was at 2015/02/14 02:33:46
Crusader, Honor Guard of the Cardinal's Crimson.
 |
|
|
|
|
2014/09/07 12:02:58
Subject: Re:Orion Paintworks Commissions (and other exciting things on my workbench!): Fine Molds 1/72 X-wing
|
|
Colonel
This Is Where the Fish Lives
|
I've been working these last few days so I haven't been able to make too much progress on the X-wing, but I have done a little since the last time I posted.
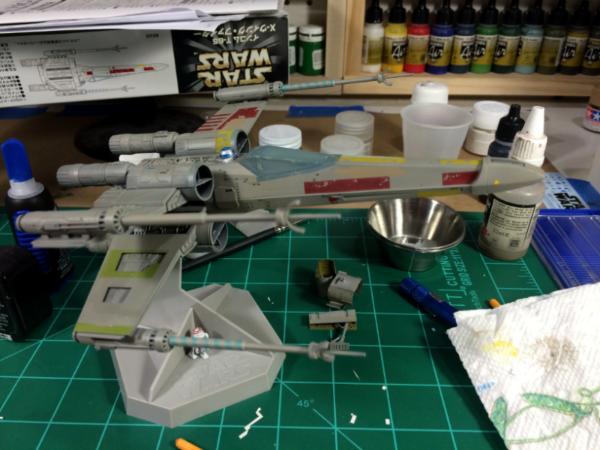
I got all of the tiny decals on! There are numerous black squares all over the model and most of them were individual decals and were a total pain to put on. According to the decal guide, there is supposed to be more than what I put on but I gave up. Besides, most of them aren't visible on the filming miniature anyways. I also used one of the smaller colored panel decals on a panel I missed but I'm not happy with it and I'll probably end up painting over it. Overall, I'm not entirely happy with any of the decals because they are pretty thick and I don't like the way they went down. I'll probably end up giving them a couple coats of MicroSol to help them conform a little more, especially the ones that cover panel lines.
With commission models slated to be arriving this week, I'd really like to finish this model so it can take its place in my display cabinet.
I also caved and finally purchased this:
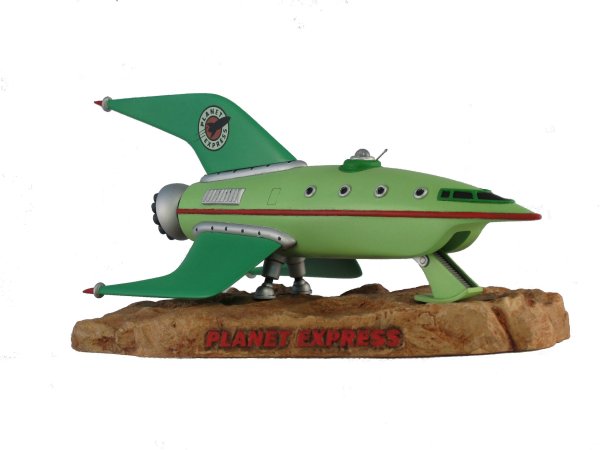
It is a resin model made by Skyhook Models, a garage shop that specializes in sci-fi models. It's only a handful of pieces and about 11" long when complete. The proportions are a little off compared to the Planet Express Ship in the cartoon, but for $60 shipped I'm willing to live with it. There is another, more accurate option out there made by Harrison Krix, a prop maker from Atlanta. It's a touch more expensive, as it will set someone back a nice $380.
|
d-usa wrote:"When the Internet sends its people, they're not sending their best. They're not sending you. They're not sending you. They're sending posters that have lots of problems, and they're bringing those problems with us. They're bringing strawmen. They're bringing spam. They're trolls. And some, I assume, are good people."
|
|
|
|
|
2014/09/09 03:47:05
Subject: Re:Orion Paintworks Commissions (and other exciting things on my workbench!): Fine Molds 1/72 X-wing
|
|
Colonel
This Is Where the Fish Lives
|
And it's done:
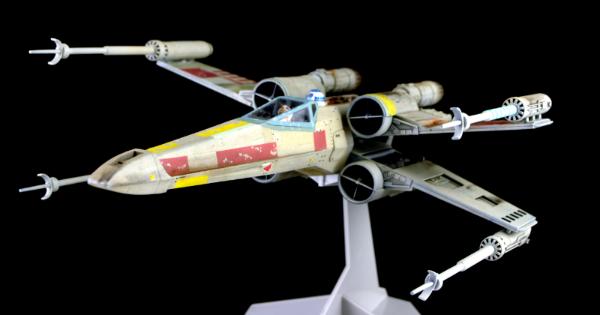

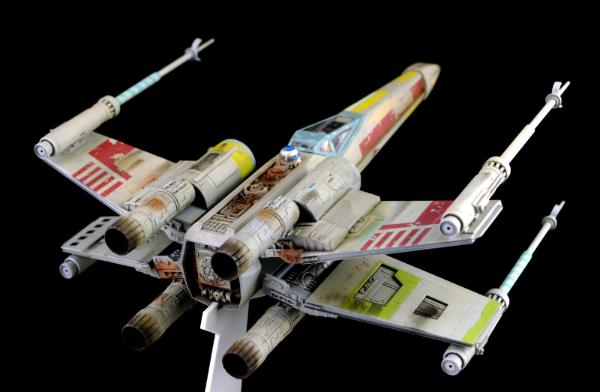

I'm not that happy with how it turned out. I don't like the base color, the pigments are not how I want them, and the decals still piss me off. Personally, I think the photos look better than the model (for once).
That being said, it turned out pretty nice. I haven't done the base because I don't really know what to do with it yet.
|
d-usa wrote:"When the Internet sends its people, they're not sending their best. They're not sending you. They're not sending you. They're sending posters that have lots of problems, and they're bringing those problems with us. They're bringing strawmen. They're bringing spam. They're trolls. And some, I assume, are good people."
|
|
|
|
|
2014/09/09 10:05:53
Subject: Orion Paintworks Commissions (and other exciting things on my workbench!): X-wing is done!
|
|
Is 'Eavy Metal Calling?
|
I'd say it looks pretty good!
|
|
|
|
|
|
2014/09/11 12:09:12
Subject: Orion Paintworks Commissions (and other exciting things on my workbench!): X-wing is done!
|
|
Colonel
This Is Where the Fish Lives
|
Thanks!
It is the perfect time to have the X-wing out of the way because my next round of commissions arrived in the mail the other day. I will be painting a Stormraven and a Knight-Titan for the same client I recently completed two Stormtalons for. The good news is, these models will feature the same desert yellow scheme as the Stormtalons, which I really enjoy. The bad news is, they were second hand models... not exactly my favorite things to work with. My experience with second hand models has always been the same: horribly painted and way over-glued. These models definitely fit the bill.
The Stormraven is in two major pieces plus the engines. The bottom hull is one piece and the top hull/wings is the other. Of course, the cockpit was incomplete and glued shut. Luckily I was able to remove it with little to no damage to the pieces. I spent over an hour sanding all of the glue off the model. It appears it was put together with something like Tamiya Extra Thin Cement, which is a great glue. The person that put it together "painted" the surface of every joint with the stuff, which is not needed with this glue. To use it correctly, you just have to touch the joint with the brush and capillary action sucks the glue into the joint and you press and hold of a minute and it's done. Right now, the model is awaiting a coat of primer so I can paint the interior and then complete the assembly (which I will have to do off of poorly scanned PDFs of the instructions because the original owner didn't send them).
And then there is the Knight-Titan. I've been waiting for a long time to paint this model and I was looking forward to jumping in to as soon as it hit my doorstep. Unfortunately, some of the big pieces were already painted and most of the model was assembled, which is something I actually enjoy doing! There was also no assembly instructions, but luckily fellow Dakka-ite darefsky is also building one for a client so he hooked me up with some pictures of the instructions.
Here is how model arrived at my house:

Not too bad, but not that great either. Either way, the painted pieces are enjoying a nice bath in Super Clean as I type this.
Also showing up at my house, was this little baby:

I am a huge Futurama fan (as evident by my username) and have been since the series first aired in 1999. I think it was a mix of a few things that lead to my love of this show: it has the classic Matt Groening style, I absolutely love science fiction, and the show debuted in the waning years of my Simpsons addiction.
A couple of years ago, when I first started modeling Warhammer figures, I found out that there was a model of the Planet Express Ship available... or at least it was. It had recently gone out of production so there was little chance that I would be able to get a hold of one. Then I found out it was coming back in to production: now would be my chance! So of course, I didn't buy one. Well, that all changed last week when I finally decided it was time to bring one home! So let's take a look at what comes in the box...


This kit is made by Skyhook Models, a garage resin company that specializes in underrepresented science fiction topics. The model is ten pieces (including the huge base), cast in a hard white resin and is free of any major casting flaws; nothing outside of standard resin cleanup will be needed on the parts. You also get a frosted acrylic bead for the gun turret, a small section of 0.31mm wire for the cannon, and two ALPS printed decals for the tail fin.
The real question is: how accurate is the kit? Well, it isn't that accurate compared to the "real" one. The fuselage is much too narrow in the middle and the nose is too pointy. However, these are all things I knew when I bought the model. Being pretty much the only model of this awesome spaceship available (outside of a near $400 model made by a prop builder from Atlanta), I am more than willing to accept the flaws in this kit. The only real issues with the kit is that the molding that runs around the fuselage doesn't wrap around the rear of the ship like it is supposed to. That isn't too much of a problem as the the engine mount takes up most of the space in the rear. However, I will probably have to sculpt some more molding out of Milliput to complete it. My other issue is the door on the starboard side; it is severely lacking detail. I will probably scratch built one out of plasticard to replace it and add the ladder on the hull with some brass rod. I will probably end up scratch building the the gun for the turret as well.
All and all, this is a fantastic kit of an awesome subject. Despite the flaws with the kit, it is well worth it's $59 (shipping included!) price tag.
|
d-usa wrote:"When the Internet sends its people, they're not sending their best. They're not sending you. They're not sending you. They're sending posters that have lots of problems, and they're bringing those problems with us. They're bringing strawmen. They're bringing spam. They're trolls. And some, I assume, are good people."
|
|
|
|
|
2014/09/12 23:30:18
Subject: Re:Orion Paintworks Commissions: Stormraven & Knight-Titan... plus the Planet Express Ship!
|
|
Colonel
This Is Where the Fish Lives
|
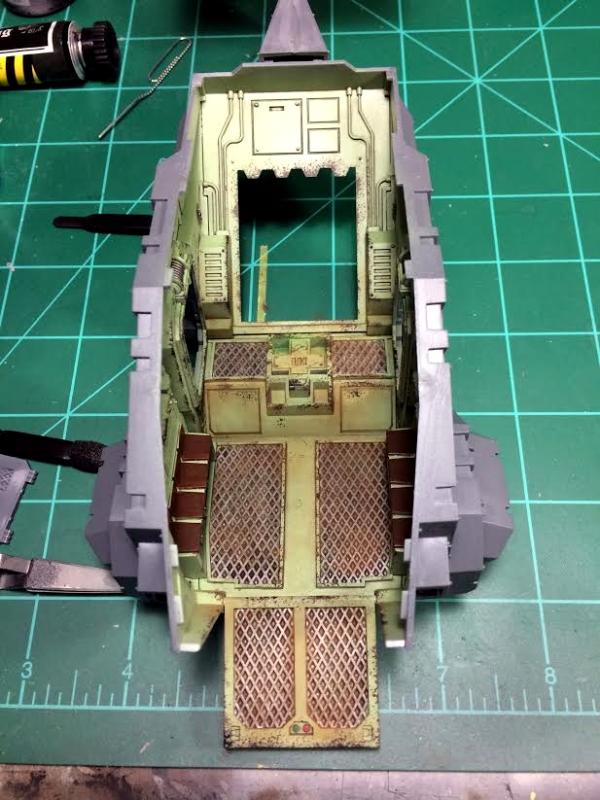
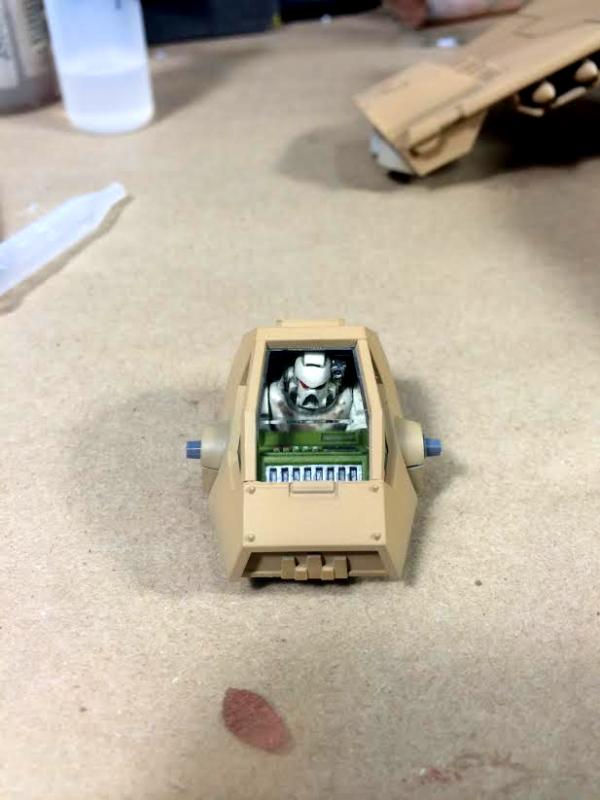
I finally got some time to sit down and begin working on my next round of commissions this week. I decided to start things off with the Stormraven, which was mostly assembled and would make painting the interior somewhat difficult. Luckily, the inside of the model is pretty large so I was able to get a nice coat of grey Vallejo Surface Primer down to begin painting. This is an instance where priming with an airbrush really pays off; there is no way I could have primed the interior with a spray can. After I allowed to the primer to cure for 24 hours, I gave the entire interior a couple of coats of my chosen interior green color: a 1:1 mix of Vallejo Model Air Pale Green and Vallejo Model Air US Grey Light. I chose this color based on the interior of modern APCs and IFVs, which are a light greenish color. I gave everything a coat of Future and after that dried, a wash of 502 Abteilung Starship Filth and then cleaned up the excess with a makeup applicator and odorless turpenoid. This was the result:
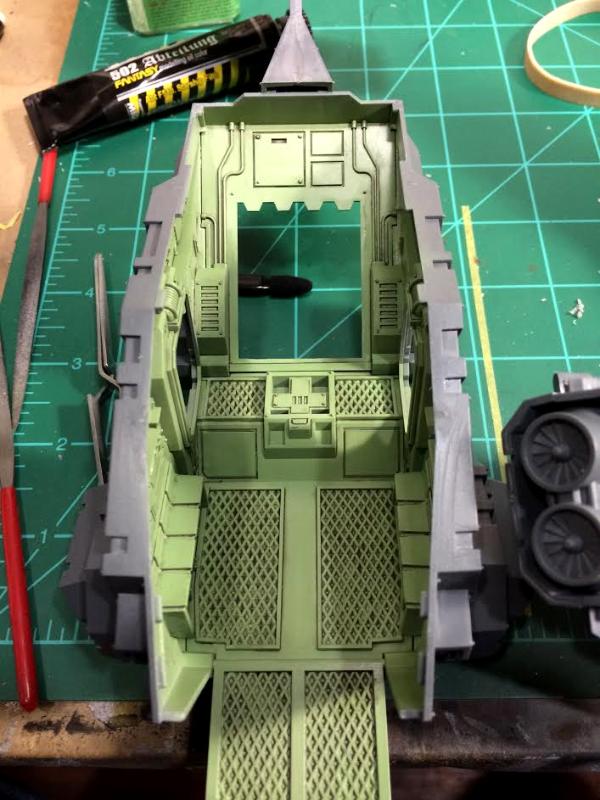
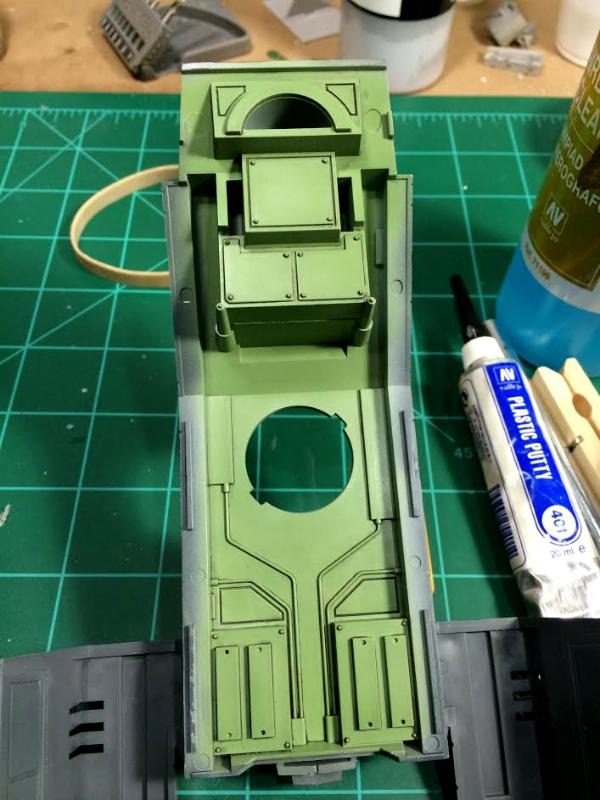
After the oil dries overnight, I will seal it in with matte varnish and begin painting the details by hand. I will also spray the the metal grating with VMA Gunmetal just for a little variation. After the details are painted, I will give the interior a little bit of sponge weathering and some pigments before it gets closed up.
|
d-usa wrote:"When the Internet sends its people, they're not sending their best. They're not sending you. They're not sending you. They're sending posters that have lots of problems, and they're bringing those problems with us. They're bringing strawmen. They're bringing spam. They're trolls. And some, I assume, are good people."
|
|
|
|
|
2014/09/14 23:39:54
Subject: Re:Orion Paintworks Commissions: Stormraven & Knight-Titan... plus the Planet Express Ship!
|
|
Colonel
This Is Where the Fish Lives
|
After the oil paint had dried, I sealed everything in with matte varnish to protect it from the next layer of work to go in. I painted the steel grating with a 1:1 mix of Vallejo Model Air Steel and VMA Black, which as slowly become my go-to color for steel. I then painted all of the various details like the seats and the computer panels. I would normally do a gem effect for the screens like I did with my Land Raider, but given the fact that the interior was already assembled and getting my airbrush to the right angle would prove tricky, I just left them black. I then did two layers of sponge weathering, first using VMA Camo Black Brown and the second layer with VMA Black. I used various earth tone pigments to simulate dirt and followed everything up with some Tamiya Gun Metal pigment for the most worn corners and Tamiya Steel pigment for the metal grating.
I assembled the two hull pieces and glued them together with Tamiya Extra Thin cement and allowed it to dry using rubber bands to hold everything together. I then gave the entire model a coat of grey Tamiya Surface Primer from a rattle can. This primer is fast drying and gives a wonderful surface to work on. I chose the rattle can as opposed to my airbrush because of the large surface area of the model and because it takes to sanding much better than Vallejo Surface Primer. This is important because there are already a couple of areas that will require more filler and sanding.
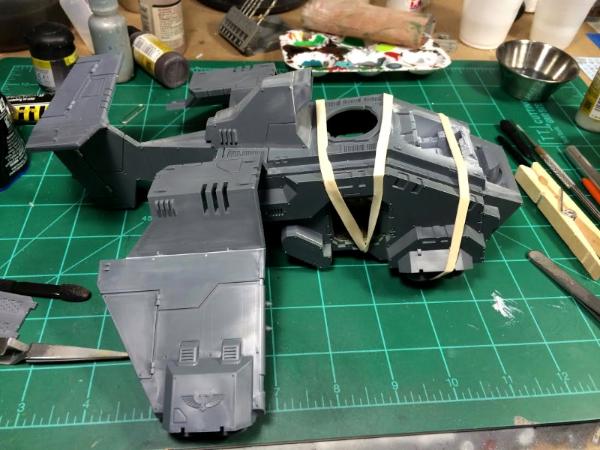
After the primer cures, I'll fix any rough spots with more putty and primer and begin preshading in preparation for the base color.
|
d-usa wrote:"When the Internet sends its people, they're not sending their best. They're not sending you. They're not sending you. They're sending posters that have lots of problems, and they're bringing those problems with us. They're bringing strawmen. They're bringing spam. They're trolls. And some, I assume, are good people."
|
|
|
|
|
2014/09/19 13:08:53
Subject: Re:Orion Paintworks Commissions: Stormraven & Knight-Titan... plus the Planet Express Ship!
|
|
Colonel
This Is Where the Fish Lives
|
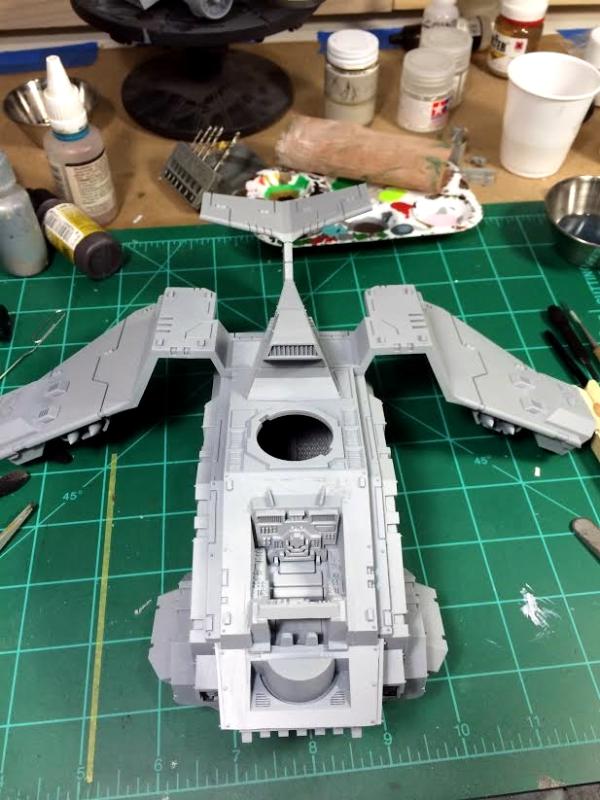
After going back and filling in rough spots with Tamiya Liquid Surface Primer and sanding them smooth, I reprimed the areas and question in preparation for the preshading. There were still a few areas that I wasn't completely happy with, but I was will to live with them in order to get some paint on the model. I preshaded the model using VMA Black:
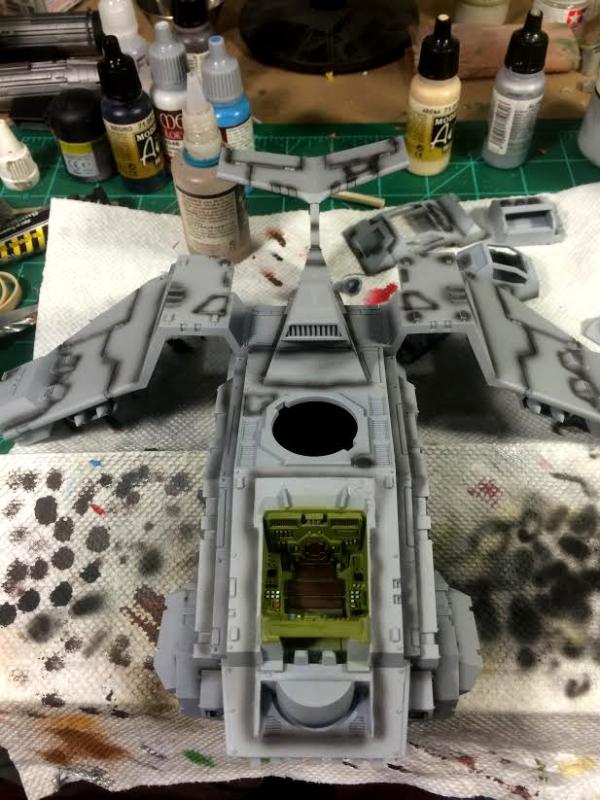
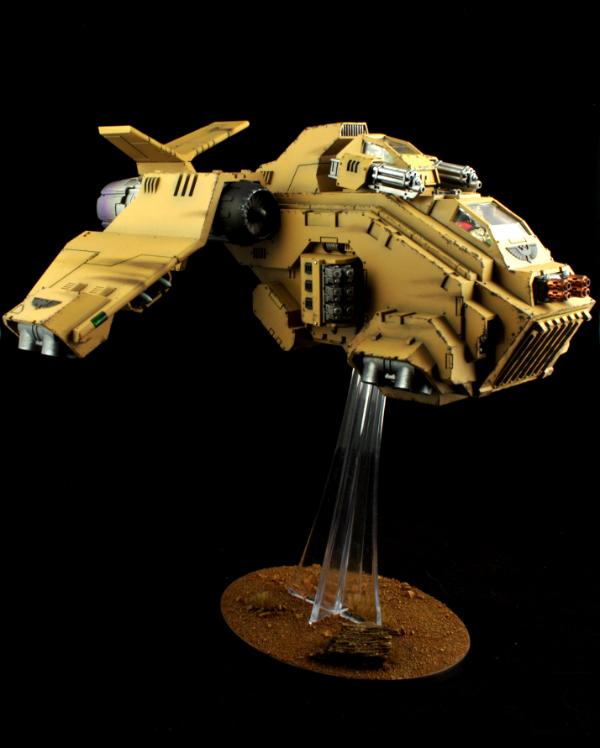
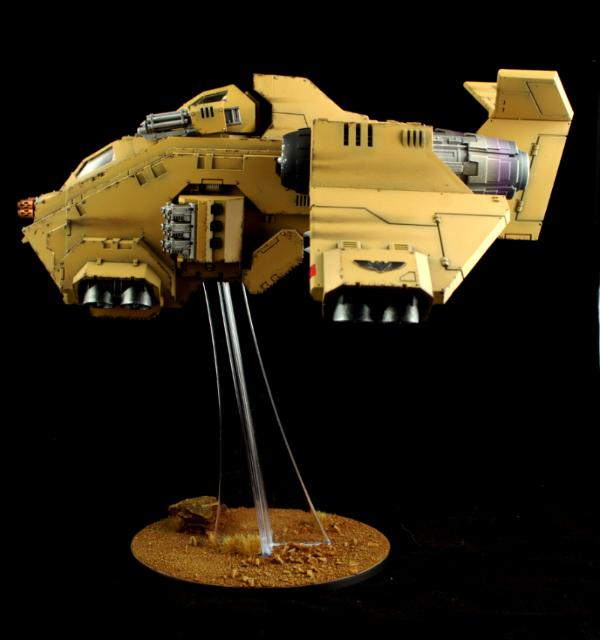
After the preshading dried, I moved on to giving the model a basecoat of Tamiya Desert Yellow (XF-59). Tamiya colors airbrush very well and dry to an extra matte finish, which is nice but leaves the model vulnerable to fingerprints! This was the result:
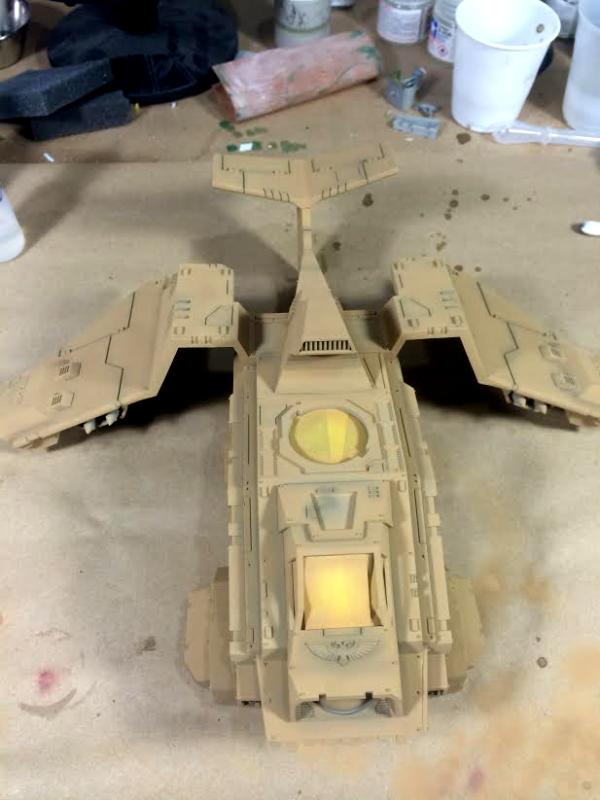
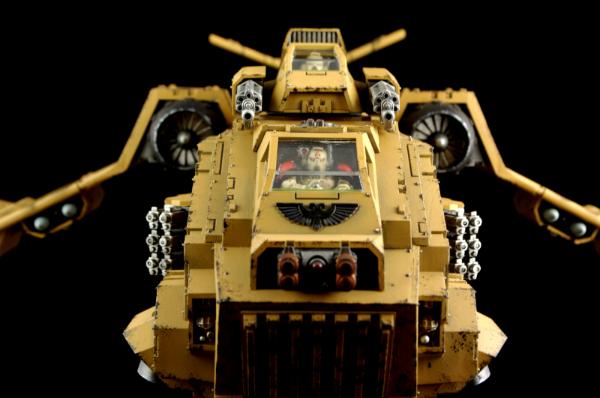
At the request of the client, I converted the turret to accept a space marine gunner as opposed to a servitor (which never made much sense to me). It took a little bit of work; cutting the torso down so it could fit into the opening and the arms so they would fit. The end result is a little cramped but it looks alright.
All of the metallic bits have been painted as well and the armor needs a coat of Future to protect the paint in preparation for an oil pin wash.
|
d-usa wrote:"When the Internet sends its people, they're not sending their best. They're not sending you. They're not sending you. They're sending posters that have lots of problems, and they're bringing those problems with us. They're bringing strawmen. They're bringing spam. They're trolls. And some, I assume, are good people."
|
|
|
|
|
2014/11/24 23:10:48
Subject: Re:Orion Paintworks Commissions: Stormraven & Knight-Titan... plus the Planet Express Ship!
|
|
Colonel
This Is Where the Fish Lives
|
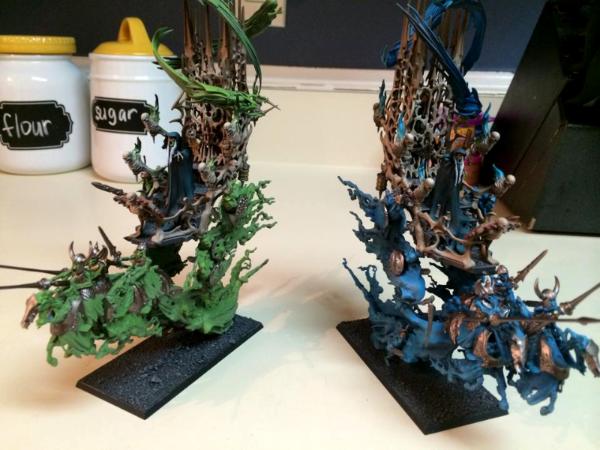
It's been a while since an update, mainly because I've been pretty busy working on a variety of things. I have a Knight and a Stormraven completed and I am finishing up a Vampire Counts army for a local gamer. The army is two Mortis Engines and 40 skeleton warriors; the Engines are complete and in the hands of the client and the skeletons are wrapping up tonight/tomorrow. I snapped a quick picture of the Engines with my phone and I will update them with "glamor shots" when I find the time to import and process them to my computer.
|
d-usa wrote:"When the Internet sends its people, they're not sending their best. They're not sending you. They're not sending you. They're sending posters that have lots of problems, and they're bringing those problems with us. They're bringing strawmen. They're bringing spam. They're trolls. And some, I assume, are good people."
|
|
|
|
|
2014/11/25 15:41:17
Subject: Orion Paintworks Commissions: Stormraven & Knight-Titan... plus the Planet Express Ship!
|
|
Blood Angel Captain Wracked with Visions
|
Fantastic work, sorry I missed this plog before
|
|
|
|
|
|
2014/11/27 15:52:36
Subject: Orion Paintworks Commissions: Stormraven & Knight-Titan... plus the Planet Express Ship!
|
|
Colonel
This Is Where the Fish Lives
|
Thanks man!
As promised, here are the updated pictures:
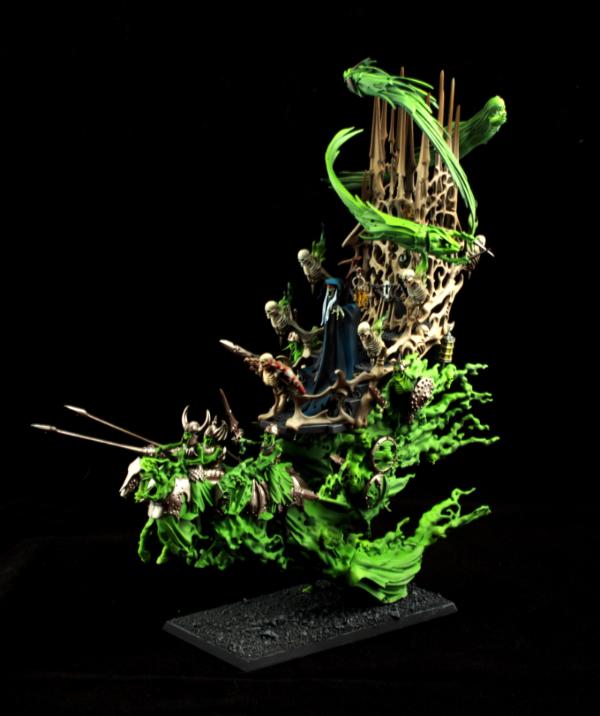
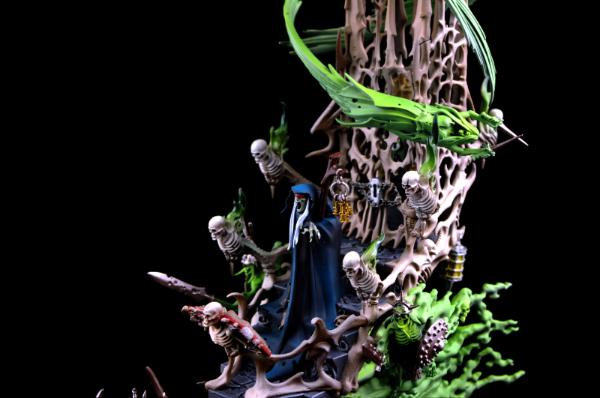
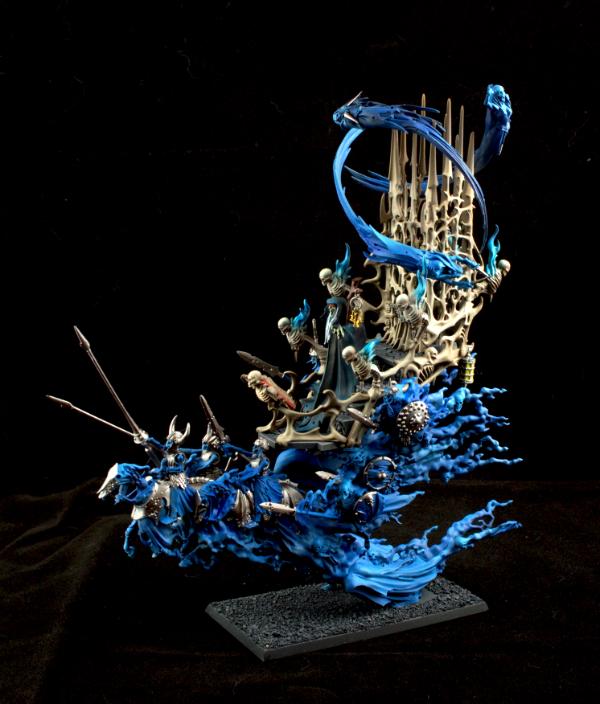
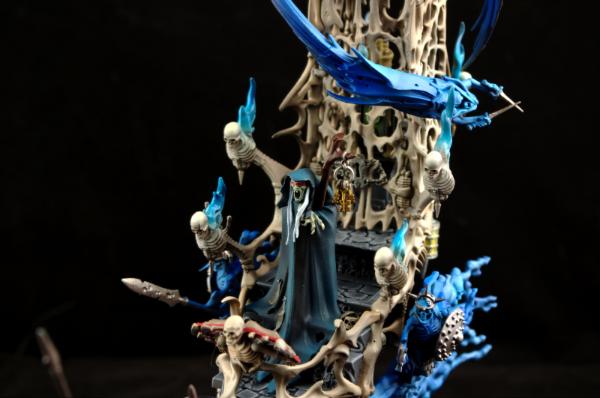
The client was very happy with the way they turned out. In the end, there are some things I would have improved upon, mainly the metallics on the ghost swarm weapons. It should be noted, however, that I went back and added a black wash followed by a light rusty wash on the weapons/armor after I took these pictures. Even after I did that, I still would have like to improve it some more. Unfortunately, going above and beyond must sometimes be sacrificed to meet a deadline (which kills me because I'm a perfectionist). I took these pictures of the morning I handed them over to their owner and I didn't have a chance to take new ones (it's also why the first picture is slightly out of focus).
Comments and criticism are always welcome. Thanks for looking!
|
d-usa wrote:"When the Internet sends its people, they're not sending their best. They're not sending you. They're not sending you. They're sending posters that have lots of problems, and they're bringing those problems with us. They're bringing strawmen. They're bringing spam. They're trolls. And some, I assume, are good people."
|
|
|
|
|
2014/12/02 00:03:40
Subject: Re:Orion Paintworks Commissions: New Bandai Star Wars models!
|
|
Colonel
This Is Where the Fish Lives
|
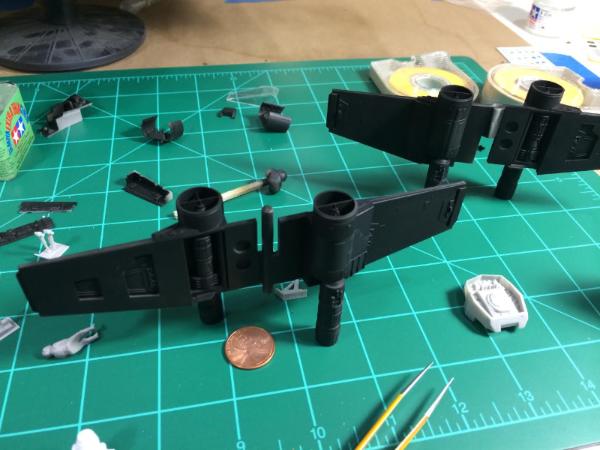
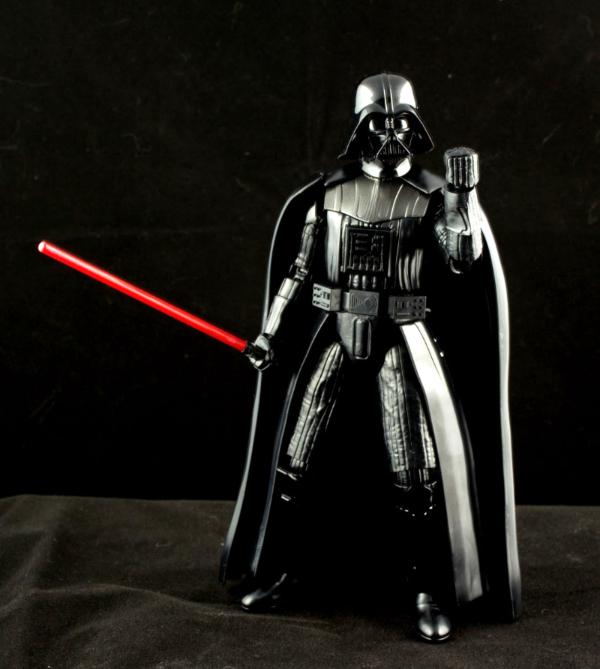
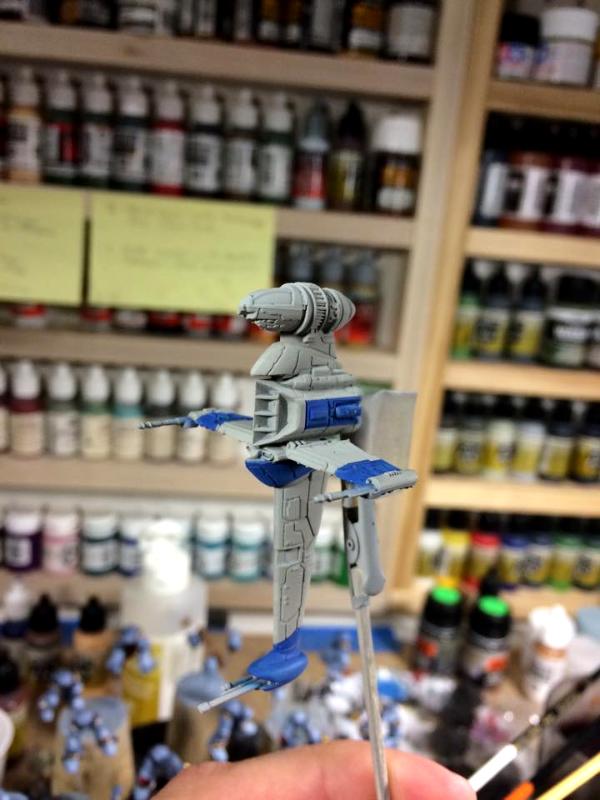
I recently got my hands on all three new offerings from Bandai now that they have taken over the Star Wars license! I have been eagerly awaiting these kits and I have one each: 1/72 X-wing, 1/72 TIE Advance/x1, and the 1/12 Darth Vader. I have the Fine Molds version of the X-wing and TIE, so while I was excited about getting a new version of those kits, I was really excited about the idea of a Darth Vader model kit... and it doesn't disappoint! The model goes together a lot like a Bandai gundam kit, which is a good thing as the joints and seams practically disappear and the kit offers a wide rang of posing options. It was designed to be built right out of the box and is supplied with both waterslide decals and stickers, depending on what your skill level is. I opted to leave those off for the time being because I want to fill the seams and paint this kit to give it the perfect finish. Here is what it looks like now, before paint:
|
d-usa wrote:"When the Internet sends its people, they're not sending their best. They're not sending you. They're not sending you. They're sending posters that have lots of problems, and they're bringing those problems with us. They're bringing strawmen. They're bringing spam. They're trolls. And some, I assume, are good people."
|
|
|
|
|
2014/12/07 04:38:26
Subject: Re:Orion Paintworks Commissions: New Bandai Star Wars models!
|
|
Colonel
This Is Where the Fish Lives
|
Here is a space marine Stormraven I recently completed for a client that is an active duty Marine. It was painted to match a pair of Stormtalons I painted a couple of months ago. It is painted to match modern military armor with no insignias, embellishments, or other markings and based as requested by the client. The servitor in the turret was replaced by a space marine at request of the client as well. The interior of the the gunship can be found a couple of posts ago.
Comments and criticism always welcome!
|
d-usa wrote:"When the Internet sends its people, they're not sending their best. They're not sending you. They're not sending you. They're sending posters that have lots of problems, and they're bringing those problems with us. They're bringing strawmen. They're bringing spam. They're trolls. And some, I assume, are good people."
|
|
|
|
|
2014/12/07 16:08:04
Subject: Orion Paintworks Commissions: New Bandai Star Wars models!
|
|
Is 'Eavy Metal Calling?
|
Very nice work!
|
|
|
|
|
|
2014/12/08 18:43:11
Subject: Orion Paintworks Commissions: New Bandai Star Wars models!
|
|
Colonel
This Is Where the Fish Lives
|
Thank you!
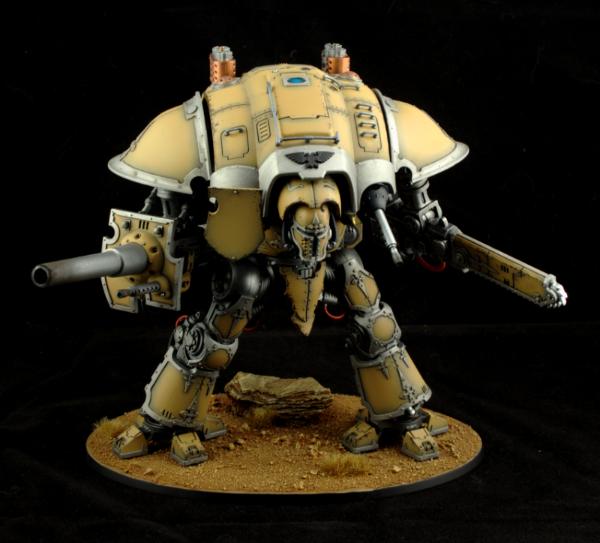
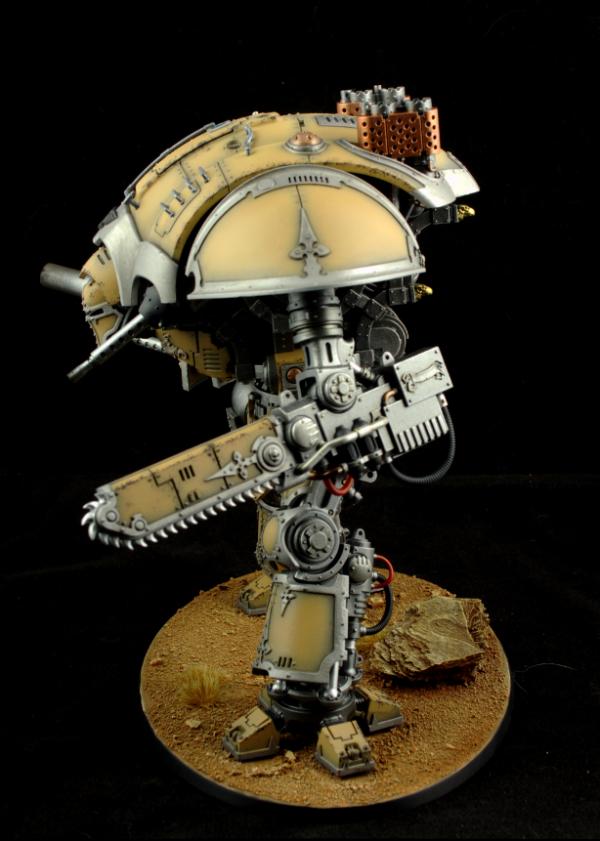
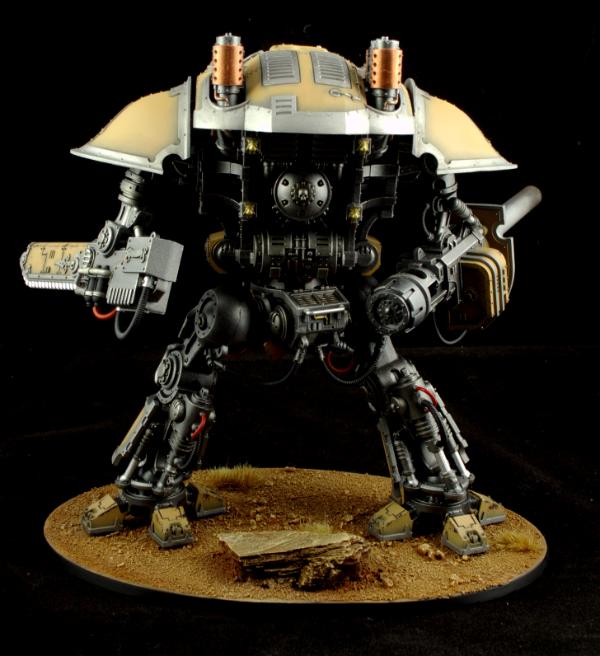
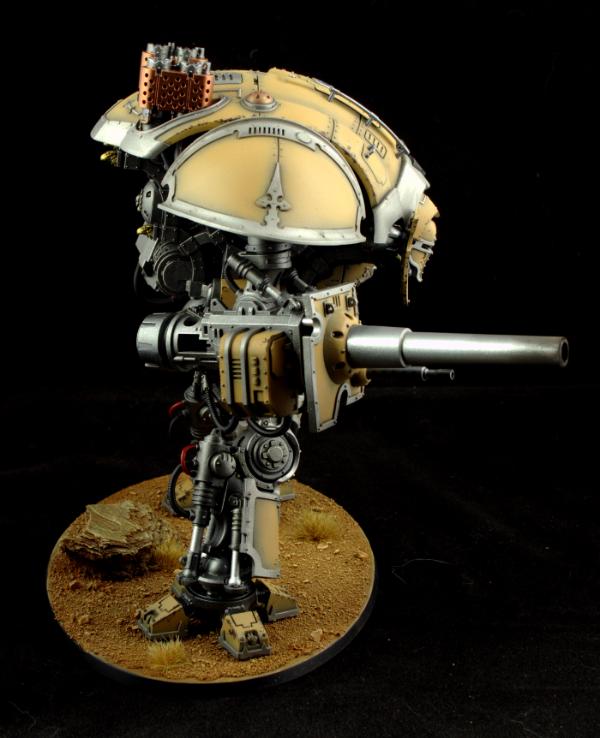
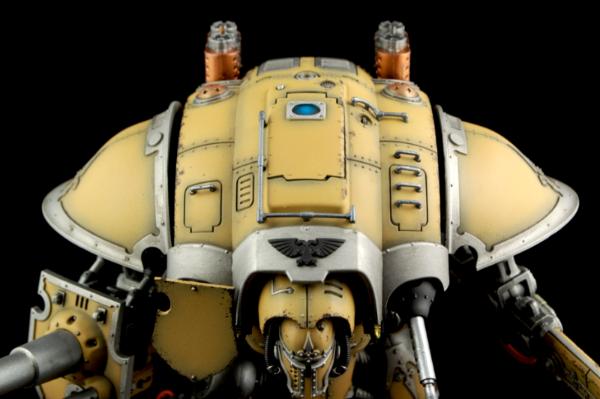
Here is an Imperial Knight-Titan I recently completed for a client that is an active duty Marine. It was painted to match a pair of Stormtalons and a Stormraven I completed for the same client. It is painted to match modern military armor with no insignias, embellishments, or other markings and based as requested by the client. He requested subtle battle damage (much like the previous models) so an oil wash and some sponge chipping were used to add a little weathering. I would have liked to do more, but time and the client's vision for the model prohibited that. This model was sent to me partially completed and partially painted, requiring me to strip off as much paint as I could. I'm not sure what it was painted with, but it gave me fits and ended up leaving a rough texture on a few armor pieces. Surprisingly, after repriming and painting it, the rough texture look good on the final product as it more closely resembled what real armor looks like. Also, half of the pieces were missing so the client asked me to track down what I could; I managed to get most of what was needed but I was unable to procure the piece that allows the head to swivel so it was glued in place. There were no instructions supplied either, so luckily my fellow Dakka-ite darefsky was able to hook me with a copy of them, so massive thanks to you!
Comments and criticism welcome as always!
On the commission front, I have a handful of Vampire Counts skeleton warriors that I will be starting to go along with another 40 I had already completed for a local client and I also have a 1/350 USS Michigan (SSBN-727) to complete for a family friend. In the backlog I have a 1/700 USS Mississippi (CGN-40) that will be a gift for my father-in-law. It is a complete surprise and I know he will be touched by it, as he completed his last three years with the Navy on that ship.
|
d-usa wrote:"When the Internet sends its people, they're not sending their best. They're not sending you. They're not sending you. They're sending posters that have lots of problems, and they're bringing those problems with us. They're bringing strawmen. They're bringing spam. They're trolls. And some, I assume, are good people."
|
|
|
|
|
2014/12/14 16:55:30
Subject: Re:Orion Paintworks Commissions: Holiday lull & personal projects
|
|
Colonel
This Is Where the Fish Lives
|
I have a lull in commissions at the moment, which is actually quite nice as it is the holidays and I can get some personal stuff going. I have two requests for rather large commission that need to respond to, but until then I'd really like to get some more Star Wars models completed. I have a massive stack of various Star Wars models that need to be completed and I still hope to, but in the mean time I found this Trollbloods Mauler I had sitting on my shelf and decided it could use a nice coat of paint:
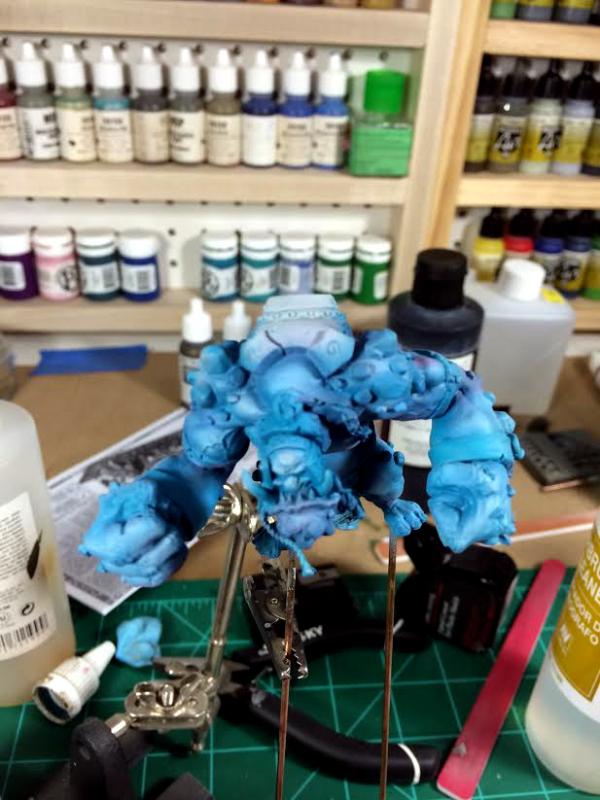
I used a variety of blues (VGC Turquoise, VGC Electric Blue, P3 Underbelly Blue, with VMA White) for the skin and added some shadows with Secret Weapon Minutes Black Red wash and ground up red and purple artist pastels. I still need to give the model a coat of Future and an oil wash before I move on to the details.
|
d-usa wrote:"When the Internet sends its people, they're not sending their best. They're not sending you. They're not sending you. They're sending posters that have lots of problems, and they're bringing those problems with us. They're bringing strawmen. They're bringing spam. They're trolls. And some, I assume, are good people."
|
|
|
|
|
2014/12/17 14:35:51
Subject: Re:Orion Paintworks Commissions: Holiday lull & personal projects
|
|
Colonel
This Is Where the Fish Lives
|
I've really enjoyed clearing out some of my backlog and getting these miniatures completed and photographed.
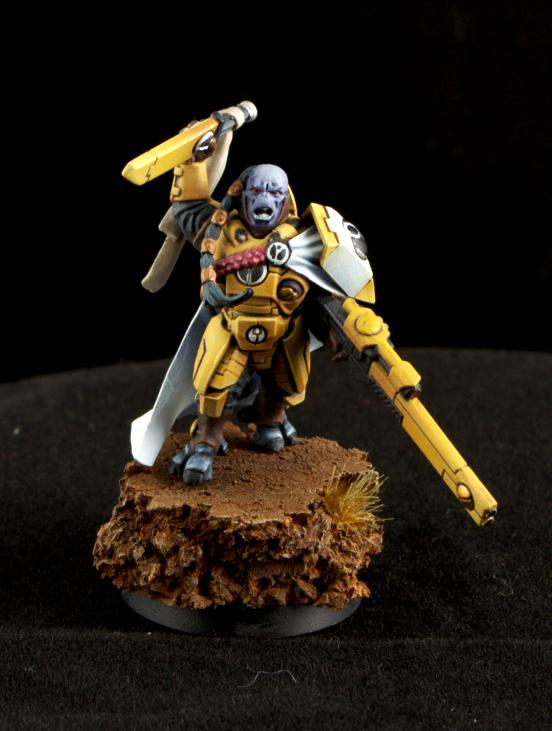
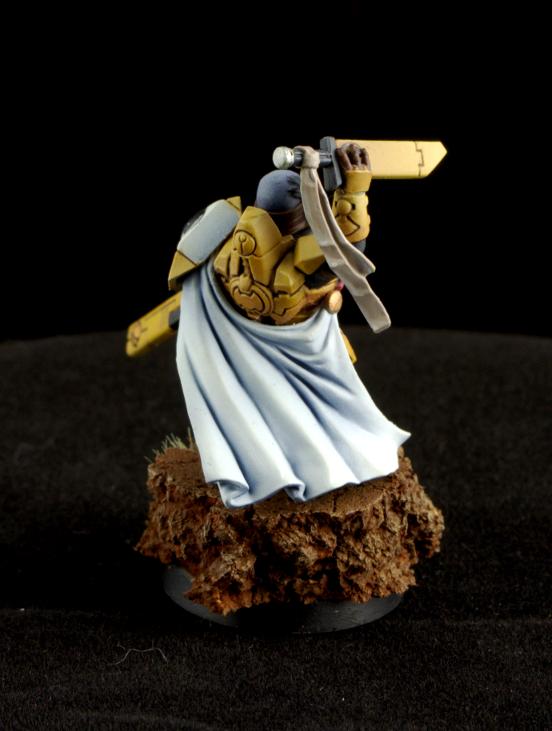
First up, Tau Cadre Fireblade:
Raptors Commander of the 9th Company, Master of Relics:
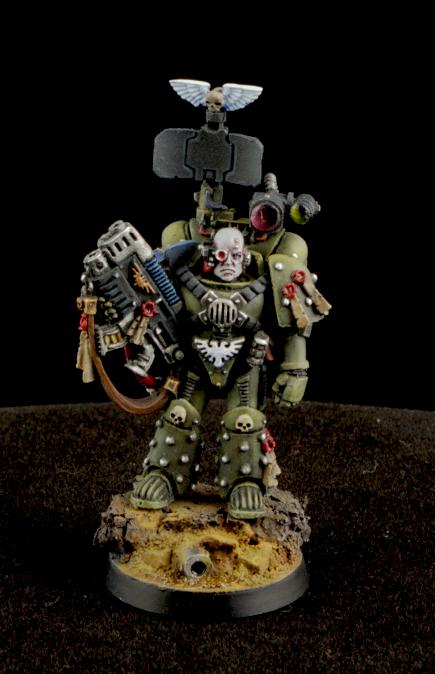

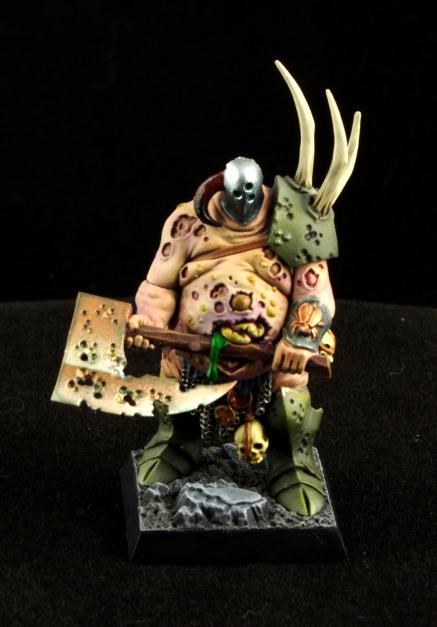
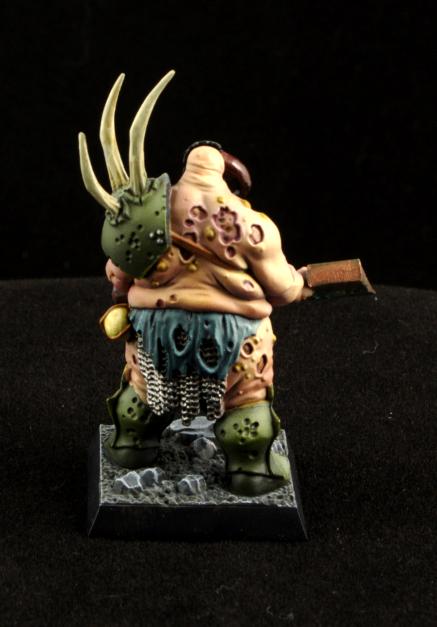
Chaos Nurgle Lord:
I've got some more models waiting to be finished, including a Raptors Land Raider Crusader and a Raptors Sternguard squad!
|
d-usa wrote:"When the Internet sends its people, they're not sending their best. They're not sending you. They're not sending you. They're sending posters that have lots of problems, and they're bringing those problems with us. They're bringing strawmen. They're bringing spam. They're trolls. And some, I assume, are good people."
|
|
|
|
|
2014/12/17 14:37:45
Subject: Orion Paintworks Commissions: Holiday lull & personal projects
|
|
Is 'Eavy Metal Calling?
|
Good stuff, the Raptor and Fireblade especially!
|
|
|
|
|
|
2015/02/04 05:22:58
Subject: Re:Orion Paintworks Commissions: Space Wolves invade!
|
|
Colonel
This Is Where the Fish Lives
|
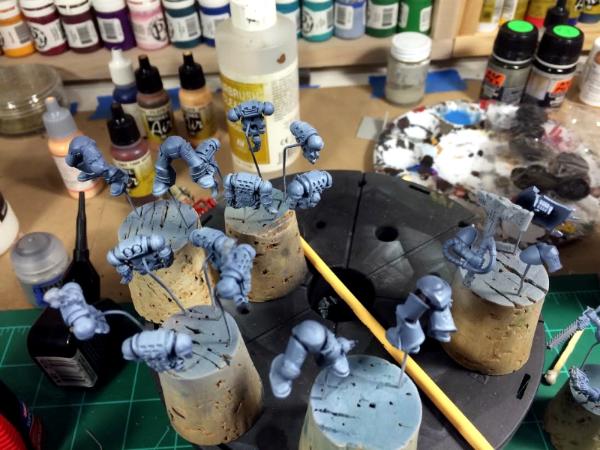
I have one commission currently in progress that I started a couple of weeks ago. I'm little behind schedule due to dealing with the fallout of the losses in my family, but I'm looking to getting back on track in the weeks to come. This is a squad of Grey Hunters that will compliment a squad of Blood Claws and a Stormfang gunship. They are base coated with VGC Sombre Grey and still need to be shaded and highlighted. I'm enjoying these models so far, I love the color and I think they models have a lot of personality.

In other news, I'm happy to report that I am registered for the NOVA Open this summer and I will be playing in the X-wing Championship (and also some other X-wing games if I can squeeze them in). This is my first gaming convention and I'm really looking forward to soaking up four days with other gaming and hobby enthusiasts from around the country (and the world!).
|
d-usa wrote:"When the Internet sends its people, they're not sending their best. They're not sending you. They're not sending you. They're sending posters that have lots of problems, and they're bringing those problems with us. They're bringing strawmen. They're bringing spam. They're trolls. And some, I assume, are good people."
|
|
|
|
|
2015/02/17 03:02:14
Subject: Re:Orion Paintworks Commissions: Space Wolves invade!
|
|
Colonel
This Is Where the Fish Lives
|
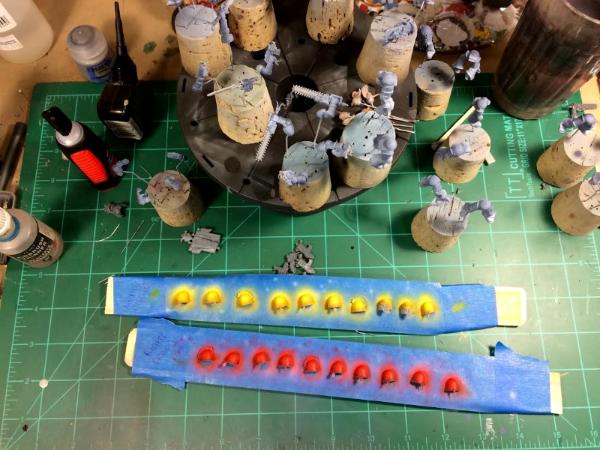
The main colors on the armor are complete as are the shoulder pad colors. Next is the trim detail, transfers for the shoulder pads, and the pack markings. So far, these miniatures have been fun to paint and I really like this pale blue-grey color I used. The armor was primed grey, basecoated with VGC Sombre Grey, and the highlights were accomplished by slowly adding VGC Wolf Grey into the Sombre Grey, finishing it off with pure Wolf Grey for the final highlight. The yellow shoulder pads are primed white, basecoated with VMA Gold Yellow, shaded with VMA Burnt Umber, and highlighted with VMA Yellow over VMA White (to make the yellow brighter). The red shoulder pads were primed white, basecoated with VMA Italian Red, shaded with VMA Tank Brown, and highlighted with VMA Scarlet Red. The yellow pads will have the chapter logo and the red will have a black tribal design that I haven't decided on yet.
The Frost Blades were painted in my "standard" NMM power weapon scheme of white basecoat, VMA Light Blue, VMA French Blue, 1:1 mix of VMA Dark Sea Blue and VMA Black from lightest to dakest. I know this scheme is pretty much played out by now, but I still enjoy it and I think it will look quite nice on the completed model.
|
d-usa wrote:"When the Internet sends its people, they're not sending their best. They're not sending you. They're not sending you. They're sending posters that have lots of problems, and they're bringing those problems with us. They're bringing strawmen. They're bringing spam. They're trolls. And some, I assume, are good people."
|
|
|
|
|
2015/03/04 20:37:07
Subject: Re:Orion Paintworks Commissions: Space Wolves invade!
|
|
Colonel
This Is Where the Fish Lives
|
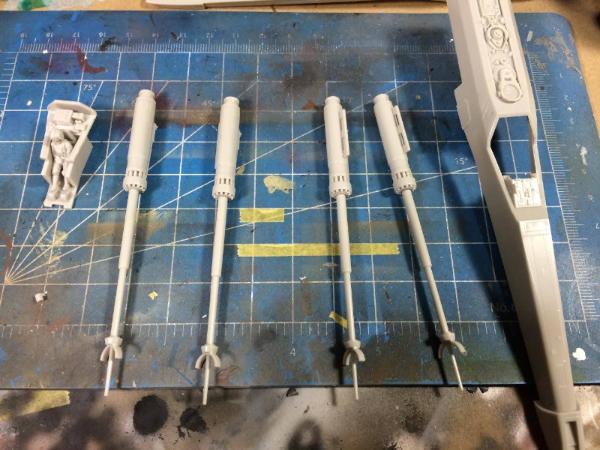
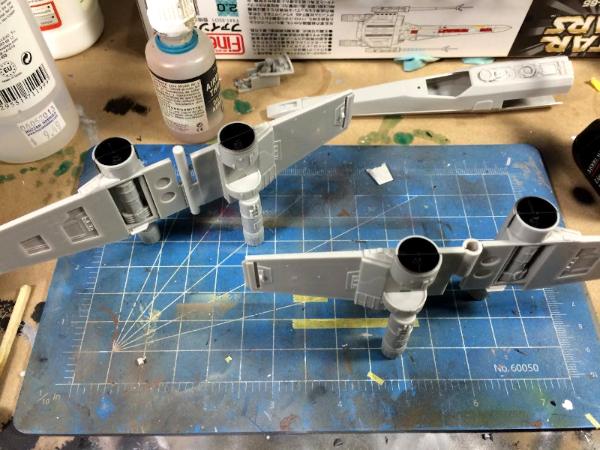
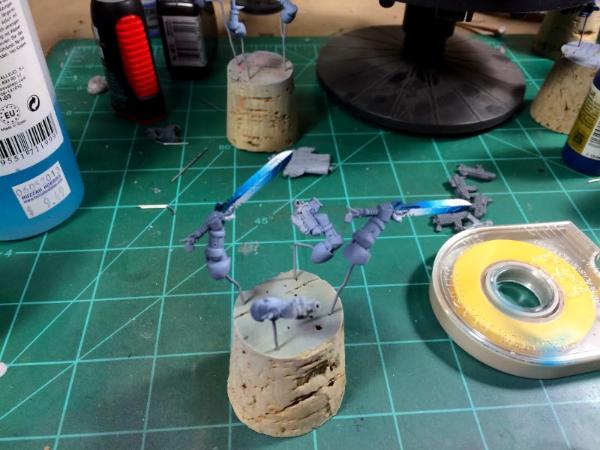
My Space Wolves commission is still on going, but I also picked up a small commission for a fellow member of NOVA Squadron. He wanted three B-wings painted as Blue Squadron so I was more than happy to paint them for him. For the hull base color, I used the same mix of Tamiya Medium Grey and Flat White that I used for the X-wing I painted. The blue squadron markings are RMS Ultramarine Blue, then highlighted with RMS Ultramarine Highlight and VMA Light Sea Blue. I still need to block in the blue on the other two ships before moving on to the details.
|
d-usa wrote:"When the Internet sends its people, they're not sending their best. They're not sending you. They're not sending you. They're sending posters that have lots of problems, and they're bringing those problems with us. They're bringing strawmen. They're bringing spam. They're trolls. And some, I assume, are good people."
|
|
|
|
|
2015/03/05 15:16:20
Subject: Orion Paintworks Commissions: Space Wolves invade!
|
|
Purposeful Hammerhead Pilot
|
Hot damn that looks nice. I've always been a fan of B-Wings - and I know I'd have to get at least ONE if I get into X-Wing! 
|
|
|
|
|
|
|

