| Author |
Message |
 |
|
|
|
|
Advert
|
Forum adverts like this one are shown to any user who is not logged in. Join us by filling out a tiny 3 field form and you will get your own, free, dakka user account which gives a good range of benefits to you:
- No adverts like this in the forums anymore.
- Times and dates in your local timezone.
- Full tracking of what you have read so you can skip to your first unread post, easily see what has changed since you last logged in, and easily see what is new at a glance.
- Email notifications for threads you want to watch closely.
- Being a part of the oldest wargaming community on the net.
If you are already a member then feel free to login now. |
|
 |
2014/02/17 01:15:24
Subject: Raptors Land Raider Crusader w/interior detail (WIP) - New pictures! (3/5/14)
|
|

Colonel
This Is Where the Fish Lives
|
Over the last couple days, I began working on my Land Raider Crusader for my Raptors army. Now I'm not typically a player, as I much prefer to paint models instead, but I have been inspired to finally put together an army out of the mountain of boxes and grey plastic I have laying around. I recently finished a Devastator Centurion and since then I have been on a little bit of a tear. I've had this Land Raider sitting in the box, still on the sprue, since some time early last year. Even though most of the time the inside of tanks is not that visible, I have a strange obsession with painting them so I went ahead and did it on this Land Raider. Does anyone else do this?
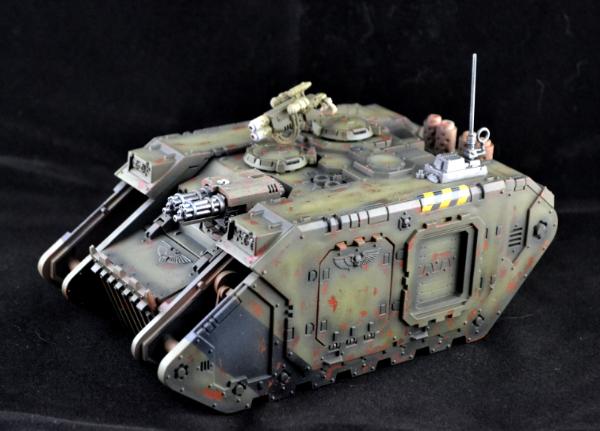
Group shot:
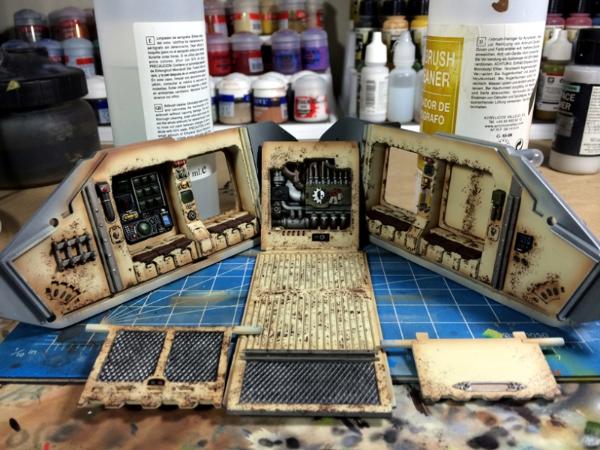
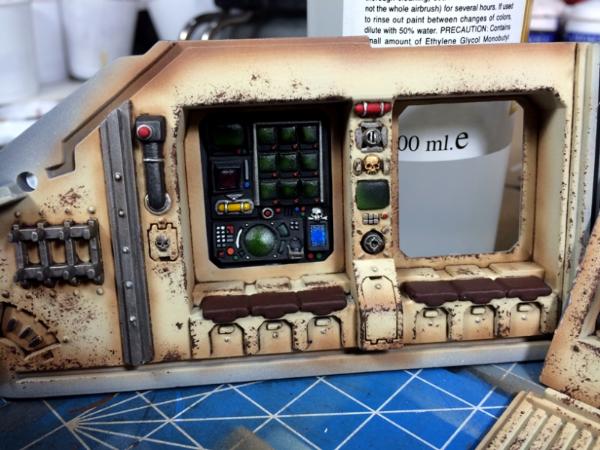
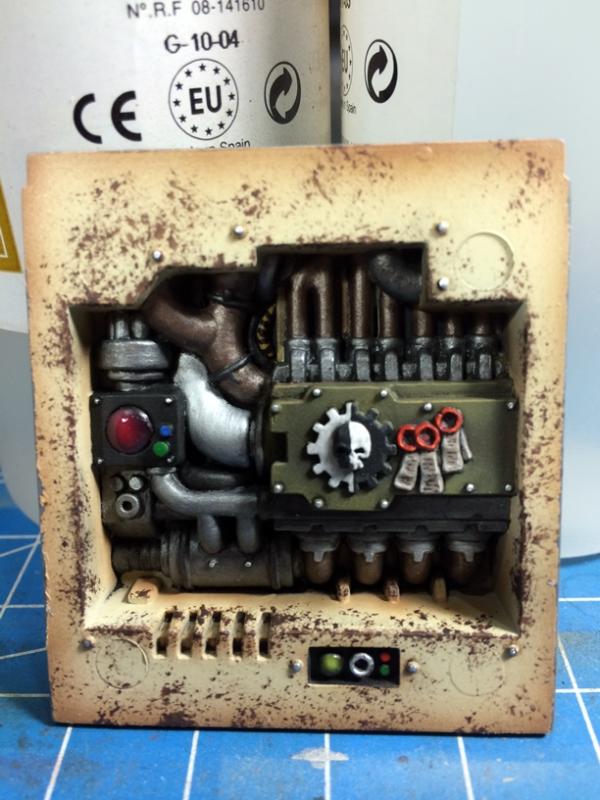
Some close ups of the different pieces:
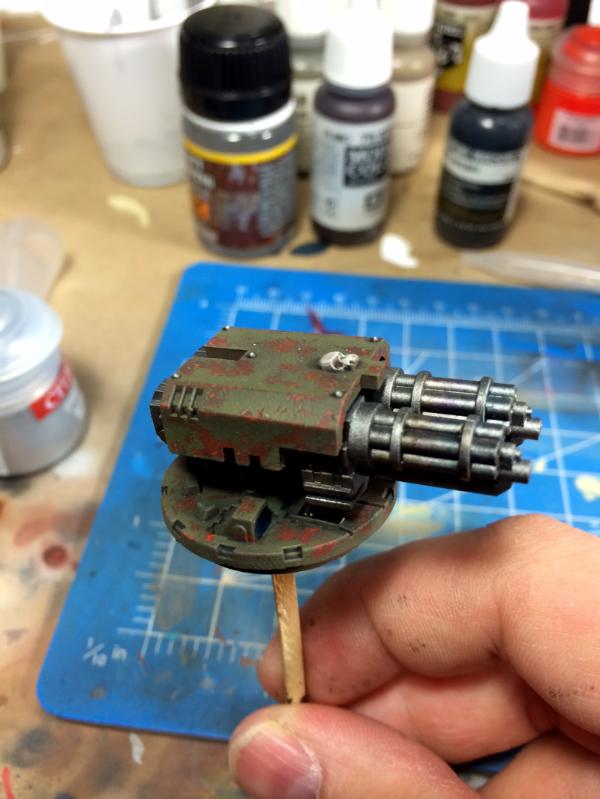
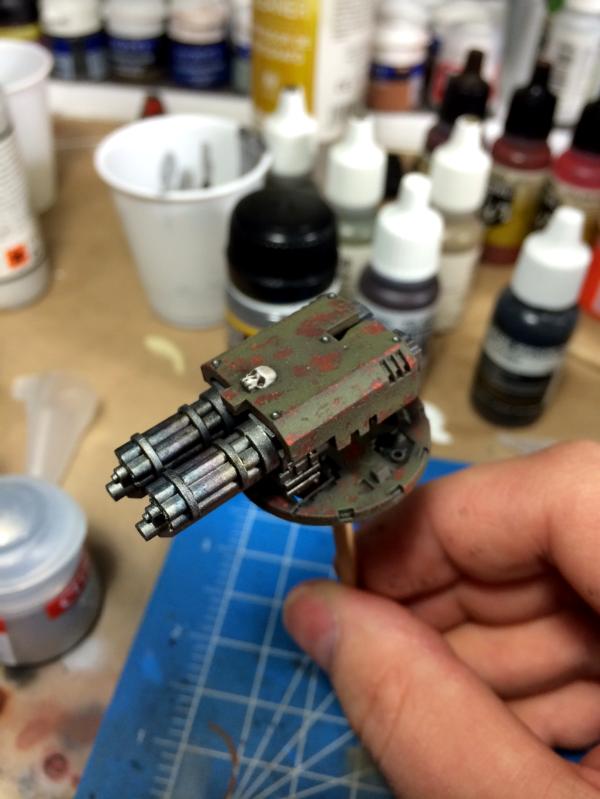
Based on feedback I've gotten on other models I've completed, I decided to go full bore and weather this tank the way it should be. I have tried it before on a Rhino I completed for a local painting contest a year and half ago (I had only been painting for 6 months and it was my first completed vehicle... I also won for best vehicle!). The last time, I was pretty conservative on the application of the weathering, but since then I have gained a little more confidence and expertise so I will attempt a more through effect. I did a test piece this morning to see how it would turn out and took a quick snap with my phone (it turned out slightly blurry, my apologies). This is the shroud for the twin-linked assault cannon:
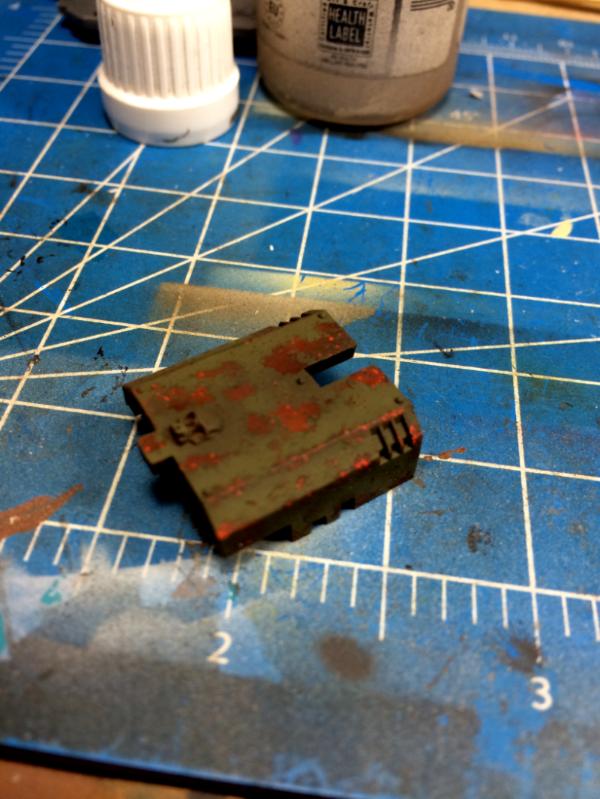
It was primed with Vallejo Surface Primer Grey then given an base coat of VMA Hull Red with an airbrush. I then added spots of VMA Rust and VMA Italian Red, also with an airbrush. I sponged on some GW Blazing Orange and VMA Camo Black Brown. To bring shift colors closer to an oxide rust and to kill the intensity of the orange chips, I used Vallejo Model Wash Rust sprayed through the airbrush as a filter. After everything was dried, I sealed the paint with a couple of coats of Liquitex Matte Varnish. When the varnish was dried, I applied three coats of Heavy Chipping Fluid from AK Interactive. If works similar the tried-and-true "hairspray technique" that AFV modelers have been using for years, with the benefit of not smelling like hairspray. After the chipping fluid was dry, I proceeded to work on the green using my normal method for Raptors, which is RMS Olive Shadow, RMS Olive Drab, and RMS Worn Olive for the shadow, base color, and highlight respectively. When that was completed, I got down to the chipping. Using and old brush, clean water, and a modeling tool, I went to town on the weathering. Using the brush with clean water, you lightly humidify the top coat of paint so that the water seeps down to the chipping fluid. After a couple seconds, you can use the brush (or a toothpick or modeling tool) to scrape away the top layers of paint, exposing the "rust" layer below. After everything was dry, I sealed the entire piece with a couple of coats of matte varnish.
As I work on this model, I will update this thread with new pictures and will post the completed model in the Showcase forum. If you have any comments or questions, feel free to ask!
|
|
This message was edited 1 time. Last update was at 2014/03/06 00:22:54
 d-usa wrote: d-usa wrote:"When the Internet sends its people, they're not sending their best. They're not sending you. They're not sending you. They're sending posters that have lots of problems, and they're bringing those problems with us. They're bringing strawmen. They're bringing spam. They're trolls. And some, I assume, are good people."
|
|
|
 |
|
2014/02/17 01:23:22
Subject: Raptors Land Raider Crusader w/interior detail (WIP)
|
|
Last Remaining Whole C'Tan
|
 ScootyPuffJunior wrote: ScootyPuffJunior wrote:Even though most of the time the inside of tanks is not that visible, I have a strange obsession with painting them so I went ahead and did it on this Land Raider. Does anyone else do this?
He who paints half a tank, is but half a man. I nearly always do the interiors - the sole exception is Chimeras, which have a unfinished interior anyway.
It looks amazing, can't wait to see it unfold.
Why don't you use salt?
|
|
This message was edited 1 time. Last update was at 2014/02/17 01:24:49
 lord_blackfang wrote: lord_blackfang wrote:Respect to the guy who subscribed just to post a massive ASCII dong in the chat and immediately get banned.
 Flinty wrote: Flinty wrote:The benefit of slate is that its.actually a.rock with rock like properties. The downside is that it's a rock
|
|
|
|
|
2014/02/17 01:33:40
Subject: Raptors Land Raider Crusader w/interior detail (WIP)
|
|
Colonel
This Is Where the Fish Lives
|
 Ouze wrote: Ouze wrote: ScootyPuffJunior wrote:Even though most of the time the inside of tanks is not that visible, I have a strange obsession with painting them so I went ahead and did it on this Land Raider. Does anyone else do this?
He who paints half a tank, is but half a man. I nearly always do the interiors - the sole exception is Chimeras, which have a unfinished interior anyway.
It looks amazing, can't wait to see it unfold.
Why don't you use salt?
I've never tried salt weathering. I had this bottle of Chipping Fluid laying around that I bought on a whim at work one night so I thought I'd give it a go. I've seen the salt technique produce some awesome weathering though, and I intend to try it out some time.
Also, I'm lazy. The salt is upstairs and I paint in my basement and I didn't feel like tackling those steps.
|
d-usa wrote:"When the Internet sends its people, they're not sending their best. They're not sending you. They're not sending you. They're sending posters that have lots of problems, and they're bringing those problems with us. They're bringing strawmen. They're bringing spam. They're trolls. And some, I assume, are good people."
|
|
|
|
|
2014/02/17 01:52:48
Subject: Raptors Land Raider Crusader w/interior detail (WIP)
|
|
[SWAP SHOP MOD]
Decrepit Dakkanaut
OH-I Wanna get out of here
|
I liked the centurion, and I like the way this is shaping up.
|
|
|
|
|
2014/02/17 09:54:14
Subject: Raptors Land Raider Crusader w/interior detail (WIP)
|
|

Morphing Obliterator
|
Looks like it's going to be a great model.
|
|
|
|
|
|
2014/02/17 14:54:12
Subject: Re:Raptors Land Raider Crusader w/interior detail (WIP)
|
|
Whiteshield Conscript Trooper
Providence, RI
|
Absolutely gorgeous job on the interior details. I'll be honest, I just put together 2 LR's last night, and just buttoned up the interior. They're getting their primer today, and I'll be starting to paint them up as well (deathwing). I commend your attention to detail on the models you've done, really like this and the rhino you linked to.
|
=====Begin Dakka Geek Code=====
DT:80+S+G+MB+IPW40k09+D+++++A++/areWD-R+T(T)DM+
======End Dakka Geek Code======
I play Dark Angels and Imperial Guard. I've also got experience in playing Necromunda.
Positive trades with: talljosh85, BrendonC, Sour Note, legions_no_more, mredzadventure, lilted |
|
|
|
|
2014/02/17 17:56:58
Subject: Raptors Land Raider Crusader w/interior detail (WIP)
|
|

Been Around the Block
|
Ouze wrote: ScootyPuffJunior wrote:Even though most of the time the inside of tanks is not that visible, I have a strange obsession with painting them so I went ahead and did it on this Land Raider. Does anyone else do this?
He who paints half a tank, is but half a man. I nearly always do the interiors - the sole exception is Chimeras, which have a unfinished interior anyway.
It looks amazing, can't wait to see it unfold.
Why don't you use salt?
How does salt weathering work?
|
|
|
|
|
|
2014/02/17 18:41:44
Subject: Re:Raptors Land Raider Crusader w/interior detail (WIP)
|
|
Neophyte Undergoing Surgeries
Portland, OR
|
Looks really good, just don't put the weapon sponsons on the back side doors 
|
|
|
|
|
2014/02/18 04:05:37
Subject: Raptors Land Raider Crusader w/interior detail (WIP)
|
|
Colonel
This Is Where the Fish Lives
|
Similar to the method I described in my original post. The basis of it is you paint your undercoat/rust/corrosion layer, seal it, put drops of water where you want the weathering to go and sprinkle salt on it. The water will hold the salt in place and after it dries you paint it was you normally would. Then you use a large brush or a toothbrush (often with water) to gently scrape away the dried salt to expose the paint underneath. It makes a really cool mottled effect when done right. Here is a pretty cool tutorial with picture on how to do it: http://www.scalemodelguide.com/painting-weathering/weathering/apply-realistic-paint-chips-salt/ You can find videos of it on YouTube as well. Just search for "salt weathering" or something similar.
|
|
This message was edited 1 time. Last update was at 2014/02/18 05:49:19
d-usa wrote:"When the Internet sends its people, they're not sending their best. They're not sending you. They're not sending you. They're sending posters that have lots of problems, and they're bringing those problems with us. They're bringing strawmen. They're bringing spam. They're trolls. And some, I assume, are good people."
|
|
|
|
|
2014/02/19 00:38:03
Subject: Re:Raptors Land Raider Crusader w/interior detail (WIP)
|
|
Colonel
This Is Where the Fish Lives
|
Small update: I've been on nights this week so my time to work on this model has been shorter than I like, but I did manage to finish the twin-linked assault cannon today before I went to work. The cannon was primed with Vallejo Surface Primer Black and then give a coat of P3 Pig Iron with an airbrush. Though not visible from these pictures, shadows on the cannon were painted using thin coats of VMA Burnt Umber and VMA Black for the darkest shadow. Scratches and edge highlights were made with GW Mithiril Silver and the cannon body was given a pin wash of Secret Weapon Miniatures Armor Wash. The barrels were given the heat-distressed look using the method described by Ron of From the Warp blog fame. The rest of the tank is put together for the most part; the inner structure is assembled as well as the engine. I didn't manage to snap a picture yet, but I hope to get the entire shell completed before I go to work tomorrow night so I can bring it and some Milliput with me to fill in the gaps on the top of the tank. abstract wrote:Looks really good, just don't put the weapon sponsons on the back side doors
The sponsons will be on the back doors but the entire assembly will be magnetized so it can be removed to view the interior. The other two doors will be magnetized/hinged so they can open to reveal the detail of the reverse of the computer and door.
|
|
This message was edited 1 time. Last update was at 2014/02/19 01:05:39
|
|
|
|
|
2014/02/19 00:45:24
Subject: Raptors Land Raider Crusader w/interior detail (WIP)
|
|
Speed Drybrushing
|
I'm trying to use the HK chipping fluid and when I do it I keep removing large spots of paint. Granted this is fantastic for Ork vehicles but I am using it on Space Mahrin and Guard soon and this will not make me a happy camper. How do you brush the paint off? When I do it either just enough comes off or great sweeping patches come up.
|
|
|
|
|
|
2014/02/19 00:46:06
Subject: Raptors Land Raider Crusader w/interior detail (WIP)
|
|
Using Inks and Washes
St. George, Utah
|
The way you describe that weathering sounds really involved but the end result speaks for itself. Fantastic.
Also, good on you for painting interiors. I have a similar obsession. To me, doesn't matter how "little" of the time the interior is even seen, because if it's seen at all, it's something I have to paint. I mean people paint the armpits of their marines too, right?
I think I could follow the step by step you laid out, but if possible think you'd be willing to do a step-by-step photo tutorial of each step you take? I think I'd like to try something similar when I get around to the Razorback I picked up awhile back.
|
|
|
|
|
2014/02/19 00:48:21
Subject: Raptors Land Raider Crusader w/interior detail (WIP)
|
|
Speed Drybrushing
|
Getting to that point is not hard at all its just a matter of doing the stages. I spent probably around 6 hours just getting my stompa to the brushing stage.
|
|
|
|
|
|
2014/02/19 01:17:08
Subject: Raptors Land Raider Crusader w/interior detail (WIP)
|
|
Colonel
This Is Where the Fish Lives
|
 SRSFACE wrote: SRSFACE wrote:The way you describe that weathering sounds really involved but the end result speaks for itself. Fantastic.
Thank you! It is pretty time-intensive but it is totally worth it.
Also, good on you for painting interiors. I have a similar obsession. To me, doesn't matter how "little" of the time the interior is even seen, because if it's seen at all, it's something I have to paint. I mean people paint the armpits of their marines too, right?
I'm a little bit of a perfectionist so if I know it's there, I need it painted.
I think I could follow the step by step you laid out, but if possible think you'd be willing to do a step-by-step photo tutorial of each step you take? I think I'd like to try something similar when I get around to the Razorback I picked up awhile back.
Yeah I can probably do something like that. I thought about it when I was doing the assault cannon but in the interest of time I decided against it. Tomorrow night is my last night of this shift so I plan on painting the entire hull of the tank on Thursday morning after I get home from work (the house will be kid and wife free all day). I will also be doing streaks/oil stains on the model as well so I can document that as well. I could make a tutorial about of the P&M Tutorial forum if you want.
 BunkerBob wrote: BunkerBob wrote:I'm trying to use the HK chipping fluid and when I do it I keep removing large spots of paint. Granted this is fantastic for Ork vehicles but I am using it on Space Mahrin and Guard soon and this will not make me a happy camper. How do you brush the paint off? When I do it either just enough comes off or great sweeping patches come up.
Using a cheap size 0 brush to wet the paint, I then use a pointed sculpting tool to scratch the paint where I want the weathering to be. Then I switch back to the cheap brush and lightly brush where I scratched to expose more of the rust layer.
|
d-usa wrote:"When the Internet sends its people, they're not sending their best. They're not sending you. They're not sending you. They're sending posters that have lots of problems, and they're bringing those problems with us. They're bringing strawmen. They're bringing spam. They're trolls. And some, I assume, are good people."
|
|
|
|
|
2014/02/22 10:44:19
Subject: Raptors Land Raider Crusader w/interior detail (WIP)
|
|
Been Around the Block
|
ScootyPuffJunior wrote:Similar to the method I described in my original post. The basis of it is you paint your undercoat/rust/corrosion layer, seal it, put drops of water where you want the weathering to go and sprinkle salt on it. The water will hold the salt in place and after it dries you paint it was you normally would. Then you use a large brush or a toothbrush (often with water) to gently scrape away the dried salt to expose the paint underneath. It makes a really cool mottled effect when done right.
Here is a pretty cool tutorial with picture on how to do it: http://www.scalemodelguide.com/painting-weathering/weathering/apply-realistic-paint-chips-salt/
You can find videos of it on YouTube as well. Just search for "salt weathering" or something similar.
Is it absolutely necessary to airbrush the outer layer, or can it be painted on?
|
|
|
|
|
|
2014/02/23 01:36:38
Subject: Raptors Land Raider Crusader w/interior detail (WIP)
|
|
Colonel
This Is Where the Fish Lives
|
I've never seen it done without an airbrush, but I don't think that it would be a problem.
When in doubt, try it on a spare model of piece of sprue.
|
d-usa wrote:"When the Internet sends its people, they're not sending their best. They're not sending you. They're not sending you. They're sending posters that have lots of problems, and they're bringing those problems with us. They're bringing strawmen. They're bringing spam. They're trolls. And some, I assume, are good people."
|
|
|
|
|
2014/03/06 00:26:44
Subject: Re:Raptors Land Raider Crusader w/interior detail (WIP) - New pictures! (3/5/14)
|
|
Colonel
This Is Where the Fish Lives
|
I'm juggling a few personal projects right now, but I am trying to finish as much of my Raptors as I can because I accepted a commission for a small Imperial Guard force that I hope to get started on next week.
The Land Raider hull is more or less done now and I documented how I went about doing it with some pictures that I hope to make into a simple tutorial this week. But, for now, here is a nice WIP shot of the tank:
|
d-usa wrote:"When the Internet sends its people, they're not sending their best. They're not sending you. They're not sending you. They're sending posters that have lots of problems, and they're bringing those problems with us. They're bringing strawmen. They're bringing spam. They're trolls. And some, I assume, are good people."
|
|
|
|
|
2014/03/06 00:55:26
Subject: Raptors Land Raider Crusader w/interior detail (WIP) - New pictures! (3/5/14)
|
|
[SWAP SHOP MOD]
Decrepit Dakkanaut
OH-I Wanna get out of here
|
You need to get a p&m blog up, would love to see your projects in one centralized spot.
|
|
|
|
|
2014/03/06 01:16:37
Subject: Raptors Land Raider Crusader w/interior detail (WIP) - New pictures! (3/5/14)
|
|
Colonel
This Is Where the Fish Lives
|
 whalemusic360 wrote: whalemusic360 wrote:You need to get a p&m blog up, would love to see your projects in one centralized spot.
I have my own offsite blog that I am working at growing. It used to be linked in my signature, but there is still a button for it down there. It more or less follows what I post here, but I also add some supplemental content as well. When I get some free time at work tonight I plan on writing my rust/corrosion tutorial and putting it up on my blog.
Feel free to check it out: The Surface of Space
|
d-usa wrote:"When the Internet sends its people, they're not sending their best. They're not sending you. They're not sending you. They're sending posters that have lots of problems, and they're bringing those problems with us. They're bringing strawmen. They're bringing spam. They're trolls. And some, I assume, are good people."
|
|
|
|
|
2014/03/06 01:46:06
Subject: Raptors Land Raider Crusader w/interior detail (WIP) - New pictures! (3/5/14)
|
|
Jealous that Horus is Warmaster
|
I like it. I've been working on some Raptors units as part of a Badab War themed army.
I really like seeing Corrosion on marine models especially. For Guard tanks or chaos it's generally a given but Marines are so often depicted as clean and glistening people seem to forget that they're sometimes asked to fight continuously for weeks at a time.
This particular Land Raider doesn't look like it just got dropped off... it looks like it's just on the road between skirmishes.
I wholeheartedly approve
|
|
|
|
|
|
|
|

 1850 0 - 0 - 0
 Marines 1850 1 - 0 - 0
 210 points Trolls 9 - 0 - 3