Previews of the remaining Blackfrost mecha, which will be appearing in KS #2.
You may commence drooling….
For wave one I should have the remaining Assault level pledges out by end of this week. Which will leave just the Carnage level stuff and that will take at least another week or two get those cast and shipped. That estimate may end up getting delayed a bit as my Grandfather is on very borrowed time ATM so I may need to pause on production for a few days while helping with funeral arrangements and doing family stuff, he's 93 and been in poor health the last couple of months so we've been half expecting it for a while. We know he has terminal cancer but the doctor won't give us any sort of estimate so it could be in a couple days or it might be a month we don't know beyond it's going to happen soon. I'm the meantime I'll be working on stuff while waiting for the call, so my schedule for the next week or two is basically in limbo until that's resolved.
Quoting myself due to page roll over and didn't want people to miss this.
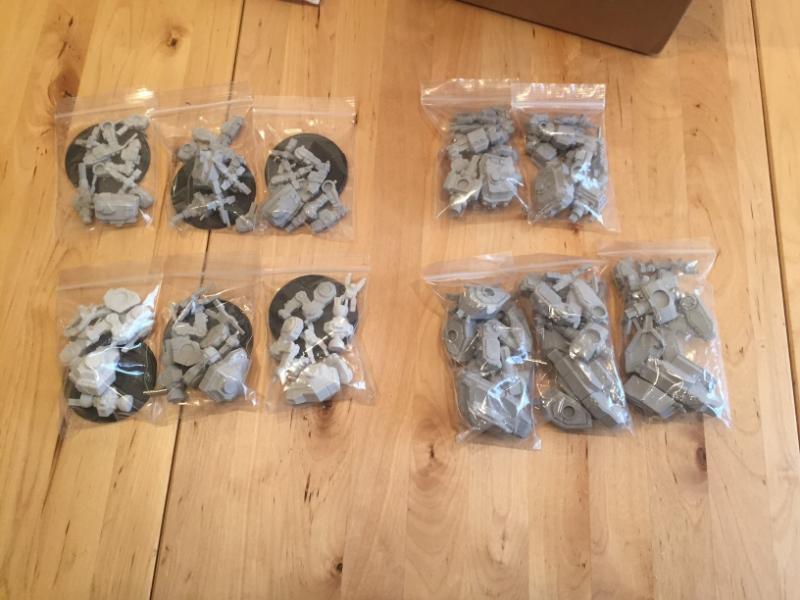
NTRabbit wrote: Just got my small and medium NorAm mechs today.
Paulson, you should change your title to 'Artisan Resin Caster and Master Sculptor', these are outstanding.
Glad you like them
You'll note that ROW backers are also managing to get theirs before KS are relisted for general retail, might be a tad slower due to the distance. However I try to treat all my backers equally and my backers will continue to have first crack at stuff before the general public. Doesn't matter where you are, every backer still a vital part of why this game line is happening and I won't lose sight of that.
I have to say though, I am loving the look of the weaponry on those. Something about the box o'doom just makes it more believable. It reminds me of my old science teacher (who was almost shaped like a vulture) waving his LaZ0r around the class to demonstrate this or that principle, scaring every student that they'd become blind if they were hit by the beam.
Those look awesome! Hopefully I'll have some money tucked away to pick up some more Blackfrost when KS2 comes around.
It looks like the end design on that light is a little different from the concept art that was put up (unless that is a different BF light).
Good to hear that you are nearing the end of the wave 1 Assault level stuff. I'll be looking for my stuff 3 Neo-Bloc lights versus 2 Blackfrost Mediums should make for some cool games. I'll probably balance it out a bit by making the lights have one or more Aces, with the BF mediums regular pilots. Maybe throw in some combined arms to try out.
Got some microscale lights, really wish i'd gotten in on the KS (or rather had the funds to). Surprised more people aren't posting proud pictures of their tiny titans yet.
Sorry to hear about a difficult holiday season. So by your update you should be casting for carnage level pledges now and I should see it sometime in January maybe?
Possibly end of Jan maybe? And not that I want to add any further pressure but when do you feel is a realistic deadline for the other mini's heavies and such to complete the carnage level pledges?
I'm currently working on the carnage level stuff. I spent most of last week running off new sets of molds for each of the models which is about 30 molds, these will cover what I need for the remaining wave one stuff. I should have all the carnage stuff done within the next week.
Once that is out of the way I can resume work on the 3d for remaining mechs. The Wolverine is basically done but will need 2-3 days to back track on and fix as the file got partially corrupted caused by errors from importing stuff between files. (and me forgetting to delete the history) That leaves 3 mechs to finish up, the Neo-Bloc Med & Heavy and the Blackfrost Heavy. I'll have each of them headed in for printing as quickly as I can finish them.
So are there any magnetisation guides? After having just gone through the plastic carving that is removing a super glued magnet I made a mistake with on another mini, I want to make sure I'm putting the magnets in the right place before I start drilling. I've got NorAm Raptors and Lynxs.
My Lynx has 2 big and 2 small magnets in the mech bag, I'm assuming the legs are glued and the big magnets go in the lower and upper torso to allow it to twist? What about the 2 smalls? Each of the weapon packs has 2 smalls as well, except for the missile and gun pack which has 4.
With the medium mecha the larger magnets are intended for the torso-hip connection. The smaller magnets are for the shoulder points and weapons. I did not include magnets for the thigh/hip connection, people can always do that on their own if they wish. What I sent magnets for is to do the torso-hip and the shoulder arm connections.
For the Lynx Alpha there's also a set of magnets to attach under the left and right torso so you can have the lasers magnetized.
There should be a pair of magnets for each of the weapon packs, they go where the connection for the shoulder is.
Depending on what weapon pack it is it may have 4-6 magnets (rather than just 2) In most cases the mech will have 4 magnets, then each weapon pack will have magnets as well, however a few times while sorting I did just stick all of the magnets for both the body and weapons in one bag. In which case you'll have 6+ magnets in one of the random bags.
On the light mecha there's only small magnets for the torso-hip connection. For the Raptor A there's a set of tiny magnets that are used for mounting the machine guns on the center torso.
I've found that marking the magnet polarity with a sharpie is very helpful. There's two ways you can do this, either mark the sides that pair up, or you mark each magnet along one facing which indicates the direction they are aligned. (the first way is usually easier)
I get the magnets paired up and mark the surfaces that are supposed to connect. Then after gluing the first magnet in place I place the other magnet on a flat metal sculpting spade or my hobby knife which is thin enough that it doesn't interrupt the magnets pull and use it do double check the alignment. If I hover the blade over the other magnet and they are aligned properly they should try and grab together with the tool in between. The tool will make it easier to separate them without it rolling or turning around so it's easier to keep track of which side is face where.
paulson games wrote: I've found that marking the magnet polarity with a sharpie is very helpful. There's two ways you can do this, either mark the sides that pair up, or you mark each magnet along one facing which indicates the direction they are aligned. (the first way is usually easier)
The best method I can suggest is to make tool. Create your application piece, either a piece of plasticard/wood (in my case a Popsicle stick) and glue one of the magnets on one side. It is a permanent piece that stays there. Then when you want to apply a magnet, attach your other magnet to the wood side of the Popsicle stick and slip it into the model. This ensures all your magnets will always be the same polarity when installed even if you are switching or using multiple different types of magnets.
So that means the shoulders glue to the torso, and the small magnet does in the shoulder to connect with the magnet inside the guns, yes?
Also for the alpha I think it means you've sent them 2 magnets short - each side needs a magnet in the launcher to connect to the shoulder, and a magnet in the bottom of the shoulder to connect to the magnet in the gun.
Not that it bothers me, I have magnets of that size, just want to make sure I've got the way it was designed to be done down in my head.
paulson games wrote: I've found that marking the magnet polarity with a sharpie is very helpful. There's two ways you can do this, either mark the sides that pair up, or you mark each magnet along one facing which indicates the direction they are aligned. (the first way is usually easier)
The best method I can suggest is to make tool. Create your application piece, either a piece of plasticard/wood (in my case a Popsicle stick) and glue one of the magnets on one side. It is a permanent piece that stays there. Then when you want to apply a magnet, attach your other magnet to the wood side of the Popsicle stick and slip it into the model. This ensures all your magnets will always be the same polarity when installed even if you are switching or using multiple different types of magnets.
NTRabbit wrote: So that means the shoulders glue to the torso, and the small magnet does in the shoulder to connect with the magnet inside the guns, yes?
Also for the alpha I think it means you've sent them 2 magnets short - each side needs a magnet in the launcher to connect to the shoulder, and a magnet in the bottom of the shoulder to connect to the magnet in the gun.
Not that it bothers me, I have magnets of that size, just want to make sure I've got the way it was designed to be done down in my head.
With the Lynx Alpha there should have been 2 larger magnets for the torso, and a total of 2 smaller magnets for the shoulder (one on each side). Those should have been including in the bag with all the body parts.
The bag with the Alpha weapon pack should contain a total of 6 of the small magnets, one for each missile pod, and two magnets for each of the lasers (one goes in the laser the other is added to the side torso) So for a complete Alpha there should have been a total of 2 large magnets and 8 small magnets. If the count is different I may have goofed up when I was packing it.
(The center and side torsos fit together without any magnets being used, same with the legs attaching to the hips)
paulson games wrote: I've found that marking the magnet polarity with a sharpie is very helpful. There's two ways you can do this, either mark the sides that pair up, or you mark each magnet along one facing which indicates the direction they are aligned. (the first way is usually easier)
The best method I can suggest is to make tool. Create your application piece, either a piece of plasticard/wood (in my case a Popsicle stick) and glue one of the magnets on one side. It is a permanent piece that stays there. Then when you want to apply a magnet, attach your other magnet to the wood side of the Popsicle stick and slip it into the model. This ensures all your magnets will always be the same polarity when installed even if you are switching or using multiple different types of magnets.
With the Lynx Alpha there should have been 2 larger magnets for the torso, and a total of 2 smaller magnets for the shoulder (one on each side). Those should have been including in the bag with all the body parts.
The bag with the Alpha weapon pack should contain a total of 6 of the small magnets, one for each missile pod, and two magnets for each of the lasers (one goes in the laser the other is added to the side torso) So for a complete Alpha there should have been a total of 2 large magnets and 8 small magnets. If the count is different I may have goofed up when I was packing it.
(The center and side torsos fit together without any magnets being used, same with the legs attaching to the hips)
Ah, there's the problem then, the alpha bag I got only has 4 small magnets in it. I should be all set now anyway
Something else I've picked up on while magnetizing some minis is that instead of testing a magnet that is in place by trying to get another magnet to attach, I reverse the other magnet and expect it to repel. That way even magnets that aren't solidly glued in can be adjusted if need be.
It's basically the same test, but instead of possibly having the magnet pop out, I can just push a little and see if I get resistance.
The only caveat is that if the hole is large enough and/or the glue is fresh enough, pushing too hard can force the one in the surface to flip around as the polarities say "feth you, want us together? Fine, we're together!", but after a stumble or two it stopped being a problem as I learned to feel for the slight resistance rather than pushing too hard.
The account for the yahoo group got hacked, I'm unable to log in and can't make any admin changes. I haven't used the group in well over a year so any emails that are coming through are definitely spam. Please add the group to you block and spam filters, or unsubscribe from the list as I'm using the forum for any discussions.
UK delivery is usually about two weeks. That can vary by about a week. I've had stuff arrive there as fast as 4 days which was crazy quick and not the norm, other times it's taken up to 3 weeks. Sometimes things need to clear customs which adds a little bit of time, other times they just waive it on through so it's a bit of a crapshoot. At Christmas time stuff also slows down, but that's over with now.
Is there any feeling better than getting new miniatures? YES - getting new miniatures that are awesome!
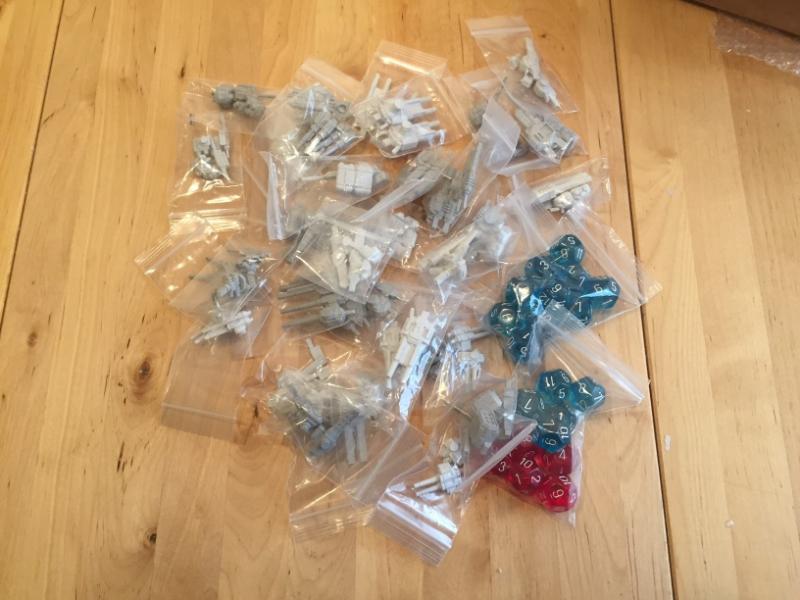
And here are the weapons and dice:What I received today:
Still working on them, the casting is going slooooow because of this stupid cold wave that doesn't want to die. The cold slows the resin process way down and it's taking me 4-5 times as long to get the models done.
This should be the final version of the Wolverine. Currently breaking it down into the individual parts for printing and barring any issues it'll be headed out for print tonight.
Having dealt with restic and Trollcast recently, I was surprised by how easy the Mecha Front resin was to work with. Mostly, that's because the pieces were so crisp and clean that they didn't need any work to clean. The material took to glue very well and everything fitted right together. The only thing I am having trouble with is the magneto zing process. Blue tack to the temporary rescue!
Bob thank you for those scale pics People have asked how they scale vs a bunch of different lines and I don't have much in the way of minis outside of GW and battletech if anyone can do a shot of them vs the current heavy gear models it'd be appreciated.
Working on the set of quad lasers for the Wolverine, A is a scaled up version of the Lynx Lasers which I can run with, or option B would be slightly customized details.
Really loving the details of version B! But then you might want to add more similar details to the rest of the models. Problem with that then becomes the question whether it would fit wit the rest of your range.
I like B also, it is still identifiable as the same weapon system but designed for a heavier caliber. It feels like the scale difference would be small enough that the increased size would be pointless (why not just pump more power into the smaller size) but still large enough to be noticed (you can spot the Wolverine laser on a pile of Lynx lasers due to size).
Tried to pull up the rules at mechafront.com, but the version 1.7 link is not working . Also are there tokens for this game? Because I think RItides needs some more ideas for tokens for his MODcubes.
B looks better. I would imagine energy weapons with a higher heat signature would come close to reaching the structural failing point of the material used in the weapon so additional cooling makes sense in the way of heat sinks. At least that's what I'm telling myself the extra greebles are
paulson games wrote: Bob thank you for those scale pics People have asked how they scale vs a bunch of different lines and I don't have much in the way of minis outside of GW and battletech if anyone can do a shot of them vs the current heavy gear models it'd be appreciated.
I don't have any Heavy Gear, but I do have some Dropzone Commander and Robotech Tactics, as well as a lot of other stuff, so if you would like scale pics with another range, please let me know.
paulson games wrote: I fixed the broken links, files should download correctly now.
No specific tokens for the game unless you want to mark damage related penalties or edge.
Thanks ,
Also not sure if I like "B" more because of the detail on the gun or because of the lack of details on the model. The renders are at two different stages and I think that might be throwing some of the appeal towards or away from it. The "b" is missing details like the cockpit and leg details that might alter final decisions.