8723
Post by: wyomingfox
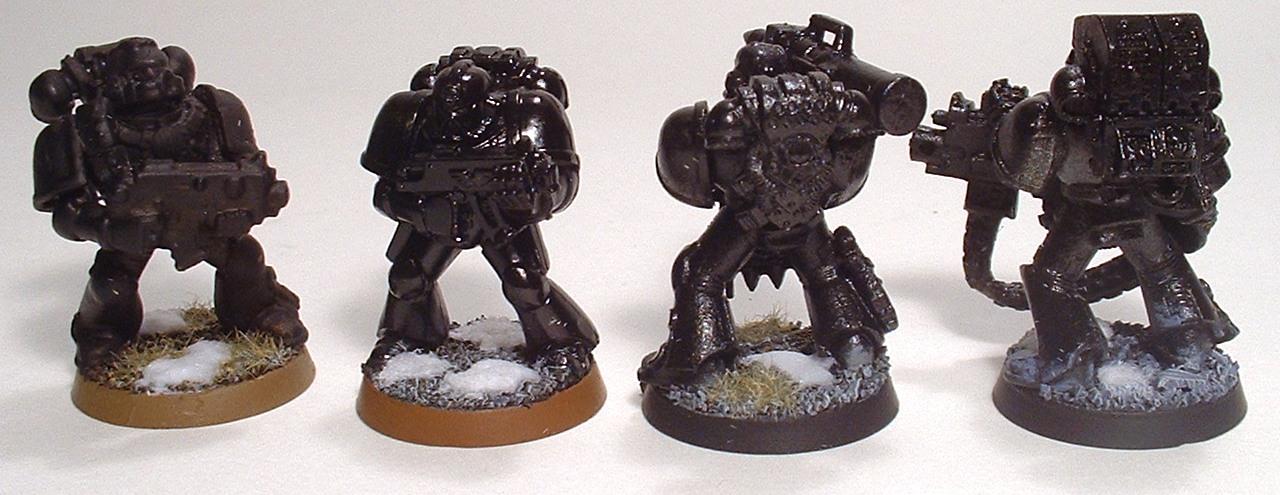
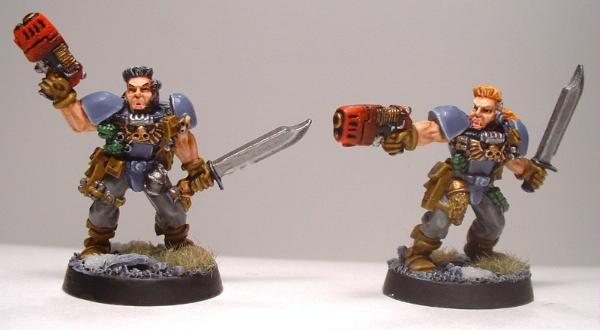
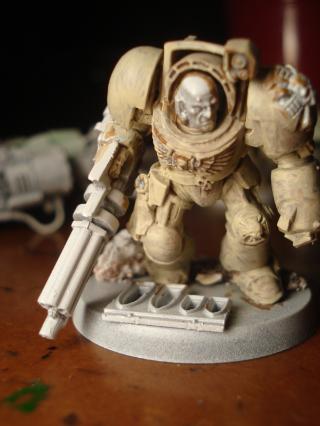
Well, Space Wolves happened to be my first miniature army I ever collected. I still remember stepping into Pegasus Games well over a decade ago and picking out two new, shiny boxes...one being a Predator Annilator and the other being a squad of Blood Claws. Why Space Wolves you ask...Viking Werewolves in Space Duhh  ! That and Eldar were in the process of being reworked and as such, there was only a few blisters available.
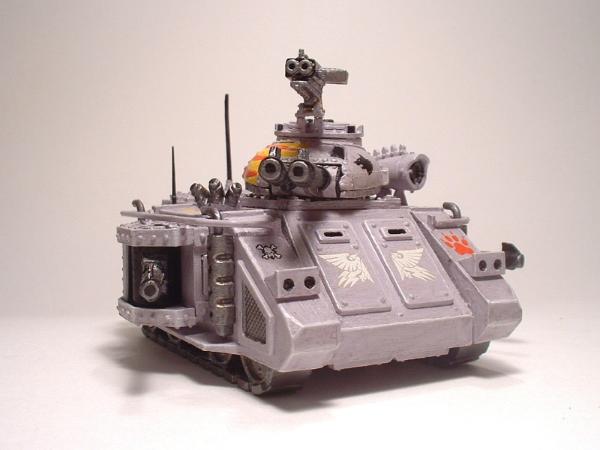
Since I lacked GW paints, I had the local true value mix me up some latex paint...thus the purpleish grey. The preditor was the first miniature I ever painted. To simplify the process, I decided to paint all the components individually...unfortunatley this made the assembly and glueing of the tank very difficult  ...lesson learned! Soon after that, I received the Space Wolves 2 ed box set as a Christmas gift  and away I went. I have been thinking of simply painting over the models, though given the already fairly thick paint job on most of the mini's, a dip in Simple Green may be nessessary. I think I will keep the tank as is though...for a momento.
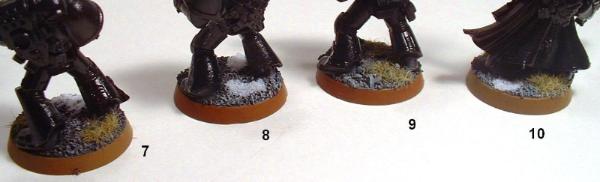
Of course alot of time has passed, and I have gradually improved...though the majority of my work has been on Tyranids. Recently, I have been repainting a squad of Long Fangs and Wolf Scouts (In more traditional Shadow greys that is). However, they still need to be based and as such, I have been experimenting with various combinations of grits, paints, and grass vs snow to find a good mix; fortunately, my friend was willing to provide me with a bunch of poorly assembled and over-primed models  !

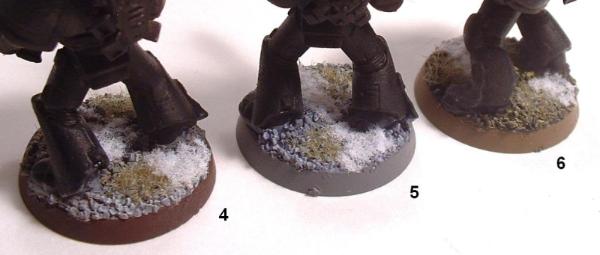
Based on the results of the first go around I desided that I liked 4 & 5 the most and would experiment further with grey rocky terrain.
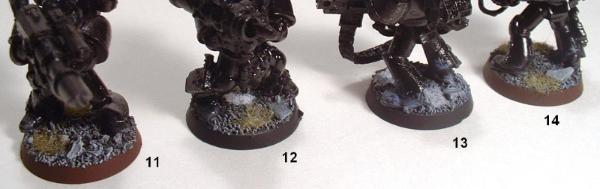
Given this second round of samples, I think I have narrowed it down to 12 and 13, which are primed black and then over brushed with Shadow Grey and Cold Grey, followed by Dry Brushes of Fortress Grey and Ghost Grey with a Black Trim. I also like the mostly fine sand mixed in with 20% medium git and 1 or 2 pebbles. And while I like the Winter Static Grass, I have not been a fan on how the snow keeps turning out...so I might end up leaving out the snow.
8723
Post by: wyomingfox
Hmmm...I just found an excellent tutorial on snow basing by Grey Death:
http://thepaintingcorps.blogspot.com/2008/12/friday-quick-tip-snow-basing.html
I will have to try this out!
8723
Post by: wyomingfox
OK, tried out Grey Deaths technique with GW snow flock. Ploblem is that the flock absorbs the glue and instantly hardens so that you have to add a ton of water to turn the mix into a spreadable gel. Even still, it is a bit of a pain  ...Grey Death how dare you make things look easy  !
Anyways, here are pics of the bases utilizing Grey Death's snow technique. All-in-all a definate improvement and I might end up keeping the snow with the static grass  .
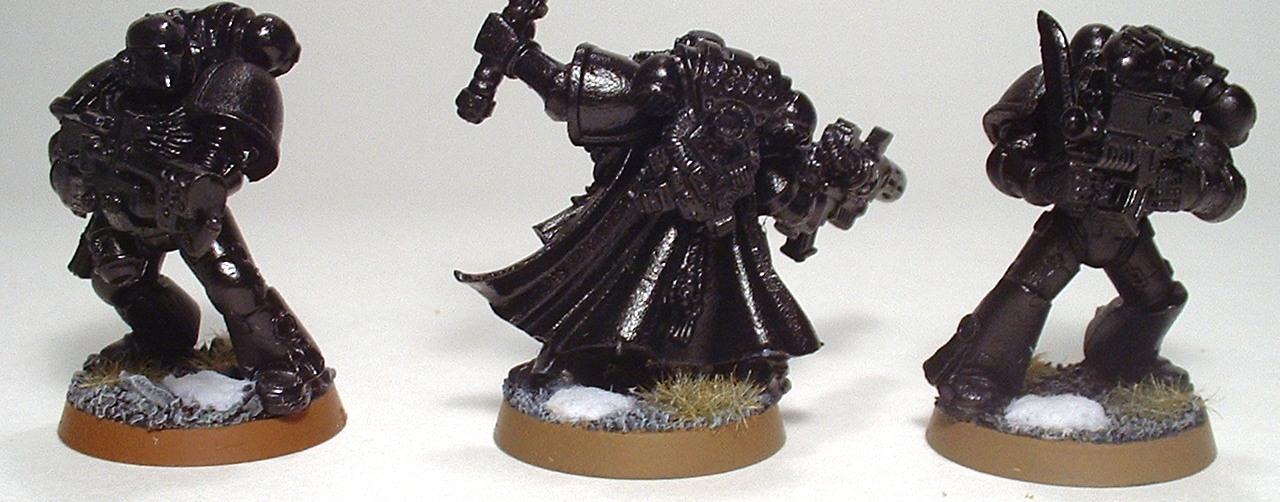
Any thoughts?
8723
Post by: wyomingfox
OK, I have been painting honest I have and here are the results complete with finished bases. All in all, I like how the bases turned out...even if my snow does look more like sheets of ice  !
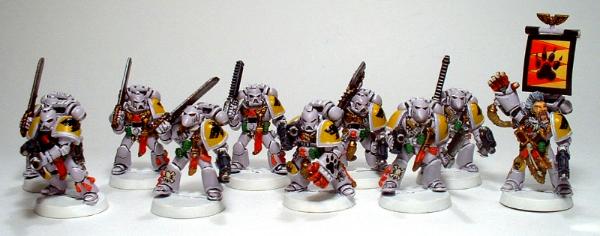
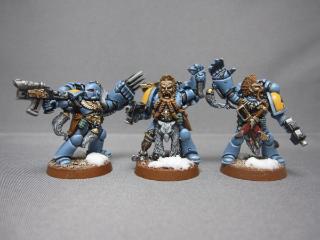
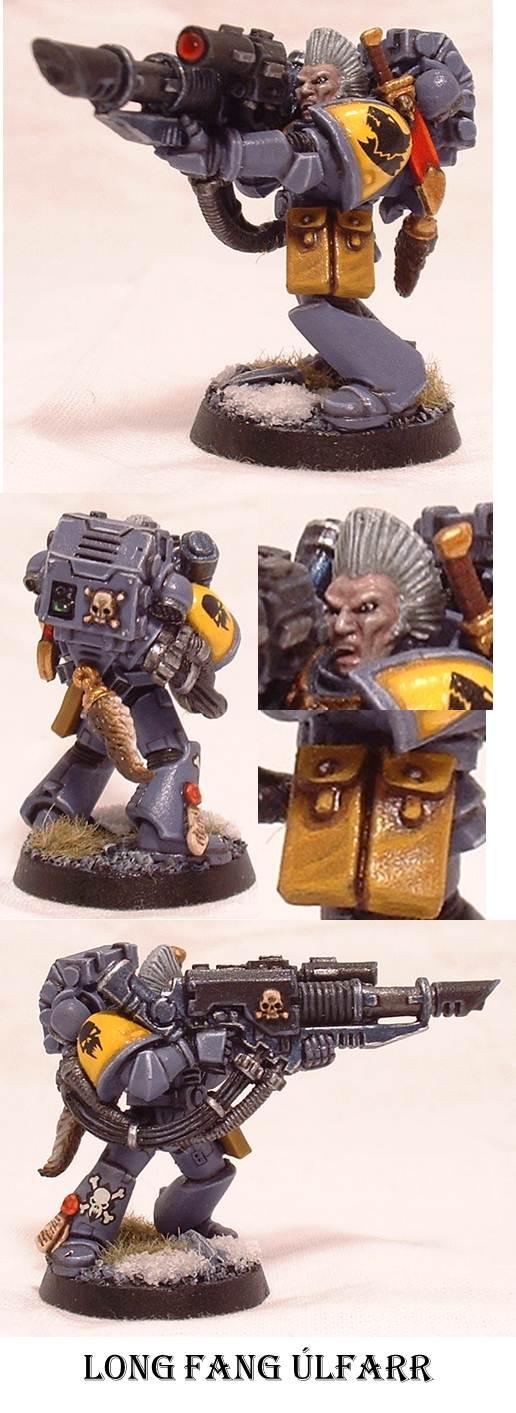
First up my Long Fang Squad:
This is a squad that I recently repainted. Also I free hand painted the red wolf skull on the Long Fang Pack Leader's shoulder. Definately room for improvement but not bad for my first attempt at such!

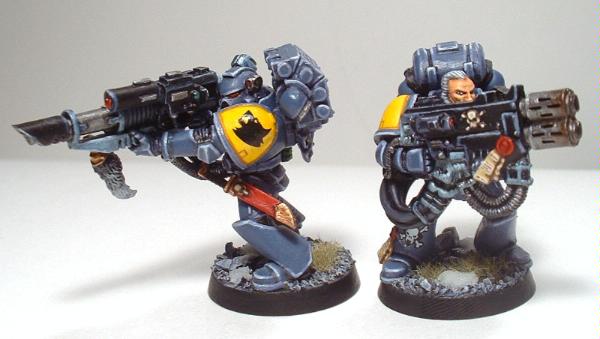
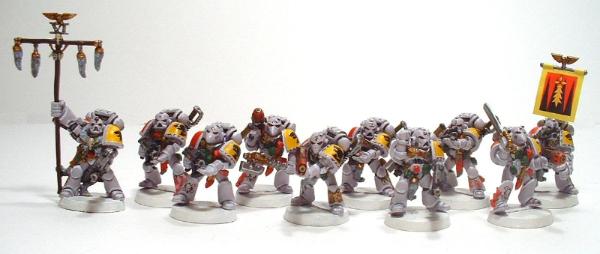
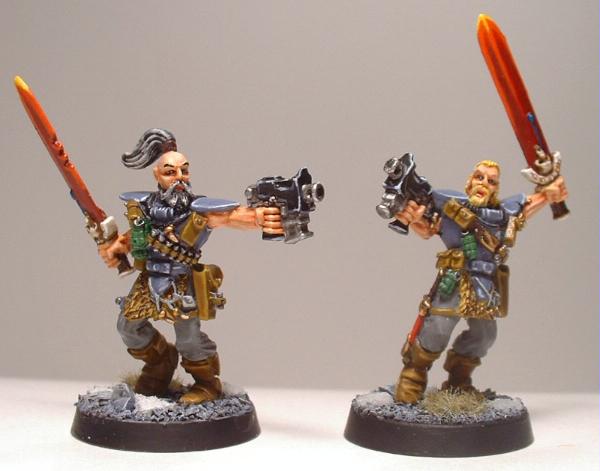
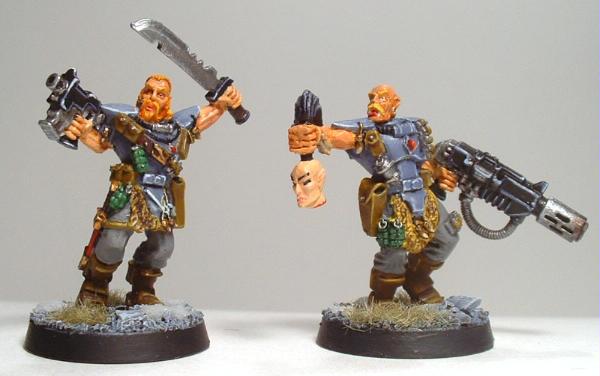
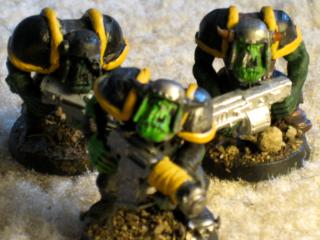
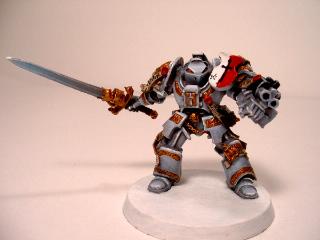
Next is my Wolf Scout Squad complete with an attached Wolf Guard Pack Leader:
Another squad that I just finished repainting. The Wolf Guard model is by far one of my favorite models, though I just had to make a little improvement by swapping out his chain sword for a power sword. For the two Wolf Scouts equiped with Power Weapons, I decided to go with an ivory/bone paint scheme for the sword hilt which I think compliments the dark red of the blade quite well. For the last two figs, I chose not to redo up the faces. Mehh, gives the overall squad a bit of contrast as their flesh is much darker. The melta gun bearer was my first conversion and involved one of my friend's Dark Eldar heads (said friend also happened to introduce me to the game so you can thank/curse him accordingly ! Man that was over a decade ago!
Well, again definately room for improvement. Yet I think that I have come along way since I first started painting Space Wolves. For one, back when these were first assembled I was way lazy and as a result I didn't clean the flash and mold lines...and I didn't feel like doing it when I was repainting them. For new models (unpainted) I definately make sure to clean the mold lines. Still I got alot of models that have already been painted and are in need of a second coat. Oh well.
14471
Post by: 1xx700007117
How did you make these wolfs?
8723
Post by: wyomingfox
1xx700007117 wrote:How did you make these wolfs?
Not sure if I follow  If you mean where did I get the models:
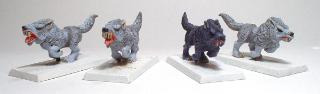
Preditor, Blood Claws, Grey Hunters, and Wolfguard are all 2nd Edition pewter figures specific to Space Wolves
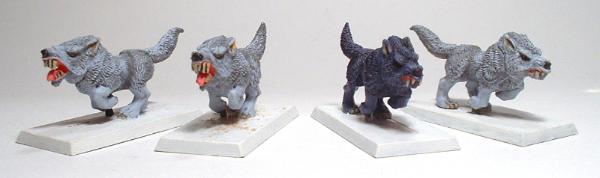
Fenrisian Wolves are OOP Warhammer Dire Wolves
Long Fangs are 3rd Edition Plastic Devistators with Space Wolves upgrade bits
Wolf Scouts are 3rd and 4rth Edition pewter figures specific to Space Wolves with weapon swaps using Space Wolves upgrade bits
Hope that answers your question 
9594
Post by: RiTides
Wow! You've improved so much! Your original models look good, but your current ones are wonderful!
Excellent work
8723
Post by: wyomingfox
Thanks for the compliment Nids .
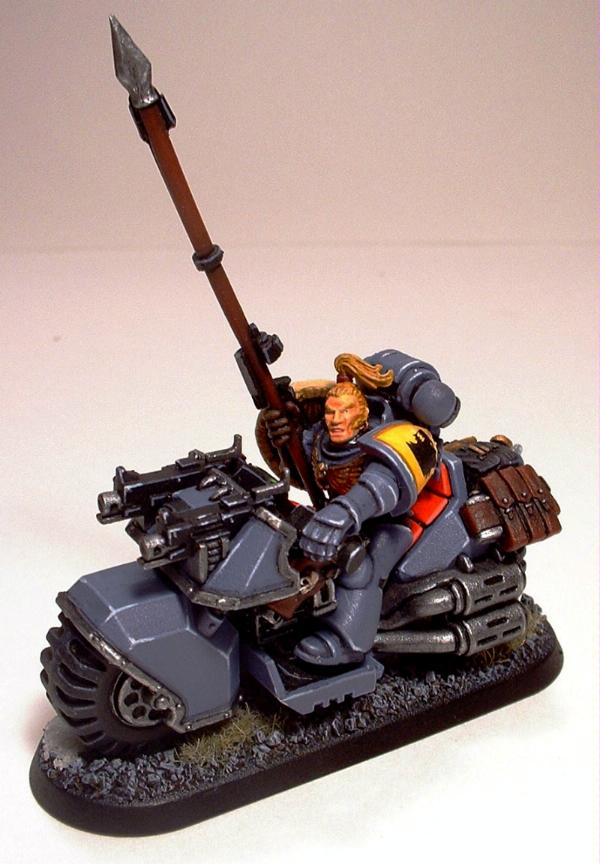
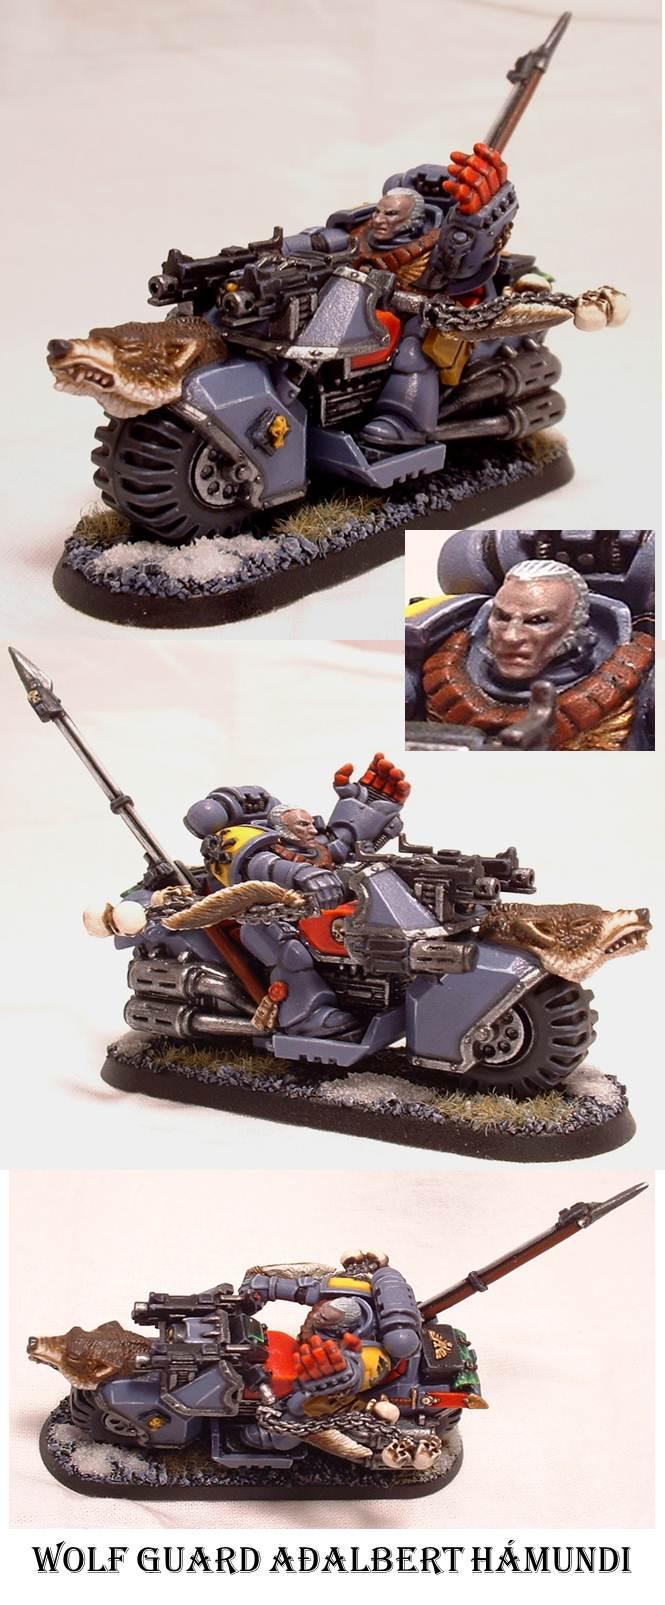
I will be basing my most recent painted model, a blood claw bike, this week. Unlike my previous posted figs, this is not a repaint, so the quality of the paint job should be that much better IMHO.
Also I am going to take another jab at the snow as I was told I was adding too much glue to the mix (the snow should look white NOT grey !)
One thing I have learned...Basing should largely be done prior to painting your actual figures due to the drybrushing required that can inadvertently get all over the figures legs  (though applying grass and snow, can be left for later) ...unfortunately I wasn't ready to try basing at the time the figures were painted so I kinda made life harder . Of course most of you guys already know that !
12030
Post by: Demogerg
I <3 your wolves.
Classic Space Wolf minis have a soft place in my heart, I started playing back in 2nd edition with space wolves and I still regularly field some of the minis that I bought in the mid 90's
I also recently started to repaint my army, and it feels good to refresh the old models.
8723
Post by: wyomingfox
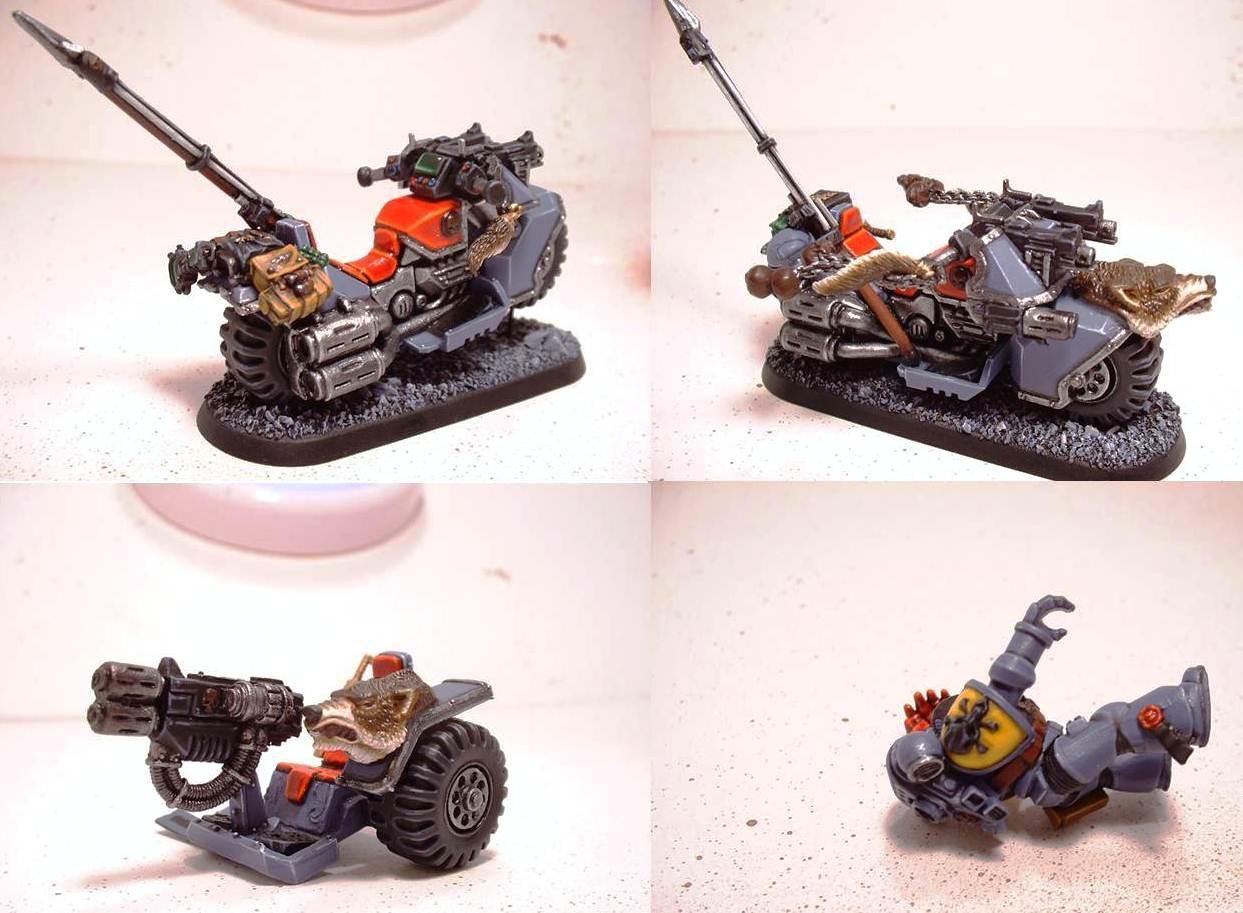
UPDATE time!
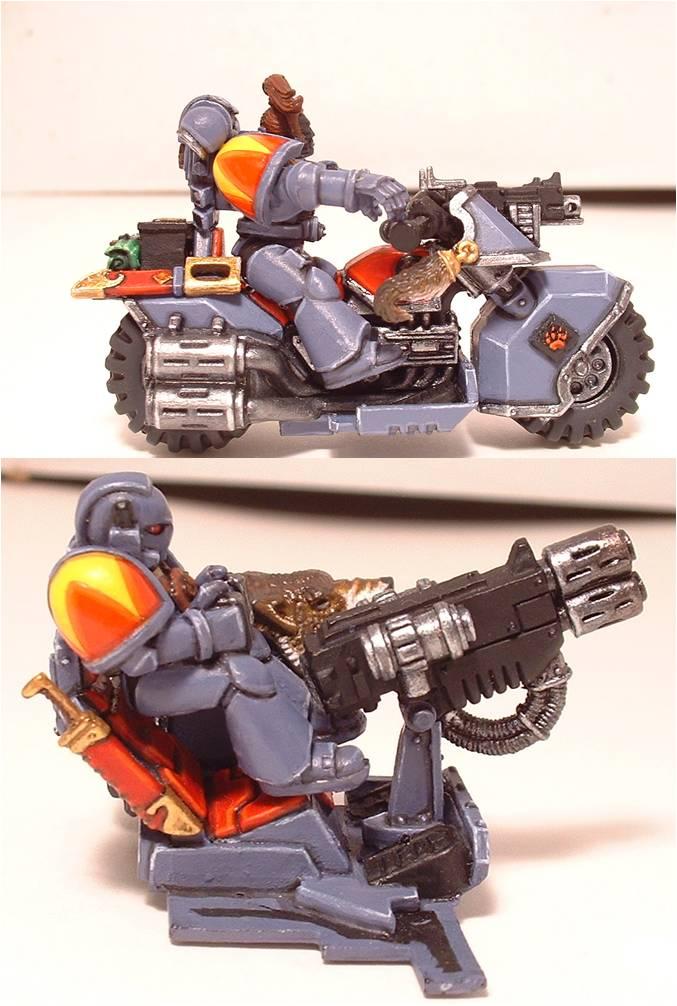
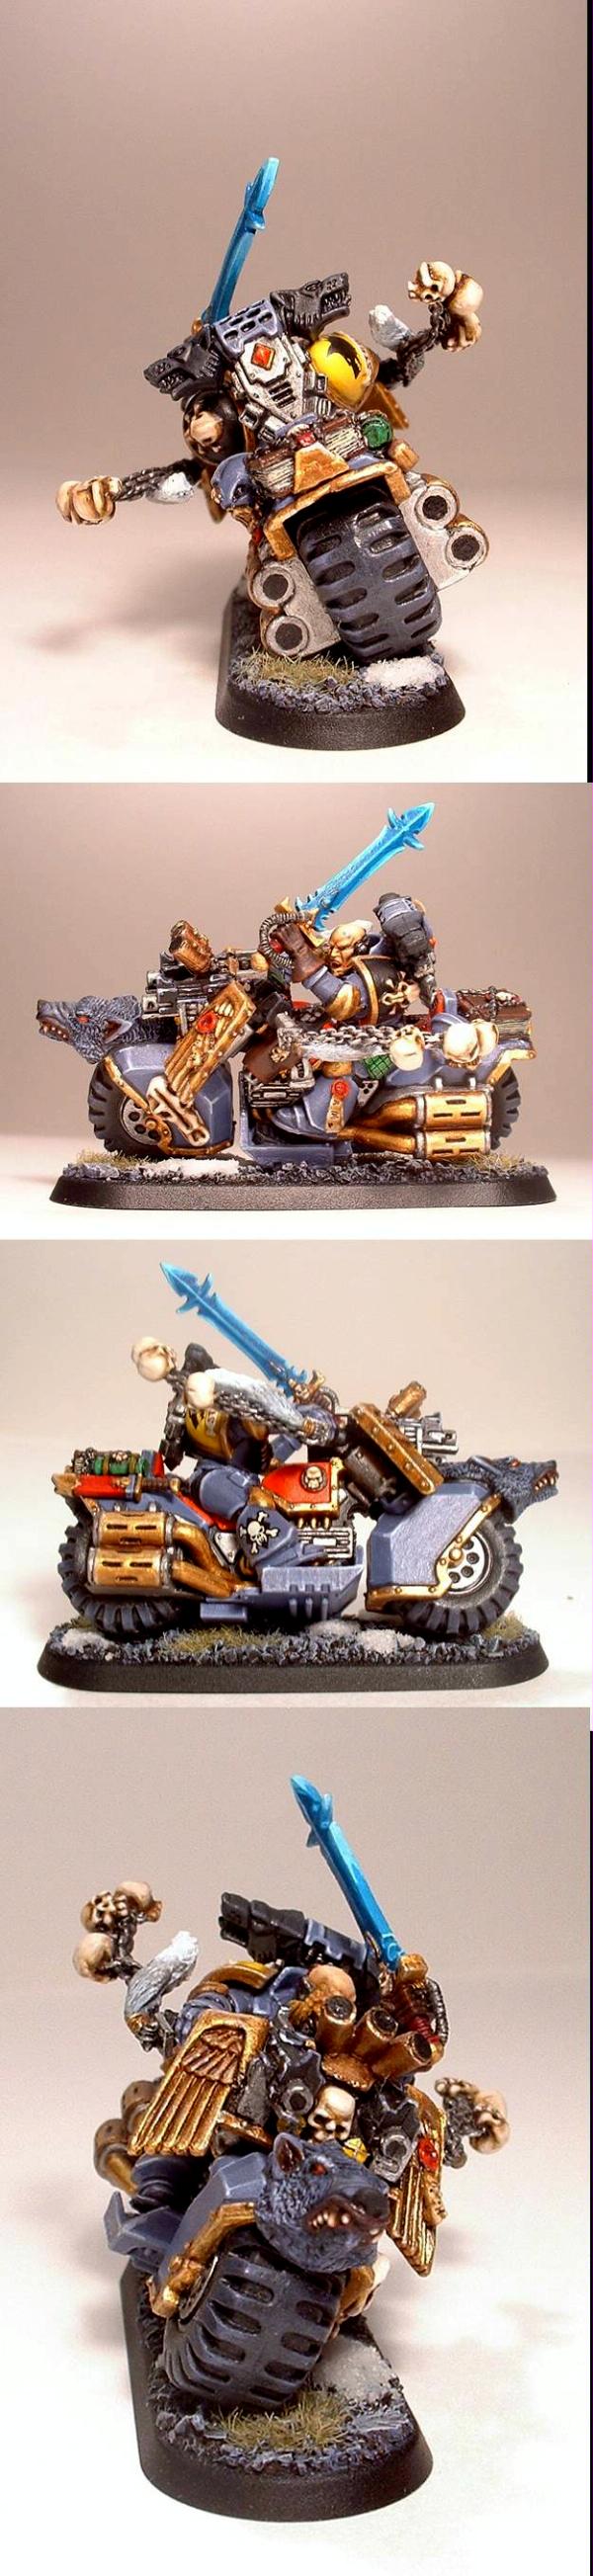
This is a WIP of a SW Bike I am repainting, having been painted originally in 2001 for my WGBL. Currently, I have repainted the wheels, the bike seat, the gold and metal trim, and added shading for the shadow grey bike panels.
I am especially happy with how the gold has turned out, having orginally been simply a single dry brush. The eagle wings cowling makes a great counts as storm shield to boot ! Now if only I could get a couple more (they were orginally from the SM Bike Chaplain).
I am currently working on the skulls with the following planned buildup:
Base Coat: Scorched Brown
1st Highlight: Beastial Brown
Intermediate: 50% Bestial Brown/50% Filthy Brown
2nd Highlight: Filthy Brown
3rd Highlight: Bleached Bone
Intermediate: 50% Bleached Bone/50% Skull White
4rth Highlight: Skull White (edges only)
As you can see, one side has been built up to Filthy Brown while the other is at the Bleached Bone Stage
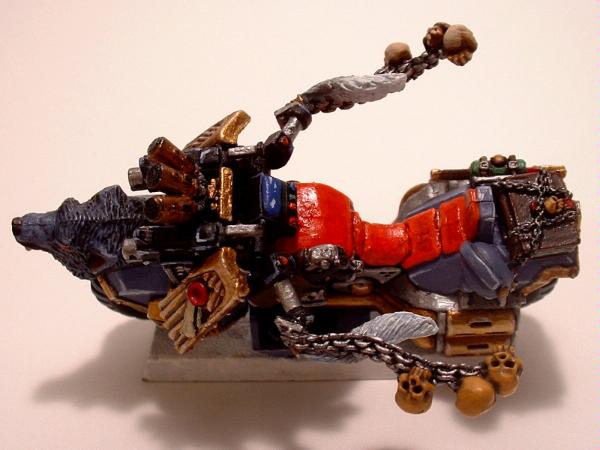
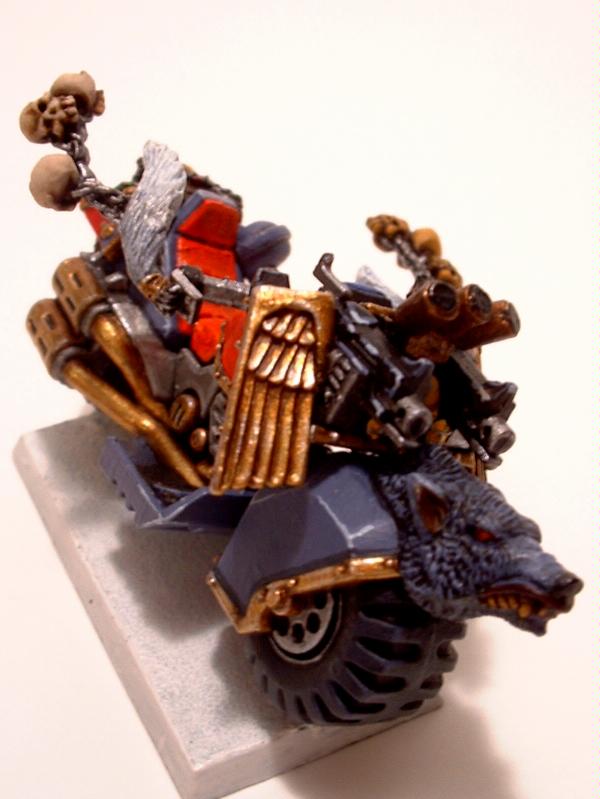
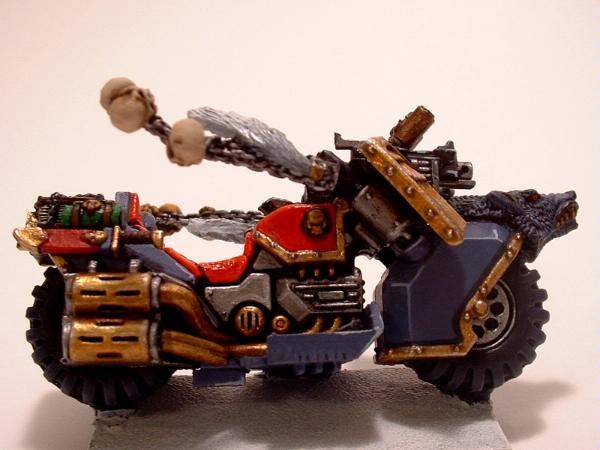
After that, I will need to touch up the wolf head, reapply the highlights on the Shadow Grey Bike Panels, redo the brass work on the smoke launchers, and redo the head and the shoulder pad of the WGBL (not pictured). After which I will reapply the model to a new base (rounded calvary base ).
8723
Post by: wyomingfox
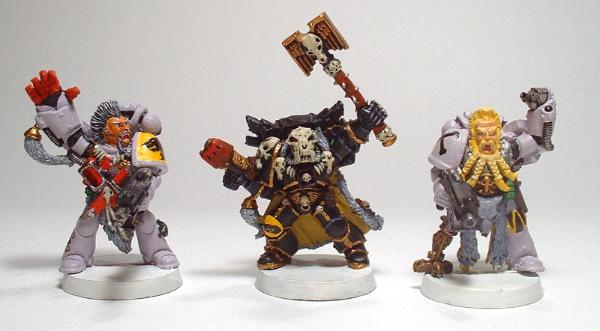
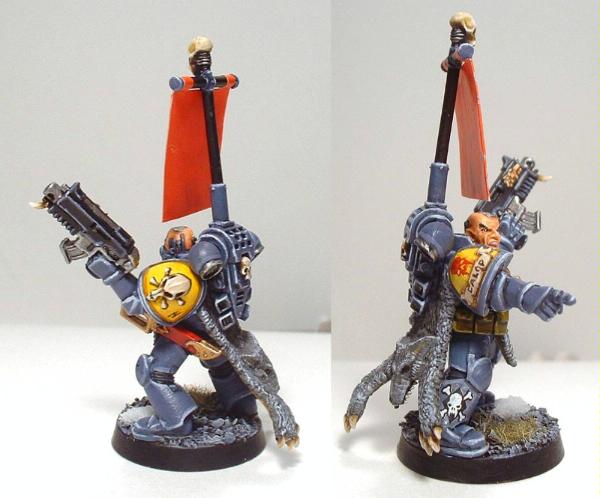
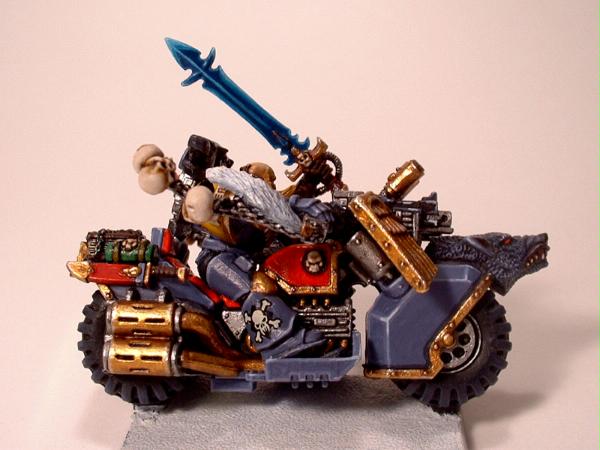
Heah guys, well I finally finished up repainting my old Wolf Guard Battle Leader and I am really pleased with how he turned out. I did some experimenting with the face with a differnet color scheme than my scouts and I love the results. IIRC, I used the following buildup:
Base: 1:1 Dwarf Skin and Charred Brown
Mid-Tone: 1:1 Dwarf Skin and Filthy Brown
Wash: Ogrin Flesh
Reapply Midtone
1st Highlight: 1:1:1 Dwarf Skin, Filthy Brown, and Elfic Flesh
2nd Highlight: Elfic Flesh
Final Highlight: 1:1 Elfic Flesh and Dead White
Apply fresh would with slash of gory red followed by a glaze of lich purple
I also like how the ivory turned out on the skulls ect. He is armed with a frost blade and a storm shield built into the bike (the golden eagle wing cowling on the front)
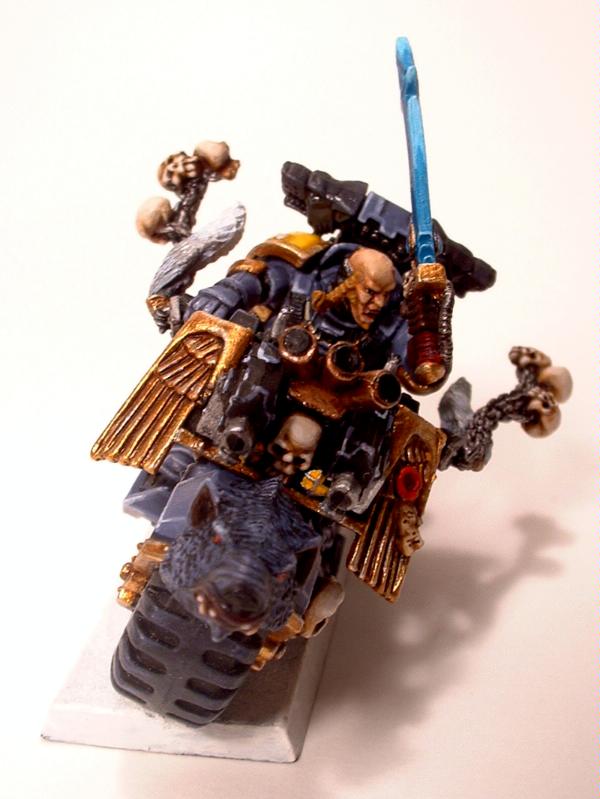
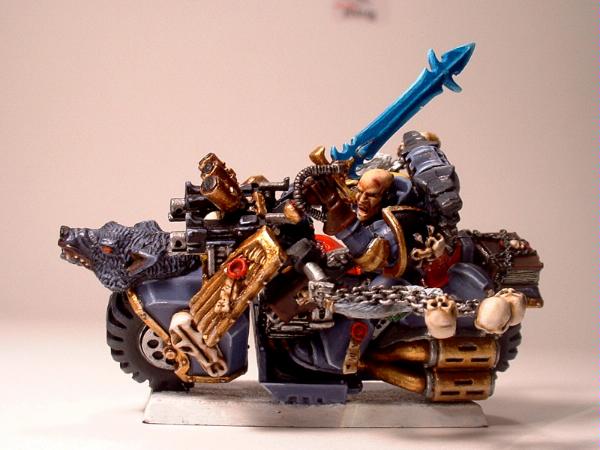
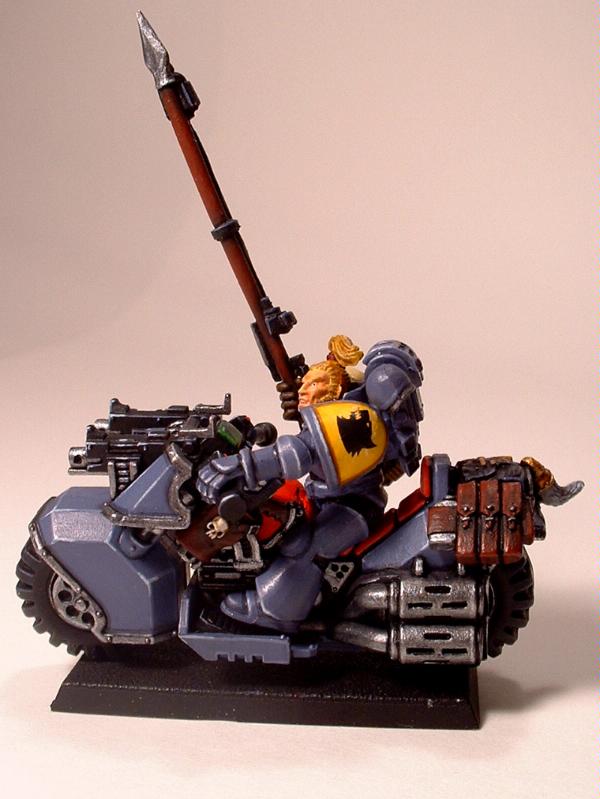
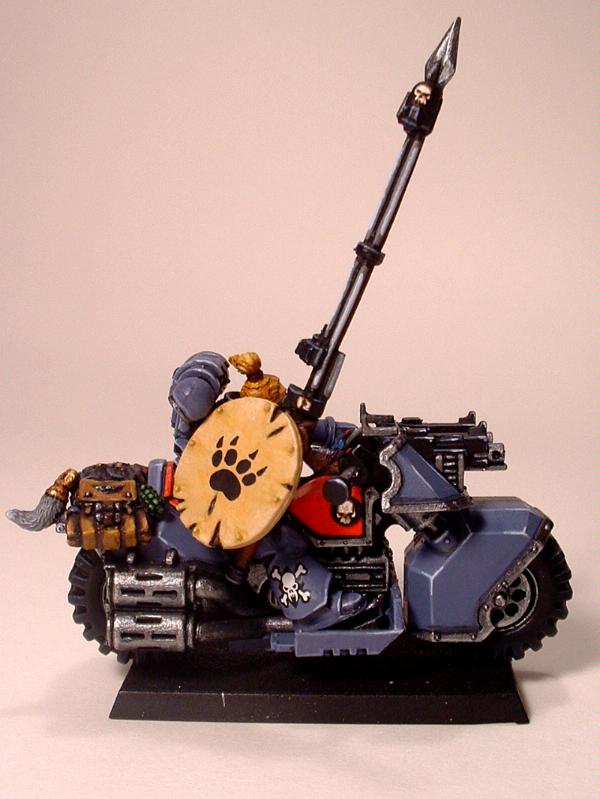
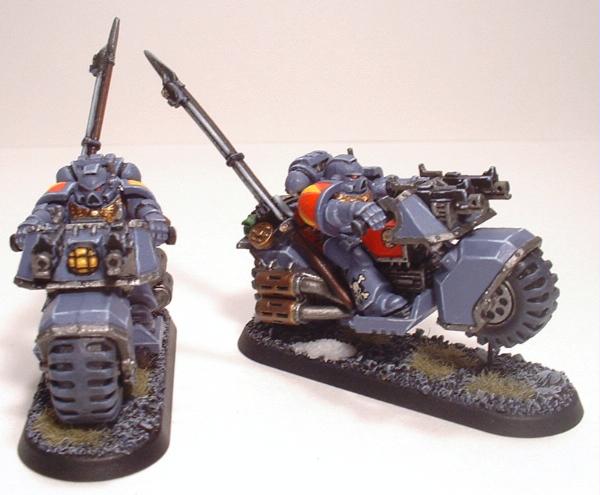
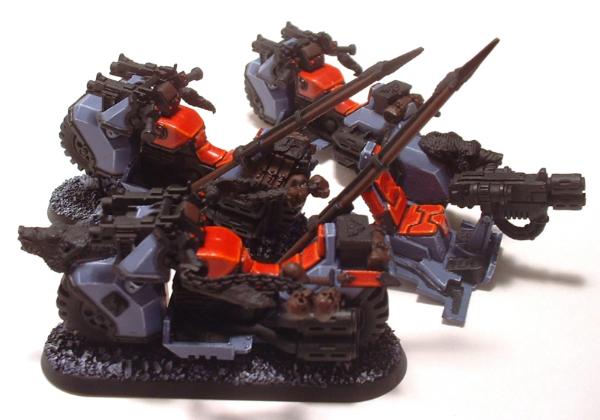
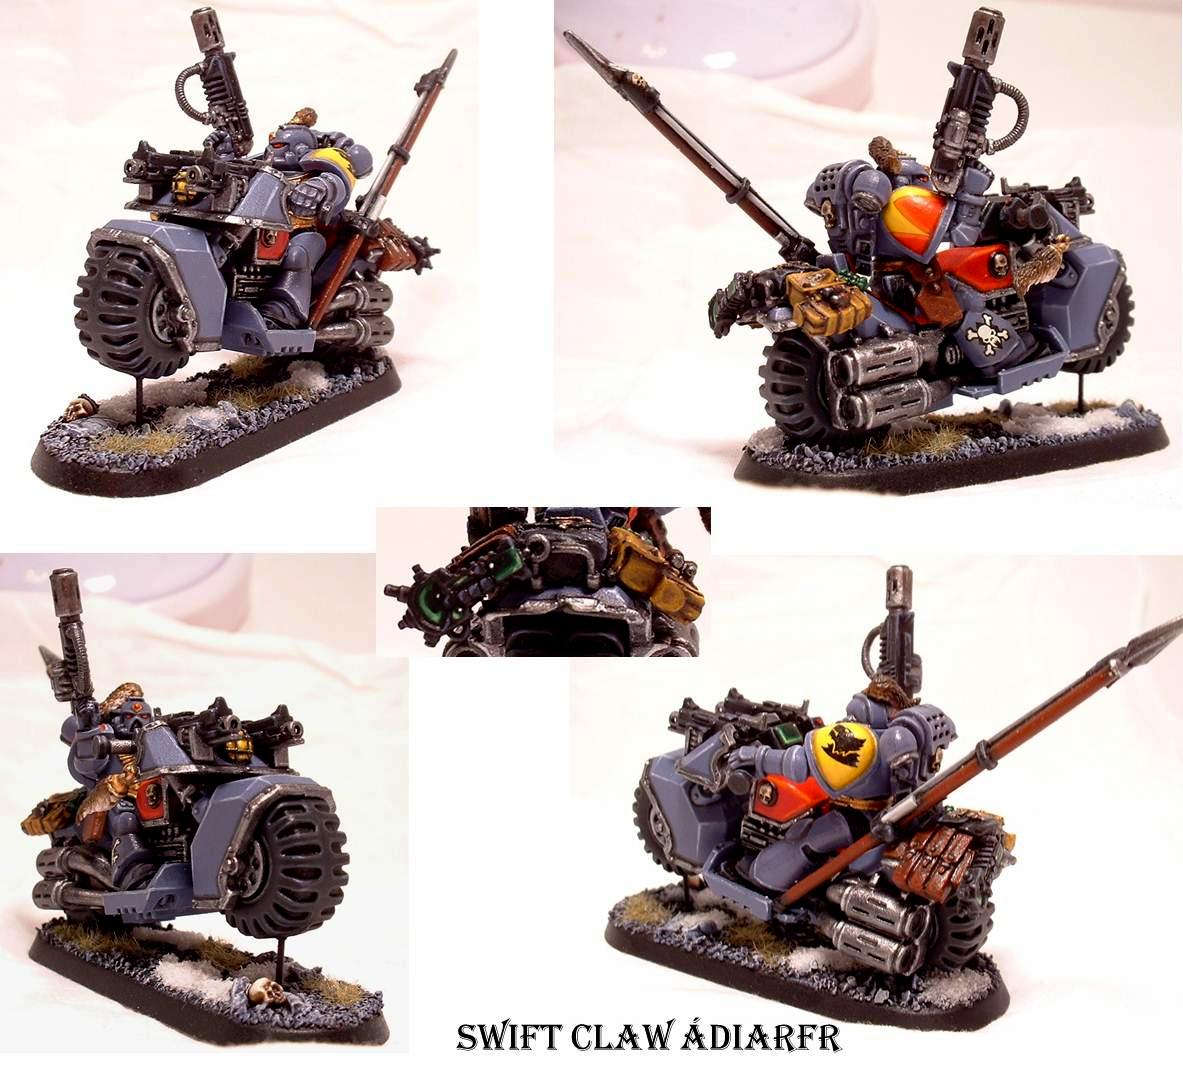
I also painted my latest Swift Wing who is armed with a hunting lance and a reinforced hide shield (2 CC weapons). Unlike my previous models, this is not a repaint.

I am currently working on repainting 3 old blood claw bikes and after that is complete, I plan on mounting all 5 bikes on new rounded calavary bases before basing the models. Well, what do you guys think of my latest efforts?
6609
Post by: Fresh
You have done a great job on getting the right blue colour for space wolves, the gold is really good. Considered weathering?
8723
Post by: wyomingfox
Thanks Gutteridge. I plan on trying some weathering techniques on a few upcoming vehicles. Nothing over the top like Mig...just some simple/basic stuff with oil paints and some sponge effects that I saw in the FW Masterclass book. Before that though I need to purchase an airgun...and master the basics of that.
8723
Post by: wyomingfox
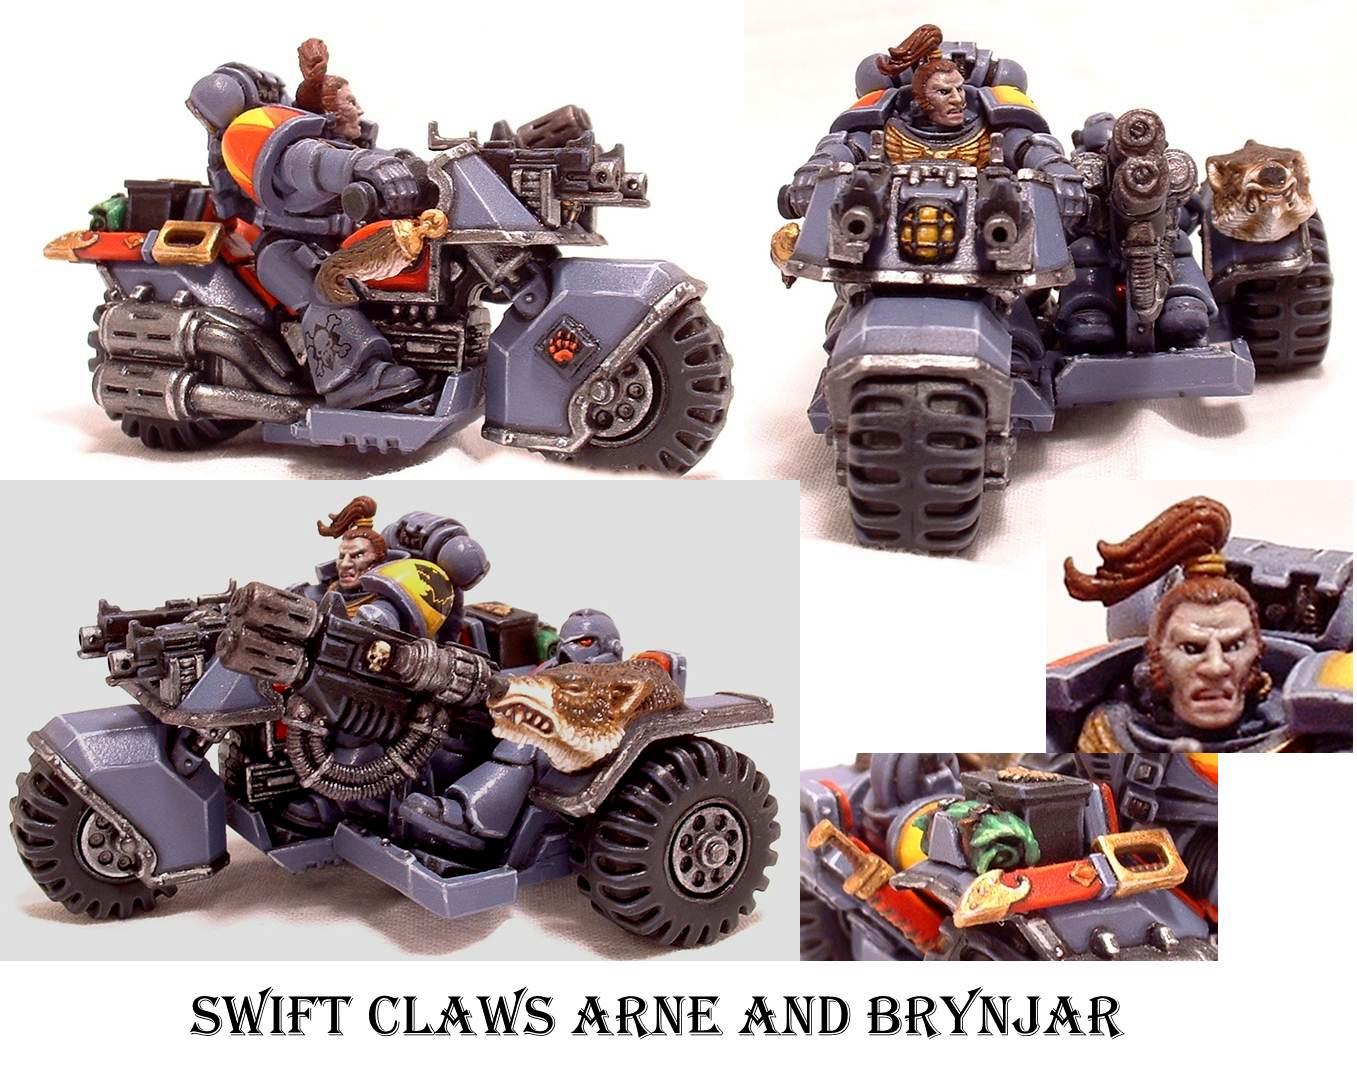
Update Time!
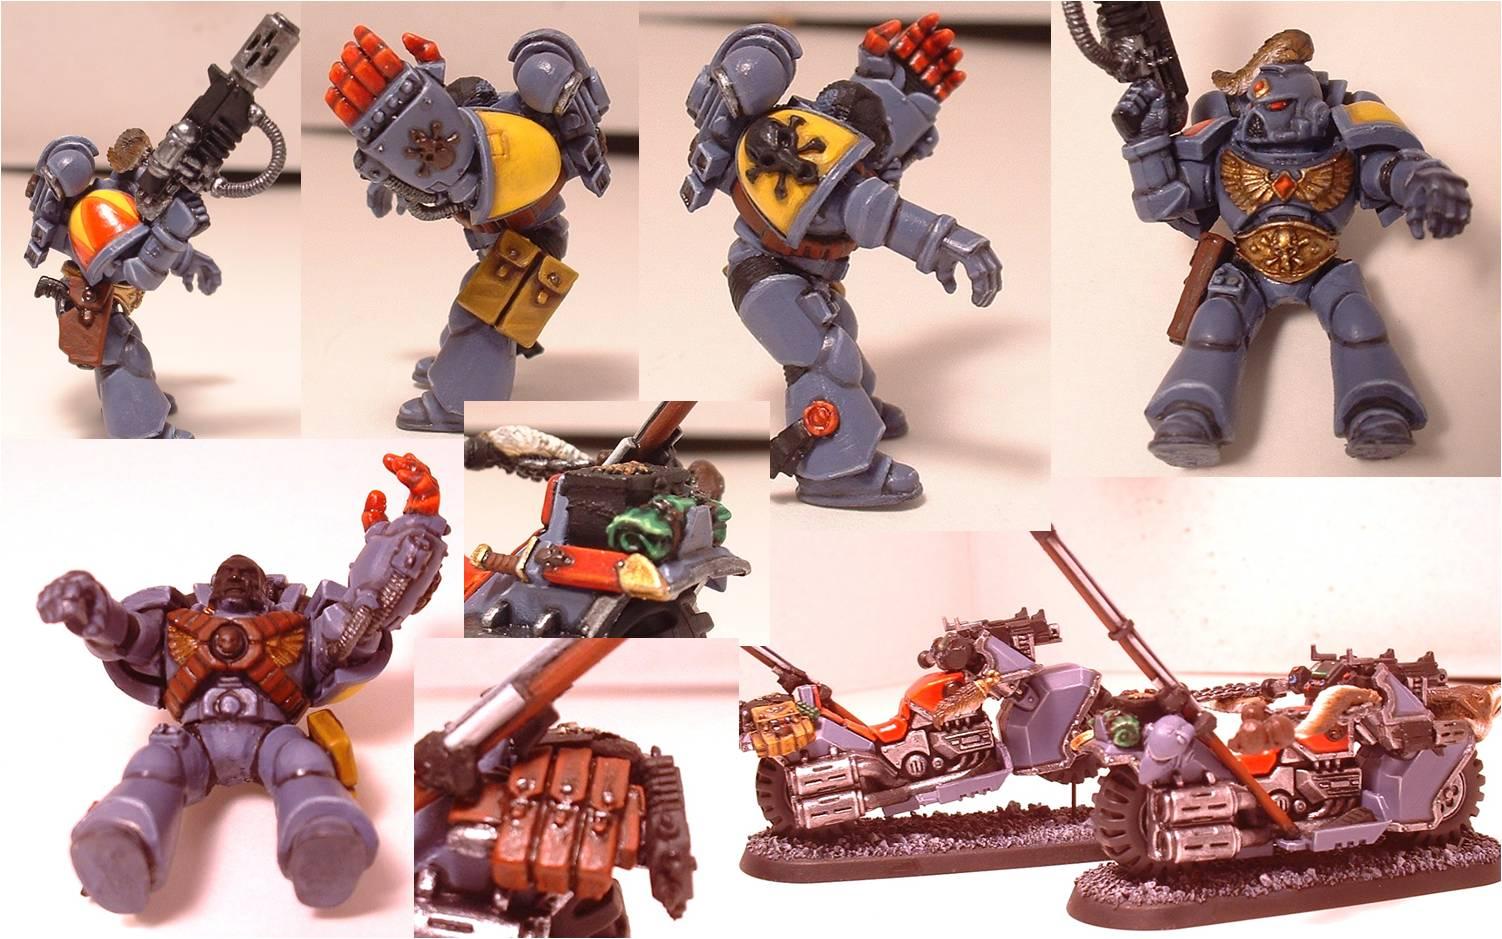
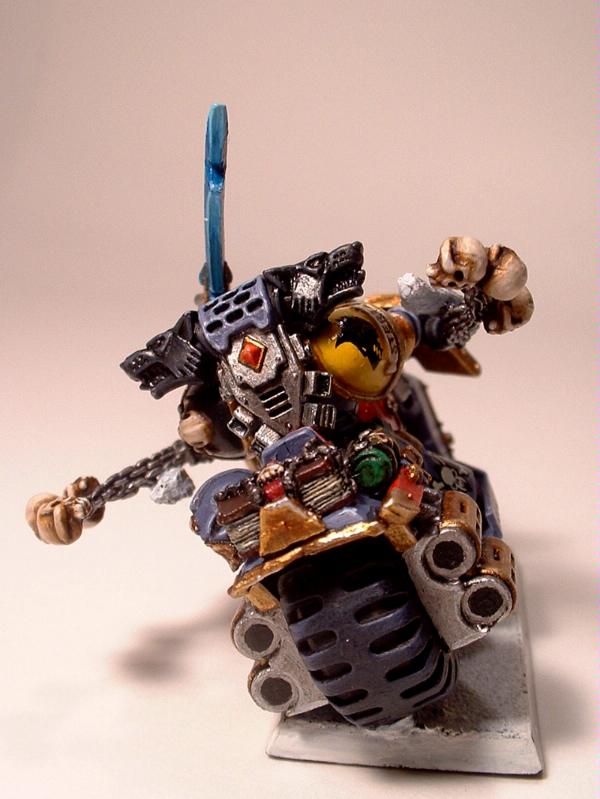
Finally finished my Swift Claw Squad led by a fierce WGBL mounted on a bike.
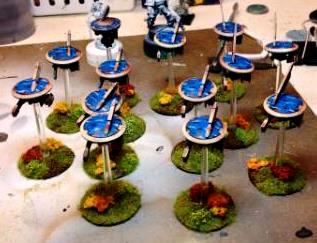
First, I removed them from the old 3rd edition calavary bases and painted up a few of the newer rounded bike bases. On a positive note, I was able to get the snow looking a little more opaque this time by adding less glue in making the slurry base as well as sprinkling on a final layer of snow flock before letting the slurry dry. Still not quite what Grey Death has in his tutorial though
And the finished results:
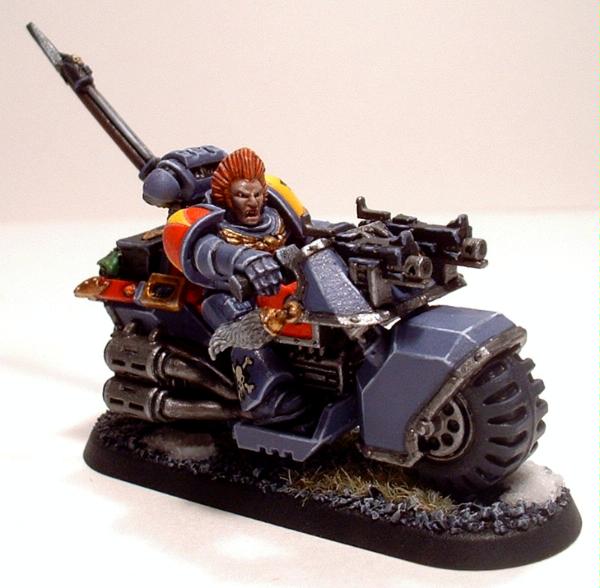
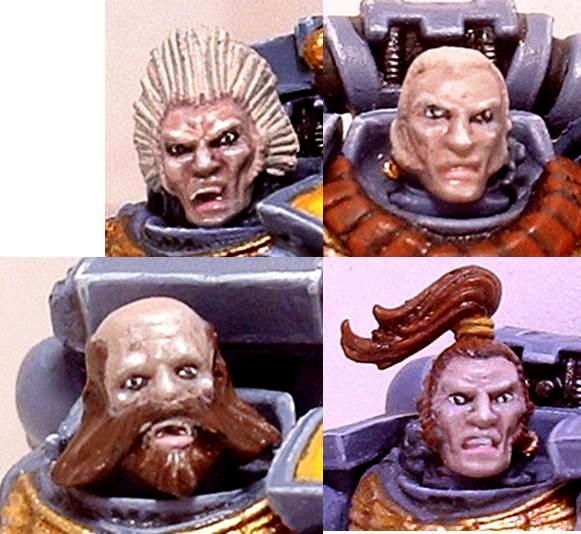
I was able to experiment with a few new techniques on painting faces as seen below.
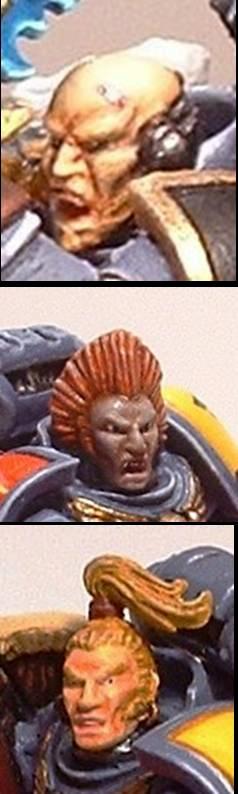
The center face (red spiky hair guy) utilizes CMDantes method outlined in detail here: http://cmdante.blogspot.com/2009/11/fleshing-things-out.html. Check it out . So which one do you like the best?
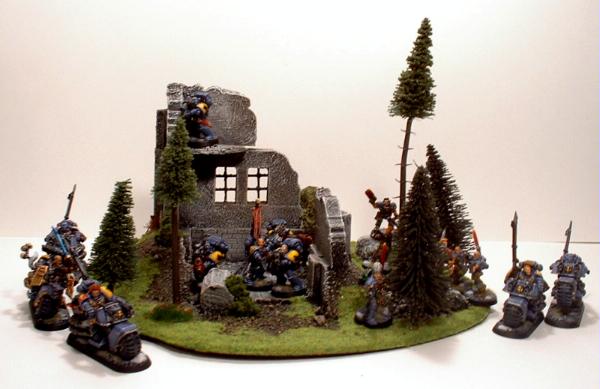
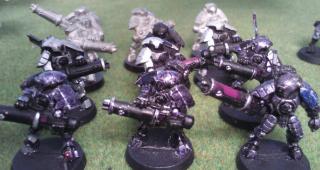
Finally my army as it stands now:
Well I am off to paint up 2 more long fangs, 6 scouts, 1 bikes, and an attack bike, and one wolf guard swift claw pack leader .
8723
Post by: wyomingfox
So 8 months and I actually have something to show . So far I have been working on a Swift Claw Attack Bike, a Swift Claw, and a WGPL on a bike. The armour and the reds have been completed and I have blocked in the ivory, greens, and browns with a brown foundation.
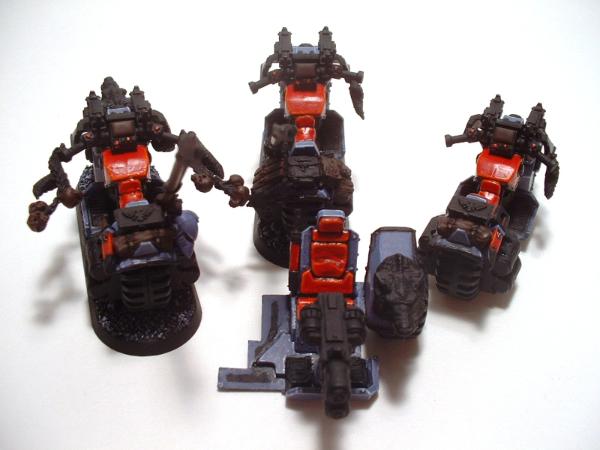
The red is a new technique slightly modified from the WD Space Hulk Masters Tutorial.
Foundation: Scorched Brown Foundation followed by several thin coats of Heavy Red.
Wash: Several washes of Devlan Mud applied heavily to the recesses.
Mid-Tone: Scarlet Red was painted with a few thin coats
Highlights: Started with a 1:1 thick highlight of Scarlet Red and Blood Red, then a second highlight of Blood Red, a thin highlight of Hot Orange, and finally a very thin highlight of 1:1 Filthy Brown and Hot Orange.
Wash: Baal Red was washed over the areas.
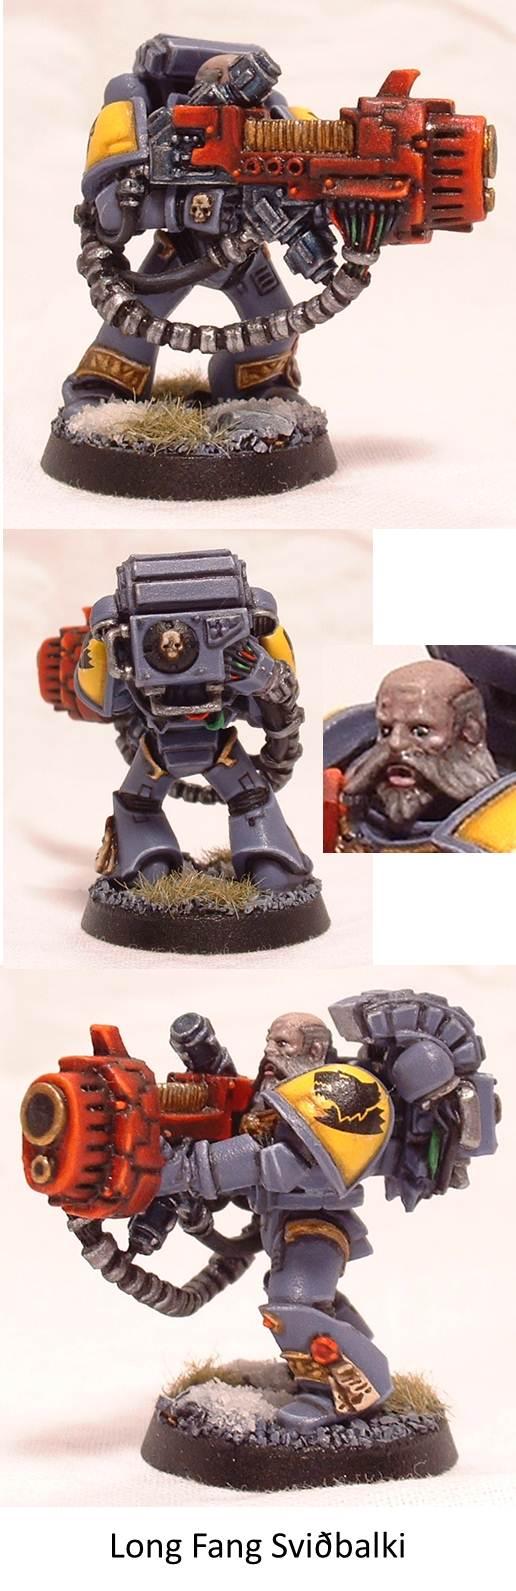
I also am working on 2 Long Fangs to flesh out my original squad.
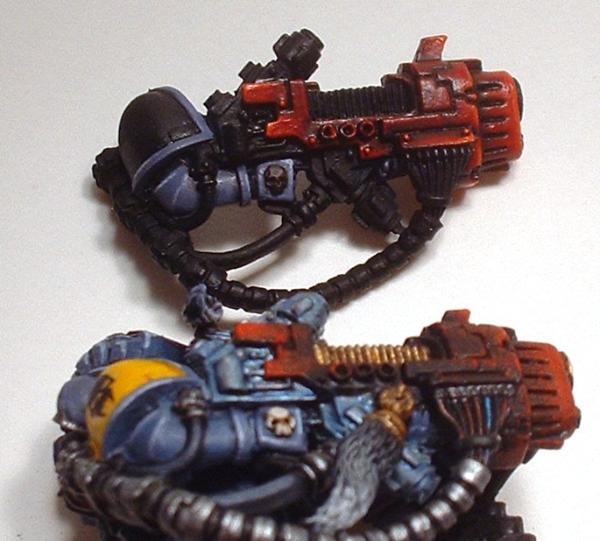
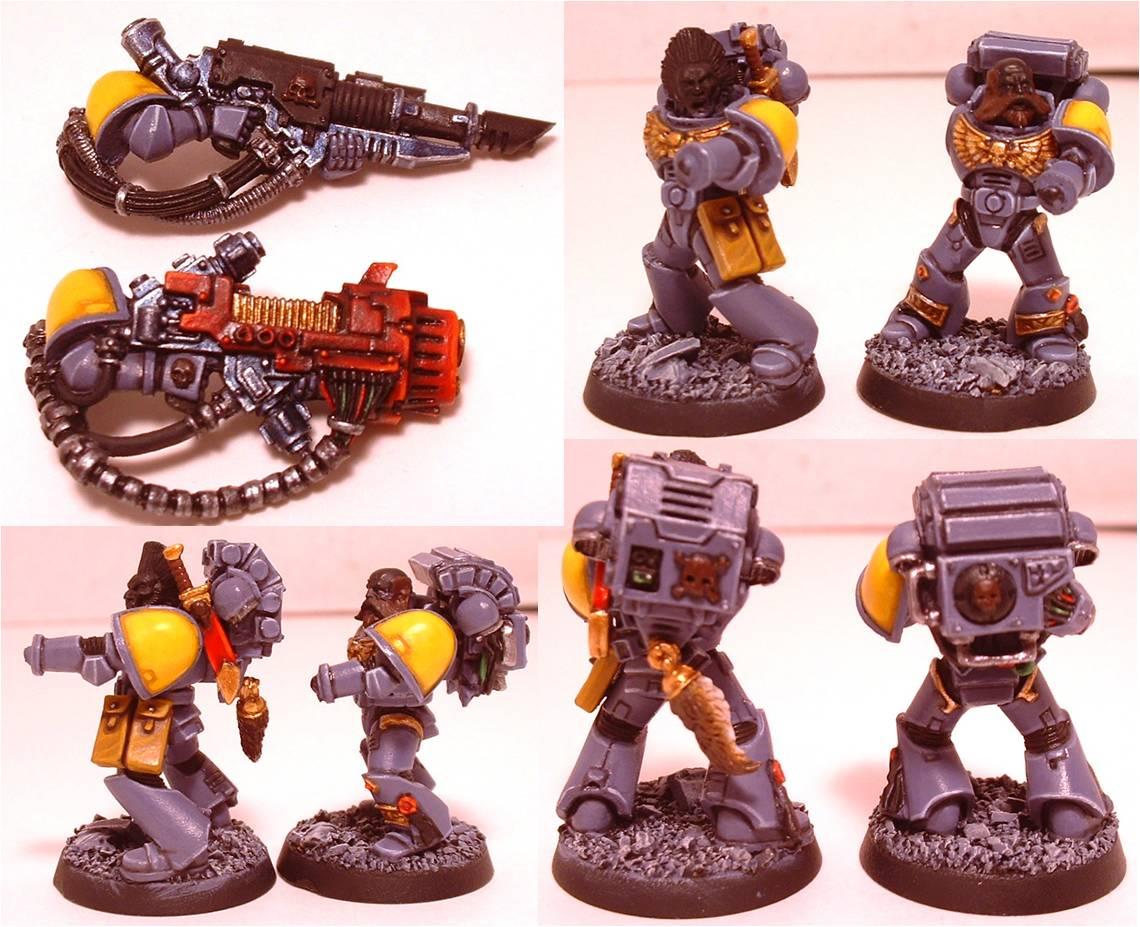
I thought it would be fun to compare my recent blended/highlighted Plasma Cannon to my earlier drybrushed one.
14392
Post by: nerdfest09
Nice stuff! really like it, I actually am quite impressed with the original colour of your first wolves I think it suits them better than some current schemes, your more recent ones are still great though :-) looking forward to more pics
8723
Post by: wyomingfox
Why thanks, it seams alot of people really aren't fans of the baby blue color scheme used in the GW's recent SW codex. It is actually kind of funny, because several of my swift claw bikes were originally painted Space Wolf Grey (the foundation of the current color scheme) back in 2000. I ended up repainting them in December of 09 as I prefered the darker tones of Shadow Grey used in my WGBL.
For September, I will be working on the metals, starting with the silver/gun metal areas and finishing with the golds. I still haven't decided if the metal trim on the WGPL bike should be painted gold (like my WGBL above) or silver like my other swift claw bikes.
Any thoughts?
30038
Post by: vent
I really, really like that red. Most impressive for weapons. Gonna have to try that!
8723
Post by: wyomingfox
Thanks Vent, I wish I had done a step by step tutorial, largely for my own sake as my memory tends to blur after a couple weeks.
I am pretty sure that on the plasma cannon, I left a bit of the scorthed brown showing in the recesses when I was layering the heavy red on; it tends to get blended together nicely after the devlan mud wash, which completes the foundation.
30344
Post by: monkeytroll
The general painting is very good, but that red is amazing
Repeat after vent : I really, really like that red.
29610
Post by: fox-light713
Looking great.
15294
Post by: MeatShield
Tasty minis you've got there. After you get a few more done, you should do a group shot for us.
8723
Post by: wyomingfox
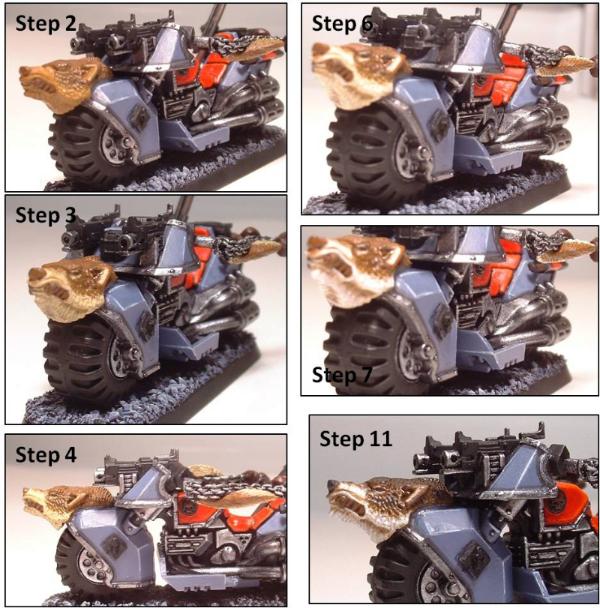
Well during the Christmas Holiday, I managed to finally nab some time to work on my swift claws and long fangs. As such, I started work on the steel areas. The look I was going for was slightly tarnished. After the positive feedback on the red upholstery, I wanted to create a work in progress collage so I snapped pictures at various stages as I was painting the steel.
So to start off with, the steel work on the swift claw bikes:
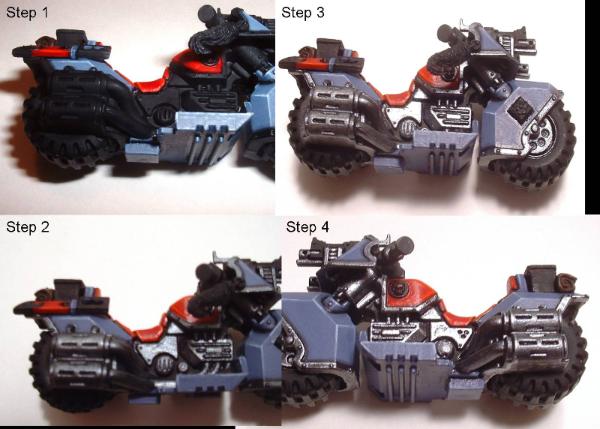
Step 1: Black Primer
Step 2: 1:2 Black/Gun Metal basecoat
Step 2b: Not Pictured  . Bolt Gun layered on making sure that the crevices show the exposed basecoat
Step 3: 2 liberal washes of Dublin Mud and one Babad Black washed into the recess
Step 4: Silver highlight on the extreme edges
For the Heavy Weapons I followed the same routine for the cabling. The gun casing differed in that I went with pure Gun Metal for the basecoat and worked it up to a metallic blue:
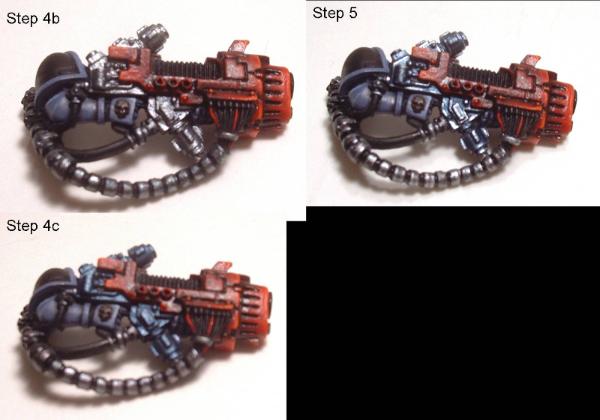
Step 4b: Washed Babad Black into the recess and applied a wash of Azurman Blue.
Step 4c: Applied 2 further washes of Azurman Blue, allowing each previous wash to dry before painting on an additional layer.
Step 5: Silver highlight on the extreme edges
15294
Post by: MeatShield
Faster! MORE!
8723
Post by: wyomingfox
Thanks for the kindly boot in the ass . Me so slow...but I will have time to work on the models this weekend. Next up, the wolf tails and wolf heads that decorate the bikes.

The picture above will be my referenece piece; so fingers crossed that I can make it work.
8723
Post by: wyomingfox
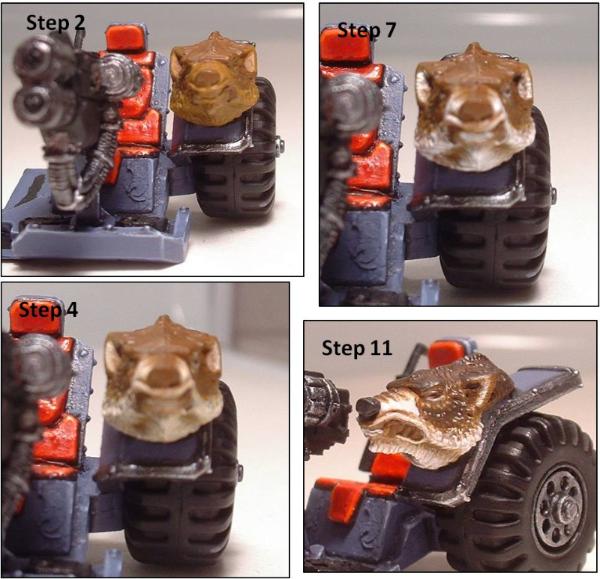
Just got the fur completed and I am pretty happy with the outcome! So here is my take on the fur:
If interested, here are the steps in how I got there:
Two Tone Fur
Step 1. Basecoat Beasty Brown
Light Fur Areas - Cheaks, Chin, Inside Ears, and Around Eyes
Step 2. 1:1 Beasty Brown/Plague brown
Step 3. 1:1:1 Beasty Brown/Plague brown/Bleached Bone
Step 4. Bleached Bone
Step 5. Dead White
Step 6. Devlan Mud Wash
Step 7. Reapply Dead White
Dark Fur Areas - Every Where Else
Step 8. 1:2 Beasty Brown/Heavy Charcoal
Step 9. 1:1 Beasty Brown/Heavy Charcoal (Reverse Highlight)
Step 10. Babad Black Wash
Step 11. Devlan Mud Wash
Paint Nose Heavy Charcoal and wash the nose with Babad Black
26179
Post by: Truffle
Thats some old school wolfy paintin styles you got there
8723
Post by: wyomingfox
Thanks! At 30, it seams to fit
30888
Post by: btemple0
Great stuff so far, by the way I have heard of some people using baking soda for snow flocking instead of what GW sells
372
Post by: grey_death
Hey Fox, Just found your wolfy blog here and I have to say I love them I'm currently doing much the same with a lot of the same old school models actually!
I thought I would chime in with the snow technique I use though. I use Woodland Scenics snow flock, and I've heard that GW's stuff just doesn't work well when you use the white glue slurry technique. I guess they are just made from completely different stuff that doesn't react at all the same.
I will be posting my first 500 points of finished wolves soon, worked on them over the last two weeks for use in Dakkacon yesterday! Unfortunately the list I used was VERY weak and they were pretty well tabled every game  .
I'll be watching this as it progresses though! Keep at it!
8723
Post by: wyomingfox
@btemple0: Thanks man, I had heard of baking soda and actually ran into this tutorial about a month ago. I plan on trying it out. Of course, I am a bit worried about what might happen if the base with the baking soda ever got wet?
http://www.coolminiornot.com/articles/content.php?1323-how-to-make-nice-snow-bases
@grey_death: Welcome to the thread. I actually have a big old container of the Woodland Scenics stuff in my cubboard. I am pretty sure I used that on the bikes (I can't remember for sure though as it has been months since I did any basing). Maybe its the glue? Do you use GW PVA glue or a different brand?
Have you tried the baking soda technique and if so what happens if the models are exposed to water (rain).
Sorry to here about your game, as a nids player I know how it feels to have your tenderly painted models mercilessly wiped off the board. Post a link to your thread when you post your pics of your army.
Next up for my swift claws...the gold!
30888
Post by: btemple0
You cover it with a matte varnish after you are done working with the base.
26790
Post by: Gitsplitta
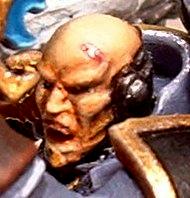
The job you did on that wolf's head is phenomenal wyomingfox... very life-like. Nice work!
372
Post by: grey_death
I've never used baking soda myself.
As to the glue I use, it's just Elmer's White Glue.
8723
Post by: wyomingfox
@Gitsplitta: Thanks for the compliment. TBH, the light fur tone was pretty easy to conceptualize. It was the dark grey fur that had me worried. I struggled with whether or not I should highlight the grey fur with lighter tones and ended up deciding to further shade the centers of the dark area instead (what I refered to a reverse highlight since typically you shade the crevices and highlight towards the edges). I also got lucky and guessed the right colors on the first go around. I did make sure to test it out on one of the wolf tails first, just as a precaution. It would have been horrific to have messed up one of the wolf heads at that late stage in the painting process.
@Grey Death: Guess who has two legs and is heading to Pamida...me!
33681
Post by: bunnygurl
Your work is beautiful. That wolf head is amazing!
26790
Post by: Gitsplitta
I feel for you w-fox... there are still several things in my painting where I have to swallow really hard before I get the nerve to start them. Every time I do the camo pattern on one of my Tranquility snipers I risk screwing up days of wet blending...
8723
Post by: wyomingfox
@Bunny Girl: I appreciate the kind words.
@btemple0: Yeah, that sounds like it may work...I suppose you would have to put on several coats to make sure everything is sufficiantly covered though. Oh, well...I got some junk models I can experiment on.
@Gitsplitta: So that's your technique...yeah, I completely understand. I experimented with Wet Blending on several of my nids...such as the back plates on this guy.
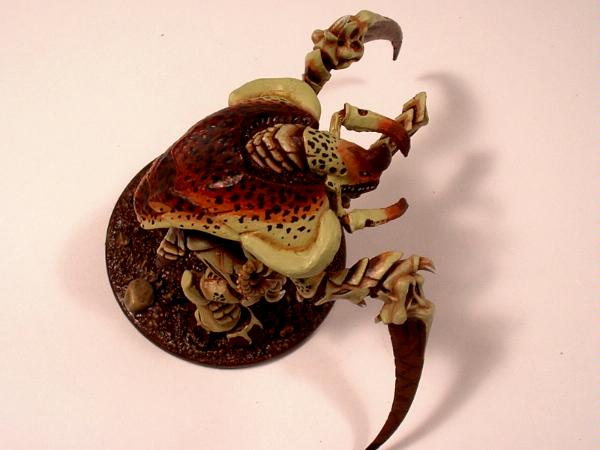
Wet blending is very hard to make corrections if you goof up at a later stage when applying details like cammo patterns. Thus, I usually stick to layering/blending. Your persistance with wet blending is a testiment to your skill.
372
Post by: grey_death
Here are my finished wolves btw:
http://www.dakkadakka.com/dakkaforum/posts/list/341813.page
We'll have to feed off each others projects
26790
Post by: Gitsplitta
That Nid carapace reminds me of a certain type of shell that we would go looking for when I used to visit my grandmother down in Sarasota Florida... Don't know if that was your inspiration but beautiful job none-the-less.
There are still a couple of things I'm freaked out by... weathering and OSL mainly. My OSL attempts just look like messy painting, which is a damn shame as the effect of the technique can be stunning to say the least.
I'm trying to get up the guts to do grey_death's sponge weathering technique on the two razorbacks I just finished painting (the mob demands it) but I'm having trouble taking that last step & putting paint (sponge) to model.
8723
Post by: wyomingfox
@Grey Death: Very nice and good job on the geometric designs. They can be a pain in the butt. For my previous Swift Claws I painted the light color as a background and then, using a pencil, lightly ploted out the points where the lines for the shape intersect and connected the dots. After painting the darker colors, I then erased any visible pencil markings and went onto the highlighting stage.
@Gitsplitta: Jeesh only two . I fear weathering, OSL, NMM, and air-brushing. Someone asked for me to try some weathering as well, but the idea of making my freshly painted models look worn, chipped and beaten goes against my core. I will have to eventually give it a try (in a light sense). I bought the FW Masterclass a while back for this reason and it had some good ideas, though many of them required an airbrush.
26790
Post by: Gitsplitta
Uugh... I forgot about NMM... add that to my list. I am getting comfortable with airbrushing though. Not too tough but it helps to have lots of simple stuff to practice on to build up your confidence before tackling gradients and such. NMM is OK to experiment with because usually you're experimenting on say... a sword, so if you screw it up you just re-paint the sword. Problem with OSL & weather is you do those over the top of a fully painted figure and if you screw the pooch on those you're looking at a major re-paint!
8723
Post by: wyomingfox
Well, I am not dead yet . Actually, I have been working my tail off the past several months on rebuilding my Tyranid army once I joined a Summer Campaign Escalation League. Pretty much had to start from scratch since 5th edition took a massive crap on my past army list...alas warriors, we knew thee well.
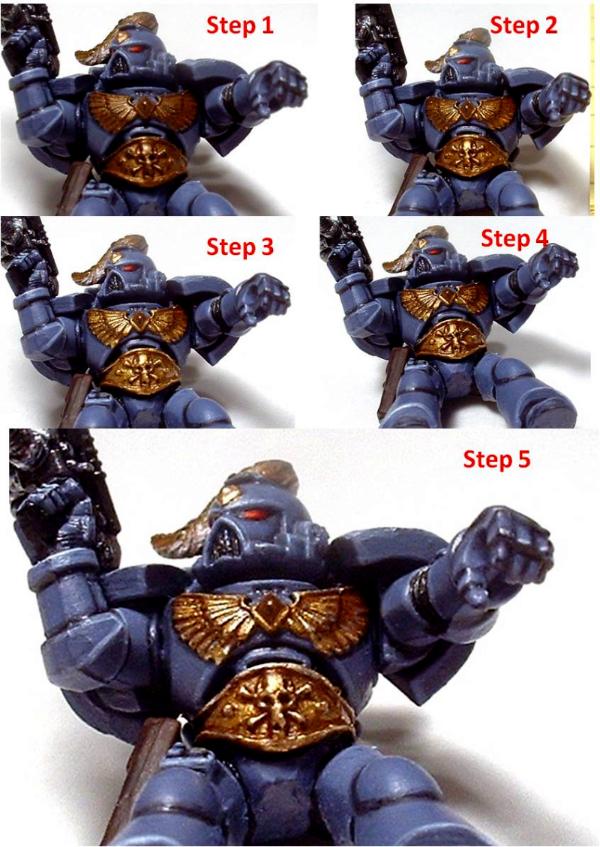
Anyways, I have taken a small break and finished the gold on my SW. Basically, my technique is:
Step 1: 1:1 ratio of scorched brown and glorious gold as the base coat
Step 2: glorious gold as the midtone, leaving reeces from previous step exposed
Step 3: polished gold as the 1st highlight hitting all the edges
Step 4: Devlan Mud and Gryphon Sepia Wash
Step 5: mithral silver as the final highlight
In the case large areas of painted gold (like in the WGBL pictured previously), I add layers working up ransitions between step 2 and 3 and steps 4 and 5. Anyways, pictures of the steps shown below.
26790
Post by: Gitsplitta
End result is excellent wfox. I'm not familiar with "glorious gold", who makes it?
8723
Post by: wyomingfox
Heah Gitsplitta. Glorious Gold is made by Vallejo as part of its Game Color line. It is the darker of the two golds they produce. Most of the paints I use are from Vallejo as they tend to keep longer.
26790
Post by: Gitsplitta
I have a lot of Their colors as well, just not familiar with that one. Thanks!
26790
Post by: Gitsplitta
Very nice! Excellent work on the yellow.
8723
Post by: wyomingfox
Thanks Gitsplitta, yellow is such a pain in the arse to paint...as you know too well . Definately the most time consuming and frustrating step.
I tried using Vallejo "heavy" Ochre (similar to GW foundation line) for a base, hoping that it would give good coverage and allow me to skip a few steps. It didn't, in fact it streaked and left bald spots just as bad as the standard yellows. In addition, the Ocher comes out looking very chalky. Big dissappointment.
So I did it the old fashioned way. Lots of thin layers building up from beastial brown to sun yellow. I think I have something like 8 layers of gold and sun yellow combined.
26790
Post by: Gitsplitta
wyomingfox wrote:Thanks Gitsplitta, yellow is such a pain in the arse to paint...as you know too well . Definately the most time consuming and frustrating step.
I tried using Vallejo "heavy" Ochre (similar to GW foundation line) for a base, hoping that it would give good coverage and allow me to skip a few steps. It didn't, in fact it streaked and left bald spots just as bad as the standard yellows. In addition, the Ocher comes out looking very chalky. Big dissappointment.
So I did it the old fashioned way. Lots of thin layers building up from beastial brown to sun yellow. I think I have something like 8 layers of gold and sun yellow combined.
That's pretty much how I do it. Though a white under-layer helps the yellow pop (then you wash with sepia to get your shades rather than starting dark). If you use too dark a brown underneath and don't get enough yellow on top, you get a greenish shade which is most unhealthy looking.
8723
Post by: wyomingfox
Green shade...Yuk! Wonder why that would be?
Can't say that has happened yet. The problems I regularly encounter is a buildup of rings around a bald spot where the yellow pigments accumulate due to poor coverage. I would have to look at my yellow recipe, but if memory serves me well, my buildup goes: Beastial Brown -> Filthy Brown -> Gold Yellow -> Sun Yellow.
So your recipe is: White Base; Gold Yellow; Sepia Wash; Gold Yellow -> Sun Yellow?
26790
Post by: Gitsplitta
Yes, and then an old color called Bad Moon Yellow as the final highlight. I use really watered down versions of each tint (and use intermediate mixes of course), so it's probably 3 or 4 layers of each tone, but they go really quickly and you can be pretty sloppy about it. There's just a lot of drying time involved. Makes for a nice yellow though, very eye catching.
Much as it is really easy to use my airbrush to get a good yellow, I think my brush painted figures actually look better. With the camo pattern added over the top, you can't really tell them apart... but if I had to do a stand-alone yellow, I'd definitely stick to brushing.
8723
Post by: wyomingfox
Vallejo still makes a "Moon Yellow"...in case GW discontinued thiers.
26790
Post by: Gitsplitta
I still have my old bottle of Bad Moon Yellow... which still works after God-only-knows how many years, but I think it is discontinued... so I picked up a bottle of the Vallejo as an emergency back-up supply.
44067
Post by: DarkStarSabre
Not meaning to interrupt the discussion on the awesome of Bad Moon Yellow (yes, I used it on my Paladins) I will say that I like the smoothness of the grey and the highlights!
The yellow and red as well are both very vibrant. Looking forward to more of the pooches!
26790
Post by: Gitsplitta
That reminds me... I did want to mention that I really like the use of the red on the bikes. The choice of surfaces to paint with the red lends a sleek, chopper-like line in the middle of a very blocky model... well done wyfox!
8723
Post by: wyomingfox
Haha, I am almost 100% positive that I stole the idea of red upholstry from a picture of a Golden Deamon Winner in the 3rd edition SW codex. I think I still have that codex, so I will check tonight. Of course my first bikes that I painted back in 1998 were baby blue (space wolf grey)with a red upholstry. They still looked pretty sharp (sorry no pics available)...but I wanted a darker color scheme, as well as a standard color scheme across the army...so I started repainting everything shadow grey. Automatically Appended Next Post: DarkStarSabre wrote:Not meaning to interrupt the discussion on the awesome of Bad Moon Yellow (yes, I used it on my Paladins) I will say that I like the smoothness of the grey and the highlights! The yellow and red as well are both very vibrant. Looking forward to more of the pooches!
Interupt away . Thanks for the compliments. I checked out your paint blog as I was trying to wrap my head around yellow Pallidins (Grey Knights). Damn are you a proliffic painter. You need to take more individual shots though. Group shots only show so much due to the distance. Love the Typhus model by the way.
8723
Post by: wyomingfox
So, for those interested, I am starting to post pictures of my WIP on my Nids which can be found HERE
44067
Post by: DarkStarSabre
wyomingfox wrote:Interupt away . Thanks for the compliments. I checked out your paint blog as I was trying to wrap my head around yellow Pallidins (Grey Knights). Damn are you a proliffic painter. You need to take more individual shots though. Group shots only show so much due to the distance. Love the Typhus model by the way.
You'll love the Death Guard when I get to them. And yes, more individual shots will start following as I get to them.
Glad to compliment good stuff anyhow. Makes sense to do so.
WIP on the Nids is nice too. Whole nid scheme is nice. Makes me jealous with my simple scheme.
14392
Post by: nerdfest09
Lovely, lovely lovely! damn nice wolves! I actually am very fond of your original purple grey ones! they just remind me of the really early wolves I've seen around! you have a very nice clean style and the highlighting is very neat and looks great on everything you've done so far, i'l most definitely be checking back regularly to see how things are progressing! makes me wish i had of done more with my wolf guard terminators in my gallery :-( but you have actually inspired me to buy some space wolf parts and a couple of bitspudlo's thunderwolves (critters) and spend some time doing them up with some care and attention! sw's were my first army as well and will always be a love of mine although my Marines Exemplar are taking up all my time now!
I also have to agree with everyone here, your wolf head is awesomely done! but I like the way you've painted the long fangs and weapons, reminds me of the old editions as well. keep it up please this is one great army build! I am now subscribed.
Nerdfest09
8723
Post by: wyomingfox
DarkStarSabre wrote:WIP on the Nids is nice too. Whole nid scheme is nice. Makes me jealous with my simple scheme.
You wouldn't be so jealous if you knew how long that scheme takes me to paint . Each guant alone takes roughly 6-8 hours to paint. There are 32 painted spine guants (which the new edition made inferior to termagants ). So that is over 200 hours on one squad .
44067
Post by: DarkStarSabre
So applying that to my swarm....
Er.
I don't want to do that maths.
And those are just the gaunts!
8723
Post by: wyomingfox
nerdfest09 wrote:I actually am very fond of your original purple grey ones! they just remind me of the really early wolves I've seen around!
It probably helps that they are all 2nd edition models  . I have to agree that the older SW pewter models have a very appealing look to them and thus a special place in my heart. The purple grey color you are fond of was actually lifted directly from the box art of a preditor tank that GW painted in SW colors. I simply took the box art over to a True Value store and after a digital color match, they made me an entire bucket of latex paint.
But you have actually inspired me to buy some space wolf parts and a couple of bitspudlo's thunderwolves (critters) and spend some time doing them up with some care and attention!
Thank you very much for the compliment. Glad I could inspire . The two tone wolf pelt takes a bit of time...but in the end, it has a very natural and pleasing result.
sw's were my first army as well and will always be a love of mine although my Marines Exemplar are taking up all my time now!
I know exactly what you mean. Tyranids have been taking up all my time for the past 4 months or so. The pace that I have been modeling and the hours put into revamping my nid list even took its toll physically. In fact, I ended up pulling my mid back out of allignment due to all the continous activity bent over that caused two of my discs to bulge  . Automatically Appended Next Post: DarkStarSabre wrote:And those are just the gaunts!
Yep, the Flyrant was around 200 hours by himself and was painted over a 3-4 month period.
8723
Post by: wyomingfox
Well an interesting little discussion pursued on a P&M thread in regards to how gallery pics get voted very low... and it got me to thinking (no, nothing caught on fire). So I decided to copy some of my musings onto this thread for easy reference in the future. Heah, deep thoughts by Wyomingfox don't happen every day .
Again, in regards to how people vote in the Dakka Gallery...It is obvious that art is in the eye of the beholder. None of us would argue that. What one person saw fit to vote as a 7, another might construe as a 9.
However, I think any talented painter would be slightly amiff if his work was given a 0 or a 1 without some constructive critisism explaining the low rating. And yes, you are not the first talented artist who has complained of bum scores. Similarily, I often become exasperated when I see a model that is given a painting score of a 8-10...when it is only primed. Ultimately, the ratings are meant to be a tool for both the artist and the gaming community at large. If posters go around giving meaningless rankings than the tool becomes less effective.
Personally, I would prefer if artist's disabled voting on all of thier WIP (which is what I have started doing) as well as post complied pics of thier work shown at different angles rather than single pics of each pose. I just think it would be more usefull if the gallery board's top pages were not clogged up with numerous stages of the same work of art (which has happened in the past). Then if you saw a finished model you particularily liked, you could always click on the owner's gallery and explore his WIP photos or links to his P&M threads.
Gaud looking is what tens are for .
Still, I don't know if the OP was complaining about recieving a 7-8 or if he was complaining about recieving a 0-3. As I said earlier, one person's 7 might reasonably be anther person's 9. However, one person's 2 should never equate to another's 9...doing so completely destroys the usefullness of the ranking system, which inconveniences not only the artist but the community at large.
I guess I would break my voting down in stages:
Note: Conversions, Interesting Poses, Water effects, Green Stuff Sculpting, Elaborate Bases, ect play absolutely no role in my vote for painting but are covered under the "Coolness Rating".
I also try my best not to let my personal feelings reflect in how I rank models.
Lastly, I often find myself voting on models in which part of it is a 9 while the rest of it...how best to say it...well it seams like the painter got either bored or tired and wanted to move on to something else. Like say an amazingly detailed banner that ranks in IMO in the 9s, but the rest of the model is just base painted with sparse or no highlights (what I would rank as a 5-6). This will likely bump his paint score down a notch or two. Anyways...
NA(0): Model is only primed, not painted, or vast majority is not painted. Again, I think it helps when WIP pics are left disabled as I really only want to vote on finished pics. Sometimes really (and I mean gawd awefull) blurry pictures will earn this rating.
1-3: Majority of model is painted. Painting is very sloppy with no clean boundary lines maintained, colors overlapping. Color selection is very poor and glaring.
4: Boundary lines are largely maintained with little color overlap. Good color selection.
5: Boundary lines are maintianed with no color overlap, no highlighting or shading. If highlighted, a poor job (shakey hand syndrome) will earn a 5.

6 - 7: Crisp solid highlights and shading; Layering is neither blended or gradual. Models with significant dry brushing (besides fur) can reach this level, but seldom higher due to the grainy texture... and that it is an easier method compared blending
8: Highlights and shades are gradually worked up to create a blended effect
9: Devil is in the free hand details. This exhibits the same blending of highlights as 8 but incorporates significant free hand details like mottled spots on animals, scroll work, glyphs, emblems, scars, ect that are sharp, precise and flavorable.

10: Golden Deamons. Shows a mastery of blended transitions and free hand details.

The thread can be found here http://www.dakkadakka.com/dakkaforum/posts/list/373495.page
44067
Post by: DarkStarSabre
A wonderful guide there and much along the ways I myself think. And it gives pictures as a more than sufficient guide!
26790
Post by: Gitsplitta
Interesting thoughts and a great guide wyfox. Having pondered this topic before, my best suggestions was an electronic one. Simply have the top and bottom 10% of scores discounted when calculating the average rating. That would help eliminate some of the random votes or votes with an agenda.
8723
Post by: wyomingfox
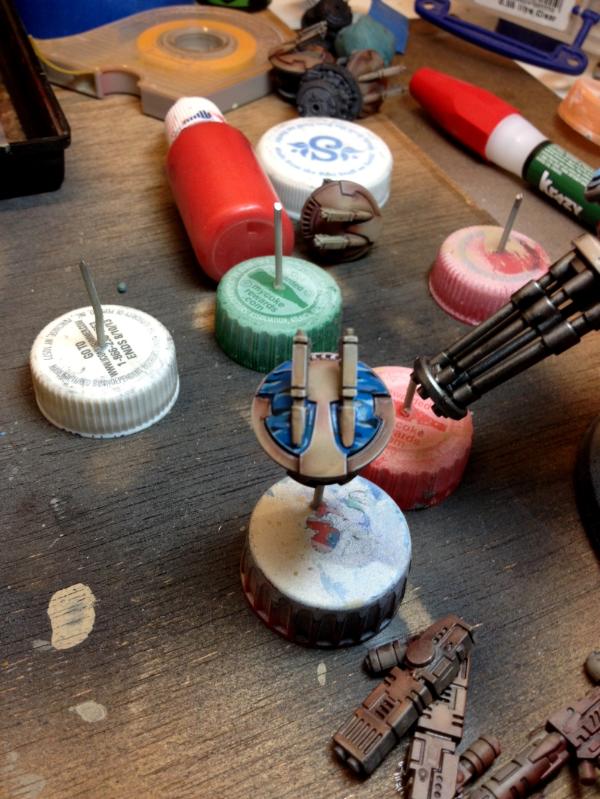
I had some spare 2nd edition hand flamers I wasn't using and so decided to convert my own combi-flamers. The top one utilizes a 4rth edition bolter (newest style). This one has been added to a Wolf Priest.
The bottom one I have posted for Gits ammusement seeing as he enjoys the old school theme . It uses a 2nd edition bolter as it base with the ammo clip converted to a side feed. The 2nd edition CF hasn't been green stuffed yet and is currently sitting in by bits box .

26790
Post by: Gitsplitta
Very nice conversion WyFox... The old bits are great to have lying around aren't they?
8723
Post by: wyomingfox
Damn your quick Gits . And yeah, they can provide some usefull customization, especially when certain options are not available. Too bad GW no longer has thier bits catalog. Them was the days of bliss back when you could get any metal bit you wanted: Hive tyrant right leg...no problem. Blood Andels Power Sword...you got it! Now a days if your wanting bits off a blister its...bend over and buy the whole kit :(.
26790
Post by: Gitsplitta
Oh yeah... I remember when they had an accident at GW and a bunch of shelve's fell down. You could by "bags" of unsorted bits... got some really neat stuff in my bag. 'course that was years ago.
I frequent the bits merchants now... expensive way to go but not as bad as buying a whole boxed set for one or two bits.
14055
Post by: 31rls31
nice wolves sir!
keep up the awsome work.
8723
Post by: wyomingfox
Thanks 31rls31! I just finished highlighting the black areas Saturday night, but I will wait on posting pictures till I have painted the various bones and teeth.
By the way, what is the story behind your user name?
8723
Post by: wyomingfox
Well, I was hoping to get the bikes done before fall hit...but that didn't happen. I did complete the highlighting on the black areas. Just have the bone, parchment, decals, and flocking left...so close.
Anyways, I will be away traveling during the upcoming weekends and will likewise be taking a break from the internets:
Sept 24-25: Wade House Civil War Reinactment
Oct 1-2: Prarie Du Chien and Gays Mills
Oct 8-9: Apostle Islands north of Bayfield, WI
Oct 15-16: Door County
Be seeing you guys
8723
Post by: wyomingfox
Usually I highlight black using Shadow Grey, followed by 1:1 Shadow Grey and Space Wolf Grey, followed by final highlight of Space Wolf Grey. But I wanted the highlights to be a bit more subtle so I used a simple buildup using 3 highlights to get from black to shadow grey: 2:1 Black & Shadow Grey, 1:1 Black and Shadow Grey, and Shadow Grey. I am happier with the results.
26790
Post by: Gitsplitta
Love the work on the video screen!
43612
Post by: Rawson
Interesting use of roughrider lances with your swiftclaws! You going to be adding any of the new SW stuff?
8723
Post by: wyomingfox
@ Gits: The video screen was easy. Just dark angels green over a scorched brown base. Then thin highlights building up from dark angels green to scorpion green to yellow. Finally a white dot in the corner.
@Rawson: Thanks. I like the idea of swiftclaws launching spears at thier fleeing enemy from on top of thier steel mounts. In regards to the new SW kits, I actually picked up the new battle force last year,; needless to say, you will see some of the new bits showing up later on...like in the long fang to the right below:

Both the head and the legs are from the new battle force sprue.
8723
Post by: wyomingfox
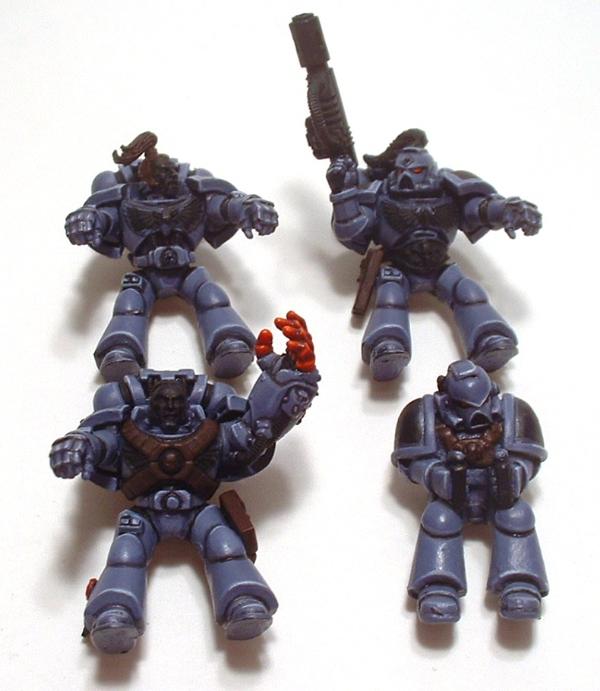
OK. So a little update on the LF and SC. Just finished painting the faces. This is my second attempt at utilizing CMDantes flesh painting technique. Though in each case, I get a much different result. His faces usually have a more peach/orangish cast to them. Where mine are more pale/whitish.
 I started with a Dheneb Stone Base (its a very light khaki -- almost an off white).
I then applied multiple thinned washes of shade to the entire face that consisted of a Dheneb Stone/Warlock Purple (basically a Pink)/Heavy Charcoal (Very dark grey) mix. Heavy Charcoal is the Vallejo equivalent to GW charadon granite.
I then applied a glaze of Matt Medium/Baal Red/Devlan Mud (what CMDantes refers to the tone) to the cheaks and mouth area before adding Baal Red directly to the inside of the mouth.
I then applied a few thin layers of dheneb stone as a initial highlight which I built up to Dead White on the furthest highlight.
I then washed the model with the original shade and afterwards reapplied the extreme highlight to the tip of the nose, cheak bones, and bridge. I think I could have skipped re-adding the highlight.
Next I applied a thinned mix of dheneb stone/warlock purple to the lower lips and a thinned glaze of Magic Blue/dheneb stone just below the eyes.
Lastly, I painted in the eyes with black, filled in the area in white and marked the pupils. Also painted in the teeth with skull white. I think I should have painted in the eye areas with scorched brown rather than black.
I started with a Dheneb Stone Base (its a very light khaki -- almost an off white).
I then applied multiple thinned washes of shade to the entire face that consisted of a Dheneb Stone/Warlock Purple (basically a Pink)/Heavy Charcoal (Very dark grey) mix. Heavy Charcoal is the Vallejo equivalent to GW charadon granite.
I then applied a glaze of Matt Medium/Baal Red/Devlan Mud (what CMDantes refers to the tone) to the cheaks and mouth area before adding Baal Red directly to the inside of the mouth.
I then applied a few thin layers of dheneb stone as a initial highlight which I built up to Dead White on the furthest highlight.
I then washed the model with the original shade and afterwards reapplied the extreme highlight to the tip of the nose, cheak bones, and bridge. I think I could have skipped re-adding the highlight.
Next I applied a thinned mix of dheneb stone/warlock purple to the lower lips and a thinned glaze of Magic Blue/dheneb stone just below the eyes.
Lastly, I painted in the eyes with black, filled in the area in white and marked the pupils. Also painted in the teeth with skull white. I think I should have painted in the eye areas with scorched brown rather than black.
Like I said, the end result was more of a pale, slightly pink flesh. Which is fine given that they are the Rus, 3 of the members will be white haired and old, and that it is a winter scene. But it would be nice to know how he adds that orange/peachy glow.
Anyways, I have also painted the bone areas (teeth and skulls -- damn there is alot of skulls) as well as finished off the purity seals. All that remains is to paint the decals, hair and flock the bases (snow and grass).
26790
Post by: Gitsplitta
Not bad wyfox. All my caucasians end up well tanned... yours are nice and pasty-pink!
8723
Post by: wyomingfox
Just like me
8723
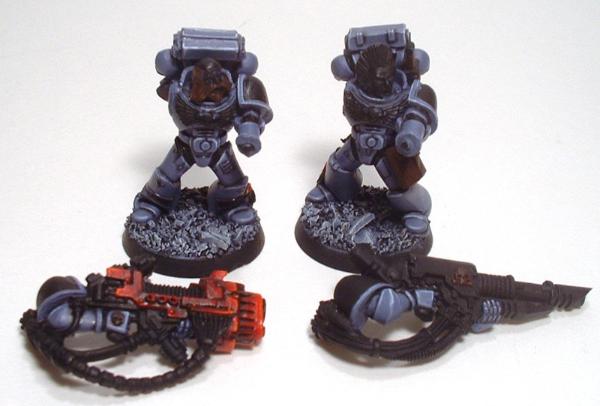
Post by: wyomingfox
Finally Finished!
Well several new paint schemes went into this batch of models. As a recap:
New red color technique
New two tone wolf tails and heads
My first beard! And a new hair color that represents graying brown hair.
A blended plasma gun...rather than my previous dry-brushings
My first assault bike
New highlight for black panels, tires, gun casings
First time that I drilled out the barrels
First auspex
First time granting a model names
In the swift claw below, I wan't sure how to approach the auspex, but in the end, I elected a simpler paint scheme with the glowing green screens and buttons.
Automatically Appended Next Post:
 Automatically Appended Next Post:
 Automatically Appended Next Post:
By far my favorite out of the lot is my second long fang. I was really worried about how the head would turn out, but in the end, the beard turned out great. Looks even better in person.
Automatically Appended Next Post:
26790
Post by: Gitsplitta
They all look really good wyfox. Clean and sharp. Beautiful work on the lenses too. Do your bikes come with lances or was that your idea?? It was a great one in any case.
Looking forward to fighting these guys some day.
OH, O.T. the boys just finished a 2000 pt nids vs. marines battle. Ended in a draw but they both did really well.
8723
Post by: wyomingfox
Thanks very much Gits. The hunting lances are from the 2nd edition rough riders. Just something I thought would look really cool given that they are riding iron horses.
Did your sons play against each other with you reffing the game? Do they often play against each other?
OT Double Time: I finally had a chance to stop by the Labryth Games last Thursday Night as my study group was canceled.
They had two tables set up and 4 people were playing. Tim was reffing and two other fellows were building. I saw 2 Dark Angels players, 1 Grey Knights, 1 Dark Eldar Player, 1 Tau and the rest ellude me. The Tau and the Dark Angels armies were very well painted. The armies were pretty small though prolly around 750-1000 as most of the guys are just getting into it and building up for the escalation league.
26790
Post by: Gitsplitta
Yes, first time they played each other. I was reffing plus giving tactical advice (little one needs it more but the eldest still could use it from time to time). Not that they always listen to me...
Sounds promising!
8723
Post by: wyomingfox
Something I noticed last night and I thought I would post my observation on here. Take a look at the bike. Low look closer at the wheels. Now back to the rest of the bike. Now focus back on the wheels. Unfortunately the rest of the bike is not as "smooth" as the wheels, but it could have been, if I had gone over it with Vallejo GC Satin Varnish.
Wheras the model was origianlly given a spray coat of gloss varnish followed by a matte varnish sealer, the wheels were given a smooth semi-shine surface with an additional satin varnish. The difference sticks out in person and is actually pretty easy to see in the pictures as well.
26790
Post by: Gitsplitta
I've fooled around a bit with the Vallejo Satin with my airbrush... haven't made it a permanent part of my methodology yet, but I know it's a stable with a lot of very good airbrush painters. Perhaps I should give it another try.
Unfortunately my compressor has developed a leak... looks like a crack in one of the hose housings. With no $ to replace it... could be a while before I can tackle any more marines. Might be painting orks for quite a while.
8723
Post by: wyomingfox
Hmmmm...another reason to come over to my house you say?
*whistles as he gazes at his air compressor and brush gathering dust*
Anyways...
This is the first I have heard about using satin varnish in a brush...do you dilute it? Just asking because it (well any varnish) tends to cake on the pallet and leave residues on the paintbrush more than other paints. I would think you would have to be extra careful in cleaning out your airbrush regularily as the varnish dries really hard.
26790
Post by: Gitsplitta
The Vallejo satin varnish that I have is especially formulated for an airbrush.
What kind of set-up do you have?
And I'll make it over to your place eventually... this weekend I'm going down to Rockford for Rock Con... going to try my 1850 pt MW army out... that is if the various parts of it come in time for me to finish it. *sigh*
8723
Post by: wyomingfox
I have two Land Speeder multi-meltas that I could lend you. One is nicely painted, and the other one is dry brush painted. I would NOT mail them to you though ! Might possibly have a third but it could have been lost...can't remember.
My airbrush set-up....hmmm...I forget. Will take a look at this weekend and maybe post some pics.
26790
Post by: Gitsplitta
I may have to take you up on that. I'd scavenge the MM's off my two normal LS but they're old and metal and as such glued on. I ordered two new ones from a bits provider but I don't know if they're going to get here on time. I could probably just take a pic of one and make a little cardboard mock-up which would get the idea across. I suspect given the circumstances and the state-of-painting of the rest of the army my opponents would understand.
Don't know what you're airbrush set-up is??? For Shame!
8723
Post by: wyomingfox
Gitsplitta wrote:I may have to take you up on that.
I could meet you over at The Labrynth in Baraboo this Thursday Night around 9:00ish (my study group should be done by then). Its a nice half-way point.
26790
Post by: Gitsplitta
Sounds good wyfox, thank you! If my bits come in before then I'll be sure to let you know.
How is their 40k gaming night going? Couldn't make it this week obviously but I'd still like to get there somewhat regularly, especially if I knew there were people to play with.
17738
Post by: Briancj
This concentration of Wisconsin 40K gamers dedicated to painting their armies and playing for fun makes me WEEP.
But I'm not going to move to Wisconsin!
Gorgeous Wolves, Wyoming!
26790
Post by: Gitsplitta
You're missing out... we have brats, beer, cheese and the Packers! Our FLGS has produced back-to-back 'Aard Boyz champions... so if you want to get really good... this is the place to be. *And* most of our best gamers have very nicely painted armies... so they aren't just WAAC gamers fielding legions of faceless grey minis.
Best of all we're only a couple of hours from Chicago... so civilization is just a short trip away!
8723
Post by: wyomingfox
Heah Braincj, thanks for the compliment and welcome to the thread . Yeah, Wisconsin is pretty sweet especially around the Driftless Region in Autumn! Beautiful scenery abounds! Automatically Appended Next Post: Gitsplitta wrote:How is their 40k gaming night going? Couldn't make it this week obviously but I'd still like to get there somewhat regularly, especially if I knew there were people to play with.
10 people showed up the first night and I believe six were present at last weeks game night when I showed up (around 8:30pm); as I stated all had armies. Store stays open till late, which is nice...if you don't have to work in the morning  .
I'll stop by after the study and see how things are shaking tommorow night.
8723
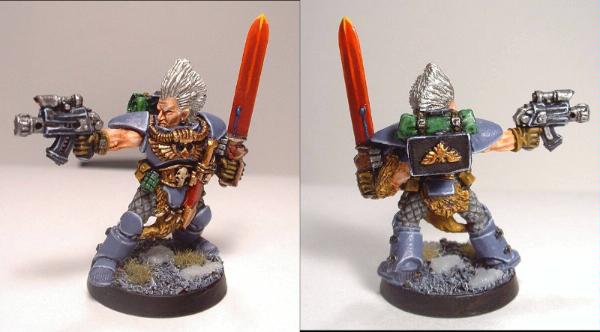
Post by: wyomingfox
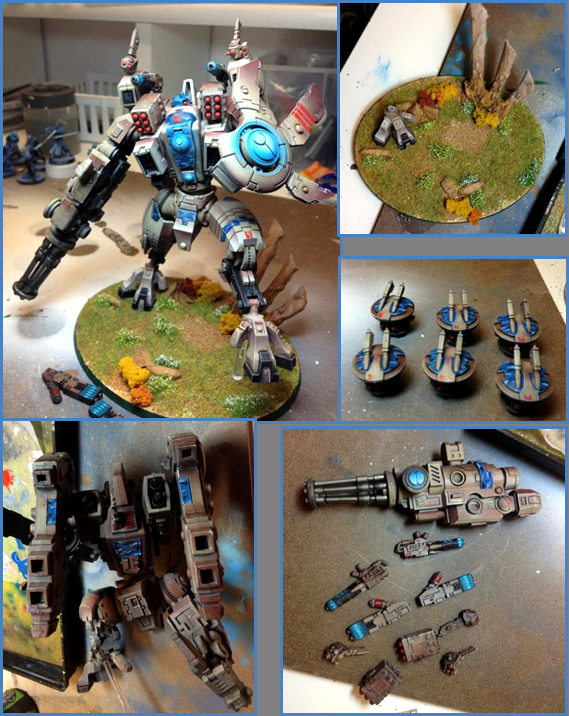
And here he is. The completed Tau Commander.
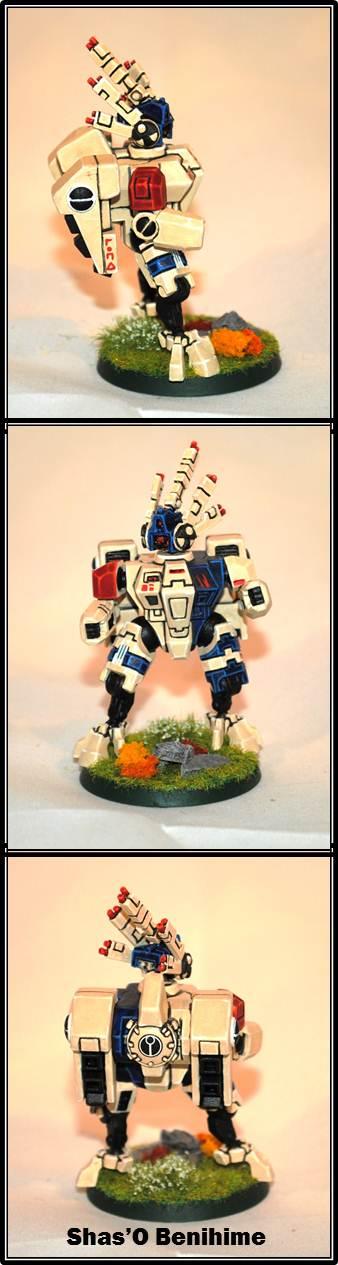
Just took me a year to get around to painting him .
26790
Post by: Gitsplitta
Nice! I like the flowers on the base... very Tau.
8723
Post by: wyomingfox
Yeah, they are from army builder and come in clumps that blend very well into static grass.
53419
Post by: voxplayer
I love me some vintage Space Wolves
8723
Post by: wyomingfox
Yeah, space wolves have some OOP models with real character.
8723
Post by: wyomingfox
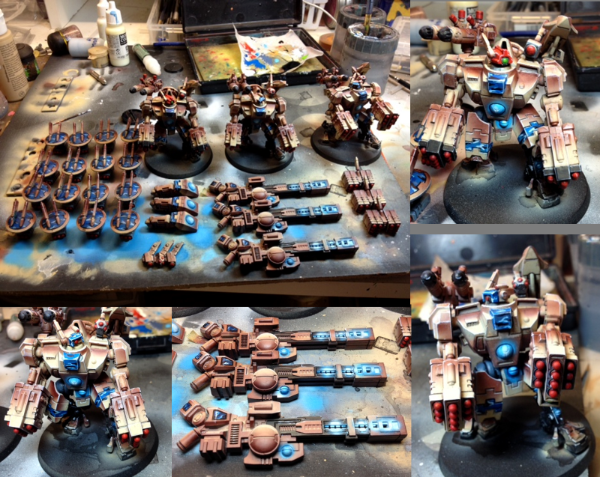
I am currently having my Tau painted by a series of commisioned artists in preperation of the next year's Adepticon Team Tournie:
Up first is some air brushed work by Caleb Wissenback from CK Studios. He is currently painting up 3 fully magnitized Riptides.
Artist: Caleb Wissenback
Company: CK Studios

8723
Post by: wyomingfox
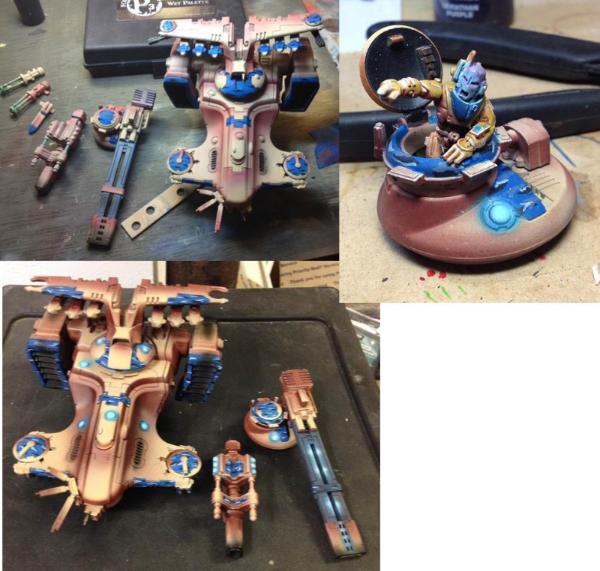
Caleb just posted finsihed photos of the Riptide I commissioned him to paint and the model is now on its way to my house!
Artist: Caleb Wissenback
Company: CK Studios
Isn't she a Beaut !
26790
Post by: Gitsplitta
Very pretty!
20956
Post by: Empchild
I hired him to do some infinity for me and he does amazing work.
8723
Post by: wyomingfox
Caleb just sent me finished photos of the last two remaining Riptides I commissioned him to paint...and here they are!
Artist: Caleb Wissenback
Company: CK Studios
Also, I posted up my first Battle Report with the new Tau here:
Battle Report 1: Ancient Enemies (Fox's Tau/Gits' Necrons) vs Raven Guard/Tau
19143
Post by: IceAngel
Wow, cool stuff! I apologize for not checking out your stuff sooner. More please.
8723
Post by: wyomingfox
Thanks, though this latest stuff is done by hired artists!
Nevertheless, they don't have the photos posted on thier own threads. So if they aren't going to bragg about themselves, I might as well bragg for them
8723
Post by: wyomingfox
Caleb just sent me finished photos of a marker drone sqaudron as well as a FW tech drone I commissioned him to paint!
Artist: Caleb Wissenback
Company: CK Studios
26790
Post by: Gitsplitta
Very spiffy!
8723
Post by: wyomingfox
Caleb does some mighty fine work . He also knocked these out in one night.
8723
Post by: wyomingfox
OK, just posted up a Battle Report featuring my new Tau units in an experiment with allied Monoliths for next years Adepticon Team Tourniment.
Battle Report 4: Ancient Enemies (Tau/Gits' Necrons) vs CSM/Tau
8723
Post by: wyomingfox
Caleb just sent me photos of 3 Broadsides as well as a group of missile drones I commissioned him to paint!. The broadsides are fully magnitizable, being able to swap out even the arm configurations!
Artist: Caleb Wissenback
Company: CK Studios
26790
Post by: Gitsplitta
Very pretty!
8723
Post by: wyomingfox
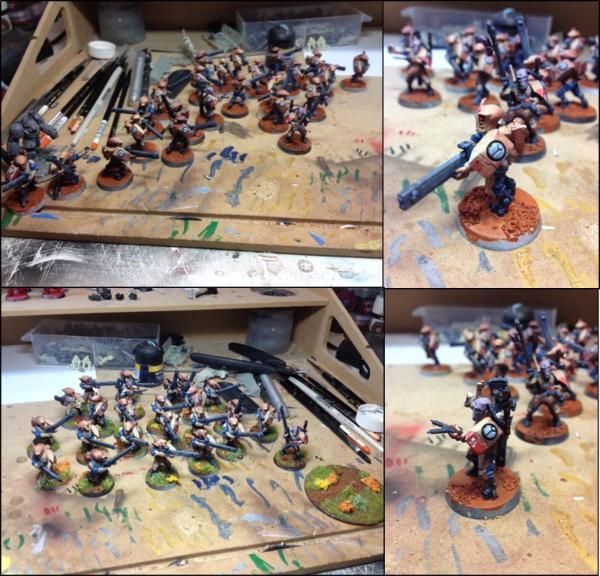
Once again, CK Studios blows my mind with some stunning commissioned work. Up this time we have two hammerheads and 2 squads of fire warriors!
Artist: Caleb Wissenback
Company: CK Studios
26790
Post by: Gitsplitta
Did you intend to include a picture with your post... or are you just teasing us?
8723
Post by: wyomingfox
...I'm just try to wrack up posts .
...last post updated!
26790
Post by: Gitsplitta
Very nice work. Love the guy coming out of the hatch. He looks like some kind of old-school Dr. Who villian!
8723
Post by: wyomingfox
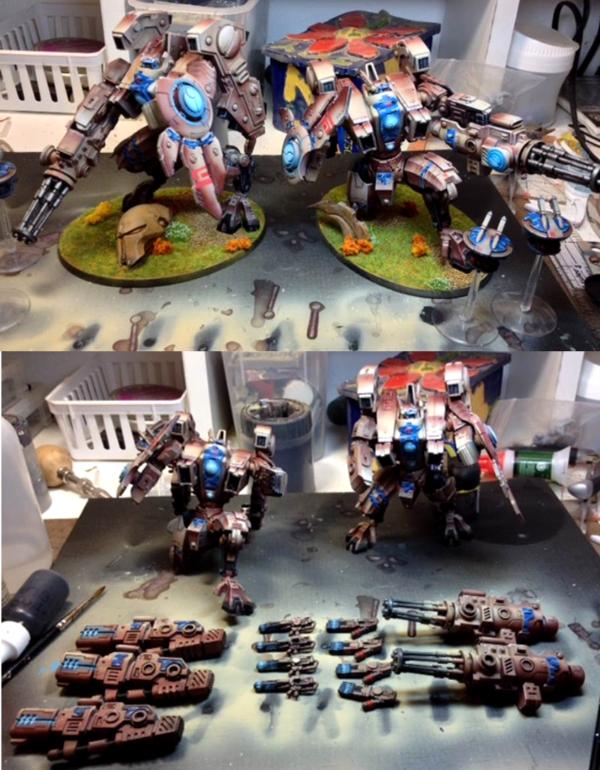
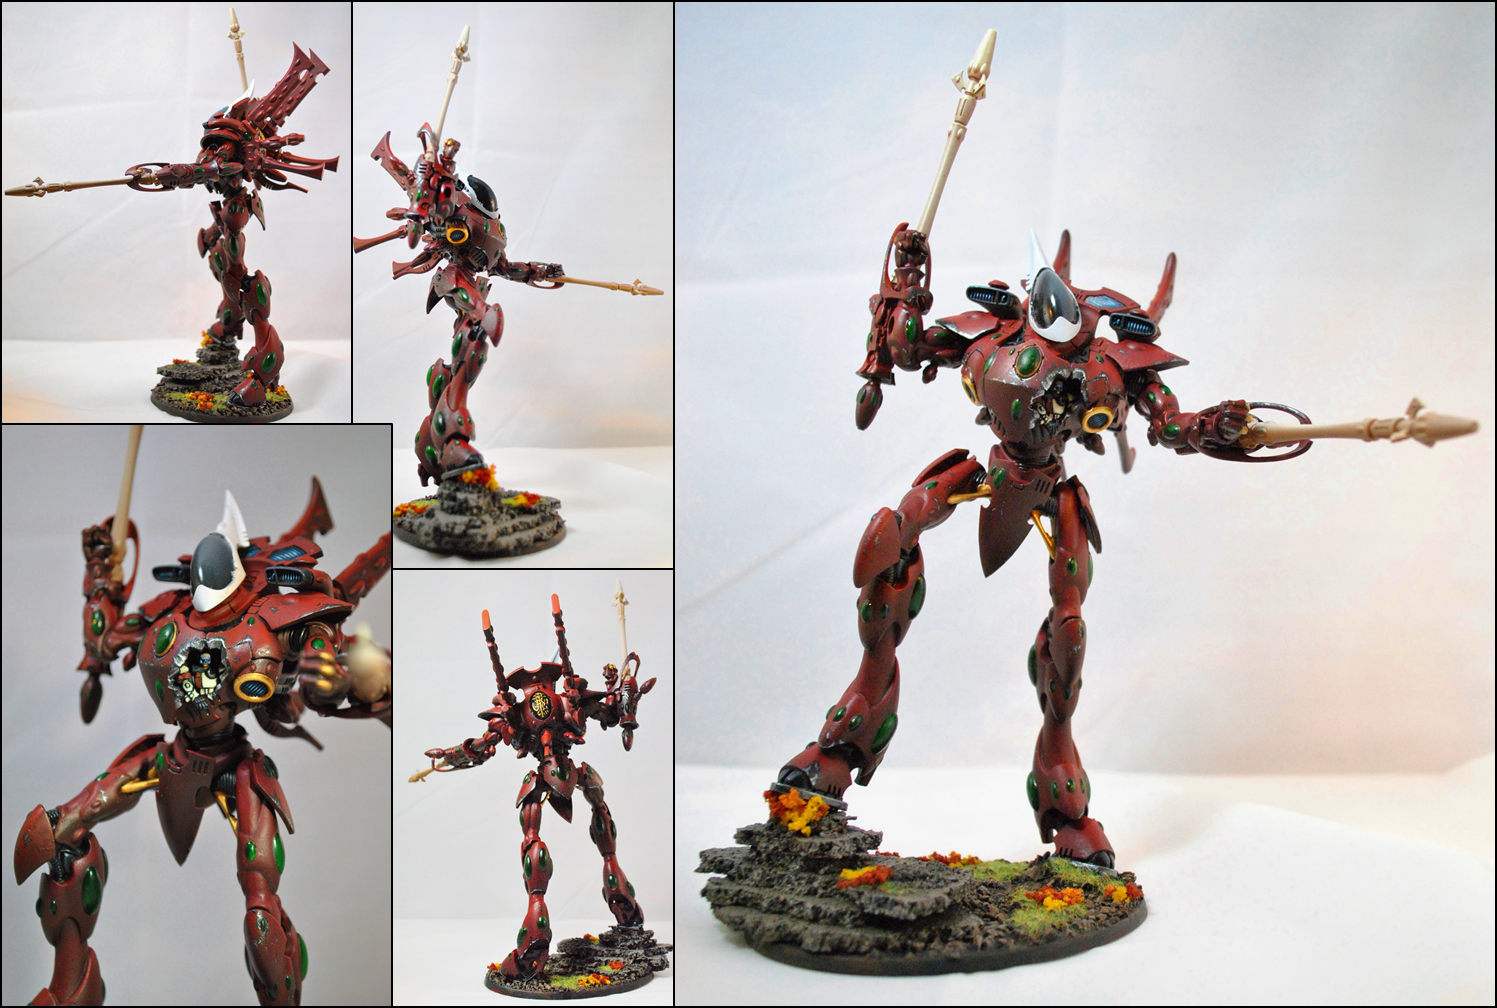
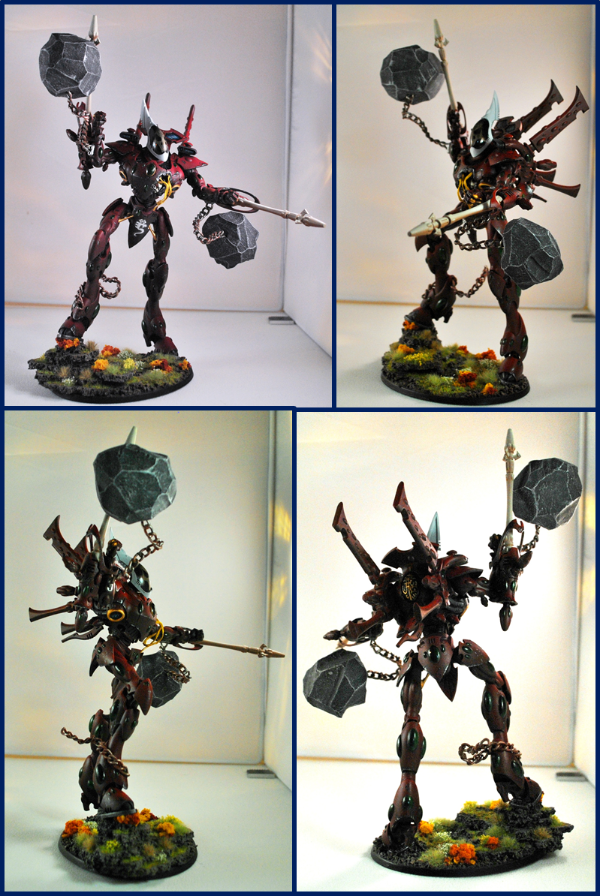
I commissioned a local artist to convert and airbrush a Wraithknight that has been hijacked by a Kroot Shaman. He did the building, assembly and magnitizing. He then airbrushed the red armour, the helmet, and the gun barrels. Following this he painted the green gems. He also did some extensive weathering. His weathering style is pretty involved. He starts by painting the entire model in a weathered metal. He then applies hairspray. He then airbrushes over this with layers. He started with a black layer and then finished with the airbrushed armour that uses black, P3 sanguin base, and P3 skorne red. He then uses abrasive tools to peel away the top layers to reveal some interesting patterns.
I repainted the black areas (excluding the visor), the gold, the silver on his feet, and the deceased pilot. I also added OSL on the vents and the pilots eyes, this is my first attempt at OSL. Then I painted the rocky base to better match my tau broadsides.
Next I cleaned up the red armour around the green gems and touched up around the places I painted. I also scaled back the battle damage in several areas. As a result, I had to repaint some sections in such a way as to appear airbrushed...which requires some crazy blending. I ended up consecutively using 6 cells of paint blending from straight Skorne Red to Sanguin Base mixed with Black. Can you tell which sections were airbrushed and which were hand blended? Lastly, I added line shading around the armours crevices, cracks, and around each non-green gem. To make the line shading fit better with the airbrushing I used lighter or darker shading depending on the surrounding areas.
Finally, I experimented with a different style of weathering that involves layering so as to add diversity. I started with black with a bit of Sanguin Base, next layer was Gunmetal with Black mixed in, and the last layer was silver. In painting the battle damage, some previously damaged areas I painted over while leaving others alone. If you look at the picture on the lower left and zoom in on the model's left knee cap you can see his style of battle damage. If you look at the chest around the damaged cockpit, that would by an example of my experiments with battle damage. This would also be my first attempt at battle damage.
The model will be returned to the artist who will be making the cockpit into a budhist/krootist shrine, adding chains weighed down with boulders, and adding custom Kroot Spirit Seer he's been converting to the base.
21254
Post by: lipsdapips
Damn! That space wolf stuff is really clean, I like it! That's the sort of quality that i'm aiming for with my Ultramarines kill team, and you've inspired me to get going with it. Subbed!
26790
Post by: Gitsplitta
Looking very nice. Great idea stuffing the guy in the chest of the WK. Nice to see that you're experimenting with new techniques. Keep it up!
8723
Post by: wyomingfox
Yeah, the artist I commissioned did a great job with the conversion...there is actually a chair the pilot is sitting in but it is hard to see. Automatically Appended Next Post:  lipsdapips wrote: lipsdapips wrote:Damn! That space wolf stuff is really clean, I like it! That's the sort of quality that i'm aiming for with my Ultramarines kill team, and you've inspired me to get going with it. Subbed!
Thanks for compliments and I am glad to be of service . In most cases, I prefer the clean look and thus I have been super slow to experiment with rusting and chipping techniques.
8723
Post by: wyomingfox
Couple Updates:
Up first is the finished Wraith Knight by Brain Kerr. Here you see that Brian has added Yellow Streamers to the Pilot's War Shrine. He has also added chains and rocks to further evidence the Wraith Knight's Captured State. Brain Added a San Heim decal and painted the helmet's canopy to reflect a Kroot Skull. There is also a spot for a Kroot Spirit Seer that can be magnetized to the base (still in progress).
Finally, I re-flocked the base and added several larger bushes, various tufts, and some spring undergrowth in patches. Really happy with the newer meadow appearance.
Artist: Brian Kerr
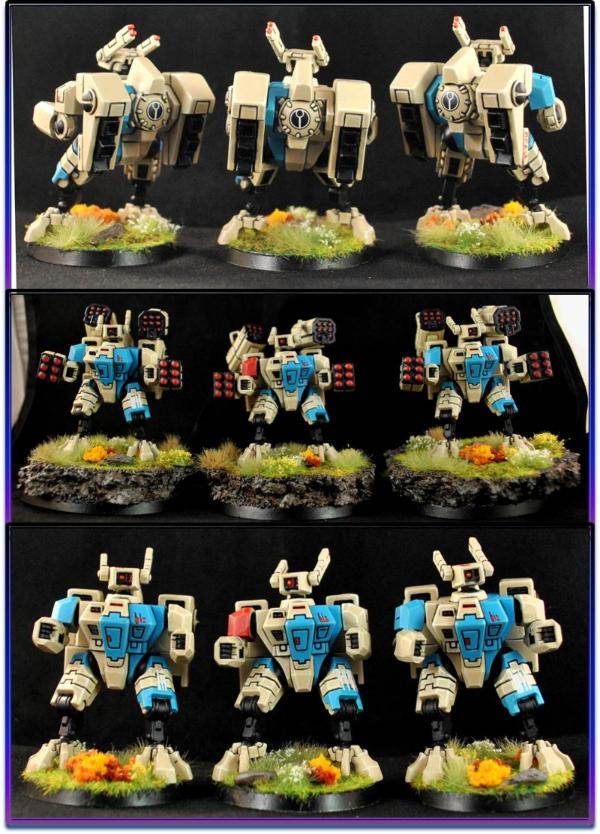
Next we have a Crisis Suit unit that I have painted. It has been magnetized so that it can be converted to a Broadside Unit, including magnetized bases so that the models are more proportional to the new Broadsides. Look how much money I saved by not Switching to the New GW models
26790
Post by: Gitsplitta
That WK conversion is pretty amazing. Had no idea you were going there with it.
8723
Post by: wyomingfox
Yeah. It was a pretty unique concept and Brian executed my vision with his conversion with pizazz.
|
|