12271
Post by: JB

Thanks BLACKHAND!
Here are two more companies that sell casting products used by 40K enthusiasts.
MicroMark is in the United States. They sell a lot of modelling tools as well as casting materials.
Sylmasta is in the United Kingdom. They sell a nice casting kit that I will order online since I live in Germany right now, and I had to get rid of a lot of my other materials before I moved from the US.
I hope to get back to casting in November. I'm sculpting some things ( 40K bases, bits, and Mordheim bits) that I want to cast.

19931
Post by: BLACKHAND
Thanks JB, have added Micromark to the OP, feel free to post any pics of your moulds and technique when you get casting in November.
28269
Post by: Red Corsair
When casting are there any harsh fumes or need for ventilation?
19931
Post by: BLACKHAND
Red Corsair wrote:When casting are there any harsh fumes or need for ventilation?
Depends on the products used, I wouldn't have thought there would be too much chance of fumes with Silicone compounds but a with resins there could possibly be a greater possibility. The products I use for instance have no fumes and very little smell at all, the silicone is often used for making moulds of body parts and is safe for contact with skin.
Of course when sanding or drilling resin you should make sure not to inhale the dust, I have had people suggest using wet/dry sand paper and submerging the piece to be sanded in water while sanding... at the very least wear a mask or work outside.
Goes without saying that working with any chemicals, be it resin, silicone or glues, you should probably work in a well ventilated space.
I will however cop the the fact that I work in a 3x6 space under my stairs that has absolutely no ventilation or natural light 
19931
Post by: BLACKHAND
Just read a review of something called "blue stuff" by Ron over at "From the Warp"
http://fromthewarp.blogspot.com/2011/10/my-attempt-at-molding-and-casting.html
Might be something of use to you guys, if anyone does try it let us know how it went!
28269
Post by: Red Corsair
Thanks BH I really appreciate the response : )
28269
Post by: Red Corsair
Can someone tell me what the minimum requirement for an air compressor is to do pressure casting?
19148
Post by: Aerethan
I assume you mean a vacuum pump for degassing. If so, no.
12271
Post by: JB
Red Corsair wrote:Can someone tell me what the minimum requirement for an air compressor is to do pressure casting?
It will depend on the size of the chamber, and how fast you want it depressurized.
The following advice comes from Sersi who has a thread dedicated to pressure casting.
Sersi wrote:There are several important features to selecting a good vacuum pump:
1. Your vacuum pump must be able to draw 28 - 30 inches of mercury, or 1 Bar. The closer you can get to 30", the better. Most likely, your gauge won't ever get to 29" unless you have a serious air compressor with a Venturi Generator or a super vacuum pump. However, 27" or 28" is sufficient; you'll just have to run the pump a little longer.
2. You want to get a 3 CFM pump at the minimum. I have a 7 CFM pump, but 5 CFM is sufficient and 3 CFM is fine for mold making and casting. CFM stands for cubic feet per minute. This is how much air the pump can displace, the lower your pumps CFM rating the longer you will have to run it to de-air your silicon rubber. Since most rubbers have a short pot life (pot life - is how much time you have to mix, de-air, and pour it into molds before it starts to harden) of 30-45 minutes. Most pumps that your will find on line will be 0.25 to 1.5 CFM pumps, while cheap avoid these as they will take forever to de-air silicon. I vacuum my rubber twice, after mixing and again after its been poured into the mold box. I do this to remove any air that may have been trapped against the model when the rubber was poured. My 7 CFM pump takes ~ 90 seconds to achieve vacuum with my Belart desiccators.
Cost:
$180 + $43.25 S&H (Re-furbished / E-bay)
$600 new (you can find them on sale for ~ $300.00)
19931
Post by: BLACKHAND
Thanks for the repost JB, and yeah Sersi is really someone that you want to watch when it comes to sculpting and casting, his stuff is pretty stunning.
28269
Post by: Red Corsair
Thanks guys, but I was referring to the pressure pot though not the degassing chamber ha ha, this stuff gets confusing.
Yea I am ordering the pressure pot but don't know what size air compressor I will need for it... I have the vacuum, expensive but well worth it I hope ; )
19148
Post by: Aerethan
A pressure pot would be a degassing chamber, as the intent is to remove air bubbles by means of a vacuum.
I don't see any benefit to adding more air into a cast. Perhaps you could link to wherever you are getting this idea of positive air pressure?
23855
Post by: LazzurusMan
Thank you so much!
I have been looking all over for a simple casting technique as i hope to start producing some of my own little bits and bobs for sale ^^
28269
Post by: Red Corsair
http://www.dakkadakka.com/dakkaforum/posts/list/243074.page#758869
The purpose of degassing with negative pressure (vacuum) is to remove air from your silicone rubber and resin mix....
The pressure pot is for positive pressure to force the resin into the mold and shrink remaining air bubbles so you capture a higher detail in the product... They are entirely different principles being applied from two different items. If you look at the link I provided from sersi you will see he recommends and uses both items but doesn't list what size compressor he uses...
My question was in regards to the PSI rating required for the second item the pressure pot (he lists the goal to be reached, 40PSI, but not the best compressor size to get here in time)...
Corsair
19931
Post by: BLACKHAND
Thanks for offering the advice Aerethan, this is pretty much over my head
12271
Post by: JB
Red Corsair wrote:Thanks guys, but I was referring to the pressure pot though not the degassing chamber ha ha, this stuff gets confusing.
Yea I am ordering the pressure pot but don't know what size air compressor I will need for it... I have the vacuum, expensive but well worth it I hope ; )
Oops sorry  , I should have read your question more carefully. You should probably just send a Private Message to Sersi to find out what pump he is using. I was planning on just using the air compressor that I have in my garage but I changed my mind after reading that I should get one with an air tank.
Aerethan wrote:A pressure pot would be a degassing chamber, as the intent is to remove air bubbles by means of a vacuum.
I don't see any benefit to adding more air into a cast. Perhaps you could link to wherever you are getting this idea of positive air pressure?
I'm not an expert on the use of pressure pots in casting (all gravity for me so far) but have been researching it (like Red Corsair) before I purchase the required equipment.
From what I've read, degassing works best when making the molds but pressure works better for the resin during the actual casting. A vacuum apparently can play hell with the resin, causing it to end up outside the mold and all over the vacuum bell. A vacuum also messes with the curing time making the process more unpredictable. Pressure, on the other hand, requires another set of equipment (pressure pot and air compressor) and can be dangerous if you don't properly seal the top of the pot. I'm thinking that I'll go with a resin that requires a longer demold time to give me plenty of time to get the filled molds into the pot, seal it, and get the pressure up to the required PSI (40-60 according to most of the sources I've read or viewed).
BLACKHAND, are you planning any more casting this year? I'm ordering my new casting materials (still gravity casting) this week. I'm planning to make some one piece molds of bases, movement trays, and vehicle stowage. It's not much but I felt I had to do something after seeing Foda_Bett's plog of Warhound wonders (including much casting).
19931
Post by: BLACKHAND
Not planning on any major casting projects in the near future JB, have a six month old and a 4 year old who are (quite rightfully) taking up most of my downtime
I am planning on a scratchbuilding a rubbish skip and casting it for use as cover on my Infinity table but nothing more complicated than the moulds I have down previously.
Thanks for mentioning Foda_Bett's plog, I have been trying to think of his name for the last couple of days to suggest that Red Corsair have a look at it. The pics of his degassing setup are about all I know about pressure casting and he sure as hell looks like he knows what he is doing.
30785
Post by: Styrofoam04
Ya I asked Sersi that question before about the pressure pot for the resin.
He wrote:
"You need a pot that can be pressured to at least 40 PSI, more is always better"
I endied up trying talc powder instead of spending $200 or so on a pot.
I have to say I'm kicking myself for not trying it earlier!! Talc Powder is Magic!! Thanks Blackhand for the tip. I have no Idea how it works but it keeps the bubbles off the surface. Even a bad resin mix looks amazing. Mind you, the bad mix was very brittle.
Talc on a good cast makes the resin flat and not shiny like a cast without Talc. Though I found it eaiser to clean and the primer sticks to it better. Details that I couldn't get before, come out perfect.
I use OOMOO 30 and sometimes Talc alone can tear small bits of rubber, So I use a light coat of release agent, then add the talc powder when dried.
If your new to casting and want the bubbles gone without buying that pressure pot I'd give Talc a try first.
19931
Post by: BLACKHAND
Yeah, I am not sure if the talc breaks the surface tension of the resin bubbles or just bonds to the resin to make it cover the surface of the mold completely but who cares? It works!
And I've become quite used to the textured surface it gives, paint adheres really well to it.
7841
Post by: Linkdead
Pressure casting does not force resin into molds. Increasing the pressure decreases the size an air bubble will be. Under enough pressure even a very large bubble in relative terms it forced into a very tiny bubble. If you look closely at Forgeworld resin you can see some of these very tiny bubbles in the final product. Since it is impossible to completely degass your silicone before you pour the mold, or your resin before you pour it pressure casting becomes extremely important.
You cannot normally use the same vessel for both pressure casting and degassing. The equipment required to create and maintain a vacuum is much more expensive then the equipment to pressurize a simple vessel. I use this for pressure casting http://www.harborfreight.com/2-1-2-half-gallon-pressure-paint-tank-66839.html along with a compressor I normally use for airbrushing. You can get a complete pressure casting setup from harbor freight including the pressure tank and a cheap compressor for under 150 dollars. A legitimate vacuum degassing setup is upwards of 600 dollars.
It is important to maintain a constant pressure level during the entire cure time that your resin requires. Always purchase a compressor with a tank for this reason. http://www.harborfreight.com/3-gallon-100-psi-oilless-pancake-air-compressor-95275.html is my recommendation. You only need between 10-30 psi however this level must remain constant or you risk the bubbles changing size during your resin cure! I pressurize both molds and casts using the same process.
Simple degassing of your resin and silicone can be accomplished with a very inexpensive vibrating table. You can build your own with a simple AC or DC motor and any flat surface. Just place your mixed resin on silicone on the table for a few minutes and nearly all the bubbles will rise to the surface. This combined with pressure casting will produce very professional results for under 200 dollars in setup costs.
12271
Post by: JB
Linkdead wrote:Simple degassing of your resin and silicone can be accomplished with a very inexpensive vibrating table. You can build your own with a simple AC or DC motor and any flat surface. Just place your mixed resin on silicone on the table for a few minutes and nearly all the bubbles will rise to the surface. This combined with pressure casting will produce very professional results for under 200 dollars in setup costs.
I've read about the vibrating table before but I haven't seen an example in pictures, much less a how-to-build it tutorial. Do you have one that you built? Could you tell us how you made it?
19931
Post by: BLACKHAND
As much as I think this could go down like a lead balloon I will mention it...
... it was once suggested to me that it was pretty easy to assemble a decent vibrating table with some foam, a piece of plastic or thin mdf and ah, well how can I say this...um a "Marital Aid"....
... of course since my painting and modelling area is under the stairs in a cupboard and also has my computer in it I havn't dared try this in case my partner was to walk in, no real way to explain it
19148
Post by: Aerethan
A vibration table is easy to make.
Materials:
A back massager(the head of which needs to be at a 90 degree angle) like this one
http://www.walmart.com/ip/HoMedics-Extendable-Percussion-Massager/14540369
2'x2' piece of plywood
4 FOAM sponges(dollar stores should have them, NOT the kind you use for dishes as they are only springy when wet)
some duct tape
Duct tape the 4 sponges on the bottom, then tape(or you can use metal connectors from Home Depot or w/e) to secure the massager onto the board head down.
Plug in and play. Automatically Appended Next Post: http://www.hirstarts.com/casting/advanced.html#vibrate
this is much better than my shoddy instructions
12271
Post by: JB
BLACKHAND wrote:As much as I think this could go down like a lead balloon I will mention it...
... it was once suggested to me that it was pretty easy to assemble a decent vibrating table with some foam, a piece of plastic or thin mdf and ah, well how can I say this...um a "Marital Aid"....
... of course since my painting and modelling area is under the stairs in a cupboard and also has my computer in it I havn't dared try this in case my partner was to walk in, no real way to explain it
 Funny, very funny but I think I'll go with Aerethan's method. Heck, I'm no glutton for SITCOM humor.
7841
Post by: Linkdead
Here you are, I'm sure you all get the idea.
http://www.hirstarts.com/casting/advanced.html#vibrate
I quick tip about these tables. The more viscous your resin or silicone is the better your table will work. You are also looking for low frequency vibrations, too high will just cause more bubbles and worse sloshing around and potentially foaming. The best mold making silicone is a very thick and slow drying. They can be degassed using the vibration table method. Most modern high quality resin is the opposite, very thin and with a fast bloom time. I usually mix and immediately pour the resin.
39783
Post by: theunicorn
I thought I would jump in on this and make a post or 3.
I have complete walkthroughs on my blog for all three methods, plus what I would like to think is usefull hobby info.
First up is press molding, it is the cheapest to get started in. I can't post pics (IP issues) of my pressmold projects but here is a link to the PressMold tutorial.
using Instant Mold and either GreenStuff or ProCreate putties
http://warfrog.blogspot.com/2011/05/saving-ebay-finds-by-casting-your-own.html for around $24.00 at the warstore you can get everything you need to get started making small bits. I strongly recommend this over BluStuff.
Next is silicon molds for resin.
Using Smooth-On's line of silicon. This rubber does not need special casting equipment like a vacuum chamber or pressure pot.
http://warfrog.blogspot.com/2011/11/two-part-mold-making-tutorial-resin.html Walkthrough.

Finally is making molds and casting white metal or pewter. Links to suppliers are in this tutorial
http://warfrog.blogspot.com/2011/10/white-metal-casting-tutorial.html

19931
Post by: BLACKHAND
Great tutorials, thanks for posting!
30785
Post by: Styrofoam04
The Idea with the syringe in the mould is brilliant!!
39783
Post by: theunicorn
Using a syringe was a tip that I think i picked up from Aerethan, I just decided to go ahead and make my pour gates with them.
19148
Post by: Aerethan
Making the gates with the syringe is a great idea that I will totally steal. I do need to work on my venting though and need to do some test casts with talc to see if it improves my bubble situation. My 6th ed. Empire soldiers will never get done. Automatically Appended Next Post: I would also add, for those in the US wanting to get into casting at a reasonably low price:
http://www.theengineerguy.com/cgi/commerce.cgi?preadd=action&key=POURABLE-SILICONE-ST
These are the products I use in a nice tidy affordable kit.
14152
Post by: CT GAMER
Aerethan wrote:Making the gates with the syringe is a great idea that I will totally steal. I do need to work on my venting though and need to do some test casts with talc to see if it improves my bubble situation. My 6th ed. Empire soldiers will never get done.
Automatically Appended Next Post:
I would also add, for those in the US wanting to get into casting at a reasonably low price:
http://www.theengineerguy.com/cgi/commerce.cgi?preadd=action&key=POURABLE-SILICONE-ST
These are the products I use in a nice tidy affordable kit.
That kit looks good.
i have been meaning to make some molds of various armour plates/extra armour for my ork vehicle and terrain builds and cranking a bunch out...
19148
Post by: Aerethan
single piece molds would save tons of time for ork armor plates. Great idea. Also ideal if you sculpt your own army specific insignia.
49451
Post by: dreadwing
i been doing some molds and casts using instant mold and resin,(yes it works great) but i get the odd air pocket, and good ways top get rid of the air or just add more air vents??
19148
Post by: Aerethan
never enough vents
28269
Post by: Red Corsair
Ok, first order of business, thanks to all of you for the great feedback.
I have my casting equipment all set up for degassing and pressure casting, now I was interested in which silicone and resin you all find the best for its ease of use and price?
Thanks again all!
19148
Post by: Aerethan
I use Smooth On products, Oomoo and Smooth Cast 300 or 305.
28269
Post by: Red Corsair
Thanks mate!
39783
Post by: theunicorn
Oomoo and Smooth cast, I wish I had known about these years ago. These are the best I have used in around 8-10 years of casting.
My Oomoo 25 tutorial http://warfrog.blogspot.com/2011/11/two-part-mold-making-tutorial-resin.html
My Smooth On 305 tutorial http://warfrog.blogspot.com/2011/11/resin-casting-tutorial.html
FYI Forgeworld resin is Smooth on 65d, FW does vacuum the silicon when making molds however it has been said that they do not pour the molds under pressure.
28269
Post by: Red Corsair
Thanks unicorn, your tutorials are amazing and very appreciated!
19148
Post by: Aerethan
Theunicorns methods are the exact same that I use for my casting. Been a while since I've made a mold and done some casts, but with Empire being redone this year I imagine I'll have to crank out some new molds and get to casting. For what it's worth I have been tracking down the models I recast so as to lessen the amount of work I have to do, but if all else fails...
Also, Liquid Green Stuff is a Godsend for dealing with micro bubbles in casts like this. My sleeves are now 100% slashed and puffy!
19931
Post by: BLACKHAND
Any chance you could post up some pics of your degassing and pressure casting rig Corsair?
I am still pretty far from that kind of setup myself but would love to see it as I am sure a lot of the other people who read this will.
19148
Post by: Aerethan
I'd be most interested in the pressure casting setup. My molds tend to come out fine but micro bubbles are a royal pain in the ass when you are casting 100 models each with 10-15 bubbles in them. Then again I should be using talc powder too...
Shame on me for not sticking to my own advice!
28269
Post by: Red Corsair
Ha ha, my camera broke over Christmas so be patient as I have to borrow one  But yea I will definitely get some pics up for you guys, I tested all my valves yesterday and I have the gear all working well. Now it's time to practice instead of theory and see what I can do I sculpt my own minis with my brothers. We have a small site http://www.bloodmoonminis.com/ It will be a while yet before I get some stuff up in resin though.
The pressure casting rig was actually the easy to aquire. The vacuum chamber is the pain. My desiccator chamber from Belart took 2 months to get here!
30785
Post by: Styrofoam04
I'm also intrested in your setup Red Corsair. I would love to get my hands at least on the pressure pot at a cheap price
I find OOMOO 25 or 30 pretty good so buying the vacuum chamber will be on the back burner for me.
28269
Post by: Red Corsair
![]()
Having trouble uploading images on this site, I have them in my gallery but I have no clue why my photos keep appearing broken :/
Automatically Appended Next Post:
Had to get them up as attachments but oh well. Can anyone explain to me how I am supposed to use the image button cause it never works for this nub lol.
Here is the setup on my kitchen floor lol. The pressure pot is the easiest piece actually Styrofoam04. I ordered it from Harbor freight and all I had to do was by the compressor attachments from lowes. They are the pointed nozzles that the hose is in Then I bought a run of the mill ball valve for the out port so I can depressurize it easily. Other wise you can use the 'T' screw on the main gauge but mine is faster and that hole needed plugging anyways hehe. BTW make sure you use valve seel tape on everything lol. Other wise you will hear A LOT of leaks.
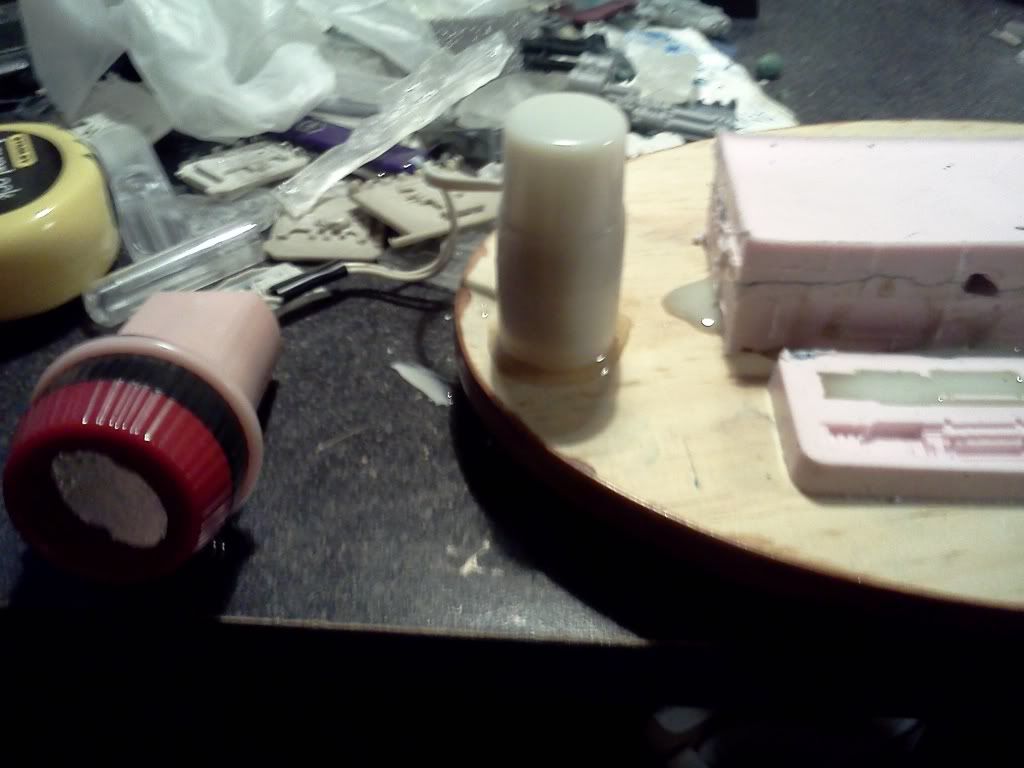
The vacuum setup was the more expensive part, but from what I hear from talking with Sersi it makes your molds bubble free so I decided to spring for it. If you have ANY air in your rubber then pressurizing it can make the mold buckle and alter your casts. This step is more for reassurance if you will. If you were to skip on any piece my advice would be this piece in the short term. Hardest to acquire for a decent price. The reason I got it was also because the 10:1 rubber has a higher tear strength and as I am planning on doing many models for my store I want to get the most out of my molds.
I bought my vac off ebay and the desiccator from Belart who took forever. But belart cost me $130 with shipping as opposed to $500+ from others. The main reason is because the desiccator is from a science lab supplier but it works great and is clear fopr better visibility.
If you need any answers regarding setting this up shout to me. It was frustrating gathering all the knowledge and parts more then anything.
3
39783
Post by: theunicorn
My vacuum chamber and pump

I got these on eBay. I had to seal the handle rivets with JB weld on the chamber to maintain -29.9 Hg but I am pleased with the vacuum chamber. Its basically a 4-5 gal soup pot with vinyl graphics and a thick clear lexan lid with gauges.
I got both the pump and the chamber for $100 ea plus shipping.
Vacuum chambers are harder to find a good deal on than pumps, this seller european-auto-dismantling is where i got my chamber from on eBay. he has feedback as recent as the end of December for chambers. I recommend them for chambers, You might have to check the rivets but the price is worth the hassle.
19931
Post by: BLACKHAND
Thanks to both of you guys for the pics and suggestions, I am sure you will be getting more than a few queries about machine casting in the future!
50145
Post by: Mortikye
Hi. First off i'd like to say thanks for the great tutorial! I have been following it since I joined dakkadakka, though never posted. Well after much research and learning what's what I have gotten into casting some of my custom made stuff so I don't have to spend countless hrs and resources hacking stuff apart. As I speak the molds for my TL-Bolter Halberds are curing  . I started out with a few GW pieces of various sizes to experiment on just in case I messed up. Didn't want to risk breaking something I cared about. I realized that for my small amount of use a vacuum/pressure chamber would be too costly, so I took the easy option and built a vibration tray. Best part is, is that it cost me $13 and it works! Here's a pic.
In case you're wondering, it's an oval display plaque with foam rubber pads glued underneath and the "powerplant" from a marital aid epoxyed to it. The aid had everything I needed in one go and cheap. Small, battery operated, simple, and variable output. Downside:asking the store clerk for a cheap yet powerful toy. Upside: the look of shock and bewilderment as my older brother pulled the rest of it out of his stocking for xmas > .
Here are some pics of the first items I will be molding once they cure.
Again, thank you all for the great tutorial!
19931
Post by: BLACKHAND
Mortikye wrote: Upside: the look of shock and bewilderment as my older brother pulled the rest of it out of his stocking for xmas > .
So funny, then I had to explain to my wife why I burst out laughing I have been told this tip before as well and heard it is an effective and cheap alternative to a full casting rig. Nice to see such a simple example! Oh and you can also try a back massager as an alternative to a marital aid... though it is obviously not as much fun
39783
Post by: theunicorn
Mortikye wrote:
In case you're wondering, it's an oval display plaque with foam rubber pads glued underneath and the "powerplant" from a marital aid epoxyed to it. The aid had everything I needed in one go and cheap. Small, battery operated, simple, and variable output. Downside:asking the store clerk for a cheap yet powerful toy. Upside: the look of shock and bewilderment as my older brother pulled the rest of it out of his stocking for xmas > .
Again, thank you all for the great tutorial!
Mortikye wins the interwebz today, for posting pics using a "adult toy" and little army men at the same time. Bonus multiplier for quite possibly "violating" a big companies IP in an inventive new way.

50145
Post by: Mortikye
Hey that IP liked it, even if we were both shamful afterwords lol. I guess I should have added that I destroyed everything directly cast from an existing GW product. One for legal reasons abound, and secondly it would totally defeat the purpose of me learning to cast. I could have bought the pieces cheaper from ebay or FW, I want to learn how to cast stuff I have made(somewhat). I'm still working on my sculpting skills. Just scored a set of jewelers letter punches in trade from a local watchmaker(i'm teaching him how to set up his car for autocross), so my next items should have some extra GKish detail. Still trying to perfect my homemade resin injection system though first. Anyone know what roto-casting is or how it works?
19148
Post by: Aerethan
I will say that using existing items to LEARN how to make molds properly is a useful "evil". But as you said, most times it is cheaper to just buy the bits of ebay or a site that sells them.
39783
Post by: theunicorn
Roto-casting is way expensive, its gonna be for folks that are running a full time business.
I am glad to hear that the IP liked the violation, even if you could not look each other in the eye afterwards.
Check out this site for details
http://www.contenti.com/products/spin-casting.html
44654
Post by: Lone Cat
i need a suggestion on a chemical 'brand' suitable for terrain project (both a brand of resin and a brand of mould silicone)
I live in Thailand and i've contact a supplier (livin' in a city next to the location where i'm living) and he says that Alumilite resin is available (well hopefully for now after the great deluge) but i'm not sure if it's really suitable and has any strengh/convertibility of GW plastics?
please
=^.^=
39783
Post by: theunicorn
check on the availability of Smooth on silicon and SmoothCast resin. Here in the States it is cheaper than Alumilte and much better quality. I have a tutorial of it on my Blog, in my sig
36940
Post by: Anvildude
I use Alumilite myself- it's a decent quality resin from what I can tell- I use it for my custom bases.
It's decently tough, and very light- stronger and tougher than Finecast (doesn't snap quite as easily) while being about the same weight.
19931
Post by: BLACKHAND
Sorry Lone Cat, I am afraid I don't have too much more to add.... hopefully some of the other subscribers to this thread can help?
44654
Post by: Lone Cat
Anvildude wrote:I use Alumilite myself- it's a decent quality resin from what I can tell- I use it for my custom bases.
It's decently tough, and very light- stronger and tougher than Finecast (doesn't snap quite as easily) while being about the same weight.
good to hear (Thai grognards here still distaste finecast, some even bend on chinese 'unlicensed GW copy' instead  ) ... but to be specific please tell me the exact ALUMILITE resin (which there are SO MANY different Resins there) do you use for your project.
36940
Post by: Anvildude
Alumilite Super Plastic- it's even parts A and B, one clear and one a sort of brownish color. When mixed, they come out a pale yellow-white color.
44654
Post by: Lone Cat
^
And do you use the pressurization techniques or just simple casting without pressure tank (to completely eliminate bubbles)??
=^.^=
36940
Post by: Anvildude
Also, how fast does the resin you use set? The resin I'm currently casting with sets in about a minute or two, so I don't see how you could use a pressure vessel unless you did the pour inside while already pressurized.
18033
Post by: WarPetrie
I'm not sure if this has been asked, I still have yet to read through the article, but how would you make a two part mold out of instant mold? I've tried several times but it doesn't come out right. I'm going to have to find that moding material you use because I've been wanting to make my own bits for my Deathwing, but the molds dont come out right :/
39783
Post by: theunicorn
Check my blog in my sig, I have a 2 part mold tutorial using instant Mold. msg me on the blog or here if you are still lost after reading it.
19931
Post by: BLACKHAND
From how I have seen it used so far it is handy fro pressmoulding but not sure how good it would be for a two part mould that had to stand up to repeated castings, would be great to see how Theunicorn achieved it.
39783
Post by: theunicorn
I wont post pics here, because I totally violated some IP with instant mold, but here is the link http://warfrog.blogspot.com/2011/05/saving-ebay-finds-by-casting-your-own.html
to my Blog tutorial. I also have a white metal mold making and casting tutorial as well as a Smooth cast / Smooth On resin tutorial.
BLACKHAND From how I have seen it used so far it is handy fro pressmoulding but not sure how good it would be for a two part mould that had to stand up to repeated castings, would be great to see how Theunicorn achieved it.
Best thing is that you just reheat and reuse, so how it holds up really is not an issue. I do intend to try using it instead of sulfur free clay for the first side of a Silicon mold, If it does not react to the Smooth On it can greatly decrease my 2 part mold making time. Because I hate cleaning clay off of my originals and mold boxes.
Here are some Necromunda Minis that I restored lost weapons using Instant mold and ProCreate.
http://1.bp.blogspot.com/-FSGDLrn2VD8/Tqyq065Wp0I/AAAAAAAAAq4/0s8ItCWAas4/s640/2011-10-29_21-37-57_643.jpg
And here is Instant mold and GreenStuff in a 2 part mold, copying tyranid vents I made on my Swarmlord
http://3.bp.blogspot.com/-MSdC30mbJX4/TpTgVRVQ4MI/AAAAAAAAAUo/4QxS-P0lSw0/s640/16782239631.jpg
19148
Post by: Aerethan
The loss of detail on the casts is disheartening. Good idea on using it for setting up silicon molds though!
20739
Post by: Lennysmash
I'm not sure if anyone has come across this product but I picked up some a little while ago and just got round to trying it out. http://www.youtube.com/watch?v=06mSBb_rWMo
I did a 2-part cast of a Praetorian to check out the detail retention and I have say I was very impressed. The details are crisp and clean, the only problem I found was setting the model correctly as this stuff sets rock hard it can be a little tricky to remove anything with overlaps.
39783
Post by: theunicorn
I can get Instant Mold to mold detail, I use a 2 piece mold and a very strong clamp to keep pressure on the halves while the GS or ProCreate is curing, the key is to use enough IM to have a around 1/4 inch or more of IM at the thinnest parts of the mold.
I don't like the Blu-Stuff product when compared to Instant Mold, Mainly because Instant mold is reusable
18033
Post by: WarPetrie
That's actually what I had planned to try out. Thanks for the link
39783
Post by: theunicorn
Glad it was helpful.
28730
Post by: Captain Klaw
I have been away for far too long :(
@Gitsplitta & Blackhand: Hello again guys!
Turns out magic the gathering is also addictive
I have however gotten back in, to necromunda of all things, and am planning on doing some more casting on space marines and specifically weapons for necromunda.
I am currently in the process of back-tracking through the forums, but at the moment, is there anything on casting small weapons i.e. sniper rifles and shotguns?
52795
Post by: kshaw2000
would this work for creating a model?
if so would you cast it's parts or the hole thing? Automatically Appended Next Post: Captain Klaw wrote:I have been away for far too long :(
@Gitsplitta & Blackhand: Hello again guys!
Turns out magic the gathering is also addictive
I have however gotten back in, to necromunda of all things, and am planning on doing some more casting on space marines and specifically weapons for necromunda.
I am currently in the process of back-tracking through the forums, but at the moment, is there anything on casting small weapons i.e. sniper rifles and shotguns?
I belive WAR SMITH is.
http://www.dakkadakka.com/dakkaforum/posts/list/428357.page
But I dont think anything is availible yet.
19148
Post by: Aerethan
kshaw2000 wrote:would this work for creating a model?
if so would you cast it's parts or the hole thing?
Automatically Appended Next Post:
Captain Klaw wrote:I have been away for far too long :(
@Gitsplitta & Blackhand: Hello again guys!
Turns out magic the gathering is also addictive
I have however gotten back in, to necromunda of all things, and am planning on doing some more casting on space marines and specifically weapons for necromunda.
I am currently in the process of back-tracking through the forums, but at the moment, is there anything on casting small weapons i.e. sniper rifles and shotguns?
I belive WAR SMITH is.
http://www.dakkadakka.com/dakkaforum/posts/list/428357.page
But I dont think anything is availible yet.
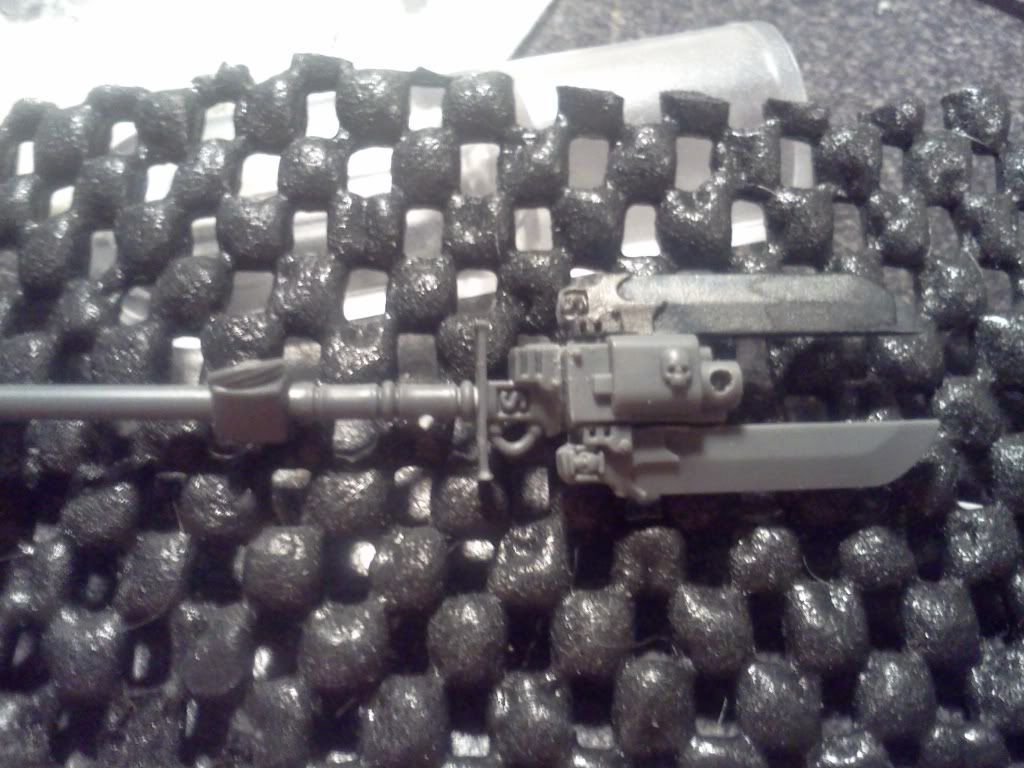
It greatly depends on the model and it's pose and parts. I'll give you some examples:

This model is posed as such that it could be cast as a single piece(as GW does). No parts are really posed in such a way that couldn't be cast in a 2 part mold.

This model has it's weapons pointed away from it's body. So the Body would be one mold, and the 2 weapons and hands could be done on a second mold(speaking in terms of resin work, metal spin casting allows for more stuff in a mold).
Please note that I'm not suggesting you cast these 2 models, I'm merely using their anatomy and positioning to answer the question. Some models are so complex that they will need several molds to make up all the parts(the Doombull in Finecast is about 5 separate molds and sprues).
As for casting weapons, the same principles apply to them as to other 2 part mold items. Make sure you have vents for air to escape, and a proper gate through which to pour(theunicorn's method of using a syringe as the pour gate is brilliant).
It's an easy wager to say that your first mold or three may not be perfect. But mistakes will teach you what you need to know that we can't type here for one reason or another.
EDIT: stolen from the link above my post:
That is what a proper setup for making a weapons sprue looks like. Use small wire like paper clips for vents and leftover sprue or plastic rod for the frame. I imagine his casts will turn out well, especially if he's pressure casting.
19931
Post by: BLACKHAND
Captain Klaw wrote:I have been away for far too long :(
@Gitsplitta & Blackhand: Hello again guys!
Turns out magic the gathering is also addictive
Hey Klaw, good to see you back.. and yep magic took several years of my life before wargaming took over
As for casting guns, Aerethan has it right and the pic he posted is a perfect example of how to do it.... course getting a decent two part mold is an art itself but a decently constructed master sprue like the ones in the pic is a must.
19148
Post by: Aerethan
Of course I'm right! have you met me?
/narcissism
I agree that while a proper master sprue is mandatory, it doesn't guarantee that the mold will come out perfect. Bubbles can wreck the most well thought out plans.
For my rinky dink home operation I use the "bombs away" method of pouring silicone rubber as I don't have access to a degassing rig. Sadly it isn't a precise science but more of an art that one has to do to learn.
20880
Post by: loki old fart
Is there any silicon that can be used for hot plastic, instead of resin?
19148
Post by: Aerethan
define "hot"
20880
Post by: loki old fart
Aerethan wrote:define "hot"
Just above melting point I.E liquid
19148
Post by: Aerethan
If you are using anything that hot, I'd recommend any of the metal casting rubbers that are made for high temperatures. Micro Mark sells a kit for that I believe.
20880
Post by: loki old fart
Our two-part liquid RTV (Room Temperature Vulcanizing...cures without heat) silicone mold rubber is ideal for making duplicate parts with our casting resins. To make a mold, mix parts A and B together and pour into a mold box containing your pattern. After curing, the mold is soft and pliable and reproduces every detail of your pattern. And, because it is genuine silicone rubber (withstands up to 600 degrees F), you can use these molds to cast small metal parts with our low-temperature alloys. Instructions for making molds are included.
19148
Post by: Aerethan
It might be worth finding out what the max working temp is for Oomoo silicone from SmoothOn.com
39783
Post by: theunicorn
I picked up the syringe injection technique in the past few years from someone online, funny enough I would have credited it to Aerethan off of the top of my head but I am truly unaware of where I "stole" the technique from.
These Necromunda dudes were acquired as bitz or in ebay lots as incomplete miniatures. I made replacement guns from originals that I owned using Instant Mold and ProCreate. In this case I chose this method over the usual silicon and resin because I did not need more than 3 of the bitz to complete the missing pieces. The quality is a little less than what I can achieve with Smooth on products but the cost is incredibly lower because the mold material is nearly infinitely reusable.
Check my blog for a complete walkthru
19148
Post by: Aerethan
Afaik I was the first one on dakka to use the syringe idea, which I stole from a youtube video I saw years ago, but I didn't think to use the syringe itself as the gate.
28730
Post by: Captain Klaw
@Aerethan:
How succesful is the syringe method? I can see how complicated moulds like the weapons sprue might be difficult (especially without the vacuum chamber)
Is the idea to inject the resin down one side through one or both side tubes of the master sprue, and have it fill upwards through vents at the base, through the guns (or what have you), pushing the bubbles with it as you go?
@Blackhand: how does pinkysil deal with pressure and or talc? in a fiddly two-part mould like this, I imagine bubbles and leaks can be problematic.
Nice to be back.
19931
Post by: BLACKHAND
Pinkysil loves Talc, I use it everytime now. The only effect is a slight texturising of the resin but it helps the paint grip so its a win/win.
as for injecting I haven't had the chance to try yet but if you build a decent mould box that encompasses the mould on every side but the one you are injecting into then it should be fine. If you decide to use rubber bands to hold the two sides together than make sure to use pieces of card on the sides of the mould to distribute the pressure of the rubber bands or the interior of the mould will be warped.
39783
Post by: theunicorn
Captain Klaw wrote:@Aerethan:
How succesful is the syringe method? I can see how complicated moulds like the weapons sprue might be difficult (especially without the vacuum chamber)
Is the idea to inject the resin down one side through one or both side tubes of the master sprue, and have it fill upwards through vents at the base, through the guns (or what have you), pushing the bubbles with it as you go?
@Blackhand: how does pinkysil deal with pressure and or talc? in a fiddly two-part mould like this, I imagine bubbles and leaks can be problematic.
Nice to be back.
WIth a syringe I push resin into the main pour gate as well as pull it out from the vent channels It helps to remove large air bubbles.
You can on this photo where the syringe pour gate was once it began to back up with resin i would put the tip into the vent gate and draw up resin and air bubbles from the pour gate. I used rubber bands and mdf boards around these molds when pouring resin
19931
Post by: BLACKHAND
Hot Damn! I never thought of drawing out of the vent gates, thats genius!
36940
Post by: Anvildude
Where do you get your syringes, are they reusable, and if so how do you clean them? Also what resins do you prefer for this technique?
39783
Post by: theunicorn
Smooth on products, I have tried others and smooth on seems to be the best I can find
http://www.smooth-on.com
I order mine from Atlanta from these guys http://www.theengineerguy.com/cgi/commerce.cgi?display=home
Resin casting tutorial
http://warfrog.blogspot.com/2011/11/resin-casting-tutorial.html
Mold making tutorial
http://warfrog.blogspot.com/2011/11/two-part-mold-making-tutorial-resin.html
Syringes on eBay 100 count $18.98 delivered to your house
http://www.ebay.com/itm/10mL-Vet-Syringe-10CC-Luer-Slip-100-bx-10CCVLS-/280715778535?pt=LH_DefaultDomain_0&hash=item415bf6d9e7#ht_1371wt_952
I get alot of uses out of them. I keep 2 labeled for A & B measuring for tiny pours and a couple for mold injection, once the resin sets I use a 2mm brass rod to knock the plug or cured resin out of the syringe, do remember to remove the plunger before the resin cures.
Automatically Appended Next Post: Anyone following this thread should also check out the resin addict forums as well. Its great for all skill levels of sculptors and casters.
28730
Post by: Captain Klaw
BLACKHAND wrote:Hot Damn! I never thought of drawing out of the vent gates, thats genius!
I know right!
30785
Post by: Styrofoam04
Captain Klaw wrote:BLACKHAND wrote:Hot Damn! I never thought of drawing out of the vent gates, thats genius!
I know right!
I cant wait to try that!! thanks for the tip Unicorn! I've been squeezing the mould, pushing out some air and then slowly release and let the resin back in
52273
Post by: ifStatement
This thread has some great ideas.
Is the OP's method for making shoulder pads mould the best one? It seems GW do it differently because with that method they don't get those little holes which run around the edges.
Also where's the best place to vent from with shoulder pads?
28730
Post by: Captain Klaw
ifStatement wrote:This thread has some great ideas.
Is the OP's method for making shoulder pads mould the best one? It seems GW do it differently because with that method they don't get those little holes which run around the edges.
Also where's the best place to vent from with shoulder pads?
Having tried the OP's method, I am very happy with it. So long as your resin is poured before it gets too viscous, it's a very simple and pretty reliable way of casting many shoulder pads, and complicated moulds are unnecessary.
52273
Post by: ifStatement
Sweet. I'll definately be giving this a go.
If anyone in the EU knows of a decent kit to start off with please tell me. The ones linked to in the thread so far are all US based.
28730
Post by: Captain Klaw
I am having some problems with the workability of the pinkysil and easycast, and before I go off and buy another batch, I am just wondering what would be the best option.
For reference, my main issue is with the working times and setting times of each batch, as they are both very finnicky and it is hard to get them set right and with no bubbles in time, especially across multiple moulds.
Additionally, the pnkiysil's softness once cured means that sometimes 2 part moulds become warped or don't fit together once the resin is injected, which as speaks for itself is problematic.
Ck
19931
Post by: BLACKHAND
Are you saying there is an issue with how fast the pinkysil sets during multiple moulds or the easycast?
28730
Post by: Captain Klaw
Both, I would like a little more time to work with each to throroughly mix and distribute properly before they set.
19148
Post by: Aerethan
As a rule I only ever make one mold at a time. This allows me to take my time and make sure that it is done right.
As for the mold warping when injecting resin, you should be using piece of heavy cardboard or mdf with rubber bands around the mold for that exact reason. Also make sure that you put keys in the mold so that it lines up properly every time.
I'm not familiar with pinksyl, but most companies offer silicone rubber with different working and curing times. The faster the cure time, the less working time.
19931
Post by: BLACKHAND
Lol, Everything Aerethan said!
20880
Post by: loki old fart
Aerethan wrote:As a rule I only ever make one mold at a time. This allows me to take my time and make sure that it is done right.
As for the mold warping when injecting resin, you should be using piece of heavy cardboard or mdf with rubber bands around the mold for that exact reason. Also make sure that you put keys in the mold so that it lines up properly every time.
I'm not familiar with pinksyl, but most companies offer silicone rubber with different working and curing times. The faster the cure time, the less working time.
Aerethan is right.The slower you go, the better/faster it'll be.
Just make sure your using the right silicone.
52273
Post by: ifStatement
Got some great results using blackhand's shoulder pad method with materials bought from tomps. I'll post some pics later in the week.
28730
Post by: Captain Klaw
some modified dark eldar weaponry I've tried moulding has been way too much trouble, so I'm just going to go back to v simple moulds, like modified lasguns, autoguns and shotguns for necromunda.
That said, I have tried a product (again from Barnes) called '4PU' which has double the working time of 'Easycast'. A very good product that I recommend to anyone using Easycast, though the longer demould time means you'll have to be a bit more patient.
19931
Post by: BLACKHAND
I have said it before but it bears saying again, in a lot of cases it is cheaper and easier to buy from bitz sites than cast up weapons and the like.
The exceptions are personal sculpts and highly modified or rare weapons that you require in a large amount.
The cost in resin, silicone and more importantly TIME when totaled up will often equal or exceed what you will pay from a bits site.
That said there is nothing like pulling a perfect cast from your own mould
Kaptain Klaw - thanks for the tip on "4PU"!
52273
Post by: ifStatement
Does anyone have any experience with using wax coated disposable cups over basic plastic ones for mixing slicone? I've been using cheap plastic ones and the slicon doesn't run out of them very well and I'm always left with a fare amount of waste which refuses to run out.
19931
Post by: BLACKHAND
Sorry ifStatement, I have only ever used plastic measuring cups that you use for medicine, they are small enough that there isn't too much wastage after the pour.
Would be very interesting to hear how the wax cups work out if you do try them.
28730
Post by: Captain Klaw
BLACKHAND wrote:I have said it before but it bears saying again, in a lot of cases it is cheaper and easier to buy from bitz sites than cast up weapons and the like.
The exceptions are personal sculpts and highly modified or rare weapons that you require in a large amount.
The cost in resin, silicone and more importantly TIME when totaled up will often equal or exceed what you will pay from a bits site.
That said there is nothing like pulling a perfect cast from your own mould
Kaptain Klaw - thanks for the tip on "4PU"!
Blackhand is absolutely correct.
I have had limited success trying to cast extra bits of slightly modified plastic weapons, and in all honesty it would be SIGNIFICANTLY easier, quicker and cheaper to buy bits if you need.
The success stories I HAVE had however, and am very pleased with, are the castings of particular bases and shoulder pads.
These are significantly easier and more reliable than 2 part moulds, not to mention cheaper in terms of silicone and resin used.
While I have made a bunch of custom weapons from scratch, it is in fact easier for me to build a whole new weapon than to try and cast one successfully.
Of course, common sense applies here too: If you're wanting a particularly large amount of something or it took far too long to sculpt, casting may be for you.
57098
Post by: carlos13th
Would you ever consider making custom moulds for people Blackhand?
19931
Post by: BLACKHAND
Hi Carlos13th, I really wish I had the ime to be able to do that for people, its a dream of mine to become a sculpter and caster full time but with two kids under 5 I have neither the time or the financial freedom to do so.
Hence this article and my attempts to collect the casting knowledge and assistance of as many Dakkites as possible to help people who want to give it a go themselves!
11
Post by: ph34r
That syringe method seems brilliant. I take it you are pushing air into the pour channel, and sucking air out of the air channel until resin starts to come up? Or are you using the syringe to inject resin as it cures?
I would assume that you do not try to get any resin in the syringe as it would foul it up, or does it not matter with those larger plastic syringes?
19931
Post by: BLACKHAND
I don't know about anyone else but the resin I use generally cracks off the plastic tubs I use to mix it in, I would imagine it would slide out of the syringe once it cures quite easily.
19148
Post by: Aerethan
The syringes I use are $.10ea. If I use slower curing resin I can use a single syringe for about 8 molds before the resin starts to cure inside it.
I use it to inject the plastic directly, but I also suck the resin back up a little to clear some air and create a vacuum inside the mold.
$.10 per few casts isn't such a big deal to me considering the parts I can get out of it.
I use 10ml terumo syringes that cost me $10 for 100.
30785
Post by: Styrofoam04
^^^ same here, except I dont get mine for 10 cents tho. I get mine for $1. even so they last a while and if you're quick they clean pretty easy. The resin pops right out and most of the time you get a little peg that looks like it came from the boardgame battleship. I find that the rubber gasket on the plunger part breaks before the syringe gets too bogged up.
I use the child medicine syringe
MmUjknMBM,wWWWFKw~~_35.JPG)
62373
Post by: JWMarines
Just wanted to comment to let US casters know that you can get Smooth-On Oomoo 25 and Smoothcast 300 from http://www.artsupply.com/Smooth-On_c_2290.html at a bit of a discount compared to amazon, smooth-on's terrible site, or even theengineerguy site.
Also, they currently (august 2012) have free shipping over $50. I just ordered some and you can pay with paypal. I'm sure its basic UPS ground shipping or USPS parcel, but it's free...so no complaints. They don't have much else that I was really interested in from a miniature modeling/painting perspective, though.
I'm going to be casting some shoulder pads, a banner and probably some bases for my High Elves, IG, and probably everything else I ever do. If you're interested, pics of the shoulder pad and banner are in my gallery images.
And thanks to all of you guys! All of the tutorials, advice, suggestions, etc... so helpful. I'll try to take pics while I'm trying my first castings and post them up.
19148
Post by: Aerethan
The prices are fine, but they don't have 305 or 310.
305 is what I use for two side molds so that I have longer working time to get air out.
19931
Post by: BLACKHAND
Thanks for th info JWmarine, alway sgood to have another source for casting supplies!
56040
Post by: Basimpo
BLACKHAND wrote:I have said it before but it bears saying again, in a lot of cases it is cheaper and easier to buy from bitz sites than cast up weapons and the like.
The exceptions are personal sculpts and highly modified or rare weapons that you require in a large amount.
The cost in resin, silicone and more importantly TIME when totaled up will often equal or exceed what you will pay from a bits site.
That said there is nothing like pulling a perfect cast from your own mould
Kaptain Klaw - thanks for the tip on "4PU"!
Responding to the bold part...True, its some times EASIER to go the just buy it route, but then that defeats the purpose of the "fun", "art" and sense of accomplishment you get casting and moulding your own stuff.
As to how much it costs: If you set up several moulds to get ready to pour resin in to, youll see that you can make a wide variety extremely cheaply, less than a penny or so per bit. My local flgs sells their cheapest bits for 5 or so cents. Not to mention the 45 minute drive I have to take to get over there, and back.
Speaking of TIME, this always bugs me, but its a personal thing. I consider my free time like a salaried work position. It doesnt matter how many hours I put into "work", im still going to get "paid" the same. Work being how much time I put into playing with my plastic soldiers (that I love dearly) and paid being zilch! Its not like im calling in to my actual paid job and telling them I cant work today, because I have to cast 400 bolt guns, you know?
But, Let me try to expand on the spirit of what you are saying. I think moulding and casting is another side of the HOBBY of 40k. Its like painting, modelling, playing etc. If its not something you are willing to commit yourself to in the first place, why really go all out and spend big bucks buying the stuff you need just to make one bolt gun? Same goes for modelling, playing etc. If you dont like to make your guys absolutely perfect and awesomely place, then all you need is superglue to glue em to the prepackaged bases etc. Just my 2 cents.
19931
Post by: BLACKHAND
Thanks for Posting Basimpo, alway nice to have someone's opinion or advice on casting on the thread.
I do feel you may have missed my point a little, or perhaps taken my post out of context but I still get where you are going from.
I like to think this little corner of Dakka is somewhere that novice casters like myself can come to learn a bit of the craft and sometimes people stumble across thinking that casting might be the best way for them to get the 6 meltaguns they need for a list. My comment was my way of gently encouraging them to try a bitz site first
19148
Post by: Aerethan
The point you seem to have missed Basimpo, is not the silicone needed to make the FINAL molds, but all the silicone and resin spent on miscasts and failed mold designs while you learn what you are doing.
No one is going to make a perfect mold their very first time. That $23 set of Oomoo is the cost to TRY making molds. Then you buy another 2 or 3 sets of it while you work out kinks and think up new mold ideas. Then there is all that miscast resin. That stuff doesn't recycle back into liquid resin. So every miscast that can't be salvaged is money gone, with the only gain being another step of trial and error.
Then one day you decide you want more from casting, and take on a two part mold. That right there will be another $50 in rubber while you figure out what does and doesn't work for the exact SINGLE piece you are trying to make.
So, let's take a meltagun. That is a 2 part mold, if you want it done perfect, it's a single gun mold. So you spend $25-50 on rubber for the mold, accounting for failed molds which do happen as you learn that you needed another gate or vent in a spot that you can't easily add after the fact. Then another $25 in resin for the initial learning curve of this ONE ITEM. Then add in $.10 per cast for a syringe(if you are doing it right) assuming that it can't be cleaned(always estimate costs high rather than low), plus 2 plastic cups per mix(which adds up when it's 1 gun cast per syringe and 2 cups). Then you should generally be wearing rubber gloves whenever mixing rubber or resin, and those things don't last long.
Now factor in rubber and resin wasted during mixing because you weren't 100% sure how much to mix up. For resin you learn those numbers fast, especially with syringes. But for molds, it is VERY difficult to accurately predict the amount of rubber you need to mix up. I have a few molds with super thin walls because I didn't mix enough, then I have other molds with super thick walls because I mixed too much. For all that over mixing, it is money lost.
Do you see how the INITIAL cost adds up?
Now, you might think it all worth while IF you have both the money to spend on setup AND the spare time for it, all in the name of saving yourself a 45 minute drive and a few dollars on ebay. Or your might be spiteful against whatever company makes the piece and are recasting it just to stick it to the man(I've done this, not bashing it).
What Blackhand is trying to say, is that all this effort is easily worth it when the piece you are casting is an original that you want more of, as there is no real alternative to self casting other than sculpting a new one every time. And with originals, the cost can be much higher if you only have a single item that you want multiple times on a mold, such as bases. Then you need a master original, a master single mold, X number of PERFECT casts, then another mold with X slots for larger quantity casting. My single side base mold took me 2 molds. 2 part molds can take more.
In short, recasting for originals is pricey, but often mandatory for reproduction. For a piece you can buy premade, it is a waste of money and effort, unless you are pirating for the sake of pirating.
62373
Post by: JWMarines
For anyone who's used Smoothcast 300, what is the consistency of it when cure?
I'm still waiting for my casting supplies to make it here, but in the mean time I'm sculpting a few other things. One problem I'm going to have is that I have a bunch of static pose (1 piece body old marines) and metal terminators and elites and whatnot. So, would it be possible to cast flat iconography and then bend it to a shoulderpad or something like that?
19931
Post by: BLACKHAND
I havn't tried bending resin yet, I suppose you could heat it in boiled water and try to bend it but I would imagine that it would soften to the point of being easy to squish with hands or tools.
Might be worth trying to sculpt the detail onto a blank shoulderpad and casting that.
19148
Post by: Aerethan
Smooth Cast 300 when fully cured is very rigid, much more than GW resin or plastic. It won't bend easily or very far before breaking. I haven't tried heating it up to soften it, so no clue there.
For any parts that need to be straight I let them sit about 50% of the demold time extra to prevent parts from bending while being removed.
56040
Post by: Basimpo
 Aerethan wrote: Aerethan wrote:The point you seem to have missed Basimpo, is not the silicone needed to make the FINAL molds, but all the silicone and resin spent on miscasts and failed mold designs while you learn what you are doing.
No one is going to make a perfect mold their very first time. That $23 set of Oomoo is the cost to TRY making molds. Then you buy another 2 or 3 sets of it while you work out kinks and think up new mold ideas. Then there is all that miscast resin. That stuff doesn't recycle back into liquid resin. So every miscast that can't be salvaged is money gone, with the only gain being another step of trial and error.
Then one day you decide you want more from casting, and take on a two part mold. That right there will be another $50 in rubber while you figure out what does and doesn't work for the exact SINGLE piece you are trying to make.
So, let's take a meltagun. That is a 2 part mold, if you want it done perfect, it's a single gun mold. So you spend $25-50 on rubber for the mold, accounting for failed molds which do happen as you learn that you needed another gate or vent in a spot that you can't easily add after the fact. Then another $25 in resin for the initial learning curve of this ONE ITEM. Then add in $.10 per cast for a syringe(if you are doing it right) assuming that it can't be cleaned(always estimate costs high rather than low), plus 2 plastic cups per mix(which adds up when it's 1 gun cast per syringe and 2 cups). Then you should generally be wearing rubber gloves whenever mixing rubber or resin, and those things don't last long.
Now factor in rubber and resin wasted during mixing because you weren't 100% sure how much to mix up. For resin you learn those numbers fast, especially with syringes. But for molds, it is VERY difficult to accurately predict the amount of rubber you need to mix up. I have a few molds with super thin walls because I didn't mix enough, then I have other molds with super thick walls because I mixed too much. For all that over mixing, it is money lost.
Do you see how the INITIAL cost adds up?
Now, you might think it all worth while IF you have both the money to spend on setup AND the spare time for it, all in the name of saving yourself a 45 minute drive and a few dollars on ebay. Or your might be spiteful against whatever company makes the piece and are recasting it just to stick it to the man(I've done this, not bashing it).
What Blackhand is trying to say, is that all this effort is easily worth it when the piece you are casting is an original that you want more of, as there is no real alternative to self casting other than sculpting a new one every time. And with originals, the cost can be much higher if you only have a single item that you want multiple times on a mold, such as bases. Then you need a master original, a master single mold, X number of PERFECT casts, then another mold with X slots for larger quantity casting. My single side base mold took me 2 molds. 2 part molds can take more.
In short, recasting for originals is pricey, but often mandatory for reproduction. For a piece you can buy premade, it is a waste of money and effort, unless you are pirating for the sake of pirating.
Hopefully, anyone even remotely interested in molding and casting takes a look at a bitz site first, and realizes spending 50 bucks for the oomoo starter kit is a wee bit more than spending 25 cents apiece for meltaguns. Like I said, if you are going to mold and cast, and youve made it to page, what, 15(?) of this tutorial, then chances are casting is something you are seriously considering as a means to cut gaming costs, reproduce pieces that are no longer readily available etc.
Im not talking about the final molds of something, because in my opinion, if you really study what you are going to do, and then follow some adages that are common in every day life, every mold you make will be your final mold. For example:
Haste makes waste. Who here, as a "veteran" molder/caster has said the heck with it! And hurried and cut corners, and had several, if any molds and casts come out perfect? I sure havnt! If you take your time, every time, youll end up with a great mold that you can reuse. It just takes some forethought, and planning, and use the TIPS and ADVICE given on these tutorials.
On tips and advice, I can say take the best, leave the rest.
The only single sided molds I have ever made were bases. Ive found two-piece molds to be excellent at reproducing pieces accurately, without vacuum or pressure casting.
If you spent $25 bucks on a meltagun mold, you are doing something severely wrong. With the starter oomoo kit, when I first started molding and casting, I believe I got around 8 or so molds out of it. Considering that half of 50 bucks is 25 bucks, divided by 8, is around 3 bucks per mold. And remember, thats when I started molding, before I realized I dont need to make one side of the mold 3-5 inches thick
Let me reiterate: If you are spending $25 bucks for A Mold you are doing something wrong. Stop, reread the instructions, and ask for help!!!
Also, here is a HUGE HINT. Seriously, this is big! Take note of this!
When you make a mold, and are setting it in the clay etc getting ready to pour the mold stuff on it, do not, i repeat, do NOT make a vent!
Thats right ladies and gentlemen, if the number one reason a mold fails is because vents being wrong in the mold, then dont make the vent until after the mold is made!!
Since I learned of this on a youtube video, it gives you greater flexibility. After the rubber has set, you pick a place and cut a vent into the rubber mold, and only one. Then you test it, and cut another vent as needed. If you pressure cast, this is perfect because you usually only need one vent. One vent and you are golden.
What does one vent mean? It means the least amount of detail lost! If you try and map out before you even pour the rubber, where the vents go, you honestly have no clue where the air could get trapped. Thats the point of only cutting a single vent and testing it. After the cast piece cures, you pull it out and note the places that didnt develop. Recast it, if the same places have the same issue, cut ONE more vent as needed, and recast. Continue until it comes out perfect. Once again, this is all about preplanning. If you follow some peoples advice and do crazy stuff like place the flat of the feet on the bottom of the wall of the barrier, expecting to use the feet as pour holes, youll be sorely disappointed to find your feet are always deformed etc.
Lets really take a look at the costs. We'll go with oomoo, because thats what im familiar with. We will also use necron warriors, which for a box of 12 is $36.25. Lets take the oomoo starter kit, that costs what, around $70 bucks with shipping and handling? Ill add in the price and cost a pressure casting system later. Now lets add the cost of the little clear plastic cups for measuring resin: about 2 bucks for 100 (which, if you are careful, are actually reusable). Buy a bag of large clear plastic cups ($3?) for the rubber (if you read the directions, its measured out in equal amounts, so no numbers needed to measure how much, all you need to do is eye it to so part a and part b are equal). The syringes costing 10 cents a piece? Youre crazy. Listen, go to walmart and pickup the large clear syringe that costs about 2 bucks. Make sure it doesnt have a rubber stopper. I use two of them, one to get part A resin out of the container of the smoothcast 300 because its awful to pour, and a separate one to put the mixed resin into the molds themselves. Ive had the same 2 syringes for the past 8 months now Sure, the resin hardens after a few minutes in the syringe, but with a ball inflator tip, i push the hardened resin out of the tip and reuse the syringe Dont use those cheap little squeezie syringes Ok, so thats another 4 bucks. What else? Legos. Lets say you dont have legos. Ok, another $30 bucks (expensive, right?) And clay, $7 bucks.
So, altogether so far just to get started (unless you get smart and use something like tupperware containers instead of legos ) we are at 152.25ish right? Thats a lot, you say! Nah, not really. Whats that, a couple of landraiders? Really? Pleeease. Anyway. Now we'll start canceling that cost out, by casting, and see where we are.
Without a pressure caster, id do 3 warriors at once. So, lets say you take your time and spend an hour arranging them in the clay, building the lego walls etc. Then you mix and pour the rubber and wait 6 hours for it to cure. Flip it over, clean it off, and pour again. Another 6 hours. Its done. So, just on the mold of 3 warriors for example, youve spent 13 hours, and if you went wild on rubber, you spent 5 bucks on rubber (doubtful) (maybe 1 and half hours you were actively working with the mold). Ok, next you spend another 30 minutes cutting the vents, and then you spend the next hour (20 minutes a set time) to cast and revent the mold. So thats so far, 14 and half 15 hours, of which, youve spent lets say 3 total actively working on the mold. Lets also say you went wild with smoothcast at first and for your first few molds you used 50 cents of resin. Thats A LOT of resin to use, but heck youre new, how would you know? Now the serious stuff.
Every lets say 25 minutes, you can successfully cast 3 warriors. The extra 5 minutes is the time it takes for you to get up, go to your mold, demold, reset the mold and pour it and the 20 minutes is how long it takes to cure. Furthermore, lets say that you can get only 2 successful warriors and a partial each time. Ok, so, in an hour you can create 4 warriors. That means in 3ish hours, you can create 12 warriors. Guess what, you just took 36.25 off of your cost. You just paid yourself, in 18 hours, 36.25. Guess what, 152.25 divided by 36.25 is 4.2. 4.2 times 3 hours is 12.6 hours.
You know what that means? If you work for about 30 hours molding and casting (18 actually, because 12 of those you are chilling waiting for the rubber to cure) youll have paid yourself back the initial cost of starting to cast and mold. And have gotten yourself about 48 warriors in the process. Anything after that, is money in your wallet, you see?
Now for pressure casting, throw in another 130 bucks, take away some time from the actual casting time, take away from the setting up of the mold (in my experience, you only need 1 vent for pressure casting anything unless the mold is off itself) and everything you cast will come out as perfect as you molded it. So, instead of 2 warriors, youll be gettnig 3 etc. So in cost of 48 warriors and rubber etc, itll maybe be like 6 bucks.
Resin is sooo cheap to make a single model. I cant even figure in pennies how much each figure costs Ive just recently bought my 3rd set of the trial size of the smoothcast 300, and ive made hundreds of minatures, weapons, bitz, and vehicles so far And rubberwise, once again, if you are spending 25 bucks a mold, you are doing it wrong.
Once you pay yourself back in cost, you are then spending pennies or less per cast. 36.25, 12 warriors, in 3 hours? Guess what, in cost of resin AFTER youve paid youself back for the initial startup, i bet you wont break 25 cents.
Now tell me, want to buy a meltagun for 25 cents, or, 12 meltagun wielding space marines for 25 cents? Which would you prefer?
19931
Post by: BLACKHAND
Again I think your missing our point, disregarding Aerethan's extreme examples, you still pay far more to cast a model than to buy it.
The idea that you will be able to make a single mould for a necron warrior with all it's undercuts and thin arms and legs is pretty hard to believe... have you actually done this in real life?
I would imagine that even with the method that you describe of cutting vents after you pour the mould you will still get multiple miscasts, even with your $130 pressure casting kit( btw a link to a pressure casting kit that costs $130 on ebay or online would be very much appreciated I am sure), and your claim that you have cast hundreds of minis, weapons and bits from a couple of trial kits of smoothcast is fairly hard to believe as well, is there a chance you are exaggerating for effect there?
I think maybe the disagreement comes down to the value we are putting on our time. With two kids under 5 and a wife who enjoys spending time with me I treasure my modelling time a lot, and while I am not a doctor or lawyer I still feel an hour of my labour to be worth more than a few pennies!
In the end a multiple post argument about how much a person can cast out of x amount of y product is fairly pointless as my initial post was merely a way to discourage people from buying a landraider's worth of resin and silicone to cast up a couple of meltaguns when there is a much faster and easier way to get them!
Cheers,
BLACKHAND
62373
Post by: JWMarines
 BLACKHAND wrote: BLACKHAND wrote:I havn't tried bending resin yet, I suppose you could heat it in boiled water and try to bend it but I would imagine that it would soften to the point of being easy to squish with hands or tools.
Might be worth trying to sculpt the detail onto a blank shoulderpad and casting that.
I actually have 2 variations of the iconography I need sculpted onto blank shoulderpads now. I'm just trying to find a solution for my terminators and other models that don't have separate pieces for their shoulderpads. (My terminators are the old metal ones)
56040
Post by: Basimpo
I agree. I too have 2 kids under 5 (both girls, one is 3 and the other is turning 2 at the beginning of september) furthermore, not only am I married, but shes pregnant too. You know what that means! lol anyway, my wife hates me molding and casting, so everytime I complete a project, I gleefully show it to her and say see! This is $x.xxx dollars right here! And I only spent a few cents! Hee hee! lol.
As for the link to the $130 dollar pressure casting system on ebay? I never said You can buy the kit for 130 dollars. I said, throw in 130 bucks.
I got my paint pot pressure tank from harbor freight for I think 82 bucks, I had an air compressor from buying a airbrush kit, but, I was dissatisfied with how fast it pressurized my tank, so I went to walmart and bought a larger air compressor on sale for 40-50 bucks. (50+80=130). The connectors wont match up so I went to home depot and spent maybe, maybe 3 bucks to buy the right brass connectors and plumbers tape to set it up. So, depending on current costs, it shouldnt run you more than 150 maybe? But yeah, sorry, I did it the old fashioned way
Oh, did I mention I too, am neither a doctor nor a lawyer?
Furthermore, Blackhand, check your private messages here in a bit, I took some pictures of some of my stuff and im sending you the links for em in your message inbox.
12271
Post by: JB
JWMarines wrote:For anyone who's used Smoothcast 300, what is the consistency of it when cure?
I'm still waiting for my casting supplies to make it here, but in the mean time I'm sculpting a few other things. One problem I'm going to have is that I have a bunch of static pose (1 piece body old marines) and metal terminators and elites and whatnot. So, would it be possible to cast flat iconography and then bend it to a shoulderpad or something like that?
I would do this with green stuff molds similar to the way I made sergeants' stripes for five of my IG veterans.
Practice a bit to figure out how to get the green stuff thin enough and avoid distorting the cast by stretching it before the cast has cured.
56040
Post by: Basimpo
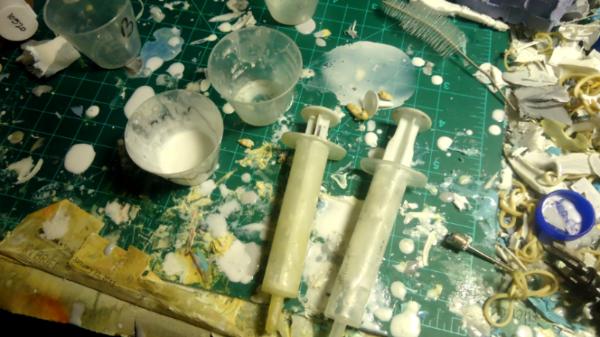
This picture will take some explaining. These are the syringes I mentioned. The one thats yellowed on the left is the syringe for part A of the resin, the syringe on the right is the one i use to "pour" the mixed resin into the molds. Notice to the right (and by accident lol) there is a handy dandy basketball air pump tip thing? Thats what i use to get the hardened resin out of the syringe. If you look inbetween the top of the two syringes, youll see a golf tee looking thing. Thats what comes out of the resin syringe after it hardens. Next youll see there are several small medicine cups on the table. Although you cant see it, there a five. 2 are marked B (you can see only one marked B), two arnt marked at all (theyre for A) and 1 looks like it has hardened resin in it. When I do multiple molds at once, I prestage my stuff. Ive found that 7.5 ccs is plenty to mix and handle at once. So, what I do is in both A's and B's i pour 7.5 ccs of the resin into each. Then, when im ready to mix, i use the first a and b, and pour it into the hardened resin cup, mix it, suck it up into the resin syringe and then "pour" it, place it into the pressure tank, if my syringe is empty after however many i did, and i still have molds to go (ive got this down pretty exact so, i wouldnt set out 2x7.5ccs of each part if i didnt think id use it) i mix the second two parts into the same container, and repeat. I then quickly shut the tank, lock it up and start the aircompressor, also preset to where it needs to be. After about 2 minutes I clean out the syringe, and leave my garage cause its loud as heck in there. 20 minutes later I come back and setup again.
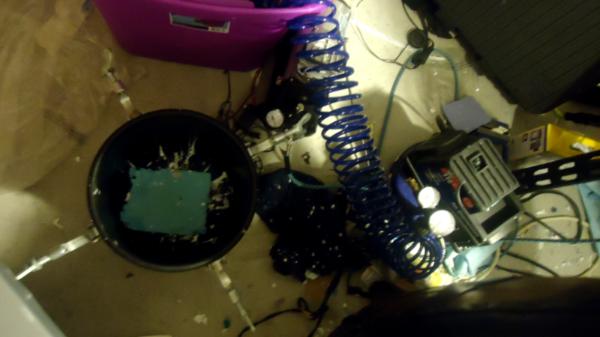
Top down view of my pressure casting system. The thing with the dials on the right is the aircompressor, the spiral hose things leads to the lid off the picture, and the thing with the mold looking thing in the bottom is the tank its self.
Blackhand suggested I post a couple of pics of my setup, he may or may not suggest for me to post more pics, and these are ones taken directly from the message I sent him. If you have any questions, let me know
62373
Post by: JWMarines
Finally got my casting supplies... took forever. Price was right, though.
So... and now the results of my first molds and castings.
Molds: as I was waiting more days than I wanted to get my supplies, I sculpted a few more shoulder pads. I had 3 Doom Eagle icon variants, and 1 each of the troop designation shoulder pads. I didn't have any legos handy, but I did have these plastic container type things. I don't remember exactly where they came from, but in GW packages they have some of these types of things. The long and flat one I cut from the packaging of a set of dremel drill bits. I found that these worked fantastically, and are reusable. They are small, so I'm not sure about durability, but I think they are pretty darn solid at this point. All I did was use some PVA on the bottoms to attach the masters. Then I did the "pour from as high as you can into the corner so the air bubbles are forced to break and you get a better mold" technique. It seemed to work well. Without further adeu...

I failed at the first casting attempt. I tried to pour both into one container strait from the container they come in... very messy and I lost pot time trying not to get it everywhere. So, the result was nearly hardened resin before I had even gotten to the last mold... only got the sculpted top for a WHFB square base out of that mess...
My Second attempt worked much better. I poured part A of my smoothcast 300 into a cup and part B into another, then just mixed into one of them... I tried to get too slick with the first batch and screwed myself. Lesson learned. I'm thinking about transferring the Part A and B into their own squeeze bottles (think those red and yellow squeeze bottles that you can put ketchup and mustard in with the small tip). You can get clear ones at Walmart in the states for $1 each. Not sure if the plastic they are made of, being really cheap, will be degraded or affect the resin components or not.... gonna test it one of these days with a small amount of each part in its own bottle.
Anyway... here's the product of my second casting attempt. I ended up with a pretty good result, the only real problem one is one of the eagle pads. part of the skull had a bubble on it.
Here they are:
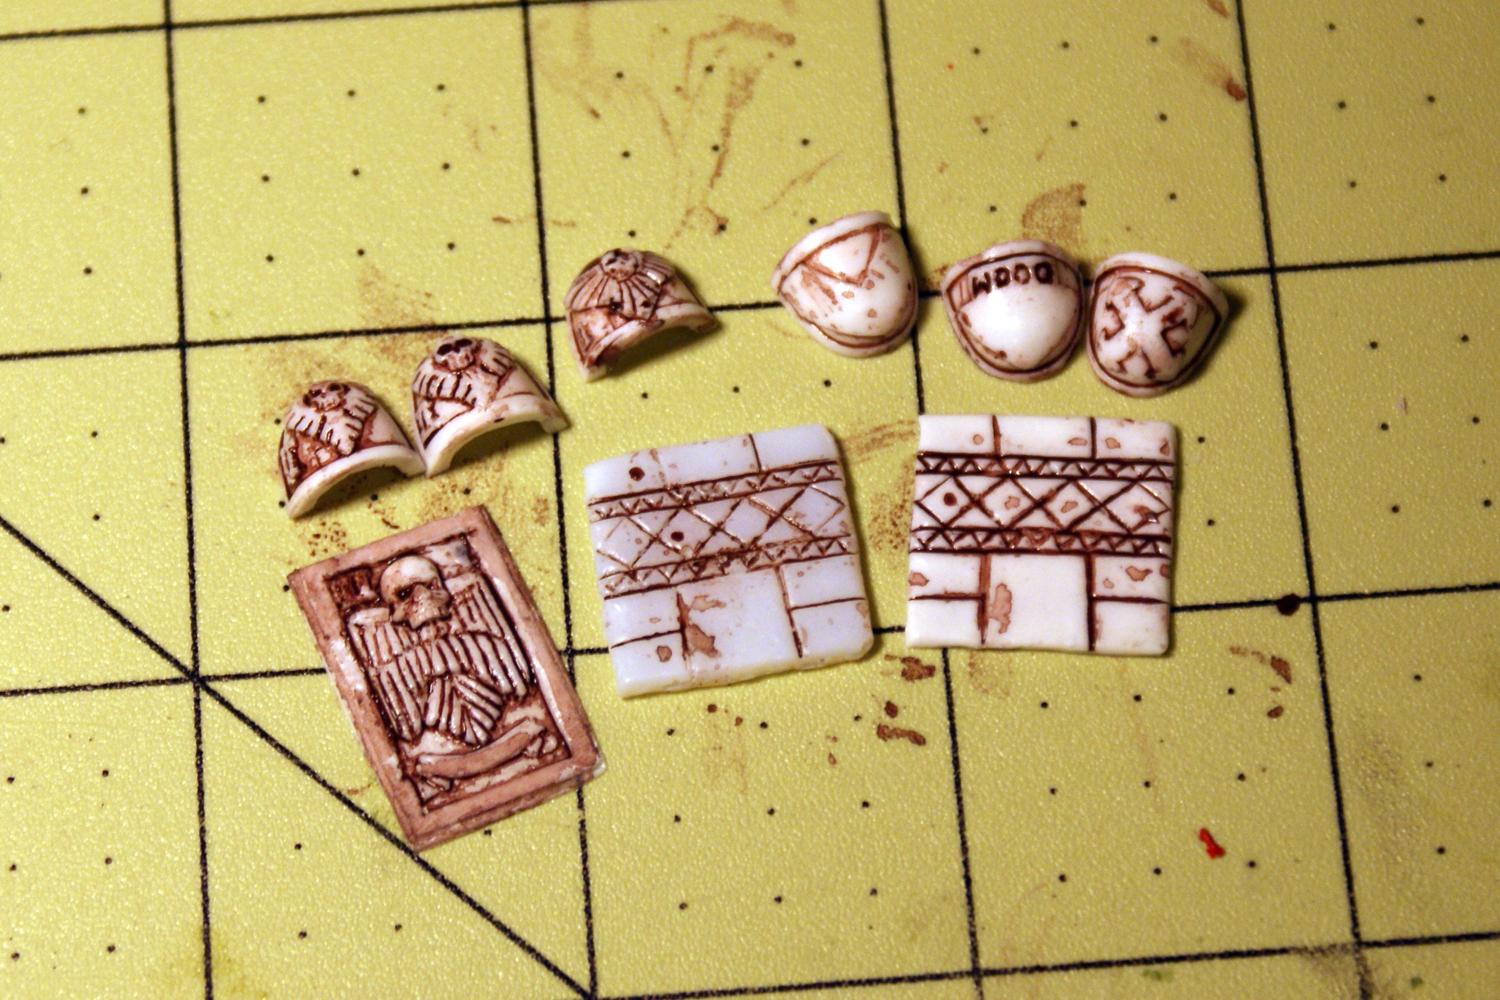
Thanks again to all you guys, I picked up a ton of tips from you all.
Now to cast a WHOLE bunch more shoulder pads...
19931
Post by: BLACKHAND
Looking good JWMarines, I like the idea of squeeze bottles for the two parts of the resin, would definitely make it easier to pour smaller batches of resin.
Good luck with the rest of your casts, I know how tedious it can be to cast shoulderpad after shoulderpad!
56040
Post by: Basimpo
Looks excellent! Drop those in some simple green, and youre good to go!
Oh, you arnt trying to spray mold release into them, are you?
19148
Post by: Aerethan
Mold release or talc are not suggested for the shoulder pad molds as it would all settle in the bottom and give miscasts.
Honestly, release agents and such are only really needed for two part molds where air escape and undercuts are an issue.
The shoulders are small enough that miscasts aren't a huge loss of resin, and the plate molds can have bubbles picked out of them after resin is poured if you use a slower cure resin.
I might have to commission someone to sculpt me some Red Hunters pads since getting the decals for them seems to be difficult.
56040
Post by: Basimpo
With the smoothcast/oomoo stuff you do not need mold release agents of any kind, whatsoever. The liquid actually takes the place of where the resin could be, causing a greater number of miscasts (As Aerethan indicated )
62373
Post by: JWMarines
yeah, I'm not using mold release. Second successful casting came out great, so I confirmed that all of the details are there in the molds.
19148
Post by: Aerethan
Mold release itself is useful for rather specific things, like urethane rubbers and such.
As said, if you are using Smooth Cast and Oomoo then you won't need a release.
Talcum powder is used to help the resin flow into small areas and break up some surface tension so that bubbles move away from the corners and such. You only need very little of it though.
And as always, you should rinse parts with degreasing detergent like dish soap before priming and painting. But that is true of pretty much every model.
56040
Post by: Basimpo
You guys got me all excited about molding and casting again, so I set up another lego blocks box, clay, and the item I want molded. Sprayed it, yada yada. Open my containers of oomoo, and the pink stuff has almost solidified. The blue stuff was extremely, extremely liquid like. I mixed em together based on volume, and tried pouring it, and it came out like...A cross between oatmeal, molasses and mud. It didnt pour at all, just clumped out. Looks like im out the 180 bucks I spent on the gallon or so containers :/
19931
Post by: BLACKHAND
Jeez, you bought gallons? I usually go for the 500mls at max!
I guess this is a good warning to everyone about an issue we haven't touched on,
THESE PRODUCTS DO HAVE A SHELF LIFE,
if you are unsure that you will get through the amount that you are buying ask the retailer how long it will last.
56040
Post by: Basimpo
Thats the thing, its shelf life is waaaay under what I would ever think it to be. I bought em in march!
19931
Post by: BLACKHAND
Basimpo wrote:Thats the thing, its shelf life is waaaay under what I would ever think it to be. I bought em in march!
Then that is strange, I know that resin compounds can go off due to exposure to moist air but the silicone should last longer than that, I would contact your retailer.
26386
Post by: hungryp
BLACKHAND wrote:
Then that is strange, I know that resin compounds can go off due to exposure to moist air but the silicone should last longer than that, I would contact your retailer.
I've actually had the opposite problem; my silicone components hardened up, but my reallllly old resin is still viable. As for talc, I've found it helpful for getting into the odd little details that the resin may sometimes not want to slip into, such as corners and narrow points. I blow out all but the finest of dust though, because yes, it will create its own problems if there's too much.
Glad to see some life in this thread...even if it did get a little heated
19931
Post by: BLACKHAND
 hungryp wrote: hungryp wrote:Glad to see some life in this thread...even if it did get a little heated
Funnily enough it was quite polite behind the scenes in PM Land, I suppose looking back on the posts it does seem fairly heated
Main thing is that people are giving suggestions and advice on casting!
19148
Post by: Aerethan
Now I have to go back and re read the entire thread. I don't remember it being heated at all, but then again this thread has been around for a while now so I may have forgotten.
At the end of the day I'd like to think that something constructive came out of it all.
26386
Post by: hungryp
Lol, just the last page or so, with the debate on whether it's better to cast or buy bits. Not like anybody's mothers got called anything unsavoury or anything
19148
Post by: Aerethan
Ah yes, well the point remains that for people who don't already know how to do this stuff, it is rather cost prohibitive in 99% of cases.
There isn't really a cheap way to get to the point where your molds and casts are perfect.
26386
Post by: hungryp
It's true. Fortunately we have threads like this to help ease the pain. (I really gotta lay off the winks!)
43932
Post by: jjrb
So would i go about the same way for casting IG legs for my steel legion as you did for the shoulderpads 
19148
Post by: Aerethan
jjrb wrote: So would i go about the same way for casting IG legs for my steel legion as you did for the shoulderpads
are you asking about casting the GW legs?
43932
Post by: jjrb
yes i made some sculpts of the bottom part of the trench coat onto some cadian legs so i could have kneeling legs
Thanks.
19931
Post by: BLACKHAND
You may be able to get away with casting them in that way but a two part mould would be a more sure way of getting consistent results.
Aerethan's question was due to the fact that we don't really advocate casting GW models.
43932
Post by: jjrb
Alright thank you
19148
Post by: Aerethan
Fun fact that I just learned:
Oomoo 25 sets too quickly for you to apply a brushed on layer with the same batch you use for the body of the mold. If you want to brush on a layer first to make sure there are no surface bubbles, mix a small batch just for that.
Hopefully I salvaged this mold I just poured, I'll find out tomorrow if it worked.
48377
Post by: spudkins
This is some awesome things all around.
Subbed
Spud 11th Legion
19931
Post by: BLACKHAND
@Spudkins - Thanks!
@Aerethan - How did your mould recovery go?
19148
Post by: Aerethan
It worked well enough. A little too much Part B, so the mold is rather soft but I made it thick enough to not tear. Most importantly is that the casts come out pretty decently.
I've finally also started to dust my molds with talc and that has improved casts in 2 part molds significantly. I haven't tried using my Mold Release 200 yet.
19931
Post by: BLACKHAND
I have always found Talc to be easier to get a thin even coating with as you can tap the mould upside down to rid it of excess where mould release often pools at the bottom, TBH though I haven' t used mould release in around 7-8 years so my memory might be getting a little hazy.... all those resin fumes!
45990
Post by: gilljoy
Has anyone used here?
www.mbfg.co.uk
They're just down the road from me so I'm thinking of picking up some stuff to make some resin bases for my army. Trying to avoid picking stuff up online as the postage from mainland uk to here is quite pricey.
Speaking of which, do Silicon molds break down over time? I know the deteriorate through use but I'll probably be only casting very occasionally for my bases as and when required and don't want the mold to go "off" so to say in the months where its not being used.
19148
Post by: Aerethan
I've got a few molds that are a good few years old and they work just fine. They may discolor from use as the resin reacts slightly with the rubber, but it shouldn't loose it's elasticity just from sitting on the shelf.
For long term storage however, you should have the molds powdered with talc and stored in a dark cool area. Leaving them in the sun(they have sunshine in Belfast right?) could possibly mess with them.
45990
Post by: gilljoy
 Aerethan wrote: Aerethan wrote:I've got a few molds that are a good few years old and they work just fine. They may discolor from use as the resin reacts slightly with the rubber, but it shouldn't loose it's elasticity just from sitting on the shelf.
For long term storage however, you should have the molds powdered with talc and stored in a dark cool area. Leaving them in the sun(they have sunshine in Belfast right?) could possibly mess with them.
We do occasional see some a strange ball of light in the sky when its not overcast, not sure what this Sunshine thing is.
Cheers for the advice
61752
Post by: Wagguy80
I like to use a more slow curing rubber for my molds. Since the resin bits cast quickly but molds last a long time no need to rush.
I'll typically use a rubber with at a least a 4 hour cure time and I won't cast for at least 12 hours after curing.
Anyway Once I pour the rubber I go do some laundry, and set the mold on the lid. The vibrations from the dryer vibrates the mold, and releases all the air bubbles which come to the surface.
I've never gotten a bad mold with this technique. It also came as a tip from someone who works at forgeworld although I think they have a special vibrating table which is much more hi-tech than my laundry dryer. lol.
Truth is while pressure casting, and vacuuming rubber, and resin gets the best results. The cost of equipment, part size limitations, and added time only exacerbate the process.
I've found I try to use resins that don't have insanely short cure times. Sure we all want the parts now but the cast results from a 30 - 45 minute cure resin are vastly improved over a 15 minute cure resin. Also I use a spray in mold release even when no necessary. A lot of people try to avoid this as it add's "cost" however it also works to help eliminate bubbles in the surface of the mold. So the $10 spray can will last for 100's of casts, and will cause less miss-casts = savings. It also extends the molds life which = more savings.
It's pretty much a $100 process to figure out how to cast anything beyond bases, or basic large pieces.
I use Smooth-On rubber and resin I find it so far to be the best I've used personally.
19148
Post by: Aerethan
Agreed. Right now I use 30 minute set resin (Smooth Cast 305 iirc) which I let sit for about 35 minutes before I demold it. I went with longer cure time because it meant longer working time, which when you are trying to fill 8-10 molds in a batch is much needed.
Oomoo has about a 6 hour cure iirc but I let them sit until the next day before use, mostly because I make them at night so that they cure while I'm sleeping.
Pressure casting and vacuum chambers are really only worth the investment if you intend to mass produce and sell. For my projects it's much cheaper to just use LGS or putty to fill in any micro bubbles.
I like the idea of putting new molds on a washer or dryer to agitate bubbles out.
2726
Post by: J'santai Khan
WOW!!! I just learned more reading through this than I did my entire senior year of high school!! LOL!! That being said, have any of you had any experience with large scale resin casting? I'm talking 'ol school Armorcast style stuff. I have sculpted a Mycetic Spore for my 'nids and I want to cast a whole bunch of them. I realize that the basic premise is the same, but I'm wondering if there are better products for this scale than the ones that are being used to do the 'flat' and small scale casting??? Thanks and I'll definitely post my results, once I get to it!
39783
Post by: theunicorn
J'santai, I am sending you a PM that might help
19931
Post by: BLACKHAND
@J'santai - Thanks for posting, I am really glad that the accumulated knowledge here is of help It's been so cool to have people post up their tips and advice for everyone to benefit from. The fact that many of them like Aerethan and theunicorn obviously continue to monitor the thread and offer help is a real credit to Dakka and it's users. As for large scale casting I am afraid I am no real help but hopefully the info that Theunicorn has sent is.
@theunicorn - Thanks!
56040
Post by: Basimpo
Ill pm you too
19931
Post by: BLACKHAND
You guys might have already seen this thread but I thought I had to link to it
http://www.dakkadakka.com/dakkaforum/posts/list/554272.page;jsessionid=428DA9A901B5A819DA85CFCC406DC1F9
A fantastic Step by step of a dragon sculpt but the real gem is the video on the spincasting process, a must watch for all you guys who want to try their hand at casting their own sculpts
Cheers,
BLACKHAND
56040
Post by: Basimpo
Thats pretty awesome! I need to get a rig like that! Wow! Thanks Blackhand!
62353
Post by: foto69man
Just bought some Lego pieces, EasyCast Resin, OOMOO 30 Rubber.............once it arrives, the games will begin. 
Probably start small, learn by doing custom bases and shoulder pads and work my way up from there. I'll take pictures and contribute as much as I can to this thread.
Thanks for inspiring me guys!
19148
Post by: Aerethan
foto69man wrote:Just bought some Lego pieces, EasyCast Resin, OOMOO 30 Rubber.............once it arrives, the games will begin.
Probably start small, learn by doing custom bases and shoulder pads and work my way up from there. I'll take pictures and contribute as much as I can to this thread.
Thanks for inspiring me guys!
Is EasyCast the clear stuff at Michaels? I have some of it but it didn't set right when I tried it out, was all rubbery.
62373
Post by: JWMarines
 Aerethan wrote: Aerethan wrote:foto69man wrote:Just bought some Lego pieces, EasyCast Resin, OOMOO 30 Rubber.............once it arrives, the games will begin.
Probably start small, learn by doing custom bases and shoulder pads and work my way up from there. I'll take pictures and contribute as much as I can to this thread.
Thanks for inspiring me guys!
Is EasyCast the clear stuff at Michaels? I have some of it but it didn't set right when I tried it out, was all rubbery.
Yeah I've got some of that too. I haven't even used it yet, but I was thinking about trying it out to make medallions with some large hornets I picked up after taking out their nest.
19931
Post by: BLACKHAND
Easycast clear can be tricky, got to stick to the ratio very closely. Some of the pieces I cast with it was hard on the outside but still soft on the inside.
Would be nice to find a 1:1 clear resin , much simpler.
62373
Post by: JWMarines
BLACKHAND wrote:Easycast clear can be tricky, got to stick to the ratio very closely. Some of the pieces I cast with it was hard on the outside but still soft on the inside.
Would be nice to find a 1:1 clear resin , much simpler.
http://www.michaels.com/Castin'-Craft-Clear-Casting-Resin-with-Catalyst/gc1703,default,pd.html
That's what I've got. It's 1:1. Maybe there's a different item/brand with the same name in NZ?
19148
Post by: Aerethan
Nope, that's the stuff I'm talking about. It's 1:1, but that damn well better be a NASA precision mix, otherwise you end up with slightly yellowed casts that are similar in feel to Reaper Bones plastic. Very soft.
56040
Post by: Basimpo
BLACKHAND wrote:Easycast clear can be tricky, got to stick to the ratio very closely. Some of the pieces I cast with it was hard on the outside but still soft on the inside.
Would be nice to find a 1:1 clear resin , much simpler.
Smooth-cast 326 is AMAZING. Its changed my casting life forever. It has a long pot life, which helps me not only cast multiple molds, but put them in the pressure pot and pressurize it in time to actually make a difference. Its a very forgiving 1:1 ratio clear resin. Ive dyed it transparent red (got the color for making motorcycle tailights) and opaque black. Ive recently found if you dont add enough black dye (I just reused the container I measure the ratios in) it tints it, so I have some black tinted clear pieces. Otherwise it comes out, as they say in arabic, clear as the sun.
19148
Post by: Aerethan
I prefer Smooth Cast 300 and 305(the longer set time).
The 5 minute demold is nice for bases and small parts, the 30 minute set is nice for doing larger pieces or more molds at once. I really need to get a degassing setup going.
56040
Post by: Basimpo
Hes looking for clear resin Aerethan.
Automatically Appended Next Post:
They were out of 305, thats how I wound up and fell in love with 326
Automatically Appended Next Post:
Oh if you vacuum chamber resin, it, like goes insane and makes one hell of a mess.
19148
Post by: Aerethan
Ah, my only experience with clear is that easy cast stuff.
Would a pressure cast setup be better for casting? mostly same equipment besides the pump.
56040
Post by: Basimpo
I use the same thing for my vacuum chamber/pressure pot. Saves money, and you need an air compressor instead of a vacuum pump, and dont go cheap and get a pancake 2 1/2 gal air compressor, get atleast a 10 gallon compressor. The longer it takes for your tank to fill, the more likely air bubbles will form.
62353
Post by: foto69man
So.......................I finally got around to making/trying a mold.

Lessons learned so far:
1. Don't make your mold too big dummy... 
2. Making your mold too big means you only had enough materials for one side of the mold... 
3. Always assume your not mixing enough rubber...trying to repour and stir more is a royal pain
4. You can never have enough legos
That's about it for now. I have to get more rubber now, and then tomorrow I will wait and see how this half of the mold looks
19148
Post by: Aerethan
I always try to mix less than I think I'll need. As long as the surfaces get covered the first time, you can always add more rubber to bulk up the back of the mold.
But yes, that is a very large mold you made there!
Luckily I have 2 sons, so legos are in no short supply around here!
62353
Post by: foto69man
Aerethan wrote:I always try to mix less than I think I'll need. As long as the surfaces get covered the first time, you can always add more rubber to bulk up the back of the mold.
But yes, that is a very large mold you made there!
Luckily I have 2 sons, so legos are in no short supply around here!
Well I am stationed in Turkey, so I will have to see if I can find more of the OOMMOO 30 here. Last time I sent it to families house in the states and they mailed it on to me. Until then, well...only half the mold will be made
19931
Post by: BLACKHAND
Lol, gotta love trial and error! I'll Second Aerethan's comment, I always try to pour a thin layer over the entire object I am making a mould of then back fill later as needed.
Another way of gauging the amount of rubber needed is to make the casting box with the master inside it then fill it with water. Simply pour the water into a measuring cup ( or your actual mixing cup) and you will know roughly how much rubber you will need to mix.
62353
Post by: foto69man
Yes, definitely trial and error. So, woke up this morning and the mold was set!!!!!!!!!!!!  
Start to take it apart and then realize my next few errors lol:
1. I didn't have the clay covering the whole bottom so some rubber came back in on itself...
2. I am thinking I am using the wrong clay, or is that how it is for everyone? (See photos below for what i'm talking bout)
On a positive note, it's amazing/awesome the level of detail. Peel/scooping off clay and seeing the detail was like opening a treasure chest. Definitely will keep doing this just for the fun factor alone. Any thoghts on the proper clay or what to use as the bottom of the mold when making a two parter?


19148
Post by: Aerethan
You should be using Plasticine clay. It's non drying, but shouldn't stick like that.
You definitely need to do several smaller molds. Trying to cast in that thing without bubbles would be massive luck.
84345
Post by: Nitrous
Actually, plasticine clay usually contains suphur. Sulphur inhibits most molding compounds.
There is "plasticine-like" modelling clay that is sulphur free.
Bottom line: don't use Plasticine.
Here is a wiki entry that gives some brand name sulphur free clays.
http://fx.wikia.com/wiki/Clay
19931
Post by: BLACKHAND
Cool, thnks for the tip Nitrous
84345
Post by: Nitrous
NP
19148
Post by: Aerethan
Nitrous wrote:Actually, plasticine clay usually contains suphur. Sulphur inhibits most molding compounds.
There is "plasticine-like" modelling clay that is sulphur free.
Bottom line: don't use Plasticine.
Here is a wiki entry that gives some brand name sulphur free clays.
http://fx.wikia.com/wiki/Clay
This is correct and is a detail I had forgotten(been forever since I've made a mold or had to buy clay).
Thank you for the reminder!
62749
Post by: Dr H
I have, however, had no problems with using Newplast Plasticine with a platinum-catalysed RTV silicone.
So that plasticine appears sulphur-free. 
84420
Post by: AliceK
I never had good results with Plasticine. You need a polymer clay for the best results. Well its always worked for me.
54829
Post by: Cuchulain
I was just wondering if full-sized models work okay or if there is a problem with bubble forming and the like. I hate buying from GW and try to get as much stuff as I can from Ebay.
19148
Post by: Aerethan
 Cuchulain wrote: Cuchulain wrote:I was just wondering if full-sized models work okay or if there is a problem with bubble forming and the like. I hate buying from GW and try to get as much stuff as I can from Ebay.
1. We are not here to give information on recasting GW models.
2. Casting any full model depends entirely only the sculpt and undercuts. Some models are perfectly fine to cast as single pieces due to static poses and fairly simple details, others will require multiple parts to be broken down and cast separately.
3. The bigger the item to be cast, the more chance of bubbles there will be. Pressure casting is the best way to avoid this.
19931
Post by: BLACKHAND
The same advice I have given a lot on this thread applies here as well....
..I most cases it is cheaper to buy bits or whole kits than casting your own. Casting is best for reproducing your own original sculpts.
|
|