| Author |
Message |
 |
|
|
|
|
Advert
|
Forum adverts like this one are shown to any user who is not logged in. Join us by filling out a tiny 3 field form and you will get your own, free, dakka user account which gives a good range of benefits to you:
- No adverts like this in the forums anymore.
- Times and dates in your local timezone.
- Full tracking of what you have read so you can skip to your first unread post, easily see what has changed since you last logged in, and easily see what is new at a glance.
- Email notifications for threads you want to watch closely.
- Being a part of the oldest wargaming community on the net.
If you are already a member then feel free to login now. |
|
 |
2012/08/18 21:46:06
Subject: BLACKHAND'S General Casting Tutorial
|
|

Nurgle Chosen Marine on a Palanquin
|
I havn't tried bending resin yet, I suppose you could heat it in boiled water and try to bend it but I would imagine that it would soften to the point of being easy to squish with hands or tools.
Might be worth trying to sculpt the detail onto a blank shoulderpad and casting that.
|
 BobtheInquisitor wrote: BobtheInquisitor wrote:I tend to glue metal models with a combination of BSI cyanoacrylate and my tears of frustration.
|
|
|
 |
|
2012/08/19 03:53:18
Subject: BLACKHAND'S General Casting Tutorial
|
|

Excellent Exalted Champion of Chaos
Lake Forest, California, South Orange County
|
Smooth Cast 300 when fully cured is very rigid, much more than GW resin or plastic. It won't bend easily or very far before breaking. I haven't tried heating it up to soften it, so no clue there.
For any parts that need to be straight I let them sit about 50% of the demold time extra to prevent parts from bending while being removed.
|
"Bryan always said that if the studio ever had to mix with the manufacturing and sales part of the business it would destroy the studio. And I have to say – he wasn’t wrong there! ... It’s become the promotions department of a toy company." -- Rick Priestly
 |
|
|
|
|
2012/08/19 04:30:31
Subject: BLACKHAND'S General Casting Tutorial
|
|
Dakka Veteran
|
 Aerethan wrote: Aerethan wrote:The point you seem to have missed Basimpo, is not the silicone needed to make the FINAL molds, but all the silicone and resin spent on miscasts and failed mold designs while you learn what you are doing.
No one is going to make a perfect mold their very first time. That $23 set of Oomoo is the cost to TRY making molds. Then you buy another 2 or 3 sets of it while you work out kinks and think up new mold ideas. Then there is all that miscast resin. That stuff doesn't recycle back into liquid resin. So every miscast that can't be salvaged is money gone, with the only gain being another step of trial and error.
Then one day you decide you want more from casting, and take on a two part mold. That right there will be another $50 in rubber while you figure out what does and doesn't work for the exact SINGLE piece you are trying to make.
So, let's take a meltagun. That is a 2 part mold, if you want it done perfect, it's a single gun mold. So you spend $25-50 on rubber for the mold, accounting for failed molds which do happen as you learn that you needed another gate or vent in a spot that you can't easily add after the fact. Then another $25 in resin for the initial learning curve of this ONE ITEM. Then add in $.10 per cast for a syringe(if you are doing it right) assuming that it can't be cleaned(always estimate costs high rather than low), plus 2 plastic cups per mix(which adds up when it's 1 gun cast per syringe and 2 cups). Then you should generally be wearing rubber gloves whenever mixing rubber or resin, and those things don't last long.
Now factor in rubber and resin wasted during mixing because you weren't 100% sure how much to mix up. For resin you learn those numbers fast, especially with syringes. But for molds, it is VERY difficult to accurately predict the amount of rubber you need to mix up. I have a few molds with super thin walls because I didn't mix enough, then I have other molds with super thick walls because I mixed too much. For all that over mixing, it is money lost.
Do you see how the INITIAL cost adds up?
Now, you might think it all worth while IF you have both the money to spend on setup AND the spare time for it, all in the name of saving yourself a 45 minute drive and a few dollars on ebay. Or your might be spiteful against whatever company makes the piece and are recasting it just to stick it to the man(I've done this, not bashing it).
What Blackhand is trying to say, is that all this effort is easily worth it when the piece you are casting is an original that you want more of, as there is no real alternative to self casting other than sculpting a new one every time. And with originals, the cost can be much higher if you only have a single item that you want multiple times on a mold, such as bases. Then you need a master original, a master single mold, X number of PERFECT casts, then another mold with X slots for larger quantity casting. My single side base mold took me 2 molds. 2 part molds can take more.
In short, recasting for originals is pricey, but often mandatory for reproduction. For a piece you can buy premade, it is a waste of money and effort, unless you are pirating for the sake of pirating.
Hopefully, anyone even remotely interested in molding and casting takes a look at a bitz site first, and realizes spending 50 bucks for the oomoo starter kit is a wee bit more than spending 25 cents apiece for meltaguns. Like I said, if you are going to mold and cast, and youve made it to page, what, 15(?) of this tutorial, then chances are casting is something you are seriously considering as a means to cut gaming costs, reproduce pieces that are no longer readily available etc.
Im not talking about the final molds of something, because in my opinion, if you really study what you are going to do, and then follow some adages that are common in every day life, every mold you make will be your final mold. For example:
Haste makes waste. Who here, as a "veteran" molder/caster has said the heck with it! And hurried and cut corners, and had several, if any molds and casts come out perfect? I sure havnt! If you take your time, every time, youll end up with a great mold that you can reuse. It just takes some forethought, and planning, and use the TIPS and ADVICE given on these tutorials.
On tips and advice, I can say take the best, leave the rest.
The only single sided molds I have ever made were bases. Ive found two-piece molds to be excellent at reproducing pieces accurately, without vacuum or pressure casting.
If you spent $25 bucks on a meltagun mold, you are doing something severely wrong. With the starter oomoo kit, when I first started molding and casting, I believe I got around 8 or so molds out of it. Considering that half of 50 bucks is 25 bucks, divided by 8, is around 3 bucks per mold. And remember, thats when I started molding, before I realized I dont need to make one side of the mold 3-5 inches thick 
Let me reiterate: If you are spending $25 bucks for A Mold you are doing something wrong. Stop, reread the instructions, and ask for help!!!
Also, here is a HUGE HINT. Seriously, this is big! Take note of this!
When you make a mold, and are setting it in the clay etc getting ready to pour the mold stuff on it, do not, i repeat, do NOT make a vent!
Thats right ladies and gentlemen, if the number one reason a mold fails is because vents being wrong in the mold, then dont make the vent until after the mold is made!!
Since I learned of this on a youtube video, it gives you greater flexibility. After the rubber has set, you pick a place and cut a vent into the rubber mold, and only one. Then you test it, and cut another vent as needed. If you pressure cast, this is perfect because you usually only need one vent. One vent and you are golden.
What does one vent mean? It means the least amount of detail lost! If you try and map out before you even pour the rubber, where the vents go, you honestly have no clue where the air could get trapped. Thats the point of only cutting a single vent and testing it. After the cast piece cures, you pull it out and note the places that didnt develop. Recast it, if the same places have the same issue, cut ONE more vent as needed, and recast. Continue until it comes out perfect. Once again, this is all about preplanning. If you follow some peoples advice and do crazy stuff like place the flat of the feet on the bottom of the wall of the barrier, expecting to use the feet as pour holes, youll be sorely disappointed to find your feet are always deformed etc.
Lets really take a look at the costs. We'll go with oomoo, because thats what im familiar with. We will also use necron warriors, which for a box of 12 is $36.25. Lets take the oomoo starter kit, that costs what, around $70 bucks with shipping and handling? Ill add in the price and cost a pressure casting system later. Now lets add the cost of the little clear plastic cups for measuring resin: about 2 bucks for 100 (which, if you are careful, are actually reusable). Buy a bag of large clear plastic cups ($3?) for the rubber (if you read the directions, its measured out in equal amounts, so no numbers needed to measure how much, all you need to do is eye it to so part a and part b are equal). The syringes costing 10 cents a piece? Youre crazy. Listen, go to walmart and pickup the large clear syringe that costs about 2 bucks. Make sure it doesnt have a rubber stopper. I use two of them, one to get part A resin out of the container of the smoothcast 300 because its awful to pour, and a separate one to put the mixed resin into the molds themselves. Ive had the same 2 syringes for the past 8 months now Sure, the resin hardens after a few minutes in the syringe, but with a ball inflator tip, i push the hardened resin out of the tip and reuse the syringe Dont use those cheap little squeezie syringes Ok, so thats another 4 bucks. What else? Legos. Lets say you dont have legos. Ok, another $30 bucks (expensive, right?) And clay, $7 bucks.
So, altogether so far just to get started (unless you get smart and use something like tupperware containers instead of legos ) we are at 152.25ish right? Thats a lot, you say! Nah, not really. Whats that, a couple of landraiders? Really? Pleeease. Anyway. Now we'll start canceling that cost out, by casting, and see where we are.
Without a pressure caster, id do 3 warriors at once. So, lets say you take your time and spend an hour arranging them in the clay, building the lego walls etc. Then you mix and pour the rubber and wait 6 hours for it to cure. Flip it over, clean it off, and pour again. Another 6 hours. Its done. So, just on the mold of 3 warriors for example, youve spent 13 hours, and if you went wild on rubber, you spent 5 bucks on rubber (doubtful) (maybe 1 and half hours you were actively working with the mold). Ok, next you spend another 30 minutes cutting the vents, and then you spend the next hour (20 minutes a set time) to cast and revent the mold. So thats so far, 14 and half 15 hours, of which, youve spent lets say 3 total actively working on the mold. Lets also say you went wild with smoothcast at first and for your first few molds you used 50 cents of resin. Thats A LOT of resin to use, but heck youre new, how would you know? Now the serious stuff.
Every lets say 25 minutes, you can successfully cast 3 warriors. The extra 5 minutes is the time it takes for you to get up, go to your mold, demold, reset the mold and pour it and the 20 minutes is how long it takes to cure. Furthermore, lets say that you can get only 2 successful warriors and a partial each time. Ok, so, in an hour you can create 4 warriors. That means in 3ish hours, you can create 12 warriors. Guess what, you just took 36.25 off of your cost. You just paid yourself, in 18 hours, 36.25. Guess what, 152.25 divided by 36.25 is 4.2. 4.2 times 3 hours is 12.6 hours.
You know what that means? If you work for about 30 hours molding and casting (18 actually, because 12 of those you are chilling waiting for the rubber to cure) youll have paid yourself back the initial cost of starting to cast and mold. And have gotten yourself about 48 warriors in the process. Anything after that, is money in your wallet, you see?
Now for pressure casting, throw in another 130 bucks, take away some time from the actual casting time, take away from the setting up of the mold (in my experience, you only need 1 vent for pressure casting anything unless the mold is off itself) and everything you cast will come out as perfect as you molded it. So, instead of 2 warriors, youll be gettnig 3 etc. So in cost of 48 warriors and rubber etc, itll maybe be like 6 bucks.
Resin is sooo cheap to make a single model. I cant even figure in pennies how much each figure costs Ive just recently bought my 3rd set of the trial size of the smoothcast 300, and ive made hundreds of minatures, weapons, bitz, and vehicles so far And rubberwise, once again, if you are spending 25 bucks a mold, you are doing it wrong.
Once you pay yourself back in cost, you are then spending pennies or less per cast. 36.25, 12 warriors, in 3 hours? Guess what, in cost of resin AFTER youve paid youself back for the initial startup, i bet you wont break 25 cents.
Now tell me, want to buy a meltagun for 25 cents, or, 12 meltagun wielding space marines for 25 cents? Which would you prefer?
|
|
|
|
|
|
2012/08/19 04:55:36
Subject: BLACKHAND'S General Casting Tutorial
|
|
Nurgle Chosen Marine on a Palanquin
|
Again I think your missing our point, disregarding Aerethan's extreme examples, you still pay far more to cast a model than to buy it.
The idea that you will be able to make a single mould for a necron warrior with all it's undercuts and thin arms and legs is pretty hard to believe... have you actually done this in real life?
I would imagine that even with the method that you describe of cutting vents after you pour the mould you will still get multiple miscasts, even with your $130 pressure casting kit( btw a link to a pressure casting kit that costs $130 on ebay or online would be very much appreciated I am sure), and your claim that you have cast hundreds of minis, weapons and bits from a couple of trial kits of smoothcast is fairly hard to believe as well, is there a chance you are exaggerating for effect there?
I think maybe the disagreement comes down to the value we are putting on our time. With two kids under 5 and a wife who enjoys spending time with me I treasure my modelling time a lot, and while I am not a doctor or lawyer I still feel an hour of my labour to be worth more than a few pennies!
In the end a multiple post argument about how much a person can cast out of x amount of y product is fairly pointless as my initial post was merely a way to discourage people from buying a landraider's worth of resin and silicone to cast up a couple of meltaguns when there is a much faster and easier way to get them!
Cheers,
BLACKHAND
|
BobtheInquisitor wrote:I tend to glue metal models with a combination of BSI cyanoacrylate and my tears of frustration.
|
|
|
|
|
2012/08/19 14:17:16
Subject: BLACKHAND'S General Casting Tutorial
|
|
Long-Range Land Speeder Pilot
|
 BLACKHAND wrote: BLACKHAND wrote:I havn't tried bending resin yet, I suppose you could heat it in boiled water and try to bend it but I would imagine that it would soften to the point of being easy to squish with hands or tools.
Might be worth trying to sculpt the detail onto a blank shoulderpad and casting that.
I actually have 2 variations of the iconography I need sculpted onto blank shoulderpads now. I'm just trying to find a solution for my terminators and other models that don't have separate pieces for their shoulderpads. (My terminators are the old metal ones)
|
|
This message was edited 1 time. Last update was at 2012/08/19 14:18:34
|
|
|
|
|
2012/08/19 14:31:03
Subject: Re:BLACKHAND'S General Casting Tutorial
|
|
Dakka Veteran
|
I agree. I too have 2 kids under 5 (both girls, one is 3 and the other is turning 2 at the beginning of september) furthermore, not only am I married, but shes pregnant too. You know what that means! lol anyway, my wife hates me molding and casting, so everytime I complete a project, I gleefully show it to her and say see! This is $x.xxx dollars right here! And I only spent a few cents! Hee hee! lol.
As for the link to the $130 dollar pressure casting system on ebay? I never said You can buy the kit for 130 dollars. I said, throw in 130 bucks.
I got my paint pot pressure tank from harbor freight for I think 82 bucks, I had an air compressor from buying a airbrush kit, but, I was dissatisfied with how fast it pressurized my tank, so I went to walmart and bought a larger air compressor on sale for 40-50 bucks. (50+80=130). The connectors wont match up so I went to home depot and spent maybe, maybe 3 bucks to buy the right brass connectors and plumbers tape to set it up. So, depending on current costs, it shouldnt run you more than 150 maybe? But yeah, sorry, I did it the old fashioned way
Oh, did I mention I too, am neither a doctor nor a lawyer?
Furthermore, Blackhand, check your private messages here in a bit, I took some pictures of some of my stuff and im sending you the links for em in your message inbox.
|
|
|
|
|
|
2012/08/19 14:38:21
Subject: BLACKHAND'S General Casting Tutorial
|
|

Fixture of Dakka
|
JWMarines wrote:For anyone who's used Smoothcast 300, what is the consistency of it when cure?
I'm still waiting for my casting supplies to make it here, but in the mean time I'm sculpting a few other things. One problem I'm going to have is that I have a bunch of static pose (1 piece body old marines) and metal terminators and elites and whatnot. So, would it be possible to cast flat iconography and then bend it to a shoulderpad or something like that?
I would do this with green stuff molds similar to the way I made sergeants' stripes for five of my IG veterans.
Practice a bit to figure out how to get the green stuff thin enough and avoid distorting the cast by stretching it before the cast has cured.

|
|
This message was edited 1 time. Last update was at 2012/08/19 14:40:26
The secret to painting a really big army is to keep at it. You can't reach your destination if you never take any steps.
I build IG...lots and lots of IG. |
|
|
|
|
2012/08/19 23:43:39
Subject: Re:BLACKHAND'S General Casting Tutorial
|
|
Dakka Veteran
|
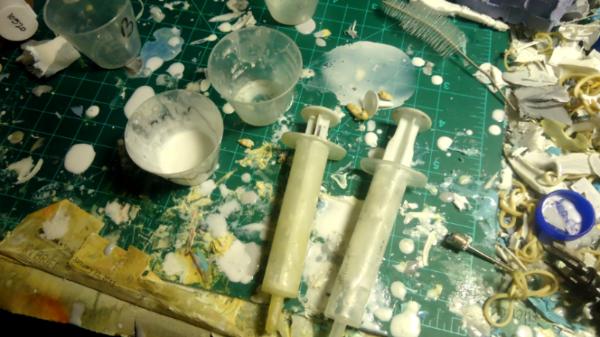
This picture will take some explaining. These are the syringes I mentioned. The one thats yellowed on the left is the syringe for part A of the resin, the syringe on the right is the one i use to "pour" the mixed resin into the molds. Notice to the right (and by accident lol) there is a handy dandy basketball air pump tip thing? Thats what i use to get the hardened resin out of the syringe. If you look inbetween the top of the two syringes, youll see a golf tee looking thing. Thats what comes out of the resin syringe after it hardens. Next youll see there are several small medicine cups on the table. Although you cant see it, there a five. 2 are marked B (you can see only one marked B), two arnt marked at all (theyre for A) and 1 looks like it has hardened resin in it. When I do multiple molds at once, I prestage my stuff. Ive found that 7.5 ccs is plenty to mix and handle at once. So, what I do is in both A's and B's i pour 7.5 ccs of the resin into each. Then, when im ready to mix, i use the first a and b, and pour it into the hardened resin cup, mix it, suck it up into the resin syringe and then "pour" it, place it into the pressure tank, if my syringe is empty after however many i did, and i still have molds to go (ive got this down pretty exact so, i wouldnt set out 2x7.5ccs of each part if i didnt think id use it) i mix the second two parts into the same container, and repeat. I then quickly shut the tank, lock it up and start the aircompressor, also preset to where it needs to be. After about 2 minutes I clean out the syringe, and leave my garage cause its loud as heck in there. 20 minutes later I come back and setup again.
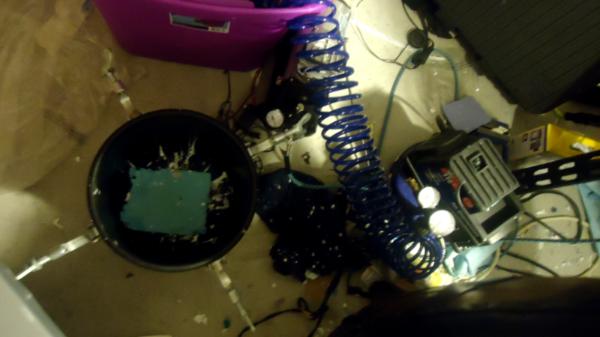
Top down view of my pressure casting system. The thing with the dials on the right is the aircompressor, the spiral hose things leads to the lid off the picture, and the thing with the mold looking thing in the bottom is the tank its self.
Blackhand suggested I post a couple of pics of my setup, he may or may not suggest for me to post more pics, and these are ones taken directly from the message I sent him. If you have any questions, let me know 
|
|
|
|
|
|
2012/08/25 22:08:29
Subject: Re:BLACKHAND'S General Casting Tutorial
|
|
Long-Range Land Speeder Pilot
|
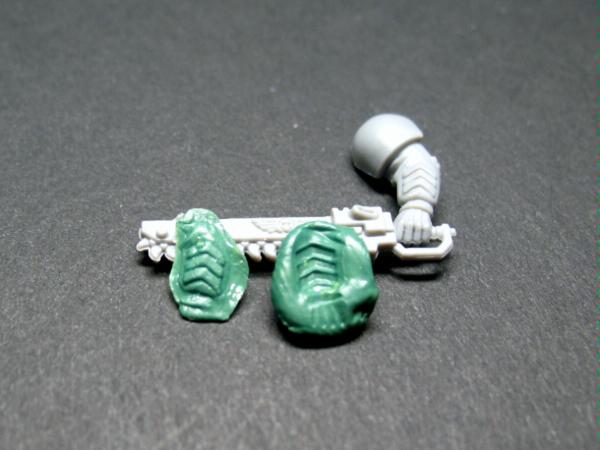
Finally got my casting supplies... took forever. Price was right, though.
So... and now the results of my first molds and castings.
Molds: as I was waiting more days than I wanted to get my supplies, I sculpted a few more shoulder pads. I had 3 Doom Eagle icon variants, and 1 each of the troop designation shoulder pads. I didn't have any legos handy, but I did have these plastic container type things. I don't remember exactly where they came from, but in GW packages they have some of these types of things. The long and flat one I cut from the packaging of a set of dremel drill bits. I found that these worked fantastically, and are reusable. They are small, so I'm not sure about durability, but I think they are pretty darn solid at this point. All I did was use some PVA on the bottoms to attach the masters. Then I did the "pour from as high as you can into the corner so the air bubbles are forced to break and you get a better mold" technique. It seemed to work well. Without further adeu...

I failed at the first casting attempt. I tried to pour both into one container strait from the container they come in... very messy and I lost pot time trying not to get it everywhere. So, the result was nearly hardened resin before I had even gotten to the last mold... only got the sculpted top for a WHFB square base out of that mess...
My Second attempt worked much better. I poured part A of my smoothcast 300 into a cup and part B into another, then just mixed into one of them... I tried to get too slick with the first batch and screwed myself. Lesson learned. I'm thinking about transferring the Part A and B into their own squeeze bottles (think those red and yellow squeeze bottles that you can put ketchup and mustard in with the small tip). You can get clear ones at Walmart in the states for $1 each. Not sure if the plastic they are made of, being really cheap, will be degraded or affect the resin components or not.... gonna test it one of these days with a small amount of each part in its own bottle.
Anyway... here's the product of my second casting attempt. I ended up with a pretty good result, the only real problem one is one of the eagle pads. part of the skull had a bubble on it.
Here they are:
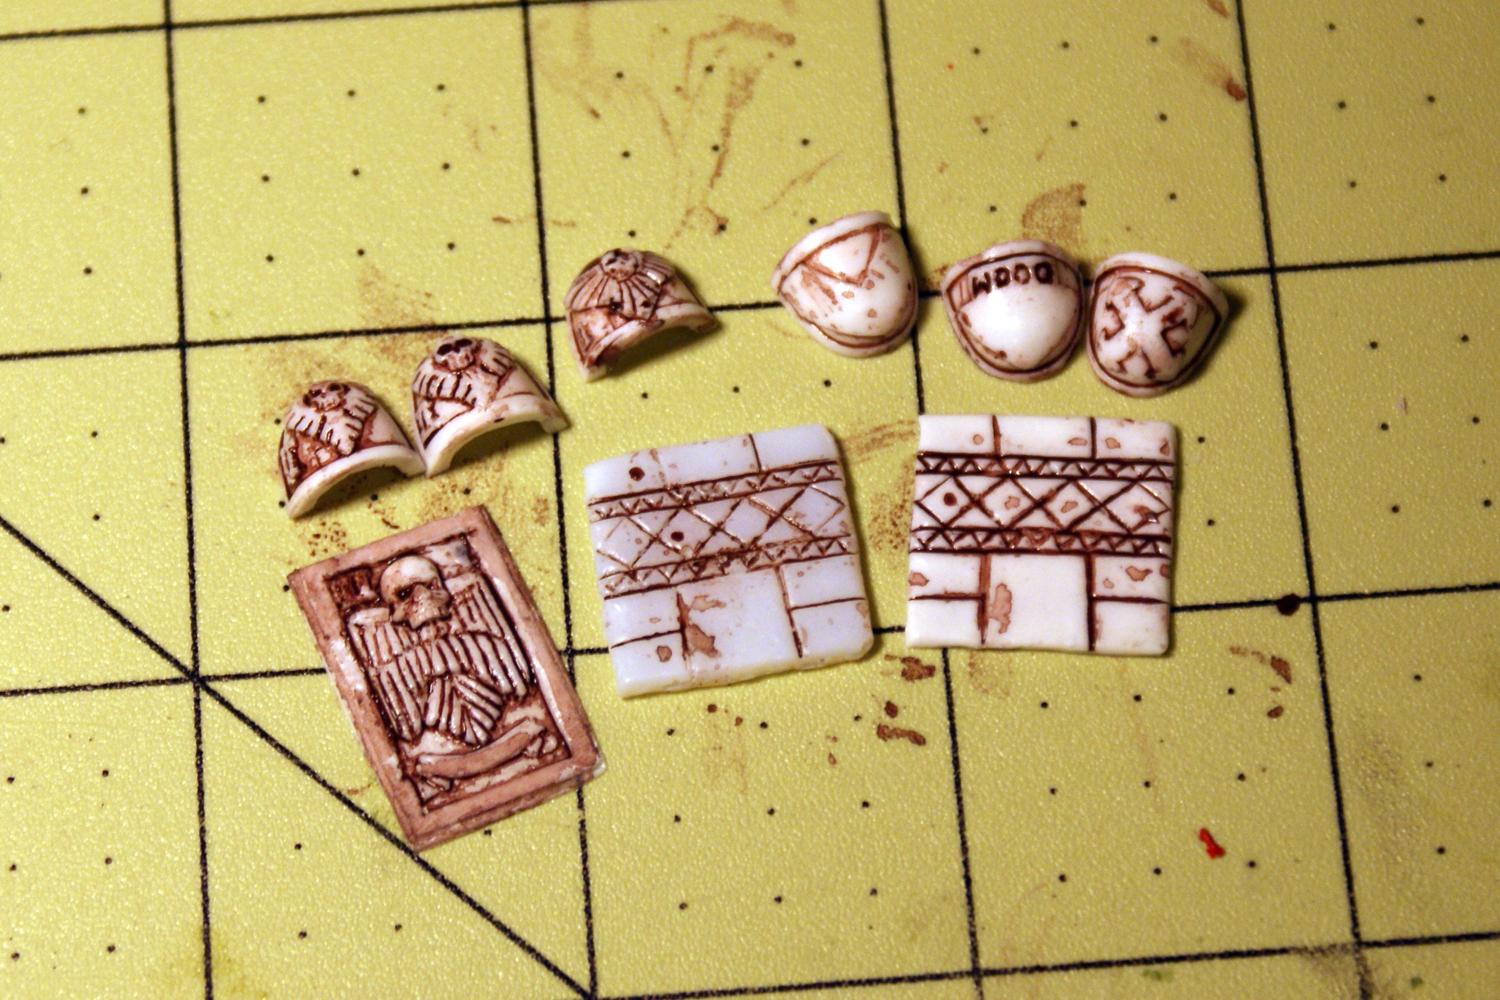
Thanks again to all you guys, I picked up a ton of tips from you all.
Now to cast a WHOLE bunch more shoulder pads...
|
|
|
|
|
|
2012/08/25 22:16:57
Subject: BLACKHAND'S General Casting Tutorial
|
|
Nurgle Chosen Marine on a Palanquin
|
Looking good JWMarines, I like the idea of squeeze bottles for the two parts of the resin, would definitely make it easier to pour smaller batches of resin.
Good luck with the rest of your casts, I know how tedious it can be to cast shoulderpad after shoulderpad!
|
BobtheInquisitor wrote:I tend to glue metal models with a combination of BSI cyanoacrylate and my tears of frustration.
|
|
|
|
|
2012/08/26 00:43:15
Subject: Re:BLACKHAND'S General Casting Tutorial
|
|
Dakka Veteran
|
Looks excellent! Drop those in some simple green, and youre good to go!
Oh, you arnt trying to spray mold release into them, are you?
|
|
|
|
|
|
2012/08/26 01:11:07
Subject: BLACKHAND'S General Casting Tutorial
|
|
Excellent Exalted Champion of Chaos
Lake Forest, California, South Orange County
|
Mold release or talc are not suggested for the shoulder pad molds as it would all settle in the bottom and give miscasts.
Honestly, release agents and such are only really needed for two part molds where air escape and undercuts are an issue.
The shoulders are small enough that miscasts aren't a huge loss of resin, and the plate molds can have bubbles picked out of them after resin is poured if you use a slower cure resin.
I might have to commission someone to sculpt me some Red Hunters pads since getting the decals for them seems to be difficult.
|
"Bryan always said that if the studio ever had to mix with the manufacturing and sales part of the business it would destroy the studio. And I have to say – he wasn’t wrong there! ... It’s become the promotions department of a toy company." -- Rick Priestly
|
|
|
|
|
2012/08/26 01:19:44
Subject: Re:BLACKHAND'S General Casting Tutorial
|
|
Dakka Veteran
|
With the smoothcast/oomoo stuff you do not need mold release agents of any kind, whatsoever. The liquid actually takes the place of where the resin could be, causing a greater number of miscasts (As Aerethan indicated )
|
|
|
|
|
|
2012/08/26 01:31:27
Subject: BLACKHAND'S General Casting Tutorial
|
|
Long-Range Land Speeder Pilot
|
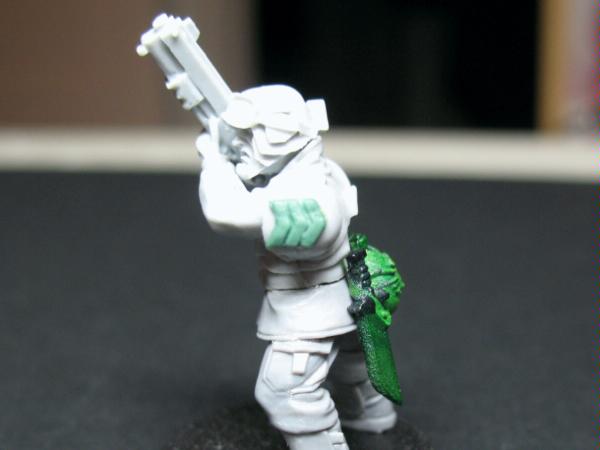
yeah, I'm not using mold release. Second successful casting came out great, so I confirmed that all of the details are there in the molds.
|
|
|
|
|
|
2012/08/26 02:11:57
Subject: BLACKHAND'S General Casting Tutorial
|
|
Excellent Exalted Champion of Chaos
Lake Forest, California, South Orange County
|
Mold release itself is useful for rather specific things, like urethane rubbers and such.
As said, if you are using Smooth Cast and Oomoo then you won't need a release.
Talcum powder is used to help the resin flow into small areas and break up some surface tension so that bubbles move away from the corners and such. You only need very little of it though.
And as always, you should rinse parts with degreasing detergent like dish soap before priming and painting. But that is true of pretty much every model.
|
"Bryan always said that if the studio ever had to mix with the manufacturing and sales part of the business it would destroy the studio. And I have to say – he wasn’t wrong there! ... It’s become the promotions department of a toy company." -- Rick Priestly
|
|
|
|
|
2012/08/26 17:24:33
Subject: Re:BLACKHAND'S General Casting Tutorial
|
|
Dakka Veteran
|
You guys got me all excited about molding and casting again, so I set up another lego blocks box, clay, and the item I want molded. Sprayed it, yada yada. Open my containers of oomoo, and the pink stuff has almost solidified. The blue stuff was extremely, extremely liquid like. I mixed em together based on volume, and tried pouring it, and it came out like...A cross between oatmeal, molasses and mud. It didnt pour at all, just clumped out. Looks like im out the 180 bucks I spent on the gallon or so containers :/
|
|
|
|
|
|
2012/08/26 19:33:39
Subject: BLACKHAND'S General Casting Tutorial
|
|
Nurgle Chosen Marine on a Palanquin
|
Jeez, you bought gallons? I usually go for the 500mls at max!
I guess this is a good warning to everyone about an issue we haven't touched on,
THESE PRODUCTS DO HAVE A SHELF LIFE,
if you are unsure that you will get through the amount that you are buying ask the retailer how long it will last.
|
|
This message was edited 2 times. Last update was at 2012/08/27 00:17:57
BobtheInquisitor wrote:I tend to glue metal models with a combination of BSI cyanoacrylate and my tears of frustration.
|
|
|
|
|
2012/08/26 21:50:02
Subject: Re:BLACKHAND'S General Casting Tutorial
|
|
Dakka Veteran
|
Thats the thing, its shelf life is waaaay under what I would ever think it to be. I bought em in march!
|
|
|
|
|
|
2012/08/27 00:18:57
Subject: Re:BLACKHAND'S General Casting Tutorial
|
|
Nurgle Chosen Marine on a Palanquin
|
Basimpo wrote:Thats the thing, its shelf life is waaaay under what I would ever think it to be. I bought em in march!
Then that is strange, I know that resin compounds can go off due to exposure to moist air but the silicone should last longer than that, I would contact your retailer.
|
BobtheInquisitor wrote:I tend to glue metal models with a combination of BSI cyanoacrylate and my tears of frustration.
|
|
|
|
|
2012/08/27 01:51:35
Subject: Re:BLACKHAND'S General Casting Tutorial
|
|

Mekboy Hammerin' Somethin'
|
BLACKHAND wrote:
Then that is strange, I know that resin compounds can go off due to exposure to moist air but the silicone should last longer than that, I would contact your retailer.
I've actually had the opposite problem; my silicone components hardened up, but my reallllly old resin is still viable. As for talc, I've found it helpful for getting into the odd little details that the resin may sometimes not want to slip into, such as corners and narrow points. I blow out all but the finest of dust though, because yes, it will create its own problems if there's too much.
Glad to see some life in this thread...even if it did get a little heated 
|
|
|
|
|
|
2012/08/27 03:10:59
Subject: Re:BLACKHAND'S General Casting Tutorial
|
|
Nurgle Chosen Marine on a Palanquin
|
 hungryp wrote: hungryp wrote:Glad to see some life in this thread...even if it did get a little heated
Funnily enough it was quite polite behind the scenes in PM Land, I suppose looking back on the posts it does seem fairly heated
Main thing is that people are giving suggestions and advice on casting!
|
BobtheInquisitor wrote:I tend to glue metal models with a combination of BSI cyanoacrylate and my tears of frustration.
|
|
|
|
|
2012/08/27 03:26:21
Subject: BLACKHAND'S General Casting Tutorial
|
|
Excellent Exalted Champion of Chaos
Lake Forest, California, South Orange County
|
Now I have to go back and re read the entire thread. I don't remember it being heated at all, but then again this thread has been around for a while now so I may have forgotten.
At the end of the day I'd like to think that something constructive came out of it all.
|
"Bryan always said that if the studio ever had to mix with the manufacturing and sales part of the business it would destroy the studio. And I have to say – he wasn’t wrong there! ... It’s become the promotions department of a toy company." -- Rick Priestly
|
|
|
|
|
2012/08/27 03:55:35
Subject: BLACKHAND'S General Casting Tutorial
|
|
Mekboy Hammerin' Somethin'
|
Lol, just the last page or so, with the debate on whether it's better to cast or buy bits. Not like anybody's mothers got called anything unsavoury or anything
|
|
|
|
|
|
2012/08/27 04:09:19
Subject: BLACKHAND'S General Casting Tutorial
|
|
Excellent Exalted Champion of Chaos
Lake Forest, California, South Orange County
|
Ah yes, well the point remains that for people who don't already know how to do this stuff, it is rather cost prohibitive in 99% of cases.
There isn't really a cheap way to get to the point where your molds and casts are perfect.
|
"Bryan always said that if the studio ever had to mix with the manufacturing and sales part of the business it would destroy the studio. And I have to say – he wasn’t wrong there! ... It’s become the promotions department of a toy company." -- Rick Priestly
|
|
|
|
|
2012/08/27 04:15:04
Subject: BLACKHAND'S General Casting Tutorial
|
|
Mekboy Hammerin' Somethin'
|
It's true. Fortunately we have threads like this to help ease the pain. (I really gotta lay off the winks!)
|
|
|
|
|
|
2012/09/27 23:24:09
Subject: Re:BLACKHAND'S General Casting Tutorial
|
|
Just the Bare Metal
|
So would i go about the same way for casting IG legs for my steel legion as you did for the shoulderpads 
|
|
|
|
|
|
2012/09/28 00:36:53
Subject: Re:BLACKHAND'S General Casting Tutorial
|
|
Excellent Exalted Champion of Chaos
Lake Forest, California, South Orange County
|
jjrb wrote: So would i go about the same way for casting IG legs for my steel legion as you did for the shoulderpads
are you asking about casting the GW legs?
|
"Bryan always said that if the studio ever had to mix with the manufacturing and sales part of the business it would destroy the studio. And I have to say – he wasn’t wrong there! ... It’s become the promotions department of a toy company." -- Rick Priestly
|
|
|
|
|
2012/09/28 00:45:58
Subject: Re:BLACKHAND'S General Casting Tutorial
|
|
Just the Bare Metal
|
yes i made some sculpts of the bottom part of the trench coat onto some cadian legs so i could have kneeling legs
Thanks.
|
|
|
|
|
|
2012/09/28 06:53:18
Subject: BLACKHAND'S General Casting Tutorial
|
|
Nurgle Chosen Marine on a Palanquin
|
You may be able to get away with casting them in that way but a two part mould would be a more sure way of getting consistent results.
Aerethan's question was due to the fact that we don't really advocate casting GW models.
|
BobtheInquisitor wrote:I tend to glue metal models with a combination of BSI cyanoacrylate and my tears of frustration.
|
|
|
|
|
2012/10/02 00:39:02
Subject: BLACKHAND'S General Casting Tutorial
|
|
Just the Bare Metal
|
Alright thank you
|
|
|
|
|
|
|
|


 2500 pts
 2000 pts
 WIP
WIP