| Author |
Message |
 |
|
|
|
|
Advert
|
Forum adverts like this one are shown to any user who is not logged in. Join us by filling out a tiny 3 field form and you will get your own, free, dakka user account which gives a good range of benefits to you:
- No adverts like this in the forums anymore.
- Times and dates in your local timezone.
- Full tracking of what you have read so you can skip to your first unread post, easily see what has changed since you last logged in, and easily see what is new at a glance.
- Email notifications for threads you want to watch closely.
- Being a part of the oldest wargaming community on the net.
If you are already a member then feel free to login now. |
|
 |
2010/07/29 23:14:08
Subject: BLACKHAND'S Shoulderpad Casting Tutorial
|
|

Nurgle Chosen Marine on a Palanquin
|
sandwhich the mold between two flat peices of plastcard or thick cardboard THEN use rubber bands, should keep it from warping
|
 BobtheInquisitor wrote: BobtheInquisitor wrote:I tend to glue metal models with a combination of BSI cyanoacrylate and my tears of frustration.
|
|
|
 |
|
2010/07/30 14:06:55
Subject: Re:BLACKHAND'S Shoulderpad Casting Tutorial
|
|

Morphing Obliterator
|
LOL! Thanks. Maybe I should have checked the forums before I started.
So I tore up the box to get it out and I did a horrible job cutting the rubber in half.  My first pour didn't turn out that well either. The rubber bands ended up warping the mould and the resin couldn't get all the way into the mould. But I didn't give up. The second pour I didn't use the rubber bands. I let the resin leak through. Then I held it closed with my hands until the resin stopped being as fluid. 20 mins later I opened it up and it worked! had a bit of trimming to do but that came out pretty good. now that the test is over I can cast the model i wanted. This time using what I learned. I had tons of fun and I want to cast everything I own! Thanks for your help Blackhand!
|
|
This message was edited 1 time. Last update was at 2010/07/30 16:54:58
|
|
|
|
|
2010/07/30 16:05:50
Subject: Re:BLACKHAND'S Shoulderpad Casting Tutorial
|
|

Lieutenant Colonel
|
The amount of information i've gathered off this Thread and Google is astonishing. I need to make some masters of the Shoulder Pads so I can copy and cast them. If anyone has any tips on making originals from green stuff let know (Trying to do a Bear Claw design on a Pauldron see below.)

Although i will only do the top one and possibily attempt my own Bear Head at some point, the Shaman one is way beyond my skills!!!!!
Anyone with any pics of moulding / Casting/ pouring etc please post. This thread is very good.
|
Collecting Forge World 30k????? If you prefix any Thread Subject line on 30k or Pre-heresy or Horus Heresy with [30K] we can convince LEGO and the Admin team to create a 30K mini board if we can show there is enough interest! |
|
|
|
|
2010/07/31 09:21:07
Subject: BLACKHAND'S Shoulderpad Casting Tutorial
|
|
Nurgle Chosen Marine on a Palanquin
|
Awesome Styro! glad to here you have caught the casting bug, I'm telling you now it can consume your modelling time but you will end up with armies that are truly unique as well.
@mwnciboo - I sanded the shoulderpad a bit to flatten it out and give the GS something to grip to then just went to town, I guess marking the pattern out first with pencil or markers may help but GS is an art as much as a skill so it may take a while to get them looking how you want. When you have one that you like, cast it then use the original and the cast replica to make another mold, this gives you three molds, cast them again then mak a third mold with the four copies and the original, this means you can then make a sweet 8 replica in one cast which should be enough for anyone!
I agree with Mwnciboo btw, anyone doing their own casting is very welcome to post to this thread, even pics of disasters or people wanting advice please feel free to post as I'm hoping to attract the attention of Dakka's veteran casters to this thread so that we can all share our knowledge and tips and tricks 
Cheers
BLACKHAND
|
BobtheInquisitor wrote:I tend to glue metal models with a combination of BSI cyanoacrylate and my tears of frustration.
|
|
|
|
|
2010/07/31 23:13:52
Subject: BLACKHAND'S Shoulderpad Casting Tutorial
|
|
Speedy Swiftclaw Biker
|
Thanks heaps for that BLACKHAND
|
 "A fortress is built with blood and toil. Only by blood and toil may it be taken." Leman Russ. "A fortress is built with blood and toil. Only by blood and toil may it be taken." Leman Russ. |
|
|
|
|
2010/08/01 17:40:35
Subject: BLACKHAND'S Shoulderpad Casting Tutorial
|
|

Water-Caste Negotiator
|
@mwnciboo: good luck with the sculpting!
I'm busy making up some master sculpts for casting at the moment, and it's pretty difficult even with basic shapes!
So I wish you luck with the afforementioned bear claw, post pics of what you end up doing!
|
|
|
|
|
|
2010/08/02 07:21:32
Subject: BLACKHAND'S Shoulderpad Casting Tutorial
|
|
Water-Caste Negotiator
|
Just poured my first pinkisyl casts! Look great, now to mix up some resin after uni.
|
|
|
|
|
|
2010/08/02 07:49:59
Subject: BLACKHAND'S Shoulderpad Casting Tutorial
|
|
Nurgle Chosen Marine on a Palanquin
|
Sweet!, remember a little resin goes a long way
|
BobtheInquisitor wrote:I tend to glue metal models with a combination of BSI cyanoacrylate and my tears of frustration.
|
|
|
|
|
2010/08/02 09:58:18
Subject: BLACKHAND'S Shoulderpad Casting Tutorial
|
|
Water-Caste Negotiator
|
Yeah I went and got myself some pinkisyl and some easycast this morning and the smallest batches i could get were 500grams. I've poured a one part shoulderpad mould using Lego and foamcore board (the foamcore was an experiment resulting in very moulds getting stuck to them) and am half way through a two part storm shield mould. I may just post some pics up. Love the pinkisyl btw, great material!
|
|
|
|
|
|
2010/08/02 10:29:01
Subject: BLACKHAND'S Shoulderpad Casting Tutorial
|
|
Nurgle Chosen Marine on a Palanquin
|
Yeah, luckily the store I buy mine off does a "starter kit" with a 100gm of each which is enough to use at my speed without it going off.
By all means post pics of what you are doing, would be great to see some other bits being cast and might even inspire some other Dakkites to try casting
|
BobtheInquisitor wrote:I tend to glue metal models with a combination of BSI cyanoacrylate and my tears of frustration.
|
|
|
|
|
2010/08/02 11:26:30
Subject: BLACKHAND'S Shoulderpad Casting Tutorial
|
|
Water-Caste Negotiator
|
Yeah this mythical starter kit doesn't exist on the dark side of the moon that is Perth. Your thread definitely inspired me to cast so if it helps I'll post up!
|
|
|
|
|
|
2010/08/02 14:18:46
Subject: BLACKHAND'S Shoulderpad Casting Tutorial
|
|

[SWAP SHOP MOD]
Decrepit Dakkanaut
OH-I Wanna get out of here
|
I cant get the barnes silicone over here (cost a bizillion bucks to ship), but they pointed me at a place in PA that makes a similar product, so once they get back to me and I get an order in, I'll let ya know how it goes.
|
|
|
|
|
2010/08/02 15:41:22
Subject: BLACKHAND'S Shoulderpad Casting Tutorial
|
|
Water-Caste Negotiator
|
Something tells me that being in the U.S you shouldn't have any trouble finding a replacement. All you need is a low-viscosity quick-drying silicone-based moulding compound (bit of a mouthful).
Also, bit of news on the casts: the two-part mould didn't really work too well, but it was my first cast, and I know what I did wrong- not enough injection points.
The easycast is remarkably quick to set, although it's warpable for about 10mins after it appears to have set, so don't be tempted to pull them out too quickly!
My squad shoulderpads have turned out nicely (not so the terminator pads, something I have to sort out).
|
|
|
|
|
|
2010/08/02 16:04:56
Subject: Re:BLACKHAND'S Shoulderpad Casting Tutorial
|
|
Decrepit Dakkanaut
|
I'd be really interested in seeing what you come up with for US-available materials...
|
|
|
|
|
|
2010/08/02 16:11:36
Subject: BLACKHAND'S Shoulderpad Casting Tutorial
|
|
[SWAP SHOP MOD]
Decrepit Dakkanaut
OH-I Wanna get out of here
|
Well the location recommended by Nicole Barnes (of the company that makes BHs stuff) is Polytek in PA. I emailed them on Saturday eve and havent heard back yet (not a big supprise). I'm not really sure what stuff is the stuff I need, so if someone can point me in the right direction, that'd be great.
http://www.polytek.com/
|
|
|
|
|
2010/08/02 16:39:03
Subject: BLACKHAND'S Shoulderpad Casting Tutorial
|
|
Sneaky Sniper Drone
|
Can this technique be used on other parts of the modle, and other armies as well?
|
|
|
|
|
|
2010/08/02 19:34:29
Subject: BLACKHAND'S Shoulderpad Casting Tutorial
|
|
Nurgle Chosen Marine on a Palanquin
|
@captain Klaw - Funny how it all starts to make sense once you start casting. And yeah on two part molds you need lots of injection points and will probably need a couple of channels on the bottom edge to catch bubbles. If the mold is keying together well ( the places where you cut to get the master out after the rubber set have a nice fit) then you can squeeze the mold after the resin is poured in and often you can get bubbles out that way as well. Post up a pic of the terminator pads if you like and we can see what went wrong, I am looking at casting a deathwatch terminator pad from the inquisitor range and don't want to goof that up @whalemusic and Gitsplitta - Looking at the polytek website you will probably want the "platsil 73-75" and the "easyflo" but goddamn they are expensive! and since the bottles are so large for the resin you may need a can of dry air to spray into the bottle to stop moisture from ruining it. @Tazay - For sure, I have cast marine feet , chestplates dread missile launchers decorative bases and once most of a space wolves dreadnaught. As long as you can visualize how the resin will flow into the shape you are casting and are prepared to spend some cash ( casting is as expensive as plastic kits themselves) you can cast just about anything.
|
|
This message was edited 1 time. Last update was at 2010/08/02 19:35:05
BobtheInquisitor wrote:I tend to glue metal models with a combination of BSI cyanoacrylate and my tears of frustration.
|
|
|
|
|
2010/08/03 00:25:34
Subject: BLACKHAND'S Shoulderpad Casting Tutorial
|
|
Thunderhawk Pilot Dropping From Orbit
|
Thanks BH, another great contribution. Not quite ready to start my casting just yet, lack of space in uni rooms a real downer for certain aspects of the hobby,
Will try and find the product here in the UK and post any links that I find for it.
Thanks again BH.
|

No trees were hurt in the making of this sig, however many electrons were disturbed.
|
|
|
|
|
2010/08/03 03:17:20
Subject: BLACKHAND'S Shoulderpad Casting Tutorial
|
|
Speedy Swiftclaw Biker
|
Can't wait to see Klaw's results
|
"A fortress is built with blood and toil. Only by blood and toil may it be taken." Leman Russ. |
|
|
|
|
2010/08/03 03:37:48
Subject: Re:BLACKHAND'S Shoulderpad Casting Tutorial
|
|
Regular Dakkanaut
|
I didn't see it posted anywhere, but here are a couple of very important tips when working with resin:
1: After pouring your mixed resin into your flat-backed mold, press a sheet of plexiglass or a CD case against the back, not so much to deform the mold, but enough to squeeze out the excess resin while the resin cures. This will make the "flash" minimal to nearly non-existent. The con: you may need mold release on your plexiglass or CD case to detach it from the hardened resin. The awesome trick: Polypropylene. You know those smooth glossy plastic bags they use at software stores and department stores? (not crinkly thin plastic grocery bags) those are made of Polypropylene, a material that won't stick to resin at all. Staple a sheet onto a piece of wood or cardboard and use that to press off the excess resin while it hardens.
2. Dust the inside of your mold with talcum powder, commonly called baby-powder. (not cornstarch!) This will greatly reduce bubbles. Also, after pouring the resin but before it cures, you can insert a toothpick into the molds to release any small bubbles that are sticking. Always wear safety glasses since your face will be close to liquid resin that may splatter if your hand slips.
|
|
|
|
|
|
2010/08/03 04:24:32
Subject: BLACKHAND'S Shoulderpad Casting Tutorial
|
|
Water-Caste Negotiator
|
Hobofisherman wrote:Can't wait to see Klaw's results
Alright alright lol.
They'll be up in the next hour (I need to start fulfilling promises) Automatically Appended Next Post: Here's the first batch of moulds, including shoulderpads in the big and small blocks, and a storm shield in the two-part mould.

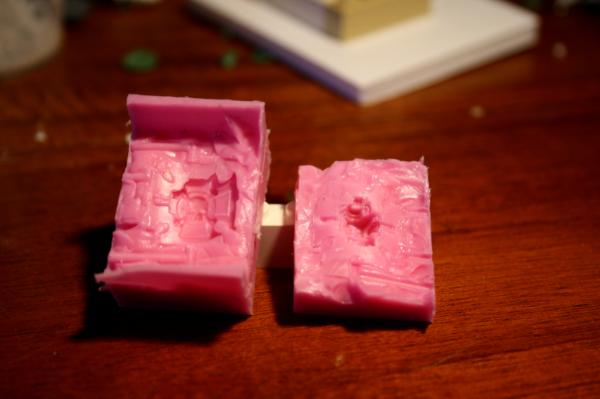
This would be my third pour or so, but I'll show you the results of the first pour.

Sorry about the image quality, I couldn't be bothered setting up the camera properly (just supressed flash, stand used, external lighting)
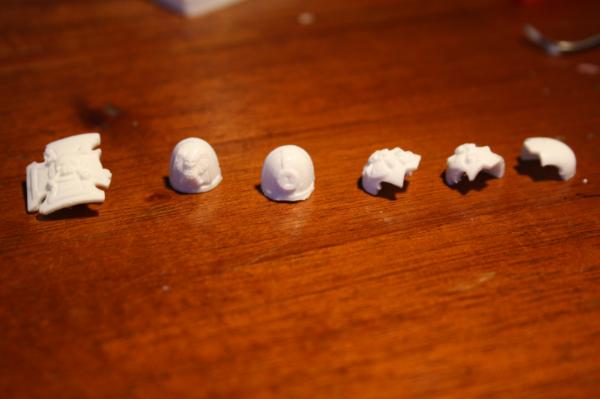
The white resin is a bit hard to look at in the pics but the quality is amazing.
@BLACKHAND: The terminator shoulderpads are in the second photo, and you can see the air bubbles that formed in the corners and prevented them from forming properly.
I know why this is: when you lay the terminator pads on the plastic card to do the initial pinkisyl pour, the little corner cut-out that allows for the shield badge to be placed means it doesn't contact the card, and therefore isn't open when you invert and do the resin pour. Just try laying a pad flat and you'll see what I mean.
I eventually got past this by pouring in the resin very slowly and mixing it with a dental tool to remove bubbles in the pocket. The 3rd batch I did turned out fine.
|
|
This message was edited 1 time. Last update was at 2010/08/03 04:51:23
|
|
|
|
|
2010/08/03 05:01:01
Subject: BLACKHAND'S Shoulderpad Casting Tutorial
|
|
Speedy Swiftclaw Biker
|
Ah cool they look great Hopefully I'll be trying this out the next week or so. Pretty exciting stuff though
|
"A fortress is built with blood and toil. Only by blood and toil may it be taken." Leman Russ. |
|
|
|
|
2010/08/03 08:23:00
Subject: BLACKHAND'S Shoulderpad Casting Tutorial
|
|
Nurgle Chosen Marine on a Palanquin
|
Thanks for all the comments guys, I'm stoked that this tut has been of so much interest.
@terraformer - Both your tips are great! I will definitely start flattening the excess resin, though do you wit till its started curing so that there isn't any shrinkage or is that not an issue?
I have heard about the talcum powder trick and will give it a try with my next casts.
Thanks again!
@captain Klaw - Awesome stuff, I can imagine the storm sheild would be a real bugger to get cast right. Glad to know you are getting some decent casts of your pads it can be hard when you have so many small casts to pop all the bubbles before the resin cures.
Apparently you can also refrigerate the resin compounds to slow down the curing time . I have pondered refrigerating the molds too but I'm worried about moisture.
Oh and don't worry too much about miscasts, they can always be cleaned up with GS or used as basing scenery
I see the crossbones on the terminator crux in the second pic didn't cast well, thats the problem I have with my deathwatch pads as well, I guess it comes down to poking the bubbles properly and not rushing it, though perhaps talcum powder will do the trick
Cheers
BLACKHAND
|
BobtheInquisitor wrote:I tend to glue metal models with a combination of BSI cyanoacrylate and my tears of frustration.
|
|
|
|
|
2010/08/03 10:06:20
Subject: BLACKHAND'S Shoulderpad Casting Tutorial
|
|
Water-Caste Negotiator
|
BLACKHAND wrote:
Oh and don't worry too much about miscasts, they can always be cleaned up with GS or used as basing scenery
Haha I think my next army will have had to have battled several first companies with the amount of terminator shoulderpad miscasts incorporated into their bases.
|
|
|
|
|
|
2010/08/03 10:41:40
Subject: BLACKHAND'S Shoulderpad Casting Tutorial
|
|
Regular Dakkanaut
|
BLACKHAND wrote:
though do you wit till its started curing so that there isn't any shrinkage or is that not an issue?
With the resin and silicon I use, there is never any shrinkage, I don't know about the materials you're using however. I press my backing against the mold immediately after pouring unless I have some little bubbles to poke out, because while it still has very low viscosity it will sandwich out easier. Then sometimes weigh the backing down with something to keep air from seeping under it while the resin cures, a real issue if the surface of your mold is even slightly uneven. If it works right, you should have just the thinnest traces of flash around the edges, and barely need to trim the pieces at all.
|
|
|
|
|
|
2010/08/03 14:42:36
Subject: BLACKHAND'S Shoulderpad Casting Tutorial
|
|
[SWAP SHOP MOD]
Decrepit Dakkanaut
OH-I Wanna get out of here
|
Do you have links for the stuff your using Terra? I'd like to get something that I know other people have used with success.
|
|
|
|
|
2010/08/04 01:14:16
Subject: Re:BLACKHAND'S Shoulderpad Casting Tutorial
|
|
Regular Dakkanaut
|
Most of our stuff I order from http://www.smooth-on.com/ including their Moldmax series silicone, and their Smoothcast 300 resins. Some of their products can be a bit expensive but for the amount of casting we do lately I have to order large quantities of the highest quality stuff available. Also it should be noted that Urethane resin can be a pain in the rear to prime and paint, and in my experience auto-primers work best, so resin cast parts should be primed separately from the rest of a model.
|
|
|
|
|
|
2010/08/04 01:29:26
Subject: BLACKHAND'S Shoulderpad Casting Tutorial
|
|
Nurgle Chosen Marine on a Palanquin
|
Thanks again terraformer for adding to the info on this tutorial, its really starting to feel like a decent resource for dakkites.
BTW love your realm of battle board!
|
|
This message was edited 1 time. Last update was at 2010/08/04 01:30:34
BobtheInquisitor wrote:I tend to glue metal models with a combination of BSI cyanoacrylate and my tears of frustration.
|
|
|
|
|
2010/08/04 03:22:33
Subject: BLACKHAND'S Shoulderpad Casting Tutorial
|
|
Decrepit Dakkanaut
|
Absolutely, I agree with blackhand. Have been itching to do some casting myself but have been hesitant as I have no experience. Hat's off to you guys for adding your knowledge and experience to the mix so the rest of us can benefit.
|
|
|
|
|
|
2010/08/04 06:38:58
Subject: BLACKHAND'S Shoulderpad Casting Tutorial
|
|
Water-Caste Negotiator
|
Don't worry Gitsplitta, this was my first attempt and with the success I'm lining up some more projects, including heresy-era terminators etc.
|
|
|
|
|
|
|
|
 Chemos' Seekers