Need to get this finished ASAP for a Necro campaign at our after school club in the local library.
So for once will try and update a Blog
Fisrt up, the idea came from a Youtube video, and will try and dig it out.
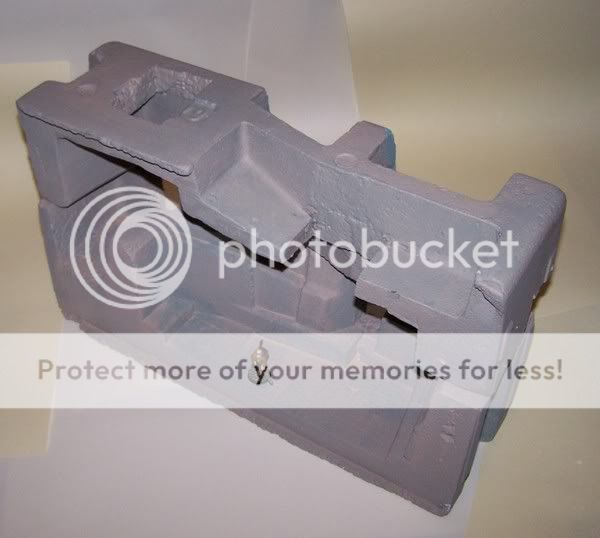
The concept uses polystyrene packaging to provide the gaming surfaces.
Have adapted it to hopefully have a modular system in which the blocks can be rotated to add variety to the terrain.
the figure is a Delaque ganger bought off a very nice chap on ebay ready painted for scale reference.
I think this came from TV packaging so there are 4 pieces which means a mirror copy.
They have been chopped slightly differently, but have just two on display to give an idea.
Now I know they have some fearsome mutants down in the Underhive, but YIKES!...
Not only can the units be rotated but the intention is that they can be stacked also.
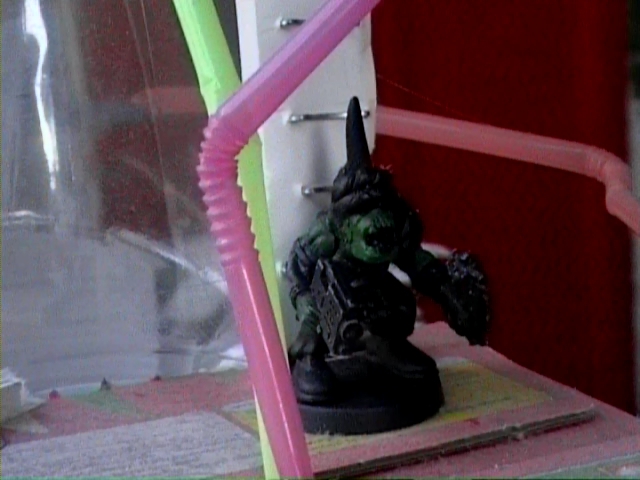
To support the walkways have made some concrete pillars though looking at the pics not happy with the scale.
They were inspired, not by disposable cups, but the concrete pillars where the limestone was stored are now used for climbing practice
due to the flexibility of use, and time constraints, detailing will be minimised unfortunately.
However I still want to add more character to the Art Brut concrete. (thanks to Neil on Vik's Steampunk Airship thread for reminding me of the term)
Would ideally have liked to have the expansion lines but that will be too time consuming. Maybe another project in tribute to the architect Tadao Ando
Still may do some UnderHive movie posters if I have time.
Thanks for looking
any comments and ideas will be welcomed please.
Finally
nice to see your started with your necromundan idea. the polysterene bloks look very promising. lots of difficult terrain situations there. also the prospect of having more than one piece of the foam formed the same is something that helps to create that actual architectual feel...the term art brute concrete is so fitting, yet i havent heard it that way. the video of the of the landschaftspark duisburg is also as close to beeing grim dark 40k related as it could be in real life without having to attach lots of skulls everywhere.^^
that said the scenery reminds me of lots of dire history in this rotten country of mine...but move on^^
may i make some suggestions? i would carve/cutt cardboard any old how and even tear it and then glue it with pva glue to the polystyrene so that you will get a got cover for the paint you certainly will aply. will you spray the things? i guess it would be the fastest way but then you risk the "burn" syndrom of that maerial...
the blocks could even be played stacked , so you could create a "death race" campaign, object marker on the oposite level and all run and fight like hell to get there...
for the pillars i would suggest looking for toilet cardboard rolls...i know for sure one day i need them and i collected so much of them that i will not be in short suply any time near, quite th oposite^^...
i like the idea with the bandages to create texture so...
this will be getting soon one of my favorite blogs i guess, have fun building and ploting^^
I have been applying a mixture of a universal filler/PVA/Acrylic paint to try and tone down the polystyrene texture. The numer of coats with the addition of Johnsons Klear floor polish will protect the polystrene.
I think my next stage with be another coat or two of paint and some washes.
Ideally I would have cut squares of plastic sheet and tiled the structure to make the expansion joints that you get in concrete. That would probably benefit only myself as the kids won't care about such details. It just won't be worth the effort!
More of the same mix will be going on the supprts to take off the textue a bit. The bandages were coated with the mix so they would harden otherwise the cups wiould not be strong enough. It Worked! they are hard and tough now!
I put bandage on some foam board walkways. But just with pve but they are still too springy. However It does give a quick if too irregular texture that mimics metal mesh walkways. But I may use that on the underside as I am going to try and cast some resin sections for the upper surface. So watch this space
also I may be recycling some floppy discs as bulkheads and making and casting resin ladders.
The casting will be simple push moulding. Nothing fancy, but hopefully effective. Also will be using the resin that you get from the car repair shops. Not the expensive stuff
a while back, when I was obsessed with Necromunda, I started a thread where I put on home made posters fornecromunda. But it never got past the first poster.
That video was excellent.....I've spent the last twenty mins (and I assume the rest of the day) listening to various Einstürzende Neubauten tracks, I haven't done that since I stopped dabbling with that goth look I was rocking in the late 90's.
I've saved the picture of rock climbers the industrial scenery in the background is great inspiration.
As for the polystyrene buildings the shapes are good, that was lucky because the last tv i got had really poor shapes. A quick and easy way to make it look more structural is getting say a 2cm strip of card and folding it down the middle and sticking it to the corners. These could then be painted in rusting metallics to contrast with the stone colour.
ah this is getting better´n better...
you get resin in car repaishops??? will have to pay them a visit me guesses...
at first when i saw these structures the gave me the impression of making me afraid and of complete unorder...
now through this thread i see the potential and even the beatuy in these bulking structures...quite the change there...
for reinforcing metal grirds, do you absolutly dont want to use them or have no idea? if the later then i would recommend the use of chopsticks... they could work really good. but i understand when you dont want to create sharpe edges on the terrain, afer all your playing it with kids...
personaly i would also go for naughty graffitis but i fully understand your point, we discussed that already^^
hope to see some shots soon. also back to your use of materials, yep a floppy deisk can be a godsend^^
Hey Chibi, I think it was on Scrazza's blog that i mentioned, Brutalism http://en.wikipedia.org/wiki/Brutalist_architecture which is post war civilian style ,but also very closely related to german military and the rest of european 2nd world war archetecture , as vik mentioned earlier , although this style of bunker building is more appropriately named blockhouse style http://en.wikipedia.org/wiki/Blockhouse the best example of this i have found is the German Flaktürme , Flak Towers, in fact i love these buildings so dkokhttp://en.wikipedia.org/wiki/Flak_tower just realised how big that pic was
good start on the blog matey, will definately like to see where this goes,
Chibi please stop showing me gorgeous pictures of rusty metal....if I ever get round to starting my board I'm going to need a million drinking straws of various gauges!
No reinfocing rods....but but they would give you some cover!
i used to live near an old flak tower for about two years...it had a marvelous view over the city...well it is to be expected after all it should have this view for knocking out some of the british aircafts disturbing the air in the nights and day of the early 40ies.... on some parts of the walls you can still see the gunshots that left nasty holes in it... alwas send shivers down my spine....i guess i have to persuade my folks to visit it to give you fellas some pics for referrence ...
One thing I forgot to ask advice for what to use on the walkways as barriers. At the moment the best I can think of is a solid wall of foamboard strips. But am very reluctant to do that as aesthetically and realistically it would be poor. I could scratch build from sprue but that will be far too much work. There is a ton of stuff to do as it is
Any ideas for an effective but cheap source of walkway barriers please? No use suggesting Warblasters Bitz Inc, the bank manager wil be tearing me off a strip if i start spending cash!
Other thing is, Grafitti and posters effectively means the end of the idea to rotate the sections, unless it is deemed acceptable to have the posters and graffiti on the floor or upside down. Should have thought of that first. Will ressuerct the poster thread if the mods allow to ask for suggestions. May consider printing decals from artwork
Fence/grating style barriers using aluminium mesh? You could use two horizontal strips of sprue with a few uprights, kind of a pre-formed concrete fence, you'd just have to clean up the sprue, although that might need a bit of work to get the uprights right. Solid concrete barriers not very pretty, but plenty practical and brutal.
Graff would be a problem. You could try a few non-orientated symbols, but paint drips might be an issue (Shame, I'd have liked to see a mini-banksy on there too)
A bit out-there, but how about posters made of thin card/plasticard with a smaller, thicker bit of plasticard stuck to it's back, the smaller piece has a magnet or pins attached to fit into place Be pretty awkward getting weathered, torn edges and corners though
ok i have an idea abouzt the art... posters and grafitti... since you will make all the terrain look like concrete yo will still have some areas that look like they have a painted civilian surface? yes? well then it is quite easy. put your grafitti and posters on a cardpoard piece you ripped apart to get uneven edges... the put a pin in it and stick it to the terrain on the walls. now if you just use one pin you can just circle it any way you want to have it. ans since the cardboard is the holding thing its easy to change too...
nah? sounds good or what? if this works i want a webcookie^^
vik
Had a look and this may be a solution. Two parts (the pair that are represented by the second of the sections in the photos) are probably best suited as in the pic.
That means they can be done "This Way Up"^
The other pair have two good sides, so it may be possible to do all the signage/graffiti etc in such a way as to have it showing the right way up. Hope that makes sense. It makes it a tad tricky because it involves simple logic as to which face is orientated which and to get the graffiti the right way round.
Sadly I don't do simple logic!
The aluminium mesh is a great idea except I don't have any. Will have to check out prices but it doesn't seem cheap from what I recall. Still, have a bit of time before I need it so can mull it over a little longer.
Thanks for all the ideas and support chaps. Please keep it going, it is appreciated.
Automatically Appended Next Post: What do you guys reckon please?
Have made a ladder from sprue mounted on styrene card.
Did a quick impression into some playDOH! to see if it could be cast in resin from the simple pressmould.
However, I liked the "concrete" projections that could have paper clip rungs embedded.
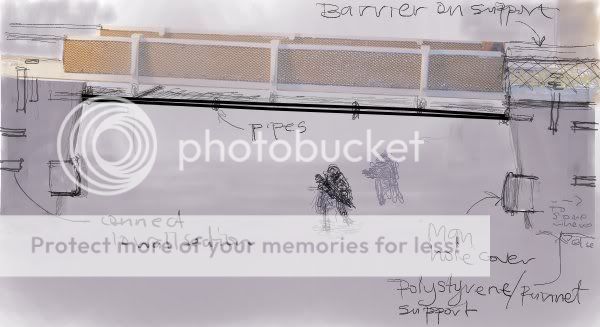
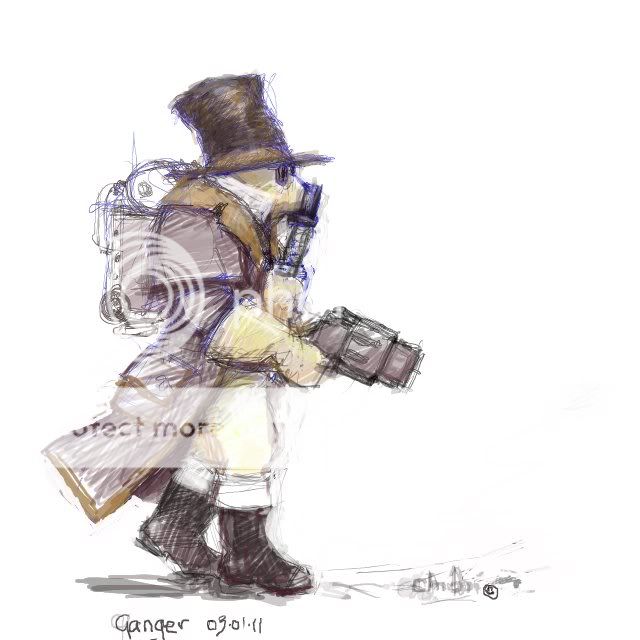
Did a quick concept sketch on the graphics palette so is a tad rough as still not used to drawing directly onto the screen.
hope you get an idea of how it could look.
Would be extra work drilling the holes for the rungs but would look a lot better than just a ladder.
This was supposed to be a quick project!!!
nice sketch chibi, have you considered using staples for ladders, i use them on foamboard for simple orky ladders. the are quite effective for that rustic look. , other wise the ladders look good mate. but moulding is a chore.... you coud grab some from one of the many bitz shops online though
Staples sounds good Neil thanks, and I may well use that idea in places. eg on the support columns.
I still like the idea of more substantial ladders in certain key locations, but your idea will cut down the work immensly
The moulding will only be simple push moulding so it is not too bad, but still time consuming.
What size do you use please?
I need a good heavy gun for stretching canvas so now I have even more incentive for an investment.
sorry mate not sure the size, but it is also a heavy duty stapler, although i was only cheap from a hardware shop. i got it to recover some chairs. i bought two different sizes of staples , and one didnt fit so , i will have a look tonight mate. there is a pic of the ladders i am talking about
http://www.dakkadakka.com/s/i/at/at2/2010/11/15/7a1a8b959e842fc85ea8eeab0acaddc3_34119.jpg
Been thinking about it Neil and my original concept may go bye-byes.
While it looks to scale it will be too big if that is not too much a contradiction.
In the Underhive they would be fine, but they take up too much space relative to the available wall space on the terrain.
Thats a shame because i really like the block style you were thinking of, maybe you could cut smaller foambard cuboids and then add staples to them. either way its a really nice design that screams brutalism and utilitarianism, exatly what i would expect from a hive. But i think the simple staples are are an effective and quick way of achieving the same look. never found out the sizes though. a few broken rungs might look good , i wanted to do that , but never got round to it
That is so grim
I'll be having nightmares but a really helpful image thanks MoD!
The flynetting looks very useful so will probably order some, if the Anonymous Hackers will let me!
The problem with the garlic netbag is that it is distorted from a flat plane. The fly net will be better to use.
Looked for ages the other night for something suitable! If only I had thought of that!
Thanks Robot.
Will try and do so.
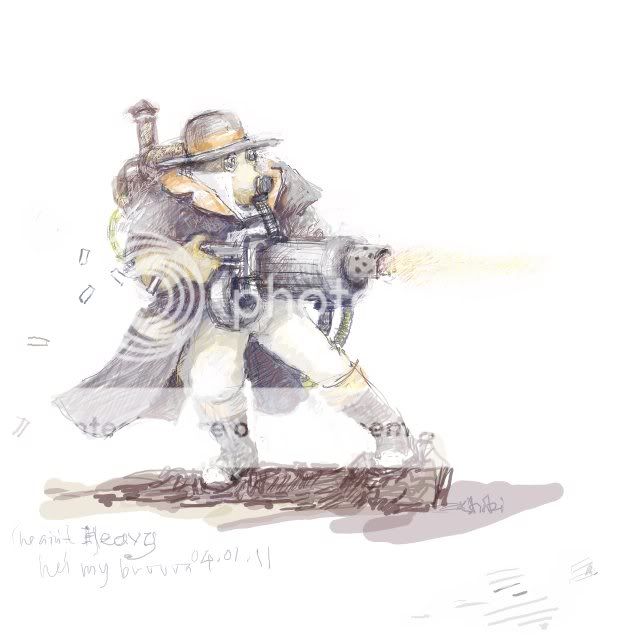
Here are some concepts for gangers meantime.
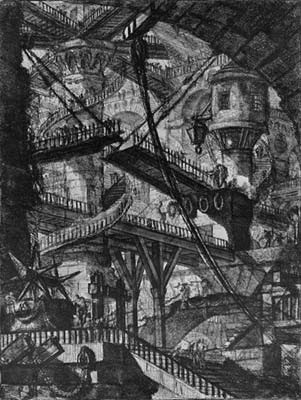
Nice artwork mate, was also looking for more inspirational pics of necro style terrain, and found these not mine..
and this from one of my fav movies Dark city. i think these guys are very delaque
i'd suggest going into a DIY store and taking a look at the plastic tubing and polystyrene bits a lot of its very good for this type of stuff and far cheaper than the made for modelling stuff.
I have no transport and there are no easily accessible DIY stores where I live any more :(
But not to worry. Am a bit of a Womble so can be quite resourceful.
Made a quick ladder last night just to see how it might look.
After a rummage for a suitable mould to put the clay in I found an pair of compasses' box, which is a much better depth. Also had a brainwave to use some clingfilm to make it easier to get the clay pressing out of the box in one piece.
The ladder is simply GW sprue glued to some plastic card.
I levelled off the clay using the metal rule, and inserted the ladder. The rule was again used to get a level pressing. The Lid worked well also and left a nice groove either side which was an unexpected bonus.
Left the moulding to dry off a tad then removed from the compass box tray. The cling film worked a treat.
left it to dry out then added some cut and bent paper clips for the rungs.
Used some GW sprue as a spacer for the rungs to project equally from the concrete.
Also added rails at the top.
What do you think guys?
Am quite happy with this though will probably make some simpler ladders too.
My only concern with the two I have started is that they are made of Das which doesn't fire or get as haed as the polymer clays, which I shall try and get tomorrow as am out of Das clay now anyway.
WOW they look Fantastic! right i am nicking that idea! so simple yet so effective, thanks for showing how you made the ladders i have never moulded anything before, but these look great ! and simple. imo i think they look more 40k than the ones in the kits! not sure what you could use for a walkway if your still planning on doing that though.. will have a think.
oh please do show us what you can acomplish with fimo for wargaming...i´ve lots of that suff liing around the house...
the ladders look super cool, i love them...they look the absolute real deal...aslo i think your first try looks very scenic and the brokne steps are very authenic looking...
Not been able to do anything recently
Failed to get Fimo at the weekend so ordered some from an ebay seller.
Who then claims the snow is still disrupting distribution, which is not good as more is on the way this week.
too tired to do any drawings but have some ideas for figures.
Hope I don't forget before getting them down
cool mate, thanks for the info on that artist by the way , i love his other romantic italian ruins as well , i particullarly like his bridges and viaducts!
Thanks Neil Gratifying to think it that it was inspirational. From the sublime to the ridiculous...
Bought some drinking straws today for 49 pennies. "And but so?" I hear you say derisively, "What of it other than they are in lurid florescent plastic?"
Ah but they are a metre long! Goodness how the bloody hell you are supposed to drink out of anything other than a bucket or a swimming pool with them, but I thought they might make for good pipes!
No they are straight Vik
The lack of bendy things is why I can't figure out how you can actually drink using them.
Unless the drink is on the floor and you stand over it.
I was thinkong that the pipes could run under the walkways. What do you reckon?
am afraid I must confess to being heavily involved with that discussion I would fill the zig-zags with filler tbh
under the walkways and along the walls i´d say good sir...i would however do the occaisonal joints so to break up the too long and thus boring getting look...
not directly what i had in mind but close:
Quick update: Have finished making a couple of ladders. They are still a bit soft because of te type of air drying clay used, but after a couple of coats of Klear the surface has bound pretty well and should be ok.
Just thinking about how best to attach to walls and allow rotation of the wall sections. magnets maybe.
Energy levels after much needed housework allowing hope to start a few pipe insertions *oo-er* as a break from rung making
Hey dude....arrrgggghhhhhh Saturday morning house work.
To catch up....I love the Delaque concept sketches.
The ladder is clever and looks good... excellent use of paper clips.
To connect the ladders magnets would work but since you are using polystyrene maybe just have some pins in the back of the clay which you can push into the walls as and where you see fit? (that might damage the building over a period of time though).
How can you not have enough energy for pipe insertion...we want to see a good pipe insertion (I reckon we (the Dakka community) can keep this going for a couple of pages )
We have to think about the kids Peter. I don't want to cause blood shed at the library. We don't really care if the kids hurt themselves or not, it's the subsequent paperwork we like to avoid!
I was thinking of pinning covered by a small diameter tube to cover the metal Then inserting some tubing into the polystyrene to protect the otherwise fragile hole. hope that makes sense.
Ah yes I forgot about the Children...I often forget about children. Or at the very least avoid them....shame my job involves lone parents I understand about avoiding paperwork and I imagine, having avoided it thus far, that dismembered children involve a lot of paperwork.
When I said pin I didn't actually mean pin just the act of pinning. Depending on the weight of the clay paper clips would make fine 'pins'. Your idea is kinda what I was thinking.
Magnets would be the easiest allround solution imo. i have seen a few online stores that sell the tiny ones for modeling , i am sure a batch of these would come in handy.
our teachers used to throw chalk when we got lucky...a whole set of keys when we were not so lucky and the ocaisonal pulled ear as a short version of a enpasent get-told...
why do i get the strange feeling i will see a monty vid in the close future?
ever nutted a keyring with lots of heavy keys on it? well that was something we looked forward to...rubber...tststs... still wet behind yer ears ye are and callin schoollife difficult, are ye? Lucky are ye...thats what ye are
That is a blackboard rubber Vik!
Hits you on the noggin with the wooden handle you get brain damage and/or potential aneurism.
and a slow lingereing decline into madness and death.
Hits you on the noggin with the soft felt part and you suffocate in the cloud of fine chalk dust particles.
and a slow lingering death from silicosis.
The above options are not mutually exclusive as you may be hit enough times over the course of your education to have a 50/50 spread!
We'll be the judge of that .. be careful or we will turn chibi's wonderful thread into another inuendo filled weety's! and now she has turned to the drink to escape it all
Get those kegs over the lycra and leap tall buildings in a single bound Monkeytroll
Hope to get a couple of pics up tomorrow.
Made slow progress with housework and pipe insertion Moderate success with some magnets on the ladders but am fairly happy with the way it is going at the moment.
Now behave yoursleves you lot before I start wanging blackboard rubbers and keys atchya!
You're going to sit there and tell us about slow pipe insertions and then tell us to behave
How are you attaching the magnets to the polystyrene? You putting a thin layer of plasticard over the top to keep them in place, or just several coats of pva?
Popped in some magic sculpt where necessary. I have coated the polystyrene with a mix of universal filler and PVA so there is a crust on top. A couple of the magnets were simply pushed in and collaosed the surface into a crater. It was okay just to use some CA to attach the magnet.
hehe
Can't remember who suggested fly net mesh for the walkways, but it arrived today and looks to be very promising.
Looks like it will also be good for metalic mesh flooring too.
Under £4 delivered should be plenty to keep me going for a while.
Hope to have some photos soon
Thanks again for all the interest and keeping me company on the project.
Still wracking my brains to think who it was who tipped me off about fly mesh
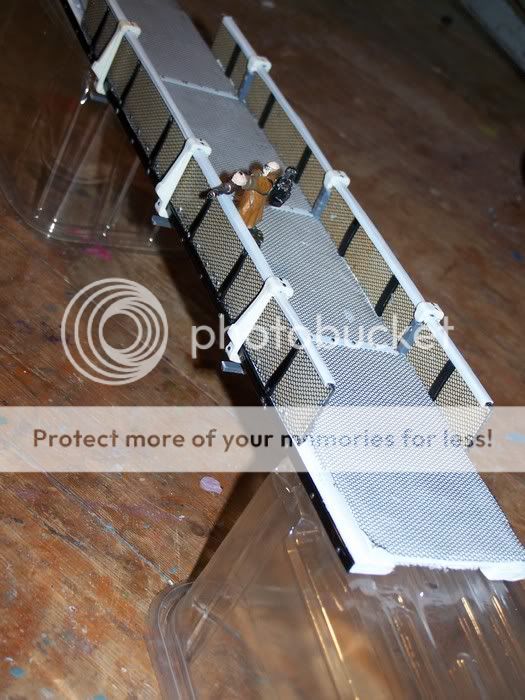
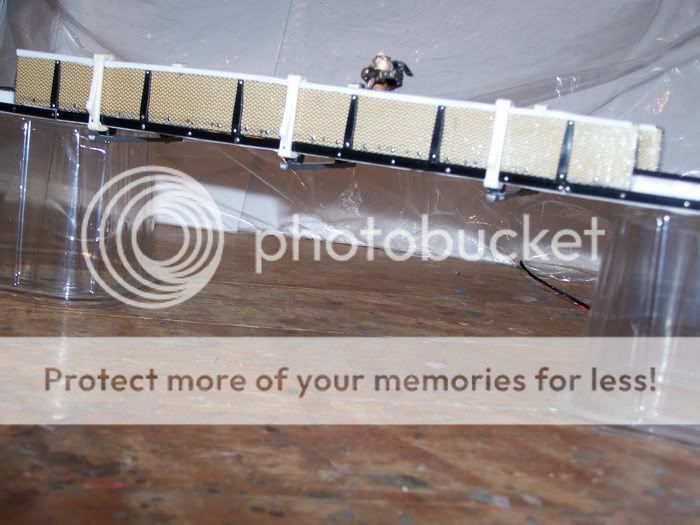
A few pics of what seemed a lot of work for little change for some reason. Took longer than I wanted to get this much done. Have pinned the ladders as well as using the magnets which did not work wholly satisfactorally tbh.
Was wondering if the terrain could double for Anima Tactics as a sort of Wissenschaft type place, but the vibe would be totally different imho. Used XII for scale in anycase just to see.
added some pipes as can be seen but not worked out the ladder position on a rotation of the wall. That will have to wait.
the pipes look lovley...no cnat possibly write that...cool!
thats exactly how i pictured it to be...i think your on to something big and cool here.is the little black plate on the second pic some structured special plasticcard from the modelshop? looks also really cool. this will be a very good and fun pice of terrain to play on. your libby kids i only can envy.
The black plate is from a pack of pads for sticking on the bottom of things to stop them scratching the furniture! Have seen a better value set in the poundshop. Same price but all the pads have a suitable anti-slip texture on them whereas thie one I have for now has a lot of felt pads. Most are circular on the other set but will be able to use for bases and manhole covers etc.
Only downside is that they are on a spongy material but will work ok I reckon.
The pipes are made of sprue wiyh the bends made out of an inner core from TV aeriel cable. This is a nice bendy plastic, and once you take the copper wire out, you have it pre drilled for a pin. Also the rubber outer sheath can be cut into rings for the mating plates. I also used the same for the ladders, by sticking the sheath into the polystyrene with NoNails glue, and the inner tube over some paper clips. I split the sheath length ways so the pin could go in and out more easily.
Have had an idea which will try to illustrate as soon as I can.
Also, mentioning manhole covers, what about manholes that gangers can go down and pop out somewhere else? It would be a great way of getting around and could be used as a sort of deep strike eqivalent/ WHFB miners etc. But there would have to be a risk involved. Who knows what may lurk in the drains and tunnels of the Hive? Yikes!!
Wow looks really good Chibi , you have turned a piece of junk meterial into a peice of art, your pipes and ladders are drool...
great work mate, the paint job on that assasin fig looks very nice too. and in the spirit of christmas here is a nice present.. this website has inspired my art for about 4 years now , i think it is time to share..if you havent seen it already he has some amazing pics of abandonned factories and buildings, the rust and junk are really great and his photography is top notch. happy browsings mate..http://www.abandoned-places.com/
hello chibi, jep thats for sure a good find to use these suitable anti-slip texture pads. if your in search for other technical looking textures i recommend the sweetsection of your local supermarket. try pralines . they often have waffellooking textures for packaging materials, you know the golden or clear looking plastic forms where the sweets are waiting for you to get devoured by you...my wife sometimes likes some local ones here in berlin and surounding and they have perfect hatchholesstructure... will take a pic in the morning for you. i have collected quite a fiew of these materials and will use them in the future too. as i have written here somewhere when i go shopping the actual tour through the market takes me a good deal longer as i always picture the objects seen in new paintjobs... i recently discovered a bottle/cup for cold capuccino...is really multicurved and looks really good for supporting structures with a twist in simple forms...
Know what you mean Vik
Have some similar packaging but the texture isn't quite right. With Christmas coming up though...
The one I have at the moment however will make excellent cobble stone sections for other projects and have cast some resin bits as a test. Will try and get some pics done too.
Neil that photo is very timely as I will explain later.
Not looked at the website just yet but already licking me chops
I think the modelling is probably finished until after Christmas. Which is a shame as the momentum is getting going. Hope I will be able to pick it up again.
Have some ideas and will try and get some concepts done.
well, saturday we went to our favorite friendly swedish frurniture warehouse namly IKEA, wenwent through the lower section instantly and there in the midst of the bureau section i discovered this:
i asked my lovely wife if i might buy it and she actually said yes! i wasn´t prepared for this^^ i have recently played with the material a bit and recommend it strongly as it is a flexible hose that has paralell rings instead of the ususal spirally ones normaly found. i have yet to find a good use, but for your underhive terrain it might come in handy...
Yeah, check out that website Chibi, there's some awesome stuff on there. Just picked up his book Abandoned Places 2 for my Mum's christmas present, unfortunately it's sealed so I can't have a preview before I give it to her There's several UrbEx sites that have great reference pics for necromunda terrain, as well as several books. I'm totally in love with Beauty In Decay, which was originally bought as a birthday present for my Mum, but which I ended up keeping for myself, some gorgeous pics in there (It's OK, I replaced her present with Sumo by Helmut Newton, which I found had been re-issued in a smaller size with a smaller price tag )
All those pipes are excellent(ly inserted). I really like the under hanging pipes...it just makes the building come to life. It is often the small details that make models pop
Hey Chibs , i have another Urb ex site , this one is bigger but less precise http://www.forbidden-places.net/explo1.php @Monkey i didnt know he had a book out.. are they any good? is it different stuff from the website , or more the same? and obviously you and your mother have good taste!
As far as I know he's got 2 out, Forbidden Places and Forbidden Places 2. I'd imagine a lot of the stuff is on the website, haven't seen the first and I don't want to break the shrink wrap on 2, so I'll let you know after christmas
Not sure if I should post this but what the heck
Just quickly cobbled together I was thinking of a gunky pool with debris, fallen masonry and stuff best not mentined in case antone reading may be about to eat There would be "stepping stones to get across but best not fall in and goodness knows what mutant beasties lurk therein.
Will try and get something better done over Christmas.
Also thought of discharge pipes in the wall section.
couple more gang concepts as the idea slowly evolves.
Needs a lot of work and am hopeless at choosing weapons and equipment
will worry about that later but may require assistance.
looks cool, the pipes sticking out of the styro wull look really cool and add to the sewer/ underhive look so well...
aslo could you show us what kind of tablet your using for you artistic sketches? i was long ago longing for the buy of one of these but it got postponed into oblivion...
I just use a Wacom Bamboo one with Gimp software
basic stuff but enough for my needs. I thought it would be a waste to go for a more expensive tablet.
Am slowly getting a feel for it and it is becoming more natural to use.
Gimp is free to download so I can't complain about that! It is possible to do a lot of stuff with Gimp (oo-er) with just a mouse.
i use gimp whenever i need to do some graühics on my pc. how much did it cost you? i know that company and indeed i was going to purchase one of them in the future...i think your doing very well with it by the way^^
i will get into a search myself and will see what i can salvage for me^^ sometimes i get lucky...would you actually suggest buying a used one too, or would that be a bit daft as you never know how much it was mistreated? it is a rather frail too so to speak...
Before I forget Many thanks again for the interest in the project and the encouragement.
There is a good buzz going on around some posts imho As I will be signing off soon for the hols I would just like to wish you all a Very Merry Christmas and look forward to seeing more of your excellent projects when I get back!
No probs Vik Hope you get a good deal when you manage to get around to it.
Haven't done much since getting back except for preping some sprue for pipes. Didn't get much drawing done either over the hols and will keep the pool in obeyance as the main walls and walkways need sorting first. Still keen on the idea but have a lot of other things I want to do as well!
Will try and get some stuff posted soon. Am doing some sketches for a Steampunkish gang. Going slightly mid-nineteenth century influence with a hint of the Wild West as that is the vibe I get from Necromunda !
the art is outstanding. really looks mole like as i recal you wanted it to be...one thing tho, i would add a cable to the gun. the backpack is for its energy or rather life support?
but i guess since it is a revolver gun there is no need for a powercable...
Hi Vik
Great minds think alike I just sketched a stub gun for this chap but will be adding cables for Laspistols/guns for sure.
Have just been imagining a burnergun with pipes too.
Am going to have a sort of sawn off water cooled Vickers for the Heavy might replace the belt feed with a drum though.
Standard back pack will probably be life support I think, as the underhive is not a nice place to be!
i just had a "bits flash" as i read about that wicked vickers,... there is one heavy gun in the aobr orks sprue thats looking like a vickers if i recall correctly... i love gatling and vickers, i might have said that sometime ago^^ (actually i lkie to come up with that as much as possible...^^)
and burner gun would be a good choice as in colse quarters a flamer gun works wonders i would guess...
by the way like waht you did with the light colored touch you did, warms the pic up a treat^^
i am at a totally loss of motivation...that guy...whoa no, now my motivation has to double on my projects, heck he even scratch built his men models...out of papermache`...
lol You have to be careful with them, they are fearsome wee beasties!
Had Vegetarian Haggis for New Year! yum yum!
Glad the link was of interest, and such good fun too!
mini update: Have put some insect netting on the foam board walkways. Initial results while it dries is promising. A few patches where the glue was a bit thick may cover the texture, but hopefully it will allow for some wash and drybrushing to bring out the detail after priming! Was a great tip off thanks Vik!
When I visited Germany,the concept of vegetarianism consisted of insisting on the inclusion of finely chopped up meat!
I see, so I'm the guinea pig with regard to the insect netting!? Will try and get some pics up soon to show you how it is going.
Am concerned about making the railings robust enough for over enthusiastic youngsters! But I think I may have a solution and in anycase, breakages could always be treated as battle damage!
chopped meat for veggies^^ lol... there are some food lies i know of that raise quite some neckhaires for me...pork in beefsausages....and my sis told me her boss tended to make gulasch (hungarian dish) normaly made from pork with chicken liver...she learned to be cook and her boss made the gulasch in the cellar and one day a customer complained about the chicken liver in it...seriously that could get you out of business...so vegetarian food with meat...omg some people ahve somefuzzy ideas...
and if your indeed a begetarian then the term guinea pig is somewhat fitting?...lol you have to know i am a big time meatconisseur...
lol I got the impression that eveyone in Germany is a connoissuer of meat!
Seriously, we had a lovely salad for the veggies in our group one evening, served with plenty of mayonaisse...
and garnished with finely chopped ham!
Also in Stuttgart a dish claimed to be vegetarian had finely chopped pork which i didn't discover until it was too late!
well i think it gets better, but normaly i would only think in a vegetarian salad there would be only walnuts and stuff like that...*shrugs* my wife was a former vegetarian up until she met me^^ i only would give up eating meat when i had to hunt it myslef...couldn´t bring myself to even kill a fish...less a bird or even a pig...i had a hard time when i saw that piglet babe movie...about two weeks no meat for me...well eventually it went back to normal then but ...
but the good thing in germany is you have the most bread and bun range in the whole world...öast time i heard about 3000! different sorts...so that is a big achievment for your taste...are you by chance even a lacto vegetarian? then the mayo would be an afront too...man they really didn´t want british vegetarians to stay too long here^^
cheers mate, i´m off to some wee hours of sleep^^
have yourself some too^^
A quickie that took too long so am calling this sketch done Though it needs a lot of correcting and may get touched up if I can find the time and energy
Great stuff Chibi , those sketches especially the last is great , very dynamic , like the washed out faded look too! looking forward to seeing what range of minis you might use for this project? i have been scouring the web for distinctive minis for my next project , and i may have found some that you could use . will post pics if you so wish!
Automatically Appended Next Post: @ Monkey Cheers mate might have to add that to a long wish list now!
and just a short hour before login here i watched a tv magazine that showed a new site of you brits... the felsh eating part...
they hunt grey squirrels that ruin the red squirrels enviroment and then they get made into pastries...ohoh... is it still time to convert to your religious eating habbits? but to tell you the truth, the meat looked yummy...omg...i´m such a jerk sometimes...
some of them can be quite agressive...when i was a kid one of these small ferrals ripped a garden chair pillow apart for the flowers that where on it...
but shooting them i wouldn´t be able to do that...
once i saw my granddad shooting a small hazelmouse with a slingshot. i dont know what he wanted to achieve, but when he killed it, the man was about to become a wreakage...and mind you he was a vet from second world war and fought in russia and in half of europe so he saw quite harder things...but he was all tears then...
Have been making slow progress, but at least it is progress.
Will try and get a pic of the first section of walkway to get partiallly assembled to see what you think.
The insect netting generally went on well with some PVA Vik, but I have some bumps here and there. This was partially due to the artificial lighting and the creases in the the netting.
If you try using it apply the net in good daylight as it is easier to see any faults.
Am pleased with the effect it has produced so far. Just hope when I get around to priming and painting there will be sufficient texture. Am confident it will be okay.
well if you ever want to make a life sized version of your mole gangers then i think you should use this here for reference:
well obviously modified but the general idea is valid i say^^
i will digest that gathering of presented sites in a long time, cause it is a odplex of new things to pinch inspiration from.
thanks for this great find!
and concerning working in day light, i never had a hobby that was producing so differently outcomes due to light-related issues as painting and modeling...
my wife sews as a hobby and for her she creates evenly good outcomes in artifical and natural light...
she should as she suffers a bit from lack of sunlight when winters time but normal even crappy sometimes work. and when shes knitting shes nearky working blind as shes mostly watching tv^^...
Nice Munda terrain, It's given me the idea of chopping a regular pipe in half and putting grate flooring across it, with large imposing metal doors at either end. The thread has also given me the inspiration to build an underground nuclear/fallout shelter so thanks.
She's not a cat, shes a mutant monster thing from the bowels of the UnderHive!
Sometimes I think that she is worse than that!
Thanks SantaMan.
Get to it! Don't forget to show pics!
Vik
Apparently those bulbs do help allieve SAD
On with the show.
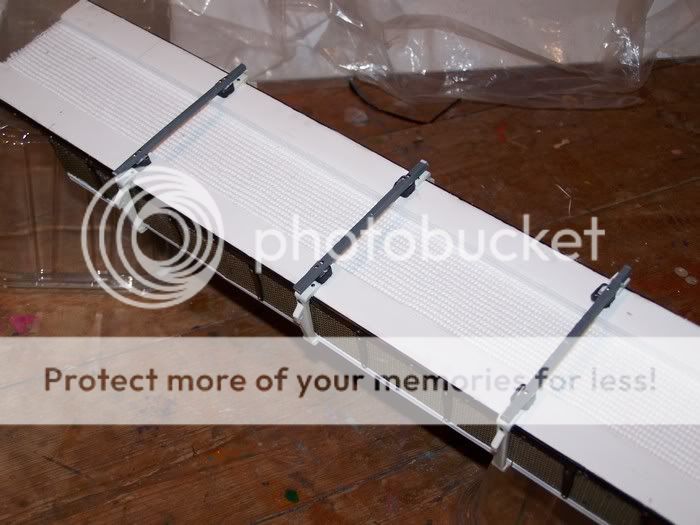
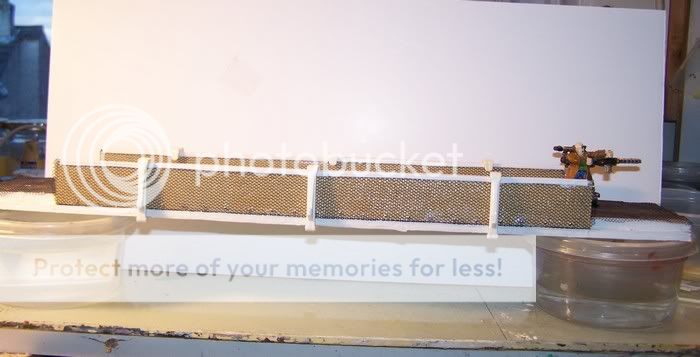
A Little update as promised.
Have enough materials for now to get another 2 walkways to this stage and will then detail them a bit more.
I pinned the walls so it looks like rivets, but was not concentrating as I meant to add a strip of plasticard first. never mind At least the concept seems to be working and it seems sturdy enough at the moment.
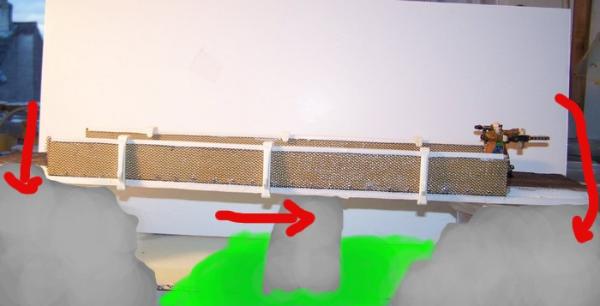
Still uncertain about the bridge ends so that is why there is no barrier to the end as yet. May need to keep it open or have a different style of barrier where the walkway connects to the wall sections.
Will take some photos with the wall when I decide what to do.
As ever comments welcomed please as long as it is about the terrain and not the cat!
I really like the walkway...what have you used for the uprights on the handrail?...hang on are they curtain hooks rail thingies*?
Having walkways with cover might mean you get to game about ground level too.
As for the ends...you could leave it so the wall sections don't look odd overhanging the buildings....and you'll want a good overhang so the bridges don't get knocked down easily.
That indeed is the correct technical term Peter! Think they are called curtain hooks.
The idea popped into my head as originally was just going to use some plastic strips
The hand rail is part of a margerine tub that the lid snaps over.
pretty much what I was thinking too regarding the overhang but it depends on how they will connect which I haven't decided upon yet.
Thanks Chaps. Insect netting and curtain hooks, bit of a drapery theme starting.
Forgot to mention. The walkway is made of foamboard and the barriers are cheapo poundshop self adhesive floor tiles cut into strips and doubled in thickness by sticking the sticky sides together.
whoa that walkaway looks really awsome, when painted it will truly rock^^
Apparently those bulbs do help allieve SAD
is that a typo or am i to dumb to understand, translation didn´t help me here...
and about your problem, i seem to have reached a point i don´t understand tech bable (sorry but was a bit to complex cause i dont understand the problem here...)
maybe a quick sketch as you want it to be looking?
SAD + Seasonal Affective Disorder.
Something to do with the lack of sunlight affecting one's moods.
Alleviate means to relieve or lessen the effects of
I think I made up a new word (Allieve) I meant alleviate Vik, apologies.
With regards to the problem, is that about the barrier?
The barriers are shorter than the walkway.
Am not certain as yet how the walkways will be supported against the wall sections.
They need to connect in a way that will keep them in place as the kids are going to knock the structures at some point.
They may overlap onto the wall structure in which case the barriers can stay as they are.
There is still a posibility that they may butt up against the structure in which case a barrier will need to go the whole length of the walkway.
Sorry for speaking poor English today Vik and hope that is clearer. Product of an addled brain!
ad·dle (dl)
v. ad·dled, ad·dling, ad·dles
v.tr.
To muddle; confuse: "My brain is a bit addled by whiskey" (Eugene O'Neill). See Synonyms at confuse.
v.intr.
1. To become confused.
2. To become rotten, as an egg.
well, one thing first here, it was me i meant to have a bad english day not you paul, my wife tried to talk about something important with me about certain documents and forms and i understood zero so i have a case of
2. To become rotten, as an egg
now without wordcreatings... (really imagine a froeign language and then someone hits you with orcish...seems to me i will never understand orkish...)
i understand your comment about those bulbs good^^
yep they are ment to help, just the average bulbs wont do, i saw once a device for that for nowegian kids to use to counter the effects of SAD in their dark season...
was some years ago and it sounded pricey to me...
have to check those out some day now...
concerning your question about the walkways...
you basically ask about how to put the walways to the wall/rock sections of your terrain? i think cut out some needed parts to install the walkways and then use liquide nails to let it stay in place...also didn´t you want to use your coneshaped pillars? after them i think it will be secure enough?
by the way i think curtain hooks are cool, i have a bag of them and i am currently on the lookout what to do with them so nice idea^^. my hooks have small wheels and they look really good and i have to use them just for their own good^^
The curtain hooks I used also had rings on. Sadly half the circle is flat, while the other half has a round cross-section. Except it is a D section because the flat and round swap place on the rear side! Hope that makes sense. Anyway they had to go, as did the arrow clip thing. Also had do use the Dremel in the top hook to make a better fit, and also remove part of the bottom hook so it would slide into place. Luckily once I got into a pattern of working with the dremel the modifications to the curtain hooks wasn't hard.
Have found a stash of margerine tubs so will get on with more barriers probably on Friday as tomorrow I want to try and get to the library.
Will also try and take some pics soon for some walkway options. Have a couple of ideas includng the concrete cones Vik
well as always its about sharping the saw... once a pattern is established and one hasn´t have to think about how to do each step work will flow in a steady and faster way...
i know of that pretty well as i scored and folded about 50 small playcards in different ways for stealplating the hull of my airship...and i couldn´t do it in like 5 together way so each one after the other...quite unnerving me^^
the D-shaped rings sound interresting... maybe tehre is still a use in them for widows or such thing?
hope we will see some pix soon^^ i just love seeing your wip^^
Have made a bit of progress on the walkway and made some small inroads on the others. Will hope to have some pics to show and have had an idea for the walkway nodes
(ie the transition from walkway to wall section)
Automatically Appended Next Post: Just watched this courtesy of BoW well worth watching imho
Automatically Appended Next Post: Quick sketch
Thinking of having "pillars" that the walkway can connect on using the same plugs as I used on the ladders.
The pillars in turn can plug into the wall sections.
This will allow the pipes to have something to connect to, and also I can have walkways to connect on top of soft fruit punnets.
Managed to push on a bit more with the walkway, slowly getting there.
and some work on the underside.
Just need to consider how to attach the pipes if I use the drinking straws. If it was a diorama there would be less of a problem, but storage, putting the terrain together and taking it apart means they need to be robust.
Drinking straws are not noted for being robust!
what about filling the straws with something like PVA or plaster? would that work? it would be like casting but after that you simply let it inside...would bring you a hell lot of sturdiness then. besides if you go for robust because of storing the pieces then i think you gain another point for realism...because you not only think about what looks cool but also what works and conserves best. anybody from constructionsites can asure you no one goes for cool on a site^^
looking good by the way your undersides of your walkways.the netting looks really good even now and will look a whole lot better when primed and so forth...
Was thinking of something along those lines Vik, but not sure how to pour the filler. Could always suck it up the straw and risk getting a mouth full Might end up getting plastered!
lol, or you could use these real big syringes that you use for insulating the bathtube with silicone...in fact using silicone would make it less brittle and heavy and also would add sturdyness with fexibility...
and if taht isn´t at home by you, then use a sprue long enough and filed and then simply push the stuff in to the straw...won´t do a pic to illustrate as it would not be familyfreindly then^^
that foam i also have in my cubboard...tho i have to warn you its rather sticky and i think you should wear old clothes while working with that stuff...i ruined some parts of my clothes and soiled the balcony of our apartment while using it.... was a messy job to get all cleared up... i am not that good first try with handywork...more a try and error kind of aproach...
but once the stuff is cured and at its designated place you have one hell of a sturdy thing... i once secured a poster of a bed to the ceiling... the hole in the ceiling was a very uneasy one and gave way to easy so i filled it with that junk and put a nail in it held for over a year without so much as a rattler...^^
Last year was slow for me but not entirely unproductive.
Managed to get some projects finished for the Warhammer Afterschool Club at the local library.
Thought it might be worth posting here for a change of pace.
The DE raider is mine aquired from a friend so no claims for that but hopefully gives a sense of scale.
Some desert rock terrain and Eldaresque objective markers
The Dark Eldar raider is not by me* and for scale purposes.
Crashed Eldar ship
Ork Tank trap
Necromunda Chemical Plant
hope there is something for you to enjoy from my labours
comments welcome and thank you for looking.
the eldar terrain is surley alien...the objectmarkes tho of unknown use look really good and are a nice eyeopener for a game^^
i often saw those desert pillar towers and thought one of these days i have to do that myself...well one day i have to do that myself as you´ve shown us how good that looks!
the crashed eldar ship looks stunning, i am still figuring out or better trying to what you did use for building it... and the surface with thise lines looks classy. straight out of an old sifi book i would say!
i really like your ork tanktraps again a rather simple yet something i haven´t done thing. did you use 1:76 tankwheels for landmines there? geniusidea and sojmething absulutly stealworthy^^
and then that chemical plant....did i have seen that here already? i think so...long ago...hmmm looks awsome by the way...
but no fancy diversion of necromundaen terrain any more master! we need no crave walkaways and ladders and underhive grit of the darkest sort...
if i copy any ideas of your terrain be sure that i copy a master^^
Have been making some slow progress and will try and get some pics up soon.
A friend kindly donated some 10mm foamboard which is perfect for extending the upper flooring. To cover the foam I made a bit of detailing from scrap plastic card and made moulds with that friendly plastic stuff. Tried Das air drying clay but the results are not as good as the resin from the car repair shop. The latter will need some cleaning up and have a fair few pinholes (oops) but otherwise is going to be better. Not as good as I would have liked but not bad for a first attempt. Still have loads to make.
Am making a stairwell inspired by Weety's thread, as it reminded me some verticals would be good. Have chopped up some foamboard that was also donated and will put strips of that plastic strapping they use in tying up packaging. (Obtained from a bin at the back of a clothes shop ) It has a good texture to replicate non-slip metal steps)
Since trying the flooring on one of the wall sets, have decided that the rotation idea will be dropped. There will be enough flexibilty in the system for a variety of layouts and it means I can concentrate on building the thing and will therefore add some extra detailing. Want to crack on in time for half term when my daughter and I can test the terrain in a game or two of Anima Tactics.
Have been playing with a reusable plastic which I intend to use for moulding some detailing.
As a trial I scratched a simple frieze to cover the foam of the foamboard sides.
After a bit of an experiment, it seems to be working okay. There are some pin holes in the resin but they were caused by bullets and fragmentation and nothing to do with me,
honest Guv!
Mock up for the intended use:
They need some cleaning up but I am happy for there intended use to be a little rough around the edges.
Just got to cast and clean up a billion more now!
The flooring and stair well as mentioned in a previous post:
As ever your comments are welcomed and thanks for taking the time to look.
Automatically Appended Next Post: ps the frieze castings are 3" long
that's about 75mm in your money Vik
You do a lot of casting, , i have never tried it ,well except plaster casts back in my youth! i picked up soem rubber you melt in a pan for attempting stuff like this but never got around to using it. You know skirting board balsa wood is great for using as edging. The new setup looks intersetring , the cardboard steel effect at the base of the tower is nice, as is the expensive looking foamboard!
gosh i have to think about unsubscribing now as i get some funny ideas watching your stuff... if i dont compose myself i will loose all time reserved for mundane things like sleep, eating and use of the loo...seeing all this inspirational stuff new thechniques and ideas i get all edgy and could abondon all my current projects...argh...its a devil of a conundrum, either do that and then your not able to do all those nice things seen here and there...semms if i see one more idea in the nxt five minites my head will ****BBBBBBBBBBAAAAAAMMMMMM****
thats waht really happens when people talk aout mindblowing...
that casting looks by the way mighty spectacular and if i may say so the occaisonal irregularity works good on your behalf as it adds that rotten feel of the undehive...
so dont fear me unsubscribing it is rather a new kind of low slow suicideal behavior...
Was really lucky with the foamboard Neil, thanks to a friend who bought it yonks ago then never got around to finishing his terrain projects. Perhaps more importantly, he never really started! It was kindly donated.
As were the squares of perspex.
lol Agree about the irregularity Vik.
I will say it was intentional for the effect *ahem* Whistles nonchanantly with an air of innocence.
Very nice work with the plastic molding for the edging for foam core. I just stumbled on the plastic thread, and I think you have one of the great uses here, making simple edging that is detailed enough to look good, but easy to make. What sort of resin did you use for the parts? I saw you said it was automotive, but I don't recognize it (Bondo?)
Thanks Wehrkind Ii's David's Fastglas, but I guess any similar fibreglass car repair resin would do the job.
bought 500ml yonks ago but apart from an abortive dabble never used it till now. I paid £6.99 but a quick google shows it a quid cheaper or the same price! not bad after several years! You also need a hardener. Paid £2.50 the other day for some. Not sure how that compares with the modelling resins but think it works substantially cheaper, which is fine for this sort of work.
Sorry to disappoint Vik but the quality is a bit more even now Some of my early attempts were taken from moulds for which I made clay moulds to make second generation resin masters in case the hot plastic melted the styrene, but it doesn't so have made new plastic moulds from the original styrene master. Not as convoluted as I made it sound.
hmmmm... i have now reopened the thought process on how to use FIMO in my current affairs in miniworks and now you offer new opetunities here...see above post of mine^^
this sound like a good thing to try...will search out for something along those lines here in germany...
think i will go now to sleep...have to fight creative urges now as tomorrow is a early up day as usual and the kids need a father tahts able to serve breakfast and not sleepy due to latenight endeavors in creativity^^
Well, this terrain blog is coming right along. The Styrofoam bits are pulling together. I like he painted pieces too. I think the cast bit is awesome, by the way. The perfect finishing touch!
Huh, so does that stuff get hot when it cures? I think my old man has spare fiberglass resin around I could get my hands on and experiment with.
Thank you sir!
Not had any indication that it gets hot, Wehrkind.
Did see some fumes off a big lump that started setting before I had finished pouring, and did wonder if it was about to burst into flames!
But no it was giving out no heat.
Word of caution re old hardener. The resin has behaved fine. Worked perfectly well. The old hardener on the other hand would not mix properly and had lumps in it.
It may be because it had been opened years ago, or maybe the cold at some point affected it. The new hardener mixed very smoothly and meant I got less air in the resin while stirring.
hth
Thanks Good Green
Long way to go yet, and lots more detailing and painting in store.
Was supposed to be quick and done by now
Prolly will still be WIP this time next year!
Thinking about the straws for pipes and making them stronger. A simple no mess nothing added no nonsense solution.
Take a legnth of plastic drinking straw.
Slice down the length of one side with sharp scapel.
push gently so the diameter reduces and insert into a second straw.
Am using my hobby time to try and push on with some Anima Tactics figures atm so the terrain has been neglected of late.
However...
Test played a skirmish game called Fear and Faith over the half term with my daughter.
Lots of fun with me on the wrong end of a 4-0 drubbing!
Thought it a good chance to try out the Necro terrain and while it has flaws shows a lot of promise as a playground for our little aggressive chums.
The upper flooring looks like it will need to be reduced in size. For practicallity of handlinfg gthe models it is to obstructive as it is.
Need to organise the steps and ladders but that was on going anyway.
well this thread was way too long dormant for my taste^^ will be good to see some fresh updates mate!
vik
and: well so much for teaching your doughter... she overrun you...see what teaching kids does?... let them stay dumb and we stay on top...*evil snigger*
ah...now i understand...early dice made from bones...got ya^^
but the lady luck is who you needed to pray to, but the more we beseach her , the more she losses interest in us... but if we tiptoe on the edge with the stakes as high as they can get, then she might be there...
Hello Chibi Bodge battle see you often on Neil and Vik's threads, didnt know you had a thread. What a great thread it is to, fantastic terrain mate. Love the eldar/dark eldar style stuff especially the crashed ship. Also like your gangway wip.
glad your still having fun! been thinking of picking up a few anima tactics models myself. Fear and faith sounds like a cool game to play with your kids must beat uno or monopoly anyday
Fear and Faith is based on Ganesha Games engine, and is pretty simple once a numpty like me gets his head around it.
I think there is a lot of mileage in it with the possibility of variation and adapting/creating one's own characters and scenarios.
Also have an the Kooky Teenage Monster Hunters expansion which is more tongue in cheek, and a bit of a wry nod to Buffy etc. So even more fun on the horizon.
The problem is getting all the games played and building/painting everything and now have decided we will have Steampunk Vampire showgirls.
Something else to add to the list of things to do
Anima Tactics I really like as a game and the fluff is good too imho. Some models are better than others but usually good to very good. "Suffers" from having some excellent concept art which the minis don't always live up to.
Not had the chance or energy to finish off any but will try and get some pics up. Not going for brilliant painting like you see on these threads that look good even under the macro lens, will be pleased to finish something that looks good on the gaming table.
The latter are a long way off
Have finished XII as I have had enough and not happy enough to show in public
Have been unable to finish off some BFSP dwarves as intended to the concentrate on the AT figures.
Also need to do some bats as we can proxy the vampires but need something for the transformation.
Have bought some transparent Fimo as the vampire leader can also turn into mist, so will try and get those done at least sculpted for my daughter when she finishes at Easter.
I am not sure how transparent it will be Vik
Doubt it will be clear see through and am expecting something more like frosted glass.
It won't matter for the transformed vampire as long as it is ethereal and looks like she is in the process of popping in and out of corporeality then it will be fine.
Will pop up some pics to show how it goes.
It is part of the Fimo Effects range.
well for the things i have in mind your decription is quite cool...as in cool as icicles...^^ or even as a new way to make forcebeams coming from weapons...add a layer of wash of your liking and your good to go...
The transparent Fimo is as transparent as porcelain.
Was not expecting a glass like finish but was hoping for something more see through and ethereal.
With some careful painting it might work.
My first attempt with Fimo and have found it difficult to work with. Guess am at the bottom of the learning ladder which doesn't help, neither does the fact that I am getting more used to GS these days.
well since fimo is unbaked squishy up to the point you are done with it, it is kind of hard to work with... real sculpting in the sense of work with GS it is not compareable at all...if you want basic shapes and maybe something like scenic bases or like i did sandbags the stuff is quite great...
like my late granddad used to say...for every job use the right tool...
by the way... any more work latley done on your wounderful necro terrain?
will you show us your fimo attempts of bats?
The bats will be GS Vik The misty vamp I tried to do with the Fimo last night is so abyssmal as to be not worth photographing!
Necro terrain is stalled pending other jobs
I agree about the materials for the job. Wasn't hoping for fine detail, the squishiness was frustrating but will use the Fimo for other projects
Automatically Appended Next Post: Misty is being salvaged
Also made her base from Transparent Fimo
Not that you can tell it is see through!
Might giver her a quick prime and paint job
She is too big but who cares.
No line of sight issues and she da boss vamp so is okay she is a strapping lass.
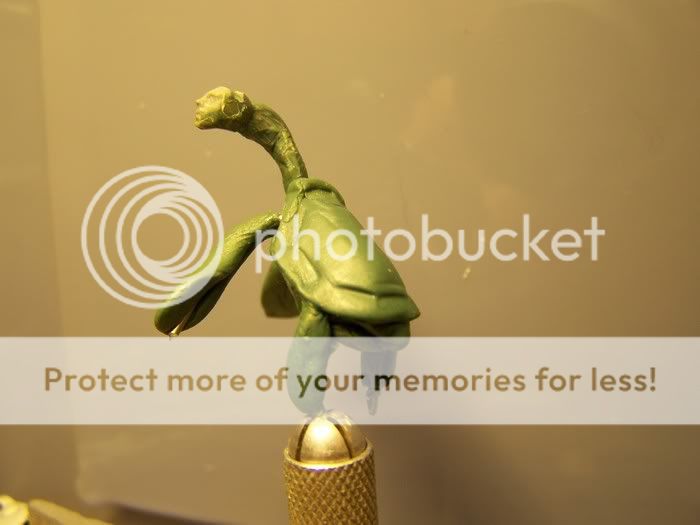
the turtoise body looks great, tho i am not sold on the head...first question, why did you make the neck so long? a nose ??? i would rather use a tau head then insted... but if you aim for a truescale^^ tortoise then i suggest going for a more like this look:
i think this head wouldn´t give you any trouble seeing your skills with GS and also ir would carry the look even further... one must however ask why...? or is it one of those questions that can be answered with a simple because?^^
cheers, and thanks for that update^^...also i just realized that you never got a comment of misty...that auto appending stuff is really crappy...so many things can get lost...
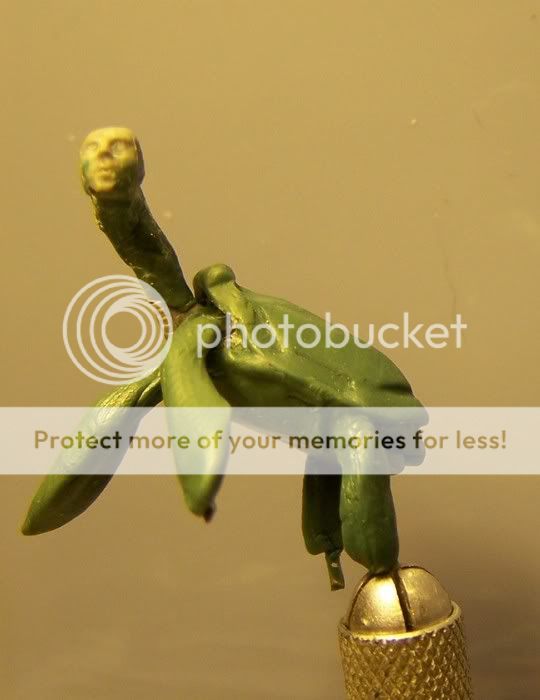
i see, long necks, i have a fleeting memory of some turtules in a sealife something i have seen... the thing i would suggest is give the current head two GS bals as eyes and if you are feeling like it then add just lids (semi open^^) to it... maybe get rid of the nose...as the nose definatly puts the head off for me...is it only me or does the face look like as if it is whisteling a tune?^^
Where the brave, super-human, genetically and surgically enhanced marines in Sooper-dooper Massive Armour refuse to go through the doors in supporting walls ?
The tortoise sculpt is definately interesting. I'm kind of invisioning it with elongated humanish hands, but unfortuatly no mutant sword weilding monkey
Is this just a fun scupt or do you have some game plans for this thing?
lol... made my own downsize attempt at lego marines last year too^^ maybe i should get me those rules and play with my wife in the evening^^ when all the kids are asleep...i think she might rank in the lines of easy rules for youngsters^^
Have done a little more on Sir Terence Topham the Terrorpin, and have some ideas am happy with but more anon.
ATM he has a tash and mutton chops with a very posh topper.
Have finished a few figures not to any great standard but good enough for the gametable (hopefully)
Just need to varnish and pray for some nice weather for pics.
Automatically Appended Next Post: edit. He has a top hat, not his mutton chops. That would be silly.
Oh man, that had me excited for a moment then. I can't recall the last time I saw a good set of muttonchops dressed to the nines, especially on a turtle.
I have been informed on many occassions I am lacking in more than a few departments Vik!
The weather has not been good lately. Will try and take some photos if the light improves. But like they say round here, "Wait for the weather, wait forever!"
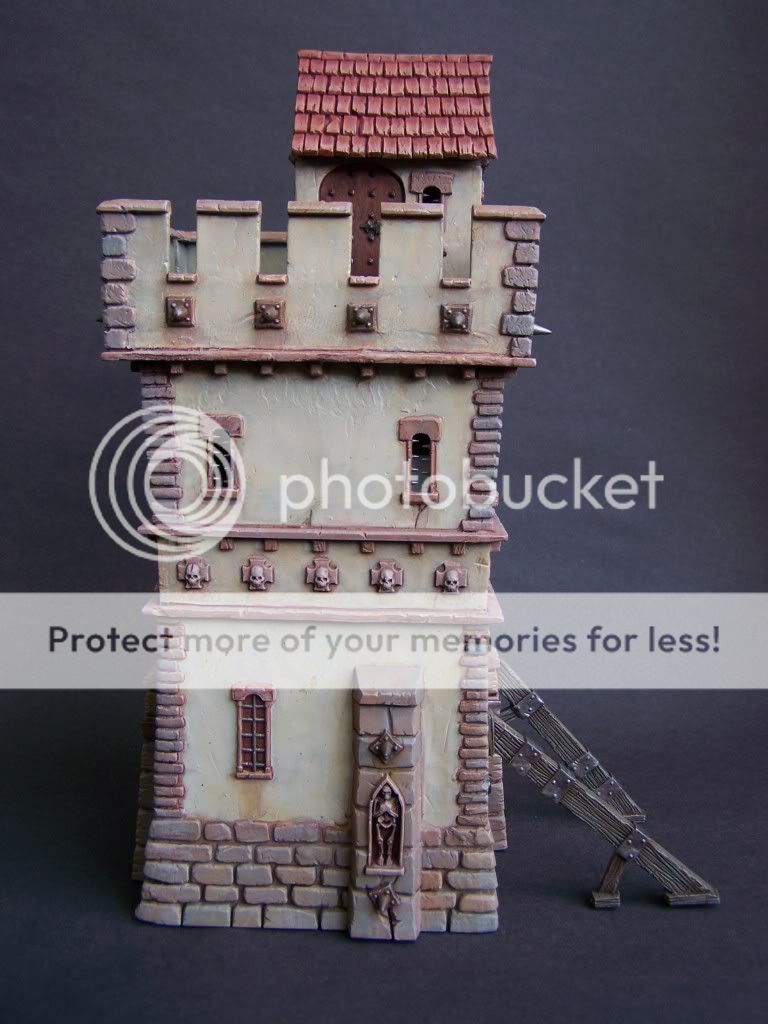
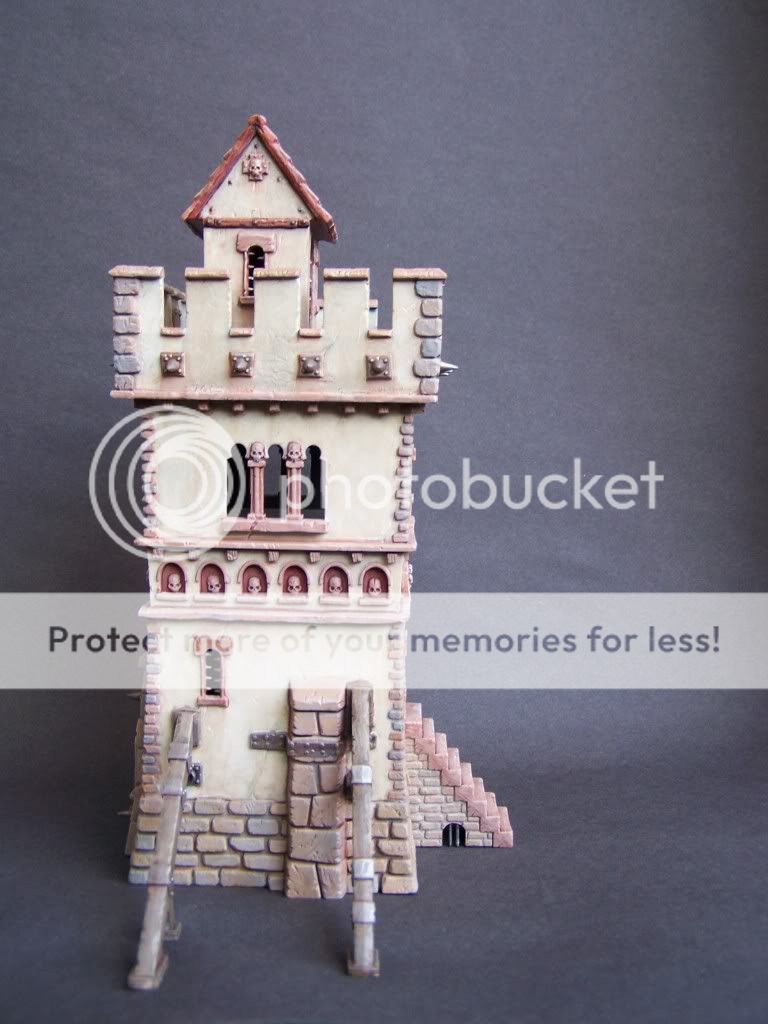
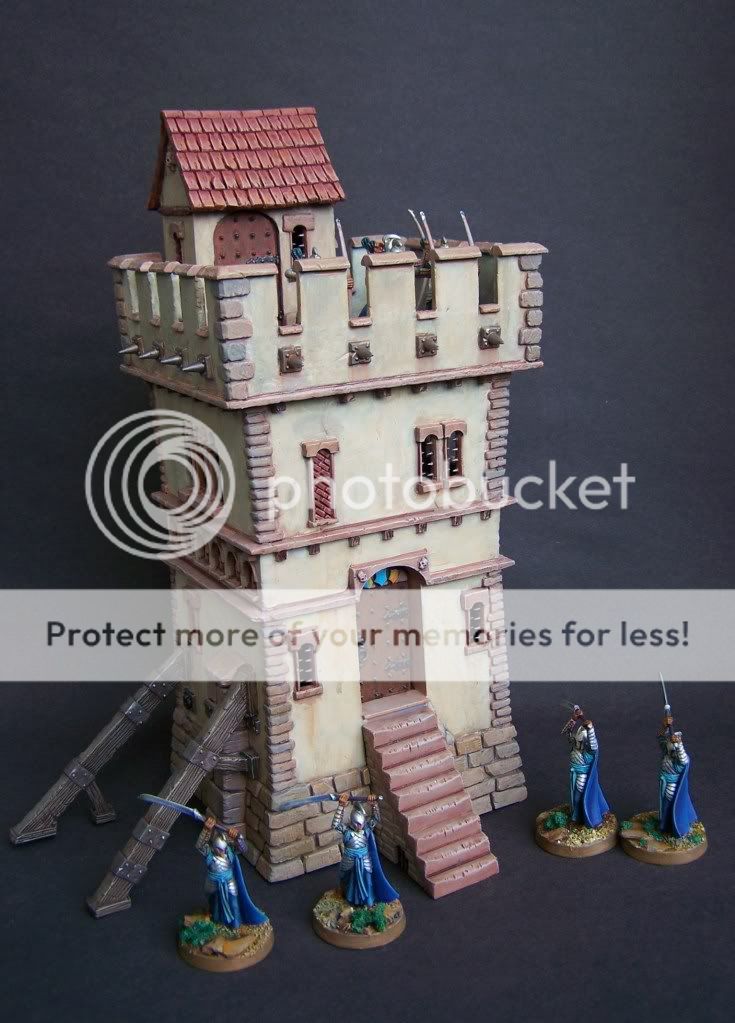
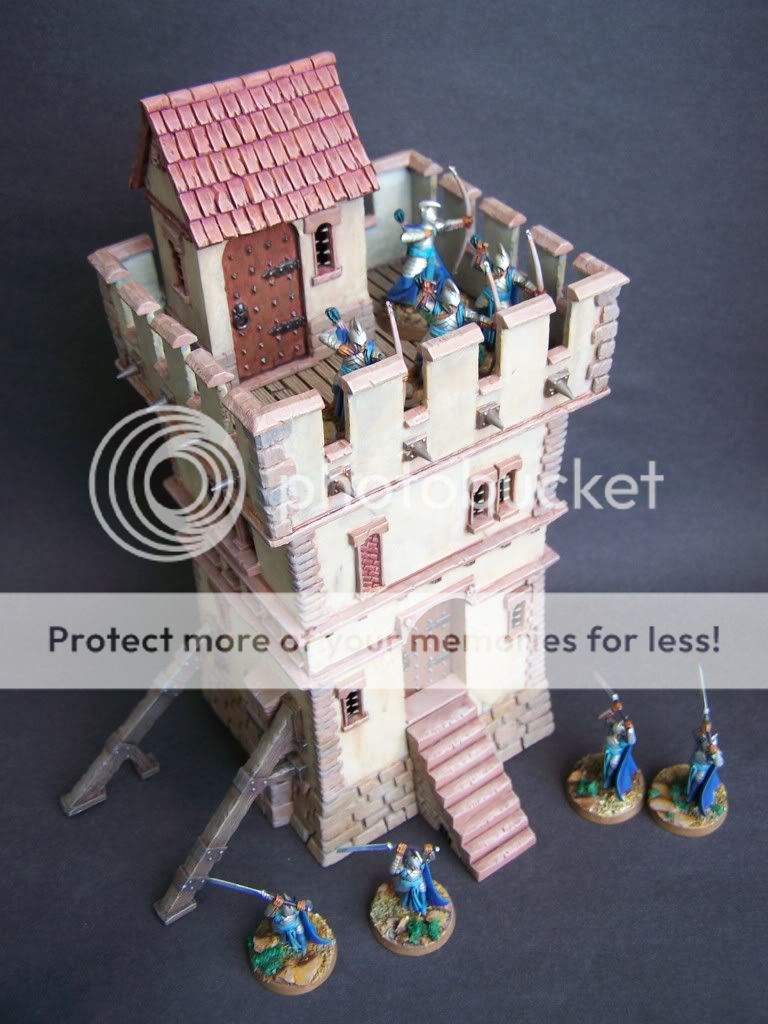
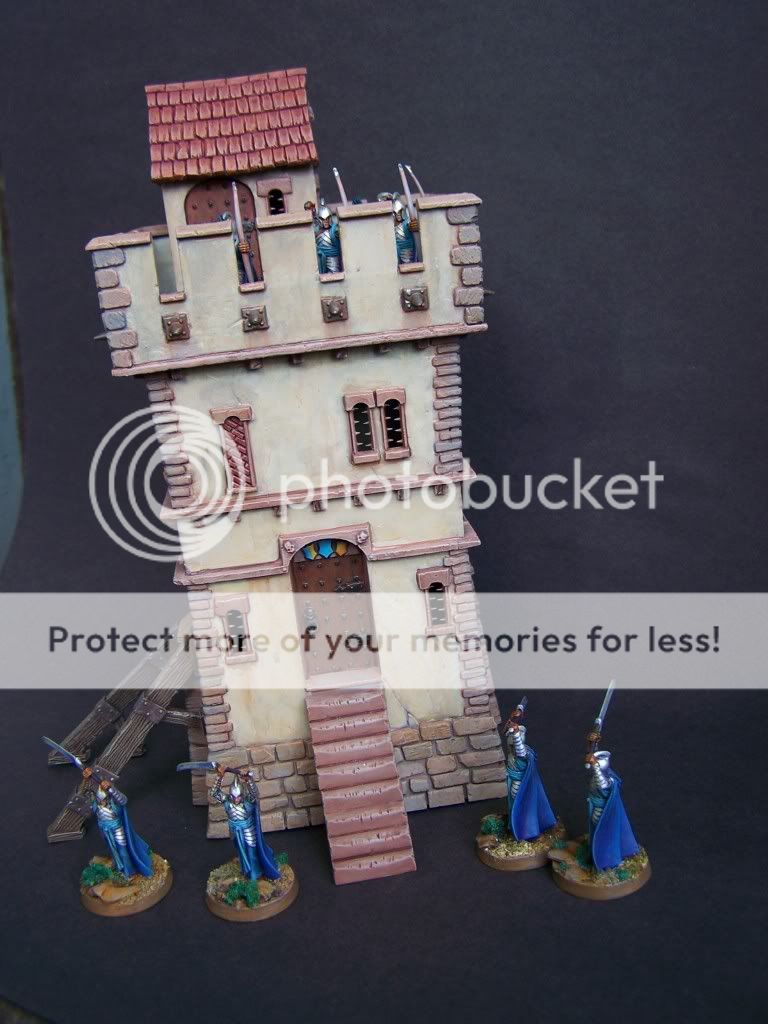
Good to see you back out to play Vik, hope you are feeling better.
wow...do you know that strange feeling when you just have fallen in love with shingles....? sorry usually i don´t use these here :wow but i think this expresses atm quite clear what i feel...
also i just love the toned down tones of the walls and then there are the beautiful steps!!! this is now my favorite of your´s so far! also the woodwork on the shorings is just plain cool looking...er... cool being a fully wrong term but i am speachless^^
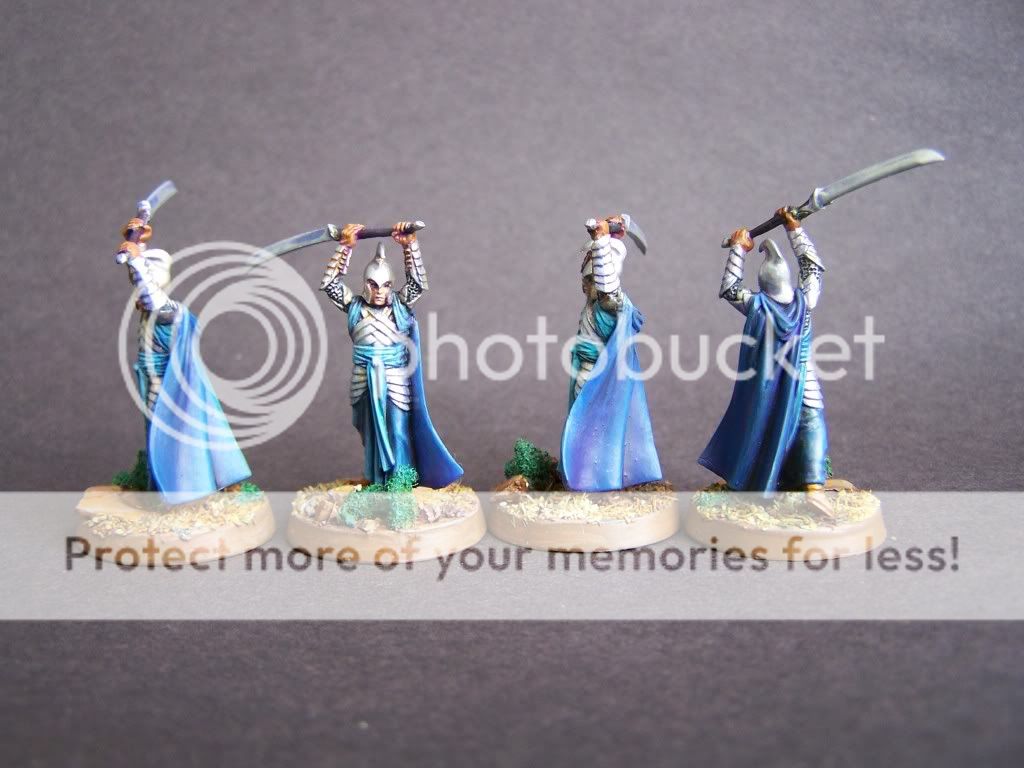
also the bows of the elves are very nicley done and i suspect that you did those too with mainly washes?
great work and it explains the long distances between updates quite clear...(hint, hint...)^^
The painting is perfect! ery impressed!
EDIT: Chibi, how have I missed this entire thread? Your terrain making is absolute art! I need to read the whole thing now! I am going to be paying special attention to your casting bits.
Hey chibs , good to see your work again mate , your painting style is so smoooooth.. the tower looks very nice and your elves rock! any chance of seeing your dwarves again too ?
was about to commence trashing on you for not comming sooner to my thread...for months...and then what you did to our lovley leaque...and then you dish out that steamy beauty...
i know you like these kind of quotes...:
"Supper at such an hour!
My stars and garters! who would be,
To have such guests, a landlady"
amating skill...were do you kept all this work covered up for so long??? mate...you should update more often...
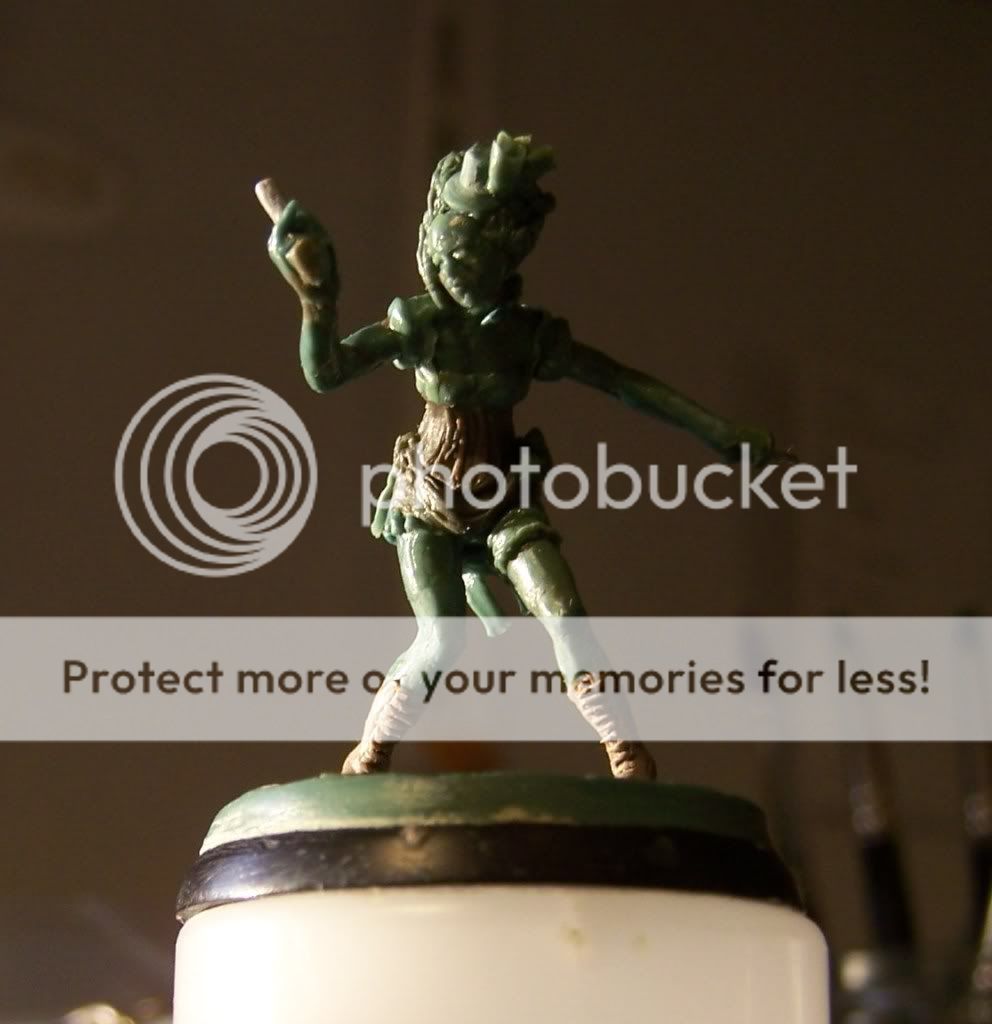
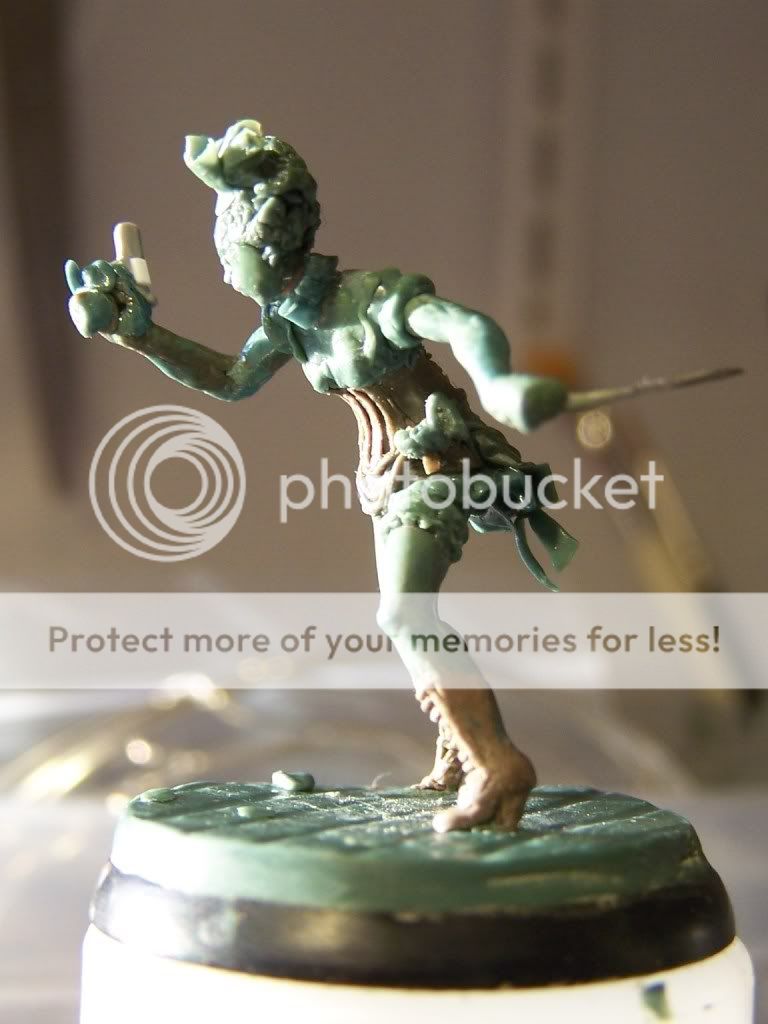
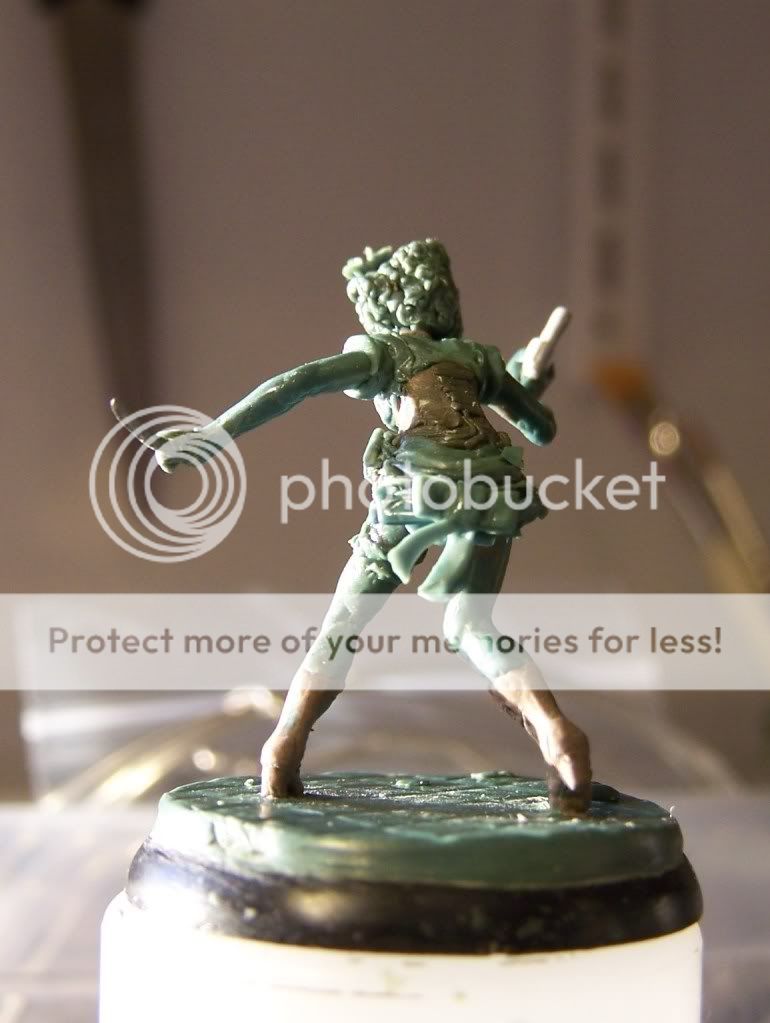
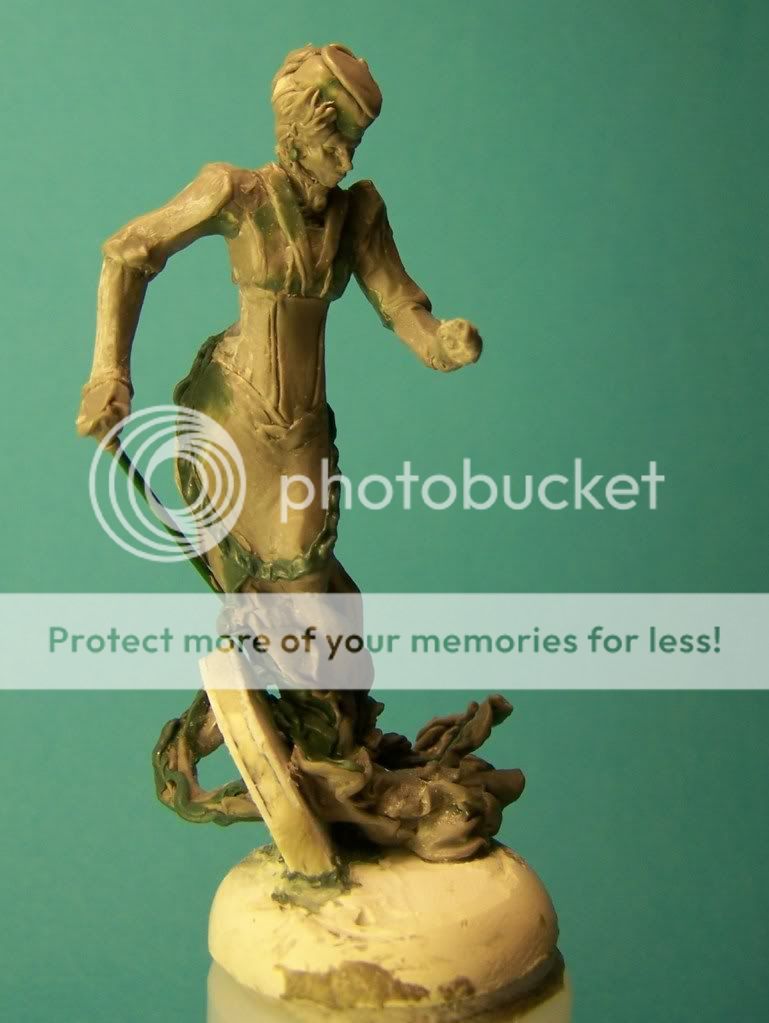
that pose and the dimensions of the body (no pun intended here) are fabulous! i like her attire... doesn´t seem too flimsy but i think a guy attacked by her will die a happy man^^
cheer mate! and i hope you won´t keep us too long in the dark with a next update on yours acrobatic damsel for distress^^
for all that know me kindness is my lowest of virtues^^ i see art i point that out... simple as that^^
but could you teach an uneducated fella why you used brwon stuff and greenstuff together? i see clearly that on some sections you only used brownstuff or miliput...whatever it is you used...a reason for that decision? also is there too a wire skeleton beneath the sculpture? and honestly i can´t wait to see the model primed... as i would love to see the finer shades of her and i think the glossy nature of the medium GS prevents that sadly...
I used paper clips for the armature inside to support the GS
TBH was experimenting with brown stuff and mixtures of GS to make harnesses for a couple of scale model aircraft on the go and then tried it out on the sculpt to see how it handles.
Brown stuff gives a crisper out line and drys harder than GS but is more brittle.
You can mix the two together to get a firmer finish than GS and not as rubbery, but not as brittle as BS
Was thinking the same thing about the priming. The different colours and the shine make it moredifficult to see but will also highlight all the things tha will need correcting!
when you say you mixed up brown stuff and GS how do you do it? mixing first GS and BS seperatly or do you mix it all in one effort with equal amounts? this is most interresting to me... as i don´t really like the rubbery effec/ touch the GS has...
and yes please prime the lady...(sounds nasty^^) as then we can really admire her...
and when you say BS is more brittle... would it crumble and break off like clay or is it still more sturdier...? never worked with that stuff... i can now say i know the limits and needs of GS so i might be open to new materials... and as it happens to be i own a box full of milliput eevn now...
Doesn't really matter ViK tbh You can mix up the BS and GS then together but as I was using small amounts it was easy just to measure the 4 parts and mix in one go.
Of course as long as you mix them thoroughly it doesn't matter.
Also I was keeping it simple and mixing 1 part of yellow/blue/white/brown
BS doesn't crumble when cured but as I found out with the seat belts it will snap whereas the GS I could bend double when cured.
I am not too keen on the rubbery effect either, especially if it needs sanding.
BS will sand better I reckon/
There is also Procreate which is sort of between the two
I made Misti mostly out of Procreate. But for some reason haven't used it since.
and primed:
i know you showed me misty before but heck she is lovley! must be said more often^^ procreate i have heard of...
just had a quick look and http://www.kraftmark.biz/pdfs/ProCreate/Pro.infoSheet.pdf acording to that pdf it is THE stuff for sculpting...hmmm always good to have something to consider for next suplies to be collected...^^
and i too hate to sand GS it ruins the look in my opinion... sure you can always add a thin layer or just prime and forgett about it but well there is sucha thing as ruining once apetite by the look of the thing^^
For starters there will be four Vamps and a henchman.
That will be followed by my gang of vampire hunters.
Misti is the mature vampire and can transmute into an immaterial form hence the version of Misti above.
She will also have a corporeal human form.
Then there three junior vampires Lilac Lily, the acrobat and a can-can dancer knicknamed rather unimaginatively Kiki Quan-quan.
They come equiped with pistols and knives. Though we will probably have a couple of equivalents, such as Kiki's lethal butcher boots of pointy steel toes.
Furthermore all vampires can transform into bats so each will also have a bat sculpt.
It all seemed a good idea at the time!
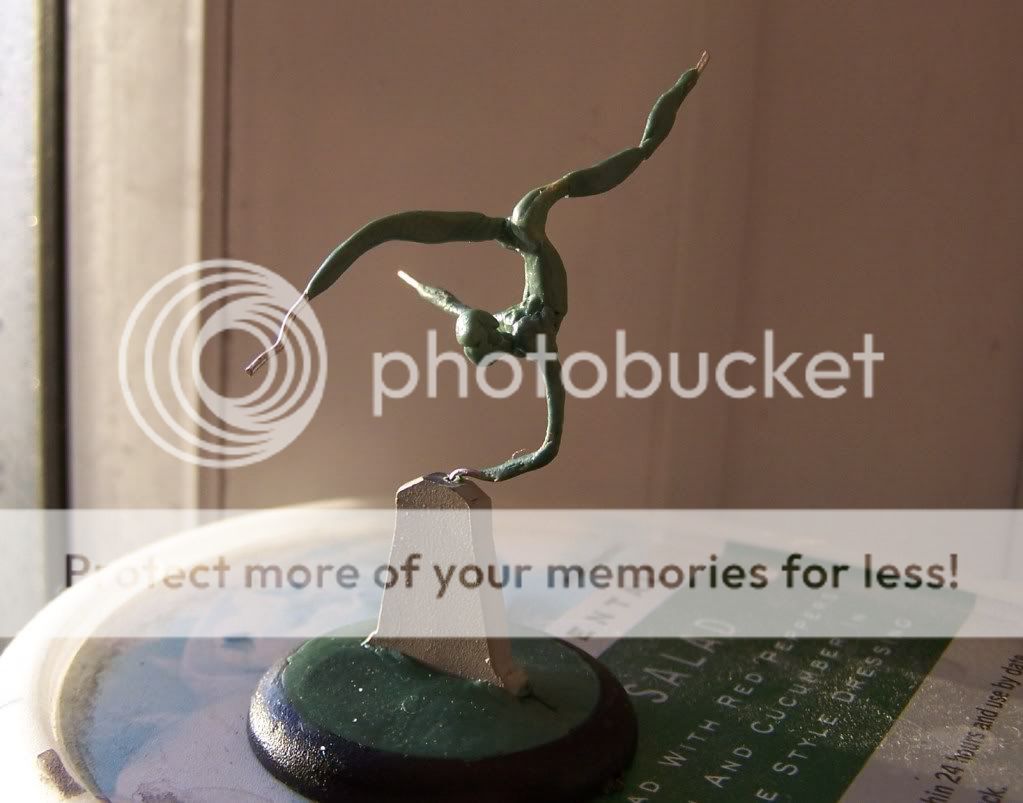
As you can see Silver you may have to wait for an armature
Dstein, you will probably see rivets on the terrorpin as I am thinking cast iron carapace with reinforcing bars rather than a naturalistic shell.
Thank you all for the words of encouragement, they do mean a lot.
Automatically Appended Next Post: Oh Meant to also say that therer could be more showgal vamps in the offing but there is a lot to be doing already but the acrobat theme could spin off into artsculpts if I can get the energy going. But then again it could fade away as the next butterfly flutters by
Also need to paint up some Freebooters Fate figures
Have ordered a set of Relics Britanans in a can while there was 20% off
Have some delicious Red Box minis to make an adventurer party for Songs of Blades and Heroes
Umpteen terrain bits and pieces and bigger stuff
I should be painting on canvas
and on and on the list grows ...
i always mused about the relics britanans... but i have way too much stuff already... tho these little fellas look very nice...
will be interresting how you do them justice...
seems you need more brushes as this is a big amount of pinting to be done by you...
Have already started a blister pack Vik (another unfinished job)
Know what you mean, I could quite happily fritter a way a fortune on the miniature goodness out there (if I had a fortune to fritter) but one has to draw the line on games.
Can honestly say the Britanans are really nice indeed.
Will be posting as soon as I get the little blighters sorted.
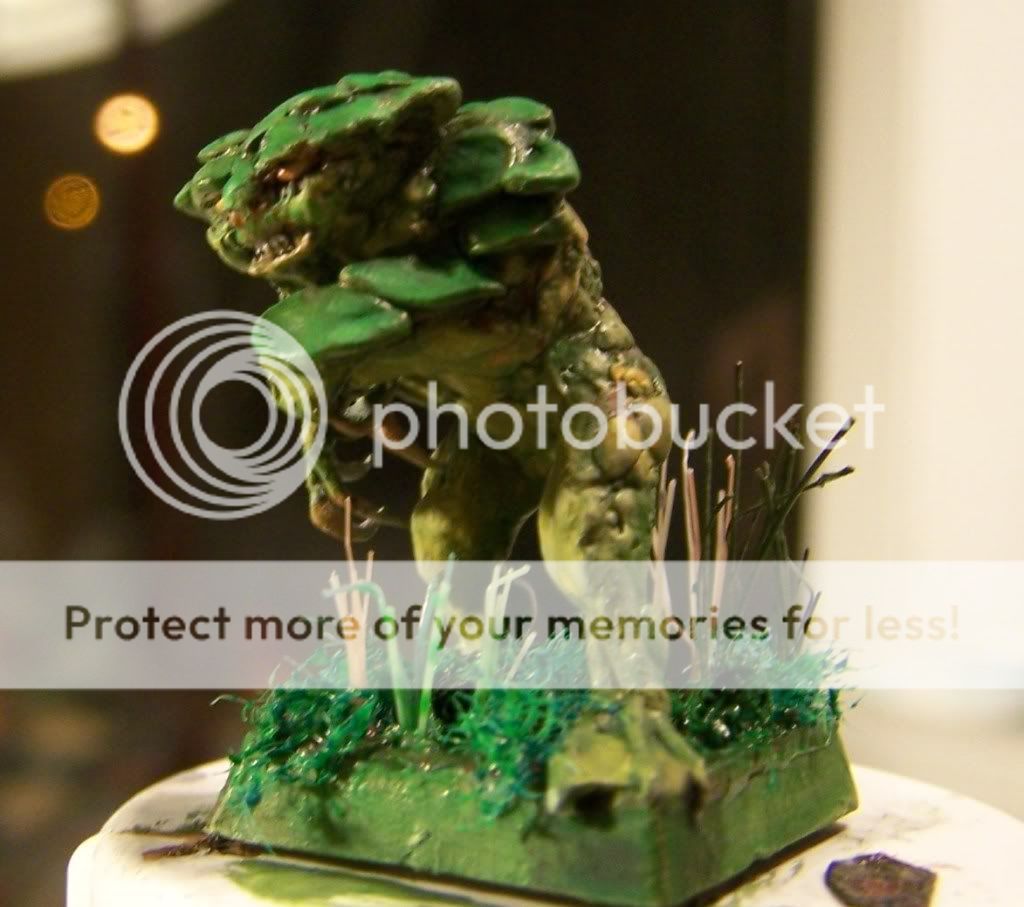
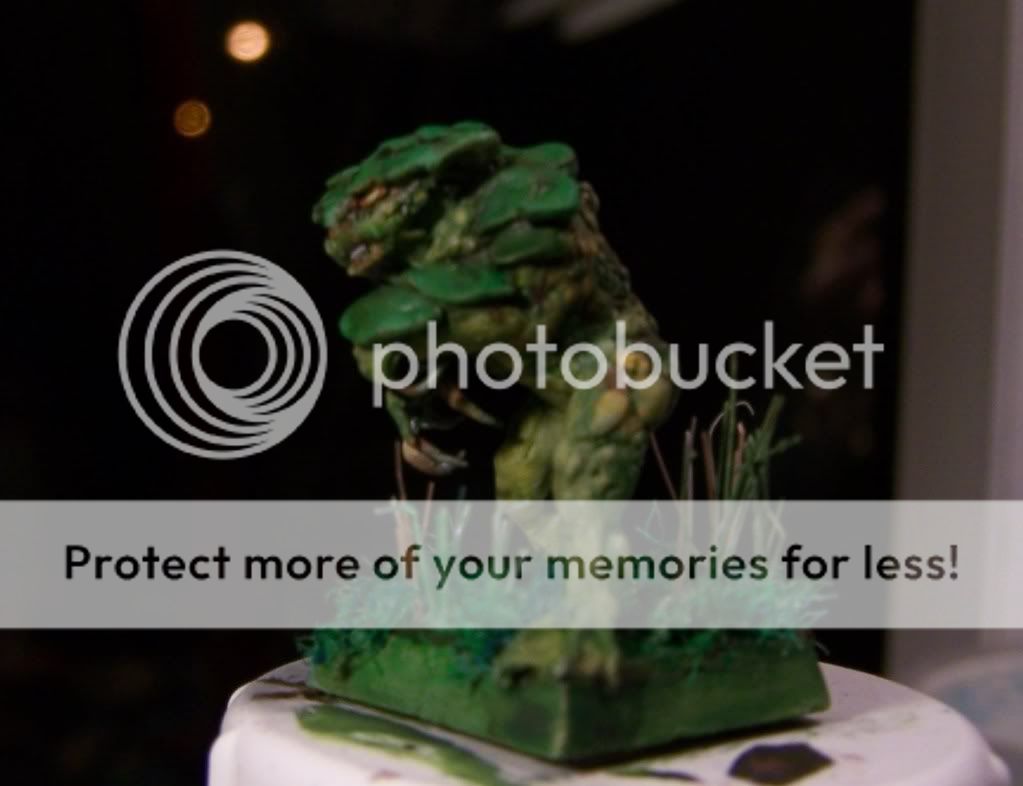
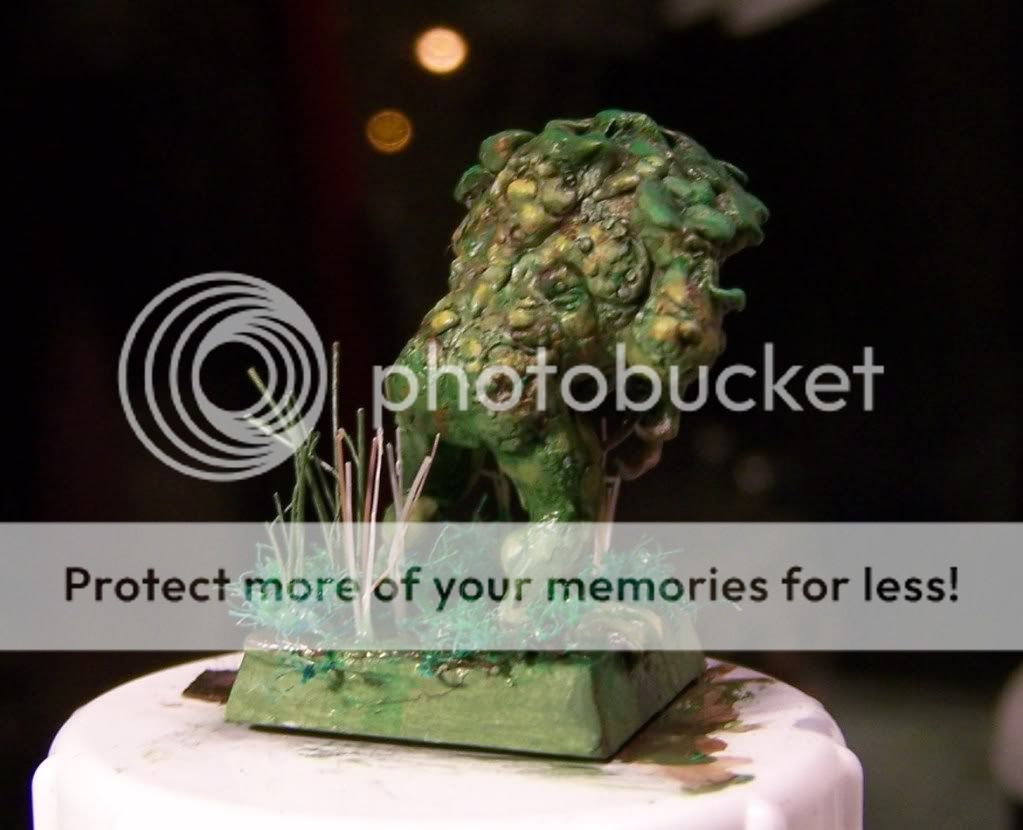
This is Boggarty Bill the Boggart with a brocolli bum
He lives in wetlands and his scales are buds that can transform into local flora. A master of camoflauge the cowardly, but vicious Boggart can sneak up on his victims unaware of his presence until they find they are being dragged into the black cold waters and having their throat skiced open with his dagger like claws!
Boggarty has been rushed a little as he is for a special game of Hero Quest on Thursday, with one of the kids writing and mapping the scenario.
He has to be varnished so want to give 24hours for the varnish to dry. Hopefully I can finish the base tomorrow too. But otherwise he is good to thwart the doomed adventurers drawn to his damp domain by the promise of booty, and maybe a lollipop or two!
well yucky doesn´t mean in the same tone that i don´t like him... he just looks like he could use some cosmetic attention in a hurry...but i guess the lady would no sooner treat him than lock herself up ^^
Since everyone else seem to be posting toys and miscellaneous bits here is my Matchbox 1/72 Grumman F9F Panther I am working on to get back into kit building
Am building it out of the box but decided to replace the token bamg seat with a scratch built effort
The old Matchbox kits came in two or three colours of plastic, depending on the series. Bit crude by today's standards but generally this has gone together pretty well
Nope Actual type Vik one of the first USN carrier born jets.
I really like the design and am tempted to get the new Hobbyboss kit. Looks really sweet to me.
and yup that is a clothes peg
Thanks Monkey, and a good spot! This kit had raised panel lines. Matchbox are notorious for huge overscale trenches! Prefer rescribe than fill the trenches tbh Will need to re rescribe a few lines due to sanding but getting close to primer stage.
Automatically Appended Next Post: Starred in the film, Bridges at Toko-Ri
That is correct Vik
The intakes and wing fences are now on. The intakes were a poor fit but should be okay after a bit of filler
The Wing fences were thinned down to make them more to scale but that meant a gap of about 1mm, so more filler needed.
It will be pretty much like the one in the film clip
Overall dark sea blue I think it is called
Which reminds me I need some paint!
The other scheme is for the Blue Angels display team But I fancy a full load out with rockets and bombs.
(probably unrealistic but, hey, who is asking? )
oh din´t knew about the blue angles... or di you explain this already to me... sponge of a brain me...but my excuse is i had only four hours of sleep yesterday and it is already 3 o´clock...darn....
Well I rushed to get Boggarty ready for today's game and.. The adventurers went and bust the door open, the wizard cast a spell and Boggarty was done for before he could scratch his gnarly arse with his claws!!!
duh.... poor boggarty... he didn´t deserve that kind of mistreatment... we will remember most fondly... by the way... the shortest battle report ewwa^^
Wow man... seriously, that show girl is amazing! I can't wait to see it painted up!
I don't even know what to say, I am just astonished, like I am meeting you for the first time.
Maybe this is what Alzheimers is like... but if so, it isn't so bad
Many thanks for the kind words, also to Neil
Everyones' support has meant a lot
My painfully slow and low rate of productivity is about to get more painful and slow as Christmas approaches and real life gets in the way.
A personal issue has cropped up which is going to be a real pain in the button hole but once it is sorted hopefully it won't take to long to get back into the swing of things.


 (Shame, I'd have liked to see a mini-banksy on there too)


 )
)