Solar_lion wrote:Amazing. The folage and details are insane. I'm going to have to try some of these techniques. Inspiring
Thanks Solar'. Good to hear that; that is why I share most of my steps, so that others may get ideas or help from what I've done, as I do from reading what others have done.
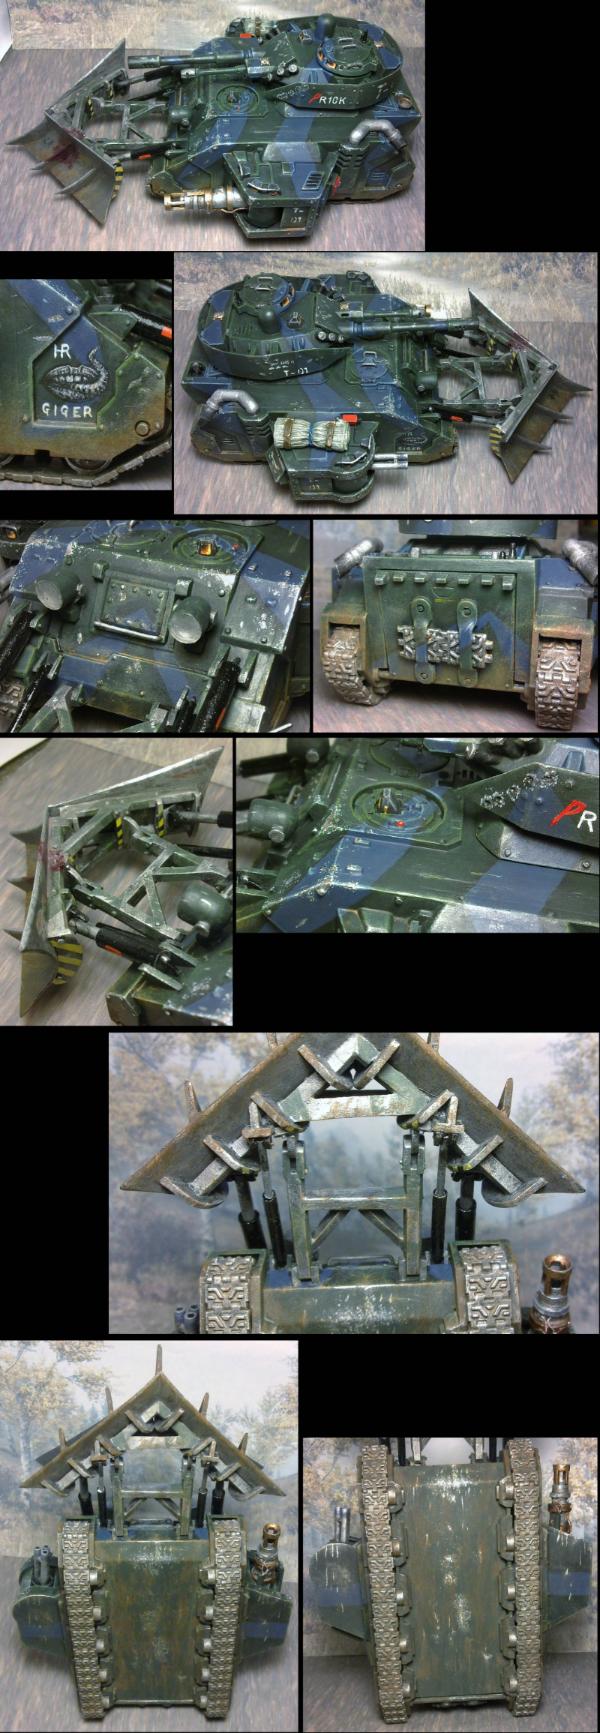
Warboss_Waaazag wrote:There's virtually no such thing as a family-friendly HR Geiger painting.
well there are at least some that are not entirely unsuitable. And then some of the potentially unsuitable that "unsoiled" minds wouldn't notice.
Not everything that Giger painted had sexual organs on display. But it is true that many of his works did, and sometimes they were VERY obvious. Other times, I'm sure he was trying to hide them in plain sight so that he could chuckle to himself as people looked at them unawares.
Maybe if you mixed a 1:5 black to blue ink wash or similarly diluted you could get a darker bluish color? Also, Geiger always struck me as favoring sepia to all other colors of the rainbow. Just my opinion, though. Still looks great, you ask me.
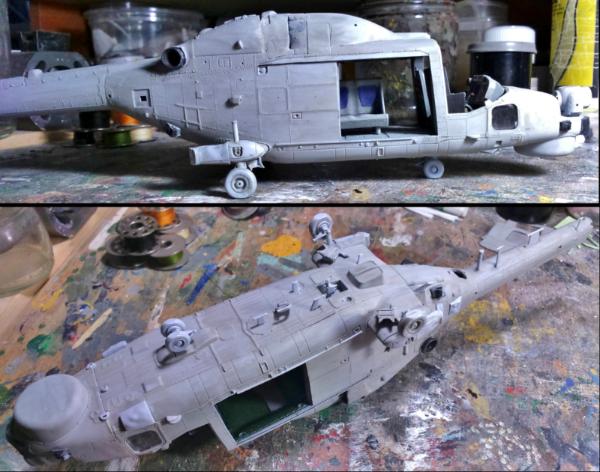
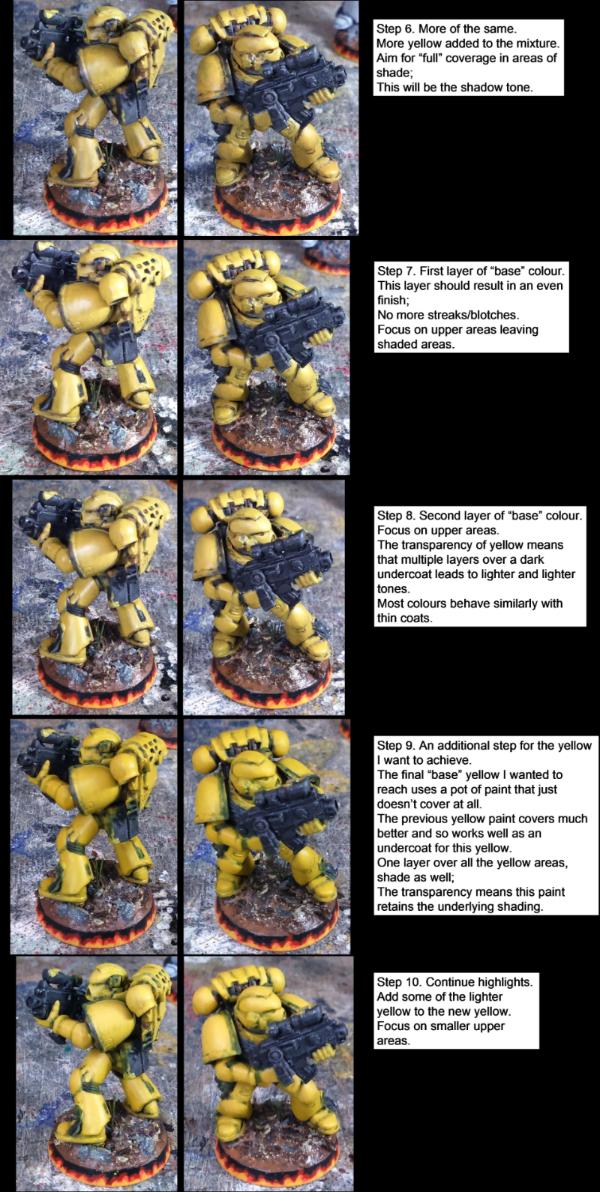
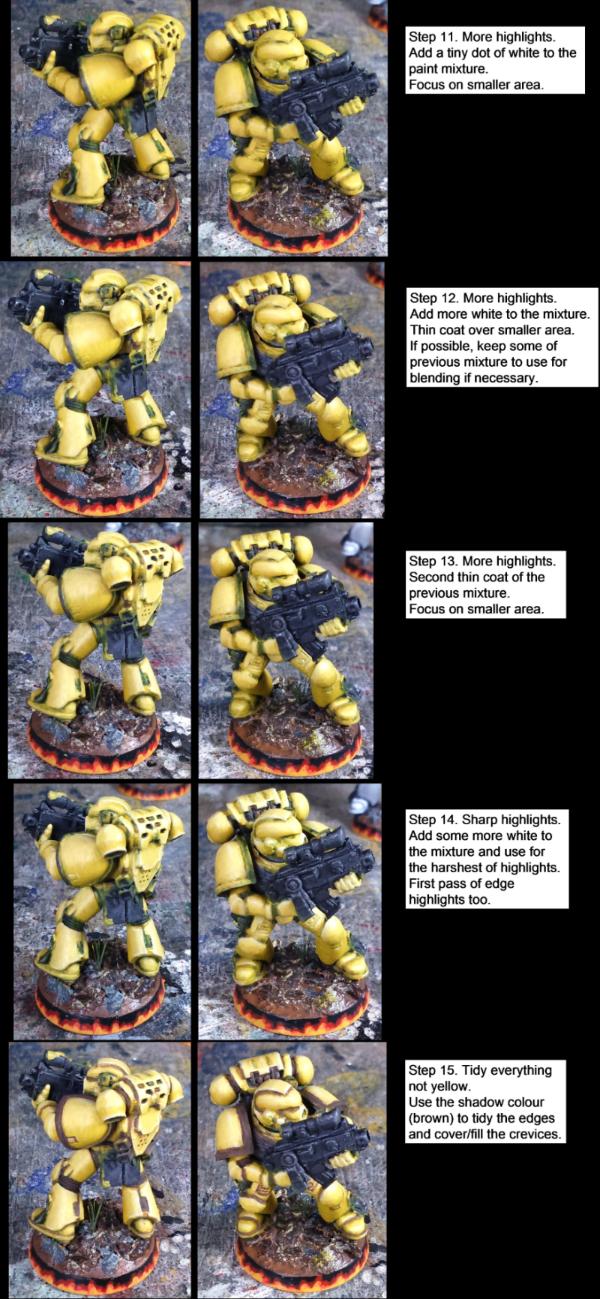
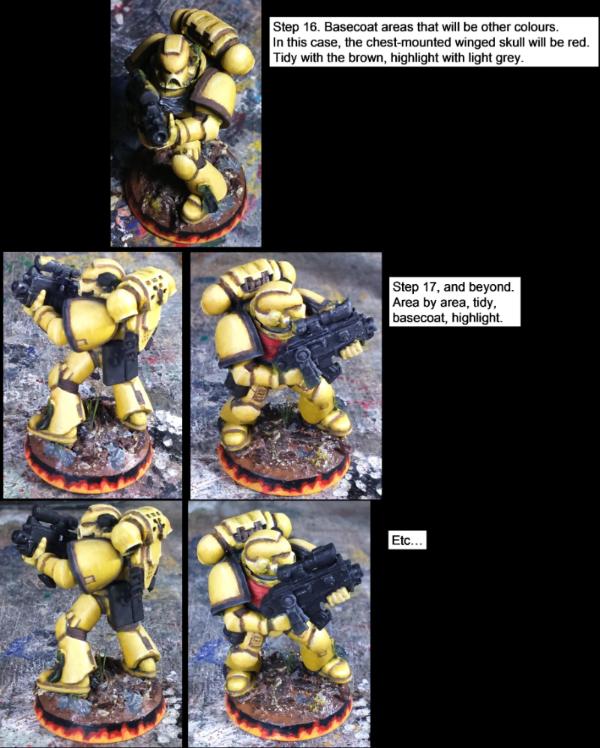
See below for colour development (it's not been straight forward so far).
Yeah, Giger did use sepia/brown as the main colours in most of his work, but not always.
This website has a large selection of his work (often in reasonably high res') that I'll let you all peruse at your leisure: http://art.vniz.net/en/giger/ You can see some of the other colours he has used on that first page.
lone dirty dog wrote:What a contrast of colours and amazing how the paint job has totally transformed the jet bike totally getting the vibe now
Thanks LDD. Not touched the bike since as I'm still pondering how to progress.
As for the UFO maybe using a slight purple wash might help with the highlight to blue, the transgression from brown to blue might be quite harsh as the purple might work as an intermediary to help subtle the change.
I'll keep that in mind when I get there. See below.
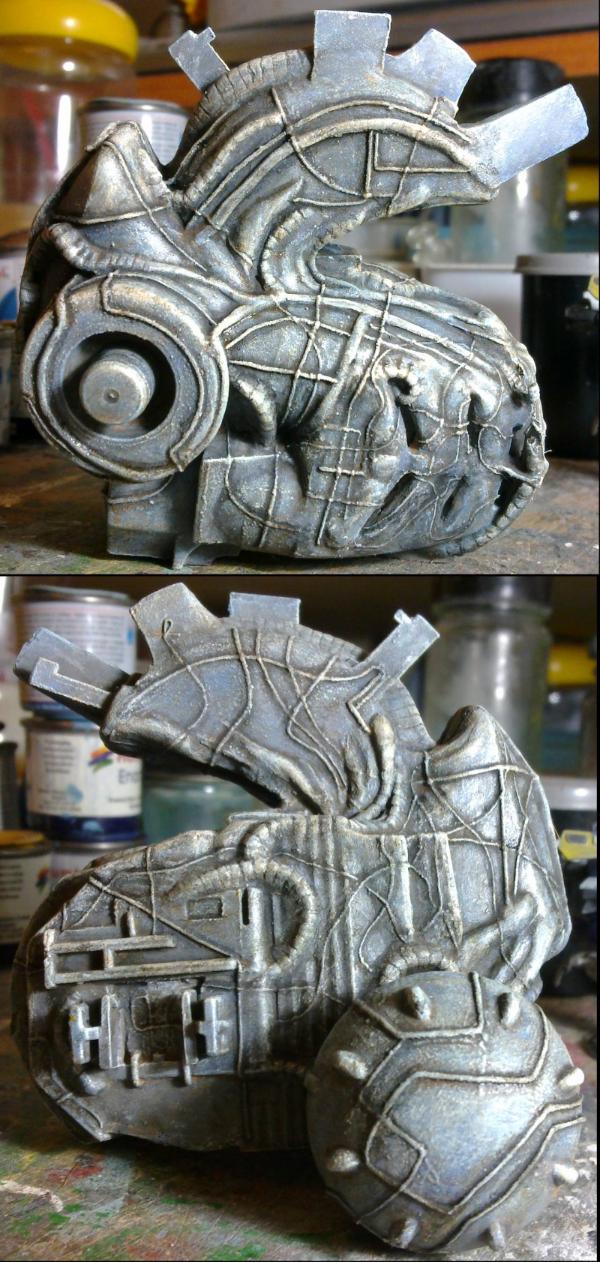
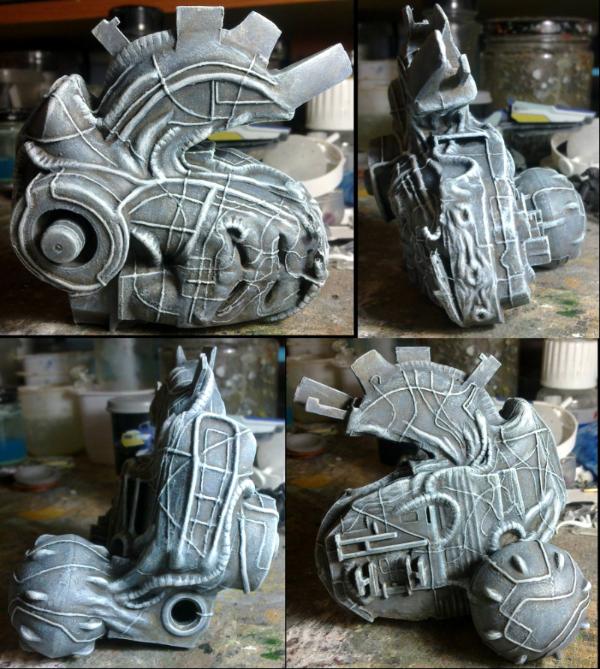
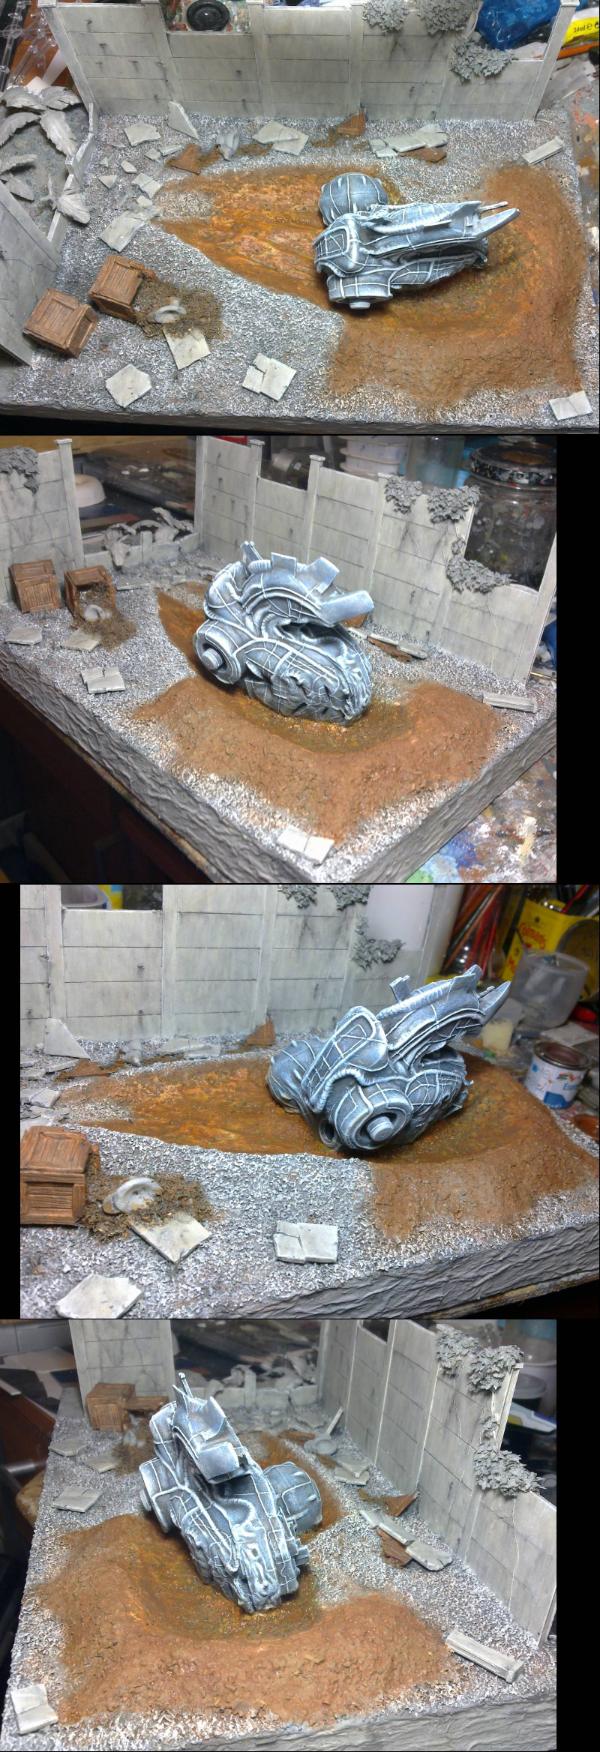
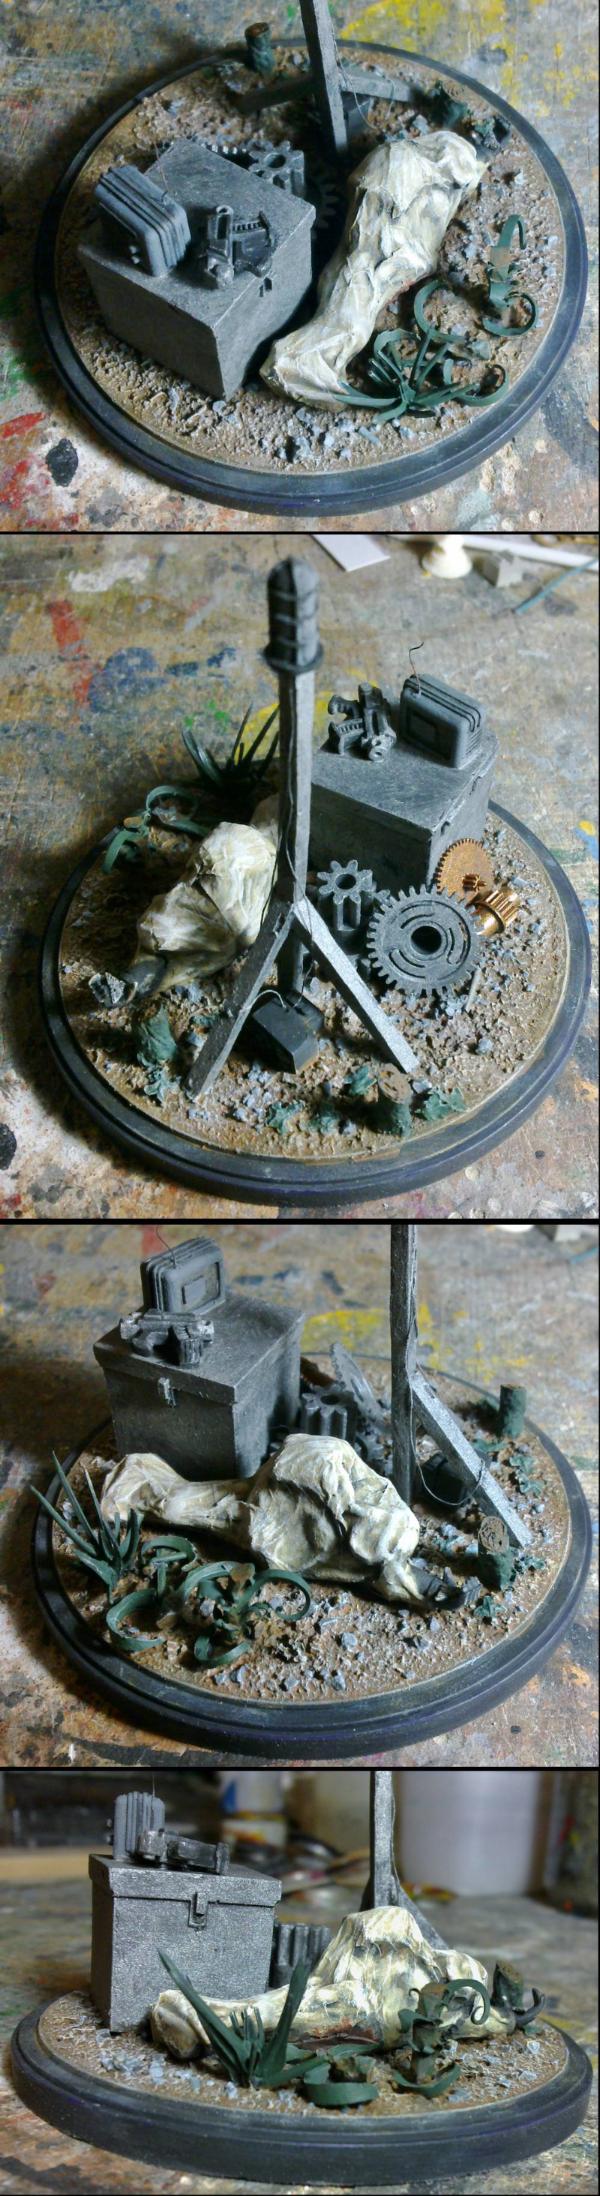
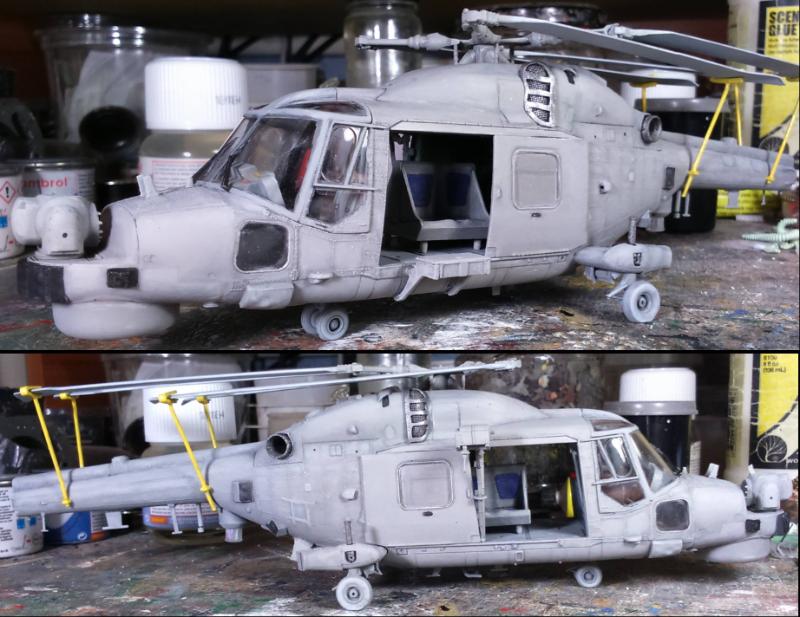
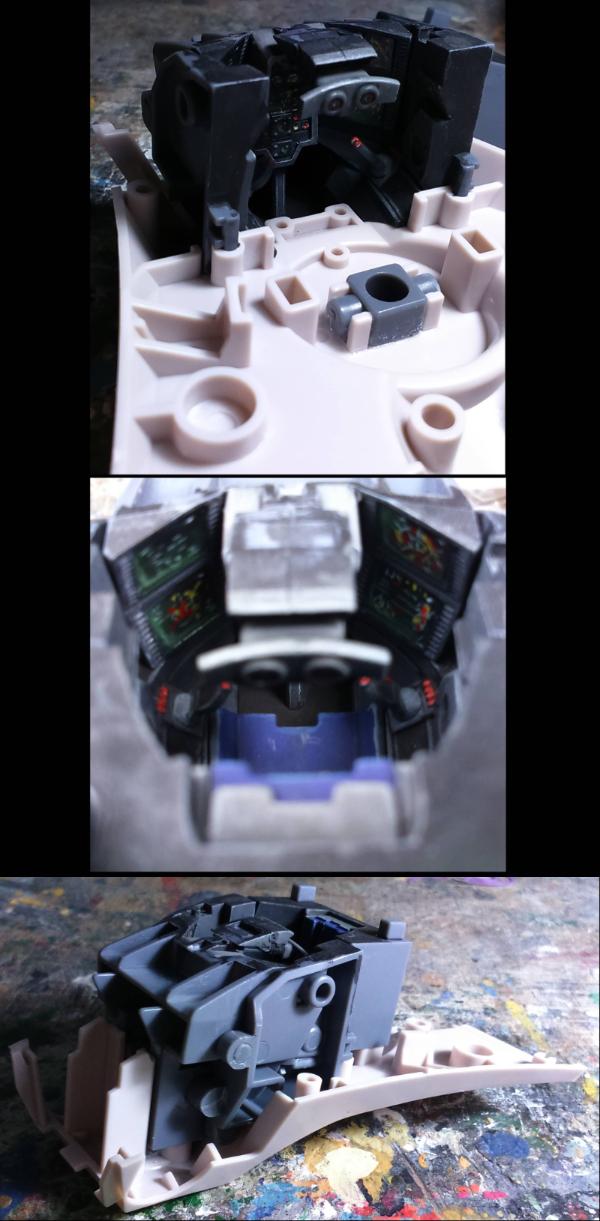
So, while I am talking about it, this is what the UFO is looking like at the moment:
This has taken quite a while and not progressed as I expected;
You will remember that I said I was going to give it an all-over wash (more of a glaze) of blue to tint it and would then shade it with brown and black.
That didn't work, all I got was blue in the recesses and the highlights stayed grey/white.
Therefore, I resorted to dry-brushing the blue (heavy, all-over mid-blue. lighter blue. light blue with white. white).
Then I gave it an all-over brown wash to get into all the recesses... and that tinted all the ridges as I had hoped that the blue would have done.
So now, resigned to the fact that I'll be touching up the highlights at the end, I've moved on to pin-washing black into all the recesses. This is what you see above.
Next will be some brown and then red/purple/dark blue (however I progress) before highlighting and final details.
In other news:
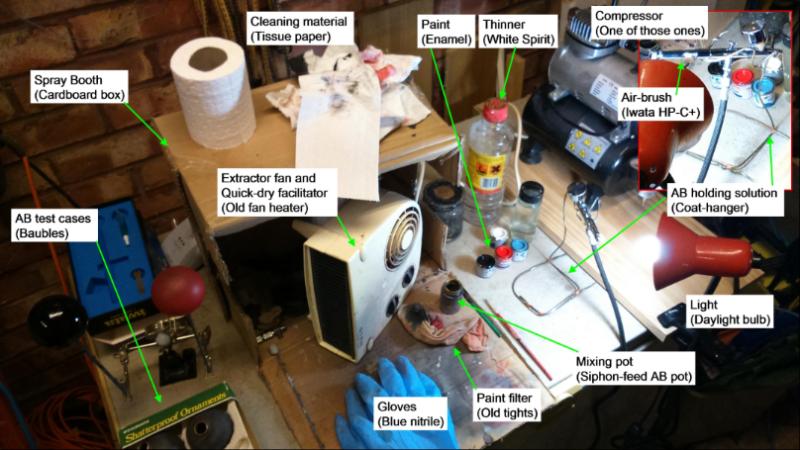
Progress has also been slowed as I've been distracted in looking at airbrushes...
Having made a reasonable profit in my money-making model ventures, I've decided to invest in an AB that will make things quicker and easier and therefore feed back into more profit.
However, I'm looking for suggestions for what to get. This is where you, dear reader (assuming you are still reading at this stage), come in.
I'm thinking:
Dual/double action, Gravity feed, airbrush.
and a compressor with tank, water trap, regulator, etc...
But, I'm hoping for all that for around £100 ($150). Having looked around and found that you can spend that on the airbrush alone and that you can spend almost half that on a full set (of dubious quality), I thought I'd ask here and see if there are any cheap recommendations. I can go a bit higher if it's worth it.
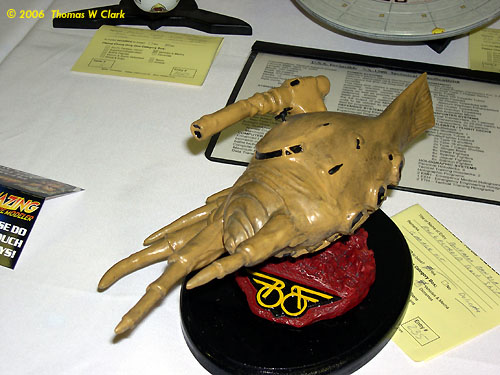
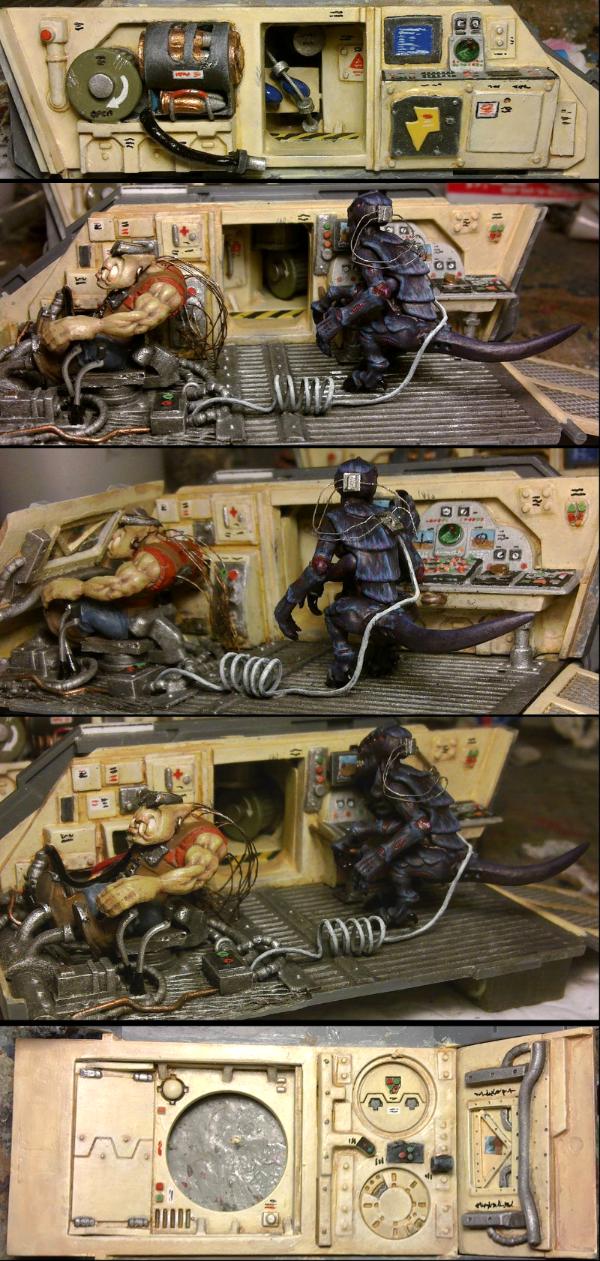
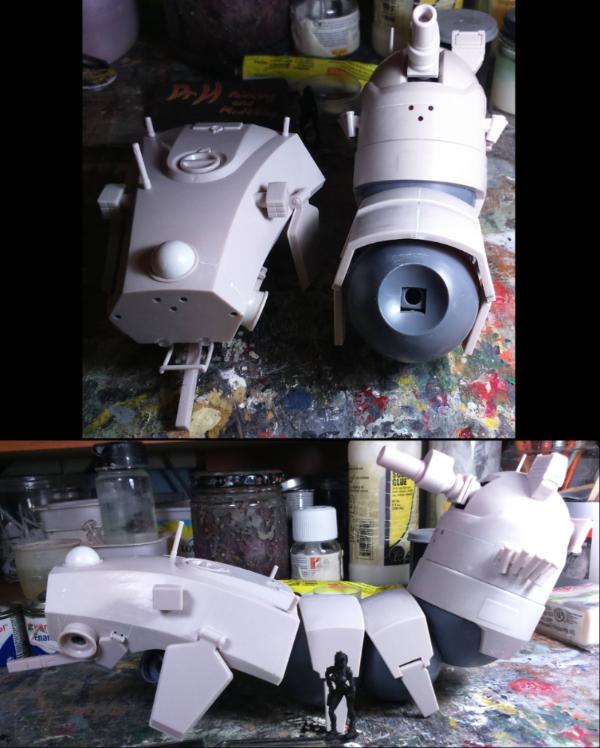
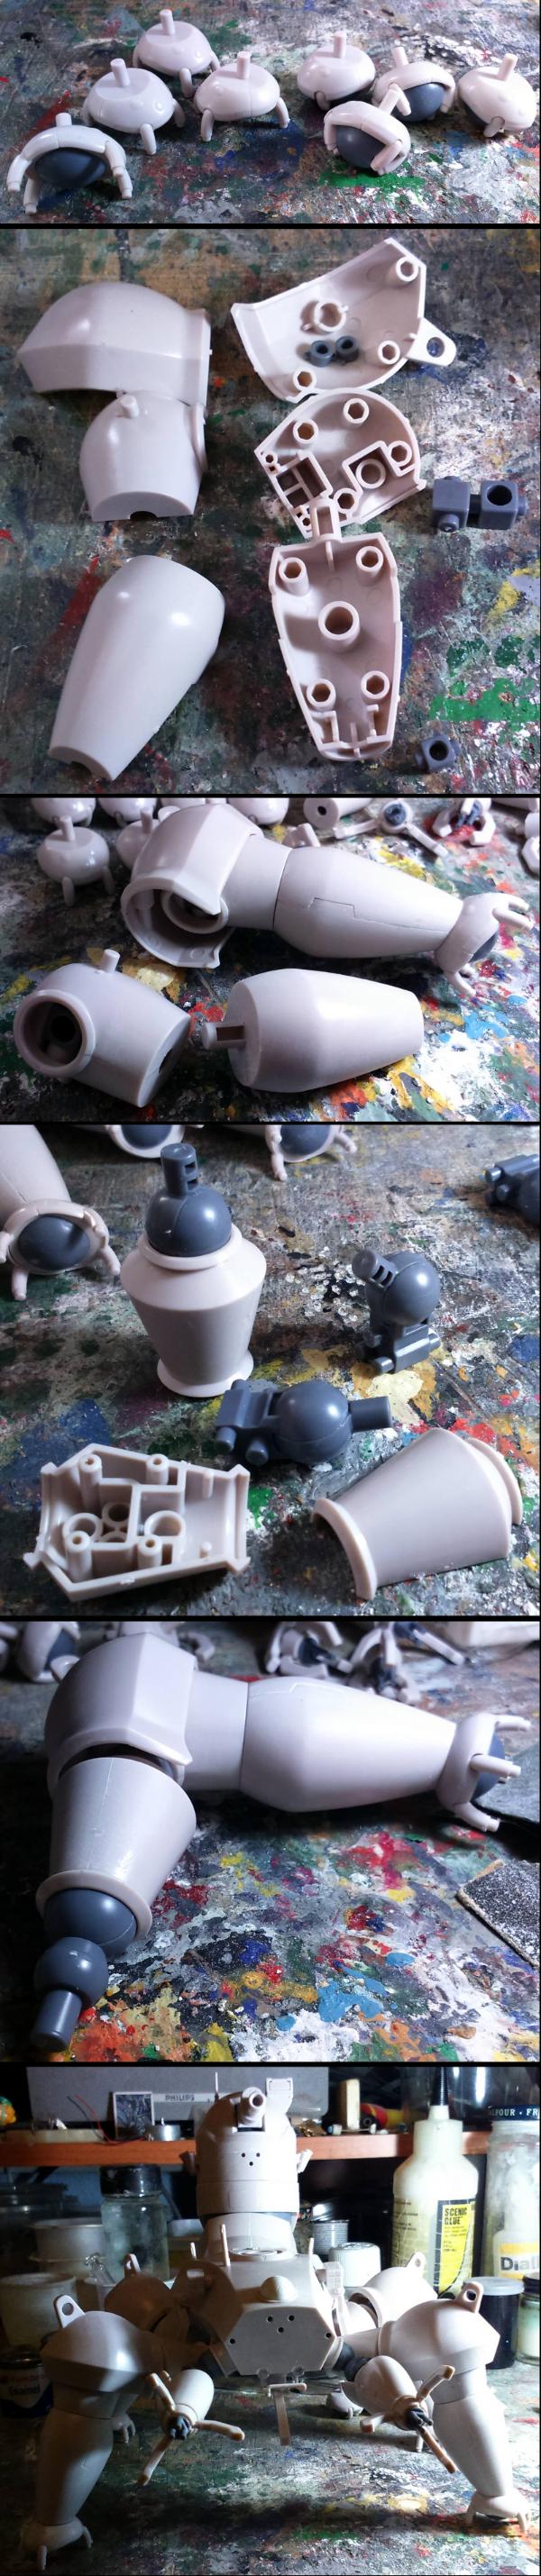
Okay here is a model of the "Thermal Pod" space ship from Buckaroo Banzai, which is why I thought of your project, but the skin of your UFO is more like the skin from the alien ship in Alien/Prmoetheus.
Thermal Pod
Buckaroo Banzai, Physicist/Brain Surgeon/Band leader-Guitarist and singer/problem solver, of course he has his clique of helpers with their talents, and their sub group of the Blue Blazer Irregulars.
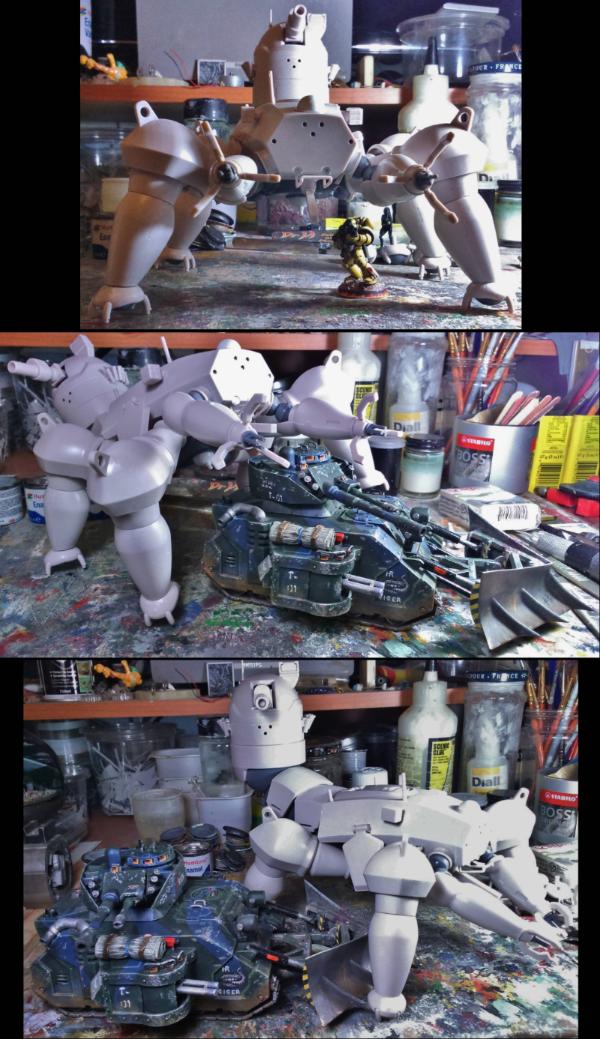
Damn Doc it's looking pretty good to me has a mix of organic and metal about it, I see the road has been hard but it is coming on nicely so stick with it mate it's looking spot on.
As for the AB go for a compressor and tank it's a must I picked up a cheap compressor without a tank of ebay (it was an ex finger nail artists one ), which was ok but would loose pressure during spraying, then the compressor would kick in causing some strange and awful results.
I got a pretty good deal of ebay for a small compressor with tank which works perfectly well, there was even a airbrush with it which I use for undercoating about all it's good for.
As for my actual airbrush I got for my birthday a few years ago it is an iwata CM-C plus, which lets just say was an expensive present but grate results once you know how to use it LOL.
Try Badger they seem to pretty well priced and get good results and there paints are highly recommended, the common theme I found when looking for advice was get the best you can afford as the cheap ones don't cut it especially as you progress and learn with it.
A good compressor is very important. Get one with a tank. I cannot stress that enough. I got my current one on clearance at a local DIY. It is a bit loud, but I can fill the tank and then turn off the compressor. I get about 20 minutes of spray before I need to turn it on again and refill the tank.
Dual action, gravity feed is fine. Needle sizes are also important. Personally, I have a siphon feed Badger Anthem which is a workhorse for priming and base-coating, and for the finer stuff a Badger Velocity (gravity feed). The Anthem gets most of the work, since I do so little miniature painting.
Prepare yourself for a steep learning curve. Cleaning and maintenance are crucial to keeping the airbrush working properly. The time you save on painting you will spend on Cleaning and other Maintenance. The results though, are worth it.
I like the color scheme on the crotch rocket, er, jet bike. Something about that UFO wants some sort of iridescence, to my eyes. At least for the hull protions.
Shas: I see. But yes, I'm going more Alien but more blue. Needs to contrast with the muddy ground (so can't be too brown) and with the concrete walls (so can't be too grey).
lone dirty dog wrote:Damn Doc it's looking pretty good to me has a mix of organic and metal about it, I see the road has been hard but it is coming on nicely so stick with it mate it's looking spot on. ...
Thanks, organic and metal or... organometallic (that is actually a thing in chemistry where you have metal ions encapsulated by an organic (that is, mainly composed of Carbon atoms) scaffold or ligand). Slowly progressing.
Solar_lion wrote:I think 'Grey Death' or ' Major Tom' had a blog on selecting an AB. Can't recall. There are other good forum blogs and articles.. just do a search.
I didn't find that last time I searched. Have found it now (and a couple of others) and read them. I had also watched this video:
Spoiler:
Which is how I know I wanted the spec' I mentioned before.
Red Harvest wrote: ... I like the color scheme on the crotch rocket, er, jet bike. Something about that UFO wants some sort of iridescence, to my eyes. At least for the hull protions.
Thanks Red. I do have a couple of iridescent paints laying about from when I did the Wave Serpent. We'll see how it looks once I've done all these layers and decide then.
Yes, I will be getting a tank for the compressor. Noise is not a problem as I won't be using it indoors (due to lack of space for one thing) and so will be outdoors during daytime. But a tank looks to be the best thing for stable pressures and ease of use.
While I only plan to use the airbrush for priming/basecoating and general gradients, I thought I may as well get the dual action trigger: because if I don't get one, I'll want one later.
I'm looking at gravity feed as that allows lower pressures for more control.
I'm also looking at medium sized tips / needles (0.3 to 0.5mm I believe), as I'll be using my usual paints through it and those are suggested for enamels (and acrylics as well anyway).
I have used, and still have, a badger spray-gun (siphon feed, external mix) with my enamels, so I'm used to fiddling about with paint mixtures and general control, I'm not going into airbrushing completely cold. I do appreciate that the spray-gun is a world away from the type of airbrush I'm intending to buy.
Also, having done some more research, the cheap airbrushes are looking out of the running. I have seen comments on where they save the money, and one of them is on the seals: which makes them useless for solvent-based paints etc... Such as I'll be using.
That means I'll have to go for a main brand airbrush. The cheapest I'm seeing from Badger (100-G Med') is about £90, so looks like my budget has just gone up to stretch for a compressor and all the tubes and things... but I'm in no rush, so can keep looking for a good deal.
With that as a yard-stick, the Badger 100-G, does anyone have any better/cheaper/alternative suggestions? Is that one rubbish?
I have the two Badgers, as mentioned, and I can say I like them very much. You would want the one with the largest cup (looks like the 100LG), but for larger projects you'll still be refilling it often. It looks a bit fussier than mine.
Badgers have teflon seals, so they can take solvent based paints just fine. People use them to paint motorcycles and whatnot. Also, lifetime warranty
Needles can be changed. Looks like the 100 can take a medium and/or a fine needle. (pro-tip: insert the needle from front to back to reduce the chance of bending the tip. And to increase the chance of stabbing yourself.) Interchangable needle sizes is a convenience. Just don't mix up the nozzles. (I did mention that learning curve, eh?)
90 Pounds? ($135) That is full retail. You can get a better price if you poke around a bit.
Find a way to get a few demos of airbrushes if you can. Nothing beats hands on with those things in order to determine what will be best for you.
No matter what you get, the key to the brush is taking your time to practice. At first you 'll find it difficult to use. You'll eventually get more comfortable with it the more you use it. Geting the right mixture is also a steep learning curve.,. You may find that you are cleanning the brush more than you are using it. In my experence this is normal.
Again practice ( and trial and error ) will get you the skill. Patience is a must!
Lastly. Have extra needles on hand at all time , the proper cleaning stuff and take time to do a good job will prevent you wasting time. If you have questions, there is a lot of good AB users on dakka. so speed up the learning curve by asking.
Red Harvest wrote:I have the two Badgers, as mentioned, and I can say I like them very much. You would want the one with the largest cup (looks like the 100LG), but for larger projects you'll still be refilling it often. It looks a bit fussier than mine.
Yeah, that makes sense really; you can always put less in a large cup, but you can't put more in a small cup...
Badgers have teflon seals, so they can take solvent based paints just fine. People use them to paint motorcycles and whatnot. Also, lifetime warranty
Yeah, that's the thing.
Needles can be changed. Looks like the 100 can take a medium and/or a fine needle. (pro-tip: insert the needle from front to back to reduce the chance of bending the tip. And to increase the chance of stabbing yourself.) Interchangable needle sizes is a convenience. Just don't mix up the nozzles. (I did mention that learning curve, eh?)
Yarp.
90 Pounds? ($135) That is full retail. You can get a better price if you poke around a bit.
Yeah, that's full price. Although all the UK distributors I'm finding at the moment are asking for even more. Poking about is definitely on the cards. (I'm doing a lot of nodding recently, I'll start saying Oooh Yes! soon).
Find a way to get a few demos of airbrushes if you can. Nothing beats hands on with those things in order to determine what will be best for you.
Will have to see what shops I can find around here. Have yet to find a hobby shop that's within range... *lives in middle of nowhere*
Solar_lion wrote:No matter what you get, the key to the brush is taking your time to practice. At first you 'll find it difficult to use. You'll eventually get more comfortable with it the more you use it. Geting the right mixture is also a steep learning curve.,. You may find that you are cleanning the brush more than you are using it. In my experence this is normal.
Again practice ( and trial and error ) will get you the skill. Patience is a must!
Lastly. Have extra needles on hand at all time , the proper cleaning stuff and take time to do a good job will prevent you wasting time. If you have questions, there is a lot of good AB users on dakka. so speed up the learning curve by asking.
2 cents SL
Thanks Solar'. Hearing you on FM. Yeah, I've seen many people mention the need to have spares ready.
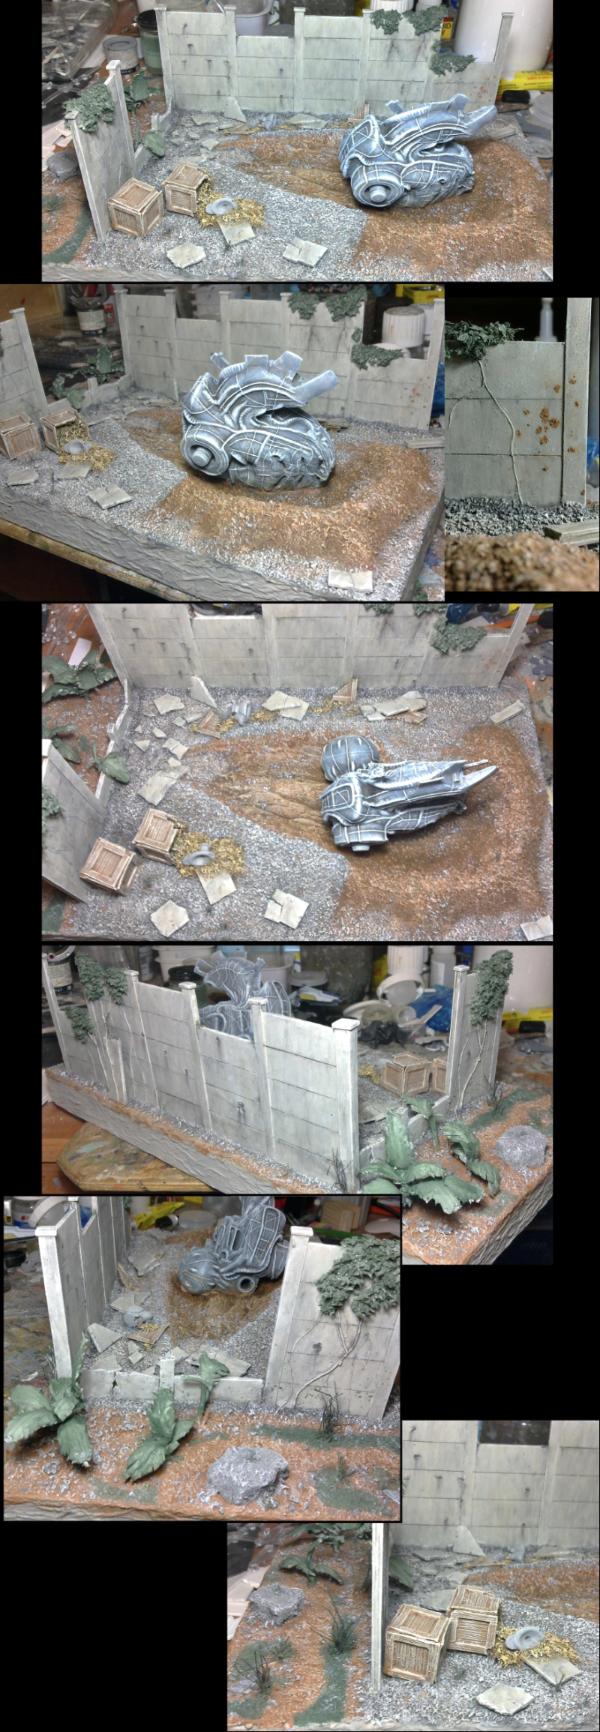
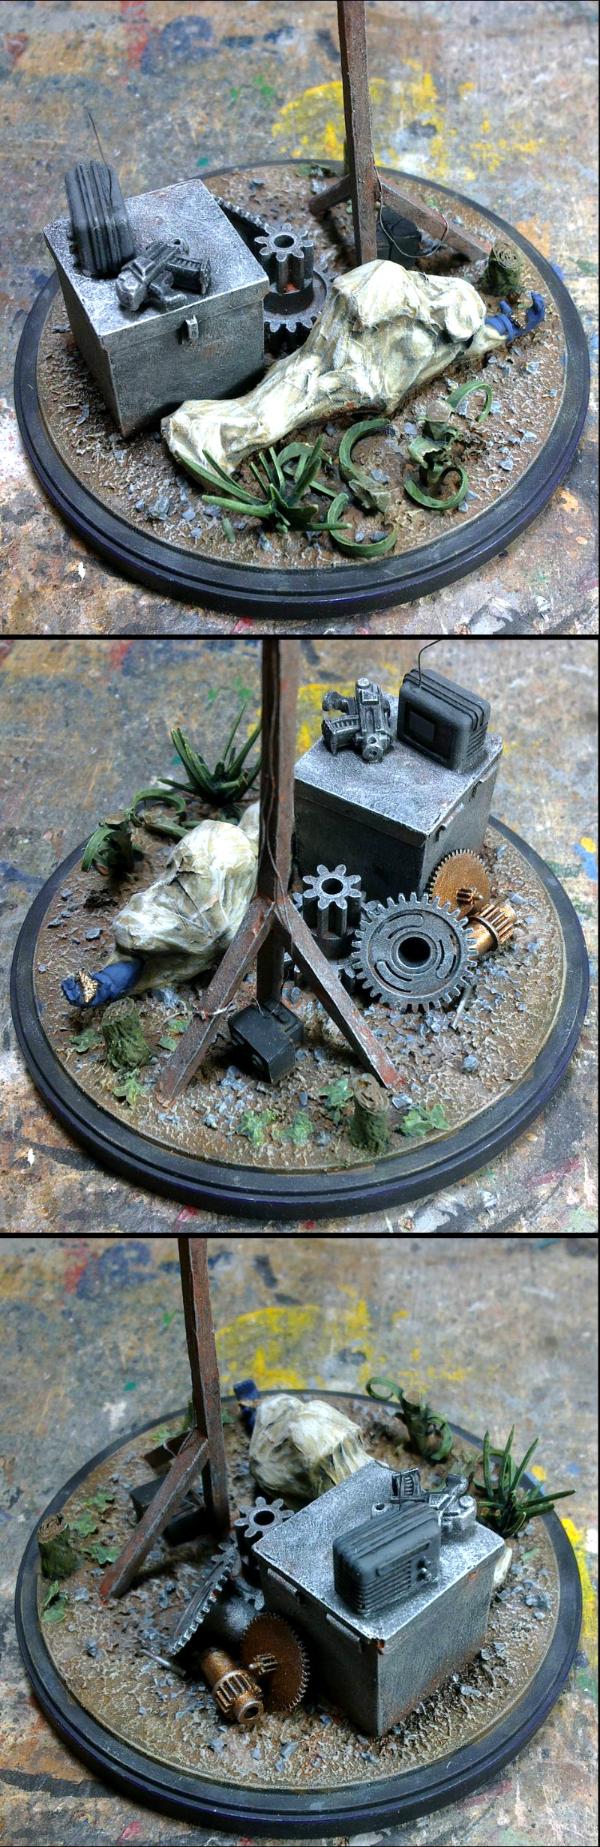
Right, while I (we) continue to think "airbrushes", I have progressed on the UFO and the colour tone is mostly done (there may be some little touch ups to do and some final details to add)
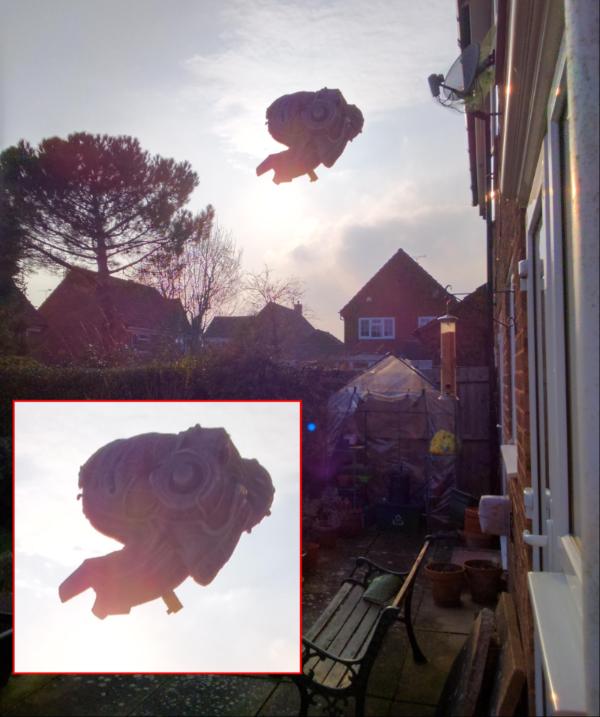
I'll try and get a "flying" picture tomorrow...ish.
Thanks Graven. Yes the asymmetric structure is a good way to make something look weird or alien (and is hard work to design).
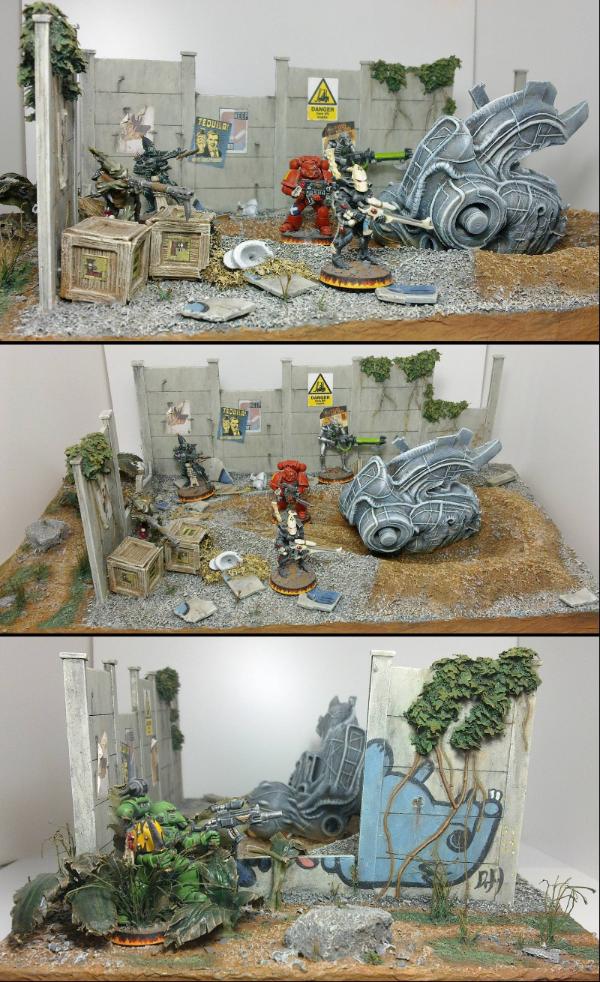
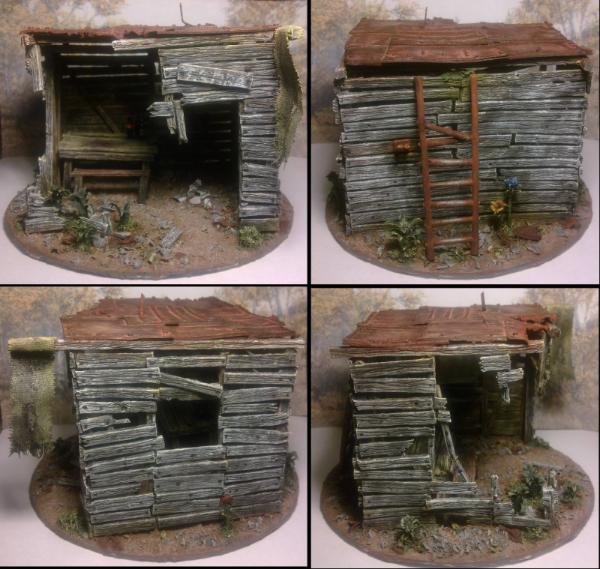
Progress. Much has happened, but wasn't very interesting to show by themselves so I saved them up for now.
First, the weather around here has been a bit "grey" so I've not yet taken my hoax photo yet.
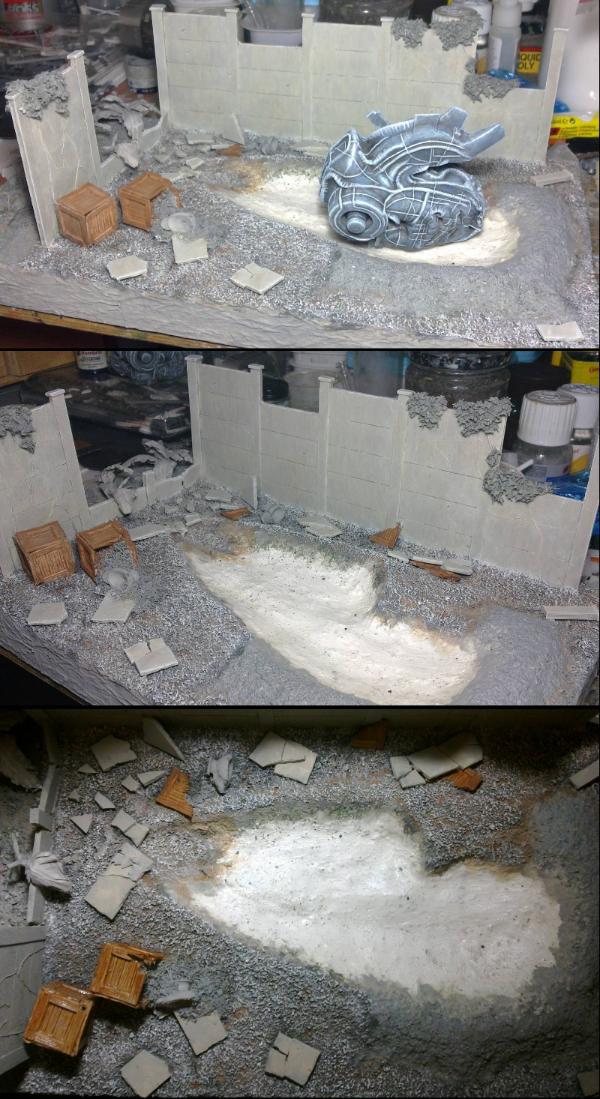
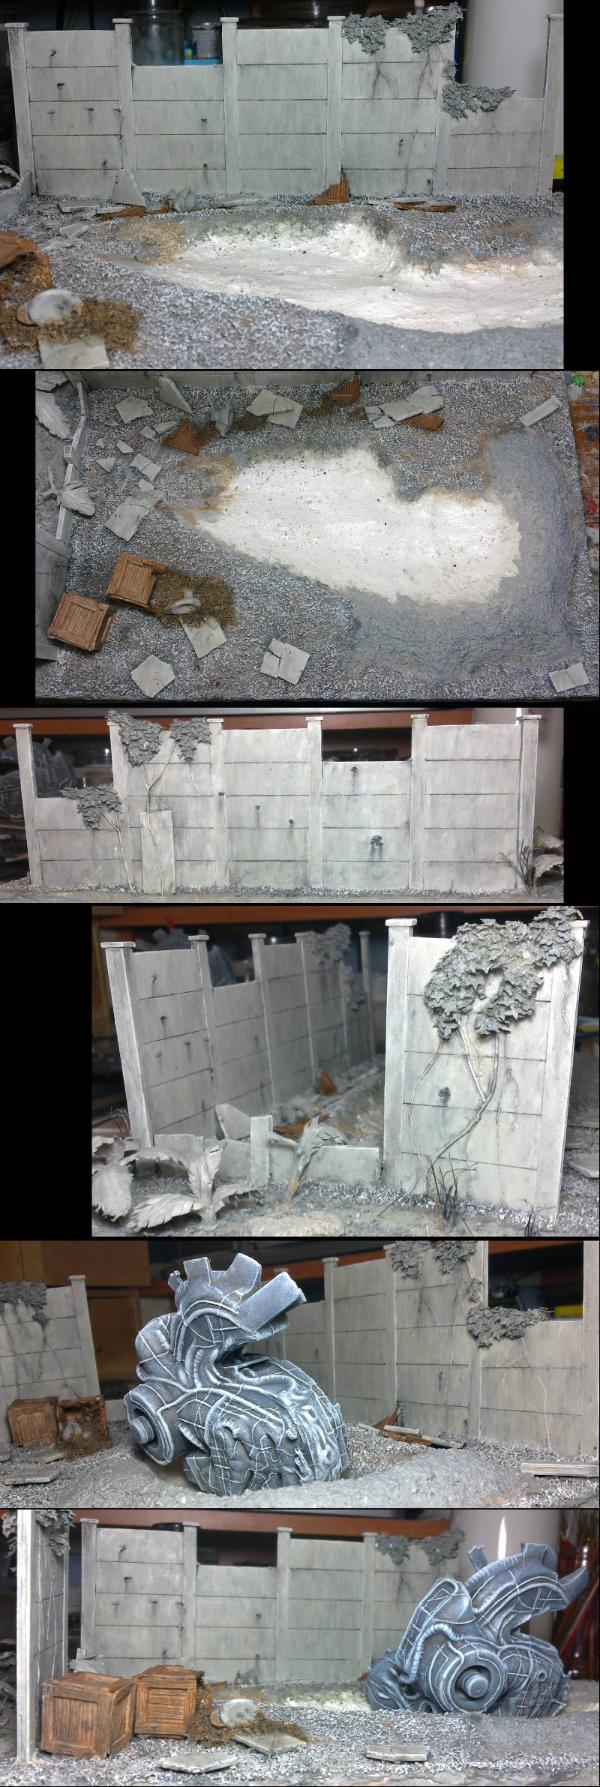
In the mean time I've painted the gravel and started to paint the concrete walls and base-coat some other bits as I come to them.
You can see here why the UFO was made blue: with it sat in the brown muddy crater (you'll have to imagine the mud. Apologies to those of you without imagination ) it couldn't be brown. As the gravel is grey, it couldn't be grey... and I made the concrete slightly sandy coloured to contrast with the grey gravel also; so couldn't use yellow tones.
That concrete was quite a tricky colour to get to and has required at least 4 coats of paint from a dark grey undercoat, through a grey/sand mix dry-brush and a light grey/bone mix, to final dry-brushes of light grey and white. Next, it will get a range of washes to make it dirty and add some shading.
The boxes are only base-coated and will be lighter so that they contrast with the mud.
You should also be able to see where the gravel surface has been broken and the mud is showing though in places. That was achieved with a brown wash over the painted gravel with a few patches picked out with brown.
And that's it, so far.
Automatically Appended Next Post: Actually, that's not all.
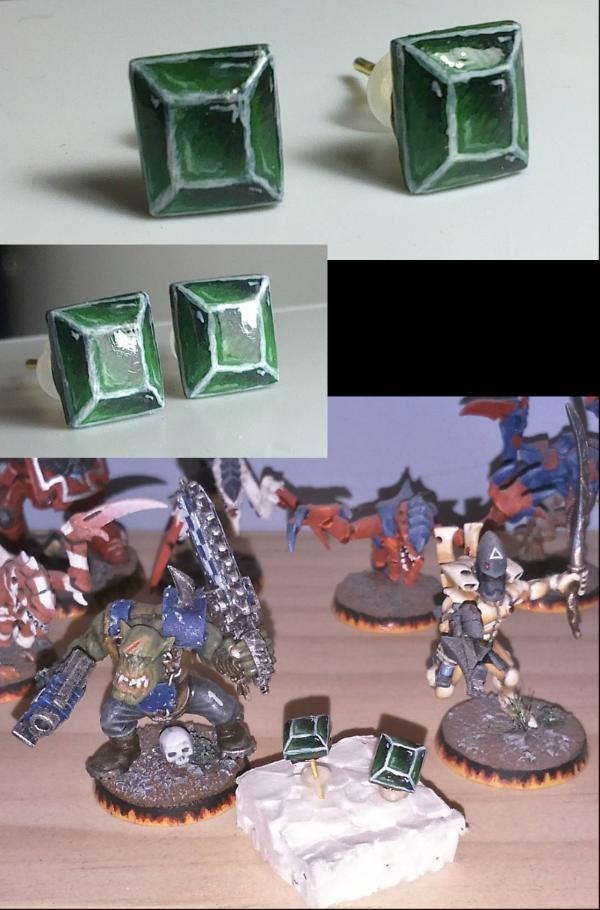
In other news; I made some more earrings for Mother's day.
As Mum has mentioned that she want's some green earrings, green is what she got.
The white edge highlights aren't great, but look fine to the naked eye.
You will also see the glossy effect on them. This is a combination of using gloss paints with a coat of spray gloss varnish and then a few layers of Pledge Multi-surface wax (Formally known as Klear).
This stuff seems to have worked well. The liquid looks like dirty dishwater (smells nice though) and is quite thin, like water. This means you get a really thin coat per layer, which is good for not covering small details. It should be really hard-wearing (that my enamel varnish has proven to not be so good on earrings) as it's intended for floors. And the result speaks for itself, nice gloss finish.
That alien ship looks pretty smart matey ! Well done !
Can't beat Pledge as a varnish ! Full of win !
Also works great as thinners for old paint , for making washes and sealing stuff for oil washes . Really really useful. And smells nice.....
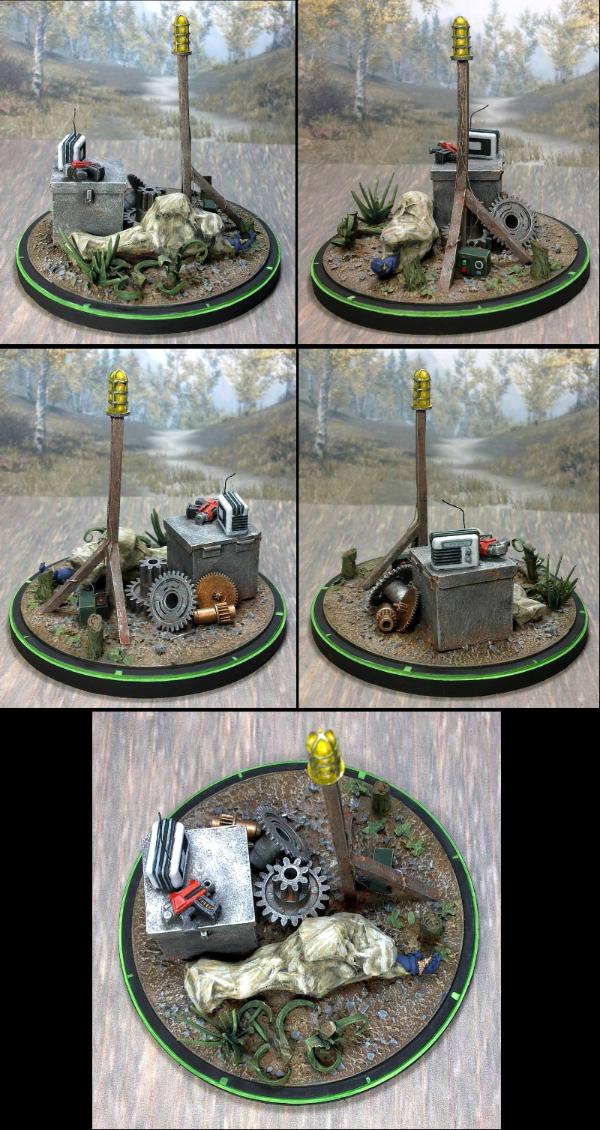
Progress on the concrete today. Just some black washes to darken the grooves and add some streaks (there will be more, but I'll leave that until after I've done the posters and graffiti).
And the weather was nice for a brief moment today, I went outside and look what flew over!!!
He would get on well with Arnold Rimmer. ...
Rimmer: Aliens!
Lister: Oh god, aliens? Your explanation for anything slightly peculiar is aliens, isn't it? You lose your keys, it's aliens. A picture falls off the wall, it's aliens. That time we used up a whole bog roll in a day, you thought that was aliens as well.
Rimmer: Well we didn't use it all, Lister. Who did?
Lister: Rimmer, aliens used our bog roll?
...
lone dirty dog wrote:Ha ha that looks awesome the base and the photo I can't wait till that picture turns up on one of those we are not alone shows .......
Thanks. Yeah, I was tempted to send it to one of the UFO investigator groups. But they (the serious ones at least) are only going to believe photos that haven't been so much as resized, and I've done a bit more that resize that photo. I would love it if it did get into the mainstream/press/UFO circles.
What posters are you putting up by the way ?
Don't know yet. I have a large collection of various posters/adverts/signs that I've found on DDakka and the rest of the internet, that I need to go through and pick out (and then print out) to use. The aim is mostly to be work/job related things on the inside of the wall as it's meant to be a workspace. The outside will be all graffiti, so no room for posters there.
OneManNoodles wrote:I was drinking when I saw that... Now I'm cleaning up...
Also, holy crap that is some fine concrete and plant work going on there!
I did also notice the ear-rings, hope she liked them, they look really good!
sorry for your mess.
Thanks. The earrings were well received. Thanks.
I have now attached the UFO to the base and that has allowed me to base-coat the mud.
I started with a load of plaster that I placed at the top of the trough and let set for a bit.
Then pushed the UFO along the trench, through the plaster, and then positioned it at the crater.
A little more plaster was added about the UFO.
Once that had all hardened, I covered it in PVA and sprinkled on some of the finest grade of crushed dried paint (to give it some texture), and picked out any lumps that were too big. That was all sealed in with a layer of water/PVA.
Once that had dried, I have covered it in brown. This is just one coat of brown, any variation is due to the underlying colour and texture, not some clever trick.
Love the photo. Some "official" looking people may pay you a visit soon enough for it, so you did not need to send it off. They'll find you. Scary thought.
Mother's day is in May. At least over here. It's March in the UK? Good to hear the gift was appreciated.
How much contrast, color contrast are you planning for between the scene/base and the UFO? And scorch marks? the whole heat of re-entry thing?
Co'tor Shas wrote:Ah, red dwarf, that was a good show .
One of the best.
Warboss_Waaazag wrote:Those walls look great. I really like how you've weathered them. The ship, too, color-wise has really come together.
I almost feel like there should be some brown splash on the walls nearest the ditch. Just an idea.
Thanks 'boss. Yep, I have already started researching what sort of mud splatter I want there.
Red Harvest wrote:Love the photo. Some "official" looking people may pay you a visit soon enough for it, so you did not need to send it off. They'll find you. Scary thought.
That's all right then, I'll just sit tight.
Mother's day is in May. At least over here. It's March in the UK? Good to hear the gift was appreciated.
Yarp. Definitely was Mother's day (or Mothering Sunday as I think it's was originally conceived, a bit more than just thank your mum day, and has now become commercial like every other occasion...).
How much contrast, color contrast are you planning for between the scene/base and the UFO? And scorch marks? the whole heat of re-entry thing?
Well the main colour of the gravel, concrete and the UFO are as they will be, largely (further tweaks will likely happen as it progresses).
The photos don't necessarily do the whole justice as yet. Sometimes the UFO can look quite grey and blend with the gravel and concrete, and others it looks quite blue and stands out.
However, the additional colours of the posters (which I've printed off a large selection today) and the plants and when the mud and others bits are done, I'm hoping the UFO stands out in it's monochome-ness, framed with the brown mud.
Scorch marks. No, I'm seeing this as having crashed after entering the atmosphere, and that being weird alien technology, it doesn't have any problems with zipping in and out of atmospheres.
Also, the crash is at relatively low-speed. Otherwise it would have left a larger crater and at the angle of impact would have tumbled and the damage to the ground would be different and stretched out over a long distance. Both of these would have meant larger builds and I wanted to limit the size.
I'm seeing this as the pilot not understanding / being confused by the wall / graffiti, flying into it accidentally and therefore being unable to avoid the ground. More of a "slow" coming to a skidding halt, than a high-speed impact.
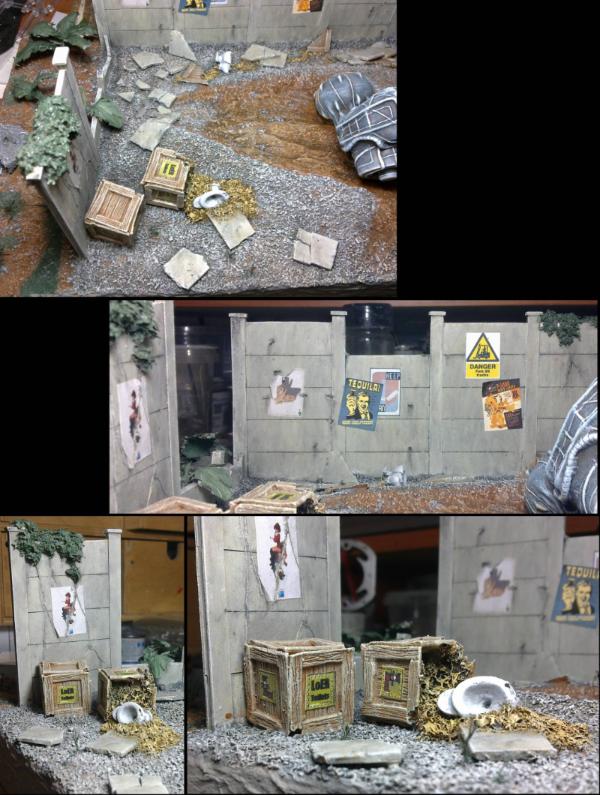
I've been building up the colour on the mud, boxes and packing material, but nothing worth showing yet. Organising these posters, digging out my printer, replacing one of the inks and finally printing them off (and re-burying the printer), took quite a chunk of the day.
Good to see that people can interpret it in different ways / reminds people of different things. Shows that it's doing it's job for what I intended.
This should answer your question, Shas.
The mud can't be too wet or nasty as this area was being used for industrial purposes with heavy boxes and machinery.
So it is a hard, dry-ish, rocky, mud.
The main reason is so that it matches the bases on all my models and will be a table-wide feature.
You will notice though, that the depths of the crater is darker than the peak of the rim. This shows the difference in moisture content, and I may even throw in some gloss varnish to make the bottom of the crater "wet".
I've also painted the mud outside the walls and I've done all the rocks (the large one may get some washes to add some colour variation).
The various plant-life has had a base-coat, but will get much more attention soon.
The boxes are also pretty much done. As is the packing material.
I've only just started on the toilets though.
And I did the mud splatter on the wall. This was just spots of PVA with a light sprinkling of my finest basing material (dried paint). I think it looks pretty good for fairly dry (as in not watery) mud splatter.
Still lots more to do, not least the graffiti (which will involve some quite ambitious pieces), attaching and weathering the posters/signs, all the plants, and finishing everything off to my usual high standards... 10ish days left,.. we will have to see...
lone dirty dog wrote:Looking good my man looking good it truly looks good did you get that it looks good, no seriously it looks really good
Something about how you say that leads me to think that you think it looks good? Thanks.
Warboss_Waaazag wrote:Looks great. Will there be more mud splatter work?
Thanks 'boss. No more splatter on this piece (future adjoining pieces/expansions will likely get more), as the main direction of the ejected material is away from the wall: The trench has been pushed down and out and dragged along (shown by the gravel being on top at the edge) and the final crater is where the mud has been thrown out when the front of the UFO came down (shown by the mud being on top at the edge).
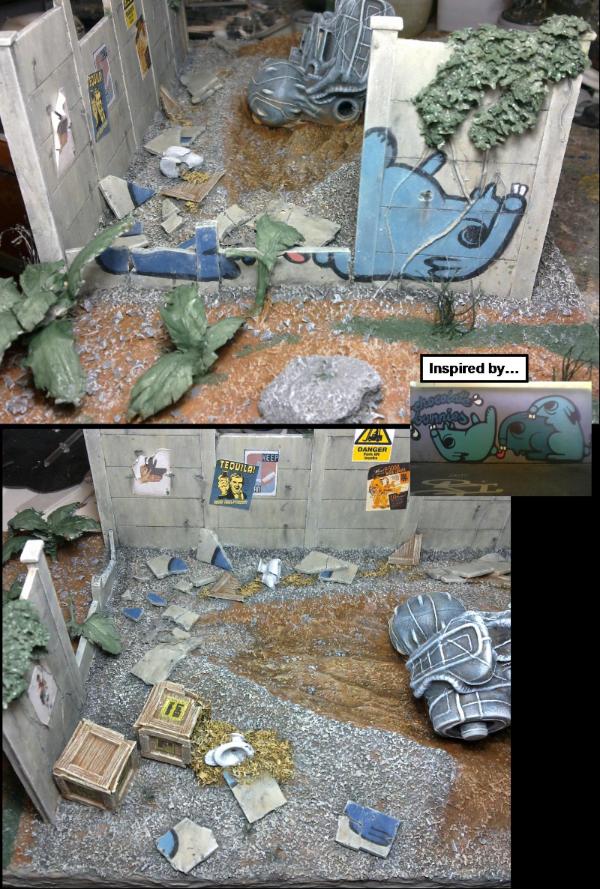
Last night I painted the toilets, and then today I have added the posters/signs. I've tried to keep them work/toilet related. There is a "Danger forklifts" sign that the workers have added (underneath) an advert for a new forklift replacement (so we can assume that the one they had was a bit old).
There's a "Keep Clean" poster that someone has partially obscured by a "Tequila! Have you hugged your toilet today" poster (keeping with the toilet theme).
Then a couple of toilet adverts. One being damaged by pieces of flying concrete from the crash, and one damaged by the roots of the plant (to show that the area has been deserted for a while).
AND, to add some rivets to the piece, some LoER signs on the boxes. This also helps to show that one of the boxes has been tipped over.
These will all get more weathering when I come to that at the end, so yes, they do look a bit clean at the moment.
Ruglud wrote:Surely the crates should be labelled 'W.C. Boggs & Son'
Ha, could have. But I needed to get some rivets in somewhere.
inmygravenimage wrote:The general state of ruination, and the pleasingly light palette, really make this effort sing. Beautiful pile of crud, my friend.
Thanks Graven.
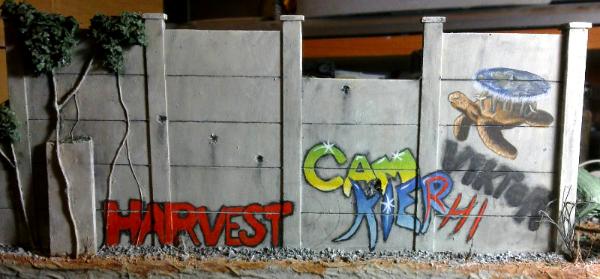
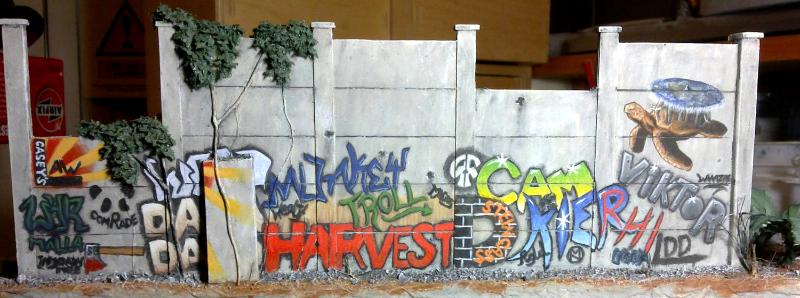
Graffiti has been started. The first was inspired by some graffiti I saw on the wall of an underpass in Poland (see insert, that wall is about 7ft tall). It amused me in it's sheer oddness and innuendo-ness.
Also, I've started the next piece and this is just a teaser. I wonder if any of you can tell what it's going to be?
Terry Pratchett and his Discworld, rest in peace, he was one of my favorite writers And your work is absolutely fantastic, it doesn't look like a diorama, it seems real
Thank you all. Glad you like it and feel that it has been done justice.
XDluca: I am honoured to be the one to receive your first post. Thanks, realism is what I strive for, glad it works.
Ruglud: Ha. Maybe when I have finally got an airbrush... nobody would suspect the person running about with a compressor... Nearly bought a compressor today, but was out-bid. Will have to keep looking...
Graven / Big H: Thanks. It's not that great, it's just blobs of paint... well, that can describe any painting really... there's not much finesse to it. I didn't think it was going to work out as I painted it and then sat back and saw that it did work. The sum is far greater than the individual parts.
I've been doing more graffiti, but first I feel I should say:
The relative position, size, overlaps, colours, details, etc. of the graffiti that I am adding is no indication of favouritism for anyone that is (or isn't) included.
With that out the way, yes, the remaining graffiti is going to be based on some of you chaps from around here.
I want this wall to look like it has been on the receiving end of years of graffiti, with one person overlapping another and then the later people squeezing in tags in the gaps. So this will build up, piece by piece, until the lower half of the wall is filled (as graffiti artists can only reach so far, and rarely bring a step ladder).
So this is graffiti-in-progress:
Cam's tag is done following his own tutorial (for part of it at least) and is the first to be finished.
The particular shade of Harvest is only part done, and will get some more additions soon.
Vik's has only just been started and will look very different.
There are many more to come and, as I said, don't feel left out if you don't feature. I can't fit you all on this one piece, and there are many more things I will build in the future...
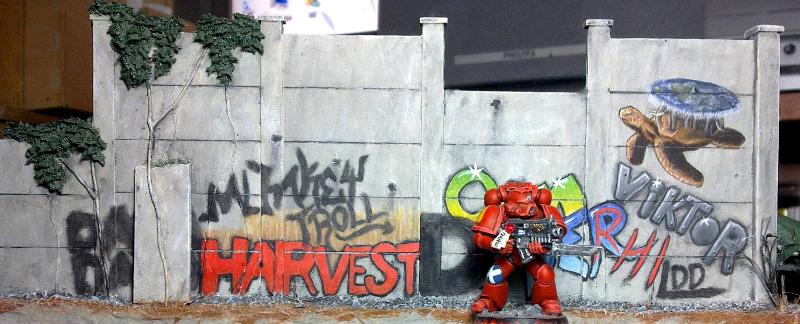
Has reminiscence of Dave's warehouse with the tagging plus gives it a sense of history, I think you should leave Viktor as it is as it just looks sprayed like a lot of common tags around.
lone dirty dog wrote:Has reminiscence of Dave's warehouse with the tagging plus gives it a sense of history,
nerdfest09 wrote:I managed a spot on one of Dave's buildings which has been the highlight of my Dakka career :-)
Ja. Dave's warehouse was the inspiration for this, as was Cam's graffiti exploits.
I think you should leave Viktor as it is as it just looks sprayed like a lot of common tags around.
Ah, but I had a plan for Vik's tag (see below). But that comment has sealed your tag
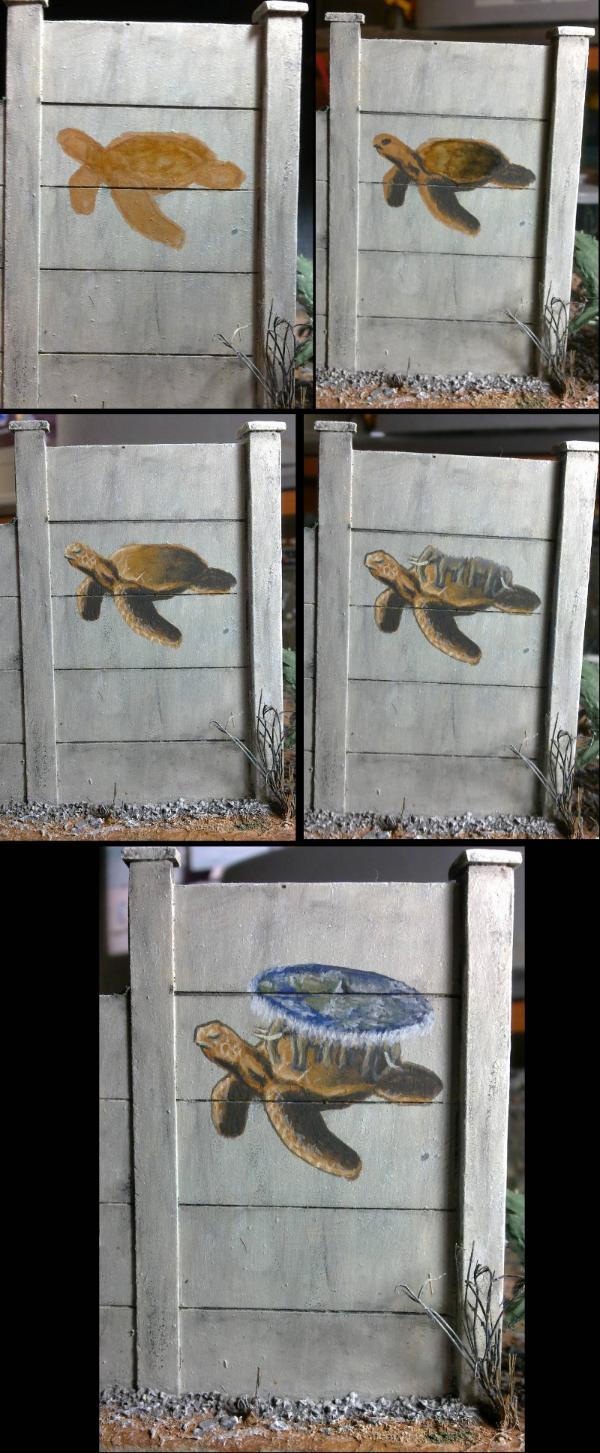
Vik's and Red's tags are done, I've blocked in a few more, and this should serve as a scale reminder (as without any reference the wall can look a bit small).
Gitsplitta wrote:I think that's a wise decision... sets the turtle apart from the rest too.
Indeed. On the pedestal he deserves.
Solar_lion wrote:Wow amazing collection of details. It's like Nerd brain exploded minus the mankini. Love the bunnies!
Thanks Solar'. Glad you like the bunnies.
lone dirty dog wrote:How comes I always get abbreviated another claim to fame although Viks does look rather splendid goes well with his old Avatar
I think it's a combination of a reasonably long name that is also very easy to abbreviate. Look at it this way, even abbreviated your name is as long as mine is in total.
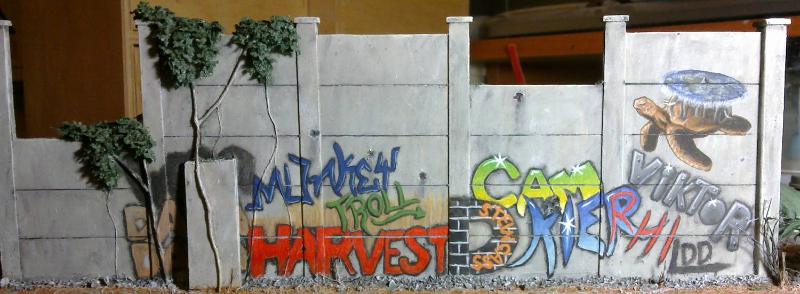
Finished off a couple more:
Dave's was going to be done in red-brick, but once I'd added the lines for the bricks (so that I'd be able to paint the bricks in) I quite liked it in black/white and so kept it.
Monkeytroll's was another easily split to make more graffiti artists.
You can also see that I've been a bit diplomatic as to the graffiti that is hidden by the fallen piece of wall.
That graffiti is awesome. I would almost advocate for more. Also, at least here in the states, graffiti "artists" tend to disrespect one another and overwrite each other's tags. So the older a wall is or the more hotly contested a territory that that surface is in, the deeper layered the graffiti will be.
Thanks 'boss. I have tried to give the impression of the tags overlapping, but without completely obscuring anything. Perhaps not quite the same, but I hope it gives the impression.
I have now run out of inspiration / willpower to come up with more different styles of tagging, and have largely filled the space. So I'm calling the graffiti done.. mostly (there may be some more small squiggles added, but these are all the "legible" ones). Some of the smaller tags didn't quite turn out well, if you can read them then you can get a warm glow. If you can't read them, then assume it's you and get a warm glow.
Next, it's on to the plants and then weathering. I might just get this done in time...
I think that in keeping with what WW said, you need to do a giant "GITSPLITTA" over the top of everything (except the turtle of course.). Only for authenticity's sake you understood. ..
Gitsplitta wrote:Ah... is the one below the red "HI"?
It is. I'm glad (and slightly impressed as it didn't come out as well as I hoped) that you can find it.
Well then... you'll have to cover up my tag too with someone else's avatar name. It's only fair after all.
Good to see that you are nice enough to compromise on such things.
shasolenzabi wrote:Dave did a tag for me in all purple,,,,,"Shaz"
Sadly, you fell prey to me having a good idea too late to fit it on. I shall save it for the future. I may throw in a little "Shas" for you when I go over with some more scribbles.
I'm quite happy how Panda's turned out. It went through many variations in planning before deciding to do a "Banksy" and just paint the black areas, and it was only in positioning the "Comrade" that I realised that the R could become the nose.
Good to hear Ruglud. It's nice how you can get the "u"s in your name to merge with the neighbouring letters.
Graven, yes there is a little Inmygraven Image squished into the bottom left.
Glad to have brought you out of lurking Comrade. and that you like it.
Thanks OMN. Yes it is, I'm quite happy with how that turned out also.
Anyone with a little tag on this one or who has missed out this time around will likely get a bigger one on something in the future. I can see my "table" having much graffiti on it.
I've started on the plants, had to go back to my Mantis Warrior model to check my own technique for the large leaves, nothing much to show yet.
In other news:
I've got an airbrush. Actually two (or even 3 if you count my old external-mix spray gun).
The compressor seems to work well. Nice and quiet and the filled tank seems to last well.
You can see a siphon-feed airbrush and a side-cup, gravity-feed airbrush.
I may practice with these (probably only the gravity-feed one) or I may just sell them on to get some money back on the deal.
I am still looking for a (more than likely) Badger airbrush, but good deals seem to be rare.
Anyway, no time to play with it yet (I didn't even expect it to arrive before Tuesday). But there you go, new toy... sorry... tool.
I was surprised at how quiet it was. I was expecting it to be louder.
Maybe it's all relative, but it's quieter than the tv or any music that I tend to have on (although that's not saying much in being quieter than my music ).
The advantage of the tank is that once it's filled, the pump is off and you can spray in silence for quite a while.
Dr H wrote: I was surprised at how quiet it was. I was expecting it to be louder.
Maybe it's all relative, but it's quieter than the tv or any music that I tend to have on (although that's not saying much in being quieter than my music ).
The advantage of the tank is that once it's filled, the pump is off and you can spray in silence for quite a while.
Dr H wrote: Thanks Nerdy. See if you can spot your's below.
Thanks 'boss. I have tried to give the impression of the tags overlapping, but without completely obscuring anything. Perhaps not quite the same, but I hope it gives the impression.
I have now run out of inspiration / willpower to come up with more different styles of tagging, and have largely filled the space. So I'm calling the graffiti done.. mostly (there may be some more small squiggles added, but these are all the "legible" ones). Some of the smaller tags didn't quite turn out well, if you can read them then you can get a warm glow. If you can't read them, then assume it's you and get a warm glow.
So I just had a "god, I'm dumb" moment. I don't like to read and mostly come for the pretty, pretty pictures. So I just now realized that the tags on the wall are all dakka members. I'm really quite honored to have my name on that wall. Thank you, Dr H!
shasolenzabi wrote:I paint in silence with my hand brushes already!
That all depends on how loud you hum/sing to yourself...
Lol 'boss. that's the power of reading for you. A picture may say a thousand words, but a caption can change the message.
So, I'm at the stage of finishing those final touches. As part of this I've been taking photos from many angles and thought I'd share some that may interest you.
At the top of this image you will see how the angle of the camera/light brings out the texture of the mud splash and of the concrete. You can also see the plants have been painted. The roots of the wall-clingers have been painted up so that the thicker roots are brown (to show their toughness in age) and the thinner roots are greener (to show their youth). A couple of the dead ones have been painted almost white.
The large leaf plants are as they were on my Mantis warrior base, except the one that was caught by the UFO: The only leaf still attached is half dead and hanging limp and those that have been ripped off, lay dead on the ground at the start of the groove.
And just for you Shas, a close up of your tag.
I'm going to finish off the little slips I've found and then call it done.
I will however, still do the fossils etc. that will go around the edges, But I'm going to get nice pictures done for the competition first before attempting those.
So I am away for a bit (ever had one of those weeks where life constantly jumps out of the bushes to crotch punch you? Yeah) and this is what I was missing?
Wow. A wall of fame, and the Great A'Tuin to boot. The only thing missing is The Luggage somewhere among the crates
Amazing piece Doc. Can't wait to see it all done up.
Thanks Big'. I did consider adding some trash about the place, but with all the rubble from the crash and the plants I thought it was getting a bit overcrowded as it is, and decided not to add any.
Thanks MT.
Ruglud wrote:Really looking good - some of those pictures could be mistaken for real world, truly impressive.
Thanks, good to hear that, it's what I aim for.
Talking of airbrushes - I bought a compressor and airbrush kit back in March 2011 - I'm yet to fire up the compressor...
lol Whenever I buy something new, I have to try it out almost immediately. Expect some airbrush happenings here soon.
Thanks, No prob' Shas.
Red Harvest wrote:So I am away for a bit (ever had one of those weeks where life constantly jumps out of the bushes to crotch punch you? Yeah) and this is what I was missing?
Hopefully life stops trying to castrate you, or at the very least gives you a cup to wear.
Wow. A wall of fame, and the Great A'Tuin to boot. The only thing missing is The Luggage somewhere among the crates
Amazing piece Doc. Can't wait to see it all done up.
Thanks. Wait no longer...
First some accompanying fluff (only for fun, doesn't really tell you anything about the model):
Spoiler:
The secretary walked into the commander's office.
"What is this?" asked the commander.
"I don't know, sir. I do not have the clearance to see what was contained in the envelope, sir" Replied the secretary.
"I asked for a report on the incident that happened 2 months ago, and I get THIS!" Said the commander, throwing down a collection of paper that were covered with black rectangles that were roughly in the shape of paragraphs but no words were visible.
The secretary threw her hands up to her face and covered her eyes. "I'm not allowed to see that, sir. They said I must not look at them and I should forget that I have ever seen them." she said, slightly panicked.
"Who said this?" Asked the commander.
"I-I d-don't know, sir. T-they were..." Started the secretary, but she was interrupted by a knock at the door which was then opened by two men dressed in black suits.
"I DIDN'T SEE ANYTHING, I DON'T KNOW NOTHING, DON'T TAKE ME AWAY!" screamed the secretary.
"We're not here for you, Ms. You may leave now." Said the first man calmly.
"WHO IN THE NAME OF THE EMPEROR DO YOU THINK YOU ARE! COMING IN HERE UN-ANNOUNCED AND DISMISSING MY SECRETARY!" Shouted the commander. "Gladys, you may leave, go and have a drink and calm down" He said to the now crying secretary. She left in a flood of tears without uttering a word.
"Who we are is not important, commander..." Said the second man.
"...We are here to caution you about that document, sir" Said the first man, as if carrying on the same sentence of the other man.
"Caution me! What, I might get a nasty paper-cut when I wipe my arse with it? Because that's all this paper is worth." Said the commander, still seething.
"Sir, this is highly classified material, and should be treated such. We will have to re-think what we trust you with if you are going to dispose of this report in a non-safe way." Said one of the men.
"This material is worthless, it's just blank paper with black rectangles on it. No-one can get any information from it." Retorted the commander.
"All information that you are not cleared to know has been redacted under section 40 of our policy. You are, however, cleared to know of the report's existence and that is important information that is not to be shared off-hand." Said the other man.
"You do know that I am commander of this base?! I have the highest clearance available." Said the commander.
"Not so, sir. There are 3 levels of clearance that you do not have clearance to know about. The contents of this report comes under the first of these levels. Said the men.
The commander threw the papers at the men and told them to get out in a very impolite way.
The commander decided to return to his living quarters early that day as he couldn't concentrate on paperwork and his secretary had apparently taken herself off to calm down somewhere private.
As he walked down the path, a large gentleman, wearing a shirt too small for him, eye-glasses that were far thicker than usual, baggy trousers and dirty shoes, approached him.
"er, Excuse me" he said in a weak voice. "You are the commander of the base here, yes?" The man looked about shiftily. The commander prepared himself for an attack, but this man didn't look the violent sort.
"Yes. Now leave me alone. I have nothing to speak to you about." Said the commander.
"er, Well... actually, we... I mean, I am part of a group of people that might have some of the information that you want." Said the man, still agitated. "You must come with me before... before the men in black notice. Meet me by the alleyway up ahead. Act natural." and with that the man walked off down another alleyway, looking anything but natural.
The commander paused for a moment and weighed his options. He could call in a police squad to surround the immediate area. But the way the fat man acted and the mention of the "men in black" halted him. As he thought to himself, a black ground-car drove past slower than necessary. The windows were blacked out, but the commander knew who was inside. He walked on.
As he approached the alleyway, he crossed the road to the far side so that he could get a good look down the alley before entertaining the idea of entering. As he crossed, he noticed another black ground-car parked a short way away. He stopped at a cafe that was opposite the alley and watched the car for a while. He then entered the cafe and asked to use their private telecom, pulling rank to gain access. He called the base's quartermaster, a man that knew how to get things done, and told him that he had something that needed doing. After he had explained, the quartermaster uttered only one word "Aye" and the call was ended.
The commander walked back outside the cafe and watched the black ground-car again. A short while later, a large, unmarked van approached and then crashed at high speed into the black ground-car. All vehicles on the road came to a halt and people from the surrounding area ran to help. As the men exited the ground-car they looked over to the cafe, but could see no trace of the commander.
Entering the alleyway, the commander noticed a dilapidated fence part-way down and as he approached one of the wooden panels was pulled to one side by a chubby hand. The commander followed the man to a dirty caravan that was covered with (apart from the dirt) stickers that he didn't recognise although many involved saucer-shaped shiny objects. There was also far too many aerials on top of the caravan. The whole caravan tilted and shifted as the large man climbed through the relatively small doorway, the commander followed.
Inside, he noticed that the underside of the roof was covered with silvery foil. There were many papers strewn about the interior, some pinned to the walls, many laying about the various surfaces interspersed with fast-food packets. The caravan continued to pitch and roll as the large man made his way to a table and it finally came to a rest, at an angle, once the man had sat down. The commander then noticed there was another man already sat at the table.
This other man was short (as far as the commander could tell of the sitting man), bald, had scruffy grey stubble and wore a stripped T-shirt that was stained with various foodstuffs. He looked up.
"So... this is the... commander" the little man said with a wheezy voice.
"Yes I am the commander, and whom might you be? What are you doing in here?" replied the commander.
"Ahh, so many... questions... so many answers... but where do... you get your answers from... and... who has seen them... first." Said the little man.
"What are you talking about?" Said the commander, the thought of just leaving crossed his mind.
"We... find answers, we find the... truth, the truths that... they... don't want anyone to... know." Replied the little man.
The commander was growing tired of the way this man talked already, but persisted out of curiosity alone. "Who... never mind. Why have you brought me here, you have something you want to share with me? Or I'm leaving."
The large man spoke up "You recently requested a report and was, we suspect, disappointed to find it largely redacted, yes?"
"How d-... never mind. I'm listening." said the commander in a flat tone.
"Well..." said the large man, getting excited "...we have a copy of the full report, and..."
He was cut off by the little man "and we... thought you might be interested... in it's... contents."
"Out with it then" said the commander, used to dealing with subordinates.
"We... can't risk... just giving you the... report..." said the little man. "We... also want... some... compensation for... the information... make it... worth... our... while... as-it-were."
"COMPENSATION! Who do you think I am?!" shouted the commander.
"We thought... that you are... the commander... of this place..." replied the little man, with a dry smile.
"How do I know that this information is worthwhile?" asked the commander.
"Well... welll... you... excuse me..." the little man broke off into a coughing fit. He nudged the larger man.
"Well, you wanted the report in the first place. This is the only way you are going to get the information." explained the large man.
"What do you want then?" asked the commander.
"A dish" said the large man.
"A dish?" asked the commander.
"A... dish..." said the little man. "A... satellite... dish" He passed the commander a sheet of paper and continued his coughing fit.
The commander looked at the paper. It was a technical drawing of a satellite dish. "This one, I assume?" he said. The little man nodded between coughs.
"Fine, I'll sort it out when I get back."
"No need..." said the large man "... sign here" he said handing him a slip of paper, it was a requisition form.
"Where'd y- never mind." said the commander and signed the form.
Having got over his coughing fit, the little man placed a metal foil hat on his head and passed another to the commander. The large man got up and, with the caravan again rocking and rolling, he walked to the door and exited. The caravan levelled off.
"What do you expect me to do with this?" said the commander looking down at the hand-made foil hat. The little man just pointed to his own head with his hat in place.
"Why?" asked the commander.
"So... they can't... listen in to... your... thoughts" Said the little man "Just put the... put the... the..." he took a deep breath "...put the... hat on." he finally managed.
The commander unceremoniously put the hat on.
"Right..." said the little man "Now we can continue." the wheezing had stopped "In the last 12 months there have been 230 reports of unidentifiable things in the sky. We call them UTitS's..."
"You mean unidentified flying objects?" said the commander.
"UFOs. UFOs yes, that's much better. Catchy, I'll have to write that down" said the little man scribbling on a piece of paper. "These reports, of UFOs, have been increasing in frequency the last 3 months, and the descriptions have been getting more... descriptive."
"So?" said the commander.
"Soooo, these UFOs have been seen flying at low levels. One report stated that one passed by his ground floor window. That's un-corroborated though, it's said that the person lives on the 12th floor of a block of flats, but that's unimportant right now. The UFOs... UFOs, huh... have been reported to be flying erratically about the sky. Then, two months ago, one report stated that one had crashed out in the old city."
"And that's the report I tried to read." said the commander.
"Exactly. And those, men in black as people like to refer to them, don't want anyone to find it before they do."
"And you know where it is?" asked the commander.
There was a long pause before the little man replied, "No."
"This is useful how, then?" said the commander.
"It's somewhere in the old city, possibly the industrial complex" said the little man.
"The industrial complex is thousands of square kilometres alone." Said the commander.
"So, it'll take some time to find. It could be worth the effort." said the little man.
"Could be, could be! What is it that needs finding anyway?" Said the commander.
"This UTitS... UFO. Think of the alien technology..." Said the little man.
"We already have some alien technology, from the Tau and the Eldar." Said the commander, somewhat jaded.
"But this is something new, something different, and they want it, they want it quietly, all to themselves. So it must be worth something. It's a conspiracy." Said the little man, becoming animated.
"Right, fine. Thank you for the information. Maybe I'll have someone look into it someday." Said the commander, standing up and removing the foil hat.
The little man removed his own hat "It... could be... the best thing... you've ever done for... this planet..." he said wheezing again.
"Yeah, great. Just what this planet needs. Something everybody else wants." The commander stepped out of the caravan.
The large man was standing outside and looked at the commander as he passed.
"So why did you have to wait out here?" said the commander.
"You had to wear my hat. We don't have enough to make 3 hats." replied the large man.
The commander looked back at the caravan, with all the various aerials on top. "No, of course you don't" and he walked off.
As he left the alleyway another black groundcar passed by and a little stab of irritation flared up in the commander. "I wonder if the quartermaster wants a holiday..." he thought to himself.
And some notes on the actual model (much of this has been discussed throughout the build but this brings it all together):
Starting with the concept. It had to be an accident, and the first thing that came to mind was a crash of some kind. As the setting of 40k is all about space travel and aliens it was an amusing thought to project something of today's views of aliens into the future, but keep it mundane in a way.
So not a spaceport or anything futuristic. A simple industrial setting. Having also missed out in competing in the previous competition, which was building walls, I had decided to incorporate a wall into this piece. That led to something crashing though the wall. And the something became a UFO.
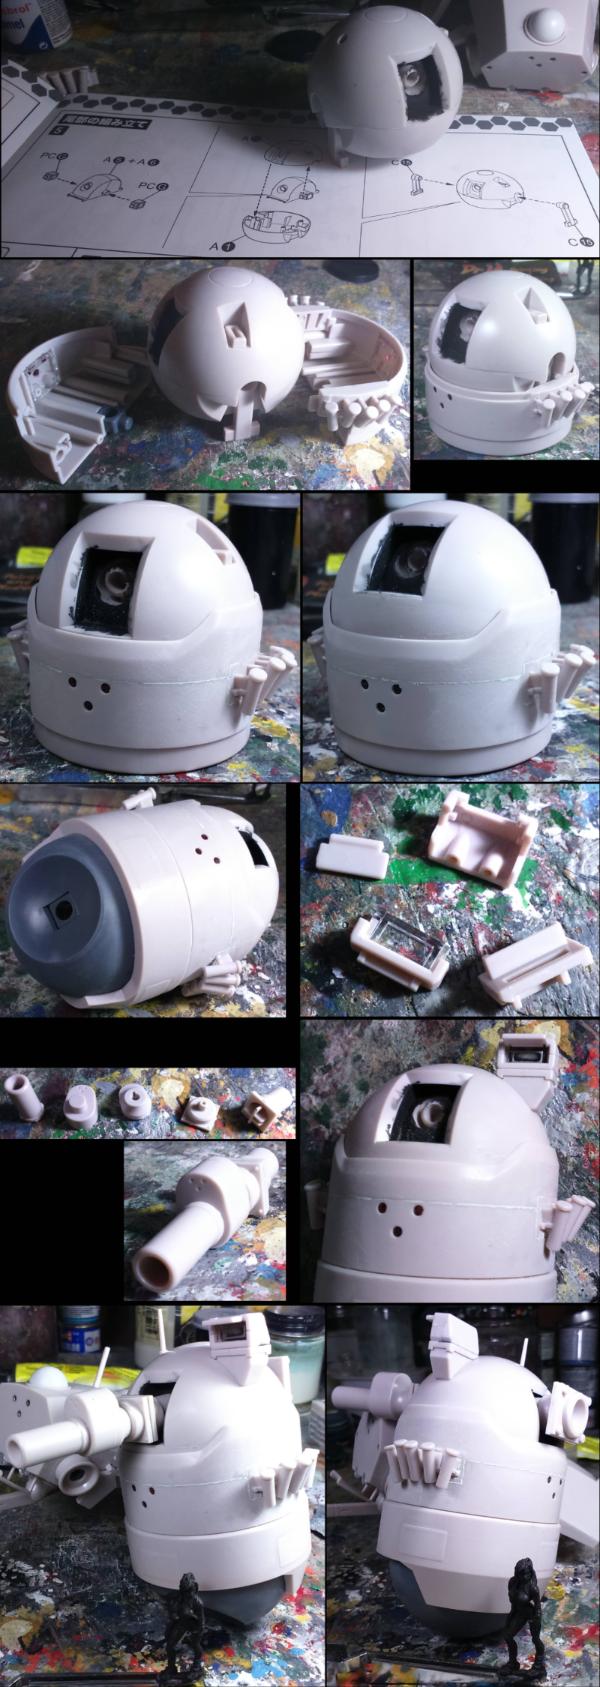
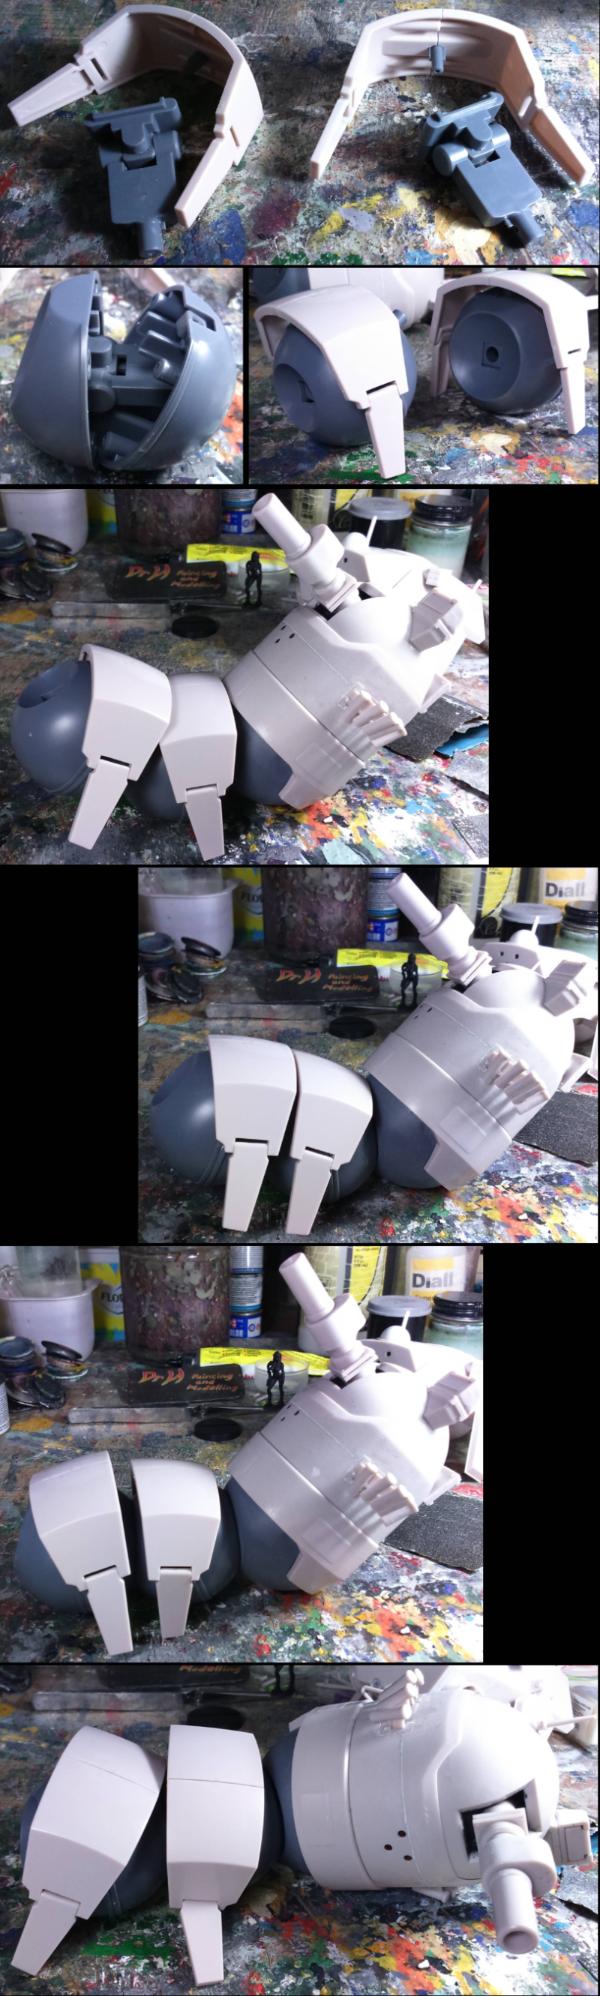
The UFO; I wanted it to be as alien as possible, so that it contrasted with the everyday background.
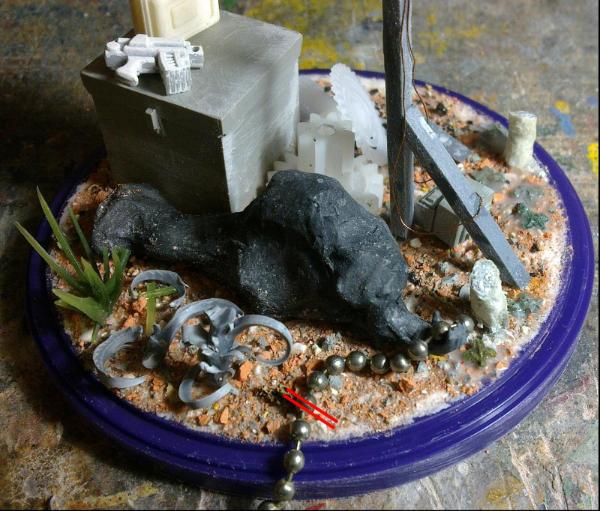
At first it was a problem to come up with a design and I eventually resorted to rummaging though my various boxes of bits and things that I've put to one side for the purpose of making into models. I pulled out a range of things that had interesting shapes and then decided to just throw them all together to make something that has no cues from any known vehicle (from real life AND from in-universe).
The main shape came together slowly and then I had to tie it all together and try to hide the pieces it was made of. Due to the large amount of research I've done recently into Giger's work (because of the tank) it naturally came to resemble the look of the alien craft that was used in "Alien" and many other Giger works.
Painting of the UFO had to follow the building and make it as alien as possible next to the base that was being planned. I knew I wanted a concrete wall, and that being an industrial complex it would have gravel on the ground. These would both be quite grey in colour and with the mud of the eventual crater being brown, I was led to make the UFO blue. I also decided to keep it monotone and devoid of markings just to add to the alien feel of the thing.
Then the base: As I had a lot of it about, the bulk of the base is made from expanded polystyrene. Glued down to a piece of wood for rigidity, the basic shape of the crater was carved out of the PS and some of what was removed was used to build up the edge.
Then this was covered with several layers of tissue and PVA/water, with a few layers of dental plaster (as I also have a lot of that laying about) thrown in. The result is very hard; I can press down on the gravel until my finger hurts and not feel any give.
The layout then became a matter of where the walls would be. I tried many variations, but ended up with them parallel to the base and extending near enough to the edges so that I could extend them in the future (when I come to make a modular gaming table... that's far future). The type of wall was set from my idea for the previous competition where I hadn't seen many scale concrete fences and wanted something unique (as is the main drive of all my modelling).
The walls are mainly built from sheet polystyrene and textured by pressing them with coarse sandpaper and a G-clamp. A few missing sections adds to the interest and the broken sections (where the crash was) was made from plaster or milliput casts of the plastic wall.
The only pre-made parts of this entire model are the boxes and toilets. These I had laying about and are used to give the back-story of the industrial complex. I had these laying about as I carved, moulded, cast and sell both the boxes and toilets and these are some of the mis-casts that I put to one side for this sort of thing.
The plants are made from a variety of things:
The grass is brush bristles (both paint brush and an old washing-up brush) of about 4 different lengths. I like the add the different lengths to each bunch of grass as it makes them look more natural. There's a few bunches inside the walls to show that the gravel is not being maintained any longer.
There's some very short grass patches outside the walls that are made from sawdust (from where I cut the wood for the base) sprinkled on.
The large leaves are leftovers from my Mantis Warrior and are made from tissue paper (not the toilet variety) and some sandwich bad ties. Note that one of these plants was tall enough to be clipped by the UFO as it hit the wall and has been damaged.
The wall-climbing plants are Birch seed pod "leaves" stuck to patches of sponge and a selection of wires for the roots. Note that the roots are either thick and painted brown (old and tough), thin and painted a light green (new growth), or thin and almost white (dead and broken).
The muddy areas are made and painted to match my existing model bases. A sprinkling of dried and crumbled paint, painted brown and then anything that looks like a rock is painted to be a rock.
The gravel is mostly the carbon grains that come out of water filters. Mostly painted grey with some brown washes thrown in to show the ground underneath.
Inside the walls are a selection of posters that are related to toilets/work. The area of the wall nearest the hole has been damaged by flying parts of the wall, and the poster there has also been damaged. There are also some splashes of mud at the crater end of the long wall.
Outside the wall is lots of graffiti that mainly speaks for itself. There's a few spots of lichens and some battle damage.
The bunny graffiti (inspired by some I saw in Poland) helps to show where the pieces of wall have been thrown inside the walled area. Some pieces however are face down, so you don't see the graffiti. (and yes, I have given thought to each individual piece as to how it was thrown in the crash).
The whole piece is meant to look like a long deserted (by both the workers and the graffiti artists - as shown by the removed piece laying against the outside of the wall) storage area that has started to become overgrown, and now a UFO has crashed there in the past weeks/days.
So, on to pictures...
First some relevant music:
I've kept these pictures as large as possible, so zoom in to see all the details.
Scale shots:
Full piece photos (all angles, many photos, large picture):
Spoiler:
Details (also large picture):
Spoiler:
Thanks for joining me on this journey... on to the next...ish (got to finish the edges of this and then back to the jet-bike).
Gawdam': "Have you hugged your toilet today?" Love that series of posters. Again, details details details. I just feel that every model needs them (and ones that have a reason to be there, not just for the sake of it ) to come alive. Thanks.
Thanks 'boss.
Jehan'. "Insane in the brain" Thanks.
You can Weety. Ha, indeed. Thanks.
I'm still considering how to add the things about the base. Either to do them as comic-like or go all in and do realistic layers in the ground. Baring in mind this will eventually be buried in a table (that one I keep going on about in the far future), it might be a lot of effort for little gain. But it will be hanging about on the shelf for quite a long time...
Maybe I'll go back to the jet-bike while I think about it...
That wall has been tagged within an inch of its life
It really has come together well but I have to say isn't strange how the wall has almost become the star of this
I was looking at the close up pics of the wall and the misses asked why are you looking at a crack den I said its a model she did not believe me at first till I proved it then she said that's good I said what a crack den
Thanks ckig. A story of some kind is very important in a model, I feel.
inmygravenimage wrote:Staggering work amigo. Top notch.
Thanks Graven.
lone dirty dog wrote:That wall has been tagged within an inch of its life
It really has come together well but I have to say isn't strange how the wall has almost become the star of this
Walls have feelings too... They have ears, at least...
This was the kind of thing I was planning for the previous "walls and fences" competition. So it's fair that the wall and the crash get equal attention.
Without the wall, there is no crash.
Without the crash, there is no.... hole in the wall...
I was looking at the close up pics of the wall and the misses asked why are you looking at a crack den I said its a model she did not believe me at first till I proved it then she said that's good I said what a crack den
I'm glad that it is getting these reactions. It means that I've achieved what I set out to do; make something realistic. Thank you both.
Further to the competition there is a public community choice award, with the prize being one of those warm glows, and the voting thread is over here: http://www.dakkadakka.com/dakkaforum/posts/list/642603.page#7719692 Pop on over there and vote for your favourite. Doesn't have to be the "best", just the piece that you like the best. The more votes cast the better the result.
And now... back to something completely different...
...A man with 6 legs!
Wait...
No, he ran away.
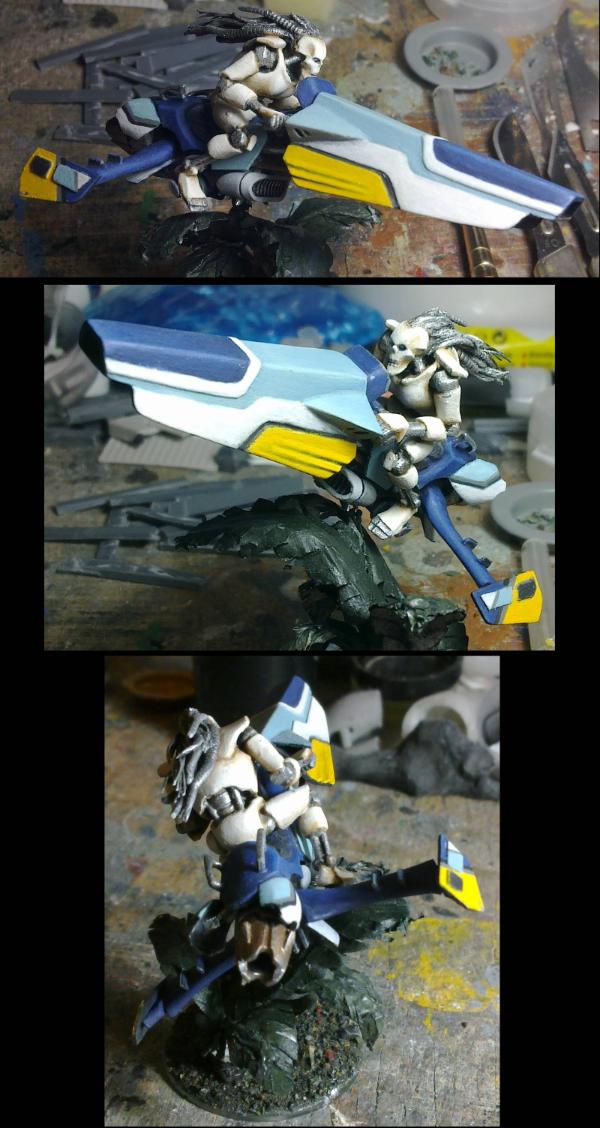
Onwards with the jet-bike:
Shading and highlighting is now mostly done on the main colours.
There's a few bits I can see need attention in the photos, but progress.
I've painted the underside black as with any racing machine you only paint the parts that the public are going to see and you don't waste time/effort/weight on parts that are not going to be on show.
Bike is coming along fantastically, nice choice of colours, reminds me of a Nintendo game I play as a kid, I hear red ones go faster. Good to see you're on a roll.
Just a wordy update today. I should have an update on the biker tomorrow though.
Theophony wrote:Bikes looking awesome, and the wall is great as well. Your tagging skills have opened a possible new career for you
Thanks Theo. Good to see you pop in.
Calibanite Lion wrote:The jetbike looks great, the canopy design is well done!
Thanks Calibanite Lion. It was a bit tricky, but has worked out well.
shasolenzabi wrote:That blue/white/yellow work well together!
Indeed. Although I can't take credit for the scheme.
Red Harvest wrote:Paint adds weight to the vehicle too. Color scheme is very "corporate'. It works very well.
And the diorama... just stunning. You certainly brought out the A+ game on this one.
Thanks Red. Yes it does and that's why it's usually a really thin coat.
I don't know about racing cars, but I know that the Ferrari F40 was so focussed on weight saving that the paint was thin enough to see the carbon fibre weave though it.
Thanks on both. I'm always pushing to improve on each model.
monkeytroll wrote:Bike is looking pretty darn neat with the paint starting to hit
Thanks. The final layers on the yellow brought it all together.
But I want to see this 6-legged man now, sounds right up my street
I believe he's gone to visit the man with a tape recorder up his nose.
Warboss_Waaazag wrote:Hey, that bike looks quite spiffy with its more refined paint job.
Thanks. Many layers and far too subtle shading later...
Co'tor Shas wrote:I'm loving the jetbike, it sort of looks like a design an actual mechanic would make.
Thanks. Always good to hear that about my models.
Solar_lion wrote:It's got that sport bike feel!
And that's what I hoped. Thanks.
OneManNoodles wrote:...Bike is coming along fantastically, nice choice of colours, reminds me of a Nintendo game I play as a kid, I hear red ones go faster. Good to see you're on a roll.
Thanks OMN. Well it is based on a computer game, so it should. There will be red ones in the future to match.
insaniak wrote:Lovely work.
Thanks Insaniak. Welcome to my corner of DDakka.
Stormwall wrote:You deserved your placing Doc. Congratulations. (I thought Cam was gonna give you a run for your money, and he did.)
But nonetheless. Grats!
Thanks Stormwall. Yes, Cam's piece was a fantastic bit of work. It did have me worried.
And yes, for those of you not in the know, My UFO crash won the LoER terrain contest... And the public vote I'm very pleased for the result as it was a lot of hard work and I tried a number of new things.
This means that I am now hosting the next round of the contest.
If you haven't seen it yet, I want you (yes, you) to build a piece of terrain from 2 non-model kit pieces of stuff...
Make something EXTRAORDINARY from something ORDINARY The 14th round of the League of Extraordinary Riveters Terrain Contest Go here:
http://www.dakkadakka.com/dakkaforum/posts/list/643658.page#7734224
Red Harvest wrote:Or the B-29 which looked pretty good unpainted, also the P-51 Mustang which just looked awesome My favorite plane from WWII.
Sig updated.
Shiny metal can look great on the right surface. Not so good for advertising though.
shasolenzabi wrote:Where did the scheme of the Jet Bike come from Dr. H?
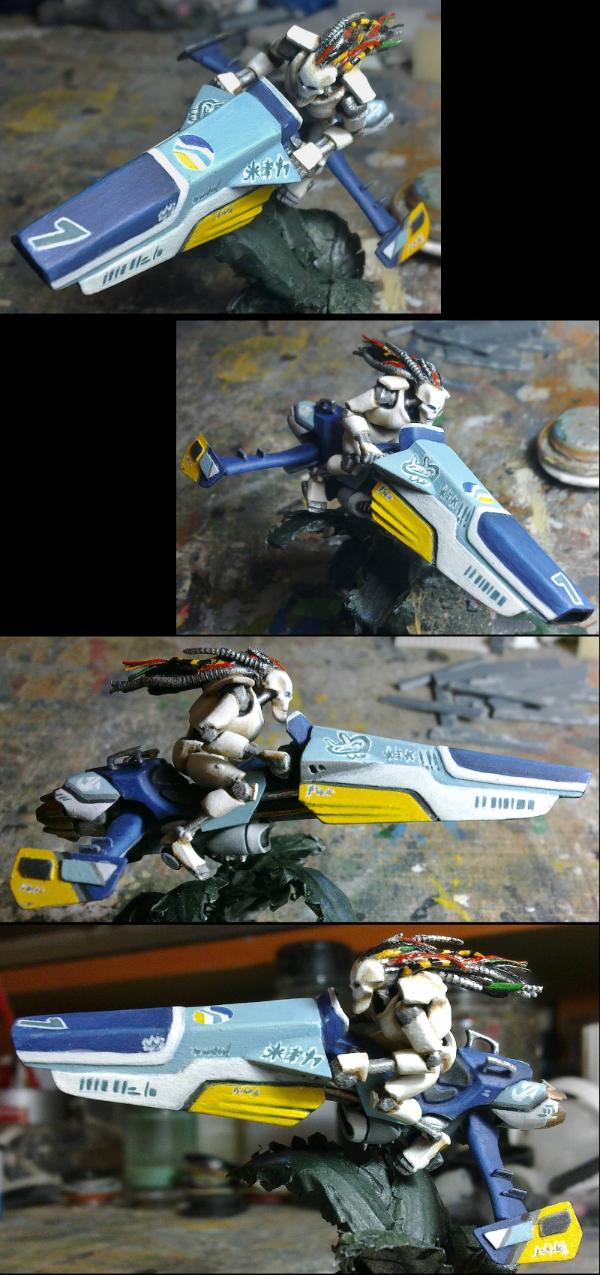
The scheme and the design cues of my additions are based on a series of computer games called WipEout. This one in particular is the Feisar team.
I said I'd furnish you with an update today, so here we are:
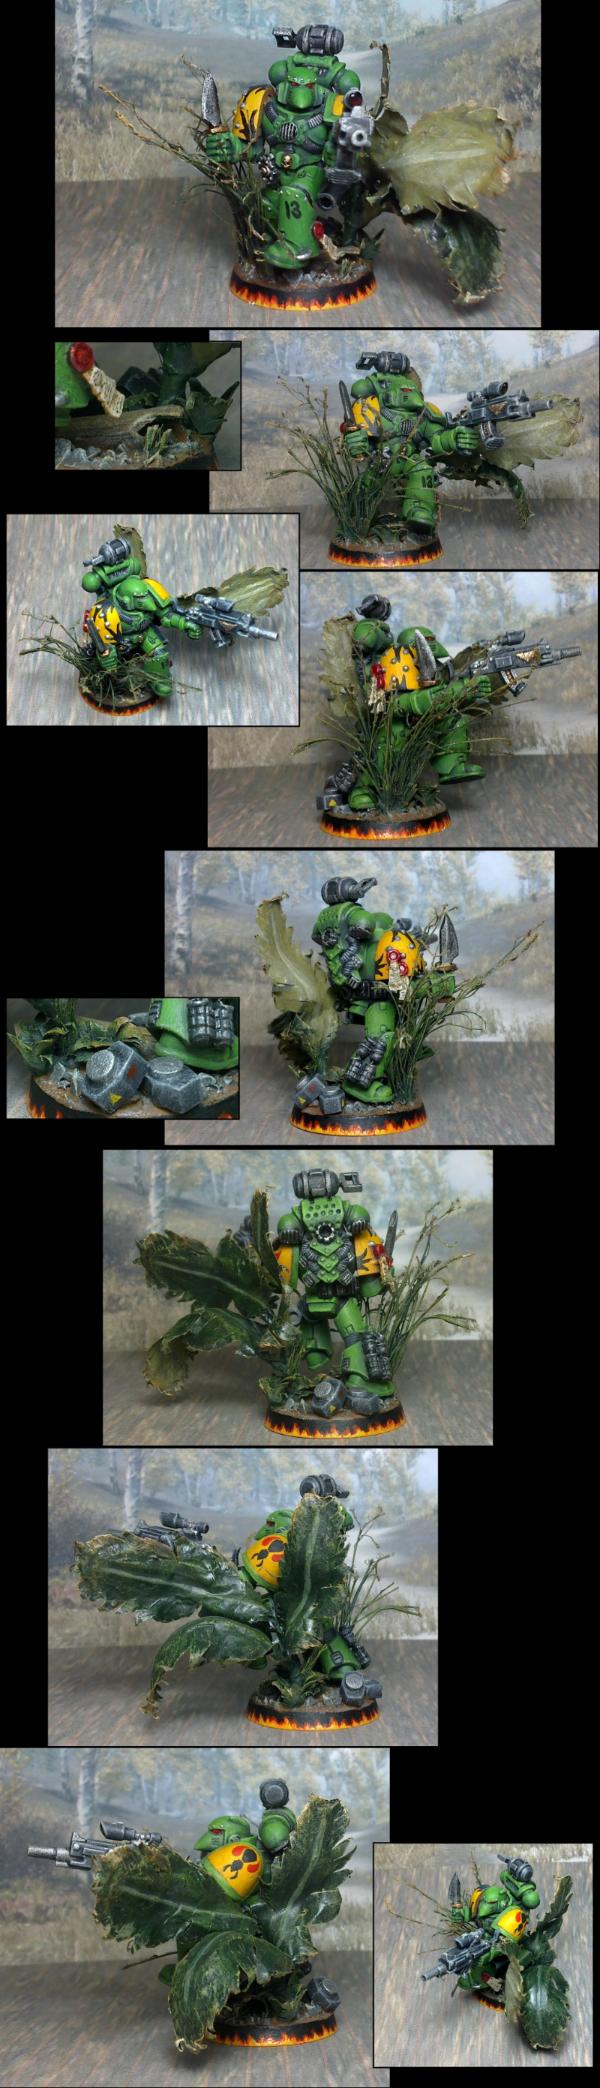
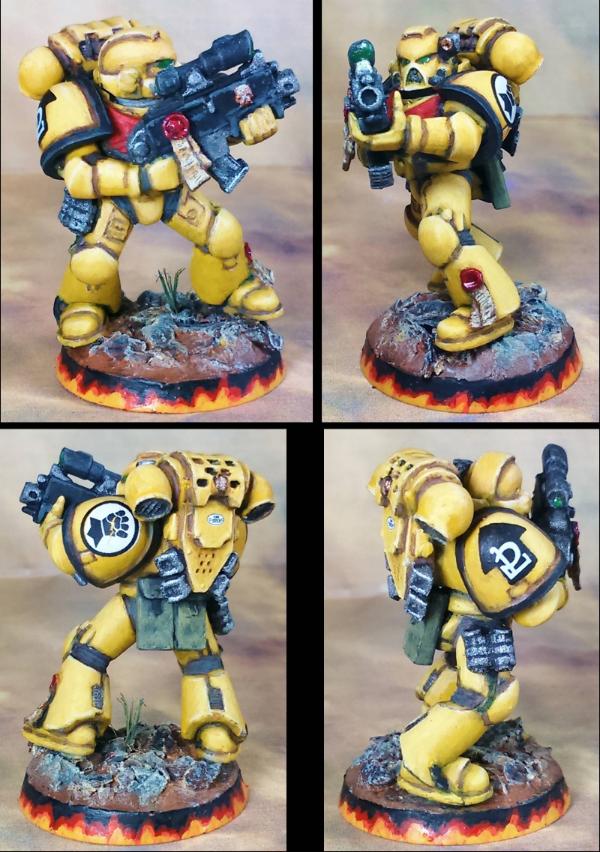
The pilot is (mostly) painted and is now attached to the bike.
This is her backstory:
Spoiler:
The ship had been difficult to bring down. The pilot was highly skilled, with incredibly fast reflexes. The Scientist looked upon the craft as it avoided yet another attempt to disable it, and had now decided that the pilot alone was worth it's capture. He had been tracking the craft for weeks now and had made 4 attempts to capture it over the past few days.
The craft itself was clearly of Necron origin, but was... different... from the usual warships. It was sleek and fast, built for agility, not battle. The Scientist could have easily (well not so easily as it turned out) destroyed the craft, but he wanted it intact to study. It's design and the way it moved was reminiscent of blockade runners; able to outrun, rather than out-gun any foes. This meant that it must have some important cargo on board, and The Scientist was eager to study it. The craft would be a bonus, now outshone by the pilot.
The Scientist's own ship was no slouch when it came to interstellar travel. The technology installed on board allowed it to fold space and leap from one end of the Universe to the other in an instant, and even without using this capability it could sneak up, undetected, to any ship and would even be able to run rings around any of the major races' craft if it needed to. But this ship, slightly smaller than his own, had proven itself far more agile. Being of Necron origin, it likely didn't require the mass-stabilisers that The Scientist needed so that he (and any other squishy life-forms) weren't killed in the manoeuvres, and this absence could provide that extra bit of performance; he would need to study it to be sure though.
Now though, he had caught up with it. The ship had stopped off at a known Necron-controlled planet, dropped off a data packet of some kind, and was just about to resume it's journey when The Scientist's craft had speared the side of the ship with a large barbed spike (that he had spent the past 20 hours riveting to the front of his ship). He had then folded space back to his own planetary system. taking the speared craft, before any help could arrive from the Necrons of the planet. He then boarded the ship.
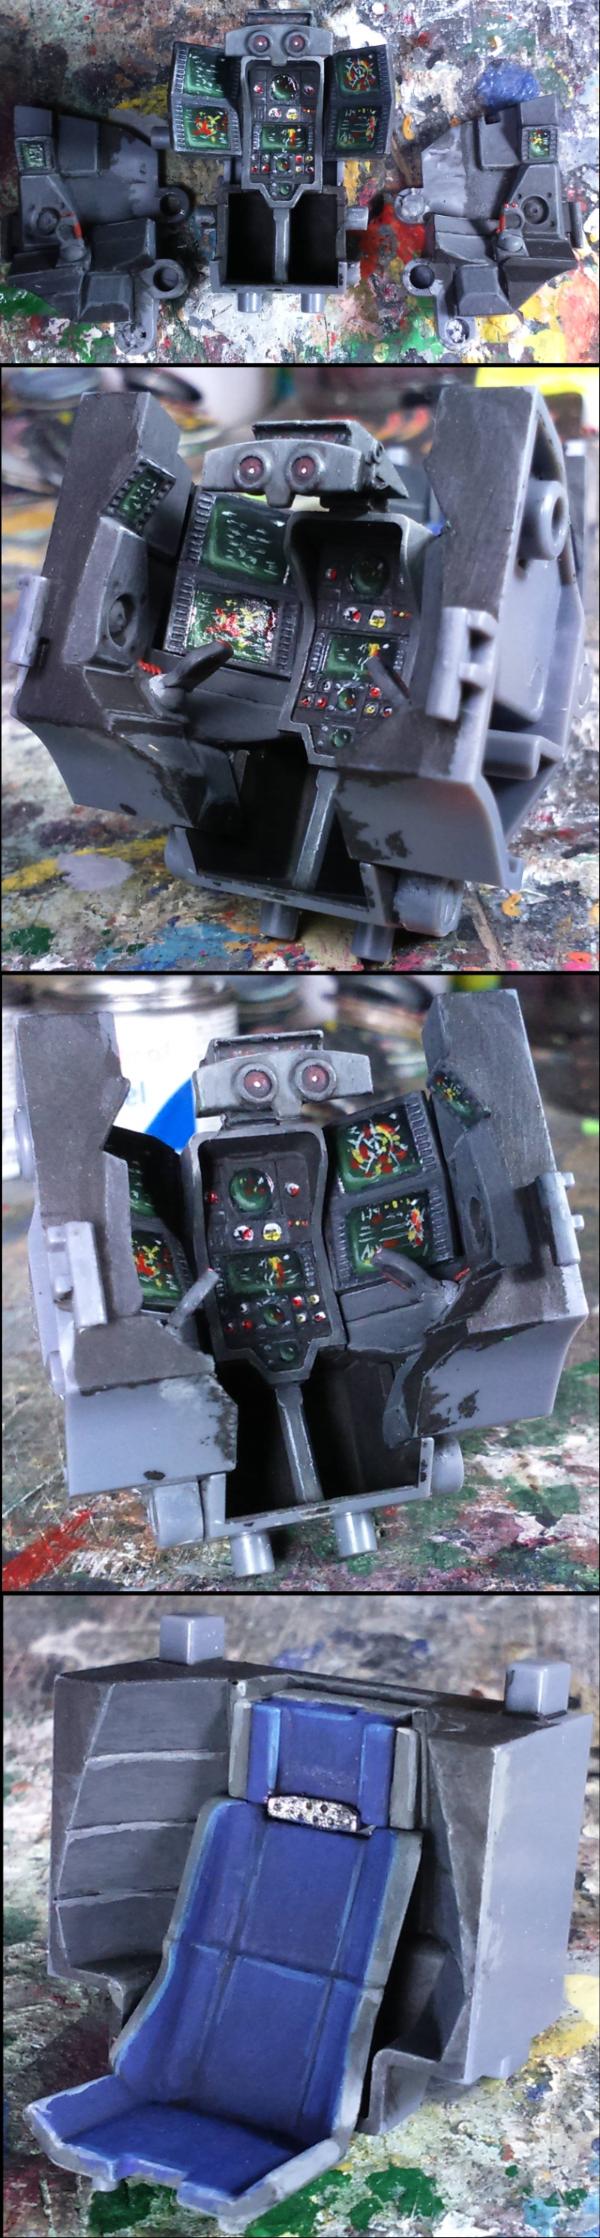
As suspected, there was no defence on board the ship. All the available space was taken up by the engines and flight-control technology. The Scientist would look over this at a later date, he was eager to meet the pilot. He found her, and it was definitely a "her" unusually for Necrons, towards the front of the ship in the middle of a spacious cockpit. Lights powered up as he entered to reveal a clean, uncluttered space. A bank of screens, displaying navigation, ship system information, etc. were situated opposite a throne of sorts.
Sat on the throne was a Necron, as individual as any of the high-level commanders. The basic frame of the body was largely the same as any other, but the panels that covered the frame were smooth and contoured into a feminine form. The harsh lines of the "standard" Necron were softened. the creamy-white surface looked soft to the touch. But between the panels and at the joints in particular there shone the familiar silvery Necron metal, and from the back of the head extended many and varied cables and wires; these plugged into the throne and obviously allowed greater and faster control of the ship. But there were also controls placed in reach of the hands and feet.
The pilot moved with a feminine grace as she stood up to address The Scientist. The cables came free of the throne and hung like long hair at her back. Her beautiful blue eyes sparkled as they caught the light.
"What is the meaning of this? You cannot stop the updates, I will be replaced." She said with an air of superiority.
"I'm not here to stop your updates, Madame. I'm here for you." Replied The Scientist.
"You will not find me so easy to capture." She said, taking up a unique fighting pose.
"Let this not get into such barbaric practices. I want you to join my cause. I am highly impressed with your skills and you would be a worthy addition. Here, catch." The Scientist tossed a small metallic sphere to the pilot.
She batted the sphere to one side with the back of her hand and said "Don't play games with me, I'll tear you limb from limb."
"Fine, fine. If that's the way you like to play" Said The Scientist, and drew a large revolver.
The pilot easily dodged the bullet from the crude gun and sprang at The Scientist, clearing the space between them in the blink of an eye. However, as soon as she impacted upon his body there was a faint "fop" noise and she awoke in a metal-walled room. The Scientist was sat opposite her.
"I'm so glad you decided to join us..." Said The Scientist "...and you want to ride one of my new racing bikes, good choice."
"Yes, logically that is where I would be of greatest use." She said, still with a slight air of superiority.
The sensation of the air flowing over her body and tugging at her hair was a thrill that she would never get tired of. The former racing bike she was riding could outperform any dedicated war-machine produced by any species, but was not as tough. That didn't really matter though, with her skills she could dodge most incoming fire as easily as she could fly though a forest, and she could fly though a forest.
And here's her on the bike:
The hair is not done yet. I wanted her to have really pale "skin" and try and give it that warm and soft look that you might associate with a beautiful woman, but without using red/pink. There's a bit more white highlighting to do, but update is an update.
A jetbike racing Necron with mecha-dreads, I can die happy. Outstanding work, the sponsor graphics a very nice touch and add that extra level of detail you don't normally get! Excellent.
This is definitely the best jet-bike ever... including star wars etc. Because it looks so... well... normal! Like the next evolution step of moto-cross-bikes and jet skis. The paint job sells it. Plus of course the design cries "speed": Something Lucas did right, but GW did not. Fie for that ravenwing jet bike, it's a flying brick of shame, it is! THIS is how it's done!
Gitsplitta wrote:Looks like a genuine racer Dr H. Outstanding!
Thanks Gits', that was the aim.
Calibanite Lion wrote:A jetbike racing Necron with mecha-dreads, I can die happy. Outstanding work, the sponsor graphics a very nice touch and add that extra level of detail you don't normally get! Excellent.
Thanks Lion. Glad you think so (but maybe hang around a bit longer ). Those extra details are what I enjoy most about modelling.
Stormwall wrote:That is so cool and unique.
Thanks Stormwall. Unique is the point of this army. I'm glad many people think it is also cool.
Ruglud wrote:Excellent mate, just excellent... An I-robot vibe going on with the paint job on the lady-cron...
Thanks. Yeah, that's the vibe. Although I couldn't use grey or blue shading for the white (due to the colour of the bike), I may make something closer to I-Robot in the future.
monkeytroll wrote:Nicely done!
She looks great, and the addition of the graphics is brilliant
Thanks MT. Some aren't as crisp as I'd like, but the best I can achieve at the moment.
Hruotland wrote:This is definitely the best jet-bike ever... including star wars etc. Because it looks so... well... normal! Like the next evolution step of moto-cross-bikes and jet skis. The paint job sells it. Plus of course the design cries "speed": Something Lucas did right, but GW did not. Fie for that ravenwing jet bike, it's a flying brick of shame, it is! THIS is how it's done!
Thanks Hruotland. High praise indeed. I'll have to do one of the Star Wars speeder bike things at some point.
inmygravenimage wrote:Awesome. I can hear the SEGA music now!
Thanks Graven.
This is what I hear:
DONE!
You've had the fluff already, so here's the pictures.
Time for a tidy up (after this and the UFO) and then on to something else...
I have finished tidying my workspace and have started making a mess of it again. However, this is a project that will be going in my other blog as it's something to sell. (nothing to show yet, but keep your eyes peeled for that thread reappearing)
Thanks lliu. Just don't look too closely at my earlier work.
I sat down today at my work space (or at least rolled my chair forward to the desk) to go though my bits and find something that I could possibly use for the Terminators I'm working on... there's a knock at the door and a package for me...
...My prize for the LoER contest from OMN!!!
And Holy
More bits...
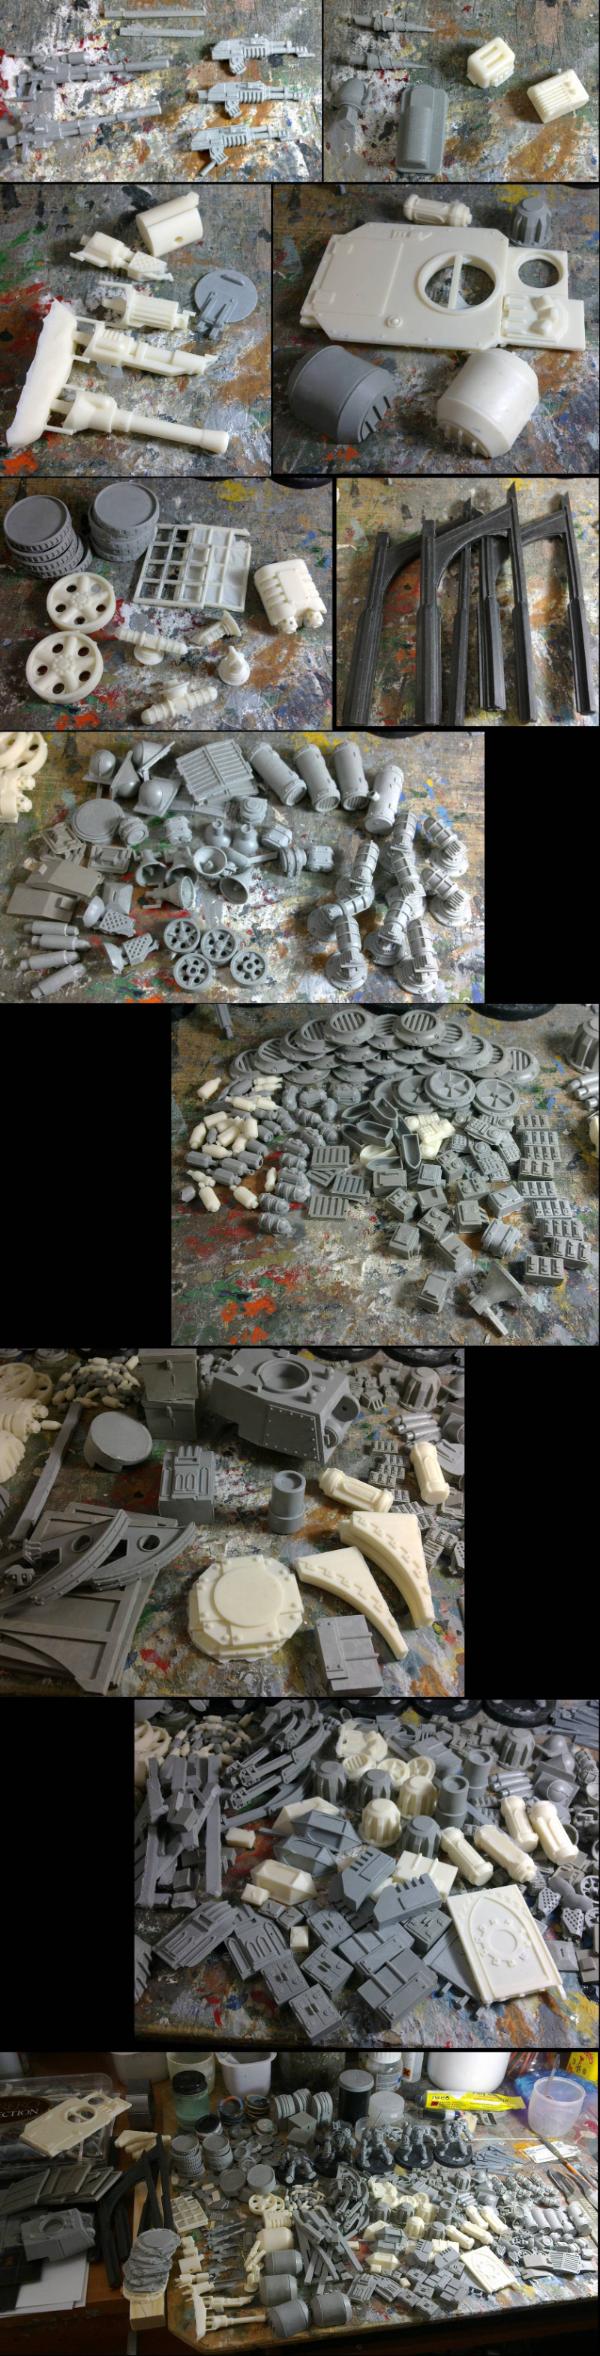
and not just a few more bits, I've just spent ages sorting though these and re-arranging my bits collection to accommodate them all.
There are (in no particular order):
A couple of sniper rifles, some future AK-alikes, and 2 blades.
A couple of drill bits, a teapot, toaster, and radio (love that radio), and something that had me stuck for quite a while but is actually a loaf of bread.
A hatch and some turret weapons (really like the flamer end).
The top of a vehicle, some fuel tanks (or similar), some ridged things and some lamp-post top-like things.
A load of fancy-edged bases, a couple of windows (may see if I can use the filled in one as it is), a couple of big wheels, some lights and a (very nice) dual bolter-alike.
Some flying buttresses.
Some headlights, a hatch, some little hatches with vision ports, some co-ax' (or hull-mounted) bolters and flamers, a few grills, some cylindrical fuel tanks and some things that are probably batteries with vents (but I think look like car sub-woofers), load more lights, some megaphones, some little wheels, exhaust pipes, and some random armour plates (?).
Loads of bottles and cans (love the flat sided bottles), more lights, drain grills, strange Gothic shaped things (?), little storage boxes and electrical boxes and control panels, battery packs and vents... so many vents... (nice fan ones too).
A turret (that the previously mentioned turret weapons fit into), a couple of boxes (that are very much like the metal boxes from Fallout 3), some terrain bits of various shapes, some riveted metal plate things, some trench crossing things (damn you dyslexia... rails, trench rails), and some of those things for models to stand on stairs with.
Some Gothic postboxes, more lights, more and large boxes, vent-like boxes, large calibre tank gun ends, a couple of doors/wall sections, and a load of sprue bits.
And the last photo shows my workspace completely swamped with the large volume of bits before I put them all away in their rightful places.
Thanks OMN. Great selection, nice pieces (puts some of my casting efforts to shame). Love it.
Thanks Big'. There are so many possibilities, and I hope to come up with many that Mr Noodles hasn't thought of.
Gits': As Big H said, everything there is made, cast and sold by OneManNoodles. Give him a shout and I'm sure he'll sort you out with as many as you like.
Jetbike looks astounding. Nice and clean and diametrically opposed to anything grim or dark. (although I am baffled, why do you guys not spell it grimme?) I like it much.
Holy Moly I wish I had entered now although I would not have won anyway
Nice Haul indeed I know as Noodle has taken some of my hard earned cash but well worth it he has created some nice pieces and the resin casts are pretty clean and free from issues.
Anyway back to you Doc can't wait see what you come up with next besides the terminators of course
The windows were the first casts I made of them, so I'm still figuring out how to cast them best. That bolterish thing was intended to be an exhaust / engine... If you want to use it as a bolter thing by all means do as you wish .
Strange gothic shaped things... which one I think you mean the little alcoves (at least that's what I call them), if it's the cylindrical shaped things or the half hexagon things... yea.. no idea. You should have plenty of lights and vents though.
I think I sent you about .5 kg of resin there, between your's and Cam's prizes you made a small dent on my stockpile. Speaking of Cam he hasn't gotten back to me yet to claim his prize...
I just hope some of those things will be useful to you! Thanks for making such an awesome entry!
Red Harvest wrote:Jetbike looks astounding. Nice and clean and diametrically opposed to anything grim or dark. (although I am baffled, why do you guys not spell it grimme?) I like it much.
Thanks Red'.
It might be because grimme is too close to grime which is dirt or a type of music, and therefore not grim; which is... grim (a bit like the north... )
hk1x1 wrote:The jetbike looks awesome , nice work on the basing as well, very dynamic.
Thanks hk'. Yeah, I wanted something better than the clear (but not quite invisible enough) stands, and I had some of those leaves left over.
Jehan-reznor wrote:So when do you make 9 more jetbikes as eldar windhose detachment proxy? and voted
At the rate I build things, the game will have moved on and something else will be the broken powergamer's friend. I might even have played the game by then... and Satan will be skating to work...
Thanks.
Thanks Magos. I like to imbue all my models with character and the characteristics of a jet-bike is that it is fast.
nerdfest09 wrote:Mother of God!!!.......
I'm glad you all had pretty much the same response to OMN's prize as I did.
OneManNoodles wrote:
Oh good you got it.
The windows were the first casts I made of them, so I'm still figuring out how to cast them best. That bolterish thing was intended to be an exhaust / engine... If you want to use it as a bolter thing by all means do as you wish .
Ah yes, that makes sense. A matter of perception. Might still use it as a gun anyway, but either way, I'll need to build something to put it on first.
Strange gothic shaped things... which one I think you mean the little alcoves (at least that's what I call them), if it's the cylindrical shaped things or the half hexagon things... yea.. no idea. You should have plenty of lights and vents though.
Yeah, the alcoves. And nice lights and vents they are.
I think I sent you about .5 kg of resin there, between your's and Cam's prizes you made a small dent on my stockpile. Speaking of Cam he hasn't gotten back to me yet to claim his prize...
I think Cam' is still in the middle of moving, so he's either busy or doesn't know which address to give you.
I just hope some of those things will be useful to you! Thanks for making such an awesome entry!
Everything will be useful. Maybe not as what they are intended (intentionally or not; see engine/gun), but they will all find a use.
Thanks again.
shasolenzabi wrote: I can just see the fluff for the haul now in regards to the Mad Scientist scoring massive loot
The Scientist has quite a backlog of materials to work with (and write fluff about).
I have been busy creating a wooden hut kit over in my "money-making" thread. Once that is cast up and ready to go, I'll be back here for something new...
Well now. That was a longer gap in proceedings than I expected. If you didn't know, I've been over in my "making money with modelling" thread making things to make me money (mainly to plough back into modelling). It feels like it's been ages since I've made anything for myself, and well... it has been about 7 months. Over that time I didn't want to pop back in here just to point out other people that died and end up with a mausoleum section in the middle of this blog; this is not what this blog is for, there are better places for that. It does seem that many Icons have passed in the past year or two. Maybe that's just a sign I'm getting older and therefore the people I have grown up with are now dying... Maybe I have just been keeping up with current affairs more than when I was younger.
Therefore, without anything of relevant substance to post, I let this blog gather some dust for a bit.
Now that I've just finished a big commission piece that promises to pay well I can come back here and do a thing or two for myself (which I hope you, if you are still out there, will enjoy watching).
First, some related music (been somewhere else, another location, = Bilocation, geddit?) from an album that I have been enjoying recently:
What, dear reader, am I going to do first?
My list of things to do has continued to grow unceasingly and more fluff has been written, on and off, for various flashes of inspiration.
One day, these things will be shown off as I create the models to match them. However, not yet...
During my time working over in my other thread I have had a couple of things staring at me, pleading me to do something with them, and their time has come.
First, is something I made for a previous model that wasn't used and has been left, unfinished, for all this time. Unlike many people, I don't like to leave things unfinished; if I start a job, I have to see it finished or it bugs me.
Those of you that were here at the time will remember my Predator tank that I built. On this, I had planned to have a "captured" body of a space marine that The Scientist will use as "raw materials" to create another member of the army. However, the body proved too big to find a suitable home on the tank, and so was left to one side... staring at me... all this time...
He will now become an objective marker (that might be useful if I ever get around to playing the game).
But I can't just glue the body to a base, add a few plants and rocks and call it done; that's a bit boring. So I'm adding a few bits and pieces that I see as a collection of useful things ready for picking up by The Scientist. I'll also make a beacon of some kind so it can be found.
Here's what I have so far:
The base is a lid that I have saved to be used for this purpose, covered in some polyfilla to give a flat top.
You can also see a box and radio from OMN, and a bolt pistol.
I'll likely add a few more "useful" bits as it progresses.
This should prove to be a quick job that will get me back into the swing of things and blow the dust off.
[guilt trip]No one? Oh well, I'll have to build up my followers again... [/guilt trip]
Right, this is where it's heading:
Final position of the radio and gun are to be decided.
The cogs have been glued down since this photo.
I'm thinking of incorporating a number "1" into this, as numbered objective markers seem to be the thing.
I may also find something for the marine to have been holding when he died (potentially after being bagged up).
Now to go and usher people from my other thread and send them over here.
Always liked the smurf in a sack, will have to call you Gargomel.
Now, I was going to debate upon which chapter to use for the exposed hand, but that has decided it; smurf it is.
looks good so far, what about a dead mans switch in his hand, linked to the box?
Hmm, well he is dead already ("by now" I should say), and I don't want this to be a trap. It's a collection of useful things waiting to be ... collected... by The Scientist.
I was thinking something more like a memento, that the marine would have clinging on to as he clung to life. But now his hand has opened to reveal (or release) what it is. Very cinematic, y'know.
Thanks 'boss.
Thanks Cleatus.
Thanks (Evil) Dr Cheese. We don't worry about labels such as "mad" or "evil" around here. We're all friends.
Thanks ckig. Indeed it is. I do enjoy whatever I'm modelling, but it has been a long time.
Radio has got it's aerial and been glued down with the bolt pistol.
And I've added plant-life. But not in the usual way:
I wanted to show that this area had been cleared to make space for the collection, so the taller plants have been cut down (I may still add some loose leaves around the back, and maybe some small grass tufts).
One of the plants is the end of a piece of Christmas tree, there's a sprue plant (cut in half), and a couple of stumps from a sandwich-bag tie and tissue experiment plant.
Warboss_Waaazag wrote:I'm impressed that you made a plant out of the sprue I normally just throw out.
Don't throw out your sprue! Make use of it, I can give you a long list of uses for sprue.
A hut:
Spoiler:
Everything between the mud on the base (dried paint on a CD) and the metal plates of the roof (card) is made of sprue. That includes all the "wood", the plants/flowers, a ladder and it's hook, the table, the bench, and the bottles on the table. The tutorial for the whole build is here: http://www.dakkadakka.com/dakkaforum/posts/list/545398.page#5935106
I've also carved hands, swords and many other small pieces out of sprue:
Spoiler:
For larger things, you can glue pieces of sprue together with poly' cement.
You can also use pieces stuck together to quickly bulk out a shape before covering in GS (or equivalent putty). I did this for the nose on my Wave Serpent:
Spoiler:
You can use wedges of sprue for re-posing models. Glue in with cement and then cut/sand down. Saves on putty and creates a stronger join:
Spoiler:
Two pieces, stuck back to back and a third round piece of sprue were used for the mines on this model's base:
Spoiler:
And the support structure for the dozer blade on this tank is largely sprue:
Spoiler:
The electrical boxes on the Tryanid's back, the back of the Ork's chair, The computer monitor the 'nid is looking at, the details on the ceiling and front, and many other small parts etc, are all sprue here...
Spoiler:
It's my "go to" material of choice when modelling.
It's free and it can be glued with plastic cement.
You jest (I think), but I did think about making a tiny smurfette after the previous comments. But this may be becoming sillier than I want the army to get; "mad" and "silly" are two different things.
Anyway, what do we think about this as a possibility? A ball-chain that I had laying about. I like the way it sits in the hand, but it might be a tad large for the purpose. Thoughts?
I remembered that I'd cut off the aquillas from a couple of bolters (that I had used on the Helbrute commission). One of those would be the perfect thing for Mr. Smurf to be holding in death.
Thanks Graven. Cool stuff is everywhere, you just have to look.
ckig wrote:Those sprue tips are awesome! Thanks.
Hope they prove useful to anyone willing to put in a little effort for something free.
Paint is looking good as well. The wrap is excellent. The little aquila is a nice touch and more subtle. I like it
Thanks. Now with added paint...
The plants, metals and smurf hand are now painted. I've kept the cogs mostly corrosion-free as I want them to look useful (The Scientist wants to collect useful things, not stuff beyond repair). The box has a few spots of rust as it's what's in the box that is useful (to be decided but will involve the number 1). The post for the beacon however, is very rusty as it's just been put up for the purpose of directing the collectors. The plants and their chopped off parts have been left healthy-looking to show that the chopping has happened recently.
The bolt pistol will likely end up "classic" red. The plan for the radio is the paint it white with a blue display to match those found in Portal 2 (in colour not style)... I may have to make some scale Portal radios if someone doesn't get to it before me... and then there's the companion cube etc... Where's that can of worms, I may have to open it. And there's the beacon equipment to be painted too.
In other news; Having recently ordered one of my Christmas presents from Japan on Thursday, cheaper than any equivalent model I could buy in England (yeah I'm getting a cool model for Christmas), and it arriving on the following Monday...
...and now finding an air-brush from Japan, for less than half price...
I'm loving Japan right about now.
If you want to know what model I'm getting, I'm not telling. But my avatar is a good clue.
And the AB I'm getting is an Iwata HP-C+ I also found a MAC valve quick-disconnect, also from Japan, that will make this the equivalent of the HP-CH. That's a £225 air-brush for £81 (plus whatever customs want).
Solar_lion wrote:good deal on the AB.. Looking forward to see what you do with it.
Yes it is. It'll mainly be for priming and basecoats, but I went for a fancy AB so that I had the option to learn more techniques and uses.
Thanks Cleatus.
As I can't really decide on what kind of number I want on this (or any future) objective marker, I'm going to leave it off for now.
Which means... it is done.
The base (lid) that I used had a groove around it and it gave me the idea to make the objective marker stand out, as it should do.
Taking some kind of subconscious inspiration from computer games, I went for a bright green "target" ring.
And this is what it looks like:
Up next is going to be something different.
Back in January, I got some money back from the RSC, as I have a limited income, for some of the letters after my name.
I almost immediately spent that money on a model... I mean, why wouldn't you...
Having quite a few GW models I decided to get something different, and actually go back to the kind of models I started with and had only built until 2012 when I started on GW figures.
I bought an Airfix kit.
This box, as I mentioned before, has been staring at me all year. So it's time to see how much better I can build an Airfix model with all the techniques I have learnt painting GW miniatures.
It won't be part of this army, or anything to do with the game, just a display model.
Is that the standard size for an objective marker?
This one is double that...
Note to self; make a set of smaller, more practical, objective markers also.
Today we have a Sigur-style update. What do I mean by that? Check his thread out, it's worth it.
What I mean is that there will be a little real-life background to the model first.
I am building an Airfix 1:48 scale Westland Lynx HMA 8.
The Westland Lynx is a British multi role helicopter that has seen service in both land based army forms as well as ship based naval variants. Entering service in 1977, the Lynx has since seen many upgrades and improvements throughout service history.
The Mk8 navel variant entered service with the Royal Navy in early 1990s and has since gone on to provide them with an execellent maritime attack helicopter, performing well in anti-submarine role, search and rescue situations and more recently, anti-piracy operations off the coast of Somalia.
Fiercely armed with either missiles, depth charges or a heavy machine gun the Lynx is a formidable machine and is more than capable of taking on the best of the world's surface vessels as well as any potential underwater threats.
The Lynx has always been my favourite helicopter. Why? When I first came across it I was led to believe (can't find proof that is; it wasn't the first) that it was, at the time, the only military helicopter that could loop-the-loop, you can strap almost any weapon to it, within reason, and it can carry troops etc.
I also think the early versions were quite "pretty" and looked streamlined (unlike the ugly Apache).
However, I did find this:
The Lynx has the distinction of being the world's first fully aerobatic helicopter. In 1986, a specially modified Lynx set the current Fédération Aéronautique Internationale's official airspeed record for helicopters. This record remains unbroken at 249mph.
A standard modern Lynx will only do about 201mph.
So when I saw one in the shop while looking for a model, I had to have it (even though it's not the prettiest version).
Having spent so long, recently, scratch-building models I am having to re-learn how to follow instructions again. This is how far I've got, seats and controls in:
I found it interesting that the pilots seat came with those holes and studs to align the back properly. I'm too conditioned to gluing pieces of plasticard together by eye.
It's not cheating, it came with the kit and I'm building the kit.
I did however, paint the green screen (with that gem effect technique) and the moulded buttons around it, and I added the white "shine" to the blue screen.
I also added buttons to the control sticks that aren't there on the kit (painted on).
I also gave all the dials a dot of gloss varnish each while keeping the rest of the panel matt.
Many of the things I'm painting are not mentioned in the instructions, so taking liberties to bring it to life.
My freehand is nowhere near good enough to match what those transfers can do.
I am getting back into the swing of working on a range of steps and planning/painting/cutting ahead.
Next up, the body is going together... once I've glued the roof and walls on the interior.
Well, I said I might go quiet. I've been playing with my new graphics card, partying at the weekend (for a friend's b'day), and I've now installed Windows 10.
So a great deal of things to pull me away from my models.
However, some modelling has happened on the Lynx.
Here is another view of the cockpit where you can see the control stick.
Then the inner walls were added,
and finally the inside was glued into the body.
Then many more pieces have come together to fill out the shape.
A few more steps and then I'll fill some of those gaps.
In other news: My new air-brush arrived. Not had a chance to play with it, but it looks nice. I'll probably write up some kind of comparison when I come to use it.
it's interesting that you'll need to go gaps- not something I think of as being necessary on commercial kits.
There's always going to be gaps (and careful shaving and sanding and bending etc. to make things fit).
They are only tiny though (try and spot them in the photos), nothing like what you get in a GW model.
Some of the gaps did arise from one piece that I attached a fraction of a mm off from where it should have been. So not all the kits fault.
It'd be boring if models just went together easily with no problems...
Ha Ha, Windows 10. Did you manage to de-fang all the spyware on it? How about that Advertiser ID it tries to stick the user with... Geez.
It fits where it sticks. Rule one of assembling models like this. And filler, which sort did you use? I had a tube of stuff from back in the day, can't remember its name. Similar to Bondo, but without the bad smell. Perfect stuff for real model kits.
Red Harvest wrote: Ha Ha, Windows 10. Did you manage to de-fang all the spyware on it? How about that Advertiser ID it tries to stick the user with... Geez.
Ja, I spent ages turning off all manner of features and "send us all your information" tick boxes.
There are some things I'm quite pleased with though:
It kept pretty much all of the programs I had installed, all working, no need to re-install anything. I was expecting a day of re-installing things to get it how I had it. So I do have to say that Microshaft did do well on that front.
I also like that the desktop background changer now has a different picture for both of my screens, and they alternately change. Not really a "world-changing" feature, but nice.
As it did keep all my old programs (and I will continue to call them "programs". I might stretch to "applications", but not "apps"), I've not had to contend with attempting to make any of the new programs work. I did have a look at them though:
Photos - rubbish. will stick with what I had.
Cortana - couldn't get her to accept English (UK) as a language she could understand. There's probably a tick box hidden somewhere, but it's too much effort to find for what little use she'll be (as I've turned off all her spyware options).
Email - Can't get it to work as I need my Windows log in password to activate it somehow, and as my pc has logged on automatically for the past 15 or so years, there's little hope of me remembering it. My (Android) phone does a perfectly good job of letting me know when I have emails anyway, so this is also too much effort to sort out.
As all the office programs I have (from 2002) are all working, I've not bothered with looking into the alternatives (that appear to want money after a trial period... no thanks).
The only thing that I have been using is Groove Music. The name sucks all kinds of animal testicles, but it has the potential to replace Jet audio as my daytime music player. It does need some changes to make it better, but the potential is there.
At night it's currently no good as I put on headphones and play the kind of music that upsets parents / neighbours / people down the road, and without an equaliser of any kind, Groove is not up to the job of deafening me further. So I'm still using Windows Media player from 3 years ago.
It fits where it sticks. Rule one of assembling models like this. And filler, which sort did you use? I had a tube of stuff from back in the day, can't remember its name. Similar to Bondo, but without the bad smell. Perfect stuff for real model kits.
I used to use something similar to Squadron Putty. Lovely Toluene-scented stuff (bad smell? I don't know what you mean, toluene is second only to diethyl ether in nice smelling solvents. To me anyway. ). But it would always dry out before I got halfway through the tube. I'll probably stick with Milliput from now on though.
Well, for music players [notes that the entire Atlantic Ocean is between him and Doc] there's always...iTunes I have a friend who likes something called Musicbee. He also saw the Windows 10 upgrade do nasty things to his wife's desktop, and to his nice Alienware laptop. Keep a close eye on those settings, BTW; they can be 'reset' by any update that Microsoft sends out... updates that you cannot refuse Shame too, as the technical improvements to W10 are supposedly very good.
To be fair , it still looks really nice, interested to see how you get on with the exterior !
Thanks for thinking that I could be good enough to freehand that well.
Red Harvest wrote:Well, for music players [notes that the entire Atlantic Ocean is between him and Doc] there's always...iTunes I have a friend who likes something called Musicbee.
Wash that mouth out, iTunes indeed... I'm not an isheep. I'll check out Musicbee, if I can control it during games it could be a contender.
He also saw the Windows 10 upgrade do nasty things to his wife's desktop, and to his nice Alienware laptop. Keep a close eye on those settings, BTW; they can be 'reset' by any update that Microsoft sends out... updates that you cannot refuse Shame too, as the technical improvements to W10 are supposedly very good.
Nothing nasty has happened yet. Although it is having issues with my old phone that I use for quick photos; I don't think it installed properly, everything goes slow when I plug it in and requires a hard reset to go back to normal. Working on fixing it.
I have ticked the options to notify me of updates and defer upgrades, so I'm kept in the loop to choose when these things happen even if I can't say "no" in the end.
The main reason to get it is for DirectX 12. Will have to see if it is worth it. Can always go back to 7.
Warboss_Waaazag wrote:Interesting project. Looking good so far.
Thanks 'boss.
Filling has happened and it looks like this:
These photos have been taken with my smart phone as opposed to my usual "stupid" phone; it takes better worse photos when contrast is happening...
I've also started on Christmas presents so progress may slow a bit.
and Thanks Cam'. Merry Christmas to you too.
Ha, nothing GW makes would fit in the cockpit even before adding the windscreen.
Happy Christmas to all of you. Hope you got some nice surprises in your stockings.
I had a nice haul:
Fallout 4 (I may go quiet for a while again...),
CDs;
Bjork - Vulnicura
8:58 (Paul Hartnol, One part of Orbital)
Pink Floyd - The Endless River
Aphex Twin - Syro
Books;
Terry Pratchett
- Thief of Time
- Making Money
- The Shepherd's Crown (his last book )
Various sweets and chocolates to satisfy my sweet tooth,
and The (Mad) Scientist has got a new tank...
The Kenbishi heavy industries HAW206 prototype multiped tank (1:35 scale model)
as seen here: https://www.hlj.com/product/KBYKP-259/Sci
Spoiler:
The box for this model dwarfs the GW battleforce boxes Expect to see this being built soon.
lone dirty dog wrote:Nice haul all though the music I would say is an acquired taste
My taste in music spans many genres and there is something for everyone in my collection. Although, Pink Floyd aside, that haul is quite electronica. So not for everyone.
That said, Aphex Twin's album was nominated for the Mercury Music prize and won a Grammy (best dance/electronic album), and Bjork's has been placed in the top 10 for many things also. So I'm not the only one to like them.
That is a hell of tank and should be an interesting build, will it be a straight forward build or will it get the mad doctors twist ?
I don't know why but the tail turret screams Orc to me like killer kan of sorts, either way should be interesting to watch.
Not sure yet, there may be a few tweaks. I have to have a close look at the kit first as I think it's pose-able if built per the instructions, I'll either have to take that into account with my modifications or glue it in one pose.
The way it attaches is reminiscent of a scorpion's tale and the whole tank could represent the 40k chaos scorpion thing (FW?).
The aesthetic though, is quite Tau in it's Manga roots...
It'll get an interesting paint job whatever happens as all vehicles in this army get a unique scheme.
I am sure if you really wanted to you could squeeze an Orc pilot in, but only if you wanted to of course which I am sure you don't LOL
True. and yes, this project is to built to the instructions with no modifications.
inmygravenimage wrote:Merry xmas dude. I look forward to the mecha madness!
That mecha needs the commander riding in the tail with his sword screaming "drive me closer so I can hit it with my sword" that way he can actually sting someone with his power weapon .
lone dirty dog wrote:Yes saw that pop on the new real this morning, mind you he has not been well for a while if I remember rightly.
Surprised he has been alive for this long to be honest, well he will be missed but never forgoton.
Well he was 70. That's a very good innings for someone that has lived the life he did.
That tank is going to be a strange concoction then, I guess we will have to see which way you go with it then.
We shall indeed...
Pink floyd I can give you the rest well let's just agree to differ LOL
I do have a lot of rock and metal in my collection as well, it's not all electronica and dance. Not to mention the classical, pop, etc... that make up lesser extents of my collection.
Theophony wrote:That mecha needs the commander riding in the tail with his sword screaming "drive me closer so I can hit it with my sword" that way he can actually sting someone with his power weapon .
We will have to see how flexible it is, but I doubt it could reach that far.
Red Harvest wrote:The giant tachikoma ought to be much fun to paint
Fun is the aim. Once I get around to it... there's still the Lynx to finish and I should probably fit a money-making project in-between too. That's once I drag myself away from post-apocalypse Boston.
Bjork? and no Adele... tsk, tsk, Englishman. I prefer the blue-eyed soul of Dusty Springfield to be honest, but that's probably a generational thing.
I can't really see the link between those (other than all being female); different genres and therefore moods required for each, Nor are they mutually exclusive; and they are all represented in my MP3 collection (that has an even wider range of music tastes than my CD collection), but Bjork is the only one I've bought CDs of (9 albums).
I'll give any music a listen and I'll like what I like and it often is shaped by my mood at the time. There's very little, relatively, that I don't tend to like.
I usually have my computer playing randomly though my whole collection e.g. the last few tracks played:
Saint Etienne - Your head my Voice
Depeche Mode - Never let me down again
Goldfrapp - Little bird
Josh Wink - Higher state of conciousness
Led Zeppelin - Over the hills and far away
Foo Fighters - Bridge Burning
Skunk Anansie - Twisted (Everyday Hurts)
System of a Down - Kill Rock 'n' roll
Nightmares on wax - Bleu my mind
Red Hot Chilli Peppers - Sexy Mexican Maid
Aerosmith - Walk this way
A Perfect Circle - Renholder
...
Any pattern is just coincidence.
in other news:
I'm still playing Fallout 4 I have some things to sort out and tidy up (in the real world and mainly on my desk) before I can get back to the Lynx.
Something will happen soon...ish.
Thank you for your patience.
No connection. It's just that Adele is quite popular at the moment, and English like you, so support a fellow Briton? (thence the nationality reference. This, and to make another reference... see following) Bjork, well, she does come from the land of the ice and snow, from the midnight sun where the hot springs blow. So she's got that going for her.
Did you sort out the music player? I've been using Clementine of late, since it works with the equalizer on the Gnome desktop. Apparently it is cross platform, so try it with Win10 if you're still seeking.
Red Harvest wrote: No connection. It's just that Adele is quite popular at the moment, and English like you, so support a fellow Briton?
Ugh, Adele. How I wish for a vomiting Orkmoticon.
Bjork, well, she does come from the land of the ice and snow, from the midnight sun where the hot springs blow. So she's got that going for her.
I see what you did there
Did you sort out the music player? I've been using Clementine of late, since it works with the equalizer on the Gnome desktop. Apparently it is cross platform, so try it with Win10 if you're still seeking.
I might try that too!
Excellent choices Dr H. Saint Etienne and Skunk? My, someone else who listed to far too much in the 90s Not often you'll find someone else with them on their playlists
Red Harvest wrote: No connection. It's just that Adele is quite popular at the moment, and English like you, so support a fellow Briton?
Ugh, Adele. How I wish for a vomiting Orkmoticon.
lol Graven.
Red: As nice as her songs may be, Adele is not really my thing; doesn't grip me as, for example, Bjork does.
I'm not a lyric person; in that I don't pick up on what someone is singing about or what it may mean. To me, the voice is just another instrument within the tune.
What this means is that many singer/songwriters that mainly sing with a simple backing track, just don't do it for me as without the meaning of the lyrics, those songs become quite boring (as does much rapping etc.).
The upshot is that I can listen to foreign singers and am not bothered that I can't understand what they are saying as that is the same for all English singers anyway. I just enjoy the whole tune together (although I do like the pick apart a tune and concentrate on individual instruments occasionally).
Bjork, well, she does come from the land of the ice and snow, from the midnight sun where the hot springs blow. So she's got that going for her.
I see what you did there
As did I.
Red: Neither that or the other one recognise my reconfigured media keys.
While they will work with fixed keyboard media keys (as it says in the options in the programs) my keyboard doesn't have dedicated media keys, other than volume, and I have had to reconfigure some other keys (email, home and another one that has worn off) for my "back", "play/pause", and "next" keys.
In order to use those programs, I would need a new keyboard, which defeats the purpose of a "free" media player. I'll keep the install files should I "come across" another keyboard in the future.
Graven:
Excellent choices Dr H. Saint Etienne and Skunk? My, someone else who listed to far too much in the 90s Not often you'll find someone else with them on their playlists
While I am an '80s child, I didn't really get into music until what I would consider "late". That is, I didn't really listen to music until I was older (can't really remember at what age, but may not even be single figures, which would mean '90s). However, I did have (still do) two older brothers that I could raid their music collections (cassettes and CDs) and so had quite the awakening to music.
In other news; I have started to glue and paint things again.
Undercarriage is on.
I decided to get these on first and then the wheels as they have flat-spots moulded in to show the weight of the vehicle and I think it'll be best to glue them on together and use a flat surface to get them all aligned at the same time.
I will soon do the rounds and leave some comments on all your blogs, but this will take some time and I may (or may not) miss some. But I do want to leave something more than just a "good job".
The undercarriage was more difficult than it looked to get to that stage; the struts are sandwiched between the existing wing structure and the outer piece, but are not glued to them (so that they can rotate for, I assume, aerodynamic reasons; the wheels twist inwards). But it seemed that it was slightly too large for the hole and I had to do a little sanding to get it all to fit together.
The wheels are now on and I started to glue on all the little bits before painting the lot all one colour (so anything "body" coloured is getting glued on).
I'd forgotten how spoilt I had got with the GW kits not including small parts. Luckily I've still been scratch-building equivalent small parts. But it has reminded me of why I have so many tweezers about.
Solar_lion wrote:I'm sure it's accurate but those wheels look tiny on that frame!
Well (as well as being real world scale and not GW scale) they are not wheels for driving about with, just landing on and being pushed into a tidy corner of an aircraft carrier. Any bigger is just more unnecessary weight to cart about, and drag while flying as these don't tuck away. At 9mm for 1:48 scale, they would be about 432mm (17 inches) in real life, which are not tiny by any measure.
Camkierhi wrote:GW has a lot to answer for, model is looking awesome.
They do. But they are not in the business for making accurate scale models. Whatever they may say. Ta.
inmygravenimage wrote:Your patience never ceases to impress!
I am quite a patient person. Growing up on these kinds of models are where my love for little details came from.
And so, with all these little bits stuck on, and the remaining parts being the windscreen, rotors, tail, doors and weapon etc. I've decided to paint the body colour now, rather than at the end as would usually be the case. The question is; do I use the airbrush?
What is there is primed already (by hand, as I went on). But with the weather being on the cold side (we had snow yesterday that is still in patches on the ground today), and the time it would take to mask this off, carting all my airbrushing stuff downstairs and setting up in the garage... I could probably have it done quicker and easier (and warmer) by hand.
However, I was handed a test case recently, that I decided to use for experimentation.
Also, I haven't used my new airbrush and was eager to see how it compares to my cheap one.
What I have is a set of old (of the order of possibly older than me) Christmas baubles. They are shatterproof (read; plastic) and the paint, glitter and decals are all scratched. They were about to go into the recycling when they were handed to me.
I decided that they can be used to practice my airbrushing, test the affect of the weather on my airbrush/paint, bring these old decorations back to life, and see what I think of my new airbrush.
I primed them today, and even though it was about 2degC, all worked well. AB behaved well and there was no adverse affects on the paint.
Still don't know if I can be bothered to mask the Lynx up though.
In other news;
I went to see "that" film last week. Was given money at Christmas to pay for tickets so didn't feel bad about forking out the raised prices (is it any wonder that it set box office records if you charge twice the price... ).
It was an enjoyable film though.
But:
Spoiler:
As a reboot it would have been fine, but this is supposed to be the 7th film in a series, and had far too much in common/similar in storyline to the 4th film in the series. Really needed more originality in the plot.
That point has been well raised all over the internet, and won't change a thing in the film industry.
Still, an enjoyable film.
I am in the process of catching up with my sub'd blogs, but Fallout 4 is still eating a lot of my time...
Patience...
Couple of things of note:
If you are getting bubbles in your colour cup, you may not have tightened the tip enough and it has come loose.
Also, gloss paints seem to require quite a few more layers than matt paints to achieve their desired finish.
The thin coats an AB lays down are so thin that a gloss paint can't form a smooth surface if the underlying surface is not smooth.
Sanding your undercoat with a fine sandpaper can help.
and, Getting a smooth transition with an AB is not quite as simple as it may at first seem...
If only because it's warmer and I can spend more time in a day with it (can only cope with 2 or 3 hours out in the cold), I think I'm going to hand paint the Lynx. Expect progress on that soon...ish.
In lieu of any model progress pictures to show, here's my AB setup:
Everything there has to be carried downstairs to the garage and set up every time I want to do air brushing. So there is quite a large motivational activation barrier to get over for this to happen. Being cold doesn't make it any easier.
Ah, well, there isn't the space in the garage to leave it set up; It is mostly filled with my stuff from when I had my own flat, and the handy flat space you see there is the top of a chest freezer that requires occasional access.
The compressor and airbrushes are still new enough that I don't want to leave them outside in a cold, damp, garage. And I strip the AB down up in my room where I can see what I'm doing and do it all comfortably (without dropping something small in a dirty garage).
The lamp is the same lamp I use for painting up in my room.
The heater, being that I found it in the garage (from when I had a cold room in a house while at uni'), does live in the garage, and so does that particular bottle of White spirit. Oh, and the piece of wood also lives in the garage (a leftover from the shelves I built).
If I'm carting most of that upstairs anyway, I may as well keep it all together and not forget anything in one place or the other.
I do indeed, Mr 'Splitta. Everything you see in my galleries has been painted with Enamel paint. It's what I've always used and am used to, rather than try and learn a new way of painting and replace all my perfectly good paints with Acrylics, I've stuck with them.
Don't let anyone tell you that painting miniatures is not possible with Enamel paint. Some things are actually easier, so I'm led to believe.
Progress is slow at the moment, I've been doing a few small odd jobs that are not for here.
However, the Lynx is in the process of being painted, but not worth showing at the moment as the grey plastic has been primed grey, had a layer of grey over than and has now been washed with grey. So other than being a slightly different shade (and more evenly coated) it doesn't look any different than above.
Tomorrow, I should start with some blending and highlighting that will be worth showing.
In other news; I'm still heavily addicted to Fallout 4.
I took some pictures to show over in the Fallout 4 thread and so I'll put a few in here for something for you to look at.
See, I have been building something...
Shas: I keep adding bits every now and then and it slowly grows. I've only gone this far on about 5 of the houses in Sanctuary hills; there's still a lot more room left.
Anyway, painting has been happening.
You should be able to see the (very) subtle shading, which is only there to accentuate the shape, so I won't be going as far as I might with the gaming figures.
There's still a few areas to tidy up the blending and a bit more highlighting of areas and details.
Thanks Graven. That is the aim.
Shading/highlighting is not something I've ever done on a model like this; all my previous models (to joining DDakka) were just flat, one colour, painting. I want this to add to the model and it's realism, not take away and be cartoony.
More shading, highlighting and blending of those has been happening... not that a quick look will actually show, so this time I'll give you a couple of different angles, just so it looks new and interesting.
And if you ever thought a model had a lot of rivets on it, just check the underside of this one (you may have to zoom in, they are tiny).
Not sure if I'll go with edge highlighting, will see when I'm near the end.
Back to construction again, I think, so things will get more interesting for all of us.
I'm not sure the Royal Navy went in for many skulls, I've not had a close look at the transfer sheet so we may be in for a surprise.
Indeed, Ruglud. See below.
I just put together the .50 machine gun and winch, and while the winch is a modest 4 pieces, that machine gun is made up of 9 pieces that all have to line up. Praise be to the wonder that is poly cement and it's ability to allow you to move things about a bit for a prolonged period of time.
Although, I'm going to have to fill in the underside of the the winch (probably to show the rope rather than just box it in), and the back of the empty cartridge box.
As I understand it, the Royal Navy goes in for "Rum, Sodomy, and the Lash"*, instead of skulls. De Gustibus Non Est Disputandum, eh? At least they aren't *&%$ foolish enough to get overflown by Iranian drones.
Seeing this makes me want to get a Sea Stallion or even an Osprey model kit. Interesting prices for them...
Red Harvest wrote: As I understand it, the Royal Navy goes in for "Rum, Sodomy, and the Lash"*, instead of skulls. De Gustibus Non Est Disputandum, eh? At least they aren't *&%$ foolish enough to get overflown by Iranian drones. *Winston Churchill quote, no?
It appears so. I can't see them using those as decoration either though.
Seeing this makes me want to get a Sea Stallion or even an Osprey model kit. Interesting prices for them...
Ooo, an Osprey would be nice. I'm also after a Chinook kit... One day (so many models, not enough time).
if you mean the assembly part, oh yeah. The painting, not so much
The painting is as much as you put into it. True, not as exciting in their colour choices as Sci-Fi models, but can still be demanding/rewarding.
Progress;
The spool was added to the underside of the winch with a length of plastic rod and some thread wrapped around it. It's certainly an improvement on a hollow box.
The rear of the gun's brass collector was filled with a piece of plasticard.
Neither of these are painted yet, or glued on to the model. Although the winch required some bending to get it fitted that I'm glad I didn't need to do once painted, so it's staying there, but the gun will come off to be painted.
The doors were glued on and show why I wanted to paint the body before now (clear windows).
Also shown is the inside of the windscreen. This required a piece glued into the inside, painted to match the cockpit, and a transfer placed on it (that you can just about see though the rear doors. I took this moment to paint the inside of the window frames, as I feel that it gives a more solid look to the finished frame compared to just painting the outside.
The outside of the window frame was then painted and looks like this:
There was a slight gap at the front of the window piece that I filled before painting, and I still have to add the windscreen wipers (that is what the two little holes are for).
Thanks Cam. Some of the shading is perhaps too subtle and it's tricky to tell if it's painted or from the lighting; but that is what you want really so maybe it's better than I think. It should all come alive when I add the other colours and the transfers at the end.
Thanks Shas'.
The windscreen wipers are on and the rotors are together and ready for paint.
Gitsplitta wrote:That red chair really pops out of the cabin. Nice.
Yeah, it appears that Lynx pilots are a bit flamboyant.
shasolenzabi wrote:Very detailed and intricate machine!
Indeed it is.
Warboss_Waaazag wrote:You're making excellent progress on this kit, Dr H.
Ta, 'boss.
Also, that fall out "house" screams ork fort. Is that a two-headed cow?
Yeah, junk construction is an Ork's dream. And, yes basically that is a two-headed cow; known in-game as a Brahmin.
OneManNoodles wrote:Making a fort in Fallout 4 ... I was wondering where you'd disappeared to lol.
Yeah, it has proven to be quite hard to escape the wasteland.
Really nice work on the lynx
Thanks.
More...
These (the yellow things) are the supports for the folded rotor blades. Once the glue and paint has fully cured I'm going to add the rotors and then painting will commence of the rest of the non-grey things (the tail there will be left separate until the painting and transfers about there are done as it is only connected by that piece you see connected to it; it's likely to get in the way and/or snap off if I glue it on first).
I also need to scratch-build some mesh intake covers. I'll explain this when I come to it...
Looking very cool, and most interested to see how you do the mesh. I was thinking my SWAT van needed some and short of buying mesh (eg secret weapon) stumped as how.
inmygravenimage wrote:Looking very cool, and most interested to see how you do the mesh. I was thinking my SWAT van needed some and short of buying mesh (eg secret weapon) stumped as how.
Thanks Graven. Mesh work below...
And so, I mentioned what was supplied with the kit didn't work for me to represent what is used on the real helicopter.
What is on the real Lynx is a wire mesh that looks like this:
What you get in the kit is a solid, clear plastic part; right shape, totally doesn't look like mesh... See below.
What is used there is a brass mesh that is bent into shape and then has some added plasticard strips for the surround.
All well and good, but that brass mesh is a lot more expensive than I expected and, as usual for me, I thought I'd try "cheaper" alternatives first.
I used the wonder-material that is Oyumaru to mould and cast (with a mixture of GS and Milliput) copies of the plastic parts; they are the right shape to fit in place after all.
I then cut out the "holes" to leave me with the frame. The point of making the casts is so that I didn't destroy my originals if this all didn't work out.
The mesh I'm using is a spare part from a previous model (Subaru Impreza WRC), so I'm sorry that I can't give a good hint for finding a cheaper alternative for the actual mesh.
Being made of plastic and not brass, this mesh can't be bent into shape and has to be glued onto a frame that is in the correct shape; this is why I made casts of the original part.
Then I ended up making two sets as the first which I'm showing for the "how to..." ended up too large.
This is what I did though:
1. Glue one edge of the frame to the mesh before cutting. Use the longest straightest edge and line it up with a straight edge of the mesh; this does half of the cutting work for you without needing to cut.
2. Once that is glued on work around the shape, gluing the mesh to the frame a part/section at a time. Due to the relatively complex shape I found that gluing it to the main curve of the frame first and then flexing and stretching it about the upper "dome" area was the easiest way to go. I did it all bit by bit, and held it in place with my reverse tweezers each time. Put the glue on the frame and not on the mesh, it's neater that way.
3. Once you have most of the mesh glued to the frame (the part before the stretching and flexing over the complicated part), cut the mesh out. This make the stretching/flexing step easier, and you should now be able to judge how much mesh you require much easier that just holding the loose part up to the mesh (saves on waste).
4. Then you will cut (or buy) strips of plasticard (0.25mm thick) that are wide enough to look right in scale; mine are about 1mm wide. Like the mesh, glue the strip down in sections, holding it firmly with your reverse tweezers. Cut to length once glued on.
5. There may be gaps, and you may want to fill these with a little putty afterwards. Then sand it all smooth.
You will see above that the first attempt glued the mesh on the outside of the frame. I did this so that I would have the nice thin strips showing on the outside, as the original and hence the casts, are a bit thick for the scale. However, due to this thickness the final result is much bigger in all dimensions then the original (which was already quite large for the job anyway).
Therefore I made the second set that glued the mesh on the inside of the frame and then sanded the frame down to get the thin frame without any strips at all.
Here is a comparison of all three from right to left (I'm always doing this in photos, laying things down from the right to the left... ); the Original kit clear plastic part, the large first attempt, and the smaller final attempt (there was some "tidying" of the final parts after this photo):
Here you can see the original part and the first attempt placed (not glued, hence the "loose" fit) on the model to show the lack of "mesh-ness" of the clear plastic and the big-ness of the other:
And here is the final set, painted and glued on:
The gaps between the frame and the helicopter's body is fine as that is sometimes done for winter work as snow can block the mesh and air needs to get in somehow.
Thanks LT. Yeah, I've found that now I've dabbled in scratch-building and even producing my own models (all with an eye for realism), I'm more critical of the model kit put in front of me, 3-4 years ago, I woudn't have questioned this kit. I've added another part not included in the kit, that you can see below.
Thanks Graven. Good to hear.
Thanks EDC.
Progress (still hampered by Fallout 4, but accelerating);
I wanted the tail attached so that I could complete the model with it in one piece.
Before I could do that I had to add some finishing touches to the tail because with it folded it makes access to it difficult.
This meant transfers/decals, just to the tail for now; there's painting to be done elsewhere before more transfers.
With those done (the stripes on the rotors are mainly transfers, touched up with paint) I attached the tail.
It's held on just by the frame at the back and one little point (into a hole in the side of the tail); this is why I haven't attached it before now - would have been broken off long ago.
There was a couple of small gaps between the frame and the details on the other side of the tail (top picture) that I filled with small pieces of plastic, before shaving them down to size/shape and painting.
Also, you will see two copper cables running from the tail into the folded end. This is single piece of copper wire that I added to represent the wires that I noticed in a photo of a real Lynx, and are not included in the kit (as thin pieces of plastic are not going to survive handling). A simple job, but adds so much to the realism.
Next job is to hunt down all the small details that need painting (that are not mentioned in the instructions) and to finish off blocking off and then shading the larger areas of non-grey colours (that are mentioned in the instructions).
Starting at the back and working forwards, as that's where I've appeared to have started...
And this time, using some 0.1mm thick copper wire, I've added the aerial wire that attaches at 3 points along the bottom of the tail.
Started at one end, glued and left to set. Then glue on the mid-point, let set. Then glue to the final point, left to set, and then cut the excess wire off.
Bit of black paint, and done.
I've also been splashing some paint about, you can see some in the photos.
Also, you will see two copper cables running from the tail into the folded end. This is single piece of copper wire that I added to represent the wires that I noticed in a photo of a real Lynx, and are not included in the kit (as thin pieces of plastic are not going to survive handling). A simple job, but adds so much to the realism.
Sadly, the people at Wyrd Miniatures think differently. Copper because it is easily bent? A nice touch too, and should make the model more durable. No comment about the use of a water slide instead of hand painting Royal Navy...
Dr H wrote: ... (as thin pieces of plastic are not going to survive handling)...
Sadly, the people at Wyrd Miniatures think differently.
Not had the pleasure myself.
But then the choices are:
1. Don't include those parts. Means there is missing details. Cheaper.
2. include fragile parts. Can and will be broken. Looks pretty when not broken.
3. make and include the parts from another material. Makes the "basic" model more difficult for the modeller, and more expensive. Looks nice.
There's always pros and cons.
Copper because it is easily bent? A nice touch too, and should make the model more durable.
Copper because it's what I had of the right thickness, is easy to bend, and the real ones are copper coloured.
Spoiler:
No comment about the use of a water slide instead of hand painting Royal Navy...
Transfers were included and when faced with the choice of spending hours going back and forwards to get the coverage and straight lines, or 5 minutes to stick on a transfer...
With it now finished (see below), I can tell you that this model has 86 individual transfers on and in it. See how many you can actually see...
Thanks EDC.
Yes, it is finished, I am done, I can start planning the next model... but first:
and this shows the spare parts and transfers (considering that I used 86 and have that much of the sheet left) that are left over from the kit. All will be very useful.
Next up, I will be jumping back to my Money-making thread as it's been a while since I've sold something...
Red', yes the green bits are supposed to be a kind of plastic or waxed cloth, so I gave them a gloss coat as opposed to the satin finish of pretty much the rest of it.
I've given my work area a tidy up, sorted and stored all the junk and bits that have accumulated recently and thoughts are turning to what is next.
Stay tuned.
I should also say: Feck, Arse, Drink, Nuns!!! One of my favourite characters, and what are the chances of two actors from the same sit-com passing on the same day, years apart.
The Father Ted sitcom? That one never made it to the States, AFAIK. However, we were blessed with the likes of 'Allo! 'Allo!, Are you Being Served? and The Vicar of Dibley We did send Starsky and Hutch to the French I suppose we've sent some *quality* programming to the UK too.
Red Harvest wrote:The Father Ted sitcom? That one never made it to the States, AFAIK. However, we were blessed with the likes of 'Allo! 'Allo!, Are you Being Served? and The Vicar of Dibley We did send Starsky and Hutch to the French I suppose we've sent some *quality* programming to the UK too.
Ja, Father Ted. Very much worth checking out if you haven't seen it. Go on, go on, go on, go on, go on, go on, go on, go on, go on, go on, go on, go on, GO ON... *
*That will make more sense if you have seen any.
In the photos, it looks a bit like green stuff.
I suppose it does. There is subtle painted shading on it, the gloss finish, and the slightly lumpy moulding (to look like uneven cloth) will all add to that appearance. Can't be helped.
Spoiler:
hk1x1 wrote:I love the attention to detail, beautiful work .
Father Ted made it to the states, when I was younger, Public TV had some of it, along with 4th Dr. Who, and Blakes' 7, Are you being served, Fawlty Towers, Monty Python, Original runs of Tinker-Taylor-soldier-spy, and others
Yeah PBS showed quite a bit of the BBC's programs. Heck the local PBS even has a UK program sub-channel WETA-UK. Never saw the Father Ted. There was some show about a priest in Ireland, ah, Ballykissangel. Not all PBS stations would have shown the same programming though.
Doc, maybe some stronger shading to indicate that it is stretched fabric, has wrinkles, as in the photo you referenced?
Red'; Yeah, Father Ted is nothing like Ballykissangel. Let's see if we can find an example... ah yes:
That should tell you all you need to know about that.
As there was no harsh lines in the moulding as is seen in the photo I stuck with smooth gradients. Maybe I'll have a look at it next time I have a green paint out.
Now, I know I said I was cutting down on Fallout 4, and modelling is happening (I'm in the process of a Tau Ethereal over in my other blog, for those interested), I have finished the main questline and have explored most of the map... I have been building up my main base of operations and made a video to show a walkthrough of the settlement. So to make the 4 hour upload time worthwhile, I'll share the 12 minute video here as well.
Have a look and see my police station (complete with jail cell), meeting hall (with it's bell tower), workshop, shopping centre, bar/chem-den, tree-house, and car restoration garage...
and, as I said, pop over to my Money making thread to see what I'm up to now.
And so, I've been very busy over in my commission thread and it's been too long since I've made something for myself...
Although I have busied myself building more settlements in Fallout 4. You can watch the walkthroughs of all 5 settlements (including that above) here:
YouTube playlist
I'm in the process of building another settlement, but this time it's in the creation kit (the program used to make the game).
This allows me greater freedom in the construction and the items I can use, but is much harder to use/learn and is taking a long time.
It does mean though, that it'll be much more detailed and could be available as a mod so that those of you with Fallout 4 (so long as it's not on the PS4, as you're not getting mods) could install it in your game and walk around it.
Anyway. We're here for models made of plastic... and metal, and resin, and epoxy putty, and anything else I can get my hands on.
The question is, what to build?
Something quick to scratch the itch.
Something larger and more exciting.
Something simple (relatively).
Something complex and heavily modified.
I have a word document on my computer, titled "Army of the Second Law; fluff, info and ideas".
As the title suggests it contains all the fluff for this army (a fraction of which you have seen),
any notes I've made on useful information from the 40K universe,
drafts of rules that I've written for this army,
and lastly a long list of ideas for future models (not covered in the previous sections).
The whole document is 105 pages.
That's a lot of potential ideas...
Due to not working on the army for a while I'm not invested in any particular idea.
So, I will post a list up here and see if anything grabs your fancy or spawns further ideas or expansions on these ideas (many of which are just a short sentence).
I may well do a re-paint too at this stage as I've been slacking on that front (having repainted a whole 2 models since stating it would be a weekly thing).
Thoughts on any and all of the following:
1. Ork Nob. Straightened legs (as I've decided to do with all my orks).
Made especially tall, has a habit of biting people's heads (as they are generally shorter than him), name of Skul-Bita.
Any klan except Death Skulls (as I've already got one of those).
2. Flying Kroot. Made more bird-like. How to handle weapons when your arms are wings?
In fact, there are many varieties of Kroot I have ideas for, including Tyranid, spider, ork, other animals (Imagine a cat and bird in one being).
Would need quite a bit of planning and design before anything can happen though.
3. Flying Tyranid. Termagant-sized (something like this exists in the game doesn't it?), with mechanical wings, skin stretched/grown over the frame.
4. Scorpion Hormagaunt. Just because.
5. Ork with many robotic legs. Because GW gives you more bodies than legs.
6. Beastman. Have a metal beastman. Pretty much just a paintjob.
6.5. Mouseman. Have a metal mouse in plate armour. More conversion required to 40K him.
Possible friend of the beastman. Could be done together.
7. Tau stealth suit. Melting into/out of a piece of terrain to represent the camo'.
8. Dire Avenger. With a Tyranid warrior head as a shield. One of the oldest ideas on this list.
May need some more "flavour": Tyranid hunter.
9. Some kind of assassin. Depends what bits I can find...
Turns out, not many.
Infinity Alguaciles (sniper). I feel there is something I should do to this mini' to make it fit the army (more 40K, less infinity) but don't know what can be achieved with a metal model.
10. The Kenbishi Industries HAW206 prototype. It's been sat there for a while, looking cool.
If you don't know what it is, watch this:
You'll have to watch the full episode if you want to know the story: Ghost in the Shell: Stand alone complex. Episode 2.
But I would recomend the whole series and the "2nd Gig" following series. Not to mention the movies too.
It's a walking tank, do you need any more reasons?!
11. Tracked servitor. I have an epic landraider. Supplied (as many other things in this list are) and inspired by Gitsplitta.
12. Something to do with wolves. I have wolves.
I think they are for goblin riders. I have the riders as well, but no guarantee they'll be used together.
Many wolves. Few ideas.
13. Holly; The Scientist's chief analyst. I have a metal lady from Full Borer mini's, and quite a lump of related fluff for Holly.
I'll need to modify the model a bit.
And find a role for her in the army, on the table.
Fluff may get a few tweaks to make her more interesting (currently only a secondary character).
14. Imperial Guard female standard bearer. I have a Victoria mini's miniature for this purpose.
Lacking any actual Imperial guard bits, I'm not sure how I'll tie her into the 40K universe, but the model is pretty close as is.
May just be a paintjob.
15. Tau Crisis suit. Quite heavily converted; there are a number of things I want to change about the model.
Would likely be a commander (of at least 3, under The Scientist himself) for the army, so a bit more special than all the troops that I've done so far.
And I only have troops at the moment.
16. Necron immortal. Not built one yet, should rectify this.
So...yeah... That's a fraction of the ideas I have on the list.
Thoughts on what you like,
what you want to see,
ideas you have to flesh out something,
Let's see if anyone is still following this thread...
OK I like many if not all those ideas. I would say can I ask you to wave off a couple days, Next round of LoER is up soon, you may be pleasantly surprized at the theme, and though terrain is not really for your army, in a way this could be.
And of course I want to see orksess.
Oh and if you don't know what Ghost in a Shell is, I feel pity for you, your life has been wasted until now, go and watch it.....NOW!
Yeah there's no rush to start. Plenty of time to collect thoughts and ideas.
And I've some tidying to do about my workspace, as is usual after a big project.
And there's a few little projects to finish off.
And I may do the re-paint first to give it more time.
By the time I've ticked all that off the contest will be up and running, and what that involves may partially inform what happens here; scale-wise at least.
One for Orksess.
Also, the Manga (that's the illustrated books or "comics" to the uninitiated) for GitS are very nice too (not suitable for work, the wife, or youngsters though).
Is Victoria Lamb the same as Victoria Miniatures? hmm, the internet seems to think so.
You can see the miniature (and a few of the others) in this picture:
This is where the re-paints are up to after today.
Building up the armour colour from black to a solid layer with minor shading.
They will both get brighter. And therefore more shaded. Although the photos portray them as brighter than they are in the hand, so you may not notice much difference by the end.
I'm taking photos of every layer so I can show off my whole process for the benefit of the Painter's society.
I don't normally show models at this stage as the colour is not finished. So bathe in the uniqueness of this post.
No prizes for guessing which chapters these are from, although the non-yellow chap may be more challenging, and this assumes you don't know what chapters I've already added to the army for these to be re-paints (same chapter).
Notice that they look rough at this stage, and they continue to until nearly finished.
Still interested in hearing opinions on what model I should build next.
Quoted for your convenience:
Dr H wrote: Thoughts on any and all of the following:
1. Ork Nob. Straightened legs (as I've decided to do with all my orks).
Made especially tall, has a habit of biting people's heads (as they are generally shorter than him), name of Skul-Bita.
Any klan except Death Skulls (as I've already got one of those).
2. Flying Kroot. Made more bird-like. How to handle weapons when your arms are wings?
In fact, there are many varieties of Kroot I have ideas for, including Tyranid, spider, ork, other animals (Imagine a cat and bird in one being).
Would need quite a bit of planning and design before anything can happen though.
3. Flying Tyranid. Termagant-sized (something like this exists in the game doesn't it?), with mechanical wings, skin stretched/grown over the frame.
4. Scorpion Hormagaunt. Just because.
5. Ork with many robotic legs. Because GW gives you more bodies than legs.
6. Beastman. Have a metal beastman. Pretty much just a paintjob.
6.5. Mouseman. Have a metal mouse in plate armour. More conversion required to 40K him.
Possible friend of the beastman. Could be done together.
7. Tau stealth suit. Melting into/out of a piece of terrain to represent the camo'.
8. Dire Avenger. With a Tyranid warrior head as a shield. One of the oldest ideas on this list.
May need some more "flavour": Tyranid hunter.
9. Some kind of assassin. Depends what bits I can find...
Turns out, not many.
Infinity Alguaciles (sniper). I feel there is something I should do to this mini' to make it fit the army (more 40K, less infinity) but don't know what can be achieved with a metal model.
10. The Kenbishi Industries HAW206 prototype. It's been sat there for a while, looking cool.
If you don't know what it is, watch this:
You'll have to watch the full episode if you want to know the story: Ghost in the Shell: Stand alone complex. Episode 2.
But I would recomend the whole series and the "2nd Gig" following series. Not to mention the movies too.
It's a walking tank, do you need any more reasons?!
11. Tracked servitor. I have an epic landraider. Supplied (as many other things in this list are) and inspired by Gitsplitta.
12. Something to do with wolves. I have wolves.
I think they are for goblin riders. I have the riders as well, but no guarantee they'll be used together.
Many wolves. Few ideas.
13. Holly; The Scientist's chief analyst. I have a metal lady from Full Borer mini's, and quite a lump of related fluff for Holly.
I'll need to modify the model a bit.
And find a role for her in the army, on the table.
Fluff may get a few tweaks to make her more interesting (currently only a secondary character).
14. Imperial Guard female standard bearer. I have a Victoria mini's miniature for this purpose.
Lacking any actual Imperial guard bits, I'm not sure how I'll tie her into the 40K universe, but the model is pretty close as is.
May just be a paintjob.
15. Tau Crisis suit. Quite heavily converted; there are a number of things I want to change about the model.
Would likely be a commander (of at least 3, under The Scientist himself) for the army, so a bit more special than all the troops that I've done so far.
And I only have troops at the moment.
16. Necron immortal. Not built one yet, should rectify this.
So...yeah... That's a fraction of the ideas I have on the list.
Thoughts on what you like,
what you want to see,
ideas you have to flesh out something, ...
Looks like a lot to do, and love the GiTs footage.
1. Make him a Goff
2. Make his feet carry the gun, put it on a flying base?
3. Yeah Gargoyles are their name.
4. Scorp-a-gaunt sounds cool.
5. Orky mech might do that to himself.
6. Beastmen used to be part of 40k so go for it!
6.5. see above
7. That would be cool.
8. That would look cool, and also another hunter would be good as a paired team.
9. Plastic add ons, or dare I say it, green stuff some grim dark on him.
10. Yeah that will be a beast of a robo-tank.
11. that would work
12. Cyber-ized wolves.
13. sounds good, maybe have her as a medic? or act for the scientist the way a commissar might for the minis? or she could also be the mech that keeps the Kenibichi going in case something happens?
14. fortunately Victoria minis are IG stand ins anyway.
15. well, as crisis suits are called that as they are rapid response on the battlefield anyway to deal with things the troops can't.........
16. Model a interference device so that he does not pop-back to his tomb world and be lost from the scientist.
Thanks Solar. This pair was selected as they looked hideous next to everything else (especially the newer stuff). They were stipped, re-built, and re-painted.
Thanks Shas'.
Gitsplitta wrote:I do love the beakie helmets... it just says "space marine" to me.
I think that's a sign of the time that you got into 40K. The other helmet is what says "Space Marine" to me. Neither is wrong in my view.
This one got the beakie helmet as he's a White Scar marine, and as they are all about fast bikes and stuff he got the streamlined helmet. (every details has a reason)
And now may I present to you, the finished marines along with a breakdown of every layer of paint added to the IF marine.
Before that, I'll show you the before and after photos:
Tactical marine #5: White Scar.
Tactical marine #6: Imperial Fist.
As I said, they were hideous.
Thick paint, little to no highlighting... or even shading in some places.
Uneven edges.
and just a general lack of knowledge of what I was painting.
Not to mention that some numpty didn't remove the paint from areas that were to be glued; hence the reason these were also re-built.
So these were stripped and then I took photos of every layer of paint I added. Here is the full series (with annotations) from primer to tidy armour (no additional details) for the Imperial Fist.
Spoiler:
That's a lot of layers on some areas...
And once all the details are done, you are left with these (which are the vote-able photos):
Not the greatest of paint-jobs, but as rescue attempts (and compared to what they were), they are good enough.
Ta
A couple of arty projects to finish off and then I'll be back here to start something from the list. Speak now to possibly influence my decision.
No problem, Gits'. Not something that's necessary to do for all models; there were moments where I thought I had a copy of the same photo but could tell them apart from the background changing Some colours and paint effects vary from model to model, but as an example of the steps I take to a finished paint-job, it'll do nicely.
And the decision has been made. After collating, combining, analysing, subjecting to peer-review, lost, found, lost again, reconstituting, extrapolating, and finally throwing darts at the masses of votes I received on what to do next... I went with my gut; The one model that kept creeping into my thoughts over the past few days is the HAW206.
It's a large, walking, rolling, multi-ped think-tank.
It's got hands, Gatling guns, a cannon, smoke launchers, anti laser-guided weapon systems, and a brain in a box.
The model is even movable, with polyethylene joints.
I'll tease you all with photos of the parts to start with.
From top to bottom;
Turret parts,
Main body parts,
More tail/turret parts and cockpit parts,
Clear parts (inc. stand), and ball camera/sensors,
Arm pieces (2 of everything),
Joint pieces,
Leg pieces (4 of everything),
Scale shot of the larger bits with #6 standing in for scale; this is quite a big beast (but the hatch is very small for 40K scale),
And the last photo is of the first page in the instructions, showing sketches and details of the tank...
...You can see it has a 120mm main gun (smoothbore is says),
12.7mm Gatling guns in the arms,
The scale to a human (this is a 1:35 scale model),
and it even shows how the feet work for walking or rolling.
The kit even comes with alternate parts for the hands and feet for open/closed, walking/rolling.
At the moment, I may not be making many changes to the kit, but small details may be added as I go along.
I'm going to try and keep it mobile, but will have to see how it stands on it's own to see if it really needs gluing to keep a specific pose (it comes with a stand to support the tail for a reason).
The paint-job, though, will be more exciting than shown.
I've just spent all morning translating the instructions to make sure I don't miss something. It's mostly pictures, but there are a few comments in Japanese.
dsteingass wrote:OOoh! I love those movable Japanese kits!
I've only just started this kit and I love it.
Red Harvest wrote:Tachikoma FTW!
I was looking for Tachikoma kits when I found this one, and it flew all the way from Japan for less than I could find locally.
You were slumming with those space marines, Doc. The HAW206 is a project worthy of you.
A sprinkling of "normal" is what helps to give meaning to the madness.
Oh My God, this kit is amazing!
Not only did it make it's way from the far side of the Earth for a fraction of the cost, but the mould lines are so well placed and so minimal they are actually hard to find (and so far would be hidden by the construction anyway)...
...And then, to build it, it has pegs and slots and fits together perfectly; just look at the photos below.
Most of this is not even glued (some will be just to be sure, but it doesn't "need" it).
I'm not sure yet if I'm going to use the cockpit for this model as the hatch is very small to see in, and is far too small for anyone in the army to climb in.
However, the kit comes with a brain-case (part of the anime's plot) that I might build a small cockpit for just inside the hatch.
Still, that's not going to stop me painting this cockpit up and seeing how it goes with the rest of the kit.
That looks to be a beautiful kit sir, agree, can't wait to see some paint on it.
My son has been collecting Gundams, from Japan, wife has been getting them, they are usually really nice kits. I commented and have a nice shiny one in a box waiting just for me, keep putting it off.
So will you go with the standard colouring, or is the scientist getting this for his army, I was looking at it and thinking how cool it would be to paint decloaking.
Lastly, I bet you could get Grots to crew this puppy!
Thanks Graven. Coming off the back of a major scratch-build, a nice kit is very exciting.
It is nice isn't it, Dave.
Hope so, Shas'.
Camkierhi wrote:That looks to be a beautiful kit sir, agree, can't wait to see some paint on it.
My son has been collecting Gundams, from Japan, wife has been getting them, they are usually really nice kits. I commented and have a nice shiny one in a box waiting just for me, keep putting it off.
You should give it a go. I was putting this one off since I got it at Christmas (things to do, etc...), but it's going to be a joy to build.
So will you go with the standard colouring, or is the scientist getting this for his army, I was looking at it and thinking how cool it would be to paint decloaking.
Of all the tech' this thing has that would probably make it OP in a 40K game, cloaking is not one of them, that I know of. However, if I see a kit for the think tank from the first GitS film I'll be getting that and it'll be cloaking. This one though, will be getting an exciting colour scheme... ...well, I say that like I have it already planned. It's not, but it will be...distinctive. At it's size, camo' is not really necessary, so "intimidating" will be the word. And it won't be subtle like the Predator.
Lastly, I bet you could get Grots to crew this puppy!
Possibly, but they'd need a booster seat. I do possibly have a model that'll fit (Infinity pilot), but it'll need testing once I get to that stage of the kit.
Batō wrote:I approve
No, seriously; looking forward to see the kit coming together.
Yeah, I'm not entirely sold on a live-action GitS film. Especially Scarlett as Motoko. Don't get me wrong, Scarlett is very hot. But Motoko is something special that goes beyond just hot (and beyond Black Widow, which might be the obvious comparison). But the Geisha from those teasers does look cool, so there is hope for the visuals in the film. But I still have a soft spot for the artwork that goes into an Anime or Manga. Will she make a good Major, we'll have to see...
Anyway, done a bit of painting in the cockpit: That actually looks quite a but rougher in the photos that I expected. I may either pull it apart (it's only press-fit together, but they are very tight fits), or throw a black wash over it as I think I'd like it darker anyway.
And in other news: I got a new toy for my birthday... A 3D printing pen. Ooo, Ahh, but what can I do with it? I'm sure I'll find a use for it, but, NEW TOY!
Right, so I pulled the cockpit apart and re-painted it.
Then added the screen details, etc.
And then stuck it in... why? Well it turns out quite a few points on it are used, structurally, for the rest of the model.
But we'll all still have the pictures to remember the interior detail:
The two pieces of the cockpit then push into location holes in the base of the body.
The front piece first because the seat on the rear piece overlaps with the lower edges of the front and pegs into the triangle of small holes you see in the first picture here:
The top-down view shows how cramped the cockpit is, and the last shot shows it fitted in.
These photos then show various sub-contructs being added around the cockpit,
All just press in to location holes and slots,
The top of the body then fits on, locating into 12 separate slots/holes/pegs at once.
And this is the body together (now glued and curing with a rubber band around the front).
Also, the Infinity pilot that could fit through the hatch: I'm going to paint her up, but leave her separate as standing on the seat you'd only see her head and shoulders peeking out the hatch, and then the working hatch would also be worthless. She is now the designated driver of the tank for this army.
Number 5 for scale; this is just the front part of this tank, no legs attached, no turret/tail.
Thanks Dave. There were so many dials... How many dials and screens does a tank need?!
Thanks Insaniak.
As this is an unusual model for this forum, I may as well cover every step, and they are coming along quickly.
The main body:
With the top on, it was time to start fully closing it in and adding details.
Notice the 3 little dots on the white sphere? You'll see many more of those about the body, that's how the pilot sees. Every angle is covered and many can move (on the model too, that one can rotate and move up and down a little; that'll be easier to show when it's painted).
Those square boxes on the sides push into the holes on the sides of the cockpit inside; I've not glued them, they can be posed.
The hatches open. I don't know what the little one is for though, probably refuelling.
The next couple of shots show the quality of the model kit. See the pencil thin lines of putty; that's all the gap filling that is required.
And then there's the sensors, anti-laser-guided-weapon lasers, Bull-bar to protect the headlights, and the thing underneath (that again can be rotated).
The final photo shows the "hips" of the tank, and yes, another "eye" underneath.
Then the turret was built.
These photos cover about 40 pieces.
The gun can move vertically in the mount, and the mount can move vertically, while the whole thing can rotate 360deg.
Then the "tail" was built.
Each of those ball sections is about 14 pieces.
And there is a huge degree of motion about each joint.
And finally, the body and tail come together to create a beast of a tank, and it's not standing on it's legs yet...
Arms and legs to come next.
I may need to find a larger model to show the scale...
dsteingass wrote:That is so Rivet ready you know....
Well... it is a bit thin on the finer details. I'll look into it.
Thanks Cam'. It is a lovely kit. You need strong fingers to push many of the parts together fully (and if you do the gaps are non-existant), but really nicely designed and tidy kit.
Thanks Shas'. Yeah, this should give many of your tanks a run for their money, and I've now got a total of 2 tanks (3 if you count the Wave Serpent).
Next job was the arms. Very flexible with those 3 balls and two sets of hands.
And then it was the legs. 2 sets of feet for walking or rolling. Lots of joints but not quite the range of motion I'd have hoped for (many armour plate clashes). Looks lovely all together.
And that's the basic building done. Now that Dave has mentioned rivets I'm going to have to add more details; thinking cap on... The push-fit joins between all the separate sections are pretty good. It seems to be able to hold it's pose (so long as it's not too extreme), so I'm going to keep it flexible and not glue any more.
And I mentioned that I needed a larger model for scale purposes; how about my Predator (as a Space Marine can stand under this tank with room to spare): I think we all know who'd win that fight.


 well there are at least some that are not entirely unsuitable. And then some of the potentially unsuitable that "unsoiled" minds wouldn't notice.
  Not everything that Giger painted had sexual organs on display.