4271
Post by: Eisenhorn
Well with the money I made cleaning out old 40k stuff I went and bought new 40k stuff.
This time I am doing a Tank Army.
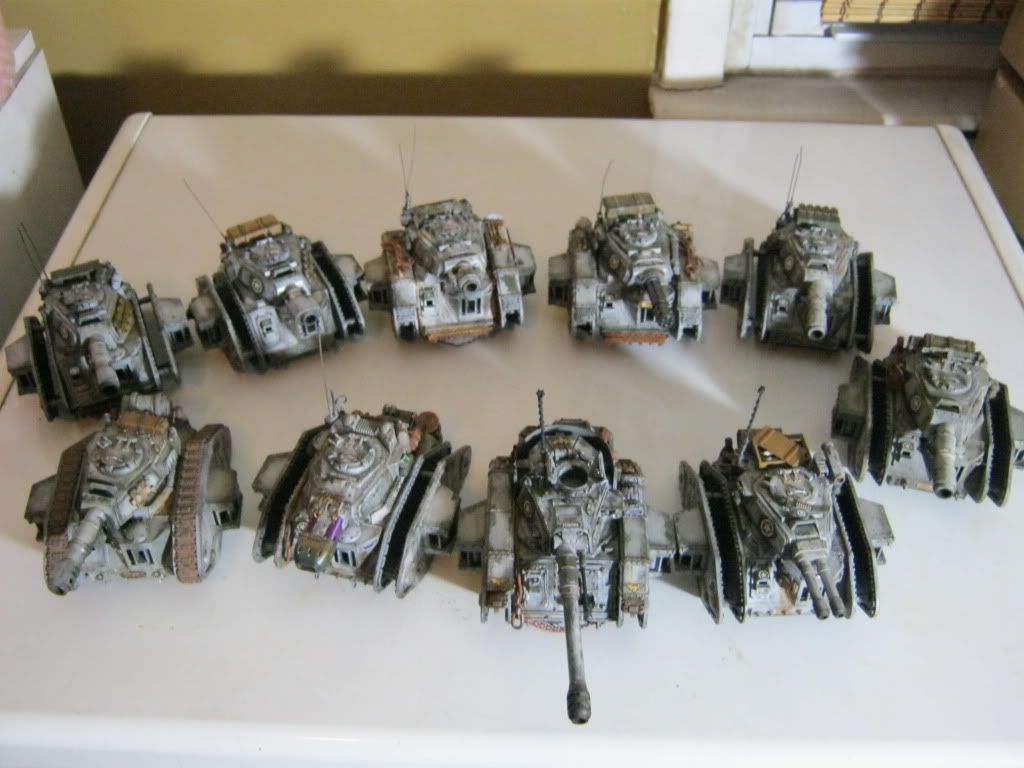
10 Leman Russes all modified and superdetailed,I am taking my time on these guys.
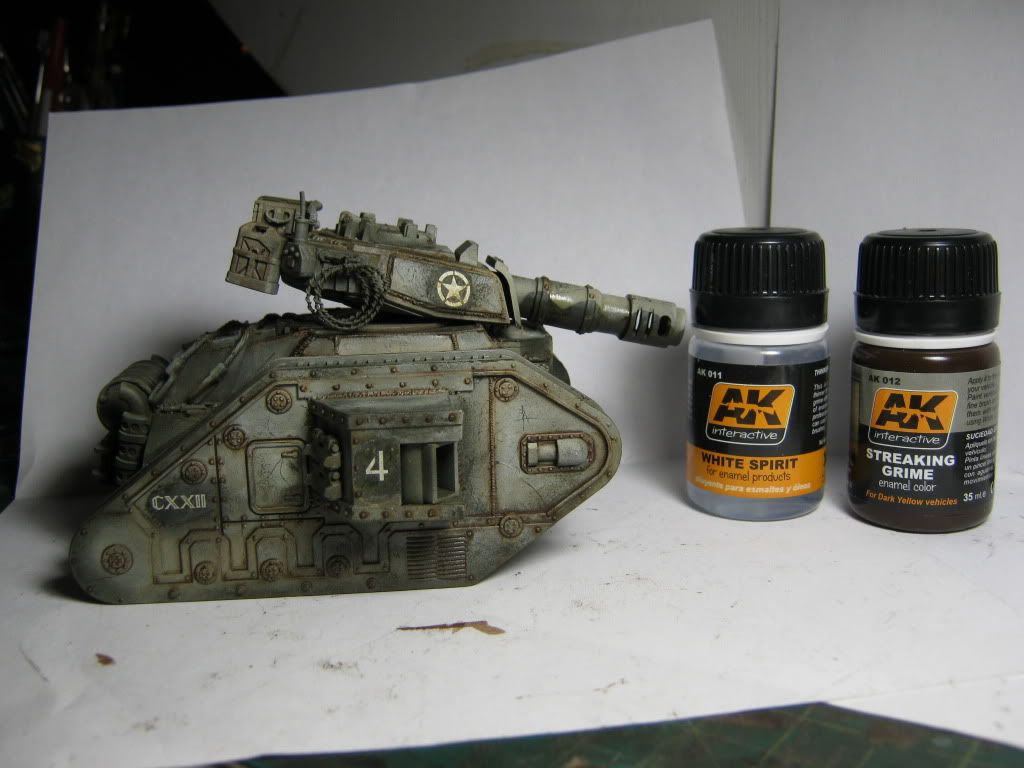
I bought about 80% of the AK Interactive weathing products,so you guys are going to be in for a treat.
It is going to be a winter themed paint sceme with faded winter camo over Olive Drab.
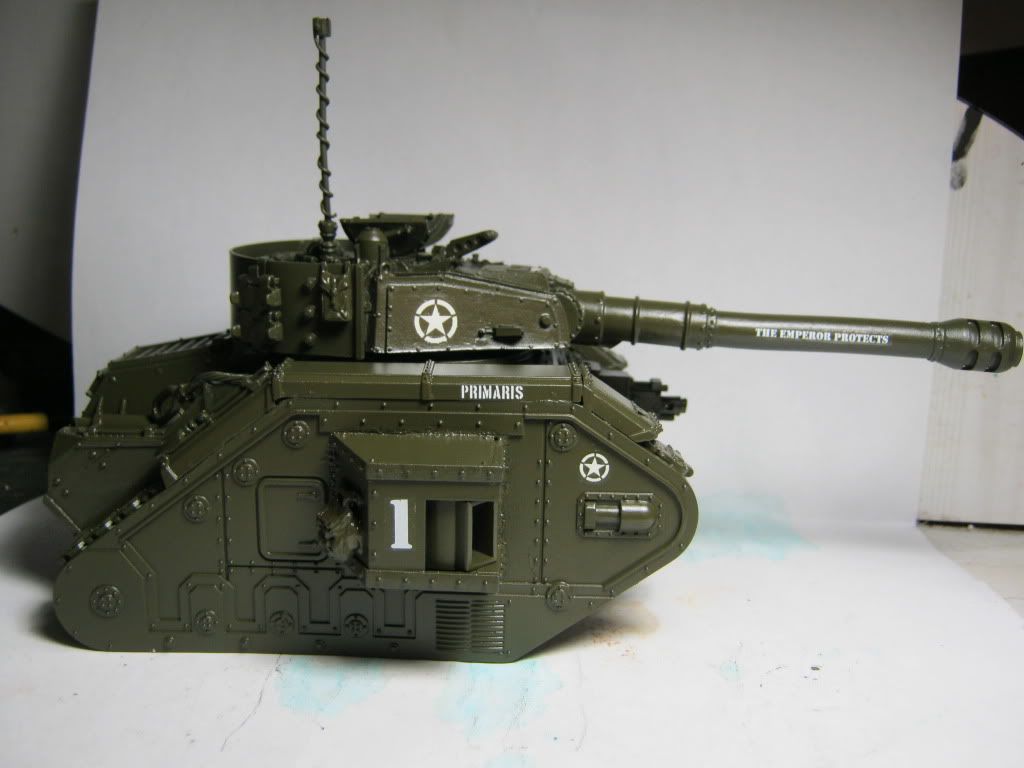
Picking the Merican Lancers I can use the Archer transfers I had for my Sherman Stars in 1:48 which work well for 40k.
So without further ado I have the first one underway.
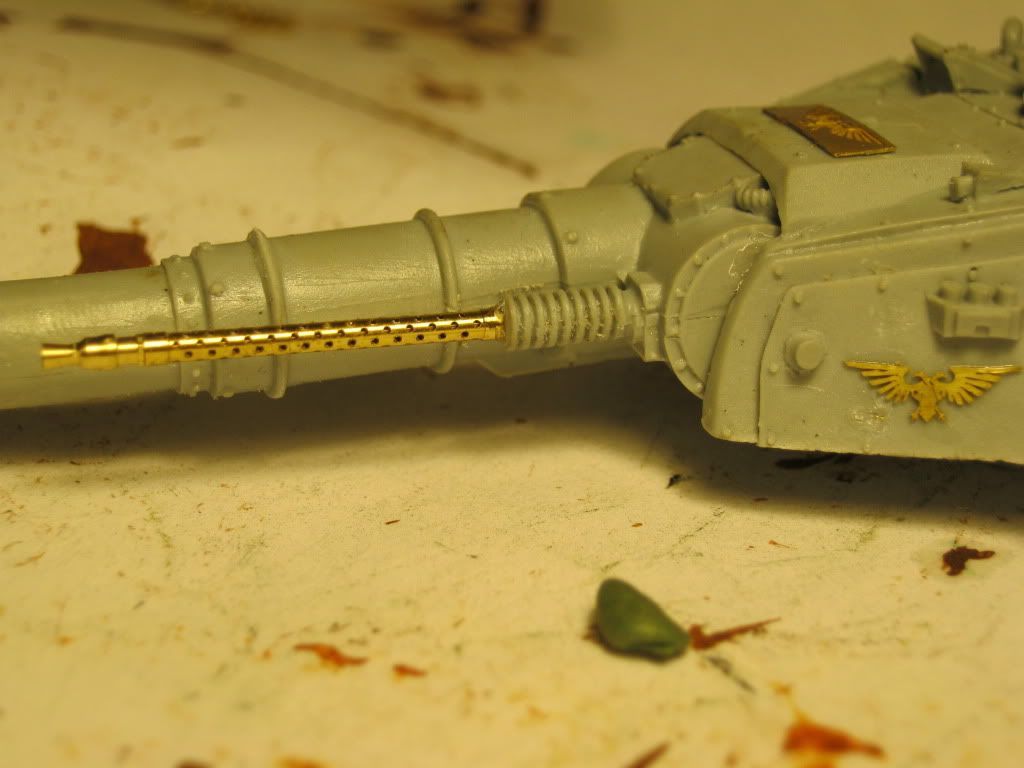
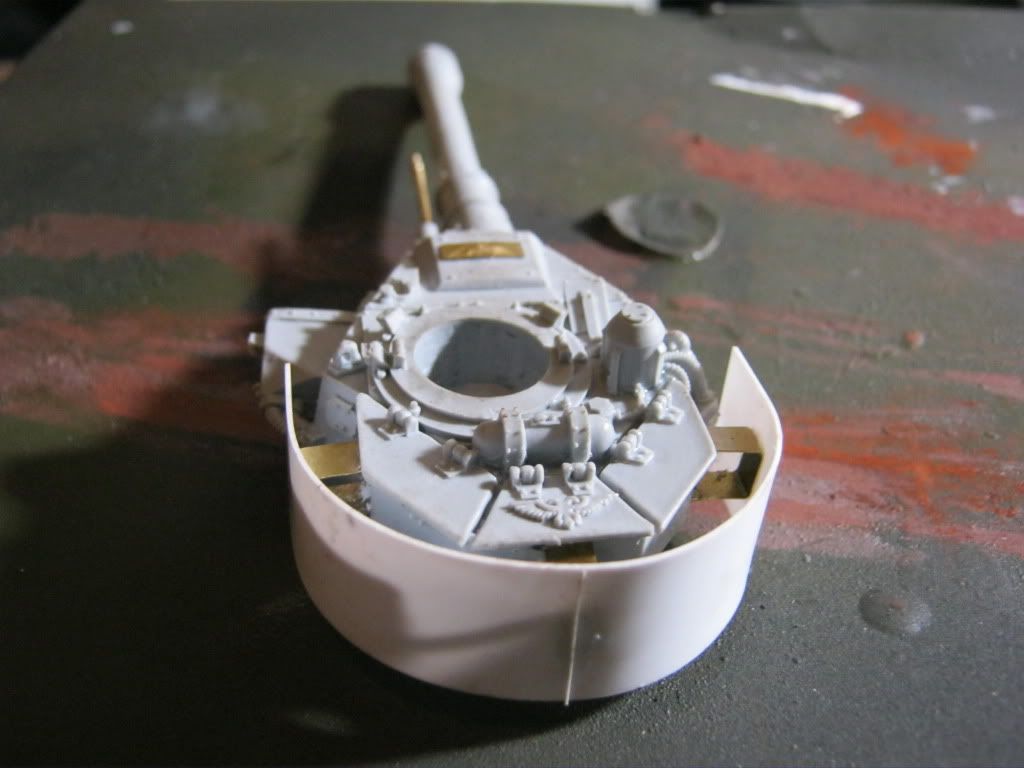
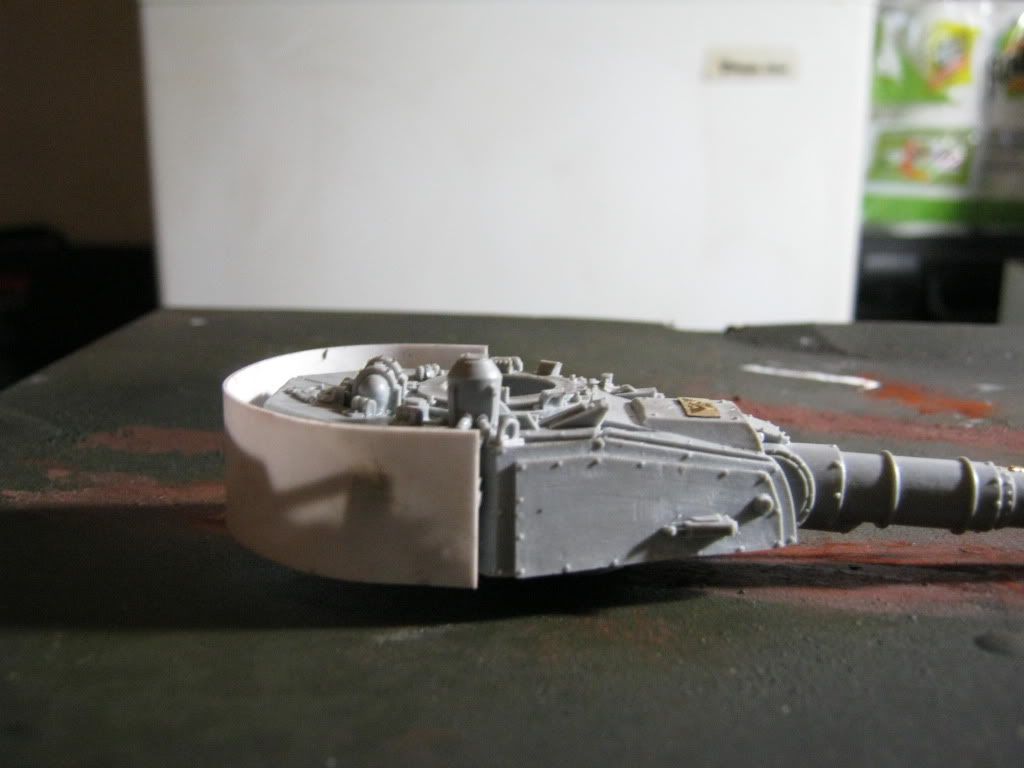
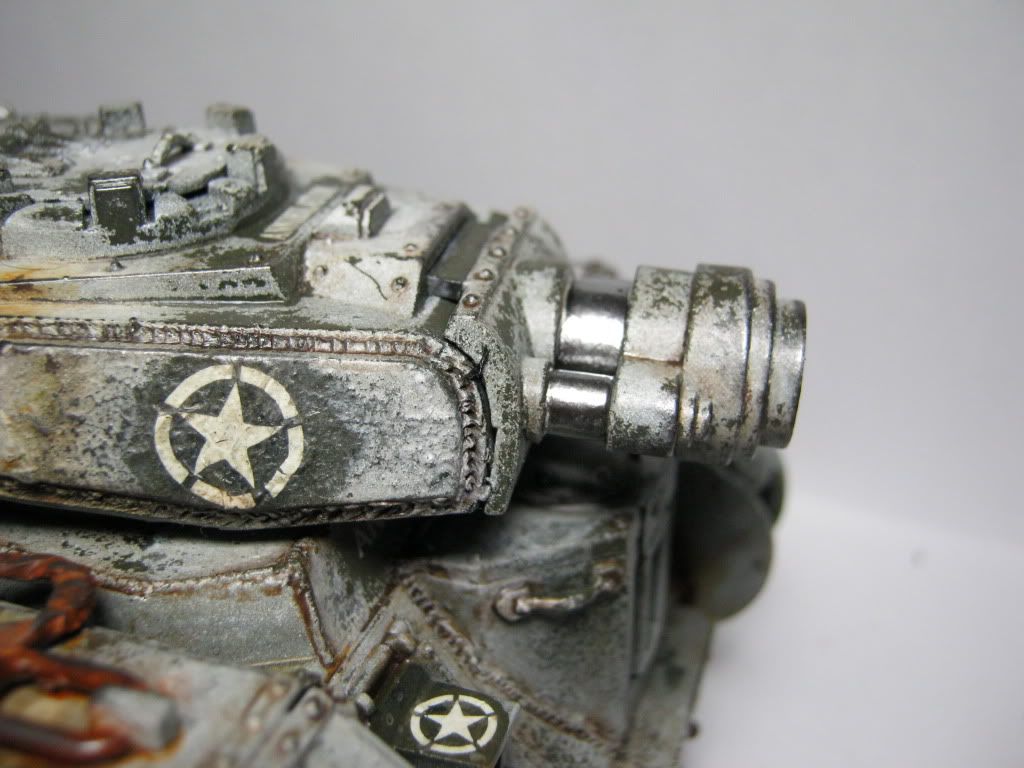
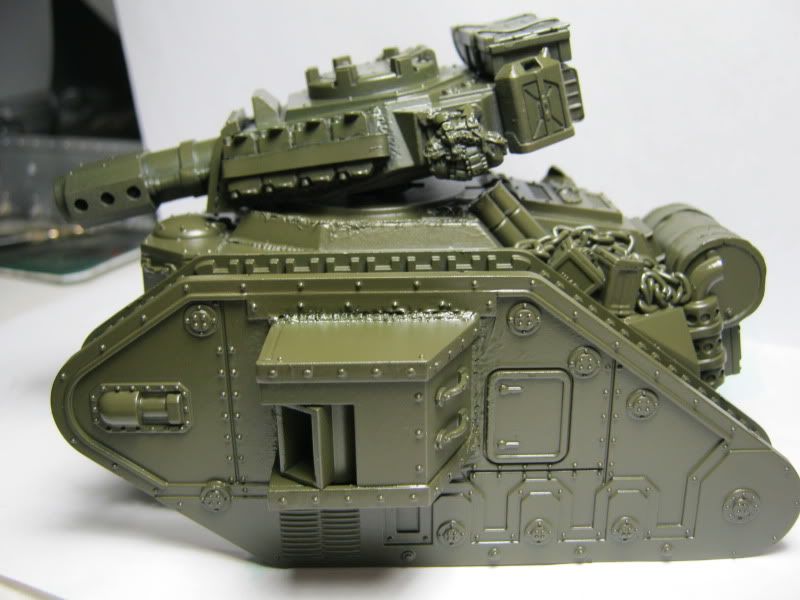
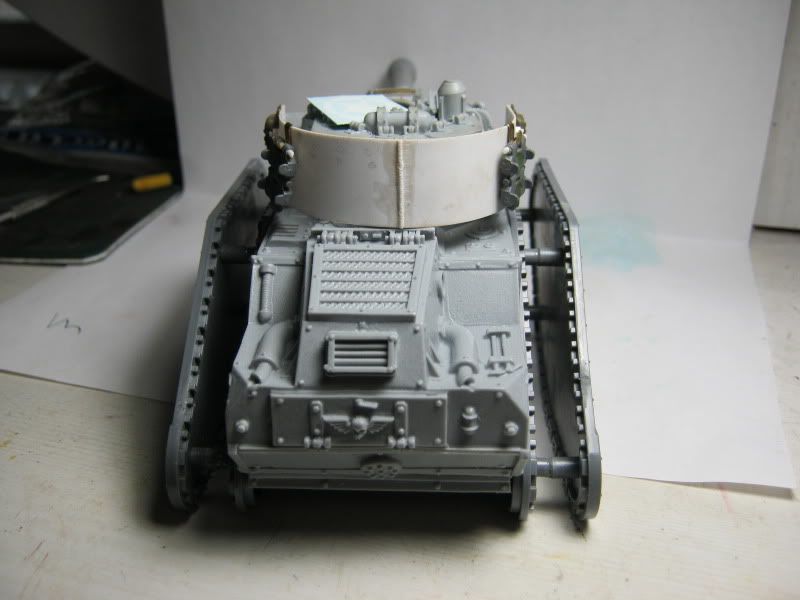
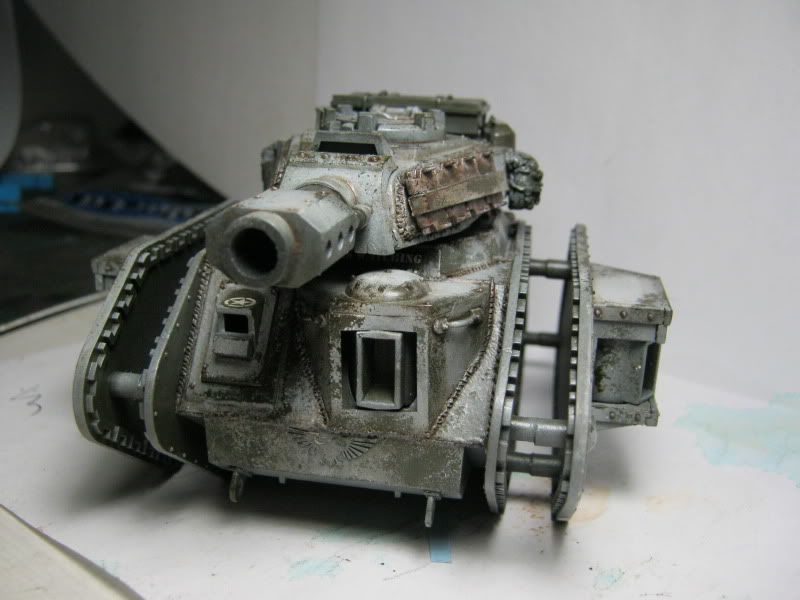
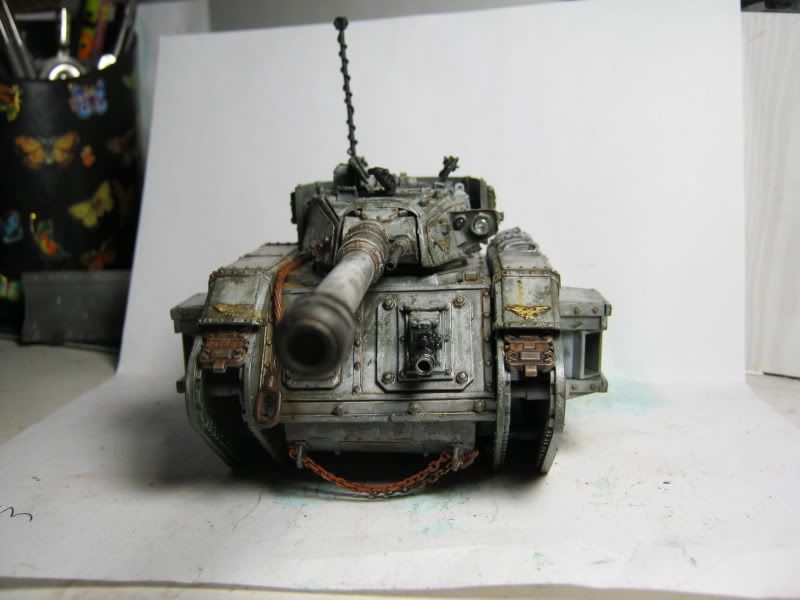
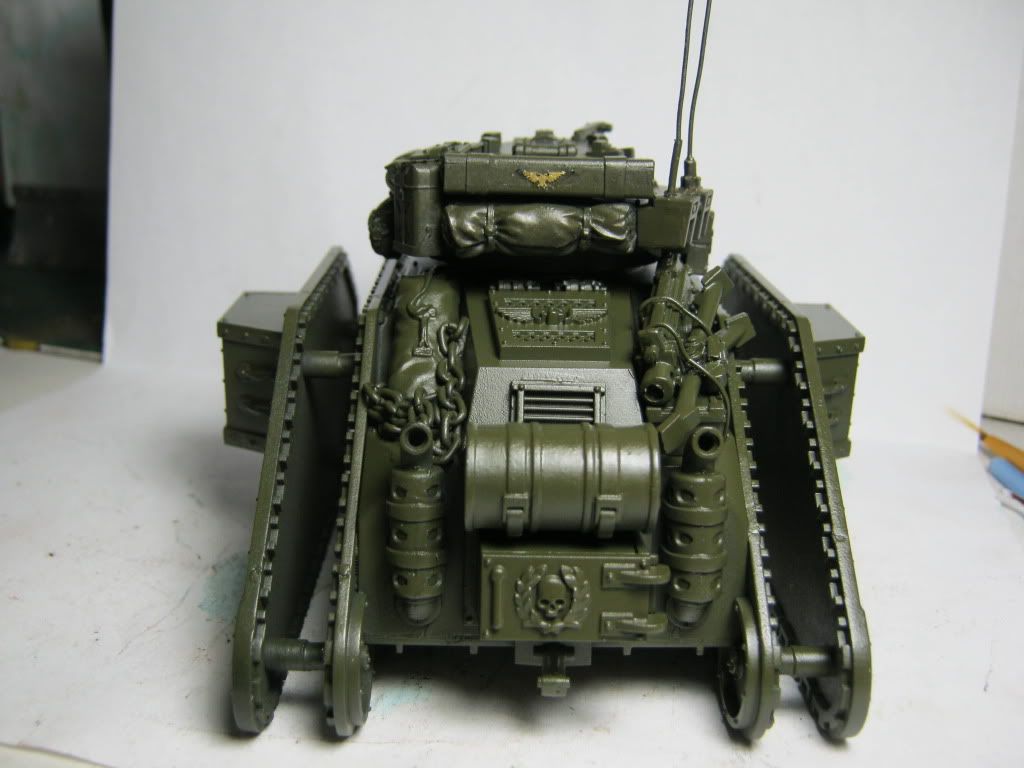
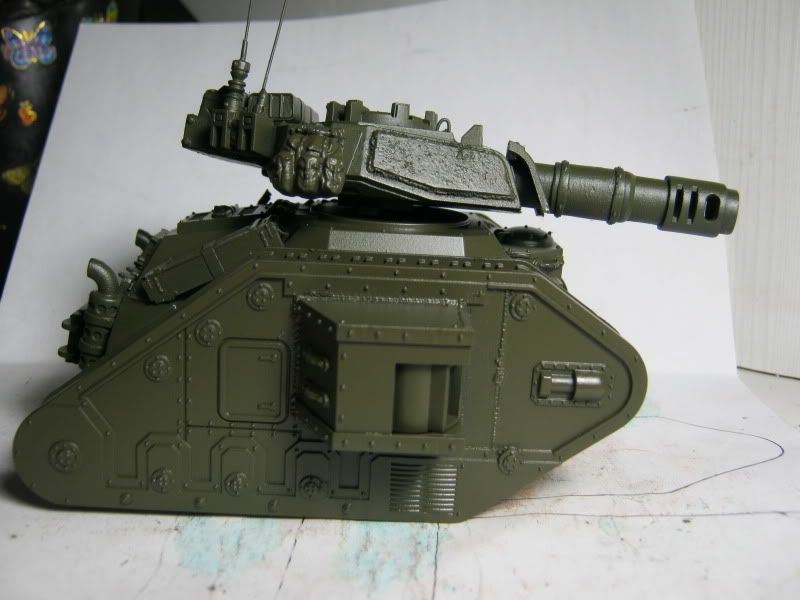
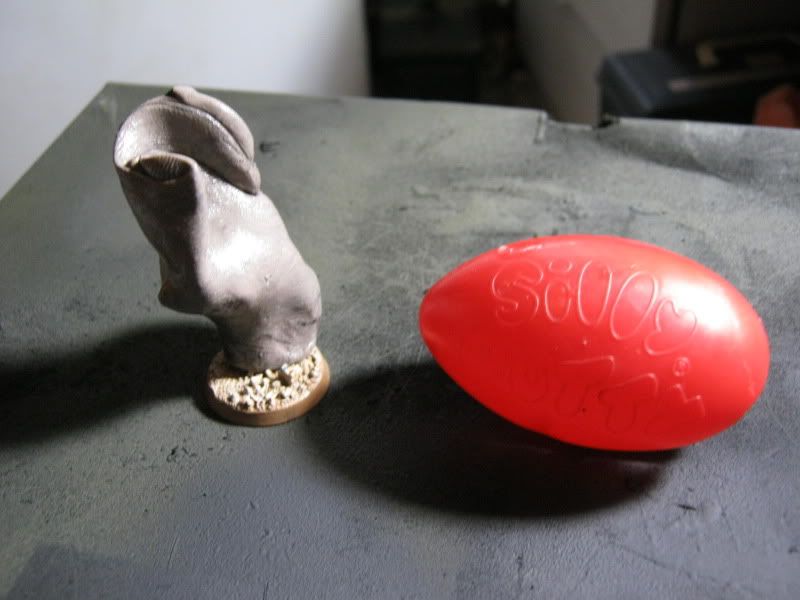
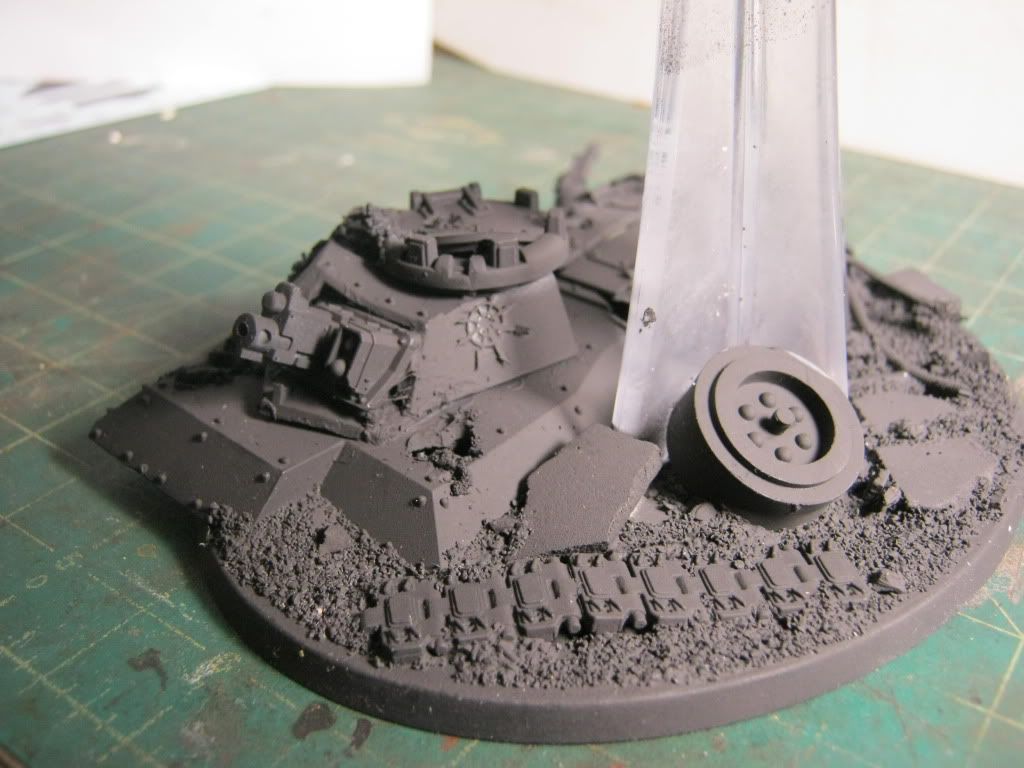
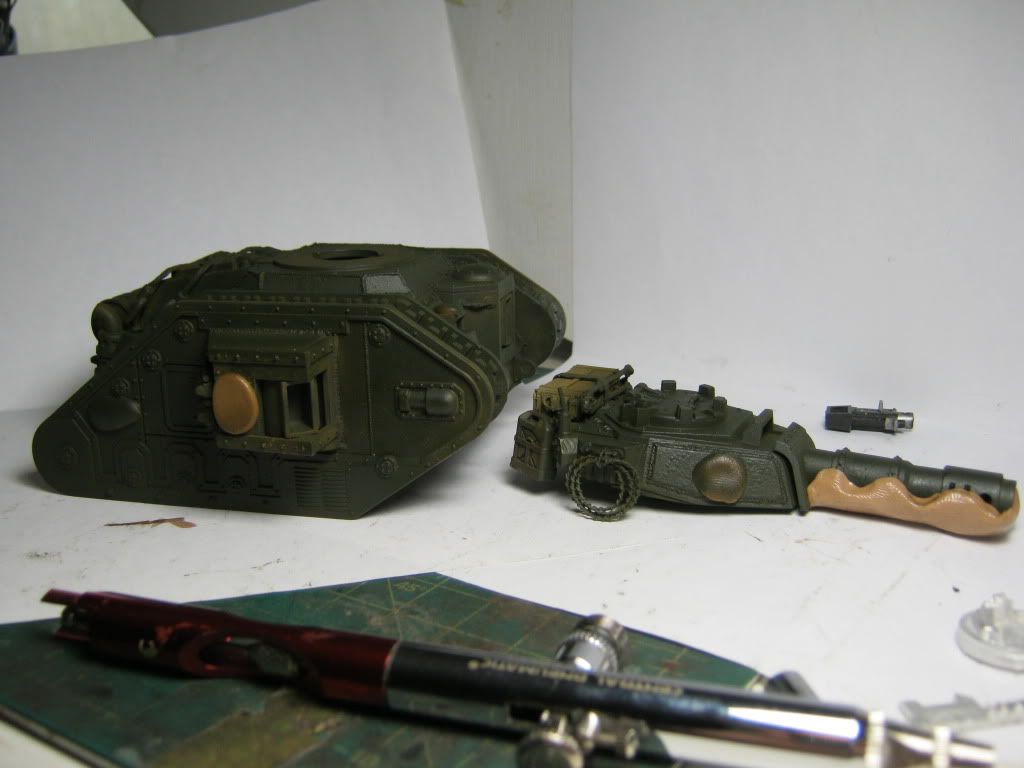
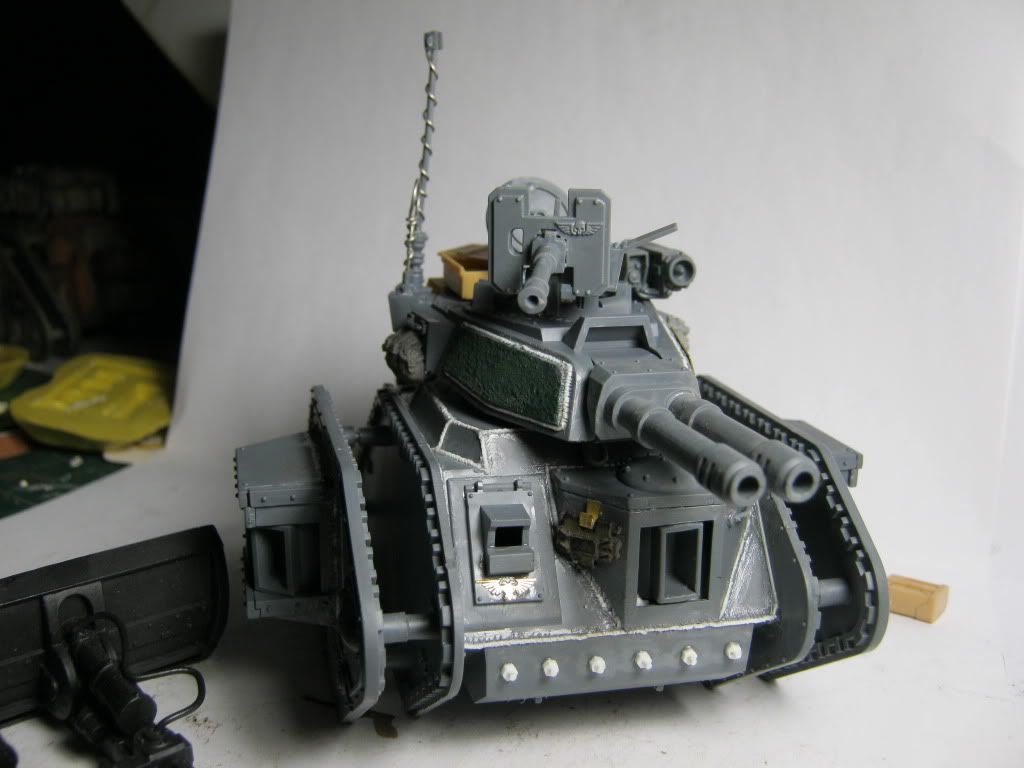
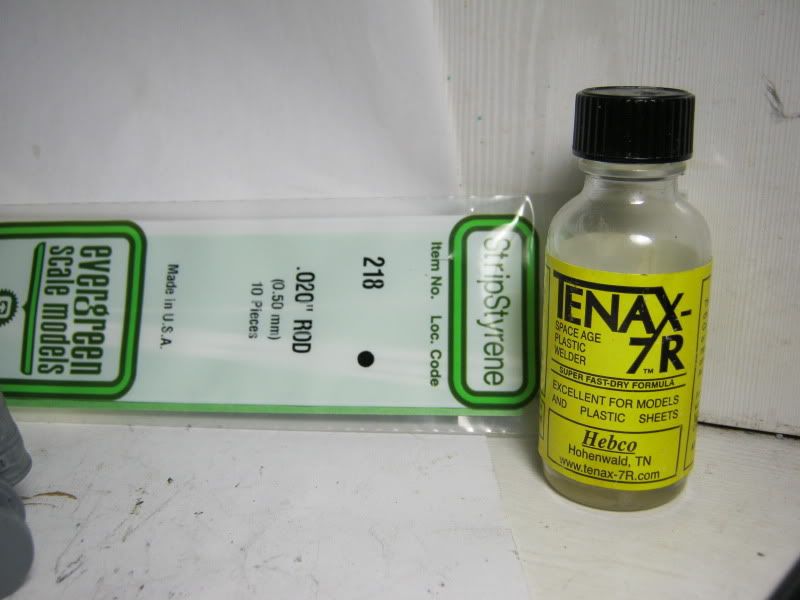
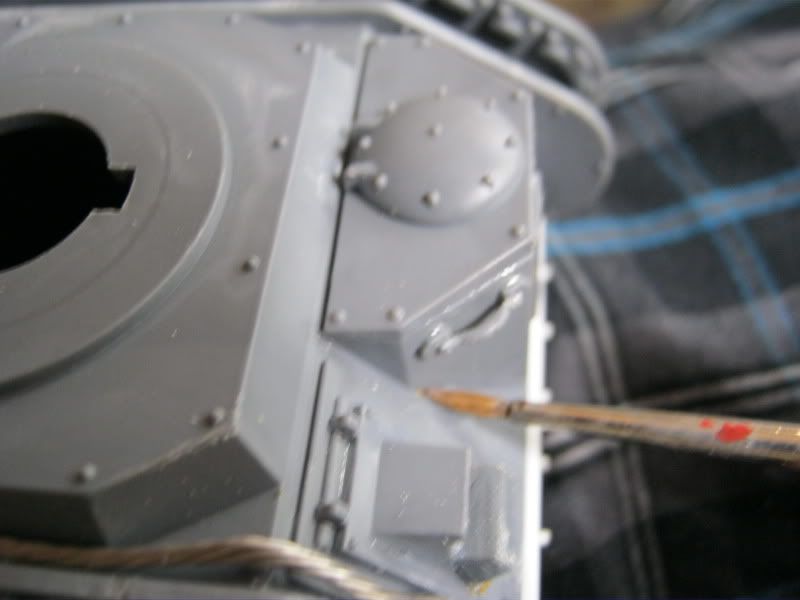
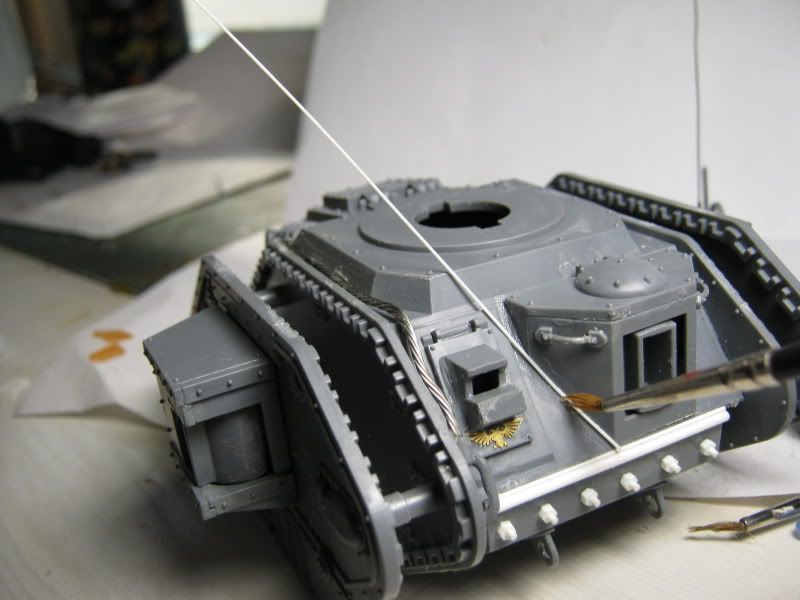
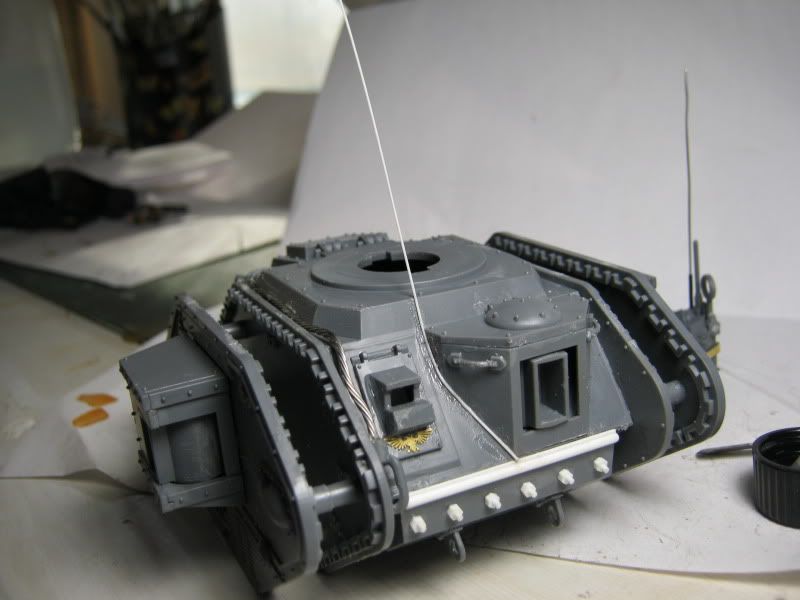
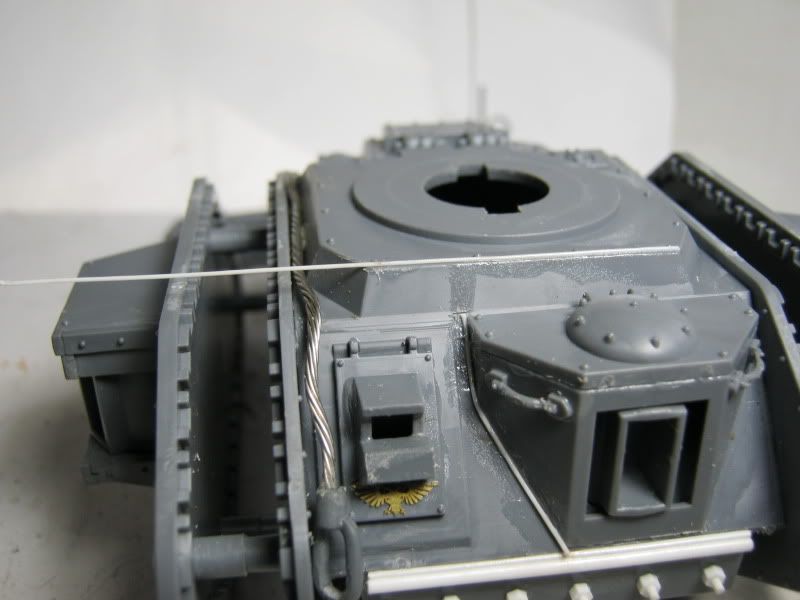
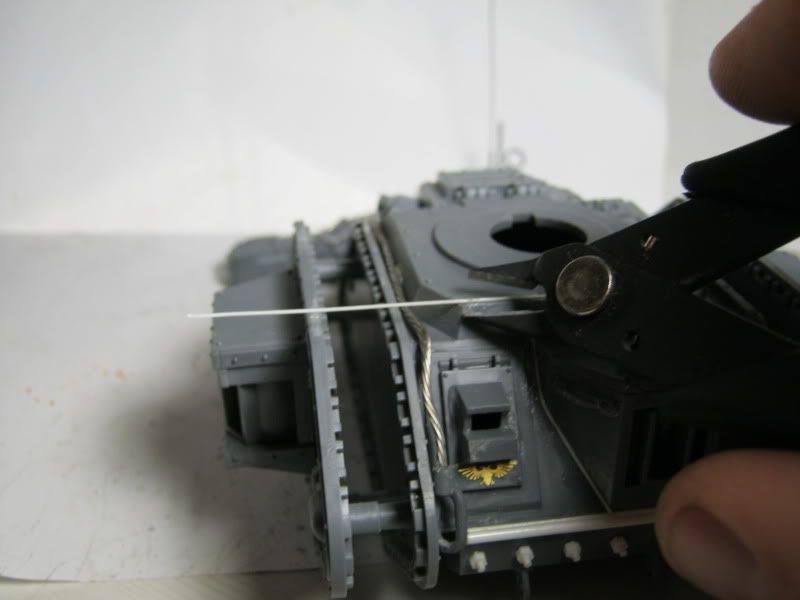
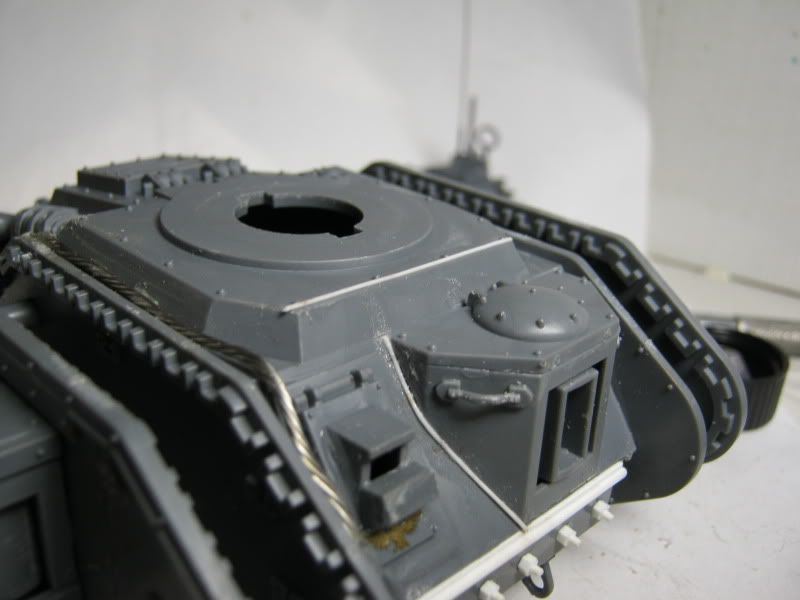
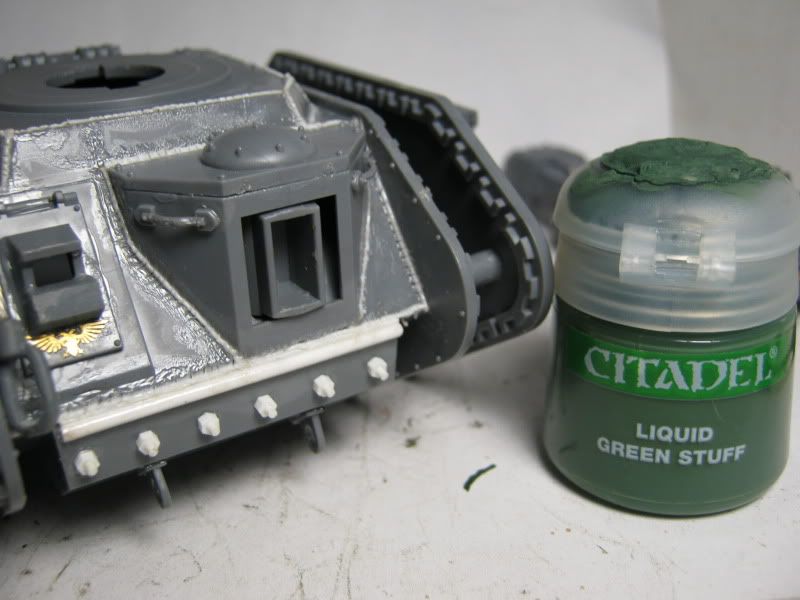
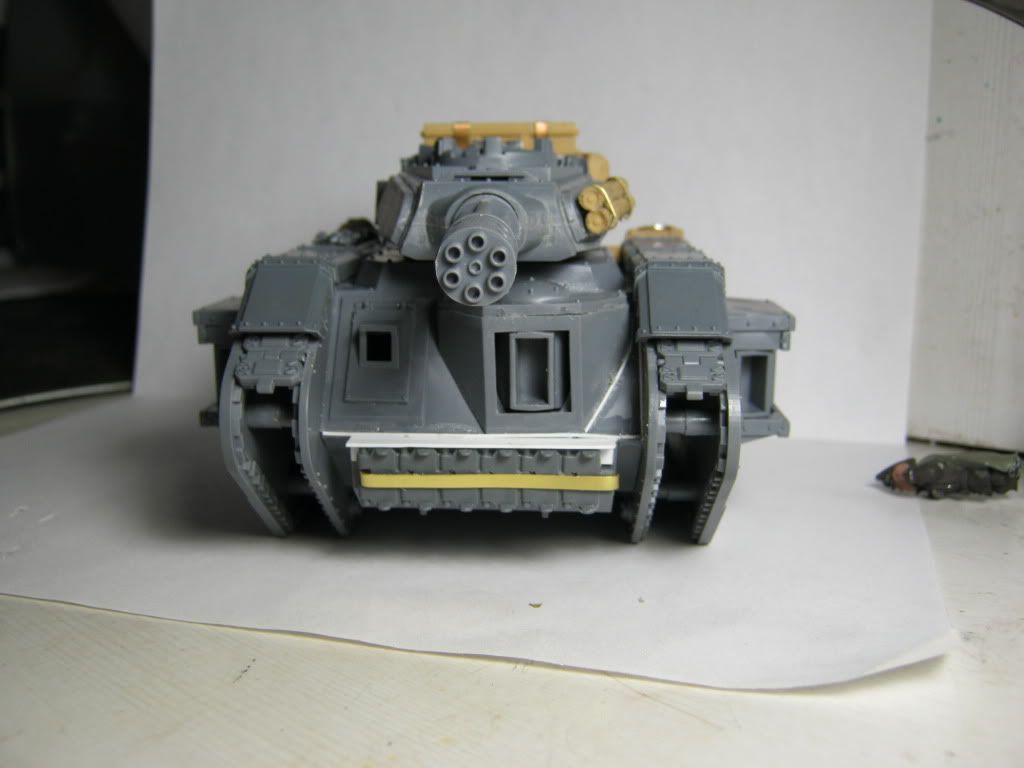
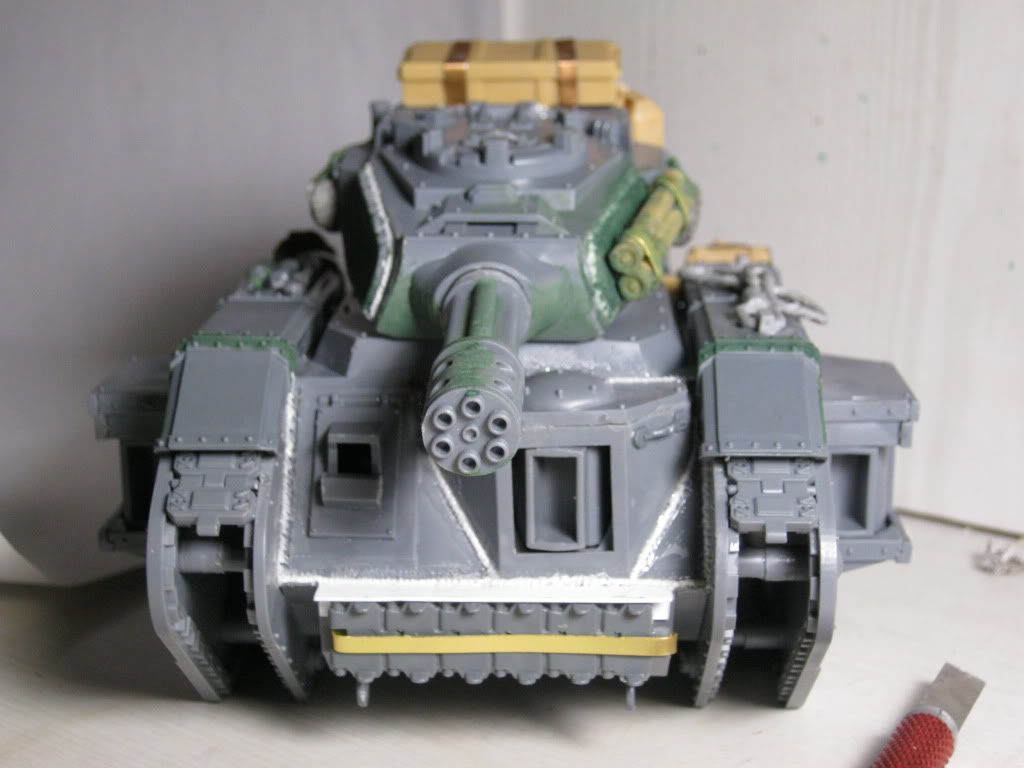
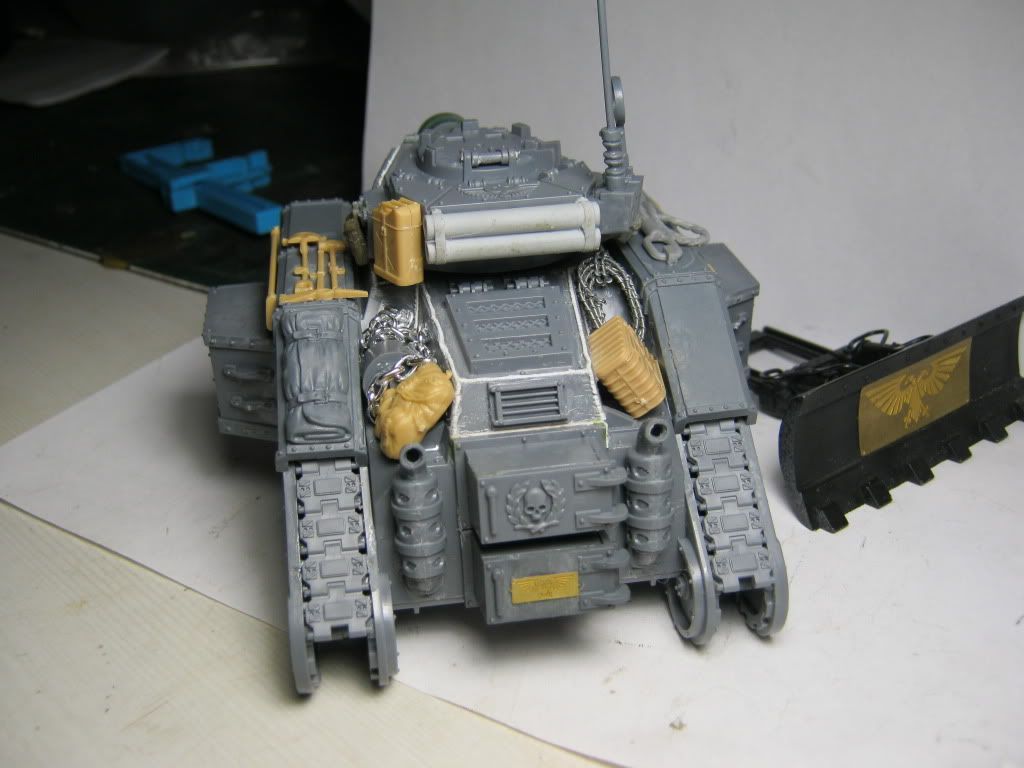
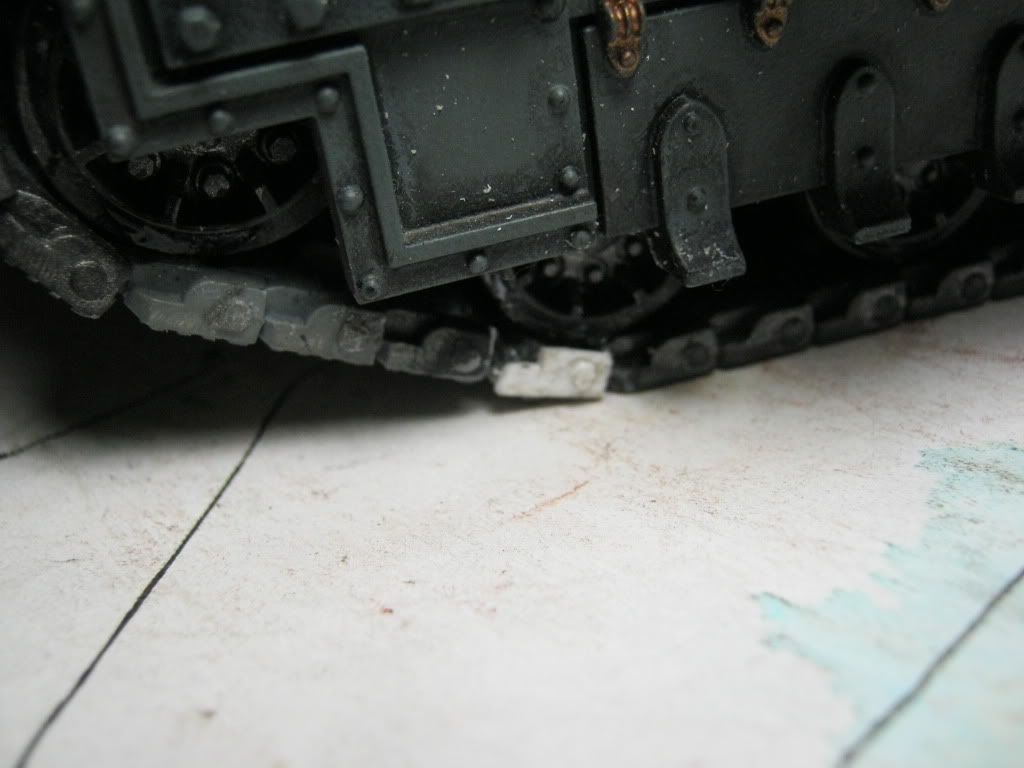
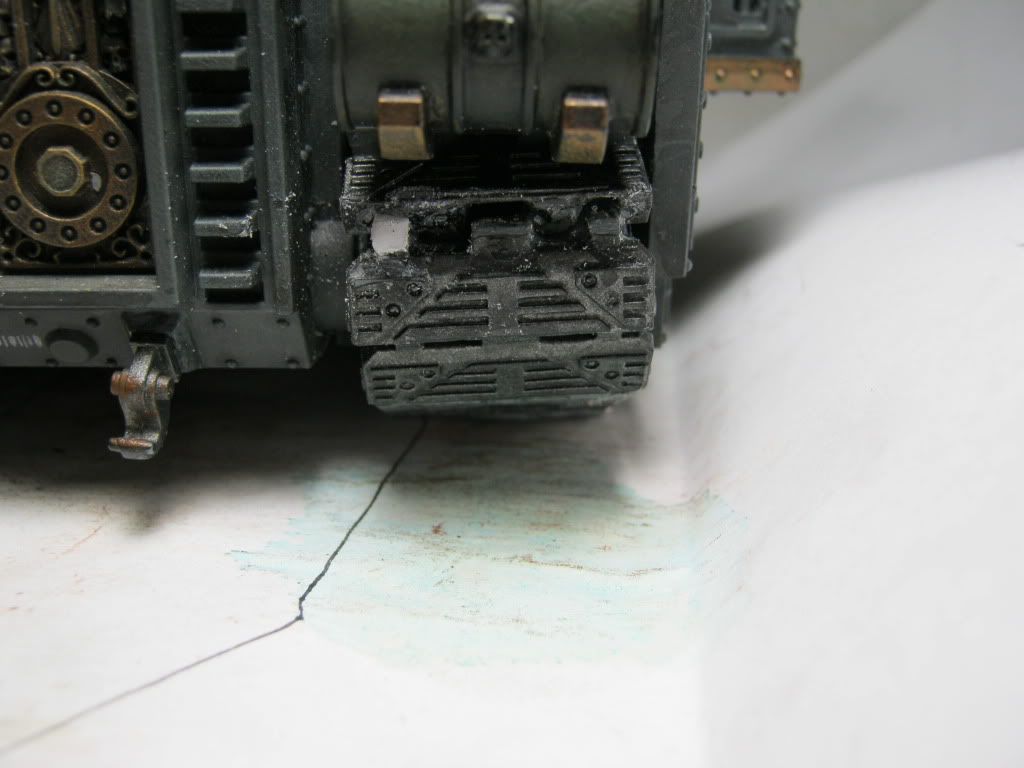
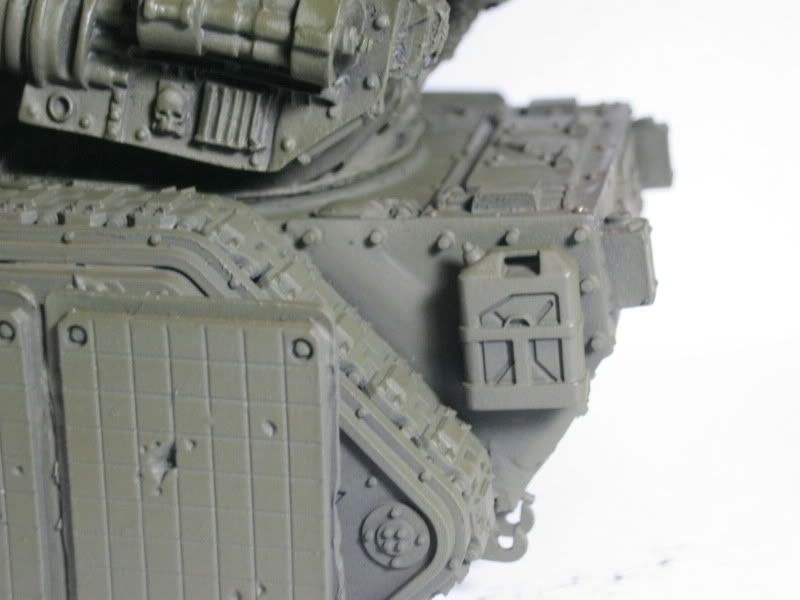
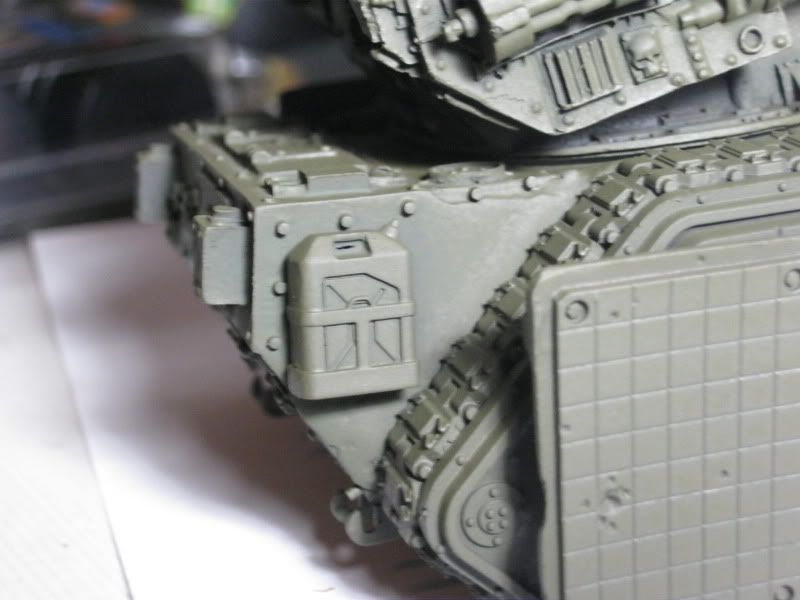
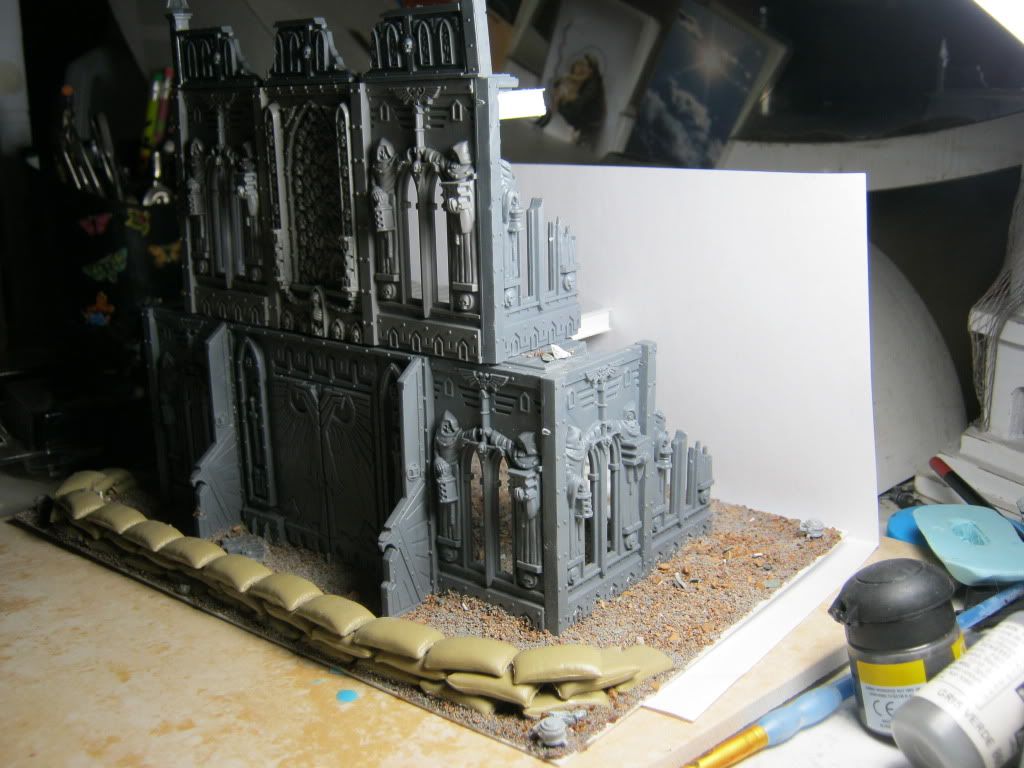
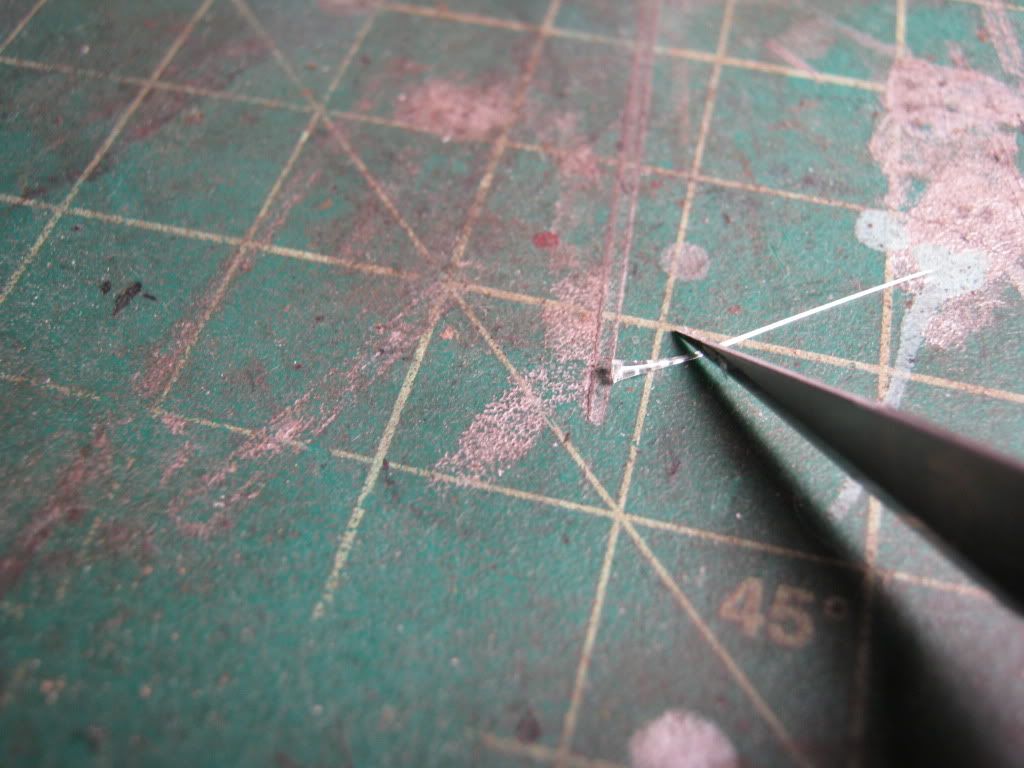
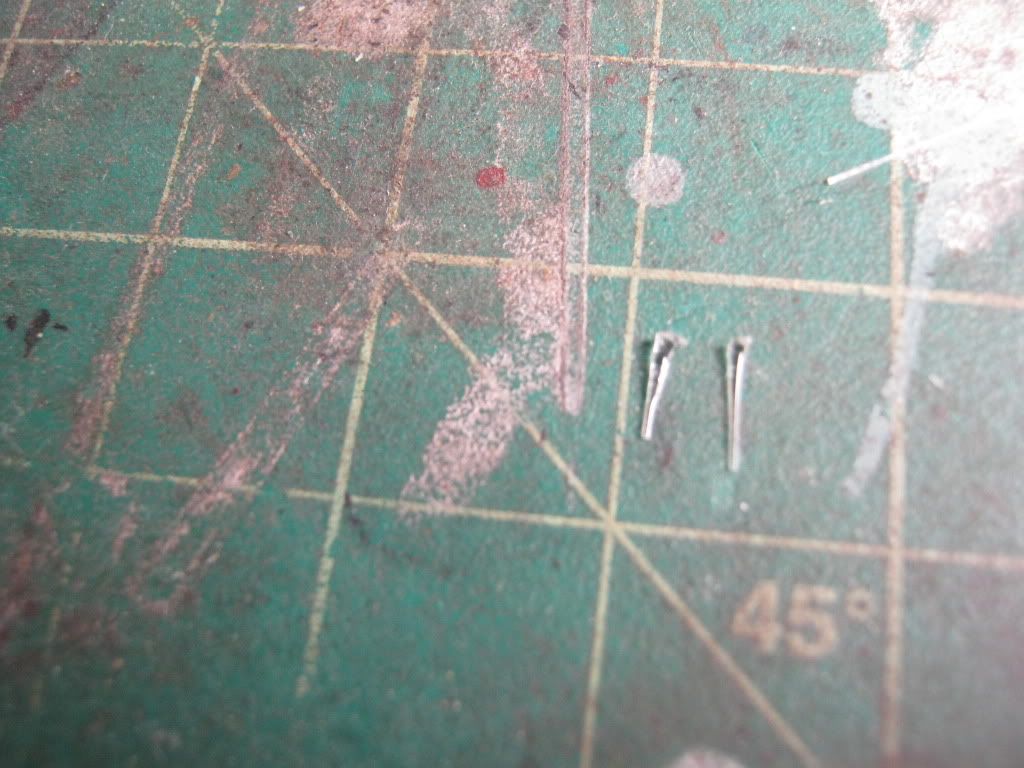
This one is welded using .020 plastic rod coated in Tenax plastic glue,then pressed into shape with a brass rod cut at a 45 degree.
This process leaves glue residue around the welds so I thinned Liquid Green Stuff and applied a skim coat over the glue areas.
Wow this stuff is sooo underated,I really really like this stuff a must have for the toolbox.
Thinned to the consistancy of paint it provides a velvetly smooth undercoat,it like cover-up for the surface of a model.
I also put it on right out of the bottle on the turret plates then stippled it with the stipple brush to provide a roughcoat texture you see on heavy armor plate.
4271
Post by: Eisenhorn
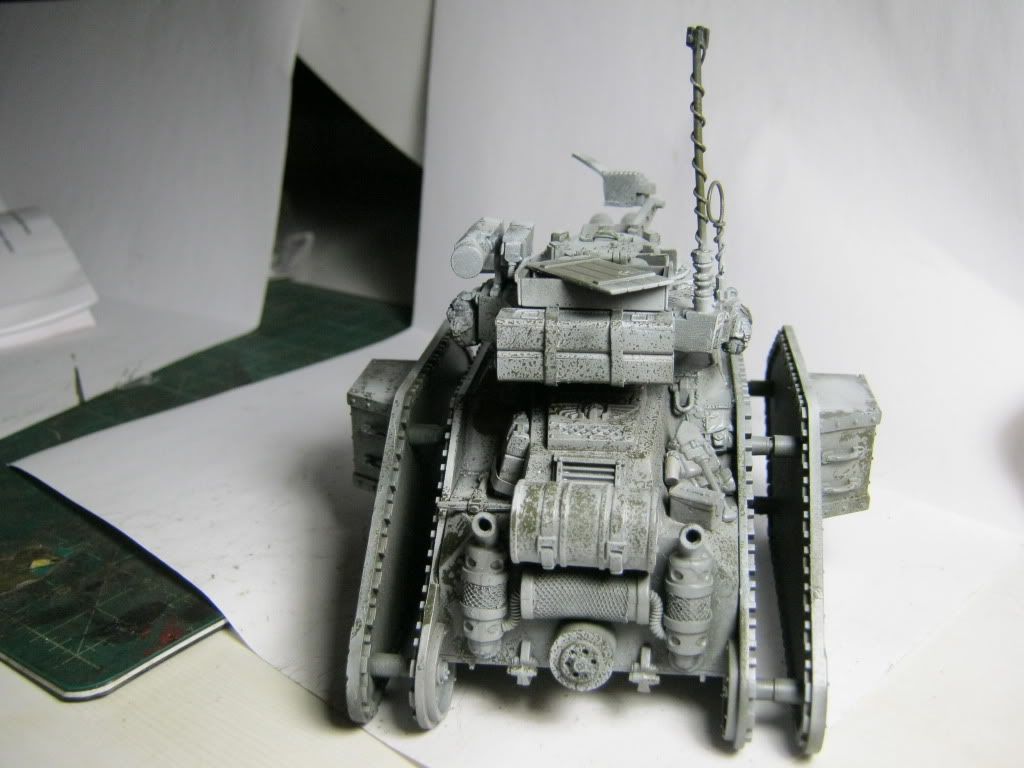
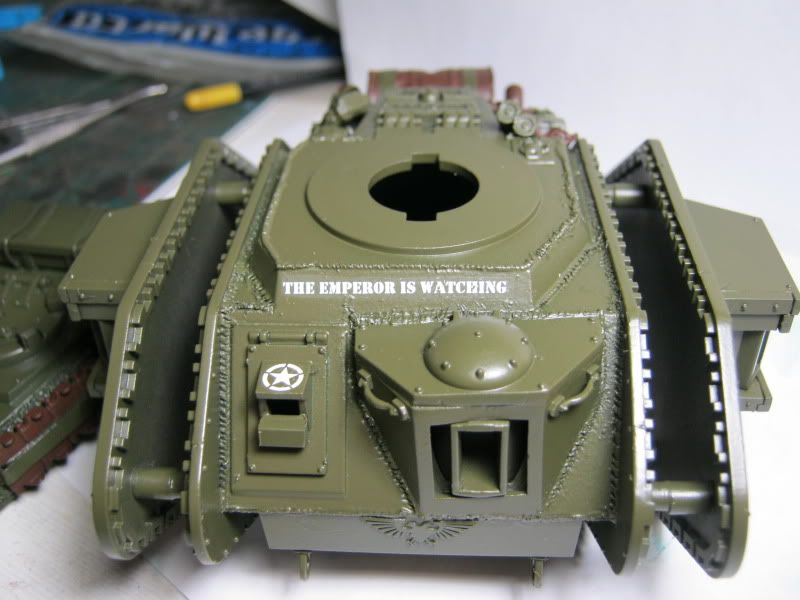
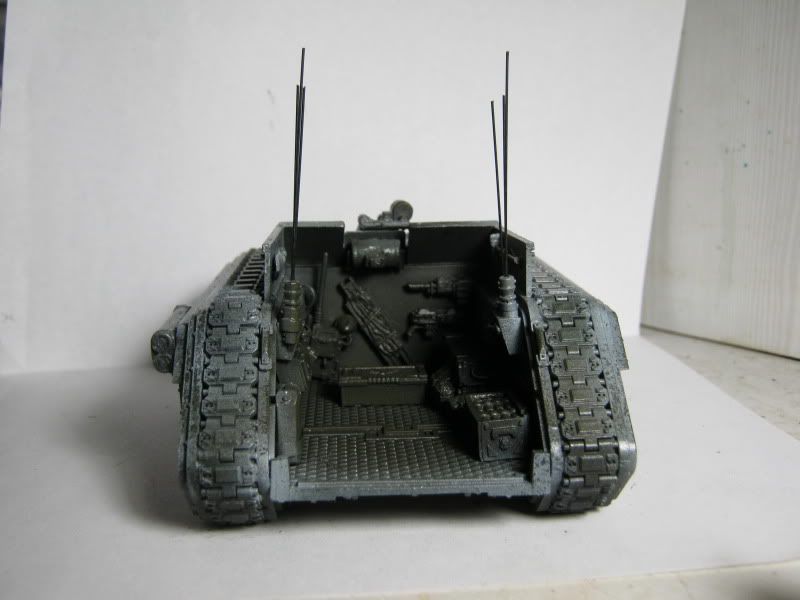
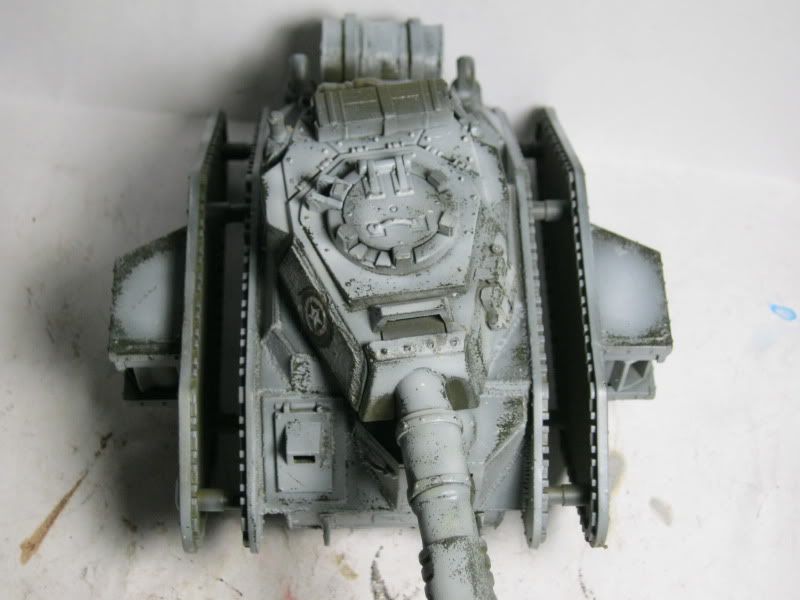
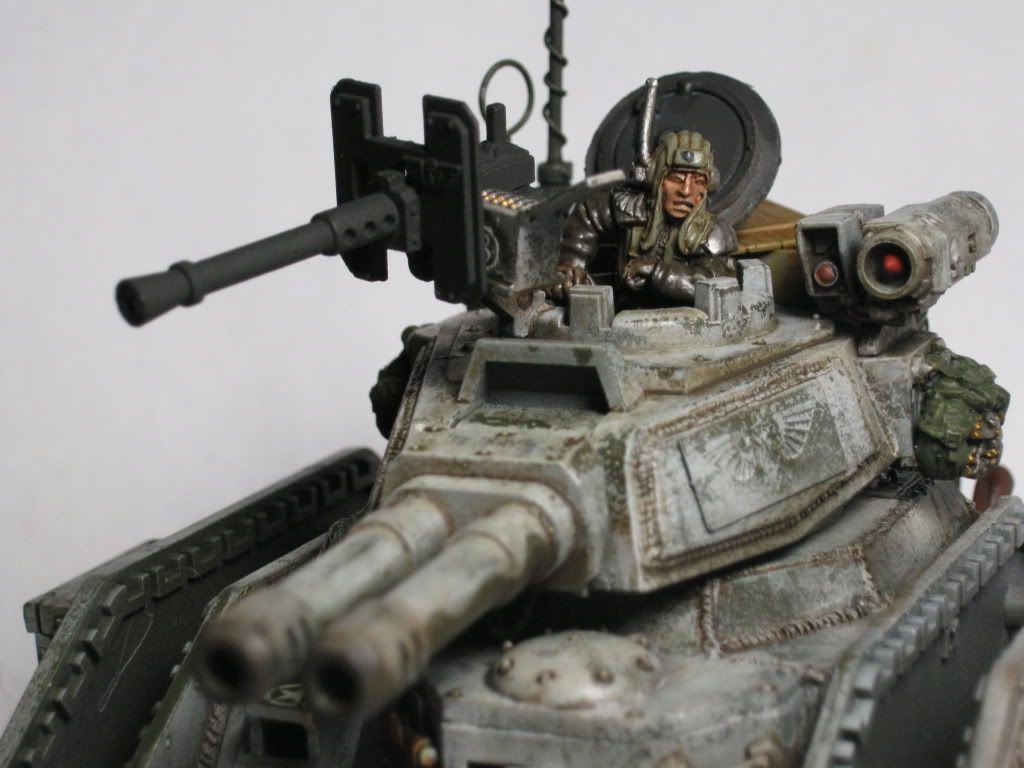
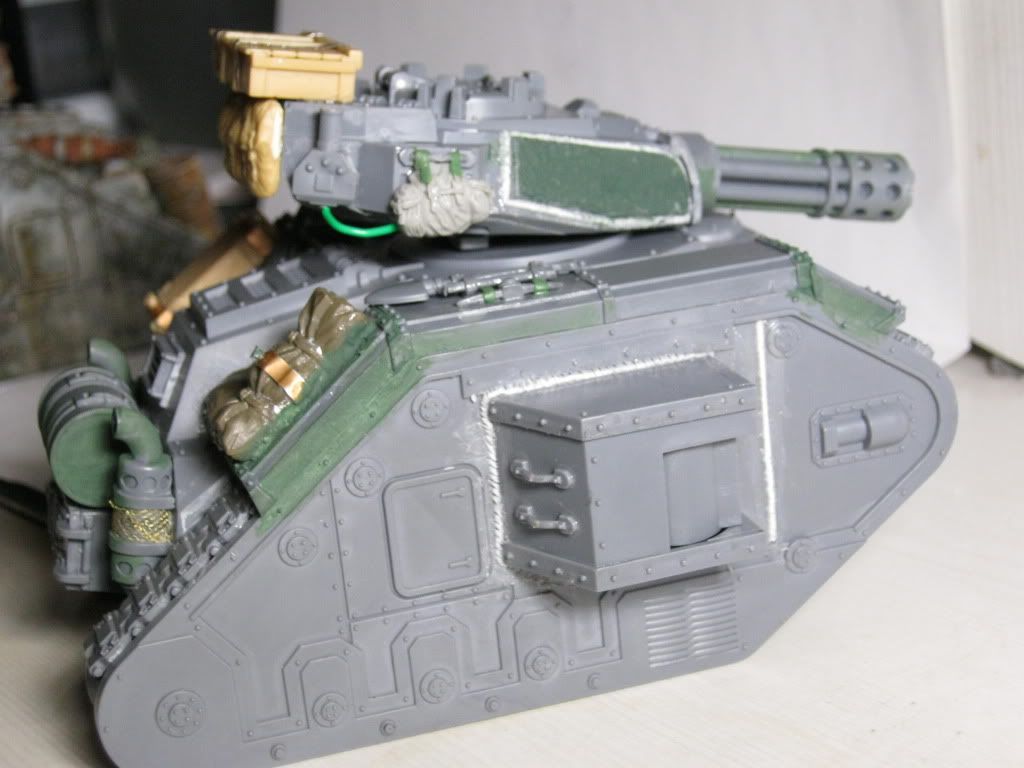
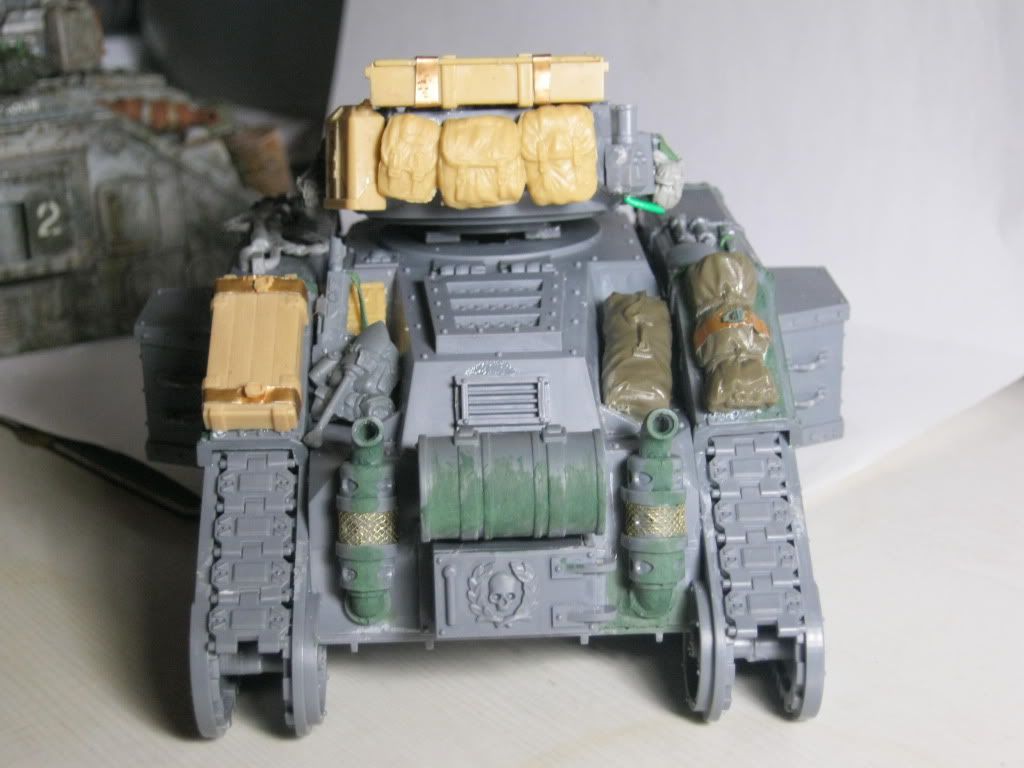
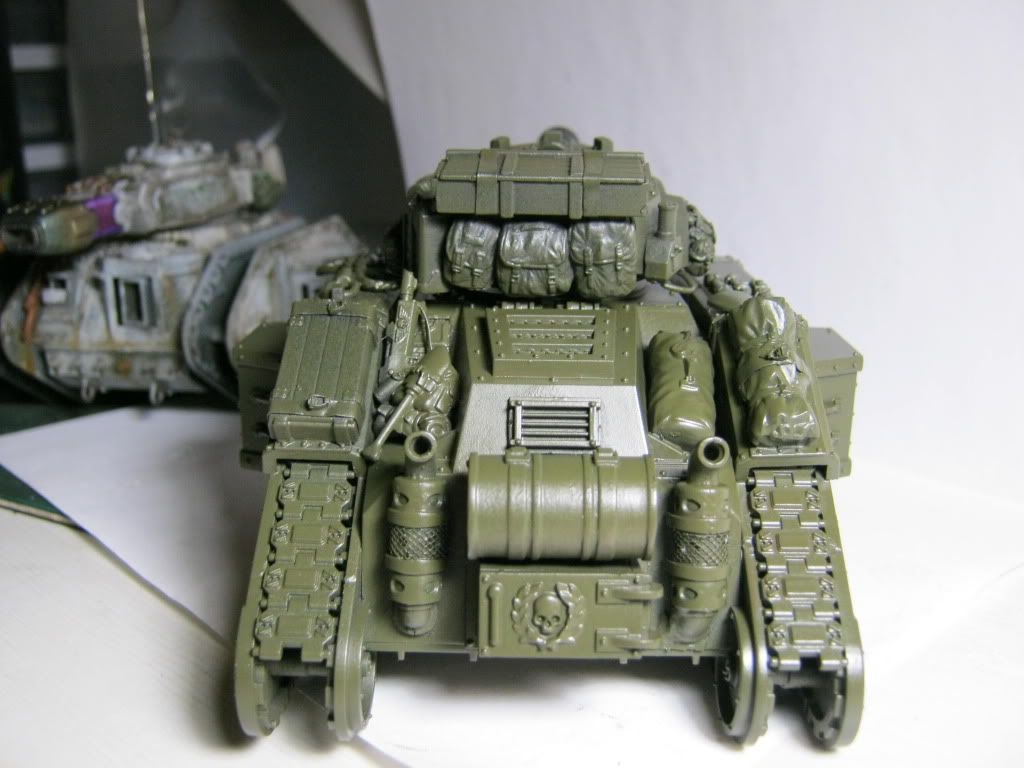
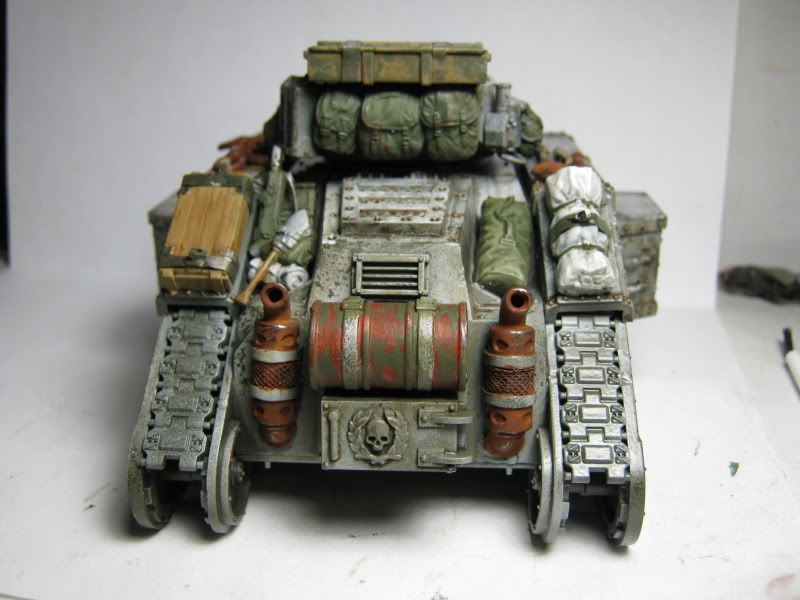
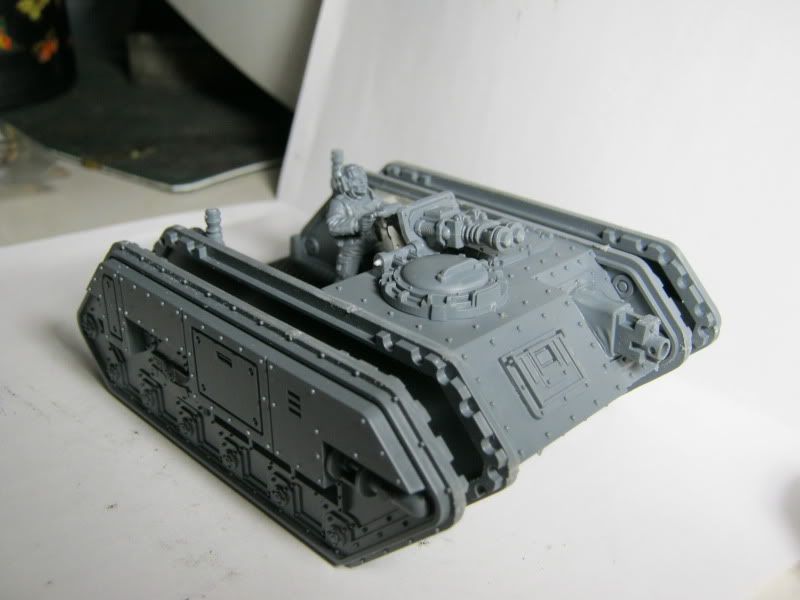
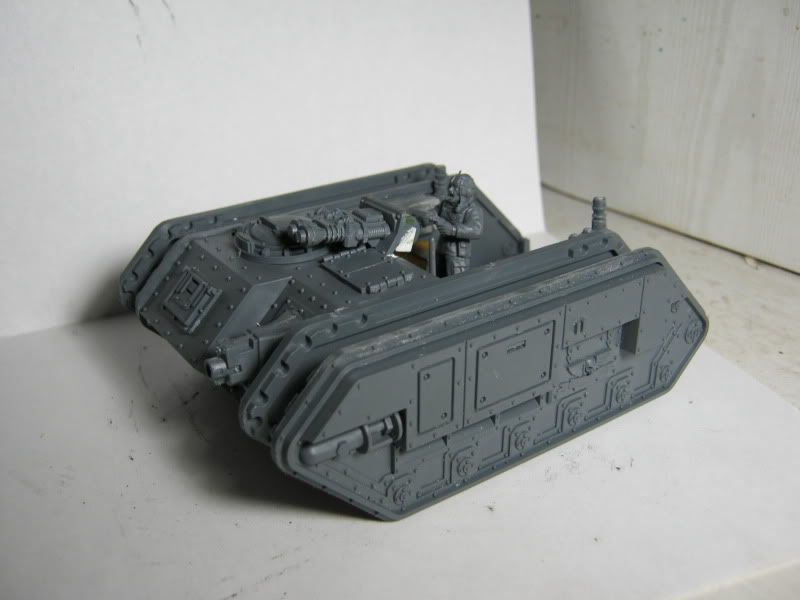
Steadily made progress last night,added moderate stowage.
I just bought a grip load of 1:35 accessory kits from tamiya and afv,next tank is going to look sweet,but I am getting ahead of myself.


6548
Post by: Chaplain Cy
I really like what you're doing here! I plan to definitely keep my eye on your thread good sir!
49233
Post by: Fab
Keep them coming 
4271
Post by: Eisenhorn
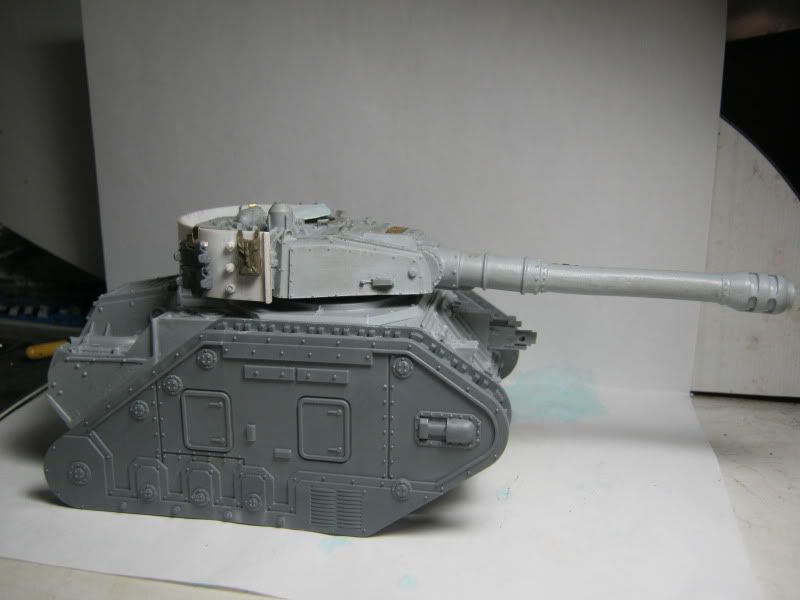
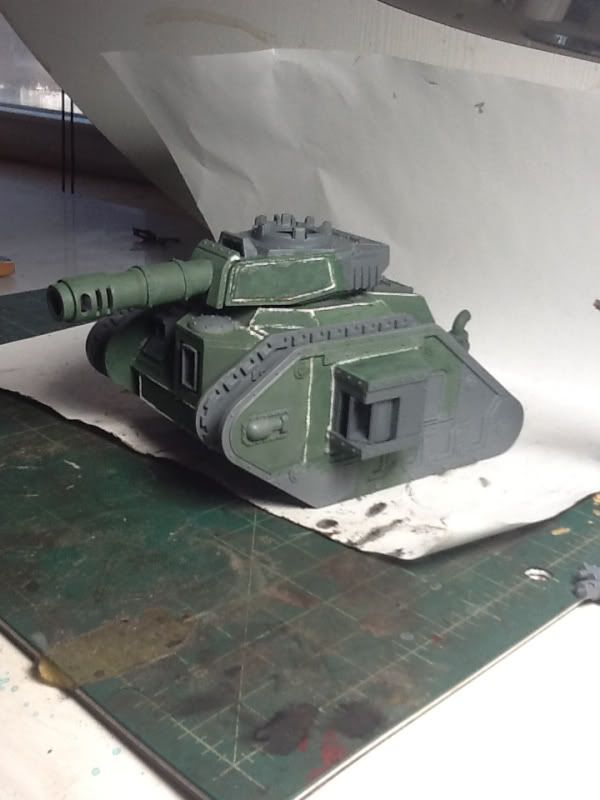
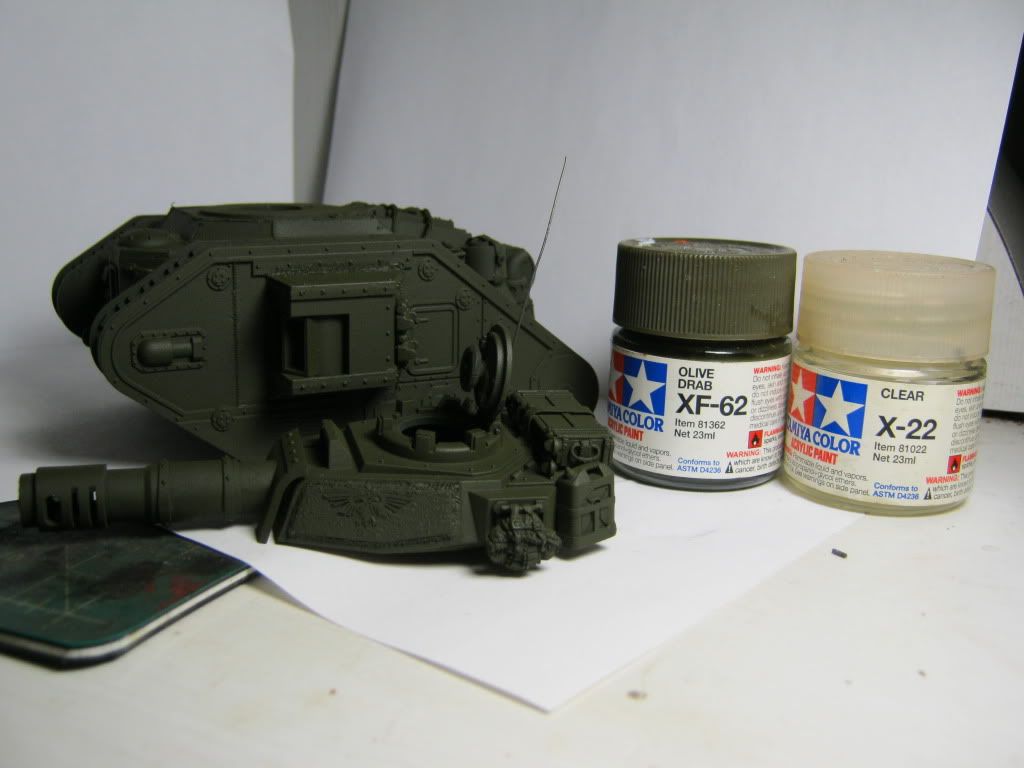
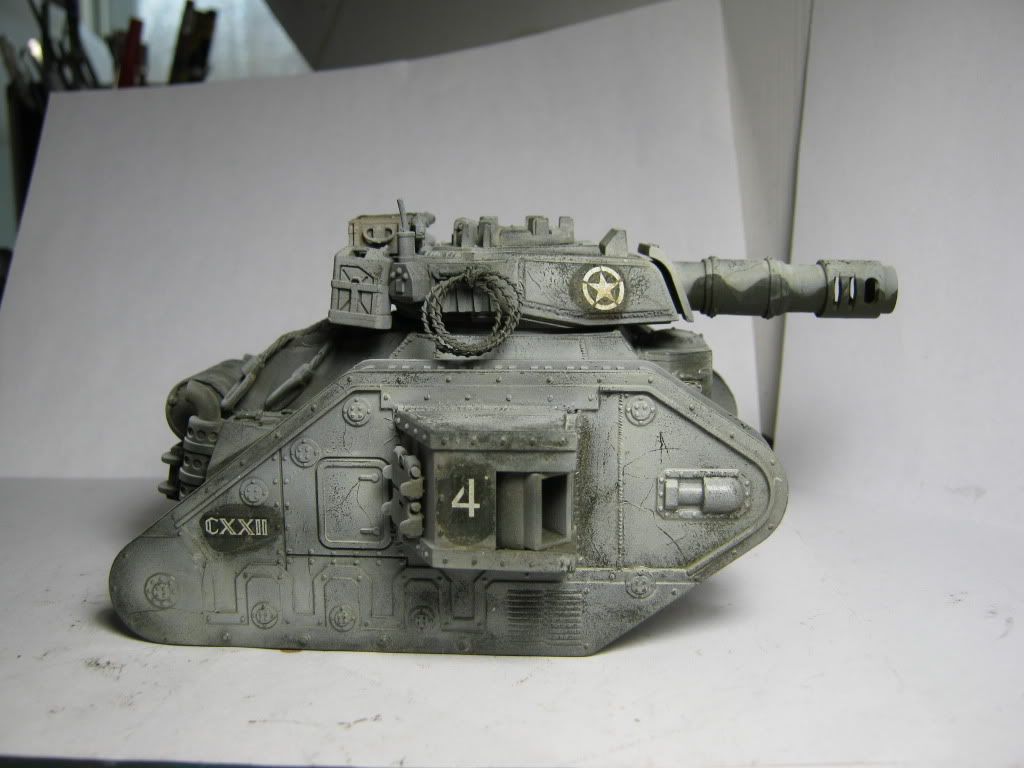
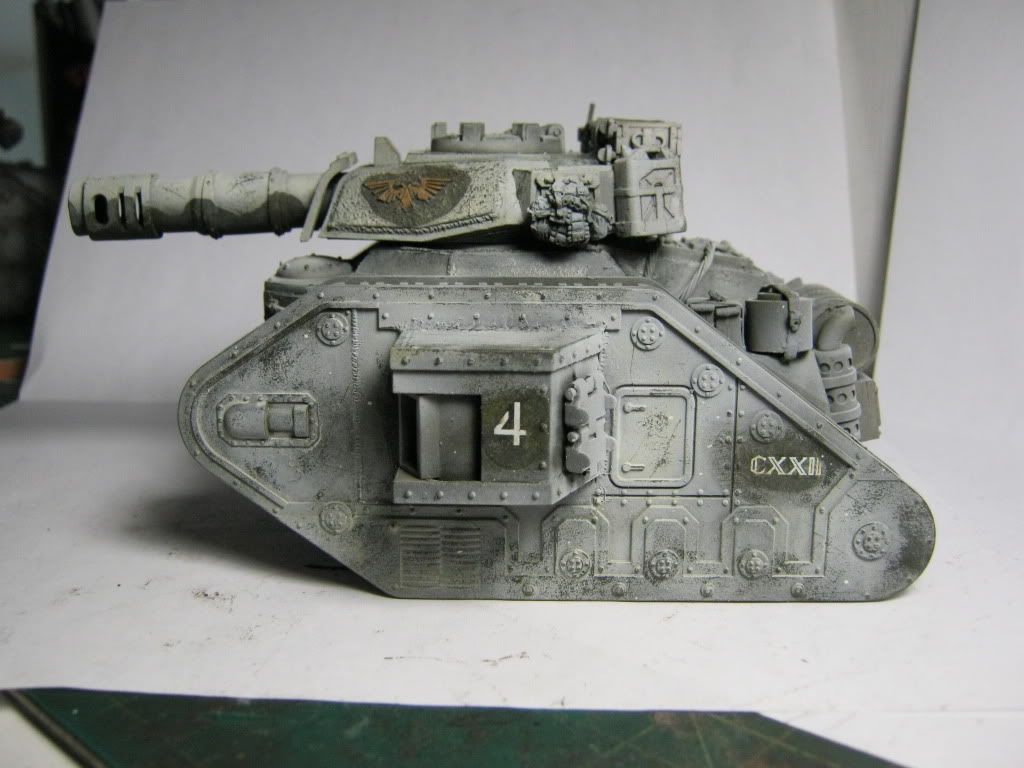
Ok here is the first step of the painting process.
Black primer and Tamiya Hull Red for the tank's primer layer.
I am foing to let this dry overnight so the paint has time to set.
The weathering process is going to use alot of rubbing so you want the undercoat hardened.
Even though you think it is dry acrylic paint takes about 24 hours to fully cure.
If you ever did the hairspray technique and pulled up more than the top layer revealing plastic,that is why.
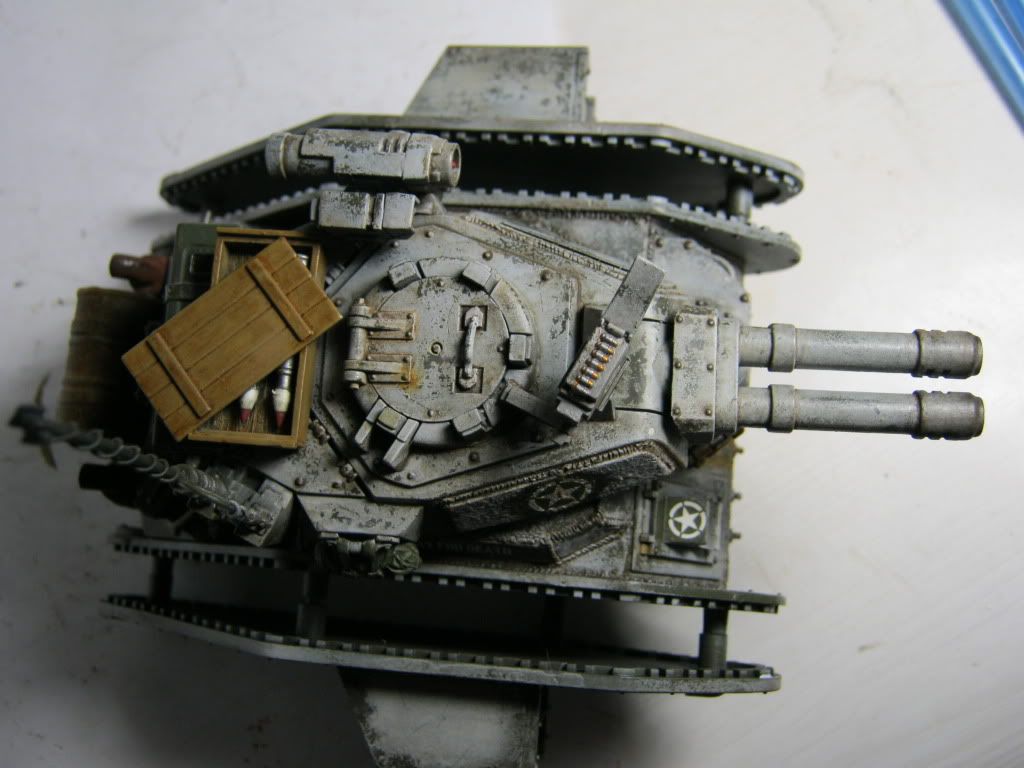
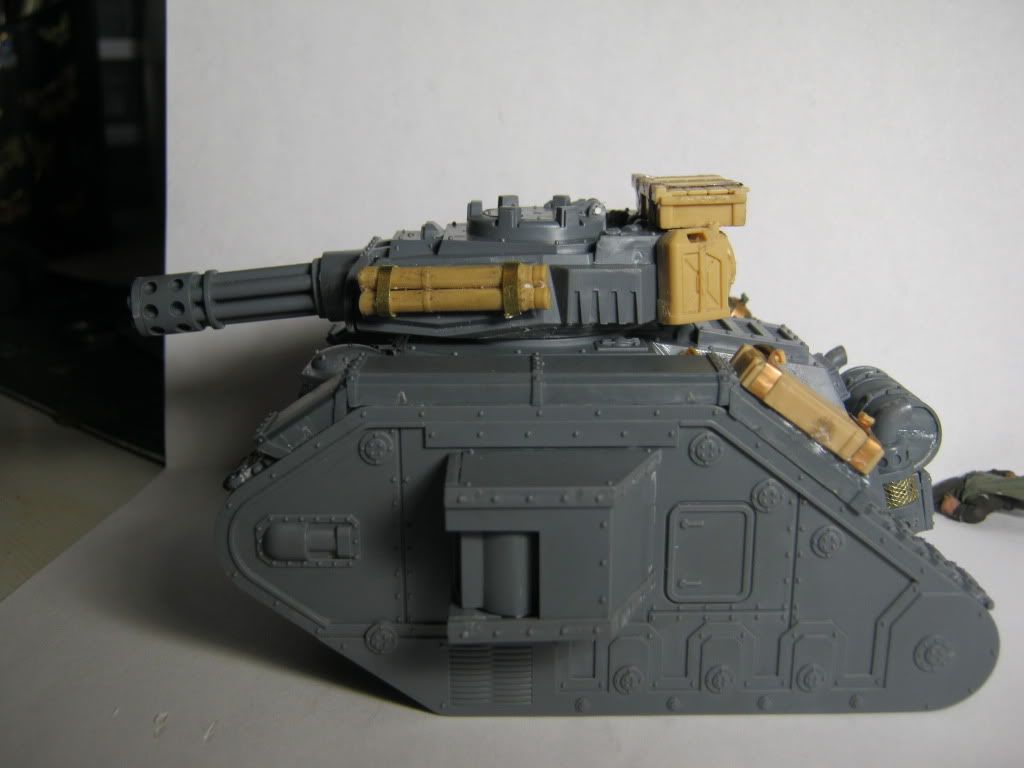
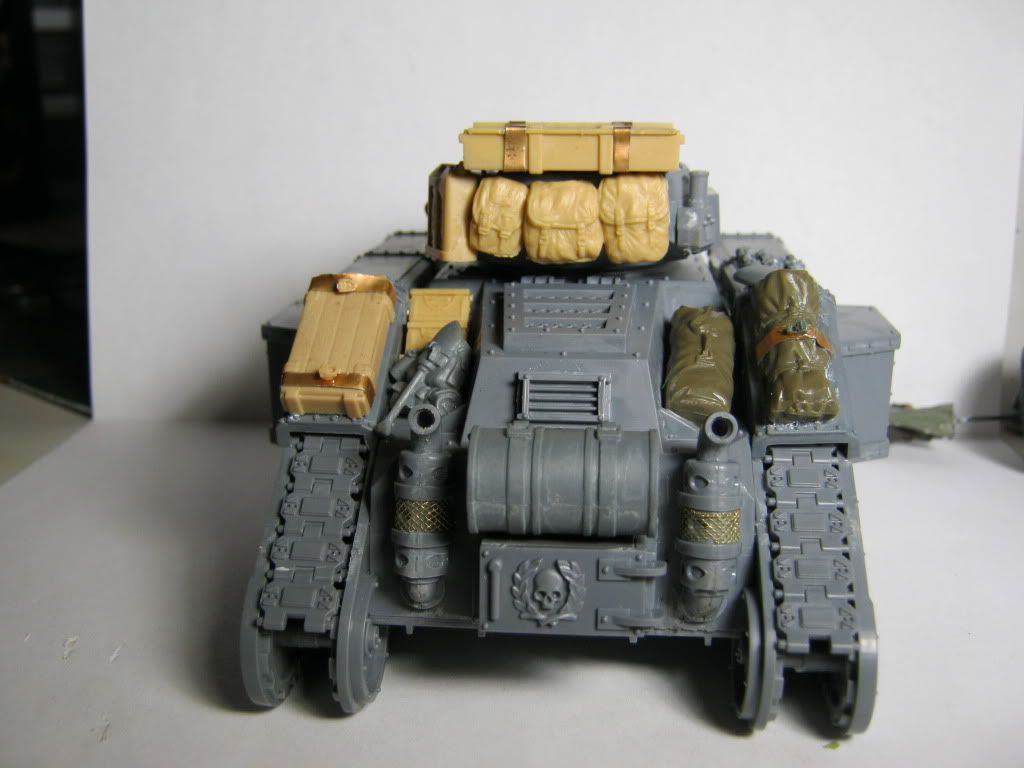
I bought quite a bit of 1:35 scale tank stowage,some really neat woodgrain crates,should look awesome painted.
Some even come with brass-etch !!!

47280
Post by: OZ-Guardsman
Very interesting,definitely following this one.
4271
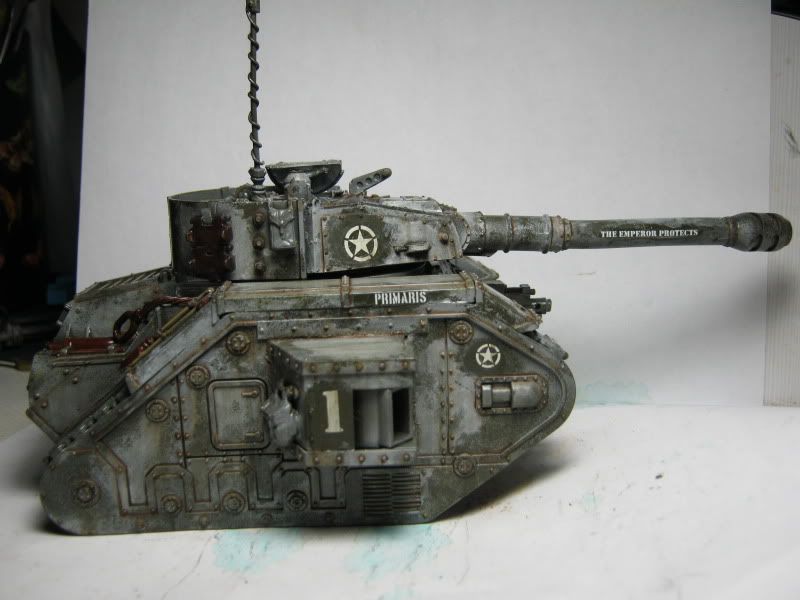
Post by: Eisenhorn
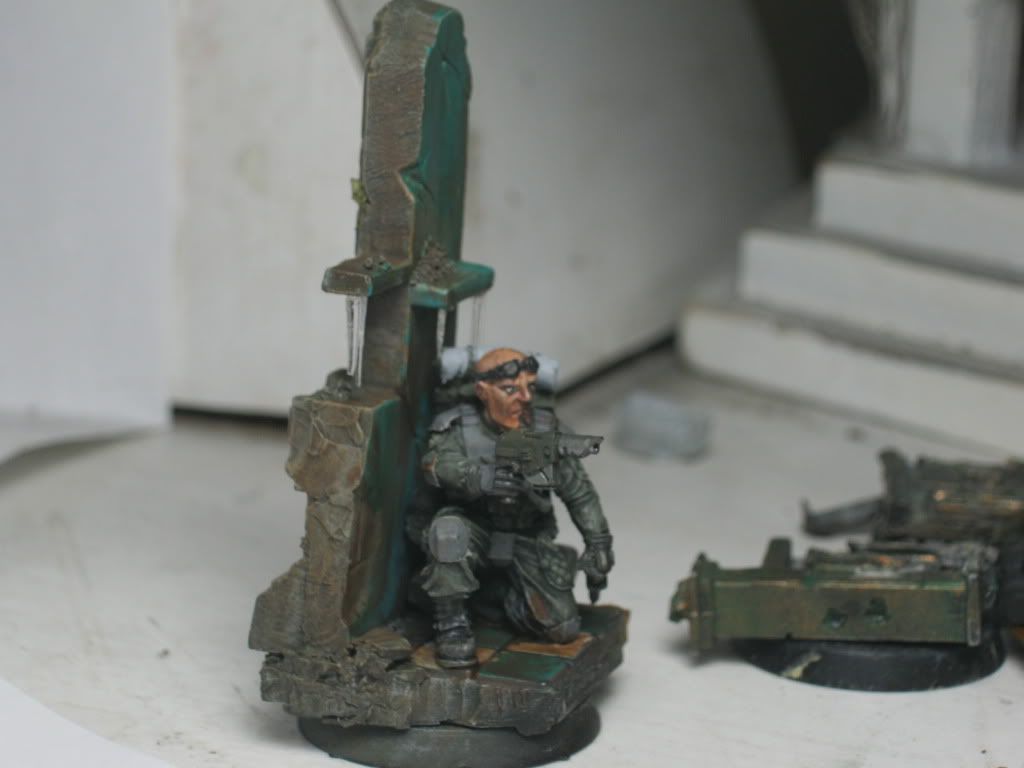
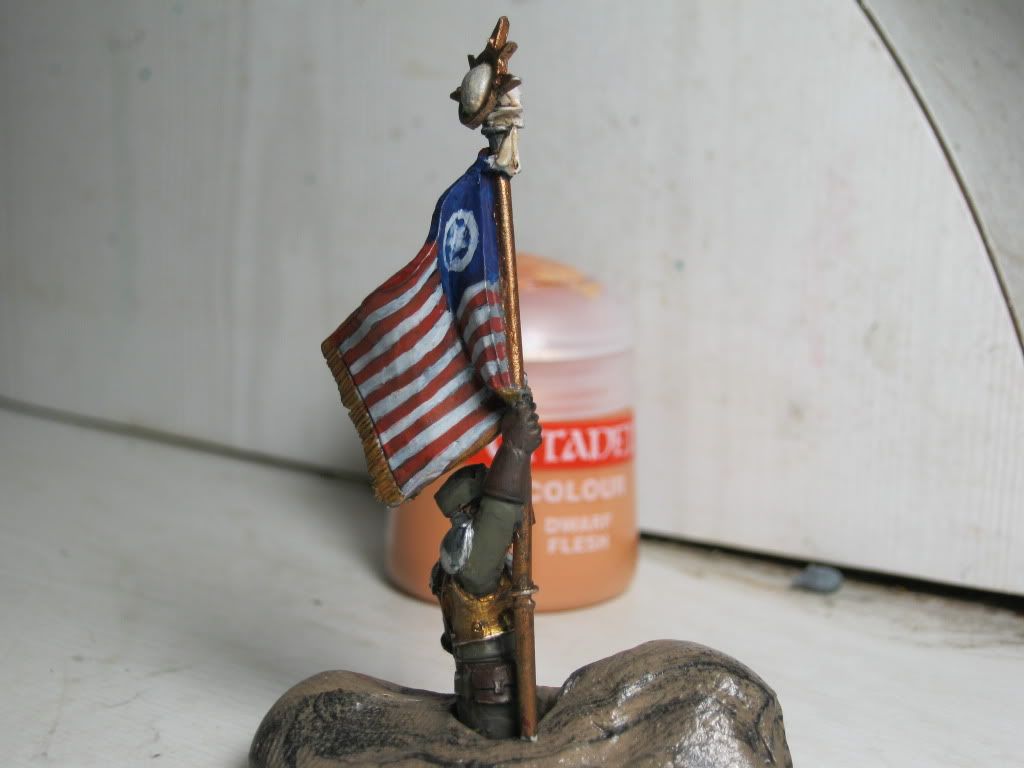
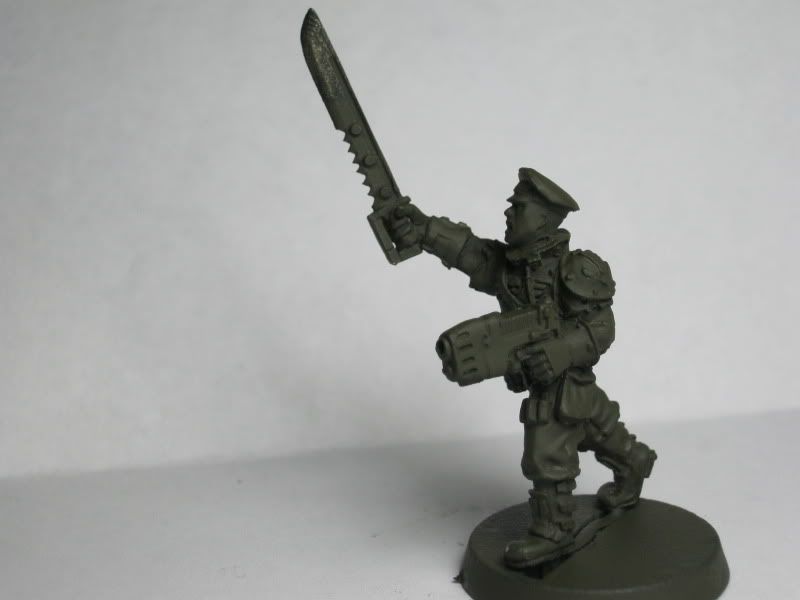
I just wanted to show you guys the model I made a while back that inspired this army
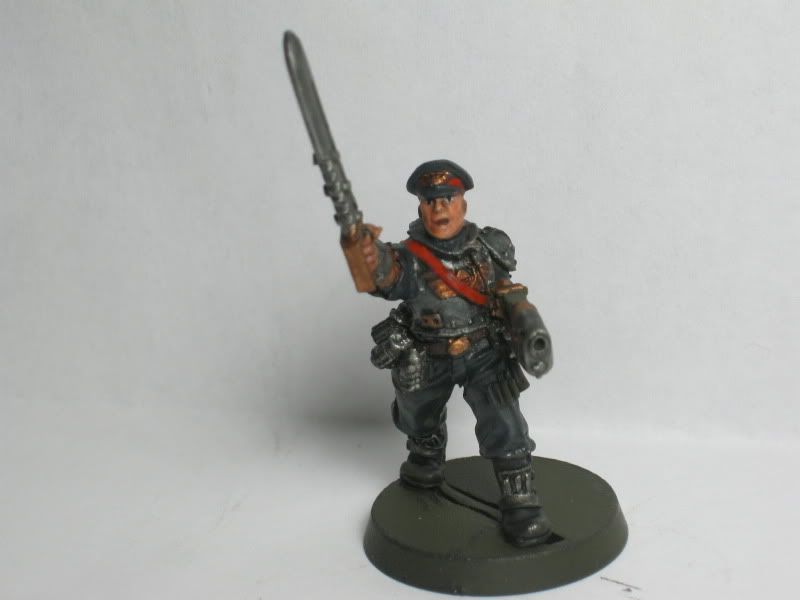
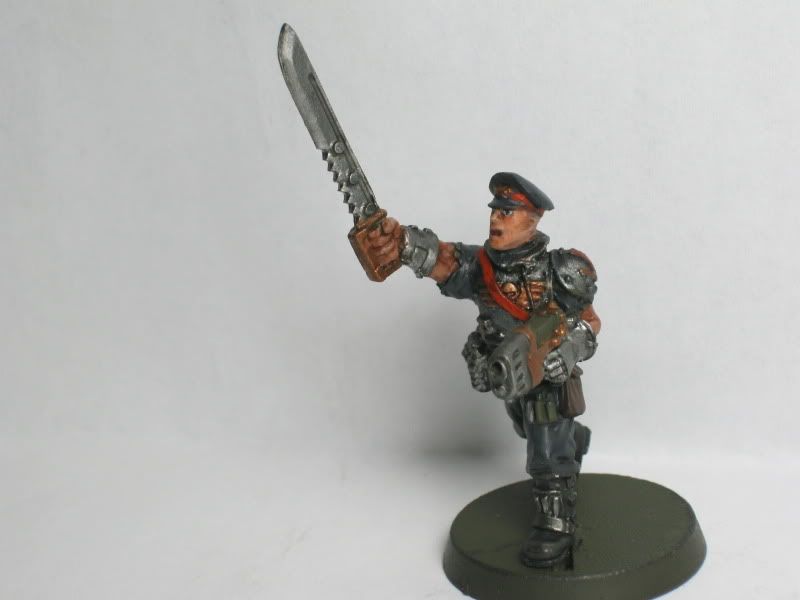
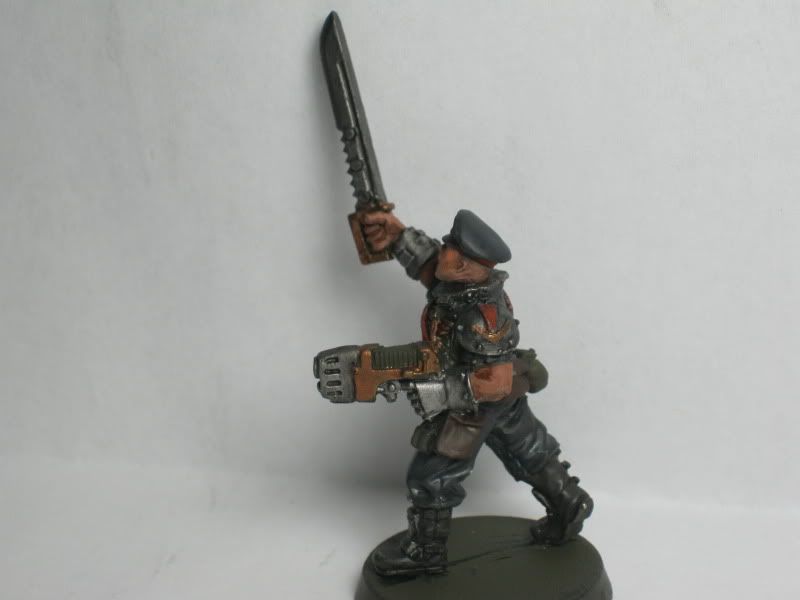
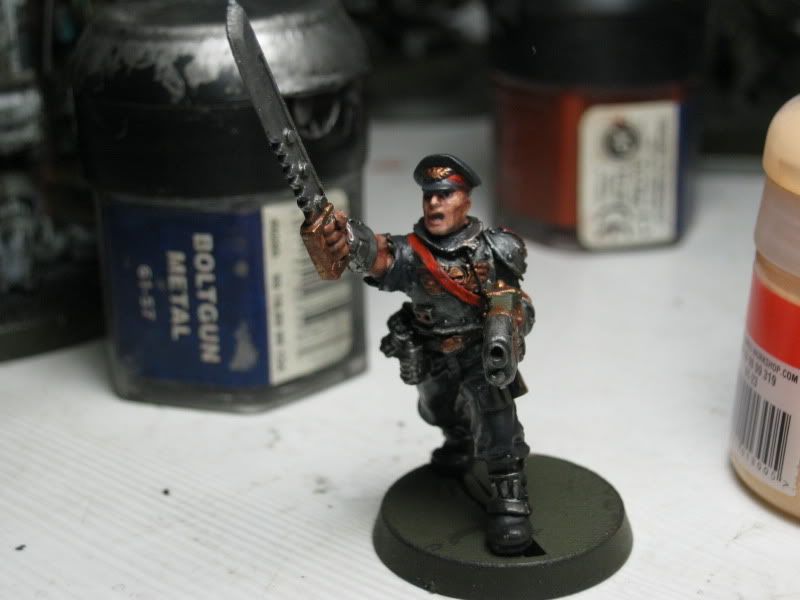
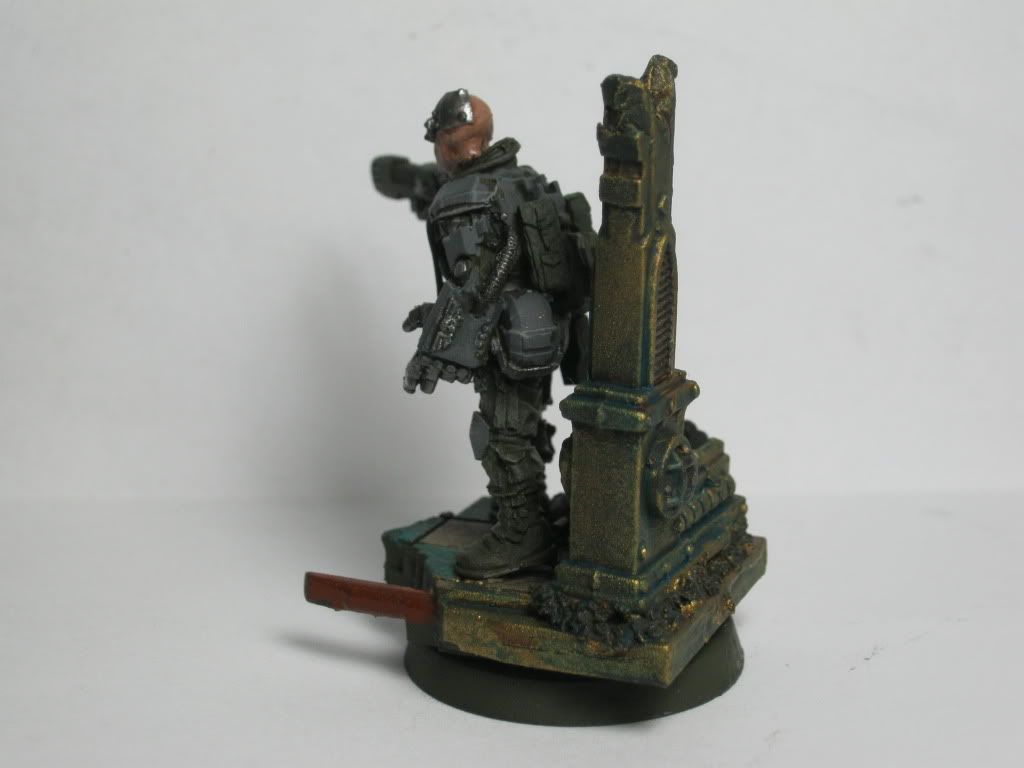
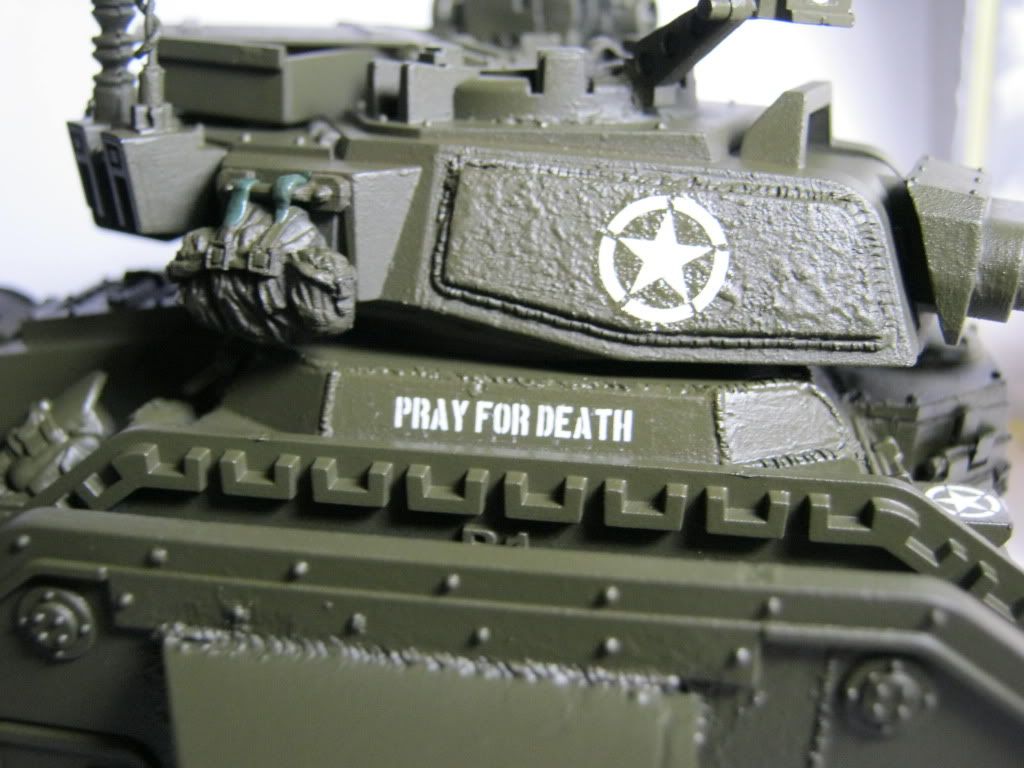
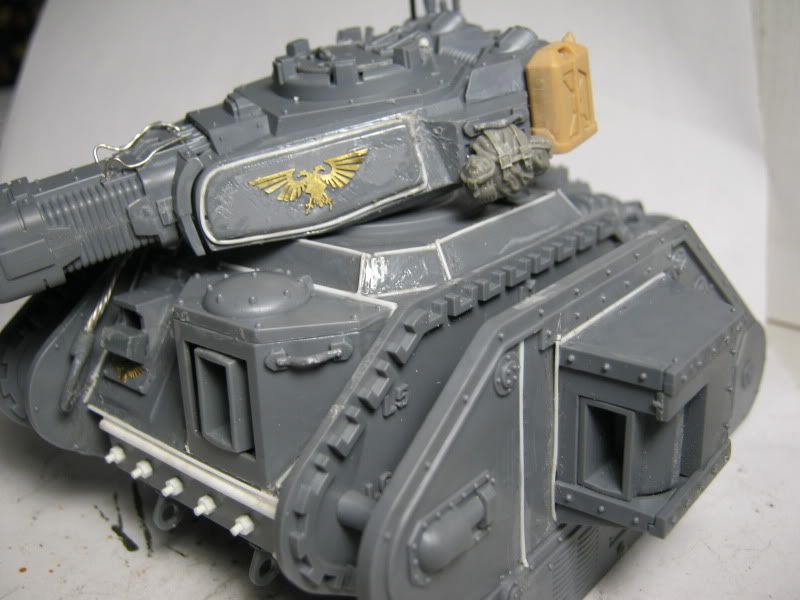
Here is the Regimental Standard for the 1st Merican Lancers
I used the Cadian 8th banner from the new kit shaved down
( GW stop with the Pre-Detailed banners :angry: )
I also used bits from the Cadian Vet pack from forgeworld


4271
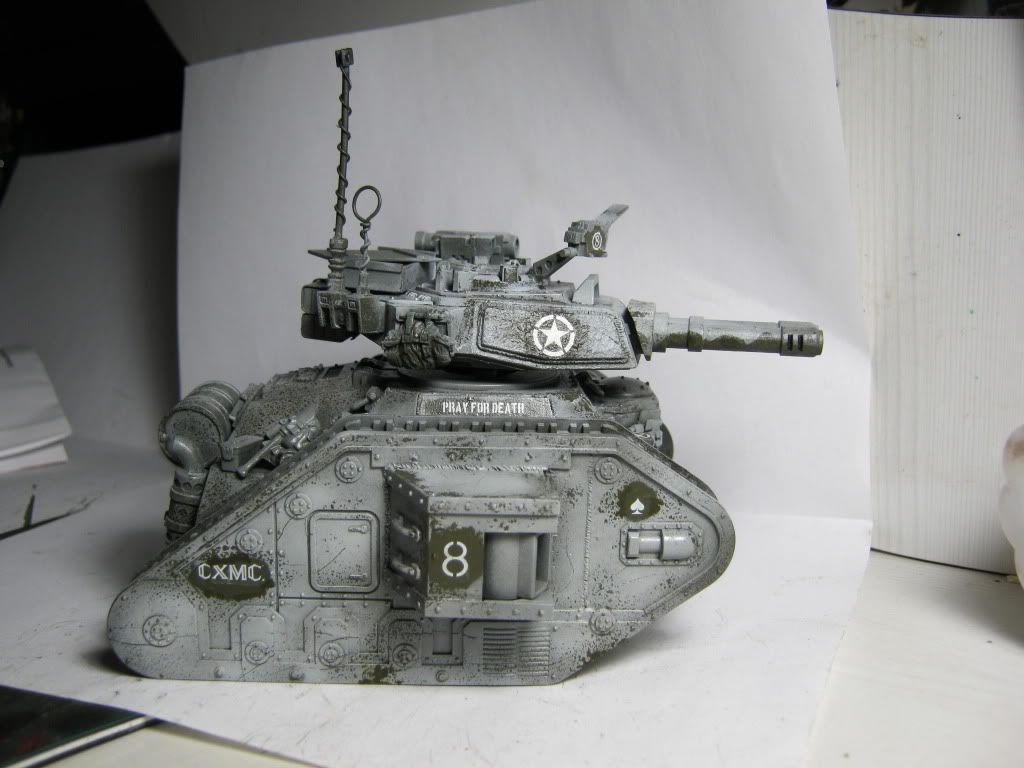
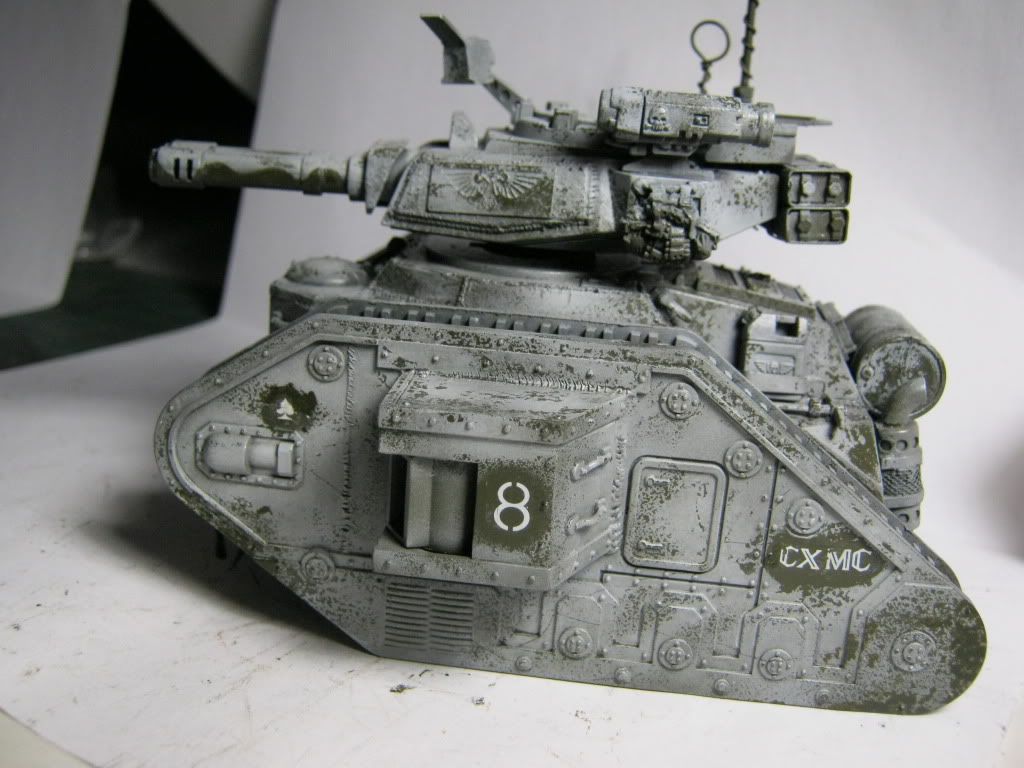
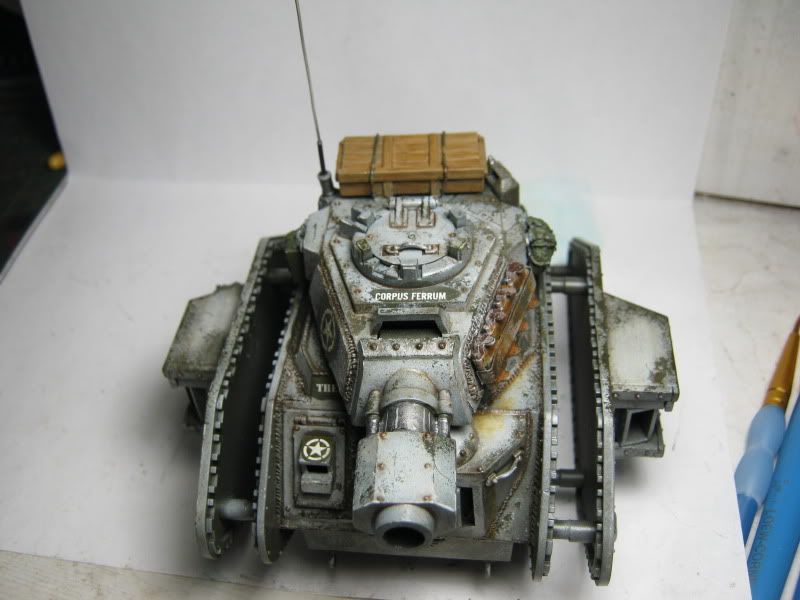
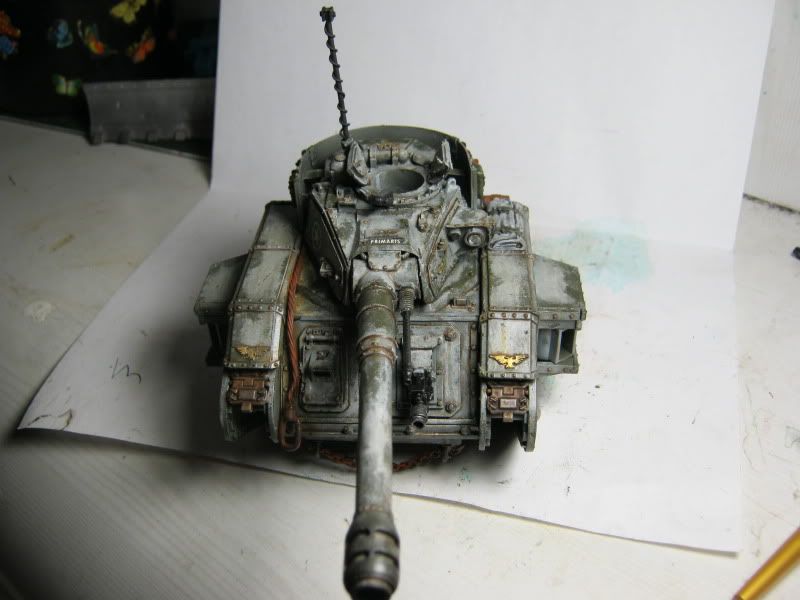
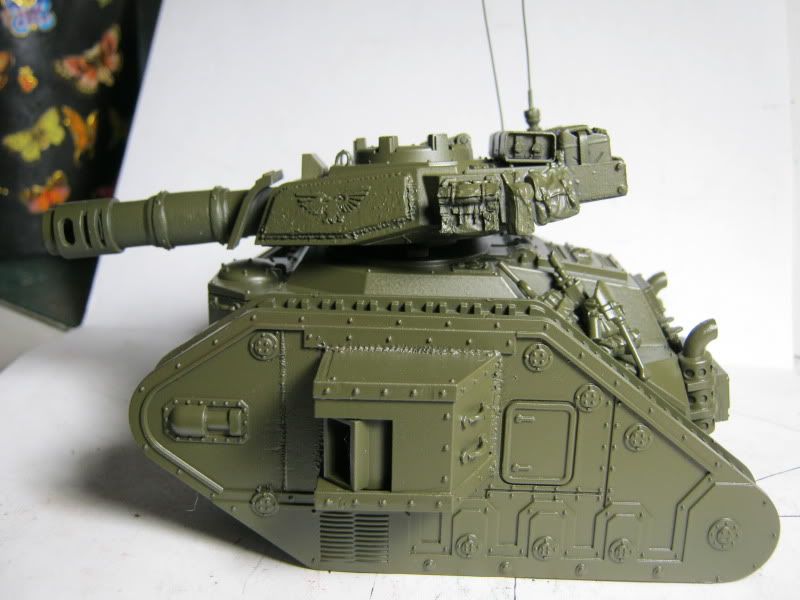
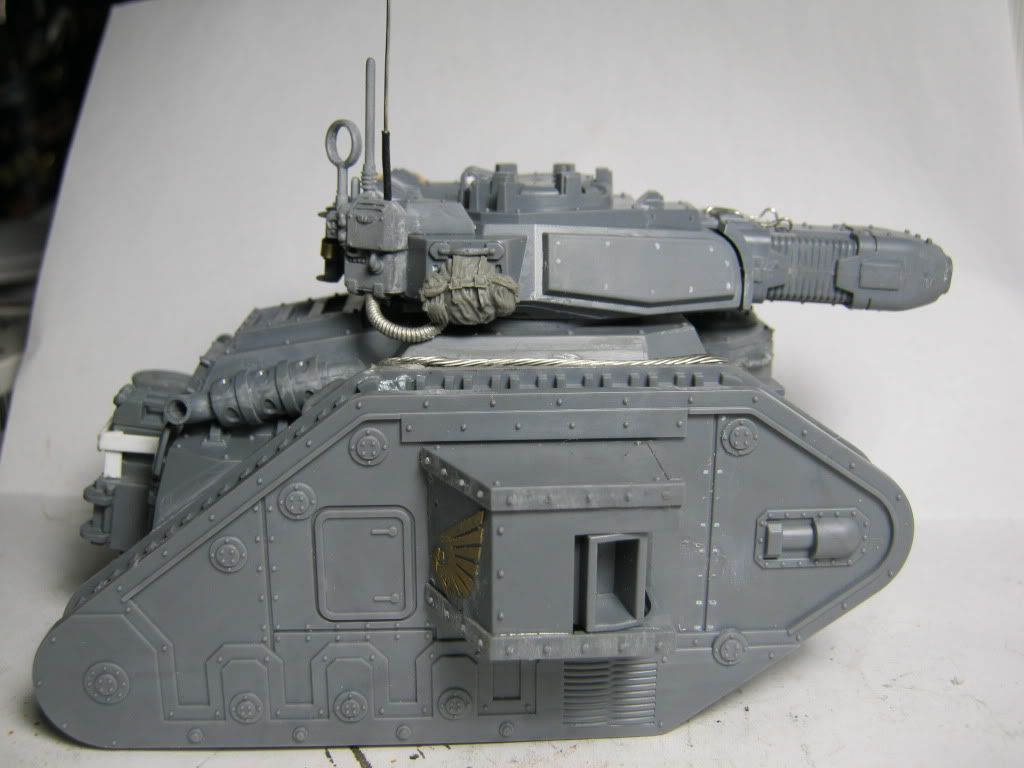
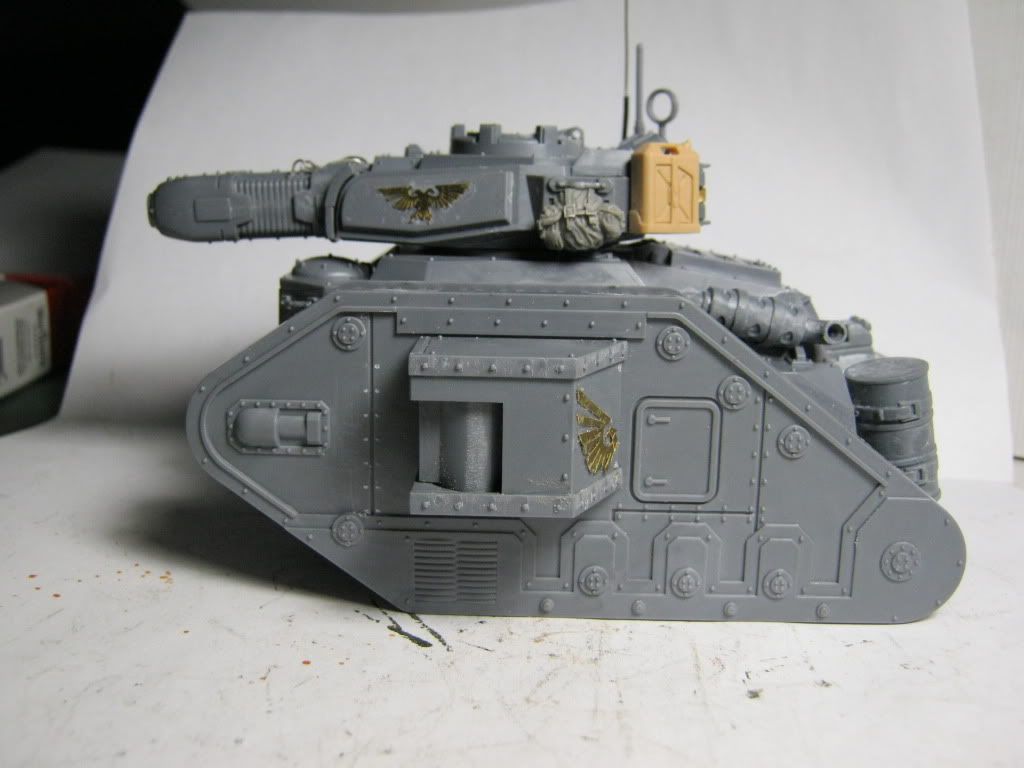
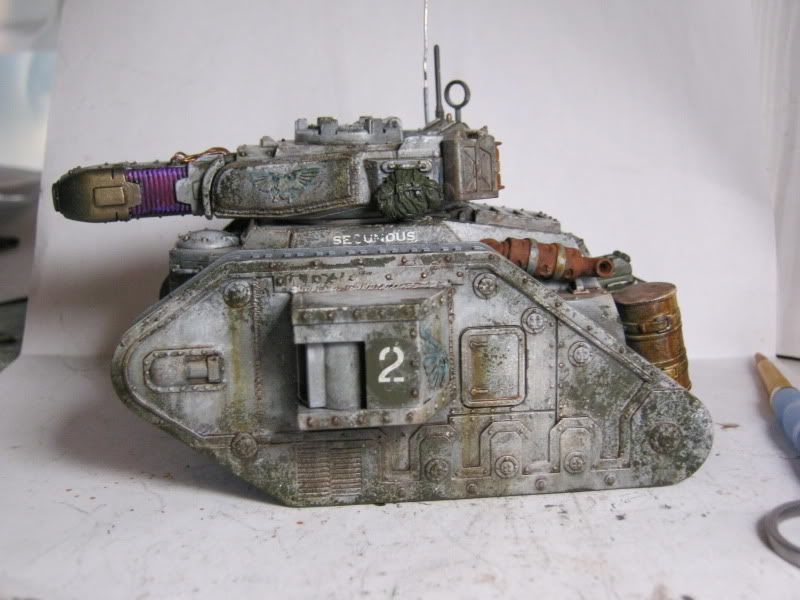
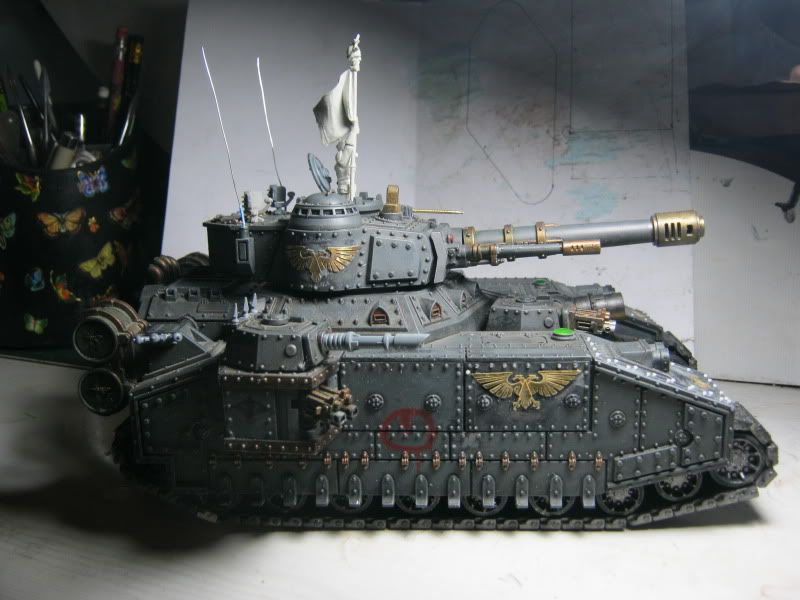
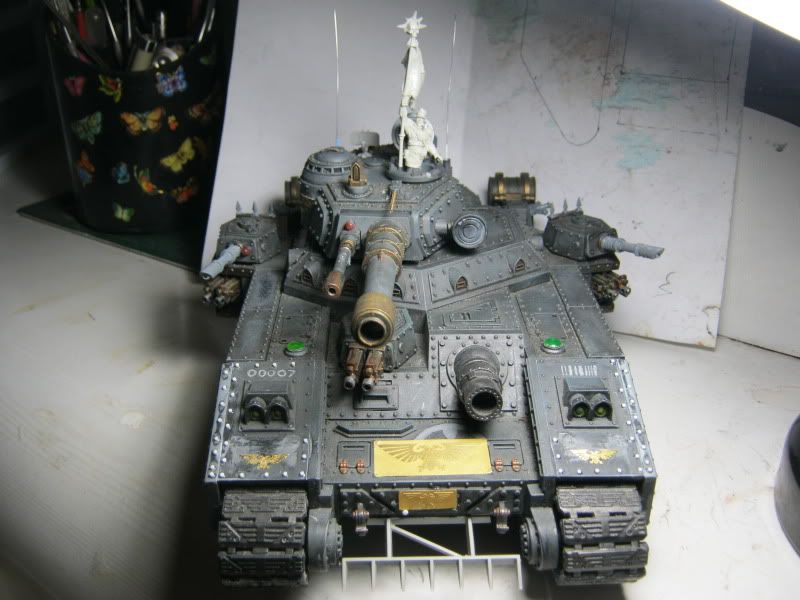
Post by: Eisenhorn
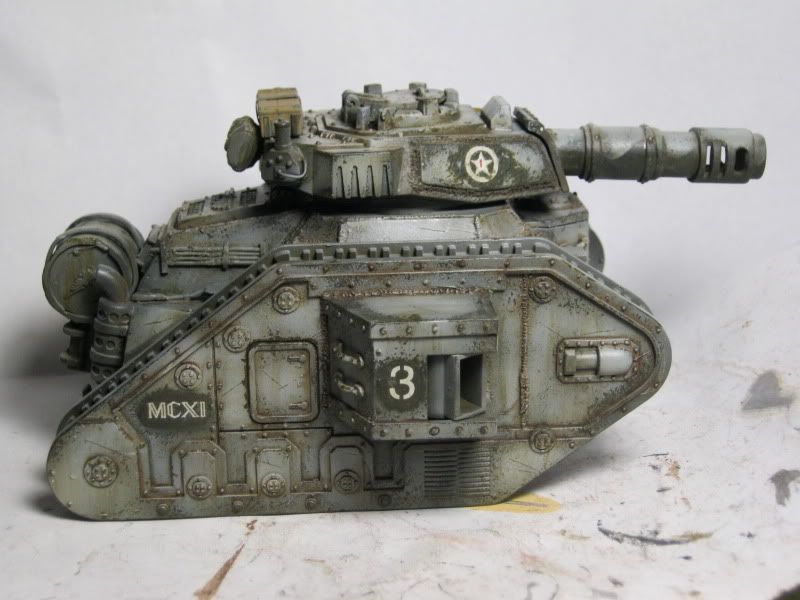
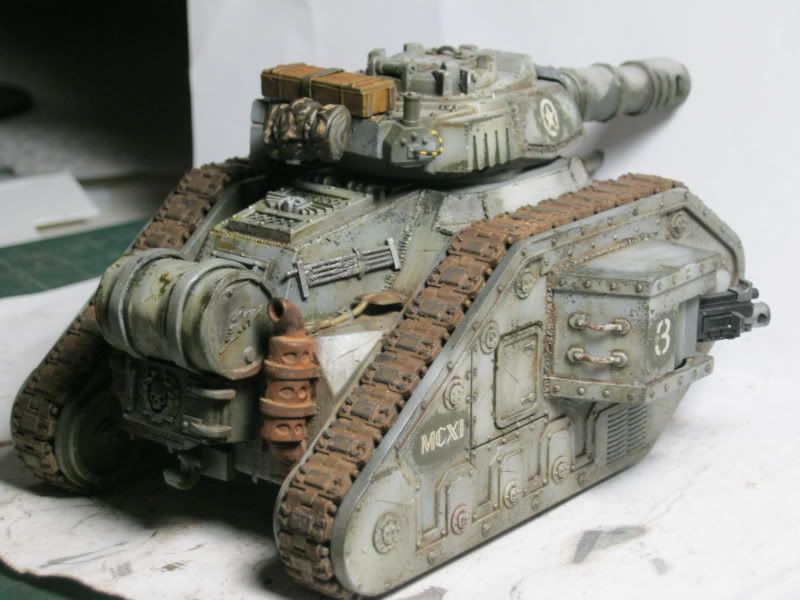
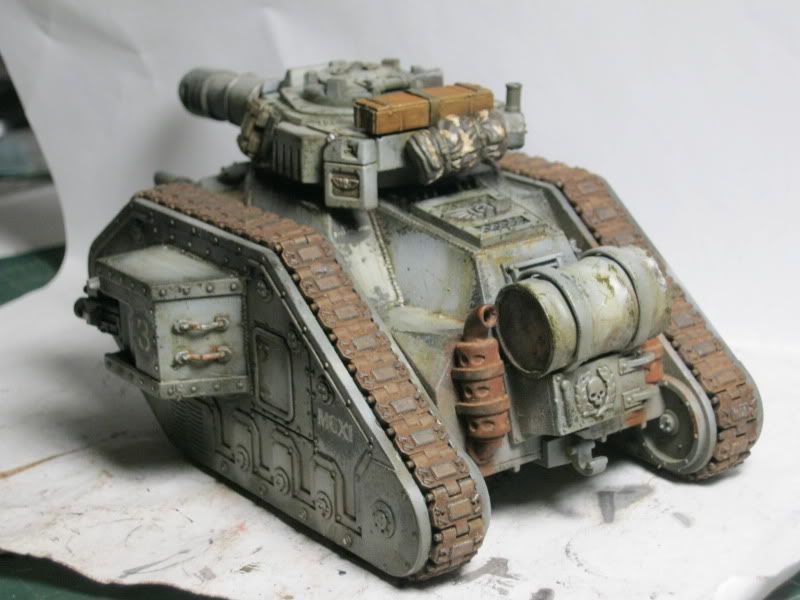
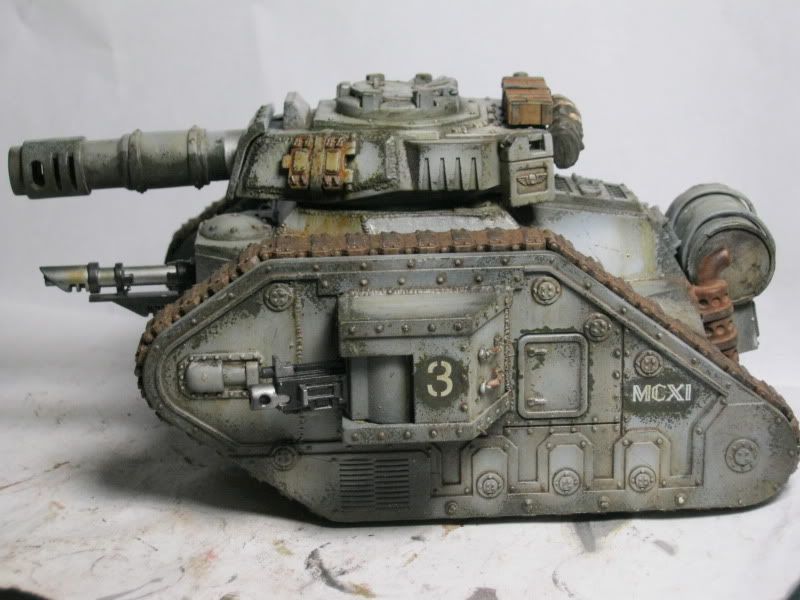
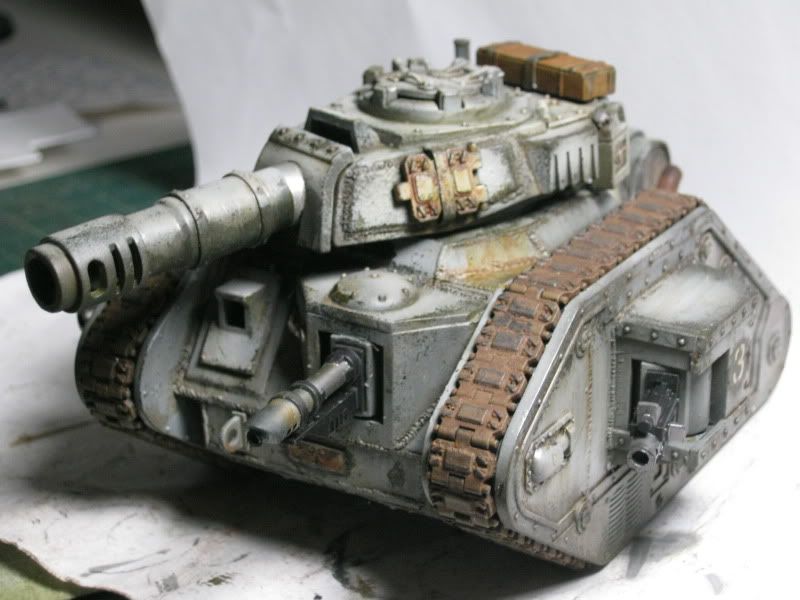
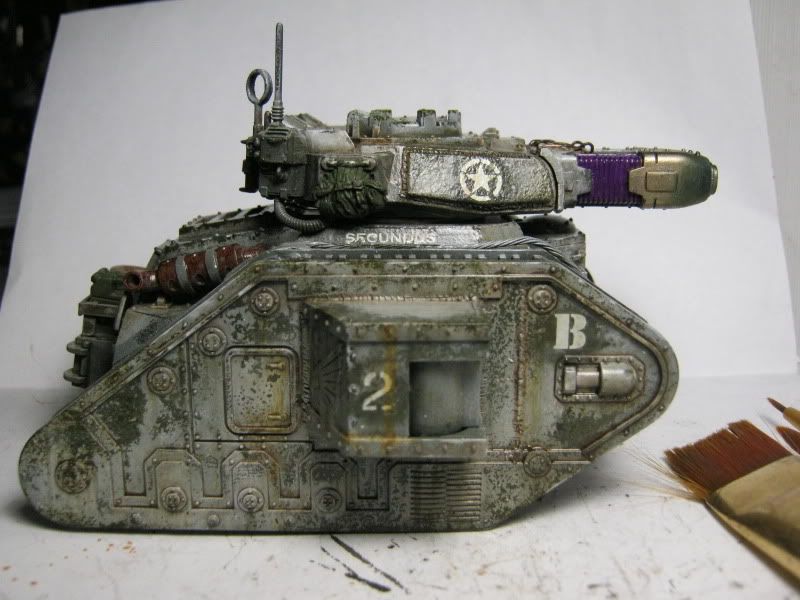
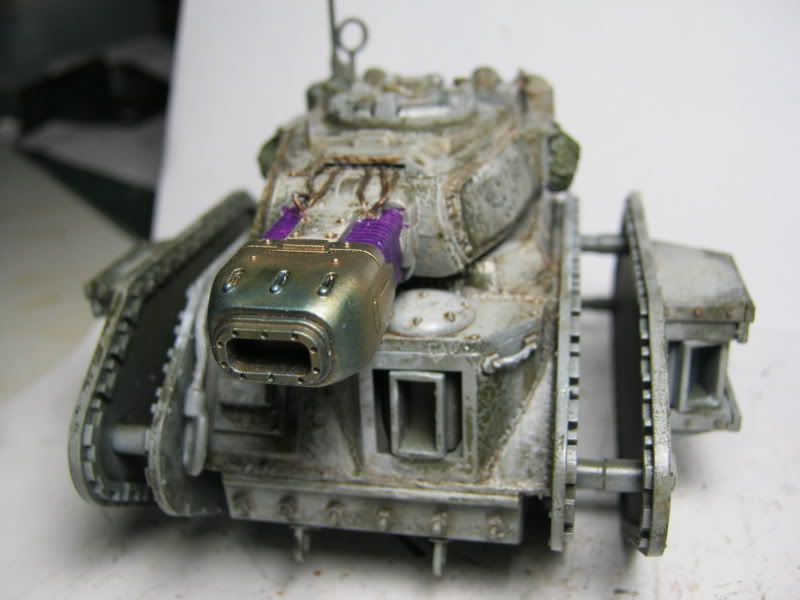
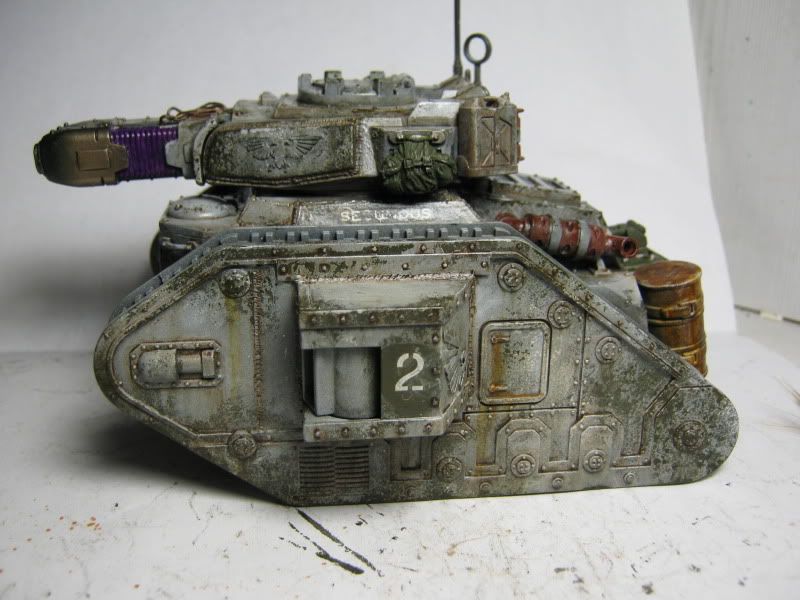
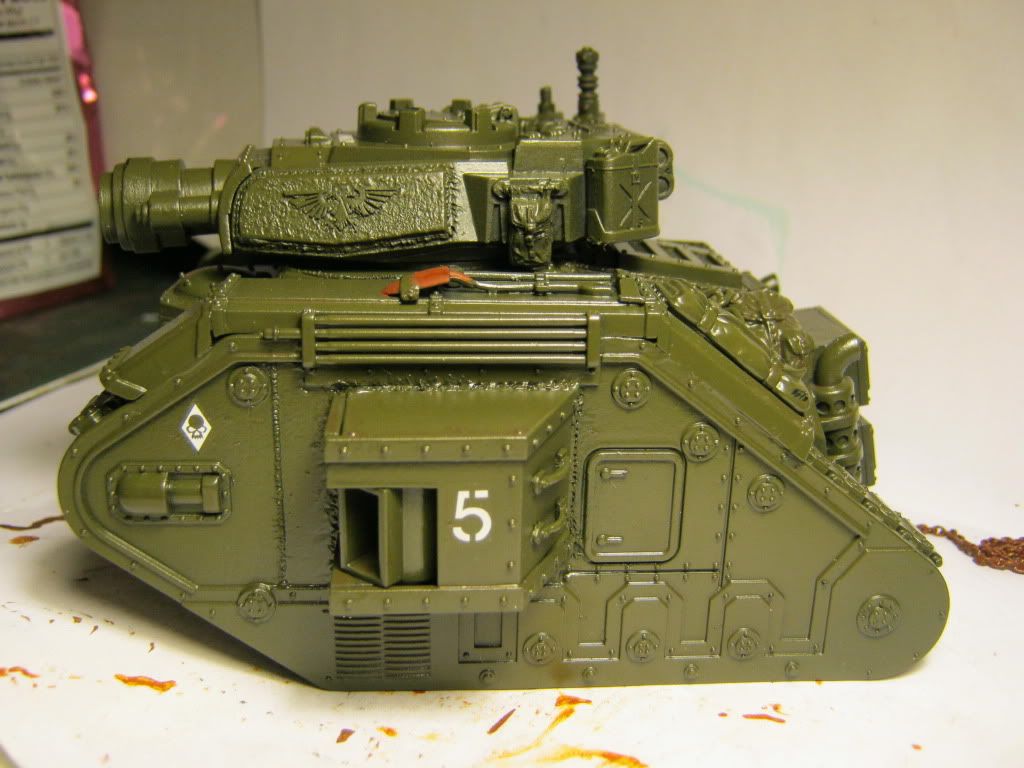
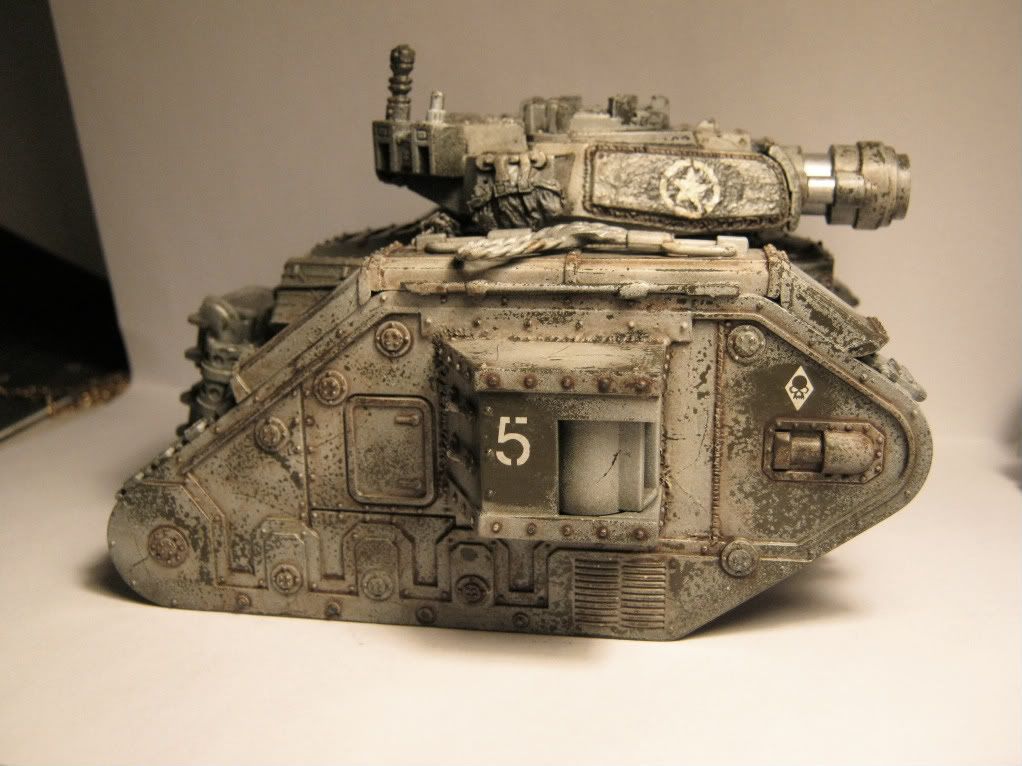
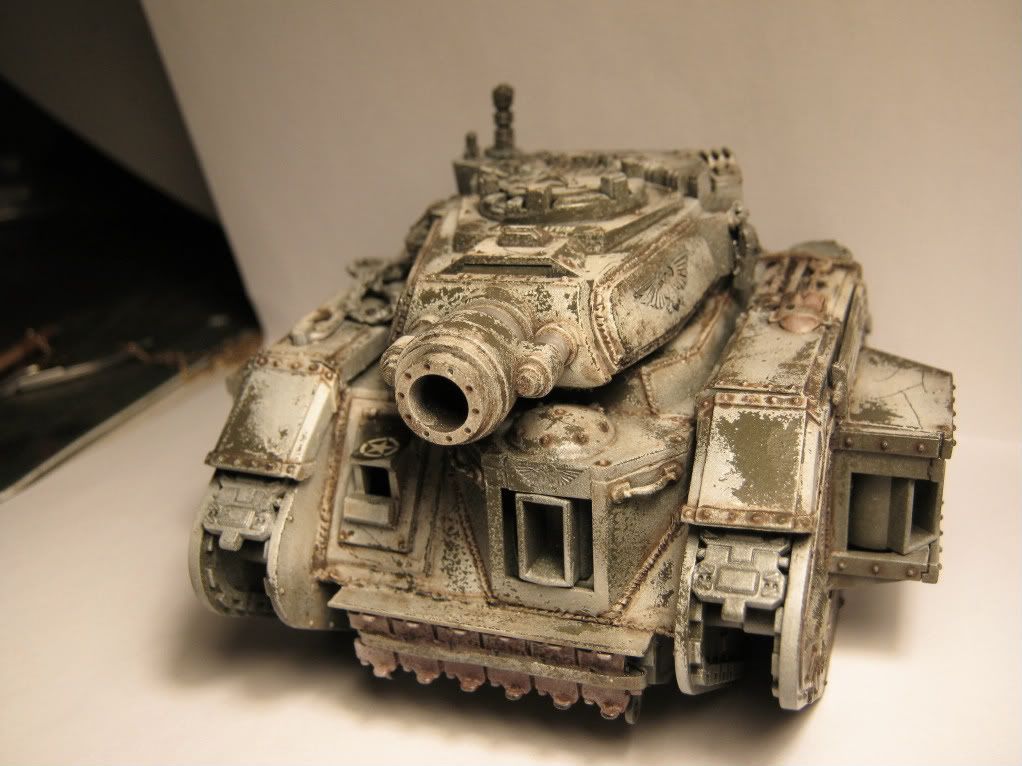
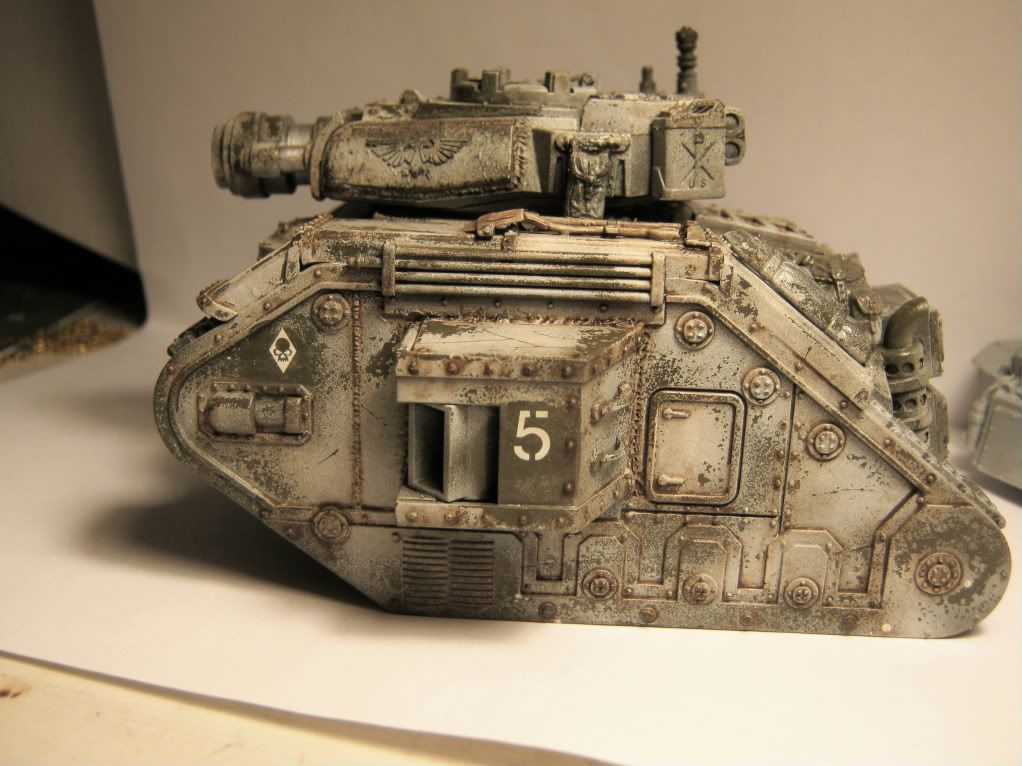
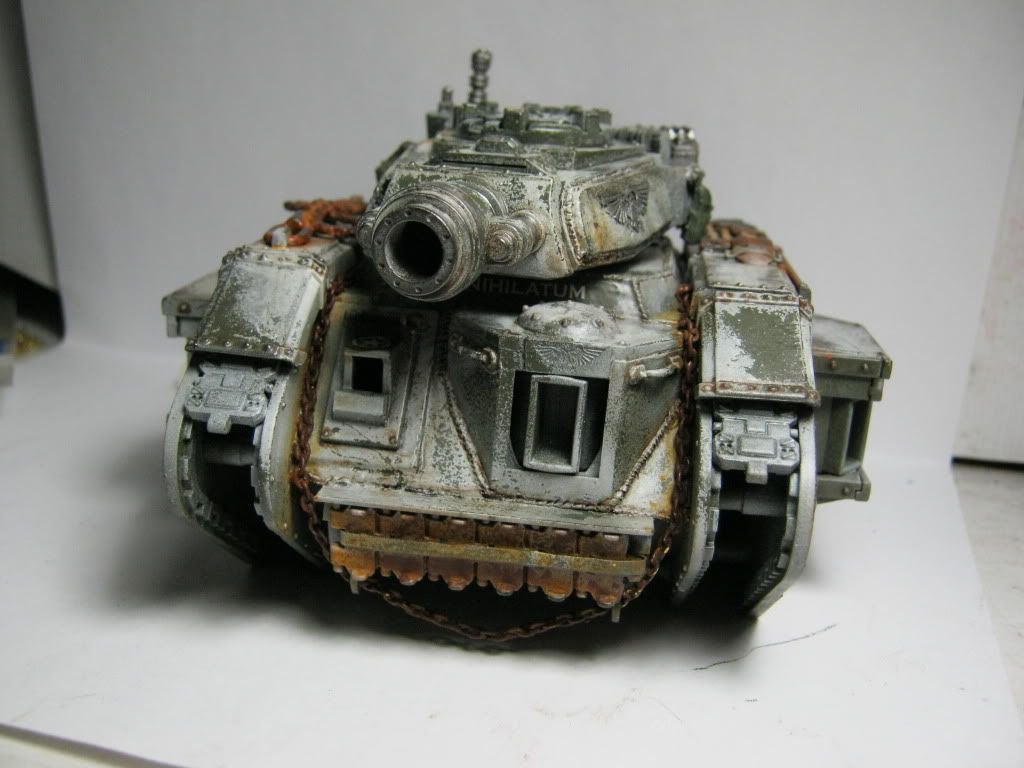
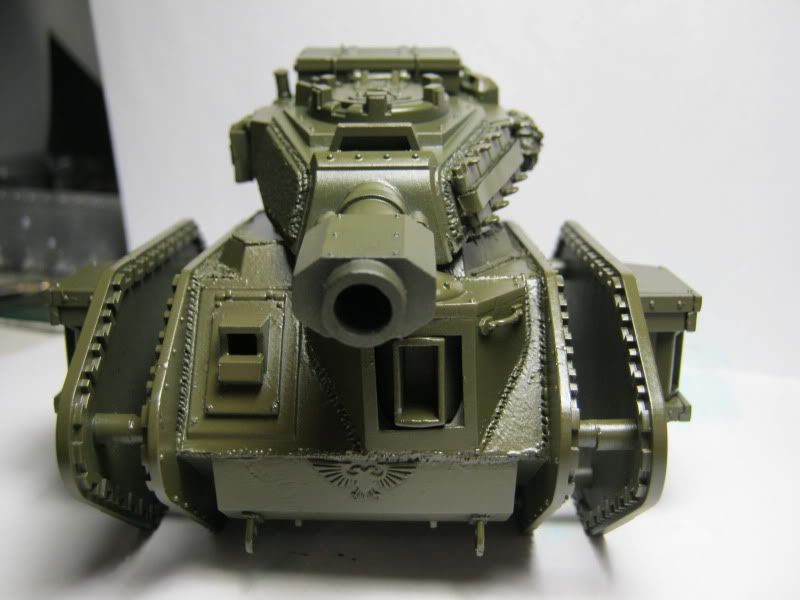
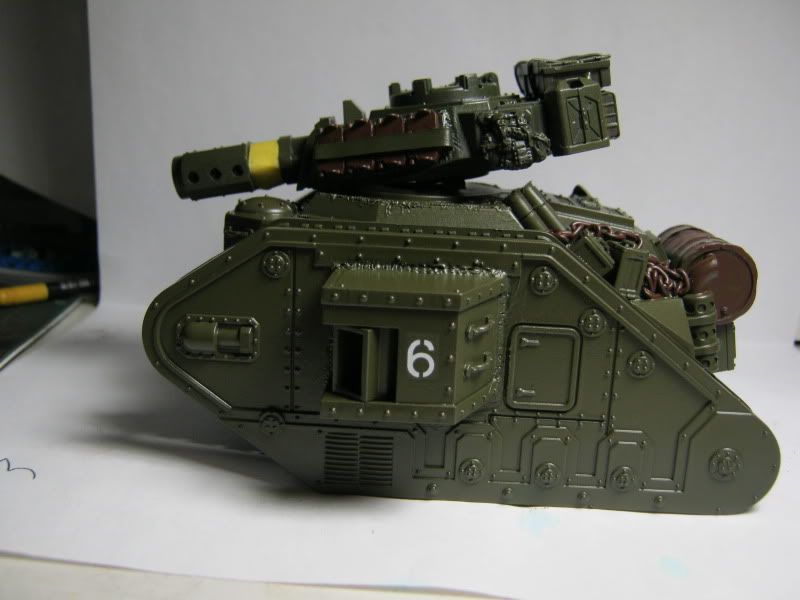
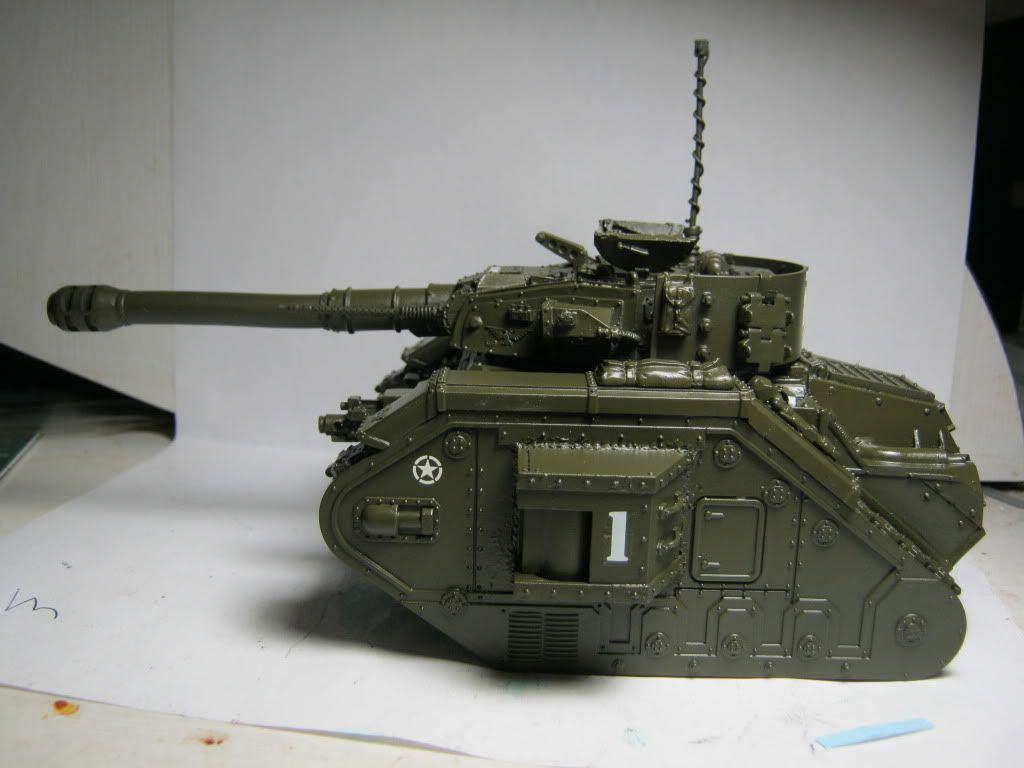
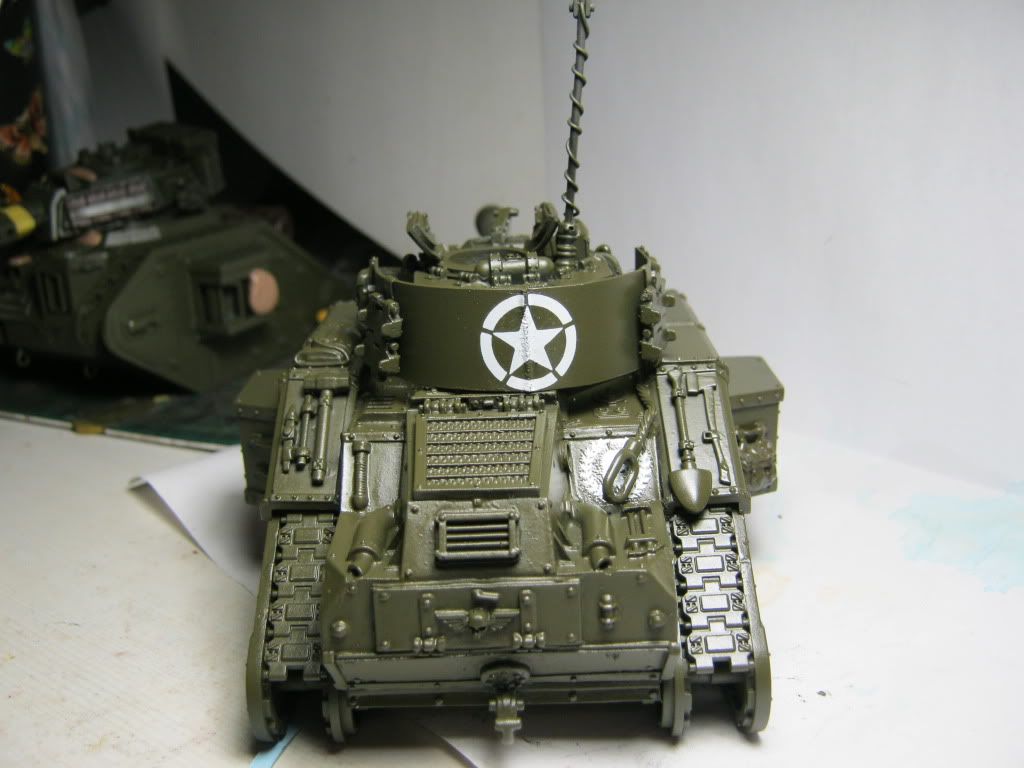
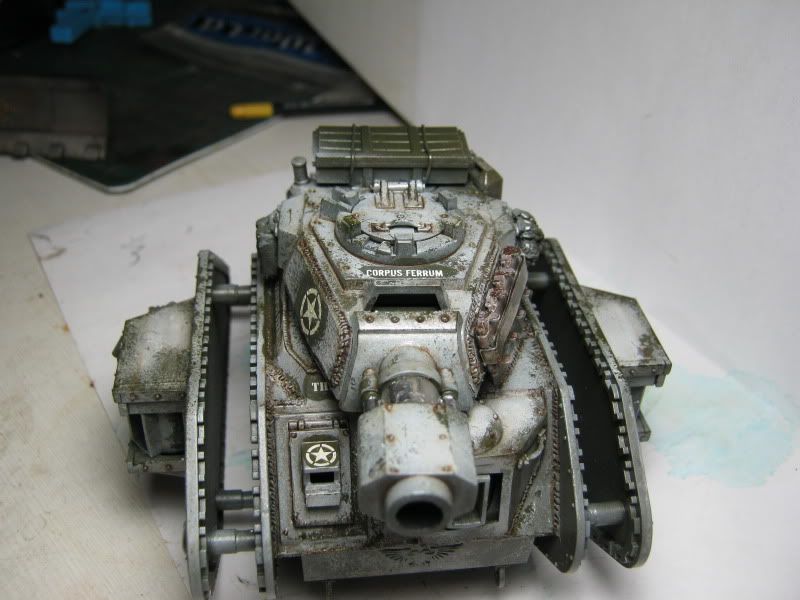
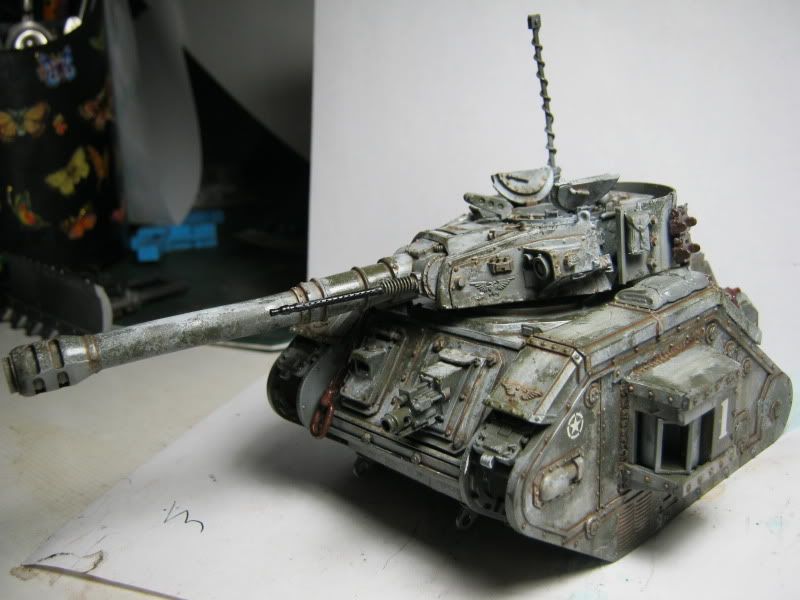
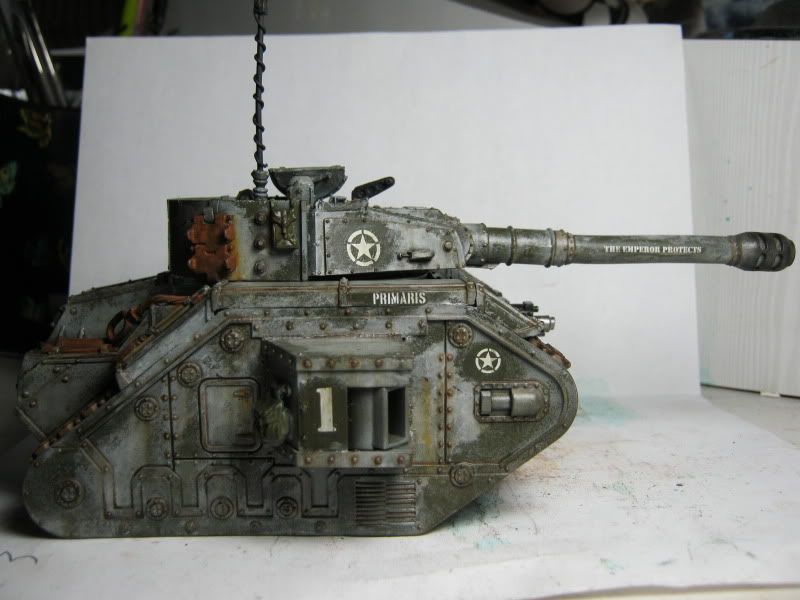
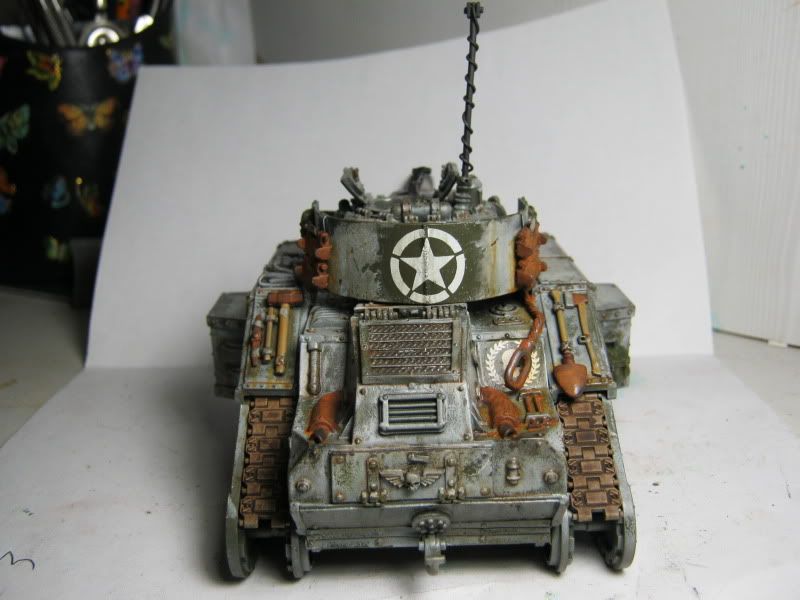
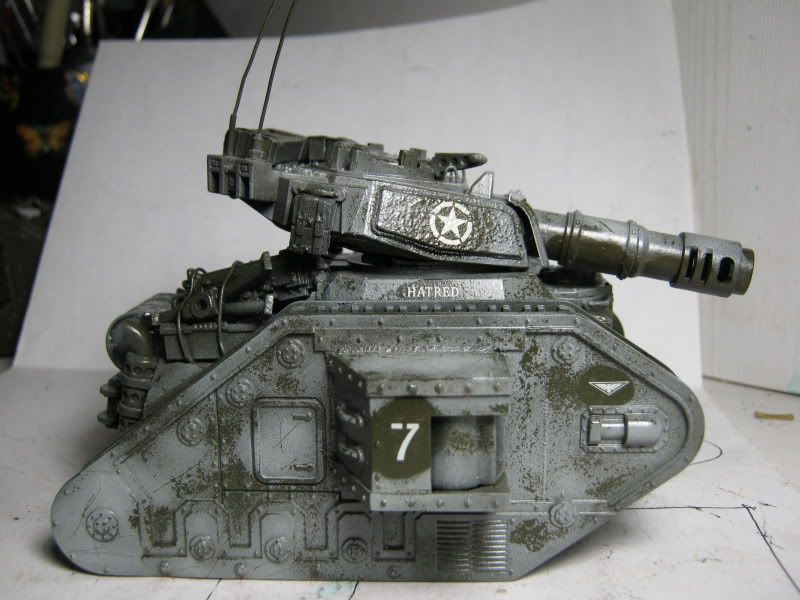
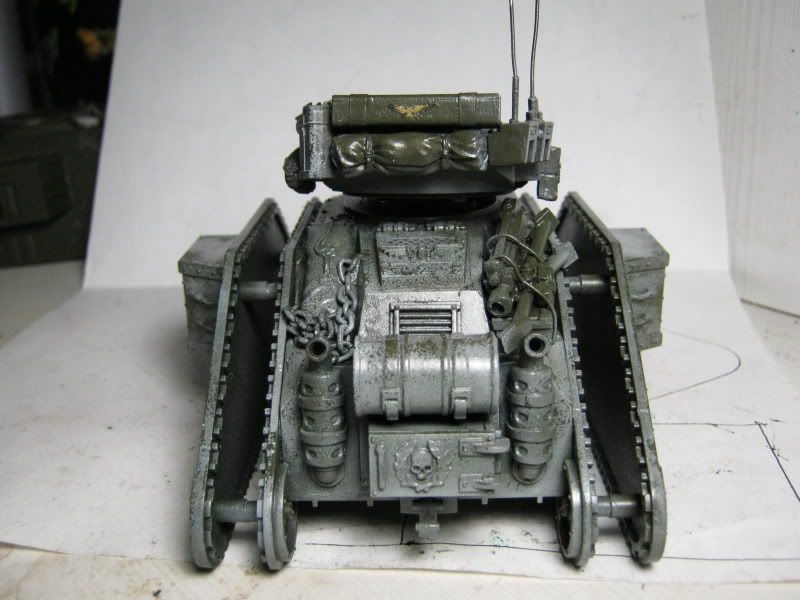
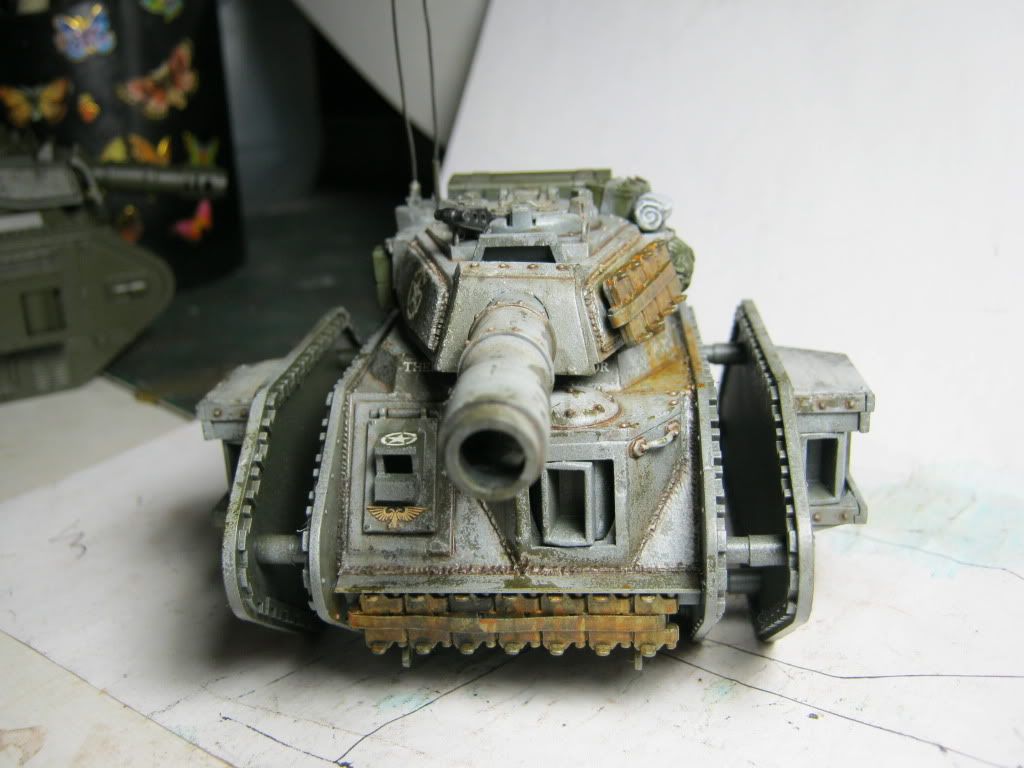
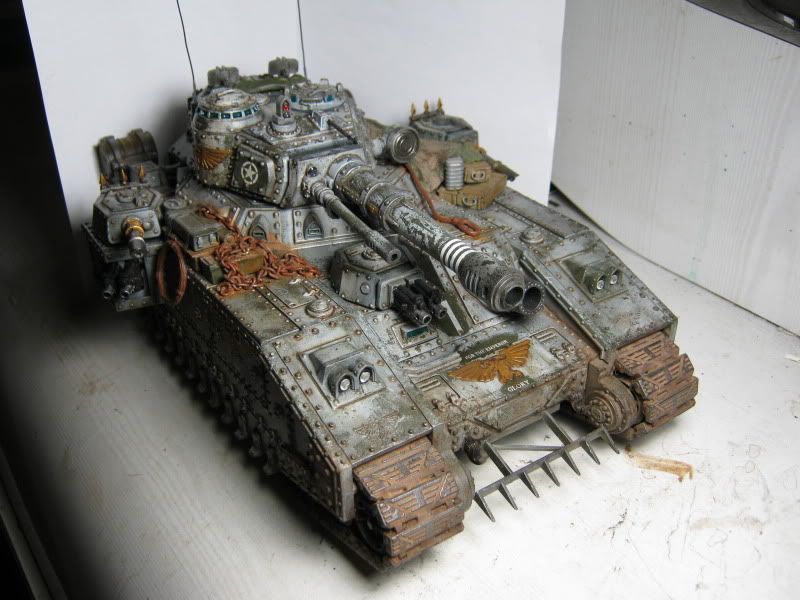
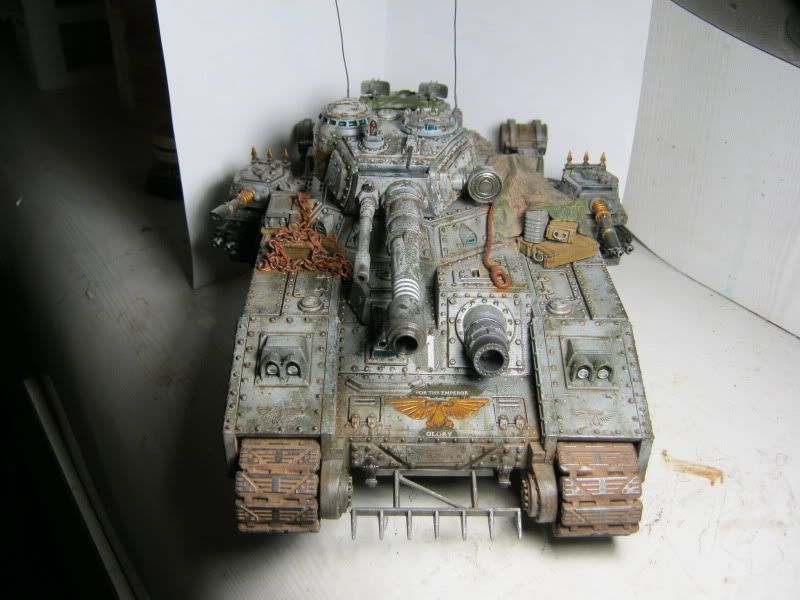
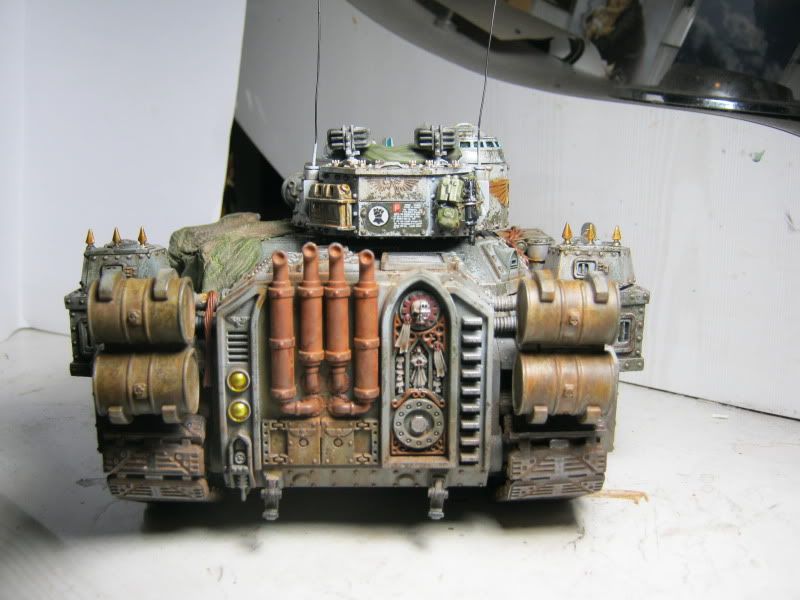
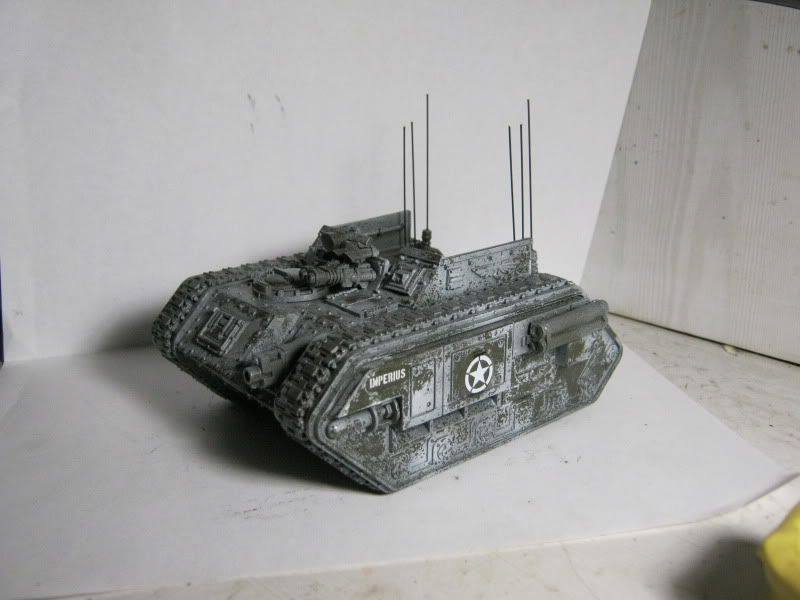
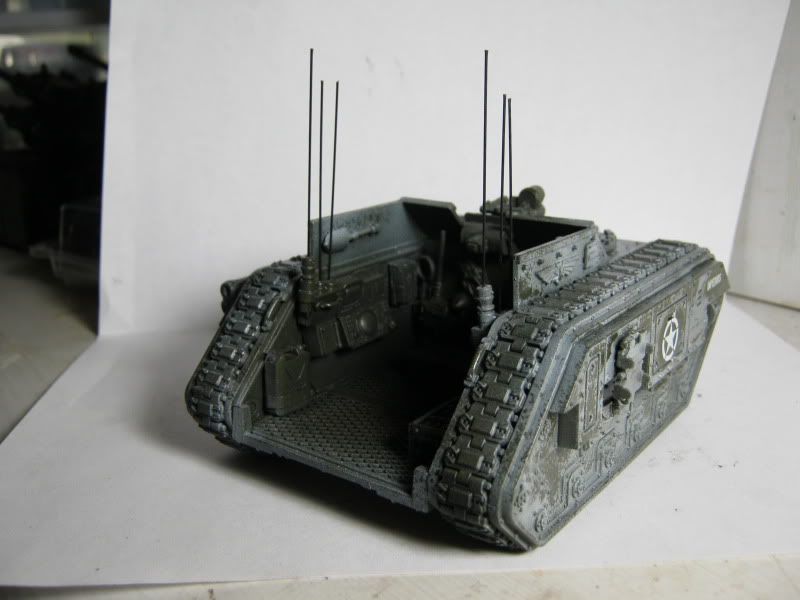
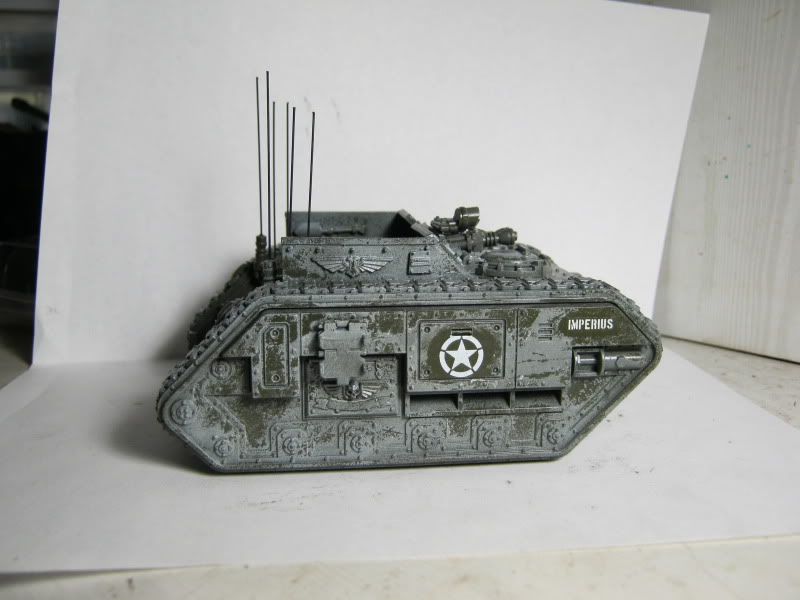
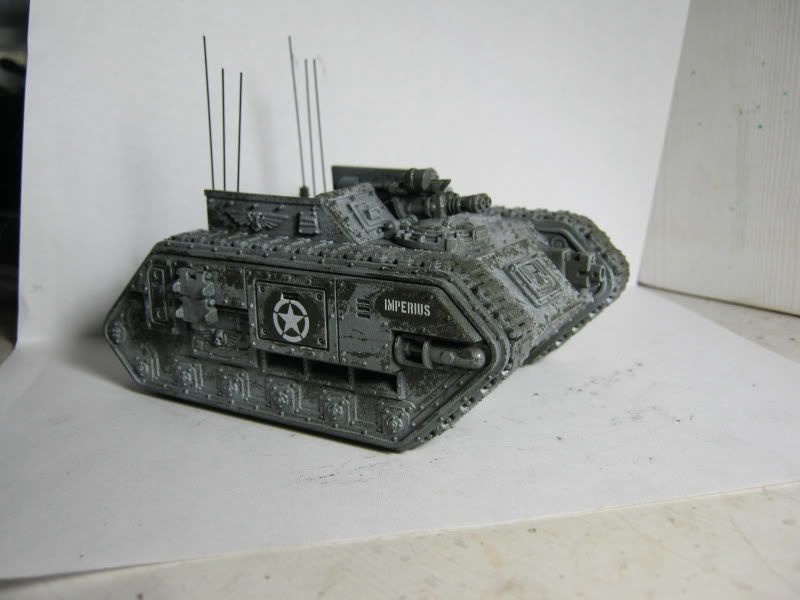
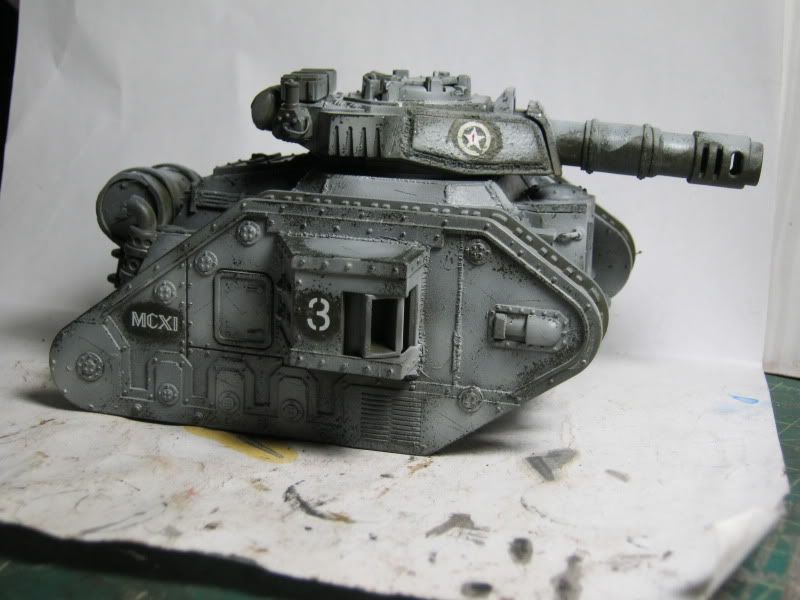
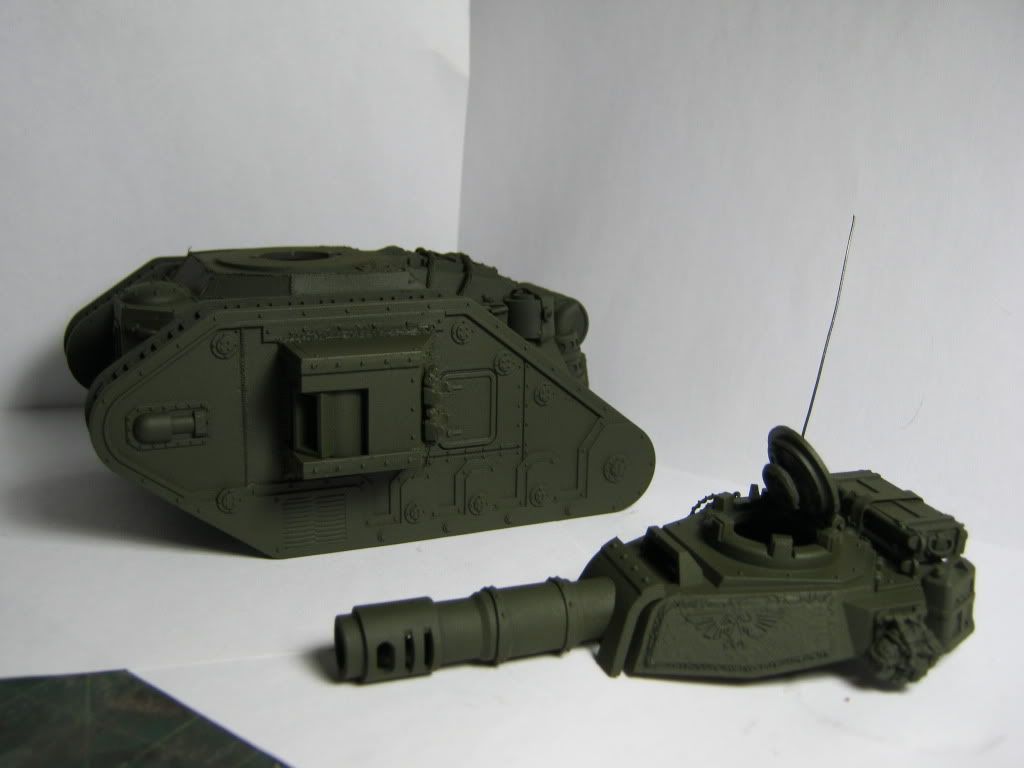
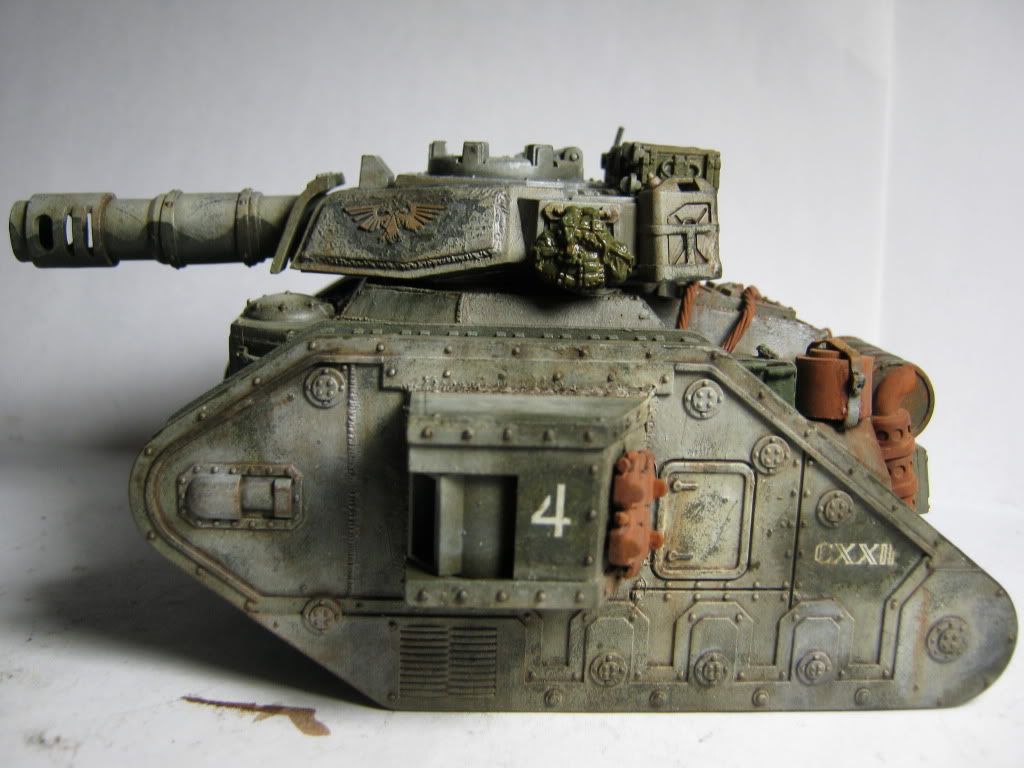
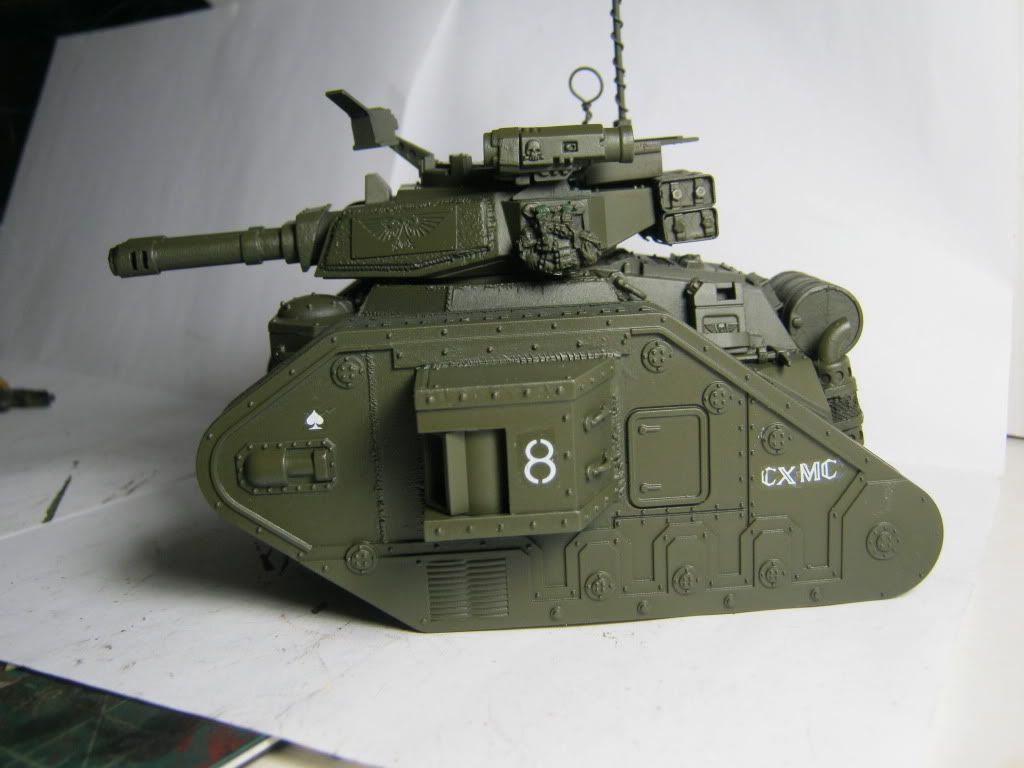
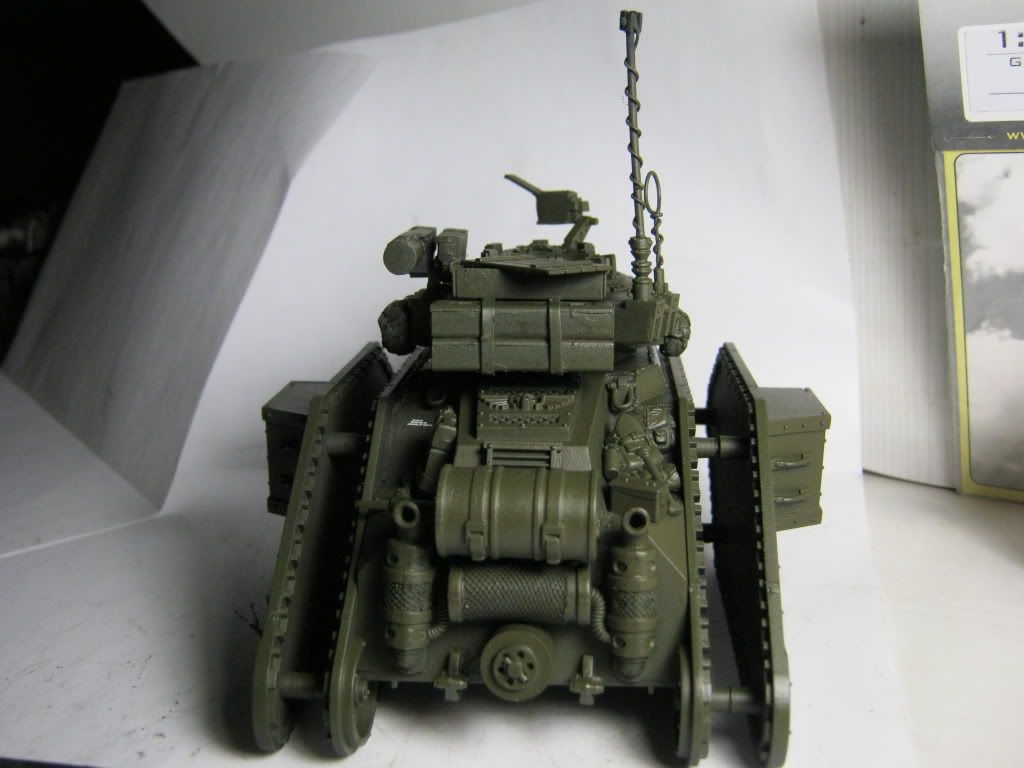
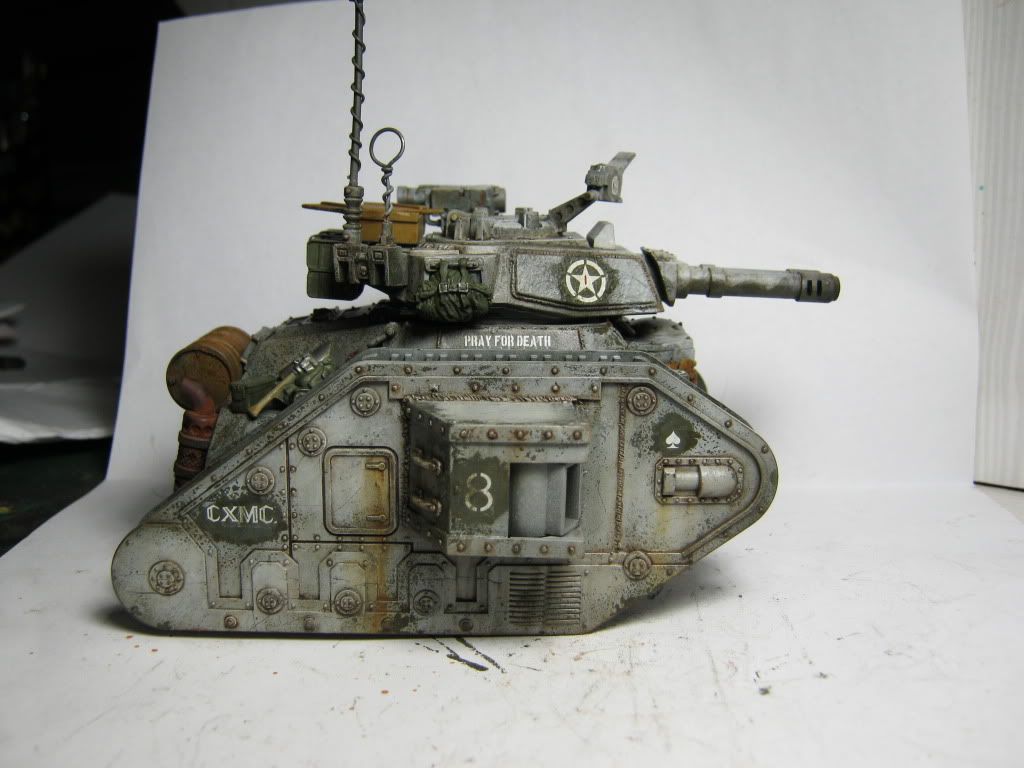
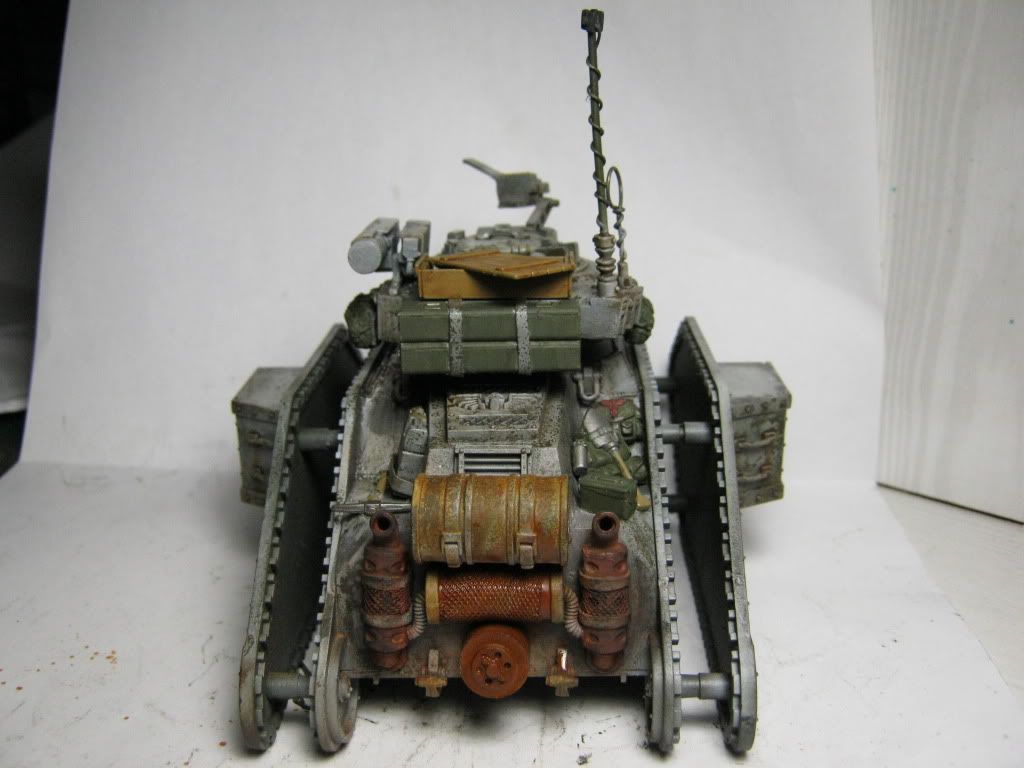
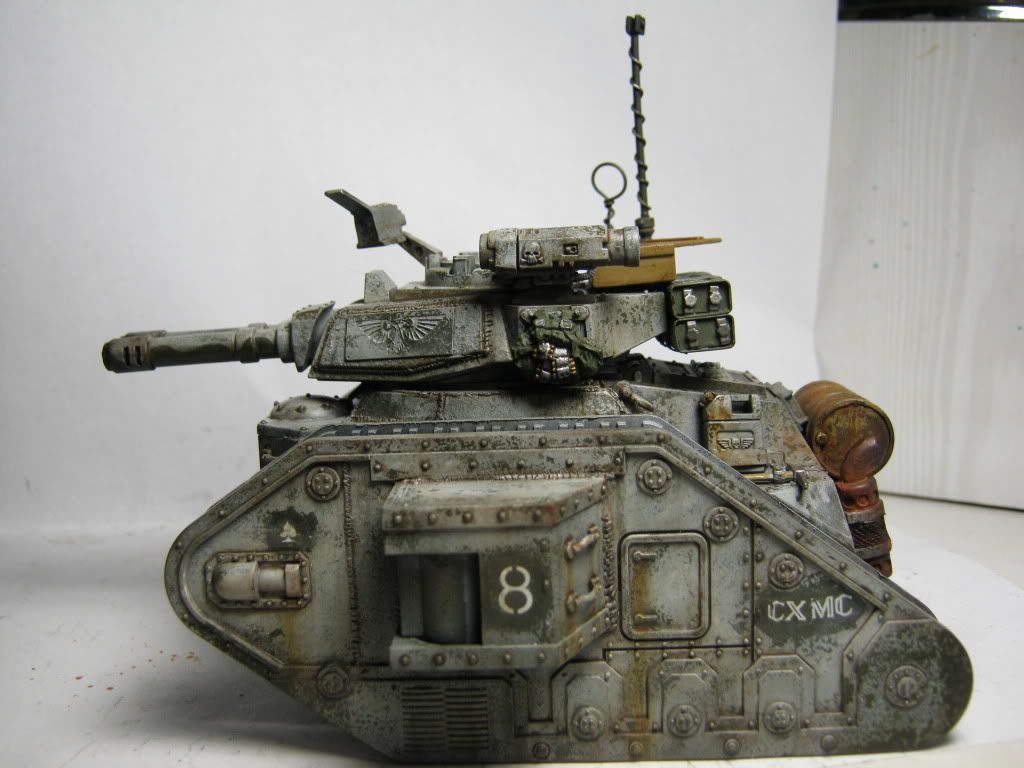
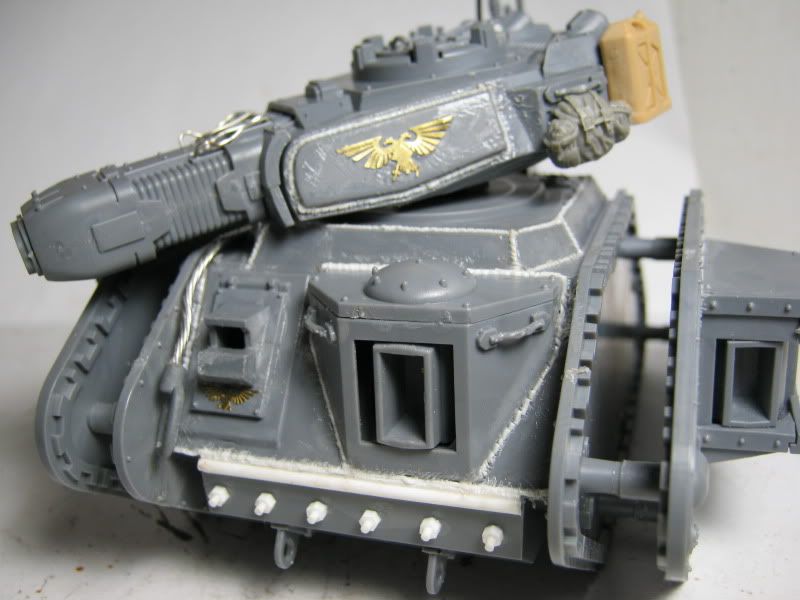
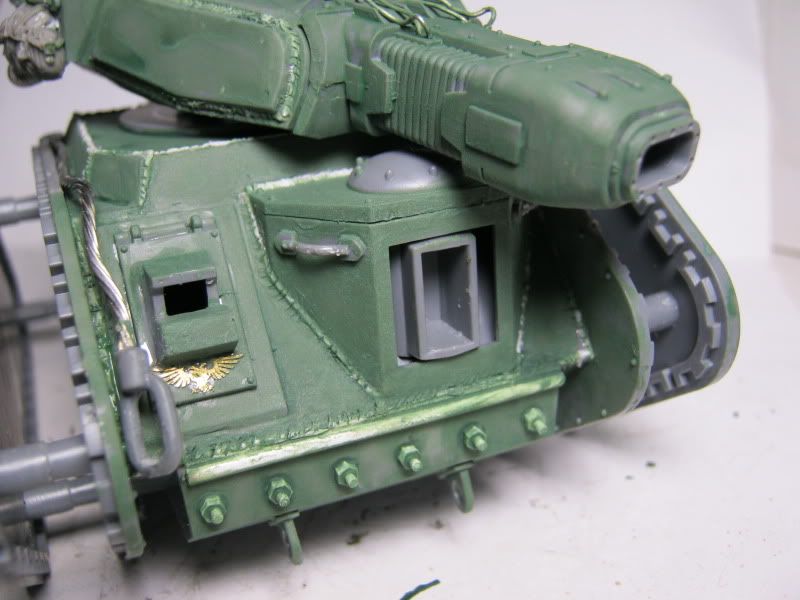
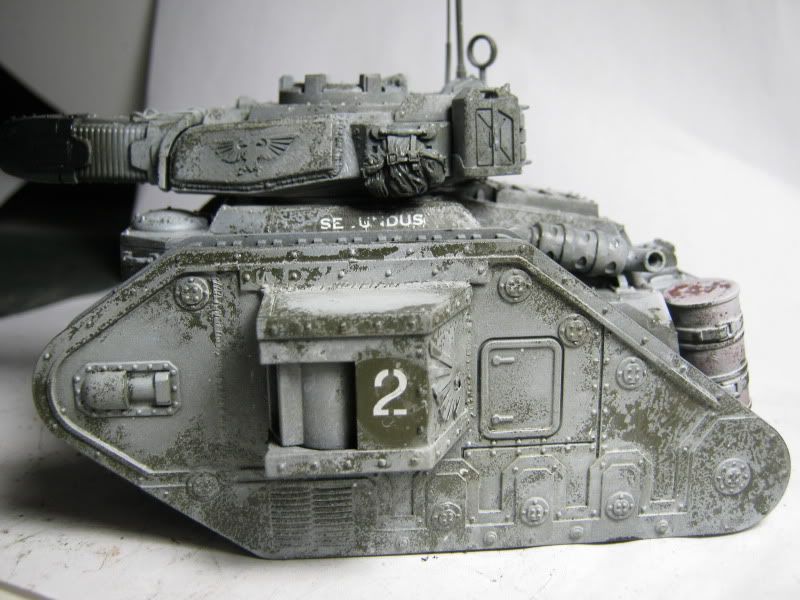
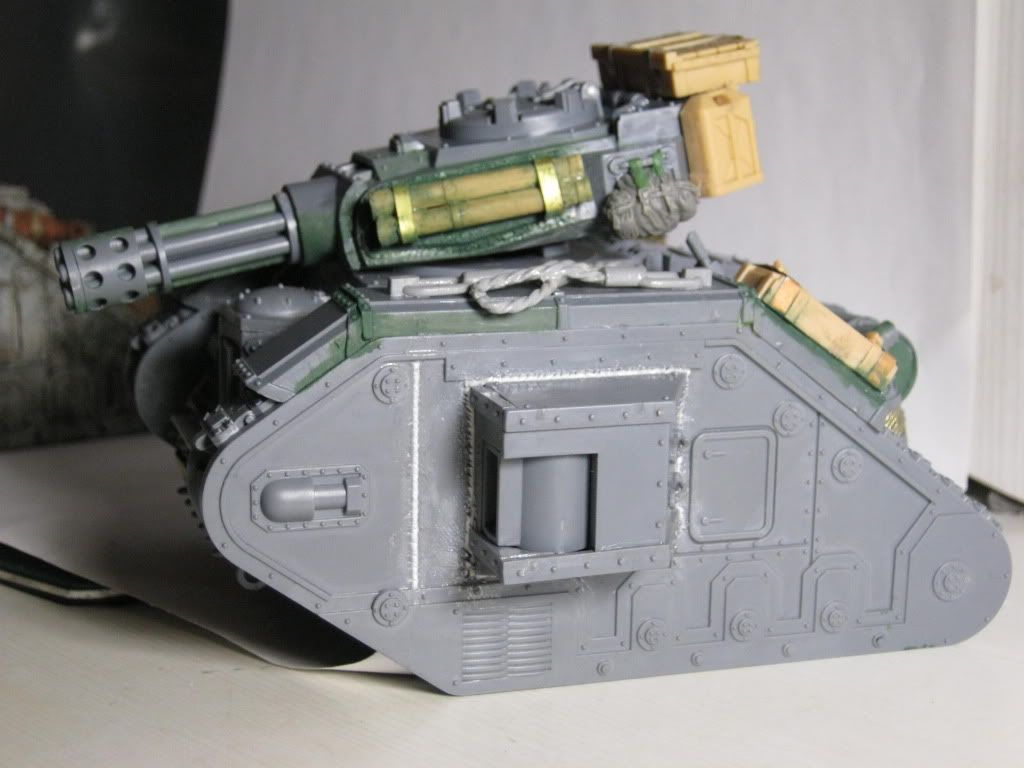
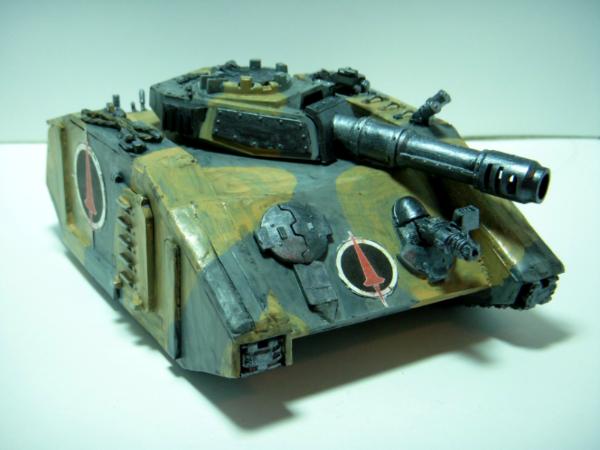
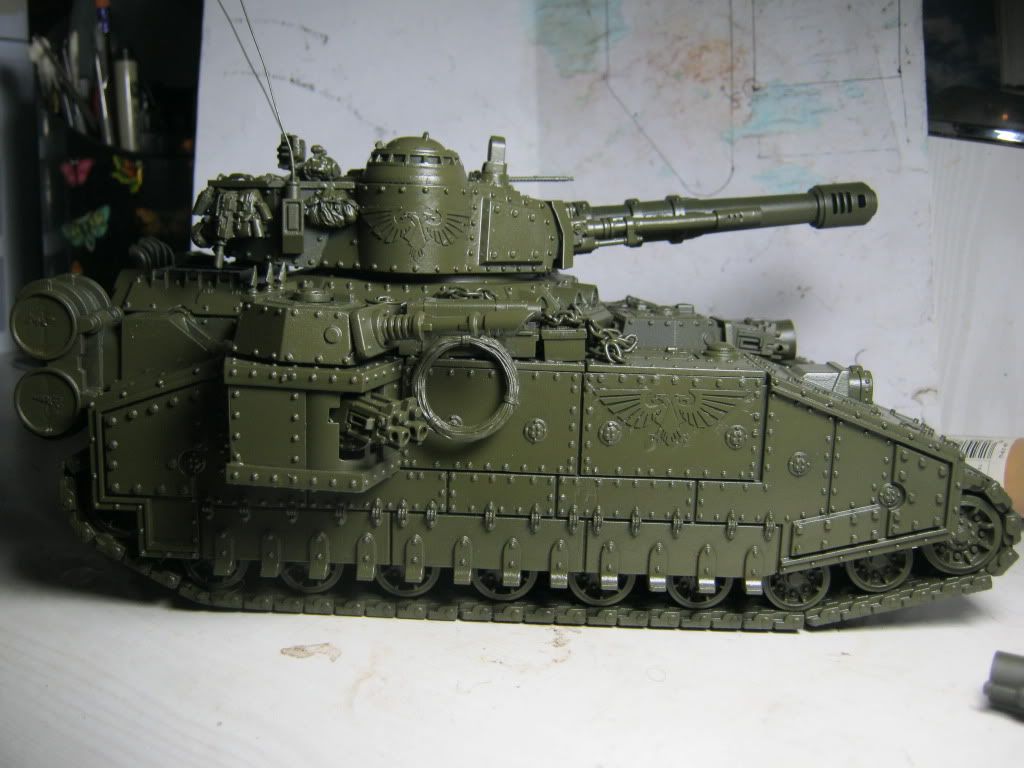
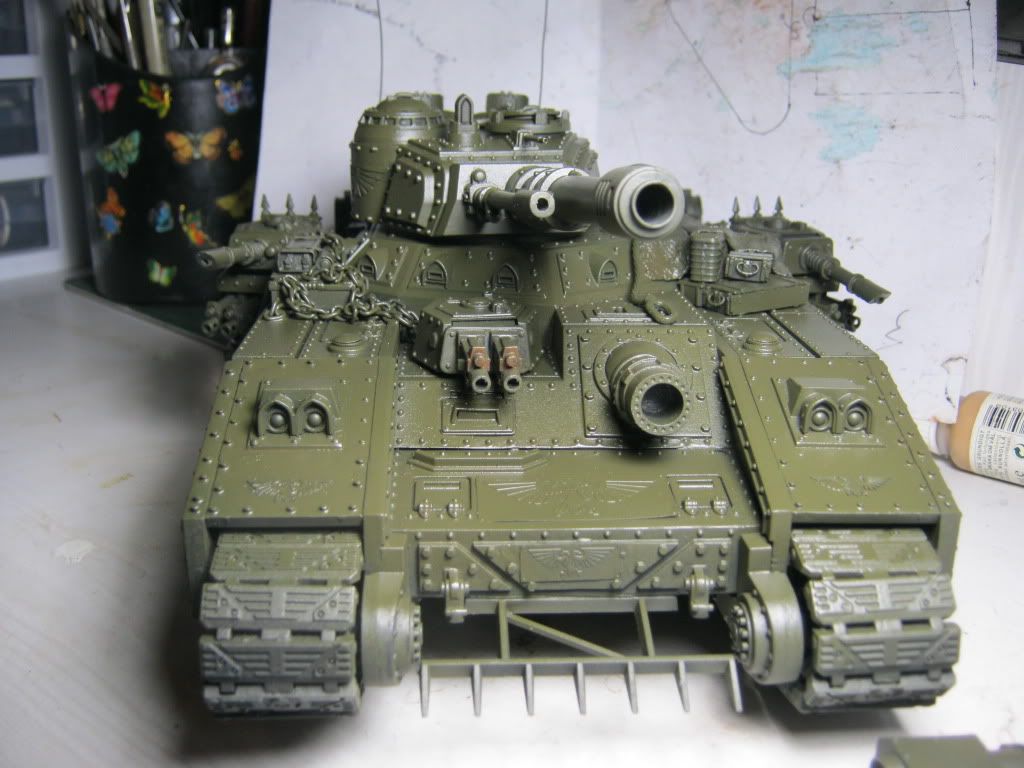
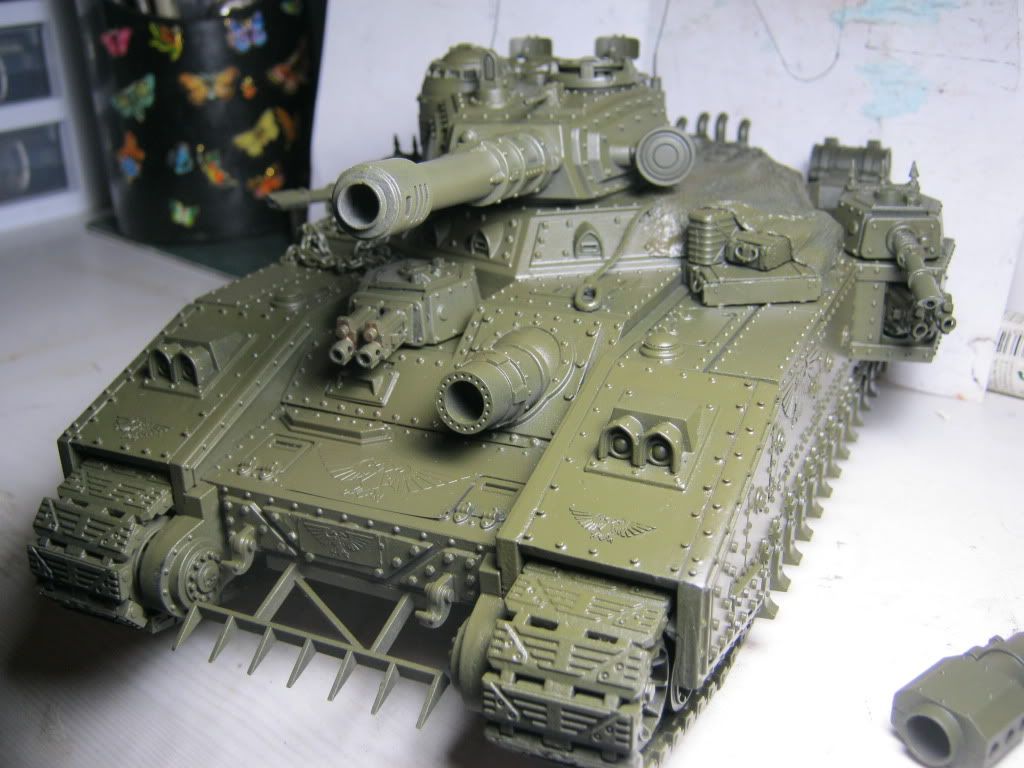
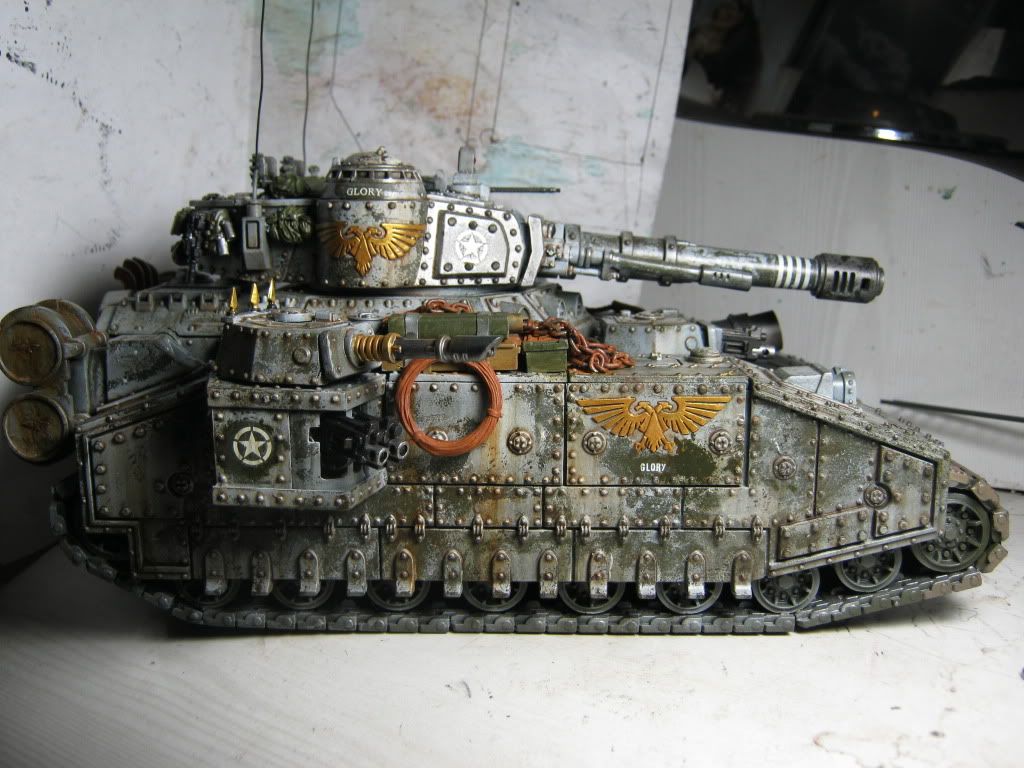
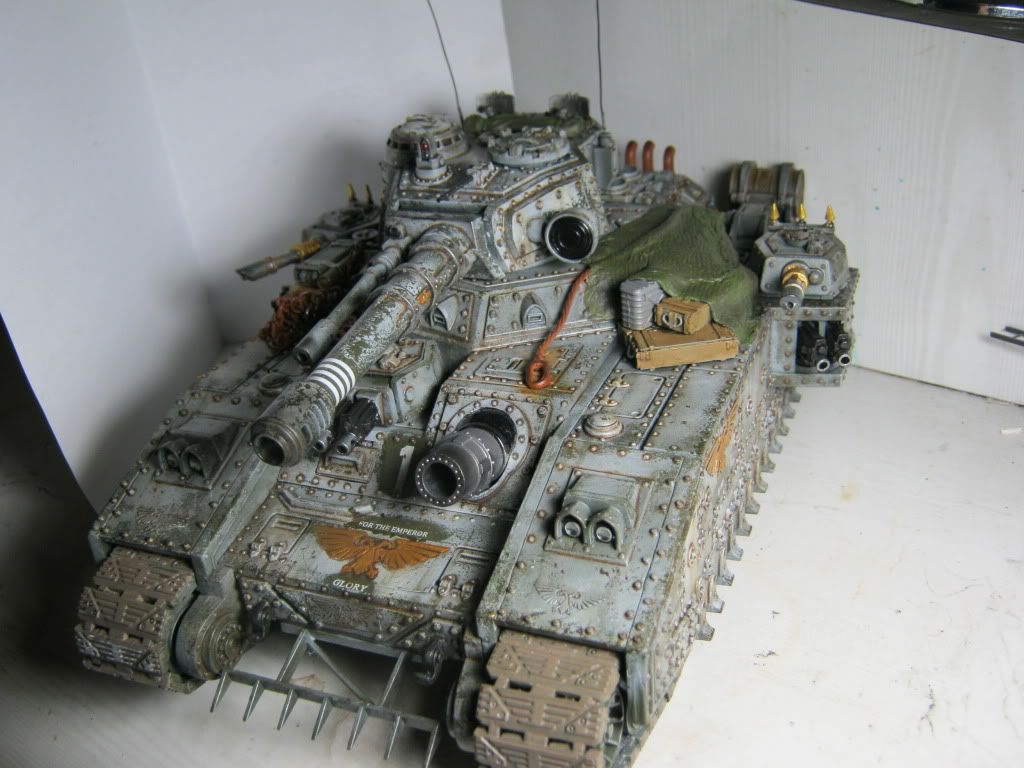
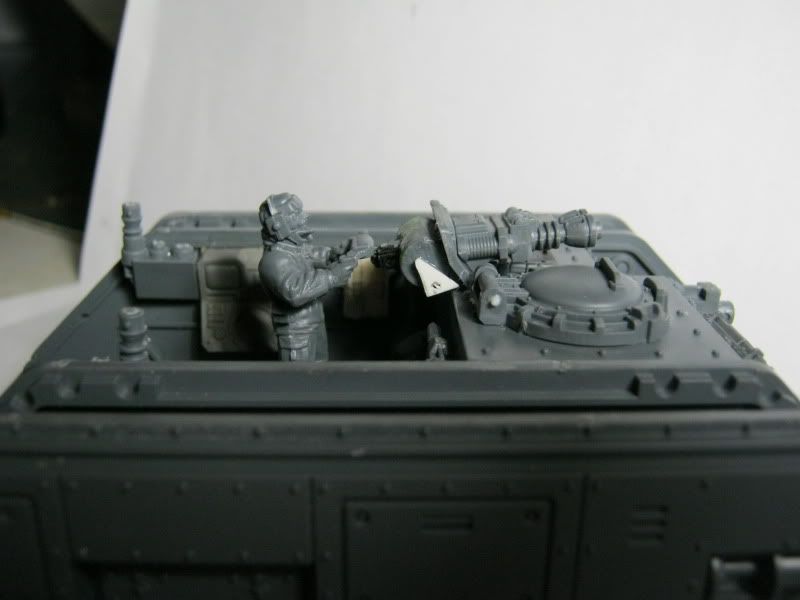
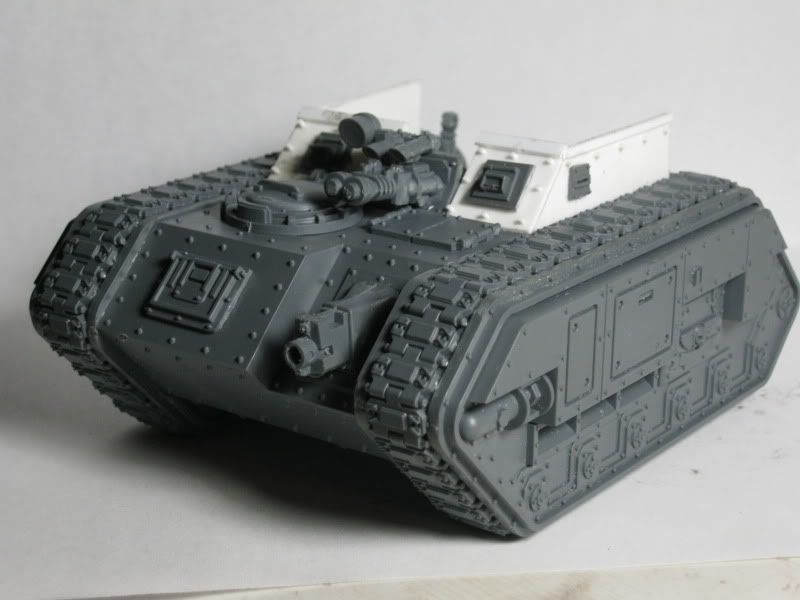
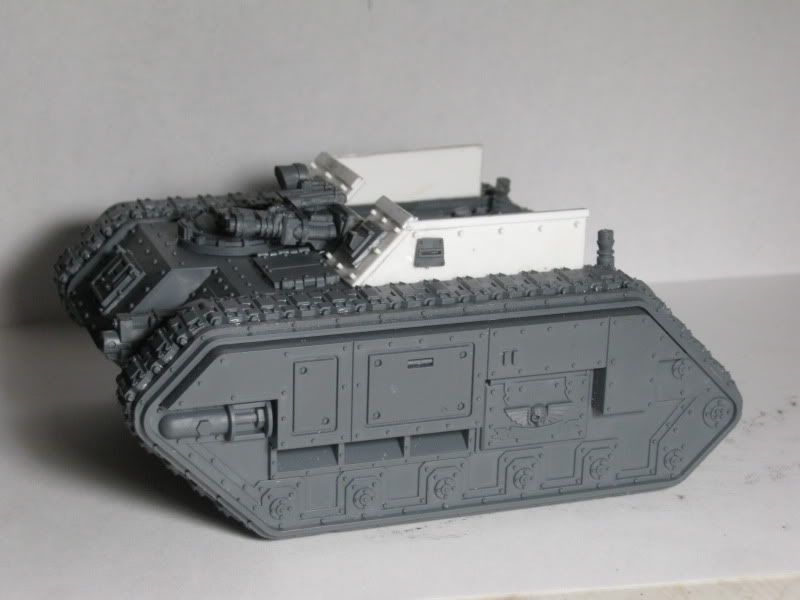
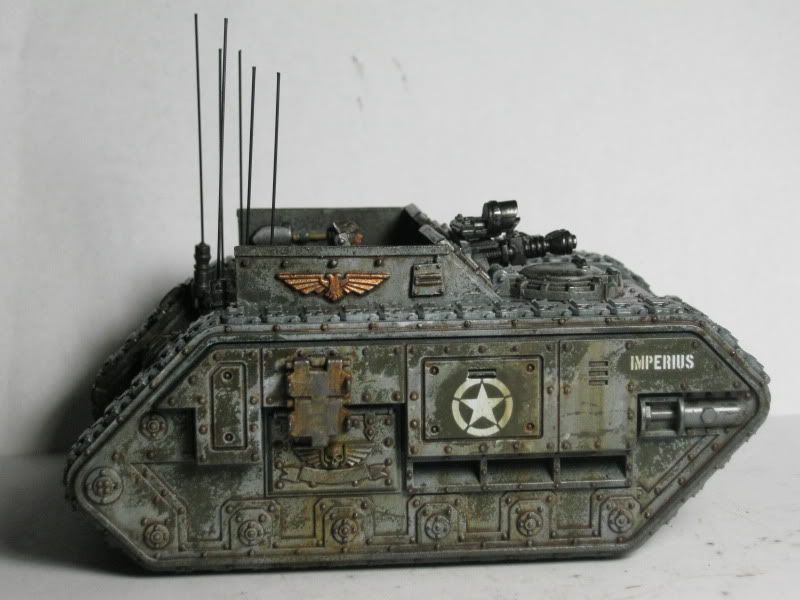
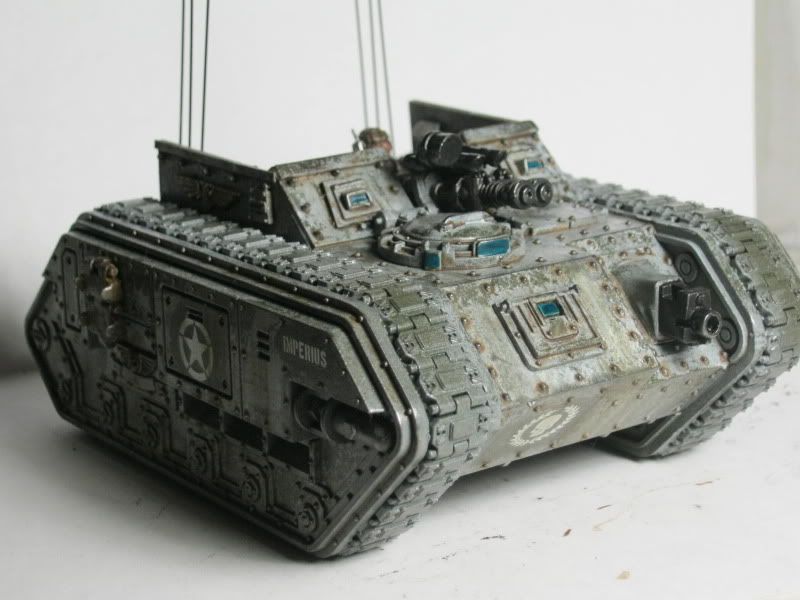
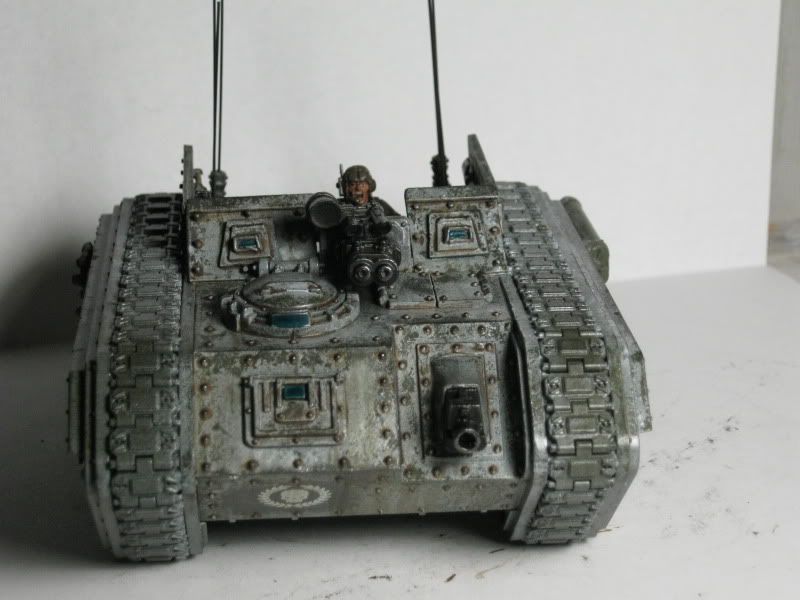
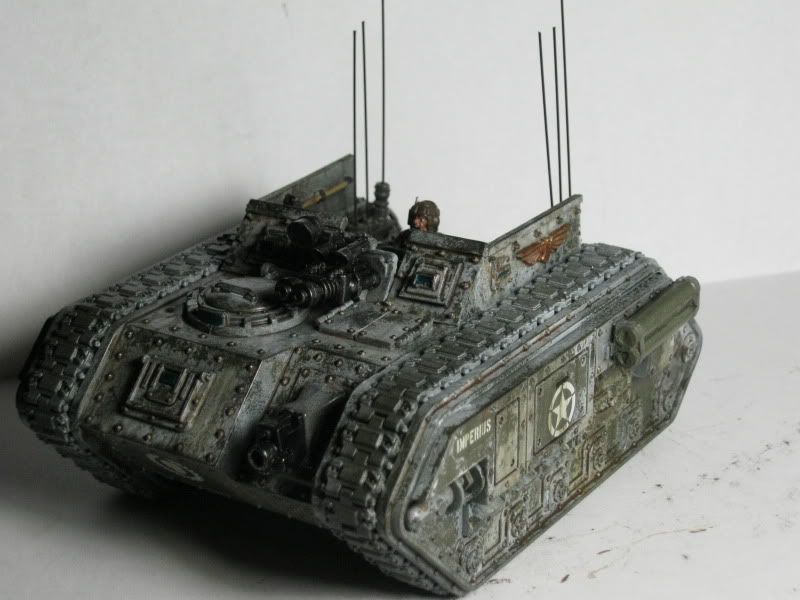
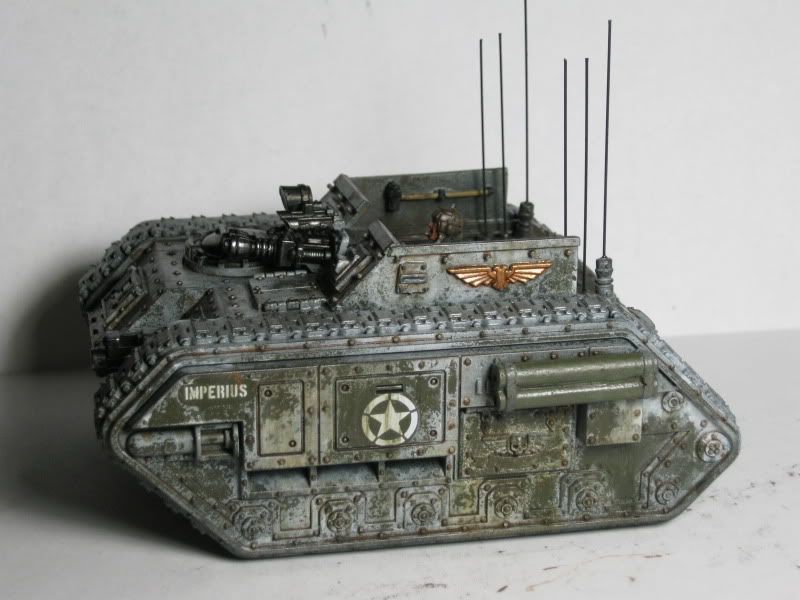
Here is the first tank I am doing with Winter Camo
Nowhere near finished ,now it gets weathered 
I numbered it tank 3 because 1 and 2 are going to be the CO and XO with special tanks.

32775
Post by: Tortured-Robot
Oh lordy - it is too tempting, I'm sure I am a treadhead at heart. Your tanks are coming on great, I must say however I dislike the banner- seems a bit uncreative and a stars and strips knock off.
15930
Post by: I-bounty-hunt-the-elderly
Excellent details and weathering on the tank!
4271
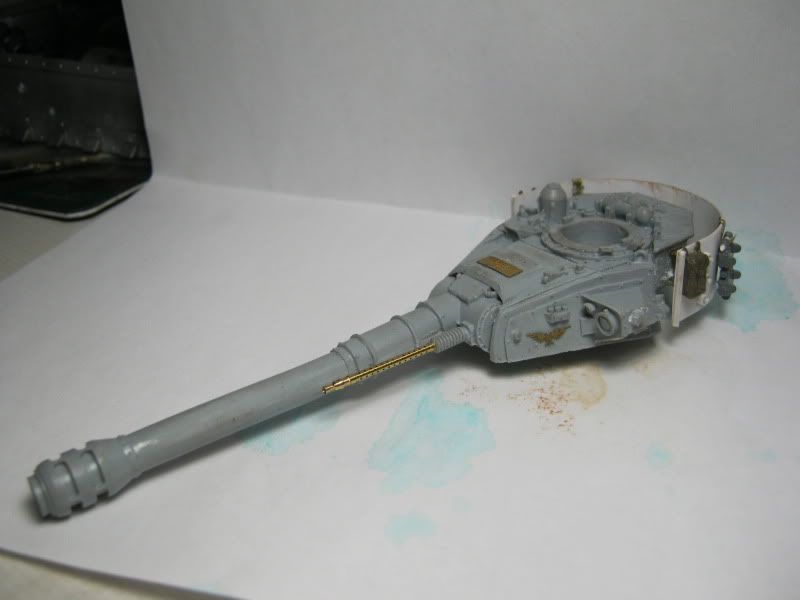
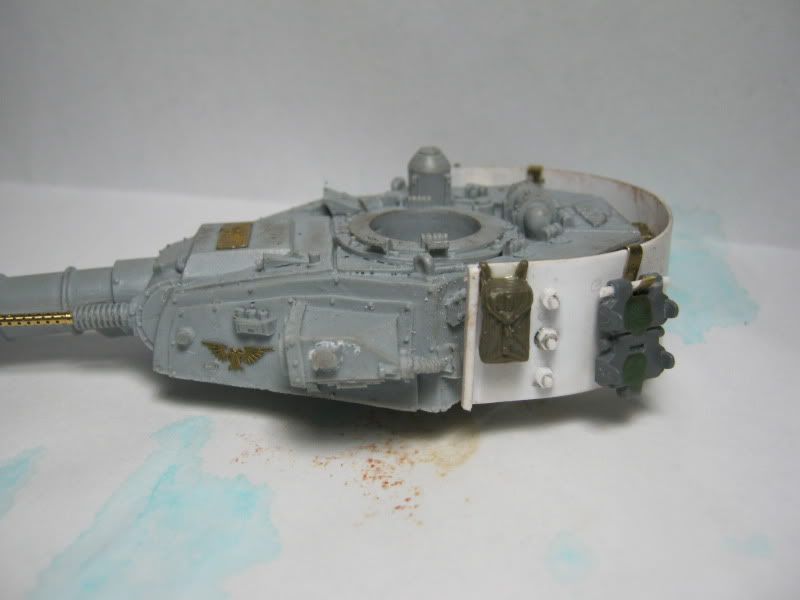
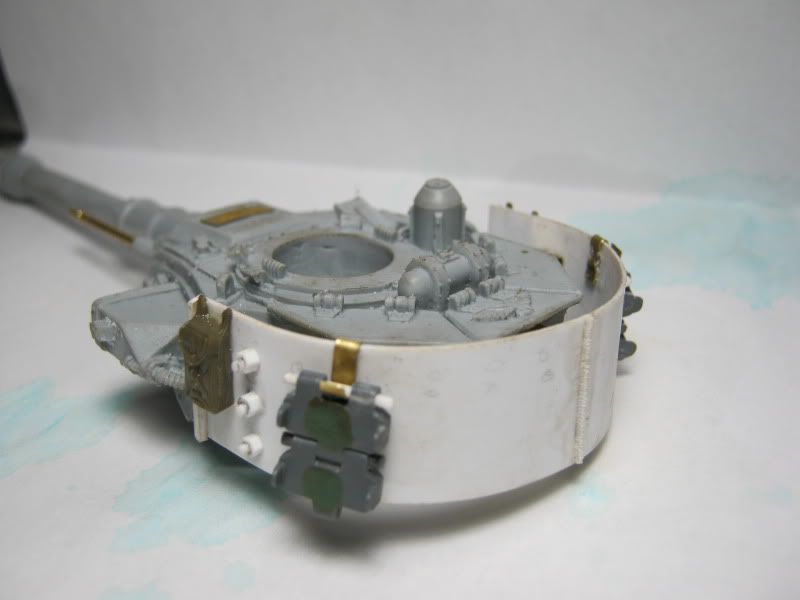
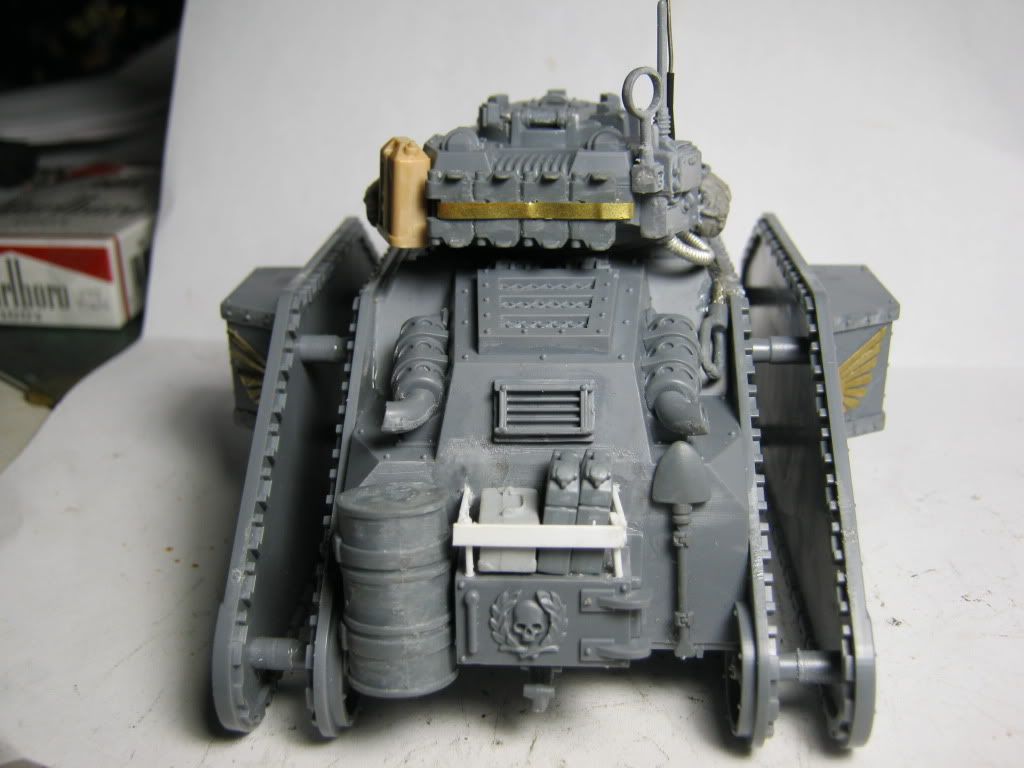
Post by: Eisenhorn
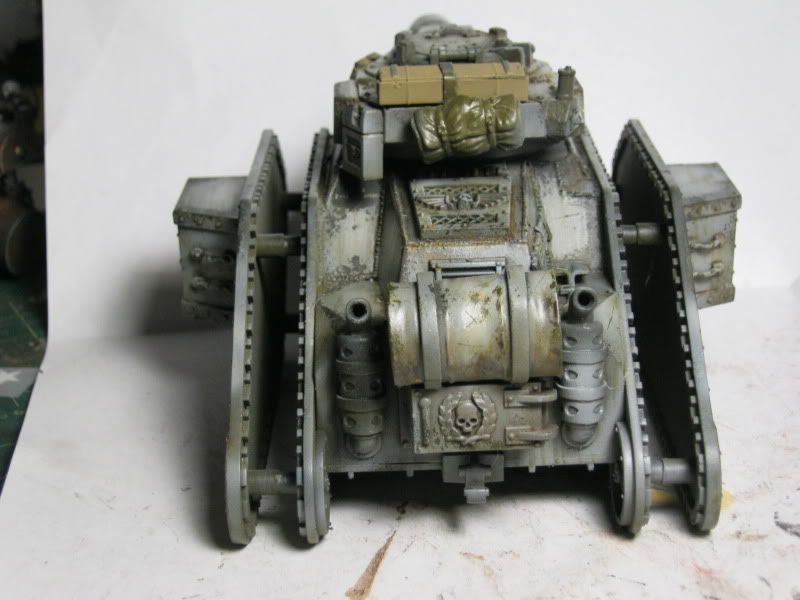
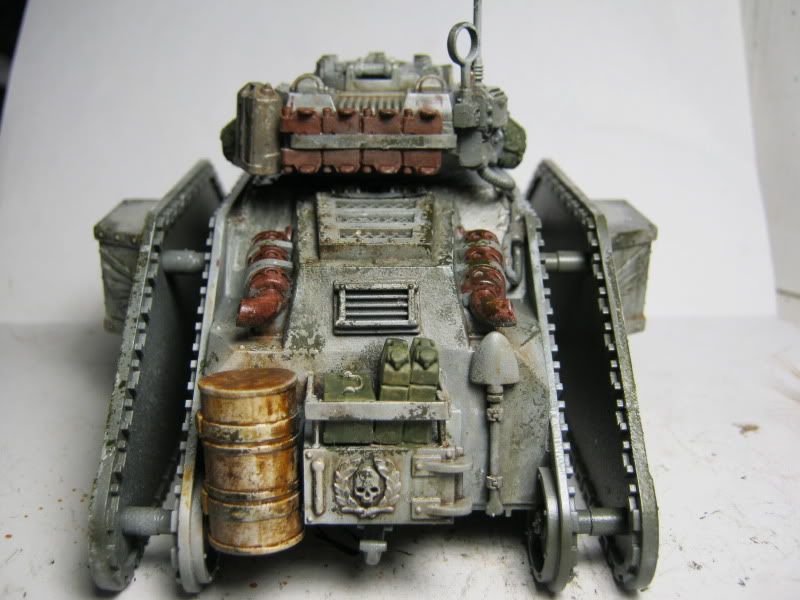
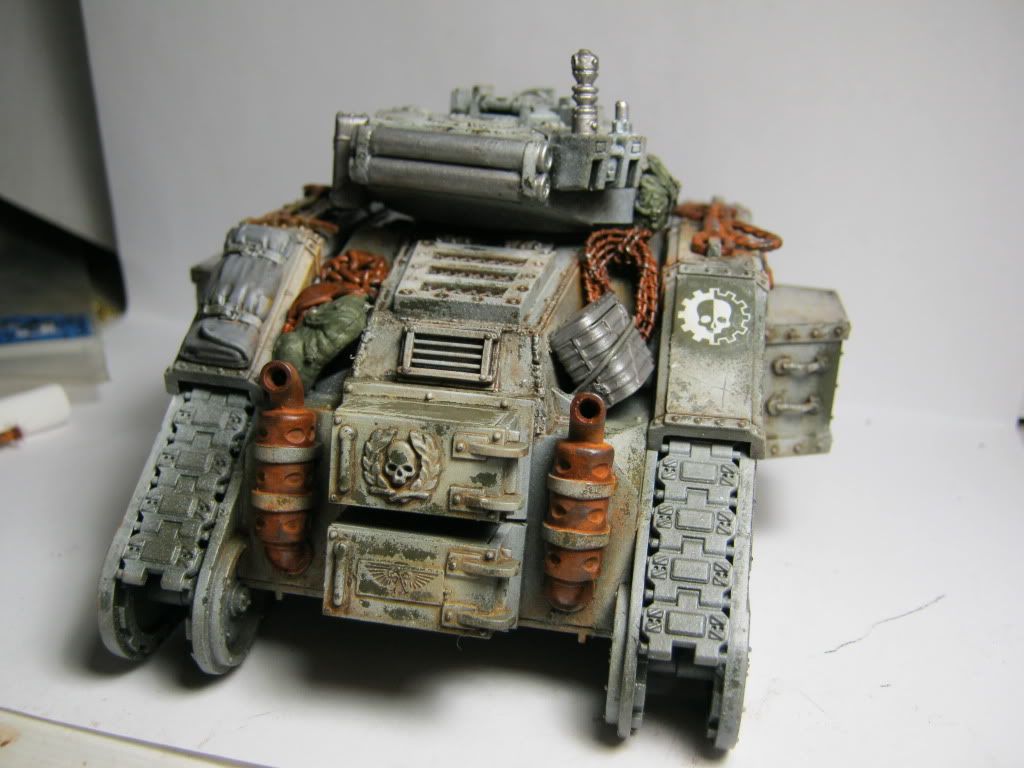
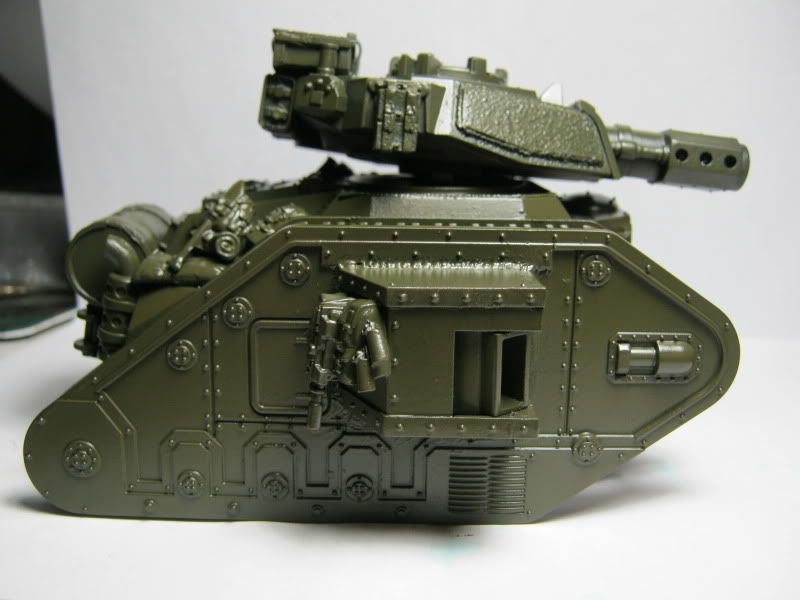
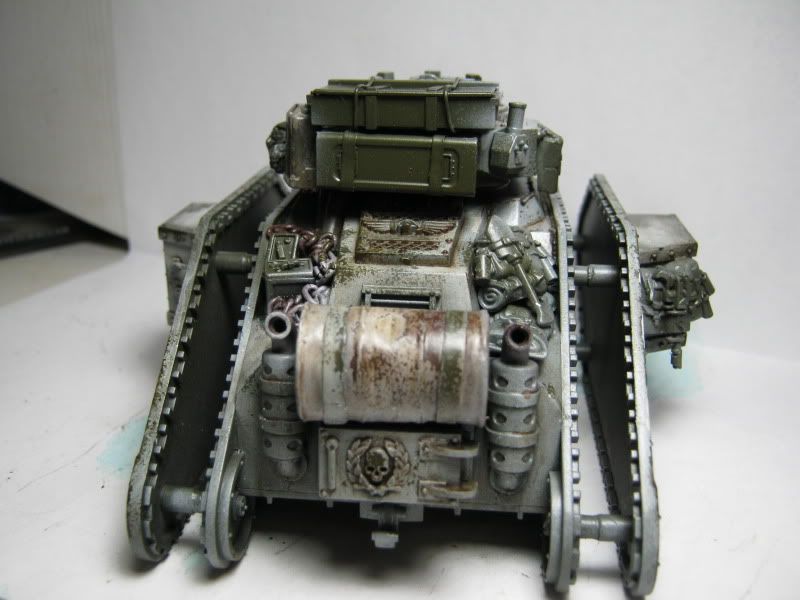
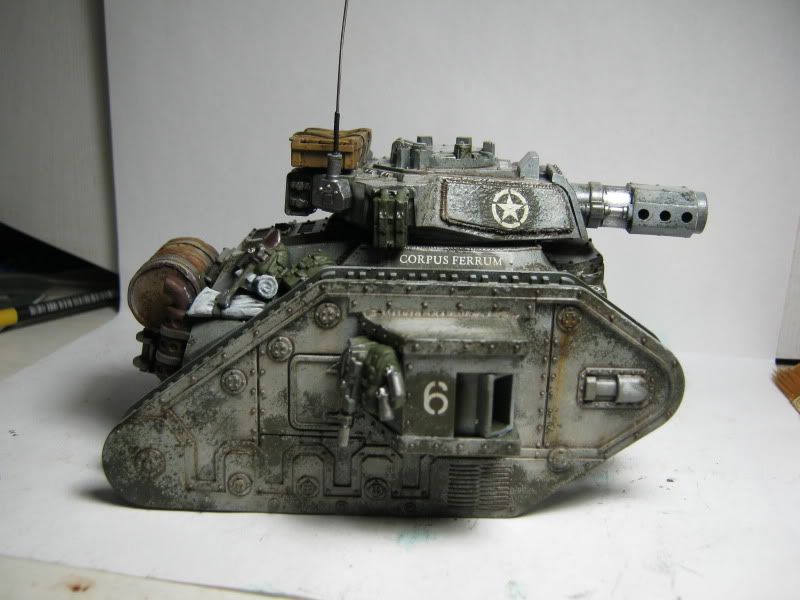
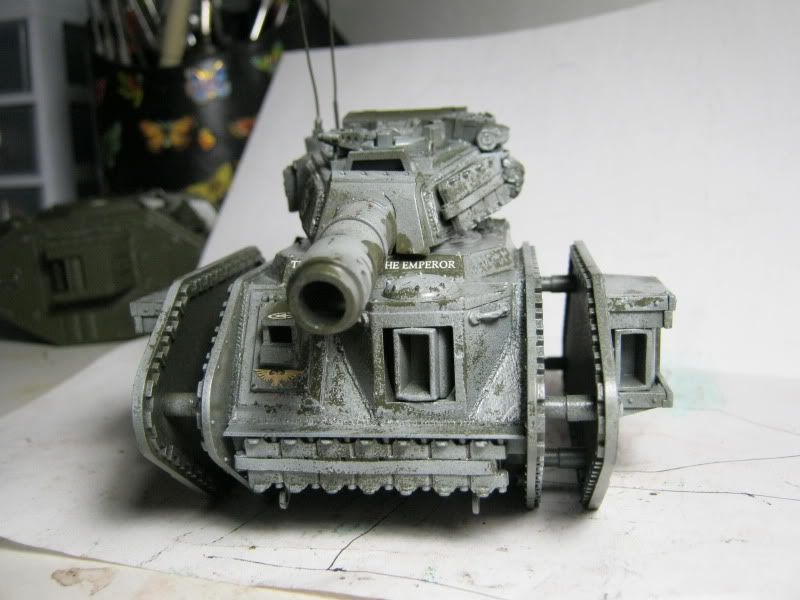
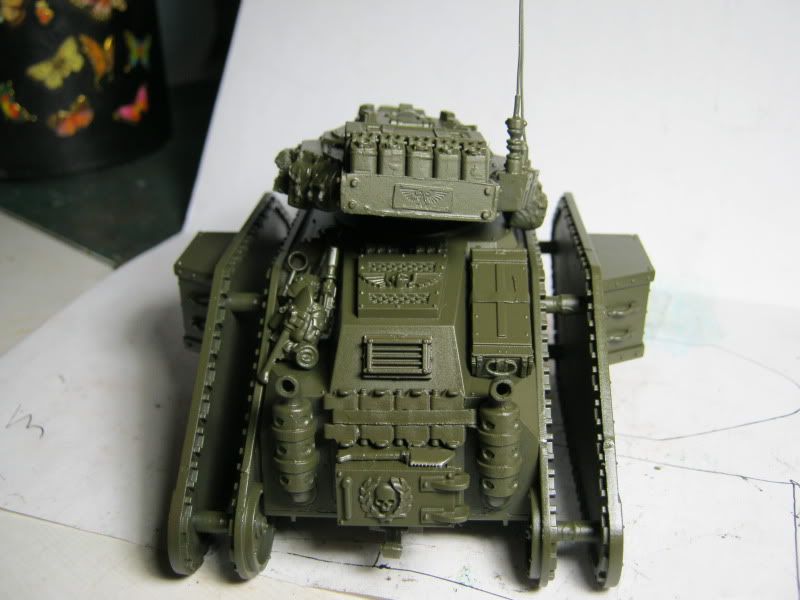
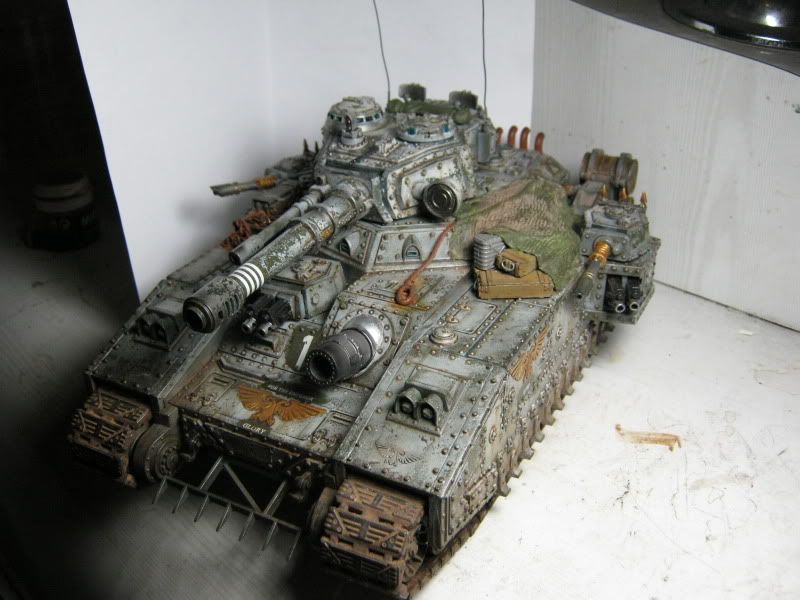
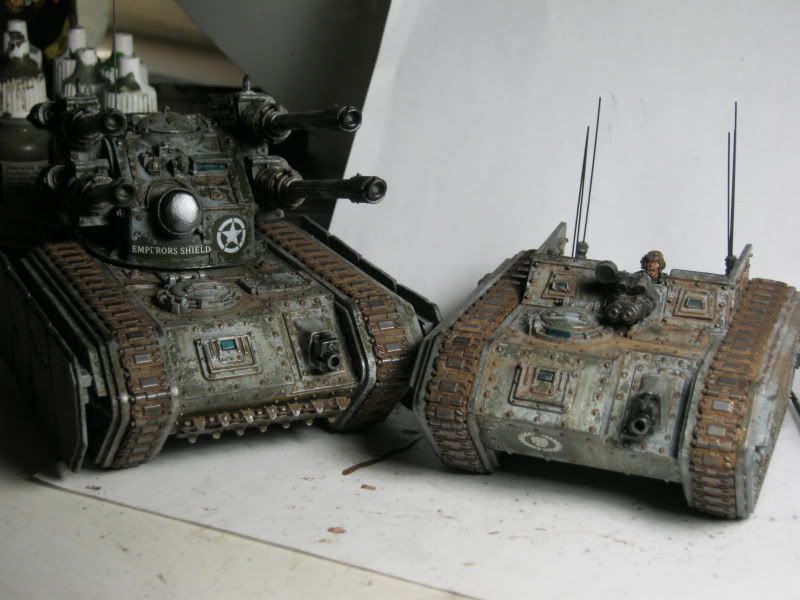
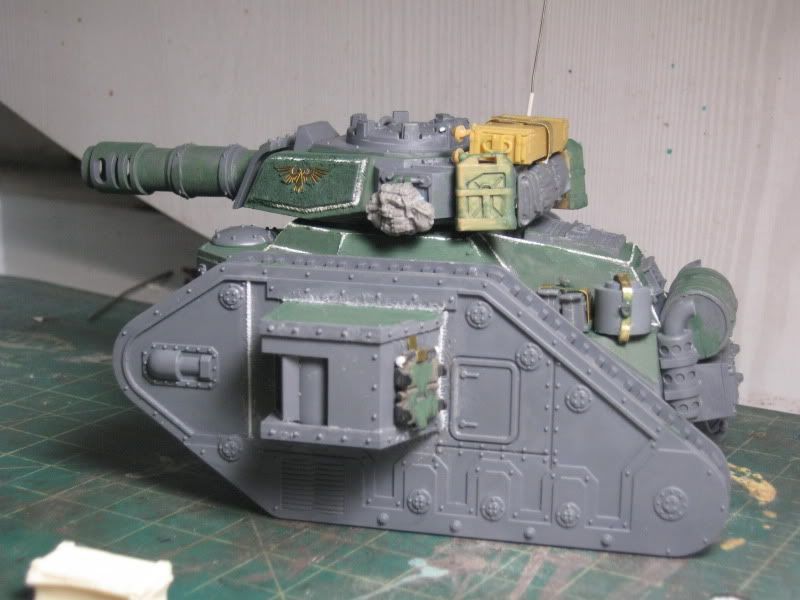
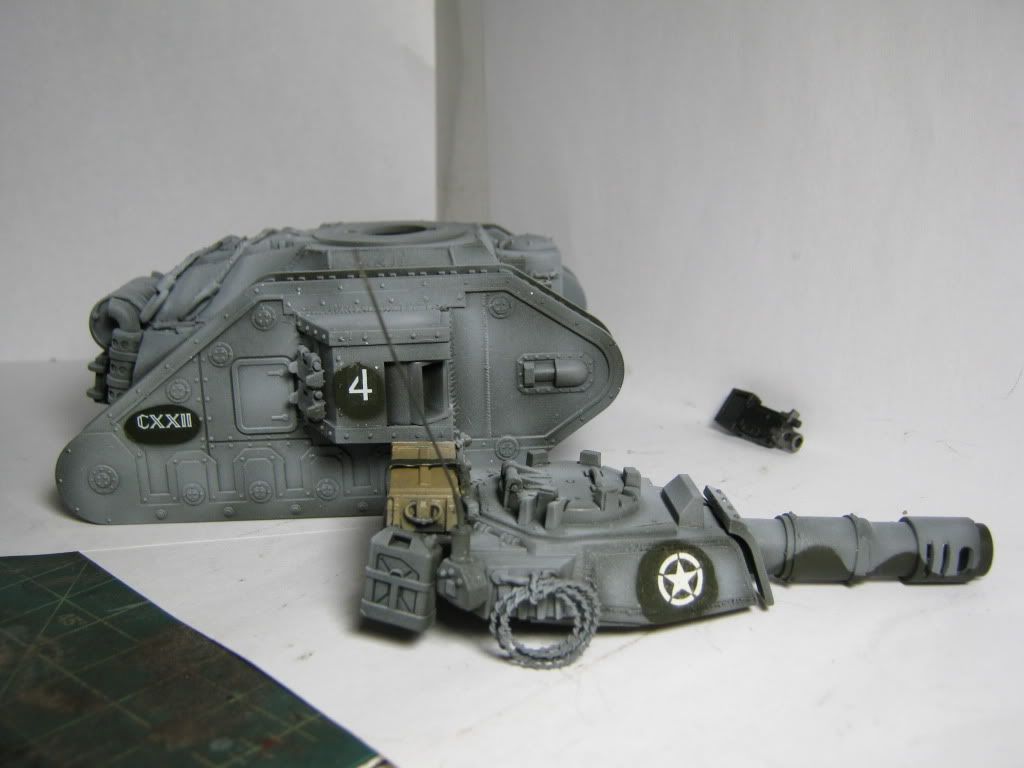
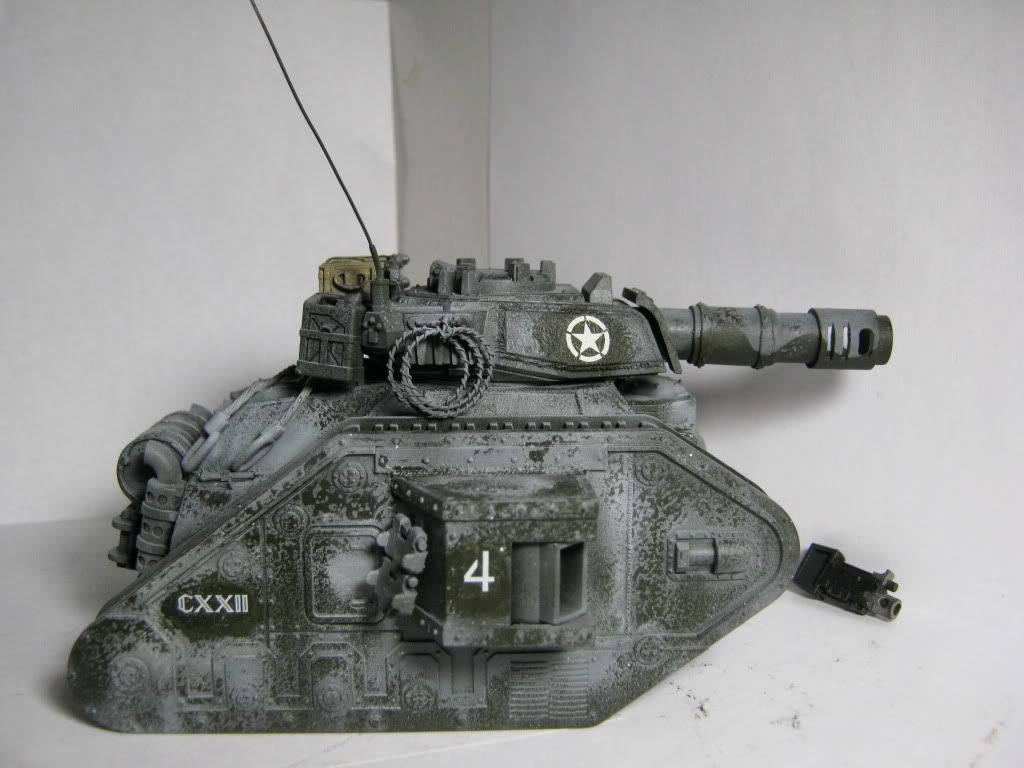
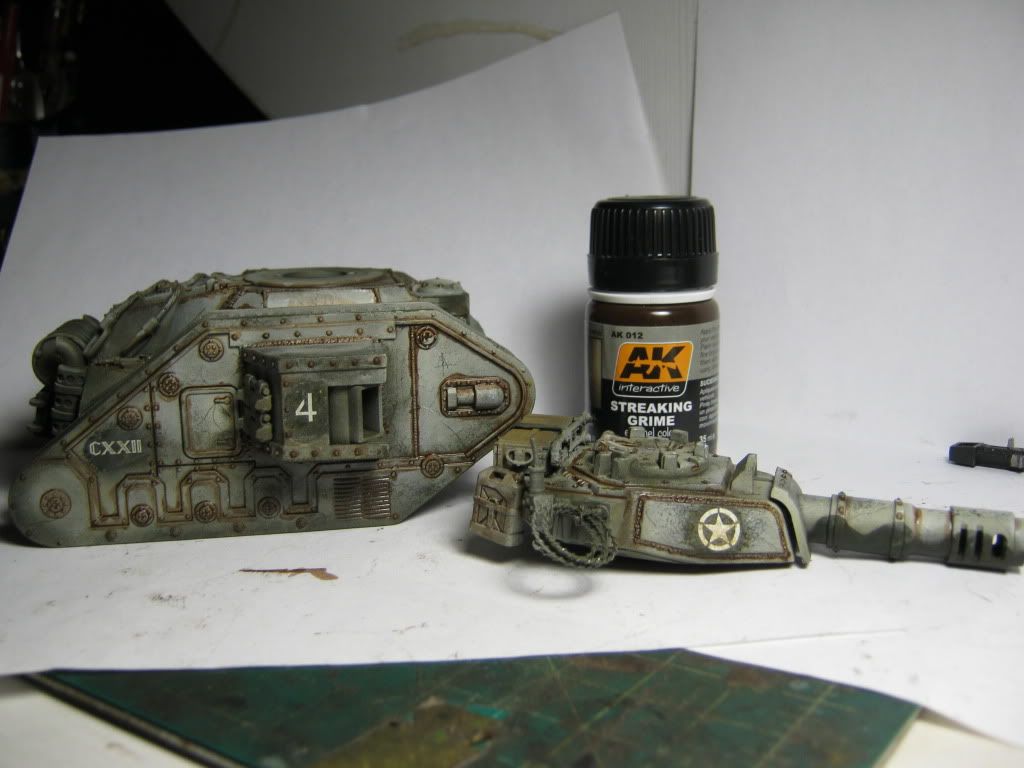
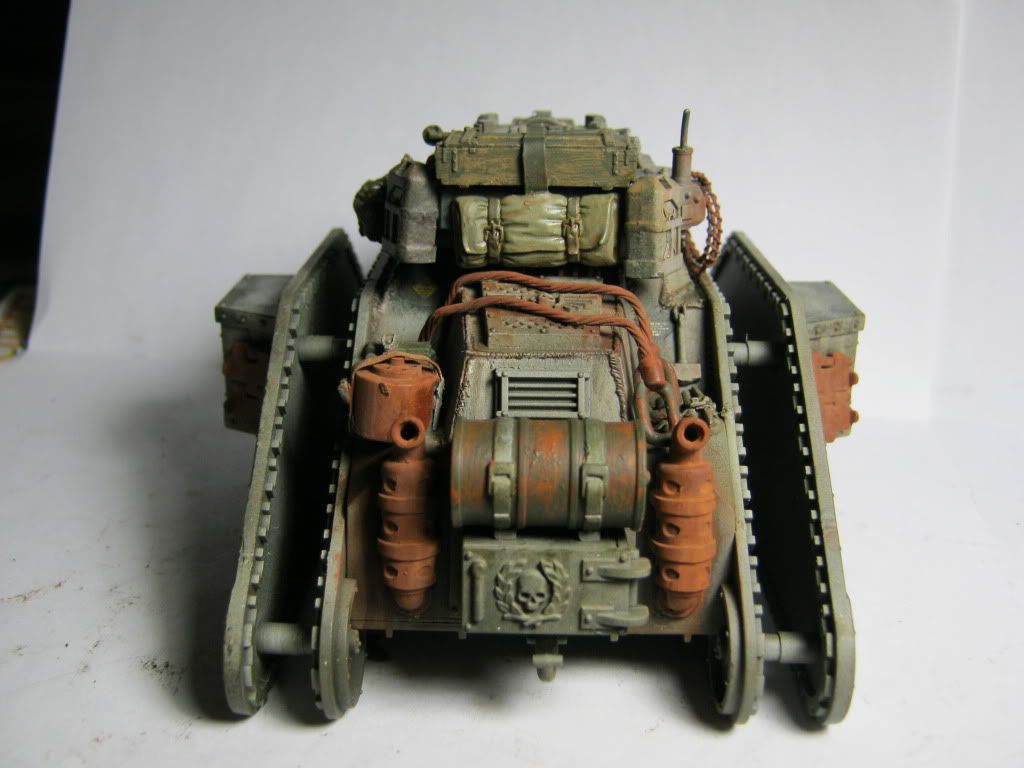
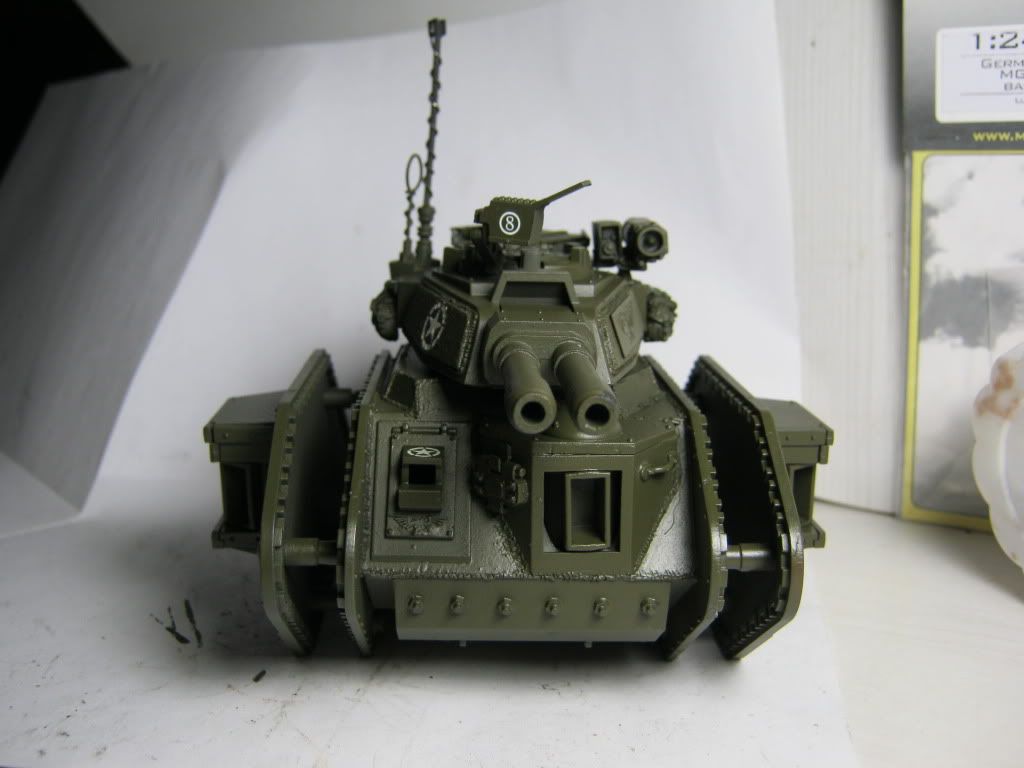
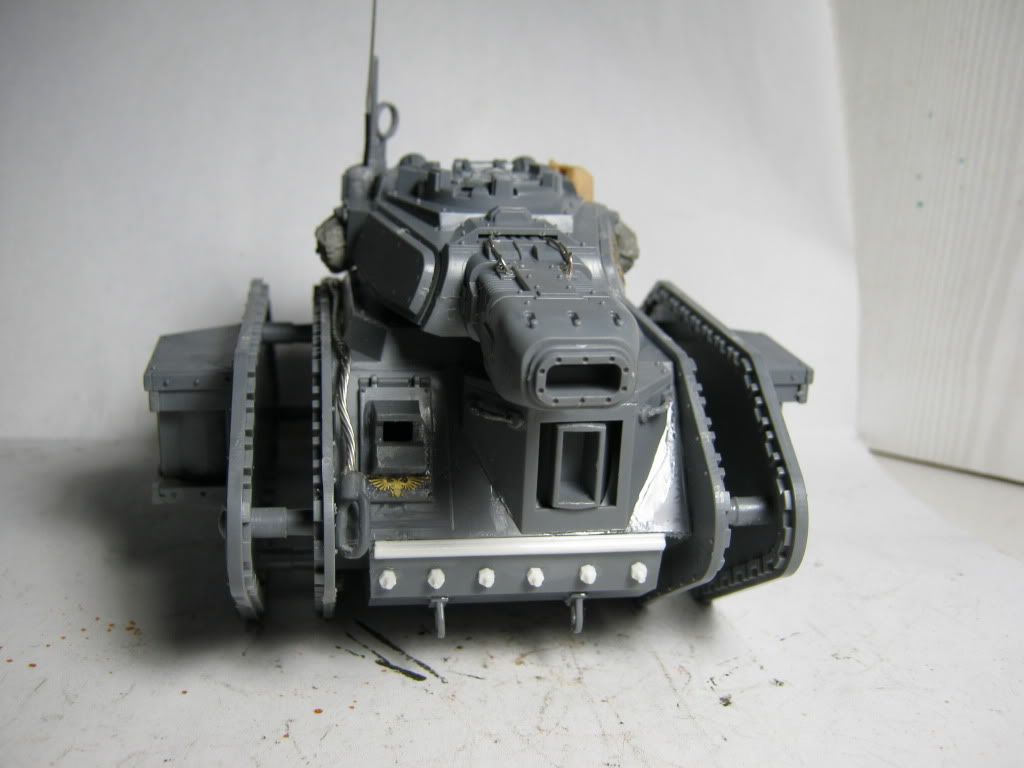
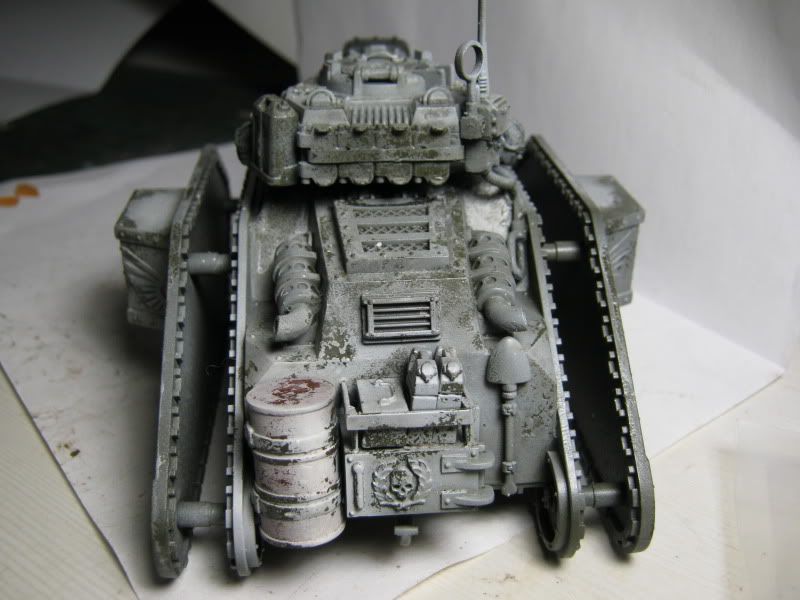
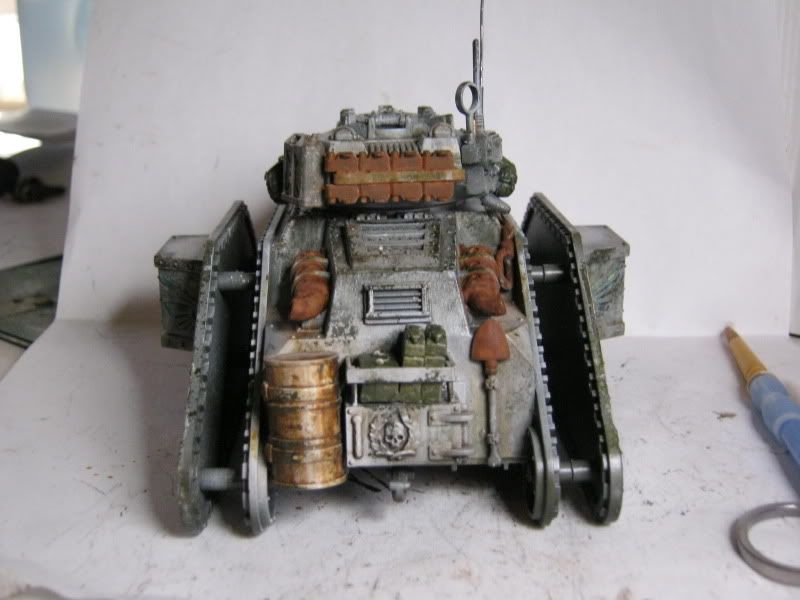
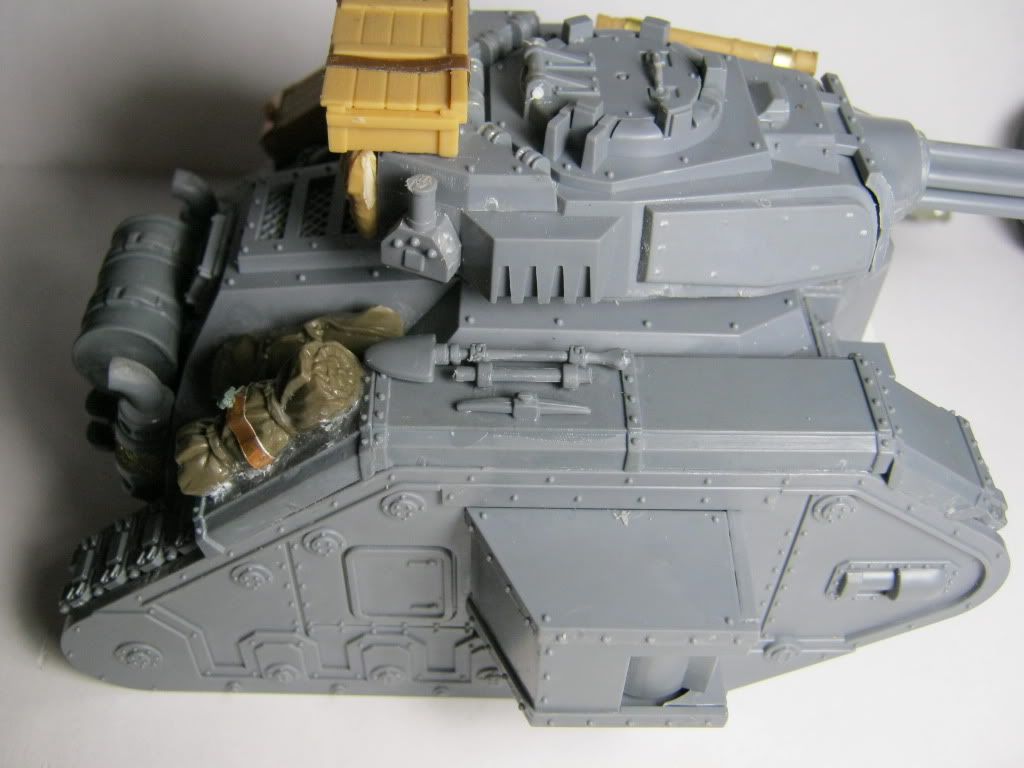
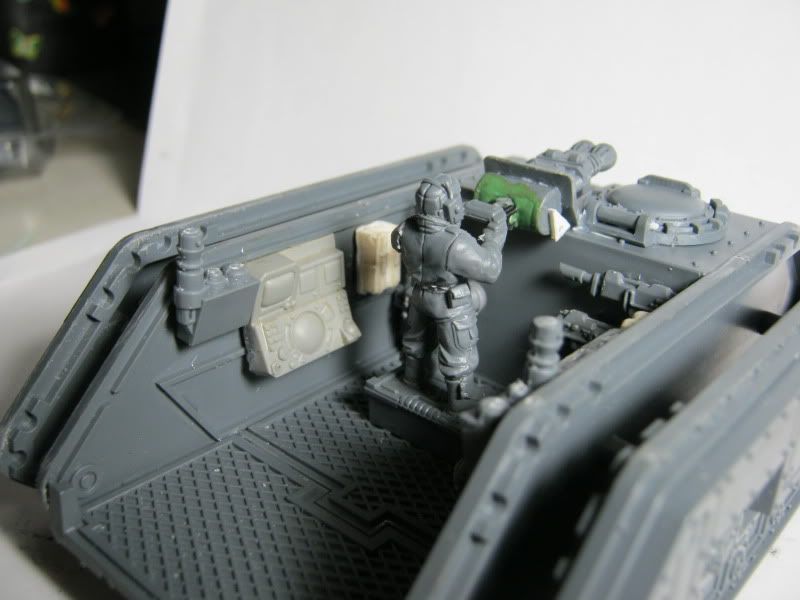
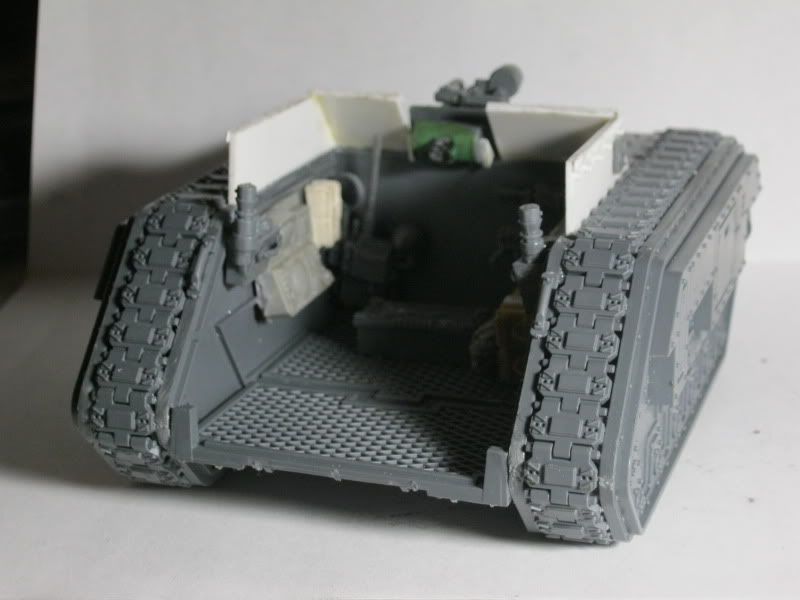
I finished the build for number 4.
Stowage is better placed ,paying more attention to straps.
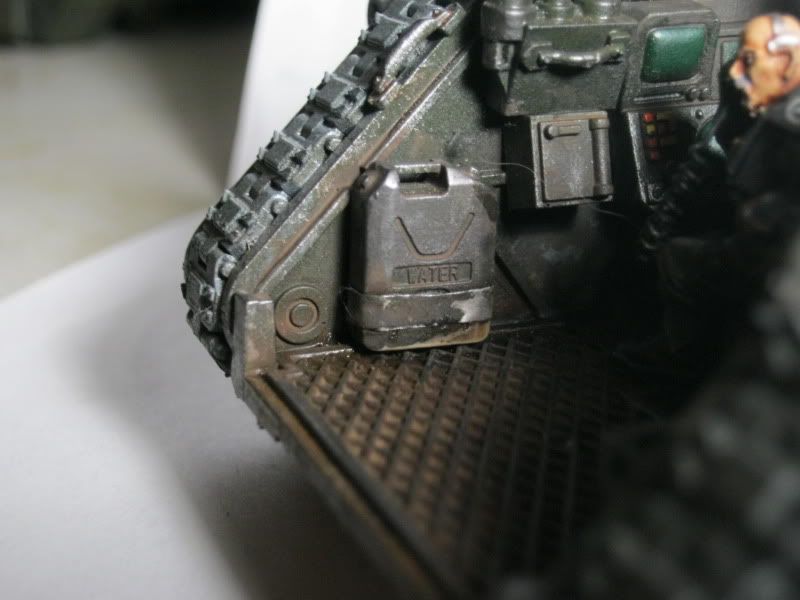
If you have the Tamiya 1:35 German jerry can set the fuel caps look like very convincing strap brackets like the kind you see on semi loads.
I cast a bunch of the stowage such as bedrolls and they cme out really well.
I would like to try to make fitted stowage pieces on card with pinoner tools that you could just glue in place and save on the amount of pickaxes and shovels I buy.
Like last tank I added welds like last time this time with brass strip brackets I made buy cutting brass etch sprue.


 Automatically Appended Next Post: Automatically Appended Next Post: I came up with this idea looking at the Sherman stowage
Pre fitted pieces to kit out tanks.
I'd like to make a few of these a poineer tool one,an ammo one and more
This one is a broken down heavy stubber strapped down

33168
Post by: doubleT
Wow, nice results with the camo and weathering. Thanks for telling me about the powders in my thread. 
But you know what you need more, imho? Mud! 
Just kidding, they are good. I especially like the contrast of the tracks to the camo.
4271
Post by: Eisenhorn
I was planning on adding light mud when they are all finished so it is same texture and shades.
43612
Post by: Rawson
Great results! I wasn't sure what you were doing at first, but now the details really show up! I especially am fond of your welded seams. Great touch!
Keep up the great work!
Rawson
6548
Post by: Chaplain Cy
I love how these came out, got time to do a write up on how you did tank #3 painting?
4271
Post by: Eisenhorn
I'll do a step by step when I paint tank 4
An airbrush is required though
44654
Post by: Lone Cat
do they comes from Terra? (there was a hive city named Merika and it is said to take part so early in any Imperial campaigns. as far as the late 29th millenia. or early 30th millenia. yes by the time the Imperium was born.
4271
Post by: Eisenhorn
One and the same Lone Cat.
I am dying to hear more about Merica and Ancient Terra in the coming Horus Hersy books.(Check out Outcast Dead as it is set on Terra)
The only kind of offical mention of an actual unit is the Merican Fusilers from the Mecharian Crusade of Lord Solar Mecharuis.
I see the Merican Fusilers part of the Old 100,regiments spared by the Emperor during the Unification Wars.
The 1st Lancers are the Top Elite Company in the whole army.
Armored Cav that is suited for all possiblities.
I see any Terran based unit having only the very best in eqiupment.
Automatically Appended Next Post:
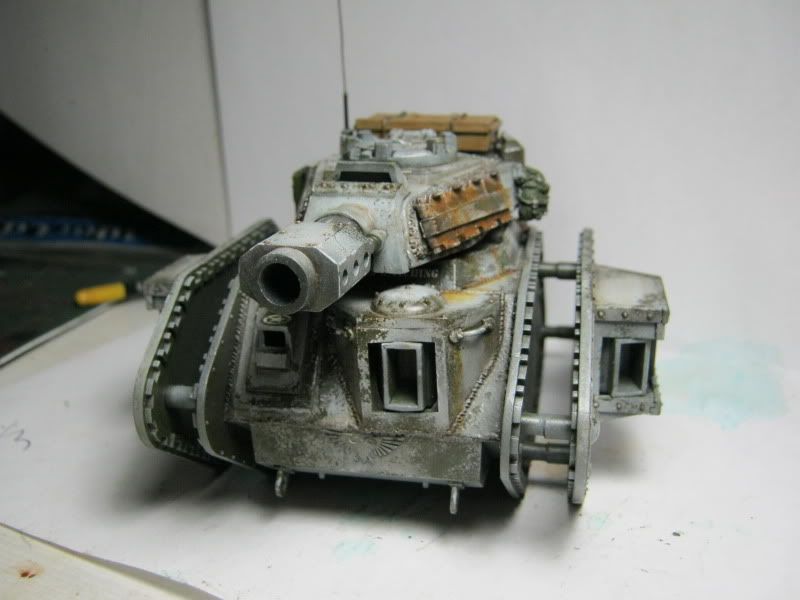
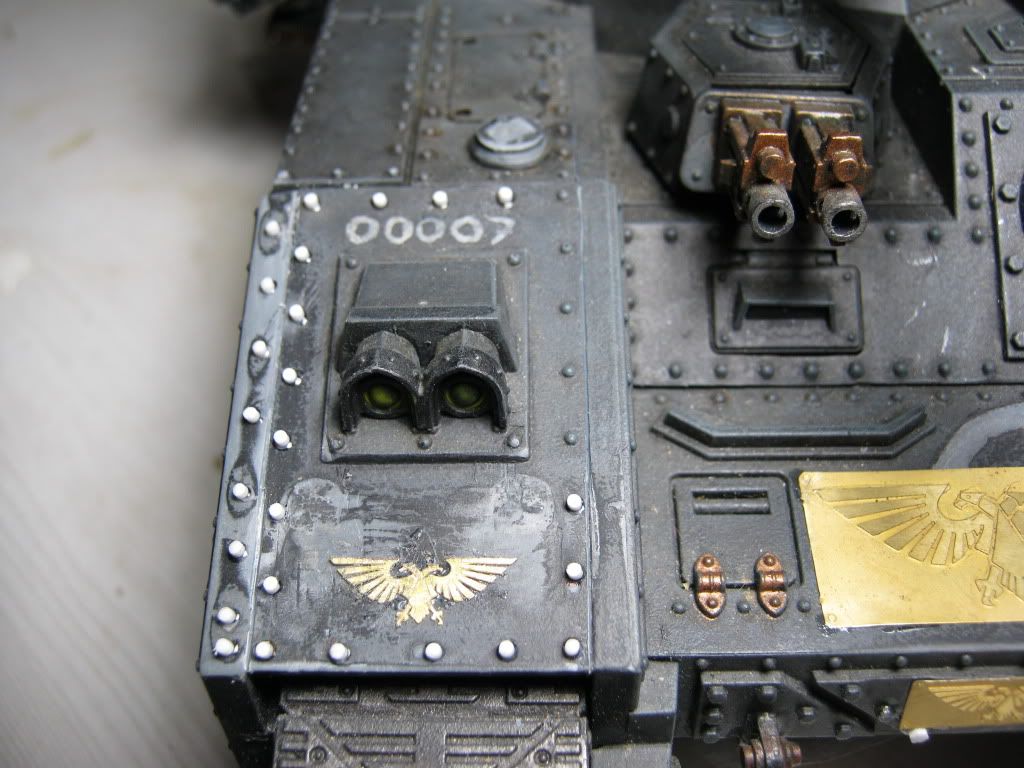
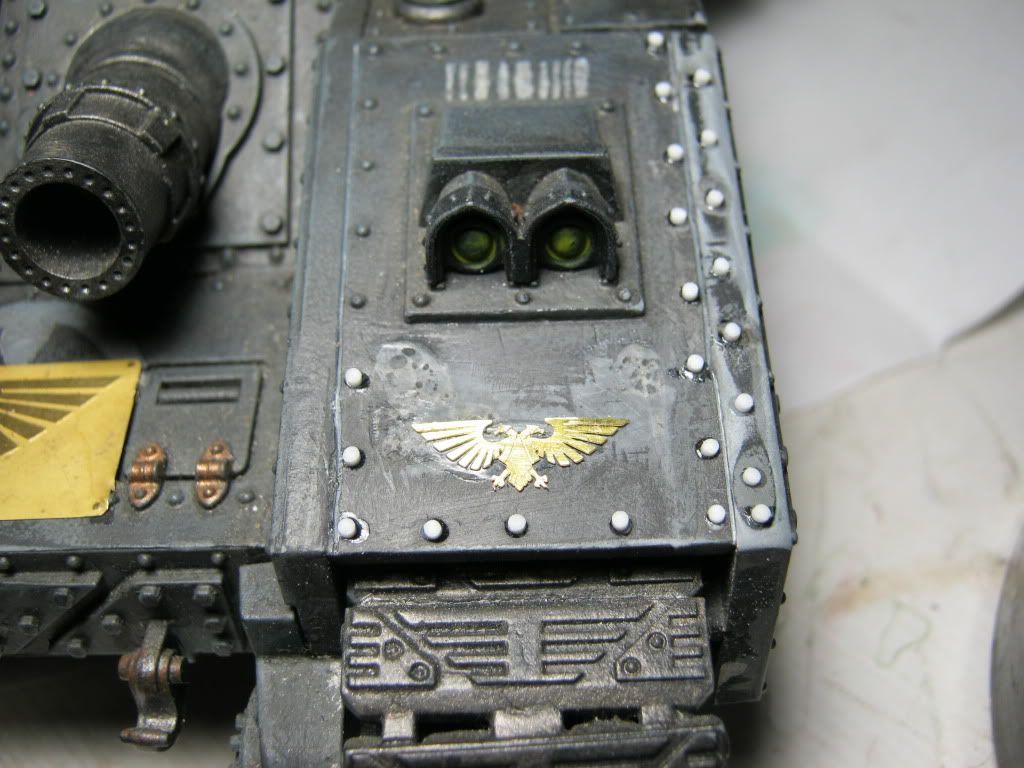
Here is the Step by Step for Tank Number 4.
I am going to put down the products I use,you can always use subsitutes with varing degrees of sucess.
I like to use Tamiya for my Winter Camo.
Even though it is advertised as acrylic it is in fact a lacquer based paint,which is more durable.
-First prime your model Black using whatever primer you usually use.
-Using 8 parts Tamiya Olive Drab X-62 to 2 parts Tamiya Clear X-22 to make a Satin Finish Olive Drab,thin with Lacquer Thinner
-Spray Tank Completely with Olive Drab.
The Satin Finish Helps with Decals and is the ideal surface for the AK washes I will be using.
-Let this Dry for an Hour or Two
Then add Decals,spray with Testors Glosscote to seal the decals,then with Dullcote to bring back the matt/satin fiinish
 Automatically Appended Next Post:
The next step is to cover the decals and aquilas with silly putty.
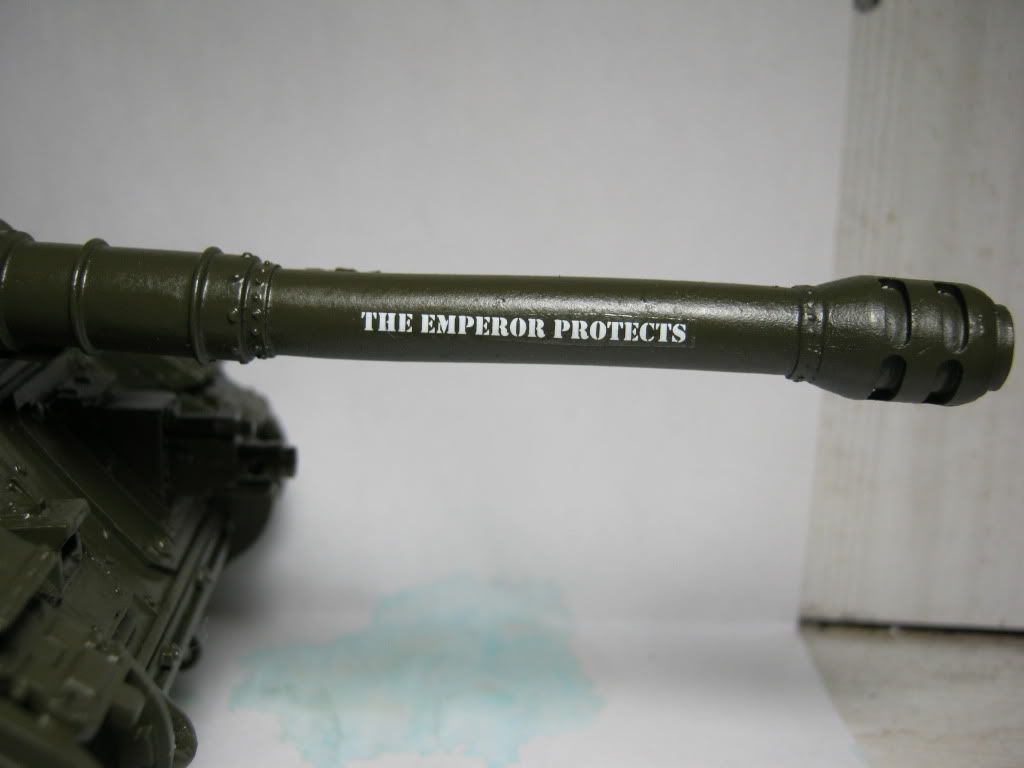
I also went along the barrel in a wave pattern shermans used to hide thier barrel length.
Once this was done I coated the tank in two layers of Worn Effects fluid from AK

I then used 4 parts Tamiya Flat White # XF-2 and 6 parts Lacquer thinner and sprayed the tank in a patchy fashion.
You want the center panels whiter that the edges,and anything you want chipped needs to be slightly translucent.
This tank I wanted to have alot more chipping and ware than the last tank so I sprayed the whit a little lighter than last time
Then using a flat brush dampened with water lightly brush away where you want the chipping.
Take your time work the tank in sections,not the whole thing at once(ie left side,barrel,right side.top.
Go panel by panel.

If the chipping is too much,spray with Dullcote,recover the decals and respray the white and chip again.
4271
Post by: Eisenhorn
After working the weathering step,I am not too happy with the outcome,so like I said I sprayed with Dullcote recovered the decals and will try again tomarrow.


46
Post by: alarmingrick
Man, those tanks a beautiful!
Fantastic work!
44654
Post by: Lone Cat
The paintjob is based on the WW2 G.I. Joe.
is it an 'official' colour scheme the HH novels describe Mericans ?
4271
Post by: Eisenhorn
The only real mention of Merica is when they are talking about the parlours of Merica.
I think in Fulgrim describing the composer lady.
She was really famous in the parlours of Merica.
Seems even in 40k,Merica is the place to go to tie one on
Yes I am basing the paintjob off of WW2 Winter Camo Shermans,even bought Flames of War stars for the turrets.
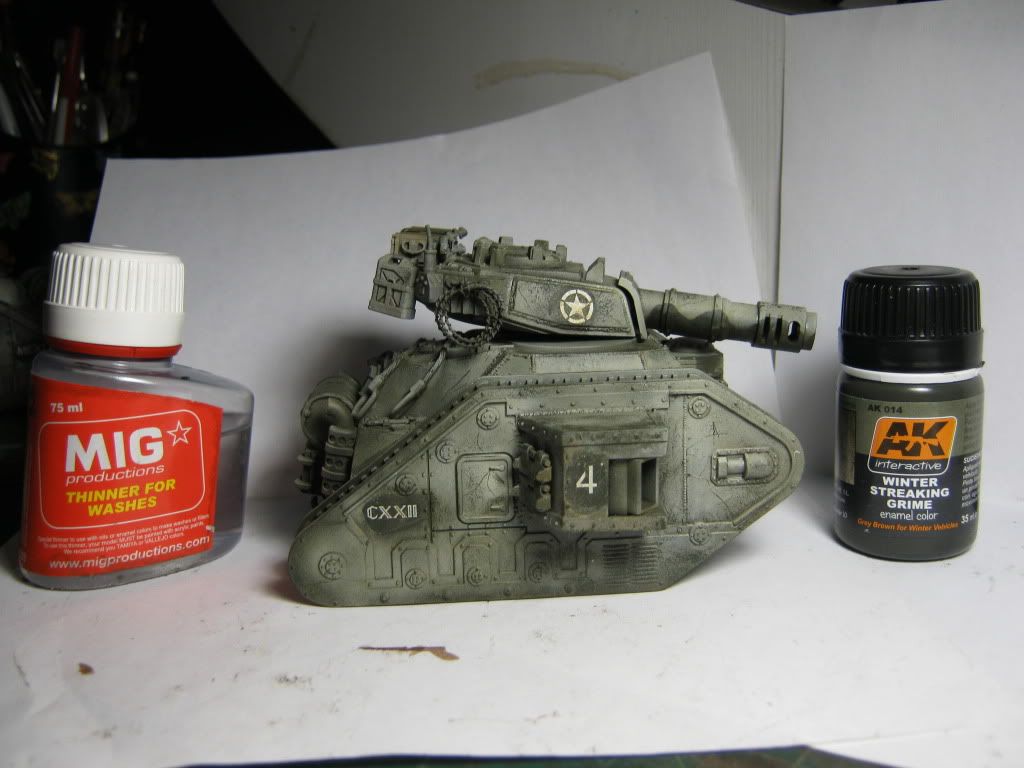
Just resprayed 4 back to olive drab and I am going to give it "A Nother Go"
Then I went back through the winter camo process as I said before,this time I went heavier with the white.
The more white you put on the harder it is ti chip off,with the chipping fluid if you lightly drag tweezers across the tank you get wicked cool scratches.
Once you have the camo the way you like it,varnish with Testors Dullcote or Satin Varnish,you can the continue with the filters and washes.
I used Mig Thinner for Washes(Odorless thinner will work too) and AK Winter Streaking Grime(WSG) to make a filter.
I used 8 parts thinner to 2 parts (WSG)
A filter is an enamel wash that changes the tone of the color depending on the wash.
(WSG) is a nice green/grey wash that brings everything together nicely on this type of paint sceme.
You want the surface wet but do not let the filter pool
 Automatically Appended Next Post:
Then use Flat White Enamel to brighten up the white.
A few patches here and there and then stump them with Thinner

Once again spray with Dullcote
Then use Streaking Grime to apply a pinwash to all rivets and recesses and let dry.
Once dry I used AK's White Spirit to clean the model of wash where I do not want it.
The white Spirit is a little stronger than odorless thinner more of a turpentoid.
Then use (WSG) to make streaks down the side,have them come off rivets and handles
After this dries spray again with Dullcote.
Then use the Flat White enamel again to brighten the White areas of the model.
Then paint your stowage and exhusts.
I used a basecoat of Dark Flesh then ran through the gamut of MIG rust powders(dark,rail,standard,light,fresh,)
to go over any rust colored areas.
I then used MIG Europe Dust to dust over the rust.
I then sealed this with Thinner.
I also pick out 2-3 spots for a rust streak down the side using AK Rust Streaks,once dry then stump with thinner.
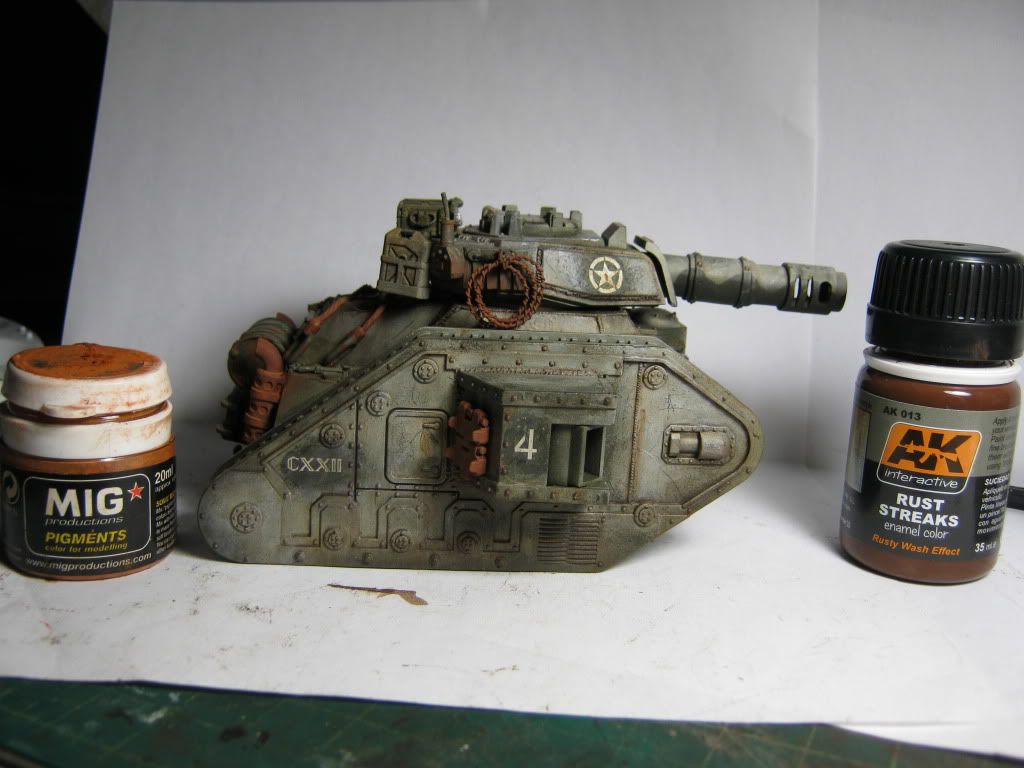
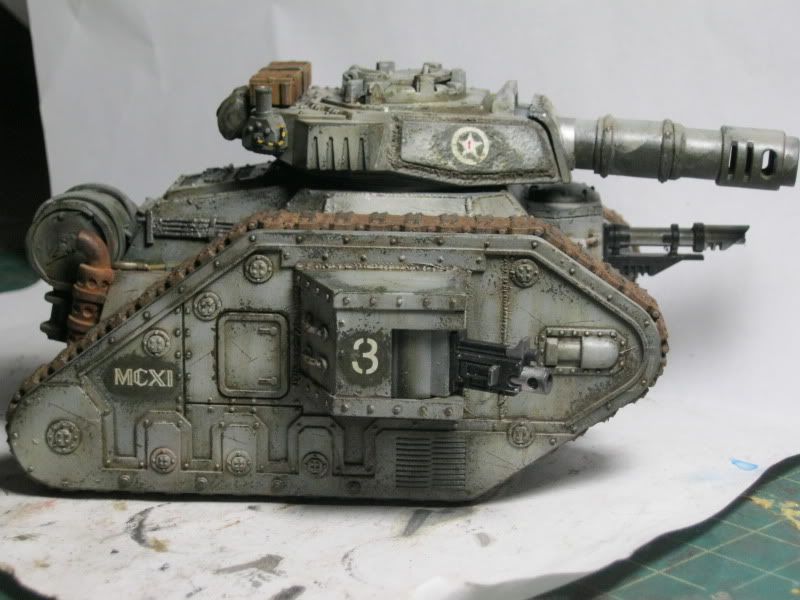
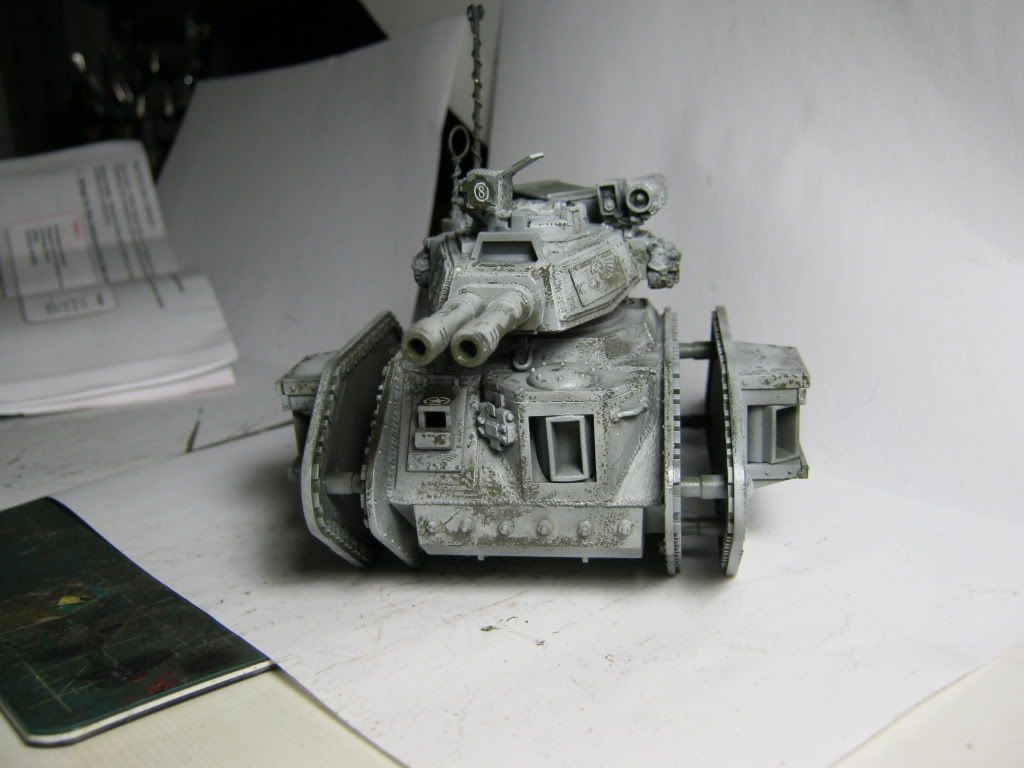
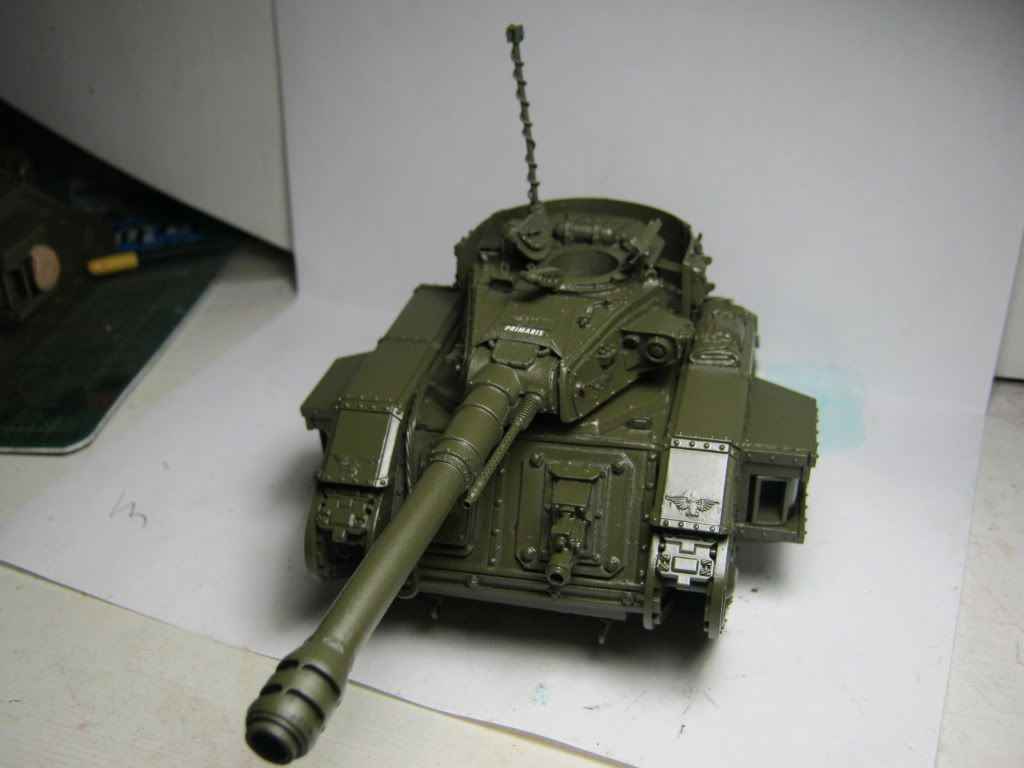
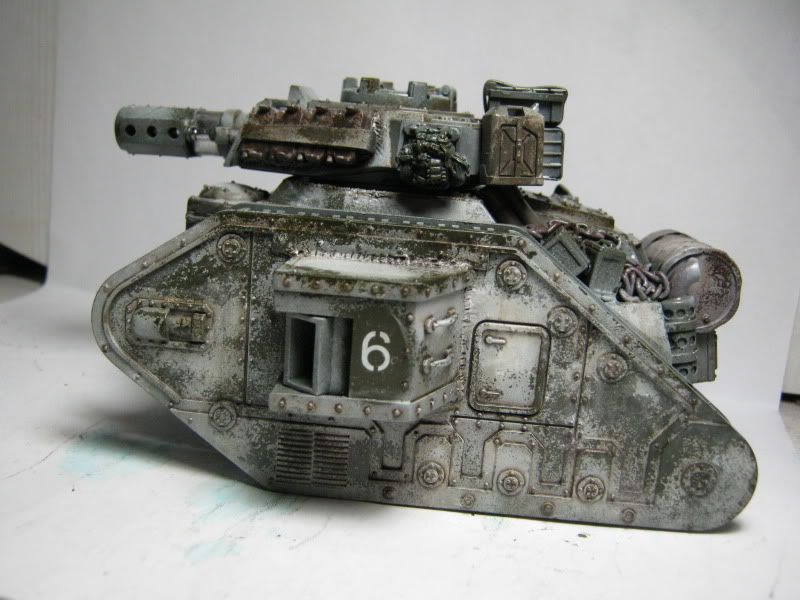
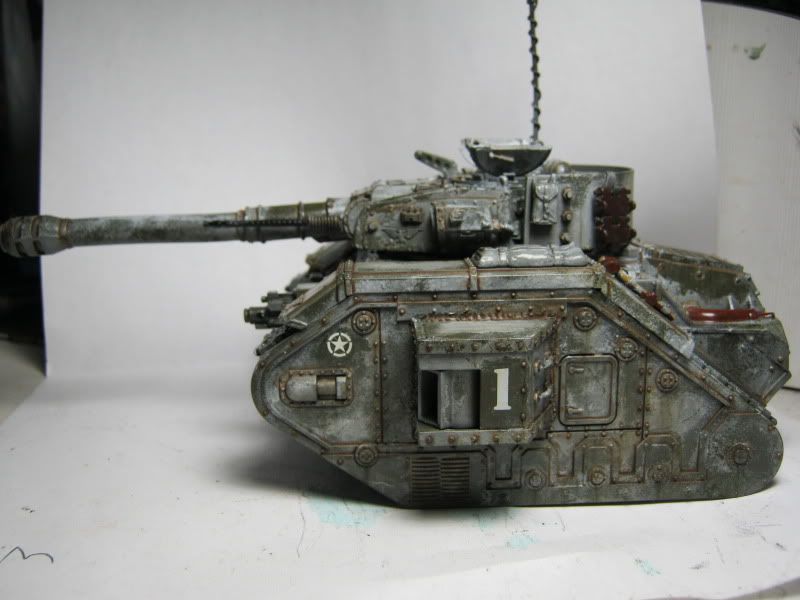
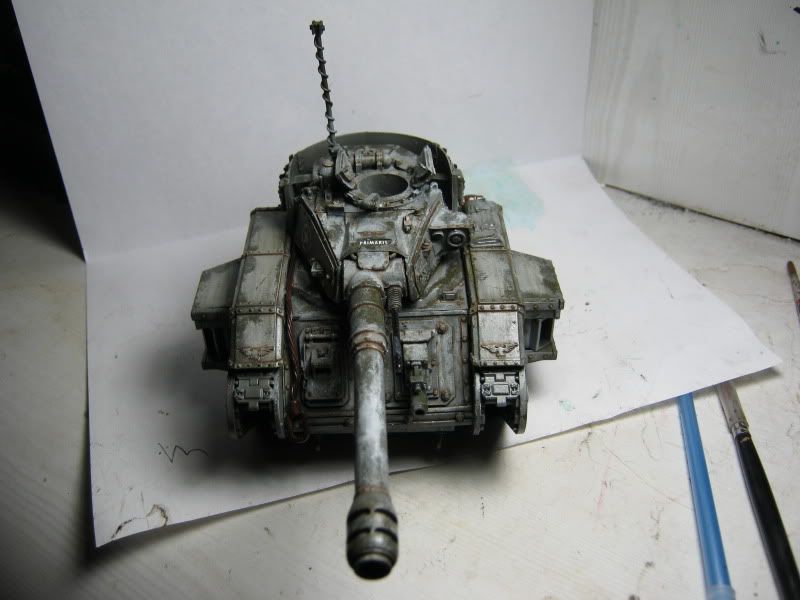
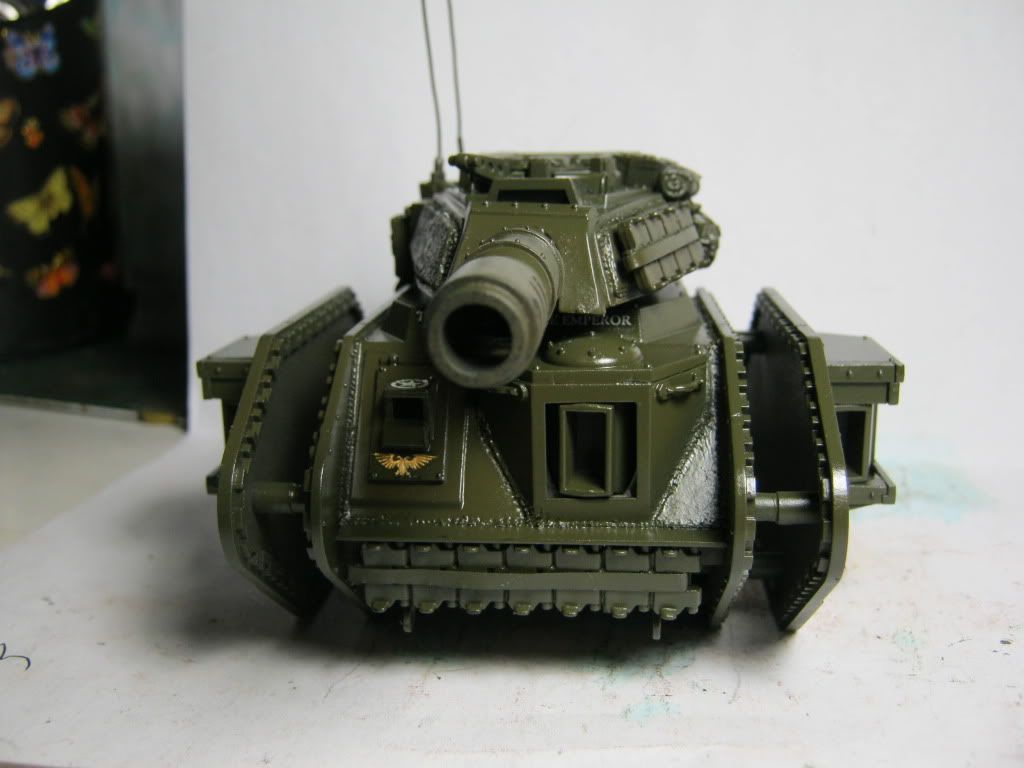
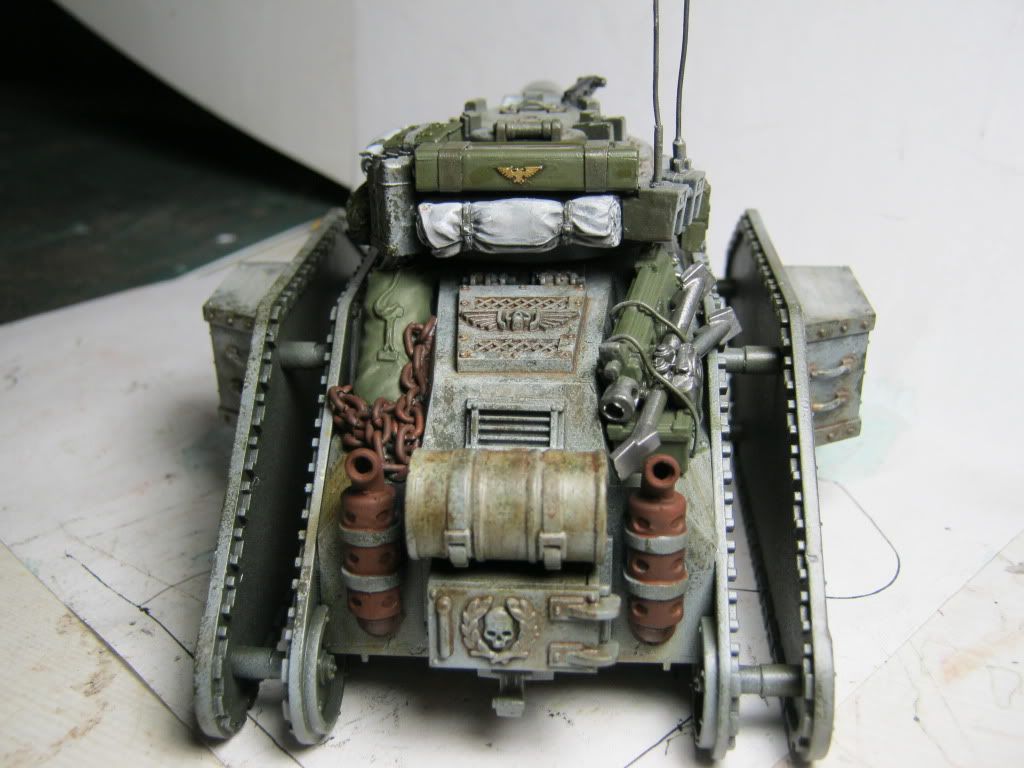
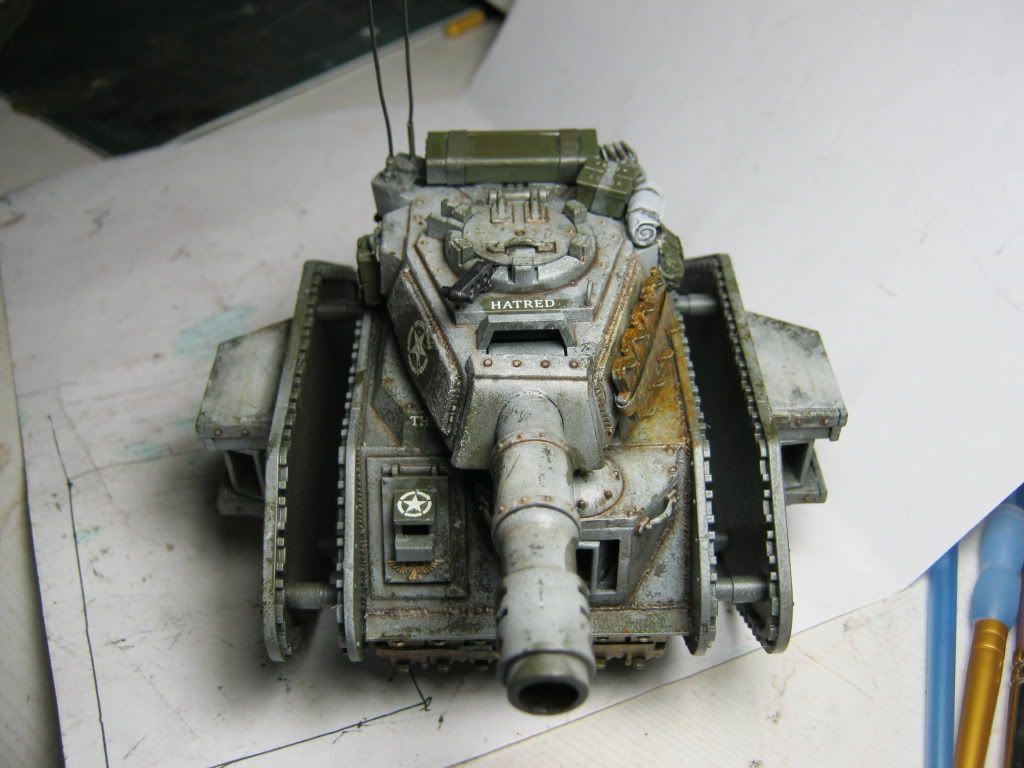
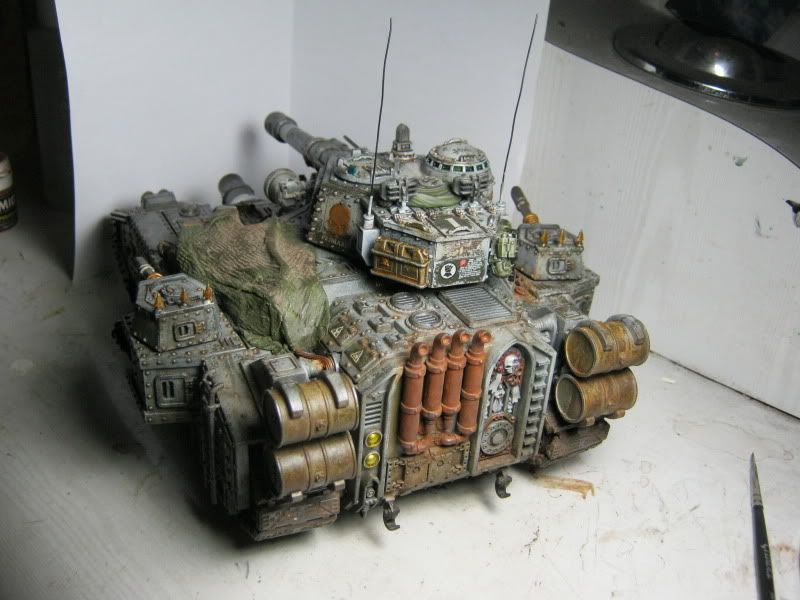
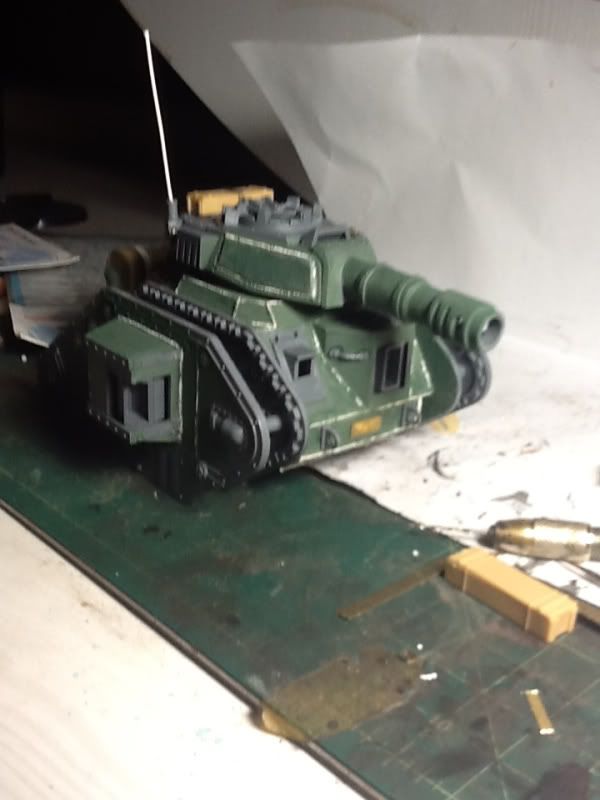
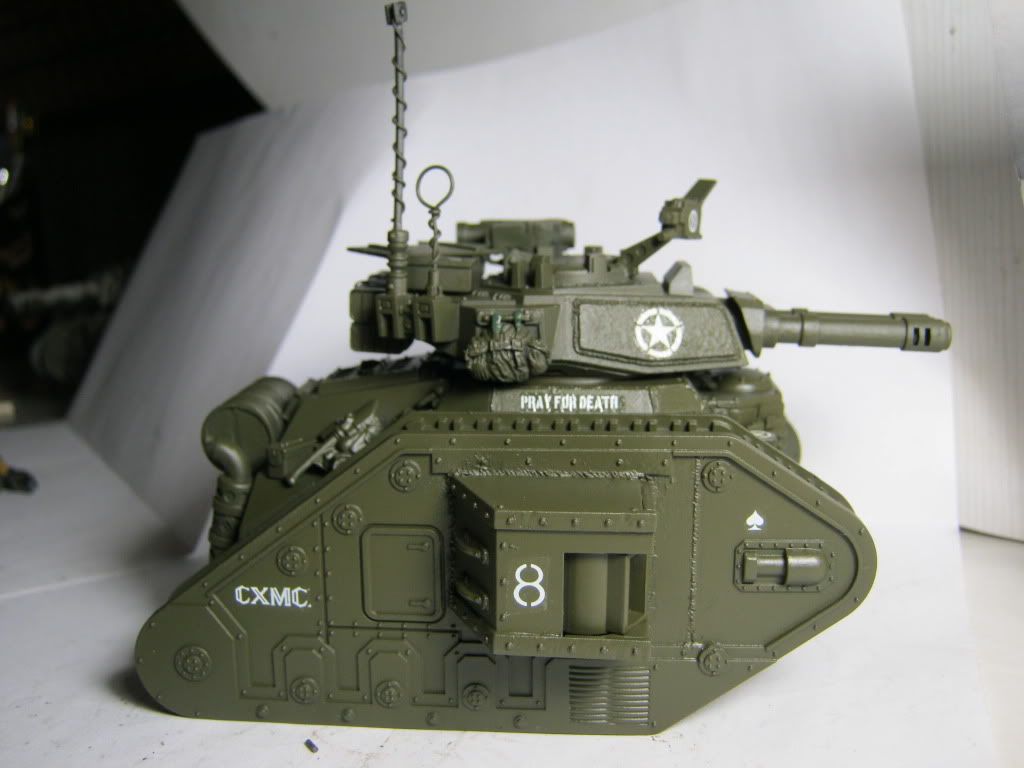
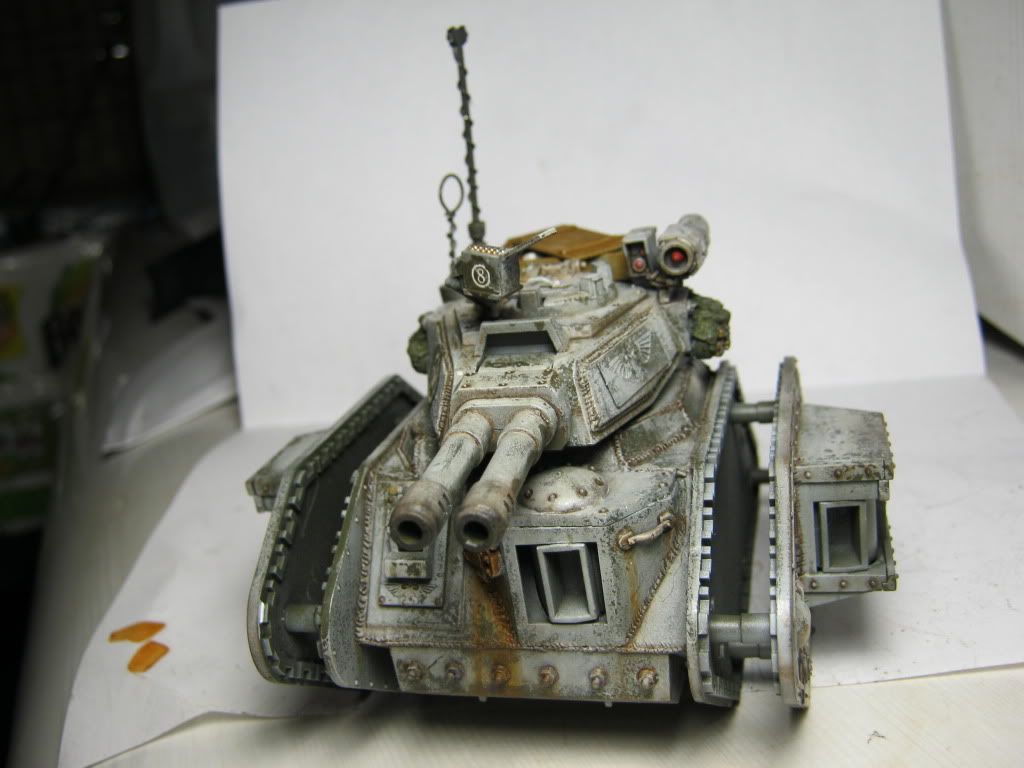
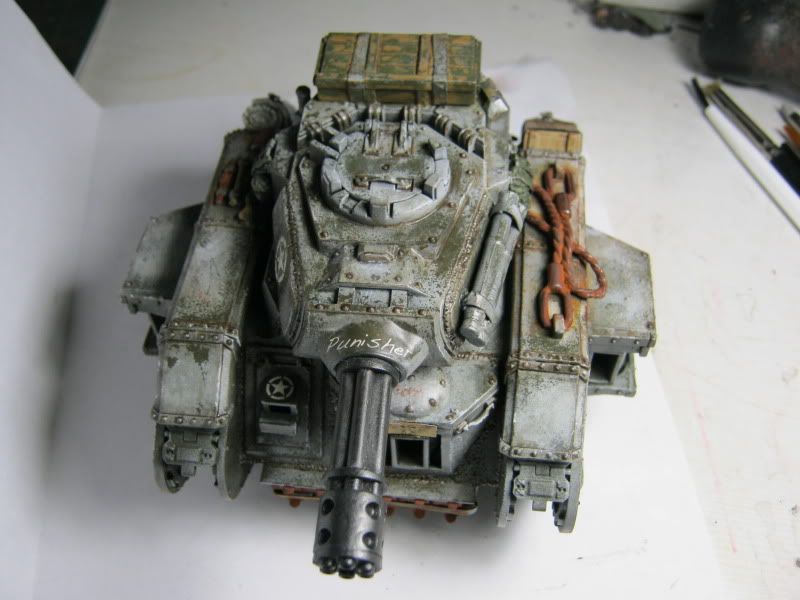
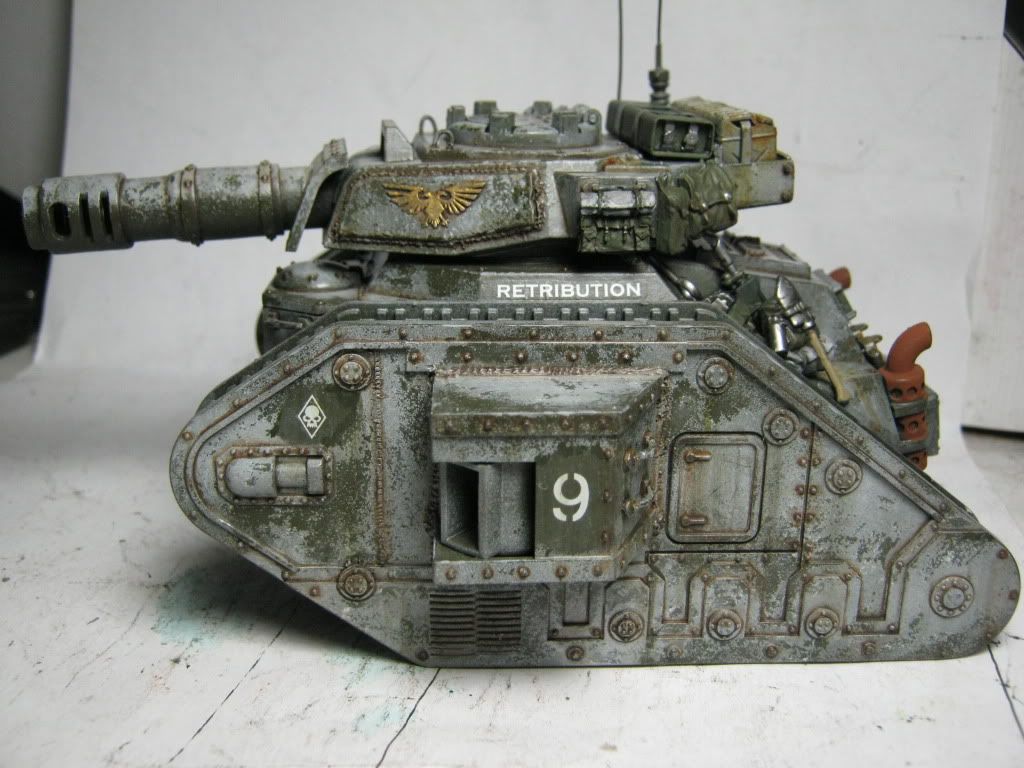
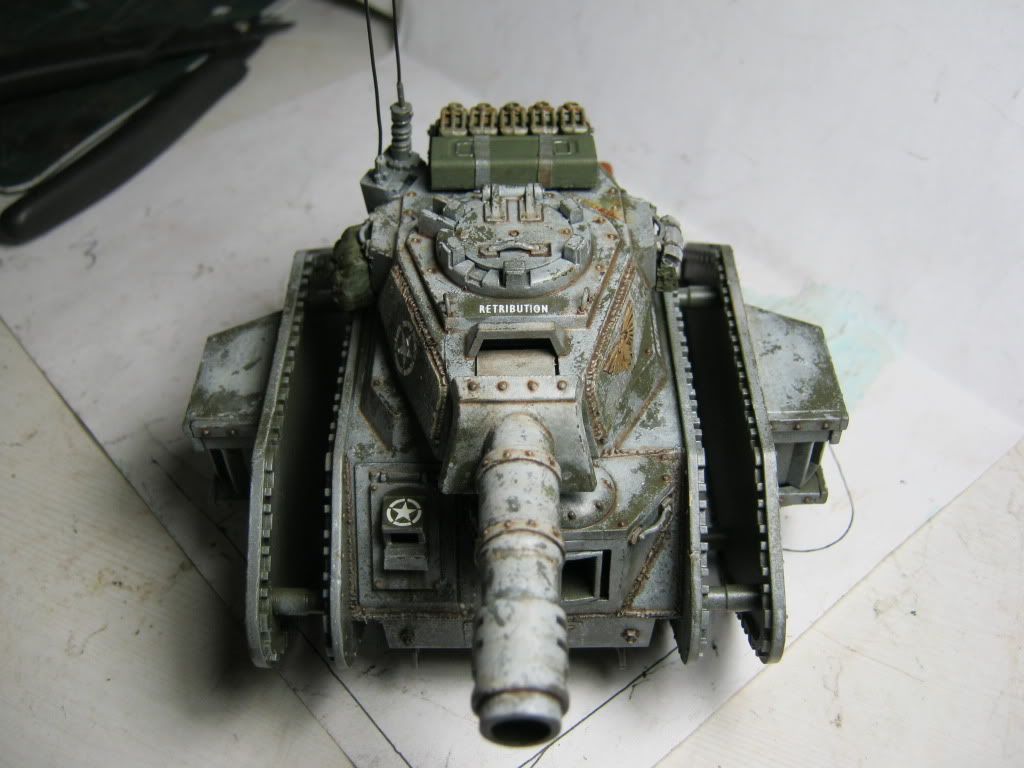
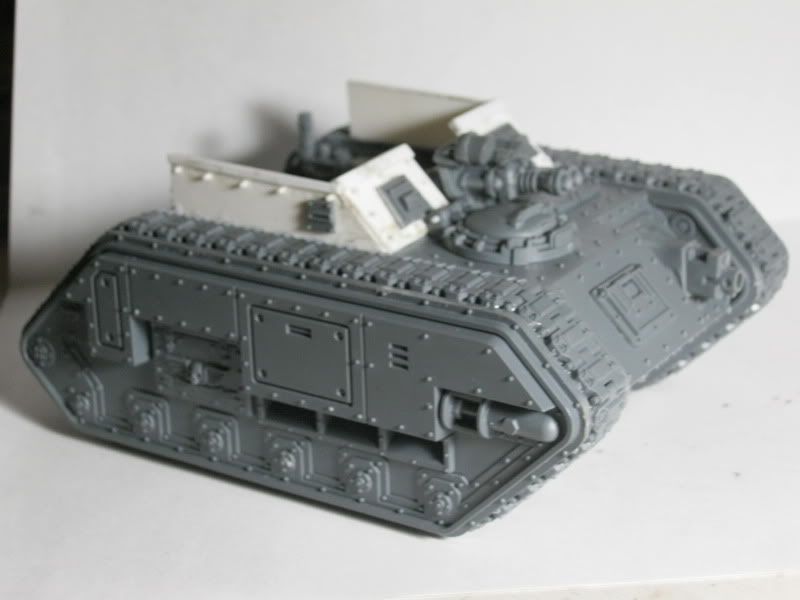
And there you have it the Completed Chassis for Tank #4

4271
Post by: Eisenhorn
Work has begun on Johnny #5
This is going to be the scout tank with autocannon.
No toolbox in the back for this guy,he has a supercharger.

43612
Post by: Rawson
Eisenhorn wrote:Work has begun on Johnny #5
This is going to be the scout tank with autocannon.
No toolbox in the back for this guy,he has a supercharger.
I like the concept! Stripped down, just the essentials This is just a fluffy idea, right? Or will you impliment some special rules?
50179
Post by: Hmelrose
'Merica F  Yea!
Nice work man!
3728
Post by: Sheep
Looking superb mate, the painting is very professionally executed, I really like the tut you did too.
4271
Post by: Eisenhorn
Rawson wrote:Eisenhorn wrote:Work has begun on Johnny #5
This is going to be the scout tank with autocannon.
No toolbox in the back for this guy,he has a supercharger.
I like the concept! Stripped down, just the essentials This is just a fluffy idea, right? Or will you impliment some special rules?
Just fluffy the way I like my pillows,just trying to justify a tank company choosing an oversized machine gun over a cannon.
I see this,like you said a stripped down,moblie pointman
34243
Post by: Blacksails
Fantastic looking tanks. I wish mine looked half as good as these!
4271
Post by: Eisenhorn
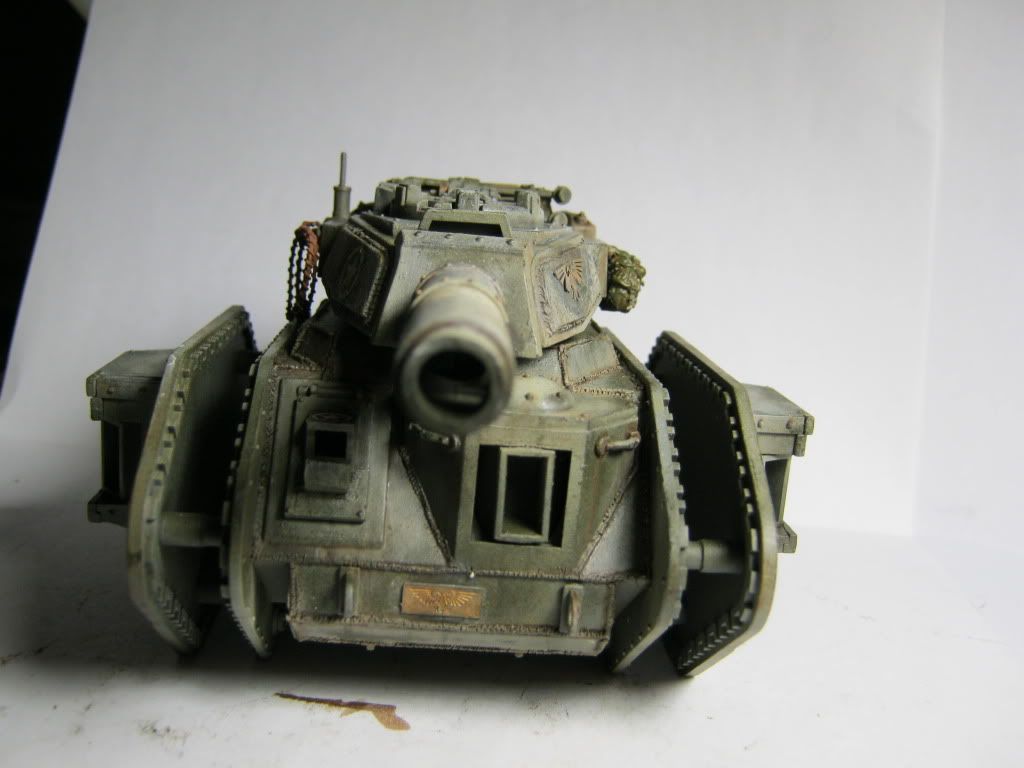
Finished the build for tank #5
Like I said I envision this to be the pointman tank
I added advanced comms to relay to the commander,he also has a H/K missle to take care of anything big he sneaks up on.
The heavy stubber is renforced with a gun shield from the HW kit.
I added rivets to the lower portion like the Mars pattern
Just gotta add the tow cable and clean up the glue residue.
This tank is also going to have a dozer blade.


43612
Post by: Rawson
More great work from Inq. Eisenhorn
I love the ammount of effort that you put into customizing your tanks. It really goes a long way. Keep it up! I really like the super charger on this one! Great fluff!
I don't think the stowage on the back of the turret lends itself to the stripped down look. I know Johnny 5 has less than the other tanks, but I'm still not a big fan. Other than that, great work!
Rawson
4271
Post by: Eisenhorn
Instead of stripped down,I went the other way.
Enough supplies for him to go on his own for a few days.
If you look closely there are also 3 anchor points for him to be airlifted
43612
Post by: Rawson
Eisenhorn wrote:If you look closely there are also 3 anchor points for him to be airlifted
I hadn't noticed that, but I love the concept! How about a little fluff to fill out the story of this guy?
50557
Post by: Thatguy91
Aweomse stuff! cant wait for more. I do love me some tanks!
4271
Post by: Eisenhorn
Rawson wrote:Eisenhorn wrote:If you look closely there are also 3 anchor points for him to be airlifted
I hadn't noticed that, but I love the concept! How about a little fluff to fill out the story of this guy?
I was thinking on numbering this tank 8 instead of 5,that way his crew can be called the Crazy 8's
I see this tank commander as the type who too Gung Ho,is every bit as likely to press the attack even though told to fall back.
He can drive his tank over terrain that would be immpossible for other drivers,letting him get to places you would not expect to find a 60 ton machine.
This tank has an autocannon to keep the weight lower,as Battle Cannon and its ammo weigh a whole lot more.
No one can spot an ambush like him not even Pask and while he might not be as accurate as Pask,his crew will always get off the first shot.
31886
Post by: dkellyj
On the next tank can you show us the process you use to create the weld lines?
4271
Post by: Eisenhorn
Another tutorial grrrrrrrrrrrr.
J/K I,d be more than happy to.
In short I use super thin styrene rod (0.20) and glue the rods where the welds go.
Then I coat the rod with Tenax Liquid cement.
Then I press in the weilds with a brass rod cut to a 45 degree angle.
Once the weld is done,I use Liquid Green Stuff to clean up the area.
I'll take pics next tank however
4271
Post by: Eisenhorn
I did indeed number this tank #8 the Crazy Eights
Nice Slogan from the FW guard sheet
Found Tamiya Olive Drab Spray can today and the color is spot on.
Thank God O.D. is a bitch to clean from the airbrush.
Time for some winter magic
33033
Post by: kenshin620
Those looks pretty cool. Very reminiscent of old ww2 schemes but still it fits on 40k stuff pretty well
Although every time I look at them, I'm reminded of dust tactics
25963
Post by: Miraclefish
Merica! Feth yeah!
Absolutely stunning. I don't know why, but for me, the weld lines make it. Incredible.
45282
Post by: ninja13
These tanks are just epic! Hope to see this project finished!
4271
Post by: Eisenhorn
kenshin620 wrote:Those looks pretty cool. Very reminiscent of old ww2 schemes but still it fits on 40k stuff pretty well
Although every time I look at them, I'm reminded of dust tactics
Funny you say that,Dust was one of the big inspirations for this paint sceme
15077
Post by: infilTRAITOR
As a treadhead and a fan of realistic paintwork I am in sexytimeheaven with this thread!
4271
Post by: Eisenhorn
I just finished the chassis for tank number 8
I have to get in gear and crank out some tracks for this and the other two tanks.
I have 1/35 scale paint stencils coming in the mail,when I get it I am going to stencil H/K on the top of the crate.
 Automatically Appended Next Post: Automatically Appended Next Post: Here is the commander for the Crazy Eights,Eightball himself
The models eyes are not the best,if I painted the white they would be cockeyed.
But it looks good squinting like he is looking for traps and ambushes

4271
Post by: Eisenhorn
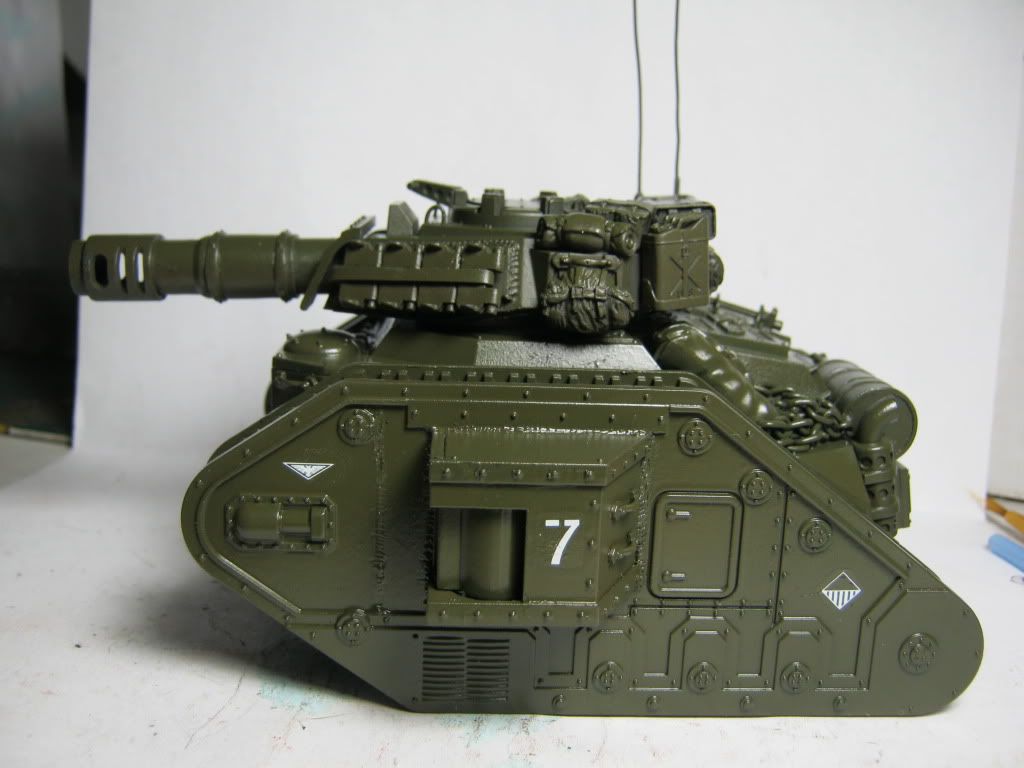
I have pretty much finished the build for the next tank.
Gonna start getting on track this will be the XO's tank Tank number 2
They say the Plasma tanks are rare so I figure the XO would get that.
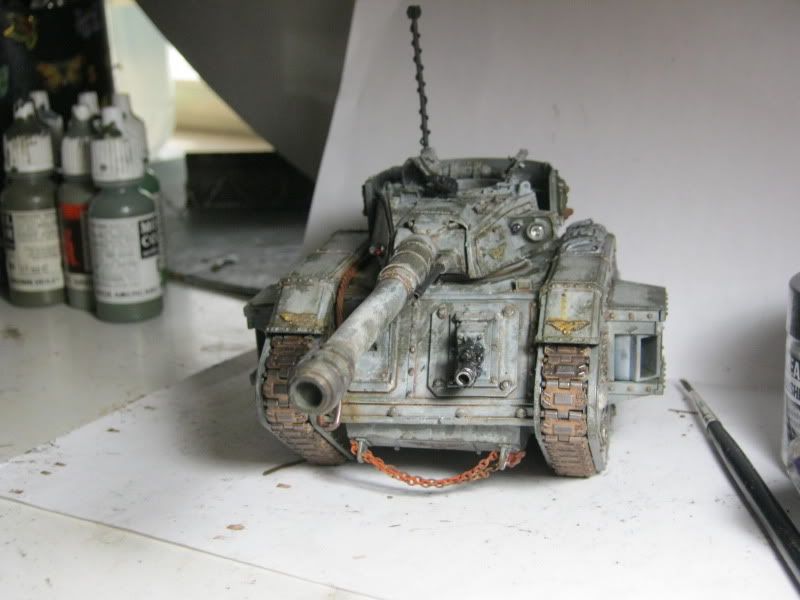
The CO is going to be on a Mars Pattern Vanquisher,have the turret just need the chassis.
Copying last tank this too has bolts along the bottom Mars style as well as the exhausts,extra wire detailing on the cannon and spare tracks strapped to the back of the turret.
I added a Stowage rack to the back and filled it will gas cans and a ammo box.
This time I used a guardsman Comm unit for the Comms added 24 guage wire antenne.
I also used picture hanging wire to replace the tow cable
Next post will be the welding tutorial Welding 101.
 Automatically Appended Next Post:
As promised Welding 101
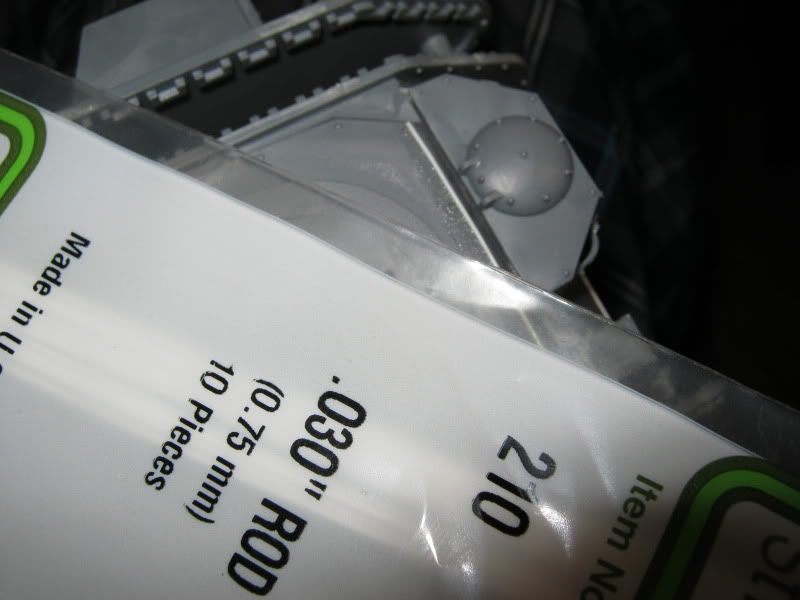
First you need Tenax liquid cement and .020 plastic rod,you will need .030 if there are any gaps in the construction.
Tenax is a super thin waterlike plastic glue that is super strong.
Get an old brush and paint on the Tenax where you want the weld.
Then cut off a workable size of rod an attach to where you want the weld,the rod is thin enough to wrap around,details,then paint over this with another layer of glue.
Cut off flush using cutters or a number 17 flat Exacto blade the blade give you the most control.
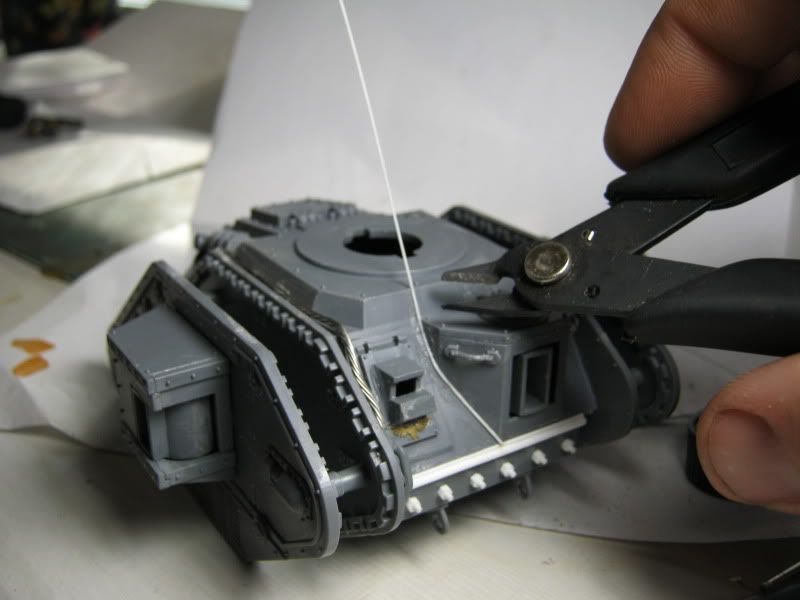
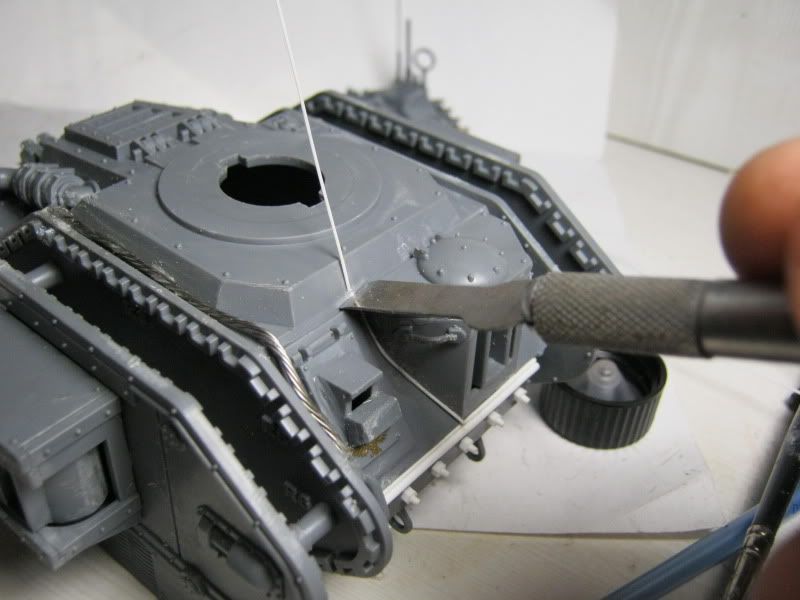
Like I said there was a gap where the sponson meets the hull that the .020 fell right into,this is when we use the .030.
Now continue this process anywhere you want welds on the tank
Now you will need a brass rod cut off at a 45 degree angle,metal coat hanger works good for this.
I added some g/s for comfort,using just the rod is hard on the fingers.
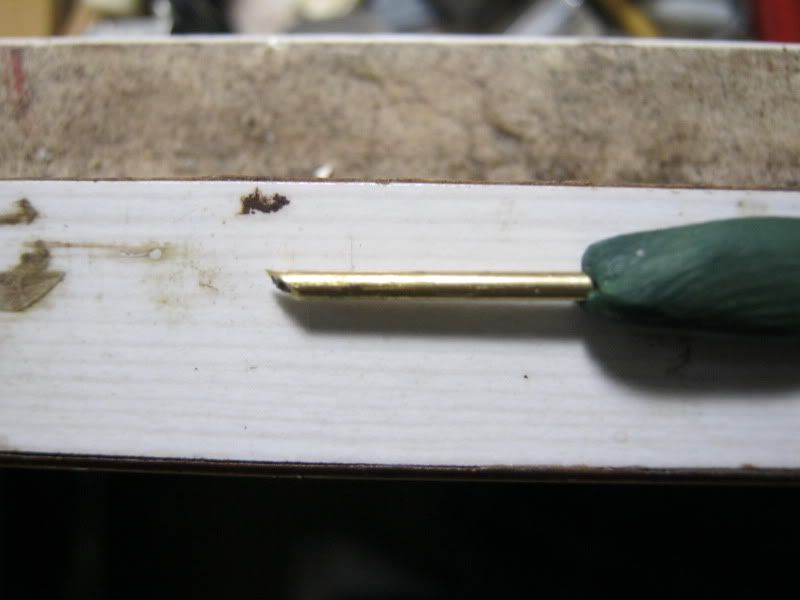
Now coat the weld in a layer of Tenax wait 20-30 seconds then start pushing in your weld ridges
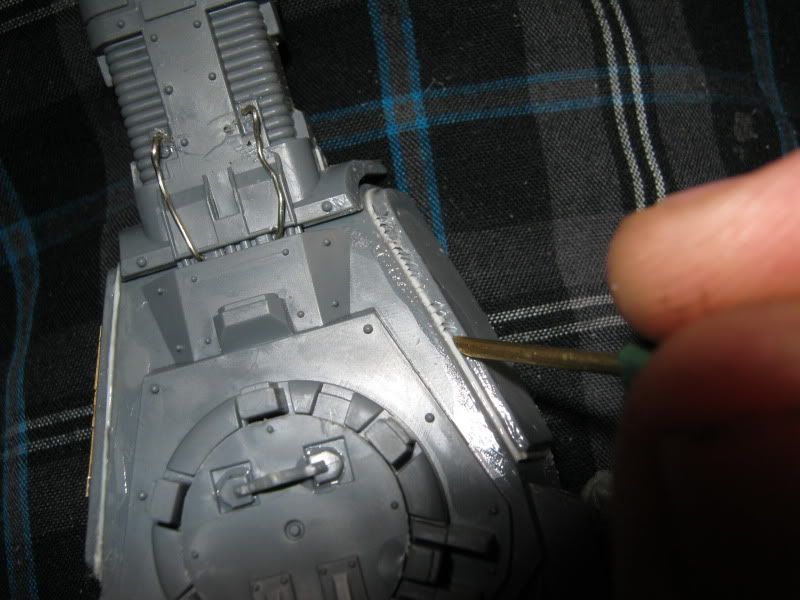
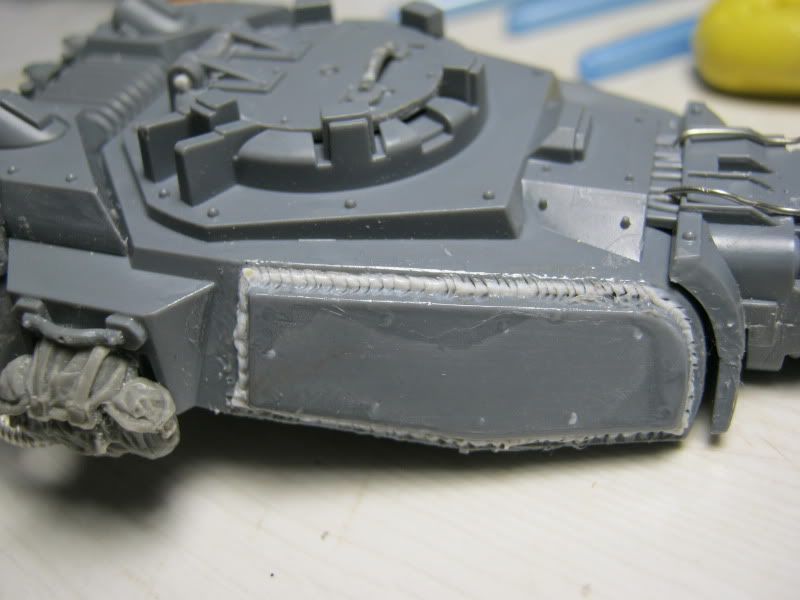
Continue until all the welds are welded
Now the final important clean-up step
Using Liquid G/S make a miketure that is paintlike in consistancy and paint over and glue residue.
I cover the whole section to keep it uniform
Once dry Prime and Paint
4271
Post by: Eisenhorn
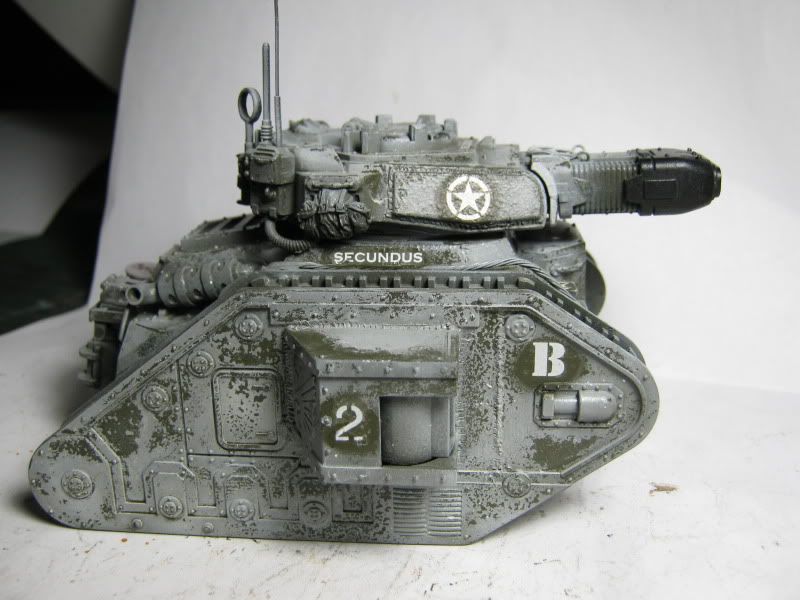
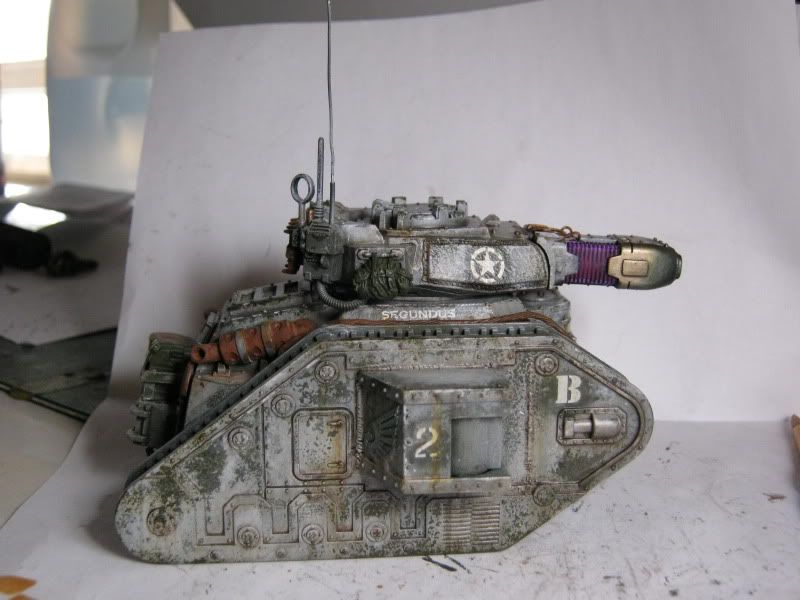
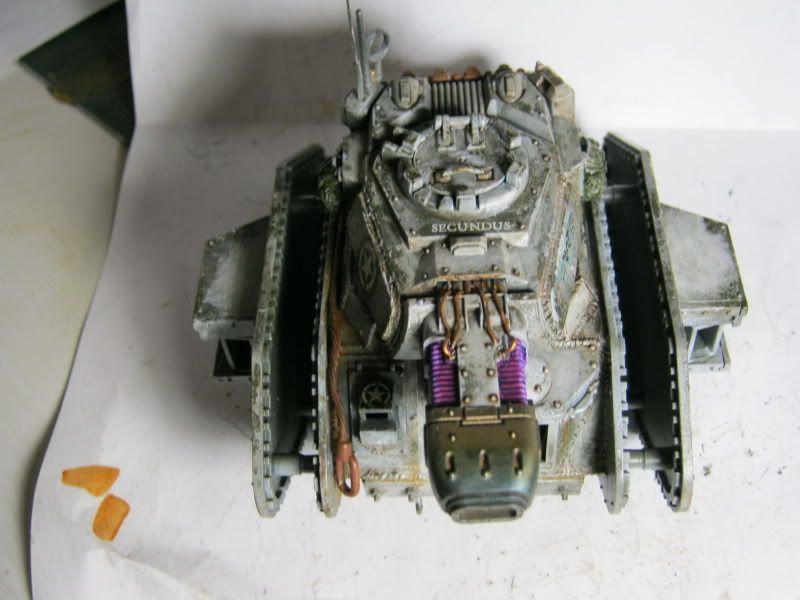
Number 2 is camoed up.
This is the Secundus the XO's tank.
A bit of the decal lifted but that will just be wear and tear.
Need to do a few touch ups then weather.
Just ordered the Mars Chassis for Primarus.
1340
Post by: Northen
Great looking tanks here.
Thanks also for the tutorials, it's always nice to see the process behind great models.
53002
Post by: Tibbsy
Wow, these tanks are great! Love the weathering...
Consider me subbed
518
Post by: Kid_Kyoto
Eisenhorn wrote:Rawson wrote:Eisenhorn wrote:If you look closely there are also 3 anchor points for him to be airlifted
I hadn't noticed that, but I love the concept! How about a little fluff to fill out the story of this guy?
I was thinking on numbering this tank 8 instead of 5,that way his crew can be called the Crazy 8's
I see this tank commander as the type who too Gung Ho,is every bit as likely to press the attack even though told to fall back.
He can drive his tank over terrain that would be immpossible for other drivers,letting him get to places you would not expect to find a 60 ton machine.
This tank has an autocannon to keep the weight lower,as Battle Cannon and its ammo weigh a whole lot more.
No one can spot an ambush like him not even Pask and while he might not be as accurate as Pask,his crew will always get off the first shot.
Rules wise taking Creed as you HQ would allow you to give him out flank and pop up from nowhere.
Great stuff and as others said America feth yeah!
18424
Post by: Imperial Monkey
Amazing looking tanks, truly inspirational for any guard tread-head (what other reason is there to take guard?)
48376
Post by: Capitansolstice
That is amazing. I wish you were working on chaos though
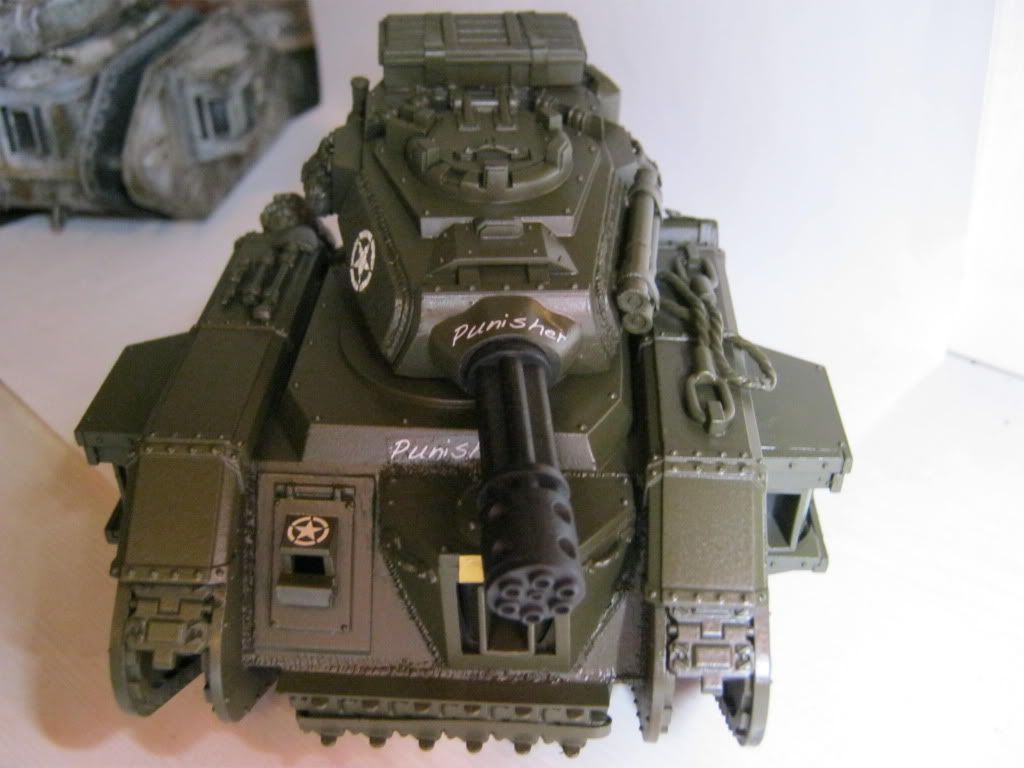
4271
Post by: Eisenhorn
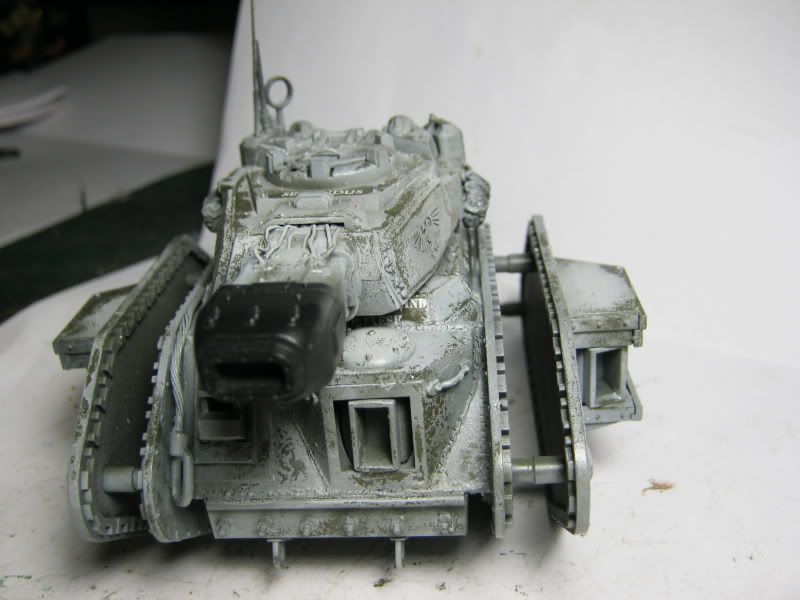
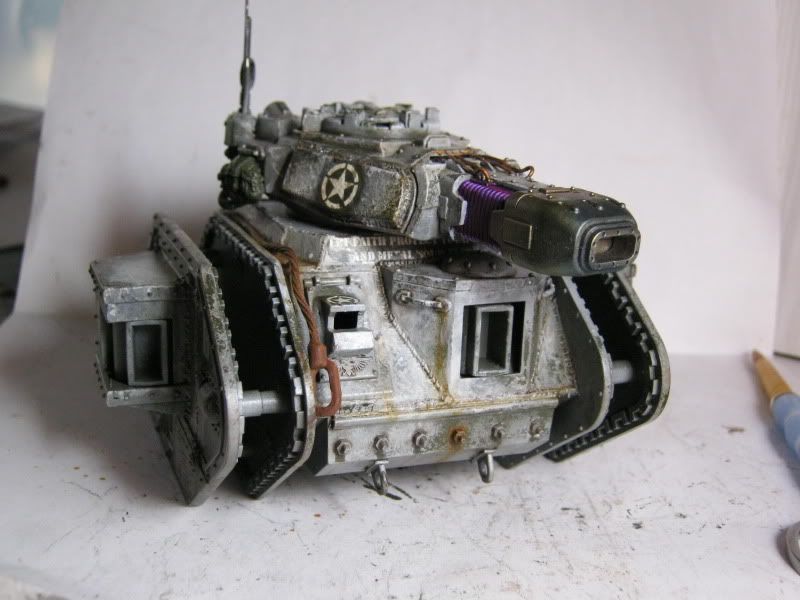
Tank 2 fresh off of the assemby line,well so to speak.
Really pleased with the plasma burned barrel,used Tamiys Burnt Blue and Burnt Orange powder for that effect
I made this tank a little more old looking,keeping with the fact Plasma tanks are now artifacts.
I am not 100%thrilled with the comms however I think that I will need to come up with something scrachbuilt along the lines of the Forgeworld one.
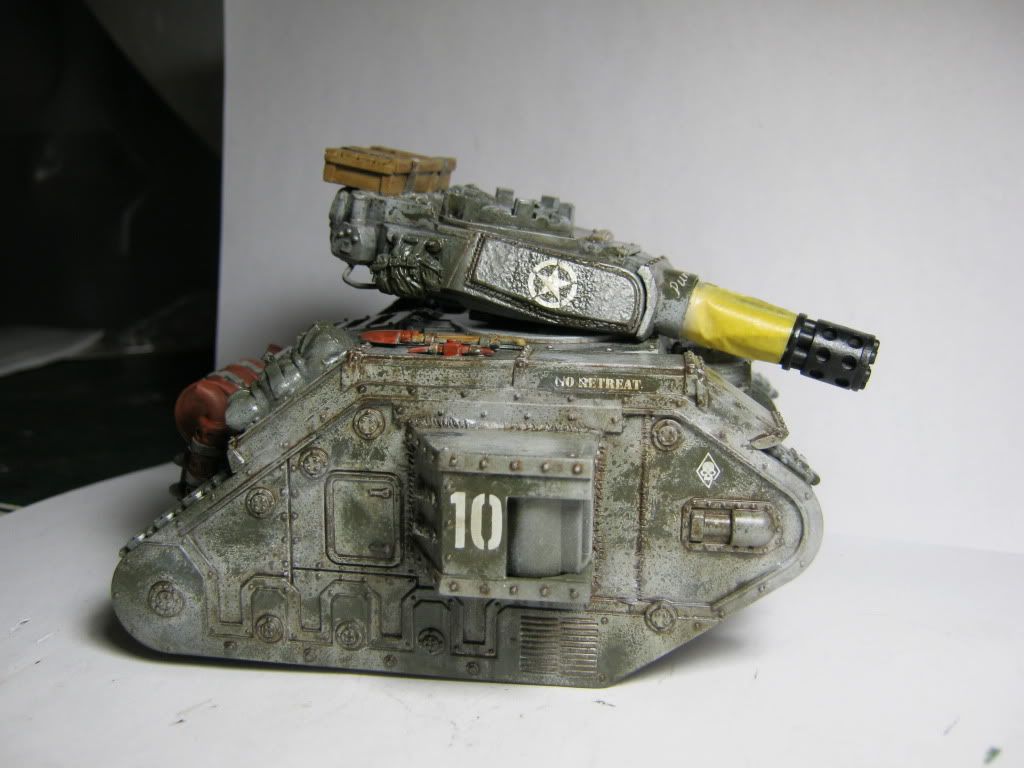
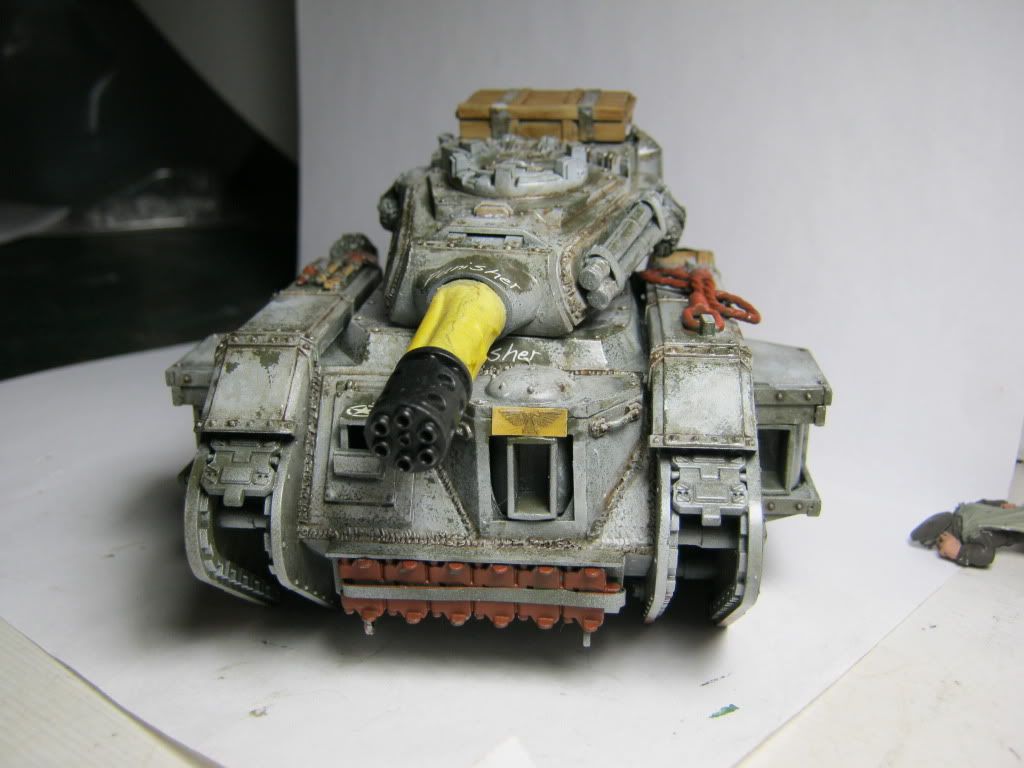
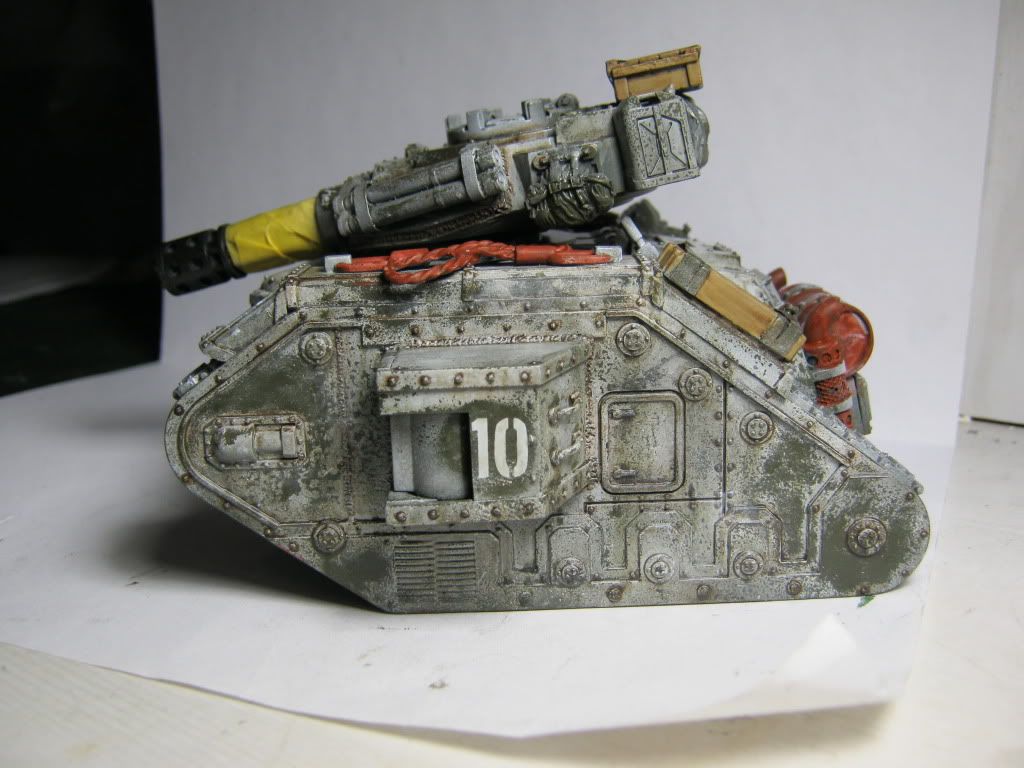
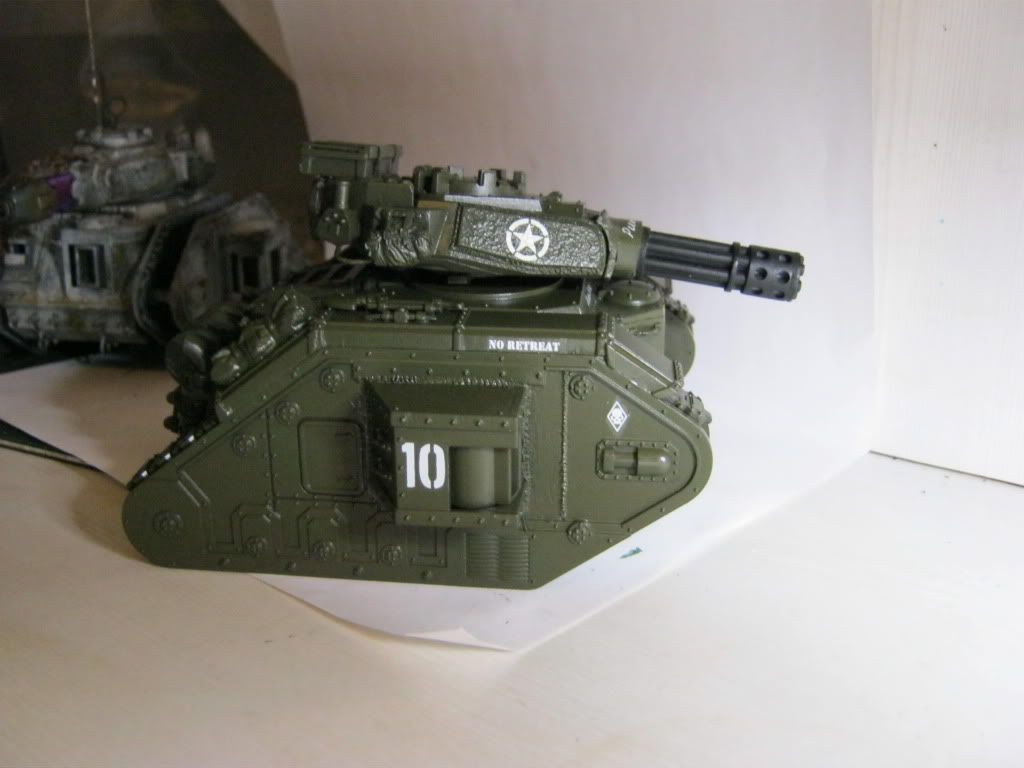
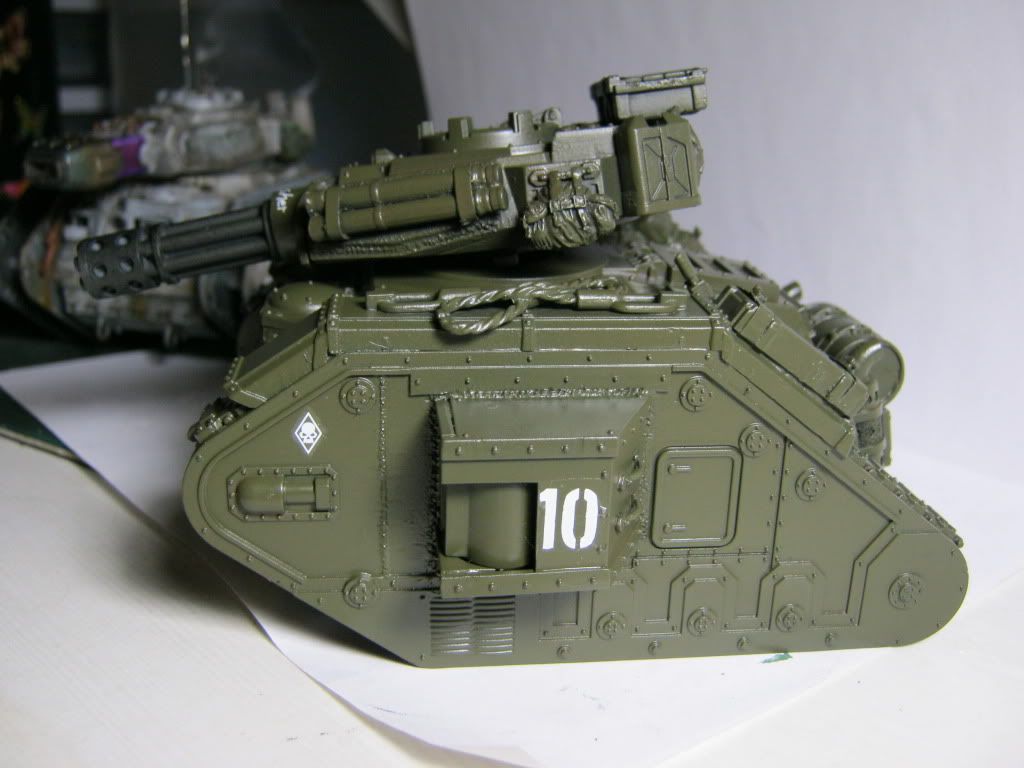
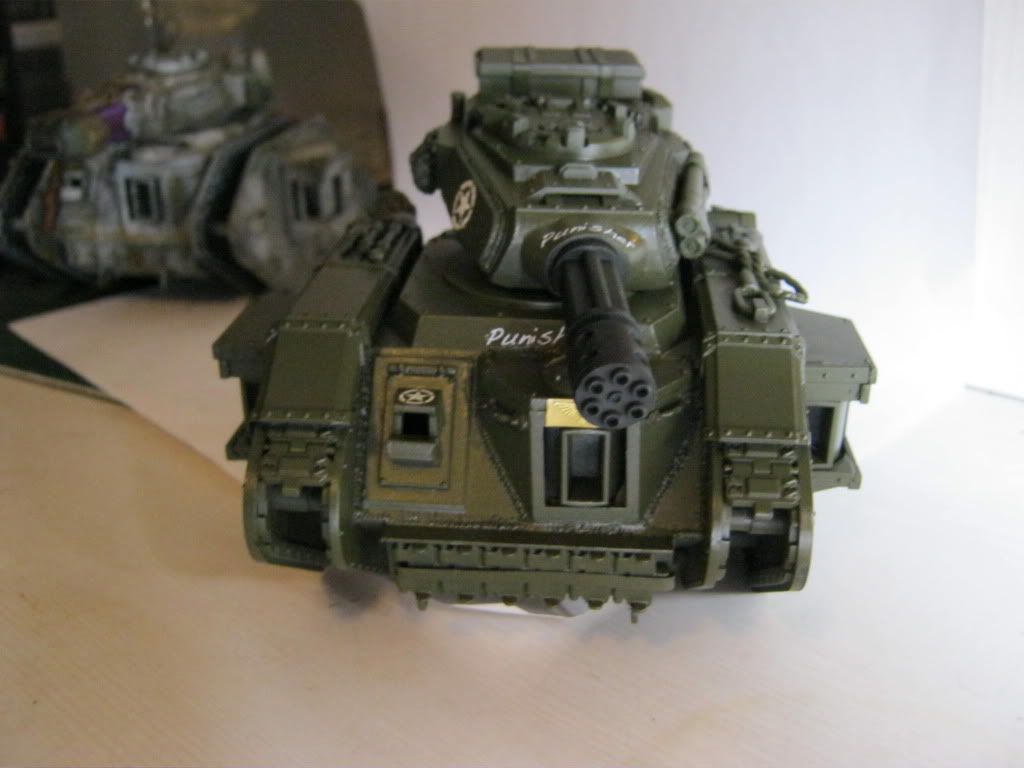
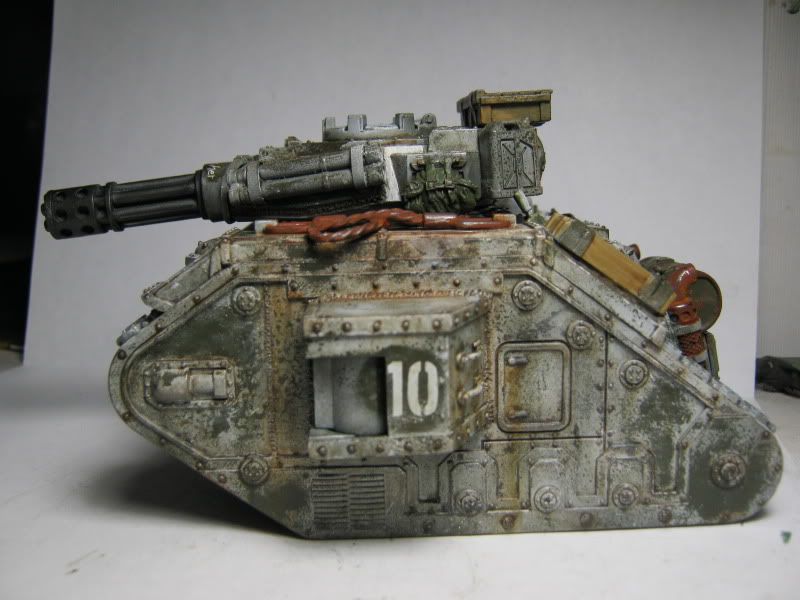
 Automatically Appended Next Post: Automatically Appended Next Post: I have started the build for tank number 10 the Punisher.
I figure this tanks supports the footsloggers a bit more so I added fenders for the guys to hitch a ride on.
I added the spare track to the front this time with a bracket made out of an L piece of pasticard
Sowage is a mix of Academy 1:35 tank stowage and pioneer tools from the equipment sprue
4271
Post by: Eisenhorn
The build is finished,funny how I picked this model up at 11:00 thinking I was just going to weld the front plate.
Three hours later the whole tank is ready for primer now.
I Added Tow cable from the old vindi kit on the left fender,now they do not look so bare.
It is surprising hard placeing stowage in a realistic manner.
24703
Post by: Norn King
The weld-lines look awesome. (is that how you spell it?)
4271
Post by: Eisenhorn
Thanks a bunch,I thought this was ready to paint until I remembered I have to clean up the glue residue with a liquid g/s skimcoat
and yes you spelled it correctly you get to advance to the next round of the Spelling Bee Automatically Appended Next Post: So for my tank company I bought a box set off e-bay.
They came as a 1 box full of sprues for the russes.
My question is when you buy 1 new style leman russ box does that tank come with the accessory sprue with the dozer blade and most importantly comms?
I am starting to think this seller took out all the accessory sprues to resell then sold me just the tanks.
Or does the Apocalyspe package not come with them?
Any info is appreciated,thanks.
4271
Post by: Eisenhorn
Thank God for the FW guard decal sheet,if not for that I would of had to line up the 1 and 0 myself.
I found the perfect decal however on the Dust allies decal sheet,the Punisher.
The basecoat for the camo is finished this time I am going to prepaint the barrel a rust color for a really cool effect once I use the chipping fluid.
14392
Post by: nerdfest09
Amazing work mate! you have shown me an absolute Aladdin's cave of fantastic ideas and techniques! I will definitely try your welding method as well as subscribe to keep watching your tanks come to life!
great stuff, well done! can't wait to see more!
Nerdfest09
18980
Post by: Arakasi
Awesome work here. One thing - I can see frosting around the decals. Now, it may be exaggerated by the photographs, but there are a couple of things you can do to make it even better:
1) Trim the decals as close to the design as you are comfortable.
2) Coat the panel in gloss varnish, let dry, then apply the decal. The frosting comes from small pockets of air trapped under the decal due to the matt finish. You can reduce the "edge" effect further (and protect the decal) by gloss varnishing over the top once dry. You can then matt varnish to bring it back in line with everything else.
When your work is as good as yours, its the little things that stick out!
Keep up the good work!
4271
Post by: Eisenhorn
It is not as bad in person,but funny you said that.
I was starting to mask off the decals when I misplaced the tape.
When I lifted it started to rip the No Retreat decal,thats when I rememered a step I forgot.
Gloss Varnish after the decals(I apply them on a semi gloss).
But when I think about it,there is no reason not to gloss the drab before the decals,it gets the semi gloss after it is all done anyway.
Which tank do you see frosting the worst on?
18980
Post by: Arakasi
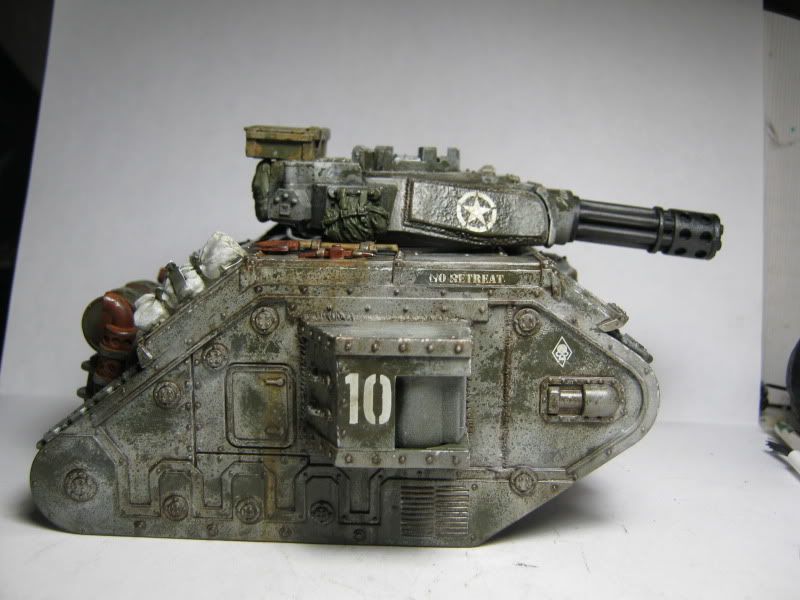
That last one was noticeable enough to make me comment The diamond skull, the 10 and the Punisher on the front most notably.
4271
Post by: Eisenhorn
Thank god that has not been camoed yet,still time to fix it.
Good looking out,like you said I am trying to get this unit the best I can.
Something like that would kill me a liitle inside.
17808
Post by: oadie
Gorgeous work! I always love seeing experienced historical modelers from the AFV crowd work their magic on 40k vehicles. Seems like it's only relatively recently that wargamers have started applying lessons and techniques learned years ago by other modelers, but as evidenced here, the results are downright fantastic!
4271
Post by: Eisenhorn
I am actually a 40k'er who got into AFV
I first got the Forge World Masterclass book and saw the MIG pigments.
I looked into them and more importantly the guy who made them, Mig Jimenez.
From there I started following AFV as well as 40k.
The amount of super detailing in AFV blows my mind.
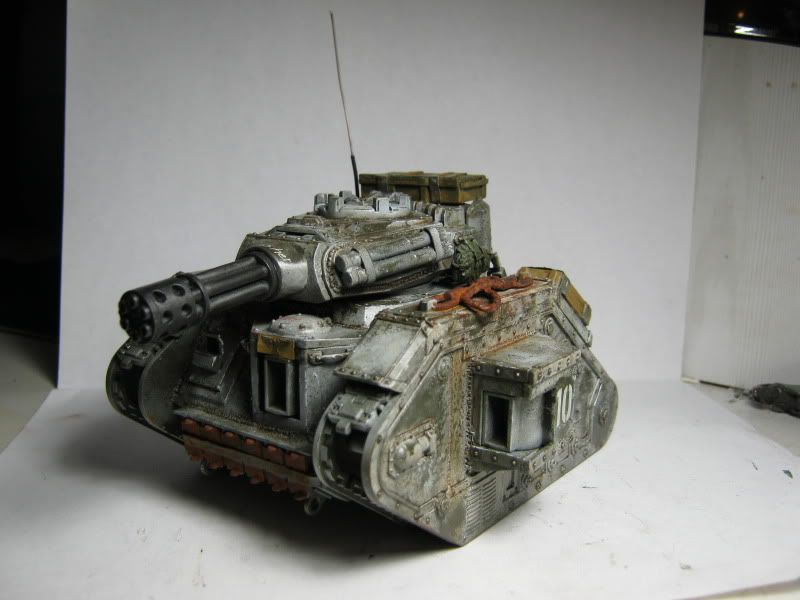
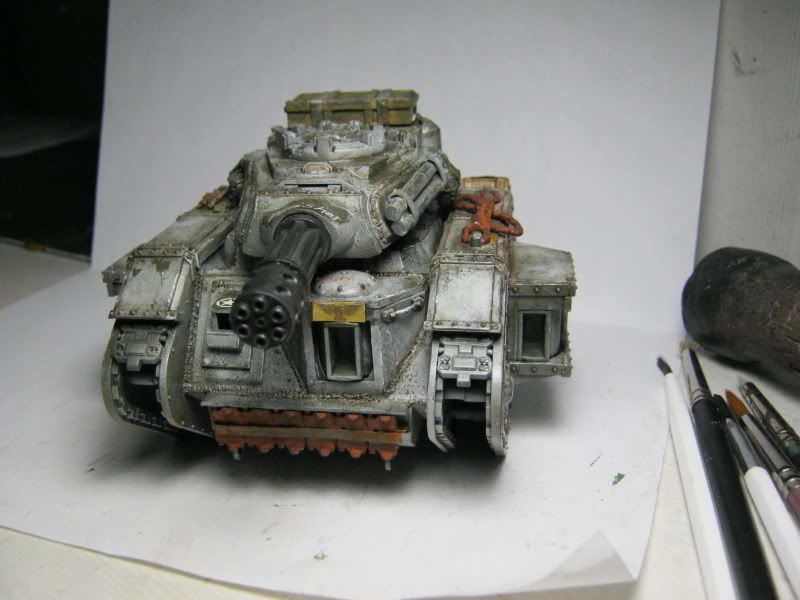
Here is the finished chassis for tank 10
4271
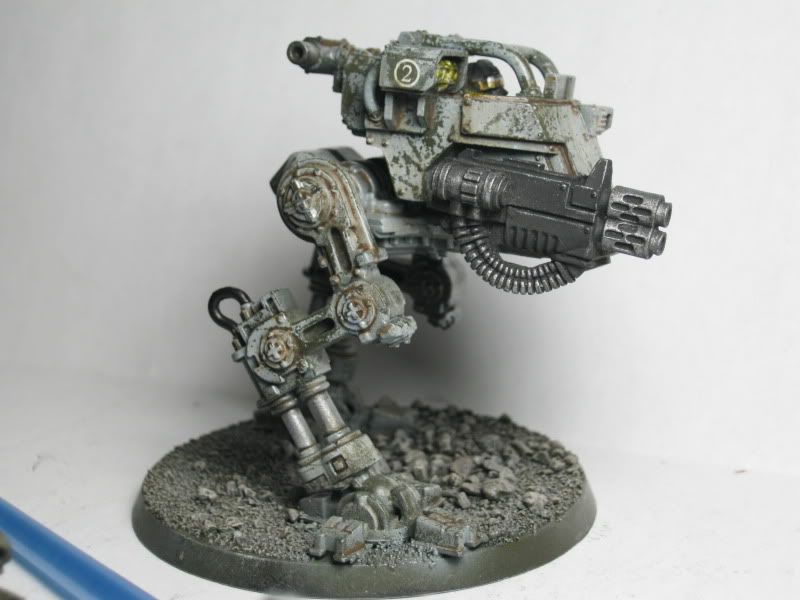
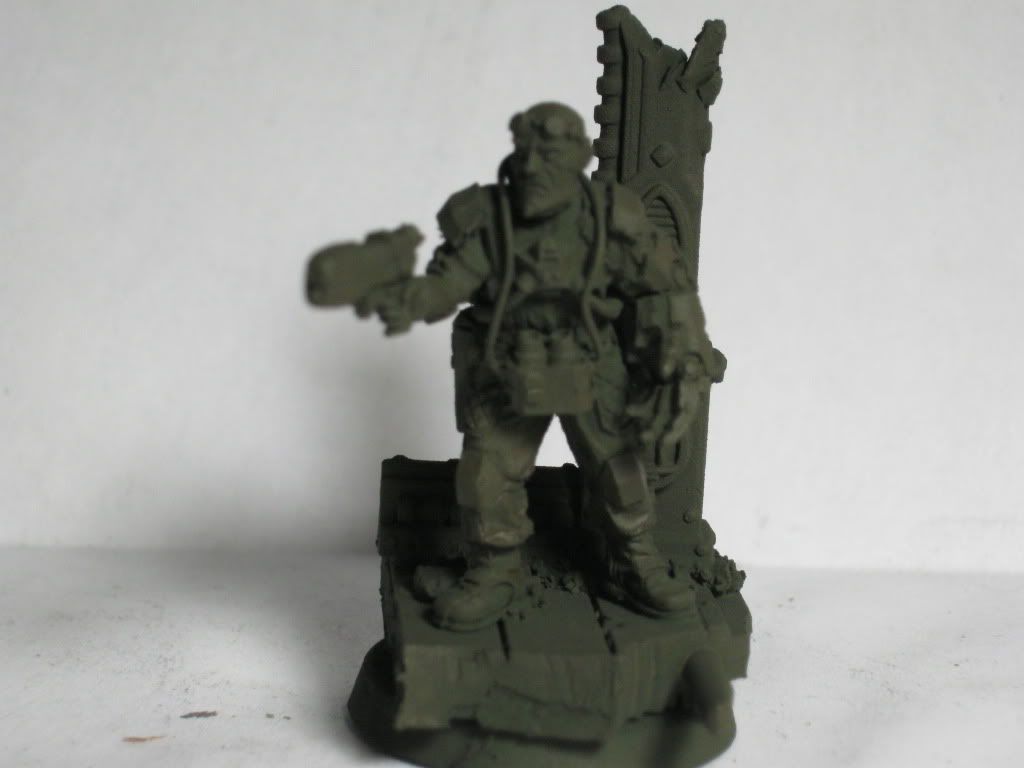
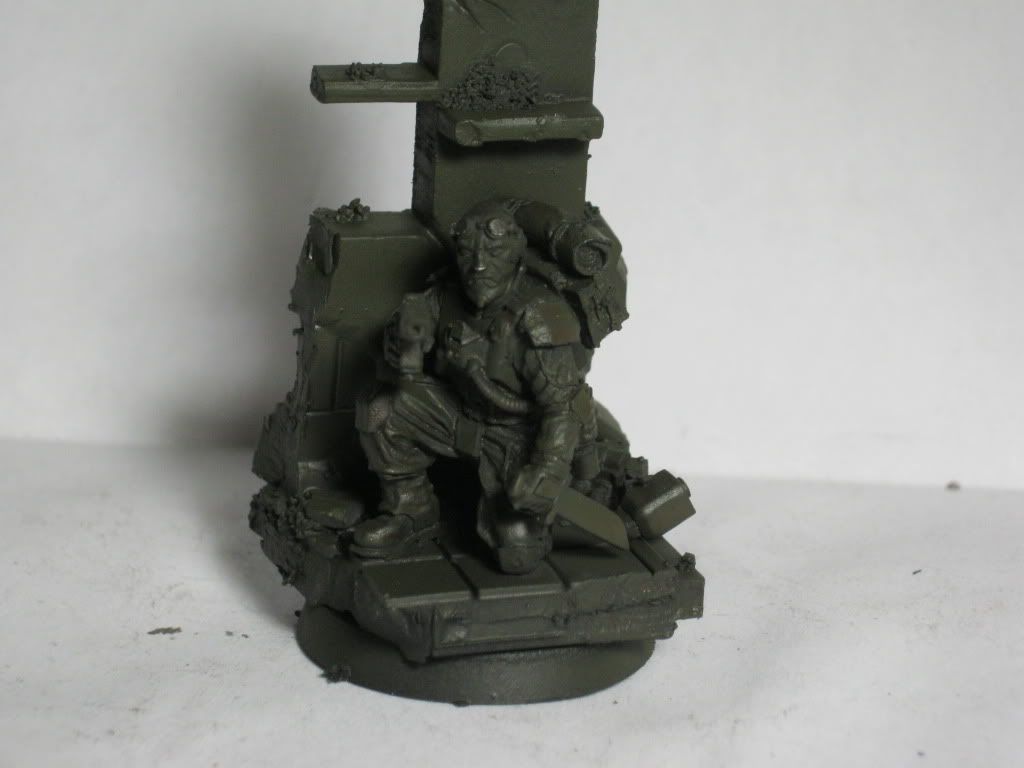
Post by: Eisenhorn
I finished the build for tank #5 tonight
This is a Seige Engineer tank with more tools than the average one.
He also has a double toolbox in the back


48376
Post by: Capitansolstice
I think it needs some welds, and possibly rivets.
But I like it. It definitely adds to the model.
48376
Post by: Capitansolstice
Man, Its hard to decide!
I think I like it, but Im not sure if I like it on that turret...
53075
Post by: DrGonzo
I really like your tanks man keep up the good work
40138
Post by: Joshh
First off, amazing tanks!
2nd off, keep the turret armour on the Vanquisher. It looks completely boss.
3rd off, work faster on the rest of the tanks! I'm really excited to see the conclusion of this tank battalion!
44654
Post by: Lone Cat
haven't I ever seen Joes ever use german-style space armor in the WW2 before?
the similar technology. the "cage armor" is a successor of this concept and used by the present-day Stryker AFV
meow
54592
Post by: AlfonsoTheTraitor
I like the weld lines a lot !
4271
Post by: Eisenhorn
Lone Cat wrote:haven't I ever seen Joes ever use german-style space armor in the WW2 before?
the similar technology. the "cage armor" is a successor of this concept and used by the present-day Stryker AFV
meow
Hell I seen a picture once of a looted Panzer,that was repainted in US colors.
Makes sense,there was a time when the Shermans 75 would be like hitting a panzer with a stone, Id loot one too
33248
Post by: SkaerKrow
I love the work that you've done so far, it's a real treadhead's delight.
48376
Post by: Capitansolstice
1. I agree with you, the polished steel is amazing
2. the way you painted that Aquila is amazing! It looks like it's popping out!
48384
Post by: LordRogalDorn
Wow, just wow. Those are some beautiful tanks you've got there.
My only suggestion (if its not too late) is for the turret guard on the back of your vanquisher. I would recommend narrowing it a little bit. It seems a little tall. Other than that everything you have done is absolutely amazing. I may even have to start a tank company because of this =)
48376
Post by: Capitansolstice
That stuff makes the lenses look real!
6098
Post by: ghostmaker
I love it looks great ! keep up the work !
41398
Post by: palehorse
Great work!
34514
Post by: 40kFSU
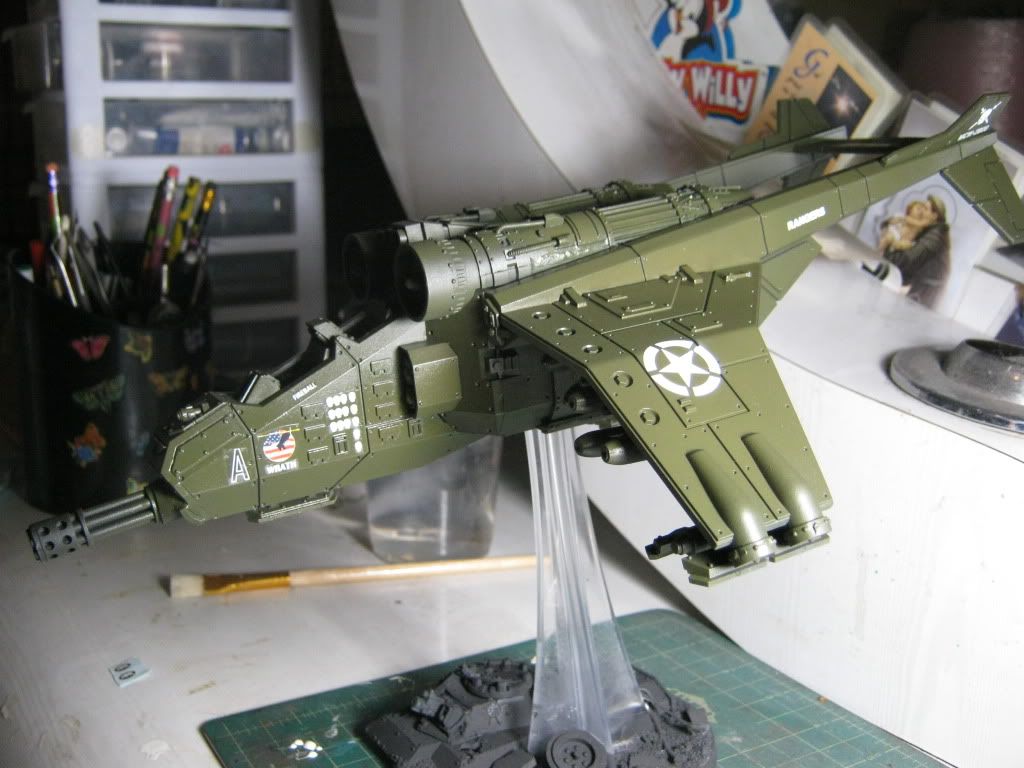
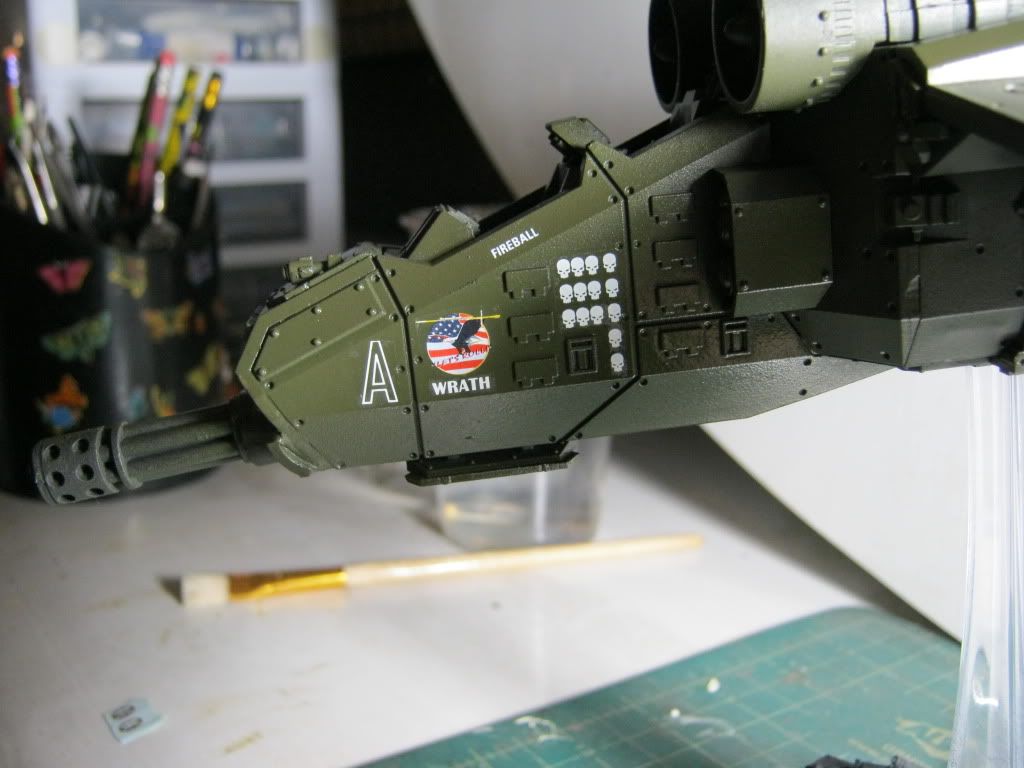
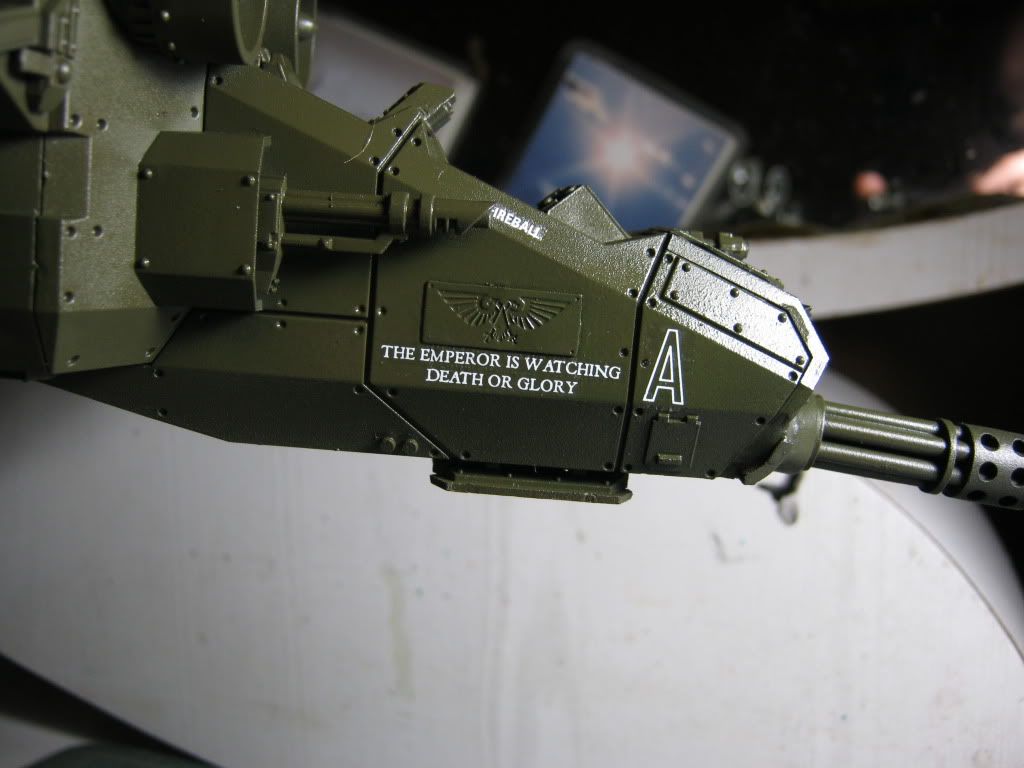
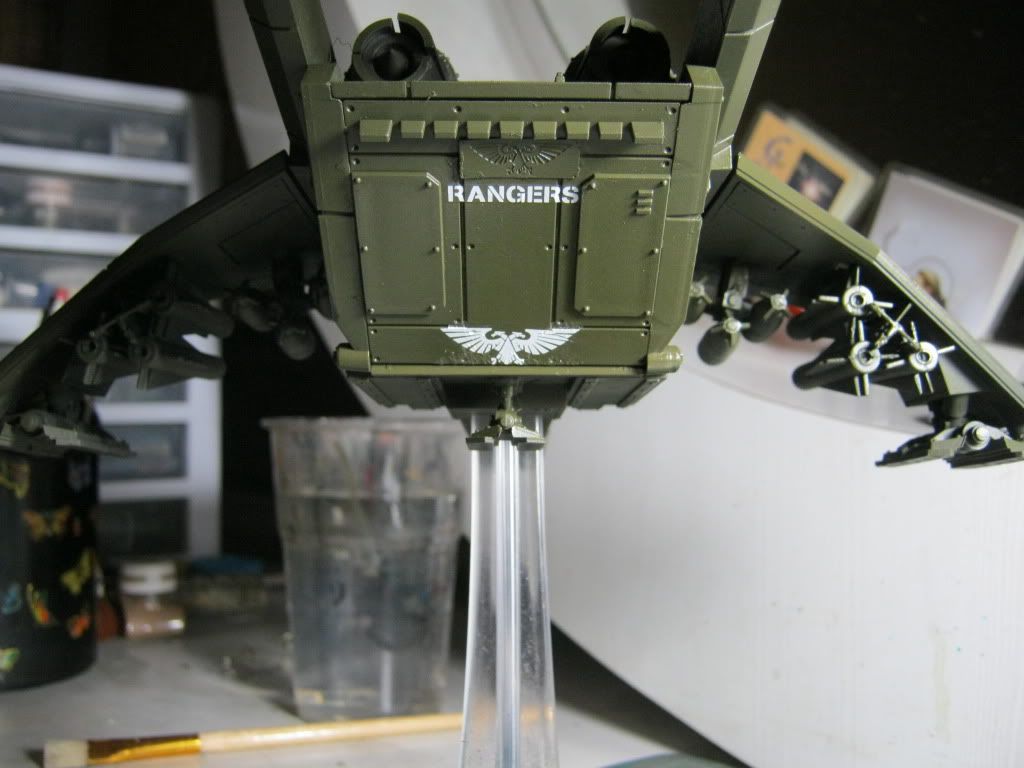
"Lead a life of Danger"? Are some Rangers on the way? I would love to see your take of them.
4271
Post by: Eisenhorn
FSU gets the medal.
Airborne Ranger Elysians
19650
Post by: shingouki
Truly some of the best vehicles i've ever seen.I'm at a loss for words to describe how cool they look too me.
48376
Post by: Capitansolstice
Eisenhorn wrote:FSU gets the medal.
Airborne Ranger Elysians
That would be cool
34514
Post by: 40kFSU
Good call, The Elysians would be great. They have that light, but hard hitting feel to them.
40138
Post by: Joshh
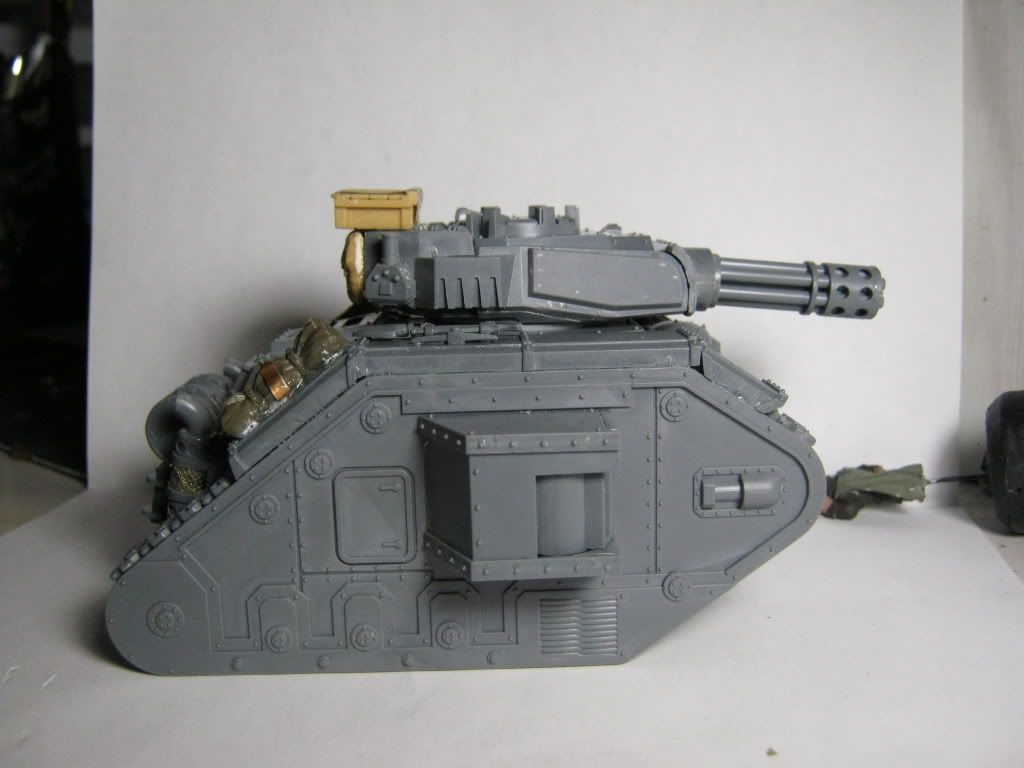
Not to hijack the thread but here's a scratchbuilt Russ for my Elysian Drop Troops army. It's sort of based off the M551 Sheridan airdropped tank.
[ 
The paintjob has been updated since, and I'm planning on adding rivets and such to further detail it.
28269
Post by: Red Corsair
Can we get a group shot of everything?
43612
Post by: Rawson
Red Corsair wrote:Can we get a group shot of everything?
Second that!
4271
Post by: Eisenhorn
Well I finished tank 9 that completes the Russ company.
This final one is another stock Russ,I was tired of seeing barrels so I went with a Jerry can set-up I made from styrene and Academy US gas cans.
I am in the process of retrofitting the Baneblade.
She needs a little restoration firstmbefore I start adding the details to turn it into a mobil command.


 Automatically Appended Next Post: Automatically Appended Next Post: The Mandatory Group shot at last

48376
Post by: Capitansolstice
Exalted
4271
Post by: Eisenhorn
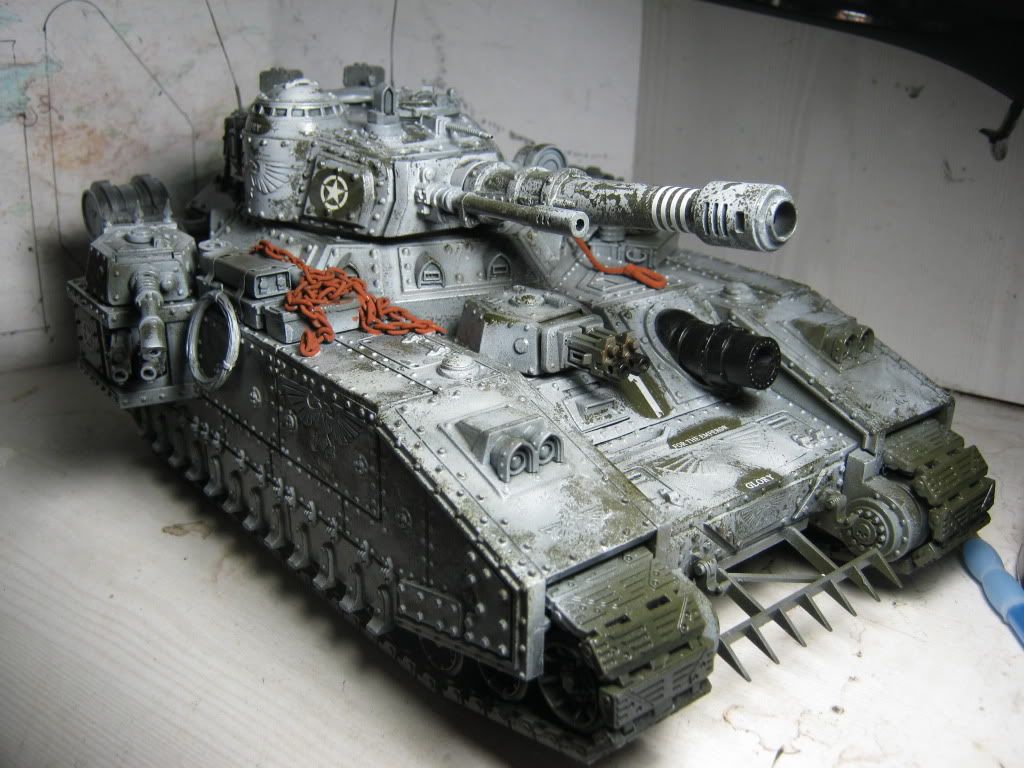
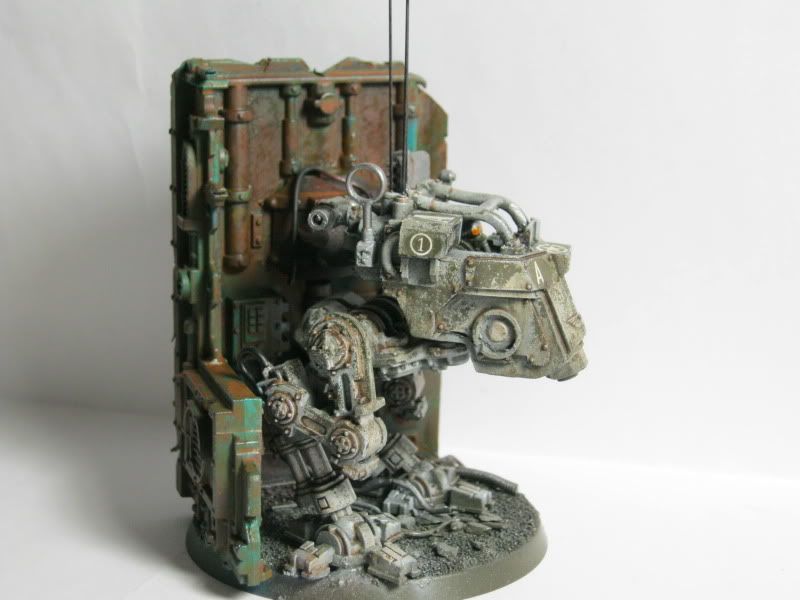
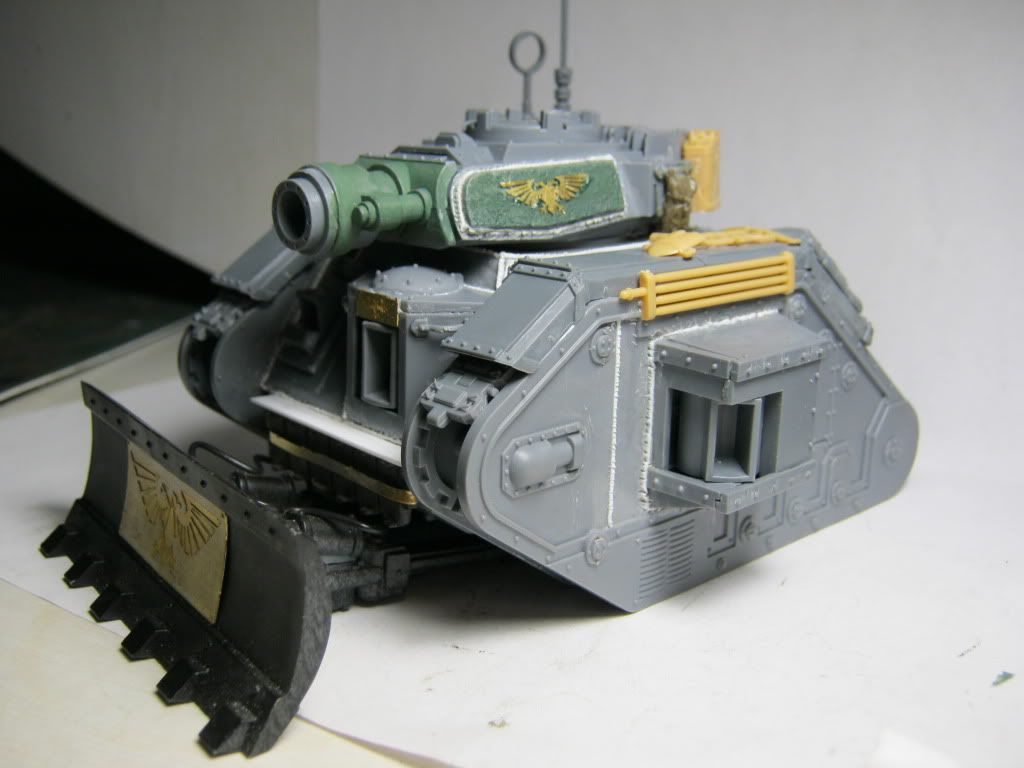
Here is the refit work on the turning the Sons of Horus Fellblade back into an Imperial Baneblade
Here it is as a Fellblade I painted when this kit first came out.
It took forever to get all the Aquillas off,then I used autocannon barrels instead of lascannons,topped off with a healthy dose of spikes

Today it took forever to get the Aquillas on correctly 


Then I had to sand down the front where I went a bit heavy with the glue,when I attached the chains and skulls,after I sanded it down I reattached any rivets that got sanded off with 0.30 plastic rod
Then I added lascannon from the HW sprue cut down
Finally I fixed a track I glued on backwards,had to cut it out and redo the detail
I now have the baneblade pretty much built,just need to add some stowage.
I added a 1:32 german mg barrel to act as the heavy stubber co-ax style,since I do not want the turret obstructed.
I found the perfect model to lead this tank army,he even has the proper style " 1 " on his left shoulder molded on.
He was desitined to lead them.
However when you then give him McArthur's pipe,you know you have issues

48376
Post by: Capitansolstice
Are you going to add any more super detail? or is this the whole tank?
4271
Post by: Eisenhorn
Going to add stowage,but I went and did a real stupid thing a few weeks ago.
I sold my spare shadowsword and sold ALL the extra bits I need like road wheels and spare track.
Did I mention this is magnetized but I have no spare cannon 
Going to add pioneer tools.
Gonna trolling the nets for some ideas
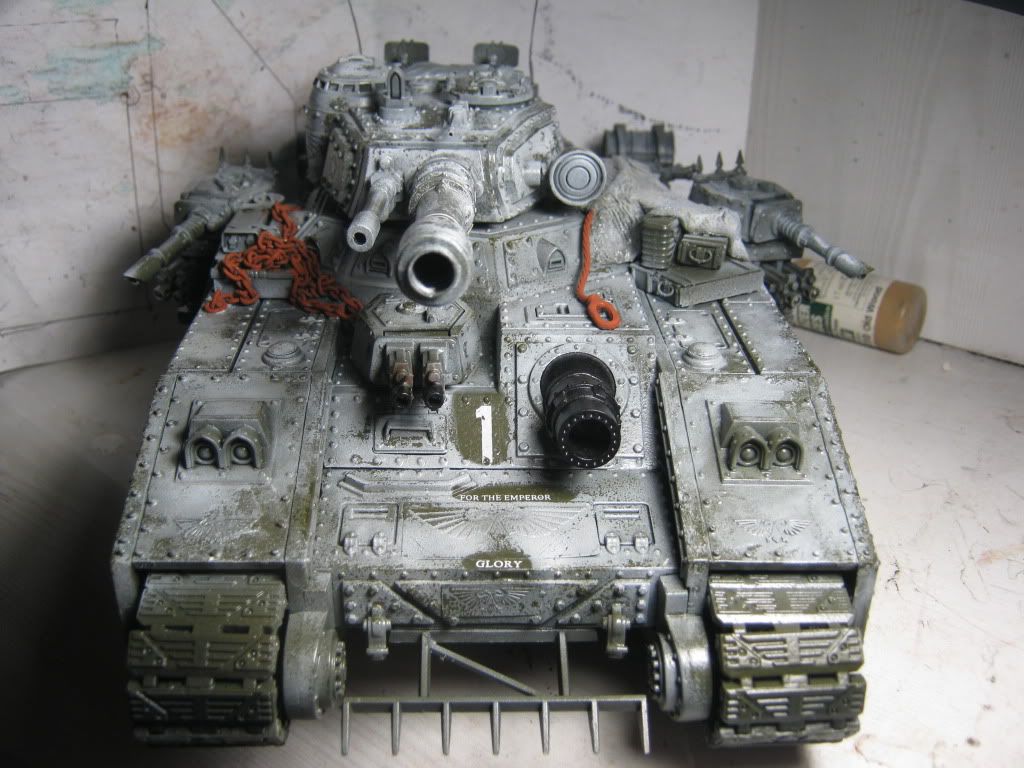
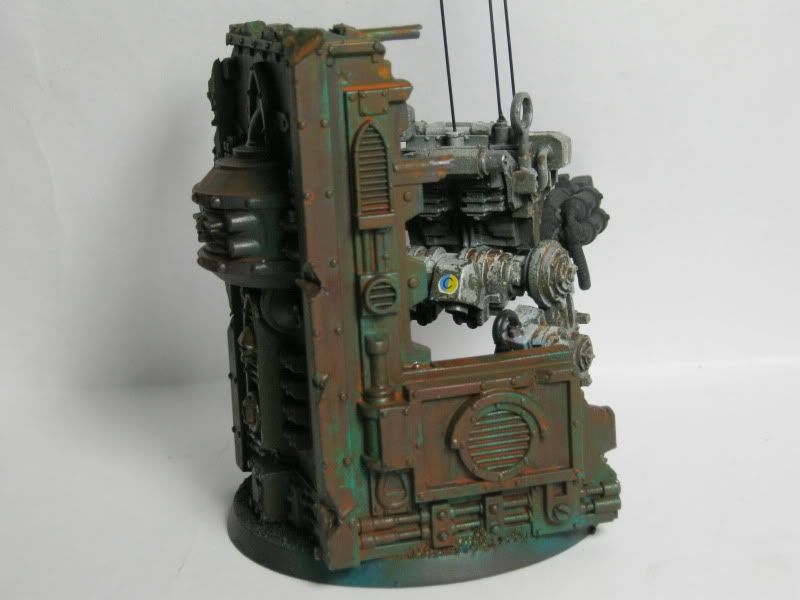
edit ne good thing I found the spare cannon Automatically Appended Next Post: Here she is ready for decals,I did'nt want to go overboard on stowage.
Used the tissue paper/pva method for the tarp on the left side.
Doubles as and effective way to secure the stowage.
I also give the nice illusion of actually having more stowage there.
I used radar dishes from the marine vehcile sprue for command level comms.
I think I did a bang up job returning this tank to its former beauty.
Funny at the time I painted it I was soooo proud of that SoH Fellblade,looked at it now like yuck.
Maybe now it will not sit in a bin and collect dust for three years.


48376
Post by: Capitansolstice
Nice!
34514
Post by: 40kFSU
You are the weathering master.
4271
Post by: Eisenhorn
Maybe but the Supreme Grand Master is Mig Jimenez
too back he only does historicals
4271
Post by: Eisenhorn
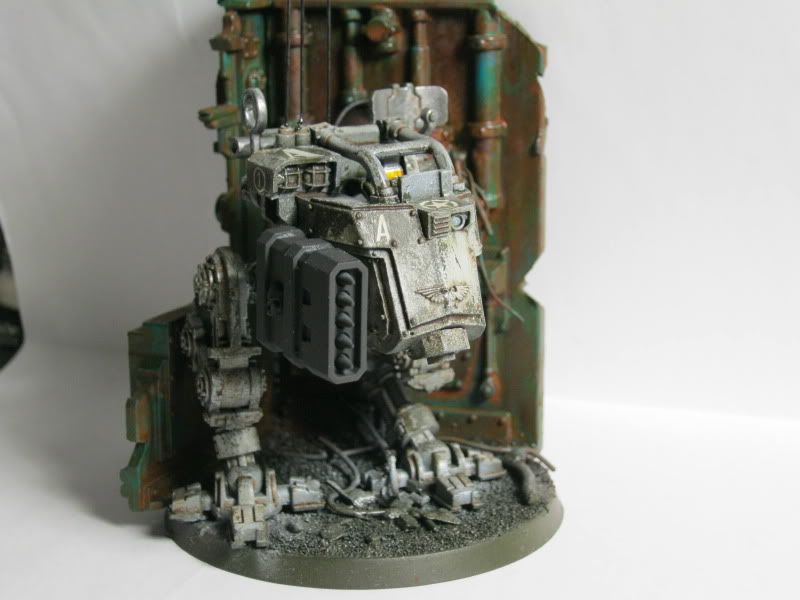
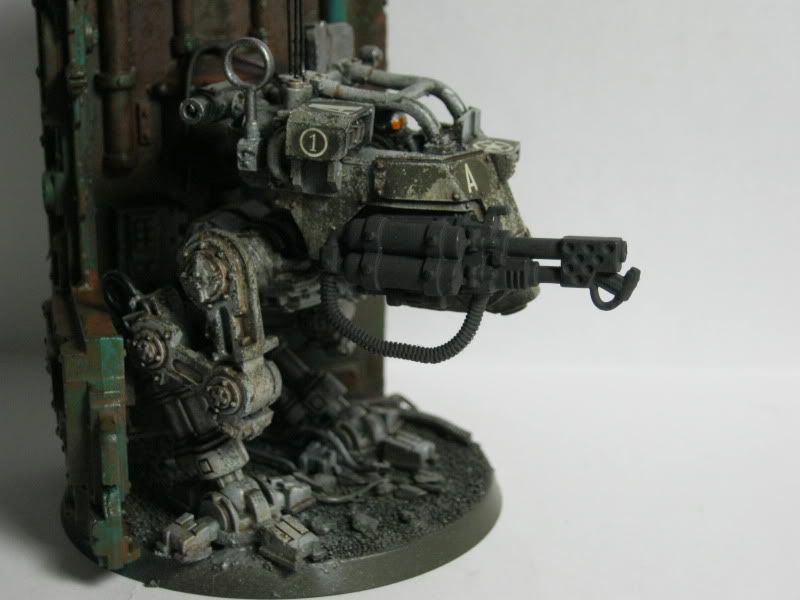
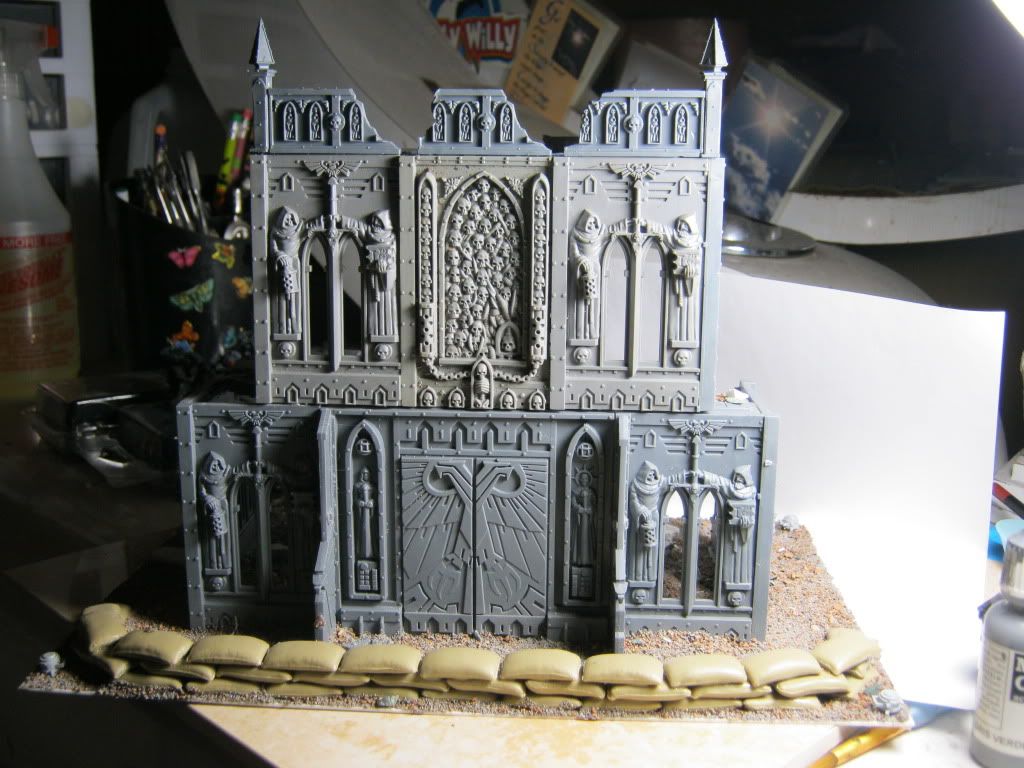
Glory is almost complete,just have a few special effects that I need to do tomarrow with the airbrush and a little more detail work like viewports and touching up the rust in a few spots.
I also need to work the back shrine.
Now that the bulk of the painting is done and it received its final Dullcote layer I could add the final piece of super detail I have been dying to use.
AK Interactive realistic lenses for the headlights,Autocannon targeter,and shrine sensor on the turret,I am floored by them and I am also hot on the trail on a way cheaper alternative.
Plus my Brother kind of talked me into trying to make them myself with shiny foil and clear epoxy as I would love one for the Big Searchlight but I cannot find them that big.
So I might as well try, anyone have experience with clear resin?


48376
Post by: Capitansolstice
Looking amazing!
18980
Post by: Arakasi
Stellar work - and so fast too!
45857
Post by: SelvaggioSaky
Just fantastic man!
4271
Post by: Eisenhorn
I just had an Epiphany.
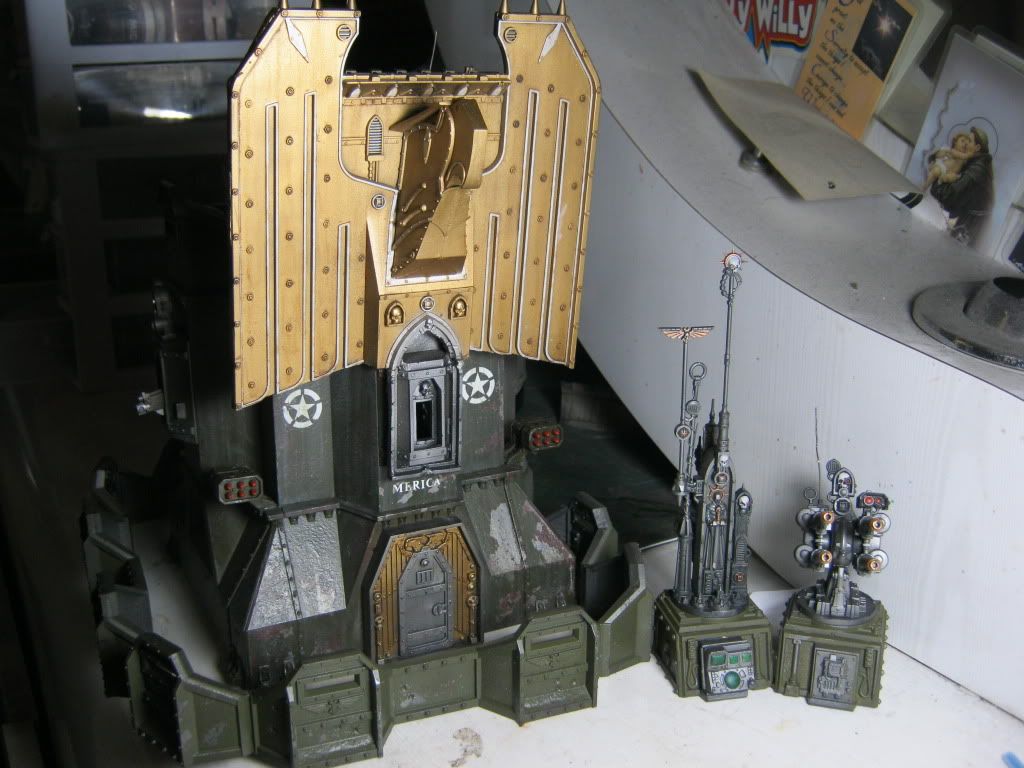
"FORTRESS AMERICA"
4271
Post by: Eisenhorn
And here is my fever dream realised
"Fortress America"
Finally found a use for kits that were just sitting there
I added a few things Assault cannon for the front and back.
Typhoon Missle pods on the front.


48384
Post by: LordRogalDorn
That Fortress America is pretty awesomely amusing. And your baneblade is just fantastic.
18980
Post by: Arakasi
Shouldn't that be "Fortress Merica"?
48376
Post by: Capitansolstice
LOL! That is pretty sweet man!
4271
Post by: Eisenhorn
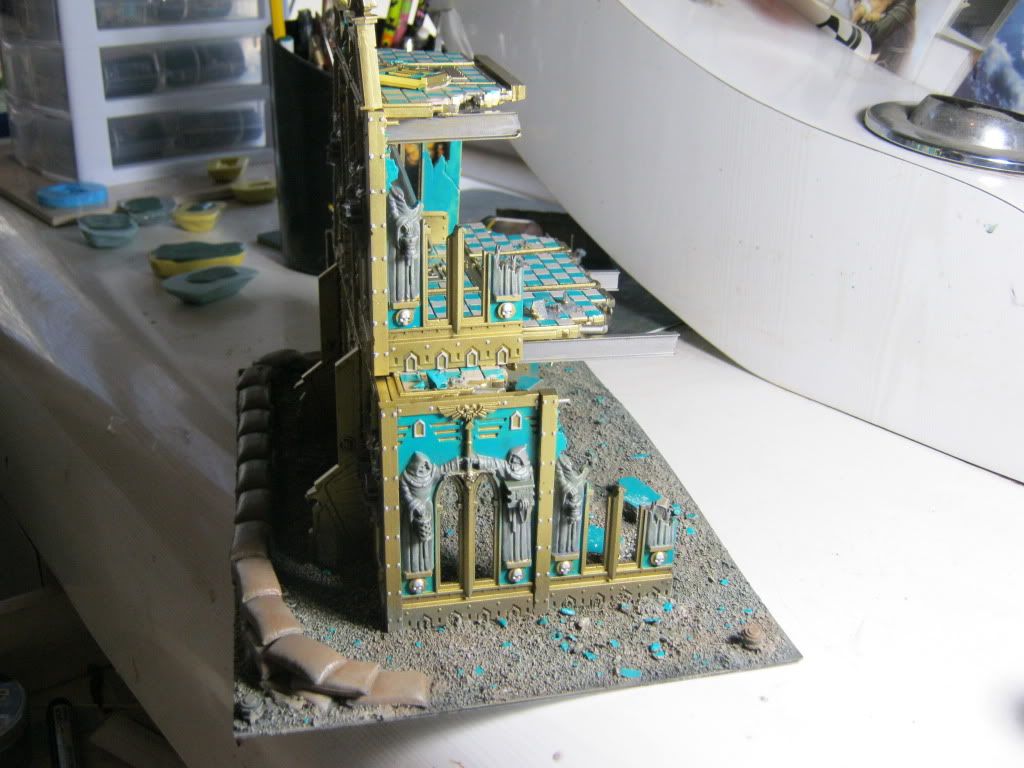
Here is a pic with the bastion weathered
I designed a base to go with it out of two sheets of 1mm plasticard.
I spent an hour or so painting the walls only to have to redo them because I had to prime the ground.
Nothing fancy just medium ballast with a little barbed wire and course course the required skull pile,I added a second for symetry .
The bastion will just sit on top of this,I am not going to permenantly attach to base for both ease of storage and you can still plop the bastion down on anyboadys board without base.
with base
48376
Post by: Capitansolstice
Love the skull piles!
4271
Post by: Eisenhorn
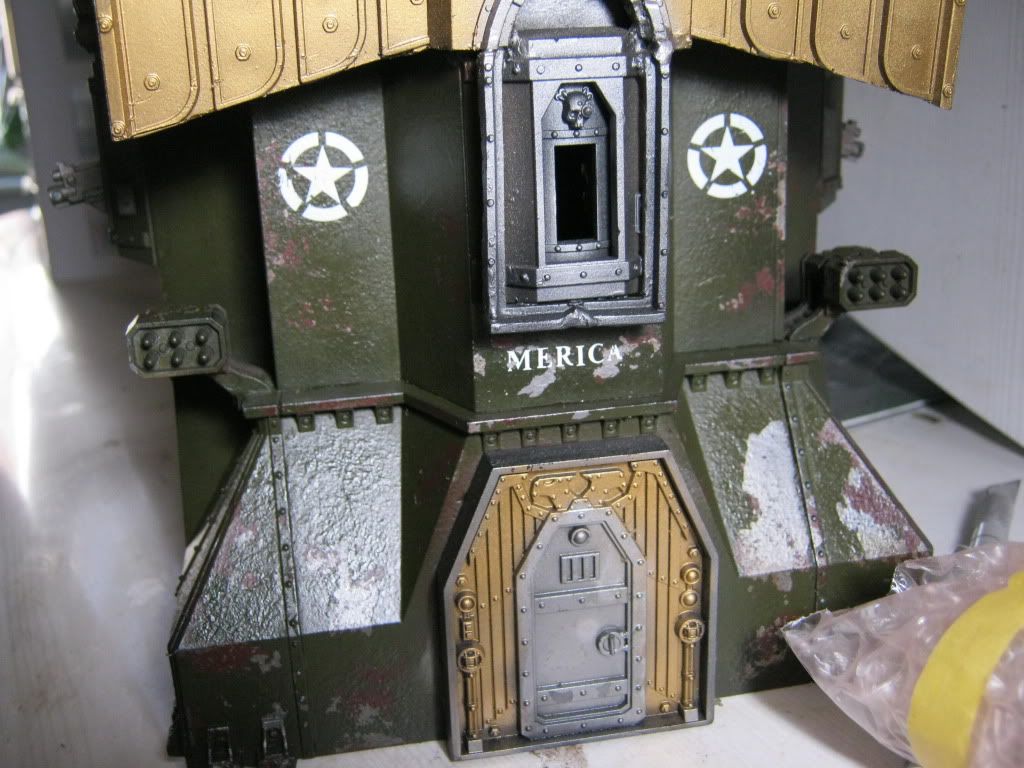
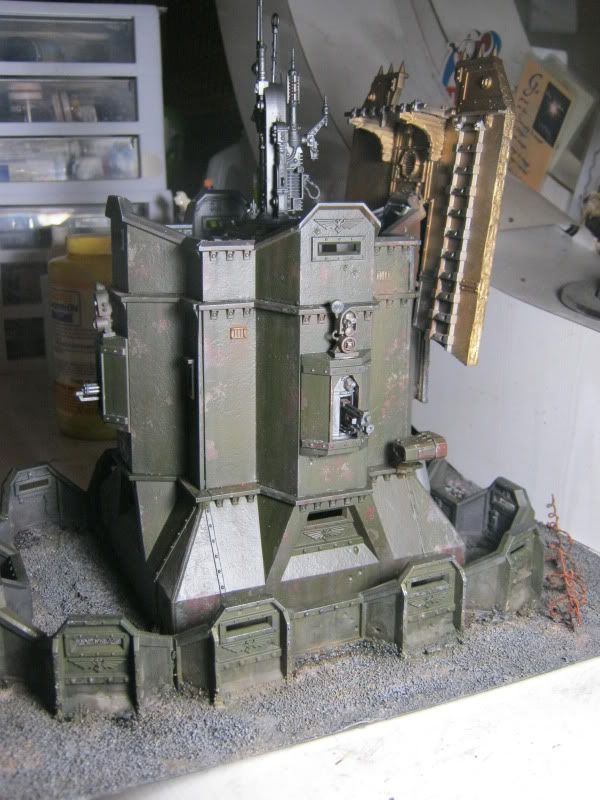
Here is the finished Bastion "Fortress Merica"(Yes I went an changed it )
I weathering it with various AK streaking fluids and Brick Dust weathering powder
On the roof I added a crate,scoped lasgun and Missile Launcher.
The barbed wire has frags as additional booby traps.


4271
Post by: Eisenhorn
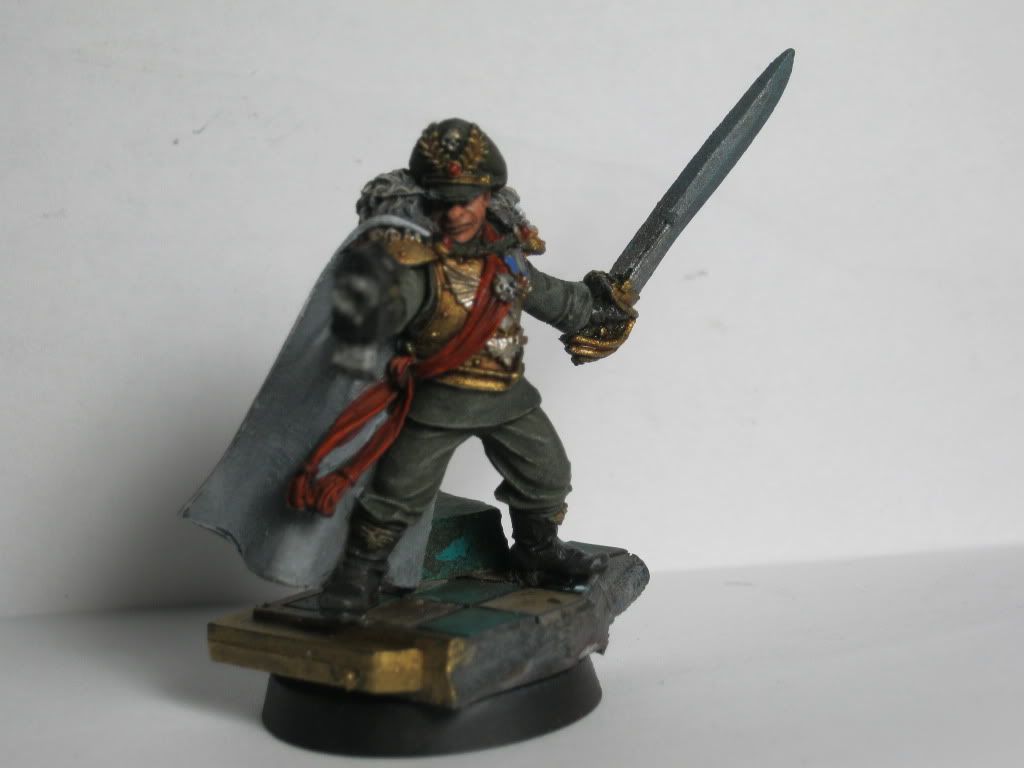
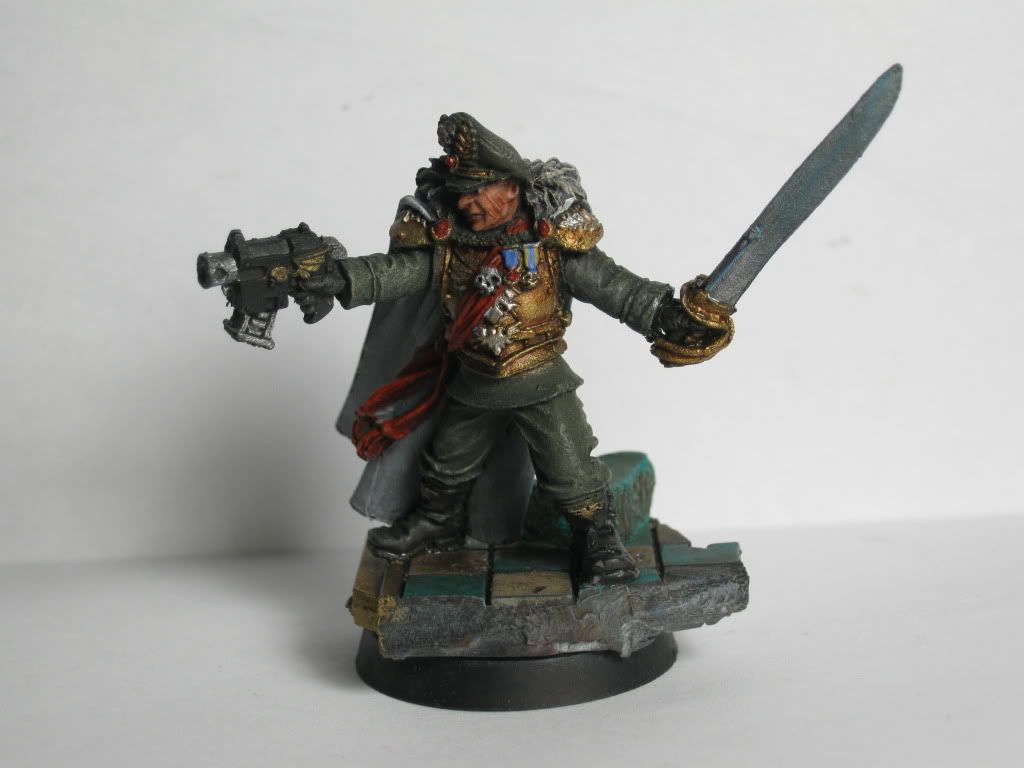
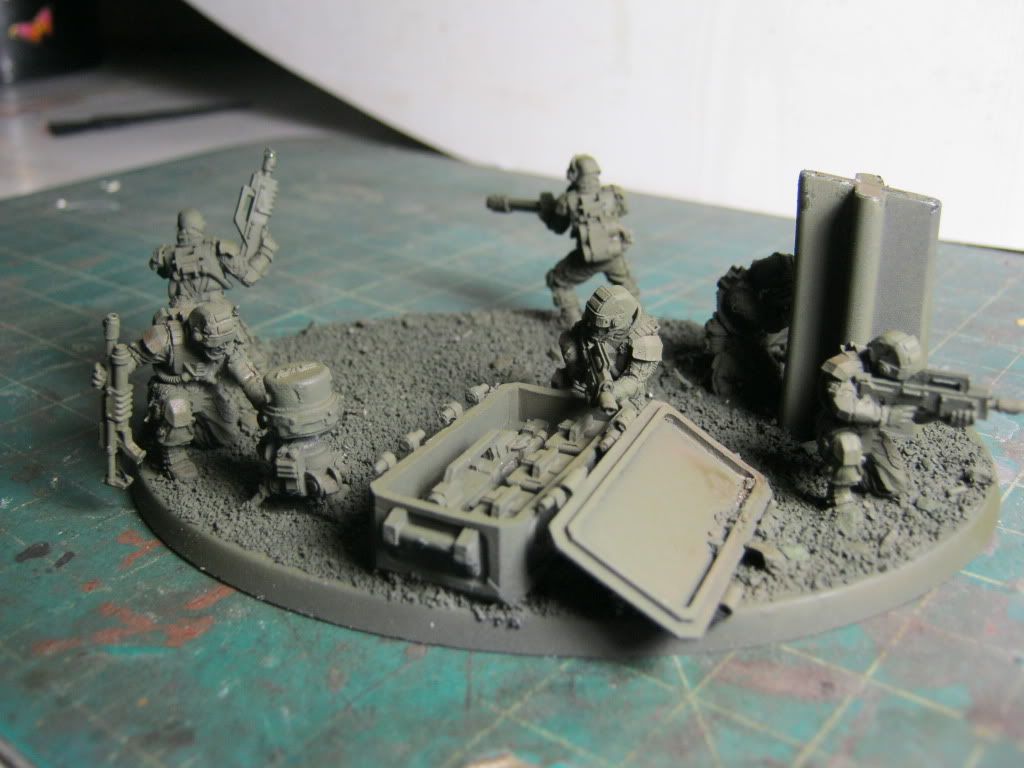
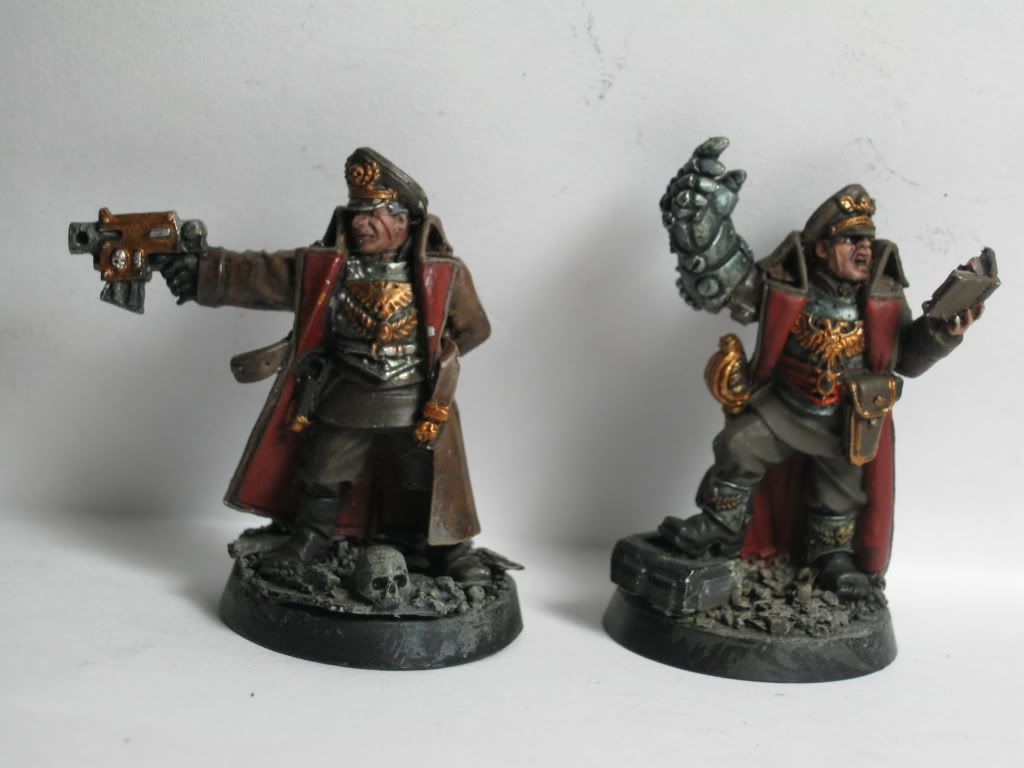
The Troops are starting to fall from the sky as we speak.
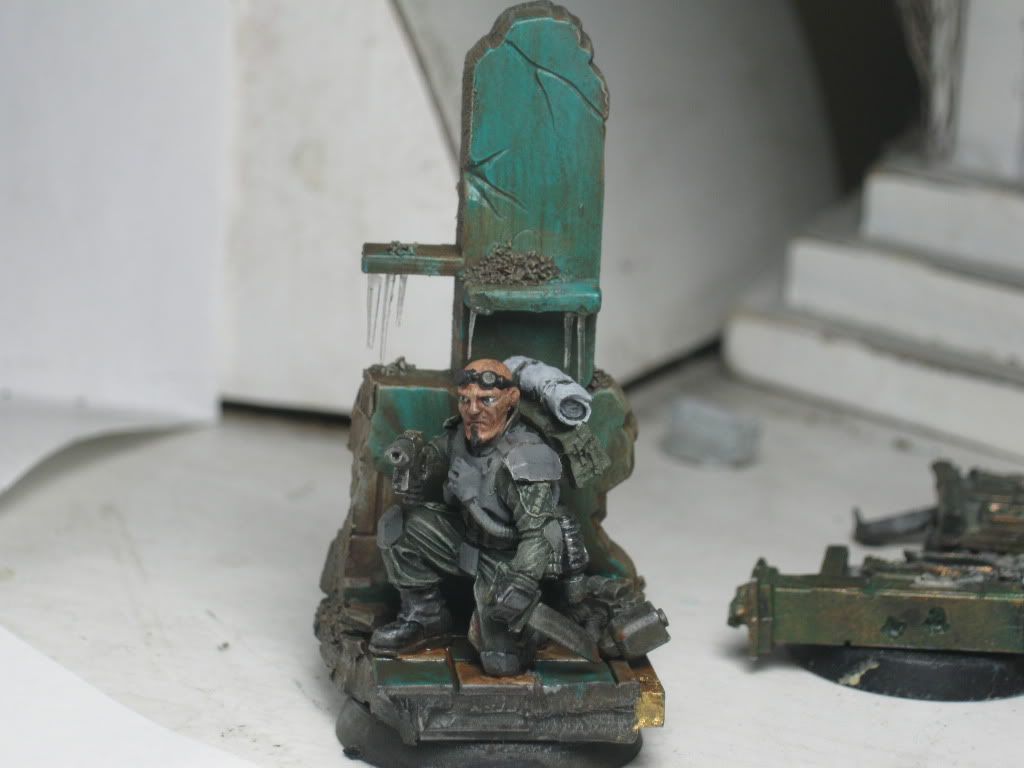
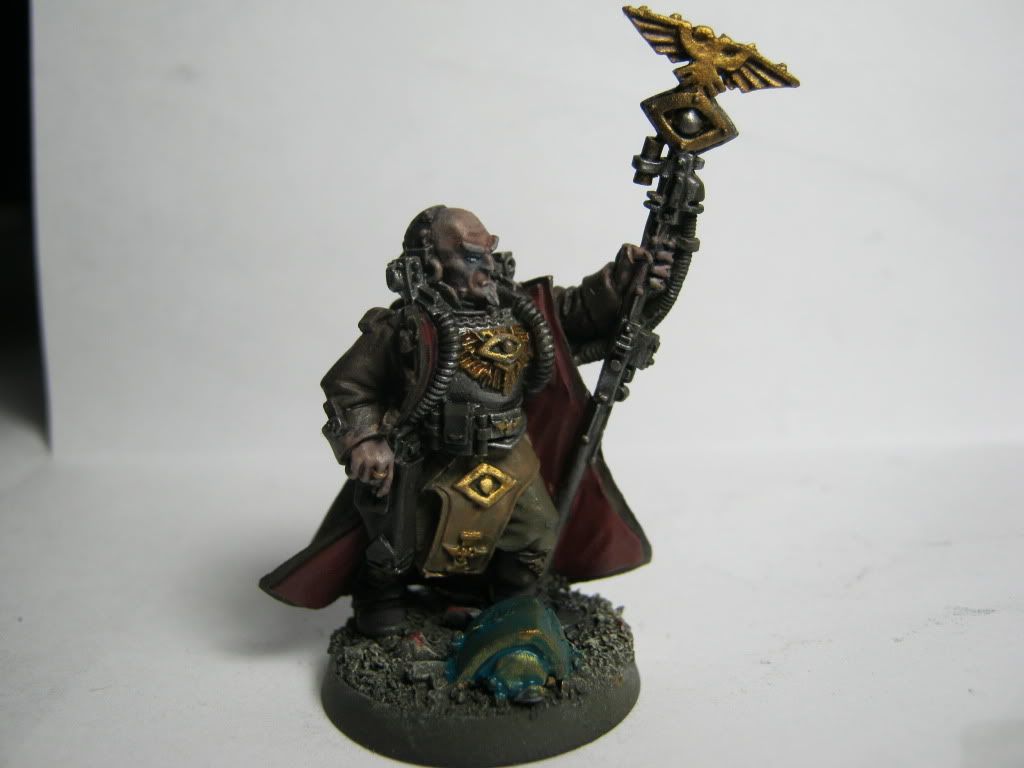
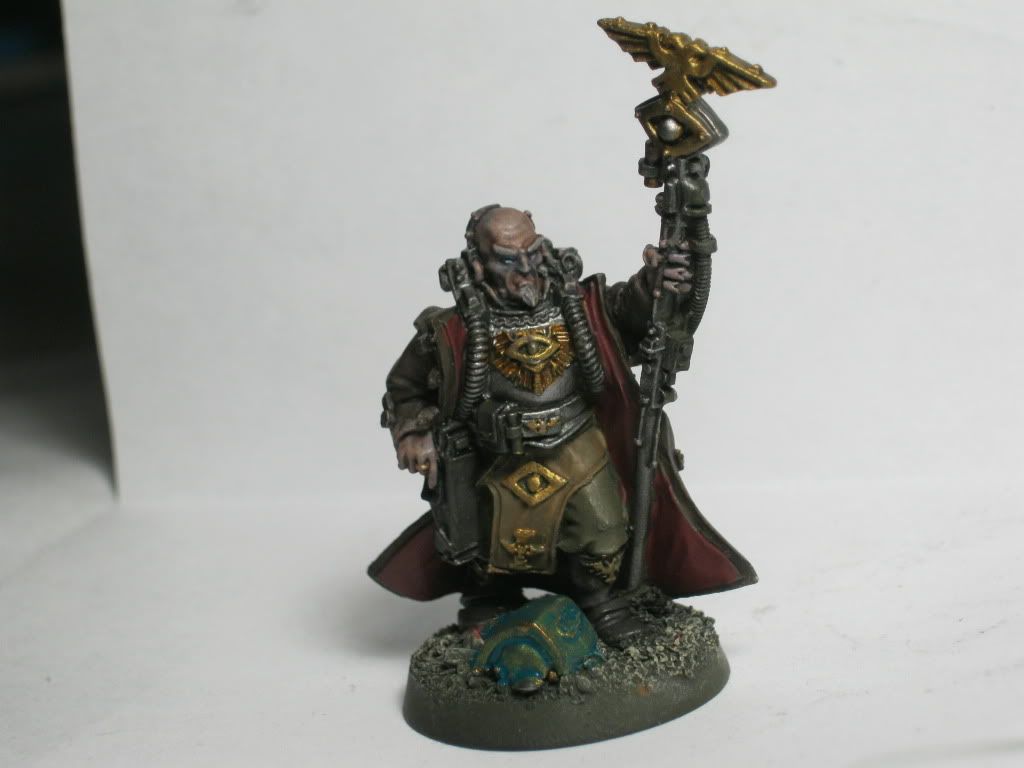
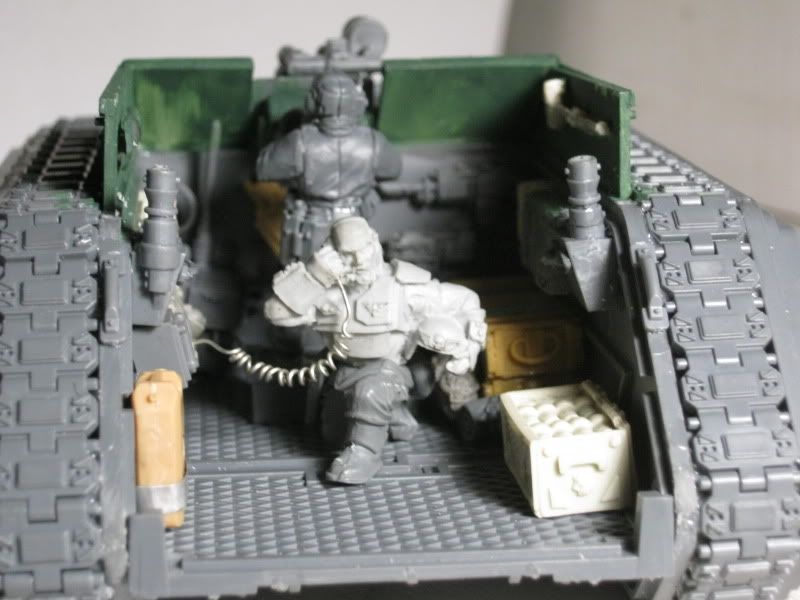
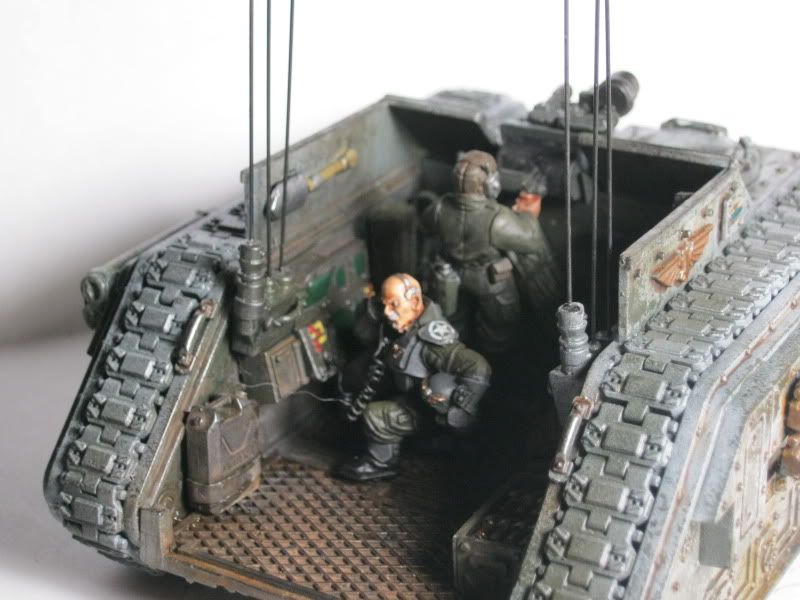
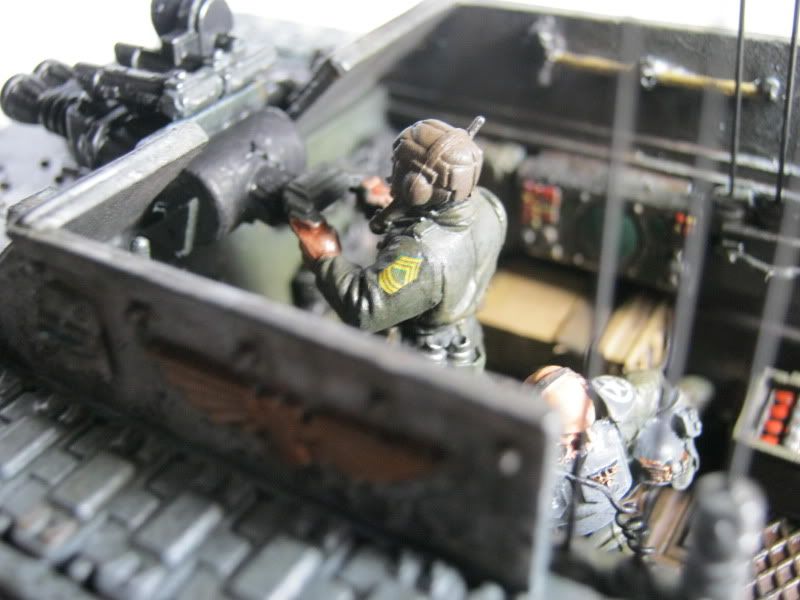
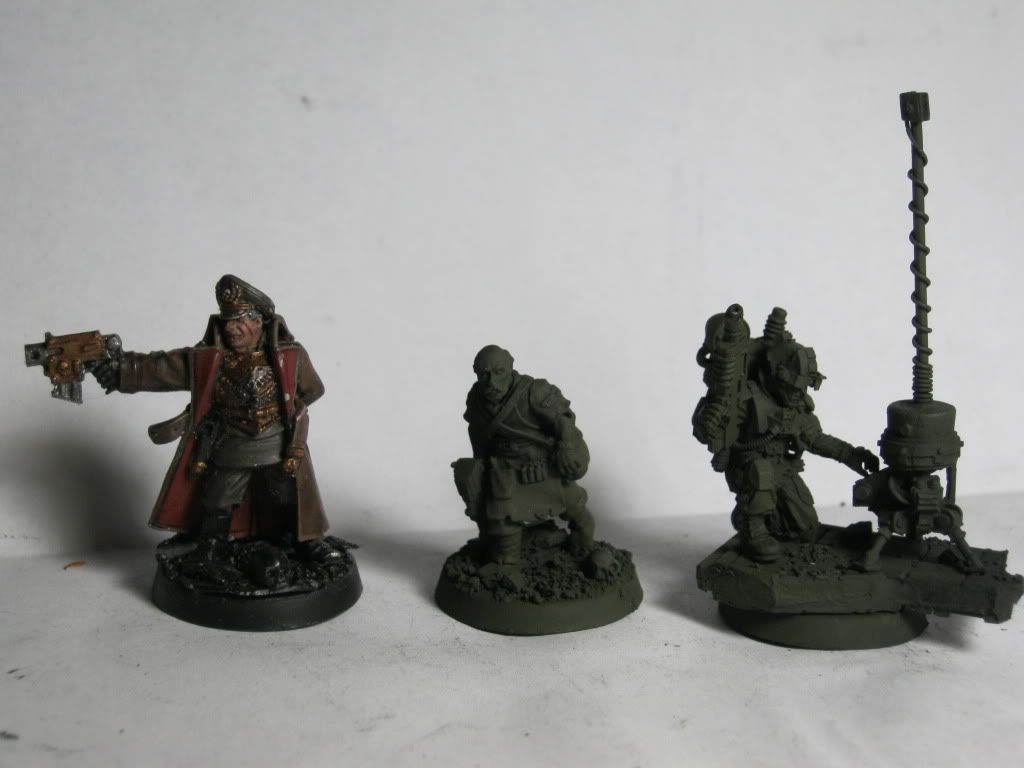
Before I start on new business,first old business the tank commanders.
Here are the CO and XO even though the Pask model is supposed to be in charge he cannot because he does not have fancy shoulder epaulets.
And the CO is pointing in true 40k fashion so he must be the boss and Pask looks like he is listening to new orders on his headset.
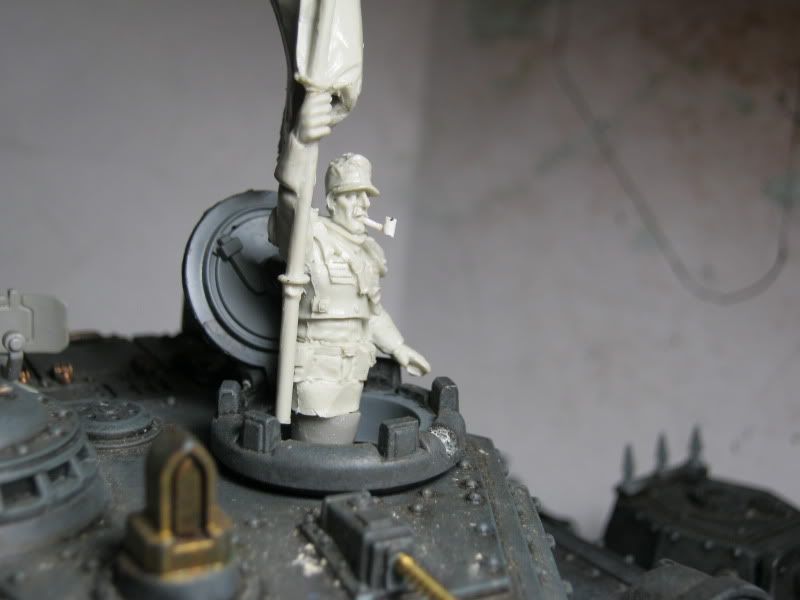
The Third is the General with the Lancers Colours
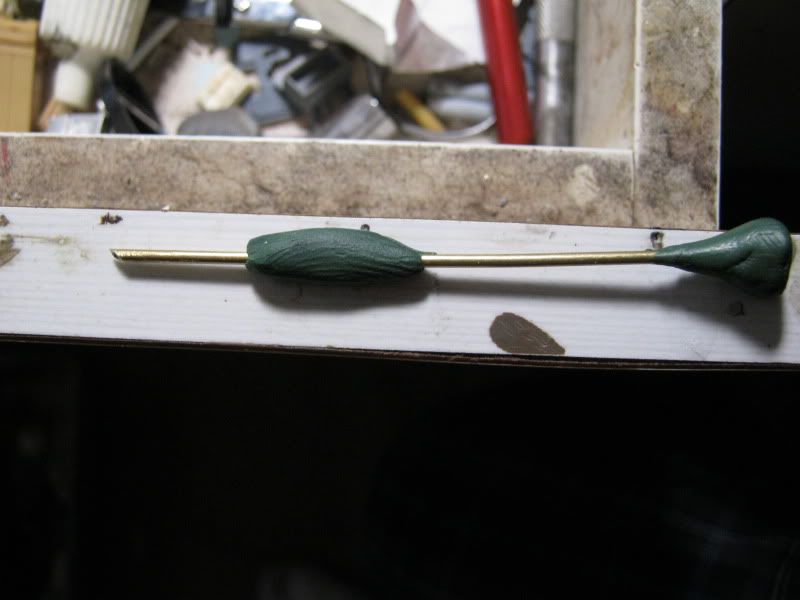
He is a true blueblood as depicted with he fancy smoking pipe I made from really really small plastic rods
What I would give to know how they make the real decals not the sheet you spray with varnish that stuff never works for me.


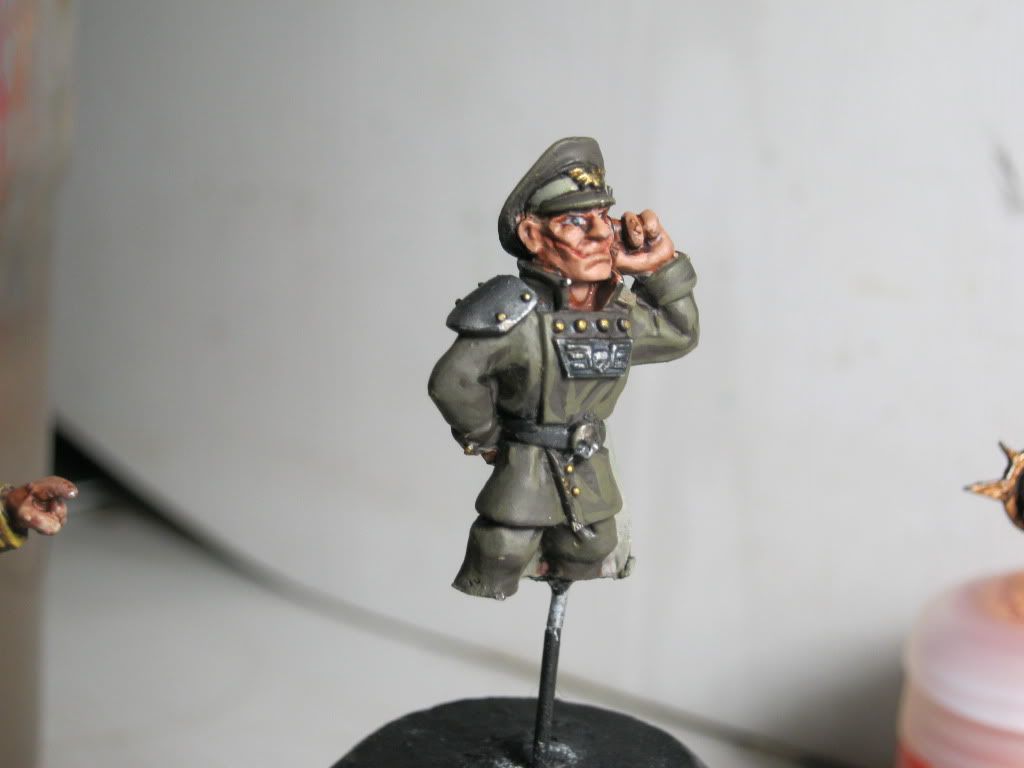


And Finally is the Col Shaffer Model not sure where he is going to fit in might use him as a Jr Officer,Marbo,not sure.
I know what I want to do have him lead the penal Legion as a Speical Forces Advisor leading a Native Guerilla Squad
Have no clue what good looking savage models GW makes.

18981
Post by: Sanchez01
You continue to impress.
48376
Post by: Capitansolstice
Cant wait for more troops!
45282
Post by: ninja13
Was just catching up on this thread and it stopped here. D: Anyway the stuff looks awesome.
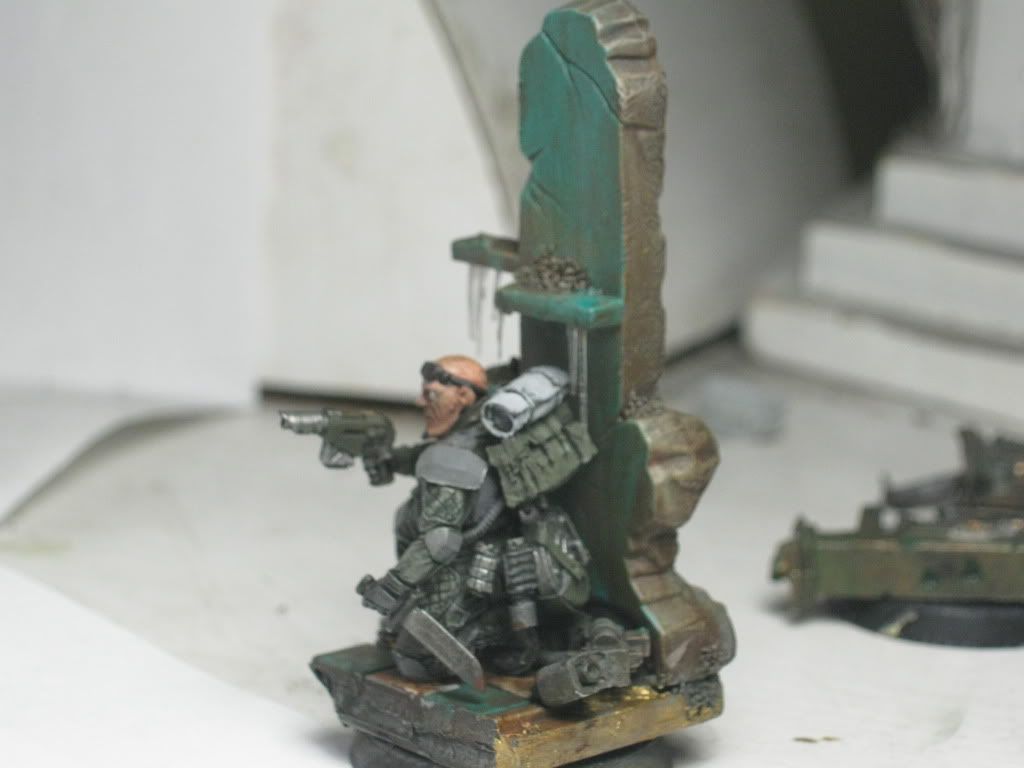
4271
Post by: Eisenhorn
As painted w red sash and with a head swap,Shaffer would make a great Drop Commissar
6098
Post by: ghostmaker
Merica ! your stuff rocks decent amount of tanks there !
25750
Post by: worldwarme
I love the fact that you added a pipe to Gen Grizmund! Genius. I have really enjoyed this thread. Keep it up, Please!
4271
Post by: Eisenhorn
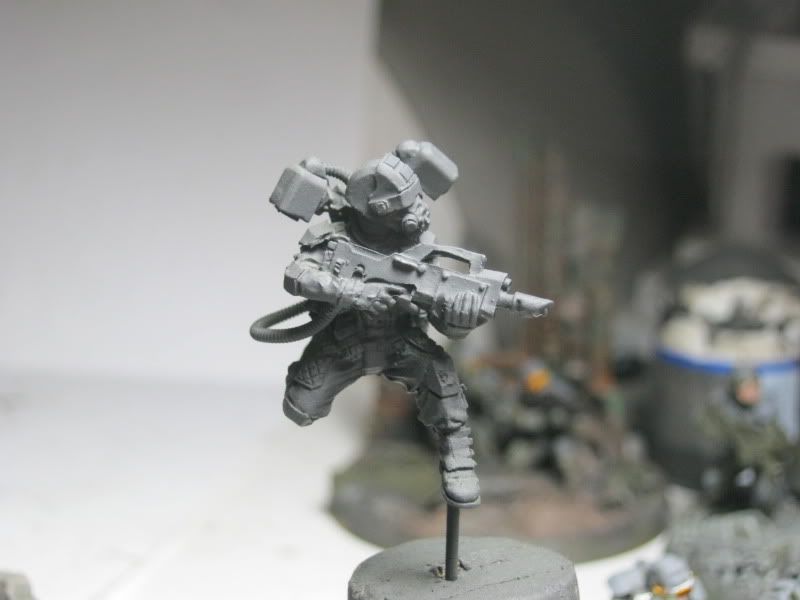
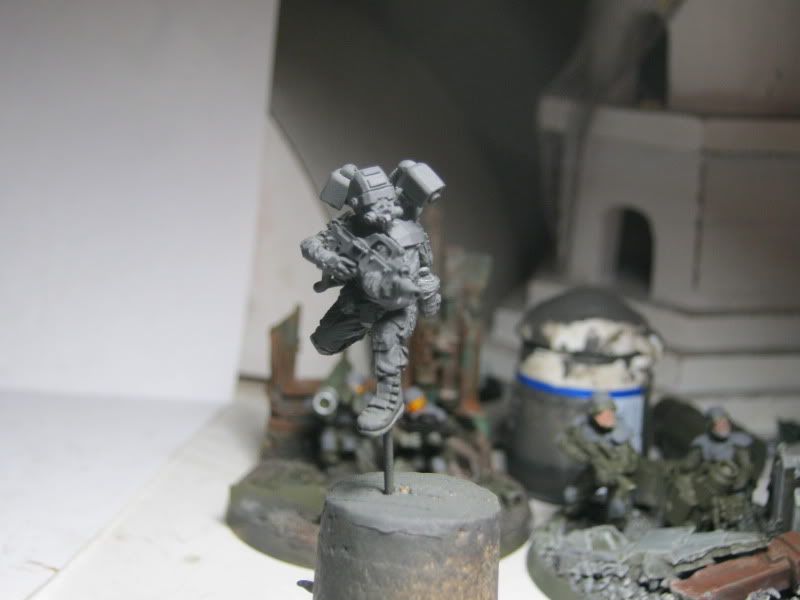
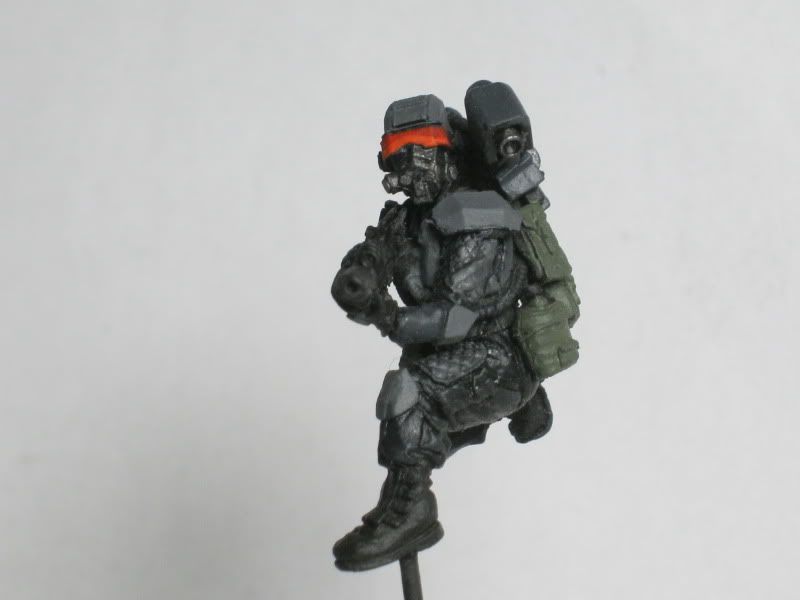
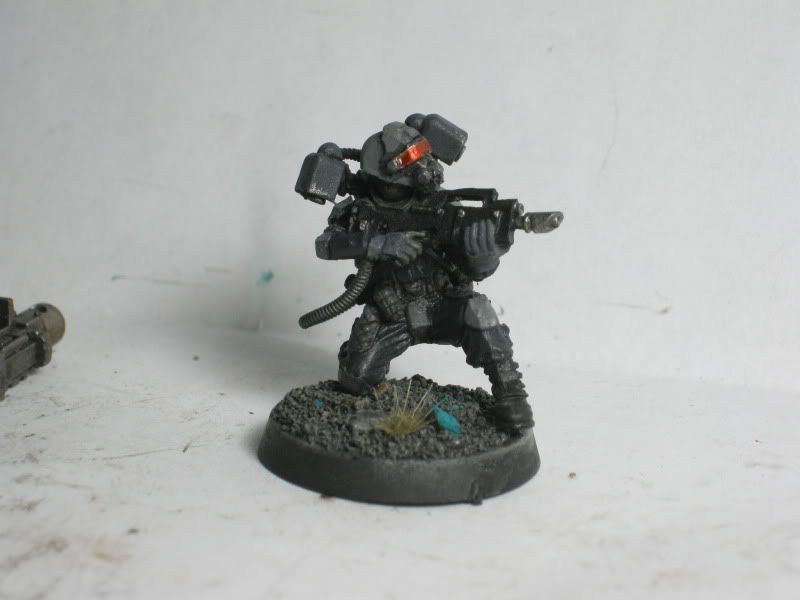
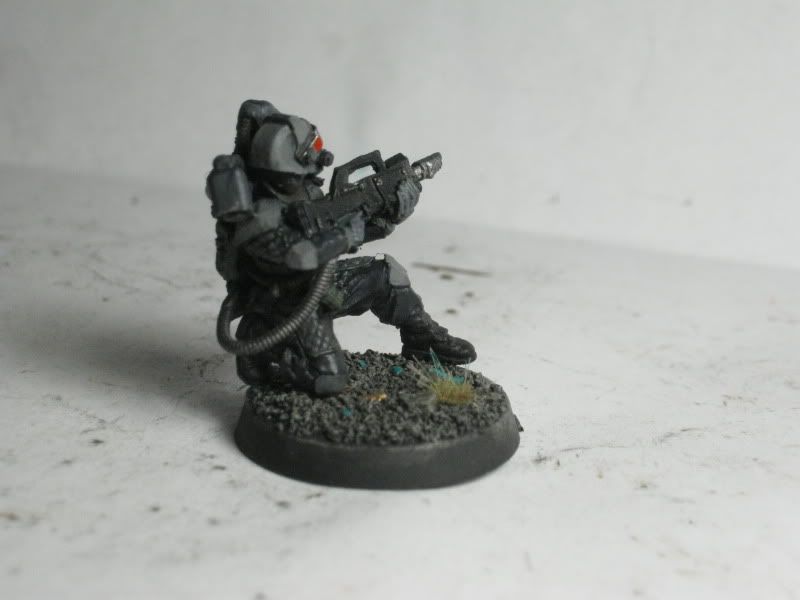
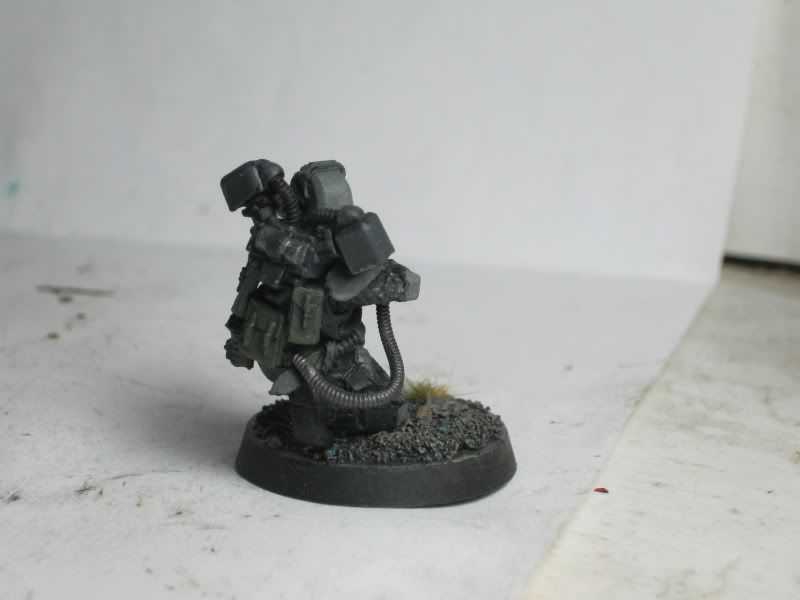
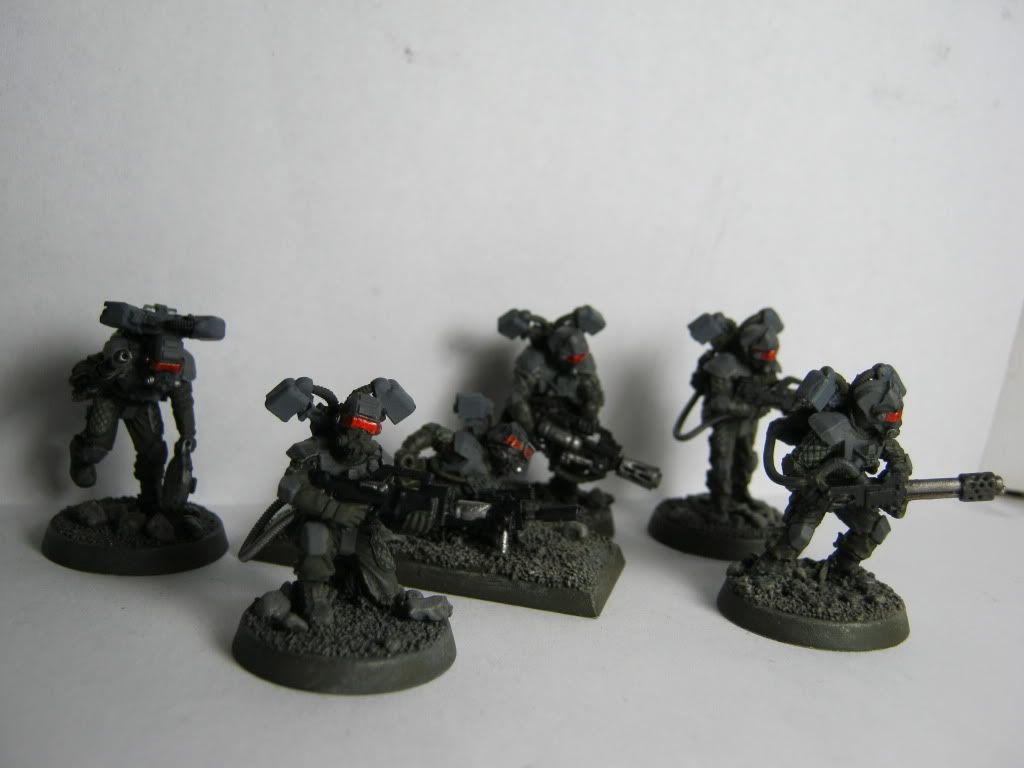
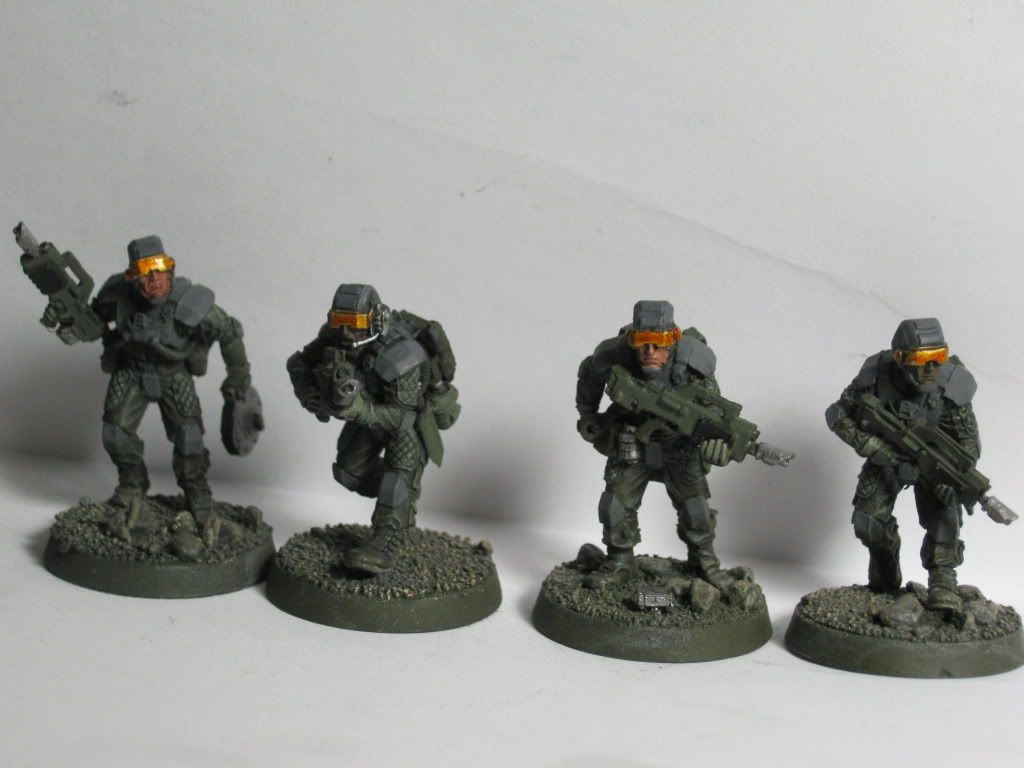
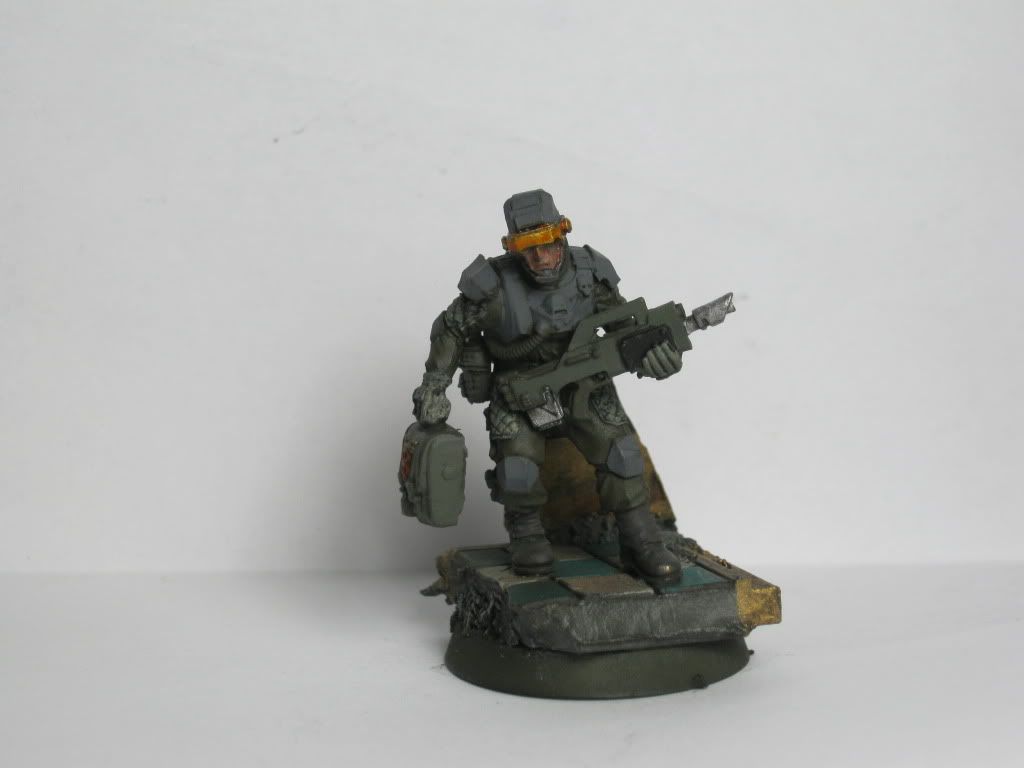
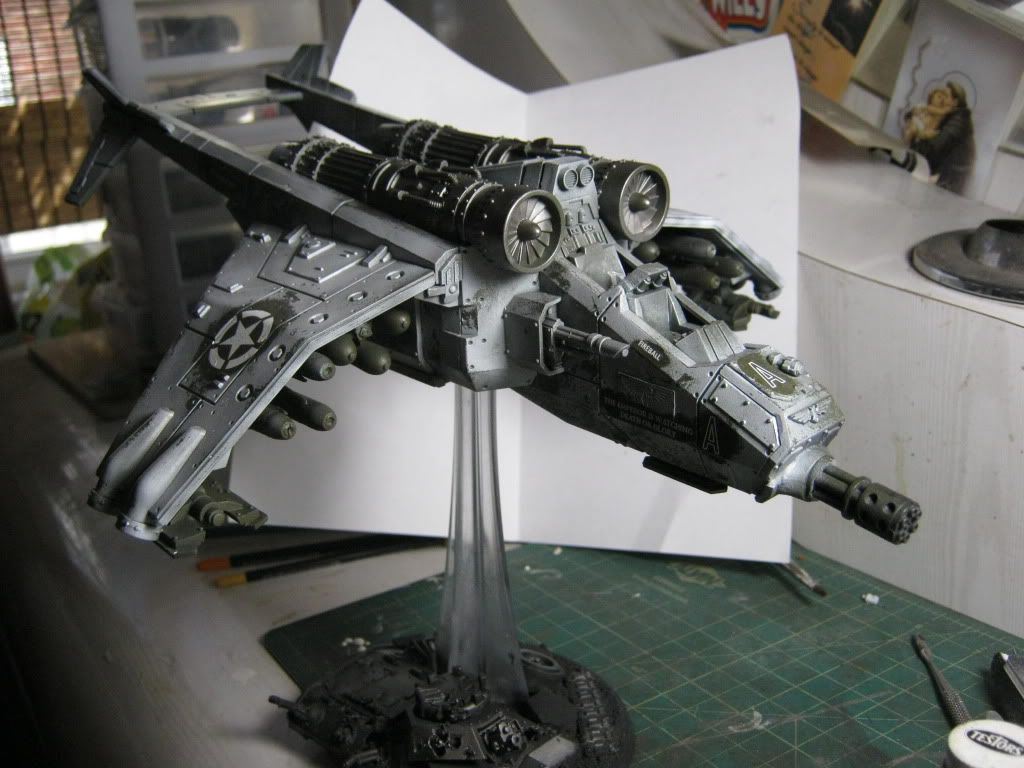
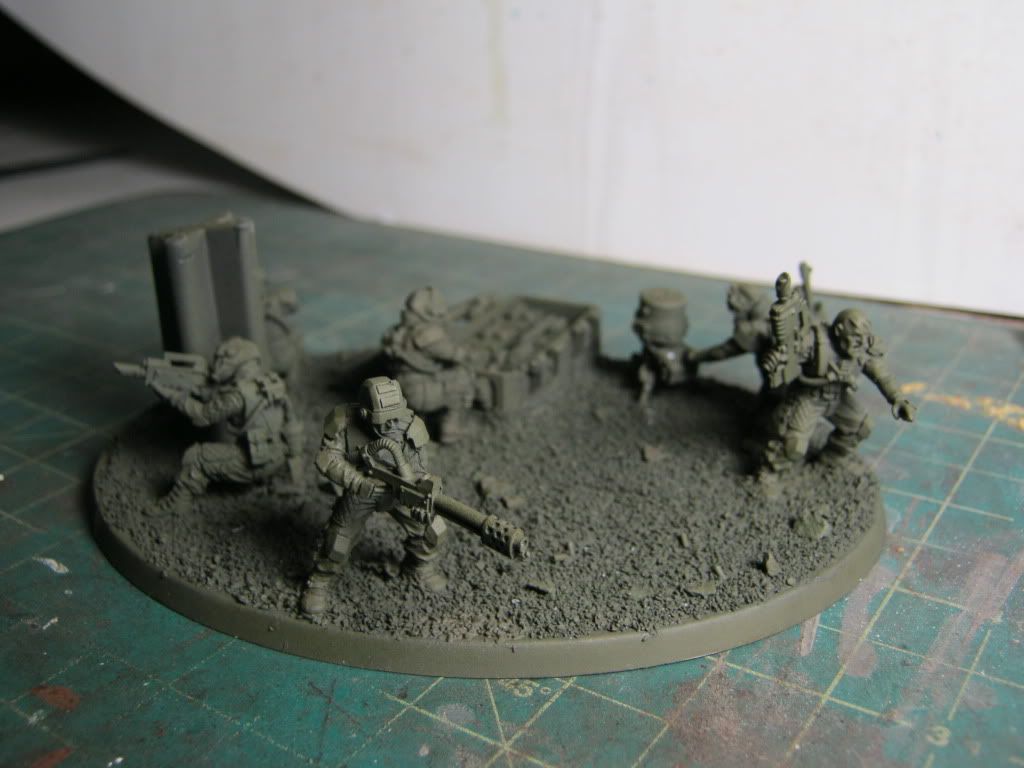
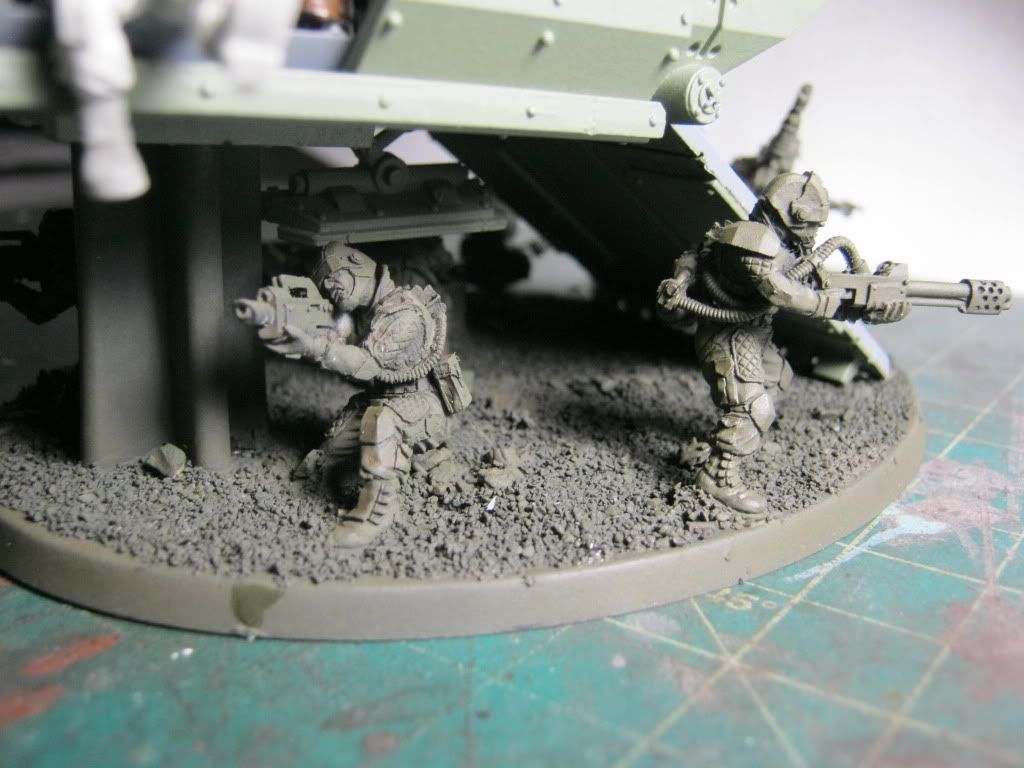
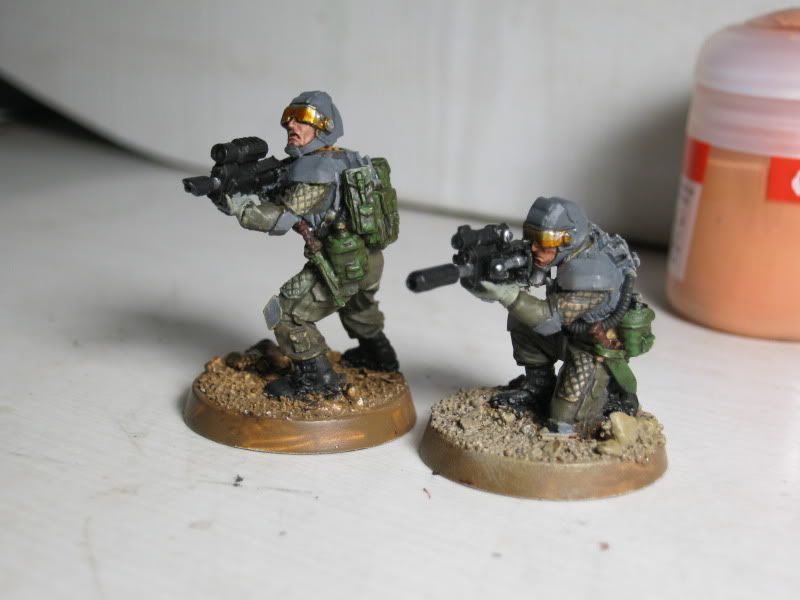
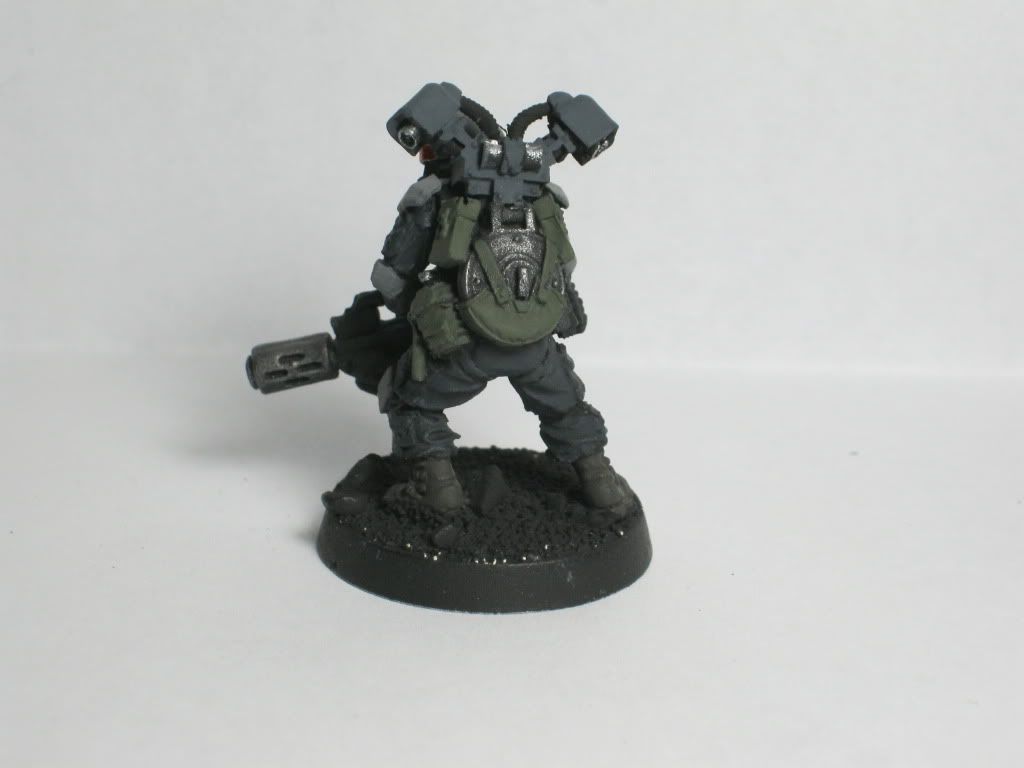
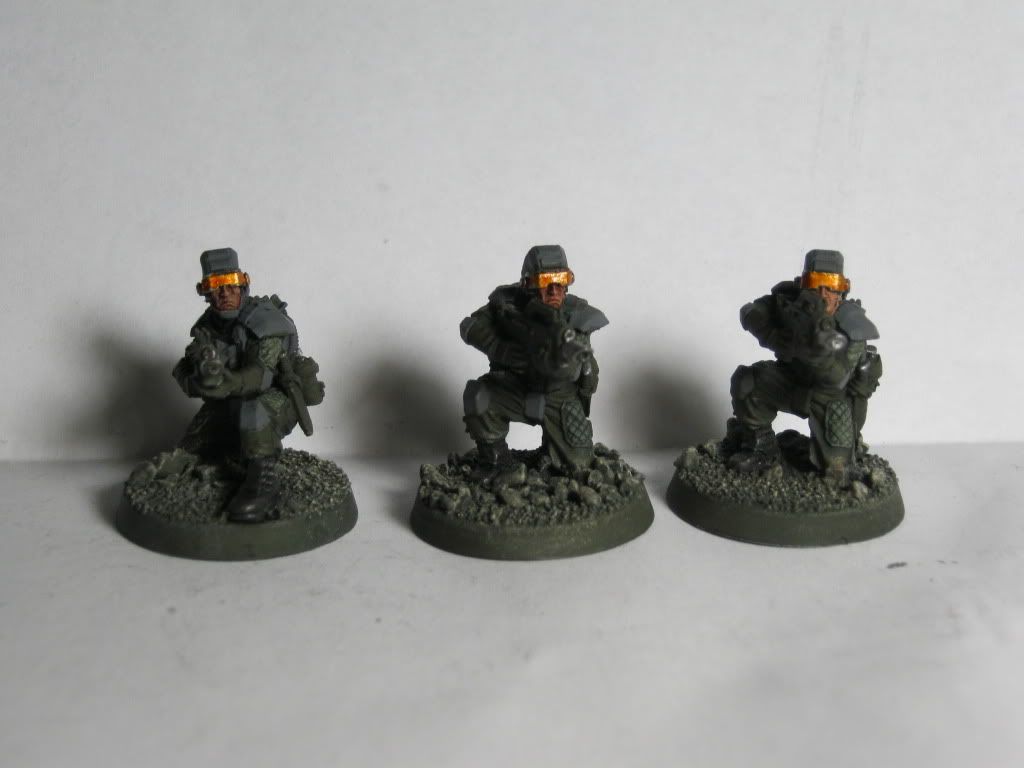
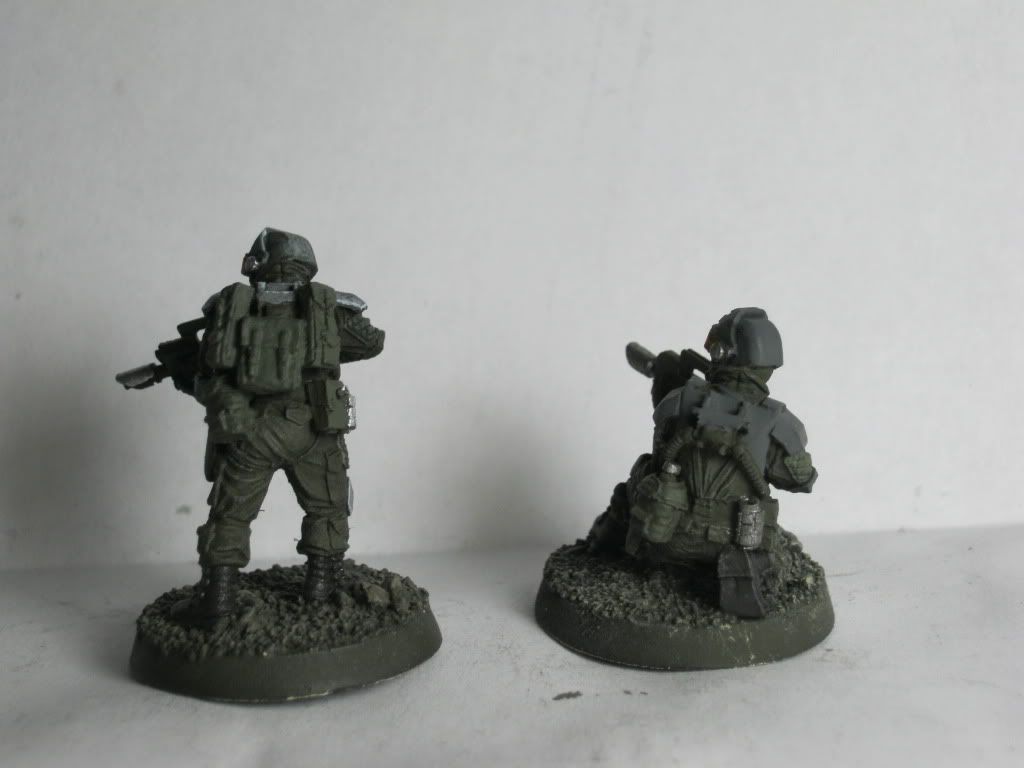
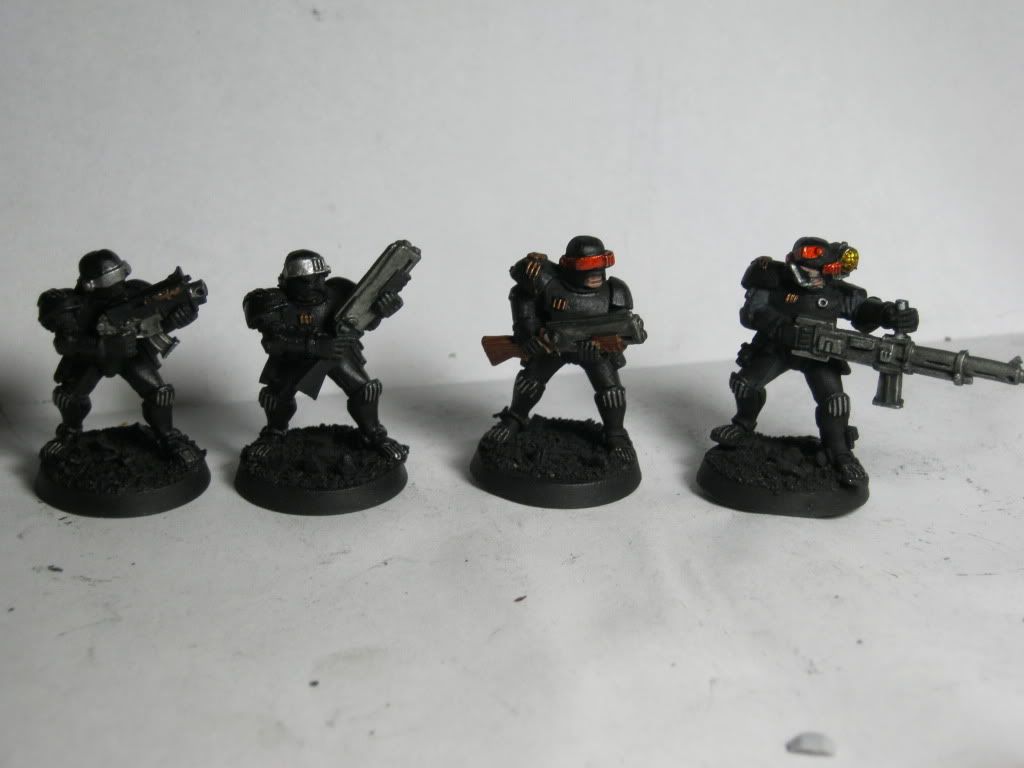
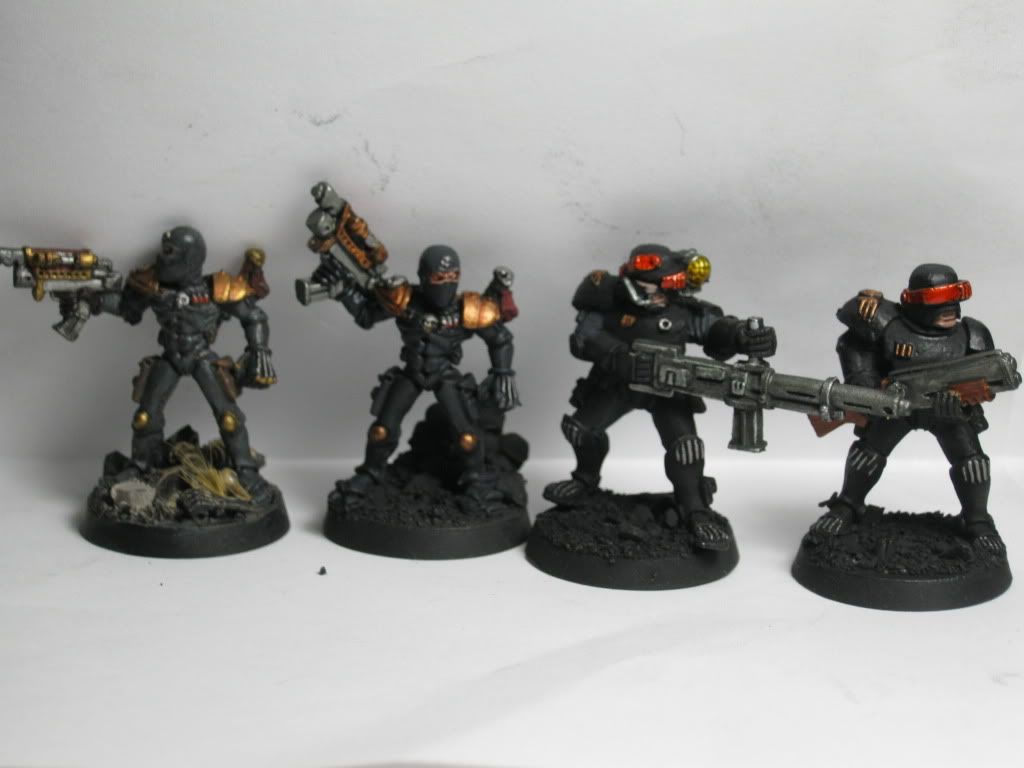
Speaking of Drop Troops,The first group of Airborne Rangers have landed.
Still in progress but well on thier way


Sniper and Spotter
48376
Post by: Capitansolstice
I LOVE the goggle colors, cant wait to see the end product
55595
Post by: Beastagon
Very nice stuff.
4271
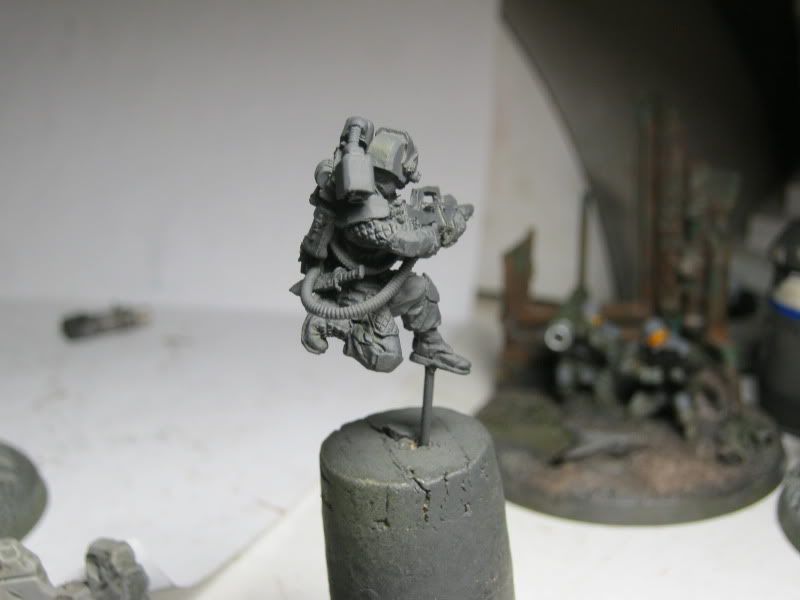
Post by: Eisenhorn
Here they are a bit more finished,gotta work the body armor a bit,some edge highlights,badge.
I found a neat new product at the hobby shop Carbon Fiber Rod in the .020 size which is the size I use for antenne.
I replace the wire one on the comms guy with the carbon one.


45282
Post by: ninja13
Very nice.
48376
Post by: Capitansolstice
What color bases are you using?
4271
Post by: Eisenhorn
Those are all getting painted over to match my style.
Though I gotta admit it is a hell of a great DIY desert base the guy made using fine ballast and small pebbles.
If I had to make a guess the guy is a vet who did time in the middle east.
40138
Post by: Joshh
Those are some awesome Elysians.
48376
Post by: Capitansolstice
Thats a great idea, Loving the sentinel!
48376
Post by: Capitansolstice
Are you going to super detail the rest of the army?
4271
Post by: Eisenhorn
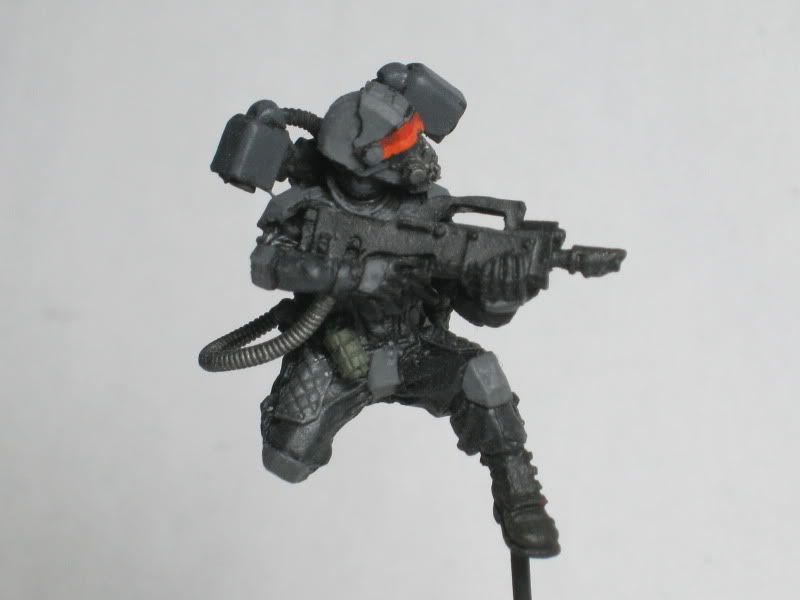
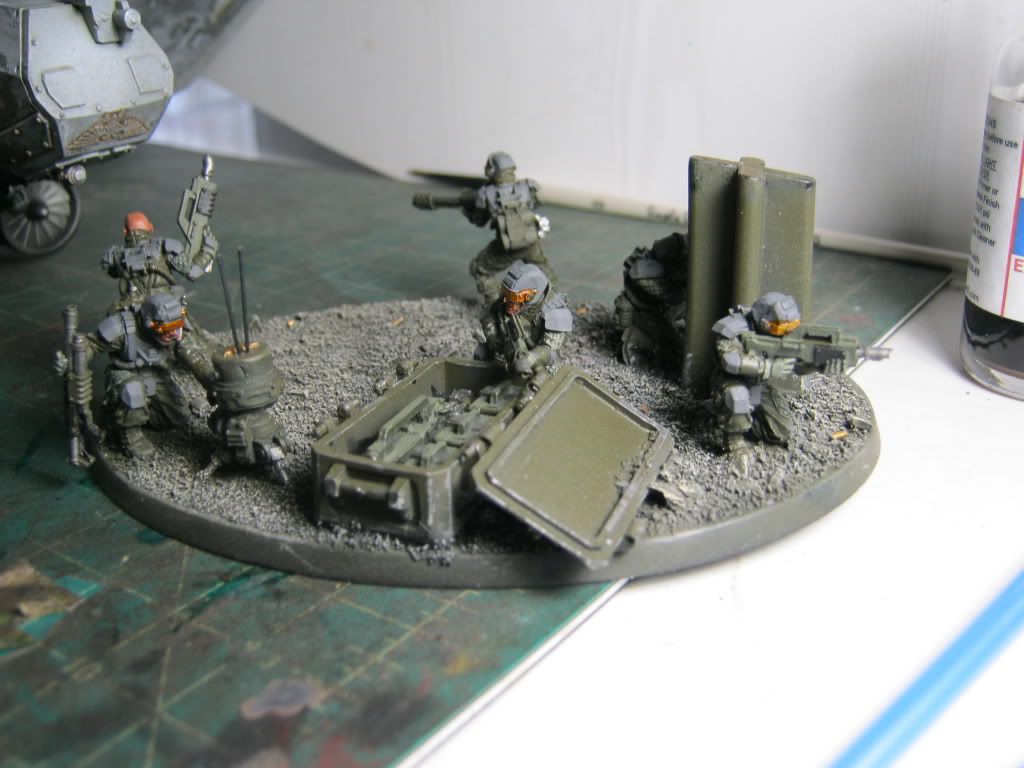
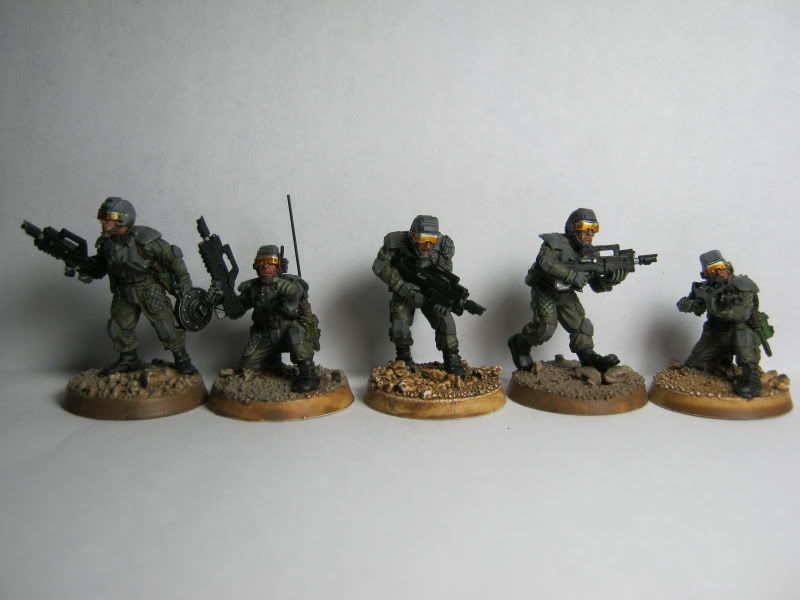
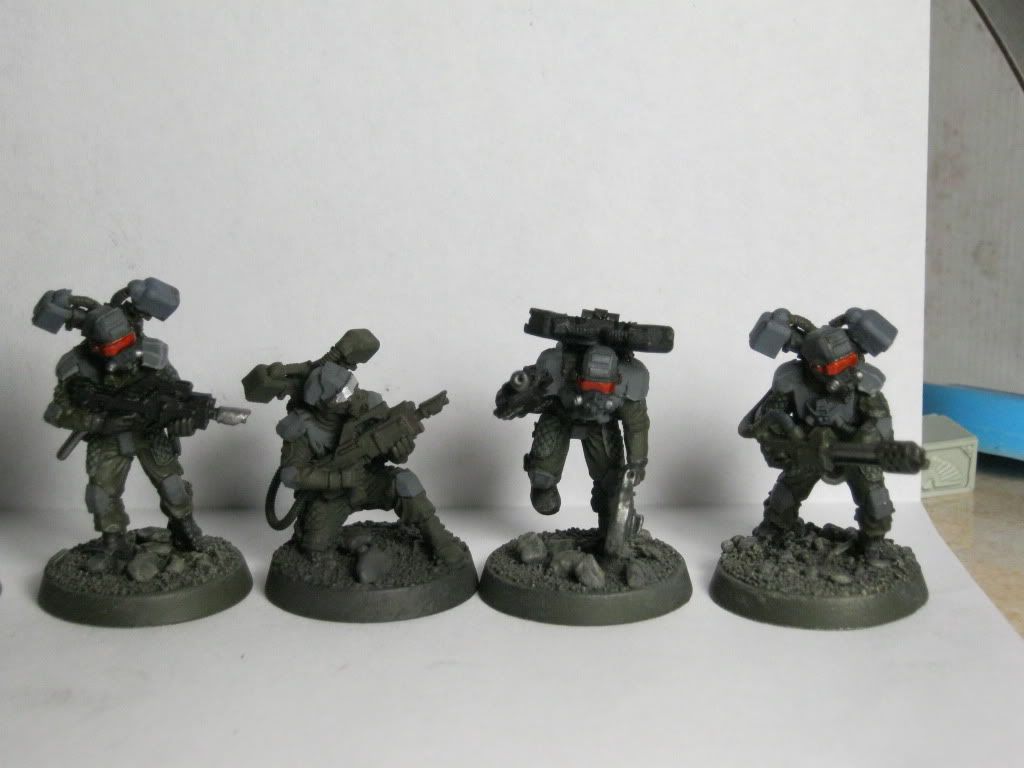
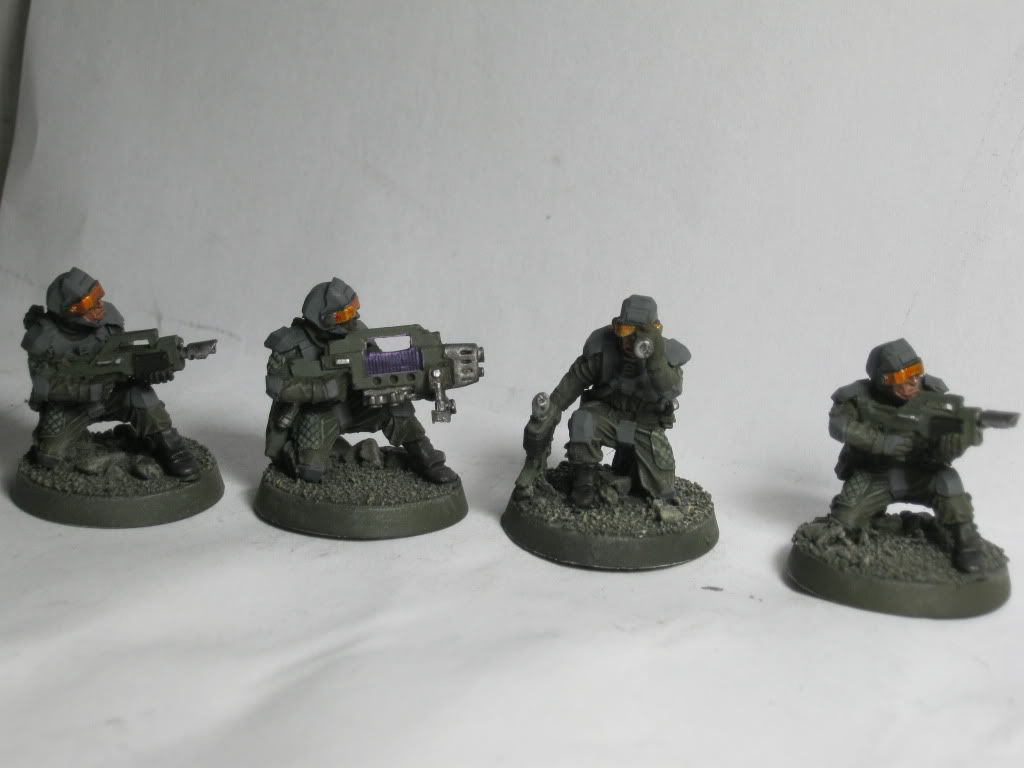
Here is a shot of the first squad+sniper team of Drop Troops finished.


Still alot more to come,I have some neat ideas.
I bought a second Schaffer to convert into a drop Commisar(Intellegence Officer) with a Head and Weapon swap.
Drop SOG Stormtroopers with Hellcarbines
I also have the command Sentinel built hiding behind a wall packed to the gills with comm gear.

This would be the forward observer unit with advanced targeting/comm capabilty hiding in a ruin painting the target for the heavy stuff.
The other with barbed wire base is another stock version finishing off the squadron
48376
Post by: Capitansolstice
Cool!
44654
Post by: Lone Cat
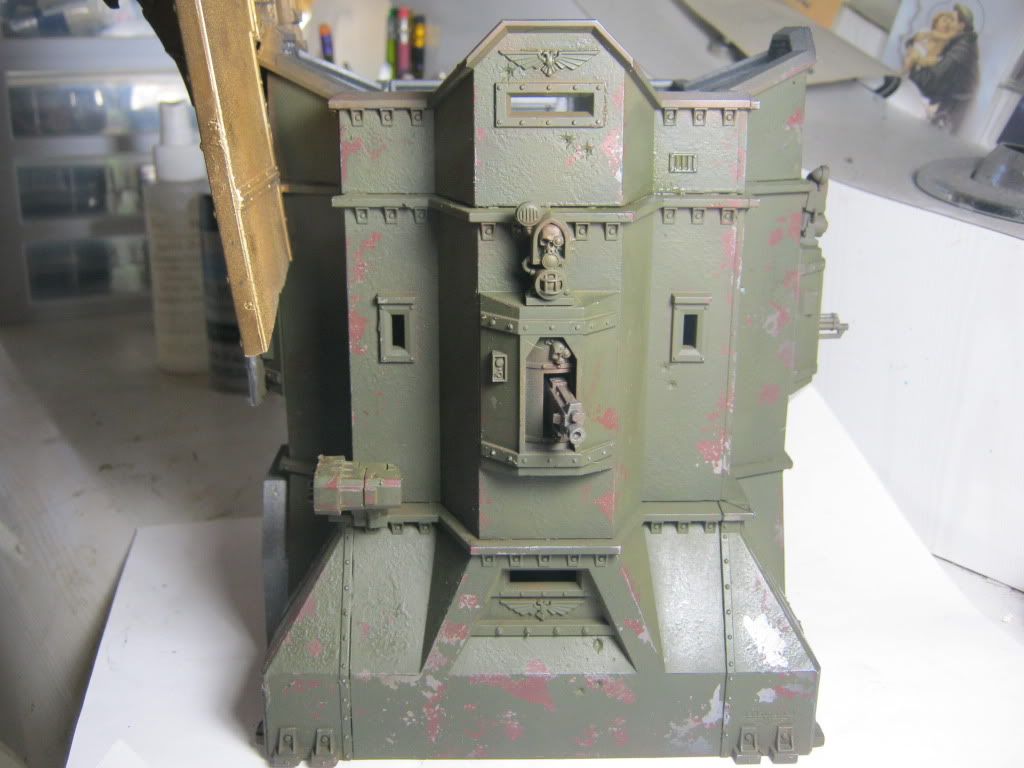
And with a big gilded eagle to the front (of what that should also be called BLOCKHOUSE). how do you balance its C.G. so it will not trip over its own base?
and story wise. is this blockhouse made of steel or ferrocrete??
4271
Post by: Eisenhorn
Blockhouse I like that alot
It is made from steel the lighter chips are actually mettalic steel,might do more rusting not too much.
The idea is these are dropped from heavy transport and bolted in place for the duration of the war.
If still in one piece,they unbolt it and bring it back aboard the Cruiser so it would never get crazy rusty(unless the war was fought in a caustic environment)
The Bastion itself is study as hell,the Eagle had no bearing on stabilty,I just slapped it on,The Eagle bit is not that heavy once chopped.
With the Bastions big square footprint you could stack a hell of alot more on there,before you had to add some covert lead wieghts.
Hell screw lead glue a few stacked pennines on the inside if need be.
6548
Post by: Chaplain Cy
all i can say is wow. and that i'm very very jealous . very inspiring mate, definitely keep up the awesome work!
34514
Post by: 40kFSU
Merica!! F#^%@^# Yeah!! Seriously your fortress is great, very imposing. And the Rangers are coming along nicely, Ellysians are the ticket.
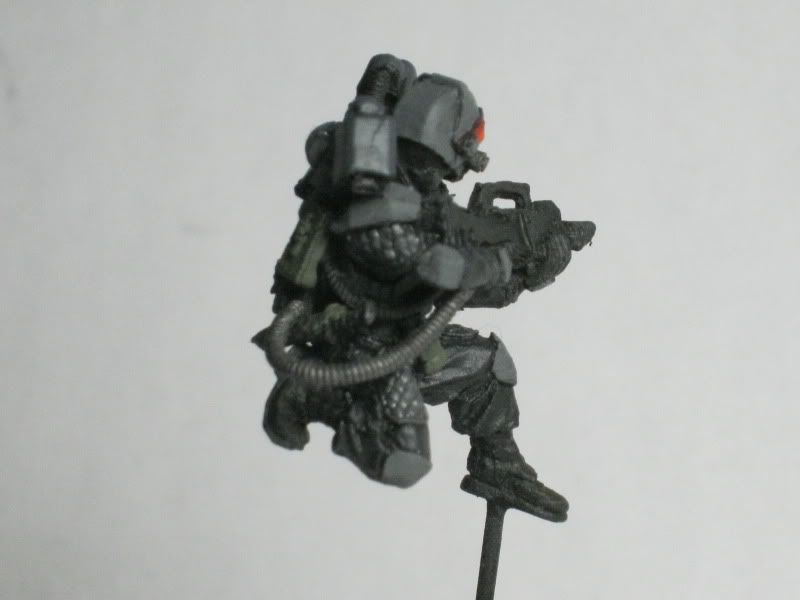
4271
Post by: Eisenhorn
I just recieved the second Schaffer today.
I quickly converted him into a Drop Commissar with a simple head swap.


48384
Post by: LordRogalDorn
I feel he would benefit greatly from a sash as well. Other than that I think all of your work is stunning and an inspiration for a lot of people here.
53075
Post by: DrGonzo
I love the drop troops the skin looks amazing
4271
Post by: Eisenhorn
I was on a tank kick again today.
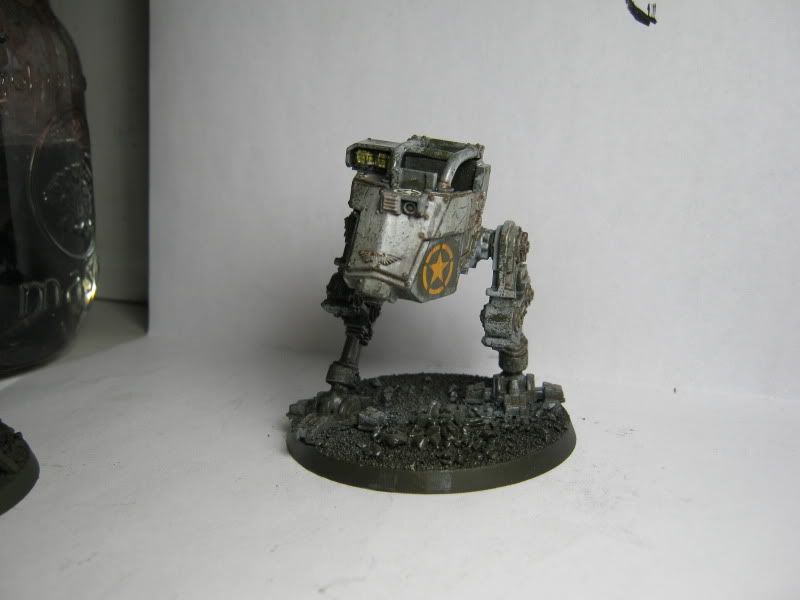
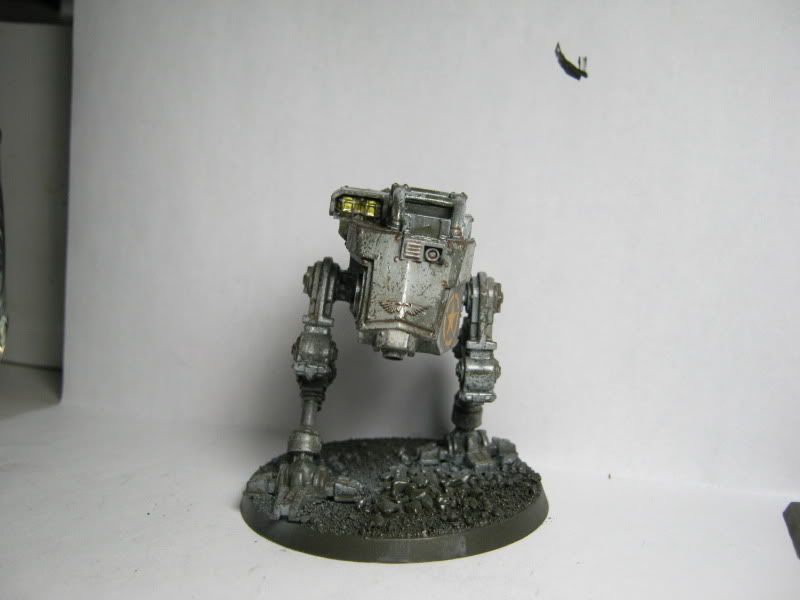
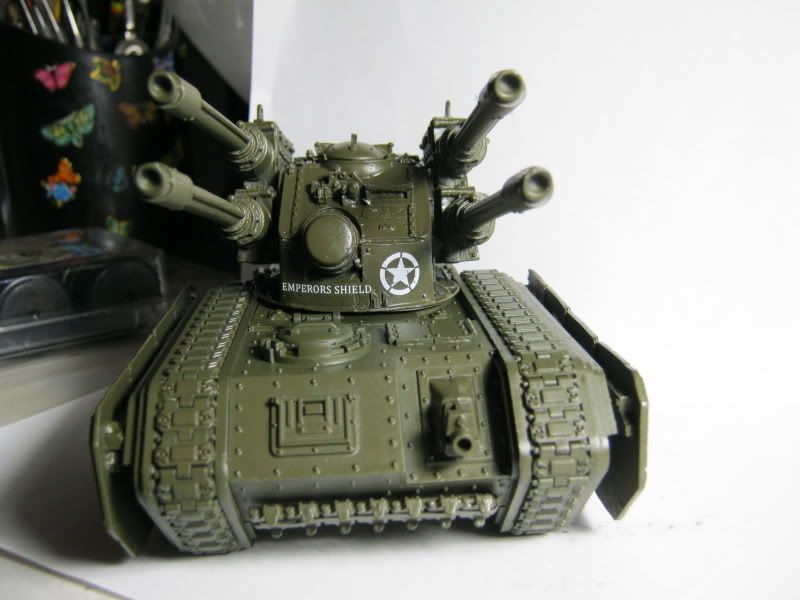
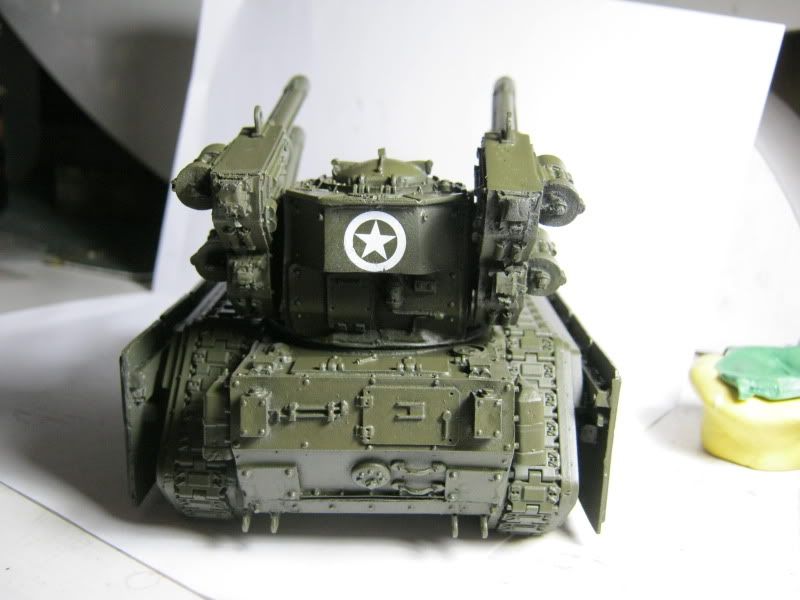
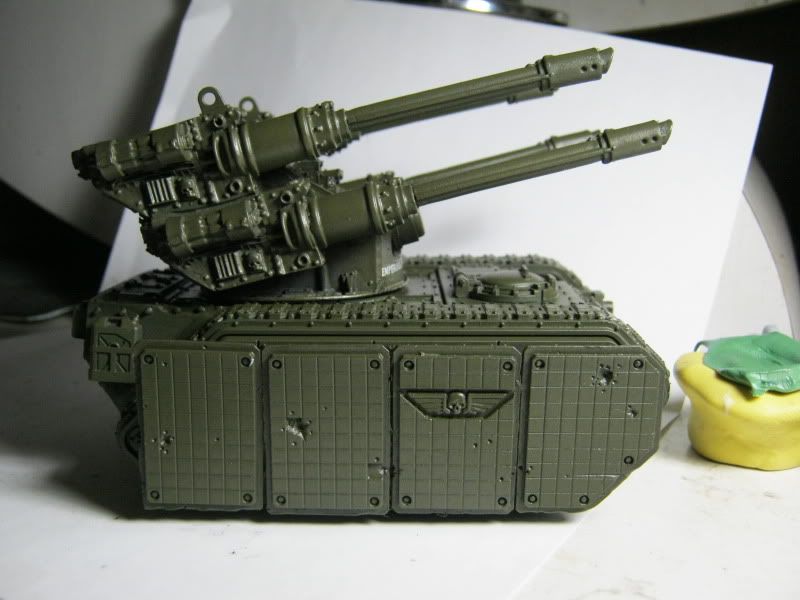
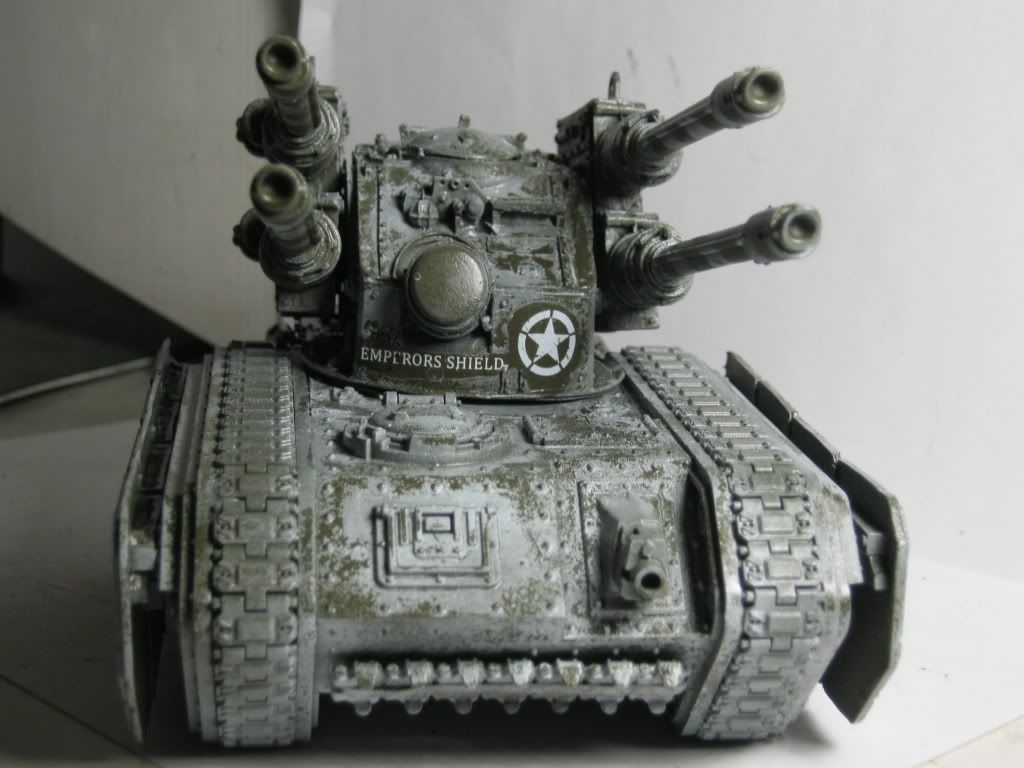
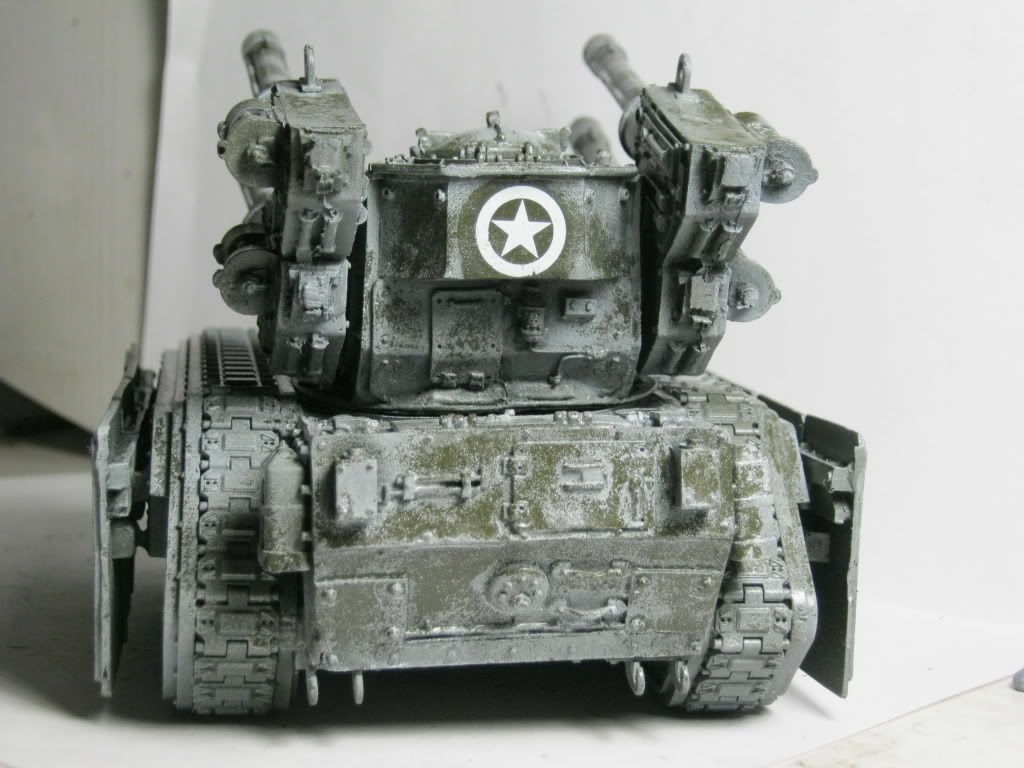
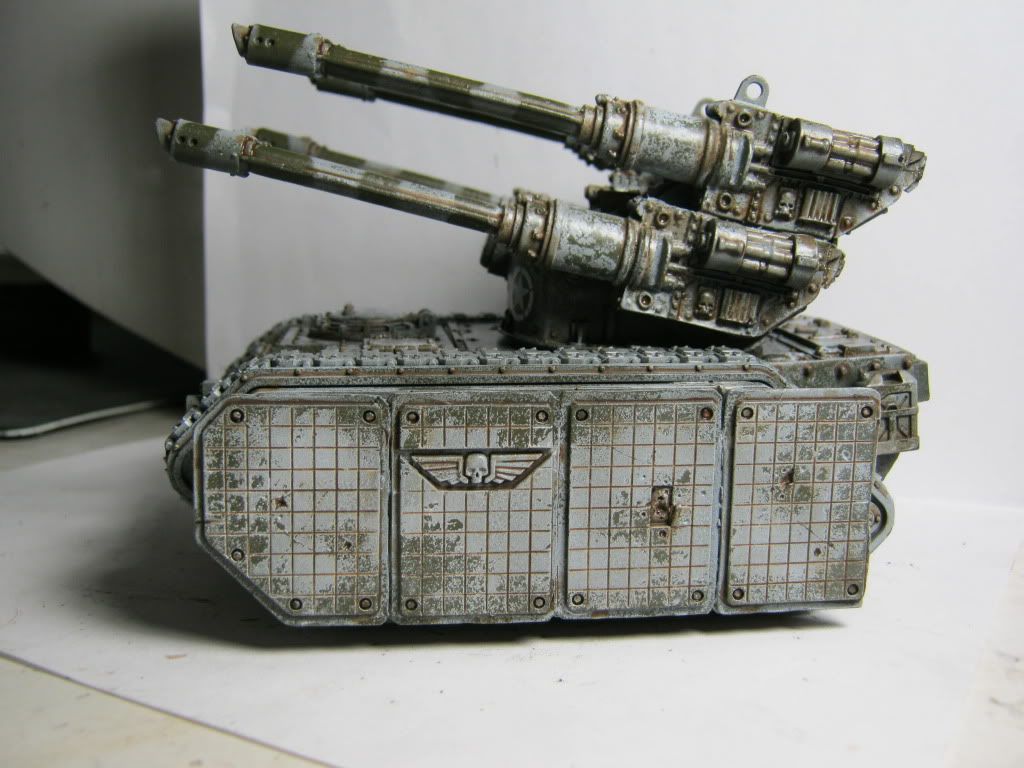
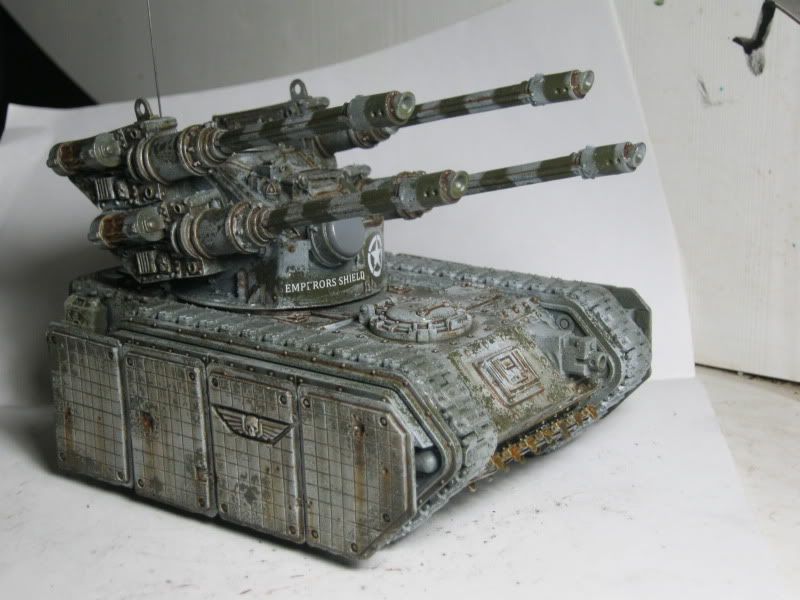
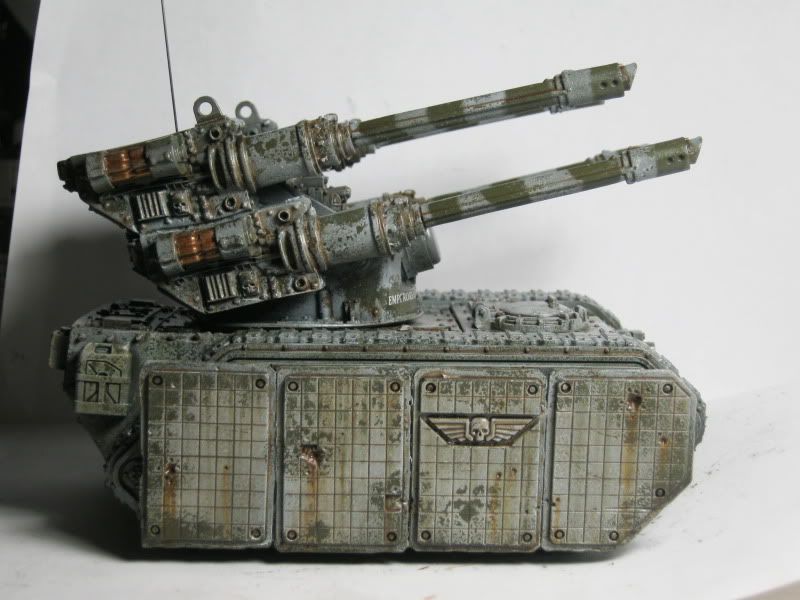
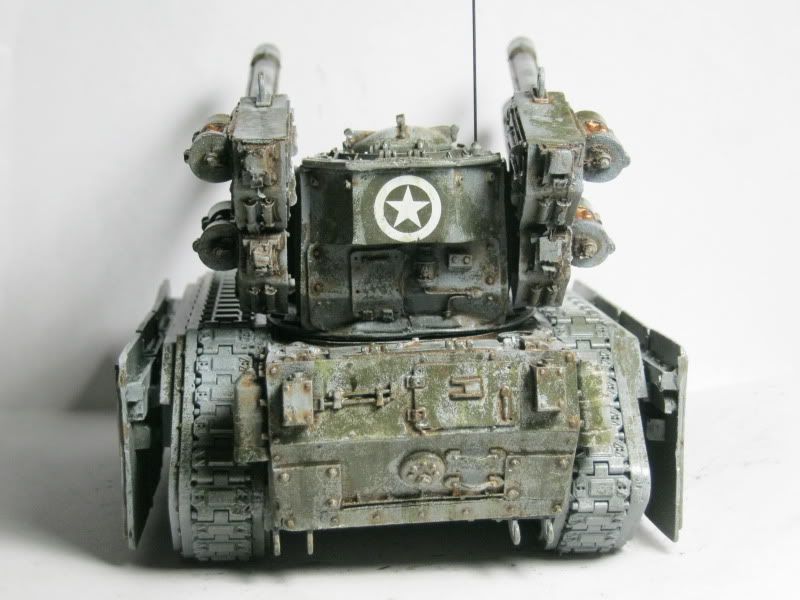
I built the Air Defense Hydra the "Emperor's Shield"
Keeping with my motto "Stock Sucks" I added armored skirts to jazz it up.
There were gaps in the rear I had to shim,sand and re-rivet
I also put Fuel cans to distract

The next one is a kit I have been dying to build ever since reading about them a hundred times in the Cain books the Command Salamander
While building the Hydra I went to the FW page to see how the back went on,while there I saw the Salamander a nd noticed you could 110% build one of these from the Chimera kit with a couple of extra bits namely the Rhino Comm Panel and Vehicle Accessory Sprue
I still need to fabricate the armor the goes around the top
But I built the Chimera and left the back off.
I used the Turret Flamer with the handle of the stubber cut down and neatend with g/s.
Noticed the one problem with this build the back deck was too low for a gunner.
That was until I used the standard tank crate for a firing step,now the gunner sits perfect height.
I used the spare antenne I had from the Hydra and this kits for advanced comms.
Once painted I will add the six carbon fiber antennes.
I cut down the Rhino Comm panel to use for this tanks Comm panel.
I also used a Land Raider one for the other side.
A couple of spare rifles,portable comms,ammo crates further detail the tank.
 Automatically Appended Next Post:
Here is the finished build for the Salamander
I need to add stowage still and permanent Gunner/Officer
I used the armored Sentinel bits for the outer detailing,The windshield wiper windows really fit.
Commander and Gunner
48376
Post by: Capitansolstice
I think yours is better than the FW one, Its got lots of character.
18499
Post by: Henners91
Sub'd.
Truly inspirational work
45857
Post by: SelvaggioSaky
That is pure cool!
4271
Post by: Eisenhorn
3:30 am and I have this bad boy finished.(aside from tracks)
I pulled no punches on this model,infact if this was also on the Forge World IG tank page I would buy this version every time.
I really lucked out with the sentenel windows with wipers it was like they were made for this.
I made sure Imperius was well stocked but not over the top a couple Crates few packs,a strecher,shovel and sledge,and water can along with FW bolter crate make up the stowage.
I made the gunner a Gunnery Sergeant with the stripes to prove it,something all the Sgts are getting thanks a Dust Tactics decal sheet.
I also gave the Commander the US Star from the same sheet.
I used 22 guage wire wrapped around a .030 rod to make the phone cord a touch that puts it over the top.


45282
Post by: ninja13
Just...Awesome!
32265
Post by: Armorum Ferrum
Simply amazing Will, this keeps gettin better and better !
53075
Post by: DrGonzo
You do marvelous things to tanks sir.
40138
Post by: Joshh
"Hello, this is stormtrooper"

48376
Post by: Capitansolstice
Nice!
4271
Post by: Eisenhorn
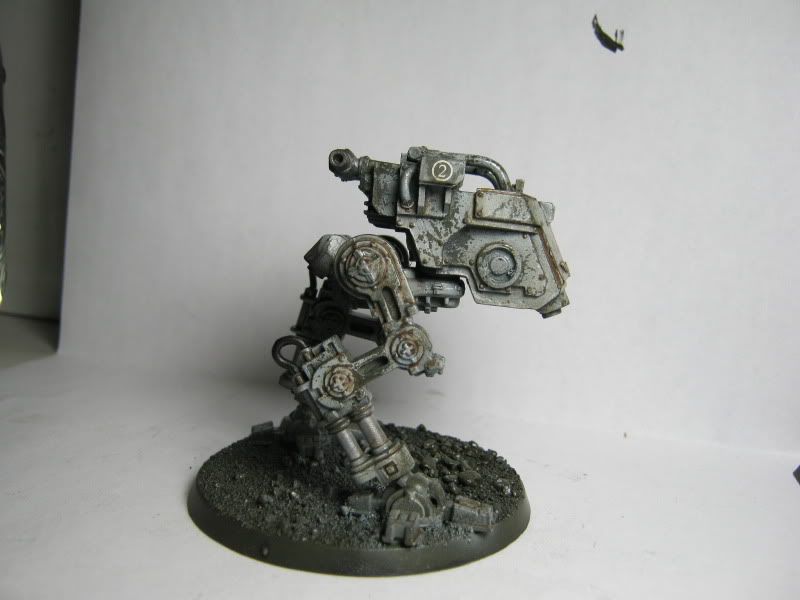
Did I mention sometimes I work on two at once.
The Hydra "Emperor's Shield" is camo'd up ready for weathering.
I added armored Skirts to improve the model and they will look really cool weathered

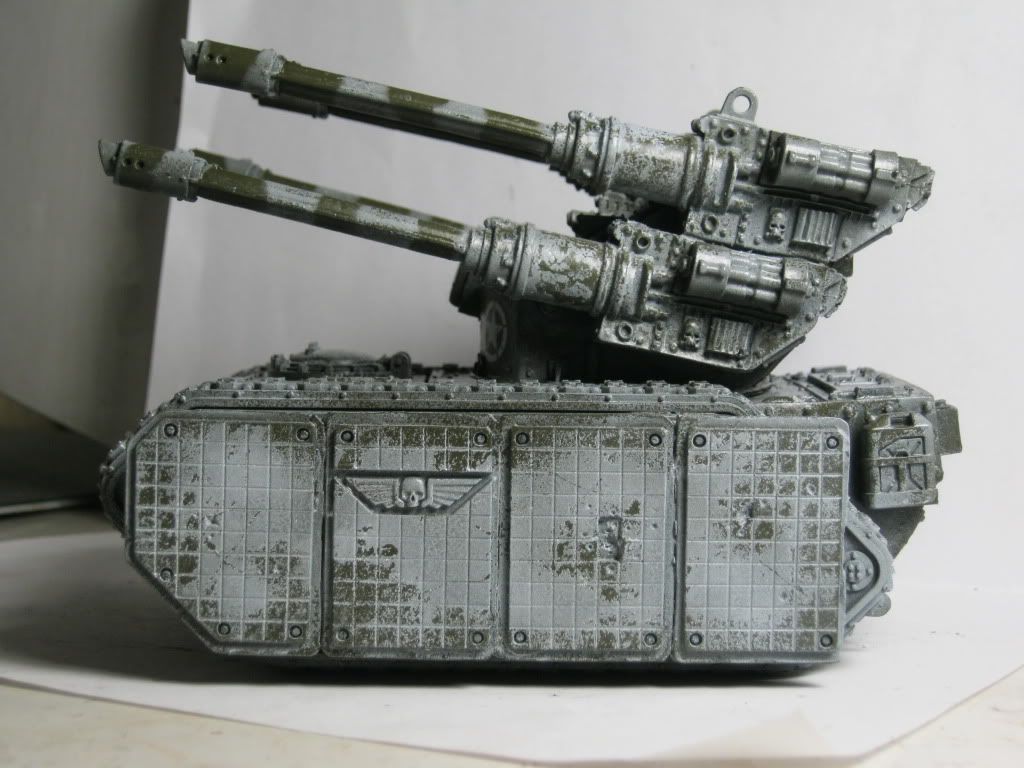 Automatically Appended Next Post: Automatically Appended Next Post: And here is a shot of it with the pinwash
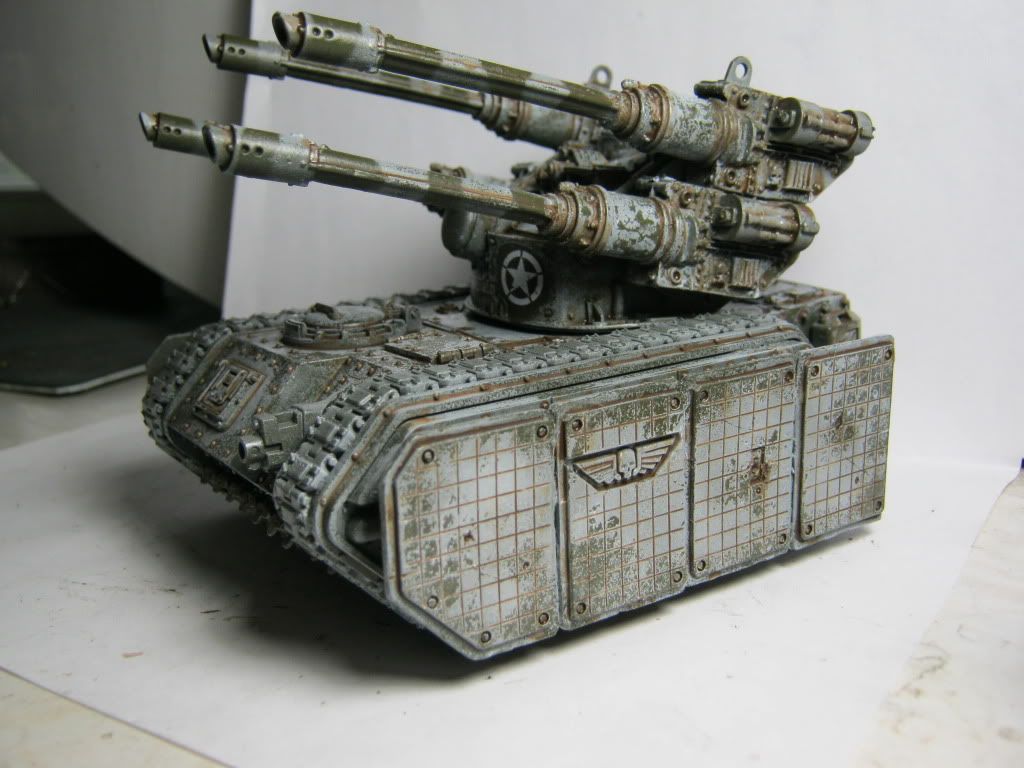
 Automatically Appended Next Post: Automatically Appended Next Post: I finished the Hydra pretty much aside from tracks and bolter.
I'd like to also paint the searchlight like they did in the FW Masterclass book.
Now I got these two vehicles out of my blood,time for some more troops.


44654
Post by: Lone Cat
wait wait wait... where do you get 'water' jerry can?
48376
Post by: Capitansolstice
I like how your starting the stormies, but I think they need more "pizzazz"
4271
Post by: Eisenhorn
I still have to add Grav-Chute and Gear along with the paintjob will make them stand out.
He is just the prototype
Water Jerry can courtesy of either Academy or AFV 1:35 scale tank stowage kits either modern or WWII not sure,the box has a drawing of everything inside.
48376
Post by: Capitansolstice
Oh, Grav chutes would make them stand out!
24019
Post by: Sieggfried
Lone Cat wrote:wait wait wait... where do you get 'water' jerry can?
Tamiya 1/35 scale Modern U.S. Military equipment set
55050
Post by: c9805222
Eisenhorn wrote:I have the Command Sentinel nearly complete,just need to paint the ground and stray wires.

I think Pask works as a comanader, a pared down realist that knows that medals and fnacy shoulders don't win you wars (games)!
Is your command sentinal just a decoy for the stealth sentinal?
Why have windscreen wipers on a open topped vechicle?
Did you paint your own troops as you mentioned them being based being based by some else? Either way I'mloving this foce. Also I'mIsending my friend a link to this thread so he can be inspired for his own ig.
Thanks
PS Your tanks rule
EDIT: that hydra turret is boss is it your own?
Did you green stuff the packs on the storm trooper they look immense.
and generally I'm green eyed with envy at your skill.
4271
Post by: Eisenhorn
Fancy Shoulders totally wins wars and gets the babes
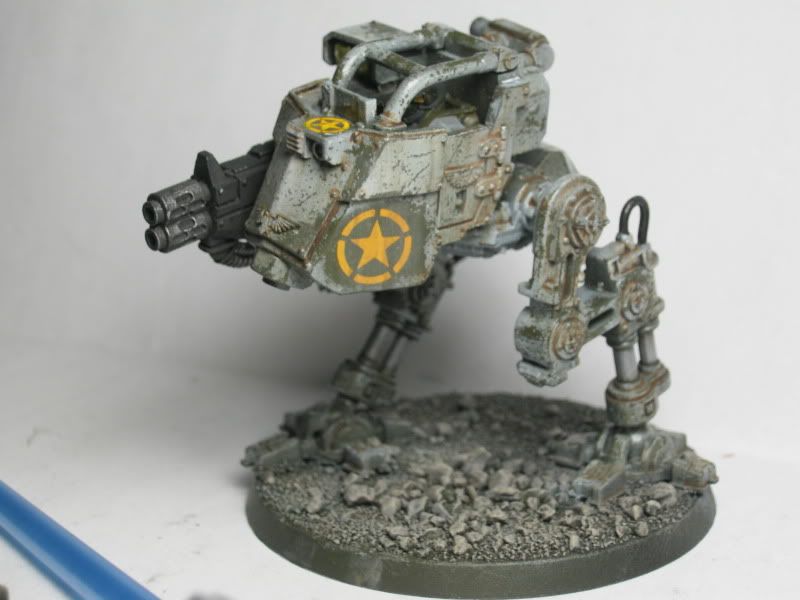
The command Sentinel is supposed to be hunkered down relaying a target or something,hence hiding behind wall.
Hyrda is FW or a damn fine copy,bought it on E-bay,not too cheap so it might of been legit.
Not sure the gun detailing is a little muddled but The hydra is an old kit so that is how they might come.
You still need a windshield on an open topped vehicle or you get bugs in your teeth
100% my paintjob I reprime over everything,kind of a shame the original paint is a real cool desert sceme.
One of the reasons this force is US themed is so I can use extras from 1:35 and 1:48 scale models.
You have no idea how far ahead the guys who paint WW2 and modern tanks are.
Brass etch,resin replacement parts(not the kind that slot right in either,the kind you really have to work(kind of like some FW kits)
That is one reason why a crappy FW kit does'nt phase me,I can see how they made the orginial with the same stock styrene parts I have
Every FW kit was originally a scratchbuild so if a piece is messed up I just fabricate what I need.
48376
Post by: Capitansolstice
You should do different colors on a shoulder pad. something stand outish. Maybe Hawk turquoise, or blood red.
4271
Post by: Eisenhorn
That is a very possible once alot more are done to denote squads.
I am eyeballing DIY Rub-on transfers and waterslide.
I need to get a new printer anyway so....we'll see
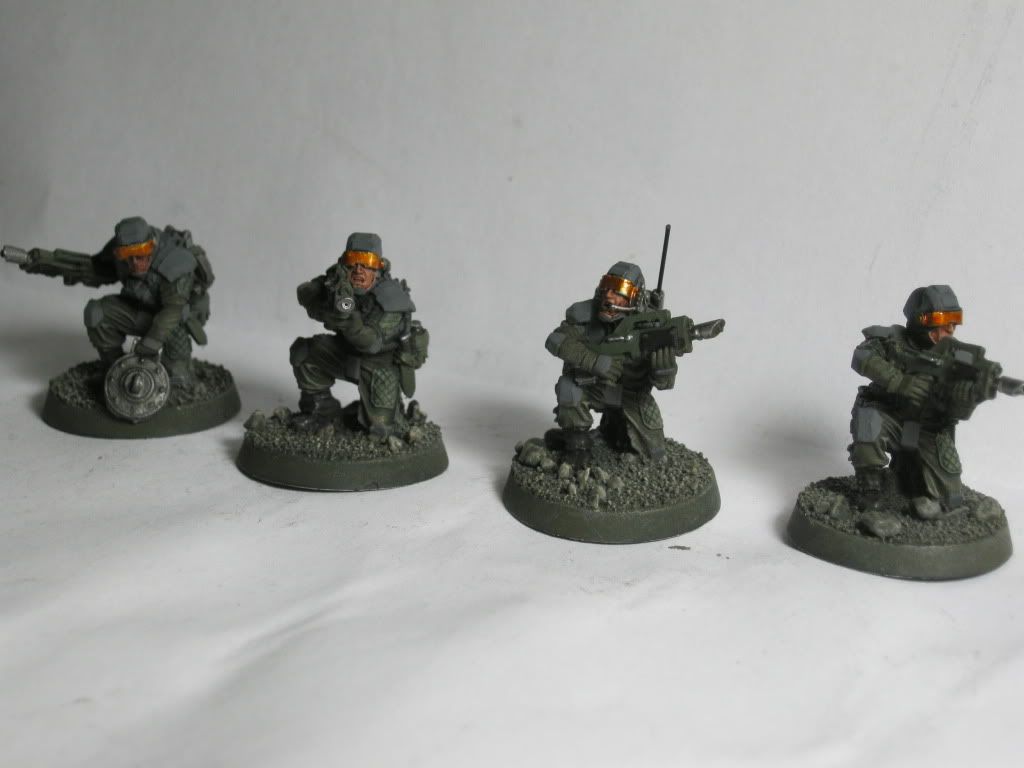
Now then today I put the finishing touches on 3 Heavy Weapons Teams one of each type except they do not have a lascannon team.
Maybe someday I do not feel like scratchbuilding 3 light lascannons when I have so many other things to do.
Missile Launchers

Mortars

Heavy Bolters

32169
Post by: Rogue Wolves
amazing looking IG, very nicely detailed and i love the color sceme (altough i might be a bit biased ) only bad thing is, the flag for my IG isnt going to be much different from that, just no star on the back.. oh well good ideas come in multiples yes?
32492
Post by: l33tninj4
Best guard army ever.
All it needs is to be led personally by Lord General Patton.
4271
Post by: Eisenhorn
Thanks l33tninj4 I was thinking Lord Solar Macarthur
Patton would be in charge of the tanks,the Lord Solar gave him his pipe
So you like my flag huh,so you are really really going to like what is coming in the mail.
34514
Post by: 40kFSU
Those HWT are just about perfect.
6548
Post by: Chaplain Cy
damn i'm jealous ><. Awesome progress man, keep up the fantastic work!
4271
Post by: Eisenhorn
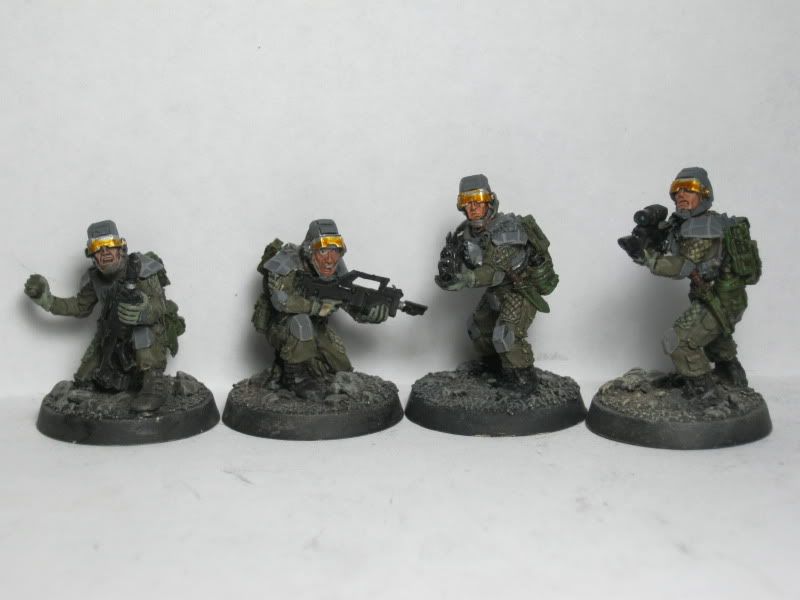
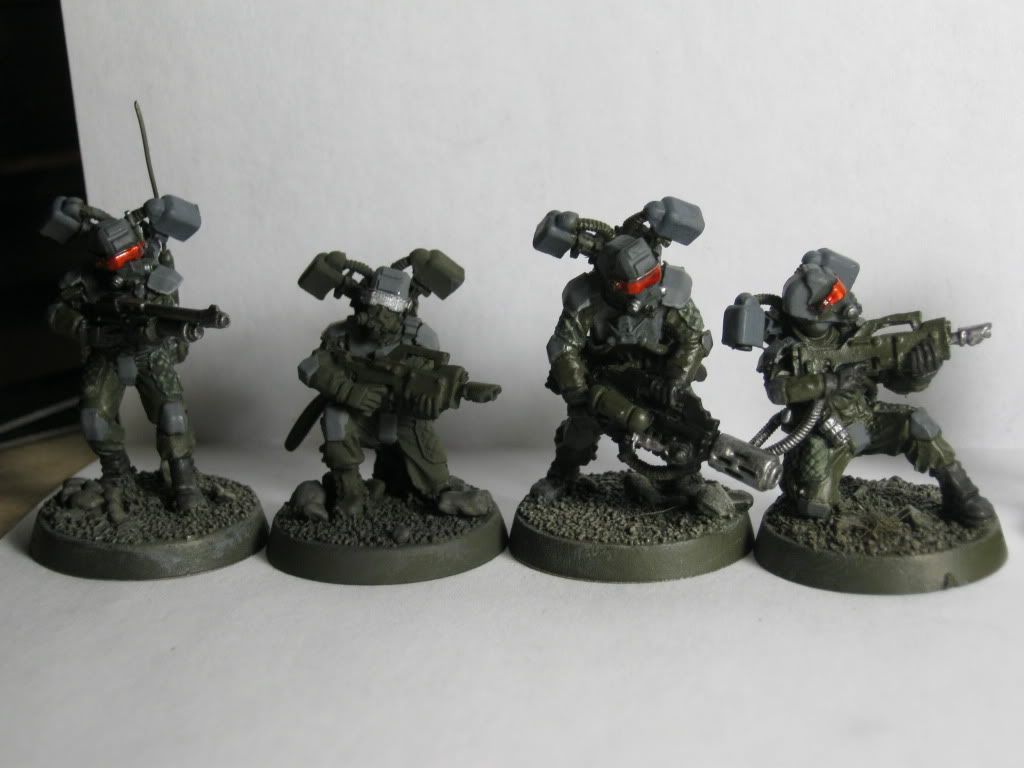
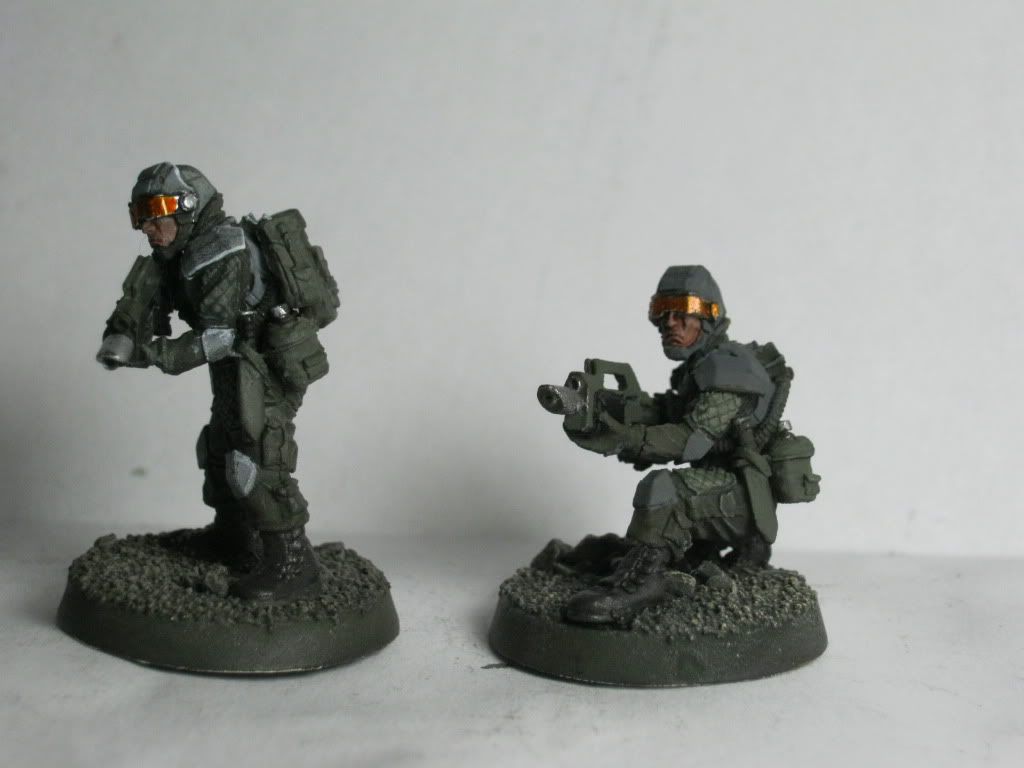
The next unit I am working on is "Team 6" the Stromtroopers
You seen the first here is the second the comms officer
Melta
He really hates tanks and bunkers
Flamer and Hotshot lasgun#2

4271
Post by: Eisenhorn
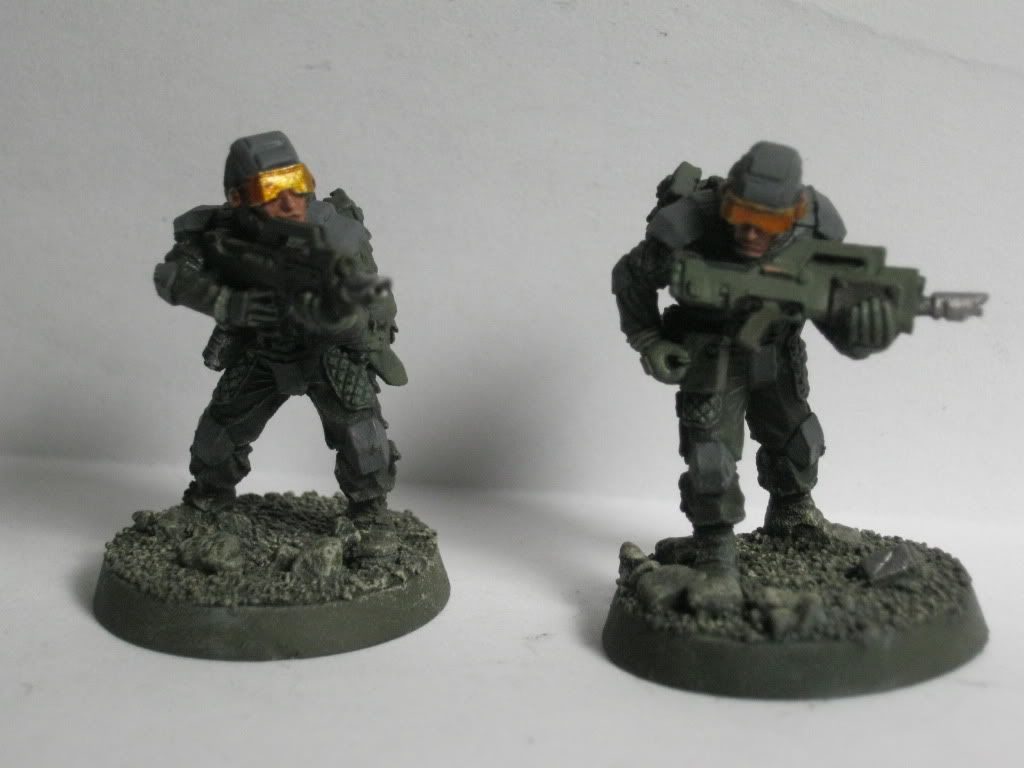
I decided to repaint the Stormtroopers in the same colors as the army.
The Dark Grey just did not look as good IRL.
They will be the only unit in respirators so that and the hellguns and red visors will set them apart

43612
Post by: Rawson
Troops are looking great! I think the respirator heads and grav chutes are more than enough to distinguish them as stormtroopers. Do you have some weathering planned for them?
Keep up the great work!
Rawson
4271
Post by: Eisenhorn
Yeah once I finish the 10,I go back and work weathering powder on the base and feet.
I also plan to buy a good DIY transfer kit once I buy a new printer
I need really small stars in circles or at the very least small stars
32169
Post by: Rogue Wolves
what color is that orange visor? its really nice!
4271
Post by: Eisenhorn
That is Minthril Silver base then Tamiya Clear Orange.
The Red ones Clear Red.
I am going to make the command squad soon and wanted to make a nice display base for them.
I made a small ruin that sits on a sheet of styrene.
I finally got to use my sandbag kit and there are four scanners/beacons watching the perimeter.


43612
Post by: Rawson
What is this "sandbag kit" you speak of? So far, my sandbag strategy has been to save up leftover GS in a sandbag-ish shape
4271
Post by: Eisenhorn
Tamiya 1/35 sandbags,premade sandbags.
However for troops and HW teams I recommend 1/48 sandbags,they better match the size you find on the HW teams.
The 1/35 is better suited for terrain and long sandbag walls.
What you see is the contents of one kit minus 8 bags
48376
Post by: Capitansolstice
I love the blue
34514
Post by: 40kFSU
I dont think Ive ever seen Imperial ruins that color. I like it. Repeating the blue on the debris is a master stroke.
4271
Post by: Eisenhorn
If you saw my Blood Pact most of my ruins on the bases are this color.
Wish I had room for a whole table.
Finished the display base


45857
Post by: SelvaggioSaky
Nice squad, like the one on his belly, give the team a more "dynamic" feel!
4271
Post by: Eisenhorn
If you watched the movie Navy Seals every elite unit needs God.
http://www.youtube.com/watch?v=AAf2qjrOGO0
4271
Post by: Eisenhorn
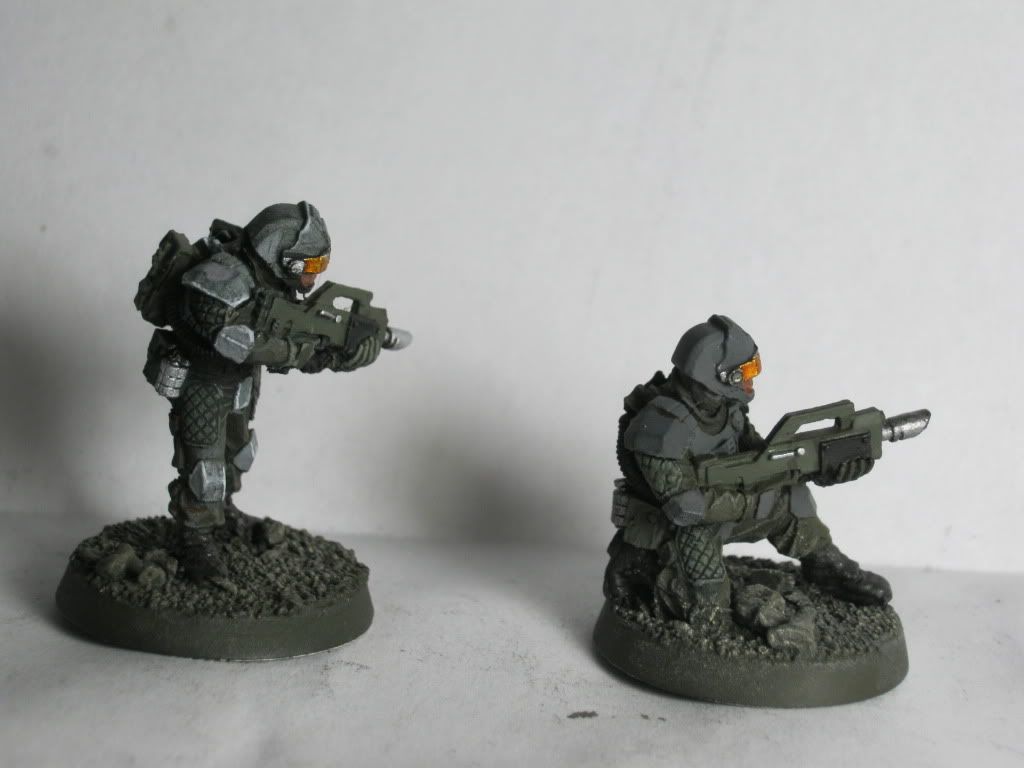
So here is the next 10 man platoon with plasma rifle special weapon almost finished
Another day of fine tuning and they should be done
The next 10 man squad is right on their heels

48376
Post by: Capitansolstice
I think OSL would really benefit your models
4271
Post by: Eisenhorn
I did a slight bit on the plasma gunner.
He is the second squad"The crouching squad" in the platoon finished
I started highlighting the fatigues with a drybrush of Green-Grey

48376
Post by: Capitansolstice
Oh, I see it now! That sure is nice and subtle!
4271
Post by: Eisenhorn
Capitansolstice wrote:Oh, I see it now! That sure is nice and subtle!
You see it now because I followed your suggestion
I was given a great idea over at Ammobunker to paint the troops armor plate like my tanks.
Now I am not going to repaint 20 guardsmen,I do have another platoon to do.
So after the next 10 guys that would make a nice sized 30 man platoon,I am going to paint the next platoon with winter camo armor.
I made a test piece,here he is compared to a guy from the last batch.
Whadda think?


48376
Post by: Capitansolstice
IMHO it just looks like one has more highlights. I think your camo scheme is so.... different that it doesn't do it justice on smaller plates
4271
Post by: Eisenhorn
Thats what my delemma is I have two people saying it looks better two saying worse and I cannot decide.
Might run a 10 man winter squad see how it looks
48376
Post by: Capitansolstice
I think if you made the camo a bit more clear, then Yes, but right now, Im not sure
43612
Post by: Rawson
Eisenhorn wrote:Capitansolstice wrote:Oh, I see it now! That sure is nice and subtle!
You see it now because I followed your suggestion
Classic
Eisenhorn wrote:I was given a great idea over at Ammobunker to paint the troops armor plate like my tanks.
Now I am not going to repaint 20 guardsmen,I do have another platoon to do.
So after the next 10 guys that would make a nice sized 30 man platoon,I am going to paint the next platoon with winter camo armor.
I made a test piece,here he is compared to a guy from the last batch.
Whadda think?
I think it looks so much better! (I love being the tie breaker ) I think it adds a bit of pop that goes a long way. You're spending so much time and effort, it would be a shame not to go the extra mile. I think if you could get a bit more detail and/or highlighting and or washing on some of the other details (like all the kit shown below) I wouldn't have anything left to give CC on 
Eisenhorn wrote:
4078
Post by: albinoork
First, I'm a big fan of the visors. The red/orange makes a fantastic contrast with the green/gray.
In my opinion, the infantry are too small to replicate the tank pattern. On the tabletop the detail just gets lost. Perhaps you can make the infantry armor a lighter shade of gray and highlight with white. Also, try drybrushing all the green parts than wash or ink with yellow than hit with drybrush.
This should keep the feel of the tank coloring.
Been following your thread for awhile, thanks for bringing a new style of tank painting to Dakka.
take care and be well.
4271
Post by: Eisenhorn
Do you mean yellow ink as a shade?
Anyhow,starting to get burnt out painting troops,so we have to switch it up.
I figure time to start working on the Command element
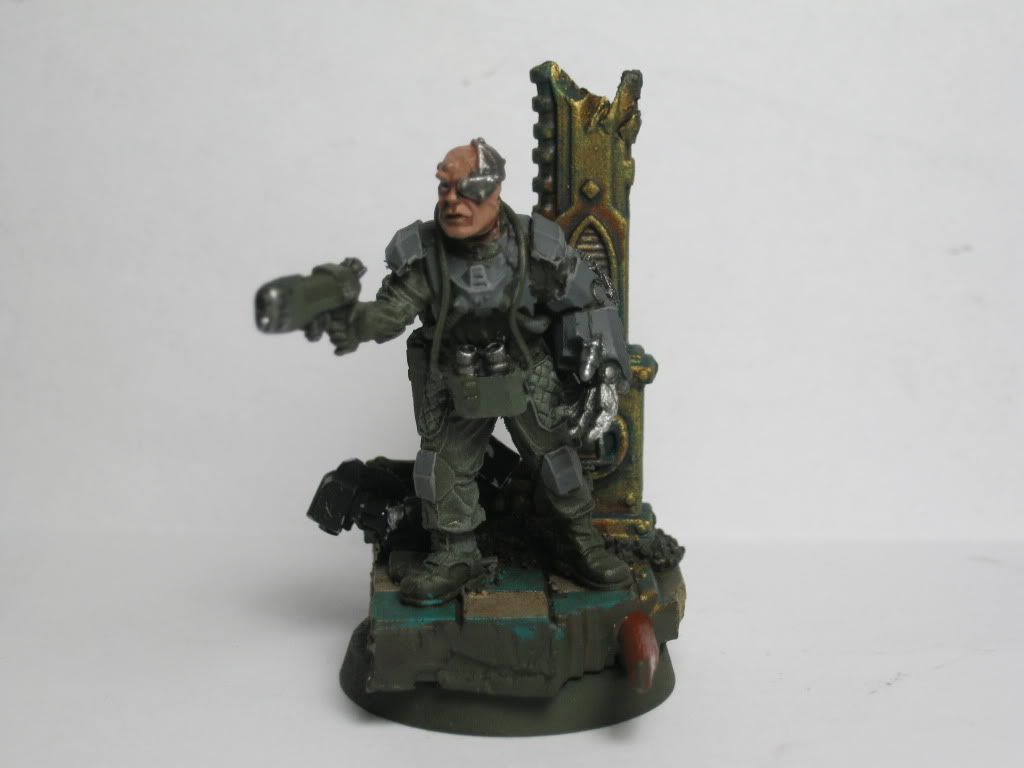
I have my Creed/Kell here as Lord Commander Vilhelm Ellsworth and the Top

The head is from the guard head bits from the GW site,they really need to retake those picks there are in fact quite a few choice heads on there.
Here is the Command Comms

The Surgeon General
Platoon Command Squad Capt Diemetris Van-Loo
Platoon Medic

48376
Post by: Capitansolstice
I love the replacement creed, hes very characterful!
32169
Post by: Rogue Wolves
very nice use of that head sprue, really adds some nice character ^ as cap't solstice said
4271
Post by: Eisenhorn
Yeah GW really needs to take better pics of that sprue.
The site pics make them look terrible
I saw someone else use the one I used for Capt. Diemetri with the riddick googles and bought it for that,was super pleased to find the creed one was even better.
There are a couple of duds but there are quite a few really cool Sgt Heads, a few would make for great Marines too.
4078
Post by: albinoork
Eisenhorn wrote:Do you mean yellow ink as a shade?
After a bit more thought .....
Maybe try a dark green wash / ink first and than start drybrushing, yellow wash, drybrush. I feel this would add more depth to the models and make all those fantastic details pop.
Looking forward to seeing more.
take care
4271
Post by: Eisenhorn
Worth a try
I did some work on the Regimental standard.
This would of been impossible if this was not a finecast model
32169
Post by: Rogue Wolves
the flag looks great!
4271
Post by: Eisenhorn
F%$%,F^%$,F%$^^
I fething mispelled Merica
43612
Post by: Rawson
Eisenhorn wrote:F%$%,F^%$,F%$^^
I fething mispelled Merica
It's okay, Eisenhorn! The 1st Mercia Lancers doesn't sound so bad
Could have been worse: I was in a tattoo shop once and a guy flipped out because his daughters name was misspelled. In ink. On his arm.
4271
Post by: Eisenhorn
My friend has that beat,he let a rookie tattoo artist do his first portrait ever of his daughter on his arm.
It looked like his Grandma,then he tried to cover it up
but it looked like his grandma peeking through the bushes.
Now it is a Tiki Mask of sorts.
His stupid arm has enough ink for the Daily News for a year.
Well I fixed the banner it is Merica now
I also did the switcharoo on Diemetri's head.
Once I said Riddick I knew this head belonged on my Sly Rambo
And lastly Lord Commander Vilhelm Ellsworth and two of his Lucifer Black bodyguards


4271
Post by: Eisenhorn
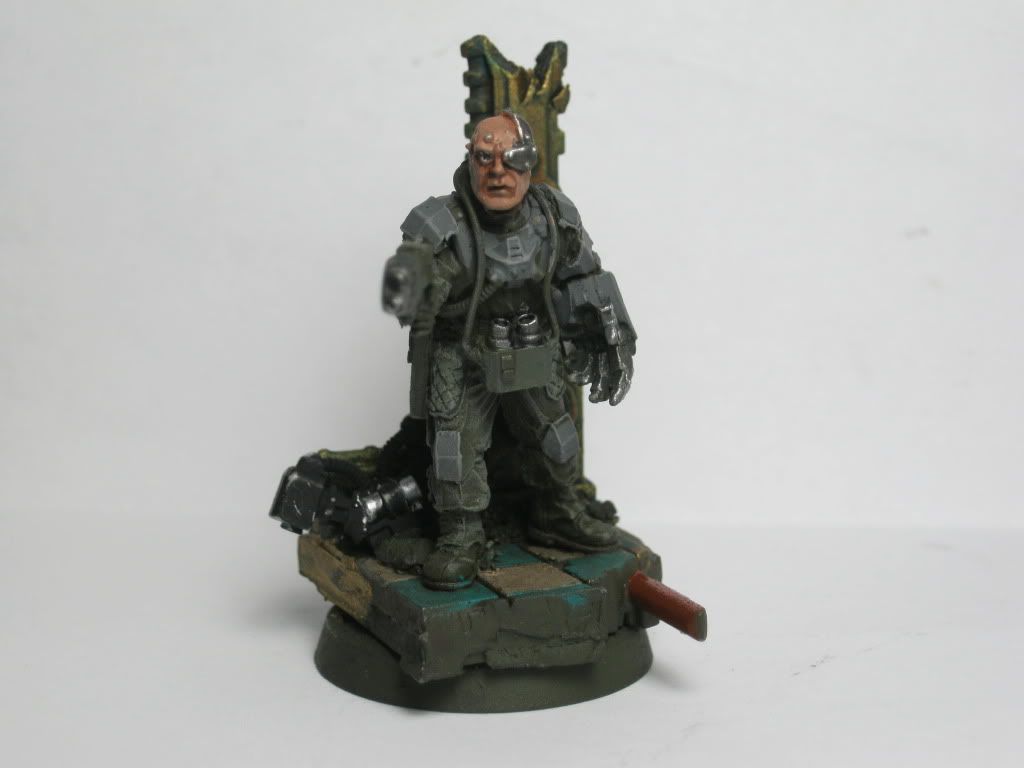
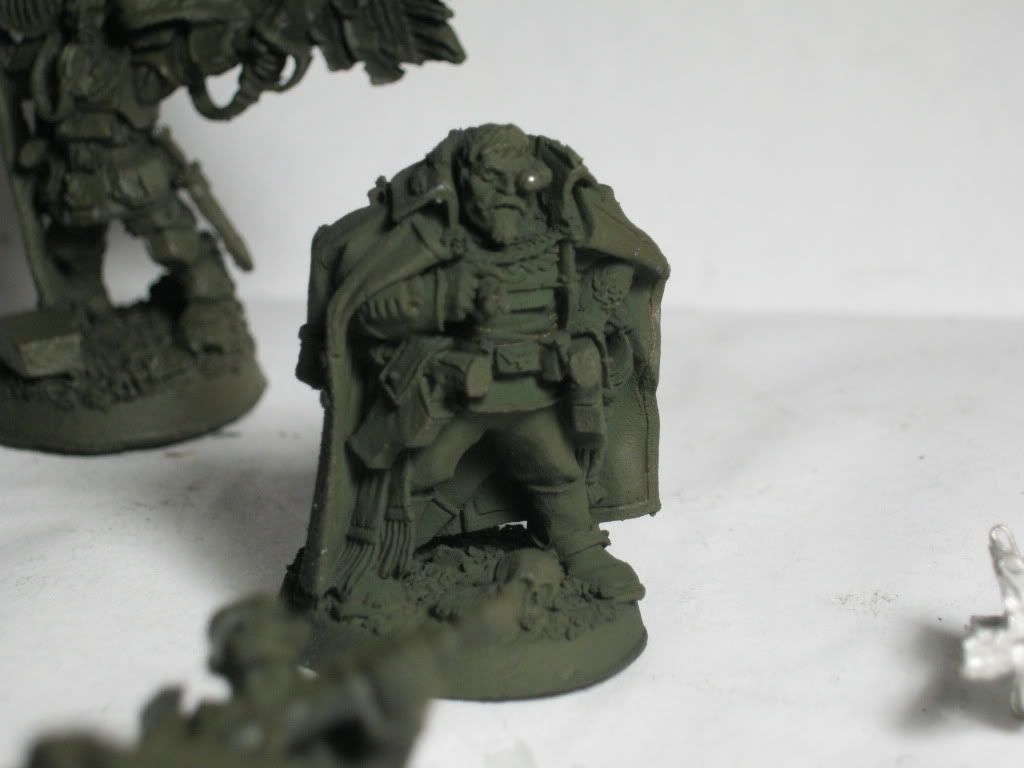
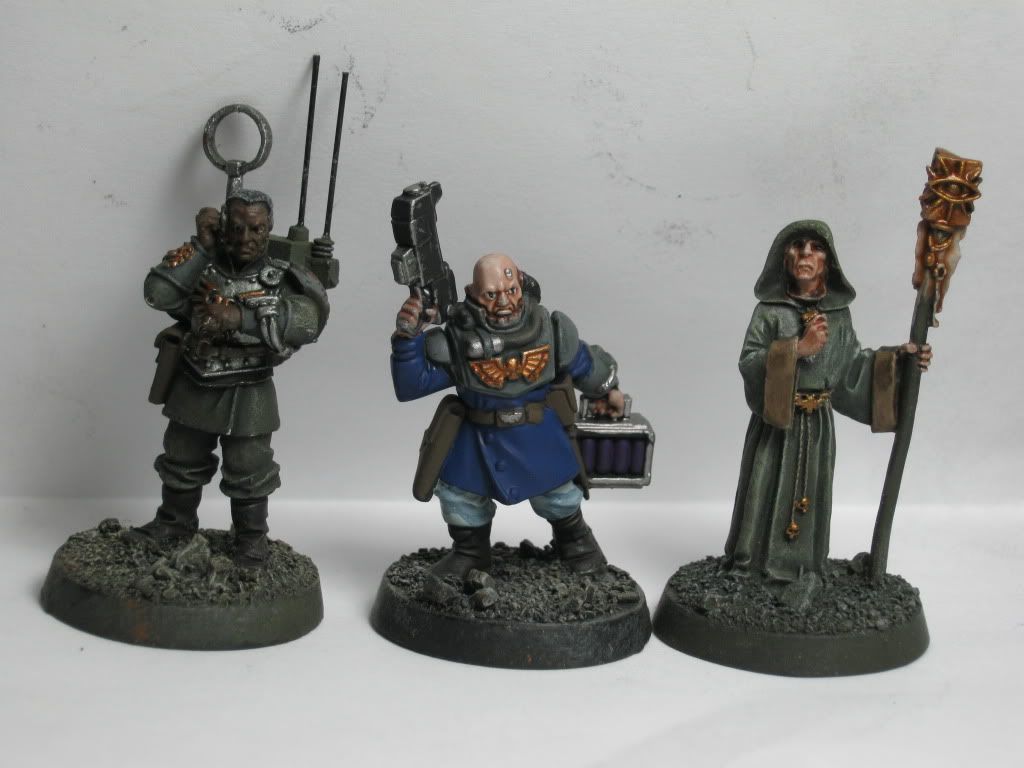
I have been buzy today putting together the General Staff
I have Vilhelm Ellsworth,Gunny Kell and two model I am using for Ellsworth's wound counters
A Lexomatic to record all of his glory and a very special gift from the Mechanicum.
His pet dog Dexter was mortally wounded during a political function when he attacked the Martain Ambassador's Mechandrite.
The Abassador's mechandrites following standard self defense protocol ripped into his beloved pet.
The Mericans are held in high esteem by Mars and when word got out to the Fabricator General he had Lucas Chrom construct a canine drednought chassis.
Dexter's nervous sytem was sucessfully intergrated into an nearly indestructable chassis.

Here are his advisors from Left
Lucifer Black bodyguard,Astrotelepath,Master of Ordinace,Officer of the fleet,Lucifer Black bodyguard

I have two other Lucifers
Brigadier Combat Iterator(Lord Commissar)Surgeon General,Master of the Vox
32169
Post by: Rogue Wolves
nice soldiers, very nice indeed.. but on this last picture, what is the head on the middle one from??
39973
Post by: Galorn
Rogue Wolves wrote:nice soldiers, very nice indeed.. but on this last picture, what is the head on the middle one from??
WHFB Empire militia/free company I think...
4271
Post by: Eisenhorn
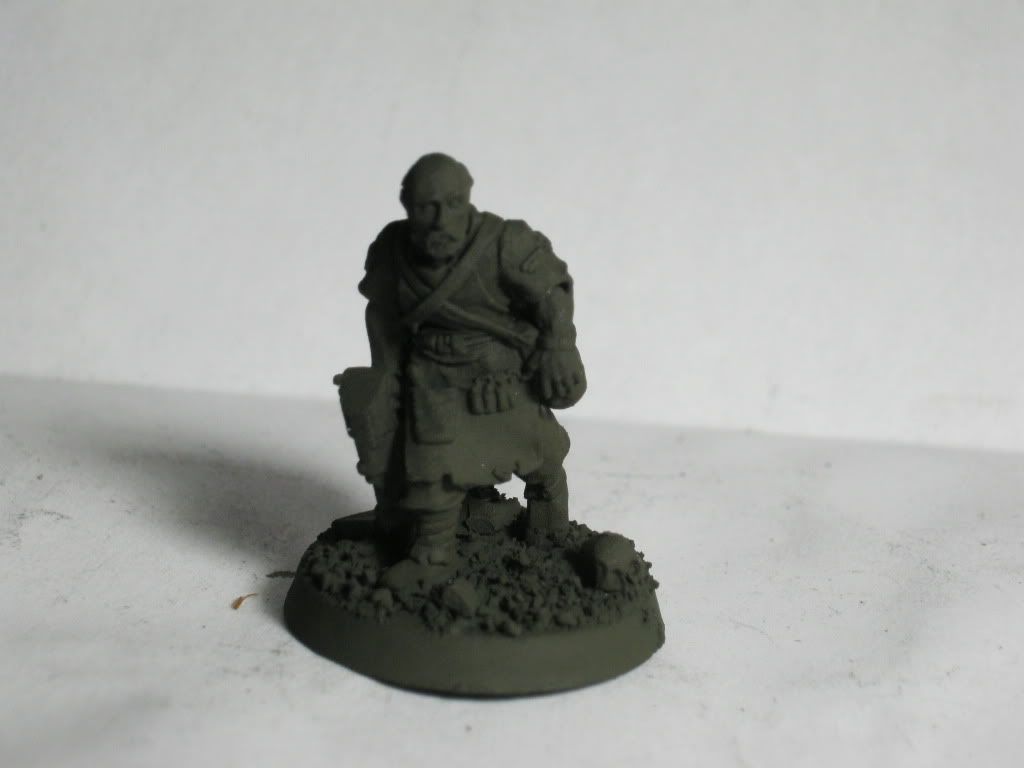
Nope
That is Dorden the medic from the Guants Ghosts set.
One piece model.
39358
Post by: Paranoia_Agent
Your infantry look great the lexomatic and master of the vox are my favourites.
32169
Post by: Rogue Wolves
Eisenhorn wrote:Nope
That is Dorden the medic from the Guants Ghosts set.
One piece model.
aahh ok, thanks for that one.. and i wish it was free company because i have one, but unfortianatly not
4271
Post by: Eisenhorn
Well while painting the Lexomatic it got me thinking where he came from and a much much better Command Medic.
I have to find the Quartermaster Med-Sevitor.
Sure Dorden is kind and fatherly but that Med-Servitor has a Buzzsaw
Buzzsaw>Kind
Here is the finished Lord Comander and Gunny Kell
I had a second Hound I figured use them both,the hounds count as one model,lexomatic the other.

32169
Post by: Rogue Wolves
really well done, nice color choices on all of them.. 3 questions on that..
1. blue on the merican flag?
2. white stripes on merican flag?
3. green on clothes?
4271
Post by: Eisenhorn
1)Midnight Blue
2)Astronomicon Grey
3)Model is primed first black then basecoated Tamya TS-5 Olive Drab spray
Then I drybrush Vallejo Green-Grey trying only to hit high points (avoid chauky finish)
Then I wash with AK Brown Blue enamel Wash
Just wanted to say I just bought the DKoK Quartermaster Medic Servitor for the new command medic
32169
Post by: Rogue Wolves
^thank you sir
4271
Post by: Eisenhorn
Here are his advisors Master of Ordinace,Fleet Officer,Astrotelepath
And two styles of bodyguard Imperial Ninja and Lucifer Black
And two Combat Iterators(Commissar)
32169
Post by: Rogue Wolves
i really like that fleet officer and those commisars
39358
Post by: Paranoia_Agent
Those commissars look sweet, nice choice of colours.
4271
Post by: Eisenhorn
Here is the complete bodyguard set
Lucifer Blacks
Carthage Warrior Women and Imperial Ninjas

Ya know the I have 4 Lucifer Blacks the Necromunda Enforcer Set comes with 6
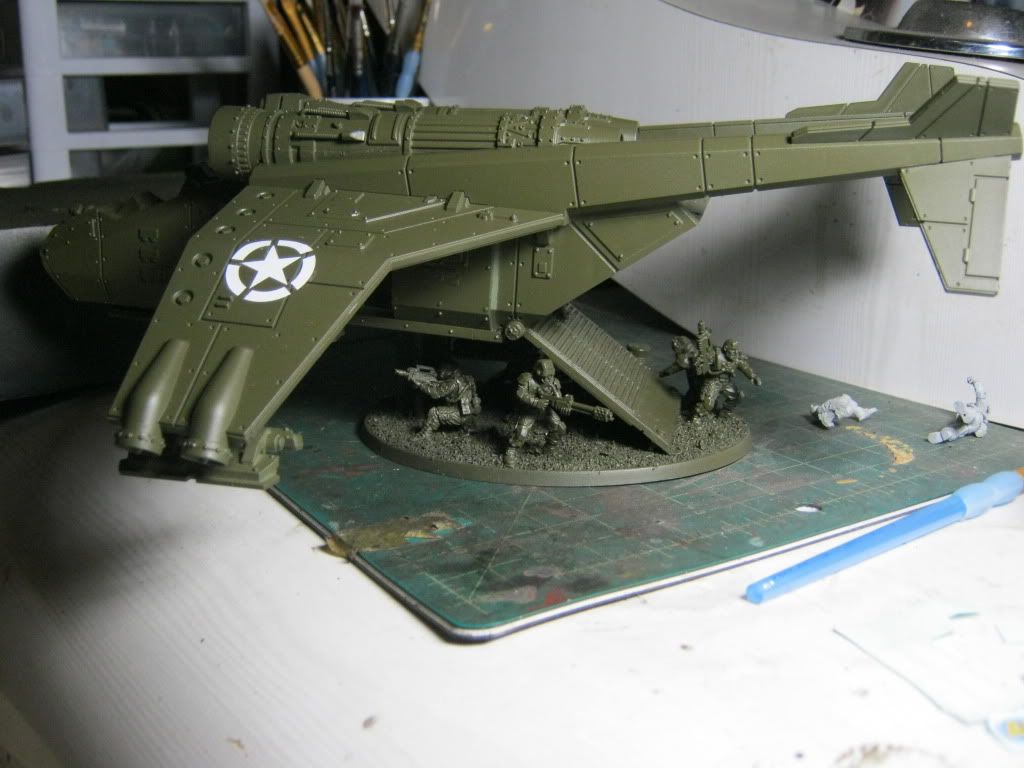
I think I know what I am using as a Veteran Squad,makes the shotties legit too.
39973
Post by: Galorn
Looking really good there. very atmospheric .
32169
Post by: Rogue Wolves
^ agreed, i love him.. all besides the fact that i hate stallone, but the model is cool!, what did you use for the iceicles?
34514
Post by: 40kFSU
Any chance of a group shot? I would love to see this army together.
4271
Post by: Eisenhorn
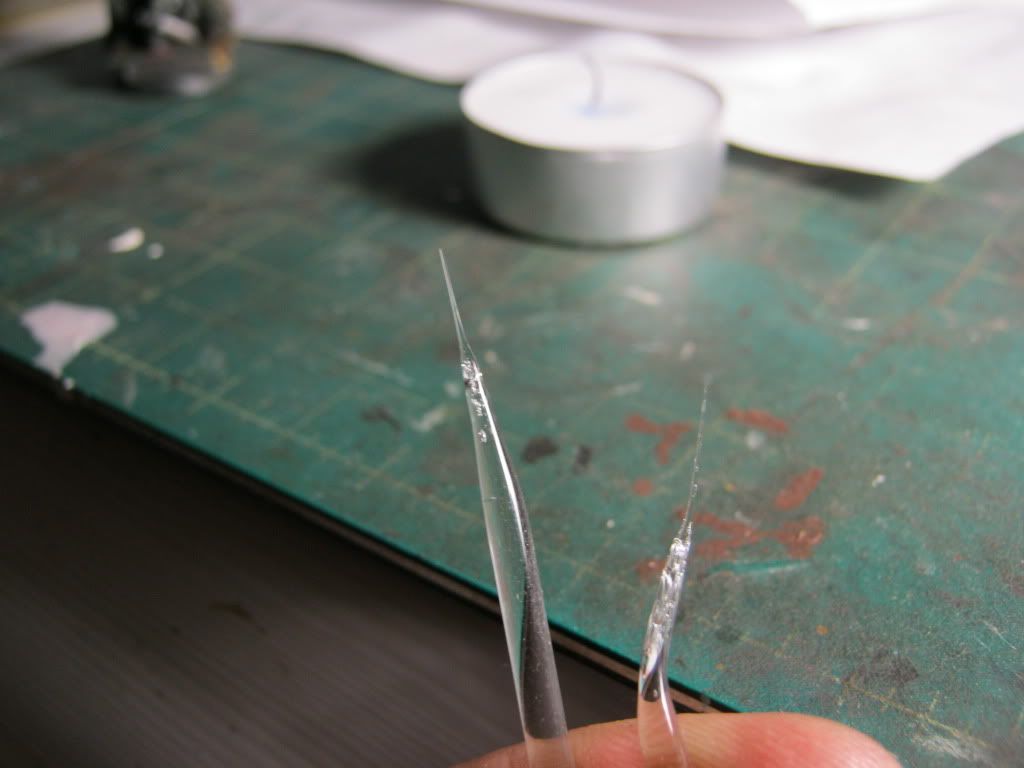
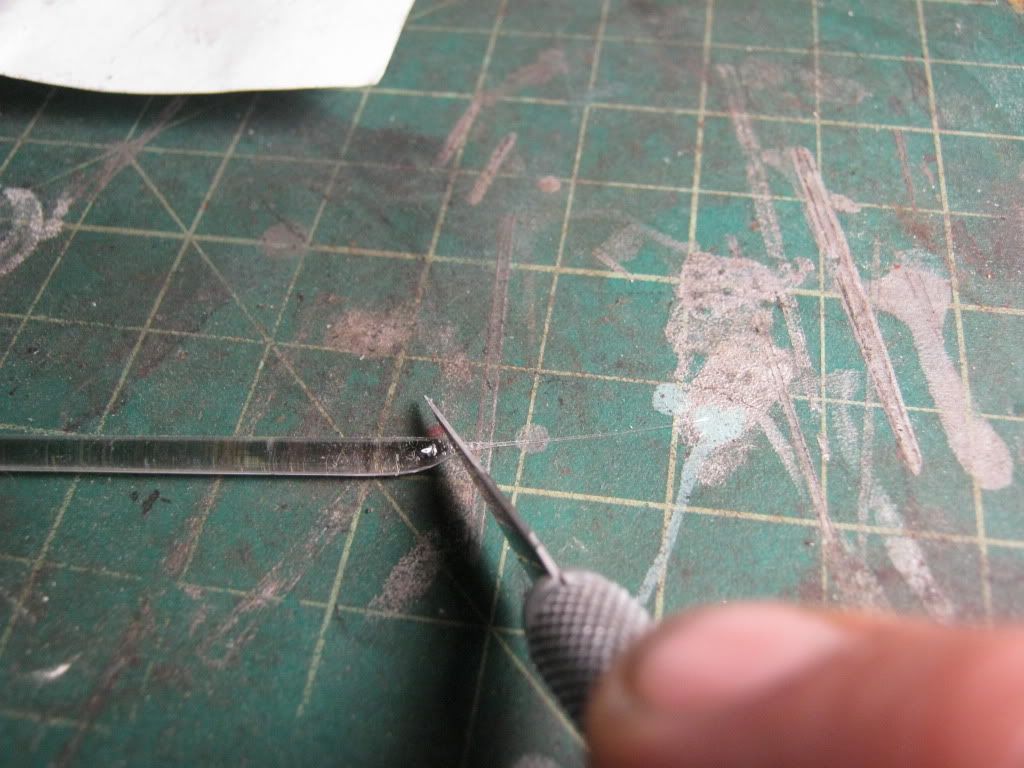
The ice was made by heating clear rod over a flame,when soft stretch the rod
(wow that sounded so wrong,but strangely correct both ways :p )
This is a quick little tute on how to make realistic icicles for the 40k scale.
You need a heat source,clear rod,and exacto
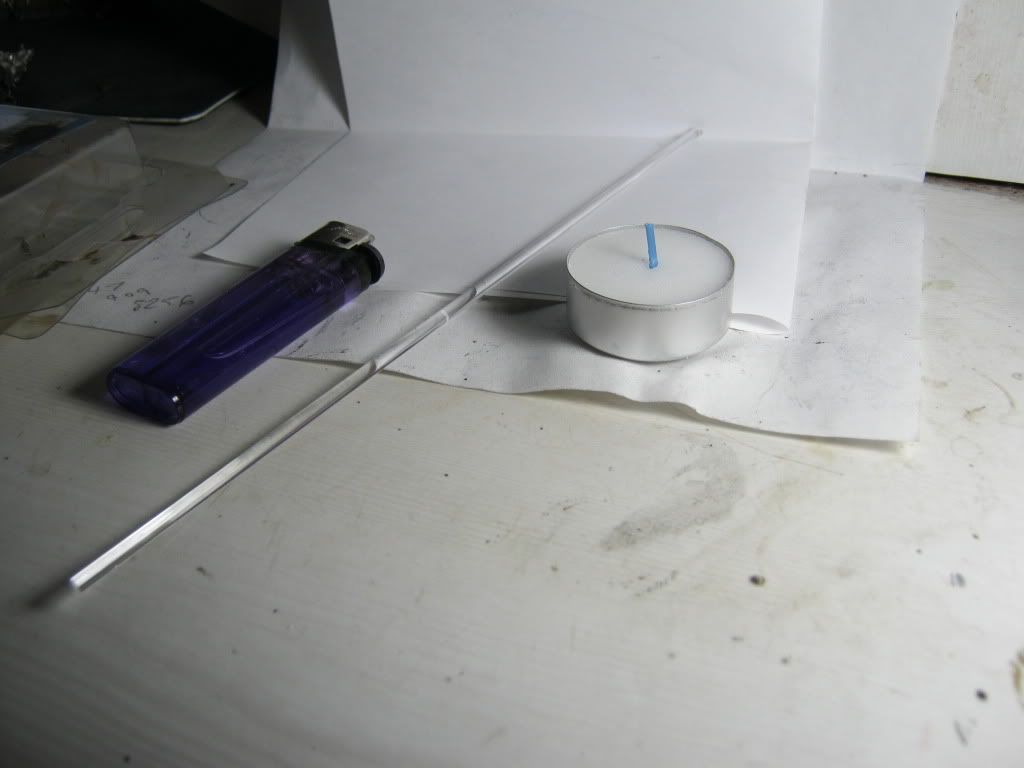
Take the rod and heat it over a candle until is starts to sag.
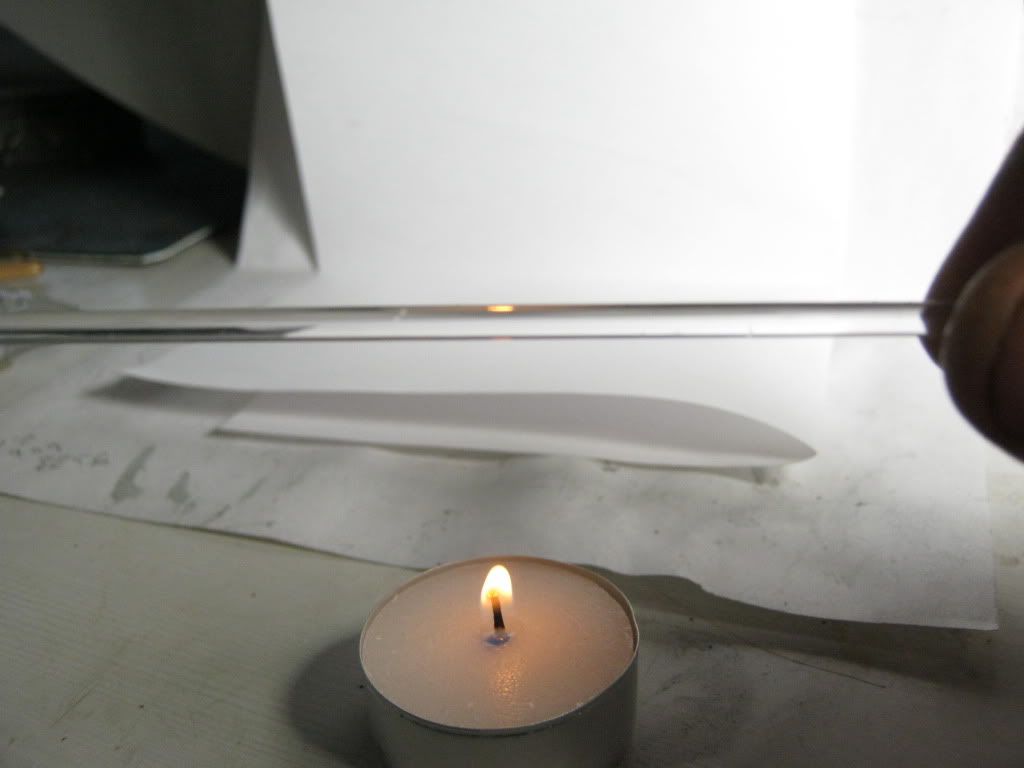
Then pull on the rod until it stetches wire thin and let it cool.
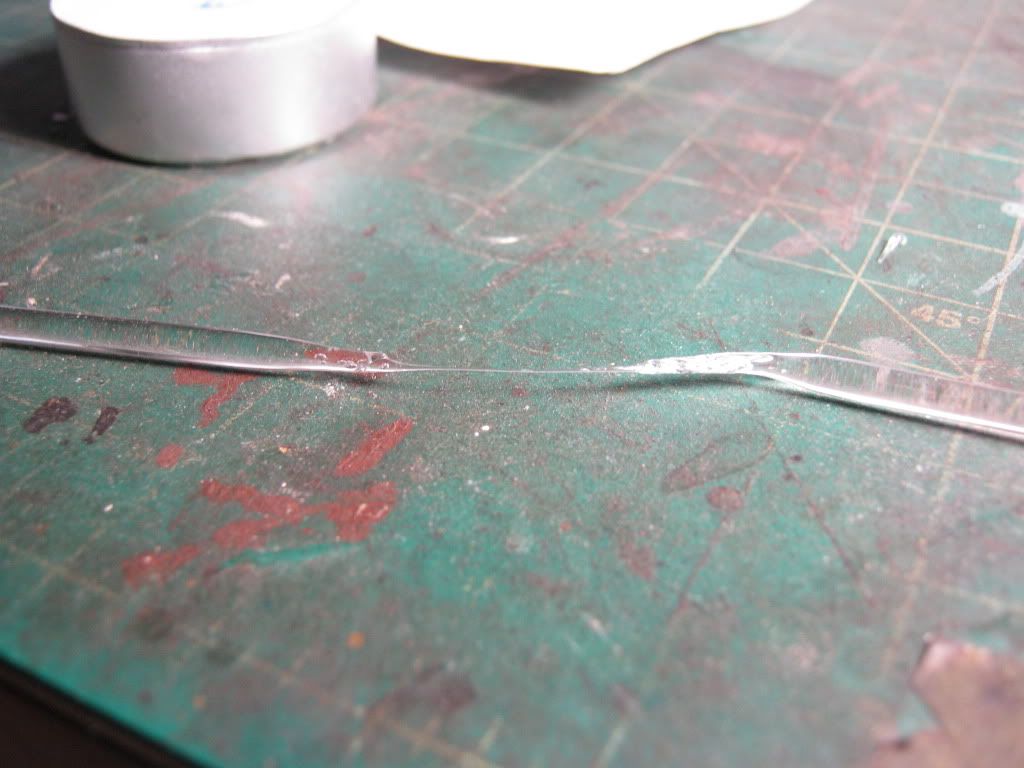
Then pull apart and cut off the very tips,voila instant icicle.
32169
Post by: Rogue Wolves
thanks for this....btw
"...when soft stretch the rod"-Eisenhorn
sigged
32169
Post by: Rogue Wolves
the commissar looks great all the colors work well together
4271
Post by: Eisenhorn
Oops besides the boot and gold under the armor,I plum forgot to paint the rope that holds his cloak
39973
Post by: Galorn
For the "marbo" counts as if you haven't added snow yet maybe a more subtle "frost" effect on the "wall" as if there was a sudden cold snap?
32169
Post by: Rogue Wolves
wow this (sergant i assume) the one with the powerfist, is a great looking model, did those bino's come with the drop troops?
48376
Post by: Capitansolstice
I think the only thing to make your models better would be to paint the littler details on the stowage(straps ect.)
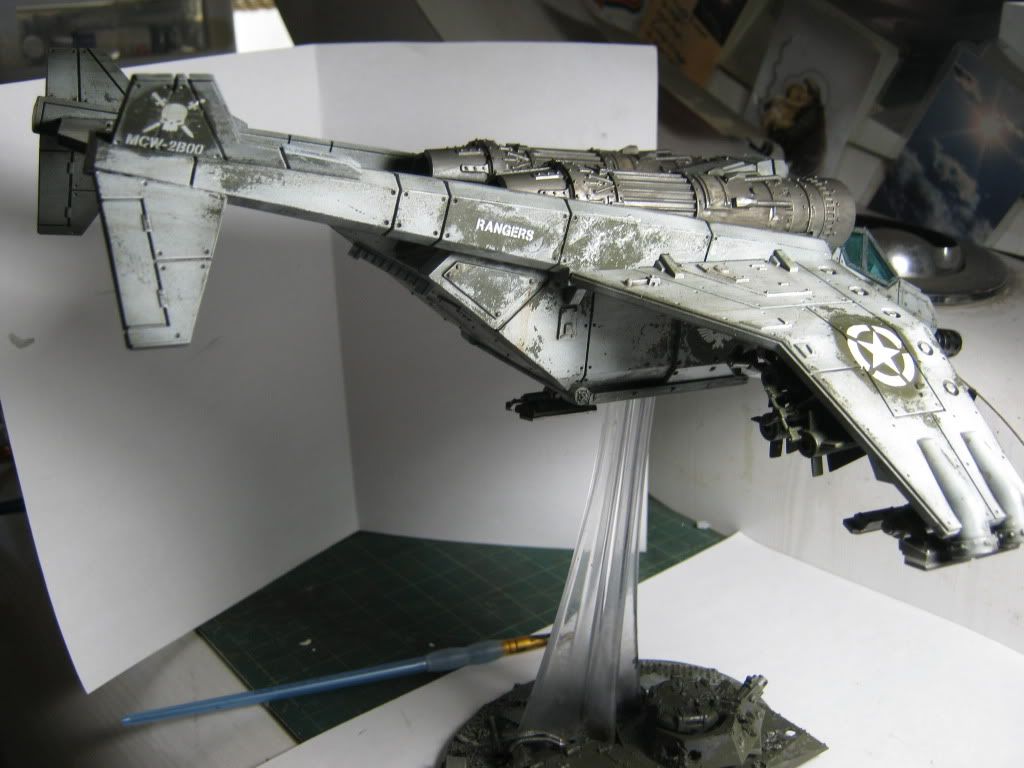
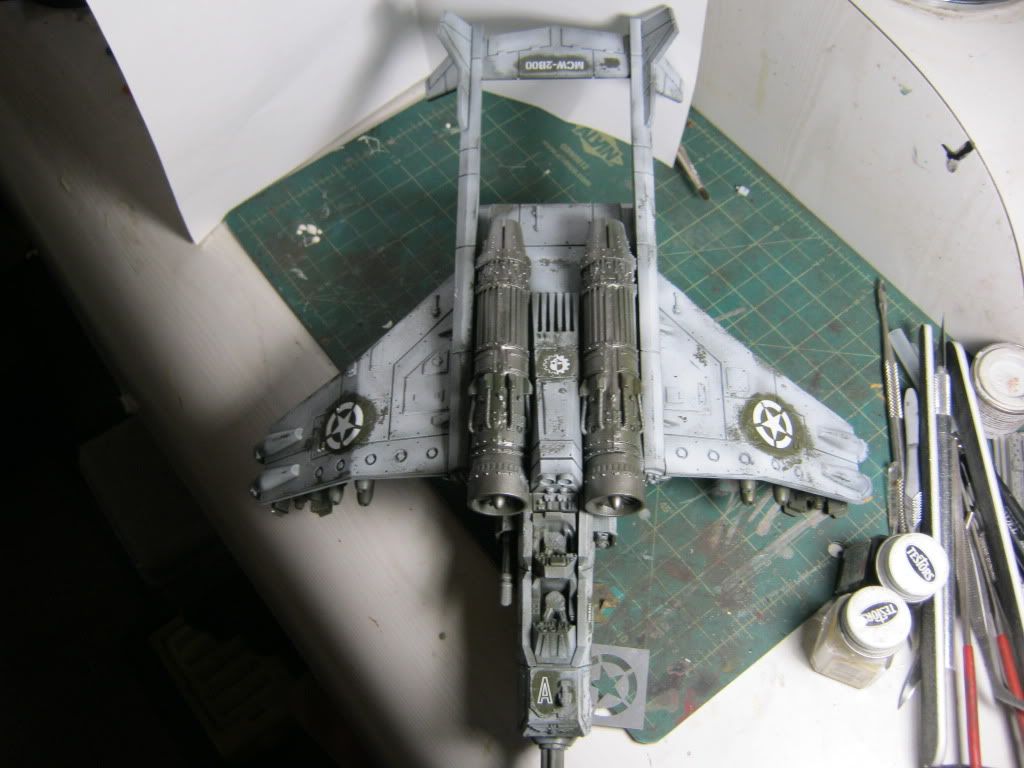
32169
Post by: Rogue Wolves
^ this would be a nice addition me thinks too
4271
Post by: Eisenhorn
One day I'll have a straps day,probally soon as I am wrapping up the first platoon.
But like you can tell every week or so I switch it up from troops to vehichles.
I have 3 or 4 of these as a Fast attack sqaudron.
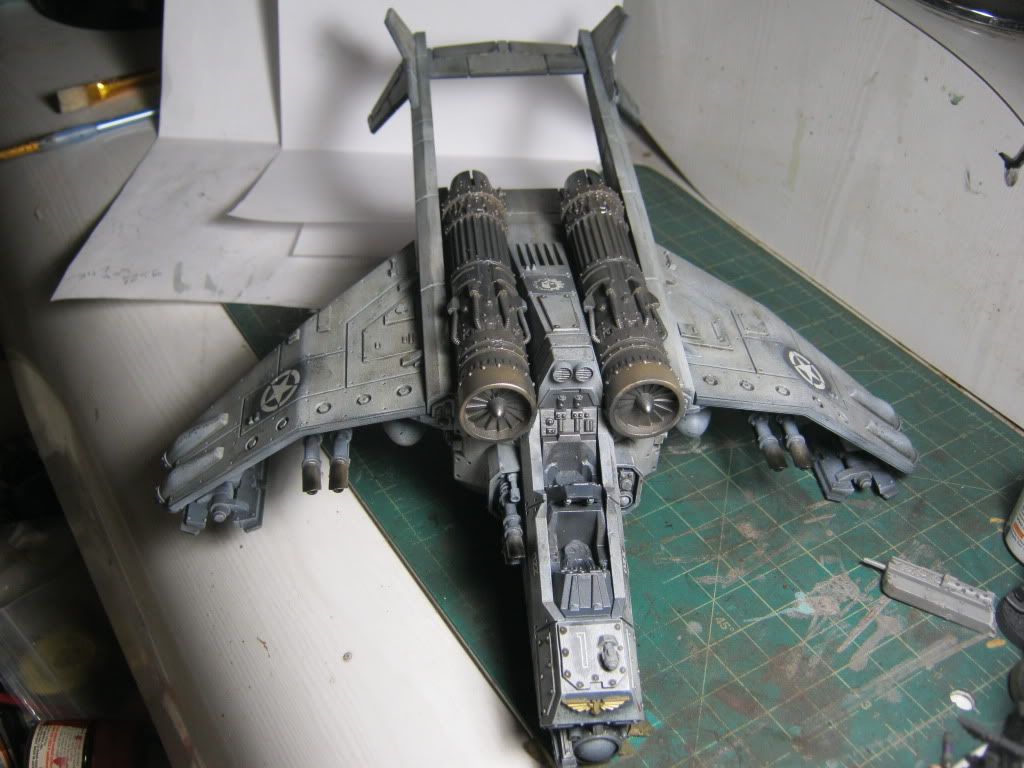
I felt it was time to get the Vendetta out of the way.
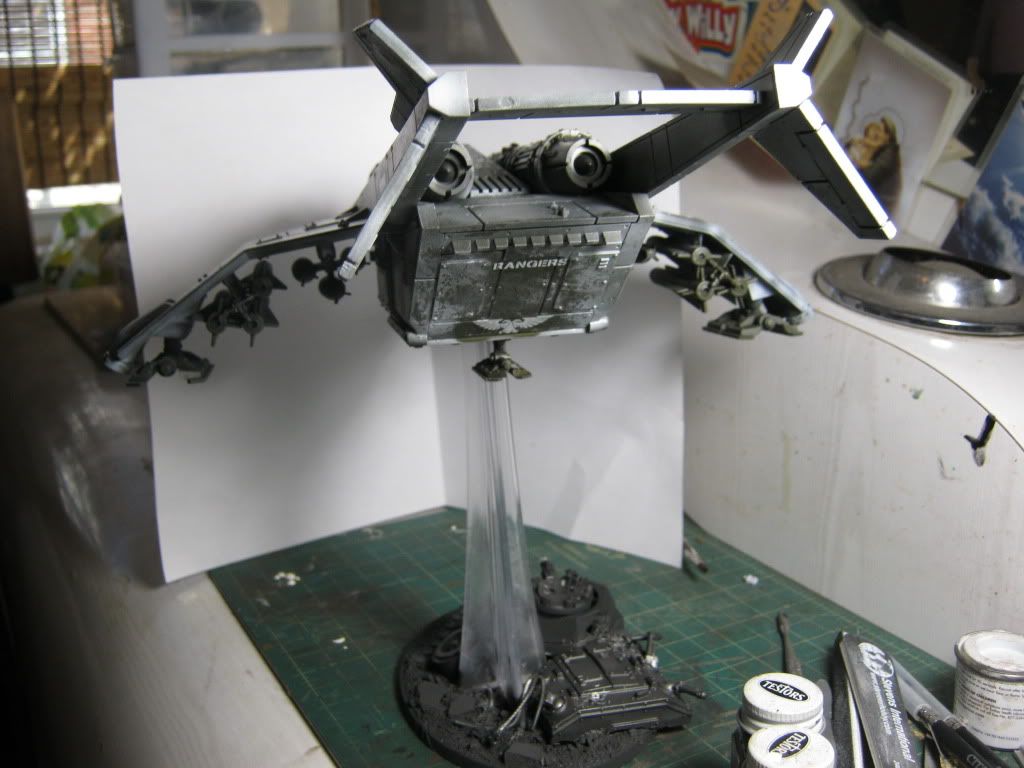
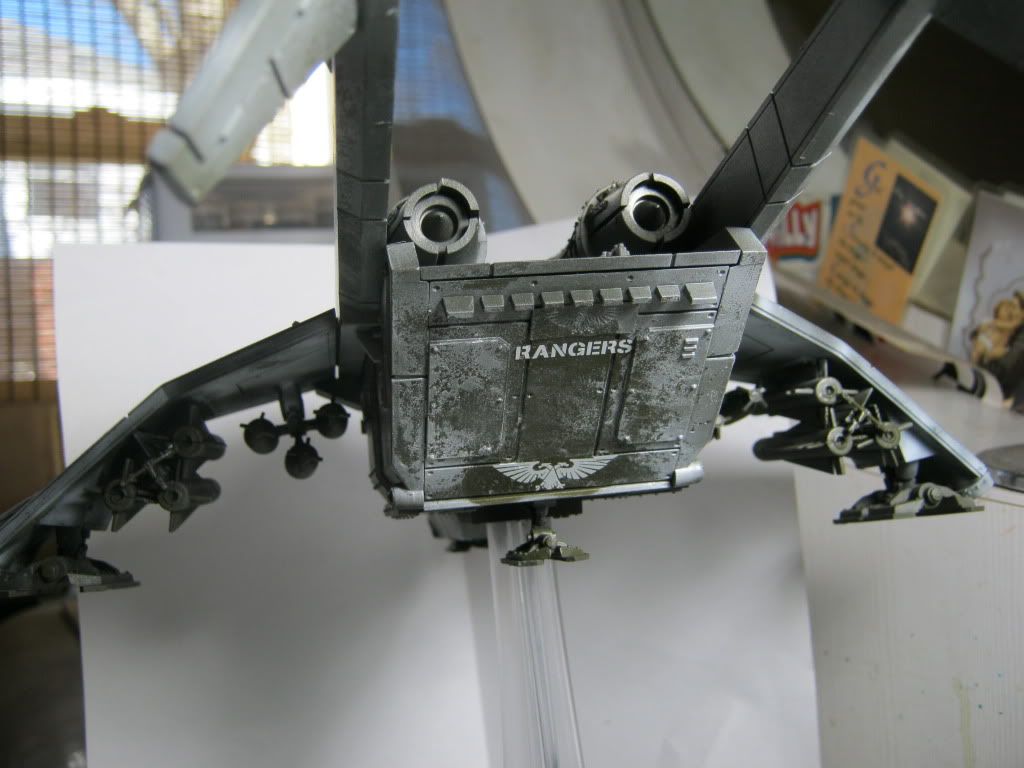
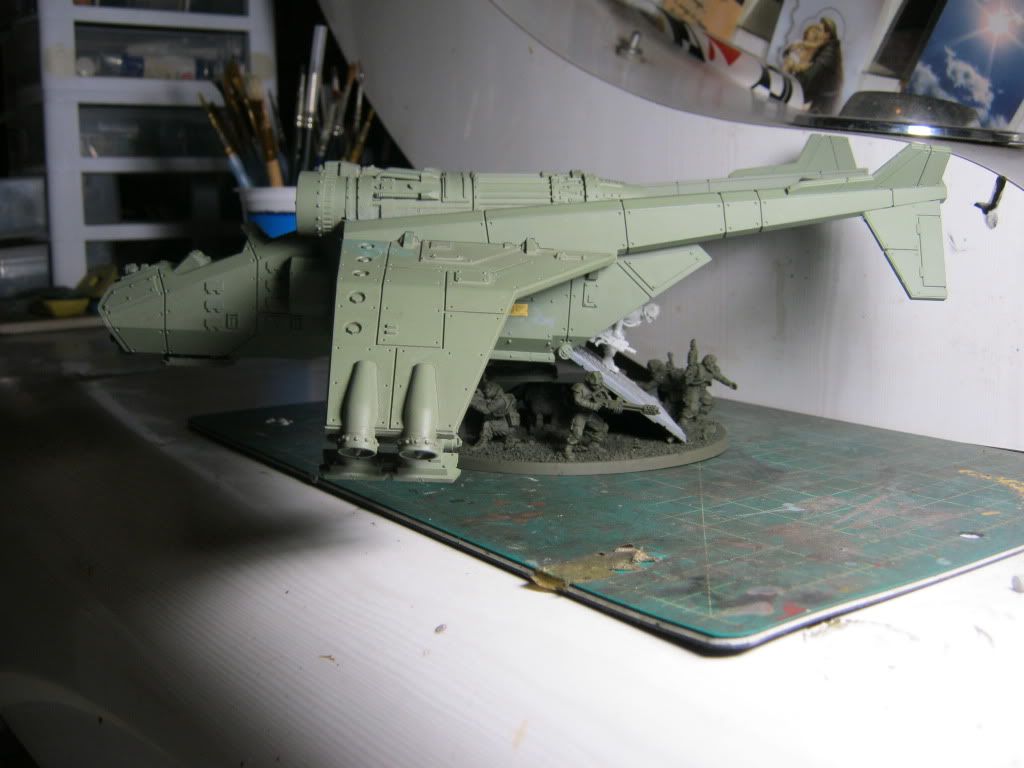
I see a Vendetta as being more close to the ground,so I painted this one in a winter camo too,
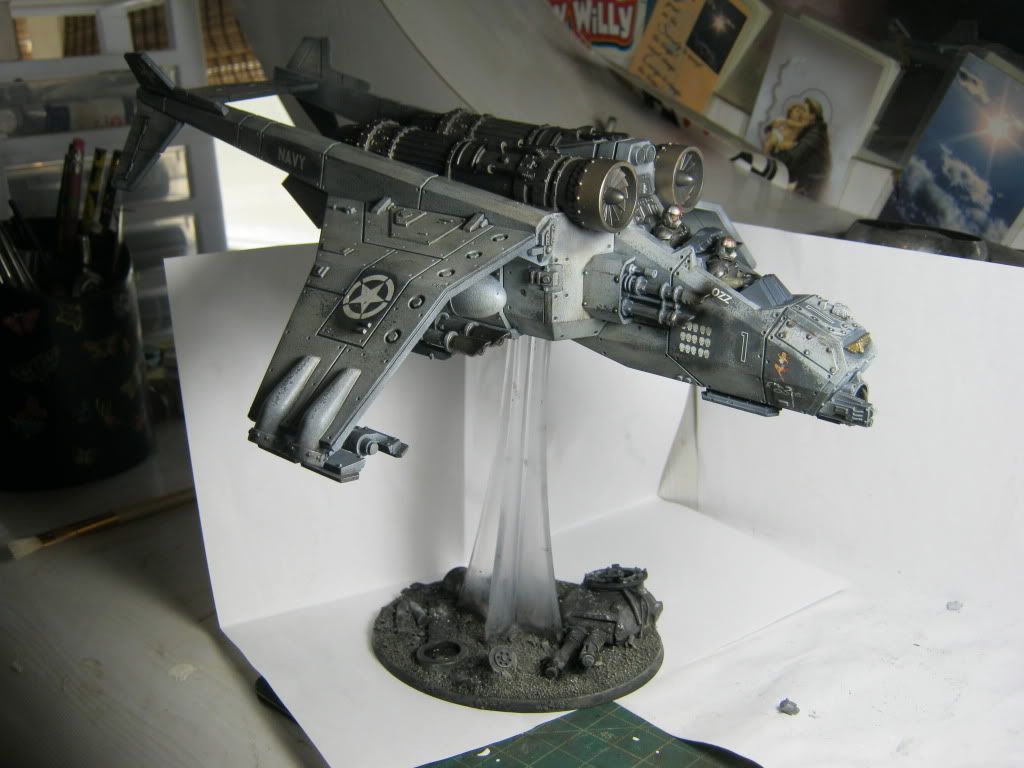
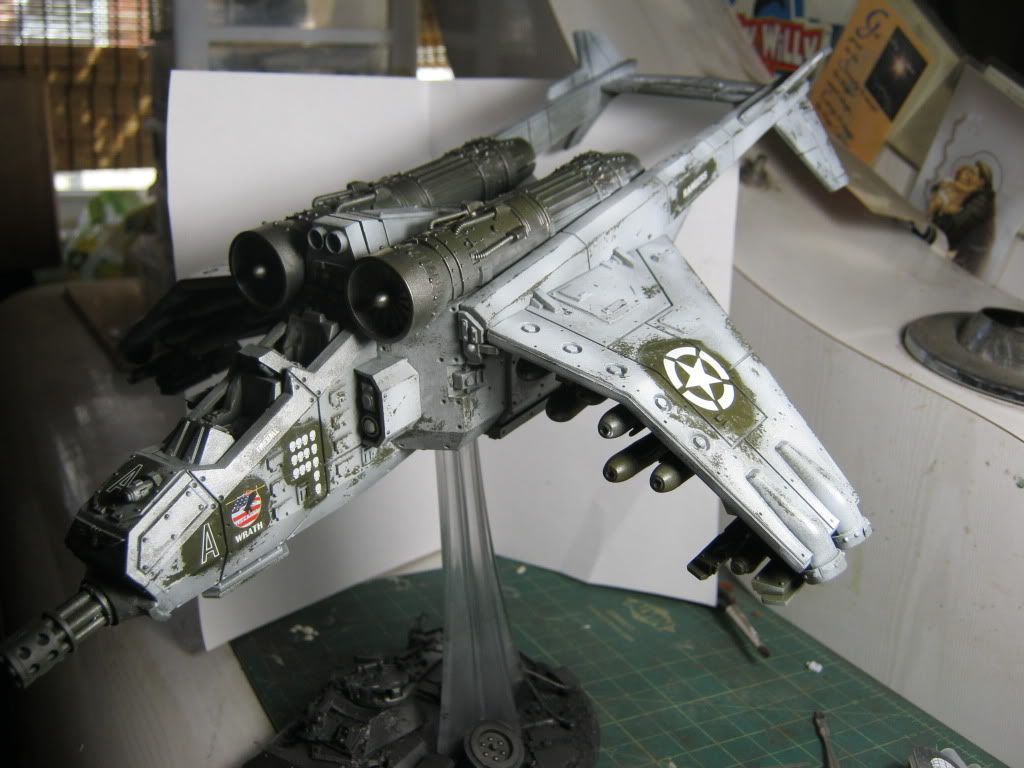
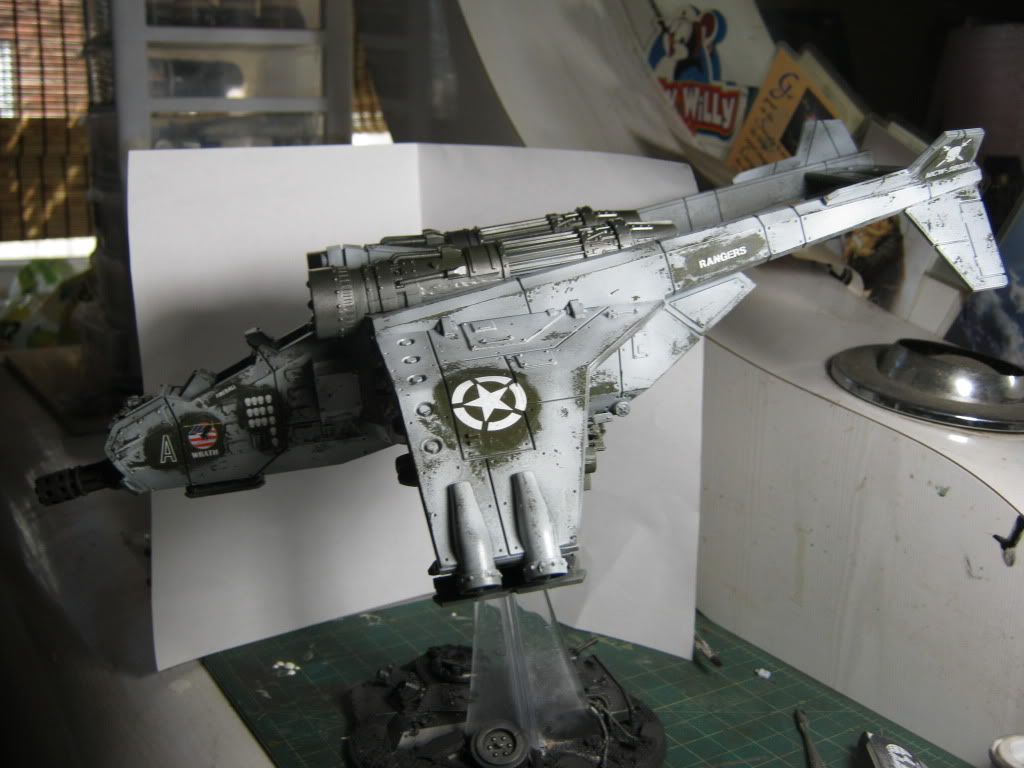
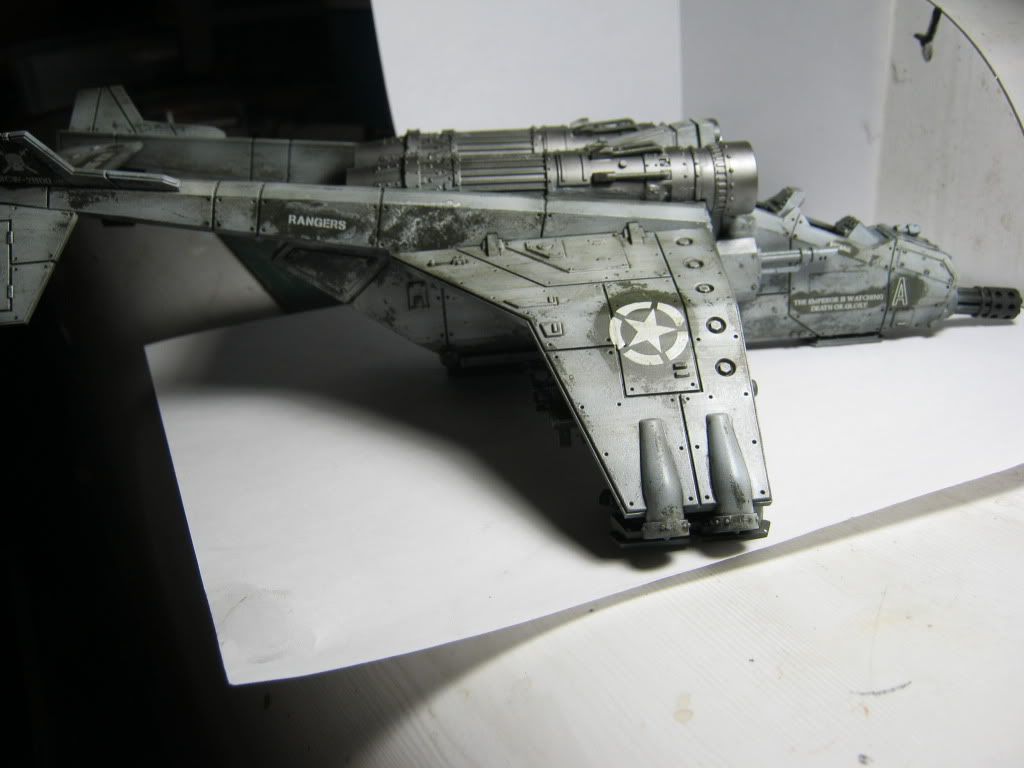
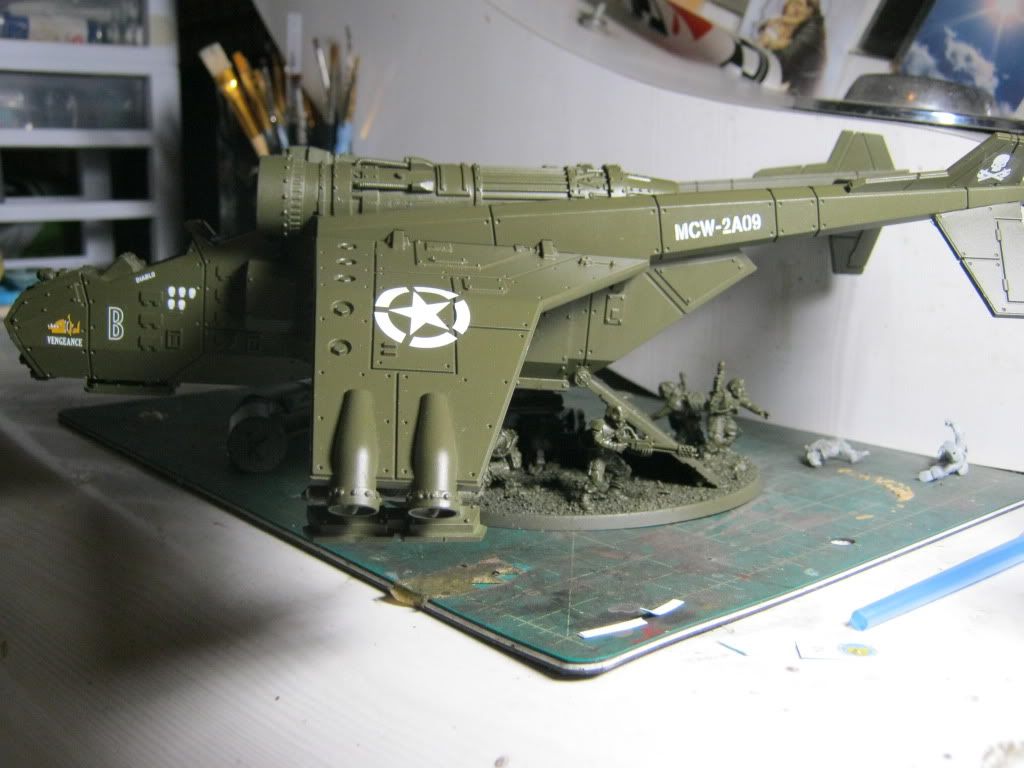
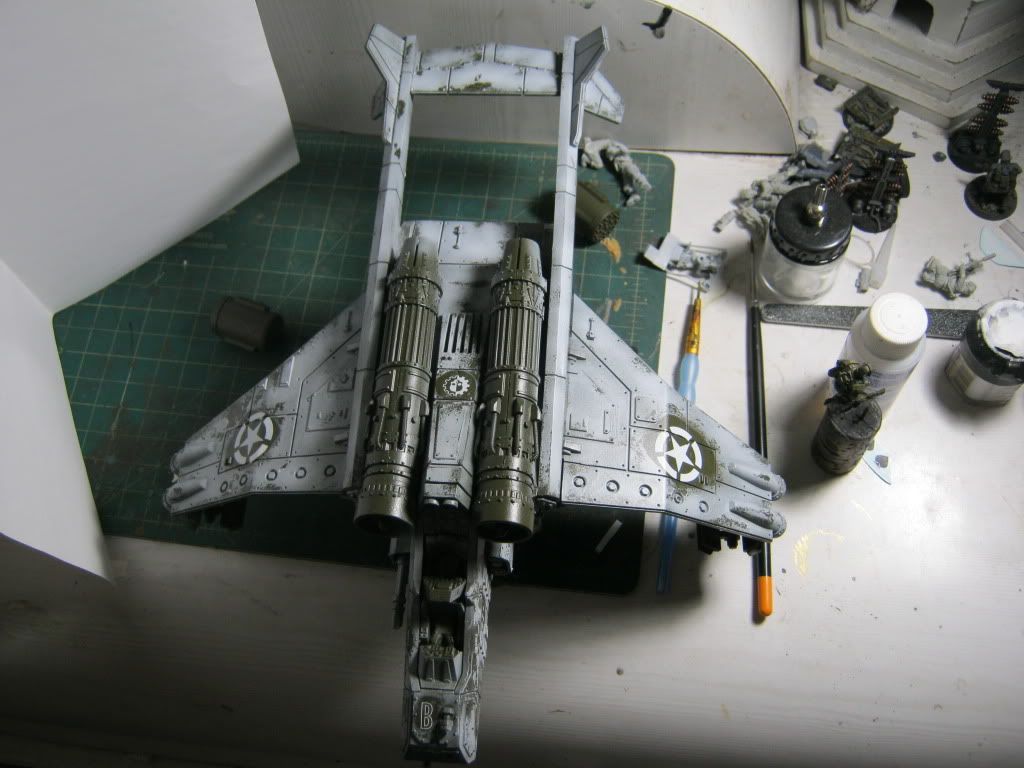
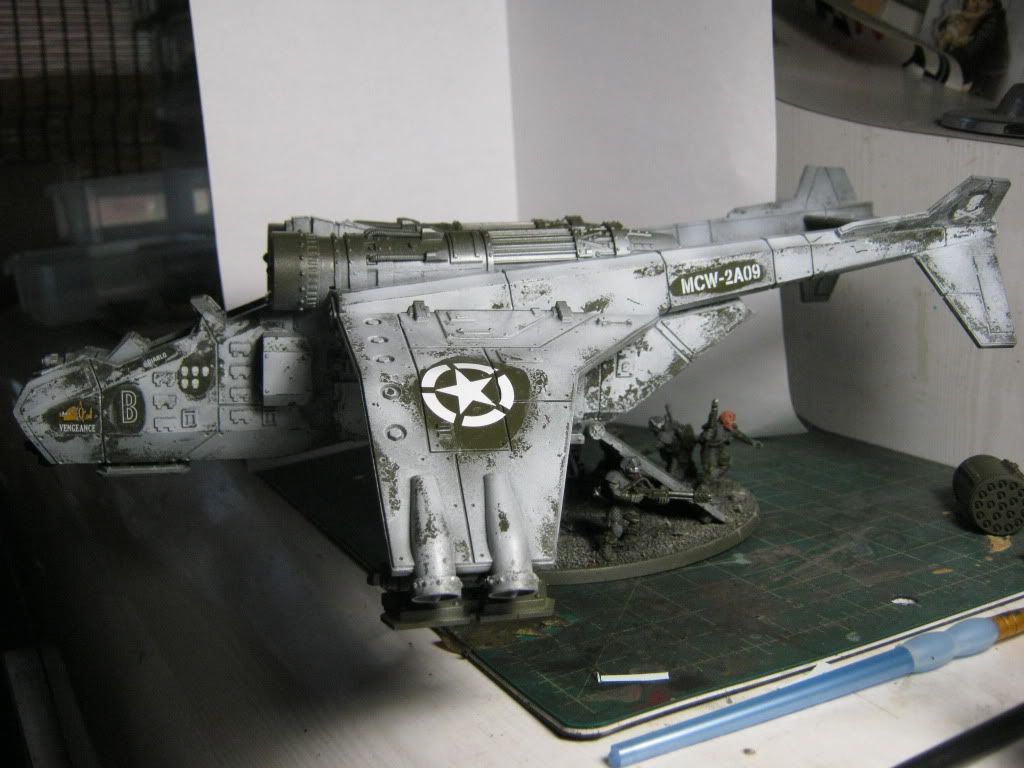
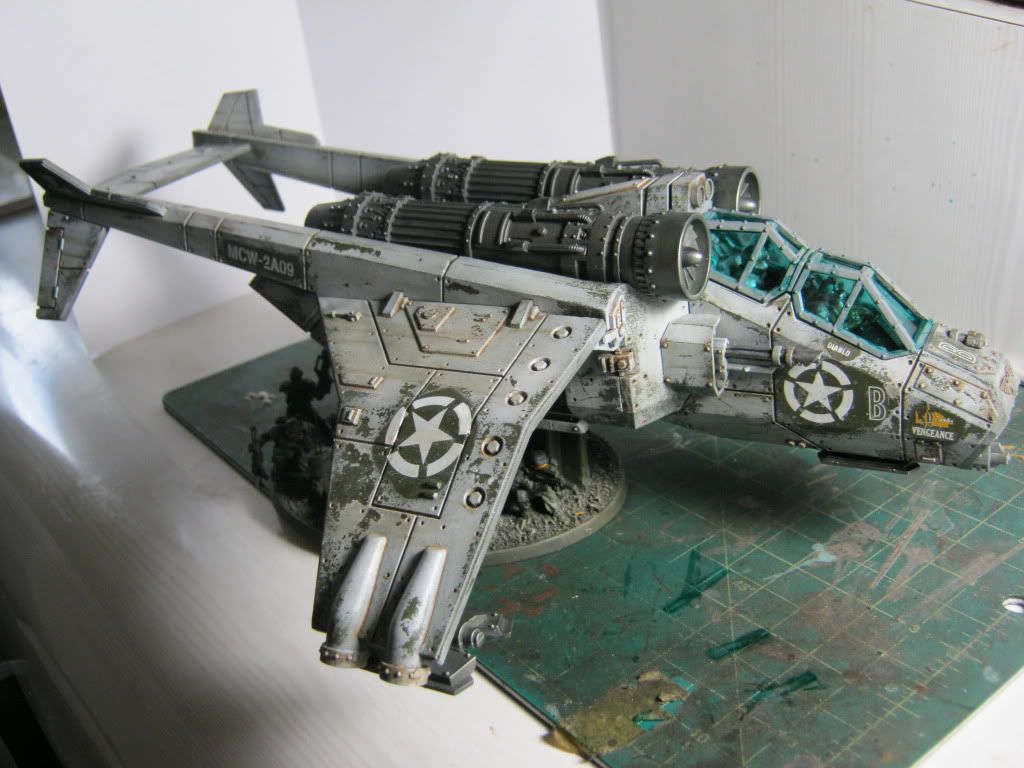
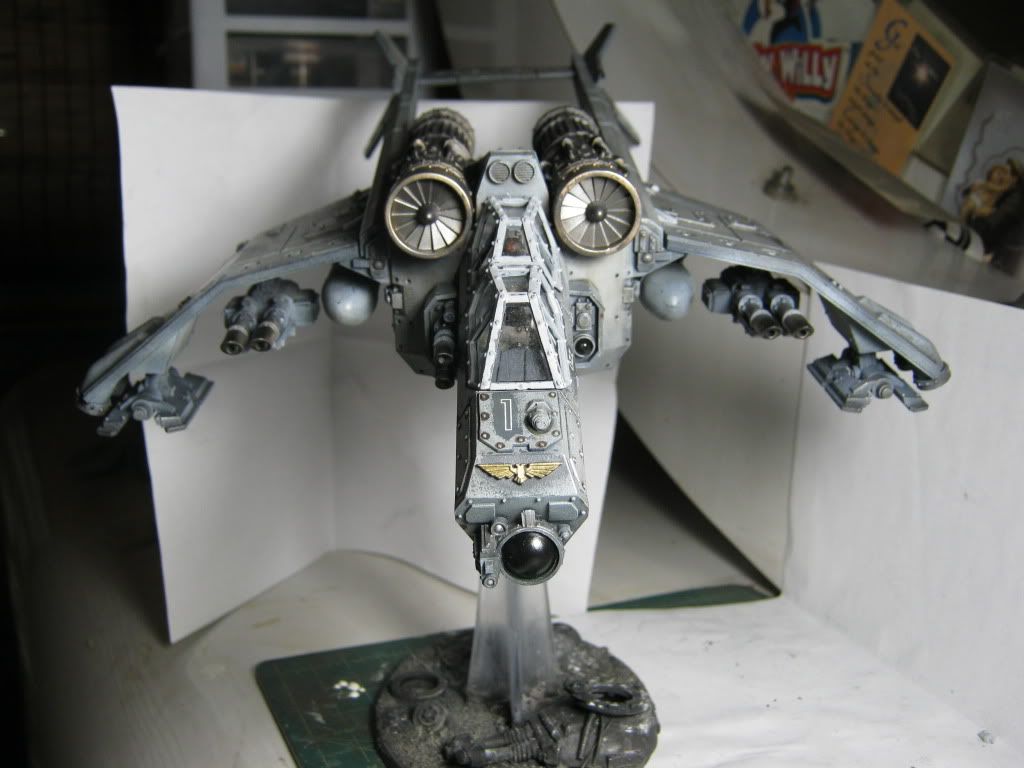
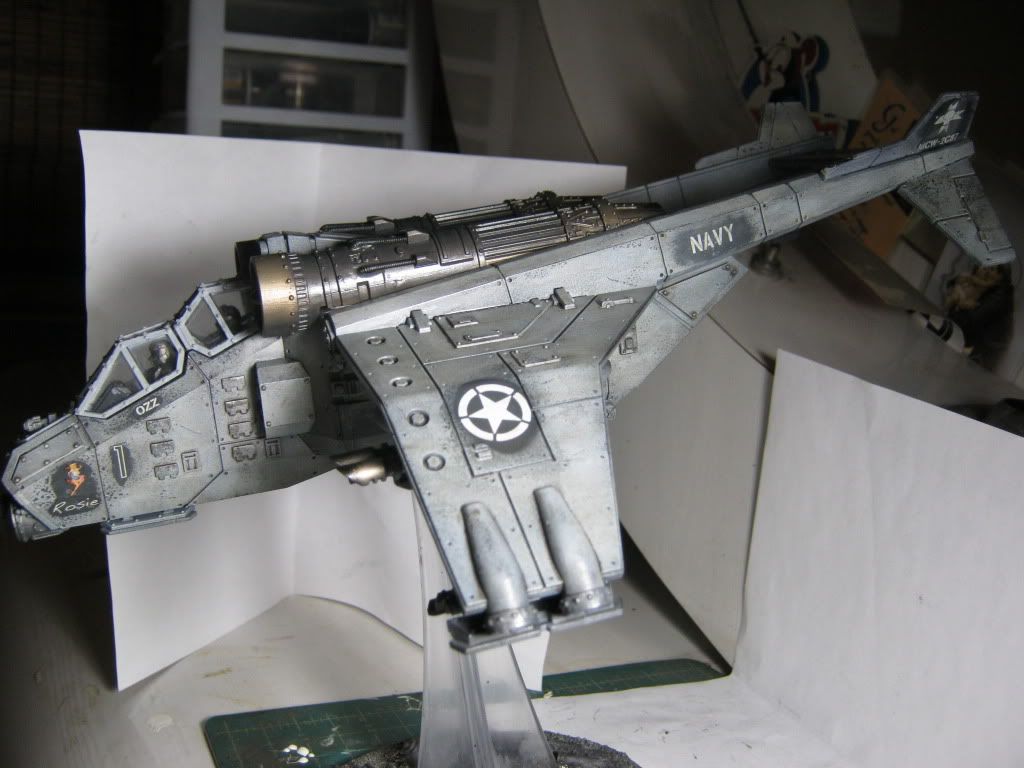
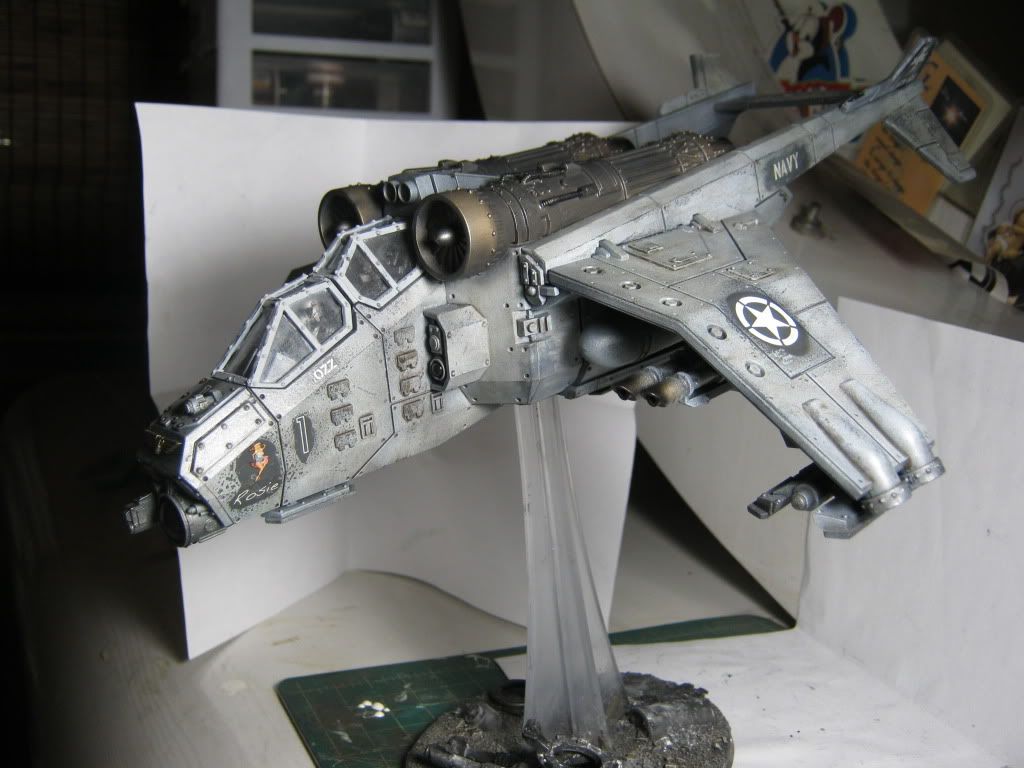
The other ones will be Valkryie transports that belong to the Lancers but the Vendetta piloted by the great and powerful Ozz is straight up Navy.
Nose art is from the Dust US vehicle transfer sheet

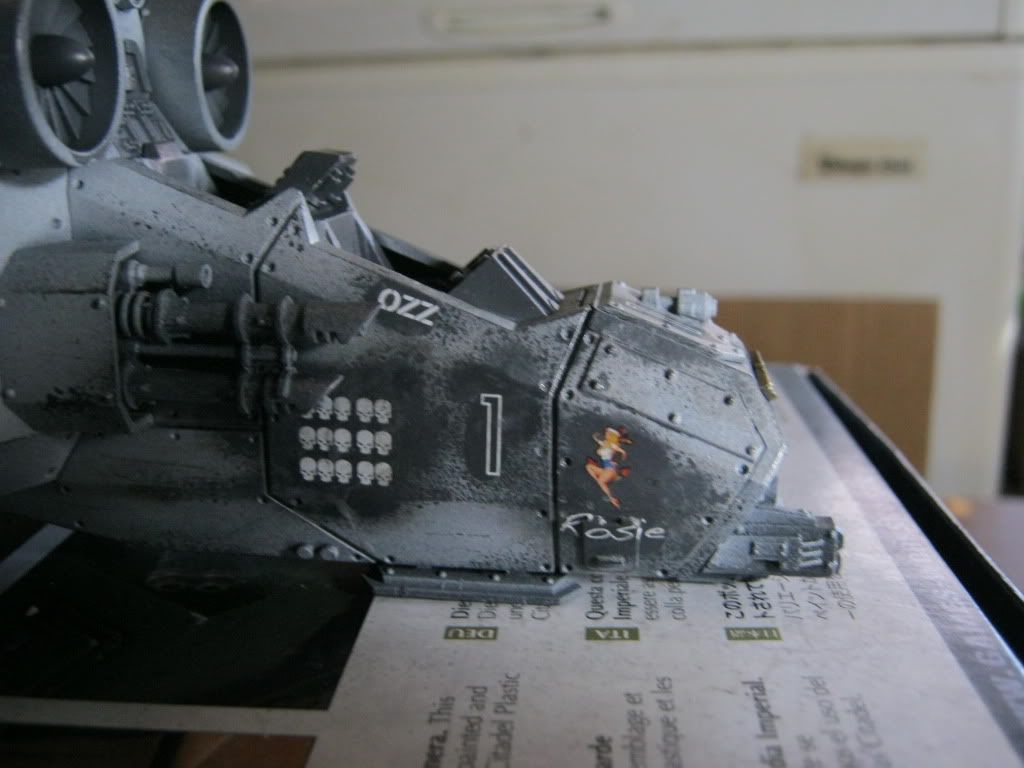

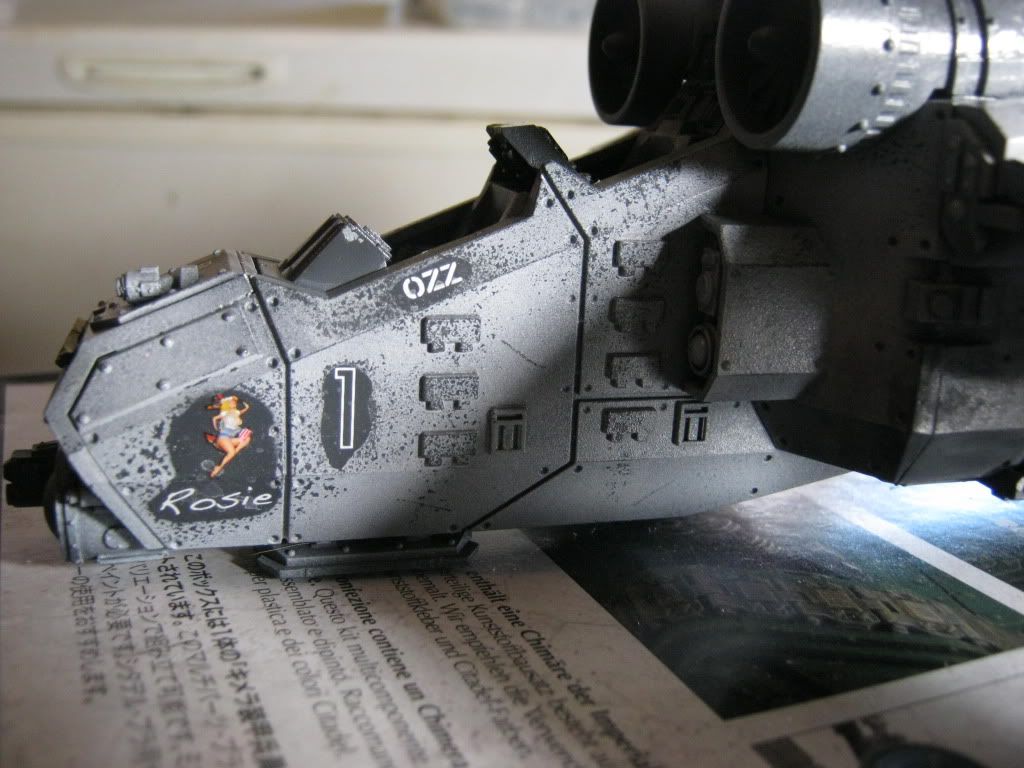
32169
Post by: Rogue Wolves
wow.. i love it!!
6098
Post by: ghostmaker
Love your stuff looking great !
32169
Post by: Rogue Wolves
i love America and i love IG.. so i STILL love this!
40138
Post by: Joshh
That vendetta is beautiful. Well done all around.
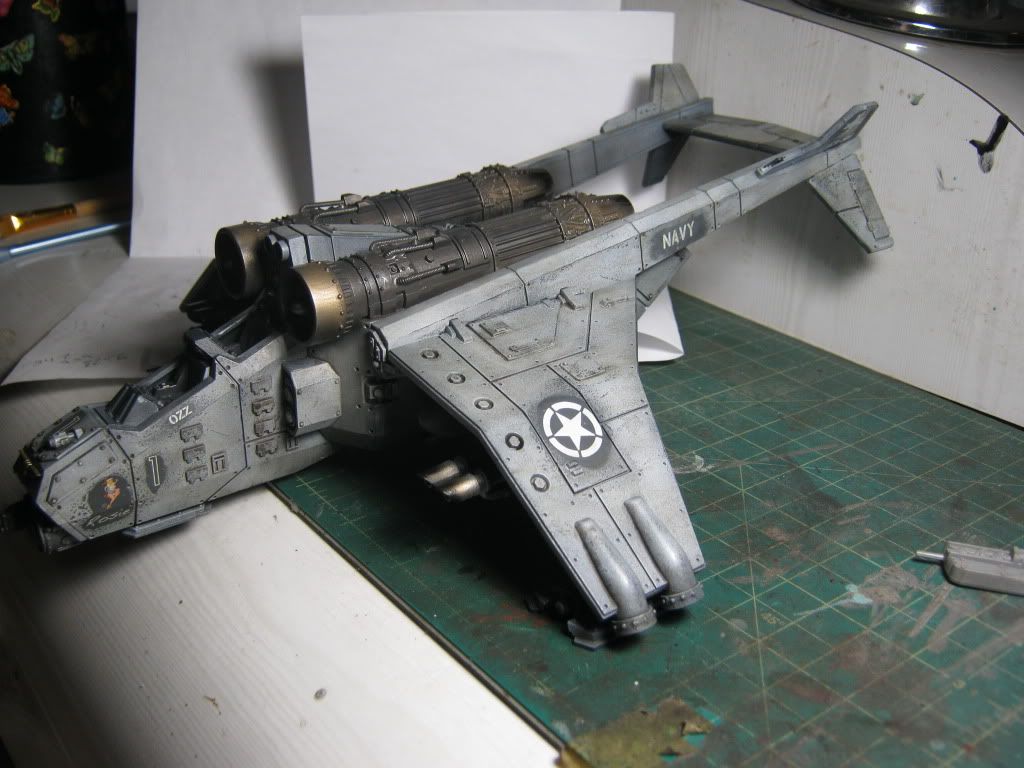
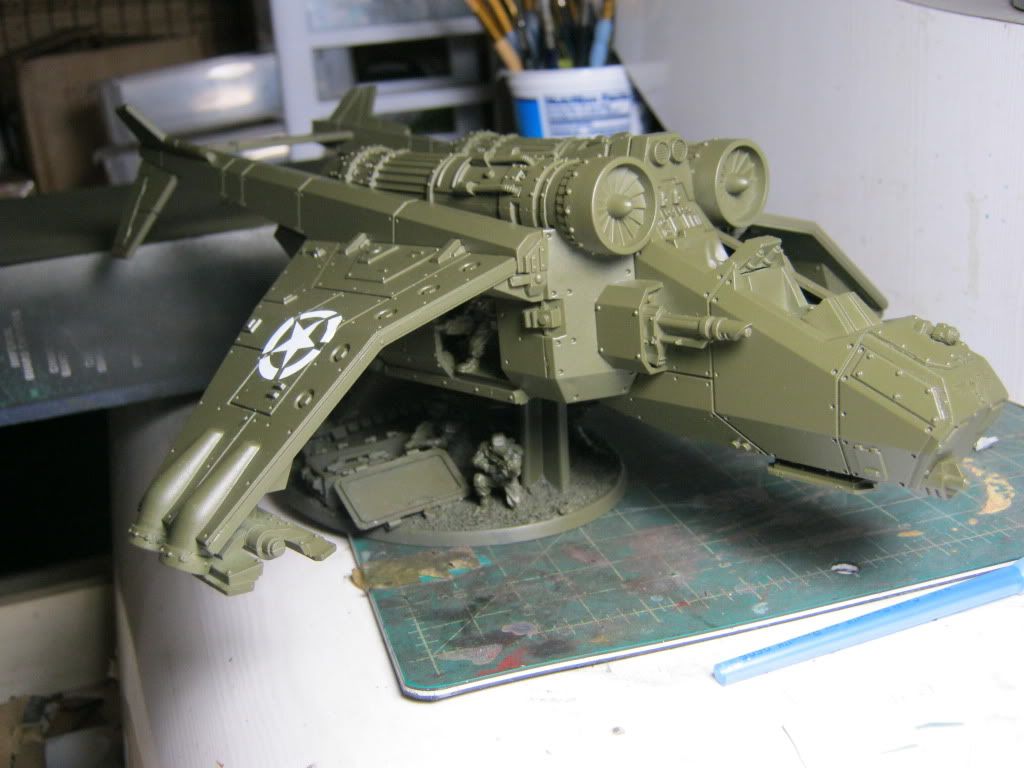
4271
Post by: Eisenhorn
Thanks
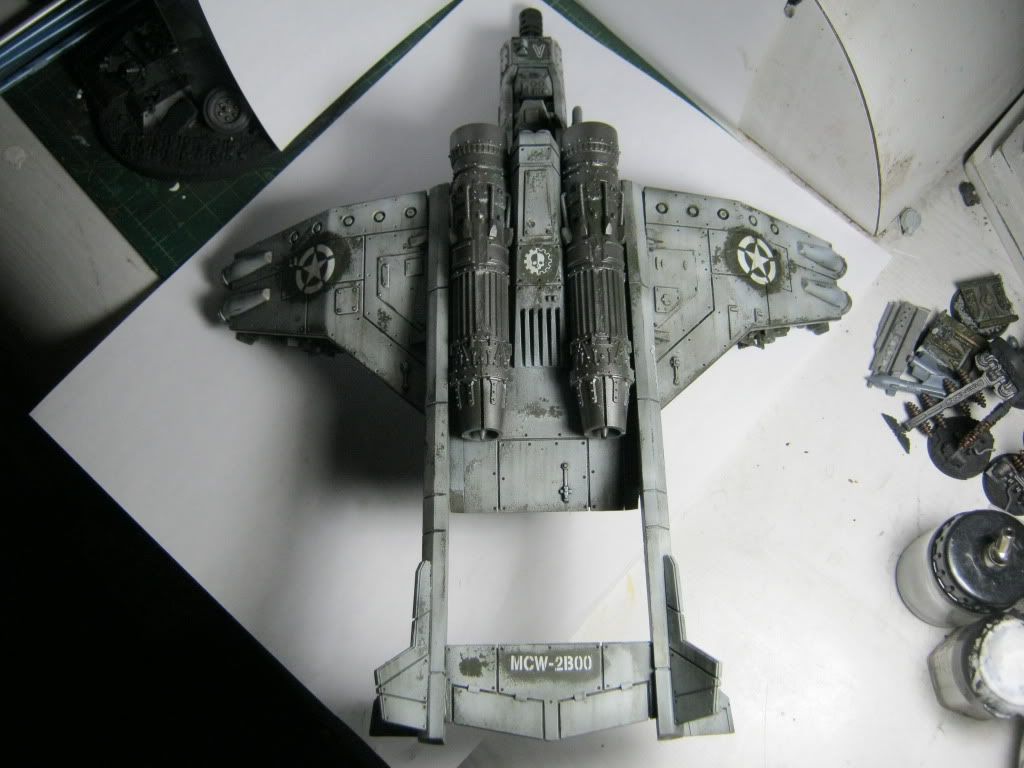
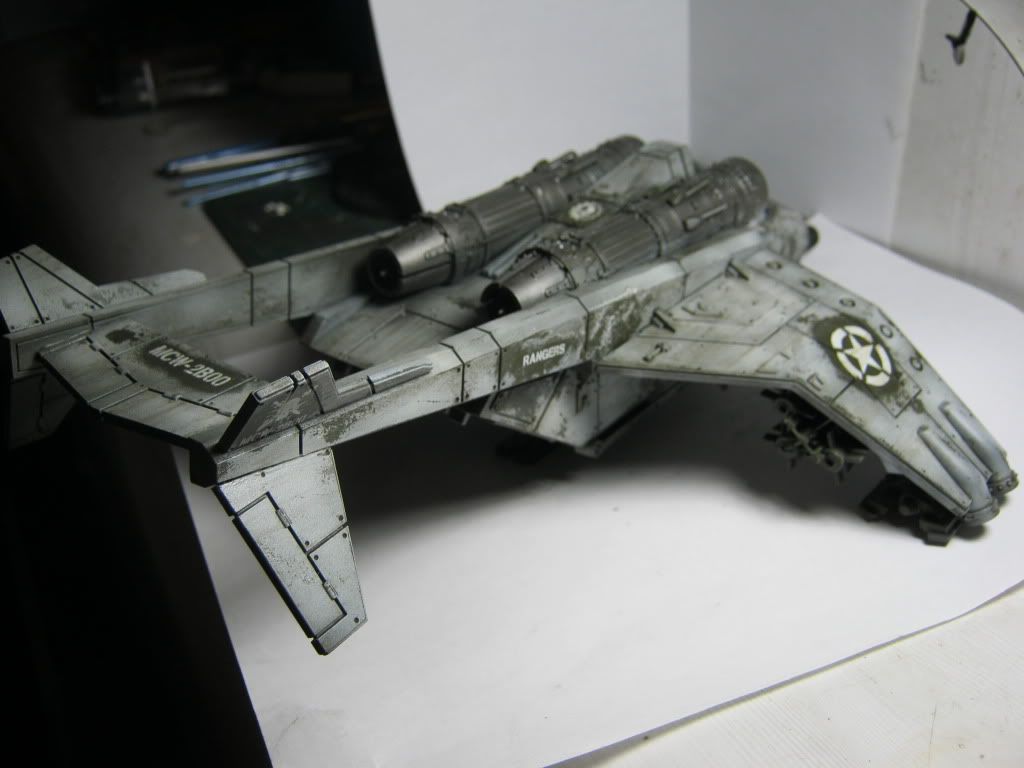
Here are the final pics w/canopy attached

[IMG]
 http://i216.photobucket.com/albums/cc52/Esinhorn/001-50.jpg
[/IMG]

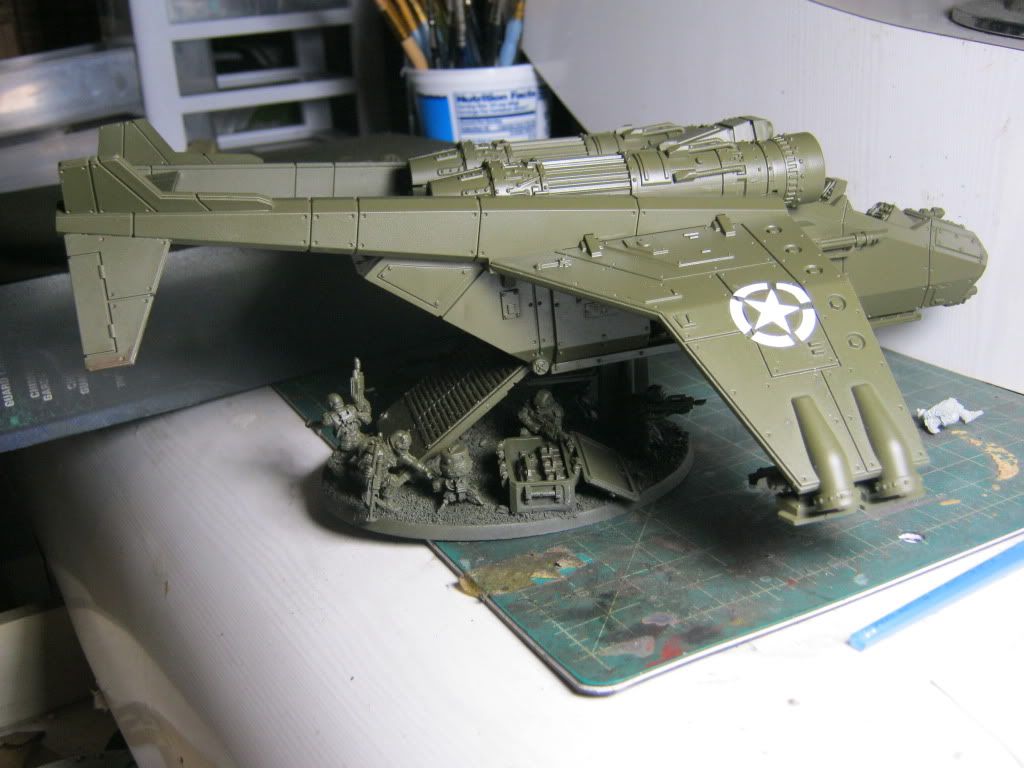
For the A-10 Valk I had this in mind K.I.S.S(Keep It Simple Stupid) Punisher Cannon on the nose.
I have a Heavy Bomb Set and Might also use a Modern Fighter Maverick Missle cluster.
Or I might just also cram in Rocket Pod with the heavy bomb rack to give that distintive loaded for bear look.
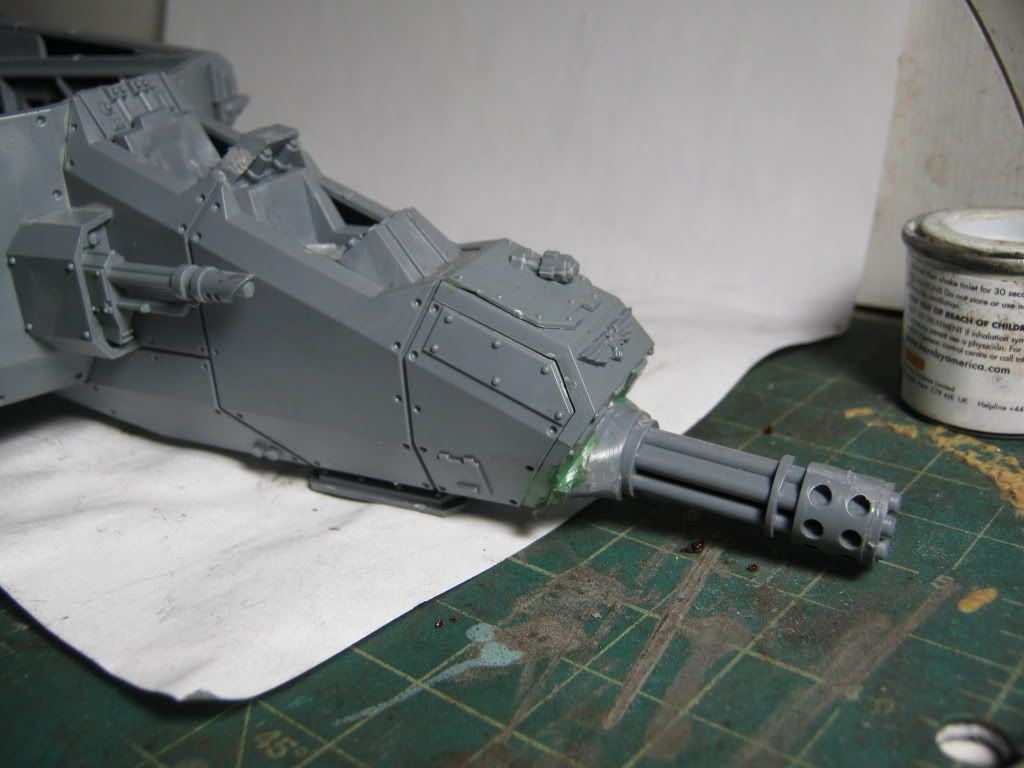
 Automatically Appended Next Post: Automatically Appended Next Post: Here is the finished build for the A-10 Valk.
Just have to add stabilizers.
I used FW Heavy Bombs and a Maverick missile cluster from the real A-10 model.
40138
Post by: Joshh
So much dakka, an Ork would be proud.
31303
Post by: swampyturtle
That vendetta, Its beautiful!
This blog is full of so much win
32169
Post by: Rogue Wolves
wow that thing looks great! and you intigrated the punisher cannon very well!
49740
Post by: Awesomesauce
Valkyrie Looks great! And I love the A-10 idea
4271
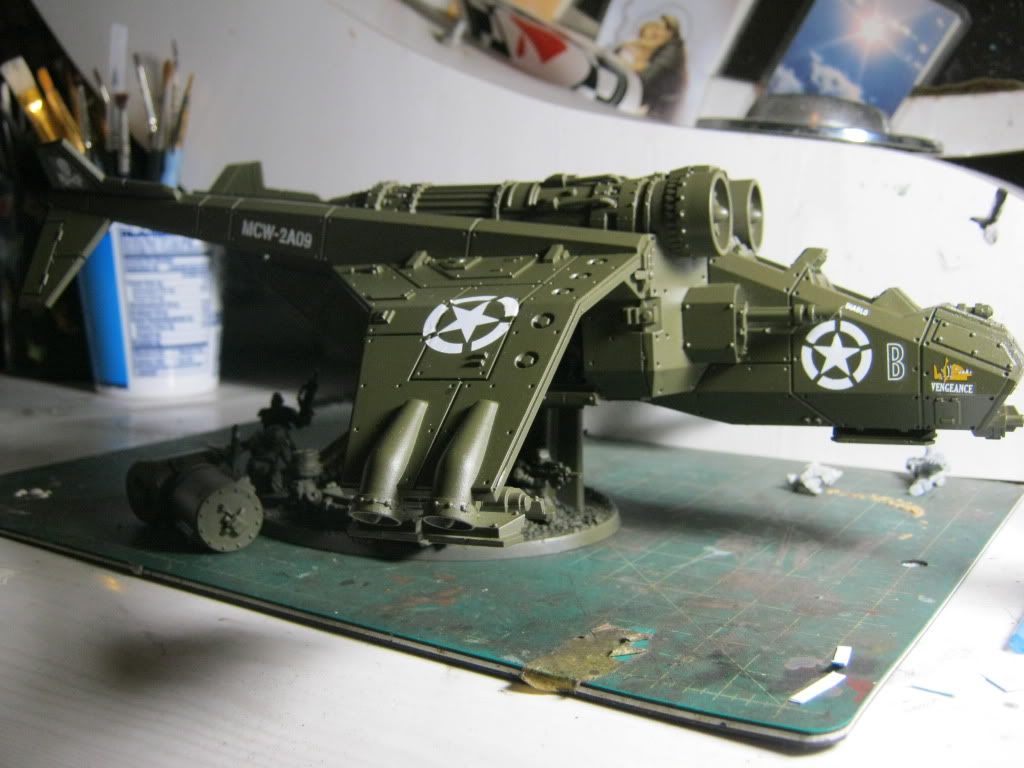
Post by: Eisenhorn
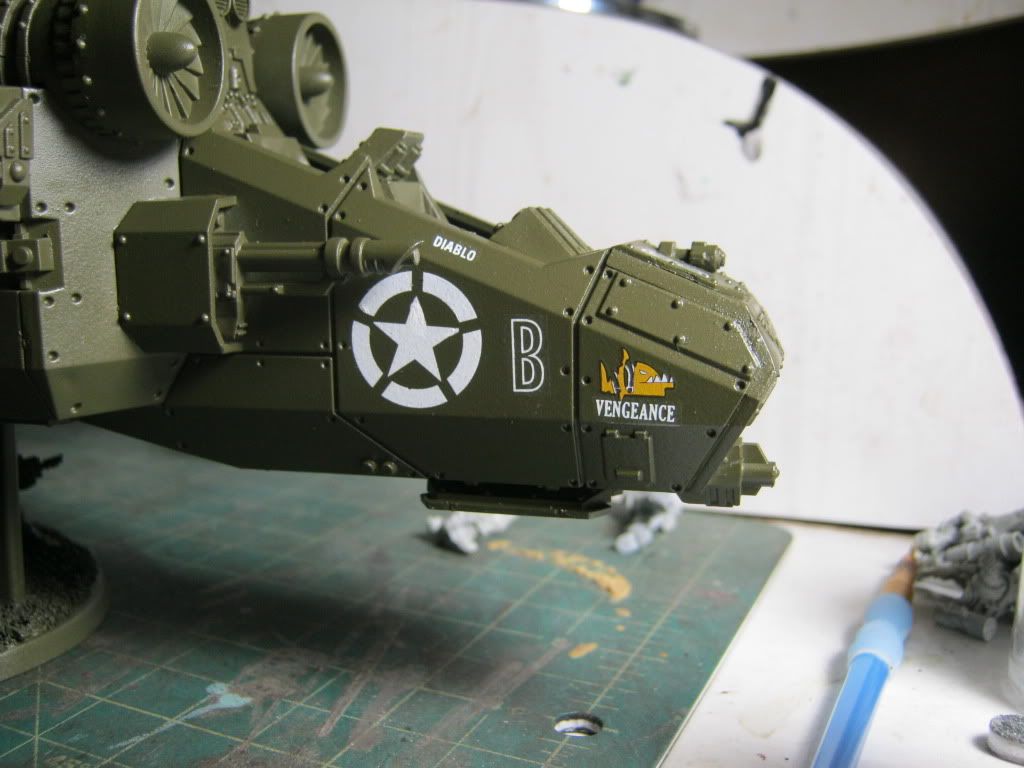
I have the basecoat and decals down for the newly christened "Wrath"
I am giving this guy a winter camo too,over a green base.
I have two more Valks that I will make Navy like the first for a squadron of three.
This guy is permenantly attached to the Lancers
I would start the camo tonight but it is late and the airbrush loud.

32169
Post by: Rogue Wolves
it looks great! btw where did you get all these nice american transfers?
48376
Post by: Capitansolstice
I know its too late, but the nose gun looks overly long, if I were you I would shorten it a little bit
4271
Post by: Eisenhorn
CaptainSolstice I find your lack of faith disturbing
I was going to leave as is,but way too many people(not just on here)suggested shortening the barrel.
When I looked again at the real A-10 it was indeed much shorter.
And I cannot fight the rule of cool"Looks better that way ,nuff said"
BTW the decals are Mostly from the Dust Transfers sheets (allied/axis and allied vehicle)
The stars are Archer dry rub transfers since I needed a whole alot more stars.
But I also pick up cheap second hand model kits just for the decals these days.
I would of loved to of givien this bird the sharks teeth.
The funny thing is,I used to be so militantly against decals,I used to think it was cheating.
I came to the realisation that it is not when I jumped ship over to the AFV hobby.
Decals like painting is an art and when done right,very stunning.
And for the record these decals are not correct per say(The camo gets in the way of this)The final step should now be to spray the entire bird with gloss to hide the decal film.
However with my camo process it is not really nessessary since they get covered and anything that does poke through just needs to be hiden with some camo touch-up.
48376
Post by: Capitansolstice
Hahahaha your right Eisenhorn, you are, after all, a lot more willing than me
and BTW it looks way better now!
35710
Post by: Talarn Blackshard
Everytime someone brings up the A-10 ... I always think of Ouze's Avatar.
Love it! Love all of it!
32169
Post by: Rogue Wolves
he looks great!
4271
Post by: Eisenhorn
She
Aircrafts,Cars,Boats and Guns all are shes.
32169
Post by: Rogue Wolves
i was expecting someone to say this! which to be honest is why i called her a him
32169
Post by: Rogue Wolves
4271
Post by: Eisenhorn
I have the aircraft pretty much finished at this point.
I used Alclad Armored Glass on the windows.
The advanced Hellstrike missle cluster came out even better than I hoped.
Why can Revell make a kit a 1/3 the price but with 50 times more detail is beyond me.
These missles had a clear piece for the optics to cap off the missiles.
When I find my white colored pencil I am going to write a message on the bombs,like we did when I lived on a carrier.
I also gotta do the pilots and finish off the base.


45857
Post by: SelvaggioSaky
Outstanding work mate, like a lot the winter camo You do on your stuff, simple looking and affective, nice use of trnfers as well!
32169
Post by: Rogue Wolves
Eisenhorn wrote:I really wanted to finish the winter camo before work,just got it done with time to spare to clean my workspace a bit too.
where did you get that Star Stencil from??
4271
Post by: Eisenhorn
The one on aircraft came from the Archer Dry transfer,but You can also find them on Flames of War Decals sheets(smaller)
Cool thing with archer dry rub,they also sell a cvlear decal film you can rub the dry run onto and then it becomes a waterslide.
Dust decal sheet.
The key word is Sherman Tank stars in circles.
The brass etch stencil came from Voyager Models I think.
I have'nt tried the stencil yet,going to soon because I am running low on the wing size star transfer.
Wow this is a first,I am out of models ready to paint not sure what to work on next
The last Valkryie
Tauros Ventalator
Tauros
Drop Sentinels
Troops
17738
Post by: Briancj
Because Revell sells at least two orders of magnitude more models than GW.
Great work on the flyers, and great use of other kit munitions to up-gun the beasts!
--Brian
18424
Post by: Imperial Monkey
That looks fantastic. Love the idea (although i'm surprised I've not seen it before...).
The painting is excellent as always, gritty and realistic!
I don't really like the punisher cannon on the nose of the other valkyrie however, it just looks a bit too bulky. I think you would have needed a slimmer cannon like an assault one for that to work to to its fullest.
4271
Post by: Eisenhorn
Looks like the A10s cannon to me,you ever see that thing?
Thr real thing looks too bulky too
31303
Post by: swampyturtle
That looks fantastic. Love the idea (although i'm surprised I've not seen it before...).
Its probably because people that have elysian models only have a few in number and want them in their squads, not as display pieces on the bases that will never get to see game play. FW stuff is expensive man! Haha. Same deal for catachans , cadians and other IG minis. Id rather that single guardsman be firing a lasgun in a real squad than just a display piece on the base.
32169
Post by: Rogue Wolves
thats really cool, im going to have to do something similar to this
18424
Post by: Imperial Monkey
swampyturtle wrote:That looks fantastic. Love the idea (although i'm surprised I've not seen it before...).
Its probably because people that have elysian models only have a few in number and want them in their squads, not as display pieces on the bases that will never get to see game play. FW stuff is expensive man! Haha. Same deal for catachans , cadians and other IG minis. Id rather that single guardsman be firing a lasgun in a real squad than just a display piece on the base.
Tbh I was meaning this in reference to normal IG models. No, that's the fun of the display pieces, you have them there for the hell of it! Soon as the valkyrie model came out I would have imagined these sort of things would be coming out...
@ OP - Anyway it looks good. With reference to the A10 (whose Gatling cannon actually looks identical to the punisher, haha) I think it is the scale that is wrong. The A10 has it mounted on the underside of the nose, so it looks smaller in perspective. While the valkyrie model makes this impossible granted, what looks wrong (to me, anyway) is that where the cannon is attached to the model it takes up the whole nose...For example it would work better I think if it was slightly off-set. That said, with what you've got to work with i think you did a stirling job, I'm just being nit-picky in my constructive criticism.
As to the diorama you should paint it to a particularly high standad and go for a golden daemon with that bad boy. Perfect for it!
4271
Post by: Eisenhorn
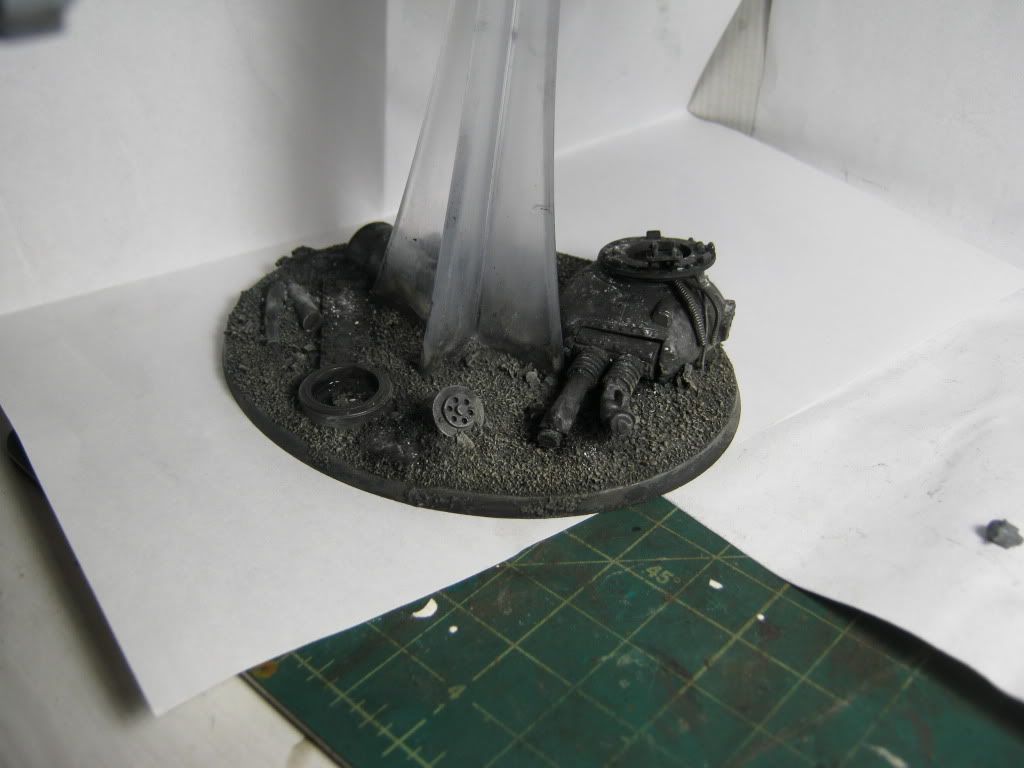
I hear you with the size but this is 40k everything is bigger,badder,bolder
As cool as this is the diorama I have waiting for GD will blow your mind.(G for Greta at waypoint Bravo)
I have it about 70% done but I am waiting for GD to come closer to New York.
27097
Post by: dark6spectre
Wow, your work is amazing, well done!
48376
Post by: Capitansolstice
Eisenhorn wrote:I hear you with the size but this is 40k everything is bigger,badder,bolder
As cool as this is the diorama I have waiting for GD will blow your mind.(G for Greta at waypoint Bravo)
I have it about 70% done but I am waiting for GD to come closer to New York.
From double eagle? when are you gonna show us that one?
4271
Post by: Eisenhorn
I'm not that one is suspended for now.
If I built it I would have to keep it somewhere.
However if you want to see,the progress I made check out my blog Heresy Workshop Nov\Dec 2010
http://heresy-legions.blogspot.com/2010/11/g-for-greta-pt1.html
Hey I found a nice pic of it I forgot I took,here it is

48376
Post by: Capitansolstice
Wow... Cant wait till you get that one back out, and I love your valks!
4271
Post by: Eisenhorn
Thanks I think painting Tanks and Aircraft is where I have the most fun.
I have an old dissassmbled Valk that I just might do in Aluminum too,as a one off maybe Steel Legion.
If I was going to do a GD diorama like this that is probally how I would go.
But like I said if I ever do go back "G" for Gretta will definitely be the one.
Somewhere on that blog is the fuel truck I made with a FW hellhound,that will be refueling the plane.
Did I mention I was a fueler and drove those trucks in the Navy,so the superdetail on that one is bar none.
Probally one of my favorite models.
40138
Post by: Joshh
Looks great! But I'd really like to know, has anyone found a way to get the Valkyrie cockpits on securely without having to gap-fill a gak-ton? It's like the clear plastic bits are too small or something - it's ridiculous.
32169
Post by: Rogue Wolves
its looking really good, the only thing i would have changed is that i would have painted the helmetless guy's skin more pale, as it sticks out compared to the rest of them
34514
Post by: 40kFSU
You have outdone yourself sir. I've never seen anyone pull off a squad disembarking from a Valkyrie.
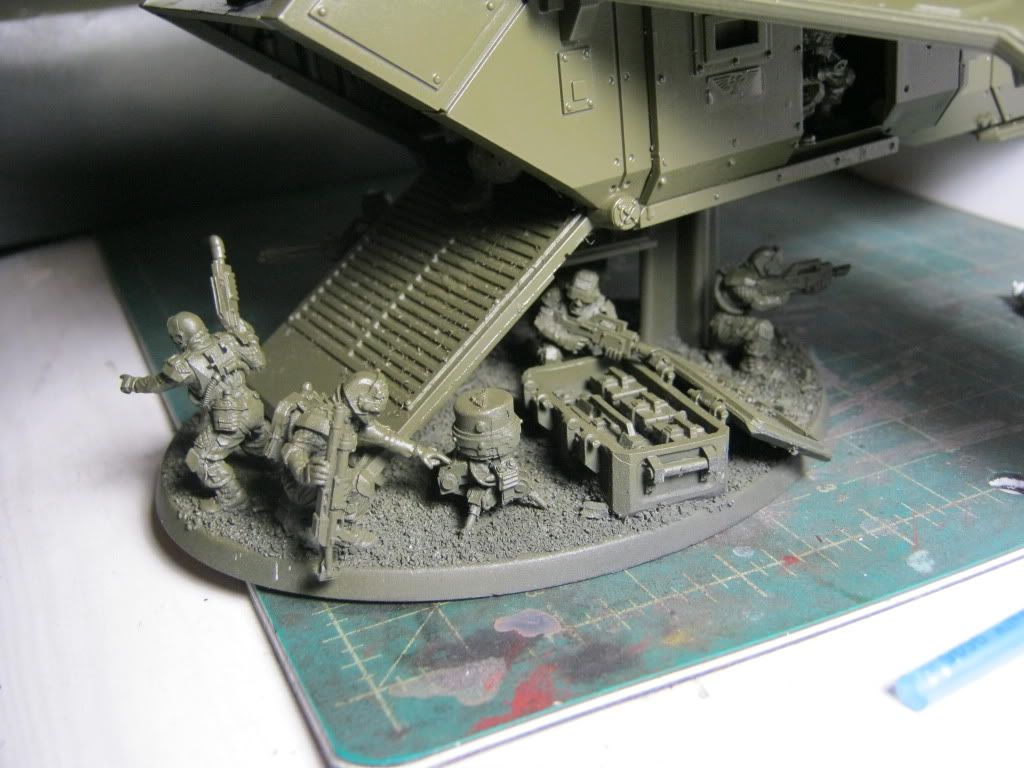
4271
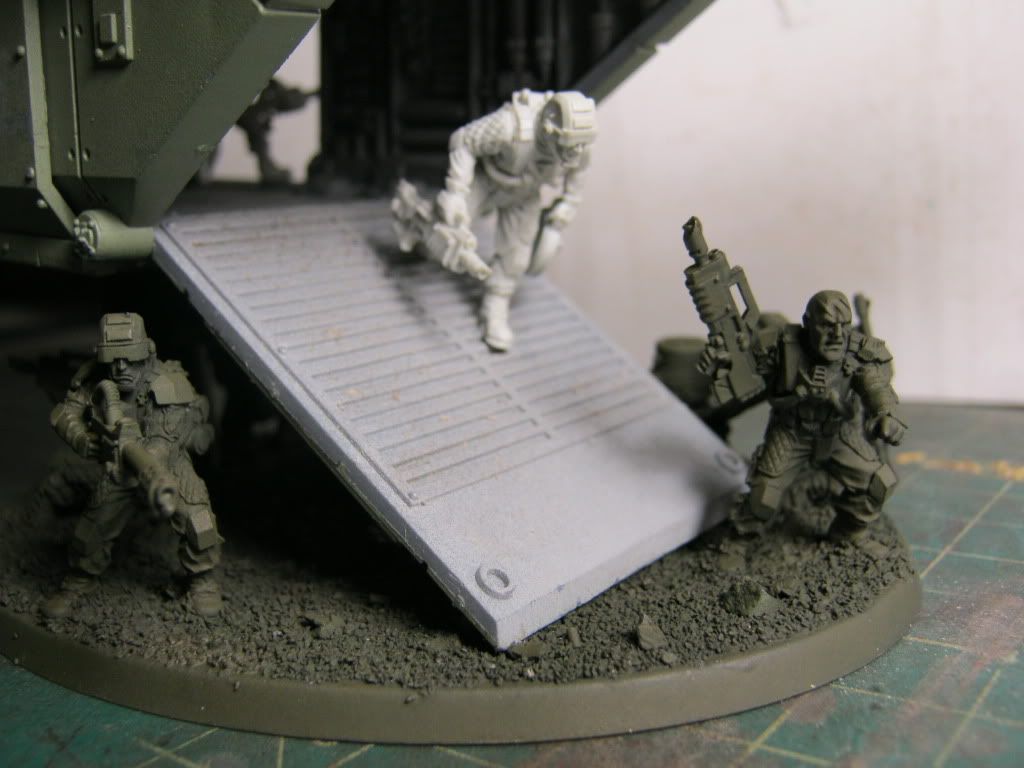
Post by: Eisenhorn
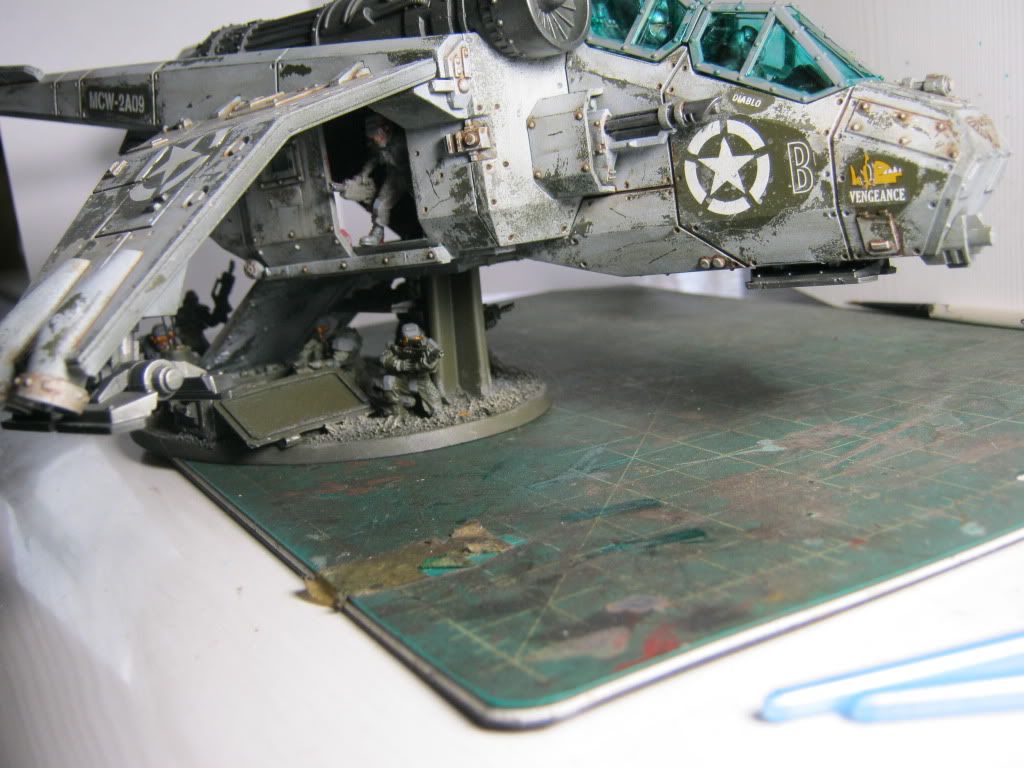
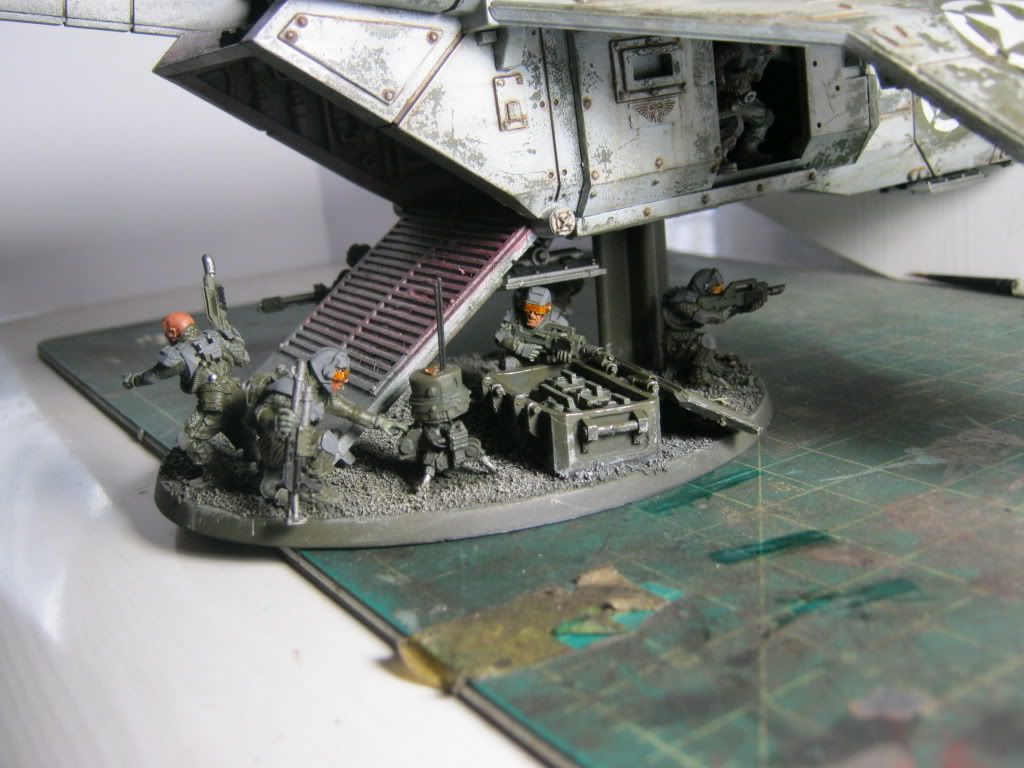
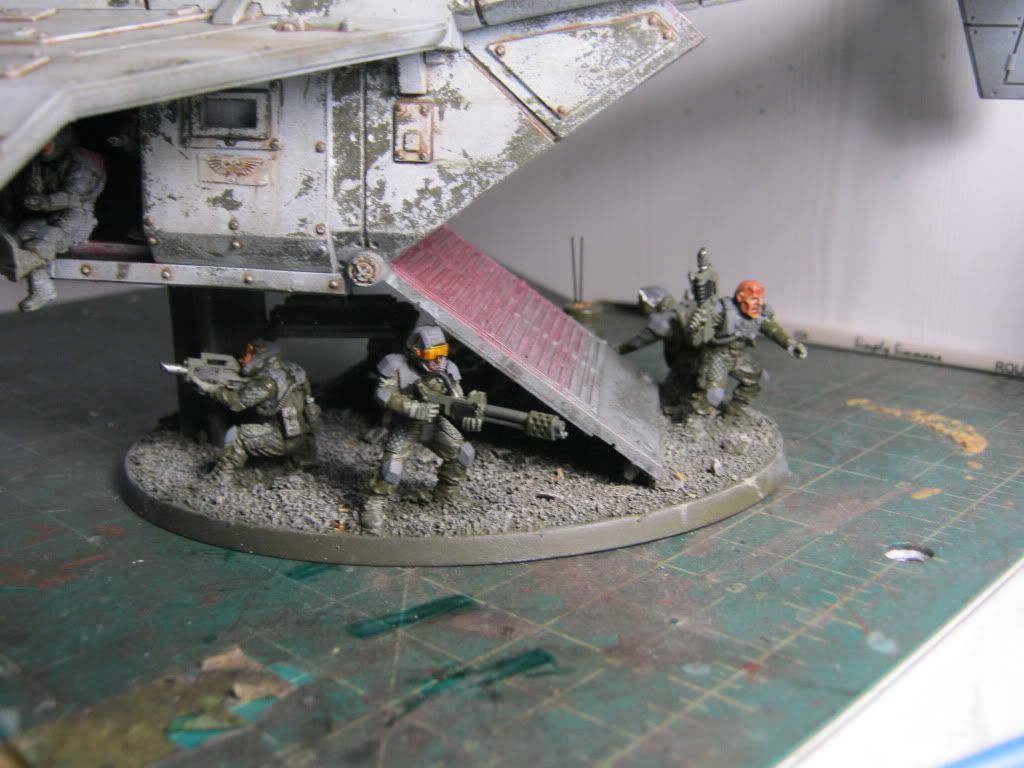
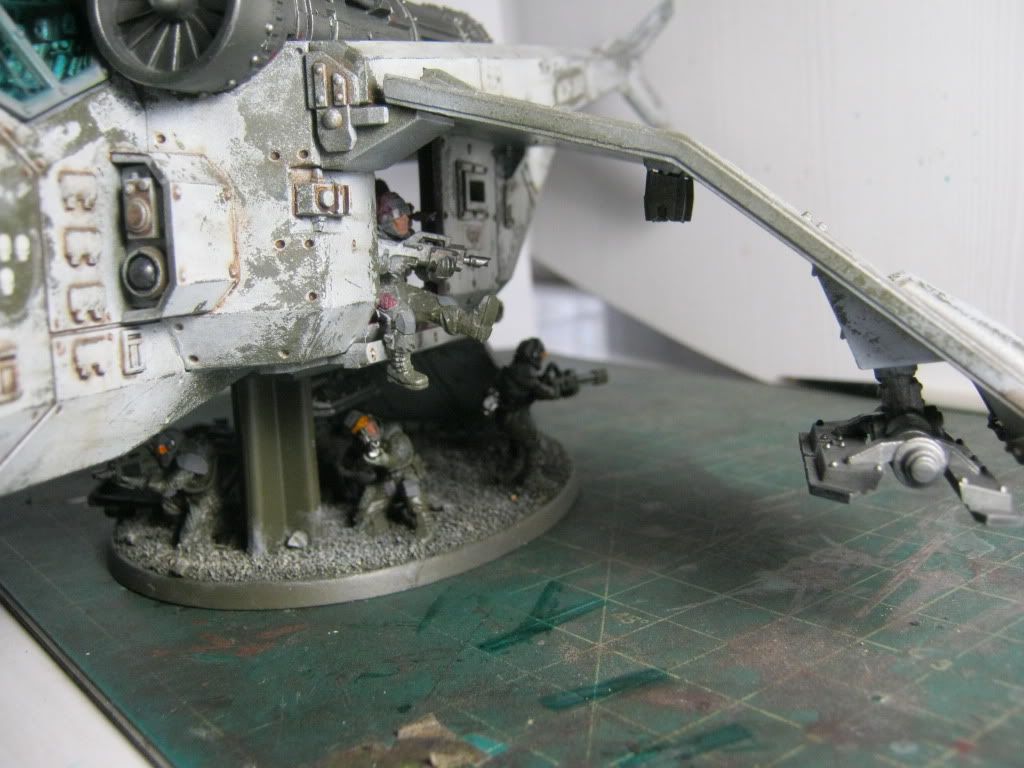
Oh Fudge there is a guy missing,the demo charge guy.
FETH I thought I had this one in the bag :(
18424
Post by: Imperial Monkey
I don't think that the OSL really works here (sorry to be a Negative Nelly) but it looks a bit too chalky at present...Otherwise I love it. It has a bucket load of character!
32169
Post by: Rogue Wolves
^ if you throw in one other red to highlight it, i think it will give it better depth
4271
Post by: Eisenhorn
I agree with both statements,this guy has a bit more work left to do.
Just as I figured out how my towed artie goes togther
I lightened the ramp lighting quite a bit,much more subduded now.
I may give the new red glaze a try see how it looks,why no right?
Just finished this build,time for more Dakka


4271
Post by: Eisenhorn
BooYah a Battery of towed guns to go with the Russes.
Look with the right diameter rod I can make these either Medeusa or Earthshakers

40138
Post by: Joshh
Those beauties are forgeworld, correct? I can't wait to see what you do to them!
32169
Post by: Rogue Wolves
OOOOOoooooooooooh baby, can't waite to see these bad boys in action!
|
|