Project No.1- Space Marine Blood Raven Vulkan He'stan Conversion
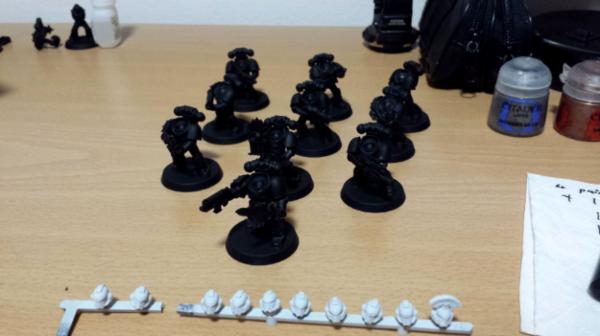
So, I have just gotten a new SM commander, and with some GK bits, I will be making a Vulkan He'stan conversion. This blog will be all encompassing all projects I do from now on and my current project will be noted in the tilte. Pics of each stage will be up an running son. I have only primed the components (minus the shoulder pads) so far, but that will go in the pics. I plan to use Vulkan not for his Chapter tactics but for the look. I like his look. I have a big fluff plan for all my Captains and Officers of my chapter, which happens to be Blood Ravens, albeit with a slightly scewed scheme from where I was 12 and said "No Scab red, right, just blood red. No Bleached bone? Yellow will do." Thankfully I have painted over the yellow with BB but the bright red remain s. Hopefully this guy will end up darker. I
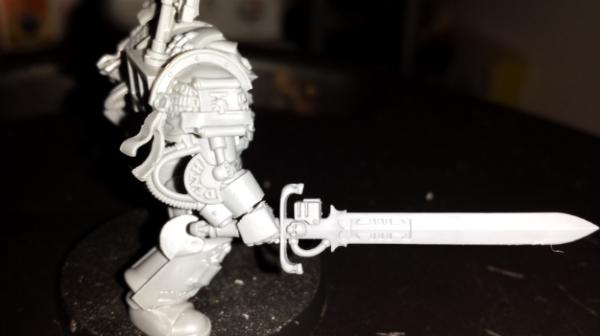
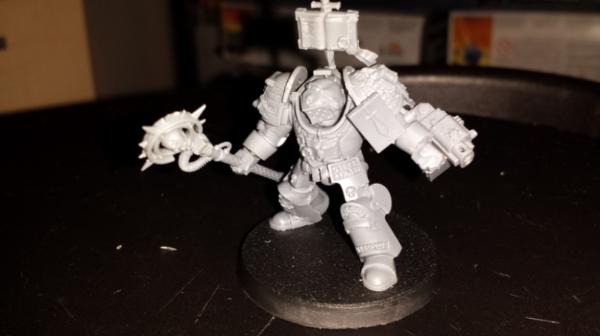
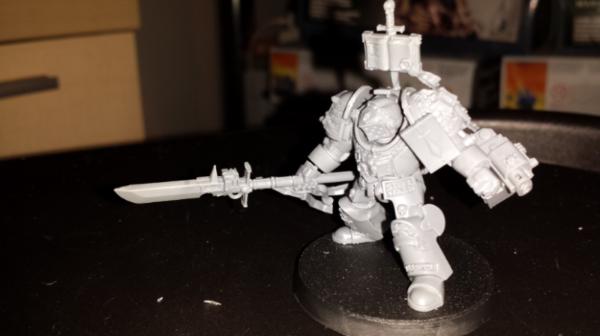
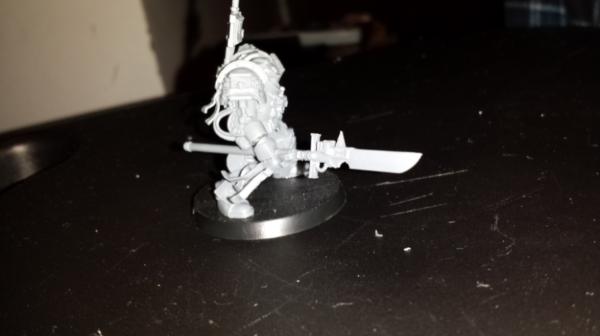
Vulkan will be called "Perseus Helstrom" and will be Captain of the 4th Company. For his full fluff, I have another thread. I have the link handy so anyone that wants to read it can find it Here So, without further ado, I present Stage 1, the bitz!
R
The pieces I am using. From left to right.
Top Row: Grey Knight Terminator Incinerator, Cloak/Backplate from SM commander, commander breastplate, Iron Halo from commander, commander legs, Commander head with bionic eye
Bottom Row: Commander's backpack, SM terminator tilt plate, Power armoured Grey Knight Halberd, commander's chainsword arm with the chainsword and hilt cut away, regular arm with no hand.
I still need a pair of shoulder pads. I show those when I get them.
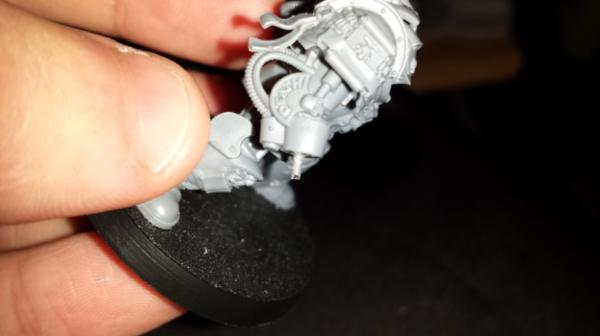
Here, the two torso pieces assembled with the helmet, and the Iron Halo on the backpack. The Incinerator is now mounted on the back of the chainsword arm, which is from the commander kit, just with the hilt and blade cut away and filed down. Unfortunately the incinerator wasn't dru before I primed so it came off but it is easily fixed. I won't bother showing them detached.
And primed! I know it doesn't look primed, but it is. The Dakka system has pretty bad graphics for photoes IMO. My camera, an 8MP on a Samsung Galaxy S2, does the pics far better, with clear resolution and sharper colours, and less flash.
That's all I have so far, I just got it primed today, bought yesterday, but hopefully, I can make this interesting, maybe get 15+ views, maybe exalted a few times. Masybe my models will score higher than 4 on when they are finished. Anyway, adios amigoes.
December 2013
Grey Knight Terminators and Purifiers
PENDING CHRISTMAS PRESENTS
These are possible projects for next year
Blood Raven Kor'sarro Khan on bike Conversion
Blood Raven new Sternguard Veterans
Blood raven new Vanguard Veterans
Blood Raven new Tactical Squad
Blood raven Centurian Squad
Grey Knight Brotherhood Champion count-as (the Emperor's Champion)
Grey Knight Terminator Librarian
Repainting my current Terminator Librarian from my Blood Ravens (oldf and metal, so perfect for stripping )
Chaos Space marine Black Legion Squad
Chaos Maulerfiend or Forgefiend (undecided)
Chaos Heldrake (pending priming)
Tyranid Gargoyle Brood
Tyranid Hormagaunt Brood
Tyranid Carnifex
Possibly other Nids depending on what's released
SIDE PROJECTS
Dreadfleet Flaming Scimitar (undercoated)
Dreadfleet Swordfysh (undercoated)
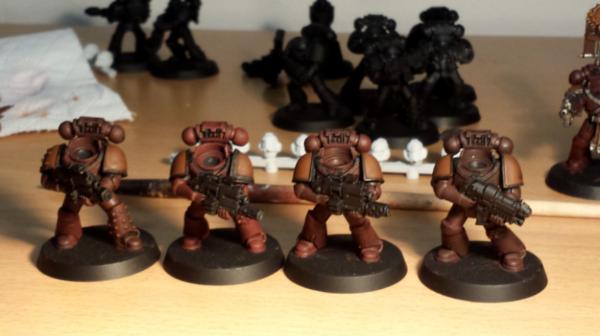
Ok, so I am back on day 2, for post number 2! I got the basal red for my model's armour.This blog will also be partly a tutorial, so any who want to try out my techniquesand build things like I put here can. So, onto pics!
Just to show that they are indeed primed, here are the parts again. ust sprayed with GW black spray can.
These are all the paints I plan to use, along with new "Lhemian (spelling?) Medium" from the new range, which I will get later in the week.It shall be my first paint of the new GW line.
Any, if you can't see the labels, they are, fro left to right
Top Row; Calthan Brown
Middle Row; Devlan Mud, Gloss Varnish, Skull White Dheneb Stone, Bleached Bone
Front Row; Mechrite Red, Blood Red, Badab Black, Shining Gold, Burnished Gold, Chainmail
This is the first paint I used, Mechrite red. You will also need some Chaos Black
I mixed it,using 2 dollops of Mechrite, and just a speck of black, as shown below. it may not be clear but you should see the amont of Black in the centre of that red. Its too much!
The colour should look somewhat like this.
ok, now, after that, I started the painting. The amount of paint shown above? You will need quite a bit of it if you want to try it out, cause we are going to basecoat all the red armour, and it dires quick. Make sure to add a droplet of water so it applies thinly. The brush I am using is just a GW Large brush, with the red tip
And here is how the legs look with that red/black, followed by all the rest of the parts. I always start with the legs with I am painting models, so when doing any stage I always start with the legs. I will post the pic to show how it looks and then a pic of all the components that I did that to.
Next stage was some shading, and for that I used good old, rather smelly, Devlan mud! Now, while I hear amazing reviews about how it is liquid Jesus or whatever, personally, I have only EVER owned that half bottle. I was discussing the new paints with a guy at a store, and we got talking about DM. I said I have never used it, and I don't really see the big deal. Ogryn Flesh has gotten me what I need fine. He took this out, albeit helf-3/4 full, and just gave it to me! For free!
Anyways, models! Just the legs and the rst with the DM wash. Some pieces may not yet be dry.
And that's all I have so far, but more will follow. I hope to finish this guy by the end of the month, so wish me luck.
BTW, all of these pics are in my gallery, so if youwant to take a closer look at anything, you know where to o. Feel free to check out my other pics while you are there. I don't pride myself on being an amazing painter, but that's what 4s and 5s are for right?
I wanna see the Completed Model! I've always wanted to Convert my own He'stan as i hate Metal models and i'm not a fan of his pose. Let's hope it works out!
well, at the rate I am going I should have him done soon. Personally I love the model, but there are 3 main reasons I am doing this.
1-I play Blood Ravens, and he is covered in Sallies things. I had the idea for this weeks ago, and the halberd, tilt plate and incinerator all cut and flied.
2-I didn't know it was going finecast
3-The model does NOT look like its artwork. The GK halberd is closer than that piece of gak !
Hey, back for round 3. Dispite a lack of replies (cept you Buzzsaw, you win da cookie for first), I have taken the time so I will power on.
Here is the pieces with the Devlan Mud wash fully dry overnight.
The next step was to add Calthan Brown to the cloak and rope on the torso. The paint below is still a little wet but further images show it better.
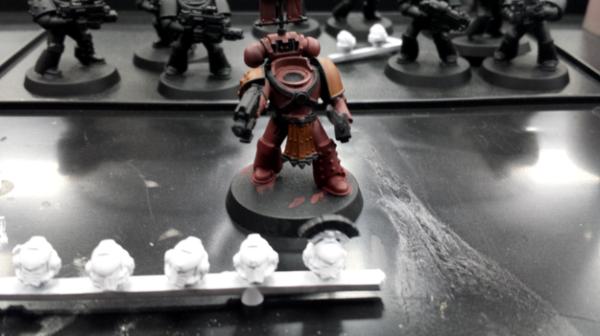
Next step was a layer of hihlighting. The first hgihlight is Scab red, or should be. I don't have any, so I used a 4:1 of Mechrite red and blood red. If you wish to try this and feel it is a little too bright, use a PIN PRICK, and I mean a pin prick, or black to darken it. Any more than a pinprick will make it too dark. I used a PIN, literally!
When hgilighting, make sure to keep it very thn, and leave behind the old colour at the edges of the armour and the recesses. The right knee cap is not highlighted at all,as I plan to paint this black later and it saves time and paint.
The next stage, I regret to say, I didn't take a pic of. My paint was drying on the palet and I needed to work fast, as I needed it for the next stage as well. Thhe second highlight is 2:1 mix of Mechrite:Blood. Again, keep it thin and leave behind the previuos layer. This time I didn't go as far out toards the edges as before.
The next stage was a 1:2 of mechrite/blood. It should even sparser than before. I thankfully got a pic this time.
The final hihlight is a pure blood red. This should be kept VERY THIN if you do this, and only applied to the very top, most prominent spots. This is because Blood Ravens should have much darker armour armour than BA. So whereas BA use another portion of red in their mixes, BR don't, and don't have the final Bazing Orange highlight. Just a Blood red.
The legs
And the rest of the armour, now finished. I still need to finish the cloak, hghilight it, paint all the metal and the weapons. I have also just realised the Chainsword arm I am mounting the Incinerator on isn't the way I want it to be, so I need to cut that wrist and repostion it. Then I need to get some new Texture paints. Having.never used them myself but having seen the great effects I want to try these out. The attach to the bae and hey presto!
I also need to get some Codex Grey, or the new equivilent. I want to use this opportuniy to try out NMM for the first time on the blade. Or I could go an alternate route and try Lightning effects?
Automatically Appended Next Post: Hi all, just a quick clarification. Moments ago I recieved a PM from someone, who wishes to remain anonymous, asking if I am following a painting tutorial by a user on Dakka named girlpainting. For the most part I am, although, as usual, and steps I can't do I modify, blend up or skip. Although I should've put that in at the start, I didn't. Apologies, and credit will be given where credit is due. Girlpainting is a seriously talented painter and gives greatly detailed painting tutorials, but skips the boring bit of watching the person paint the model. If you haven't seen any of Girlpainting's video tutorials, I seriously recommend you do.
Hi all. t may be hot but I am here to continue with update number 4 on day 4. Here is where I left it yesterday, with the armour plates finished with their final Blood Red highlight.
I also had the cloak basecoated in Calthan Brown. But before I show my next step, I have some news. Today I picked up my first item from the new GW paint range, the Shield 145 as I call it, which is a Technical paint known as Lahmian Medium, this
As you can see by this next image, the new pots have a special "Fin" to prop the lid open and drip it into the pot. The new, redesigned "collar is also very good, as it can help prevent spilling, ie, it can tip more before spilling out. In addition, the design means it can be poured more neatly and easily.
What Lahmian Medium is, is a slightly worse version of the stuf that came with the 'Eavy Metal paint kit. It is sort of the opposite of Gloss varnish/'Ardcoat, in that is a clear item to applied like a paint, but dries MATT. This allows it to seal transfers very well. Simply cover the chosen with gloss and apply the transfer as usual, but then this stuff will o over instead of more gloss. It takes away the shinyness and also hides the edges. Very important, as I plan to use a BR transfer from FW. Not being able to access FW regularly, and costing £9.50 per A4 sheet, I am not wasting a single transfer.
But that's not all, order right now and it becomes a very good paint thinner! Better than water. Ever get when trying to thin your paint with water it becomes translucent and streaky? This is the same, but without that bad stuff!" It spreads the paint out to apply it easier, and leaves your model streak free! Don't believe me? Here's my test on a piece of sprue!
on the left, mrked by X, is Mechrite red thinned with water. As you can somewhat makle out, it is capable of seeing the sprue colour underneath. The one on the right, marked by a circle type thing, is pure Mechrite. It is quite thick, and not very good for anything other than a simple, "dip and play" type army. You can sort of make out brush strokes in it too. in the middle, the smallest bit, marked by a sort of square, is Medium thinned Mechrite. It may need a second coat, but it gives as good a coverage as out of the pot, is thin and easy to apply.
Wait, there's more! It also dulls glazes! The new GW glazes dry shiny. While this may be good for some, applying this will dull it down. You retain the hue but it doesn't leave you dirty orks or beastmen looking like a disco ball!
Basically, I can't recommend this stuff enough. If you haven't got it, get it! If you have the stuff from the 'Eavy metal set, put it in a bullet proof glass case, because I can only assume it is everything here and more! It is probably one of the best addtions to the product line and from now on, I will be thinning all my paints with this stuff.
Now, onto the blog. Before I start painting, I need to fix the flamer arm. The arm I plan to mount it on would have made the weapon sit at an angle, so one barrel is above another. I want both to be level, and the gun horixontal. So I had to cut the wrist
And repose it slightly so the gun will be the way I want.
Ok, so THEN painting. The first tep was a hihlighting of the cloak. As I mentioned in my last post, I am mostly following Girlpainting's Blood Raven Captain tutorial, so I needed a 50:50 mix of calthan Brown and Dheneb stone. In Girlpainting's video there were a lot of recesses, but on mine I just left a small margin of pure Calthan Brown near the folds of the claok and the tassel at the back. The tassels themselves were simply brushed over with the mix. As I said earlier, I thinned it with Lahmian Medium. This stuf is fantastic. I got great, thin, paint with only 1 drop, and great coverage. Don't et me wrong, I still neded a second coat, but the step up from just water is fantastic.
Ok, next was some gold!
As per Grilpainting's video, I should have used a 50:50 of Calthan Brown and Tin bitz. However, I was later informed that any metallic brown would do, so a 2:3 mix of Chainmail and Calthan Brown was applied to the parts I neded gold. Sooooooo...
The next stage was suppossed to be the gold. I wanted to try Girlpaint's special mix of Dwarf bronze, Tin Bitz and Burnished or Shining Gold. However, as I have niether TB or DB and no room on my mixing tray, I went for straight up Gold paint, thinned with Medium of coarse as it is a little gloopy in this heat. knowing Burnished is better as a highlight over another metal, I went for Shining Gold.
And that's all I got! Fortuantely it was a pure colour, so while Ididn't get the backpack gold, I can easily do this without remixing. I got the halberd decor, the "Inferno " on the gun and the Aquila on the chest in Shining. My next step tomorrow, though I may get none done, is to finish the backpack, wash all the gold with a tiny amount of Badab Black to bring out the detail I somewhat lost, and then highlight with a 1:1:1 of Shining Gold, Burnished Gold and a little Chainmail for shinyness, and finally a mix of Shining and Burnished. I will then wash this with Ogryn Flesh for sheen and do the rest of my parts. Probably not get any of that done, but there's always the weekend!
Advertising works lol! Thanks for the comment TAS! With a full day this weekend he should be finished by the ned of the month which is next Thursday I believe? So plenty of time to complete my target goal.
Hello! So, first off, a bit of news. My local GW store is runnin a mini-Games Day type party. They have a mini scrap Daemon contest (which I won last year) and a mini-Golden Daemon. The key word here is mini. As in, it isn't full scale GD quality. Being some of my best paintwork yet, I want to enter this guy! The deadline is noon on Saturaday the 26th May. 2 days away and it is already midnight, so basically a few hours to paint the eyes, base it, and the halberd blade and build it. So here is what I got done today.
First of, a little reminder of where I left off. The backpack, and a little bit of the head still needed gold. Eerything other than that and the aforementioned is complete.
Now, what I did next was finish the gold, and start the silver, as you can see by the gun, in Chainmail.
What happened next was I hihlihted all the gold in a 2:1 mix of Burnished and Shing Golds. Then I washed all the metals in Badab Black to enunciate the decals. I also ashed the cloak in Devlan Mud to shadow.
And the back to show the effect. Notice it most near the tassel and fold on the right, as well as near the shoulders at the recesses.
Here I have done the wash and also slightly edged highlighted all the metal with Mythril silver, to help express the edges.
At this point my flamer arm broke again, so I ned to fix that p. Here, all the gold is washed with Ogryn Flesh for a more brilliant tone. Gryphonne Sepia works as well.
The pieces untouched until now, the shoulder pads and the Tilt Plate. I didn't bother undercoating the pads as I don't have time or a decent ase to go over black. As it was I had to use Dheneb stoe . I basecoated the main area of the shoulders and the entire plate in Dheneb.
And here we are, 5 days after purchase, and aprroxiamtely 7.5 hours total painting time, nearly finished!
And construction is finally underway. I want to fix the arms on before I put the helmet. To do that I need the halberd blade apinted. I also need the flamer attached. The shoulder pads and Tilt plate need the arms on, and then I finally base the model. I have decided to try the new GW texture paints and have gone with the green one, Lustrian Undergrowth for it, but that'll all come tomorrow.
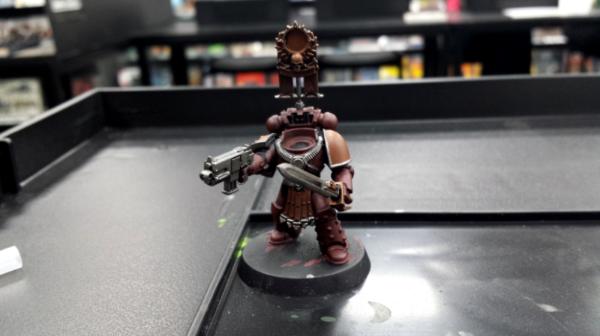
So, on Friday, I finished Perseus helstrom, who will be my 4th Company Captain (though uses the rules for Vulkan He'stan). ok, here we go. Finished in 6 days and entered into a mini-Golden Demon. Results at the end.
Ok first, two new cast members!
I love these bad boys! Used the green glaze to create source lighting and the Lustrian to base! They are both fantastic!
Next, I spent the entire day trying to fix the flamer arm, basing (took 5 minutes with the Lustrian!) and wet blending this!
For my very first attempt, I don't think its too bad! This is one side finished and now a WB showcase!
Ok, so didn't go as amazingly as it could've, but for a first attempt it is very encourafging! I ned to perfect tis technique for my Khan conversion, when I get it!
Here are the colours I used. On the left is a 3:1 mix of Goblin green (new equivilent is Warboss Green) and Chaos Black (Abaddon Black). The middle is pure Goblin and the right is a 3:1 of Sunburst (Flash Gitz) Yellow and Goblin Green. I just used water for these as I wanted them to be very liquid, but didn't want to waste Lahmian Medium. For the blending based I used a 50/50 opf Goblin Green and Black, to try for something close to orkhide Shade, which I don't have and the replacement, Caliban Green, is closer to Dark Angel Green. After doing the wet blending I gave a coat of Gloss Varnish('Ardcoat from the new range, from the Techinical section).
And here is the flamer arm just attached. Flamer not included.
Here is the flamer arm when first attached
And the preattached head. For the eyes I used Goblin green as a basecoat, followed by a dothighlight of the Sunburst/Goblin mix I used int the wet blanding, the a coat of Gloss. Same for the digital weapon lenses. I put just a tiny bit of waywatcher reen on the bionics to "glow" it.
Ok, so here is the final pic I took for the night, before heading down to my Grandad's overnight. He let me finish up down there, as I only had the pads and Tilt plate and Halberd to stick on. The pad on the far right takes two transfers from the standard sheet that comes with most marine kits, taking an "I" and "V" and placing them to look lke the Roman Numeral IV, which is 4, as in Captain of the 4th. The pad on the left and the tilt plate both have transfers from the Blood Raven's Forgeworld transfer sheet. A skull, for HQ, and a Blood Raven, second smallest version (the smallest are for scouts).
ok, so one last pic to show before the entire showcase of the endpiece. The texture of the Lustrian
As you can see this is quite like a mousse rather than a paint. Contrary to popular belief it does NOT contain grit. It clumps due to the formula. I used this stuff to base the model, then washed the coat withDevlan Mud. You will need a large brush to apply this, and DO NOT thin it in any way. Use as is, and apply evenly over the area. After the wash of DM I drybruashed the base with a 50/50 mix of Goblin green and Snakebite Leather.
Finally, the end result! This images are alln the gallery so please vote!
[
You probably won't be ale to see it, but I put green glaze over the gun, the side nearest the hadberd, and the tilt plate and shoulder pad, to give it a glow. Here is a clearer image
And, as mentioned, I ut my deadline from the end of the month to today! To enter a mini Golden Demon contest (I am only 15 so was entered in young bloods :( ) But first, the cake(s) served to the attendees of the GW Belfast Games Day party, which were great. First, a Games Day 2012 Ckae!
Every time the store throws a party, either for its birthday or Games Day or what, or the 25th anniversary of 40k,it has a cake. The Birthday last year had an amazing Crux Terminatus Cake, which can be found on GW Belfast's Facebookpage. The 25th annivesary had a rubbish, yet funny, space marine helmet, 3D and all! Apparently the guy who did the Crux and this was sick, so we had to get a non-hobbyist baker to do that. The second cake was made by the wife of one hobbyist and mother of one too! She doesn't play herself but in a house of 3, and two are gamers, you pick stuff up, apparently. So, here is the second cake (at this point many people screamed "Cake for the Cake God!")
Ok, so without further ado, the entrants, and my competitors in my category, all of which were very well painted for a young bloods grouping. However, eventually there was a winner, who recieved a brand new, Tyranid Trygon/Mawloc kit. This was very intereting to me when it was announced, as I had been looking to buy a second one for a Mawloc. But before I announce the winner, here is the entrants. Ignore the two models on the right of the black pillar and the Yarrik in front.
The entrants were the Lord Commissar to the left, my Vulkan centre of photo), a Vindicare to the right, an UM Libby, a Warithlord (hunched over to look at a piece of dynamite?) and Kaptain Badruk at the back. Pic 2, different angle, maybe not blurry
And finally, my first project has come to an end. I willend this post with a single picure, I took of the winner. That'll be me untill my next project. Bye!
Second place was the Lord Comissar 3rd was the Vindicare.
Project No.2- Space Marine Blood Ravem Stormtalon Gunship
So I am back with my June 2012 project, and I am doing a Space marine Stormtalon Gunship in the colours of the Blood Raves. It should be easier and shorter than my Vulkan aiove. He was a sort of test for my new BR colour scheme, instead of my 12yr old- recent "spray white then bright red, add detail" approach.
So, here is what I have doen so far. Asembly and some angle shots, primed in black+angled, and basecoat. seing as I was just doing an out-of-the-box building I decided to leave the building out, and just post endstages. Because i was doing a conversion before, I did WIP shots. So here ios just a block of pics!
You may not be able to make it out, but the top and bottom of the cross has been slightly widened, allowing me to move the gunship around slightly, leaning in a similar manner to the way the new GW ball topped stemsdo.
With the canopy set on. I haven't attached the control console or pilot as I want to paint the pilot and cokpit in detail. As you can determine the canopy is not glued yet. I have gone with Skyhammer missile launchers on the basis I can get a TLHB/LC or TML on other stuff.
And undercoated.
Detachable assalt cannons, which can actually aim backwards and can be attached/detached when the kit is assembled to the instructions by the letter, unlike the stormraven, who's uns don't swivel full if you attached the top vent behind the turret.
And the initial basecoat of mechrite red with a little black. A word of caution for those with no experiance with vehicles, don't thin the paint too much, something i learned the hard way. Get some medium. Do not use water. Use a tiny amount of medium.
And that's all. Oh, before i forget, there is another painting competition at the end of the month at GW Belfast, exclusively for flyers. Stormravens, Valks, Doom Scythes, you name it. There will be plenty of stormtalons entered but I can do my best right?
Automatically Appended Next Post: Also, the engines are not glued in place or together. There is simply one engine attached to the rod that transverses the craft, and the other is unglued. They will be able to rotate when I am done too!
So whle I haven't had time to post stuff for my blo hrein the last fe days, I have been getting on with my Stormtalon and have ben progressing rather slowly due to having to mix most of the paint so far, and the mix dries on my pallette before i can paint the whole model or i run out so need to keep mixing more, which is the opposite of Vulkan who I could mix a small batch and do a stage on all the parts. but enough of that, here is what I have.
So the day after I last posted here, I did my wash. Now, I know what you are thinking, washing a vehicle? but I i could pull out the pools on the flat bits and it had enough panel lins to make it worthwhile. So I did that and my Stormtalon broke, the glue wan't dry. Thankfully only an engine detached from the stick that connects the two, so it gave the bonus of being able to be painted seperately.
So I continued with the third stage of the armour, the layer. A simple 1:2 mix of blood and Mechrite reds, as seen used on Vulkan. I didn't follow with more highlights thouh of 50/50 and 2:1. Just an edge highlight. Because it took me so long, I needed to do it over 3 days. here is day 1.
You can really see the brightness of the Washed and layered setions. The washed is much darker.
So on day 2 I finished what i didn't on 1, except the underside o 1 wing, which I finished today. unfortuantely I didn't take pics.
But, after finishing the layering i took a pic. Not a great one but here.
So then a little edge highlighting. I wanted it to e subtle, so it just edged the plates and made them stand out as seperate, but not noticable.
Finally what i did today was paint the panels where the Bleached bone accents will go, it skull white. i purposely left these sections unlayered so the white would pply better. The panel next to the cockpit, opposite to the exhaust, will be where the chapter symbol goes, and the top section will have a Fast Attack cross. The wing and tail tips are just accents and the Assault Cannon has little spots too.
This will allow me to start the interior cockpit and the other metals tomorrow and this week.
Oh, and for giggles, here is the Stormtalon Gunship without Engines. Your judgement must pass!
Hi! Haven't had a chance to update recently but the weekend is here and so am I.
First off, KillyKaveKommando asked how I got my white so smooth. My answer was I didn't, and this image is just to prove it. You may have to turn the brightness on the screen down to see it.
And then I finished the white and the bone layer, adding that accent colour, to avoid the inevitable question of "Why do BA have a Stormtalon?" (even though the house rules state they can).
This is white before the bone, followed by 2 shots with bone, both the main section and rimming the Mechanicus symbol underneath
Before
And after
And then, the unthinkable happened. My brother came barging into my room while I was painting. I set the canopy on top of the cockpit to chase him out. And it dropped off. My mum came in later. I turned back to paint, and crack.
I tried...to fix it...
So, I forgot to take pics of my next 3 steps. I painted all of the metal areas, first in Chainmail, then a wash of Badab Black. The metals then got a drybrush, in one of 2 colours. For the assault cannons, front of the engines and the cockpit, as well as the symbol on the underside, I went with Mythril Silver to enhance it, but the thrusters and engines were Chaos Black to make it scorched.
I then took some Goblin Green to all the sensors and buttons around the cockpit and For the sensors of the front, as well as the larger buttons in the pilot's seat, i put a bit of a 3:1 mix of Sunburst Yellow to Goblin Green. I then put a slight glaze of Waywatcher green over the buttons, sensors and areas around them.
The very next step was to reattach the engines. I slottd the pipe through, glued it to the other end and left it to dry. When I was done the eniges could rotate but were still attached to the model. The turret was left unglued so I can remove and rotate it.
Then I began basing, using Lustrian Undergrowth texture opaint. Some pople don't like these texture paints, prefering to use sand and PVA glue. Personally I prefer the paints, as my PVA glue isn't work and the grit brushes off easily. However, this doesn't, so its a lot better. Not only that, but because its a paint, you can wash and drybrush it, whereas with sand it can come off when painted over. So here it is based initially
And here it is built up and placed onto the base for show overnight while I slept
Then, and here is the good part of Texture paints, i washed with Devlan Mud to provide depth and stop it looking so flat
And dried
This is it wet, so it is a little shiny. I used my large drybrush to do this so i need to wait a while before doing my next step. I used a large drybrush as I don't have a wash brush. My closest is the GW large brush and it was taking forever.
SDo the final touch up was to drybrush it with a 1:1 mix of Snakebite leather and Goblin Green. Any similar colour will do, just so long as you mix Goblin Green, whihc is nice, flat green, with any browny colour. I chose snakebite because I don't have another brown I do but it is calthan and I didn't want to waste it as it is my brother's.
So that is the entire exterior finished and ready to recieve the pilot and control panel, which I will begin work on as soon as I get them sprayed, probably next Saturday, where I will be down at GW for an all flyer battle, so I hope this buger will not die to a Hydra instantly. I also hear rumours of a store copy of 6th Ed rules being giving out, and my gut tells me the cenario in WD and the game will be one of the first goes with the new ruleset, so keep watching for my review. It will be mostly based on the new flyer and Jump Infantry rules, as well as Hydras as the vehicular examples, as that is all that will be used.
So, I planned to do a unit per month when I started, and finished Vulkan within a week, and probably this with the full month. With Vulkan taking a week, I expect i can do the pilot much quicker as I am not painting pieces seperately, nor having to stop because I didn't have the paints (I already have what I need), nor having to base him nor struggle with fine detail. I'll have 1 week to o a 5 stage layering (base, wash, layer, layer, highlight), which i can do on a more detailed 1 in a few hours, followed by a quicker go at eyes, and then a simple metal cuboid.
So yeah, looking pretty good so far.Thanks to all the people who have commented and those who haven't but who have subscribed/exalted, if any of you have. In fact, thanks to all who have taken the time to look in or read through.The images you see here are all enclosed into a gallery on my rofile, and showcase images will be in another gallery so please vote on them. Thanks.
I had suggestions about both of those but I really don't want to do either. I want to see my nicely painted cockpit (thanks btw) and hopefully pilot and expensive FW transfer on his shoulder so I don't want to paint over it. I also hate battle damage so won't be doing that. I just can't stand it. How can people be acceptant of putting holes in their stuff? I could never bring myself to do it.
the main reason I am not fixing it, or even glueing it on, is because when I broke it, I put a mesage on Facebook asking ifanyone had a spare or knew a place I could get on. One person, who will remain anonymous, messaged me saying that as he had recently taken up casting of clar plastic like that, and he was my friend, he would recast me one free of charge just as soon as he could make a mould of the original. The only thing I have to do is not name him and give him the broken one, so he can melt it down. He is trying to gather as much of this plastic as possible. He plans for each of his Cron units to have a differently coloured rods in the guns.
But thank you both for making suggestions and taking the time to post and view my blog.
Might be better to try and find it a new canopy or just damage that one a little more, to try to make it slightly more convincing of battle damage. Something like the main panel being sort of blown out with jagged edges. Either way if you go with the damaged canopy, should probably also make it looked a little worn around the cockpit to make it sort of fit together.
Very impressive job on the Captain. Perhaps I can learn a bit from your technique? And the Stormtalon is looking very good so far. Sorry to see the canopy. Maybe you can hide it by making it look like battle damage or something.
Just some minor work. The guy who is getting.me a new canopy in return for my broken one, says he can't use.mine as it has superglue on it but he's still making a new one, so in the.meantime I decided to paint the frame.
I also touched up stray paint and did a secret touch, which I do on all my vehicles Aquilas. Who knows what I did?
So, uh yeah. Back with no pics. Just info. Another painting competition. All flyers. Have untill Saturday 23rd June. Same day 6th comes out.
So I got to work on the pilot. Mold lines cleaned and head, torso and legs built. Spray priming those, arms, shoulders and control panel tomorrow and beginning painting the pilot. That will take all Wednesday and Thursday, and Friday for control box, and apply transfers.
Automatically Appended Next Post: Just sprayed my pilot and control panel
Sort of worked out well then seeing the progress on this.
I'm assuming the red thing in the middle of the Aquilla has something to do with your avatar? Or is that going too far and it's to make them look like the Blood Raven's symbol?
Hey all! I am in an especially good mood today for 2 reasons!
1- Passed a big french oral exam today after epically failing a Spanish one yesterday (needed 6 minutes worth and got 44 words, 40 of which I was allowed on a sort of cheat sheet )
2-I got a banner for this blog, including my Avatar, thanks to Castiel. I owe you one . You can see it in my sig.
3- I finished the Stormtalon! Yep, transfers and pilot all finished and can be found in my Gallery under "Finished Showcases."
Here. The pics arn't good quality but I shall take better pics when the sun finally decides to show its moon (backside).
I painted the Techmarine Pilot's armour using a mix of Mechrite Red and a pinch of black for basecoating, then an allover wash of Devlan Mud. As Techmarine's normally have red armour no matter the Chapter, and my marines were red, I decided to leave it the dark red so to differentiate. The Chapter Badge shoulder was kept on the left, and the Mechnicus Symbol Pauldron, his squad marking, on the left and the colours kept the same. The silver bits were just Chainmail and then Badab Black. The eyes were simply Goblin Green and Badab to shade. I didn't bother with much fine detail as I was ion a rush and most people won't see the pilot anyway due to the large crack (still waiting on replacement)
I am going to my aunt's tonight but I am entering a painting competition with it tomorrow, and hopefully get seeing the 6th Ed book, if there is an open copy given to stores to showcase. In the meantime I plan to get my Razorsaw back from my friend so i can start July's project...Tyberos, the Red Wake, from IA 10, Badab War pt 2. He is named "Leonidas Hedromus" and is captain of the 1st company.
So anyway, that's it. Please check out that gallery, vote on my images, both the Stormtalon and Vulkan and stay tuned. I am workingon a Mawloc on the side. I may or may not post WIP pics, but if you all want I can. I only have the body.
Ok, so I mentioned I had a painting comp for the Talon? I won!!! Or should have done. It was cancelled. I was the only one who entered -.-
Anyway, nothing new will be going up till next sunday where I start my next project. I am planning to do Tyberos the red wake from Forgeworld. It will be.my first time with FW resin so wish me luck and hope I don't feth it up!
Yes it is. I love the model and his rules. I.just wish he had.more than a 5++. And he allowed Hammernators as troops, rather than a single squad of Asssault Termies. With all LCs.
I love the Vulkan conversion and even better... Blood Ravens!
they are definitely one of my all time favourite Chapters.
I'm glad to see you also won your mini-GD competition.
I've always wondered what a kit-bash for Vulkan with those bits would look like, and you've not failed to impress.
As for the Stormtalon, it looks as if it's coming along nicely and it'll deffo fit the theme of the Blood Ravens, as they've always been a very much IN YO FACE Chapter imho. ^^
Hey all. I am back, with something basic and not very special but even so. In my OP and when I finished up last month I said I would be working on Tyberos the red Wake for the 1st half of July. I have him cleaned up and primed, but unbuilt as I can't build him without superglue I will be working on my Mawloc for a bit. This Mawloc was actually my prize for winning the mini-GD (see Pg 1). So here I go
Here is me getting started, way back at the start of June while I had no project to work on. Then the Stormtalon came out and the Mawloc took a backseat. My nids were my first army. My 1st 24 Nids actually came from the 4th ed Battle for Maccrage starter set back in 2006, but I had no clippers or tools so it was 2007 before I actually built anything and I didn't even play a game untill 2008 after 5th ed dropped. I have come so far. Obviously the BfM was Hive Fleet behemoth. Like my Blood Ravens, who's 1st Tac Squad came from the same place, I didn't have all the correct colours needed to follow the painting guide. I did have Blood Red, but I had only white for teeth and Enchanted Blue for the Carapace, so I have just stuck with it. I have never used a wash on any opf them before. I liked the bright, extravagent red, even if the quality was woeful. But this guy here is getting a heavy wash of Devlan Mud, and a fair few drybrushes of Browns. Reason? Her tunnels, and I hope to have him tunneling a lot.
Woah, OT there. here is getting started
And basic body built.
Adding spikes to the torso and abdomen
The face. You can now see that I have swapped to thin plastic glue. A tip for anyone who has not used it befóre. Don't sqeeze, just tip over.
And almost finished face
Adding the arms and he head
Roar
Sensory nodes to pick up sounds and vibrations.
Tail spikes for extra spikeyness. So many spikes its almost Chaos. Slowly but surely, it is begin to grow.
And primered alongside my Tyberos parts (not shown). The enchanted blue to the left is used to drybrush the carapace using a GW Large Drbursh. This pic was taken 10 minutes ago and i have just finished doing so.
I am going to take a break for a while, make lunch for me and my little brother, wash dishes, hoover up, peel potatoes. General housework. After that i am going to come back to this and maybe you'll get to see updates as they happen.
They actually don't. The trygon is far more competitive. I already have a trygon prime from the 1st wave, but was planning on getting another for a Mawloc when I was painting up Vulkan. Dispite my favouring of Khorne, Tzeentch likes me still!
Automatically Appended Next Post: Here is the carapace drybrushed
Stormtalon looks brilliant finished, I would love to paint.
Throughout looking at this thread I noticed the newpaper and thought to myself... I recognise this, he must be local... Then I bothered to look to the left and saw your from Belfast! You should come down to Portadown someday
I have bareltly done anything this week. I have a very serious problen. Its called babysitting my 9 yr old brother and housework. Oh well, I get £10 per week for sitting and £10 a month for the housework.
Hey, just a question. Am I allowed to post stuff that isn't related to wargaming on this blog? I currently have a 1:700 scale Titanic model on a shelf. I want to take August to build it but don't want my blog left for a month. I want to have something to work.on every month.
Automatically Appended Next Post:
Gitsplitta wrote:Money is money. The figures will still be there when you're done.
Well, it's your blog Deadshot. I've put things not related to wargaming on mine from time to time. You can't put those pics in the dakka gallery though, that's strictly limited to wargaming related stuff. You'll have to put them in photobucket or something & link them from there. If you put too much unrelated stuff on your blog, you might eventually run afoul of the mods, or at the least lose a segment of your readership.
Everyone here's interested in your modeling and painting, rather than being interested in what the wargaming minatures are like. If we need inspiration on things specifically wargaming-y, there's masses around. The reason people subscribe to this is because we want to know how you're modeling and painting stuff, rather than what you're modelling and painting.
Too right. It better be worth it as I am definately going to be running a Nidzilla list once fork out £45 for this new book.
So, here is what I ended the day with a few moments ago. Got the red sexoskeleton based in Blood Red. Just pure Blood Red over black. Used Lahmian Medium to thin it and a few coats to brighten but that's it.
Tomorrow I will wash EVERYTHING in Devlan Mud and do details such as eyes and teeth
On side note; What colour should I do the inside of the mouth- Warlock Purple? Or Goblin Green? I will be doing the eyes and tongue green and the teeth white so take that into consideration please. Prsonally I am leaning towards purple but and not set on it.
On the other side note, I have just realised I have Pg3
On the other, other side note, off to play Assassin's Creed Revelations! Cheerio!
I'll consider it but am not sure. If I start buying.online my parents will say I have no need to buy from GW and then GW will begin to wonder where I am.buying.them from as there is no other GW store in NI and it just gets complicated there on out.
Besides, I pride myself on brand loyalty and don't mind paying full price.
As for the carapace, yes I plan to do another drybrush of Enchanted blue tomorrow. Currently all I have is edge highlight. My big bugs have a streaky blue design. I'll post pics tomorrow. Bear in mind this is some of my earliest stuff and the quality sucks hard, and the entire models are coated in Gloss
Hi all. I have touched up my carapce on my Mawloc to have the streaky effect my other bugs have. This pic is from my TRYGON PRIME which I have had for a while, not my Mawloc, to show the streaky effect
The effect is hard to see, but is evident on the 2 plates next to my thumb.
The rest are from my Mawloc and its progress.
The carapce on back and head with streaky effect
And done the teeth. Wil be repainting with Bleached bone. The white is just a base
And washed the entire model with Devlan Mud to give a dank, dirty look, as if it had been tunnelling, and I think it worked pretty well
Automatically Appended Next Post: Here is what I did today before heading to a gamer cafe! Its my first time gaming outside a GW, who were being douchey for the first time. Apparently there was intro (like beginner's sessions) games to 6th ed. But you needed your own rulebook which I couldn't afford.
Blah! Mawloc! Now! I hear you cry. Very little did I paint. Just the tongue and mouth innards.
I used Goblin Green for the tongue and several thin coats of Warlock Purple for the jaws
The worm is nearly done. Woke up early for the 1st time this week to get a little done. Mostly jut fine details.
The eyes in Goblin Green.
Then i redid all the claws in Chaos black,
1- To clean up any stray paint from previous stages
2- To make them a bit shinier
Then I highlihted the edges of the claws with a 2:1 mix of Skull White and Chaos Black. the closest colour would be SW Grey or equivilent of the new range or other party ranges
The highlight. Like I said it is a hgilight so quite hard to see.
Then I opened the box to put it away and saw my Trygon's tail had broken so i fixed it. And i took the opportunity to show a comparison of my newfound painting skills, newfound being the day I started this blog, compared to some earlier work. its a bad picture but I'll upload a better one tomorrow.
Just a few more things to do. A final drybrush. 1 of Snakebite Leather, 1 of Desert yellow and 1 of Graveyard Earth, used to help dirty the model. I won't be basing the sucker any time soon, as I want to have a somewhat scenic base with a hole in the ground, as if he had just come out of it. But after a quick drybrush tomorrow he will be complete. Then I will be spending the rest of my freetime this month doing up a 1/700 scale Titanic, included in which is some rather great stuff, as well as the model itself. it comes with some poly cement, which if I m not mistaken, should work on itadel plastic. It comes in a bottle not unlike Citadel thin plastic glue, albeit with less capacity. It has 10 small (thumbnail sized) pots of Acryli paint which could give me a little stuff if I use it sparily, and also two good looking brushes, which will last a while.
Anyway, Buenos Noches amigos! (That means good night for those who don't speak spanish. Pity I couldn't speak it in a speaking test!)
The Mawloc looks great! I noticed you mentioned using the Lahmian Medium (or however you spell it) to thin the red. Is it good for that sort of thing? I have yet to try out the new paint range at all, and I just wanted some feedback from others.
Anyways, keep up the good work!
Its great.for thinning paint. See, when.you.thin.with water, the liquid and paint parts become seperated, so.it becomes translucent and streaky, especially over dark surfaces. With Lahmian, it doesn't. All it does is slightly liquify the paint. It is still thinning and smoother but doesn't spread out. If you try to apply light colour over dark it will be seen through still but it will take less coats to make smooth.
For example, if you were to apply water-thinned red paint over black, and try to get a solid coat it might take 4-5 coats.
The same paint thineed with LM might take 1-2.
Never got drybrushing today. I was planning to do it when.I came home, but my aunt's dog was neutered today and she wanted me to hold him in the car. On the upside I won my game today. 2 for 2 wirh Nids!
Tomorrow I want to do the drybrush, and then use the rest of the month to do up an Aegis Defense Line
I started with a heavy drybrsuh of Graveyard Earth, followed by a light one of Desert Yellow. To appear like mud and then dry dirt that got stuck.
Desert Yellow
And some showcase pics here. Please have a look and vote on them and the other images in that gallery too. That's why its there, so I don't have a clutered WIP gallery.
Thanks. I think I mentioned it in passing but I want to have a scenic base for it with a tunnel entrance and bits of dead marines.lying all over, as it he had just sprung his TftD.
Automatically Appended Next Post: Thanks. I think I mentioned it in passing but I want to have a scenic base for it with a tunnel entrance and bits of dead marines.lying all over, as it he had just sprung his TftD. And currently I have neither the tools, supplies or know how to do that.
Automatically Appended Next Post: Oh, and Thanks Gitsplitta. Missed you there!
Project No. 4- Imperial Style Aegis Defense Line with Quad Autocannon
Its me with.my.project.for the second half of July- as above lol!
So all.I have done is cleaned up the mouldlines and stuff. I have had this kit for over a year, designed to provide battlefield terrain for me and my little brother (who is a damn sore loser and won't play anymore). BUt now it is an option in an armylist, here I go!!!
Cleaned and lined up
Here is the line being put to good use by Helstrom, A vindicare and 2 Space Wolves (Frost axe, and Chainsword+Stormshield). For those interested, the Imperials won this fight.
Tomorrow if.it is dry and I have time I am priming this ADL along.with.other.stuff.I have lying around
I already have a very effective way, turned out brilliant on the one test model I have painted up.. but it's using the discontinued paints and it involves lots of mixing (something that scares the living hobby out of me), so I'm curious as to your method.. hoping it's a simple but effective one.
They're not mine. A little while ago a friend left them at a local store along with a custom Sentry gun (some sprue and a Predator Sponson on a 40mm base). I recognised them and have been.holding on to them.
Edit- Actually, its not a little while, its a big while. Amost 2 years! I don't see him often, but I always keep them in my.case just in case.
I'll put pics up if the guy is ok with it. I'll contact him tomorrow. No clue how he painted them though. To me it looks like Space Wolf Grey, with Iyanden Darksun for the shoulders, but at the same time they are too patchy to be a base. Am in bed now so pics tomorrow
Now, because we are.now into summer and I have no use for my desk other than painting, I bust out this bad boy!
With all my paints neatly aligned in order of purchase. First is an old, dried up pot of Skull White, with the old black lid pot. Then my Goblin Green, of which it is.my longest lasting paint. It is one of the 1st 9 paints I boughy in a starter paint set. I need to soften.it with water or Medium but it still works. And then so.on and so forth.
So, today I sprayed my Aegis Defense Line along with some other bit.
And then based the armour with Goblin Green
Here is the size brush I am using for the basecoat. No numbers or anything, but here is a size comparison
Here.is the design basis. The green panels and the metal edges done on one short piece and the entire gun+platform
Once I have painted all the silver, including the built in bullet holes, I wash heavily with Badab Black, or that's the plan at least, giving extra heaviness to the bullet holes.
Hey guys. This isn't an update, just a bump post to sort.of say that I am still alive and that the blog will go on. The Aegis line is coming very slowly. I have all 4 short pieces blocked out along with the Quad Gun and one long section.
I have discovered a lot about me. I hate painting terrain! It is dull and boring for something I will rarely if ever take in place of of a squad, as my local club has a 1000pt max restriction unless its an exceptionally slow day.
I think I was being a little ambitious trying to get 2 projects done.in one month. I think I will put my Aegis Line down for August and put my Tyberos away untill I have Superglue.
In other news, I have a couple projects to add to my lengthy waiting list. Firstly, I have decided to get some SW allies to add to my Space Marines. So for my Troops I get a pack of Grey Hunters and For HQ a pimped out Thunderwolf Lord. However, as the only reason I want SW is for the awesome look of TWC I will simply get a pack of those and use the 3rd TWC as my Lord.
Also, in the SW Pack you get a pair of right handed LC. So if I get a SM commander and pick up a Jump Pack from a friend's bitz box then I bave my Captain Shrike Kitbash!
Not only that, but an idea for a Pedro Kantor Conversion! Just need a Commander, a spare GKT Stormbolter and the Powerfist from basically anywhere (The commander kit itself has one) and Presto!
I have an idea for Khan I could do for £8! Just buy a SM biker, add a GK sword, of which I have 10 Termy sized and 5 PA ones, and sorted.
Not only that, but theres another terrain/objective marker I want to make, to embrace a bit of Chaos, as I feel a bit goody-goody with 2 Imperial armies, soon to be 2.5.
In the SW box you get 52, yes, 52 heads. Most are unhelmeted, and these will go into this idea. However, 13 helmets will go on the SW guys. The other 39 along with the 6 in the TWC, and all the many, many other heads from other SM kits, will be making a Tribute to Khorne. Stay tuned for the THRONE OF SKULLS. Made from nothing but marine heads piled and.glued together!
Anyway, thats's all guys. Maybe this month I'll get my Aegis Line done.
Project No. 4.5 & 5- Sgt Cronos kitbash and Forge World Tyberos the Red Wake
Hey guys, I is back with finally somke stuff done. My attempt to do up my Aegis Lione failed, and I still have 1 long section to block onto some silver, then wash everything, then a quick highlight on them. However, in the interim I managed to do up a conversion for Sergeant Cronos. Only the tank version so far but I can proxy a standard guy untill I make a footsy guy. So here he is.
I call him Colonel Oceanus
Here is him undercoated
Here is a basecoat shot, slightly blurry but it is simply blocked in colour, not much to see detailwise. As usual, my new painting scheme for my Blood Ravens dictates I use Mechrite red mixed with some black.
The Devlan Mud wash along with the silver blocked in in Chainmail. The silver was not washed in DM.
In this image you can also see I have based the shoulders in Dheneb Stone
Here is the first highlight, a 2:1 mix Mechrite red to Blood Red. Because this guy is a decoration on a tank I decided to just do two highlights, instead of the 4ish for Vulkan and my next project.
Here is the basecoat fopr the gold, a 3:1 mix of Chainmail and Calthan brown (though Tin Bitz is best). I also blocked the eyes using goblin green using the point of a GW large brush (which I use for everything).
The 2nd highlight of thin blood red on the high points, along with the Shining Gold. I highlight the eyes with a 3:1 mix of Sunburst Yellow and Goblin Greena and glazed over with Waywatcher Green
The detail on the fist done in Shining Gold (which hails from the SM Commander), the Bleached bone one the pauldron, the crux done in various shades of grey. Starting with a 1:1 mix Skull white:Chaos Black, and build up the ratio of White: Black untill it beomes 4:1. I also washed the gun and hatch in badab Black.
Here is that Crux finshed up and given a quick wash of badab black to darken the recesses.
And that's it, bar a shot of the gold bits washed with badab Black and highlighted Burnished gold, of which I need a pic. I orgiannly intended this guy, who I have had since last year, to be an alternate Stormbolter mount for one of my tanks. The idea was the actual stormbolter got ripped off, so, Ultrabadasss tank commander punches the hatch off, grabs a stormbolter and begins firing widely with his gun.
"Drive me closer, I want to punch them with my fist!"
So, that's all of project 4.5 done.
here is number 5!
Tyberos the Red Wake from Imperial Armour 10, AKA, Blood Raven's 1st Captain Leonidas Hedromus. Now before anyone says anything, all names, fluff and everything in my blood ravens is completely non-canon, and Bar the Name Gabriel Angelos, everything is my own creation and idea, taking place after the renegade Chapter Master was defeated. A link to such fluff can be found in the OP.
Without further blabbering, here is the parts in prep, all the way back in April when I picked this guy up from Warhammer World. Unfortunately my superglue seemed top have a problem of becoming think, gunky and not very useful. So on Friday I was in town and picked up a new one, along with some Liquid Greenstuff, always useful.
Claws, which needed straightening, and after many attempts I finally found my mum's hairdryer to finally get them done. Hot water didn't work.
And body
Built and undercoated. I actually undercoated them right after I got the but without superglue I couldn't build. I just stuck some blutack over thecontact points to make sure I was resin to resin rather than resin to paint to paint to resin and have a weaker bond.
Stage1- basecoat front and back
Stage 2- Devlan Mud wash front
The wash here is still a little wet so slightly shiny.
And that is me finished for this blog post.
In other news, another project to add to my lengthy waiting list, which will move to the top as I want to get it done by the 21st Aug for a painting comp, a Khorne Chaos Lord, pinned to have either dual LC or an Axe (Power Axe or Daemon Weapon, depends on mood) and twinbolter. The Chainfist and combimelta will be going into storage for when I manage with find an Imperial Termy, so I can convert up my 9th Captain, who wields a Chainfist and Combimelta. Chainfists I could make or had, but finding combimeltas to fit termies is hard.
Darkvoidof40k wrote:Hey DS, don't suppose we could get some pictures of your entire armies?
Woohoo, page 4!
I just noticed this post on the last page. I have indeedy taken those pics and have a gallery dedicated to my Blood ravens, each unit gets his own close up. Check it out, and be harsh with critism.
Automatically Appended Next Post: Back again
Stage 3 first highlight- 3:1 Mechrite Red :Blood Red
Slow day. Going to GW so will have plenty of pics.
Back again. Lots of stuff from 2 days. Up to stage 14 or something now.
Anyway...
Stage 4 front and back- Dheneb Stone on pauldrons
Stage 5 - Gold base in Balthasar Gold (borrowed). I didn't have my calthan brown which I normally blend in a 3:1 mix of Brown: Chainmail as a base for the gold so I used thiss stuff
Stage 7- Gold in shining gold, followed by Badab Black wash
Stage 8+9 front and rear
8- Blood Red highlight
9- Bleached bone on pauldrons
Stage 10- Skull trophies- 2 thin coats skull white followed by Devlan Mud Wash
Stage 11- Burnished Gold highlight to shining gold, edge highlight only
Stage 12- Chainmail applied to all metal
Stage 13 Wash metal with Badab Black (no pics yet)
So that's what I got done in two days. And not only that I also finished my Aegis Defense Line. WIP bits of the last stages below, a link to showcase pics to follow.
Continueing with the style of writing I did when my Aegis Defense line was up. I am only doing the "Stage X" bit for Tyberos because hopefully, anyone who had been following this blog (I at least hope some have) will know my Blood Raven paint system now.
So anyway, dispite being two weeks late (One of which was spent in a place called Hell (or a cottage up North in NI), here is my final WIP picks from my Aegis defense Line
Here I have finished up all the metal, of which I was literally painting.one section every time I attenpted to paint it. And had large breaks between sections.
To make it stand out from the Aquilas on the barricades, I painted this one on the Gunbase in gold. I couldn't be assed mixing paint so I went straight Shining Gold over black undercoat.
Then, to shade the metal, dirty up the line's green panels and also to fill the dark recesses of the bulletholes, I washed EVERYTHING with Badab black, heavily, using a largish old paintef's brush from a basic artist set. It was useful as it splayed out and was quite soft, so it was good for wash. Basically I just slathered the entire kit, everywhere.
Here the gun stand. I didn't bother highlighting the Aquila with anything..I want it to look oily and dirt caked.
And a long section.
Here I finished the final details- the servo skulls. I painted the skulls themselves in white and washed with Devlan Mud, and the lights were painted in Sunburst yellow. To give it a bit more "oomph" (I.don't know how else to put it) as the yellow was really thin, I washed it with Ogryn flesh to make it a bit.more glowy. The red bits are Blood Red with Ogryn Flesh for the same reason
And that is Project 4 complete, and No. 5 almost complete. All I need to do is the eyes and base it.
Oh, and another thing. I managed to secure a part for a future. project who will end up my Shrike conversion. I swapped the guy who let me use some of his Balthasar gold, a piece from the banner in the SM command Squad, the.one that resembles a Crozius Arcanum, for a Chaplain Conversion he was on, for a Sanguinary Guard Mk IV PA.Single Thruster Jump Pack. This was intensely helpful as it means I don't need to waste money buying a pack of 5 Jump Packs for only 1 to use, and also means my JP leader has a unique, special jump pack. All I need now is a SM commander and right handed lightning claw, both.of which I can get.
Hey thanks Darko! As for Tyberos, like I said before he is almost finished. Just eyes in green and a green texture paint base. I was going to cut up some WHFB movemnet tray to use as tiles but I couldn't be assed.
I presume you're using the forge world rules for him? Would be remiss of you not to. Should whip him up a retinue of lightning claw toting assault Terminators for that ass-whooping troop choice.
This gallery showcases all the projects I have done for this blog in their final, completed stage so please do vote on the images. This gallery was made with the express purpose that I disabled votes on the WIP gallery to avoid having half finished paintjobs getting low votes.
Anyway, in that showcase shot I have finished him completely. There wasn't much to do except the base eyes.
Stage 14- eyes
Goblin green base, wash with Devlan mud to darken the recesses. It was at this point I spill my only pot of Devlan Mud. Losing half the pot.
Luckily enough, later on I helped a friend carry his stuff to his car. Apparently a friend of his got one of the new Megapaint sets, so gave the guy I was helping all his old, OOP paints, and in return for helping him he gave asked if I needed any of it as a gift. So he gave me Mechrite red. I bought my first pot of that stuff back right before the switch, and between Dreadfleet Heldenhammer, Vulkan, Stormtalon, Cronos and him, I have used a huge amount. This pot is almost new.
He has also given me a pot of DM which he says he's got in the house but will find it for me. As you can imagine I was intensely grateful.
So anyway, after the wash I gave the eyes a simple glaze of Waywatcher green.
Stage 15
The base
Lustrian Undergrowth Texture, DM wash, drybrush a 2:1 mix of Goblin Green:Scorched Earth (borrowed as my snakebite leather is now completely dry).
So that is Tyberos finished, used in two games and sucked hard.in both. Need those LC Termies.
He's just a beatstick. Either use him to distract a portion of the enemy army, or just send him after something big. Land Raider or something.
Thing is, despite his rule to make lightning claw terminators troops.. and despite what I said earlier.. I would never take that squad. They die way too easily, when for the same points you can have the toughest SM close combat unit. Stick him with five TH/SS Terminators and he'll be really tough to get killed with all that 2+/3++ and look out sir on a 2+.
Taking a Land Raider.. may or may not be good. Haven't tried it out in 6th yet but I often find my Terminators footslogging it when their expensive ride dies early. Take a tac squad with a teleport homer or something like that. He's a really powerful unit, if used properly.. six attacks on the charge at either S5 or S9 and then if he eats a unit, which he damn well should, then 7 attacks.
Pretty much.. he's a distraction from the rest of your army, he can't capture objectives so he's there to get under your enemies' skin. Send him troop hunting or something.
Anyway, this isn't the place for tactics.. hopefully it helps though. I look forward to seeing pictures of him finished.
Still given the changes in 6th, normal Terminators without the stormshields are somewhat more survivable than they were.
Maybe take three with shields and two with claws, march them with the shields in front and the claws at the back for the saves against shooting. Lascannon or whatever shoots at them and it hits the shields.
Make them look a little fancy and act as his guard.
Nah, I'd say either go full LC for the troop choice or full TH/SS for the cheap deathstar. Tyberos has enough power weapon attacks, at I6 on the charge, to make up for any loss.
Darkvoidof40k wrote: Nah, I'd say either go full LC for the troop choice or full TH/SS for the cheap deathstar. Tyberos has enough power weapon attacks, at I6 on the charge, to make up for any loss.
Darkvoidof40k wrote: Nah, I'd say either go full LC for the troop choice or full TH/SS for the cheap deathstar. Tyberos has enough power weapon attacks, at I6 on the charge, to make up for any loss.
Yep. Will give a quick battlerep on his performance below.
Battle 1 vs CSM
Chainfist/Heavy Flamer Termies in LRR with Cronos. T1 assualt a Chaos Raider and explode. Get shot up so bad only Tyby left by assault phase with 2 wounds. Assaulted by 7 Berserkers and Sorceror of Slaanesh with the regular stuff. 3 LC attacks on Zerks, 2 attacks on Sorcy with Chainfist. Sorcy goes first, nothing, fluffs 3 attacks on Zerkers, gets massecred. Won by linebreaker at the end of turn 5 due to that Land Raider though
Battel 2 vs Different CSM
Same set up, assaulted Plaguemarine rhino with Termies, leave Tibs.kn Raider. They get shot to pieces by the other rhino who had a plasmagunner, and Oblits
Tibs gets out, aiming to chop down his warlord, a Nurgle Prince. My Warlord trait is that I gain 1 VP for each Character slain in a challenge. Never got the chance as I could reach (snake eyes!).
That game was embarrassing. 2 VPs for 2 rhinos, and hjs plasmagunner killed himself. By end of the 6 I was tabled.
So, yeah, I think a Crusader Raider with Cronos, 5 LC Ternies and Tyberos should be a sufficient slaughterer.
Or a Stormraven with the Termies and Tyberos. Especially with Locator Beacon to avoid Skies of Blood Scatter.
Hey Deadshot!
Love your stuff man! The Vulkan and Tank guy (forgot name soz) look really nice! Congrats on winning the mini young bloods, I'm hoping to enter young bloods too this year as well!!!! The gaint bug is pretty nice also!!!! Love it! Cant wait to see triobous the red wake finished too!!!!! Hey could you check out my bloog too??? (Link is in the signutre).
Thanks very much Hazzer, I will check there in a minute. Tyberos is indeed finished, but I don't post finished pics up, just a link to the gallery he is in (the idea is that if I put them here then people don't vote as they just look at them in this thread.). Will get you a.link as soon as I can but if you want to see before then, go to my galleries and its the "P&M Showcase" at the bottom.
Anyway, now that I am back here to this thread, I will announce, what will hopefully be my September project- Dark Vengeance Chaos! This month I hope to paint up the Lord, Chosen and maybe Hellbrute (depends on how long the cleanup is). Next month is cultists and then, depending on whether or not I get the LE version (as I would be having the chaplain as I pay the extra cost (£4 more than the guy I am splitting with but still) and then either Chaplain Palmarius (Blood Ravens) or the Hellbrute in December. I still need to ask my parents to allow me to buy it but I will have confirmation before the day is out.
Automatically Appended Next Post: Confirmation recieved, I will indeed be purchasing Dark Vengeance tomorrow (hopefully a limited edition).
Automatically Appended Next Post: Well guys, its official! I am now completely BOOKED SOLID for painting for the next year! My waiting list extends to Aug 2013!
Thanks for checking out my therd Deadsot!!!! Looks like you have alot of painting ahead of you. It was my bday not that long ago and am going to GDuk this year as well so its either DV ltd ed or GD and FW minis for selling and my arny... May just split the box anyway tho with a frind or but the chaos guys off ebay...
Ok, so today, after a rather long and strange arguement over the cultists with my buisness partner I finally got it sorted and purchased DARK VENGEANCE! And have clipped and cleaned up the parts of the Chosen and Lord.
Now, the first thing that struck me was the sheer amount in the kit! The models are so tightly packed, its epic! Niether Battle For Maccrage nor AOBR had this level of detail and value for money.
The second thing struck me as I began to clean them. I took out my knife and some wet&dry paper to file with. And I literally said this line.
"Where are the fething mouldlines?! Where are they? Oh wait..., no. Oh wait yes, there's one!"
Overall the 7 models took 10min to clean and I aslo put some parts together. Backpacks , the Bolterchosen and Champion and lord are unattached as putting any of these on would prevent me reaching some detail but other than that I have them built.
No pics for the time being but I will head to GW this Saturday to get a spray priming so I can begin painting
As am I. I am actually a little intimidated. I hadn't expect this level of detailing on a miniature, especially a snap-fit starter setter. However I am spray prime this very moment and hope to get painting either tonight or tomorrow.
So anyway guys, here's the deal. Seeing as I essentially doing 2 projects at once, the Lord and Chosen, to save and waste time, I will be doing more regular, dual updates. When I say dual, I mean that I will do one update for the Chosen and 1 for the Lord, seperate, but they will go up within 24hrs of each other as I paint in batches.
Now, they reason I am actually doing these simultaneously, as I mentioned before, both saves and wastes time. It saves time in that I can get more done within a month and not extend my ENORMOUS waiting list even further, and wastes it in that if I were to paint my Lord solo, I would finish in a few weeks max.
So anyway, Here is the start of a new project and new army! Hip, hip...
Project No. 6-A, Khorne Chosen of the Crimson Slaughter
So, this is a very special occassion in that this project marks the first time I have tried to paint more than 1 model (I don't count the defense line) to a high quality, as anyone who has viewed my Blood Raven complete Gallery can attest to. However, it also marks the 1st Squad for my blog and I am proud to say nothing makes me happier than a beautiful looking Khorne squad. Hopefully I can get it half-decent and work my way up over the years.
So anyway, I will begin as always with the start, and work towards the end. All these models, due to having parts that can't be painted if fully assembled (such as behind the Bolters and capes) are unbilt and just clipped together, with the exception of the PF, LC and Power Axe Chosen (not including backpacks) who don't have this problem.
Anyway, here we go! First up is unbuilt, freshly clipped pieces
And like I said some are partly asembled
Next up is Primer shots! (Don't try these, you et poisoned, not drunk!)
So then I tested my basecoat. Since I was "swimming in open water", ie, doing this without a test model, I just stuck with a formula I know. Mechrite red with a little black. Nice Dark red like blood.
Lighting is crap here but hopefully you can see the tone.
Next I washed with Devlan Mud but mysteriously all those photoes have vanished. :(
Any, that took me to the end of my work at GW on Saturday (I went to try my first game with GK in 6th and spent 4 hours basecoating Chosen)
So today I managed to highlight the armour and I have gone for Mechrite red. I was going to leave it the dark red, amybe a slight highlight, maybe, untill someone beside me said "They look brown." I argued they weren't untill several minutes later the manager asked, "Nurgle?"
Me-"No, just angry red spikey Khorne marines.""
Him-"Sorry, I just saw brown and thought they were Nurgle."
So I highlighted it but am now not happy. Too bright for my liking, too close to my BR scheme. So once they're all highlighted another wash or two of DM will be in order.
So that is me. Apologiesd for less than Stellar pics. One of my lightbulbs has blown and the sun through the window now oversaturates the model slightly, and the pics from GW suck because of simple bad lighting.
Automatically Appended Next Post: Porject 6-B, Khorne Lord with Daemon Weapon and Plasma Pistol or the Crimson Slaughter
So, same method as above but I just wanted to sperate the Lord out for the blog.
So, pieces and primer-
Next the basecoat.
And the highlight
And that's all my work so far.
Now, I have a quick question for you guys. I feel my basecoat is in fact red, but as its other's opinions that matter to me, I ask if it looks red or brown?
Seconds, I feel my CSM look a little too Word Bearers with the Darker red, but I want a second opinion.
And that's really all I haveto say for now, so enjoy these two updates 9that;'s an order!) and keep subscribed (or do so if you're not. Pwease?)
As you've pobably read in the title I come here bearing bad tidings. My phone was stolen tonight. In addition to the many other expensive features and the cost of a replacement, it is also my only way to upload pictures to the internet. Therfore, untill stated otherwise, this blog will be pictureless. I will still write up the blog and tell you what's happening but obviously I have to press on to finish by the end of September, so stick with me in this hard time and wait for the final sots or leave and move on.
Darn it Deadshot, I'm gonna have to come to your green blob with a pitchfork or two and we're gonna have to hunt us a no good damn dirty thieving bugger.
Darkvoidof40k wrote: Darn it Deadshot, I'm gonna have to come to your green blob with a pitchfork or two and we're gonna have to hunt us a no good damn dirty thieving bugger.
Not if I get him first. Thanks you 3 for your support.
I may be able to get it back but i doubt it. My mum is going to bluff it and put a notice in the local paper (we have a paper for our road) and say it was caught on CCTV and if the thief (or if it was lifted by "accident") comes with it we won't take it further.
But for the meantime I will just have to make do with a wall of text.
Over the week I have managed to layer up all but 1 bolter chosen and 1 Backpack with Mechrite red, which I am then going to wash with Devlan Mud to provide shading. Then I can get started on the detail work.
With this I have hit a stumbling point as i can't decide whether to do gold or silver details. Silver is my prefered method and is easier, but that will make them look like Word Bearers which I have no respect for, whereas gold will make them more World Eaters, but I am not sure on them.
Also, I am well liking the Bolter Chosen's heads! They have mark IV helmets! Sweet!
Hey all, still without pics but I am doing well with 1 week to go. I have the metallic banding all finished and washed. Unfortunately I lost/had stolen my Badab black, but highly watered down Chaos Black got me through. I also picked up some Balthasar Gold (aweful stuff, can't get the paint because of the inbuilt thinner) if a 50/50 mix with Shining Gold and washed with Black.
As for the rest of the model, I just finished painting all the bone with Bleached Bone and then I plan to do a second coat tomorrow. All I have left is the fleshy tubing in various greens and purples, the Eye of Horus (I want to have a mixed WE/Black Legion army) and then the silvery weapons, plus a few details on guys like the Champion (his head and such).
So that's my update, hopefully I can get this stupid IPhone my aunt is lending me to work but even then the pics will be gal, but until then still nothing.
All the bone structures (exposed ribs on the Axe guy, skulls and spine on the Lord, horns, etc) have been given their second coat of Bleached Bone and then washed with Devlan Mud. The fleshy cables have been painted in a mix of Warlock purple and Goblin green throughout the group and the cloaks and scraps of clothing have been done in Goblin Green. In both circumstances the green has been washed with Devlan Mud and I am very pleased with the effect of the clothing, especially the Champion and Lord.
All I have left to do now across the unit is metalowrok (ie, weapons) in silver, washed with watered down Chaos Black/Nuln Oil if I buy it, base with Lustrian Underrowth, and do the eyes in Green. And of course the eyes of Horus.
Then just a few finishing ouches for individual models. With only 6 days left untill the deadline (30th September) and lots of homework between then and now, it will be literally, a race to finish
Yes, that is correct people, I am back. I have shiny new Chaos Chosen and Lord painted, rather awesomely if I do say so myself, of which I am rather poud. And I have pictures!
Having finally gotten my aunt's iPhone 3 (NO FLASH?! HERESY- oh wait...) to take decent pics I can now show you the friuts of my labour from the past month I finished just a few days ago.First up I'll give you a rundown of my scheme to recap and then the finished pics, and for once I'll actually post them up instead of linking to the gallery. But before I go further I would ask deeply, from the base of my minis and the tip of my brush, if you could please hop over to the galleries I have, particularly the Showcase one, and vote on some of my pics. I am immensely impressed with my own improvement since opening this blog and with the Chaos in particular but feel I could do better and really need those votes to see my level.
Paint Scheme- Undercoat is GW Chaos Black Spray
Armour Basecoat of Mechrite red mixed with chaos black Devlan Mud wash Relayer everything wit pure Mechrite Red Rewash with Devlan Mud
Gold Basecoat 50/50 mix of Balthasar and Shing Golds Wash with extremely watered down Chaos Black as my Badab Black is mysteriously missing. While not a permanenet sub, its nice to know that I can use this if |I run out of a wash.
Silver Chainmail Basecoat Wash with Chaos Black as above
Bones and Horns 2 Layers of Bleached Bone Devlan Mud wash
Daemonic Tubing/Faces on armour Green- Goblin Green washed with Devlan Mud Pink- 2 layers of Warlock Purple
Cloaks Goblin Green devlan Mud
Helmet Eyes Goblin Green Glaze Waywatcher green
Daemonic Eyes This was the most fun and exciting bit of the entire project and was actauly inspired by a pic on Castiel's blog, where he had a pic of a reddish brown TDA Sorceror with an Ice Blue Eye on the staff and I loved it, so I nicked it (Sorry Castiel). The scheme not the model that is. Start with a Modian Blue Basecoat Layer on a thin coat of Enchanted Blue Relayer with Ice Blue, but only on the top, flat section, leaving the edges dark. The Pupil wasdone in chaos black and I can't really explain the method, but I sort of started at on end, flicked my writ towards the centre, flipped the model and repeated, making sure to have a clothe ready to wipe away muck-ups. I tried to centralise it but if it was slightly off to the side it was good as it made it look like the eyes was looking at something, and just more real, and Daemonic
So without further ado I give you
Finished Project 6-A- Khorne Dark Vengeance Chosen
Power Axe Added painting- none, but had lots of bone. My favourite mini to paint to date, althought its a tossup between him and the Lord
Bolter Chosen Added painting- Sword scabbard and pistol holster Calthan Brown basecoat, Devlan Mud wash
Chosen Champion with Power Maul Added painting- Skin Calthan basecoat, (Long OOP) Bronzed flesh, wash devlan mud. As it was then a little shiny I used Lahmian Medium to matte it. I was incredbly pleased with this and its outcome as I had previously been fearful of painting any sort of flsh, except maybe orks, and was infact one of many reasons I don't play IG or WHFB as a whole, as they have a lot of human, exposed flesh, compared to 40k. And I am now confident enought to have a go at the Cultists
Eyes (normal ones) First I used a small, tiny dot of |Mordian Blue, then even smaller one of Enchanted blue. Tjhen I somehow managed to draw a hairstrand thin line of white around the edges, with getting outside the eye socket or onto the blue. Then, a tiny, minscule dot of black, looking down that I need a magnifying glass to see but apparently not paint. But its awesome if you can see it.
Please link to this image by clicking it. Zoom in on the eyes (the regular ones) and you can hopefully see the pupils I can't even see, so False-Emperor knows how I painted them!
Project 6B- Khorne Chaos Lord with Daemon Weapon and Plasma Pistol
And will have Fleshmetal Armour (2+ save once the new codex is mine (just 3 months till Xmas).
Added Paint schemes parts - Plasma Pistol Coil Goblin Green, glaze with Waywatcher Green
Pelt cloak Basecoat Calthan Brown Wash Devlan Mud Drybrush bleached bone
Sword- (Heavy) Drybrush Ice Blue (Light) Drybrush Skull White
Anyway, that concludes my September project, a bumpy and painful road, but Chaos is not for the weak, dispite Imperial beliefs. The weak are culled quickly, either as vain sacrifises, cannon fodder or simply killed. Anyway, that's Project 6, and leads up nicely to October's 7, who are already built and cleaned- Sect Anarkus- Cultists with Autopistol, CCWs, a Flamer and Champion with Power Axe and CCW (if new codex allows it, otherwise just 2 CCWs).
Hey all, back again with the first and only post concerning my Sect Anarkus (Close Combat Cultisits). I finished them in record time and they lok amazing if I do say so myself. They have black-drybrushed flamer, bloody-gore all over, Marks of Khorne in blood and even 3 skin tones!
So here goes!
Project 7- Sect Anarkus, Close Combat Cultists from Dark Vengeance
First off some WIP shots. Not many as there were'nt a lot of steps and many required fast work that didn't allow for pics.
Untouched
Undercoat+Grey
The clooks and robes were all drybrushed in the same mix of 50/50 Skul White and Chaos Black, which, because its a drybrush, greatly speeds up the highlighting and looks great, but this crappycamera doesn't pick up well.
Next I went on to skin tones
First I did the typical white skin, as you, for some reason, usually find. Don't know where people are intetionally doing it or not but anyway...
Simple really, Calthan Brown, OOP Bronzed Flesh, a Devlan Mud wash (which I am now practically out of, save like, a drop). Easy.
Then I looked at some guys and thought, "hey, why not make them darker skinned" (to be PC)
So I skipped the Bronzed Flesh and went for a straight Devlan Mud over Calthan Brown
Finally I decided to add a third tone and mixed a 1:1 Clathan Bronw and Chaos Black, washed it with Devlan Mud and got even dark tones, probably unnoticable on the pic.
So then I did all the silver weapons in the usual chainmail and washed with Watered down chaos black. Simple. Then the fun began with the step I wish I could've taken pics off but had to work too fast- Gore! What better way to dedicate them to the blood god.
So, I did a little research but couldn't find a GW paint EXCLUSIVE tutorial. So I did my own thing and I am quite pleased.
Firstly, I got the old brush I use for mixing. Came from an art store painting set. Pretty wide, would've made a good brush for canvas or arge, flat surfaces but mine's pretty haggard, bristles stuck together and hairs at all ends. I use it for mixing paint but here I used it for this. So the mix I started with is a 50/50 mix of Mechrite Red and Chaos Black, WHICH I DID NOT PAINT WITH, add a second part of MR AFTER the 1:1, because adding it before doesn't work somehow.. Then, Taking some on the brush, I stabbed at the weapon, not trying too be neat. Blood isn't need, I eventually ended up with a nice, rough coating, with droplets over the nearby arms and clothes.
Then I added a portion of Blood red to metalicise it, as blood has a natural metalic tint and taste thanks to the iron present, and repeated, but lighter.
Then I added a second portion of Blood Red and repeated. I then used this xolour to paint on symbols of Khorne, the one found inm the rulebooks or codexes, onto various parts of the body, trying to differentiate each model. On the pec of the white shirtless guy above, on the shoulder of his darker twin, the Champion's skirt, the Flamer's apron (I even did blood effects on the flamer's weapon's body, as if he'd bashed someone's head in with it), one uy even has it on his bald head like a tattoo. One of the guys with spiky balls on the chain has it on the side of his face and his double has it on the back of his jacket. One has it on his autopistol.
Then I simply covered all the blood with |Gloss Varnish.
After that I did the details, leather in Calthan Brown, red cloth in Mechrite red, washed with Devlan Mud and Ogryn Flesh respectively. The eyes on various masks were fleshed with Waywatcher green to give a glow, as was the pressure readout on the fuel tank of the flamer.
Eyes were given a small dot on Skull white. When dry, some guysgo Enchanted Blue, others Goblin Green, others Calthan Bron, tryiong to leave a white margin. Then I put a tiny dot of black as a pupil.
Finally I based with Lustrian Undergrowth and |Devlan Mud.
So that's pretty much it, finished. I have GCSE Controlled Assessments this month and the start of Nov so hopefully the next 10 cultists will provide a quick enough project for that month and allow December for my Helbrute.
In other news...
I have started my first army profile for this army, or indeed, any army, here====> http://www.dakkadakka.com/wiki/en/Deadshot%27s_Crimson_Slaughter#Unit_Photos. Please have a look, and it will be updated in the next few months as I finish units, get the codex for lists and it also gives a complete background of my army, including setting me up to purchase the new FW Heresy kits (cataphractii termies, Mk II- V armours, and even Angron) for a preheresy WE force I intend to starrt. The fluff I have written allows me to use thiese as part of my either elements of my Crimson Slaughter or as a HH army itself. Please have a look and as always please vote on any images I have posted above as it allows me to improve, and that makes everyone happier.
Hey you lot, here's a surprise bonus project! I decided that because I had my Cultist schem set out it would only take a few days and guess what? I was right. Took me 4 ays total.
Project 8- Sect Tetchvar, Autogun Cultists of Dark vengeance
So as usually I went through the processes of undercoat, drybrush and block, wash and detail, base. Pretty simple, so here is loads of pics.
GW Chaos Black Undercoat spray (my last drop, the damn guy I had spraying used up way more than he needed to!).
Drybrush 1:1 mix of Chaos Black and Skull white. I made this version a lot lighter than on the last batch as I reasoned that there wouldn't be as much blood, skin and gore to distract from the clothes themselves.
On the back of the Champion. Also, his skin,. As per the last batch for white skin and the Chosen Champ, it is a bae of Calthan Bronw, layered Bronzed flesh and washed with Devlan mud. Additionally, as I was using Calthan then, I did most of the brown leather and darker skin, as well as the wood on the shotgun stock, and washed with Devlan Mud again. I don't have close-ups of the other skins. Basically I wanted to have equal numbers of white/brown/dark skin and because most of my other grouop are white I made this group almost exclusively non-white. In fact, only the Stubber and Champ are white. Just before anyone says it, this is not racsist intent, just happened to fall this way.
All skin and leather
Here I have done up the metals in Chainmail and am washing with watery black as I am still short my Badab(?).
Done the wash and glazed green around runes, eyepiece lenses, etc. |Basically anything that glows. The Champion is in fluff a Traitor Commissar, and he wears a Commssar coat so I did the inside and lapels Mechrite red, washed with Devlan Mud and then highlighted with 2 thin layers of Blood Red though I should've used a darker red or left it. I also used the opportunity to do the scar tissue in the cente of his chest, using a 4:1 mix of Bleached Bone to Blood Red, so it formed a pale pink scar. I was thinking it was too pale buyt I like it after it dried.
Here is the nearly finished Commissar. He has his shouklder bits based in Calthan Bronw, layered in Bleache Bone and shaded lightly with my VERY LAST DROP OF DEVLAN MUD. Paint well useed IMO. His buttons are done in gold. Eyes used green so the green glaze would be effedctive. And the base paint on but unwashed. Now, normally I use Devlan Mud to base but IO had run out? Good lord! Thankfully I picked up a pot of the new rplacem,ent Agrax Eartshade, and frankly, anyone whining about this being a different colour to Devlan Mud, the differences between the shades are negligible. Stop whining.
Finally I have them finished in the last batch of pics. I gave them Marks of Khorne as I ant my army to be majorly Khorne Foot troops with a couple Black legion vehicles (except the Helbrutes and Khorney vehicles I may get such as Brass Scorpians). Anyway, giving them a MoK gives me the option to add them to my other bunch to make a 20man squad, and they get counter attack anyway. To match this Khorneiness I did a small bit of gore in a 2:1 mix of Mechrite red and Chaos Black, stabbed on with an old brush. On the Autogunners and Stubber I went wiothn a small amount on the housing and near the fists as if they used them as clubs. On the 2 guys with bayonets, well, I put them on the bayonets obviously. The Champion got 1 edge on his sword and the top side of the other covered, the edge that he would slash with. So that way it can seem like he's been slashing and stabbing.
These are my final showcase pics so please vote on these images by clicking them, and also any other pics you like in the showcase gallery.
Heavy Stubber
Autogunner with Bayonet
Traitor Commissar Champion Tetchvar
So, with that done I aslo had time to finish one of my long running side projects (from nearly a year ago), Heldenhammer from Dreadfleet
[/url]
Fiannly, one last thing I would like to say is something I metioned in my last post, advertising my new army profile. Please do look and comment on the related discussion thread. The link is below.
So that leaves just 2 more models and units that I recieved from Dark vengeance. I had tosplit the set to afford it so I lost out on the Dark Angels, minus the 1 model that matters. So, November is a chance to paint the Helbrute, Malus Helfist, and December, the special Christmas edition, I will be doing the Limited edition Dark vengeance Chaplain!
Thanks a ton! the water is easy. Its a mordian blue base, drybrush/ edge highlight the crests with Ice Blue nad then a fine drybrush of white and finally gloss.
The gold is Shinging Gold, Washed with Nuln Oil and drybrushed Burnished Gold. That is the hammer bit and the rest of the detail along the lenght is just Burnished Gold.
Hi everyone. This is my latest update for the beginnings of my Helbrute and also a little side project, a go at freehand on mu Command Squad banner. Originally I had this a yellow Canvas that simply read
And
The shall
Know no
Fear
Like that on the banner. So I repainted it bleached Bone and have had it that way for a few months and decided that since my painting has come on leaps and bounds, and I am using proper techniques (washing, layering, highlighting), along with a few more complex skills, namely skin, wet blending, and blood effects, next on the list is freehand. I wil be starting with that today. Please note my PC is down so I am typing from Iphone and some mistakes may get through but I will try to minimise it.
So this is the image I am basing my work on
And here is my process
Step 1 was to get a good canvas and so I decided to shade the Bleached Bone with Agrax Earthshade. Here are two pics.
Then the outline of the Raven. Not excellent but acceptable. A little cunky
Then I outlined the Iron Halo and V with Balthasar Gold, and the scroll with Calthan Brown
Finally i just forgot to take pics but here is the finished piece.
The Gold is the Balthasar, layered first with Shining Gold and thenBurnished Gold
Blood Drop is mechrite red, ighlighted with Blood Red. To do it, I used the mechrite red, drew an upside down Crucifix (Christian Cross) as a guideline and filed in from there.
Writing, and lines on the wreathe are Black, thinned, as are the things in the corners. The wreathe itself is Goblin green.
And that's it.
Project Number 9- Dark Vengeance Helbrute
So I started this by using my last drop of Chaos Black Spray to under coat this guy, but thankfully next month's project is a small model I can basecoat by hand or borrow a can. Apologies for bad lighting that grants red tint.
Next I used my usual black/red mix
Then washed with Agrax Earthshade (really no different than Devlan Mud) and did the face is Calthan Brown
Then I rehighlighted with Mechrite Red and layered the bone in Bleached Bone
And that is all I got time for. I have schoolwork to do tommorow, which I "should" have done over the Half Term, (its called Half Term BREAK for a reason), but I may get a few pics in. Also today I was helping my brother paint his Black Reach marines, of which only his Dreadnought is done and his Warboss done, the latter alone and crude, the former with help so better. He is doing them Ultramarines and I showed him how to basecoat and then lent my Asurmen Blue wash. Pics tomorrow. Our system was that I started a PF guy for demonstration, and he then did the Sgt at the same tie. I finished second as I was doing all detail, and he was just doing what he felt comfortable. Once he finished to his ability he moved on to the next guy, and I then finished and touched up the bits he'd missed. We then did the wash together. He started as I was touching up the last guy and we just shaded down everything. Pics tomorrow.
Hi guys, apoligies for my absence, I had school stuff. But I have finished my Helbrute and have a few pics to show for it.
Here is the gold banding in Balthasar Gold, along with the face touched up with Bronzed Flesh
The Matalwork in Chainmail
I then decided to paint all of the Daemonflesh and for that I used Goblin Green which gives it a somewhat Nurgley look but I maintain the red armour makes hiom Khornate
Then I washed the bone, face and green with Aghrax Earthshade, possibly 2-3 times in places.
And that is all the pics I have currently. I meant to upload more but my phone died (at 15% WTF?) so maybe tomorrow if I have time.
I wasn't sure when I saw that first layer of green, but it came out extremely well! Perhaps it could do with another coat to help blend them, but the contrast works well.
Thank you both very much for the replies. I was beginning to think I was losing readers.
Anyway, here is the rest of the pics.
Finished Project 9- Malus Hellfist, Dark Vengeance Helbrute
In the above pic I have added white to the eyes of Malus and done a dot for a pupil.
I then realised I hadn't done the toenails, so here they are is Bleached Bone washed with Agrax Earthshade
In the following pics I do up the Daemonic eyeballs on the flesh and armour. The first here is Mordian Blue, washed with Asurmen Blue
Enchanted Blue Layer
Ice Blue
Black Pupil+Gloss
So, I found a store, a little hobby shop that does WW2 type models, possibly FoW, right next to GW, which does paints for equal or cheaper than GW, and one of these brands is Vallejo. So, for 20p less than GW codex grey, I picked up this
which is Vallejo Model Colour Neutral Grey, product code70992 if I am reading the right number. The one next to the colour name?
Any, I quite like this brand, its very thin. I am going to have to get used to droppoer bottles, as my 1 use brought out far too much. I don't plan on completely replacing GW as I still need to go to GW to game, and the store has a very limited selection of paints from Vallejo but there are others.
Anyway, I used this to do the stone block on the foot
And then washed with Nuln Oil along with the metals. I also highlighted the gold with Burnished Gold but I don't have a handy pic.
And finally I based him
Lustrian Undergrowth
Agrax Earthshade
And finally drybrush a 50/50 mix of Goblin Green and Graveyard Earth
And here is the finished piece
And that is Malus Hellfist finished.
And you know what that means? My Chaos Models, for this year, are finished. owever, there is still 1 more model of Dark Vengeance I want to paint before the year is out, one of the most special models in the box., and one of the most badass minis made.
In Other news
Deadshot's brother
Since seeing my awesome models m brother has been inspired to paint up his AoBR kit, and so far all we've done is the dreadnought (mostly by me) which was done about 9 months ago and some of the Termies. Here is a quick snapshot of the Termies as of last week.
I use model on the far left as a demo model, but the rest are entirely his work, with the except of touching up the especially delicate areas around the Crux Terminatus, at his request. The above is Mordian Blue washed with Asurmen Blue. We have made some progress since then so once my phone recharges, and we do some more on Friday (our designated day for painting together) I'll upload more pics.
POP QUIZ!!!!
On Saturday GW Belfast held a conversoon day. Not a competition, just a day designed to help inspire you, with people bringing down bitz boxs and converting the hell out of stuff. So by scavenging a pair of legs from a test model from ages ago, I made this
1 Internetz Cookies to the first person to tell me the model! Clue: He's a Son of Dorn.
10 Internetz cookies to who can tell me what parts I used, and from what kits their from.
Hints- The legs are standard, and the non-PF arm is a scout BP arm with the writ reposed.
Project No 10- Dark Vengeance Limited Edition Chaplain
Hey everyone, been a while, exactly a month from my last update it seems. Anyway, as I promiosed, this month's project, my "Christmas Special", I decided to do up a model worthy of the slot, and to the very best of my ability, and as I had him, what better model than the Dark Vengeance Chaplain? So, after a week of hard slogging, I have what I can proudly say is my best paionted model ever!
Here is the preliminary stages of cleanup and assembly
Undercoated by hand with Undercoat Black, as I felt this made it more personal and I didn't have spray. I have also heavily drybrushed him with Vallejo Model Neutral Grey and washed with GW Nuln Oil
And the initial basecoat for the cloak and shoulder pad. This is Calthan Brown. I unfortunately have not taken any WIP pics after this, except the finished base, but I can explain my process in a moment.
After establishing that basecoat of Calthan Brown, I made a 1:1 mix of Calthan and Bleached bone and covered the area, followed by 1:2 Calthan:Bone, and finally opure Bleached Bone (two layers). I then washed with with Agrax Earthshade bfore edge highlighting the raised parts of the robe such as the folds, tassels, the edges, etc. The Dark Angels icon (I wouldn't alter such a perfect model for anything, I'll make up fluff) was done in Chainmail with a thin wash of Nuln Oil. I would've done gold but flet it would be clash with the cream robe.
For the Gold, I started with a base of Balthsar gold, highlighted with Burnished Gold, washed with Nuln Oil and then Ogryn Flesh.
The pistol was done in Chainmail with Nuln Oil,, and the coil is Goblin Green, Nuln Oil and then Waywatcher gren glaze, in that order.
The scroll on his left pauldron was done the same as the robe, as was the flat areas surrounding the skull on the other shoulder. The scroll is currently blank but a tiny Techdrawing pen should help with writing his name- Palmarius- on it. Bit cheating but I can't take chances.
The Crozius grip was Mechrite red with Agrax Earthshade.
The eyes were Mechrite red, a touch of Nuln Oil and then Blood red. I decided to leave the entire helmet blac as it looked great.
The base, was painted seperately. I first based the rock ith Neutral Grey and they washed with Nuiln Oil. I then gave 2 layers of Bleached bone to the skulls, 1 of raveyard Earth to the dirt, then washed it all with Agrax Earthshade.
And finally, here is the last of Deadshot's 2012 painting projects and Dark Vengeance set, Chaplain Palmarius, Reclusiarch and Master of Sanctity of Deadshot' Alternate Blood Ravens
So that's it, thanks for readin my painting projects for the last 8 months, and to celebrate my continued progress and improvement, I will be celebrating by uploading a bunch of new pics of my Blog Projects at their best in a new showcase thread by the end of the year, along with my christmas goodies to give a taste of my projects for 2013. So, again, thanks for reading.
Merry Christmas, and Happy New Year. You know, unles we all get eaten by Zombies next Friday. Good Luck if you arn't prepared for Z-Day . You're gonna need it
Hey everyone, long time, no updates. Let's see if I remember how to do this?
So, since my last upate I've been through some stuff, not a lot hobbywise. But we didn't all die last month, so that's good! And I have pics of my first project of the Year!!! Woohoo!
Project No. 11- Crimson Slaughter Warp Talons
So, I have exams this moth so I took the last few days of 2012 to get a head start and have actually finished my Champion and 1 warp talon already which will feature in the final pics, but my other 3 are still a WIP. I have 1 with fingernail calws, 1 with the crystal wolverine style stuff and 1 with the jagged armour bands as claws. My progress as follows.
Here's the lot of them together, un-undercoated.
Here are 2 of them at the basecoart and 1st wash stage, and |I have a third at the next one.
Hey there, have my Warp Talons finished. I actually finished them on Wednesday 30/01/2013 but just couldn't get the blog updated untill now. So anyway, a showcase of my models!
All the armour and gold was done as per the way I did my Helbrute, Chosen and Lord earlier in the blog. The LCs were painted in Chainmail and glazed with Waywatcher Green and then varnished. The eyes were done first in Goblin Green, Washed Nuln Oil and then Glazed Green, then varnished.
Squad shot
Warp Talon A
Warp Talon B
Warp Talon C
Warp Talon D
This guy's claws were based in Chainmail, and then the green bits were covered with Waywatcher Green Glaze, and the blue in Asurmen Blue Wash.
Warp Talon Champion
And so my first project of 2013 finished and leaves me time to do my 2 projects in February
Hey all, me again. These last few months my updates have been few and far between, as oppossed to when I started it had a post every day nearly. And recently I have only been showing the painting and just doing a long wall of pics and text at the end. That all stops, because I'm back up again and plan to show as much as I can, when I can. So here's what I've been doing since Thursday.
Project No. 12A Forge World Grey Knight Dreadnought
So, for those who have been here since August will remember my Tyberos the Red Wake model? If not, he is on Page 2 and 3. Well, I picked him up at warhammer world last April when I was there along with this Dreadnought and have finally got around to building it.
I decided I wanted detachable arms, so I made a pin. I wasn't planning to as I had no pins, but the 1mm drill bit snapped while being used. So I used that
Finished assembly- Note the waste join needs gule, and the arms are only pinned
Project No. 12B- Crimson Slaughter Raptors
Work on the Raptors, the next step in my Chaos army, has already began to grow. Have 3 models fully built- I've gone with 2x Plasma pistols and a Champion with Plasma Pistol and Power Sword. I tried to really capture a sense of movement and dynamism that helps them look as good as the more exotic WEarp Talons, who are rather static. The cruving arms and leg shapes really help.
And that's all I got for today but with any luck I'll get the others built and all 6 models sprayed before week's end.
You do enjoy painting red don't you seriously though they all look and are all uniform, i'd love to see at least one of these armies finished at some point, so best of luck
Thanks a lot Logan. But I doubt anyone will ever see any of my armies finished. In fact, one contigent of my Chaos I have fluffed, which are a bunch of Preheresy WE coloured blokes, which there are 50 of, will cost my the guts of £500 from FW. And I doubt ANYONE can afford to finish a full Chapter.
But yeah, I love red. But funny enough I don't like Evil Sunz Orks.
Hey everyone. I realise I am rather late with my February project. But I'm here now and here to show off my last P&M project untill July, due to exams in May and June. It is indeed the GKFW Dreadnought and I am quite proud of it and I hope you'll like it, so C&C encouraged, welcome and recieved with thanks to all who give in advance. Unfortunately due to bad weather I have been unable to spray prime my March project but I promise it willbe my first project when my blog gets back up in the summer. In the meantime I present Venerable Brother Haraldus of the Grey Knights' 3rd Brotherhood
The guts and spine were made using Greenstuff. As my first attempt sculpting the stuff C&C is highly appreciated.
Hi everyone, finally back after my couple months break for my exams in school. I have been painting like mad all week, but it was one character and I have 2 more to do before the end of July. So, I present what I consider one of my finest works;
Project 13A, Black Legion Terminator Lord of Khorne with Daemon Axe
The axe was a bit of a let down. Wet Blending and Lightning effects are things I struggle with but am working to improve on. Otherwise, I am immensely please how it turned out. The armour in particular, as I have heard about how hard black is to paint decently.
Here, I sprayed the entire model Chaos Black and highlighted the armour edges in Vallejo Model Colour Neutral Grey, and then washed 2-4 times with Nuln Oil. For the gold, 1 coat of Balthasar Gold, followed by complete cover using a 4:1 mix of Burnished Gold and Balthasar Gold. I then washed using Nuln Oil,
A Mark of Khorne, to show his Patron's favour and his bloodthirsty preference for Close Combat. Unforttunately, square transfers and curved surfaces don't gel together, leading to an irratating, but one I can live with, crease. You can also see here the Combibolter, shown in Chainmail with a Nuln Oil wash. You also can see the skull on the ironsights, done with Blerached Bone and a heavy wash of Agrax Earthshade. You can also more clearly see the Chaos iron basing piece shown in Calthan Brown with heavy Agrax earthshade wash. My original plan was to use Dheneb Stone and Bleached Bone to build up to a creamy colour but it looked good like that and I knew that I would not be capable of getting it quite right with the lighter colours.
The cloak is the thing I am especially proud of, as I tried to match the box picture. For the fur, I started with Cal;than Brown. Then Agrax Earthshade. Then I drybrushed one Bleached Bone, then washed twice with Agrax. Another highlight with Bone, then 2 more of Agrax Earthshade. The cloak part wash based with my standard 1:1 mix of Mechrite Red and black. Then washed with Agrax Earthshade. I then found this too dark and repainted entirely with Mechrite Red, followed by 2 washes of AE. Then highlighted the edges, the edges of the folds and tears with Mechrite and then 1 more wash. Then rehighlighted with Blood Red and then 1 final wash.
Lord Khuroth's Daemonic Combat Familiar. The skin is Golbin Green washed with Agrax and the Base is Lustrian Undergrowth, WAshed with Agrax, and drybrushed with a 50/50 of Calthan Brown and Goblin green. You can also see the bone protrusions, again Bleached Bone and yes, you've guessed it, Agrax. Agrax I find to be just as effective as devlin mud was. It works with reds, greens, browns, bones, yellows. The only thing it doesn't work on is Blue and any secondary of teritiary colour of blue, unless it happens to be one of the aforementioned.
The Lord is clearly a high ranking member of Abaddon's horde, having the symbol of his Warmaster, Legion and Primarch as sculpted relief rather than simple paint.
the Axe began with mny usual red base of Mechrite and Black, the recipe for which is mentioned practically every post. I then wet blended the axe head's main section (top edge to bottom); Mechrite Red, Blood/Mechrite Reds 50:50, Blood Red. I then did the opposite on the cutting edge. This is very hard to see due to the nature of the design and colours and the lightning effects. |The lightning was done by a 3:1 Neutral Grey:Skull White, followed by a line of Skull white in the middle. I then glazed over with hyper-diluted Blood Red (6 parts water to 1 part red) and cleaned the excess by holding it up and collecting the droplet by a tissue at the bottom.
Khuroth has been masquerading in the Galactic South for a while before joining the Black Crusade, having claimed a trophy from a Leviathan Tyranid Warrior. It was obviously quite a while ago, enough so the exoskeleton has faded to but bone, and the blood and gore long since rotted from the spikes. The skull was done in the usual, BB and Agrax, and the carapace started as Black, layered so the recesses remained black, with a 50/50 mix of Mechrite Red and Mordian blue, and further highlighted with a 50/50 of Mechrite ands Enchanted Blue, although Mordian Blue and Blood Red give the same colour. A final highlight of Blood Red and Enchanted Blue followed by Gloss Varnish to finish.
There are 5 heads in the box. 2 were bare and the third was for the Sorceror. The options left were the WoC looking helmet and the TDA shown above. I wanted mine to look less stock and this simple change in helemt from the one on the box drastically alters his look IMO. With the WoC style helmet he looks pretty upright but here he looks hunched and I like it. The tusks are done as all the bone was and the eyes were Mechrite Red, Blood Red and then glossed. In hindsight, OSL wouldn't have been amiss but too late not.
Overall I am greatly pleased with my work and the miniature in general and hope everyone likes this.
hello everyone, Deadshot again. My 2 characters are finished and so I am done painting untill next month althiough I still have modelling to do on next month's work, which are Tyranid warriors to bring me up to 6 of the beasts, or 5 and 1 prime.
Anyway, presented below are my 3rd Captain and Chapter master for my Blood Ravens and I hope I can get feedback on them.
Project 13B- blood Raven's 3rd Captain Matheus Julius
So this guy started out from a marine I painted up for a scheme creation competition, which I lost, and spare parts.
Above you can see the bits. I took a pair of legs from that test model, scratched the red paint off with a knife, and used them. Then I added a GK breastplate to a standard backplate, along with a backpack and the Powefist from a Commander. The stormbolter comes from a GK Terminators and I cut off the magazine and repositioned it on the other side. The arm it is mounted on is a scout Combat Knife arm, obvious sans knife and with the hand cut and repositioned. An iron halo from the Terminator kit and a head from a tank and there we go.
You can see him here along with my other character who I will come to in a moment. Sorry for the glare. This is both of them built up to Mechrite red and the glare is bleached bone.
Here is him highlighted up to blood red. The step that is missed is a couple of Agrax earthsahde washes and rehighlighting.
Here is the gold highlight. I started with a base of 4:1 Burnished Gold to balthsar gold, then highlighted Burnished.
Again, ignore the other model. On the left you can see the Chainmail metal parts and the gold washed with Nuln oil.
And the finished product. Due to having to take pics quick I couldn't take a pic of every step.
here's a quick run down.
Eye- Goblin green, followed by 3:1 Sunburst yellow:Goblin Green, followed by Agrax Earthshade, folowed by Waywatcher Green,then Gloss varnish. Bionic lense- Waywatcher green The transfers come from the standard Space marine one, with an I and II stuck together.
A more zoomed out view. The skull on the far tilt plate is from the FW Blood Blood Raven's sheet
And one of the Chapter hereldry
Although i quite like this guy, the bare chestplate and scruffy look means he could be better. After I built him a friend gave me a right-handed powerfist so now I can combined that with a regular GK stormbolter arm and a MkVIII chestpiece from a Tactical squad for even better looks. Then this guy will unfortunately be relegated to Squad Sergeant, and his tilt plate confiscated probably, and his numerals replaced with a squad marking.
Project 13C- Blood raven's Chapter master Gabriel Angelos
Ok, so for the great Gabriel Angelos, I had a good long think. I wanted him to represent a special character with a special hammer. Obvious choice for C:SM- Darnath Lysander. But rather than ust buy Lysander and do the usual thing and paint him red, I took a diffent Finecast character model with a Storm Shield, archaic looking Thunder hammer and TDA- SW Arjac Rockfist!
Here he is new on sprue. This is a first purchase of the model and from a distance looks practically perfect. A closer inspection would reveal a few air bubbles which I promptly fill but there was like 1, on his thumb and it took a pinhead's work of LGS to fill.
This is the model highlighted all the way up to Blood red with Calthan Brown, washed with Argrax for the face, takingcare to avoid the beard. This follows on from the image shown before beside the Captain.
In this picture I have covered all the areas that will be metallic, along with his beard, in Dheneb stone. I wanted to distinguish him from Captains for instead of Gold I decided on silver. I had a paint lying around I wanted to try.
This is the paint. I have never come across it online but it was cheaper than GW and comes in a glass pot with a screw on lid, comes in a pot slightly bigger than GW, and the guy who suggested it to me said it was good and gives a very shiny silver, and the guy who runs the little model shop I got it from (who, I must say, is the nicest shop owner I have ever met. Very honest and knows his stuff. Imagine a GW employee, with other brands, and wasn't forcing things down your throat, good hygiene, prices and no little kids) said it was good stuff.
Anyway, I picked it up. It says it can be used for DIY and it has a very "painty" smell. Not like the acryllic paints but something for fences and woodwork. Very nice. It is quite thin stuff. It took about 4 coats over the Dheneb Stone to cover properly. It gave a nice enough finish but after a wash of Nuln Oil it could've been GW Chainmail with the same wash. So dispite its reviews and pros, I have to say that it'll be my only pot, unless GW doubles their prices or something. One thing the brand does have is ready made, cloured metallics in red, blue, green and purple which are certainly interestiong. I made have to try them.
Back to models........
Here it is before the wash and as you can see it gives a colour akin to unwashed Mythrill Silver
This is after the wash of Nuln Oil but you can see it gives decent finish to work with. Also seen are the handle of God-Splitter in green to contrast the red grips of everyone else, and the red armour. In addition I have layered up the face with Broned Flesh and highlighted his beard with Skull White.
Closer view.
And finally a close up of God-Splitter
And the finished piece!
And that is Good Ol' Gabe finished.
Ok, so most of you will have questions about certain aspects of Gabe
1- The hair and beard.
When I selected the model to use I forgot about the beard and baldness, but I like it after completion. I like to think that is shows an aged, more wizened version of him, many years after DoW2 and taking command of the Ravens.
2- The wolfiness.
This one took some thinking and I have a small fanfic story to justify it.
Spoiler:
After the events of the Aurelian Crusade, and the launch the 13th Black Crusade, Gabriel and a a force of 3 companies left to lend aid to Imperial forces fighting in the Cadian System, leaving overall command of the remaining Chapter, and its continued rebuilding to Raphael Xiortan, Captain of the Second Company, and the most organized marine in the entire chapter at the time. Upon arrival they were ordered to deploy onto a snow-covered Shrine World to the south that was being overrun by Word Bearers and Traitor Guard forces. named "Magnum Opus", which translates to Low Gothic "great Work, for reasons as lost to time as the Blood Raven's Primarch. Angelos, along with the First, Third and Sixth company deployed, making use of Vengeance rounds and bike squadrons to encircle and decimate the traitors there. The overall commander of the Imperial Forces, Logan Grimnar, had also dispatched a force of 50 of his own Chapter from Krom Dragongaze's Great Comapany, lead by Rune Priest Njordmarr Backbreaker. With the help of the battle Sisters and the Wolves alreadythere, victory was within easy reach, untill the Word Bearers called forth their daemonic Allies. The Sisters and Blood raven's Sixth, being first to the fray, were decimated within an hour. The Third were gone after the 5th day, bar a few brothers including Captain Matheus julius, Angelos's Successor as Captain. Angelos himself was untouchable, his Daemonhammer, God-Splitter, gifted by an Inquisitor of the Ordo Malleus, slaughtering the foul denizens of the Warp in an unending tide of purple ichor. The Space Wolves fought valiantly and the Runic protections bestowed on them by the Priest, along with the blizzards and gale-force winds, meant that they were basically untouched. After the first day of fighting, Backbreaker had given Angelos the same runic protection. His skill and Hammer were too valuable to lose in this battle. Eventually, all but Terminator Squad Hedromas, Angelos and a few others were dead. the daemonic forces were all but spent, their Warp Gate closed. But all was not finished. The last of the Traitor guard burst in showers of gore from bolter fire. At the battle's climax, a deranged and malicious Sorceror tried to destroy those near him in a vortex of doom. The sorceror's mind was obliterated by the energies unleashed, and the vortex wiped out the remaining Chaos marines and a handful of Space Wolves. Angelos was caught at the edge of the blast, saved only, only, by the runic wards. had the Space Wolf psyker not granted him such protection, the Blood Ravens would've lost their Chapter Master a second time. As way of thanks, Angelos adopted the symbol of the Wolf as his personal hereldry and was permitted to keep the runic protection as aparting gift. With a relief force of Cadian Shock Troopers and Battle Sisters arriving at magnus Opus, Angelos, with permission from the Great Wolf, withdrew the few dozen marines under his command from the conflict and returned to his Chapter proper.
Ok, so there is a story and a few miniatures to enjoy. please leave comments and criticism, on anything really. The painting, the sotry above, even my general manner in which I go about this blog. Please, it is appreciated. Bye!
Hi everyone. Yes, I'm still alive. I have been somewhat busy getting used to 6th Year life and workload but I have found some time for my beloved hobbying and am here to share some of my recent workload.
ok, so first up is my most recent finished project, my Lord executioner, Captain Vladimir, "Vlad", Umbros- who is a counts-as Kayven Shrike. i realise that with the latest codex dropping it has altered the way I need to game, ie, more nameless characters and I can't run multiple special characters anymore (Boo ), but I am going to finish this project if it kills me, and tjhat is to own all Space Marine Specvial Characters (not including the Black Templars, I still think they should have their own codex).
Please forgive the flash if you're screen ios very bright- on my phone, which is an excellent camera BTW, iot was perfect.
Ok, so the main body came from yet another Space marine Commander Kit, this time with a head featuring the iron Skull from an old kit, and Warp Talon Lightning Claws, sawn off at the bicep/tricep and reposed, but the fingertip blades were selected to give it a retro, Great Crusade-esque look.The backpack comrs from a Sanguinary Guard, swapped for a few bits from my bitzs box.
Overall I quite like the outcome of this model, and even more becaause it brings me 1 step closer to my goal of having all 10 Captains and all the special characters.
So following on from that success, I have decided I want to finally build my GK that I've had since last Christmas, so set my mind to building my Purifiers and a terminator Squad, so I can actually run a 10 man Paladin squad (and some as terminators so I can field 2 troops without Draigo). My Purifiers are still in pieces as I want to prime the heads and right pauldron white instead of black but once i get them primed and buiolt I will post pictures. my Terminators are fully built though, and I am most proud of their poses!
here is the entire sdquad of 5 together. As you can see I've chosen to outfit them with Swords, as I have a specific concvention for which squads get what weapons.
Strike Squads= Swords, Psycannons and hammer on Justicar
Swords keep them cheap while psycannons are versatile and allow them to shoot effectively on the move, or stand still and hold ground. Hammer on the Juysticar to maximise the impact of his extra attack.
Interceptors- falchions, Incinerator and Hammer On Justicar.
Falchions are aggressive and Incinerators allow them to recive inevitable countercharges well, and take on the odd horde. Hammer as above
Purgation Squads
Psilincers all around as they are Devastators and should be static, and 4 can lay down a hefty number of shots. The Justicar with Hammer as above and everyone else with swords for cheapness.
Purifiers
The Knight of the Flame has a warding Stave to protect him in a challenge, and seeing as everyone has the same number of Attacks, the hammer can go elsewhere.Halberds for the rest to get sdtrikes in before the modesl they are fighting, as they are my horde control, and have an Incinerator to boot.
Terminators
Hammer on someone, with a pair of Psilincers. These guys are my objective holders and hence need surviability and have swords. The Justicar has a Sword or warding stave or is upgraded to Thawn.
Paladins
Halberds mostly, with a few hammers, psycannons, an Apothecary and Brotherhood Banner.
Project 15- Grey Knight Terminator Squad
Anyway I disgress. Models. You will definately need to turn the brightness down.
The entire Squad
Daemon hammer
In this image, you can see where I tried to make it look as if he were swinging the handle up to grip it 2 handed.
Heavy weapon wielder
I was inspired by the GK release issue WD, where they have the this pose and weapon
Inspired by the FWHH Legion Praetor, whom I love
And finally this guy, who is designed to look as if he is chopping across his body, a shoulder to groinsplit.
Then at last we come to the leader, my Justicar. I chose the most ornate and "Officer"-y pieces I could and made him stand out with the back banner thing.
As you can see, an ornate sword pad and Iron skull on the helm.
The on the sword as well.
I have also included a temporary pin on the force Weapon so I can swap his weapon out.
here is he with a Warding Styave for soaking up challenges
And built up as the mighty Justicar Thawn
That's all for now but i plan to finish paintingmy Nid Warriors soon and upload them so stayed tuned!
Hi everyone. Its been quite a long time since I've been here. Over 2 years in fact. Almost as long since I painted anything. That stops now. I no longer have the excuse of a girlfriend to commit weekends to, nor am I too depressed or overworked to paint either. In fact, university is a blast, and my recent trip home over Christmas has allowed me to bring my Marines over to Scotland. The GW I now go to is huge, compared to the tiny 10ft room of GW Belfast, and I plan to go there every Thursday to paint or game. It's great.
I never really got a lot of replies or comments previously. I was hoping it was a case of people lurking, in hindsight, it was probably a combination of having little interaction with my readers. Or rather, a lack of readers to begin with. That kinda discouraged me from the blog a lot. Sometimes it felt like I was just rambling to myself, making a show of models that were tabletop standard at best. That said, I'm almost 3 years older than the last time I posted. Time flies. Point is, if you were a regular reader, I hope you enjoyed this blog, even if my bravado was unfounded at times, and I would dearly hope that any old supporters, even lurkers, would be interested in continuing once again. And anyone new, seeing this for the first time, I would love if you guys would read this too. It motivates me and makes me want to get better. If people want to be involved, give their thoughts, good or bad, tips, questions, I would really love more interaction with people who read this, as many or as few of you as there may be. And, to all the people who did, do, and continue to keep reading this blog, thank you for making these last 6 pages of just different red models be not a complete waste of time.
Now, onto the actual important stuff, that's minis.
So, first off; the Jump Pack Captain Shrike conversion above? Yeah, when you lead your models to a 12 year old, things tend to get broken. So he's lost an arm, probably vacuumed up. Luckily there is such a thing called Bitzbox.com where I bought a fresh set of the claws for an outrageous price for a milligram of plastic. But I got a new arm for him prepped and ready once I finish major projects.
The GK Terminators are still unpainted and will remain so for at least a few months until I go home again and bring them back over. On the plus side, I did manage to paint up some very cool looking Purifiers last summer. Took the whole summer but worthwhile. They will be featured in a future post.
At some point, I bought one of the new Tactical Squads an assembled it, so I'd have the new Grav Gun, and it will function as the latest addition to the 5th Company, as 1st Squad, with the Veteran Sergeant being the 2nd in Command to the Captain. That project will take place immediately after I finish the boxset below.
For now though, I'm currently working my way through this bad boy.
My Christmas present and what a beautiful kit it is. Now, I mentioned the new store I go to, Warhammer Glasgow, which is hosting a huge event over the next months. An escalation league type thing, using 40k rules and the current Marine Codex, but in battles aimed at recreating the Heresy. So with that in mind, I decided to take my new Heresy models and go for it. However, I can't abandon by Blood Ravens and so the two will merge. The next few projects will be Heresy minis, in Blood Raven's colours, and will function as Thousand Sons for the campaign (see what I did there?). Anyway, here is the first Power Armour Squad, who will be acting as Sternguard Veterans.
This next picture is momentous. Its the first models I've built in over a year
Here's more
As you can see, I'm attaching the heads using Super Glue to sprue. That way I can spray them white, for Veterancy, while the bodies get sprayed black later.
Shot following the primer, both using GW spray, the black being 2 years old and unused, the white being brand new.
In this image, the Sergeant, equipped with Bolter and Power Sword, has his undercoat applied.
If you are a returning reader, you might remember I use the same red mix for my basecoat every time and now is no different. If you don't know, or have forgotten, its a Mechrite Red and Black mixture, roughly 2 to one, but mostly eyeballed to be honest. And if you don't know what Mechrite Red is, its a foundation paint. Which came before the current range. Its roughly the equivalent to Mephiston Red. And with only a quarter pot of Mechrite remaining to me, these might be the last models to get a full Mechrite Red treatment.
NB: I actually had to take a moment of appreciation for the Mechrite Red and what its meant to me over the years. It surprised me, that a paint could have so much sentiment.
You can see in the image above 4 more models who were painted today, this Sergeant being done 2 days ago. The models you see behind are equipped with the 3 Combi-Weapons of the Calth box, a Melta, Flamer and Plasma respectively, along with a Combi-grav from the Tactical Squad, which I had been saving just for Sternguard, although at the time I thought it would be the actual Sternguard models. You can also see a little bronze on the Sergeant's banner, while is Balthasar Gold base paint.
Here are the same 4 models with their red basecoat, painted only a few hours ago. The brown is Mournfang Brown base.
Both sets of minis with wash of Agrax Earthshade, now in a double sized bottle, over the brown and red. You may notice in the first image of the sternguard that one is particularly brighter than the others. This is due to the mixing. When I mix the base, the quantities are not all the same, resulting in variation. This is why I always wash with Agrax Earthshade all over, as it firstly gives the shading need, but also serves to better blend the red and black mix so its more consistant across the squad. And while that same model, the Combi-Melta, is still brighter, following highlights the difference will be almost unnoticed.
This is also the squad with the metals basecoated. here I've used Leadbelcher, and the bronze on the flamer part is Balthasar gold. I washed all of the metals in Nuln Oil. The picture of the Sergeant above already has the wash applied, these guys are waiting until tomorrow when I wash them and the heads together (see next paragraph)
Here. I'll show you the Sergeant's head.
The crest is a 3:1 mix of Abaddon Black and Skull White. Normally I'd just do 1:1 of Abaddon Black and Vallejo Model Colour Neutral Grey, but I was in a store, plus the staff there are very friendly and let me borrow the store's Mournfang Brown as they were out of stock (and then continued to let me borrow over the weekend as the deliver didn't arrive as they told me! How cool is that?). anyway, this is 3:1 Black and white on the crest, Balthasar Gold for the bronze, and washed CAREFULLY with Nuln Oil. I then hung the head upside down over the edge of the tray to keep the black from seeping onto the white paint.
Here, I have applied the usual Neutral Grey, mixed equal parts with Abaddon Black, to the next piece of the helmet, as well as filled in the skulls with gold base. Sorry about poor quality. My room lighting is not great, I'm using a desklamp which just glares off. I now plan to wash the whole helmet set in Nuln Oil. Yeah, after hanging one upsidedown to stop that. I posted a thread, Here, where Ghidorah linked me to a guy using the same idea, black wash over white, on Stormtroopers, and as a bonus, using the same paints as me. So shoutout to Ghidorah for the link and to Sorastro cuz I'm going to steal your method. I haven't washed yet, planning to do so tomorrow alongside the metals.
That's all for this post guys. Again, even if there's only 1 person reading this, thank you for taking the time to read this. It means a lot. I will return in the next few days with another update and more WIP pictures. In the meantime if anyone has any comments, welcome backs, questions or just wants to make this blog less monologue and more bloggy, please do!
Xeanee wrote: Didn't get to see this blog when you posted all those years ago, but now i've read through it i'm looking forward to seeing your progress with Calth
Hey there Xeanee, glad to see you enjoyed reading the blog! Unfortunately its again been a long while since I posted simply down to motivation and time constraints but when I eventually start posting again I hope you'll keep reading.
While I'm here I'll make a general announcement about the blog. The main reason as I mentioned, for lack of posts is that a) I now work twice the hours I did last year and combined with more university work, I haven't had time to paint all year. I have managed to do bits and bobs here and there so hopefully one day soon I'll have time to upload something.
For any wondering about the outcome of the caltch box, I have made progress with the set and have it around 3/4 complete. I have been considering doing an "army profile" video for this page and to help get this back on track, maybe with a poll on my next project as well. If this is blog is something people would like to see regular updates for, or any updates, please feel free to say. Part of staying motivated for me is knowing other people enjoy my work, and lack of replies encourage me to simply paint for my own enjoyment and not share my work.
The above is likely entirely incoherant, been up for 56 hours straight between work and assignments, literally running on (coffee) fumes so please forgive me for any mistakes.

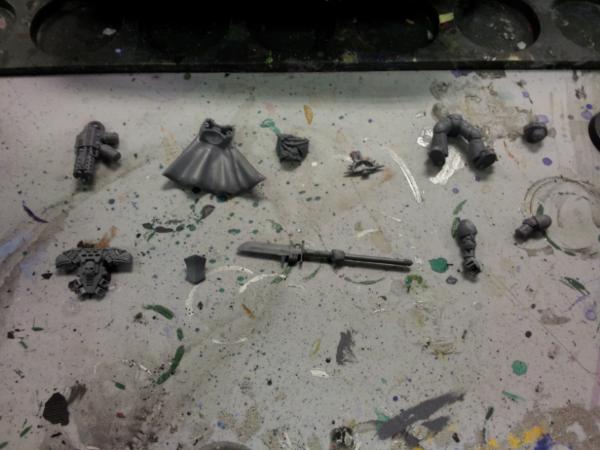
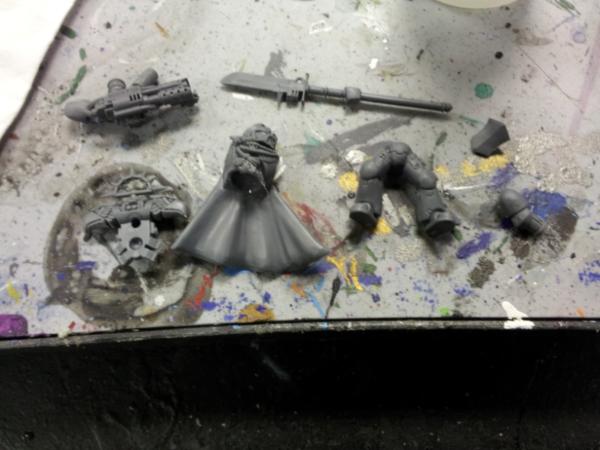
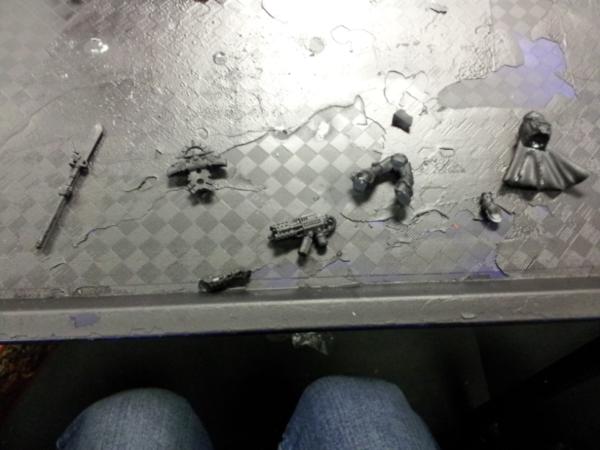
 )
)
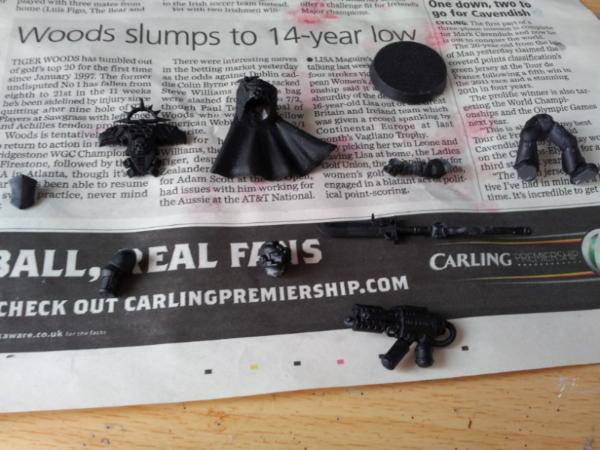
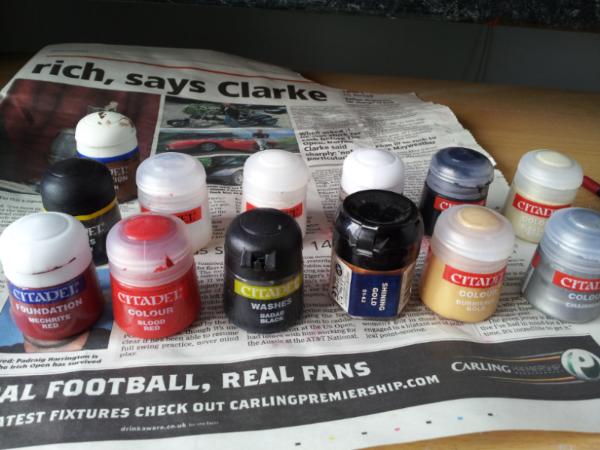
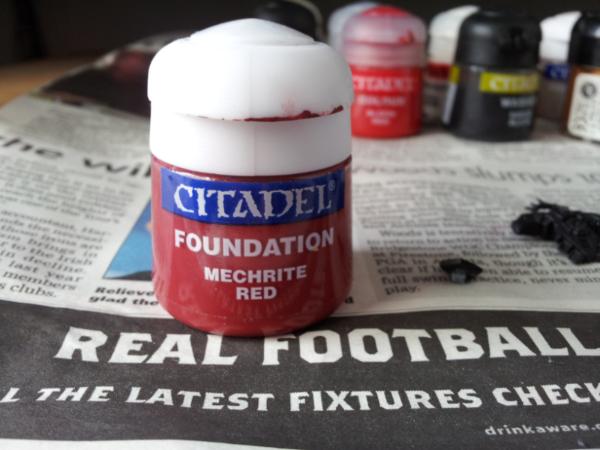
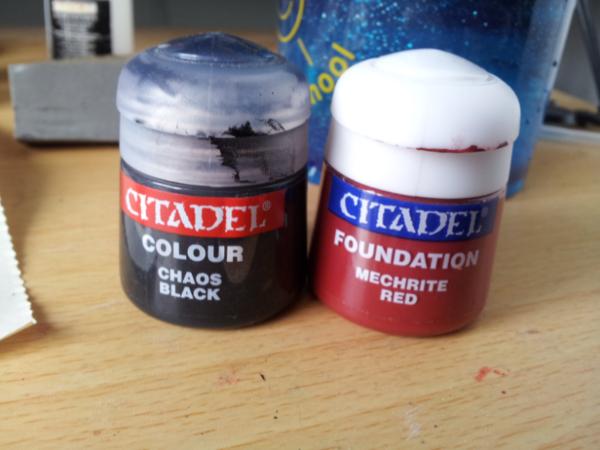

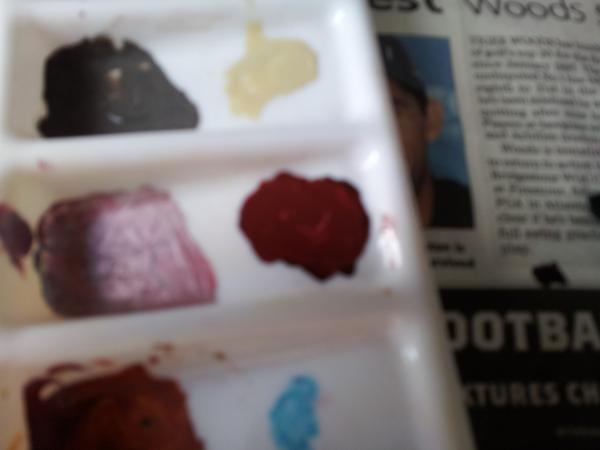
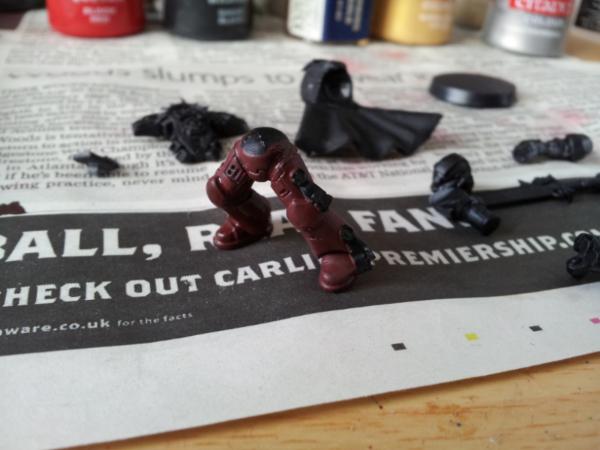
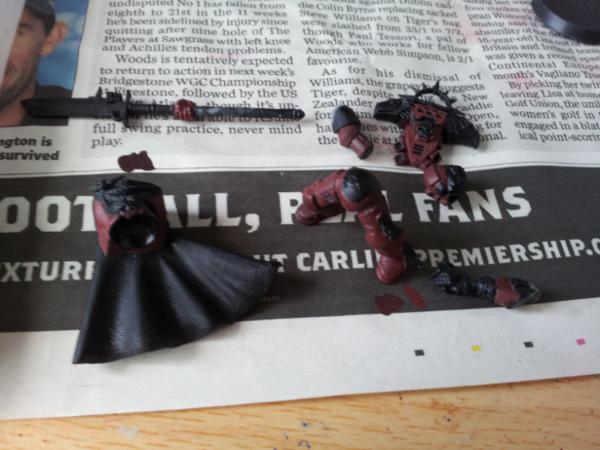
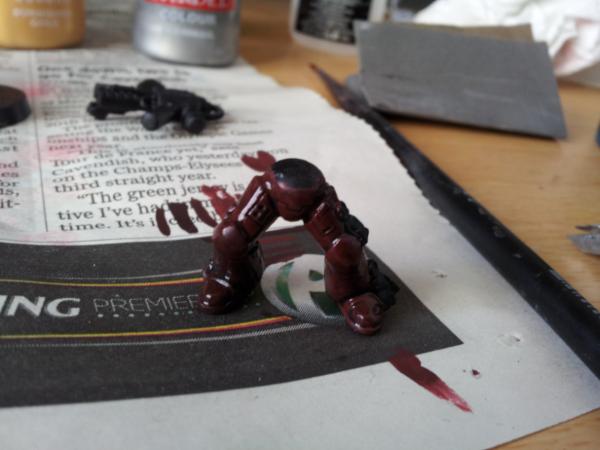
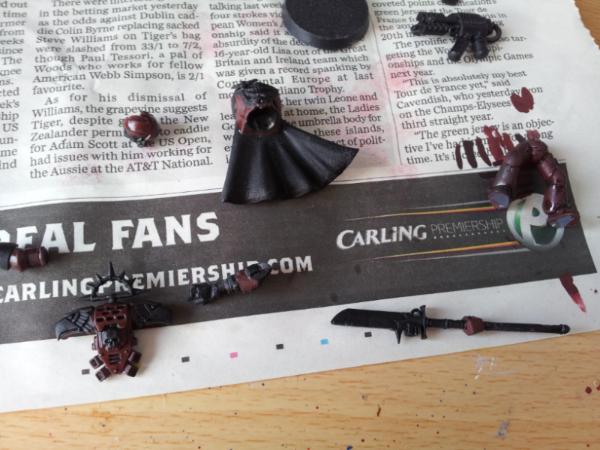

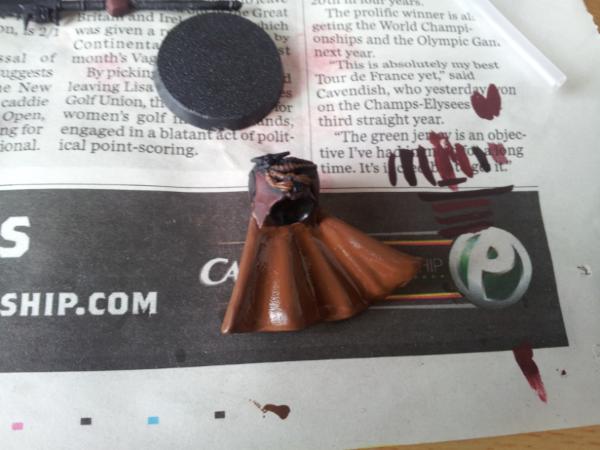
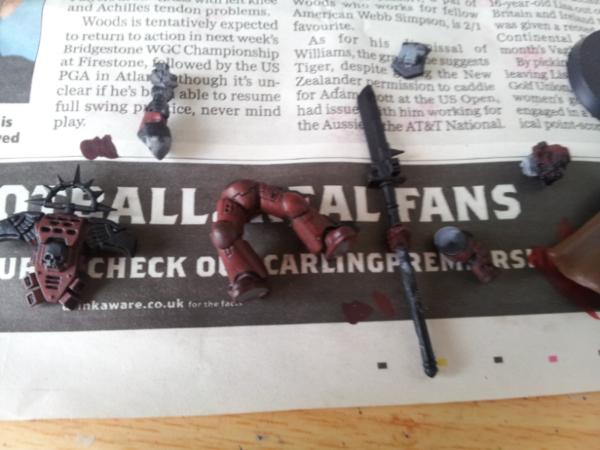

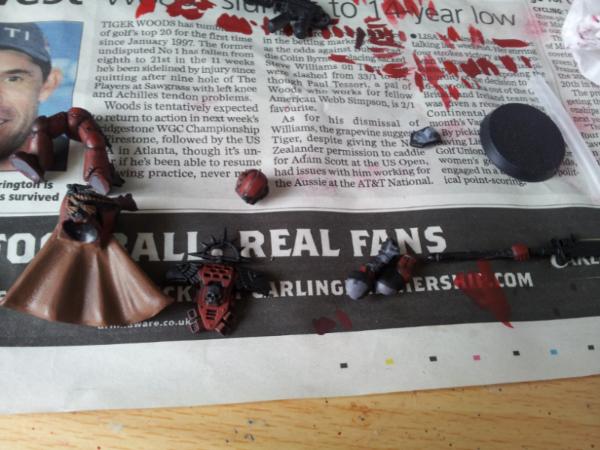
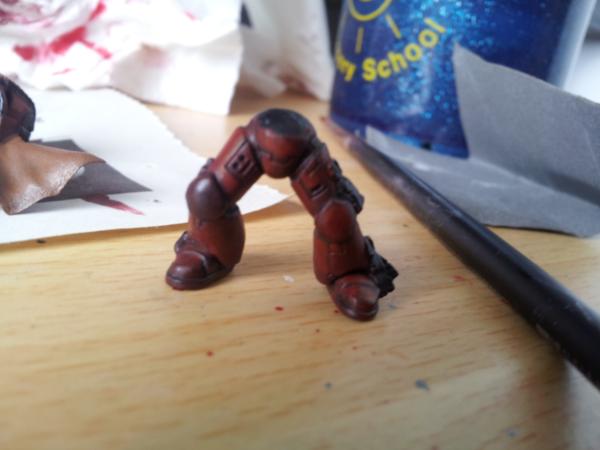
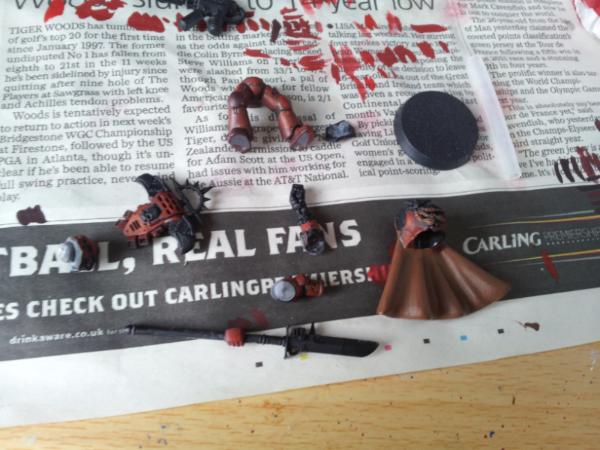
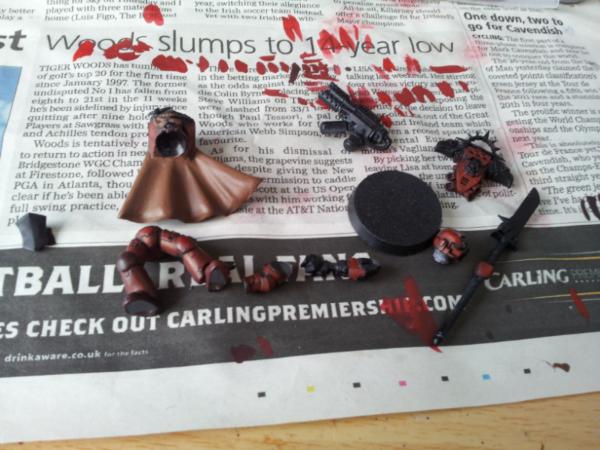
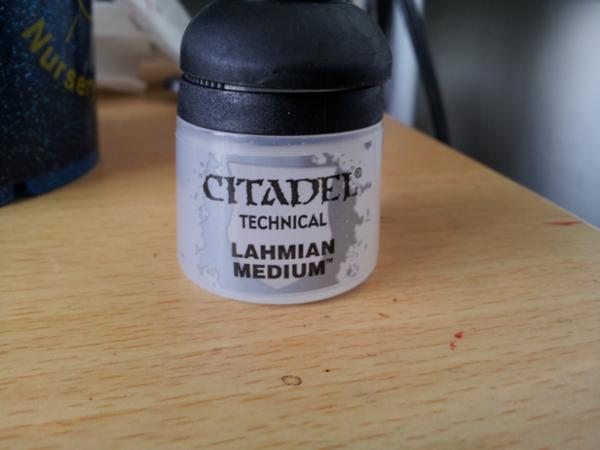
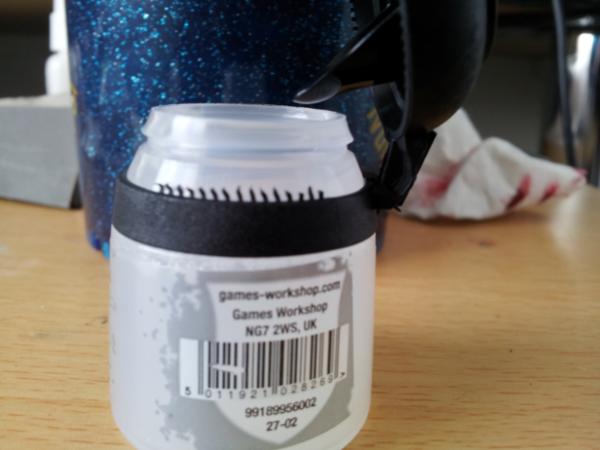
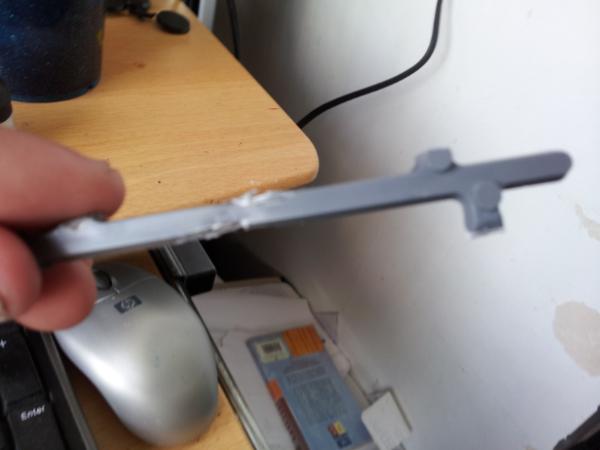

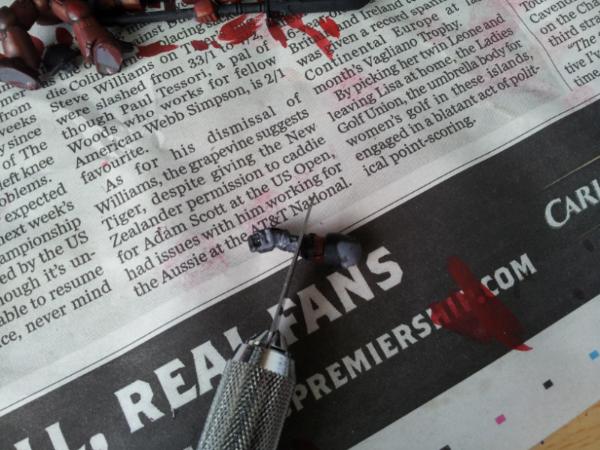
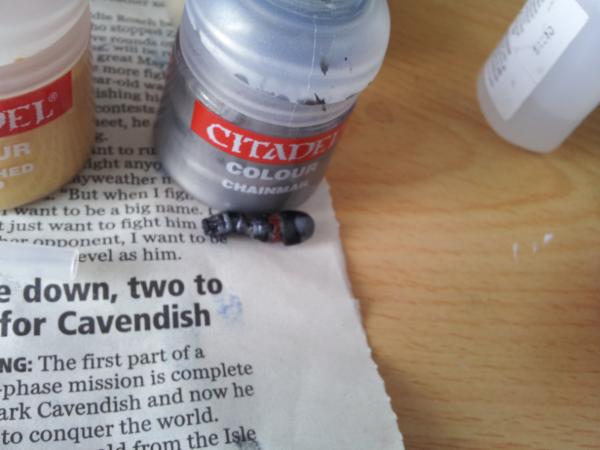
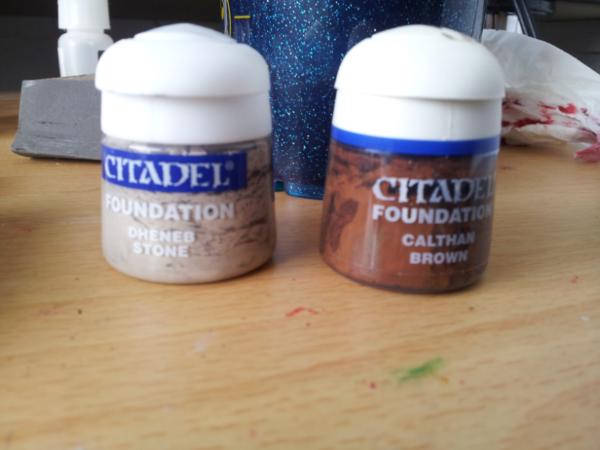
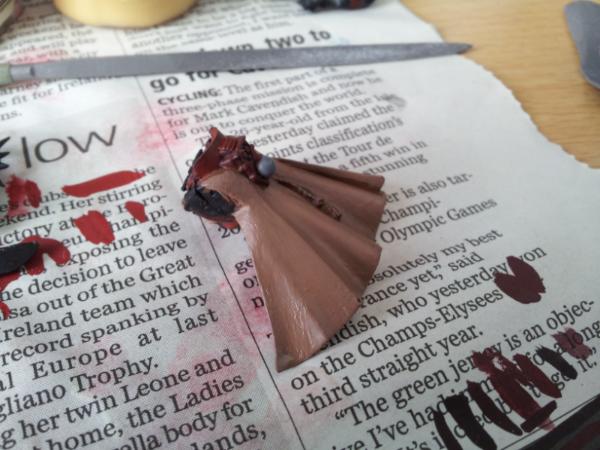
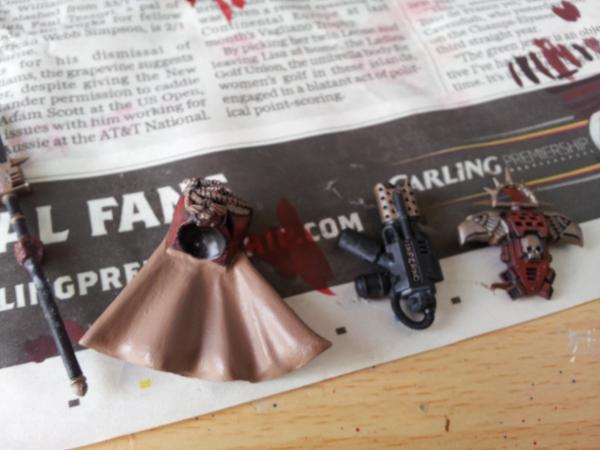
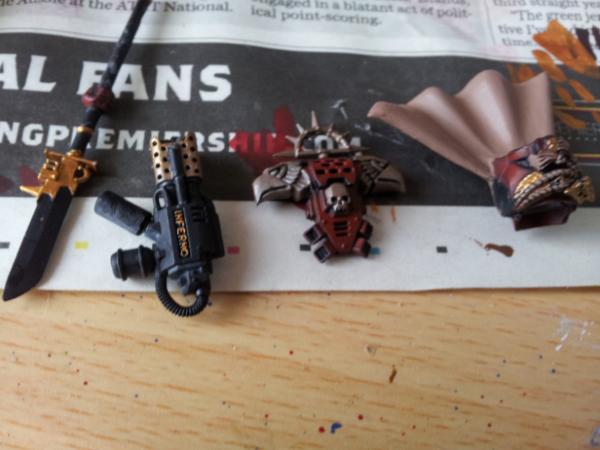

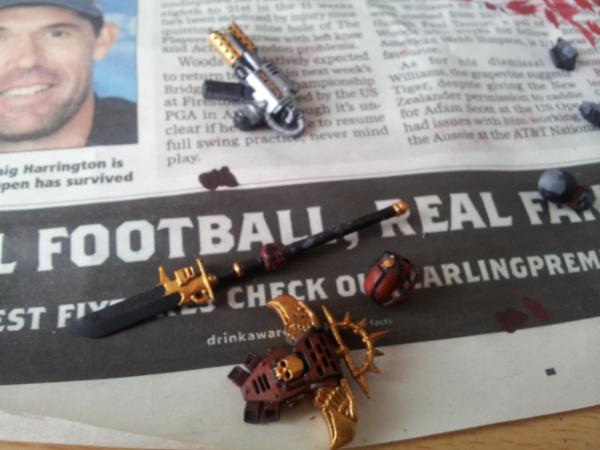
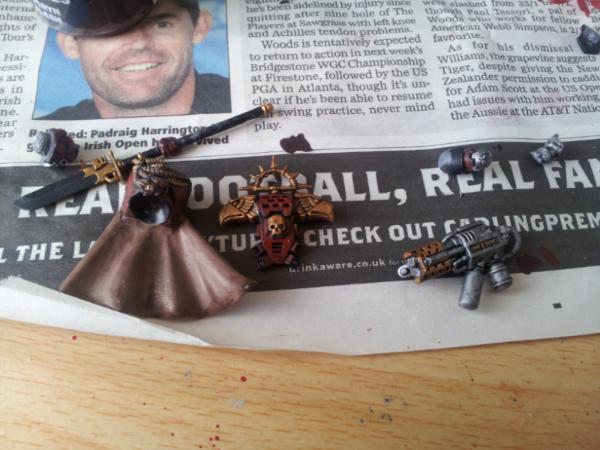
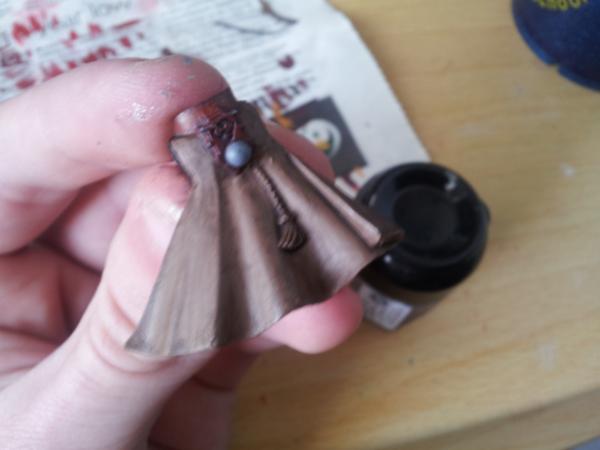
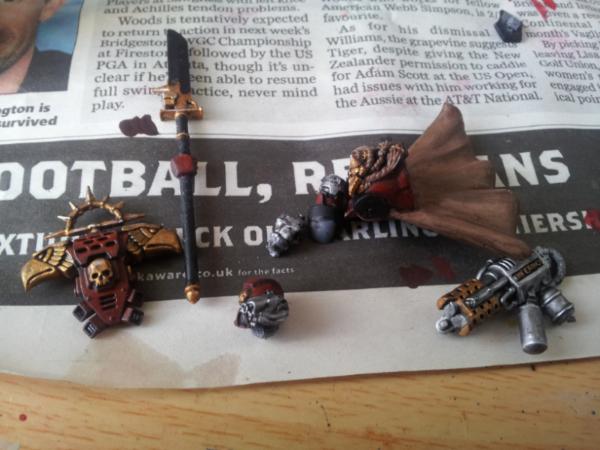
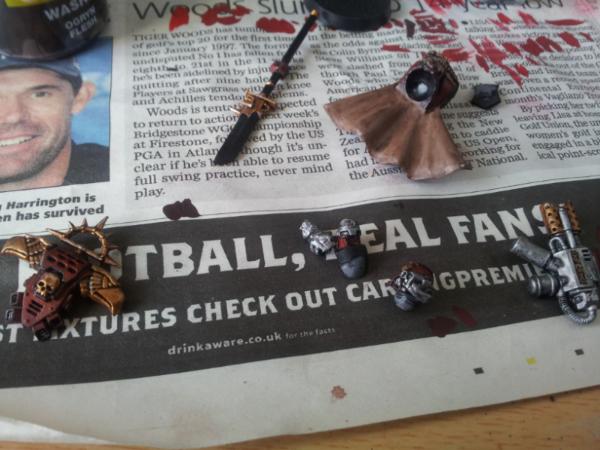
 . I basecoated the main area of the shoulders and the entire plate in Dheneb.
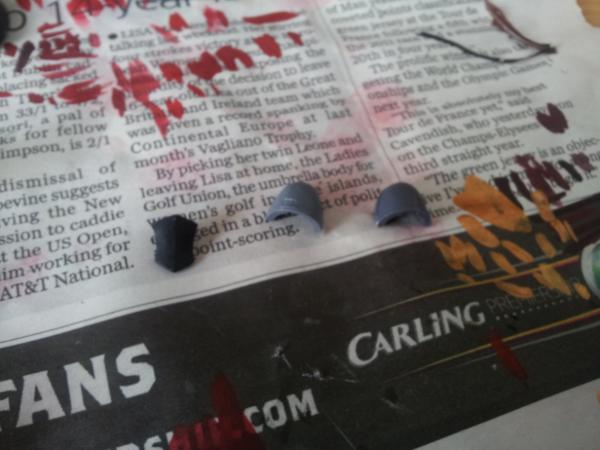
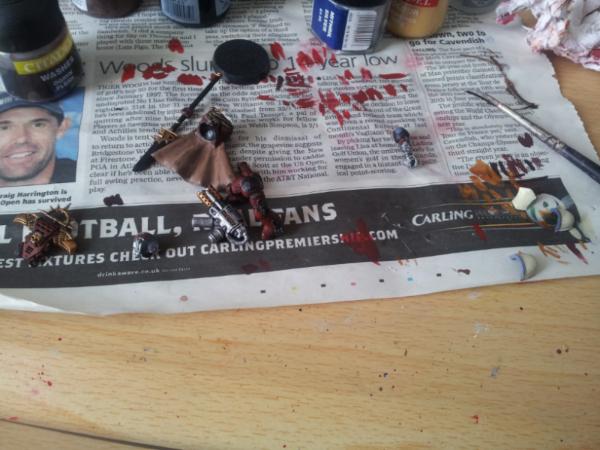
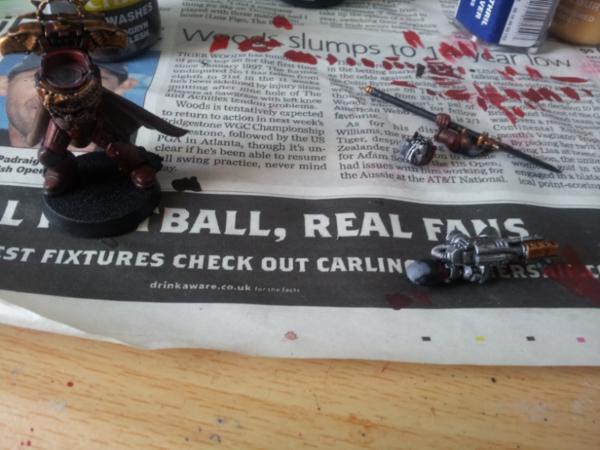
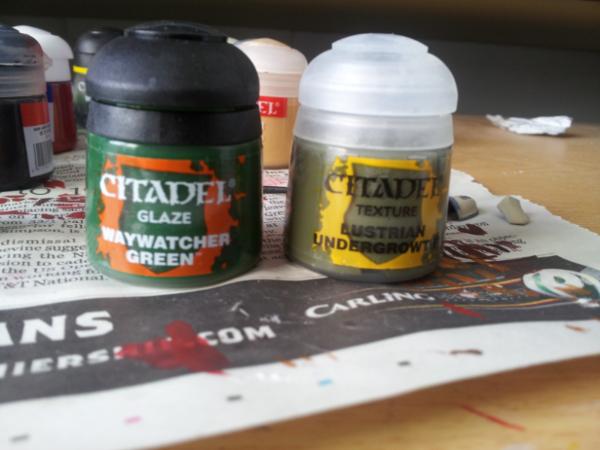
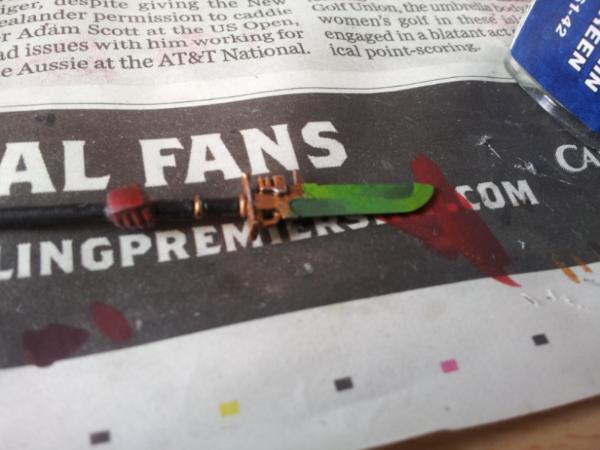
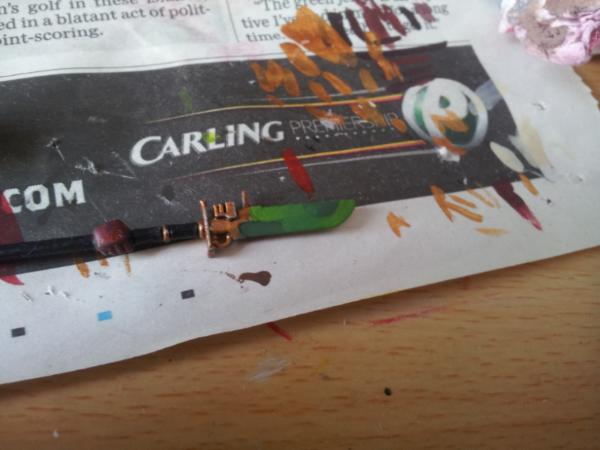
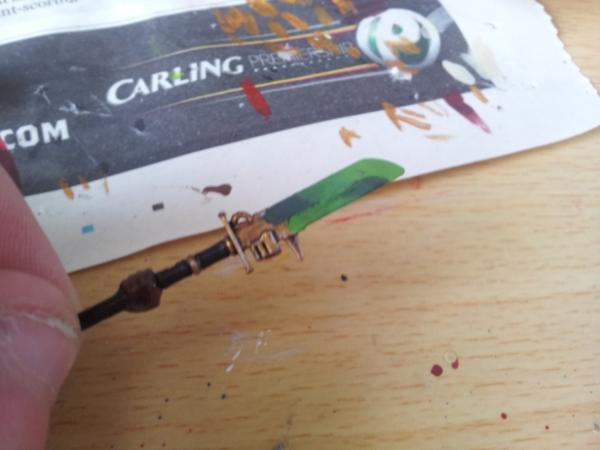
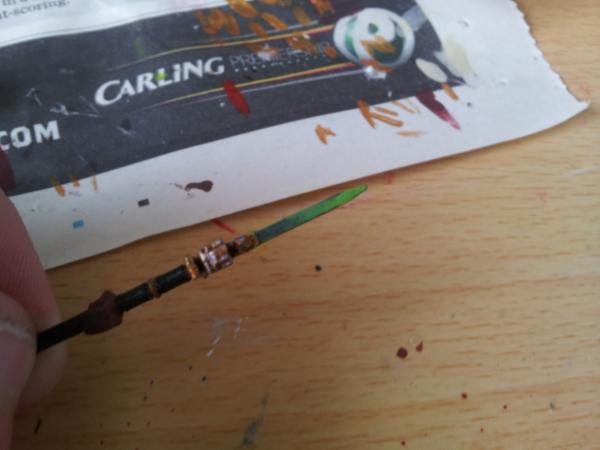
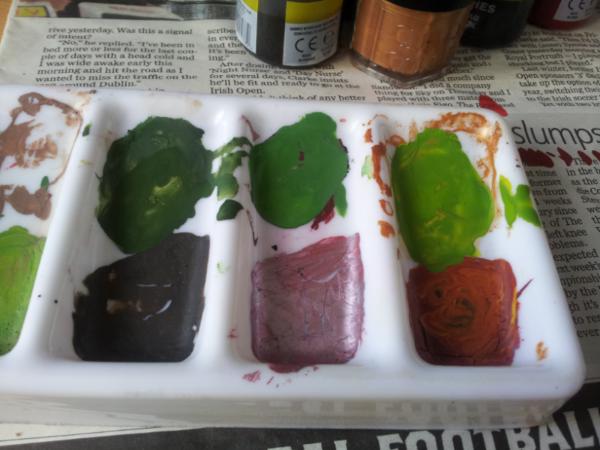
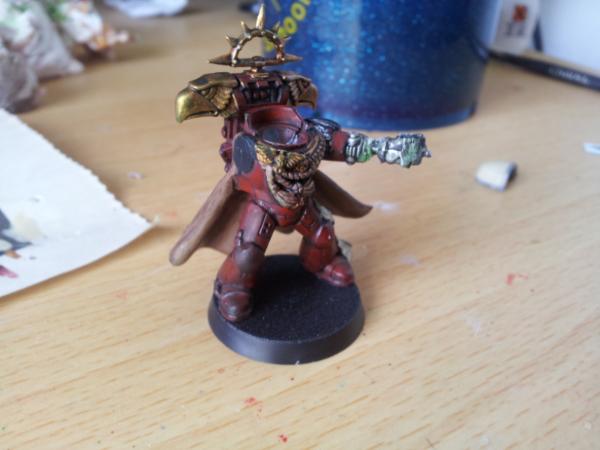
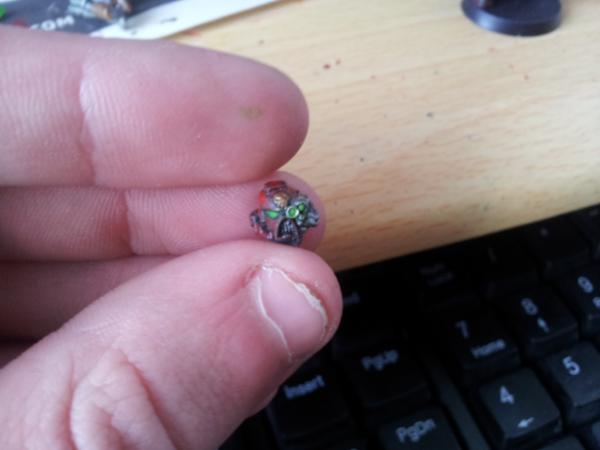
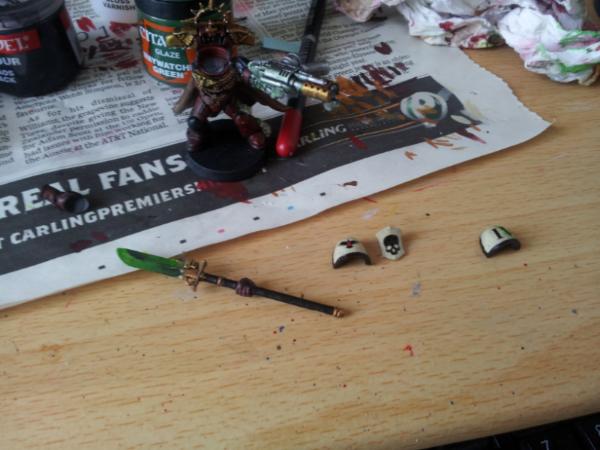

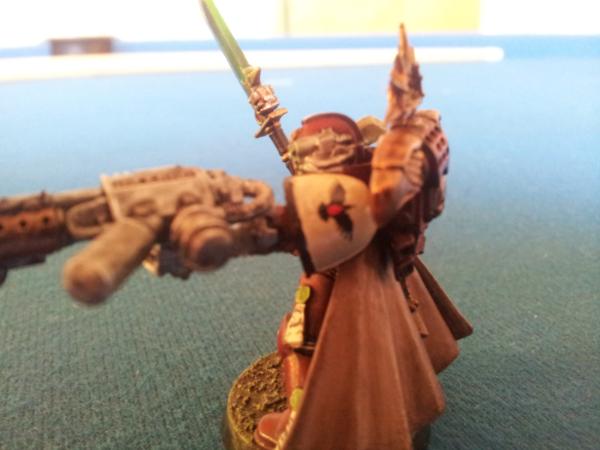
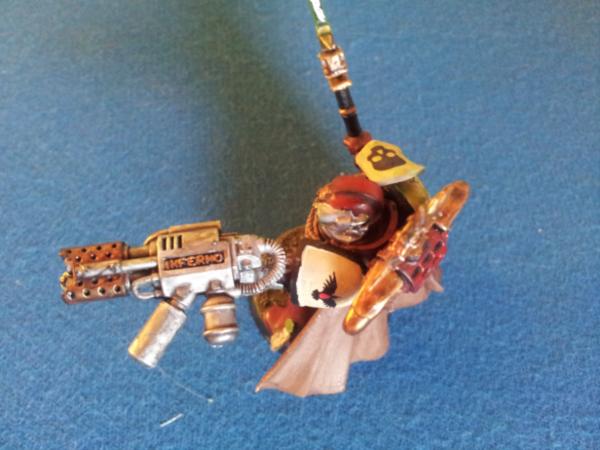
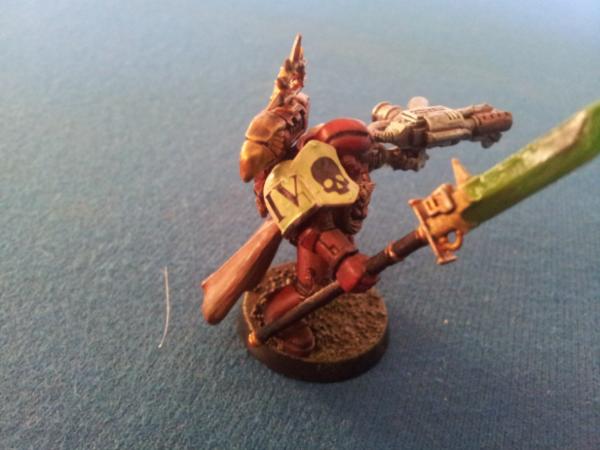
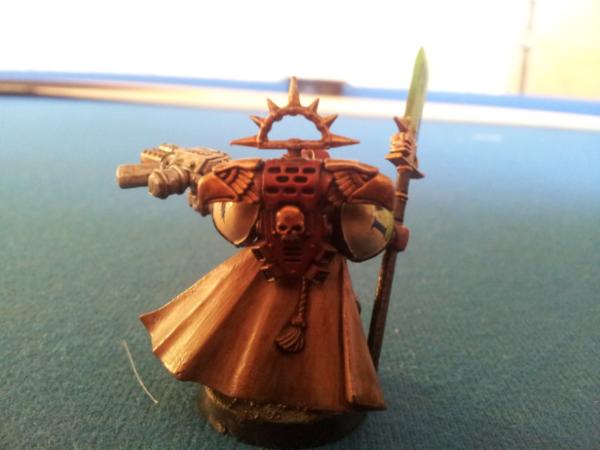
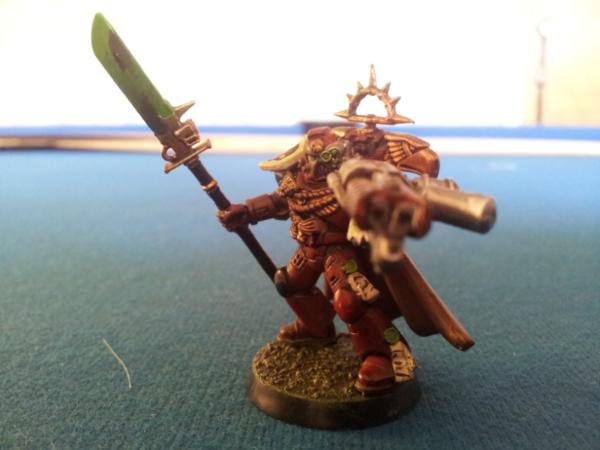
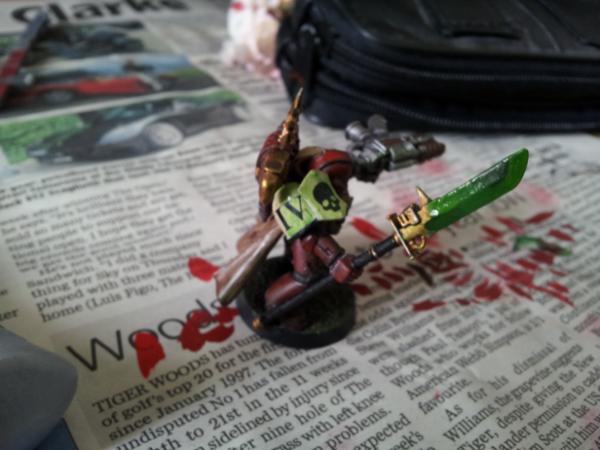
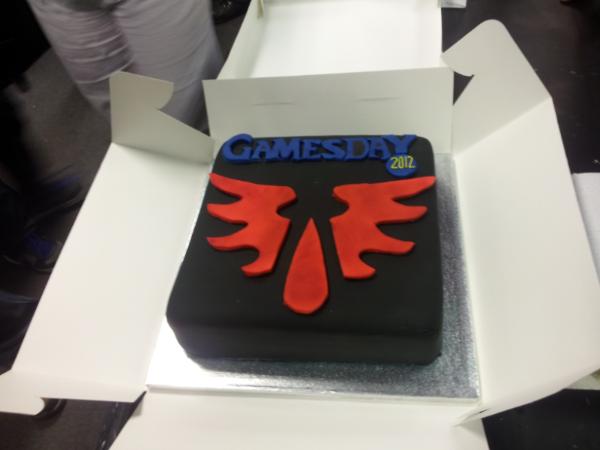
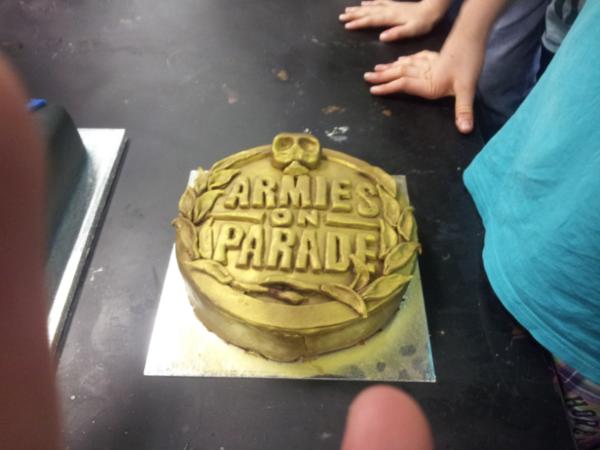
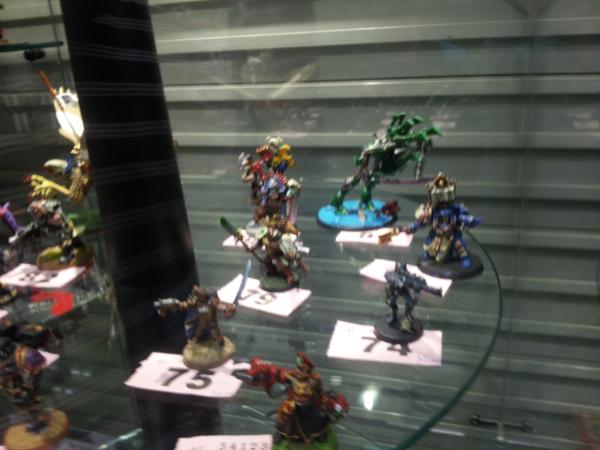
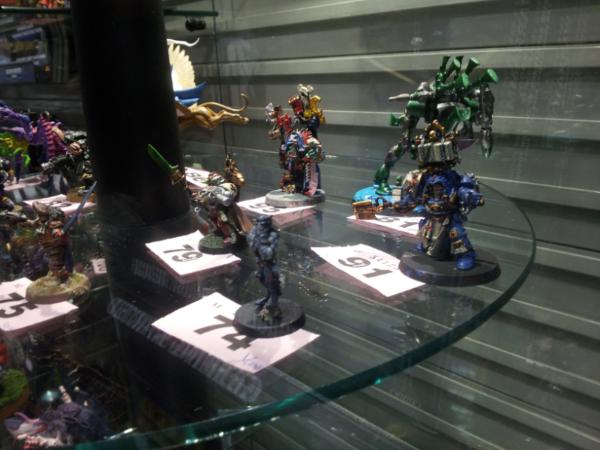
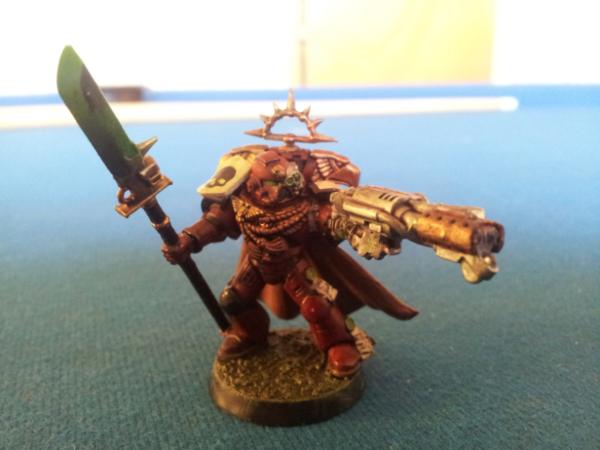

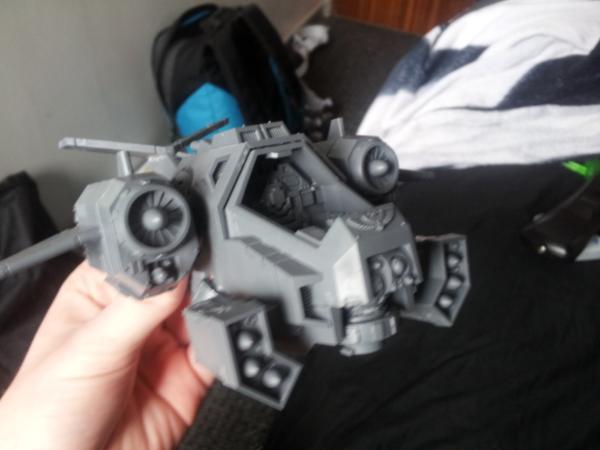
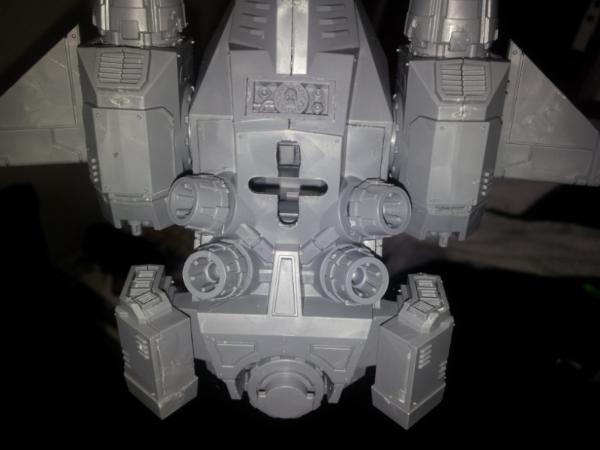
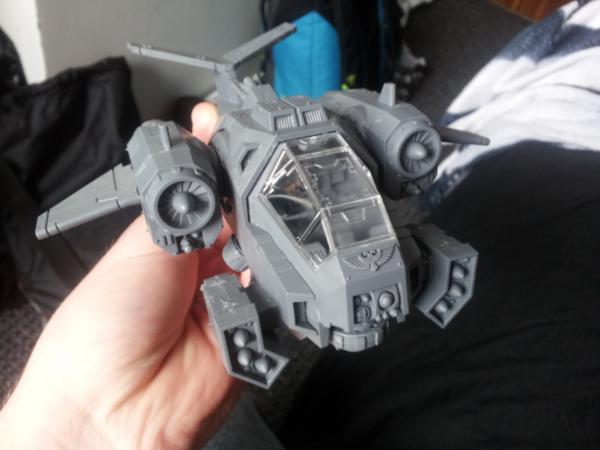
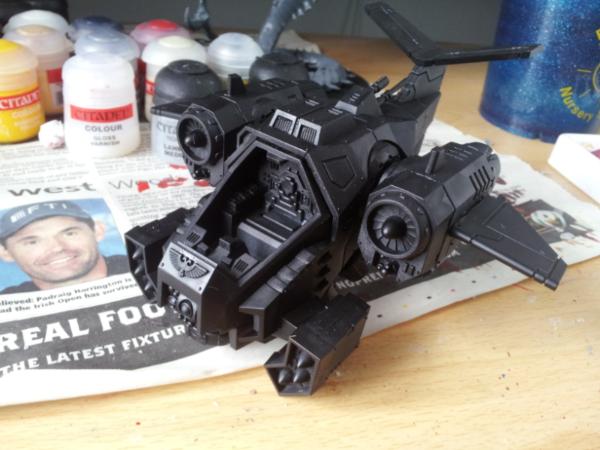

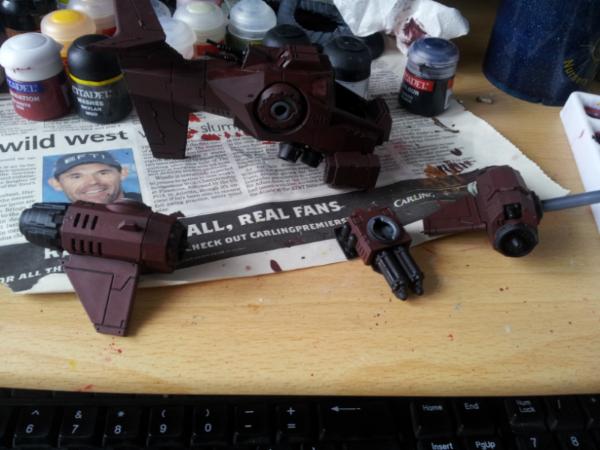
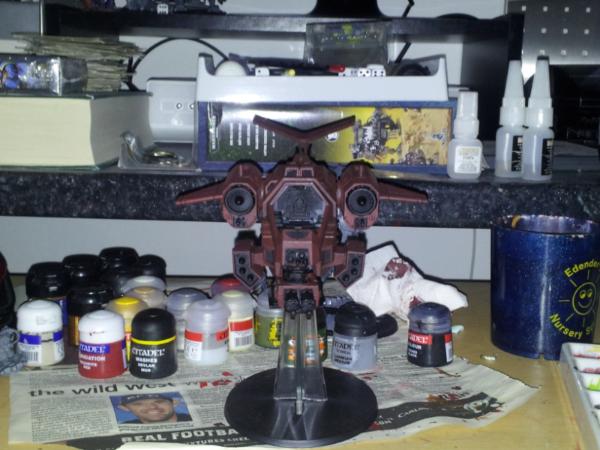
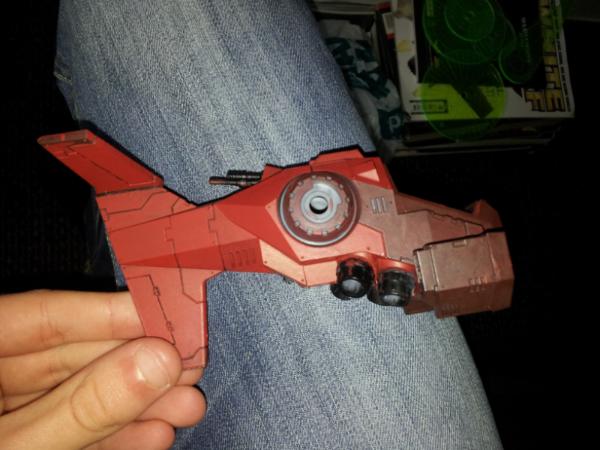
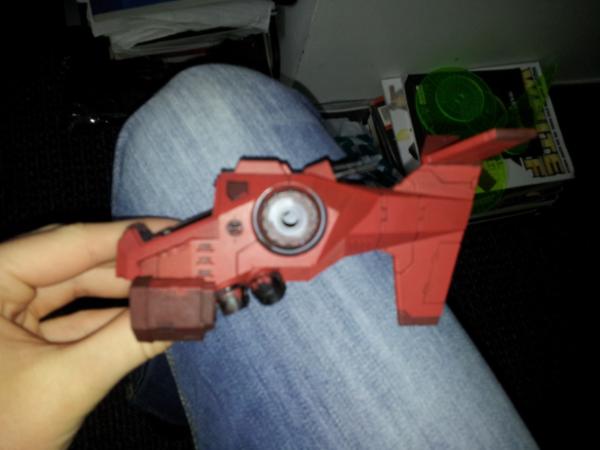
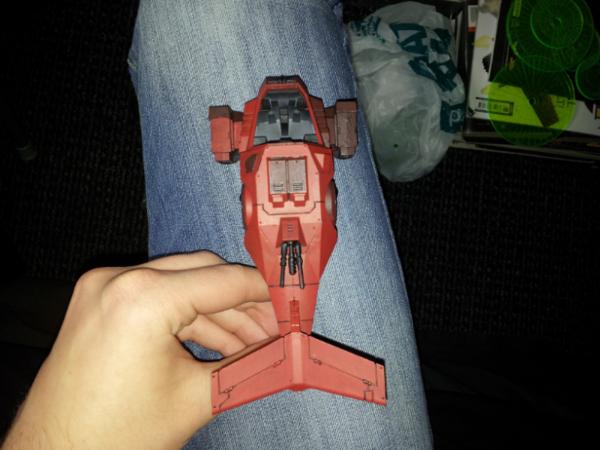
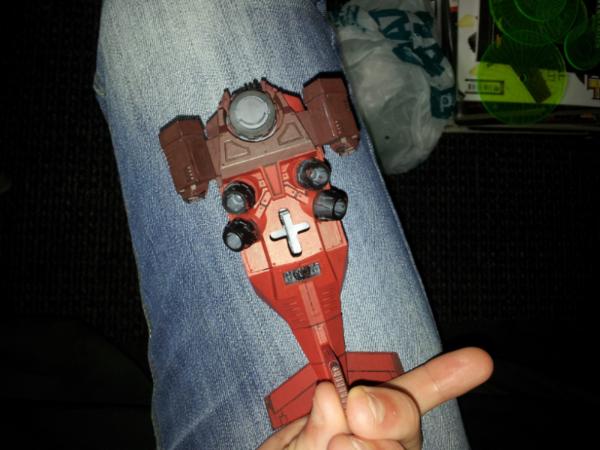
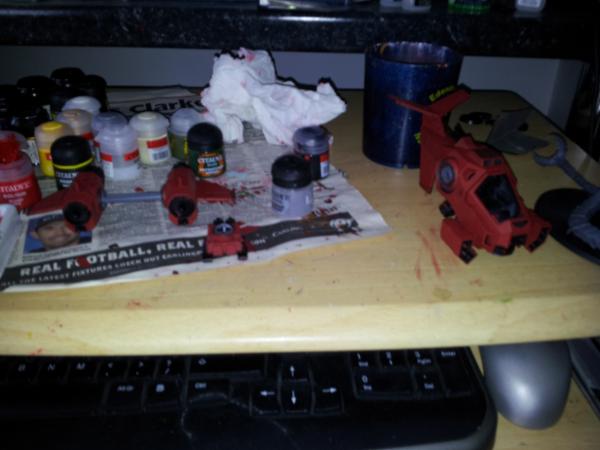
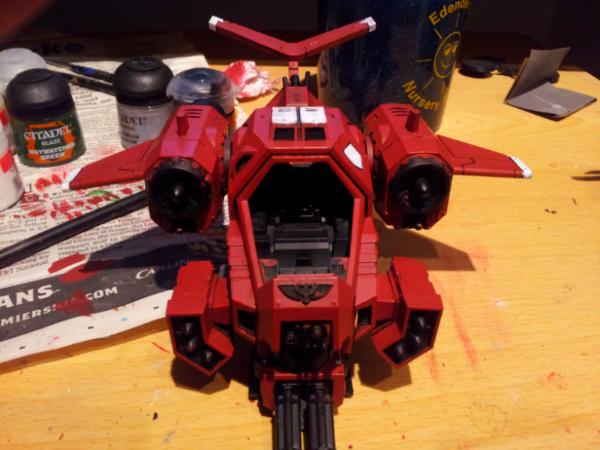
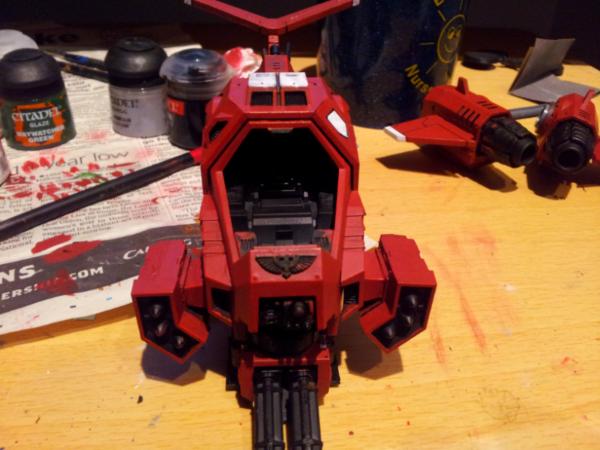

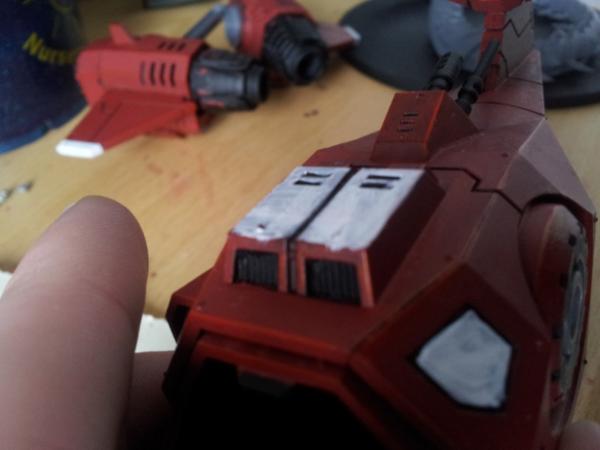
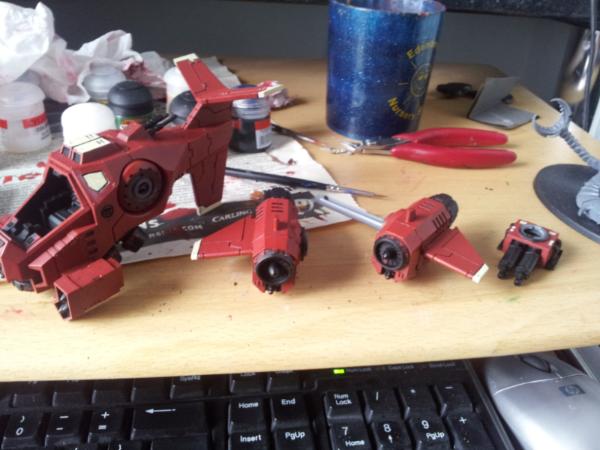
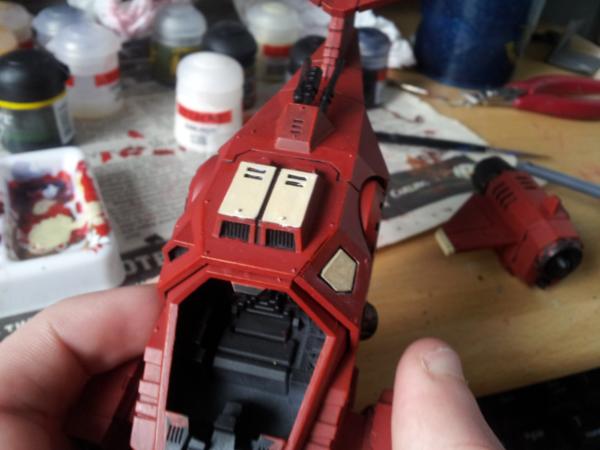
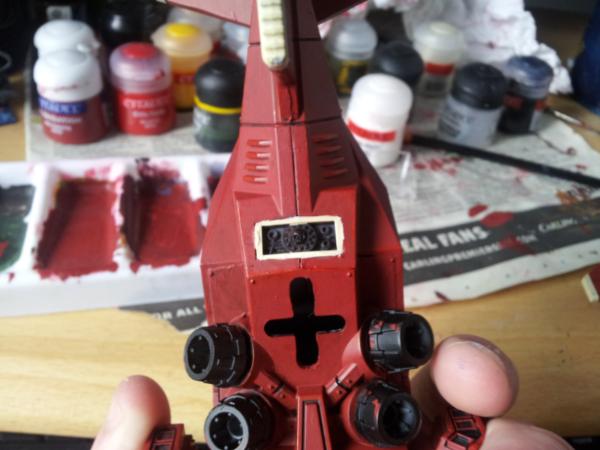
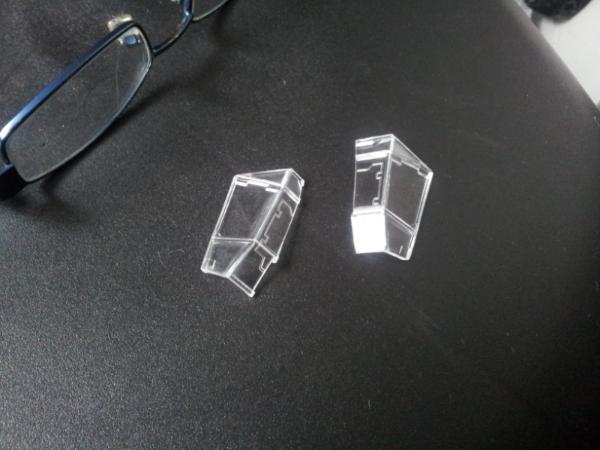
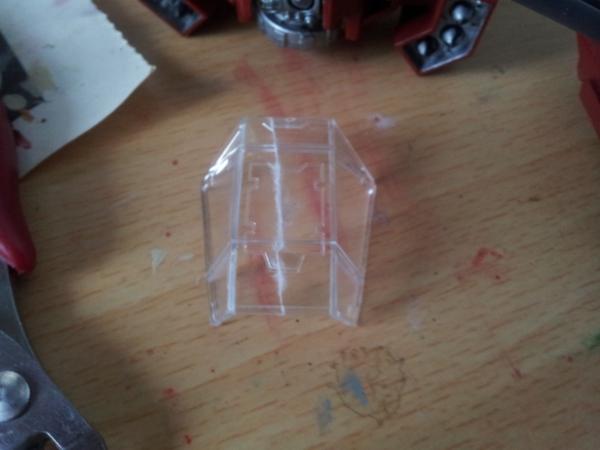
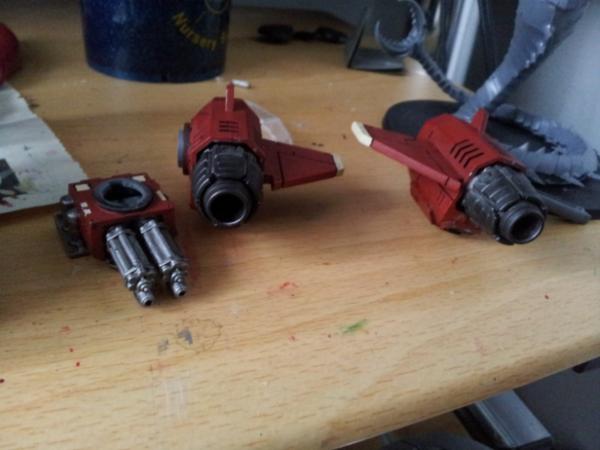
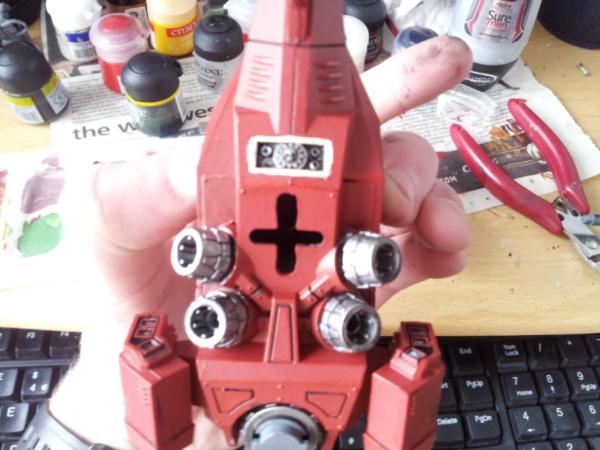
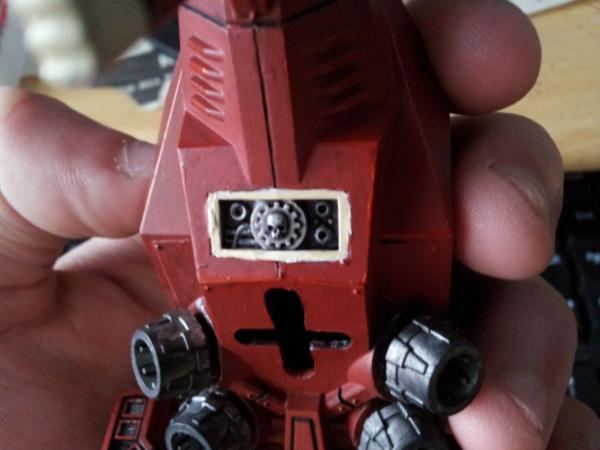
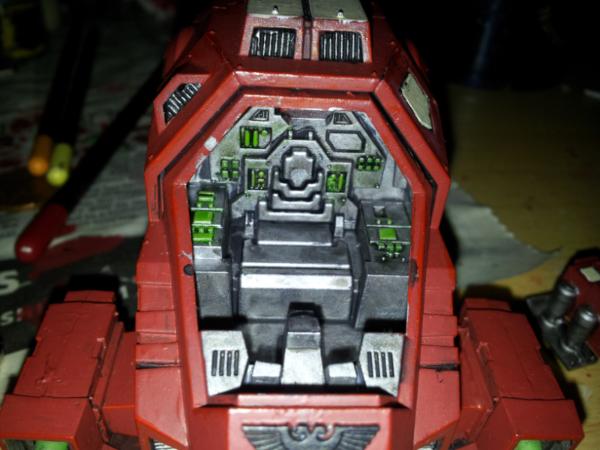
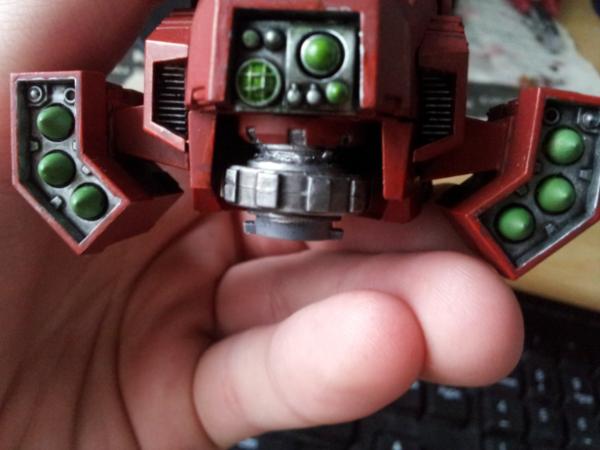
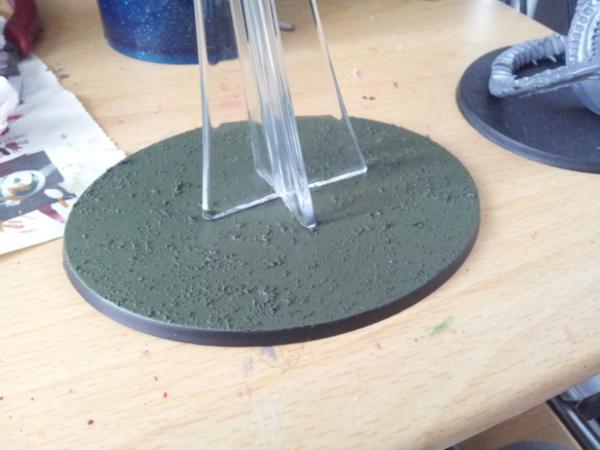
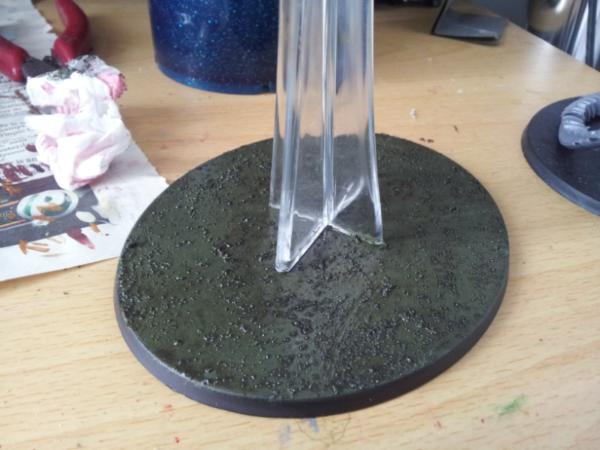
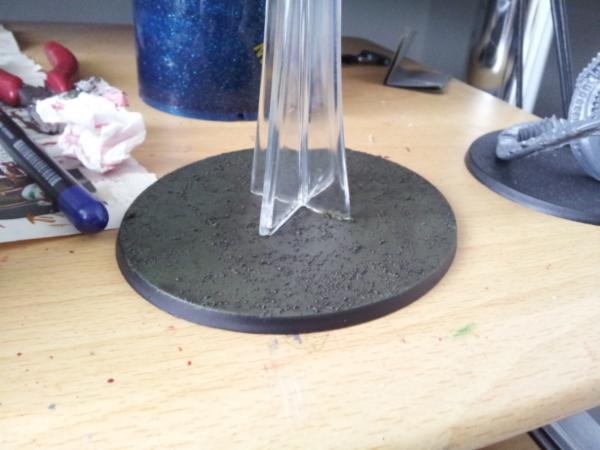
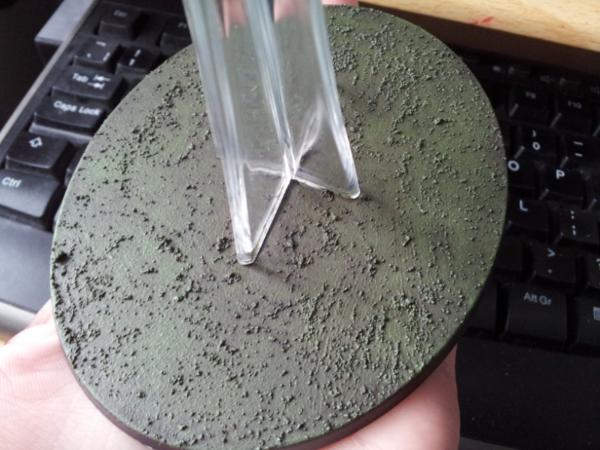
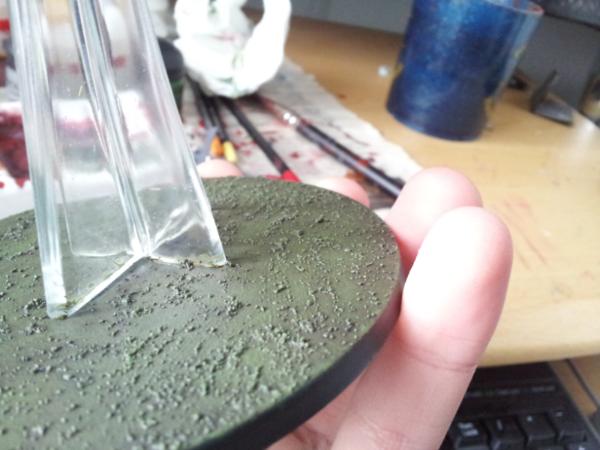
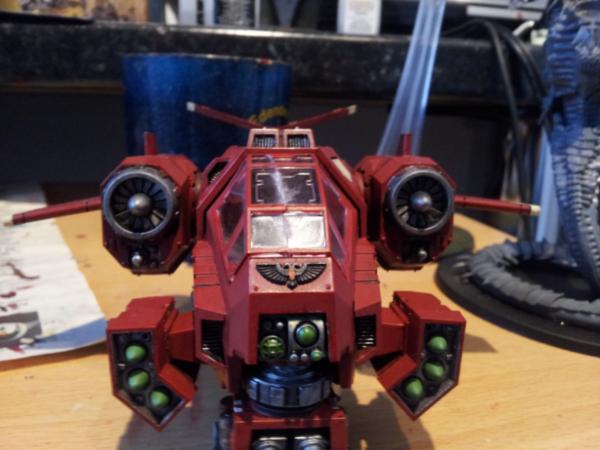


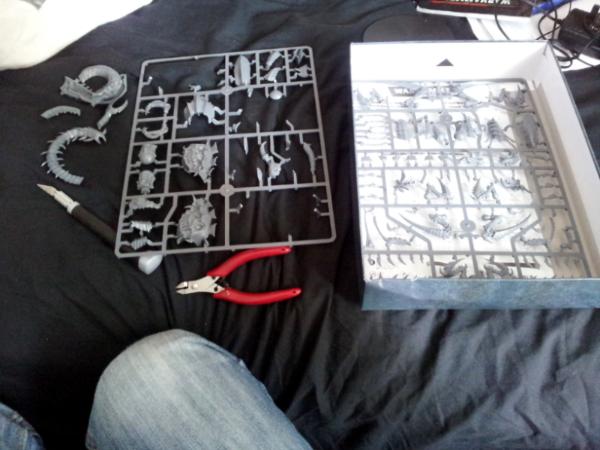
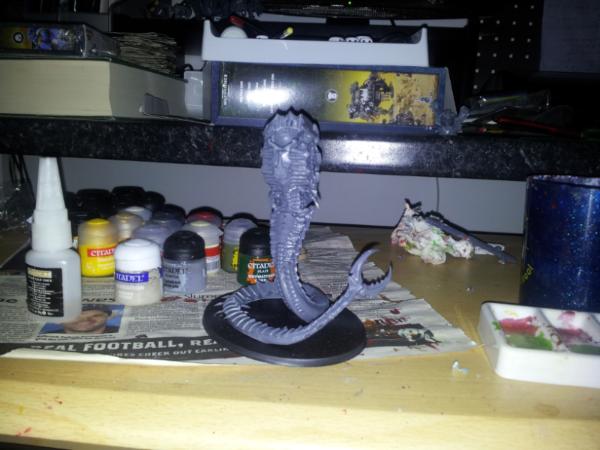
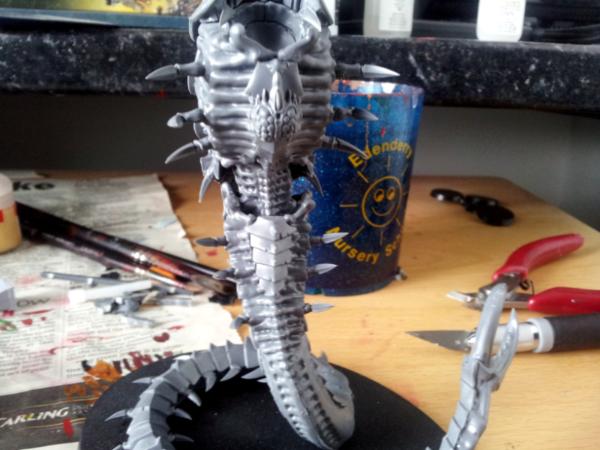
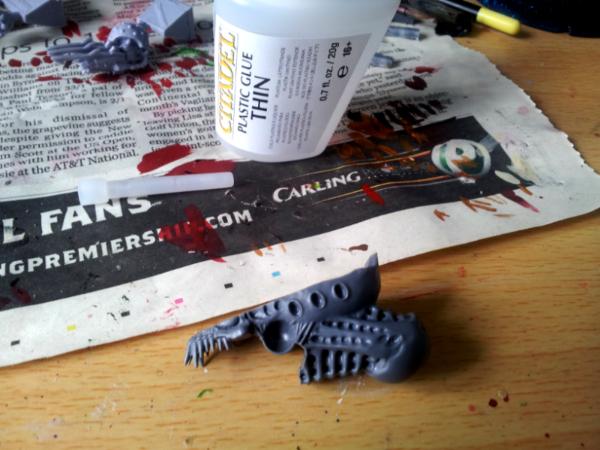
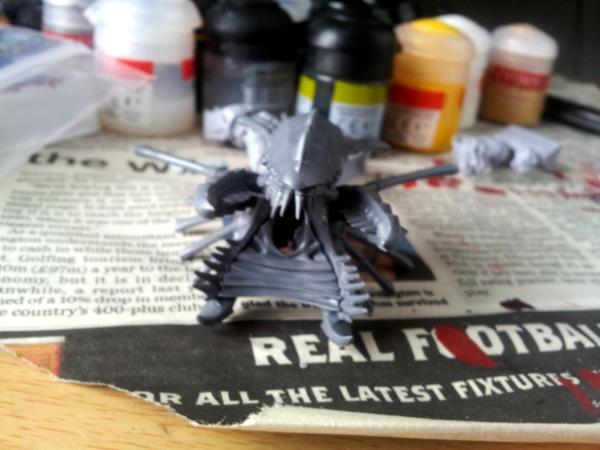
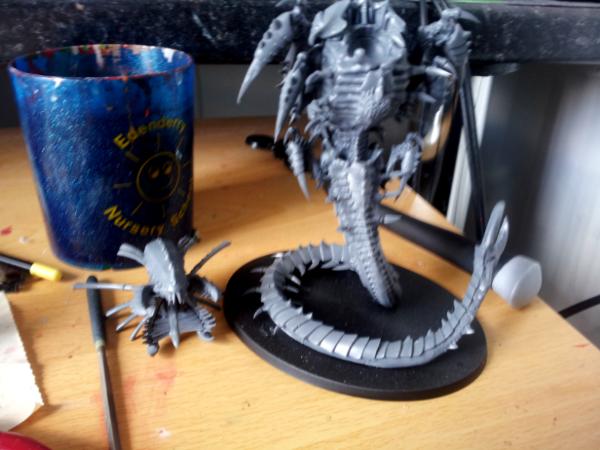
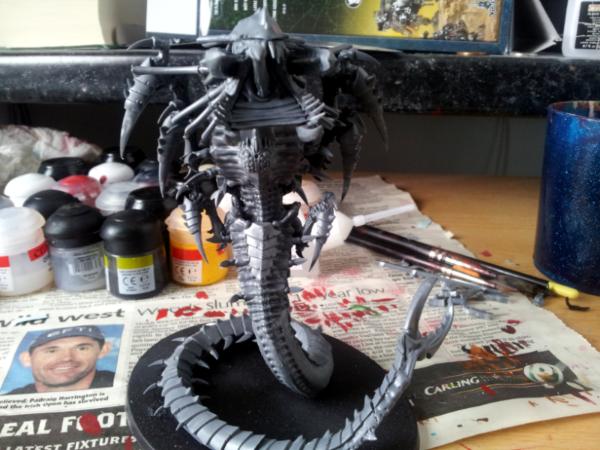
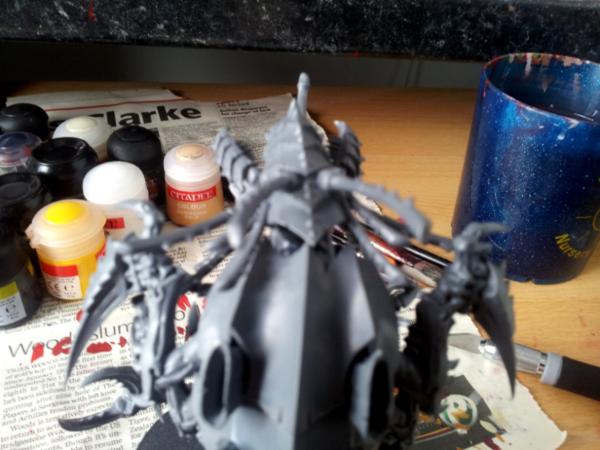
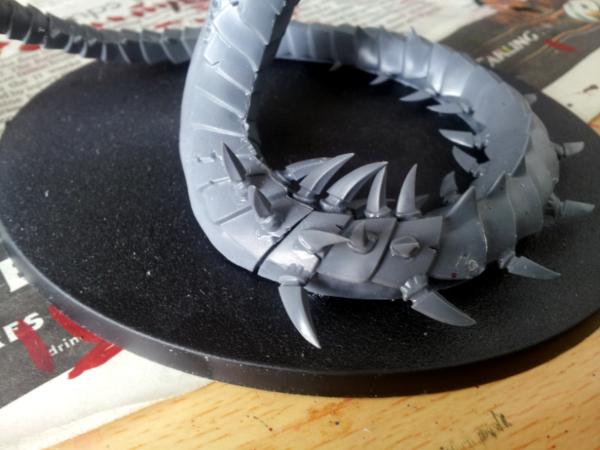
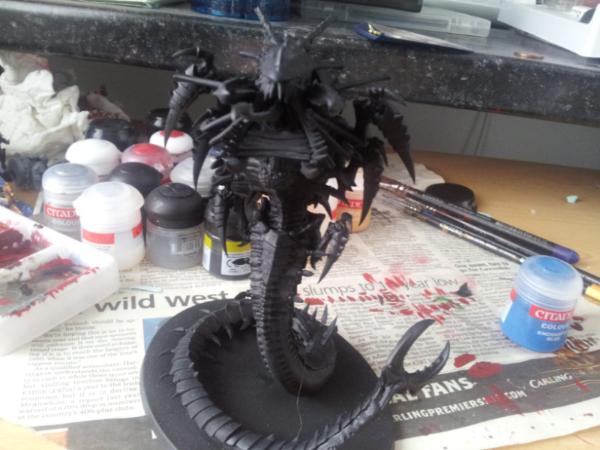
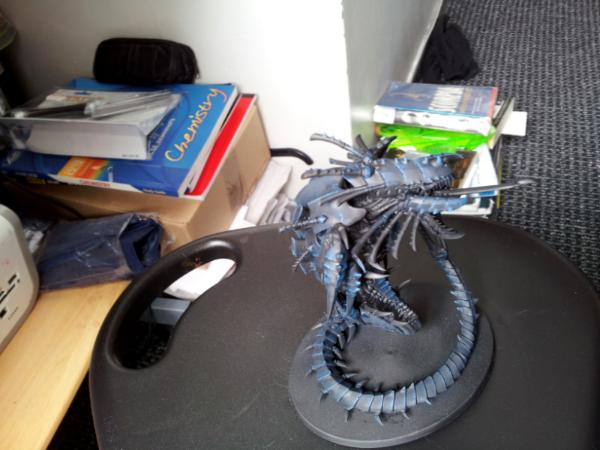
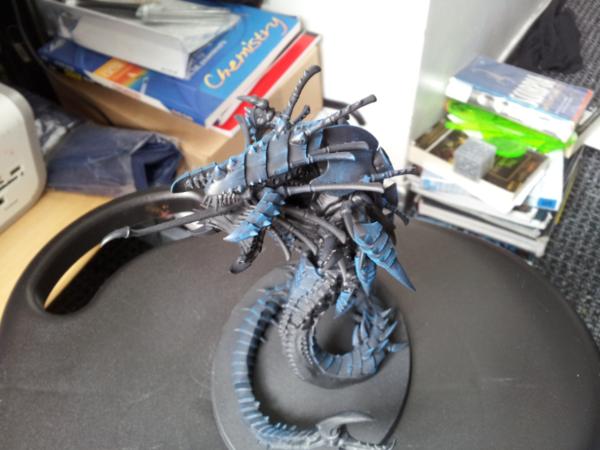
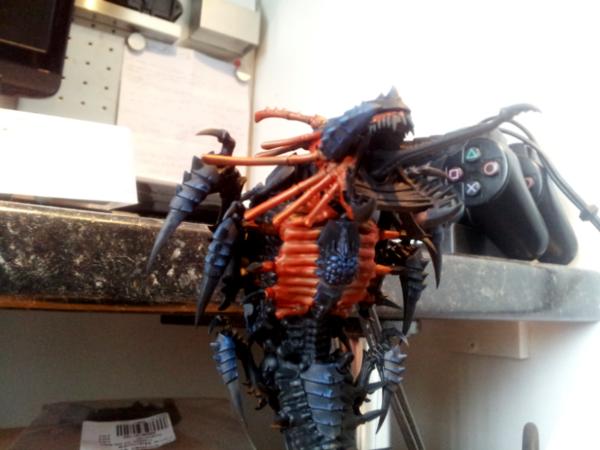


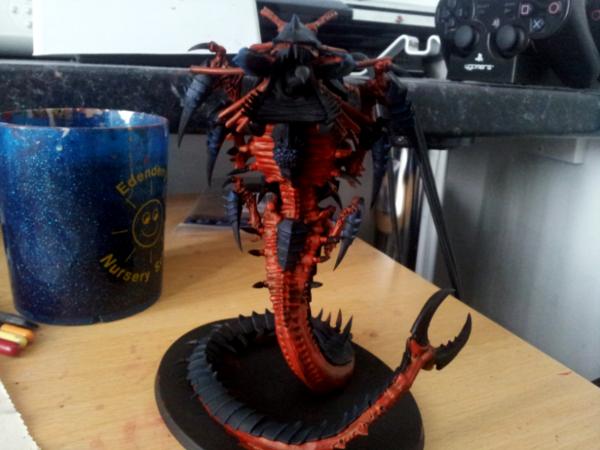
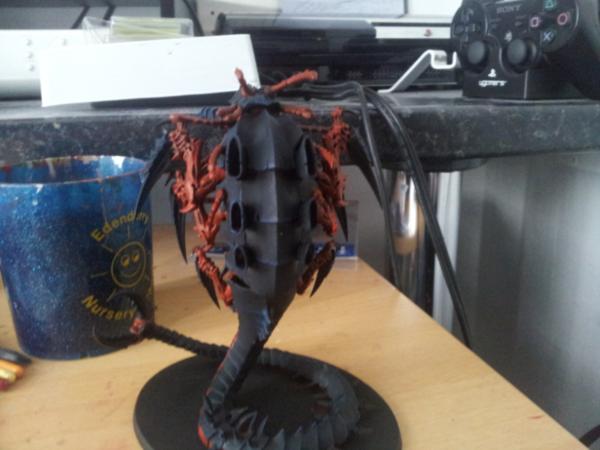

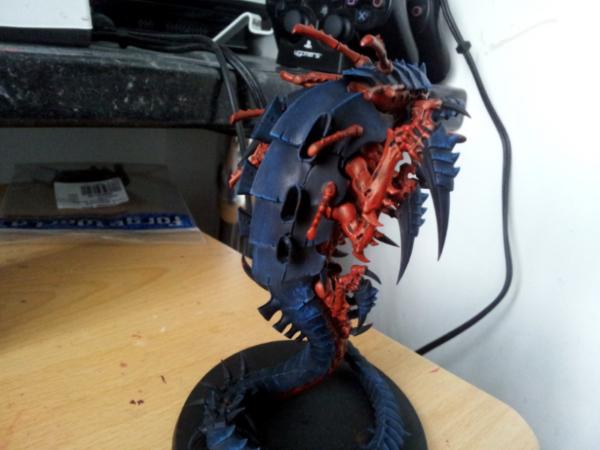
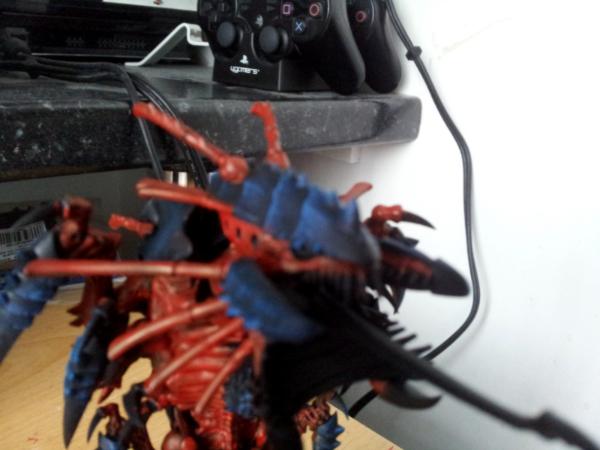
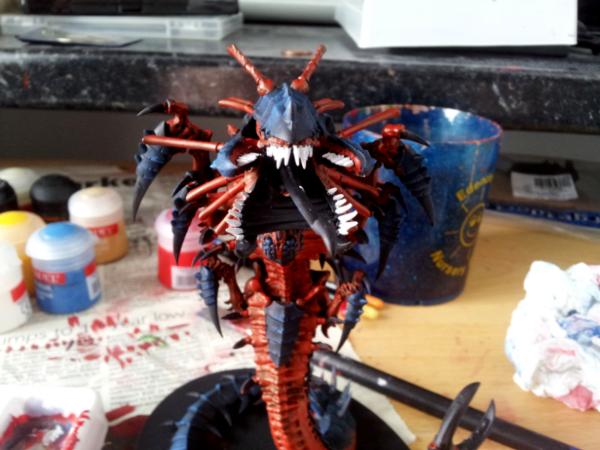
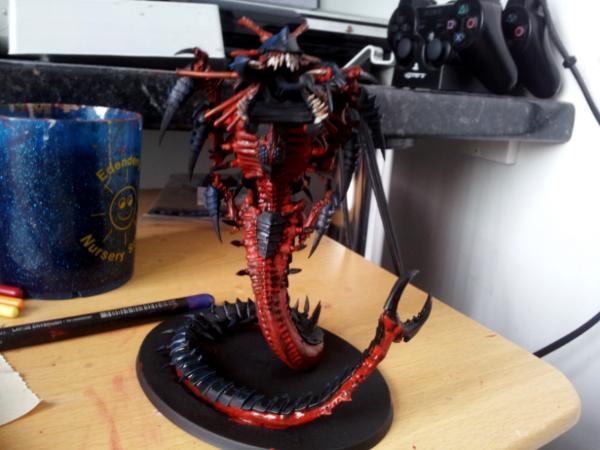
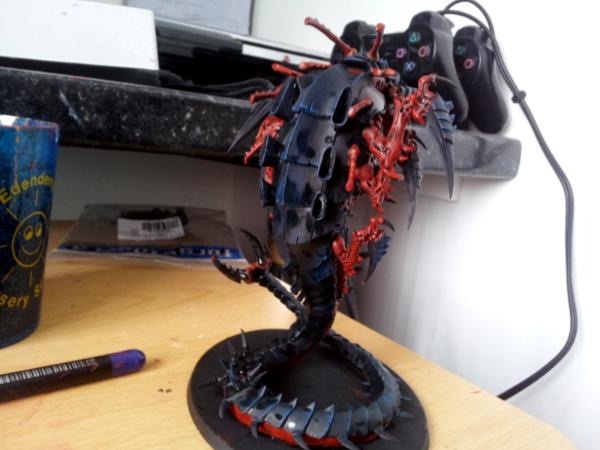


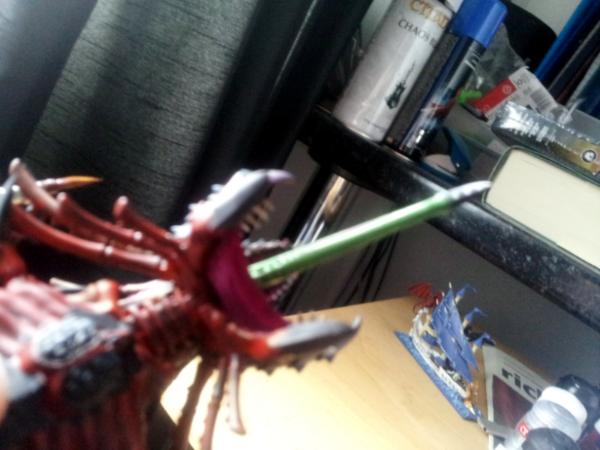
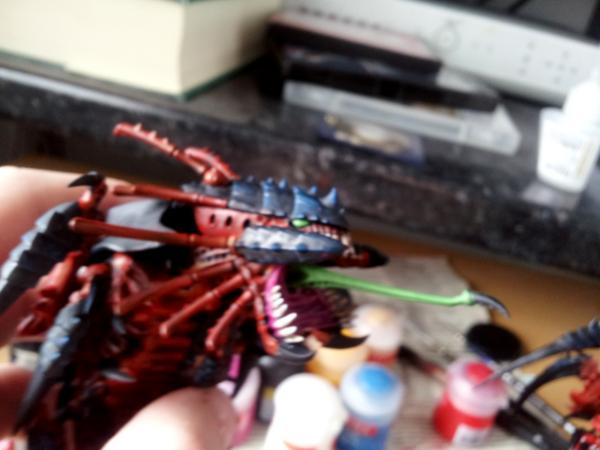
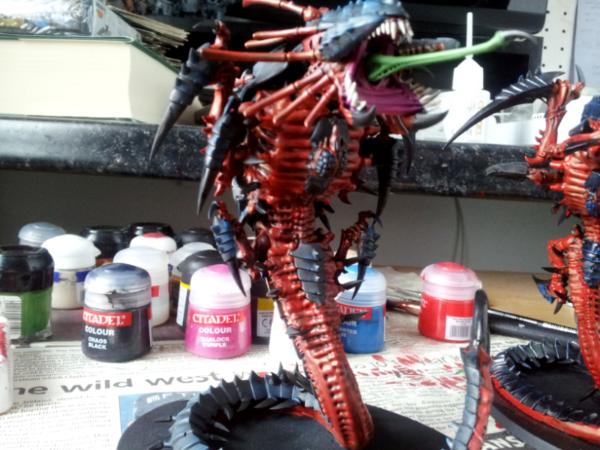
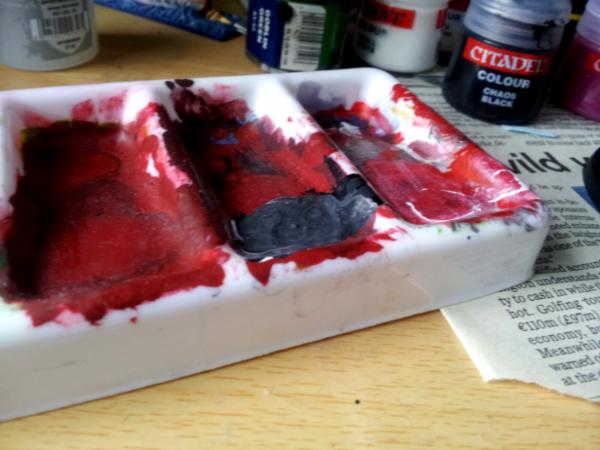


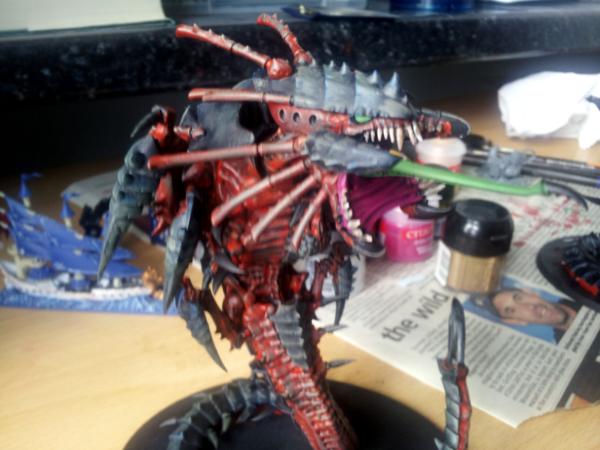
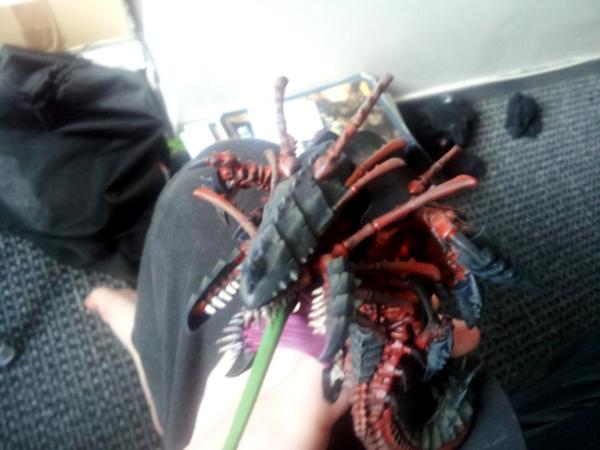
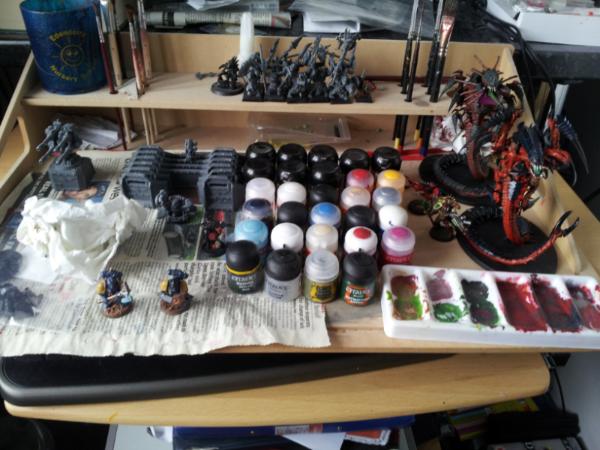
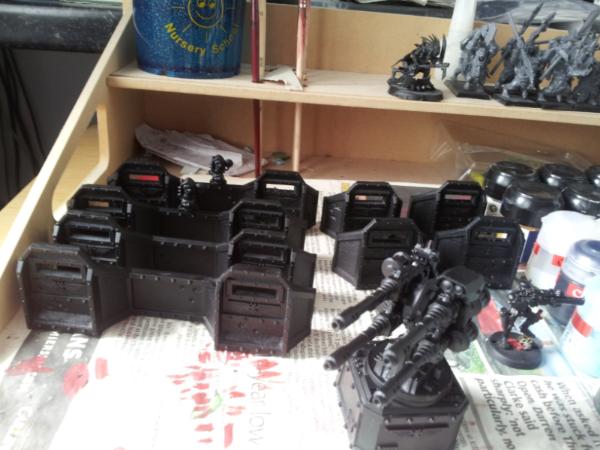

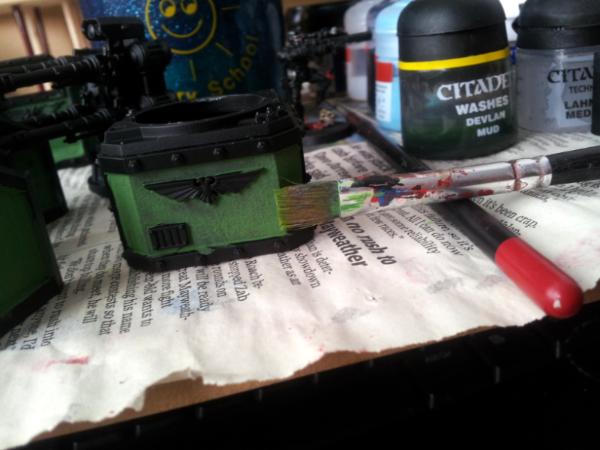
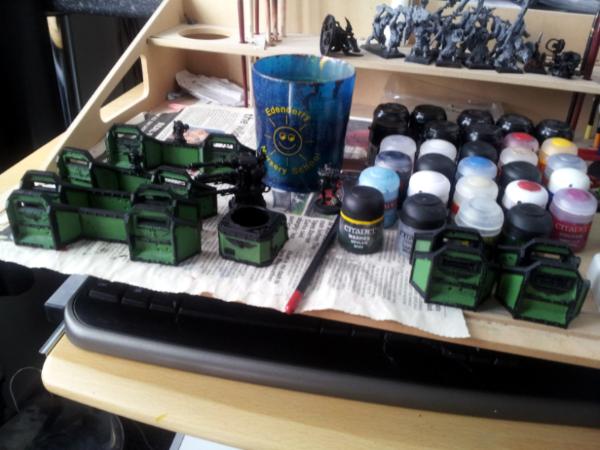

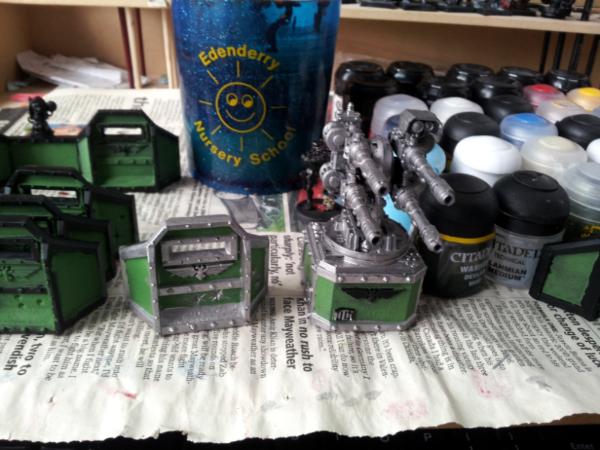
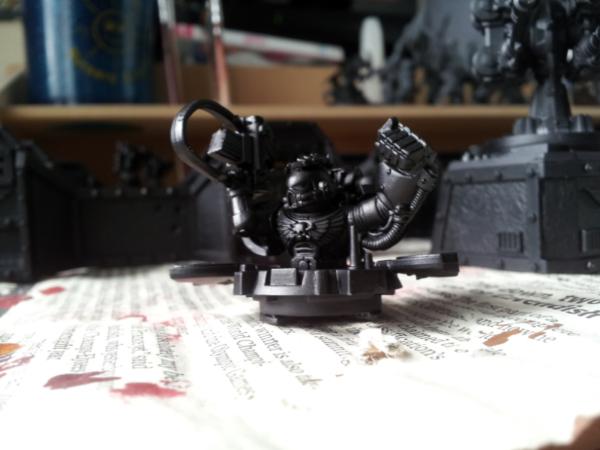
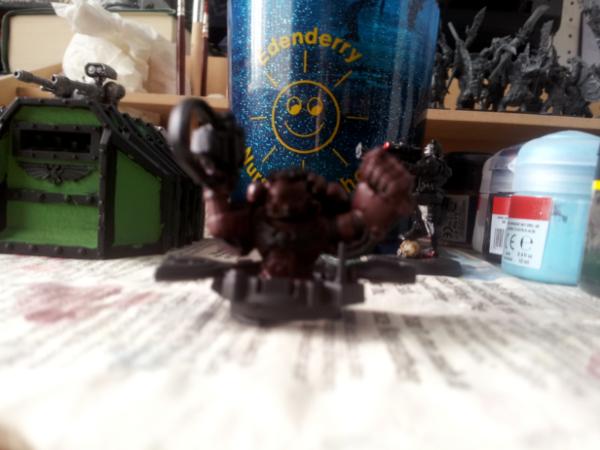
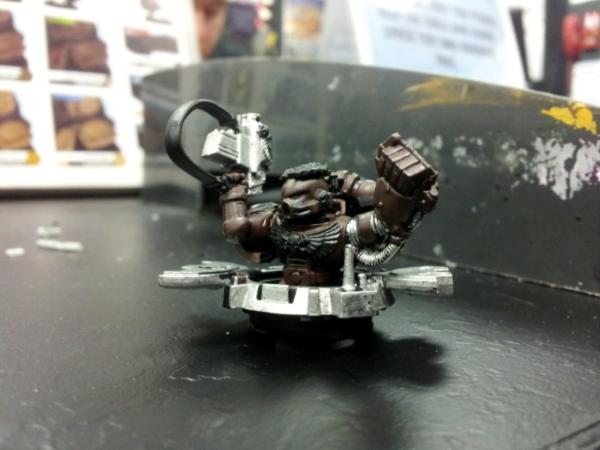
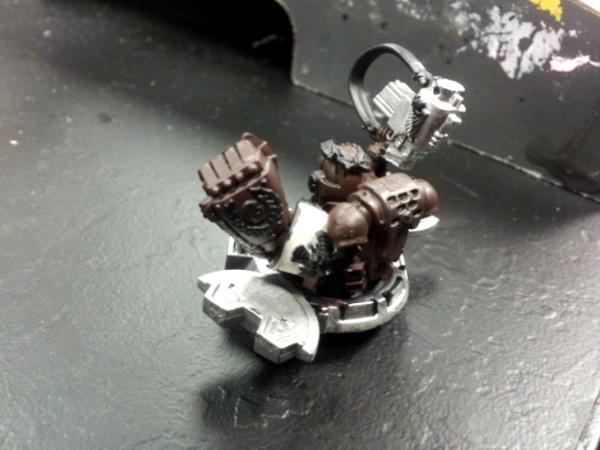
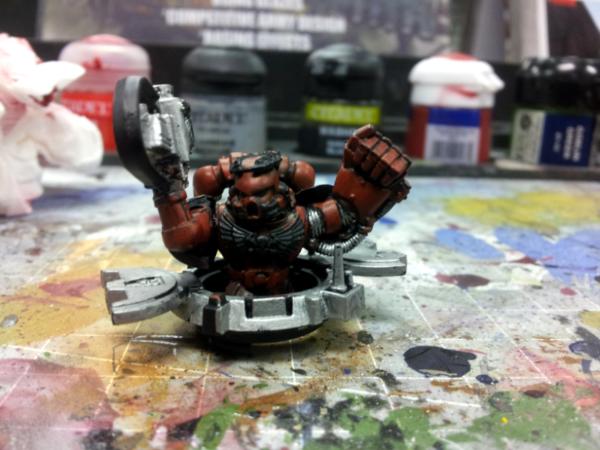
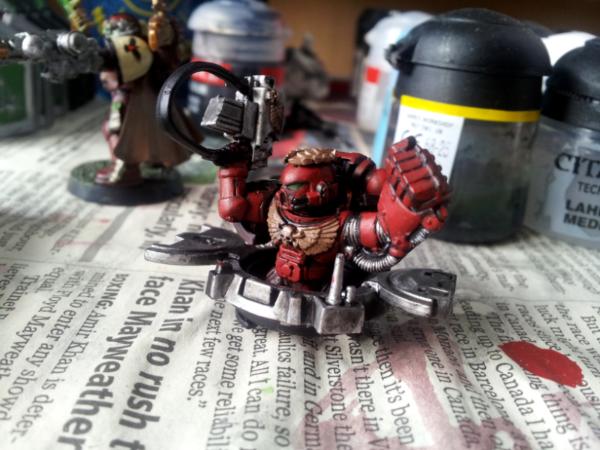
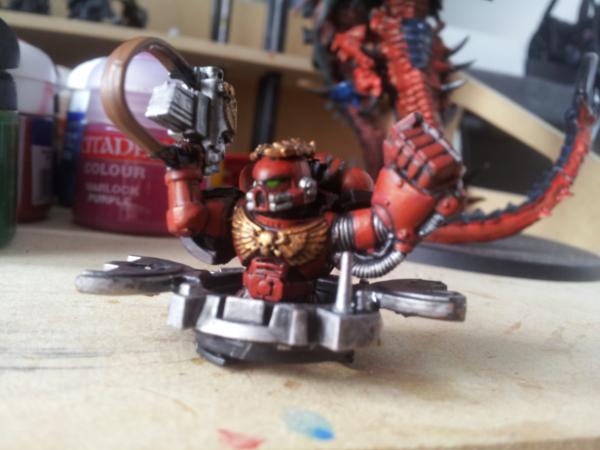
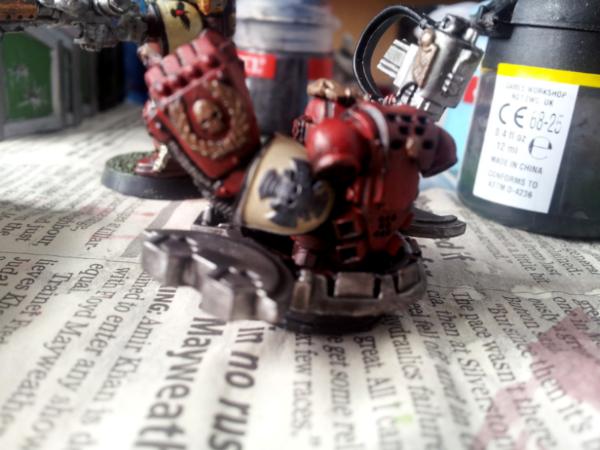
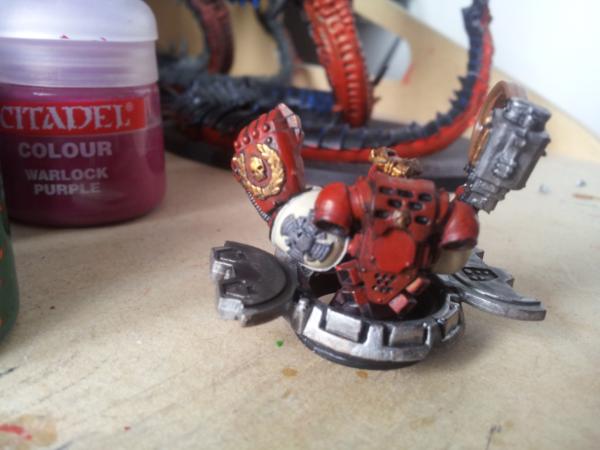
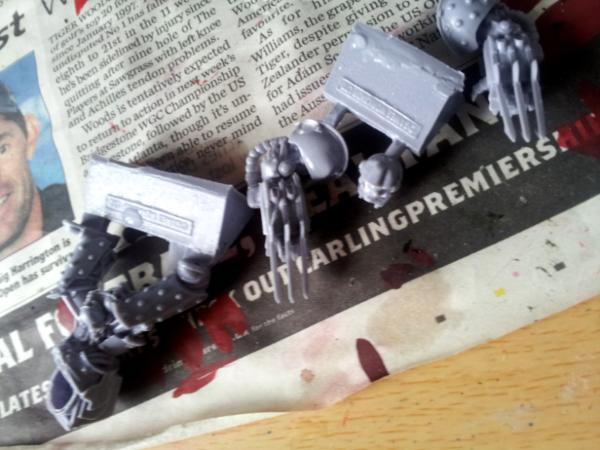
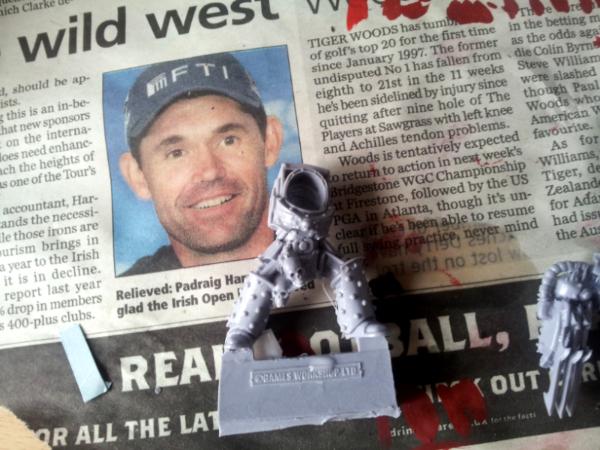
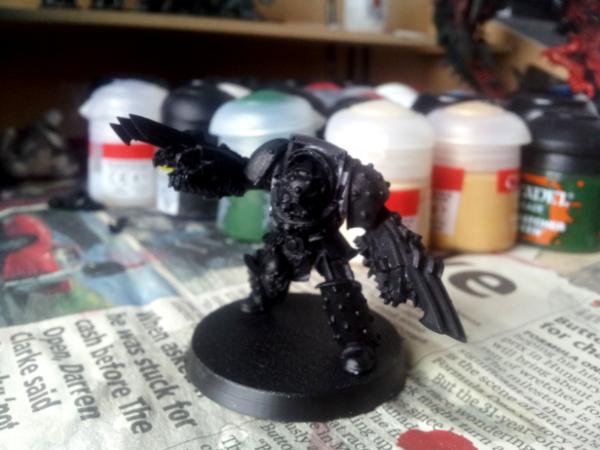
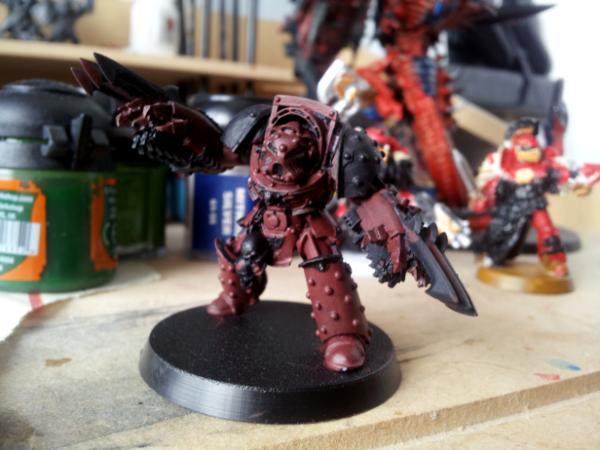
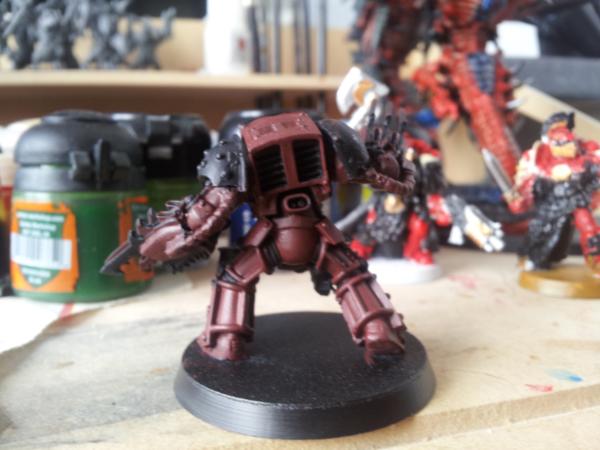
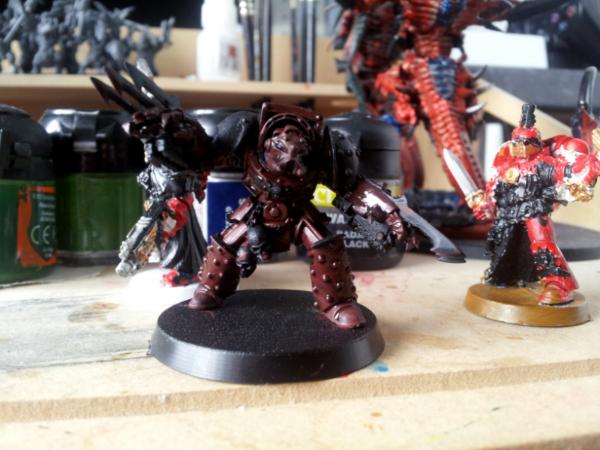
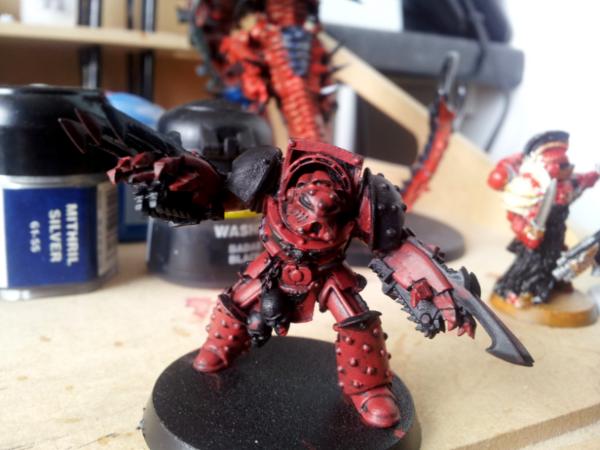
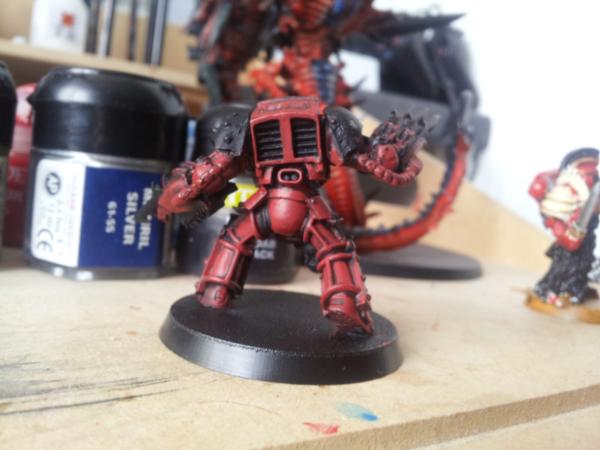

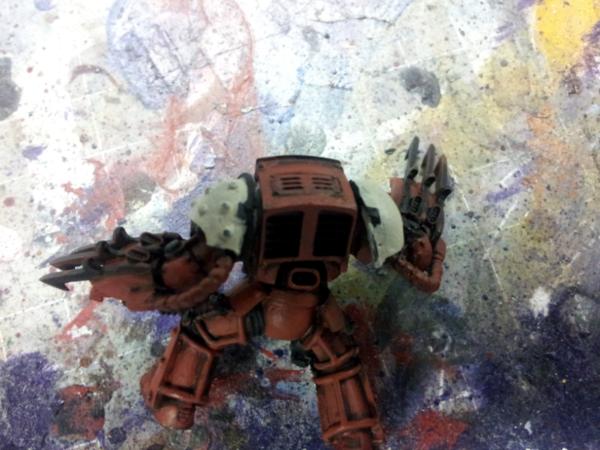
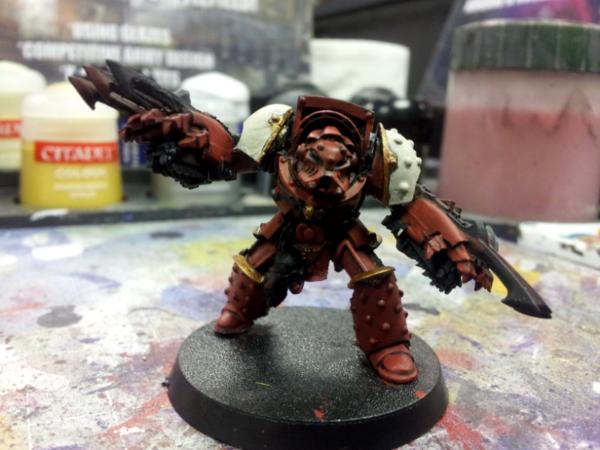
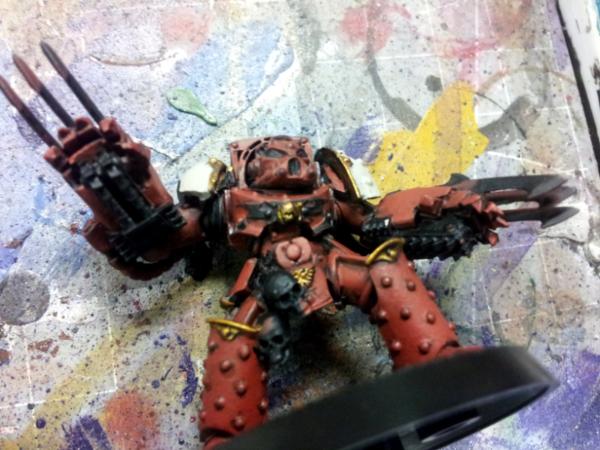
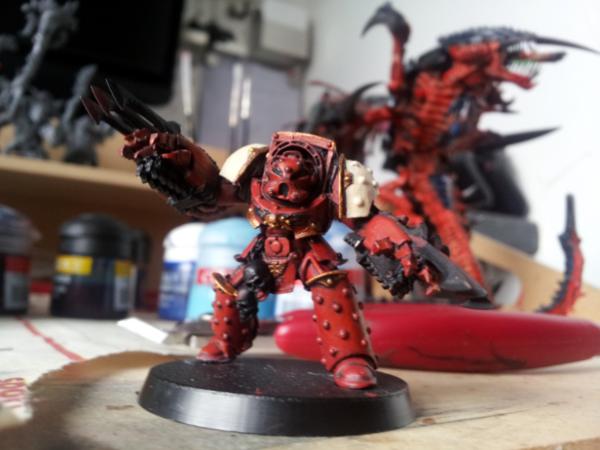
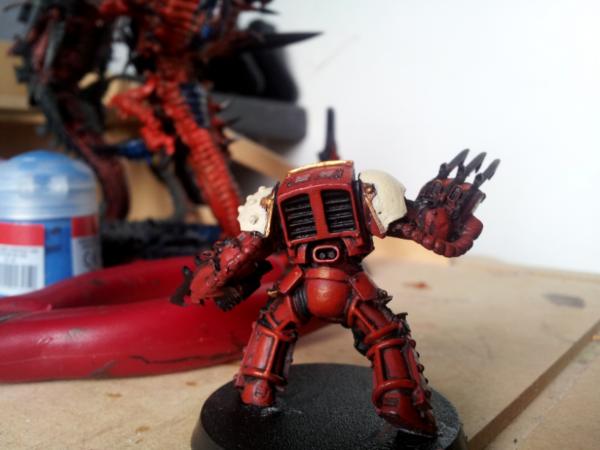

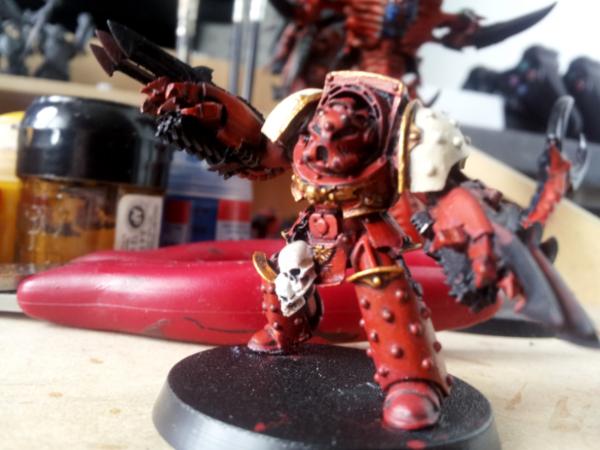
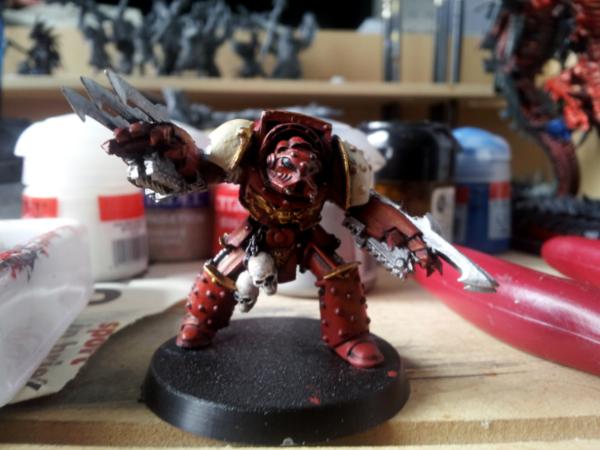
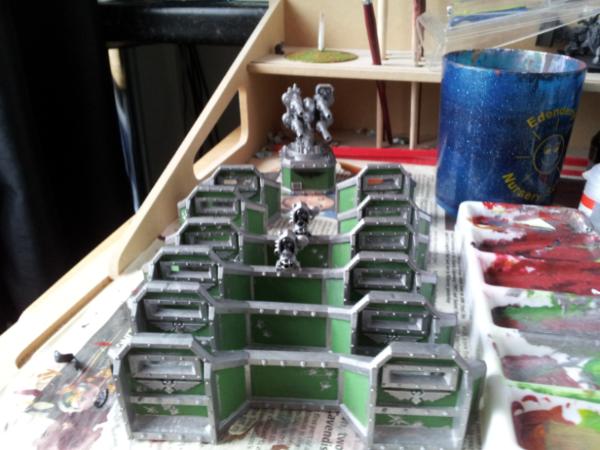
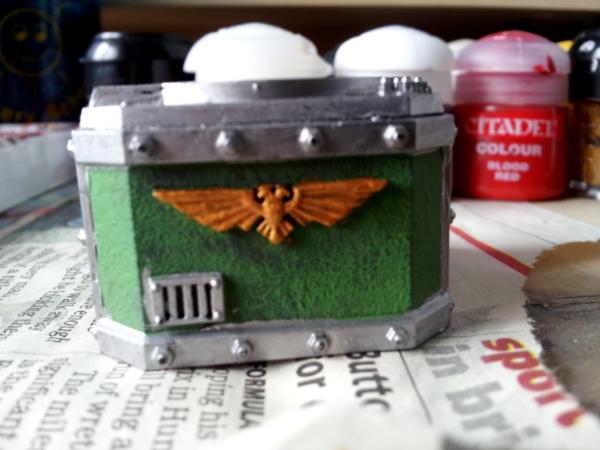
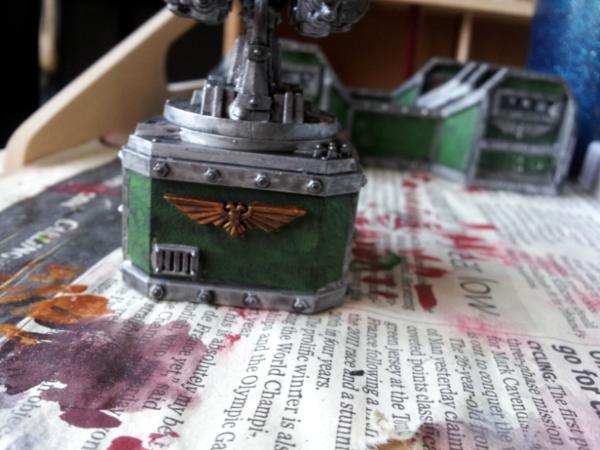
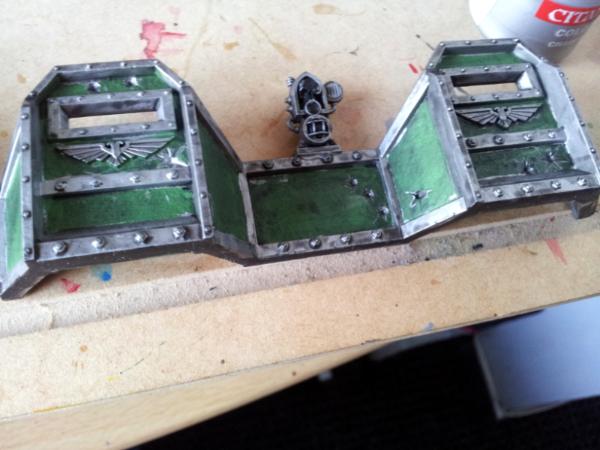


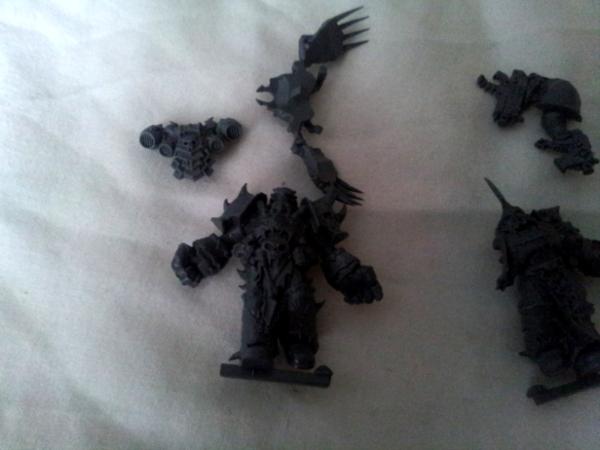
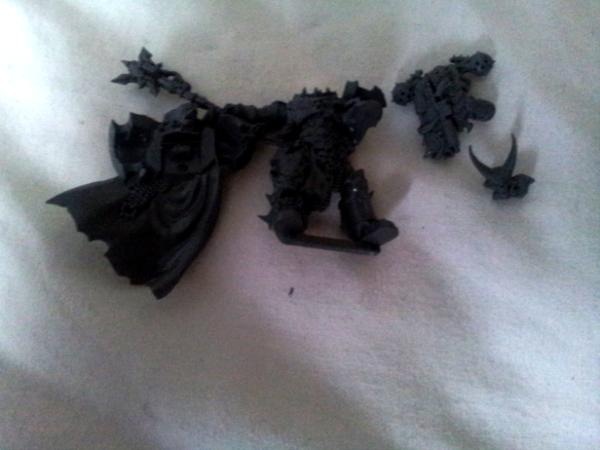
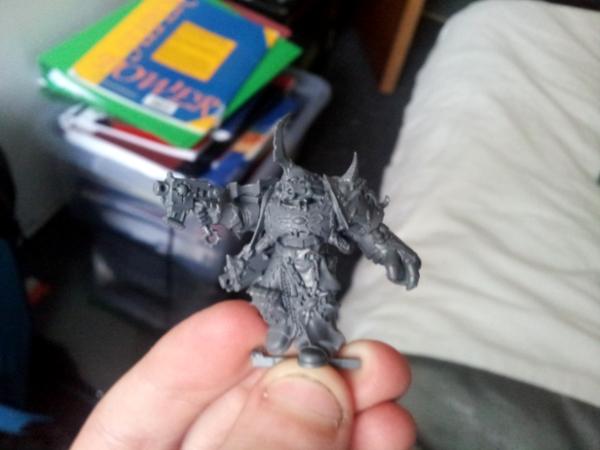

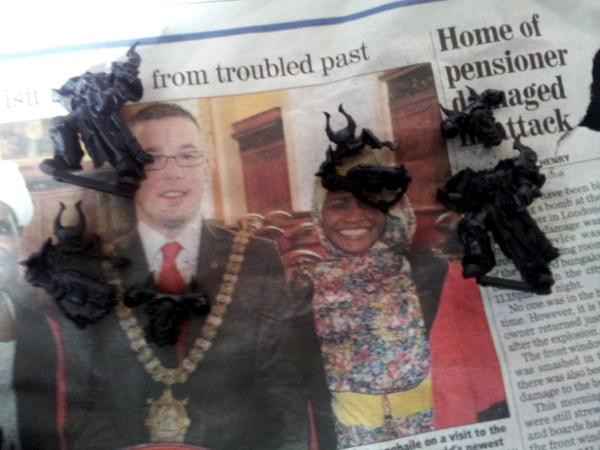
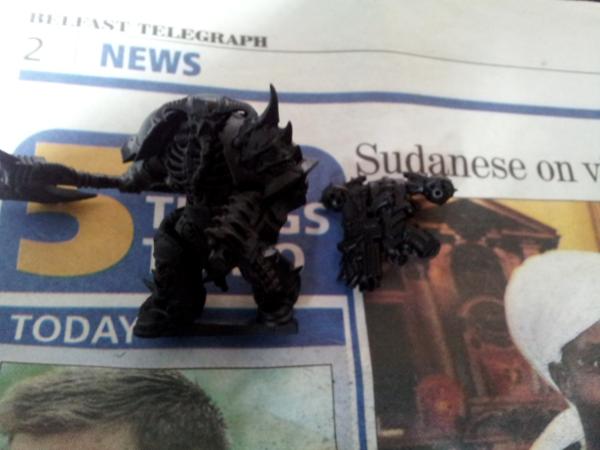

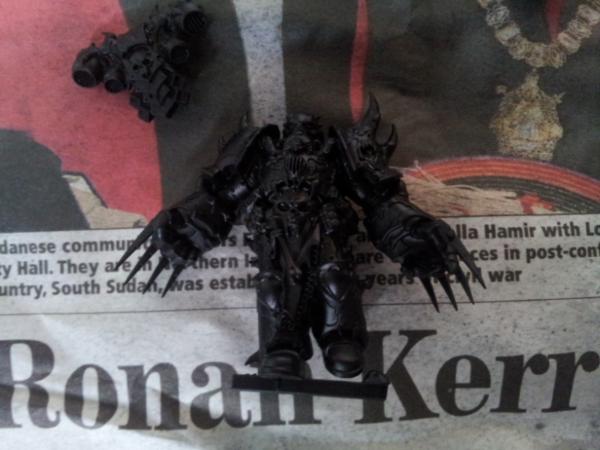
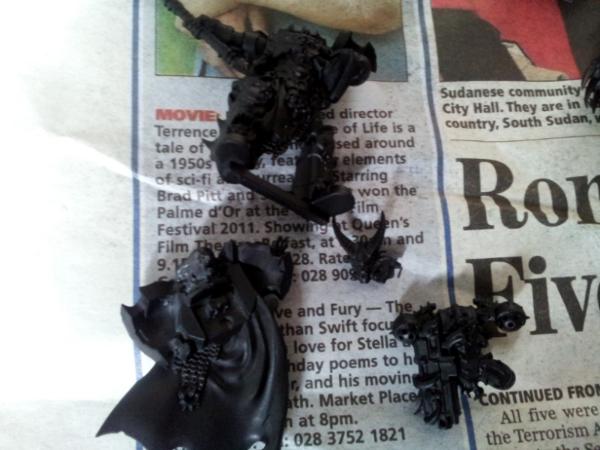
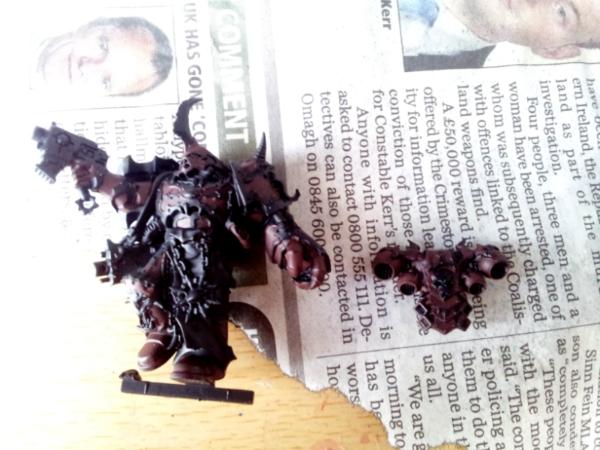
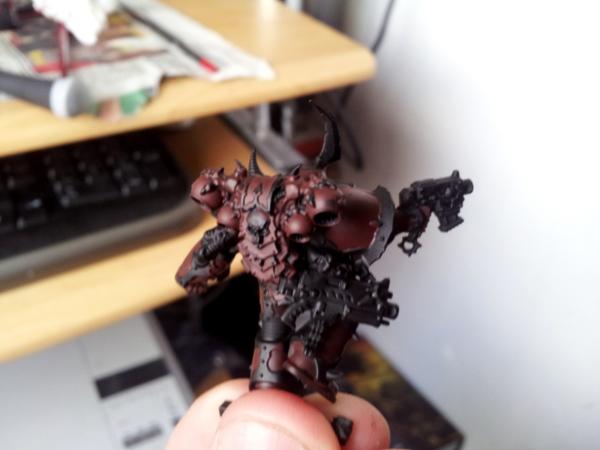
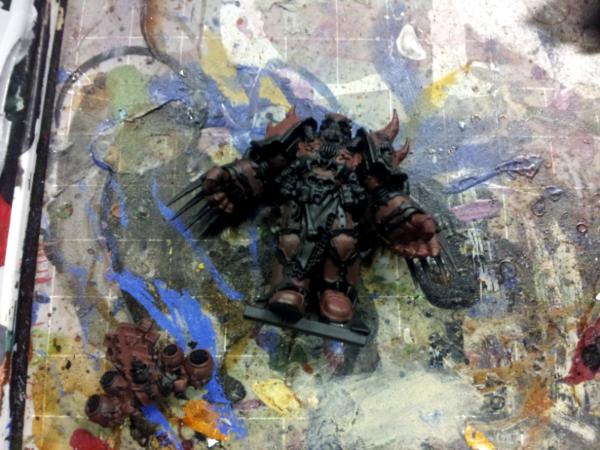
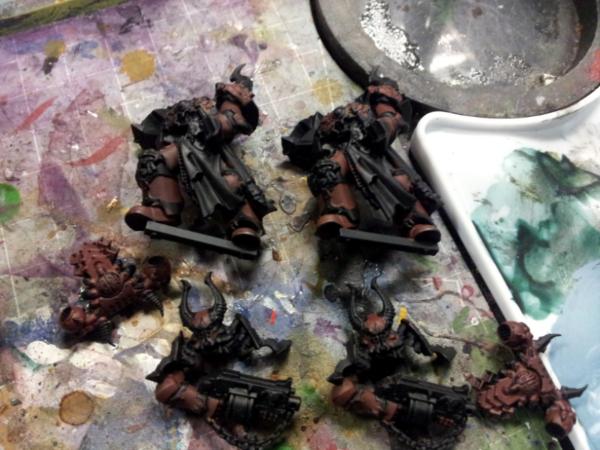
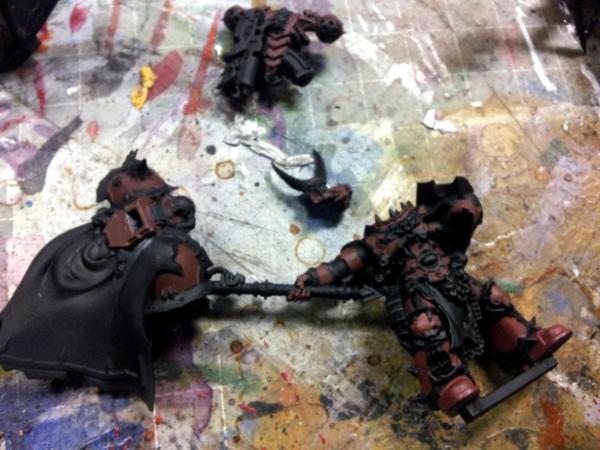
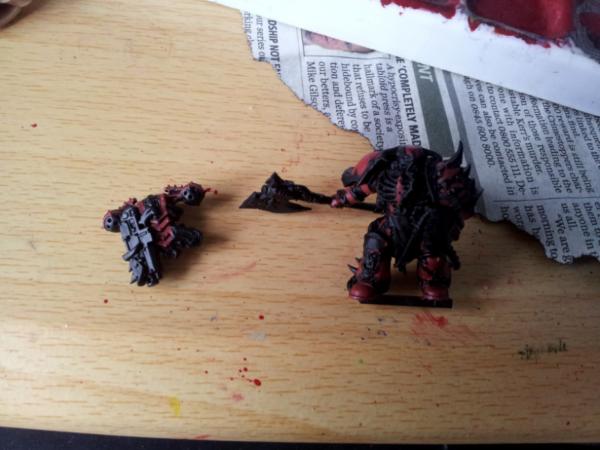
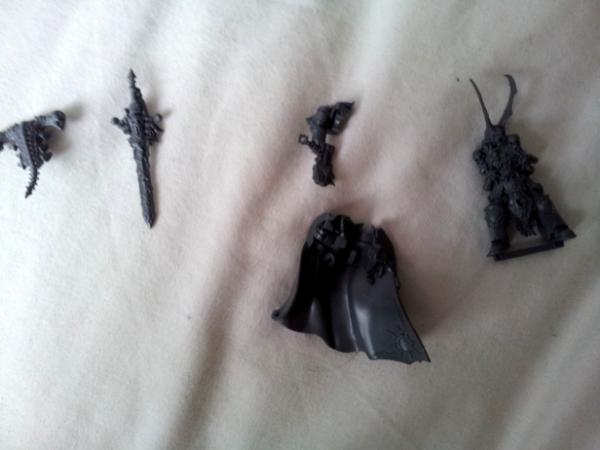
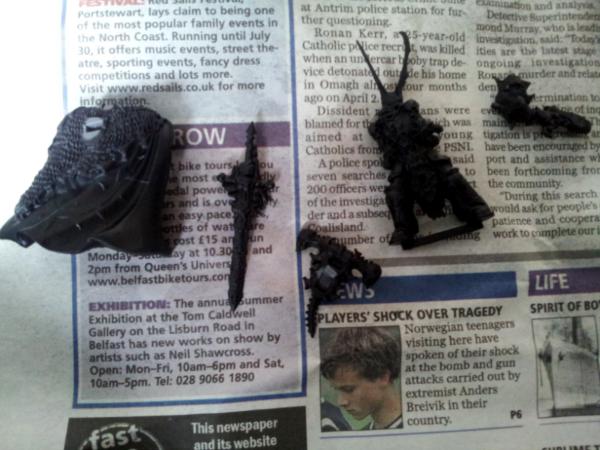
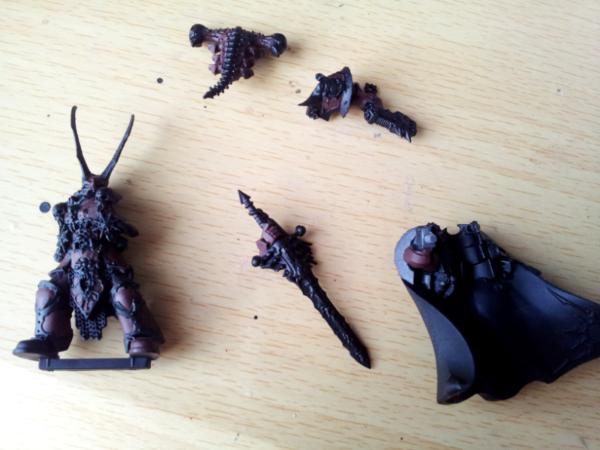
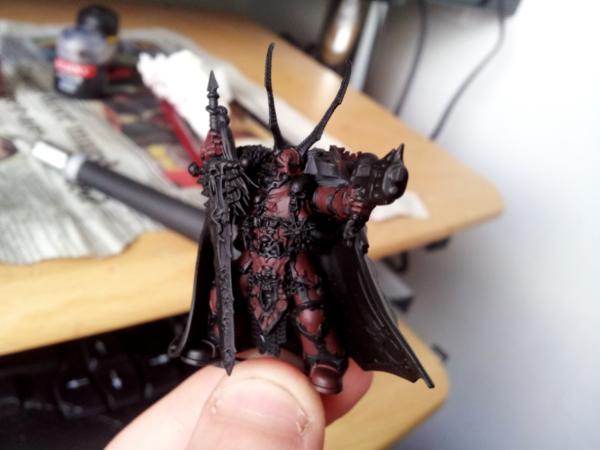
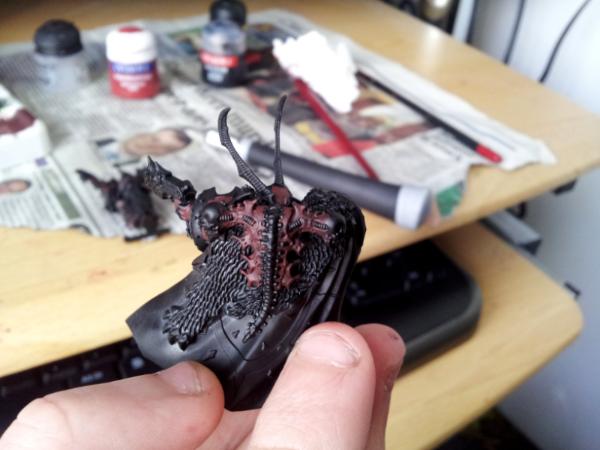
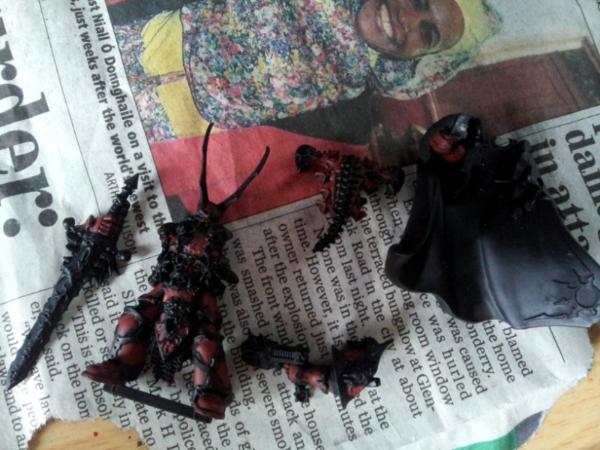
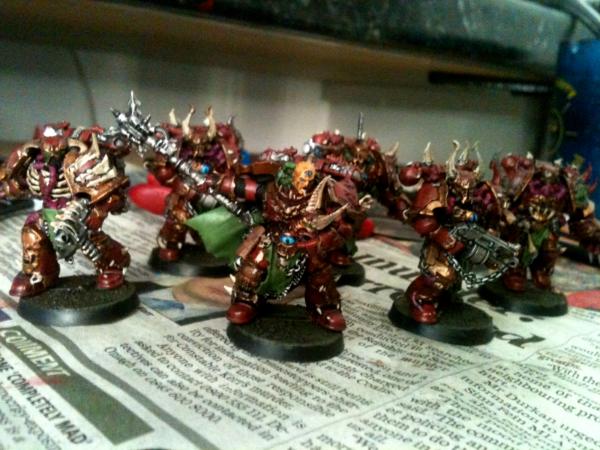
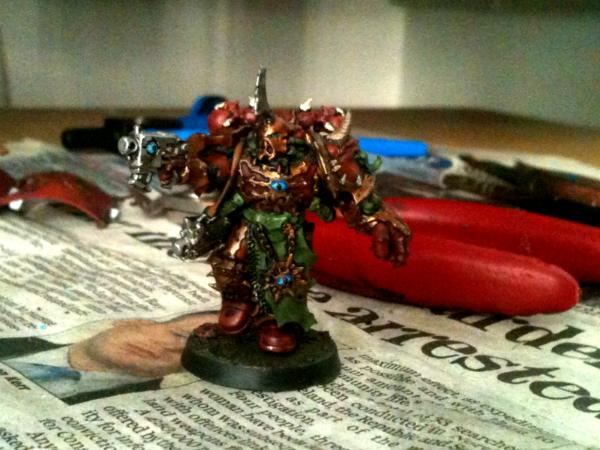
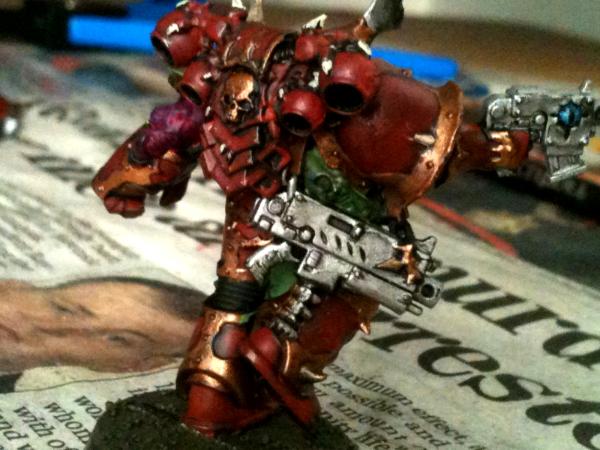

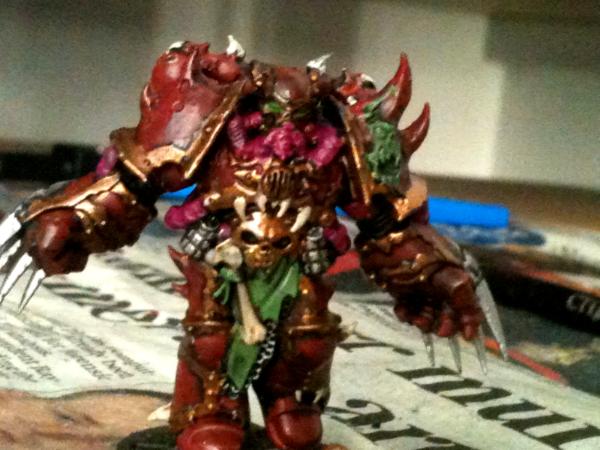
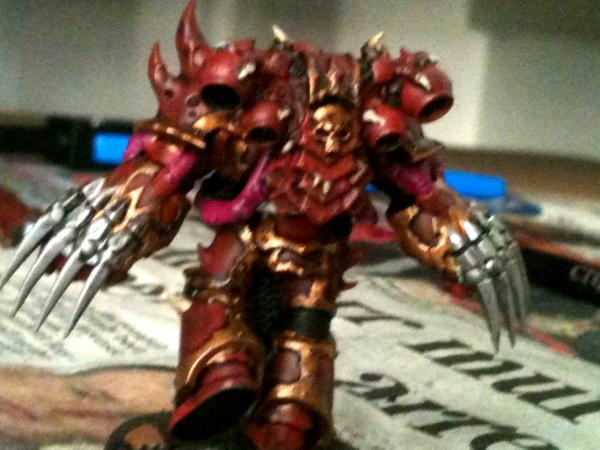
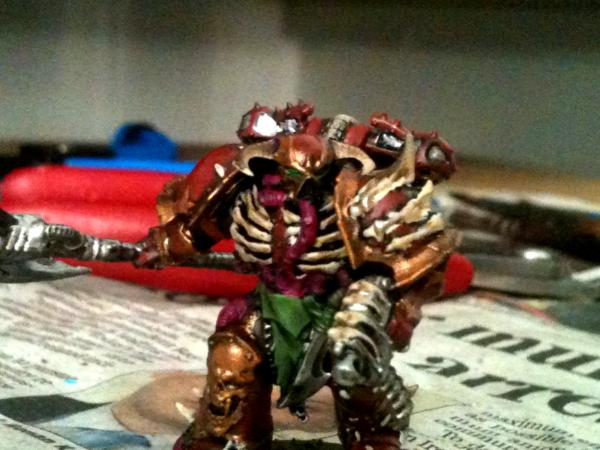
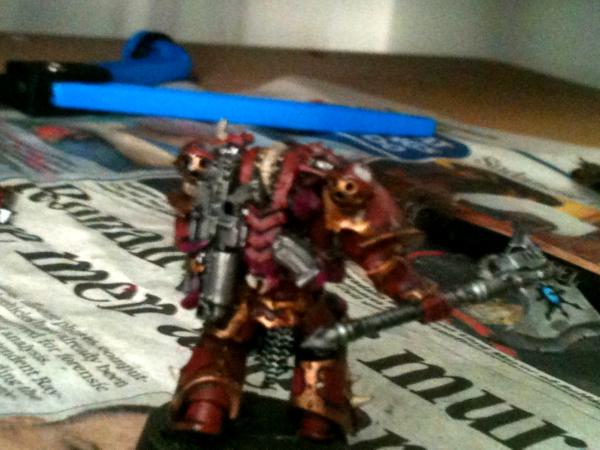
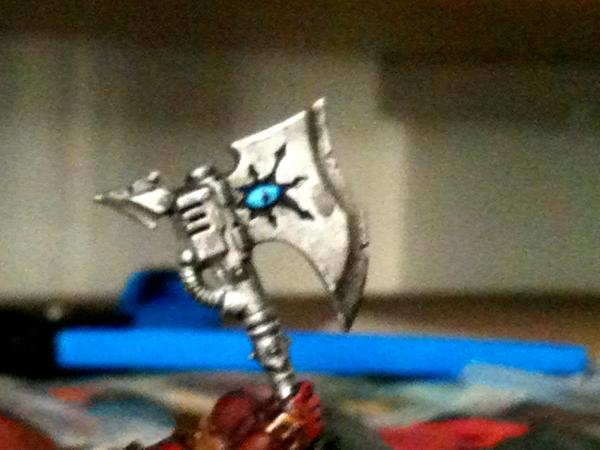
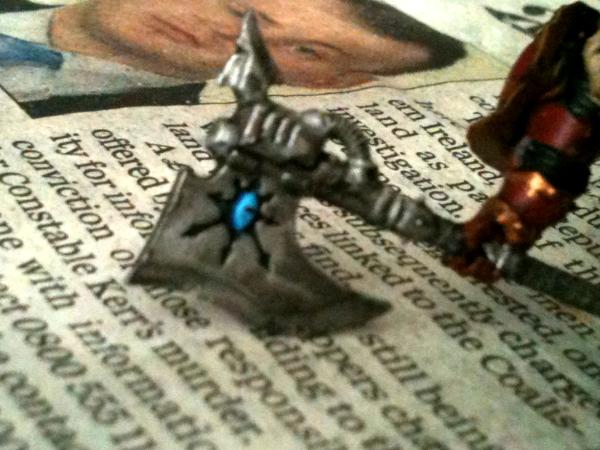
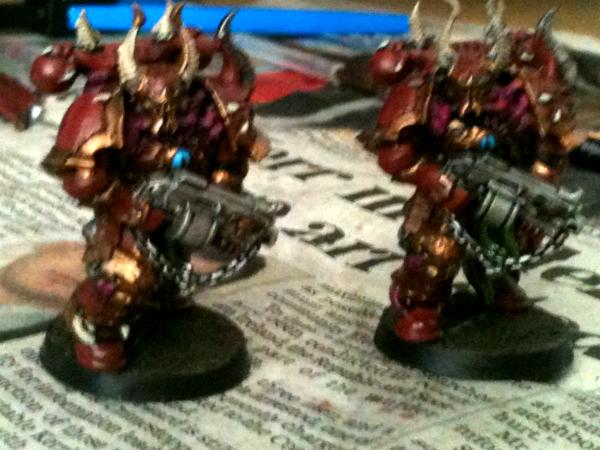
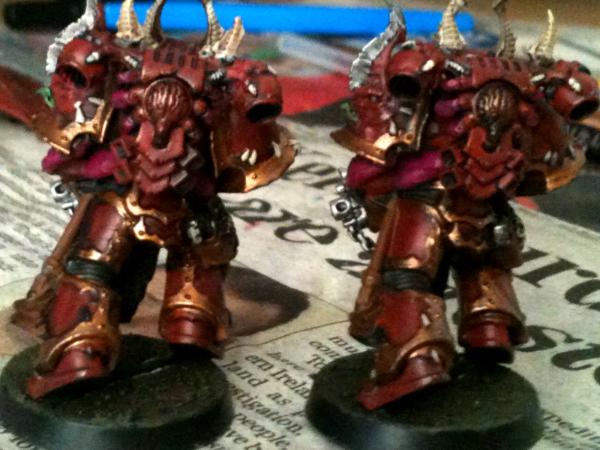
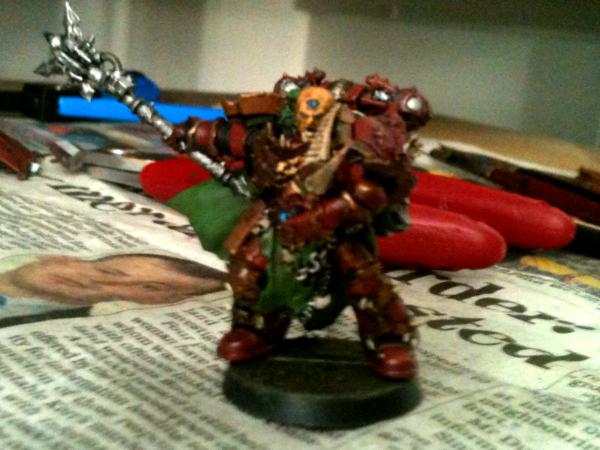
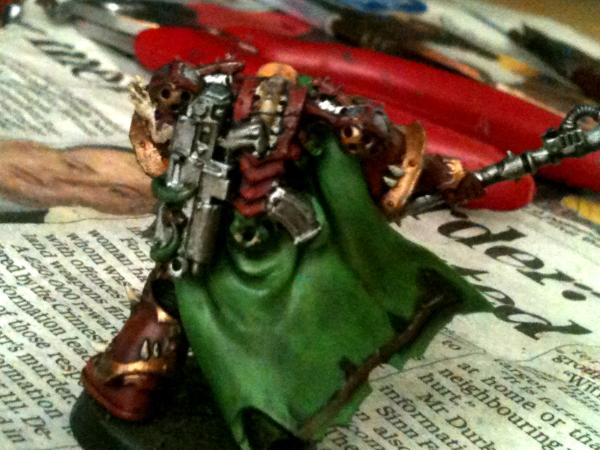
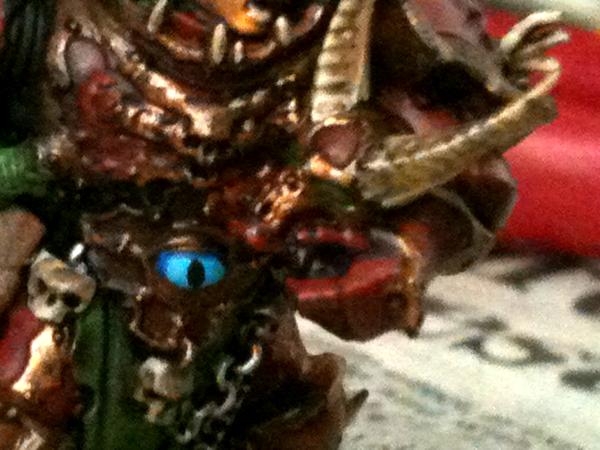
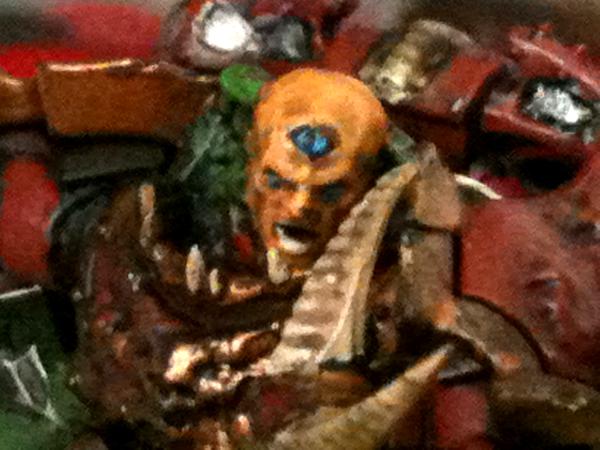
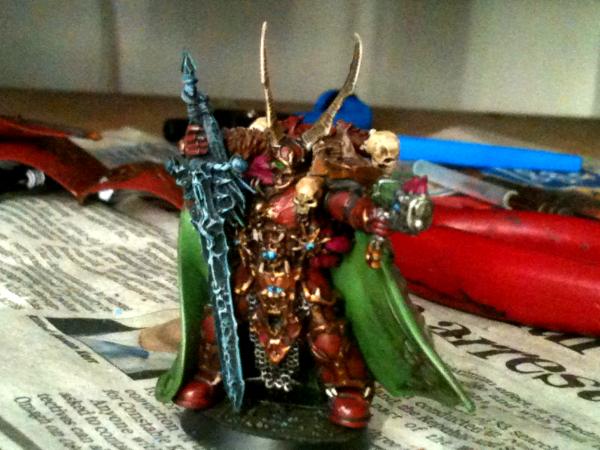
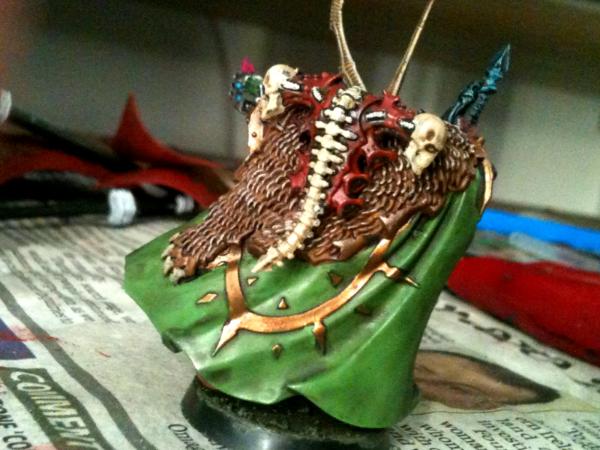
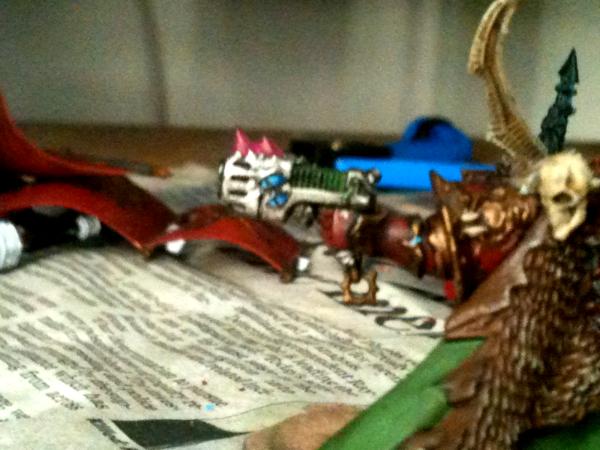
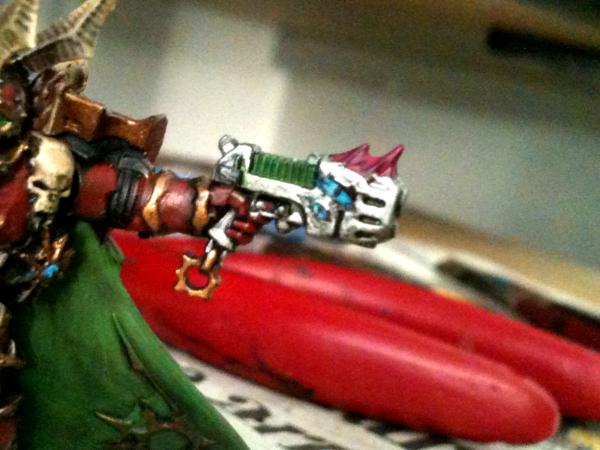
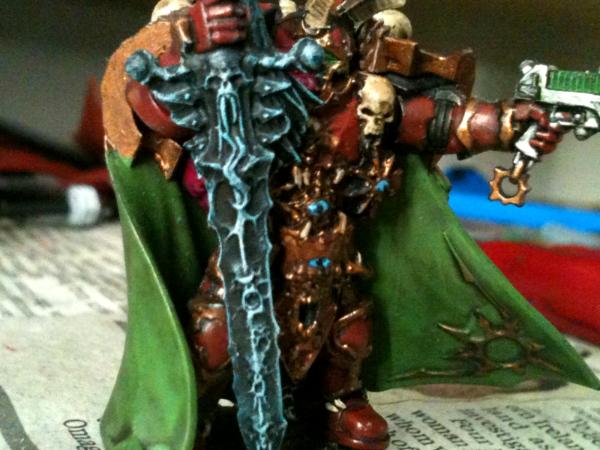
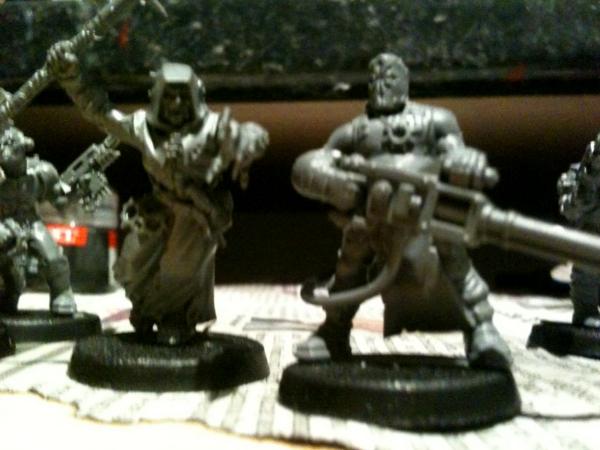
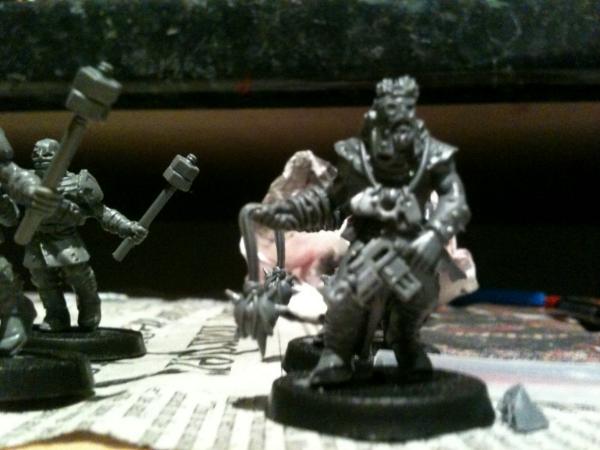
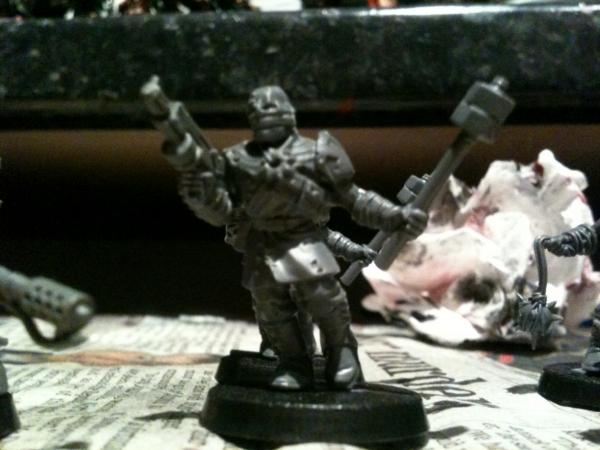
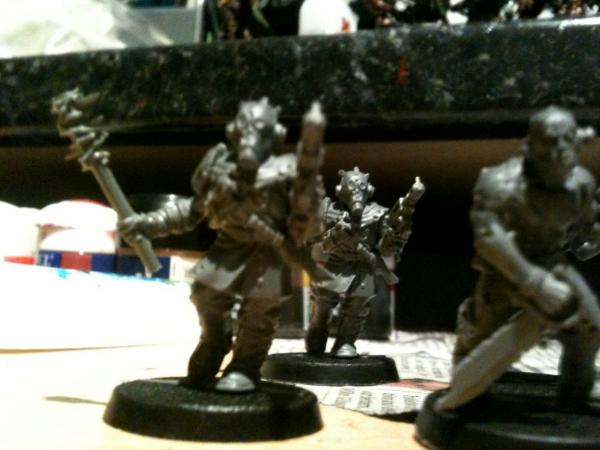
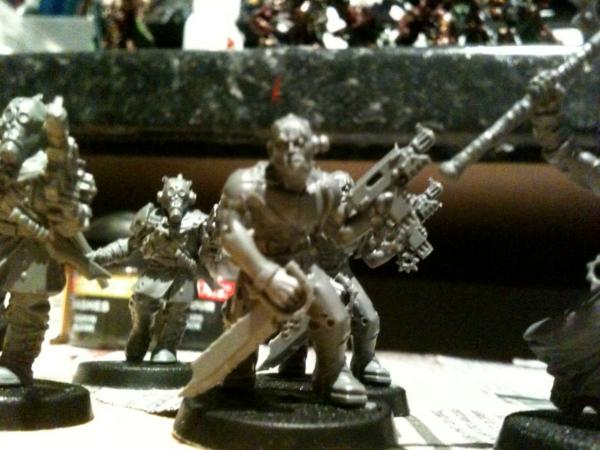
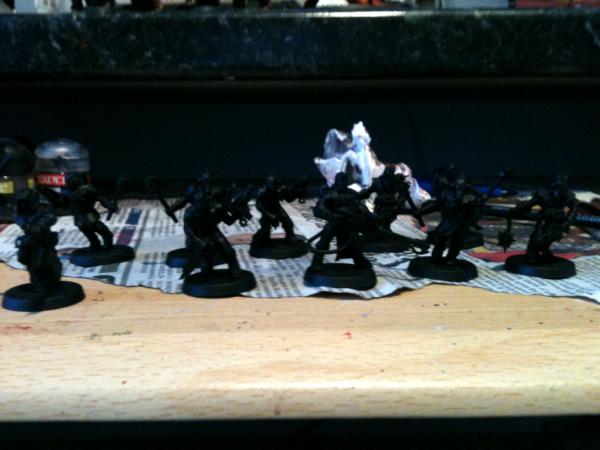
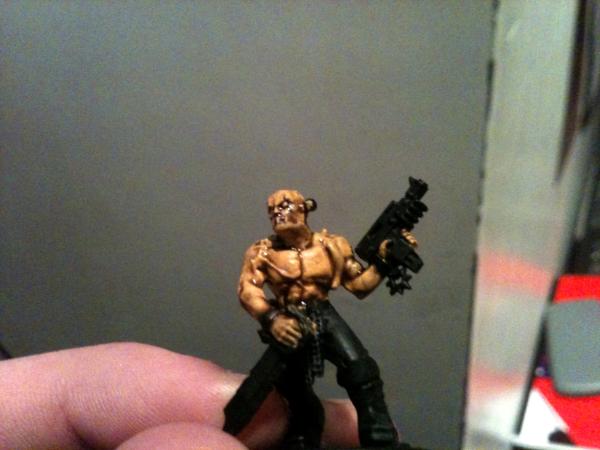
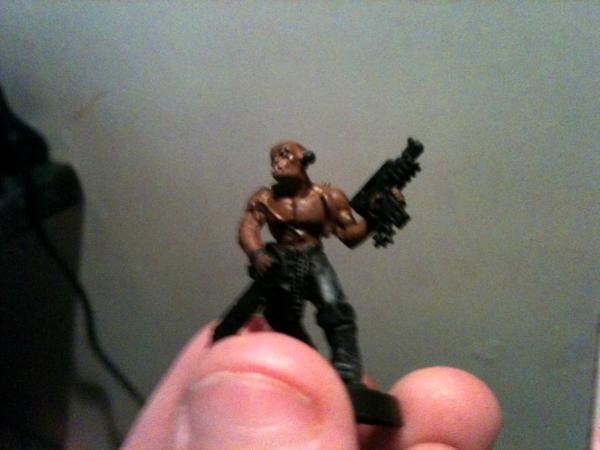
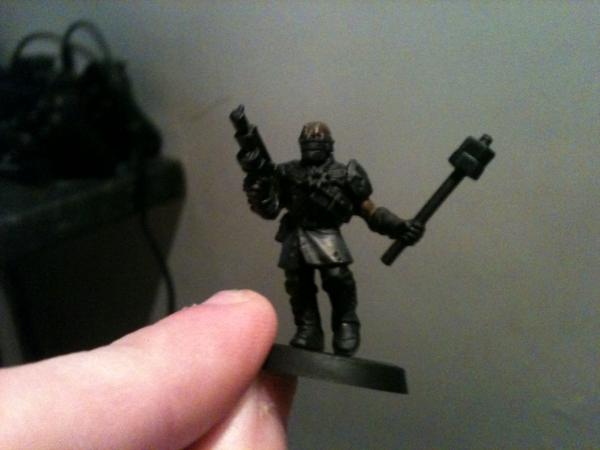
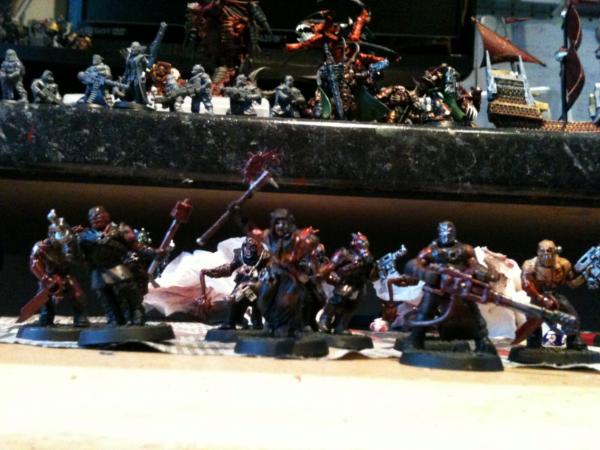
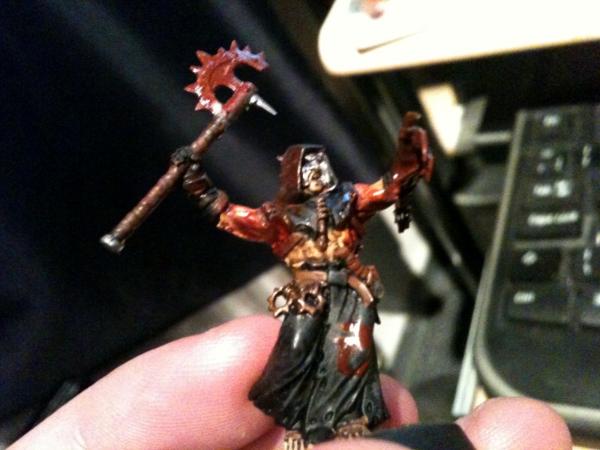
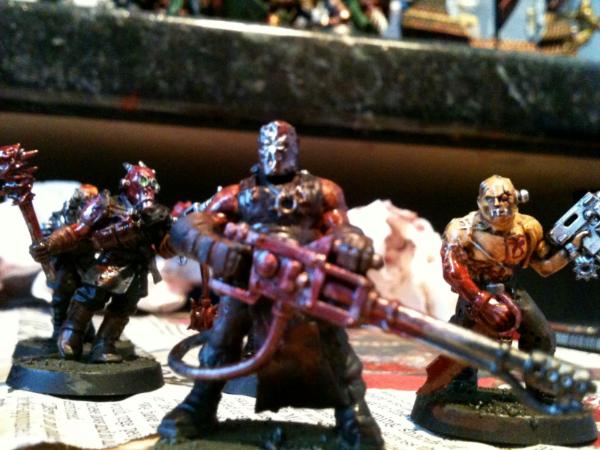
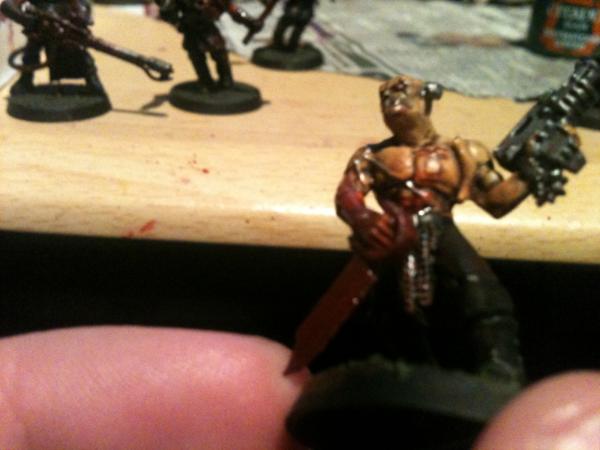
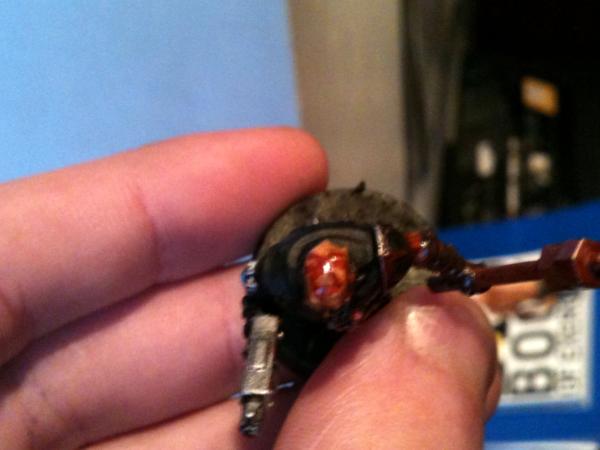
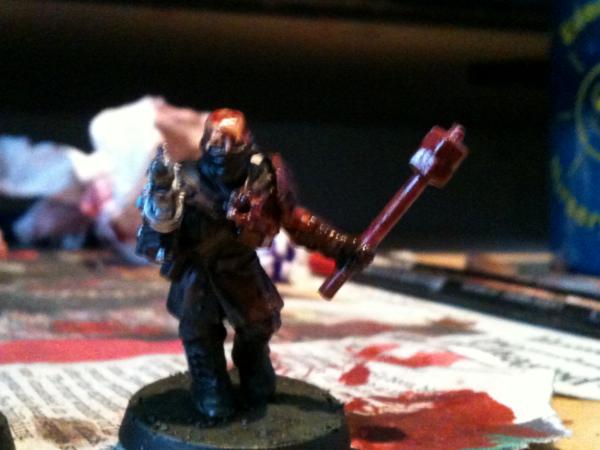
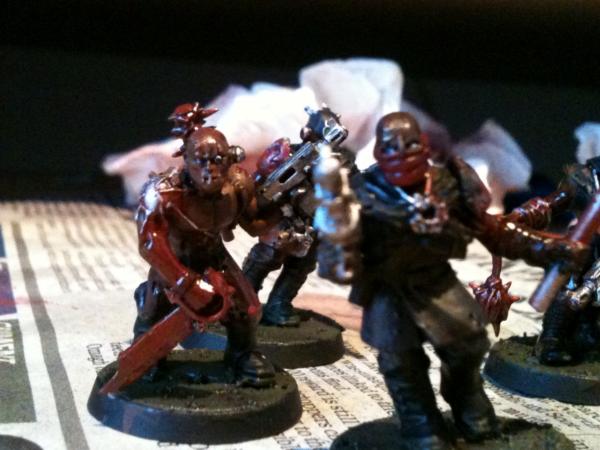
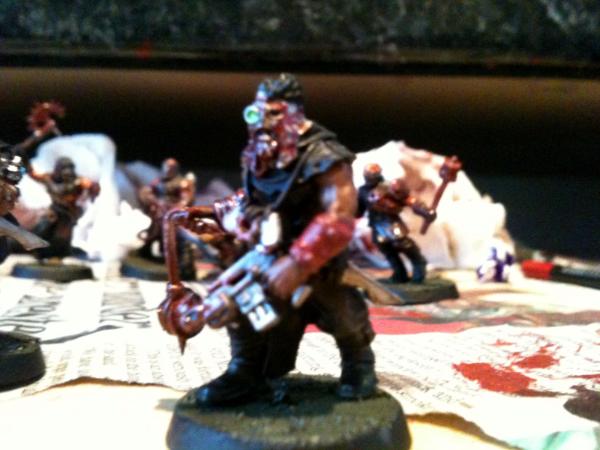
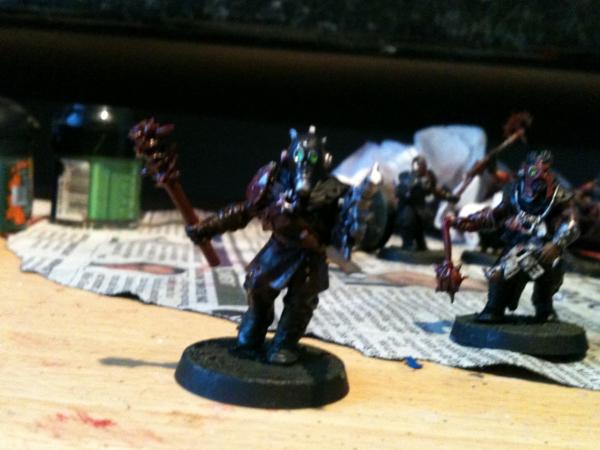
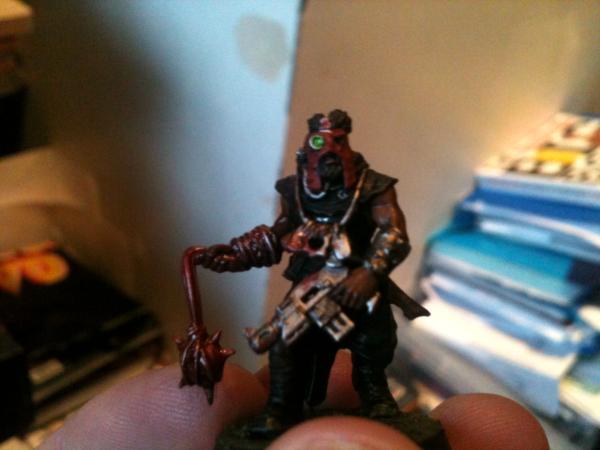
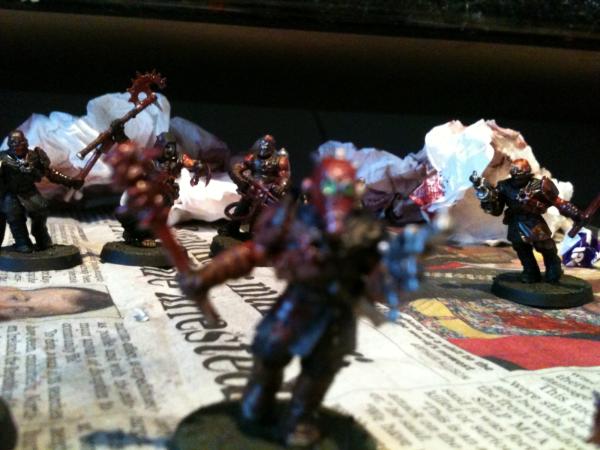
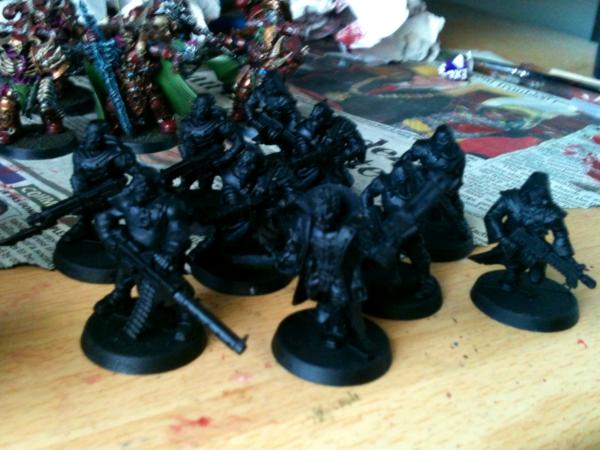
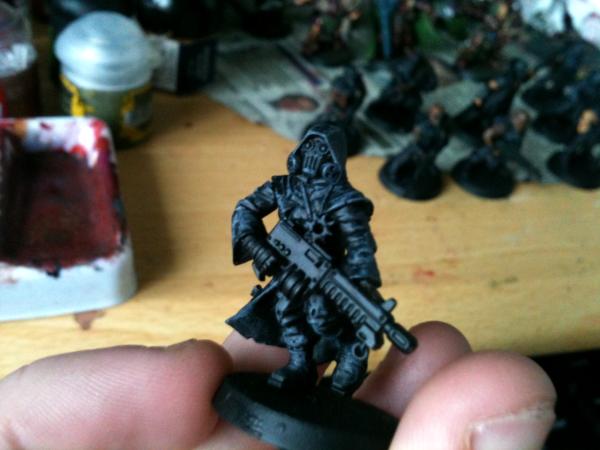
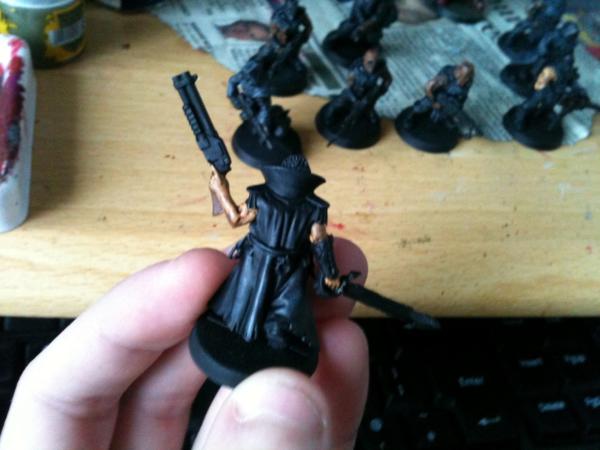
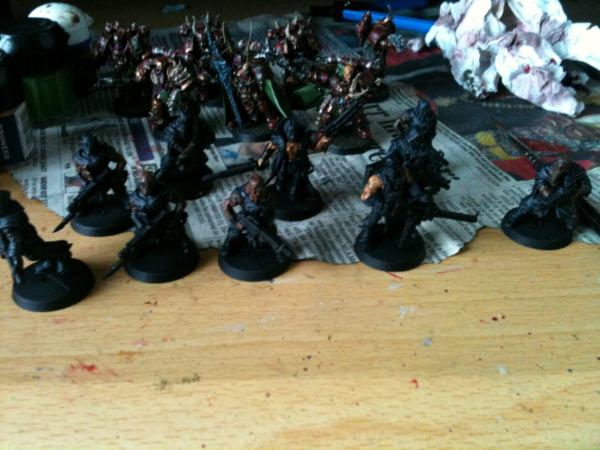
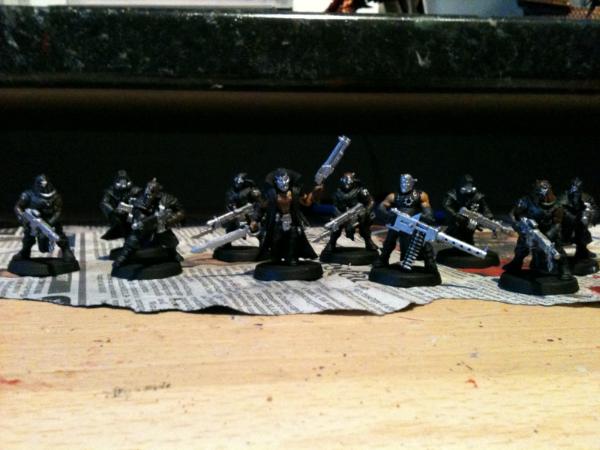
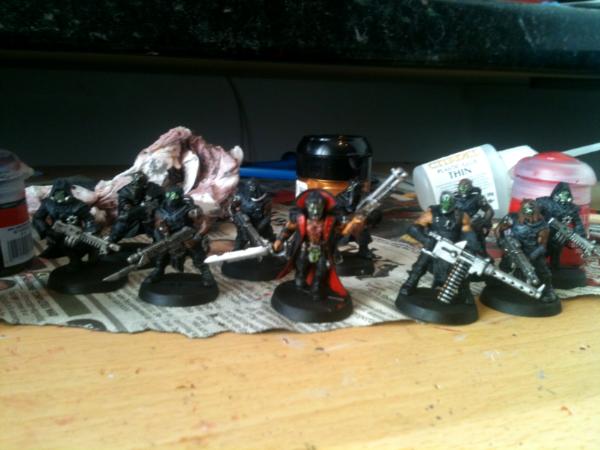
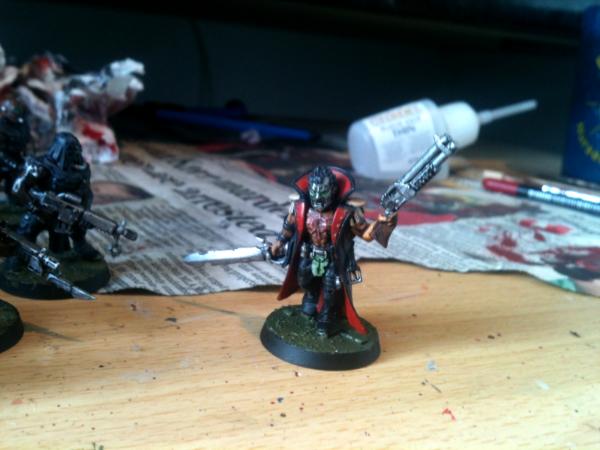
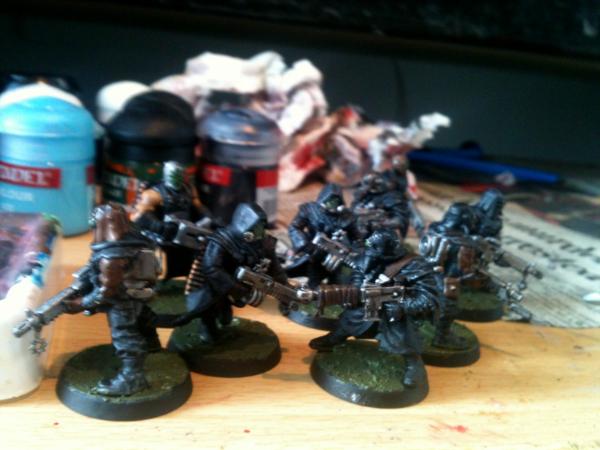
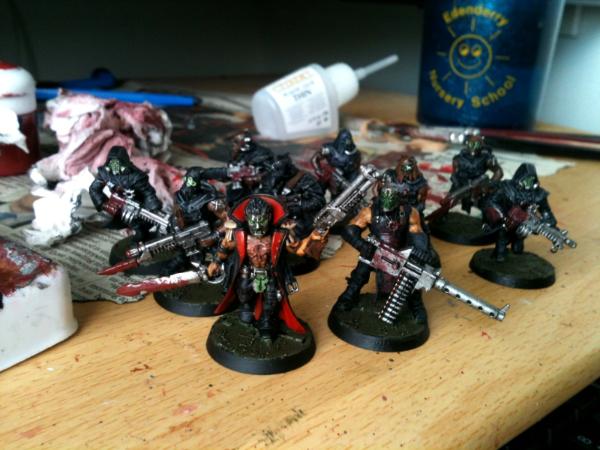
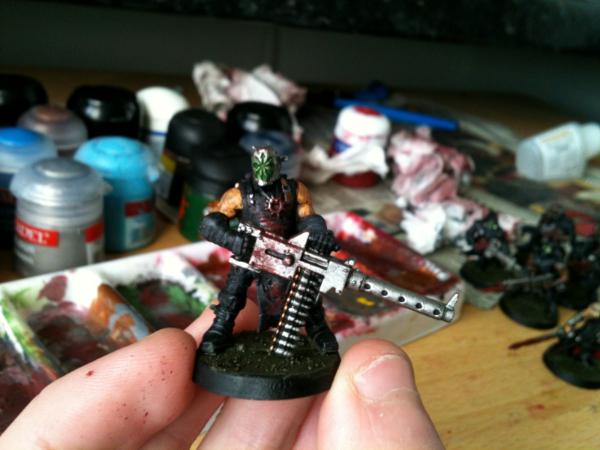

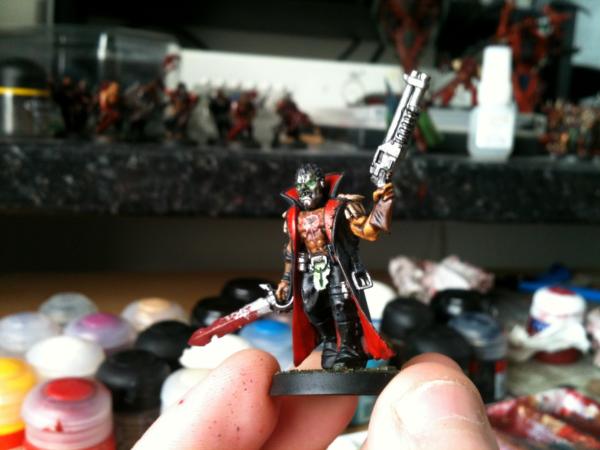
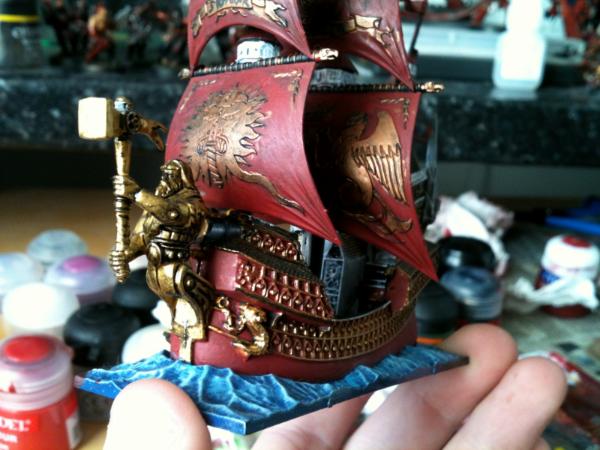
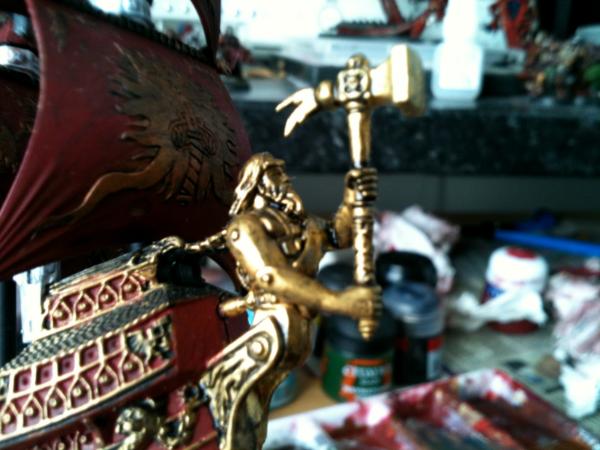
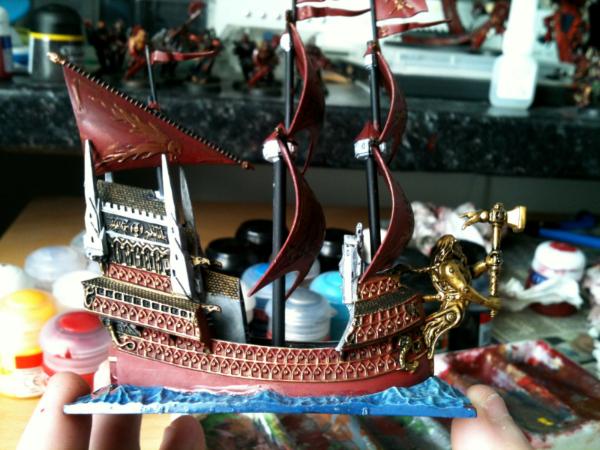
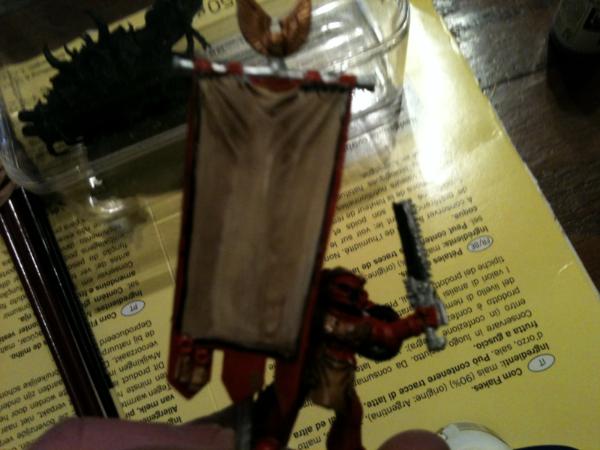
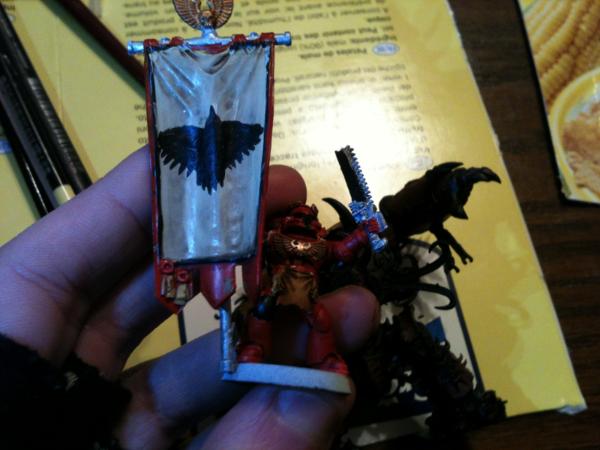
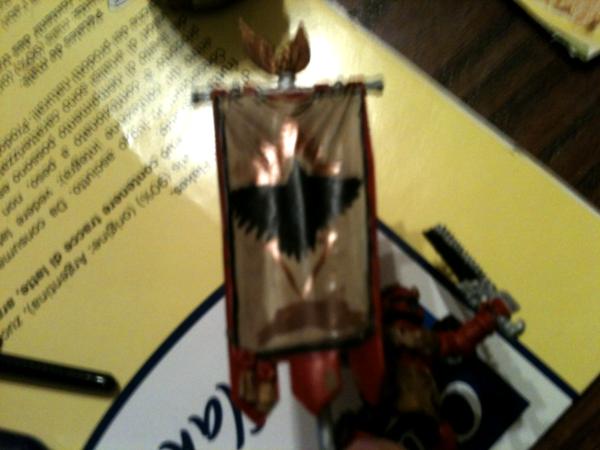
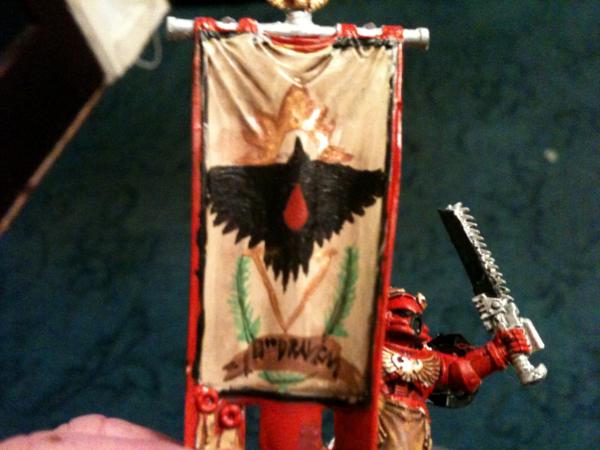

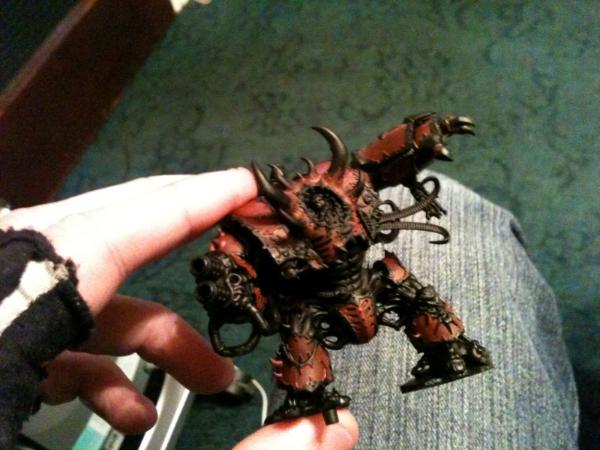
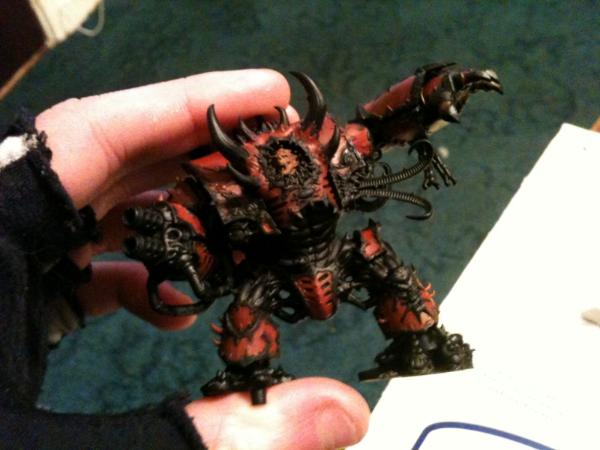

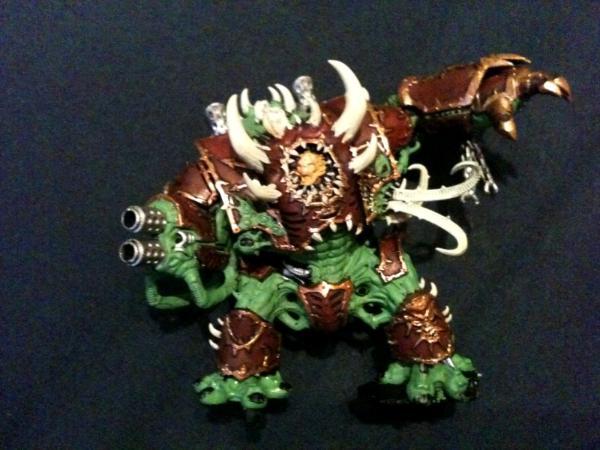
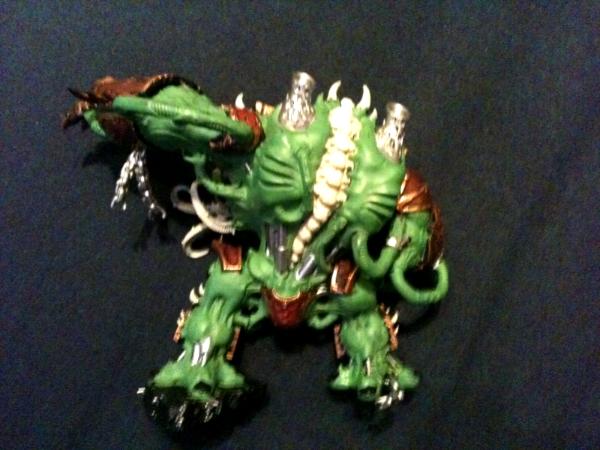
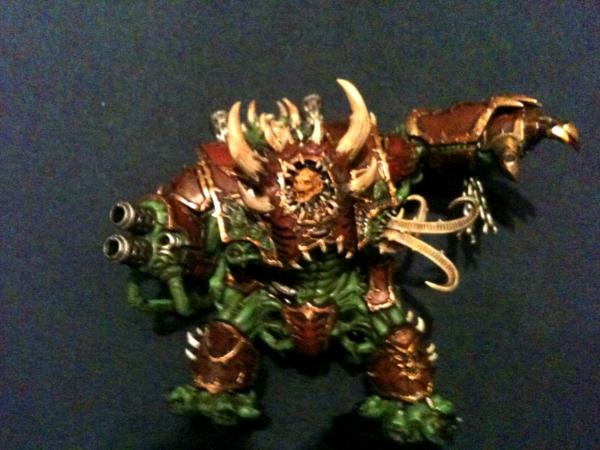
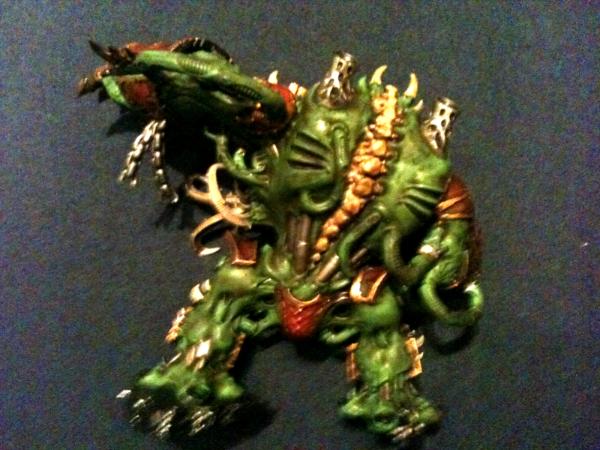
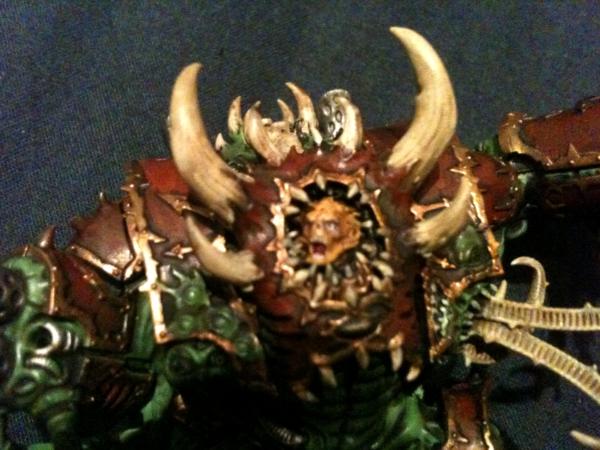
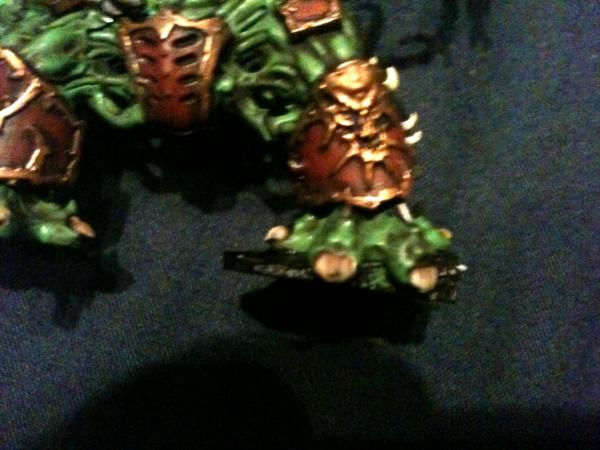
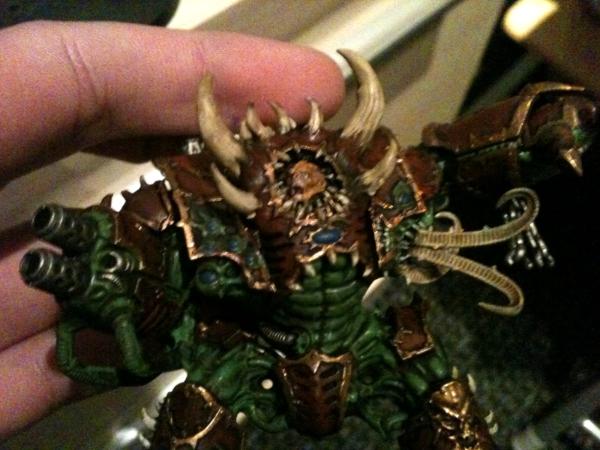
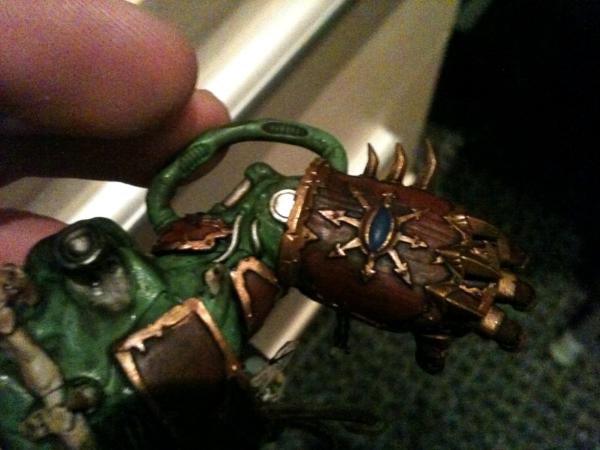
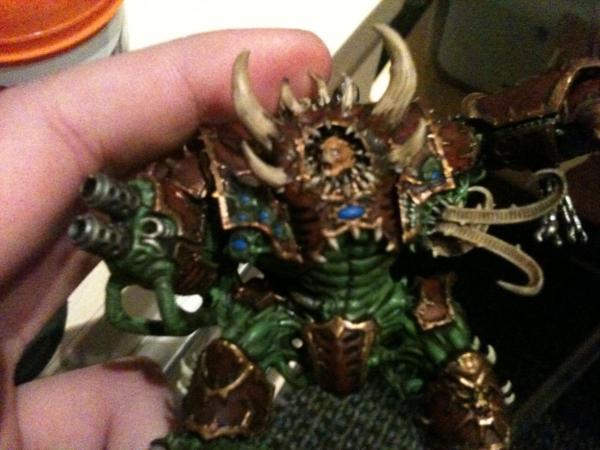
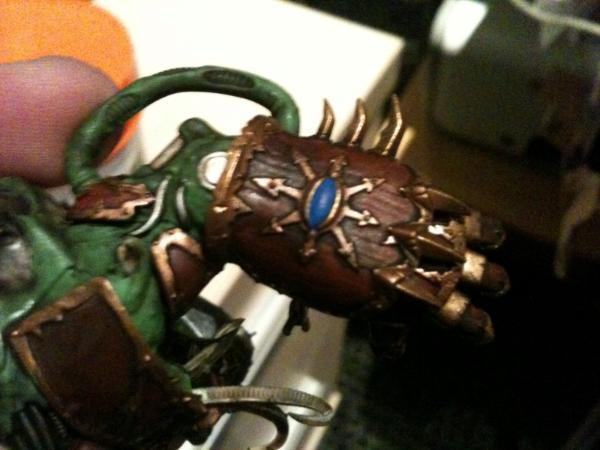
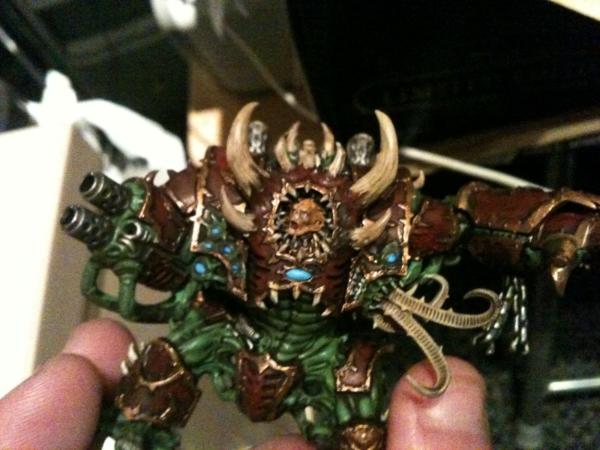
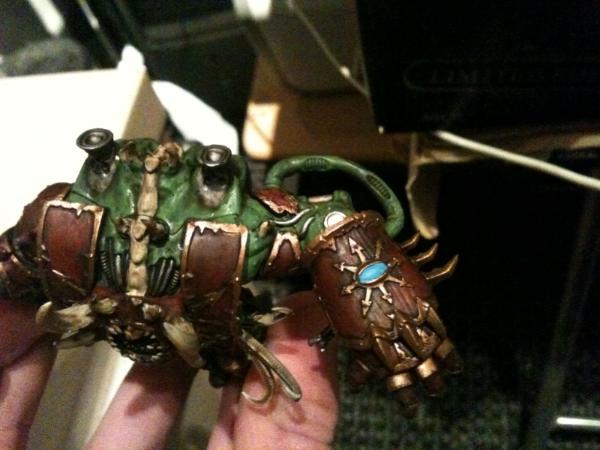
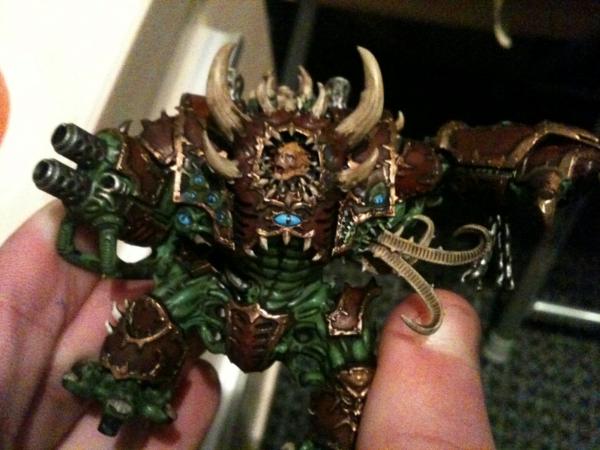
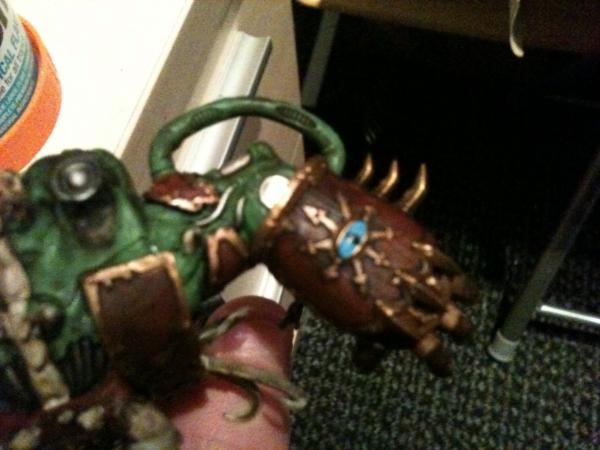
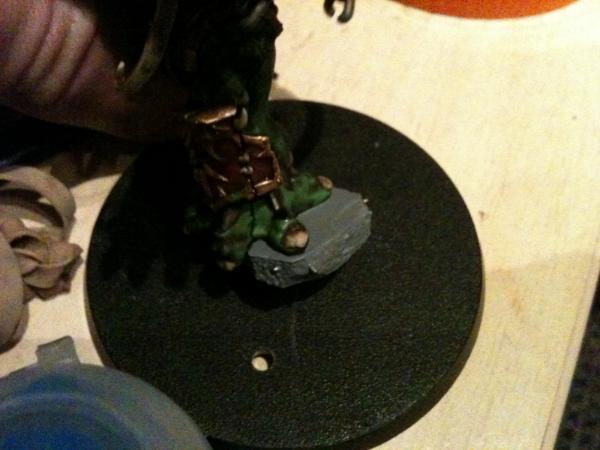
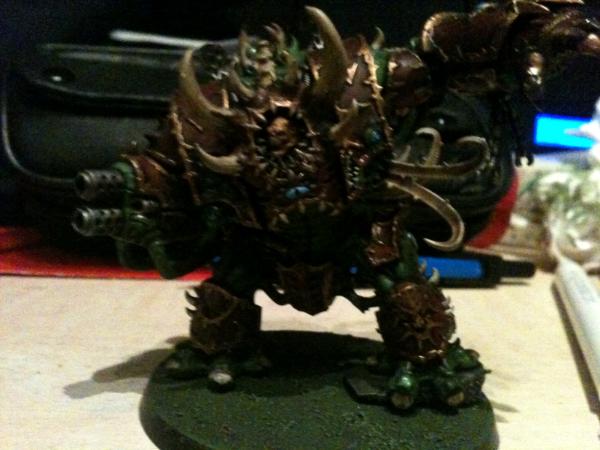
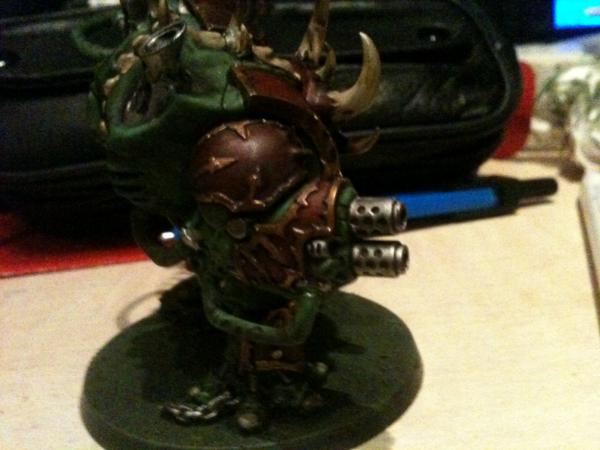
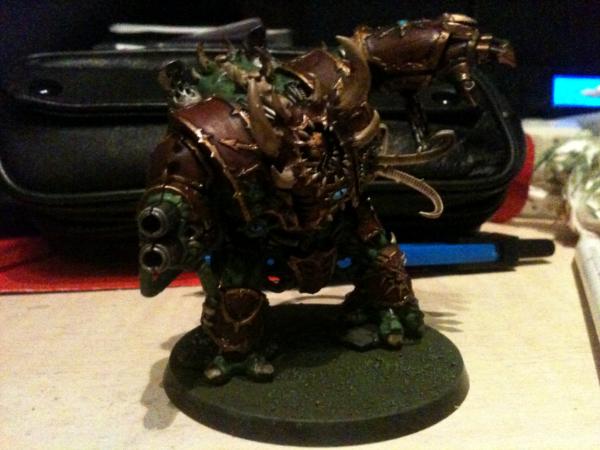


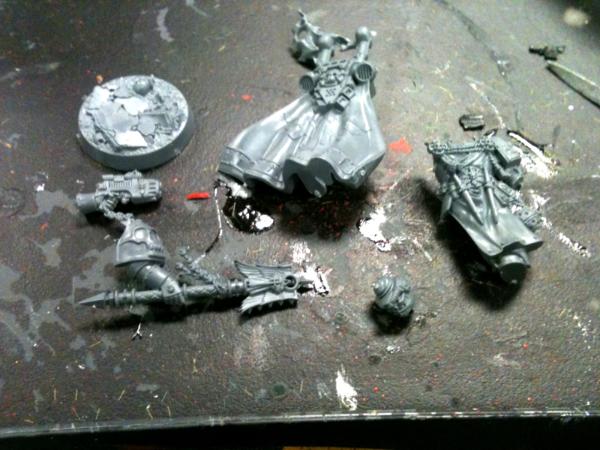
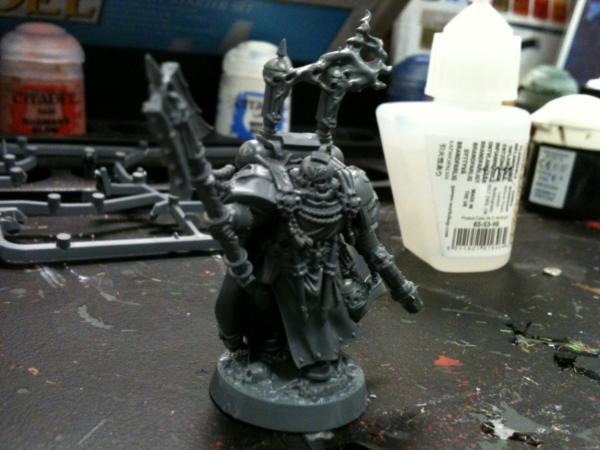
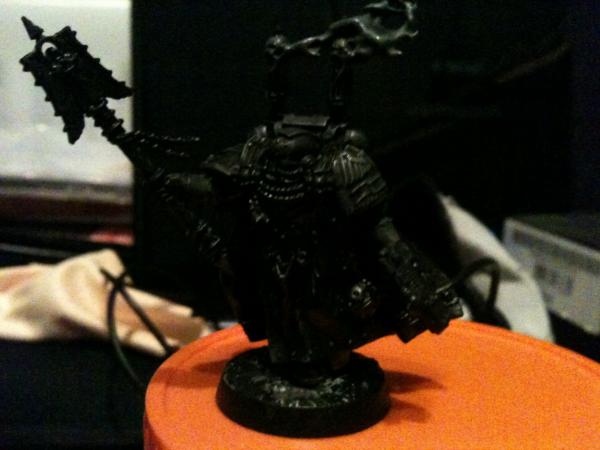
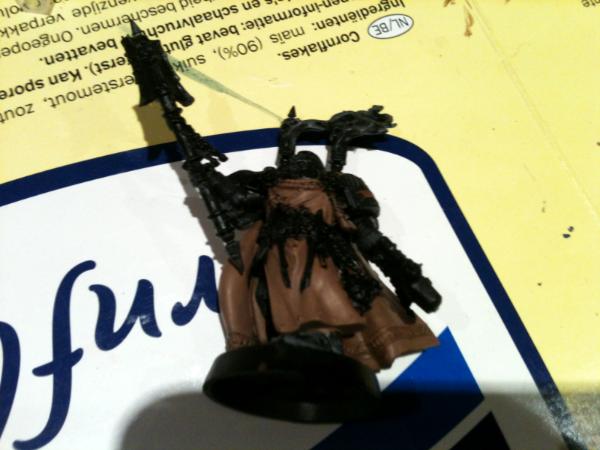
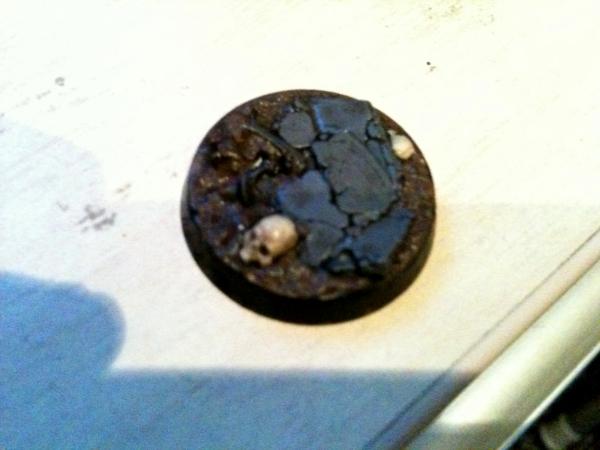
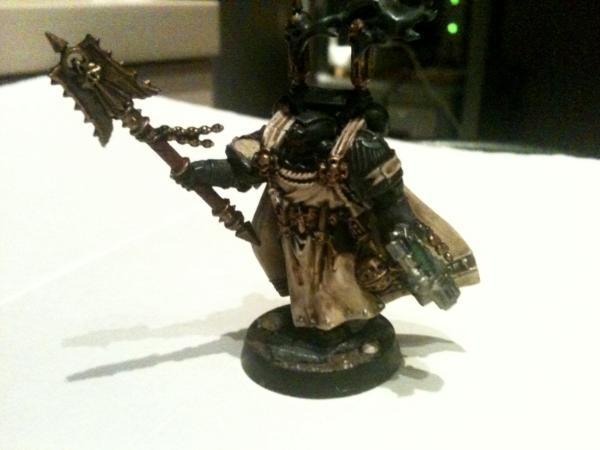
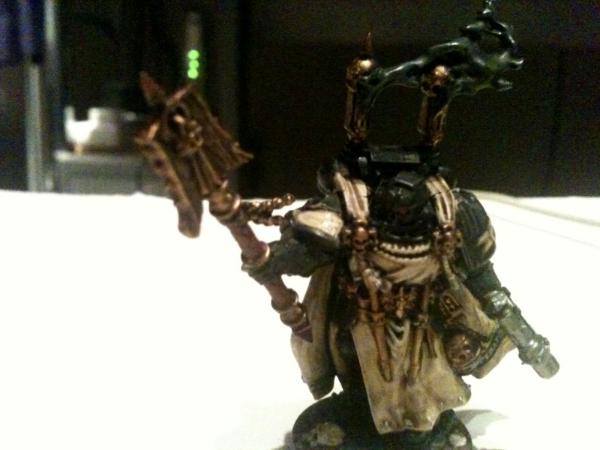
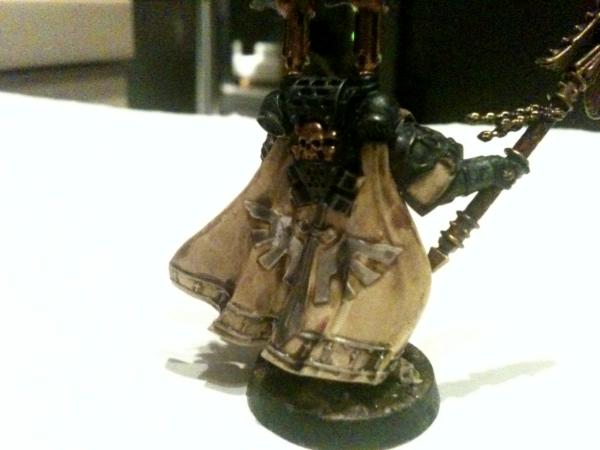
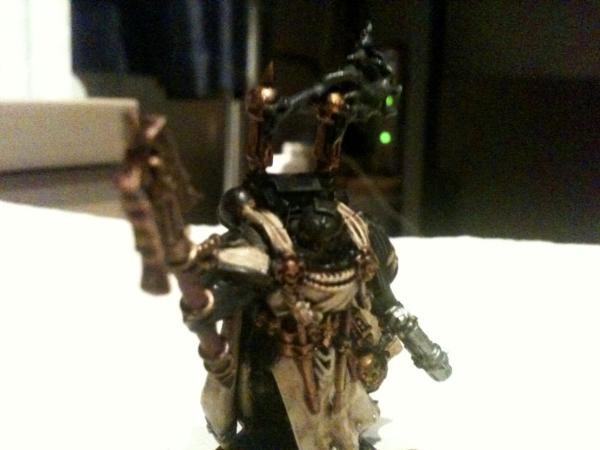

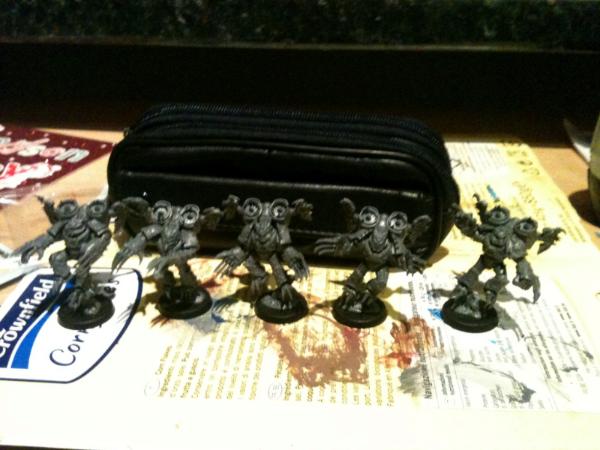
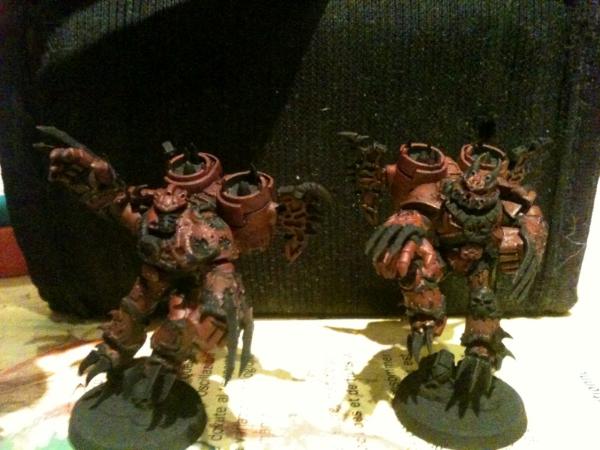
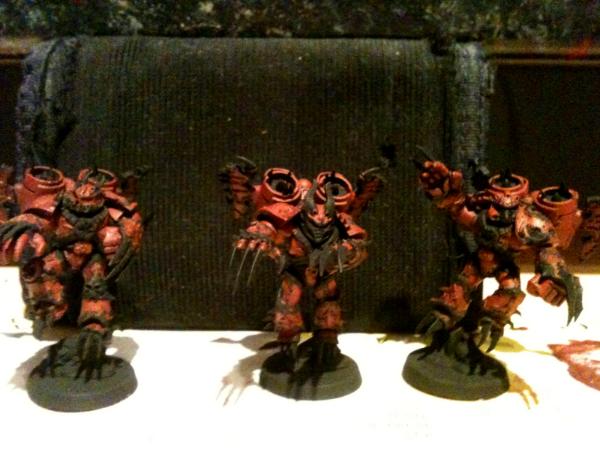
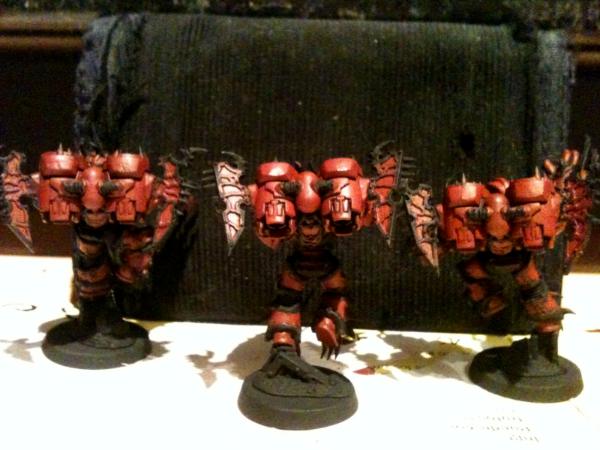
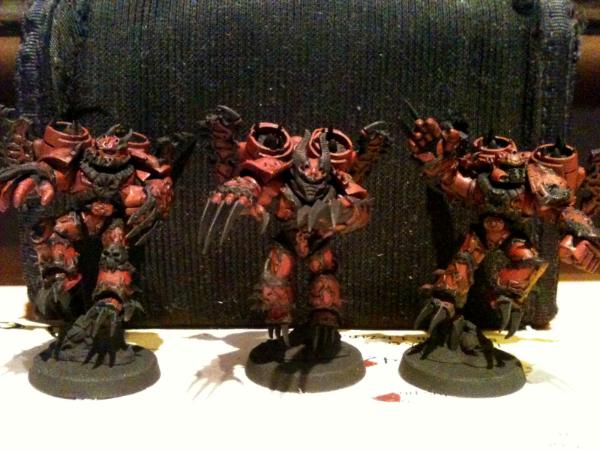
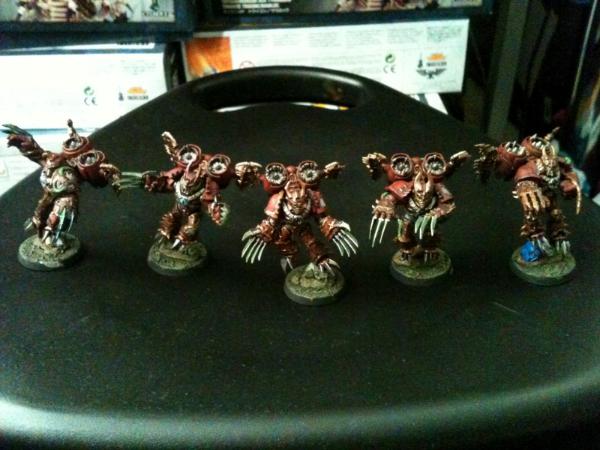
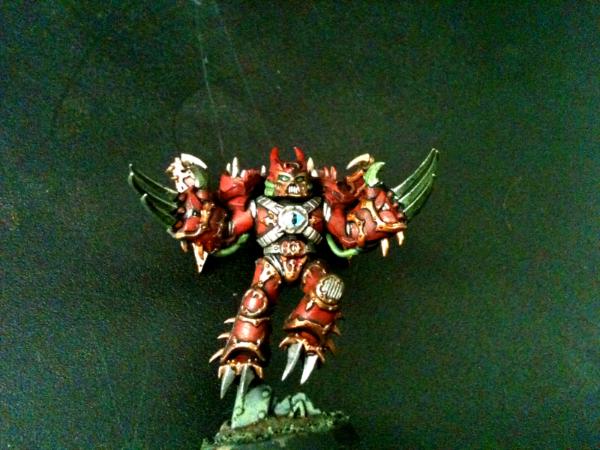

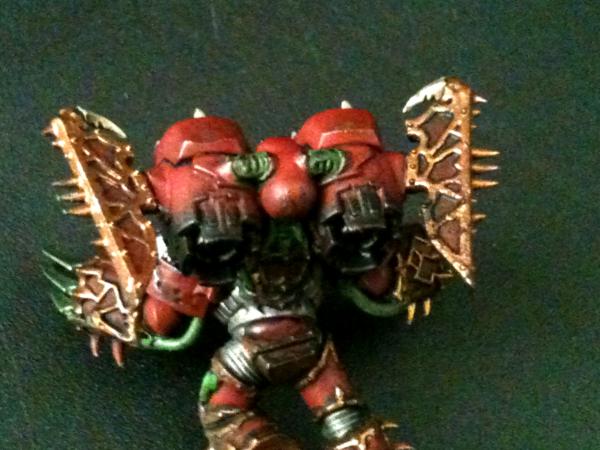

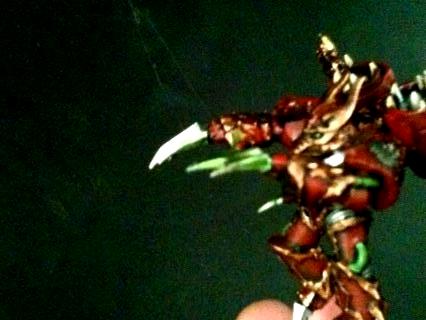
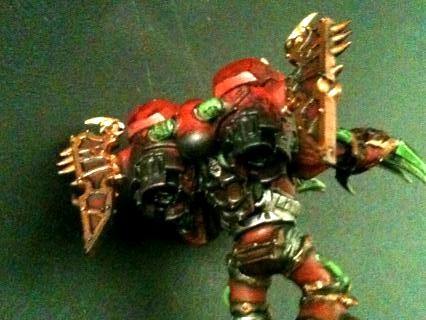
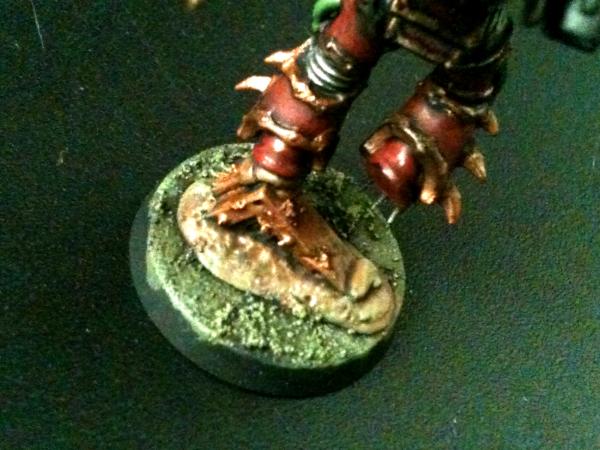
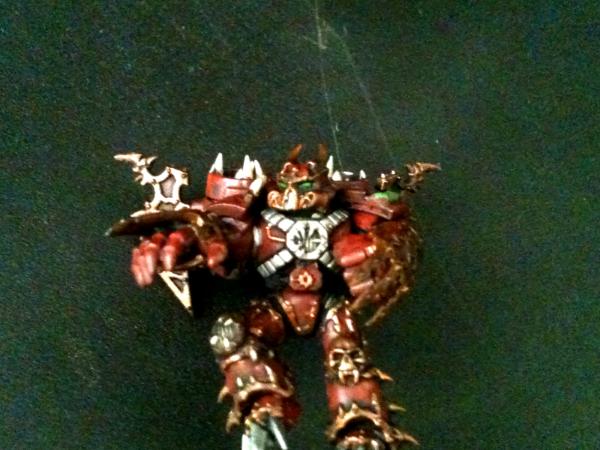
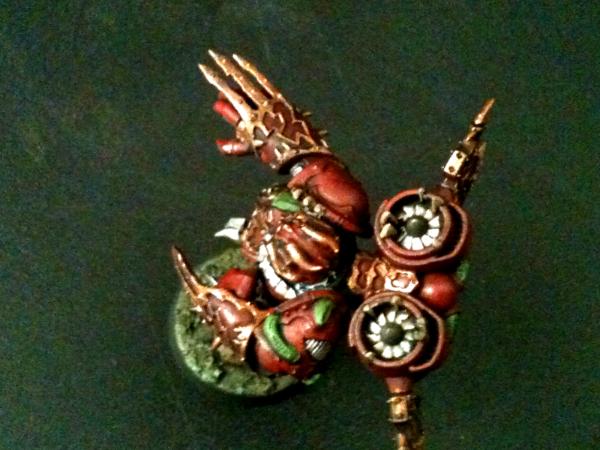
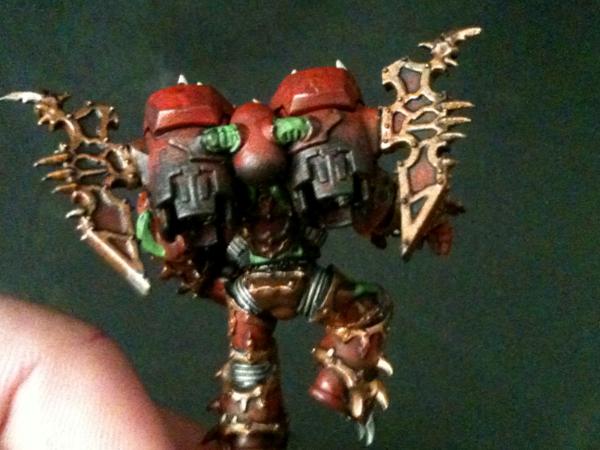
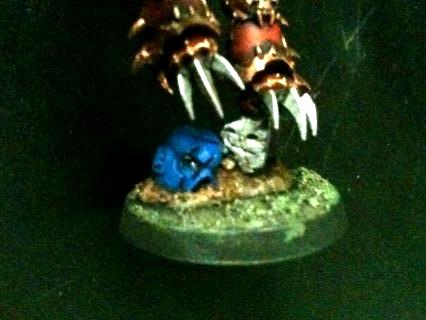
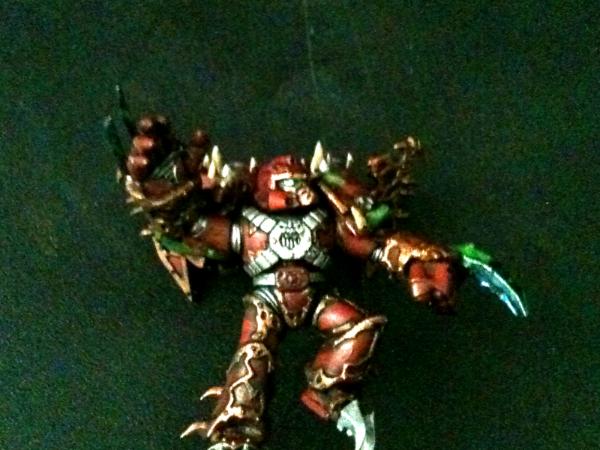
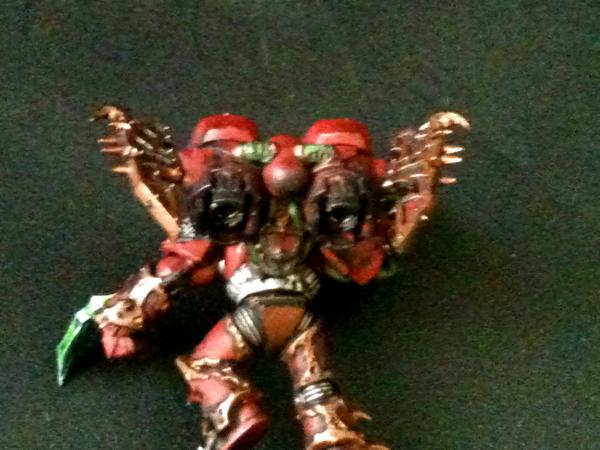
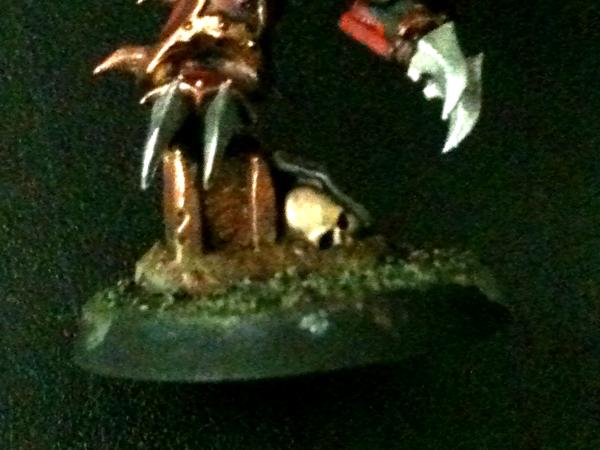
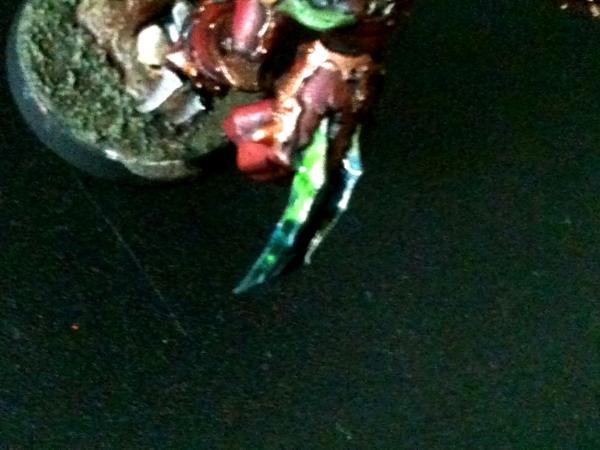
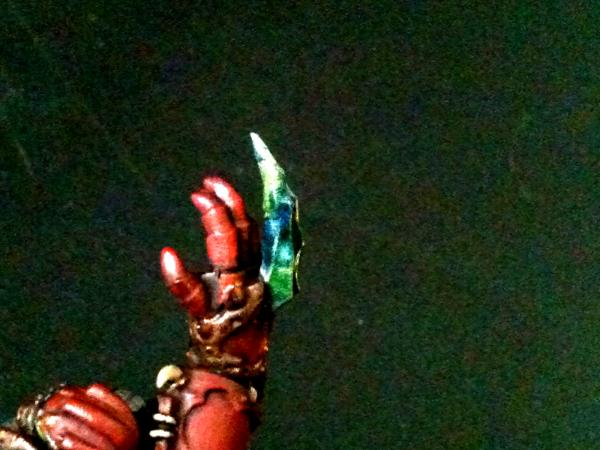
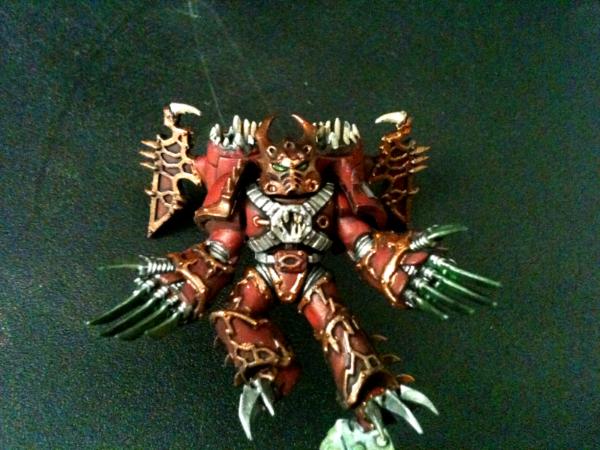
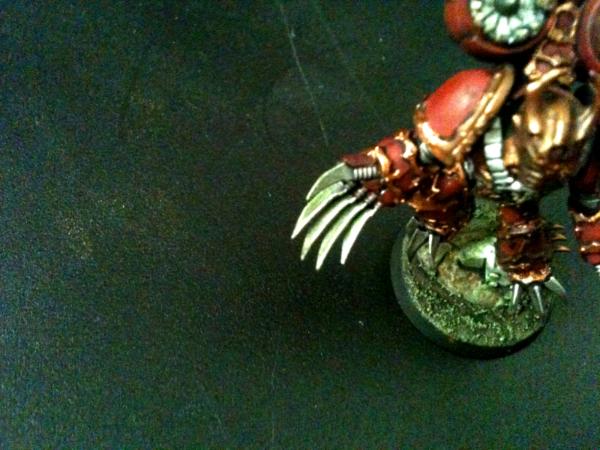
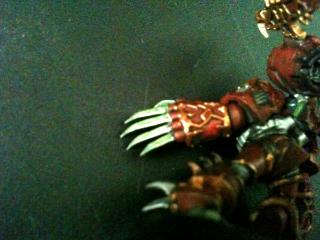
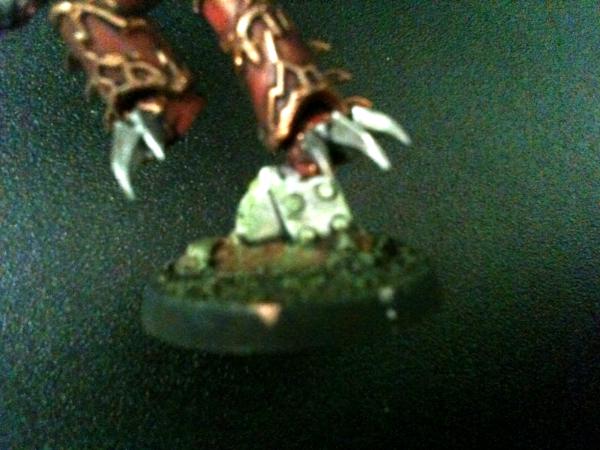
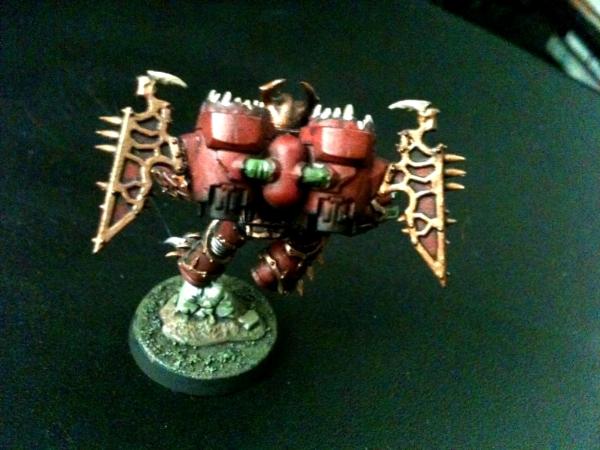

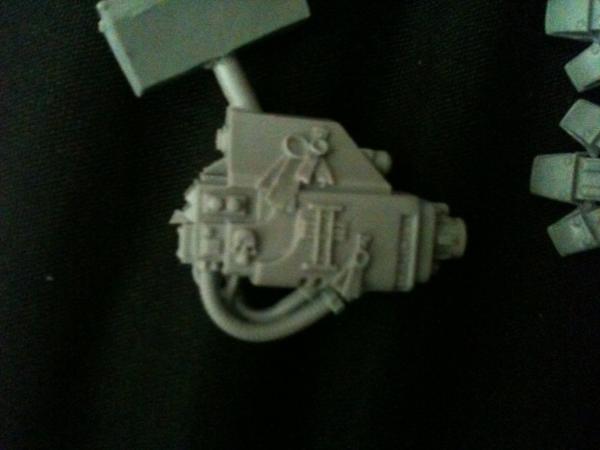
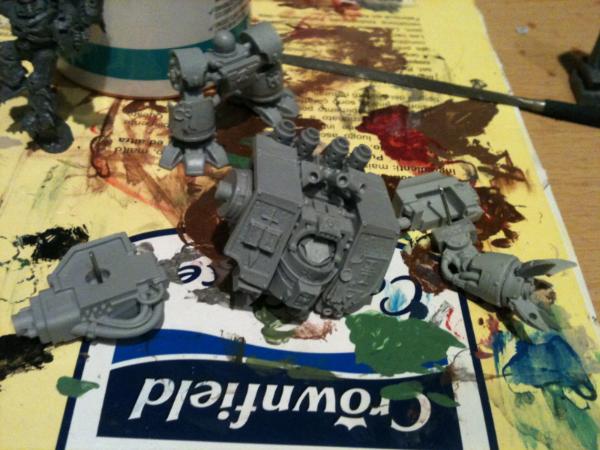
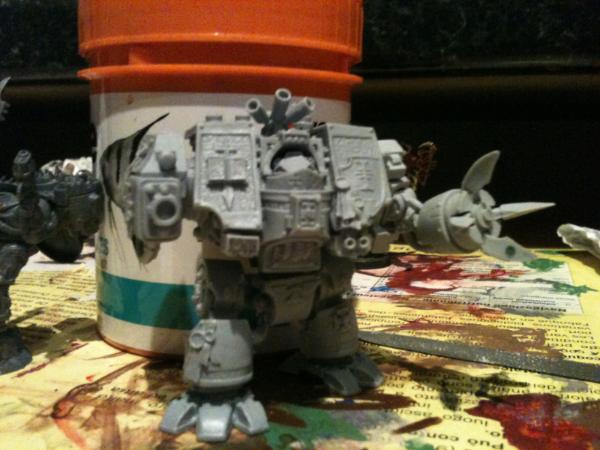
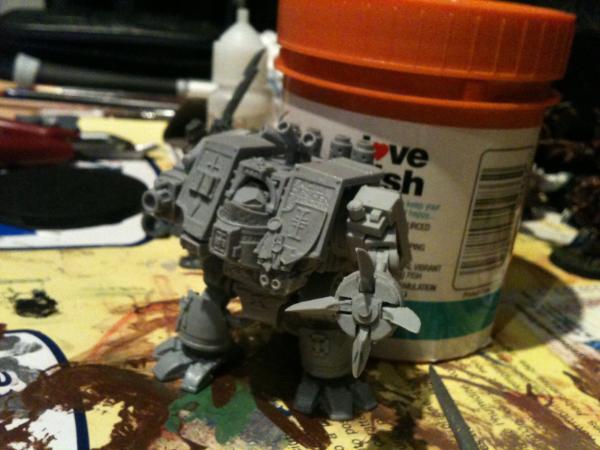
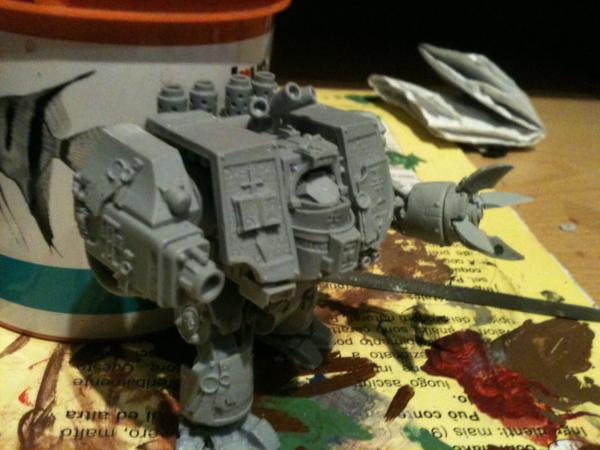
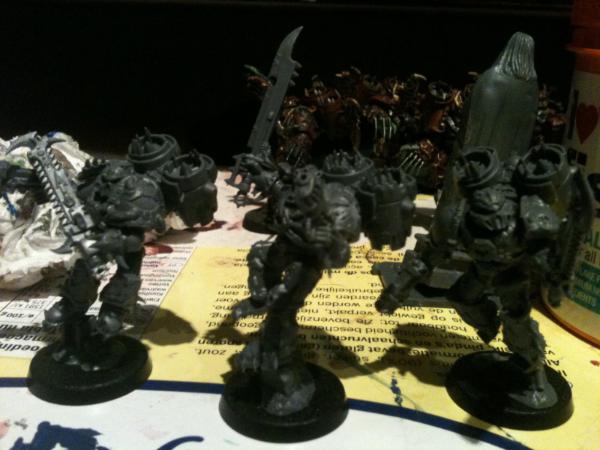
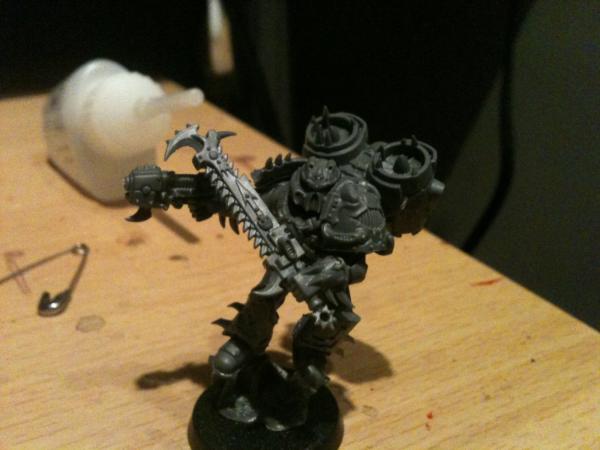
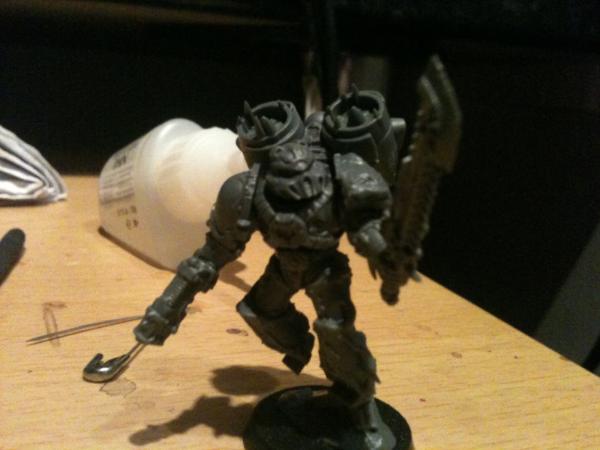
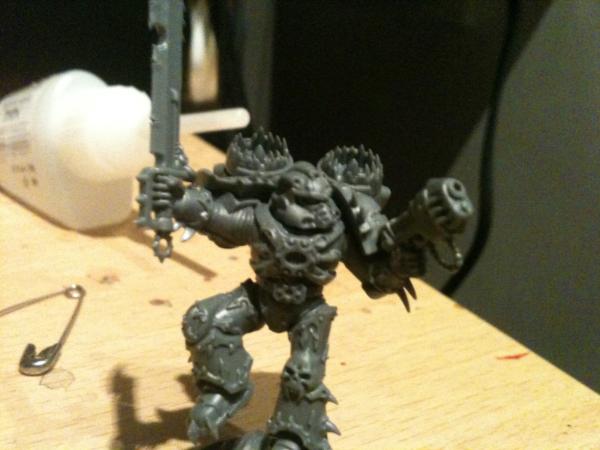
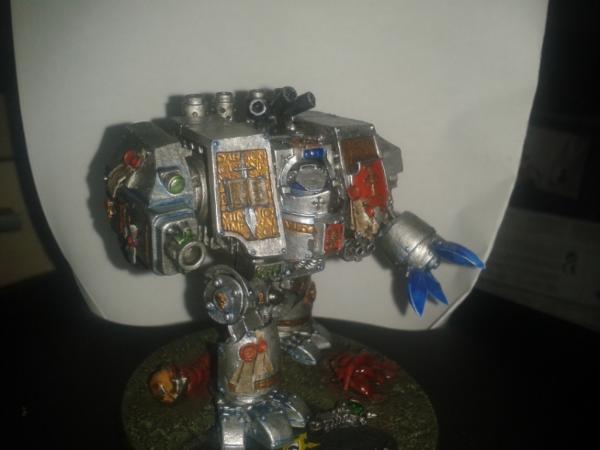
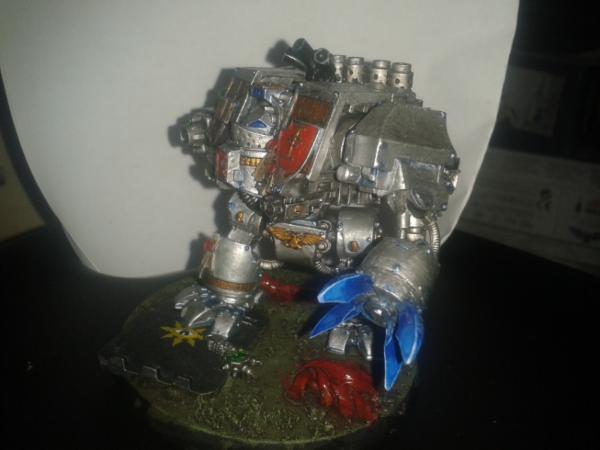
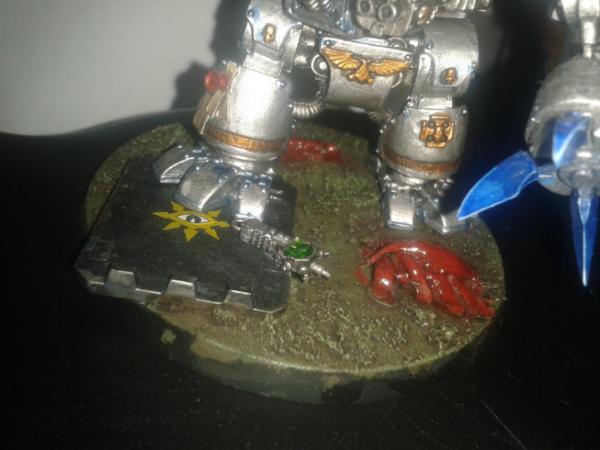
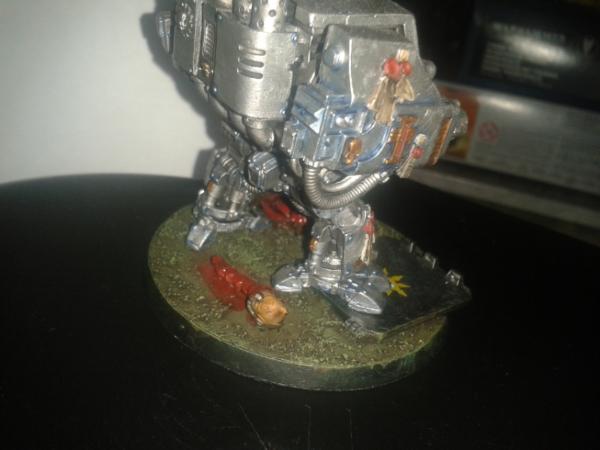
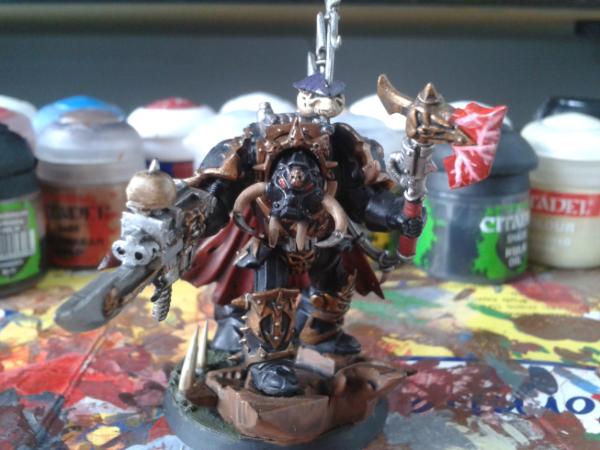
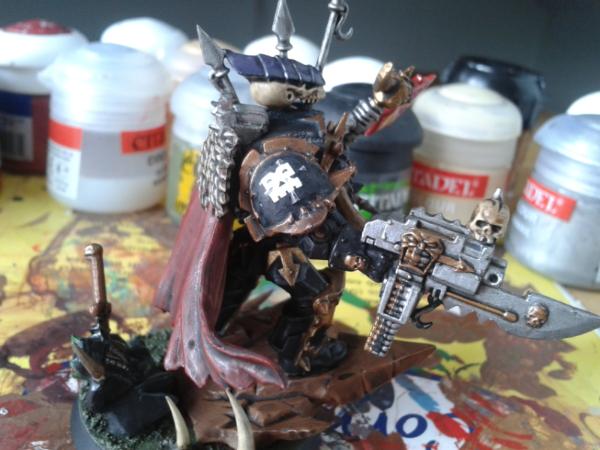
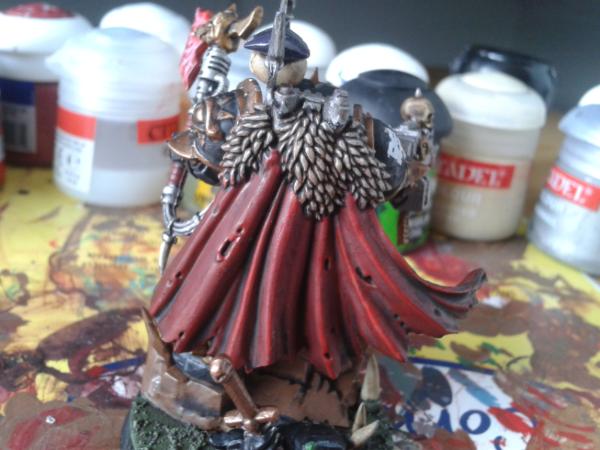
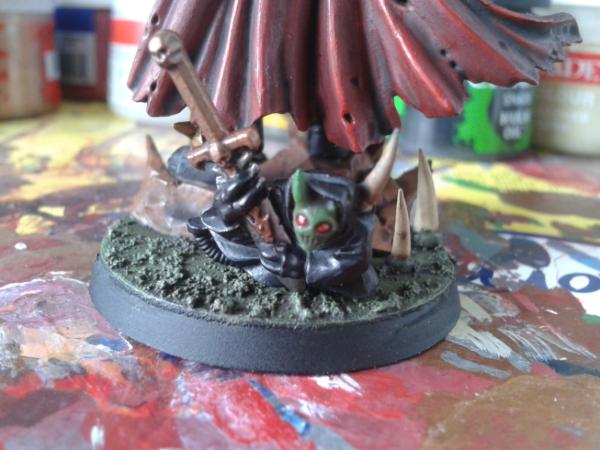
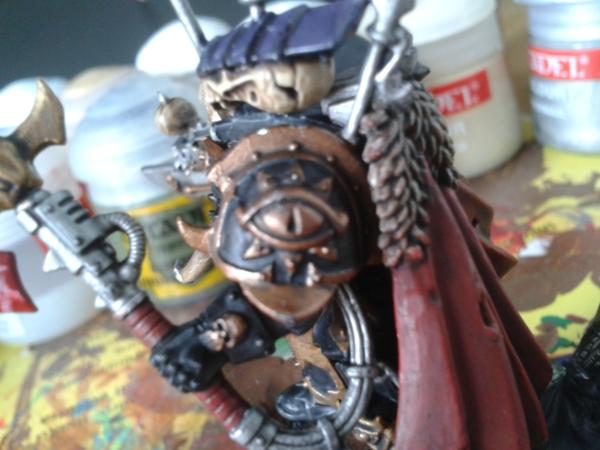
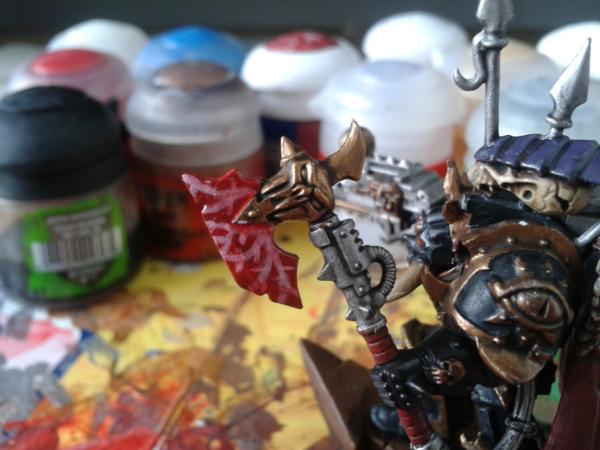
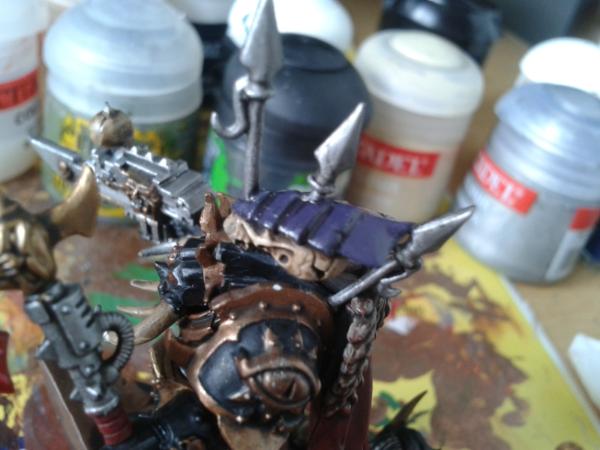
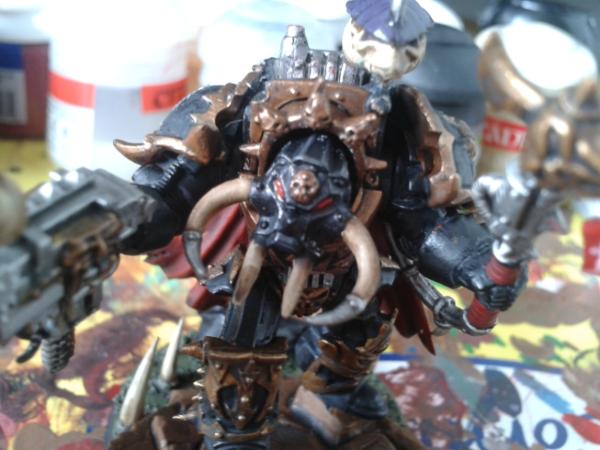
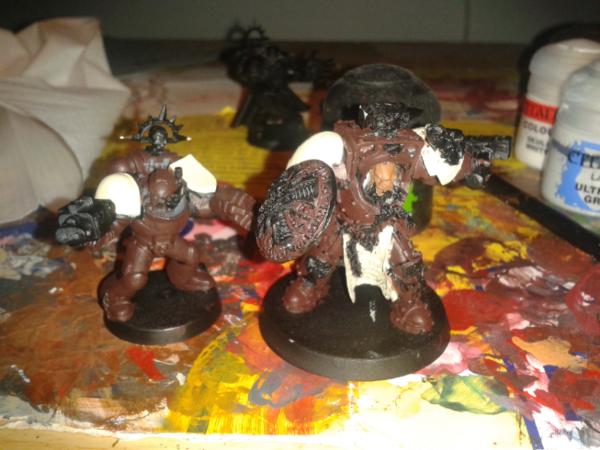
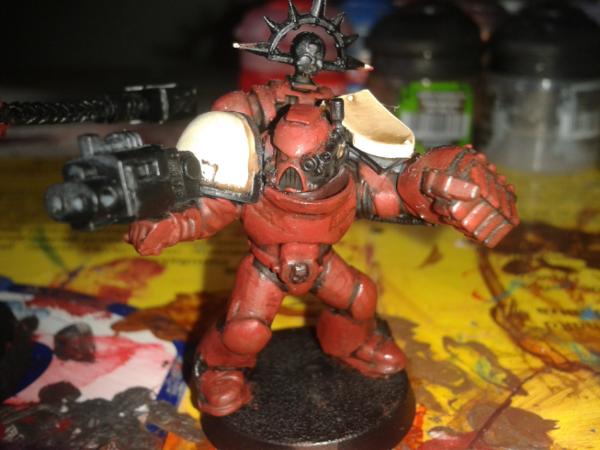
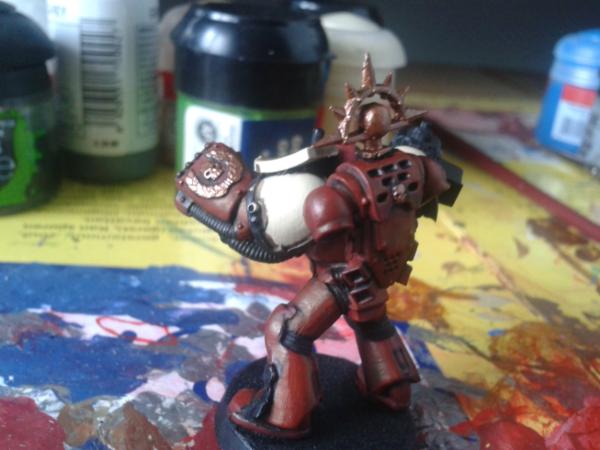
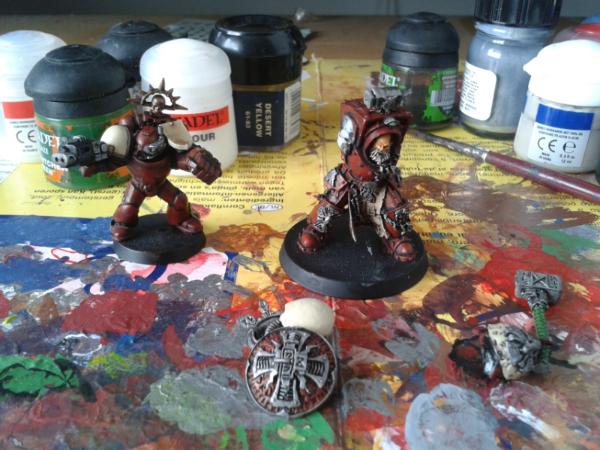
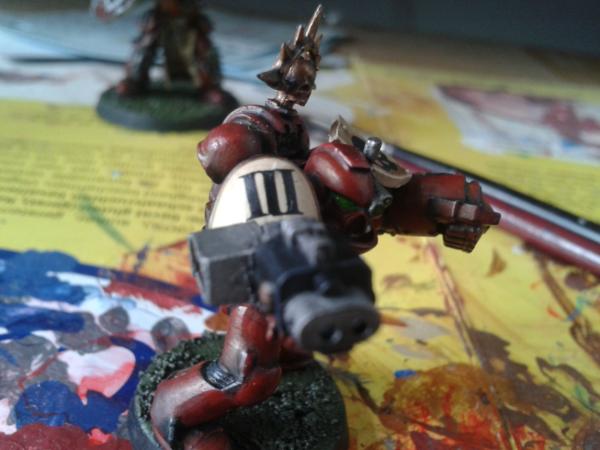
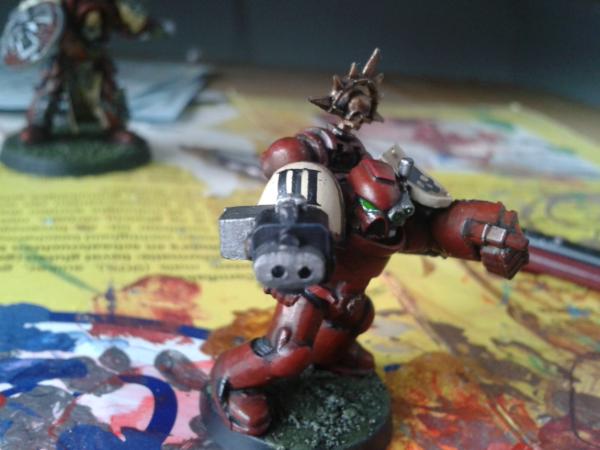
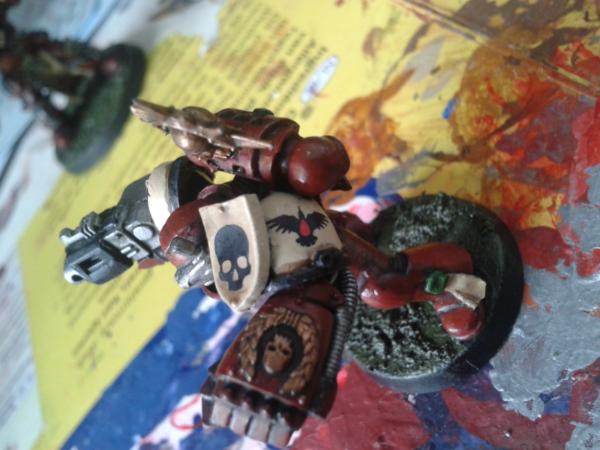
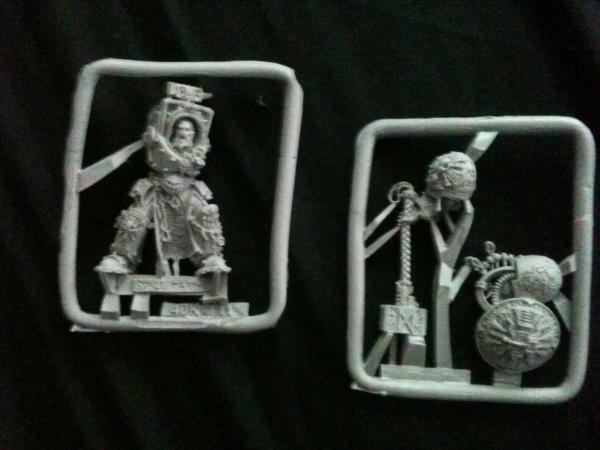
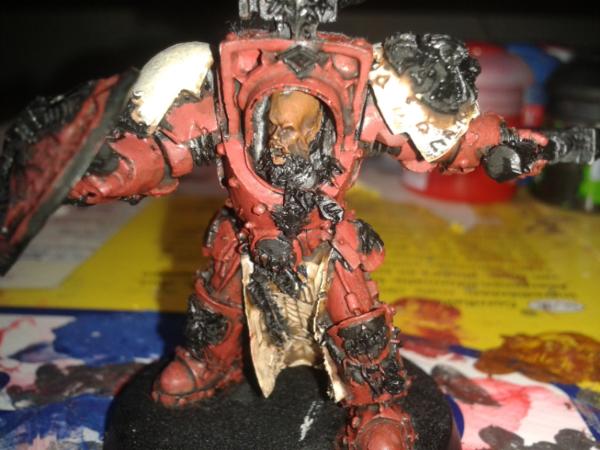
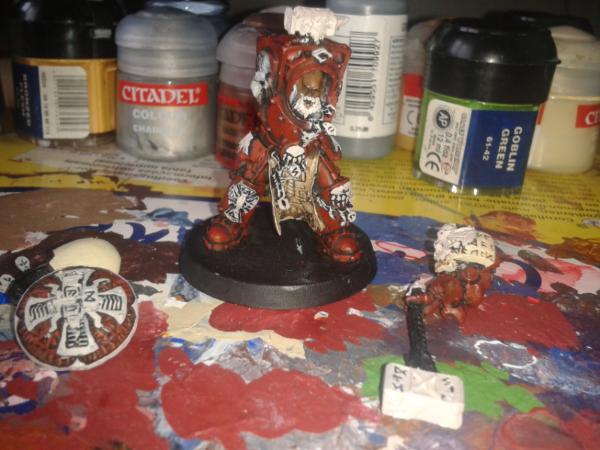

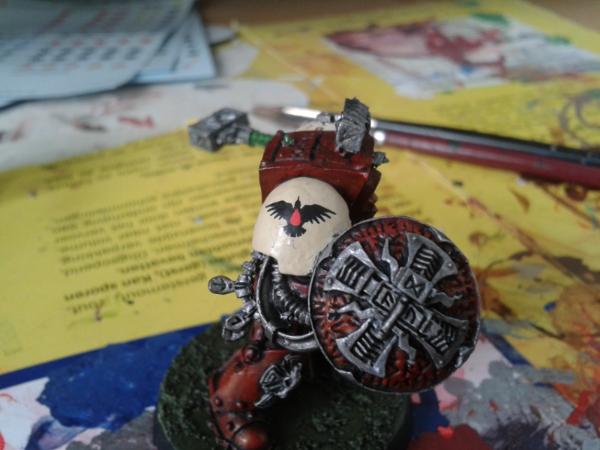
 ), but I am going to finish this project if it kills me, and tjhat is to own all Space Marine Specvial Characters (not including the Black Templars, I still think they should have their own codex).

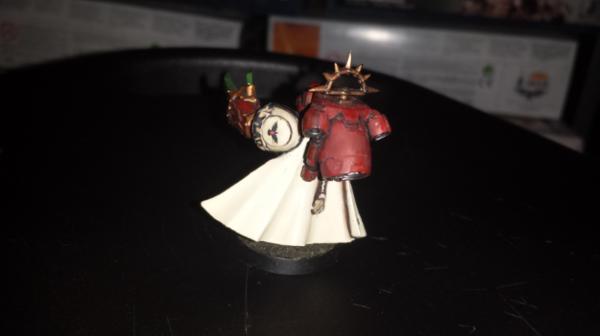
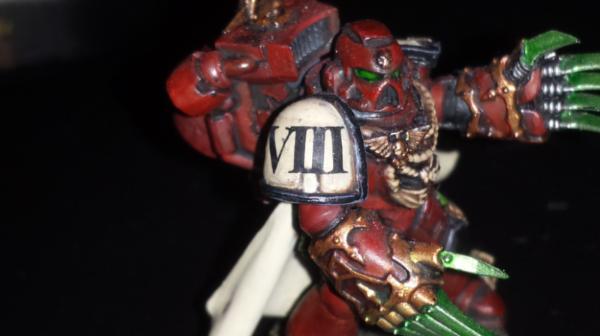
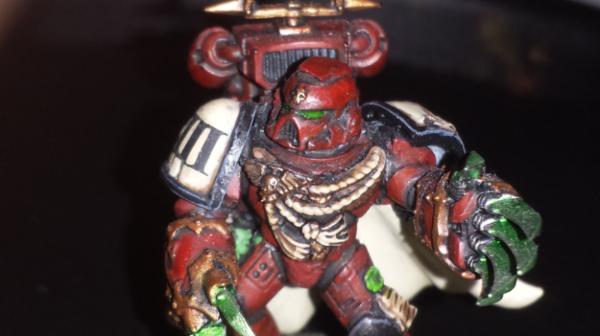
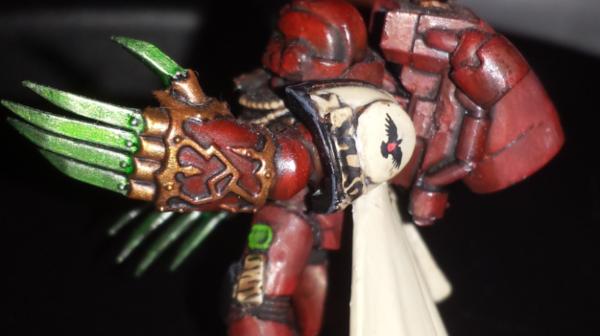
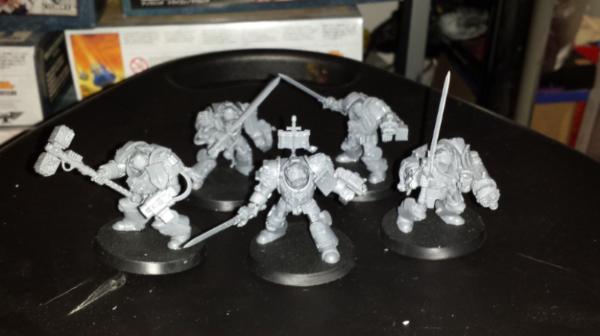
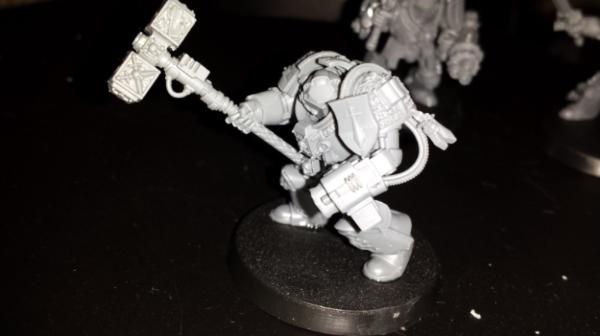


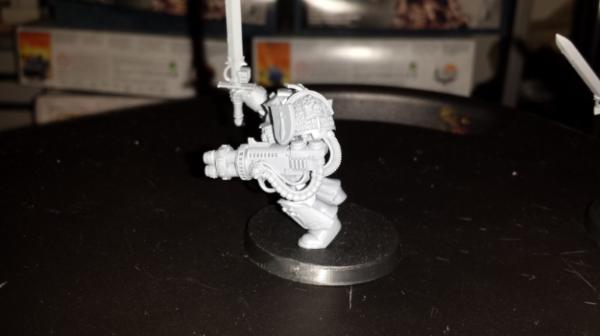
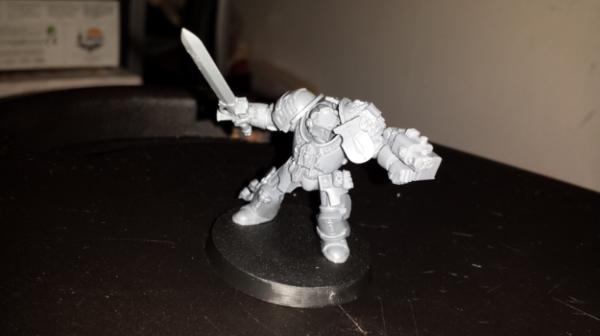
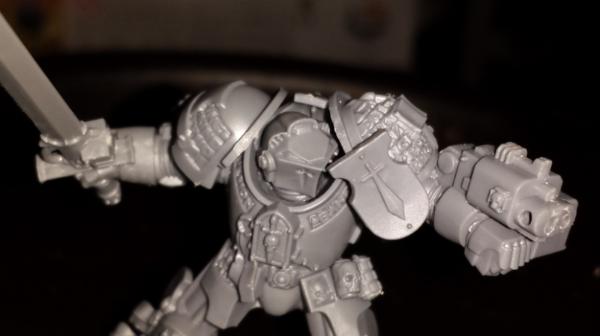
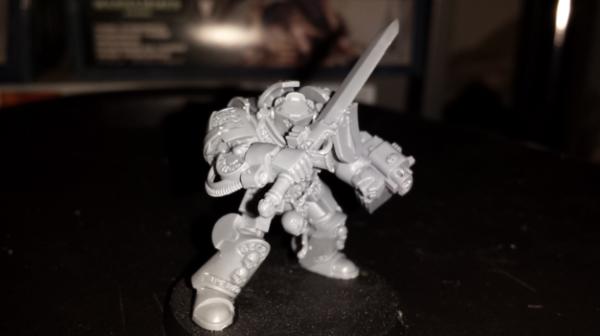
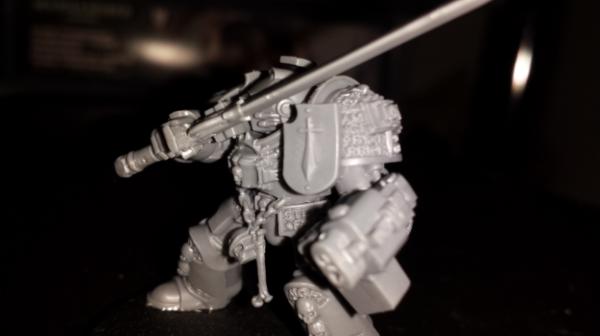
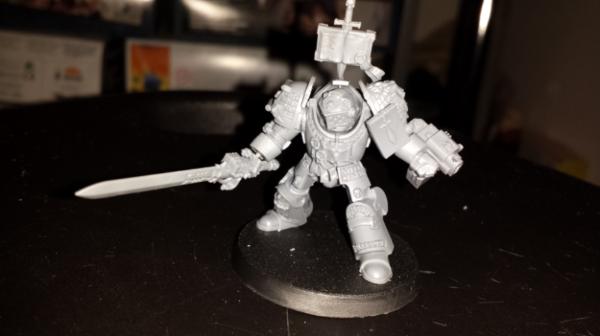
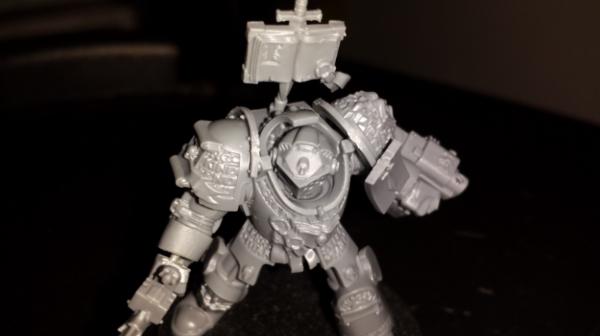
 on the sword as well.