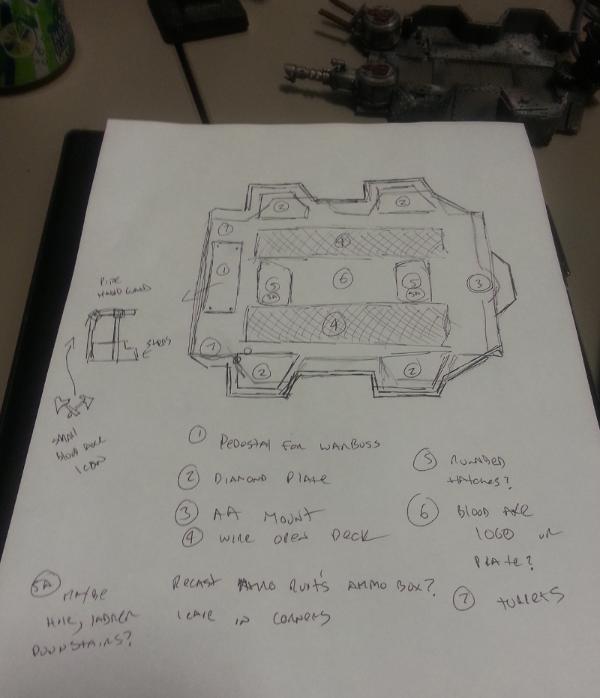
So, I was flipping through IA:A2, when I saw this totally sweet Kustom Ork Battle Fortress.
I was immediately smitten. Look at that thing! It looks like an angry fist, ready to rip through the lines of anything that stands in it's way. As I admired it, I considered. They don't make this kit, AFAIK. I can't buy it anywhere.
I thought some more.
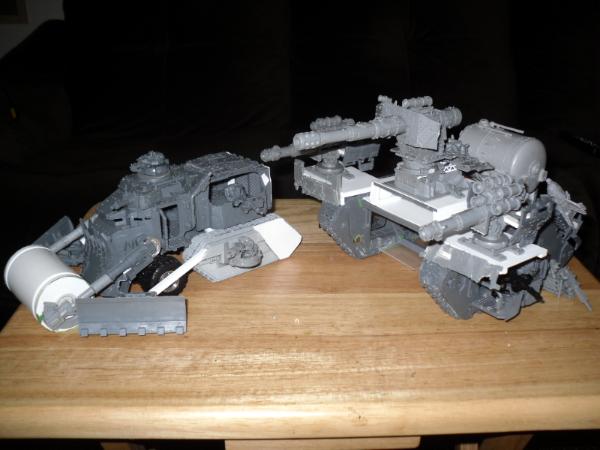
I already have a Supa Kannon that I haven't built, as I had no carrier vehicle for it.
Dare I dream?
Could... could I build something like this?
No, probably not, I thought.
Well, barring that, could I spend a bunch of money on yet another project I won't complete?
Surely!
And could I post a worklog on Dakka Dakka, to which many people will view, and comment muchly upon, and then slowly become more and more disappointed as they realize I'm rarely able to finishmyprojects?
Let us begin!
So, I started with these here plastic I-beams.
I made a box skeleton using these. I didn't take a picture of this, so imagine this:
But....
Made of plastic.
Speaking of, I knew I'd need a lot of styrene for this. I stopped at Lowes on the way home, got 2 more loctite superglues, and one of these signs for five bucks. I did some quick testing and was pleased to discover, no prep needed, just cut and use - plastic cement has no problem welding it together even over the printing. .
So they I cut a tank side shape out of cardboard. Then I repeated it 5 more times, and glued them into 2 sides, 3 sheets thick, the whole time thinking I should have also gotten a sheet of plexiglas for another 2 bucks and saved myself a lot of sanding and gluing here.
So, I glued it together into this:
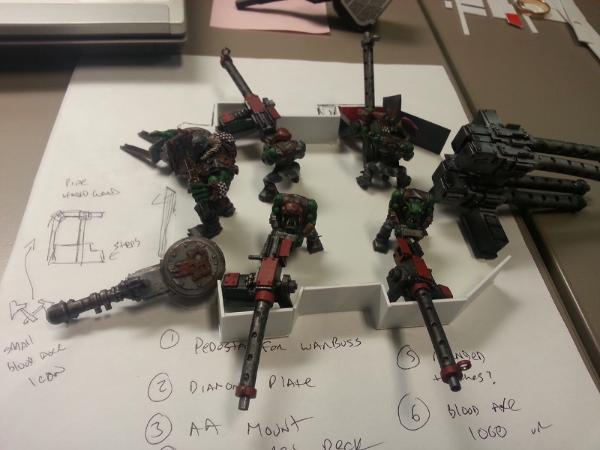
and here's a Mekboy for size reference:
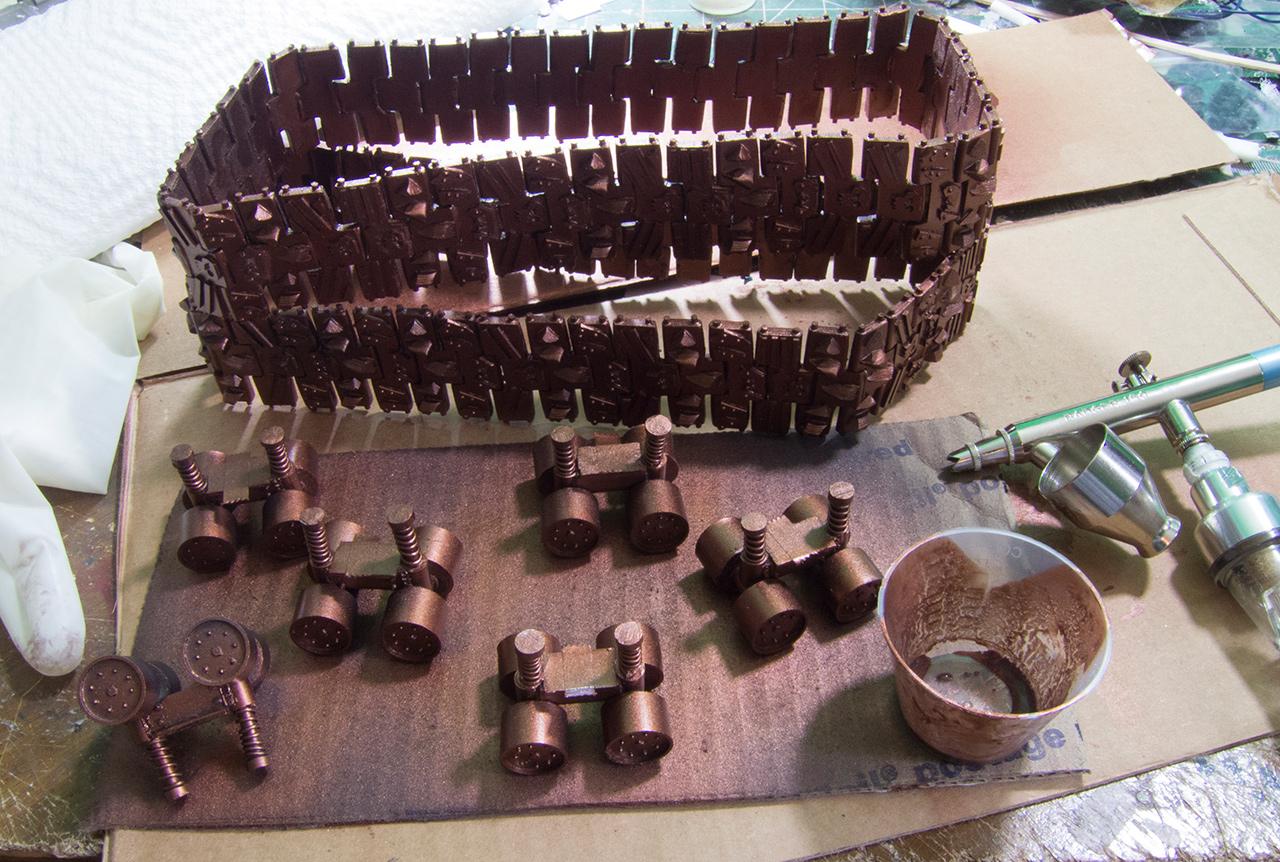
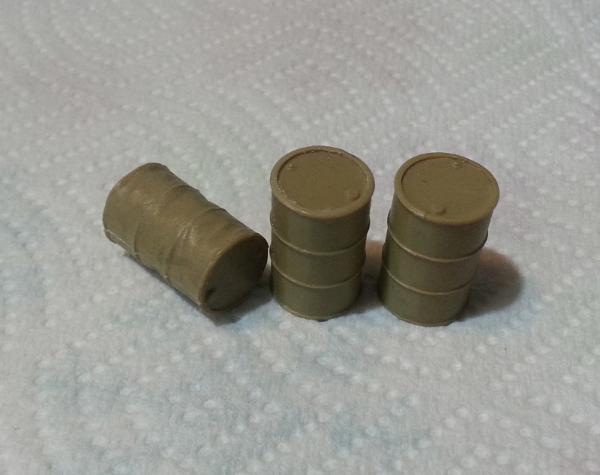
OK, I'm up to the part where I make wheels. I started with wheels:
The top left is a tube made of solid aluminite resin, which I cast at some point in the past in case I needed rods that thick (that's what she said). The one to the right of it is the same tube, but adorned with rivets where rivets were, and a center bolt. The rivets are were made of water filter beads, but they came off when I demolded it. I probably should have taken a picture before I cast it, but... I didn't. So, pretend. The ones below it are actually the tops that came with my needle-free syringes: they come in single--serving syringe tubes, and the top flips off and you take the needle free syringe out.
You can get the syringes for 10 cents each if you buy a whole box on Amazon (and you should if you use resin, since it's a godsend for measuring without spilling your giant bottles), but I don't see the ones I got with those tops anymore: so maybe find a junkie or look for a soda bottle or something. The rest of the rivets are hex bolts from Tichy Train Group.
Once these were done, I made a mold of them.
That's the mold, yes. Once I made 3 more of those little wheels, I cast a lot more of them.
Like, a lot more. I figure I need at least 16 each, right?
Then I made this bogie:
And that's where I am right now - I need to get the bogies finished.
My original idea was the bogie would be 4 wheels, like so:
but now I'm thinking it might be too wide.
Looking at the Kill Bursta, which is pretty similar in size, I think a single wheel width + slightly offset bogie wide would work best. The treads will already be a little wider than on the KB, no reason for them to be almost twice as wide.
I'm an RJE operator for a company that makes farm equipment (think green and yellow). My day consists of watching automated jobs on a mainframe server that's older than I am, and if the job crashes (or more accurately, abends, for ABnormally ENDs) then depending on the job, I either do nothing, or restart it, or call an analyst in the morning and tell them, or call an analyst immediately, even at 3am on Thanksgiving (this actually happened). On a slow day I can watch 3 movies in a row (pausing only every 30 min to do a 30 second check), and on a busy day I'm going pretty nuts, but the former is much more normal then the latter - it's usually very quiet unless the network breaks. It's pretty cush all in all, but it is complicated, and now that I work in the day I'm getting way fatter because it's totally sedentary and there are tons of fast food places around here. I've worked here for 7 years, but up until to 2 months ago I worked doing something totally different (night helpdesk'ing) and my hours were 11pm to 9am - so nothing was open, so I couldn't just, like, have a giant ass sandwich delivered (which also just happened). There are increasingly rumors that we'll be able to work from home this year, something I'm truly hoping for, even though I know I'll probably just get even fatter, quicker.
I mean, there's a rib place 100 yards from my job. Ribs.
sonofruss wrote:Nice start on that beast. my scratch build supa fortress started out as a building and a landraider.
Do you have pictures of this? I'd love to steal all your best ideas see them and get some inspiration.
I cast a few more bogies last night, I should have 4 and I think I need 6. I'm going to go single width I think, with double wheels.
Also, I don't know if there is a better way to do this, but I'm planning on just, like, making a track by hand, then making 2 or 3 more, and then making a mold with however many pieces I made and recasting them until I have as many links as I have. If there is a faster or better way to do this, I'm all ears....
No picks of it for some reason the card reader on my laptop stopped working so the only cameras i have is an ipod touch or my blackberry that can't transfer anything i will try with the ipod tho.
Sure, even if the pics aren't so great I'd like to see them.
I just finished 3 treads and got them into a mold. I'll demold them in the morning and take pics then; I might try and make more then 3 links first. I had a 4th one but I kinda messed it up, it was the first attempt and I decided with all the effort I'm putting into this I'm only going to use the stuff that came out right, not the sort-of-OK halfass parts I make.
Also, if this winds up coming out quality, I intend to ask a mod to move this to the larger forums when it's done (or almost so) so keep that in mind if you don't want to post stuff. I thought I'd keep it here for now in case I screw it up or abandon it, which seems to be what Yak's post says this area is for.
Lol I don't have a prob looks like they came out ok and I will spoiler them so they don't bog down the page The tower comes off and yes it will easily fit 20 boys lol it could fit 20 mega nobs.
Good idea (about putting it out in the larger forum) when it's getting ready!
Have you talked to Wehrkind about casting? He's my go-to guy if I ever need something cast and knows a lot of tricks. But the way you're going about it sounds like the right way to go to me.
Jeez, that's a pretty incredible battle fortress, sizewise. What did you use for the Deffrolla tube and caps?
So far as casting, I haven't talked to Wehr or Jacqualine or anyone since I'm only using simple, one-piece molds for this. I'm not a great caster, but I'm competent enough for that - it's double-sided molds that give me problems, and I'm not using those here and probably won't.
Here are the treads:
I had a bunch of errands to run today so I couldn't build any more original ones, but I did get out 2 casts of the 3 I did. I'm not sure how many I'll need in the end, I should probably figure that out at some point.
I also need to figure out more tread patterns to use.
This is hot. Likin' it. I also concur that moving it out to the general forums once you're happy with it and ready for release into the larger world is a good approach. When I did my big "learning 6th" thread, I later re-posted some of the more detailed battle reports in the main forums with a bit of cleanup.
The end caps are old jerky chew containers and the roller is 2" abs tubing need to get another pack of brass tacks to rivet it up and add the gun that comes on the GW deff rolla sprew to the tower.
Nothing groundbreaking today, just more slogging along.
I'm starting to be concerned I made the treads a little too wide.
If they aren't too wide, they're certainly on the outer edge of the "OK" envelope. On the other hand, after seeing that guy's double-wide rhinos, I'm not so sure, since the wide treads look pretty awesome on his.
I am considering doing something with the body to balance it out, though I haven't decided yet. The cab is going to naturally lengthen it a little anyway, and maybe I can put something in the rear to lengthen it even more.
Otherwise, I just made more links today. I made a new moldbox, and created 3 new links - only one of which worked out, the other were all misshapen somehow - and realized I could fit 4 in the box instead of 3, so I can bang out 7 at a time now. I also slightly rejiggered one of the existing ones, so I should have 5 unique tread patterns.
Subbed w/ respect. I admire scratch build skills, and you have them aplenty. Looking forward to seeing what is coming next.
Also, regarding the ink- have you spent any time (military or otherwise) in a Polynesian / Pacific Rim location? Doesn't usually see Koa fish unless someone has.
I had done around, I don't know, about 20 track links and felt pretty good about it. So I did some math - 6.5" bottom, 8" top, and about 2.5 and 3" on the sides and determined that each side of "Daisy", after subtracting what the deck will cover, would be about 16" or so - 32" of track total. Since each link is about half an inch, I need 64 links, plus a fudge factor for the inevitable screwups.
Luckily I'm working 11pm to 11am tonight, so, like a boss,
With the ones I had previously made, that should be adequate.
I could have made a larger mold, with say, 10 links in it, and made it faster. That has it's own problems, though - I'm using Alumilite instead of Tap resin. Alumilite has some distinct advantages - it's cheap, I can get it retail here, and it's very forgiving on the ratio - it's about 50/50, but if you're off a little it's fine. The only issue is it kicks really, really fast. The Tap resin starts to kick in about 10 minutes or so and can be demolded in around 30 minutes, and can be sanded & stuff in around 45 min - it will be as rigid as it's getting. The Alumilite, on the other hand, starts to kick in about 4 minutes and can no longer be poured within 5. It can be carefully demolded in around 12 minutes and can be sanded & such in about 20, depending. Larger batches kick faster and harder - those big wheels started to kick within 3 minutes and were sandable within 12 or so minutes, there being that much more catalyst present. So, it was great for getting a lot of work done fast, but any larger of a mold and I wouldn't have had time to pick out the air bubbles with a toothpick before it started to kick. At home I guess I could have blasted it with a heat gun but with my crappy electrical infrastructure I'd probably pop a breaker, so whatever.
That brought me to another point - in addition to what's pictured, there are another 7 or so that I have in a baggie to test when I get home with primer. They're bubbly, and it's my fault. Some of you guys know about resin, so you can skip this part. If you don't know about resin, it's hydroscopic - it will absorb water from air. If it absorbs enough of it, it starts to bubble up and look like crap. At that point, the resin has gone bad and needs to be replaced - all resin has a shelf life when you open it. With my casting habits, this is usually about a year or so. You can extend it by, after using the resin, spraying a gas blanket inside the bottles to keep air off it, which I do at home.
Anyway, I poured out 30cc's of resin and catalyst into little medicine cups instead of using straight from the bottle (which have dropper tips). By the bottom of those medicine cups, the catalyst had absorbed enough moisture to (maybe) ruin the casts. I say maybe because the bubbles obviously go up, towards the part of the tread you can't see anyway - the bottoms look perfect. I'll prime them and see how they look; but one of my rules for this project was no half-assing anything and calling it good, so I'll toss them if the primer reveals bubbles.
Mostly this little essay was an excuse to use the word "hygroscopic".
Skalk Bloodaxe wrote: Also, regarding the ink- have you spent any time (military or otherwise) in a Polynesian / Pacific Rim location? Doesn't usually see Koa fish unless someone has.
No military, and no exotic travel. My dad was a big koi keeper, and so am I. I've kept them for about... 6 or 7 years, I want to say? I built a pond pretty shortly after moving to Iowa, where I finally had land with which to do so. Anyway, my dad died about a year ago, and I got that tattoo to commemorate him, since it was really the only thing we had in common (it was a really broken relationship, but that's a whole other thread).
A.) Styrene, cut from "No Parking" signs I got at lowes, or
B.) Alumilite, which is a kind of resin I'm experimenting with over my normal Tap Plastics Urethane. Again, I hasten to add that the kick times posted on those products totally don't match the reality I've seen: the Alumilite kicks a lot faster then the Tap.
I put in an order last night for some textured styrene - diamond plate, grille, corrugated. I'm getting ahead of myself, as I still have lots of structural work to do yet. I also got some clear styrene sheet for maybe some windows in the cab.
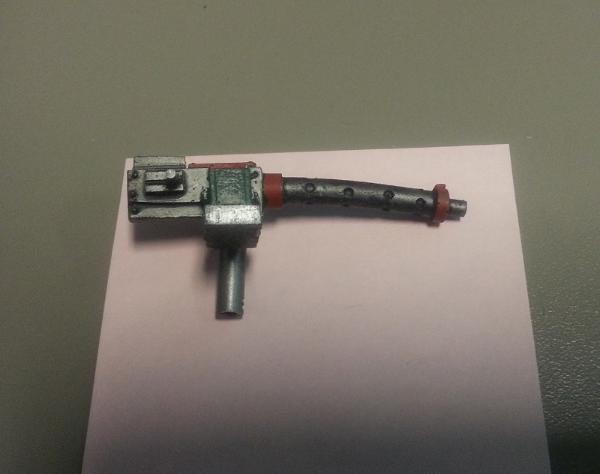
While waiting for the textured styrene to arrive, I made a gun barrel using this tutorial by wazzoo2000. I don't have the styrene tubing available in the sizes he did, so I used some brass tube, and I wrapped some tamiya masking tape to fill the gap. I then created a mold of it (the tape pulled off when I demolded it, but the cast was fine) and made 4 barrels. Eventually these will go to the anti-aircraft gun on top.
I kinda wish I had gotten a picture a.) before the bottom unraveled, and b.) I dropped it on the floor and it picked up all that dog hair and dust. Oh well.
I don't own the 6th edition rulebook yet (still!) but my understanding is flyers are a big deal or something, so maybe anti-air is a good idea. If not, it's cool looking, so either way it's a win. I haven't get made the guns themselves, just the barrels.
The styrene arrived. As usual, my poor grasp of scale screwed me on this.
The leftmost one is the diamond plate I ordered, which I totally cannot use for anything because the scale is too large. The next one over is the corrugated sheets, which have the same problem. The next one over is probably OK. Finally, we have some double diamond plate I got on a whim at Hobby Lobby when getting dullcote, and was kicking myself over wasting money on it since I had the other stuff coming in the mail. Turns out that worked out really well since that's all I can use. I don't know what I'll do with the other stuff, maybe give it away to another DCM or something. Anyway, that will be the top deck, and inside of the cab, as well as random extra orky armor.
I created the springs atop the bogies by hand. The curled wire was too tight to be able to demold, and when I made another master with a less-tight curling, I realized since I only need 12 I can probably just make them in around an hour, rather than wait for a mold to cure and recast. So I did that. Here's what I have so far, when I started work this morning:
I mounted the bogies onto some styrene H girders cut to size. I also discovered that if you spray kicker near blu-tac, it melts it into a huge mess.
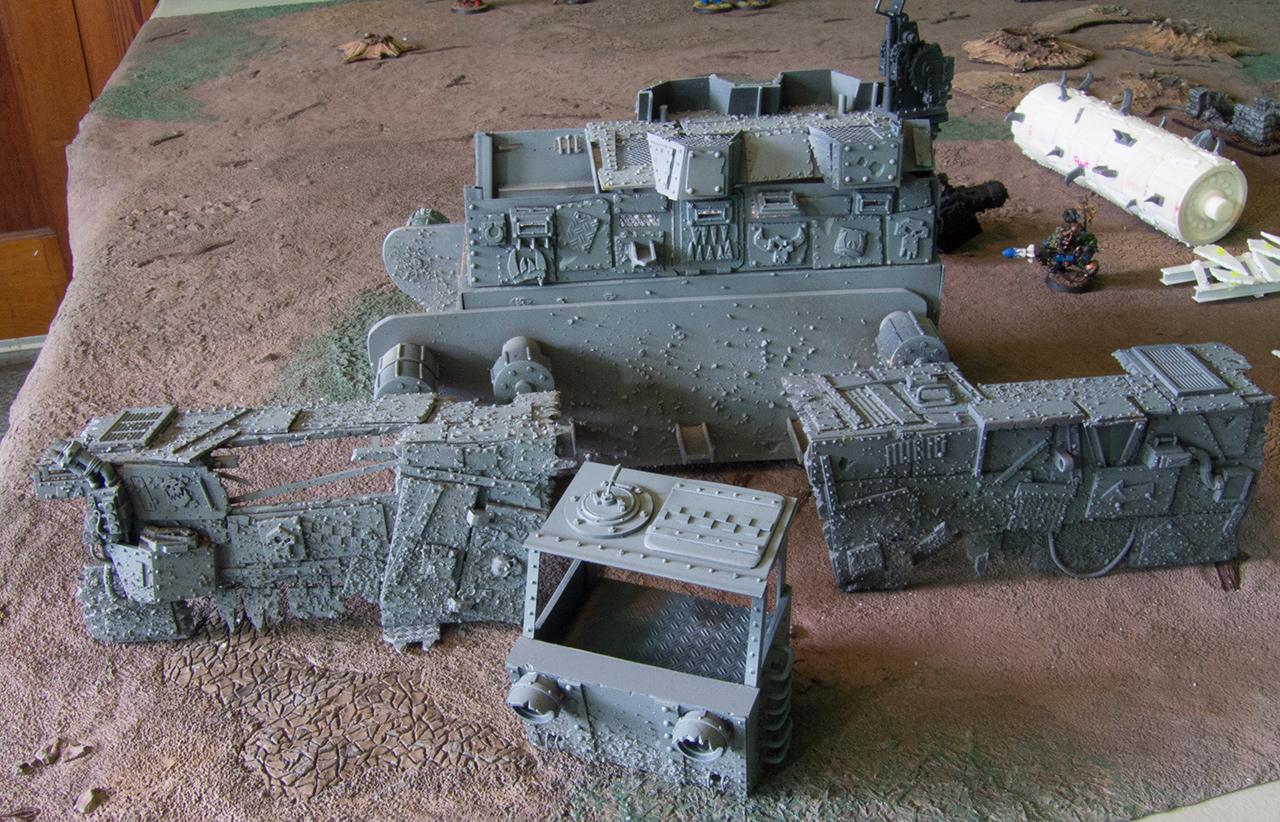
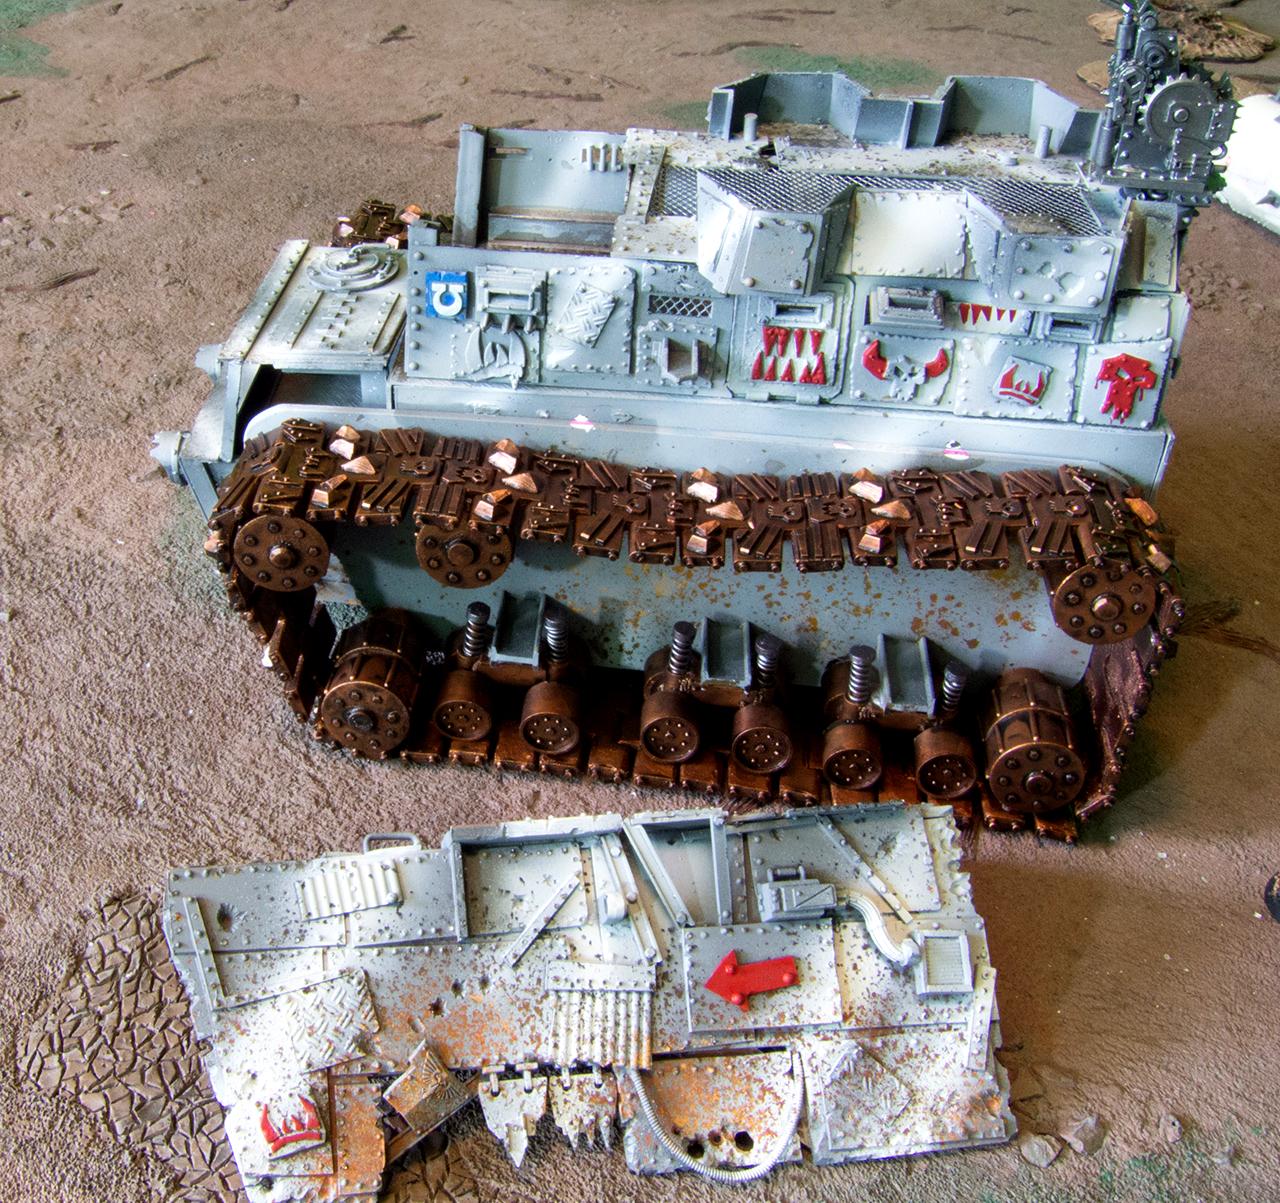
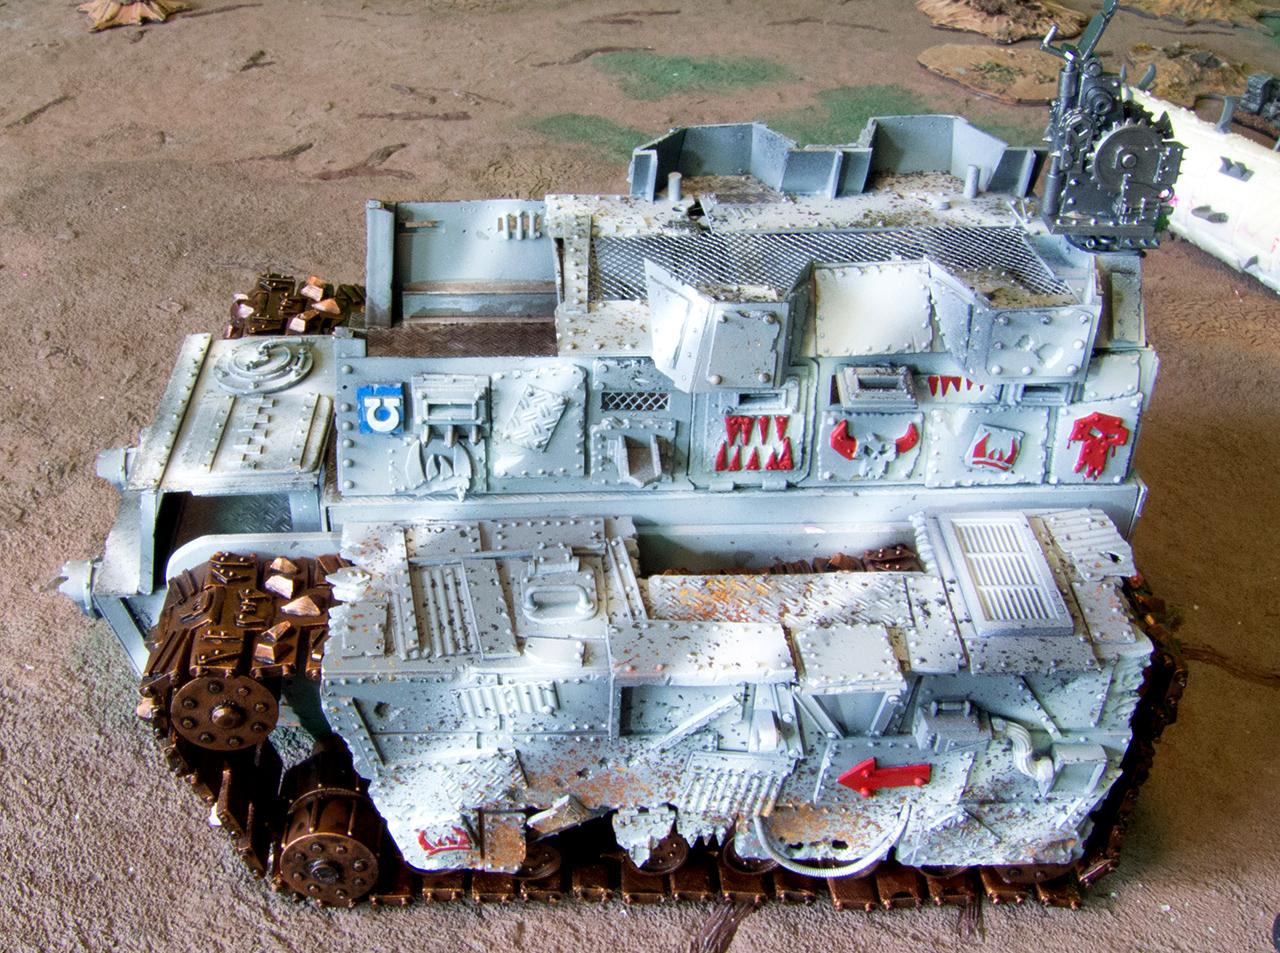
Side & frontal views of the tank:
I made the sides and track guards. I wanted track guards because a.) they're in the inspiration pic, and b.) it would keep me from having to make that many links. Since I wound up making a bajillion links anyway, and the links look pretty pimp, I'm wondering about omitting the track guards.
And with a Mek for size reference:
The sides reall cover up a lot of my hard work, so I plan to cut some holes in them and then haphazardly cover the holes with armor plates which reveal the bogies and stuff beaneath. Or maybe I'll just shorten them some, I haven't really decided. Also, maybe sponsons? It looks kinda land-raidery already, more than I expected, but I imagine the cab will fix that up.
I have a really hard time staying on task for this sort of thing. Either I run into some sort of technical or conceptual problem, or I get sick of seeing it and move on, or I get shiny syndrome and start building something else. In this case I'm feeling a little of both the first and last items. I don't really know exactly how to do the cab, although I'm sure I'll figure it out, I mean it's just a box essentially. The larger problem is that I have other projects that are also compelling, along with 40k ADD. Specifically, I worked a lot of hours last month. I worked Christmas Eve, New Year's Eve & Day - so for the last paycheck I have 135 hours - much of it holiday doubletime and OT. I wound up rewarding myself with a Warhound, which arrived yesterday. The urge to screw with it is enormous... I've already washed it, and it's dry. But I really want to get this done first. I'm trying, Ringo.
That's where I am so far. I'll work on the cab next.
I think your track guard is too large, reducing it a good deal with reveal more of your hard work on those tracks. I'd be inclined to construct the tracks in their entirety first then work the guards onto them afterwards.
Since I will also be ordering some of that diamond plate, could you reveal the right side scale for me?
MeanGreenStompa wrote: Since I will also be ordering some of that diamond plate, could you reveal the right side scale for me?
The "correct sized" scale is G-scale, 1:24. That being said it's out the outside edge of the OK envelope. Smaller would be better - O scale, maybe. Check with someone who knows what they're talking about before spending money though, because I'm winging it.
The Lucius pattern - the angled surfaces make it look "more realistic" to me, especially the upper deck. I don't care for the "mouth" on the Jackal (I think they're otherwise identical?).
Also, for MGS there's a thread here on scale that I should have read first (and you should read before you order!). I agree with the last post - G scale is definitely too big for parts. Maybe OK for terrain, I dunno.
Yea for scale use O scale for tread ladders stairs ect. G scale works for some things and Ouze remember you arn't "building the wagon Orks are They will use whatever they find to build their toys.
I'm off today, and up after sleeping 15 hours straight. Kind of impressed by that, to be honest. I think I caught up on sleep all the way back to Thanksgiving.
I started putting the links together.
I had a concern, here. Keep in mind my experience with Alumilite is very limited, this is really the first project I've done with it. When I was doing the rearmost tracks, the front bit slid off. Instead of them snapping, the just kinda...bent, slowly. The whole assembled run kinda has a vinyl-y feel to it. I'm going to paint the tracks separately anyway, and if they paint doesn't take the way I like it to, I might redo them with with a more reliable resin. I have all the originals, I have molds already done, it would just take a night of work while at work anyway. But I'm getting ahead of myself - they might work out just fine. No need to be all doom and gloom yet.
I also did one of the sides tonight, just about. I need to add some more wiring and such though.
I didn't do the riveting yet, that will come last, but you can see how it's going. I think I screwed up a little with that little hatch - it's pretty far forward, and there is supposed to be sort of a sponson-turret kind of thing pretty close to that. It won't take much effort to rip it out if need be - the handle's a little big anyway.
The more this progresses the more it's kinda diverging from the reference design.
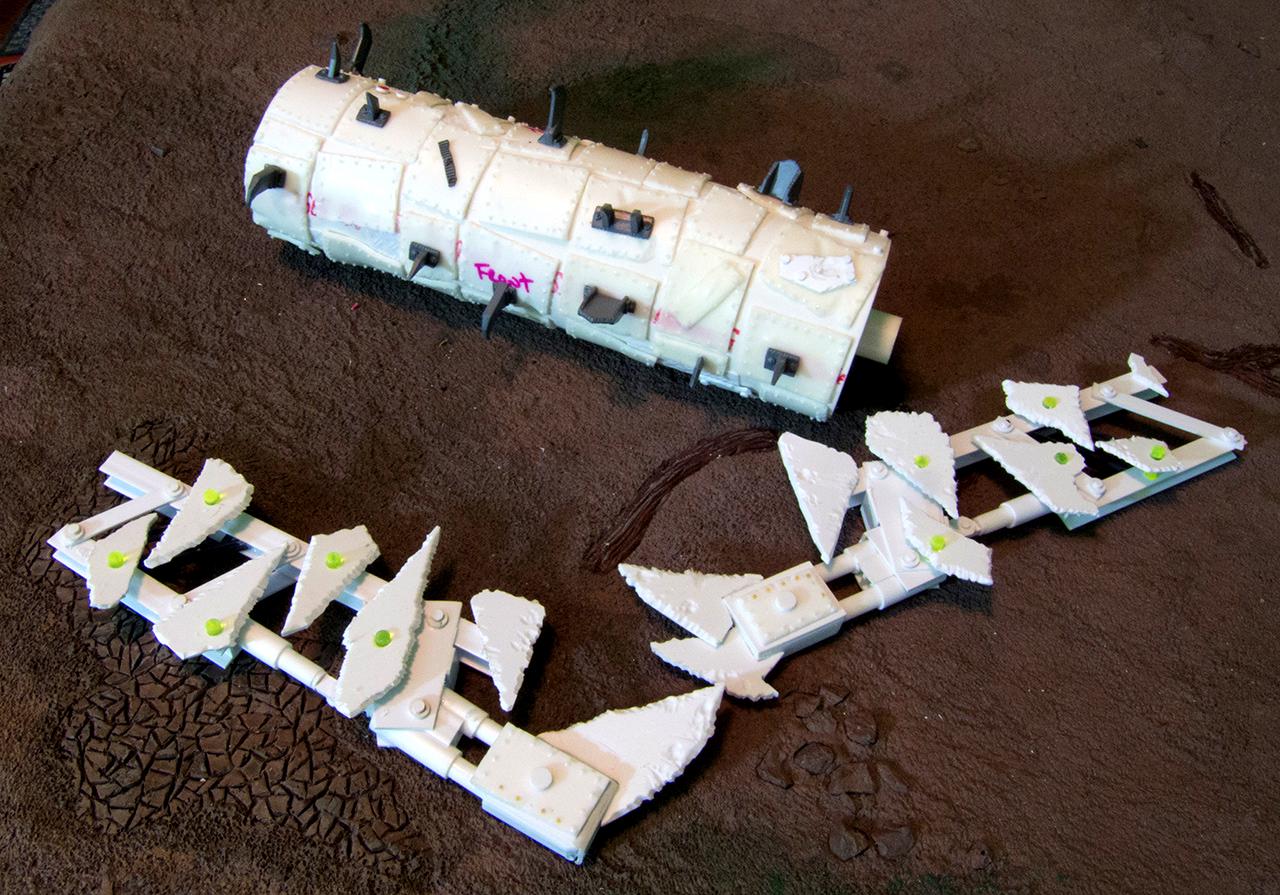
Here's a frontal view of the treads, with a size reference:
I also started work on the cab. Not too sure about how I like this so far. It's vaguely Thunderhawk-y, kind of.
Going to go do random stuff now. Watch Shameless, at the very least.
Also, I found a few more of those old syringes with the caps on I used to make the big wheels! I need to take a picture of those.
The more this progresses the more it's kinda diverging from the reference design.
Such is the ork way, I never thought it would look the same as the original but start to develop a mind of it's own almost as soon as you started. I think it's looking great and it will come together a great deal once it has a symmetry of both tracks fitted.
Perhaps, but I can take a strong guess at yes, or a ram or something... Because it will be fun to make and because you can give it a very aggressive profile that way!
I was looking around the house for a tube to use to make a Deffrolla today. I guess I'm no longer exactly building what was in the reference image at this point, I might as well continue my journey into I-don't-know-where-this-is-going.
I did find some really cool glyphs in my Stompa's box. I found them after I took these pictures though, so they'll be on for the next set. I also again forgot to take a picture of those stupid syringes.
I did the right side tracks, and most of the right side armor. I did agree that the track covers were too big, so I degraded them a bit and tore some chunks out. I also realized during a test fit I don't have enough links after all - funny how that worked out. My math was right when I didn't expose the top parts, which you now will be able to see. No big, I have the molds, I have resin, I'll just cast up some more. Maybe a dozen more should do it or so.
I also used up just about every single wheel I cast, even though I thought I had extras. I used a bunch of them as spacers for my now-wider tracks. I also am wondering if maybe I need more wheels in the front of the tracks. I need to look at some tank pictures this week and decide. I'd love to make one of those um, tank wheel gear things
a tank wheel gear thing
yeah, that thing - but I don't know how. My track links are pretty irregular so it might not look good even if I did make one.
Ok, so here are the images.
Right side tracks:
As you can see, I've tried taking pictures atop a darker surface. The Alumilite is so blinding white, and the board I was using was very pale, so the lack of contrast made it hard to see details.
like so
Still hard to see specific details, so that will have to wait until they're primed. The fact I'm a totally awful photographer has not helped any. I bought a super fancy camera a few months back; and as it turns out, it's a poor carpenter who blames his tools. My pictures are somewhat better - reading this guide helped more then upgrading the camera - but still fairly bad. Eh. Much like my painting, I got it to a level that was good enough and haven't tried to improve it more.
Frontal view of the tracks:
Right side armor\track cover. Not yet done.
Jesus H Christ. In the middle of posting these images, I just heard this loud-ass flapping. I peeked out the window and there was a damn hawk in my koi pond, big as hell, flapping around wildly; enjoying a bath (and no doubt crapping in it). I just had to yell at him until he left. There's a net over the pond right now since the leaves started falling - do hawks fish? I don't even know. I have to look into that.
Um.
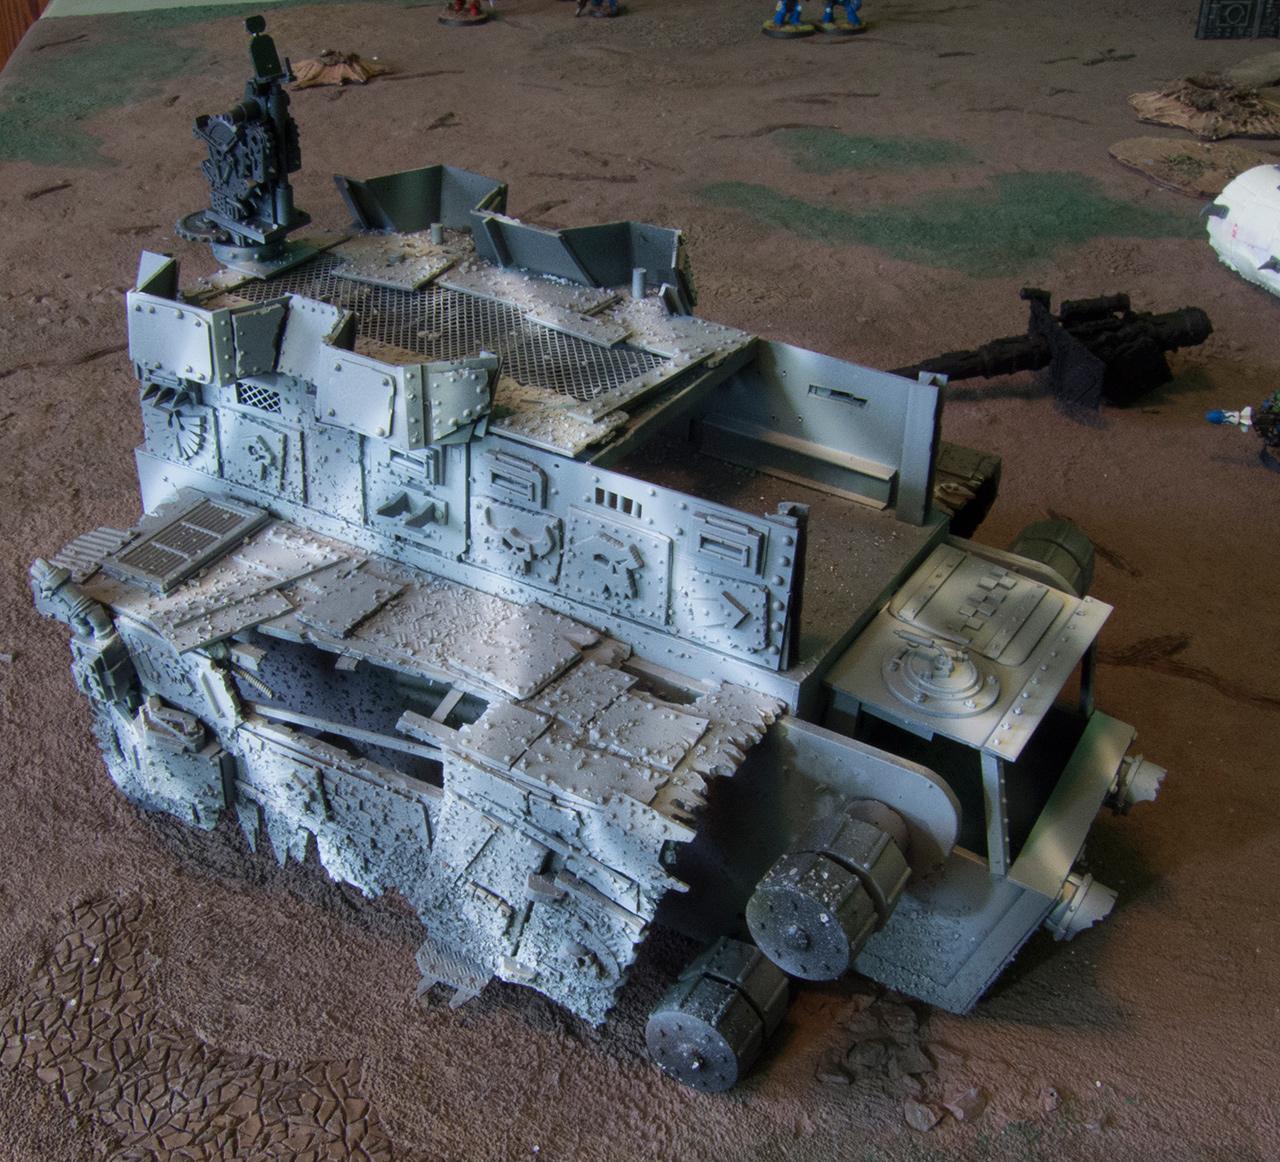
Ok, so. Size reference with a Predator.
So, here is where I am on cabs. Here's the one I've been building:
Here's a premade, which is cheating - but it does look good...
Stick w/ the scratch. You're very skilled and it'll keep the overall scheme more genuine. Plus once it is done you can claim it as 100% yours. I've only built a few 100% scratch items in the last few years and the pride I have for them is equal to the best work I've done on my pre-fab stuff.
Enjoying the progress and looking forward to seeing more.
I agree with the scratch one, but I honestly like the look of the last one. I think it would look cool if you could go all Big Rig on it, and attach something so the cockpit can turn on an axis like a Semi.
Skalk Bloodaxe wrote: Stick w/ the scratch. You're very skilled and it'll keep the overall scheme more genuine. Plus once it is done you can claim it as 100% yours.
IDK about the "very skilled" part - I think anyone with a box cutter, styrene, resin and silicone can pull this off - but the rest of what you said speaks to me. I do like the idea of it being totally build and designed by me, with the only non-scratchbuild bits being some glyphs and such. Well, maybe "design" isn't the right word to use since I'm making this up as I go along.
Besides, I might need that Stormraven. I heard rumors on the internets you can make a Thunderhawk Gunship with 2 Stormravens, and I have a boxed Stormraven plus most of another one (which is what was pictured) that I got on a super lucky auction from Spikeybits for like $8. I don't care much for Marines but I like building stuff. So, maybe someday.
I haven't gotten any real progress on this done since the last post, as I'm at work for the next few days, but I'm trying to think of what to do with it this weekend. I need to build the Flakk gun up, and finish the cab (kab?) and start deciding what I'm going to do with the space on top. It was going to be like the reference design, but you know what else is sorta cool? Evil Eye in the Sky. I'm still leaning like 90% towards battle fortress but I also like the idea of somehow launching Deffkoptas off it.
Ok, I got a little bit of work done today. Not as much as I wanted to, but I had to fix my oven and that took up a big chunk of today's limited free time, which also involved a lot of "sleeping" and "dicking around on the internet".
Here's an offtopic cool story bro:
Spoiler:
My oven every so often won't light. The culprit is virtually always a piece called an Igniter (aka glow bar). On modern ovens, they don't have pilot lights. They have a little valve made of 2 different metals, which is normally flipped close, sealing the gas. When you turn it on, current runs to the igniter, which is a ceramic rod with a filament of carborundum wrapped around it.
No, that's, uh, something else.
Anyway when you apply current to the igniter, it heats the carborundum until it's red hot. That makes the bimetal valve flip open, which releases the gas, which ignites, and the stove turns on (this also applies to gas dryers). Replacing this is sort of trivial - you need an igniter (around $30) and glass tape and about an hour or so (a soldering iron and flux is optional but useful for doing a good job). If you call for service, it might take a week for the tech to show and it will be like $150, so this is something you may want to try yourself. So, that's what I did with today, since the replacement igniter and high temp tape arrived - took out the botton plates in the oven, unscrewed the gas bar, cut the leads, soldering the new one on, tested it, wrapped it up with high temp tape, screwed it all together, done.
After that was done, I went to my computer. I decided that I should order another igniter for next time, so I can fix it right away instead of not being able to use the oven for however long. So, I did that.
I think that was the most responsible, adult thing I've ever done.
So, here's what I got done today after that. These pictures kinda suck, I took them with my cell phone as I was pinched for time and was charging the batteries in my camera that's a lie, i forgot to bring it upstairs and I was too lazy to go back downstairs and get it.
I made a few generic armor plates and then made a mold of them.
I probably should have done that, uh, significantly earlier into this build as a timesaver. I intend to use these for the maybe-Deffrolla. I'm going to cast them with my Tap plastics resin, which has a fairly long working time. When they're soft, mid-Jolly-Rancher consistency, I'll demold them and apply them to the Deffrolla. They'll finish curing with the curved shape I need. I did that for my Blood Raven Terminator Storm Shields and it worked OK.
I also finished the track links, and started working on a top deck:
The left side droops a lot more than the right does. I'm not sure that's undesirable.
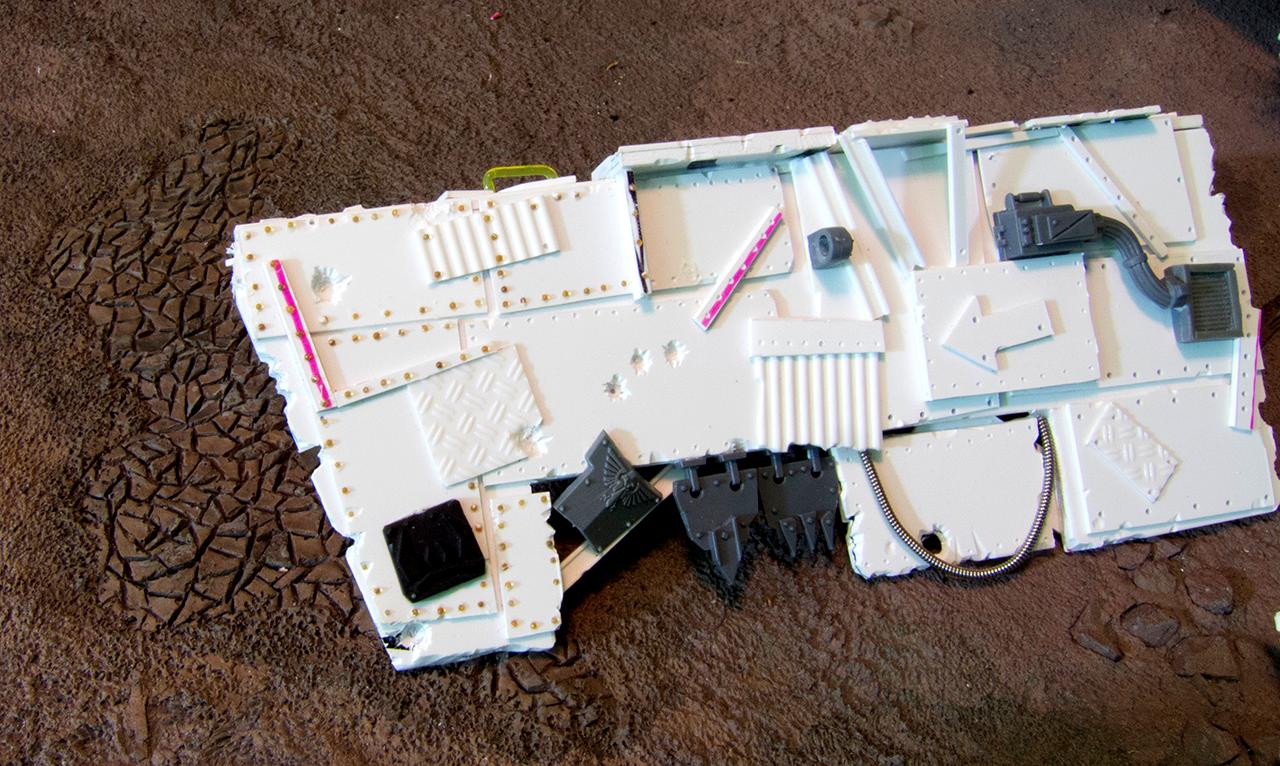
I glued on the side armor plates with a single drop of glue for you to see where I am with it as a whole:
You can see where you will be able to see the tracks through the hole in the track cover here:
Left side:
Left side, damaged track cover detail:
I have a needle-tipped squeeze bottle coming in the morning, as well as some more super thin CA glue. So I might start working on studding the armor plates. That should provide a riveting update to this story.
Because I'll be gluing on rivets. Get it? Riveting?
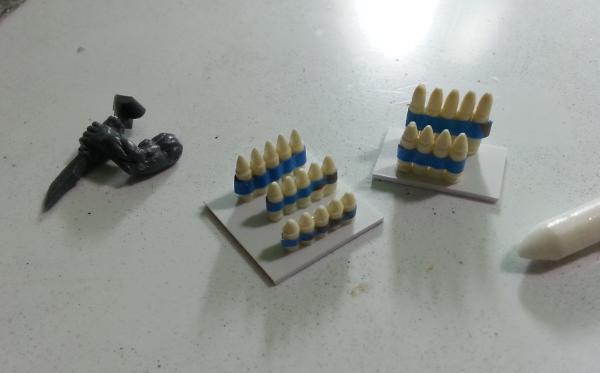
Also, I found those some of those old syringes and took a picture of them. Unfortunately, it looks like I took the picture mid-epileptic fit. I updated them offsite so Kid Kyoto didn't rightfully delete the image like the garbage it is. So again, taking a picture of these for the first post is on the task list. For now, though, behold:
I got these from a vet supply guy on Amazon. If you work with resin, these are ideal for dispensing it in exact amounts for small pulls. You can also use regular syringes if you like dealing with needles but I do not. The covers for those are what the bigger wheels are made of.
Ok, I got some more work done this weekend on this, as opposed to the thing I was supposed to be doing this weekend - fixing my bathroom floor.
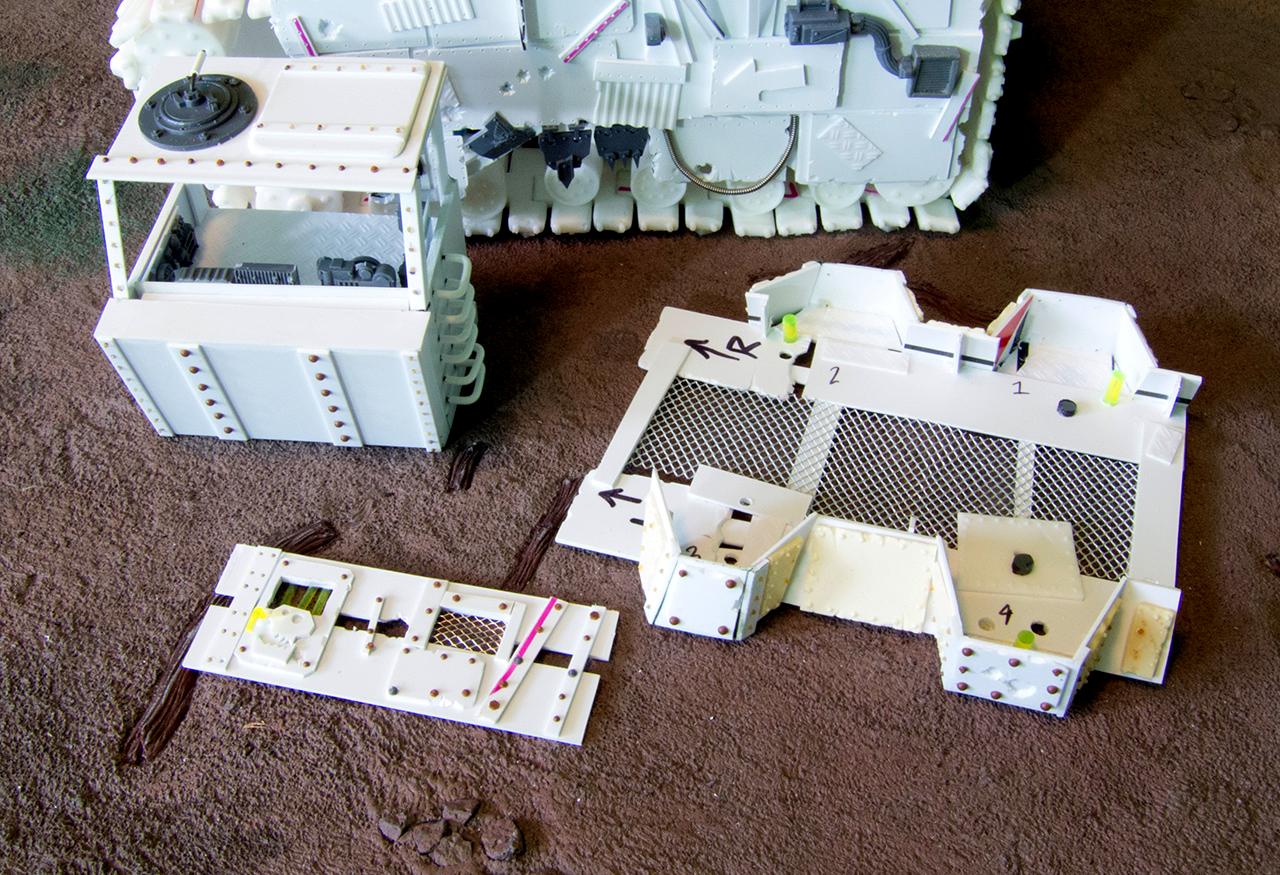
I started building up the midlevel walls:
The door, glyphs are and spikey bits are from the Stompa kit I got for Christmas of 2009 and still haven't finished. Shameful. I wound up getting more glyphs on ebay, as I'm going through a lot of them. Good size for vehicles.
other side, more of the same, except with a Rhino door.
After this I started working on the top deck, and realized that I wouldn't be able to paint anything below it if I enclosed it. So, I carved out a spot for the rails of the underside of the top deck in the support girders and build from there. It doesn't wiggle around when working on it, but comes off easily.
The mounts for the shootas are just placeholders of course, I need to make some better ones. I haven't do so yet because I'm not sure which weapons I want to put there, and also because I don't have enough gunners - I need to convert some boyz, though I posted a thread in the DCM swap shop looking for Battlewagon gunners, if anyones reading this and has spares. I'm going with Big Shootas since I like how they look but might replace them with Rokkits, since I can make my own easily, they look good, and work well in game (that's the last thing I consider, though). I also added a boarding plank, because I like how it looks. I might add another one to the other side, too. Pretty sure I have some left over from my Kans and Dreads.
The open spot at the front is for the Supa Kannon. I got one when they first came out, primed it black, and then realized I need a solid vehicle to mount it on. So I put it in a box and misplaced it.
You'd be amazed at how often the events in that last sentence happen.
My work week starts in the morning, so this is the last update for a few days.
I started working on the cab a little more. I did the hatch to allow access to the interior here, and also added an emergency hatch in the roof. I should probably add a ladder or something to that, too.
The whole instrument panel assembly slides out so I can paint it.
Frontal view of the cab:
And, I found the Supa Kannon today (in a box called "Battlewagon", because I meant to at some point order a Battlewagon for it, which totally makes sense I guess). It looks like it just about fits, though I will need to work on the walls a little.
The guns up top are just placeholders. I think Big Shootas might be a little too small, I might upgrade them a little - make the barrels a little longer, if nothing else. I also need to get the Flakk gun done and figure out where that's going, space-wise.
I think it's coming along pretty well so far, all in all.
Well, in this case an "emergency" being a good proppa scrap breaking out in front of the ride, with shiny bitz for the taking - need to get there before those light-fingered grots take all the good gubbins.
Unexpectedly, an update! I woke up super early this morning for no reason at all, 14 hours before I need to work a 10 hour shift. I probably need to take a nap at some point today, but until then, here's what I got done.
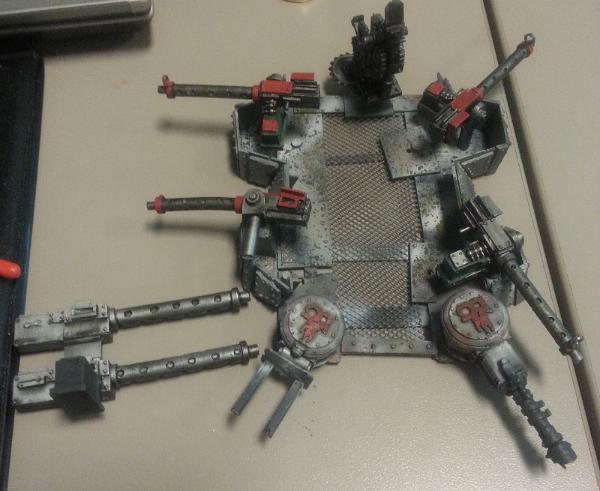
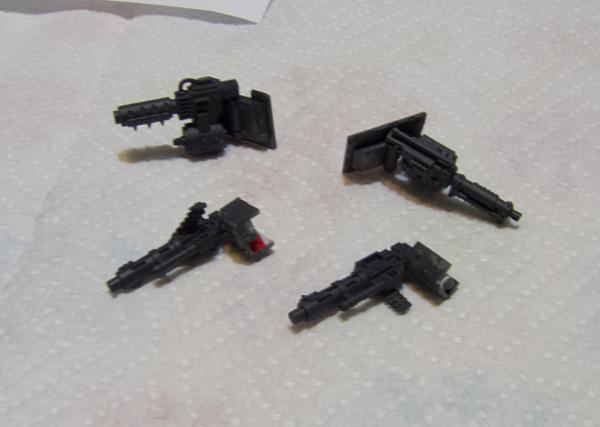
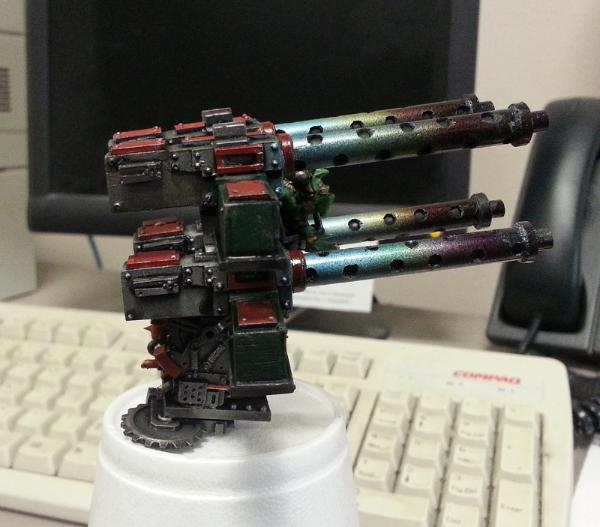
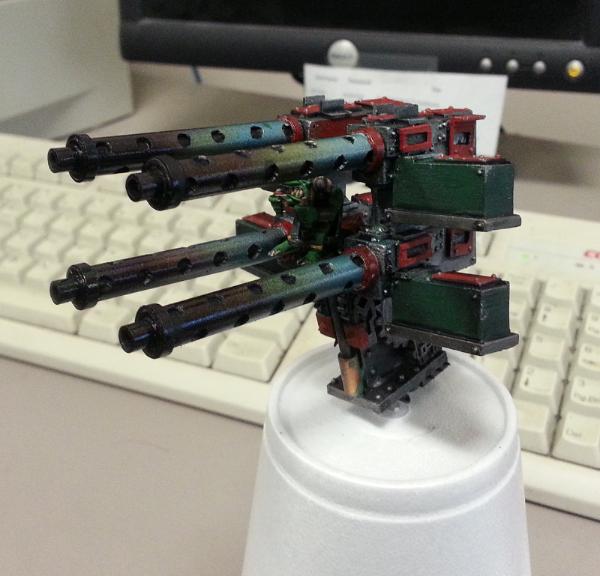
I build a single Bigga Shoota (is that a thing?). I think the regular vehicle mounted Big Shootas are too small looking, so I went with something a little larger. I don't know if anything like this exists in the rules exactly, I'm just making stuff and I'll figure that out later.
All the components are blu-tacked on. Here's how it looks as it's going into the moldbox (the barrel has it's own mold):
The reason I didn't permanently attach the cocking level, ammo box, etc etc is because I want to do a quad mount, and need to be able to swap that stuff from side to side while using the same mold for each gun.
Also, here's how I made the shells:
and the shells are glued together, and then a um.. whatever you call that strip that connects them - I made that out of a little strip of lead foil and glued that on as well.
OK, going to go eat and watch a movie and then maybe take a nap before work. See you guys again on Sunday probably, I'm going out drinking on Saturday.
Is there any way to get the rules for that? I don't have that WD and don't own or want to own an Ipad... are they integral to the vehicle, or are they an optional upgrade with it's own point value?
Otherwise I might consider them Dakkaguns like from warbikes.
Nevermind, I googled and found their profile and points on a site reviewing them when they were released. I'm probably not supposed to link that here so I won't. Yeah, those seem like a good fit. Thanks.
This is an awful un-Orky thing to say, but I think they might be too big.
I might just make these into the quad mount and then put normal size big shootas on the deck.
I think you can make something in between these and the regular big shootas for the deck. These could either go on the quad for the back... or you can use them to make a terrain set AA quad autocannon for your orks? It's BS2 unmanned or you can put a lil mob of grots in there and make it BS3. It will allow you to start your next project... Defence line or a Tower.
Ouze wrote: Well, I molded them so I could definitely make more. It's all one block so I can churn one out every 20 minutes, give or take.
You do agree they're too big for the deck, then?
I do, I also think it would be a mistake to just use regular big shootaz for the deck, as you won't be satisfied with them in the months and years to come. Make something in between, the shootas you made weren't that much too big, it was principally the length that's off. So you just need a mite smaller but a degree shorter.
Also have you considered purchasing the forgeworld grot package? I think some sheet magnets and some magnet basing for those and the gunners etc will make it easier to pack/tansport and paint.
I have a pretty big pile of grots left over from the various kits I have, but to be honest doing this project has made me realize that although I dislike painting, and am indifferent to playing, I really enjoy building. There's that DCM order coming up; I may partake of adding some more grots to it.
Edit: Yeah, I'm gonna get more grots. Can never really have too many. Also, will build some more (smaller) deck guns later; it didn't really take all that long. But going to bed now.
To that end - I think you saw I screwed up that last order pretty bad because I don't really understand scale. What's a good tubing size for such guns? Less then 1/4", but fairly bigger then 1/8th" - from here or here?
No idea, but unlike the diamond plate, you will be able to use all the sizes of tube, so treat yourself and get some packets of each. From exhausts to cyborg bits to building pipework, all those sizes will come in useful and that way you will be able to cherrypick for each task.
Briancj wrote: WUT?! Weez finally get propa-sized big shootas, and youze say dez too big? WAAAGH, I bonk you onna head!
BIG GUNS MEANZ MOAR DAKKA!
Welllll... I know your post was humorous, but if I can get serious for a moment, I really do think that ork scratchbuilding and kitbashing is really abused in that regard, there is a real art to great ork modelling and there is also a megaton of gak out there with 'stuff glued on other stuff' and I think scale regards, details like rivets and other subtle things are really important in that.
It kind of grindz me gearz to see some really bloody awful ork kitbashes and plastic toys with ork bits randomly stuck on or even, I remember seeing on dakka, some guy sticking an empty icecream tub on top of a rhino and painting some glyphs on it.
Ouze is doing everything right, imo, in checking back on the scale and paying attention to detail and making sure it looks like it could vaguely work IRL. Plasticard, kitbash, conversion, all have great opportunities but it takes skill and time to get like the greats.
How many times have you seen a ww2 tank with some ork bitz glued onto it? A toy monster truck with random plasticard and zoid guns? It looks zoggin terrible.
This is how you convert a model vehicle to orkz (that's a quad tractor under there), by the greatly missed legend that was Scarpia:
Kr00za, Jamsessionein, Lemmingspawn, Grimteef... these and several others here and on The Waaagh are the ones getting it right and they stand head and shoulders above the 'zoid guns on hotweels' brigade. Watching this building slowly, seeing Ouze taking the time to go back and change things out, that will lead to him growing as a Tru Mek and bring him the prestige to stand with those luminaries.
Anyway, rant off.
Oh and yes, Ouze, you should also be posting this thread over on The Waaagh, some of those chaps have some wicked skills and can offer some good advice.
Yes, my post was 100% humorous, and for the same reasons, MGS. It is actually very hard to make good-looking Ork vehicles and conversions. It is one of the reasons why, in spite of my deep love for all things Orks, I have never built an Ork Army. You'd think I'd be able to bash out Orky stuff in a heartbeat, but my brain just doesn't work that way.
No, the decision to scale the big shootas back is a sound one. The shootas AS IS might work well for equipping Kans or Deff Dreds or even Stompas, so I wouldn't toss the molds out quite yet!
I got the tubes this morning, and they're definitely a better scale. Sadly, I don't have pictures yet - I didn't get much done. I'm pretty busy with my demanding schedule of "sleep for 3 hours, be awake for three hours, the whole time being neither awake nor asleep".
The new gun body is about 60% size, and the barrel will be as well. Imposing, but not ridiculous.
Largely what I need to do is make some sort of gunner. I have an FW order in on that last DCM one for some Grots, we'll see if on of them will work. I'm considering grabbing a box of Grots to upgrade all the gunners - I had intended to use Orks but I do love Grots...
At this point, I think I have all the main weapons and stuff done. I think.. maybe it's ready to prime? Not sure if there is anything else to do on the building. Which is unfortunate, because I'm dreading painting it up.
I confess to being slack and not sending out those gunners last week. They will be in the post tomorrow, promise!
I will say I think orks would not allow the grots any of the really fun jobs, so there'd be an ork driving and orks opperating all the guns, with grots feeding ammo or making fixins.
Also really looking forward to seeing what you decide to do on the front with the deffrolla/ram etc.
The fortress is looking great, and the paint job on those grots is Sweet, too. I may have missed it- did you say if you painted them yourself? If so, you may not Enjoy painting, but you're good at it
RiTides wrote: The fortress is looking great, and the paint job on those grots is Sweet, too. I may have missed it- did you say if you painted them yourself? If so, you may not Enjoy painting, but you're good at it
Eh, not so much. Yeah, I painted them - I've never had anyone else ever paint any of my stuff because I'm too cheap. The grots are super easy to paint - I simply prime them white, then give them 2 washes of Thraka Green, then paint their tools\pants\\guns\whatever. Easy as pie.
MeanGreenStompa wrote: I will say I think orks would not allow the grots any of the really fun jobs, so there'd be an ork driving and orks opperating all the guns, with grots feeding ammo or making fixins.
Also really looking forward to seeing what you decide to do on the front with the deffrolla/ram etc.
Sorry to keep updating this thread with non-updates, at least not meaningful ones. But, I have been thinking about this post for a few days, and I also had an order out for both 2 ork gunners and a box regular grots on ebay (which arrived this morning) and my FW grots (which also arrived this morning).
This weekend I should be able to get some stuff done, and here is what I am working on:
1.) You are right about Orks vs Grots. There is nothing in IA8 that allows a Battle Fortress to have Grot Gunners. As such, the gunners will be the 2 orks off ebay, and whatever you sent me. It does allow grot riggers - an option I usually don't use - but in this case its going to have some grots on it anyway. Plus, now I have another 10 grots & a herder to add to my grot-mob in 40k.
2.) Additionally, I am definitely going to make a Deffrolla, since the battle fortress requires a reinforced ram or Deffrolla. Since the Deffrolla has so many more uses, I guess that's the way I'm going to go despite the lack of either on the reference model. The problem I'm having with this is I really don't know how to fit it in and I've been struggling conceptually with how to do it. If I make it the width of the cab, it's going to look too small. If I make it the width of the entire front of the vehicle, it's going to look a little too big. If I made it midway between those, it will look about right, but I also don't know where to put the arms that support it - they'd be right in the middle of the tracks. I'm kind of stuck here. I'm sort of opposed to using S-shaped arms that come out from the sides of the cab, and then go out over the width of the body, and then go forward again to join the Rolla, making the whole front of the vehicle look like one of those sticky lint-sweepers you use to get pet hair off your clothes, but not sure how else it can be done.
Hmm, I sent those gunners to you first class on Monday, they should have arrived to you by now?
I certainly meant the orks v grots in a background sense, but if they are not allowed to take grots on the guns it certainly makes sense to me, also an ork would definitely be driving it, for the thrill of driving over beakies and bugs and 'earing dem pop'.
Deff Rolla; with improvements to the actual bladed parts to be far more killy and terrifying, I really love this 'combine harvester' look:
Ouze wrote: The problem I'm having with this is I really don't know how to fit it in and I've been struggling conceptually with how to do it. If I make it the width of the cab, it's going to look too small. If I make it the width of the entire front of the vehicle, it's going to look a little too big. If I made it midway between those, it will look about right, but I also don't know where to put the arms that support it - they'd be right in the middle of the tracks. I'm kind of stuck here. I'm sort of opposed to using S-shaped arms that come out from the sides of the cab, and then go out over the width of the body, and then go forward again to join the Rolla, making the whole front of the vehicle look like one of those sticky lint-sweepers you use to get pet hair off your clothes, but not sure how else it can be done.
How about you split the roller in three? (ie a full width roller, but supported by two struts either side of the cab) Have the arms come out from the side of the cab, with a central roller the width of the cab, but with two smaller rollers on each end in front of the tracks? The rollers could be different or the same, or the two outer the same and the middle different (ie a crusher in front with smaller shredders on the sides).
MeanGreenStompa wrote: I will say I think orks would not allow the grots any of the really fun jobs, so there'd be an ork driving and orks opperating all the guns, with grots feeding ammo or making fixins.
Also really looking forward to seeing what you decide to do on the front with the deffrolla/ram etc.
Sorry to keep updating this thread with non-updates, at least not meaningful ones. But, I have been thinking about this post for a few days, and I also had an order out for both 2 ork gunners and a box regular grots on ebay (which arrived this morning) and my FW grots (which also arrived this morning).
This weekend I should be able to get some stuff done, and here is what I am working on:
1.) You are right about Orks vs Grots. There is nothing in IA8 that allows a Battle Fortress to have Grot Gunners. As such, the gunners will be the 2 orks off ebay, and whatever you sent me. It does allow grot riggers - an option I usually don't use - but in this case its going to have some grots on it anyway. Plus, now I have another 10 grots & a herder to add to my grot-mob in 40k.
2.) Additionally, I am definitely going to make a Deffrolla, since the battle fortress requires a reinforced ram or Deffrolla. Since the Deffrolla has so many more uses, I guess that's the way I'm going to go despite the lack of either on the reference model. The problem I'm having with this is I really don't know how to fit it in and I've been struggling conceptually with how to do it. If I make it the width of the cab, it's going to look too small. If I make it the width of the entire front of the vehicle, it's going to look a little too big. If I made it midway between those, it will look about right, but I also don't know where to put the arms that support it - they'd be right in the middle of the tracks. I'm kind of stuck here. I'm sort of opposed to using S-shaped arms that come out from the sides of the cab, and then go out over the width of the body, and then go forward again to join the Rolla, making the whole front of the vehicle look like one of those sticky lint-sweepers you use to get pet hair off your clothes, but not sure how else it can be done.
Hmm, I sent those gunners to you first class on Monday, they should have arrived to you by now?
I certainly meant the orks v grots in a background sense, but if they are not allowed to take grots on the guns it certainly makes sense to me, also an ork would definitely be driving it, for the thrill of driving over beakies and bugs and 'earing dem pop'.
Deff Rolla; with improvements to the actual bladed parts to be far more killy and terrifying, I really love this 'combine harvester' look:
Okay... dude...you just gotta model some blood/gore geyers off that thing somehow... like, Army of Darkness/Evil Dead explosion of gore! Well done mate!
whembly wrote: Ouze... I'm drooling with envy! Wished I had some of that mad skillz.
It's really super easy, generally.
--
So I have some good news and some less good news. The good news is I actually made some progress on this today, and have the deffrolla almost done. I also remembered to take pictures of the whole process. The less good news is the pictures came out awful. I used the very last drop of the Alumilite today, and will be replacing it with Tap resin as a replacement, which is ivory and matte. The Alumilite is interesting in some ways but at the end of the day the super high gloss, bright white finish of it makes it very, very difficult to photograph, at least for someone of limited photography skills like myself. The only saving grace is that these pictures generally don't need a lot of details to be useful from a tutorial/worklog perspective, and the few parts that do have detail that has been obscured (the deffrolla) will have more pictures later in the process. That's the best I can polish this turd, moving on...
So. I went to Lowes, and got some pipe. I think it was 2.5" diameter, but if you're following along at home, get whatever size you feel is appropriate. It was $3 or so.
I then lightly sanded the entire outside of the pipe with fine sandpaper (220 grit), just to take the shine off.
I capped the end of it with a piece of wide masking tape, and then flipped it over and pressed it into a piece of paper towel folded in quarters. It's not, as my wife cackled, " a piece of toilet paper" despite how poor the picture is.
I then mixed up 20ml of Alumilite and poured it into the pipe.15 minutes later, I had the pictured plug.
As it turns out, there may have been a better way to have done this. The Alumilite bonded with all the glue from the tape; so when I peeled the tape off it was utterly smooth, and the adhesive was really, really stuck to the Alumilite plug. I wound up removing it by simply rubbing it off with my thumbs (snicker) and then sanding it down a little, but in retrospect I probably should have just flipped it over and worked on the other side. Hindsight.
So, I then added some details to make it into a spindle for the rolla:
The center is a brass tube I filled with Alumilite. I had made the flange bit for a different project, which i made in this method: I took one of those covers from the syringes we talked about earlier, cut off an end, and slid it onto the brass tube, then dripped in a little resin to make it. The little discs are made with a leather punch and styrene, and I addeed hex bolt heads from Tychy Train Group. I then made a mold.
After molding it, I recast 2 more copies. It's been pretty important for me create molds of all the difficult bits so that, if I decide to make another one at some point, it will be easier since I can crank out components much more quickly. I've been working on this for about 3 months now, spending a few hours per weekend on it, but I think I can make the next one in a few days if I really worked on it with what I've made here.
So, you guys remember those armor plates I made earlier? These:
So, I used the mold for this to crank out a bunch of plates. The curing time for Alumilite is about 8 minutes or so (less when it's warm like it's supposed to be). I cranked a window to let some of the freezing-ass Iowa air in the room to arr-tard the curing process, and then cast the plates. I pulled them early, intentionally, about 5 minutes in. They were solid enough to hold their shape, but still a little soft, like a Jolly Rancher you've sucked to the halfway point. I then put a little thin CA on the rolla and pressed the plates on, molding them to shape of the tube, and gluing my fingers to the tube about 9 times before I got a feel for how much CA to use (less is more).
This was tedious. It took about 3 hours until I had it all covered. Here's an awful picture where the brightness of the resin combined with my lousy photography completelty obliterated just about all of the detail:
Those plates all have riveting edging them.
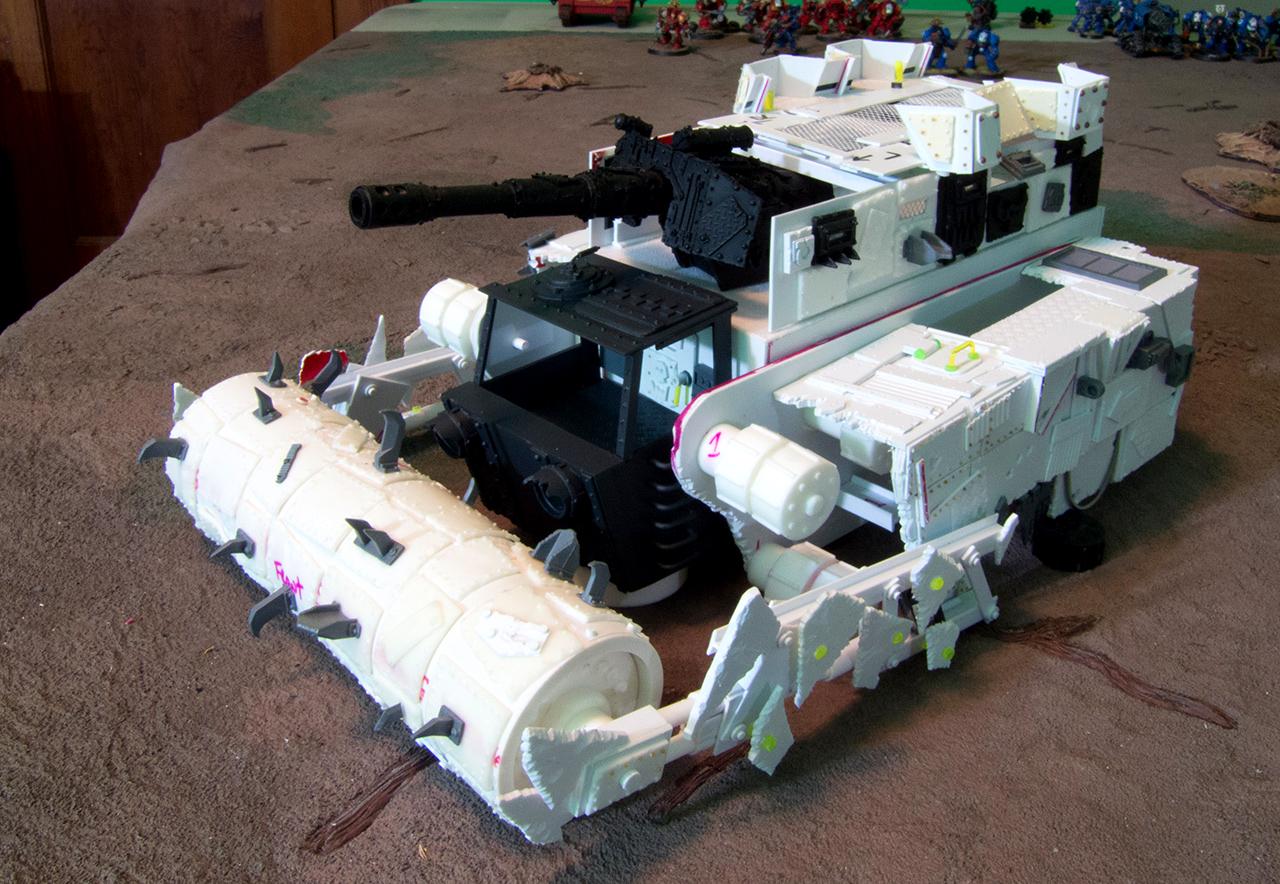
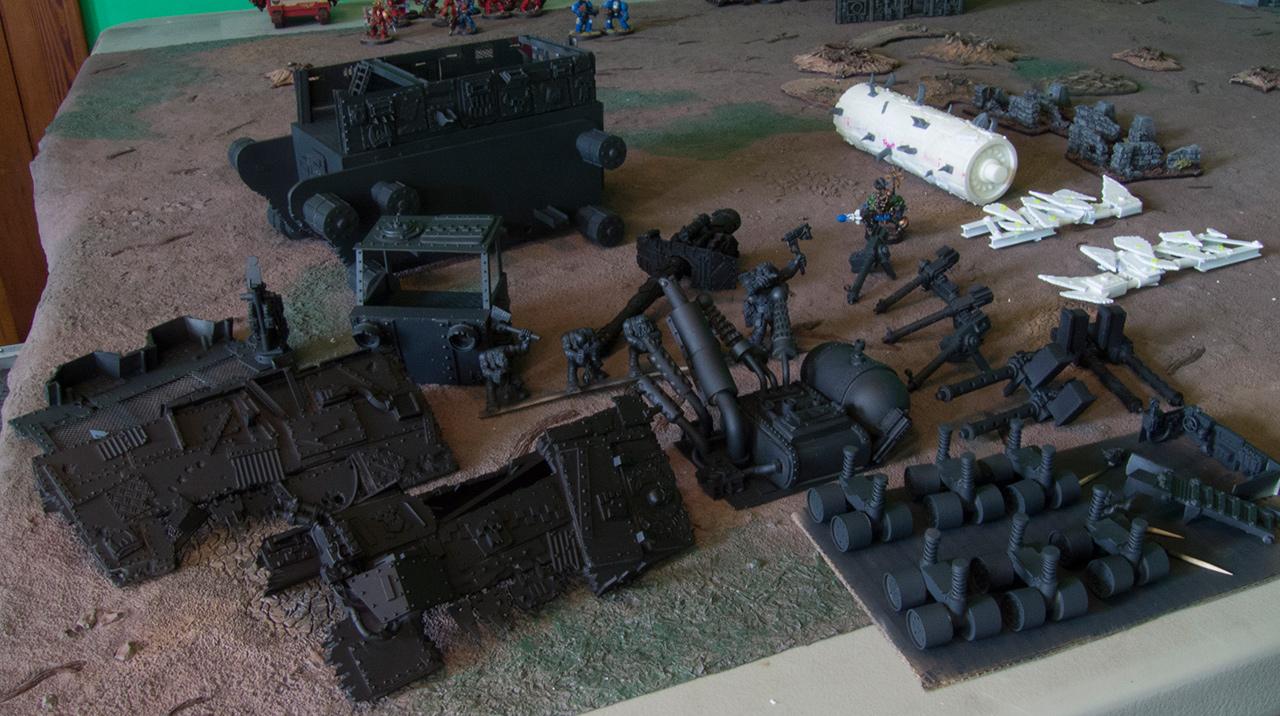
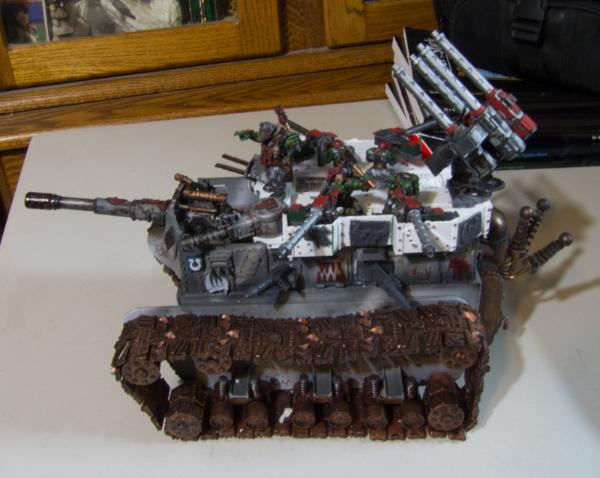
So here's where I am right now:
As you can see, I decided to go with a very traditional, full width rolla, and am going to just put the arms on the side. I thought about this an awful lot, and I think it segues nicely into how I'm going to paint it: I am going to go with my traditional 3 color grey camo, b-b-but I'm going to darken the base colors a hair, and then on the sides of the arms, I'm going to do them in red, and add big, bulky white teefs to the side. I'm then going to do lots of gore and red washes on the Deffrolla to give the whole thing the look of a hungry mouth (I hope).
Still to do:
1.) Spikify and Bladerize the Rolla
2.) Figure out the arms, and add teefs
3.) Get the gunners I got from MGS (thanks again, btw!) and the one I got on ebay cleaned up.
4.) Finish the quad mount gun and work in the grot gunner I got from Ebay, if workable.
5.) Make tripods for the dek shootas.
6.) Make some kind of an engine. I haven't decided much on this yet. I'll probably just try and copy the one off the back of my Kill Bursta as much as possible, because last I saw in the gallery, there are only voting radio dials for "paint job" and "coolness", not "Originality"
8.) ????
9.) Profit
10.) move to the public fora?
11.) Prime and paint
Definitely needs some spikes and perhaps you should hang some trophies about the vehicle?
Something that bothers me a mite, the walls either side of the vehicle above the tracks, they still look too much like smooth and equally cut flat surfaces with plates attached to them, some additional weathering and layers of more plates, chains, rivets and spikes should break their crisp outline up. Same for the walls above them with the guns.
Yeah, I hadn't finished armoring any of the walls before I got bored and moved on to the other stuff, and then I forgot about it. I'll fix the to-do list.
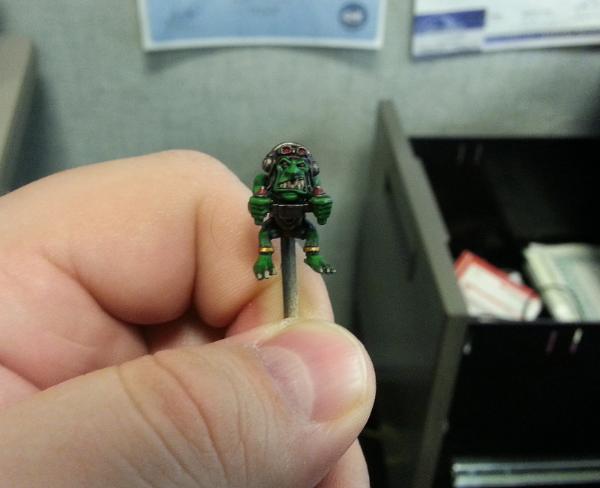
I also got the Grot Gunner ready to go. I added some feet to him, and made him a little chair. I'm going to have him centered in the middle of the quad gun. I also added a loop to change his ear-cups into headphones, because those guns are loud and Orks believe in safety first.
Here's a frontal view. It's a little dusty in there.
So we talked about the Dek (Dekk?) earlier. Turns out it's really, really hard to fit 4 orks on top of it. So I made lemonade out of lemons and expanded it a little. Its still WIP - when the glues good and cured I'll cut out the wall sections you can currently see in the way.
That one closest to the camera, that's a little lopsided? I might rip it off and do a better job on it. The others are all pretty good, that one was the first one.
It was better than The Postman was. The funny thing is the valdize sp? was renamed prior to the making of the movie. for a while it resided here in Portland.
Ouze, I hadn't seen the 4th page here- it is looking fantastic! The deff rolla and grot gunner are great and the new deck helps a lot. I think it makes the whole thing have a bit more shape / look less like a big box.
The arms for the deff rolla look good, as long as they don't make this already monstrous model too wide!
Ok, progress on this has slowed a little, due to, frankly, Mechwarrior Online. It's eating up a lot of my free time. Additionally, I'm covering some extra shifts this week, so no real updates this weekend yet either. I do have this to offer for now.
I got stuck on the engine. I'm not burdened with a lot of creativity - I mostly just recreate things I've seen elsewhere. To do the engine for this won't be any different - I'm going to essentially try to copy the engine from the Kill Bursta. This has been substantially harder then I expected; I spent a really long time looking around the house for junk to use. I came up empty, and wound up using Super Sculpey to make a body shape and bake it. I then added some styrene strips, as below:
I then recast it. This was sort of a waste of silicone because the engine had no detailing on it yet, but I think it was a necessary evil. Super Sculpey is, like, immune to super glue. I was barely able to hold those styrene strips on there long enough to recast it, and making anything from it would have been impossible. My Tap Plastics resin arrived this morning (yay!) so here is where I am with the engine, in resin:
Funny, even though it's ivory colored, the picture is still super overexposed. It's like maybe it's not that the material is hard to photograph so much as I'm just a really, really lousy photographer.
I'm planning on adding some really bulky rivets to those strips and adding various gubbins. I've ordered some nice big Tichy Train Group ones off Ebay today, so early next week.
And Mechwarrior Online, before that... but I also have other stuff related to this that caused hiccups. I ran out of resin, and that just got delivered, and I ordered a ton of different types of rivets to do the engine. I should have some progress this weekend - I found some interesting bits to try and advance it.
Oh my gosh, I love the grots!! Will you consider adding any from the GoblinAid project? Not that you need any more that is quite a collection to go on one (albiet huge) tank!
Chapter 19: In Which Weird Science Makes a Long Overdue Appearance
So, there have been a number of things keeping me away from this. Partially it's a combination of Bioshock Infinite and Mechwarrior Online, partially it's this new policy at work that gave everyone 5 times more floating holidays (so I've been working a lot of overtime to cover them) but mostly... I've been stuck. I've been thinking about what to do for about a week and a half.
I wasn't sure how to do an engine for this. I wanted something big, and sort of like the one on the Kill Bursta, but not just a copy. I wanted something that was my own. I thought about trying something with exposed pistons, but I couldn't figure out how to make them fit together correctly. Then, it came to me - when it doubt, do the third favorite Ork thing to do: weird science. So, that's where I went with this.
First, every weird science project needs tesla coils. To make some, I made a mold of a wire nut, then demolded it and recast it. I then sliced it up, drilled a hole, and strung it out over 3/32 rod, and topped it with a bead. The results don't look as good as what Zinge sells but they'll do. Note; they also make really good looking gears, that should come in handy at some point.
Then I just went to work on it. I wish I had taken more images of the work in progress, but I was on fire and just kept going till I got to here:
I did stop and make about 10 of those pressure gauges, and made a mold of them. So I've got pressure gauges for life. To make the originals, I just stuck sliced off tubing onto some double sided tape, poured a drop of resin inside, waited 15 minutes, them peeled them off the tape, pushed the resin plug back into it a little (since the other end is concave, not flat) and added a styrene needle.
The rest of the stuff is I think sort of self explanatory. I seated a lot of rivets. I also made some vent stacks and molded them as well for future use. The brass tubing is a miter bend as suggested in P&M, and I think it could have been better, but it's not too bad either. I didn't mold it since I think I could probably improve upon it.
Here it is blu-tacked onto the back of the fortress:
I don't think there's much left to do except
1.) Finish the armor plating on the sides of the vehicle
2.) Similarly, finish fleshing out the sides of the top dekk
3.) Make a better system for mounting that quad onto the roof
4.) Figure out what to put in that open space on the mid-deck, if anything - I could raise the engine a bit and just close it off, I suppose
5.) Finish the deffrolla support struts, add the teefs
6.) Exterior of the kab is a little plain still
7.) Did I miss something? You tell me.
I think this might be ready to rotate into the public fora, as I think I'm likely to actually finish this. I was disinclined to post another project I wouldn't finish there but I see little competition in the near future from bringing this home. I'm over all the conceptual hurdles, and IA12 looks like maybe a good read but not likely to inspire a lot of model inspiration in me.
So far as Goblin Aid goes, I'd like to help but I have to be frank, I don't understand wtf is going on with that project. Is that a kickstarter, or an auction, or what? I see a lot of people making greens but are these going into production or what?
whembly wrote: Epic work man! Can't wait to see it painted too!
I can't even think about that yet. The way my stupid mind works, I think about how long and difficult that will be, and then it just seems overwhelming and I don't even start. I have to think baby steps.
whembly wrote: Epic work man! Can't wait to see it painted too!
I can't even think about that yet. The way my stupid mind works, I think about how long and difficult that will be, and then it just seems overwhelming and I don't even start. I have to think baby steps.
I hear ya man... I do think Orky vehicles are easier to paint as it shouldn't have clean lines like a speesh murren vehicle.
Still... it's truly awesome, and thanks for sharing.
I got thoroughly sick of it, so did a Necron Overlord and that Tomb Stalker for a break. I've been working on it exclusive since Jan 7th - thats just about 4 months, which is about 3 months more then I usually spend on a project. For me, this is always, every single time, the hardest part of one of my "things" - the first 50% flies, the next 40% moves very fast, and the last 10% drags on forever.
However, there is a challenge that has occurred. On the very last step of the Tomb Stalker, I broke my airbrush (like broke broke, the air valve separated from the body, bad weld). I mailed it back to have it repaired, so now I kinda have to work The Beast for a bit.
I did the rear door this very evening, and got it riveted up. I'm also off all next week (allllllllll week!) so plan to try and have it done for reals then, not counting Iron Man Monday.
Sorry to hear about the air brush, hope it all works out on the repairs/replacement.
I hoping to get the other half of my battle fortress back from a friend, that was holding onto my stuff...but I have been asking for it for the past 5 months...I got 2 weeks until a 30day break from work for a surgery and hope to have it by then though. I have been wanting to finish it up for a long time but without the front half it makes things well a bit difficult...
It may not be a scrach build but I'm happy with it sofar.
I just read through all five pages and oh my, you have just inspired me to make my own battle fortress/waaghcraft carrier. The best part is I work at lowes so I get all these little pipe cuts and styrene signs for free!
Well, barring that, could I spend a bunch of money on yet another project I won't complete?
Surely!
And could I post a worklog on Dakka Dakka, to which many people will view, and comment muchly upon, and then slowly become more and more disappointed as they realize I'm rarely able to finish my projects?
Holy Moly! I was reading that and thought "When did I write this post? I've been thinking about building an Orky Battlewagon, but I haven't even started yet..." Then I saw the ink and realized it wasn't my post after all.
Sure am glad I'm not the only one spending gobs on unfinished projects!
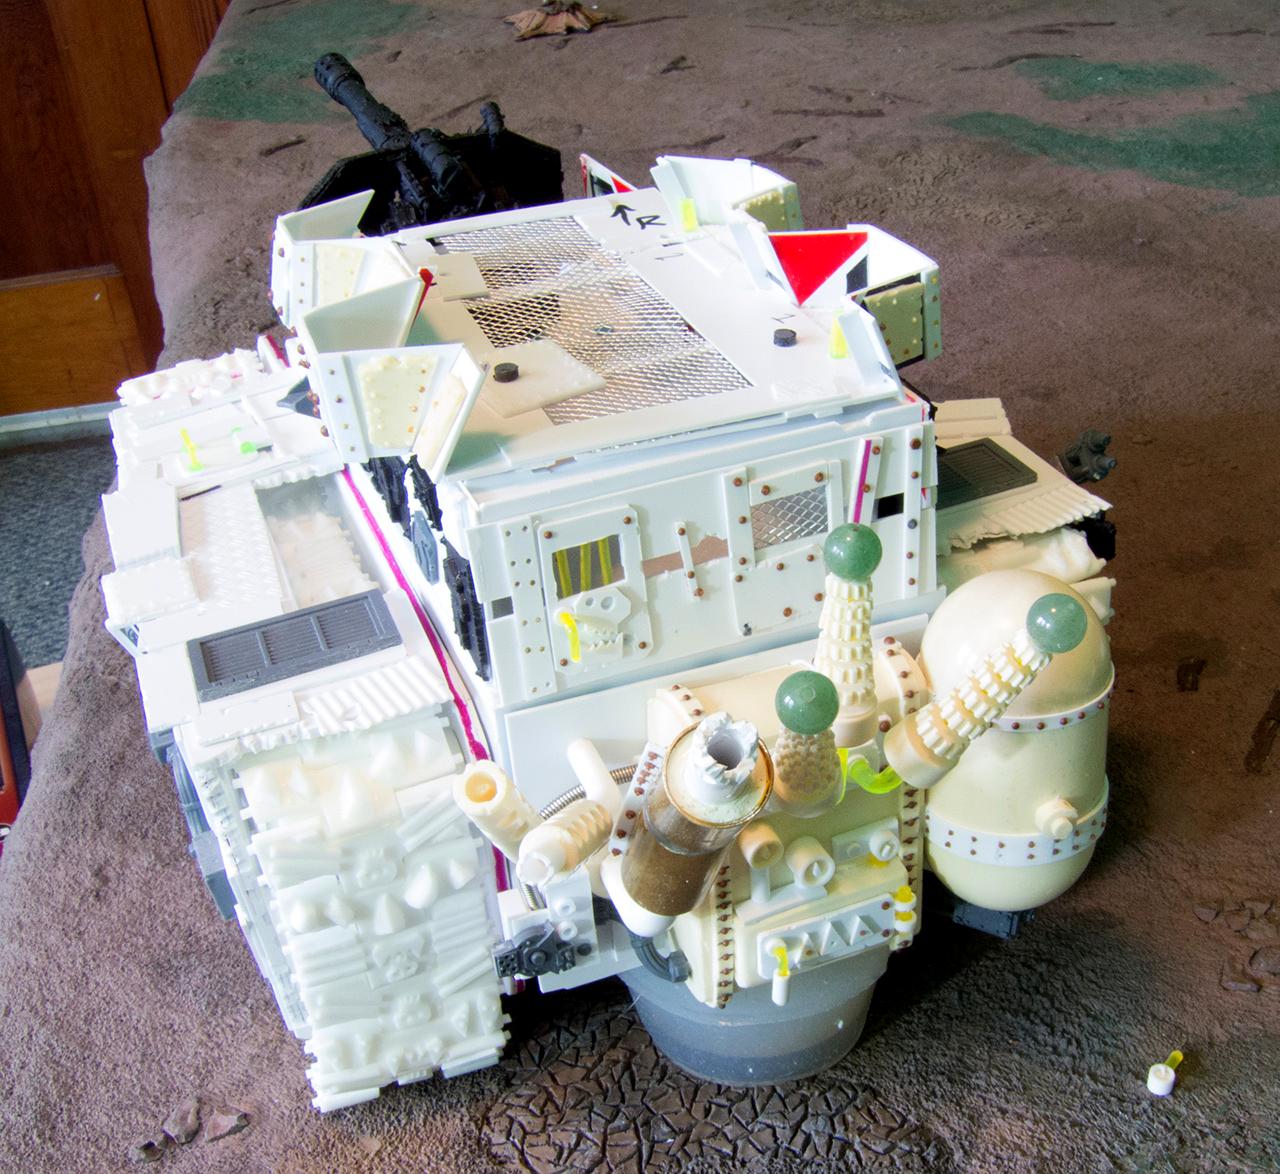
I did some detailing on the cab, did the backplate, and added armor to the deck.
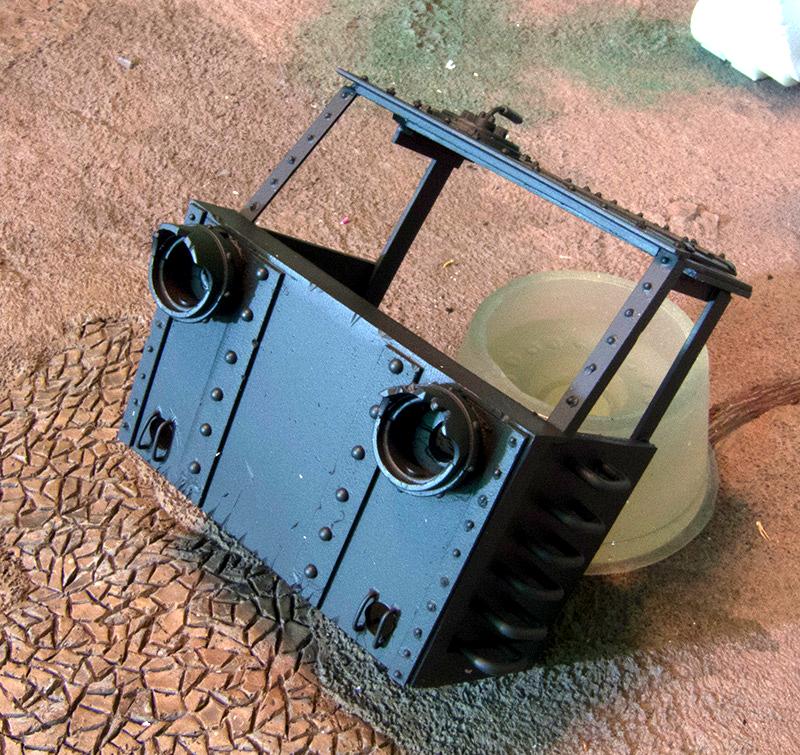
Some views of the backplate, with the engine in place:
That's the last time it's going to be together for a while. I disassembled it today so I could start riveting and priming. I think I got pretty much all the design phase done; now we're up to the boring parts.
I took off the sides, and started riveting. This is mind-numbing in the extreme. This took me like an hour.
I did the cab, and for it primed:
This is where I am with the Deffrolla:
The way I see it, there is kind of a piston augmented rail that pushes back and forth, and I tried to represent two rails that move with the bumps in the road and whatever things it hits, and they both move independently, sort of a suspension/compensator. Since they move back and forth, then adding some teef would help to shred anything that somehow got under the deffrolla alive. I intend to do the deffrolla rails red, the teef white, and kind of make it look like giant mouth.
I didn't realize until I saw this picture what a dumb idea it was to add headlights to the cab:
I'm still not 100% sold on the Deffrolla, so maybe it will work out.
I did about... 3 or so hours on this. All of it was doing rivets. I am really, really starting to hate this project, but things are looking up. First, let me explain my methods for doing rivets in the hope someone will explain to me the error of my ways.
1.) This is how I did the rivets on my Meganobz: Drill out the holes with a pin vise. Add a tiny drop of Model Master Plastic Cement. Drop in a bead from a water softener with tweezers.
There were a lot of problems with this. First, my fingers would be absolutely killing me after about 20 minutes of this from the pin vise. It was hard to get an even drop of plastic cement out, and sometimes when dropping in the bead, I'd miss. The real problem with this, though, was that the plastic cement doesn't really bond with the water softener beads, so with further handling, some would just rub off and need to be re-applied. Tedious (although after priming them, the beads seem pretty secure). I then moved over to method 2:
2.) Drill the holes with a dremel tool, then put in a drop of ultra-thin superglue, then (this is gross, I know) touch the back of my hobby knife to my tongue, pick up a bead, and drop it in the hole.
This had some advantages and some disadvantages. I was averse initially to using a 1/32" drill bit in the dremel tool since my previous experience showed me it would overheat swiftly and snap on even the slowest speed. However, that's back when I was drilling into white metal for pins (dumbass) and that problem doesn't happen in styrene.
The beads are really, really in there with this method. However, there are other problems (besides super glue on my tongue). First off, to get really good precision on the super-thin superglue, I couldn't use the needle applicator it came with, since it wasn't actually a needle; the gauge was too wide. I cut an old insulin hypo a friend gave me in half, and attached it to the tip of the dispenser. This gave very, very precise glue application; but the glue also kept drying in the needle, requiring me to hit the needle with a lighter to clear it. The real problem is that the glue would sometimes run up the bead and onto the blade. For every bead I seated easily, I had another that got glued in the wrong place, got glued to the blade, or that had a little filament of saliva-kicked superglue coming off of it. Not ideal. I tried initially just dropping them in with tweezers, but i'd othen either miss, or - this leads me to my next problem - the glue had already cured and it would bounce off. The super thin CA seems to cure in, tops, 40 seconds. I did about a third of one side of the battle fortress with this method, and easily most of my time was wasted with burning the needle tip, cleaning off glue smears, or assorted garbage. This method is essentially free, but my time isn't and although I enjoy spending it, I don't like wasting it. I finally gave up on this and moved to method 3:
3.) Drill the holes at least 4mm with a dremel tool, hit the drops with plastic cement, and then use tweezers to shove in a Tychy 8076 rivet.
This method is the least hassle. Drilling the holes is just zip, zip, zip, then glue, glue, glue, and then I cut off the rivets 24 at a time and just pluck and seat. I did the entire rest of the armor side in about an hour.
This side is not without it's disadvantages, though. For one, Method 2 leaves really irregular looking rivets, which is ideal for an Ork vehicle. With method 3, any small glue overage is usually covered by the rivet head, so it looks perfect, maybe new perfect.
The other downside is, well, it's kinda expensive, comparatively. Doing all the rivets with Method 2 is essentially free, whereas after doing the side with the Tychy rivets, my thoughts weren't "well, that's done, great" but instead "well, that's 5 bucks".
I have to try and convince myself that 5 bucks is actually not that much money, I'm on vacation this week with limited time, and it's worthwhile. But there wasn't that much actual cost in this project; believe it or not. The rivets used a lot of resin, but almost everything else I either already had (the FW Killkannon, the tons of bits from years of war store grab bags) or was cheap as shoats ($10 in styrene signs, a $5 piece of PVC pipe). If I do the whole thing with Tychy rivets, it would actually be probably tied for the most expensive part with the tracks - $30 in alumilite, and $30 on rivets.
But it would actually get done. And that makes it worthwhile, I suppose. If someone else has Method 4, I'd love to hear it.
Automatically Appended Next Post: Oh yeah, I meant to post this and forgot - the real way to have done this, and how I'd do it if I ever do a project like this again: Make a dozen or so armor plates in various sizes of styrene, and then recast them, and then essentially copy & paste them. I eventually did this, but way too late the main body of the vehicle, though they were handy for the Deffrolla. The problem with that method is it removes some of the spontaneity of the model; but it sure would move a lot faster.
Again if someone knows a better way I'd love to hear it.
Out of curiosity, why are you not cutting rivet heads out of styrene rods (round or hex) and applying them with a drop of styrene plastic glue with a needle applicator?
Because they look all big and chunky, and the heads aren't rounded like actual rivets. I've done the method you describe, but I think these look better.
Automatically Appended Next Post: I am flying through them now. It took about 5 minutes to make a bunch of rivets, and then in the last 10 minutes I did about an hours worth of riveting. No hole, just mark with a pen, then glue glue glu, dip dip dip, and done. They look just a little less regular than the Tychy ones, which was the effect I want. It's perfect.
And you know who is to thank? You, BrianCJ, because I was googling a deffrolla done with the method you described to show you why I didn't like it, and then I found that tutorial wholly by accident. So, I am actually super, super grateful to you for sparking this chain of events!
Automatically Appended Next Post: Got the other side complete done in exactly an hour. Much, much faster - these will be my new workhorse rivets.
I also figured out the proper Method #2. I had been drilling a very shallow hole; more of a dimple really. The correct way to do it is to dig a tiny bit deeper - a pit perhaps 1mm deep. Then, fill i with superglue, and - this is the trick - barely touch the bead to the glue (don't push it in). If done right, the surface tension of the glue kind of sucks the bead in and seats it.
Also, if I leave the top off the glue, it doesn't dry out for as long as I'm working; which is the most counterintuitive thing ever and the opposite of ever other CA glue I own, but I'll take it.
Ouze wrote: Because they look all big and chunky, and the heads aren't rounded like actual rivets. I've done the method you describe, but I think these look better.
Automatically Appended Next Post: I am flying through them now. It took about 5 minutes to make a bunch of rivets, and then in the last 10 minutes I did about an hours worth of riveting. No hole, just mark with a pen, then glue glue glu, dip dip dip, and done. They look just a little less regular than the Tychy ones, which was the effect I want. It's perfect.
And you know who is to thank? You, BrianCJ, because I was googling a deffrolla done with the method you described to show you why I didn't like it, and then I found that tutorial wholly by accident. So, I am actually super, super grateful to you for sparking this chain of events!
Automatically Appended Next Post: Got the other side complete done in exactly an hour. Much, much faster - these will be my new workhorse rivets.
I also figured out the proper Method #2. I had been drilling a very shallow hole; more of a dimple really. The correct way to do it is to dig a tiny bit deeper - a pit perhaps 1mm deep. Then, fill i with superglue, and - this is the trick - barely touch the bead to the glue (don't push it in). If done right, the surface tension of the glue kind of sucks the bead in and seats it.
Also, if I leave the top off the glue, it doesn't dry out for as long as I'm working; which is the most counterintuitive thing ever and the opposite of ever other CA glue I own, but I'll take it.
Now to get in the shower and go see Iron Man 3.
That......is fracking brilliant. Nice find there ouze
All the detailing is done. Started priming today. Ran out of flat black spray paint. I might finishing priming with Vallejo Surface Primer, but I'm not sure - it's a new product to me, hence it's untrustworthy.
Unfortunately not sure how much further I can go for a bit even though I'm pretty hot right now - force majeure. My primary airbrush is in for repairs, and my backup airbrush... well, it's the backup airbrush for a reason. We'll see, perhaps Badger will surprise me with a really fast repair turnaround.
Not sure how long I need to let this dry for a good strong adherence before I apply the salt and hairspray. I've been working on this for nearly 6 months so I'm pretty inclined to give it a bit.
The headlights are there for when you run it without the Dethrolla.
Alternatively...
The headlights are there so the driver can see the expressions of the people he runs over as they go flippyflippyflippy around and around, impaled on the spikes.
Briancj wrote: The headlights are there so the driver can see the expressions of the people he runs over as they go flippyflippyflippy around and around, impaled on the spikes.
That reminds me. I have some clear styrene sheet to make windows out of, while I'm waiting for this to be good and totally dry, I can make the window panels. I'm thinking it needs wipers, and possibly blood spatter. I don't usually use spatter on my models but I think it's probably going to work well here.
Got some work done, even with the backup airbrush.
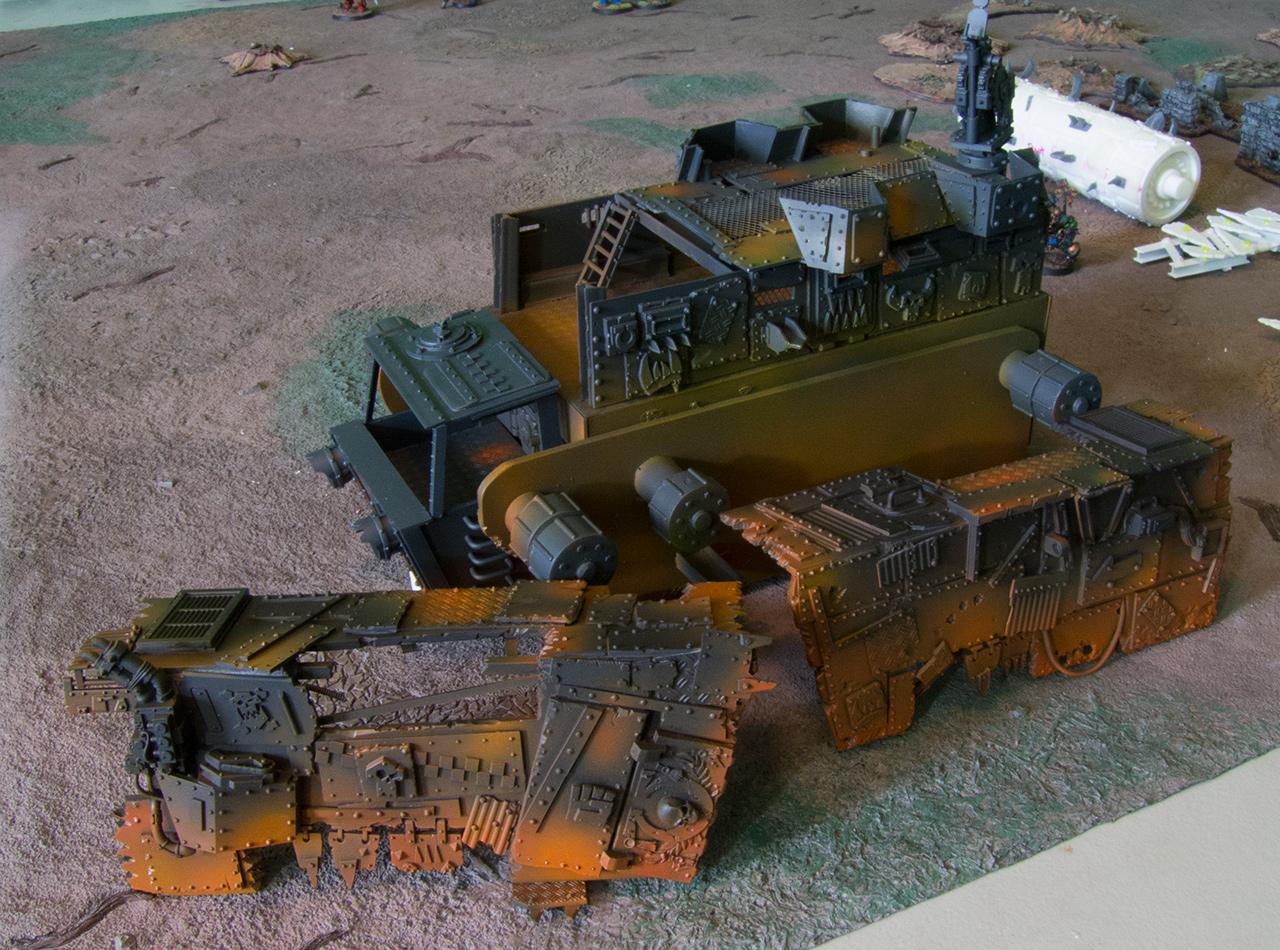
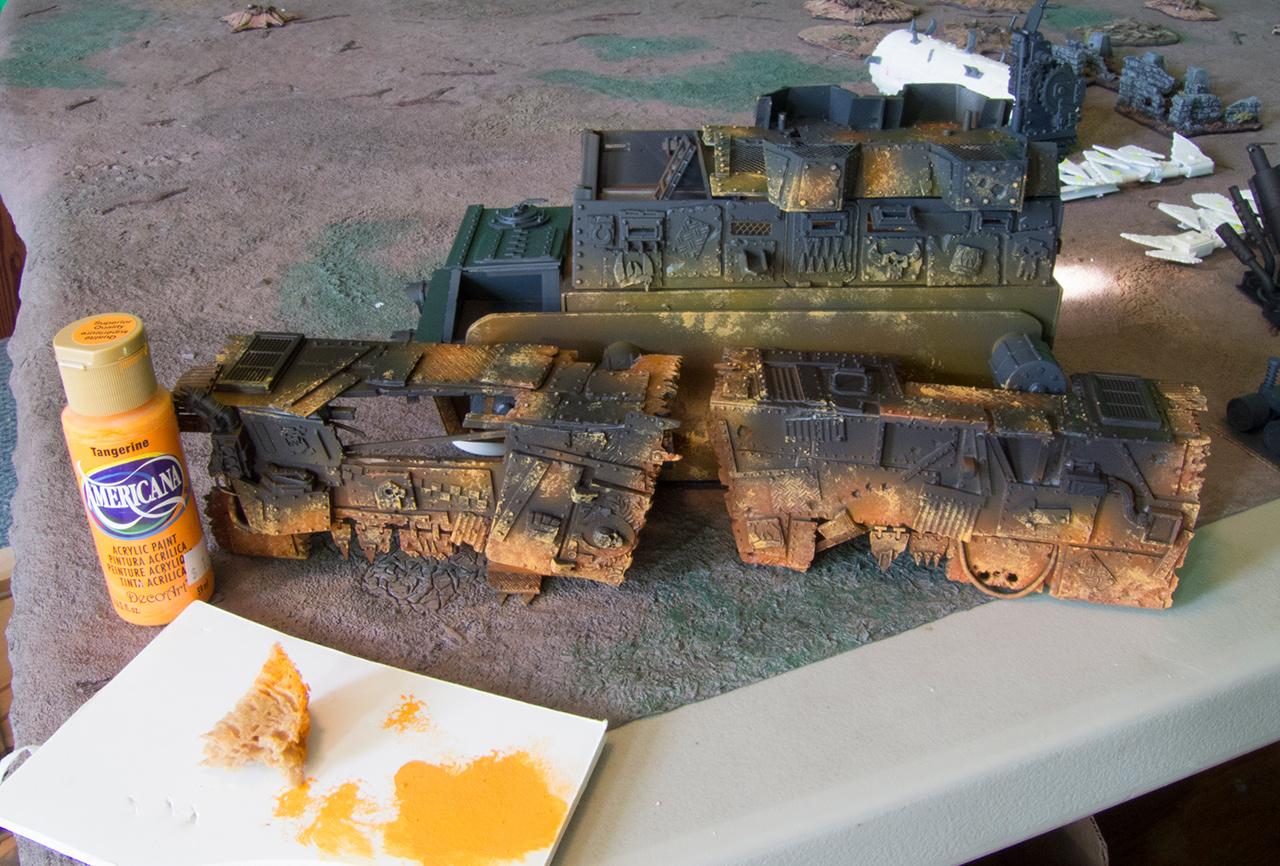
Salt to taste. I went heavier on the bottom; and although it looks ridiculous at this stage, a good bit of it is going to blow off when I start laying down paint; as you can see with...
the basecoat.
And, my favorite 3 color camo:
and other side
and, the treads:
The last 3 images seem a little bright; but the upcoming wash will tone them down some. I also have yet to drybrush the treads prior to the wash. Anyway, I think the airbrushing parts of this project are over. I just need to let the paint dry for a few hours before removing the salt.
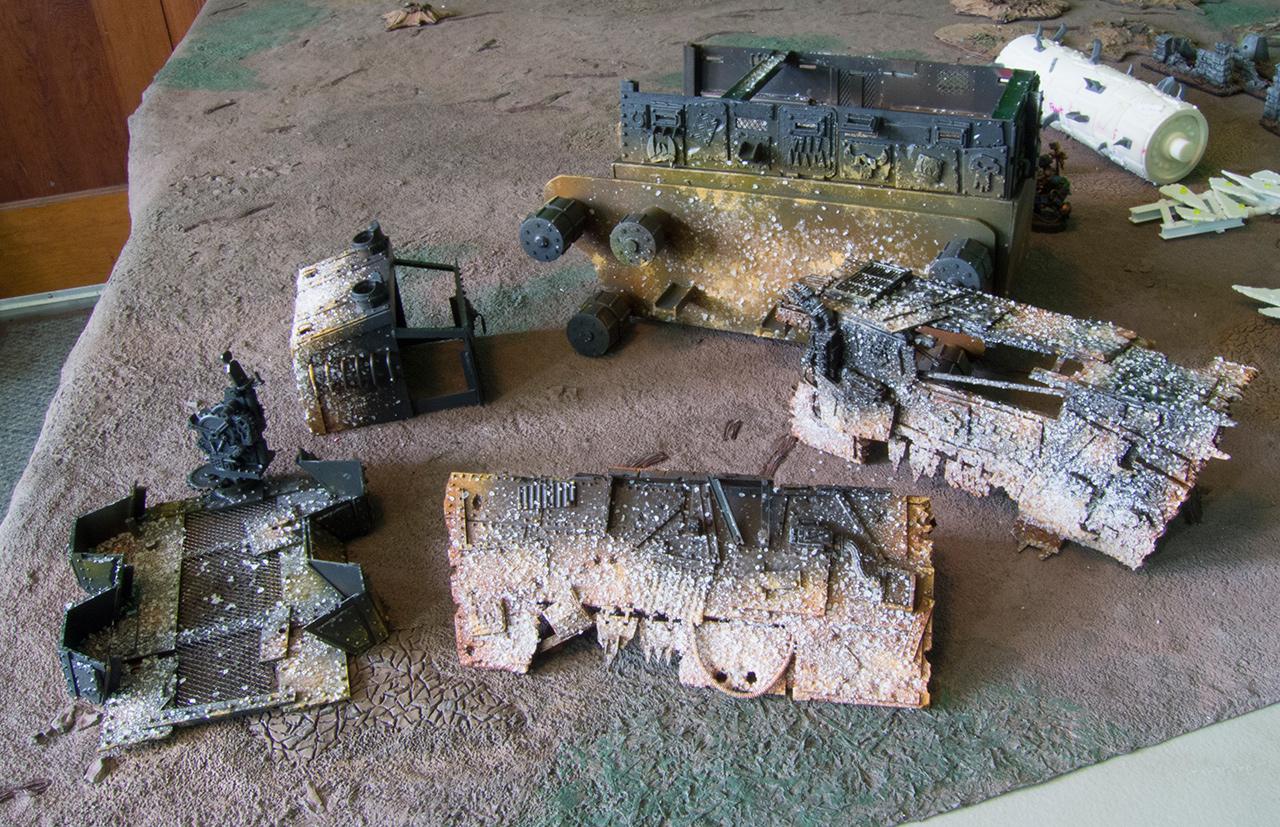
Automatically Appended Next Post: Washed off the salt, it's drying now. The side panels are perfect, the top panels less so - I went way too light on the salt on those. I wanted "less"; not "nearly none". Not a problem, I can sponge some on lightly.
Probably crashing soon, been a full day of fishing and painting.
And how much will be visible with the side plates on:
In some spots the treads look a little rough, but for my previous projects the weathering annihilates all that anyway. I probably did more on the treads then was necessary as is, before adding the rust & earth powders.
I had hoped to finish this project this week, that seems unlikely. They're still an awful lot to do. But it's proceeding apace; so hopefully this month. I did make good strides this week, certainly.
I generally try not to run craft paint through the airbrush because; in my experience; I can only seem to get two settings: too thick & cloggy, or too thin & runny. Something about the way it's formulated has not lent itself well to airbrushing; at least not in my setup. It might just be I'm really crappy at getting a good ratio of airbrush medium to paint, but who knows. At this point since I can't get a consistently good mix I only airbrush Minitaire colors, or homebrew Les Bursley style washes for very large models (i.e super rarely).
I absolutely love it for painting terrain and such though, perfect for that. When you need quantity vs quality it's perfect.
That being said all three shades of gray here were cheap craft paint; so there goes my theoretical vs practical application. Same goes for the treads, which were basecoated with the airbrush using a 99 cent tube of copper, then drybrushed with some old Dwarf Bronze. The IG tanks I did for my nephew (which I sadly lack pictures of) were all done with Americana as well (or something identical). Essentially any large models, vehicles really, I do use the cheap stuff.
Well, no one saw this coming, but I have some updates for this project.
I have a much more important project I am working on, but in between working on that I've been taking little bits of this to work with me now and then over the last few months. I should tell you now I took some of these pictures with my cell phone so some of them are of dubious quality.
First, I unpacked the top deck to get started up, and was unhappy with what I had.
The Alumilite resin that I made the tracks for was also used to make the gun barrels. As it turns out, that was a pretty big mistake. There was some pretty bad sag over time.
I had to recast the barrels with my reliable Tap Plastics resin.
Secondly, I looked at the Kustom Battlewagon rules and realized that - this is going to sound pretty stupid as far in as this project has gone - that this is not a legal build. I have one really big gun, and then 4 counts-as big shootas. The Kustom Battlewagon needs 3 big gunz, which are swappable for type... I need two more bug gunz. So, i used some Kromlech turrets I bought forever ago and came up with a twin-linked rokkit launcha and, why not, a Zzap gun.
That has really hit home for me that there have been some problems with this top deck pretty much from the beginning. It's super crowded on top - I can only fit the boyz on there if each specific one is arranged in a specific way. Adding these 2 new turrets is a super tight fit.
I decided to bit the bullet and create a new top deck. This time, though, I would do something that is very un-Ouze like - I would create a plan and do it right.
I knocked up a rough draft. I also straighted the walls so that they were no longer sloping; such a design would mean every round that hit them had a pretty solid chance of riccocheting up into an Ork Gunner's chin. It seems unlikely any Mek would build such rubbish. The rough draft:
Here's a size reference. As you can see, evem though the new deck is only a little bit larger, the better placement and shape of the walls means I can now fit everything much more comfortably. I managed to hew pretty close to the plans.
Looking at the guns really made me realize that the ammunition in the bigger guns wasn't ideal. I decided to make some better ones.
I made one cartridge, cast it a few times, and then made a belt. Repeat. Once again I was, as you can see, hobbled by a poor choice I made earlier - the size of the ammo boxes dictated the length of the rounds - quite short. They look sort of like stubby little .45 ACP rounds instead of the nice, long A-10 rounds I wanted (front row, vs back row)
but at this point they will have to do because I'd have to redo the ammo boxes, the ammo entry point, and maybe the gun bodies over again. Too much, small short rounds it will be. I wound up using the longer rounds in the ammo boxes, and I am sure they will come in handy for some future project as well.
I also started doing the electrical work when I had time at home. Unfortunately I didn't get very many pictures of this but really, all you'd see is the underside with some blue wires running here and there.
I added a rail running down the length of the second level of the vehicle. That worked pretty well and I embedded some lights into it. The problem that created is that once the lights were on, it was pretty clear that there was nothing on the second deck. No big deal. I'll just make some stowage to fit in there.
First, some barrels and hoses. The barrels are 1/48 Tamiya. The hoses are just recast guitar wire that I bent in hot water, I have a hard time shaping guitar wire normally.
I also made some modular ammunition boxes. You can see the original in styrene with brown Tychy rivets in the center back, there. After making the box I made a model and recast it. I also made 3 different types of inserts: a pile of ammo (center), 2 large shells, and a 6 pack of standing shell rears. The larger shells I made by turning a resin rod on a dremel tool and using the edge of a hobby knife to shape in as a kind of half-ass lathe; it didn't work really well but they look very good on one side and you only need to see one side. The primer rear end I did by filling a styrene tube, filling it with resin, then drilling a little indent in one end and filling that with a procreate ball to make a little primer.
I decided to add Grot gunners to be counted in the rules as Grot Sponsons. To do this, I just went with regular grots who were holding pistols in a "gunner" position, and cut off the pistols. I also had to make little stepstools for them since they were a little too short to reach the portholes I had cut in the sides of the walls.
I used various Big shoota type guns to make the sponsons. They swivel from side to side.
Test fit it all together.
I also finished off the grot flakk gunner. It's from (I think) that newish Ork flyer kit. The grot has no feet normally, for whatever reason, so I also made him some feet.
I also finished the flakk gun and did the same burn effect I did on my Sicaran tank. You'll probably see that effect on most of the larger guns I do from now on because it looks good and is readily achievable with even my poor airbrushing skills.
At this point I removed everything from the deck and painted it. At this point it's done, the next series of pictures will be of the finished and painted vehicle. I'm resizing the pictures in photoshop now and want to have them up later tonight.
I wound up counting the spiked treads as the required Deffrolla. The one you saw worked on previously will make a re-appearance at some point, but I really need to design a vehicle from the ground up to use it - this was too far along to add it on in a way that would have made me happy.
What an incredible project Ouze! WOW! Can't wait to see the final shots of it all together. Very inspirational. I think you've got enough amazingly handy little molds that you could open up your own bits company!

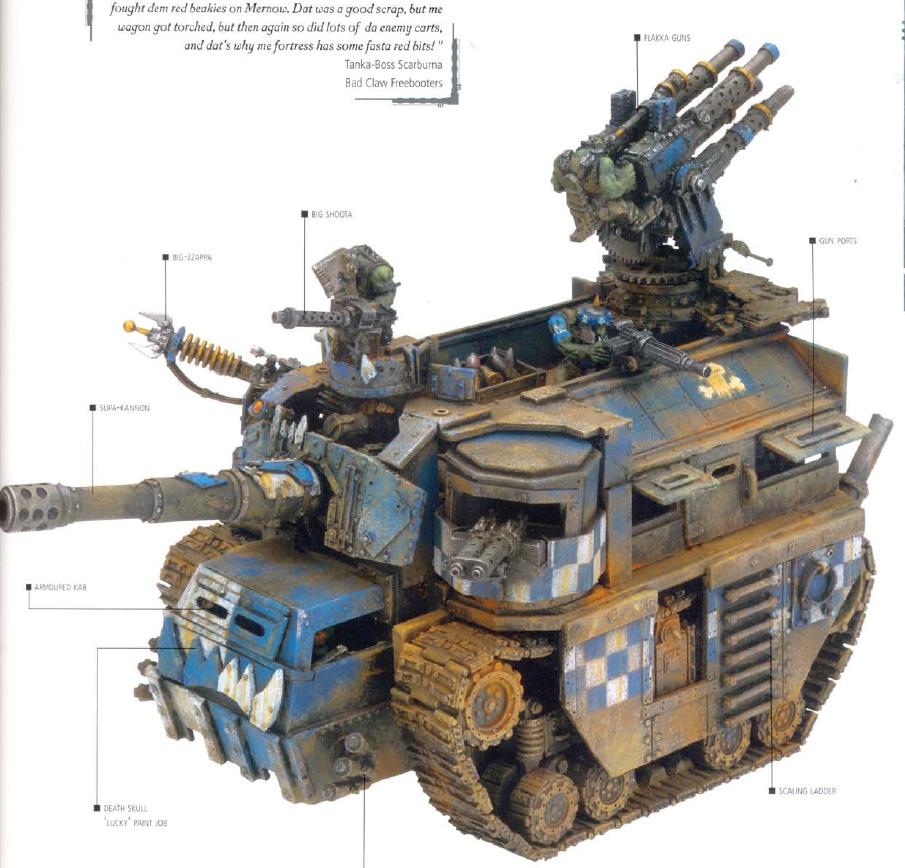

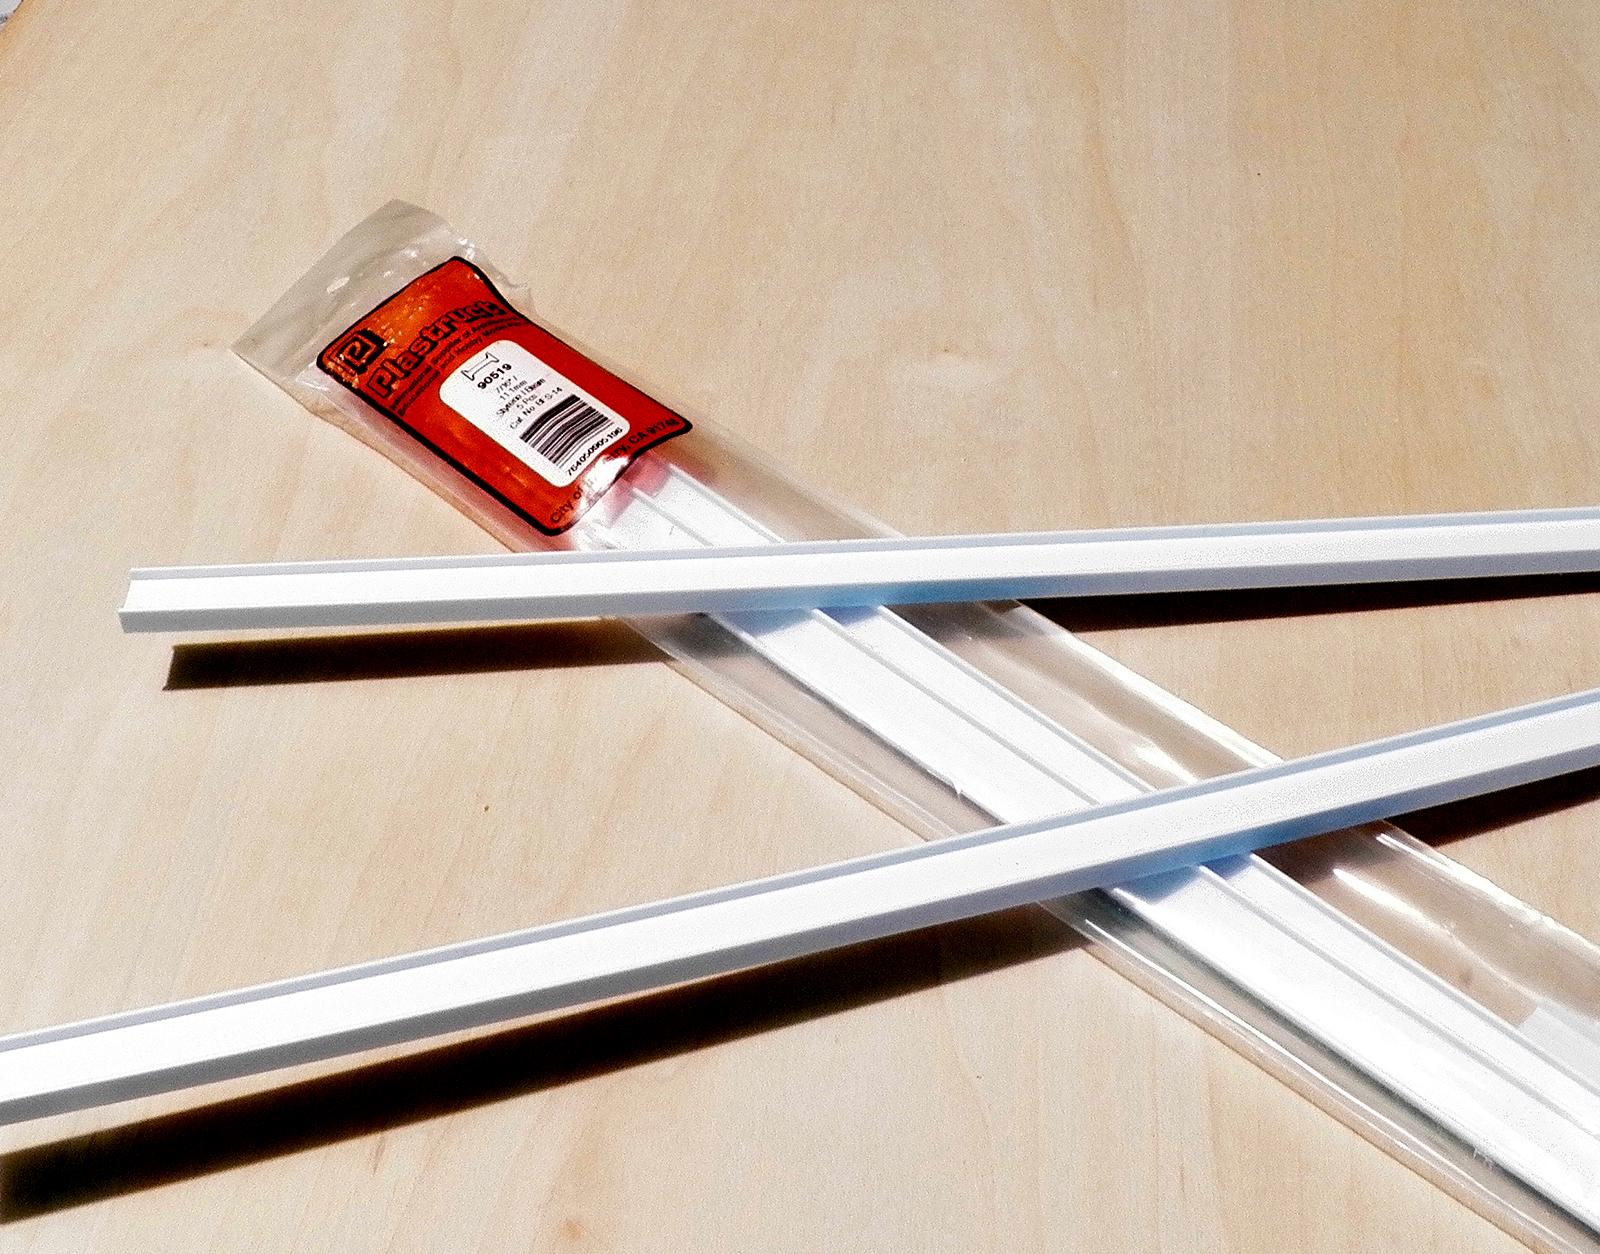

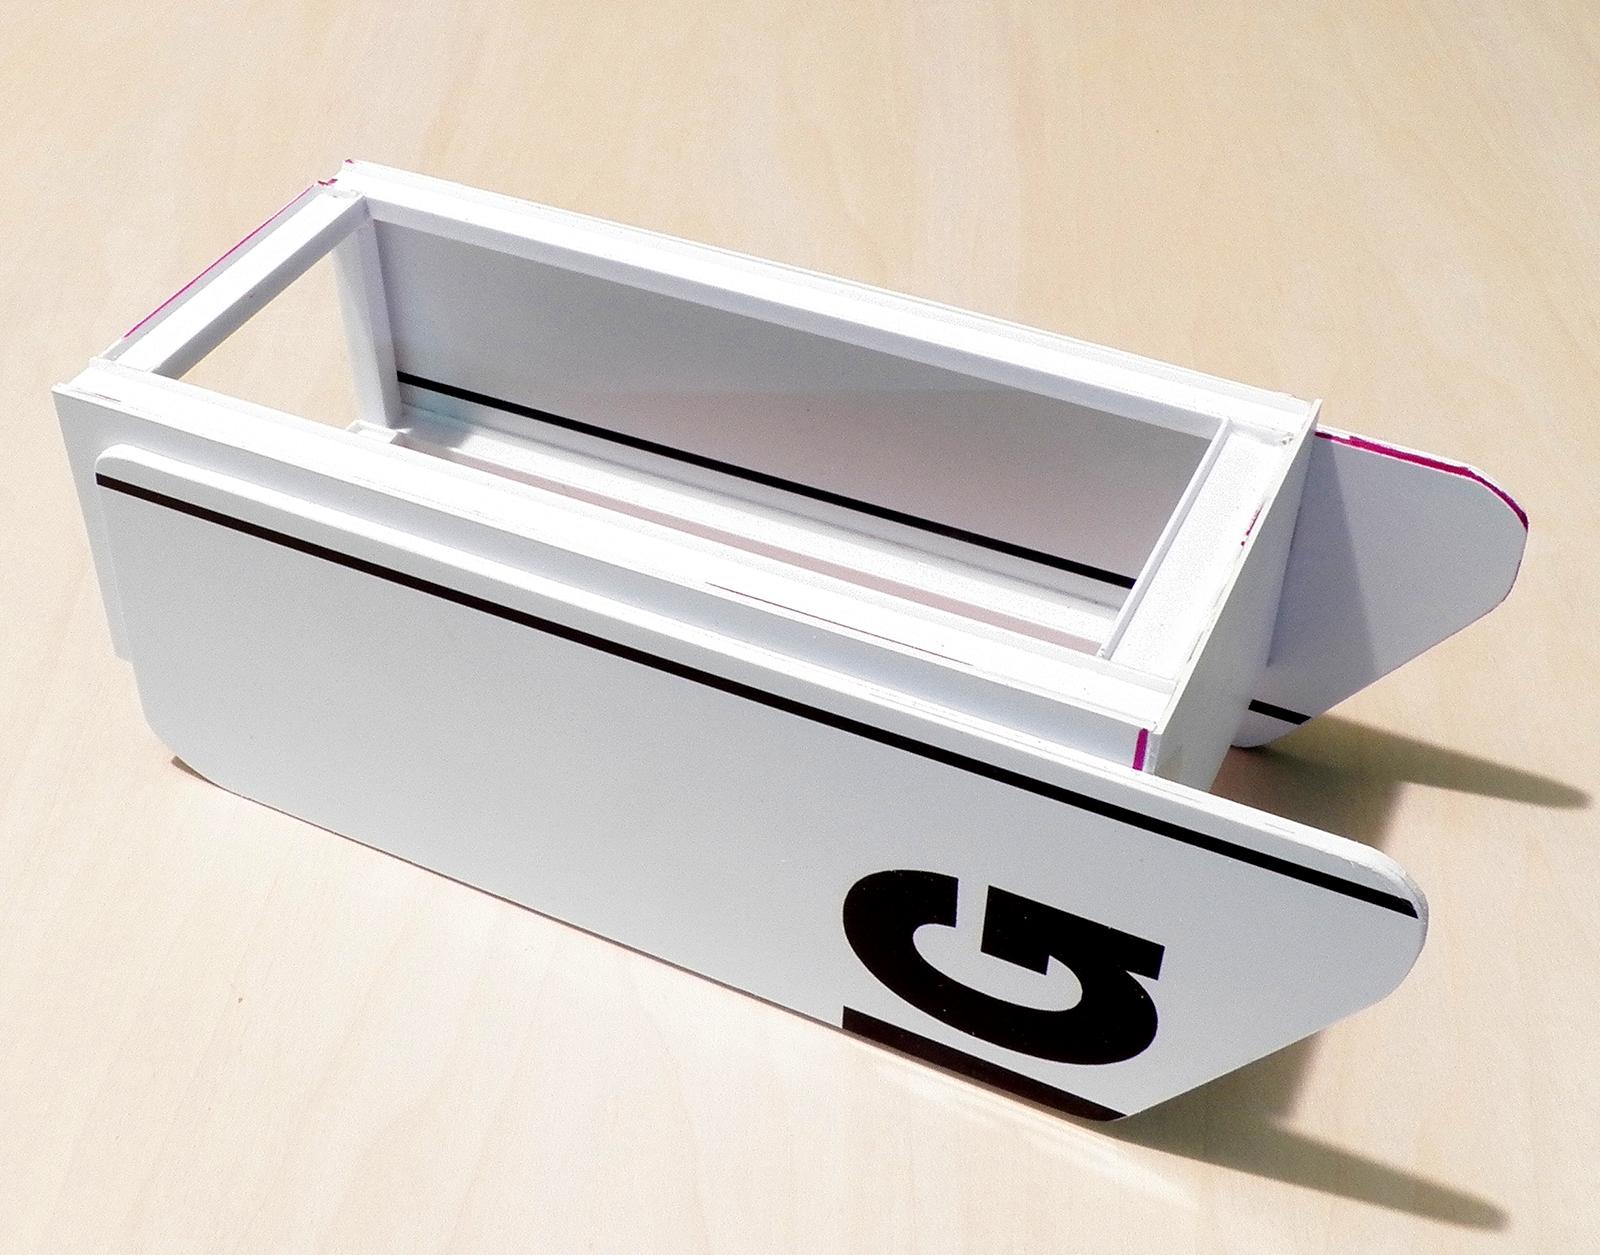
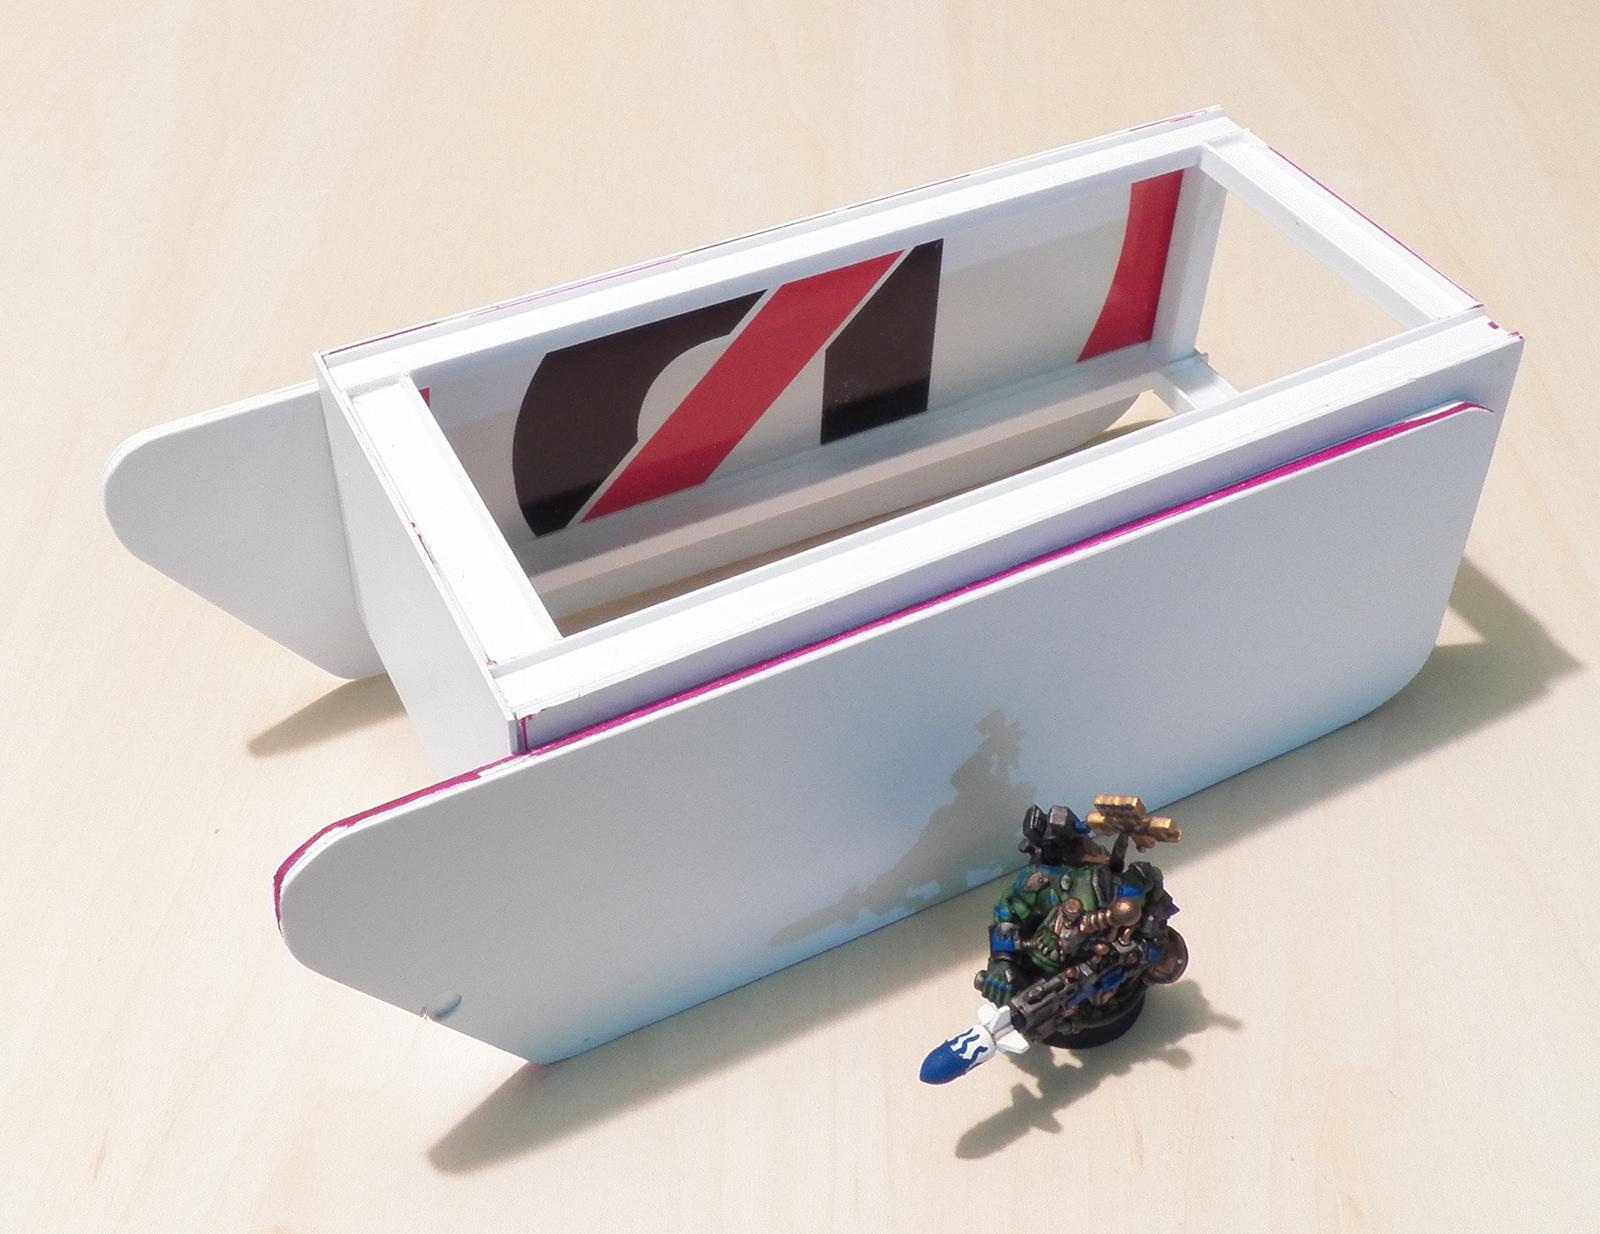
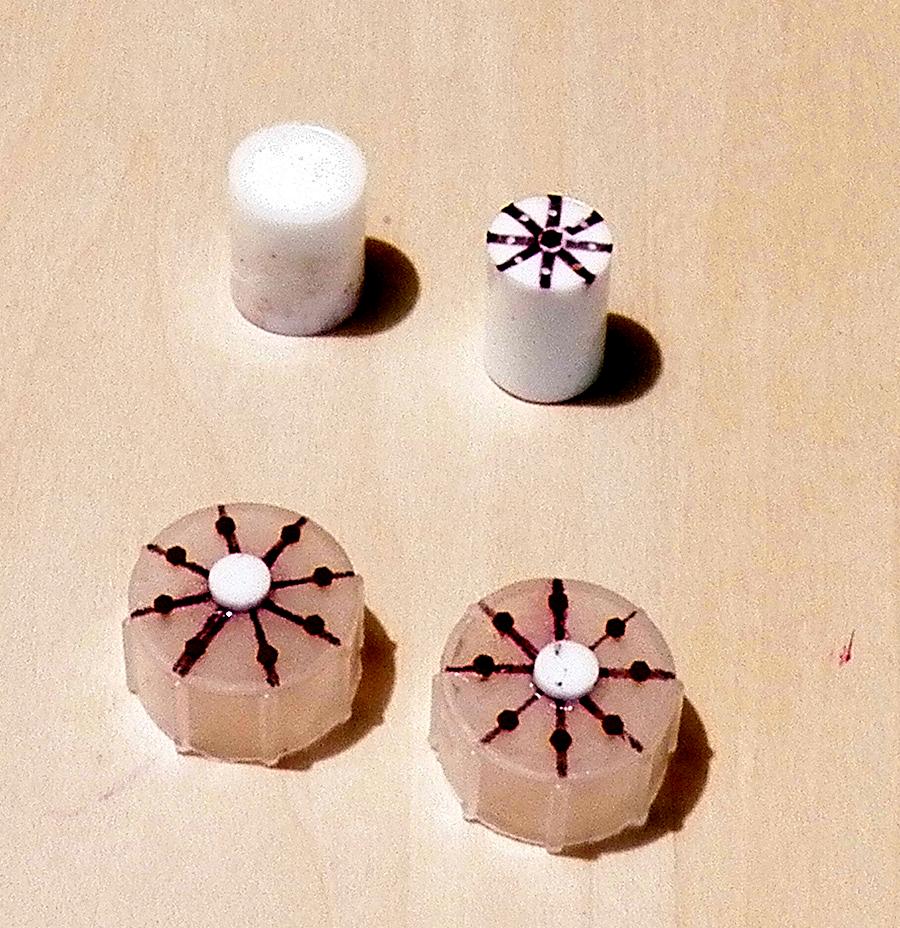
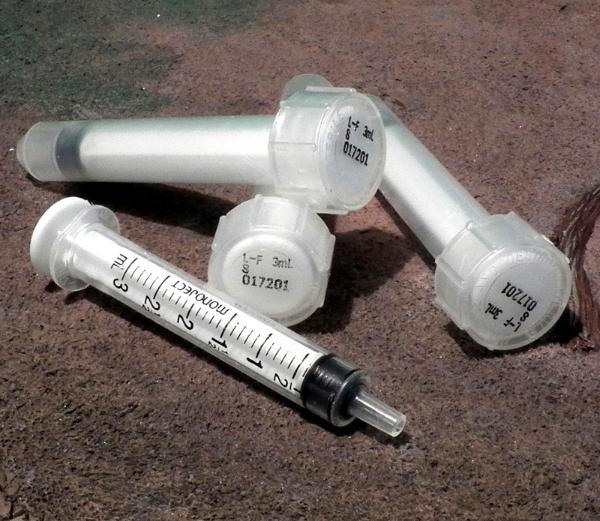

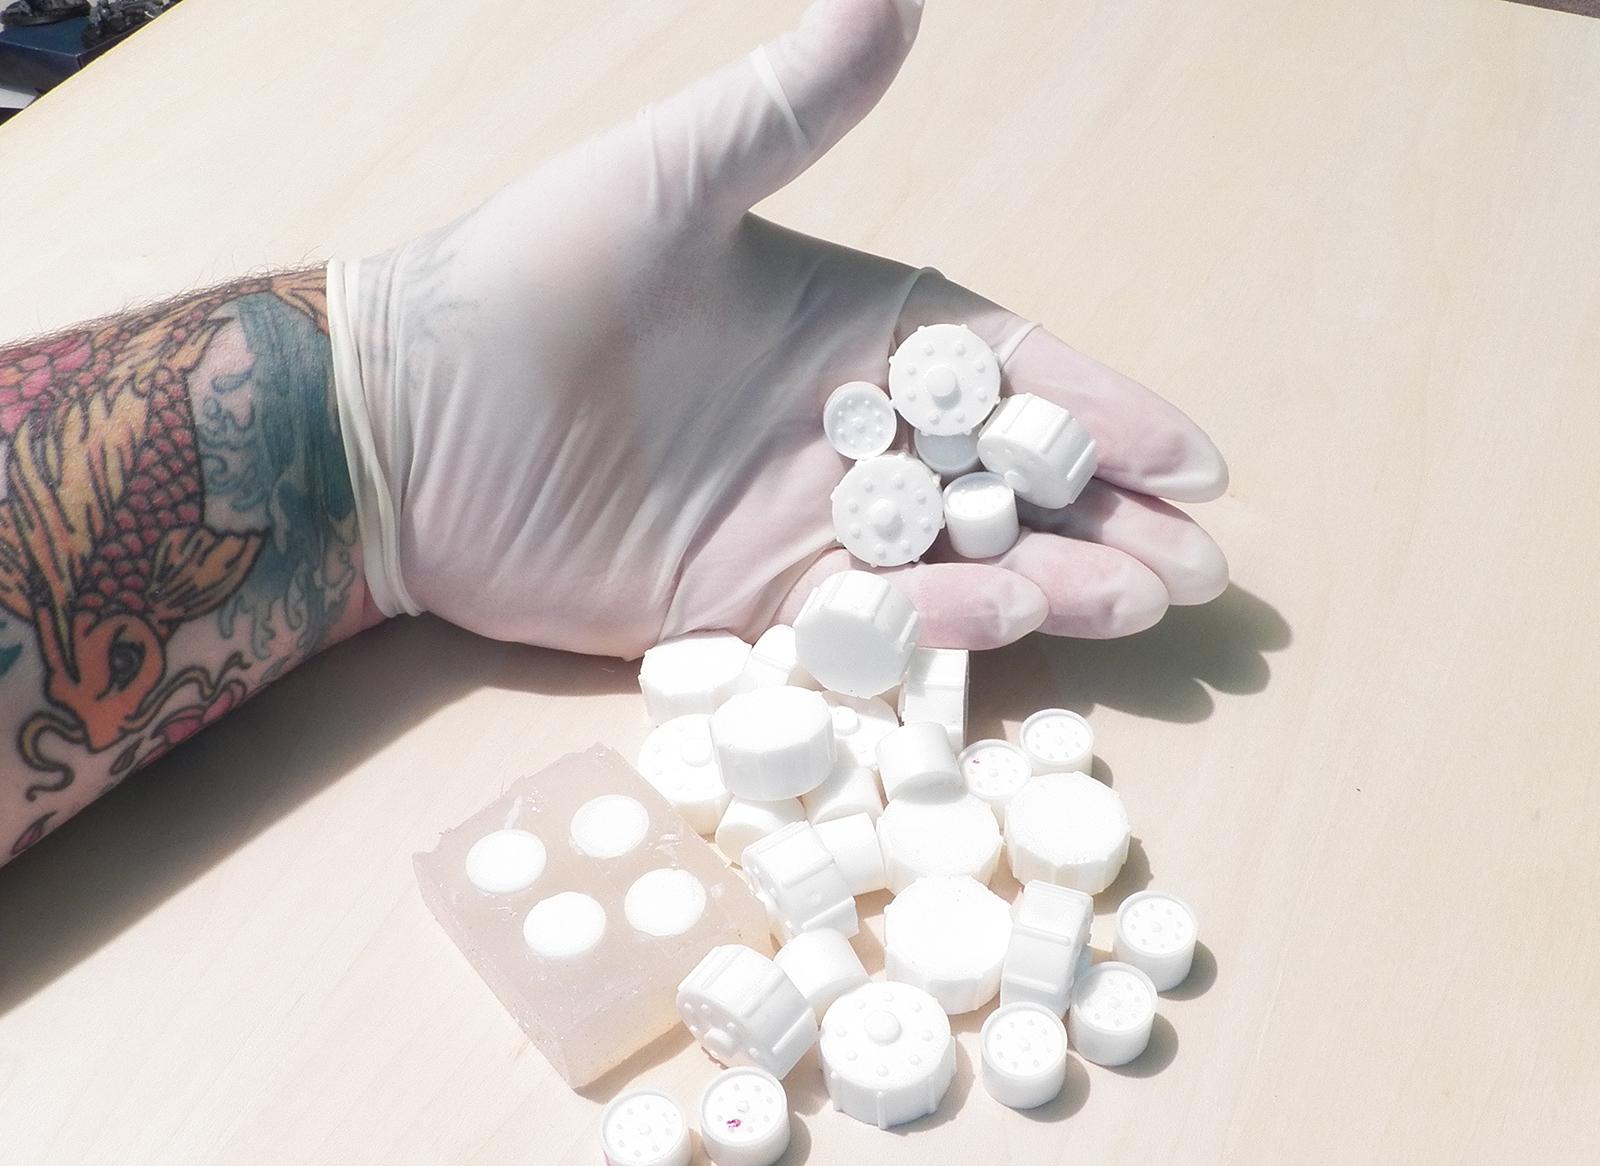
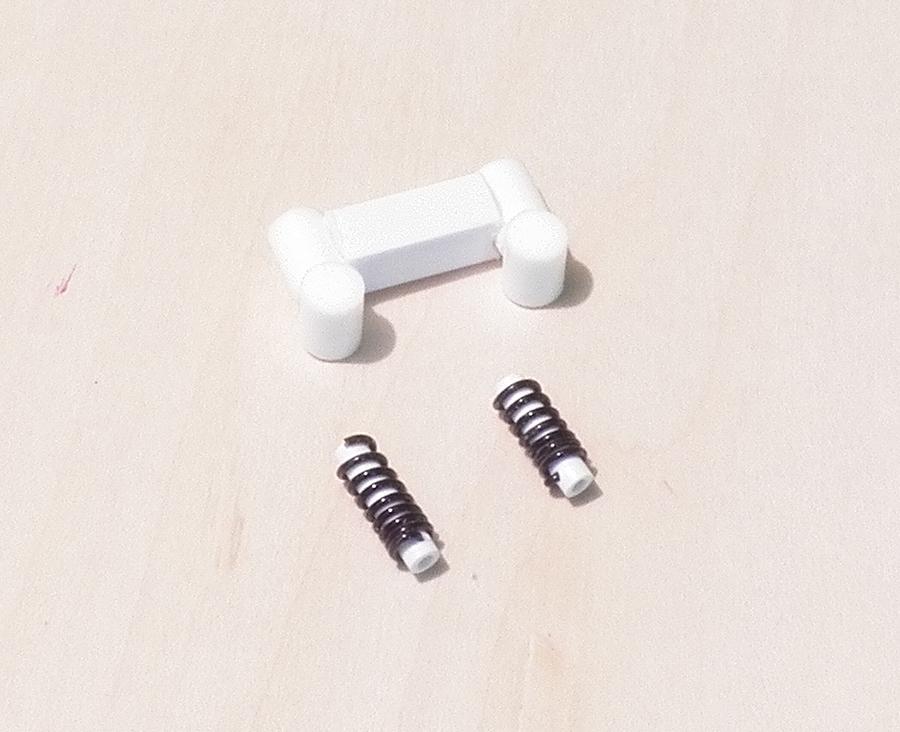
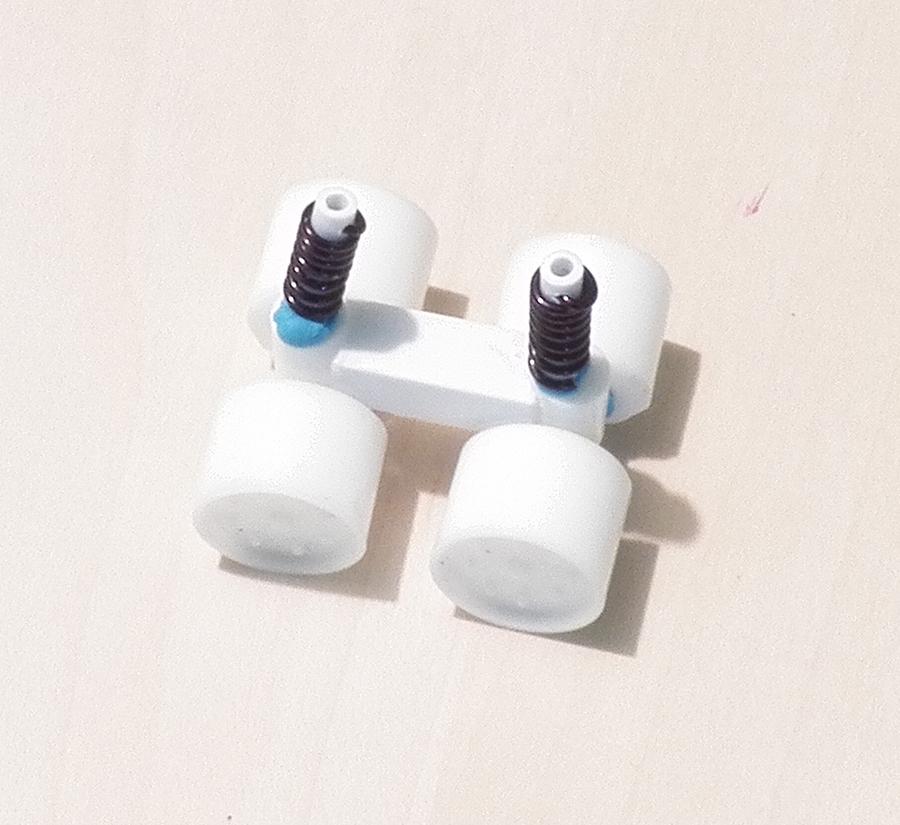
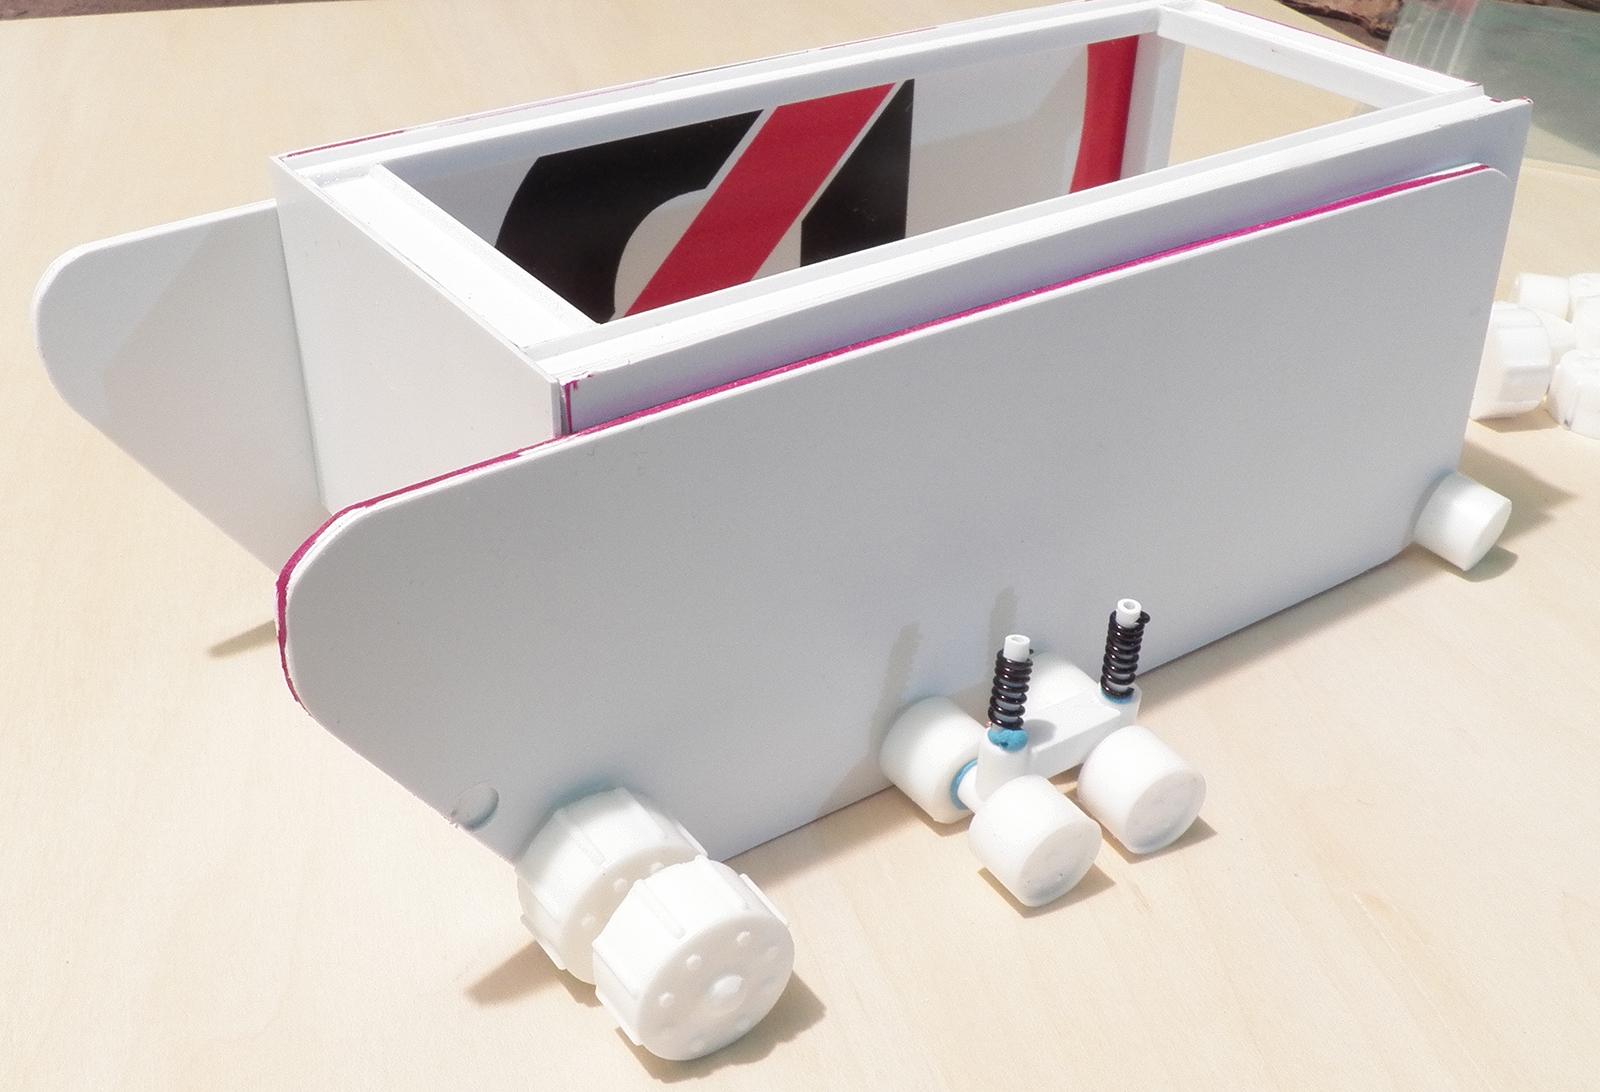

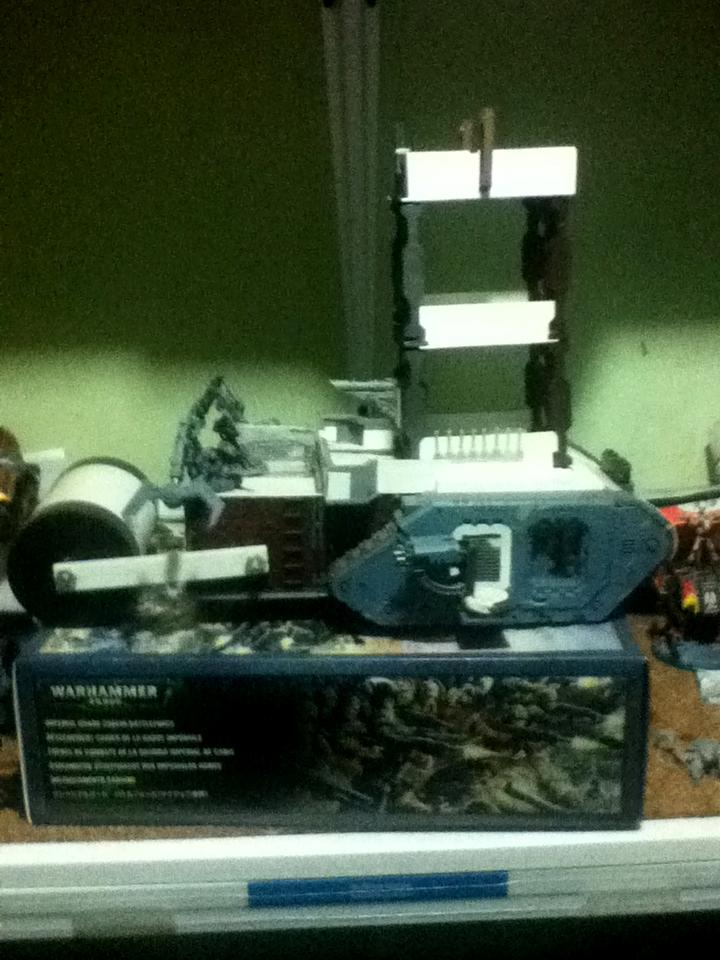
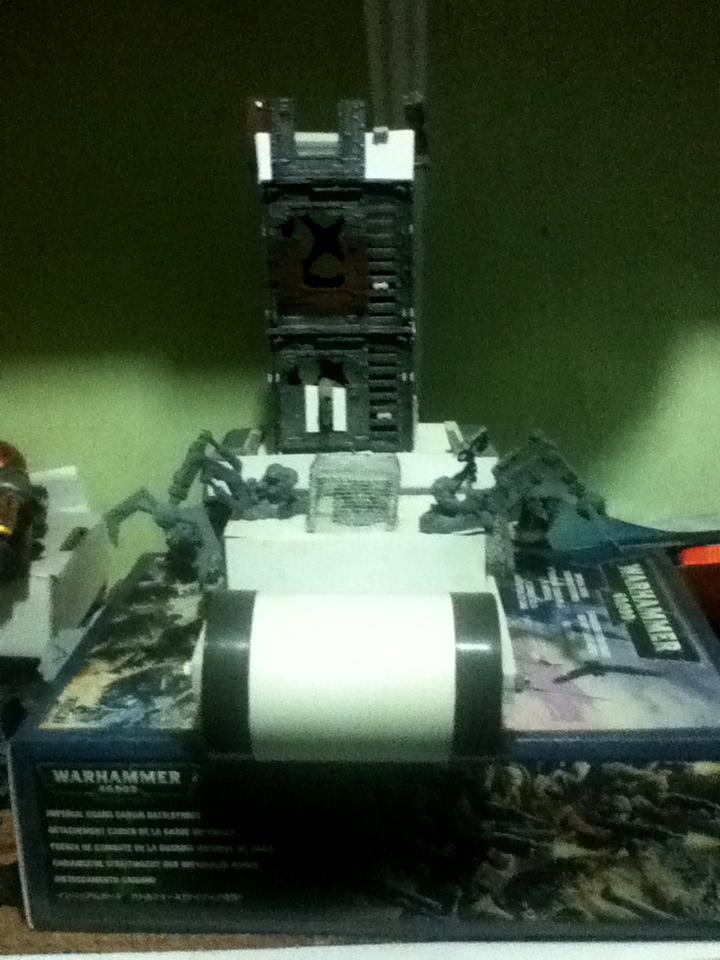
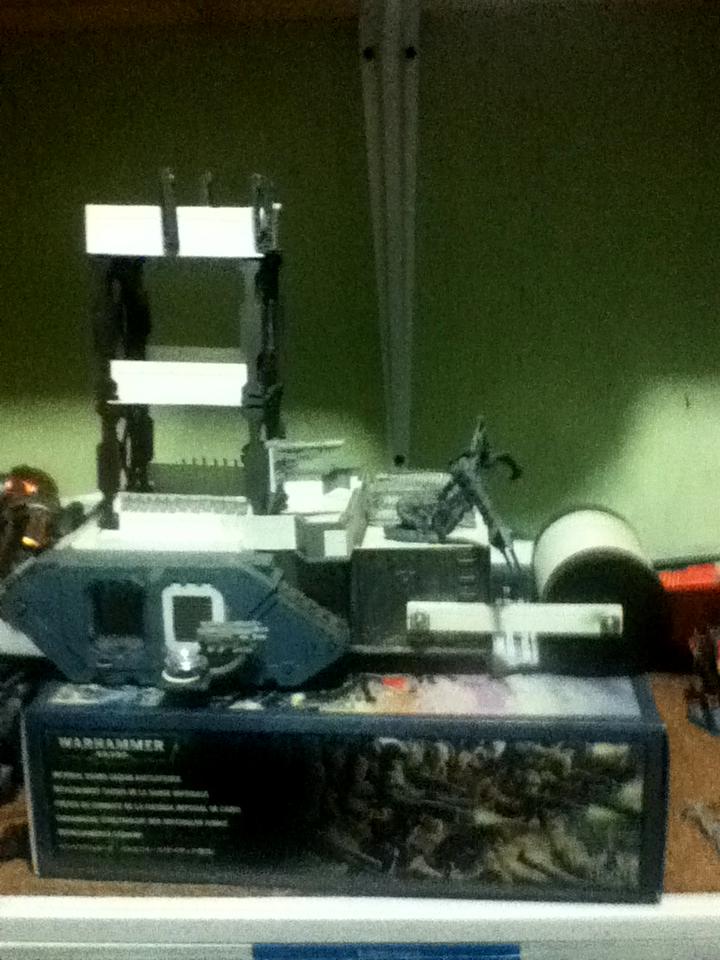
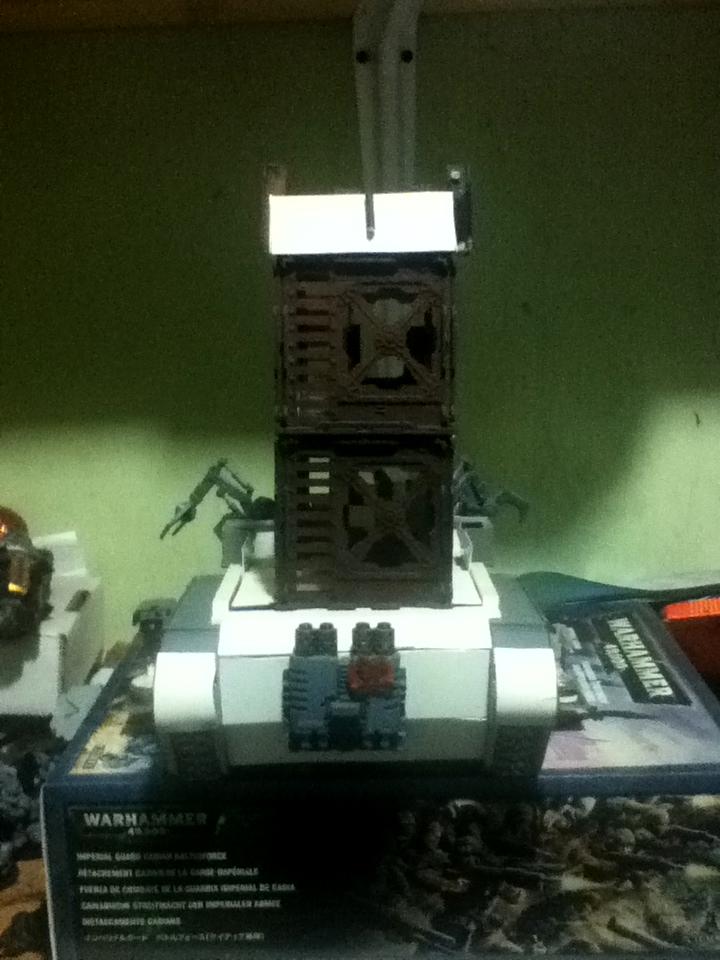
 and knows a lot of tricks. But the way you're going about it sounds like the right way to go to me.
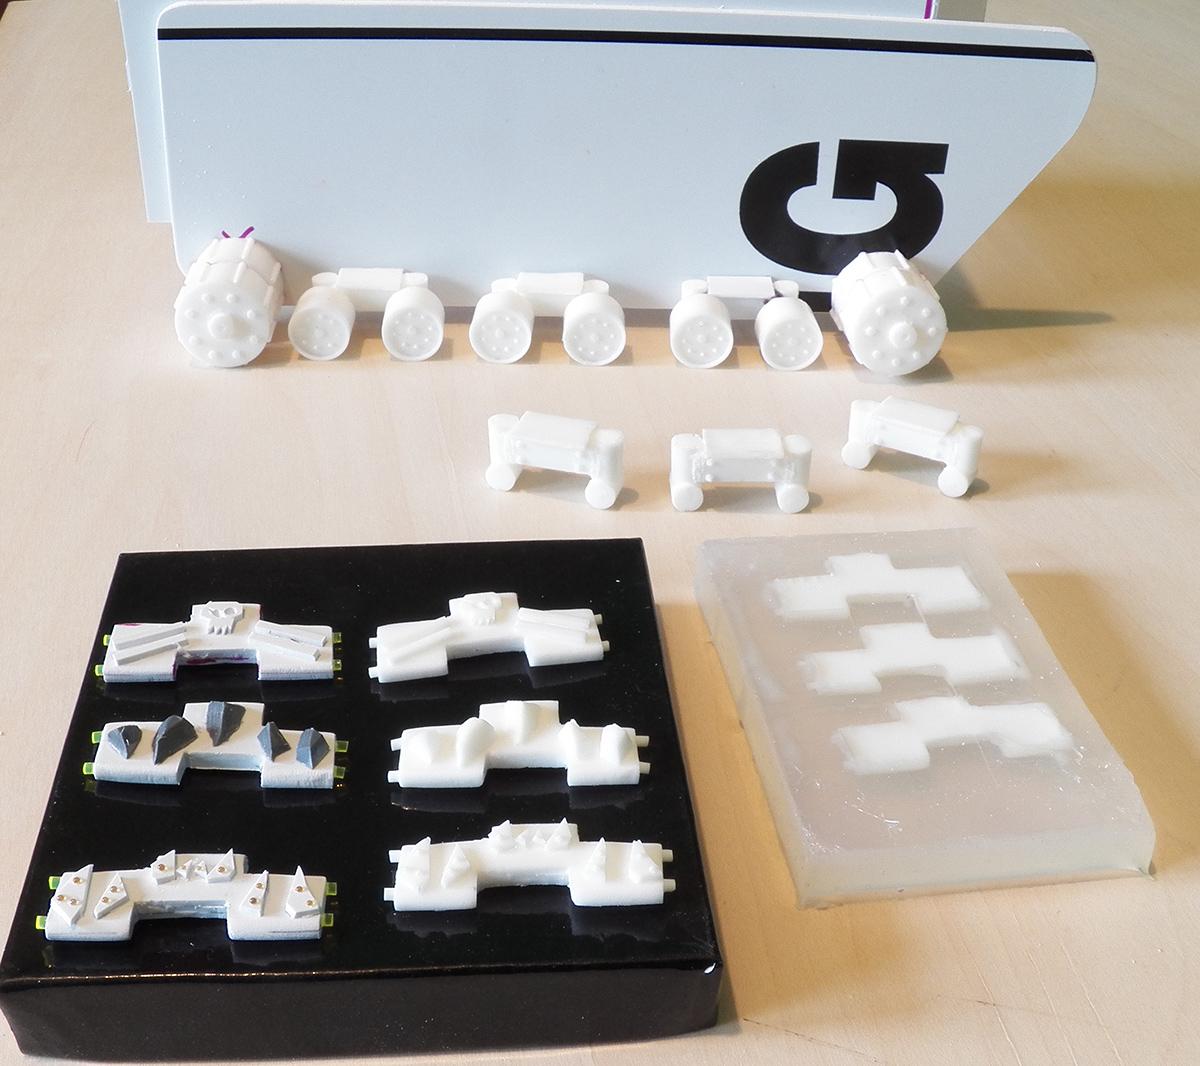

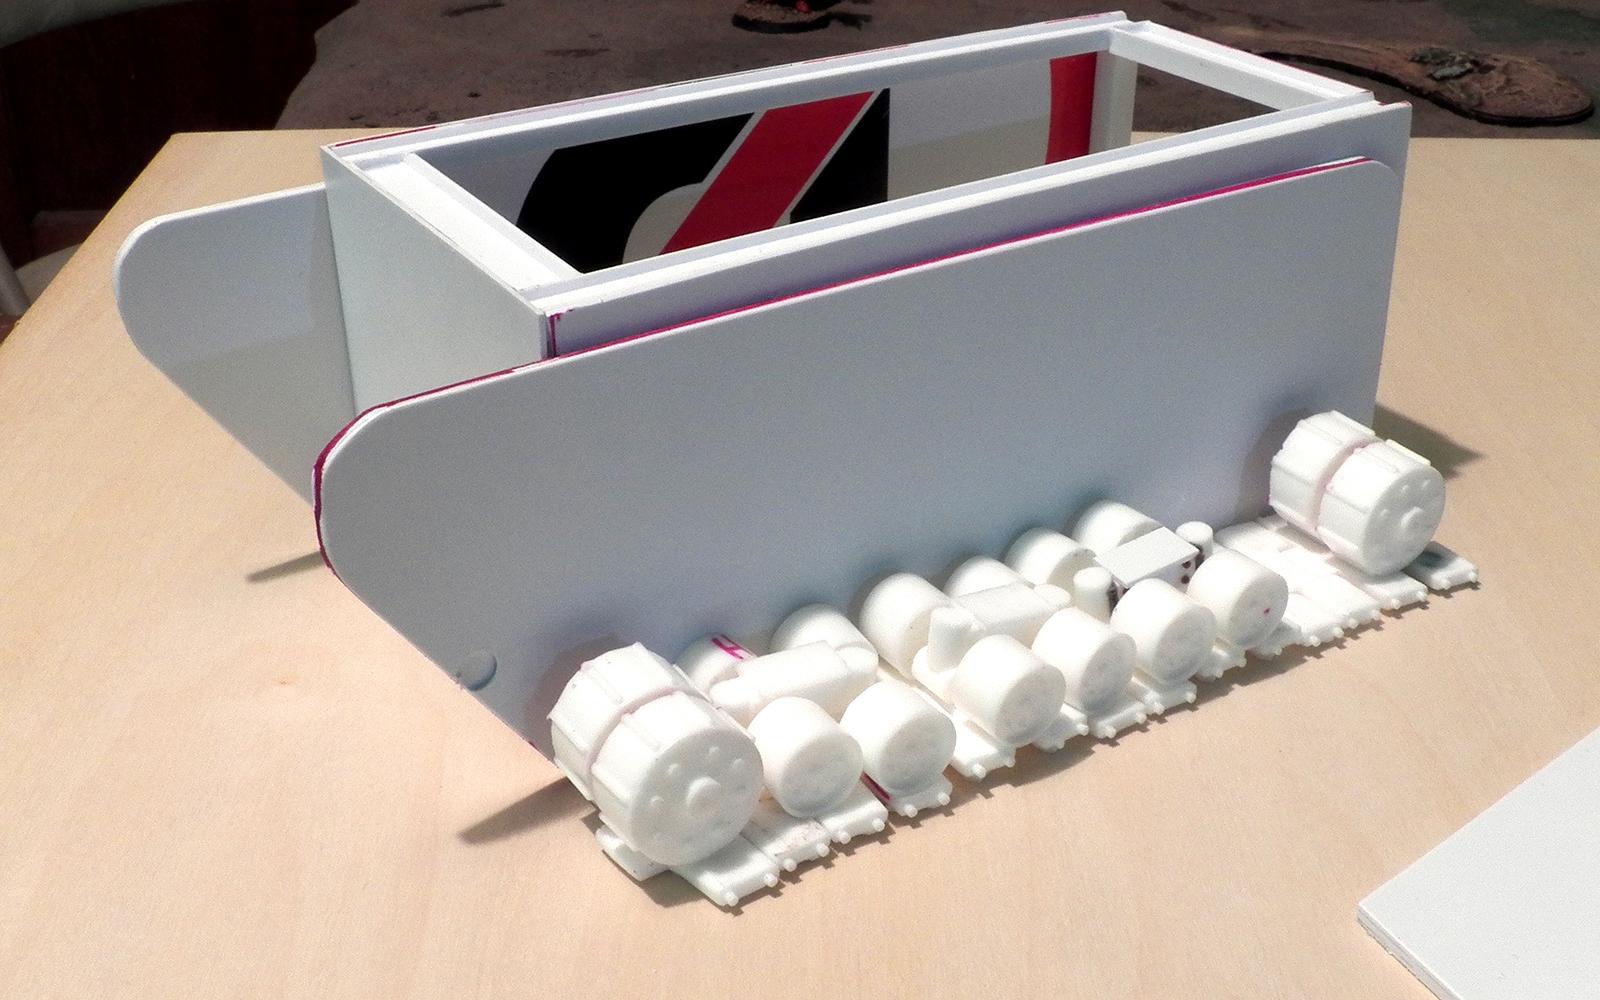
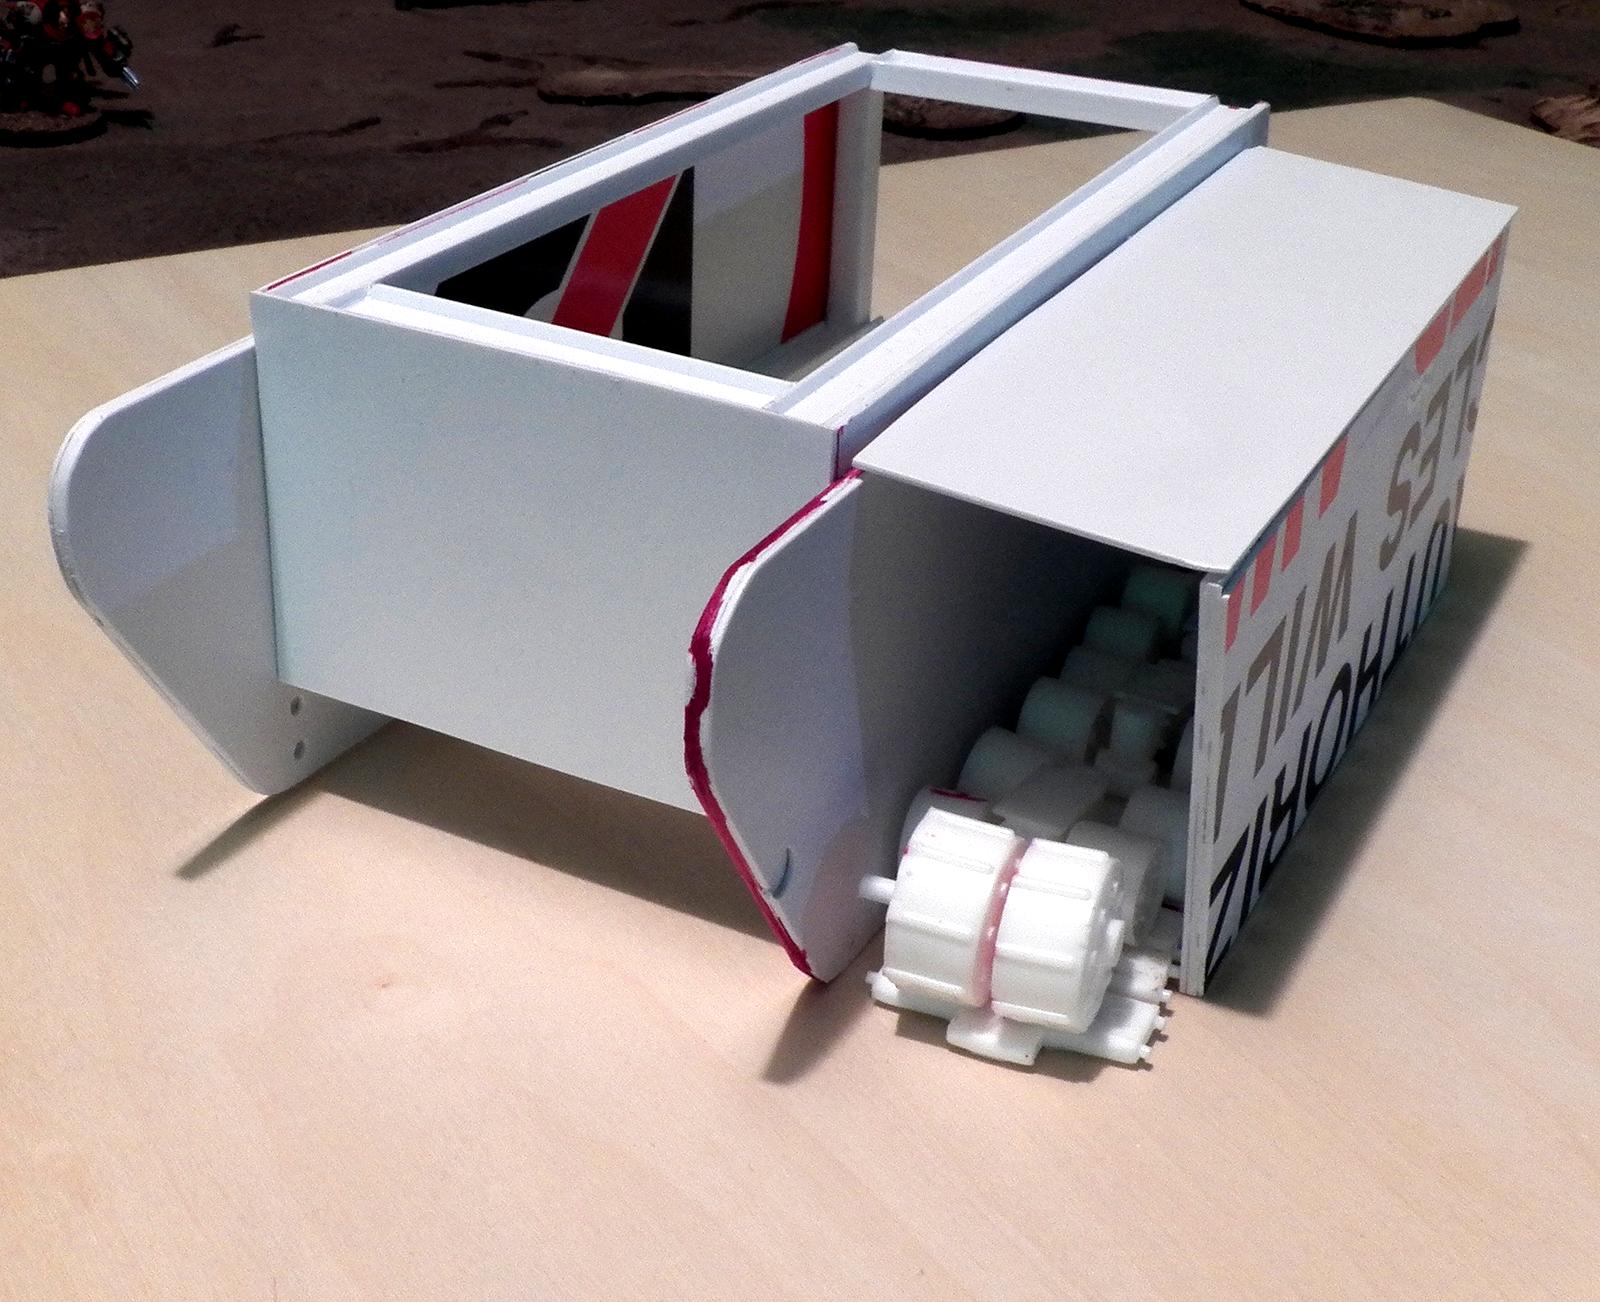
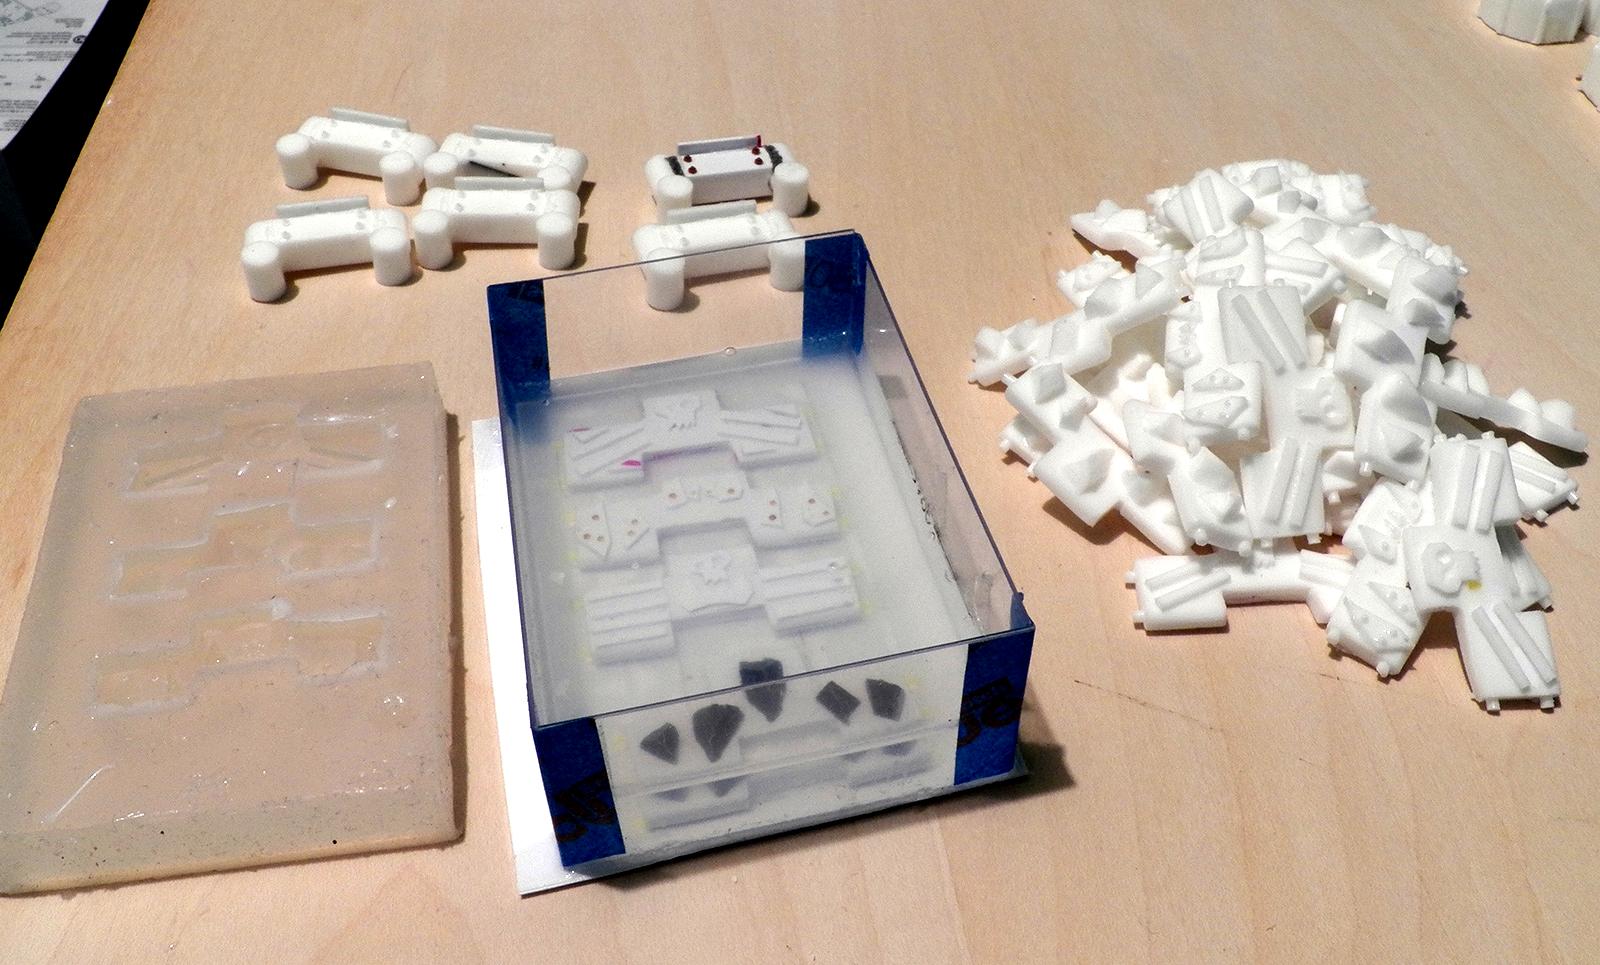
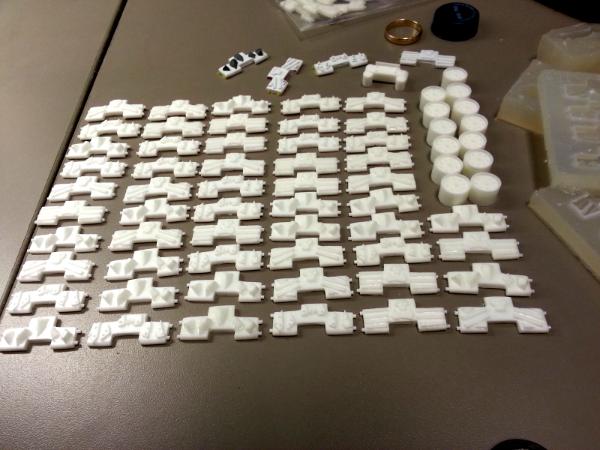
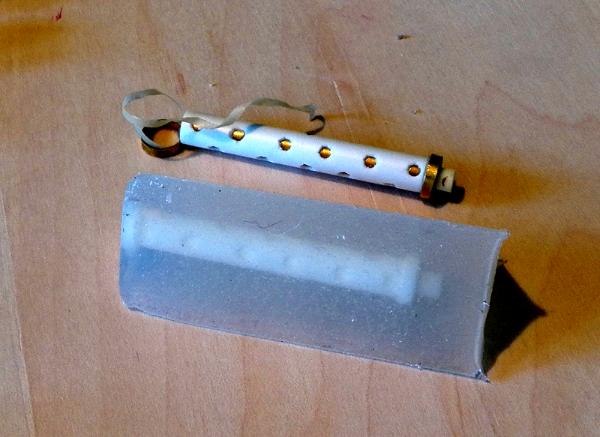
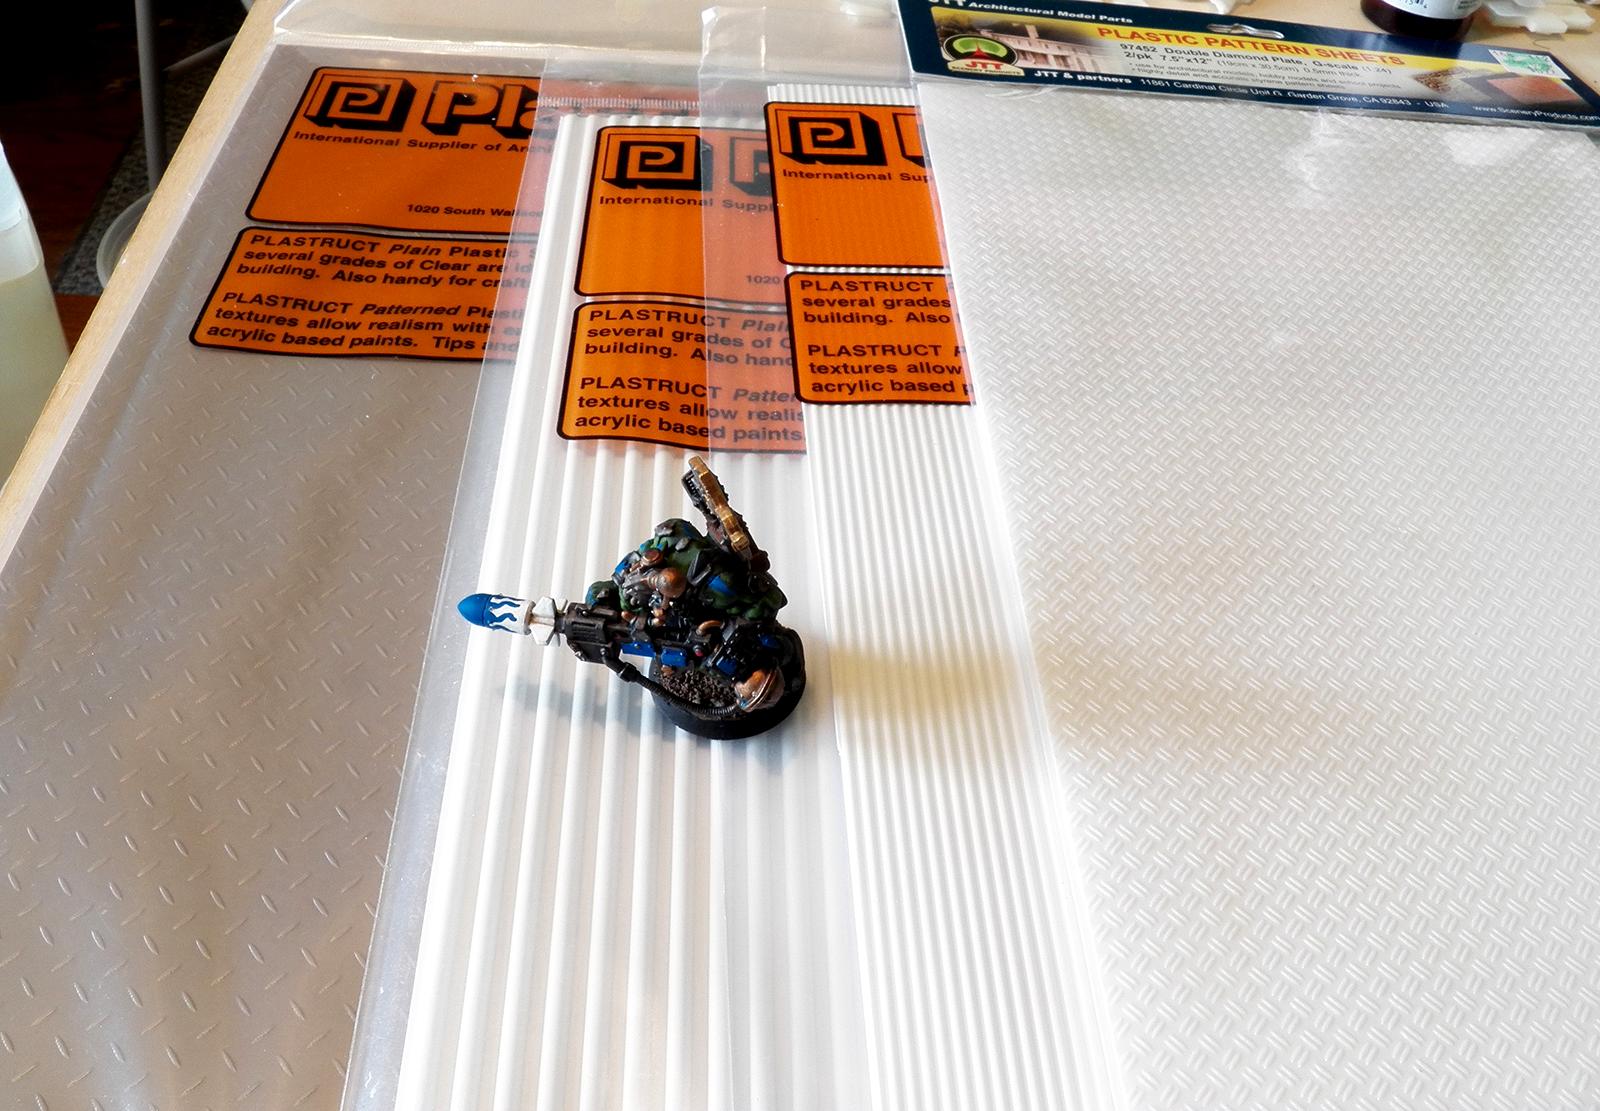
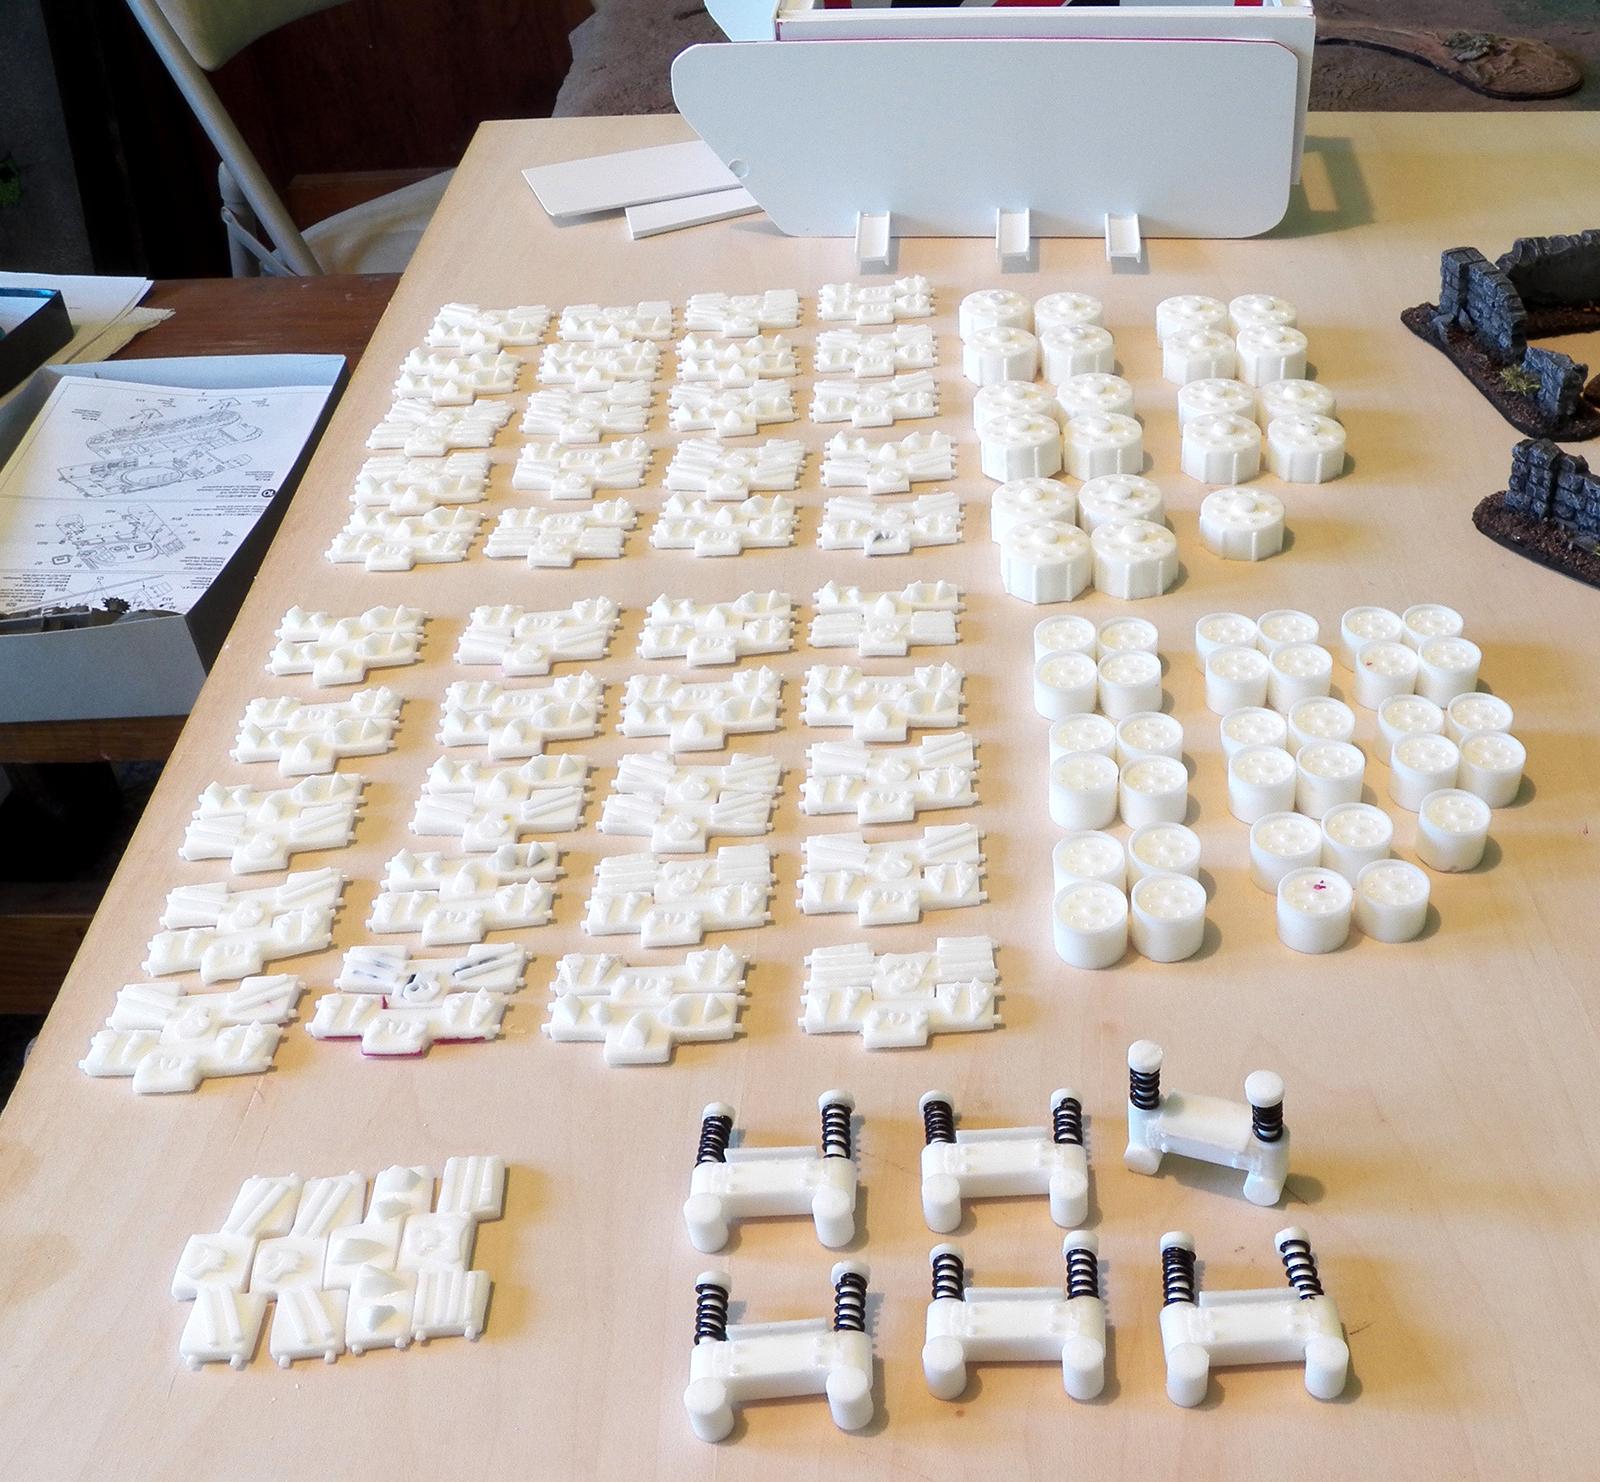

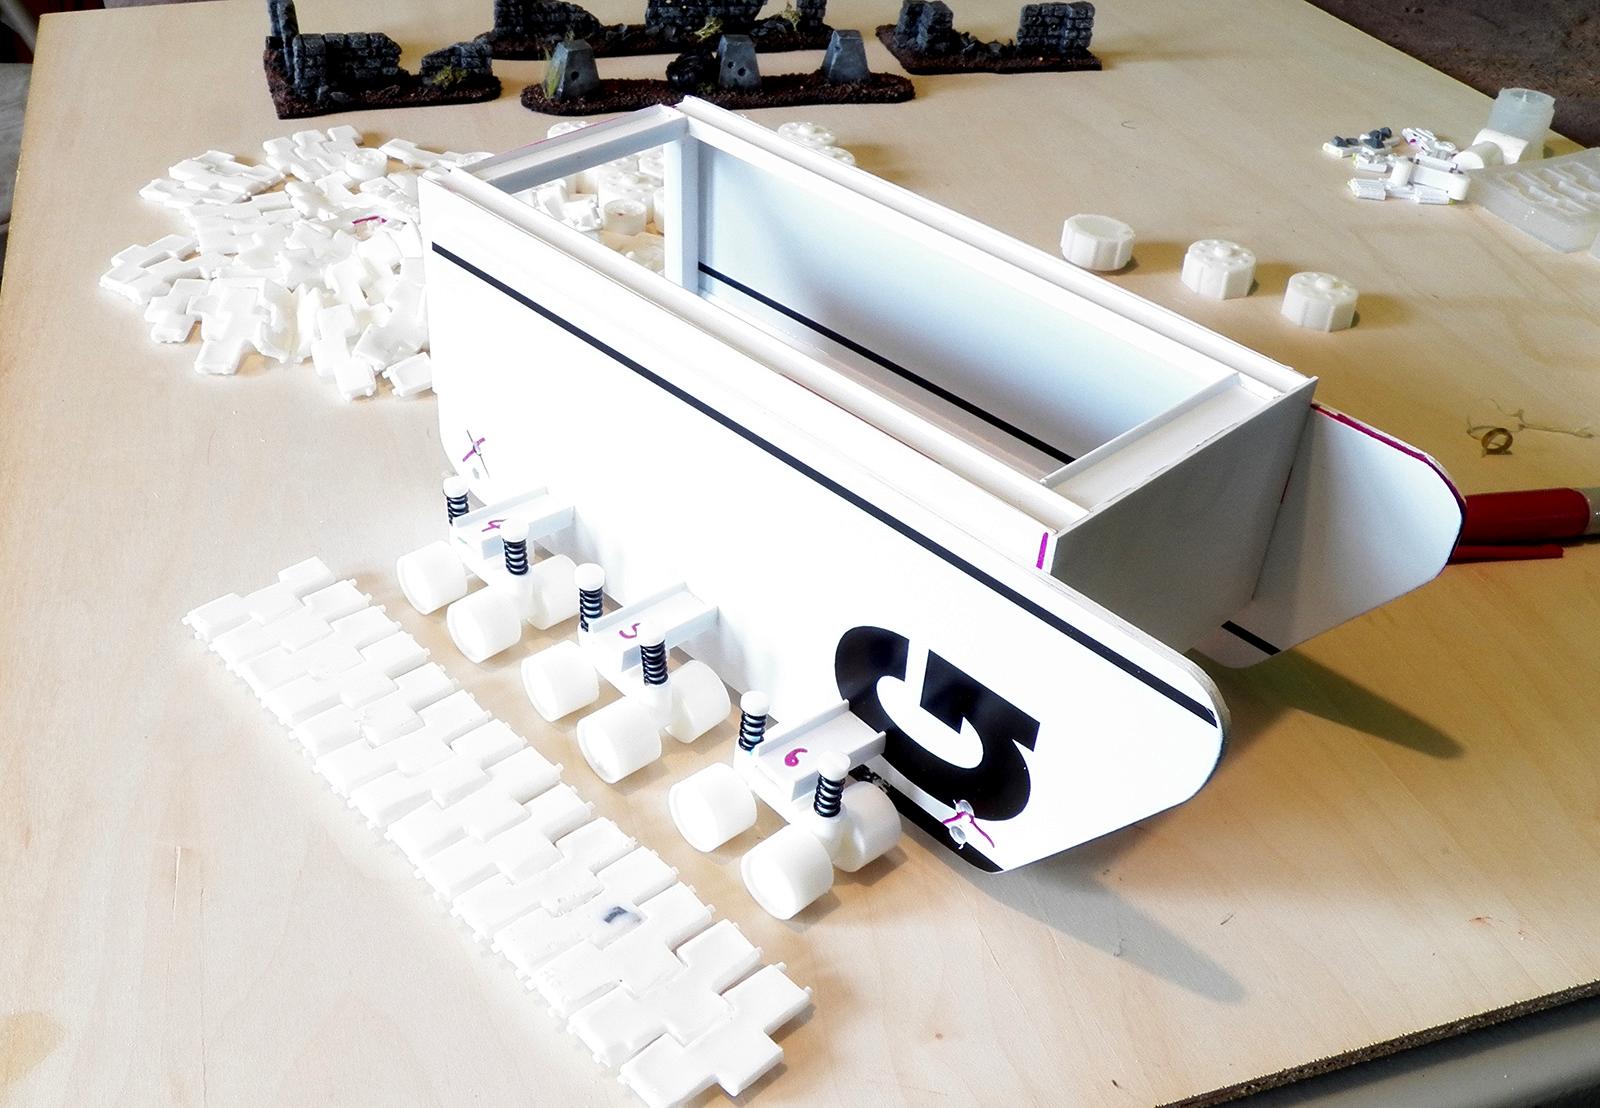
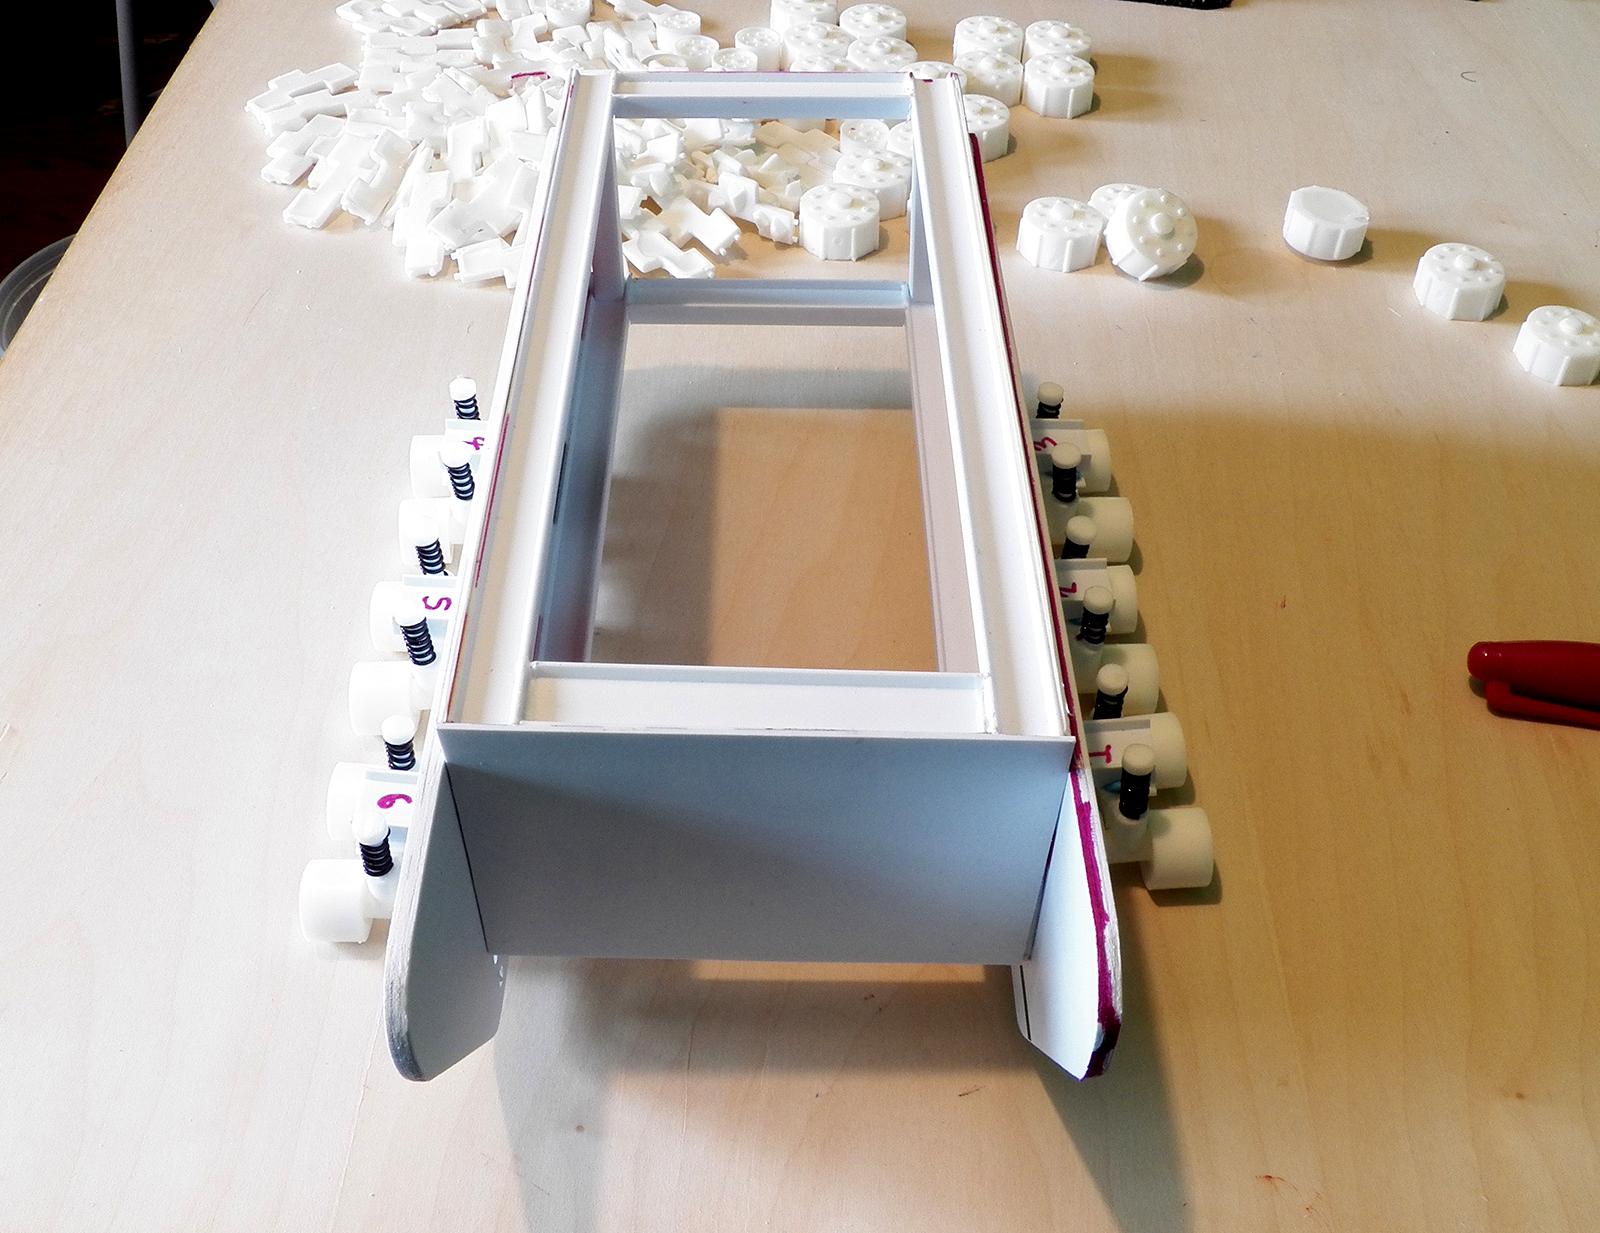
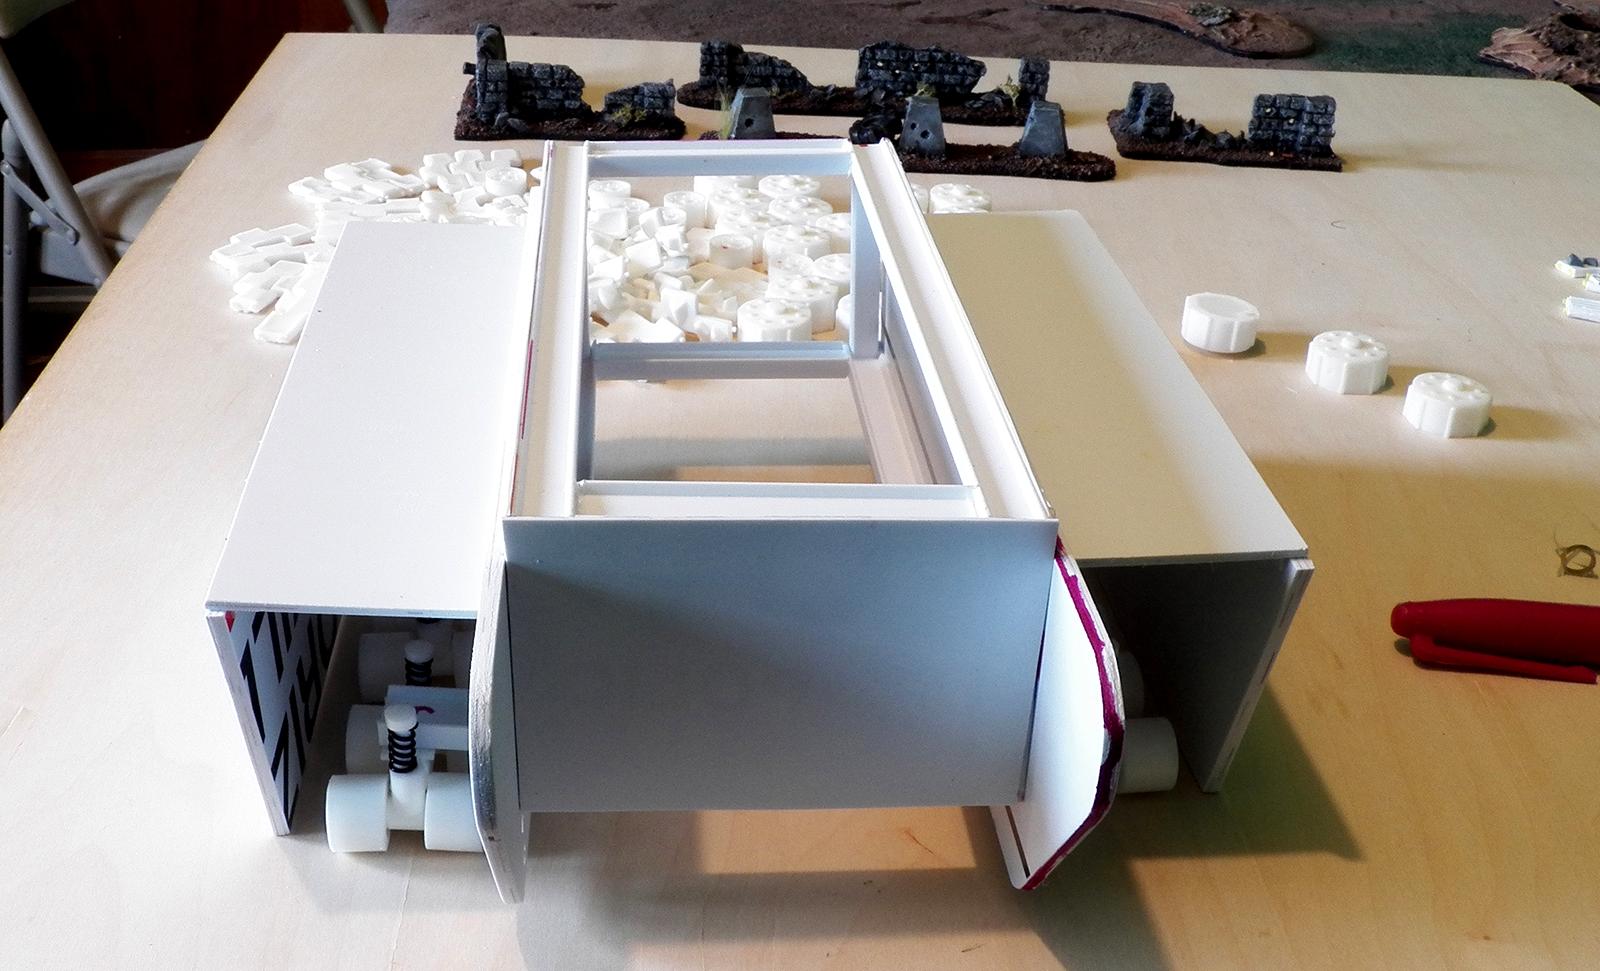
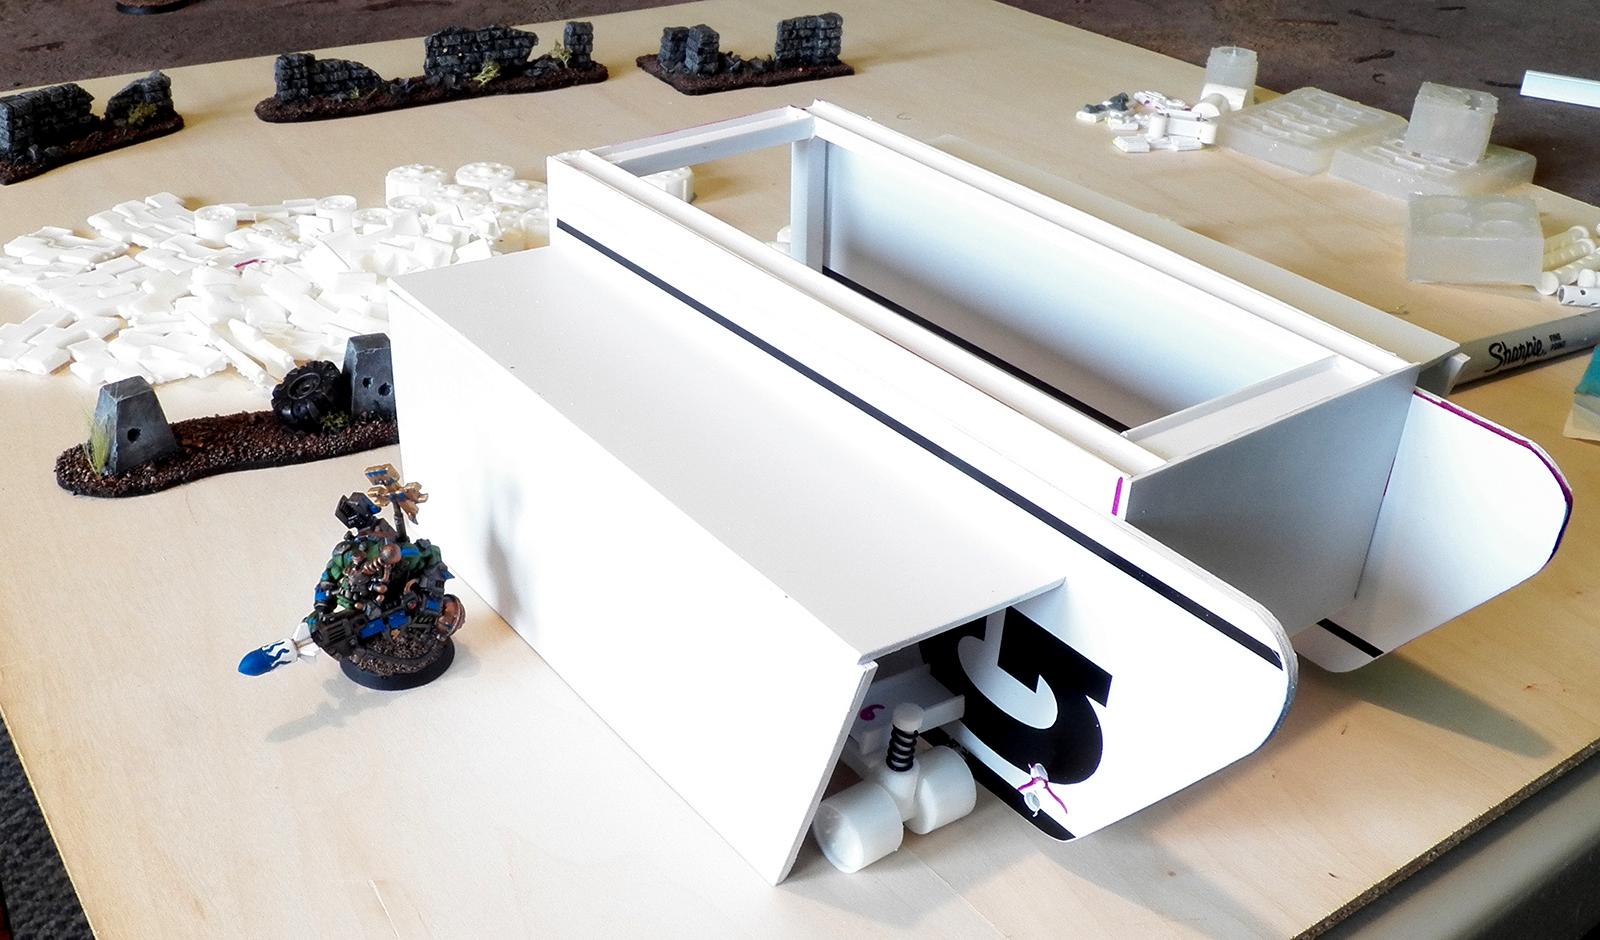


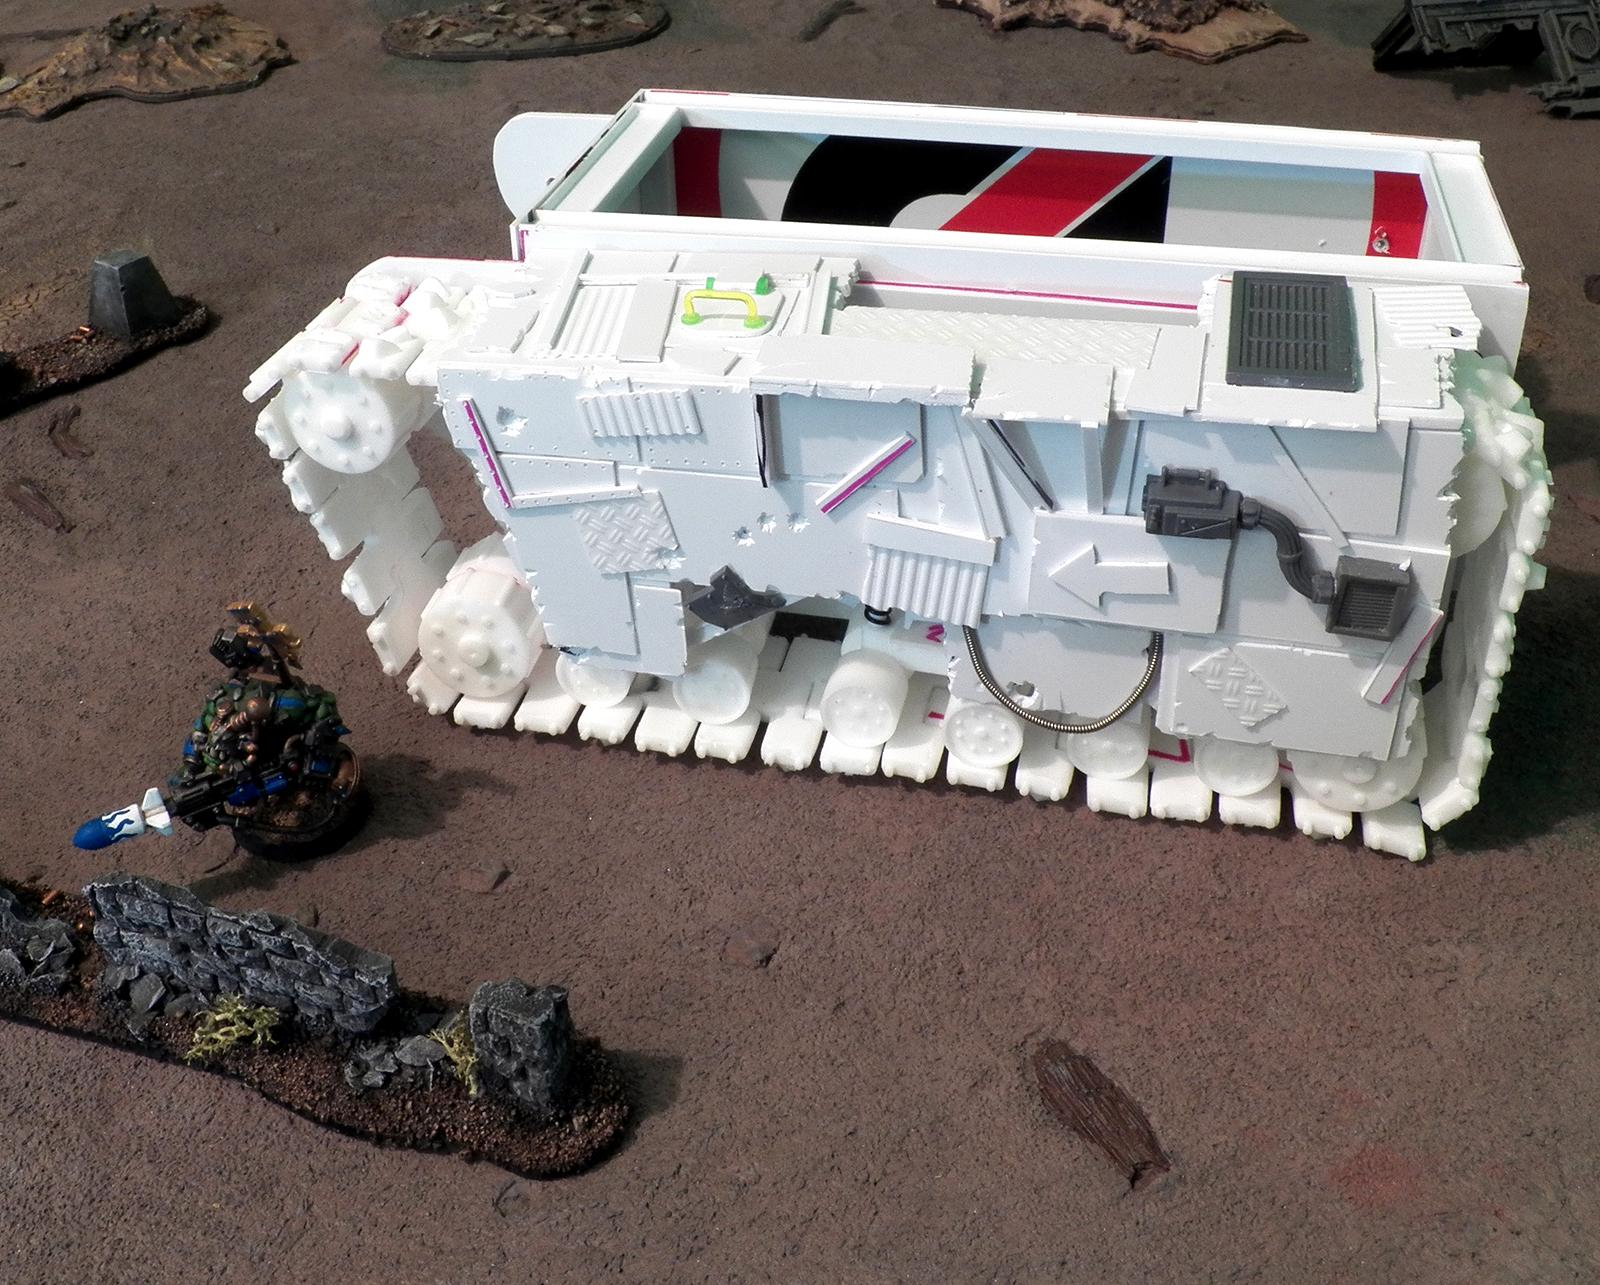
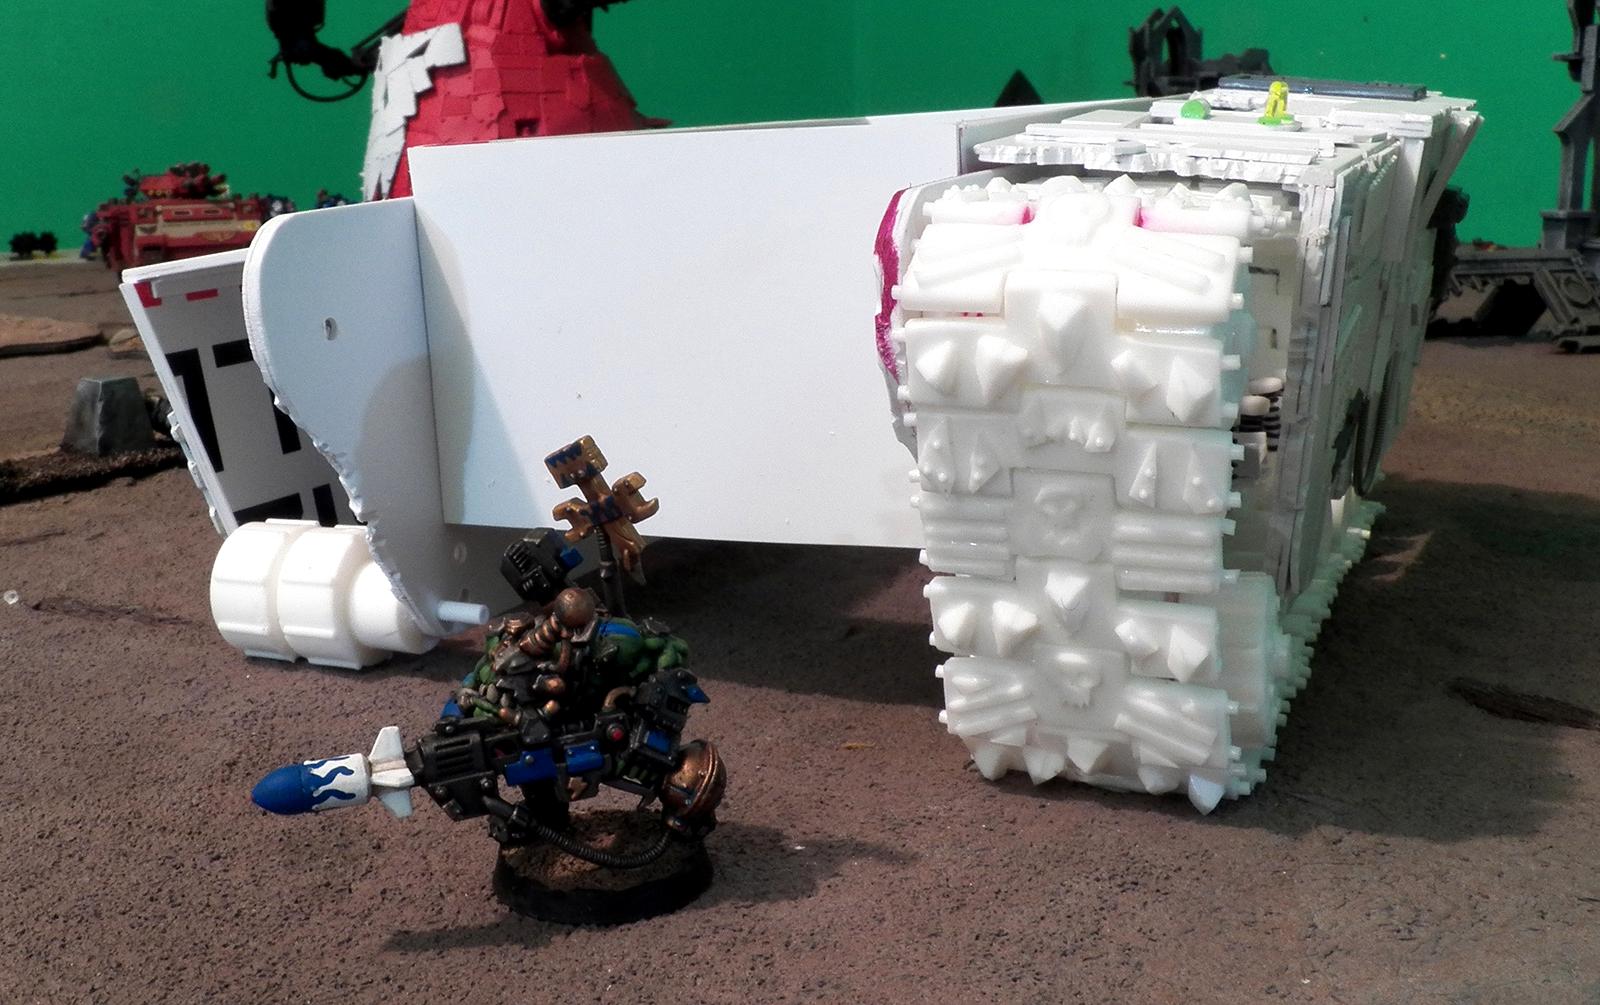
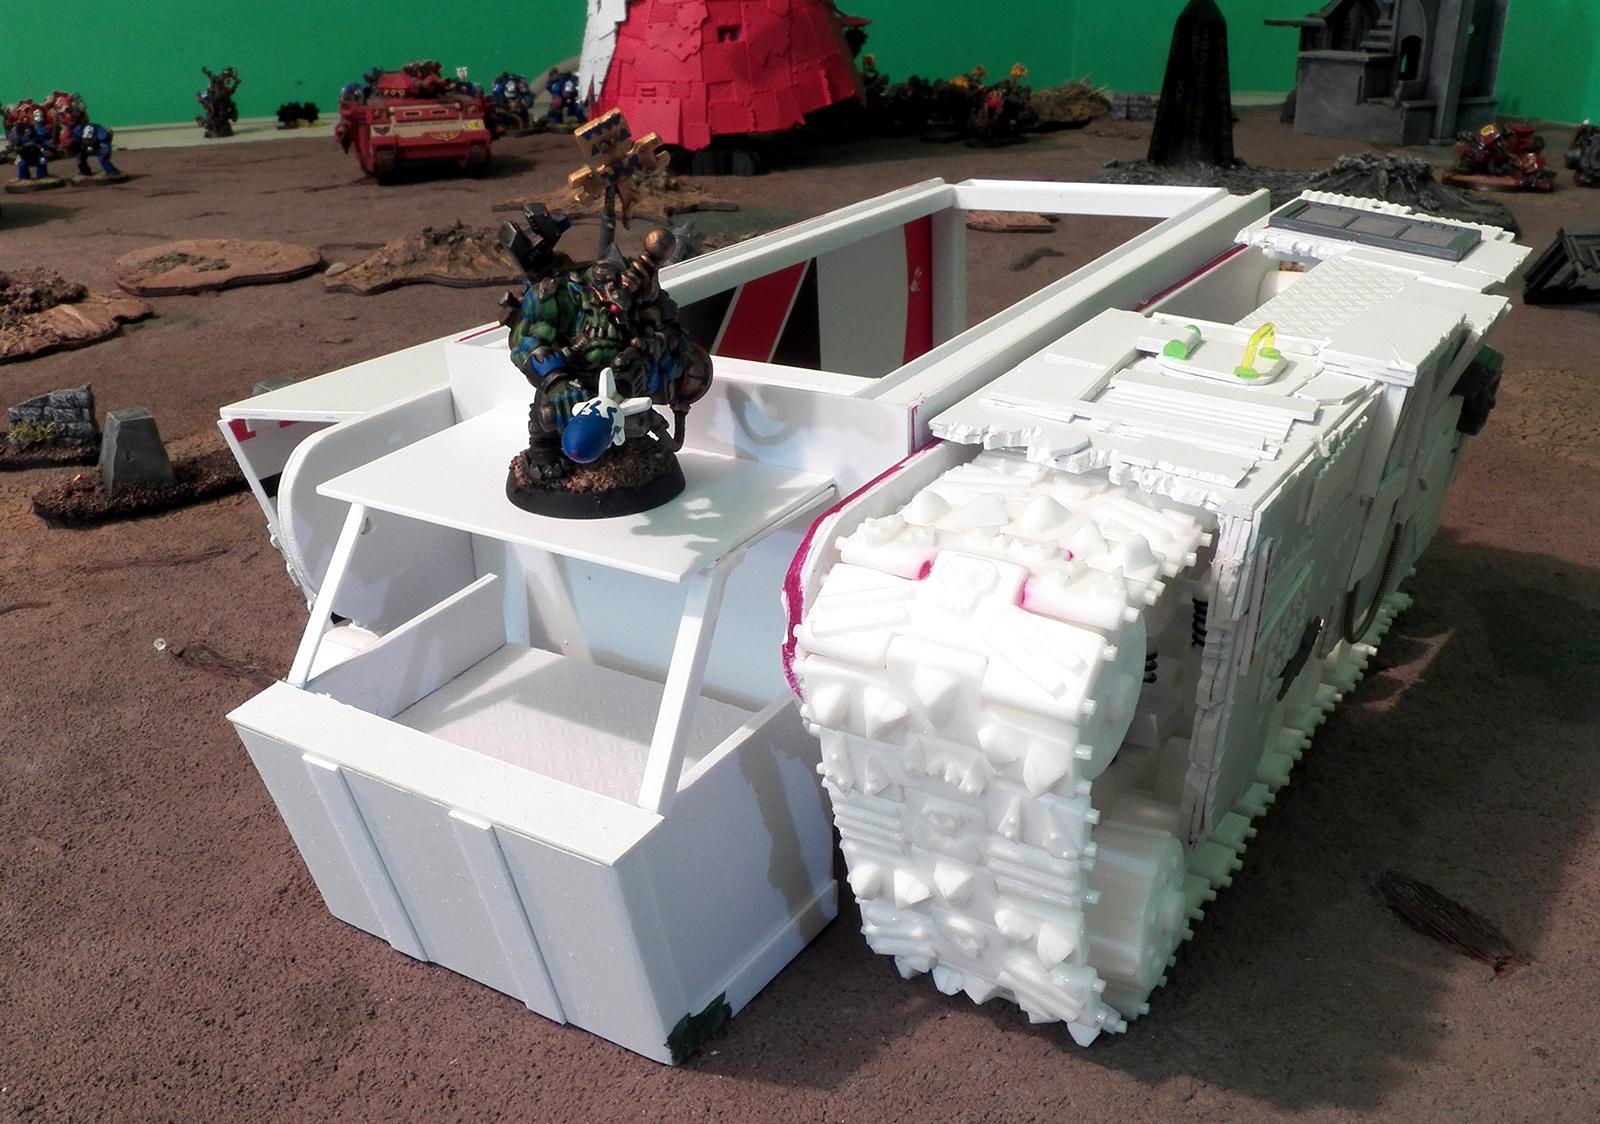

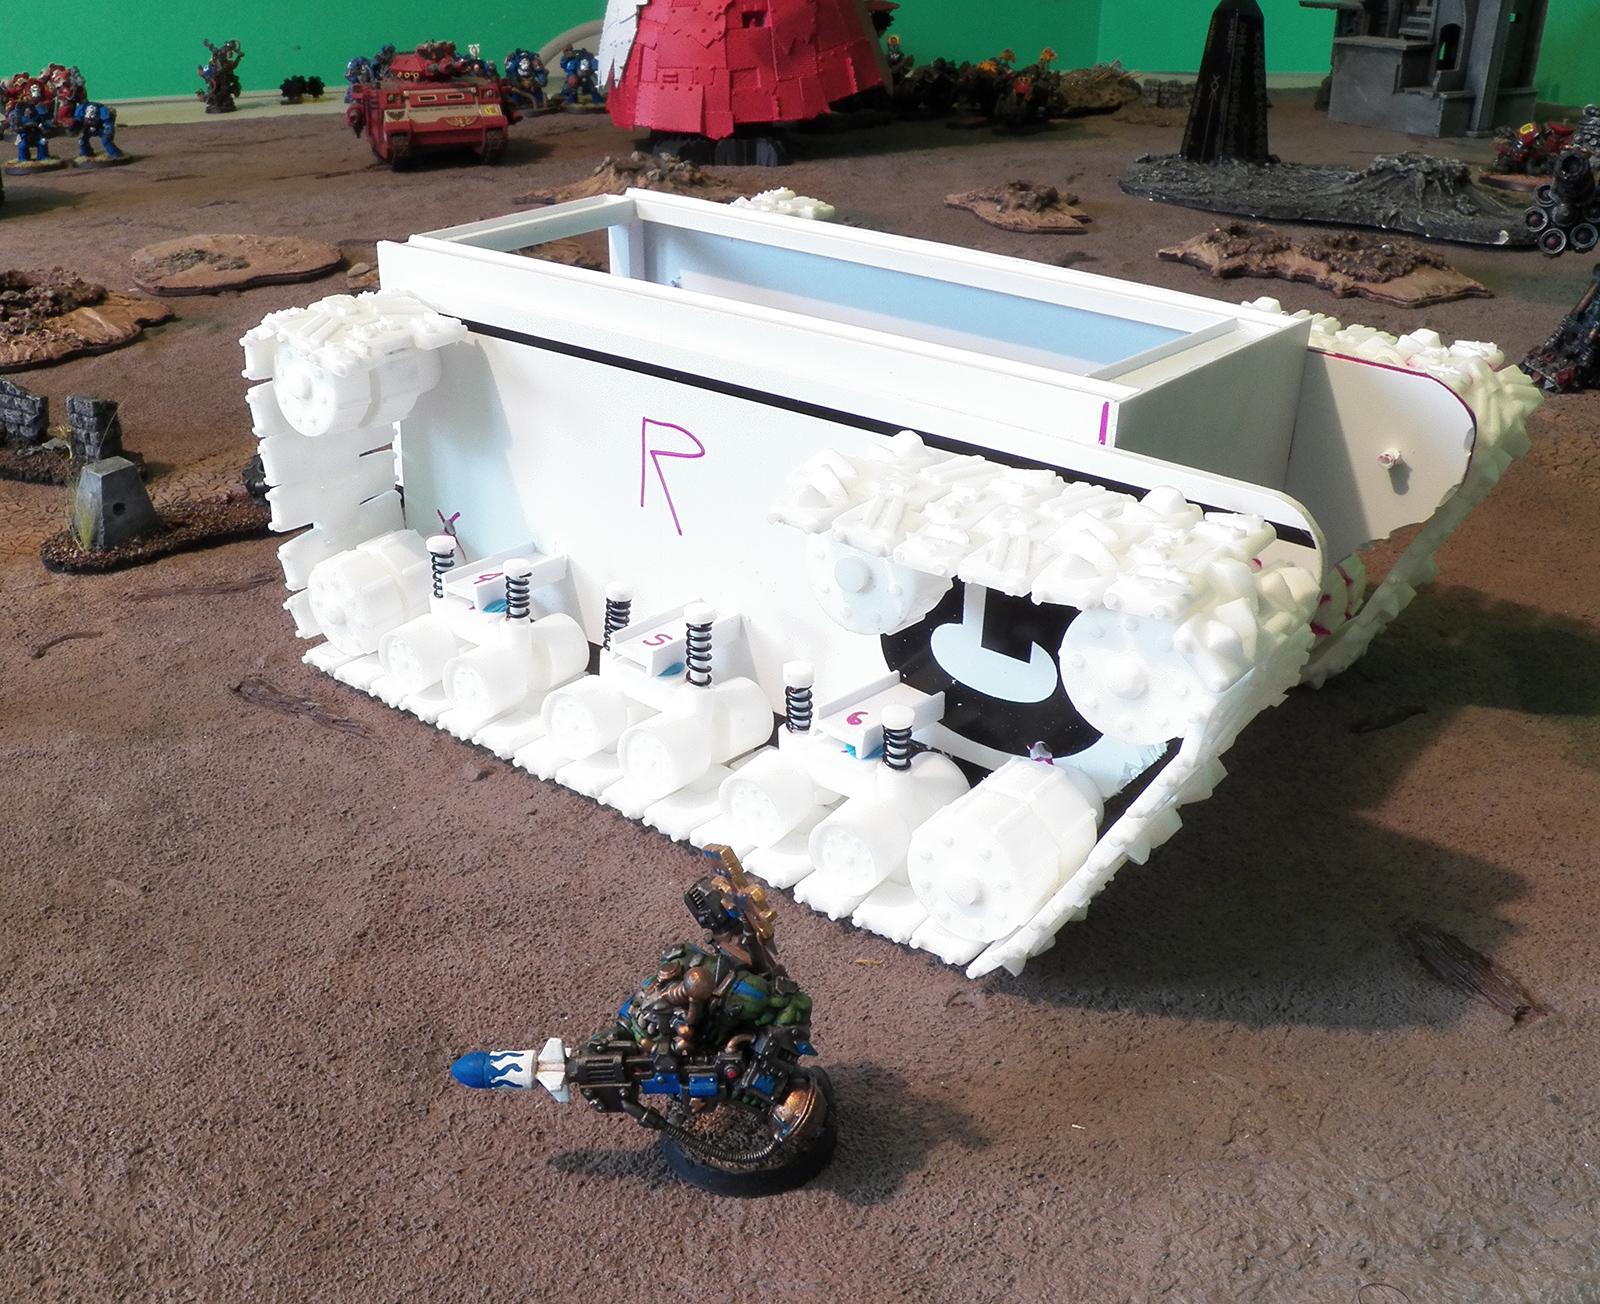


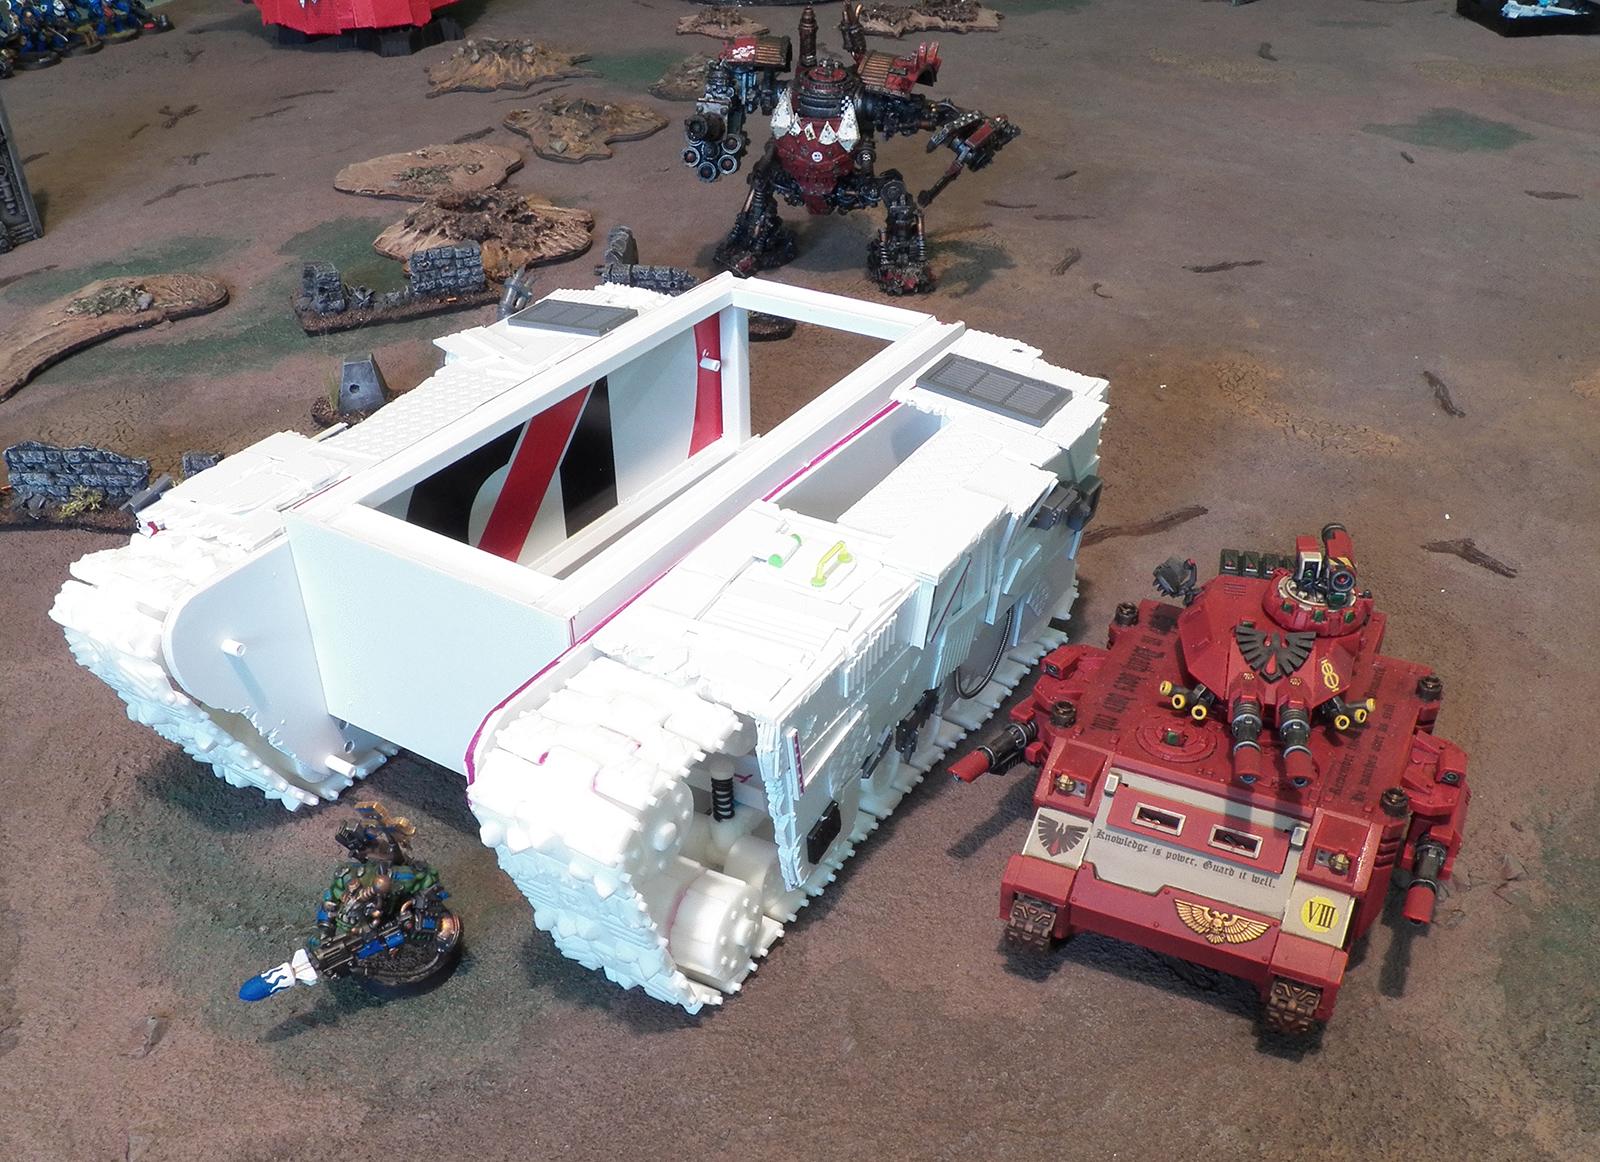
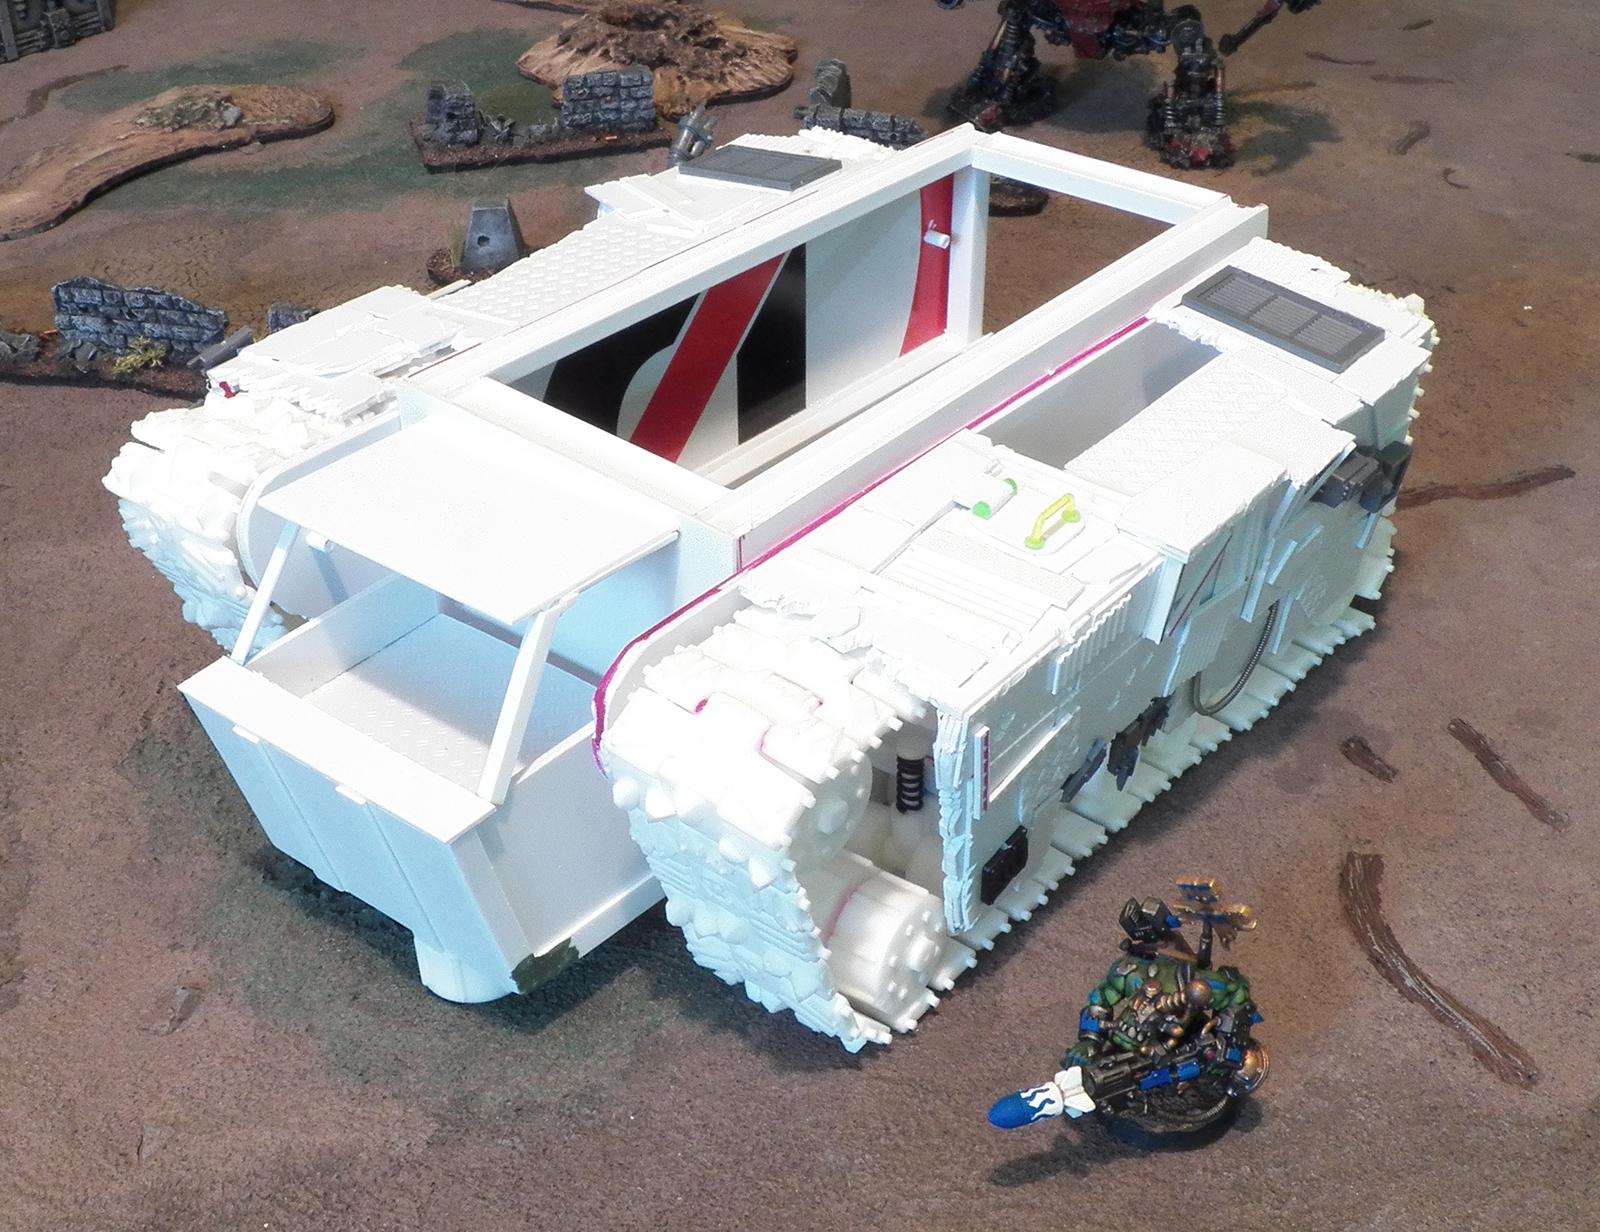
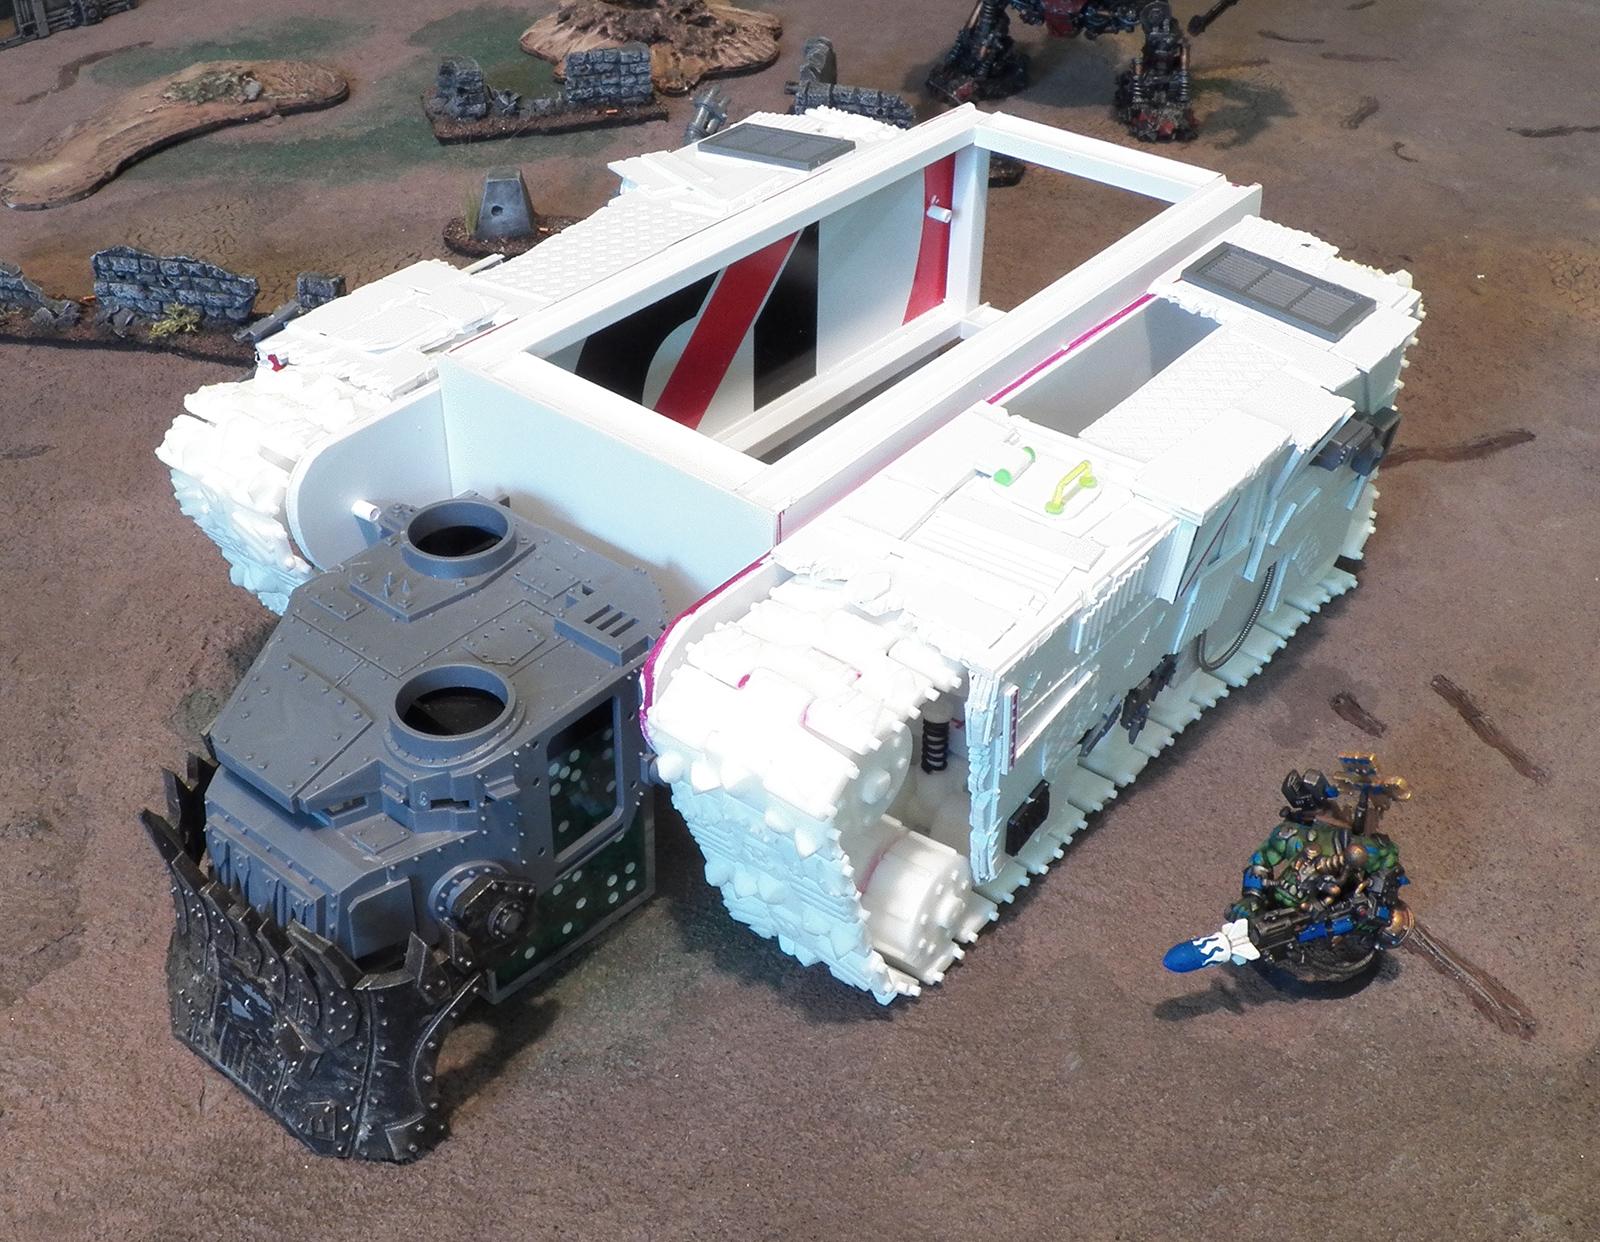
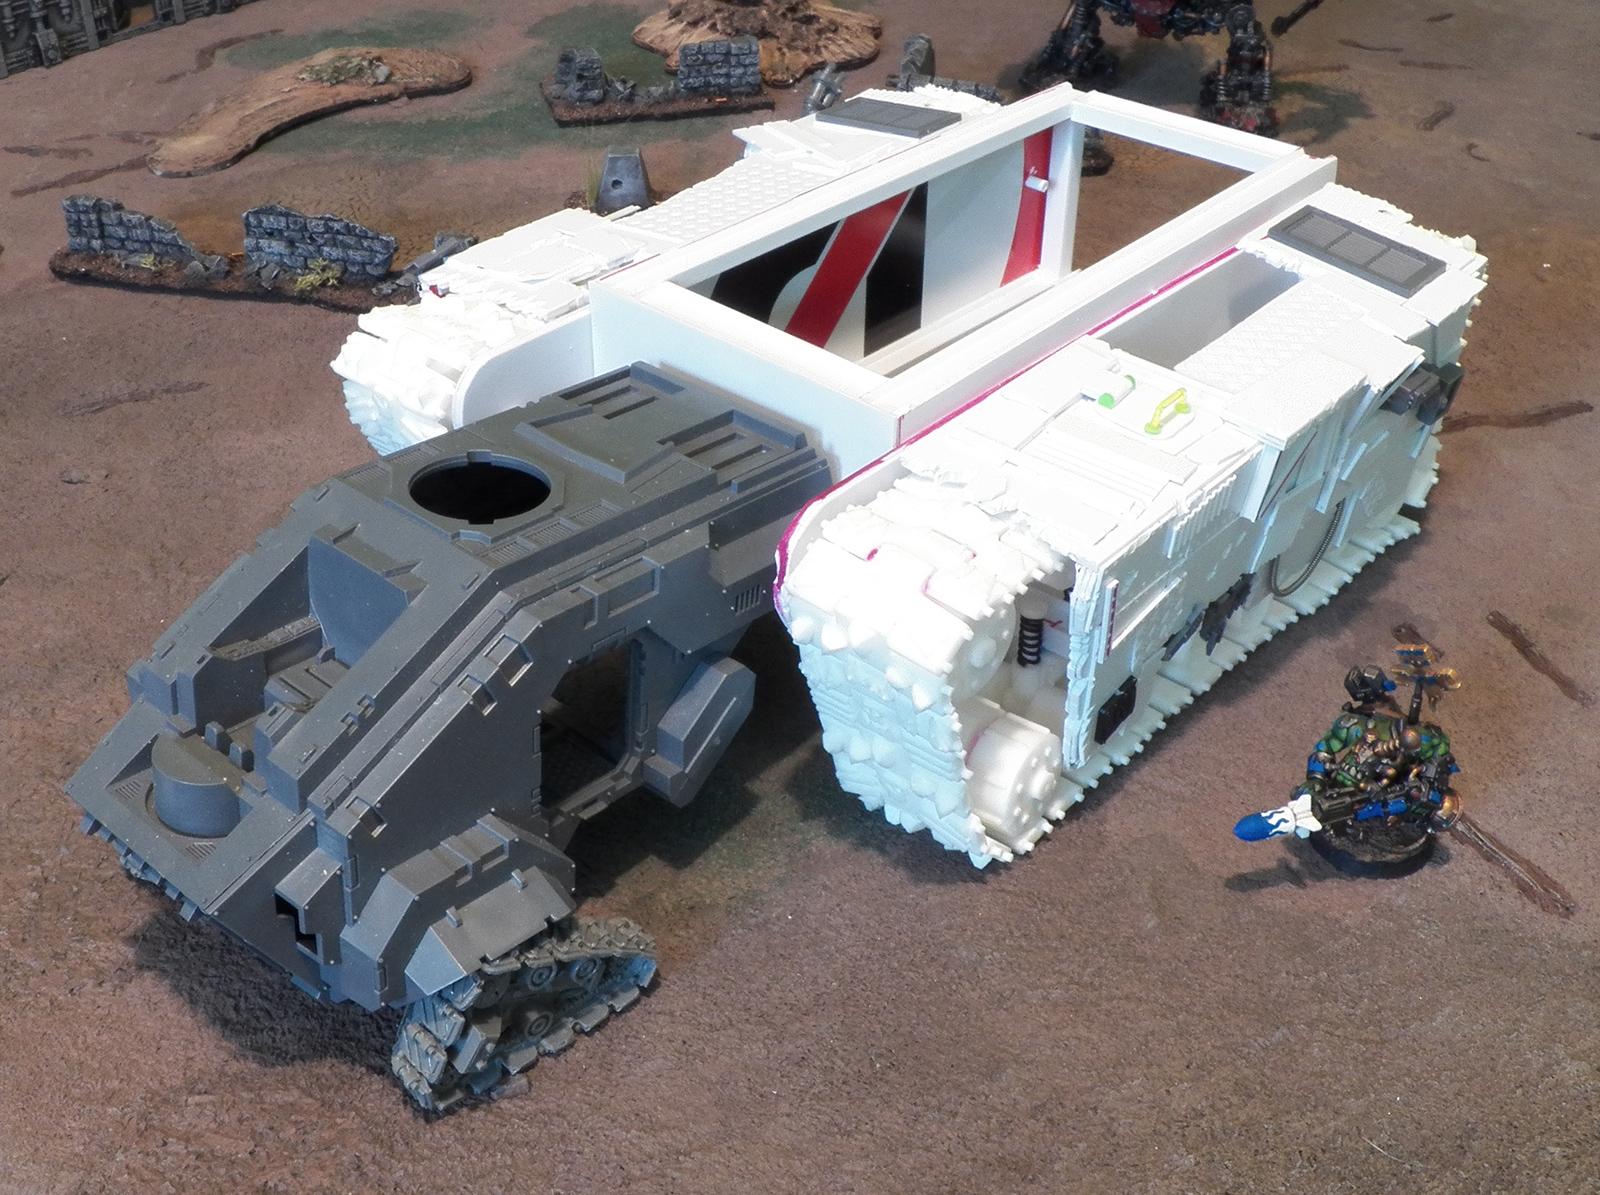


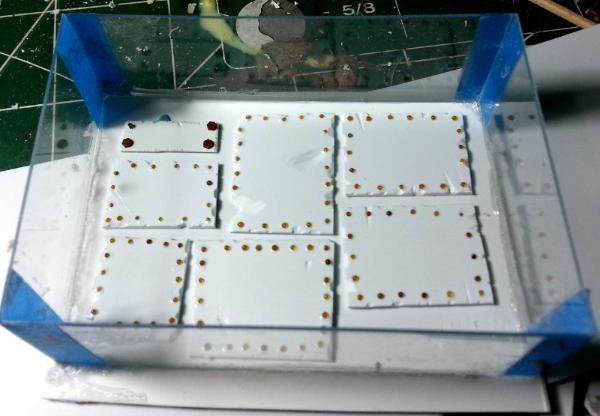

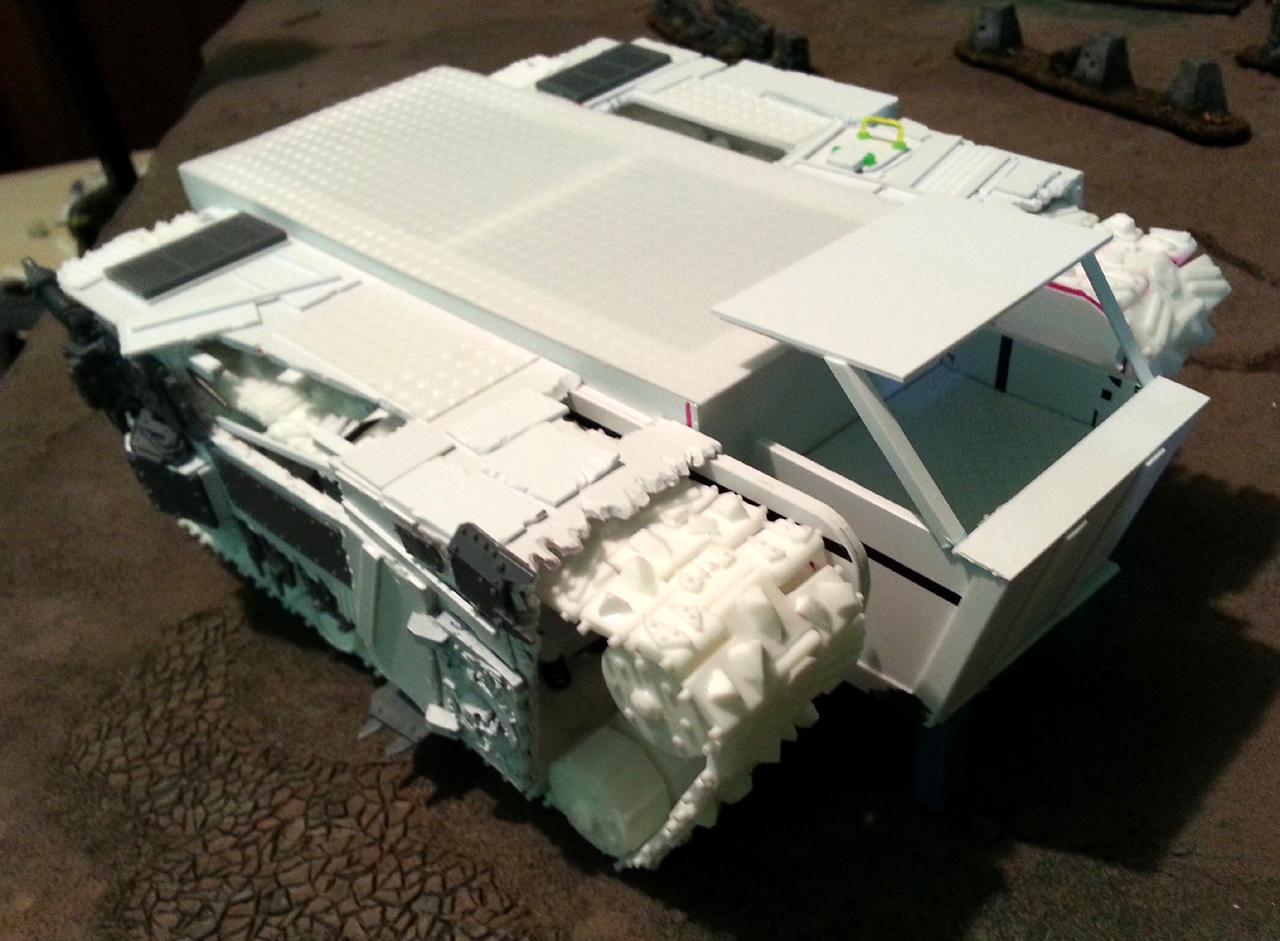
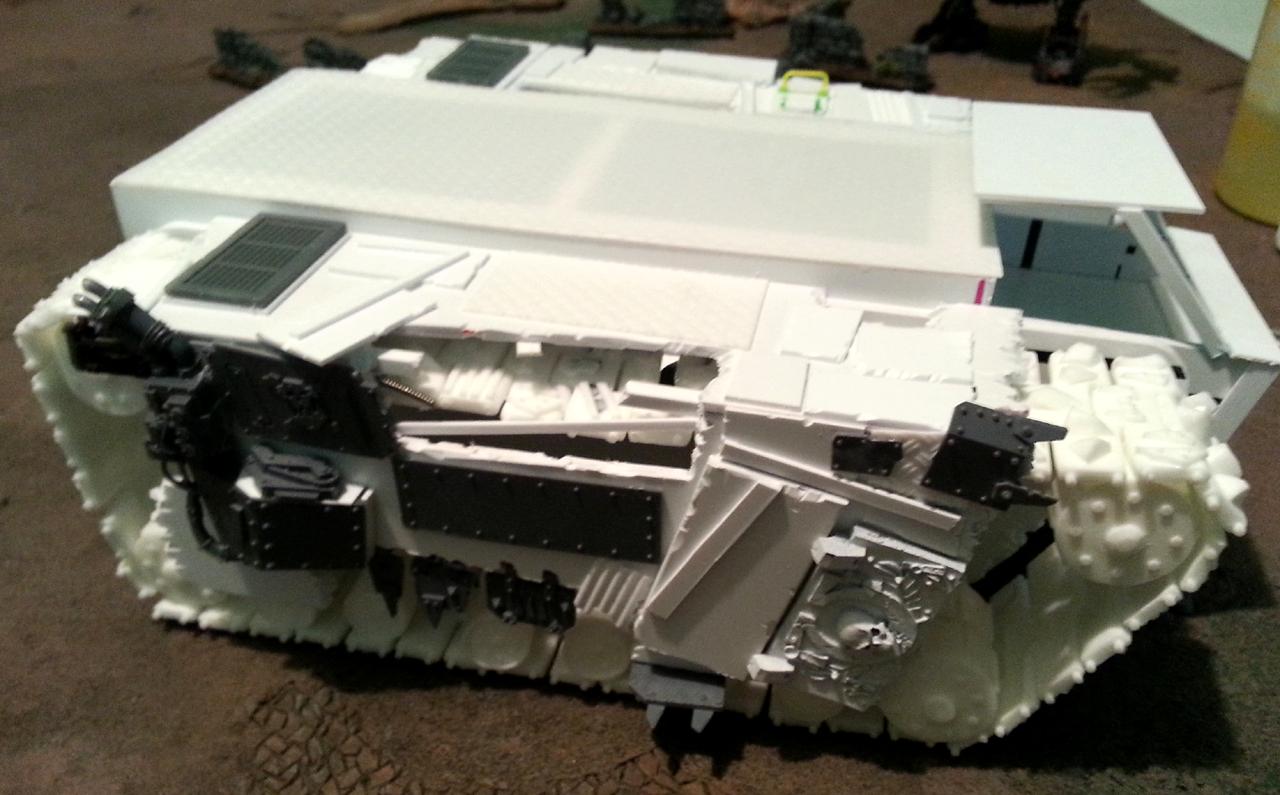
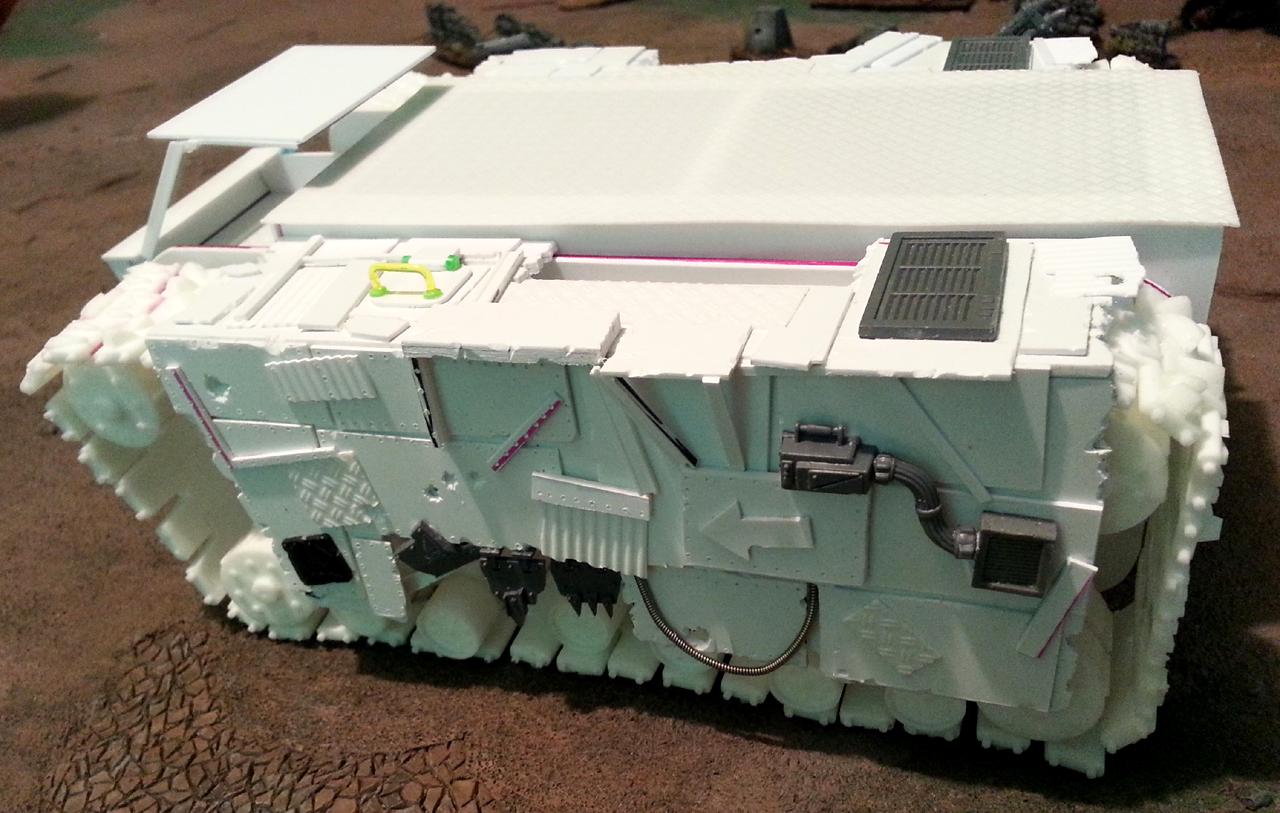
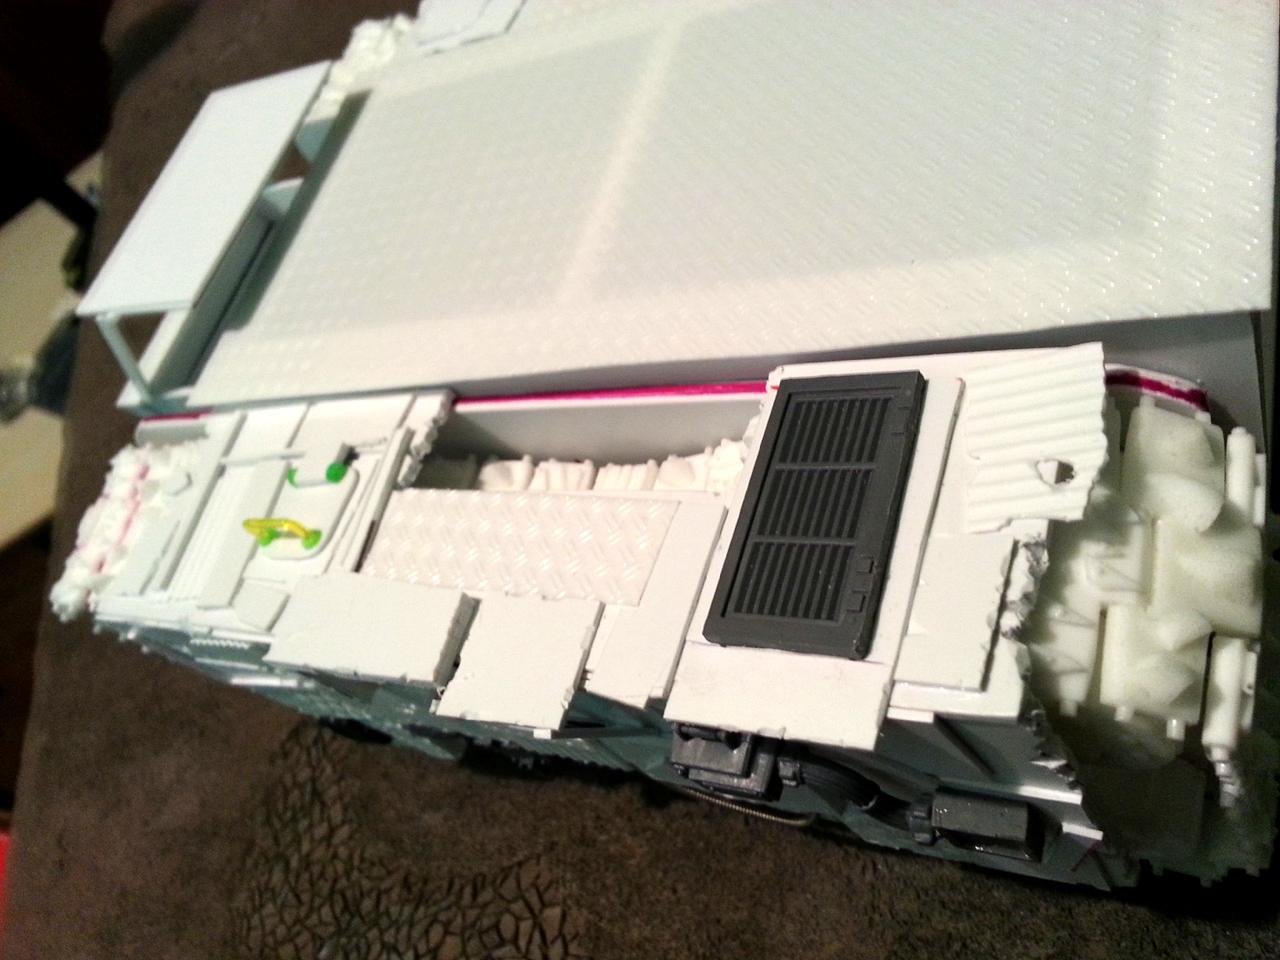

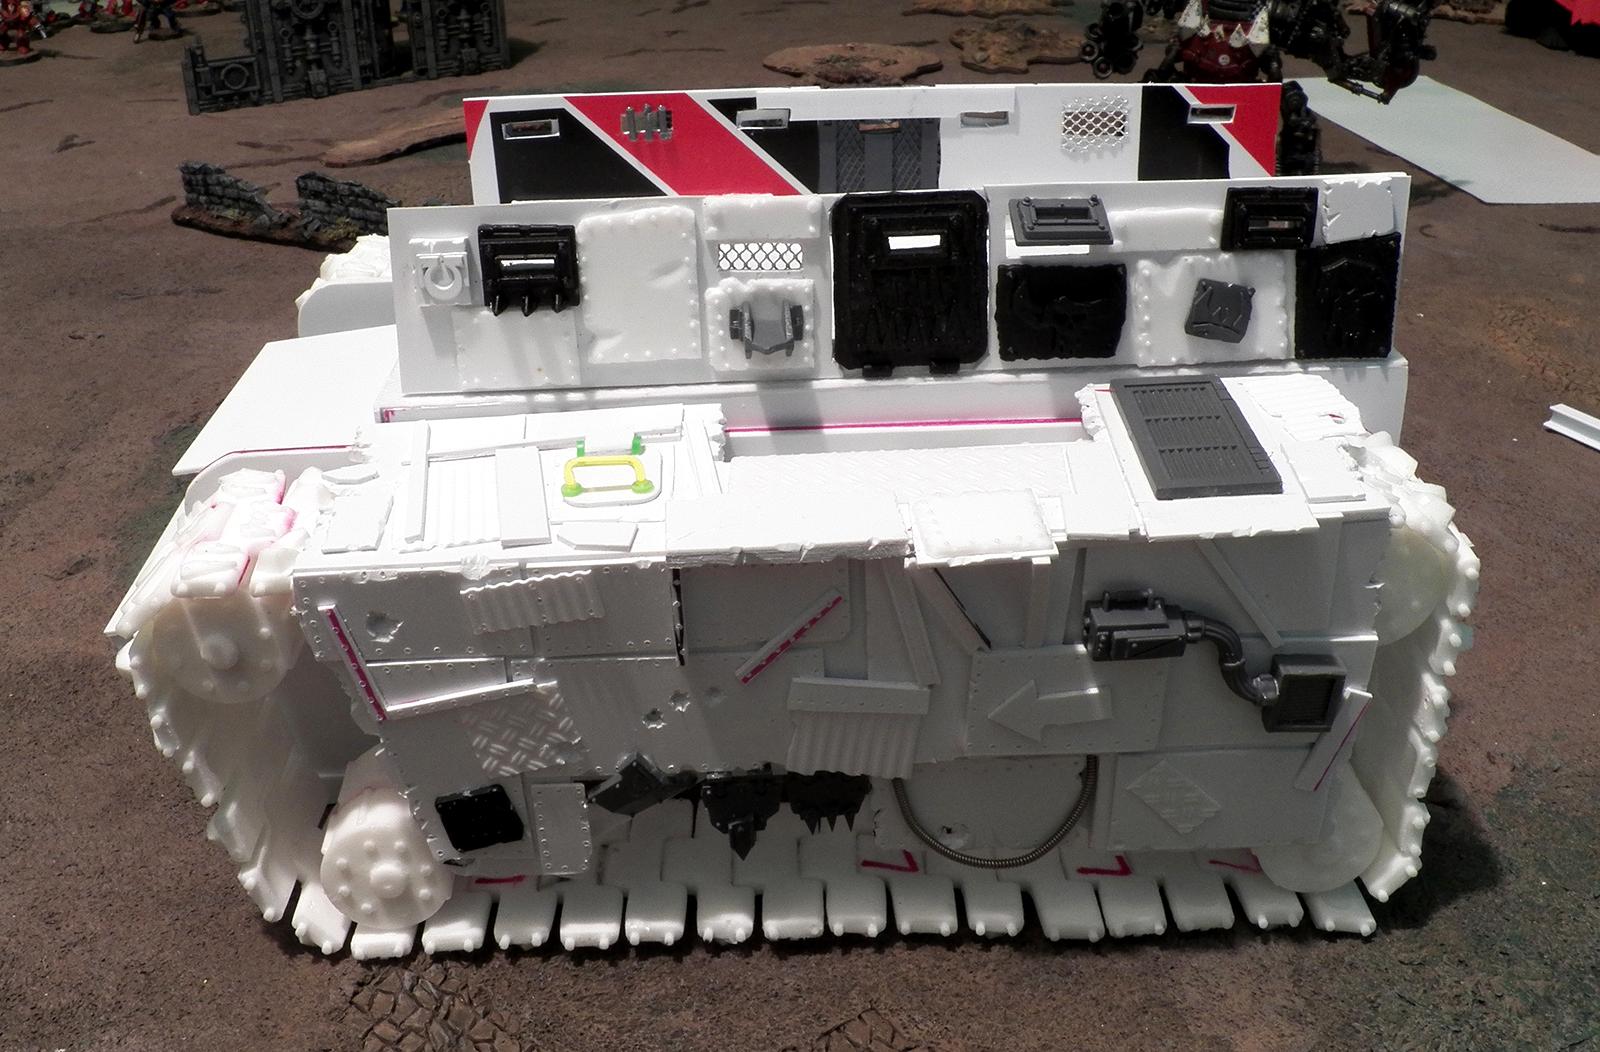
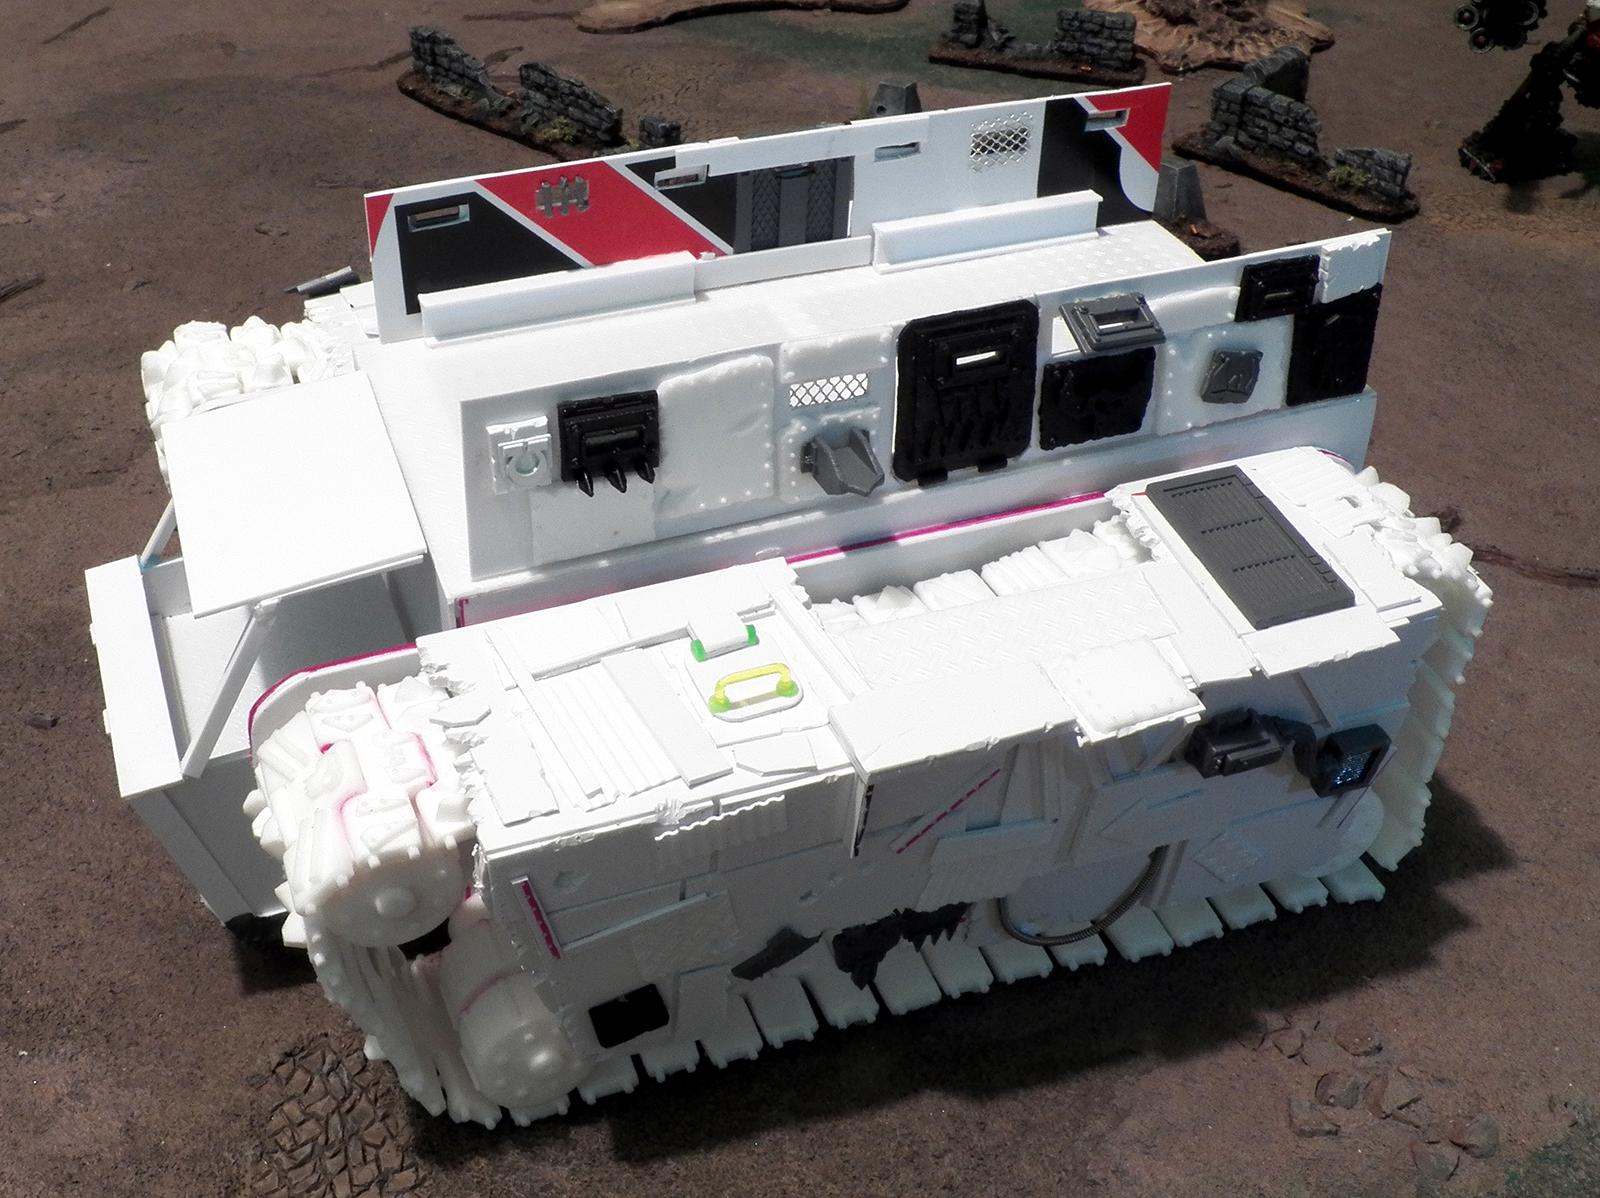
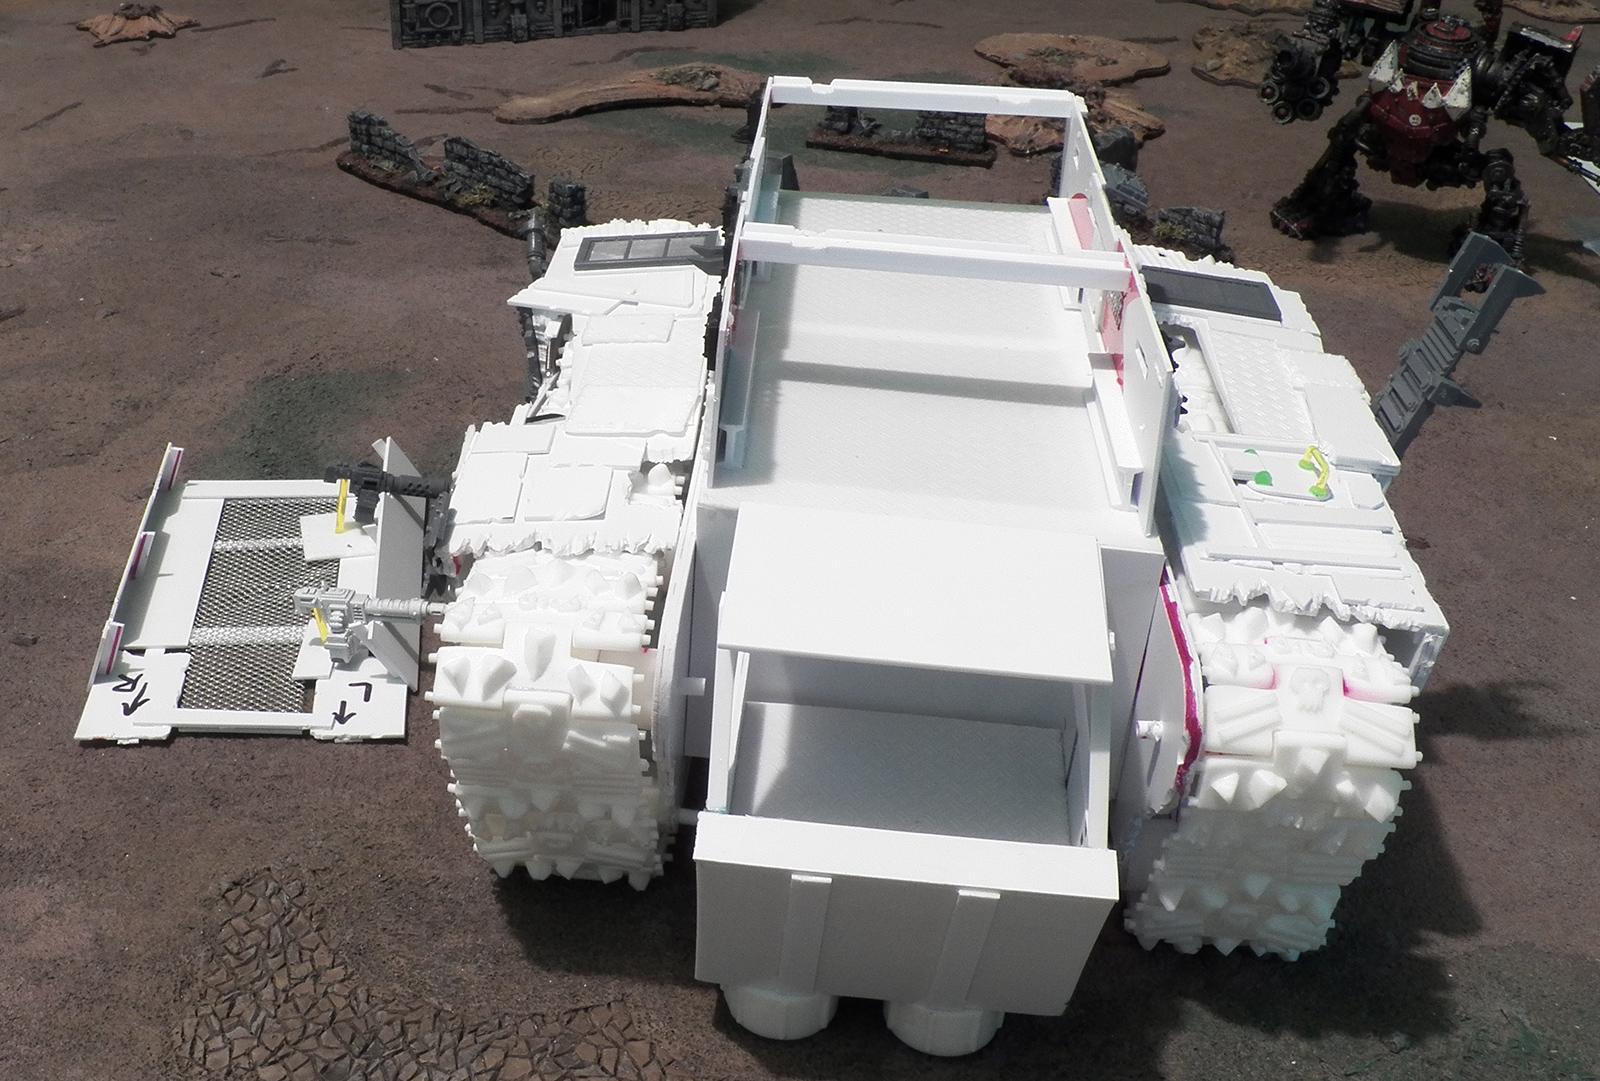
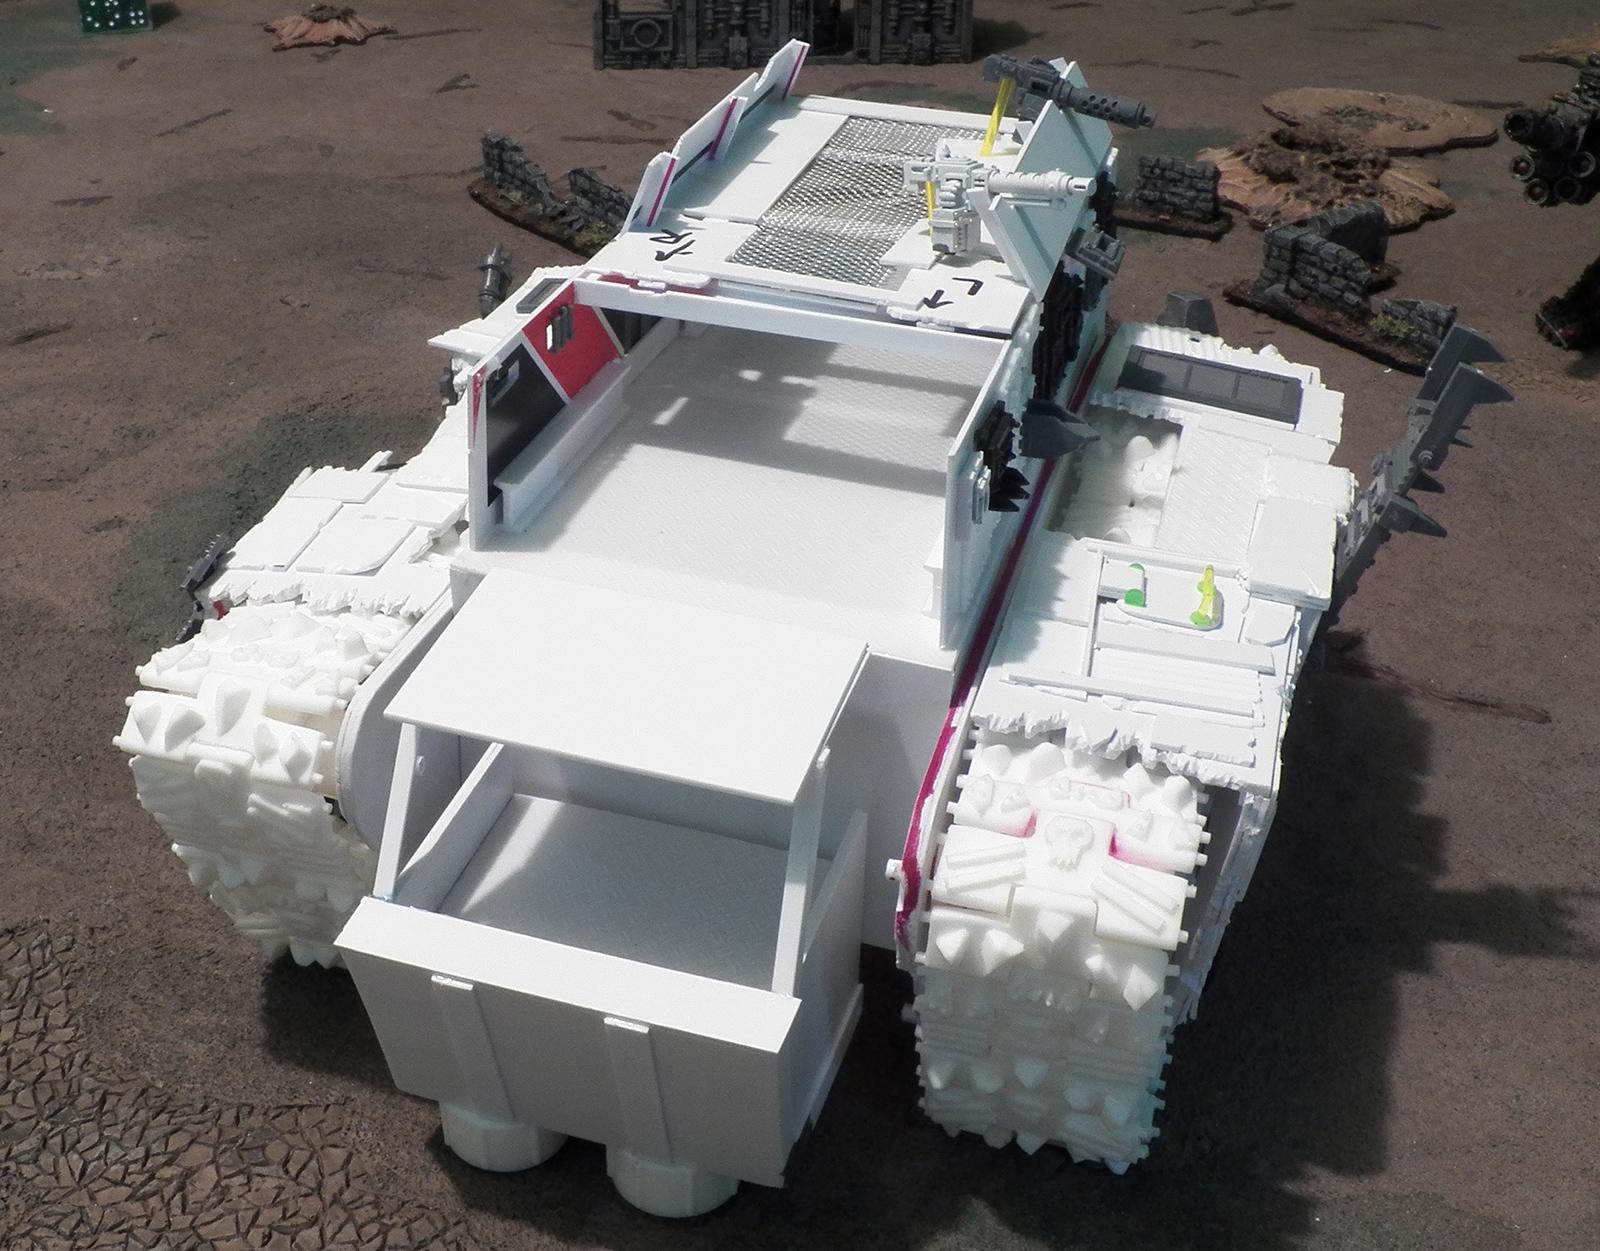
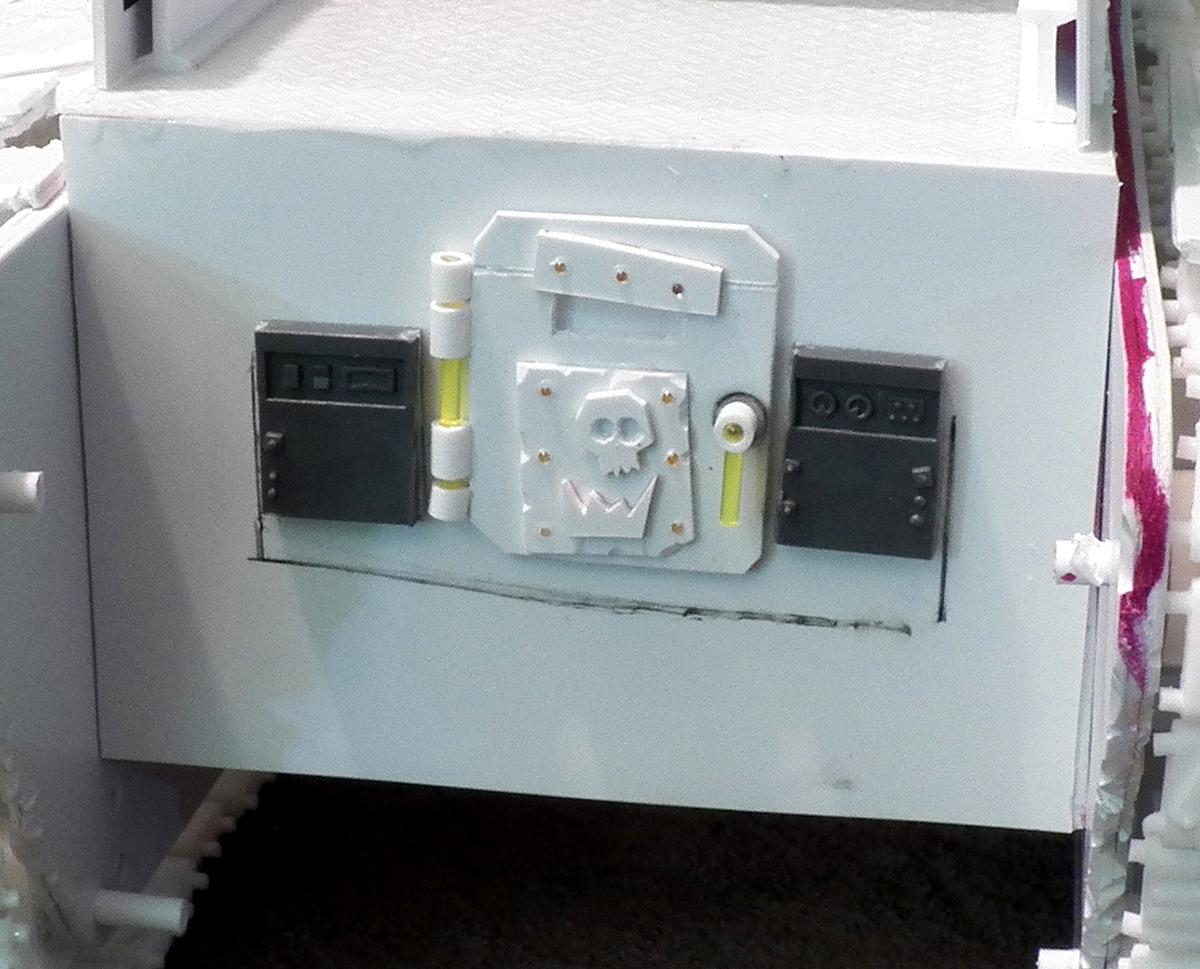
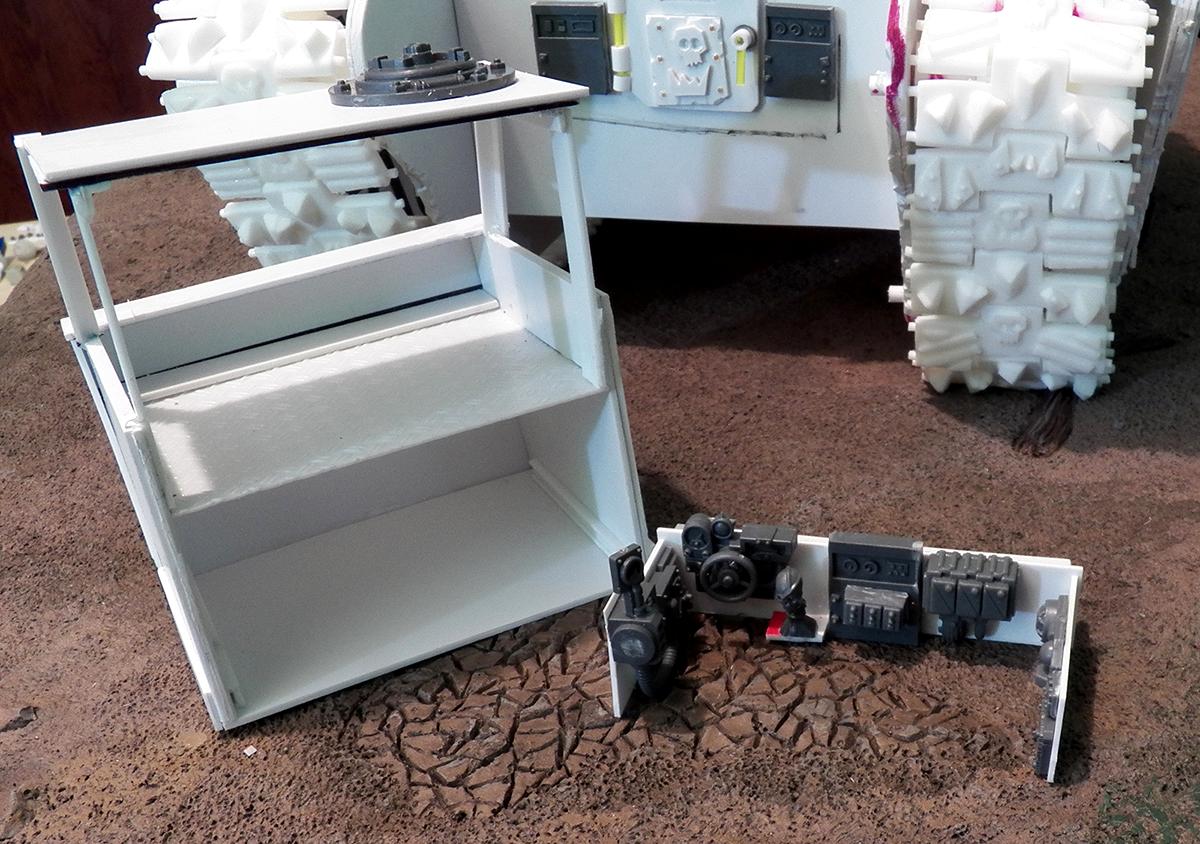
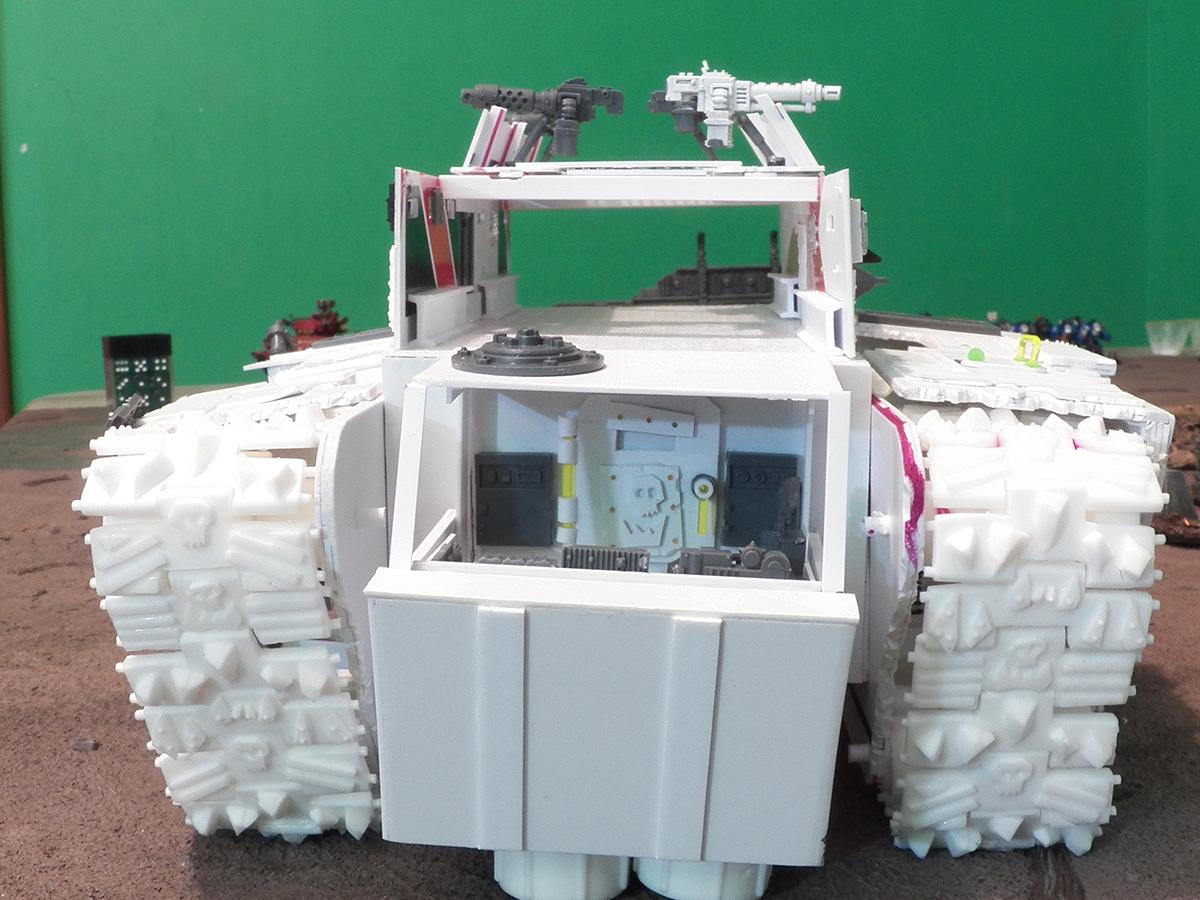
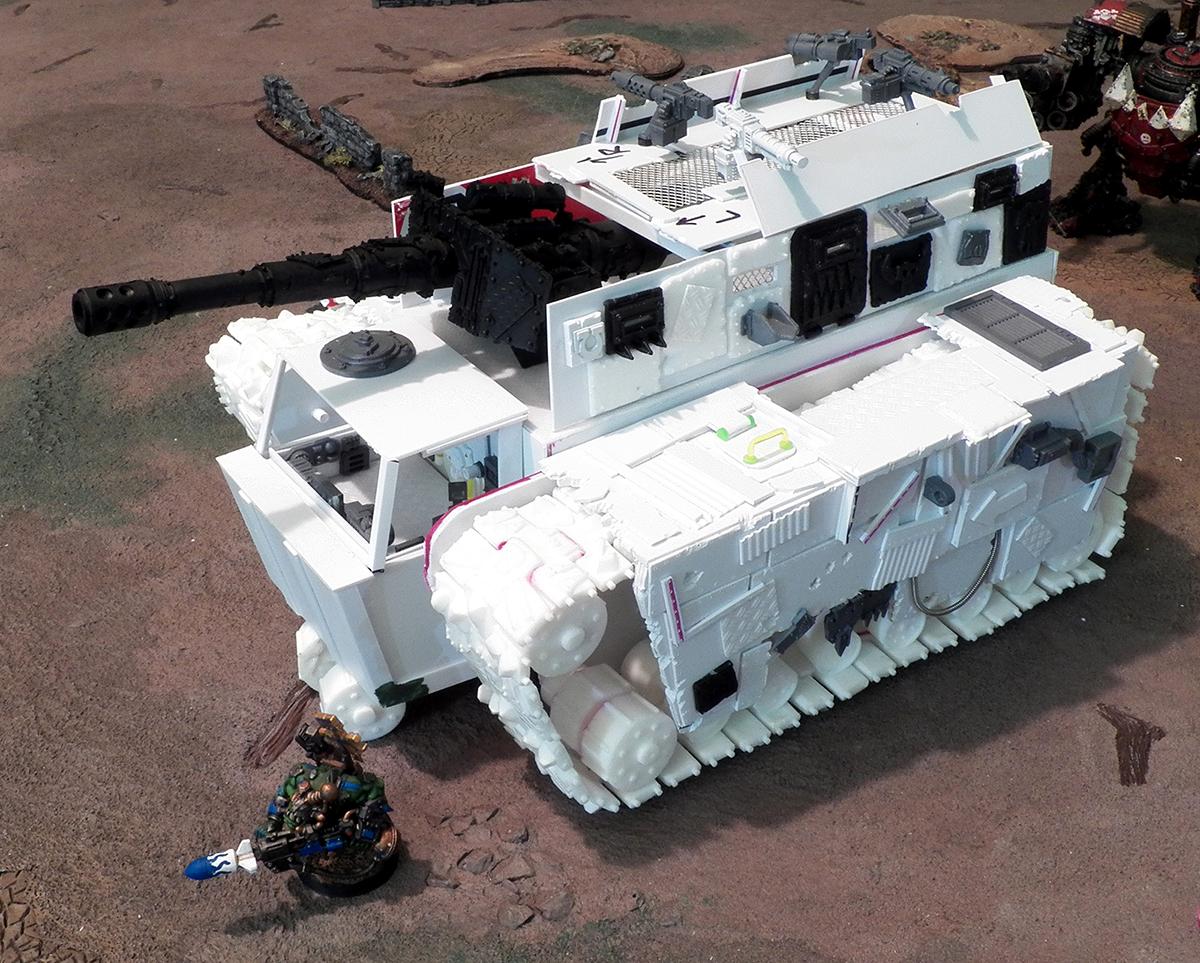
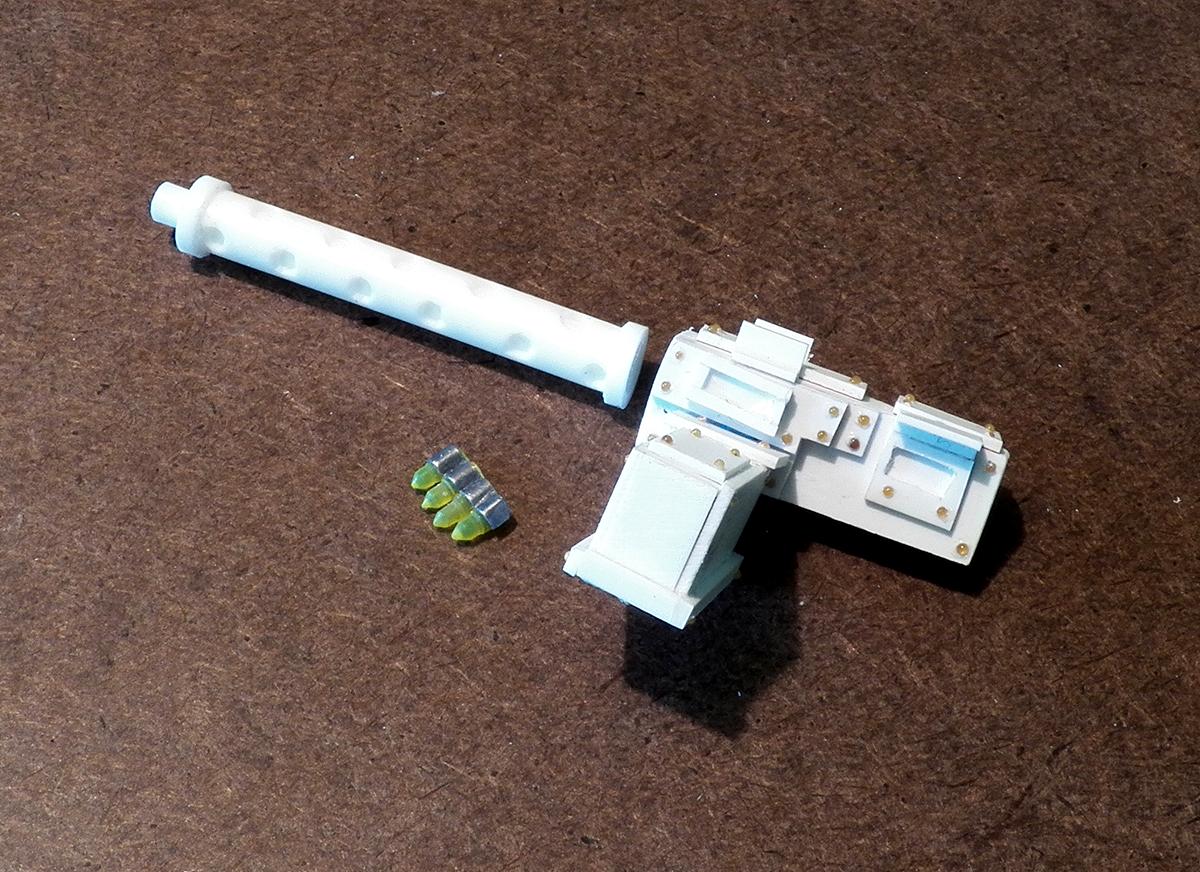
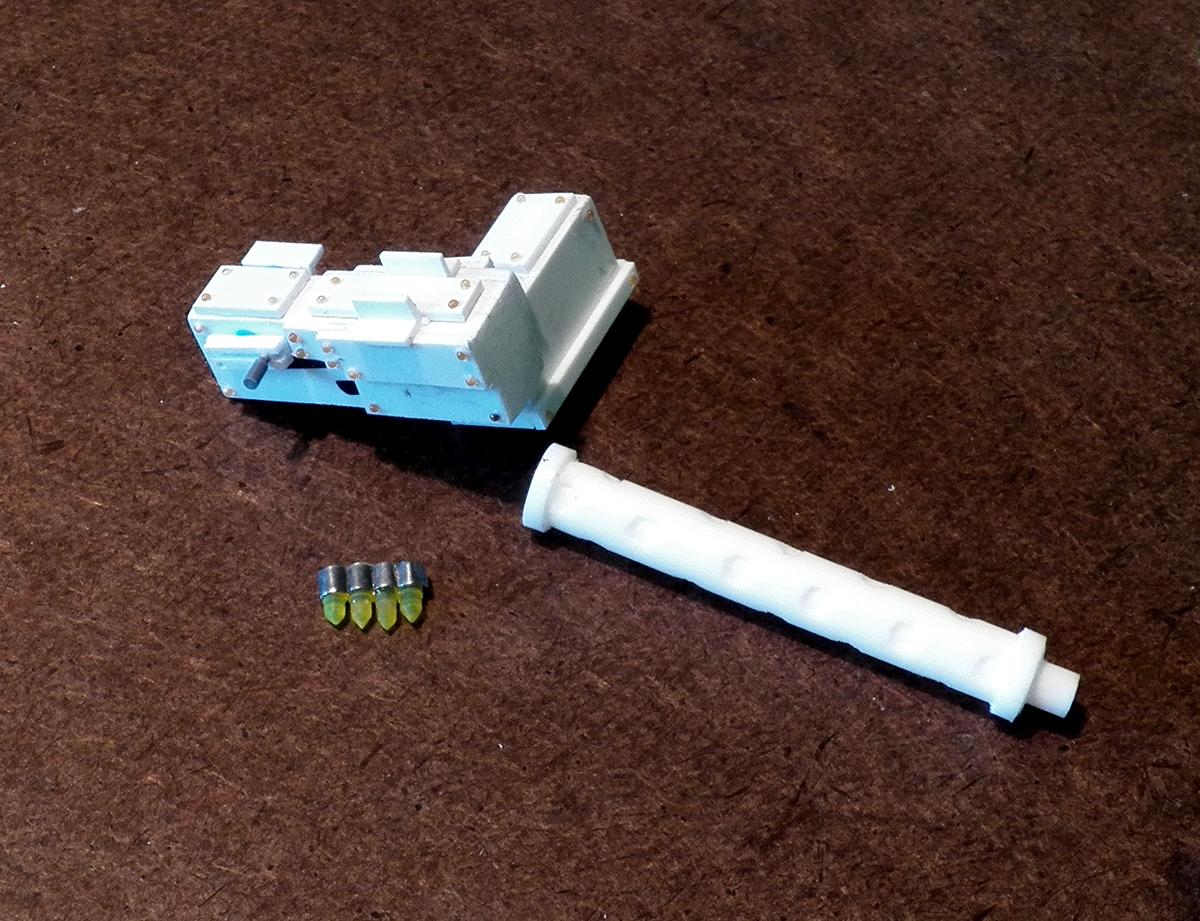
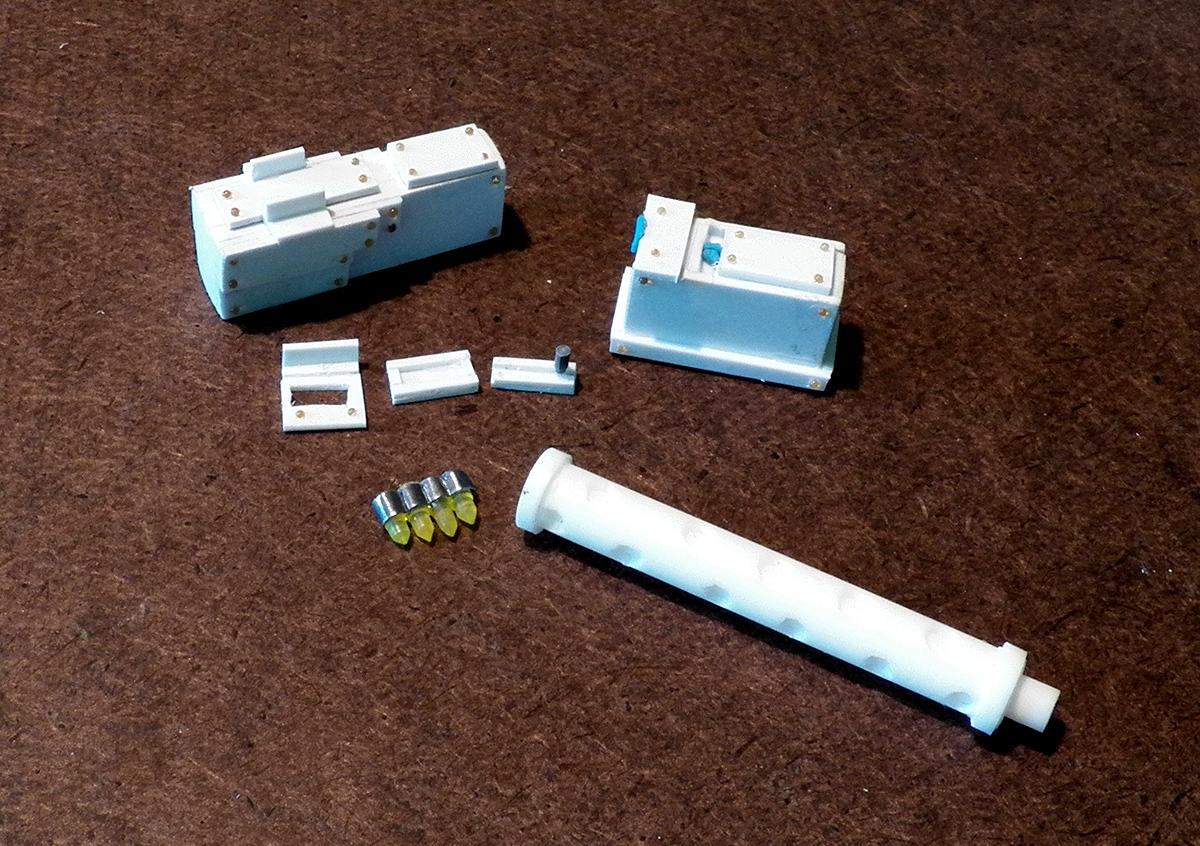
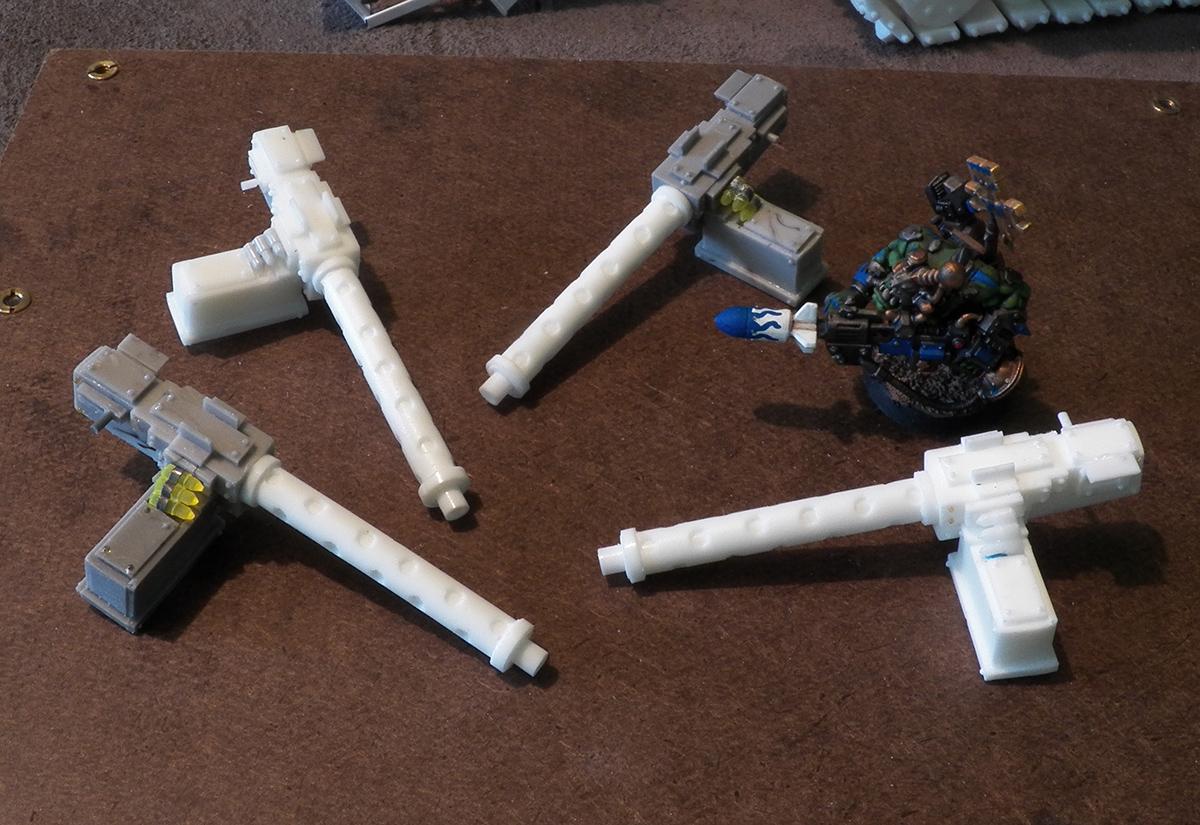
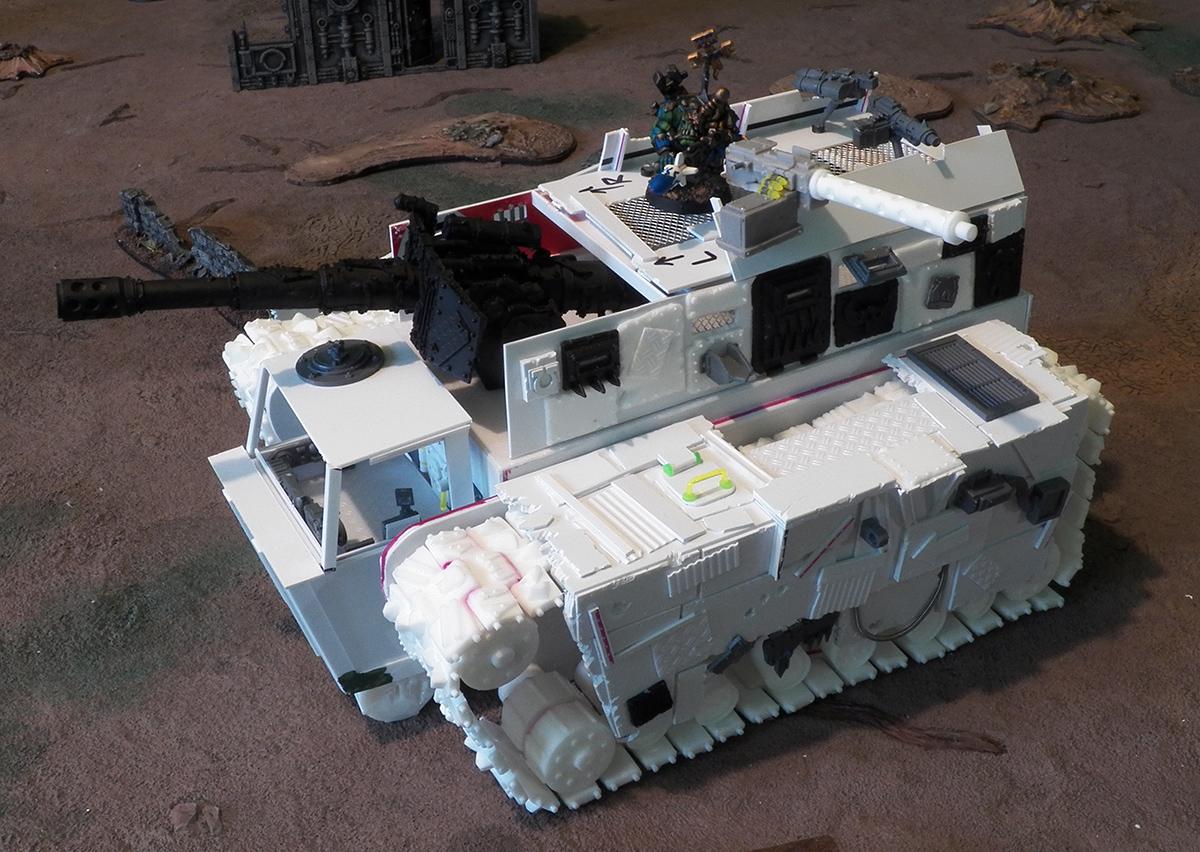

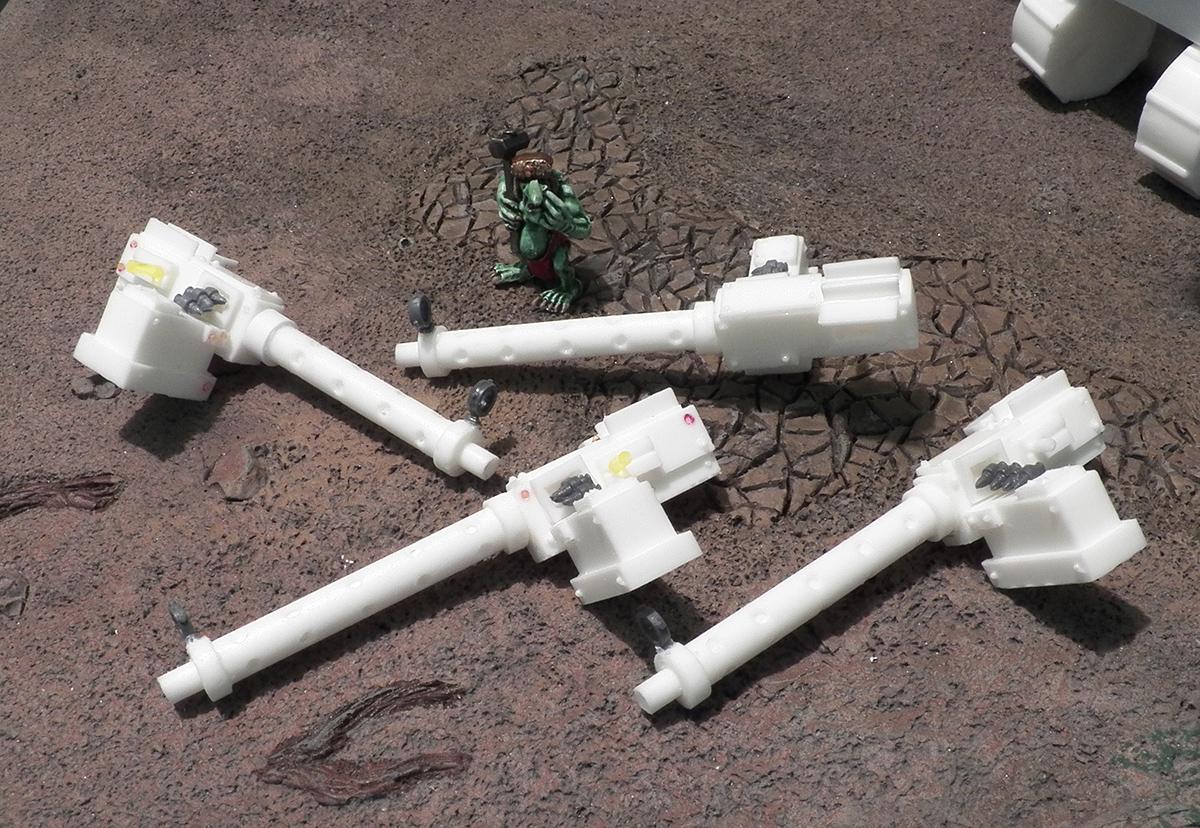
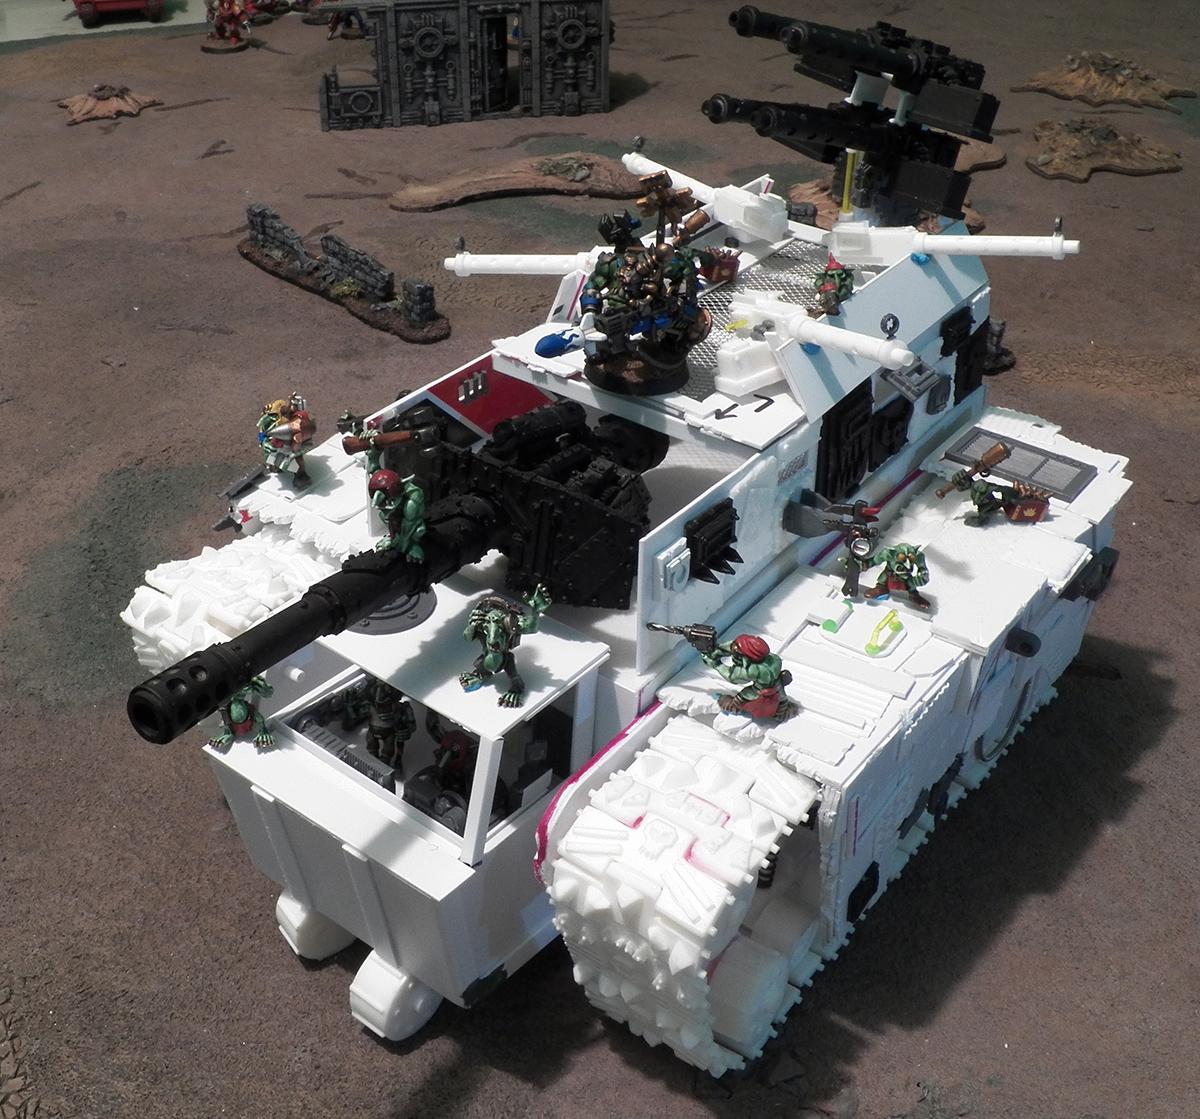 [/url
[/url


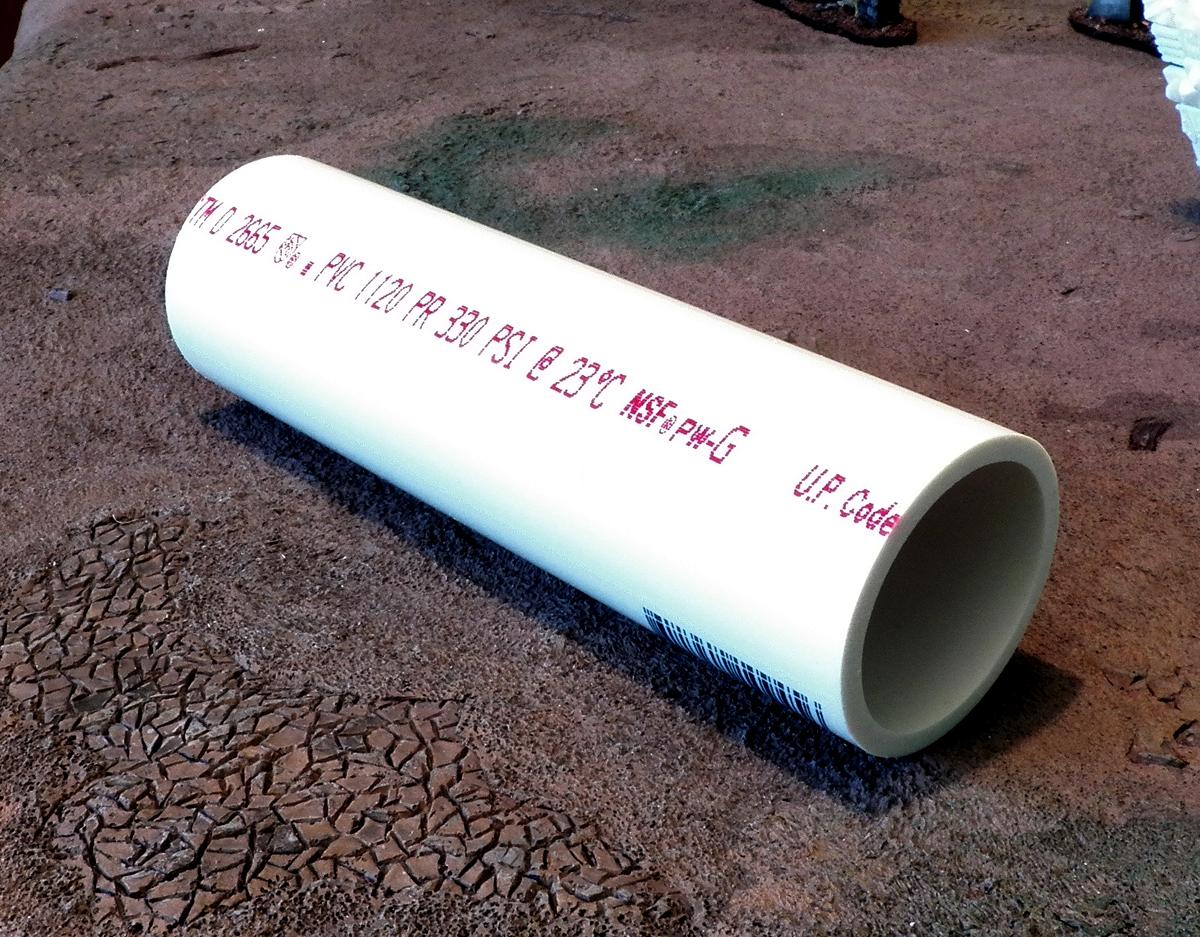
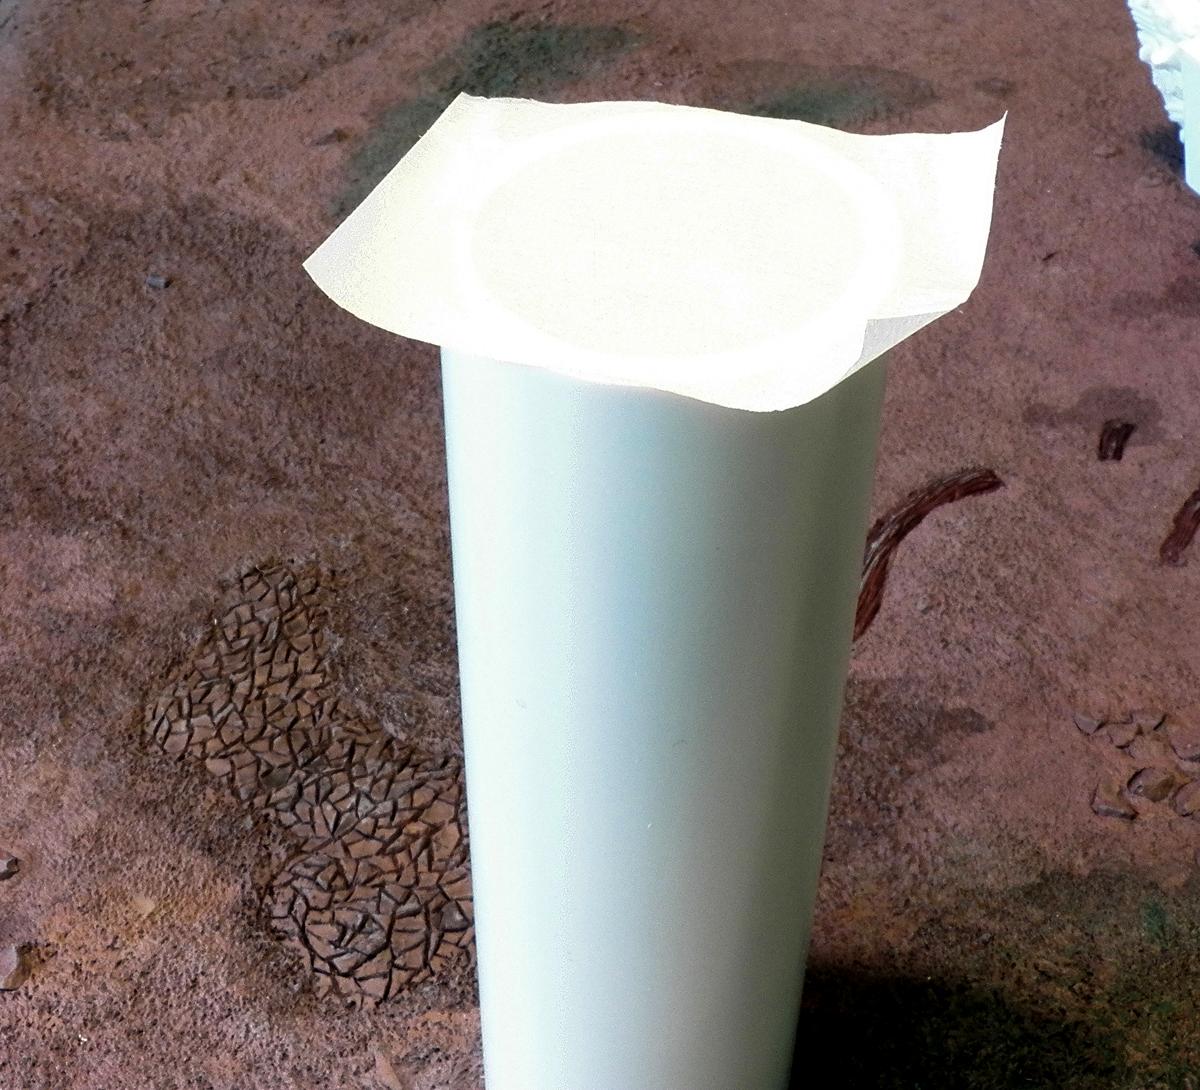
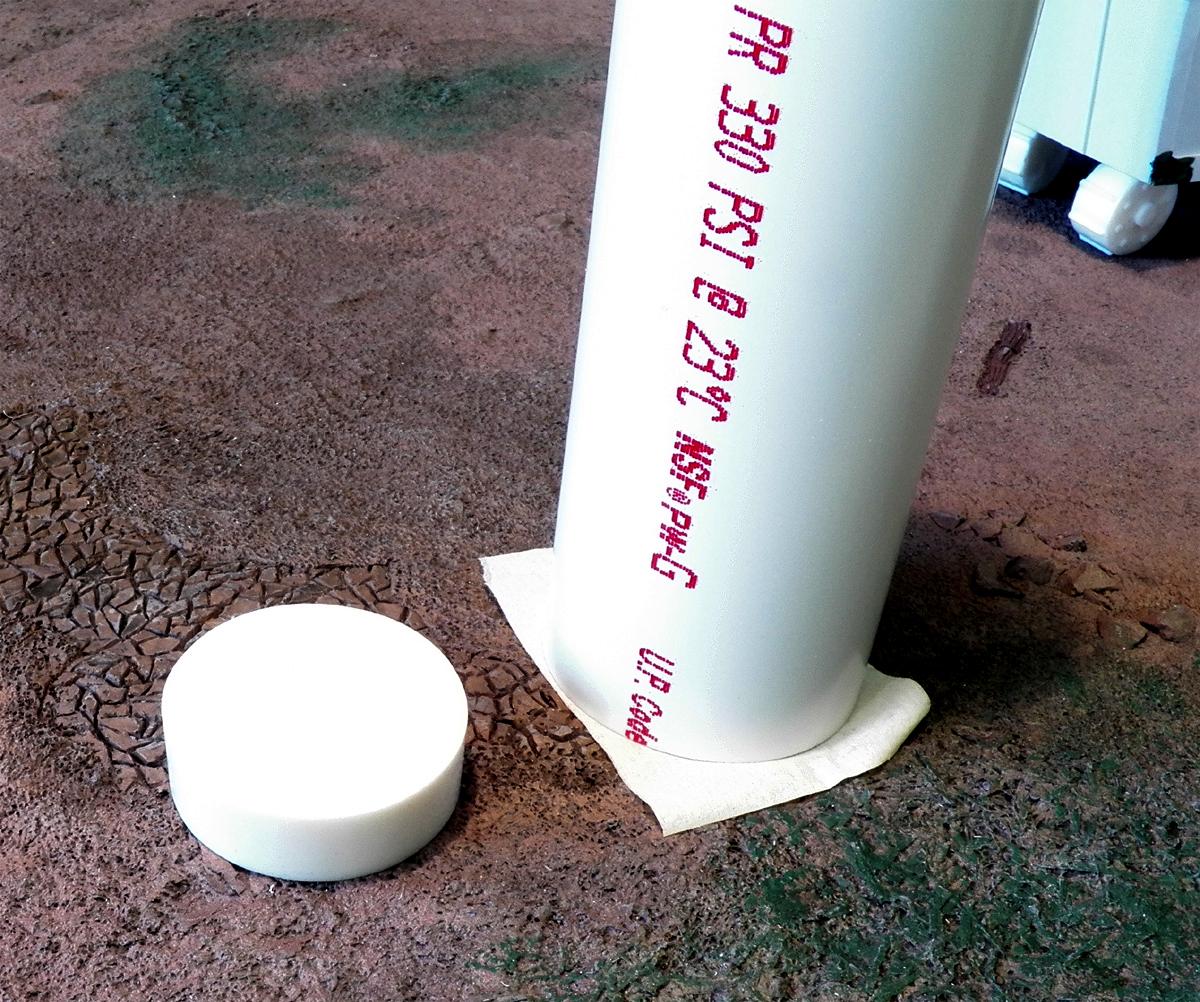
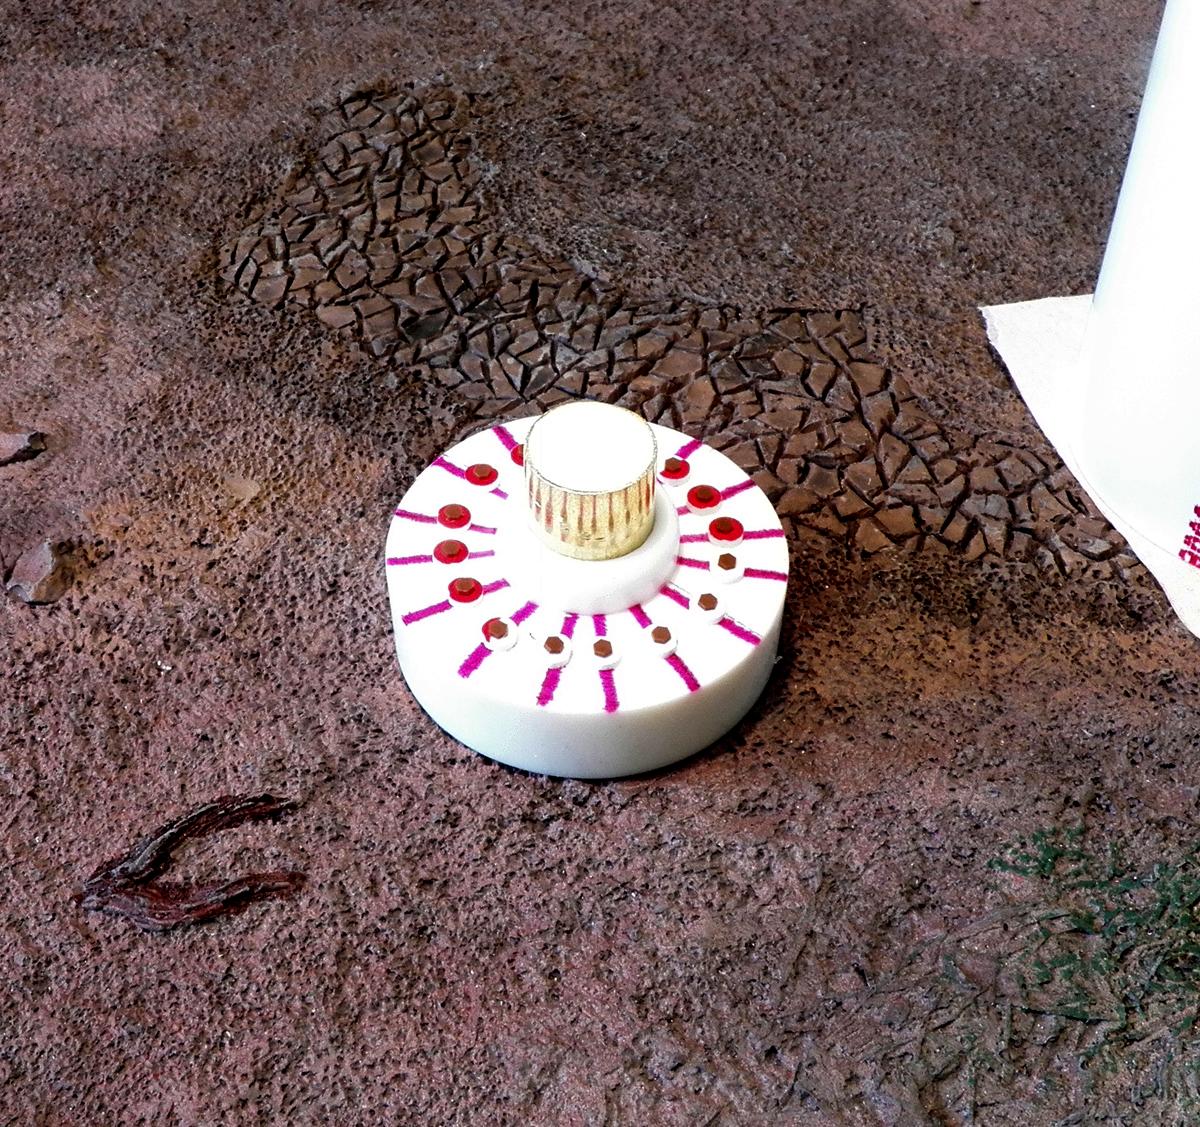
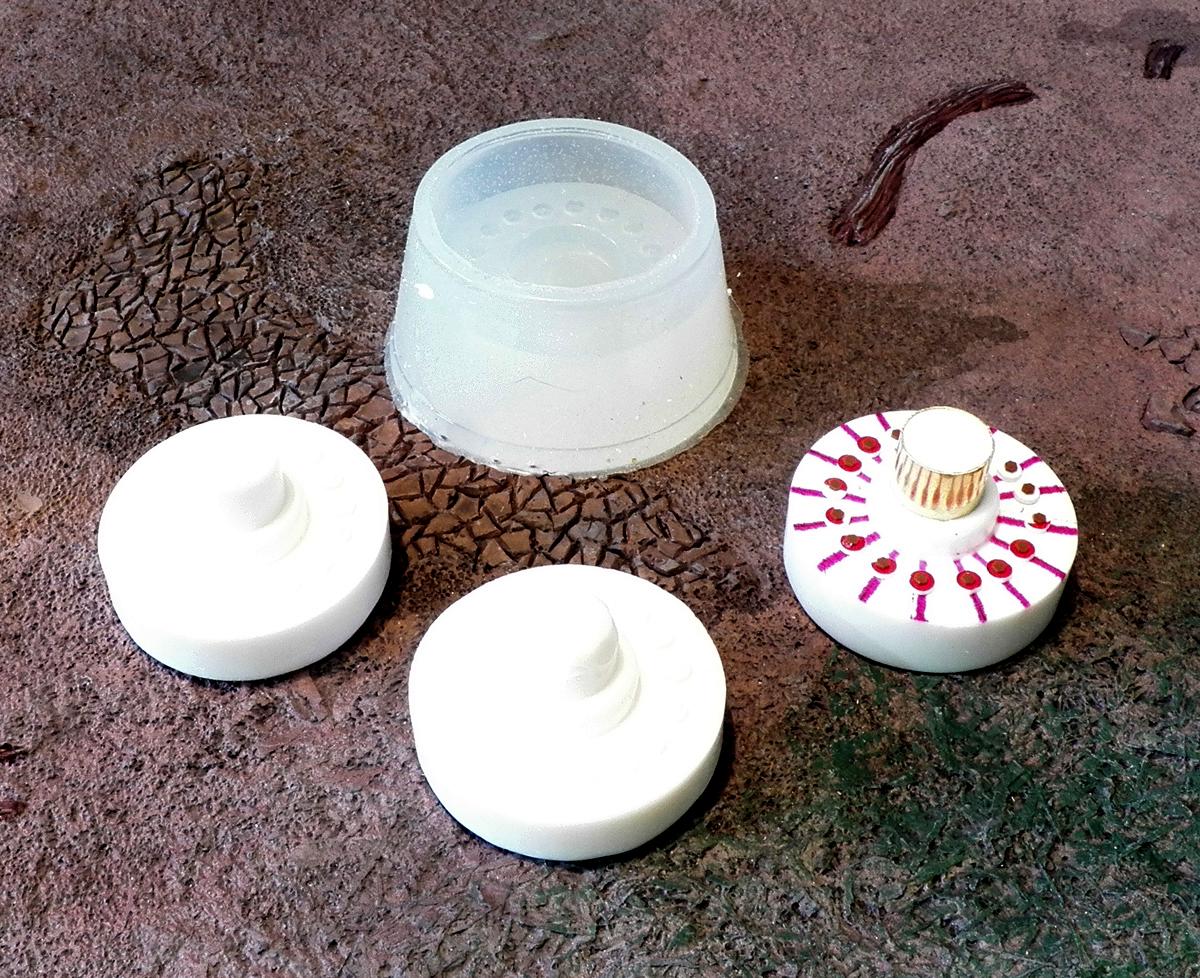
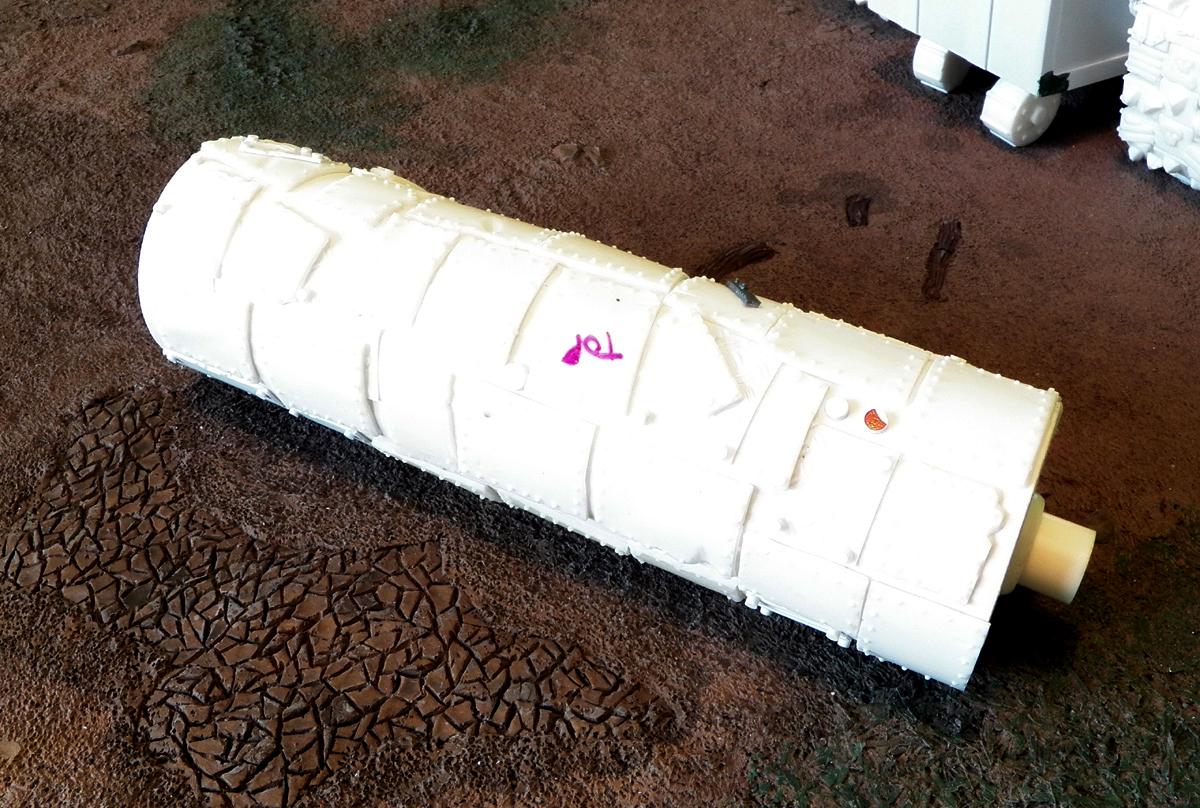
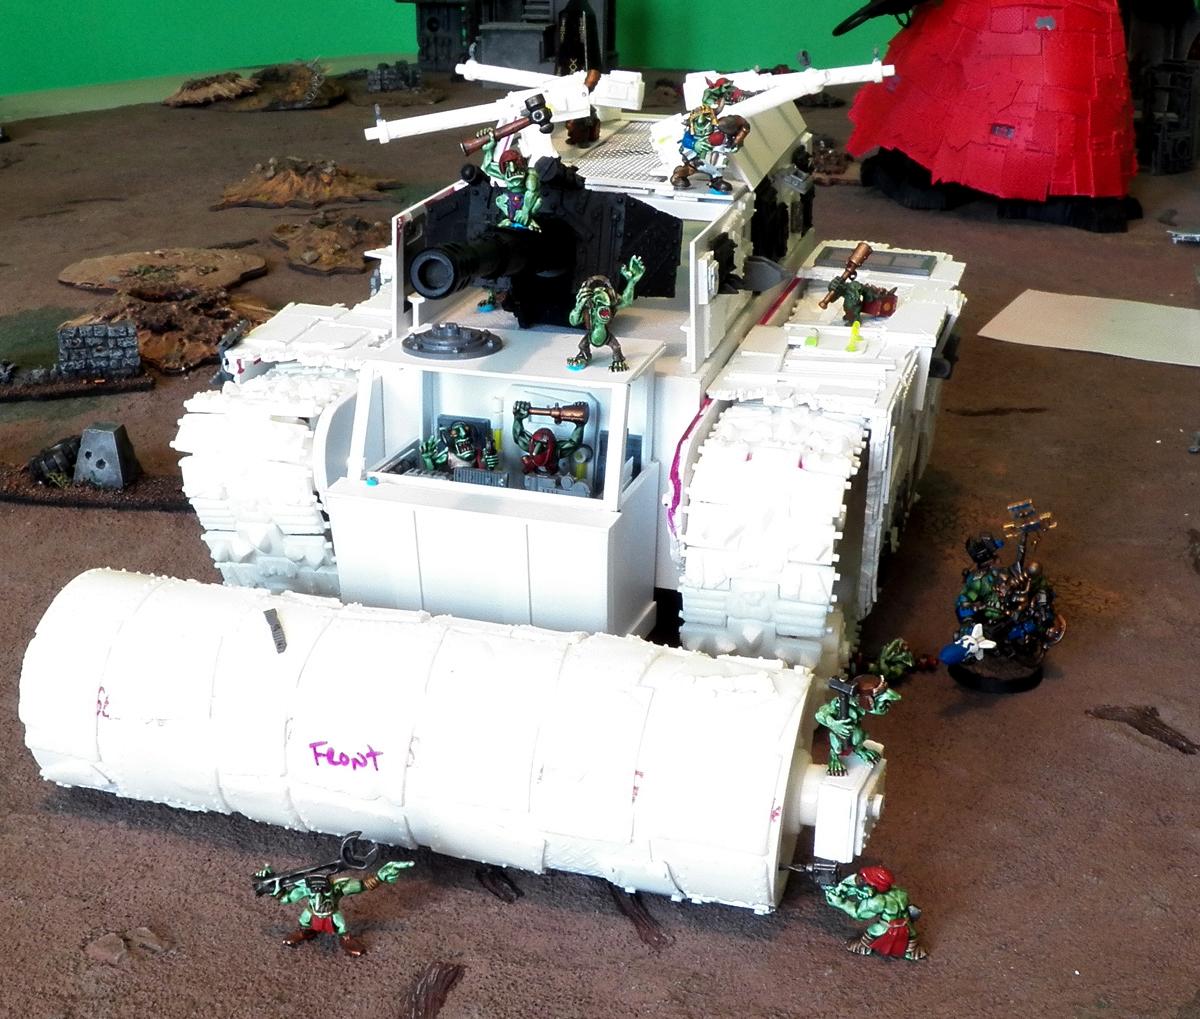

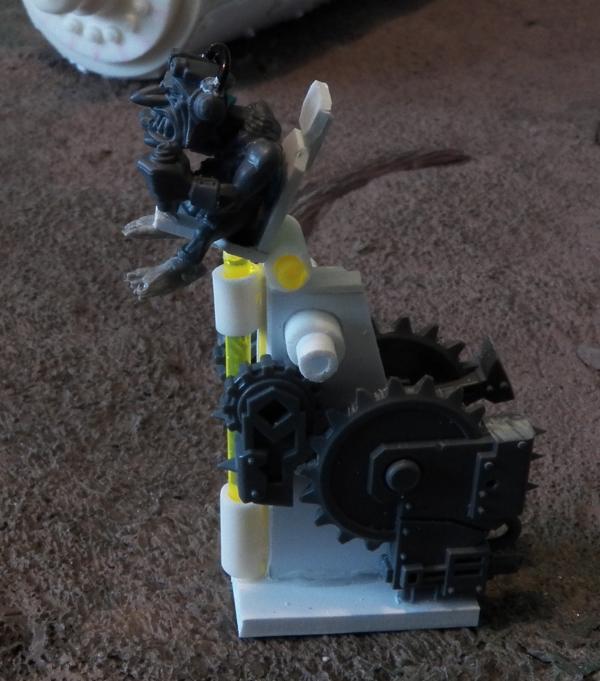
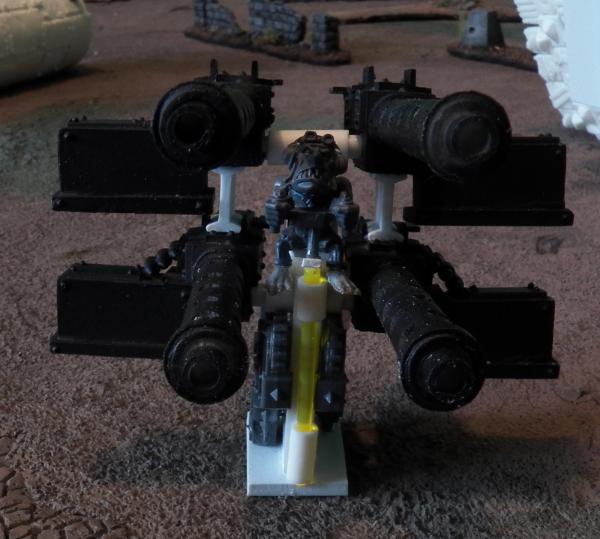
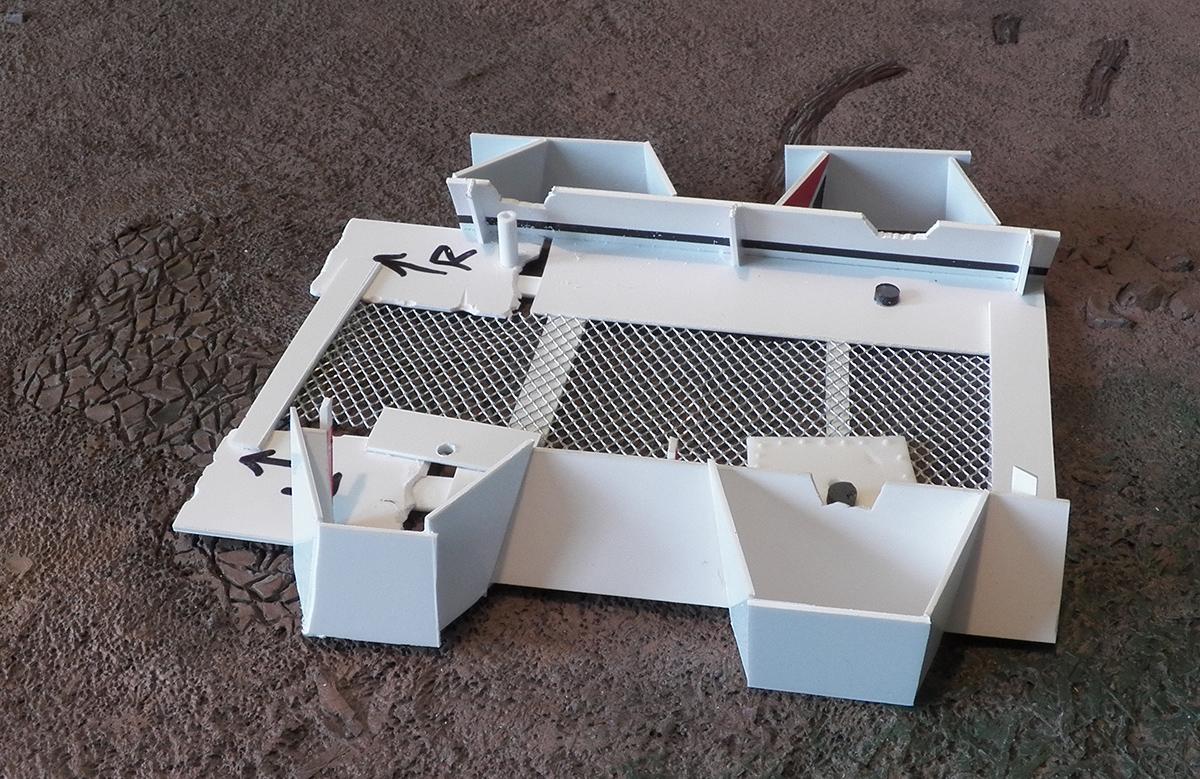
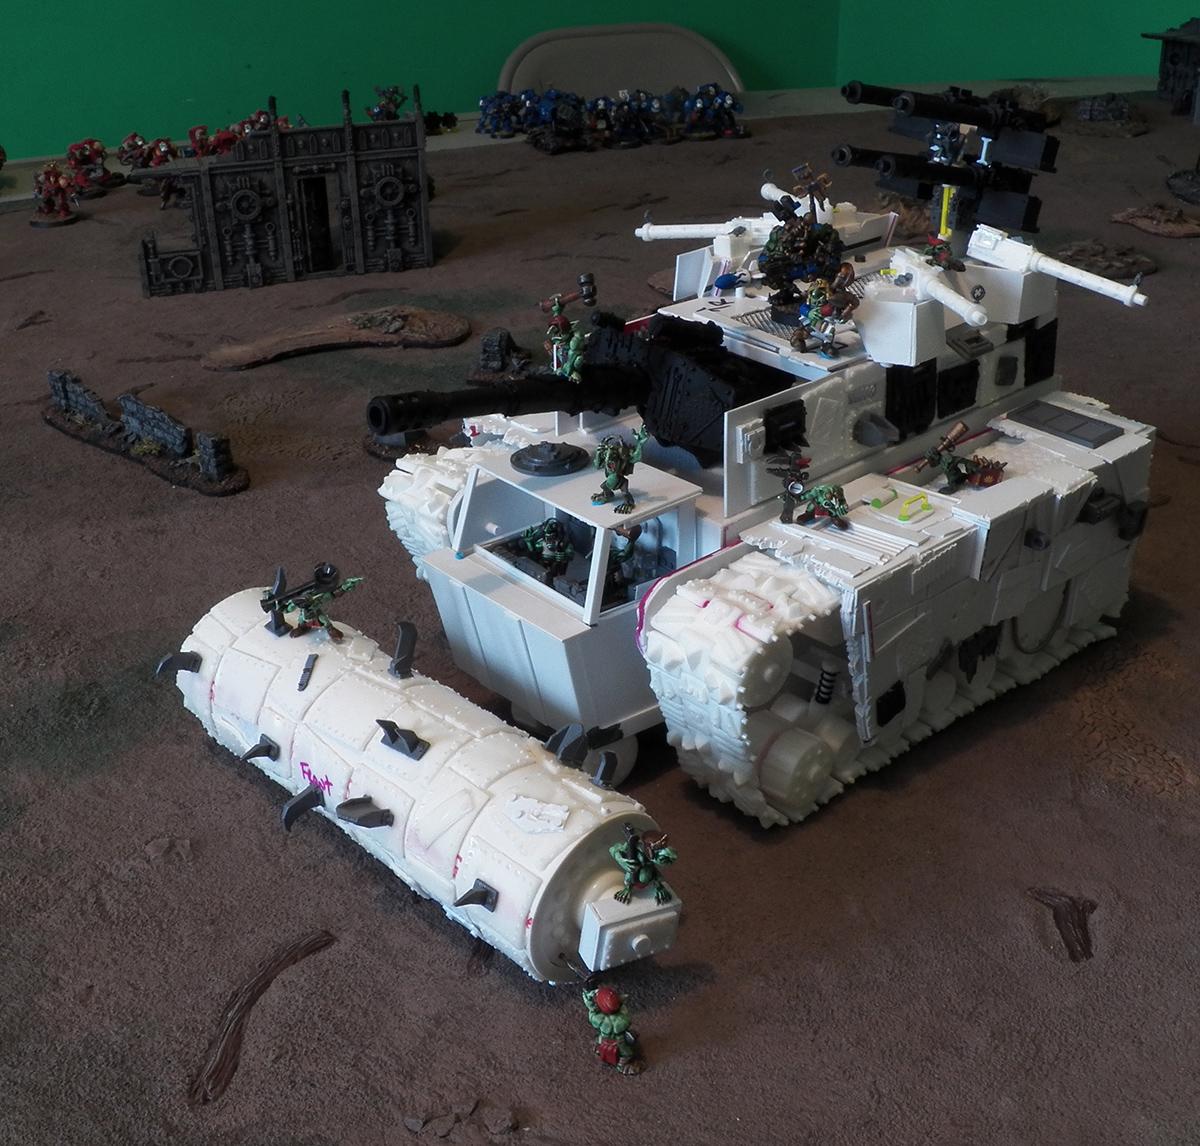
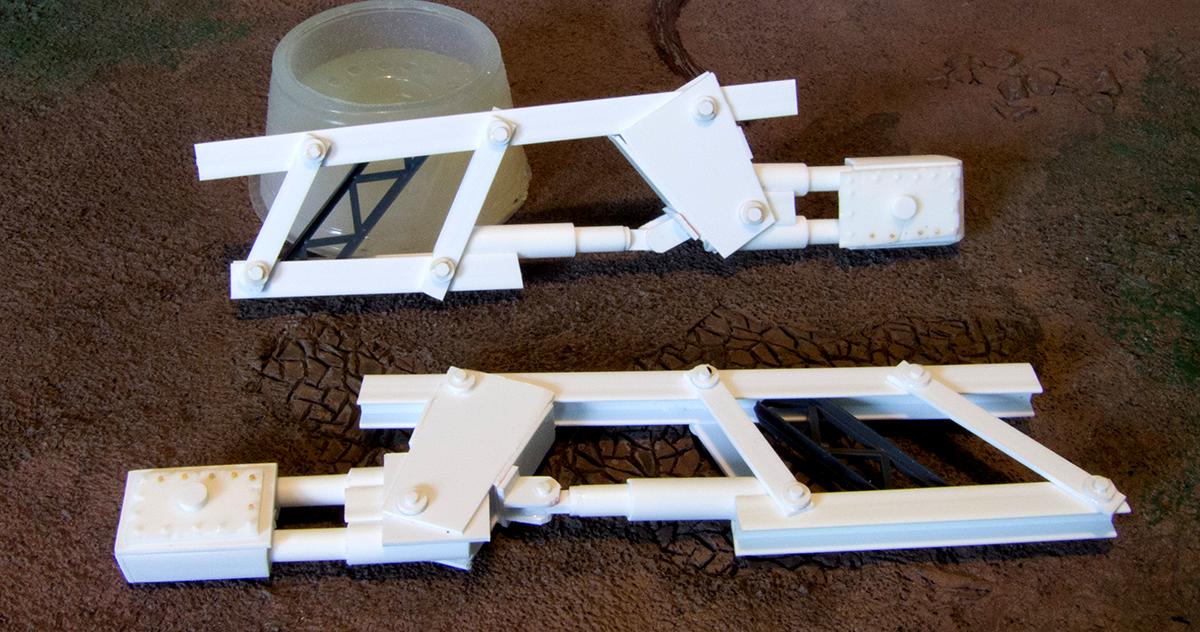

 and the new deck helps a lot. I think it makes the whole thing have a bit more shape / look less like a big box.
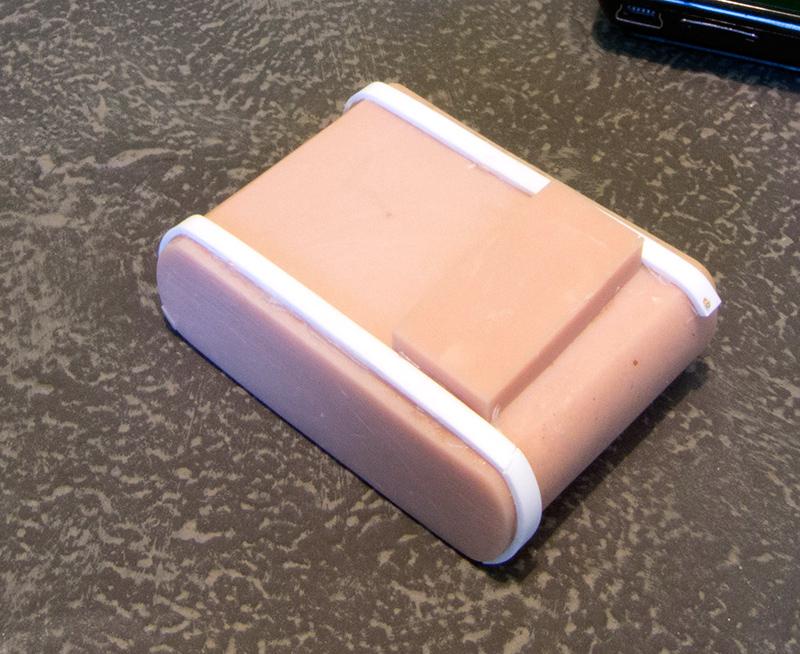


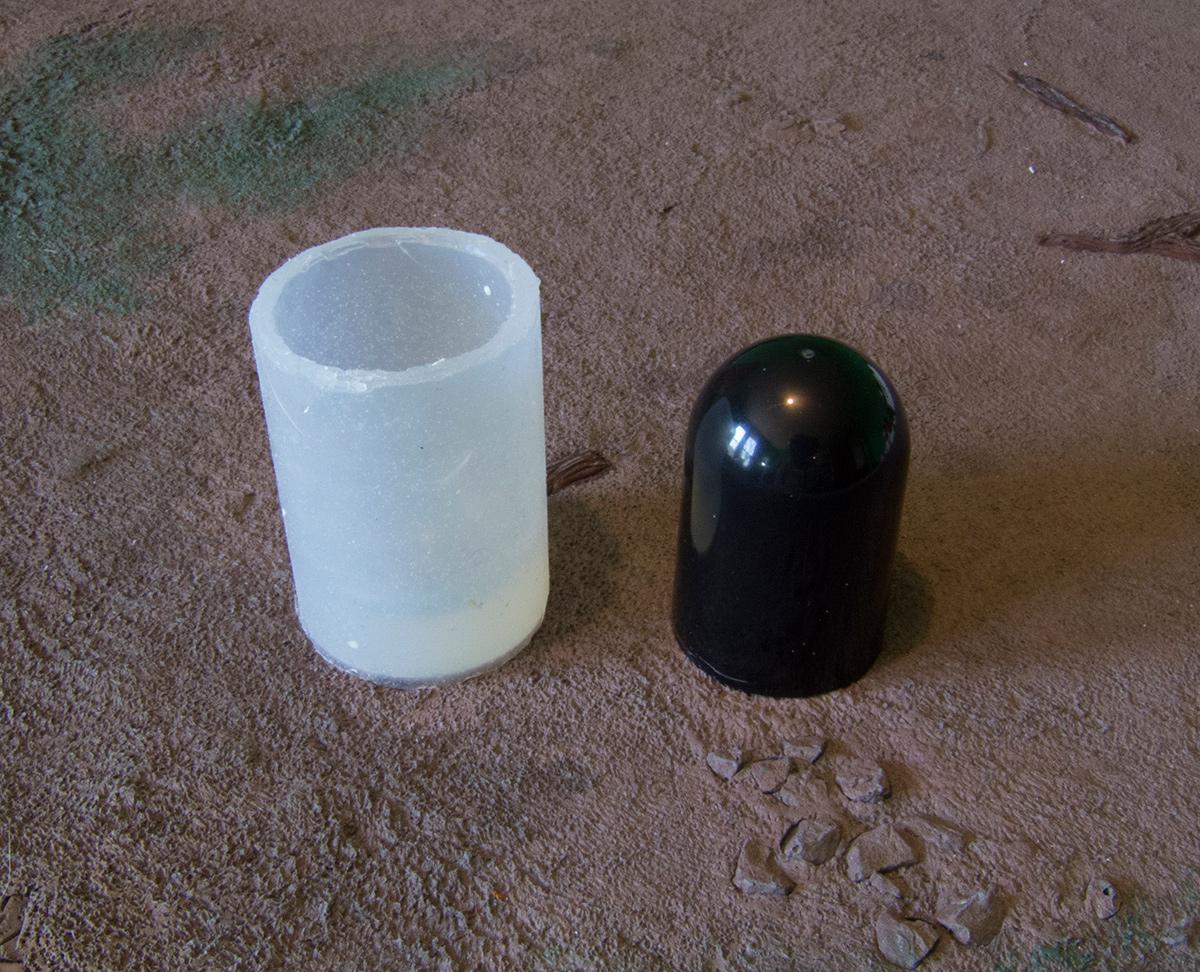

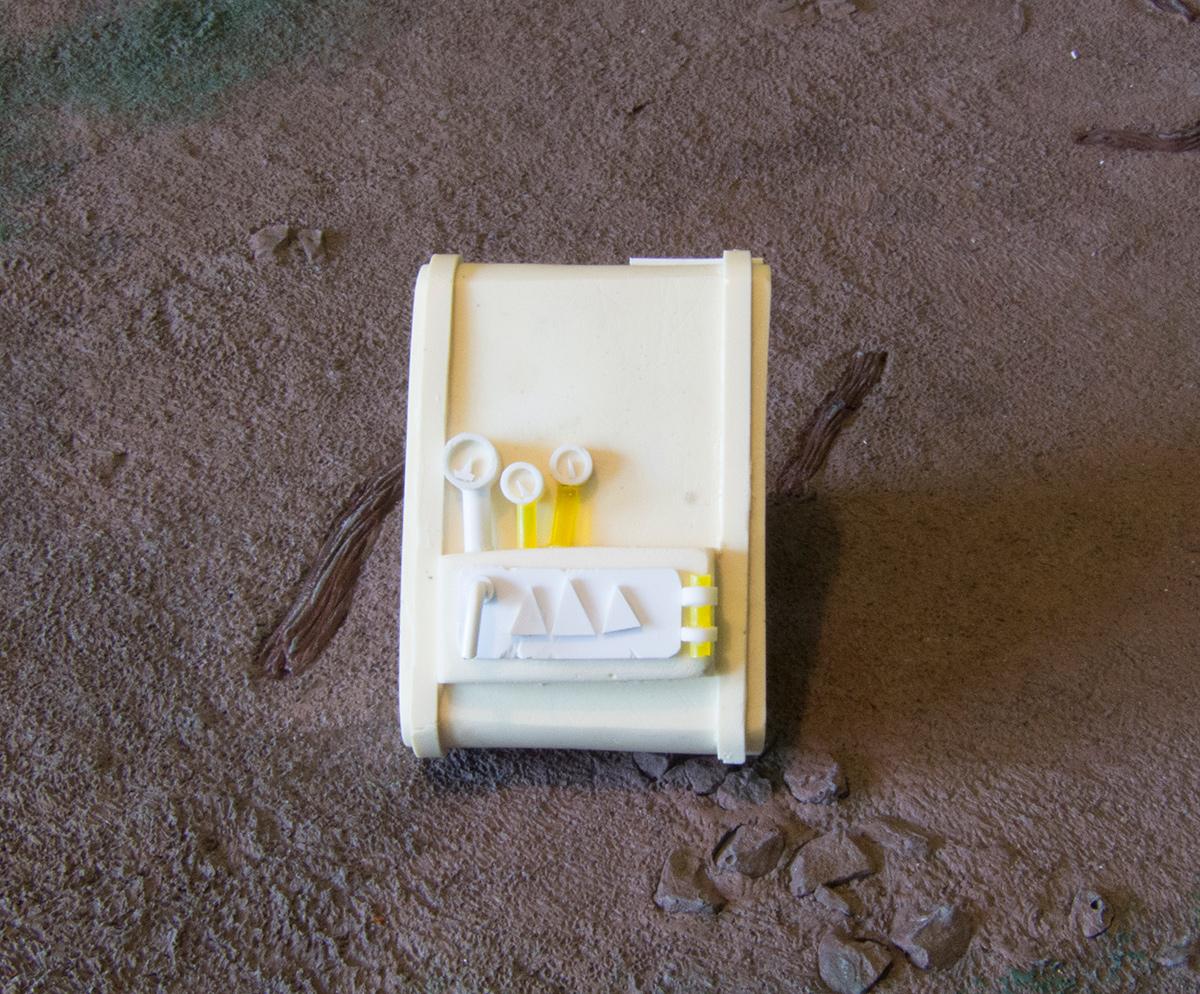

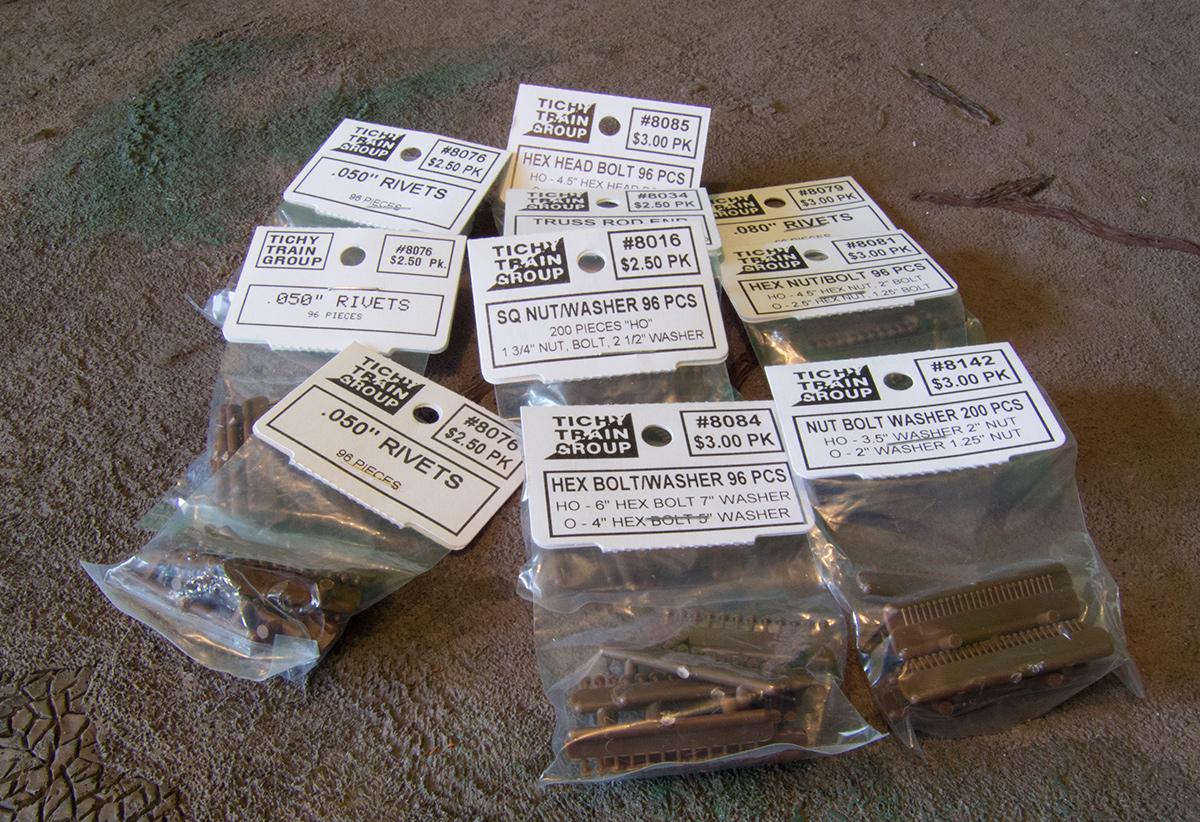
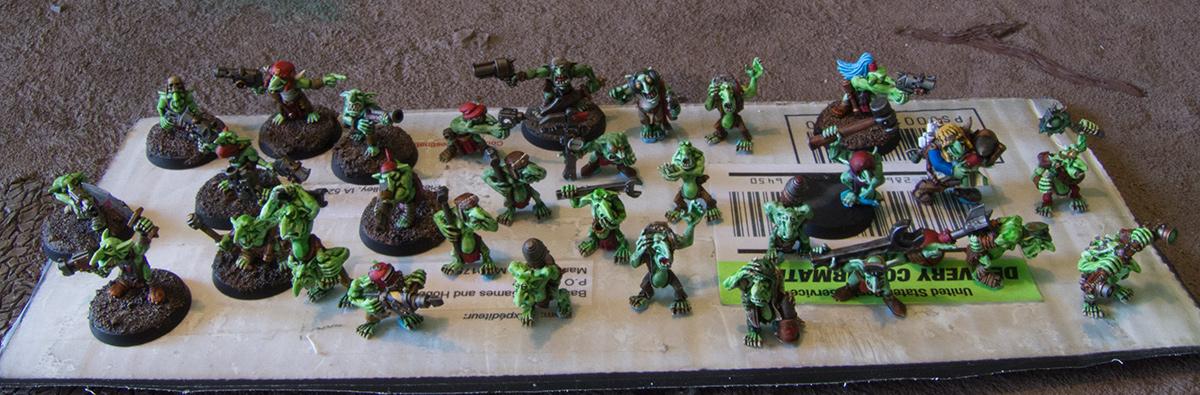
 that is quite a collection to go on one (albiet huge) tank!