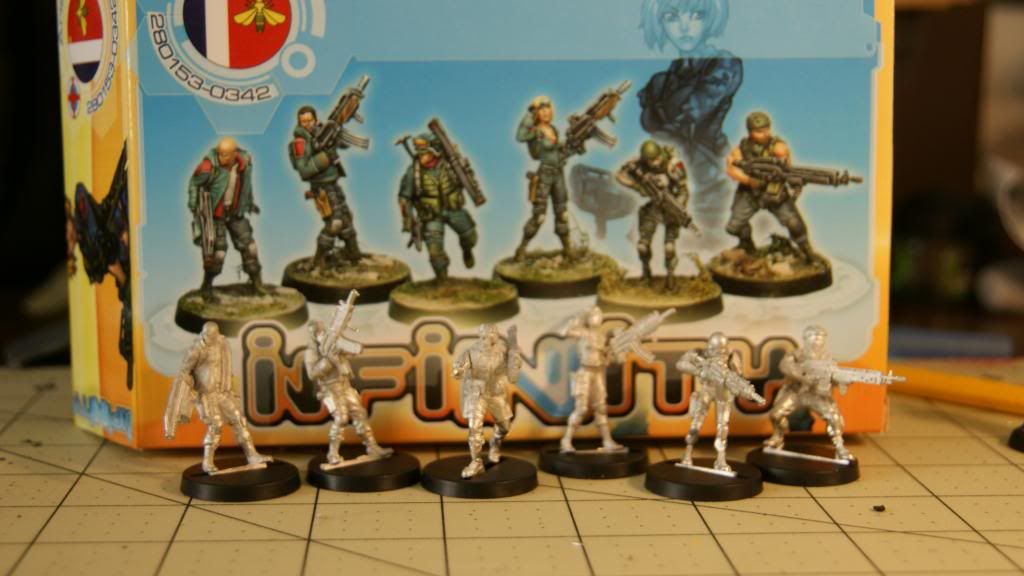
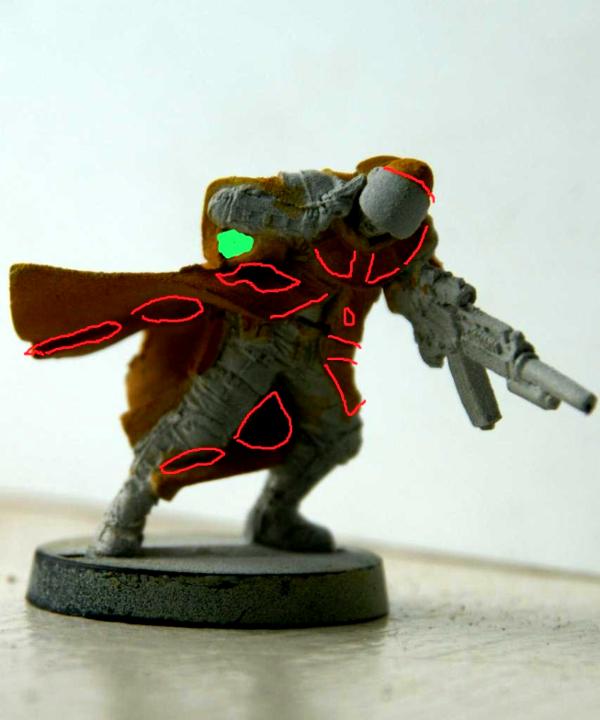
Recently, I've taken interest in the skirmish game infinity. I thought I'd keep a blog on dakka to allow others who are also curious to check out the models and maybe get some more insight to the game that is infinity.
So, about the camera, at the moment it's all I have access to. The images are a bit out of focus in some places. What is a good camera for taking pictures of miniatures? I need a new camera anyways, so I may as well get something that will help with this blog.
I'm giving up on cataloging all this stuff in the OP, but I'll keep this stuff here as I'm not sure what stays or what goes.
Spoiler:
[spoiler]
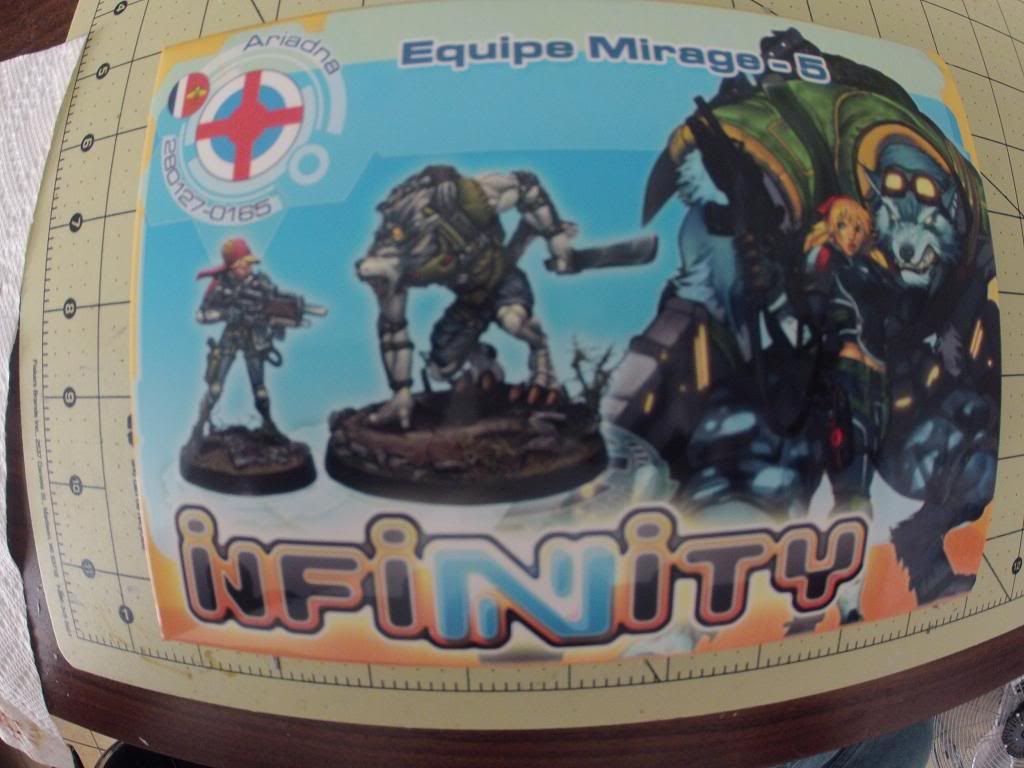
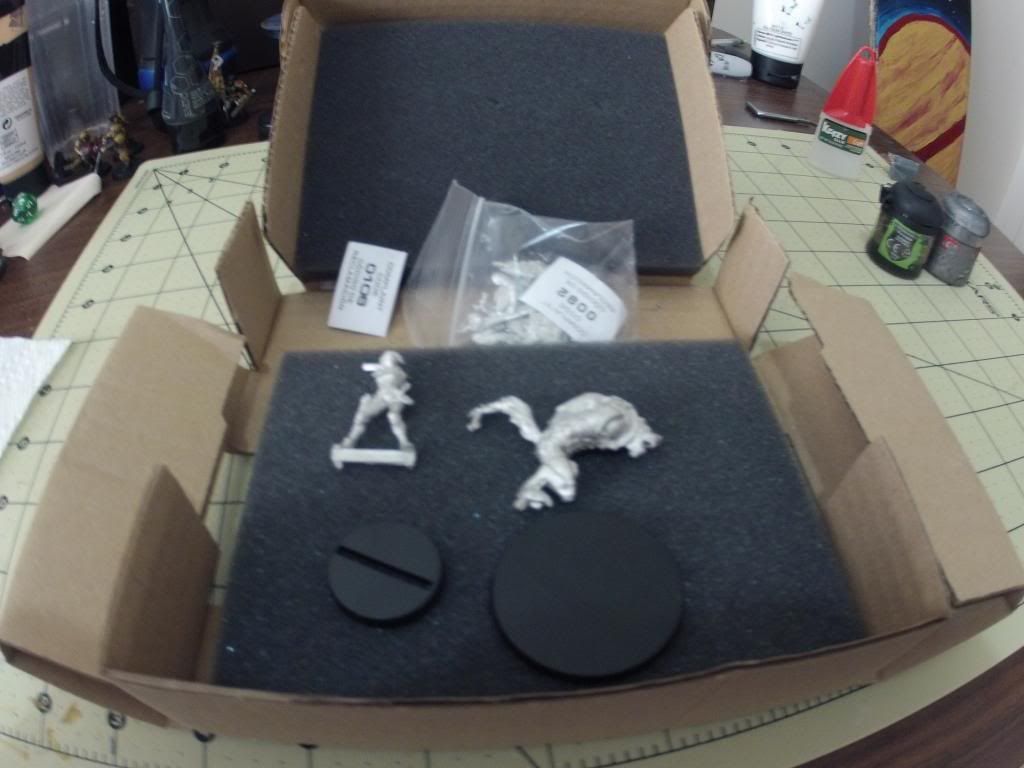
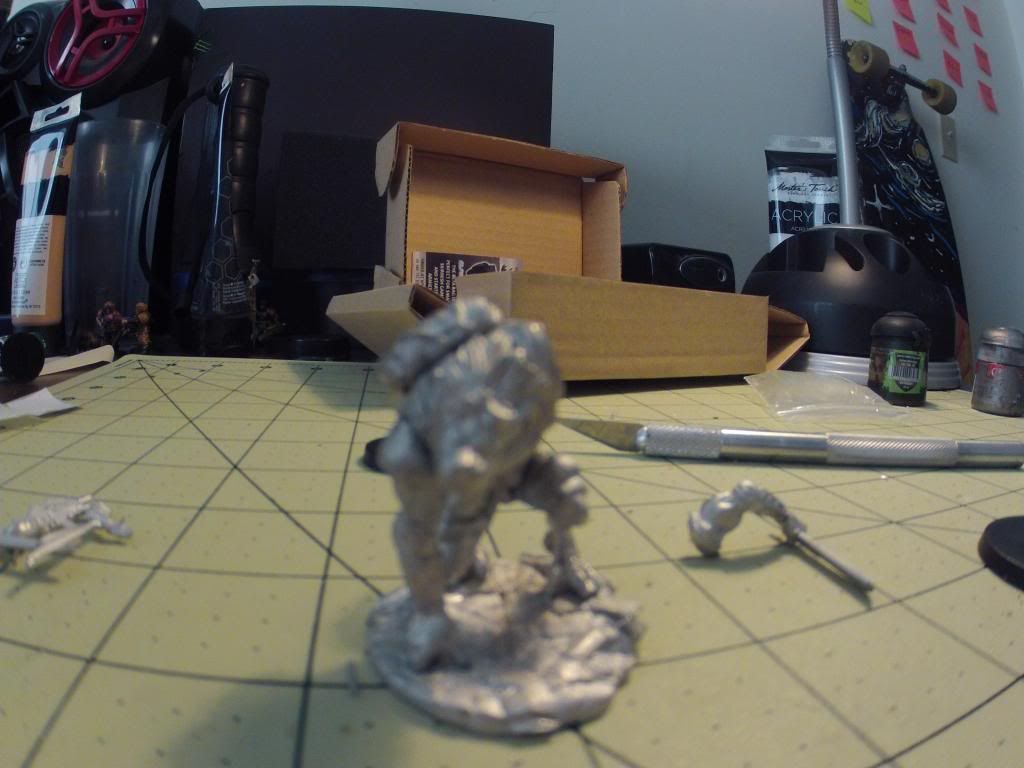
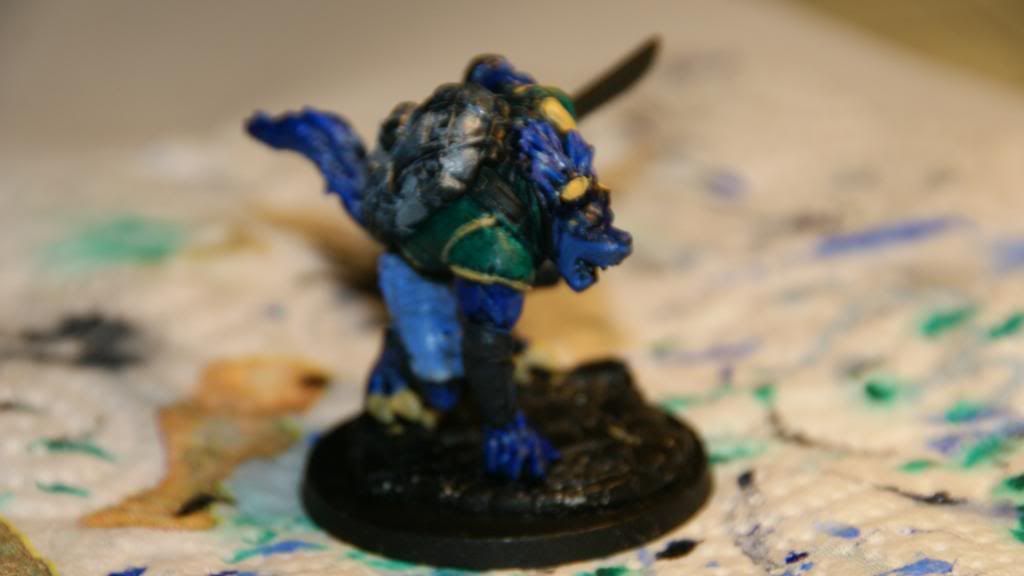
2/9/2013 This update is square zero. I open the box and put two models together: (Old camera, sub-par pics)
[spoiler]
The models were packed excellently with craft foam. There was no damage, I only had to shave off some pewter in a few locations.
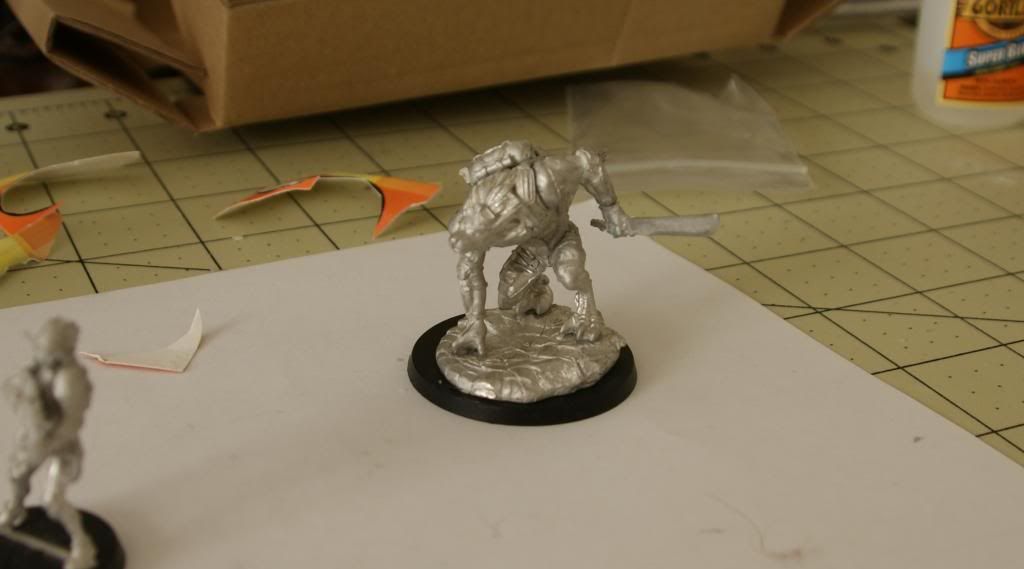
I decided to put together the werewolf first. Durok, I think his name is. This guy basically outflanks in from one side and unloads two chain rifles (think flamethrowers, but with using shrapnel instead of flame) onto something that needs to die. From what I understand of the rules, he is quite mobile, too.
Almost there!
Done!
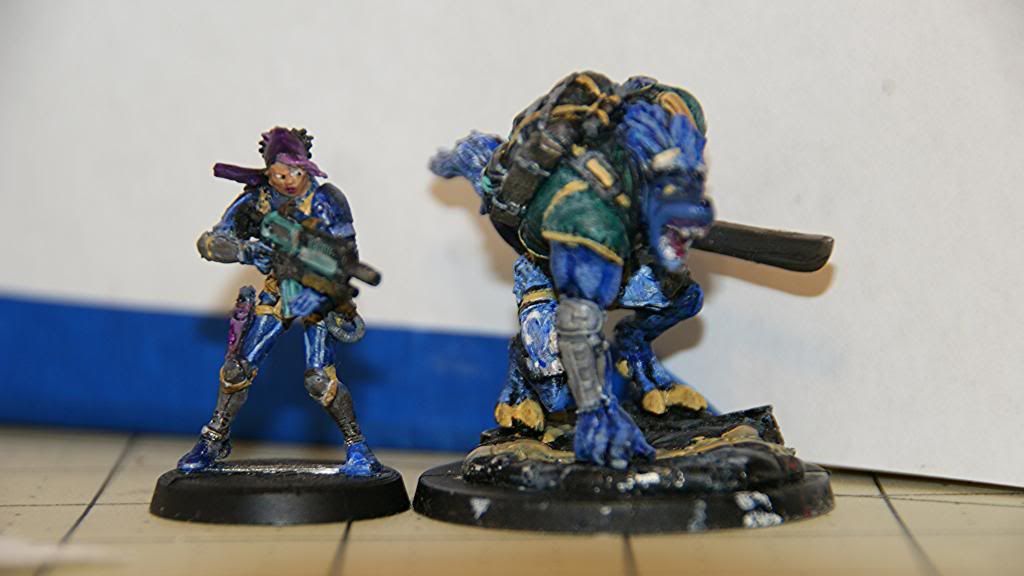
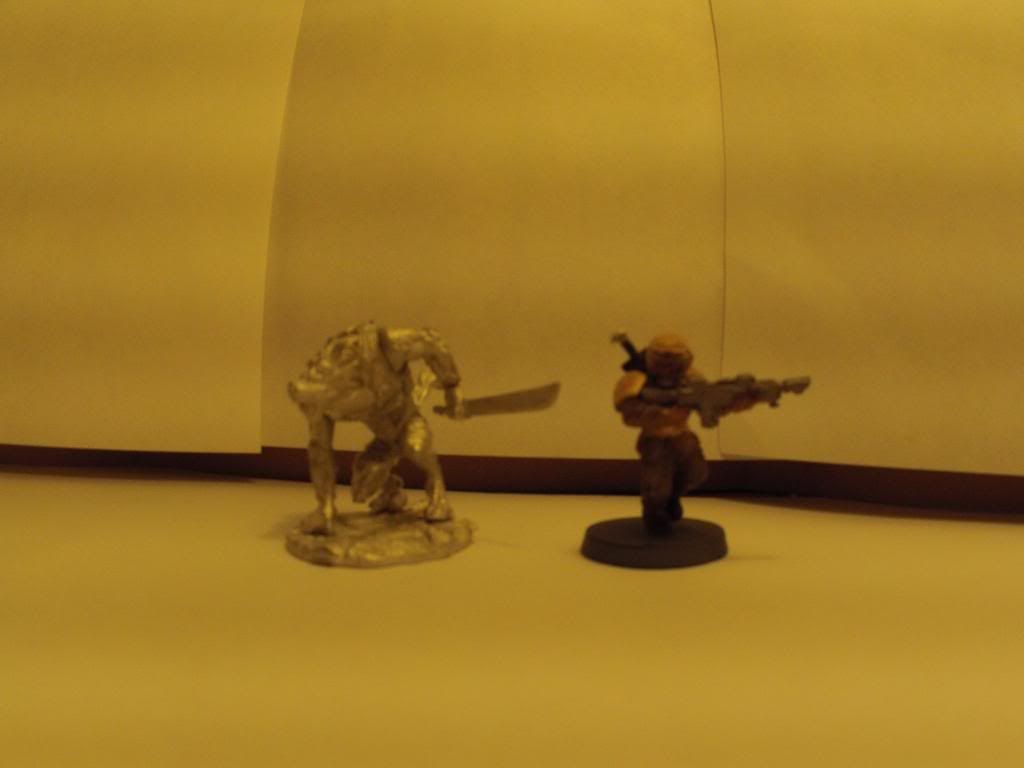
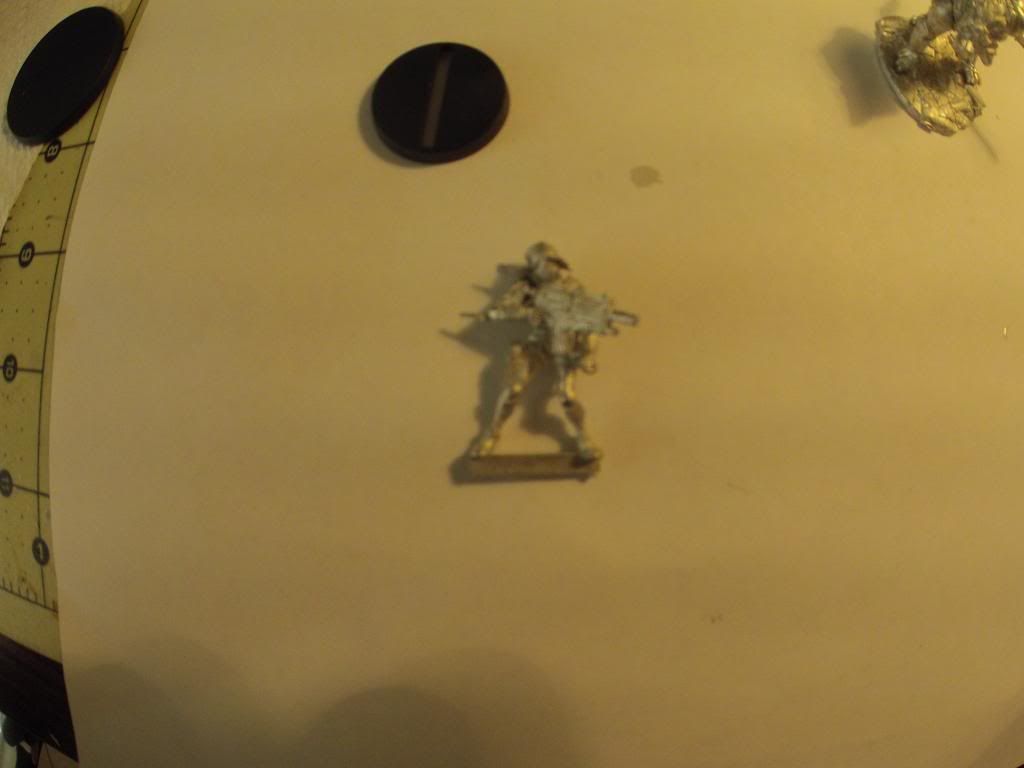
It's interesting, the guy is bigger than a guardsman, but his base is the exact same size of a crisis suit. Here's a pic for some size comparison the base Durok goes on is placed in front of him, right next to a suit, and the guardsman is sitting in the back there.
(the crisis suit is still a WIP, it was just the closest thing I had on the desk XD). (and you guys get to see my ghetto-as-crap "lightbox." Don't hate.)
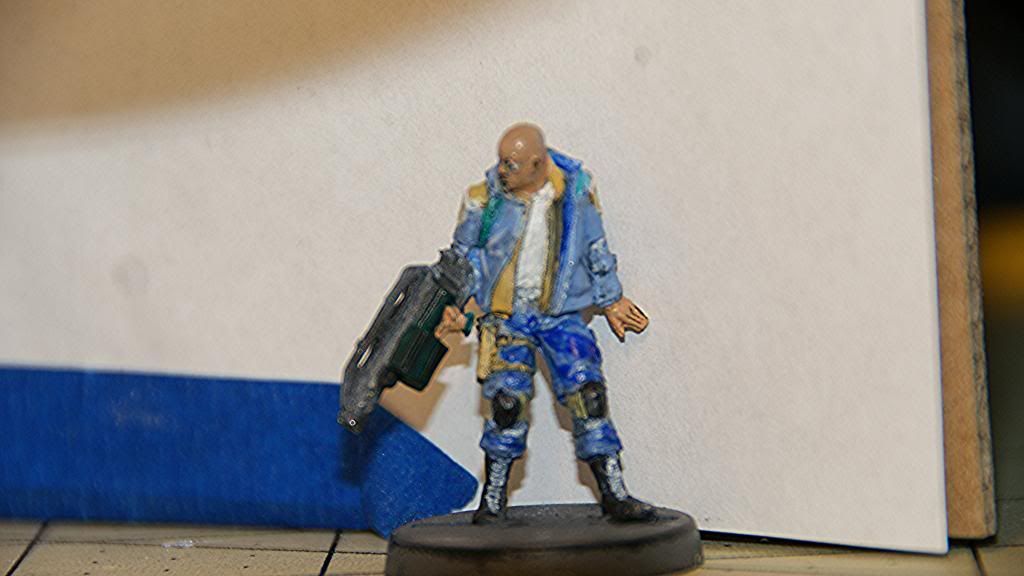
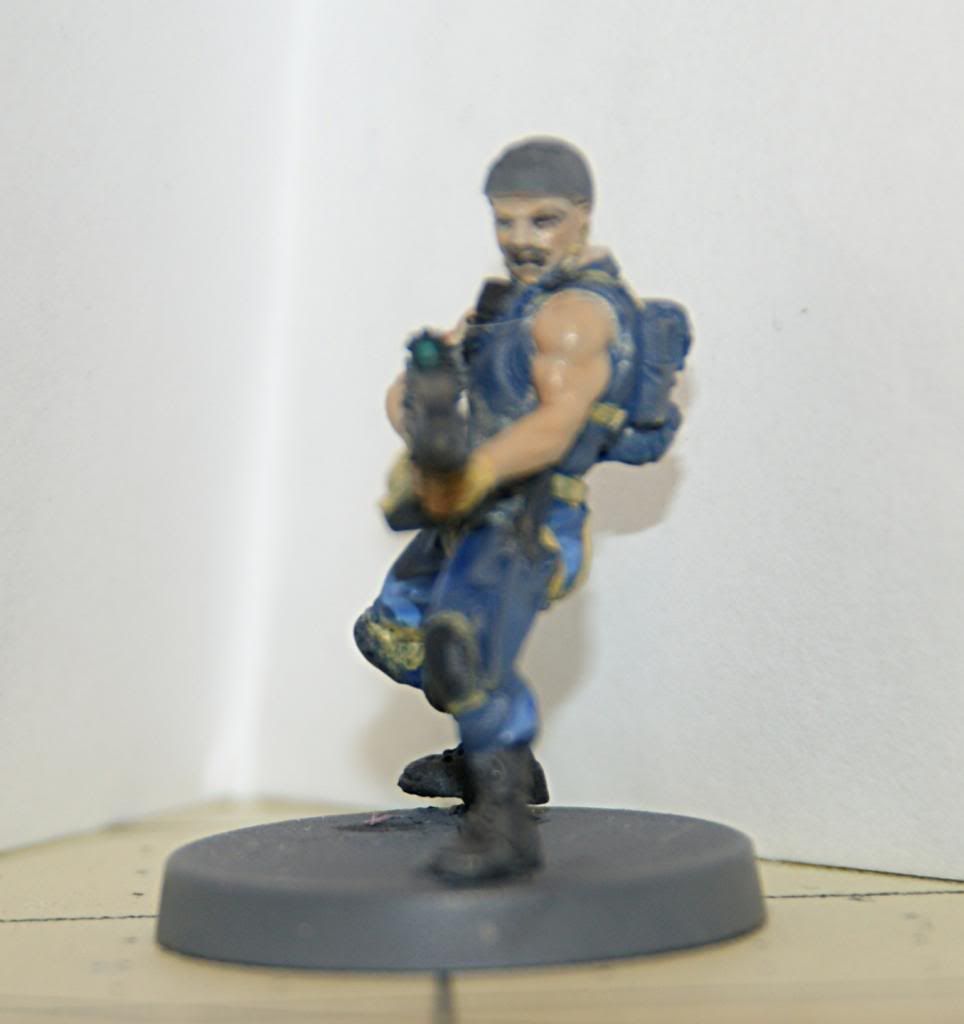
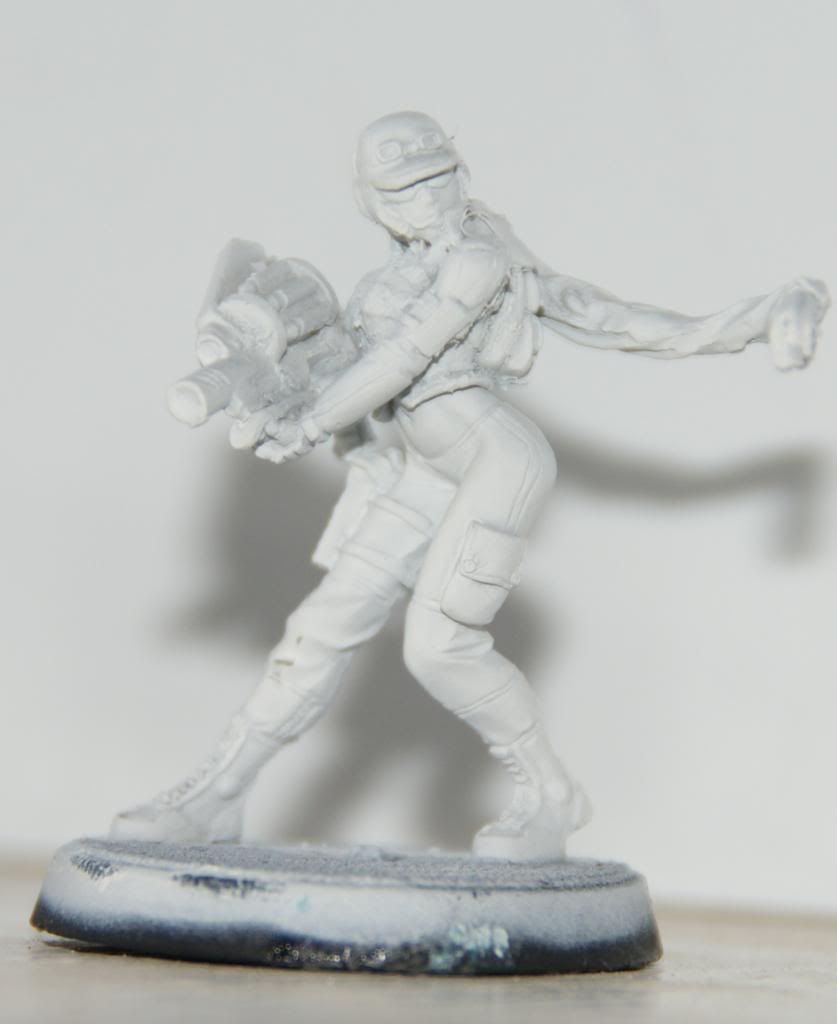
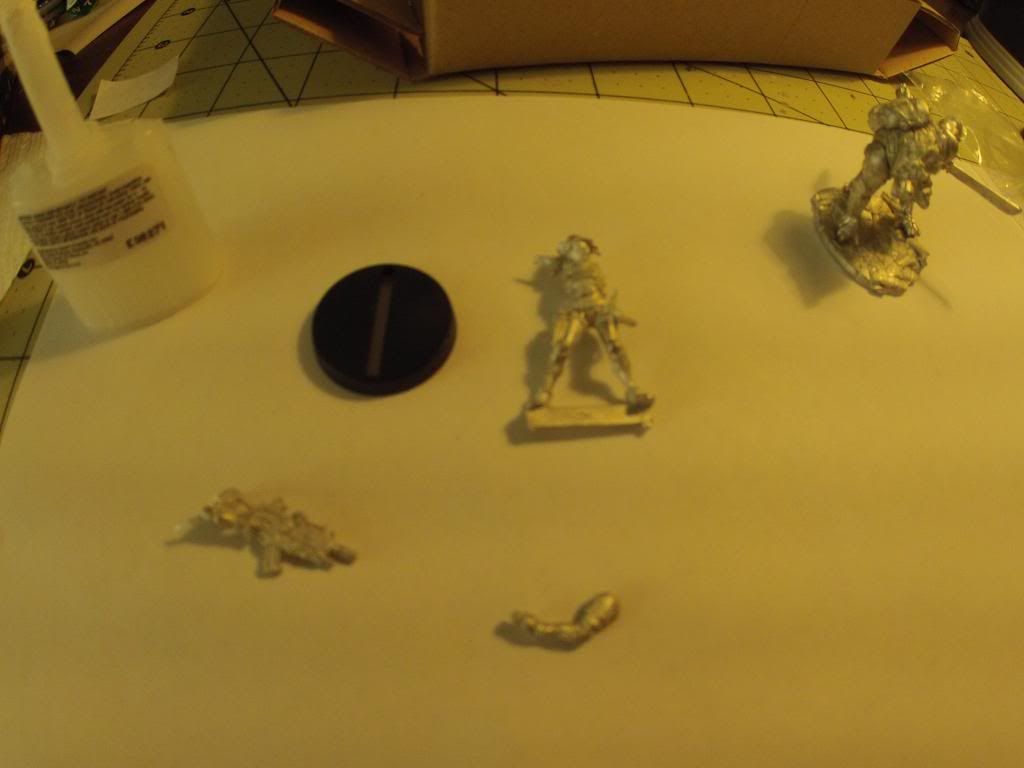
So, with Durok done, I move to the second figure in the box, Margot. She is not a close combat monster like Durok. Instead of getting close, she uses a rather high ballistics skill to harass with a grenade launcher and a rifle from medium range. The little pewter arms were difficult glue in place at first, put I think I managed well:
to
Bam! I was excited to see the two built. These pictures really do not do the models justice. The detail level on each mini is amazing. For example, I can make out the saftey on Margot's rifle.
However, I refrained from gluing Margot to her base. I want to put some work into this force and really make it shine. I need to find some materials to sculp margot a unique base with a metropolis theme, such as a sidewalk or a curb before I glue her down.
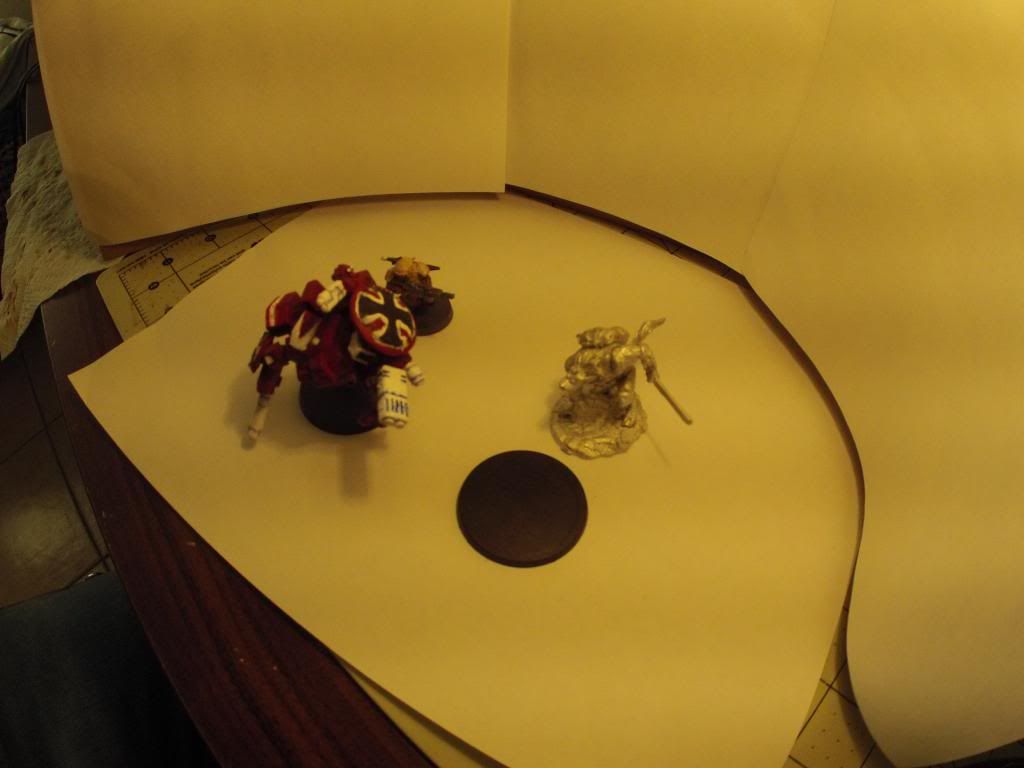
Even though margot is 28mm, she is less heroic, and my 40k models look kinda bulky and unweildy in comparison. So, with that, I'll leave you with this shot of a few models lined up so you can get a better idea of the scale:
So, if there is one thing I gotta say, it's that my camera doesn't do the detail on these things justice. While there are not many pose-able options a la 40k, the sheer cool factor more that makes up for it, in my opinion. Next time, I'll start to work on Margot's base and perhaps put the preliminary coats of paints of the miniatures. Thanks for reading! More to come soon!
2-11-2013 (High-Quality Camera Action!)
Spoiler:
2-11-2013
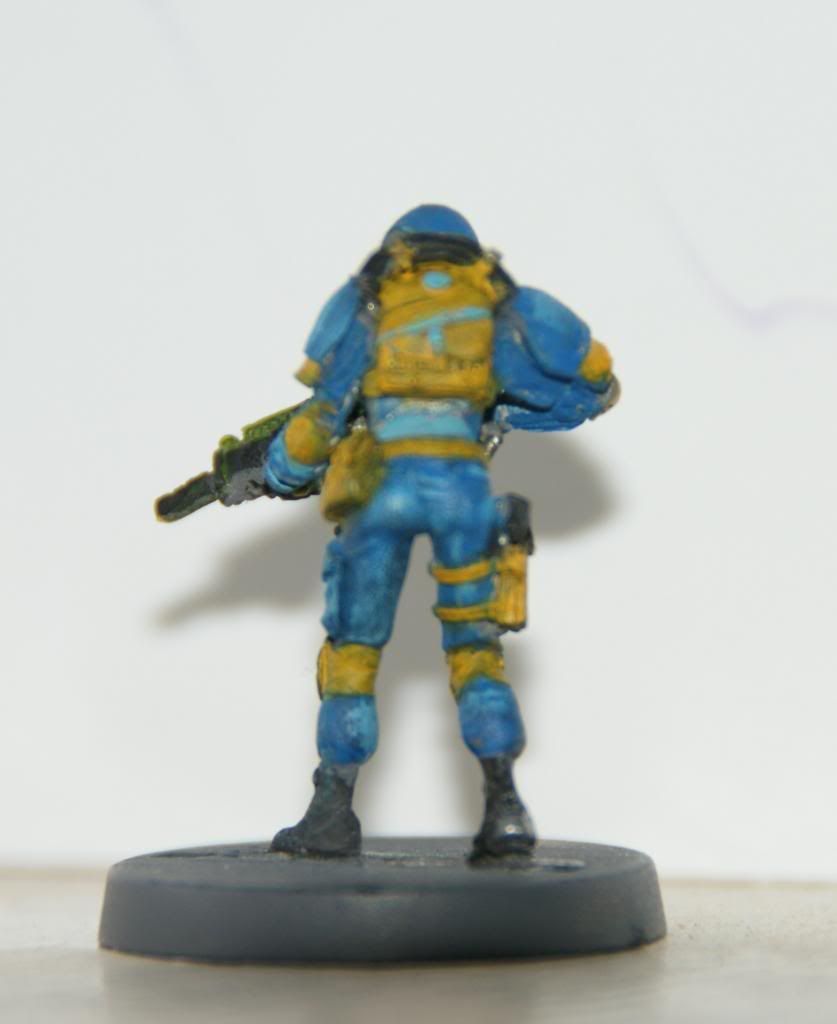
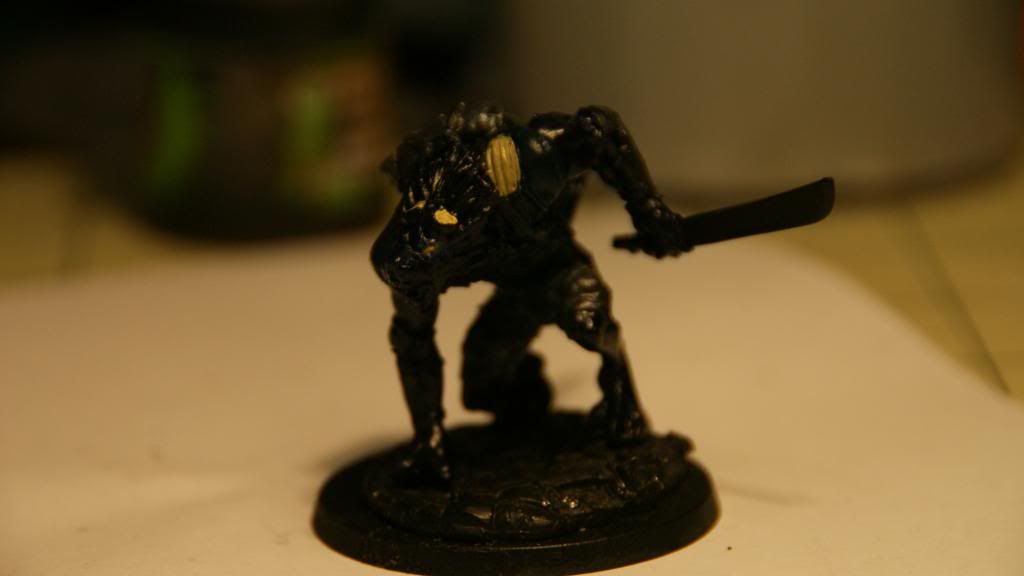
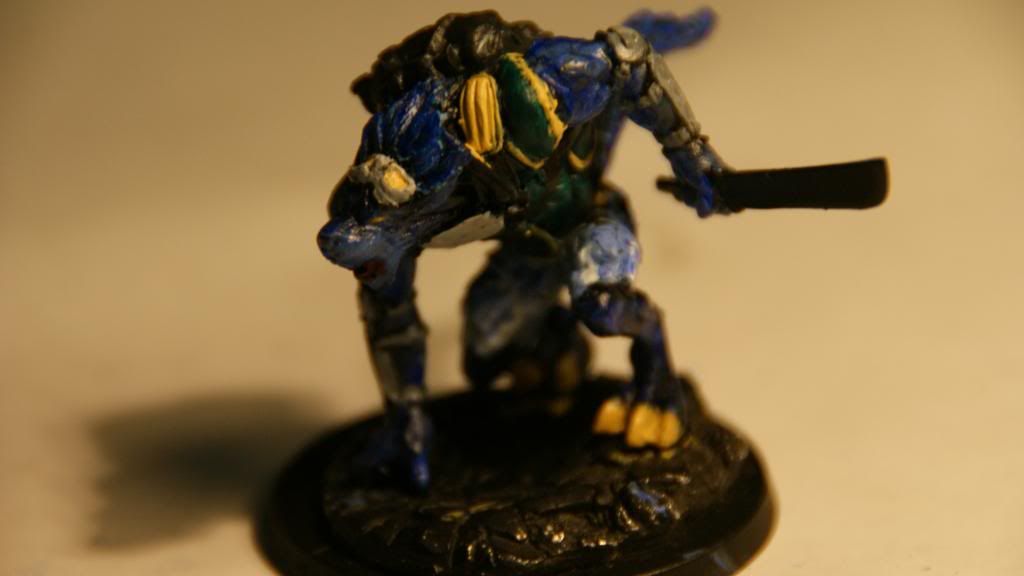
Nothing yet. I liked the artwork on the cover of the box rather than the grey-ish model displayed on the back. So I decided to make Durok that blue/teal. Realizing I didn't have many hues of green to work with, I decided to go for just blue. I applied the basic colors to get an idea of the scheme.
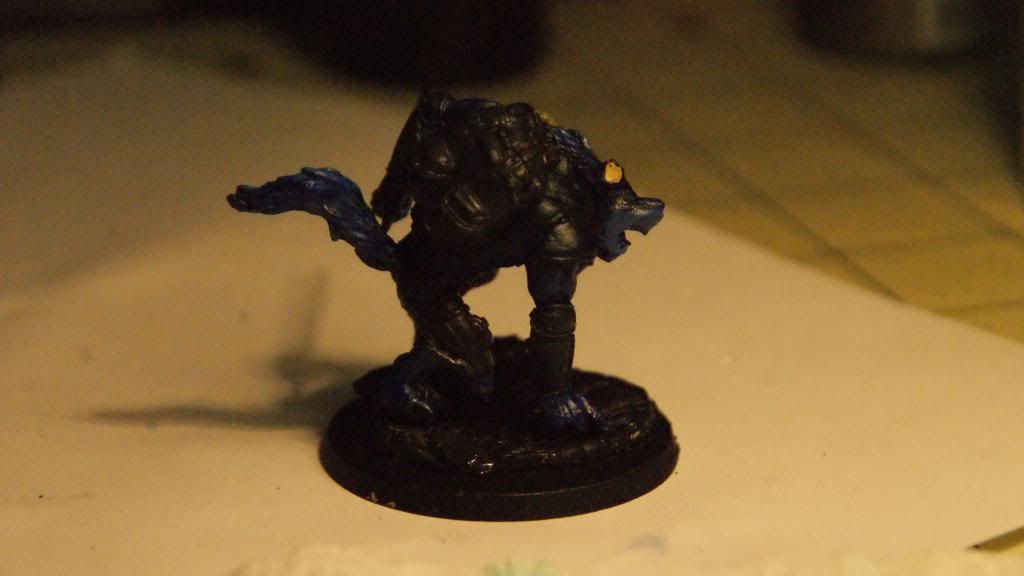
At this stage, I wanted the backpack, arm-guards, and shorts to be sort of an urban blue/grey camo, so I painted them a nice gray. To lighten the blue up, I mixed the dark aquamarine I was using with some white and applied another coat. Here it is from another angle:
Then I ran into a bit of a problem. Both the shorts and the backpack looked a bit too much like a metal-y substance. I tried a little wash in a lighter grey, but that didn't really help. So I decided to lighten up the arm-guards and darken the backpack a little bit, then I decided to give the shorts a light blue/white urban camo. They look a bit like swim trunks, in my opinion, but it I like them overall. I added some orange trim as well.
Now happy with the swim trunks, I turned my attention to detail work. There are SO many little straps and buckles on this guy. The goggles on his head, the straps under his chest, the straps on his swim trunks, the straps on the arm-guards. I really think I lost count of how many little lines I painted.
Finally, with all the details colored, I couldn't help but feel the model was too dark. So, I took my drybrush, dipped it in white, and lightly powdered the entire model in a soft white. The difference was amazing!
He's still a WIP as of now, I kind of half-heartedly painted a line on the base. It was meant to be one of those yellow lines you see on the road, I'll probably change that later.
.
(2-15-2013)
Spoiler:
The image is a little touched-up, as my setup is a bit dark atm. I have to run and get a smaller brush. I could NOT do the eyes with the smallest brush that I had. :X
As far as the sceme goes, I wanted an urban sort of uniform with bright colors. I'm thinking the "fluff" of my MRRF is that they operate in urban environments to protect key assets and act as a counter-intelligence force. So more MI-5 and less Urban warfare. I tried to think what civilians in infinity would wear, and I decided that a bright blue with a yellow trim would pass as inconspicuous against all the bright colors found on the hyper-commercial worlds of Pan0.
Thats a good scale shot, would be really useful I think for people who want to know the relative sizes! Your 40k looks cool so will be interested in seeing what you make of the Infinity stuff!
About the camera, pretty much any modern digital automatic these days should have a decent macro function. You can also get some really good deals these days - a lot of really good cameras have come down in price, but anything with a Nikon, Canon, Olympus, even Samsung or Sony badge on it should be OK. If you want to look for performance of these cameras, aside from megapixel figure (everything these days has far more than you could ever need for casual usage) then look at the 'f' figure, or aperture (essentially the speed), of the lens - lower is better. It will just help you a little with depth of field of the shot, with miniatures specifically meaning you can get them all in focus when using the macro lens.
Perhaps as important is getting a good photo taking set-up. Here is a useful guide: http://cipher-studios.com/2009/09/photographing-miniatures-by-ryder-gaddis/ Now the guy in this has gone really far into it, but you can do just as well with very little effort. I just have a set up on a table with a couple of pieces of grey coloured card. Use one underneath the miniature, and another behind it. The point a bulb (I guess 2 if you have them) - preferably a 'daylight bulb' - at the miniature. I managed to get this result from just doing that http://www.dakkadakka.com/gallery/431945-.html?m=2
Actually even if you are planning to get a smart phone, a lot of those have a macro function also. I've got a Samsung galaxy 2 - it has an 8 megapixel lens (absolutely mental ) - the penalty however is that the lens isn't that fast, meaning you need a good light level
Thanks! Actually, your post reminded me that I may have an old camera buried away in in the back of the closet. I did a little digging (well, a lot of digging, I'd completely forgotten about it for 4+ years) through the closet, and I found a hand-me-down Sony DSLR-A350 with 14.2 megapixels! It's like Christmas. (Some of my family does photography, and when one of them upgraded they passed the camera to me)
The thing is all dusty, the battery has to charge up, and I'll have to figure out how to use all the buttons on the thing, but it's safe to say I'm VERY excited to say the least. The battery is charging, and I'll throw some test pictures of some of my guardsmen up soon.
Nice to see you progress from asking about the game in the sub forum to opening your own Infinity blog! Looking forward to seeing you paint these. Durok was my favourite model when I started Infinity and probably still is. He needs a kilt though.
Hehe. Curse my good/bad luck. It seems the other lenses were stored somewhere else. I'm stuck with a lenes built for long-range action photos, like for taking good pictures of sporting events, which is the complete opposite of a miniature picture. XD
So, since I'm new at this, any advice on which lens would work best, preferably one I can find on ebay? I figure since this camera is old, I can find the lenses for a reasonable price, but I honestly have no clue what I should be looking for.
K. So after fiddeling with the camera a bit, I managed to get some pretty good pictures.
So, without further ado, here's Durok, from beginning, to an almost complete paintjob (I was a bit tired of painting for so long, so I stopped).
Spoiler:
2-11-2013
Nothing yet. I liked the artwork on the cover of the box rather than the grey-ish model displayed on the back. So I decided to make Durok that blue/teal. Realizing I didn't have many hues of green to work with, I decided to go for just blue. I applied the basic colors to get an idea of the scheme.
At this stage, I wanted the backpack, arm-guards, and shorts to be sort of an urban blue/grey camo, so I painted them a nice gray. To lighten the blue up, I mixed the dark aquamarine I was using with some white and applied another coat. Here it is from another angle:
Then I ran into a bit of a problem. Both the shorts and the backpack looked a bit too much like a metal-y substance. I tried a little wash in a lighter grey, but that didn't really help. So I decided to lighten up the arm-guards and darken the backpack a little bit, then I decided to give the shorts a light blue/white urban camo. They look a bit like swim trunks, in my opinion, but it I like them overall. I added some orange trim as well.
Now happy with the swim trunks, I turned my attention to detail work. There are SO many little straps and buckles on this guy. The goggles on his head, the straps under his chest, the straps on his swim trunks, the straps on the arm-guards. I really think I lost count of how many little lines I painted.
Finally, with all the details colored, I couldn't help but feel the model was too dark. So, I took my drybrush, dipped it in white, and lightly powdered the entire model in a soft white. The difference was amazing!
He's still a WIP as of now, I kind of half-heartedly painted a line on the base. It was meant to be one of those yellow lines you see on the road, I'll probably change that later.
Anyways, when he's finished I'll set up a good background in some sunlight to take pictures. The light is 100% better during the day.
The image is a little touched-up, as my setup is a bit dark atm. I have to run and get a smaller brush. I could NOT do the eyes with the smallest brush that I had. :X
As far as the sceme goes, I wanted an urban sort of uniform with bright colors. I'm thinking the "fluff" of my MRRF is that they operate in urban environments to protect key assets and act as a counter-intelligence force. So more MI-5 and less Urban warfare. I tried to think what civilians in infinity would wear, and I decided that a bright blue with a yellow trim would pass as inconspicuous against all the bright colors found on the hyper-commercial worlds of Pan0.
Ah what miniature is that mate? I don't recognise it..
Really like the colour scheme, and the reasoning behind it. I know what you mean about painting the eyes - I've tried it on a few of mine, but others have ended up looking like they are psychos on drugs with massive, staring eyes. So another way I guess is to just use shading, and let the eyes hide within the natural shadows of the face. It is a tough one that's for sure (and I think possibly the reason that some people have all-helmeted forces!)
Pacific wrote: Ah what miniature is that mate? I don't recognise it..
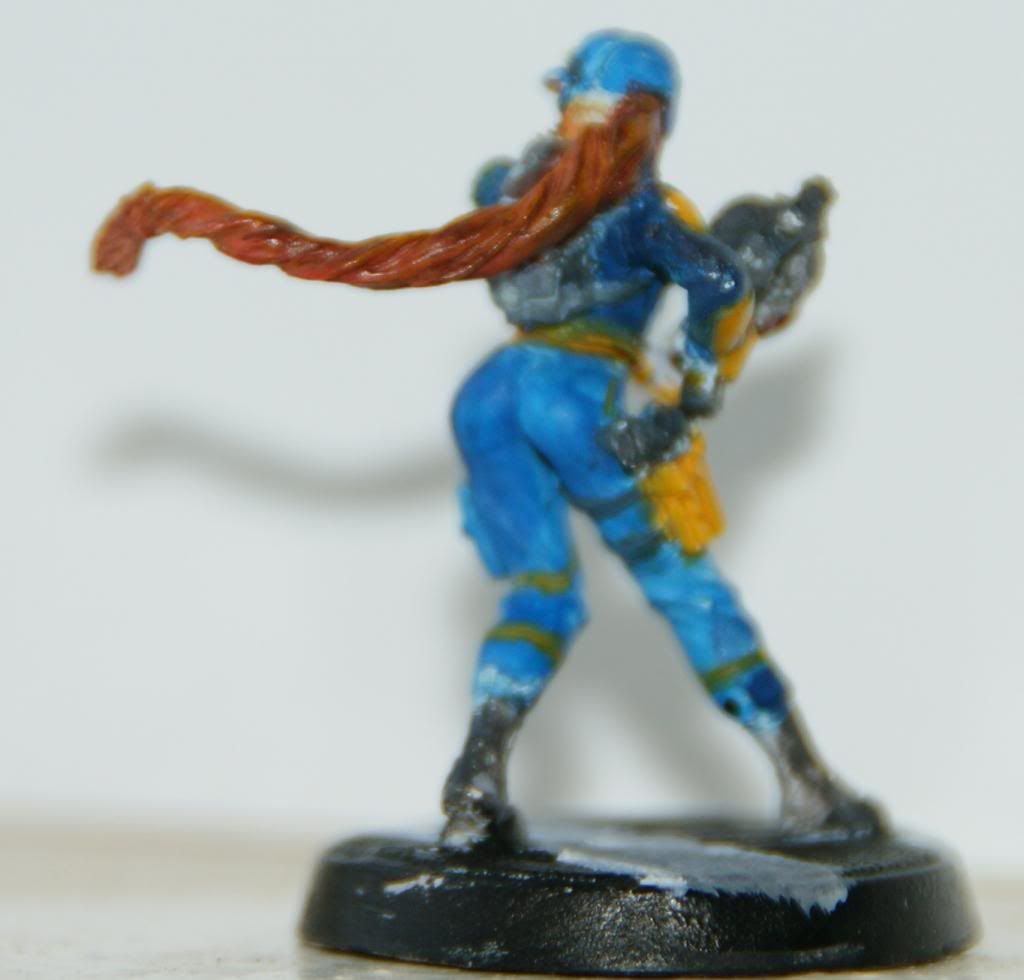
The mini is Margot of Mirage-5. I changed the bandanna and hair color, (from blond to black with a pink highlight) and gave the pistol a pink holster.
Thanks for taking the time to comment! I really appreciate it! I placed an order for the MRRF (Merovingian Rapid Response Force.) I should receive them in 4-5 days.
Hopefully, by then, I'll have a better-quality brush, another lamp to light the photos up, and a whole batch of new minis to paint!
Good start, mate! Looking forward to the next ones!
I'm no expert, so take this with a pinch of salt, but I suggest slowing your process down. Work on one colour, slowly build it it up with multiple thin coats, washes and highlights and then move on to another and go through it again. One of the great things about Infinity is you can spend as long as you want on every model, with only about 10 miniatures per force you can really go into detail.
I'm no expert, so take this with a pinch of salt, but I suggest slowing your process down. Work on one colour, slowly build it it up with multiple thin coats, washes and highlights and then move on to another and go through it again. One of the great things about Infinity is you can spend as long as you want on every model, with only about 10 miniatures per force you can really go into detail.
Keep it up!
Will do. I really do have trouble going slowly. I guess that comes from painting boatloads of guard at a time.
I really appreciate the support. I know I'm not the best painter around (pretty much anyone else on this site can put me to shame), but that just makes your support that much more awesome!
No worries man, everyone has a learning curve to work through. Some people are naturally more talented at certain things or learn it quicker but that doesn't make someone else's hard work any less worthy. Also, there are many people who's work equates yours, my own included so don't worry about that.
There are some blogs I don't follow or rarely look at because the artist is rude or big headed. No matter how good their work is I'd rather follow someone's first attempts for instance than read that sort of nonsense. That said, I try to look at someones work not who they are, even those rude individuals have quality inspiration to provide and tips to be gleaned.
Most of the blogs I follow are from people I aspire to achieve the same quality as one day. Others, like your own, I follow because the work is close to my own abilities and I can therefore pass on the information I'm getting from the heavyweights.
/ramble
So yeah, hard, honest work is well deserved of the community's support. Keep doing what you are doing and I'm sure more people will start commenting soon.
So which model are you going to paint first when you get your box through? You should plan out colours, theory and technique in advance so you are prepared before you even wet your brush. If you need any help just ask.
Look like a nice start always nice to see more Ariadna players. Casey's Law had some really good tips, I would also really recommend that you work with thinner paints better to use several thin coats the end result will be much smoother and bring out the fine details better. When using thin paint it is important to not overload your brush drag it on some paper or a cloth to remove excess paint this will prevent pooling and give you better control of the paint.
I like the colour you use it does remind me of some of the artwork in the rulebooks.
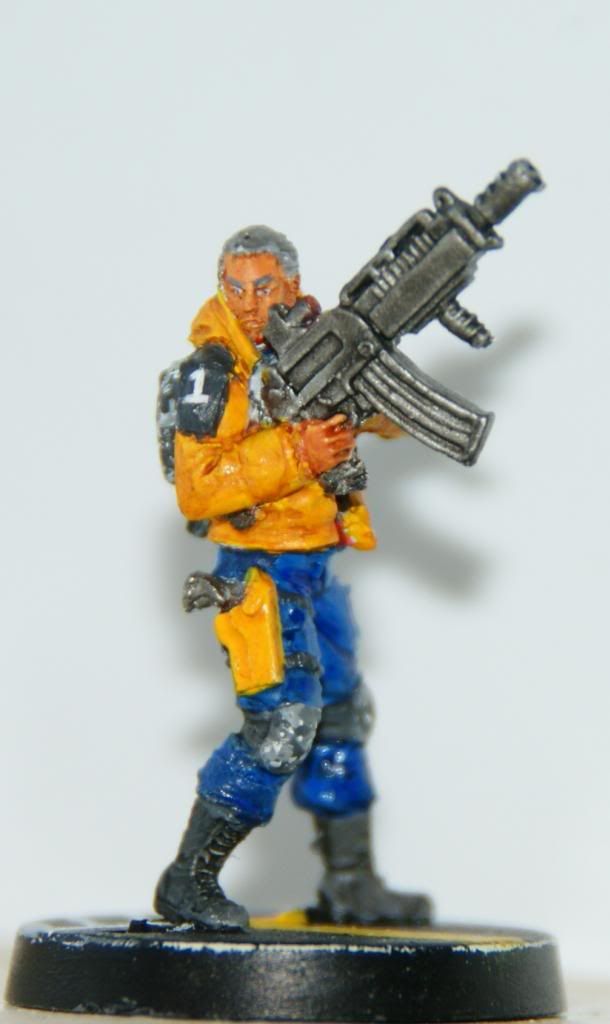
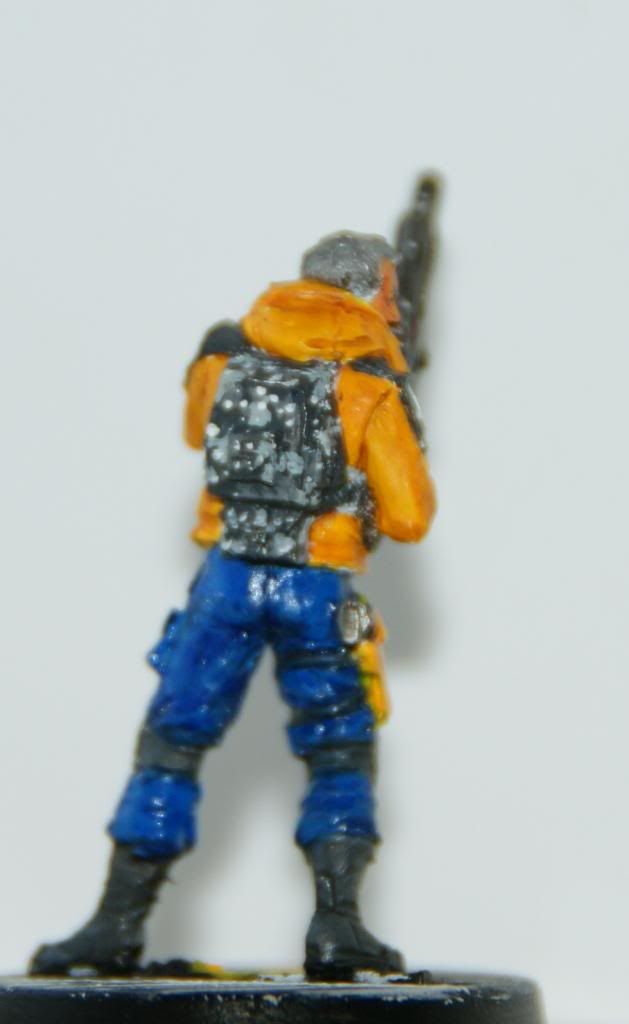
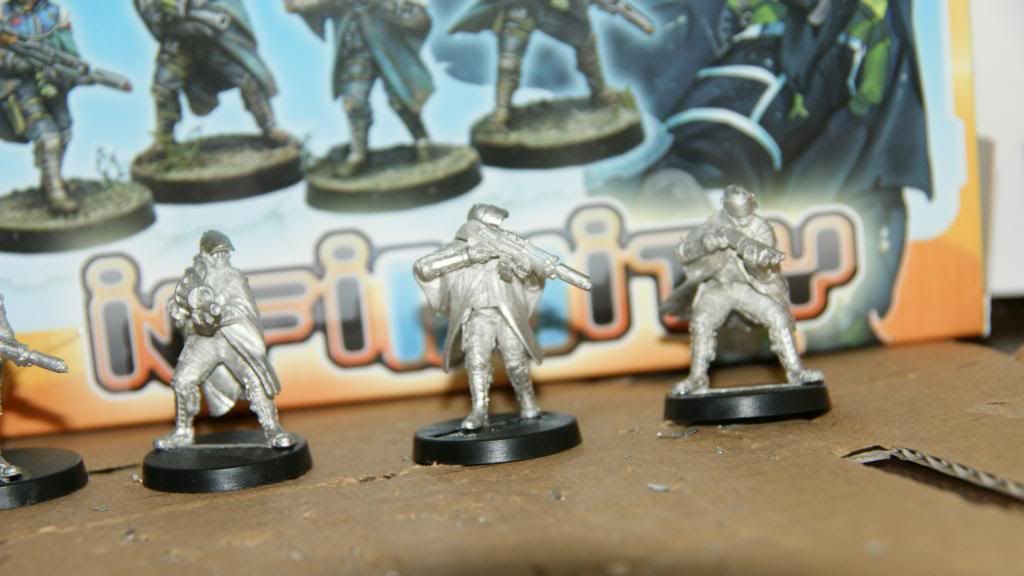
Quick update: I'm still alive. My MRRF arrived and I assembled the models. I did a couple of quick modifications pose-wise. While the models arn't all that poseable, I try to make mine different in subtle ways.
With the leftmost metro, the one with the grenade launcher, I turned his wrist outwards a bit, showing off the profile of the grenade launcher. It looks a little more stylish IMO.
Second, I messed around with the Zouave , the guy with the bazooka-looking thing in the middle. I put the arm up and rotated the bazooka off the shoulder in a more "I think I heard something over there" pose, rather than the "cool-guys don't look at explosions: they just walk away" pose on the box.
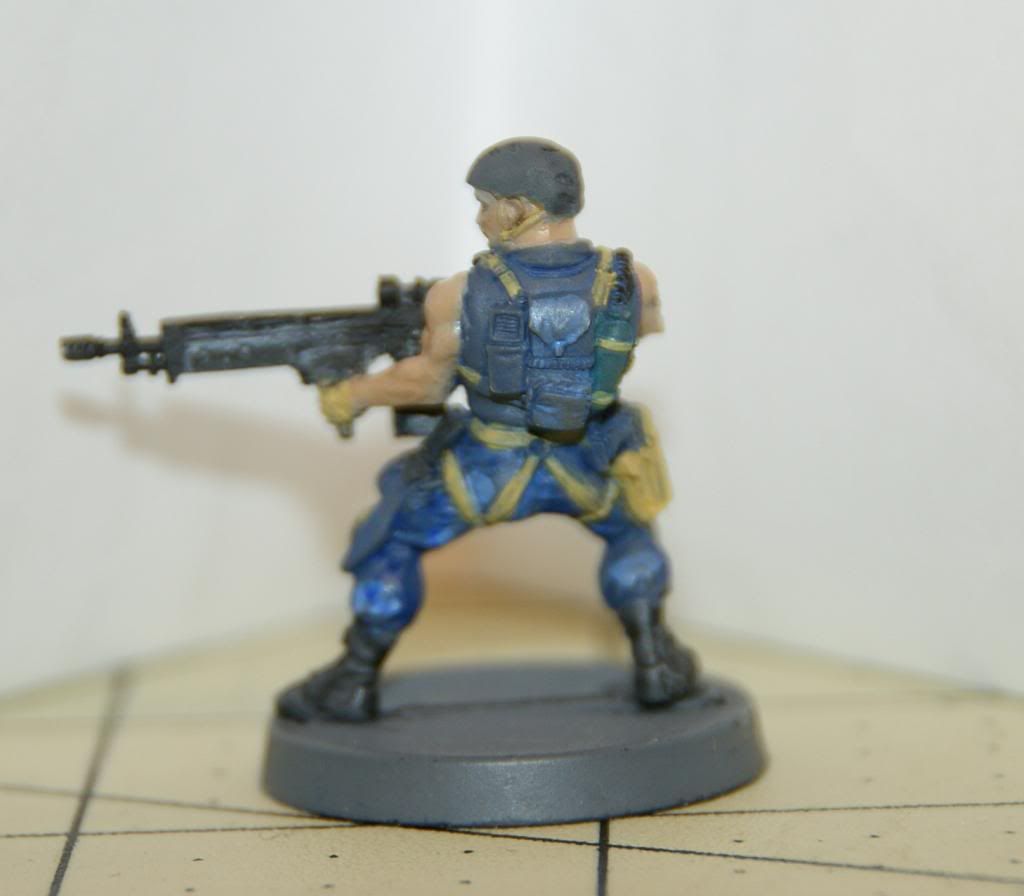
Gotta say, my favorite is the para-commando (the guy with the big, honkin' machine-gun). I'm debating cutting the barrel off at the end for a more square-looking MG to give it more of a sci-fi feel, but I'm currently undecided.
I'm actually thinking of ordering some cool bases for these guys. So far I've been looking at these but if you guys can think of anything that's more infinity-ish please let me know.
Not bad bases. I wish they were not so broken up though. You could probably mix them with other companies bases too. I have to agree about that para trooper. He's bad ass.
I used the smaller brush to touch up margot and durok. They look better IMO. I still need to work or Durok's face. I'm not quite happy with it. On a side note, my buddies have started calling my Durok "the beast" because of his blue color and his ability to rip through anything with his chain-rifles and teeth. He took out a su-jian in close combat and then rambo'd two other troops to death in one of his first games. Also, he took a D.E.P. and close range and lived. total immunity is total.
I like how the expression on Margot's face turned out, even if a bit quizzical. I've started on the grenade launcher metro:
I feel like I'll have to blend the colors on the pants a bit, but I do like the way the jacket came out. The face and the grenade launcher is still a WIP as of now, but I've watered down my paints quite a bit and I quite like the scheme. I'm noticing a big difference! I'm definitively progressing. The picture is a bit out of focus, but I'll upload more when I finish him. Any advice is appreciated!
Nice updates, dude! I think you've slowed down your process a bit from what I can see. Along with the other techniques your applying, like paint thinning, it's definitely improving your results. Keep it up!
New update. The paratrooper with an HMG in inbound!
I'm slowing down my paint. I'm quite proud of the pants. I used a less-saturated shade of blue by mixing the blue with black, and then white to loose the blue pigment, then I applied splotches of camo here or there. Granted, the camo isn't that great, but it adds some texture. The backpack is a little plain, but I'm happy with it.
Also. I like the stash. Don't steal this frenchman's baguette.
Lookin' good bro, you're coming along nicely. What experience have you got with washes? I think they should be your next step. If you can get them right you'll see massive changes to the finished model. Also, have you watched any tutorials on YouTube? These are great to copy and help you improve.
I mustache you a question, but I'll shave it for later.
Quick update:
I'm not quite sure what to do with the pants. . .
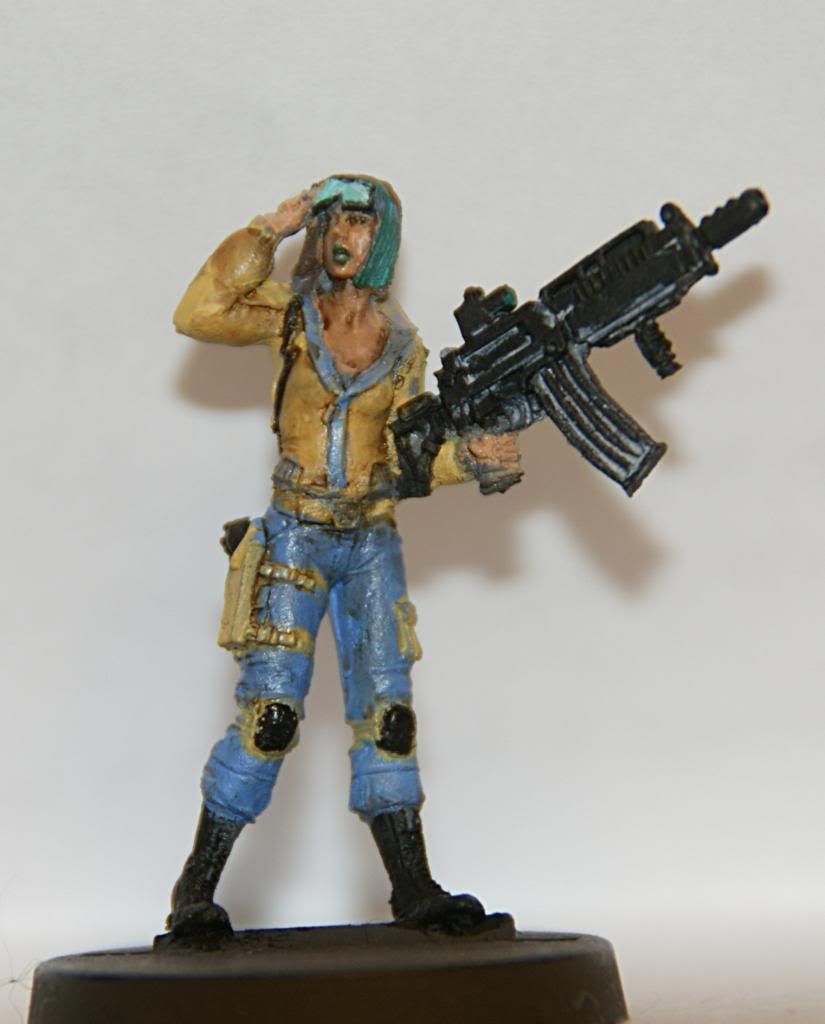
To make it look sci-fi, I painted parts of the hair green, as if it were some stylish hair die,and I particularly like the way the goggles turned out.Now I only have the zoauve, the Molblot, and one more metro to paint.
I played around with the devin mud wash i have. I'm split. While they make the details more apparent, I'm not a fan of that "dirty" look on my metros. Even though I do kinda like the look on this particular model. Pun unintended, it seems she's not afraid of getting dirty while on the job-- in other words, it gives here some attitude. I usually lay the wash on way to thick, or way to thin to where it is unnoticeable. Washes and I don't get along.
Anyways, are there any specific video tutorials you guys would recommend?
Solid start, boss. With washes, my advice would be to use a wash specific to the colour you are applying over. This isn't always necessary but you might find it helpful to wash one area of colour at a time af least. There is also nothing wrong with painting it on directly into the recesses. What you are using it for right now is better known as 'dipping'. Dipping is a great tool but isn't as easy as some people think. So try thinking of the wash as another layer of paint until you build your confidence up.
Also, washing isn't really a shortcut although it can appear like that. It's purpose is primarily to retrospectively paint in shadow. Try something like this:
Basecoat
Wash
Re-Basecoat(leave the recesses)
Highlight(leave the recesses and most basecoat)
You'll want at least 60% of the surface area to be basecoat when you are done. When you get more confident you can add more layers of shading and highlight.
As for tutorials, I can't link stuff from my phone but check out the big names like Les from awesomepaintjob and Chung from wgconsortium. You'll find more by looking at their favourites. Also try searching for things you want to learn.
Lastly, I think you will get a lot out of Privateer Press' P3 Hobby Videos Volume 1: Core Techniques. They probably sell it on their website or there might be other ways to aquire it, I wouldn't know. If you can get a hold of that and just copy it section by section until you are happy with what you are doing.
Long time, no see, but I've got my very first ITS tournament coming up tomorrow, and I've been painting like mad to have my whole force painted up (not required, but I just want to show off.)
Anyways, i had an interesting experience painting. First, I painted my Molblot model, which came out better than anything I have ever done. Heh, too bad the Molblot is less-than-optimal. Still, I'm going include her in all my lists in the tourney. Because it's not what you bring, it's how you play it:
Looks like I missed a spot below the backpack. This camera picks up EVERYTHING.
Then, for the next model.I thought something like "oh, hurr durr, I know how to paint now, so I can do the next one at lightspeed." When I painted the zouave. The zouave turned out SO horribad that I don't have the heart to show him. (he's horribad. Just trust me on this.)
In other news, one of my buddies offered to paint the last metro (who is quite a good painter here on dakka, and ,has just started a second blog. I'll give him a plug once I get my model back and can get pics and such. I don't know what it looks like yet, but I'm SO EXCITED because he is an excellent painter with a few commissions under his belt. (all part of the master plan to get him into infinity, Muhahahaha!)
BUT WAIT THERE'S MORE: Although my MRRF and Mirage-5 are now painted, I still have one more model to paint, I bought this chasseur the other day as a birthday gift to myself:
I messed with the ponytail to give it a bit more sense of motion.
So far she's primed, and I plan to paint her to Molblot-quality tonight
your paint skill is drastically improving over a short time. A simply scan through the photos of this thread shows more control and precise application of color to each new miniature you paint. Would love to see how you base these models in addition to your paint work, but casey's law offers very good advice to painting.
I also offer the 3 color theory to your work.
Base in the darkest color that is either a complement to the color or a complete negative.
Use the color you wanted, this be your yellow or the sort.
Apply your color mixed with white as a dry brush for lazy people, layer for the more aesthetically pleasing.
Wash it to mellow the drastic areas into a smooth color, use a glaze to warm it if you so desire.
So, in my grand master-plan to try and get my good friend into infinity, I insisted he try and paint a model. While I don't think I quite have him hooked (yet) he did a great job with the painting, and I promised I'd give him a plug on my blog.
If you like what you see, you can check out his Orks here and his newly-stared tron-dar here The guy takes commissions at very fair prices. So definitely give him a look and send him a PM if you need the odd model painted.
As for me, I finished le chasseur, but for the life of me I can't figure out why she has goggles on her hat AS WELL as sunglasses. It seems a bit redundant. Also, she held midfield solo in the second game I fielded her, downing 3+ enemies in ARO all the while dodging sniper fire before finally getting gunned down.
that's it for now, I'm out of infinity models. The next one I'll probably get is the Metro HMG because of link-team goodness (plus he looks cool.) Maybe a Dozer and a Tractor MUL If you guys have any suggestions as to my next model, I'm all ears! And, as always, constructive criticism and complements are always welcome.
I think comradepanda is right, you do seem to have improved since you begun the blog. I'd actually say you and your friend's painting is at a very similar level.
The advice I would offer now is to just keep plugging away at the suggestions already given by a few people, keeping chipping away at the column until you have a needle, as I was once told. Apart from that, try finding other people's work you like and copy their tutorials or take bits from them and practice the technique a lot. I like to give myself targets to achieve or someone's work I'd like to be able to replicate one day.
I did a little conversion work. I figured since I'd be using the viral rifle loups the most, I'd want them to look awesome, and the rightmost pose on the box just wasn't doing if for me. So I did a simple gun-swap, swaping the shotgun for the rifle.
I like this much better, as it looks as if the rightmost guy is pumping the shotgun, or simply checking if a round is cambered (always a good idea when handling a firearm), due to the angle of the gun and pose. I guess i'll call him the gun safety "garou"
I debated going for the briscard box set instead of the loups, but ultimitally, it was the looks of the loups that won me over. Also, the Heavy rocket launcher briscard was the one I was really interested in, and that doesn't come with the box set.
More painting to come, probably monday or tuesday.
Aight. So I got a little painting in. I've run out of painting stuff, so I've got to go out and buy some paints and primer.
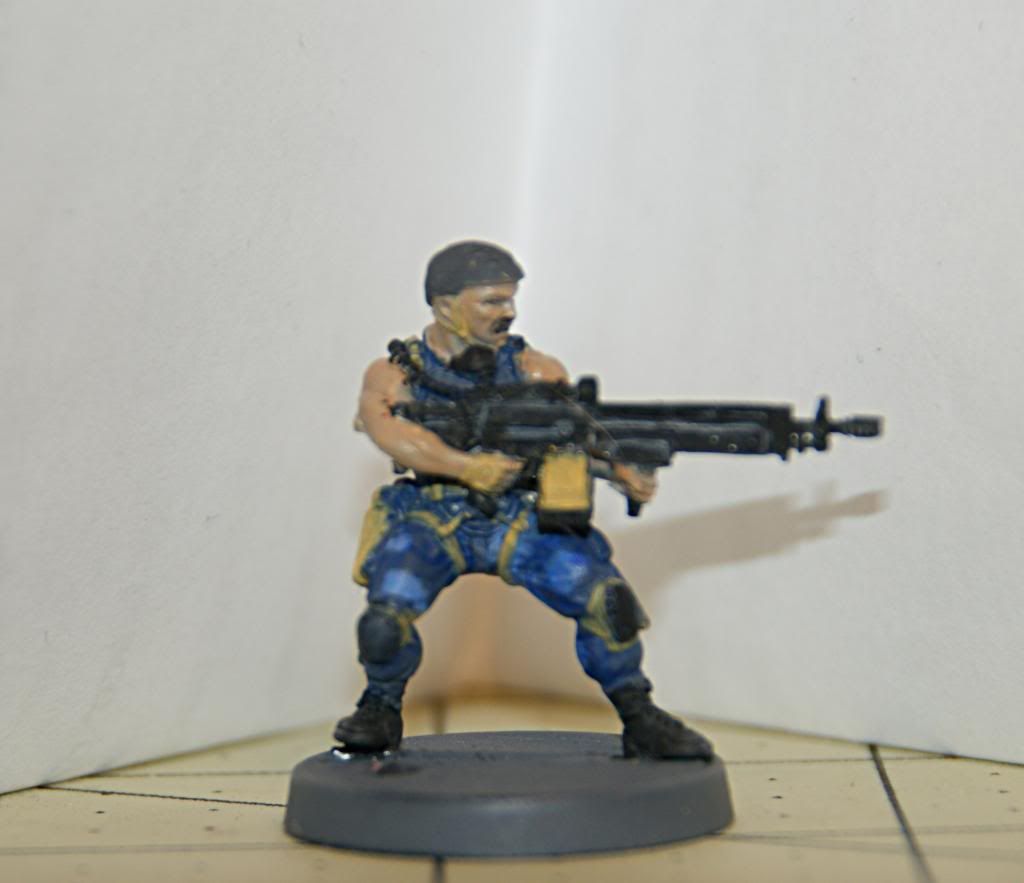
Anyways, next up is the Metro with an HMG. I love the model, as it instantly reminded me of hooded badasses in general. So I wanted to make this guy look the part.
"Viva la Ariadna, bitch"
and a super-close-up:
IMO, I succeeded. For the face, I painted the top part black, followed by a thin grey blend into the skintone on his chin. It gives the illusion that the hood is shrouding his face. At first, the gun was going to be black, but I didn't want it to blend in with his jacket, so i tried something new, using yellows and blues and then muting it with a thin grey-ish wash, as I thought it looked a little TOO bright. I'm still on the fence about the gun, but I do like how everything else turned out, except maybe the pistol holster and the hands(they could use a little more detail). In any case, Working with yellow requires too many coats to get a bright yellow
Another thing to remember is that I like to take super-close-up pictures so I can see my flaws better. One of these day's I'll take pictures from a distance, like a group shot or something so it doesn't all look horribad.
Good job chief. I seeing improvements with each new miniature you do!
At this stage I don't think you should bite off any more for the foreseeable future. Chew on what you are doing for a while. Just keep practicing the basics until you can do them with your eyes closed. It might be worth buying a box of cheaper minis to practice on actually, something with a range of textures and 'materials' to be painted. Something from the WHFB range is probably the best idea, maybe a box of 20 Empire models or something.
One thing I'm noticing that I really think should be your aim to fix on the next model is the slightly dirty, grainy look of the paint in places. At first I thought it was your paints but looking back I can see your friend had cleaner results and it's not on every part of your models. With that in mind I'd guess you might not be cleaning your brush enough between colours or your not leaving any time for paint to dry before the wash. The former is more likely as I think you are thinning the paints just about enough for them to dry quickly.
It may also be that it's because your thinning your paints and painting these bright colours over black. That'd mean your friend as actually using thicker paint or more layers. More layers is the way to go and you'll also want to use a few different types of each colour. If you are going to undercoat in black then add these colours your probably going to have to do this as a minimum for both the blue and white:
Undercoat Black: 1-2 coats
Basecoat Medium Blue/Yellow: 2+ coats
Wash Dark Blue/Red/Orange: 1-2 coats
ReBasecoat Medium Blue/Yellow: 2+ coats
Highlight Light Blue/Yellow: 4+ coats(Use the current paints for this stage)
I think that is pretty much the bare minimum you'll get away with this but others might be able to tell you otherwise. It's just a very difficult paint scheme to execute. 12 coats of milk thin paint might seem labour intensive but bright colours take a lot of work, especially over black. If you Undercoat white you can probably approach this a different way but you'll have to paint the entire miniature, every nook and cranny, or it won't work.
I think you need to decide which way works best for you and definitely buy a box of minis to practice on, you could even try out a few different ways of doing things on them. I'd be happy to go over some other processes if you decide to change your undercoat.
Overall, as I always say, you're improving, keep practicing! I hope that helped.
That helps a lot! I've found that I have better results when I prime with white, however, I only had black primer available and I'm feeling a bit of a time-crunch, a as a local ITS tournament is just around the corner. Today, I'll go out and buy the bascoat again, as well as some extra paints.
Great advice on all the layers, however, if I stick with white primer and the blue/yellow that I've been using, what would that process look like, layer-wise?
It's also very good to know that I'm getting better. I've always wondered why I'm getting a bit of that grainy look. In case, I'll slow down and wait a bit longer between layers. With some white primer, some time, and many, many, layers, I think I'll have a brilliant team of Loups!
Yep, many thin layers is the key. If you go back to white primer there are a couple of options but the principals remain.
Undercoat White
Basecoat Medium
Wash Dark
ReBasecoat Medium
Highlight Light
I think this is your best option, it's the simplest of them and highly effective. Other options include preshading and building up colour with washes, using no washes and layering from dark to light or a mixture.
You can simplify the process even more by drybrushing. You will find it massively faster but the quality will drop. It's a great place to start though, you just do the last two steps with drybrushing instead of layering.
Whatever route you take make sure you leave some of the last layer visible around the one you are currently painting.
So I think I've figured out what's going wrong while doing the base color for my two loups. Take a look at the pic below.
So, with the loup to the left, his cloak has a darker, grainy look to it. The one on the right doesn't. With the left loup, I was a bit paranoid about having the paints thin that I'd leave the brush in the water a bit too long when I thinned the paints, as such, the brush would pick up the dull-gray color of the water and apply a little bit of it to the loup. The problem isn't apparent at first, but it does seem to build up after a few coats. With the one on the right, I'd wouldn't leave my brush in the water for too long, and if I found that it was starting to glob, I'd quickly dip the brush in water and spread it around a little more.
Good to have that solved. Still eats up time to do layer upon layer of yellow xD. If I ever start another faction, I think I'll avoid yellow.
You should not be using your dirty paint water to thin your paints!
You should have placed them on a pallet and with clean water apply it to the mixture until the paint is a similar to milk consistency on the pallet. Now do layers with that, if the paint dries out while working add more water to it, ect. It should be almost like painting with water color, almost..
Do not dip the brush in paint, and then in water and then apply to model, that is a sloppy and bad way to thin your paints, and gets the color tainted.
NEVER USE YOUR DIRTY PAINT WATER TO THIN YOUR PAINTS. YOU HAVE CONFIRMED IT TAINTS IT! PURGE THE HERESY!
These guys did great in the last tournament when they were linked-teamed up. Holding their own against ALEPH and absolutely decimating the Toa. They were picked apart by an opposing nomad link team in the last game, but I still managed a win.
For the dakkanaughts not familiar with infinity In infinity, and only if you run a sectorial, some units can form link teams. These are basically highly-trained fireteams which act as a squad. Having units in a link team gives them massive bonuses, such as another dice to roll while shooting, a bonus to their ballistics skill, and the ability to react even in an ambush or if the model shoots from outside their facing. They make a great team!
Fluff-wise, these guys are the riot police or Ariadna. That might not sound badass, but just remember Ariadna is full of werewolfs, American cowboys, Scottish highlanders, and boisterous, badass Russians. Yeah. They deal with all that.
I wouldn't have gone for yellow cloaks if I knew how many layers it would have taken. The original reason I went with yellow is because other players in my store already have some loups. One painted their cloaks blue, the studio color, and the other painted their cloaks green. I wanted something different, that would stand out.
Yep, big improvement there pal! Could use some slightly better pictures but the yellow looks much more solid now.
Keep working at it, next step should be defining your layers. Don't worry about the individual blends just now but start with a dark basecoat, then a middle range colour and highlight with your current choice of yellow. Your dark base can be a lightish brown which'll also help you with coverage.
Well done, kes. That's a solid and flat looking yellow, mate. Makes sure you do the same with the other colours.
What paint range are you using? We might be able to give some better advice of what to use if we know. Also, would you consider putting a miniature aside to paint up really slowly? If you are interested I think it'd be beneficial to paint up one stage at a time under advisement, posting pictures before we describe the next stage. Once you've done that once you'll probably be able to duplicate it really easily from memory.
I'd be glad to paint up slowly, as soon as I get my next mini (probably the sniper garou). I've been working on all four of these minis at once, and already have a bit done on the last man in the squad. As soon as I get the next loup in I'll let you know and we can start from scratch on the last loup garou. I want to wait until i pick up my paycheck monday, becasue infinity has been sucking up some of my income, and I don't want to over-spend.
Your defiantly getting better with each mini kestril
May I ask what your using for your white primer as I can see bare metal in places so it might be affecting the rest of your painting. In regards to painting yellow, after the white undercoat I'd use a coat of Averland Sunset which is a base paint and then go over the raised areas of the cloaks in Yriel Yellow if you want to highlight further then a thin streak of Flash Gits yellow down the middle.
Goodness, you brits are so helpful. I may just have to cross the pond and invite myself over for a cup of tea.
As far as priming goes, it's a can of white krylon primer that I picked up at the local hobby store. I've noticed this too, it's mostly on curved surfaces, like the ends of shoes, where the paint refuses to stick.
Thanks for the paint advice! I'll be sure to pick those up next time I drive into town where the game store is.
Keep it simple, most of all. Averland, Yriel yellow layer, gryphonne sepia wash, well-watered down yriel layer, flash gitz highlight (if you feel up to it). Alternatively if you prime white just an yriel coat, sepia wash, yriel layer might do rather well. as to the small straps on the legs, you might consider using another color than yellow for your own sanity Still, if you insist, try a ceramite white coat (there are other options than GW paints but the new range does have a gem or two and availability is more or less universal), thin application of yriel, sepia wash and a real thin line of either yriel or flash gitz either down the middle or on the top of it - all depending on how straight and thin you think you can get the lines!
As to the blue, I'd say the white edge highlights are a *bit* stark; even if they'd be perfectly applied I don't think it'd "work". Try mixing your base color with the white for a rather more subtle effect then *maybe* apply a bit of white on the most highlighted/highlightable bit of the edge (but really, that one's optional).
The effect on the visor is quite nice! I'd imagine that'd work real well on a tabletop, nice work!
If I were you, I'd focus on getting blacklining in between colors as much as you can (not necessarily actually black; a selective application of a dark wash in one of the colors you're already using, or complementary to that, works real well too!); that's really the one single easiest way to get minis looking good from some distance.
as to the flesh, try a coat of ratskin flesh (works over pretty much any color in one go, maybe two thin ones), layer cadian fleshtone over that, wash reikland fleshshade, layer (more subtly this time!) cadian fleshtone again, then apply some selective highlights to knuckles, cheekbones, chins etc etc. with a mix of cadian fleshtone and white. I stress the *some* in "some white" here; your propensity for enthousiastic highlights can, with some practice, be extremely cool for armour etc if you have the patience; fleshtones however are a different story!
as to the black, start with black and highlight very thinly and sparsely with a rather dark type of grey, then apply a bit of a lighter grey tone to the corners and bits of edge where the light would hit the "sharpest". it's quite hard letting highlighted black still look like black (because of course there's no darker colour to start from and there's not really such a thing as a "light shade of black"!)
edit ah, just missed your post I see uhm, I've heard good things of krylon so that shouldn't be it; are you applying it correctly? (thin but not too thin, correct distance, time between coats, correct temperature/humidity)?
edit ah, just missed your post I see uhm, I've heard good things of krylon so that shouldn't be it; are you applying it correctly? (thin but not too thin, correct distance, time between coats, correct temperature/humidity)?
I applied the krylon when it was blazing hot outside. The base globbed up a bit to give it a gritty look.
In any case, I've ordered this guy , and he should be in by wednesday. Then I can start painting under the guidance of the internet. I'll also stop by the game store tomorrow to pick up some more yellows.
I've changed the thread title, and finished the last guy. However, my camera just ran out of batteries. Expect updates monday of the four I've painted now. Then I'll go slowly, step-by-step, on the last squad member with you guys, from start to finish.
ooh, ooh, when you stop by the game store pick up a pot of gloss varnish as well. selective application of that stuff to the visor will really make it shine (...sorry ) IRL (not so much on camera, but that hardly matters!), combined with what you're already doing.
also, a pot of black wash is always useful and especially when a white-primed mini needs blacklining added. It's really one of those things you might as well pick up because it's useful when painting pretty much anything
For some reason, the flash was really harsh this time around, but the lighting isn't the best in my room, so hopefully you'll get a better idea with the flash off.
Anyways, the last guy I'm waiting for comes in wednesday or thursday. Then I'll start painting it one step at a time with you guys.
I've also picked up Averland Sunset, flash gitz yellow, a seipia wash, a black wash, and a varnish.
I'm really looking forward to taking it one step at a time. Hopefully it'll come out to be the best mini yet!
kestril wrote: Am I still not good enough for dakka?
Haha, it's not that! If your happy with them that's all that matters mate! We are happy to guide your progress though.
I keep seeing improvements in your miniatures and I think your going to nail the next one. Panda is right about too many cooks spoiling the broth though, if everyone pitches in with a different idea about the next step you'll have a rough time trying to get something good from it. Have you heard the phrase, a camel is a horse designed by committee? That's very much how things will go so choose one plan and follow it to the letter taking advice at the end of each stage.
I'm happy to walk you through using my suggestions if you'd like, we can take it nice and slow. If you have a certain way you want to do things I'm happy to work alongside that. Also, I won't be offended if you want to use someone else's advice, the important thing is you get what you want out of it.
If you use the method I suggest then the first step is very simple. Get a nice undercoat down and post a picture so we can see if there are any issues before moving to the next step. I'll take this very slowly with you so you might want to continue painting other stuff as we go.
I think we agree'd on pretty much the majority of it and there are loads of ways of doing things. The best thing is not to get confused by overlapping ideas though.
So not a painting update, my roomate mistakenly used all of my primer for one of his projects. I'm still waiting for him to get back to me with a new can of primer.
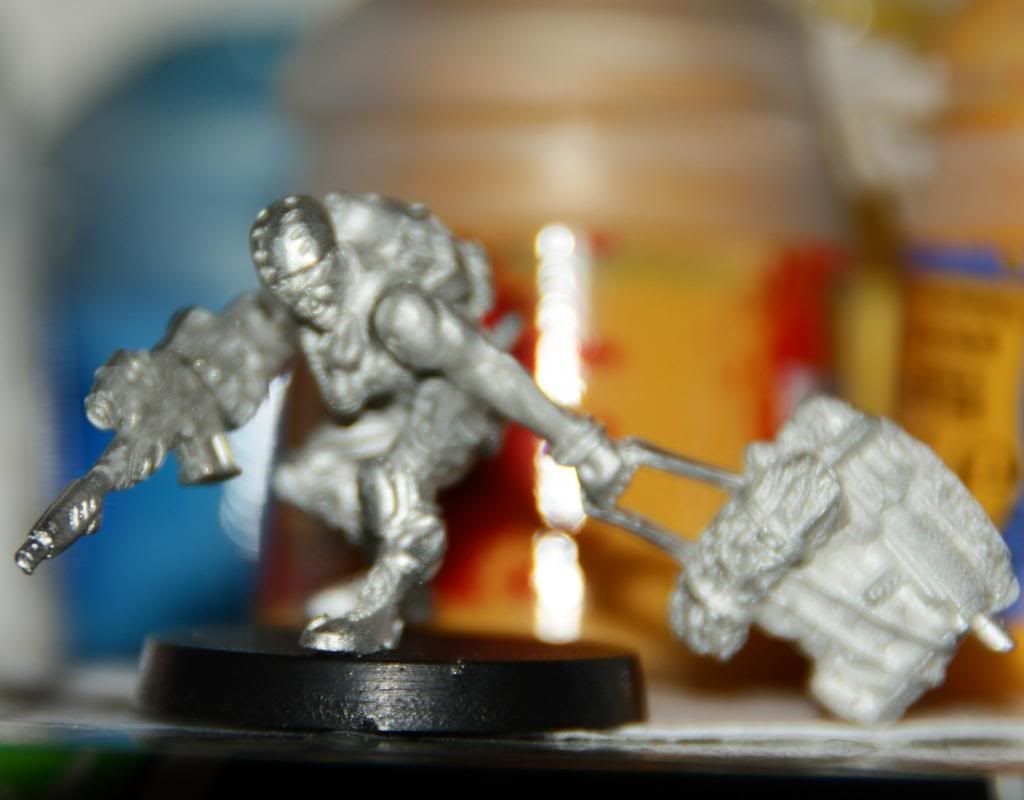
Anyways, I picked up a new model today, the paracommando with a light grenade launcher, but I'm not a fan of the LGL, so, I did some converting work with the weapons pack that I won at the last local tourney. I tried to make him look as if he's trying to keep a low profile while moving forward, rather than dragging his gear out of the mud. I chopped up a haqqislam sniper rifle and glued it to the back end of the LGL. Then, I cut the barrel and made it a bit shorter, so I can run it as a rifle, instead of a sniper if I want. Also, I can even run this guy as a heavy machine gun, I'll just say it's in the bag!
At one point my superglue globbed up on me and wouldn't come out of the bottle. In my infinite wisdom, I decided to bite the globed-up glue to allow the rest to flow out. Needless to say, it did, and splorted all over my mouth. Contrary to popular belief, I wasn't a stupid enough to close my mouth, but now I have dried superglue coating some of my teeth and lips. it's quite irksome.
I'm still debating if I want to keep the bag or not. I could just cut it off, but as of now I'm still indecisive.
That miniature is really growing on me since the competition. A very characterful little fella. Nice conversion although you might want to tidy up the joins with greenstuff.
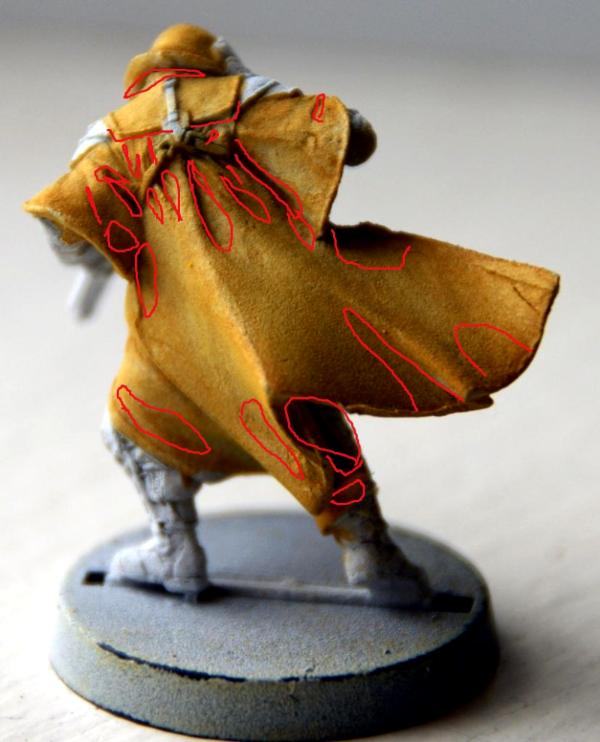
Personally I'd layer it up to the "main" yellow color first: Yriel yellow in this case, I believe. paint most of the cape, just not the creases/other recesses. I could break out MS paint and mark it out on the model but... actually I think I will. Don't be too harsh on me, my skills with graphics software aren't what they should be (using a mouse instead of something with a shiny wacom logo on it doesn't help either!) still, this should give you a good start. layer yriel over everything not marked, maybe even put some lines of whatever brighter yellow you have (or just 2 yriel to 1 white!) on the really brightest parts (I could mark it out but that would probably be overkill ) **Then** apply sepia. thin coat - make sure you don't get pooling where it shouldn't pool (e.g. anywhere but the recesses!) but don't make it too thin either: it's a wash, not a glaze after all.
Oh just one thing: my techniques will never win you any serious painting competition but they're quicker than they're dirty and tend to look pretty much decent (from any sane distance for viewing gaming minis!). Added advantage is that it's all quite easy - the trick is learning to do it *fast*. Either that or making it more complicated. But really, this stuff will do for the basics.
If OTOH someone feels like taking you through blending a cloak through 28346 distinct layers of color feel free to paint along with that - I've never had either the skill or patience but respect those who do very much - however it's nowhere near as practical for just getting decent-looking minis onto the table. Just throwing in this preface-after-the-fact (lolwut?) so you know where I'm trying to steer you - might avoid disappointment later on! Seems that loup is one from the box set? I was looking through the ariadna stuff at the FLGS today, had it been one in blister I wouldn't have had to make an example in MS paint now shame, but it's a much cooler model than that blister loup for sure.
That's very helpful I'm fine with faster techniques. I still need to get the basics down, after all. I'm not seeking do win any painting tournaments. I just want to improve my skills.
Actually this IS the loup from the blister pack. (it should say loup garou with sniper rifle). A link to the full model is here: http://www.infinitythegame.com/infinity/en/2011/miniatures/loup-garous/. The four I painted previously are the ones from the boxed set. Better double back to the FLGS and pick it up!
Funny, I had expected it to get a little bit brighter. No matter, I think this might actually work out for the best. Looks good, I'd say go ahead and do the front in a similar manner.
...Actually I have a small suggestion, which I will now proceed to visualize using my terribad MSPaint skillz: (I omitted some lines where I think your layering did a pretty decent job already: middle fold for example. Those are also the places which can be a bit of a pain to get this right; it's probably best to keep it simple for now anyway. Once you have the basics down comfortably you can always experiment a bit, after all!) Some (relatively!) stark edge highlights along those lines would not be a bad idea. Keep in mind you don't want them to get all too bright, but the wash will dull them significantly. e.g. they *have* to look "too bright to be right" before the wash is applied; I edge-highlight the red color with some orange layering with pure flash gitz yellow for the results in some of my pics in the infinity pledging thread, for example see http://www.dakkadakka.com/gallery/520031-.html . Do keep in mind those are *supposed* to be extreme and a bit contrastey, much more so than you'd ever want on a cloak. OTOH, you're already painting fething yellow, you don't go up to a really bright contrasting color from there anymore. you might just use flash gitz with some white mixed in, make it look just a wee bit too bright and apply only thin lines.
Oh, if you want me to MSpaint some more horrible red lines on that front pic, just say so
Green area will either be tactfully filled in with a drop or two of sepia wash, or just painted black. it's supposed to be hollow, after all, more or less.
Well, this was a hard one, not so much to actually highlight as it is to draw that on a photo. Basically, the idea is to leave any sculpted recesses (such as by the edge of the cape, or when one piece overlaps another) the darkest color (basic shading 101), as well as anything which looks as if it's somewhat recessed or would be in a shadow of sorts. There's multiple ways to go about this: if you decide to light a model from one angle and paint it like that, it's generally going to look extremely good from a limited number of angles (as well as being a pain in the rear to pull off believably!); therefore what we are going to do is somewhat unrealistic, in the sense that the absolute bottom of the cape between his legs will get quite a bright highlight (while still leaving most of it shaded!), by which we'll be going for what I'm told is a bit of a comic book look. Fun thing is that, however unrealistic it might be if you think about it/approach this scientifically, it tends to look more natural on this scale, IMO.
Certainly if you're going for a tabletop standard. Scale does funny things. (In the same spirit, do NOT try to replicate shading from either 15mm or 54mm models on 28mm stuff - it often doesn't quite 'work' in the flesh IME! ...and this concludes clippy's random tooltip 3463 )
Short version: everything not lowered/recessed/in shadows will be highlighted (and really, this is more of a first layer, we'll move on to some hard edge highlights before applying a wash after this).
Yup. Make sure to apply with moderation so that it doesn't pool where it shouldn't, but does where it should. Not my most helpful hint ever I know Well, stuff like the creases in the rear, near the top, should take a relatively large amount of the wash; the flat areas just a thin coat. apply just so much that a little starts to pool in the lowest parts of the mini, then keep draining that away carefully with a small brush until it stops pooling. Rather a labour-intensive method but it works, especially until you get some more feeling for how much to apply!
two things to watch out for:
1) do the whole area in one go. I know it's more to keep from unduly pooling, but it's nigh impossible to make a seam between two individual coats invisible. Keep in mind it's transparent so both gaps and overlap show, and since borders tend to gather a bit of a thicker line of pigment anyway you'd have to start carefully wiping that away/blending it with isopropyl alcohole or somesuch and that's a lesson for another day!
2) get reasonably thick, dark lines of wash in all the borders with 'other' coloured areas. That makes shadow and distinguishes different colours, giving definition to the model above and beyond just the colours, so to say.
Remember what I said about of a "comics" look? this is another of those things that smells a bit like that and really, really helps at 28mm.
...Then again by the time you hit 54mm or 72mm etc that seems to be much, much less of an issue (even looking way overdone/cartoony).
Funny thing to add is that however much a TAG for example is that other size, it certainly isn't that other scale and because of that (and to keep consistent with the rest of the army!) you simply use the same kind of blacklining etc
Well, I swung by the FLGS today and it seems the loup blister had sold :( no point ordering it, by the time it comes in I will have talked you through the entire model so no point in that.
Anyway, have fun. Oh, you might as well use whatever dark blue you have available to start with on the clothing I'd start with something really dark but then again, I work from black primer most of the time; working from white you might as well use something which looks like the kind of colour you'd want the textile to look like if it were scale 1:1. We'll then proceed to layer/highlight that and apply a wash.
As to straps/etc well, I'm not sure what colours you'd want everywhere (in hindsight I should've had you block out basic colours over the entire model! No matter now, and don't bother, we'll work it out this way!) but since you have decent covering paints for most stuff and will be finishing off with a boatload of different washes anyway I don't think it matters all too much; however, we will paint (and wash!) the blue uniform parts before bothering about the straps, especially since washes tend to leak unto such details as well. Do you have a dark blue wash colour available? Also, are you dead set on the yellow on the weapon? I know for sure that would turn me nutty, but I can talk you through it if you really must
. Do you have a dark blue wash colour available? Also, are you dead set on the yellow on the weapon? I know for sure that would turn me nutty, but I can talk you through it if you really must
I've got a sepia wash, and a black wash. I figure I'd use the sepia for the cape and the black for the blue stuff.
As for the weapon I'd rather try to make it look "realistic"--like the black metal-y look. I've just been experimenting around with each of my mini's weapons because I want to find something that looks decent.
Black will work! Even better IMO, actually - it'll just be a bit less of a "bright" looking mini. Not a bad thing, generally - the yellow hits that ticket already
There's black metal paints around for things like that, personally I'm going to experiment with a vallejo metal medium somewhere this weekend (will let you know how that goes) or you could paint a weapon black and drybrush/highlight carefully with metallic colors, or paint metallic and wash black several times... I suspect a mix of metallic medium/black with some metallic highlights, followed by a black wash to blend them in and some matte varnish will go a long way. I'll experiment a bit with that and see how close we can come to the standard assault rifle look, so to say (that is what you mean, right? )
anyway, that black wash could be good for carefully filling in some shadows, (even on the cloak!) as well as just painting in the blacklining (the one point where starting with white primer really suffers as opposed to black.
did you get gloss varnish by the way? I personally rather like using that on metallics (though again, that goes for the cartoony look rather a bit!) and of course some shiny stuff like visors/gems/lenses here and there.
By the way, have you considered using some bits of wood-look in the weapon the way the stock model was painted? it breaks up the monotony of a weapon a bit and it does look rather striking IMO. Also, we could try to paint the lens of the scope something fancy (but again, bit cartoony!) if you fancy a go at that
I'm all for cartoony! After painting 70+ brown. desert. guardsmen., I really do want something bright and colorful (I do say that it drew me to infinity as well, with its brightly-colored anime asthetics).
In fact, the cloak seems a little dark after that wash (but pretty marvelous, as well.) in any case I'm going to re-go over it with the medium yellow and the highlights (on the non-shadowy places, at least) to bump up the contrast more and provide a brighter look. I realize that the colors won't "transition" as well, but it's the dynamic look I think I've been after all this time.
I DO have gloss varnish, and my other soldier's visors look great because of it in fact, I was thinking of a glowy green scope on the rifle, but since that color doesn't appear anywhere else on the mini, I may have to settle for blue or yellow.
It's funny, when I walk into the store, I'm not the best painter, but people are blown away from the improvement between minis.
Actually such a contrasting green would be great. I thin Iknow a good and laughably simple way to pull it off, but I'm going to try that first before I make you buy useless paints...
As for the re-payering and highlighting:go for it! Maybe highlight it a bit too far then apply another wash of 1 sepia, 1 thinner medium and 2 water but the idea is fine and since yellow paint is so transparent in general it'll be easy enough to pull off
Which blue paint(s) do you have? That would be good information to have rather than me taking a shot in the dark
Automatically Appended Next Post: Actually such a contrasting green would be great. I thin Iknow a good and laughably simple way to pull it off, but I'm going to try that first before I make you buy useless paints...
As for the re-layering and highlighting:go for it! Maybe highlight it a bit too far then apply another wash of 1 sepia, 1 thinner medium and 2 water but the idea is fine and since yellow paint is so transparent in general it'll be easy enough to pull off
Which blue paint(s) do you have? That would be good information to have rather than me taking a shot in the dark
Automatically Appended Next Post: Oh and if you can use very, very thin black paint to get the weapon all the way to black that will certainly be useful as well, later on
yup, that'll work. Caledor sky basecoat on the blue bits it is mixing is fine but hardly a good way to attain consistent results. it'll be fine for a visor, though
Oh, maybe just leave the scope lens part of the weapon white, that way all we'll have to do is apply some really very thinned down green, mix that with some white for a few accents (more on that by that time ) and apply gloss varnish to the whole thing after the matte varnish spray has gone on
I like the minis nice and striking colour scheme and you have really improved from the first minis. I like what you have done with the yellow cape on the loup garou a tip if you haven't tried it is to mix purple with your yellow for shading it would be useful for the deepest shadows and to create some delineation for the rest of the miniature.
Another suggestion would be to look at you undercoat because the paint looks a bit grainy it might be that you are holding the paint can a bit to far from the mini so the paint is to dry when it hits the mini to much heat or moisture in the air can also affect the result. Another factor can be if you place the mini in a cardboard box and spray it is that there is dust in the box that will be mixed with the paint and cause graininess.
This one.
Hmmm, I'm thinking you might be best off just drybrushing the lightest blue tone ( I keep thinking sky blue as that's the VMC equivalent of what you've got that I use, but you'll know what I mean!) and drybrush (not especially lightly, but certainly with some subtlety!) the blue with that with the smallest flatbrush or something like that you have, then applying the wash. Some more careful layering (this would require a 2:1 mix of your basecoat to that light blue color I'd say!) followed by an extreme highlight of sky blue/equiv. on the blue around the shoulders could work, and will probably yield a better result. do the drybrushing first; it's easier to make the layering look like the drybrushing than the other way around You'll see what I mean.
Mixing some purple with the yellow is a good suggestion; I think perhaps that would be more suited to a non-wash approach though! (you seem to be getting the layering/highlighting down pretty well; just using a somewhat darker base color and doing everything manually is something you could probably figure out for yourself in one or two tries once this model is done!).
How to make it play nice with the sepia wash I wouldn't dare to say
I really have a hard time with all those little details. You can see that I missed some strokes and hit his gun holster with the blue.
Ahhh that area, that's not a cloth area. It's like a forearm/elbow pad. . .thing. I'd totally try the dark purple trick, but I don't have any purple, sadly.
In other news, I think I've decided on a green visor (because I need to make this mini more complicated, obviously.)
Meh, you need to paint the visor separately anyway so using a contrast color for that hardly makes it more complicated, only giving you a bit more variety.
I'd really go with something brownish on the straps and holster - blue and yellow give a striking contrast but having a few bits of dark stuff/drab boringness on the mini only brings out the color that much more.
As for both purple and green: both are colors you will use a lot of, especially if you want bright, colorful models. I'd get a dark and a light tone of each just pure (as well as doing the same with red, perhaps) - mixing is good but has it's limits
I see what you mean about the elbow pad, my bad! any idea what color those should be?
As for colour selection, have a read through this page:
http://blog.brushthralls.com/?page_id=1203 as well as some of the other tuts under their prep/colours section. Great stuff in coming up with paint schemes.
It'll confirm a lot of what you already do intuitively but there's always a few things it can teach you of which you might not have thought yourself.
(Basically, it points towards what I said before a bit: it's generally a good idea to have not only the brightest of colours, especially if you want them to stand out!)
Blue looks nice, spot on IMO.
As a final thought, you might consider taking out a really, really fine brush and using it with some of the black wash to carefully darken the lines between yellow and blue (there's some green to be seen now, and not all the areas are precisely correctly defined. not a gamebreaker, but it's dead simple to solve!)
I see what you mean about the elbow pad, my bad! any idea what color those should be?
Unfortunately, I have no idea. I was thinking a light or dark gray. Kinda so it looks like some protective plastic, like a a shin guard for football player.
As for colour selection, have a read through this page:
http://blog.brushthralls.com/?page_id=1203 as well as some of the other tuts under their prep/colours section. Great stuff in coming up with paint schemes.
It'll confirm a lot of what you already do intuitively but there's always a few things it can teach you of which you might not have thought yourself.
Will do!
Also, i don't have any browns Atm. maybe if I just leave the straps as an averland sunset color to help bring out the cape?
Blue looks nice, spot on IMO.
Thanks!
As a final thought, you might consider taking out a really, really fine brush and using it with some of the black wash to carefully darken the lines between yellow and blue (there's some green to be seen now, and not all the areas are precisely correctly defined. not a gamebreaker, but it's dead simple to solve!)
O.o I don't think I have a brush with a good enough tip with the moment. Perhaps with a lot of patience, I'll be able to manage.
actually you could just get the wash on as subtly as you can manage, then wipe off the excess. it's lovely stuff to work with (just make sure you wipe it off of the yellow right quick; the blue it'll hardly show on but the yellow is another matter!)
As for the straps, have another look at that article I linked. You'll easily be able to mix up a brown colour with just the knowledge from that (actually mixing up brown is not exactly a hard thing to do ^^ ).
mix a light brown color then apply a 2:1 sepia:black wash mixture over that - should work just fine.
Another option would be painting them white, then applying two or three sepia washes (white plus sepia makes sepia with lighter highlights, sepia is brown ) Would be a wee bit on the bright side but I think it'll still make for a nice contrast! again, just wipe off excess wash from the blue in a swift fashion right after application of the wash and it should be just fine.
Whether there's a dark brown line or a dark black line between colours isn't that much of an issue at good tabletop plus and lower standards
The worst thing you can do to "bring out" the cape is paint more yellow onto the mini. To "bring out" the cape you need contrast if anything! using some darker, or at least "NOT YELLOW" colours does that Sounds weird, but using a few dark colours on a mini predominantly painted very brightly actually makes it look brighter.
Works the other way around too: the red on my drones looked pretty bright until I painted some blueish-white surfaces right next to it. Now it's downright dark and grimy - as intended - which goes to show that the best thing to bring out something you want to show is to make it contrast with some other details.
With CB's level of detail on most minis this isn't a hard thing to do - most Infinity stuff gives me a headache trying to decide which of the eleventy billion panels of armour will be what colour. Once the decision is made however, the amount of detail (just as those straps!) actually 'helps' you with painting the model. Yes, it's a boatload of work but those things are really in all the best places to break up large surfaces nicely.
...Okay, of course only now I think to ask: you *do* have white paint, don't you?
I went ahead and did the visor, along with the straps. I was trying to make the visor have a smooth buildup, so that's about 5 layers of green there. While it could be brighter, I'm still happy with the end result. While not pictured, I painted the straps on his back that dark brown color too. It really works wonders. Now that I see it up close, I think that circle on his collar could look good green.
I've still got a little spot of blue to go over on the cloak, but I figure I'll get to that once I do the shinpads and elbowpads.
I'm still at a loss as to what color to paint them. I'm thinking a grey?
O.o all these bright colors makes the mini look a little psychedelic, but at the same time I think it looks great as well--it's definitely unique, and I can see this guy being a riot police to some wacky-colored 80's scifi flick. The problem is, now I have to go back and paint all my dudes to this standard
Things that need work next:
Overlaps and cleaning them up. - Neatness will come with time clean up takes time. This is why this sort of colour scheme is so difficult, painting yellow over blue requires many layers, as does blue over brown. Tidying up those overlaps is going to require more luck.
Photography. - Really important in the modern hobby, better images are better.
Seriously, you are doing a top job, well done. This is how far you've come in just 5 and a half months. Before:
That works pretty well, good going!
Note particularly how both brown and black wash 'spillage' mostly just looks like shadow if you don't look too hard - don't hesitate for a moment to grotesquely abuse this in the "whoopsies cleanup" department; all of us do
pads in black/grey tones would be good. Basically blacks/greys and a couple of browns while you're at it always work well enough (take care what *kind* of brown you use though - again, colour theory articles! ) and provide a "calm" and functional looking component to a miniature which is often overlooked in colour scheme selection, but can really make a model stand out that much more for very, very little effort!
As to the grey: just slap on two or three (thin!!!) layers of black wash to the white pads until it gets dark enough, then mix a grey tone light enough to highlight an edge or two with (not **too** bright again, keep it somewhat subtle!) and do so and you're basically done.
An alternative would be two thin coats of black, stark white highlights, another coat of wash. That will *probably* look a bit grimy for the overall look you seem to be going for though so if you're feeling up to it, stick with method one!
Do the boots the same colour as the straps: you want them dark, trust me on that! Also, they shouldn't be the same colour as the pads since that would be dull. This way you alternate brown/grey/brown from the hips downward, all over the much brighter tones they all help bring out without getting too monotonous (I believe one of the paint scheme selection articles on that site goes over stuff like this in some detail as well; read it, live by it! I wish I'd've had those few pages when I was just starting to really learn to paint a bit!).
Next up will be the gun. You mentioned 'realistic' gunmetal-esque black looks. This is doable, though I'd advise thoroughly against painting black and highlighting it. either paint black/drybrush/wash and call it a day (perhaps a coat of gloss varnish, I've really taken to that on my own stuff of late, it's quite nice) or start with a dark metallic (but still 'iron' look, no brownish stuff - we have washes for that!) then drybrush - or get a pot of vallejo metallic medium, mix some into your black, paint the gun that then add some white to the mixture and drybrush the lot with that, finishing off with gloss varnish again.
Up to you, really
...And I understand the 'paint stripping tutorial' will be up next?
kestril wrote: So, Casy, if you hear a weird sound through your speakers, that's probably my jaw hitting the floor.
Thanks to all you guys! I wouldn't have come this far without your support
You have made leaps and bounds by doing two things.
Taking your time.
Trying.
That is how it gets done. The rest is just technique. Well done! I am impressed to see you come along like this with layering and things. You are really using the 3 tone theory well and also splitting up your work. Finishing a section moving on. It looks great.
the visor while good still lacks one thing that is critical. A reflective sheen. You have the what i call "glow" where the plastic/material would light up differently from a light angle, but now you need the glare. a small amount of white down the middle and bottom lip towards the face, a top with a gloss varnish should be all it takes to push that.
Curses! I've been commisioning you this whole time! And I would have gotten away with it too if it weren't for that dog and those mettleing kids!!!
Jk, anyways. . .
A few other things have happened since I last posted. A) school started again so my spare time is rapidly approaching zero. B) I won a local infinity tourney and won two more models, the male molblot and the limited max scorpio, official bounty hunter. I'm painting those as we type and I'll be able to post something whenever.
Don't expect regular updates because school, but I'll post when I have the chance!
Nice, looks like a solid paintjob. Waiting for more.
One word of advice, your mini would look even better, if you took a bit more time with the picture next time. With just the cam of a mobile phone with the closeup program activated you can make nice photos. Going the extra mile of using a dark backdrop and cutting the picture to size pays of too.
So, while I think these are all pretty good, I am reluctant to call them "finished" until they have undergone inspection from Dakka's keen eye.
Below, they are all pictured individually. The left one is a re-paint of one of the light grenade launcher trooper I did ages ago.
I don't want to pick at you, but well it's really hard to tell anything from the blurry pictures, sorry.
I can only tell, that there are several different colors relatively neatly applied to the miniatures. I cannot discern light from shadow or anything.
What do you use to take the pictures? Even with just a smart phone, by switching to makro (flower icon in most cases) you should get much clearer pictures.


 ) - the penalty however is that the lens isn't that fast, meaning you need a good light level
 It's like Christmas. (Some of my family does photography, and when one of them upgraded they passed the camera to me)