I've been a Guard player and collector for about 6 years and I've played 40k on-off (mostly off) since I received a 2nd Edition starter set for my 10th birthday (soo many plastic gretchin), I came back during 5th and have been here since.
After seeing Dave Taylors great rendition of the Genswick Rifles a few years ago I thought I'd have to give it a go, I really liked the Idea of a gritty trench fighting army like the Dkok, but these were well out of my price range at the time. So i bought a few boxes of brettonians, and some heavy weapon teams, and since i already had plenty of guard spares lying around I threw up a platoon in no time.
2 years later I added the veteran squads, Heavy mortars and inspired by Tinners of warseer I scratch built my ragnarok, bringing the army up to 1.5k. You may have seen my company commander posted in the showcase section (he will appear here too).
And since a Thursday evening seems the perfect time to start a p&m blog here we go. So here is the army so far, mostly finished, I want to edit the bases a bit to bring them more in line with the ones I make now.
And with additional units from allied regiments I could field 3k easily, I've dabbled with traitor guard and marines both loyal and traitor, but I felt that I could do more with my Genswick army so I started thinking of adding some more artilery and what better than a basilisk, after playing around with a few designs I decided to stick with the soviet look for the vehicles as you'll see.
so thats the boring part done, pics time...
My ragnarok, I would like to repaint this (not that its finished ), sticking with the trench fighting theme all my vehicles will have trench rails
Pic of one of my veteran squads, escorting my very first play with plasticard made 4-5 years ago based of of a design I copied from workinprogress (i think, it was long enough ago for me to forget
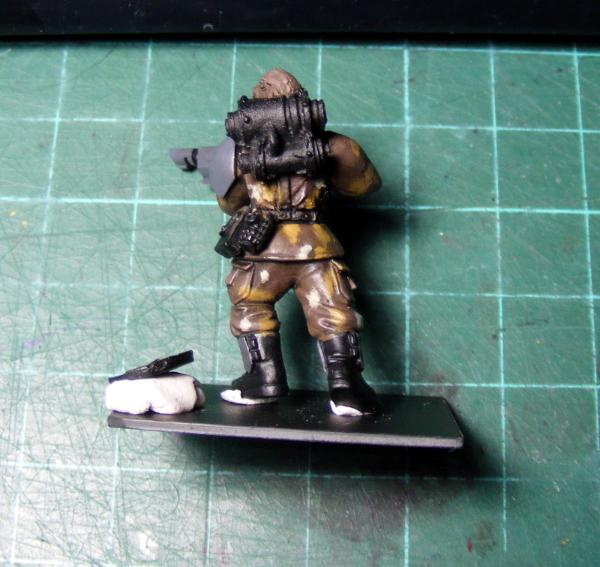
Oh and these are my storm troopers, I am very happy with how these turned out, I will try resin casting if I make some more.
My CCS with master of ordinance (on the left)
And here is what a basilisk turned into as of 2 weeks ago ...
...2 chimeras, a devil dog and a basilisk.
Ok
so the devil dog is only a turret atm and I haven't built the hull for the basilisk
I have more planned but for now, updates to follow.
I've actually got quite a few scratch built tanks lying around in various states of painted-ness
Yea oddly enough for fantasy scale the Brettonians work nicely in 40k, I only have a few pics from last weekend, I'll take some new ones when i get some fresh batteries for the camera so you can enjoy some more bad photos.
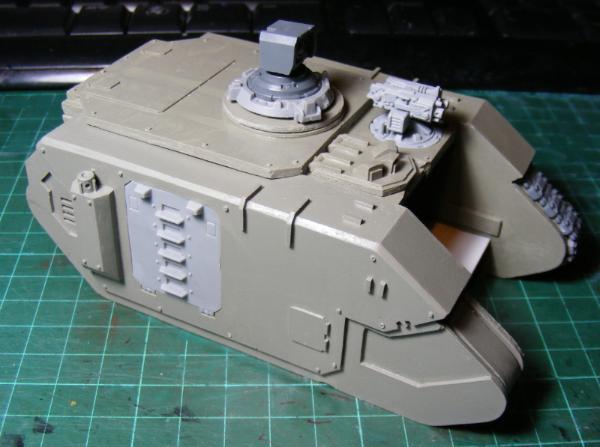
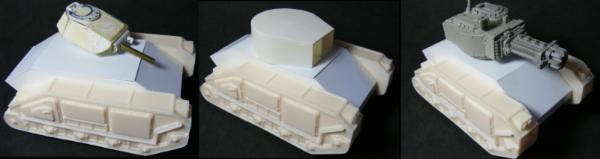
anyway, some progress, I had a go at making a kv-1 style turret to fit in with the ragnarok. but I'm not happy with the look. but I've started work on the hull details, hatches etc and glued the sides on.
so instead of the kv look, I'll be going for the t-34 look with the old russ turrets, they look a bit big on my chimeras tho, what do you think?
also I where I found the design for the sentinel tankette on Boot Camp Link credit given where credit due, my thanks Union J.
Like I say I'll try and get some fresh images this weekend and I'll put some closer pics of the rest of the army up on my gallery
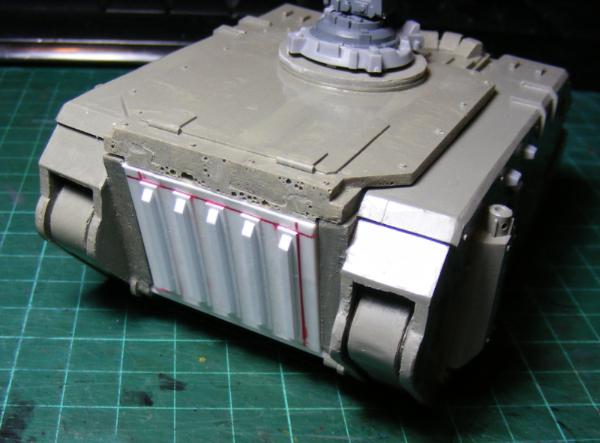
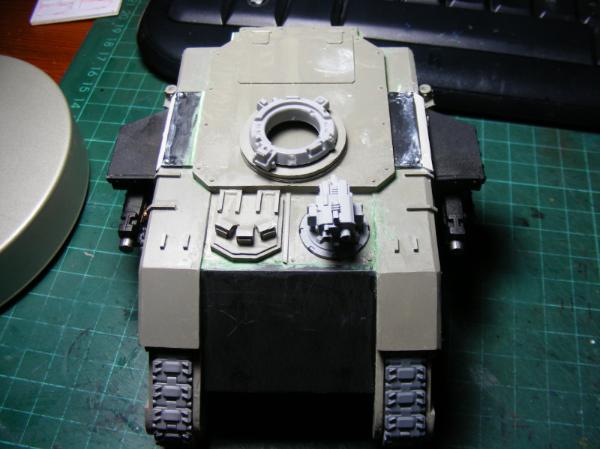
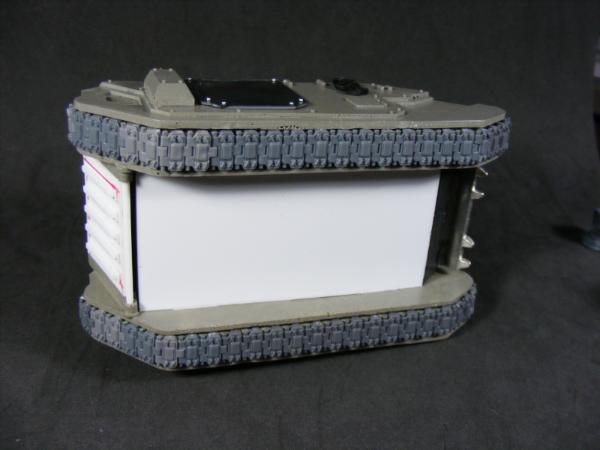
So some progress I've been working on the side details
and a view of the back
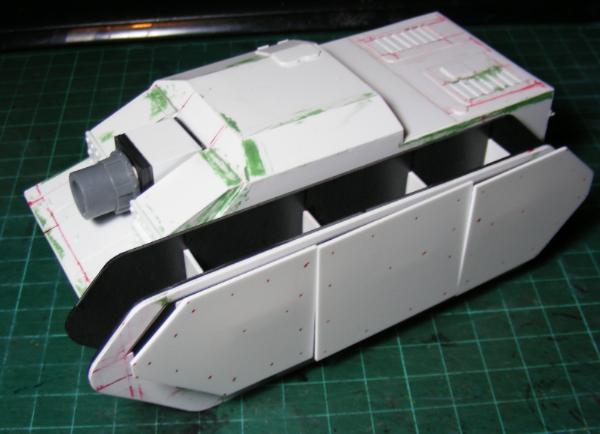
...and if anyone is wondering here is some size comparison with a normal chimera
I probably could have finished by now but I've run out of some materials and I got a bit distracted by this
I'll be finishing up off the yellow tonight...
I picked up a copy of the Forgeworld model masterclass volume 1 from ebay the other day, I'm hoping to pick up a few techniques to use when I repaint the Ragnarok.
I'm subbed. I think the leman russ turrets actually look way better than chimera turrets (way too small), nicely made well-proportioned vehicles. Good job!
Thanks for all your kind words, I dont have much to report,
blessings of the mechanicus (batman)!, materials to continue. I've also ordered some airbrush paints for when I've finished my current wave of scratch building.
the masterclass has so many shiny things, very nice but apart from the quality of the work, pictures and explanations, most of the information in it can be found in forums and youtube vids, but still it's nice to have the information in one place. I definatly think my vehicles will be getting some FW style love.
As I mentioned I haven't got much further with my tanks, I'm working on the details which I'll try and get some pictures up tomorrow. In the mean time have a PIP tech priest with servo skulls to assist with my building.
I also threw some scatter terrain together one evening, nothing special, just an ammo dump and 2 streetlights
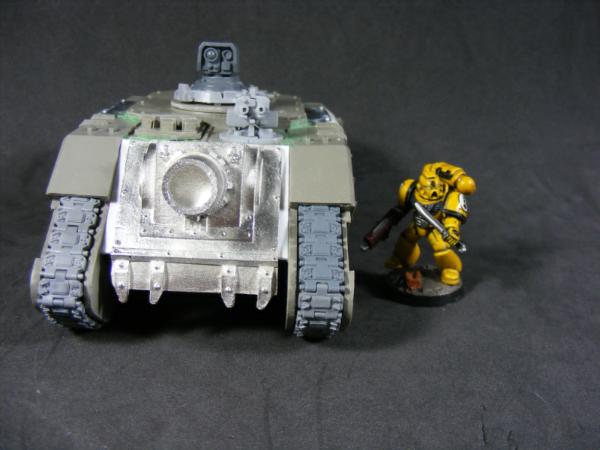
and finally here is a size comparison between my Ragnarok and a normal Leman Russ, she's a big 'un.
My chimeras are coming along nicely, still lots more details I'd like to get added before I add stowage and rivets. One thing I completely forgot about was exhausts on them, I'll have to work something out, initially they were meant to have an engine in the front for added survivability, but now it looks like they'll have to be powered by magic as usual lol.
Since Forgeworld have stopped selling the dkok tank filter upgrade kit with the exception as part of the mars alpha series. I had a go at making some trench rails to go on the back but I'm not too happy with them. :(
the chimeras as they are on my desk
I have also gotten started on the basilisk, the picture below was taken this morning, I've since finished the lower hull, I'll post a picture up when I've started on the top half. It's a little over a centimeter longer than the chimera, I exptect it to be done by next week
In other news I find myself serverly tempted to convert a trio of mini blightdrones that count as nurgle spawn from the new daemon plague drones. hmmm
Oh don't you worry, there isn't much chance of me quiting this, so you'll all have to put up with my terrible English and worse photos for a while longer lol
Here is the basilisk chassis and the hull for the devildog,just need a bit of filler on some of the awkward compound joints.
I'll be working on the gun and mantel for the basilisk tonight, I'm planning to make a canvas cover over the top and back made from rolled green stuff if only because I'm too lazy to make an interior with loaders.
I've been giving some thought to the army list, the old 1500 pts list (see spoiler) was build on an infantry wave + gunline idea from the previous edition, with the change I can no longer use my Ragnarok as a central gun bunker, with mortars kept back lobbing shells over the advancing infantry. I know this list would get howls of disapproval from most guard players but, I've managed to pull off wins fairly easily with a list similar to this.
Ragnarock (Leman Russ): 3* Heavy Bolters, Heavy Stubber 180
And since this list is changing, I am scrapping the mortars and sentinels, the heavy mortars are sidelined until I get the new IA1, the CCS will be altered and the infantry platoon rearranged like this:
I'd actually say both of those lists are fine - you had enough anti-tank in the first one (just) and some nice anti-infantry firepower spread about the place. Mortars are actually pretty 'in' this edition from what I've been hearing, just because of their snipeability. Doesn't make them amazing but slightly more effective than in previous editions, when they weren't exactly bad.
I'm looking forward a lot to seeing your devil dog And I'd love to see a batrep with photos sometime if you have the inclination...
My main problem with the mortars was you really need them in numbers to actually be effective, probably more cost effective to pay the additional points and upgrade them to 3 heavy bolters, that and they were still on 25mm bases from 4th edition If i have the points I might try them again, when I get around to writing a proper list for this army.
Unfortunately I didn't play much 5th edition, and I haven't tried 6th yet. I'm generally just going to make a "fun" list, rather than a competitive one, based on the theme of this army which is a siege regiment being moved off from a warzone with a few attached fragments of other regiments, forced to divert to the defense of a planet to assist the PDF forces In holding a rebellion at bay. So the regiment is based on taking out hard points and buildings, flushing infantry out, perfect for city fighting. I might sort the fluff into a better narrative later, atm I just have a few rules to stick to like:
1. no plasma or rocket launchers
2. the more anti-cover and template weapons the better, If you cant burn them out, blow them up!
3. mostly footsloggers with some quick objective grabbers
by the end of the project I'm aiming for a full FOC, an allied Tank company (to make use of the dozen or so russ tanks that I'll either use or sell), an emplacement and super heavy detachment
Anyway thats enough of that.
The basilisk is coming along nicely, I think I should have extended the hull further back by another 10mm for more realism, but this is 40k so who cares
and the Devildog is coming along, I'll be working on this tonight with luck/ I may have finally found a use for all the wheels that I've not built into my tanks.
Those are some great tanks you got there. Im also really impressed with how well you pulled off the original Ginswick design, trimming the arms and fitting them onto the Brettonians. I also think its cool how you are building a fluffy army, moving to warzones and city fighting. Plus arming them to match. Really cool project here.
I've ordered the parts to make the additional infantry I'll be needing, I'll have a go at throwing up a tutorial for them when I've cobbled together all the bits.
Progress:
Some trench rails, these are a pain to make, I might have a go at casting them when I've finished them.
devil dog is coming along, I'm still figuring out what I'm going to do on the sides, I want to have a more armored look as well as showing the wheels, I'll be using the default GW tracks I should have enough stashed around. atm I'm working on the filters and exhausts for the back end.
and a group shot so far, I really need to make the gun on that basi
I'm getting there slowly tho
I think I've sorted out the armored battle group part as well.
These are slightly painted in my previous army's colours that I didn't get around to finishing, I'll upload some pictures at some point. All in all I've got 14 russes atm, eg too many, i'll be selling about half I should think, the ones above i've earmarked for a repaint, even though I do not have the new IA volume 1 the allied list that Im thinking of is roughly as follows;
hq:
command: vanquisher, lascannon
elite:
commissar: exterminator lascannon, 2* heavy bolters
troops:
seige squadron 1: 2* demolisher
siege squadron 2: executioner (... yea I know I said no plasma, but how can I resist this lol)
also I made a Stug a while ago ... now where can I fit this in
Ah, I see - I think . But still, I'm going with the BB-Medusa reccomendation. I never quite got the hang of mentally classifying Assault Guns - Artillery? TD? Cheap tank? And I don't know how much their extra frontal armour compares to a contemporary medium or heavy tank, so I think 12/10/10 seems to fit the bill. Plus AFAIK the chimera chassis is a little longer than the Russ, making it fit the footprint better, and I think under the current FW rules a TD has no blast, so you're going to be more accurate with the BB, and I also don't know if a TD has Armourbane.
I know competetiveness is not your highest priority, but still, Medusa-BB is a good buy for the 'assault gun' archetype.
In the previous Imperial guard edition you could run basilisks without indirect fire not amazingly useful or survivable but they were 100pts each, so I loved fielding 3 in 1000pt games and to me they were assault guns like the current edition Medusa is an assault gun to me.
Assault guns in early 20th C. warfare held a niche role of infantry support for assaulting dug in enemy positions due to the in-accuracy of existing artillery being able to being a big self-propelled gun safely to range where it could minimize the chances of friendly fire was a practical solution, it was only latter that they evolved into tank destroyers, anyway enough history.
The vehicles are coming to their finish, I'm just putting off doing the riveting before I get around to stowage and things like that, probably another 2 weeks at this pace assuming of course it doesn't continue to snow into April. The hull of the chimeras have been modified to compensate for the width of the turrets. looks a little less silly now lol.
the Basi has a gun now ... well ... its tacked on but whatever, still wants a bit of detail adding and a gun sight adding before I make the tarpaulin to cover the back end. when the gun has had more detail added to it, It'll probably be in that position, if only because I didn't have the foresight to magnetize it.
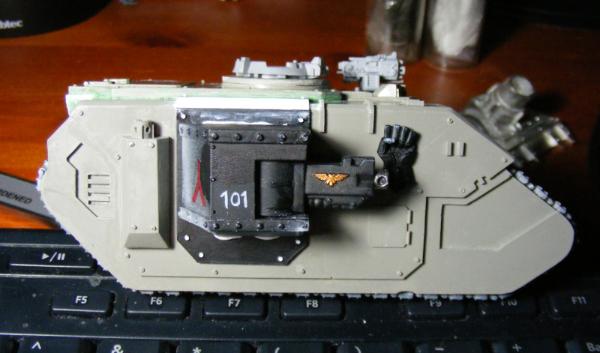
And finally here is the Devildog, the hull heavy flamer is magnetized so I can swap it with a multi-melta
So far its the only tank that I have made the trench rails for. I wanted a more armored look to the sides reflecting the higher side Armour compared to the chimeras, but I might have been too conservative with the road wheels, I think I could have made them stick out below a bit more, It does look quite different to the other tanks.
These are made from evergreen 3.2 mm angle cut into 12mm segments with 1 mm shaved off one side, to make them 3.2 x 2.2 mm L shape angle , with 2 mm rod between them. These are then glued down to a 0.25 x12 mm strip of plasticard underneath.
I did think about making something better in cad then getting them 3d printed & casting them, but unless I was making them to sell its not worth it for just a few trivial things like this
thank you good sir!... very clean and efficient way to make these tracks...
well massproducting these...would only work if you would make much more ... also casting... not something we all are able to do...i envy those that can tho^^
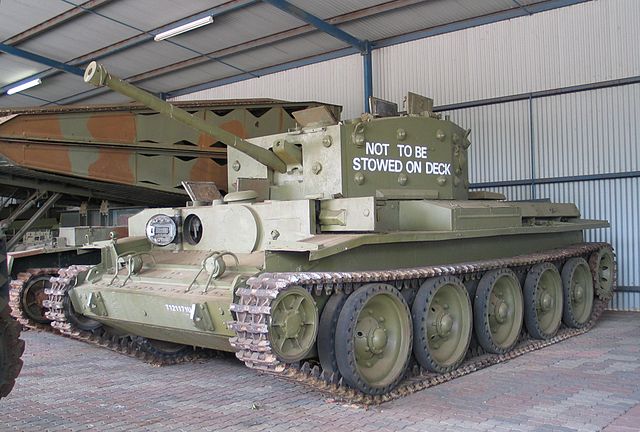
So Genswick goons uses Raggies and a tankette.
And it does appears that a tankette Genswick uses are loosely based on Vickers ones. correct?
And do these Raggies share thesame attributes as any conventional Leman Russ you also have?
Lone Cat wrote:So Genswick goons uses Raggies and a tankette.
And it does appears that a tankette Genswick uses are loosely based on Vickers ones. correct?
And do these Raggies share thesame attributes as any conventional Leman Russ you also have?
not seeing the Vickers but I believe the designs I copied are based on a T60, and as for the rag atm I'm thinking of using it as a Leman Russ eradicator I like the idea of firing all guns all of the time (range permitting)
Lone Cat: your not the only one, I'm fed up of them being on my desk already . I probably would have finished them by now if I wasn't inventorying most of my 40k stuff together to sell, I've got a few fully painted guard armys and other projects that have been in boxes unfinished and unloved for far too long.
I've been testing my tank painting, thought I'd try the oil weathering technique but with water colours (tube ones).
All in all its not too bad, just so long as you remember to add washing up liquid to break the surface tension, its very easy to clean off mistakes as it cleans off nicely and if the palette dries ... just add a bit of water. These points aside I think an oil based wash would look a lot better, I'll pick up a tube of paint in the week.
hmm ... just looks grubby doesn't it
I also thought I'd have a drive at finishing my little harkanor's reavers warband off (i'll probably sell them)
Thanks, nah the paint is not oil based it's "lamp black" Winsor and Newton "cotman" water colour.
I add small amounts of washing up liquid, like 1 drop per 100ml, when I water down washes it helps prevent the "bath ring" effect where the pigment gets deposited unevenly
oh and that tank is just 1 of 3 that I'm painting up to sell one of my 6 (2 of them traitor) guard armies, this blog will probably be taken over with me getting stuff ready to sell for a while, I'll have some images up in an hour or 2
Fast Attack
- Sentinal: Autocannon, HK missile
- Banewolf/hellhound: Hull Multi-melta
Spoiler:
droopy gun syndrome
Heavy Support
- Leman Russ: heavy bolter
- vanquisher: lascannon, heavy stubber
Spoiler:
- Demolisher: HB (you've already seen)
laser destroyer
Spoiler:
valkyrie/vendetta
Spoiler:
also I have another chimera and 2 unpainted sentinels that would bring it up to 2000 points ish of mechanized fun, there is something like £700 of plastic/resin/metal there, probably more.
Back to more normal things:
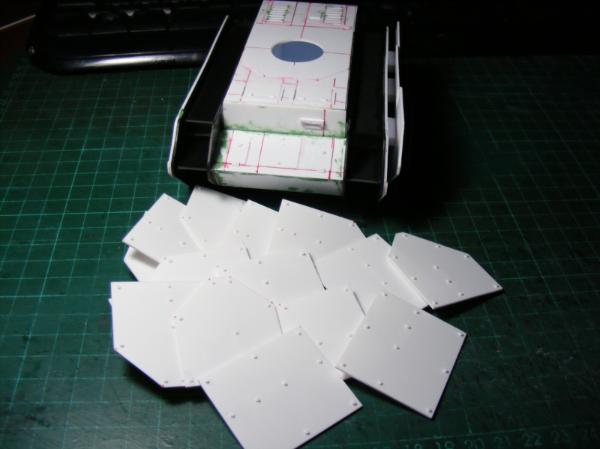
baby got back
and I won these from some one on ebay selling cut 3mm mdf for terrain bases, really cheap too
Been a while so I thoguht I'd better give an update
Sorry vik I don't have any WIP pics I'd have to make some more for that, tho your the second person to ask so i might just do that.
Started on the terrain competition, after messing about with card I thought I'd make a plasma generator with the shrine being the controlling machine spirit interface ... thing, very well thought out ofc. all I know is i've got 5 parts to it; the generator, control unit, transformer, the shrine'y bit and the base.
Since the image was taken I've finished off riveting the sides, the back is still blank but there will be pipes, hatches, other grubbins etc.
wow.... sweet riveting!
that shrine looks very cool already... i am eager looking forward to what you put inside!...also... i think i need to copy that idea and look soon too... lovley idea altogether!
and well... if you start now with lotsa WIP´s then all is well that ends well
haha, you mean I'd just have shelves of unfinished projects ... yep, maybe I'll even finish some of them here,
I'd really like to not start anything new right now.
That's looking excellent so far, It sounds like this is going to be a great detailed terrain piece, I look forward to seeing all the parts come together
And I do the same thing, start another project before the current ones finished, actually i dont think i know a single artist that doesnt do that on a regualr bases.
I think it's just a sign of great creativity .
I'm trying right now to keep myself focused on one project, and not get sidetracked by the other seven I have on my mind... we'll see how long that lasts .
Thanks guys,
hopefully I wont get bored of the various bits I'm working on, even if I only get the generator and control shrine finished this should be ok.
Its a good feeling to see something finished occasionally ... if only to then see a mistake to fix or an addition to make.
hk: I know what you mean mate, I've got a list of vehicles in my head I'd love to build as well as armies to expand.
back view
I've got a bit more to add, I've got something planned for the interior but I'm holding back on it until I can get it to work
Thanks Haz glad you like it. Haha, yea I've been looking at your blog, just haven't had chance to comment yet, keep up the painting and green stuff work you've got real potential
I added headlights to the tanks, still got a lot to do on them. but the shrine is taking most of my hobby time atm.
Gave the stug a base coat of russian green with my spraygun on the weekend, I forgot to do a rust undercoat and liquid mask that I had planned ... oh well maybe next time.
and just a size comparison
I'm waiting for some bits to come so I can do some more work on it
DiDDe wrote: Really nice work on the tanks! I really need to get me some pc to build stuff myself.. what are you using? and where do you get it from?
Thanks, I get most of my plasticard from a UK modeling tool mail order company called squires, I've started using greenscene sheets as the edges and corners are more accurate and its a bit smaller.
As for the size I use 1mm (.040") for thicker bits and 0.5mm (.020") for most things with 0.25mm (.010") occasionally for the really thin bits. Hope that helps
Ok I've got the basic shape of the shrine base built and I've also made the basic shrine part, I'll not be showing this until its done . Until I get a masq mini tube tool that I ordered 2 week s ago I cant do much for the insides, but anyway on the pics.
Still got the steps and top surface, that power generator is going over the hole and the control shrine is between the generator and the steps, with wires, hatches and other grabbings on the top.
I also have developed a fetish for buttresses especially the flying kind, I'll have to fit some in.
thanks for reading,
noodles
Edit: I meant evergreen styrene sheets not greenscene
Had a bit of a break and made a start on some heavy weapon teams, mortars are nearly finished just need to make crews for the autocannons and finish off the bases, should bring my total up to 15 heavy weapon teams
and I've ran out of glue so no more building for a few days, that said I'm just adding the finishing touches to a tutorial for building the le mediko style heavy weapon teams, part one will be up soon.
That shrine base is outstanding. Great attention to the details and consistency over the whole base. Will be following with interest to see where this goes.
Small update time, I finally had a go at mold making using silicone rubber, it takes a while to set but it's pretty good stuff when its done, I'm not going to do resin casting just yet, I've made some things I'll like to cast copies of in resin and I'm making another set of tank sides (like my chimeras) for copying in that way. So I'm using the rubber mold to make copies of bits in green stuff (or grey stuff).
Also I've had a go at sculpting different types of armour and heads mostly still wip or just for practice and to try out ideas. I'd really like to make some decent greatcoat legs, as I'd like some more poses like running and crouching but most of the 3rd party ones available suck the maxmini ones are the best so far but the poses are too limited, I have had a try at doing my own but I can't seem to get the size and proportions right.
On the painting front I've finished painting the mortar battery the black base edges too, I just need to build the crew of the autocannons, I should probably add some munition crates or something like that too the bases.
And I finally finished the sentinels, I've always had a soft spot for these models, the legs are fiddly but just part of the fun really.
The shrine is coming along nicely, I'm getting a bit edgy over it as It's time to get painting soon, I'll try and get some pics up of the base as I've nearly finished the detailing.
you did that masked head? wow... great looking sculpt!
and yeah... I can see that you defiantly have a great need for that soup plate helmet ...it is an iconic feature for your army... also that cuirass is something that really suits your army!
Thanks dsteingass, after the terrain comp is done I'll be back to the tanks, got a few more designs to try out.
shrine so far:
The colour scheme is a bit undecided atm and the base needs most of the work. I messed up some of the colonnades so they are mostly hidden under filler, but with luck I'll get it all done this week.
OO nice shrine. Time to worship. Your work is inspiring! I hope you get something near unlimited hobby time to continue to use your skills to my amazement.
@ vik: roof is done its a bit like lead lining with a cog pattern on top didn't fancy doing shingles, theres a pic further down showing the shape of it.
@ cormadepanda: I wish I had the focus and single mindedness to actually finish most of these things along with my other plans and projects.
@ hk: thanks mate.
roof still wip on the images
Could do with some advice / ideas on what colours I should use...
the main colour for the flat surfaces is red
corroded lead roofing,
cog patterns alternating black & faded white
the collonading on the base I have no idea.
ideas??
Well, glad I let my curiosity get the best of me! I do believe I have found a borrowable solution in the future for scratch built treads, But then again, that would only be if I want to disappoint Zinge that is. LOL! Nice scratch builds!
well noodles i think you are one of the few that really are building a true shrine of awesomeness... that whole scene is looking so damn fine it really starts to hurt the eyes
as for color suggestions...
don´t overdue the red i say.... but i can´t really picture the paintjob atm... by the way... is that a small tablet PC in the middle of the control shrine?... lol... see how our own tech knowledge makes us rethink about our views of science fiction tech? fifty years ago it would look like an enterprise control panel with all them fancy bulbs and stuff^^...
thanks vik,
I'm trying too avoid too much red and gray, although right now its painted red and grey ...
It is amazing how science and technology in factual now, and to come, is much more weird and wonderful than most science fiction authors can come up with, with the exception Clarke and Asimov.
the screens are meant to be screens for the lesser mechanicum novices who haven't been gifted with the neural interfaces, which makes me think I should probably add something more.
Beautiful work mate, as for painting the only thing i can think of is about using weathering and ageing techniques on it when the main paint job is finished, as these can really help emphasize the age and back story to the piece, and add another level of realism to it, but you've probably all ready thought of that.
Finally decided on a colour scheme; cream, red and brass with the black and white cog work too I'll be going for the same look as my lamp posts so a bit like this:
So the shrine is shades of brown atm, Its looking good
Whist I was deciding I got some more painting done on my Genswick and finally figured out how to sculpt greatcoats which I've done on a few Cadian legs for casting.
and I've just noticed some things I need to touch up on them ...
@ hk1x1: Thanks a lot mate Its the reason its going to be cream-ish.
cheaper paint production means they can drive their costs up more (GW logic)
@ Pedro: thanks, hopefully there will be more to come.
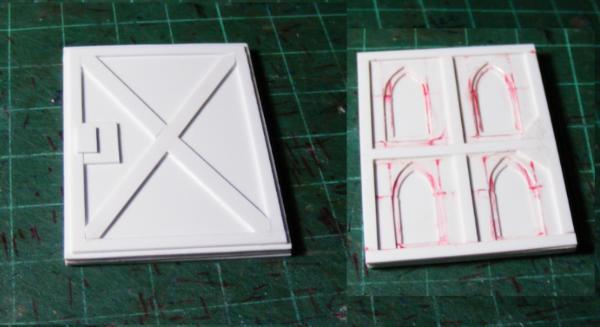
The tiles are textured plasticard, I used to put a pattern into green stuff or carve lines into plain plasticard ....
I cannot tell you how glad I am those times are far behind me.
Almost finished painting a quad launcher, I love the light arty models they are easy and so much fun, also I've made another 3 arty crew, bringing my total up to 9, I think each gun needs 5 so I might just convert some krieg crew to add different poses etc.
PIP resin crack
And ...
... yes this is new, I've learned a lot since my previous vehicles and am now planning to make this pair or tank sides to cast. So I'm making these as best as possible without hiring a laser cutter or going into 3d printing.
If all goes well and if anyone is interested I would quite like to sell some that I make to help cover the costs of materials etc, equipment like a vacuum pump, vibration table etc I can MacGyver together. Ofc there will be no GW ip things coming within half a mile of this build!
I've not tried anything of this size and I would really appreciate any tips anyone can offer and I would especially like to know peoples thoughts on what the tracks should be like? my previous ones were fine for something that is hardly visible
I already know all the basics, mold release in the details, 2 part mold making and to fill in any gaps like its going out of fashion
thud gun looks really good...your trenchers too...very characterful...
and I will be watching the new built with interest...(my wife and kids have helped me in the recent days to prepare some new future project of mine as they built me some new very long tracks^^...when I will build a matching tank for these...I don´t know yet...^^)
Thanks, the heavy weapons bases are such a large canvas its a shame to waste them.
Update on the shrine entry, its definatly PIP, more or less every spare hour I have is going to be on getting this to a worthy standard.
And I'm getting close to finishing the master for the new tank chassis, just a bit more riveting and sticking the details on to do before its ready to go. Then I have 60 or so track segments to make ... thank the flying spaghetti monster there is TV and radio to have in the background.
I was checking out the LoER page and saw we had a new Riveter amongst us so I figured out I'd stop by to say 'hello' and check out your work.
Hello!
You have excellent scratch build skill. The shrine you are working on and the tanks you showed earlier in your thread are impressive, and your casting / painting is solid as well. Over all though it is your vision and inspiration that draws me to your work. Subbed and looking forward to seeing more work from you.
@ shasolenzabi: after spending an hour flicking through your thread I've noticed, some pretty cool stuff there.
I'd like to go back and remake my Ragnarök design some time as well as my other pieces and bits floating around in my head.
Managed to get more paint on this pain on the weekend.
It's coming along, the main colours are mostly done, just details, weathering and verdigris on the roofs, fingers crossed I might actually be finished with something that I feel content with.
@ shas: yea it does go on, but in a good way . Thats the plan.
@ vik : thanks its nearly done now (he says for the 8th time).
Finished making my first 2-part mold of the left chassis, the silicone for the right side is curing atm and I'm working my way through a set of tank tracks for them to cast a sprue of next.
Left chassis ready to go...
...and an pic of the finished mold.
I'm still fighting with the vacuum chamber and I need to get that working to an acceptable level before I try the mold, I may have to remake it there is a bubble in an awkward place (inside one of the inserts for the track guards), I'll have to try using the vacuum chamber for making the molds. Ah well you live you learn
Next I'll have to see about getting a tank hull to go with this, I'm thinking of going for an arty chassis with some modular weapons options. First tho I've accepted a commission from another forum member that looks like it's going to be fun to do, I'll put up the WIP shots when I've got started on it.
Can't wait to see the end process. Even if it is just an arty chassis at first! When you are ready to expand, a not chimera would rock, with a set back turret and none of those nasty side lasguns.
@ shas: Its a real pain tho and not cheap to get started
@vik: Thanks vik, I was thinking £15 per pair but atm the quality is pretty bad, as soon as I get this all sorted I'll let you know.
@ sparky: Thanks for stopping by, I was thinking of doing an arty hull like a cross between my basilisk and devil-dog hulls, but without any big weapon shield on the back, that would be a separate bit so I could use any sort of weapon on it.
I tried casting both sides earlier this evening, one I must have tightened the mold too much, the other not enough and since I'm not using a proper vacuum pump or chamber (a big pan with a lab pump and some silicone tubing...) I have plenty of bubbles mostly on the rivets, besides pressure and vibration I'm not sure how I can deal with it, the resin only has a 2-4 minute working time it seems.
I now know I'll also have to re-make both molds so I can pour from the bottom as well as add a few more pieces to allow air to escape though, but I'm not sure what else I'm doing wrong here.
I'll try and get some picks up later in the week.
When life gives you lemons...
Edit: Cave Johnson quotes...
i thin you should talk to the casting gang here... blackhand is probably the best (i know off...) caster at this board that doesn´t cast for a living... but then galorn who sells his stuff is a very good and professional caster and his stuff is in my view very flawless...
I did a second cast, not quite as bad but there are big bubbles from there not being enough resin in the mold, anyway here is the two attempts side by side, I've sprayed them grey so its actually possible to see the problems.
bottom second cast (see where i didn't add enough resin). If you click and zoom on the top one you can see how bubbles are on all of the rivets, ouch.
right second.
I've been looking at getting a vacuum chamber and pump, I'd have to sell at least 50 of the tank chassis to cover the cost for it, but if i get a decent quality
But first I'll try a vibration table, I know I should have built one for the molds before now but really I thought I had managed to avoid/solve the problem of bubbles in the molds. Since I've got all the materials I need and a faultless plan in my mind what could possibly go wrong.
I also finished the tracks on the weekend and made something else whilst I was avoiding finishing them but I cba to edit the images till tomorrow.
ouch indeed... those bubbles do look very brutal...but...you could use them for now as wrecks... or nurgle them up... thus you could even sell the tanks on ebay... and no good resin would be gone to waste... or as terrain...
the tracks look very good... i bet it was quite painstaking to make all of these...
@vik: yep now I just need some miscast chassis to go with them , and I'll probably get rid of them on ebay, speaking of which I'm going to have to thin out my collection some what to cover all this.
I treated myself on my birthday to an audio version of one of my favorite books Dune, it takes the pain away ... that and paracetamol lol
Well I know if you do get them selling, I would probably buy enough sets (even better with chassis) to go with my guard. Last count was like 6 I needed, plus chassis for hydras and such. So now you just need to sell 40 more chassis sets. And with the right weapon sets who knows how many I will buy!
It sucks to see the molds turn out like that. but as vik said. i'm sure they are fully sellable.
and holy he**!!! that is one BIG turret! it just screams KV-2 about it! and that is a good thing! i love the look of the KV-2 with that big ass turret xD
will you make any versions of barrles for it to? or will it have a short stubber as the KV?
???.... is it the turret or the main body? and mind to explain why you had to use so much putty??? your PC work looks always so clean i really don´t know what purpose would be in your case for putty?
I know there is a lot that I could have done better on the shrine, there are quite a few mistakes that I see when I look at it, its not so much that it is finished, mearly I no longer want to see it on my desk. If I don't win that just means I don't have to pick a prize.
That said I would love to have an entire table in a similar style to it.
@ shas: thanks mate, nah I meant simpler layout to the front armour the angles on the plates were a pain to do (one of them might be mostly filler) so I will make it more KV style than IS next time.
My vibration table is more or less up and running, just need to stick the motor to the underside and test it. I'm just getting ready to make a mold for the tracks and re-make the mold for one of the chassis side, the putty I have been using for the 2 part molds is a headache, so I'm switching to play dough.
by the way... i voted for one of your pics in the gallery...but i am not sure i had chosen the right one... in fact i couldn´t decide which one would be the best presentable...maybe you make a new one that shows and says all?
and... mate... don´t short sell your stuff... that shrine is top notch... really... no argueing about it...
and when you finally have perfected your casting issues i seriously need to ask my missus to allow me some of your casted candy ^^
OneManNoodles wrote: I know there is a lot that I could have done better on the shrine, there are quite a few mistakes that I see when I look at it, its not so much that it is finished, mearly I no longer want to see it on my desk.
That. Right there. I understand that so much, and I wish I didn't. I feel like I put a lifetime into this piece:
Spoiler:
I was really into it at first, then I started to grind on it, and in the end I was completely sick of it. I really enjoyed the Dakka camaraderie while I was building it, though. LoER guys are pretty cool.
Wishing you luck in the contest, you have a great entry.
Excellent designs and casts man! Bubbles are a fixable issue. I'd buy those casts from you, bubbles and all! You'll get it straightened out, I believe in you!
@ Vik, Thanks mate, hmm ... good point, all the cool kids have images like that, I'll have to do it later my pc doesn't have the RAM to handle me messing around with gigantic images and my browser...
@ skalk: thanks mate, that is exactly how I felt a week ago.
@ dsteingass: . I'll be doing as viktor suggested and turning them into terrain, the bubbles are too big to be solved easily with filler (it's like half the insides are missing), thanks for the offer
@shas: I don't know how GW handle their finecast, but going by the quality most third parties and other mini companies are producing, they must be doing something wrong.
I've never bought a finecast mini so I've not seen first hand the problems people have, sounds too bad for me to bother.
I've managed to blow up my vibration table the DC motor I had attached to the board has a rotational speed of >5000RPM when you pass a 5v supply over it. I knew it as going to happen, more testing is required.
I made a sprue for the tracks
These are ready for molding when I get some more silicone and my vacuum chamber.
been working on the detailing on the rag turret
and made the basic shape of the artillery/support tank hull
I'm with Vic , Noodles, rivet the sprue or give it some other details (cabling , ducting , plates ) and then it can be used up for something , even if its just basing material , such a shame to waste all that lovely resin !
@ shas: hmm I've got an idea for the details on the front of the tank hull but i'm not sure about the inside, I want to be able to use that back part to support a missile launching system, but its not going to be visible most of the time.
@ vik: LOL, riveting them, I can't really be bothered to shrink them tho (take too long to remake). It shook itself appart about a second after flicking the on switch. I guess you could say it had one too many [puts on sunglasses] good vibrations.
@big h: nothing a bit of glue won't handle. hmm most of the sprue is there simply to allow resin to flow through and trap bubbles away from the tracks, I'll think about it then.
now I'm going to enjoy a sunny afternoon with my airbrush.
Second place, well I can't complain, here is a final image of the shrine (no more I promise):
@dsteingass: maybe I think that is how white metal casts are done
I've added some rivets to the sprue, broken up it would be fine for basing, the resin is actually quite brittle so breaking it up isn't too hard, now to get it molded up!
For the hull, have you thought of making a turret mount that would take a turret from a current large manufacturer?
While your current design is cool, it doesn't fit the look I am looking for, while the rest of the hull/tracks do, and I am not a miracle worker with plastic card.
@ sparky: yes I was planning to do so, if only because there seems to be a "default" size turret ring that all the smaller manufactures use. I'd like to know what you mean, what part is is "doesn't fit the look" you are after?
The tank hull is meant as a blank canvas with different options for the back/top, its too small for the turret I've posted up
I'm focusing on getting the sides and tracks out, the hull and anything but my commission are on hold until I can get some things sold
your work is stunning... and on that comp i wouldn´t have wanted to be the judge... i was following your work very closley and it could have ended any other way too imho...
the new finished tank looks very good... bright but not glaring, muted colors... i like that, wish i could do that myself...not too overly weathered but just seeling the used look
What a great thread! I really like watching people's skills evolve and mature as they move through ambitious projects. it's logs like this that got me started on my own dark path to resin addiction.
If you're having frustrations with the process, it really is best to step away and take a breather. Learning how to resin cast well comes with a learning curve. Keep an eye on my WIP thread over the coming weeks and you might get some information and techniques that could aid you in your endeavors.
Love the tank. That green scheme is a realistic, basic color. I think it works so well because the model itself is so detailed and brilliantly put together. Weathering is just right too. All of it compliments each other perfectly.
@ vik: probably the weather, too hot for my brain, I'll be keeping my genswick, fists and one or two other things, I've got 2 1000 point-ish guard armies and a handful of other things hanging around including one traitor guard army that I'm impressed with.
It (along with the others) will never see the light of day otherwise. :(
@ subtle: Thanks, I had read (and was re-reading) your thread for the marine Armour on B&C before the server died.
@ 40ksu: Thanks mate it was actually pretty quick, easy and surprisingly fun to paint, usually I hate painting tanks.
I'll be giving my other vehicles the same treatment as the devildog, If anyone has any questions on how I painted them I'll be happy to help.
I've casted up 5 sets of tank chassis now, they are almost all messed up to varying degrees, I know I said I'd keep some back for terrain but I need the funds to push forward with this so if anyone is interested let me know. I've also got enough resin left for another 9 since I've managed to eliminate 90% of my bubble problem, the next few casts should be decent enough. I just have to be careful not to let the resin cure in the vacuum.
Thanks Vik, I'm close to being burned out, so I need a bit of a break, been like it since I bought my vacuum equipment (very good but expensive as hell).
Only 3 sets (my first 3) so far are so badly miscast that they are only useful for terrain, I wouldn't force these on anyone.
At the moment have 6 sets now that are good enough that I would accept, not perfect but much better than my first few at least the sides are straight now.
I've managed to lower the amount of bubbles to probably the best I can get it at for the present time, most of the bubbles are sub-surface and given how hard the resin is it isn't much of a problem unless you start attacking them with a hammer.
I'll get a pic up this evening to show you and edit my swapshop thread later
Thank you dsteingass and thank you panda. I really appreciate it.
I've uploaded images of what the current casting quality is like to my swapshop, the worst of them I'm keeping for myself to repair and use.
After discovering that forgeworld uses vacuum casting like me I'll be switching resins once I find something that I can use for longer periods before it starts to set.
@ lonedog: Thanks, glad you like them.
I've got my plasticard mojo back so I'm trowing myself at getting some things finished.
I could be in for some of these once you get the bugs ironed out also have you considered casting up the trench rails ? I would be interested in a few of those.
Especially as FW have stopped stocking theres so think you could have a bit of a market there for those.
I got Tinners to nock a couple of sets for me together but I could use more, thought of making my own but just aint got the time or patience.
@ LDG: I don't have any problem with you posting about them here mate.
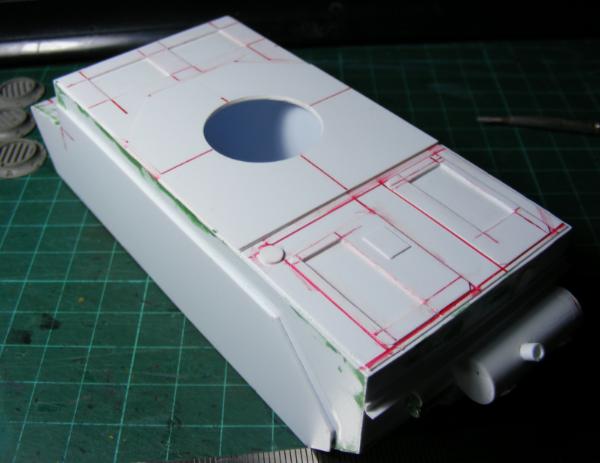
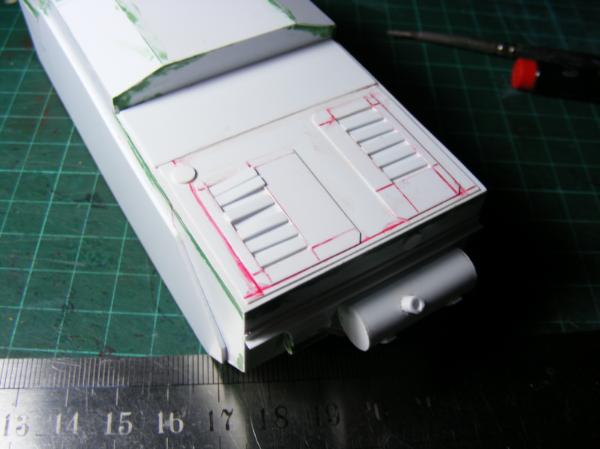
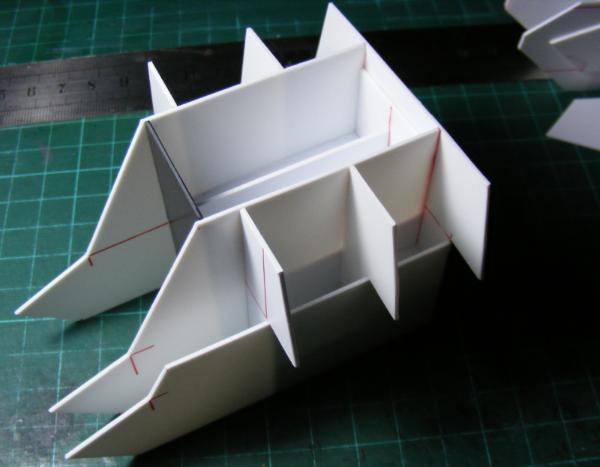
Managed to get a bit more detail on the arty hull and finally built the gun shield after the third attempt.
The vertical red lines mark out where the gun mount is going to sit, when I work out what it's going to look like. The discs above the driver and hull gunners positions are going to be hatches, I'm going to have all my hatches opening forwards with the hinge at the front, hopefully I've left enough room for them with the gun mount.
The back slots together, the thick piece sits at the back of the hull filling the gap.
@ LDG: No worries, yea I'll be casting it up eventually once I figure out how to make a tarpaulin to go over the top.
I've made some mock ups of my ideas for the Ragnarök's main weapons
A: Battle cannon
B: Eradicator
C: Vanquisher (based on soviet 152mm ISU gun so will look like a long barreled version of that)
D: Demolisher
I'm thinking of adding banding across the barrels strapped to the bit underneath.
I'm having trouble with the muzzle break on the Vanquisher, any Ideas on how to make multiple horizontal groves all to the same depth?
And here is a rubbish image of a flying buttress I knocked up on the weekend
As to the same depth grooves you could place the muzzle end in a vice but raise it slightly above the top section, then take a saw and cut roughly the lines where you want the grooves.
If you are following this so far (fingers crossed ) take a round file to widened the grooves evenly hope that makes sense and helps some.
Here are those pics of the trench rails, I have an idea to make my own as well using the similar principle.
@ dsteingass: I might just do that once I've finished the arch.
@ Depraved: Thanks, hmm ok B & C are mine, good thing I'm making all of them
@ LDG: I think I tried everything apart from using a vice I've been trying using a mitre box and a razor saw
Don't worry about the quality of the pictures I'm used to it with my own by now Thanks alot.
Nice work.
I like them without any banding to the part underneath , at the moment it looks like the recoil assembly for the barrel , if you fix it with banding it'll look wrong , IMO .
I'm not sure what to add to the flying buttress, It's a bit plain I haven't had time to take images of the physical version but here is what It looks like atm in profile
(ignore the bit on the right that is part of a building)
ideas?
@ Big H: Thats what I was thinking (the recoil) but I had the 50cm gun on the sturmpanzer 2 or bison spg, the recoil assembly is in a housing that had some banding linked over the barrel.
well rivtes?... otherwise some companies think adding skulls is the thing to do... personally i think you could leave them as is... i think they are very good looking!!!
... I finally finished the tanks I might have overdone it on the weathering powders.
I've also been working on a bunch of other things (some started, some finished) which (with luck) I'll be posting up pics in the coming days. If I can keep away from new vegas for long enough, I know I've been quiet recently but that has not been the reason.
@LDD: Thanks mate, Lincoln cathedral if I'm not mistaken, I think I might just save that for wherever I go next with terrain.
I decided to leave the buttress as-is, Just haven't got around to finishing the mold for it yet, I've got an old mold to chop up in to tiny pieces for recycling first.
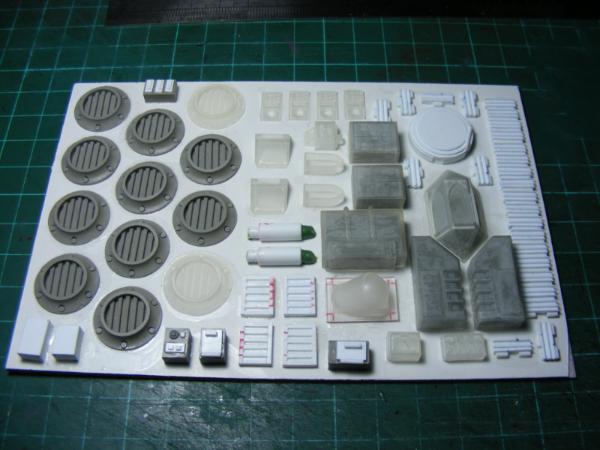
top left: ragnarok gun parts + a forgotten torso.
top right: heads and ammo packs
centre: a selection of weapons ( see below)
and lastly at the bottom is a selection of torsos
Some weapons I made a while back which are difficult / impossible to get hold of...
...so on the left there is; a sniper rifle, shotgun and a hellgun, I've found a bi-pedal stand that fits the rifle which I think is from the scout heavy bolter so I molded that up with the weapons.
Also shown is 2 shotgun ammo pouches and a head and torso based on some artwork for Maccabean janissaries by FFG
Been trying a different resin, I managed to get my hands on a trial pack of smoothcast 305, since all the US blogs seem to be saying its great, and whilst It fixes the problem I've had with the workable time I have before the resin starts to set, it turns to foam in 50%+ humidity ... meaning Its almost useless in the sunny UK climate :(, I'll try boiling moisture out of the resin and molds by vacuuming them but I only have to wait 50 years before it won't be an issue
Anyway, thanks everyone glad you like the tanks I'm especially glad the basilisk turned out ok, It was a nice frosty white from bad varnishing at one stage
@ 40kFSU: I just thought the old russ turret looked a bit like the turret of a T34-85 and besides with its "stock" gun it just looks silly.
I am interested to see how those molds work for you. I have done a few like that with the L shaped channel to fill from the bottom. I had mixed results. Are you pouring or using a syringe to inject the resin? I prefer the syringe but then I have a 2 minute cure time on the resin I use.
@ LDD: tell me about it, its ok if you only want one thing but if you want lots ...
@ Depraved: The bottom filling technique seems to work pretty well for me, there are issues with adding channels to allow air to escape on parts like my rifle scopes and I think its a mold technique better suited to basic or pressure casting (like it seems everything is ...). I've been using both pouring and syringe and think they both take about the same time, the syringe is quicker to fill the voids in the molds but you've got to get the resin in the syringe first. The resin I've been using has about a 3 minuite pot life and 30min cure time, out of interest what are you using? and what problems are you having with your casts?
I've done some casts using the new molds using 2 types of resin. there is alot of flash on the weapons sprue but thats not much of an issue
The top 2 casts are using a fast casting polyurethane resin from a UK company, the lower 2 using a smooth-cast resin that turns to foam unless you live in the Mojave.
Otherwise I realized I was missing a key weapon for my genswick.
I'll give you 2 guesses and no its not "the element of supprise" or "a fanatical devotion to the pope" emperor". Its quite a bit smaller than the marine equivalent that is more or less the only other option so much more guardsman friendly.
I was using smooth-cast 300 with no vacuum or pressure. The main issue I had was air bubbles on fine tipped features like spikes (I think this would be solved by vacuum/pressure casting). Another issue was detaching the cast from the thick square channel on the bottom. The resin was hard to cut on such a big contact point. I solved this by making a smaller channel leading from the bottom channel to the cast. The L shaped mold requires more resin and I have found that the more mixed resin you have in a container the faster it cures. Finally it just seemed like I was using a lot of extra silicon rubber and resin with the L-shaped molds. Of course in hindsight I still have massive quantities of both left over. The last molds I did I injected straight down into each cast part, keeping the mold loose so that it would not get trapped on the finer points and then tightening it up after. It creates a lot of flash but seems to preserve the details better.
Your casts are looking very good, so perhaps I will fire up the vacuum chamber and pull out those older L-shaped molds.
@ Depraved: I know the feeling, I have a lot of problems with small bits as well. I think the L-molds are a bit more suitable to pressure casting, but if you are going to vacuum you need to make sure your molds are suitable for it you basically need a reservoir to hold the resin as it is forced out by expanding air bubbles and then that resin be drawn into the gaps left once pressure is re-applied.
If you can, give smooth-cast 305 a try it has a 7 minute pot life which is usually enough to fill a mold and do whatever needs to be done.
I've heard that you can use a type non-silicate talcum powder to "draw" resin into details by capillary action, I've not tried this myself but I might give it a shot.
Nice melta like the end nozzle shame more don't look like that as for the casting using talc I have made some basic moulds myself with some success using this method.
I made a couple of simple pour mould's and a split mould and it worked reasonably well, the way I applied talc was by using a small make up brush which you can gently dust the moulds without creating clumping it the mould.
If you can, give smooth-cast 305 a try it has a 7 minute pot life which is usually enough to fill a mold and do whatever needs to be done.
I've heard that you can use a type non-silicate talcum powder to "draw" resin into details by capillary action, I've not tried this myself but I might give it a shot.
Yes I definately want something with a longer working life once I run out of my current supply.
I apply johnson and johnson baby powder to my molds with a feather brush before each cast(carefully shaking/blowing away the excess). It does seem to improve details and gives it a nice matte finish for painting. I also heard it is good to store your molds with a liberal coat of powder to prevent sticking.
@ Depraved: I've not had any problems with my molds sticking yet, but thanks for the tip . Also I think you are right larger amounts of resin do cure quicker, annoyingly. I suspect its because the reaction is exothermic, you can try keeping the resin cooler than it says on the pot to extend it, if you haven't already.
I've been working on the basilisk, I've got most of the gun built and I'm nearly done riveting the entire thing.
In the mean time, some more genswick
"some men just want to watch the world burn"
These will give me something easy to paint, I've got another 30 or so infantry lined up (mostl in my head) so there will be more. I'm starting to sculpt my own greatcoats over cadian legs, since I've got a few lying around, pics to come.
Time for what seems like is becoming my monthly update.
@LDD: good to know, the white resin is a pain I agree, I would have bought something to colour it but I doubt I would be buying more so I'd probably be wasted money. Love to see what you do with the bits .
I thought I would try making a plasmagun to do with the meltagun, that would fit better with IG, the kneeling greatcoats will be the last I make (with luck).
Also got around to making a cast of that Gothic buttress I posted a while back
I'm using another type of resin, this one more flexible and coloured black, apart from it smelling of paraffin, I'm really impressed with how it turned out for a first cast, I've not even cleaned it up yet apart from snapping the pour point off.
So I might just cast up 20-30 of them and put them up on ebay for a month. If they sell then that should get back the costs for them, if not I'm sure I can find a use for them broken up as base decorations at least.
Now for something a bit different, I thought my Imperial fists could do with an upgraded captain, so between mold making and casting I threw this guy together from my bits-box, It's something I'd had planned for a year but not had the will power to make.
Thanks everyone, that Captain will probably be sitting in a box for another year, still got purity seals and scrolling to add. I've got so many half finished things knocking around, its not fun.
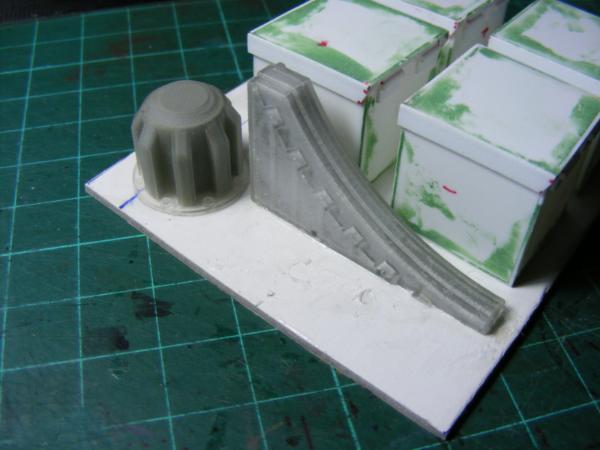
Time for a bit more terrain that I've half heartedly been making.
After playing far too much fallout I had to make something inspired by it.
Metal boxes. Even when they say "empty" you have to search through them anyway These are about 20mm cubed, as you can guess I didn't want to make anything too fancy... yet.
Also I started making some more terrain bits from offcuts, botched builds and failed casts. Nothing too special just a rubble heap on the left and a ... something on the right
@dsteingass: Thanks, Initially I was thinking of something like that or maybe a curved roof between two levels of a building, but atm its heading to some sort of locker
@LDD: I'll finish it all eventually ... or sell it.
Here is the guy that captain will be replacing
my current stand in
Greatcoats
from left to right:
2 commissars, an officer, ammo carrying grunt and 2 veterans with demo charges.
The left most commissar's hat is my own work, not bad for the second attempt and it seems the second commissars arm is falling off hmm.
At least with resin casting I have no shortage of basing materials,
Dam you are getting good and the great coats have turned out really well, just loving the look I really must get to the bits and have ago at a couple of things myself.
Although I have been side tracked by this dam badass comp, my brain is full of ideas now but need to stay focused
Been a while
Finally finished my first commission I was working on that has been giving me a headache.
yes ... its another metal box.
The images are minus the rivets and some other surface details that I've since added, I also have a mind to make my own rear and side hatches and my own hull bottom giving me a complete kit .
For my own use I'd like to add sponsons and make up my own rules for it, just have to finish making the molds for it first.
General shape and design follows usual aesthetics of similar formats so spot on, but would rather see the finer detail as mentioned to get a better feel for the model.
You have done most of the model so why not the doors and hatch
my thoughts exactly!
I'll try and get some images of the sides tomorrow (the rest is in silicone) It's pretty plain as the client requested... also fits in with the general aesthetic of like vehicles.
i often heard bad talk about the emperors chosen hero model...but for my own sins...i love that model...i own it twice for that reason even...
and that yellow looks really warm and lovley noodles!
also...mate i think you need to show us your range of bitz you are able to market... really... i am currently replanning my rennaisance steampunk army look...and your selfmade stuff could be right up their alley...
oh...and i even overlooked your lovley terrain pieces...noodles...you are a busy man...and a splendid modeler!!!
the parallel grooves are for IG like tracks to slot in (which they do quite nicely), the interior is basically non-existent...
I'm going to go over it once more to make sure its cleaned up nicely then I've got to figure out how to mold the damn things, the detailing I've tried to be restrained on.
@ 40kFSU: Thanks, the great coats are actually pretty easy to do.
@ vik: It is pretty cliche , I preferred the older version of the model holding the sword with both hands, I think it was a "limited edition" model or something. I keep forgetting to post up my Fists
I'll have to see what I can do with bits, the weapons and some of the torsos and heads are a no-no, it'd have to re-make them from scratch but some of the things are OK or just need a bit of modification when I have time. I'll see what I can do, If you see anything that peeks your interest let me know.
Thought I'd play around in 3d for a bit as there was some thing on the radio worth listening to, so I'm re-making the weapons starting with my hellgun.
No idea if this will turn into something. Darn sight quicker (and easier on the eyes) than doing so by hand.
That tanks looking great, a beautiful piece of scratch building there,
how long did it take you to build that?,
just curious, as my work always seems to end up being more complex and time consuming than I ever anticipate .
Thanks hk,
how long? too long! I started in july, I know exactly what you mean, something that starts off simple can turn out much harder than expencted. Luckily I use CAD for building and vehicle pieces like this it really saves a lot of time and tears.
to give you an idea most of the model is is built up by laminating multiple pieces of 0.5 and 1mm plastic. More pieces means more bits that can go wrong.
I noticed your stuff on ebay btw, what resin are you using?
@ hk1x1: I know the stuff, its tough as hell, for a first experiment it looks great.
Bit more 3D work.
Nearly finished the infantry weapons (except for a melta and plasmagun)
I don't really like the weapon's butts, I'll probably have finished the sniper rifle in an hour or two.
Also having lost both of the magnetised hull multi-meltas that I've had. I thought id make my own along with a lascannon, heavy bolter and Heavy flamer. (the dark block is just a backing to build from).
I'm happy with the multi-melta, the H.flamer is very wip as are the other two.
Been playing around with a few ideas I've had knocking around for a while:
Some sort of contraption ... lol I have no idea what I was thinking of when I made this, besides the buttresses and the little maintenance hatches I'm going to make up some air vents for the sides, some piping on the other end to the console and maybe some sort of power transformer on the top., It's a bit low to the ground as it stands so I'll raise it up on some foam-board or whatever.
And I was browsing though the dakka gallery a little while ago and came across some thing really cool by a dakka member called "marcineczek0" his gallery, Thought I would try and emulate the shape to make a duel lift to an underground facility and air vent building with some roof space and other things.
Those resin tanks look very impressive, well done .
I cant tell if that's a black and white photo or if the casts are actually that grey color,
If they are that color could you tell us which resin you used, or if you used a coloring agent?
@hk: Lol the pic is full RGB. The resin is Polycast G26 from Sylamaster, they sell coloured casting resins in the UK. Its more expensive than and not as tough as other types but the quality and pot life are good, It doesn't smell, flexible under heat, generally decent stuff. Be warned Sylamaster's postage and isn't cheap and if your interested I think the resin is made by a company named "Sika" and looking into it Its cheaper to buy from Sylamaster than the manufacturer. The pic of the tank casts represents approximately 1.8kg of the stuff.
I'm just playing around with some ideas for that lift building I'm not sure what to fill up the blank walls with, I want to put some form of arches on the side. with reinforced/buttressed corners (to cover up the join lines. but I also want to use some of the flying butress casts that I have lying around and at the same time add at mid-level platform over the slanted back with ladders to the top and ground. Hmm ... I'll try to do a mock up of some sort.
Also I'm having some parts 3d printed by shapeways just to see what I can get away with, so I'm waiting for a phone call saying "we can't do that" , but I think the process will take a few weeks, so fingers crossed and I'll post up when I get them.
Quite looking forward to skalk's competition, this should be fun.
Thanks for the info, I'm going to experiment with the Polycraft SG2000 resin I've been using, as it's worked really well with my molds so far,
I just don't like the ivory color, so I'll try some of their resin color dye and see how that turns out.
Good luck with the 3D printing, heres hoping they can do what you want .
@hk1x1: Best of luck with that mate. if you go for a black colour you should only need a drop or 2 of colour to give a nice off-grey colour.
With luck I should get my 3d prints tomorrow I really cannot wait to see how bad they turned out lol. Just kidding I've used one before and I sat with it watching, mesmerized by how cool the process concept is.
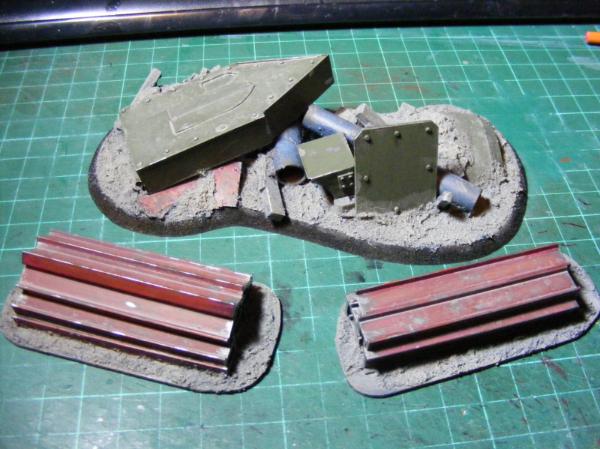
Got started on the junk pile piece, I have a pile of junk all ready + 60mm base.
miscast bits, scraps and offcuts of plasticard, scrap pieces of resin,some test pieces that didn't quite work out or got abandoned (including; a filing cabinet, a terminal/computer and a fridge!?), a random plastic servo gear, a laboratory tube connector and a random suitcase thing. Appart from that you'll see it when its done .
I'm sure it wouldn't take you 5 minutes to knock one up Vik , It's a box with some bits stuck on lol, as it happens that's my second attempt the first became the fridge because of its size.
I got my prints from shapeways and I think I chose one of the absolute worst materials for photographing, so you may want to zoom in to see any detail
and here is what they look like in software:
any blob-y bits (especially in the vents at the bottom) are bits of the dissolved supporting wax that collected and I haven't cleaned off
So there is copies of all the infantry weapons that I hand made so far, 2 round vent covers and 2 muzzle breaks for my tanks that I found too difficult to make by hand (yes I cheated). So now my vanquisher gun now has a muzzle break:
The only big thing that I've noticed is the sniper rifle is missing its ammo clip, I'm not sure what I did wrong there for that not to print out, but otherwise I'm very impressed with the results, hell I've even got drilled out gun barrels!
I've only done something simple here basically nothing that couldn't be done using hand tools but what this technology is and what more it is possible to do with is awesome. I think the main problem will come from people failing to take full advantage of or failing to realize the possibilities this technology offers. I'll probably return to my usual cynical self soon enough.
whoa.... those look brilliant...in every sense of the word mate!!!... i am not doing sweet talk here but this is the same style and quality of work anvil or mad robot does!...
the vents look really nice... i could think about a dozen uses for these... and muzzles for tank barrels... i bet that´s something new...
I also ordered something in the frosted plastic from Shapeways and tossed the idea of trying to take photos. The melta and grav gun look more questionable than everything else, and the muzzle on vanq turret looks solid.
@ Moltar: Questionable, how so? (btw its a meltagun and my redesign plasmagun ), glad you like the barrel muzzle.
@ Vik: Thanks . There are quite a few bits companies using shapeways to make the master models ... and really who can blame them It really does save ones eyesight, the only hard part is judging how much detail seeing something 100x the size on screen its really tempting to add more and more fine detail that probably wouldn't print let alone be seen.
Not knowing the resolution of the print I didn't take into account tolerances on those muzzle barrels, school boy error I know. I should have mentioned they are made to fit onto evergreen plastic tubes, when I've corrected my mistake I might do some more
I've been making sprues of the weapons and I'll be hollowing out the vents to lower the cost a bit and maybe give them more uses, when thats done I'll put things up so anyone can buy prints, with a cheaper material than the one I used they shouldn't be hugely expensive.
Also nearly finished making the "junk pile" waiting for some things to dry on it before I can add the final details and start painting.
The idea was to represent debris piled up to a walkway supporting pillar in a war-torn (its 40k, everything is war-torn...) factory building, I'm tempted to write "please stand by" on the terminal monitor and i just noticed the keypad is keyless...
I should really take more care of my paints, the above was basically painted as with water colours
@ Dr H: Thanks the wire on top really is wire. "looking AND commenting" so ... thats one up on me then, try not to pull a muscle there
Hey everyone, I hope you all had a very merry Christmas
Thank you all for your kind words, I'd love to have a large factory on a terrain board with arches like that inside ... oh well.
Thank you to all those who voted (and not just for me) in skalk's terrain comp. I think I did quite well considering I avoided not using oils or powders. I know everyone keeps mentioning the monitor but really It's only there because I planned for the monitor to have "please stand by" written across it.
For the last two weeks my PC has been freezing within 5 minutes of starting up ... I might have fixed it
I finally started getting some paint on a previous junk pile and added a pair of small girder piles as I found a pack of plastic girders lying around.
a few more genswick using the last of my bodies, including a master of ordnance (far right) with the worst sculpted mustache. The guy on the far left will probably be an "astropath" when I can find some suitable arms, it's an old unfinished model that was going to be an officer styled after Rommel, but got left at the wayside some time ago.
The tank pile is growing, the sides of the tanks are nearly done now, filing corners and filling gaps. The hulls are , besides the three wip you see below there are another 2 at the "pile of plastic pieces stage" with the third on the drawing board/shelved, though I seem to have messed up the measurements on half of the parts... ho well.
The Genswick look great and the tach looks fine in the picture to me, are those guns conversions or 3d sculpts you did your self ? Either way look great mate
Rommel looks great although he is missing his bino's
Nice stock pile of to be tanks what measurements have you done wrong then ?
Don't worry the sickness will pass after about 2 or 3 weeks
Thanks LDD, the guns are resin copies, I have made some weapon sprues for 3d printing I'm just fiddling around to see if I can make them printable in the cheaper plastics, but as they are they are good to go.
The tank hulls so far, I must have read something wrong as I ended up with massive gaps on the joints on the right tank, thankfully that one is for me and it's nothing that can't be fixed with enough filler bottom left is a WIP of a tank destroyer hull just to show how I build. I start with a skeleton of 1mm plastic with ribbing built up on the sides, with a layer of 0.5 mm plastic as a "skin" generally anyway, this one i'll be getting more WIP shots of as I go.
so here is my second ragnarok so far with the turret for scale, the 3rd is under construction coming along much more smoothly.
and incase anyone wanted a closer look at the side details, so far i've punched out 96 of those little discs ...
and lastly a possible hint to the new year (I made this last month, but my putty has gone all lumps since ... strange)
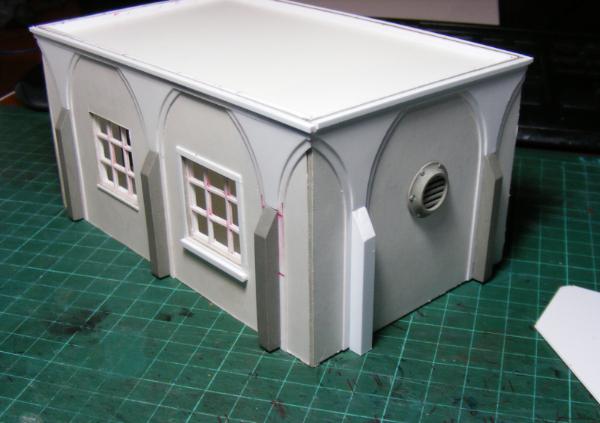
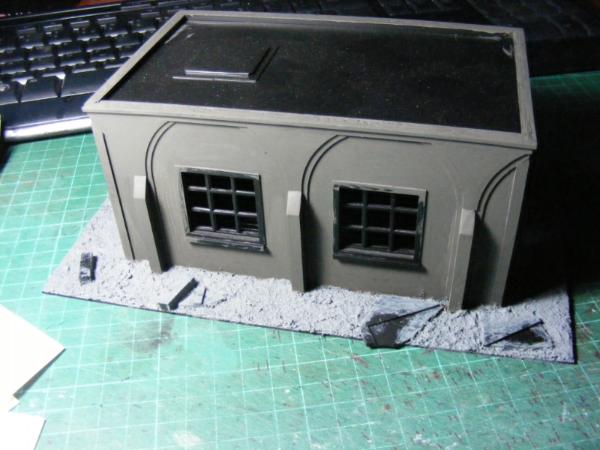
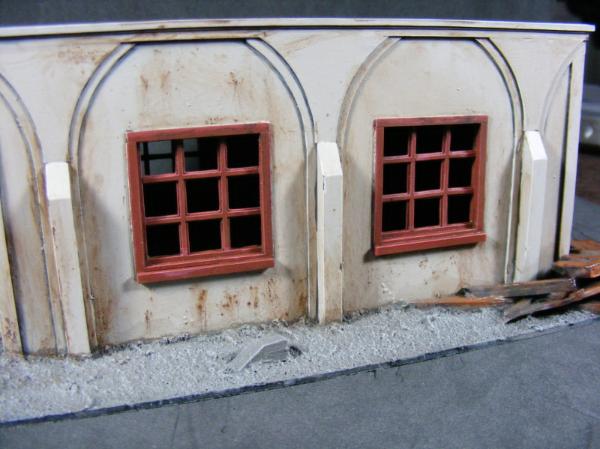
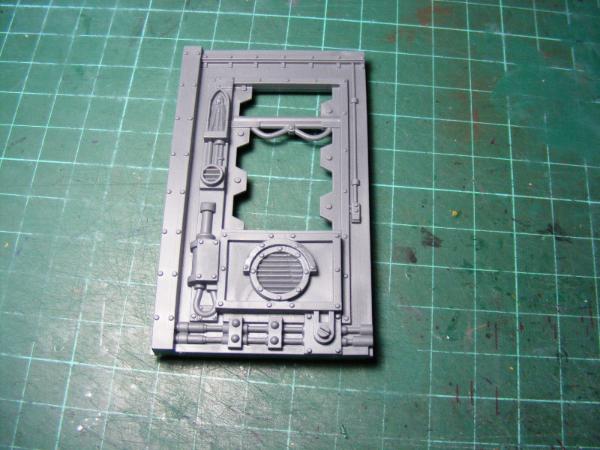
and I've been giving some thought to Cam's League terrain competition (see banner in my sig for the link), I'd quite like to make a small factory building, like a small office or workshop, as part of a factory complex here is what I had initially planned and built in the summer:
It's made from laminating 1mm and two layers of 0.5 mm sheets, this was to make the windows.
If you look closely you can see the sides (with windows) are buckled and bent, for some reason whenever I laminate sheets of plastic they always do it no matter what I try these where held between two plates of aluminum with clamps holding them in place. closer side on look
the side with the broken window is worse than this, I broke the window trying to straighten it
ideas on how I can fix or avoid this in future anyone? the only thing I can think of is using something like an I-beam to try and force it flat.
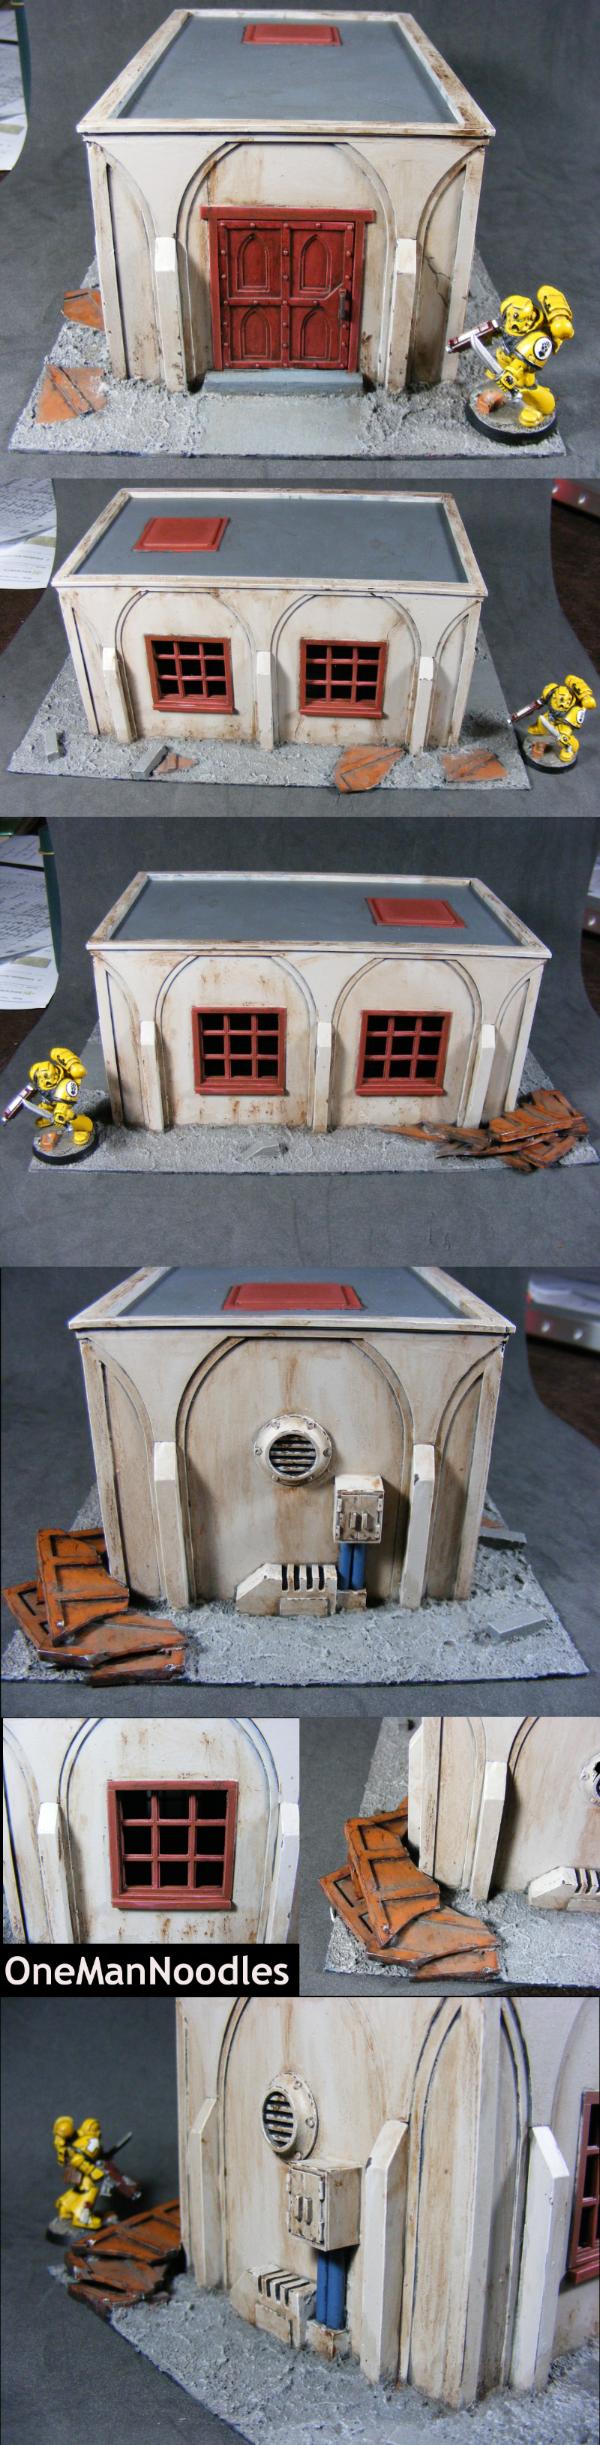
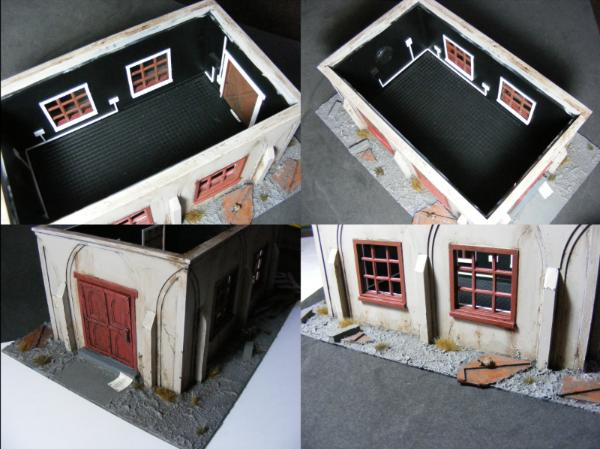
Anyway I'm thinking of recycling this to make a re-purposed building as a makeshift billet, with packs, other equipment and sleeping bags made from green stuff, and adding my own touch of Gothic, I doubt it'll be as good as my generator but we'll see, either way I've got an A3 sheet of plastic with this competition written all over it.
@ Vik: Thanks, ah there is planty of ideas floating around I'll bet
@ Big H: I've taken your advice here, thanks for the tip I'll bear that in mind next time.
Managed to just about get the bent bits to flatten out a bit by adding a thick layer of card to the outside wall facing.
and the results:
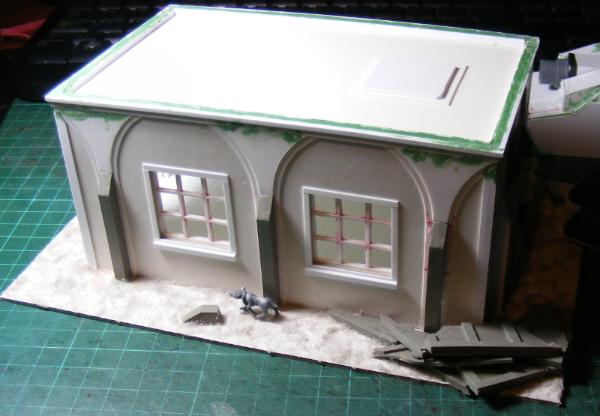
WIP interior. The red line on the top marks where the roof will sit eventually and be removable.
A long way to go with this, I've got my idea for the outside sorted, interior is a bit of a blank slate besides sleeping bags and other kit / equipment as mentioned in my previous post.
Probably not a comfortable one thats for sure... But really I'm not certain on the building type, I'm using the tiled look basically because it looks nice.
The Idea is that It's like a small site office as part of a larger factory complex, some where for small pieces of paperwork, a desk or 2 the odd chair easy cleaning floor for muddy boots. Or I could make it as a small machine shop, as above but with some form of machinery inside.
The only other thing it could become is a gloried toilet using some of Dr.H's amazing loos!
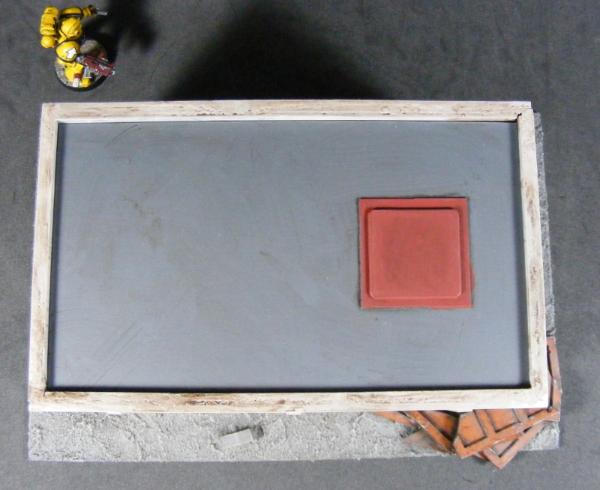
The roof was originally going to be flat , with a hatch for access, a vent, detritus blown up there and what not... I might change it for an angled corrugated roof.
So I'm obviously very decided on what this building is going to be.
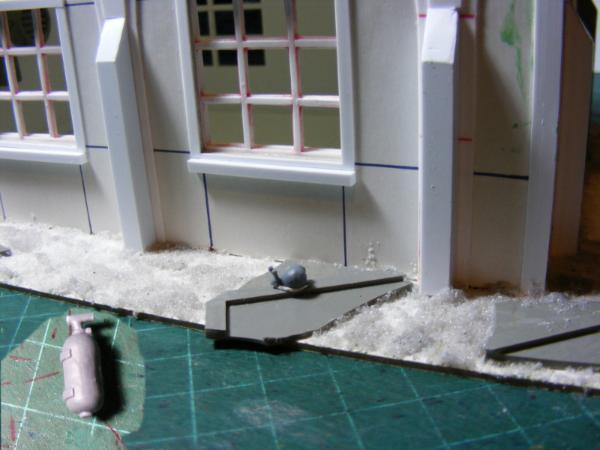
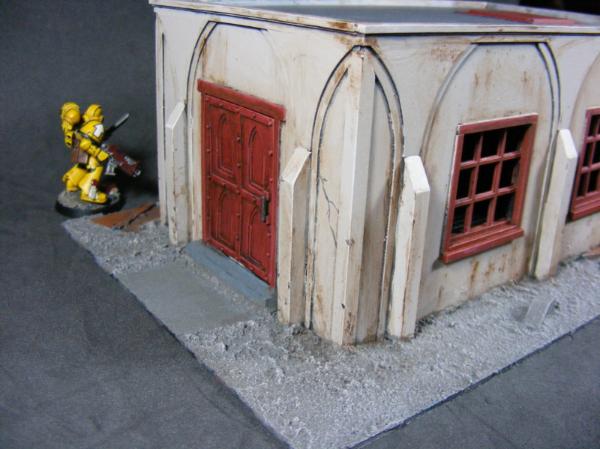
This is the general look i'll be going for, simple and subtle, but there is going to be problems on the corner joints that i'll have to mask over, I think I've got some right angle strips of a suitable size but there is still a little warping that going to make things interesting.
with a whole load of arches on the strip ready to go, these should finish the sides off then carving the buttresses into shape and window frames next.
working hard on the tanks too;
The stug is taking shape, it's hard to make out but there are thin hatches on the front most glassies, the other two vehicles are likewise endowed, with vision slits and hatches. I'll get some shots up of those tomorrow with luck
All three of the tanks have rears identical to this, the exhausts were pretty fun , its literally just a tube blocked at both ends then a second, smaller, tube stuck into the side.
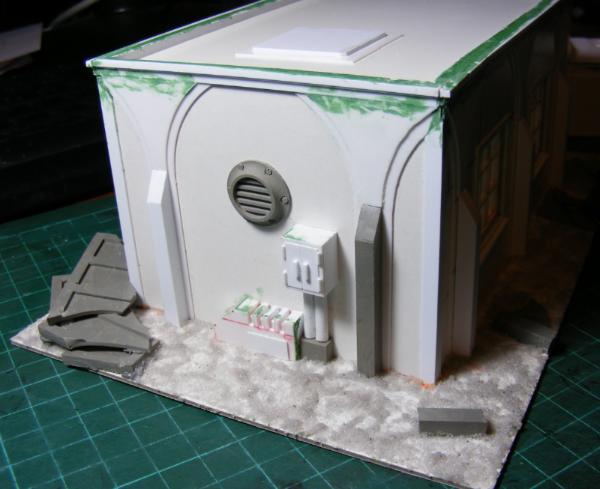
Three out of four walls down,
the fourth is still unattached and unadorned for now and there is even a roof (ok its just a slab of plastic, but its the thought that counts right).
still very rough but the look i'm going for should be visible now
Yes that is a table on the roof and why not .
There will be a second both going inside.
@ Littletower: if I had time I'd put some deckchairs and a coolerbox full of beers there too
@ shas: quite possibly.
@ BigH: thanks mate, It's coming along nicely
Before my pc decided to implode last week, I managed to do a bit of casting.
New space marine Vindicator using a damaged cast of the LandRhino, I've managed to scrounge some parts together and found a classic vindicator demolisher cannon
some miscellaneous terrain bits including a copy of one of the buttresses for the league competition, It seemed a bit quicker than carving plastic. The big things on the left were inspired by some of the makeshift barricades seen in fallout 3 around super mutants, I've got an idea for using them to make a counts-as aegis defensive line.
Some of you may remember I had a play with 3d printing a little while back, well I made some resin copies of the little round resin vents that I'd made, I've got two open molds being used to cast these atm I'll probably make a third using the best casts to copy along with more small useful bits, when I'm ready.
I've got piles of uses for these. Below was made whilst the shrine competition was running, the vents finish it off.
Thanks Doc, It really is amazing what a bit of colour can do.
Thats more or less what I was thinking with the worst casts, I haven't been hugely careful with casting any of the pieces for the most part apart from the tank.
It seems with an open topped mold just "brushing" the resin into recesses to dislodge bubbles with a lollipop stick seems to work well enough.
First of the tank looks great mate really pro looking now did you make this yourself or is it an actual model ? Sorry got a bit lost with the post.
Now those resin vents are the bomb if you ever want to sell any can I take a set of 8 of your hands they would work great for my SP laboratory that still needs finishing
Awesome work mate keep it up before long I can see you running your own little business
@LDD: Yes the tank is all my work, I've got a few of them lying around that'll find their way on ebay sooner or later. Thanks I'll be casting piles of the vents when I get a sizable mold up.
@ Thanks shas, I'm thinking up more things to do along these lines especially simple things like the vent. I've set up my own shapeways shop to sell some of these things but I'd expect it
@BigH: thanks mate. I'm really happy with how these have turned out.
I have quite a few more 3d pieces approaching completion I'll put them up as I complete them, I'm really enjoying making small-medium sized terrain pieces, I've remade the flying buttress and the column that was used in Skalk's junk pile contest.
I'll definitely be making some more smallish bits like those vents for terrain and vehicles in future.
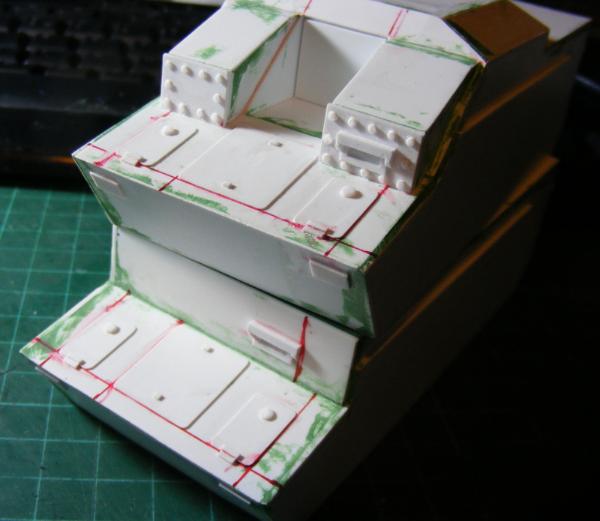
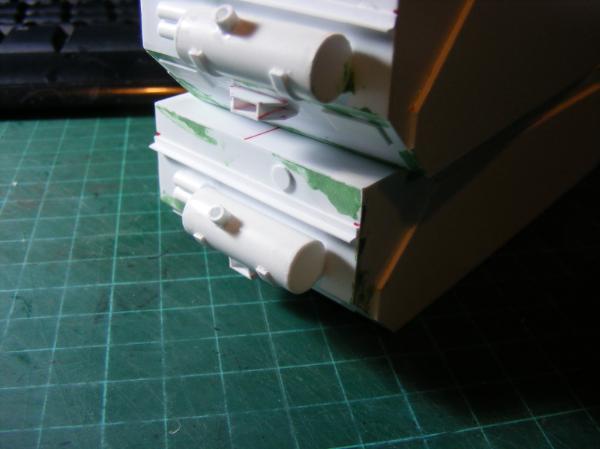
Back to real plastic cutting . The Tanks are coming along; adding details, vents, hatches, etc.
front
back
top
and a mock up of slats for the vents.
As I've been typing this I've added the slats to the vents, fiddly.
Lastly an update on the League competition entry. Started adding window frames. I'm waiting for some Plastic L-angle to arrive, since non of the local shops had any, to cover up the corner joints.
Great clean work mate you really are an artist when it comes to the PC
The comp entry is looking great I never even started mine no surprise there to be honest LOL
The Land raider looks great mate if I was into SM I would have snapped one up, alas I am not a fan of the steroid induced bullies so no real need for it but maybe I could find a use for one
Any way great stuff you should add a link to your shapeways shop as well
I prefer the name "Pholos" to "land rhino" on my marine tank. The tracks are a pain but they always are to me and I think I'll cover up the side hatches with an additional armour plate to give it a more close quarters look.
I've added a pile of items into my shapeways store (link now in sig) all the weapons and bits so far are up there along with some new things I've been working on, including these:
I thought it might be a neat idea to make complex muzzle breaks to sit on the end of plastic tubes (of what seem to be standars sizes) for tank gun barrels, so far I have two diameters that they fit to; 1/4" and 5/16" these seem like standard sizes for plastistruct and evergreen tubes.
Next time I do a print order I'll add one of these.
That's a bloody good idea creating the muzzle breaks I bet you could sell those quite easily, I think I will have to check out your store mate seems like you have some good ideas to go with the talent
@ LDD: Thanks mate, I've got a list of 40-50 items to work through, I'm trying to come up with things that would be really hard to make conventionally.
@ plastictrees: Thanks, yes I am it is just the Pholos/Land-rhino right now (some images of part of one below). It's not perfect and I'd never say it was but I'm pretty happy with it for what you could call a "garage kit". I do plan to finish some others in the future. I don't have a shop set up so I am just selling through dakka right now.
I've managed to give myself RSI in my right wrist ... [a pause for you all to get the sniggering out of the way] ... and so to avoid a serious case of carpel tunnel I'm downing tools for a while.
still I can post a few images!
The building is as far as its going to get. If/when I add an interior I'd be added separately after anyway, likewise for a door. At least I've got a base on it and all the external details that need to be done prior to painting are done.
the dog and snail are going to be stuck down after I've left them off for now. Insert in last image is a fire extinguisher made from the Cadian flamer backpack - my favorite part so far.
The Pholos is coming along, dispite it being a miscast (i broke part of it de-molding carelessly while the resin was in the brittle stage AND the tops of the sides are both uneven from the mold being too tightly bound and slipping a bit, its going ok, nothing I can't clean up or fix.
I did think for a time I'd really screwed up the door slots (they are not perfect anyway) then I realized I was using land raider doors ...
not enough resin and too little time in low pressure means bubbles.
Lastly who doesn't like Schürzen!
Interesting to see a possible image for a knight model in the news section, I've not been a fan of some of GW's latest designs, what about you peoples?
I'd quite like to make a clean slate on my traitor guard and try again at doing a small mechanicus attachment to the Genswick (techpriests, a squad of skitarii something like that, mostly for scenario and objective purposes). I don't really see a knight fitting in... well we'll see .
@ Dr H: I aim to please. I'm stuck as to what to paint the building.
@ shas: thanks, glad they appeal to your expert eye
@ Big H: right now there are just two sizes but really any size (within reason) is possible, they are aimed at fitting over specific plastic tubes that you might buy. You would have to check the entries for them in my shapeways store (see sig) to get more details on the sizes (as well as seeing them in spinning 3d) I'm way too tired to remember. The larger of the two is standard "battle-cannon" size.
Built a front for the vindicator, and decided to cover up the sides to give a more hardened look, needs gaps filling and more rivets.
and how is this for using the kit as a chimera, sponsons from the leman russ as like a mini-raider with the ramp at the back (and the original front not this piece of plasticard)
and lastly I've been toying around with starting afresh with traitor IG, what do you think of this as a new scheme?
Raider vindicator front looks good not sure about the russ sponsons though don't seem to match in style.
As for the traitor guard cant really see the colour to well I gather there is some kind of camo scheme, but the light seems to be dulling the over look so hard to tell
@ LDD: thanks, I know the sponsons kind of clash, but I've got a stack of them rather than .... and actually it's not too bad, looks a bit like Forgeworlds mark 1 raider, otherwise i'd be using the sponsons from the landraider upgrade sprue from GWS online.
I know what you mean, I'll try and replace the image, the camo is probably a bit too subtle in colour difference
anyway.
While I'm at it I'll replace the image of the tank with sponsons.
@ Shas: thank you, probably undivided maybe with a bit of a nurgle leaning.
Yesterday and Friday I spent most of the time destroying old molds, by hand its not so fun but it had to be done. Oh and riveting!
... and making a door....
... for this building which I knew I would not be able to finish in time, I've had a lot on my plate recently and I'm going to be busy all the next two weeks.
See the camo much better now kind of reminds me of the German WW2 autumn pattern a bit which I like maybe an alternative colour for the shoulder pads though not fond of the grey sorry.
I think the issue I have with the raider and the sponsons is the tank has quite smooth lines, as for the sponsons they are more bulky and kind of rough looking so clash some in my mind.
But the overall look is great
Also love the barracks block coming on nicely and loving the new doors pulling in the gothic arches nicely, you should do a how to on this some great architect aspects that could be used and adapted for other models.
Here's my entry to the League terrain comp: round 8.
Its not perfect, and I've gone and sealed up the oil work before I noticed my screw-ups.
The building was going to be layed up from charidon granite to dehnib stone, but I got fed up of that very quickly and just painted it with a roughly 50:50 mix into the recesses and added 2-3 layers of dehnib stone over it then sealed with a gloss varnish and finally an oil wash 4:1 Burnt umber : lamp black.
The inside is completely blank right now and I will be fully working the interior. I've already added to the outside since those images were taken, I've added wildlife (well ... a snail and a dog) and some army painter stick-on tufts.
The windows started as 9 square holes carefully cut out of a sheet of 0.5mm plasticard with parallel strips left between them, then thiner strips stuck either side of the spars to add strength and the "stepped" detail. The sheet with the holes in was then sandwiched between two extra sheets with a hole made for the window. (if you zoom in on that last image you can see the joins how i made it and what i mean.
hope that answers your question LDD
I've been going through my old projects again and I'm shocked by the number of stalled and unfinished things lying around ... again (I'm pretty sure I did the same last year). Better get cracking I guess!
Big H wrote: Nice use of burnt umber , its a very useful colour !
Great work make, looking forward to see what stalled projects you bring out of hiding !
Ever thought of using the LandRhino chassis to make a Self Propelled heavy artillery gun a bit like a "not Basilisk " ?
Thanks, I'm really enjoying using oils and not from the fumes !
Right now no, I am going to be using them to make razorbacks and chimeras using this "Space Marine Land Raider Terminus Ultra Conversion Kit" with the predator sponsons for the chimeras, the extra lascannons can be used for making a vendetta gunship.
I also have the bits and designs to turn an ebay wrecked basilisk and a chimera hull + basilisk gun into 2 enclosed basilisks that I've had for about 2 years! not to mention the glowing pile of un-painted terrain and 2 unfinished Genswick tanks lying about.
I have some tracks on the vindicator now:
I did have to use a long sausage of greenstuff to stick them on party due to my superglue and partly because there is a bit of a dip in the centre of the track mount.
But they fit all the way around quite nicely so I'm really happy about that! So its all finished and ready to paint Now ... how do I paint yellow again?
I use artists odourless thinners from HobbyCraft , a little more expensive but house interior friendly !
The enclosed Basilisk sound interesting , get on it ! I have a plan in my head to make a Baneblade with a rear mounted turret and a big long gun and I'd like to see your ideas !!!
Vindicator looks good , gutted you beat me to it , really going to have to get to work on mine !
nearly finished this piece of kit.
I'll sculpt a few lights a few lights. and add some copies of some new things I'm having printed when they arrive to finish it off.
@ Big H: Thanks on the vindi, It was easier to make than I was expecting, there were some gaps to fill in ... but so do FW kits. I've got 4 more of them to make when I can sum up the effort! I can really see I'm going to run out of spare tracks fast with these tho.
The basilisks were to make up then sell .. like so much else I've got lying around.
I picked up some odourless thinner, works a treat!
@ Dr H: Thank you, its amazing what a little oil can do.
Automatically Appended Next Post:
The hut is being wired up on the inside, windows done and I've added some posters/propaganda blown around.
This is something I threw together earlier, I had an Idea for a small light tank (counts-as salamander) using the tank sides that I have so many of, using a quick and simple hull, just need a turret for it. These are the 3 so far:
On the right Is a kromlech turret based on a Czech inter-war tank IIRC, alas there is nothing that uses a plasmacannon but it does look cool.
The middle is something that I was using to try curved surfaces when I first bought my circle cutter that I could make piles of easily.
Lastly the one on the left is one of the first things I made (it's orientated like that as I've not made any holes for the turret to slot into), should be castable too.
Decisions, decisions.
The look on the Comp's building is great, I love the worn look you achieved without going OTT. Once I learn how to paint with my water-based colours, I should probably give oil washes a try...
(And looking at - and loving - the interior pics, things would have been even tougher if you'd had more time! The interior surface-wiring is just ace )
The new building looks good too, I specially like the sloped, buttressed wall, that goes to my to-do list if you don't mind.
And as for the tank, probably too much 40k influence, by I like the 2 and 3 turrets more, the first one, IRL inspired, seems a bit too small now, Third one is maybe a bit too detailed for such a small tank (Or maybe the gun is too big or complex; have you tried an autogun, or anything else lighter than the one you have there now?), but that's just me.
Love the interior great to see someone going the stretch to include fixings cant wait to see that finished
Like the side tracks nice job and great detail on them, personally I think you need a more fitting turret something the size of the centre picture but more angled like the first pic or even opened top like a troop carrier would be cool.
Guess the middle turret has it, 3/3 people prefer it
I agree with both of you on the turrets, the kromlech one is just as it comes,
the hull is based on the soviet T-70 (wikipedia):
@ Littletower: thank you very much , Ive got plenty of time to fill the interior however I like now.
Water colours a good start as the principle is the same as the oils just with water instead of a solvent ... oh and they are easier to rub off which can be useful
@ LDD: Thanks, agreed on the turret, maybe looking more like a Cromwell? (wikipedia):
I would try an open topped one but neither (yep I'm making two) of the ones I've made are suitable, maybe number 3 will be open.
Remember I was building 3 tanks before and I put the third on hold? Well I've got started on the third.
I have had a few more Items 3d printed, and am prepping them to make resin copies right now. It's mostly terrain bits mixed with some tank bits and parts I've hand made. Including a set of tank treads I made a while back but failed at making the molds of twice, so I'm using the extra space for them.
The images are large so feel free to zoom in but I doubt you'll be able to make much out until I get my first casts. Many of the larger pieces are greyed in a bit, that's resin, because I made them large and hollow I filled them with resin to stop them exploding / imploding when I degas the molds. And yes there are 3d printed rivets.
I found I had rather a few of these:
and I don't really like the windows (they don't make sense to me) and I have enough of these bits to make a small factory. So ... (and I know this is really painful to try and make out, but take my word for it)
The insert in the above image shows what the horribly whitish-clear bits of plastic look like in detail.
There is actually more, but I'll not torture you all with it, as and when I am able to make some in resin, you'll be the first to know. I spent most of my free time this last week cleaning up the prints of the oil and supporting wax they cover them with, then carefully filling them with resin.
I've still not made a turret for the light tank, I'll make some shelving for the office building while I think about it.

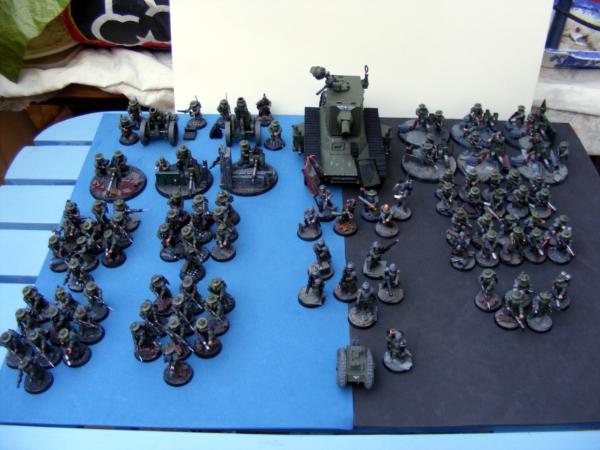

 ), sticking with the trench fighting theme all my vehicles will have trench rails
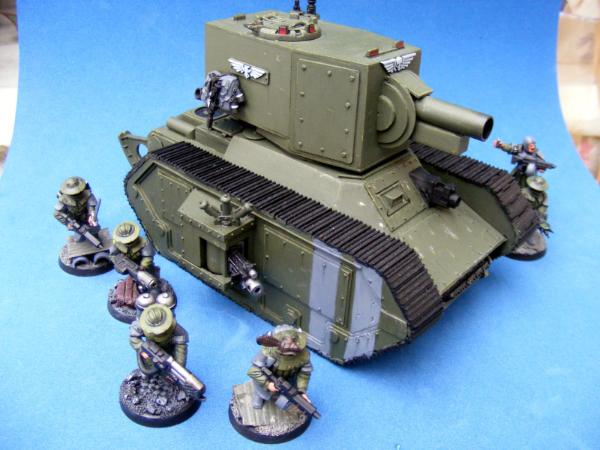

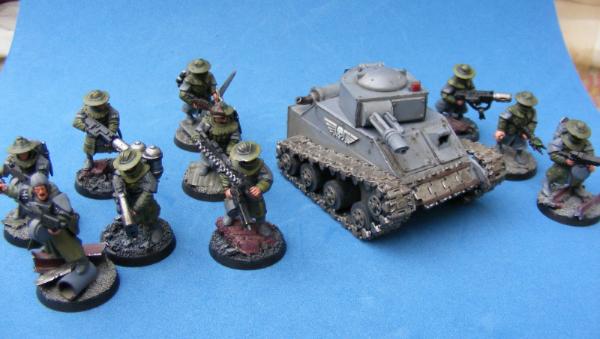
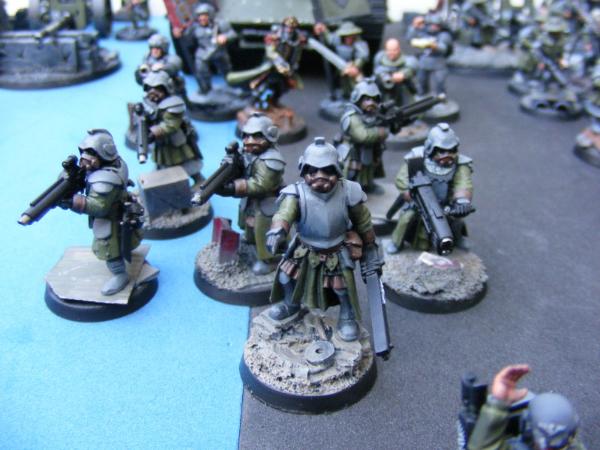
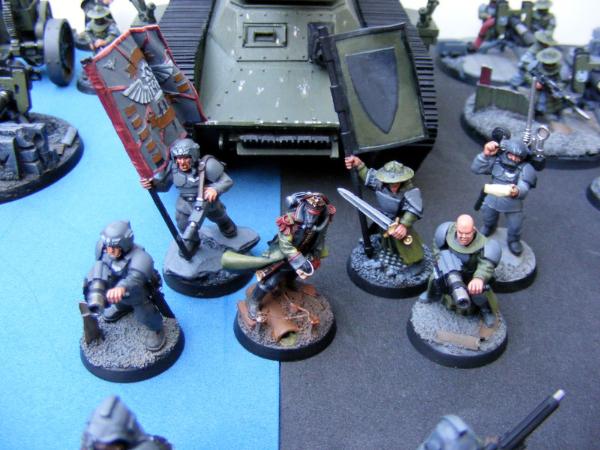


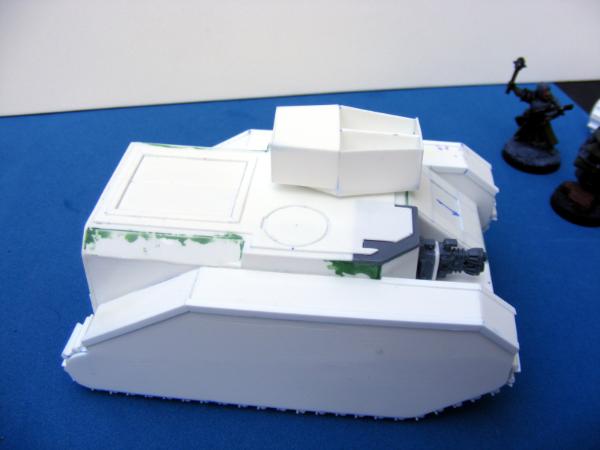
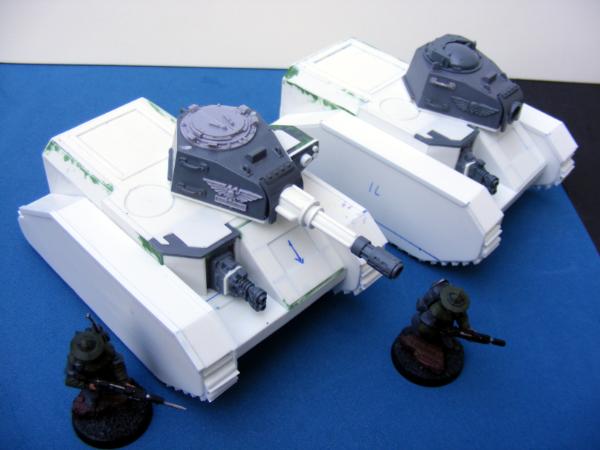
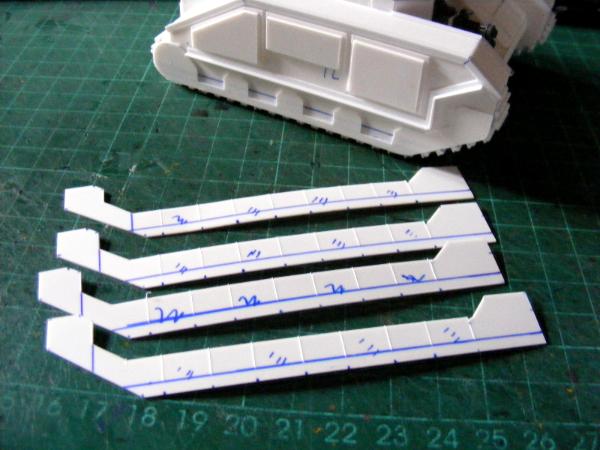
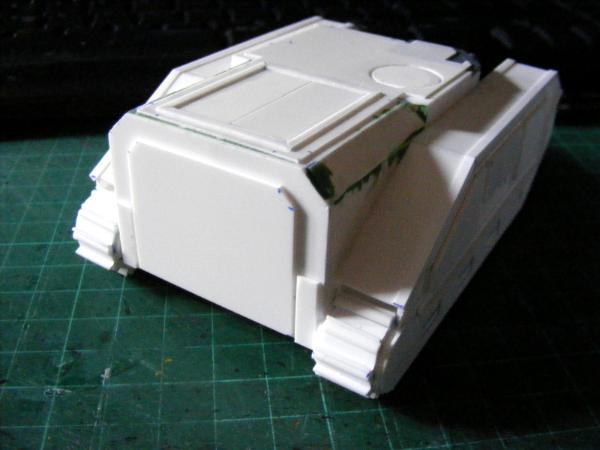
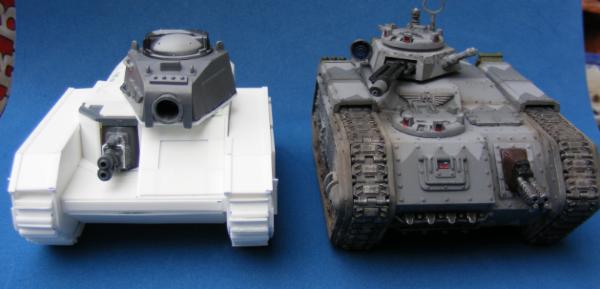
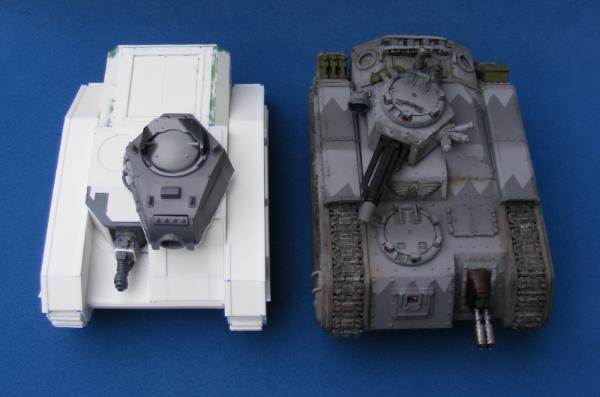
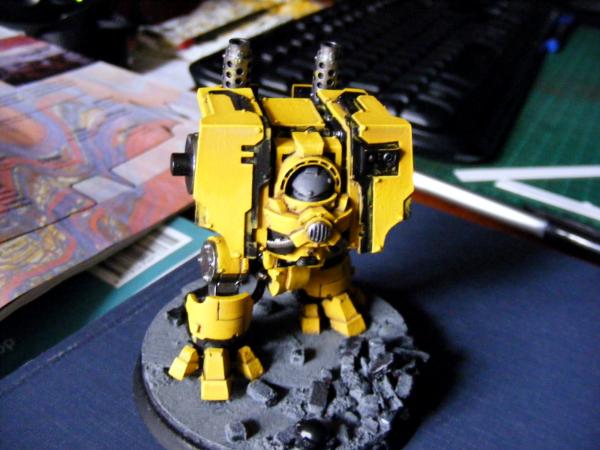
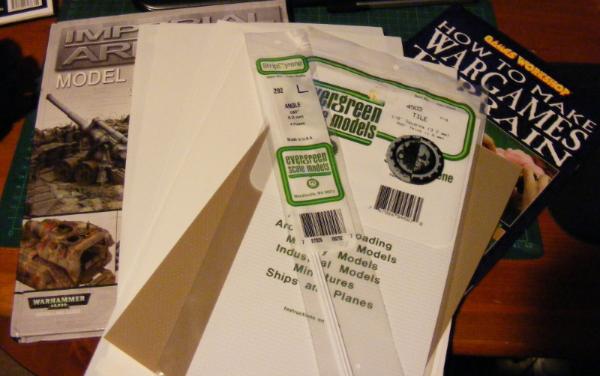
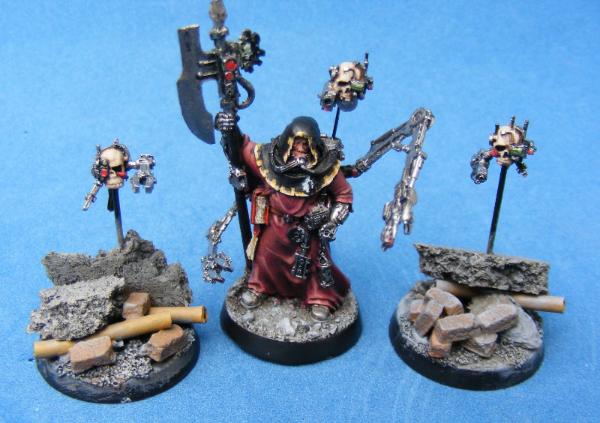
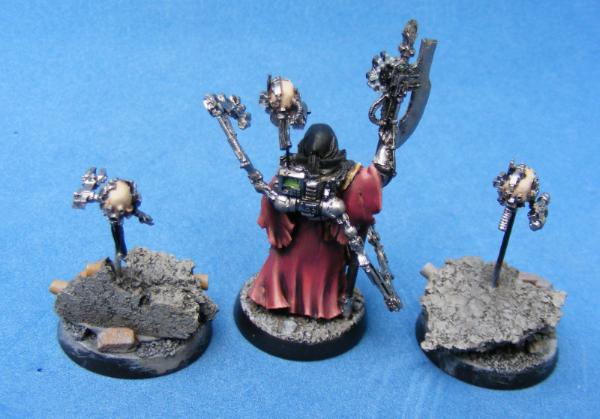
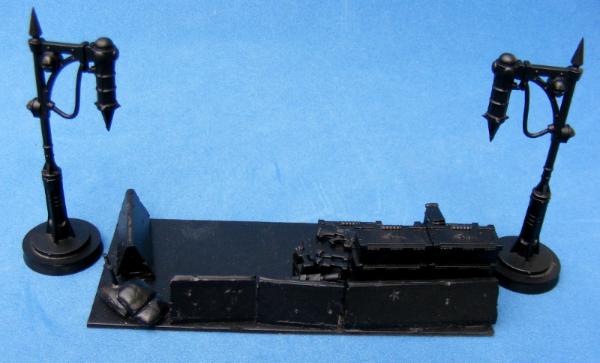
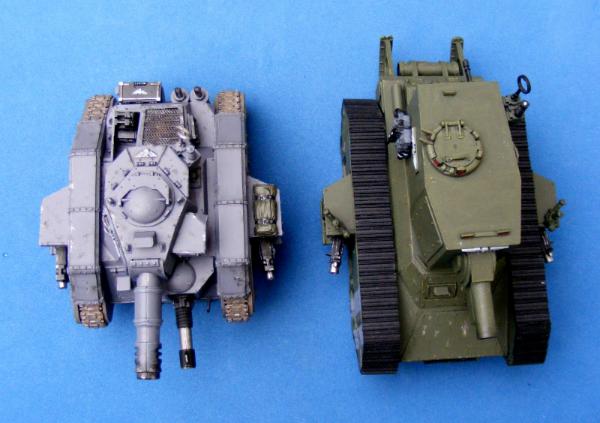
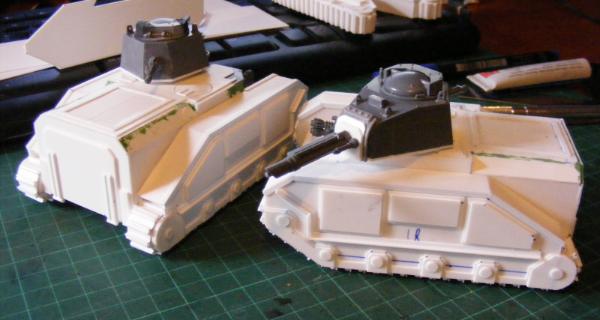
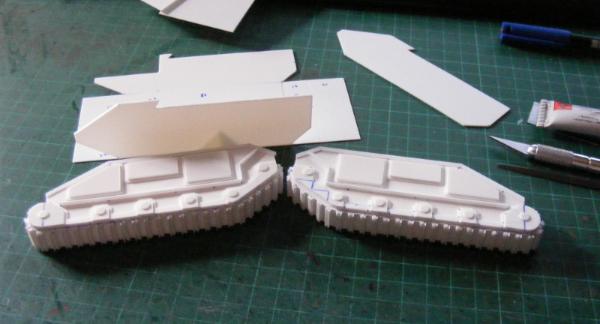
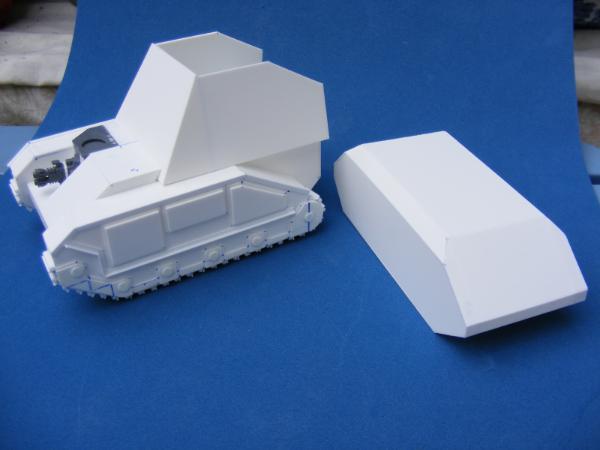
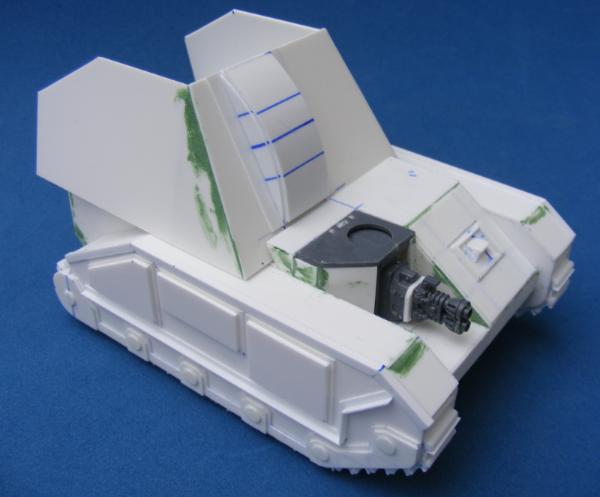
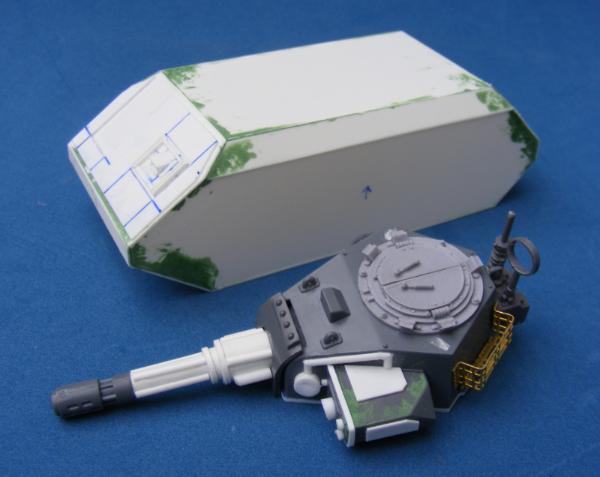

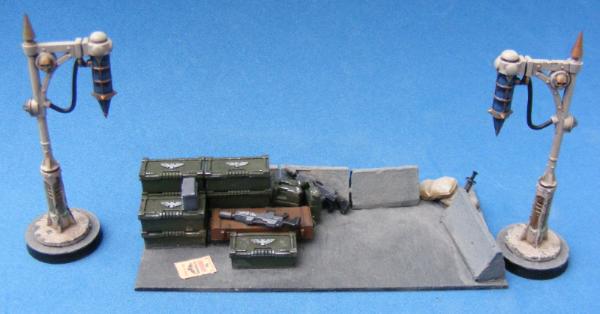

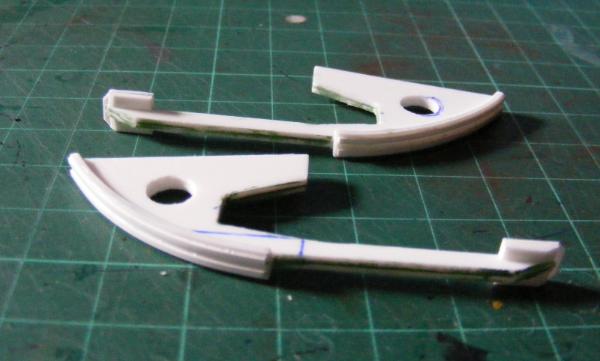
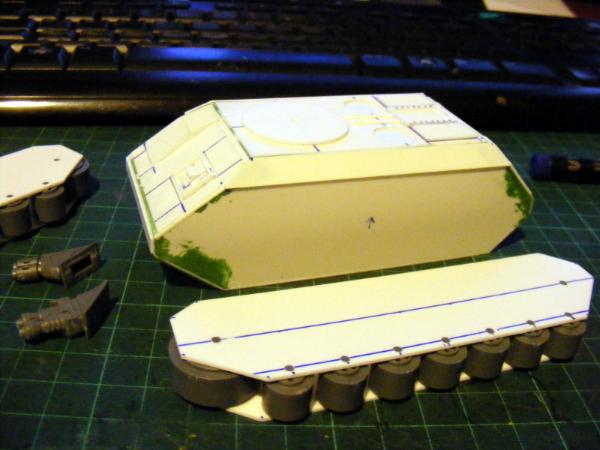
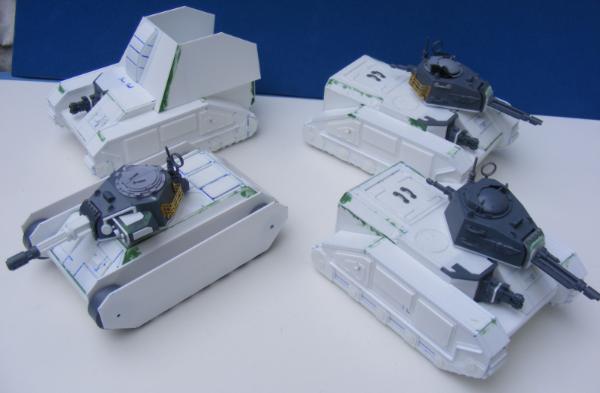
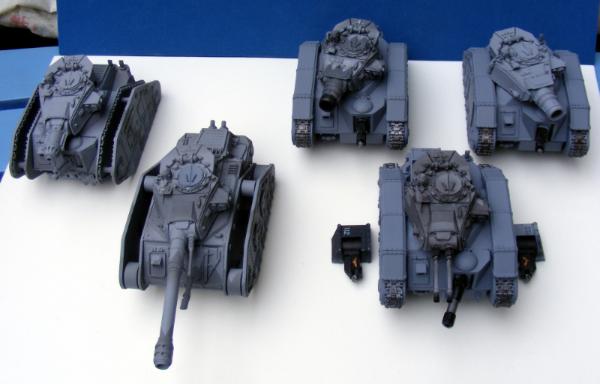
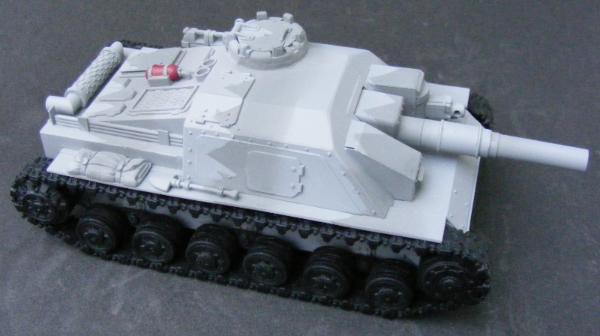
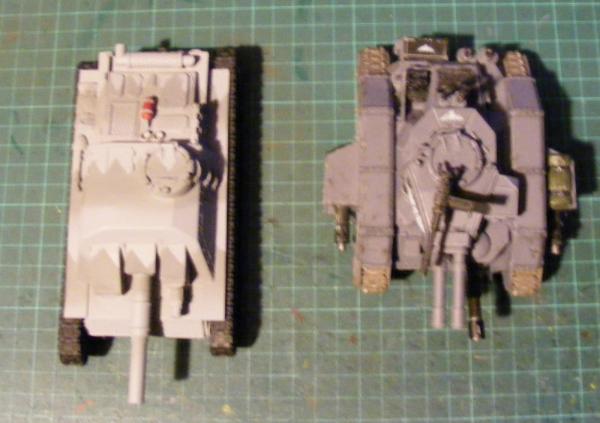
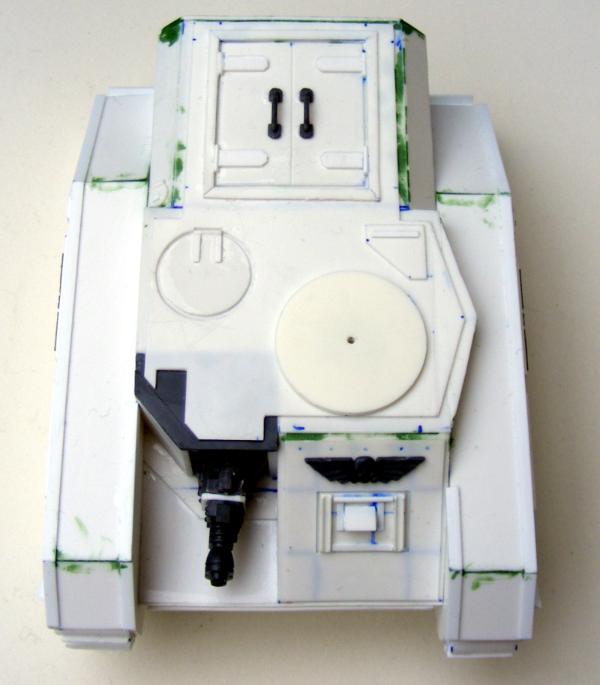
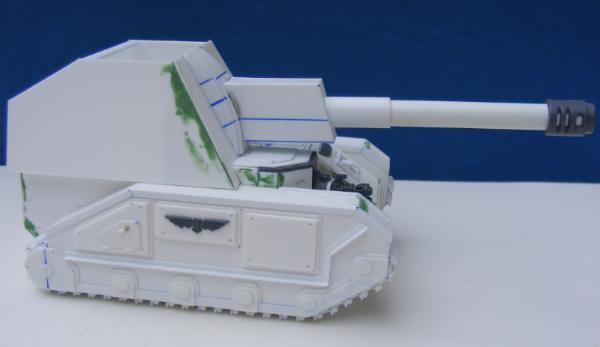
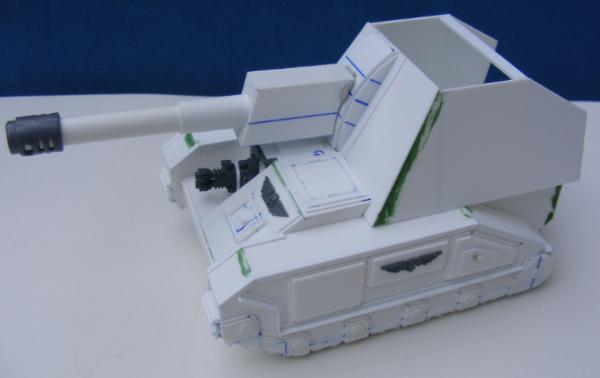
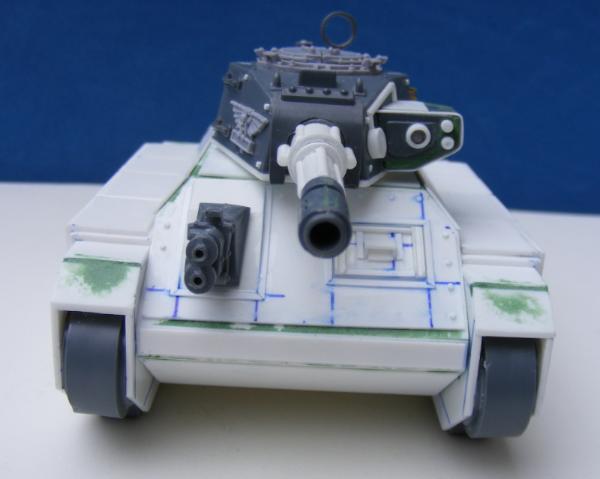
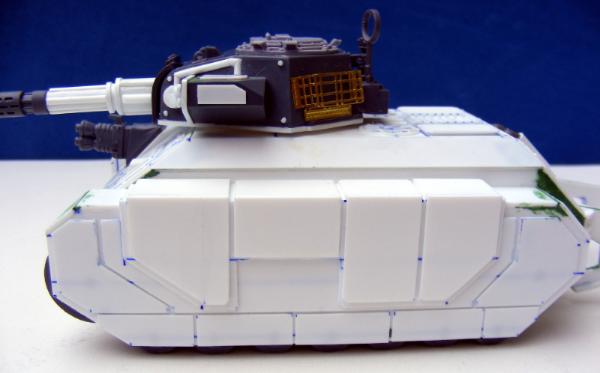
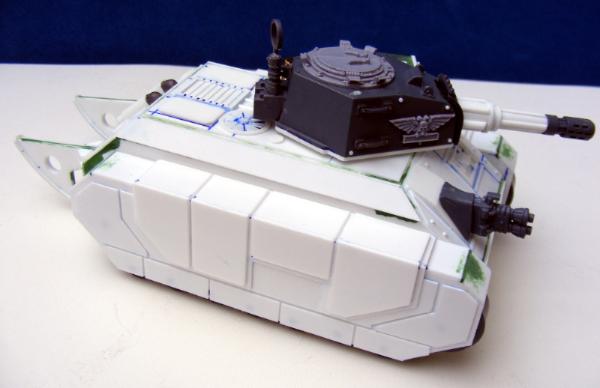

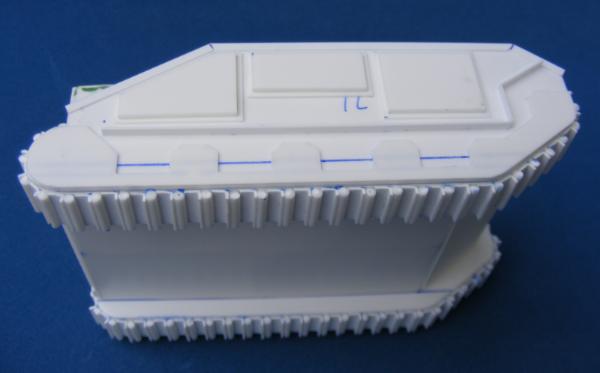
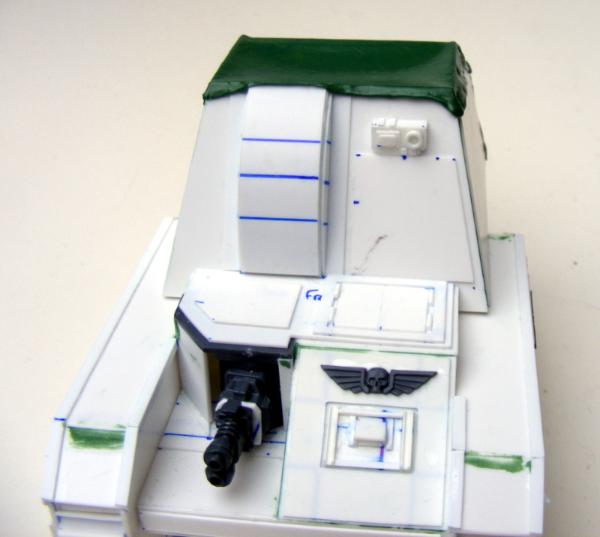
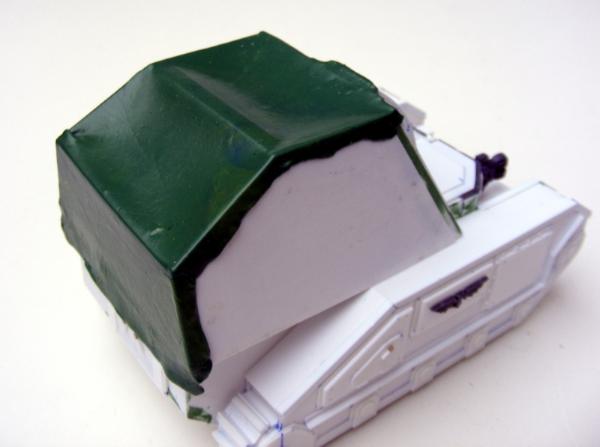
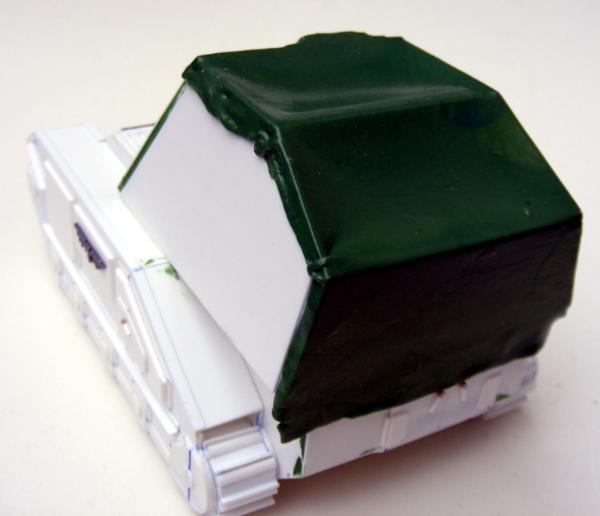
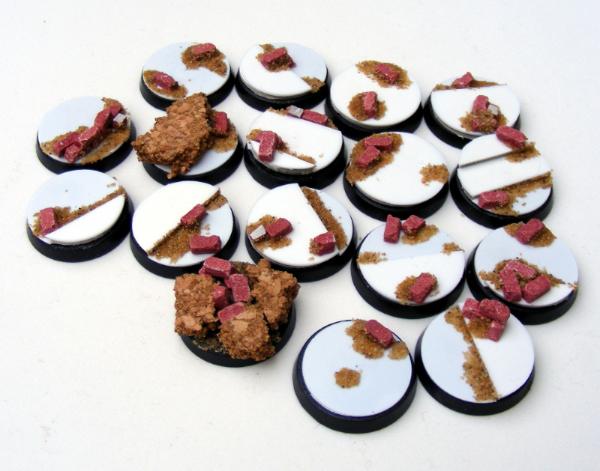
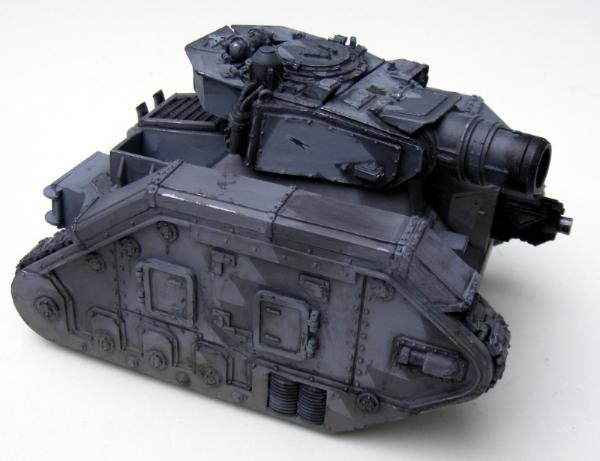
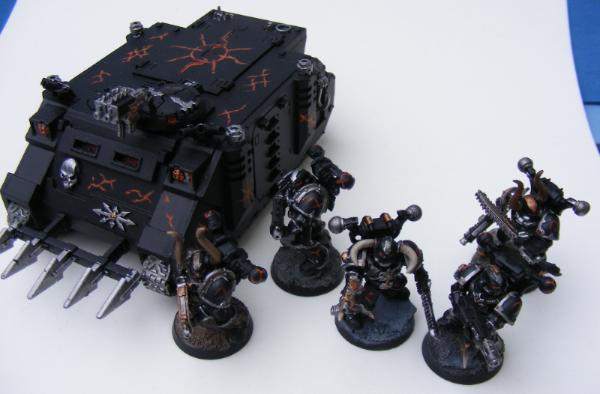
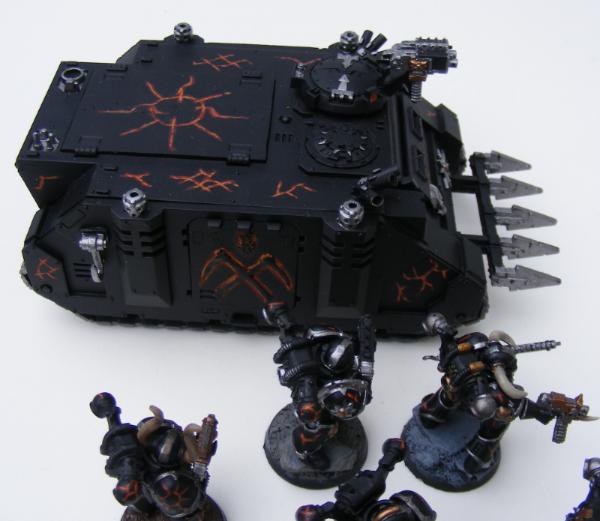

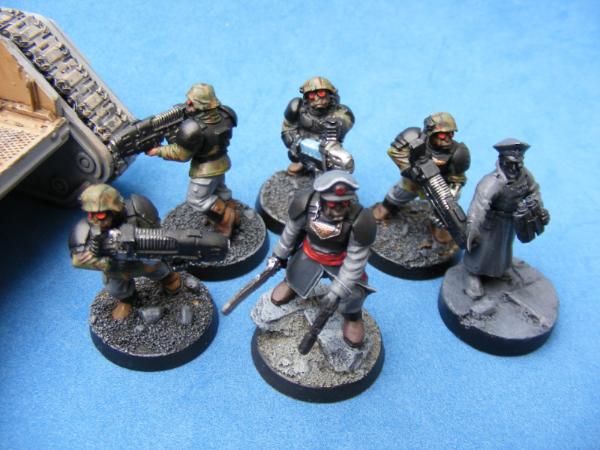
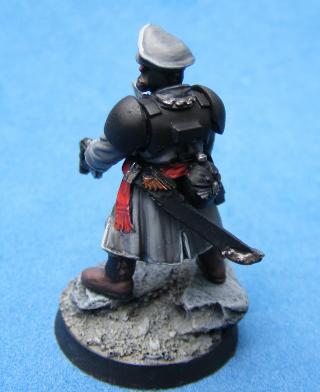
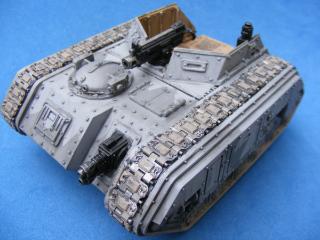

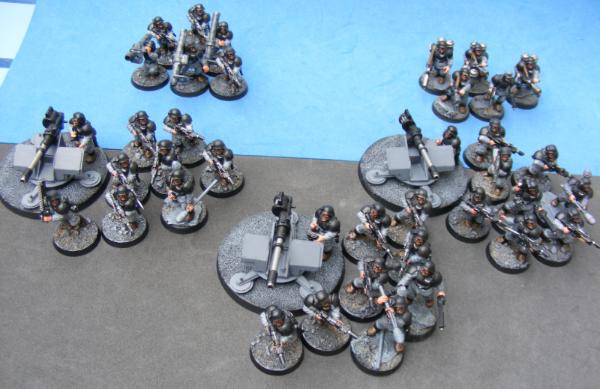
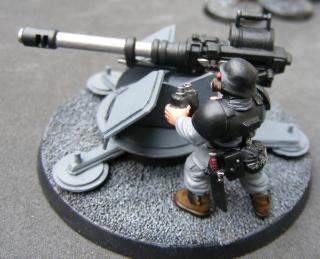
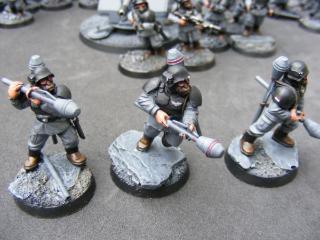
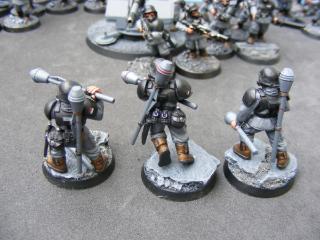
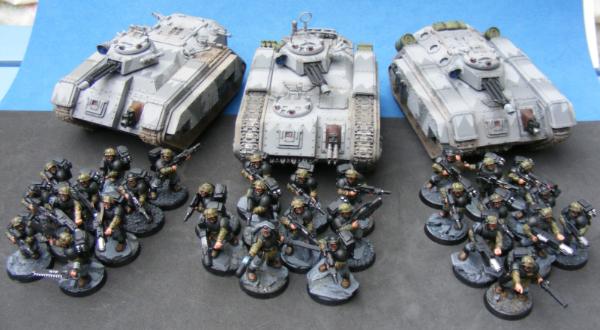
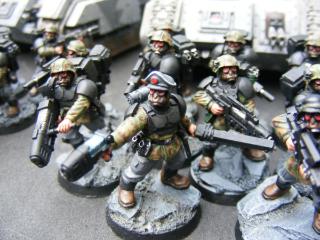
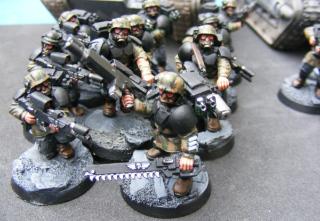
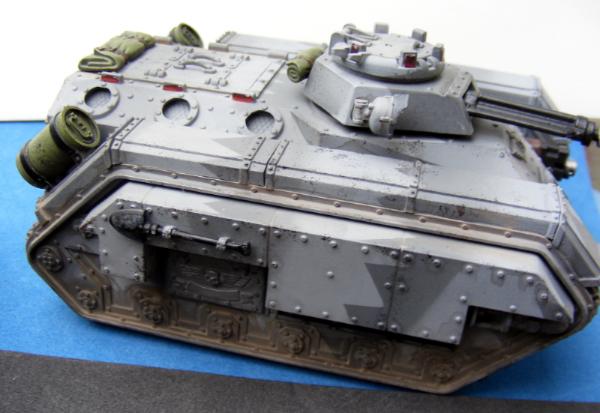

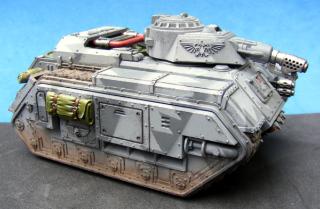
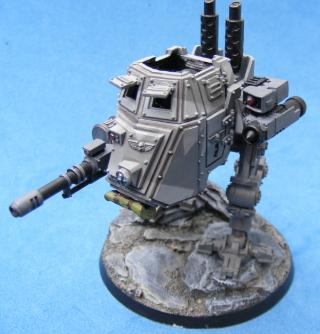
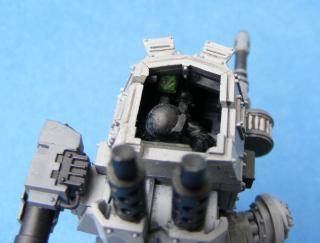

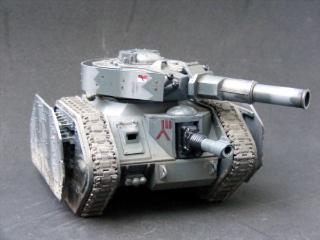
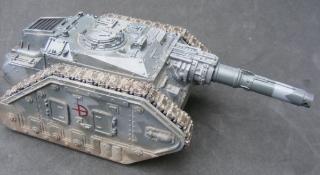
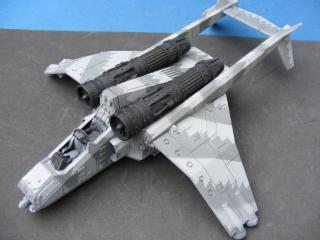
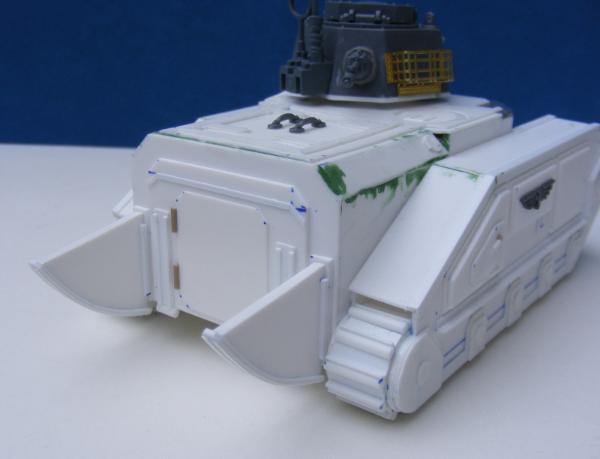
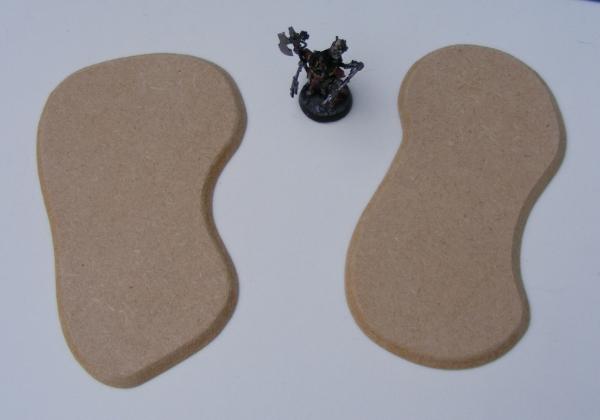
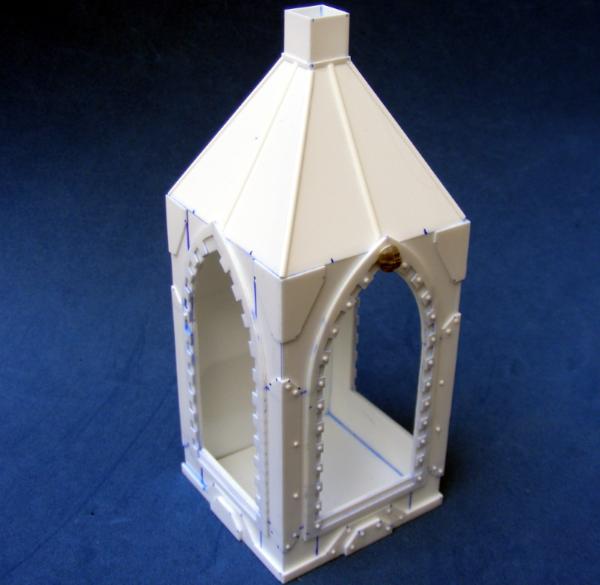
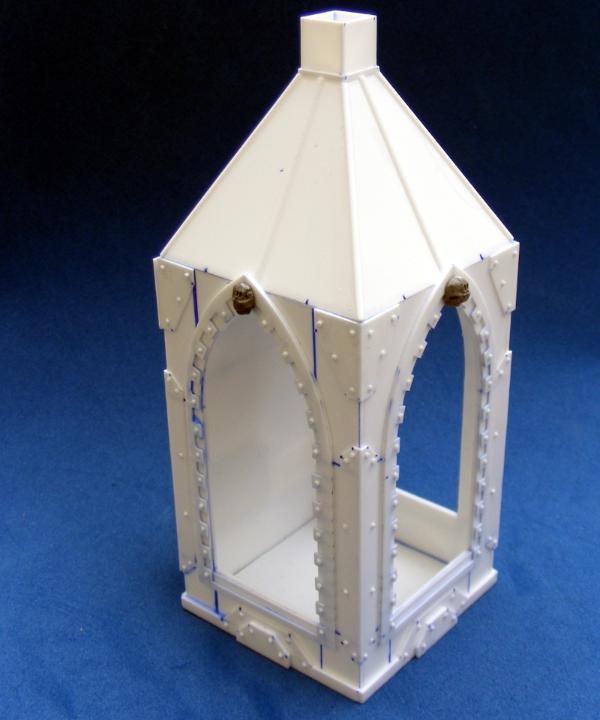
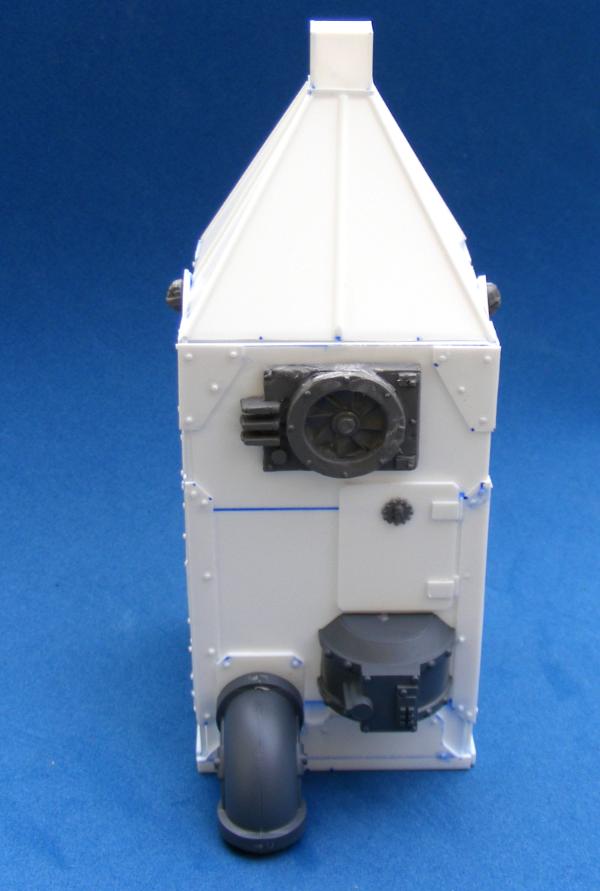

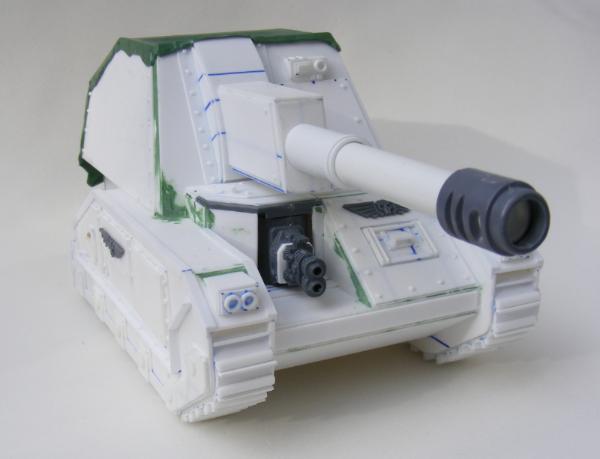
 ... oh well maybe next time.
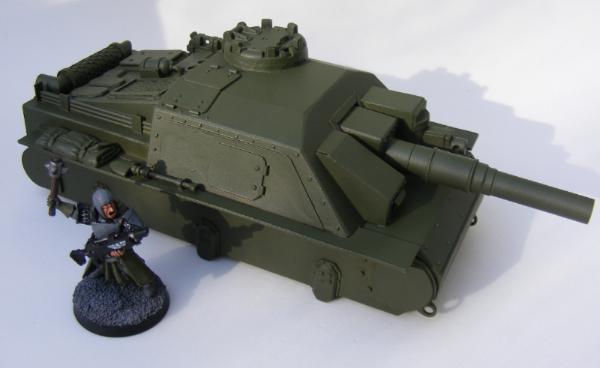
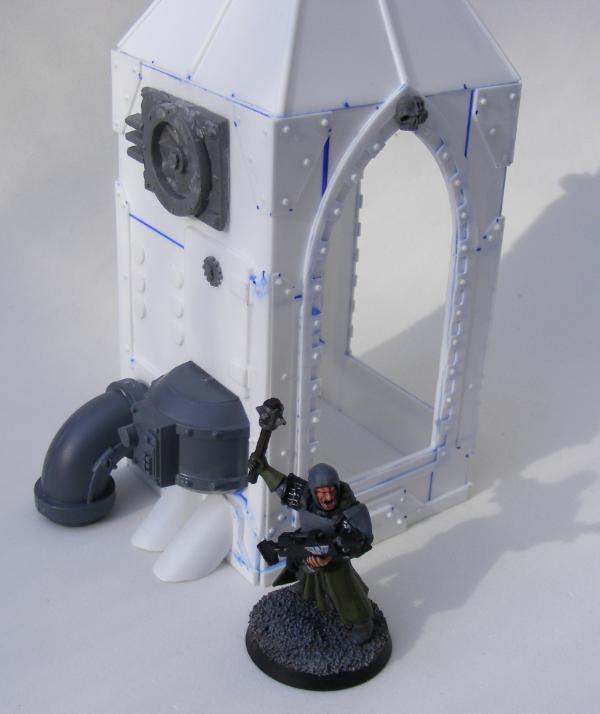
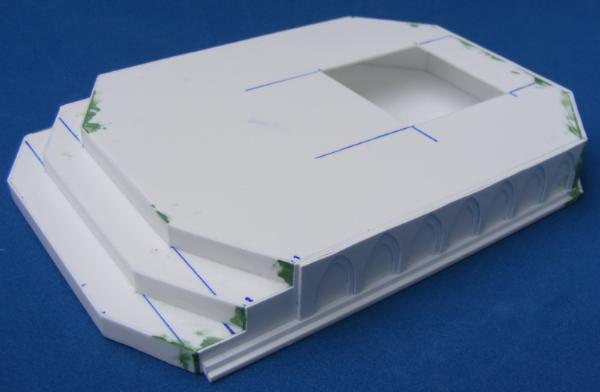
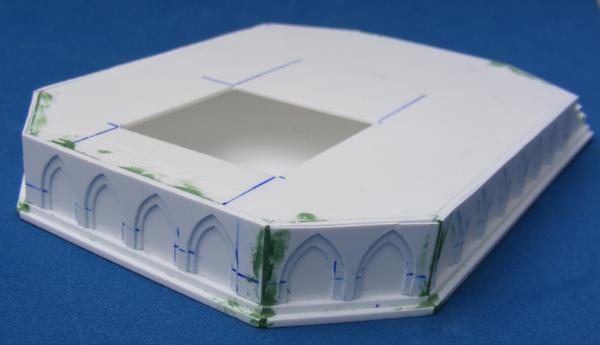
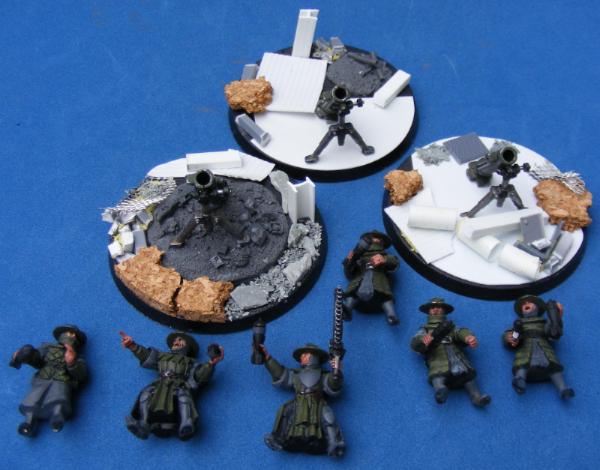
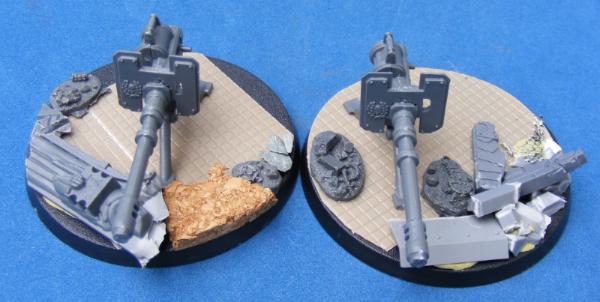
 so no more building for a few days, that said I'm just adding the finishing touches to a tutorial for building the
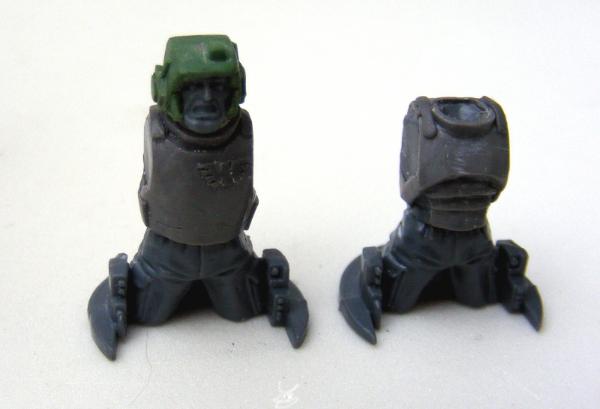
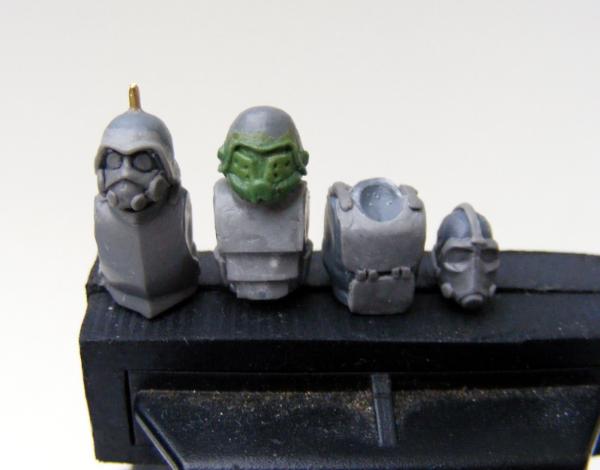

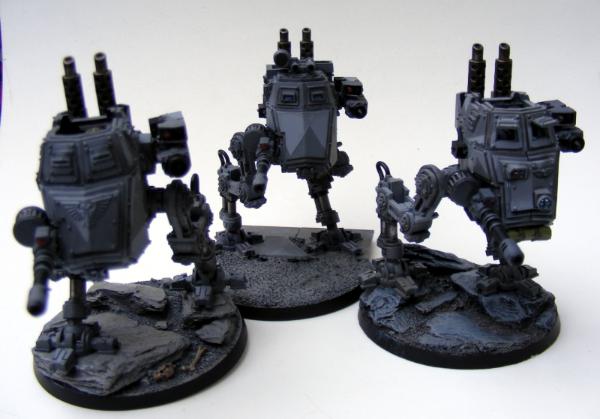
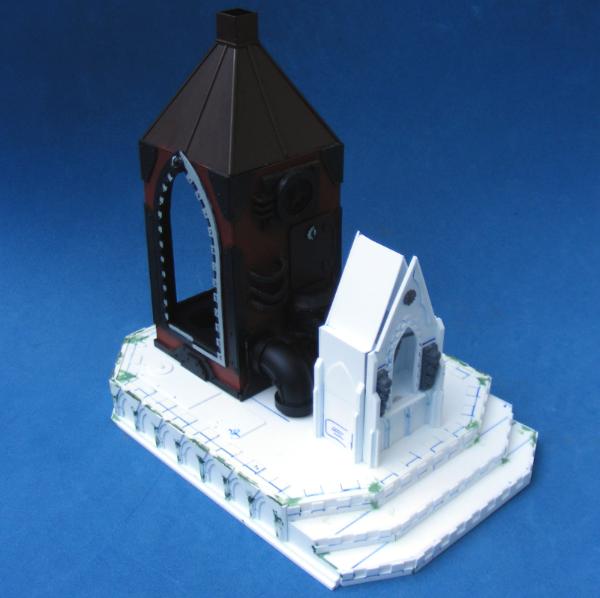
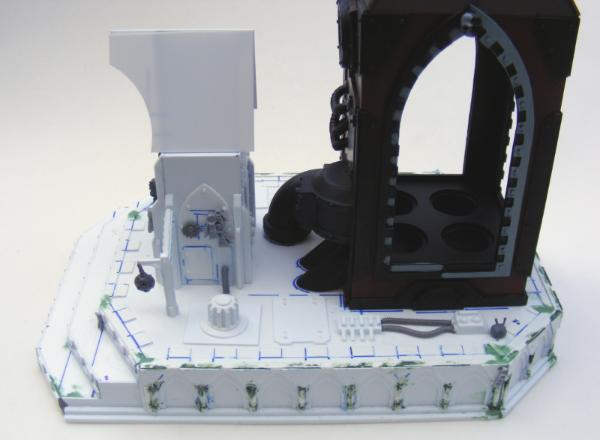
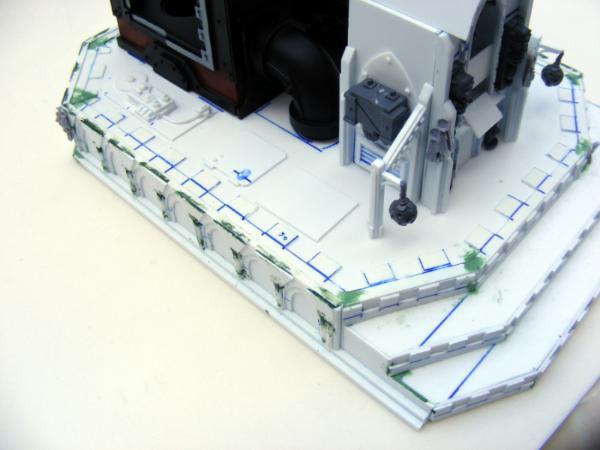
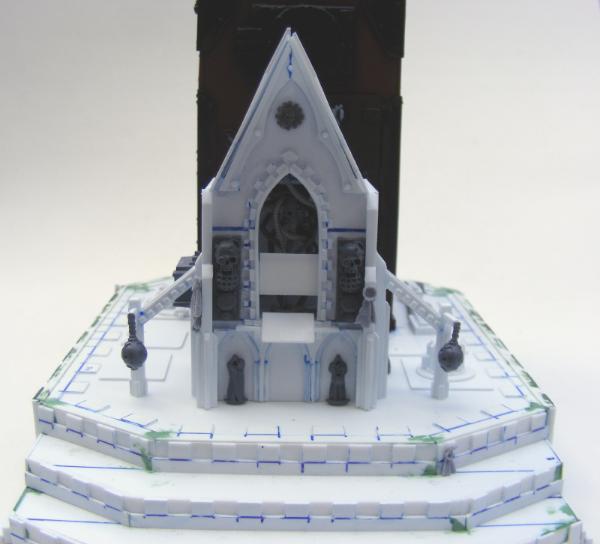
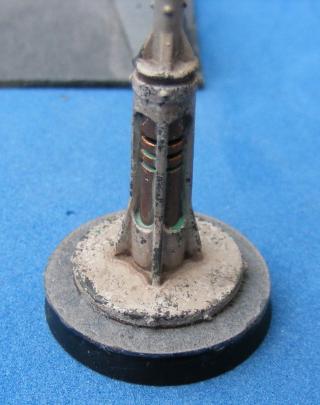

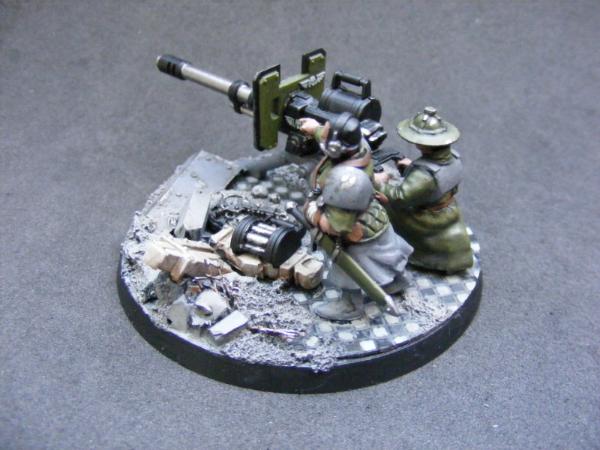
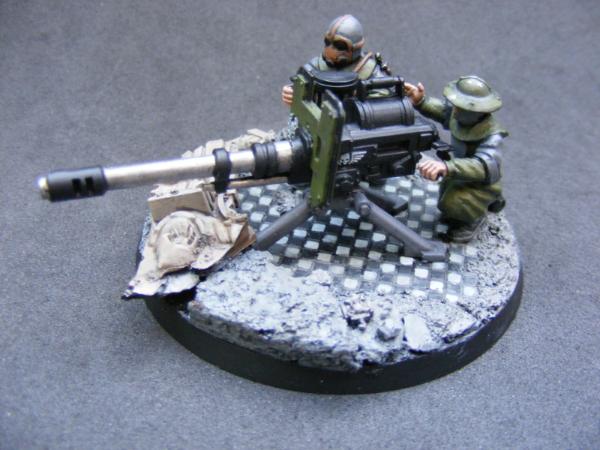
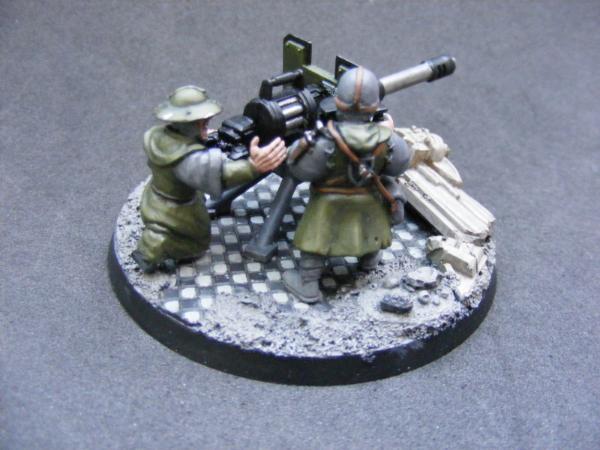
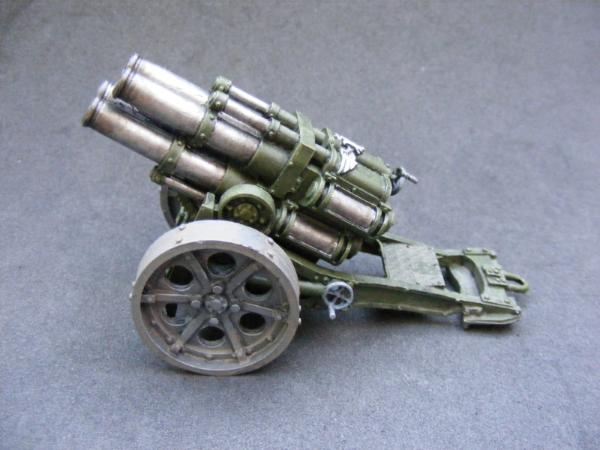
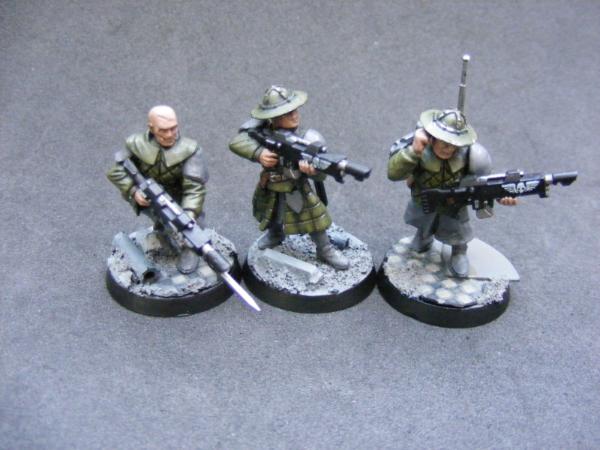
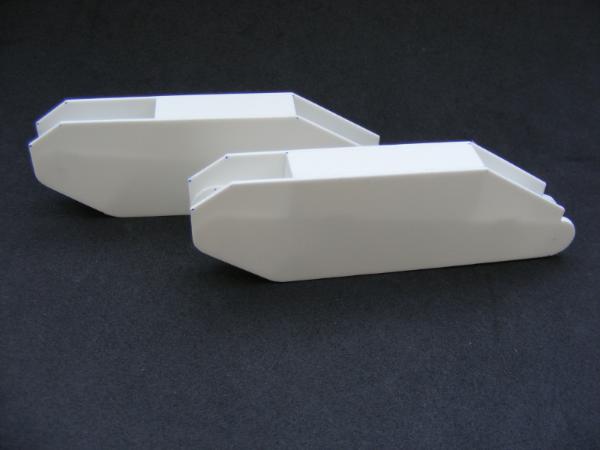
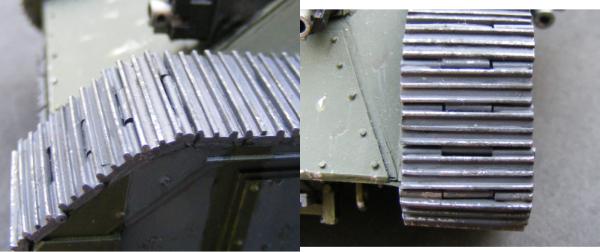
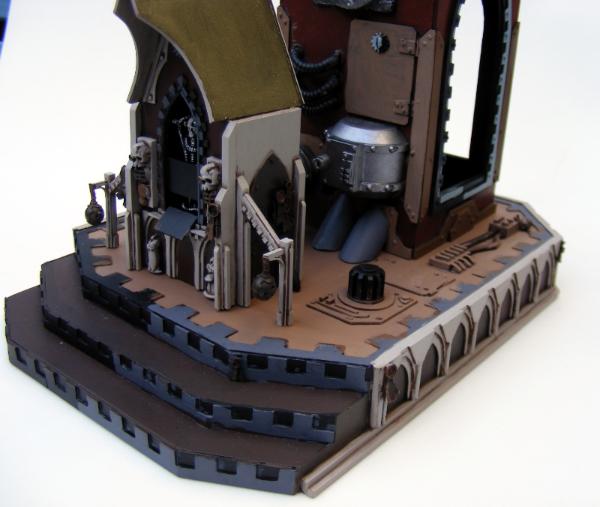
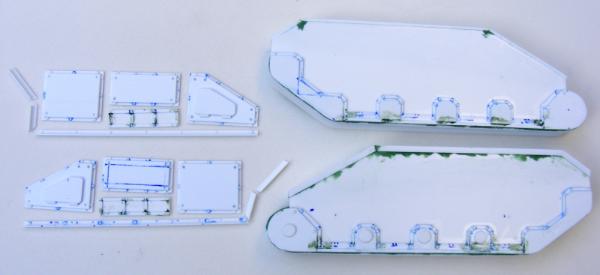

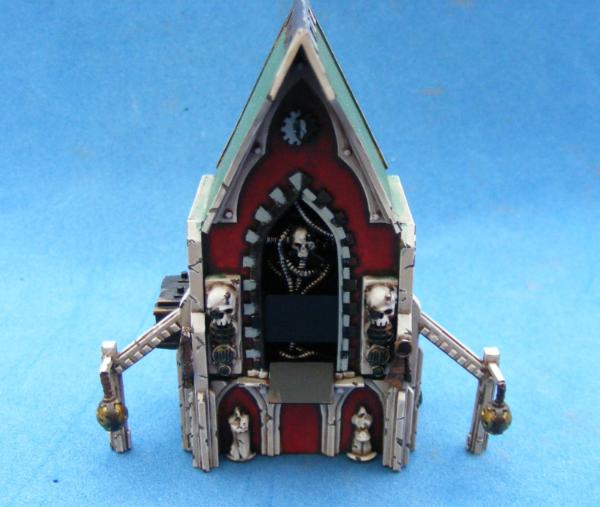
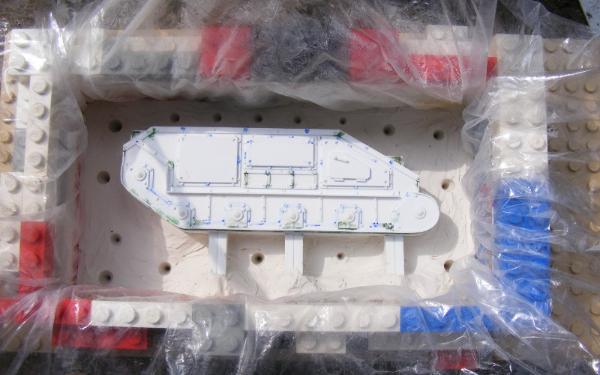
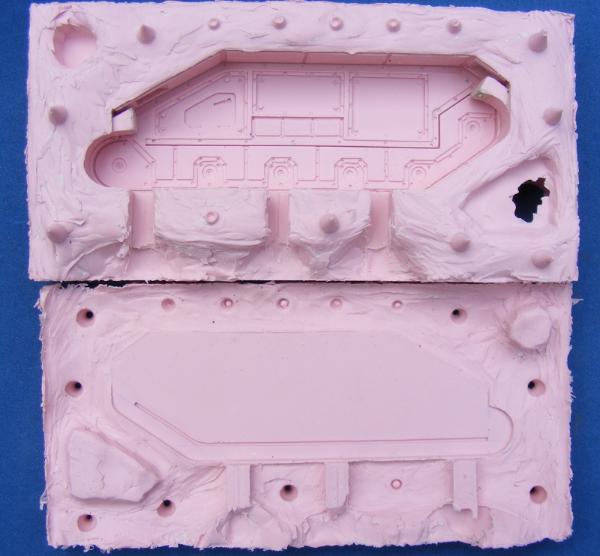
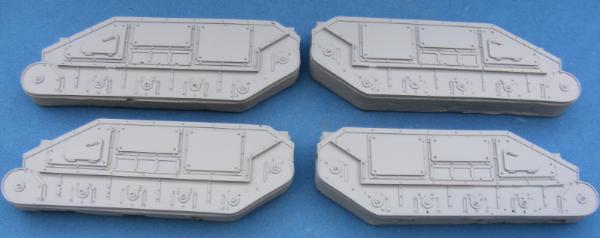
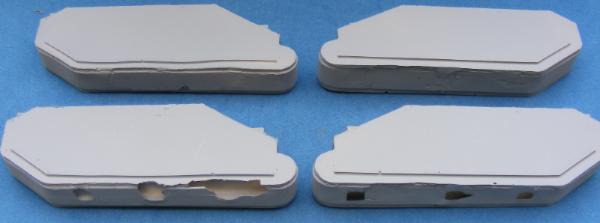
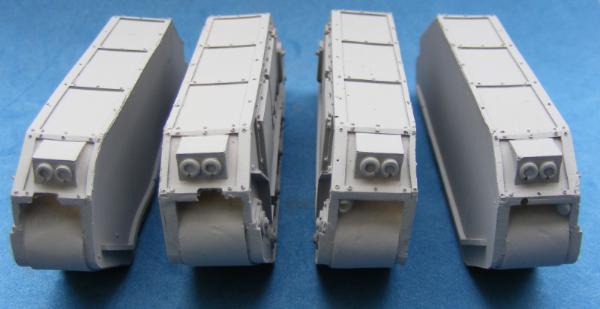
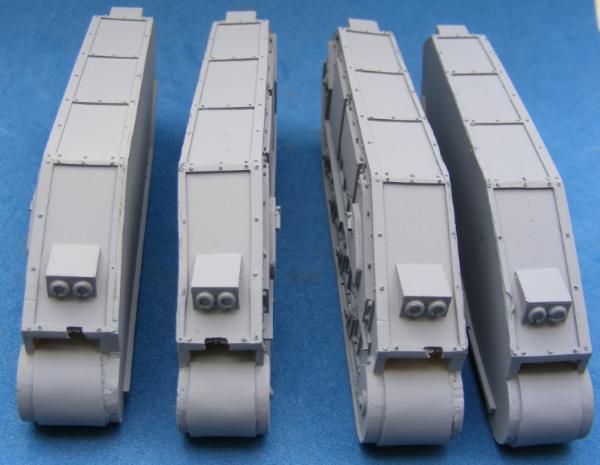
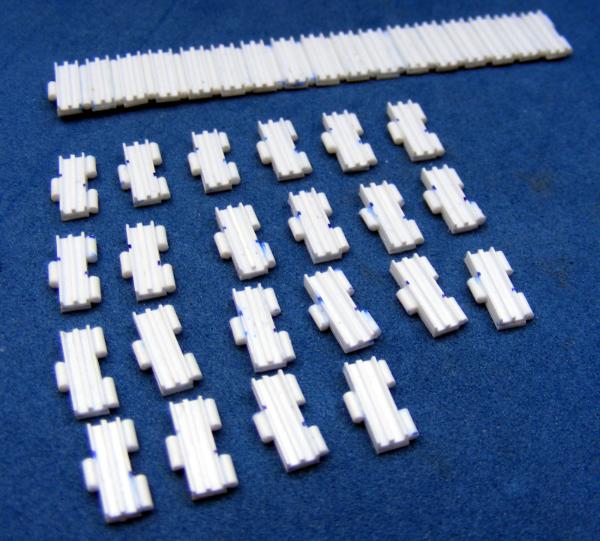
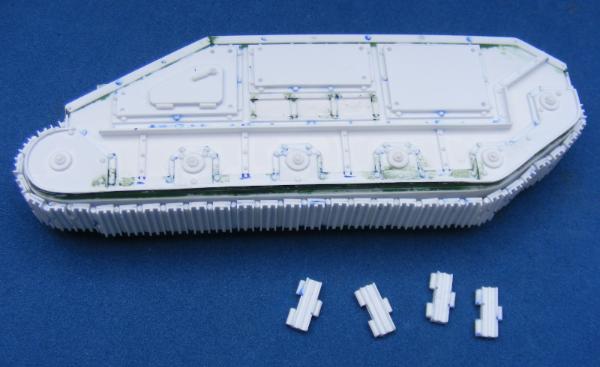
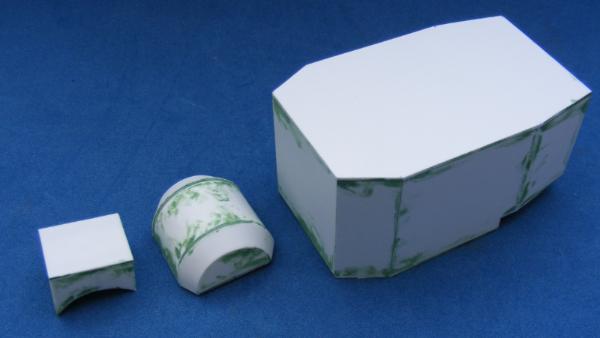
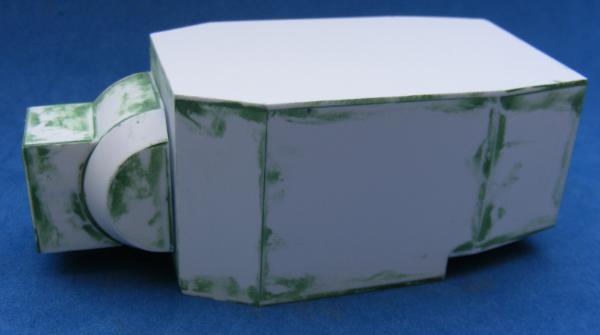
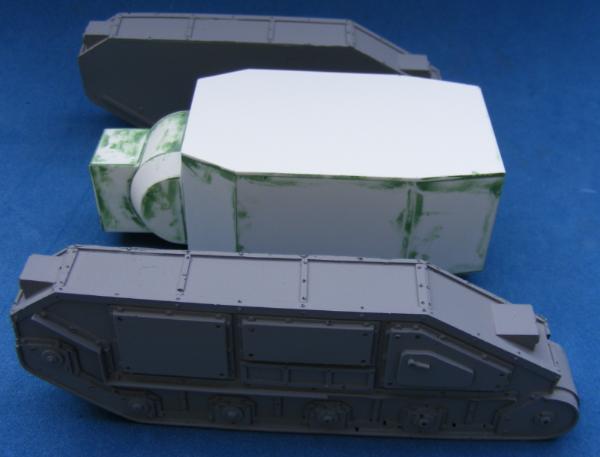

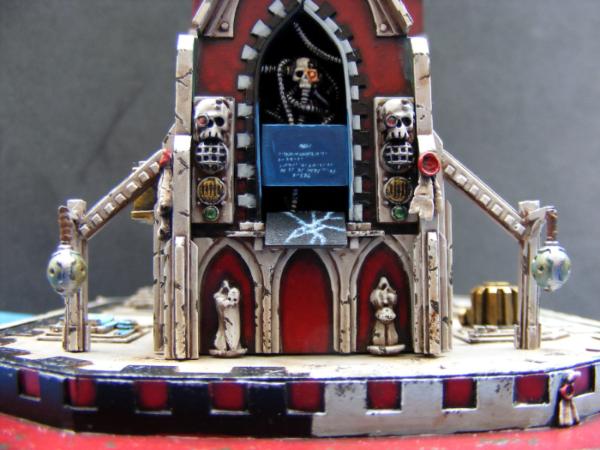
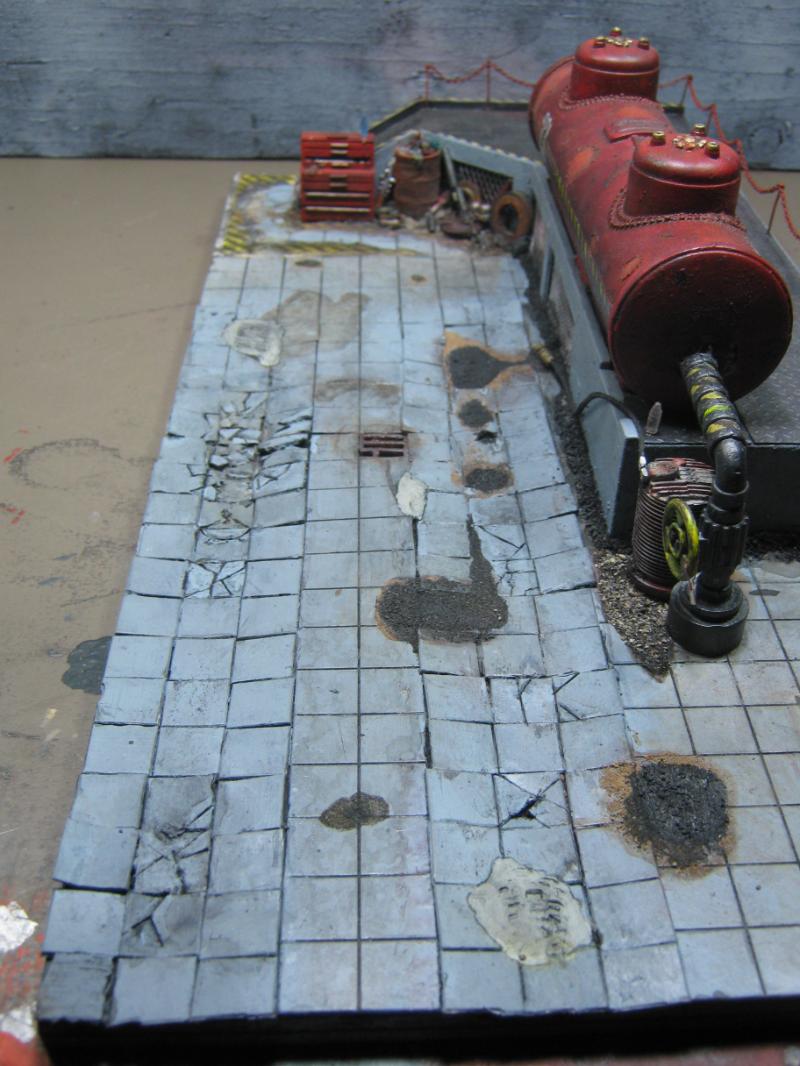
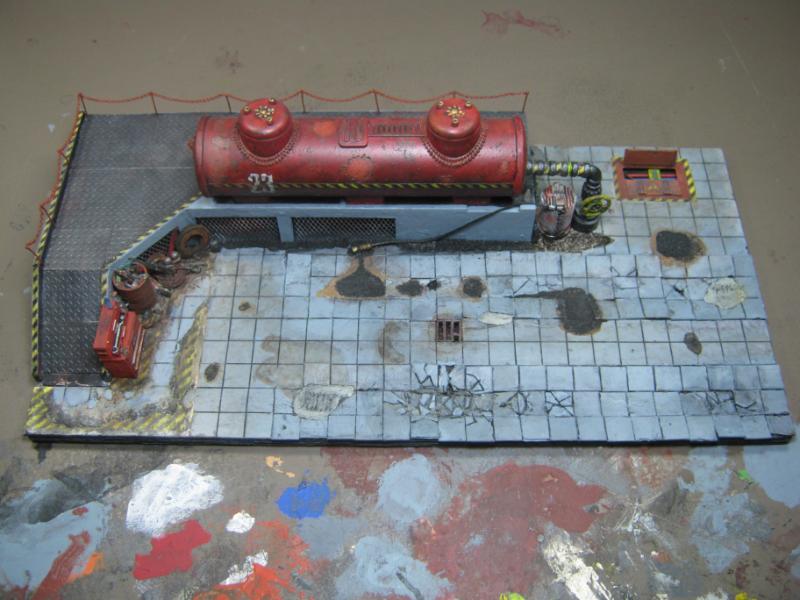
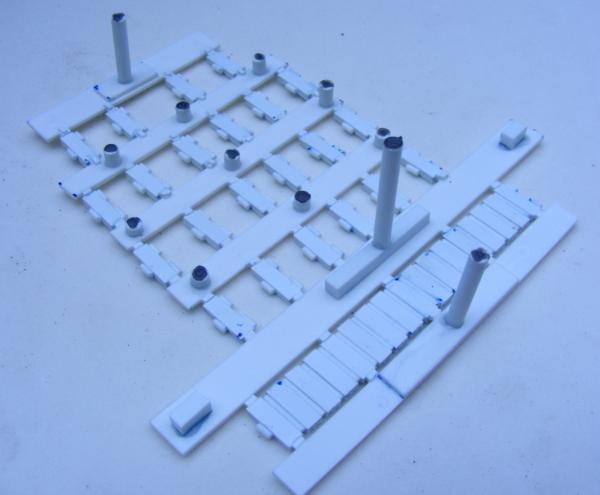


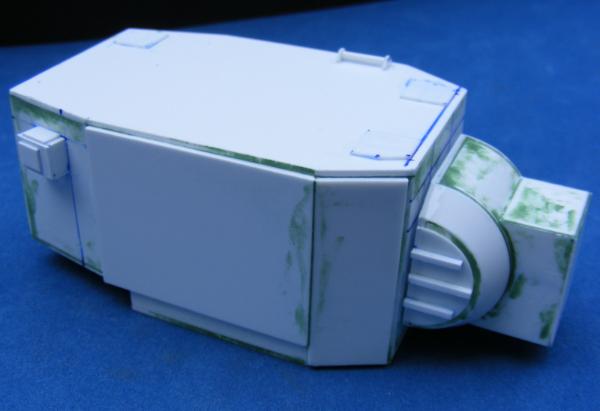
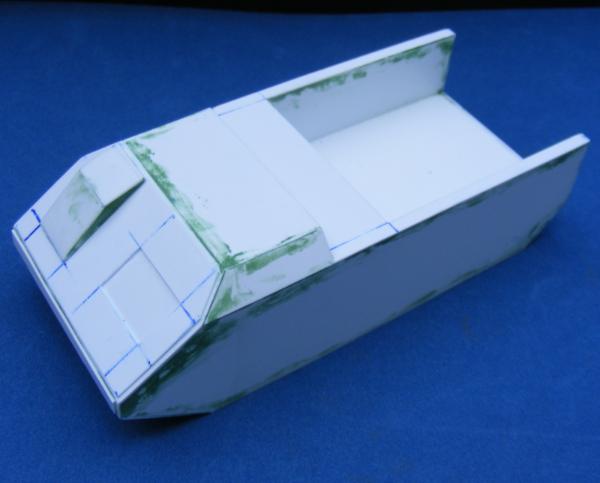

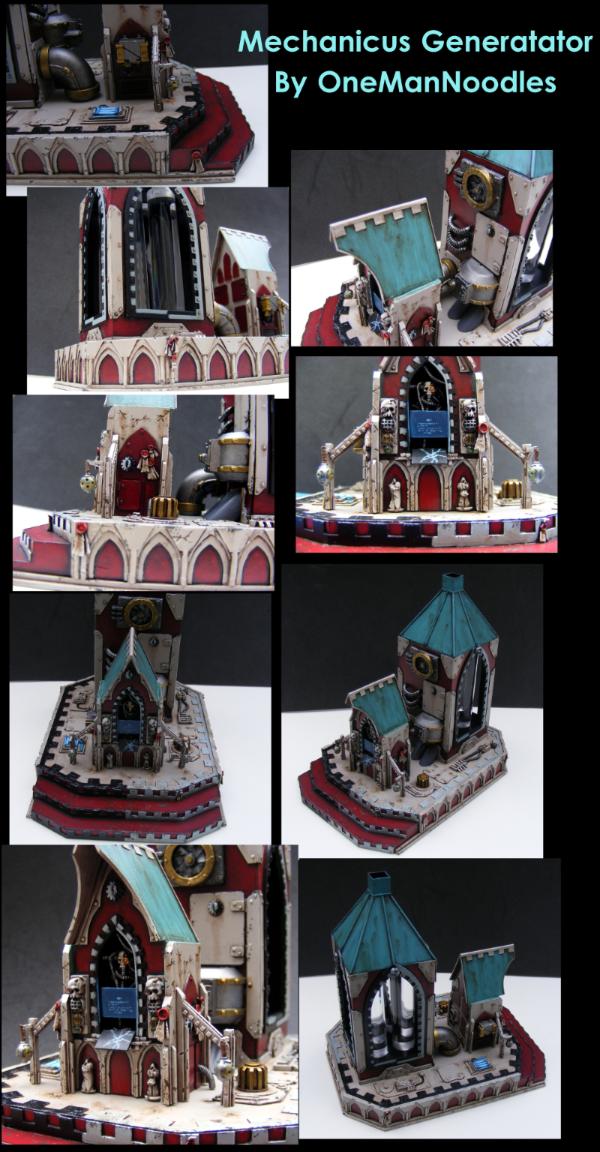
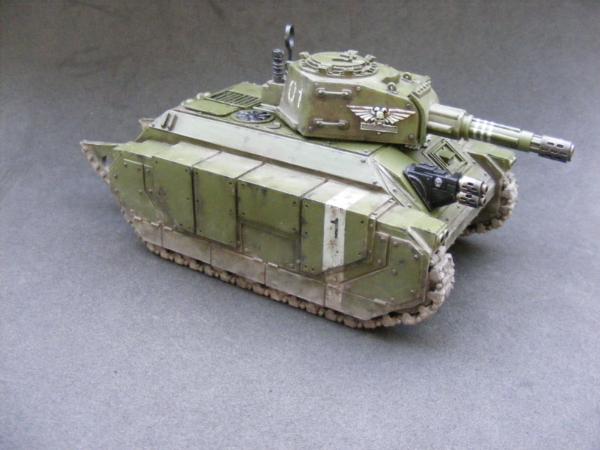
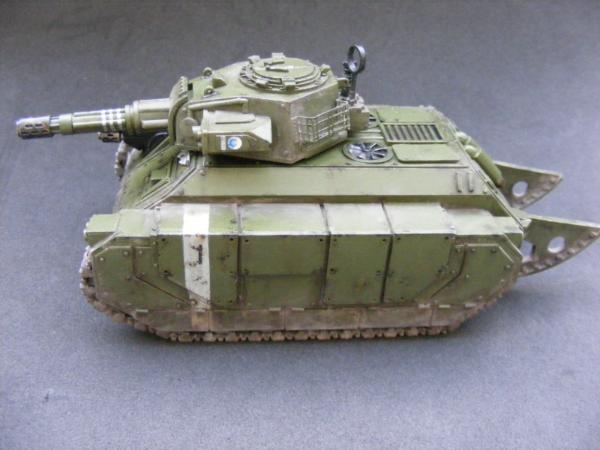
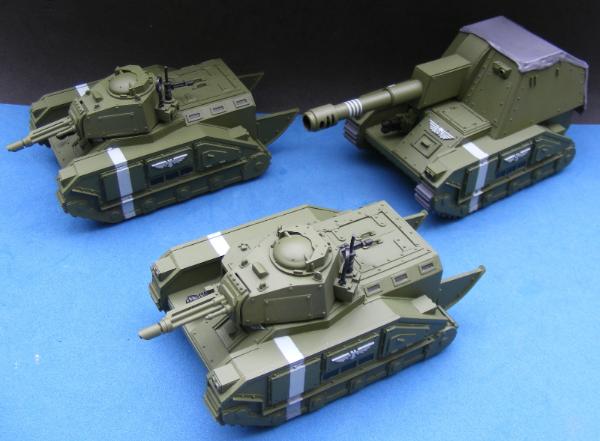

 so think you could have a bit of a market there for those.
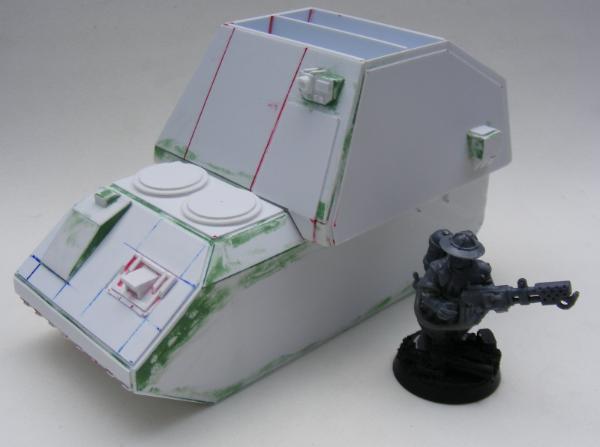
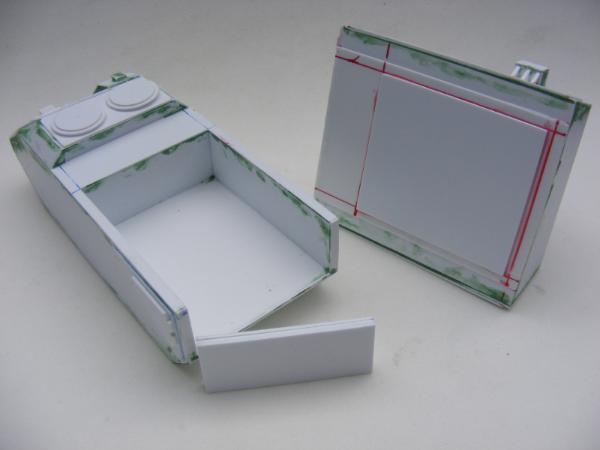
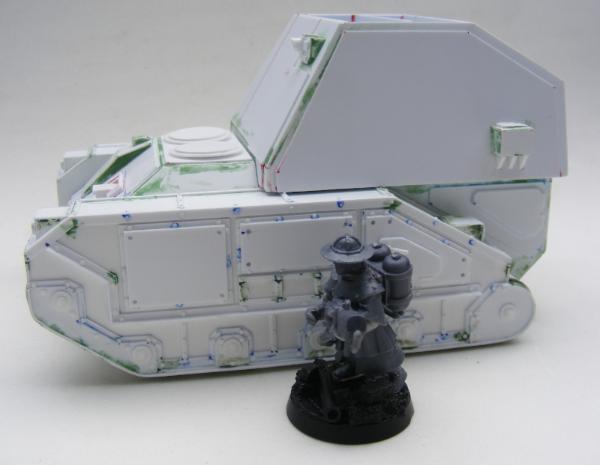
 will this be casted up as well then
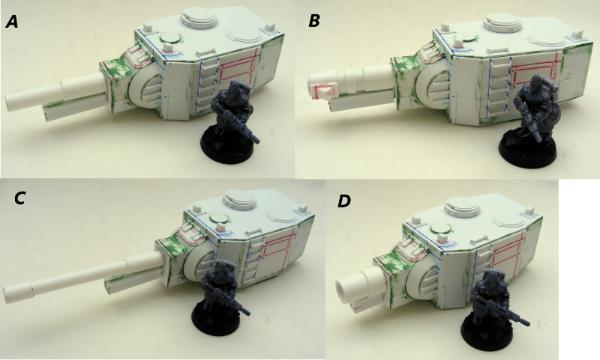


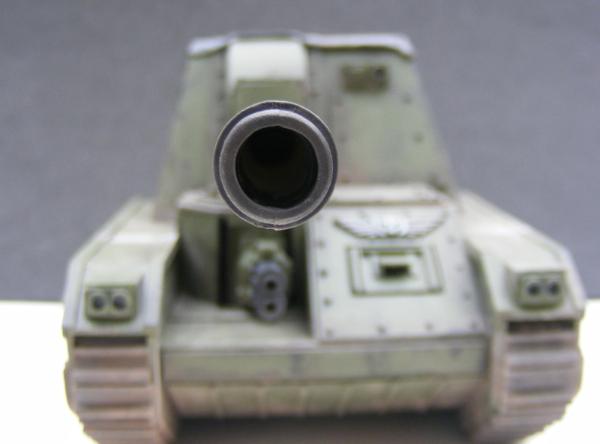
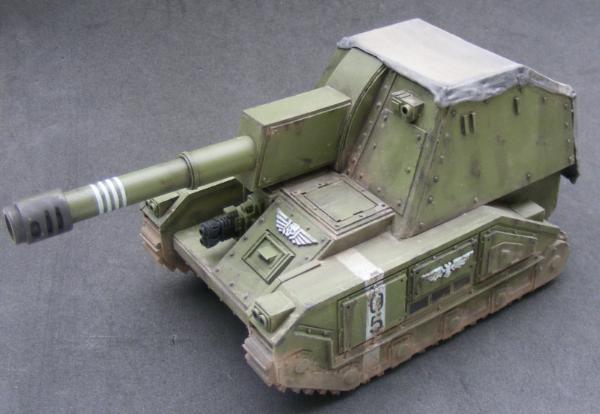
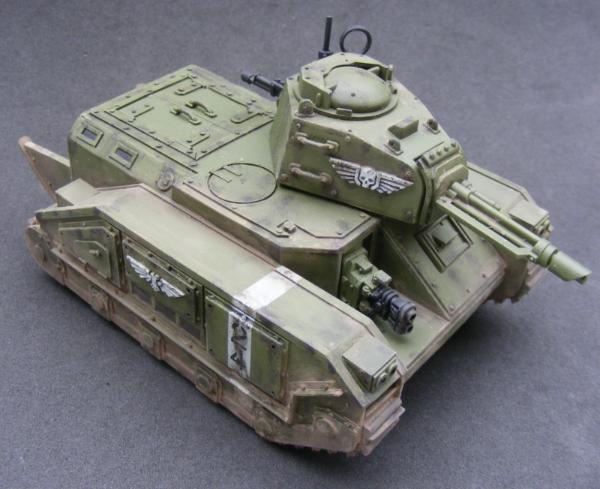
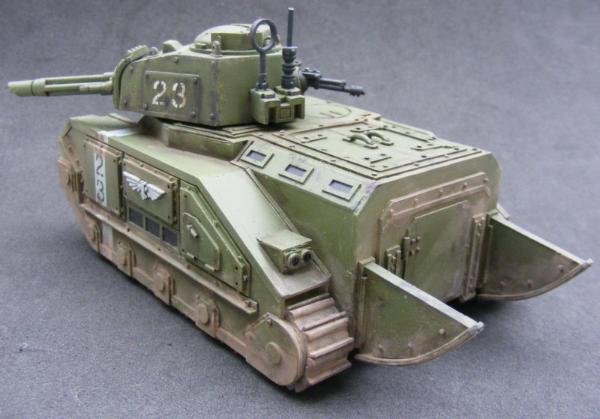


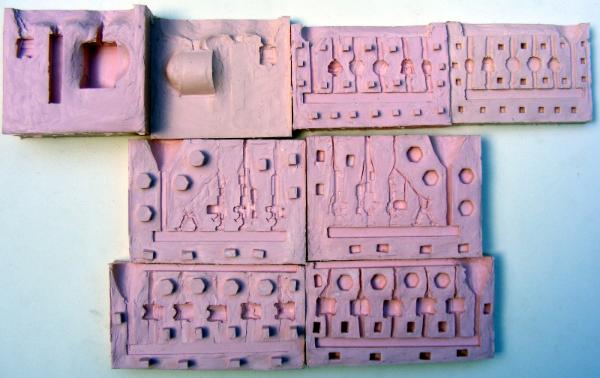
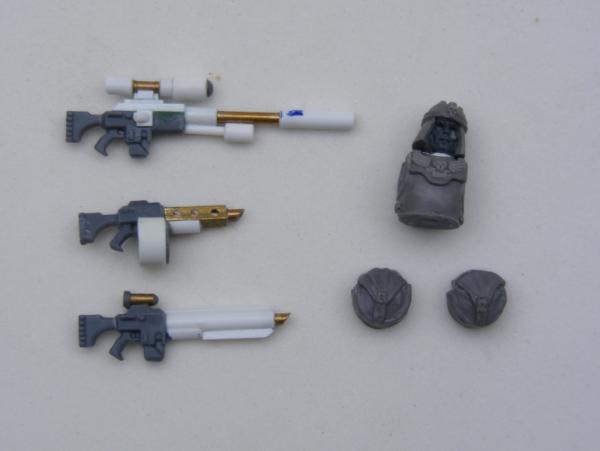

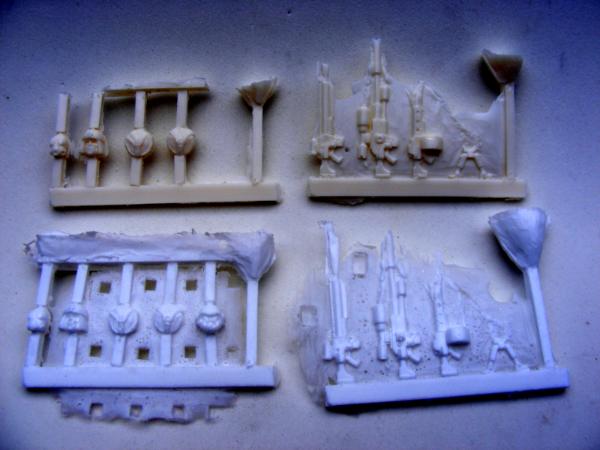

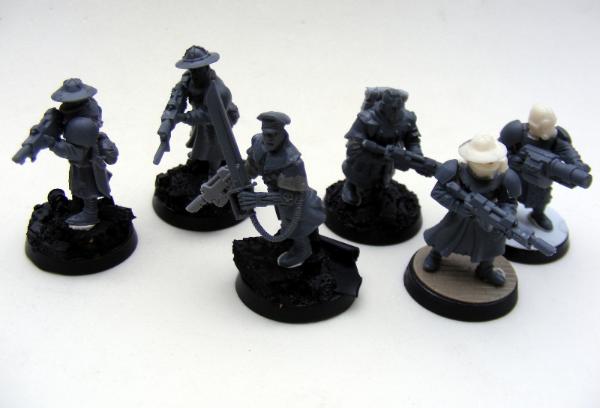
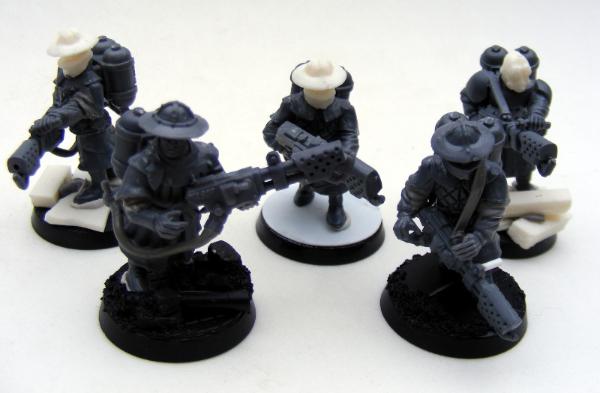
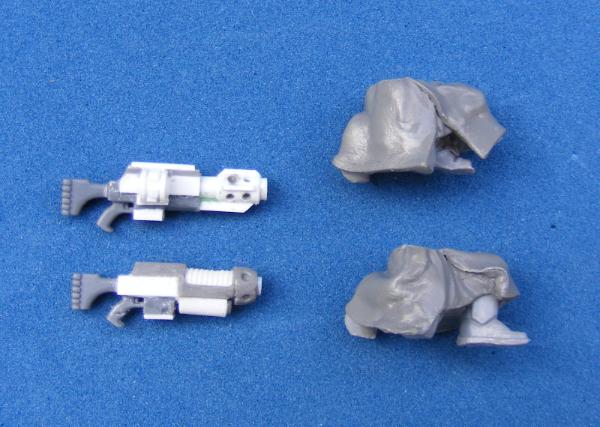
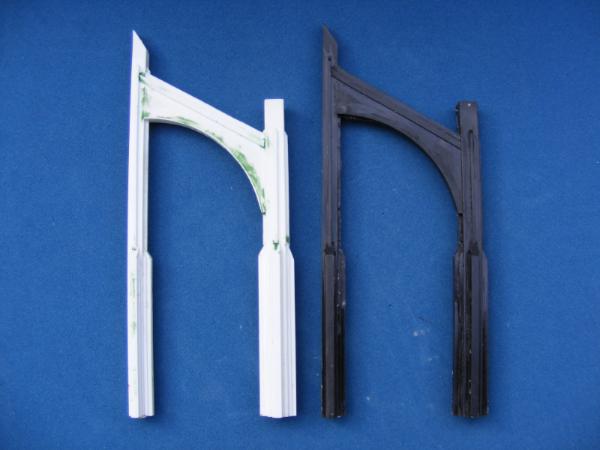
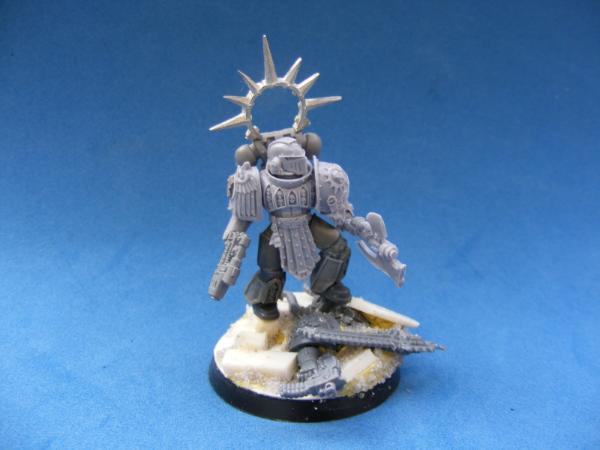
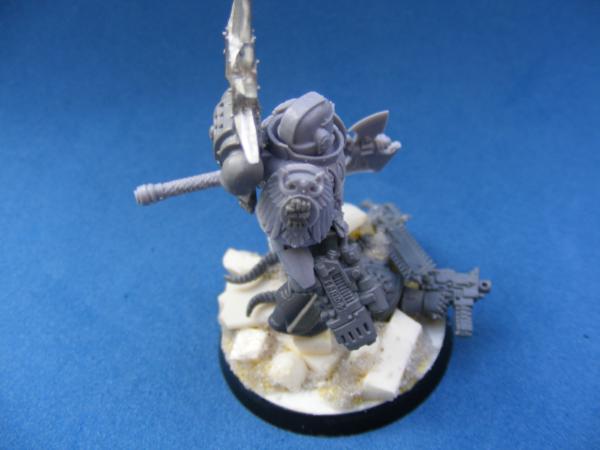
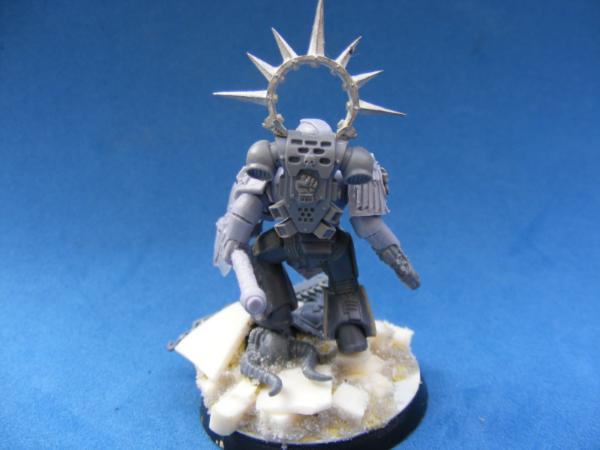
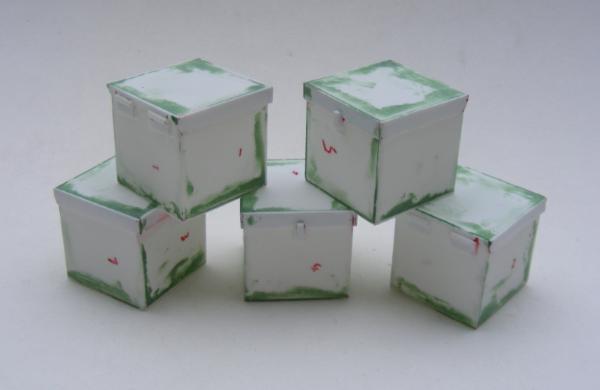
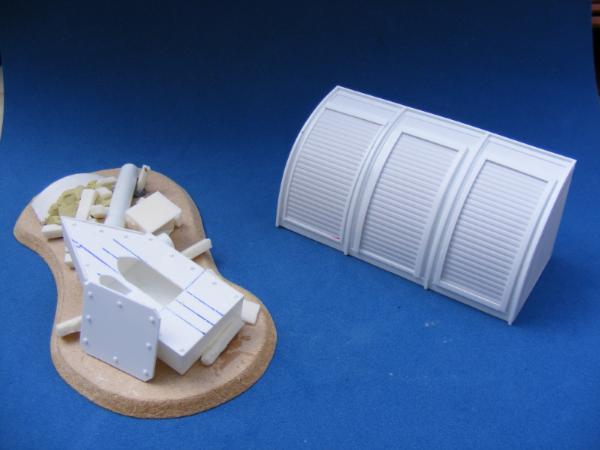
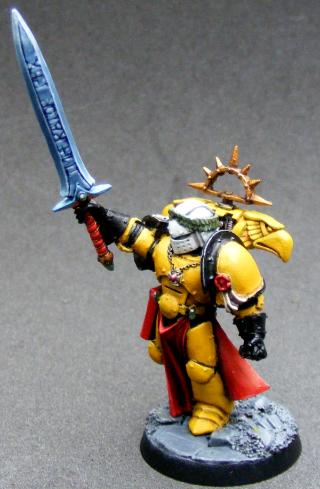
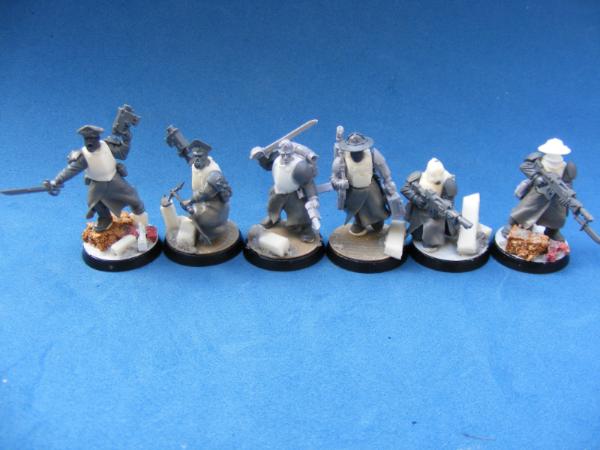
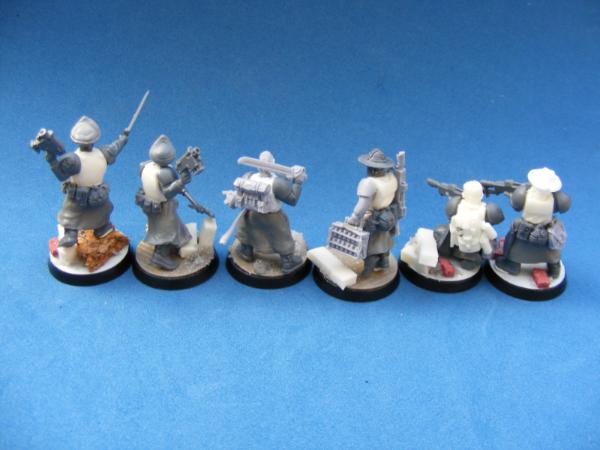
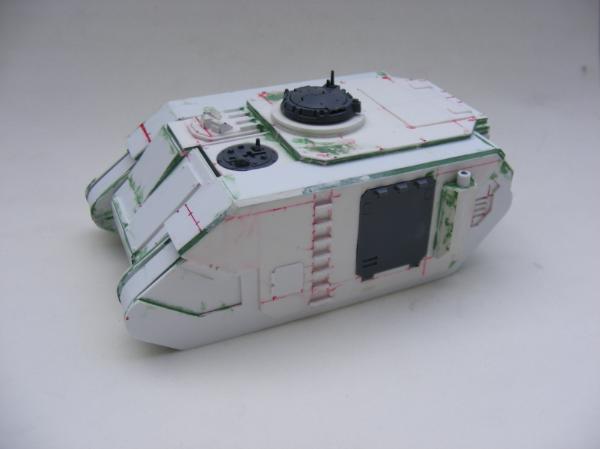
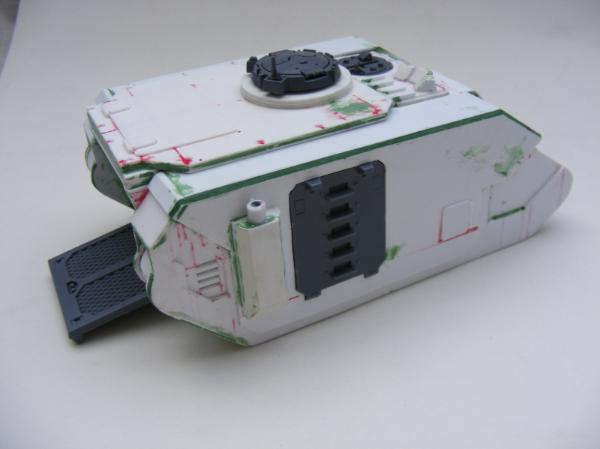
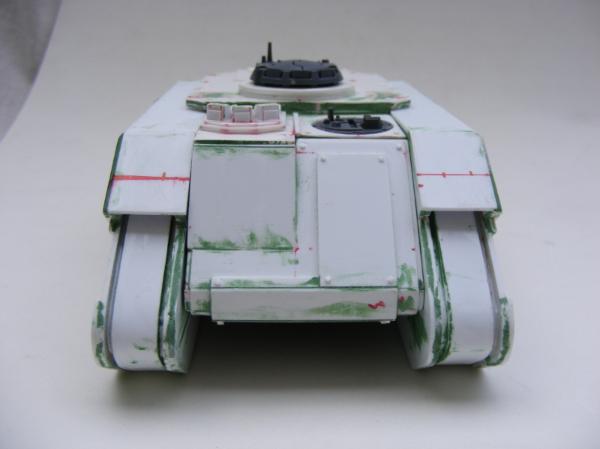
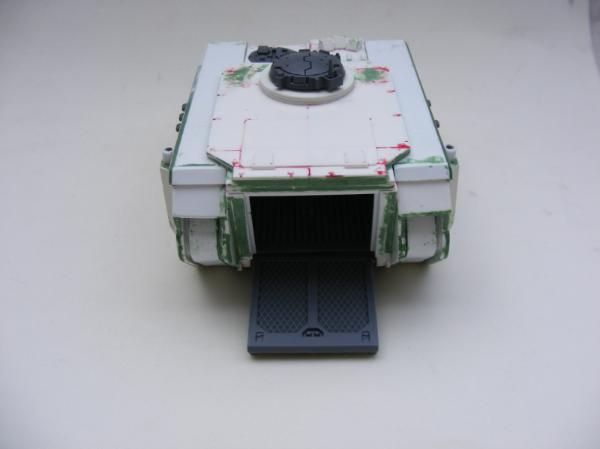
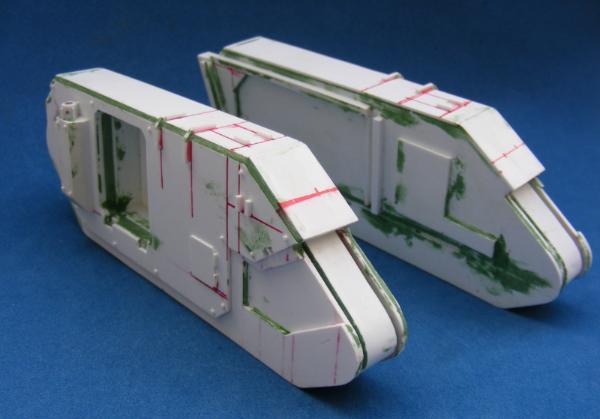
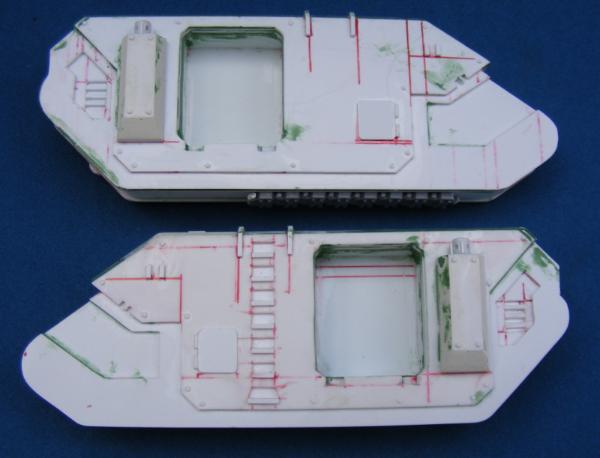


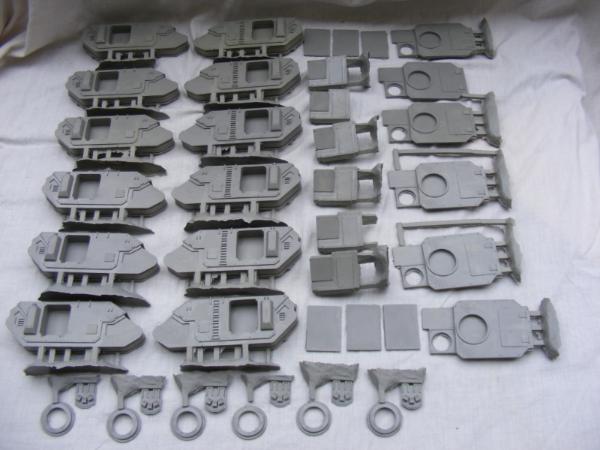
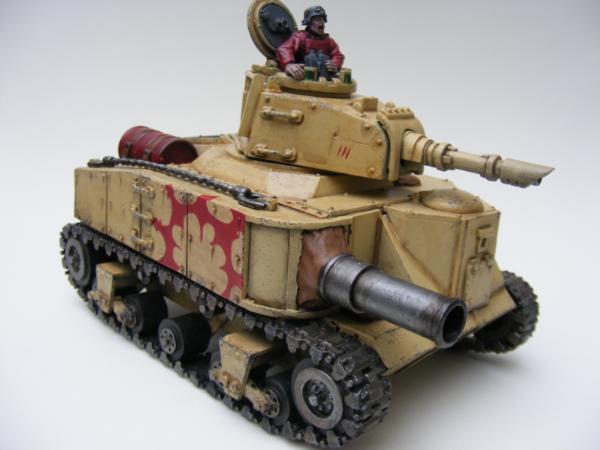
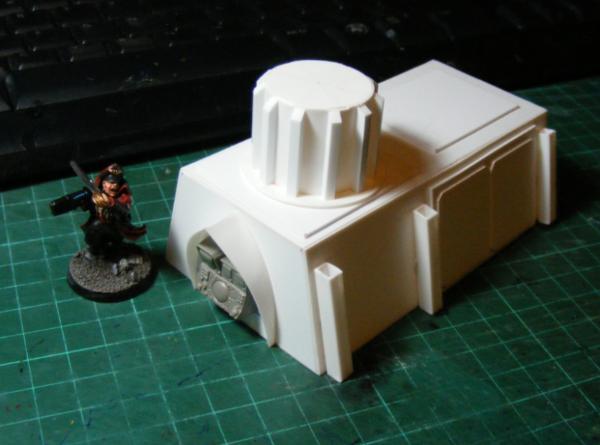
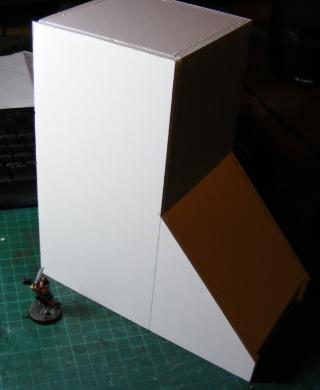
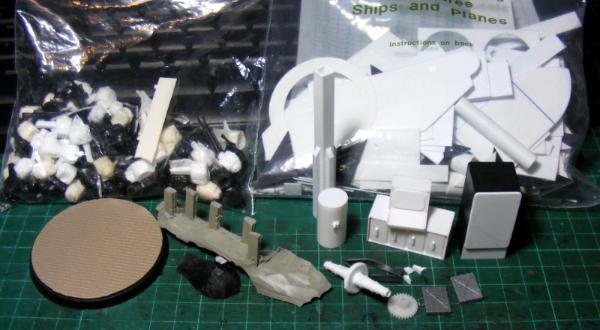
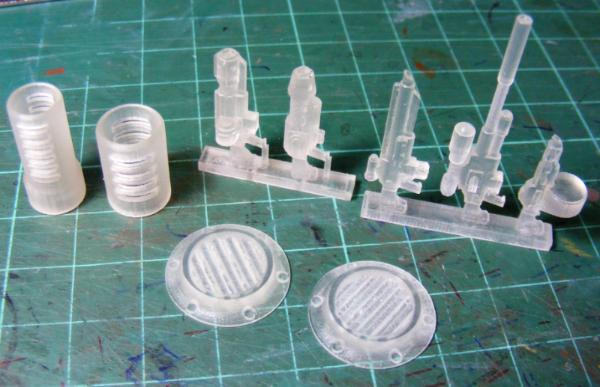

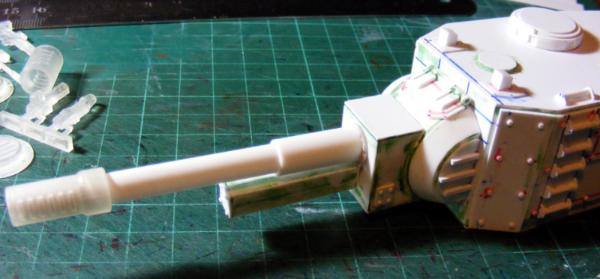
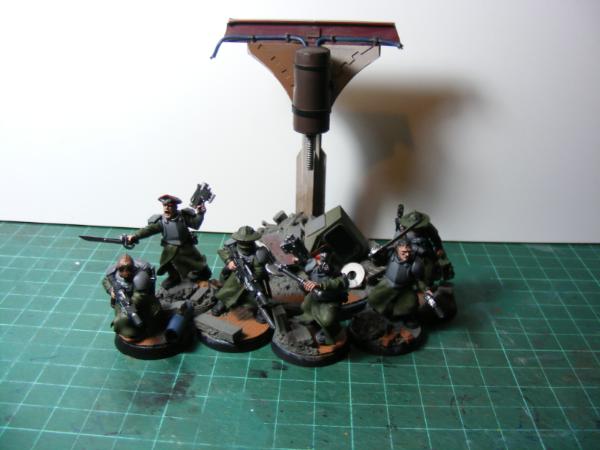
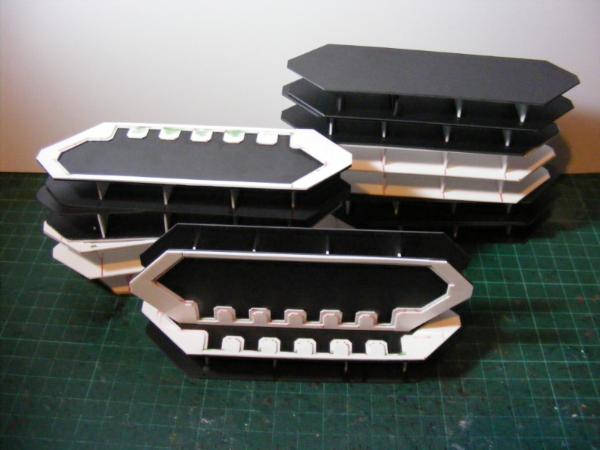
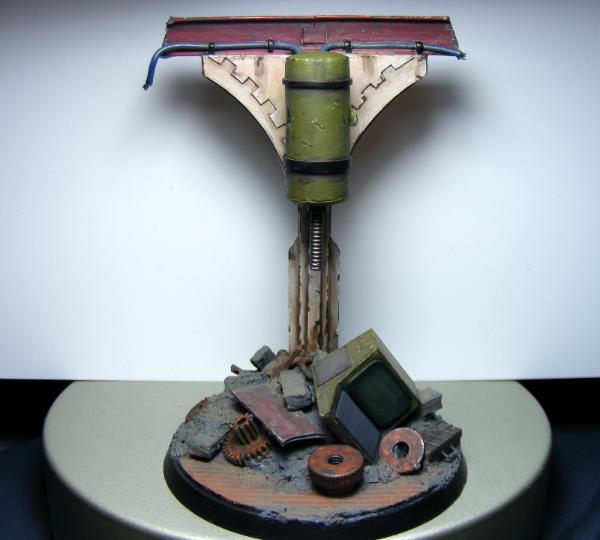

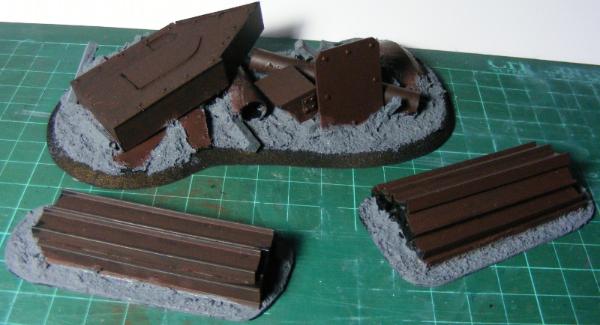
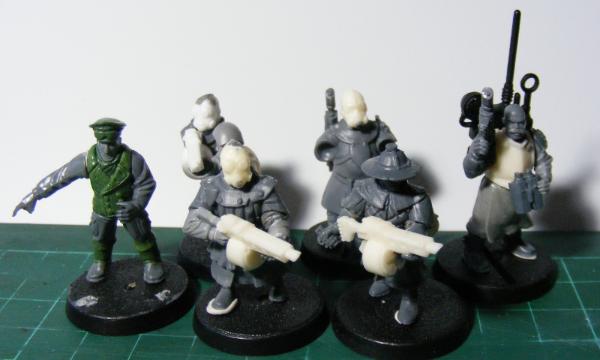
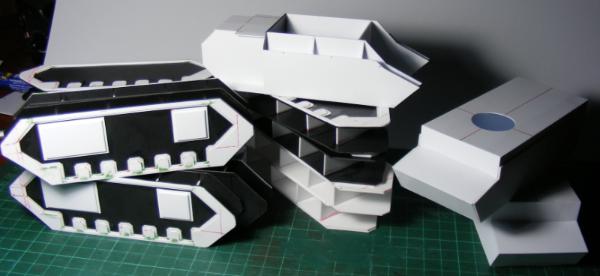
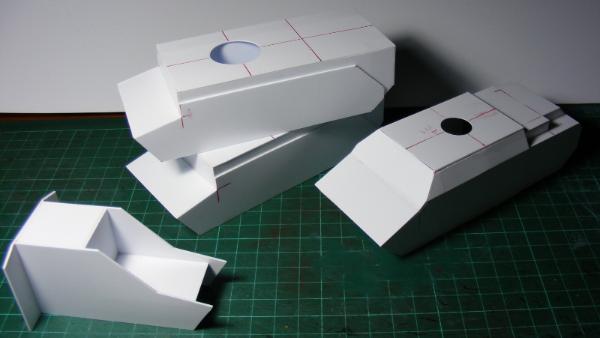
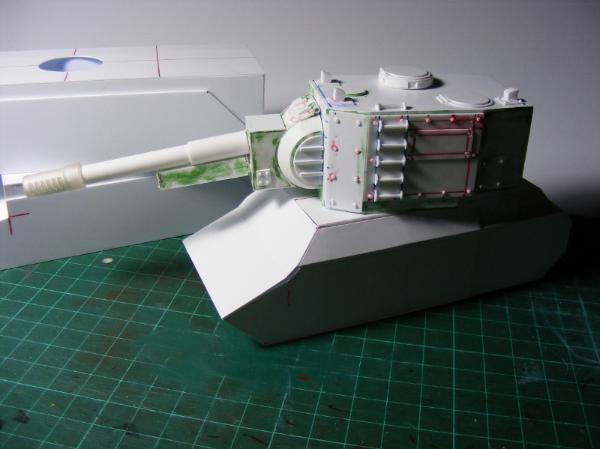
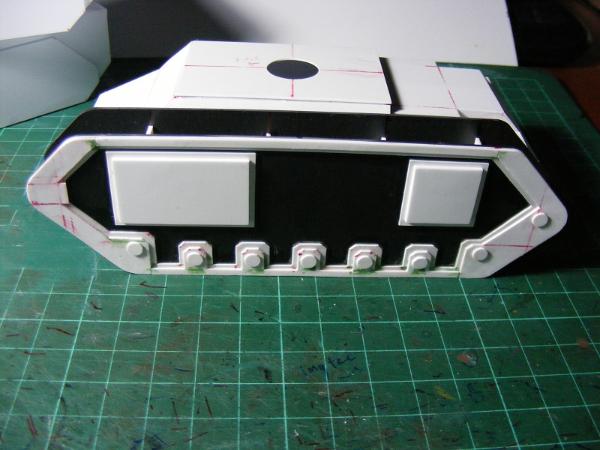
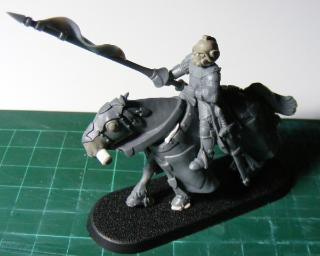
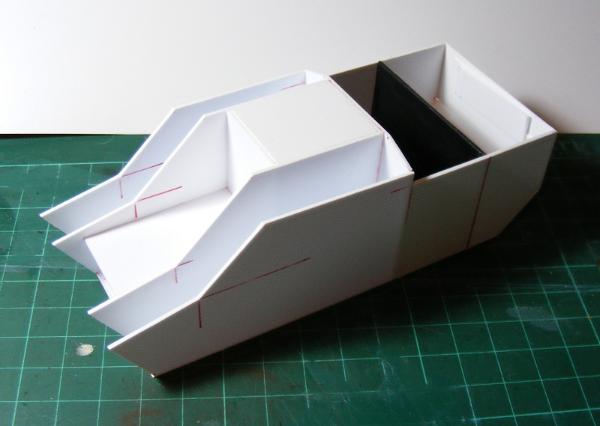
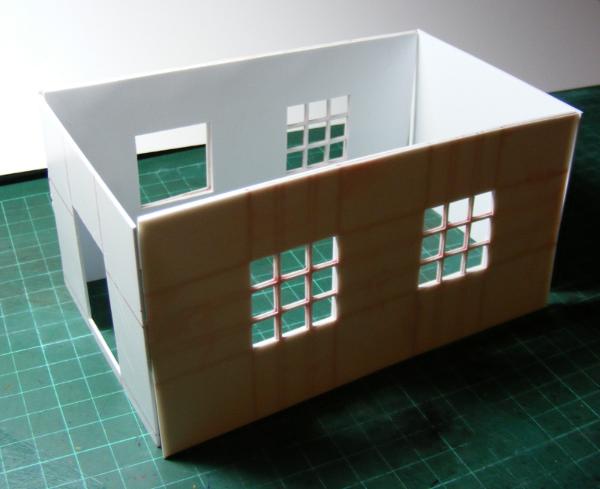
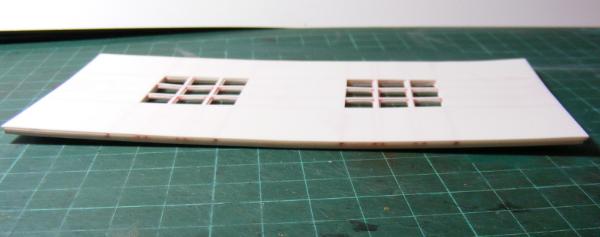
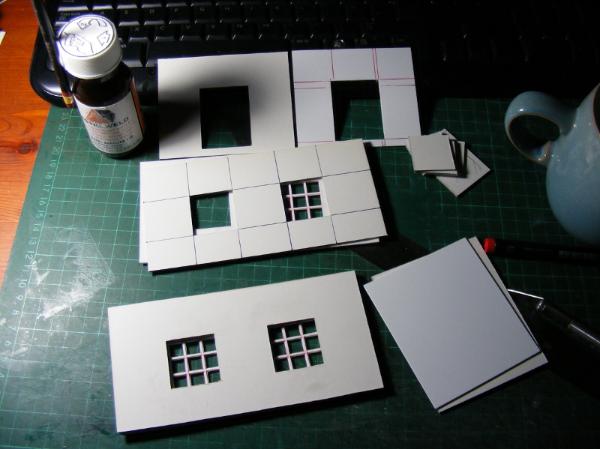
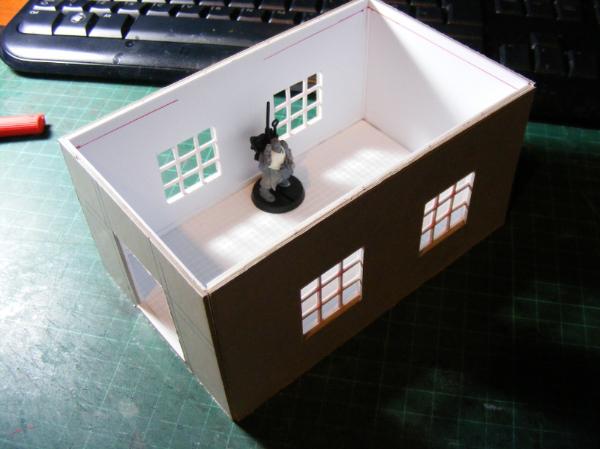
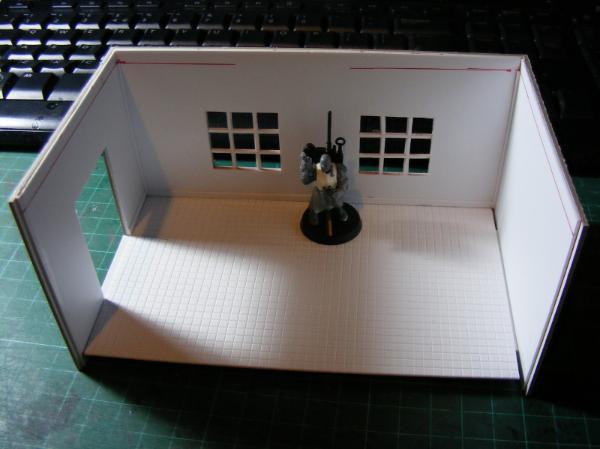
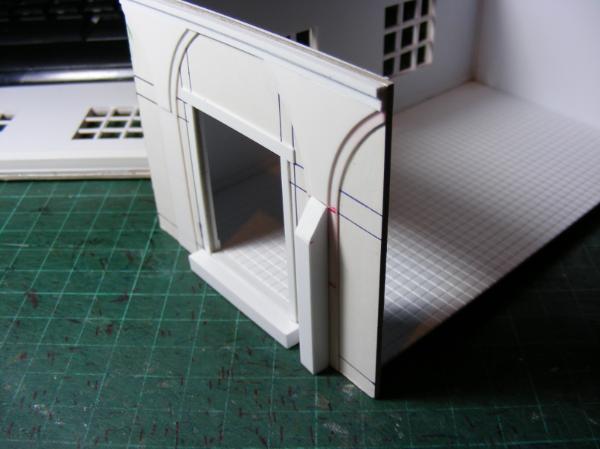
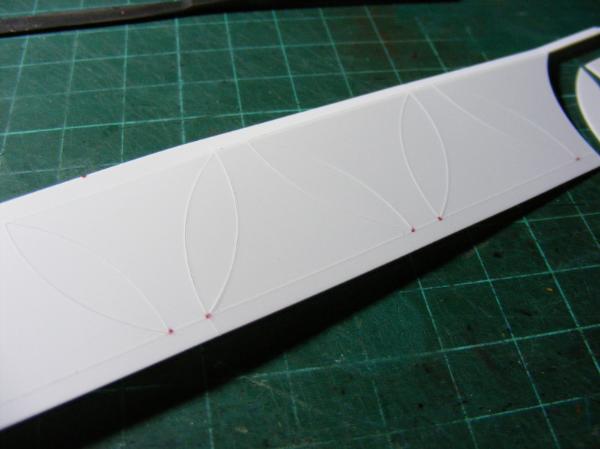
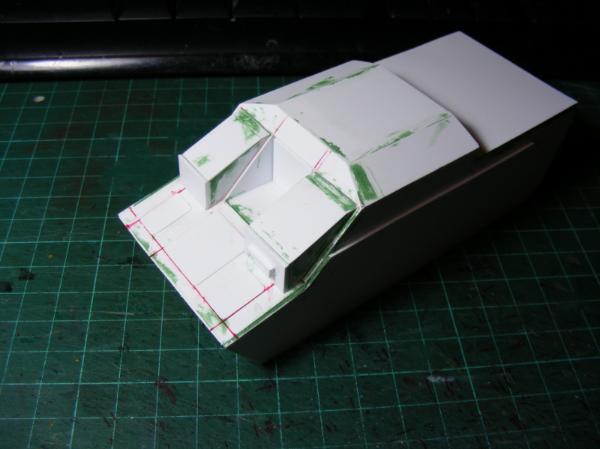
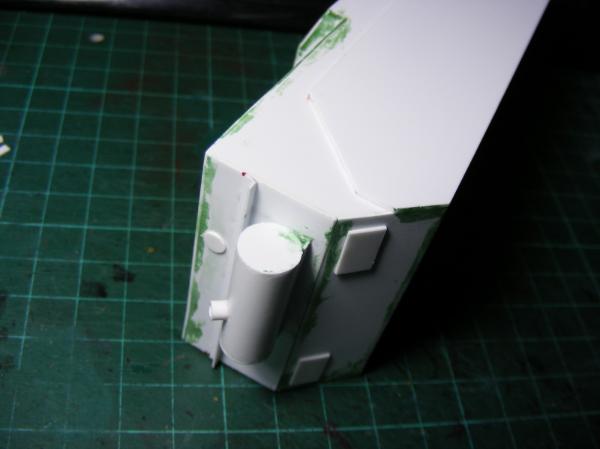
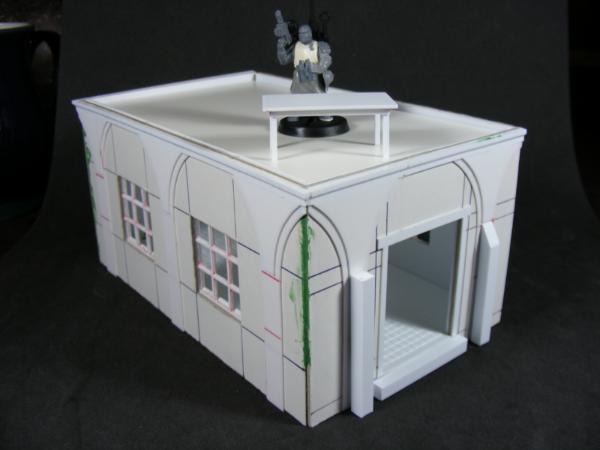
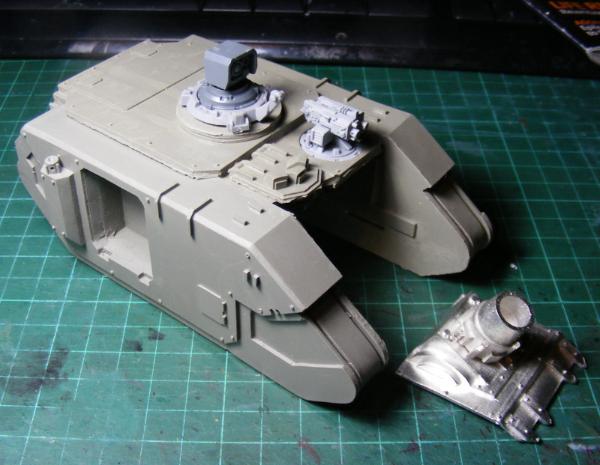
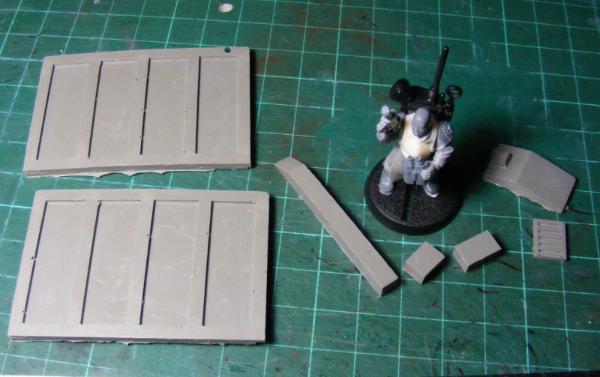
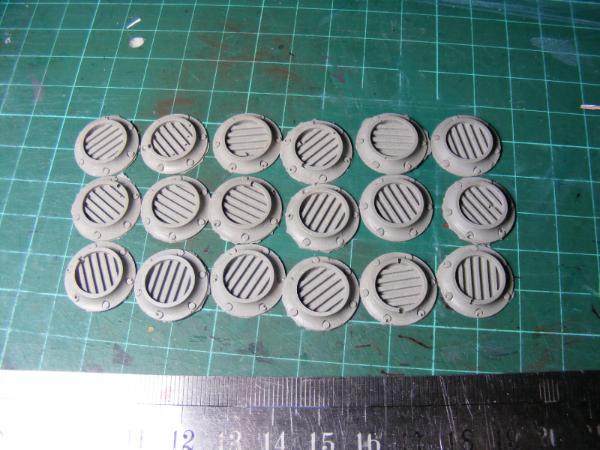
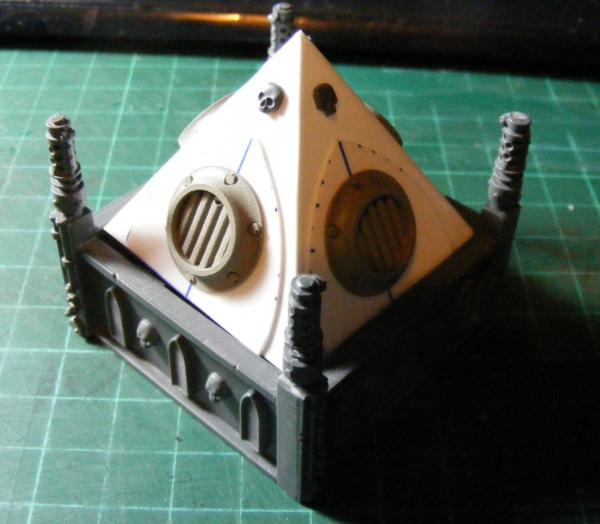
 if you ever want to sell any can I take a set of 8 of your hands