Big H wrote: Mate , those rapiers look like a good reason to buy the Taurox filth, if you can come up with a descent use for the chassis i might buy one !
(Armoured train perhaps ? )
You could send it to me that sounds like a good idea ............ well to me at least
Big H wrote: Mate , those rapiers look like a good reason to buy the Taurox filth, if you can come up with a descent use for the chassis i might buy one !
(Armoured train perhaps ? )
You could send it to me that sounds like a good idea …......... well to me at least
How many Taurox to make this !
Noodles , fancy casting some parts to create this ???
It would still look more like an armoured military truck.
I've had another (crazy) idea for making a squad or two of engineers (krieg engineers, just more genswick-ish), I've found all the parts apart from backpacks and equipment, anyone encountered something that might fit? I would just grab a set of dkok packs ... if FW sold them separately.
If anyone reading this has any of the Death korps packs and entrenchment tools (especially those), or better yet the krieg engineers equipment, let me know we can sort out a trade.
Going to have a look today, not sure, I bought a bunch of stuff a while ago, including some DKoK stuff will look, I know I definatly have horsey dudes.
Shapeways is having a 20% off "own designs" sale thing as well as $10 credit when you buy from a shop on the marketplace. [so buy from my shop and get $10 to spend on your next order]
I'll be getting one of my light tank turrets (unfortunately the multi-laser for the model has gone AWOL), a set of bottles and one or two other things.
If there is any requests for bits that I have on the store that you'd like to make, I'll be putting my order in between 5 or 6pm GMT. So get a message to me before then, here or PM, the link to my store is in my sig.
@Magos: Thanks mate I wish there was more to see over the last few pages
@Cam: Cheers mate I appreciate it.
I found some of the DKoK entrenchment tools on bitzbox (they had a 75% off sale and I missed it ). I'll probably have to sculpt the rest adding in some pouches from other kits.
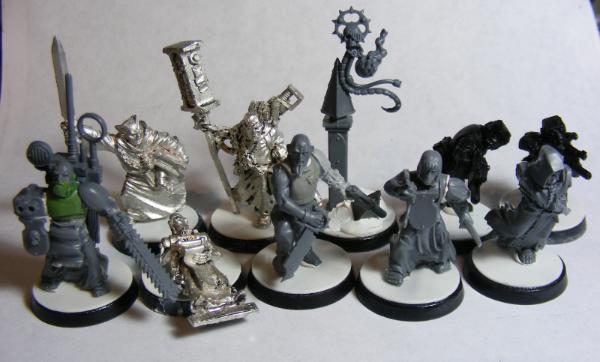
I'm working on a new squad of armed civilians / Escalarchy / remnants of shattered PDF units getting back in the fight, using bits and pieces I've been collecting.
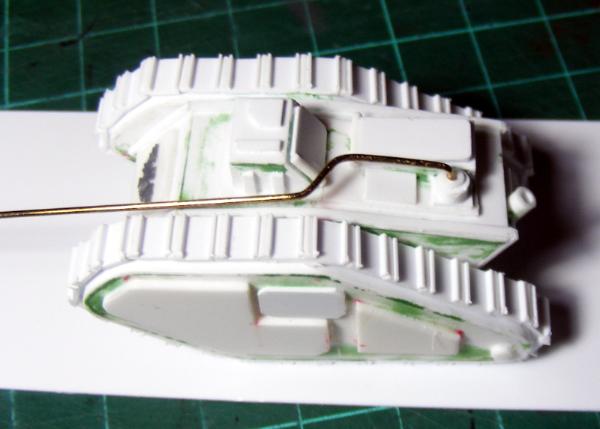
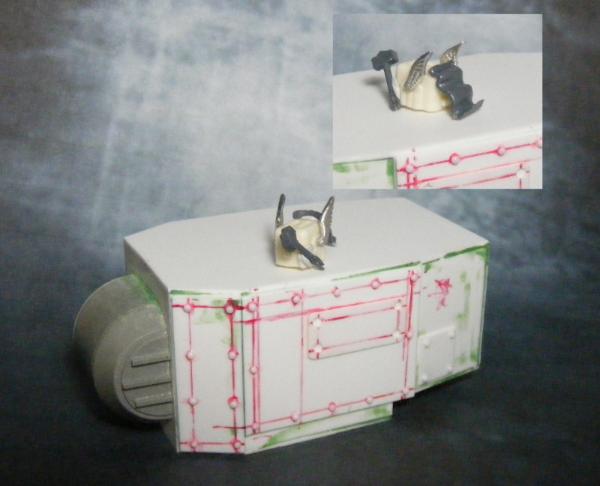
Also I'm about to embark on adding a radio cable and maintenance hatches to the Cyclops wish me luck!
I'm thinking of trying to imitate the FW tracks which seem to be a strip wrapped around and then a second wider strip that has been cut wrapped around.
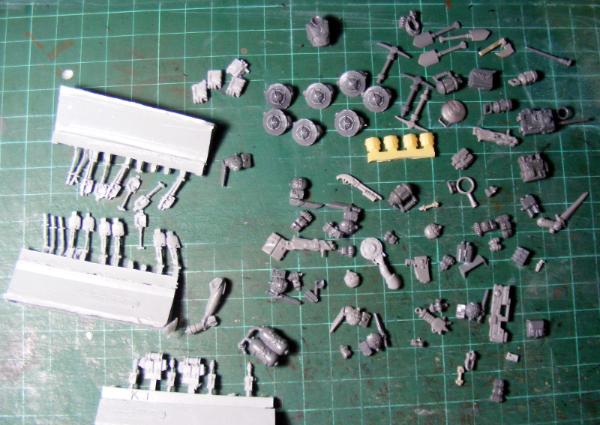
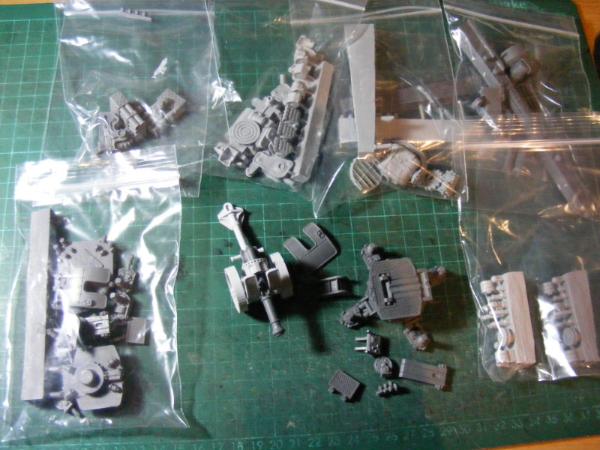
Thanks Cam, that's a cool selection I like the wire spools at the back, (if that's what they are) look interesting especially if that is not sprue that they are surrounded by. I could really use something like that with some thin wire wrapped around.
I have some 1:35 stowage that I find a bit large so any of the 1:32 would be a little large, however those grey loose bags in the centre left and across might be useful.
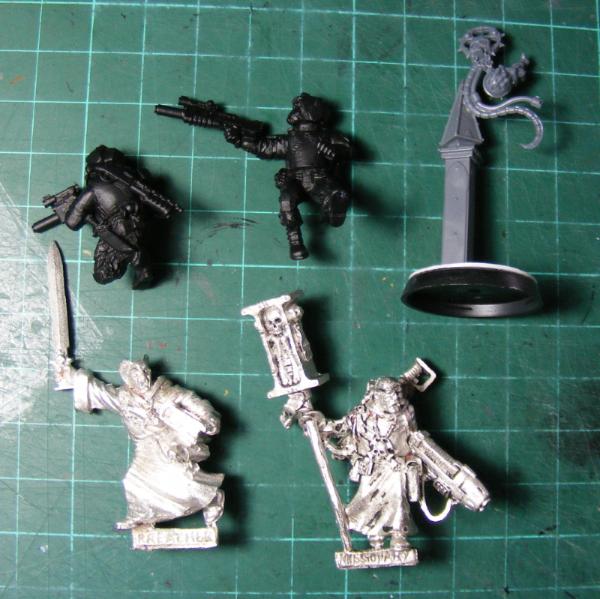
Here are the bits that I've assembled so far from my bitsbox
I'll probably try and use gs for the main bag and attach tools etc as I go.
So for the armour I'm thinking of attempting to copy a WW1 german body armour but with a neck guard like modern bomb disposal and Victoria Lamb's groin and maybe thigh armour.
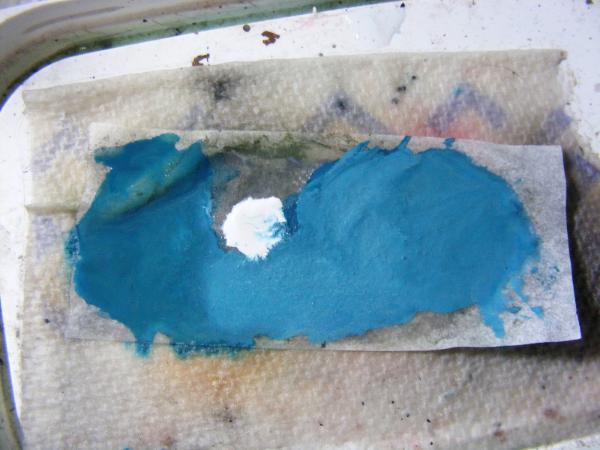
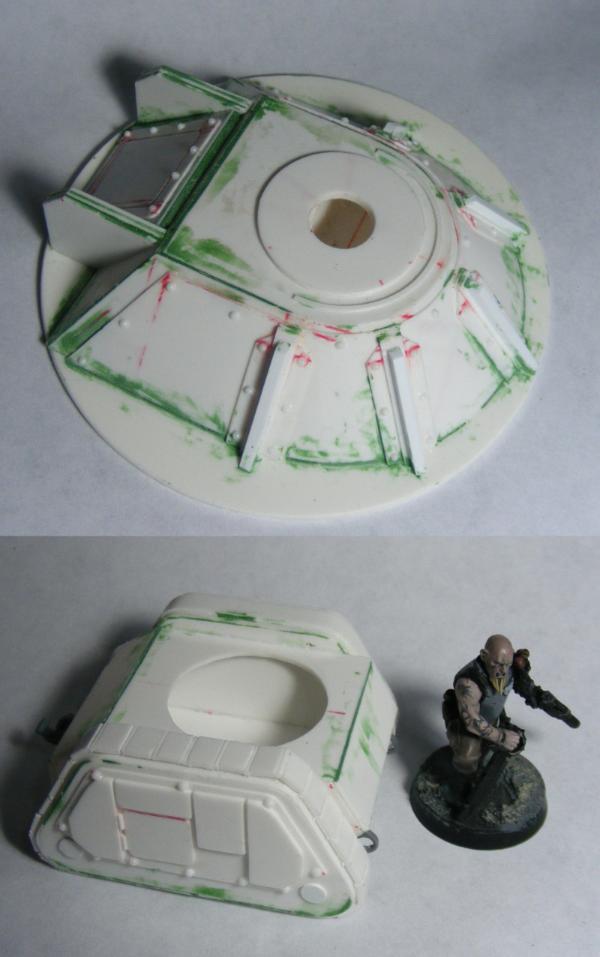
only a short post, I've got more to update but Christmas etc. and I've had a present from shapeways which is currently having a bath.
I'm sure you'll have seen them but Victoria Lamb is making some nice pouch sets, a "bread bag " style was released lately. Also a body wrapped in a rolled blanket which might fit your Genswick pseudo russian tanks nicely.
Cyclops is pretty sweet, would make a nice heavy weapon platform !
@Big H: yea I've been thinking of enlarging the design to make a few rapiers, rather than using taurox parts, hell it's not too much of a stretch to make a centaur from them.
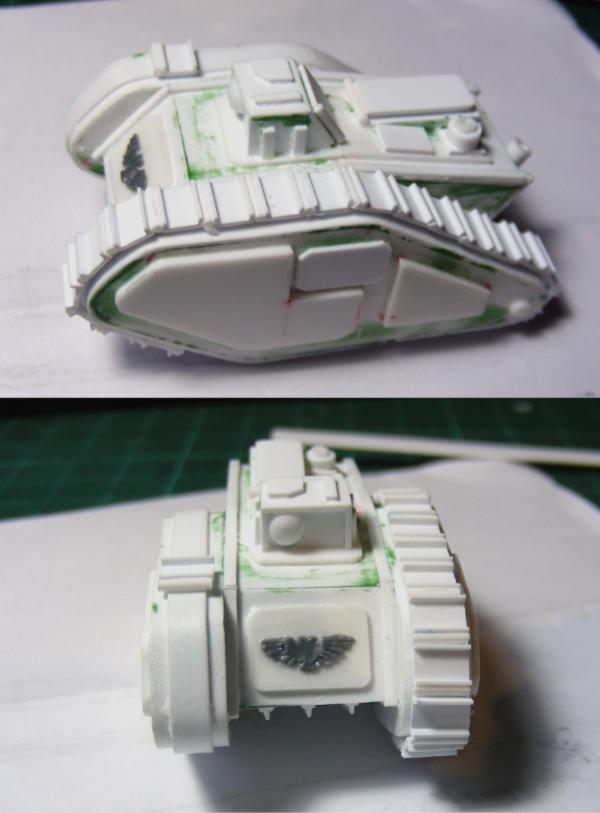
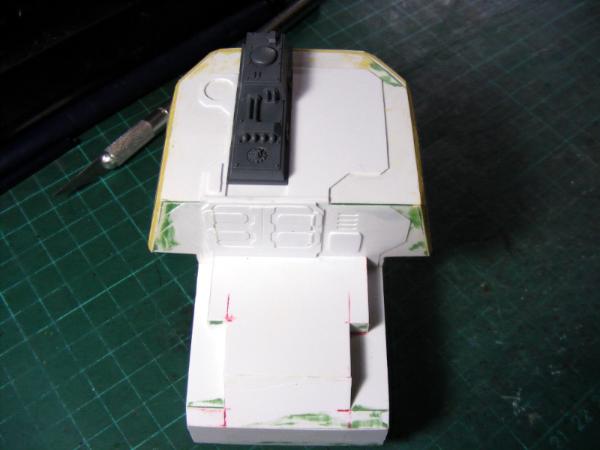
I had an idea to make a radio antennae that is bend and folded around the body of the Cyclops finishing somewhere around the front (fixing in front of the sensory block).
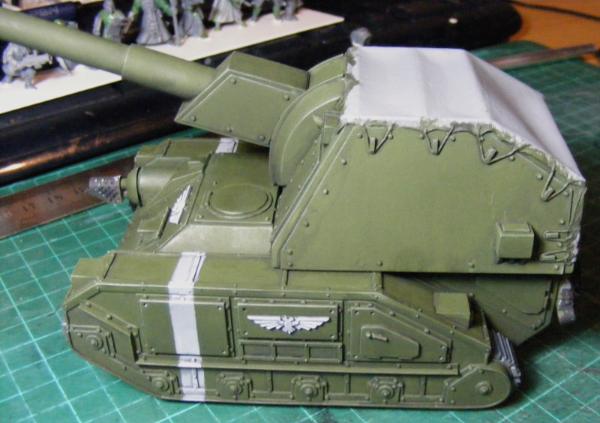
Most of the base colours are done on the basilisk:
and these are going to be a fun distraction to finish off:
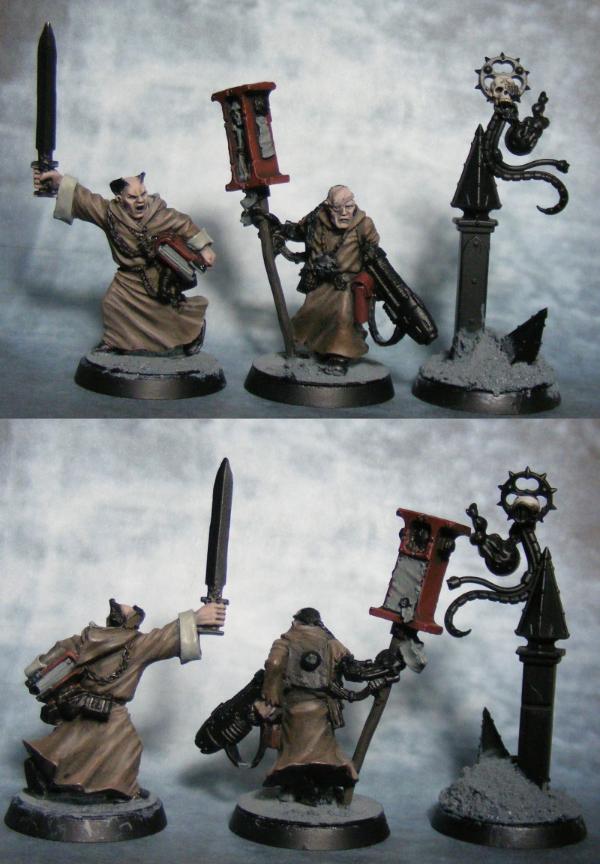
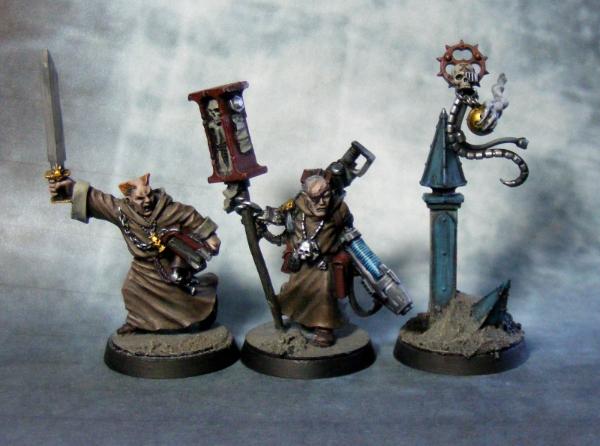
I've removed the detailing on the priest's hat so I can get a SoB ~ escelarchy decal there.
@Big H: yea I've been thinking of enlarging the design to make a few rapiers, rather than using taurox parts, hell it's not too much of a stretch to make a centaur from them.
I had an idea to make a radio antennae that is bend and folded around the body of the Cyclops finishing somewhere around the front (fixing in front of the sensory block).
I think Rapiers would be awesome and a couple of Centaurs would be a no brainer.
The design has lots of possibilities. Stretch the whole thing and turn it into an APC / Engineer / Tank Recovery Vehicle. or some Quad Anti Aircraft.
@ Big H: The AA gun is a cool Idea, one more thing to add to the list! I'll give it a shot when I make a trio of rapiers as it'll be that size.
@ LDD: Thanks mate, The high elf archer legs are not to bad actually, besides the silly thin hips and the pointed shoes, if you can fix those and combine them with a suitable torso they are not too bad. I bought a few of them years back to try a little ad-mech squad, it failed horribly but useful bits none the less.
Out of interest do you own any of Victoria Lamb's groin or thigh armour, if you do what do you think of it, size etc?
Kinda supprised with the reception on that tarp, its only my second attempt at making something like that, glad you all like it anyway
The basi is OK, despite using masking tape, I've painted the white line wonky ... nothing a bit of stowage can't fix! and time to see if I can get some paint on that tarp!
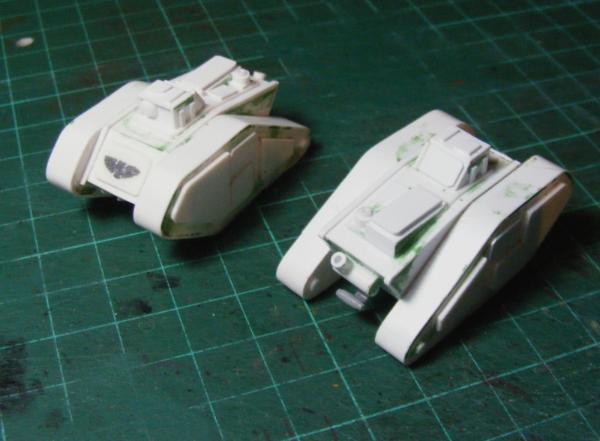
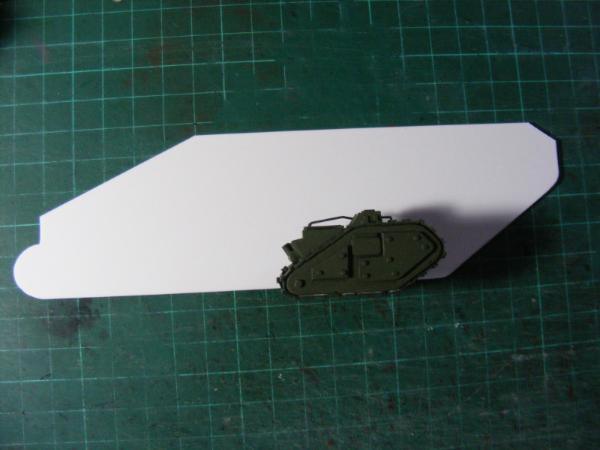
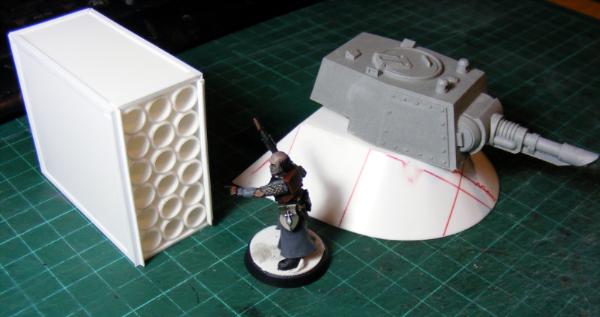
Scale comparison with the cyclops, started riveting and finished the tracks. I'll try and get these finished tonight, now I know what I'm doing with the aerials they should be quick and easy to finish. more or less the home stretch.
and lastly one of the many things that has emerged from a hot bath with one of the weapons, still a fair bit of cleaning to do on it but it is very cool:
Yes I widened the waist band a little to fit the torso better the other I used the Archer torso so it fitted any way, plus I left the pointy feet as they kind of worked with the look I was going for.
The Cyclops look spot on better than a certain companies own the new print looks great and fitting as well although that material is not the easiest to pick detail out on
As for Vic's minis armour plates I do have some of both although the thigh ones are from the beastmen set which I aint assembled but they look pretty cool and should work well with your Genswick guard, as for the groin guard they fit well and do what the tin said LOL
@ LDD: thanks a lot mate, looks like I'll pick up some for sure. I might give the thigh guards a miss then,
All this talk though of more greatcoat legs is making me want to postpone my order for a while as I'm unsure of what legs to use now, I either go for vic's conscript or combat legs (as initially intended), wait to see what the greatcoat legs are like or use empire archers (I have just bought a box and they will make great genswick!).
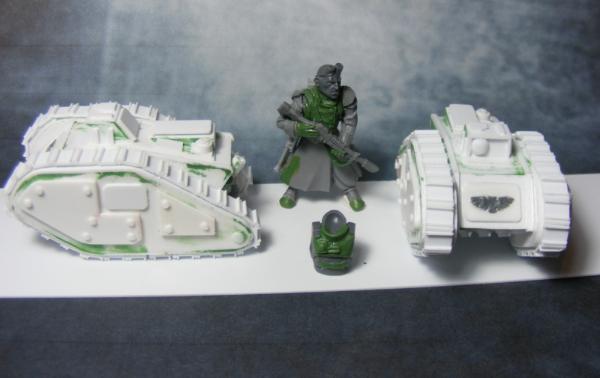
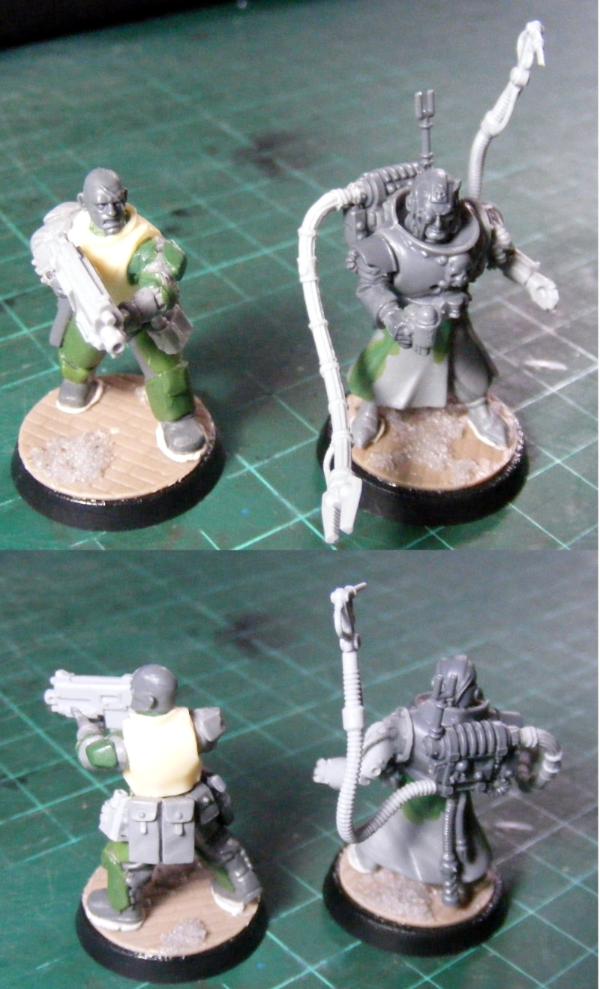
I forgot to mention the torso in the image showing the Cyclops in the previous post:
Spoiler:
is a prototype of the torso I'm thinking of using for the gens engineers.
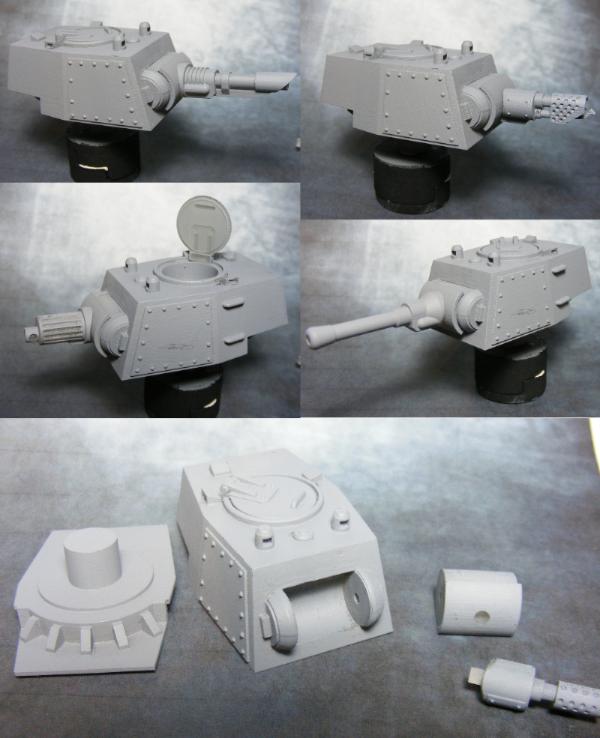
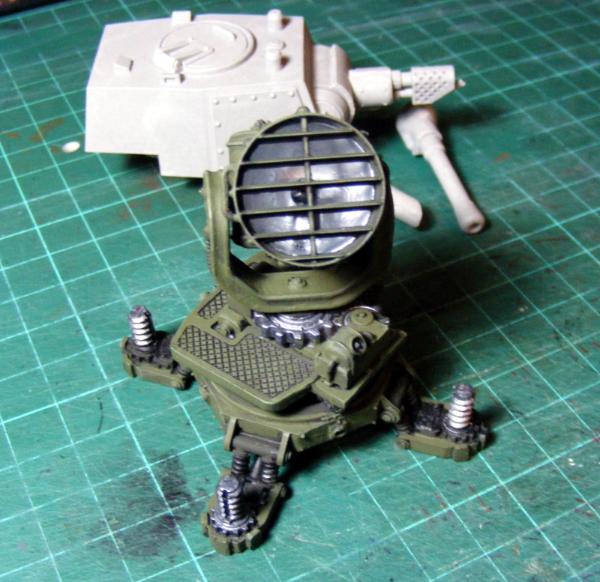
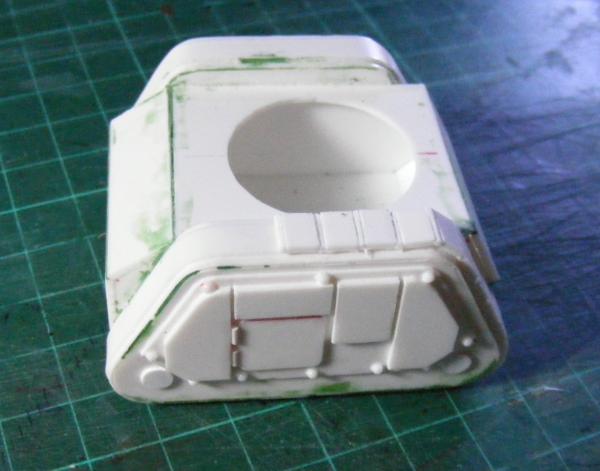
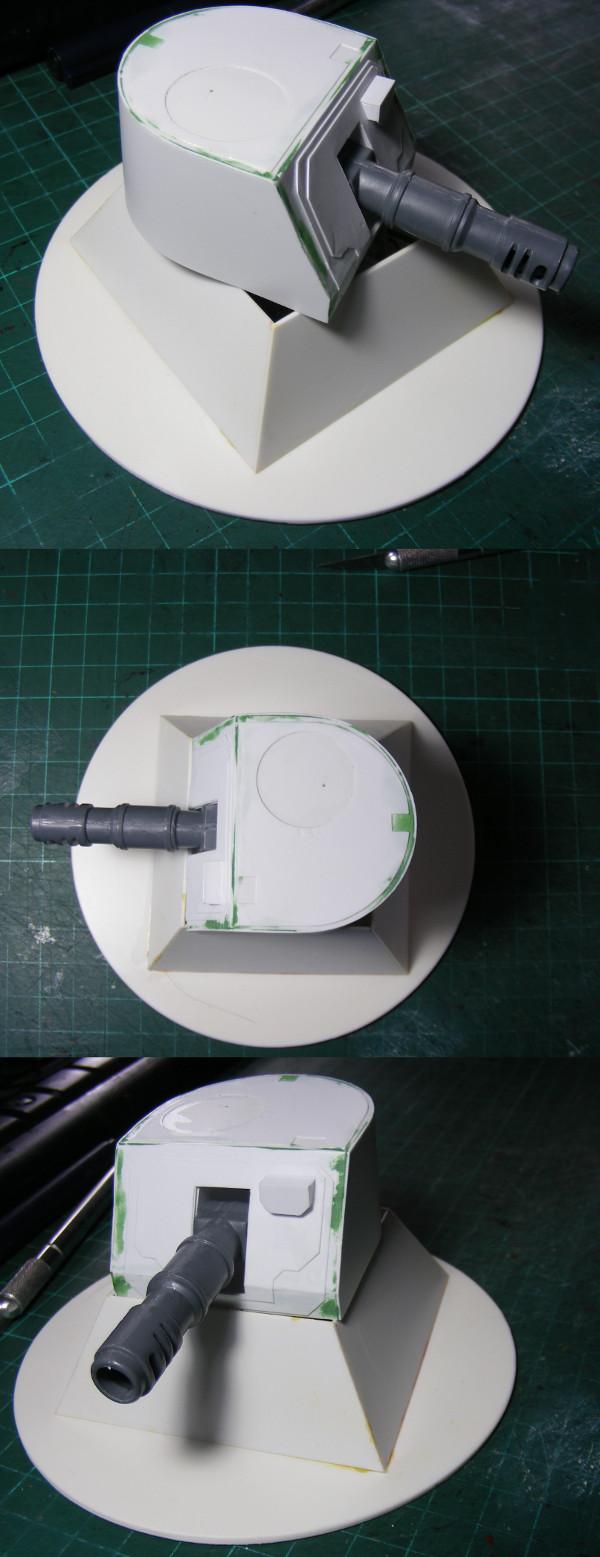
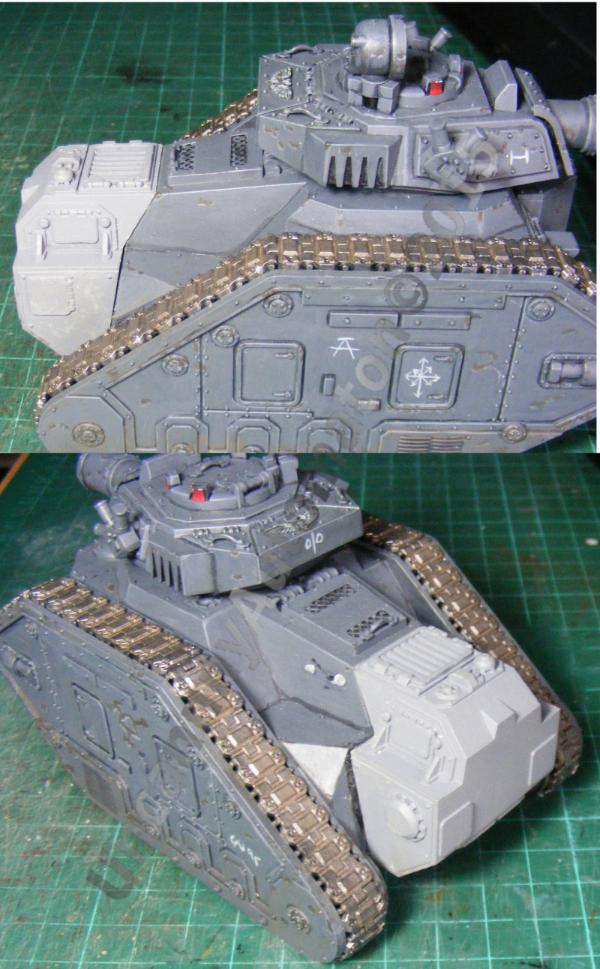
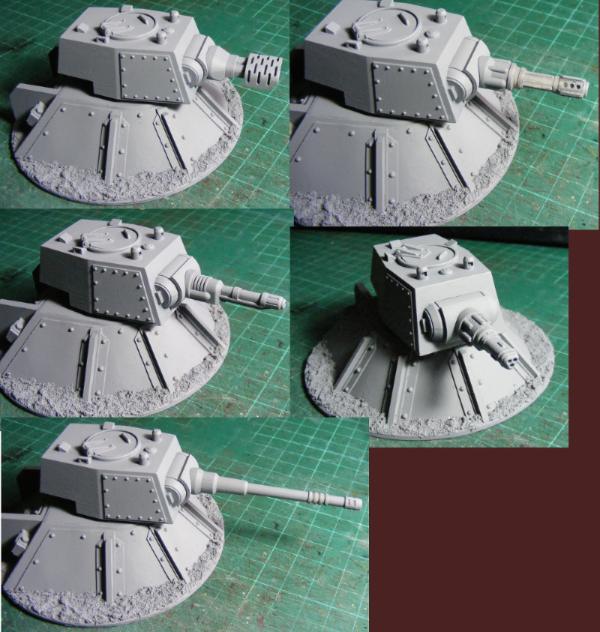
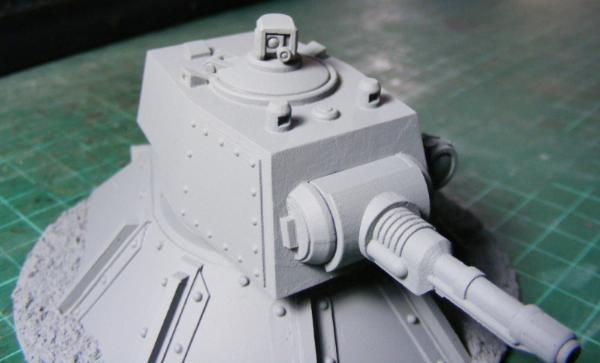
I might just spray the turret grey just so I can see the detailing! it is pretty awesome, all the parts slot together perfectly and cleanly, only things I might change is the cupola, more detail, and extending the pegs and socket on the weapons.
Oh mate, cyclops look even better with a figure for scale !
Engineer body looks pretty sweet too !
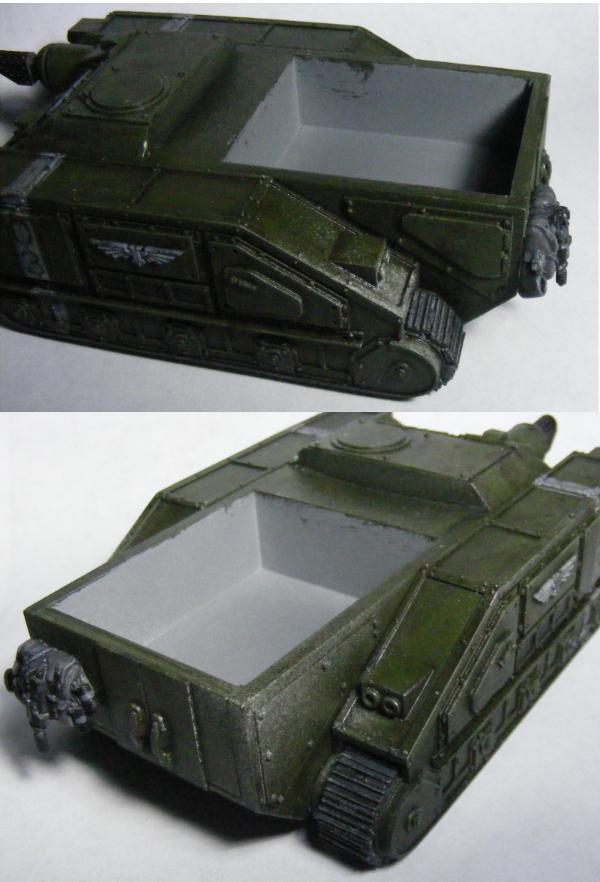
You're turning out some really cool stuff, but secretly we all know you made the Basilisk with a tarp so you didn't have to detail the open compartment !!!!!!
so at least I can say I have 2 tanks finished this year ...
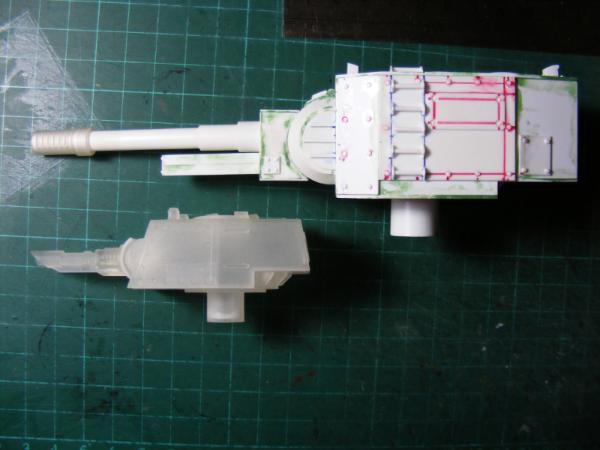
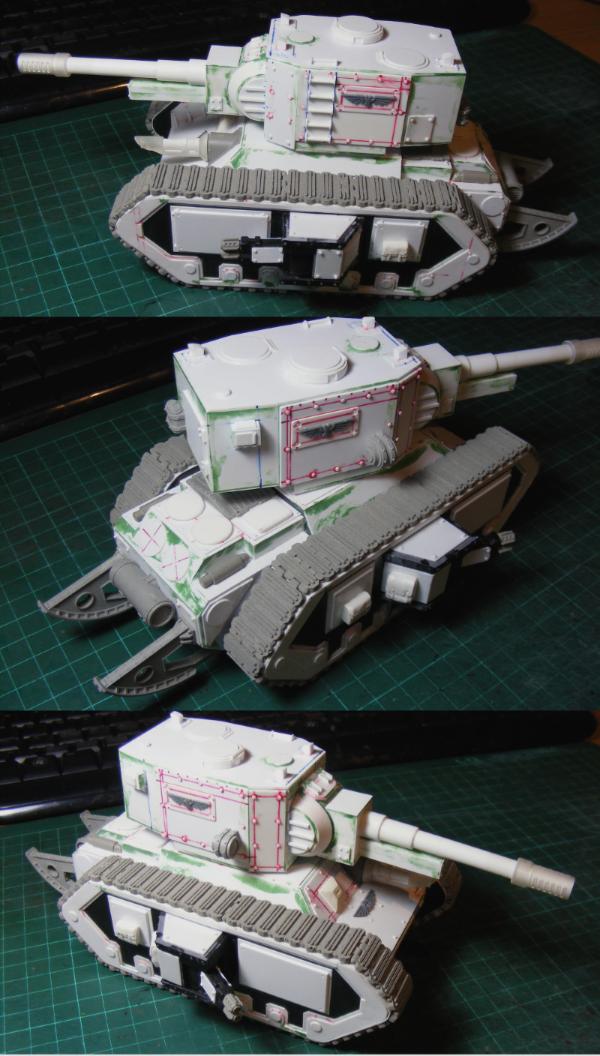
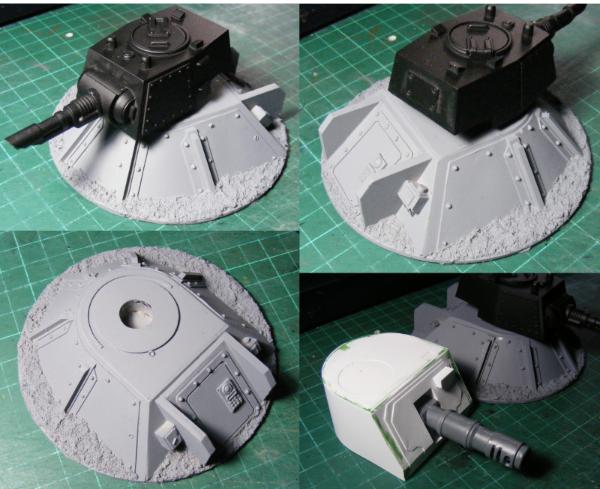
Here's the turret after a light-ish grey spray:
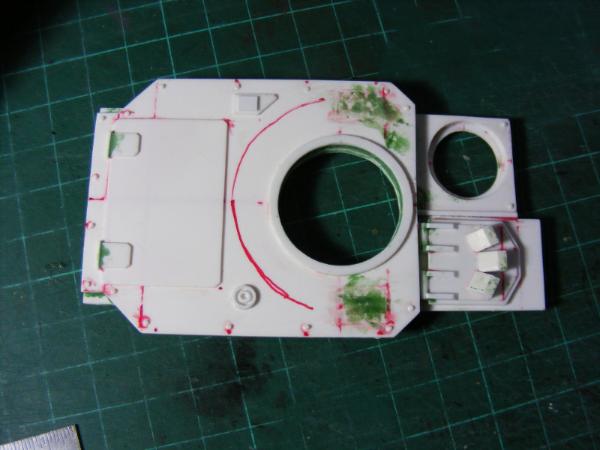
A good idea to do this, quite a few places that I missed. I can see a few places that I could add more to, but it's a nice blank canvas for the most part, room for stowage etc. Lots of conversion possibilities.
So, now the Cyclops are done I am starting work on an entry for the League competition. 13 days left now
Some lovely treats displayed over the last couple of pages.... really nice work... I have to echo the comments about the Basilisk tarp... it is truly effective and very nicely done! I am trying to think up something to make just to try out that idea!
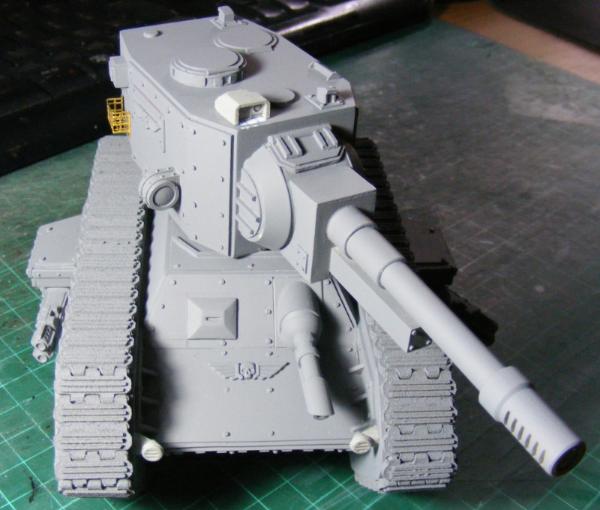
Also very much like the form of that turret... the slab sides make it look really solid and recon it will make a fearsome but interesting looking tank!
Thanks Magos, good luck if you try it!
You have to do it all in one piece all at once which can be quite daunting and difficult to judge the amount of putty that you require, I made the top sheet first, then whilst it was still sculpt-able added the ties using fresh putty.
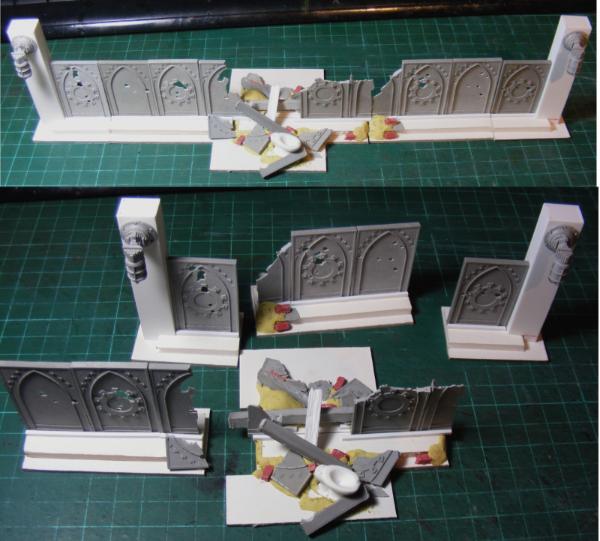
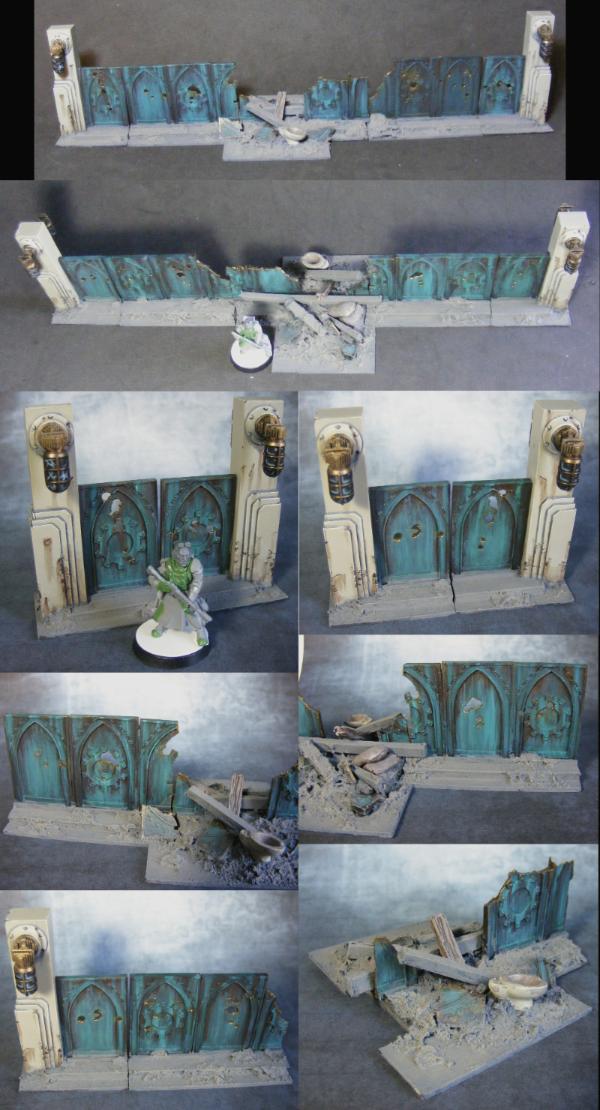
I've had a shot at making some walls for monkey's -=L=- competition, I've finished the build phase and am now starting to paint them. Let me know what you think!
The wall segments, total length is bout 12" or 30.5 cm somewhere around there, notice the toilet.
and the finished ends, going art deco now:
I have had two fantastic supply drops from DrH. and cam, thank you both ... I forgot to take pictures, I'll edit them in with comments later
Very nice wall sections mate! Really nice light fittings and the bullet holes will look awesome when painted!
I mean this in a good way.... but it looks like the toilet has been shot through the wall!
@ LDD: Well you know what it's like, you can never find one when you need it. , Thanks and yep the turret is like that to allow room for upgrades, stowage etc.
@ Sanka: Thanks alot
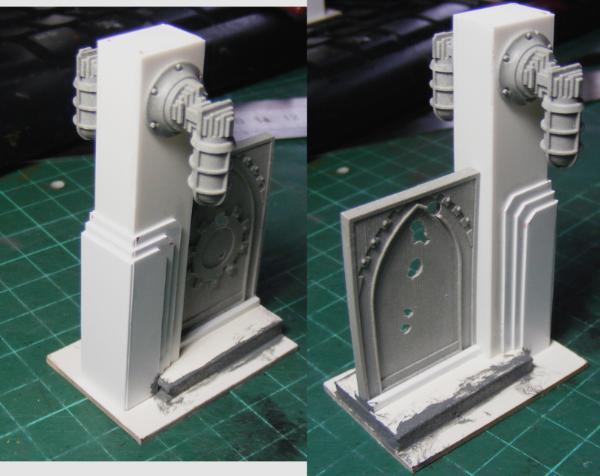
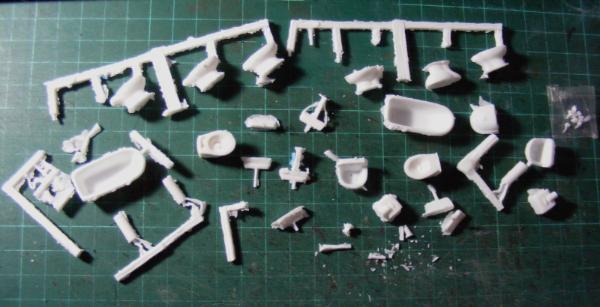
So here is the supply drop that I have gratuitously received from DrH sans the toilet, and carved wood effect piece of sprue(!) used in the wall:
very nice, all of the pieces look well cast, the resin used is a lot softer and easier on the knife than that I am using, something to think about. I've got lots of ideas for these, more than enough to keep me going for a while anyway.
I highly recommend DrH for all of your bathroom suite needs!
I did some verdigris on beastmen copper looking armor, used the light greens like the dead flesh very thin over the other green (was it snot green? or what? I forget now, it was a couple years ago, and another bought the beastman army from me.
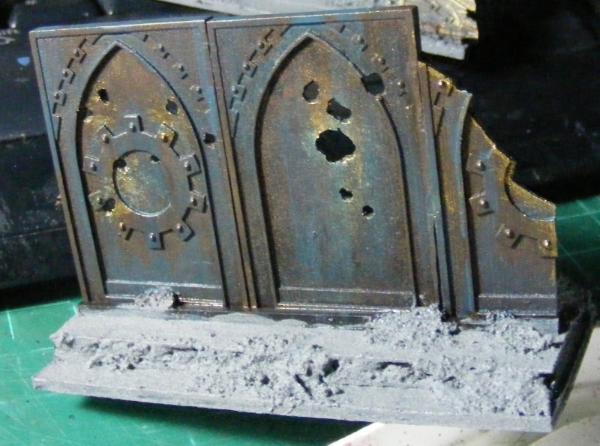
I decided to try Verdigris a bit differently on Camkierhi's suggestion last time I painted some. Which was to use more darker shakes, eg brown with it.
The following images was taken a few seconds after I took the previous image showing my wet pallet. This is where I was starting from ...
... I think I've actually finished (the verdigris that is) now, just the weathering on the end pillars left now. You'll all have to wait to see the finished article.
lone dirty dog wrote: ...but have to ask why is there a toilet in the middle of a wall section
Toilets crop up in the most unlikely places...
Look forward to what you get up to with the bathroom items, OMN. Yeah, it' quite a nice resin to carve and (thankfully) easy to clean up.
Looks like the cistern pipes didn't survive well though (while nice to carve, it's not the strongest of substances). A length of paperclip is the perfect replacement, as that is what I used for the original. A total height, with toilet, of 2.1cm, so you know how tall it should be.
Since I hadn't posted it here, here is my finished entry:
I opted not to bother with powders or oil washes (or even filling the gaps in the plasticard), I know it could have made it look a lot better but I felt it to be unnecessary with time not on my side. Just painted with normal acrylics, I could have made the base section darker however.
@DrH: Thanks for the info, I was thinking of replacing them anyway, because It may be safer to pin them together, butter fingers that I am, I know I'd break the pipe just cleaning it!
@Lady_Mournival: Thank you for your kind words.
I trust you all had an exciting Christmas
Happy new year all, may it be interesting.
Those few pieces that I have cleaned up and assembled, represent the sum total of my modelling for 2015.
They seemed too fun not to get. Until I opened the box I had no idea what was in there, trying to remember if I bought anything last time I was drunk, it was completely out of the blue. Also really jealous of the resin that they are using and quality of casts.
@Stormwall: Welcome to the madness. The revolver cannon is a thing of beauty. The multi-missile launcher could be used as a thud gun (although there is a multi mortar that was made as well, but I wasn't too fond of it).
Only problem with the revolver cannon is it's a tight fit with that gun shield, I'm really surprised about that especially seeing as how easy it is to check and fix that in Rhino (the software it was designed in).
Still excellent stuff, very happy, maybe I should have got more...
I know that feeling LDD, I'm now wondering what I should do with the searchlight that I've just assembled... first world problems.
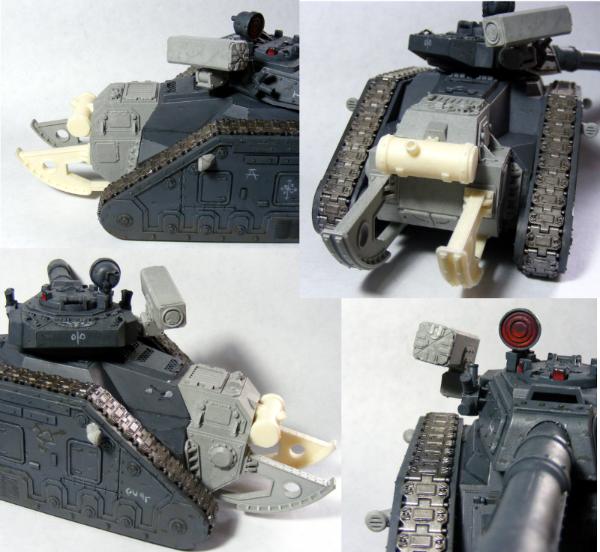
Ragnarok number 2 is coming along:
adding rivets, stowage, sponsons, etc.
other than that my free time is spent getting molds together, if only so I will actually have some bits to give away as a prize!
Also I'm trying to think up ideas for showing off that (not so small) turret I showed a while back, malcador annihilator? defensive emplacement? or just a second pair of transports.
Not sure there's much else needed for the Pholus top. Cutting out th turret ring is a good move, although to be honest that wasn't particulary tricky to do anyway. The two added details work well and don't overcrowd the area. Maybe a recessed handle onthe rear hatch? Possibly a recessed vent/grille type of thing next to the front hatch - it could be left as a vent or covered with the additional part then? Possibly a couple of rivets at the front of that section too.
looking at mine I can't see much else that would add value to the top - it works very well as it stands anyway.
You will all just have to wait and see what I am making. Meanwhile I'm having another shot at adding a gun shield to that earthshaker.
@monkeytroll: I managed to gouge a piece out of my thumb removing that bit on the turret ring in the resin ones (I did it the same way you did) should make life easier.
Yea I had thought of a grill, there is also the "defective" parts eitherside to the front of the turret ring that I should try and smooth out again. I'll see what I can get away with rivet wise.
Brilliant work mate! Really good looking tank up there! I have pretty much fallen off the wagon and only getting small chunks of time to work on anything but its always nice to see your work to give me a kick in the ass!
Yeah, I concur , the Hull tops are fine , maybe a little grill or filter type unit someplace , but i reckon they are good to go pretty much.
Mate , please make a ridiculously large Crasus / Baneblade mash up ! That would be so awesome ! Particularly as I'm toying with the idea of turning a Baneblade into a giant Sicarius and will rob your ideas mercillessly !!!
Dream on Greldinard , If I had not just attached the eagles too the turret I would consider casting that ... maybe the second turret .
The rest of it was not built to be cast so ...
@DrH: Yep that's more or less my thoughts too, which is why I'll probably skip on adding much more now, thanks mate.
@Big H: Cheers mate.
I'll be making a Malcador, this time I'll try something with actual wheels! It'll be a bit like one of those big inter-war tanks, crossed with my Genswick Chimeras.
I should paint something before I build any more 'large plastic boxes' ...
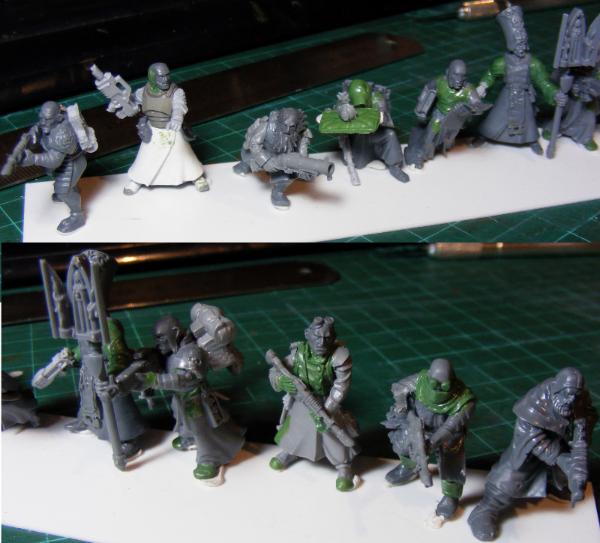
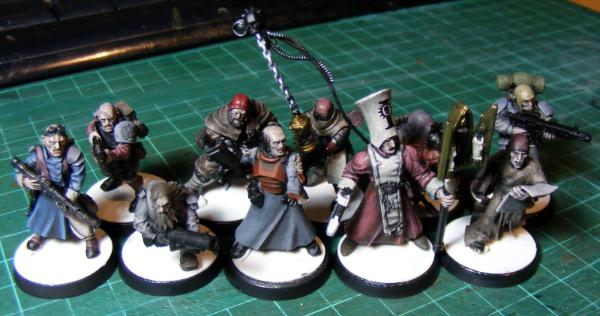
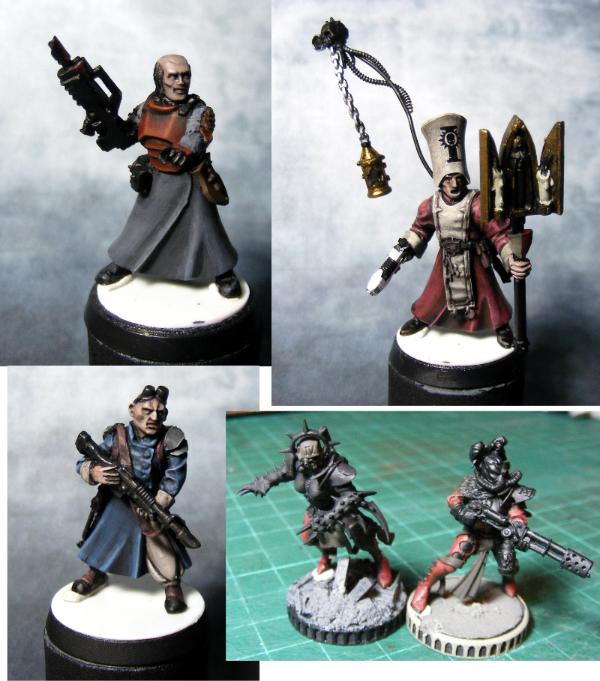
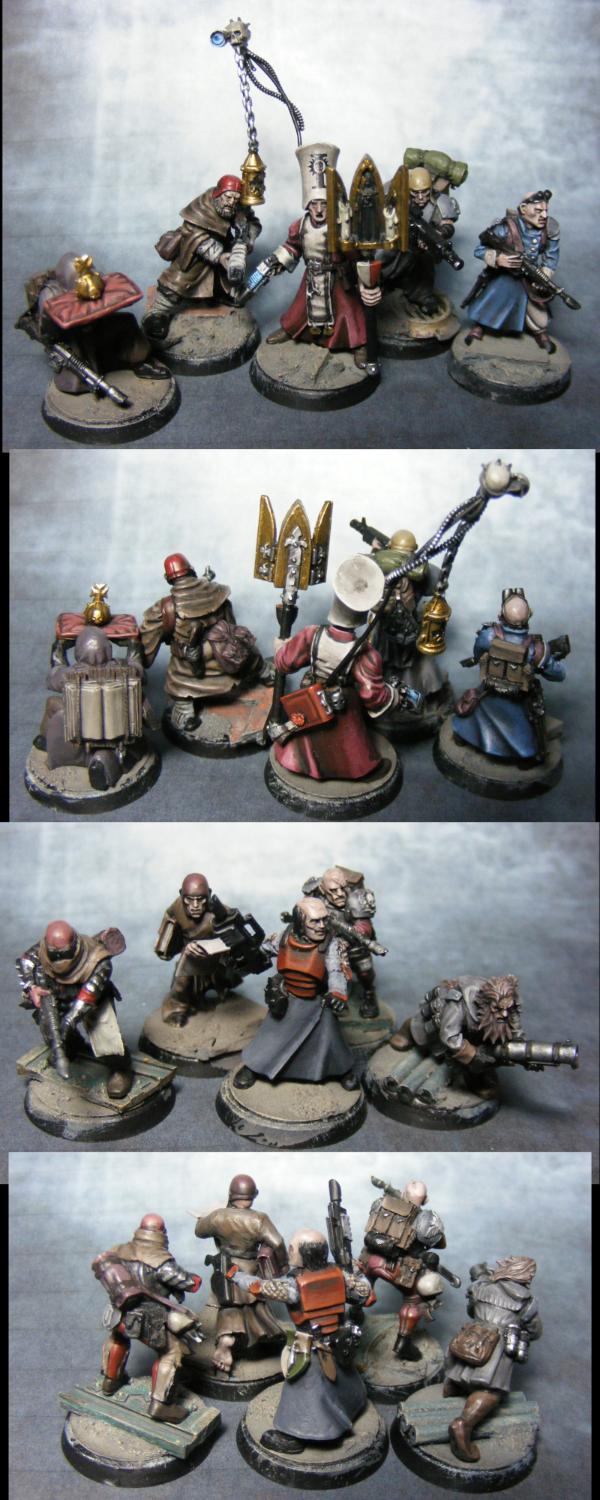
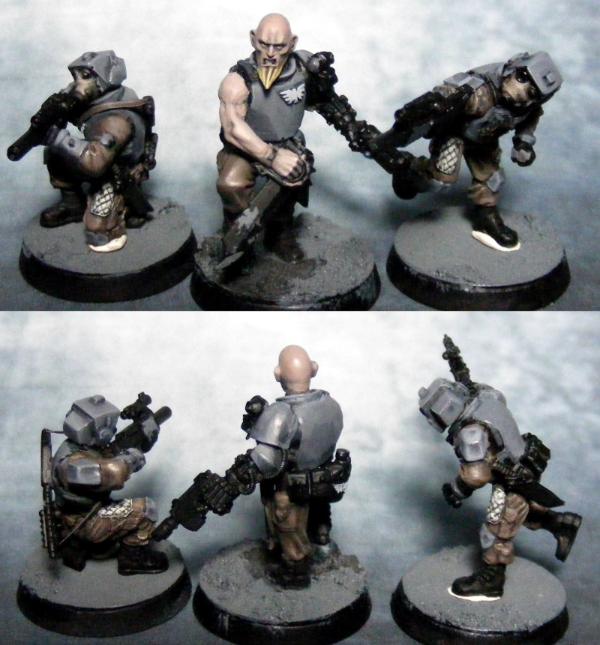
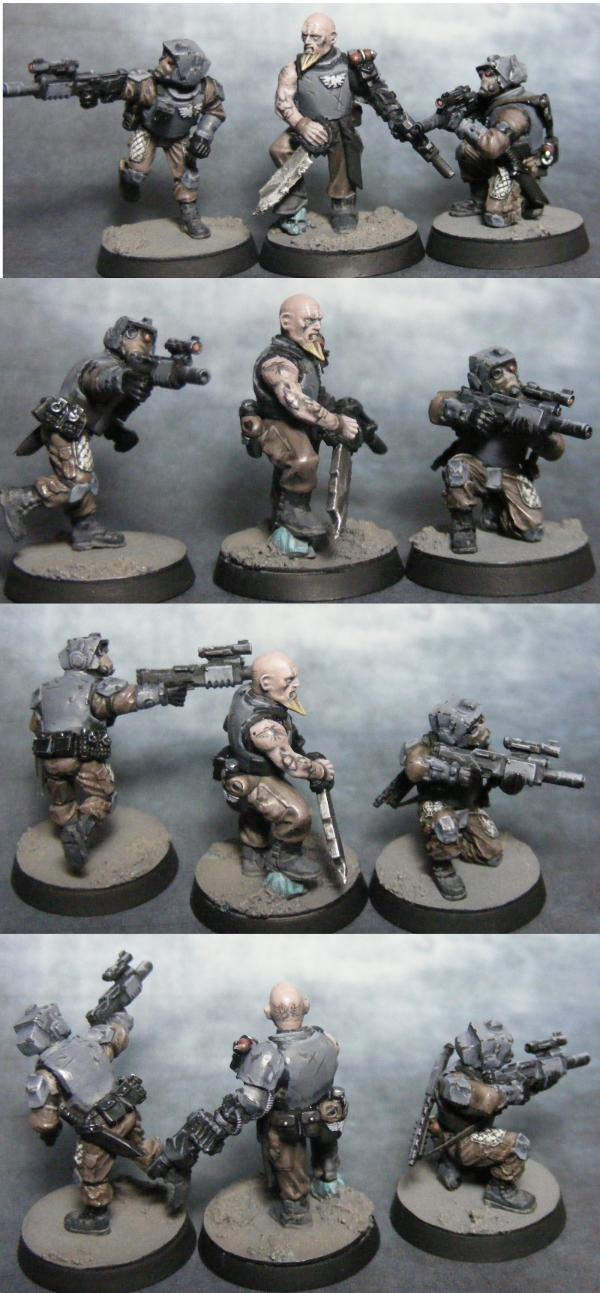
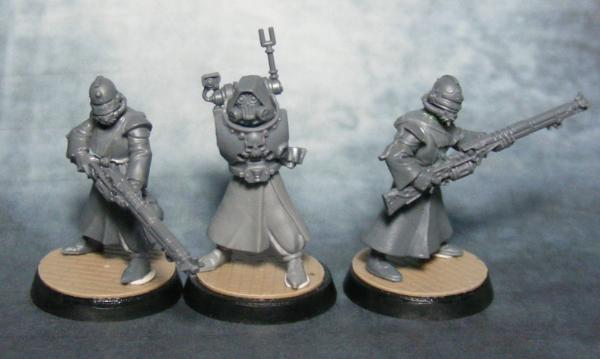
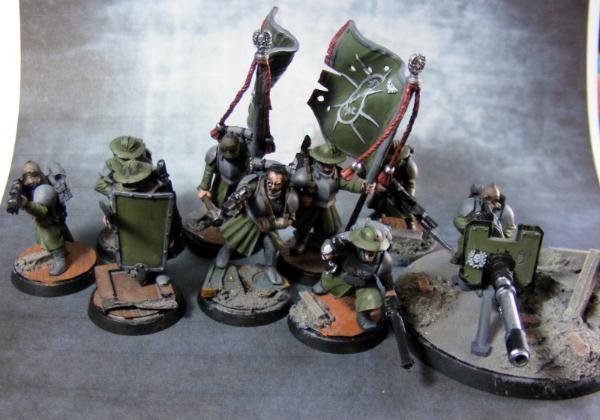
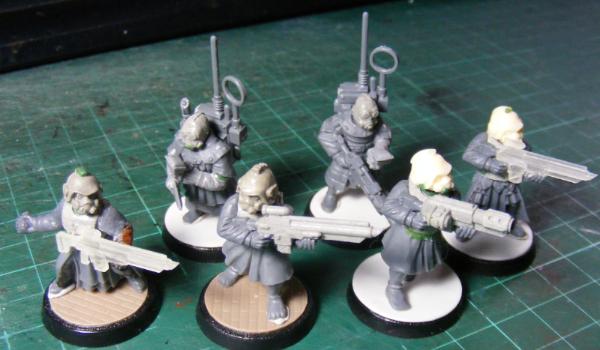
Very Paint in progress, but here is my first Imperial Militia squad so far:
I'm really enjoying the diversity of colours in this colourful bunch.
and a few close ups, along with two ladies for my Inquisitor's retinue that I'd started to get some colour on, although I'll have to repaint that red though, it's a bit shabby.
Fist of my Searchlights from the Curious Constructs Kickstarter. Something sneaking in the background too...
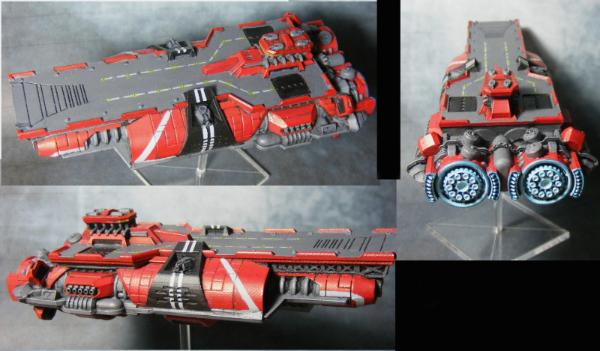
Lastly something non-40k that I found whilst digging around. I really like Spartan's style with Firestorm armada the ships just look cool, I went with a retro-ish Homeworld style with this ship (the onle one I have)
The militia is intended to be a mix of PDF veterans, civilians who have taken up arms, bodyguards as well as the priest guy with his entourage. It's nice to have a bit of variety and colour for a change.
Best of all because I'm only doing small amounts of different things, painting them doesn't feel tedious.
Well I'd like the red on the one with the flamer and the one with claws to look more in line with these:
Spoiler:
Since they are in the same group.
Otherwise I fancied trying something new and different, not sure what, yellow and black stripes?, I'll have to glance through the Inq28 projects of those more talented than I.
Spent the day trying to re-arrange my Dakka Gallery as well as photograph the last of my marine stuff to get rid of, so I'll be selling my Pholus (land rhino) Vindicator, and others that I have not yet built but have purchased the bits for.
Also I tried to varnish the second basilisk, raining today so decided to use a fan heater to help with the drying process so I wouldn't get frosting ... not only did it not work but the gun barrel bent and whilst heating and bending it back, I broke it.
I hate painting tanks.
@ Cam: Cheers Cam, I'll get some more pics of it as I progress.
Not sure If I have any bats, I'll look around... I've got plenty of snails and dogs... OK after some searching I found that I have one of these
Spoiler:
from the Vampire counts corpse cart (best source of zombie parts). Thank you Cam there is now going to be a small terrified bat clinging to the second searchlight.
@ LDD: I've cast up 6 so far, with all 4 weapon options. The cold is slowing down casting somewhat. That said they are really nice. Could do with more detail mind you...
@40kFSU: Thanks mate, That Ragnarok should be considering I've been working on it for 18 months
I do have an airbrush and even a fancy extractor so I can use it inside As soon as I have some vehicles to paint and some paint to use I'll dust it off.
@LDD: maybe you are right on the assassins.
maybe I'll make a new chassis, let me know if you have an idea for one.
I do have an airbrush and even a fancy extractor so I can use it inside As soon as I have some vehicles to paint and some paint to use I'll dust it off.
@LDD: maybe you are right on the assassins.
maybe I'll make a new chassis, let me know if you have an idea for one.
Yes I found a similar issue with a green paint I used once when I tried it on another model it looked less effective but I could not figure it out, then I realised it was due to the contrast of the other colours and that fact there was less of it.
I will have a think of what kind of chassis although I am steering towards the WW2 Russian look
I use Pledge acrylic floor polish as my general varnish / oil sealer / gloss layer for decals and then matt everything down at the end with Windsor and Newton non-yellowing acrylic varnish, mainly because both are available in large bottles for way less than a tiny pot !
Both go thru the airbrush just fine with a little thinning ( I use a mix of water and Tamiya thinners, don't exactly know why but it seems to work)
You will need to be careful to clean the airbrush with thinners after or it will be properly gummed up.
I've got some johnson's klear floor varnish, it's fantastic stuff, I found it didn't need any thinning, but I've got Vallejo thinner already so I might see what their matt varnish is like (since apparenly that does need thinning). I'll have to see if the W&N varnish will work with the Vallejo since I've got a big botttle of the stuff and it may work out cheaper.
I will have a think of what kind of chassis although I am steering towards the WW2 Russian look
Sure, I'm thinking actual suspension and maybe something more like a BMP series vehicle. Combining it with the lump of a turret that I've created will be interesting.
LOL, I think we're on the same page with the floor polish !
Also, what the artist Matt Varnish looks like , if you're interested, I got it at hobby craft last year sometime, I think it was £10 or something like that.
Hmm, maybe some DIY places might, small household grocery stores maybe?
"Johnsons' Pledge® Multi-Surface Wax" ... A lot of people are saying the new formulae circa 2009-2011 is crap.
I bought mine on eBay some time last year, I would be at a loss without it now, I use it regularly to make washes , seal stuff, thin paint etc !!!!
I read on the TinterWeb that Johnson's wasn't as good as Pledge, if that's the case Pledge must be fricken awesome and wear a cape of an evening cos Johnson's is pretty useful !
Fun with turrets and more. I've got a lot of plasticard to cut.
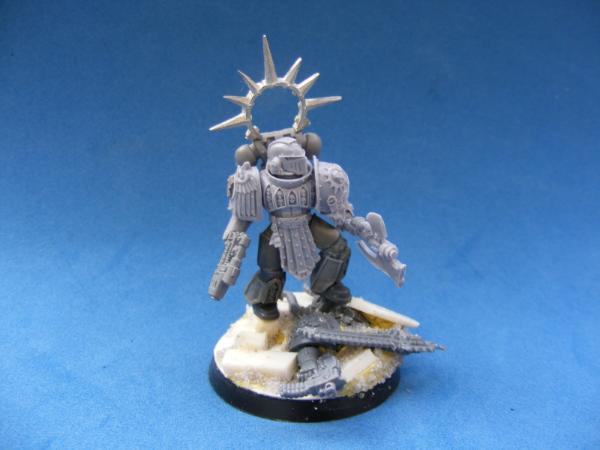
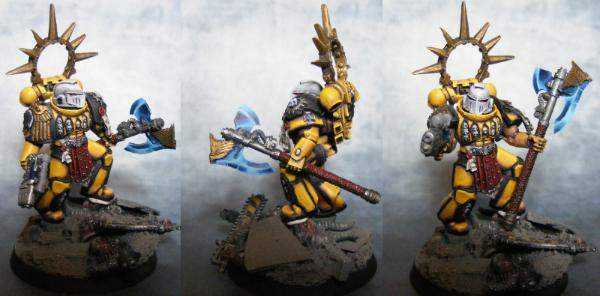
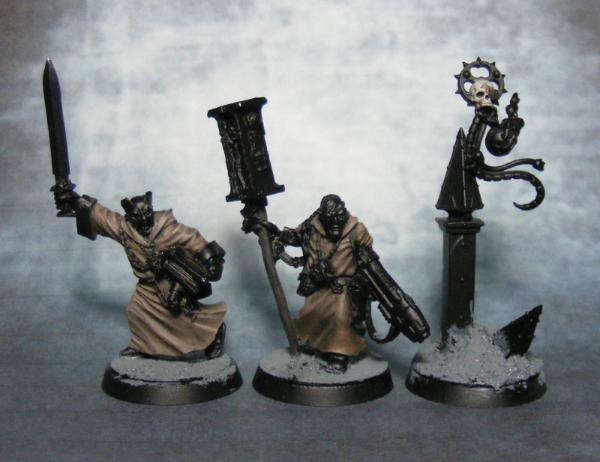
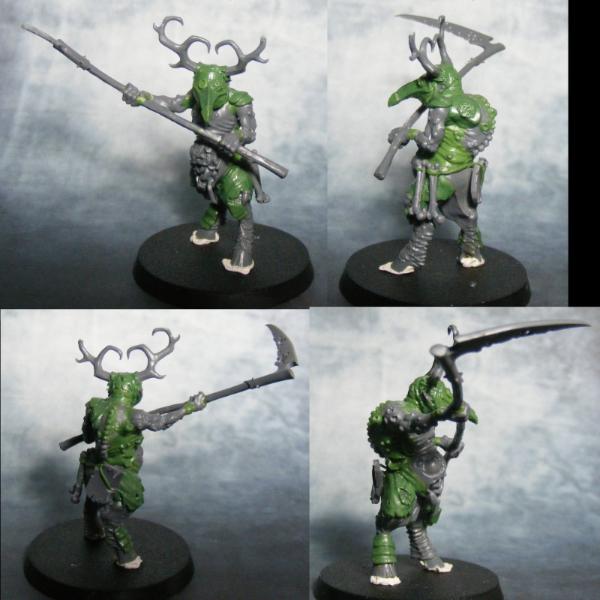
painting so far on the Captain. Painting from purple!!!
Plan is; to paint the body as per arms, black lining, red tabbard, axe haft and eyes. Then the CSM on the base will be a wordbearer (red matching tabbard etc) with a yellow / black hazard stripe chainsword (old school and matching marine armour colours) the rest will be grey-white, silver and gold. As and when I can paint it.
Power axe / relic blade and plasma pistol glow will be blue ... because. Only thing I'm not decided on is the eagle at the top of the axe.
And I have found some of that polish, finally (Sainsbury's Milton Keynes. Not that it was there the last time I checked), so will give that a go when I have something to use it on.
Nice one Dr good to hear you found some , try it out first on something that doesn't matter too much first just in-case it isn't quite right. Fairy power spray should remove it too.
Let me know if it works OK, I've got less than half a bottle left.
Thanks Cam and Graven
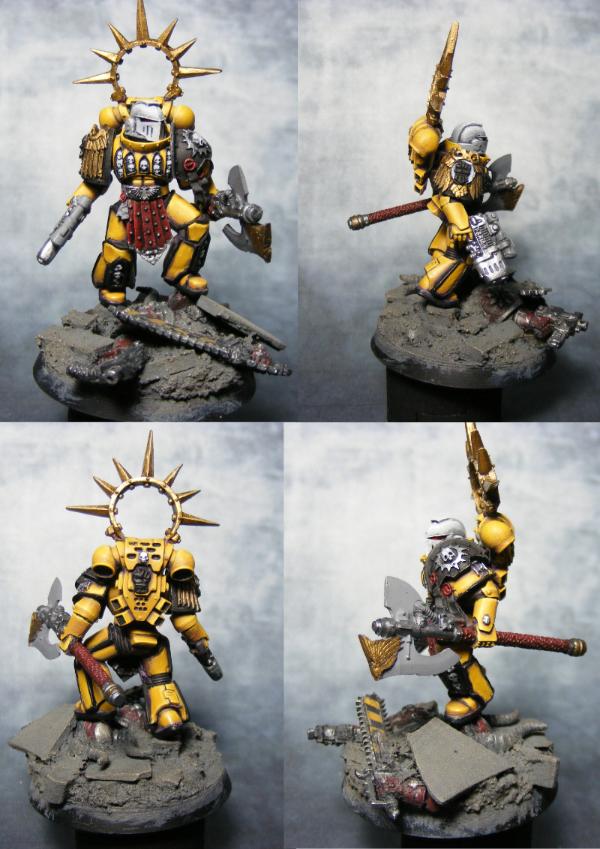
The Captain is coming along OK, all the metallics on there are from Vallejo's model air range, I find they have really good coverage. However I'm having a bit of an issue with the gold, it seems to separate more readily than the silvery metallics that I have also its like there a little lumps of dried paint in it, might be that It was left a little too long in the warehouse and there was a bit of dried paint that shaking a lot broke up. Anyway It's fine for brush painting so long as I'm careful, I don't think I'd try it in the airbrush though... I'm hoping a few good washes will fix the gold and increase the contrast on the white, the hlmet looks way better IRL but it might be a little washed out in the images.
He has 22 skulls on his armour and an axe that is roughly the same size as him, speaking of which it's going to take the reminding time of the competition just to paint that sucker!
Also I got a bit more done on the Militia squad, they are nearly done now, just a few small details left on each model, like eyes and stuff.
I think I have enough bits for two maybe three squads like this. I really love that squad, they have been a real joy to paint so far.
Lastly I've been updating my ebay listing and managed to consolidate the terrain bits into one multi-mega-listing. [ eBay item number: 221710119392 ] ATM it is UK post only until I know that it actually works then I'll add the international options.
I'll also put up the listing for vehicle parts and turrets etc. when I know things work with it.
Your painting is definitely improving all the time, the militia I really like especially the muted pallet with a splash of colour on each miniature.
They seem to belong together yet have no resemblance to one another, the second squad more so as there is a very earthy tone to this group loving the guy with the blooper and his stooping pose
The other nice thing is the simplicity of your bases although limited on colour they tie together nicely and resemble a earthy war ravished terrain.
Great Job
As for the marine not my thing but I like the colour scheme and the build up technique you are using, plus thanks I have spent several minutes counting skulls of which I can only count 20 possibly 21 Good Luck with the comp
Bloody Hell those little militia squads look brilliant.
My favs are:
Squad 1 chap in blue on the right
Squad 2 chap on the left....he looks nails and reminds me of the merc from The Chaos Engine computer game.
OneManNoodles wrote:Nice one Dr good to hear you found some , try it out first on something that doesn't matter too much first just in-case it isn't quite right. Fairy power spray should remove it too.
Let me know if it works OK, I've got less than half a bottle left.
I will be sure to broadcast what I find when I've had a chance to try it out (some possibility of tests this week).
Nice work on the marine. He's looking good.
And great work on all the peoples. Love the chap with the holy hand-grenade. Although, he could do with some writing on his book
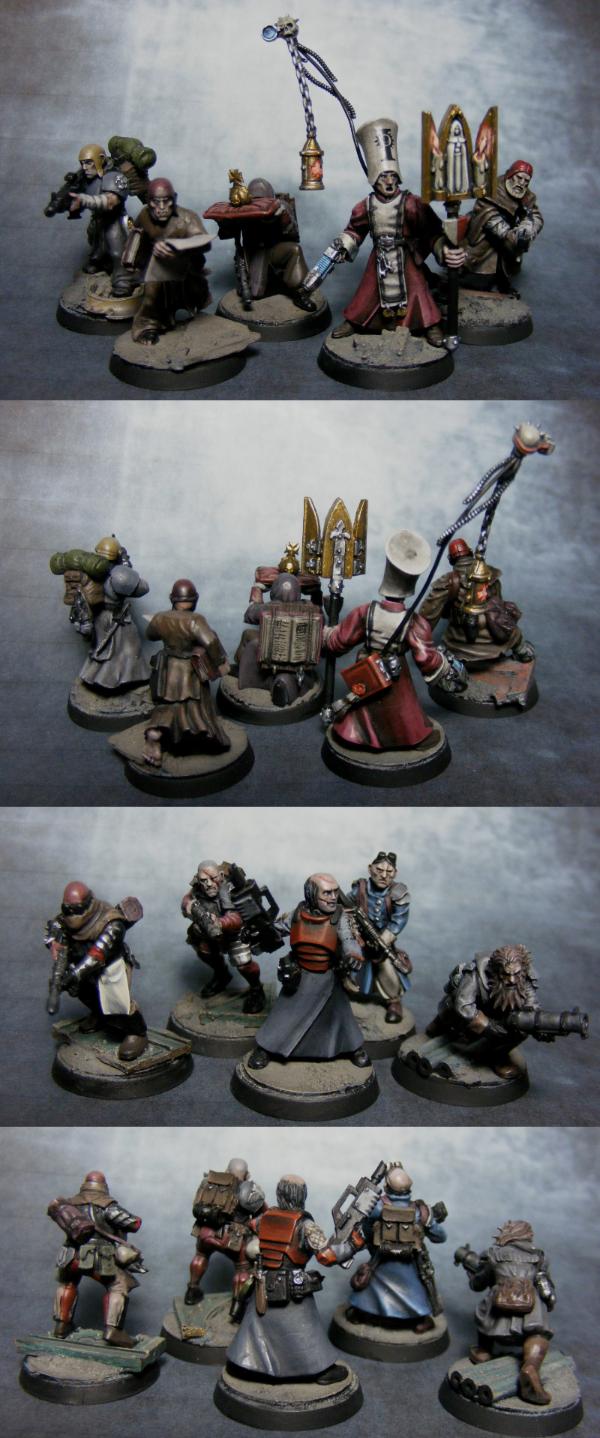
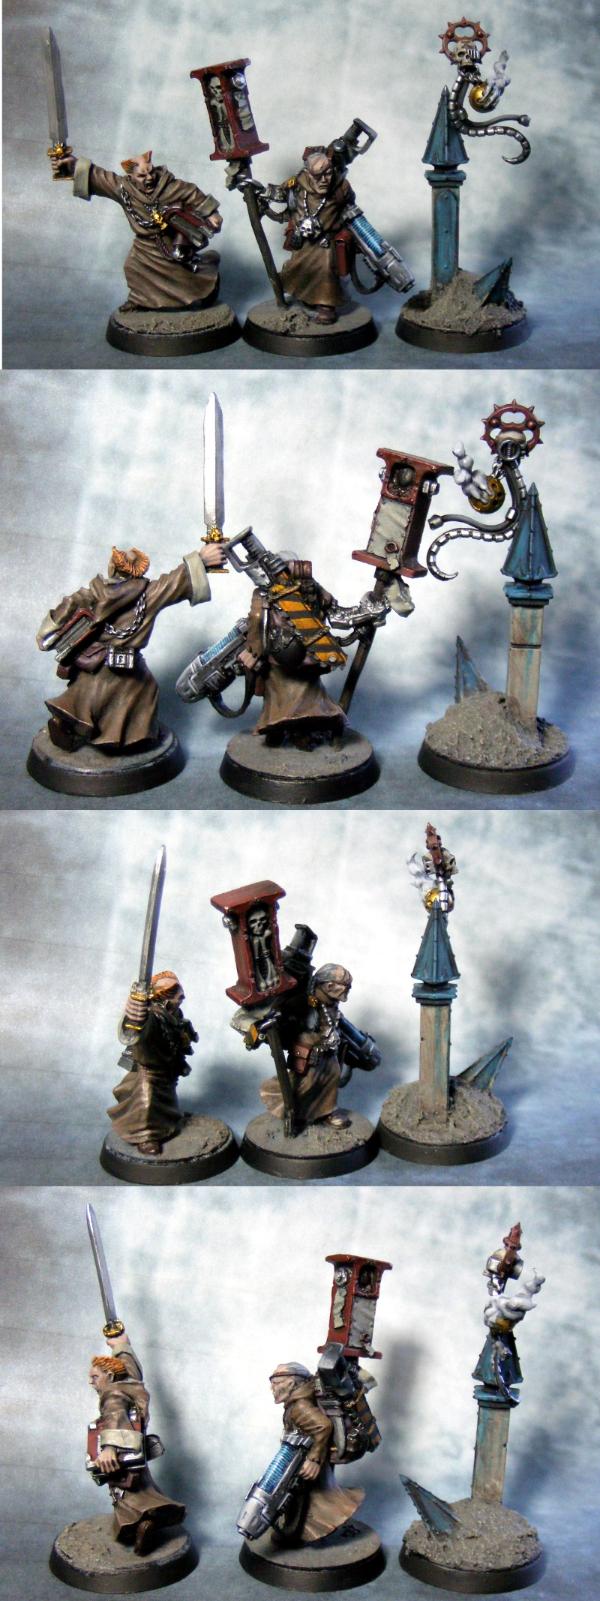
Militia are finished. ... I think unless I've missed something. I've taken images from multiple angles of each of them, but for now I don't fancy stitching together 40 images.
So with those out of the way, I've not done any more on the Imperial Fist captain, but at least my bench is finally a bit clearer, not by much
I'll try and get a picture of all the paints I used on these. Also Thanks for getting them on the Gallery Front page, despite not being finished
Without further ado, here is the next 5 militia; I've actually had a dig around and can confidently say I have enough for another 30!
So yea, Adding some PDF veterans made from Elysians and some sculpted heads and torso's, with more Ecclesiarchy, eventually there will be more armed rabble and miscellaneous characters.
And I did get a bit more done on that emplacement after:
Cheers for the Feedback all.
@DrH: I know the book isn't great, it was only in hindsight that I thought I should have painted a white rabbit or some such.
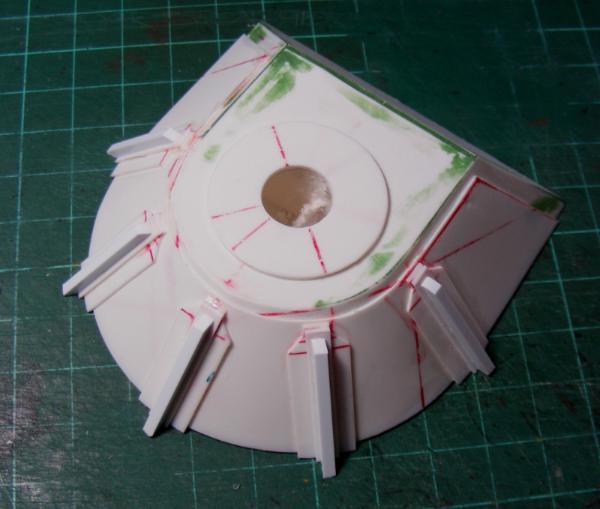
To answer your question: Badly! lol. The shape is called a truncated cone, simply half of one. It's getting the size of the nested circles right.
I cba to type out the math here, here is a site that will do it for you :http://craig-russell.co.uk/demos/cone_calculator/
although you have to take into account the thickness of the plasticard, I'm using 0.5mm and I also added the little tabs on the end.
Currently considering chipping my Captain... not sure how to start. Otherwise procrastinating on painting his power axe. It'll take me hours to do.
The miitia look excellent, especially the Holy Hand Grendade. Thou Shalst Count To Three, and Three Is The Number Thou Shalst Count To....
As for chipping on the yellow, have you considered/tried Sponge Weathering? It's a simple as it sounds; take some sponge or scouring pad, mix up a suitable colour (I like black/brown with a hint of metallic for yellow) and lightly dab it on the required area. Once that's done, put a veeery thin highlight around the larger chips to look like peeling paint and you're golden.
Thanks for the link noodles will give it a look and then sit there twice as confused than before
Good luck with the chipping just remember you can always add more but you can't take it away
Yea that's why I'm holding back on the chipping.
Think of it as, you are trying to make half a cone lying sideways with another cone cut out of it. Edit: It's just Pythagoras ...
Paradigm wrote: The miitia look excellent, especially the Holy Hand Grendade. Thou Shalst Count To Three, and Three Is The Number Thou Shalst Count To....
As for chipping on the yellow, have you considered/tried Sponge Weathering? It's a simple as it sounds; take some sponge or scouring pad, mix up a suitable colour (I like black/brown with a hint of metallic for yellow) and lightly dab it on the required area. Once that's done, put a veeery thin highlight around the larger chips to look like peeling paint and you're golden.
I know how to do chip weathering, badly, I use it on my tanks ... not that it shows since I usually bury them with powders... Thanks anyway. It's the edging of the chips that is something I've not been able to do.
Thanks Dr
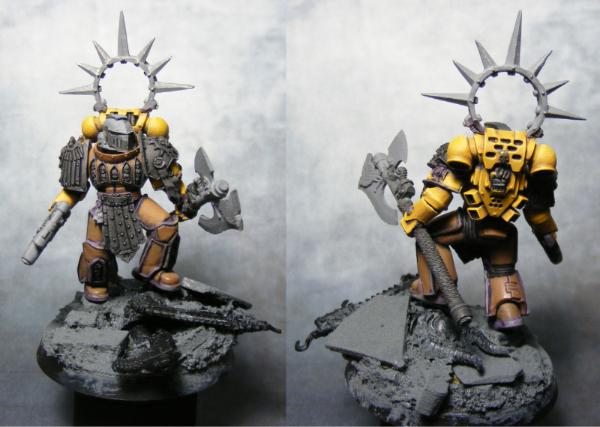
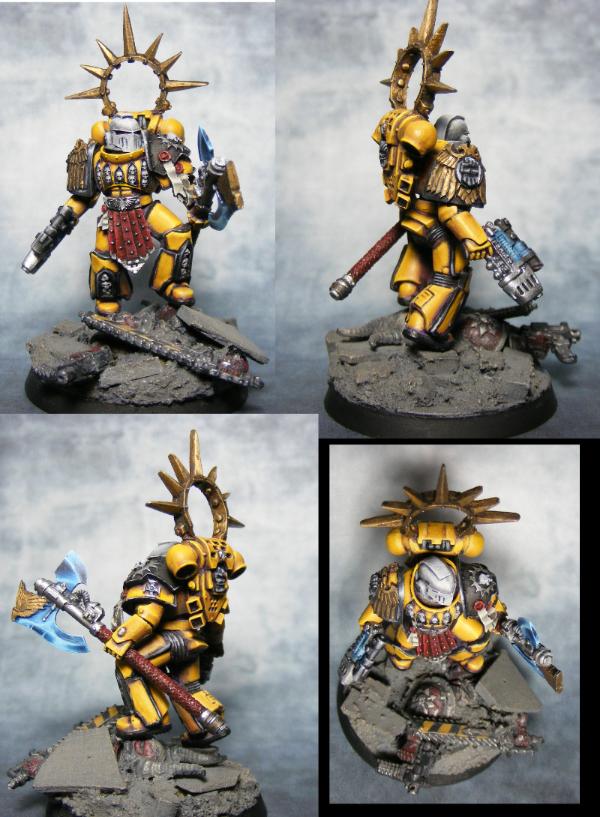
I've had a go at painting the power axe.
It's not great, but I'm not repainting it.
I had planned to try something similar to that on the black reflection and scratch edging on the shoulder pads tonight but maybe tomorrow or whenever.
An alternative to painting the highlight around the chip is to do the sponging with the light colour (paint chipped down to the undercoat, I use a very light grey) and then paint in the metal (where all the paint has been chipped off) inside those marks, leaving only a thin edge showing.
Some of the smaller chips can be left with just the light colour, and the larger ones can have darker shades in the middle (to make them look deeper).
Now if you gave some of those toasters wings......
I'll second Doc's advice re: chipping - sometimes it's easier to leave a thin edge highlight from the previous step than it is to try and create one. I aslo think sponge chipping can look fantastic on yellow.
I have been looking for wings after you mentioned that. Alas I can only find bat wings of the right size...
... Bat-toaster: The Dark Toast Rises.
[quote=Dr H 509255 7696403 773f933490621071a6f5b953864f2c46.pngHowdy Doodly Do!
Would anybody like any toast?
@ThunderFury 2575: Thank you very much... I really do need to finish those Ragnaroks, the first one needs rivets finishing, the second needs tracks, a turret and rivets!
Just a quick update my terrain and vehicle bits are now available on ebay for international post ( eBay item number: 221710119392 )
I am preparing some more things to mold atm, cleaning prints up takes a while, so I'm not doing anything especially fun and exciting atm, since I pulled something in my back whilst casting...
Aim for tonight is to finish riveting Ragnarok 1 and make 10 more Genswick.
Hey Noodles, I was wondering. If WFB is truely blown up and Bretonnia is discontinued, what are you going to use for your Genswick? I have been kicking around the idea of starting another army and this is kinda giving me pause.
Hey 40kFSU, I really REALLY hope they are not doing away with fantasy.
As to what would I do .... well for a start I have enough brets and I have recently been using empire archers (more poses and they fit pretty well) for the genswick, I have enough of them to "finish", as it were, the infantry section of my army. Just a few odds and ends to fill units.
I have been looking at Victoria Lamb's miniature company some of the parts would fit in ok with my army, I'm planning to add 2 engineer units using parts from there. It'd mean no more flat helmets though...
Maybe The Perry Brothers will make something I can use.
Or maybe I'll make something myself
GWS' management has taken what was a very successful and popular game and managed to completely ruin it to the point it isn't profitable. If I was less tired I'd make a completely unprofessional rant about how and why this happened.
I finished the first Ragnarok ! 2.5 years to make, a new record
Brief update, Busy writing up the results of the LoER contest.
Here is my starting entry to the 2nd Dakka painting contest:
3 Veterans that form part of my second milita squad, WIP below:
Guy on the front row right, not sure what yo do with him, I need to find some lasgun arms htat will fit and look right, The chap to his left will be another preacher model left hand chainsword and in the right a relic.
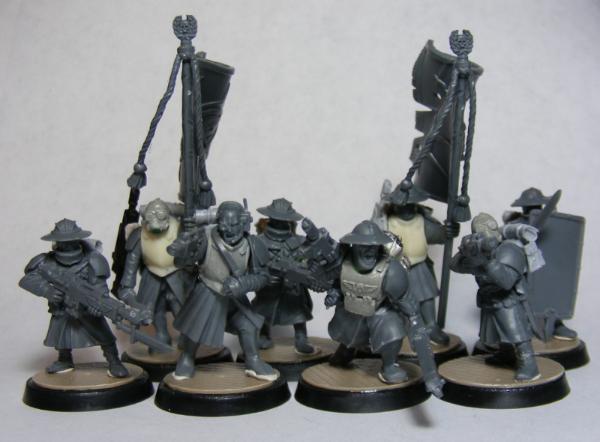
These are the last 8 genswick to finish off the 2nd platoon:
These are using the 5th ed Dkok rules so only 2 special weapons in the Platoon command squad. With the milita squads filling the other two slots in the platoons
Your Genswicks are getting so progressively better Im running out of words to describe them. I need a thesaurus or something. I too hope they dont do away with all the cool fantasy stuff. Ive always wanted to build a WFB army. Frankly, its the price. For $100 I can get 2 tactical squads, maybe an assault squad or HQ selection. WFB $100 gets you one unit. Im with you I hope they fix it and keep all the models, if not all the factions. I like the victoria lamb stuff too. Was kicking around the idea of getting a bunch of pith helmet guys.
@LDD: the arms is from one of the chaos cultists that come in the dark vengeance box.
@40kFSU: hahaaha, cheers mate, if you are looking for pith helmets try Curious Constructs, they've got a cool colonial british in space range (run by the tallented mr Col Gravis iirc).
There used to be a mini Fantasy thing years ago, skirmish sized, I think it was in WD mid 200's maybe. Could always try some historical armies .
Been enjoying reading 'Civilians in Warhammer 40,000 AD' By Kid Kyoto Good inspiration for the milita Kinda wish I'd bought the Dark heresy books now while I had the chance, I'll have to watch out for them.
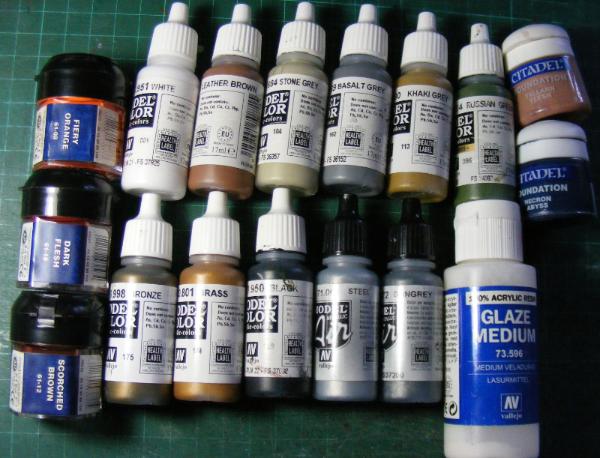
OK so I promised I'd post up my "limited palette" that I used on the militia ... well just in case anyone was waiting desperately for it, here you go:
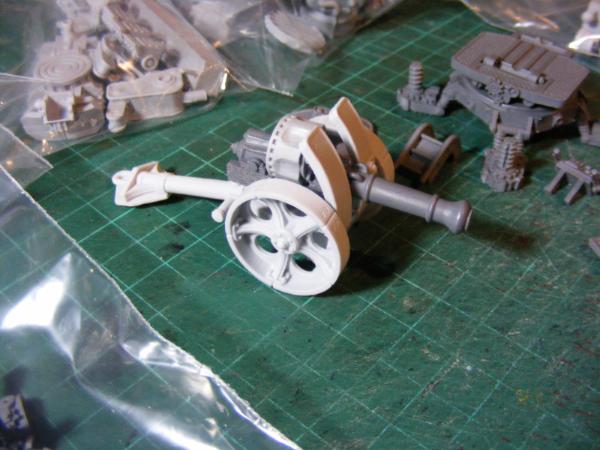
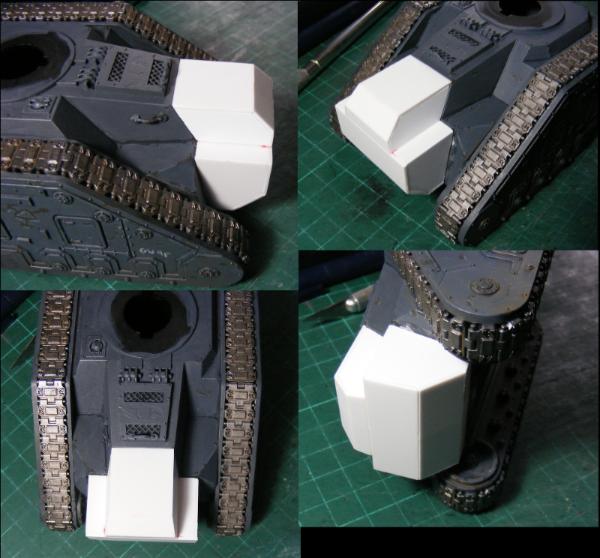
I started having a go at a little towed weapon platform after the Cyclops were finished, it was meant to be a trial at a rapier but I made it a little large.
I'll announce the winners of the League comp later, need to correct some of my horrible English to make it legible.
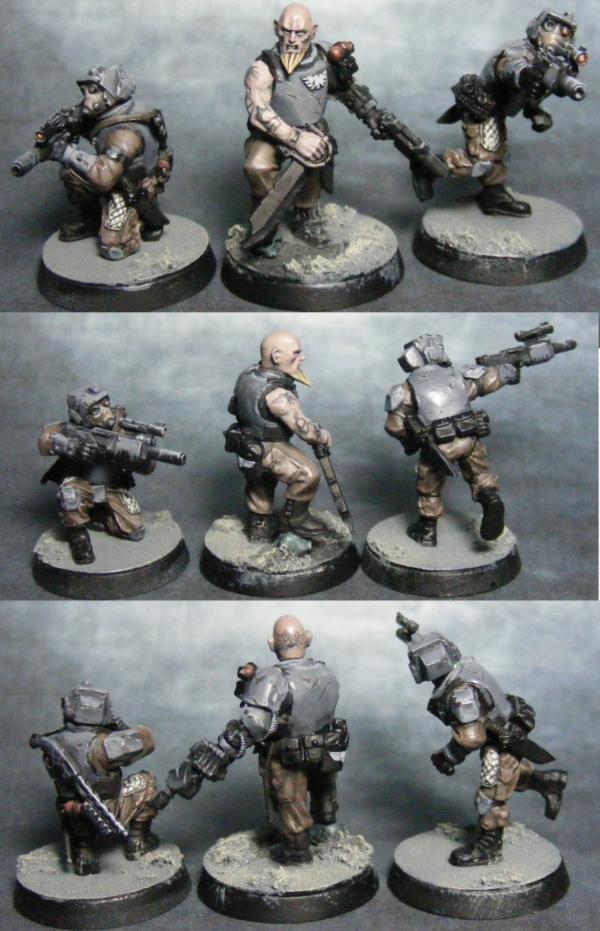
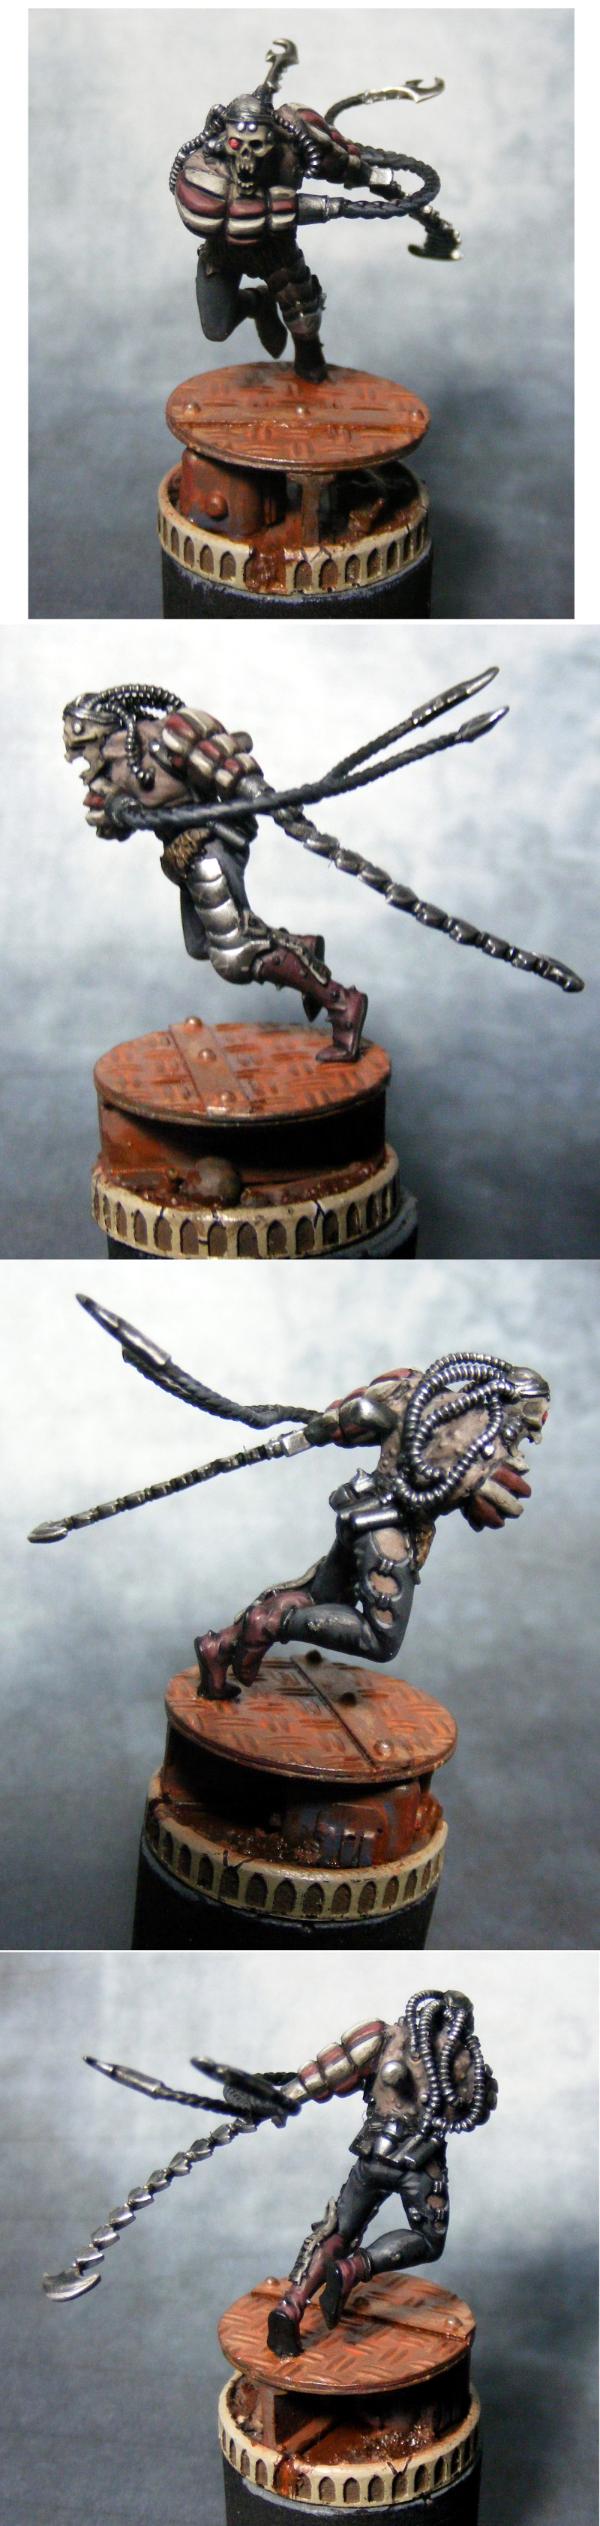
Well here is a fairly rough look at what I'm thinking of doing to them:
I'll be adding some dark flesh - red to bring colour for lenses and maybe stripes on the armour, also tattoos for the chap in the centre. (there is actually a verdigris skull under his left foot)
I'm really not happy with the grading on the armour and the flesh, My painting seems really sloppy right now and I just can't seem to draw the effort to paint well.
James why are you being so tough on yourself mate, I really like that you use a muted palette and the shading looks toned well.
As for your skin what is it you think that looks sloppy also the beard has come out well I hate trying to paint blonde but you have seemed to achieved it nicely
I like the idea of tats but would not go mad with them, and although the red would work the gloss black kind of rocks and has a sinister stealth like theme.
I really like your take on human sized infantry, and the painting !
You have know idea how many ideas I rob from you for my Traitor Guard !
Blonde beard looks great, I agree , tattoos would seem a good idea , but can be really tricky to pull off well , Google the subject (miniature painted tats and real ones!) a lot !
My only critique of the latest three additions is about the head of the third guy. I don't think people really run with their head in that position. It looks like the shape of the helmet forces you into an awkward position, but maybe trimming the ridge off of the top of the torso armor would allow for a more natural position. Whatddaya think?
LDD: that gloss black is the undercoat... I'm thinking of doing something simular to the black on the IF captain, so painting up to white the highlights, some scratches too, but black on the cyber arm, guns and equipment; yes.
@Big H: Thanks mate. With luck the tattoos will not look like I've just been careless with the brush or something. I've got plenty of fine brushes and drying retardant.
Thanks for the tip Rawson I'll be sure to put it to good use on the tattoos when I get around to it. As for the head, yea good point I'll quickly alter that (the head is only held on with greenstuff anyway), only thing is it makes the neck look a little longer.
@LDD: Blond hair isn't too hard, my recipe is:
leather brown with a little yellow in it, then a little black for the shading and a little white for the highlights.
It's not perfect, there are a lot of shades of blond though so there is a good bit of freedom.
Nice work OMN. The skin looks fine to me. The grey could be a little smoother, but it's far from sloppy. Don't be so hard on yourself.
Tattoos; I've done ok with just a mixture of black and skin-tone (with a fine brush and a steady hand). And yes, it's a good idea to keep a little skin paint to touch up the edges.
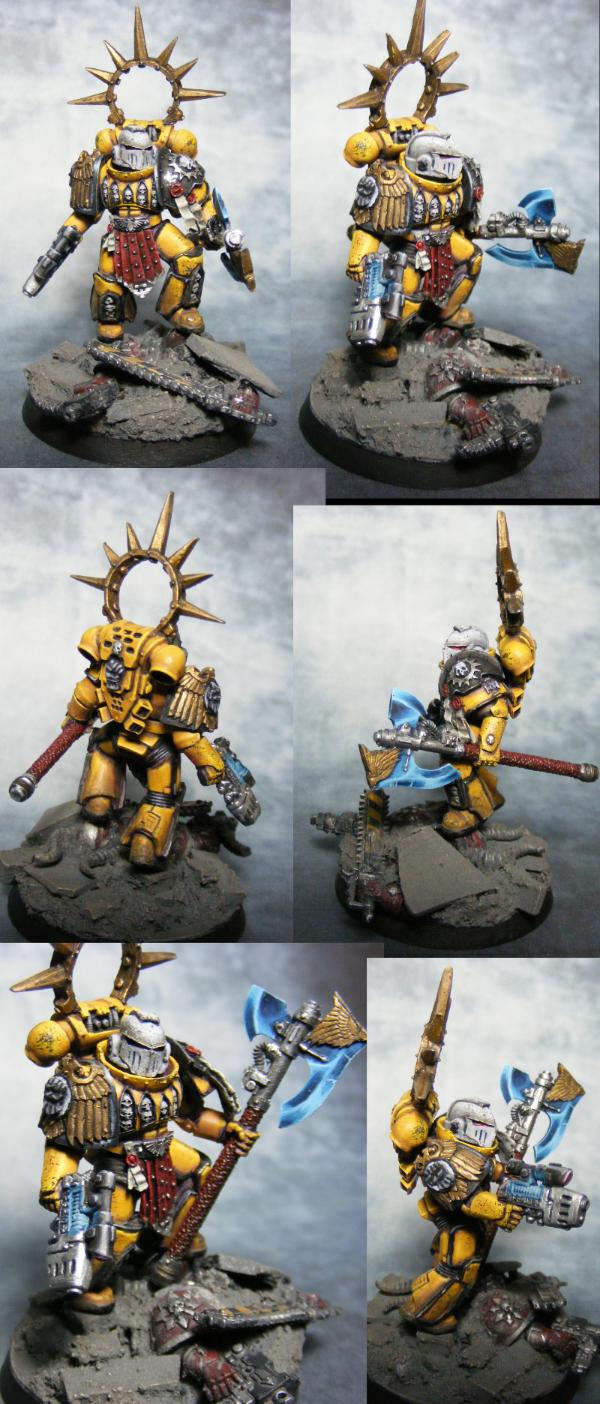
I gave those tattoos a shot with your tips Dr H & Rawson, ok, its not bad for a first attempt, plenty of room for improvement though...
... Also redid parts of the armour, chipping and did a bit of reflection / scratching on the weapons, may have over-done the scratching; and in future I will use glaze medium in everything (its a drying retarder).
next up, I've been plodding along with two little side projects. The little tracked thing on the bottom is intended to be a base for an ADL quad-autocannon, I might use one of the Curius Constructs ones that I didn't get from the kickstarter.
I managed to find some time to attack the frosting problem that I had earlier in the year on my 2nd basilisk, no such luck, I've re-varnished twice ... at least it hasn't got any worse. I plan on abusing weathering powders to "fix" it.
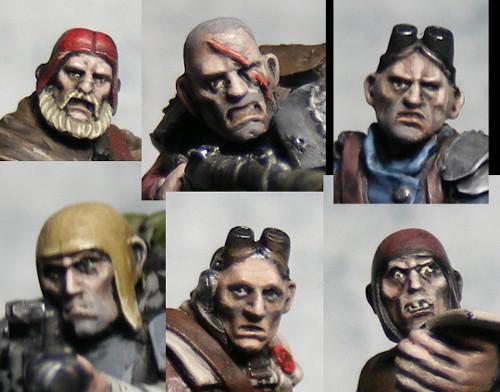
Lastly on a whim I compiled a few of the faces that I've painted recently, I call it "The good, the bad and the out of focus"
Not bad mate especially for a first attempt and the scratches look pretty good from here, I am sure with a few more goes you will get tattoos spot on mate
The emplacement looks pretty damn cool will you be casting these up at some point ? how about adding that turret of yours to it
That frosting is a bitch when it happens and totally soul destroying I think with some clever weathering you should be able to cover it without any issues maybe even some stowage
You could probably go even further with the tattoo's , maybe some banding or tribal stuff on the bicep/ triceps area and forearm ? What you've done look proper bo tho !
Frosting : have you tried spray on gloss varnish to clear it ? then come back once its dry and matt it again, there's an article on Dakka somewhere I found helpful !
Putting together an army or squad with such character/detail must make these a real treat to stare at in person, tabletop or elsewhere.
I think it would be kinda funny to see those toasters converted into tau drones or necron scarabs or skull drones. Just add wings to the toasters then grimdark them for proxy's sake.
@ Rawson: I don't know if you noticed but I took your advice on that running guy (adjusting the head), I think it looks better now, thanks for the tip . 4 of those heads come from the same kit
@Big H: Yep, twice, the "whitening" is caused by the oil wash not having completely dried I'll bet.
@aw_man: Hold that toaster-y thought.
@KrautScientist: Thanks, that model is probably my favourite that I own, mostly down to that expression.
@LDD: I'm making the emplacement mostly for that turret (maybe then I'll be able to shift some...). I'll have some extra parts for it at some point.
I broke the bottom plate on the master trying to fix an issue with air getting in, so I'll have to print another one, and also try and shift the centre point forward a bit so it doesn't lean forward as much.
@ Rawson: I don't know if you noticed but I took your advice on that running guy (adjusting the head), I think it looks better now, thanks for the tip . 4 of those heads come from the same kit
I did notice. I like him this way, too Glad I could help!
I like the "defence turret" noodles , it looks better than the turret on a chimera or leman russ IMHO.
Oil washes can be a huge pain in the ass , mine work better now I airbrush Klear to seal the oil instead of using pre filled cans but that might be a coincidence too !
The Chimera tracks look way better than the Leman Russ in my opinion , a conversion kit comprising a new upper chassis and a turret would be very sweet !
Right so I've finished (read: reached a point where I no longer want to see these models on my desk) my Veterans entry to the 2nd painting competition. Fingers crossed I'll come second again
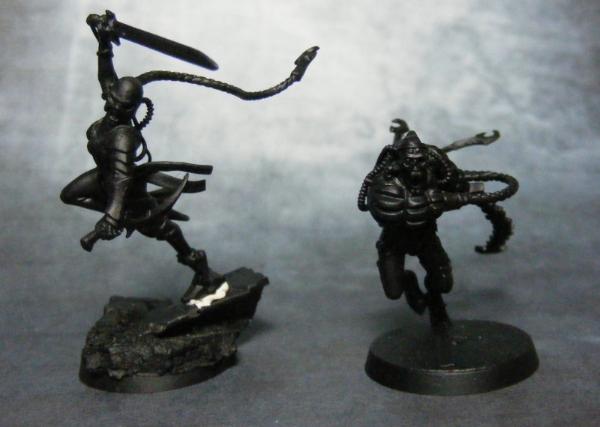
If Fast and Furious is the theme for the next painting competion, then I'll be entereing one of these, maybe both if I have time to paint them, whislt also trying to get some more paint on some of the other models littering my desk.
I'll have to make a base for them first, so they'll fit with the members of my little warband, but I think I'll only have time to paint one.... choices, choices.
Lastly I've got some more detail on Rag turret number 2, and answered one of mankind's (probably the shop, rather than the race) oldest question: What would happen if Thor's hammer, Mjolnir, passed to a toaster?
@LDD: Consider Thor-toaster now a "thing". I'm thinking about it, its on awkward parts of the vehicle.
@ Big H, I'd also have to make a new rear section too, for trench rails, hatch, maybe new engine as well.
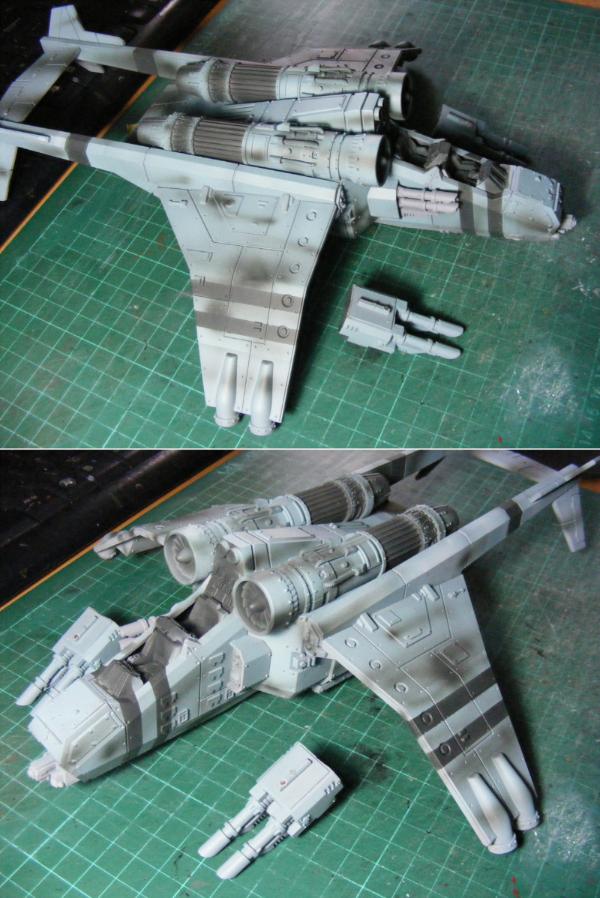
So I set up my airbrush and actually got some paint on my vendetta / valkyrie (the weapons are all magnetised) ... I may have got a bit carried away with spraying ... :
I was having fun. I forgot how large that model is there is a hell of a lot to paint.
I've decided to do just the one model for the next painting round and I opted for the AF I'm quite looking forward to that, maybe I'll get some more done on the militia while I'm at it.
@ Para: Cheers mate
@Oestergaard: Thanks
@LDD: Thanks I'll definitely need that luck, the competition is tough for this one.
@ Cam: Thanks, yep all tattoos turn blue after a decade or 2 in the sun.
@Stormwall: The red is a fine permanent pen, the sort that is used for overhead projectors, I don't waste time with pencils on plasticard like some people do, if I want to rub it off, I've got a jar of ethanol.
The green is Squadron green, it's a filler that doesn't shrink and can be filed, dries very quickly though and the fumes are pretty nasty.
@shas: yep this has been living in a box for too long, might as well finish it so it can continue ... living in a box.
@ LDD: Cheers mate, I got way too carried away with the airbrush.
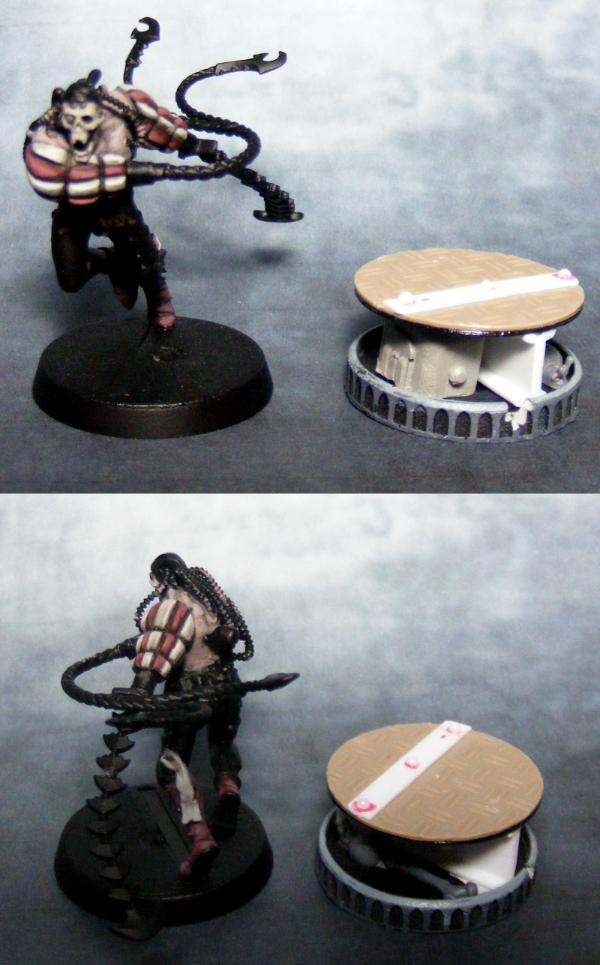
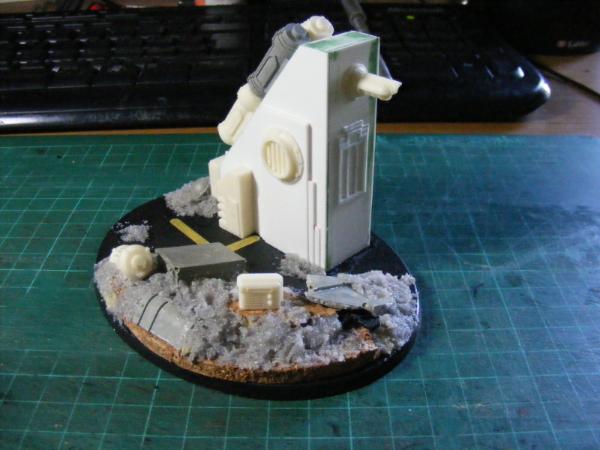
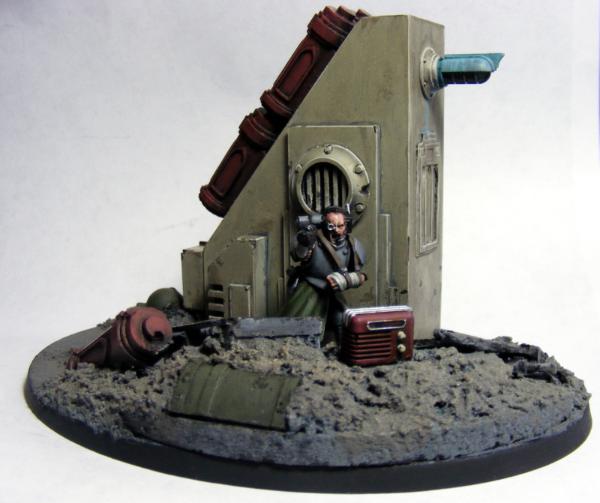
Managed to give the AF some paint (bit blurry, nvm), also got started on the base, fancied doing something different for a change (yes that is a toaster underneath the walkway). I'd like to fill the bottom of the base with a sort of; rusty slime, maybe having it slightly pouring out of the base though the holes from the bubbles. Much Grimdark, no skulls though. Also note the snail, nothing is faster or more furious than snails (to some garden plants).
I've been toying with the idea of scrapping using this in the competition and instead entering the Thorster for & giggles
Also got some paint on militia members 14 - 16:
I've got one more of these ready to paint, but 3 more that are nowhere near finishing. So I may have to come up with 3 replacements from my bits box (easy enough).
and I bought some of the Skitarii parts from a bitzbox, combined with parts from my own bits box and ... :
The random unfinished mini pile grows...
I'll have to bust out the airbrush again tomorrow to get going on the decals for the Valk, probably would have been smarter to have done the decals and what not before "weathering" ... I'd like to get started on the base tonight. Unless I try to do any on the thousand other things on my desk.
Thanks again everyone.
OMN.
Tell me about about this 'revolver rifle'. who produces it?
GWS, since they released the Adeptus mechanicus skitarii vanguard things.
Blizzard of activity from me, I have managed to paint .... A base.
Yes just one, for the AF, that's basically all I've done this month.
I decided to break the 4th wall on this one a little with corrosion slime osing out of the sides of the base where there were air bubbles, I used a number of different techniques and mediums combined on this like powders mixed into gloss varnish for the damp surfaces.
the AF himself is still unchanged, though I have managed to break both of his flails again, unfortunately I don't have replacements so glue everywhere.
Love the little details on that base! I will need to go through the past pages to see how you made the small crested details that circle the base.... really nice!
@Para: Thanks mate they are going to be radically differently painted so no worries there.
@Dr H: Cheers, rust seems to be in dakka-vogue right now, always worth trying something new.
@Shas: or maybe anywhere that sprung a leak .. a long time ago, the Imperium has a lot of forgotten corners.
@ Magos: Thanks, good luck finding that though, I don't think I mentioned it, it's a resin copy of a 3d print I made, plenty more where that came from too.
@hk1x1: If it wasn't for the painting competition, I probably wouldn't have done much more, so don't be too impressed . Thanks for stopping by mate, glad you like the base
I'll have to try selling those bases again....
Over the weekend I plan to have a bash at finishing painting my AF, depending on how many other half started projects ambush me on the way, like a Valkyrie, some more Genswick, a searchlight.....
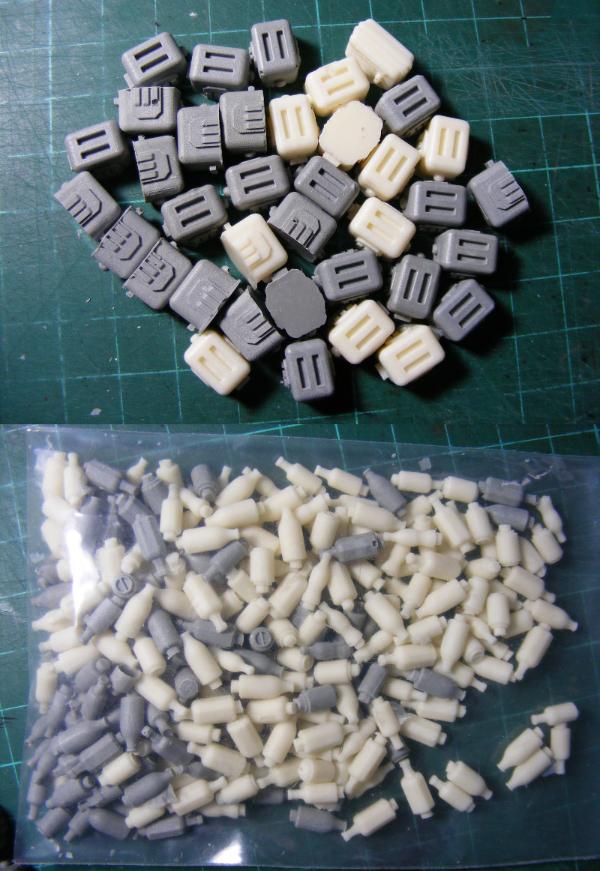
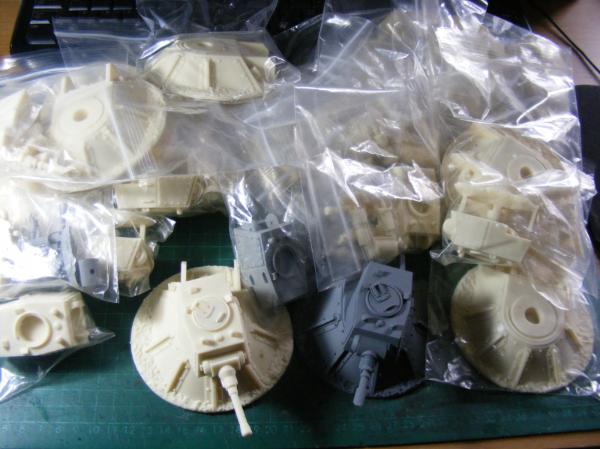
I've finally got started casting the turret emplacements. They've cast up really well, take a look:
That is my first one so I missed a few bubbles, there is also a bit of resin bleed as well so some must not have mixed properly which is odd, meaning the primer came off in parts, it'll also make paint rub off so lucky I didn't fly on ahead and get it fully painted, I think the way to fix it is to wash in warm soapy water and re-prime, I'm going to have to find a better way of mixing resin.
I may have made the turret ring a bit tight, it will rub paint off, but yea .... no-one will see that and it won't fall off like the old FW turrets. Otherwise yea I'm really happy with it.
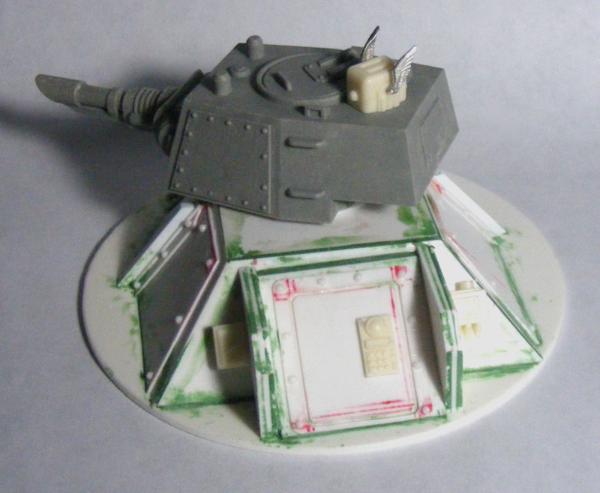
Also since my plan was to have two lascannon armed turrets and one with a battle cannon, I thought I'd get started on that, it is a little large for the emplacement, so I think a bigger one is in order. I may have made the turret look too Orky. let me know what you think.
I'll also have a larger update tomorrow probably as I've been playing with plasticard some more.
Maybe LDD, but I was going for a sort of naval destroyer turret look, besides I'm making a larger emplacement specifically for the battle cannon. I just made it too stumpy that's all, I could have put the gun in better too, and done something to fill that huge gap.
As for the emplacement, well I'm already casting them so its a bit late to go back and change things now. Cheers LDD
I missed your sales of the custom rhinos (lack of funding :( ), but these are looking sweet! If you happened to make a "gatling" version as well, then one might be able to use them as proper stand-ins for a certain company's emplaced gun set.
OneManNoodles wrote: Maybe LDD, but I was going for a sort of naval destroyer turret look, besides I'm making a larger emplacement specifically for the battle cannon. I just made it too stumpy that's all, I could have put the gun in better too, and done something to fill that huge gap.
As for the emplacement, well I'm already casting them so its a bit late to go back and change things now. Cheers LDD
I think you misunderstood me I meant change the turret not the emplacement as it is great piece but I see more where you are going as to the design now of that turret as to the Naval destroyer reference.
Maybe extending the barrel might work better as the Russ turret is what looks odd to me, can you not make your own as you did 3D print your own barrel ends after all
@LDD: yea sounds about right for me. I was planning to use one of my plasticard gun barrells that I have lying around from the Ragnaroks, but I had a spare russ gun handy and it saved some time despite being hideously ugly.
@Kepora: Just pm me when you want one, it's not as though I can't cast more
@Shas: Thank you, imposing is just what I was aiming for
*General open invitation*
I'm looking for ideas of bits to make in 3D, so if there is anything anyone would like me to make just say here. " I wish some one made ..."
anyway I'll have some more to show later, once i've edited the images.
Automatically Appended Next Post: Auto-appended?
battle cannon emplacement:
I have finally got something done on the laser destroyer, the main thing that is left is to make a gun mount, (it'll be a non-laser destroyer) so I've already got a gun barrel ready:
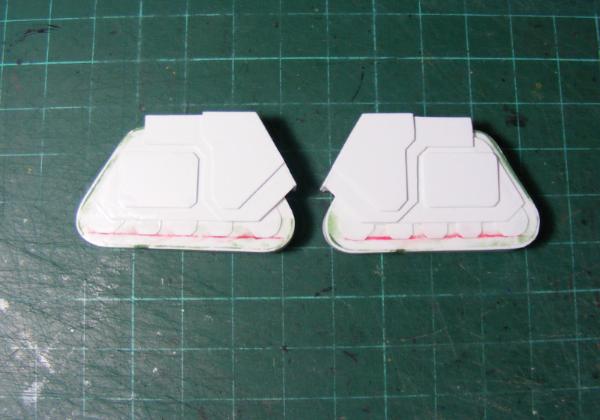
Made the side sections for a rapier, the main headache is going to come from making a gun, I don't really want to go down the FW route of 4 smaller lascannon barrels and would rather make something a bit more original if only so I can have more than one, yea watch this space.
And lastly, I finally got started on the engine extension for the Russ, I'm glad to say it actually fits and I'll be able to attach trench rails etc at my leisure once I finish it off at any rate:
You going to cast up the end section I only ask as I am to lazy to make what I need
Plus I would be interested in the turret emplacement as the design fits a range of barriers I have, how much you knocking them out at ?
Yes at some point I will have some ideas and measurements for that project I spoke to you about a while ago, need to make sure I have the cash to cover it first though.
Like the start of the new emplacement plus you would need to change the barrel if you make them for general sale hint hint
Lovely looking gun emplacement there my friend! Really cool!
I wonder if I might be so cheeky.... perhaps I could sent you a file or 2 of some parts I have done in 3d and see how much they would be to produce!? I did have some high and mighty ideas about working through shapeways etc to produce some things but just have had 0 time and capital to be able to do it!
I have Sketchup files if that's alright? I will ping you a PM after work if that's cool?
@LDD: I guess I could cast it up, it's actually not perfect I must have mis-measured something as there is a gap at the base of the second (narrower) level that connects to the hatched section of the tank, not sure how I managed that, looks like a 0.7mm gap. I'm not sure it's fixable without re-making it ... or just using filler.
The small emplacement yea, atm I'm thinking maybe £18 for the emplacement & turret, the turret itself is £12. I'll be adding some more bits for the turret at some point, searchlight, extra weapons etc.
That second emplacement turret is just for personal amusement, no more. Although I am making a larger turret for a different reason.
@Magos: Fire away, its no skin off my back to just check them for you. I'm using rhino and it says I can import .skp, shapways takes a number of formats but the standard type for 3D printers is .stl.
@Elnibbus: Patience? I just don't allow myself to place FW orders. Glad you like my veterans, I did enjoy painting them and I admit I'd like to do more, when I get some more Elysians I will.
Sounds like a fair price to me mate might be in for a couple soon, the base looks pretty good and I like the height it gives to the model very atmospheric.
@LDD: Depends, only if they have no bubbles or mold lines, I think I lost (sold) my masters, I'm trying to repair the prints atm. I'll add a bit more detail to the engine section first though
Whilst I have paint on my desk I got working on some more Militia, I need an ammo cable to make the last of them.
and if "monster" wins the next round of the unofficial painting contest, I'll be entering this chap:
It'll be good to do something different for a change. Although I'd like to try the rusty basing again for this one.
I will have a look at the ones I have and see, if I think it will fit your needs I will take some pics and send them to you for you to say yes or no does that sound ok ?
Yes let me know when you get it sorted
Like the militia so far but could do with a little splash of colour to lift them, as for monster looks errr strange and odd but in a good way,
Wondering what colour theme you are considering for this ?
Wondering what colour theme you are considering for this ?
Yea me too. Probably something to contrast with the rust & decay I have planned for the base but at the same time blending in.
Sure mate, it wouldn't be too much effort to have some more printed off. We can work something out, I'll send you some replacements & extra bits as thanks as well as a small stamped & addressed box for you to post them too me.
There are a few problems with the trench rails that need addressing, namely the height from the bottom hull attachment point, some of the sharp edges are too sharp and are just bubble traps and lastly the lovely 5 sided bolts & washers, whilst they are nice they stick out too much and yes .. bubbles. Other than that bottom spar is too thin and needs bulking up to stop it breaking almost every time I de-mold them.
I'm only 3 hours into those militia give me a chance plenty of time & space for colour: I'm thinking left to right; orange hair, blue plasma, verdigris post.
I like the idea to reflect the rust scheme some browns and oranges like an Auburn scheme would work well, what about the scythe will the blade reflect the rust of the base ? maybe make the wood handle a greenish mossy colour to reflect the dank decaying atmosphere of the model.
Yes I know you had just started on the militia but wanted to make sure you added some colour
Are these OK for what you need ? they are all pretty good to be honest the only bits I can see are a little flash or mold line that needs cleaning up.
Let me know what you want to do you don't have to send a box mate I have plenty of them knocking around and packing materials they will be snug as a bug if you want me to post them to you plus saves time
But you will need to PM me your address
Let me just say these pics are exactly as I received them no clean up or tidying, yes they are that good no wait great
Thanks shas, I know how you feel, only I have to fork that out at the post office.
To post up to 100g of small things, like the trench rails, to the US is £3.15 for airmail.
All I can really do is lower my item prices since if I made postage cheaper, some of my items are priced low enough for me to be at a loss in some circumstances.
OneManNoodles wrote:Thanks shas, I know how you feel, only I have to fork that out at the post office.
To post up to 100g of small things, like the trench rails, to the US is £3.15 for airmail.
All I can really do is lower my item prices since if I made postage cheaper, some of my items are priced low enough for me to be at a loss in some circumstances.
lone dirty dog wrote:
shasolenzabi wrote: Those trench rails do look nice, shame it costs so much for international shipping!
You could see if any one else wants any near you and group buy ? just a thought and I have to say they are worth the investment
Well, if bought, there may be a return on that airmail price! I will have to order the things all myself as I am in a gaming deadzone so to speak here where I am LDD
Hmmm, OMN, Please PM me a price index for the trench rails and emplacements, I may order me some anyway!
Thanks all, I suspect I might get that flight stand finished by the weekend.
Story time...
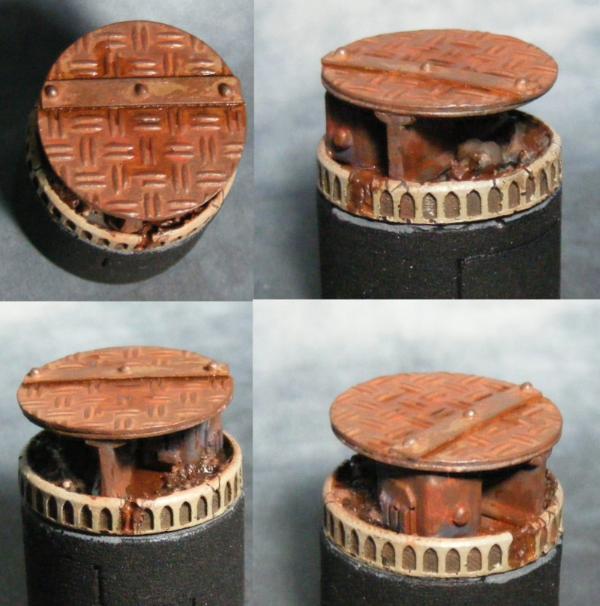
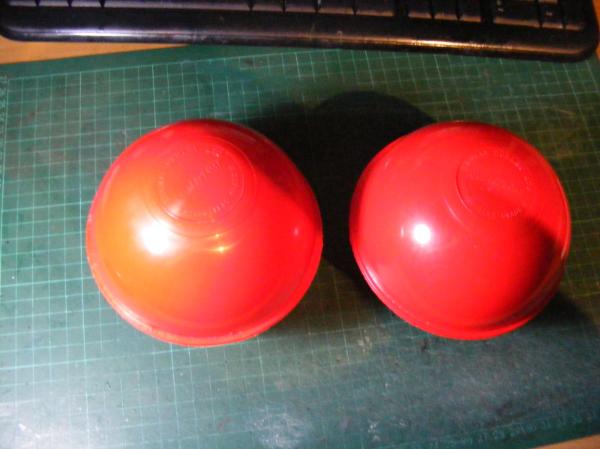
Now a few weeks ago, when DrH's round of the League terrain contest was running, I actually had an idea for an entry, but far too late to enter, after wandering into wilkos and seeing nice spherical toilet ball floats for the earth shattering sum of 99p.
Perfect for gas stores! Now these things are not small each is about 120mm diameter, so it'd take a while to make some sort for base walkways and other supporting structures around them, I'm wondering if I can twiddle it to enter the current round of the terrain contest. Possible? Ideas?
@magos: cheers mate, if I didn't think people enjoyed seeing these models, I'd stop posting them.
@LDD: Thats the original tacked on atm, I'm making my first moves on moulding it up along with all the other goodies.
@Dr H: Cheers mate, I picked up 2, not that I wanted more mind you, as I say, they are large, actually I was thinking of building bulkier supports, more like the building piece used on the Valkyrie base, though I might get some frame work made to save space.
It'd have the two spheres roughly side by side, with a foot area something like 20 x 36 cm. Making the base for it might prove a problem.
Also they feel like they are Polystyrene, so less hassle to glue plasticard things to.
@graven: That might be the only way I can go on this graven.
Good point shas, but maybe with a bit more of this:
I'm going to call this batch of militia finished now, mold lines, wonky painting 'n' all:
Valk base done and dusted (ok no powders), my brushwork sucks of late but at least I got the colours how I want them [Genswick trooper pictured for scale]:
Milita rock love the hazard lines on the back chain sword just gives the model that lift, also loving the ginger barnet
The stand turned out spot on you should really produce these better than the usual crappy bases you can get, also love the radio inspired by anything in particular ?
Turns out my floats are probably ABS, neither of my glues will touch the stuff ... super glue it is.
I think they'd look good painted blue with paint flaking off to reveal a rusty layer underneath, streaking down the sides. With white faded numbers and maybe an imperial eagle stencilled on.
@LT: cheers for stopping by, good to see you.
I posted up a pick of a few WIP genswick a little while ago, they are now nearly finished, I got started on them last weekend, and I'll have them done by the end of the day.
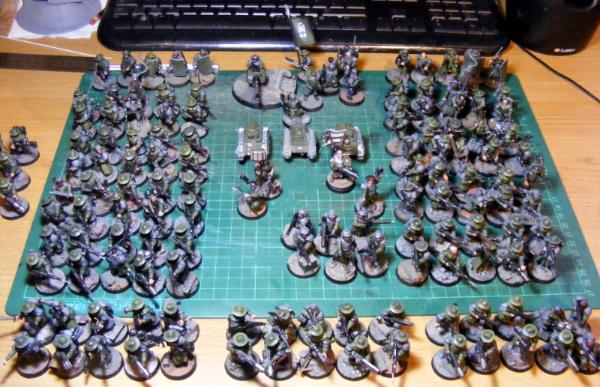
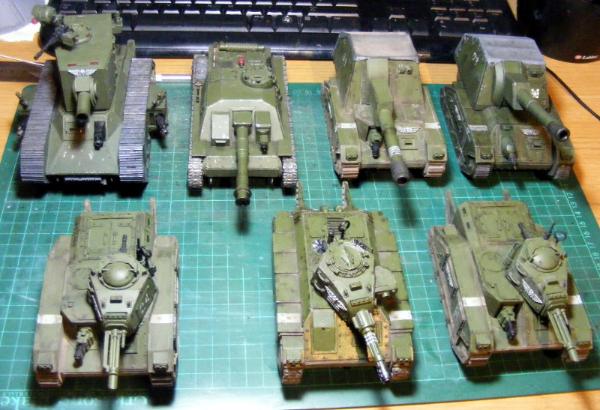
3 weeks absence, time for an army shot to take stock!
I decided to put some time in on getting an army shot of what the finished models in my Genswick army looks like so far, I feel that whilst the contents of the last 30 pages might vary wildly at times at least the bad pictures offer some continuity.
The infantry blob so far; it's nearly finished I've got two Cyclops controllers and four stormtroopers to make. As well as another 1-2 squads: assault engineers (when I stop blowing funds on other things and get my Vic lamb order in) and maybe a sharpshooter squad which I'd like to add. There are some spare grenade launchers and flamers on the side that I don't particularly want to make dedicated squads for too:
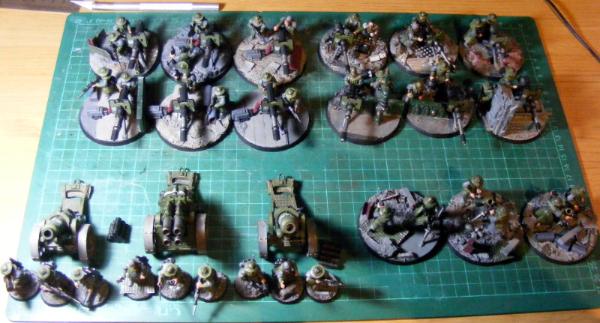
Support weapon teams:
The finished tanks:
Yes I'm still working on two more Ragnaroks, the destroyer-Ragnarok, the earth shaker + tow vehicle and a manticore, they are just going slowly I don't know how I'm going to make the destroyer's gun mount, idealy I'd like to make it swappable with a demolisher cannon, still a pile of my new bits will be finding homes adding detail to these tanks!
List looks something like as follows (using the 5ed codex):
Command squad: autocannon, MoO, Astropath
2*{ Commissar: bolt pistol, power weapon}
2*{ priest: shotgun}
Damn that army is looking tops and love the tanks especially the off set turret chimera as for the turrets and weapon load choices I can confirm they are stunning pieces in the flesh
The tank conversion kits are FANTASTIC !!!!! to say the least well wroth the investment as is all the pieces in his current collection.
I've not really been doing much in the way of modelling, outside of modelling on my PC anyway.
Shapeways has another free post offer, this time on orders over $35 (pre-tax amount unfortunatly ...).
So I've been throwing together some bits 'n' bobs for that, re-worked the plasma cannon (with left and right handed versions...) added rifling to the cannons ( you'll have to search for the other variants). Other than that I've been slowly adding to some other projects like the Pholus [chrome spell-checker says "Pholus" should be spelt "phallus"] and more add-ons for that turret of mine.
There is also WIP of; 4 Genswick Stormtroopers to fill that unit of 6 to full strength along with the two Cyclops operators, strewn across my desk untouched for a while now. I'll get some pics up despite there being not much to show.
I've been meaning to do airbrush two of my emplacements, but I haven't had much drive to do so, or even finish the valk...
Thanks for your comments peeps, I do appreciate them, even if it does take me 3 weeks to say something.
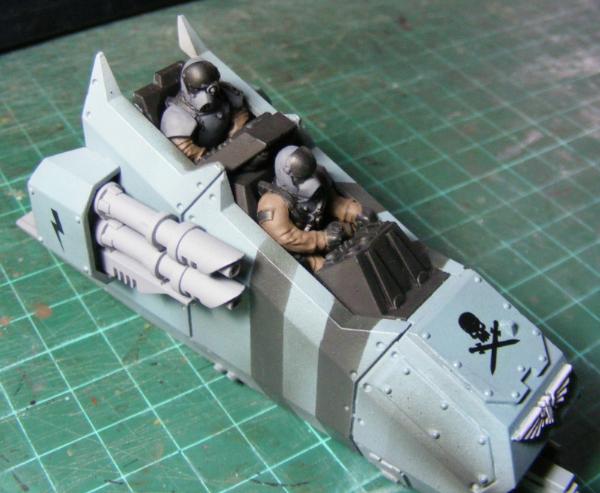
I briefly picked up my paintbrush to get started on the crew for the Vendetta since the interiour is going to take some work, also I've forgotten about adding the side gunners.
Here is as far as I've gotten on the 4 Gens storms and the Cyclops controllers, just putty work to do on these and equipment:
A bit more fun with some resin bits; adding more details for the Ragnarok { The brass mesh on the side is an 'Panniers' from secret weapon minitures. Also my second emplacement has a periscope on the top.
Two chaps from my bits box; left an officer maybe with a FW boltgun; right a tech servitor / junior enginseer or something like that. The cables are from a FW "MECHANICUM SCYLLAX GUARDIAN-AUTOMATA ", nice source of mechanicus bits them, that I picked up from an ebay bits store.
I'm thinking of adding some thing as an add on to the Genswick, something different that could fill a different role to the rest of the army, something that stands out. Maybe a super heavy, maybe a small number of Imperial Fists, no idea what though, any Ideas?
Shapeways has free post on any order till the end of Monday 31st EST. I had a go at making a human sizetorso in a flak jacket, I hope I've got the dimentions & proportions right I threw one into my order so hopefully it'll be OK when I have it in my hands.
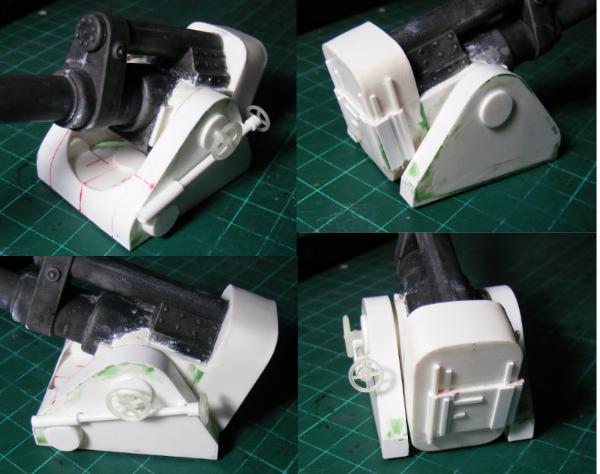
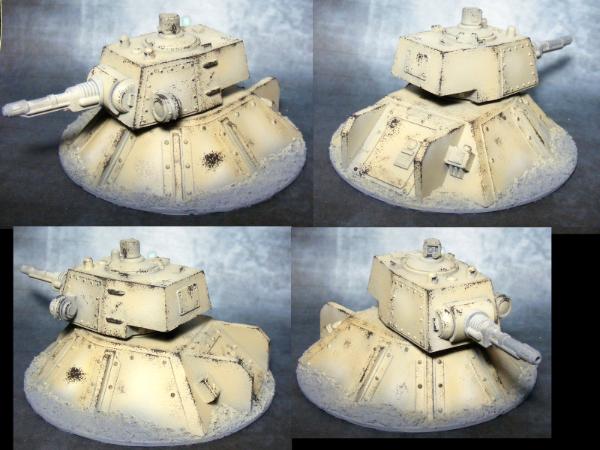
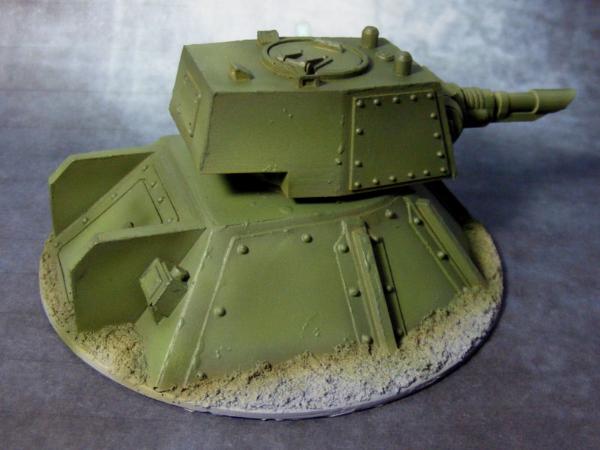
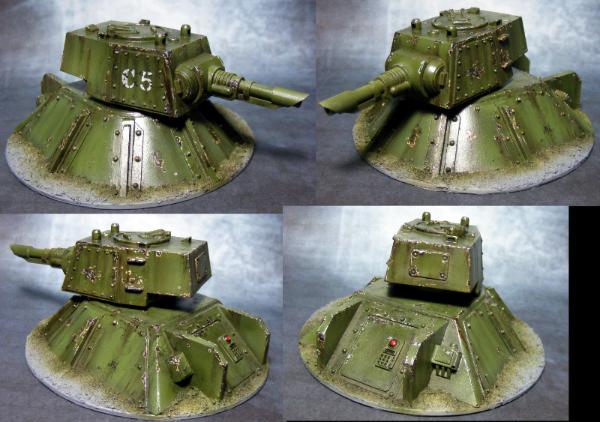
Got a little airbrushing done on 2 emplacements. This is the undercoat that I'm aiming to apply a chipping medium or liquid mask fluid to expose as much of the under layer as I want then airbrush them Genswick [Russian] Green. The weapons will be painted to match the rest of the turret
First with Mk1 laser cannon
Second with Mk2 laser cannon, search light and commanders perescope. This second one I'm hoping to paint off as a show piece to display some of the other weapons when I remember to clean them up to paint..
As for other projects ... I'll probably just get on with trying to finish some of the other projects that I've started and put on hold, I could do a small marine force however, some counts-as scouts with a LS storm and a predator backed by some DS terminator goodness, maybe, as much as I'd like to do some HH stuff...
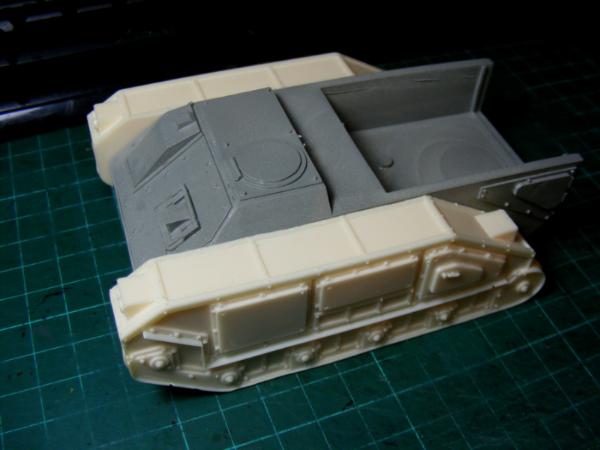
Also I keep forgetting to mention; I have 3 of these tank hulls (pictured below) which are surpluss to requirements, I have 5 but after cutting back on some projects I only need 2. They are assembled and glued together, generally as you see the one below but with the exception that I have removed the thin piece that runs perpendicular all the way down the side of the track sections, this is because it is fragile and prone to damage, there is also some deformities made to the hull from making the molds (since the hull was not made to be molded basically), if anyone is interested i'll take some pics for them.
@Joe: Cheers for the input, I had thought about trying true scale the only issue I have is that there are so many different ways of making them and I have no idea which method would be the best for me to do. Easiest for a spec-ops unit would be to pick up a pack of anvil industries' not-marines, since all their stuff seems very cool.
My radio, well, I am debating what color to make the body. My thread has the choices I was looking to do. My room mates when asked went with 2-3 of the sporty colors
@Cam: Yea the tank hulls are for sale, I'll get some pics of them for you.
@Shas: I should have given you more than one shouldn't I. Whilst they were designed for the "sporty" colours that your room mates went with, I like the idea of the wooden ones, might have to try that myself.
@Shas: I should have given you more than one shouldn't I. Whilst they were designed for the "sporty" colours that your room mates went with, I like the idea of the wooden ones, might have to try that myself.
Dude , love the turrets and Ragnarock ! Really good looking pieces , if I can get little H off of WHFB and back to 40k I'd be up for some !
Ref. Truescale marines. I saw a guy on dakka making some awesome Truescale simply by using forge world tartaros termie legs and marine / terminator bodies, I was thinking of doing some plague marines in that style.
Anvil look super cool as well and you can easily stretch them out by adding a plasticard spacer at the waist and maybe the legs too if you can be bothered.
Keep it up matey, no one is making bits like you ! You need a kickstarter project !
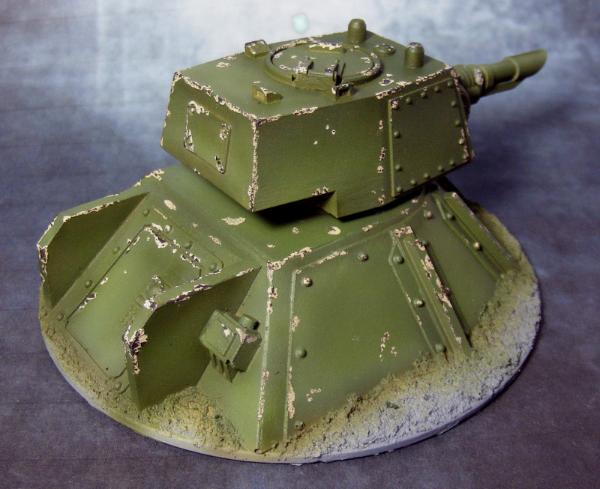
So I put some masking fluid on one of the turrets, then sprayed it green here's what it looks like before the mask was removed:
After:
It does want a bit of touching up and filling some of the beige up, because its hard to be exact with the masking fluid even more so when you are painting it on with a cocktail stick. Also I should have tried harder to get more small bits of the undercoat showing through to reflect more smaller chips.
Then I'll have to add some bare metal to some of the more worn areas before varnish sealing for decals and oil wash / streaking.
@BigH: Cheers mate. Dakka member MonkeyBallistic makes some awesome truesacale mk3 marines using the FW cataphractii legs, thing is that's a bit over my hobby budget atm I'd rather just add a unit of tartaros terminators a unit of breacher marines (both are amongst my favourite marine models around ATM).
I'll have to pick up some yellows to airbrush with, I did have a shopping list around here somewhere...
I filled in some of the chips so there wasn't quite as much of the bright undercoat showing, along with some fresher deep scratches. It's still glossy as I've not yet been able to seal and matt after the oil layer.
Should probably get started on number 2.
Lascannon Barrel might need a bit more work.
Then I can get to work on the base, I've got some stick-on tufts of grass to use, but I'd like to go for a more earthy-sandy base colour, for some reason I don't think the urban rubble look that I've been using for my infantry's bases would look quite up to scratch. Also an excuse to use more powders!
Turned out another master piece I hope I can do mine justice, the run lines look spot on great effect achieved and once it's had a matt varnish should look perfect.
The only thing it's lacking is a welcome mat though
The best thing about using oils to do streaking is that when you mess some thing up, it's not set in stone as it were, you can go back and remove or add more as you see fit.
I might write "get off my lawn" onto the second one since it's going to have a big ass flamethrower on it


 ). I'll probably have to sculpt the rest adding in some pouches from other kits.
 that's a cool selection I like the wire spools at the back, (if that's what they are) look interesting especially if that is not sprue that they are surrounded by. I could really use something like that with some thin wire wrapped around.


 but they look pretty cool and should work well with your Genswick guard, as for the groin guard they fit well and do what the tin said
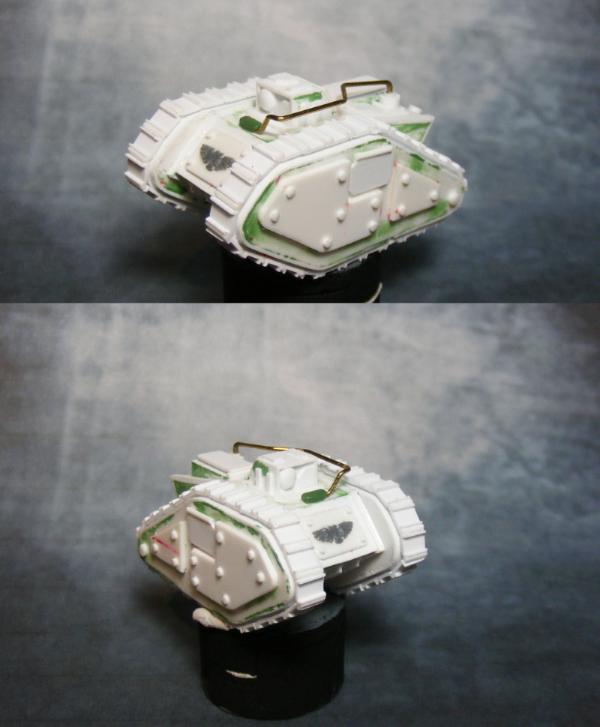

 I forgot to take pictures, I'll edit them in with comments later


 nice range of colour like an organised rable
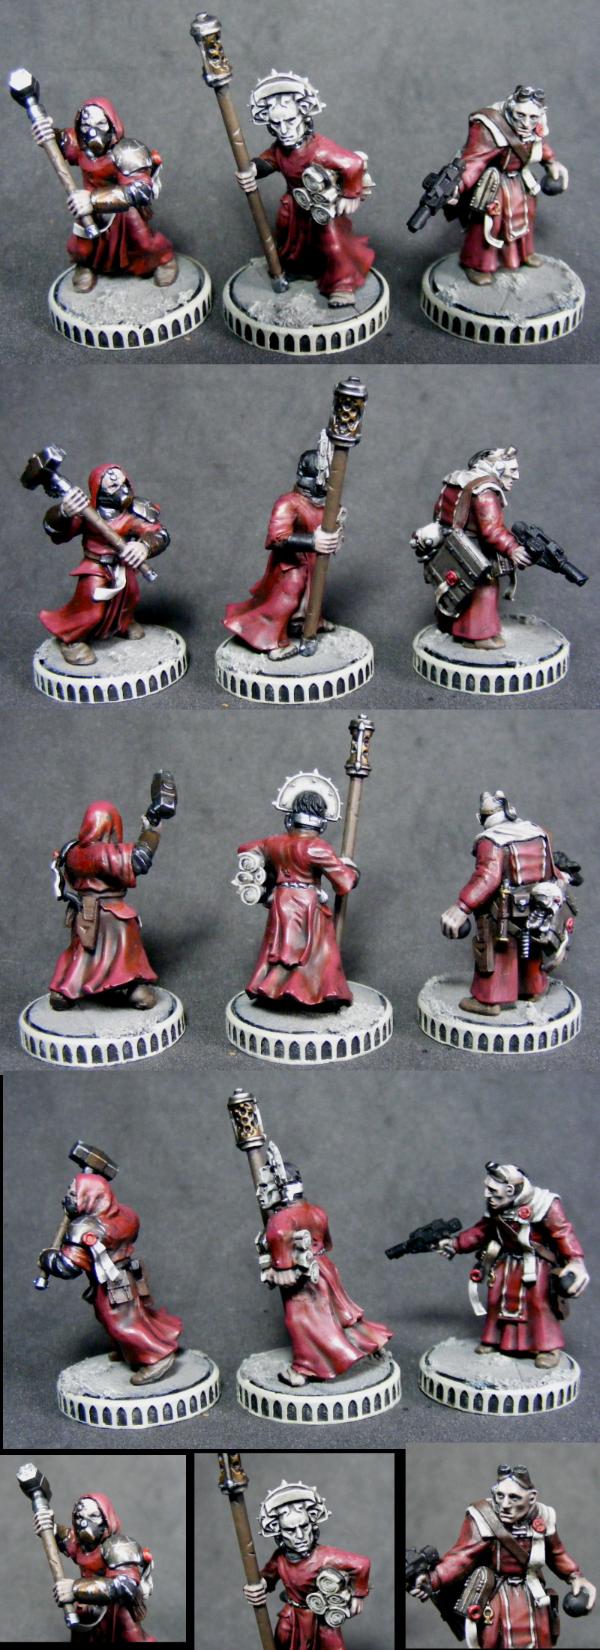


