Welcome to the 17th round of the League of Extraordinary Riveters Terrain Competition!
"The (re)Cycle of Life"
Come one, come all! Congratulations you are about to embark on an exciting odyssey joined by your fellow Dakkanauts, be it arm chair enthusiasts or terrain-a-holics!
For those of you who are new to this event, a short explanation:
This is a competition about terrain building - the main aim of which is to build creativily, from random materials, tabletop worthy terrain pieces. Dioramas are also welcome! Each round has a “theme” or other defining attribute(s) that must in some way be applied to the your terrain project, to compete with other modellers for that most prestigious of prizes, membership into The League of Extraordinary Riveters [LoER].
The competition is open to everyone registered on Dakka Dakka, all are welcome to enter regardless of ability, etc.
The main aim of these competitions is to encourage gamers and model-makers alike to go that extra mile when building terrain that can be used for playing your preferred tabletop wargame (or similar pastime - for example, a board game playing piece would be acceptable). Those taking part can expect to receive ideas, inspiration, encouragement and feedback from each other. At the end, each of the participants is "rewarded" with a new piece of terrain for their own use (that's the thing you just built).
The winner of each round hosts the next round, and the cycle continues.
The theme, limitations, rules, judging and prizes are all the responsibility of the host, although he or she can get help from others for some of those things...
For those who are returning once again to compete a most sincere and heartfelt welcome back!
Speaking of the last competitions, here is a list of links to former glorious days of the already finished competitions...:
Do you see a bit of sprue and think, 'hey! I could use that!' Do you find odd bits around the house and dream of the shapes they can make? Packing peanuts from Christmas shipping got you going, "hmmmm"?
Well, don't worry, you will after this!
While we know that secretly everything wishes to be used in a terrain piece, the inventive terrain maker always has his or her eye on particular pieces for use in the Next Project (TM). The main theme of this go around is "use, reuse and recycle"*! Use as much as you like of materials not necessarily meant for terrain building. The origin can be cleverly hidden, or out there in the open, making a statement!
Completely new to terrain making? no problem! Remember when we were kids, playing with blocks, building castles? This is just the grown up version. With glue. And sharp objects. So, give it a go! Be warned though - terrain making is very addictive!
Please post as many WIP pictures as you like. Others love to see how you work and you will inspire them to follow in your footsteps. It will also help keep this thread alive and encourage others to participate. Besides, who does not get a boost out of seeing their hard work slowly become complete? And if you get stuck or have questions, others can encourage or give advice!
Rules:
1. Talk about the Competition! Cast your voice on the wind... err, spread the word! Got a P&M Blog? use it! The more people, the more projects and the more projects, the more we all have a chance to learn something new and see a beautiful piece take form.
2. Deadline: Entries must be in no later than March 3rd, 2016. If RL happens near the finish line - and we all know it does - please contact me and do your best to submit. Assume the March 3rd date is a hard date however.
3. Size doesn't matter! (That's what she said...) no, really, that's what she says. Want to make a Castle out of butter tubs? Ok! Want to make a flea village out of tips of toothpicks? Ok! But you need to be able to take good pictures which gives us...
4. Take good pictures! Do your best to well-lit, non blurry pictures. WIP pictures can be snapped in a hurry but final ones will represent your ultimate effort so try for good pics Look for 'how to's' to check out, if you're unsure.
5. All pieces should be suitable for terrain use - any scale, any wargame, any setting. As mentioned, dioramas are also welcome but please keep the emphasis on the terrain rather than any miniatures therein.
6. Sign up in this thread, post at least one WIP picture of your materials to be used, even if it's not all you end up using, and one of a more finished state (that's two pics for those counting).
7. Final Entry: Six or more photos of your final entry, showing top, front, both sides, back and all the important parts. Do not to post them in this thread, please PM me with links to your galleries, albums, etc. Also, a statement of the materials used, or better yet, a picture, is required this go around.
8: Please include some fluff or an explanation of the model/setting to allow the rest of us to fully appreciate your work. Last few competitions this was optional...now it is a must! we want to share your fluffy feeling about your models!
9: AMBITION: Push yourself. Try something new! Always wanted to use leds? Go for it! Fancied weathering powders? Here's your chance! I'll be looking at your galleries for previous work, entries etc. I want everyone to feel that their best has a fair shot at this.
10: Not so much a rule, but it wouldn't be the League of Extraordinary Riveters if there are no rivets. This also means similar small details are highly valued (rivets are the best example of this level of detailing).
11. THE RULE OF COOL trumps all.
If you are unsure of anything just ask away.
Winner is entitled to membership to the League of Extraordinary Riveters. You will be allowed to fly the League's banner and be recognised as a modeller devoted to Rivets.
Prizes: aside from that warm fuzzy feeling, I'm sure I will come up with something soon!
After the competition has ended a people's choice poll will be started to let the your fellow Dakkanauts judge you as well. Which entitles you to more warm feelings inside and the bragging rights that your peers love your work.
Judge: Guildenstern (me!)
^_^ Go forth and BUILD!
CURRENT ENTRANTS: Ruglud
TheEyeOfNight
Littletower
mad_eddy_13
KINGPIN54
Tactical_Spam
Viktor Von Domm
mxwllmdr
GamesEtc
MagosBiff90
OneManNoodles (provisionally! )
Camkierhi
TheMuppetMaster
Ubl1k
inflatable love badger
inmygravenimage - entry rec'd
Grimdork - entry rec'd
Kleggt
*feel lucky - my husband suggested 'Big Balls' when I was discussing topic ideas amongst the throng at home!
Oh and updated HTML code for the comp banner...
{url=http://www.dakkadakka.com/dakkaforum/posts/list/675142.page]{img]http://images.dakkadakka.com/gallery/2012/11/8/429237_md-.jpg{/img]{/url]
Sig updated. Surveying the huge table of shame that I have built this year I don't think I'll have time to start something new. But I can still cheerlead
This looks like fun, sign me up! My lady has been in hospital a long time and I've been scavenging all the bits left lying around, nurses have even started collecting them for me! Never scratch built scenery before so it might be pretty basic, do we post a WIP of materials before we start building stuff?
Inflatable love badger wrote: This looks like fun, sign me up! My lady has been in hospital a long time and I've been scavenging all the bits left lying around, nurses have even started collecting them for me! Never scratch built scenery before so it might be pretty basic, do we post a WIP of materials before we start building stuff?
Sorry to hear about your lady =(
And a materials WIP pic is perfect yup!
Automatically Appended Next Post:
inmygravenimage wrote: With baby #3 due on 3rd Feb, I shall merely lurk with interest, and try not to get suckered in to making something for my Poison Ivy crew
That is very cool ^_^ I have three boys, they're a handful! but so many gamers is nice
In the spirit of the challenge I intend to do lots of rivets is there any special technique to this?
I have picked up a nail art kit and plan to drill ting civets and then glue a very bead into each one, applying glue with a cocktail stick. Looks like long fiddly work, anyone have any tips?
Just to show that I am still keeping an eye on things in DDakka and that I may start posting a bit more soon...*
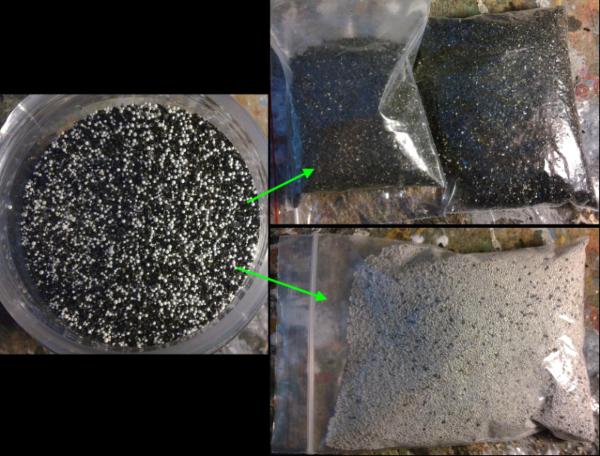
Rivets can be made by the following methods:
Chopping polystyrene rods (effective, you can choose the size you want, a little tedious)
Using water-filter beads and drilling pits for them (effective, very tedious and sometimes hit and miss, expensive if you don't actually use the filters) You do also get some nice scale gravel too... with more effort...
Spoiler:
Spoiler:
Other small round beads can be used like this also.
Nail-art beads can be found in many sizes and stuck on with no extra effort (unlike the round beads above, don't go quite as small as the above beads or plastic rods).
You can also use small drops of glue (CA or PVA), applied with a small point like a cocktail stick. (hit and miss, gets better with practice, unlimited supply).
I have also used left over milliput (GS would also work), that I've rolled into a thin sausage and left to almost fully set (otherwise you'll squash the rivets), then cut into rivets. This also lets you choose the size of your rivets and uses up that bit of putty that you always have left over.
Spoiler:
I've also seen a tutorial of using an automatic pencil to press recessed rivets (little rings) into putty (for when you are sculpting). You could lay down a thin strip of putty and then do this for a change.
Camkierhi has championed a method of using a hot metal cylinder (can be attached to a soldering iron) to melt in recessed rivets into plastic.
Any of the other techniques can produce recessed rivets by making a hole larger than the rivet and gluing the rivet into the centre of the hole (can be tricky to get them central).
and I'm probably missing some more, but that should keep you going for a while.
EDIT: and you can use pins; drill a hole to insert the shaft (cut to length before or after) and leave the head of the pin as the rivet on the surface.
*I will start to post on people blogs soon, and my desk is now available for me to continue with the Lynx... Once I've dragged myself away from the post-apocalypse.
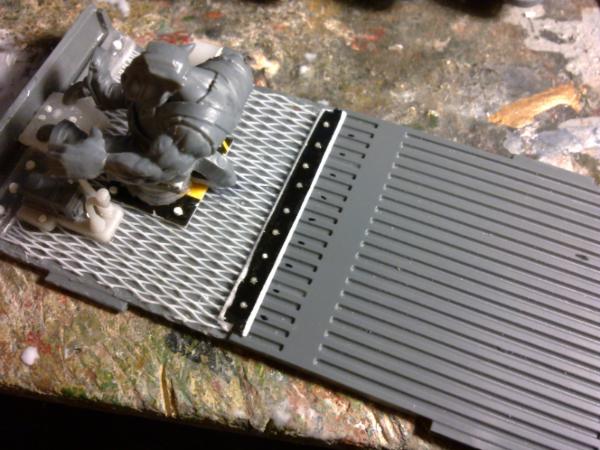
Tentatively wading in. I'm not sure what exactly all this is going to be, but in honor of receiving my Maelstrom's Edge box, I'm thinking some sort of Cybel Energy Storage Plant.
The little white plastic bit (container for some model trees) could make nice storage tanks.
I'm still new to the hobby as a whole and I haven't done a single piece of terrain yet, but I'll definitely lurk throughout this event. I move back to school in three days, so time for much hobbying is going to disappear.
Right. Well, I'm in. I have an idea, although I'm recycling old terrain (amongst other things) to make new. Slightly bending league rules but hey. It'll motivate me to finish!
TheEyeOfNight wrote: Tentatively wading in. I'm not sure what exactly all this is going to be, but in honor of receiving my Maelstrom's Edge box, I'm thinking some sort of Cybel Energy Storage Plant.
The little white plastic bit (container for some model trees) could make nice storage tanks.
That's a lovely piece of cardboard/filler whatever you call that kinda stuff. Love the shapes!
Cam has hauled me in, tentatively. I need a break from painting orcs so maybe I'll knock some terrain together. The plan will be for it to be relatively small and unassuming, as letting my idea(s) get too big was partially what had me drop out of the last comp.
Not sure what yet. I've got to finish batch painting these 13 orcs and then I'll give it a good think. Either modern, fantasy, or scifi...
Took a break from painting orcs. Going with a rustic/dilapidated cabin to start. If I get that done I may add some scatter or other bits. Will need other bits because so far it's just scratch and not so much recycle...the windows are reused I guess.
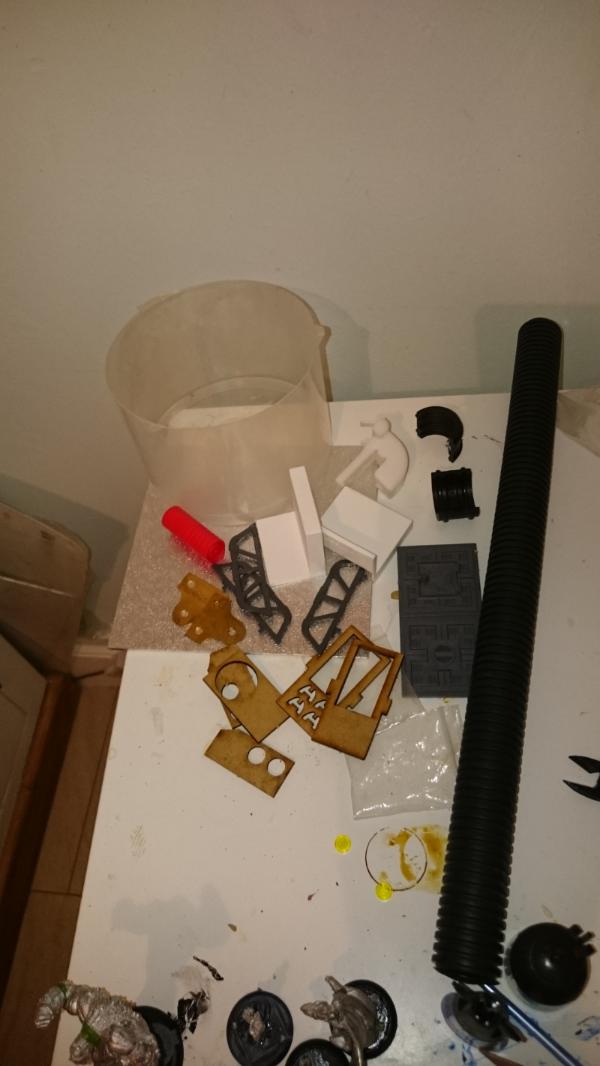
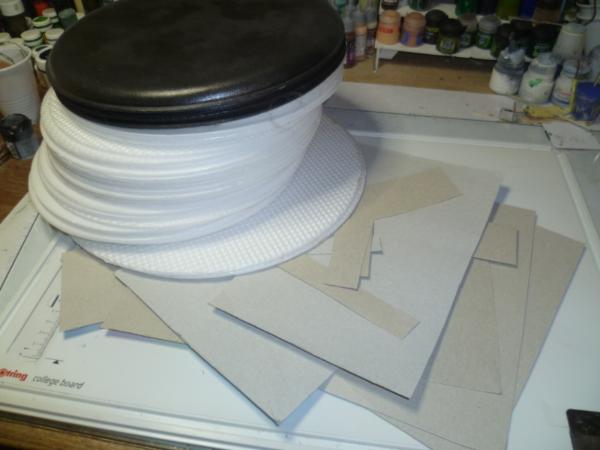
Bits gathering a-plenty:
Cake board, CD holder, pen lid, blind clips, door parts, dead zone rails, piece of cod flooring, MDF offcuts, cable tidy, etc. In my head, it makes sense.
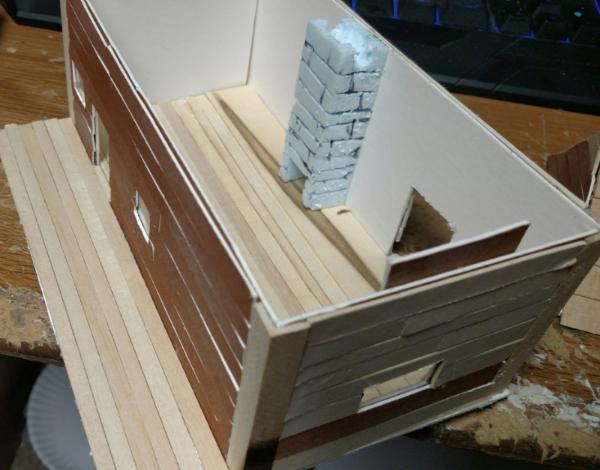
For the complete piece, I'm also recycling some old, broken, half finished cod terrain:
These aren't part of loer contest entry, but add to overall batman board and give context.
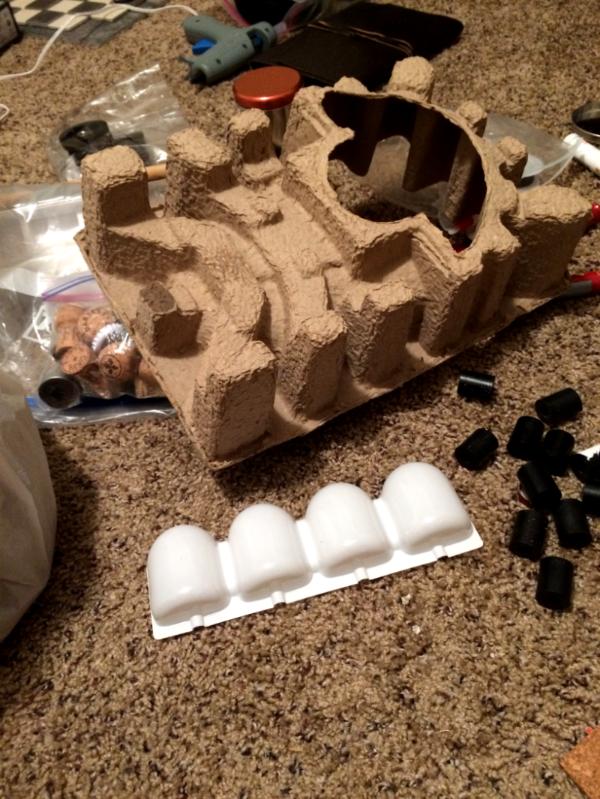
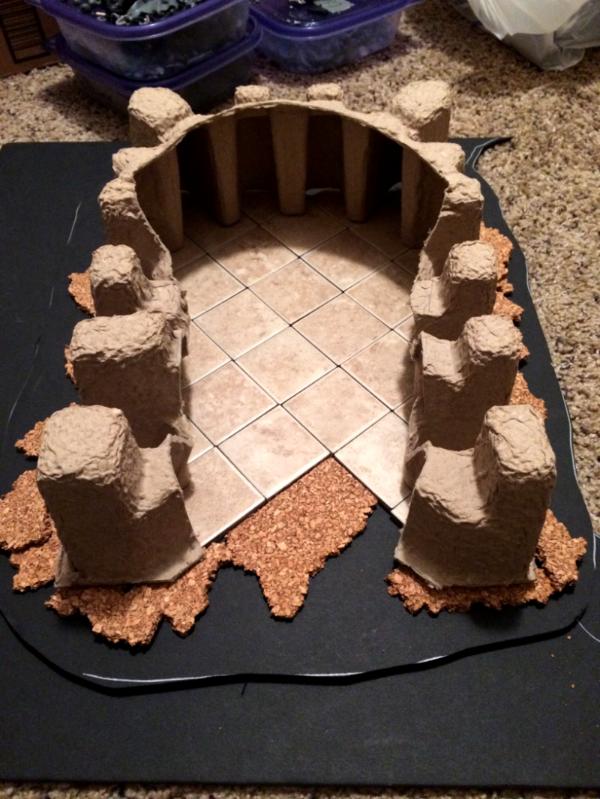
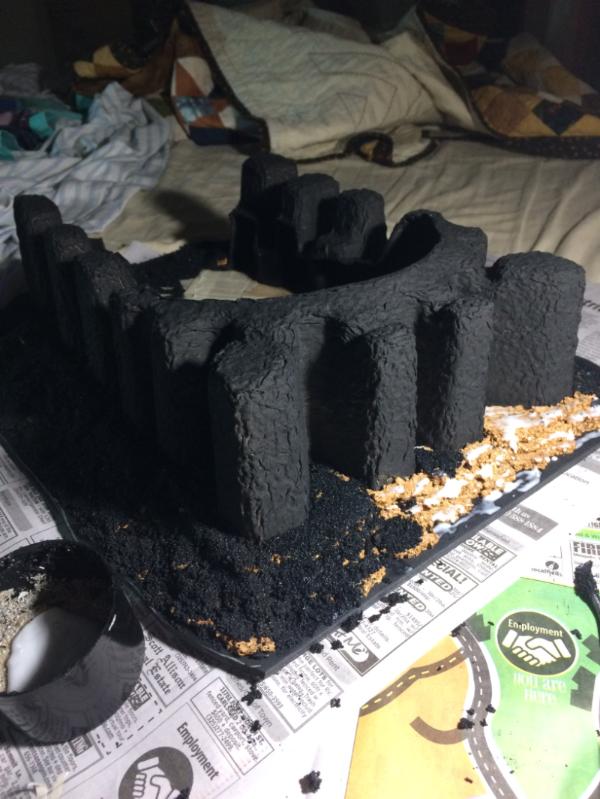
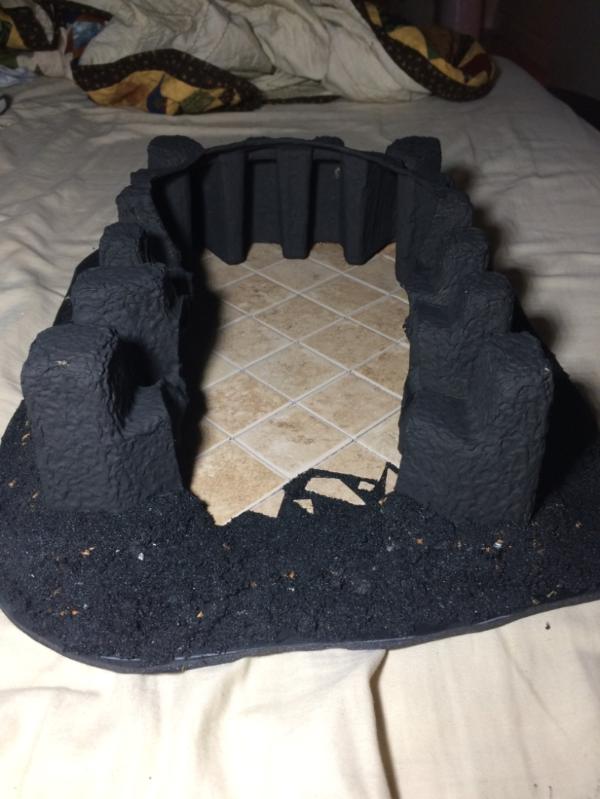
Well I found the first stuff to recycle, a broken angle grinder disc thing and a piece of plastic that I picked up on a building site, thinking of a kinda altar thingy
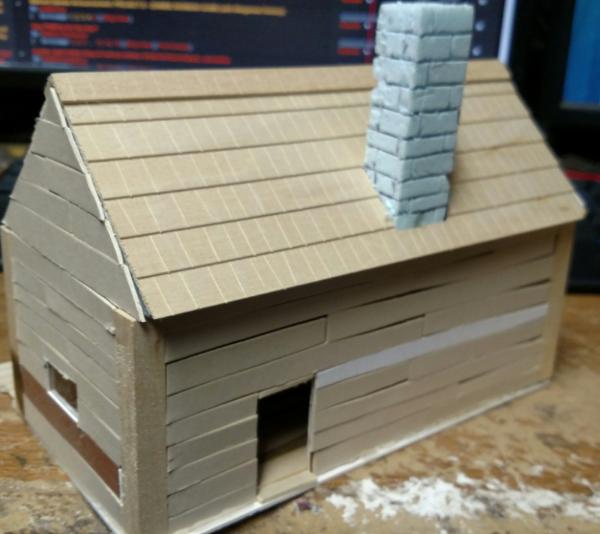
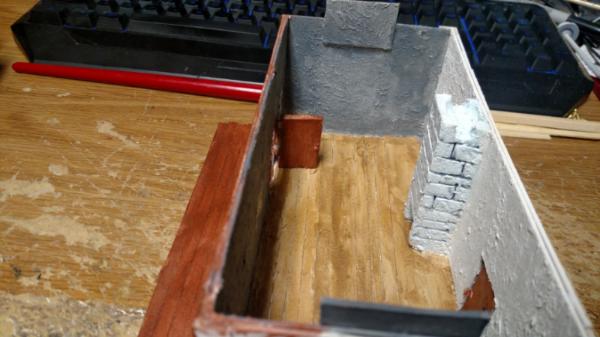
So here's the house with all of the exterior done. Need to source a chimney. May look to junk first and end up with something round over a square brick affair as most junk would be round.
Then a floor. Should the floor be done in the same style as the walls?
Buttery Commissar wrote: I feel like I ought to be able to make something from this... But I'm not yet sure what.
You've got a sphere, a can of Citadel paint, and your dreams. Go forth and be majestic.
Meanwhile, personal progress check: class is starting, so I tried to get as much work in over the weekend as I could, since things are likely to slow down now. Added cork around the cardboard structure, and overlayed that with a thick layer of rubble paste. Once it dries I'll get into the painting process.
Still only a vague idea of what I'm going to do for the interior. Crossing that bridge later.
That Leadbelcher is very very dead. Just there for scale.
I was thinking of trimming the square, running thread/cord around to make that panelling, and then when I do some casting, running spare liquid resin around inside the dome for strength.
It's only chocolate packaging, it will bruise eventually.
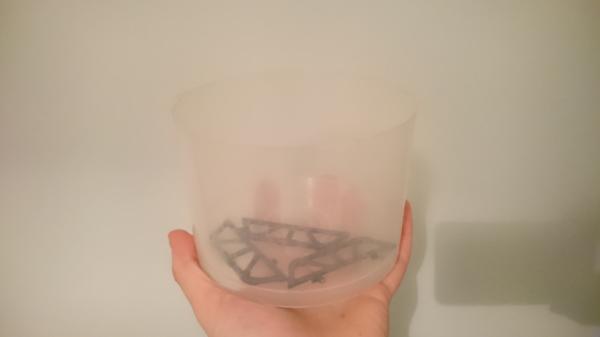
TheEyeOfNight wrote: Looking good, Graven. I've never played around with liquid effects, what do you have in mind to fill the vat?
Whatever I have lying about Given that whenever I'm doing league stuff I only use what I have to hand, it'll be PVA on a plastic lid, with the underside of the lid painted (probably) to allow the light to shine through.
Automatically Appended Next Post: More progress. Blood sacrifice made to God of new scalpel Blades.
Here is my random collection of 'useful' bits. Terrain is one of the things I have basically zero of, so the contest will be some good motivation to put something together.
Finally had a sort through my toolboxes and various boxes of old rubbish I've 'carefully' hoarded to find this stuff. Some interesting shapes and features that should prove useful in a piece of terrain or two
Wanna make my rendition of a place where people get sacrificed, there will be a "table" where the martyr/poor sod will lay on, can't decide if I must go ad mech or sons of malice. That and for some reason now that I'm looking around for junk laying around in the streets or wherever....nothing seems to work for me.
Ah, street junk. My wife is sick of me saying, "Ooh, that's a nice bit of plastic!"
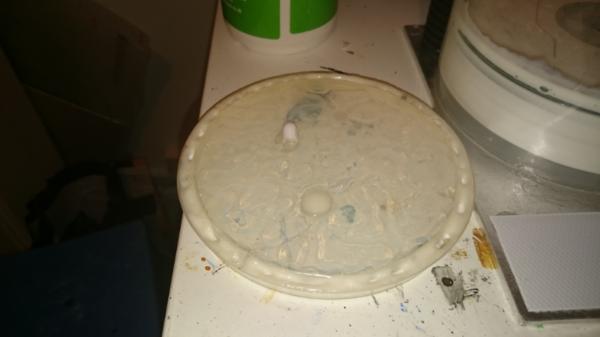
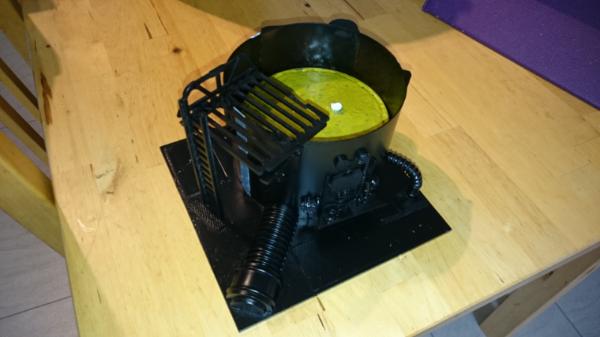
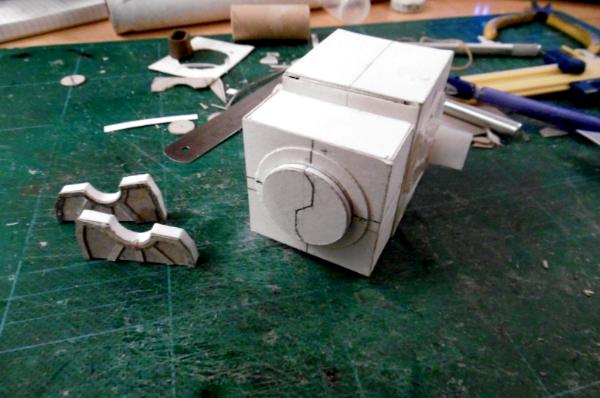
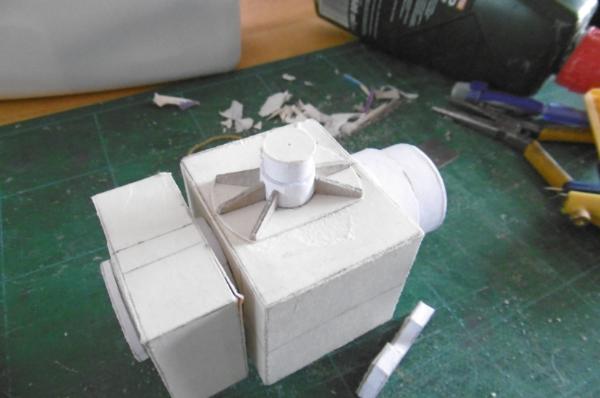
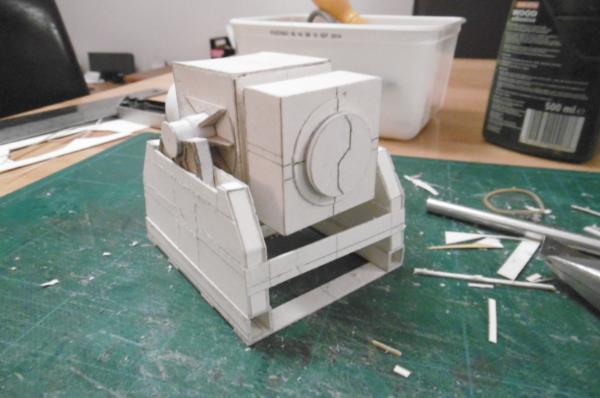
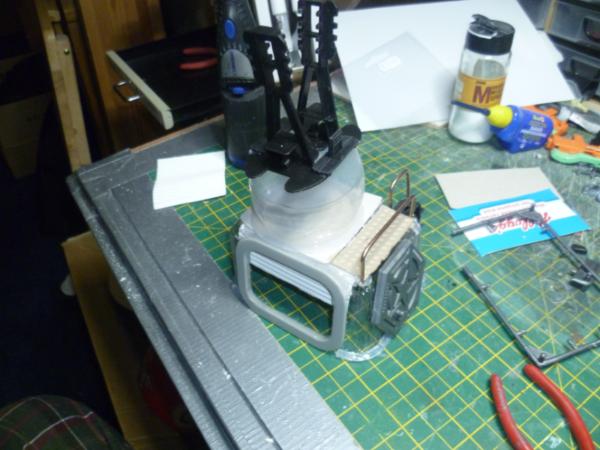
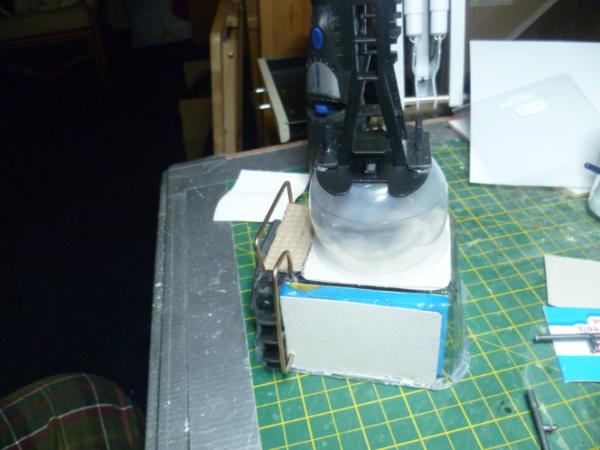
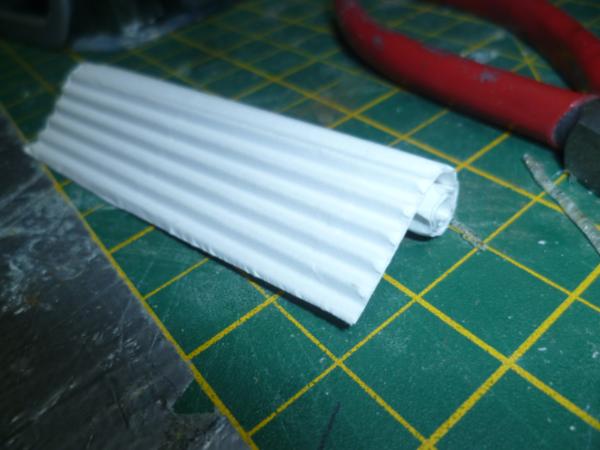
Working away at Ace Chem vat, gradually filling it with PVA in all the internal gaps. Pleased with how the control panel has turned out. All that's left is rivet strips up the sides of the tank, I think.
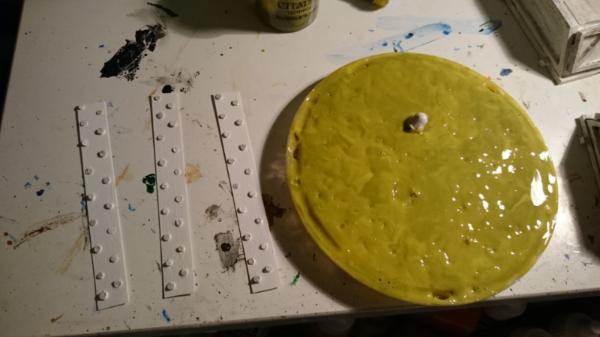
Of course there's also the surface of the liquid. That may be a certain hood shaped helmet that will be red in there.
Mmm, bubbly. I'm going to paint it as far as possible with a translucent green, so that the light from the led comes up through it.
Automatically Appended Next Post: Of course, we need rivets here in the LOER!
And acid, obviously
Decided I'm going to make a bone wall...or three, to go with the new spell in ASoBaH. Not sure if this is the best way to go about it as it is a looot of hassle.
I like what I'm seeing of this bone wall...what was your source for skeletons?
I'm trying to decide if I want to keep my cabin as my entry for this or if I'd like to jump to something else... the cabin doesn't exactly have a lot of reused parts..
Excellent work all, wonderful ideas and use of materials. Icky goo is superb. Very interested to see where your going Kingpin, just intriguing as hell.
I am totally with you Grim, I will be starting over, mine is too run of the mill for me, it's not anything I do not do every day anyway, so need to rethink it. Plenty of time though and lots of inspiration around here so no worries.
I forget to which point I have kept you guys updated on the cabin...
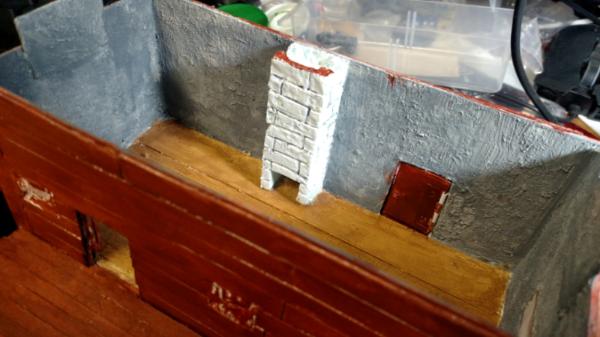
Here's the back complete with chimney:
And here you can see the hardwood floor and small porch.
I uhh. I probably should have segmented the boards for the floor like I did the walls on the outside.. but I wanted the floor to look cleaner. And its kind of a bear to do. Basically, doing the floor like I did got it done, and trying to do it the other way may have further stalled the project.
I think I'm going to use existing/free standing furniture for this one so I may or may not be scratch building that. Regardless, none of it will be directly attached to the cabin, and in other words that means I'm almost ready to paint.
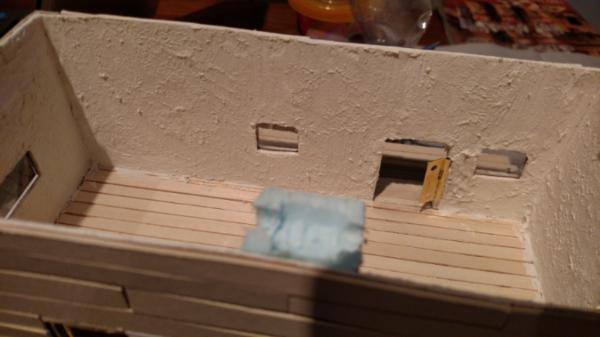
The only thing... should the interior walls have some kind of texture? I don't want to do more wood/boards. Maybe some kind of stucco? Just a thin layer enough to get a little texture on there?
The paint work should be pretty fast and easy on this one, and getting it done before the deadline means I may take time to add to the project so I'd like to get on with it. Just can't decide readily on the interior walls.
GrimDork wrote: I like what I'm seeing of this bone wall...what was your source for skeletons?
Thanks!, They're just some real cheapo toys from the pound/dollar store. They're a little bigger than 28mm scale so better for scenery and conversions.
Depends what you're going for, I've seen some people use dollhouse wallpaper, or just download a favorite pattern and print onto paper. If you wanted you could dirty it up, tear it up a bit, whatever, so you've got it 'aged' - heck could graffiti over it, if you're going for an abandoned look as well.
could also use drywall filler (spackle) to just give it some texture, might take some time because you'd have to try to get the texture small enough. I've not done this so no idea how long it might take.
More coats down. What should I do with chimney. I would have defaulted to the grey I used on the walls...but I used it on the walls. Roof shingles will be dark grey. I could do some kind of redbrick but the bricks are much too large to be regular bricks. Could do some kind of fancy stonework pattern with 2-4 shades of tan/brown (or greys). Could just do a lighter grey than the walls. I'm leaning towards the light grey for expediency but I dunno. What say you folks?
Like the possibilities of the skeleton wall. Maybe run some PVA and/or plaster between the parts to fill the gaps and make them more a part of the wall and less stuck on (more "in").
Nice holo-screen. Maybe add an outline to show the extent of a "window" within the screen.
Nice hut build. Have a google for "feature chimney" and see if that gives you an idea. A strong red would work.
Alright, I'm about done painting the cabin. I've got a little 'victory lap' time to try and push this over the edge. The only really new thing I did was the functional inset windows. Well, and the working doors. I guess it's also my first reasonably buildingy looking building that hasn't come from a kit... But I feel like it needs more oomph.
I could custom build furniture but that seems redundant when I have three sets of dungeon saga stuff that works well as both fantasy and outdated for modern use. I could paint some of the DS stuff specifically for the cabin but that's hardly pushing my limits...
I'm thinking the best I can come up with is a batch of complementary scenery to go with the cabin. I probably don't have time to build scratch built trees (i'd need to learn how) but I could do a small area of natural/Forest terrain to set the cabin into. A 2x2' area wouldn't be out of the question... I'd need some stuff to put in there though.
Thoughts? A stone-ringed burn pile would be very possible. As far as pushing my limits... I don't know. I wouldn't mind trying s water feature but a lot of those eat up expensive materials and such.
I need to work the recycling angle more too... There're a few weeks left but I'll have to get cracking if I'm gonna have anything beyond the simple cabin.
What you want, GrimDork (and anyone else for that matter), is to give your model some "character"; give it a back-story and not just in some fluff.
Make it looked lived in. Don't just add furniture (whether that's scratch-built or kit parts), add the things that people collect. Look about your own home (or other people's if they'll let you) and mentally subtract the basic furniture of tables, chairs etc. and see just how much "other stuff" that you have.
A table is not always just standing there clear of items, shelves are rarely empty, a fire-pit (or other cooking solution) needs implements, containers and foodstuff.
The same kind of thoughts can be brought to any terrain model; think about the kind of people that will have passed through and left their mark, not just bullet holes but keepsakes and rubbish/trash.
Think about a story/fluff for your model and let that dictate what and where to put things.
It may just be something to add an obstacle to your gaming table, but those little details will give it a life to match the little running/jumping/shooting people that you will be placing around it.
I think, at least in part, that since I want to keep the cabin viable for both fantasy settings and more modern uses.. I had left out such features. I think, though, for the purposes of the competition I could just pick one and go with it. Nothing need be permanently glued down.
Still trying to think of some co-features for a small terrain area...but adding some more touches to this can't hurt.
Dr H wrote: Like the possibilities of the skeleton wall. Maybe run some PVA and/or plaster between the parts to fill the gaps and make them more a part of the wall and less stuck on (more "in").
Thanks, yeah I was thinking it did need a gap filler to tie it all together. I started wondering if the cardboard was a good idea or not, but I'll see how it looks once all sides are covered.
So update on lack of update: between writing papers for school, studying for promotion test, and maintaining sanity with minor model work, I haven't done anything on the terrain piece.
Not officially bowing out, but I might be pushing the deadline on this one.
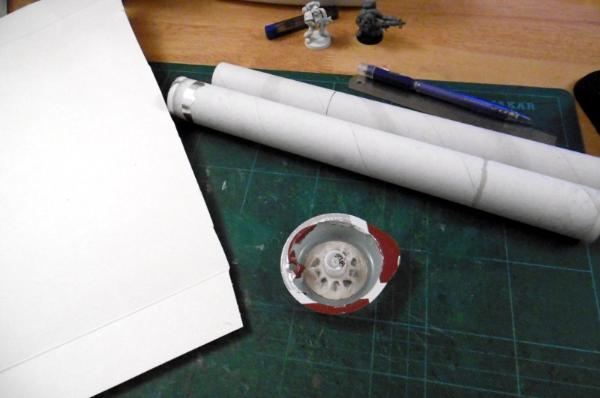
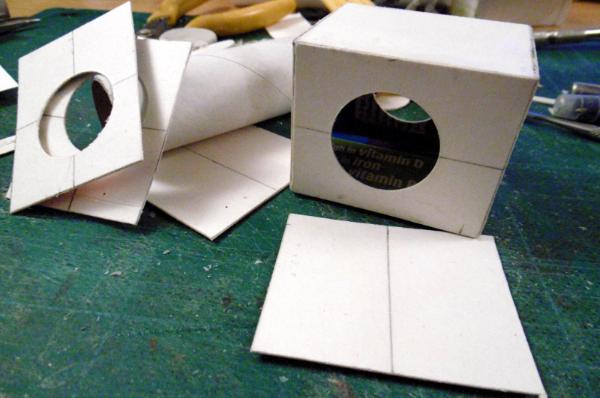
Struggled to come up with an idea from the jnk I had so went back to basics and found some cardboard tubes, cereal box card, waste paper and empty Tassimo coffee pods (other coffee machines are available...)
Cool! Definitely staying on task for the theme of this one.
I think I may do a touch more with the cabin and call it a day. There's a lot more I wanna do with that line of scenery, but not within the scope of this project.
I think I'm going to wait until the next "Build this type of terrain out of any materials" contest comes up, 'cause I just can't narrow down options when it's such a wide-open materials list.
Well, it was a lot of fun but family problems have got in the way, just wanted to let you know I won't be able to finish. But good luck everyone, I look forward to seeing your creations!
I think, at least in part, that since I want to keep the cabin viable for both fantasy settings and more modern uses.. I had left out such features. I think, though, for the purposes of the competition I could just pick one and go with it. Nothing need be permanently glued down.
Still trying to think of some co-features for a small terrain area...but adding some more touches to this can't hurt.
Ah, well, trying to fit in with multiple settings can throw up tricky limitations to what you can do. But, as you say, doesn't need to be permanent... You could (the idea just hit me) do two sets of furniture:
Some things are universal; wooden boxes, sacks (of the right material), generic rubbish, but you could do two tables in the same dimensions (so that they fit in the same place) and have one made to look "fantasy"; made of wood with candles etc... and one that looks modern/Sci-fi; made of metal with an electric lamp etc...
It would be cool to have the same hut, laid out the same, but with the furnishing swapped to fit the setting.
Probably more work than you could fit in to the time left, but a cool idea... might even be good for a future round of this contest; build one piece of terrain that can be used for two different settings with the furnishings changed...
Anvildude wrote:How do you guys come up with these things?
There's two main ways that I come up with ideas for models.
One is where the idea comes first. I have a long (very long) list of ideas that I add to whenever I get an idea for a model from something I see or if it just pops into my mind; I note it down then and there (otherwise it's gone forever).
When I want to start a new model I'll look over the list and see if something grips me. There's some ideas that I really want to try and have been fleshed out over time as the idea builds. Sometimes two or more ideas will merge into one.
Some ideas there are just a short sentence (often disjointed words rather than a proper sentence) that will outline the basis of an idea.
If I find something there that I want to do, I'll look at my pile of grey plastic to see if I have the base model to start on, although this is not necessary for scratch-building... For that, I'll look though my piles (and piles) of junk that has been collected for their potential to be used in a model; an interesting shape is all that is required.
This is where this method comes together with the other main method:
Picking pieces out of the pile of junk can be the first step. I'll choose them based on an interesting shape (as I did for my UFO crash piece), or if it's shape reminds me of something else (that thing looks like a ... with a few tweaks). As I gather more pieces, and the idea for what I'm building takes shape, I'll start looking for more specific shapes (I need a thing that is "x" shape and "y" long...) and pick a few items that are close to what I want, then select the best fit from those (note that is this the best fit and not the closest to what I was originally looking for).
The thing is, at this stage and even right up to painting, I don't fully pin down what the model will look like at the end. I have a direction I want to take the model, but if a part is not quite the "perfect" shape, or something else looks even better in place, I'll let the items do the work and make the model for me (in a sense). The idea stays "plastic" until the end, always evolving.
If you try and stick to a design then you're never (rarely) going to find the "perfect" piece to make the model and have to sculpt if all from scratch (and that then gets into sculpting ability Vs. the vision in your head; and I view this in the same way as the pieces, let it evolve as it progresses), and ultimately you may loose interest/motivation as you "can't" make what you want to...
Only then, when I have the basic shape made from the parts, do I start scratch-building the pieces that I couldn't find, filling gaps, merging pieces together to form one shape, and adding the final touches to make the model into whatever it has ended up turning into... Sometimes I'll start building a "generator" and end up with a "pump", or start building a "weapon" to end up with an "engine"; often they end up closer than that, but you get the point. I let the pieces define the model as it comes together and don't stick strictly to an original design.
This way the final model will look more natural, as the pieces have come together in a way that works for those pieces and not been "forced" into an unnatural joining to try and fit a design.
Hopefully some of that may be of use to someone out there, if not, just ignore my ramblings.
Yeah I'll be doing some furniture for sure, possibly more than one set. Probably just the cabin this wave. I have other buildings and even a modest board planned to go with this, so sure I'll enter them in the next found it they match.
May try to squeeze some furniture into the deadline, needs more recycling.
Yar, Cam, you make me seriously jealous with that! sweet piece
Just pointing out, without putting any undue pressure on anyone that the deadline is coming up pretty quickly, but hey at least it's a leap year so you technically have an extra day
Listen guys I know I put my hat in the ring, but I have been too busy. Check out my thread if you're wondering what could have kept me away from here so effectively...
Gah! Forgot deadline was tomorrow, just need to snap photos, good thing it's sunny out. What's the best form of entry, a dakka gallery PMed to the boss?
GrimDork wrote: Gah! Forgot deadline was tomorrow, just need to snap photos, good thing it's sunny out. What's the best form of entry, a dakka gallery PMed to the boss?
I had plans...and sadly no energy to act upon them...hopefully in the next run i will be more active...
so then i wish all of you who did finish...:good luck! and guildenstern to you the same... judging is a hard earned breadbtw...your price too is still on my desk in the heavy WIP phase...
Ruglud wrote: Sorry folks, but I'll not make the deadline (today). Looking forwards to seeing all those who did
Noooooes :(
well ok if you're sure =/ we all know RL happens, which sucks
But seriously, I'll take anything "today" which since I'm judge is my time and it's only currently 13:27 March 3 - you have a whole almost ten hours before it's March 4th
Been a difficult one, we all seem to have had RL issues slowing us down or halting us. But you managed to keep it rolling Guildenstern, holding the rivet high, well done, and good luck.
Ok entry updated Comp Boss, gonna fish around and make sure I have adequate WIP photos.
Post Mortem: I'm happy with it. Gonna get stomped in the finals but I'm glad to have another piece of versatile terrain and some nicknacks to go inside it. It was kind of an odd entry for this round of the competition, would have been much more at home during the last round. I could have recycled a bit more parts for it, the window glass is from heroclix packaging and the chimney used to be on a sheet of foam insulation foam before being a take apart travel board, eventually it got hacked into pieces for more terrain and now a part of it lives on in the cabin. But most of it was just made of scraps (some wood, some paperboard, a lot of hot glue) that I had laying around for making scenery so only a little bit on topic.
Sorry i did not withdraw, had a couple of things on my mind. Did not know if ir was appropriate to submit. Heck to make a ling stiry short. I missed tge deadline. But Here it is know tooo late but had issues cool comp and goodluck to all riveters
Sorry for late response! I had intended to sit down and make a good go of this and all this weekend but you know how life is =/ I spent all day yesterday at the ER with my youngest son. He's ok, but it was a damn near miss. He had to have someone do the heimlich on him or he'd not have made it likely. Just one of those freak things. Scary though! We're all very grateful to the man who was able to save him, an ex-marine (also interesting since that's what my youngest aspires to be). Now he knows they're RL heroes from firsthand.
Anyway, yes Kingpin go for it we have a dearth of entries - well ok like 4 I think now and I'm fine with letting your's in I shall endeavor to get my stuff together here and render a decision by Monday, March 7th (my time).
Again sorry for the delay! Keep riveting my friends ^_^
Thanks g, sorry to hear about your son, seems like life is really testing us this year, had to rush wife to hospital for a ruptured peptic ulcer, she recovering from op.
Ok guys! finally had a chance to sit down and go through my notes. (I know I'm mean if you really want the TL;DR version scroll down!)
First off I'd like to really thank everyone for their work, even those who didn't complete their project. You all had a ton of really good ideas, some I was very sad to see some not get finished, but I hope that you do indeed finish them up later. It's totally worth it
So, that being said, when I tried to come up with criterion to help me judge, I made up a point system, all things being 10 points possible, excepting the theme since that was really one of the most important. Some of the items are kind of no-brainers, like did you finish? did you provide the WiP shot/list I requested? Improvement was based on how well any previous work you'd done stacked up to this piece. Paint job is based on the same scale I use in my head when I look at all the Dakka images - could I have painted it? it's a 6. Is it better than anything I can do by far? it's prolly about an 8. etc. Would it win a golden daemon? 10. Hopefully this will clarify any problems anyone would have with how I went about this.
my point system:
use of recycled items (followed theme) - 20 points
If you'd like to know your scores, I will be happy to post them with my comments. I wanted to check first, as not everyone may enjoy public criticism! I'll happily PM them if you'd rather. It was a terribly close race tbh and was really really hard to judge!
Also, it's my understanding there is usually a public poll done after this so there is a 'people's choice' award. If that's true, I will be happy to set up one tomorrow, I wanted to wait just because I haven't done this before and don't want to step on anyone's toes
OK ok enough already as our winner for the 17th LoER Terrain Contest, I give you (*drumroll*)
Spoiler:
inmygravenimage
Also! my choice for "most improved" is...
Spoiler:
KINGPIN54
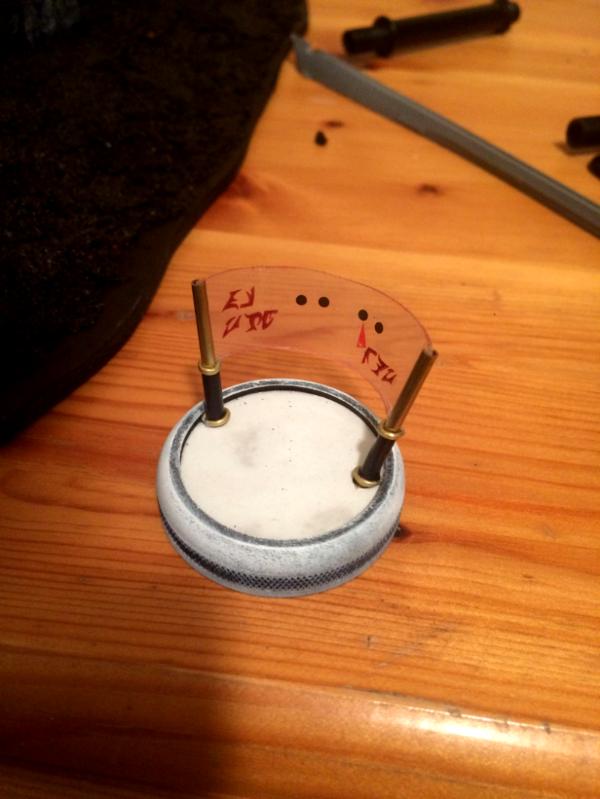
And a nod out there to TheEyeOfNight for the best idea I've seen in a competition yet: the nyquil touchscreen display!
Congratulations to everyone, especially our winner! I had a ton of fun watching you all create your pieces and hope you did too!
Wow! Well, I'm chuffed congrats to all on a good fight and thanks to Guildenstern for running such an inspiring contest. I would certainly like to see scores and breakdown. Round 18 to follow soon!
also... respect to all of you who have finished...i wasn´t able to put even two bitz together in the time from last comp to today... so...hopefully this may change for the next round...(where was that finger crossed orkmoticon when we need it?...)
Hey guys sorry again, been a long week o.O Youngest boy had his surgery last night, it went fine, he's up and playing Destiny now so he's feeling a lot better! Crazy thing, the water bottle top was still in his esophagus O.o was pretty easy to get it out, he just had to be put under so they could extract it. No cutting involved thankfully! but we now have the worlds most expensive bottle cap ever lol
Anyway! to get to the point here's the points spread and my comments (which I'll try to edit into more readable form) if anyone has any questions about a particular score, let me know and I'll try to reconstruct my thought process about it; also I know someone mentioned graven's piece being on the front page for a long time. I actually got the link shortly after starting this contest iirc, but honestly I never saw it or noticed it on the front page. I actually tried to ignore the front images a lot, more because I was trying to get some of my own work done but I can assure you that didn't actually influence my decision. Also, as you'll see below, it was an incredibly close call on the winner.
GrimDork (house):
70 of 100 pts
- use of recycled items (followed theme) - 10
- WiP shot of materials/list - 10
- finished piece - 10
- how much improvement made? - 8
- creativity - 8
- realism (including scale, weathering etc) - 8
- paint job (technical skill) - 6
- rivets! (any tiny details) - 10
- comments: I feel like the house needs more weathering. The chimney was particularly well done with the different coloured bricks, the roof was also well done. Painting - I felt like you just didn't add enough maybe to give your skill a chance to shine; it seemed pretty basic and could have used more examples of above plain or average paint job. Some things I loved about it: the blood smear by the door made me seriously lol, that was great! the books, the foods stuffs, rifle in the corner - all great little touches. My only direct complaint about the furnishings was the chairs seemed too small for the scale, more like toddler chairs, but possibly that is the picture as well. Really enjoyed your "in action" series of shots as well. Some things I could see that would improve your house: more character in the house itself, window ledges or shutters outside, gutters, a pile of firewood by the door etc. Since it's meant to be delapidated (sp) or abandoned I would have loved to see more overall weathering, ivy growing or some such, water stains.
Still overall a really great piece of terrain!
KINGPIN54 (Altar):
74 of 100 pts
- use of recycled items (followed theme) - 15
- WiP shot of materials/list - 10
- finished piece - 10
- how much improvement made? 10
- creativity - 9
- realism (including scale, weathering etc) - 8
- paint job (technical skill) - 6
- rivets! (any tiny details) - 6
comments: I think better pictures may have helped me see better, but just going on what I could see, it seemed like your paint job was fairly standard. I loved the blood but overall thought it could use more rust/weathering. I was amazed honestly with what you did with the grinder thingy. I did think it could use more 'rivets' or more details but you definitely built a solid piece of terrain which I'm sure will see lots of ingame use!
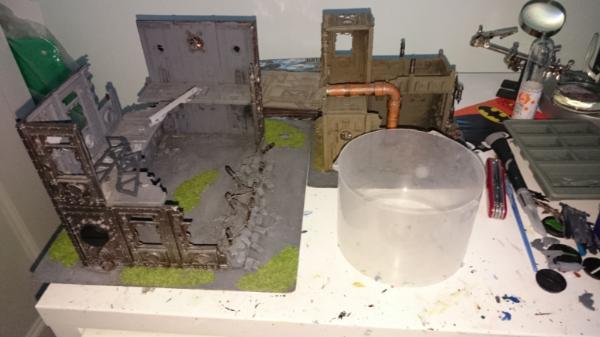
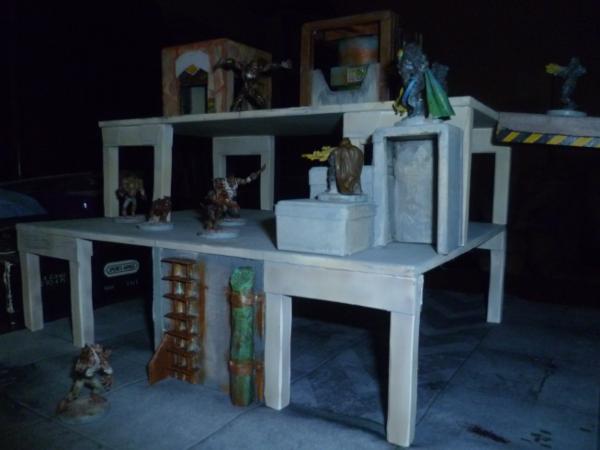
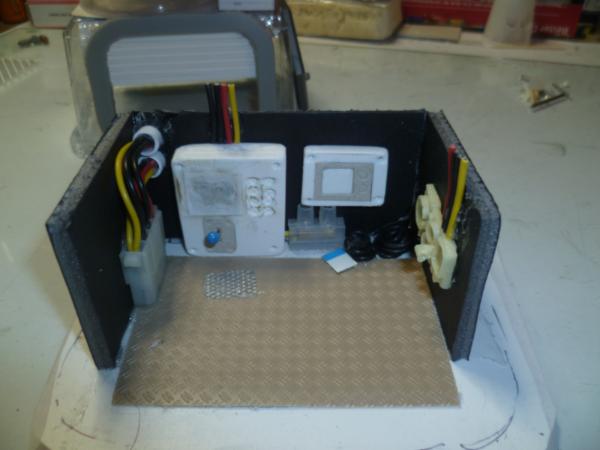
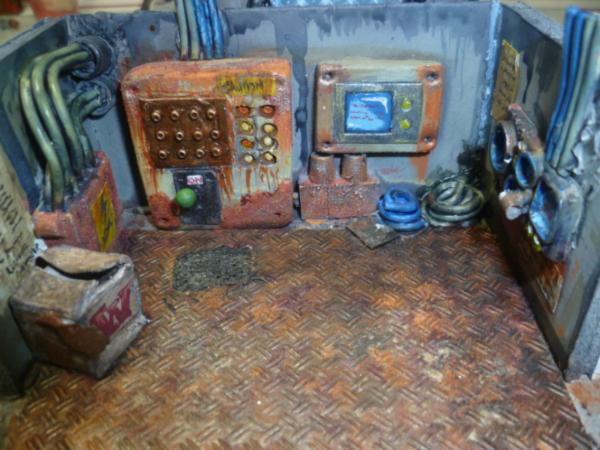
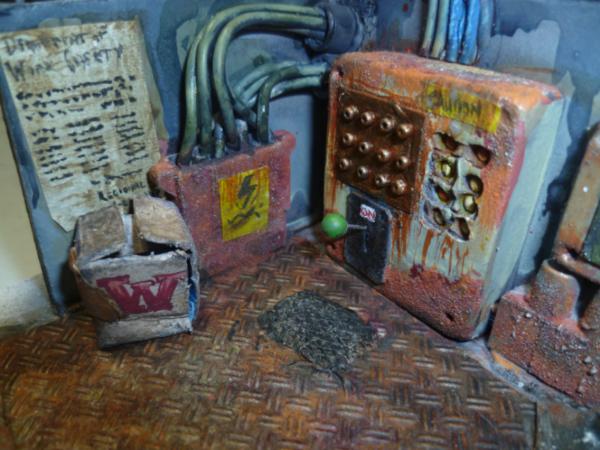
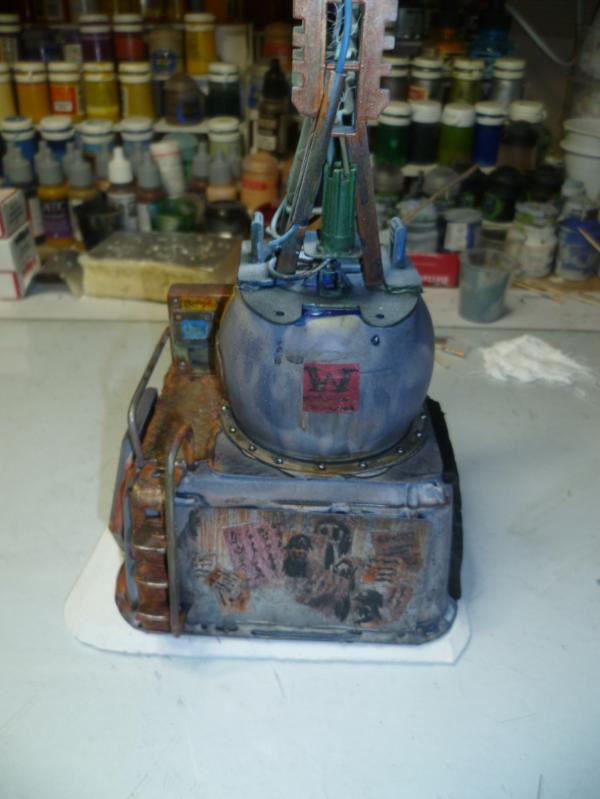
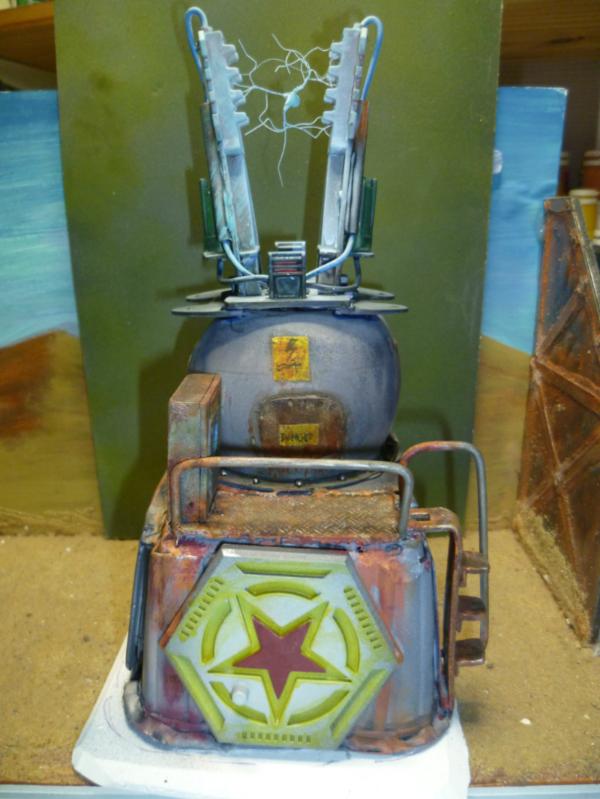
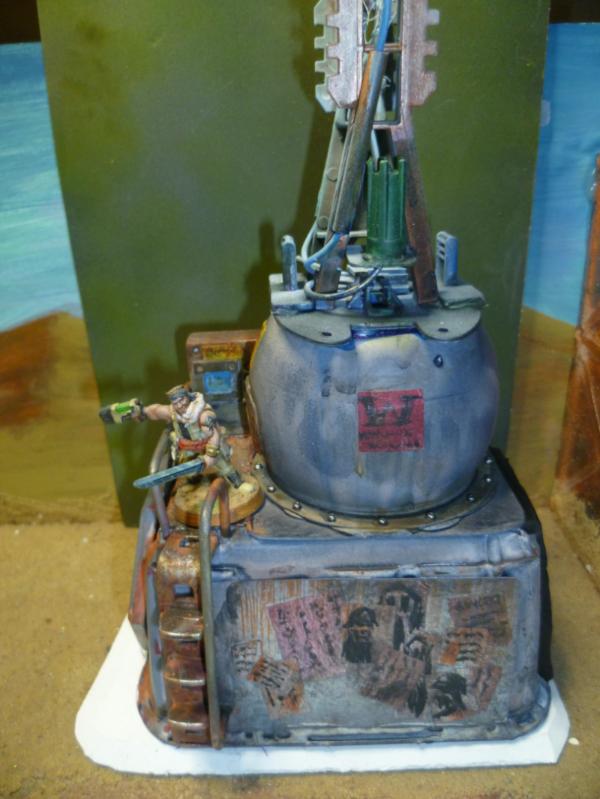
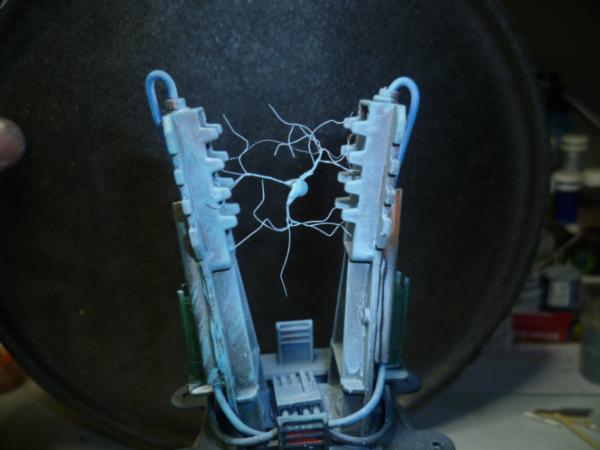
Camkierhi (Substation):
83 of 100 pts
- use of recycled items (followed theme) - 18
- WiP shot of materials/list - 10
- finished piece - 10
- how much improvement made? - 7
- creativity - 10
- realism (including scale, weathering etc) - 10
- paint job (technical skill) - 8
- rivets! (any tiny details) -10
Comments: Parts I loved: the cables, monitors, coloured buttons, "on" lever, the box was a great touch, so were the posters and of course the actual rivets. The interior is amazing! my favorite part is the electrical danger sign lol The corrosion effect you achieved was just excellent. Re: the painting, overall I felt it was great but the electricity between the towers just didn't do it for me. The physical form you built was perfect! but for whatever reason I just felt the OSL didn't work =/ But again another awesome piece of terrain and horribly hard to judge!
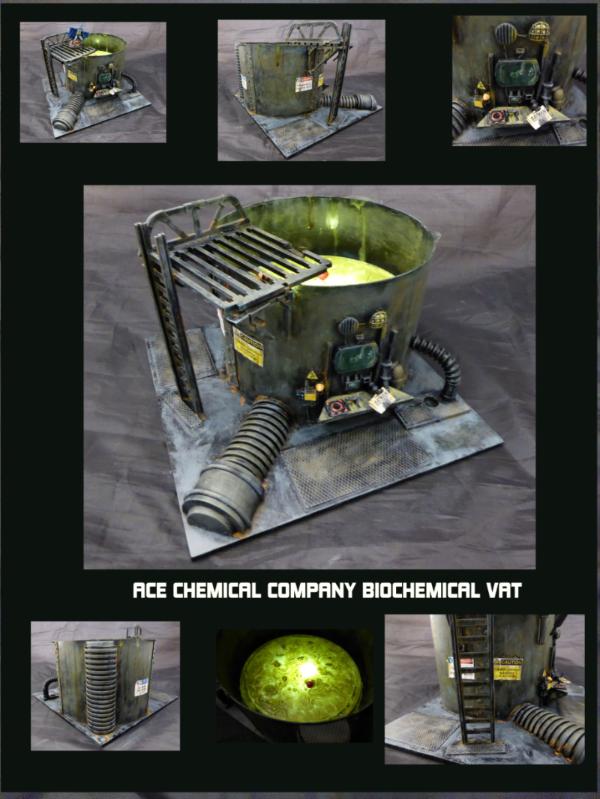
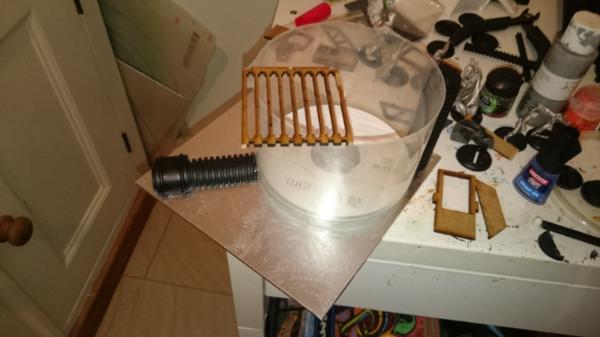
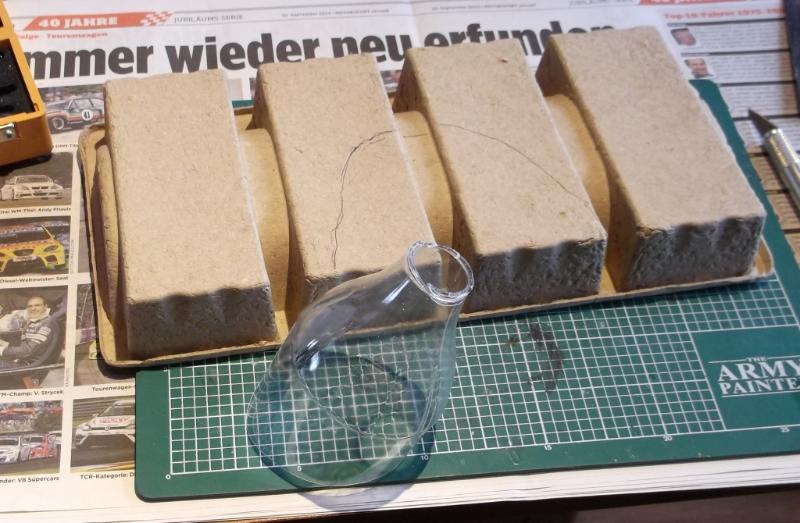
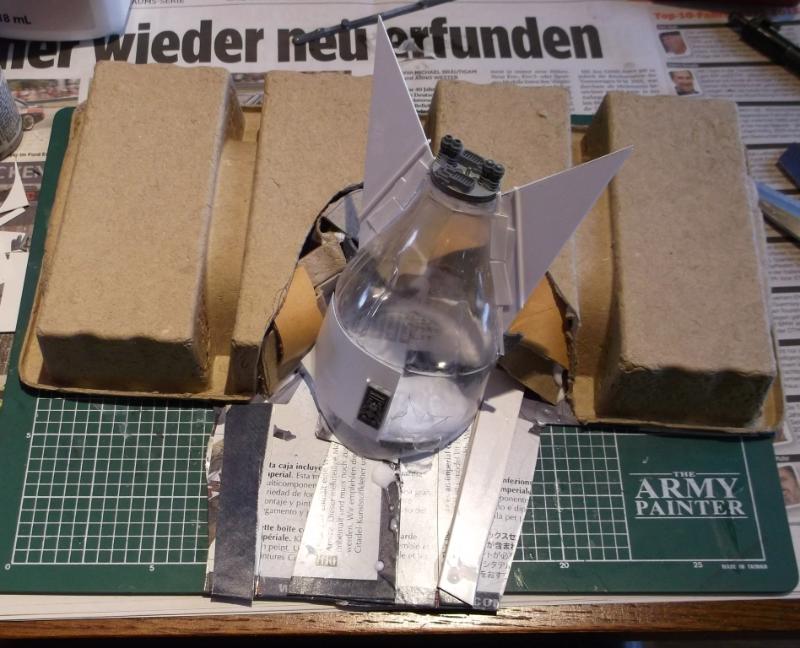
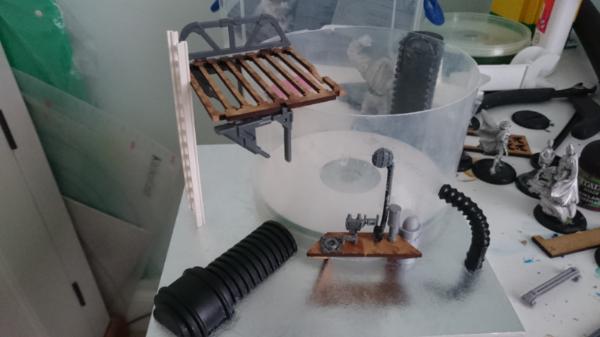
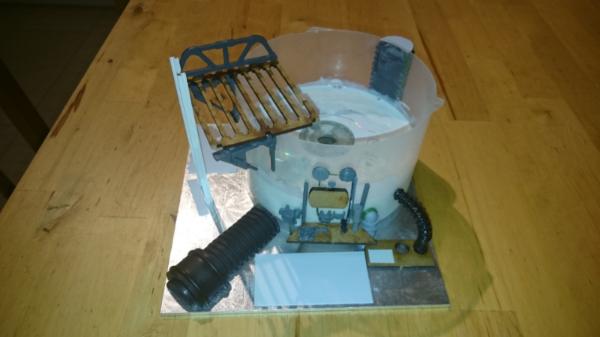
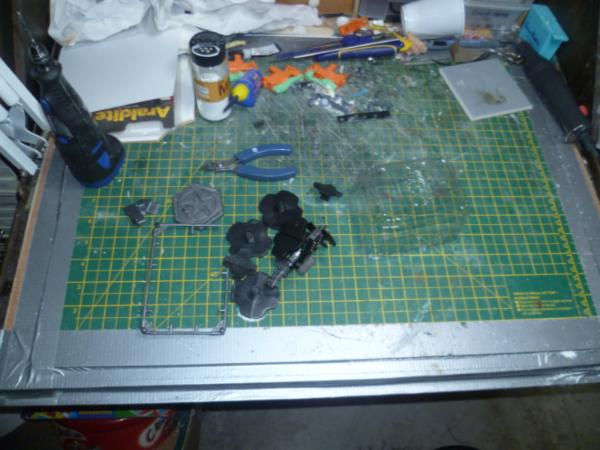
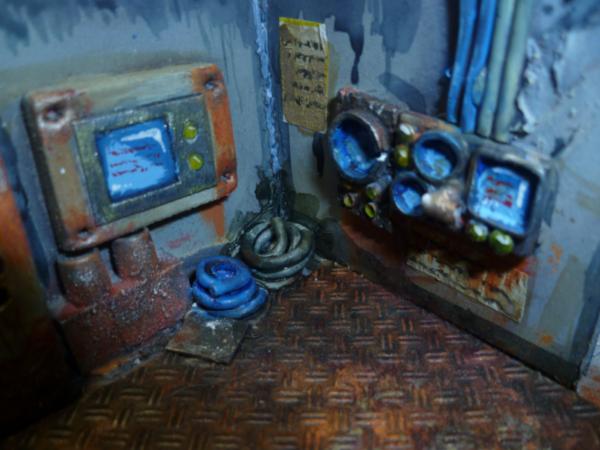
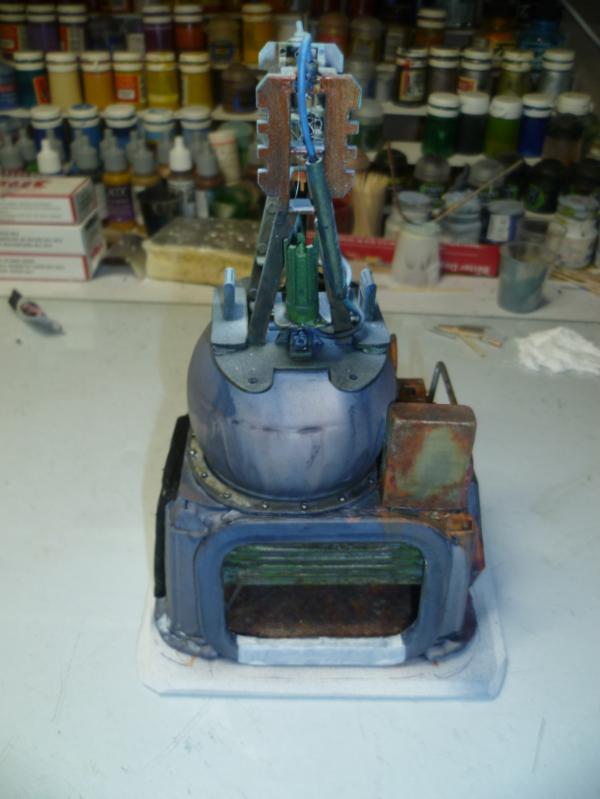
inmygravenimage (bat vat):
84 of 100
- use of recycled items (followed theme) - 18
- WiP shot of materials/list - 10
- finished piece - 10
- how much improvement made? - 8
- creativity - 10
- realism (including scale, weathering etc) - 10
- paint job (technical skill) - 9
- rivets! (any tiny details) - 9
comments: I loved all the different materials you used, the lights, meshing, posters, esp the newspaper! tank leaking etc. I thought it was very clever how you put the tank together and how well it came out from those disparate materials to actually look like a vat of acid was just amazing. Ok and now here's my only quibble, and I worked long and hard at thinking about this. The only thing I don't really like about your vat project is the flanges on the tank itself seem out of place. I would have cut them off. :p
So, anyway, hopefully no one is offended! This is all my own opinion of course and while I try to be objective as possible in the end it's still a subjective process. Grats to all again!
Thank you for the great feedback, and completely agree. I think I overdid the OSL on the electrical.
Great efforts from everyone, even those who did not quite finish. Always something gained from these competitions, ideas and inspiration, as well as pushing myself a little harder.
Can't count how many times I have come second now, must be a record there somewhere, but I am always happy with the result, Gravens piece is brilliant and I would be happy to come second to any of the entries.
And really glad the lad is on the mend. Great news.

 So, give it a go! Be warned though - terrain making is very addictive!
 And if you get stuck or have questions, others can encourage or give advice!
 Look for 'how to's' to check out, if you're unsure.

 I don't think I'll have time to start something new. But I can still cheerlead
 IN!!
IN!!
 is there any special technique to this?


 know tooo late but had issues cool comp and goodluck to all riveters
 if you really want the