Welcome to the re-imagined League of Extraordinary Riveters Hobby Challenge, Round 36. This round's theme is Crossings (described below) and the round ends on Monday, February 28. A public voting mechanic similar to the painting challenge is TBD. Our goal is to elevate and celebrate the aspects of the hobby beyond painting miniatures-- the scratch-building, theme-evoking, and detail-obsessing construction efforts that help immerse our models in a believable and richly textured world. Come one, come all!
The theme for Round 36 was selected (narrowly) by public poll and was originally phrased as follows:
CROSSINGS: Your build should relate to crossings or transitions in some way; bridges and spans, portals and gateways, docks and landing pads, things that must be crossed like water, lava, etc... anything that connects two points.
I'm excited that this theme was chosen as the first for our renewed hobby challenge, as it allows any model's base to qualify. Since a model's base represents the terrain the model or unit is crossing, please consider entering a freshly based unit of any size crossing the deserts of Mars, a frozen tundra, a lava field, a temple floor, a boggy swamp, a toxic wasteland... literally anything fits.
In addition to bases, please consider building and painting playable terrain pieces, decorative scatter terrain, display plinths and dioramas, table tiles or modular components, game aids, restoration or conversion projects... if it isn't a wargaming figure, it probably qualifies.
Please complete the build and paint phases in the course of the two-month challenge period. Please post up to six (6) high-quality photos in this before the deadline expires in your local time zone. A member of the League will compile and post the finished work for public review. Please post materials and progress photos here as well, ask and answer questions, offer insights and advice, and celebrate the work as much as the finished products.
Part of my ongoing board build is a canal tile with a sunken ship in the middle that acts as a makeshift bridge. I was planning on building + painting it prior to gluing it in place, so might as well do it now.
Here are my concepts, first draft and second. I like the silhouette of the first, and the design elements of the second. The build lies somewhere between the two of them.
To temper my ambition, the piece must be playable, built at an angle where models will not slide off. I would also like at least part of the masts to be removable to help with storage, which may prove difficult with the planned flags.
I'm excited to see what everyone else challenges themselves with. Stay productive folks!
Awesome slate of designs, and right at the drop to boot. Nicely done!
Mothsniper: I'm excited for this one! I'm completely hooked on the Proxxon+pink foam approach. I'm wondering, sunken in what?
Thumpingbear: I'm really pleased you're in this round; I've really enjoyed (and tried to emulate) your textures, so I'm pumped for this. Will it be one big piece or separate halves?
JoshInJapan: I too get my breakfast cereal from a seventeenth-century Protestant who lives in my cabinet. That build is going to be very cool in scale alone.
Peterhausen: I love this. I've been intimidated by water effects, so this will be fun to watch. Are you planning multiple sections?
I took an approach similar to Mothsniper's and cut a bunch of stock foam to work with. I cut a bunch of 1", 3", and 5" chunks at 1" and 2" thickness. I also dug out a template set to work with. When I ordered the Gothic template I used on my last build from Shifting Lands, their US fulfillment outfit (basically a fantasy laser woodshop) sent me the Romanesque arch template instead. They quickly shipped my Gothic windows and I just stowed this one. I like the embrace of the architectural archetype of the arch (see what I did there?) as both a span and a portal. I think I'm going to go big and do a rough cut of a table's worth of varied 9th ed. terrain. I'll likely put volume ahead of detail or complex paint schemes; I'll be building it for a friend's neoprene mat to airbrush himself to match... so maybe just a quick drybrush from me.
endtransmission: Welcome aboard! Your past submissions have me looking forward to your take on the theme.
Jazzy: Having had the pleasure of a game on your home table recently, I can say I'll be running along your gantries purging heretics at some point.
Everyone's sketches inspired me to put some effort into a proper template this time with some planning-- much credit to the stencils from ShiftingLands.com
Peterhausen: I love this. I've been intimidated by water effects, so this will be fun to watch. Are you planning multiple sections?
I will be doing multiple sections of around 20cms long to give more variety and modularity. As for intimidating water effects, well, I am going old school and cheap with a method I first used some 20 years ago. Its not fancy, but it is effective.
@MacPhail - "Sunken" as in ruins that are or recently where underwater for along time. Not planning to do actual water effects, because I am afraid of water/works and resins.
Made an arch, but want to try make a mold from this because I need 12 or more of those, but I has no more latex resins to cast molds and no monies for restocks for those resins are quite expensive.
Found videos of folk making simple molds using silicone caulking and water. So that is the plan for caulking i has.
That archway looks fantastic! Good luck with the caulking molds, I'll be interested to see how well that works!
I made a start on mine last night. In order to have a crossing, I needed to have a river. In the past I tried just painting it onto the hexes, with a little bank, but it looked a bit boring. Yesterday evening I created some new hex templates with two sides to bank up filler so that I can use these without the risers, giving a sunken river effect. I'm currently waiting for the first batch to dry before adding some detailing and levelling off the earth to match the height of existing tiles. I'm going to need quite a few more of these to create both banks of a river...
Mind if I join? I started trying to build some terrain and this might work as a good reason to actually finish something for once, haha.
I'm trying to "bulk-up" an aegis defence line to make it seem more like an actually fortification - and not just a random fence. I guess it's more in the "try-to-cross" than a "crossing" per se, but oh well.
Early WIP where I've only built the base platform and filled in the aquilas:
This will be a trial section and if it comes out well then hopefully I'll continue with the other pieces.
Welcome to the challenge! You could always create an additional sally point for the Aegis line, creating the Crossings bit?
I did a bit more work on the actual crossing bit of the river this afternoon, including some *actual* foam! Sadly I've still got a lot of river banks to make as I ran out of polyfilla... once I've restocked, I can create the banks around the brickwork so that it looks like it's part of the river bank
endtransmission wrote: That archway looks fantastic! Good luck with the caulking molds, I'll be interested to see how well that works!
I made a start on mine last night. In order to have a crossing, I needed to have a river. In the past I tried just painting it onto the hexes, with a little bank, but it looked a bit boring. Yesterday evening I created some new hex templates with two sides to bank up filler so that I can use these without the risers, giving a sunken river effect. I'm currently waiting for the first batch to dry before adding some detailing and levelling off the earth to match the height of existing tiles. I'm going to need quite a few more of these to create both banks of a river...
Going over the river is a nice stone bridge
Thanks, interested to see how it turns out too.
Good start on tiles! What material are those tiles?
And Is that a Reaper bridge? from the "troll encounter" ?
Automatically Appended Next Post:
Boringstuff wrote: Mind if I join? I started trying to build some terrain and this might work as a good reason to actually finish something for once, haha.
I'm trying to "bulk-up" an aegis defence line to make it seem more like an actually fortification - and not just a random fence. I guess it's more in the "try-to-cross" than a "crossing" per se, but oh well.
Early WIP where I've only built the base platform and filled in the aquilas:
This will be a trial section and if it comes out well then hopefully I'll continue with the other pieces.
Welcome!
Always though original fence looked a bit flimsy
Thanks, interested to see how it turns out too.
Good start on tiles! What material are those tiles?
And Is that a Reaper bridge? from the "troll encounter" ?
The tiles are ones I designed and 3d printed on a Ender 3, with Polyfilla/premade plaster for the landscaping. The bridge is also 3d printed, but I've forgotten where the model came from. I had to scale it a bit so that it fit across the tiles nicely.
Boringstuff wrote: Mind if I join? I started trying to build some terrain and this might work as a good reason to actually finish something for once, haha.
I'm trying to "bulk-up" an aegis defence line to make it seem more like an actually fortification - and not just a random fence. I guess it's more in the "try-to-cross" than a "crossing" per se, but oh well.
Early WIP where I've only built the base platform and filled in the aquilas:
This will be a trial section and if it comes out well then hopefully I'll continue with the other pieces.
I'm going to lend my vote, for what it's worth, in support of your project. None shall cross, implies there is something to cross in the first place.
The tiles are ones I designed and 3d printed on a Ender 3, with Polyfilla/premade plaster for the landscaping. The bridge is also 3d printed, but I've forgotten where the model came from. I had to scale it a bit so that it fit across the tiles nicely.
I never used Polyfilla plaster. Is it cheap or not? and is it liquid-ish enough to be filled into a mold? And how hard does it dry?
I am looking for cheapest material I can comeup with to cast my arches in. So far I have small bag with PlasterofParis that wont last long. Wondering if I can use material you are using for my arch mold...
Automatically Appended Next Post:
Peterhausenn wrote: I have the pieces cut out and have begun making the banks with some air dry clay. Will give them some time to dry before moving on.
Let me know the dry time and the smell of the airdry clay you are using.
Because I have used Das Terracotta and it takes long time to dry and has a strong odor when wet.
As for smell, never noticed any. There might be a slight one, but my sense of smell is weak at best. This clay is a paper based clay so it drys relatively fast. Granted the thicker it is the longer it takes. Also in some random test pieces I have noticed that the centers of thick pieces don't harden even after a few days. I assume they will eventually, but I don't know for sure as there is no air contact. For the applications I usually use I would say it becomes dry to the touch within an hour or two. I usually wait a full day before doing anything to it though just to make sure. I'll also point out it doesn't dry rock hard. Again though, it works well for this application.
I should mention that I am in Japan and I don't know if this type of product is readily available throughout the rest of the world. On the plus side if you can find it it's quite cheap as it only cost me a dollar for a block that is 5"x4"x1". Not much of a loss if it doesn't do what you need.
I never used Polyfilla plaster. Is it cheap or not? and is it liquid-ish enough to be filled into a mold? And how hard does it dry?
I am looking for cheapest material I can comeup with to cast my arches in. So far I have small bag with PlasterofParis that wont last long. Wondering if I can use material you are using for my arch mold...
Polyfilla may be too thick for a mold. I use it as it is really east to put a little bit on a base for rocks or rough ground. I would probably suggest getting dental plaster from eBay. It is fairly cheap, comes by the kilo and is rock solid once cast. It is also very fine, so catches detail nicely
Peterhausenn wrote: I have the pieces cut out and have begun making the banks with some air dry clay. Will give them some time to dry before moving on.
Let me know the dry time and the smell of the airdry clay you are using.
Because I have used Das Terracotta and it takes long time to dry and has a strong odor when wet.
As for smell, never noticed any. There might be a slight one, but my sense of smell is weak at best. This clay is a paper based clay so it drys relatively fast. Granted the thicker it is the longer it takes. Also in some random test pieces I have noticed that the centers of thick pieces don't harden even after a few days. I assume they will eventually, but I don't know for sure as there is no air contact. For the applications I usually use I would say it becomes dry to the touch within an hour or two. I usually wait a full day before doing anything to it though just to make sure. I'll also point out it doesn't dry rock hard. Again though, it works well for this application.
I should mention that I am in Japan and I don't know if this type of product is readily available throughout the rest of the world. On the plus side if you can find it it's quite cheap as it only cost me a dollar for a block that is 5"x4"x1". Not much of a loss if it doesn't do what you need.
Polyfilla may be too thick for a mold. I use it as it is really east to put a little bit on a base for rocks or rough ground. I would probably suggest getting dental plaster from eBay. It is fairly cheap, comes by the kilo and is rock solid once cast. It is also very fine, so catches detail nicely
Thank you! Interesting, usually don't associate dental with cheap, will check it out!
Automatically Appended Next Post: Prep for the mold make.
Lightly glued the arch to the plexiglass
Brushed on Bagbalm as "mold release"
Just been playing around with a new pot of polyfilla and the multipurpose stuff may be smooth enough for the mold, but you would have to be really careful about pressing it into the mold properly as it purposefully doesn't flow.
Just had a look on eBay and dental plaster at the moment seems o be quite pricey. I think I paid about £8 for 3kg of plaster, which is still not all used up
I’ll jump in with a small 3D print that I got from Super Denny Bros on Etsy.
A nice little piece that should paint up quickly, not to take away from any of the incredible effort on display already just to be here and be part of something special.
I guess the English translation is Light Paper Clay Karugaru from a company called Padico. There are a few different varieties and companies that sell it here. Here is a pintrest link that kind of describes it...
@endtransmission - I might make a ramp over the embankment to allow vehicles to move across it, that would fulfil the criteria I think. Thanks for the idea! I'm interested to see how you are using those tiles, is it buried somewhere in your blog?
@Mothsniper - Agreed, it is definitely more of a fence. Your building looks like it's going to be massive when it's done, hopefully the casting goes well.
@DJJazzyJeff - True, true!
I did some more work today and the earth embankment is mostly sculpted now:
Boringstuff wrote: @endtransmission - I might make a ramp over the embankment to allow vehicles to move across it, that would fulfil the criteria I think. Thanks for the idea! I'm interested to see how you are using those tiles, is it buried somewhere in your blog?
How about a bike ramp with a couple of planks on a barrel to jump over it?
The tiles will be dotted over the last 7 pages or so of my plog
theCrowe wrote: I’ll jump in with a small 3D print that I got from Super Denny Bros on Etsy.
A nice little piece that should paint up quickly, not to take away from any of the incredible effort on display already just to be here and be part of something special.
Glad you are with us!
That is a supper clean print.
I have never dealt with 3D prints, how long does it take to de-sprue and clean-up a print like that?
I guess the English translation is Light Paper Clay Karugaru from a company called Padico. There are a few different varieties and companies that sell it here. Here is a pintrest link that kind of describes it...
I checked ali, ali does not have that particular one, but I found the Padico company store Wow they are alot of nifty stuff! Never heard of them before, thanks for sharing.
found it on amazon https://www.amazon.com/202-Karugaru-Clay-Slight-japan/dp/B009KG0VNQ Next time I will get air dry clay, will try this one for sure!
@Mothsniper - Agreed, it is definitely more of a fence. Your building looks like it's going to be massive when it's done, hopefully the casting goes well.
Looks much beefier already!
Automatically Appended Next Post:
endtransmission wrote: Just been playing around with a new pot of polyfilla and the multipurpose stuff may be smooth enough for the mold, but you would have to be really careful about pressing it into the mold properly as it purposefully doesn't flow.
Just had a look on eBay and dental plaster at the moment seems o be quite pricey. I think I paid about £8 for 3kg of plaster, which is still not all used up
That is a reasonable deal.
What would you say is cheapest casting material? plaster right?
Automatically Appended Next Post: Never molded caulking before, so It is even more sticky than green-stuff, bagbalm does not help but soapy water does, like in tutorial videos.
Gloves proved to be quite useless, sticking to material too quickly.
Doing this on plexiglass turned out to be accidentally genius as it allowed to see through the back side during the application. SO I could see if caulking filled every gap or not.
Soapy water helped with the smell too, but not by much, will finish the rest outside.
@Mothsniper- no idea. Super Denny Brothers did all the hard work producing it and it only cost me £3.50. It’s just a man-sized portal. Not very large but great quality. Still has some print grain as you’d expect but I’m not so bothered that I’m going to putty-wash it or anything.
What was dumb is using cardboard for the sides, not only because it became soggy but because I cant level corners to cardboard uneven flimsy soggy edge.
Removed cardboard
Built frame that has a rigid edge and consistent height
Threw in some dirt as filler in attempt to use less caulking and flattened the corners. So the mold when flipped will stand like a table on 4 corners. Hopefully leveled-ish.
you'll want to have all of it supported wherever the plaster is going as the weight will bend the caulking and give you distorted arches. Plaster is heavy stuff, especially when wet
endtransmission wrote: you'll want to have all of it supported wherever the plaster is going as the weight will bend the caulking and give you distorted arches. Plaster is heavy stuff, especially when wet
You are probably right.
I will do a test and see... because building outside frame was ez, building interior lancet arch is a bit outside of my ability.
If mold sags with weight of sand, ill pour sand for weight test, then will have to get creative and building up small pillars with silicone around the lancet arch.
Good call!
Automatically Appended Next Post: Ha, no weight test needed. Removed the matrix and it sagged by its own weight.
Will leave it overnight so silicone can cure from the inside too. Tomorrow will reassemble the frame jig and fill in extra supports.
Quick question; if you use platicard in your builds is there a "standard" thickness which is easy to cut but still stiff enough to be used structurally? 2 mm & 4 mm are both too thick and still a pain to cut, and 0.75 mm seems unable to hold its own weight.
Boringstuff wrote: Quick question; if you use platicard in your builds is there a "standard" thickness which is easy to cut but still stiff enough to be used structurally? 2 mm & 4 mm are both too thick and still a pain to cut, and 0.75 mm seems unable to hold its own weight.
Depends what you are cutting with, and depends what weight are you trying to support.
I have little experience with plasticard, I do have it and use it. For me it comes down to scoring both sides with a hobby knife and then break/snap the two halfs like you would with plexiglass
Never tried to cut anything but straight cuts and always assumed that there is a special tool for complex cuts.
Try scoring and snapping thick pieces
Quick search
Cutter
This guy glues 1mm plates together to get 2mm thick pieces
Automatically Appended Next Post: On side note about plasticcard.
Cheap substitute would be PVC Vertical Blind
Automatically Appended Next Post: _______________________________________________________________________________________________________
Luckyly I bought 5 tubes thinking that will probably only use 3
Last 2 went into building up the back because it does sag under its own weight.
Boringstuff wrote: Quick question; if you use platicard in your builds is there a "standard" thickness which is easy to cut but still stiff enough to be used structurally? 2 mm & 4 mm are both too thick and still a pain to cut, and 0.75 mm seems unable to hold its own weight.
I use a lot of 1mm myself, but I guess the question is - what are you trying to do / support? I mean, you can get away with 0.25mm if you build a support frame underneath it with 2mm or thicker....
Mothsniper wrote:Depends what you are cutting with, and depends what weight are you trying to support.
I have little experience with plasticard, I do have it and use it. For me it comes down to scoring both sides with a hobby knife and then break/snap the two halfs like you would with plexiglass
Never tried to cut anything but straight cuts and always assumed that there is a special tool for complex cuts.
Try scoring and snapping thick pieces
Quick search
Cutter
This guy glues 1mm plates together to get 2mm thick pieces
On side note about plasticcard.
Cheap substitute would be PVC Vertical Blind
_______________________________________________________________________________________________________
Luckyly I bought 5 tubes thinking that will probably only use 3
Last 2 went into building up the back because it does sag under its own weight.
Pro tip - Stale Wafer Cookies shims !
You seem to be spot on with the scoring for thicker stuff - I was trialling that this morning and it's much easier that way than using a scalpel/stanley knife. Also, I found out the no curved cuts the hard way - I just ended up cutting a bunch of straight lines and sanding the corners instead.
Love the use of the stale biscuits, haha.
Arakasi wrote:I use a lot of 1mm myself, but I guess the question is - what are you trying to do / support? I mean, you can get away with 0.25mm if you build a support frame underneath it with 2mm or thicker....
Maybe I exaggerated slightly, the 0.75mm doesn't sag by itself and I do have supports for it - it just feels super flimsy. I actually just double checked the thickness and it is more like 0.6mm, including the patterned surface on that part.
Thanks for the advice, I think I'll get some 1 - 1.5 mm stuff and see how it goes.
First cast!
Kinda meh... I'll see how it looks when painted.
The idea was to cast 2 halfs and glue them together into one arch. The backs might not be strait flat however...
From tutorial videos folks talk about using Joint Compound instead of plaster. Will try Joint Compound tomorrow because plaster is a bit brittle pricey and I am running out.
Boringstuff wrote: Quick question; if you use platicard in your builds is there a "standard" thickness which is easy to cut but still stiff enough to be used structurally? 2 mm & 4 mm are both too thick and still a pain to cut, and 0.75 mm seems unable to hold its own weight.
I use Styrene card for anything less than 1mm. For anything bigger than 1mm, I use foamed PVC (a.k.a. Palite, Celtec, Komatex, others), which behaves similarly but is less dense and therefore easier to cut at greater thicknesses. I use a lot of 3mm for bases for larger terrain pieces. I cut it with a steel ruler and a utility knife with a fresh blade. Score-and-snap works, or about three passes with a sharp blade. I bevel the edges with a grinding wheel on a Dremel tool, and it sands and takes primer and paint really well.
Awesome progress, and some great new entries, too! This is shaping up to be an amazing round.
@MacPhail - thanks for sharing, never heard of foamed PVC, will have to check it out!
Automatically Appended Next Post: _______________________________________________________________________
Rough dry-brush just to see how the first cast cameout
Quite impressed! The plan to cheap out on molding material by using caulking worked! About $30 spent
This is a first cast with plaster that was poured into the mold right after the silicone set, meaning that all small artifacts, tiny bit of extra water, and leftover (BagBalm) was still there when I poured. I took out plaster cast before it dried completely and it damaged the cast a bit, and I had to spray it black form a rattle-can , that must of clogged up some small detail. That had to be done because brush bristles would scrape of plaster and leave white scratches all over; At least with a film of paint spray paint I could dry brush the arch.
I expected the cast to look dull with less detail but it is not too bad at all!
Foam matrix is on left, plaster cast on right. ( Keep in mind that the foam matrix on the left was covered in pieces and flakes of silicone and bagbalm, I just painted over everything, so the original detail is not there)
Glued both together with garilla glue
boringstuff, I love the transformation of your defenses... definitely a big return on your investment.
Mothsniper, that arch turned out great! The three layers of depth look awesome.
Mothsniper and I have dueling arches, and I have a rough cut of my first "L" with the 5" x 2" foam. I bungled a few of the blocks as I etched the ends because I didn't match the inside and outside block patterns, but I got the rhythm by the time I turned the outside corner. The next ones will hopefully go more quickly... I'm trying to force myself to not be too meticulous and focus on moving quickly, as I have a whole table's worth to do.
Ferrous695 welcome!
Cant wait to see what you had in mind for the overpass!
_________________________________
My progress was slow, lots of waiting for things to dry. I tried join compound. It mixed very well, poured beautifully but never dried after 3 days, so I took it apart and noticed that smaller pieces that are dry would crumble easily.
Big fail.
I even tried to mix 1/6 Woodglue with water into the joint compound for sturdiness but that did not help at all.
If I mixed more of the wood glue that would do the trick but then I am not saving any cost on the glue. Might as-well go back to plaster.
Next try I saw perfect cast material and will try that, suppose to be much stronger than plaster, but not as cheap.
Might as well enter these I had loads of plans for more exciting projects but these need paints. Literally spue with cereal card added to make scrap walkways for skirmish games.
I've finally started to get some paint onto the river tiles... there is still a few layers of different blues and some modpodge to deal with before flock starts to appear... there are also another 10+ river tiles to paint before then as well as the bridge and main crossing point...
Automatically Appended Next Post:
Mothsniper wrote: Good progress guys!
My progress was slow, lots of waiting for things to dry. I tried join compound. It mixed very well, poured beautifully but never dried after 3 days, so I took it apart and noticed that smaller pieces that are dry would crumble easily.
Big fail.
Ooooh sorry you're having so much trouble casting these things... keep those broken bits for basing though, they will look great!
Im feeling bad about just buying in my entry and painting it up (Which is probably against the rules) so I’m going to make an extended base/ stone circle to place it in.
Slab of foam at the ready.
I’ve a few odd bits I may adjust to be able to swap out the central feature for a stone table or a statue or something. I can’t be turning in a painted item with no scratch-built element surely.
Automatically Appended Next Post: It’s coming out a little more Indian sandstone paving at the garden centre than mystical arcane stone circle.
but I’ll press on and try and age it down a bit like the relentless grinding of the centuries at an abandoned garden centre.
endtransmission wrote: I've finally started to get some paint onto the river tiles... there is still a few layers of different blues and some modpodge to deal with before flock starts to appear... there are also another 10+ river tiles to paint before then as well as the bridge and main crossing point...
Ooooh sorry you're having so much trouble casting these things... keep those broken bits for basing though, they will look great!
Dig that texture! Oh these are much smaller than I previously thought.
Btw, I can't keep those broken bits, joint compound does not dry hard and crumples easily.
Automatically Appended Next Post:
theCrowe wrote: Im feeling bad about just buying in my entry and painting it up (Which is probably against the rules) so I’m going to make an extended base/ stone circle to place it in.
[url=https://www.dakkadakka.com/gallery/1129364-.html]
but I’ll press on and try and age it down a bit like the relentless grinding of the centuries at an abandoned garden centre.
Man that portal is looking crispy!
And don't feel bad, any terrain things is within the new rules. But I do like that huge carved stone dais for the portal, just adds extra narrative.
Dig that texture! Oh these are much smaller than I previously thought.
Btw, I can't keep those broken bits, joint compound does not dry hard and crumples easily.
Each hex is about 8x10cm, which means there is a lot of flexibility in building the table layouts. There re some new examples that show scale on my blog Larger pieces are multiple hexes stuck together.
Shame about the broken bits not being usable, some of those look fantastic. It'd certainly be worth casting one in a more brittle plaster and smashing it up for basing
I have four stream sections finished. Now I need to design start and end pieces. I think the end piece will be easy to do, but I'm struggling with what I want to do for the start piece.
My river is just going to go straight across the board, so I'm not worrying about start/end points. I figure it can be just off the board edge if it needs to be that close to the source.
If you really want to do something you could create a small cave piece that has the water coming out of it
Everyone's entries are looking amazing! Really excited to see how some of these turn out.
Finished both smoothing (with sandpaper and then a thin layer of plaster) and then dirtying (just good ol' glue and dirt) up the overpasses, just realising I probably want to add just a few small details like hatches, loose panels or larger debris. I'll play around with it a bit, but I'm almost ready to prime it and get painting! I still need to build and paint the supports, but I'll do that separately methinks.
Just wanted to show a quick update of what I’ve been working on with this.
So now the portal sits within a stone circle flanked by stone pillars with little bowls of fire (hot glue) around it. The “fire” can be taken out of the bowls so I can set it up with unlit torches and a blank plate instead of the portal, because as any Zelda fan will tell you nothing says “there’s a secret portal here that will magically appear if you light these four oil lamps” quite like a magic stone circle with four unlit lamps and a mysteriously empty centre spot.
Spoiler:
But there’s so many more options that I’ve been working on some of which are a bit off theme or very tenuously theme-related but I just thought you’d maybe like to see.
So I made these just before Christmas there from DAS clay.
A mouse statue, a sword in a stump, and a stone slab table for picnics or sacrifices.
I rebased or altered them to fit the stone circle so I can swap them out. And then I made even more options just for the fun of it. So here’s the 6 other options. We have...
The holy shrine (of mousey godliness)
The unholy ring of magic summoning.
The sacrificial altar.
The vampire’s resting place, pop the lid and steak that sucker!
The tunnel entrance to the ghostly catacombs.
Or the grassy mound where the sword of the faerie king awaits a hero.
Some could be on-theme for crossing the threshold between worlds but not all of them. I thought a wishing well might also be a nice one or maybe a fountain.
Anyway, I’ll stop spamming up the thread now until i get some paint on it all.
theCrowe wrote: Just wanted to show a quick update of what I’ve been working on with this.
Spoiler:
So now the portal sits within a stone circle flanked by stone pillars with little bowls of fire (hot glue) around it. The “fire” can be taken out of the bowls so I can set it up with unlit torches and a blank plate instead of the portal, because as any Zelda fan will tell you nothing says “there’s a secret portal here that will magically appear if you light these four oil lamps” quite like a magic stone circle with four unlit lamps and a mysteriously empty centre spot.
[spoiler]
But there’s so many more options that I’ve been working on some of which are a bit off theme or very tenuously theme-related but I just thought you’d maybe like to see.
So I made these just before Christmas there from DAS clay.
A mouse statue, a sword in a stump, and a stone slab table for picnics or sacrifices.
I rebased or altered them to fit the stone circle so I can swap them out. And then I made even more options just for the fun of it. So here’s the 6 other options. We have...
The holy shrine (of mousey godliness)
The unholy ring of magic summoning.
The sacrificial altar.
The vampire’s resting place, pop the lid and steak that sucker!
The tunnel entrance to the ghostly catacombs.
Or the grassy mound where the sword of the faerie king awaits a hero.
Some could be on-theme for crossing the threshold between worlds but not all of them. I thought a wishing well might also be a nice one or maybe a fountain.
Anyway, I’ll stop spamming up the thread now until i get some paint on it all.
Dude!
Your simple portal turned into modular epic terrain piece with backstory and lots of narrative. Way to get sucked into it lolz The portal and mouse shrine is my faves. The mouse shrine reminds me of Ghost of a Tale Game.
Automatically Appended Next Post:
Ferrous695 wrote: Everyone's entries are looking amazing! Really excited to see how some of these turn out.
Finished both smoothing (with sandpaper and then a thin layer of plaster) and then dirtying (just good ol' glue and dirt) up the overpasses, just realising I probably want to add just a few small details like hatches, loose panels or larger debris. I'll play around with it a bit, but I'm almost ready to prime it and get painting! I still need to build and paint the supports, but I'll do that separately methinks.
Oooo I like those blue pipes.
Are you planning on adding some broken rebar sticking from the broken edges?
I have four stream sections finished. Now I need to design start and end pieces. I think the end piece will be easy to do, but I'm struggling with what I want to do for the start piece.
Looking good!
I don't have a good suggestion for the beginning, perhaps just heavy overgrown side with cattails that would cover the "beginning"
Or like it was mentioned before, just have river run from edge to edge.
Automatically Appended Next Post: ---------------------------------------------------------------
Progress.
Finally some perfect cast came in.
This stuff really supercool! Mixes well, pours smoothly, after 30 mins hard enough to pull from that mold without breaking like plaster did.
I even tried to put old spruces in for the support.
For the excess, I made dents in the ground with a rock, now I have some nifty solid rock pieces.
theCrowe wrote:Just wanted to show a quick update of what I’ve been working on with this.
So now the portal sits within a stone circle flanked by stone pillars with little bowls of fire (hot glue) around it. The “fire” can be taken out of the bowls so I can set it up with unlit torches and a blank plate instead of the portal, because as any Zelda fan will tell you nothing says “there’s a secret portal here that will magically appear if you light these four oil lamps” quite like a magic stone circle with four unlit lamps and a mysteriously empty centre spot.
[spoiler]
But there’s so many more options that I’ve been working on some of which are a bit off theme or very tenuously theme-related but I just thought you’d maybe like to see.
So I made these just before Christmas there from DAS clay.
A mouse statue, a sword in a stump, and a stone slab table for picnics or sacrifices.
I rebased or altered them to fit the stone circle so I can swap them out. And then I made even more options just for the fun of it. So here’s the 6 other options. We have...
The holy shrine (of mousey godliness)
The unholy ring of magic summoning.
The sacrificial altar.
The vampire’s resting place, pop the lid and steak that sucker!
The tunnel entrance to the ghostly catacombs.
Or the grassy mound where the sword of the faerie king awaits a hero.
Some could be on-theme for crossing the threshold between worlds but not all of them. I thought a wishing well might also be a nice one or maybe a fountain.
Anyway, I’ll stop spamming up the thread now until i get some paint on it all.
[/spoiler]
Looking great, love the hot glue fire pits! And I love modular terrain.
Spoiler:
Peterhausenn wrote:I have four stream sections finished. Now I need to design start and end pieces. I think the end piece will be easy to do, but I'm struggling with what I want to do for the start piece.
theCrowe wrote: Just wanted to show a quick update of what I’ve been working on with this.
Spoiler:
So now the portal sits within a stone circle flanked by stone pillars with little bowls of fire (hot glue) around it. The “fire” can be taken out of the bowls so I can set it up with unlit torches and a blank plate instead of the portal, because as any Zelda fan will tell you nothing says “there’s a secret portal here that will magically appear if you light these four oil lamps” quite like a magic stone circle with four unlit lamps and a mysteriously empty centre spot.
[spoiler]
But there’s so many more options that I’ve been working on some of which are a bit off theme or very tenuously theme-related but I just thought you’d maybe like to see.
So I made these just before Christmas there from DAS clay.
A mouse statue, a sword in a stump, and a stone slab table for picnics or sacrifices.
I rebased or altered them to fit the stone circle so I can swap them out. And then I made even more options just for the fun of it. So here’s the 6 other options. We have...
The holy shrine (of mousey godliness)
The unholy ring of magic summoning.
The sacrificial altar.
The vampire’s resting place, pop the lid and steak that sucker!
The tunnel entrance to the ghostly catacombs.
Or the grassy mound where the sword of the faerie king awaits a hero.
Some could be on-theme for crossing the threshold between worlds but not all of them. I thought a wishing well might also be a nice one or maybe a fountain.
Anyway, I’ll stop spamming up the thread now until i get some paint on it all.
Dude!
Your simple portal turned into modular epic terrain piece with backstory and lots of narrative. Way to get sucked into it lolz The portal and mouse shrine is my faves. The mouse shrine reminds me of Ghost of a Tale Game.
Automatically Appended Next Post:
Ferrous695 wrote: Everyone's entries are looking amazing! Really excited to see how some of these turn out.
Finished both smoothing (with sandpaper and then a thin layer of plaster) and then dirtying (just good ol' glue and dirt) up the overpasses, just realising I probably want to add just a few small details like hatches, loose panels or larger debris. I'll play around with it a bit, but I'm almost ready to prime it and get painting! I still need to build and paint the supports, but I'll do that separately methinks.
Oooo I like those blue pipes.
Are you planning on adding some broken rebar sticking from the broken edges?
I have four stream sections finished. Now I need to design start and end pieces. I think the end piece will be easy to do, but I'm struggling with what I want to do for the start piece.
Looking good!
I don't have a good suggestion for the beginning, perhaps just heavy overgrown side with cattails that would cover the "beginning"
Or like it was mentioned before, just have river run from edge to edge.
Automatically Appended Next Post: ---------------------------------------------------------------
Progress.
Finally some perfect cast came in.
This stuff really supercool! Mixes well, pours smoothly, after 30 mins hard enough to pull from that mold without breaking like plaster did.
I even tried to put old spruces in for the support.
For the excess, I made dents in the ground with a rock, now I have some nifty solid rock pieces.
Glad you found a good material, and genius idea with the sprues!
Thanks for bringing up rebar actually, because I had actually cut some pieces of wire to use for exactly that purpose, and I had completely forgotten about them. So I will probably be adding them later, though not sure if the paint will hold, as I won't bother priming them separately. Speaking of priming, got the overpasses primed and partway through painting, just a quick grey with white drybrush, and some green for the pipes (I'll brighten it up later, after I do some washes as well). Still trying to figure out whether I want to do the metal walkway as chipped/ rusty paint, or just a rusty/ oily steel. Anyway, here's some pics:
@ Ferrous695 :
How about rust on metal and few dabs of greenery?
__________________________________________
Progress
7 pieces cast, glued back to back, spray-painted black.
Adjusting the plan as I go. Instead of ruined wall section of a cathedral with the arches, I'll combine them into a tower of a sort. It is much easier to move it around that way.
Need something for the top
Found some old foam pieces from old projects. Will try to put it all together.
Some really nice stonework there. Nice big chunks like you might put on a trebuchet to sling at an army of orcs.
Seriously though, I’m looking forward to seeing this piece coming together. Are you going to make it buildable and take-down-able? (It’s late, I’m losing the words) I thinking that big heavy terrain pieces are hard to store if you can’t take them down into box-sized chunks.
I've been caught up in finishing terrain for an upcoming game, but hope to get back to the river pieces this weekend
Thanks. That was an accident that turned out very well. I am yet to actually use it in other work.
I tried to color the fine flock but instead the paint soaked into the flock staining it whole. After it dried it has that look and texture of orange rock moss.
theCrowe wrote: Some really nice stonework there. Nice big chunks like you might put on a trebuchet to sling at an army of orcs.
Seriously though, I’m looking forward to seeing this piece coming together. Are you going to make it buildable and take-down-able? (It’s late, I’m losing the words) I thinking that big heavy terrain pieces are hard to store if you can’t take them down into box-sized chunks.
Indeed.
I plan to have it all as one piece. Initially the idea was to cast in plastics but that is too expensive because the piece is that big.
BUT! this has a specific purpose and wont be moved a whole lot so I am ok with it being a bit bulky and heavy.
Dry brushed the arches, stained them a bit green (finally good use for that GW contrast pot), and begin to cover the arches in coats of resin.
This is Aquarium safe resin, usually used in combination with calcium carbonate to make mold aquarium decorations.
So the idea is to coat terrain piece in that, and make it aquarium safe. I have done tests before and it will work.
Casting with that will be pricey, but coating saves a ton of resin and still has the terrain detail.
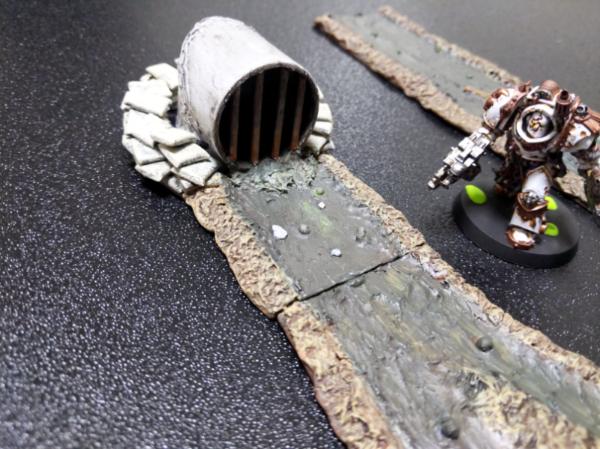
I am looking to have a beginning and end point for more options when setting it up. Took some advice from the suggestions but instead of rocks or a cave I went for a sewer pipe which is kinda like a cave.
Indeed.
I plan to have it all as one piece. Initially the idea was to cast in plastics but that is too expensive because the piece is that big.
BUT! this has a specific purpose and wont be moved a whole lot so I am ok with it being a bit bulky and heavy.
Dry brushed the arches, stained them a bit green (finally good use for that GW contrast pot), and begin to cover the arches in coats of resin.
This is Aquarium safe resin, usually used in combination with calcium carbonate to make mold aquarium decorations.
So the idea is to coat terrain piece in that, and make it aquarium safe. I have done tests before and it will work.
Casting with that will be pricey, but coating saves a ton of resin and still has the terrain detail.
These are turning out great. Is there a reason they need to be aquarium safe?
theCrowe wrote: Just wanted to show a quick update of what I’ve been working on with this.
Spoiler:
So now the portal sits within a stone circle flanked by stone pillars with little bowls of fire (hot glue) around it. The “fire” can be taken out of the bowls so I can set it up with unlit torches and a blank plate instead of the portal, because as any Zelda fan will tell you nothing says “there’s a secret portal here that will magically appear if you light these four oil lamps” quite like a magic stone circle with four unlit lamps and a mysteriously empty centre spot.
Peterhausenn wrote: I am looking to have a beginning and end point for more options when setting it up. Took some advice from the suggestions but instead of
Spoiler:
rocks or a cave I went for a sewer pipe which is kinda like a cave.
Loving everyone else's builds, they're really starting to come together! Peterhausenn That rust effect looks great! I'm a little jealous. Mothsniper Loving the arches, and love that moss effect on that old project of yours.
I think I've got all the painting done, though I am prone to going back in the next day or two and changing things. I'm not super happy with how the rusted metal came out in the end, but I don't hate it.
All that's left is to try and add some flock, though adding realistic greenery is definitely a weak point of mine, but we'll see how I get on.
Thanks. It is a fun process which is my go to for rust. I use basic craft paint mixing the colors of a brown, an orange, and a metallic gold until I get a decent "rust" color. For application I started with an iron for the bars and then I just apply the rust mixture quite runny and watered down, starting at the bottom and pulling it up allowing it to run back down. I wick off any large pools and repeat the process a couple times. The gradient forms naturally and allows me to simulate a rustier bottom than top.
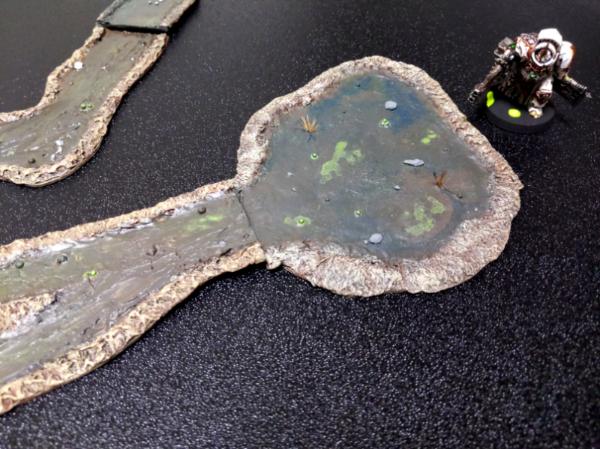
Starting on what I think will be the final piece. Just a little run off sludge pond.
Ferrous695 wrote: Loving everyone else's builds, they're really starting to come together! Peterhausenn That rust effect looks great! I'm a little jealous. Mothsniper Loving the arches, and love that moss effect on that old project of yours.
I think I've got all the painting done, though I am prone to going back in the next day or two and changing things. I'm not super happy with how the rusted metal came out in the end, but I don't hate it.
All that's left is to try and add some flock, though adding realistic greenery is definitely a weak point of mine, but we'll see how I get on.
Cool! Have you ever tried that SteelWhool and Hydrogen peroxide rust paint?
Thanks. It is a fun process which is my go to for rust. I use basic craft paint mixing the colors of a brown, an orange, and a metallic gold until I get a decent "rust" color. For application I started with an iron for the bars and then I just apply the rust mixture quite runny and watered down, starting at the bottom and pulling it up allowing it to run back down. I wick off any large pools and repeat the process a couple times. The gradient forms naturally and allows me to simulate a rustier bottom than top.
Interesting, I never used metallic paint in the rust mixture. Will have to give it a try one of these days
__________________________________________________________
I have to do one side at a time for resins, and the glues have to cure for full 24 because pieces are big n "heavy" ish.
Progress is slow due to dry time for resins or glues.
There is a bit of a gap, and bowing, the arches are not 90 degree leveled or even and that is due to my redneck-style mold making.
Therefor building up shapes for that extra detail and for the glue to get a good grip on the pieces that don't line up really well.
I used gorilla glue for the first time recently. It’s a bit tricky, if you used too much water it really foams
Out like expanding foam but then it’s not too hard to cut down to shape again after if you can get a knife into the corner. But yes, the drying/curing time was really quite annoying, especially if you leave something to set overnight and then get up in the morning to find it’s set out of shape and you have to chop it apart and re-position it.
Your stone arch ruins are looking mega! What kind of aquarium are we talking?
Have the "water" down along with some details mixed in. I had a bit of a concern with the "reeds" that I used. The "reeds" are simply bristles from a toothbrush cut off and shoved into the then wet caulking. It was after I placed them in the caulk I became concerned if I would be able to paint them while on the base. I probably should have painted them before placing them as it would be easier. I wanted to get this figured out before painting the rest of the piece since if I would have to redo them it would be less harmful now. I decided to try to tint them with a wash and see if that would work. Thankfully it did and I am happy enough with the result. Now I just have to give the caulk another day or two to fully cure and I can start painting the rest.
theCrowe wrote: I used gorilla glue for the first time recently. It’s a bit tricky, if you used too much water it really foams
Out like expanding foam but then it’s not too hard to cut down to shape again after if you can get a knife into the corner. But yes, the drying/curing time was really quite annoying, especially if you leave something to set overnight and then get up in the morning to find it’s set out of shape and you have to chop it apart and re-position it.
Your stone arch ruins are looking mega! What kind of aquarium are we talking?
Yep, with gorilla glue you are suppose to clamp pieces down, and that is tricky to do on delicate terrain piece.
I am not a fan of gorilla glue because of long dry time however this glue has a very strong bond and does not melt pink insulation foam like super glues and hot-glue gun does!
My other options are, Titebond III woodglue or 2PartEpoxy, both of those I don't have, plus they are not cheap, plus wood glue is strong but not with pink foam to plaster or shiny resin to resin (I will have to mix something into that woodglue to give it tooth), and 2PartEpoxy takes too long to work with and messy. Thus gorilla glue.
Wow! I go skiing for a few days and everyone takes huge leaps forward! Mothsniper, those arches are fantastic, and I appreciate the added challenge of waterproofing them. Peterhausen, the design of your culvert is brilliant, and I'll second the comments about your rust effects. I think I need to make time to go back a full page and check in with everyone else.
Here's where I have made it... my first effort at cutting the arches was tedious and inaccurate, so I made templates of card (for the Proxxon) and styrene (for the engraving and texturing) and they sped things up considerably. I'm on pace to have all four of the 5" Ls ready this month, and I might push on and make a set of 3" templates to crank out my 2-story buildings to accompany them. Here's a quick reference pic with some classic 2e models for scale, and I'll post a few process pics to my plog.
Finally the top pieces coated and dry. Waiting on resin on the arches to dry before gluing together.
Btw, Shininess does not bother me because underwater you cant see it.
Great work on the arches. What kind of fish will you/do you have in the tank? I think I see a little guy hanging out by the filter. I can't really tell but is it a puffer by chance? The smaller tanks looks like there might be a guppy or molly in it.
Great work on the arches. What kind of fish will you/do you have in the tank? I think I see a little guy hanging out by the filter. I can't really tell but is it a puffer by chance? The smaller tanks looks like there might be a guppy or molly in it.
I think what you see by the filter is a yellow snail. No puffer, fresh water only I have 2 fish in the big tank: some type of loach and a plecostomus, can't see them because both like to hide.
Smaller tank has 1-Betta, 1-Otocinclus, 5-Zebra danio, 1-Guppy and bunch of snails. I will get more fish for big tank when the decorations are in; don't know what fish though, perhaps a lot of small schooling fish be nice.
Speaking of, a bit of a problem. Too much foam, not enough plaster, the damn thing floats. Though I was almost done, nope.
Automatically Appended Next Post: So, I have done a test in the past. Used that aquarium safe resin with calcium carbonate to build up a thin shell of 3-4 layers, painted it, and hollowed it out using acetone that melted the foam and left the resin shell. Perfect for wide and larger pieces.
It did work, however there is not way for me to re-seal the inside on something long and narrow. On the arches all I have is 2 layers of paint and 2 thin layers of resin.
Ether need to build up 4-5 layers with calcium carbonate, repaint, re-seal, hollow-out with acetone, wash out, air-out, somehow re-seal the inside while losing all detail on the surface. Or just add something heavy to the arches so it sinks. Or, spray it with matt varnish and use it outside the tank for something else.
Oof, that's a bummer so close to the end. What about mounting it on a flat base that you could bury in the gravel? The acetone trick seems like a huge new step.
However over a month underwater I noticed some black and green molding happening. Pulled them out, dried them up, and want to coat them in resin too for long term use. But this time got PlastiDip clear Matt spray to seal the trees with. Folk use Matt black PlastiDip to paint aquarium filter piping to make it less visible and be aquarium safe. However this stuff is not very durable and the rubbery film can be peeled off (from my research), figured for the trees should be sturdy enough. Hope this works.
Automatically Appended Next Post:
MacPhail wrote: Oof, that's a bummer so close to the end. What about mounting it on a flat base that you could bury in the gravel? The acetone trick seems like a huge new step.
Base would make sense, also it will secure the legs together, because now they are by them selves and if accidentally bumped might crack off.
Well, my tank is already set up and planted, kinda don't want to disturb it.
Plus wanted the legs free standing (even if they are vulnerable) that way I can pull it out, clean tank, put piece back in.
Plus, I don't think that gravel is heavy enough to keep it down lolz. I feels like that thing need some serious weights to keep it down.
Think I figured out what to try.
Will attempt to pour acetone from the bottoms, down each "foam column" ie the corner, because the corners are the largest foam pieces.
Hopefully the 2 layers of paint and 1 layer of resin will hold-on long enough for me to pour plaster into the hole burned out by the acetone! Sealing the interior from melted foam and adding weight.
If this works then hurray! If not, then I will be posting progress of reattaching arches with new corners made from rocks and wood-glue.
________________________________________________________________________________________
IT WORKED!!!!
kidding, of course it didn't lolz
(decided to document process for such an unusual thing)
First try:
Made a hole to melt down the column.
Melting went well, and left extra thin wall. Here you can see the light shining right through it.
As more of foam melted, the column began to fold on it self and wrinkle. sadface
But it held together and I though to try and pour some PerfectCast but acetone must of melted through some cracks unseen to me. Emergency plastiline patching did not help at first. Lots of patch, pour, clean, patch pour clean, repeat.
Eventually:
4) - Left this part foam
3) - Was the first "pour" that did not leak out but blew out the column.
2) - Second pour was a test and helped to seal up some other leaks.
1) - Rest filled up well with PerfectCast but I was unable to un-wrinkle the column
Second Try:
Decided to melt column in smaller sections and from the side instead of one big melt down from the bottom.
1) - Poke a hole
2) - Pour acetone, fill with plaster, move on.
3) - To give an idea of the thickness that I am working with. Plastelin helped in holding shape and prevent leaks.
Was able to fill 4 holes, even if its plaster foam plaster foam.
Third try:
Decided to take entire top off the corner section and fill from top.
1) - Scoring before acetone accelerates melting dramatically
2) - Uneven melt left wall in places thin/thick, helps with holding the shape.
Extra plaster is poured over flat surface and later repurposed as filler for the next pour.
First pour pushed out the walls a bit. Second pour filled in the rest but was much lower due to wall bulging. Ended up building up wood-glue/dirt mixture to make up the difference.
That is pretty crazy. I'm a bit late with the suggestion, but before going through all of that did you think to try to heat a rod/pipe/tube to make your hole to avoid the acetone risk?
I’ve seen heat wire/rod very hard to control with foam too. Prob wouldn’t have been any less destructive than the acetone. The other option might have been drilling out some holes but that might’ve just torn the legs off it. Nightmare. Well I suppose it’ll look plenty eroded by the time you’re done. Hope the fish appreciate all the effort.
That is pretty crazy. I'm a bit late with the suggestion, but before going through all of that did you think to try to heat a rod/pipe/tube to make your hole to avoid the acetone risk?
Thanks for remind me that! I totally forgot about heat.
So i wanted to do try that for the rest but 2 reasons why I did not:
One is that heat is really hard to control and where acetone does not melt the thin layer of resin, heat will burn right through it.
Two, the biggest reason is that I have a Foam Cutter Pen, but I could not find it anywhere. I just remember that it was cheap and not very good so I never really used it and so I could not find it to give it a try.
theCrowe wrote: I’ve seen heat wire/rod very hard to control with foam too. Prob wouldn’t have been any less destructive than the acetone. The other option might have been drilling out some holes but that might’ve just torn the legs off it. Nightmare. Well I suppose it’ll look plenty eroded by the time you’re done. Hope the fish appreciate all the effort.
I think at this point I gave up on finding cheap and quick way to make highly detailed aquarium decoration and now just get enjoyment from the process of solving this issue.
Damn fish better like this tower!
____________________________________________________________________________
Progress
Did a quick dunk test, it no longer floats!
You can see warped corners and wrinkled holes around.
Now need to finish painting, sealing, waiting to dry.
I can always make more smaller pieces and glue to this rig at a later time to built it up some more. And eventually have part of it sticking out of water.
Sorry to jump in with my finished piece so early but here’s my final photos.
Portal in place from the front.
This is the other side of the portal door (which I think I like better than the front!)
I’m pretty happy with how it turned out but what I like best of all is the playability.
Our heroes come upon a strange arcane circle in the darkness. What could it mean? What mysteries await to be unraveled in this strange portentous place?
Stumbling upon a stone pillar with an oil lamp set on top , naturally they decide to light the lamps.
They process around the circle lighting each lamp in turn. Squirrel is feeling a tingle in his tail. Is something terrible going to happen?
No sooner is the fourth and final lamp lit than a weird portal appears in the centre of the stone circle.
An unnatural wind whips up roiling magical energies at the threshold to another realm.
But before they have gathered their wits there issues forth a band of unspeakably hideous fiends! Beasts from another dimension! Not at all cute or adorable but foul and brutish and accursed!
That’s what you get for lighting the lamps in mysterious magic stone circles.
And just because I’ve got lots more options to play with though not necessarily on theme here’s a collection of bonus unofficial pics just for fun.
Spoiler:
A mouse maiden offers devotions at the statue shrine of the mouse goddess.
The sorcerer’s apprentice reaches for the sword of destiny.
The evil Count Venom is tracked to his burial casket by a witch hunter intent on slaying the foul beast.
The stone circle is set for the summoning of spirits from the nether-realm.
Two rabbits defend their burrow.
Dark magic and unspeakable evil is afoot .
Thanks for having me on board for this challenge. I’m really looking forward to seeing everyone’s work coming in over the rest of the month.
Finished painting my first section of the Aegis defence line. Nothing fancy, just mucking about with drybrushing and washes to try and weather it a bit.
I guess I need to get a move on and do some more sections? XD
Well, with only about two weeks left, I had better get started. I need a way to get up to the roof level, but I have some ladders and levels once you get up there.
Need to build ramps and planks connecting the structures, little bits and bobs to sell the factory feel, then coat and paint everything. So much time and so little to do . . .
theCrowe, boringstuff, those are both beautiful entries! I love the modularity of the portal circle, and the defensive position is many times improved from the original. Jazzy, that's going to be awesome, assuming you can pull it off!
I hit a nice milestone with a finished-ish project, but it's only a quarter of what I had planned... the production curve was steeper than I'd thought. I'm happy with the outcome, but I need to up the efficiency. I still need to stage some good photos... hopefully with at least one additional set. As always, a few more pics on my blog.
@theCrowe - That turned out really well. I really like the colors on the portal vortex.
@Boringstuff - The weathering effects are really nice. I also like the conrast in color between the walls and earthen base. Looks natural in its build up.
@MacPhail - It always seems easy at the start but there always seems to be a surprise lurking to muck things up. What you do have finished looks great.
Have paint on the run off pond, I just need to try to match up everything for some group pictures.
The river sections are getting there. A couple of layers of modpodge still needs to go on, as well as grasses to blend them into the grassy tiles that will exist on the rest of the boards
Boringstuff
That raised thickness in the back gives weight to the piece. Solid.
DJJazzyJeff
Love to see everyday throwaway objects turn into something nifty!
MacPhail
Those arches look hellza clean.
Peterhausenn
Good end piece. Have you tried to use ModPudge gloss on the surface before, for that liquid effect? I have seen videos but never tried it my self.
endtransmission
Those look good! Same ModPudge gloss question for ya too.
Automatically Appended Next Post: _____________________________________________________________
Progress
So it sinks but the side of the arch that was made from foam is still raised. However this time a small rock on top will do the trick.
All coated in resin and dry.
Will take pictures in aquarium after the trees are in.
Had to glue them to rocks to give weight, because sticking them in and taking them out without disturbing the substrait would be much preferred.
Coated them with resin too to seal the glue and paint.
endtransmission
Those look good! Same ModPudge gloss question for ya too.
This is the first time I've used it, so we'll see how it goes. I finished putting a layer on all of them today, I basically spread a layer over the blues and then stippled it/swirled it to look a bit more like water and remove the spatula marks. The ones that have dried look quite nice, so the grass went on this evening
Seen folk use airbrush or blow through a straw to move the ModPodge around for that wave effect. It honestly in looks crazy simple and too good.
Cool, cant wait to see it done!
The tank is looking mega! Haha, for once on dakka the best tank in the thread is an aquarium! A nice Bala shark would look neat swimming through those arches. Though they may not be suitable with your own fish. Think they can be nippy when they grow.
theCrowe wrote: The tank is looking mega! Haha, for once on dakka the best tank in the thread is an aquarium! A nice Bala shark would look neat swimming through those arches. Though they may not be suitable with your own fish. Think they can be nippy when they grow.
I do like that shark look! however they might not get along with the full roster.
Made a list of most cheapest and hardiest fish to get first. Black and Monk Tetras, Cherry Barb, Khuli Loach, Harlequin Rasbora, For that shark look will get Siamese algae eater. Will try to get 6 of each over time.
Also the arch expansion, additional terrain pieces, and a tree canopy idea all in the plans for future terrain challenges. I got water test kits, heater, bio filter, thermometer and will make sure water quality and temp is best that I can make it so fishies be happy and tolerate my terrain projects.
The tank looks great and the piece you built fits in perfectly. Would like to see pictures of it stocked as well. For your tree canopy idea might I suggest simply going with floating plants. I had a lot of luck with Anacharis in the past as both a food source and a place for the fish to hide. You could attach it to your trees to form the canopy. And like real trees Anacharis are a good source of oxygen for the tank.
Foliage like that is also a good environment for fish like platties and guppies to breed without much intervention. The little’uns hide in the plants til they grow big enough to venture out.
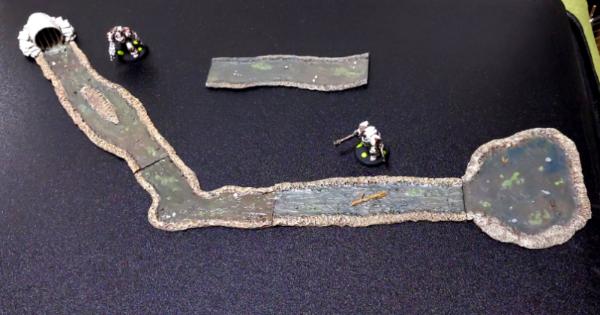
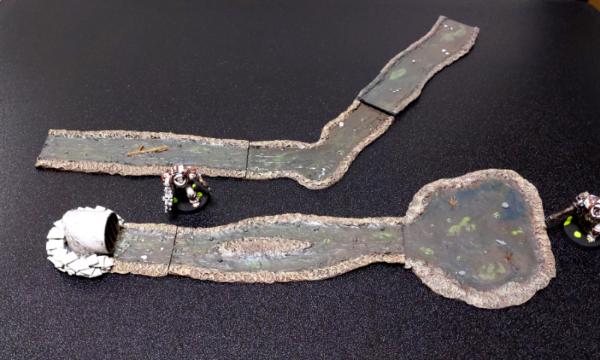
Well, I think I'm done with the river and crossings for the challenge. The trainline are there to just see how they sit against other terrain.
I made two different crossing types, depending on what sort of game I'm playing. The stone bridge will be good for 28mm+ fantasy/pulp games; the other crossing will be good for games where we want something more rustic
Mothsniper - I have to echo the praise. That tank looks amazing. Those fish don't know how good they have it.
Thumpingbear - Sorry to hear about life. There is a book by Clive Barker called, "The Thief of Always". The opening line of the book is, "The great grey beast February had eaten Harvey Swick alive."
I was hooked from that line on. February is a long month. Keep the faith, brother.
endtransmission - The river crossings are awesome. Your table is so versatile. I'm in awe. As I start to get enough industrial/post-apocalyptic stuff built to fill a table, I find myself wishing for some sort of mechanic like your hexes to incorporate and shift to another landscape. As it is, it seems like I am stuck with what I have until I get an entire other table worth of stuff built.
Speaking of industrial, post-apocalyptic terrain, here's where my entry stands:
I was trying to build some walkways, ramps, or stairs to lead up to the platform of my factory from the last update. I was putting together some structures and ramps out of chipboard - my now favorite building material - and I stumbled across this video from Wylock's Armory. I got super into it, and before I knew it, my simple ramp/stairs to get to the factory had morphed into an all-out terrain piece in its own right. I've been cutting and glueing chipboard for about a week straight.
I'm now at the point where most everything is base coated black, but no paint work has occurred. I also have a few more supports and girders to cut out, but the palm of my hand is bruised from using a hole punch on chip board. I'm helping my sister move today, but hopefully will get some painting in this weekend. Not sure if I'll have it across the finish line by the end of the month. Should've started back in January , but my muse is an unpredictable one.
Boringstuff wrote: Finished painting my first section of the Aegis defence line. Nothing fancy, just mucking about with drybrushing and washes to try and weather it a bit.
Spoiler:
I guess I need to get a move on and do some more sections? XD
Looks like I won't have any additional sections, so this is my submission - a bit on the small side, but eh, I made something at least!
endtransmission - The river crossings are awesome. Your table is so versatile. I'm in awe. As I start to get enough industrial/post-apocalyptic stuff built to fill a table, I find myself wishing for some sort of mechanic like your hexes to incorporate and shift to another landscape. As it is, it seems like I am stuck with what I have until I get an entire other table worth of stuff built.
Thanks! The hexes are pretty easy to do for more organic things like wildernesses, they become more problematic with squared off things like the Zone Mortalis tiles, or large buildings. I'm trying to work out how to do a necromunda table that still integrates to the hexes, but allows for the square nature of things... it's a bit of a nightmare to be honest; though ash wastes as a setting will ease things a bit as I don't need to worry about floor textures, just lining things up. I suspect the answer will be lots of gangways that can just be placed between buildings if they are close enough.
Hey all, sorry I've been out of touch. I did get a couple of pieces done and photographed, so I'll upload those tomorrow. I've also posted next round's theme poll, with two strong finishers from last round and two fresh faces.
I'll also look to get a Showcase thread up ASAP to celebrate these awesome projects!
My finished river. It will suit it purpose well. Something that I wanted to do was add a bit of flocking to the banks. Nothing too much, but enough to add some texture and color differentiation. Unfortunately I don't own any flocking material and couldn't find some locally. I might come back to add some if I ever acquire some. Another thing that turned out differently than I would have liked was the addition of modge podge to one of the sections. I had seen other people use it for their terrain projects and since I had an old container of it that had been given to me by a friend who moved away I thought I would give it a try. Even though the label said gloss I didn't expect it to be as glossy as it was. Way too glossy for my liking. I might try to paint over it to bring the sheen down but that will happen at another time. For now I am calling this done.
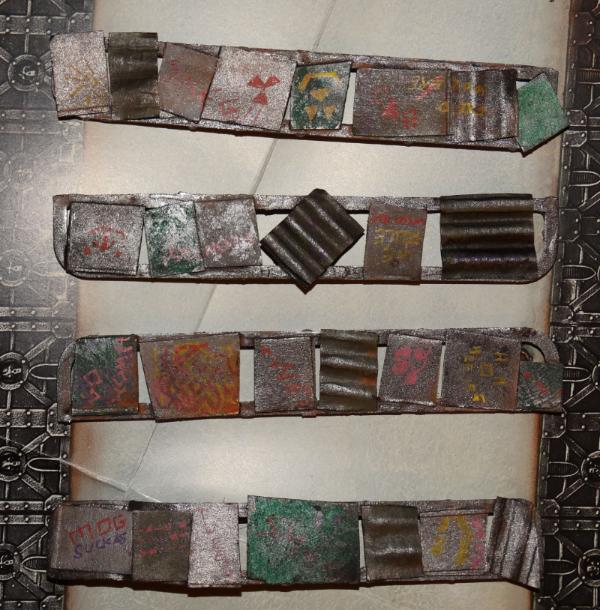
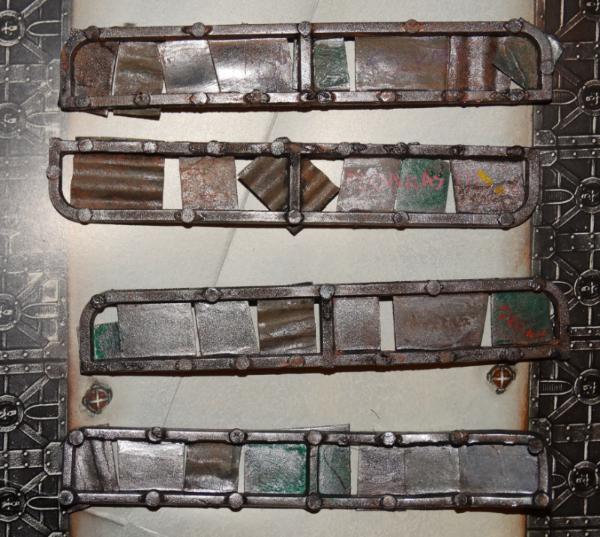
Not the most exciting entry but 4 improvised scrap gantries for any game I like more Stargrave/Necromunda style than anything else heavily Graffitied off course
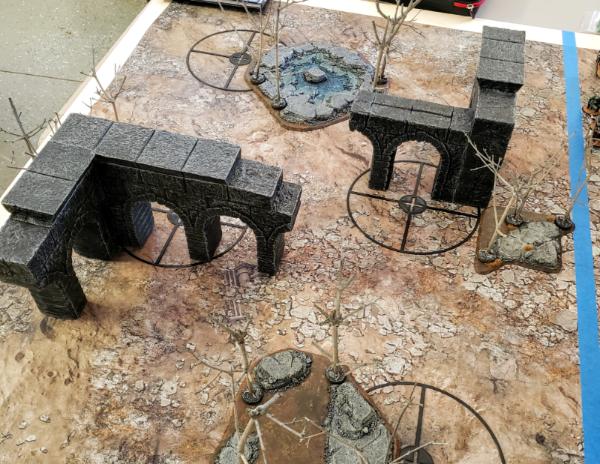
Alright, I managed to grab a few pics of my ruined arches in a recent game. Once I finish the set (I can't believe I though I'd get four times as much done!), the new owner will airbrush them to match the mat you see here. This was for a 25PL Patrol game to kick off a campaign... now I need to get some more pieces done before the campaign advances to 50PL battles.
Thanks to all of those who joined, and to those of them who finished. The next round theme poll is already up, as is the showcase thread to enjoy all the products. Great work everyone!
DJJazzyJeff wrote: I'm not going to be able to finish this month. Even with a day or two of wiggle room, it's not coming across the finish line here.
All good, carry project to the next round Want to see epic project finished!
Automatically Appended Next Post:
MacPhail wrote: Alright, I managed to grab a few pics of my ruined arches in a recent game. Once I finish the set (I can't believe I though I'd get four times as much done!), the new owner will airbrush them to match the mat you see here. This was for a 25PL Patrol game to kick off a campaign... now I need to get some more pieces done before the campaign advances to 50PL battles.
Spoiler:
Thanks to all of those who joined, and to those of them who finished. The next round theme poll is already up, as is the showcase thread to enjoy all the products. Great work everyone!
Woopwoop!
Nice and clean arches.
Automatically Appended Next Post:
Llamahead wrote: Not the most exciting entry but 4 improvised scrap gantries for any game I like more Stargrave/Necromunda style than anything else heavily Graffitied off course
Spoiler:
The most interesting for me is to see scrap and trash turn into nifty pieces of terrain.
Those work and well repurposed spruces!
Automatically Appended Next Post:
Peterhausenn wrote: My finished river. It will suit it purpose well. Something that I wanted to do was add a bit of flocking to the banks. Nothing too much, but enough to add some texture and color differentiation. Unfortunately I don't own any flocking material and couldn't find some locally. I might come back to add some if I ever acquire some. Another thing that turned out differently than I would have liked was the addition of modge podge to one of the sections. I had seen other people use it for their terrain projects and since I had an old container of it that had been given to me by a friend who moved away I thought I would give it a try. Even though the label said gloss I didn't expect it to be as glossy as it was. Way too glossy for my liking. I might try to paint over it to bring the sheen down but that will happen at another time. For now I am calling this done.
Spoiler:
Nifty river section!
Came together nicely, and I do like the muddy feel of it.
Solid work!
Boringstuff wrote: Finished painting my first section of the Aegis defence line. Nothing fancy, just mucking about with drybrushing and washes to try and weather it a bit.
Spoiler:
I guess I need to get a move on and do some more sections? XD
Looks like I won't have any additional sections, so this is my submission - a bit on the small side, but eh, I made something at least!
Nice and beefy. I like that the walkway is raised and has extra thickness. That gives me ideas for my inquisition guard.
Plans to make unique wall sections, like a broken wall section, flooded wall section ets?
Automatically Appended Next Post:
endtransmission wrote: Well, I think I'm done with the river and crossings for the challenge. The trainline are there to just see how they sit against other terrain.
Spoiler:
I made two different crossing types, depending on what sort of game I'm playing. The stone bridge will be good for 28mm+ fantasy/pulp games; the other crossing will be good for games where we want something more rustic
Love that sand texture in contrast with the blue.
Really well done!
Boringstuff wrote: Finished painting my first section of the Aegis defence line. Nothing fancy, just mucking about with drybrushing and washes to try and weather it a bit.
Spoiler:
I guess I need to get a move on and do some more sections? XD
Looks like I won't have any additional sections, so this is my submission - a bit on the small side, but eh, I made something at least!
Nice and beefy. I like that the walkway is raised and has extra thickness. That gives me ideas for my inquisition guard.
Plans to make unique wall sections, like a broken wall section, flooded wall section ets?
Plenty of plans, little-to-no follow through. XD In January I was reading HH & SoT books so I was really in the mood for seige terrain and some 30k models. Then I bought KD and now I'm distracted, hah.
Boringstuff wrote: Finished painting my first section of the Aegis defence line. Nothing fancy, just mucking about with drybrushing and washes to try and weather it a bit.
I guess I need to get a move on and do some more sections? XD
Looks like I won't have any additional sections, so this is my submission - a bit on the small side, but eh, I made something at least!
Nice and beefy. I like that the walkway is raised and has extra thickness. That gives me ideas for my inquisition guard.
Plans to make unique wall sections, like a broken wall section, flooded wall section ets?
Plenty of plans, little-to-no follow through. XD In January I was reading HH & SoT books so I was really in the mood for seige terrain and some 30k models. Then I bought KD and now I'm distracted, hah.


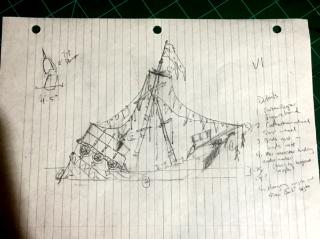


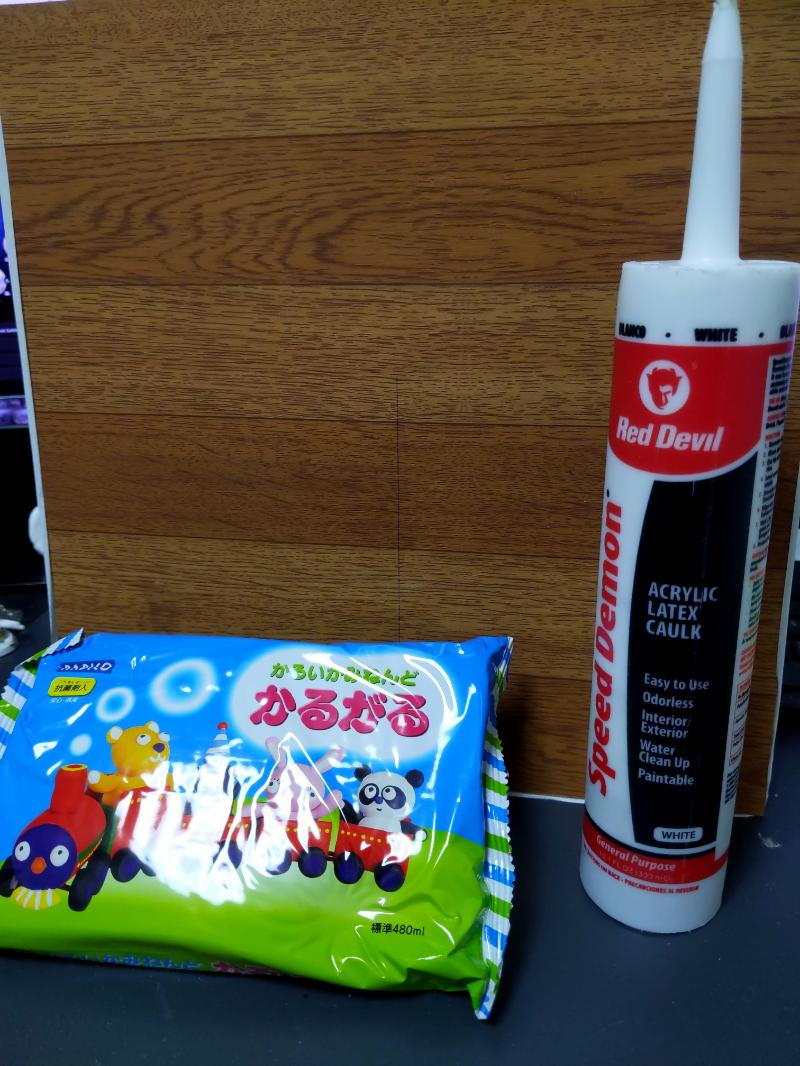


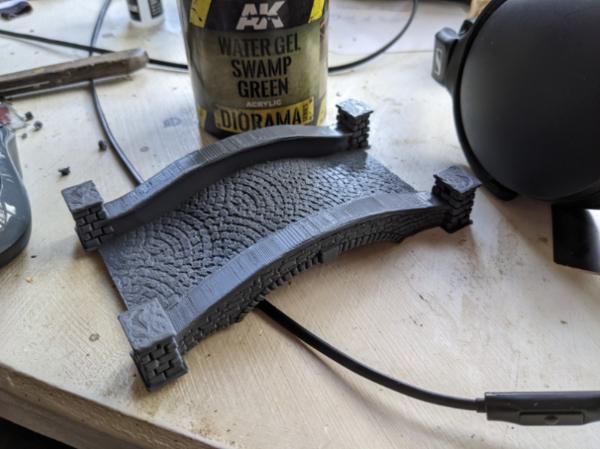


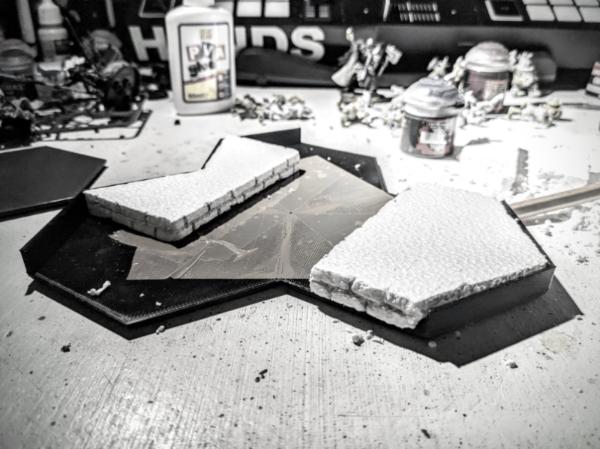
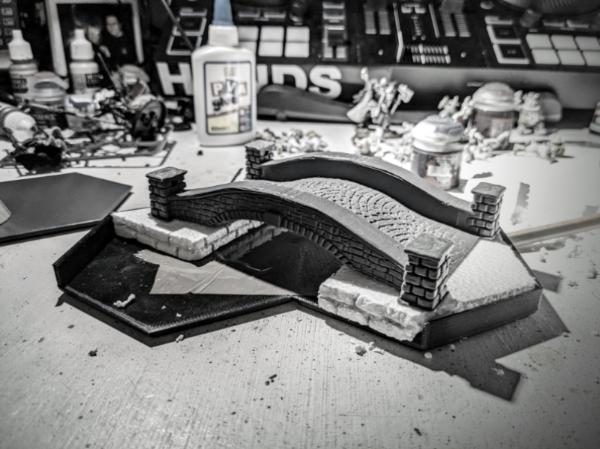
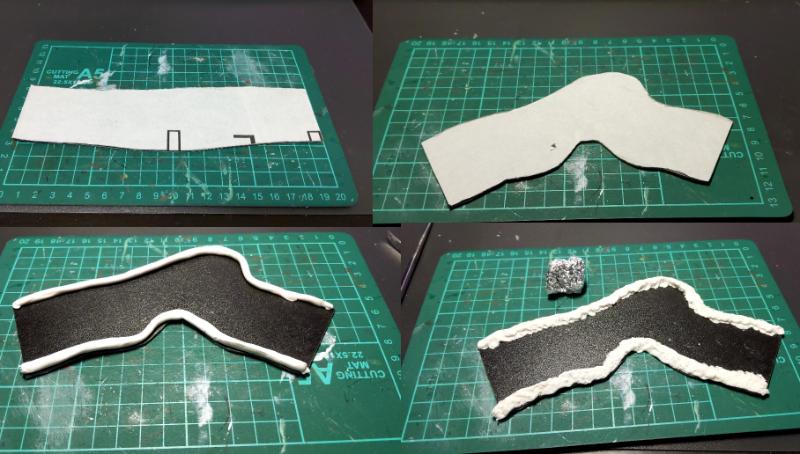

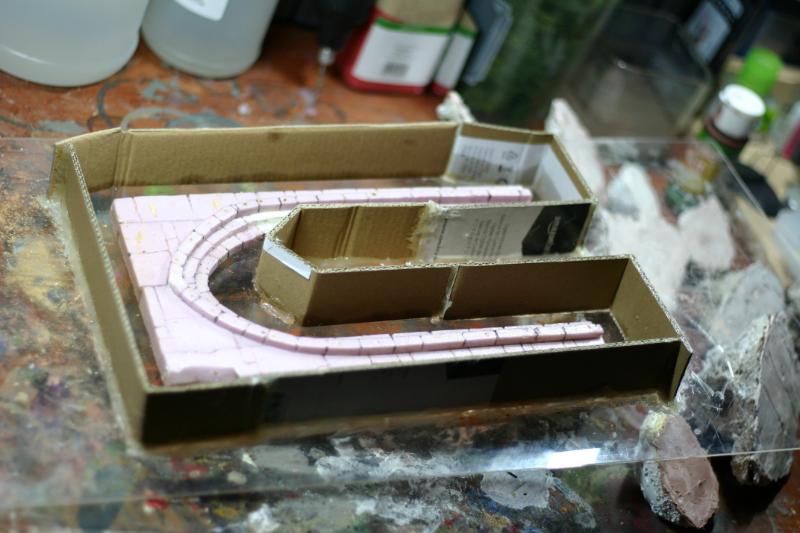


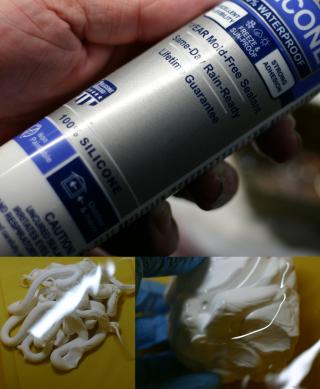
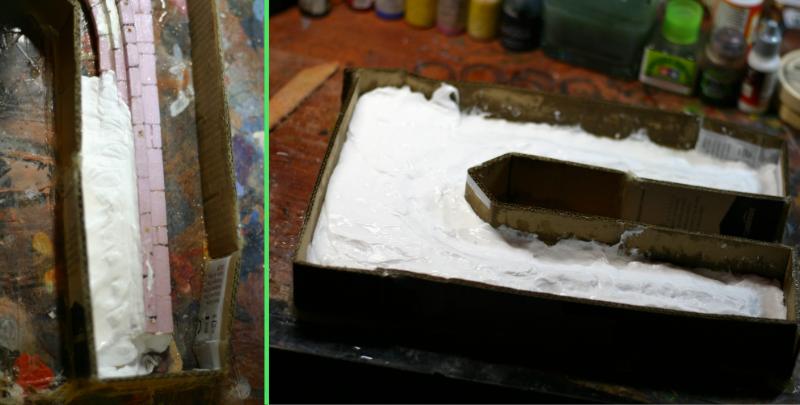


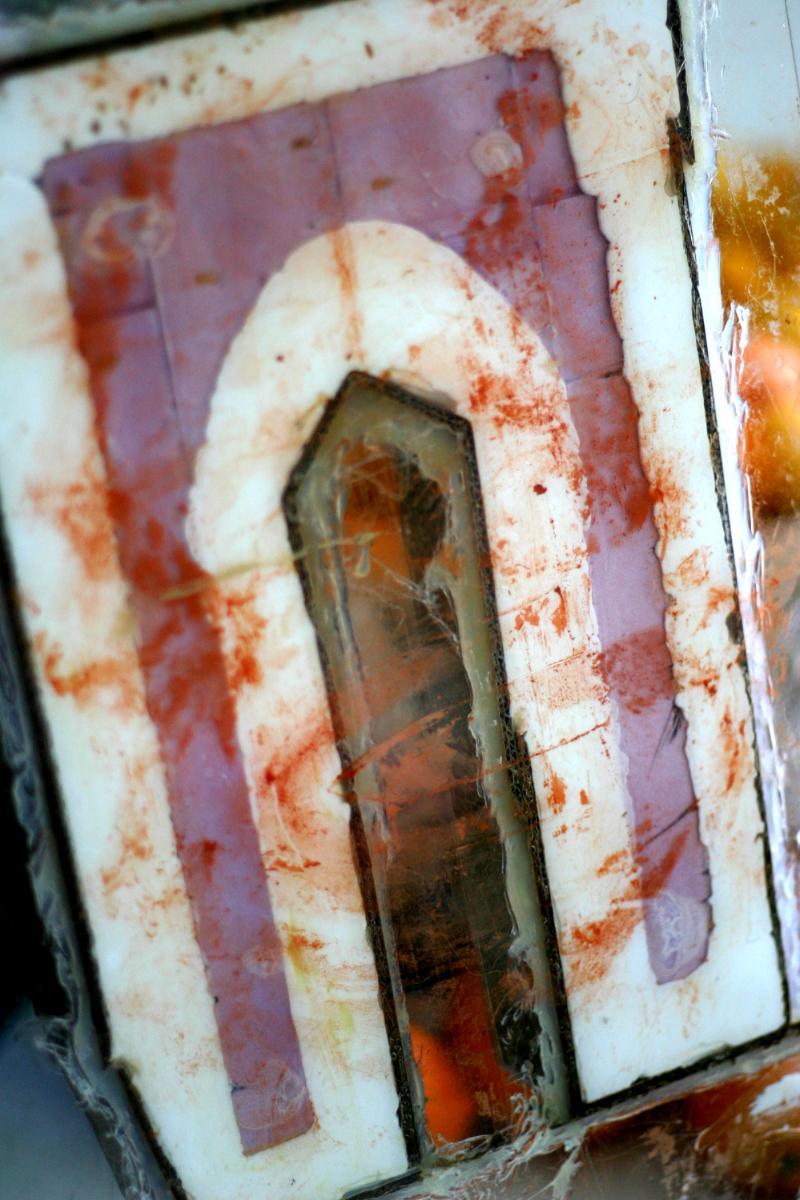

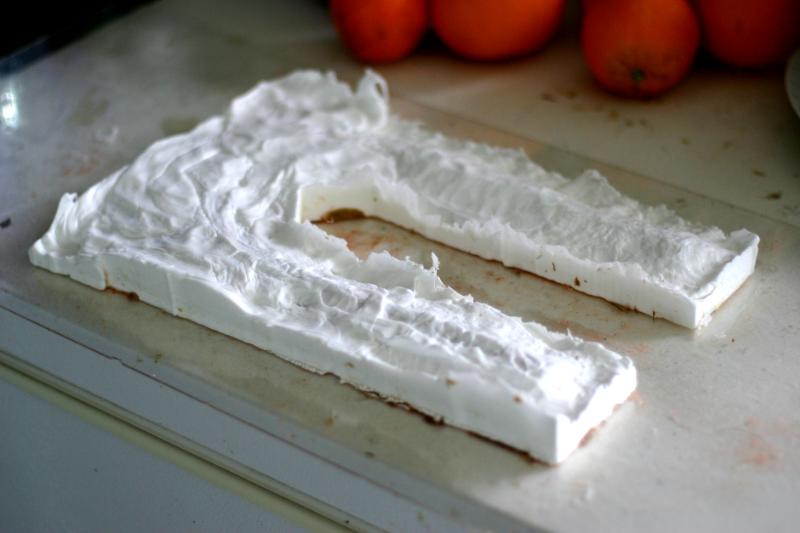
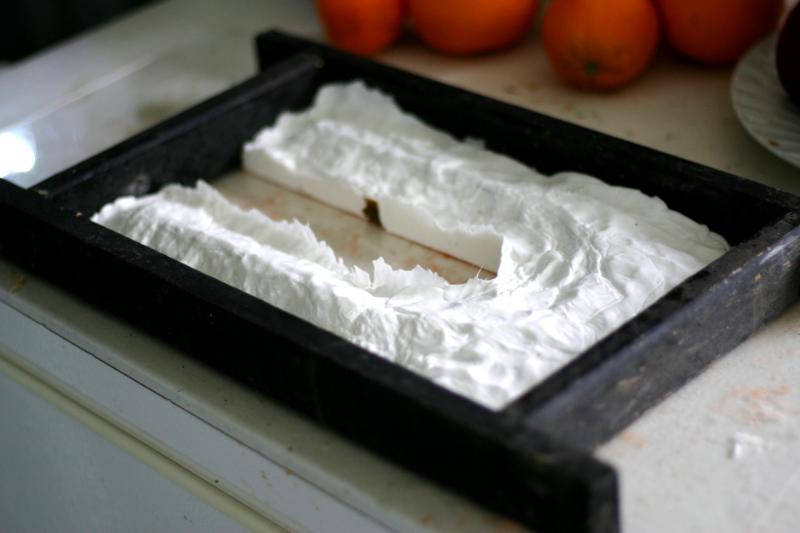
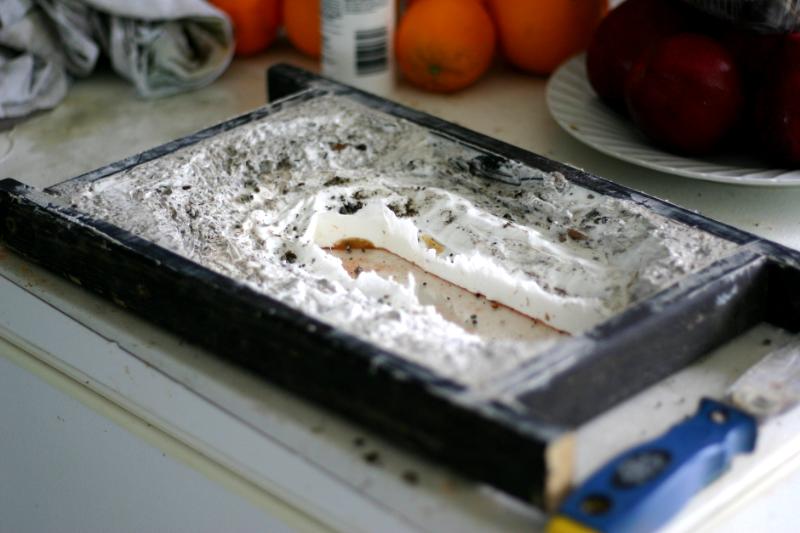
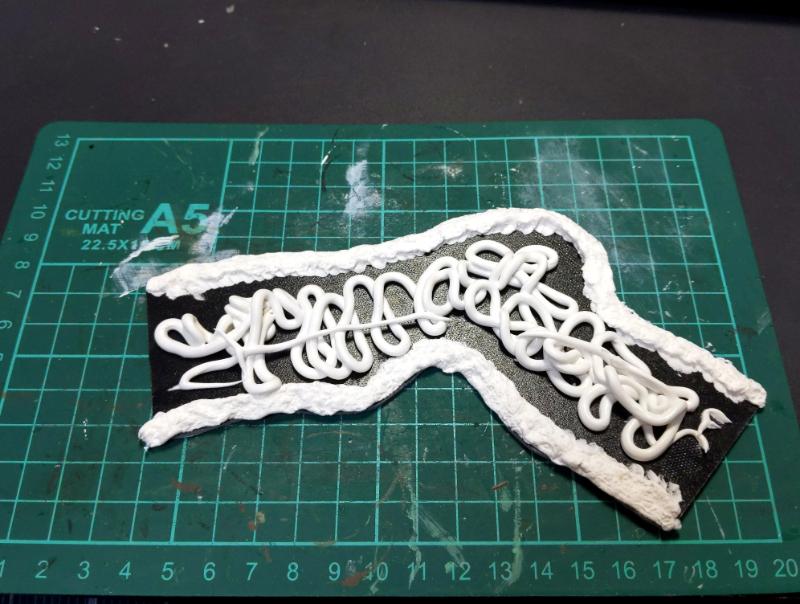
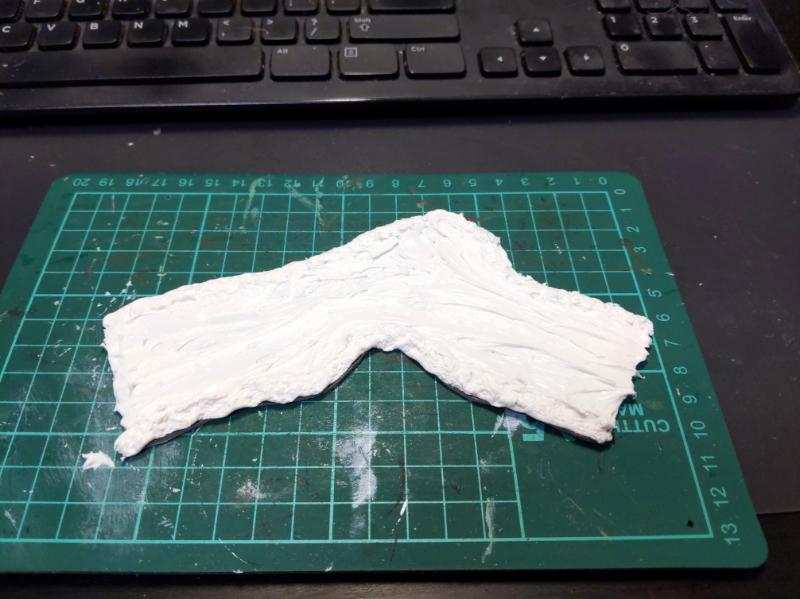
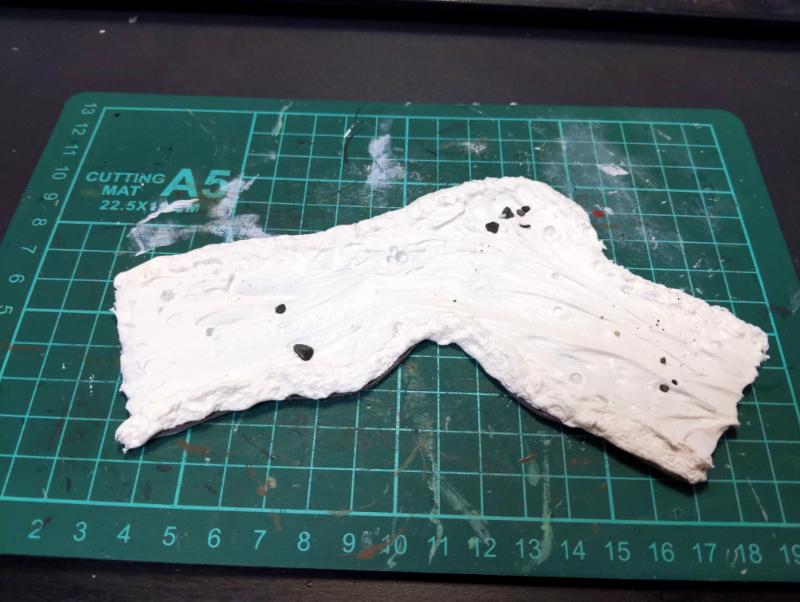
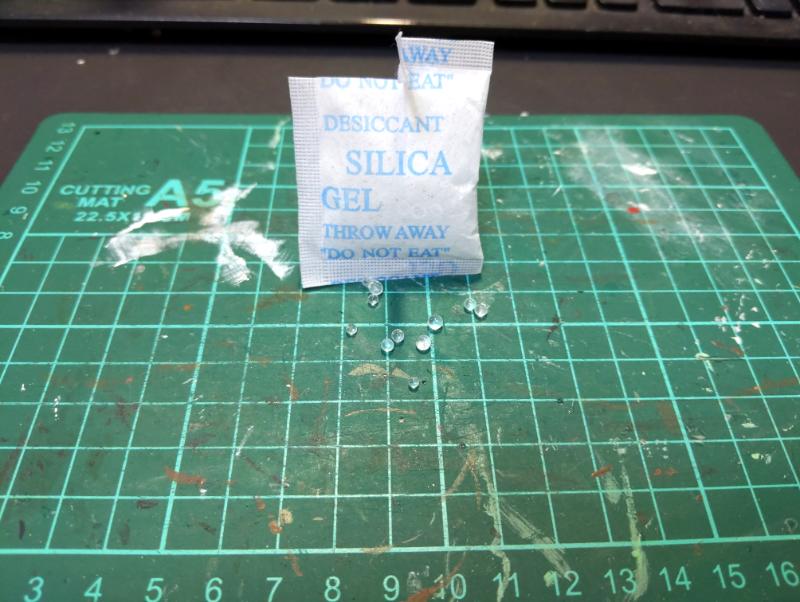
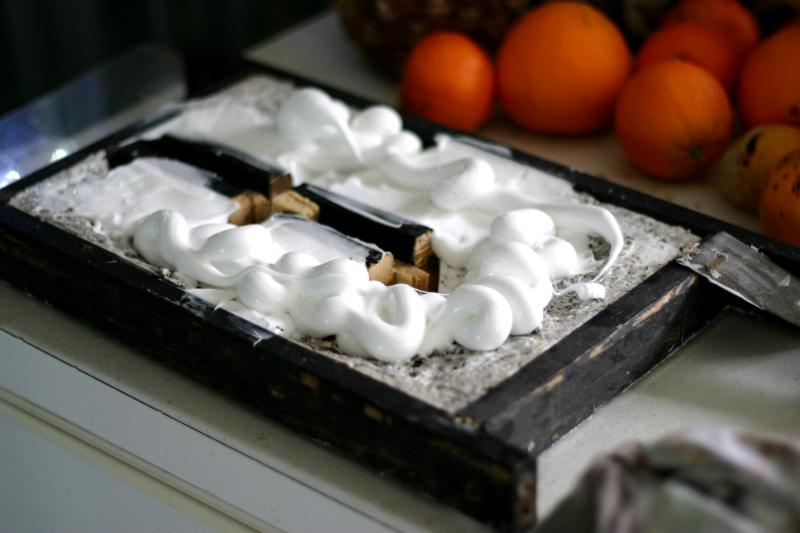
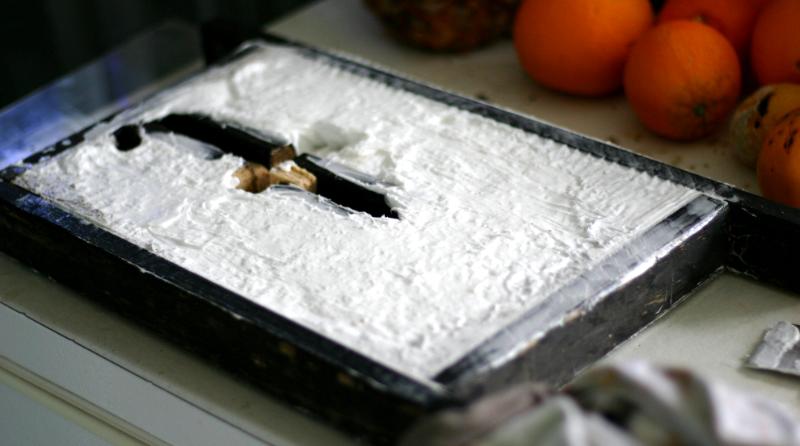
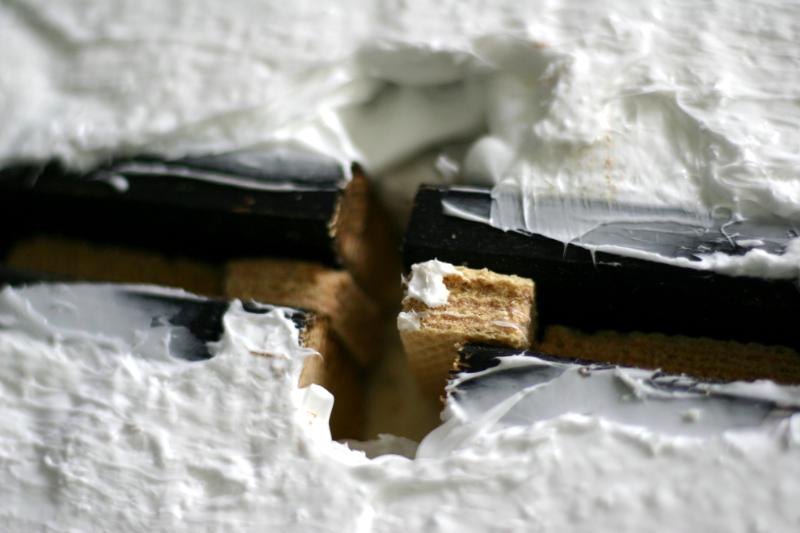
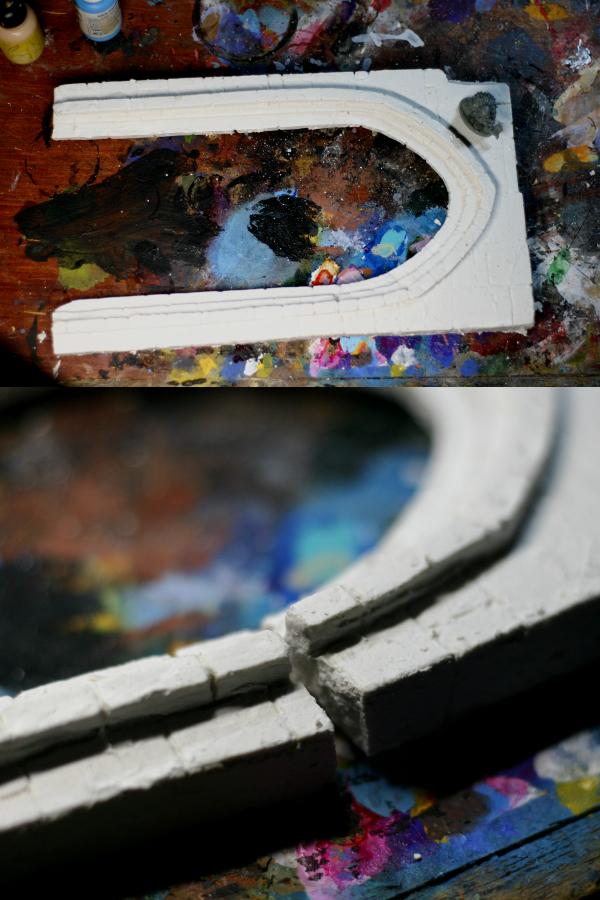
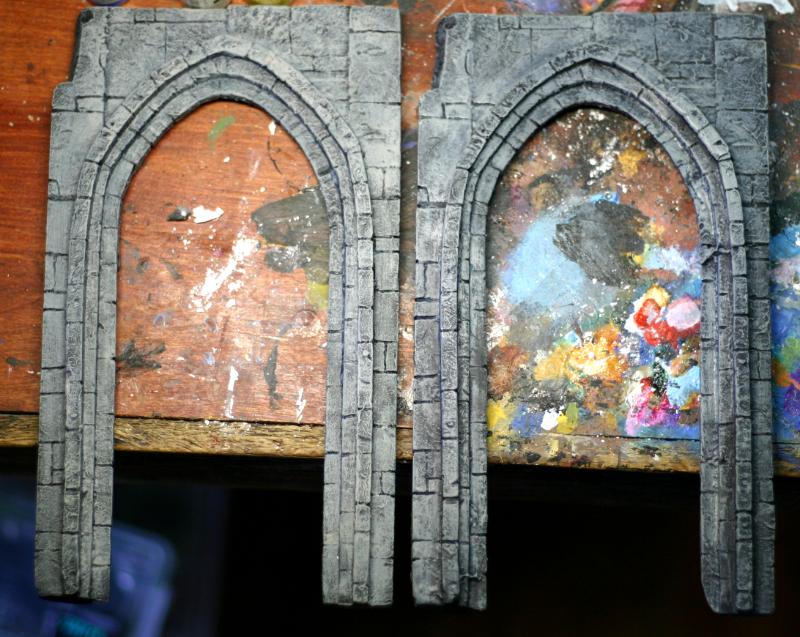
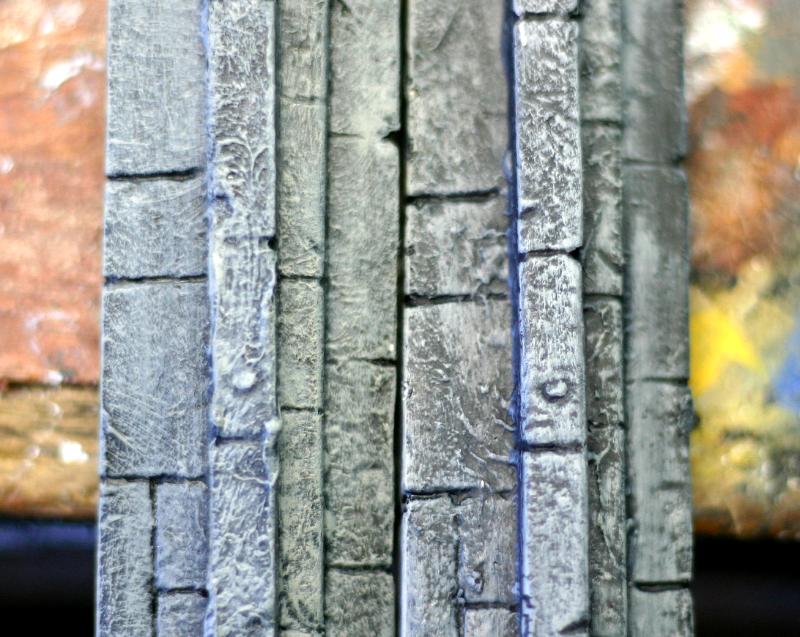
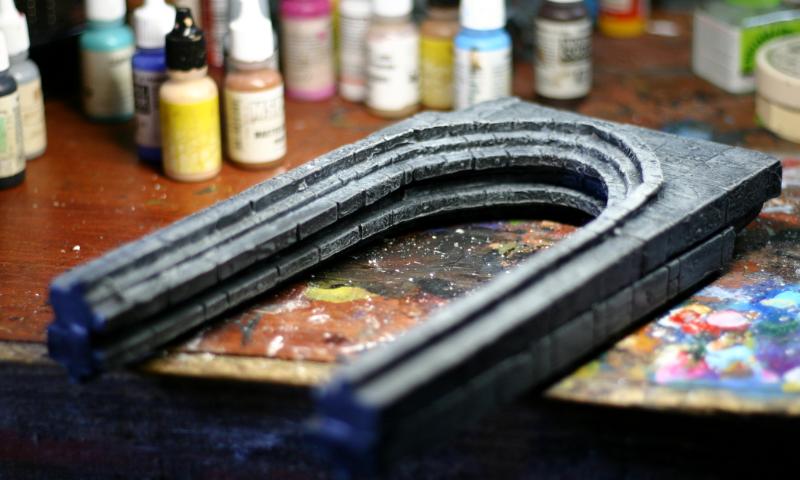
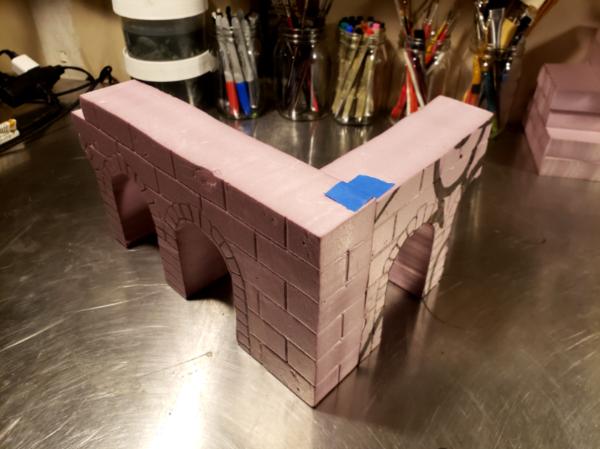
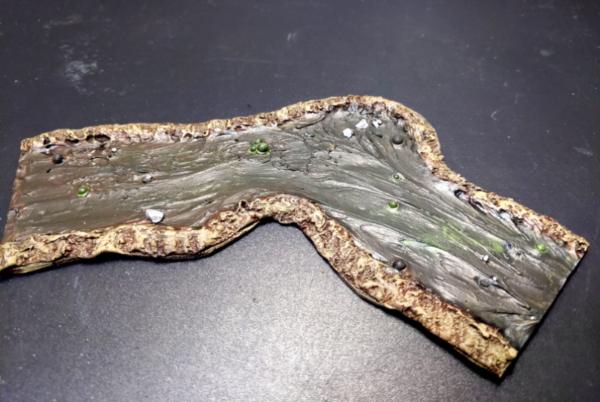
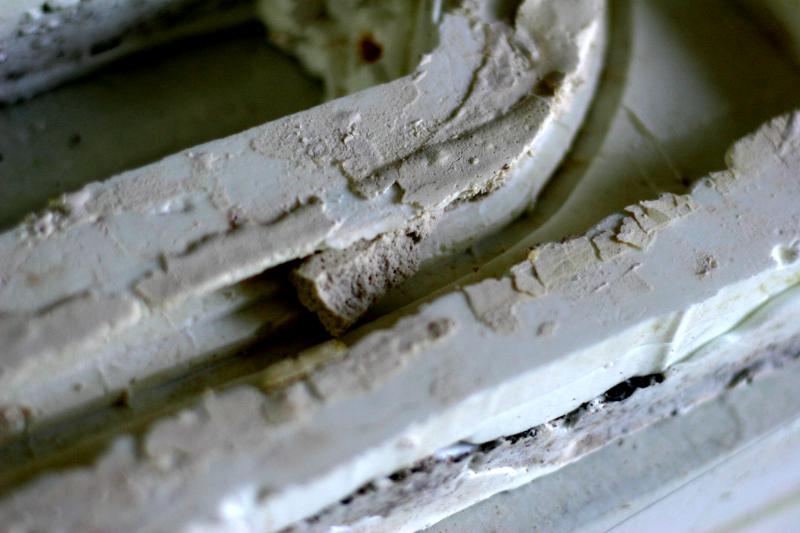
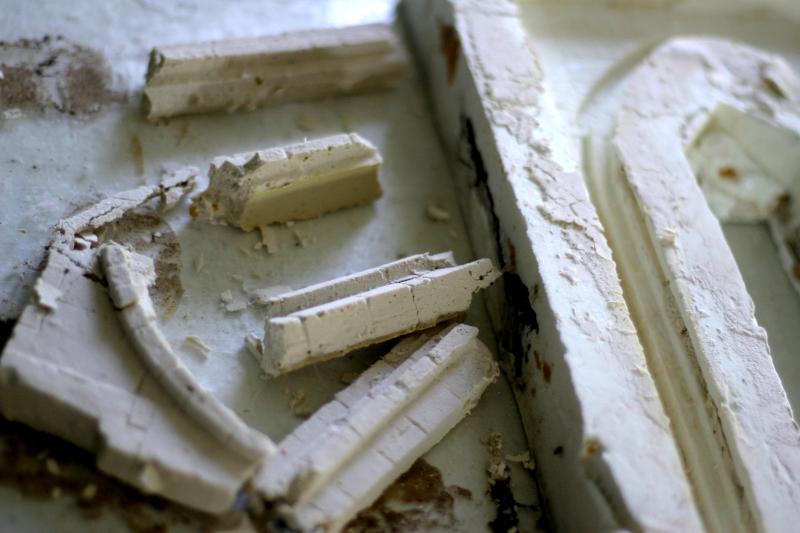
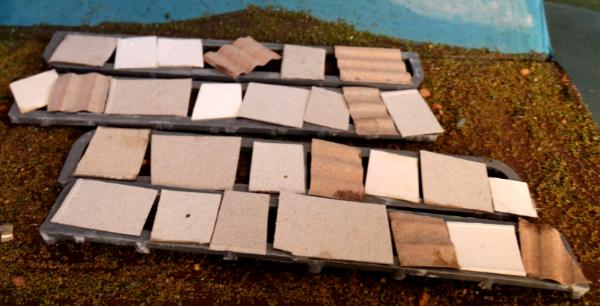
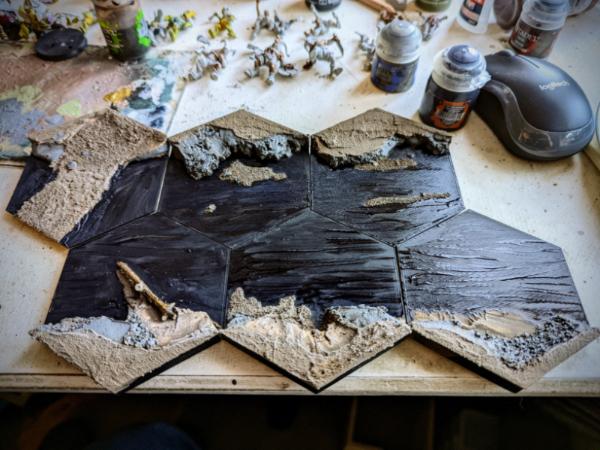


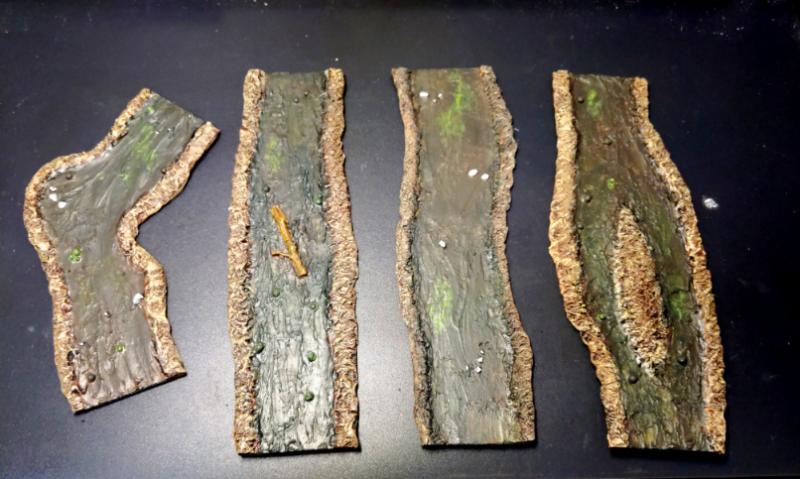
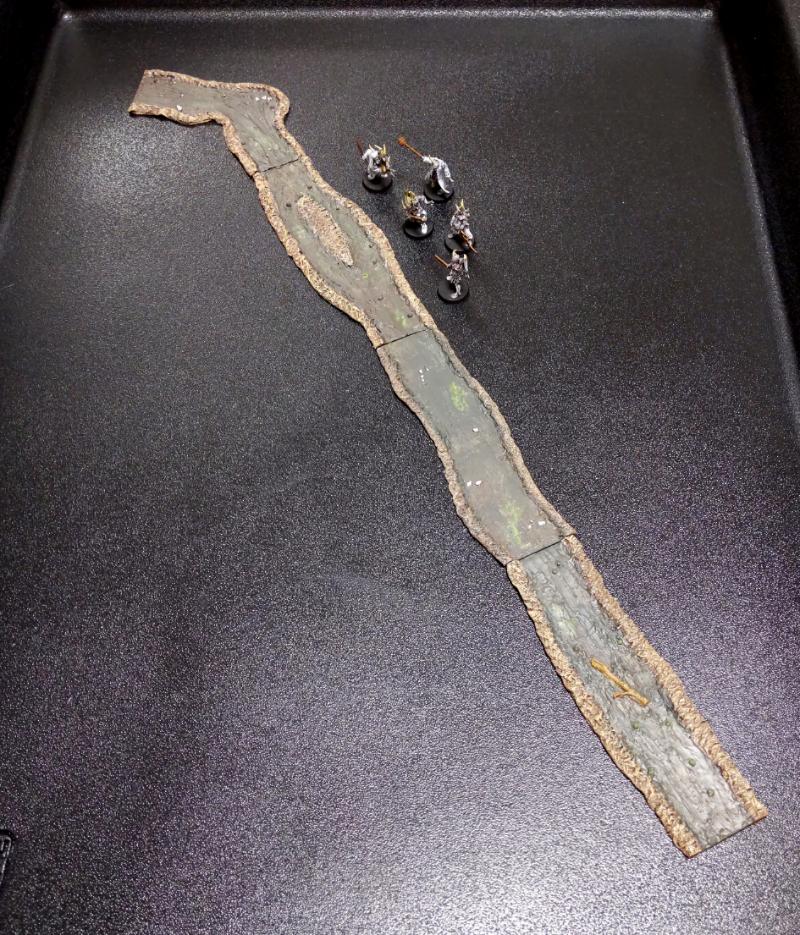
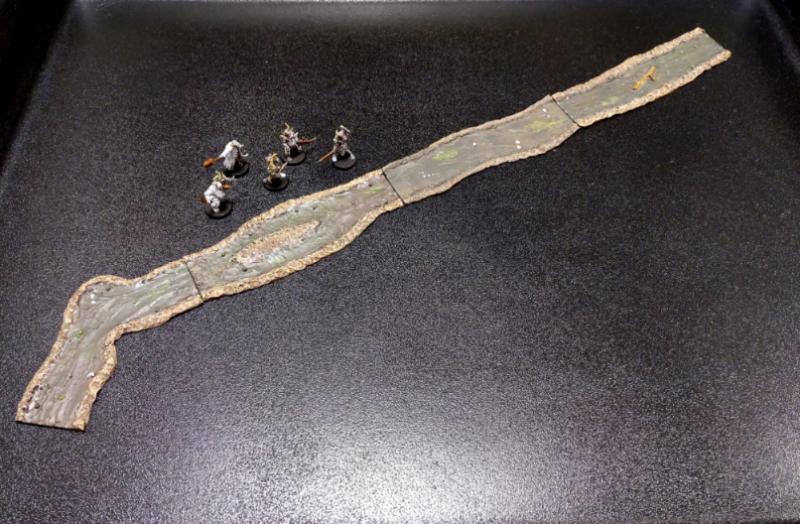
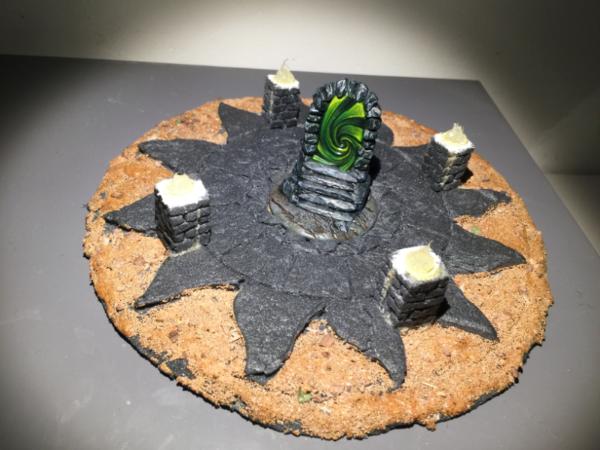

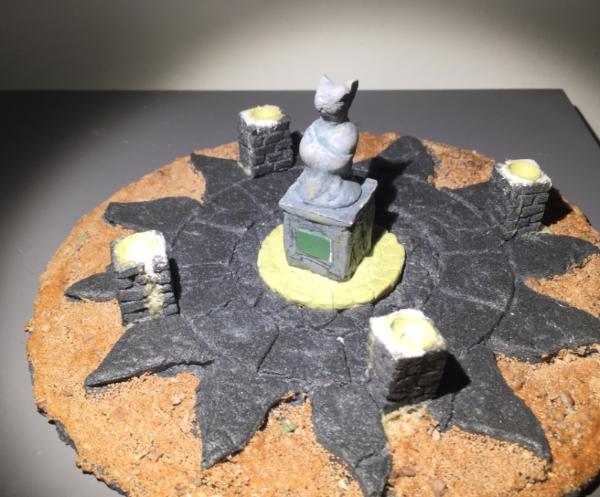


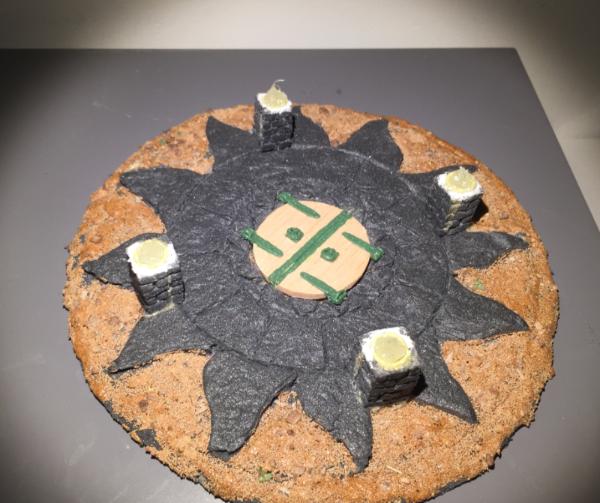

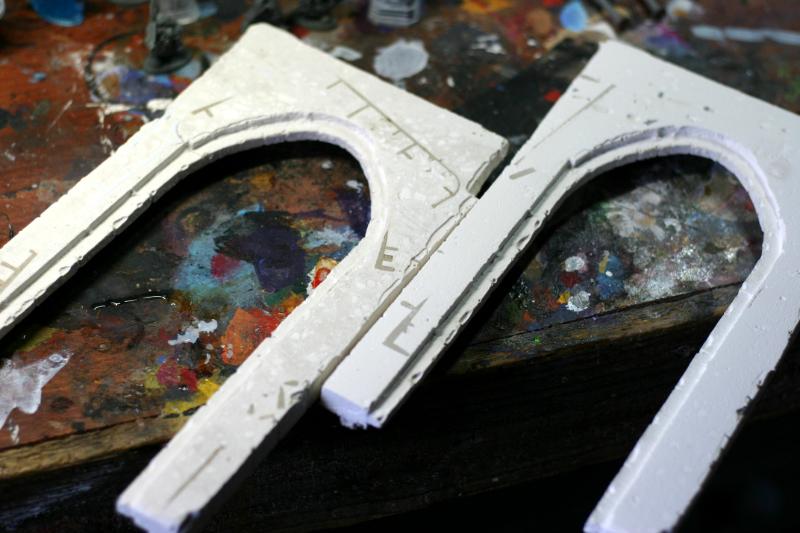
 So I will probably be adding them later, though not sure if the paint will hold, as I won't bother priming them separately. Speaking of priming, got the overpasses primed and partway through painting, just a quick grey with white drybrush, and some green for the pipes (I'll brighten it up later, after I do some washes as well). Still trying to figure out whether I want to do the metal walkway as chipped/ rusty paint, or just a rusty/ oily steel. Anyway, here's some pics:
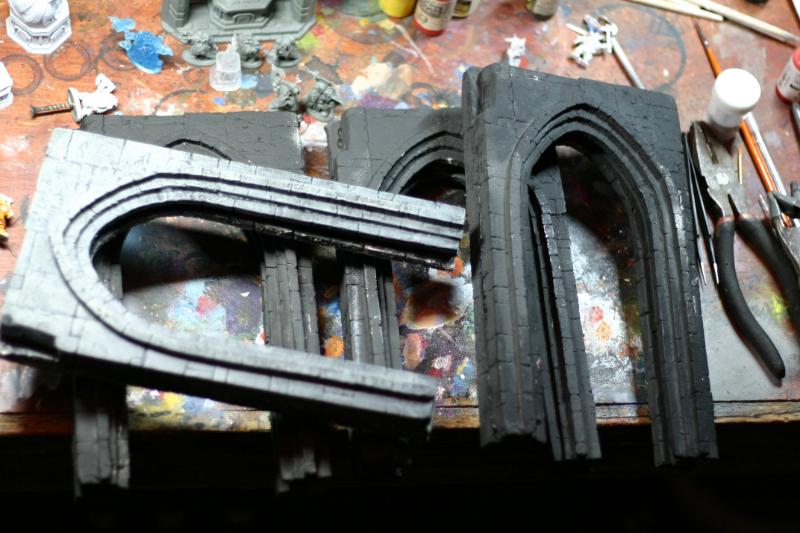
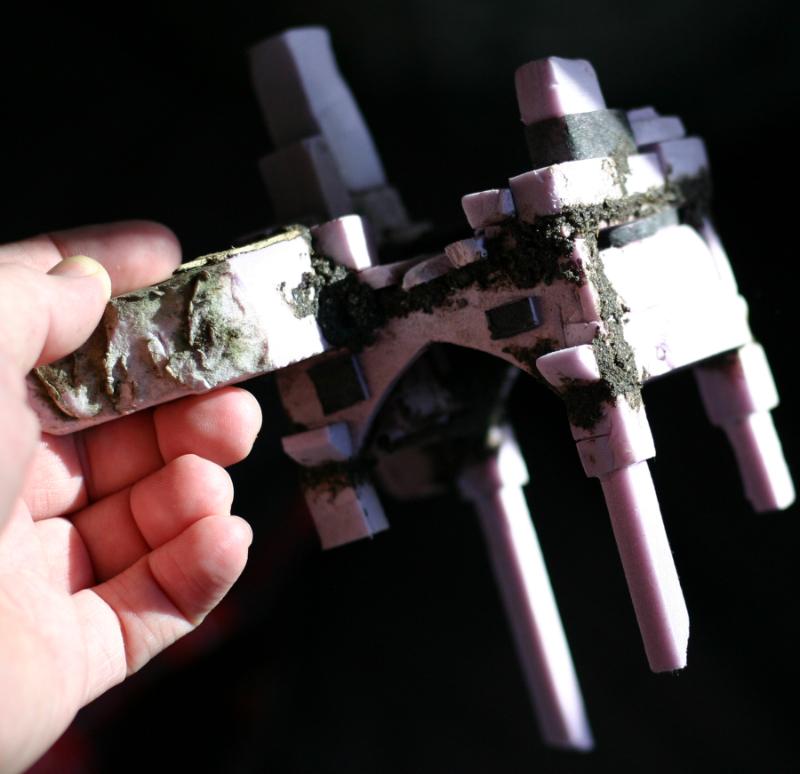
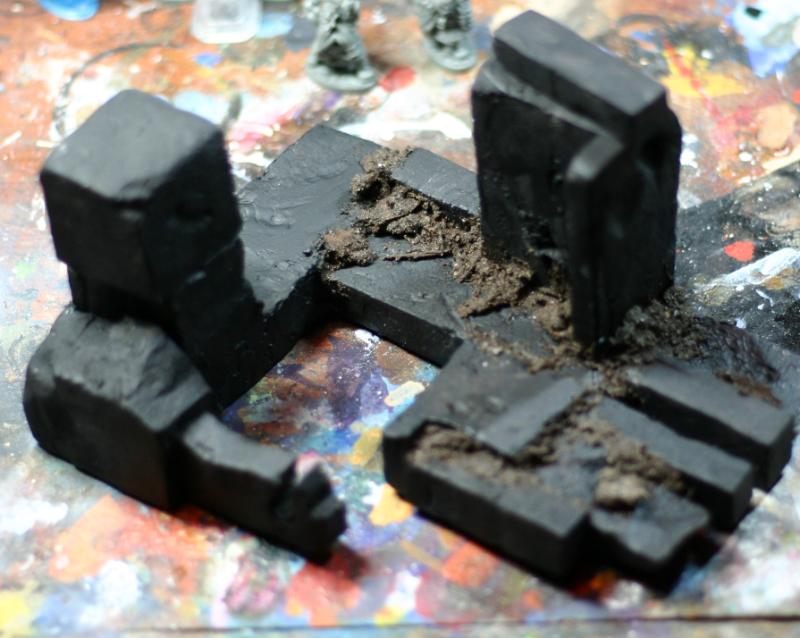
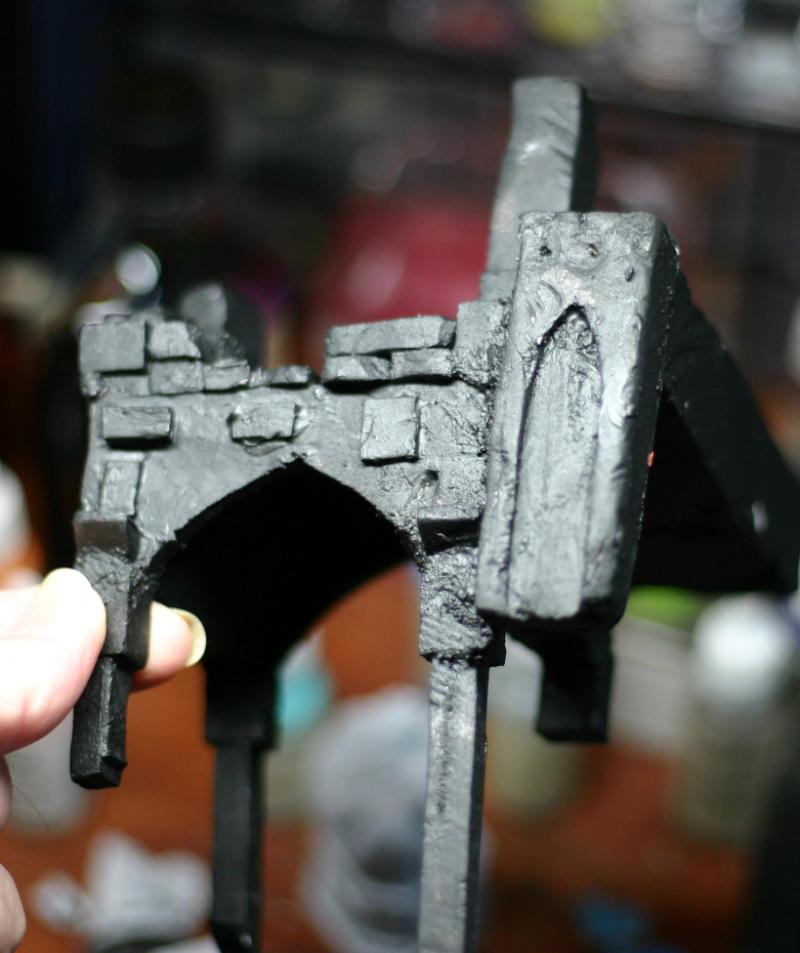
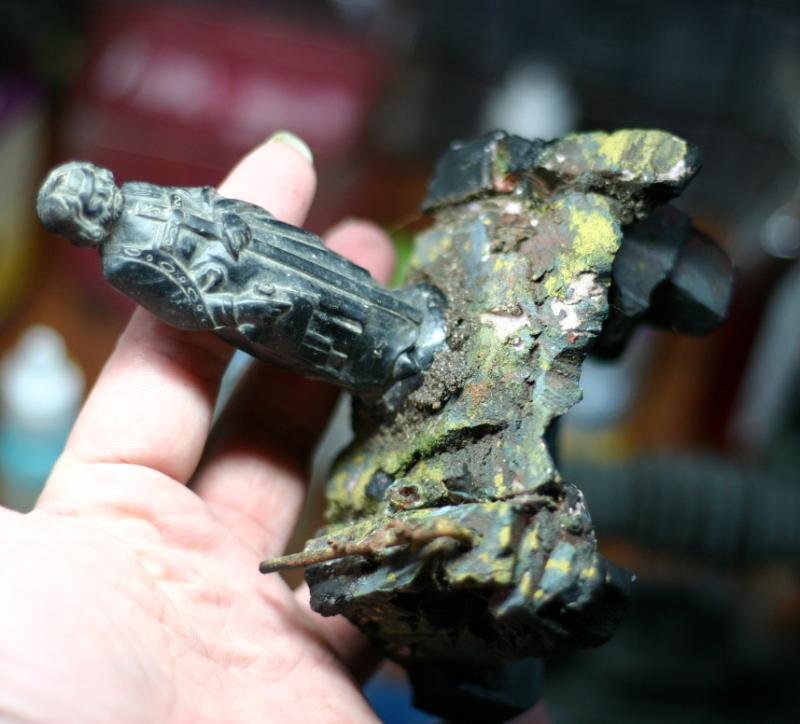
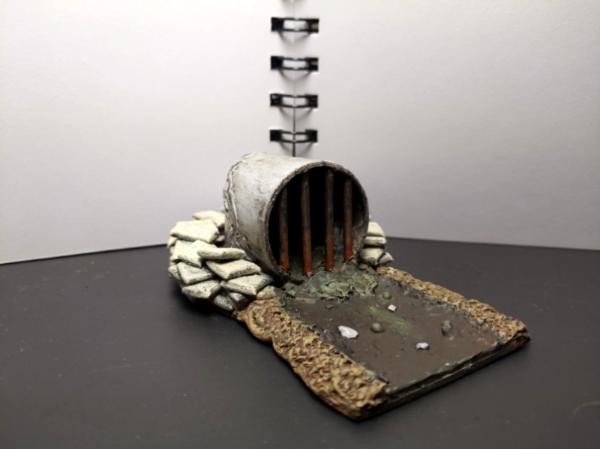

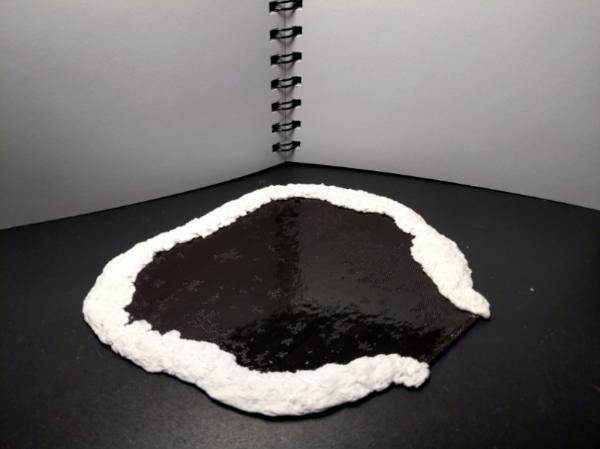
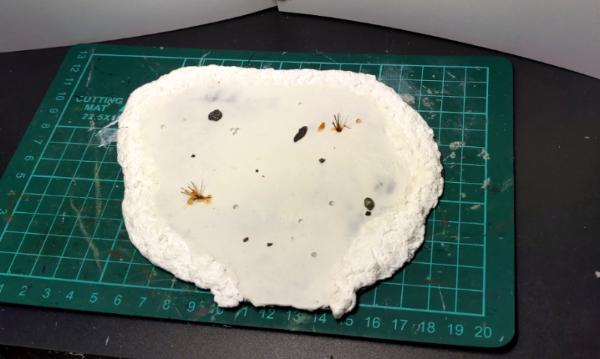

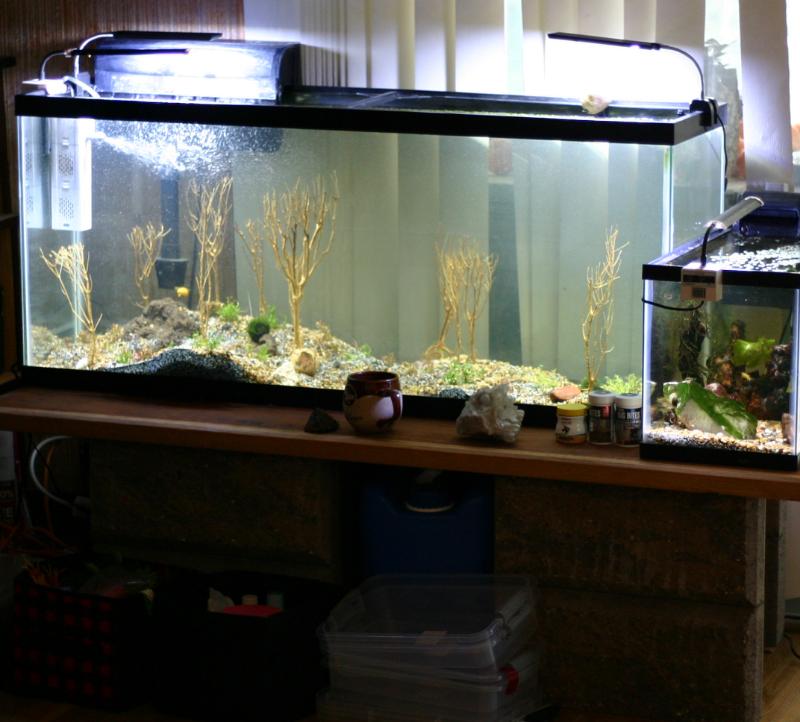
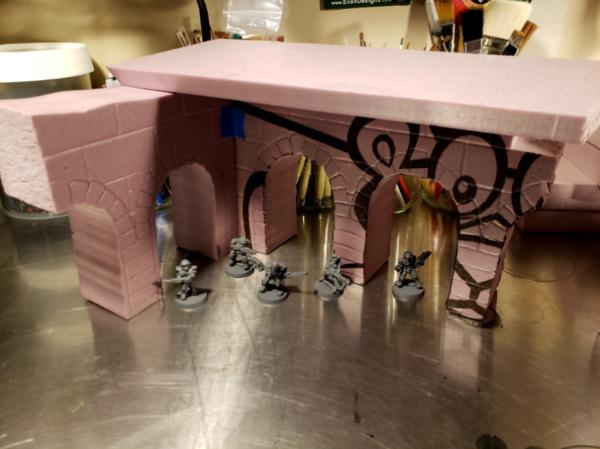
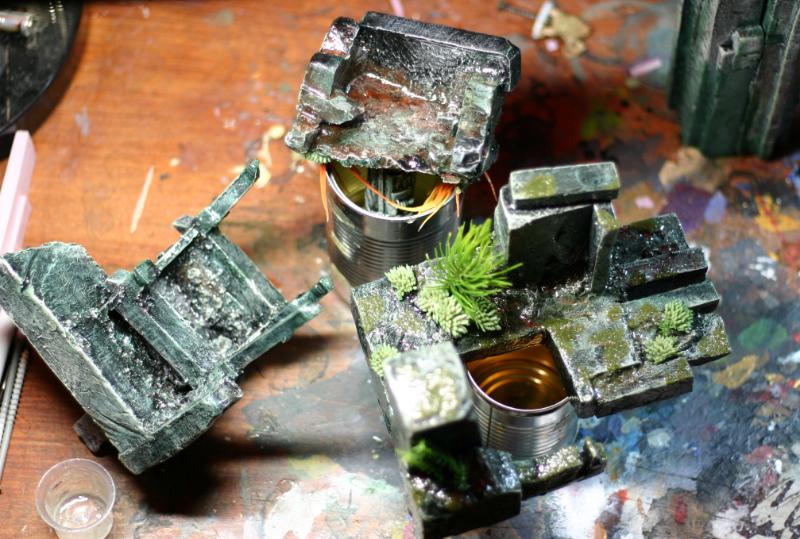
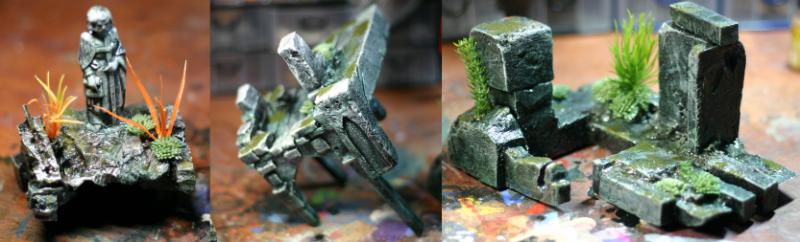
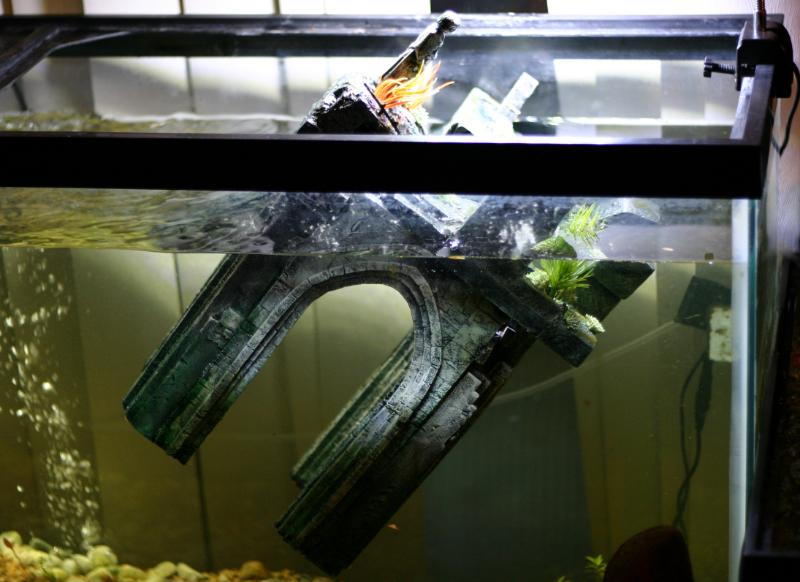
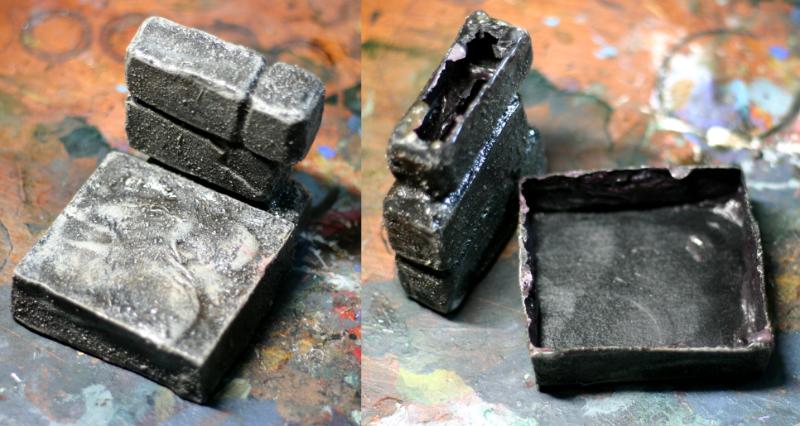
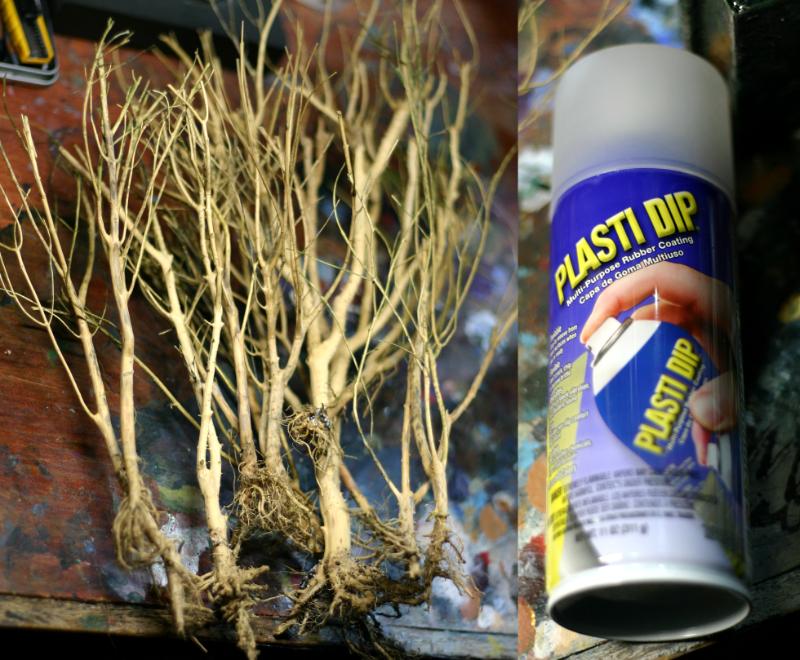
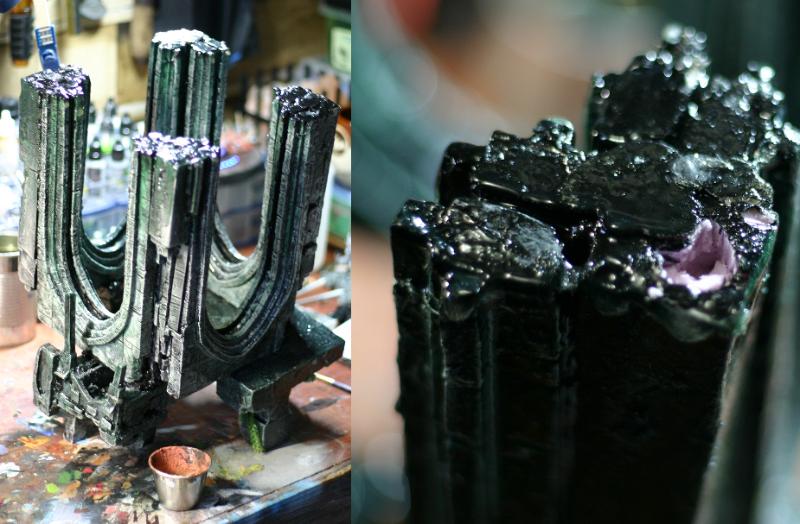
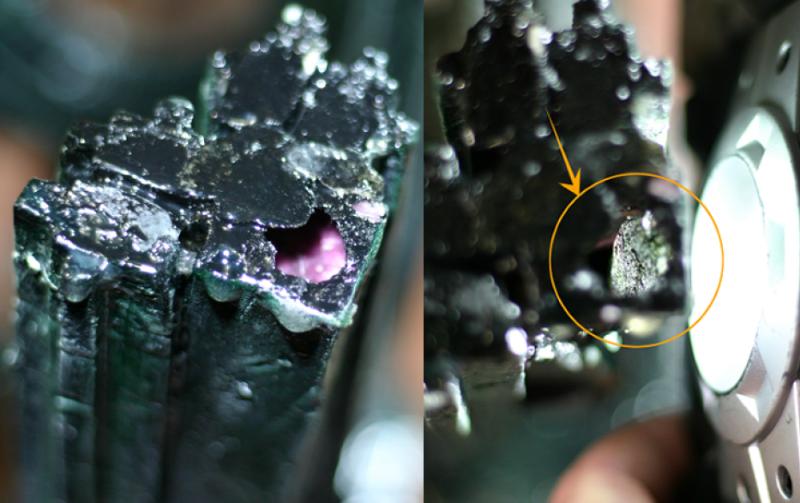
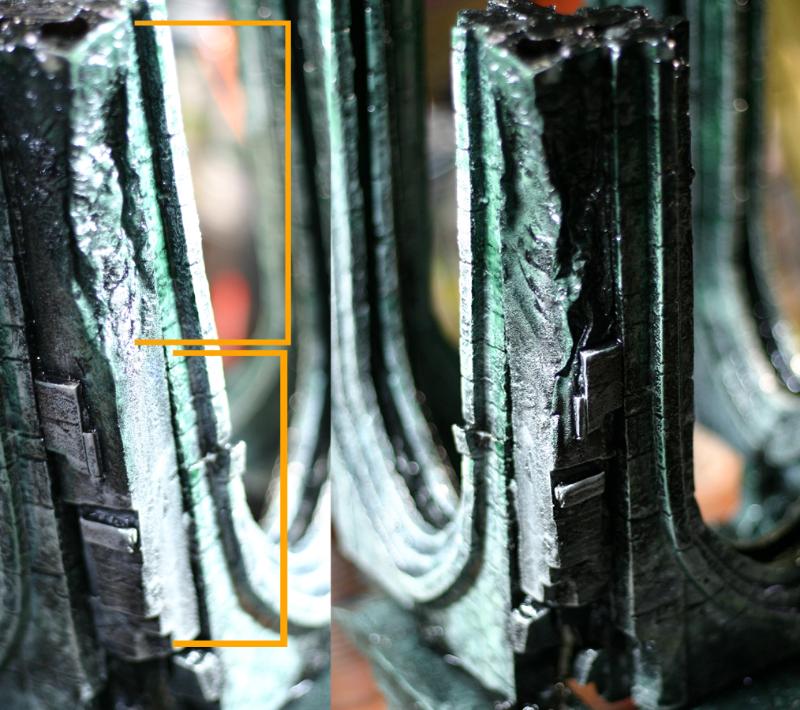
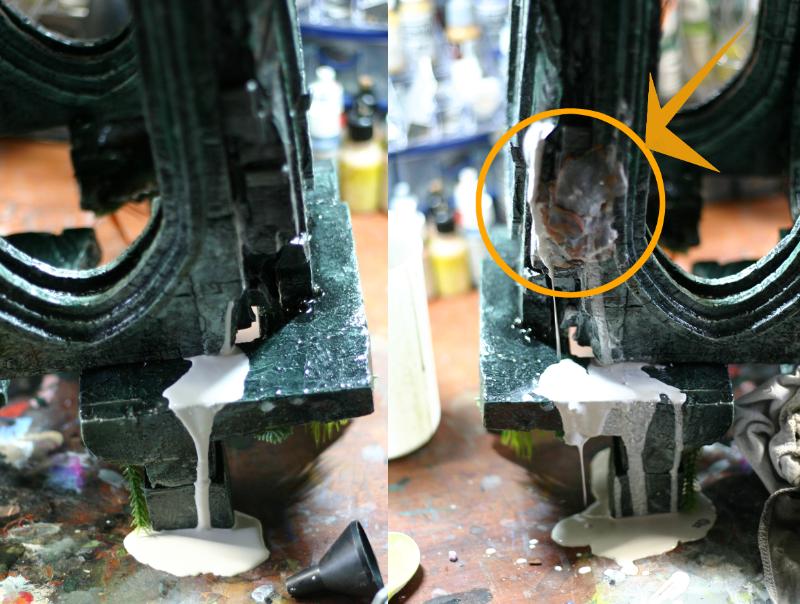
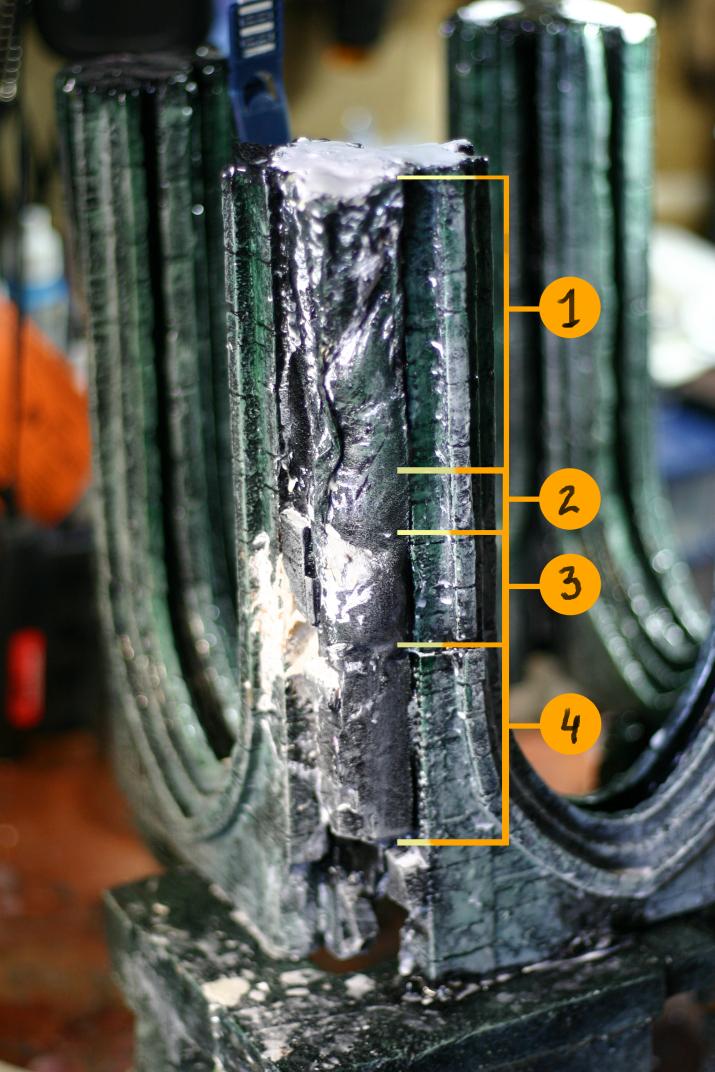
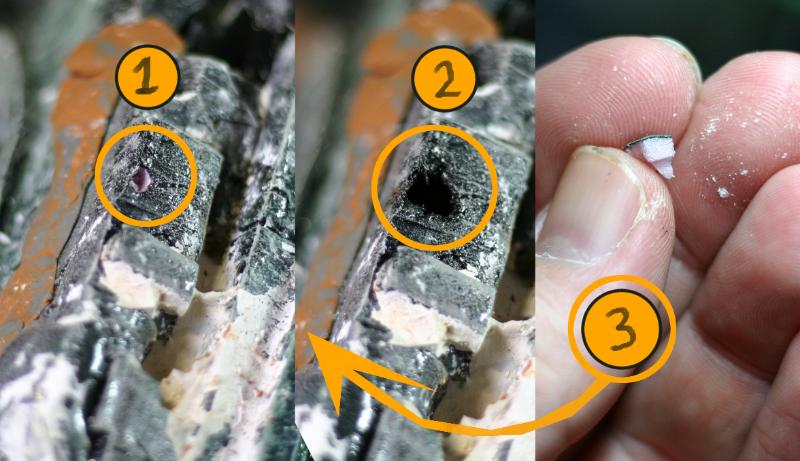
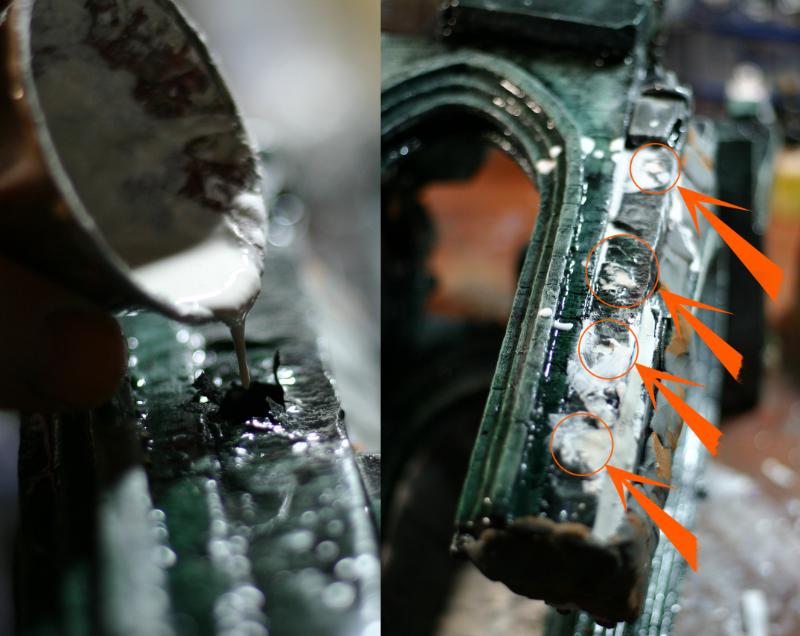
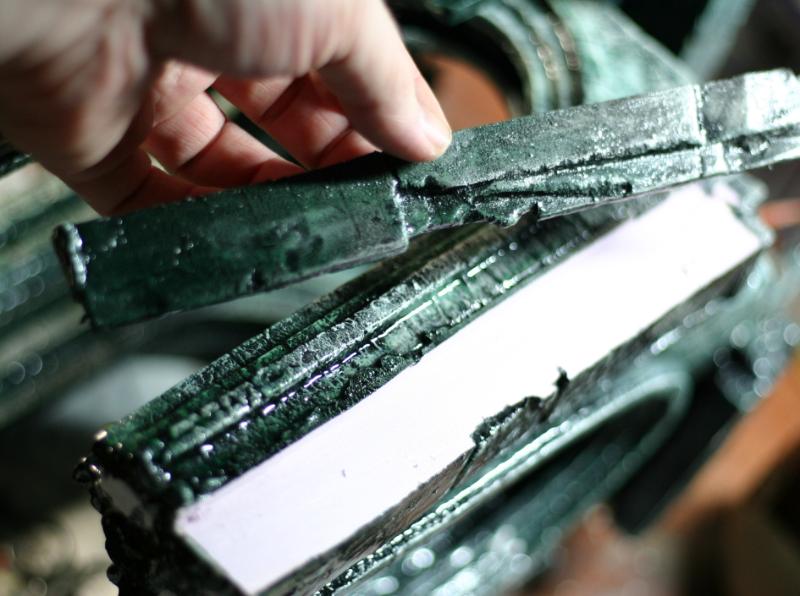
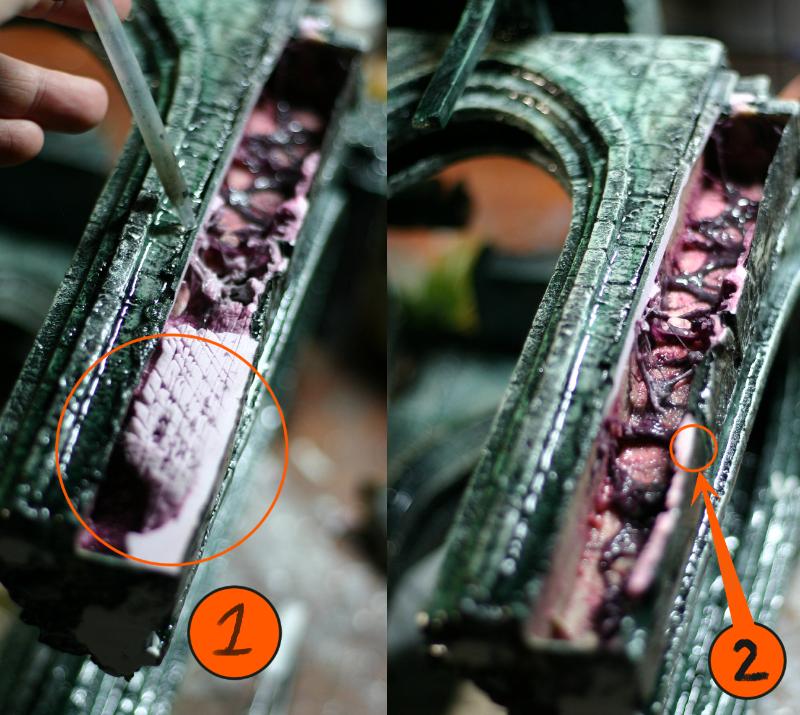
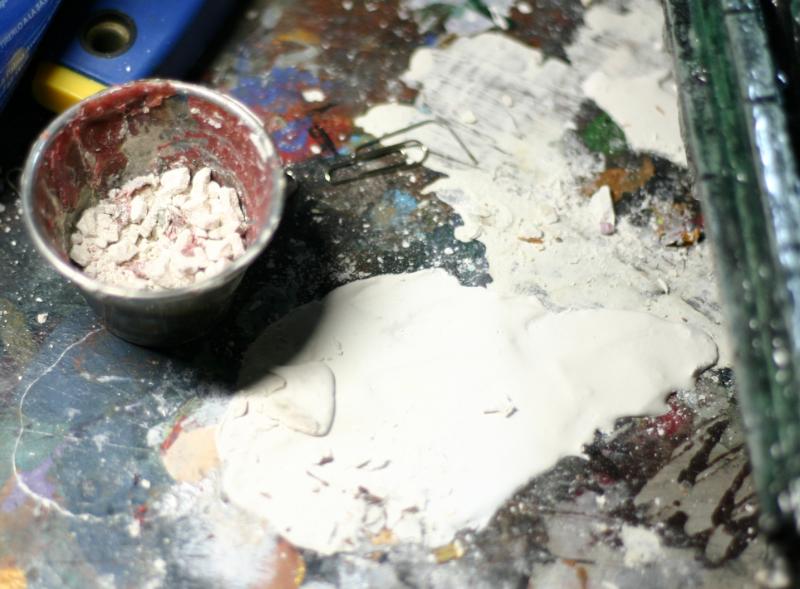
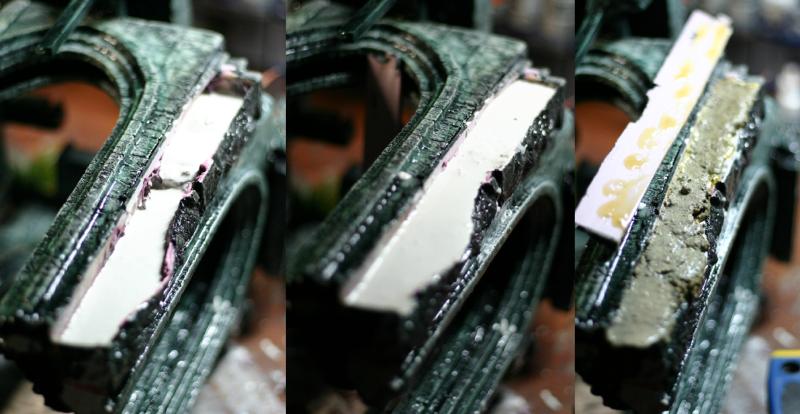
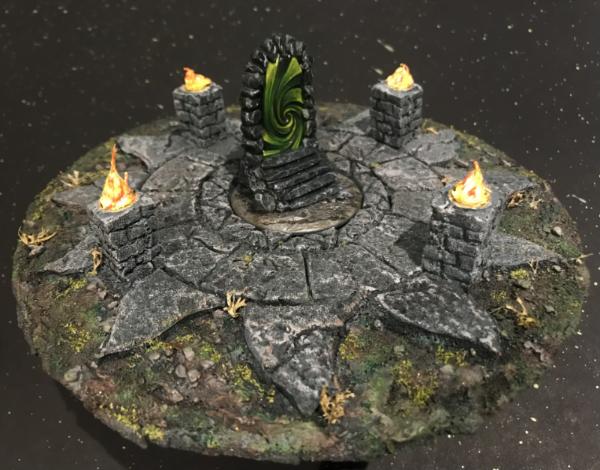

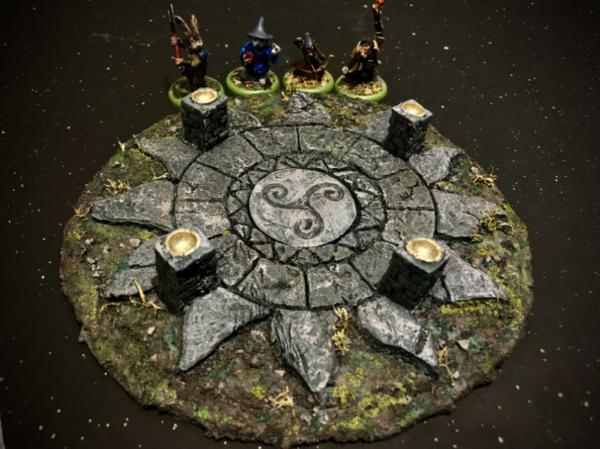
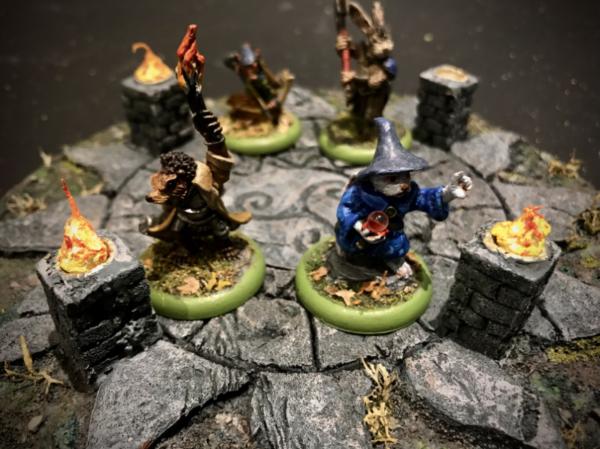


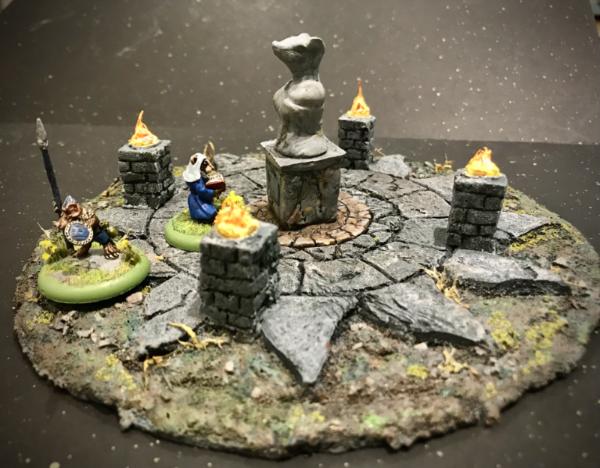
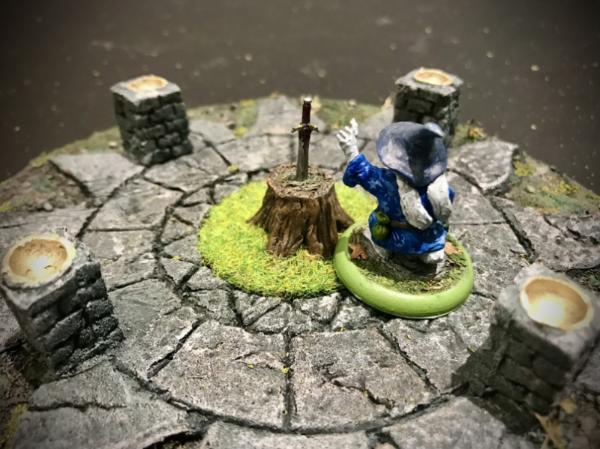
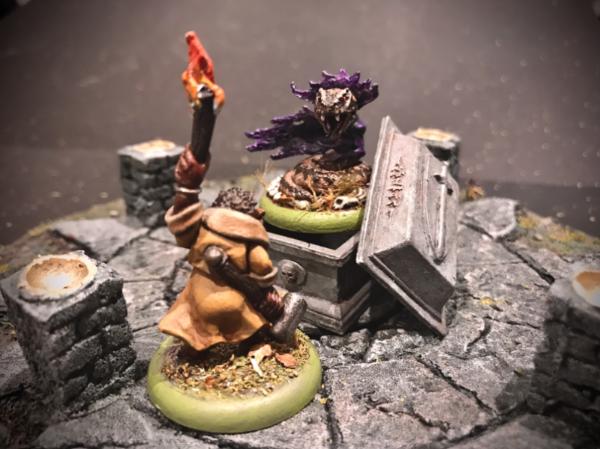


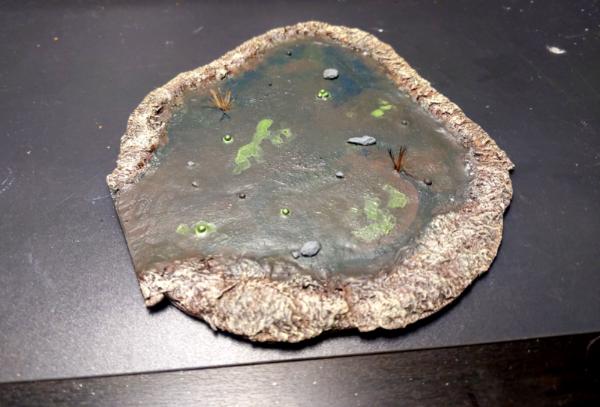

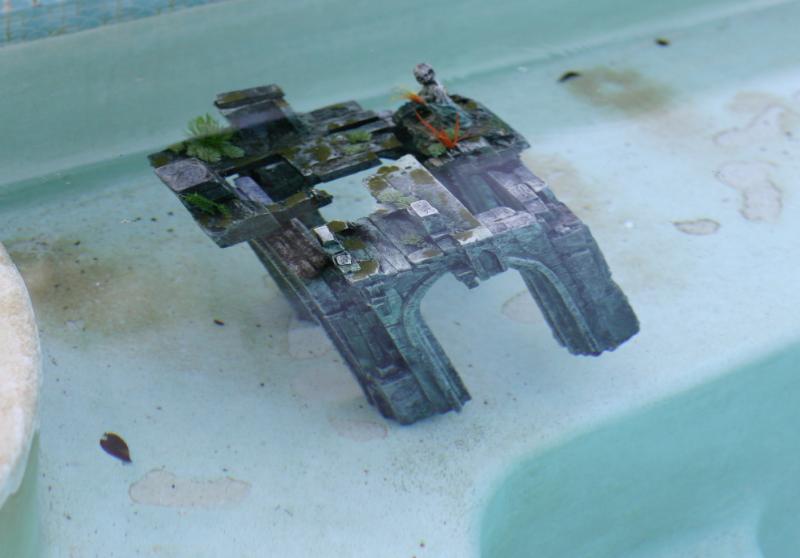
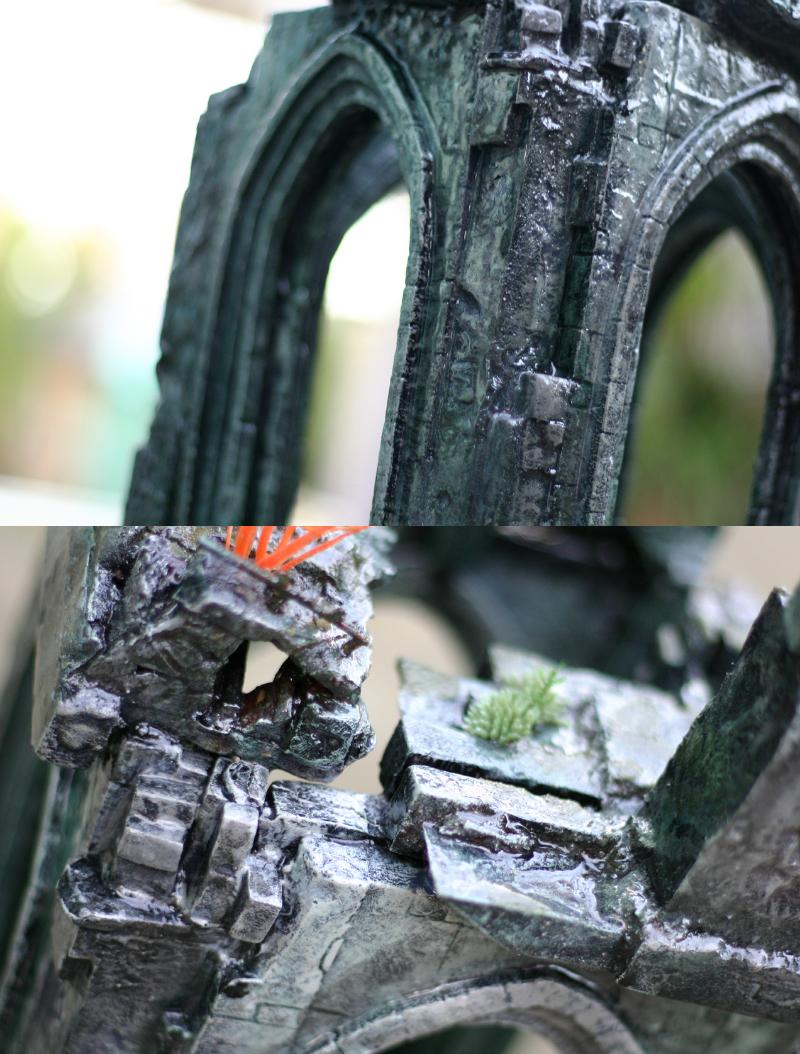
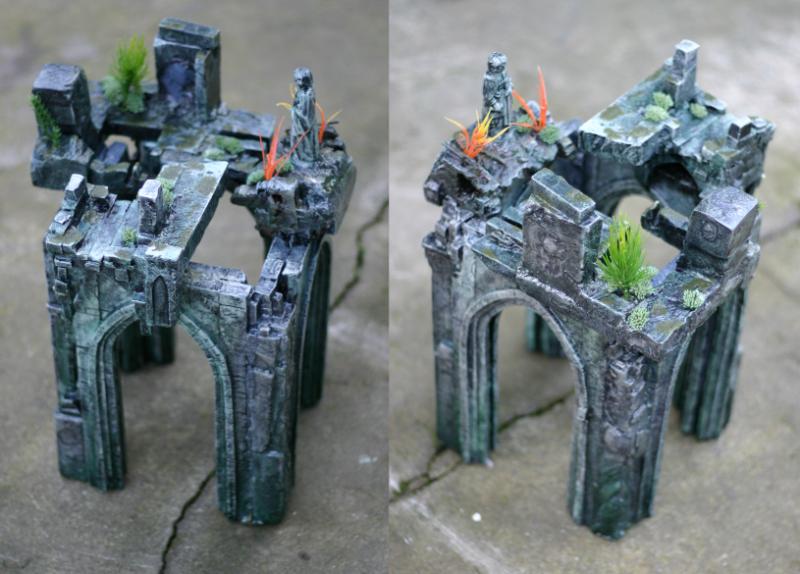
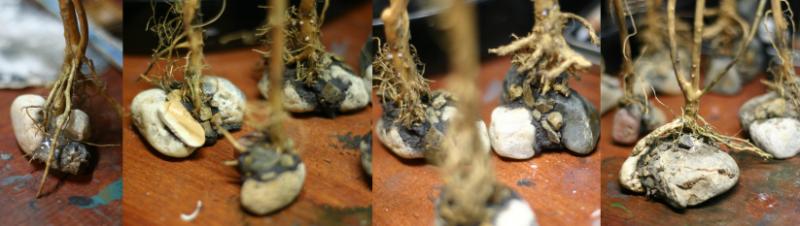
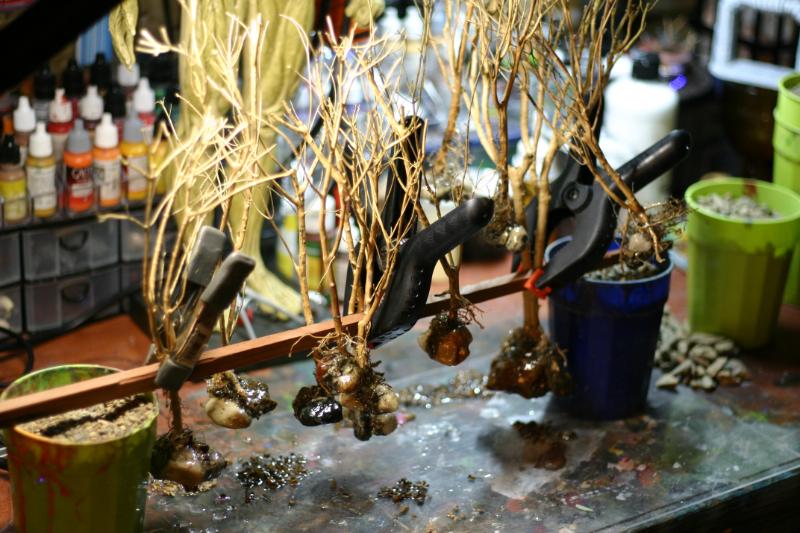
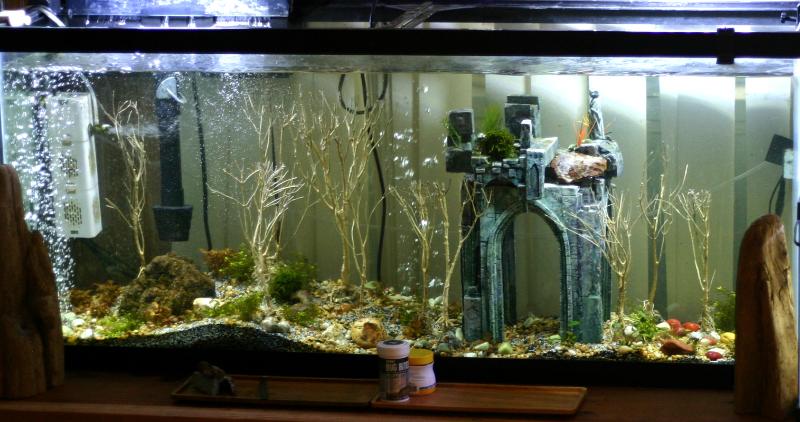
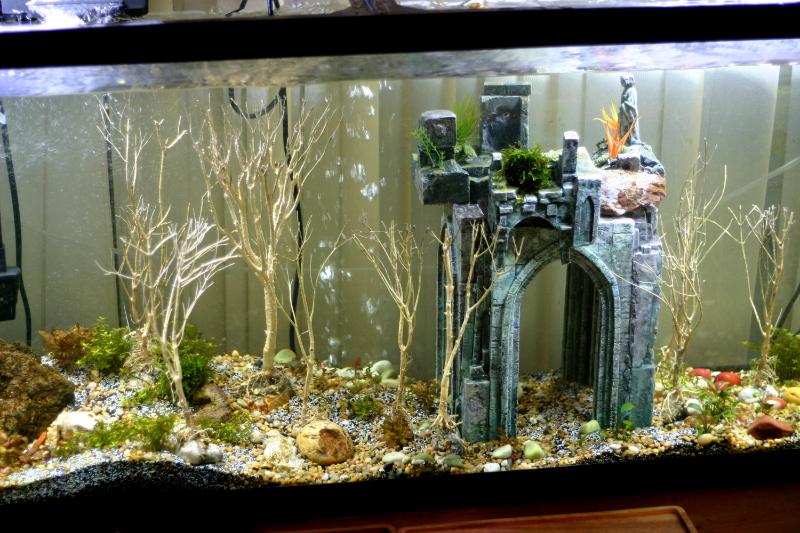
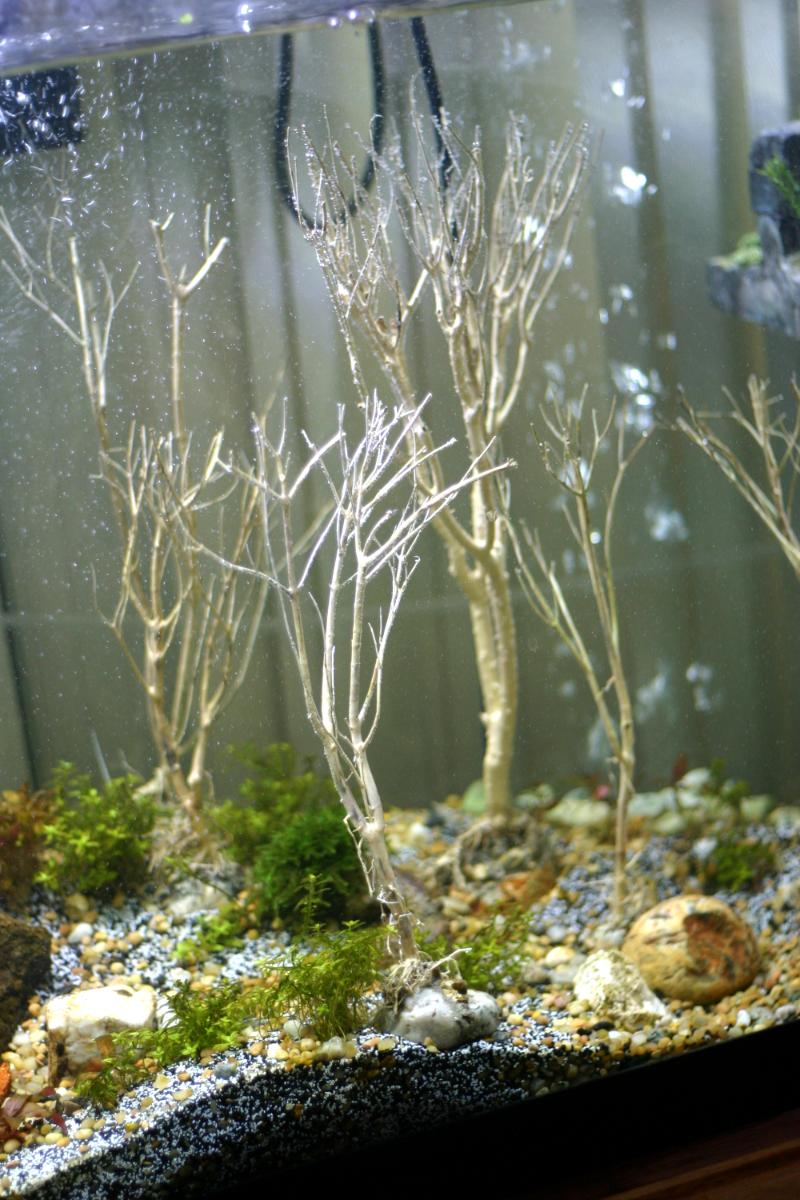

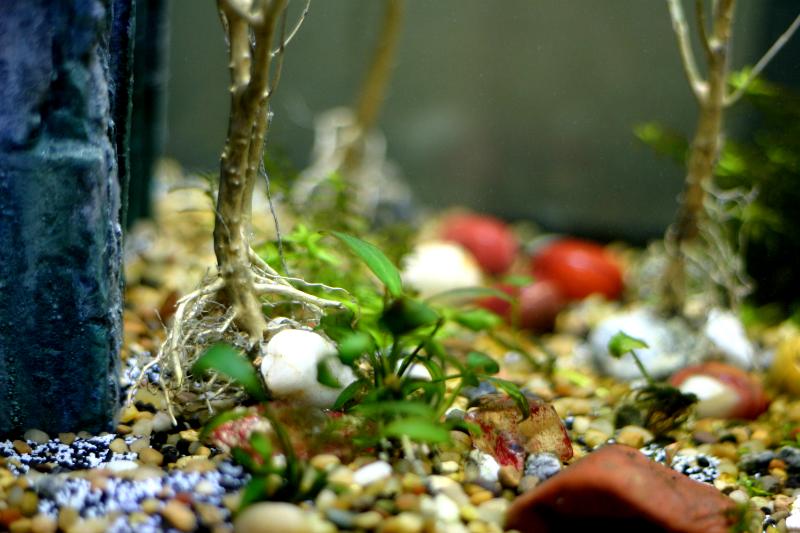
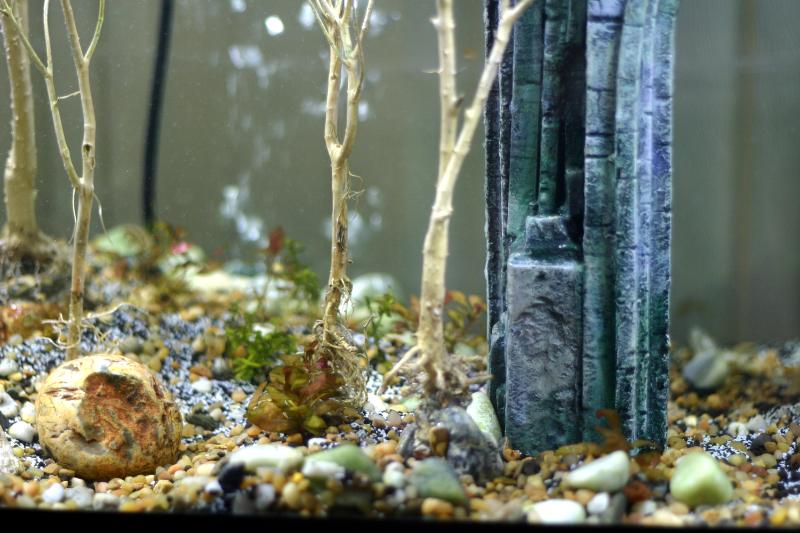


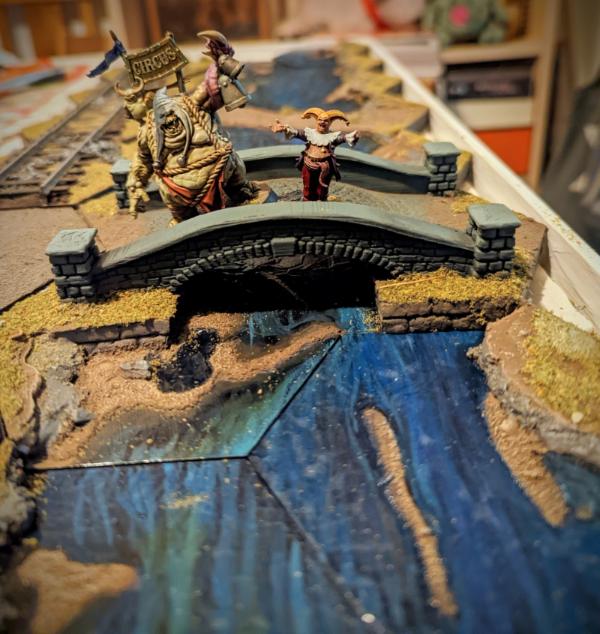
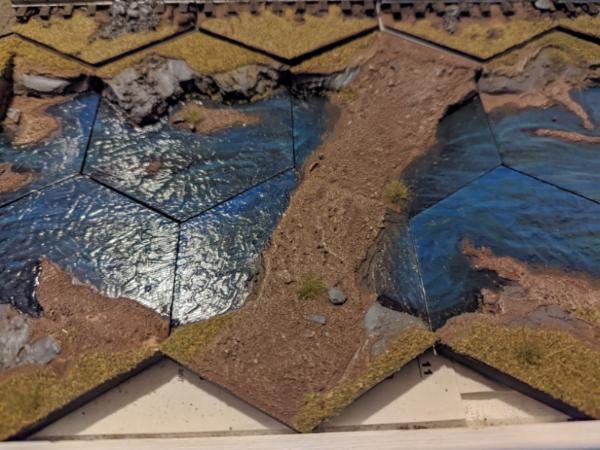
 month. Keep the faith, brother.