Since most people has a misconception that Tau is a relatively weaker codex compared to the new toys, I will be putting up a series of battle reports to illustrate how to play Tau properly against different codex/armies.
First up, the lists :-
Tau 1750 points
Shas
El (Missile, Plasma,
BSF,
HW.M.T.) - 90
3 Crisis Suits (3xMissile, 3xPlasma, 3xM.T.) - 186
3 Crisis Suits (3xMissile, 3xPlasma, 3xM.T.) - 186
3 Crisis Suits (3xMissile, 3xMissile, 3xBSF) - 138
6 Fire Warriors, Devilfish w Pod - 145
10 Kroots, 7 Hounds - 112
10 Kroots, 3 Hounds - 88
1 Piranha (fusion, T.A.) - 70
1 Piranha (fusion, T.A.) - 70
1 Piranha (T.A.) - 65
2 Broadsides (2xT.A.) - 160
2 Broadsides (2xT.A.) - 160
3 Broadsides (3xT.A., Leader, Target Lock, 2 Shield Drones) - 280
SWs 1750 points
Rune Priest (Jaws, L.L.) - 100
Rifle Dread - 125
Rifle Dread - 125
Rifle Dread - 125
5 Grey Hunters-melta, Rhino - 115
5 Grey Hunters-melta, Rhino - 115
5 Grey Hunters-flamer, Rhino - 110
5 Grey Hunters-flamer, Rhino - 110
Speeder (M.M.) - 60
Speeder (M.M.) - 60
Speeder (M.M.) - 60
6 Long Fangs -
MLs, Las/
Plas Razorback - 215
6 Long Fangs -
MLs, Las/
Plas Razorback - 215
6 Long Fangs -
MLs, Las/
Plas Razorback - 215
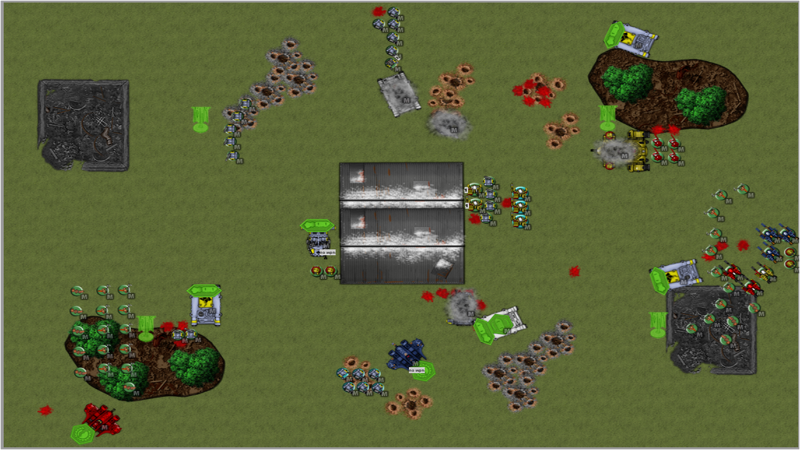
Terrain/Table is standard Nova style, with a huge
LOS blocking and Impassable terrain in the middle, and other terrains spread across the 4 sides.
Actual BatRep will follow soon. Before that, comments on the list or how each side should play the game are welcome.
Primary Mission - Sieze Ground, 4 Objs
Secondary Mission - Table Quarters
Deployment - Spearhead
Tau won the roll off, and elects to go 2nd.
I will use pics from vassal to illustrate stuff as best as i can. This is the toughest battle of my series of BatRep, due to list matchup (the
SW list is pretty optimised, and S8 missiles are the bane of Crisis Suits), and to a slight extent, the terrain.
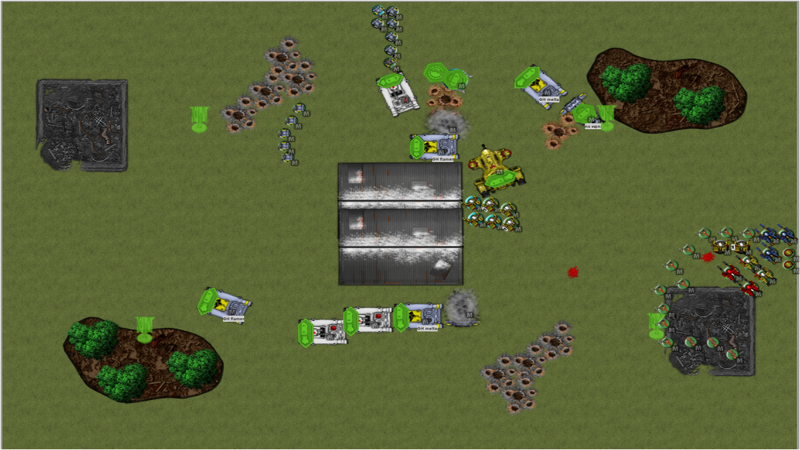
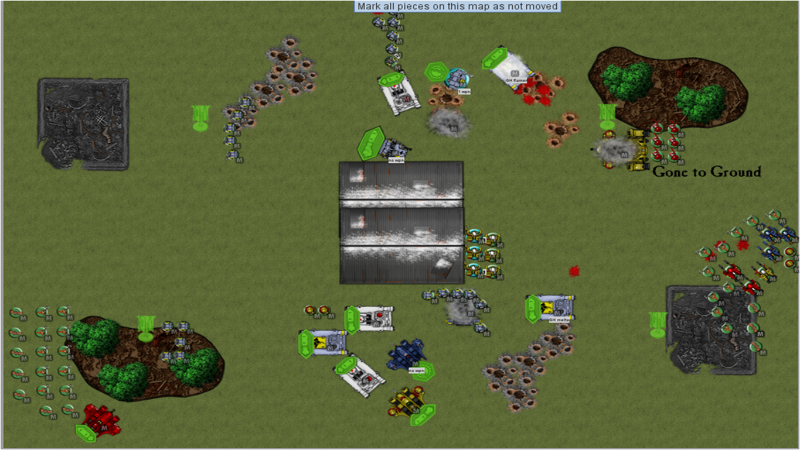
Deployment
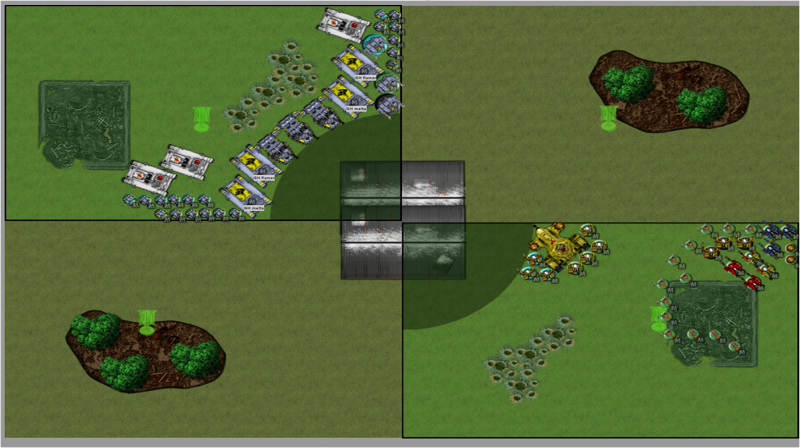
In terms of attrition, I am at a disadvantage due to efficient spam of S8 AP3s, which can instant kill the Crisis Suits and negate their 3+ Armor. But as with any battle, play to your strengths and reduce the impact of your weakness. My advantages in this battle are my Suit's mobility, and me being about to start 2nd and refuse flank my opponent. You will later see that by deploying the FireKnives close to the central huge terrain, I am able to limit
LOS to the Crisis Suits from half (or more at some parts of the game) of his army.
Larger Kroot squad outflank
All piranhnas in reserve.
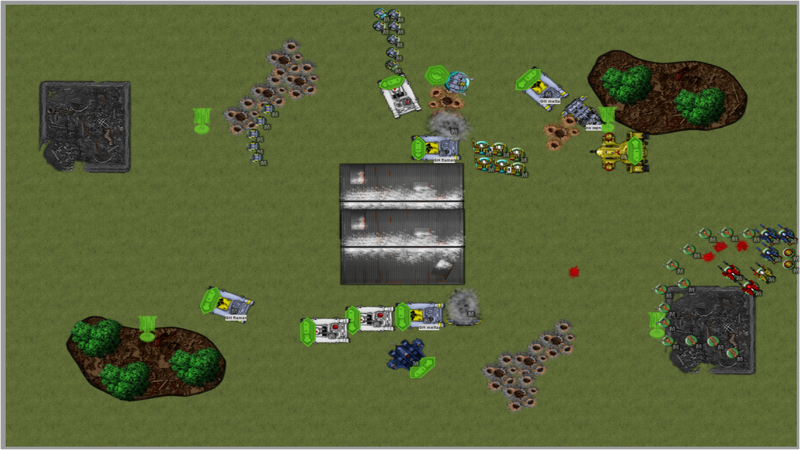
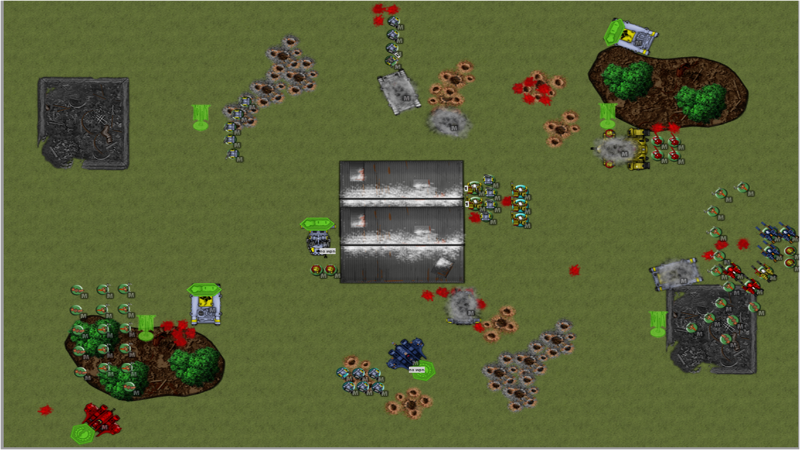
SW Turn 1 Movement
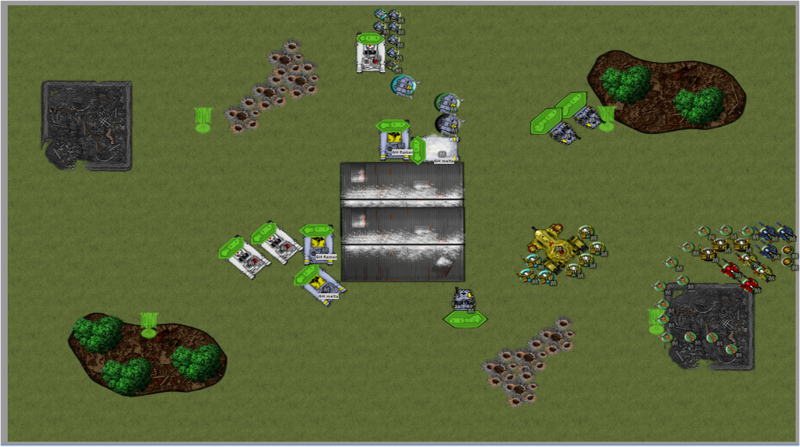
Dreads and Rhinos move up
Both bottom Long Fangs squad embark into Razorback, and cruise up.
Speeders turboboost.
1 Rhino pops smoke.
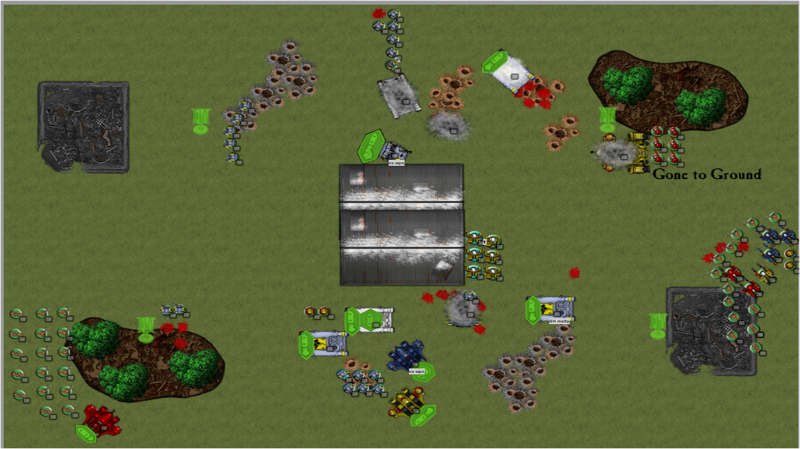
SW Turn 1 Shooting
After cover, Missiles, Lasc, and Autocannons kill one
Deathrain suit, one
Fireknife, and puts a wound on Shas
EL and another
Fireknife.
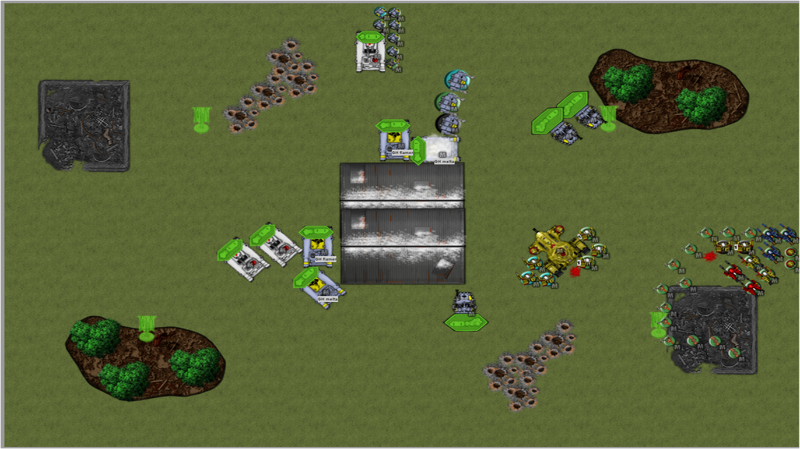
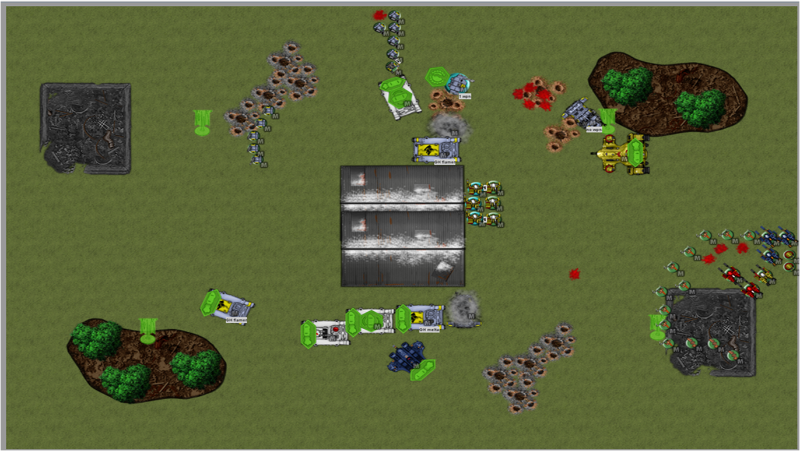
Tau Turn 1 Movement
Devilfish and Crisis Suits shuffle.
Tau Turn 1 Shooting
All Crisis Suits unload into the Speeders (they are the greatest threat to the Suits next turn as they can instant gib them and manuevor to get clear
LOS and deny any cover. Also, they are the easiest to take down). So there are 2 parts to this rule of thumb here. (1) Greatest, imminent threat (2) Spend your bullets on threats that grants you the highest chance of success of taking them down.
2 speeders went down, last one got weapon destroyed and stunned.
After 8 railguns into the Dreads, 2 went down, one got immob and shaken.
Tau Turn 1 Assault
Suits jump back for cover.
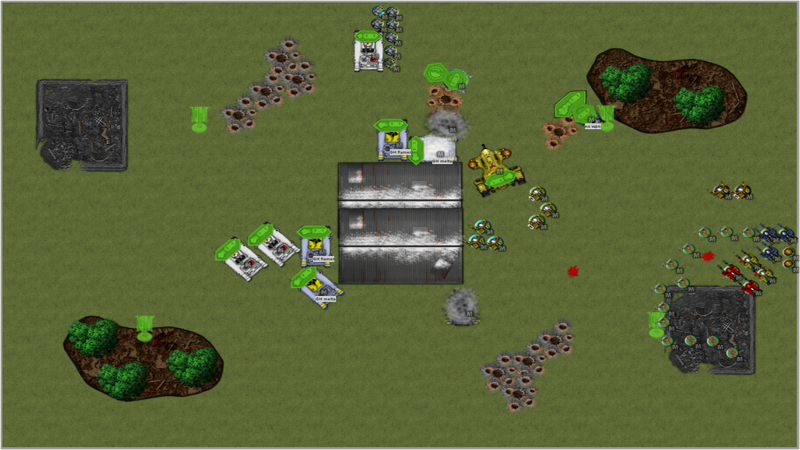
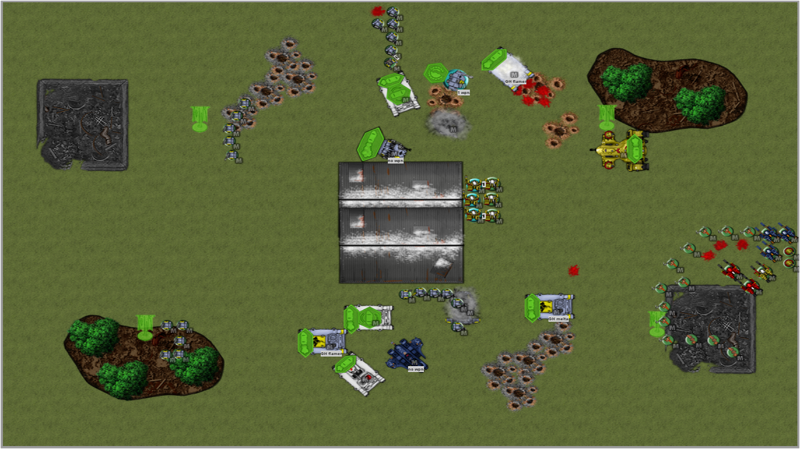
SW Turn 2 Movement
Bottom Rhinos and Razorbacks advances.
Top Rhino drops off
GHs, who heads for top left obj.
SW Turn 2 Shooting
Top Long fangs can only draw
LOS to the
Deathrain suits, who after cover got decimated.
Lasc fires at Broadside, who fails its cover save and drops. The standing broadside in the squad later fail its morale and fall back.
*On hindsight,
SW player actually should have melta-ed the Devilfish from within the rhino.
Tau Turn 2 Movement
1 Fusion Piranha arrives from reserve.
Fireknife suits shuffles for better
LOS.
Broadside regroups.
Tau Turn 2 Shooting
Piranha stuns Razorback.
Railguns shakes/stuns top Razorback, Weapon Destroys Dread, and explodes top right rhino.
Fireknife suits unload decimates a squad of
GH, and kills a leader in RunePriest's
LF squad.
Tau Turn 2 Assault
Suits jump back close to the central terrain to limit
LOS.
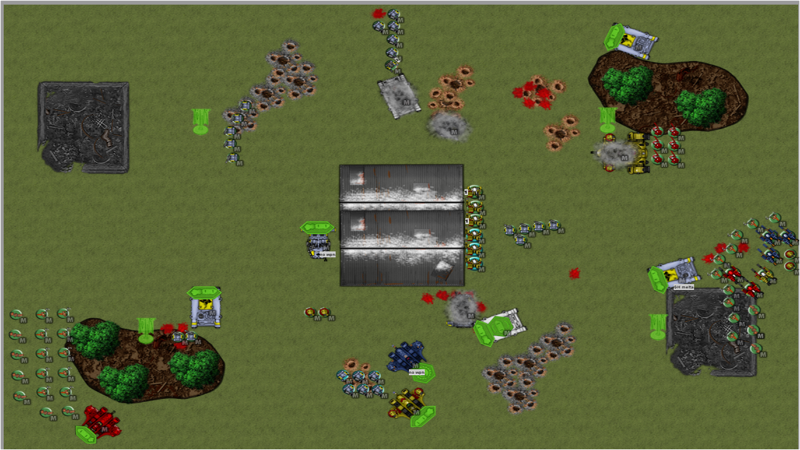
SW Turn 3 Movement
Bottom left Rhino unloads
GHs onto obj. and then advances.
Razorback shuffles and advance to get side shots on Piranha.
Bottom right rhino cruises towards the right.
1 Long fang squad disembark from stunned razorback and move towards the right.
Speeder boosts and hide behind terrain.
Top rhino move towards obj. and pops smoke.
SW Turn 3 Shooting

Only 1 long fang from Priest's squad can draw
LOS to the Crisis Suits. The rest splits fire into Devilfish. After cover saves, Devilfish goes down, and suits remain unharmed.
FWs pinned.
2 Autocannon shots from Dread did nothing to the Crisis Suits.
Rapid Plasma shots from Razorback immbolises and wpn destroys Piranhna.
Tau Turn 3 Movement
All other reserves arrive. Kroots outflank from the bottom left.
Crisis Suits jump towards bottom long fangs.
Right Kroots shuffles to the right away from incoming wolves.
Drones disembark from immobilised piranhna, and jumps behind a Razorback.
Tau Turn 3 Shooting
Yellow Piranha explodes bottom razorback.
Between outflanking kroots and Red Piranhna, 3
GHs go down, who fail their morale and fall back later.
With a bit of luck, drones shakes the Razorback.
Both squad of suits unload into the fangs and reduce them to a single model.
Railguns kills the top razorback and dread.
Tau Turn 3 Assault
ShasEl's squad jumps back and stick close to the terrain, while the other squad of suits assaults the lone long fang. After 9 S5 attacks, the loner is killed. Suits consolidate close to terrain as well.
SW Turn 4 Movement
Bottom left
GHs regroup.
Bottom rhino move towards
GH at bottom left, preparing to pick them up.
Bottom Razorback advances towards the right.
Bottom right rhino drops off
GHs, and then declare tank shock against kroots, but misses by 1 inch.
Speeder moves around central terrain, preparing to contest.
Top rhino also moves behind forest, preparing to contest top right obj.
SW Turn 4 shooting
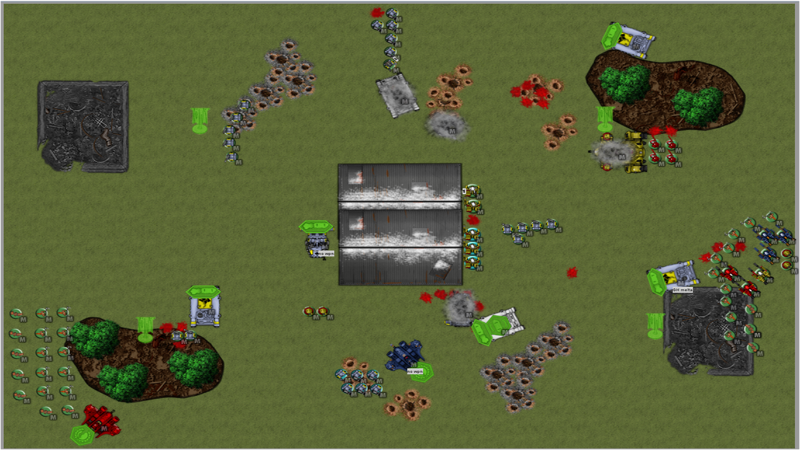
Bottom fangs splits fire and explodes 1 piranha, immob the other.
GHs squad (near the suits) fire melta and pistols into ShasEl's squad, killing one in the process.
Top fangs only has
LOS to the broadsides OR
FWs. They choose to unload into the
FWs. After 3+ cover (by going to ground), 2 are killed.
SW Turn 4 Assault
GHs assaults into Shas
El's squad, putting a wound on another suit, and losing one model in the process.
Tau Turn 4 Movement
Unengaged Crisis Suits shuffles for
LOS to top fangs.
Bottom left kroots move towards
GHs.
Drones jump towards central terrain.
Tau Turn 4 Shooting
Crisis Suits kills 2 long fangs.
Railguns focus fire and finally pops bottom 1 rhino and 1 razorback.
Bottom left
GHs are wiped out.
Tau Turn 4 Assault
GHs kills another suit, with ShasEl dealing no wounds in return, but passes morale.
Crisis Suits jumps back toward central terrain.
SW Turn 5
Speeding things up here a little
Bottom left rhino tank shocks the kroots, who passes morale.
Top right rhino shocks the
FWs, who fail morale and fall back.
Top fangs fire on the
FWs, killing another 2 and reducing them to below half so they are not going to regroup.
BOttom fangs blasts the kroots. But thanks to 3+ cover, only 3 kroots go down.
One drone dies to bolter fire.
Speeder boosts towards obj near the Broadsides.
In assault,
GHs finishes off ShasEl, but sadly consolidates in the open :-)
Tau Turn 5
Crisis Suits wipes the
GHs in the open.
Railguns destroys the speeder and top rhino (who just rammed the
FWs).
Kroots assaults into bottom left rhino and only score an immoblised result.
At the bottom of turn 5, Tau controls one obj, and
SW controls one.
Game Continues to turn 6
SW Turn 6
Bottom fangs continue to blast the kroot squad, who loses 3 more members.
Drone from piranhna got finished off by bolter.
Top long fang squad unload into broadsides, who shrug off AP5 L.L and AP3 missiles with their 2+ armor.
Free attacks by the kroots on the bottom left rhino nets another immob result.
Tau Turn 6
Crisis Suits jump out, killing another 2 long fangs at the top.
RailGuns unload into the surviving priest and one long fang, decimating the whole squad.
2 Railgun fires into surviving rhino, but it passes its cover.
Crisis Suits jumps towards top left
GHs.
Kroots assaults the rhino once again, and finally glance it to death.
Game Ends with Tau winning 2-1.


 .....Bay Area Open GT 2013 - Best Tyranids
 .....LVO GT 2014 Team Tournament - Best Generals


 Playing WH40k in the United Arab Emirates!!
  &
& 


 All of those Broadsides and Missile Pods will give those Space Puppies a challenge...
 And if you're drinkin' well, you know that you're my friend and I say "I think I'll have myself a beer"


 Tash'var Tau 3034 PTS [W]5[L]11[D]0 'Cadre Carnivores of Tash'var' Completed:47/3034
 Member of


 80 Minitures.