| Author |
Message |
 |
|
|
|
|
Advert
|
Forum adverts like this one are shown to any user who is not logged in. Join us by filling out a tiny 3 field form and you will get your own, free, dakka user account which gives a good range of benefits to you:
- No adverts like this in the forums anymore.
- Times and dates in your local timezone.
- Full tracking of what you have read so you can skip to your first unread post, easily see what has changed since you last logged in, and easily see what is new at a glance.
- Email notifications for threads you want to watch closely.
- Being a part of the oldest wargaming community on the net.
If you are already a member then feel free to login now. |
|
 |
2009/10/02 20:09:36
Subject: "The Iron Curtain" - Soviet T-55A Diorama
|
|

Rampaging Reaver Titan Princeps
|
Working with a bloke who served in a Chieftain during the Cold War and he mentioned they always went on exercise a round or two light because the ammo store was nice and cool and kept the food fresh! Great stuff on the crew and the outsides of the tank are looking brilliant!
|
|
This message was edited 1 time. Last update was at 2009/10/02 20:10:47
"But me no buts! Our comrades get hurt. Our friends die. Falkenburg is a knight who swore an oath to serve the church and to defend the weak. He'd be the first to tell you to stop puling and start planning. Because what we are doing-at risk to ourselves-is what we have sworn to do. The West relies on us. It is a risk we take with pride. It is an oath we honour. Even when some soft southern burgher mutters about us, we know the reason he sleeps soft and comfortable, why his wife is able to complain about the price of cabbages as her most serious problem and why his children dare to throw dung and yell "Knot" when we pass. It's because we are what we are. For all our faults we stand for law and light.
Von Gherens This Rough Magic Lackey, Flint & Freer
Mekagorkalicious -Monkeytroll
2017 Model Count-71
|
|
|
 |
|
2009/10/02 21:25:03
Subject: Re:"The Iron Curtain" - Soviet T-55A Diorama
|
|
Regular Dakkanaut
|
Thats cool, I may have to model that some day, an interior with a kitchen! 
Thanks for the kind comments too Llama
|
|
|
|
|
|
2009/10/02 23:24:34
Subject: "The Iron Curtain" - Soviet T-55A Diorama
|
|
Stalwart Veteran Guard Sergeant
|
Wow that crewman is almost frightening realistic looking. Great job, this is looking amazing .
You said you were layering filters on - could you explain what exactly filters do and why you apply them? I've seen them mentioned a lot but I've never really known what they're for and how they help. Cheers!
|
|
|
|
|
|
2009/10/03 00:18:37
Subject: Re:"The Iron Curtain" - Soviet T-55A Diorama
|
|

Stormin' Stompa
|
Gundam-Mecha wrote:

#2 looks like he just farted in the tank... #1 looks like he just noticed.
Seriously, though, these are all very nice models. Are these 28mm scale? I have about a hundred 28mm Soviets from Bolt Action minis I'm yet to work with...
|
|
|
|
|
2009/10/03 17:25:21
Subject: "The Iron Curtain" - Soviet T-55A Diorama
|
|
Stalwart Veteran Guard Sergeant
|
Nah, they're larger scale ones - I remember I looked at the site he got them from when I was looking for altenative heads for my imperial guard.
|
|
|
|
|
|
2009/10/03 17:43:29
Subject: "The Iron Curtain" - Soviet T-55A Diorama
|
|
Storm Trooper with Maglight
|
This blog is staggeringly awesome, from the level of detail involved to the excellent paintjob/weathering techniques used. Keep it up!
Can you explain exactly what ratio of Bicarb/white paint/PVA you use to make the snow please?
|
|
|
|
|
|
2009/10/04 15:20:47
Subject: "The Iron Curtain" - Soviet T-55A Diorama
|
|
Rampaging Reaver Titan Princeps
|
No trouble mate its exceedingly easy to be nice about such a great model!
|
"But me no buts! Our comrades get hurt. Our friends die. Falkenburg is a knight who swore an oath to serve the church and to defend the weak. He'd be the first to tell you to stop puling and start planning. Because what we are doing-at risk to ourselves-is what we have sworn to do. The West relies on us. It is a risk we take with pride. It is an oath we honour. Even when some soft southern burgher mutters about us, we know the reason he sleeps soft and comfortable, why his wife is able to complain about the price of cabbages as her most serious problem and why his children dare to throw dung and yell "Knot" when we pass. It's because we are what we are. For all our faults we stand for law and light.
Von Gherens This Rough Magic Lackey, Flint & Freer
Mekagorkalicious -Monkeytroll
2017 Model Count-71
|
|
|
|
|
2009/10/05 11:12:35
Subject: Re:"The Iron Curtain" - Soviet T-55A Diorama
|
|
Regular Dakkanaut
|
Thanks for all the kind comments guys, and apologies for not being able to reply over the weekend, I was in Milan Italy.
Chopper - A filter is basically a very heavily diluted wash, it has the consistency of tinted thinner mixed usually from oil or enamel paint and turpentine or artists thinner. The ratio is usually 95% carrier to paint and retains a high transparency. The idea with a filter is use it to subtly change the colour and qualities of a surface colour very gradually. Filter coats are usually built up in layers of three to five upwards, and each layer is left to dry for two hours in between. Since a filter aims to change the base colour and add chromatic richness it is only applied to the large or exposed surface areas and not applied into details such as weld seams, panel lines, or rivets. Washes are best used for picking out details.
You can buy filters that are ready mixed to use out of the bottle such as the excellent sets from Sin Industries (a subsidiary company of Mig Productions, like citadel colour and citadel miniatures), or alternatively you can mix your own. It's important to remember that the brush should not be too heavily loaded, first wipe it on a piece of kitchen towel to remove the excess. It's important that the filter coat is light, and controlled and a lightly loaded brush helps with this. go over the area that needs to be "filtered" once (no more than twice) with a large soft brush and then leave to dry for two hours. I'll post later on some comparison shots of a surface without a filter and one with filters and nothing else, as well as a brief tutorial. As they build up in layers the effect becomes much more noticeable and helps to break up the monotony of a strong base colour.
Arctik -These are 1:35 scale with works out around 32mm I think and sadly not 28mm. If you want heads for GW sized figures you could try 1:48 scale sets as theyare much closer in size to heroic scale. Hornet are well known for their head sets and the quality of sculpting is great, they are all resin sets also which adds to the detail.
Oshunai - As for the snow mix it depends on the effect i want, heavy snow, fresh snow, melting or wet snow. Usually though I'd say somewhere in the region of three parts bicarbonate, 1 part PVA, 1 part white acrylic. I then add a little water as I'm stirring the mix, the consistency should be wet enough to be able to apply by brush but still retain a thickness to hold in place. You can always add more bicarb into the mix when you make it to thicken it up if you want. For melting snow add more water to give it runny texture, once it's dry you can also give it a coat with some gloss varnish by brush to give it a shiny look. For heavy or fresh snow more bicarb than water and PVA, you can also sprinkle bicarb powder over the surface directly while it is still wet to add further texture.
Llama - Cheers!
|
|
|
|
|
|
2009/10/05 16:29:31
Subject: Re:"The Iron Curtain" - Soviet T-55A Diorama
|
|
Stalwart Veteran Guard Sergeant
|
Gundam-Mecha wrote:Thanks for all the kind comments guys, and apologies for not being able to reply over the weekend, I was in Milan Italy.
Chopper - A filter is basically a very heavily diluted wash, it has the consistency of tinted thinner mixed usually from oil or enamel paint and turpentine or artists thinner. The ratio is usually 95% carrier to paint and retains a high transparency. The idea with a filter is use it to subtly change the colour and qualities of a surface colour very gradually. Filter coats are usually built up in layers of three to five upwards, and each layer is left to dry for two hours in between. Since a filter aims to change the base colour and add chromatic richness it is only applied to the large or exposed surface areas and not applied into details such as weld seams, panel lines, or rivets. Washes are best used for picking out details.
You can buy filters that are ready mixed to use out of the bottle such as the excellent sets from Sin Industries (a subsidiary company of Mig Productions, like citadel colour and citadel miniatures), or alternatively you can mix your own. It's important to remember that the brush should not be too heavily loaded, first wipe it on a piece of kitchen towel to remove the excess. It's important that the filter coat is light, and controlled and a lightly loaded brush helps with this. go over the area that needs to be "filtered" once (no more than twice) with a large soft brush and then leave to dry for two hours. I'll post later on some comparison shots of a surface without a filter and one with filters and nothing else, as well as a brief tutorial. As they build up in layers the effect becomes much more noticeable and helps to break up the monotony of a strong base colour.
Ah awesome, cheers for that. I actually ordered the complete mig set over the weekend in anticipation for doing my tanks - looks like a made a good choice. Am I right in thinking that they are effectively a tinted varnish (ie a wash that colours rather than runs into cracks and creases)? Would they be useable on things like leather jackets which would need a sheen to them?
|
|
|
|
|
|
2009/10/05 16:34:01
Subject: Re:"The Iron Curtain" - Soviet T-55A Diorama
|
|
Storm Trooper with Maglight
|
Gundam-Mecha wrote:
Oshunai - As for the snow mix it depends on the effect i want, heavy snow, fresh snow, melting or wet snow. Usually though I'd say somewhere in the region of three parts bicarbonate, 1 part PVA, 1 part white acrylic. I then add a little water as I'm stirring the mix, the consistency should be wet enough to be able to apply by brush but still retain a thickness to hold in place. You can always add more bicarb into the mix when you make it to thicken it up if you want. For melting snow add more water to give it runny texture, once it's dry you can also give it a coat with some gloss varnish by brush to give it a shiny look. For heavy or fresh snow more bicarb than water and PVA, you can also sprinkle bicarb powder over the surface directly while it is still wet to add further texture.
You sir are a wonderful human being. Thanks for that, just solved a load of problems I was having.
|
|
|
|
|
|
2009/10/05 16:35:30
Subject: "The Iron Curtain" - Soviet T-55A Diorama
|
|

Death-Dealing Dark Angels Devastator
Annapolis, MD
|
Wow GM, the face on that crew member is amazing! Almost creepily lifelike. Mind explaining what you did there?
|
|
|
|
|
2009/10/05 18:49:45
Subject: Re:"The Iron Curtain" - Soviet T-55A Diorama
|
|
Regular Dakkanaut
|
get to the chopper! wrote:
Ah awesome, cheers for that. I actually ordered the complete mig set over the weekend in anticipation for doing my tanks - looks like a made a good choice. Am I right in thinking that they are effectively a tinted varnish (ie a wash that colours rather than runs into cracks and creases)? Would they be useable on things like leather jackets which would need a sheen to them?
Exactly, thats the idea, glazes of colour to change the base shade, although they are matt and won't dry shiny. You can use filters on figures also, you can also use them as a light wash to pick out details as well if you only want something subtle. However the main use is for changing the characteristics of the base coat. If you want to add shine to a leather jacket for example your best bet is a gloss varnish applied by brush directly over your painted surface of high lights and shadows etc.
Oshunai - no worries happy to help anytime. It's not an exact science really. The best way is to just play around with some mixes and see what you like best. As with everything in modelling do whats best for you personally as a modeler.
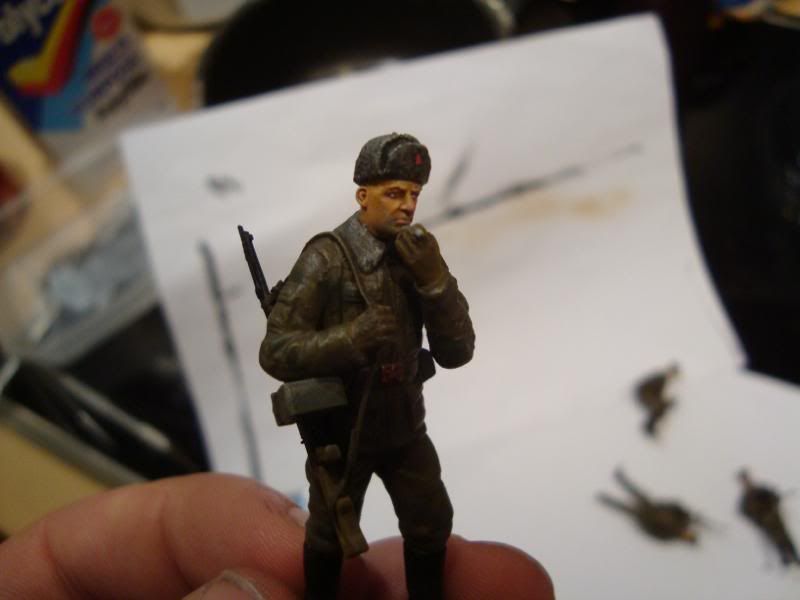
Shellfish - thanks! The skin tones and faces are my first attempt at painting faces with oils instead of acrylics. I've found it rather a hard lesson and it's certainly been a challenge but I'm really glad I took the leap to try another technique. I've got a lot to learn on this but I hope with practice I can improve things. The hardest thing about painting with oils is the long dry times inbetween coats or during blending. 1-2 hours from base coats to blended highlights etc. You also have to be real real subtle. A tiny dot of white is enough to highlight a whole cheek, and once blended will work really well. Too much though and your figure ends up looking like a snowman! Also with oils they are very translucent when wet, you won't really see the highlight effect till it drys, so it really is a leap of faith following the tips in guides and hoping that the effect will be what you want in a few hours time. If you try to over compensate to make it immediately visable while wet the results will dry very heavily. I think this is the biggest difference between blending with acrylics. Pretty much how an acrylic looks on the brush and immediately on the surface when wet is how it will look dry. With oil blending its another story, you really have to be restrained. For a good guide on painting faces with oils you should check out Mark Bannerman's excellent Osprey book "Modelling Panzer crewmen of the Heer" it has some fantastic step by step photos.
|
|
|
|
|
|
2009/10/19 21:46:13
Subject: Re:"The Iron Curtain" - Soviet T-55A Diorama
|
|
Regular Dakkanaut
|
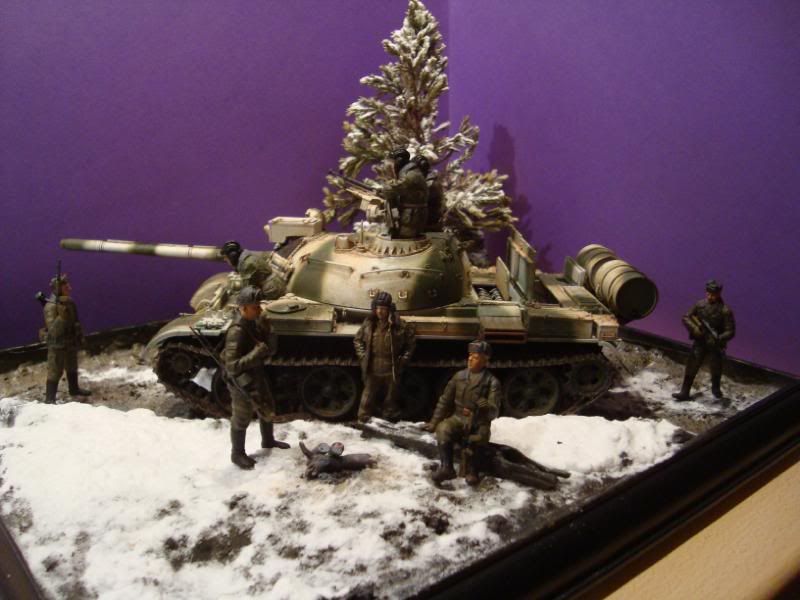
Time for a quick update.
The scenic base with blending and oil washes and filters:
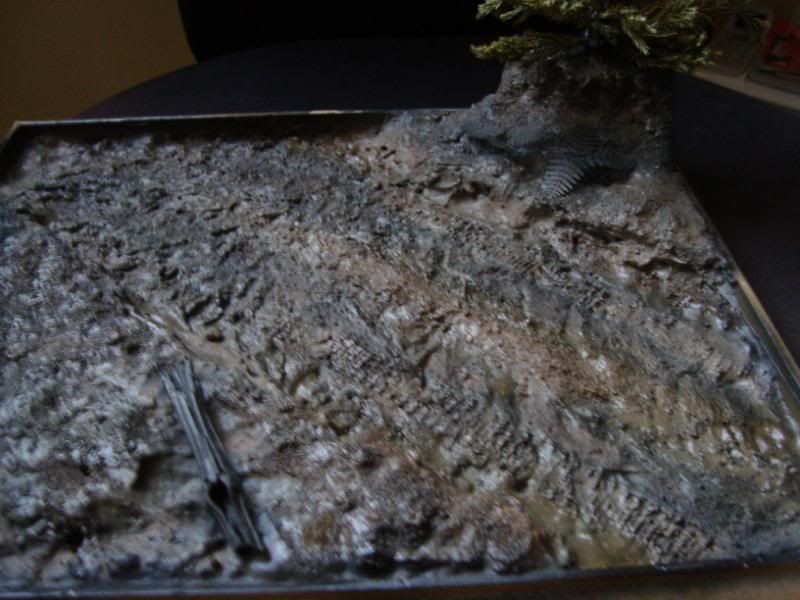
Snow effects:
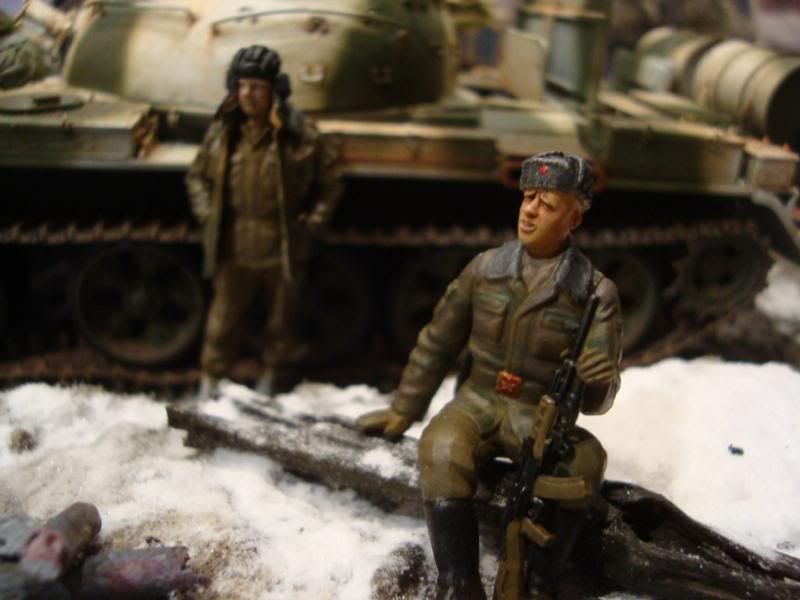
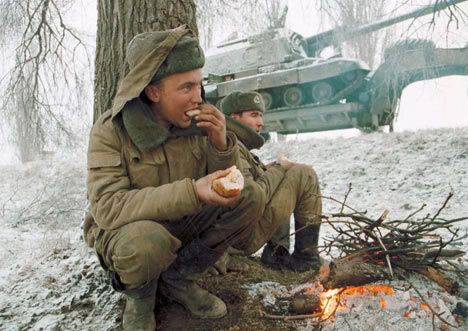
The reference inspiration
The actual dio
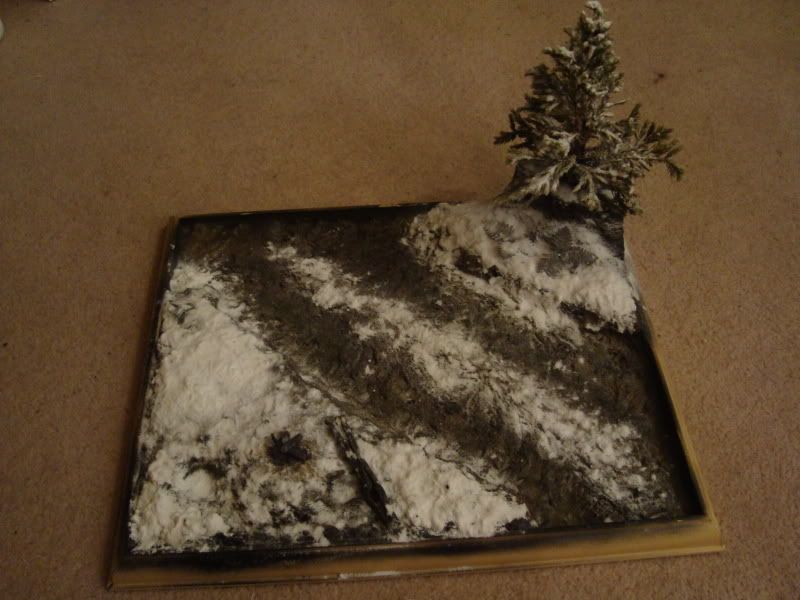
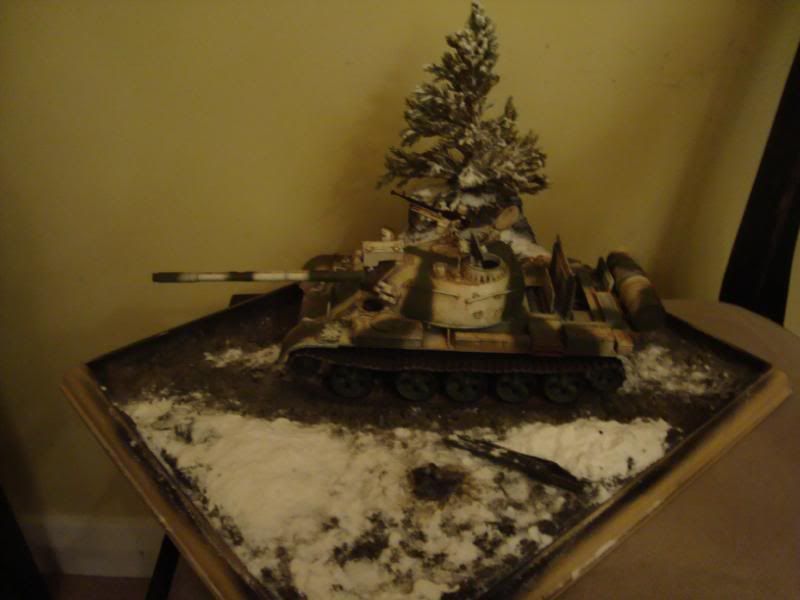
As you can see in the last image I built a small campfire of burning embers that the figures will be sitting and standing around, much like in the photo.
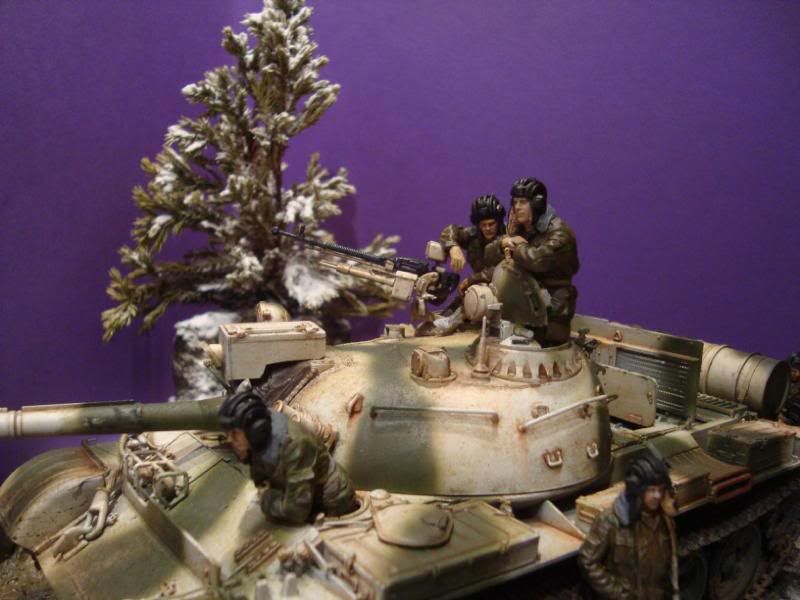
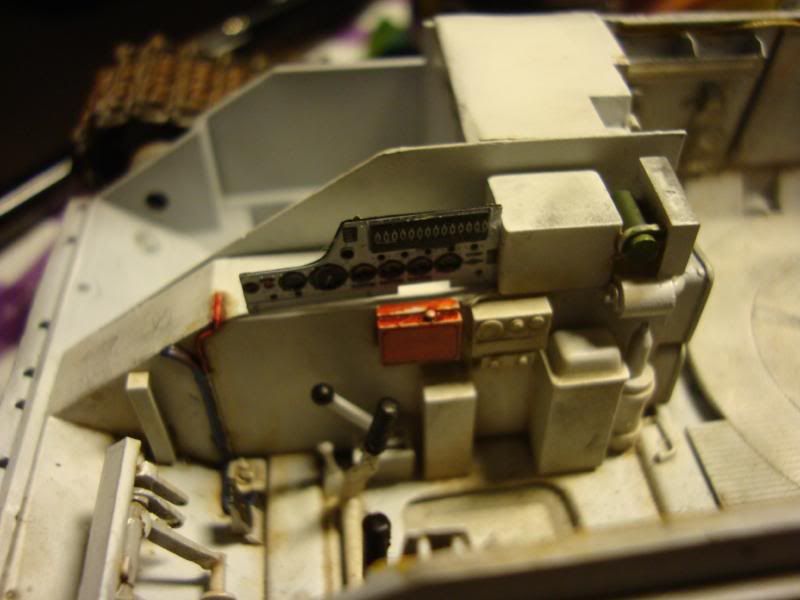
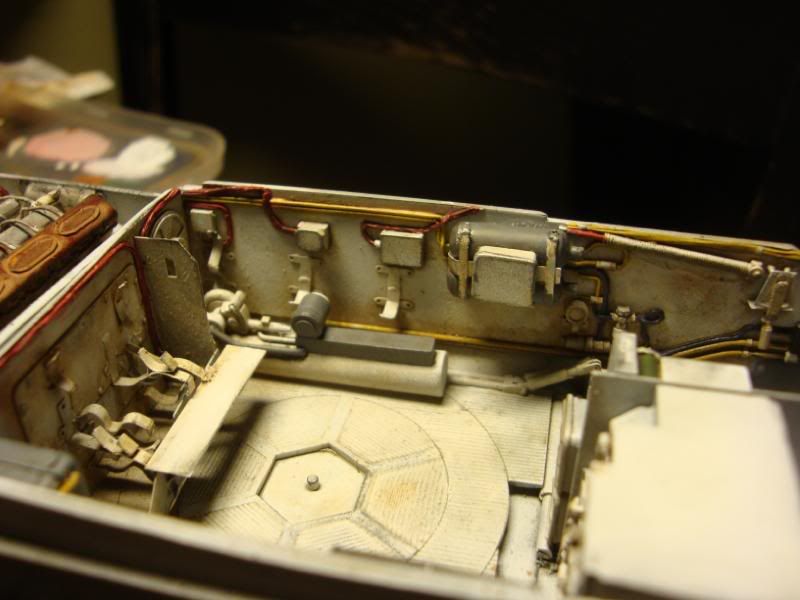
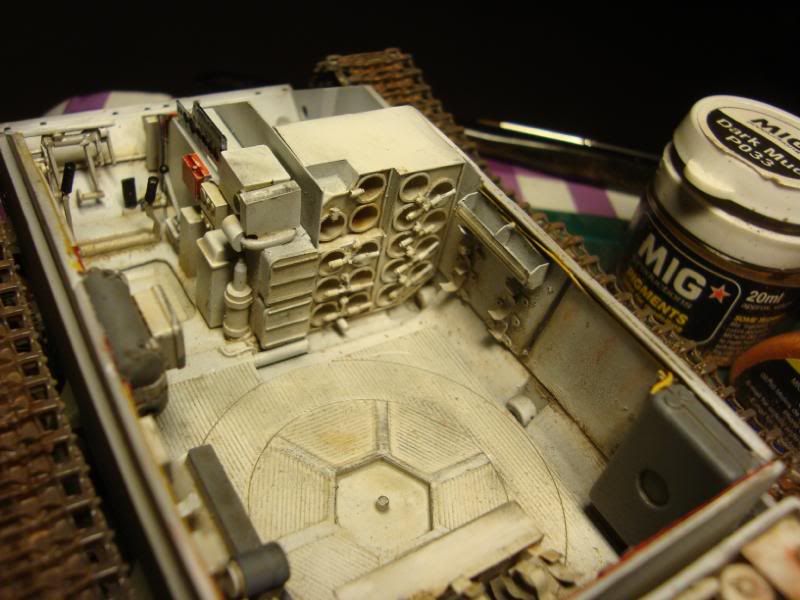
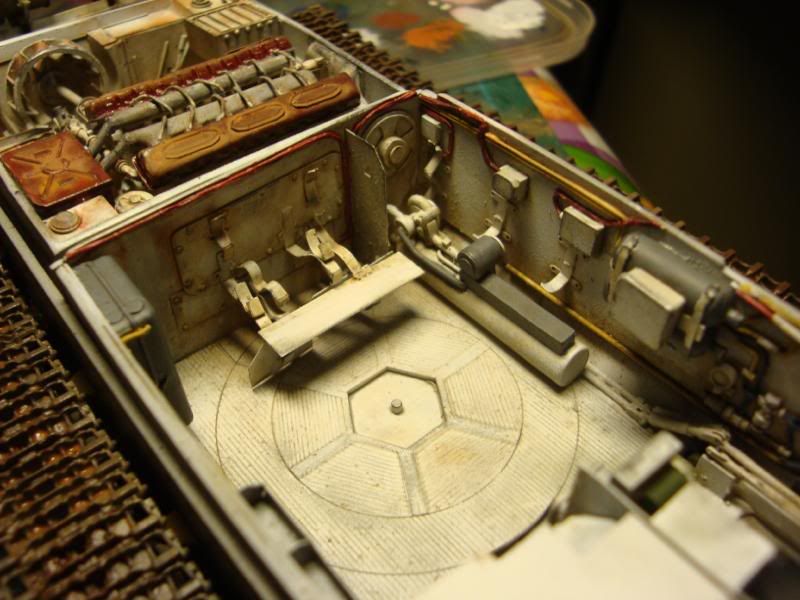
T-55 interior, still a lot to do here and very much a WIP:
|
|
This message was edited 1 time. Last update was at 2009/10/19 21:50:25
|
|
|
|
|
2009/10/20 11:43:30
Subject: "The Iron Curtain" - Soviet T-55A Diorama
|
|
Stalwart Veteran Guard Sergeant
|
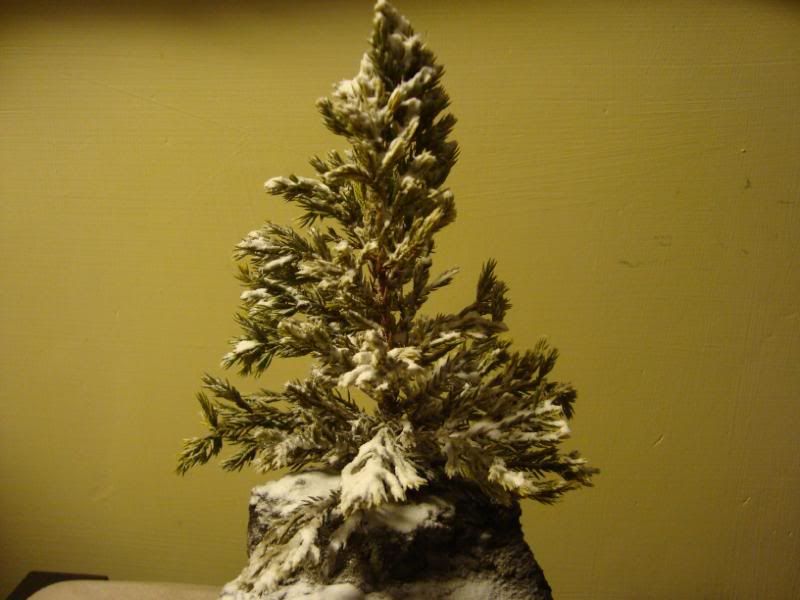
Looks awesome man, great job. I love that tree on the base - how did you make it?
|
|
|
|
|
|
2009/10/20 12:57:00
Subject: Re:"The Iron Curtain" - Soviet T-55A Diorama
|
|
Regular Dakkanaut
|
Thanks Chopper.
The tree is made up of various cuttings of a small evergreen tree that my parents had in their garden. These were soaked in Glycerin to preserve them and then glued together and attached to the base. To add the snow I used the hairspray technique and then sprinkled bi carbonate of soda directly onto the tree.
|
|
|
|
|
|
2009/10/20 13:19:09
Subject: "The Iron Curtain" - Soviet T-55A Diorama
|
|
Stalwart Veteran Guard Sergeant
|
Ah thats a great idea - I may do that myself, cheers.
|
|
|
|
|
|
2009/10/20 13:22:19
Subject: "The Iron Curtain" - Soviet T-55A Diorama
|
|
Junior Officer with Laspistol
|
Yeah sounds like a cool idea, might be useful in making terrain. Thanks for the tip.
The diorama itself is coming along well, can't wait to see it all put together. Keep up the good work!
|
"I refuse to join any club that would have me as a member."-Groucho Marx
|
|
|
|
|
2009/10/21 14:09:52
Subject: Re:"The Iron Curtain" - Soviet T-55A Diorama
|
|
Regular Dakkanaut
|
Thanks for the feedback guys!
Actually I'm not too pleased with the interior, I had very a specific idea in mind when I was doing this and was following lots of reference photos from the Osprey T-55 guide, in the end though the finished result didn't really come out how I had hoped.
I also found weathering the interior very tricky as theres so much small photo etch that really is very delicate. I had to hold back a bit on the graphite weathering because I was worried that the parts would break off. Another issue was the fluff and lint that I found had gathered in corners and stuck to things during the oil washes and filters... plucking all that out with a pair of tweezers was a pain too especially on the deleicate photo etch parts.
So I guess I have a love hate relationship with this interior, I'm not entirely satisfied with it, so it's interesting to hear what others think.
Particularly I'm not very happy with the engine, I think I will work on that some more tonight.
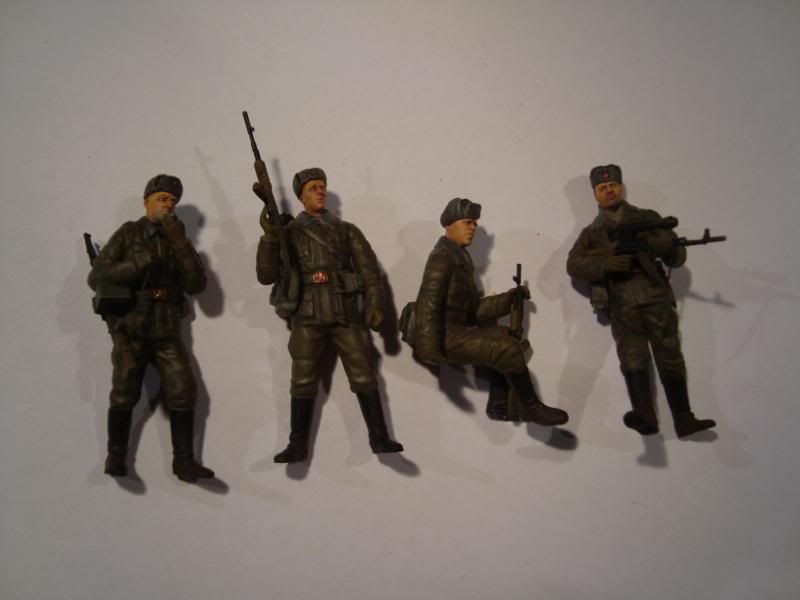
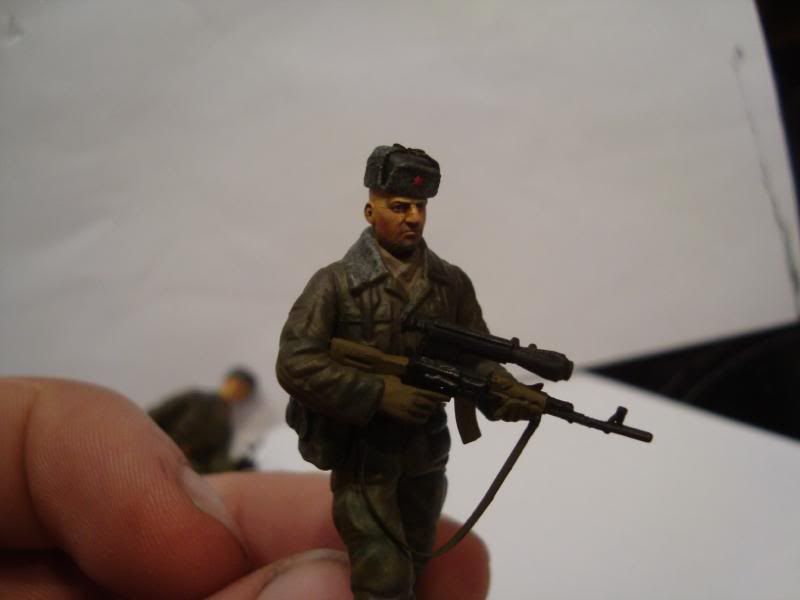
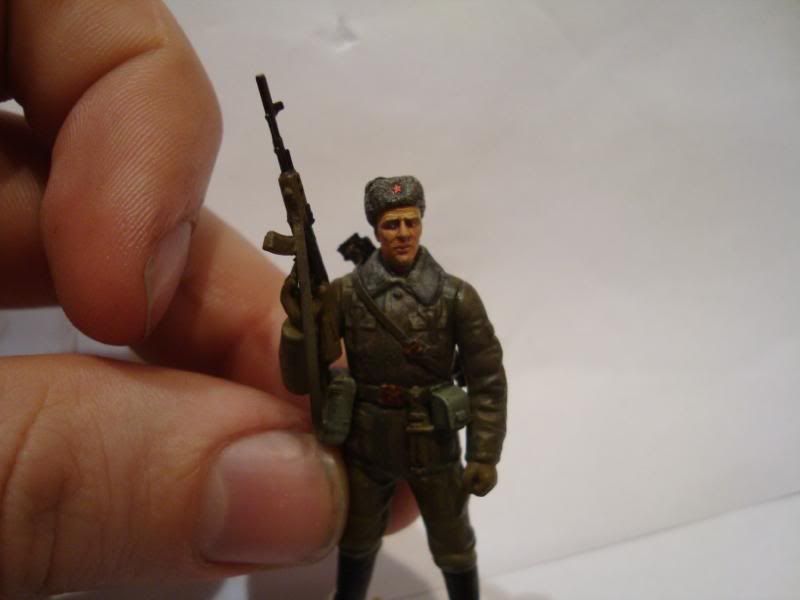
On a positive note I've been painting the Motor Rifle Troops and they are coming along well. Although I still need to finish off the Tank Crew. I plan to weather the tank some more with the snow and mud effects
|
|
|
|
|
|
2009/10/21 20:36:39
Subject: "The Iron Curtain" - Soviet T-55A Diorama
|
|
Stalwart Veteran Guard Sergeant
|
I know what you mean about the interior. TBH when I saw it I though it was only half finished. It kind of looks like its missing something. Maybe its in a stage where its too weathered to look like a nice new tank, but not weathered enough to look like a beaten up old one.
In terms of graphite weathering, how do you personally do it GM? Do you rub some on your finger and then rub it on; do you rub straight from the stick; or do you use some sort of tool to get rubbed on with more detail?
|
|
|
|
|
|
2009/11/16 20:52:38
Subject: Re:"The Iron Curtain" - Soviet T-55A Diorama
|
|
Regular Dakkanaut
|
|
|
|
|
|
|
2009/11/16 21:32:12
Subject: "The Iron Curtain" - Soviet T-55A Diorama
|
|
Junior Officer with Laspistol
|
Bloody hell! Your infantry look incredible!
|
|
|
|
|
|
2009/11/17 12:33:28
Subject: "The Iron Curtain" - Soviet T-55A Diorama
|
|
Highlord with a Blackstone Fortress
Adrift within the vortex of my imagination.
|
Just noticed this thread, I was reading in some aprehension because the uniforms were initially very wrong for what you wanted. This was fixed but you were threatening to do thick snow, nice that you did thin snow.
its been a rollercoaster read of nooooo, but it came out 100% in the end/so far.
Thick snow true Russian winter would have been bad not for the uniforms (though gloves are noticably missing) but for the poses. they are too relaxed and 'open' for deep cold.
The tank commanders jacket open is not a problem, it can actually get hot in tanks
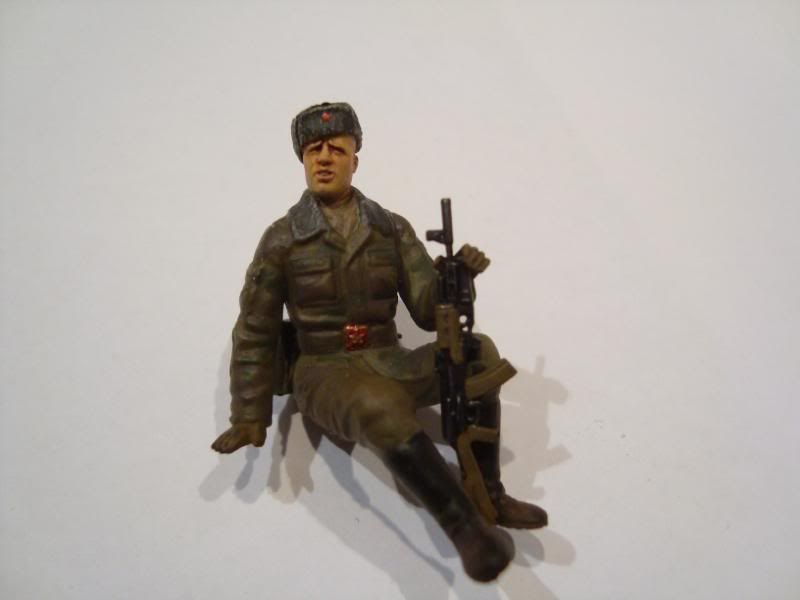
My one remaining niggle is about the seated infantryman, he is sitting on a bare log which is not a good idea. You need to make it look like he had brushed the log first, sitting on snow gives you a wet seat, lying on snow is not so bad but sitting is a lot of pressure from a hot part of the body, the soldier will get damp and cold wet is a thousand times worse than cold dry. Most winter troops without modern equipment, and even with, learn to sit on something.
Thus the log needs to look like he has swept his hands over the seat.
Also think about footprints.
Normally i wouldnt be anything like this picky, but its a sign of where I think you are at with your modelling.
|
n'oublie jamais - It appears I now have to highlight this again.
It is by tea alone I set my mind in motion. By the juice of the brew my thoughts aquire speed, my mind becomes strained, the strain becomes a warning. It is by tea alone I set my mind in motion. |
|
|
|
|
|
|